Embed Size (px)
Citation preview

READ THIS FIRST!For your safety, read this Owner's Manual and understand it thoroughly before operating this POWER BLOWER.
GeneralA power blower is a high-speed power tool, not a toy. For your own safety and the safety of others, read and be sure you understand all of the safety precautions contained in the Owner's Manual before operating the power blower. Retain the Owner's Manual, and make it available to all persons who will be using the power blower. Periodically, review the manual to refresh your understanding of the safety instructions contained in it.●Careless or improper use can cause serious injury. Obey the safety instructions contained in this manual as well as all applicable governmental and workplace safety standards, regulations and ordinances. Your authorized Kawasaki dealer can show you how to operate your power blower properly.●High pressure air flow or small blown objects could injure eyes. Do not direct air blast towards people or animals.●Do not allow children to operate the power blower. Operators must have sufficient size, strength and maturity to be able to lift and operate the power blower correctly for extended periods of use. They must also be able to read, understand and follow the safety instructions in this manual.●Exhaust fumes contain poisonous carbon monoxide gas. Operate your power blower only outdoors in a well-ventilated area. Stop the engine immediately if exhaust fumes cause you to experience symptoms of headache or nausea.●Gasoline is highly flammable and can be explosive under certain conditions. Before refueling, stop engine and allow it to cool. Do not smoke. Make sure area is well ventilated and free from any source of flame or sparks, including appliances with a pilot light. Wipe up fuel spills immediately. Check for and repair any fuel leaks immediately. Check for and repair any fuel leaks before starting power blower.
Operator●Inattention or fatigue can lead to serious injury. Never operate the power blower under the influence of drugs or alcohol. Do not use the power blower if you are sick or taking medication that causes drowsiness. If you get tired while using the power blower, take a break.●Always wear appropriate protective gear to avoid injury. Eye protection in the form of goggles or properly fitted safety glasses must be worn. Hearing protection, such as earplugs, should also be used. Have your hearing checked regularly. protect your hands and feet by always wearing heavy-duty boots and non-slip gloves when operating the power blower. ●Loose clothing or hair can lead to injury. Unconfined hair and loose articles of clothing such as scarves, neckties, jewelry, and so forth, can be drawn into the intake of the power blower. Always wear sturdy close- fitting long-sleeve shirts and long pants that still allow freedom of movement.Secure hair to keep away from blower intake.●Stop the engine and make sure that the fan for blowing air is stopped when cleaning, checking, maintenance or working on the power blower.●Gasoline is highly flammable and can burn or irritate skin. Change clothing immediately if fuel is spilled on it. Never remove fuel cap while the engine is running.●Be alert for signs of repetitive stress injury. Using a power blower or any vibrating machinery over a period of time may cause numbness, burning sensations, or other indications of injury. If you experience any such symptoms, discontinue use of the power blower and consult your doctor.
Power Blower●Modifying the power blower may make it unsafe. Never modify your power blower, except as advised by Kawasaki in writing. Use only Kawasaki supplied or approved attachments and repair parts.●Recoil starter rope can injure you if released suddenly. When starting the engine, grasp the recoil starter firmly by the grip. Do not grasp the starter rope itself. Always control the rope during rewind into the housing. Releasing the starter rope suddenly may allow the rope to ship around and injure you or damage the recoil starter mechanism.●Proper maintenance is essential for safety. A well-maintained power blower is safer and operates more efficiently. Regularly check power blower adjustments and replace worn or damaged parts. A worn out or damaged muffler can emit sparks and cause a fire. Increased noise levels can lead to hearing loss. Observe the maintenance schedule in the Owner's Manual.●Store the power blower safely to prevent fire or equipment damage. To avoid fuel leakage and fire hazard, always empty the fuel tank and run the carburetor dry before storing your power blower. Old fuel can clog the carburetor and lead to hard starting or poor running conditions. Store the power blower in a dry, secure location out of the reach of children. When transporting the power blower in a vehicle, take precautions to secure it against damage from falling over and fuel spillage.
EMISSION CONTROL INFORMATIONFuel Information THIS ENGINE IS CERTIFIED TO OPERATE ON UNLEADED REGULAR GRADE GASOLINE ONLY. A minimum of 87 octane of the antiknock index is recommended. The antiknock index is posted on service station pumps in the U.S.A.
Emission Control Information To protect the environment in which we all live, Kawasaki has incorporated an exhaust emission control system in compliance with applicable regulations of the United States Environmental Protection Agency, and the California Air Resources Board. Also, depending on when your engine was produced, it may have an assigned emissions durability period. ★See below for the engine emissions durability period that may apply to your engine.
Exhaust Emission Control System This system reduces the amount of pollutants discharged into the atmosphere by the exhaust of this engine. The fuel, ignition and exhaust systems of this engine have been carefully designed and constructed to ensure an efficient engine with low exhaust pollutant levels.
Engine Emissions Compliance Period
CaliforniaModel Year - 2000 and laterDurability Period - 300 hours
All Other StatesEngines less than 50 ccModel Year - 2002 and laterDurability Period - 300 hours (Category A)
Engines 50 cc and moreModel Year 2004 and later Durability Period - 300 hours (Category A)
★If your engine has an assigned emissions durability period, it will be located on the certification label attached to the engine (IMPORTANT ENGINE INFORMATION).Maintenance and Warranty Proper maintenance is necessary to ensure that your engine will continue to have low emission levels. This Owner's Manual contains those maintenance recommendations for your engine. Those items identified by the Periodic Maintenance Chart are necessary to ensure compliance with the applicable standards. As the owner of the power blower, you have the responsibility to make sure that the recommended maintenance is carried out according to the instructions in this Owner's Manual at your own expense. The Kawasaki Limited Emission Control System Warranty requires that you return your engine to an authorized Kawasaki dealer for remedy under warranty. Please read the warranty carefully, and keep it valid by complying with the owner's obligations it contains.
Tampering with Emission Control System Prohibited Federal law and California state law prohibits the following acts or the causing thereof: (1) the removal or rendering inoperative by any person other than for purposes of maintenance, repair, or replacement, repair, or replacement. of any device or element of design incorporated into any new engine for the purposes of emission control prior to its sale or delivery to the ultimate purchaser or while it is in use, or (2) the use of the engine after such device or element of design has been removed or rendered inoperative by any person. Among those acts presumed to constitute tampering are the acts listed below:●Do not tamper with the original emission related parts.●Carburetor and internal parts●Spark plug●Magneto or electronic ignition system●Fuel Filter●Air cleaner element1

TABLE OF CONTENTSSpecificationsAssembly and Preparation Dealer/Owner Assembly Parts Assembly Fuel and Oil Type MixingOperating Instructions Starting the Engine Warming up Operation Stopping the EngineMaintenance and Adjustment Periodic Mainenance Chart Air Filter Service Fuel Filter Service Spark Plug Service Spark Arrester Cleaning ServiceStorageTroubleshooting GuideEnvironmental Protection
ITEM SpecificationValve clearance Not applicableIgnition Timing UnadjustableIdle Speed 3000 r/min (rpm)Idle Mixture Screw UnadjustableHigh Mixture Screw UnadjustableSpark Plug Gap 0.6~0.7 mm (0.024~0.028 in.)Other specifications NO OTHER SPECIFICATION
FOREWORD Congratulations on your purchase of a new Kawasaki Power Blower. Please read this Owner's Manual carefully before starting your new Power Blower so that you will be thoroughly familiar with the proper operation of our power Blower's control, its features,capabilities, and limitations. To ensure a long, trouble-free life for your Power Blower, give it the proper care and maintenance described in this manual.
For those who would like more detailed information on their Power Blower, a Service Manual is available for purchase from any authorized Kawasaki dealer. The Service Manual contains detailed disassembly and maintenance information. Those who plan to do their own work should, of course,be competent mechanics and possess thespecial tools described in the Service Manual.
Keep this manual at your fingertip at all times so that you can refer toit whenever you need information. This manual should be considered a permanent part of the Power Blower and should remain with the Power Blower when it is sold.
All rights reserved. No part of this publication may be reproducedwithout prior written permission from Kawasaki Motors Corp., U.S.A.
This publication includes the latest information available at the time of printing. However, there may be minor differences between the actualproduct and illustrations and texts in this manual. All products are subject to change without prior notice or obligation.
Model KRB300AType Backpack typeMax. air volume cfm 295Max. air speed mph 150�Dimension L×W×H mm 320×350×370� (in.) (12.6×13.8×14.6)Weight kg(lbs) 6.0(13.2)Engine Type Forced air cooled 2-stroke, horizontal shaft, gasoline engine Displacement mL(cu.in) 26.3(1.6) Carburetor Diaphragm type Ignition Solid state ignition Spark plug NGK BPMR6A Starter Recoil starterFuel Mixing ratio 50 parts of regular unleaded gasoline to 1 part of 2-stroke engine oil by volume Tank capacity L (US qt) 0.6(0.6)
Specifications
2
23�3�3�4�4�4�4�4�5�5�5�6�6�6�7�7�7�7�8�8

Index No.Parts name Qty's 1 Hose Band 2 2 Flexible Pipe 1� 3 Base Pipe 1� 4 Middle Pipe 1� 5 Pipe 1� 6 Clamp 1
Assembly and PreparationDealer/Owner Assembly Parts
Assembly
●Loosen the screw on the trigger lever assembly (A).●Fit the trigger lever assembly (A) onto the outer circumference of the base pipe (B).●Fit the hose band (C) to each end of the flexible pipe (D).●Connect the flexible pipe (D) to the elbow pipe (E), and then tighten the screw firmly to fix the flexible pipe (D) to the elbow pipe (E).●Connect the base pipe (B) to the flexible pipe (D), and then tighten the screw firmly.
●Clamp the corrugate tube assembly to the outside of the flexible pipe (D) with the clamp (F) by pressing it over the flexible pipe.●Firmly tighten the screw to install the trigger lever assembly on the base pipe (B).●Install the middle pipe (G) into the base pipe (B) and the pipe (H) in the middle pipe (G).
1
2
3
4
5
6
A
BC
D
E
F
G H
3
Operating InstructionsStarting the Engine
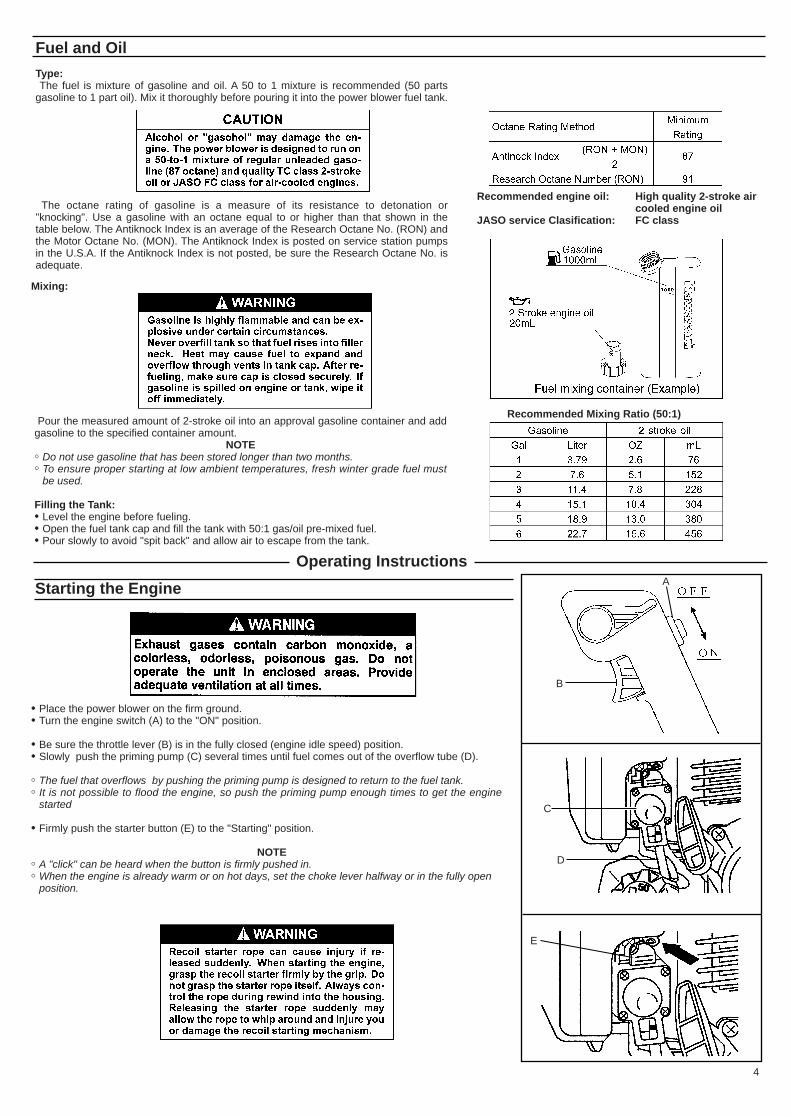
●Place the power blower on the firm ground.●Turn the engine switch (A) to the "ON" position.
●Be sure the throttle lever (B) is in the fully closed (engine idle speed) position.●Slowly push the priming pump (C) several times until fuel comes out of the overflow tube (D).
○The fuel that overflows by pushing the priming pump is designed to return to the fuel tank.○It is not possible to flood the engine, so push the priming pump enough times to get the engine started
●Firmly push the starter button (E) to the "Starting" position.
NOTE○A "click" can be heard when the button is firmly pushed in.○When the engine is already warm or on hot days, set the choke lever halfway or in the fully open position.
A
B
C
D
E
Fuel and OilType: The fuel is mixture of gasoline and oil. A 50 to 1 mixture is recommended (50 parts gasoline to 1 part oil). Mix it thoroughly before pouring it into the power blower fuel tank.
The octane rating of gasoline is a measure of its resistance to detonation or "knocking". Use a gasoline with an octane equal to or higher than that shown in the table below. The Antiknock Index is an average of the Research Octane No. (RON) and the Motor Octane No. (MON). The Antiknock Index is posted on service station pumps in the U.S.A. If the Antiknock Index is not posted, be sure the Research Octane No. is adequate.
Recommended engine oil: High quality 2-stroke air cooled engine oil JASO service Clasification: FC class
Pour the measured amount of 2-stroke oil into an approval gasoline container and add gasoline to the specified container amount.
NOTE○Do not use gasoline that has been stored longer than two months.○To ensure proper starting at low ambient temperatures, fresh winter grade fuel must be used.
Filling the Tank:●Level the engine before fueling.●Open the fuel tank cap and fill the tank with 50:1 gas/oil pre-mixed fuel.●Pour slowly to avoid "spit back" and allow air to escape from the tank.
Mixing:
Recommended Mixing Ratio (50:1)
4

Operation
●This power blower is designed to allow the operator to control the engine speed and air flow direction using only the right hand at the trigger lever assembly.●The power blower is designed to be carried on the operator's back.●Adjust length of the straps to a comfortable operation.NOTE○Proper use of the shoulder harness is important for effective power blower operation.
Stopping the EngineOrdinary Stop●Return the throttle lever (D) to the idling position, and keep the engine running at idling speed for a few seconds.●Turn the engine switch (E) to the "STOP" position.
Emergency stop●Turn the engine switch to the "STOP" position.●Return the throttle lever with the set lever to the idling position.
D
E
●After allowing a few minutes warm-up period, run the engine at idling speed.
Idling speed is about 3,000 rpm
NOTE○Turn the idle screw (C) counter-clockwise for the engine speed to decrease when idling speed is higher than 3,000 rpm.○Turn the idle screw clockwise to increase the engine idle speed to idle specification if needed.
●Pull the recoil starter grip (A) slowly to engage the starter, then give a short, quick pull.●Press in the starter button (B) to the "Running" (Engine idle speed) position. If the engine fires, but does not run continuously, repeat the starting procedure with the starter button to the "Running" position.
NOTE○Should the engine fail to start, do not try to pull the recoil starter grip too many times with the starter button to the "Starting" position. This will cause the fuel to flood into the cylinder and make starting even more difficult. In this case, set the starter button to the "Running" position and repeat the starting procedure.○After starting, vary the engine speed a few times, to draw out the remaining air from the carburetor.
Warming UpB
C
A
5
High-pressure air will come out the nozzle when the engine speed is not at idle when carrying the power blower on your back.

Air Filter Service Clean the element every 50 hours.●Remove the screw holding the air filter cap (A), and remove the element (B).●Clean the element in a bath of kerosene or high flash-point solvent.●Soak the element in new 2-stroke engine oil, and squeeze it to remove excess oil.●Fit the element into the air cleaner base and reinstall the air filter cap screw firmly.
NOTE○Operating dusty condition may require more frequent maintenance than above.
A
B
Maintenance and AdjustmentPeriodic Maintenance Chart
6

Sperage Blower to be stored 30 days should be completely drained of fuel to prevent gum deposits formingon essential carburetor parts, fuel filter, and fuel tank.●Clean the engine and the machine.●Remove all the fuel from the fuel tank and run the engine at idle to use up the fuel in the carburetor.●Remove the spark plug, pour in 0.5 ml of new 2-stroke engine oil through the plug hole (H), pull the recoil starter several times, and reinstall the spark plug.●Slowly pull the recoil starter grip until you feel resistance. This brings the piston onto the compression stroke, closing both intake and exhaust ports by the piston.●Store the blower in a clean and dry place. H
Lubricator
Fuel Filter Service Clean the fuel filter element every 20 hours.●Take out the fuel filter (A) out of the fuel tank (B), and then remove the fuel filter assembly (C) from the fuel tube (D) to keep dust from entering into the fuel filter.●Clean the fuel filter assembly in a bath of high flash-point solvent.●Dry the fuel filter assembly before installing.
NOTE○If fuel does not flow better with the fuel filter cleaned, replace the fuel filter assembly with a new one.
Spark Plug Service Clean or replace spark plug and reset gap (E) every 50 hours of operation.
●Disconnect the spark plug cap from the spark plug and remove the spark plug.●Clean the electrodes (F) by scraping or with a wire brush to remove carbon deposits and wetness.●Inspect for cracked porcelain or other wear and damage. Replace the spark plug if necessary.●Check the spark plug gap and reset it if necessary. The gap must be between 0.6 mm (0.024 in) and 0.7 mm (0.028 in). To change the gap, bend only side-electrode, using a spark plug tool.●Install and tighten the spark plug to 12 ~ 17 N・m (1.2 ~ 1.7 kg・m), then connect the spark plug cap.
RECOMMENDED SPARK PLUG: NGK BPMR6A
Spark Arrester Cleaning Service Clean spark arrester every 50 hours.
●Remove the engine cover and the muffler by unscrewing the screws from the engine.●Take out the spark arrester (G) from the muffler, and then clean by brushing it.●Reinstall the spark arrester, muffler, and engine cover onto the engine firmly.
A
B
C
D
E
F
G
G
7

Troubleshooting Guide
Environmental Protection
8

-MEMO-

-MEMO-