Embed Size (px)
Citation preview
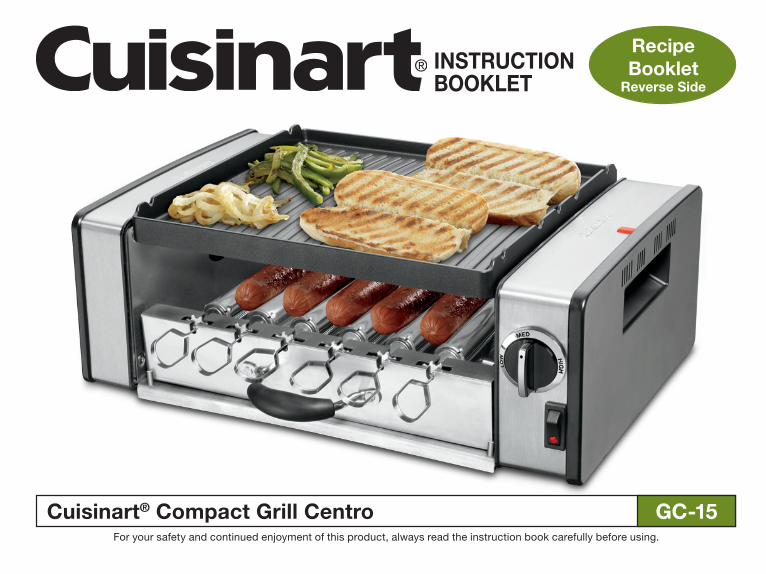
For your safety and continued enjoyment of this product, always read the instruction book carefully before using.
Cuisinart® Compact Grill Centro GC-15
INSTRUCTION BOOKLET
RecipeBooklet
Reverse Side
2
Important SafeguardS1. READ ALL INSTRUCTIONS.2. Do not touch hot surfaces; use handles or knobs.3. To protect against fire, electric shock, and injury to persons,
DO NOT IMMERSE CORD OR PLUG in water or other liquids.4. Close supervision is necessary when any appliance is used by or
near children.5. Unplug from outlet when not in use and before cleaning. Allow to
cool before putting on or taking off parts, and before cleaning appliance.
6. Do not operate any appliance with a damaged cord or plug, or after the appliance has malfunctioned or has been damaged in any manner. Return the appliance to the nearest Cuisinart® Repair Center for examination, repair or adjustment.
7. The use of accessory attachments not recommended by Cuisinart may result in fire, electrical shock, or risk of injury to persons.
8. Do not use outdoors.9. Do not let power cord hang over edge of table or counter, or touch
hot surfaces.10. Do not place on or near hot gas or electric burners, or in a heated
oven.11. Unplug the unit when finished using.12. Do not use appliance for other than intended use.13. Extreme caution must be exercised when moving an appliance
containing hot oil or other hot liquids.14. To disconnect, turn temperature control dial to Off setting, then
remove plug from wall outlet.15. WARNING: TO REDUCE THE RISK OF FIRE OR ELECTRIC
SHOCK, ONLY AUTHORIZED PERSONNEL SHOULD DO REPAIRS.
16. Do not operate your appliance in an appliance garage or under a wall cabinet. When storing in an appliance garage always unplug the unit from the electrical out-let. Not doing so could create a risk of fire, especially if the appliance touches the walls of the garage or the door touches the unit as it closes.
SaVe tHeSe InStruCtIonS for HouSeHoLd uSe onLYSpeCIaL Cord Set InStruCtIonSA short power-supply cord is provided to reduce the risks resulting from becoming entangled in or tripping over a longer cord. Longer extension cords are available and may be used if care is exercised in their use.If a long extension cord is used, the marked electrical rating of the extension cord should be at least as great as the electrical rating of the appliance, and the longer cord should be arranged so that it will not drape over the countertop or tabletop where it can be pulled on by children or animals, or tripped over.
ContentSImportant Safeguards. . . . . . . . . . . . . . . . . . . . . . . . . . . . . . . . . . . . 2 Parts and Features . . . . . . . . . . . . . . . . . . . . . . . . . . . . . . . . . . . . . . 3 Before the First Use . . . . . . . . . . . . . . . . . . . . . . . . . . . . . . . . . . . . . 3 Assembly Instructions . . . . . . . . . . . . . . . . . . . . . . . . . . . . . . . . . . . . 3 Operating Instructions . . . . . . . . . . . . . . . . . . . . . . . . . . . . . . . . . . . 4 User Maintenance . . . . . . . . . . . . . . . . . . . . . . . . . . . . . . . . . . . . . . 6 Cleaning, Care and Maintenance, Storage . . . . . . . . . . . . . . . . . . . 6 Warranty . . . . . . . . . . . . . . . . . . . . . . . . . . . . . . . . . . . . . . . . . . . . . . . 6
3
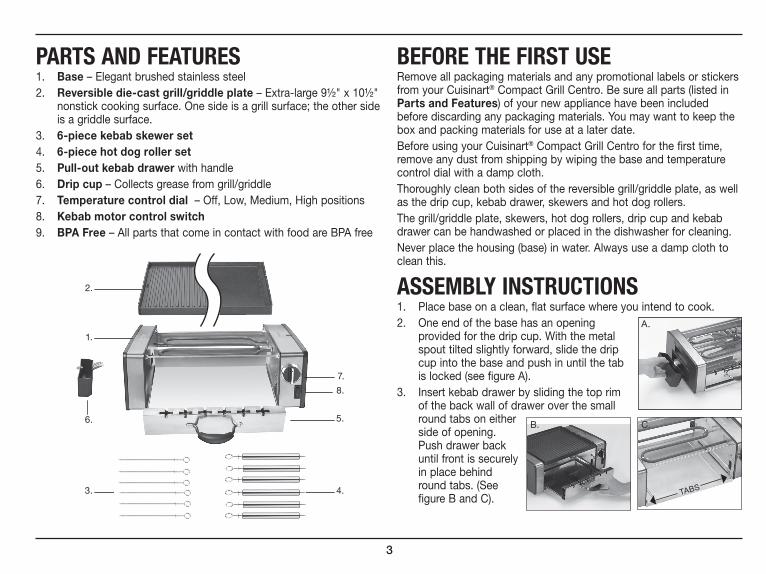
partS and featureS1. Base – Elegant brushed stainless steel2. Reversible die-cast grill/griddle plate – Extra-large 9½" x 10½"
nonstick cooking surface. One side is a grill surface; the other side is a griddle surface.
3. 6-piece kebab skewer set4. 6-piece hot dog roller set5. Pull-out kebab drawer with handle6. Drip cup – Collects grease from grill/griddle7. Temperature control dial – Off, Low, Medium, High positions8. Kebab motor control switch9. BPA Free – All parts that come in contact with food are BPA free
before tHe fIrSt uSeRemove all packaging materials and any promotional labels or stickers from your Cuisinart® Compact Grill Centro. Be sure all parts (listed in Parts and Features) of your new appliance have been included before discarding any packaging materials. You may want to keep the box and packing materials for use at a later date.Before using your Cuisinart® Compact Grill Centro for the first time, remove any dust from shipping by wiping the base and temperature control dial with a damp cloth.Thoroughly clean both sides of the reversible grill/griddle plate, as well as the drip cup, kebab drawer, skewers and hot dog rollers.The grill/griddle plate, skewers, hot dog rollers, drip cup and kebab drawer can be handwashed or placed in the dishwasher for cleaning.Never place the housing (base) in water. Always use a damp cloth to clean this.
aSSembLY InStruCtIonS1. Place base on a clean, flat surface where you intend to cook.2. One end of the base has an opening
provided for the drip cup. With the metal spout tilted slightly forward, slide the drip cup into the base and push in until the tab is locked (see figure A).
3. Insert kebab drawer by sliding the top rim of the back wall of drawer over the small round tabs on either side of opening. Push drawer back until front is securely in place behind round tabs. (See figure B and C).
3. 4.
A.
C.B.
1.
2.
6. 5.
7.
8.
TABS
4
To remove drawer, allow to cool for 30 minutes. Remove all skewers, then lift drawer up and over the round tabs, and pull it toward you.
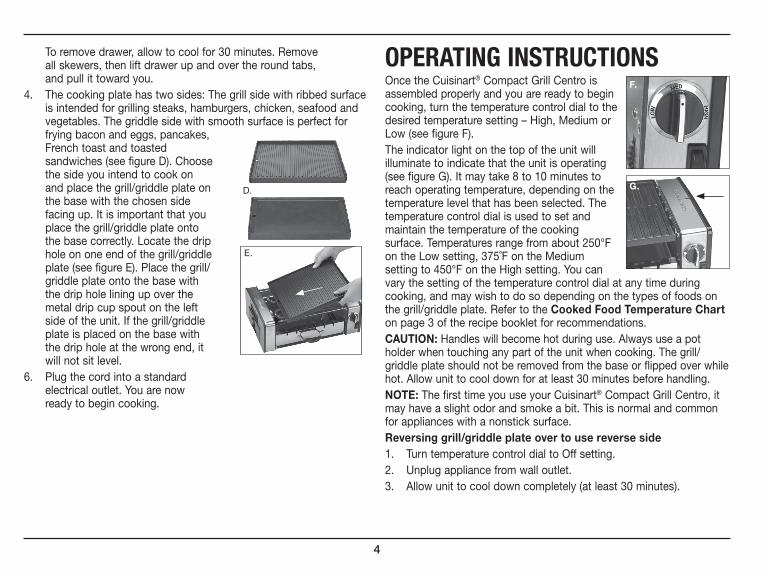
4. The cooking plate has two sides: The grill side with ribbed surface is intended for grilling steaks, hamburgers, chicken, seafood and vegetables. The griddle side with smooth surface is perfect for frying bacon and eggs, pancakes, French toast and toasted sandwiches (see figure D). Choose the side you intend to cook on and place the grill/griddle plate on the base with the chosen side facing up. It is important that you place the grill/griddle plate onto the base correctly. Locate the drip hole on one end of the grill/griddle plate (see figure E). Place the grill/griddle plate onto the base with the drip hole lining up over the metal drip cup spout on the left side of the unit. If the grill/griddle plate is placed on the base with the drip hole at the wrong end, it will not sit level.
6. Plug the cord into a standard electrical outlet. You are now ready to begin cooking.
operatIng InStruCtIonSOnce the Cuisinart® Compact Grill Centro is assembled properly and you are ready to begin cooking, turn the temperature control dial to the desired temperature setting – High, Medium or Low (see figure F). The indicator light on the top of the unit will illuminate to indicate that the unit is operating (see figure G). It may take 8 to 10 minutes to reach operating temperature, depending on the temperature level that has been selected. The temperature control dial is used to set and maintain the temperature of the cooking surface. Temperatures range from about 250°F on the Low setting, 375˚F on the Medium setting to 450°F on the High setting. You can vary the setting of the temperature control dial at any time during cooking, and may wish to do so depending on the types of foods on the grill/griddle plate. Refer to the Cooked Food Temperature Chart on page 3 of the recipe booklet for recommendations.CAUTION: Handles will become hot during use. Always use a pot holder when touching any part of the unit when cooking. The grill/griddle plate should not be removed from the base or flipped over while hot. Allow unit to cool down for at least 30 minutes before handling.NOTE: The first time you use your Cuisinart® Compact Grill Centro, it may have a slight odor and smoke a bit. This is normal and common for appliances with a nonstick surface.Reversing grill/griddle plate over to use reverse side1. Turn temperature control dial to Off setting.2. Unplug appliance from wall outlet.3. Allow unit to cool down completely (at least 30 minutes).
F.
G.
E.
D.
5
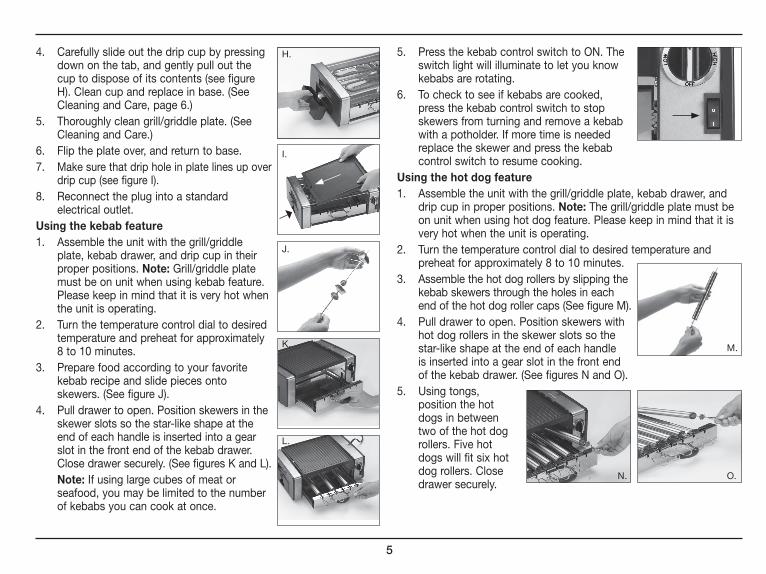
4. Carefully slide out the drip cup by pressing down on the tab, and gently pull out the cup to dispose of its contents (see figure H). Clean cup and replace in base. (See Cleaning and Care, page 6.)
5. Thoroughly clean grill/griddle plate. (See Cleaning and Care.)
6. Flip the plate over, and return to base.7. Make sure that drip hole in plate lines up over
drip cup (see figure I).8. Reconnect the plug into a standard
electrical outlet.Using the kebab feature1. Assemble the unit with the grill/griddle
plate, kebab drawer, and drip cup in their proper positions. Note: Grill/griddle plate must be on unit when using kebab feature. Please keep in mind that it is very hot when the unit is operating.
2. Turn the temperature control dial to desired temperature and preheat for approximately 8 to 10 minutes.
3. Prepare food according to your favorite kebab recipe and slide pieces onto skewers. (See figure J).
4. Pull drawer to open. Position skewers in the skewer slots so the star-like shape at the end of each handle is inserted into a gear slot in the front end of the kebab drawer. Close drawer securely. (See figures K and L).
Note: If using large cubes of meat or seafood, you may be limited to the number of kebabs you can cook at once.
5. Press the kebab control switch to ON. The switch light will illuminate to let you know kebabs are rotating.
6. To check to see if kebabs are cooked, press the kebab control switch to stop skewers from turning and remove a kebab with a potholder. If more time is needed replace the skewer and press the kebab control switch to resume cooking.
Using the hot dog feature1. Assemble the unit with the grill/griddle plate, kebab drawer, and
drip cup in proper positions. Note: The grill/griddle plate must be on unit when using hot dog feature. Please keep in mind that it is very hot when the unit is operating.
2. Turn the temperature control dial to desired temperature and preheat for approximately 8 to 10 minutes.
3. Assemble the hot dog rollers by slipping the kebab skewers through the holes in each end of the hot dog roller caps (See figure M).
4. Pull drawer to open. Position skewers with hot dog rollers in the skewer slots so the star-like shape at the end of each handle is inserted into a gear slot in the front end of the kebab drawer. (See figures N and O).
5. Using tongs, position the hot dogs in between two of the hot dog rollers. Five hot dogs will fit six hot dog rollers. Close drawer securely.
H.
I.
J.
K.
L.
M.
O.N.
6
Using kebab, hot dog and/or grill-griddle feature together You may use different cooking features simultaneously. Follow instructions on page 4-5
uSer maIntenanCe• Neverusemetalutensils,astheywillscratchthenonstickgrill/
griddle plate. Instead, use only wooden or heat-proof plastic utensils.
• Neverleaveplasticutensilsincontactwiththehotgrill/griddleplate.
• Afterusing,scrapeexcessfoodbuildupthroughdripholeandintodrip cup, then wipe off any residue from plate(s) with a paper towel before proceeding with next recipe.
CLeanIng, Care and maIntenanCeCAUTION: BEFORE CLEANING APPLIANCE, MAKE SURE IT HAS COOLED DOWN COMPLETELY.Once you have finished cooking, turn the temperature control dial to the Off position and unplug the power cord from the wall outlet. Allow the unit to cool down for at least 30 minutes before handling. Dispose of grease from the kebab drawer and drip cup once cooled. The kebab drawer and drip cup can be cleaned by hand or in the dishwasher.The grill/griddle plate can be washed by hand, using a soft sponge or cloth and hot water. It may be washed in the dishwasher, as well.Do not use metal objects such as knives or forks for cleaning the grill /griddle plate. Do not use a scouring pad for cleaning. The nonstick coating can be damaged.If you have been cooking seafood, wipe the grill/griddle plate with lemon juice to prevent the seafood flavor from transferring to the next recipe.The drip cup, kebab drawer, skewers and hot dog rollers may be submerged in water or washed in the dishwasher.
The housing base and temperature control dial can be wiped clean with a soft, dry cloth. For tough stains, dampen cloth. Never use abrasive cleaners or harsh pads.Any other servicing should be performed by an authorized service representative.
StorageAlways dry and assemble your Cuisinart® Compact Grill Centro before storing. Ensure that the base, grill/griddle plate and kebab drawer are correctly positioned. The power cord can be wrapped around the back of the base for storing.
WarrantY LImIted tHree-Year WarrantYThis warranty is available to consumers only. You are a consumer if you own a Cuisinart® Compact Grill Centro that was purchased at retail for personal, family or household use. Except as otherwise required under applicable law, this warranty is not available to retailers or other commercial purchasers or owners.We warrant that your Cuisinart® Compact Grill Centro will be free of defects in materials and workmanship under normal home use for 3 years from the date of original purchase.We recommend that you visit our website, www.cuisinart.com for a fast, efficient way to complete your product registration. However, product registration does not eliminate the need for the consumer to maintain the original proof of purchase in order to obtain the warranty benefits. In the event that you do not have proof of purchase date, the purchase date for purposes of this warranty will be the date of manufacture.If your Cuisinart® Compact Grill Centro should prove to be defective within the warranty period, we will repair it, or if we think necessary, replace it. To obtain warranty service, simply call our toll-free number, 1-800-726-0190, for additional information from our Customer Service
7
Representatives or send the defective product to Customer Service at Cuisinart, 7811 North Glen Harbor Blvd., Glendale, AZ 85307.To facilitate the speed and accuracy of your return, please enclose $10.00 for shipping and handling of the product.Please pay by check or money order (California residents need only supply proof of purchase and should call 1-800-726-0190 for shipping instructions).NOTE: For added protection and secure handling of any Cuisinart product that is being returned, we recommend you use a traceable, insured delivery service. Cuisinart cannot be held responsible for in-transit damage or for packages that are not delivered to us. Lost and/or damaged products are not covered under warranty.Please be sure to include your return address, daytime phone number, description of the product defect, product model number (located on bottom of product), original date of purchase, and any other information pertinent to the product’s return.CALIFORNIA RESIDENTS ONLYCalifornia law provides that for In-Warranty Service, California residents have the option of returning a nonconforming product (A) to the store where it was purchased or (B) to another retail store that sells Cuisinart products of the same type.The retail store shall then, at its discretion, either repair the product, refer the consumer to an independent repair facility, replace the product, or refund the purchase price less the amount directly attributable to the consumer’s prior usage of the product. If the above two options do not result in the appropriate relief to the consumer, the consumer may then take the product to an independent repair facility if service or repair can be economically accomplished. Cuisinart and not the consumer will be responsible for the reasonable cost of such service, repair, replacement, or refund for nonconforming products under warranty.California residents may also, according to their preference, return nonconforming products directly to Cuisinart for repair, or if necessary, replacement, by calling our Consumer Service Center toll-free at 1-800-726-0190.
Cuisinart will be responsible for the cost of the repair, replacement, and shipping and handling for such products under warranty. BEFORE RETURNING YOUR CUISINART PRODUCT If you are experiencing problems with your Cuisinart product, we suggest that you call our Consumer Service Center at 1-800-726-0190 before returning the product for servicing. Often, our Consumer Service Representatives can help solve the problem without having the product serviced. If servicing is needed, a Representative can confirm whether the product is under warranty and direct you to the nearest service location.Your Cuisinart® Compact Grill Centro has been manufactured to the strictest specifications and has been designed for use only in 120 volt outlets and only with authorized accessories and replacement parts. This warranty expressly excludes any defects or damages caused by attempted use of this unit with a converter, as well as use with accessories, replacement parts or repair service other than those authorized by Cuisinart. This warranty does not cover any damage caused by accident, misuse, shipment or other than ordinary household use. This warranty excludes all incidental or consequential damages. Some states do not allow the exclusion or limitation of these damages, so these exclusions may not apply to you. You may also have other rights, which vary from state to state. Important: If the nonconforming product is to be serviced by someone other than Cuisinart’s Authorized Service Center, please remind the servicer to call our Consumer Service Center at 1-800-726-0190 to ensure that the problem is properly diagnosed, the product is serviced with the correct parts, and to ensure that the product is still under warranty.
IB-10879
©2011 Cuisinart150 Milford Road
East Windsor, NJ 08520Printed in China
11CE124119
Any trademarks or service marks of third parties referred to herein are the trademarks or service marks of their respective owners.