Embed Size (px)
Citation preview
Learning and Teaching Office [email protected]
Pag
e1
Blackboard Quick Guide
If you would like to record a number of mini-lectures capturing topics of particular importance to your students,
Blackboard Collaborate Ultra offers an easy and relatively quick solution. If you are capturing a live lecture (the list of
rooms equipped to capture live lecture on Collaborate is available below), you have no choice in the length of the
recording. However, if you are recording at your desktop, please consider breaking your lecture into short topical
chunks (between 5 and 15 minutes) and record each of those separately. It will make it easier to use for your students
while allowing you to be more selective and focused, and also to start small and build your video resources gradually.
A PowerPoint (PPT) is by far the most common way to present a lecture, so this Guide will use it as an example.
There are two ways of capturing your presentation: by sharing application/screen, or by sharing a pre-loaded file (PPT
or PDF). Here is how the features compare:
Pros & Cons Share screen or application Share files
Pros Best if your PPT has transitions or animations (e.g., paragraphs on your slide are sequenced to appear one after another as opposed to all at once)
The most common setting if you are recording during a live lecture
Easy to navigate on a single screen
Can draw/point on slides while presenting
Works with screen readers
Blackboard-preferred option optimised to present well on all devices
Cons Could be a little trickier to set if you only have one screen
Does not support animations
Contents 1: The process .........................................................................................................................................................1
2: Recording a shared screen or application: step by step ....................................................................................2
3: Recording a shared file .......................................................................................................................................4
4: Where to find the recordings .............................................................................................................................4
5: Rooms equipped for live lecture capture with Collaborate ...............................................................................5
1: The process The process is very simple:
Have your PowerPoint presentation ready;
Go to your course in Blackboard and create a Collaborate Ultra session;
Join the session, do an audio-check, activate microphone, share SlideShow and start recording;
Present your slides and stop recording once finished;
Wait for your new recording to automatically appear in Blackboard once generated.
Recording a PowerPoint Presentation using Blackboard Collaborate
Qui
Learning and Teaching Office [email protected]
Pag
e2
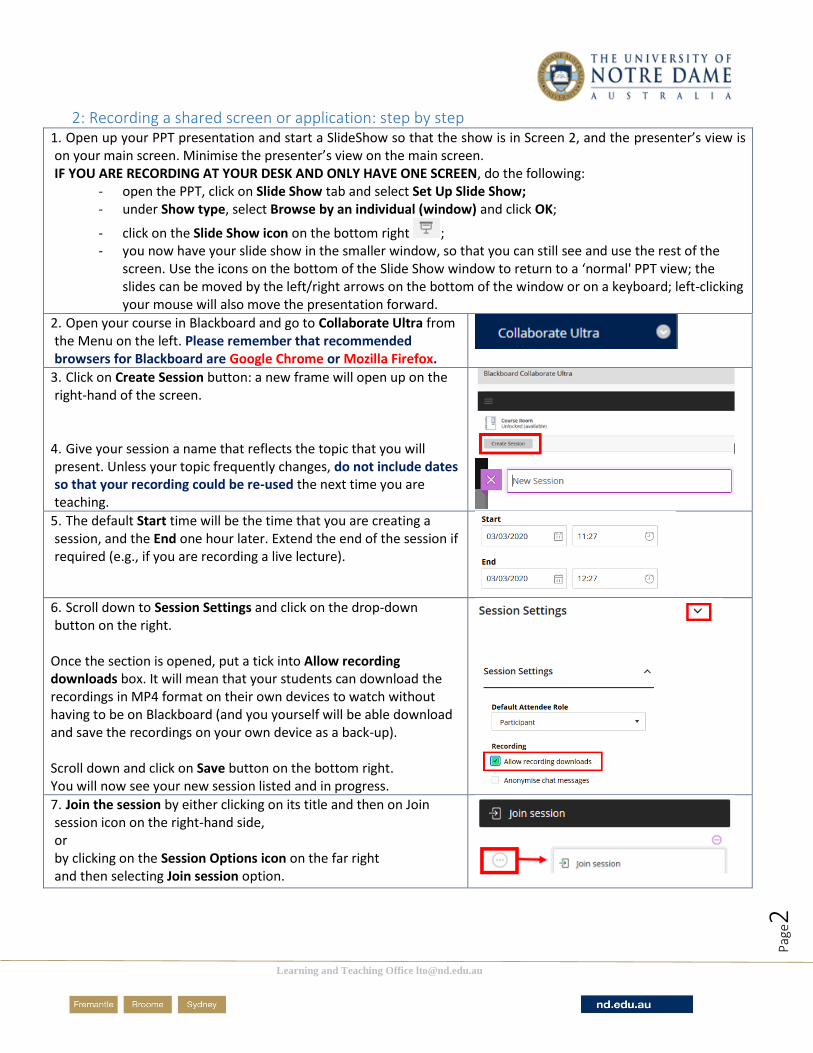
2: Recording a shared screen or application: step by step 1. Open up your PPT presentation and start a SlideShow so that the show is in Screen 2, and the presenter’s view is on your main screen. Minimise the presenter’s view on the main screen. IF YOU ARE RECORDING AT YOUR DESK AND ONLY HAVE ONE SCREEN, do the following:
- open the PPT, click on Slide Show tab and select Set Up Slide Show; - under Show type, select Browse by an individual (window) and click OK;
- click on the Slide Show icon on the bottom right ; - you now have your slide show in the smaller window, so that you can still see and use the rest of the
screen. Use the icons on the bottom of the Slide Show window to return to a ‘normal' PPT view; the slides can be moved by the left/right arrows on the bottom of the window or on a keyboard; left-clicking your mouse will also move the presentation forward.
2. Open your course in Blackboard and go to Collaborate Ultra from the Menu on the left. Please remember that recommended browsers for Blackboard are Google Chrome or Mozilla Firefox.
3. Click on Create Session button: a new frame will open up on the right-hand of the screen.
4. Give your session a name that reflects the topic that you will present. Unless your topic frequently changes, do not include dates so that your recording could be re-used the next time you are teaching.
5. The default Start time will be the time that you are creating a session, and the End one hour later. Extend the end of the session if required (e.g., if you are recording a live lecture).
6. Scroll down to Session Settings and click on the drop-down button on the right.
Once the section is opened, put a tick into Allow recording downloads box. It will mean that your students can download the recordings in MP4 format on their own devices to watch without having to be on Blackboard (and you yourself will be able download and save the recordings on your own device as a back-up). Scroll down and click on Save button on the bottom right. You will now see your new session listed and in progress.
7. Join the session by either clicking on its title and then on Join session icon on the right-hand side, or by clicking on the Session Options icon on the far right and then selecting Join session option.
Learning and Teaching Office [email protected]
Pag
e3
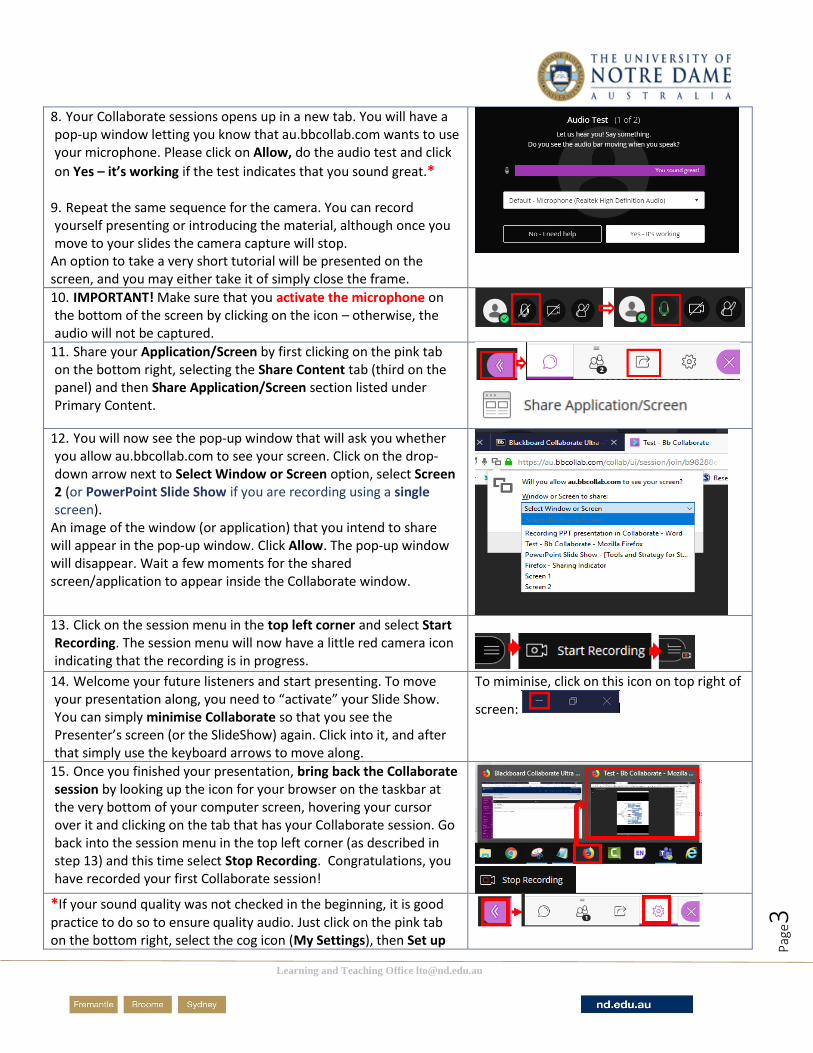
8. Your Collaborate sessions opens up in a new tab. You will have a pop-up window letting you know that au.bbcollab.com wants to use your microphone. Please click on Allow, do the audio test and click
on Yes – it’s working if the test indicates that you sound great.* 9. Repeat the same sequence for the camera. You can record yourself presenting or introducing the material, although once you move to your slides the camera capture will stop.
An option to take a very short tutorial will be presented on the screen, and you may either take it of simply close the frame.
10. IMPORTANT! Make sure that you activate the microphone on the bottom of the screen by clicking on the icon – otherwise, the audio will not be captured.
11. Share your Application/Screen by first clicking on the pink tab on the bottom right, selecting the Share Content tab (third on the panel) and then Share Application/Screen section listed under Primary Content.
12. You will now see the pop-up window that will ask you whether you allow au.bbcollab.com to see your screen. Click on the drop-down arrow next to Select Window or Screen option, select Screen 2 (or PowerPoint Slide Show if you are recording using a single screen).
An image of the window (or application) that you intend to share will appear in the pop-up window. Click Allow. The pop-up window will disappear. Wait a few moments for the shared screen/application to appear inside the Collaborate window.
13. Click on the session menu in the top left corner and select Start Recording. The session menu will now have a little red camera icon indicating that the recording is in progress.
14. Welcome your future listeners and start presenting. To move your presentation along, you need to “activate” your Slide Show. You can simply minimise Collaborate so that you see the Presenter’s screen (or the SlideShow) again. Click into it, and after that simply use the keyboard arrows to move along.
To miminise, click on this icon on top right of
screen:
15. Once you finished your presentation, bring back the Collaborate session by looking up the icon for your browser on the taskbar at the very bottom of your computer screen, hovering your cursor over it and clicking on the tab that has your Collaborate session. Go back into the session menu in the top left corner (as described in step 13) and this time select Stop Recording. Congratulations, you have recorded your first Collaborate session!
*If your sound quality was not checked in the beginning, it is good practice to do so to ensure quality audio. Just click on the pink tab on the bottom right, select the cog icon (My Settings), then Set up
Learning and Teaching Office [email protected]
Pag
e4
your camera and microphone and follow the prompts as in step 8 above.
3: Recording a shared file As an alternative to the above process, you can run the PowerPoint right in the Collaborate session. Loading PPT file
into the session will optimise it to suit Collaborate format by deleting animations and sounds.
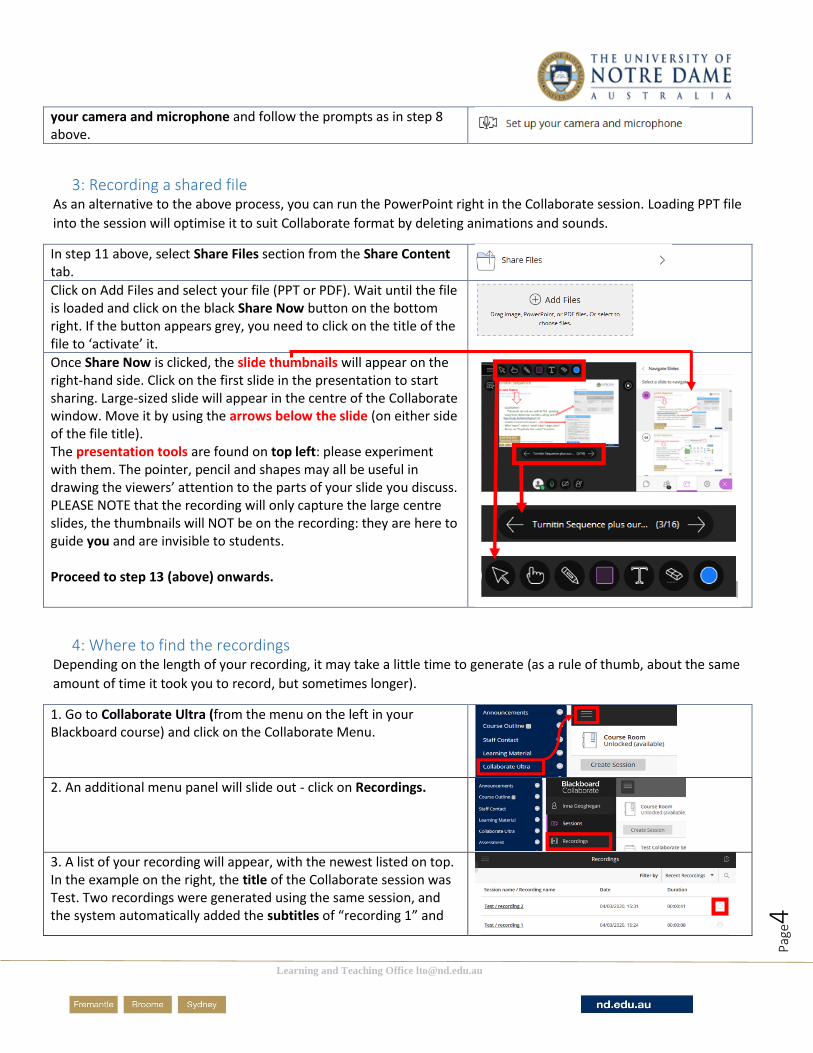
In step 11 above, select Share Files section from the Share Content tab.
Click on Add Files and select your file (PPT or PDF). Wait until the file is loaded and click on the black Share Now button on the bottom right. If the button appears grey, you need to click on the title of the file to ‘activate’ it.
Once Share Now is clicked, the slide thumbnails will appear on the right-hand side. Click on the first slide in the presentation to start sharing. Large-sized slide will appear in the centre of the Collaborate window. Move it by using the arrows below the slide (on either side of the file title). The presentation tools are found on top left: please experiment with them. The pointer, pencil and shapes may all be useful in drawing the viewers’ attention to the parts of your slide you discuss. PLEASE NOTE that the recording will only capture the large centre slides, the thumbnails will NOT be on the recording: they are here to guide you and are invisible to students. Proceed to step 13 (above) onwards.
4: Where to find the recordings Depending on the length of your recording, it may take a little time to generate (as a rule of thumb, about the same
amount of time it took you to record, but sometimes longer).
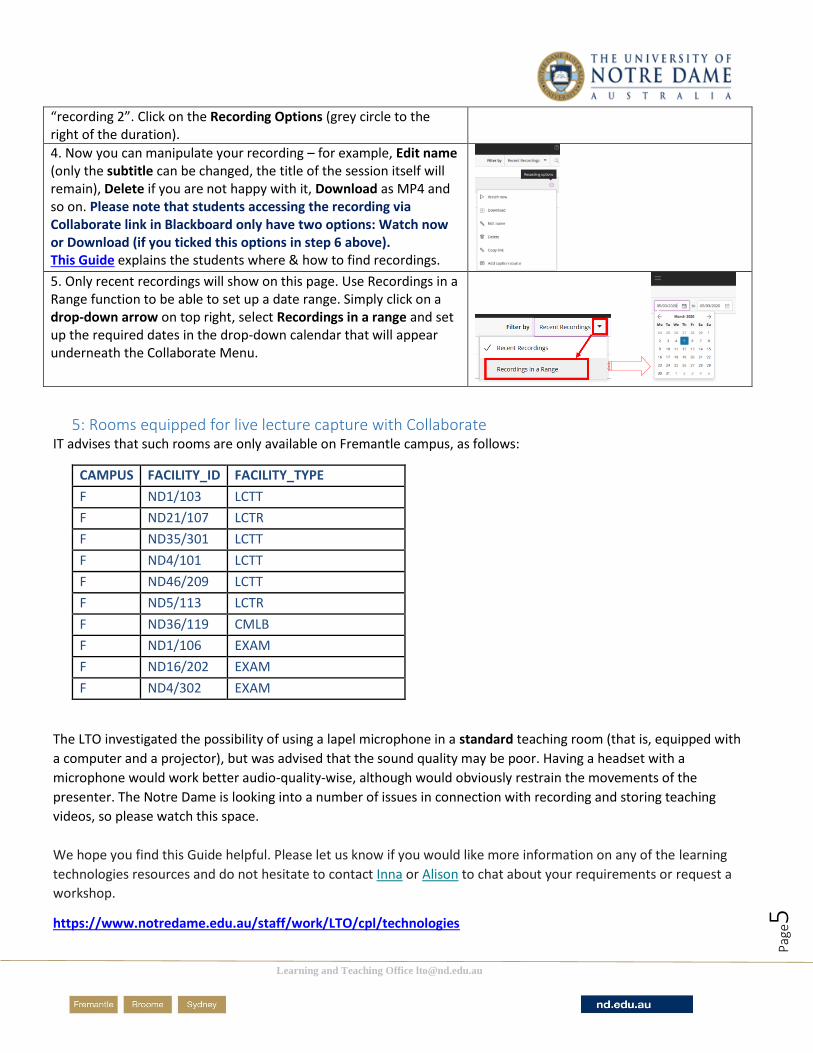
1. Go to Collaborate Ultra (from the menu on the left in your Blackboard course) and click on the Collaborate Menu.
2. An additional menu panel will slide out - click on Recordings.
3. A list of your recording will appear, with the newest listed on top. In the example on the right, the title of the Collaborate session was Test. Two recordings were generated using the same session, and the system automatically added the subtitles of “recording 1” and
Learning and Teaching Office [email protected]
Pag
e5
“recording 2”. Click on the Recording Options (grey circle to the right of the duration).
4. Now you can manipulate your recording – for example, Edit name (only the subtitle can be changed, the title of the session itself will remain), Delete if you are not happy with it, Download as MP4 and so on. Please note that students accessing the recording via Collaborate link in Blackboard only have two options: Watch now or Download (if you ticked this options in step 6 above). This Guide explains the students where & how to find recordings. 5. Only recent recordings will show on this page. Use Recordings in a Range function to be able to set up a date range. Simply click on a drop-down arrow on top right, select Recordings in a range and set up the required dates in the drop-down calendar that will appear underneath the Collaborate Menu.
5: Rooms equipped for live lecture capture with Collaborate IT advises that such rooms are only available on Fremantle campus, as follows:
CAMPUS FACILITY_ID FACILITY_TYPE
F ND1/103 LCTT
F ND21/107 LCTR
F ND35/301 LCTT
F ND4/101 LCTT
F ND46/209 LCTT
F ND5/113 LCTR
F ND36/119 CMLB
F ND1/106 EXAM
F ND16/202 EXAM
F ND4/302 EXAM
The LTO investigated the possibility of using a lapel microphone in a standard teaching room (that is, equipped with
a computer and a projector), but was advised that the sound quality may be poor. Having a headset with a
microphone would work better audio-quality-wise, although would obviously restrain the movements of the
presenter. The Notre Dame is looking into a number of issues in connection with recording and storing teaching
videos, so please watch this space.
We hope you find this Guide helpful. Please let us know if you would like more information on any of the learning
technologies resources and do not hesitate to contact Inna or Alison to chat about your requirements or request a
workshop.
https://www.notredame.edu.au/staff/work/LTO/cpl/technologies