Embed Size (px)
Citation preview
Descriptive conventions in this document: 1. Male or female pronoun can generally refer to either gender, wherever the context requires. 2. ☺ Symbolises a move that is commonly known to be effective. E.g., the jab is so commonly
effective that almost every martial art that relies on striking moves introduces the jab to its students first. It may be referred to as 'lead straight punch to the head' or the 'ayazuki', but its still a jab.
3. � Symbolises a move that is generally not sensible but is included for completion. E.g. it may not be sensible to deflect a kick up from the groin as that would lead the kick towards ones solar plexus …
4. Anything that I take from a book, I will put in Italics 5. I’ll describe the execution of martial arts training and techniques in appropriate numbered lists, for
ease of readability and ease of reference. Theory will be in prose. 1. Who am I? • This is being written by Andrew Coll, as a process of self-discovery. Alternatively, to put it
another way: This is being made up as the author goes along. ☺ I’m not writing this to publish, I’m making it to reference all the martial arts material I have in one location.
2. What is this document? • This is a study off unarmed combat and improving oneself through martial arts. Please note that it
is nowhere near complete. It’s also not an instructive document. In fact, it is a list of commonly taught unarmed combat manoeuvres. This is being written as part of the process of discovering martial arts. This is not intended for publication or anything; but for reference.
3. When • It started as a list of martial arts moves a long way back in 1999. It just rather evolved. 4. Why • Everyone needs a hobby. The home contained quite a few martial arts books and it became
annoying trying to trawl through them all looking for a particular snippet. Therefore, they are being collated into one source, which will be easier to search.
• Whatever the level of ambition, or lack of ambition, of the reader, this is written as a reference to gain insight into martial arts. If anyone reads this then remember that reading about a process doesn’t allow one to understand that process.
• Writing this sort of thing is a great way to organise ones thoughts, and recommended to anyone wanting to improve their martial arts skills, or any other sort of skills, that they create their own reference. Add to it whenever they come across any snippet of information that they might want to remember. Categorise all the snippets such that eventually it evolves as a reference source. In fact, if anyone reads this, you can consider it an open source document. Take a copy and use it as a template for your own martial arts reference/ training diary, delete any bits you don’t want, and add in any bits you want to put in. “Absorb what is useful, reject what is useless” – Bruce Lee.
5. Disclaimer: • THE AUTHOR MAKES NO WARRANTY OF ANY KIND IN REGARD TO THE CONTENT
OF THIS DOCUMENT, INCLUDING, BUT NOT LIMITED TO, ANY IMPLIED WARRANTIES OF MERCHANTABILITY, OR FITNESS FOR ANY PARTICULAR PURPOSE. THE AUTHOR OF THIS DOCUMENT SHALL NOT BE LIABLE FOR ERRORS CONTAINED IN IT, OR FOR INCIDENTAL OR CONSEQUENTIAL DAMAGES IN CONNECTION WITH THE FURNISHING OF USE OF, OR RELIANCE UPON INFORMATION CONTAINED IN THIS DOCUMENT.
• In other words: “I’m not a doctor, nor do I play one on TV!” I cannot be held liable for any damages or injuries that you might suffer from somehow relying upon information in this document, no matter how awful. Not even if the information in question is incorrect or inaccurate. If you break your neck or crack your spine, it’s your own damn fault.
• (By the way, if anyone does make a copy of this, I’d keep the disclaimer if I were you).
The moves: • Training.
• Why and When should one train • How should one train? • Training routine. Warming-up, progressive training schedule, etc. • What should one train. Breathing, flexibility, Conditioning, etc.
• Manoeuvrability: • Stances • Footwork, Dodging and distance. • Recovering.
• Striking: • Punches, • Kicks, • Elbow, Knee, head-butt, straight hand.
• Defence: • Parry, deflections. • Blocks.
• Throws: Backward, forward, and side. Sweeps: takedowns. • Holds (AKA locks, immobilisation’s): immobilising an opponent, arm-lock, leg-lock, and
wristlock. Chokes: Grapples: readying an opponent for a throw, hold or choke. Push, pull, and grab.
• Escapes: Escaping from chokes and holds. • Tactics: feints, distance. • Styles. A list of some martial arts styles. • Medicine and health. • Bibliography. • Stuff
Training Why should one train? What sets the martial arts apart from most exercise systems is the stress on the integration of mind with body. Training is one of the neglected phases of athletics. Too much time is given to the development of skill and too little to the development of the individual for participation. Training deals not with an object, but with the human spirit and human emotions. It takes intellect and judgement to handle such delicate qualities as these. Unarmed combat training doesn’t just have to be a means of learning to fight nor just a sport. It can be a form of art and self-expression and as with all arts there can be few more satisfying feelings than to be able to perform well. It takes a lot of hard work and dedication but with the right amount of dedication and guidance from the right source, anyone can improve their martial art beyond recognition. Sometimes suffering disappointments along the way can strengthen your resolve to do better. Instead of letting setbacks get one down, resolve to work even harder to reach perfection. This sort of experience makes progress. It is important to remember that although not everyone can become a world champion, everyone can improve. When should one train? • Everyday opportunities for exercises:
• Takes a walk whenever you can – like parking a car a few blocks away from your destination. • Avoid taking the elevator; climb the stairs instead. • Cultivate your quiet awareness by imagining an opponent attacking you – while you are
sitting, standing, lying down, etc. – and counter that attack with various moves. Simple moves are best.
• Practice your balance by standing on one foot to dress – or simply stand on one foot whenever you choose.
• The body grows and regenerates muscles during sleep; so muscular training should ideally be performed in the evening.
• The best time to stretch is when your muscles are warmed up. If they are not already warm before you wish to stretch, then you need to warm them up yourself, usually by performing some type of brief aerobic activity. Obviously, stretching is an important part of warming-up before, and cooling-down after, a workout. If the weather is very cold, or if you are feeling very stiff, then you need to take extra care to warm-up before you stretch in order to reduce the risk of injuring yourself.
• Many of us have our own internal body clock or “circadian rhythm” as it is more formally called. Some of us are “early morning people” while others consider themselves ”late nighters”. Being aware of your circadian rhythm should help you decide when it is best for you to stretch (or perform any other type of activity). Gummerson says that most people are more flexible in the afternoon than in the morning, peaking from about 2:30pm-4pm. Also, according to `HFLTA’: “There is some evidence to suggest that flexibility and strength are greatest in the late afternoon or early evening. If this is true, then, all else being equal, an athlete might get a better workout by hitting the gym right after work rather than before work.”
• On the other hand, according to Kurz, “if you need [or want] to perform movements requiring considerable flexibility with [little or] no warm-up, you ought to make early morning stretching a part of your routine.” In order to do this properly you need to first perform a general warm-up. You should then begin your early morning stretching by first performing some static stretches, followed by some light dynamic stretches. Your early morning stretching regimen should be almost identical to a complete warm-up. The only difference is that you may wish to omit any sport-specific activity, although it certainly won’t hurt to perform it *if* you have time.
• According to Minick: “There are two periods of the day that are best suited to performing exercise: in the morning after rising and in the early evening before dinner. These are the optimal hours for exercise as the stomach is empty. People are quicker on their feet and more mentally agile when they are a little hungry. A full stomach tends to make one sluggish and sleepy. Furthermore, digestion starts a long series of events that specifically stimulate a number of internal organs in a way that is contrary to the effect that the exercises are trying to achieve. For instance, the digestive process brings a great deal of blood in to the walls of the stomach and intestines. The exercises are distributing this blood to the other internal organs. Another part of the digestive process is
peristalsis, a muscular, rhythmic squeezing movement produced by the intestines during digestion. Many exercises stimulate the intestines by moving and stretching them in directions opposed to the function of peristalsis. Exercising after eating tends to strain the area being exercised. Once you pick a time of day to exercises try to stick to it. The body has a number of natural rhythms, such as sleep, feeding, excretion – and exercising. If it’s done regularly, the body responds easily. Both body and mind fight change, however, so make things easy for yourself”.
How should one train? Training is the psychological and physiological conditioning of an individual preparing for intense neural and muscular reaction. It implies discipline of the mind and power and endurance of the body. It means skill. It is all these things working together in harmony. Training means not only knowledge of the things that will build the body, but also knowledge of the things that will tear down and injure the body. Improper training will result in injuries. Training, then, is concerned with the prevention of injuries as well as first aid to injuries. How often to train: According to Minick: “Ideally one must exercise daily. However, if you have not exercised in some time it is advisable to start more slowly and gradually work yourself up to every day. Try twice a week for the first month. The intervening three or four days is just as important as the exercises themselves. It is in that period that the stimulated organs respond by building more cells. Exercise them immediately again is straining them and not allowing them to rebuild. After the first month, try to increase the program to every other day. The internal organs should be ready to bear the strain by then. However, if you are not feeling stronger, drop back to twice a week until feelings of new strength appear. Once you are at the every-other-day level, there should be a marked difference in our energy output. You should sleep more soundly, wake up more easily, and have a greater capacity for work and play. After a month, you should be ready to increase the program to once a day”. This is not as much as it may seem. Bear in mind that fighters and athletes train for several hours a day, every day. Mental attitudes: If you are unused to physical exercise, there is another reason for a seemingly slow start. According to Minick: “Starting in once a day every day tends to be discouraging. It is too demanding, and after the first burst of enthusiasm has worn off there is a tendency to drop the program as being too rigorous. The gradual building of a training program allows your brain to get used to the discipline required to perform daily exercise. Also important is the mental state while performing exercise. You must have nothing else on your mind. You must pick a time of day when you have nothing else to do. Just before dinner is excellent because you have finished, the days work and have nothing to look forward to but your leisure. The morning is very good providing you can get up early enough, to give yourself the time and privacy that exercise requires. If you force yourself to rush through the exercises or have something else on your mind, the entire purpose of the exercises has been defeated. Besides stimulating the internal organs, the exercises are supposed to slow your mind down and put you more in touch with yourself. This cannot be accomplished if there are all sorts of pressures on you”. Although bear in mind that it can be tempting to skip a night than to perform exercise in an improper state of mind some people find that a little light exercise can lift their mood. Smoking and drinking: According to Minick: “The purpose of exercise is to improve the body. Drinking, smoking or any drug taking produces the opposite affect. As long as you persist in doing any or all of these things, you are negating the effects of the exercises. This is not to say that you will not make some progress; you will, but it will not be at a much slower rate than without these drugs. Smoking is of particular detriment, as the success of cardiovascular exercise lies in developing deeper lungpower. Virtually any drug is putting a strain on the internal organs and a strained organ does not respond well to additional stimulation”. Diet and nutrition : Eat natural foods, not ones loaded with artificial chemicals. Every artificial chemical put into the body has to be filtered out by the liver and kidneys, why make them work harder? The diet should be 80% vegetables where vegetables include fruit and grains. The other 20% should be lean meat and fish. Training routine A training session consists of three phases, the warm up, the actual skill training for the sport and the cool-down. The warm up and cool down can be further subdivided into three phases, general warm up, stretching, and sport specific activity.
1 Warm up 1.1 General warm-up. 1.1.1 Joint rotations 1.1.2 Aerobic activity 1.2 Stretching. 1.2.1 Static stretching 1.2.2 Dynamic stretching 1.3 Sport specific activity. 2 Actual Sport. 3 Cool down. 3.1 Sport specific activity 3.2 Stretching 3.3 General cool down: Aerobic activity 1 WARM-UP � Any athlete or active person will tell you that a warmed up body bends more easily, is more agile,
graceful and responds with greater speed than a body that has not been warmed up. � Warming up reduces the viscosity of a muscle, its resistance to its own movement. It improves
performance and prevents injury in vigorous activities by two essential means: 1. A rehearsal of the skill before competition commences fixes in the athletes neuromuscular co-
ordination system the exact nature of the impending task. It also heightens his kinaesthetic senses.
2. The rise in body temperature facilitates the biochemical reactions supplying energy for muscular contractions. Elevated body temperature also shortens the periods of muscular relaxation and aids in reducing stiffness.
� Because of proper warming up there are improvements in accuracy, strength and speed of movement, and an increase in tissue elasticity that lessens the liability to injury.
� Stretching is *not* warming up! It is, however, a very important part of warming up. Warming up is quite literally the process of "warming up" (i.e., raising your core body temperature). A proper warm-up should raise your body temperature by one or two degrees Celsius (1.4 to 2.8 degrees Fahrenheit). The warm-up is divided into three phases: general warm-up, stretching, and sport specific activity.
� No fighter uses his leg violently until he warms it up carefully. The same principle applies to all muscles that are to be used so vigorously
1.1 GENERAL WARM-UP . The general warm-up is divided into two parts: joint rotations and aerobic activity.
1.1.1 Joint rotations. 1.1.1.1 The general warm-up should begin with joint-rotations. Start from your toes and work your
way up, or from your fingers, and work your way down. This facilitates joint motion by lubricating the entire joint with synovial fluid. Such lubrication permits your joints to function more easily when called upon to participate in your athletic activity. You should perform slow circular movements, both clockwise and counter-clockwise, until the joint seems to move smoothly. You should rotate the following (in the order given, or in the reverse order):
1.1.1.1.1 Fingers and knuckles, 1.1.1.1.2 Wrists, 1.1.1.1.3 Elbows, 1.1.1.1.4 Shoulders, 1.1.1.1.5 Neck, 1.1.1.1.6 Trunk/waist, 1.1.1.1.7 Hips, 1.1.1.1.8 Legs, 1.1.1.1.9 Knees, 1.1.1.1.10 Ankles, 1.1.1.1.11 Toes 1.1.1.2 Loosening sinews. 1.1.1.2.1 Stand erect, with feet comfortably placed. Relax your arms and hands by allowing them to
hang loosely at your sides. 1.1.1.2.2 Simultaneously shake arms and hands as if you were trying to shake drops of water from
your fingertips.

1.1.1.2.3 Lift your right leg and shake it gently as in the previous movement. 1.1.1.2.4 Repeat the same procedure with your left leg. 1.1.1.2.5 Consciously attempt to relax the neck muscles, and then allow your head to drop as far
forward as possible. 1.1.1.2.6 Slowly revolve your head clockwise for two revolutions. If you are at ease this will crack
your upper spine. 1.1.1.2.7 Standing erect, slowly bring your hands up from your sides, palms parallel to the floor,
arms held in front of the body. 1.1.1.2.8 Continue the upward movement of your arms until they are stretched vertically and are on
the same plane as the rest of the body. At the same time, raise yourself as high as you can on the balls of your feet. Hold this position for a count of five, and then slowly allow your arms to return to your sides and your heels to the floor.
1.1.1.2.9 Return to the position that you began the exercise with. Standing completely still feel your muscles relax.
1.1.2 Aerobic activity . 1.1.2.1 After you have performed the joint rotations, you should engage in at least five minutes of
aerobic activity. Such as jogging, jumping rope, or any other activity that will cause a similar increase in your cardiovascular output (i.e., get your blood pumping). The purpose of this is to raise your core body temperature and get your blood flowing. Increased blood flow in the muscles improves muscle performance and flexibility and reduces the likelihood of injury.
1.1.2.2 It is very important that you perform the general warm-up *before* you stretch. It is *not* a good idea to attempt to stretch before your muscles are warm (something which the general warm-up accomplishes).
1.1.2.3 Warming up can do more than just loosen stiff muscles; when done properly, it can actually improve performance. On the other hand, an improper warm-up, or no warm-up at all, can greatly increase your risk of injury from engaging in athletic activities.
1.1.2.4 It is important to note that active stretches and isometric stretches should *not* be part of your warm-up because they are often counterproductive. The goals of the warm-up are (according to Kurz): "an increased awareness, improved co-ordination, improved elasticity and contractility of muscles, and a greater efficiency of the respiratory and cardiovascular systems." Active stretches and isometric stretches do not help achieve these goals because they are likely to cause the stretched muscles to be too tired to properly perform the athletic activity for which you are preparing your body.
1.1.2.5 One of the finest exercises to develop of a sense of balance is undoubtedly not ordinary haphazard skipping, but rather the real thing. First, skip on one foot, holding the other in front of you; then skip on the other. After that, skip on alternate feet with each revolution of the rope (not as simple as it may appear) and work up to the highest possible speed. Keep the skipping going for three minutes (the duration of a round), then rest for a minute and skip for another three minutes. Three rounds of skipping in a variety of ways will form the opening for a good workout.
1.2 WARM-UP STRETCHING . The stretching phase of your warm-up should consist of two parts: static stretching and dynamic stretching.
� Many people are unaware of the fact that there are different types of flexibility. These different types of flexibility are grouped according to the various types of activities involved in athletic training. The ones that involve motion are called "dynamic" and the ones that do not are called "static". The different types of flexibility (according to Kurz) are dynamic flexibility, static-active flexibility, and static-passive flexibility.
� "Dynamic flexibility": Dynamic flexibility (also called "kinetic flexibility") is the ability to perform dynamic (or kinetic) movements of the muscles to bring a limb through its full range of motion in the joints.
� "Static-active flexibility": Static-active flexibility (also called "active flexibility") is the ability to assume and maintain extended positions using only the tension of the agonists and synergists while the antagonists are being stretched. For example, lifting the leg and keeping it high without any external support other than from your own leg muscles.
� "Static-passive flexibility": Static-passive flexibility (also called "passive flexibility") is the ability to assume extended positions and then maintain them using only your weight, the support of your limbs, or some other apparatus (such as a chair or a bar). Note that the ability to maintain the position does not come solely from your muscles, as it does with static-active flexibility. Being able to perform the splits is an example of static-passive flexibility.
� Research has shown that active flexibility is more closely related to the level of sports achievement than is passive flexibility. Active flexibility is harder to develop than passive flexibility (which is what most people think of as "flexibility"). Not only does active flexibility require passive flexibility in order to assume an initial extended position, it also requires muscle strength to be able to hold and maintain that position.
� Duration, counting and repetition: � One thing many people seem to disagree about is how long to hold a passive stretch in its
position. Various sources seem to suggest that they should be held for as short as 10 seconds to as long as a full minute (or even several minutes). The truth is that no one really seems to know for sure. According to `HFLTA': Some controversy surrounds how long a stretch should be held. Some researchers say 30-60 seconds. Recent research on the hamstrings indicates that 15 seconds may be sufficient. Whether the 15 seconds that may be sufficient for the hamstrings is also sufficient for other muscle groups is unclear.
� A good common ground seems to be about 20 seconds. Children, and people whose bones are still growing, do not need to hold a passive stretch this long (and, in fact, Kurz strongly discourages it). Holding the stretch for about 7-10 seconds should be sufficient for this younger group of people.
� A number of people like to count (either out loud or to themselves) while they stretch. While counting during a stretch is not, by itself, particularly important ... what is important is the setting of a definite goal for each stretching exercise performed. Counting during a stretch helps many people achieve this goal.
� Many sources also suggest that passive stretches should be performed in sets of 2-5 repetitions with a 15-30 second rest in between each stretch.
� Exercise order: � Many people are unaware of the fact that the order in which you perform your stretching
exercises is important. Quite often, when we perform a particular stretch, it actually stretches more than one group of muscles. It stretches the muscles that the stretch is primarily intended for, and other supporting muscles that are also stretched but which do not receive the "brunt" of the stretch. These supporting muscles usually function as synergists for the muscles being stretched. This is the basis behind a principle that `SynerStretch' calls the "interdependency of muscle groups".
� Before performing a stretch intended for a particular muscle, which actually stretches several muscles, you should first stretch each of that muscle's synergists. The benefit of this is that you are able to better stretch the primary muscles by not allowing the supporting muscles the opportunity to be a limiting factor in how "good" a stretch you can attain for a particular exercise.
� Ideally, it is best to perform a stretch that isolates a particular muscle group, but this is not always possible. According to `SynerStretch': "by organising the exercises within a stretching routine according to the principle of interdependency of muscle groups, you minimise the effort required to perform the routine, and maximise the effectiveness of the individual exercises." This is what `Health for Life' (in all of their publications) call "synergism": "combining elements to create a whole that is greater than the mere sum of its parts."
� For example, a stretch intended primarily for the hamstrings may also make some demands upon the calves and buttocks (and even the lower back) but mostly, it stretches the hamstrings. In this case, it would be beneficial to stretch the lower back, buttocks, and calves first. In that order, using stretches intended primarily for those muscles, before they need to be used in a stretch that is intended primarily for the hamstrings.
� As a general rule, you should usually do the following when putting together a stretching routine: 1. Stretch your back (upper and lower) first. 2. Stretch your sides after stretching your back 3. Stretch your buttocks before stretching your groin or your hamstrings 4. Stretch your calves before stretching your hamstrings 5. Stretch your shins before stretching your quadriceps (if you do shin stretches) 6. Stretch your arms before stretching your chest.
1.2.1 Static stretching. • It is important that static stretches be performed *before* any dynamic stretches in your
warm-up. Dynamic stretching can often result in overstretching, which damages the muscles. Performing static stretches first will help reduce this risk of injury.

• Once the general warm-up has been completed, the muscles are warmer and more elastic. Immediately following your general warm-up, you should engage in some slow, relaxed, static stretching. You should start with your back, followed by your upper body and lower body, stretching your muscles in the following order: 1) back, 2) sides, 3) neck, 4) forearms and wrists, 5) triceps, 6) chest, 7) buttocks, 8) groin, 9) thighs, 10) calves, 11) shins, 12) hamstring, 13) instep.
1.2.1.1.1 Back 1.2.1.1.1.1 Lower back stretch:
• Lying down with your back on the floor, straighten one leg, while bending the knee of the other leg, and try to bring the thigh of your bent leg as close as possible to your chest. Hold it there for 10-15 seconds.
• Then cross your bent leg over your straight leg and try to touch your knee to the floor (while trying to keep both shoulders on the ground). Repeat this same procedure with the other leg.
• Then, bend both knees and bring both thighs up against your chest (keeping your back on the floor). Hold that for 10-15 seconds.
• Then, put both feet on the ground but keep the knees bent. While trying to keep both shoulders on the ground, roll your legs over to one side and try to get your knees to touch the floor beside you. Hold for about 10-15 seconds and then do the same thing on the other side.
• Now repeat the same stretch, but this time beginning with your feet off the floor so that your leg is bent at the knee at about a 90-degree angle.
• These stretches work mostly the lower back, but also make some demands on your abdominal, and your external oblique (side) muscles.
• “As for isometric stretches for the back, I don't recommend them”. – Stretching by Brad Appleton.
1.2.1.1.1.2 Upper back stretch: • Stand up. Relax knees, clasp hands and push forwards. Feel stretch across upper
back. 1.2.1.1.1.3 Kneeling lower back stretch:
• Kneel down, with palms on floor, arms locked and head down, extend back upwards. Feel stretch across lower and middle back.
1.2.1.1.1.4 Abdominal stretch: • With palms on floor and arms locked, extend legs so thighs are flat on floor. Push
chest out and shoulders back. Feel stretch in abdominal. 1.2.1.1.2 Sides (external oblique) 1.2.1.1.2.1 Shoulder stretch:
• Stand tall with knees relaxed. Extend arm across body, holding it in place with other arm. Feel stretch in shoulders.
1.2.1.1.2.2 Lat. stretch: • Standing tall. Grasp elbow with hand and gently ease it overhead. Feel stretch in lat.
muscle. 1.2.1.1.2.3 Reaches:
• Keeping knees relaxed, reach to ceiling. Feel stretch in oblique and lats. 1.2.1.1.2.4 Side stretch:
• Stand tall with knees relaxed. Keeping hips square, slide arm down leg. 1.2.1.1.3 Neck 1.2.1.1.4 Forearms and wrists 1.2.1.1.4.1 Static wrist suppling:
• The gymnast clasps his hands together and rolls them round. 1.2.1.1.5 Triceps 1.2.1.1.5.1 Triceps stretch:
• Standing tall. Position the palm of the hand on the back. Place other hand on elbow and ease elbow back gently. Feel stretch in triceps.
1.2.1.1.6 Chest 1.2.1.1.6.1 Chest stretch:
• Place palm and forearm flat against wall, turn shoulders away from wall. Feel stretch in pectoral muscle.
1.2.1.1.7 Buttocks

1.2.1.1.7.1 Lying buttock stretch: • Lie on your back again with both knees bent in the air and with your feet on the
floor. • Take your right foot in your left hand (with your hand wrapping under your foot so
that the fingertips are on its outside edge) and hold your leg (with your knee bent) in the air about 1-3 feet above your left breast. Relax; we haven't started to stretch the buttocks just yet. The leg you are holding should be in much the same position as it is when you start your groin stretch in the next exercise, only now it is in the air because you are on your back.
• Exhale and slowly pull your foot over to the side and up (toward your head) as if you were trying to touch your outstretched leg about 12 inches to the outside of your left shoulder. You should feel a good stretch in your buttocks about now. If you feel any stress at all on your knee then stop at once. You are probably pulling "up" too much and not enough to the side. You may wish to use your free hand to support your knee in some way. Hold this stretch for about 20 seconds (and stop if you feel any stress in the knee joint).
• Now repeat this same stretch with the other leg (using the other hand). Remember that the leg you are *not* holding should have the sole of its foot on the floor with the knee bent and in the air.
• This mainly stretches your buttocks (gluteus muscles) but also makes some demands on your groin and upper inner-thigh area. You must be very careful *not* to apply any stress to the knee joint when performing this stretch. Otherwise, serious injury (such as the tearing of cartilage) may occur.
1.2.1.1.7.2 Isometric lying buttock stretch: • To make an isometric stretch out of this: When you are performing the passive
stretch (above) and feel the stretch in your buttocks, continue trying to pull your foot to the outside of your shoulder while at the same time resisting with your leg so that it pushes against your hand. No actual leg motion should take place, just the resistance. Stop immediately if you feel any undue stress to your knee.
1.2.1.1.7.3 Gluteus stretch: • Lie back flat on the floor. Stretch out legs, lay one leg flat and grasp knee of other
leg while keeping back flat. • Pull knee gently towards opposite shoulder. Feel stretch in gluteus muscle
1.2.1.1.8 Groin (adductors) 1.2.1.1.8.1 Butterfly stretch :
• Sit down with your back straight up (don't slouch, you may want to put your back against a wall) and bend your legs, putting the soles of your feet together. Try to get your heels as close to your groin as is *comfortably* possible. Now that you are in the proper position, you are ready to stretch. For the passive stretch, push your knees to the floor as far as you can (you may use your hands to assist but do *not* resist with the knees) and then hold them there. Once you have attained this position, keep your knees where they are, and then exhale as you bend over trying to get your chest as close to the floor as possible. Hold this stretch for about 20 seconds. This mainly stretches your groin and upper inner-thigh area, but also makes some demands on your lower back. It is often called the "butterfly stretch" or "frog stretch" because of the shape that your legs make when you perform it.
1.2.1.1.8.2 Isometric butterfly stretch : • The isometric butterfly stretch is almost identical to the passive stretch. However,
before you bend over, place your hands on your ankles and your elbows in the crooks of your knees. As you bend over, use your elbows to "force" your knees closer to the floor while at the same time pushing "up" (away from the floor) with your thighs to resist against your arms.
1.2.1.1.8.3 Adductors stretch: • With legs wide, bend one knee and ease straight leg into ground. Feel stretch leg into
ground. Feel stretch in inside of straight leg. 1.2.1.1.9 Thighs (quadriceps and abductors) 1.2.1.1.9.1 Psoas stretch:
• This stretch is sometimes called the "runner's start" because the position you are in resembles that of a sprinter at the starting block. It mainly stretches the psoas muscle located just above the top of the thigh.
• Crouch down on the floor with both hands and knees on the ground. Put one leg forward with your foot on the floor so that your front leg is bent at the knee at about a 90-degree angle. Now extend your rear leg behind you so that it is almost completely straight (with just an ever so slight bend). The weight of your rear leg is on the ball of your rear foot with the foot in a forced arch position. Now we are in the position to stretch (notice that your rear leg should be in much the same position that it would assume if you were performing a front split).
• Keeping your back straight and in line with your rear thigh, exhale and slowly try to bring your chest down to the floor (you shouldn't need to bend much further than the line your front knee is on). You should feel the stretch primarily in the upper thigh of your rear leg but you should also feel some stretch in your front hamstring as well. Hold this position for at least 15 seconds. If you wish to also stretch your rear quadriceps from this position: You can shift your weight back so that your rear leg makes a right angle with your knee pointing toward the floor (but don't let it touch the floor). Now, without bending your rear leg any further, try to force your rear knee straight down to the floor.
• Now repeat the same stretch/stretches with your other leg in front. 1.2.1.1.9.2 For an isometric psoas stretch:
• You can do this same stretch in front of a wall and instead of putting your hands on the floor, put them in front of you against the wall. Then push against the wall with the ball of your foot (without decreasing the "stretch" in your psoas).
1.2.1.1.9.3 Quadriceps stretch: • For this stretch, you will need one (or two) pillows or soft cushions to place between
your knee and the floor. You must be very careful when performing this stretch because it can be hard on the knees. Please be advised to take it easy (and not overdo) while performing this exercise.
• Put the pillow under your rear knee and let your knee rest on the floor. Lift up your rear foot and grab onto your foot with the opposite hand (grab the instep if possible, but if you can only reach the heel, that is okay). If you have trouble grabbing your foot, then you may need to sit (or shift) back onto your rear leg so that you can grab it. Then shift forward into the starting position (with your hand now holding your foot). Now, exhale and very gently, but steadily, pull your foot toward its buttock (butt-cheek) and lean toward your front foot (you may also wish to twist your waist and trunk towards the foot you are holding). You should feel a tremendous stretch in the quadriceps (top right thigh) of the foot that you are pulling. If you begin to feel stress in your knee, then discontinue the exercise (but let your foot down slowly - not all at once). Hold this stretch for about 15 seconds. When you are finished, shift your bodyweight slowly back onto your rear leg and let your foot down while you are still holding onto it. Do not just let go and let your foot snap back to the ground - this is bad for your knee.
1.2.1.1.9.4 Isometric quadriceps stretch: • Get into the same position as for the passive quadriceps stretch. • As you lean forward and pull on your foot, resist with the leg you are holding by
trying to push your instep back down to the ground and out of the grip of your hand. However, no actual movement should take place.
• Now do the same stretch with your other leg in front. • Stop the stretch immediately if you feel pain or discomfort in your knee.
1.2.1.1.9.5 Seated inner-thigh stretch: • You will need an apparatus for this stretch that is at least 12 inches off the ground.
Sit on it with your knees bent with the sole of your foot solidly on the floor. A bench, or a firm bed or couch will do. Alternatively, you could use two chairs with your butt on one chair and the heel of your foot on the other. The bench should be long enough to accommodate the full length of your leg.
• Sit on the bench and have your leg comfortably extended out in front of you. Your heel should still be on the bench and the other leg hanging out to the side with the leg bent and the foot flat on the ground.
• You should still be sitting on the bench with your outstretched leg in front of you. Now turn on the bench so that your leg is outstretched to your side, and you are facing the leg that is bent. You may perform this next stretch with either your toe pointing up toward the ceiling or with the inside edge of your foot flat on the bench with your toe pointing forward (but flexed). Alternatively, you may try this stretch both ways since you will stretch some slightly different (but many of the same) muscles either way. Some prefer to keep the toe pointed towards the ceiling because they feel that the other way applies too much stress to the knee, but you can do whatever feels comfortable to you.
• Note: If you are using two chairs instead of a bench, the first thing you need to do is to make sure that one of the chairs supports your outstretched leg somewhere between the knee and the hip. If the support is being provided below the knee and you try to perform this stretch, there is a good chance that you will injure ligaments and/or cartilage.
• Place your hands underneath the bench directly under you. Alternatively, you may keep one hand under the portion of the bench that is below the knee of your outstretched leg.
• Pull yourself down and forward (keeping your back straight) as if you were trying to touch your chest to the floor. You should be able to feel the stretch in your inner-thigh. Hold this for about 20 seconds.
1.2.1.1.9.6 Isometric seated inner-thigh stretch: • For the isometric stretch do, the same thing you did with the hamstring stretch: keep
both hands underneath you as before and try to force your foot downward "through" the bench.
1.2.1.1.9.7 Quad stretch: • Stand tall. Lift one heel backwards and grasp the ankle. Keeping knees together,
gently tilt hips forward. Feel stretch in front of bent thigh. 1.2.1.1.9.8 Hip flexor :
• Gently lunge forward, keeping front knee in line with shoelaces. Feel stretch in front of thigh.
1.2.1.1.10 Calves 1.2.1.1.10.1 Seated calf stretch:
• You will need an apparatus for this stretch, a bench, or a firm bed or couch: that is at least 12 inches off the ground. Not so high that you can't sit on it with out your knees bent and the sole of your foot solidly on the floor. Alternatively, you could use two chairs with your butt on one chair and the heel of your foot on the other. The bench should be long enough to accommodate the full length of your leg. .
• Sit on the bench and have your leg comfortably extended out in front of you. Your heel should still be on the bench and the other leg hanging out to the side with the leg bent and the foot flat on the ground.
• With your leg extended directly in front of you, face your leg and bend it slightly. Place your hands around the ball of your foot and gently pull back so that you force yourself to flex your foot as much as possible. Hold this stretch for about 20 seconds (don't forget to breathe).
1.2.1.1.10.2 Isometric seated calf stretch: • In this same position, use your hands to try to force the ball (and toes) of your foot
even further back toward you while at the same time using your calf muscles to try to straighten your foot and leg. You should be resisting enough with your hands so that no actual foot (or leg) motion takes place.
1.2.1.1.10.3 Standing Calf stretch: • With feet pointing straight ahead, keep back heel on floor. Feel stretch in calf muscle.
Bend back knee for stretch in Achilles. 1.2.1.1.11 Shins 1.2.1.1.12 Hamstrings 1.2.1.1.12.1 Seated hamstring stretch:
• Now that our calf is stretched, we can get a more effective hamstring stretch (since inflexibility in the calf can be a limiting factor in this hamstring stretch). Still sitting on the bench in the same position, straighten your leg out while trying to hold onto your outstretched leg with both hands on either side as close as possible to your
heel. Starting up with your back straight, slowly exhale and try to bring your chest to the knee of your outstretched leg. You should feel a "hefty" stretch in your hamstring and even a considerable stretch in your calf (although you just stretched it). Hold this stretch for about 20 seconds.
1.2.1.1.12.2 Isometric seated hamstring stretch: • Now for the isometric stretch: when you have your chest as close as you can to your
knee, try to put both hands under the bench by your heel (or both hands on opposite sides of your heel). Now grab on tight with your hands and try to physically push your heel (keeping your leg straight) downward "through" the bench, the bench will provide the necessary resistance, and should prevent any leg motion from occurring.
1.2.1.1.12.3 Lying V stretch: • This stretch is very good for working toward a side (Chinese) split. This exercise
should be performed *after* you have stretched each of these areas individually with prior stretches (like the ones mentioned above).
• Start by lying down with your back flat on the ground and your legs straight together in the air at a 90-degree angle. Try to have your legs turned out so that your knees are facing the side more than they are facing your head. Slowly bring your legs down to the sides, keeping your legs straight and turned out. When you reach the point where you cannot bring them down any further into this "lying" side split position, leave them there.
• With both your feet either flexed or pointed (your choice) use your arms to reach in and grab your legs. Each arm should grab the leg on the same side. Try to get a hold of the leg between the ankle and the knee (right at the beginning portion of the calf that is closest to the ankle is almost perfect). Now, exhale and use your arms to gently but steadily force your legs down further and wider (keeping the legs straight) getting closer to the lying side-split position (where, ideally, your kneecaps would be "kissing" the floor). Hold this position and keep applying steady pressure with your arms for about 20 seconds.
1.2.1.1.12.4 Isometric lying V stretch: • Assume the same position as the passive lying V stretch. As you use your arms to
force your legs wider, use your inner and outer thigh muscles to try to force your legs back up together and straight, like scissors closing. However, apply enough resistance with your arms so that no motion takes place (this can be tough since your legs are usually stronger than your arms). You may find that you get a much better stretch if you use a partner (rather than your own arms) to apply the necessary resistance.
1.2.1.1.12.5 Standing hamstring stretch: • Place one leg out in front and push backside out. Feel stretch behind front leg.
1.2.1.1.12.6 Suppling exercise 6: [lower back and hamstrings] • The gymnast sits with his legs out together and straight, knees pressed against the
floor, back straight. He then reaches forwards and grasps under his heels with his hands, pressing the backs of the legs against the floor and holding the pike position for at least five seconds, with his chest on his thighs before releasing.
1.2.1.1.13 Instep 1.2.1.1.13.1 Ankle suppling b:
• The gymnast sits with legs out straight and feet pushed back. He stretches first his ankles, then his toes, and pushes his toes back, followed by his ankles. A four-beat exercise. The feet must stretch from the ankles.
• Unfortunately, not everyone has the time to stretch all these muscles before a workout. If you are one such person, you should at least take the time to stretch all the muscles that will be heavily used during your workout.
1.2.2 Dynamic stretching. � Once you have performed your static stretches, you should engage in some light dynamic
stretching. Leg-raises, and arm-swings in all directions. According to Kurz, you should do "as many sets as it takes to reach your maximum range of motion in any given direction", but do not work your muscles to the point of fatigue. Remember - this is just a warm-up. The real workout comes later.
� Some people are surprised to find that dynamic stretching has a place in the warm-up. However, think about it: you are "warming up" for a workout that is (usually) going to
involve a lot of dynamic activity. It makes sense that you should perform some dynamic exercises to increase your dynamic flexibility.
1.2.2.1 Back 1.2.2.1.1 Bending. [Back]
• Stand erect, with feet apart, arms held loosely at the sides. • Inhaling, gradually lower the torso until your hands are almost touching the ground.
The back and the legs are held as straight as possible. • Maintaining this position, clasp your hands together. • Exhaling, gradually assume a standing position, but with your clasped hands and
extended arms held at a ninety-degree angle to the torso. Note: when you straighten up, try to imagine that you are lifting an enormous load with your arms.
• Inhaling, unclasp your hands and drop your arms to the side. This completes the first part of the exercise.
• Continuing to inhale, bend your body backward while raising your palms until they are parallel with the floor.
• Exhaling, and keeping your arms straight throw the arms upward until your palms are over your upper chest and parallel with the floor.
• Permit your hands to drop along the same arc they travelled to your sides with the palms parallel to the floor, and gradually resume a standing position.
1.2.2.1.2 Suppling exercise 2: • The gymnast must stand correctly with his hands clasped above his head, with arms
straight. He moves the arms back and forth with a double bounce, stretching in the shoulders and then bends forwards with legs straight to double bounce his hands on the floor. A four-beat exercise.
1.2.2.1.3 Suppling exercise 3: (dynamic, back) • The gymnast stands with his legs wide apart. Bending forward from the hips, he
reaches forward and places his hands on the ground in front of him. Then drives his chest, arms between his legs to place his hands on the ground behind him, he then swings his chest and arms forwards and up. Then repeats the exercise. A three-beat exercise.
1.2.2.1.4 Suppling exercise 5: (dynamic, lower back) • The gymnast sits with his legs out together and straight, knees pressed against the
floor, ankles stretched, back straight. He reaches forward from the hips with his hands stretching beyond his feet, bouncing forwards three times, and returning to straight-backed sit with his hands on the floor out to the side. A four-beat exercise.
1.2.2.1.5 Back arching: • The gymnast must push his back up from the floor, pushing his torso towards he
ceiling, and rock the shoulders back and forth over the hands, four or five times, straightening his knees as he pushes back. The knees must be pushed back towards the hands. The hands should point forwards toward the feet and should not move throughout the exercise. The feet must be kept flat. The feet should not move throughout the exercise.
1.2.2.1.6 Sides 1.2.2.1.7 Neck 1.2.2.1.8 Forearms & wrists 1.2.2.1.8.1 Dynamic wrist suppling:
• The gymnast kneels with his hands turned in flat on the floor, pointing toward each other and the arms straight. He then proceeds to walk his hands out away from each other until his arms start to bend or the heel of the hands start to lift off the floor, and then he starts to walk them back in again. The gymnast must keep his arms straight.
1.2.2.1.9 Triceps 1.2.2.1.10 Chest 1.2.2.1.11 Buttocks 1.2.2.1.12 Groin 1.2.2.1.12.1 Suppling exercise 4: (dynamic, hip)
• The gymnast starts in kneeling position, hands and knees on the floor, with his arms straight and back straight, swings one leg up, to the side, back, and down, and repeats with the other leg. A four-beat exercise.
1.2.2.1.12.2 Suppling exercise 11 dynamic hip:
• The gymnast must stand up straight with one foot slightly turned out, and swing the free leg up to the side with the knee facing upwards, and the hips facing forwards. Repeat the swing ten times with each leg. The gymnast must swing with straight leg, knee facing upwards.
1.2.2.1.12.3 Suppling exercise 12 dynamic, hip: • The gymnast must stand correctly and swing the leg up forwards from the hips,
accelerating the swing upward. The body must remain upright, with the leg swinging through straight.
1.2.2.1.12.4 Suppling exercise 13 dynamic, hip. • For this exercise, a wall bar would be useful but failing that, the gymnast will have
to use something else. The gymnast faces the wall bars, holding on with arms straight and the chest as upright as possible and hips and shoulders facing forwards. He then swings one leg up to the back and down again, repeating the exercise ten times with each leg. There must be no turn of the body during the swing.
1.2.2.1.12.5 Suppling exercise 14 groin: • The gymnast must lower into side splits without bending forwards, and use his
hands for support until he is down all the way, with legs remaining straight. The hips and feet must be in a straight line.
1.2.2.1.12.6 Suppling exercise 15 groin: • The gymnast must use his hands for support, keep his legs straight, with the back knee
and foot facing downwards and the hips and shoulders in square line. The back foot must be turned under, the shoulders relaxed and arms out to the side.
1.2.2.1.13 Thighs 1.2.2.1.14 Calves 1.2.2.1.15 Shins 1.2.2.1.15.1 Knee raising. [Knee & fingers]
• Sit down, cross your legs comfortably in front of you, and rest your hands loosely on your knees. Take one deep breath, letting your lungs gradually fill and empty.
• Inhaling, draw up your left leg so that it is roughly perpendicular to the floor. • Clasp your hands together in front of the leg. Now flip your hands over so that the
thumbs are pointing to the ground but the fingers are still interlocked. • Exhaling, pull your leg as close to your chest as possible and then allow it to return
to the floor. • Still exhaling, flip your hands back over, unclasp them, return to the original sitting
position and take another deep breath. • Now perform the identical operation with the right leg. This constitutes one
complete cycle. 1.2.2.1.16 Hamstrings 1.2.2.1.16.1 Hamstring suppling:
• The gymnast starts in a crouch position with the palms of his hands on the floor in front of his feet. He does a double bounce in crouch; on the third beat, he straightens the legs, pushing the knees back and the feet flat into the floor and stretching the hamstrings, with the palms of the hands remaining on the floor. This must be repeated several times, with a smooth three-beat rhythm.
1.2.2.1.16.2 Suppling exercise 7: [hamstrings] • The gymnast must sit in wide straddle position, knees pressed against the floor, and
swing the arm right over the head to the opposite foot. • The gymnast reaches his arms over his head to the opposite foot, • Stretches his chest on to the floor, • Reaches his other arm over his head, and then • Returns to a straight backed sitting position. A four-beat exercise. Or six-beat
exercise if he does a double sideways stretch. 1.2.2.1.17 Instep 1.2.2.1.17.1 Ankle suppling a:
• The gymnast kneels with his feet together, and rocks tightly back on to his heels to stretch his insteps with his hands on the floor by his feet.
1.3 SPORT SPECIFIC ACTIVITY . 1.3.1 The last part of your warm-up should be devoted to performing movements that are a
"watered-down" version of the movements that you will be performing during your athletic
activity. `HFLTA' says that: “The final phase of the warm-up involves rehearsing specific movements that the athlete will be using during the practice or the event, but at a reduced intensity. Sport-specific activities improve co-ordination, balance, strength, and response time, and may reduce the risk of injury.”
1.3.2 Warming up is a process, which elicits the acute physiological changes that prepare the body for strenuous physical performance.
1.3.3 IMPORTANT: To gain the greatest benefit from the warming up procedure, the exercises should imitate as closely as possible the movements that are to be used in the event.
1.3.4 The duration of the warm up period varies with the event. In ballet, the dancers spend two hours before the performance, commencing with light movements and gradually increasing the intensity and range of motions until the moment before their appearance. This, they feel, reduces the risk of a pulled muscle which would destroy the perfection of their movements.
1.3.5 The athlete of more advanced years tends to warm up more slowly and for a warmer time. This fact may be due to greater need for a longer warm up period, or it may be that an athlete tends to get 'smarter' as he gets older.
2 THE ACTUAL SPORT . The rest of this document. � SPORT: Skill – Progression – Overload – Repetition – Tedium. 2.1 Skill : You should never sacrifice technique for speed when performing exercises. 2.1.1 Precision:
• Precision of movement means accuracy and generally is used in the sense of exactness in the projection of force.
• Precision is made up of controlled body movements. These movements should eventually be executed with a minimum amount of strength and exertion, while still achieving the desired result. Precision can only be attained through a considerable amount of practise and training on the part of both the beginner and the experienced fighter.
• A skill is best acquired by learning accuracy and precision first with speed before the skill is attempted with much power and speed.
• A mirror is a definite aid to achieving precision by providing a constant check on posture, hand position, and technical movement.
2.1.2 Power: • To be accurate, the striking or throwing skills should be executed from a body base that
possesses enough strength to maintain adequate balance during the action. • To appropriately incorporate momentum with mechanical advantage, neural impulses are
sent to the working muscle to bring a sufficient number of fibres into action at precisely the right time. Impulses to the antagonistic muscles are reduced to lessen the resistance, all acting to improve efficiency and to make the best use of available power.
• When approaching an unfamiliar task, the athlete tends to over-mobilise his muscular forces, exerting more effort than required. This is a lack of ‘knowledge’ by the reflective neuromuscular co-ordinating system.
• A powerful athlete is not a strong athlete but one who can exert his strength quickly. Since power equals force times speed, if the athlete learns to make faster movements he increases his power, even though the contractile pulling strength of his muscles remains unchanged. Thus, a smaller man who can swing faster may hit as hard or as far as the heavier man who swings slowly.
• The athlete who is building muscles through weight training should be very sure to work adequately on speed and flexibility at the same time. Combined with adequate speed, flexibility and endurance, high levels of strength lead to excellence in most sports. In combat, without the prior attributes, a strong man will be like the bull with its colossal strength futilely pursuing the matador or like a low-geared truck chasing a rabbit.
2.2 Progression: Aim to work slightly harder each time you train. • Build a progressive training schedule. For example: • Pick ten exercises, five exercising the upper body, five exercising the lower body. E.g.
upper body: press-up, sit-up, triceps dip, dorsal raise, heel slide, and lower body: squat, jump, lunge, leg-change, and star jump. Find your maximum score in these exercises so that you have a base from which to start. Make sure that you perform the exercises correctly and that you record your scores. The repetitions must be continuous. Remember to have a break of a minute or so between exercises. You don’t have to choose the same exercises as chosen for this example. This training schedule is devised for aerobic repetition.
2.2.1 Day 1 week 1: perform all ten exercises, for each exercise record the maximum number of repetitions for that exercises, this is now your max score. 1 x {max press up, max sit up, max
triceps dip, max dorsal raise, max heel slide, max squat, max jumps, max lunge, max leg-change, max star-jump}
2.2.2 Day 2 week 1: rest day. This doesn’t mean do nothing. 2.2.3 Day 3 week 1: upper body: do a ‘circuit’ of the upper body exercises. Do half the numbers of
your max score for each exercise. Do four circuits. 4 x {½ max press up, ½ max sit up, ½ max triceps dip, ½ max dorsal raise, ½ max heel slide}
2.2.4 Day 4 week day 1: lower body: 4 x {½ max squat, ½ max jumps, ½ max lunge, ½ max leg-change, ½ max star jump}
2.2.5 Day 5 week 1: rest day. 2.2.6 Day 6 week 1: upper body: 4 x {½ max press up, ½ max sit up, ½ max triceps dip, ½ max
dorsal raise, ½ max heel slide} 2.2.7 Day 7 week 1: lower body: 4 x {½ max squat, ½ max jumps, ½ max lunge, ½ max leg-change,
½ max star-jump} 2.2.8 Day 1 week 2: rest day 2.2.9 Day 2 week 2: upper body: 4 x {½ max press up, ½ max sit up, ½ max triceps dip, ½ max
dorsal raise, ½ max heel slide} 2.2.10 Day 3 week 2: lower body: 4 x {½ max squat, ½ max jumps, ½ max lunge, ½ max leg-change,
½ max star-jump} 2.2.11 Day 4 week 2: rest day 2.2.12 Day 5 week 2: upper body: 4 x {½ max press up, ½ max sit up, ½ max triceps dip, ½ max
dorsal raise, ½ max heel slide} 2.2.13 Day 6 week 2: lower body: 4 x {½ max squat, ½ max jumps, ½ max lunge, ½ max leg-change,
½ max star-jump} 2.2.14 Day 7 week 2: rest day. 2.2.15 Go back do day 1 week 1. Retest your self and record your new max scores. If you’ve been
doing the exercises correctly, you should now see improvements in all areas of your fitness. 2.3 Overload:
• You should push yourself to your limits without sacrificing technique. This allows your muscles to grow and develop.
• It is important that you do not practise finely skilled movements after you are tired, for you will begin to substitute gross motions for finer ones and generalised efforts for specific ones. Thus, the athlete practices fine skills only while he is fresh. When he becomes fatigued, he shifts to tasks employing gross movements designed principally to develop endurance.
2.4 Repetition: • Practice makes perfect. One doesn’t become a skilled boxer overnight. • Training for skill (co-ordination) is purely a matter of forming proper connections in the
nervous system through practice (precision practice). Each performance of an act strengthens the connections involved and makes the next performance easier, more certain, and more readily done. Likewise, disuse tends to weaken any pathways that have been formed and makes doing the act more difficult and uncertain (constant exercises). Thus, we can attain skill only by actually doing the thing we are trying to learn. We learn solely by doing or reacting. When learning to form pathways, be sure the actions are the most economical as well as the most efficient use of energy and motion.
• Co-ordination is by all means one of the most important considerations in any study of proficiency in sports and athletics.
• Co-ordination is the quality that enables the individual to integrate all the powers and capacities of his whole organism into an effective doing of an act.
• Before movements can take place, there must be a change of muscular tension on both sides of the joint to be moved. The effectiveness of this muscular teamwork is one of the factors that determine the limits of speed, endurance, power, agility and accuracy in all athletic performances.
• In static or slow resistive activities, such as executing a handstand or supporting a heavy barbell, the muscles on both sides of the joints act strongly to fix the body in the desired position. When rapid motion takes place, as in running or throwing, the muscles closing the joints shorten and those on the opposite side lengthen to permit the movement. There is still tension on both sides, but on the lengthening side, it is considerably reduced.
• Therefore, learning co-ordination is a matter of training the nervous system and not a question of training muscles. The transition from much uncoordinated muscular effort to skill of the highest perfection is a process of developing the connections in the nervous
system. Psychologists and biologists tell us that the billions of elements in the nervous system are not in direct connection with each other. But that the fibres of one nerve cell intertwine with those of other cells in such close proximity that impulses can pass from one to others by a process of induction. The point at which the impulse passes from one nerve cell to another is called the ‘synapse’. The synapse theory explains why the baby who displays much uncoordinated responses at the sight of a ball eventually becomes the big-league ball player.
2.4.1 Signs of poor co-ordination: • The fighter whose movements seem awkward, • Who never seems to find the proper distance, • Is always being timed, never ‘out guesses’ his opponent, • Always gives warning of his intentions before they become serious. • Muscles have no power to guide themselves. The manner in which the muscles act, and
consequently the effectiveness of our performances depend absolutely on how the nervous system guides them. Thus, a badly executed move is the result of incorrect impulses sent by the nervous system. Sent to the wrong muscles, or sent a fraction of a second too soon or too late, or sent in improper sequence or in poorly apportioned intensity.
• Any excessive tension in the lengthening muscles acts as a brake and thereby slows and weakens the action. Such antagonistic tension increases the energy cost of muscular work, resulting in early fatigue. When new tasks with demands that are different in intensity of load, rate, repetition or duration is undertaken, an entirely new pattern of ‘neurophysiological adjustment’ must be acquired. Thus, the fatigue experienced in new activities is not just from using different muscles but is also due to the braking caused by improper co-ordination.
2.4.2 Signs of good co-ordination: • The well co-ordinated fighter does everything smoothly and gracefully. • He seems to glide in and out of distance with a minimum of effort and a maximum of
deception. • His timing is usually good. Because his own movements are so rhythmical they tend to
establish complementary rhythm on the part of his opponent, a rhythm he can break to his own advantage because of his perfect control of his own muscles.
• He seems to out guess his opponent because he usually takes the initiative and largely, forces the reactions of his opponent.
• Above all, he makes his movements with a purpose, rather than with a doubting hope, because he has confidence in himself.
• Well executed movement means the nervous system has been trained to the point where it sends impulses to certain muscles, causing these muscles to contract at exactly the proper fraction of a second. At the same time, impulses to the antagonistic muscles are shut off, allowing those muscles to relax. Properly co-ordinated impulses surge with just the exact intensity required and they stop at the exact fraction of a second when they are no longer needed.
• The outstanding characteristic of the expert athlete is his ease of movement, even during maximal effort. The novice is characterised by his tenseness, wasted motion and excess effort. That rare person, the ‘natural athlete’, seems to be endowed with the ability to undertake any sport activity, whether he is experienced in it or not, with ease. The ease is his ability to perform with minimal antagonistic tension. Ease of movement is more apparent in some athletes than in others but can be improved by all.
2.5 Tedium: 2.5.1 Try to vary you're training routine to enjoy your sport more fully. 2.5.2 To become a champion requires a condition of readiness that causes the individual to
approach with pleasure even the most tedious practice session. The more ‘ready’ the person is to respond to a stimulus, the more satisfaction he finds in the response, and the more ‘unready’ he is, the more annoying he finds it to be forced to act.
2.5.3 SMART goal setting: Specific - Measurable - Attainable - Realistic - Time-bound 2.5.3.1 Specific: 2.5.3.2 Measurable: 2.5.3.3 Attainable: 2.5.3.4 Realistic: 2.5.3.5 Time bound:
3 COOLING DOWN. � Stretching is *not* a legitimate means of cooling down. It is only part of the process. After you
have completed your workout, the best way to reduce muscle fatigue and soreness (caused by the production of lactic acid from your maximal or near-maximal muscle exertion) is to perform a light "warm-down". This warm-down is similar to the second half of your warm-up (but in the reverse order). The warm-down consists of three phases:
3.1 Sport-specific activity � Ideally, you should start your warm-down with about 10-20 minutes of sport-specific activity
(perhaps only a little more intense than in your warm-up). In reality however, you may not always have 10-20 minutes to spare at the end of your workout. However, you should attempt to perform at least 5 minutes of sport-specific activity in this case. The sport-specific activity should immediately be followed by stretching: First perform some light dynamic stretches until your heart rate slows down to its normal rate, then perform some static stretches. Sport-specific activity, followed by stretching, can reduce cramping; tightening, and soreness in fatigued muscles and will make you feel better.
3.2 Stretching � Relaxed stretching is very good for "cooling down" after a workout and helps reduce post-workout
muscle fatigue, and soreness. 3.3 General cool down: aerobic activity � According to `HFLTA', "light warm-down exercise immediately following maximal exertion is a
better way of clearing lactic acid from the blood than complete rest." Furthermore, if you are still sore the next day, a light warm-up or warm-down is a good way to reduce lingering muscle tightness and soreness even when not performed immediately after a workout.
What should one train? There are natural abilities that we are all born with and other abilities that are gained only through experience. Breathing, sports massage, flexibility, aerobic conditioning and strength. Breathing 1 In the martial arts, it is essential to be able to control the breath, for breathing can win or lose a
match. Proper breathing increases stamina, speed and power. The first lesson in breath control is relaxation; the second is to breathe in when preparing to execute a technique and breathe out upon delivery of the technique. One widely known breathing exercise is the Okinawan sanchin.
2 Cardiovascular fitness is a measure of how efficiently your body exchanges gases at the cellular level. To put it another way, constitution is how quickly your body oxygenates the muscles.
3 Gorindo breathing exercises p29+ 4 “ Ki Breathing: By Hal Singer (Virginia Ki Society) : 4.1 Ki Breathing may be done in any position; the best position is when sitting seiza (kneeling). Ki
Breathing should be done for 20 minutes at a time. You should be able to continue Ki Breathing for 30 minutes; this is a minimum goal to attain. Ki Breathing should be natural, not forced. Ki Breathing will allow you to consume more oxygen and expel more carbon dioxide than most breathing methods. Ki Breathing will energise and relax you at the same time. Ki Breathing will enhance your ability to co-ordinate mind and body. Ki Breathing will allow you to become more centred and positive.
4.2 Correct Ki Breathing is difficult to master because just being able to sit still for 20 minutes at a time is a task in itself. So, do not force it. Breathe as long as you can until you feel the urge to stop. When this happens, it is time to stop. At first, breathing should be done at the same time every day. The next day, breathe at least as long as you did the day before. Continue this process until you can reach the 30-minute goal. Remember that slow and consistent practice will allow you to benefit the most from Ki Breathing.
4.3 The following is a description of the Ki Breathing Method: 4.3.1 Position yourself in the correct seiza posture, sitting kneeling...lower back in, leaning slightly
forward over your centre. This will be referred to as the neutral position. 4.3.2 Concentrate correctly; imagine your mind at your centre (3 inches below your navel)... let
your muscles naturally relax but do not collapse... focus your Ki (attention/energy) away from your body and your centre.
4.3.3 Exhale first: open your mouth and begin to let your breath flow out naturally. As you exhale, create the sound "HAAAA" as softly as possible. Use your throat muscles to control the flow
of your breath. If you do not control your breath, the exhalation will be done much too quickly. When you cannot exhale any longer, bend slightly forward from your centre. This will compress the diaphragm and allow you to exhale a bit more. After shifting forward and exhaling completely, return to the neutral position and concentrate on your centre, still imagining that you are exhaling. Remain in the neutral position for 5 seconds. The exhalation cycle should take 35 seconds in total... exhale for 30 seconds and hold for 5 seconds.
4.3.4 Inhale next: close your mouth and begin to let the air flow naturally through your nose. Use your throat muscles to control the flow of your breath. If you do not control your breath, the inhalation will be done much too quickly. When you cannot inhale any longer, bend slightly backward from your centre. This will expand the diaphragm and allow you to inhale a bit more. After shifting backward and inhaling completely, return to the neutral position and concentrate on your centre, still imagining that you are inhaling. Remain in the neutral position for 5 seconds. The inhalation cycle should take 25 seconds in total...inhale for 20 seconds and hold for 5 seconds.
4.3.5 Remember, do not force this exercise, if a 30 second exhalation is too much for you to do reduce the exhalation to 20 seconds or whatever feels right. Remember to also reduce the inhalation time to 2/3 of the exhalation time. Always hold the neutral position for 5 seconds, no matter how much the inhalation or exhalation times change.
4.4 When inhaling and exhaling, imagine that your Ki is flowing along with your breath. This will allow you to maximise the effect of Ki Breathing to your overall wellbeing. I hope this will be helpful in this most important part of KI-AIKIDO. - Hal Singer 7/28/88.”
5 Breathing during stretching: 5.1 Proper breathing control is important for a successful stretch. Proper breathing helps to relax the
body, increases blood flow throughout the body, and helps to mechanically remove lactic acid and other by-products of exercise.
5.2 You should be taking slow, relaxed breaths when you stretch, trying to exhale as the muscle is stretching. Some even recommend increasing the intensity of the stretch only while exhaling, holding the stretch in its current position at all other times (this doesn't apply to isometric stretching).
5.3 The proper way to breathe is to inhale slowly through the nose, expanding the abdomen (not the chest); hold the breath a moment; then exhale slowly through the mouth. Inhaling through the nose has several purposes including cleaning the air and insuring proper temperature and humidity for oxygen transfer into the lungs.
5.4 The rate of breathing should be controlled using the glottis in the back of the throat. This produces a very soft "hm-m-m-mn" sound inside the throat as opposed to a sniffing sound in the nasal sinuses. The exhalation should be controlled in a similar manner but with more of an "ah-h-h-h-h" sound, like a sigh of relief.
5.5 As you breathe in, the diaphragm presses downward on the internal organs and their associated blood vessels, squeezing the blood out of them. As you exhale, the abdomen, its organs and muscles, and their blood vessels flood with new blood. This rhythmic contraction and expansion of the abdominal blood vessels is partially responsible for the circulation of blood in the body. In addition, the rhythmic pumping action helps to remove waste products from the muscles in the torso. This pumping action is referred to as the "respiratory pump". The respiratory pump is important during stretching because increased blood flow to the stretched muscles improves their elasticity, and increases the rate at which lactic acid is purged from them.
Sports Massage 1 Many people are unaware of the beneficial role that massage can play in both strength training and
flexibility training. Massaging a muscle, or group of muscles, immediately prior to performing stretching or strength exercises for those muscles, has some of the following benefits:
1.1 Increased blood flow: The massaging of the muscles helps to warm-up those muscles, increasing their blood flow and improving their circulation.
1.2 Relaxation of the massaged muscles: The massaged muscles are more relaxed. This is particularly helpful when you are about to stretch those muscles. It can also help relieve painful muscle cramps.
1.3 Removal of metabolic waste: The massaging action, and the improved circulation and blood flow which results, helps to remove waste products, such as lactic acid, from the muscles. This is useful for relieving post-exercise soreness.
2 Because of these benefits, you may wish to make massage a regular part of your stretching program: immediately before each stretch you perform, massage the muscles you are about to stretch.
3 Beat the sky drum. [Back & neck]. A self-massage exercise: taken from a kung-fu exercise hence the bizarre name.
3.1 This exercise begins in a sitting position, with both legs comfortably crossed in front of you. The spine is held straight and the hands rest loosely on the knees. Before beginning the movements that comprise this exercise, inhale and exhale once deeply.
3.2 Inhaling, make two fists and place them alongside the spinal column. 3.3 Facing forward, begin to gently pound as far up and down the spinal column as you possibly
can, making sure that you do not hit the spine itself, but only the area immediately to each side of it.
3.4 Gradually turn your head to the right while still pounding the spinal area. Twisting your neck in this position actually manipulates the spine, so push your neck as far as it can go without feeling too uncomfortable. When you have turned your neck as far as possible, hold the position until your lungs are completely full.
3.5 Now slowly turn your head in the opposite direction as far as possible, gradually exhaling as you move. When you reach the extreme position, your lungs should be empty; if not, hold your neck there until they are. Do not stop pounding along your spine.
3.6 Inhaling, turn your head to the right again, slowly inhaling as you go. If your lungs are not full, hold the pose until they are. This completes one performance.
Flexibility 1 Factors Limiting Flexibility : 1.1 Flexibility is defined by Gummerson as "the absolute range of movement in a joint or series of
joints that is attainable in a momentary effort with the help of a partner or a piece of equipment." This definition tells us that flexibility is not something general but is specific to a particular joint or set of joints. In other words, it is a myth that some people are innately flexible throughout their entire body. Being flexible in one particular area or joint does not necessarily imply being flexible in another. Being "loose" in the upper body does not mean you will have a "loose" lower body. Furthermore, according to `SynerStretch', flexibility in a joint is also "specific to the action performed at the joint (the ability to do front splits doesn't imply the ability to do side splits even though both actions occur at the hip)."
1.2 Some sources also suggest that water is an important dietary element with regard to flexibility. Increased water intake is believed to contribute to increased mobility, as well as increased total body relaxation.
1.3 According to `SynerStretch', the most common factors that limit ones flexibility are bone structure, muscle mass, excess fatty tissue, and connective tissue (and, of course, physical injury or disability).
1.4 Depending on the type of joint involved and its present condition (is it healthy?), the bone structure of a particular joint places very noticeable limits on flexibility. Thus, age can be a factor limiting flexibility since older joints tend not to be as healthy as younger ones.
1.5 Muscle mass can be a factor when the muscle is so heavily developed that it interferes with the ability to take the adjacent joints through their complete range of motion. For example, large hamstrings limit the ability to fully bend the knees. Excess fatty tissue imposes a similar restriction.
1.6 The majority of "flexibility" work should involve performing exercises designed to reduce the internal resistance offered by soft connective tissues. Most stretching exercises attempt to accomplish this goal. Most stretching exercises can be performed by almost anyone, regardless of age or gender.
2 How Connective Tissue Affects Flexibility: 2.1 The resistance to lengthening that is offered by a muscle is dependent upon its connective
tissues: When the muscle elongates, the surrounding connective tissues become more taut. In addition, inactivity of certain muscles or joints can cause chemical changes in connective tissue, which restrict flexibility. To quote M. Alter directly: “A question of great interest to all athletes is the relative importance of various tissues in joint stiffness. The joint capsules (i.e., the sac-like structure that encloses the ends of bones) and ligaments are the most important factors, accounting for 47 percent of the stiffness. Followed by the muscle's fascia (41 percent), the tendons (10 percent), and skin (2 percent). However, most efforts to increase flexibility through stretching should be directed to the muscle fascia. The reasons for this are twofold. First,
muscle and its fascia have more elastic tissue, so they are more modifiable in terms of reducing resistance to elongation. Second, because ligaments and tendons have less elasticity than fascia, it is undesirable to produce too much slack in them. Overstretching these structures may weaken the integrity of joints. As a result, an excessive amount of flexibility may destabilise the joints and *increase* an athlete's risk of injury.”
2.2 When connective tissue is overused, the tissue becomes fatigued and may tear, which also limits flexibility. When connective tissue is unused or under used, it provides significant resistance and limits flexibility. The elastin begins to fray and loses some of its elasticity, and the collagen increases in stiffness and in density. Ageing has some of the same effects on connective tissue that lack of use has.
3 How Ageing Affects Flexibility: 3.1 With appropriate training, flexibility can be developed at all ages. This does not imply,
however, that everyone can develop flexibility at the same rate. In general, the older you are, the longer it will take to develop the desired level of flexibility. You'll have to be more patient if you're older.
3.2 According to M. Alter, the main reason we become less flexible as we get older is a result of certain changes that take place in our connective tissues. “The primary factor responsible for the decline of flexibility with age is certain changes that occur in the connective tissues of the body. Interestingly, it has been suggested that exercise can delay the loss of flexibility due to the ageing process of dehydration. This is based on the notion that stretching stimulates the production or retention of lubricants between the connective tissue fibres, thus preventing the formation of adhesions.”
3.3 M. Alter further states that some of the physical changes attributed to ageing are the following: 3.3.1 An increased amount of calcium deposits, adhesions, and cross-links in the body 3.3.2 An increase in the level of fragmentation and dehydration 3.3.3 Changes in the chemical structure of the tissues. 3.3.4 Loss of "suppleness" due to the replacement of muscle fibres with fatty, collagenous fibres. 3.4 This does *not* mean that you should give up trying to achieve flexibility if you are old or
inflexible. It just means that you need to work harder, and more carefully, for a longer period when attempting to increase flexibility. Increases in the ability of muscle tissues and connective tissues to elongate (stretch) can be achieved at any age.
4 Strength and Flexibility: 4.1 Strength training and flexibility training should go hand in hand. It is a common misconception
that there must always be a trade-off between flexibility and strength. Obviously, if you neglect flexibility training altogether in order to train for strength then you are certainly sacrificing flexibility (and vice versa). However, performing exercises for both strength and flexibility need not sacrifice either one. Actually, flexibility training and strength training can actually enhance one another.
4.2 Why Bodybuilders Should Stretch: 4.2.1 One of the best times to stretch is right after a strength workout such as weightlifting. Static
stretching of fatigued muscles performed immediately following the exercise(s) that caused the fatigue helps to not only increase flexibility, but also enhances the promotion of muscular development (muscle growth), and will actually help decrease the level of post-exercise soreness. Here's why:
4.2.2 After you have used weights (or other means) to overload and fatigue your muscles, your muscles retain a "pump" and are shortened somewhat. This "shortening" is due mostly to the repetition of intense muscle activity that often only takes the muscle through part of its full range of motion. This "pump" makes the muscle appear bigger. The "pumped" muscle is also full of lactic acid and other by-products from exhaustive exercise. If the muscle is not stretched afterward, it will retain this decreased range of motion (it sort of "forgets" how to make itself as long as it could) and the build-up of lactic acid will cause post-exercise soreness. Static stretching of the "pumped" muscle helps it to become "looser", and to "remember" its full range of movement. It also helps to remove lactic acid and other waste products from the muscle. While it is true that stretching the "pumped" muscle will make it appear visibly smaller, it does not decrease the muscle's size or inhibit muscle growth. It merely reduces the "tightness" (contraction) of the muscles so that they do not "bulge" as much.
4.2.3 In addition, strenuous workouts will often cause damage to the muscle's connective tissue. The tissue heals in 1 to 2 days but it is believed that the tissues heal at a shorter length (decreasing
muscular development as well as flexibility). To prevent the tissues from healing at a shorter length, physiologists recommend static stretching after strength workouts.
4.3 Why Contortionists Should Strengthen: 4.3.1 You should be "tempering" (or balancing) your flexibility training with strength training (and
vice versa). Do not perform stretching exercises for a given muscle group without also performing strength exercises for that same group of muscles. Judy Alter, in her book `Stretch and Strengthen', recommends stretching muscles after performing strength exercises, and performing strength exercises for every muscle you stretch. In other words: "Strengthen what you stretch, and stretch after you strengthen!"
4.3.2 The reason for this is that flexibility training on a regular basis causes connective tissues to stretch which in turn causes them to loosen (become less taut) and elongate. When the connective tissue of a muscle is weak, it is more likely to become damaged due to overstretching, or sudden, powerful muscular contractions. Strengthening the muscles bound by the connective tissue can prevent the likelihood of such injury. Kurz suggests dynamic strength training consisting of light dynamic exercises with weights (many reps, not too much weight), and isometric tension exercises. If you also lift weights, dynamic strength training for a muscle should occur *before* subjecting that muscle to an intense weightlifting workout. This helps to pre-exhaust the muscle first, making it easier (and faster) to achieve the desired overload in an intense strength workout. Attempting to perform dynamic strength training *after* an intense weightlifting workout would be largely ineffective.
4.3.3 If you are working on increasing (or maintaining) flexibility it is *very* important that your strength exercises force your muscles to take the joints through their full range of motion. According to Kurz: “Repeating movements that do not use a full range of motion in the joints (e.g., bicycling, certain techniques of Olympic weightlifting, pushups) can cause a shortening of the muscles surrounding the joints of the working limbs. This shortening is a result of setting the nervous control of length and tension in the muscles at the values repeated most often or most strongly. Stronger stimuli are remembered better.
4.3.4 Over flexibility : 4.3.4.1 It is possible for the muscles of a joint to become too flexible. According to `SynerStretch':
There is a trade-off between flexibility and stability. The looser you get, the less support offered to the joints by their adjacent muscles. Excessive flexibility can be just as much of a liability as not enough flexibility. Either one increases your risk of injury.
4.3.4.2 Once a muscle has reached its absolute maximum length, attempting to stretch the muscle further only serves to stretch the ligaments and put undue stress upon the tendons (two things that you do *not* want to stretch). Ligaments will tear when stretched more than 6% of their normal length. Tendons are not even supposed to be able to lengthen. Even when stretched ligaments and tendons do not tear, loose joints and/or a decrease in the joint's stability can occur (thus vastly increasing your risk of injury).
4.3.4.3 Once you have achieved the desired level of flexibility for a muscle or set of muscles and have maintained that level for a solid week, you should discontinue any isometric or PNF stretching of that muscle until some of its flexibility is lost.
5 Stretching to Increase Flexibility: 5.1.1 When stretching for increasing overall flexibility, a stretching routine should accomplish, at
the very least, two goals: 5.1.1.1 To train your stretch receptors to become accustomed too greater muscle length. 5.1.1.2 To reduce the resistance of connective tissues to muscle elongation. 5.1.2 If you are attempting to increase active, you will also want to strengthen the muscles
responsible for holding the stretched limbs in their extended positions. 5.1.3 Before composing a particular stretching routine, you must first decide which types of
flexibility you wish to increase and which stretching methods are best for achieving them. The best way to increase dynamic flexibility is by performing dynamic stretches, supplemented with static stretches. The best way to increase active flexibility is by performing active stretches, supplemented with static stretches. The fastest and most effective way currently known to increase passive flexibility is by performing PNF stretches.
5.1.4 If you are very serious about increasing overall flexibility, then adhere to the following guidelines:
5.1.4.1 Perform early-morning stretching everyday. 5.1.4.2 Warm-up properly before all athletic activities. Make sure to give yourself ample time to
perform the complete warm-up. 5.1.4.3 Cool-down properly after all athletic activities.

5.1.4.4 Always make sure your muscles are warmed-up before you stretch! 5.1.4.5 Perform PNF stretching every other day, and static stretching on the off days (if you are
overzealous, you can try static stretching every day, in addition to PNF stretching every other day).
5.1.5 Overall, you should expect to increase flexibility gradually. However, if you really commit to doing the above, you should (according to `SynerStretch') achieve maximal upper-body flexibility within one month and maximal lower-body flexibility within two months. If you are older or more inflexible than most people are it will take longer than this.
5.1.6 Don't try to increase flexibility too quickly by forcing yourself. Stretch no further than the muscles will go without pain.
6 Performing splits: 6.1.1 Many people seem to desire the ability to perform splits. If you are one such person, you
should first ask yourself why you want to be able to perform the splits. If the answer is "So I can kick high!" or something along those lines, then being able to "do" the splits may not be as much help as you think it might be in achieving your goal. Doing a full split looks impressive, and many people seem to use it as a benchmark of flexibility, but in and of itself, it will not enable you to kick high. Kicking high requires dynamic flexibility (and, to some extent, active flexibility) whereas the split requires passive flexibility. You need to discern what type of flexibility will help to achieve your goal, and then perform the types of stretching exercises that will help you achieve that specific type of flexibility.
6.1.2 If your goal really is "to be able to perform splits" (or to achieve maximal lower-body static-passive flexibility). If you already have the required range of motion in the hip joints to even do the splits (most people in reasonably good health without any hip problems do), you will need to be patient. Everyone is built differently and so the amount of time it will take to achieve splits will be different for different people. Although `SynerStretch' suggests that it should take about two months of regular PNF stretching for most people to achieve their maximum split potential. The amount of time it takes will depend on your previous flexibility and body makeup. Anyone will see improvements in flexibility within weeks with consistent, frequent, and proper stretching. Trust your own body, take it gently, and stretch often. Try not to dwell on the splits, concentrate more on the stretch. In addition, physiological differences in body mechanics may not allow you to be very flexible. If so, consider that when working out.
6.1.3 Common Problems When Performing Splits: 6.1.3.1 First, there are two kinds of splits: front and side (the side split is often called a "Chinese
split"). In a Front split, you have one leg stretched out to the front and the other leg stretched out to the back. In a side split, both legs are stretched out to your side.
6.1.3.2 A common problem encountered during a side split is pain in the hip joints. Usually, the reason for this is that the split is being performed improperly (you may need to tilt your pelvis forward).
6.1.3.3 Another common problem encountered during splits (both front and side) is pain in the knees. This pain can often (but not always) be alleviated by performing a slightly different variation of the split.
6.1.4 The Front Split: 6.1.4.1 For front splits, the front leg should be straight and its kneecap should be facing the ceiling,
or sky. The front foot can be pointed or flexed (there will be a greater stretch in the front hamstring if the front foot is flexed). The kneecap of the back leg should either be facing the floor (which puts more of a stretch on the quadriceps and psoas muscles), or out to the side (which puts more of a stretch on the inner-thigh (groin) muscles). If it is facing the floor, then it will probably be hard to flex the back foot, since its instep should be on the floor. If the back kneecap is facing the side, your back foot should be stretched out (not flexed) with its toes pointed to reduce undue stress upon the knee. Even with the toes of the back foot pointed, you may still feel that there is too much stress on your back knee (in which case you should make it face the floor).
6.1.5 The Side Split: 6.1.5.1 For side splits, you can either have both kneecaps (and insteps) facing the ceiling, which
puts more of a stretch on the hamstrings. Alternatively, you can have both kneecaps (and insteps) face the front, which puts more of a stretch on the inner-thigh (groin) muscle. The latter position puts more stress on the knee joints and may cause pain in the knees for some people. If you perform side splits with both kneecaps (and insteps) facing the front then you
*must* be sure to tilt your pelvis forward (push your buttocks to the rear) or you may experience pain in your hip joints.
6.1.6 Split-Stretching Machines: 6.1.6.1 Many of you may have seen an advertisement for a "split-stretching" machine in your
favourite exercise/athletic magazine. These machines look like "benches with wings". They have a padded section upon which to sit and two padded sections in which to place your legs (the machine should ensure that no pressure is applied upon the knees). The machine functions by allowing you to gradually increase the "stretch" in your adductors (inner-thigh muscles) through manual adjustments which increase the degree of the angle between the legs. Such machines usually carry a hefty price tag.
6.1.6.2 A common question that people ask about these a split-stretching machine is "are they worth the price?” The answer to that question is entirely subjective. Although the machine can certainly be of valuable assistance in helping you achieve the goal of performing a side-split, it is not necessarily any better (or safer) than using a partner while you stretch. The main advantage that these machines have over using a partner is that they give you (not your partner) control of the intensity of the stretch. The amount of control provided depends on the individual machine.
6.1.6.3 One problem with these "split-stretchers" is that there is a common tendency to use them to "force" a split, which can often result in injury. Another is to hold the "split" position for far longer periods than is advisable.
6.1.6.4 The most effective use of a split-stretching machine is to use it as your "partner" to provide resistance for PNF stretches for the groin and inner thigh areas. When used properly, "split- stretchers" can provide one of the best ways to stretch your groin and inner-thighs without the use of a partner.
6.1.6.5 “However, they do cost quite a bit of money and they don't necessarily give you a better stretch than a partner could. If you don't want to "cough-up" the money for one of these machines, I recommend that you either use a partner and/or perform the lying `V' stretch.” – Brad Appleton Stretching.
6.1.7 Working Toward the Splits: 6.1.7.1 The following stretching routine is tailored specifically to the purpose of achieving the
ability to perform both front splits and side splits. It consists of the following exercises: 1. Lower back stretches 2. Lying buttock stretch 3. Groin & inner-thigh stretch 4. Seated calf stretch 5. Seated hamstring stretch 6. Seated inner-thigh stretch 7. Psoas stretch 8. Quadriceps stretch 9. Lying `V' stretch
6.1.7.2 DON'T FORGET TO WARM-UP YOUR BODY BEFORE PERFORMING ANY OF THESE EXERCISES
6.1.7.3 On a given day, you should either perform only the passive stretches, or perform only the PNF stretches, in the order given. If you perform the PNF stretches, don't forget to rest 20 seconds after each PNF stretch, and don't perform the same PNF stretch more than once per day.
6.1.7.4 The order in which these exercises are performed is important because the entire routine attempts to employ the principle of synergism by stretching a muscle fully before using that muscle as a "supporting muscle" in another stretch.
6.1.7.5 As with all stretches, you should *not* stretch to the point of intense pain! A tolerable amount of discomfort should be more than sufficient. You do *not* want to pull (or tear) your muscles, or be very sore the next day.
7 According to Gummerson, flexibility (he uses the term "mobility") is affected by the following factors: internal influences and external influences.
7.1 Internal influences: 7.1.1 The type of joint (some joints simply aren't meant to be flexible). 7.1.2 The internal resistance within a joint 7.1.3 Bony structures which limit movement 7.1.4 The elasticity of muscle tissue (muscle tissue that is scarred due to a previous injury is not
very elastic)
7.1.5 The elasticity of tendons and ligaments (ligaments do not stretch much and tendons should not stretch at all)
7.1.6 The elasticity of skin (skin actually has some degree of elasticity, but not much) 7.1.7 The ability of a muscle to relax and contract to achieve the greatest range of movement 7.1.8 The temperature of the joint and associated tissues (joints and muscles offer better flexibility
at body temperatures that are 1 to 2 degrees higher than normal) 7.2 External influences: 7.2.1 The temperature of the place where one is training (a warmer temperature is more conducive
to increased flexibility) 7.2.2 The time of day (most people are more flexible in the afternoon than in the morning, peaking
from about 2:30pm-4pm) 7.2.3 The stage in the recovery process of a joint (or muscle) after injury (injured joints and muscles
will usually offer a lesser degree of flexibility than healthy ones) 7.2.4 Age (pre-adolescents are generally more flexible than adults) 7.2.5 Gender (females are generally more flexible than males) 7.2.6 One’s ability to perform a particular exercise (practice makes perfect) 7.2.7 One’s commitment to achieving flexibility 7.2.8 The restrictions of any clothing or equipment 8 When done properly, stretching can do more than just increase flexibility. 8.1 According to M. Alter, benefits of stretching include: 8.1.1 Enhanced physical fitness 8.1.2 Enhanced ability to learn and perform skilled movements 8.1.3 Increased mental and physical relaxation 8.1.4 Enhanced development of body awareness 8.1.5 Reduced risk of injury to joints, muscles, and tendons 8.1.6 Reduced muscular soreness 8.1.7 Reduced muscular tension 8.1.8 Increased suppleness due to stimulation of the production of chemicals which lubricate
connective tissues 8.1.9 Reduced severity of painful menstruation ("dysmenorrhoea") in females. 8.2 Unfortunately, even those who stretch do not always stretch properly and hence do not reap
some or all of these benefits. Some of the most common mistakes made when stretching are: 8.2.1 Improper warm-up 8.2.2 Inadequate rest between workouts 8.2.3 Overstretching 8.2.4 Performing the wrong exercises 8.2.5 Performing exercises in the wrong (or sub-optimal) sequence 9 According to `SynerStretch', there are three factors to consider when determining the effectiveness
of a particular stretching exercise: 9.1 Isolation 9.1.1 Ideally, a particular stretch should work only the muscles you are trying to stretch. Isolating
the muscles worked by a given stretch means that you do not have to worry about having to overcome the resistance offered by more than one group of muscles. In general, the fewer muscles you try to stretch at once, the better. For example, you are better off trying to stretch one hamstring at a time than both hamstrings at once. By isolating the muscle you are stretching, you experience resistance from fewer muscle groups, which gives you greater control over the stretch and allows you to more easily change its intensity. As it turns out, the split is not one of the best stretching exercises. Not only does it stretch several different muscle groups all at once; it also stretches them in both legs at once.
9.2 Leverage 9.2.1 Having leverage during a stretch means having sufficient control over how intense the stretch
becomes, and how fast. If you have good leverage, not only are you better able to achieve the desired intensity of the stretch, but also you do not need to apply as much force to your outstretched limb in order to effectively increase the intensity of the stretch. This gives you greater control.
9.2.2 According to `SynerStretch': The most effective stretches provide the greatest mechanical advantage over the muscle to be stretched. Like isolation, good leverage makes it easier to overcome the substantial resistance offered by inflexible muscles.
9.2.3 Many borderline-stretching exercises can be made effective by adjusting them to provide improved leverage ... [which] provides for an easier, more effective stretch.
9.3 Risk. 9.3.1 Although a stretch may be very effective in terms of providing the athlete with ample leverage
and isolation, the potential risk of injury from performing the stretch must be taken into consideration. Once again, `SynerStretch' says it best: “Even an exercise offering great leverage and isolation may be a candidate for the discard pile - because many otherwise good stretches subject joints to potentially injurious stresses. Some of these exercises may involve rotations that can strain ligaments or tendons. Others put pressure on vertebral disks and can lead to lower back problems (like the classic backbend exercise). Still others call for twists or turns that can cause problems in areas unrelated to the stretch.”
9.3.2 The following stretches (many of which are commonly performed) are considered risky (M. Alter uses the term `X'-rated) because they have a very high risk of injury for the athlete that performs them. This does not mean that these stretches should never be performed. However, great care should be used when attempting any of these stretches. Unless you are an advanced athlete, you can probably do without them (or find alternative stretching exercises to perform). Each of these stretches is illustrated in detail in the section `X-rated Exercises' of M. Alter:
9.3.2.1 "The yoga plough": In this exercise, you lie down on your back and then try to sweep your legs up and over, trying to touch your knees to your ears. This position places excessive stress on the lower back, and on the discs of the spine. Not to mention the fact that it compresses the lungs and heart, and makes it very difficult to breathe. This particular exercise also stretches a region that is frequently flexed because of improper posture.
9.3.2.2 "The traditional backbend": In this exercise, your back is maximally arched with the soles of your feet and the palms of your hands both flat on the floor, and your neck tilted back. This position squeezes (compresses) the spinal discs and pinches nerve fibres in your back.
9.3.2.3 "The traditional hurdler's stretch ": This exercise has you sit on the ground with one leg straight in front of you, and with the other leg fully flexed (bent) behind you, as you lean back and stretch the quadriceps of the flexed leg. The two-legged version of this stretch is even worse for you, and involves fully bending both legs behind you on either side. The reason this stretch is harmful is that it stretches the medial ligaments of the knee (remember, stretching ligaments and tendons is *bad*) and crushes the meniscus. It can also result in slipping of the kneecap from being twisted and compressed.
9.3.2.4 "Straight-legged toe touches": In this stretch, your legs are straight (either together or spread apart) and your back is bent over while you attempt to touch your toes or the floor. If you do not have the ability to support much of your weight with your hands when performing this exercise, your knees are likely to hyperextend. This position can also place a great deal of pressure on the vertebrae of the lower lumbar. Furthermore, if you choose to have your legs spread apart, it places more stress on the knees, which can sometimes result in permanent deformity.
9.3.2.5 "Torso twists": Performing sudden, intense twists of the torso, especially with weights, while in an upright (erect) position can tear tissue (by exceeding the momentum absorbing capacity of the stretched tissues) and can strain the ligaments of the knee.
9.3.2.6 "Inverted stretches": This is any stretch where you "hang upside down". Staying inverted for too long increases your blood pressure and may even rupture blood vessels (particularly in the eyes). Inverted positions are especially discouraged for anyone with spinal problems.
10 Pain and discomfort: 10.1 If you are experiencing pain or discomfort before, during, or after stretching or athletic activity,
then you need to try to identify the cause. Severe pain (particularly in the joints, ligaments, or tendons) usually indicates a serious injury of some sort, and you may need to discontinue stretching and/or exercising until you have sufficiently recovered.
10.2 Common causes of muscular soreness: If you are experiencing soreness, stiffness, or some other form of muscular pain, then it may be due to one or more of the following:
10.2.1 Torn tissue: Overstretching and engaging in athletic activities without a proper warm-up can cause microscopic tearing of muscle fibres or connective tissues. If the tear is not too severe, the pain will usually not appear until one or two days after the activity, that caused the damage. If the pain occurs during or immediately after the activity, then it may indicate a more serious tear (which may require medical attention). If the pain is not too severe, then light, careful static stretching of the injured area is supposedly okay to perform. It is hypothesised that torn fibres heal at a shortened length, thus decreasing flexibility in the injured muscles. Very light stretching of the injured muscles helps reduce loss of flexibility resulting from the injury. Intense stretching of any kind, however, may only make matters worse.
10.2.2 Metabolic accumulation: Overexertion and/or intense muscular activity will fatigue the muscles and cause them to accumulate lactic acid and other waste products. If this is the cause of your pain, then static, isometric, or a good warm-up or cool-down will help alleviate some of the soreness. Massaging the sore muscles may also help relieve the pain. It has also been claimed that supplements of vitamin C will help alleviate this type of pain, but controlled tests using placebos have been unable to lend credibility to this hypothesis. The ingestion of sodium bicarbonate (baking soda) before athletic activity has been shown to help increase the body's buffering capacity and reduce the output of lactic acid. However, it can also cause urgent diarrhoea.
10.2.3 Muscle spasms: Exercising above a certain threshold can cause a decreased flow of blood to the active muscles. This can cause pain resulting in a protective reflex that contracts the muscle isotonically. The reflex contraction causes further decreases in blood flow, which causes more reflex contractions, and so on, causing the muscle to spasm by repeatedly contracting. One common example of this is a painful muscle cramp. Immediate static stretching of the cramped muscle can be helpful in relieving this type of pain. However, it can sometimes make things worse by activating the stretch reflex, which may cause further muscle contractions. Massaging the cramped muscle (and trying to relax it) may prove more useful than stretching in relieving this type of discomfort.
10.3 Stretching with pain: 10.3.1 If you are already experiencing some type of pain or discomfort before you begin stretching,
then it is very important that you determine the cause of your pain. Once you have determined the cause of the pain, you are in a better position to decide whether you should attempt to stretch the affected area.
10.3.2 Also, according to M. Alter: An important thing to remember is that some degree of soreness is often experienced by those who have not previously exercised or stretched - this is the penalty for having been inactive. On the other hand, well-trained athletes who work out at higher-than-usual levels of difficulty can also become sore. (However, you should immediately stop exercising if you feel or hear something popping or tearing.) As a general rule, remember the acronym "RICE" when treating an injured body part:
10.3.2.1 Rest 10.3.2.2 Ice 10.3.2.3 Compression 10.3.2.4 Elevation 10.3.2.5 This will help to minimise the pain and swelling. Then seek appropriate professional advice. 10.4 Overstretching: 10.4.1 If you stretch properly, you should *not* be sore the day after you have stretched. If you are,
then it may be an indication that you are overstretching and that you need to go easier on your muscles by reducing the intensity of some (or all) of the stretches you perform. Overstretching will simply increase the time it takes you to gain greater flexibility. This is because it takes time for the damaged muscles to repair themselves, and to offer you the same flexibility as before they were injured.
10.4.2 One of the easiest ways to "overstretch" is to stretch "cold" (without any warm-up). A "maximal cold stretch" is not necessarily a desirable thing. Just because a muscle can be moved to its limit without warming up doesn't mean it is ready for the strain that a workout will place on it.
10.4.3 Obviously, during a stretch (even when you stretch properly) you are going to feel some amount of discomfort. The difficulty is being able to discern when it is too much. In her book, `Stretch and Strengthen', Judy Alter describes what she calls "ouch! Pain": If you feel like saying "ouch!" (Or perhaps something more explicit) you should ease up immediately and discontinue the stretch. You should definitely feel the tension in your muscle, and perhaps even light, gradual "pins and needles", but if it becomes sudden, sharp, or uncomfortable, then you are overdoing it and are probably tearing some muscle tissue (or worse). In some cases, you may follow all of these guidelines when you stretch, feeling that you are not in any "real" pain, but still be sore the next day. If this is the case, then you will need to become accustomed to stretching with less discomfort (you might be one of those "stretching masochists" that take great pleasure in the pain that comes from stretching).
10.4.4 Quite frequently, the progression of sensations you feel as you reach the extreme ranges of a stretch is: localised warmth of the stretched muscles, followed by a burning (or spasm-like) sensation, followed by sharp pain (or "ouch!" pain). The localised warming will usually occur at the origin, or point of insertion, of the stretched muscles. When you begin to feel this, it is
your first clue that you may need to "back off" and reduce the intensity of the stretch. If you ignore (or do not feel) the warming sensation and you proceed to the point where you feel a definite burning sensation in the stretched muscles, you should ease up immediately and discontinue the stretch! You may not be sore yet, but you probably will be the following day. If your stretch gets to the point where you feel sharp pain, it is quite likely that the stretch has already resulted in tissue damage, which may cause immediate pain, and soreness that persists for several days.
11 Stretching with a partner: 11.1 When done properly, stretches performed with the assistance of a partner can be more effective
than stretches performed without a partner. This is especially true of isometric stretches and PNF stretches. The problem with using a partner, however, is that the partner does not feel what you feel. Thus, a partner cannot respond as quickly to any discomfort that might prompt you to immediately reduce the intensity (or some other aspect) of the stretch. This can greatly increase your risk of injury while performing a particular exercise.
11.2 If you do choose to stretch with a partner, make sure that it is someone you trust to pay close attention to you while you stretch, and to act appropriately when you signal that you are feeling pain or discomfort.
12 Types of stretching: � Just as there are different types of flexibility, there are also different types of stretching. Stretches
are either dynamic (meaning they involve motion) or static (meaning they involve no motion). Dynamic stretches affect dynamic flexibility and static stretches affect static flexibility (and dynamic flexibility somewhat).
� The different types of stretching are 1. Ballistic stretching, 2. Dynamic stretching, 3. Active stretching, 4. Passive or relaxed stretching, 5. Static stretching, 6. Isometric stretching, 7. PNF stretching.
12.1 Ballistic stretching: • Ballistic stretching uses the momentum of a moving body or a limb in an attempt to force it
beyond its normal range of motion. This is stretching, or "warming up", by bouncing into (or out of) a stretched position, using the stretched muscles as a spring that pulls you out of the stretched position. An example is bouncing down repeatedly to touch your toes. This is not considered useful often leading to injury. It does not allow your muscles to adjust to, and relax in, the stretched position. It may instead cause them to tighten up by repeatedly activating the stretch.
12.2 Dynamic stretching: • "Dynamic stretching", according to Kurz, "involves moving parts of your body and
gradually increasing reach, speed of movement, or both." Do not confuse dynamic stretching with ballistic stretching! Dynamic stretching consists of controlled leg and arm swings that take you (gently!) to the limits of your range of motion. Ballistic stretches involve trying to force a part of the body *beyond* its range of motion. In dynamic stretches, there are no bounces or "jerky" movements. An example of dynamic stretching would be slow, controlled leg swings, arm swings, or torso twists.
• Dynamic stretching improves dynamic flexibility and is quite useful as part of your warm-up for an active or aerobic workout (such as a dance or martial arts class).
• According to Kurz, dynamic stretching exercises should be performed in sets of 8-12 repetitions: “Perform your exercises (leg raises, arm swings) in sets of eight to twelve repetitions. If after a few sets you feel tired - stop. Tired muscles are less elastic, which causes a decrease in the amplitude of your movements. Do only the number of repetitions that you can do without decreasing your range of motion. More repetitions will only set the nervous regulation of the muscles' length at the level of these less than best repetitions and may cause you to lose some of your flexibility. What you repeat more times or with a greater effort will leave a deeper trace in your [kinaesthetic] memory! After reaching the maximal range of motion in a joint in any direction of movement, you should not do many more repetitions of this movement in a given workout. Even if you can maintain a maximal range of motion over many repetitions, you will set an unnecessarily solid memory of the

range of these movements. You will then have to overcome these memories in order to make further progress”.
12.3 Active stretching: • "Active stretching" is also referred to as "static-active stretching". An active stretch is one
where you assume a position and then hold it there with no assistance other than using the strength of your agonist. An example is bringing your leg up high and then holding it there without anything (other than your leg muscles themselves) to keep the leg in that extended position. The tensions of the agonists in an active stretch help relax the muscles being stretched (the antagonists) by reciprocal.
• Active stretching increases active flexibility and strengthens the agonistic muscles. Active stretches are usually quite difficult to hold and maintain for more than 10 seconds and rarely need to be held any longer than 15 seconds.
• Many of the movements (or stretches) that are found in various forms of yoga are active stretches.
12.4 Passive (or relaxed) stretching: • "Passive stretching" is also referred to as "relaxed stretching", and as "static-passive
stretching". A passive stretch is one where you assume a position and hold it with some other part of your body, or with the assistance of a partner or some other apparatus. An example is bringing your leg up high and then holding it there with your hand. The split is an example of a passive stretch (in this case the floor is the "apparatus" that you use to maintain you’re extended position).
• Slow, relaxed stretching is useful in relieving spasms in muscles that are healing after an injury. Obviously, you should check with your doctor first to see if it is okay to attempt to stretch the injured muscles.
12.5 Static stretching: • Many people use the term "passive stretching" and "static stretching" interchangeably.
However, there are a number of people who make a distinction between the two: According to M. Alter:
• "Static stretching" involves holding a position. That is, you stretch to the farthest point and hold the stretch...”
• "Passive stretching" is a technique in which you are relaxed and do not contribute to the range of motion. Instead, an external force is created by an outside agent, either manually or mechanically.
• Notice that the definition of passive stretching given in the previous section encompasses *both* of the above definitions. Throughout this document, when the term "static stretching" or "passive stretching" is used, its intended meaning is the definition of passive stretching as described in the previous section. You should be aware of these alternative meanings, however, when looking at other references on stretching.
12.6 Isometric stretching: • "Isometric stretching" is a type of static stretching (meaning it does not use motion) which
involves the resistance of muscle groups through isometric contractions (tensing) of the stretched muscles. The use of isometric stretching is one of the fastest ways to develop increased static-passive flexibility and is much more effective than either passive stretching or active stretching alone. Isometric stretches also help to develop strength in the "tensed" muscles (which helps to develop static-active flexibility), and seems to decrease the amount of pain usually associated with stretching.
• The most common ways to provide the needed resistance for an isometric stretch are: • To apply resistance manually to one's own limbs, • To have a partner apply the resistance, • Use an apparatus such as a wall, or the floor, to provide resistance.
• An example of manual resistance would be holding onto the ball of your foot to keep it from flexing while you are using the muscles of your calf to try to straighten your instep so that the toes are pointed.
• An example of using a partner to provide resistance would be having a partner hold your leg up high (and keep it there) while you attempt to force your leg back down to the ground.
• An example of using the wall to provide resistance would be the well-known "push-the-wall" calf-stretch where you are actively attempting to move the wall (even though you know you can't).
• Isometric stretching is *not* recommended for children and adolescents whose bones are still growing. These people are usually already flexible enough that the strong stretches produced by the isometric contraction have a much higher risk of damaging tendons and connective tissue. Kurz strongly recommends preceding any isometric stretch of a muscle with dynamic strength training for the muscle to be stretched. A full session of isometric stretching makes a lot of demands on the muscles being stretched and should not be performed more than once per day for a given group of muscles (ideally, no more than once every 36 hours).
• The proper way to perform an isometric stretch is as follows: 1. Assume the position of a passive stretch for the desired muscle. 2. Next, tense the stretched muscle for 7-15 seconds (resisting against some force that
will not move, like the floor or a partner). 3. Finally, relax the muscle for at least 20 seconds.
• Some people recommend holding the isometric contraction for longer than 15 seconds, but according to `SynerStretch' (the videotape); research has shown that this is not necessary. Therefore, you might as well make your stretching routine less time consuming.
12.6.1 How isometric stretching works: • Recall from our previous that there is no such thing as a partially contracted muscle fibre.
When a muscle is contracted, some of the fibres contract and some remain at rest (more fibres are recruited as the load on the muscle increases). Similarly, when a muscle is stretched, some of the fibres are elongated and some remain at rest. During an isometric contraction, some of the resting fibres are being pulled upon from both ends by the muscle that is contracting. The result is that some of those resting fibres stretch!
• Normally, the handfuls of fibres that stretch during an isometric contraction are not very significant. The true effectiveness of the isometric contraction occurs when a muscle that is already in a stretched position is subjected to an isometric contraction. In this case, some of the muscle fibres are already stretched before the contraction, and, if held long enough, the initial passive stretch overcomes the stretch reflex and triggers the lengthening reaction, inhibiting the stretched fibres from contracting. At this point, according to `SynerStretch': “When you isometrically contracted, some of the resting fibres would contract, any of the resting fibres would stretch, and many of the already stretched fibres, which are being prevented from contracting by the inverse myostatic reflex [the lengthening reaction], would stretch even more. When the isometric contraction was relaxed and the contracting fibres returned to their resting length, the stretched fibres would retain their ability to stretch beyond their normal limit. ... The whole muscle would be able to stretch beyond its initial maximum, and you would have increased flexibility...”
• The reason that the stretched fibres develop and retain the ability to stretch beyond their normal limit during an isometric stretch has to do with the muscle spindles. The signal that tells the muscle to contract voluntarily, also tells the muscle spindle's (intrafusal) muscle fibres to shorten, increasing sensitivity of the stretch reflex. This mechanism normally maintains the sensitivity of the muscle spindle as the muscle shortens during contraction. This allows the muscle spindles to habituate (become accustomed) to an even further-lengthened position.
12.7 PNF stretching: • PNF stretching is currently the fastest and most effective way known to increase static-
passive flexibility. PNF is an acronym for "proprioceptive neuromuscular facilitation". It is not really a type of stretching but is a technique of combining passive stretching and isometric stretching in order to achieve maximum static flexibility. Actually, the term PNF stretching is itself a misnomer. PNF was initially developed as a method of rehabilitating stroke victims. PNF refers to "post-isometric relaxation" stretching techniques. In these a muscle group is passively stretched, then contracts isometrically against resistance while in the stretched position, and then is passively stretched again through the resulting increased range of motion. PNF stretching usually employs the use of a partner to provide resistance against the isometric contraction and then later to passively take the joint through its increased range of motion. It may be performed, however, without a partner, although it is usually more effective with a partner's assistance.
• Most PNF stretching techniques employ "isometric agonist contraction/relaxation" where the stretched muscles are contracted isometrically and then relaxed. Some PNF techniques also employ "isometric antagonist contraction" where the antagonists of the stretched

muscles are contracted. In all cases, it is important to note that the stretched muscle should be rested (and relaxed) for at least 20 seconds before performing another PNF technique. The most common PNF stretching techniques are the hold-relax, the hold-relax-contract, and the hold-relax-swing. 1. The "hold-relax": This technique is also called the "contract-relax". After assuming an
initial passive stretch, the muscle being stretched is isometrically contracted for 7-15 seconds. After which the muscle is briefly relaxed for 2-3 seconds, and then immediately subjected to a passive stretch, this stretches the muscle even further than the initial passive stretch. This final passive stretch is held for 10-15 seconds. The muscle is then relaxed for 20 seconds before performing another PNF technique.
2. The "hold-relax-contract": This technique is also called the "contract-relax-contract", and the "contract-relax-antagonist-contract" (or "CRAC"). It involves performing two isometric contractions: first of the agonists, then, of the antagonists. The first part is similar to the hold-relax where, after assuming an initial passive stretch, the stretched muscle is isometrically contracted for 7-15 seconds. Then the muscle is relaxed while its antagonist immediately performs an isometric contraction that is held for 7-15 seconds. The muscles are then relaxed for 20 seconds before performing another PNF technique.
3. The "hold-relax-swing": This technique (and a similar technique called the "hold-relax-bounce") actually involves the use of dynamic or ballistic stretches in conjunction with static and isometric stretches. It is *very* risky, and is successfully used only by the most advanced of athletes and dancers that have managed to achieve a high level of control over their muscle stretch reflex. It is similar to the hold-relax technique except that a dynamic or ballistic stretch is employed in place of the final passive stretch.
• Notice that in the hold-relax-contract, there is no final passive stretch. It is replaced by the antagonist-contraction, which via reciprocal inhibition, serves to relax and further stretch the muscle that was subjected to the initial passive stretch. Because there is no final passive stretch, this PNF technique is considered one of the safest PNF techniques to perform (it is less likely to result in torn muscle tissue). Some people like to make the technique even more intense by adding the final passive stretch after the second isometric contraction. Although this can result in greater flexibility gains, it also increases the likelihood of injury.
• Even more risky are dynamic and ballistic PNF stretching techniques like the hold-relax-swing, and the hold-relax-bounce. If you are not a professional athlete or dancer, you probably have no business attempting either of these techniques (the likelihood of injury is just too great). Even professionals should not attempt these techniques without the guidance of a professional coach or training advisor. These two techniques have the greatest potential for rapid flexibility gains, but only when performed by people who have a sufficiently high level of control of the stretch reflex in the muscles that are being stretched.
• Like isometric stretching, PNF stretching is also not recommended for children and people hose bones are still growing (for the same reasons. In addition, like isometric stretching, PNF stretching helps strengthen the muscles that are contracted and therefore is good for increasing active flexibility as well as passive flexibility. Furthermore, as with isometric stretching, PNF stretching is very strenuous. PNF should be performed for given muscles group no more than once per day (ideally, no more than once per 36 hour period).
• The initial recommended procedure for PNF stretching is to perform the desired PNF technique 3-5 times for a given muscle group (resting 20 seconds between each repetition). However, `HFLTA' cites a 1987 study whose results suggest that performing 3-5 repetitions of a PNF technique for a given muscle group is not necessarily any more effective than performing the technique only once. Consequently, in order to decrease the amount of time taken up by your stretching routine (without decreasing its effectiveness), `HFLTA' recommends performing only one PNF technique per muscle group stretched in a given stretching session.
12.7.1 How PNF stretching works: • Remember that during an isometric stretch, when the muscle performing the isometric
contraction is relaxed, it retains its ability to stretch beyond its initial maximum length. Well, PNF tries to take immediate advantage of this increased range of motion by immediately subjecting the contracted muscle to a passive stretch.
• The isometric contraction of the stretched muscle accomplishes several things:
1. As explained, it helps to train the stretch receptors of the muscle spindle to immediately accommodate a greater muscle length.
2. The intense muscle contraction, and the fact that it is maintained for a period, serves to fatigue many of the fast-twitch fibres of the contracting. This makes it harder for the fatigued muscle fibres to contract in resistance to a subsequent stretch.
3. The tension generated by the contraction activates the Golgi tendon organ, which inhibits contraction of the muscle via the lengthening reaction. Voluntary contraction during a stretch increases tension on the muscle, activating the Golgi tendon organs more than the stretch alone. So, when the voluntary contraction is stopped, the muscle is even more inhibited from contracting against a subsequent stretch.
• PNF stretching techniques take advantage of the sudden "vulnerability" of the muscle and its increased range of motion by using the period of time immediately following the isometric contraction to train the stretch receptors to get used to this new, increased, range of muscle length. This is what the final passive (or in some cases, dynamic) stretch accomplishes.
Aerobics 1 In order to proceed beyond the most elementary moves one must, preferably under the guidance of
a coach, go through a rigorous programme of exercises for preparing the body to correctly learn and execute martial moves. Each training session must contain a period when the trainee concentrates on strength and fitness training. The athlete must improve his strength so that he can handle his body weight in all circumstances and he must be able to keep his body tight for long periods aswell. Ideally, this should not be done just before a skill training session though as skill training must be done while the body and mind are fresh. However, a correctly conditioned body must be developed before skills can be developed. One cannot, for example attempt high kicks if one cannot support ones body weight on one leg.
2 Aerobic repetitive exercises: 2.1 Press-up 2.1.1 The exercise can be done on the floor, or the feet can be raised on a bench or a wall bar to
incline the body. The object is to use the upper arms to raise and lower the whole body. This must be performed with the body tight and the upper back rounded the elbows in, bending toward the hips. High repetitions are recommended. Keep the body tight, and bend the elbows in by the hips.
2.2 Pull up 2.2.1 Start from straight-arm hang, and pull up until the chin is above the bar. It is better to do this
exercise on a high bar. Keep tight and lift the chin above the bar. For an advanced form of the exercise, the gymnast can pull up with the wrists in over-grasp and when the shoulders are above the bar, turn the wrists and press up to front support.
2.3 Handstand dip 2.3.1 At first, it is better to do this with support. With hands, shoulder width apart; lower the body
from handstand position to a headstand. Keep the elbows in and lower the head forwards of the hands. Keep the body tight and the legs together. An advanced form of the exercise requires moving to handstand on a bench and lowering the head onto the floor.
2.4 Parallel bar dip 2.4.1 Perform this exercise with the body straight and no swing. Bend the elbows in by the chest,
until the angle at the elbows is no more than ninety degrees. The exercise must be performed smoothly. High repetitions are recommended.
2.5 Hang and pike 2.5.1 It is better to do this exercise on a high bar. The athlete hangs with the wrists in over grasp and
pike the legs to the bar without bending the legs. The pike must come from the hips without setting up a swing. A partner could steady the back.
2.6 V-sit 2.6.1 The exercise starts lying on the back with the arms above the head. Keep the arms straight and
pike the legs straight up without bending the legs Touch the hands to the feet as tight as possible without bending either the arms or legs.
2.7 Back arching 2.7.1 Lie on the front with the feet under a wall bar or, better still, lie on a box top bending forwards
over the end with the feet being held down by a partner. With the hands on the head, or the arms above the head, arch the back as high as possible and then lower. Keep the legs together.
2.8 Hop-jump
2.8.1 Hop along the length of the training area, keeping the legs together and the back upright. Use the knees, the feet and the ankles to lift the jump. The feet should be stretched in the air. Lift the knees to the chest. Remember to land on the balls of the feet. You can hop forwards, from side to side, or over a chair or a bench.
2.9 Pike and lift 2.9.1 Keep the legs straight and with the hands on the floor, lift the hips to bring the feet close to the
hands. Move the hands forward and repeat. The feet should never be more than 45cm (18”) behind the hands. With each step, lift the hips to bring the feet to the hands and move the hands 30cm (12”) forward. Suck in the stomach as you lift the hips and don’t move the hands too far in front of the feet.
3 Aerobic Tension Exercises: 3.1 Half-lever 3.1.1 Sit on the floor with the legs straight. Keep the legs tight together, the hips between the arms,
and the head high. Press the shoulders down, don’t hunch them, to lift the body off the floor and hold it there for at least five seconds. Keep the head high and the legs straight.
3.1.2 Variations include the straddle half-lever, with the legs outside the arms, the knees up by the elbows but not balancing on them, shoulders pressed down, head up and a pike at the hips.
3.2 Front arching hold 3.2.1 Lie on the back with the upper back and legs off the floor with the head forward, stomach
tight. The hands should be reaching toward the knees. The position should be held for 20 to 30 seconds. The legs must be pressed tight together, the feet just off the floor.
3.3 Back arching hold 3.3.1 Lie on the front with the chest and legs off the ground. Keep the body tight and the hands
behind the head. Don’t arch the back too much. Hold the position for 20 to 30 seconds. Remain as tight as possible, particularly the legs.
3.4 Wide push up hold 3.4.1 Lie on the front with the arms out to the side. Push up off the floor by pressing down with the
palms of the hands. The upper back must be rounded, the whole body tight. Push hard against the floor. keep the chest in. Press against the floor for five seconds and repeat.
4 Ballet exercises: 4.1 Starting positions: In ballet, there are five basic positions of the feet. 4.1.1 1st position: stand comfortably and firmly on your own two feet, heels touching, with toes
apart. This is called the first position. 4.1.2 2nd position: The legs are apart, not too wide. The width can be measured by the width and a
half of one’s foot. 4.1.3 Turnout: all ballet positions require ‘turnout’. This turnout of the legs and feet is important as
it encourages a greater range of movement in the hip joint. Care must be taken not to allow the feet to roll forwards with all the weight over the big toes. Spread the toes evenly, stretch the legs and tighten the seat muscles. Straighten the spine by tilting the pelvic bone towards the back. The shoulders should be relaxed, the neck extended and the chin lifted. The stance described with the feet in the first position is the correct posture for beginning every exercise. Most people take this position with one hand resting, but not gripping a bar. One can use a wall or a chair instead.
4.1.4 Dancing and gymnastics have much in common with martial arts. Both have long and noble traditions, both demand discipline and both are expressions of physical art. Because dancing is an art form, young men are shy of becoming involved in it. However, if they can meet the physical challenge and the hard work of dance or gymnastic training, the quality of their martial art will be greatly enhanced.
4.2 The battement tendu (tight thrashing) 4.2.1 Tendu means ‘tight’. Applied to this exercise the muscles in the legs contract s the foot pushes
against the floor and slides away from the supporting leg to a stretched position on the big toe. Slide and pull back again to the starting position.
4.2.2 The weight must be entirely upon the supporting leg. The battement tendu may be taken forwards, sideways and backwards. Allow the heel to push forwards and upwards when taking the leg to the front. Forwards when to the side and underneath when to the back.
4.2.3 Repeat this exercise with each leg by turning around and holding the bar with the other hand. 4.3 The plie (The bend) 4.3.1 Plie means to bend. The bend occurs only in the leg, at the knee, which creates a secondary
angle in the ankle and hip joint. The angles increase according to the depth of the bend. 4.3.2 The visual effect is similar to a horse-stance used in karate or kung fu.
4.3.3 The demi plie (demi means half) is a small bend at the knees, keeping the heels on the floor. This exercise is essential for all jumps. Keep the head, shoulders and hips in line with the feet – perpendicular. Do not collapse into the bend, but press against the bending action throughout, as though trying to keep ‘tall’.
4.3.4 When performing the full plie in first position, keep the heels down until the half bend is reached then allow them to lift as the bend increases, until the thighs are horizontal. In 2nd position, the heels remain on the ground.
4.3.5 Keep a slow rhythm when performing the plies. Repetitions of these movements will strengthen the thighs, calves and back muscles.
4.4 Grand battement (Grand thrashing) 4.4.1 Battement means beating or thrashing. The grand battement is a development of the battement
tendu. As the foot reaches the extended position on the toe, the action continues, lifting the leg until horizontal with the hip joint, returning to the closed fist position. The leg should be perfectly straight during the lift and the action powerful. The pattern may follow that of the battement tendu, forwards, sideways and backwards, remembering the position of the heel throughout. The supporting leg must be straight with the heel firmly on the ground. When the leg is lifted to the to the back, the body may lean forwards, but in the sideways and forward lift, the body must be kept upright.
4.5 Developpe 4.5.1 This exercise follows the same pattern as the grand battement, but the leg action is one of
unfolding. It is particularly beneficial for strengthening and enables the leg to be held in the lifted position as in the arabesque.
4.5.2 The working leg is first bent at the knee with the knee pointing sideways and the anklebone resting just below the knee of the supporting leg. The leg continues to lift first bent then slowly unfolding to an extended position as in the grand battement. When fully extended and horizontal, hold there for three seconds. Return the leg to the starting position. Repeat to the side and to the back. When lifting to the back the body may lean forwards.
4.6 Releve 4.6.1 The releve is a rise up on to the toes. The exercise should be dynamic beginning with a very
slight bend at the knees followed by a snatching of the feet together upon the toes. The emphasis of the action is through the instep. The quick repetitions of the rise and return of the heel will increase muscle strength in the foot. The releve may be taken from two feet or from one.
4.6.2 During the exercise, keep the body upright with the weight slightly poised forwards and well centred over the supporting leg. The shoulders should be completely relaxed and kept down and the stomach muscles held well up.
4.7 Saute 4.7.1 This is a spring from two feet. Stand in first position. Begin with a small bend of the knees,
thrust downwards through the feet and spring upwards extending ankles and knees. The insteps must stretch in full and the toes pointed when in the air. The heels must be lowered to the floor on alighting, but the lowering of the heels must be with resistance and should be soundless. It is very important to keep the shoulders down, even while jumping upwards.
5 The silk weaving exercises: An alternative warm-up routine: A warm up used in some kung-fu classes. Hence, the bizarre names.
5.1 Loosening sinews. 5.1.1 Stand erect, with feet comfortably placed. Relax your arms and hands by allowing them to
hang loosely at your sides. 5.1.2 Simultaneously shake arms and hands as if you were trying to shake drops of water from your
fingertips. 5.1.3 Lift your right leg and shake it gently as in the previous movement. 5.1.4 Repeat the same procedure with your left leg. 5.1.5 Consciously attempt to relax the neck muscles, and then allow your head to drop as far
forward as possible. 5.1.6 Slowly revolve your head clockwise for two revolutions. If you are at ease this will crack your
upper spine. 5.1.7 Standing erect, slowly bring your hands up from your sides, palms parallel to the floor, arms
held in front of the body. 5.1.8 Continue the upward movement of your arms until they are stretched vertically and are on the
same plane as the rest of the body. At the same time, raise yourself as high as you can on the
balls of your feet. Hold this position for a count of five, and then slowly allow your arms to return to your sides and your heels to the floor.
5.1.9 Return to the position in which you began the exercise. Standing completely still feel your muscles relax.
5.2 Horse position. 5.2.1 Stand erect, spine straight, feet slightly apart, hands open and held loosely at the sides. 5.2.2 Keeping the toes stationary, force the heels outward. In the same action, make the hands
become fists, and are swung to the front of the body at waist level. 5.2.3 Keeping the heels stationery, simultaneously force the toes outward and pull the fists back. 5.2.4 Again keeping the toes stationary, pivot the heels outward while bringing the fists in front of
the waist. 5.2.5 The heels remain stationary while the toes are swung outward until the feet are parallel to each
other. At the same time, the fists are planted firmly on the upper thighbone. 5.2.6 The arms should be drawn back and the fists should face forward. At the same moment,
keeping your back as straight as possible, sink into a crouch. When seen from the side, it should resemble a man sitting in a chair, although no chair is present. At this point consciously, begin the deep-breathing exercise. Initially the position should be held for two minutes. If this becomes difficult, concentrate on your breathing, this will enable you to endure the unfamiliar strain. As your strength increases you may hold it as long as you wish.
5.3 Two hands push the sky. (A.K.A. stretch toward the sky) [Calf and forearm stretch] 5.3.1 Stand erect, spine straight, feet comfortably apart, hands relaxed at the sides. 5.3.2 Inhaling, turn your palms outward and slowly bring them above the head, inscribing a circle in
the air with both arms. 5.3.3 By, the end of inhalation, hands are directly over the head and the fingers interlocked. 5.3.4 Holding your breath for a moment, turn the palms outward and then over so that they are now
facing the sky, whereas they previously faced your head. 5.3.5 Exhaling, slowly push your hands and entire body skyward until you are on the balls of your
feet. 5.3.6 Still exhaling, lower yourself until your feet are back on the floor and your hands just over
your head. 5.3.7 Again, hold your breath for a moment and flip your palms over so that they are facing your
head. 5.3.8 Inhaling, unlock your fingers and slowly let them drop to your sides forming a semicircle in
much the same way you did earlier in the exercise. 5.4 Riding horse, use bow and arrow to shoot the eagle. [Neck and shoulders stretch] 5.4.1 Inhaling, either jump or work your way into the horse position, as described earlier. Hold this
pose until your lungs are completely filled. 5.4.2 Turning your head to the right, bring your left arm across your chest and hold it in a claw
shape, just as if you were clutching the strings of a bow. The right hand is brought up to chest height with the index finger and thumb extended upward and the remaining three fingers bent. The claw position of the left hand counter-exerts in the opposite direction. When the hands have reached this position, your lungs should be completely filled.
5.4.3 Exhaling, gradually push the right hand out to shoulder height and pull the left hand back, almost as if you were pulling a real bow taut.
5.4.4 After the maximum stretch point is reached, relax the bow while exhaling completely. Note how the hands gradually dissolve the bows structure.
5.4.5 The bow is dissolved completely as both hands pass in front of the chest and you begin a new cycle of inhalation.
5.4.6 Still inhaling, reform the bow on the left side, with the right hand in the claw shape and the left as the energy focal point.
5.4.7 Exhaling, pull the bow taut, as it was earlier on the right side of the body. 5.4.8 Still exhaling, relax the bow, return the hands to the horse position, and take a deep breath
before going on to repeat the exercise. 5.5 One arm rising. 5.5.1 Stand erect, spine straight, hands held loosely at the sides, feet spaced comfortably. 5.5.2 Inhaling, gradually raise your left arm until it is shoulder high and your palm is facing
skyward. Simultaneously, bring your right arm out and away from your side, the palm facing toward the body.
5.5.3 Continue the slow upward movement of the left arm until it is above the head. At the same time, the right arm pivots from the elbow to a position where the flat of the palm is slightly above the navel and is facing the floor.
5.5.4 Exhaling, push downward with the right palm and upward with the left. As you begin this movement, gradually raise yourself on your toes – stretch until your arms can go no further and your toes no higher. Remain in this position until exhalation is complete.
5.5.5 Inhaling, lower your body and hands until they return to approximately the same position they were in before the stretching manoeuvre.
5.5.6 Still inhaling, lower your hands to your sides, and then exhale. This completes the first half of this exercise; the second is identical, except that the movements are reversed.
5.5.7 Inhaling, raise your right arm until it is shoulder high and your palm is facing skyward. Simultaneously draw your left arm out and about a foot away from your side, the palm facing toward your body.
5.5.8 Continue the slow upward movement of the right arm until it is above the head with the palm still facing skyward. During the same movement, the left arm pivots at the elbow to a position where the palm is slightly above the navel and parallel to the floor.
5.5.9 Exhaling, push upward with the right palm and downward with the left. As you begin this movement, gradually raise yourself on your toes, stretching until both your arms and toes can go no higher. Remain in this position until exhalation is complete.
5.5.10 Inhaling, lower your body and hands to where they were before the stretching manoeuvre began, then slowly allow them to relax to your sides, following the same path they originally took.
5.5.11 When your hands are back in place, exhale. The exercise is complete. 5.6 Head and body swinging. [Back] 5.6.1 Inhaling, either leap or work your way into the horse position. 5.6.2 Still inhaling, lean a little forward and place both hands on your thighs just above your knees.
Thumb and forefinger should encompass the top part of the thighs while the remaining fingers grip the side of the thighs. This will keep you comfortably braced for the spine-stretching action that follows.
5.6.3 Consciously attempt to loosen your spine and back muscles, and then, exhaling, begin a slow clockwise movement with your torso.
5.6.4 Still exhaling, concentrate on your breath to allow your spine to stretch to its maximum. The more you concentrate on your breath, the lower you will be able to go.
5.6.5 Complete your exhalation; return to the position from which you started your first revolution. 5.6.6 Inhaling, repeat the same circular stretching motion, except this time it is performed counter
clockwise. 5.6.7 By the time your lungs are full, you should have returned to the original position. 5.7 Bending. [Back] 5.7.1 Stand erect, with feet apart, arms held loosely at the sides. 5.7.2 Inhaling, gradually lower the torso until your hands are almost touching the ground. The back
and the legs are held as straight as possible. 5.7.3 Maintaining this position, clasp your hands together. 5.7.4 Exhaling, gradually assume a standing position, but with your clasped hands and extended
arms held at a ninety-degree angle to the torso. Note: when you straighten up, try to imagine that you are lifting an enormous load with your arms.
5.7.5 Inhaling, unclasp your hands and drop your arms to the side. This completes the first part of the exercise.
5.7.6 Continuing to inhale, bend your body backward while raising your palms until they are parallel with the floor.
5.7.7 Exhaling, and keeping your arms straight throw the arms upward until your palms are over your upper chest and parallel with the floor.
5.7.8 Permit your hands to drop along the same arc they travelled to your sides with the palms parallel to the floor, and gradually resume a standing position.
5.8 Punching. [Arms] 5.8.1 Inhaling, either jump or work your way into the horse position. 5.8.2 Exhaling, slowly push your right fist outward. There are two stages to this movement. Move
the fist halfway out, completed a quarter turn with the wrist and now hold it vertical as opposed to the horizontal position seen in the left hand.
5.8.3 Completing your exhalation thrust the fist completely forward at shoulder height. Here the fist makes another quarter turn and is again horizontal, but upside down in comparison to the left fist.
5.8.4 Inhaling, gradually bring the fist back to the side, following the same path that was covered when it was thrust out.
5.8.5 Exhaling, make the left arm and fist follow the same movements as the right. 5.8.6 Inhaling, return the left arm to the side and hold the classic horse position once more. 5.8.7 Exhaling, raise the upper right arm, using the elbow as a pivotal point, gradually push out the
forearm and the fist, and keep them on the same plane as the torso. 5.8.8 Emptying your lungs completely, push out the right forearm and fist until the right arm is
parallel to the floor and shoulder high. 5.8.9 Inhaling, return the arm to the side, following the same movements that brought it out from
the body, and resume the horse position. 5.8.10 Exhaling, push the left arm outward in an identical manner to the right. 5.8.11 Inhaling, return the left arm to the side and hold the horse position for a moment until your
lungs are completely filled. This completes one performance. 5.9 Beat the sky drum. [Back & neck] 5.9.1 This exercise begins in a sitting position, with both legs comfortably crossed in front of you.
The spine is held straight and the hands rest loosely on the knees. Before beginning the movements that comprise this exercise, inhale and exhale once deeply.
5.9.2 Inhaling, make two fists and place them alongside the spinal column. 5.9.3 Facing forward, begin to gently pound as far up and down the spinal column as you possibly
can, making sure that you do not hit the spine itself, but only the area immediately to each side of it.
5.9.4 Gradually turn your head to the right while still pounding the spinal area. Twisting your neck in this position actually manipulates the spine, so push your neck as far as it can go without feeling too uncomfortable. When you have turned your neck as far as possible, hold the position until your lungs are completely full.
5.9.5 Now slowly turn your head in the opposite direction as far as possible, gradually exhaling as you move. When you reach the extreme position, your lungs should be empty; if not, hold your neck there until they are. Do not stop pounding along your spine.
5.9.6 Inhaling, turn your head to the right again, slowly inhaling as you go. If your lungs are not full, hold the pose until they are. This completes one performance.
5.10 Four arm movements. [Arm] 5.10.1 Inhaling, either leap or work your way into the horse position. Maintain this position for a few
seconds, or until inhalation is completed. What follows is a series of arm movements that are four in umber, from which the exercise takes its name. The key to the effectiveness of these movements is exhalation. During each motion, you should exhale about ¼ of your lungs capacity so that at the completion of the exercise it’s necessary to inhale again.
5.10.2 Still in the horse position, simultaneously draw both fists upward in the flattest arc possible until they are directly over your shoulder bone. If this is done correctly, your forearms should be parallel to the floor. At the completion of this movement, you should have exhaled ¼ of the air in your lungs.
5.10.3 Return your fists to your sides, thus resuming the horse position. Your lungs should now be half emptied.
5.10.4 Your chest bone is the bony shield over your heart that separates your right pectoral muscles from your left pectoral muscles. Simultaneously bring your right fist to the left side of your chest bone and your left fist left fist to the right of your chest bone – both arms should be parallel to the floor. It doesn’t matter which fist is above the other. Your lungs should now be ¾ empty.
5.10.5 Push both elbows outward until they are on the same plane as your torso. Arms should still be parallel to the floor and held at shoulder height. Your lungs should now be completely empty.
5.10.6 Inhaling, return the arms to the classic horse position. When your lungs are completely full, repeat the cycle.
5.11 Knee raising. [Knee & fingers] 5.11.1 Sit down, cross your legs comfortably in front of you, and rest your hands loosely on your
knees. Take one deep breath, letting your lungs gradually fill and empty. 5.11.2 Inhaling, draw up your left leg so that it is roughly perpendicular to the floor. 5.11.3 Clasp your hands together in front of the leg. Now flip your hands over so that the thumbs are
pointing to the ground but the fingers are still interlocked.

5.11.4 Exhaling, pull your leg as close to your chest as possible and then allow it to return to the floor.
5.11.5 Still exhaling, flip your hands back over, unclasp them, return to the original sitting position and take another deep breath.
5.11.6 Now perform the identical operation with the right leg. This constitutes one complete cycle. 5.12 Dragon spies prey. [Arm & shoulders] 5.12.1 Slowly inhaling, wither leap or work yourself into the horse position. 5.12.2 Still inhaling, bring your fists up in two intersecting arcs that cross in front of your face. If the
exercise is being performed properly, your upper arms should be parallel to the floor. From this point, the exercise is essentially a circular movement performed simultaneously with both arms, which inscribe two intersecting circles in the air.
5.12.3 Inhaling, continue the arc your fists were making in the previous movement, until they are no longer intersecting and are above your head. Since your arms are moving in a circular fashion, your elbows must be bent. Also, note that up to this point, the back of each hand is facing away from you; this will continue through one more movement and then will change.
5.12.4 Exhaling, bring your fists down to eye level, keeping them on the same plane as the torso. Stay in this position until you have exhaled completely.
5.12.5 Inhaling, turn your fists outward so that the backs of your hands are now uppermost. Then bring both arms downward in front of your body, forming two circles that will again intersect.
5.12.6 As you continue inhaling, the two arms begin to intersect. For this to properly occur it once again becomes necessary to twist the fists so that the back of the hand is the part of the hand now facing away from the body. At this point, you have now completed one cycle.
5.12.7 After completing the cycle, return to the horse position for one inhalation and one exhalation. 5.13 Four body movements. [Hamstring] 5.13.1 From a standing position, place your hands on your hips and slide you’re left foot backward
(keeping your leg straight) until your right thigh forms a right angle with your right calf. 5.13.2 Inhaling, pivot a quarter turn and change your balance so that your weight is now on your bent
left leg while your right leg is now straight. 5.13.3 Exhaling, again shift your balance by touching your head to your straight right leg. Do not be
discouraged if this doesn’t come at once. In time, you will limber up enough to do it. Still exhaling, return to the position shown immediately above.
5.13.4 Pivot back to the original position from which you started the movements. At this point, your lunges should be completely empty. This is the first half of the exercise; the second half is a reversal of the first half.
5.13.5 Pivot 180 degrees so that the right leg is straight and the left one bent. Repeat the above directions, substituting the word ‘right’ for ‘left’ and vice versa.
5.14 Crane looks behind. [Hips] 5.14.1 Named for the pivotal motions by which the practitioner ends up facing in the opposite
direction from the one he faced when he started. From a standing position, slide your left foot backward (keeping it as straight as possible) until your right leg bends to the point where the thigh is parallel to the floor. Making a fist, simultaneously extend your left arm above your head while pulling your right arm back. Note that both arms form a straight line.
5.14.2 Inhaling, bring your left arm down and begin to pivot to the left on your heels. 5.14.3 Continue pivoting until you are facing front. Begin to bring your right arm around and start to
swing your left arm to your side. 5.14.4 Still inhaling, pivot still more until you are almost facing in the opposite direction from the
one you were facing when you began. Note that the right leg is now the straight leg and the left one is beginning to bend. The right arm begins to swing upward.
5.14.5 Now one should be completely reversed from the starting position – the right arm is now over the head and the left is drawn back and on line with it. At this point, your lungs should be completely filled.
5.14.6 Exhaling, pivot in the opposite direction until the original starting position is again reached. This completes one cycle. Upon completion of the exercise, continue exhaling and return to a standing position.
5.15 Tiger stretches its back. [Back] 5.15.1 From a standing position, slide your left leg back (keeping it as straight as possible) until your
right leg bends so that the thigh is parallel to the floor. Allow your hands to hang loosely at your sides.
5.15.2 Inhaling, twist your torso slightly to the left without moving your feet. At the same time, bring both arms up from your sides, the right higher than the left.
5.15.3 Keeping your feet in place, twist your torso a quarter turn to the left. Making fists, pivot the arms ninety degrees, bringing the right arm over the head and the left elbow to your upper thigh. Then bend your body as far to the left as possible, keeping it there until your lungs are full.
5.15.4 Exhaling, return to the starting position. This is the first half of the exercise. 5.15.5 For the second half of the exercise, pivot 180 degrees so the right leg is now extended and the
left one bent. 5.15.6 Inhaling, twist your body in the manner described for the first half of the exercise, until the
extreme position is reached. Then slowly exhale while assuming the original starting position. The exercise is complete when, still exhaling, you regain a starting position.
5.16 Leopard reveals its claws. [] 5.16.1 The visual effect of this exercise is similar from that of a puppet on a string being pulled in
opposing directions. Stand erect, feet slightly apart, arms held loosely at your sides. 5.16.2 Inhaling, move your feet about a foot apart, make a fist with both hands and slowly raise the
right hand until it is directly over your head, with the back of the hand facing away from you. 5.16.3 As you exhale, the right fist begins descending while the left fist and the left leg start an
upward block and kick motion. 5.16.4 As you continue exhaling, the two fists pass each other – the right going down to the right
side, and the left above the head with the back of the hand acing away from you. Simultaneously, the left leg is kicking outward until it is waist high; the left hand and the left leg should reach the high points of their swing at the same moment. During the kicking manoeuvre, the leg is held as straight as possible.
5.16.5 The left leg returns to the floor and the left fist remains above your head. At this point, your exhalation should be complete.
5.16.6 As you inhale, the left fist begins its downward arc to your side and the right fist starts its upward arc. Simultaneously, the right leg kicks upward.
5.16.7 Still inhaling, the right fist is now above the head and the right foot is waist high (the left fist has returned to your side).
5.16.8 The right leg returns to the ground but the right hand is still held over your head. Your lungs should be completely filled and you should be ready for the next cycle. The exercise is complete when the remaining raised arm is lowered and you gradually expel all the air from your lungs.
Where can one learn more? There's martial arts and athletics clubs in every major town these days; these provide the first starting point for an investigation into martial arts. Where to exercise: According to Minick: “One way to help develop your internal rhythm is to exercises in the same place. Set aside a special corner of your room and always do them there. Try not to perform any other activity there and you will build up a positive association with that area. It is essential that the place where you exercise be well ventilated and neither dusty nor dirty. Much of the benefit of the exercises is derived from deep breathing, so the air you take in must be as pure as possible. The corner must also be quiet and peaceful. Concentration can play a vital role in exercise and there should be no distracting influences. If your thoughts ramble during practice you may not perform the exercise properly, impeding your progress”.
ACTUAL SPORT The rest of this document is concerned with the actual sport of martial arts. Throughout this document, the convention of describing a movement with the PAR system will be used; that is Prepare Act Recover. Where Preparation is doing whatever is necessary to allow an action to be performed. That is, moving into a stance that is mechanically favourable to perform the action, Action is carrying out the movement and Recovery is getting back into the ready position prior to performing another movement. The BOSS system might be worth doing as well; that’s Body Order Speed Shape. Training concepts: • Reflex action: A reflex is an unconscious and usually involuntary response to an outside event.
The basic element in martial arts training is to condition the reflexes so that they answer a given situation according to certain rules; for example, without thinking, you will automatically block and counter an attack directed toward you.
• Technique: a specific movement that one trains the body to perform automatically by repetitive practice.
• Combination: A series of techniques, often abbreviated as ‘combo’. • Economy of motion: A basic premise of most martial arts: never allow a technique to extend too
far to be practicable. For example, a punch should not extend so far as to throw the puncher off balance, and a block should not be carried more than ten inches above the head.
• Tactics: Used primarily in those martial arts that include actual combat or sparring. The science of tactics deals with finding and making the best use of openings in the opponents defence. In addition, with using the proper technique for every situation.
• Form: The proper posture, balance, co-ordination, and timing of a specific technique. Form is also used to describe a predetermined pattern of techniques, known in Japanese martial arts as kata.
• Focus: The ability of the martial artist to concentrate on a specific target and apply all his energy to it on the split second of contact. Focus is essential to some of the more spectacular feats in the martial arts, such as breaking bricks with the hand or dealing a powerful blow from a distance of one inch.
• Linear motion: Any technique, either of the whole body or of an individual limb, which follows a straight line. This type of movement delivers a direct blow as opposed to the indirect approach of circular motion techniques.
• Circular motion: Many martial arts recognise the power and ability to cover all sides that is inherent in continuous smooth circular movements. For example, circular motion is one of the three basic teachings in hapkido, and pa kua is based on the circle formed by the eight symbols of the I Ching. The term circular motion can refer to a technique that describes a circle such as a crescent kick, or it can define the stepping action taken in an offensive or defensive move.
• Centre line: One of the basic concepts of the martial arts. The centre line is an imaginary line running directly down the middle of the body. It is the location of many vital points, so to aim for your adversaries centre line, while protecting yours, is an efficient method of attack.
Manoeuvrability: Dodging and recovering. Stances. Stances: For all stances, consider the position of: • Head • L arm and hand • R arm and hand • Trunk • L foot • R foot. 1. Forward stance ☺ • ‘Jogging stance’. Best for launching punches to targets in front of you. This is the most natural
stance of all. Boxing uses this stance exclusively. Right handed person
• Step forward on left foot Left handed person
• Step forward on right foot
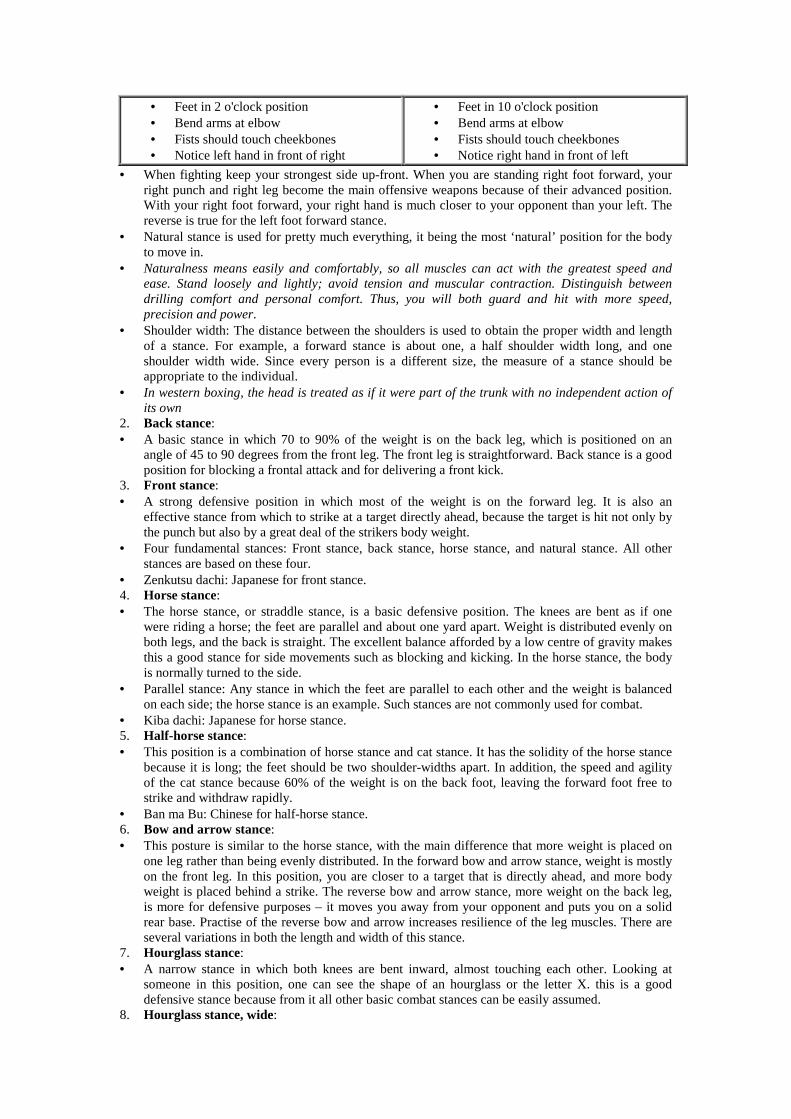
• Feet in 2 o'clock position • Bend arms at elbow • Fists should touch cheekbones • Notice left hand in front of right
• Feet in 10 o'clock position • Bend arms at elbow • Fists should touch cheekbones • Notice right hand in front of left
• When fighting keep your strongest side up-front. When you are standing right foot forward, your right punch and right leg become the main offensive weapons because of their advanced position. With your right foot forward, your right hand is much closer to your opponent than your left. The reverse is true for the left foot forward stance.
• Natural stance is used for pretty much everything, it being the most ‘natural’ position for the body to move in.
• Naturalness means easily and comfortably, so all muscles can act with the greatest speed and ease. Stand loosely and lightly; avoid tension and muscular contraction. Distinguish between drilling comfort and personal comfort. Thus, you will both guard and hit with more speed, precision and power.
• Shoulder width: The distance between the shoulders is used to obtain the proper width and length of a stance. For example, a forward stance is about one, a half shoulder width long, and one shoulder width wide. Since every person is a different size, the measure of a stance should be appropriate to the individual.
• In western boxing, the head is treated as if it were part of the trunk with no independent action of its own
2. Back stance: • A basic stance in which 70 to 90% of the weight is on the back leg, which is positioned on an
angle of 45 to 90 degrees from the front leg. The front leg is straightforward. Back stance is a good position for blocking a frontal attack and for delivering a front kick.
3. Front stance: • A strong defensive position in which most of the weight is on the forward leg. It is also an
effective stance from which to strike at a target directly ahead, because the target is hit not only by the punch but also by a great deal of the strikers body weight.
• Four fundamental stances: Front stance, back stance, horse stance, and natural stance. All other stances are based on these four.
• Zenkutsu dachi: Japanese for front stance. 4. Horse stance: • The horse stance, or straddle stance, is a basic defensive position. The knees are bent as if one
were riding a horse; the feet are parallel and about one yard apart. Weight is distributed evenly on both legs, and the back is straight. The excellent balance afforded by a low centre of gravity makes this a good stance for side movements such as blocking and kicking. In the horse stance, the body is normally turned to the side.
• Parallel stance: Any stance in which the feet are parallel to each other and the weight is balanced on each side; the horse stance is an example. Such stances are not commonly used for combat.
• Kiba dachi: Japanese for horse stance. 5. Half-horse stance: • This position is a combination of horse stance and cat stance. It has the solidity of the horse stance
because it is long; the feet should be two shoulder-widths apart. In addition, the speed and agility of the cat stance because 60% of the weight is on the back foot, leaving the forward foot free to strike and withdraw rapidly.
• Ban ma Bu: Chinese for half-horse stance. 6. Bow and arrow stance: • This posture is similar to the horse stance, with the main difference that more weight is placed on
one leg rather than being evenly distributed. In the forward bow and arrow stance, weight is mostly on the front leg. In this position, you are closer to a target that is directly ahead, and more body weight is placed behind a strike. The reverse bow and arrow stance, more weight on the back leg, is more for defensive purposes – it moves you away from your opponent and puts you on a solid rear base. Practise of the reverse bow and arrow increases resilience of the leg muscles. There are several variations in both the length and width of this stance.
7. Hourglass stance: • A narrow stance in which both knees are bent inward, almost touching each other. Looking at
someone in this position, one can see the shape of an hourglass or the letter X. this is a good defensive stance because from it all other basic combat stances can be easily assumed.
8. Hourglass stance, wide:

• Similar to the front stance except that the front foot is turned inward at a 45-degree angle, whiles in front stance it is straightforward. By turning the foot inward, the knee of the forward leg is forced outward, giving added protection to the groin area. This stance is good for both offensive and defensive movements but is used mostly for defence. The ‘hourglass’ effect is created by the inward bending of the knee. It is also called half-moon stance.
• Half-moon stance: See hourglass stance, wide. • Sanchin dachi: Japanese for hourglass stance. 9. Bow-shaped stance: • The bow-shaped stance is a useful defensive posture against attack from the front. In the bow
stance, most of the weight is on the forward leg, and the forward knee is bent. It is a long, solid stance, in which the feet are two shoulder-widths apart.
10. Cat stance: • With most of the weight on the rear leg and both knees bent, one resembles a cat preparing to
spring. Cat stance is a difficult but very flexible stance, useful for moving away from an attack and then countering with the front foot.
• Hsu Bu: Chinese term for cat stance. • Neko-ashi dachi: Japanese for cat stance. 11. One-legged stance: • Mastery of this position is essential for kicking techniques. The leg on the ground is bent, the knee
of the other leg comes toward the chest, and the back is straight. Practice of this posture is one of the best ways to improve the balance that is so essential to all martial arts techniques. One-legged stance is also called golden chicken on one-foot stance.
12. Rooted stance. • This very stable and strong position is actually a combination of the front stance and the horse
stance. The rooted stance, so called because it provides such a powerful base, is used for delivering a simultaneous block and counterattack to even the strongest blows.
• Fudo dachi: Japanese for rooted stance. 13. Square stance. • A good defensive stance very similar to the horse stance, except that in square stance the feet turn
outward at 45 degrees, and in horse stance they are pointed straight ahead. 14. Turtle posture. • Turtle posture is a stance unique to tamo shu kung fu. The turtle posture is a side horse stance, but
the back is hunched to look like a turtles shell so that all vital points on the chest and abdomen are difficult to penetrate.
15. Natural stance. • Natural stance is a position of relaxed alertness from which one can easily move into any stance.
Generally, the arms hang by the sides and the legs are about one shoulder width apart. • Open-leg stance: A relaxed posture, in which ones are not prepared for combat. Open-leg stance is
commonly referred to as natural stance. • Shizentai: Term used in most Japanese martial arts to designate the natural stance. • Standing position: The heels must be together; the feet slightly turned out. The legs straight, the
hip girdle turned under so that the lower back is not hollowed. The back straight, the shoulders relaxed but not drooped forward, the arms straight down by the sides, the neck long and the head high with the eyes looking ahead.
16. . Small phasic bent knee stance (copied directly from the JKD ready stance) JKD right-ready position: • Head: evasive motion of head from head
shots as well as sudden change of level. • Shoulder: slightly raised shoulder and
slightly dropped chin to protect the right side of the face.
• L-hand: protects the left side of face as well as the right side of face & groin. It’s the major hand defence.
• R-hand: protects the right side & left side of face and groin, it’s the major striking weapon.
• R-elbow: protects the centre, right ribs, and right side of body.
JKD left-ready position: • Head: evasive motion of head from head
shots as well as sudden change of level. • Shoulder: slightly raised shoulder and
slightly dropped chin to protect the right side of face
• R-hand: protects the right side of face as well as the left side of face & groin. It’s the major hand defence.
• R-forearm: protects the centre of the body. • R-elbow: protects the right side of the body. • R-elbow: protects the centre, left ribs, and
left side of body. • L-hand: protects the left side & right side of

• L-elbow: protects the left side of the body. • L-forearm: protects the centre of the body. • R-knee: turn inward slightly for groin
protection. • L-heel: like a coiled spring, is raised for
greater mobility. • R-heel: turned slightly outward, its the other
major weapon; kicking.
face and groin, it’s the major striking weapon.
• L-knee: turns inward slightly for groin protection.
• R-heel: like a coiled spring, is raised for greater mobility.
• L-heel: turned slightly outward, its the other major weapon; kicking.
• The central theme is springiness and alertness of footwork. The left heel is raised and cocked ever ready to pull the trigger and explode into action. YOU ARE NEVER SET OR TENSED, BUT READY AND FLEXIBLE.
• The semi-crouch stance is the perfect stance for fighting because you are braced but are, at all times, in a comfortably balanced position from which you can attack, counter, or defend without preliminary movement. This stance may be referred to as the ‘small phasic bent knee stance’. � Small: Small means appropriate not over-extended steps or insufficient length of stepping.
Small quick steps for speed, controlled balance in bridging gap to opponent, not distinctive enough for opponent to time.
� Phasic: A stage or interval in a development or cycle, not still or static, but constantly changing.
� Bent-knee: ensures readiness in motion at all times. � Body shape in the small phasic bent knee stance: 1 The head: 1.1 In western boxing, the head is treated as if it were part of the trunk with no independent action
of its own. In close-in fighting, it should be carried vertically, with the point of the chin pined to the collarbone and the side of the chin held against the inside of the lead shoulder. The chin does not go all the way down to meet the shoulder, nor does the shoulder come all the way up. They meet halfway. The shoulder is raised an inch or two and the chin is dropped an inch or two.
1.2 The point of the chin is not tucked into the lead shoulder except when angling the head back in an extreme defensive position. Tucking the point of the chin into the lead shoulder turns the neck into an unnatural position, takes away the support of the muscles and prevents straight bone alignment. It also tenses the lead shoulder and arm, preventing free action and causing fatigue.
1.3 With the chin dropped and pinned tight to the collarbone, the muscles and bone structure are in the best possible alignment and only the top of the head is presented to the opponent, making it impossible to be hit on the point of the chin.
2 The lead arm and hand: 2.1 The shoulder is loose and the hand is held slightly lower, relaxed and ready for attacking. The
entire arm and shoulder must be loose and relaxed so that the fighter will be able to snap or whip out the lead in rapier-like thrusts. The hand position changes frequently from low back fist position to about shoulder height and as far to the outside of the lead shoulder as possible without raising the elbow.
2.2 Keep the lead hand always in some subtle motion for easier initiative 2.3 The preference for a low-line position with absence of an extended lead is because most people
are weak in low-line defence. In addition, with the absence of an extended lead, many preparations on an extended lead become useless. The head now becomes a moving target, augmented by sensitive distance. So, if the opponents’ offensive game is based on these preparatory movements, he is severely handicapped and partly checked
2.4 The elongated guard can prove a dangerous weakness in both attacks and defence. In attack, it necessitates withdrawing the arm, thus telegraphing ones move. It also needs preparation for hooks. In defence, it uncovers the lead side of the body. The opponent knows where it is and can manoeuvre all around it. An extended hand offers itself for immobilisation. Thus, adopt the recommended position to keep the potentialities of your lead reach a secret.
3 The rear arm and hand: 3.1 The rear elbow is held down and in front of the short ribs. The rear forearm covers the solar
plexus. The open palm of the rear hand faces the opponent. It is positioned between the opponent and the rear shoulder, in line with the lead shoulder. The rear hand may also rest lightly upon the body. The arm should be relaxed and easy, ready to attack or defend. Either or both hands may perform a circular ‘weaving’ motion. The important thing is to keep them moving, but retains cover.
4 The trunk: 4.1 The position of the trunk is controlled primarily by the position of the leading foot and leg. If the
leading foot and leg are in the correct position, the trunk automatically assumes the proper position. The one important thing about the trunk is that it should form a straight line with the leading leg. Since the leading foot and leg are turned inward, the body rotates in the same direction, which presents a narrow target to the opponent. If, however, the leading foot and leg are rotated outward, the body is squared toward the opponent, presenting a large target. For defensive purposes, the narrow target is advantageous, while the square position lends itself better to some attacks.
5 The lead foot: 5.1 At any time, the lead foot should be hampered as little as possible. If too much weight is on it, it
will be necessary to transfer that weight to the rear leg before starting the attack. This movement involves a delay and warns the opponent.
5.2 The feet are kept at a comfortable distance apart according to the individual, without any strain or awkwardness. A martial artist is required to shift in any direction at split notice. Some martial arts styles stress stances and footwork that are slow and awkward, these are unrealistic because nobody moves like that in a fight.
5.3 Having your feet in the correct position serves as a pivot for your entire attack. It balances you properly and lends unseen power to your blows, just as it does in sports like baseball where drive and power seem to come up from the legs.
5.4 Keeping the feet in proper relation to each other, as well as to the body, helps to maintain correct body alignment. Balance is achieved only through correct body alignment. The feet, the legs, the trunk and the head are all important in creating and maintaining a balanced position. They are the vehicles of body force. The value of a couple of good hands and fast powerful kicking depends mostly on their being on a well-balanced and quickly movable base. It is essential, therefore, to preserve the balance and poise of the fighting turret carrying your artillery. No matter in what direction or at what speed you move, your aim is to retain the fundamental stance that has been found the most effective for fighting. Let the movable pedestal be as nimble as possible. Balance is the all-important factor in a fighters attitude or stance. At all times without balance he can never be effective.
5.5 The secret of a proper balance in the proper stance is to keep the feet directly under the body, which means they should be a medium distance apart. Either the weight is balanced over both legs or, as in boxing; it is carried slightly forward over the lead leg. The lead leg is straight and the knee is loose and easy, not locked. The lead side of the body forms a straight line from the lead heel to the tip of the lead shoulder. This position permits relaxation, speed, balance and easy movement, as well as a mechanical advantage, making possible tremendous power.
5.6 Too wide a stance prevents proper alignment, destroying the purpose of balance but obtaining solidarity and power at the cost of speed and efficient movement. A short stance prevents balance, as it does not give a basis from which to work. Speed results but at a loss of power and balance.
5.7 Always leave the space of a natural step between your feet. By doing do, you are braced and never standing on just one point.
5.8 By not getting your feet cross, you are not likely to be pushed off balance or knocked down because of bad footwork.
5.9 In general, for athletic contests, a preparatory stance will include a ‘coiled’ or semi-crouched posture and a lowered, forward centre of gravity. With the bending of the forward knee, the centre of gravity moves forward a little. For general readiness, the lead heel usually remains just touching the ground even after the knees bend. Slight ground contact of the heel aids in balance and decreases tension.
5.10 You are all back, elbows, forearms, fist and forehead. You look more on the order of a cat with its back hunched up and ready to spring, except that you are relaxed. Your opponent hasn’t much to shoot at. Your chin is tucked between your shoulders. Your elbows protect your sides. You are partially contracted in the middle. The on-guard position is the safest position.
6 Rear foot: 6.1 The rear heel is raised because: 6.1.1 When you punch, you transfer all your weight quickly to your lead leg. This is easier if the
rear heel is already slightly raised. 6.1.2 When you are punched and have to give slightly, you sink down on the rear heel. This acts as
a kind of spring and takes the edge out of a punch. 6.1.3 It makes the back foot easier to move
6.2 The rear heel is the piston of the whole fighting machine. Notes on stances: 1 Mobility . 1.1 In the martial arts, the ability to move easily from one stance to another while maintaining
balance and stability 2 Balance: 2.1 Balance is the control of ones centres of gravity plus the control and utilisation of body slants
and unstable equilibrium, hence gravity pull, to facilitate movement. Therefore, balance might mean being able to throw ones centre of gravity beyond the base of support, chase it, and never let it get away.
2.2 Body slants in a preparatory position are counter-balanced with an extended arm, leg or both. 2.3 One should seek good balance in motion and not in stillness. 2.4 The fighters centre of gravity changes constantly, varying with his actions and those of his
opponent. 2.5 The missing of a blow or intended kick means momentary loss of balance. That is why the
counter-fighter usually has the advantage, but the attacker will be safe by adopting the small phasic bent-knee stance. Practice counters the moment your opponent loses his balance, especially if he is the stand-up type.
2.6 Always stay in balance to throw another kick or punch. Watch out for too much commitment. 2.7 Feel for the proper relation of the feet to each other and to the body while attacking in
combination, retreating and countering. Note their positioning for all types of hits and kicks. 2.8 Feel yourself in a balanced stance. You should be able to make all your moves at walking pace
if necessary. Feel the difference by putting yourself in balanced and unbalanced positions. Move forward, backward, and sideways. Co-ordinate with striking and kicking. Make sure you get speed, power, and above all a balanced position to keep up or to speedily recover.
2.9 Centre of gravity: 2.9.1 Balance and stability are vital to all physical activity. These qualities are acquired in the
martial arts through understanding of the concept of centre of gravity. In a relaxed standing position, the centre of gravity is located approximately at the navel. It is defined as the apex when the body is held in perfect balance. For every stance learned, it is important to know the location of the centre of gravity in order to throw the opponent off balance.
2.10 Stability : 2.10.1 The strength of a stance forms the foundation of all techniques. The test of stability is whether
the individual would fall or become off-balance, when a technique is aimed at or delivered by the individual.
3 Posture: A very important aspect of the martial arts. Posture refers to the position of the body in relationship to the technique being executed.
3.1 Postural habits: 3.1.1 Lower the centre of gravity. 3.1.2 Keep a base with lateral width. 3.1.3 Keep weight on the balls of the feet. 3.1.4 Knees are rarely straightened, even in running. 3.1.5 A centre of gravity kept under delicate and rapid motion is a characteristic habit of athletes in
games that require sudden and frequent changes of direction. 3.2 These postural habits are characteristics of readiness in motion as well as static posture; the
athlete displays these static and phasic motor habits before and immediately after each act, in preparation for the next act. When sudden movement may be necessary, the good athlete is rarely caught with a straight knee or with other completely straightened joint angles. From such bent-knee preparatory-running has come the well-known statement, ‘the good athlete always runs as if his pants need pressing’.
3.3 Proper posture is a matter of effective interiorisation of the body, which can be achieved only by long and well-disciplined practice.
3.4 A correct posture does three things: 3.4.1 The stance one assumes should insure that ones body and limbs are arranged in a
mechanically favourable position for ones next move. 3.4.2 A stance should not reveal ones intended movements. 3.4.3 A stance should keep one just tense enough to keep ones reaction time and co-ordination at an
optimum.
3.5 The posture adopted should be the one found to give maximum ease and relaxation, combined with smoothness of movement at all times.
3.6 The on-guard stance should be one of 'proper spiritual attitude'. 3.7 The pattern of bent knees, crouched trunk, slightly forward centre of gravity and partially flexed
arm is characteristic of ‘readiness’ in many sports. 3.8 Centring: A concept basic to many martial arts, centring requires total concentration of spiritual
energy, Ki, at the point approximately three inches below the navel, called the t’an tien. The t’an tien is considered the location of the bodies gravity centre in a relaxed position. To be centred is to be fully alert and at one with oneself; centring assures a powerful base for all stances and movements.
3.9 Concentration of force: When a technique is performed, it is essential that the movement is exact on contact; that is, the striking surface, the stance, and all other elements must be properly formed and executed. The entire body is working as a unit toward completion of the technique, and now at impact, all the forces are directed at the point of impact.
4 The foundation of a stance is fundamental positioning. 4.1 Fundamental suggests simple but effective organisation of oneself mentally and physically.
Ease, comfort and body feel during maintenance of the ‘spiritual stance’. Simplicity, movement with no strain. Being neutral, it has no commitment in directional course or exertion.
4.2 Positioning suggests a state of movement as opposed to a static position, an established form or attitude. Repositioning, especially with small phasic movement, resulting in further disorganisation of the opponents sustained watchfulness. Adapt to opponents watchfulness.
4.3 The use of the stance is to obtain the most favourable position to apply moves such as kicking or punching. To hit or to kick effectively, it’s necessary to shift weight constantly from one leg to the other. This means perfect control of body balance. Balance is the most important consideration in the stance.
4.4 Thus, use moves that will deviate least from the on-guard position. Practice instantaneous explosion from neutrality and retain neutrality in commitment, all into one constant smooth flow. Practice constantly to apply all the different moves there are from the on-guard position and return to the on-guard position with all possible rapidity. Shorten the gap between position and execution increasingly. Ease, speed, relay. Above all, do not lay down restricting rules.
4.5 Stances are positions, or postures, people reckon it's easier to manoeuvre in and consequently to defend in and from which to launch attacks. If you're interested in stances pick a stance and find out how one manoeuvre forward, backward, left and right in that stance, remember that no one has ever won a fight by standing still. ☺ Then see how one defends, strikes, manoeuvres and performs other moves from that position. Remember that stances are not stationary poses as one might suppose from reading many martial arts books: they are fluid. From a properly executed stance, one should be able to move in any direction. Also to defend oneself from attacks coming from any direction and you should be able to launch moves from that stance or change into other stances from that stance. If you cannot do these, then the stance is either useless (in which case why was it developed) or you're applying it wrongly. Experience is the best teacher; so don’t be discouraged if you don’t figure it out immediately.
4.6 Most stances were probably developed as teaching tools and to take advantage of different environments. They were used as teaching tools to show students how their bodies worked. They organise the bodies and limbs for economy of movement when performing certain moves. Horse stance (also known as side stance) may be a better stance to launch sidekicks from than front stance. They were developed in response to different environments and to the differences in fighting in different conditions. Fighting on a flat sandy beach requires different manoeuvres than fighting on a mountain slope. Thus, the most common stance in the world of martial arts and unarmed combat today is the 'jogging stance' used by boxers.
4.7 The ideal position of the feet is one that enables you to move quickly in any direction and to be so balanced as to resist blows from all angles. Remember the small phasic bent knee stance.
4.8 Fighting stance: Any stances that provide a fair amount of stability and mobility, allow one to effectively block, and counter an attack.
4.9 Footwork: An essential part of all martial arts training. The proper foot movements enable you to flow from one stance to another without obstruction. This flow is essential to effective attack and defence techniques.
4.10 Informal attention stance: A noncombative stance used mostly in class, while awaiting instructions from the teacher. Although a non-fighting stance, students are trained to move with speed and stability from this position to one of combat.
4.11 T stance: Any stance in which the feet are roughly 12 inches apart and the heel of the front foot lines up with the instep of the rear foot, forming a letter T.
Manoeuvrability: dodging, footwork, recovering. Dodging means getting out of harms way before it harms you ☺ Footwork Footwork consists of short gliding movements with balance maintained throughout. The feet should never cross or cause you to over-stretch. The movements described below apply to right handed people; for left handed people, simply use the opposite feet in the same movements. Note: the attack follows the feet; time spent practising foot movements is never wasted. There are only four possible moves in footwork: 1. Advancing 2. Retreating 3. Circling right 4. Circling left However, there are important variations of each, as well as the necessity of co-ordinating each fundamental movement with punches and kicks. The following are some examples: 1. Step forward.
• (Prepare) left foot leads with the right foot following • (Act) Short step forward on left foot • (Recover) Drag the right foot forward • The forward shuffle is a forward advance of the body. The forward shuffle can only be
performed through a series a series of short steps forward, without disturbing body balance. These steps must be so small that the feet are not lifted at all, but slide along the floor. The whole body must maintain the fundamental position throughout. Once body feels natural doing this, combine the step with other moves.
• The short step and the glide, as contrasted with the hop or cross step, are devices to keep the centre of gravity. When it is necessary to move rapidly, the good man takes small enough steps so that his centre of gravity is rarely out of control.
• The Quick advance: Remember, that though this is a fast, sudden movement forward, balance must be kept. The body flattens toward the floor rather than leaping into the air. It is not a hop. In all respects, it is the same as a wide step forward where the rear foot is brought immediately into position.
• Gaining ground: gaining ground may be used as a preparation of attack. Stepping forward is used to obtain the correct distance for attacking.
• The step forward will add speed to the attack when it is combined with a feint forcing the opponent to commit him or a preparation to tie and close the boundaries. If the step forward is made with the line of engagement covered, the attacker will be in the best position to deal with an attack, block or counter attack launched during this movement.
• The step-in/step-out: this is the start of an offensive manoeuvre, often used as a feint in order to build up an opening. The foot movement is always combined with kicking and punching movement. The initial movement, the step-in, is directly in with the hands held high as if to hit or kick, then out quickly before the opponent can adjust his defence. Lull the opponent with this manoeuvre then attack when he is motor set. By constantly being in small motion, the fighter can initiate a movement much more snappily than from a static position. It is not recommended, therefore, that you stay too long in the same spot. Always use short steps to alter the distance between you and your opponent. Vary the length of your step as well as the speed for adding confusion to your opponent.
• Remember also to always retain the fundamental stance. No matter what you do with that moving pedestal, the turret carrying the artillery must remain well poised a constant threat to your foe. Aim always to move fluidly but retain the relative position of the two feet.
• During sparring, a sparring partner is constantly on the move to make his opponent misjudge his distance, while being quite certain of his own. In fact, the length of the step forward and backward is regulated to that of his opponent. A good fighter always maintains such a position as to enable him, while keeping just out of range, to be yet near enough to immediately take an opening. Thus at a normal distance he is able to prevent his opponent from attacking him by his sense of distance and timing. Consequently, his opponent is then compelled to keep shortening his distance, to come nearer until he is too near!
• Stealing the march - Variations of measure will make it more difficult for the opponent to time his attacks or preparations. A fighter with a good sense of distance, or who is difficult to
reach in launching an attack, may often be brought to the desired measure by progressively shortening a series of steps backward. Alternatively, by gaining distance toward him when he lunges. This is called stealing the march.
• The simplest and most fundamental tactic to use on an opponent is to gain just enough distance to facilitate a hit. The idea is to press, advance, a step or so and then fall back, retreat, inviting the opponent to follow. Allow your opponent to advance a step or two and then, at the precise moment he lifts his foot for still another step, you must suddenly lunge forward into his step.
• An opponent difficult to reach may be reached by a series of progressive steps – the first one must be smooth and economical.
• Short steps while moving ensure balance in attack. In addition, the body balance is always maintained so that any offensive or defensive movement required is not limited or impaired as the fighter moves forward, backward, or circles his opponent. Thus, it is better to take two medium steps rather than one long one to cover the same distance.
• Variations of measure will make it more difficult for the opponent to time his attacks or preparation.
• Unless there is a tactical reason for acting otherwise, gaining and breaking ground is executed by means of small and rapid steps. A correct distribution of weight on both legs will make for perfect balance, enabling the fighter to get off the mark quickly and easily whenever the measure is right for attacks.
2. Step backward • (Prepare) Right foot leads with the left foot following • (Act) Short step backward on the right foot • (Recover) Drag the left foot backwards • The backward shuffle: The principle is the same as that of the forward shuffle; do it without
disturbing the on-guard position. Remember that both feet are on the floor at all times, permitting balance to be maintained for attack and defence. It is used to draw leads or to draw the opponent off-balance, thus creating openings.
• Breaking ground: stepping back is used as a preparation of attack. It’s used to draw the opponent within distance. 'Drawing' an opponent usually means drawing out of distance from a lead by swaying back from the hips, or making use of the feet in such a way that the lead will just fall short. Its object is to lure your opponent within reach at the critical moment, while staying out of reach yourself.
• The step back as a defensive movement should always be adjusted to the length of the opponents attacking movements to ensure that the required measure is maintained for a successful parry and riposte.
• The step back can be used tactically against an opponent who has formed the habit of retiring whenever any feint or other offensive movement is made and is therefore very difficult to reach, especially if he is superior in height or strength.
• Constant steps forward and back with a carefully regulated length can conceal a players intentions and enable him to lodge himself at the ideal distance for an attack, often as the opponent is off-balance.
• The quick retreat: This is a fast, fluid, forceful backward movement, allowing further retreat if necessary or a stepping forward to attack if so desired.
• If it is necessary to combine a step back with a parry, it is because one is pressed for time. The parry must therefore be made at the beginning of the retreating movement – that is, when the rear foot moves.
• When the opponents’ offensive action is a compound attack, the correct co-ordination will be to perform the first parry simultaneously with the movement of the rear foot and the remaining parry, or parries, simultaneously with the retreating lead foot.
• The step back can be taken first but this should only be the case when the attack has been prepared with a step forward and not when the attack has been made with a step forward.
• To a man with quick footwork and a good lead, the art comes easily enough. It is a continuous process of hit-and-away. As your opponent moves in, you meet him with a defensive hit with the lead and immediately step back; then as he follows up, you repeat the process, continually retreating around the ring. As you do so, frequently check yourself in your stride and temporarily stop to meet him with a straight right or left or occasionally both.
• Success in ‘milling on the retreat’ takes good judgement of distance and the ability to stop in your retreat quickly an unexpectedly. The common fault is to deliver your blow while actually

on the move instead of properly stopping to do it. Develop great rapidity in passing from defences to attack and then back to defence again.
• Remember; do not attempt to hit while backing away. Your weight has to shift forward. Step back, halt, then hit or learn to shift your body weight shortly forward while the foot backs up.
• Whether on the offensive or retreating, one should strive to be a confusing and difficult target. One should not move in a straight forward or in a straight backward direction.
• When avoiding or manoeuvring your opponent by footwork, keep as near to him as you can for retaliatory purposes. Move lightly, feeling the floor as a springboard, ready to snap in with a punch, kick or a counter-punch or kick.
• To retreat from kicks is to give the adversary room so it is wise at times to crowd and smother his preparation and gain time consequently with a stop-hit.
• The sliding roll – the fundamental asset of the clever fighter is the sliding roll. He spots the punch or a high kick coming, perhaps instinctively, and takes one step back, sweeping his head back and underneath. He is now in a position to come up with several handy blows or kicks into nice openings.
• The ultimate aim is still to obtain the brim of the line-of-fire on the opponents’ final real thrusts. Remember mobility, rapidity of footwork and speeds of execution are primary qualities.
• Don’t be carried away and stand on your toes and dance all over the place like a fancy boxer. Economical footwork not only adds speed but by moving just enough to evade the opponents attack, it commits him fully. The simple idea is to get where you are safe and he isn’t.
• Footwork enables you to break ground and escape punishment, to get out of a tight corner, to allow the heavy slugger to tire himself in vain attempts to land a devastating punch; it also puts pep into the attack.
• Use your own footwork, and your opponents to your advantage. Note his pattern, if any, of advancing and retreating. Vary the length and speed of your own step.
• The length of the step forward or backward should be approximately regulated to that of the opponent.
• Confident footwork and balance are necessary to be able to advance and retreat in and out of distance with respect to both your own and your opponents reach. Knowing when to advance and when to retreat implies knowing when to attack and when to protect.
• A good fighter steals, creates and changes the vital spatial relations to the confusion of his opponent.
3. Step left • (Prepare) Left foot leads the right • (Act) Short step to the left on the left foot • (Recover) Drag the right foot to the left. • From the fundamental right stance position, bring the left foot sharply to the left and forward
a distance of about 18 inches. This should carry you to the outside of the opponents’ right jab. You will find that just as you take the step to the left, the left side of your body swings forward and the right side back, so that you rotate toward the opponents’ right flank. As you complete this half circle movement, you will find that your right foot is again in its normal position ahead of the left foot.
• If you have taken the side step to the left to avoid the opponents right lead, you should sway your body and duck your head, without losing balance, in the direction of the step – that is to the left. His right will swish by, over your head, in the direction of your right shoulder. Now, as you wheel to the right toward the opponent, you have his entire right flank exposed and can quickly land a left to the body or jaw with telling effect.
• Sidestepping is actually shifting the weight and changing the feet without disturbing balance in an effort to quickly gain a more advantageous position from which to carry the attack. It is used to avoid straightforward rushes and to move quickly out of range. When an opponent rushes you, it is not so much the rush you side step, as some particular blow he led during the rush.
• Sidestepping is a safe, sure and valuable defensive tactic. You can use it to frustrate an attack simply by moving every time an opponent gets set to attack or you may use it as a method of avoiding blows or kicks. It may also be used to create openings for a counterattack.
• Sidestepping may be performed by shifting the body forward, which is called a ‘forward drop’. This is a safe position with the head in close; the hands carried high and ready to strike the opponents groin, or stomp on his insteps, or carry a two-fisted hooking attack.
• The forward drop is used to gain the outside or the inside guard position and is therefore a very useful technique in infighting or grappling. It is also a vehicle for countering. It requires timing, speed and judgement to properly execute. It may be combined with the jab, straight left, and hooks. The forward drop is also called a ‘drop shift’
• The same step may also be performed directly to the right or left or back, depending on the degree of safety needed or the plan of action.
• Properly used, sidestepping is not only one of the prettiest moves, but is also a method of escaping all kinds of attacks and countering an opponent when he least expects it. The art of sidestepping, as of ducking and slipping, is to move late and quick. You wait until your opponents strike is almost on you and then take a quick step either to the right or to the left.
• In nearly all cases, you move first the foot nearest the direction you intend to go in. In order to do the step in the quickest possible manner; the body should sway over in the direction you are going slightly before the step is made. The rear foot then follows quickly and naturally and in sidestepping a rush, the fighter turns immediately and counters his man as he flies past him.
• When sidestepping a lead the counter is naturally quite easy. Not so after a rush, for to counter effectively here a fighter has to keep very close to his opponent, moving just enough to make him miss. The fighter must then turn extraordinarily quickly to be on him before he has flashed past.
• When an opponent rushes you, it is not so much the rush that you side step as some particular kick or blow he led during the rush. In fact, if you step to the side of your opponent without catching sight of some blow to get outside of, you will be very liable to run into a hook or swing.
• Remember this simple thought: move first the foot closest to the direction you wish to go in. In other words, if you wish to side step to the left, move the left foot first and vice versa. In addition, in all hand techniques, the hand moves first before the foot. When foot techniques are used, of course, move the foot first before the hand.
• Mobility is vitally important in defence, for a moving target is definitely harder to hit. Footwork can and will beat any kick or punch. The more adept a fighter is at footwork, the less does he make use of his arms in avoiding kicks and blows. By means of skilful and timely sidestepping and slipping, he can get clear of almost any kick and punch, thus preserving both his guns, as well as his balance and energy, for counters.
4. Step right • (Prepare) Right foot leads the left • (Act) Short step to the right on the right foot • (Recover) Drag the left foot to the right. • Carry the right foot sharply to the right and forward, a distance of about 18 inches (46
centimetres). Bring up the left foot an equal distance behind the right. The step serves to swing the body to the left; bringing the right side farther forward and closer to the opponents left rear (when in a right stance himself). For that reason, the right side step is not used as frequently as the one to the left. Most of the weaving and sidestepping is to the left, keeping you closer to his right and farther away from his left rear hand. This situation changes in right stance user versus left stance user.
• Occasionally a right side step is taken just to vary the direction of the weaving and even less frequently in slipping a right lead, getting inside of it to counter with a left. It is used in starting a left to the body.
5. Step clockwise (circling left) • (Prepare) Keep the left foot fixed to the floor • (Act) Push yourself in a clockwise circle on the right foot. • This is a more precise movement requiring shorter steps. It is used to keep out of range of
rear, left hand blows from a right stance user. It also creates good position for the delivery of a hook or jab. It is more difficult but safer than moving to the right and therefore should be used more often.
6. Step counter-clockwise (circling right) • (Prepare) Keep left foot fixed on the floor • (Act) Take short steps on the right foot in an anticlockwise circle. • The right leg becomes a moveable pivot that wheel the whole body to the right until the
correct position is resumed. The first step with the right foot may be as short or as long as necessary – the longer the step, the greater the pivot. The fundamental position must be
maintained at all times. The right hand should be carried a little higher than ordinary in readiness for the opponents left counter. Moving to the right may be used to nullify an opponents right lead hook. It may be used to get into position for left-hand counters and it can be used to keep the opponent off balance. The important things to remember are to never step to cross the feet. Move deliberately and without excess motion.
7. Slip down [the bob] • (Prepare) Bend the knees slightly allowing the torso to move up and down • (Act) Roll the torso in a U-shape as you move up and down. • (Act) Keep the back straight. • Roll underneath the opponent's punches. • Sink under the swing or hook with a single, perfectly controlled movement. • Bring your fists in toward your opponent for guarding or attacking. • Maintain a nearly normal punching position with your legs and feet, even at the bottom of the
bob. Use your knees to provide the motion. • Maintain at all times the normal slipping position of your head and shoulders for defence
against straight punches. It is extremely important that you be in position to slip at any stage of the bob.
• Don’t counter on a straight-down bob except, perhaps, with a straight thrust to the groin. Weave to apply delayed counters with whirling straight punches or hooks.
• Slipping is avoiding a blow without actually moving the body out of range. It’s used primarily against straight leads and counters. It calls for exact timing and judgement and, to be effective, it must be executed so that the blow is escaped only by the smallest fraction.
• Slipping is a most valuable technique, leaving both hands free to counter. It is the real basis of counter-fighting and is performed by the expert.
• When slipping, the shoulder roll will shift your head. don’t tilt the head unnecessarily. • The body sway (bob and weave) – the art of swaying renders the fighter more difficult to hit
and gives him more power, particularly with the hook. It’s useful in that it leaves the hands open for attack, improving the defence and providing opportunities to hit hard when openings occur. The key to swaying is relaxation and the stiff, rigid type of boxer must be easier to deal with than the ever-swaying type.
• Purposes of the weave: 1) to make a moving target of your head, from side to side. 2) To make your opponent uncertain about which way you will slip if he punches at you. 3) To make your opponent uncertain about which fist you will throw when you punch.
• Weaving means moving the body in, out and around, a straight lead to the head. It is used to make an opponent miss and to sustain a counterattack with both hands. Weaving is based on slipping and is a circular movement of the upper trunk and head, right or left.
• The weave is rarely used by itself. Almost invariable, the weave is used with the bob. The purpose of the bob and weave is to slide under the opponents’ attack and get too close-quarters. The real bobber-weaver is always a hooking specialist. It is the perfect attack for one to use against taller opponents. Break your rhythm often when you use it. Don’t be a rhythmic bobber-weaver. Sometimes when you slip inside a punch, you counter terrifically as you step. Evasiveness should not be practised without hitting or kicking to counter. The weave is a combination of a bob with a slip and a step.
• Additionally, while the punches are coming, keep your eyes open every minute. The punches will not wait for you. They will strike unexpectedly and, unless you are trained well enough to spot them, they will be hard to stop.
8. Slip forward [the duck] • Ducking – ducking is dropping the body forward under swings and hooks from either hands or
feet directed at the head. It’s executed primarily from the waist. Ducking is used as a means of escaping blows and allowing the fighter to remain in range for a counterattack. It’s just as necessary to learn to duck swings and hooks, as it is to slip straight punches. Both are important in counterattacks.
• Try to always hit on the slip, particularly when moving forward. You can hit harder when stepping inside a punch than when you block and counter or parry and counter.
9. Slip backward [the snap back] • The snap back – the snap back means simply to snap the body away from a straight lead
enough to make the opponent miss. As the opponents arm relaxes to his body, it is possible to move in with a stiff counter. This is a very effective technique against a lead jab and may be used as the basis of the one-two combination blow.
10. Slip left • Slipping inside a left lead – as the opponent leads a straight left, drop your weight back to
your rear left leg by quickly turning your right shoulder and body to the left. Your left foot remains stationary but your right shoulder pivots inward. This movement allows his left hand to slip over your right shoulder as you obtain the inside guard position. . This assumes your right side is your lead side.
• It is possible to slip either a left or a right lead. Actually, slipping is more often used on the forward hand lead because it is safer. The outside slip, which is dropping to a position outside the opponents’ left or right lead, is safest and leaves the opponent unable to defend against a counterattack.
• To slip a lead over your right shoulder with a defensive movement to the left, your right heel should twist. Your weight is thus shifted to your left foot and your left shoulder is to the rear, s o you are favourably placed to counter with a right hook
• If you remember that the shoulder over which you desire to slip a blow and the heel to be twisted are the same, you will not go far wrong. Exceptions are movements similar to the first description of ‘slipping outside a right lead’.
11. Slip right • Slipping inside a right lead – as the opponent leads a right punch, shift your weight over your
lead right leg, thus moving your body slightly to the right and forward. Bring your left shoulder quickly forward. In doing so, the punch will slip over your left shoulder. Be sure to rotate your left hip inward and bend your left knee slightly. The inside position is the preferred position for attack. Move your head separately only if the slip is too narrow. This assumes your right side is your lead side.
• Slipping outside a left lead – as the opponent leads a straight left, shift your weight right and forward over your right leg, swinging your left shoulder forward. The blow will slip over your left shoulder. A short step forward and to the right with your right foot facilitates the movement. Your hands should be carried high in a guard position. This assumes your right side is your lead side.
• The key to successful slipping often lies in a little movement of the heel. For example, if it is desired to slip a lead to the right so that it passes over your left shoulder, your left heel should be lifted and twisted outwards. Transferring your weight to your right foot and twisting your shoulders will set you up nicely to counter.
• Weaving to the outside – as the opponent leads a right punch, slip to the inside position and place your right hand on the opponents left. Now, move your head and body to the left and upward in a circular movement so that the opponents right lead approximates to your right shoulder. Your body is now on the outside of the opponents’ lead and in the basic position. Carry both hands high and close. [Slip inside a right lead then weave to the outside]
12. Slip clockwise • Slipping outside a right lead – as the opponent leads a right, drop your weight back on you’re
left leg and quickly turn your right shoulder and body to the right. Your right foot remains stationery and your left tow pivots inward. The punch will slip harmlessly by. Drop your right hand slightly, but hold it ready to drive an uppercut to the opponents’ body. Your left hand should be held high, near your right shoulder, ready to counter to his chin. This assumes your right side is your lead side.
• Weaving to the inside – on a right lead, slip to the outside position. Drop your head and upper body; move in under the extended right lead and then up to the basic position. The opponents’ right lead now approximates your left shoulder. Carry your hands high and close to your body. [Slip outside right lead then weave from right to left]
13. Slip anticlockwise • Another method is to shift your weight to your left leg and pivot your right heel outward so
that your right shoulder and your body turn to the left. Drop your right hand slightly and keep your left hand high, near your right shoulder. This assumes your right side is your lead side.
• Remember that weaving is based on slipping and thus, mastery of slipping helps to obtain skills in weaving. It is more difficult than slipping, but a very effective defence manoeuvre once perfected.
14. Skip change. ☺ • A skip change is swapping ones feet over before striking. The change of stance confuses
opponents. This also makes kicks more powerful.
Footwork concepts: 1 Footwork training: Footwork can be gained also by: 1.1 Skipping rope; an exercise to learn how to handle the bodies weight lightly, 1.2 Sparring: the learning of distance and timing in footwork. 1.3 Shadow boxing; homework for sparring. 1.4 Running will strengthen the legs to supply boundless energy for efficient operation. 1.5 Increase control of the legs through medium squatting posture exercises and ape-like movement
– low walking. 1.6 Incorporate alternate leg splits for flexibility. 1.7 No matter how simple the strokes being practised in the lesson are or whether they are of an
offensive or defensive nature, the practitioner must be made to combine footwork with them. He must be made to advance or retire before, while and after the stroke he is working on has been executed. In this way, he will acquire a natural sense of distance and develop great mobility. Practice footwork along with: kicking tools, hand tools, and covered hand and/or knee positions.
1.8 Lighten the stance so the force of inertia to be overcome is less. The best way to learn proper footwork is to shadow box many rounds, giving special attention to becoming light on your feet. Gradually, this way of stepping around will become natural to you and you will do it easily and mechanically without giving it a thought.
1.9 Training drills should accent speedy footwork and the tendency toward attack with a step forward often combined with an attack on the hand.
1.10 Practice your footwork with a view to keeping a very correct and precise distance in relation to your opponent and move just enough to accomplish your purpose. Fine distancing will make the opponent strive that much harder, and thus bring him close enough to be subject to efficient counterblows.
2 Examine footwork for: 2.1 Body feel and control, as a whole, for neutrality. 2.2 Attack and defence capability at all times. 2.3 Ease and comfort in every direction. 2.4 Application of efficient leverage during all phases of movement. 2.5 Superb balancing at all times. 2.6 Elusiveness in well protected corresponding structure and correct distancing. 2.7 Footwork should tend to aim toward simplification with a minimum of movement. 2.8 Footwork should be easy and relaxing. 2.9 Good footwork means good balance in action and from this spring hitting power and the ability
to avoid punishment. Every movement involves the co-ordination of hands, feet, and brain. 2.10 A fighter should be ready to accelerate or retard his movements as required by changing
conditions. Not flatfooted but should feel the floor with the balls of his feet, as though they were strong springs.
2.11 To maintain balance while constantly shifting body weight is an art few ever acquire. 2.12 To move at the right time but also to be in the best position for attack or counter. It means
balance, but balance in movement. 2.13 Correct placement of your feet will ensure balance and mobility – experiment with yourself. You
must feel with your footwork. Rapid and easy footwork is a matter of correct distribution of weight.
2.14 The feet must always be directly under the body. Any movement of the feet that tends to unbalance the body must be eliminated. The on-guard position is one of perfect body balance and should always be maintained, especially as regards the feet. Wide steps or leg movements that require a constant shift of weight from one leg to the other shouldn’t be used. During this shift of weight, there is a moment when balance is compromised, rendering attack or defence ineffective. In addition, the opponent can time your shifting for his attack.
2.15 Small and rapid steps are recommended as the only way to keep perfect balance, exact distance and the ability to apply sudden attacks or counterattacks.
2.16 You should operate in the same manner as a graceful ballroom dancer who uses the feet, ankles and calves. He slithers around the floor.
2.17 The correct style in fighting is that which in its absolute naturalness combines velocity and power of hitting with the soundest defence.
2.18 Use the feet cleverly to manoeuvre and combine balanced movement with aggression and protection. Above all, keep cool.
3 Foot work concept: Distance
3.1 Combat is a matter of motion, an operation of finding a target or of avoiding, being a target. Springiness and alertness of footwork is the skill to develop.
3.2 One can only develop an instinctive sense of distance if one is able to move about smoothly and speedily.
3.3 Moving is used as a means of defence, a means of deception, a means of securing proper distance for attack and a means of conserving energy. The essence of fighting is the art of moving.
3.4 Distance is a continually shifting relationship, depending on the speed, agility and control of both fighters. It is a constant, rapid shifting of ground, seeking the slightest closing which will greatly increase the chances of hitting the opponent.
3.5 The maintenance of proper fighting distance has a decisive effect on the outcome of the fight: acquire the habit!
3.6 There must be close synchronisation between closing and opening distance and the various actions of the hands and feet. To fight for any length of time within distance is safe only if you overwhelmingly outclass your opponent in speed and agility.
3.7 Thus, a fighter is constantly gaining and breaking ground in his effort to obtain the distance that suits him best. Develop the reflex of always maintaining a correct measure. Instinctive distance pacing is of utmost importance.
3.8 To these examples must be added the obvious importance of choosing the correct measure, as well as timing and cadence, when making a counterattack by stop-hit or time-hit.
3.9 Marcelli, past master of fencing, said “The question of whether it is necessary to know in advance the tempo or the distance is a matter for the philosopher rather than the swordsman to decide. Just the same, it is certain that the combatant has to observe simultaneously both the tempo and the distance. And he has to comply with both simultaneously with the action, if he wishes to reach his object.”
4 Principles of distance in attack: 4.1 The first principle for fastest contact in attacking from a distance is using the longest to get at
the closest. For example: in kicking use, the leading shin/knee sidekick with a lean. In striking, use the finger jab to the eyes.
4.2 The second principle is non-telegraphic economical initiation. Apply latent motor training to intuition.
4.3 The third principle is correct on-guard position to facilitate ease of and freedom of movement. Use the small phasic bent knee position
4.4 The fourth principle is constant shifting of footwork to secure the correct measure. Use broken rhythm to confuse the opponents’ distance while controlling ones own.
4.5 The fifth principle is catching the opponents’ moment of weakness, physically as well as psychologically.
4.6 The sixth measure is correct measure for explosive penetration. 4.7 The seventh principle is quick recovery or appropriate follow-ups. 4.8 The eighth principle is courage and dedication. 4.9 When the correct distance is attained, the attack should be carried through with an
instantaneous burst of energy and speed. A fighter who is in a constant state of physical fitness is more apt to get off the mark in a fraction of a second and therefore, to seize an opportunity.
4.10 The art of successful kicking and hitting is the art of judging distance correctly. An attack should be aimed at the distance where the opponent will be when he realises he is being attacked and not at the distance prior to the attack. The slightest error can render the attack harmless.
4.11 The shielded fighter always keeps himself just out of distance of the opponents attack and waits for his opportunity to close the distance himself or to steal a march on the opponents advance. Attack on the opponents advance or change of distance toward you. Back him to a wall to cut off his retreat yourself to draw an advance.
4.12 The quality of a fighter's technique depends on his footwork, for one cannot use his hands or kicks efficiently until his feet have put him in the desired position. If a fighter is slow on his feet, he will be slow with his kicks and punches. Mobility and speed of footwork precede speed of punches and kicks.
4.13 The greatest phase of footwork is the co-ordination of punching and kicking in motion. Without footwork, the fighter is like artillery that cannot be moved or a policeman in the wrong place at the wrong time.
4.14 If fighters are constantly on the move when fighting, it is because they are trying to make their opponent misjudge his distance while being well aware of their own.
4.15 The majority of fencers, when they are preparing an attack or trying to avoid one take turns advancing and retreating. This procedure is not advisable in fighting because the advance and retreat during the assault must be made rapidly; by bounds and at irregular intervals such that the adversary does not notice the action until it is too late. The opponent should be lulled, and then the attack should be launched as suddenly as possible, accommodating itself to the automatic movements, including the possible retreat, of the opponent.
4.16 An attack will rarely succeed unless you can lodge yourself at the correct distance now it is launched.
5 Principles of distance in defence: 5.1 The first principle for using distance as a defence is combining sensitive aura with co-ordinated
footwork. 5.2 The second principle is good judgement of the opponents’ length of penetration, a sense for
receiving his straightening weapon to borrow the half-beat. 5.3 The third principle is correct on-guard position to facilitate ease of and freedom of movement.
Use the small phasic bent knee stance. 5.4 The fourth principle is the use of controlled balance in motion, without moving out of position.
Study evasiveness. 5.5 The fighting measure is also governed by the amount of target to be protected, which is the
targets the adversary stresses, and the parts of the body most easily reached by the adversary. The shin is most vulnerable and is constantly threatened. If the opponent specialises in shin/knee kicking, you have to take his measure from shin to shin.
5.6 The fighting measure is the distance that a fighter keeps in relation to his opponent. It is such that he cannot be hit unless his opponent lunges fully at him.
5.7 During fighting, there is a good deal of parrying, especially with the rear hand, but its better to use footwork – duck and counter, snap back and return, slip and punch.
5.8 Almost every fighter at one time or another reaches a dangerous spot where he loses some of his command and must protect himself. When this time comes, it is wise to have learned good defence.
5.9 When taking your guard, it is preferable to fall back a little too far than to come too close to your opponent. No matter how fast you are able to parry, if a man is close enough to you he will arrive with his attack. For the nature of an attack is such that it gives the advantage of the initiation to the attacker, providing the correct measure is there. Likewise, however accurate, fast, economical and timely your attack may be, it will fall short unless you have calculated your distance well.
5.10 It is essential that each man learn his own fighting measure. This means in a fight he must allow for the relative agility and speed of himself and his opponent. That is, he should consistently stay out of distance in the sense that his opponent cannot reach him with a simple punch. However, not so far that with as short advance, he cannot regain the distance and be able to reach his opponent with his own powerful attack.
5.11 A parry is most likely to succeed if it can be made just as the opponent is at the end of his lunge. Many a chance to riposte is missed by the defender stepping back completely out of distance when he parries.
5.12 Experiment on the following mechanics and feeling of footwork: 5.12.1 Footwork to be evasive and soft if the opponent is rushing. 5.12.2 Footwork to avoid contact point as if the opponent is armed with a knife. 5.13 Jamming: Any technique used to snuff or smother a strike before it is executed. Usually refers to
the technique of smothering a kick by coming in so close that the kick cannot be completed.
Recovery: For those occasions when all you can do is try not to say 'ouch' too loudly ☺ [Breakfall/ roll/ handspring/ cartwheel] Included cartwheel because I was running out of ways to move, it may be more for acrobats than for martial artists, although capoeira uses it a lot. Forward/backward/left/right] (4) 1. Breakfall forward. 2. Breakfall backward
2.1. Squat, tuck your chin down on your chest 2.2. Keep your back rounded and let yourself roll back
2.3. Slap both hands, palms down, on the floor as your back touches it. Keep your chin tucked in so your head does not hit the mat.
3. Breakfall left 3.1. Bring your left palm across your chest. Kick your right left forward. Swing your right arm
and leg out sideways so that you topple to the left. 3.2. Fall to your left. As you fall, stretch out your left arm and slap the floor with the palm of your
hand. The harder you slap, the easier you land. Bring your right hand to your right ear to cushion your head against banging on the floor.
4. Breakfall right 4.1. Bring your right palm across your chest. Kick your right leg forward. Swing your left arm
and leg out sideways so that you topple to the right. 4.2. Fall to your right. As you fall, stretch out your right arm and slap the floor with the palm of
your hand. The harder you slap, the easier you land. Bring your left hand to your right ear to cushion your head against banging on the floor.
4.3. Rolling Breakfall with a partner : kneel on your hands and knees and pass one hand under your tummy. Let your partner take a firm hold of your hand. Your partner will pull that arm and push on your other shoulder to flip you over onto your back. Break the force of the fall by stretching out your free arm and slapping the floor with the palm of your hand.
4.4. Most people find it easier to fall to one side than to the other. Make sure you practise both ways and don’t always use the same arm or leg.
4.5. Once you have learnt the basic skills of falling, you are ready to practise breakfalls in a proper throwing situation.
5. Roll forward 5.1. Put one foot forwards and bend your front knee. 5.2. Tuck your chin into your chest and lean forward. 5.3. With the same arm forward as leg, let yourself fall into a forward roll, tucked into a ball.
Keep your arm and shoulder curved. 5.4. As you come out of the roll, slap the mat with your free hand.
6. Roll backward 6.1. Backward roll through to handstand
6.1.1. First, it can be learned from back lying, with legs straight. Place the hands by the shoulders to push into handstand, and then roll the legs back and up, with the coach taking the feet to direct the body into handstand.
6.1.2. You can then start from standing, piking forward as you sit back into the roll, once again with the legs straight, and once again with the coach taking the feet.
6.1.3. When you can perform the move to handstand with bent arms, you can then proceed to work it with straight arms.
7. Roll left: 7.1. The parkour roll :
7.1.1. Bend the knees and put your hands on the floor. 7.1.2. Roll across one shoulder, tuck the body and roll diagonally. 7.1.3. Stand up and continue moving.
8. Roll right 8.1. The parkour roll :
8.1.1. Bend the knees and put your hands on the floor. 8.1.2. Roll across one shoulder, tuck the body and roll diagonally. 8.1.3. Stand up and continue moving.
9. Cartwheel forward/ handspring forward 9.1. Round-off practises
9.1.1. This is a change of direction move; it precedes back flip, back and side somersaults. 9.1.2. First, the gymnast must be able to cartwheel correctly, reaching forward into the move,
the second hand facing the first. 9.1.3. The gymnast can then practise cartwheel with quarter turn to face the direction from
which he has come. Then the same thing, but bringing the feet together for the landing, then adding the hop-step into the cartwheel; and finally, with push through the arms and chest, performing a round off and upward jump.
9.2. Handspring practices 9.2.1. The handspring is one of the essential forward tumbles, and must be perfected before
moving to progressing to such moves as the handspring front somersault or the
handspring full twisting flying roll. The gymnast must break down the move and learn it in its four parts: first flight (reach onto hands), strike, second flight, and landing.
9.2.1.1. For the first flight, the gymnast must extend the body and arms, and reach forward on to the hands with the shoulders behind the hands at the moment of the strike. He can practice this with kick to handstand and forward roll, with straight arms throughout.
9.2.1.2. The strike is a ‘blocking’ process, where the shoulders stop their forward momentum, and are driven upwards through the ‘punch’ off the floor. The gymnast can practise this by kicking to handstand and bouncing off the hands many times; he must learn to get off the hands, ‘punching’ through the shoulders and arms.
9.2.1.3. In the second flight, the gymnast must tighten the back, with the head between the arms,
9.2.1.4. Land the move firmly with slight knee-bend to absorb the landing, feet together. The gymnast can practise by performing the handspring off some type of low platform, to land on a crash mat. The coach supports with one hand on the shoulder to help ‘block’ the strike and the other on the back to aid the lift.
9.3. Forward walkover 9.3.1. A forward walkover goes from a standing position through handstand and back to the
standing position. With good posture in the upright position and hips pulled under, back straight, shoulders down, stomach muscles tight and legs straight, the gymnast lifts her arms above the head, ensuring there is no angle between the body and arms.
9.3.2. One leg moves forward into a deep lunge taking all the weight of the body while the back remains straight with arms still above the head. The fingers reach toward the floor and when they make contact, the back leg leaves the ground. The back leg must be very straight, with the ankles and toes extending. As the back leg swings overhead the underneath (lunging) leg straightens and eventually leaves the floor, but not before there is an angle of at least 180 degrees between the two legs. (An inverted Y shape).
9.3.3. As soon as the fingers touch the floor, the shoulder girdle should be fully extended with the head in line and the arms touching the ears. The fingers will be slightly bent with the tips pressing into the ground to help keep balance.
9.3.4. As the legs move over the head, the body will move into a handstand position with the legs split to an angle of 180 degrees or more. At this point, the shoulders are still extended the arms straight, the stomach and back muscles are contracted to keep the back straight and the body upright. The legs are straight, and the ankles, feet and toes fully extended. (A T shape).
9.3.5. The first movement toward the forward bend is made by pressing the shoulders backward over the hands in the direction from which the feet have come. The back remains relatively straight and the body is still in an on-balance position over the hands. Maintaining the on-balance position, the first leg is lowered slowly to the ground with the toes making first contact followed by the whole foot. The first leg will have to bend slightly on contact with the floor but the angle of 180 degrees between the two legs is maintained and the second leg points vertically upwards. (A backward h shape).
9.3.6. The momentum is continued as the hands leave the floor and the stomach muscles contract to pull the head and shoulders up from the floor. Arms remain in line with the head, the underneath leg straightens and hips remain static over he supporting leg. The second leg moves slightly forward and upward. (A Y shape).
9.3.7. The forward walkover finishes with the underneath leg straight and turned out. The back straight, hips tight and the second leg held straight well above horizontal rotated outwards. Arms are held up in line with the head, shoulders are pressed down and the head is upward.
10. Cartwheel backward: / handspring backward 10.1. Back somersault practices
10.1.1. Rotations in the air such as somersaults require what is known as ‘spatial awareness’ (awareness of where you are in space).
10.1.2. First, the gymnast must learn to jump up and slightly back onto a crash mat with the arms lifted and the body stretched, without rotating. Then he can practise tucked somersaults, with head in – extending, rotating by lifting the hips over the head, extending again, and landing with arms out to the side.
10.2. Wall flip – not for beginners:
10.2.1. Run and put your foot as high as possible up the wall. 10.2.2. Next, lean back and bring the free leg through. 10.2.3. Finally, tuck and land.
10.3. Backward walkover 10.3.1. The backward walkover is the reverse of the forward walkover. Start in an upright
position 11. Cartwheel left 12. Cartwheel right 15. Jump up
15.1. Cat leap up a wall: 15.1.1. Run up and push off with the stronger foot. 15.1.2. Swing the arms forward, touch the wall with the other foot and grab the top with both
hands. 16. Jump forward: Standing/basic jump
16.1. (Prepare) Bend the knees and swing the arms. 16.2. (Action) Spring from the balls of the feet. Throw the whole body forwards and bring the
knees up. 16.3. (Recover) Land on balls of feet with knees bent. 16.4. King Kong monkey vault over a fence:
16.4.1. Run and jump with your feet together and knees bent. 16.4.2. Reach as far forward as possible. 16.4.3. Tuck the legs through and push off with your hands.
17. Jump backward: 17.1. The back flip:
17.1.1. (Preparation) Bend the knees and swing the arms to build up enough momentum for the flip.
17.1.2. (Action) The point of no return… the acrobat arches his back as much as possible and prepares to bring his knees over his head to land – hopefully on his feet.
17.1.3. (Action) At this stage of the jump, the acrobat needs to pivot around his centre of gravity – somewhere around the hips – and quickly. At this point, the acrobats head is underneath his feet.
17.1.4. (Action) The acrobat brings his knees towards his chest to help the rotation. This is about halfway through the move but note that he is almost at the same height as when he started.
17.1.5. (Action) Using his arm to balance, the acrobat prepares his feet to hit the street. He also looks down to see where he is about to land to avoid a potentially embarrassing stumble and loss of teeth.
17.1.6. (Recovery) The all-important landing. The acrobat bends his knees and prepares to slap the ground with his right hand. The idea is to take the force out of the landing and spare his knees the shock.
18. Jump left 19. Jump right: 360-wall hop:
1) Run up, put one foot on the wall and push upwards. 2) Twist your body around 360 degrees in the air and catch the wall with both hands.
• Rolling – rolling nullifies the force of a blow by moving the body with it.
• Against a straight blow, the movement is backward • Against hooks, the movement is to either side • Against uppercuts, it is backward and away • Against hammers, it is a circular movement down to either side.
• Breakfall: Generally the first techniques taught in judo are the ones for falling without injuring yourself – the breakfalls, or ukemi waza. The main things to remember are not to put out a hand to break the fall, wrists are very fragile structures, nor let the head hit the ground first. There are four basic breakfalls: backward, front, to the side, and forward rolling Breakfall. • Mae ukemi: The Mae ukemi is one of the four basic judo moves for breaking a fall. Mae
ukemi, a front fall, is not used much in judo, because straightforward throwing, is forbidden. • Ukemi: In the Japanese martial arts, such as judo, that use throwing techniques, ukemi is the
very important art of falling without being hurt. See Breakfall.

• Ushiro ukemi: In judo, the Ushiro ukemi is the backward Breakfall. • Yoko ukemi: In judo, the Yoko ukemi is the sideward Breakfall. • Zempo kaiten ukemi: In judo, the Zempo kaiten ukemi is the forward rolling Breakfall, very
similar to a somersault. • Occasionally people suffer serious injury or death attempting the extreme martial arts portrayed in
movies. But it doesn’t stop people thinking that a modicum of physical fitness is enough preparation to attempt back flip from the top of walls, jumping spin kicks, etc. shish.
• The important thing to remember about these techniques is that they focus less on leaping buildings with a single bound and more on the basics. The first thing all acrobats do is learning to roll. Rolling is very important, because if you are moving forwards with a lot of momentum and you don’t roll you’re legs taking the shock. If you can roll – across your shoulder, never on the spine – it transfers the energy so you don’t get hurt. You land, you roll, you stand up and you keep moving.
• If you are going to leap from a tall building, or even just off the back of a garden fence, you need to know how to land properly. You might think you can land and just bend your knees but actually, you have to land on the ball of your foot, bend your knees in a certain way and slap the floor with your hand. It takes the shock out of the landing entirely. It looks painful but it doesn’t hurt nearly as much as landing on the heels, which can result in being unable to walk for weeks. Once you’ve nailed these moves you can leap, vault and jump as much as you like, but don’t forget that there are limits. The forces involved in take-off and landing are up to eight times bodyweight, which compares with up to three times bodyweight when running. Its no higher than it would be in sports like basketball or gymnastics, but if you misjudge distance or landing conditions it could put an unexpected load on the body, resulting in broken bones, dislocated knees or worse. The good news is that as long as you don’t land on your head, jumping about on concrete shouldn’t do you too much harm. The human body is generally good at coping with running and jumping on hard surfaces, if they’re expected. The surface would have to be as forgiving as a trampoline to make a real difference to the forces involved.
• Therefore, if the only way to avoid injury is to know exactly how and where you’re going to land, practice is the only answer. It also helps avoid a last minute case of the jitters. When you get scared, you become more rigid in your movements, your muscles become tense and you’re more likely to lose co-ordination. The mind plays a massive part. If the fear gets to you, it’s all over, so you really have to have confidence in how you’ve trained.
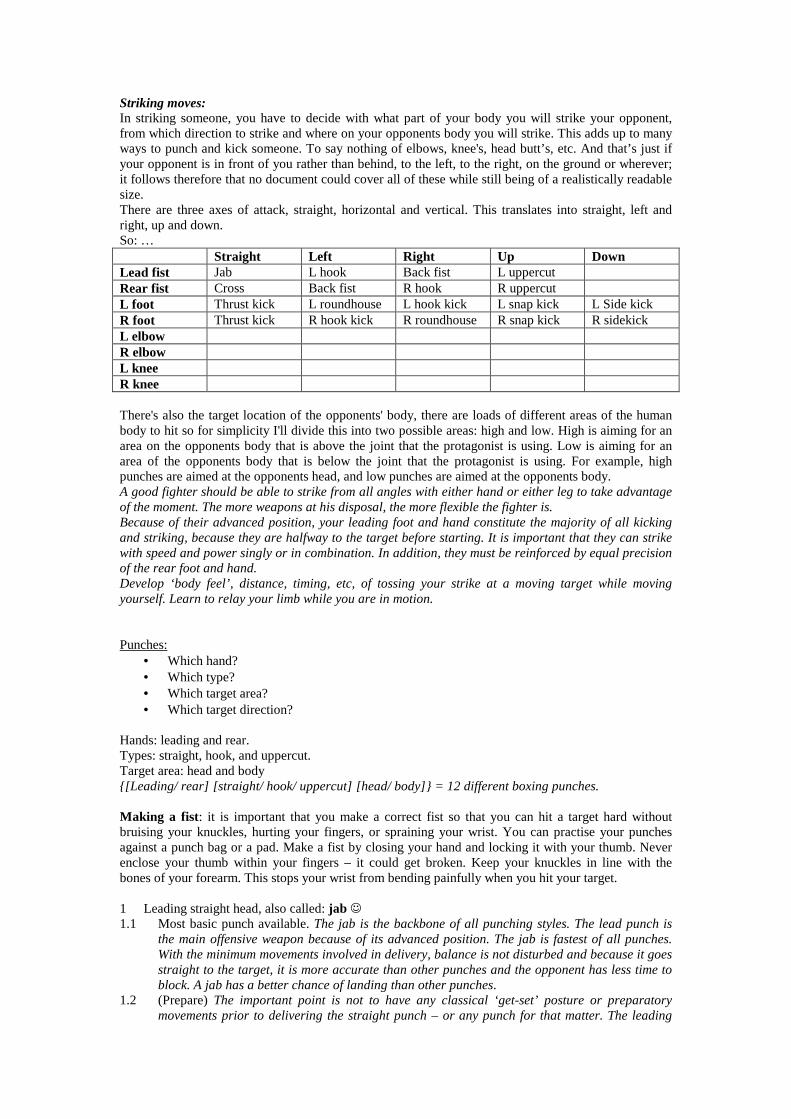
Striking moves: In striking someone, you have to decide with what part of your body you will strike your opponent, from which direction to strike and where on your opponents body you will strike. This adds up to many ways to punch and kick someone. To say nothing of elbows, knee's, head butt’s, etc. And that’s just if your opponent is in front of you rather than behind, to the left, to the right, on the ground or wherever; it follows therefore that no document could cover all of these while still being of a realistically readable size. There are three axes of attack, straight, horizontal and vertical. This translates into straight, left and right, up and down. So: … Straight Left Right Up Down Lead fist Jab L hook Back fist L uppercut Rear fist Cross Back fist R hook R uppercut L foot Thrust kick L roundhouse L hook kick L snap kick L Side kick R foot Thrust kick R hook kick R roundhouse R snap kick R sidekick L elbow R elbow L knee R knee There's also the target location of the opponents' body, there are loads of different areas of the human body to hit so for simplicity I'll divide this into two possible areas: high and low. High is aiming for an area on the opponents body that is above the joint that the protagonist is using. Low is aiming for an area of the opponents body that is below the joint that the protagonist is using. For example, high punches are aimed at the opponents head, and low punches are aimed at the opponents body. A good fighter should be able to strike from all angles with either hand or either leg to take advantage of the moment. The more weapons at his disposal, the more flexible the fighter is. Because of their advanced position, your leading foot and hand constitute the majority of all kicking and striking, because they are halfway to the target before starting. It is important that they can strike with speed and power singly or in combination. In addition, they must be reinforced by equal precision of the rear foot and hand. Develop ‘body feel’, distance, timing, etc, of tossing your strike at a moving target while moving yourself. Learn to relay your limb while you are in motion. Punches:
• Which hand? • Which type? • Which target area? • Which target direction?
Hands: leading and rear. Types: straight, hook, and uppercut. Target area: head and body {[Leading/ rear] [straight/ hook/ uppercut] [head/ body]} = 12 different boxing punches. Making a fist: it is important that you make a correct fist so that you can hit a target hard without bruising your knuckles, hurting your fingers, or spraining your wrist. You can practise your punches against a punch bag or a pad. Make a fist by closing your hand and locking it with your thumb. Never enclose your thumb within your fingers – it could get broken. Keep your knuckles in line with the bones of your forearm. This stops your wrist from bending painfully when you hit your target. 1 Leading straight head, also called: jab ☺ 1.1 Most basic punch available. The jab is the backbone of all punching styles. The lead punch is
the main offensive weapon because of its advanced position. The jab is fastest of all punches. With the minimum movements involved in delivery, balance is not disturbed and because it goes straight to the target, it is more accurate than other punches and the opponent has less time to block. A jab has a better chance of landing than other punches.
1.2 (Prepare) The important point is not to have any classical ‘get-set’ posture or preparatory movements prior to delivering the straight punch – or any punch for that matter. The leading
straight punch is delivered from your ready stance without any added motions like drawing your hand back to your hip or shoulder, pulling back your shoulder, etc. Practice your lead punch from the ready stance and finish again in the ready stance (not back on the hip). Later, you should be able to strike from wherever the hand happens to be now. Remember, punching in this manner will give you added speed (no wasted motions) and deception (no give away movements preceding the punch).
1.3 (Prepare) When advancing the attack, the lead foot should not land before the fist makes contact, or the body weight will end up on the floor instead of behind the punch. Remember to take up power from the ground by pushing off with the rear foot.
1.4 (Prepare) your lead hand should be like greased lighting and must never be held rigidly or motionless. Keep it slightly moving, without exaggeration, in a threatening manner, as it not only keeps your opponent on edge, but it also can be delivered faster from motion than from immobility. Your strike should be felt before it is seen.
1.5 (Act) Throw lead hand straight out from shoulder. The punch is never positioned on the hip, nor does it start from there. Delivering a punch from the hip is unrealistic and exposes too great an area to protect; it also adds unnecessary distance to travel to the opponent.
1.6 (Act) Wrist turns just before impact to land with palm facing the floor. This varies actually. In western boxing, the jab is a long-range punch that lands with the palm facing the floor. In eastern boxing the jab is a short range punch instead of coming from the shoulder, the punch is thrown from the centre of the body in the form of a vertical fist, thumb up, and straight toward the front of your own nose. The nose here is the centre guiding line. The wrist is slightly turned downward before delivery and is immediately straightened upon impact to add a corkscrew effect to the opponent.
1.7 (Act) Arm should be fully extended. The jab is snapped across, not pushed, and should be brought back high and kept high to offset a rear-hand counter. The arms merely relax and sink back to the body rather than being pulled back. This is as important as knowing how to deliver.
1.8 (Act) Power comes from a quarter turn of your leading shoulder. In all hitting, including the jab, all force is outward from the body. The movement of the jab should be a continuous winding motion from the shoulder.
1.9 (Act) Shoulder rises to protect jaw. At the time of landing the jab, the chin is tucked down and the shoulder is curved around the chin as a protective covering.
1.10 (Act) Middle knuckle of fist along line of sight. The lead jab is a 'feeler'; it’s the basis for all other blows, a loose easy stinger. It is a whip rather than a club. Muhammad Ali's theory is to picture hitting a fly with a swatter.
1.11 (Act) [Body] A well-executed punch doesn’t strike with only the fist; it strikes with the power of the whole body. In other words, it doesn’t hit with just arm power; the arms are there as a means to transmit great force with the correct timing of feet, waist, shoulder, and wrist motion at great speed.
1.12 (Act) Relaxation is essential for faster and more powerful punching. Let your lead punch shoot out loosely and easily; don’t tighten up or clench your fist until the moment of impact. All punches should end with a snap several inches behind the target. Thus, you punch through the opponent instead of at him.
1.13 (Act) When striking with the lead hand, it’s advisable to constantly vary the position of your head for added protection against the opponents counter. During the first few inches of advancing, the head remains in line; after that, the head should adapt. In addition, to minimise counters from the opponent, you should at times feint before leading. However, don’t overdo the feinting or the headwork. Remember simplicity; just enough is enough.
1.14 There are no wrists in boxing. The forearm and the fist should be kept on a straight line with the forearm and there should be no bending of the wrist in any direction. Be careful not to hit with your thumb.
1.15 (Act) [Body] The elusive lead: In delivering the lead, the position of the head should be constantly varied, sometimes up, sometimes down, and sometimes ‘neither up nor down’. Sometimes, the rear hand can be placed in front of the face while leading, although this might entail a loss of reach and rapidity. Keep your opponent guessing by varying your movements.
1.16 The elusive lead used in defence: The sudden change of level: use the first two inches to lead, then a sudden change – head feint. Use as defence for: swings of hands or feet, hooks of either hands or feet reverse heel kicks, spin kicks and spinning blows. Use the elusive lead to set up for grappling and tackling.
1.17 (Act) If you can't get at the opponent's head or body, aim at his biceps.

1.18 (Recovery) When striking with the lead hand, don’t drop it when withdrawing to the ready position. Though you might see this being done by a good fighter because he is potentially fast and good at timing and distance, you should cultivate the habit of returning along the same path and keeping that hand high for any possible counters.
1.19 (Recovery) Sometimes it pays to use double lead because they are unexpected and the second punch tends to disturb the opponents’ rhythm and thus, paves the way for a follow-up.
1.20 Most guarding is done with the rear hand – thus, the term ‘guarding hand’. When striking with the lead hand, don’t make the mistake of putting your rear hand on your hip. The rear hand is there to supplement your lead to make the attack a defensive offence. For example, when striking a body blow with the lead hand, the guarding hand (the rear hand) should be held high to offset any countering by your opponent to your upper body. When one hand is out, the other should be either immobilising one of your opponents arms or withdrawing (not all the way to the hip) for protection against countering and to secure a strategic position for a follow-up.
1.21 (Recover) It's important that, upon shooting the jab, you instantly return your fist to its on-guard position, ready to punch again or to protect yourself from a counterpunch.
1.22 Its great advantage is that body balance isn't disturbed and it's both an offensive and defensive weapon. In offence, the lead jab serves to keep your opponent off-balance and paves the way for more severe punching. When used as a defensive blow, the jab often stops or effectively meets an attack. You can frequently slip in a sudden and disconcerting jab to the other fellows face at the very moment he is about to release a real punch at you. Used correctly, it’s the sign of the scientific fighter, who uses strategy rather than force. It requires skill and finesse as well as speed and deception (broken rhythm). Keep in mind that there is nothing worse than slow jab, except one that's telegraphed.
1.23 It is often advisable to shoot more than one jab. The second jab has an excellent chance of landing, providing the first one was delivered with utmost economy, and it serves to cover-up the missed first jab. Naturally, you may shoot as many more jabs as you wish.
1.24 Continue to practice the jab until it’s a light, easy, natural movement. Carry the shoulder and arm relaxed and ready at all times. It requires long, diligent practice to make the movement automatic, and to obtain speed and power without apparent effort. Accuracy should be the main objective and the straighter you jab, the better.
1.25 The jab may be effectively used with the fist closed to stiff-arm the opponent away from you in defence. Keep him on the defensive and increase the pace ever so steadily. Give him no rest.
1.26 There are four necessary qualities of a straight lead: 1.26.1 Perfect balance of body, 1.26.2 Accuracy of aim, 1.26.3 Precise timing and co-ordination, 1.26.4 Maximum power of punch. 1.27 The straight lead is the blow that, whether used in attack or defence, leaves its exponent in
hitting range for a shorter period than any other blows. Most experts make it their principle blow.
1.28 Straight hitting and straight kicking is the foundation of scientific fighting skill. Requiring speed and intelligence to use, it travels less distance than round arm blows, or hooks, spinning kicks, and will reach the mark first. Straight blow and kicks are more accurate than hooks and swings and allow full use of the arm and leg reach.
1.29 Straight hitting is based on an understanding of body structure and the value of leverage. It’s an attempt to use body weight in every blow, hitting with the body and using the arm as merely the vehicle of force. Arm action alone is insufficient to give real power to blows. Real power, quick, accurate, can be obtained only by shifting the weight in such a manner that the hip and shoulder precede the arm to the centre line of the body. There are only two methods that obtain complete shift of weight
1.29.1 A pivot or quick turn of the waist, allowing the hip and shoulder to precede the arm. 1.29.2 A full body pivot, shifting the weight from one leg to the other. The waist pivot is faster and
easier to learn and is used as the basis for teaching the art of hitting. 1.30 Power in hitting comes from a quick twist of the waist, not a swinging, swaying movement, but a
pivot over the straight lead leg. As long as this straight line is maintained, as long as the hips are relaxed and free to swing, as long as the shoulders are not tensed and are turned through to the centre line of the body before the arms are extended, power will result and hitting will be an art.
1.31 Once the straight line of the lead side of the body is broken, power is lost because the straight lead side of the body is the anchor, the pivot point, the hinge from which power and force is
generated at its greatest height. So great is the power that may be attained in this manner that a real artist can deliver a knockout blow without taking a single step forward or displaying any apparent effort.
1.32 When using a body pivot, turn on the balls of both feet while punching. The fist comes straight from the centre with the full power of one or the other leg behind it. Sometimes a quick three or four inch jump will do the trick.
1.33 According to your position and the time you have to put the lead punch in, you may occasionally take a short step to the guarding side, just a few inches, with your rear foot, watch out for kicks. This will put even more weight into the punch, especially at long range.
1.34 To ensure success, the straight hit and the lunge (step) must be one co-ordinated move. 1.35 (Body) Your head should sway slightly to the guarding side as it moves forward with your step. 1.36 Remember the ‘covered line’ (outside or in) and the supplementary guard, always there
corresponding to the uncovered line. 1.37 Always keep the rear hand guard up. Be ready to follow with the rear hand. 1.38 Practices shooting the lead out in a quick succession of blows, withdrawing the striking arm
sufficient to enable full power to be put behind each blow. 1.39 Vary the leads to the head and body. 1.40 One should always finish punching with the lead hand to enable one to return to the correct
fighting position instantly. 1.41 Jab in defence: 1.41.1 Some fighters are continually making the alternate movements of engaging, then making an
absence of ouch, lowering or drifting the hand. This habit can be used to advantage. As the adversary is leaving the blade and moving across to the opposite line, the opportunity of making a straight thrust is present.
1.41.2 For an opponent who lacks decision, one who extends to lead but brings his hand back to the on-guard position, the straight thrust can follow through advantageously.
1.41.3 Defensive errors, in conjunction with a step forward by the opponent, render the straight lead more possible.
1.42 Examples of Defence against a straight lead: 1.42.1 Have the rear hands ready in anticipation of a lead. Its already opened, held a little higher
than usual and weaves in controlled circles in front of your body. Immediately, the lead hand of your opponent flickers on its way to your face. Lean slightly to the guarding side and strike firmly and quickly at his wrist or forearm with your left hand – no strength whatever is required to deflect the heaviest blow this way. Don’t fail to take advantage of the opening. Put in a stiff lead to the face or body. Your opponent will be both off-guard and off-balance.
1.42.2 Sway to the guarding side, stepping in with the lead foot and deliver a severe body shot with your right hand. This may be varied by a punch to the face.
1.42.3 Sway to the lead side, stepping in with the lead foot and deliver a heavy rear-hand punch to the body, or head in a cross counter.
1.42.4 Snap back, then forward with a return punch. 2 Leading hook head 2.1 Another hard punch with all the bodies weight behind it 2.2 (Prepare) Takes small steps to the side on you’re leading foot; provides greater stability. 2.3 (Act) Twist the hips and thus the torso; CLOCKWISE for left hook and ANTICLOCKWISE for
a right hook 2.4 (Act) Drive the leading side of the body off the corresponding foot. The lead heel must be
raised outward so that the body can pivot, and the waist and shoulders reverse when the blow lands. Much of the 'kick' behind the lead hook is accomplished by the footwork. Your lead heel is raised outward, swivelling on the ball of the foot so that your blow will have a better reach and will go through better and faster. Drop a little to the opposite side to get more weight and to safeguard yourself.
2.5 (Act) Arm bent at 90 degrees at elbow, parallel to floor and at shoulder level. 2.6 (Act) Continue rotating upper body and release punch 2.7 (Act) Aim for your opponents' jaw. 2.8 (Act) Keep the other hand high to protect the face, with the elbow tucked in. When using a lead
hook, always keep your rear hand high as a shield for the face. Your rear elbow protects your ribs on that side.
2.9 (Act) Push shoulder into punch, putting your body weight behind it. You should keep the lead shoulder high for full leverage when you hook to the side of the chin.
2.10 (Act) Frequently, a boxer tries to put too much body behind the punch, thereby making it a push punch. The hook is a loose, arm-propelled punch. The 'kick' comes from the looseness of the delivery and the proper pivoting of the feet and body. The weight of the body is shifted with the hook to the side opposite the side from which the hook is launched. If you lead a hook, you must step in with the punch to make your reach good. Use a loose, easy, snappy punch: never a wide looping blow.
2.11 (Act) In loose hooking, the whip of the arm is caused by turning the body away from the arm until the range of movement in the shoulder joint is completely used. Then, the arm must turn with the body. Executed quickly, this causes the arm to whip forward as if released from a bow. Make the blow snappy; always think of speed and more speed. Aim to drive through the opponent.
2.12 (Act) Minimise motion so that you will be moving just fast enough to have the maximum effect without hooking wildly.
2.13 (Act) The more you 'open' an outside hook, the more it degenerates into a wild swing. You must keep it tight. When you open a hook, you open your own defence. Minimise all motion so that you will be moving just enough to have the maximum effect without hooking wildly. The greatest difficulty is learning to swing sharply without twisting the body out of shape.
2.14 (Act) The more sharply the elbow is bent, the tighter and more explosive the hook. Experiment with the arm slightly rigid before landing.
2.15 (Act) At the finish of the punch, the thumb is up. There is no twist of the fist – for proper protection of the hand. The forearm is rigid from the elbow to the knuckles and does not bend at the wrist. Remember always that your knuckles are pointing in the exact direction of your whirling weight.
2.16 (Prepare) Note: Beware of dropping your hand before you release the punch. This leaves the whole side of the body and head open and vulnerable to attack.
2.17 The lead hook should be used judiciously; it is most effective when going in or coming out and is useful against an overreaching straight or against swings.
2.18 With the opponent in same stance, the lead hook is often delivered when he has lowered his rear hand guard or after he has executed a lead jab.
2.19 Against a clever defensive fighter, the lead hook is sometimes the only way you can penetrate his defence or force him to vary it so that you can find openings for other types of punches.
2.20 The lead hook can be used as a lead when, for some reason, your opponent has lost his ability to move out of the way. It is more effective as a counterblow or as a follow-up, however, because it is a short-range weapon - when the opponent is coming to you. Try a straight lead or some other preparation first. A good way to use the lead hook powerfully is to fake a rear cross. Always vary your punches: high/low or low/high, singly or in combination. Jabbing and feinting (with advance) is a good means of getting your distance.
2.21 The lead hook is also a good punch while in fighting. The lead hook comes from the side outside the range of vision and it will go around the guard. This is valuable when close in, especially after a straight blow shakes up the opponent.
2.22 (Prepare) Always jab, or feint, first to get distance. For example, feint a cross to prepare leverage but don’t throw it too far. Most boxers pull their hand back too far before throwing the hook. Try not to pull or lower the hand. Enough power can be put into the punch without pulling the arm far back.
2.23 There are at least two ways to deliver a lead hook: 2.23.1 The long lead hooks; stab your opponents face with a straight lead and quickly follow with the
hook. Study the weight shift in attacking and countering – reaching forward and shifting to the back leg.
2.23.2 The short lead hook; this is delivered from the on-guard position with the elbow closer to your side. As you counter, shift your weight from the lead to the rear.
2.24 Example of defence against a lead hook: when blocking a hook, the tendency is to pull away or out from the blow. This is absolutely the wrong thing to do. Move in, not out, so that the hook ends harmlessly around your neck.
3 Leading uppercut head 3.1 A very hard punch to the jaw area with all your body weight behind it 3.2 (Prepare) Take a small step to the side with the leading foot 3.3 (Prepare) Bend knees slightly to move body/torso toward the ground; creates "spring" for
punch. 3.4 (Act) Then twist hips/torso slightly: CLOCKWISE for left uppercut and ANTICLOCKWISE
for right uppercut.

3.5 (Act) Drive the body upward with the lead foot and then release the punch. 3.6 (Act) Push upward with the legs while pushing arm up into the air 3.7 Note: Just as with the hook, do NOT drop your hand before you "spring" upward and
release the punch. Doing so will leave one side of the body open to attack. 3.8 Lead and rear uppercuts are used freely in close quarter work. There are many opportunities
for the punch once you get the inside position. 3.9 Uppercuts can be used for head down charges and wild swinging blows. This presupposes that
you do not go in with your head down or body bent forward until you have thoroughly sized up your opponents’ style or you will run into an uppercut.
3.10 The short uppercut is an effective one. Keep your legs bent before striking; straighten them suddenly as you send the punch in. Get up on your toes and lean back a little as the blow lands, dropping more weight on the rear leg.
3.11 Against a right stance user, when upper cutting with the lead right hand, put your left hand for a moment on your opponents right shoulder to make sure you don’t run into a heavy return.
3.12 The uppercut becomes almost useless against a fast boxer who stands upright all the time and simply jabs a long lead in your face. You must then plan to get to close-quarters and apply this punch to his groin, etc. By these methods, you may then tire him so much that he will drop his head.
3.13 The blow may be practised upon a hanging bag of Indian corn. 4 Leading straight body (jab) 4.1 (Prepare) Move torso downwards by bending knees slightly 4.2 (Prepare) Keep your back straight 4.3 (Act) Throw lead hand straight out from shoulder 4.4 (Act) Wrist turns just before impact to land with palm facing the floor 4.5 (Act) Arm should be fully extended 4.6 (Act) Power comes from a quarter turn of your leading shoulder 4.7 (Act) Shoulder rises to protect jaw 4.8 (Act) Middle knuckle of fist along line of sight. 4.9 A lead to the body is an effective blow used to bother the opponent and bring down his guard,
often preceded by a feint of a high lead punch. 4.10 While not ordinarily a hard blow, it can cause distress if driven to the solar plexus. It is
important that the body follow the arm. In other words, a blow to the body is more effective and safer if the executioner sinks to the level of the target.
4.11 Drop the body forward from the waist to a position at right angles to the legs. Keep the forward leg only slightly bent but the rear leg more completely flexed. As the body drops, drive the lead arm into forceful extension toward the opponents’ solar plexus. The blow is upward, never downward. The rear hand is carried high in front of the body, ready for the opponents leading hook. Hold the head down so that only the top is visible and will be protected by the extended punching arm. The head should be held tight against the extended arm.
4.12 To hit with a straight right lead to the body, feint with the left hand toward the head by extending the left hand quickly with a slight forward movement. Step well in with the left hand quickly with a slight forward movement. Step well in with the left foot, keeping it still in the rear and at the same time lean over to the left side. You will be practically free of all danger. The right that follows can become a punishing hit and one difficult to deal with. Furthermore, you are in a position to bring up the left to the head with great force.
5 Leading hook body 5.1 (Prepare) Move torso downwards by bending knees slightly 5.2 (Prepare) Keep your back straight. 5.3 Another hard punch with all the bodies weight behind it 5.4 (Prepare) Takes small steps to the side on you're leading foot; provides greater stability. 5.5 (Act) Twist the hips and thus the torso; CLOCKWISE for left hook and ANTICLOCKWISE for
a right hook 5.6 (Act) Drive the leading side of the body off the corresponding foot 5.7 (Act) Arm bent at 90 degrees at elbow, parallel to floor and at shoulder level. 5.8 (Act) Continue rotating upper body and release punch 5.9 (Act) Throw hooks to the ribcage area 5.10 (Act) Keep the other hand high to protect the face, with the elbow tucked in. 5.11 (Act) Push shoulder into punch, putting your body weight behind it. 5.12 (Act) Note: Beware of dropping your hand before you release the punch. This leaves the
whole side of the body and head open and vulnerable to attack.
5.13 The body is the easier target for the simple reason that it covers a far larger surface than the jaw and is less mobile. The groin might be a better target too, and is definitely harder to block than the jaw.
5.14 A hook to the body is more effective close in. feint to his head, then in a flash, step forward with the lead foot and sink your lead hook into his stomach, ribs, groin or whichever target is closer. At the same time, duck to the opposite side from which your hook is being thrown. In doing this, you must bend your lead knee, bringing your shoulder as near as possible, level with the striking point. To preserve balance, turn out the toe of the rear foot. Keep your rear guard up.
5.15 The hook is a good punch to combine with a step to the side, for you are moving sideways and it is the natural way to swing at that moment. Similarly, you may land effectively on your opponent with a hook at the instant he is trying to step to the side. Remember that if you catch your man coming in, the blow will be twice as hard. Remember, also, to keep your rear hand up while striking!
6 Leading uppercut body 6.1 (Prepare) Move torso downwards by bending knees slightly 6.2 Keep your back straight 6.3 A very hard punch to the solar plexus area with all your body weight behind it 6.4 (Act) Take a small step to the side with the leading foot 6.5 Bend knees slightly to move body/torso toward the ground; creates "spring" for punch. 6.6 (Act) Then twist hips/torso slightly: CLOCKWISE for left uppercut and ANTICLOCKWISE
for right uppercut. 6.7 (Act) Drive the body upward with the same foot as whichever hand is being used and then
release the punch. 6.8 (Act) Push upward with the legs while pushing arm up into the air 6.9 Note: Just as with the hook, do NOT drop your hand before you "spring" upward and
release the punch. Doing so will leave one side of the body open to attack. 7 Rear straight head (cross) � 7.1 Similar to jab but thrown with opposite hand, the rear hand. The rear cross is delivered in much
the same manner as the lead jab in that it travels in a perfectly straight line. The rear cross, however, is the heavy artillery and the twist at the waist will be much greater.
7.2 Throw rear hand straight out from shoulder. 7.3 Drive the rear side forward off the rear foot. It's important to ensure your rear heel and rear
shoulder turn in one movement. This is accomplished be merely shifting the body weight over a straight lead leg, hinging the lead side of the body and freeing the opposite side for a forceful turn or explosive pivot. It’s the same idea as slamming a door.
7.4 Turn the shoulder into the punch, pushing all your weight behind it. Your weight should begin on the ball of your rear foot. As your rear fist travels, it twists and your rear shoulder moves in to the blow. You twist at the waist and the weight of your body is shifted forward into the punch and to your lead foot before connecting. Your rear foot follows by dragging forward a few inches in the direction of the punch and your lead fist shifts back as your body twists.
7.5 Arm should be fully extended. 7.6 Right hand turns before impact, so the right palm faces the floor. 7.7 Shoulder rises to protect jaw. Keep your hands well up at all times; especially don’t drop the
rear hand while punching with the lead. Blows should start where the hands are. The start is normally made from the on-guard position with no preliminary movement, no lifting or drawing back. The shoulder curves over the chin for protection and the chin is kept down. The rear hand must be shot from its resting-place on the chest or body; it generally starts from near the shoulder. When returning, keep your lead shoulder raised for a right stance’s left cross or a left stance’s lead hook.
7.8 Middle knuckle of fist along line of sight. Sometimes, move over a little further to the lead-side and shoot the straight cross inside his arm in a slight upward direction.
7.9 A much harder punch than the jab. In your on guard position, your rear fist is cocked somewhere under your chin, an inch or two out from your chest. When you hit with your lead, the twist at your waist shifts your rear fist from its regular on-guard position, back four of five inches to a point from which you can, without telegraphing or drawing back, hit one of the hardest blows in boxing, the rear cross.
7.10 In any power blow, the bone structure must be aligned to form one straight body side or line that enables it to support the weight of the body. Thus freeing the muscles to propel the other side of the body forward and create terrific force. One side of the body must always move in a straight line.
7.11 The secret of power in the straight rear cross is using the lead side of the body as a hinge and allowing the rear side of the body to swing free.
7.12 Let the blow slip out loose and easy, don’t grip, and don’t tighten up the arm at the beginning of the punch. Let the contraction of the muscles come just as the blow lands, with a last closing and tightening on the fist, a final burst of nervous energy to drive through the opponent. Its force depends on speed and timing with the opponents' movements. Do not forget the drive from the rear leg.
7.13 As the rear arm is extended, the lead arm is held close to the side in the position of guard. This is done only for an expected counter, but also so, the boxer will be in position to throw the second follow-up punch. Remember, one-hand out, one hand back. This movement must be practised until it can be easily, quickly and correctly performed. The arm should drive out with such snapping force as would seem to pull it clear of the socket. Again, the blow must be driven through, not just at, the opponent. The arm then relaxes back to the on guard position.
7.14 When using the rear cross, you must not hesitate. If you think you have the opening, you should let it fly, and not be half hearted about it.
7.15 Because the rear cross is a long range blow, to be effective it must be delivered straight as an arrow, fast as a shot and completely without warning. The most important part of the rear cross is to cultivate a delivery speed so, when you strike, the damage is done before your opponent realises it. You must also be accurate with the straight rear cross, the more accurate and the more explosive it will be.
7.16 Unless you have correct balance, you will not be in a position to deliver a lead shot after your rear cross. This is the most important, because if your opponent ducks to avoid the rear cross, your quickest method of recovery is to throw a lead and you must be in a correct position to do so. If you are trying to correct faulty footwork in those split seconds, you may well find yourself flat on your back.
7.17 The rear cross is difficult to use because the rear hand has to travel further and use of the rear hand will present an opening for your opponent if you miss. Practice minimising the above two points and perfect the rear cross - non-telegraphic starting, quick recovery.
7.18 Usually, you'll hit with your rear fist after first having shot a lead (one-two). 7.19 Keep the lead hand moving; don’t hold it motionless. Let it flicker in and out like the tongue of
a snake ready to strike. Above all, always threaten and worry your opponent. 7.20 Throw the lead out, stepping out with the lead foot simultaneously. Before it reaches its mark
(blocking the sight of the opponent), drive your rear fist straight out (without pulling it back even a fraction) and twist your body to the lead side, pivoting on the sole of your rear foot. As you pivot, get plenty of push and snap from the rear side of your body, up from the foot, through the legs, hips, and make sure it is capped off by plenty of snap from your rear shoulder. This power is accentuated by the co-ordination of the whole body in the follow-through. Keep balanced at all times.
7.21 It should be noted that the rear thrust is often a counterblow. Sometimes it is better to feint the opponent into leading to shoot the rear as a counter. Here the blow is delivered straight during the opponent's lead at your face. You step inside a lead, allowing it to slip over your rear shoulder, and shoot to the rear-side, meanwhile keeping an eye on his rear-side or putting a stop to it with your lead. Your head must be ducked forward and to the lead-side, to avoid the opponents lead (keep your eyes on him!), but the duck must be very slight, just sufficient to avoid being hit. The rear hand, back uppermost, should just skim the opponents elbow before his lead is straightened and the swing of the body on the hips, from rear-side to lead-side, should be assisted by jerking back the lead elbow and shoulder. It generally meets your man coming in and lands on the angle of the jaw. Do not always hit at the head however. Aim toward the centre line to drive through the opponent.
7.22 Combinations: Try 2 leads to time your cross. Try a rear hand to the stomach, then a cross. 8 Rear hook head 8.1 Another hard punch with all the bodies weight behind it 8.2 Takes small steps to the side on you're leading foot; provides greater stability. 8.3 Twist the hips and thus the torso; CLOCKWISE for left hook and ANTICLOCKWISE for a
right hook 8.4 Drive the rear side of the body off the corresponding foot 8.5 Arm bent at 90 degrees at elbow, parallel to floor and at shoulder level. 8.6 Continue rotating upper body and release punch 8.7 Aim for your opponents' jaw. 8.8 Keep the other hand high to protect the face, with the elbow tucked in.

8.9 Push shoulder into punch, putting your body weight behind it. 8.10 Note: Beware of dropping your hand before you release the punch. This leaves the whole
side of the body and head open and vulnerable to attack. 8.11 The hook is more effective as a counterblow. It is never a wide, looping blow, but is more like a
loose, easy, snappy punch. Remember, the pivot is the key; footwork makes the punch. 8.12 Avoid telegraphing! Start and end in the ready position. It must begin from the on-guard
position for proper deception. The hand is never pulled back or lowered. Always jab or feint first to get your distance and leverage.
8.13 The rear hook is valuable for infighting. Especially when coming away on the break, or when the opponent is backing away. Sometimes, you can take your opponents attention off the lead hook by showing him your rear punch.
8.14 The hook is mastered chiefly on the small punching bag. Try to explode sharply without twisting the body out of shape and be ready to follow up with more punches.
9 Rear uppercut head 9.1 Move torso downwards by bending knees slightly 9.2 Keep your back straight 9.3 A very hard punch to the jaw area with all your body weight behind it 9.4 Take a small step to the side with the leading foot 9.5 Bend knees slightly to move body/torso toward the ground; creates "spring" for punch. 9.6 Then twist hips/torso slightly: CLOCKWISE for left uppercut and ANTICLOCKWISE for right
uppercut. 9.7 Drive the body upward with the same foot as whichever hand is being used and then release the
punch. 9.8 Push upward with the legs while pushing arm up into the air 9.9 Note: Just as with the hook, do NOT drop your hand before you "spring" upward and
release the punch. Doing so will leave one side of the body open to attack. 9.10 Draw a lead, and then step in with a quick head twist to that side. As he’s still leaning forward
in his lead, deliver a short, sharp, rear uppercut to his chin, raising and obstructing his lead with your punching arm.
9.11 The rear uppercut is delivered by lowering the rear fist on the way across and ‘scooping’ up and to the jaw or groin. The lead hand is drawn back for protection as well as strategic offensive position.
10 Rear straight body (cross) 10.1 Move torso downward by bending knees slightly. 10.2 Keep your back straight. 10.3 Throw rear hand straight out from shoulder. 10.4 Drive the right side forward off the rear foot. 10.5 Turn the shoulder into the punch, pushing all your weight behind it. 10.6 Arm should be fully extended. 10.7 Right hand turns before impact, so the right palm faces the floor. 10.8 Shoulder rises to protect jaw. The front hand is up and open, elbow down, guarding against the
opponents rear hand. The head is down along the punching arm, and thus well protected. 10.9 Middle knuckle of fist along line of sight. 10.10 A much harder punch than the jab. The straight rear thrust to the body is a power blow and
used either as a counter or after a preliminary feint with the leading hand. As in the jab to the body, the body follows the blow, although added force can be obtained by a body pivot to a position over the lead foot. (Examine the difference between the two) Keep a good defensive position - watch out for a hammer blow counter. It is effective in pulling down an opponent's guard and can be used with great success against the tall fighter.
10.11 Throw straight crosses to the chest area. You have a foot of body to shoot at for each inch of chin. In addition, the body is less mobile.
10.12 This blow should be used more frequently. When properly timed and correctly delivered, it’s a very punishing blow and a comparatively safe one, since you crouch as you drive the punch home, thus avoiding full-arm counters. Opportunities for the use of this blow are rather frequent, since it's one of the best counters to the opponents opposite lead, which exposes one side of his body.
10.13 This blow should be frequently used against an adversary who protects his face with the rear hand when 'leading' to the head.
10.14 Delivering a straight rear thrust to the body: feint with your lead hand at the head and 'draw' your opponents lead as a counter to your feint, or else wait for him to lead.
10.15 Stopping a straight rear thrust to the body: merely press your front arm across your body. Simultaneously, raise your lead shoulder for fear the body blow turns into a double hit.
11 Rear hook body 11.1 Move torso downwards by bending knees slightly 11.2 Keep your back straight 11.3 Another hard punch with all the bodies weight behind it 11.4 Take a small step to the side on you're rear foot; provides greater stability. 11.5 Twist the hips and thus the torso; CLOCKWISE for left hook and ANTICLOCKWISE for a
right hook 11.6 Drive the rear side of the body off the corresponding foot 11.7 Arm bent at 90 degrees at elbow, parallel to floor and at shoulder level. 11.8 Continue rotating upper body and release punch 11.9 Throw hooks to the ribcage area 11.10 Keep the other hand high to protect the face, with the elbow tucked in. 11.11 Push shoulder into punch, putting your body weight behind it. 11.12 Note: Beware of dropping your hand before you release the punch. This leaves the whole
side of the body and head open and vulnerable to attack. 11.13 Study a left rear hook to the kidney of a crouching opponent, an opponent who turns in a right
stance to the left, leaving his right kidney an open target. The first is looped in a half-circle into the kidney.
12 Rear uppercut body 12.1 Move torso downwards by bending knees slightly 12.2 Keep your back straight. 12.3 A very hard punch to the solar plexus area with all your body weight behind it 12.4 Take a small step to the side with the leading foot 12.5 Bend knees slightly to move body/torso toward the ground; creates "spring" for punch. 12.6 Then twist hips/torso slightly: CLOCKWISE for left uppercut and ANTICLOCKWISE for right
uppercut. 12.7 Drive the body upward with the same foot as whichever hand is being used and then release the
punch. 12.8 Push upward with the legs while pushing arm up into the air 12.9 Note: Just as with the hook, do NOT drop your hand before you "spring" upward and
release the punch. Doing so will leave one side of the body open to attack. 13 Lead finger jab: 13.1 Like a fencer’s sword that is always in line, the leading finger jab is a constant threat to your
opponent. It’s western sword fencing without a sword and the primary target is your opponents’ eye.
13.2 The leading finger jab is the longest of all hand weapons as well as the fastest because of the little force needed. You do not need power to jab at an opponent’s eye. Rather, the ability to seize an opportunity with accuracy and speed is the main thing in the efficient use of the finger jab. Thus, as in all hand techniques, the finger jab should begin from your ready position without any added motions. It starts from your ready position and back again, like greased lightning. Like a cobra, your finger jab should be felt and not seen.
13.3 You should be able to snap, not push the finger jab out singly or in combination. Unless you are naturally fast, your opponent will many times be able to avoid one finger jab but you will usually catch him by instantly following the first with a second. The leading finger jab is one of the most efficient weapons, especially in self-defence, and should be cultivated to the highest form of proficiency.
13.4 Because you use shocking flickering force rather than punching force, the leading finger jab also, with the point of view of jabbing, is like swatting a fly. Accuracy is what counts. Choose your target during movement and let go to recover with ready reinforcements.
13.5 Practice and sharpen your finger jab when you are fresh or you will begin to substitute gross motions for fine motions and generalised efforts for specific economic efforts. Leave endurance exercises until after skill training. Reread the descriptions on the straight lead.
13.6 Training aid: 13.6.1 ‘A’ and ‘B’ face each other in a ready position. 13.6.2 ‘A’ advances with a low shin kick. This is mainly used as a feint to disturb the opponents’
composure and lengthen his reaction time. It also serves to obstruct any possible kick during the advance.
13.6.3 As soon as the distance is bridged and slightly before ‘A’s lead foot is down alongside ‘B’s foot, A whips out his finger jab straight as an arrow to ‘B’s now opened guard.
14 Shovel hook (inside lead hook) head or body 14.1 Shovel hooks are thrown ‘inside’ with the elbows in, pressing tightly against the hips for body
blows and pressing tightly against the lower ribs for head blows. They are thrown from your on guard position and they are short-range dandies. Make certain you have no tension in the elbow, shoulder or legs until the whirl is started. Your hip comes up in a vigorous shovelling hunch and your hand is at a 45-degree angle. The punch is angled to shoot inside an opponent’s defence.
14.2 Execution: Pull your lead elbows in and press it firmly against the front edge of your hipbone. Turn your half-opened lead hand up slightly so that your palm is partially facing the ceiling. Your palm should slant at an angle of about 45 degrees with the floor and ceiling. Meanwhile, keep your guard hand in normal position. Now, without moving your feet, suddenly whirl your body to your guard side in such a fashion that your lead hip comes up with a circling, shovelling hunch that sends your exploding lead fist into the target about solar plexus high. The slanting angle of your right hand permits you to land solidly with your striking knuckles. Make certain you have no tension in your elbow, shoulder or legs until the whirl is started from your normal position. More important, make certain that your hand is at the 45-degree angle and your hip comes up in a vigorous shovelling hunch.
14.3 The fist angle and the hip hunch are important features of all shovel hooks, whether to the body or head. The leg spring used in the hip hunch speeds up your body whirl and, at the same time deflects the direction of the whirl upward in a surge. Meanwhile, the combination of the angled fist and the bent elbow points your striking knuckles in the same direction as that of the whirling surge. You have a pure punch. Your fist lands with a solid smash with plenty of follow-through. In addition, your pure punch is angled to shoot inside an opponent’s defence.
14.4 Shovels to the head are delivered from the on-guard position. Practice it on the speed bag. Fold your right arm in toward your body, keeping your forearm straight up until your thumb knuckle is only a slight distance from your right shoulder. Be sure that your right elbow is well in and that it is pressing against your right lower ribs. Now, without moving your feet, suddenly give your body the combination shoulder whirl and hip hunch and let your angled fist explode the punch against your chin-high target. Make certain each time that your elbow is pressing against your lower ribs at the start of the whirl and that your fist, when it lands, is only a short distance from your right shoulder.
14.5 Shovel hooks are full-fledged inside lead hooks, one of the shortest, yet one of the most explosive blows. Once, you have mastered it, your hands will flash instinctively to their shovel post as your body starts its hunching whirl. Your body will pick them up.
14.6 You can make the range with any number of attack combinations in which the shovels are used for follow shots. The simplest combinations would be a long lead jolt to the head, which failed to knock you opponent backward, followed immediately by a rear hand shovel to the head or body. O, you could follow a similar straight lead to the head with a right shovel to the head or body. Likewise, a long straight cross to the head, which failed to accomplish its explosive object, would put you in position for right shovels to either target. Also, if fast opponent steps into you, his speed may be such hat you cant catch him with a stepping counter-punch, but that very speed may make him a perfect ‘clay pigeon’ for your short-range artillery. In addition, you’ll be in short range for counter-shovels many times when you ward off attacks by means of blocks, parries, slips and the like.
14.7 The shovel ranks next to your long straight punches. They enable you to knock out or at lest soften up an opponent who is trying to clinch with you. Don’t forget to use elbows, stomps, knees, etc. They help you to keep inside the attack of bobbing weavers; who mostly hook from the outside, and help you straighten them up. Since the shovels are all short, tight blows, you are less likely to be hit while using them than while throwing the more open outside hook.
15 Corkscrew hook 15.1 Strictly speaking, a corkscrew hook is delivered almost like a straight punch with the difference
that, just before contact, the wrist is turned sharply. It is a curved, tearing, and knuckle jab for medium range.
15.2 (Preparation) The essence of any hook is that the striker raises his elbow at the last possible moment when swinging. This will bring his knuckles around so they will make contact when his punch lands.
15.3 (Action) From your on guard position, start your shoulder whirl as if you were going to shoot a medium range lead jab – no preparatory movement, Instead of jabbing, however, snap your
lead forearm and fist down, and your right elbow up. Your lead fist snaps down with a screwing motion that causes your striking knuckles to land properly on the target. When your fist explodes against the target, your forearm is almost parallel to the floor.
15.4 When you step in with a lead corkscrew, you move in with a ‘pivot step’ – stepping forward and slightly to your own lead side, pointing the toe sharply in. Your body pivots on the ball of your lead foot as your lead arm and fist snap down to the target. At the instant of the fists landing, your rear foot is generally in the air, but it settles immediately behind you.
15.5 If you have a potent lead corkscrew that flashes in without warning, your opponent will be very cautious about menacing your with his rear fist. You can use the corkscrew hook to beat an adversary’s rear cross. Moreover, if he permits his guarding left hand to creep too far forward as he blocks or parries you’re leading jab, your corkscrew hook can snap down behind that guarding hand and nail his jaw.
15.6 The lead corkscrew is often delivered while you are circling to your lead side. 15.7 Practice on the light speed bag to obtain proper form and zip. 16 Palm hook 16.1 The palm hook is simply a fast, open hand hook that hits with the palm of the hand. 16.2 In the normal punching position, the right outside palm hook is very useful as a lead that shoots
in behind the opponents guarding hand. It is useful as a counter that, with guarding or slipping, beats a straight lead to a punch. .
17 One-inch punch: 17.1 This uses a throwing action rather than a thrusting action. This makes it very effective for
people with slight builds. This can develop a lot of power, even over a distance as small as 25mm (1 inch).
17.2 (Prepare) For the basic punch, begin by opening your hand and bending your elbow. Now point your fingers at your target.
17.3 (Prepare) Straighten your elbow and roll your fingers down so that your fingertips brush the top of your palm.
17.4 (Act) Clench your fist very tightly as your elbow reaches full extension. Unlike many other punches, the on-inch punch is made with the thumb uppermost.
17.5 (Act) The punch travels only a few millimetres, which makes it difficult to block. Impact is made with the lower three knuckles. You can add power by hunching your shoulders forwards behind the punch.
1 Punching concepts: 1.1 Hitting does not mean pushing. True hitting may be likened to the snap of a whip – all the
energy is slowly concentrated and then suddenly released with a tremendous outpouring of power. Pushing is exactly the opposite, with the concentrated force at the start of the blow and a subsequent loss of power as the arm leaves the body. In pushing, the body is often off-balance, as the force of the blow does not come from a pivot of the body but only from a push off the rear foot.
1.2 Pay particular attention to the development of relaxed tension. If you tighten up, you lose the flexibility and timing, which are so important to successful punches. Keep relaxed at all times and remember that timing is your chief aid in making a blow effective.
1.3 Punches are not supposed to be thrown with a wind up motion. They are made with a well-directed forearm and loose shoulder muscles. Only when the punch begins to land should the fist be clenched. The momentum helps carry the arm back to the proper position.
1.4 The top of your shoulder is at the level of the point you are striking. Sometimes its alright to stand on the balls of your feet when landing a head shot on a tall person to make your shoulder come to the level of his jaw. When hitting to the pit of the stomach, both knees give way until the shoulder is at the level of the pit of the stomach.
1.5 Remember to take up power from the ground through your legs, waist and back. Sway all your muscles into your punches, at the same time do your best to minimise the number of motions, and make them drive through the opponent. Push off from the ground.
1.6 Timing is best when the opponent rushes in. 1.7 Remember, when advancing the foot must not land first or the body weight will rest upon the
floor instead of behind the punch – heel slightly raised and pointing outward. 1.8 Always have the legs slightly bent so that the strong thigh muscles come into play, like a spring,
especially before coming in. 1.9 Your step should be long enough to make your reach good and you should drive your punch
slightly through the target.
1.10 Endeavour never to flinch or close your eyes, but watch your opponent intently all the time. Keep your chin firmly set and nicely tucked away.
1.11 The more versatile the fighter - the more alert mentally and the more agile physically - the more apt he is to shove the most unorthodox blows from the most impossible angles.
1.12 All punches must begin from the on-guard position, for added deception. 1.13 Remember that punches are not supposed to be thrown with a wind-up motion. They are made
with a well-directed forearm and loose shoulder muscles. The momentum helps carry the arm back to the proper position.
1.14 After throwing one punch, be ready to follow-up with another solid punch with either hand. 2 Follow through: 2.1.1 First, there are different types of force applications and one should use all of them. 2.1.2 Follow through generally refers to continuation of a high rate of movement, or even
acceleration from the instant of contact, until the ceasing of contact. The punch should increase in speed throughout its run and when it lands, still have enough momentum and power to drive clear through the object. Do not aim merely to strike at your man; aim to drive through him – but do not have a ‘lean on’ effect.
2.1.3 Make up your mind that you’ll hit as hard as you possibly can with every ounce of your bodily strength. With every fibre of your mental determination, and that, you’ll keep on hitting harder and harder as you progress through the object.
2.1.4 In boxing, for example, the athlete is taught to ‘strike through’ the opponent – to maintain or increase the rate of movement during the contact so that the ‘explosive push’ carries through farther and changes the opponents position more sharply.
2.1.5 Wrist snaps at the last instant in striking acts are last moment accelerations that literally go into the object like a compressed tennis ball. Instead of a relaxing follow through, the fighter must bring his hands back as fast as he thrusts them out. Reversing the waist movement aids in last minute acceleration as well as return.
3 Training aids: 3.1 It is most important, after recovering to a boxing position from any set manoeuvre (executed on
count or ‘as you will’), to shuffle about for a few seconds on the balls of your feet for footwork drill and relaxation before repeating the set manoeuvre. This tactic deftly simulates actual fighting within the drill.
3.2 The whole secret of the actual force of a terrific punch is it’s timing, co-ordinated of course with the accuracy of its aim. Hang a small ball to practice aim.
3.3 Learn economical motion of delivery from a variety of angles, and then lengthen the distance gradually.
3.4 One important point: In all hand techniques, that hand moves first, preceding the foot. Keep this in mind – hand before foot – always.
4 Combinations punching: 4.1 A good western boxer hits from every angle. Each punch sets him in position to deliver another
punch. He is always on centre, never off-balance. The more effective combinations a fighter has the more different types of opponents he will be able to defeat.
4.2 For long range fighting, jab with your lead and cross with your rear. For short range fighting hooks, rear hand body blows and uppercuts.
4.3 Alternate punching: Using either the lunge punch or the reverse punch, two or three strikes executed rapidly with alternate hands.
4.4 Consecutive punching: Punches in which the same hand is used to deliver two or more blows very quickly.
4.5 Lunge punch: A punch delivered while one is taking a long forward step. It is a very powerful technique because a great deal of force comes from the momentum of the body as it lunges toward the target.
5 Some observations are applicable to all types of hitting. Hit as straight as possible. Step in when you punch and make your reach good. Don’t telegraph any punch. If you have to set your fist in a certain way for a particular punch, do it in a manner that won’t warn your opponent. Fight from a centre and always be in a position and balanced to shoot any punch. Don’t overshoot your target, after hitting, instantly get back on guard. End a series of punches with you lead hand.
5.1 Sway a little as you hit. A hard punch must be delivered from a solid base; a boxer on his toes delivers light punches.
5.2 Learn to hold your fire until you can hit your opponent. Back him to the ropes or corner him before you attack. Don’t waste your energy missing. If he does the leading, avoid his punches and hit back with solid counter punches before he can get away.
5.3 Keep loose and relaxed except when actually fighting. Develop speed, timing and judgement of distance by many hard workouts with all types of sparring partners. With this, practice your authority; hit confidently and hard.
6 More punching concepts: 6.1 Close punch: Used in close fighting situations. The wrist of the striking hand is turned so that
the punch is inverted, or upside down. The close punch is very effective so long as it is used within the proper distance range.
6.2 Double fist punch: Any technique in which both hands are used simultaneously to deliver a blow. As the punches hit the target, the arms are parallel to each other, either horizontally or vertically. The U punch, scissors punch, and parallel punch are examples of the double fist punch.
6.3 Fore knuckle punch: Techniques in which the fingers of a fist hand are curled back at the first knuckle so that the Fore knuckle is the striking surface. It is a good technique for striking at small target areas that a fist would be unable to penetrate, such as between the ribs.
6.4 Hook punch: Any punch in which the arm bends at a 90-degree angle upon delivery of the strike.
6.5 One-knuckle fist punch: In this technique: the fore knuckle of the index finger is extended beyond the rest of the fist thus becoming the striking surface. The thumb is used as a brace for the index finger. This technique is effective in attacks upon very specific targets, such as the point directly under the centre of the nose.
6.6 Parallel punch: Double fist punches in which both hands are thrust directly forward to the same level and parallel to each other. The opponent is attacked simultaneously with both punches, which are usually aimed at the ribs.
6.7 Rising punch: A technique in which a straight punch is begun, but instead of following a straight line to its target, it moves in an arc and seems to be ‘rising’.
6.8 Roundhouse punch: A punch that follows a circular path to its target. It is usually directed toward the head of the opponent.
6.9 Scissors punch: A double fist punch that starts from the hips and travels in a circular path toward the centre of the opponents body, ‘scissoring’ him between the two blows.
6.10 Standing punch: To execute a standing punch, make a fist and turn the hand so that the knuckles are aligned vertically as opposed to the horizontal alignment of the flat punch.
6.11 Straight punch: A punch delivered in a straight line to a target directly ahead. The straight punch is most often used for striking at the ribs, head, or solar plexus. The knuckles of the second and third fingers are the main striking surfaces.
6.12 Thrust: A term to describe a number of punches used in the martial arts. The word thrust specifies the manner in which the technique arrives at its target: directly, and with a great deal of force behind it.
6.13 U punch: Both fists are used simultaneously, one to strike the upper area of the body (for example, the face) and the other to strike the lower middle area (for example, the solar plexus). The arms form a sideways letter U.
6.14 U punch, wide: A variation of the U punches in which the upper arm follows a circular path instead of the straight line of the regular U punch, and the hand is thrust straight forward. As with the U punch, it can be used effectively to strike simultaneously the face and the solar plexus.
6.15 Vertical punch: The forearm is turned inward and the fist is in a vertical position as the strike follows a straight path to its target, usually the face or solar plexus.
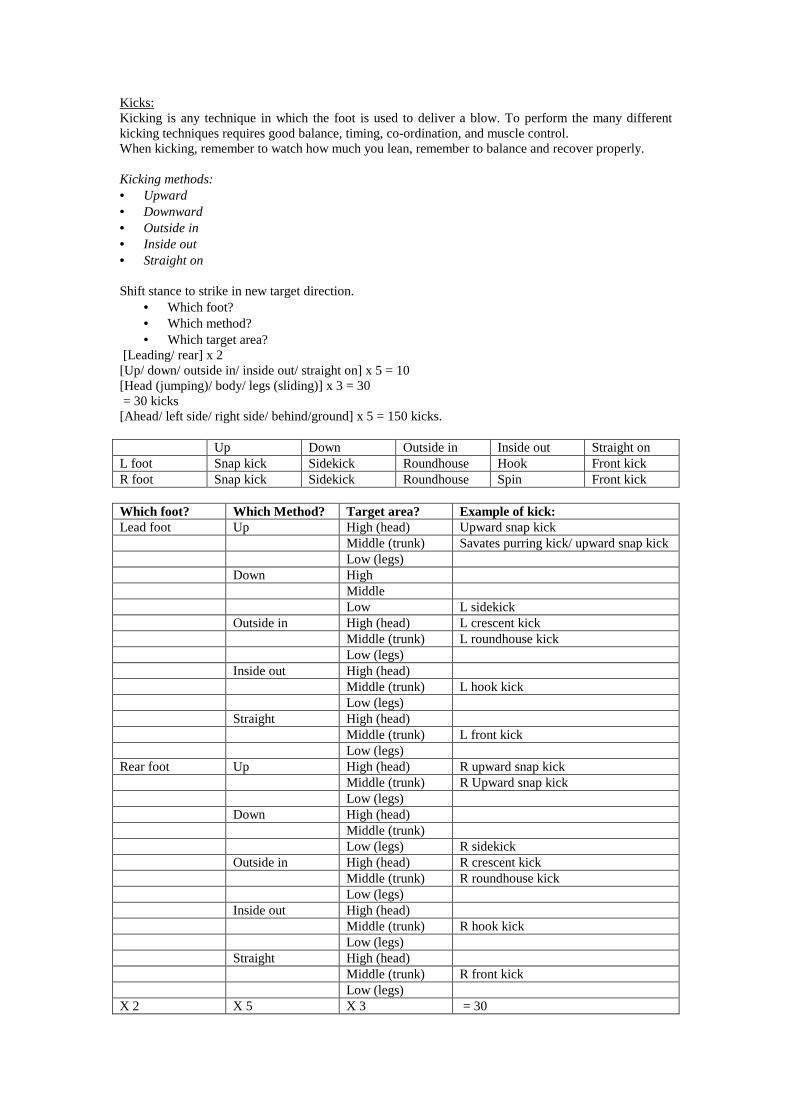
Kicks: Kicking is any technique in which the foot is used to deliver a blow. To perform the many different kicking techniques requires good balance, timing, co-ordination, and muscle control. When kicking, remember to watch how much you lean, remember to balance and recover properly. Kicking methods: • Upward • Downward • Outside in • Inside out • Straight on Shift stance to strike in new target direction.
• Which foot? • Which method? • Which target area?
[Leading/ rear] x 2 [Up/ down/ outside in/ inside out/ straight on] x 5 = 10 [Head (jumping)/ body/ legs (sliding)] x 3 = 30 = 30 kicks [Ahead/ left side/ right side/ behind/ground] x 5 = 150 kicks. Up Down Outside in Inside out Straight on L foot Snap kick Sidekick Roundhouse Hook Front kick R foot Snap kick Sidekick Roundhouse Spin Front kick Which foot? Which Method? Target area? Example of kick: Lead foot Up High (head) Upward snap kick Middle (trunk) Savates purring kick/ upward snap kick Low (legs) Down High Middle Low L sidekick Outside in High (head) L crescent kick Middle (trunk) L roundhouse kick Low (legs) Inside out High (head) Middle (trunk) L hook kick Low (legs) Straight High (head) Middle (trunk) L front kick Low (legs) Rear foot Up High (head) R upward snap kick Middle (trunk) R Upward snap kick Low (legs) Down High (head) Middle (trunk) Low (legs) R sidekick Outside in High (head) R crescent kick Middle (trunk) R roundhouse kick Low (legs) Inside out High (head) Middle (trunk) R hook kick Low (legs) Straight High (head) Middle (trunk) R front kick Low (legs) X 2 X 5 X 3 = 30
L axe kick, L stamping kick, L back kick, R axe kick, R stamping kick, R back kick, R front jump kick, Flying sidekick, jump back kick, R flying roundhouse kick, reverse turning kick, Savates purring kick, groin hook kick, reverse hook kick, straight forward snap kick, side thrust kick, back thrust kick, front thrust kick. 1. Lead front kick [straight on]
• The lead front kick is used to strike at a target directly ahead by travelling in a straight line toward it. The ball of the foot is usually the striking surface, although the toes or instep may be used. It is effective both as a snap kick and as a thrust kick.
• Mae Geri: Japanese for front kick. 2. Lead roundhouse kick [outside in]
• (Prepare) Hook kicks can be initiated without changing the on-guard position before or after kicking.
• (Recover) Pull the kicking leg back before setting foot down. • Watch leaning for balance and recovery • Landing: toe, instep, ball, shin, inside foot swipe. • Learn what muscles are involved in this kick and how to limber the parts. • Relax timing muscles but keep an overall alertness of position and timing. • Look into using the ball of the foot for attacking for shin, knee or instep. • Unlike straight-line kicks, a roundhouse kick follows a circular path. Because of its circular
direction, it takes a longer time to reach its target, but upon arrival, its centrifugal force gives it extra power. The instep is the usual striking surface, although the ball of the foot is also used.
• Wheel kick: Similar to a roundhouse kick except that the entire body, rather than just the kicking leg, spins around like a wheel. The leg is the spoke of this wheel and is capable of delivering a very forceful strike.
3. Lead sidekick • (Prepare) Step quickly behind your leading foot with your rear foot, so your hips swivel away
from the direction in which you are moving. • (Act) Thrust out your heel and little toe edge of your foot in a powerful sidekick. • (Recover) Pull the kicking leg back before setting foot down. • As you become faster, to the observer the kick will blur into a sideways hop. • The sidekick is best utilised by directing it downward. Develop in the sidekick a sense of
‘delicate use’. • This kick can be explosive, crispy thrust or a pushing thrust to wrench the opponents knee
while bridging the gap for a leg or hand follow up. It has a very demoralising effect and causes the opponent to attack less confidently. It also imposes respect of distance.
• A kick delivered from the side. The sidekick can also be used against a target directly ahead by rotating the hips to face the attacker. It can be directed to all levels of the body and is effective as a snap kick or a thrust kick.
4. Rear front kick • (Prepare) Slide lead foot forwards a short distance. • (Prepare) Bend both knees equally. Keep your guard up. • (Act) Bring your rear knee forward and up. Pull the toes back. • (Act) Keep the supporting leg bent and thrust the ball of the foot onto the target. • (Recover) Pull the kicking leg back before setting foot down.
5. Rear roundhouse kick • (Prepare) Knees bent. • (Act) Change your guard. Bring rear knee up and across your body. • (Act) Point your toes as you get ready to kick • (Act) Twist on you're supporting leg, allowing you're supporting foot to swivel freely, keep
your elbows close to your sides. Kick horizontally across the front of your body, into the side of your target. Aim the kick towards your opponents head. Strike with either the instep or the ball of the foot.
• (Recover) Pull the kick back before lowering foot.
• Wheel kick: Similar to a roundhouse kick except that the entire body, rather than just the kicking leg, spins around like a wheel. The leg is the spoke of this wheel and is capable of delivering a very forceful strike.
6. Rear sidekick [downward] • (Prepare) Turn lead foot out. • (Prepare) Turn hips away from opponent. • (Act) Bring rear knee across body, raising it to the side. • (Act) Drive heel/edge of foot out in a straight thrusting action. Lift the big toe and turn down
all the others. Aim the heel toward the target. • (Recover) Pull kick back before setting foot down. • The sidekick is best utilised by directing it downward. Develop in the sidekick a sense of
‘delicate use’. 7. Lead axe kick
• An axe kick is a kick in which the foot is swing high above your opponents head before being dropped heel first onto his head or collarbone.
• Use the arm opposite your kicking leg to help you balance. 8. Rear axe kick 9. Lead crescent kick.
• A kick in which the leg rises fully extended and makes an arc. The sole of the foot is the striking surface. This technique can be used to block an opponents punch by striking his forearm with the sole of the foot and pushing the punch out of the way.
• Mikazuki Geri: Japanese for crescent kick. 10. Rear crescent kick 11. Lead hook kick
• The lead hook kick is a straight-line kick similar to a sidekick, except that upon full extension, the leg snaps back from the knee joint with a hinging motion.
• Kake uke: Japanese for hooking kick. • Hooking kick from grasp: most people regard kicks as long-range weapons. Kicks can also be
used from short distances – but only after your opponents chance to counterattack has been neutralised. Drawing your opponent off-balance is a good way to neutralise a counterattack. Otherwise, you can step to a closed side before kicking. Be very careful about kicking someone when you are in punching range because a punch will always reach its target first.
• 1) Your attacker steps forwards with his right foot and tries to punch you with his right fist. Draw your body back into an ‘L’ stance and curl your hand over his wrist, closing your fingers and holding on tightly. Hold the wrist firmly so that he can’t pull away from you.
• 2) Lift your lead foot and flex your ankle, ready to kick. Your hips are already turned away. • 3) Lean away and hook your heel high and around, into the back of your opponents head.
Keep your eye on your opponent. Hold your left fist up to guard your body. 12. Rear hook kick 13. Lead stamping kick
• A kick in which either the heel or the side of the foot is used in a forceful downward motion directed at the knee joint, shin, ankle, top of the foot, or toes.
• Fumikomi Geri: Japanese for stamping kick. 14. Rear stamping kick 15. Lead back kick 16. Rear back kick.
• The back kick involves a powerful twisting action to spin the body right around. However, turning your back on your opponent can be dangerous, so only use a back kick as a surprise move, or after another attacking technique.
• Begin from lead fighting stance by sliding your lead foot across. Keep your guard up to protect your face.
• Twist, at the waist, to look over your rear shoulder. Keep your eyes on your opponent. • Pick up your rear foot and thrust it straight back, heel first, into the target. Pull the kick back
and continue turning on your lead foot. • Always put your foot down in a controlled way.
17. Rear Front jump kick.
• The rear front jump kick is an advanced technique. At the apex of a leap, a front kick to the opponents face or neck is executed, using the ball of the foot as the striking surface.
• Try your first jumping kick from a high stance with both knees bent. • Step up with your lead foot as though you were placing it on a chair. Raise your foot until it is
opposite your other knee. • Press down with your lead foot and spring into the air, lifting your rear knee. Kick with your
rear foot, while your lead foot is still in the air. Kick just before you reach the highest point of the jump. The kick begins as you are rising, not as you reach the top of the jump.
18. . Reverse turning kick • The reverse turning kick uses a 180-degree turn of the body. • Twist your body clockwise and allow your feet to move naturally. Look over your rear
shoulder. The twisting action sets up a rubber band like tension in the muscles of your spine and trunk. Keep your eyes on your opponent at all times.
• Begin turning your hips and lift your rear foot into chamber position, ready to kick. Draw your toes back. Remember to keep your guard up.
• Now hook strongly back with your heel in a spinning reverse roundhouse kick... 19. . Jumping/ spinning back kick
• A jumping or spinning back kick is one of the most difficult of all the airborne kicks. • Begin with a jump high into the air. Then twist clockwise so your back faces your opponent. • Look over your shoulder to check where your opponent is. • Then pull the kick back and continue turning. You will land with your knees bent, facing your
opponent. 20. . [Jumping] kick
• These are the hardest kicking techniques to master. You start out to execute a regular kick and while doing so, leap into the air. The target is struck as you reach the apex of the jump. These kicks require good timing, co-ordination, and balance in order to be effective.
• A major problem when performing a jumping kick is that you can lose your sense of direction and miss your target completely. This is why you must always keep your eyes focused on where the kick is going. This is not always easy. Twist your head quickly to look over your shoulder so you lose sight of the target for the shortest possible time. In addition, the greater the number of movements you have to produce in the air, the higher you must jump to fit them all in before you land.
• Tobi Geri: Japanese for jumping kick. 21. Rear flying roundhouse kick
• The flying roundhouse kick is a difficult technique to perform because first, you jump and twist one way, and then you twist the other way as you perform the kick. Remember to tuck up supporting leg and keep control of your arms.
• This kick is similar to the roundhouse kick but has an added jump. • Step up with your lead foot and spring off the floor with your right foot. Imagine that you are
putting your feet up on a chair. • Turn while you are in the air and bring your kicking knee forwards. This bent-knee position
before a kick is called the ‘chamber position’. Your rear leg is ready to kick. Tuck your supporting leg under you as you jump.
• Now kick out with your right shin and instep to perform the full kick. Keep your eyes on your target and land in a prepared position.
More kicking concepts: • Four basic kicking attacks
• Front kick, rear kick, roundhouse kick and sidekick. From these four, all other kicking attacks are formed. [Lead/rear] [Thrust/ snap, heel, jumping] [Front, roundhouse, sidekick, axe, crescent, hook, stamping, back]
• [Thrust] kick • A straight-line kick whose main purpose is to deliver maximum force at impact. Because the
leg thrusts forward, rather than snapping, the body must lean back to maintain stability. • [Snap] kick
• In a snap kick, the leg comes up, extends with a quick snapping motion, and returns. One must remain perfectly balanced and standing straight for the execution of this kick. Speed is essential to its success.
• [Heel] kick • The heel kick is a kicking technique in which the heel of the foot is used as the striking
surface. • Kakato Geri: Japanese for heel kick. Kicking concepts:
• Most people regard kicks as long-range weapons. Kicks can also be used from short distances – but only after your opponents chance to counterattack has been neutralised. Drawing your opponent off balance is a good way to neutralise a counterattack. Otherwise, you can step to a closed side before kicking. Be very careful about kicking someone when you are in a punching range because a punch will always reach its target first.
• Introducing a skip change before kicking increases its effectiveness. A skip change means swapping your feet over just before you kick. The skip makes the kick more powerful and the change of stance confuses your opponent.
• Do not warn your opponent of your intentions. • An opening punch distracts attention. Use the pull back of a spent punch to power the next strike. • Keep your shoulders relaxed as you kick. • Kicks coming from knee:
• Groin hook kick • Reverse hook kick • Upward snap kick • Straight forward snap kick
• Kicks coming from hip: • Side thrust kick • Back thrust kick • Front thrust kick • Jumping to strike opponents' head with striking foot parallel to body.
• Savates purring kick – circular or upward force • Knee does not have mobility like upper body. • Thrown to the front and rear. • Quickest, economic and natural, most powerful and hardest to move away from. • Heel normally makes contact. Experiment making contact with the ball of the foot. • Sometimes it’s necessary to bypass the front to attack the rear weight-bearing leg. The more
weight on the leg, the more damage to the knee. • Kicking tactics:
• Kicking technique must: 1. Have a sense of powerful ease, developed through practice and supplementary exercises. 2. Be able to adjust height in initiation. 3. Be economically sudden in initiation. 4. Have smooth speed. 5. Be able blend with any movement. 6. Be direct and instantaneous in relaying toll part to target area. 7. Be accurate and precise
• Functions of the longest kicks: 1. Primarily to reach a more distant target. 2. As a destructive tool. 3. To bridge the gap for another kick or hand technique. • The kick you use will vary according to the type of opponent you face.
• Combine kicking with all phases of footwork; advancing, retreating, circling left and right, and moving to the side. The fast kick should be felt and not seen.
• Use the speedy delivery of kicks to ‘jump’ your opponents consciousness. Find an attitude of loosening antagonistic muscles prior to delivery, a ‘continuous waiting’ attitude rather than a ‘preparatory’ one. Use the speedy delivery of kicks to ‘arrest’ your opponents ‘moving away from neutrality’.
• ‘Watch’ the delivery, landing and recovery with continuous awareness, reinforcing all with ‘watchful’ hand guards.
• The attacking lunges step and slide on all the attacking steps must:
1. Facilitate a speedy recovery out of range of a counter kick, should the attack fail. The slightest loss of balance or control may mean that some part of a counter kick target has been left unprotected for a fraction of a second.
2. Be able to overcome the long measure with speed, economy and control. 3. Have an element of surprise, catching the opponent off guard mentally or physically. 4. Be driven with great determination and speed/power once initiated. 5. Use maximum reach to kick target, ¾ bend or more especially in attack. That extended
distance is what makes an all-kicking attack possible. 6. Utilise intense grace and awareness, comparable to the hand, and explode with killing power
– that’s the art of kicking. • Develop power on the spot:
• During combinations with the same leg: • High/low hook and shin/knee side • High/low and angle-in hook kick.
• During alternate leg kicking. • During reaching, extended reaching, hooking. • During close-range thrusting.
• Apply close-range sidekick downward to avoid jamming and to add a powerful tool. • Consider kneeing in close-range and stomping while maintaining balanced posture.
• Kicking awareness: 1. Initiation
• Looseness in neutrality • Economical start that blends with neutrality • Playful looseness (mental) and smooth speed (physical).
2. Transition • Clear sight • Neutrality • Regulated balance • Tight defence
3. Landing • Well-timed collision with right part of foot. • Natural releasing of co-ordinated destructive force.
4. Recovery • Flowing back to neutrality or flow on with attack. • Reinforcement with ‘watchfulness’
• All kicks should be done with speed and sudden economy in mind, as well as with power. Learn the most efficient bridging of distance, plus efficient timing with the opponents’ movement.
• Master kicking quickly and powerfully from high, low or ground posture. Develop body feel and efficient form in dropping suddenly to fast, powerful kicks while advancing, retreating, and circling left, circling right. Learn to use ‘energy flow’ to rise from unaccustomed squatting positions.
• Learn how to cover initiation of a kick and the quick recovery back to the on-guard position. Covering should be automatic and continual.
• Develop the ability to apply a sweep with the economy of a kick. Look into initiating the foot sweep, with or without handwork, as a counter or attack at long, medium and close range.
• Which are the safety ‘speed’ lead kicks used as pace setters respect getters, for gauging distance? How much faster can you make them without turning them into ‘flicking’? Use the boxing jab as a guideline. For instance, you wouldn’t use the rear hook unless you are sure of securing distance and opponents’ condition. Learn how not to let the opponent take advantage of your commitment. Psyche your opponent, physically and mentally, by inflicting pain.
• Look into snapping a kick from the knee to get more power, or snapping a kick from the hip and knee to get more speed. Test both in long, medium and close range.
• What are the pacing kicks that are snappy and combine with quick retreat? They should slow the pursuer by hitting into his line of movement while you are moving off his line of force.
• What are the pacing kicks that jam? Work out precautions for being grabbed. • What are the close-range kicks that snap? Work out natural hand or leg follow-ups. • Learn relaying destructive force to where the target is or is headed. Use ‘body feel’ as your
guideline.
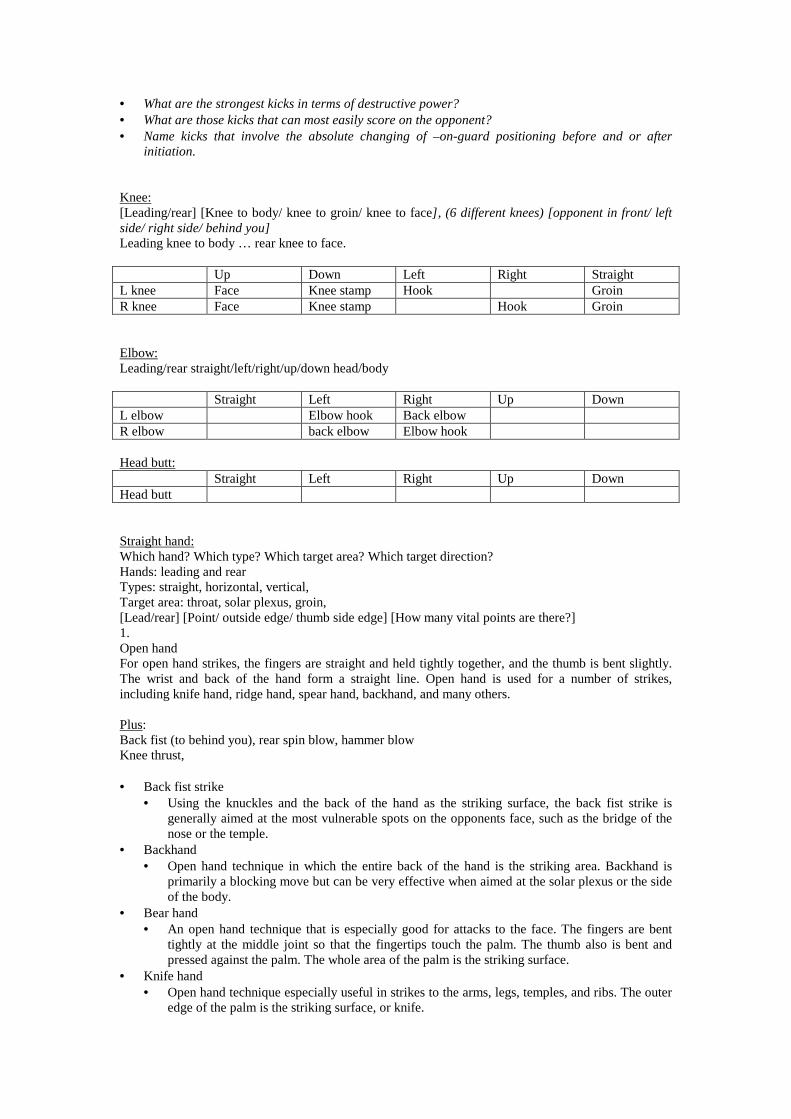
• What are the strongest kicks in terms of destructive power? • What are those kicks that can most easily score on the opponent? • Name kicks that involve the absolute changing of –on-guard positioning before and or after
initiation. Knee: [Leading/rear] [Knee to body/ knee to groin/ knee to face], (6 different knees) [opponent in front/ left side/ right side/ behind you] Leading knee to body … rear knee to face. Up Down Left Right Straight L knee Face Knee stamp Hook Groin R knee Face Knee stamp Hook Groin Elbow: Leading/rear straight/left/right/up/down head/body Straight Left Right Up Down L elbow Elbow hook Back elbow R elbow back elbow Elbow hook Head butt: Straight Left Right Up Down Head butt Straight hand: Which hand? Which type? Which target area? Which target direction? Hands: leading and rear Types: straight, horizontal, vertical, Target area: throat, solar plexus, groin, [Lead/rear] [Point/ outside edge/ thumb side edge] [How many vital points are there?] 1. Open hand For open hand strikes, the fingers are straight and held tightly together, and the thumb is bent slightly. The wrist and back of the hand form a straight line. Open hand is used for a number of strikes, including knife hand, ridge hand, spear hand, backhand, and many others. Plus: Back fist (to behind you), rear spin blow, hammer blow Knee thrust, • Back fist strike
• Using the knuckles and the back of the hand as the striking surface, the back fist strike is generally aimed at the most vulnerable spots on the opponents face, such as the bridge of the nose or the temple.
• Backhand • Open hand technique in which the entire back of the hand is the striking area. Backhand is
primarily a blocking move but can be very effective when aimed at the solar plexus or the side of the body.
• Bear hand • An open hand technique that is especially good for attacks to the face. The fingers are bent
tightly at the middle joint so that the fingertips touch the palm. The thumb also is bent and pressed against the palm. The whole area of the palm is the striking surface.
• Knife hand • Open hand technique especially useful in strikes to the arms, legs, temples, and ribs. The outer
edge of the palm is the striking surface, or knife.
• Chopping palm • An open-hand strike for which the ideal targets is the temple, neck, and collarbone. The outer
edge of the hand ‘chops’ with a rapid motion. • Hammer fist strike
• As the name suggests, the fist and forearm are used as a club, with the bottom of the fist as the striking surface.
Vertical Back fist from grab 1. Your attacker has taken hold of your wrist. He is grasping the top of your wrist with his left hand. 2. Extend your fingers and use the strength of your body to pull your wrist free. Bend forwards from
the waist. 3. Spin anticlockwise and draw your feet together. Cross your forearms in front of you with your
right arm nearest your body, your palms are facing away from you. 4. Slide out with your left foot and strike your opponent with a left back fist to the side of the head.
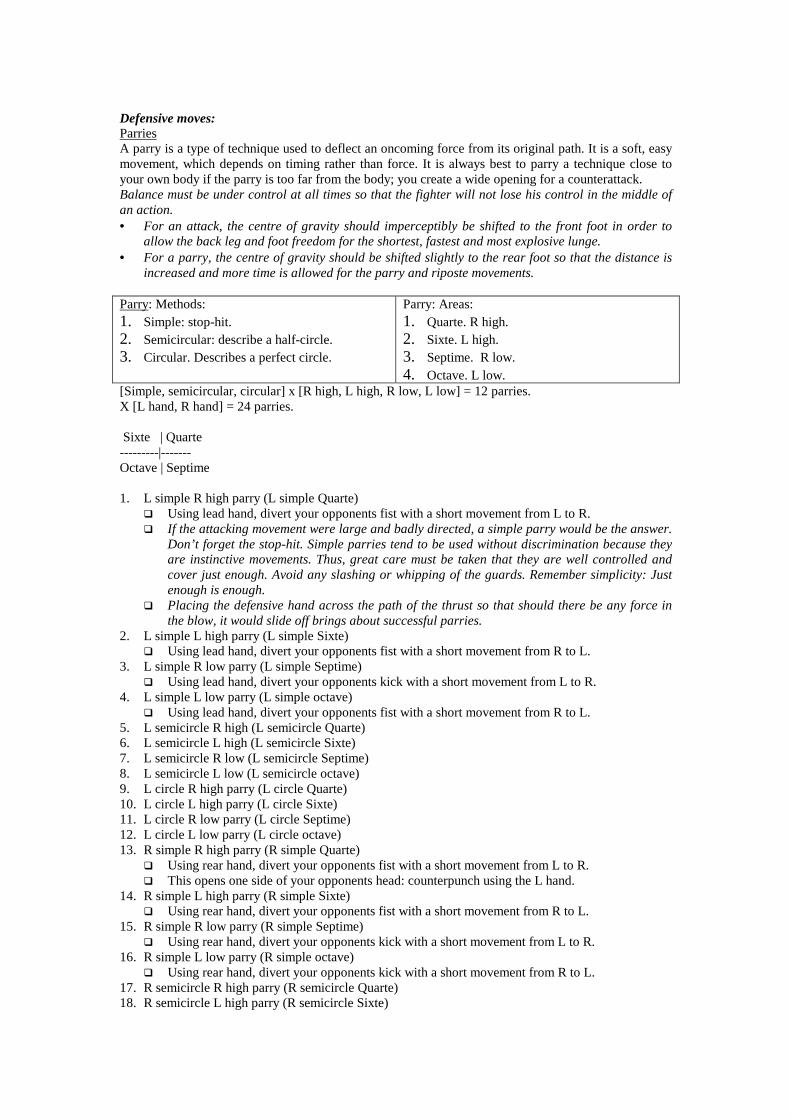
Defensive moves: Parries A parry is a type of technique used to deflect an oncoming force from its original path. It is a soft, easy movement, which depends on timing rather than force. It is always best to parry a technique close to your own body if the parry is too far from the body; you create a wide opening for a counterattack. Balance must be under control at all times so that the fighter will not lose his control in the middle of an action. • For an attack, the centre of gravity should imperceptibly be shifted to the front foot in order to
allow the back leg and foot freedom for the shortest, fastest and most explosive lunge. • For a parry, the centre of gravity should be shifted slightly to the rear foot so that the distance is
increased and more time is allowed for the parry and riposte movements. Parry: Methods: 1. Simple: stop-hit. 2. Semicircular: describe a half-circle. 3. Circular. Describes a perfect circle.
Parry: Areas: 1. Quarte. R high. 2. Sixte. L high. 3. Septime. R low. 4. Octave. L low.
[Simple, semicircular, circular] x [R high, L high, R low, L low] = 12 parries. X [L hand, R hand] = 24 parries. Sixte | Quarte ---------|------- Octave | Septime 1. L simple R high parry (L simple Quarte)
� Using lead hand, divert your opponents fist with a short movement from L to R. � If the attacking movement were large and badly directed, a simple parry would be the answer.
Don’t forget the stop-hit. Simple parries tend to be used without discrimination because they are instinctive movements. Thus, great care must be taken that they are well controlled and cover just enough. Avoid any slashing or whipping of the guards. Remember simplicity: Just enough is enough.
� Placing the defensive hand across the path of the thrust so that should there be any force in the blow, it would slide off brings about successful parries.
2. L simple L high parry (L simple Sixte) � Using lead hand, divert your opponents fist with a short movement from R to L.
3. L simple R low parry (L simple Septime) � Using lead hand, divert your opponents kick with a short movement from L to R.
4. L simple L low parry (L simple octave) � Using lead hand, divert your opponents fist with a short movement from R to L.
5. L semicircle R high (L semicircle Quarte) 6. L semicircle L high (L semicircle Sixte) 7. L semicircle R low (L semicircle Septime) 8. L semicircle L low (L semicircle octave) 9. L circle R high parry (L circle Quarte) 10. L circle L high parry (L circle Sixte) 11. L circle R low parry (L circle Septime) 12. L circle L low parry (L circle octave) 13. R simple R high parry (R simple Quarte)
� Using rear hand, divert your opponents fist with a short movement from L to R. � This opens one side of your opponents head: counterpunch using the L hand.
14. R simple L high parry (R simple Sixte) � Using rear hand, divert your opponents fist with a short movement from R to L.
15. R simple R low parry (R simple Septime) � Using rear hand, divert your opponents kick with a short movement from L to R.
16. R simple L low parry (R simple octave) � Using rear hand, divert your opponents kick with a short movement from R to L.
17. R semicircle R high parry (R semicircle Quarte) 18. R semicircle L high parry (R semicircle Sixte)

19. R semicircle R low parry (R semicircle Septime) 20. R semicircle L low parry (R semicircle octave) 21. R circle R high parry (R circle Quarte) 22. R circle L high parry (R circle Sixte) 23. R circle R low parry (R circle Septime) 24. R circle L low parry (R circle octave) Parrying concepts: 1 Timing of parries: 1.1 Parrying is a sudden movement of the hand from the inside or outside onto an oncoming blow,
to deflect the blow from its original path. It is a light, easy movement depending on timing rather than force. A blow is never parried until the last moment and always when close to the body.
1.2 To reach out to parry a blow not only makes openings for counter blows, but also enables the opponent to change the direction of his blow. Remember; parry late rather than early.
2 Tactics of parrying: 2.1 The object in the parry is to use just enough deflecting motion to protect the threatened area. If
you over-protect by moving the hand too far to one side, you are immediately vulnerable to disengaging attacks.
2.2 Parrying is an extremely useful form of defence. It is easily learned, easily performed and should be used whenever possible. Advantageous openings are created which are essential to counter-fighting.
2.3 Parrying is more refined than blocking, which uses force and causes confusion of the tissues, nerves and bones. Blocking should be used only when it is necessary because it weakens rather than conserves bodily force. A well-delivered blow, even if blocked, will disturb balance, prevent countering and create opening for other blows.
2.4 Sometimes the fighter must feel that in deflecting the thrust or kick, he is in reality taking possession of it; that through the contact he obtains, he will feel his opponents reactions when the latter realises his attack has failed.
2.5 Only use a parry against a real attack. The opponents’ false attacks can be followed with half-positions.
2.6 Training aid: 2.6.1 The teacher directs strikes or thrusts to different parts of the target. 2.6.2 The student follows these movements but stops when the teacher stops, parrying only the real
attacks. 2.6.3 Next, the teacher makes the same threats, but the student does not follow with his hand. Again,
the parry is taken only when the real strike or thrust comes. This procedure teaches the student to parry only at the last moment.
2.7 The parries of octave (low outside) and Septime (low inside) are those used for defence against attacks directed in the low line. However, for tactical reasons they can be alternatives to the parries of Sixte (high outside) and Quarte (high inside).
2.8 Against a very fast fighter or one with a marked superiority of height or reach, it is often necessary to step backwards when making a parry. When parrying with a step backwards, the parry should be taken as the rear foot moves backwards in the course of breaking ground. In other words, the parry should be formed with the step back and not after, it has been completed.
2.9 Sweep away the thrust from the target by the shortest route, with your shoulder relaxed, - counter of Sixte is taken by moving the hand clockwise, while counter of Quarte will require a counter-clockwise rotation of the blade. Hang on, that’s in fencing. In unarmed; counter of Sixte involves the hand moving from L to R. i.e. when parrying with an open palm the palm would start facing R but turn L. counter of Quarte involves the hand moving from L to R, i.e. when parrying with an open palm the palm would start by facing forward and would turn L.
2.10 What will make parries or blocks more effective? Body positioning, footwork to facilitate ready countering. Watch out for the opponents’ counter. Experiment sweeping the parry toward the opponents’ path with natural easy movements.
2.11 Examine parries with all kinds of dodging, shifting, slipping, weaving, ducking, and snapping back, for possible insertion of kicks or a combination of kicks and or punches. Insert stopping and covering with kick and punch insertions. In addition, is sure to constantly threaten the opponent with inserts during apparent shifts to various directions always positioning be on-guard.
3 There are three parries – simple, semicircular, and circular to a single offensive movement.
3.1 Simple parries. 3.1.1 Against the simple parry (that is, a lateral crossing of hands) attack with disengagement on the
other line. Blocking ~ simple parries. 3.2 Semicircular parries 3.2.1 Semicircular parries are those taken from a high line of engagements to deflect an attack
directed in the low line, or from a low line engagement to a high line. They describe a half-circle.
3.3 Circular parries 3.3.1 A circular parry envelops the attackers wrist and brings it back to the original line of
invitation, while deflecting off the target. 3.3.2 A circular parry, when used in the high line, starts under the adversaries’ hand. When used in
the low line, it starts over the opponents’ hand. The advantages of circular parries over opposition or beat parries are that they protect a larger amount of the target and are more difficult to deceive. However, they are not as rapid as the simple parries. Time spent in speeding them up will pay good dividends.
3.3.3 When using circular parries, be sure that the hand describes a perfect circle so that it finishes in its original position. Do not start or finish the parry too soon, for your hand must follow the opponents and should meet his hand just before it is about to arrive on the target.
3.3.4 Use the circular parry also to mess up the opponent who fails. 4 Compound parries: consist of two or more like parries or a combination of different parries. 4.1 The number of parries to evade can be single, dual, or plural. 4.2 Each single parry must be finished, bringing your hand to the appropriate position before
making the succeeding parry. 4.3 Mix and vary your parries so the opponent cannot set an attacking plan. The habit of always
reacting to attacks with the same type of parry will obviously play into the hands of an observant opponent. Thus, it is wise to vary the type of parry used as much as possible during a bout to keep the opponent guessing. This will cause a certain amount of hesitation on the part of the attacker whose offensive action will suffer in confidence and penetration.
5 The beat 5.1 When making the opposition parry to apply the ‘beat’ parry, your hand should not swing too far
to the right or left. Merely close the line or deflect the opponents’ hand, leaving just enough room to arrive on the target.
5.2 The beat parry is usually followed by a fast return against the sharp and powerful opponent. 5.3 The beat is used prior to a direct attack or to obtain a reaction for an indirect attack. The bind,
croise, envelopment and pressure are mainly elements of trapping prior to an indirect attack or are simply used to obtain a reaction.
6 The bind 6.1 When the hand is engaged, the action of carrying the opponents hands diagonally across from a
high to a low line or vice versa is called a bind. It is performed much like a semicircular parry. 7 The croise 7.1 The croise carries the opponents hand from the high to low line on the same side of the
engagement and does not, as in the bind, carry it diagonally across. It is not executed from low to high.
8 The envelopment 8.1 The envelopment is the action of taking the opponents hand off its target in a circular motion
and returning it to the line of engagement. 9 The pressure 9.1 The pressure is the action of pressing upon the opponents hand in order to deflect it or obtain a
reaction to disengage from it.
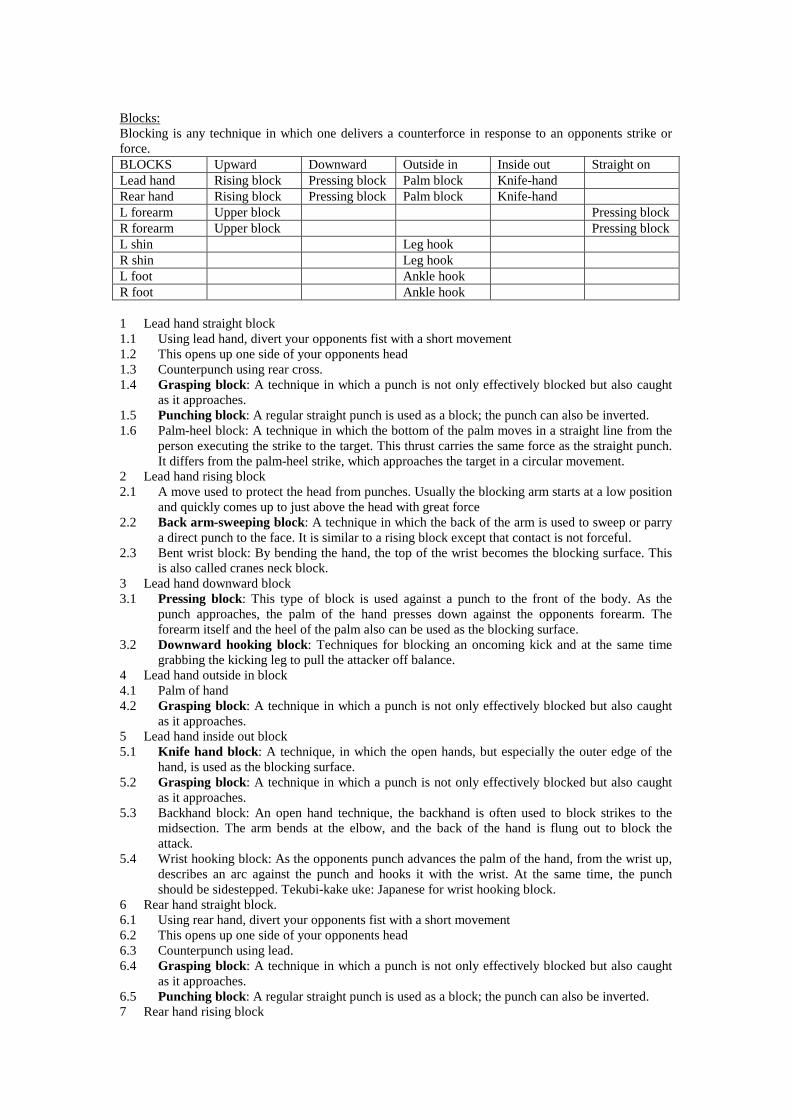
Blocks: Blocking is any technique in which one delivers a counterforce in response to an opponents strike or force. BLOCKS Upward Downward Outside in Inside out Straight on Lead hand Rising block Pressing block Palm block Knife-hand Rear hand Rising block Pressing block Palm block Knife-hand L forearm Upper block Pressing block R forearm Upper block Pressing block L shin Leg hook R shin Leg hook L foot Ankle hook R foot Ankle hook 1 Lead hand straight block 1.1 Using lead hand, divert your opponents fist with a short movement 1.2 This opens up one side of your opponents head 1.3 Counterpunch using rear cross. 1.4 Grasping block: A technique in which a punch is not only effectively blocked but also caught
as it approaches. 1.5 Punching block: A regular straight punch is used as a block; the punch can also be inverted. 1.6 Palm-heel block: A technique in which the bottom of the palm moves in a straight line from the
person executing the strike to the target. This thrust carries the same force as the straight punch. It differs from the palm-heel strike, which approaches the target in a circular movement.
2 Lead hand rising block 2.1 A move used to protect the head from punches. Usually the blocking arm starts at a low position
and quickly comes up to just above the head with great force 2.2 Back arm-sweeping block: A technique in which the back of the arm is used to sweep or parry
a direct punch to the face. It is similar to a rising block except that contact is not forceful. 2.3 Bent wrist block: By bending the hand, the top of the wrist becomes the blocking surface. This
is also called cranes neck block. 3 Lead hand downward block 3.1 Pressing block: This type of block is used against a punch to the front of the body. As the
punch approaches, the palm of the hand presses down against the opponents forearm. The forearm itself and the heel of the palm also can be used as the blocking surface.
3.2 Downward hooking block: Techniques for blocking an oncoming kick and at the same time grabbing the kicking leg to pull the attacker off balance.
4 Lead hand outside in block 4.1 Palm of hand 4.2 Grasping block: A technique in which a punch is not only effectively blocked but also caught
as it approaches. 5 Lead hand inside out block 5.1 Knife hand block: A technique, in which the open hands, but especially the outer edge of the
hand, is used as the blocking surface. 5.2 Grasping block: A technique in which a punch is not only effectively blocked but also caught
as it approaches. 5.3 Backhand block: An open hand technique, the backhand is often used to block strikes to the
midsection. The arm bends at the elbow, and the back of the hand is flung out to block the attack.
5.4 Wrist hooking block: As the opponents punch advances the palm of the hand, from the wrist up, describes an arc against the punch and hooks it with the wrist. At the same time, the punch should be sidestepped. Tekubi-kake uke: Japanese for wrist hooking block.
6 Rear hand straight block. 6.1 Using rear hand, divert your opponents fist with a short movement 6.2 This opens up one side of your opponents head 6.3 Counterpunch using lead. 6.4 Grasping block: A technique in which a punch is not only effectively blocked but also caught
as it approaches. 6.5 Punching block: A regular straight punch is used as a block; the punch can also be inverted. 7 Rear hand rising block
7.1 A move used to protect the head from punches. Usually the blocking arm starts at a low position and quickly comes up to just above the head with great force
7.2 Back arm-sweeping block: A technique in which the back of the arm is used to sweep or parry a direct punch to the face. It is similar to a rising block except that contact is not forceful.
7.3 Grasping block: A technique in which a punch is not only effectively blocked but also caught as it approaches.
8 Rear hand downward block 8.1 Pressing block: This type of block is used against a punch to the front of the body. As the
punch approaches, the palm of the hand presses down against the opponents forearm. The forearm itself and the heel of the palm also can be used as the blocking surface.
8.2 Downward hooking block: Techniques for blocking an oncoming kick and at the same time grabbing the kicking leg to pull the attacker off balance.
9 Rear hand outside-in block 9.1 Palm of hand 9.2 Grasping block: A technique in which a punch is not only effectively blocked but also caught
as it approaches. 10 Rear hand inside-out block. 10.1 Knife hand block: A technique, in which the open hands, but especially the outer edge of the
hand, is used as the blocking surface. 10.2 Grasping block: A technique in which a punch is not only effectively blocked but also caught
as it approaches. 11 L forearm straight 11.1 Forearm pressing block: The arm is bent at a 90-degree angle, and the forearm is used to
smash down on the technique – usually a punch – that is being delivered. 11.2 A very powerful technique used to block punches to the chest and face. The two basic types of
forearm block are the inside outside block and the outside in block. Because of the leverage potential of the forearm, this type of block has a great deal of force behind it. It becomes even more effective if the forearm is rotated during execution of the block, a tactic that also redirects the attack away from its target.
11.3 The elbows and forearms are used for protection against body punches. Blows aimed at the head are swept aside by the hand when you are not sliding and countering.
11.4 Straight blocks are usefully followed up by strikes. 12 L forearm rising 12.1 Upper block: A basic type of block used to protect against attacks to the head. The blocking
arm comes upward and forward to meet the attack and completes the technique directly in front of the forehead. The full movement thus describes an arc.
12.2 Sliding elbow block: A blocking technique that allows a punch to be delivered simultaneously with the block. As the punch is coming toward the face, an upper block is executed and then continued, so that the forearm rises and the fist punches the opponents face. The block is so named because in making the transition from block to punch, the elbow slides to the side to let the fist are directed forward toward the opponents face.
13 L forearm downward 13.1 The outer side of the forearm is the blocking surface as it describes an arc from the left ear, if
the right arm is used, to the left knee, protecting the midsection. The downward block is especially effective against a low front kick.
13.2 Dropping block: A powerful technique in which the forearm drops directly down on the incoming punch. Dropping blocks are used against attacks to the solar plexus.
14 L forearm outside-in 14.1 This technique travels from the outside of the body toward the centre line or from the ear to the
chest, in a circular path. The blocking surface is the outer forearm. This is one of the two basic types of forearm block, the other being the inside outside block.
14.2 Blocks in direction of rotation of hips, from L to R. Useful for preparing locks against the opponents' limb.
14.3 Scooping block: In this technique, the object is not actually to block but to gain control of the opponents limb. A circular type of block is used to redirect an oncoming blow to an advantageous position from which the attacker can be overpowered.
15 L forearm inside-out 15.1 A block done usually with a closed fist that travels in a circular path from the centre line of the
body to the outside perimeter. The blocking surface is the outer forearm. This is one of the two basic types of forearm block.

15.2 Scooping block: In this technique, the object is not actually to block but to gain control of the opponents limb. A circular type of block is used to redirect an oncoming blow to an advantageous position from which the attacker can be overpowered.
16 R forearm straight 16.1 Forearm pressing block: The arm is bent at a 90-degree angle, and the forearm is used to
smash down on the technique – usually a punch – that is being delivered. 17 R forearm rising 17.1 Upper block: A basic type of block used to protect against attacks to the head. The blocking
arm comes upward and forward to meet the attack and completes the technique directly in front of the forehead. The full movement thus describes an arc.
18 R forearm downward 18.1 The outer side of the forearm is the blocking surface as it describes an arc from the left ear, if
the right arm is used, to the left knee, protecting the midsection. The downward block is especially effective against a low front kick.
18.2 Dropping block: A powerful technique in which the forearm drops directly down on the incoming punch. Dropping blocks are used against attacks to the solar plexus.
19 R forearm outside-in 19.1 This technique travels from the outside of the body toward the centre line or from the ear to the
chest, in a circular path. The blocking surface is the outer forearm. This is one of the two basic types of forearm block, the other being the inside outside block.
19.2 Block in direction of rotation of hips, from R to L. Useful for preparing locks against the opponents' limb.
19.3 Scooping block: In this technique, the object is not actually to block but to gain control of the opponents limb. A circular type of block is used to redirect an oncoming blow to an advantageous position from which the attacker can be overpowered.
20 R forearm inside-out 20.1 A block done usually with a closed fist that travels in a circular path from the centre line of the
body to the outside perimeter. The blocking surface is the outer forearm. This is one of the two basic types of forearm block.
20.2 Scooping block: In this technique, the object is not actually to block but to gain control of the opponents limb. A circular type of block is used to redirect an oncoming blow to an advantageous position from which the attacker can be overpowered.
21 L shin straight � 21.1 By the way, don’t use the shin to block. It’s not a very strong bone, there was an incident in a
kickboxing competition where someone blocked a kick with his shin, and his shin broke. He didn’t realise it was broke until he put his foot down and he fell over leaving his lower leg broken at a right angle. Ouch!
22 L shin rising 23 L shin downward 24 L shin outside-in 24.1 Leg hook: Used to protect the abdomen from kicks. Block the attack with the leg, with the shin
catching the back of the opponents ankle. 25 L shin inside-out 26 R shin straight 27 R shin rising 28 R shin downward 29 R shin outside-in 29.1 Leg hook: Used to protect the abdomen from kicks. Block the attack with the leg, with the shin
catching the back of the opponents ankle. 30 R shin inside-out 31 L foot straight 32 L foot rising 33 L foot downward 34 L foot outside-in 34.1 Ankle hook: Hook the opponents kicking leg with the ankle. 35 L foot inside-out 36 R foot straight 37 R foot rising 38 R foot downward 39 R foot outside-in
39.1 Ankle hook: Hook the opponents kicking leg with the ankle. 40 R foot inside-out 41 Straight X-block 41.1 X block: Any block in which the arms – or more commonly, the wrists – are crossed. The hands
are usually in fists. This technique allows a tremendous amount of power to be delivered on blocking and puts the person doing the block in a position to catch the blocked technique at the cross of the X.
41.2 Reverse wedge block: A good technique for breaking a lapel grab or choking holds from the front. The hands come up and cross within the opponents’ hold. They uncross as they come down on the opponents’ wrists, breaking the lock.
42 Rising X-block 43 Downward X-block 44 L X-block 44.1 Reinforced block: A blocking technique for in which one arm or side of the body does the actual
blocking while the other side or arm supports it. 44.2 Supported arm block: When attacked with a strike that is too powerful for a regular block, the
fist of the other hand can be used to augment the strength of the blocking forearm. In addition to the added stability, this type of move puts you in a position to counter with a Back fist strike.
45 R X-block 45.1 Reinforced block: A blocking technique for in which one arm or side of the body does the actual
blocking while the other side or arm supports it. 45.2 Supported arm block: When attacked with a strike that is too powerful for a regular block, the
fist of the other hand can be used to augment the strength of the blocking forearm. In addition to the added stability, this type of move puts you in a position to counter with a Back fist strike.
46 • Chicken head wrist block: A technique in which the wrist is bent in such a way as to allow the area
just below the base of the thumb to be used as the blocking surface. • Side bottom wrist block: The base of the outer side of the wrist is used as the blocking surface. Blocking concepts: 1 Blocking tactics: 1.1 The difference between a block and a deflection is that a block describes a simple straight-line
movement whereas a deflection describes a half-circular or full-circular movement. 1.2 A block uses force to oppose force, whereas a parry deflects force in a different direction. 1.3 When blocking a hook, the tendency is to pull away or out from the blow. This is absolutely the
wrong thing to do. Move in, not out, so that the hook ends harmlessly around your neck. 1.4 Blocking should be used only when it is necessary because it weakens rather than conserves
bodily force. A well-delivered blow, even if blocked, will disturb balance, prevent countering and create opening for other blows.
1.5 Sweeping block: Any blocking technique that does not use a direct force to counter an opponents force. Similar to a parry.
2 Counterattack: One of the most important lessons the body learns in martial arts training is to deliver an instantaneous block and punch, or block and counter, when attacked. This enables a one to defend and to deliver a decisive blow to any attacker. A counterattack is any technique or series of techniques used to stop or disable an attacker.
2.1 Block and simultaneous counter: A single technique or a combination of two techniques delivered at the same time. If only one technique is used, it must block the opponents attack and retaliate at the same time. For example: a punch is used as a block against an opponents technique and then continues forward as a strike. When two techniques are used, one is a block to the attack while the other delivers an offensive technique.
3 Blocking the person: Good blocks don’t just deflect your opponents attack and stop it from hitting you, but they also ‘close off’ your opponent so that he or she cant guard against your counterattack. This is blocking the person rather than just the technique.
3.1 Once a strike has been thrust off course, the opponent is twisting away from you. Step up and thrust your palm heel into his shoulder, twisting him further away from you. He cannot defend himself with his back to you.
Throws: Every throw has three stages: 1. Entry. Preparing the throw. The way you approach the opponent. 2. Throw. (Execution). 3. Exit. Recovery. The way you finish the throw. Ippon seoi nage (forward throw) 1. Attacker pins defenders arm by putting his right arm under defenders armpit and takes hold of
defenders sleeve or lapel 2. Attacker turns his right hip into defender. He leans slightly forward, keeping his back straight and
bending his knees. 3. He straightens his knees, lifting defender off-balance and turns him over with a strong pulling
action on his sleeve. Morote seoi nage (forward throw) 1. Attacker takes hold of defenders sleeve and lapel. He steps forward, between defenders feet, and
turns. 2. As attackers right elbow bends, he pushes it up into defenders armpit. His knees bend, ready for
the throw. 3. Attacker leans forward and straightens his knees. He pulls with his left hand and pushes with his
right to throw the defender to the mat. Tai otoshi (forward throw) 1. In this throw, attackers feet stay on the outside of the defenders legs. Attacker steps his right foot
across, and bends his knees to lift the defender off-balance. 2. He pulls on the defenders sleeve or arm and pushes with the other hand to finish the throw. Harai goshi (forward throw) 1. Attacker steps his left leg between defenders feet. 2. Attacker turns on his left foot and bends left knee. His right leg sweeps defenders leg so he begins
to fall. 3. Attacker straightens his left knee, and with a strong pulling action on defenders sleeve or arm,
finishes the throw. Uchi mata (forward throw) 1. This throw starts like Harai goshi. Attacker takes a firm grip and places his left foot between
defenders legs. 2. Attacker turns on his left knee. 3. This time his right leg sweeps inside defenders legs 4. Attacker pulls hard and pushes with his right hand to turn defender over and onto the floor. Osoto gari (backward throw) 1. As soon as attacker has gripped defender, by the sleeve and lapel, he steps forward on his left foot
and hooks his right leg around defenders leg. 2. Attacker sweeps his right leg back, taking defenders feet off the ground. At the same time, he uses
his hands to control defender. 3. Attacker pushes defender down onto the mat and holds him there, ready to carry on fighting on the
ground. O Uchi gari (backward throw) 1. Attacker steps on to his left foot, turns his right hip quickly towards defender and hooks his right
leg strongly round defenders left leg. 2. Attacker then sweeps defenders left leg away with his right leg. 3. At the same time, he pushes defender on to his back, ready to pin him down on the mat. Ko Uchi gari (backward throw) 1. Attacker sweeps his right leg forwards and hooks defenders right leg away. 2. Attacker moves forward and pushes defender backward with force. 3. Attacker controls the throw with his hands all the way, until defender is pinned down.
Kosoto gari (backward throw) 1. Attacker uses his right leg to hook defenders left leg away 2. As attacker falls forward, the movement drives the defender backwards. 3. Attacker now follows into groundwork. One-foot sweep: side throw (de ashi barai) 1. This skill can be used when both competitors are moving sideways. The attack is made as the
competitors move closer together. 2. Attacker uses his right leg to sweep defenders advanced left foot away. At the same time, he uses
his hands to control defender down on to the mat. 3. The timing of each stage of the throw has to be very precise if it is to succeed. Two-foot sweep: side throw (Okuri ashi barai) • The two-foot sweep is a variation of the one-foot sweep. As before, both competitors are moving
but this time attacker use his right leg to sweep both of defenders feet away. Blocking ankle technique (Sasae tsuri komi ashi) 1. Another way of throwing the defender is to block the ankle or leg that defender is standing on and
then force defender to overbalance. It is important for .for attacker to co-ordinate the action so that attacker does not kick defenders legs. At least in a competition, in a fight stamp on his knee joint or ankle joint before doing the throw.
2. Attacker blocks defenders ankle with his left foot. With a firm grip on defenders lapel and sleeve, attacker uses his weight to force defender to overbalance to his right and over his blocking foot.
Knee wheel: (hiza guruma) 1. For this blocking throw, both competitors have to move around each other. Attacker takes his grip
on defender and starts walking round defender clockwise. This forces defender to move round. 2. When they are moving, attacker uses his right foot to block defenders left leg. Attacker uses the
speed of the turning movement and strong hand movements to throw defender forcefully. 3. This throw gets its name from the movement of the attacker blocking defenders leg at knee level. Foot sweep • Foot sweep forces your opponent to take a step forwards and sweeps his foot away as she is about
to put his weight down onto it. • Hold your opponents sleeve in your left hand and his jacket lapel in your right hand. • Use your left hand to draw your opponent forwards and to his right. Stop him from moving his
right foot by slapping into it with the sole of your left foot. He cannot stop himself from falling over.
• By drawing, your opponent forwards and preventing him from changing his foot position you have forced him off-balance. Hold onto his wrist or he will escape.
Counter to foot sweep. • Your attacker tries a foot sweep on you. He slaps the sole of his left foot against your right ankle. • Counter it by quickly lifting your right foot, so your opponent’s left foot passes under it. Now you
can force her off-balance. Help her foot on its way by pushing her sweeping leg to one side. Leg reap • The leg reaps unbalances the opponent and pushes him or her diagonally backward. Start by
gripping your opponents lapel and sleeve. • Pull your opponent towards you. As she resists, suddenly change direction and push her back. • Bring your right foot through and hook back with your heel and calf against your opponents
supporting leg. • Swing your opponent onto his back. Keep hold of her so that she cannot escape. Grip your
opponent firmly, ready for groundwork. Your opponent will slap down to break his fall. Counter to leg reap • You can use this technique to stop your opponent as he or she tries to use a leg reap against you. • This time your opponent tries to use the leg reap against you. Counter the throw by stepping back
with your left foot and leaning forwards.
• Once in this position, you are ready to throw him instead. Floating hip • For the floating hip, you drop below your opponent centre of gravity and then lift him or her by
straightening your knees. Once both feet are off the floor, you can put your opponent where you choose.
• Begin from ready position by stepping through and across with your right foot. Once you have started moving, do not stop because you are vulnerable.
• Turn so that your back faces your opponent and bend your knees. Then press your backside hard against him. Start with your knees bent, and then straighten them to lift your opponent.
• Simply tip your opponent forwards and over your hip, so he lands flat on his back at your feet. • Keep hold of your opponents wrist so that you control his landing and can follow him down into
groundwork. Be careful not to twist your opponents wrist or you could damage the joint. Once he hits the floor, your opponent is in a vulnerable position.
Counter to floating hip • You can counter the floating hip by sweeping your opponents foot as he or she steps across to
perform the throw. It is important to move quickly. • Slap the sole of you foot against his ankle. This requires perfect timing. Catch your opponent as
soon as he steps in. Neck throw • The neck throw draws your opponent forwards and off-balance because you jam his or her leg with
your thigh. • Put your right arm and hand on your opponents collar, and pull on his right arm as you quickly
step across with your right foot. • With your back towards him, block your opponents right leg so he cannot step forwards. • Swing him over your right hip. Lift his body into a horizontal position. His feet are high off the
floor. Keep hold of his wrist as you dump him on the floor in front of you. Counter to neck throw • Now your opponent tries the throw on you. He slides his hand around your collar and steps in. • Hold your opponents belt in your left hand and take control of him. • Bend your knees to get under his centre of gravity and lift him off the floor. Lean back slightly
before you throw him. With practise, it will become easy to lift your opponent into the air. • Then dump him on the floor at your feet. Grip his belt tightly as he hits the floor so that he cannot
escape. Shoulder throw 1 • This shoulder throw takes you under your opponents centre of gravity so you can lift him or her by
simply straightening your knees. Then lean well forwards, twist your body, and tip him or her over and onto his back. Be careful as you step in to make the throw, because this is when you are most vulnerable to a counterattack.
• Drop under his centre of gravity and push your right biceps muscle hard against the underside of his right arm. Grasp his sleeve with your left hand.
• Bend your knees. Drop under his centre of gravity and push your right biceps muscle hard against the underside of his right arm, trapping his right arm. Grasp his sleeve with your left hand.
• Bend sharply forwards and lever him over your back. Bend forwards until your back is almost horizontal as you throw him.
Counter to shoulder throws one • Your opponent attempts a shoulder throw on you, stepping in and trying to jam his right arm under
yours. • Bend your knees to lower your centre of gravity and take a wide, stable stance • Straighten your knees and lift him high into the air. Keep your feet wide apart. • Use your right hand to grip his left arm. Tip him over and onto his back before you let him down. Shoulder throws two

• This shoulder throw makes good use of the standard lapel and sleeve grip. First you drop right under your opponents centre of gravity as you turn in. then, as you straighten your legs, you lift your opponent high into the air.
• Keep a firm grip on your opponent as you step across and begin to wind in. • Bring your feet close together and bend your knees to drop under his centre of gravity. Drag on his
right sleeve with your left hand and lift his lapel. • Drive your hips back and roll your opponent clear over your back. As you push your hips back, he
is forced forwards. Counter to shoulder throws two • For this counter-throw, you use your hand to jam your opponents hip and stop him or her from
turning in fully. Then you bar both your opponents legs and fall backward onto the floor together. • Counter the throw as before, preventing your opponent from stepping in and bending your knees.
Space your feet wide apart. In this counter-throw, you will both fall together. • Keep a firm grip on his belt. Then fall back with him and go directly into groundwork. Deflecting a kick • Take up your guard as your opponent lifts his right knee, ready for a front kick. Keep your guard
raised to protect your body. Rather than blocking your opponents quickly rising leg, you simply lift it even higher to overbalance him.
• Slide your right foot around as he kicks, so you are both facing the same direction. Now scoop up his kick with your left hand to topple him, forcing his leg up will send him toppling backwards. He will overbalance. He will use a Breakfall to land safely on the floor.
Do’s: 1. Always keep moving 2. Be prepared for counters 3. Develop catlike movements 4. Make the opponent wrestle your way 5. Be aggressive; make your opponent think
defensive
Don’ts: 1. Don’t cross your legs 2. Don’t commit your arms too deeply 3. Don’t chase your opponent 4. Don’t rely on one takedown; be ready for
other openings 5. Don’t let your opponent circle you.
Throwing concepts: 1 Throwing tactics: 1.1 Neck and shoulder throws require a lot of leverage. Sometimes you will lift your opponent high
into the air before dropping him or her at your feet. This technique scores a full point in a judo competition. However, all neck and hip throws need a long lead-in, which makes you especially vulnerable to a counter-attack.
1.2 A backward throw can be used to put the defender off balance so that attacker has the chance to make a forward throw. When training check each stage is correct, then practise repeatedly. Practise all the skills to your right side and to your left, equally.
1.3 A forward throw is one where the person being thrown falls forward arse over elbows. 1.4 A backward throw is one where the person being thrown falls backward. 1.5 You can make a forward throw standing on two feet or you can balance on one leg using the
other leg to sweep the defenders legs away (a sweeping throw). If you use a sweeping throw, you must make sure that you keep control of your opponent throughout the throw.
1.6 Throws use leverage rather than pure strength. Sometimes you can pull your opponent off-balance and other times you will drop below your opponents centre of gravity to topple him or her over you. Always keep a tight grip on your opponent, so that he or she does not fall away from you. Throws in competition are rarely as clean as the ones you see in practice. This is because both competitors are highly skilled and have practised the counter-movements many times.
1.7 The person doing the throw is the attacker and the person being thrown is the defender. In a competition, of course, they both want to be the attacker.
1.8 There are three basic types of throw: forwards, backwards and sideways. Moreover, for each there are many different ways to throw your opponent. Some throws may look the same but look again and you will see that the players use different handhold or foot positions.
1.9 Throws involve leverage of ones body against an opponent's body to move them in the direction the opponent's body wants to go anyway. The sheer impact of being somersaulted over someone and landing on a hard surface can incapacitate many opponents.
1.10 Eight directions of unbalance: The objective in judo is to throw the opponent in one of the following eight directions:
• Straight ahead, • Straight back, • To the left, • To the right, • To the left front, • To the right front, • To the left rear or • To the right rear.
2 Training aids: 2.1 All throws are easier to do when you are moving but to learn a new throw you will start by
standing still. Then you have to walk through each stage in slow motion. Your teacher will check that you are doing it correctly. Then you will have to repeat the throw many times until you can do it without thinking and it looks as if you are doing all three stages in one easy action.
2.2 Batsukari: In judo, practice of techniques without actual execution of the throw. 2.3 Gokyo: The Gokyo comprises five sets of judo throws, with eight throws per set. These sets
were devised by the kodokan, judos central authority. That aim is to teach the student the 40 basic throwing techniques. Eight directions of unbalance x five?
2.4 Randori: In judo, free practice, in which students have the opportunity to use throwing and holding techniques. Randori is not a contest in judo; there is no winner and no loser. In Aikido, Randori is also free-form exercise, in which a single aikidoka defends him or herself against any number of others. The defensive moves should be fluid and continuous, expressing the harmony (ai) by which ‘attacker’ and ‘attacked’ become partners.
• • Kata gatame: In judo, the shoulder holds. • Kuzushi: In judo, the partner whose balance is broken. • Tsukuri : In judo, the positioning, or ‘making’, or the throw. Throws are divided into Tsukuri and
Kake, which is the actual performance or application of the throw. Sweeps: Tools: leading instep/ rear instep/ leading heel/ rear heel. Leading instep sweep: Hooking sweep with leading leg Rear instep sweep: Hooking sweep with rear leg Leading heel sweep: Hooking heel sweep with leading leg Rear heel sweep: Hooking heel sweep with rear leg
Holds (AKA locks): Immobilising an opponent by securing a hold on his body: arm lock, leg lock, and wristlock. • Lock: A technique that totally immobilises the part of the opponents’ body to which it is applied.
Pressure and proper manipulation of the limbs are used to make it almost impossible for the opponent to escape. See also arm lock.
• Arm lock : A set of basic groundwork techniques used after you have thrown your opponent. Essentially, there are two types of arm lock. The straight arm lock comprises all locks in which the object is to bend back the arm while applying pressure to the elbow joint so that it bends only in an unnatural and very painful direction. Examples of straight-arm locks are the arm crush ‘ude gatame’ and the knee arm lock ‘hiza gatame’. In the bent arm lock, one attempts to turn the arm in such a way that it dislocates from the shoulder socket.
• Gatame: Judo arm lock techniques. See arm lock. • Ground techniques: One of the fundamentals of judo, these are moves used either when one is
forced to the ground or deliberately allows himself to fall to the ground in order to execute a move such as a low kick. Ground techniques consist of leg-sweeps, rolls, falls, sweeping kicks, and leg throws.
• Holds: In judo, holding techniques are the first type of groundwork taught. Groundwork is what you do after you’ve thrown your opponent and before you’ve defeated him completely. Holds are used to control the opponent without injuring him. Judo teaches that all holds are most effective if you relax totally, thus putting all your weight into the hold. Holds and other groundwork techniques are used in contest to gain points if the actual throw was not perfectly executed. The opponent must be held down for 30 seconds.
• Osae komi waza: Judo holding techniques. See holds. • Shoulder hold: The shoulder hold is a basic judo technique that can be used if the opponent
manages to free one arm after having been pinned. The elbow of his freed arm is pushed against the opponents throat in a choking movement.
• Takedown: Techniques in which, through a series of motions and observations, one is able to quickly and accurately bring a person to the ground and retain an advantageous position; one of the fundamentals of judo.
• Joint locks: Joint locks may be done while standing or lying on the ground, as an immobilising technique.
• Attacking a pressure point: • Any hold can be made more effective by digging your fingers into a pressure point. • Pressure points: Certain areas of the body, when struck with minimum effort cause a
maximum amount of pain. These pressure points may be quite small (such as the temple) or extensive (the solar plexus). The science of pressure points is studied for healing purposes (see acupuncture) as well as for self-defence. See also dim muk.
• Atemi waza: In judo, illegal techniques in which vital points of the body are attacked. Scarf holds (kesa gatame) • This is a hold carried out when both competitors are on the ground. It’s not easy to hold an
opponent down. • This time your opponent has fallen at your side. Drop down onto your right knee, holding his
shoulders with both hands. Position your right knee so that he will find it difficult to move. • For this hold-down, you spread your legs as widely as possible and sink your body-weight by
bringing your head quite as close to your opponents. Lean heavily across your opponents chest and hold tightly onto his jacket.
• Attacker puts his right arm round defenders neck, like a scarf, and takes hold of defenders collar. • This pins defenders left arm. Attacker spreads his legs apart to help keep him in a strong position
when defender struggles. • Put your full weight on your opponents chest and trap his neck in the crook of your right elbow.
Grip his jacket firmly with both hands. Bring your hips to the floor and lower your head. The opponent may try to head butt you. Spread your legs wide for maximum stability.
Side hold: (Yoko Shiho gatame) 1. This hold is a very strong one. Attacker arm goes around defenders head and he grips the lapel. 2. Attackers head and chest lie across defenders chest. He passes his free arm between defenders legs
and takes hold of defenders belt.

3. All the time he keeps his legs spread apart for stability. Kami Shiho gatame 1. In this hold, attacker controls the upper part of defenders body. Attackers head and chest lie over
defenders chest. 2. Attacker passes both his hands under defenders arms and takes hold of defenders belt either side. Tate Shiho gatame 1. Attacker sits in defender and wraps both legs round the upper part of defenders legs. He crosses his
feet to prevent defender escaping. This controls defenders legs. 2. Attacker lies across defenders chest, trapping one of defenders arms up, and this secures the hold. Cross arm lock • Use this technique immediately after a successful throw. Keep hold of your opponents wrist at all
times and then you can follow him down onto the mat to apply a submission hold. • You have thrown your opponent onto his back and wisely kept hold of his right wrist. Step in front
of his head with your left foot and jam your right instep into his back. The correct way to hold your opponents wrist is with the thumbs on the outside or knuckle side and the fingers on the inside or palm-side.
• Sit down and lean back, drawing his right arm over your thigh and over-extending his elbow joint. Keep your head up so that you can see what he is doing. Reduce the pressure on his elbow each time he taps the floor or your leg. Do not apply too much pressure or you will damage his elbow. As you grip, be careful not to twist your opponents wrist.
• In judo competitions, the opponent will submit by tapping the floor when he starts to feel pain. Locking technique1 • The wrist is relatively weak and sensitive to pressure. Here your opponent has grabbed your lapel
with his right hand. • Take your opponents wrist in an overhand grasp and step back and around, so his elbow is
straightened. Divert his attention by targeting his jaw. • Bring your left arm over his right elbow and hold his wrist. Use your right hand to exert pressure
on his wrist joint. • Keep pressing down on his elbow and against his wrist, and squat down. This forces him down to
the floor. • Keep a firm grip on his wrist and push his elbow down so he is forced to fall forwards onto the
floor. He cannot escape from your grip in this position. Locking technique2 • The elbow is also sensitive to pressure. • Face your opponent in guard position. • Your opponent steps forwards with his right foot and tries to grab you. Use his forward movement
to add power to your attack. You have forced him backwards. • Hold his right wrist in your right hand and step back with your left foot. He is pulled forwards and
off-balance. • Keep him moving around as you step through with your right foot. Now press against his
straightened right arm. Grip his right wrist firmly with your right hand. By pressing on his right elbow, you force him onto his knees.
• Maintain your grip on his wrist and arm, and drop onto your right knee. Now bend his elbow. Use both your arms to bend his elbow.
• Straighten up and bring him up on his toes by turning and lifting his right forearm. Your right thumb digs into the palm of his hand.
Neck hold • You are grappled from behind. You can force your opponents head into a vulnerable position by
attacking him under the jaw. • Reach back and dig your thumbs under the angle of your opponents jaw. This technique is
extremely painful; the object is to get the attacker to release his hold on you.

• Keep hold of his head and draw him forwards, down, and to the side. You have forced him forwards into a vulnerable position, from which you can put him in a neck lock, knee him in the face, throw him, etc.
Trapping hands • A technique used to immobilise both an opponents hands by directing them to a position in which
they can be crossed and held by one hand while the other hand delivers an attack. This type of technique can also be used to immobilise the legs. Many practises are necessary in order to co-ordinate properly the movements in the complex technique.
Defence from jab: • Your opponent throws a right punch at you. • You do a left grasping block, grabbing his right wrist with your left hand, and deflecting his punch
to your right. With your right hand, grab his throat with your thumb and two middle fingers. • Keep a firm grip on his wrist and his throat, bend his right arm and push his wrist into a wristlock,
your thumb on his knuckles • The final move is to push downward with one arm and push forward with the other. • This is called ‘the white ape offers a cup of wine’. Presumably, it’s called this because the shape
your right hand makes in the double impact shot to the throat looks as if it’s holding a cup of wine. Escapes: Escape from rear throat bar • Your opponent has seized you from behind, wrapping his forearm across your throat. You will
have to move quickly to avoid being strangled. • Push his right elbow up and take his right wrist with your left hand as you duck down and step
behind with your left foot. • Lift his right arm up and control him by taking his right shoulder with your right hand. The palm
of his hand is facing upwards. • Bend his elbow and push your right forearm between his arm and his back, taking hold of your
own left wrist. You have taken control and put him in an arm lock. Escape from double lapel grab • The head butt is a very dangerous technique and this is an effective defence. • Your opponent has taken hold of your lapels with both hands. In this position, he could try a head
butt or a kick. • Step back with your right foot. Bring both hands up inside his forearms, turning your palms
towards him. Use both hands to force him away. Now he cannot reach you with a head-butt. • Push his head down and bring your right fist up and back, ready for a hammer fist blow. His back
is exposed to your attack. He cannot defend himself in this position. • Swing your fist down and strike his spine, just below his shoulder blades. Use the little finger edge
of your fist. Finish the attack with an up swinging kick to his jaw. Move quickly and kick him before he has time to raise his guard.
Escape from side headlock • The side headlock is a common attack. Your opponent throws his arm around your neck and pulls
your head in so that he can attack it with his fists. • Divert your attackers attention by striking his thigh with a fist. • Slide your left foot between his feet. Now prepare to grab his right ankle. • Pull back on his ankles so that he falls forward and onto his face. Keep hold of his ankles when he
is on the mat. • Fold his legs up and jam them by kneeling into his back. Grab his hair in your left hand and get
ready to punch him. Chokes: Choking techniques: In judo there are, basically, two types of stranglehold – one to obstruct breathing and one to obstruct the flow of blood to the brain. In contests, choking techniques must be used with

great caution. They are best applied when one is on top of ones opponent, but they can also be used if both contestants are standing, or even when one is on the bottom.

Pushing hands Exercises in which two people learn to interpret each others energy by focusing on adhering to one another at the hands. Pushing hands practice develops a keen sense of balance and timing while sharpening sensitivity. Tui shou: A kung-fu exercise. See pushing hands. Single arm-sticking hands Sticking hands is a way of training for close range fighting. It develops an awareness of your opponent through contact with his arms and hands. Specialised training is essential for close-range fighting. An attack may travel no more than 20 cm (8in), leaving little time for you to see, recognise, and respond correctly. An advanced form of detection will allow you to counterattack effectively. A sticking hands training sequence: 1. Face your opponent and take his left back fist on your right forearm. Bring your left hand close to
your right elbow. 2. Grab his wrist with your left hand and draw his arm down and out of the way. Bring your right fist
up and prepare to deliver a back fist. Release his left arm. 3. As you attempt your back fist, he brings his left arm up in a forearm block, with his right hand in
guard position. Then he grabs your wrist and draws it down, starting the cycle again. Another single arm sticking hands sequence: 1. Begin the second single arm sticking hands sequence by punching at your opponent with your
right fist. He blocks your right fist with his left forearm. 2. Then he drops and rotates his left hand into a palm-upwards position. You allow your right hand to
fall with it, curling your fingers over his wrist. 3. Keep in contact with your opponents arm, your fingers point upwards. Now he tries to punch you
with his left fist and you force it down with your palm heel. From this position, you can start the cycle again at step 1.
Double arm sticking hands This form of sticking hands uses both arms in a rolling action so you have to sense your opponents movements through two sets of forearms. Keep up the pressure against your opponents forearms so that he cannot escape or attack you, move slowly at first and co-operate with your opponent. Double arm sticking hands training sequence: 1. In double arm sticking hands, your arms roll one way and then the other. First, your left hand curls
over your opponents right forearm as his hand curls over your right wrist. Your right wrist is in a low position.
2. Then your hands roll so that your right hand moves into a high forearm block while your left-hand curls over his wrist in a low position.
3. Repeat this rolling action several times, always testing your opponents strength. Another double arm sticking hands sequence: 1. You have spotted a weakness in your opponents guard. Bring your right hand down to take his
right forearm and draw your left fist back, ready to punch. 2. Close him off and punch him in the jaw with your left fist. See how many times you can repeat this
sequence without making a mistake.
Tactics 1 Leading. 1.1 The master of attack must know the value of a straight lead. He must know what is liable to
happen on any lead. He realises that for every lead, there is an opening. For every opening, there is a counter. For every counter there is a parry or a counter-time. These things he understands, but he also knows how and when to lead with comparative safety.
1.2 Leading with the forward hand, guarding with the rear hand, while moving to the side, makes negligible any opening that ordinarily results from a straightforward lead with the hand.
2 In-fighting: 2.1 In fighting, is the art of fighting at close range. Not only does it take skill to get in close, but
also it takes skill to stay there. To get inside, it is necessary to slip, bob and weave, draw and feint.
2.2 Because of the many variables, fighting is a careful game. It should be readily understood that each hit must be painstakingly and patiently prepared. Yet, it is generally fatal to start a bout with a set plan. Stay actively aware, but ever flexible.
2.3 In-fighting short man vs. tall man. 2.3.1 Keep your hands up, elbows close to the body. Bob and weave, moving from side to side.
Gauge your opponents’ leads – make him miss and get inside his punches by ducking, slipping, feinting or ‘sticking’ with controlling hands. A short, straight left, rather than a hard, telegraphed one would do the trick. The opportunity is usually there but only for an instant – hence, the short, fast left, rather than the looping, hard left. Capitalise on a hooker whose either drops the hook upon delivery or throws it in too wide an arc. You should shoot over a hard straight left as soon as his right shoulder is lowered or the wide arc begins. Small fellows against taller men use the overhand left. It travels in a circular ‘over’ motion into the vicinity of the oppositions’ head. The movement must come from the shoulder. Vary it with an inward palm stroke.
2.3.2 Always try to nail a medium-range target (body or head) with stepping straight punches. However, if your opponent is blocking, evading or countering those straight blows, you can resort to medium-range hooking attempts.
3 Drawing 3.1 Drawing is closely allied to feinting. Whereas in feinting an opening is created, in drawing
some part of the body is left unprotected in order that a particular blow will be led by the opponent, thus developing the opportunity to use a specific counter.
3.2 Feinting is only a part of drawing. Drawing uses the method of strategy and the method of crowding or forcing. Being able to advance while apparently open to attack, but ready to counter if successful, is a phase of fighting that few ever develop. Many fighters refuse to lead. Then, to be able to draw or force a lead becomes very important.
4 Feints 4.1 Feinting is a movement in sparring that is a decoy or cover for the actual technique. The eyes,
hands, legs, and body are all used in a single effort to deceive the opponent. When the opponent tries to adjust for these movements, the actual target is left unguarded.
4.2 To minimise the danger of being heavily countered, a feint of some sort should usually precede leads.
4.3 Feinting creates only momentary opening. To be able to take advantage of these openings means instant reflex action or foreknowledge of what openings will be created by certain feints. Such familiarity is presupposed by practice. Only through actual practice of many feints against many kinds of opponents may a general reaction tendency be determined. If a certain feint creates an opening, that opening should not be used until a sure blow will result. A good fighter knows what openings will result before he feints and makes use of his knowledge by initiating his follow-up action almost before the opening results. Whenever two fighters of equal speed, strength and skill are matched, the one who is the master of the feint will be the winner.
4.4 The essential elements in feinting are rapidity, change, deception and precision, followed by clean crisp blows. Feints used too often in the same way will enable the opponent to time them for a counterattack, thus defeating their very purpose.
4.5 Feints against the unskilled are not as necessary as against the skilled. Many different combinations of feints should be practised until they are natural movements.
4.6 A slight wave of the hand, a stamp of the foot, a sudden shout, etc. can produce sensory irradiation sufficient to reduce co-ordination. This mechanism is at the reflex level of human behaviour and even many years of athletic experience cannot erase the distracting effects of extraneous stimuli.
4.7 No feint can be counted effective, however, unless it forces the opponent to move. To be successful, it must appear to be a simple movement of attack.
4.8 Good feints are decisive, expressive and threatening. 4.9 The feint is a deceiving thrust that invites and lures the opponent to make the appropriate parry.
As the opponent takes the parry, the fighters’ hand disengages from the opponents parrying hand and the thrust is completed in the opened line with either hand. The feint is composed of a false thrust and a real evasive thrust.
4.10 The false thrust is a half-extended arm with a slight forward movement of the upper body. The real, evasive thrust is done with a lunge. The false thrust must appear to be a real thrust in order to convince the opponent to take the parry.
4.11 Feints should be made with the arm more extended if they precede kicking and long-range advancement. If they are made after a parry and the adversary can be reached without a lunge, keep the arm slightly bent and stay well covered with shifting or a rear guard.
4.12 The advantage of a feint or feints is that the attacker can start lunging with his feints and, thus, be gaining distance from the outset. He will have shortened the distance to travel by a good half with his feint leaving to his second movement only the second half of the disengagement. He gains distance by starting his lunge with his feint and simultaneously, gains time by deceiving the parry, the opponents’ reaction, on the way to his target.
4.13 The speed of your feint is dependent upon the reaction of your opponent. Thus feinting, like speed and distance, must be regulated to your opponents’ reaction.
4.14 Execution of the feint: (how) 4.14.1 Assume the on-guard position. Advance slowly. While advancing, give a quick bend of the
forward knee. This gives the impression that the arms are moving as well as the legs. In reality, the arms are held relaxed and ready as though committing the lead hand for the opponent.
4.14.2 Make a slight forward movement of the upper body, bending the forward knee and moving the lead hand slightly forward. While advancing, take a longer step forward with the lead foot, as in the quick advance, and jab the lead arm into extension without hitting the opponent. Be extra sensitive to counters while advancing – be economical. From this close position, fold the lead arm back to the body and jab to the chin.
4.14.3 Another effective feint is a short bend of the body above the rear hip while moving forward. 4.14.4 The step-in/step-out feint means stepping forward one step as if to jab with the lead hand, but
instead, stepping out of range by pivoting off to the outside with the lead leg. Now, step in as if to feint but drive lead jab to the chin. Step out immediately. Continue, one time feinting, the next time actually jabbing with the lead hand. If possible, follow the lead jab with a straight thrust to the chin (one-two).
4.14.5 Feint a lead jab to the face and jab to the stomach. 4.14.6 Feint a lead jab to the stomach and jab to the face. 4.14.7 Feint a jab to the face, feint a rear thrust to the face and then jab the lead to the chin. 4.14.8 Feint a straight rear thrust to the jaw and hook the lead to the body. 4.14.9 Feint a lead jab to chin and deliver a rear uppercut to the body. 4.14.10 The one-two feints can be utilised laterally (inside/outside; outside/inside) or vertically
high/low; low/high), with only one hand or with the two combined. 4.14.11 The first movement, the feint, must be long and deep, or penetrating, to draw the parry. The
second movement, the hit, must be fast and decisive in its deception of the parry, allowing the defender no possibility of recovery. Thus, the feint rhythm is long short.
4.14.12 Even in the delivery of compound attacks with two feints, the depth of the first feint must force the opponent to move to the defence. However, as at this stage the measure has been considerably shortened, the second feint cannot also be long. There is no room and no time to do so. Thus, the rhythm or cadence of a two-feint compound attack will be long-short-short.
4.14.13 A more advanced form of feinting with a change of cadence could be described as: short-long-short. The object of this variation would be to mislead the adversary, making him believe that the second feint (long) was the final action of a compound attack, thus drawing the parry.
4.14.14 By ‘long’ we do not really mean slow. While penetrating deeply toward the opponent, the feint must be fast. The combination of speed and penetration are the factors that draw the desired reaction from the defence.
4.14.15 By making several real, economical, simple attacks first; the feints will be more effective. The opponent will not know whether a simple attack or a feint followed by a deception is being executed. This is especially effective against the less mobile opponent to promote a reaction. The same tactic might excite the speed-footed opponent into flight.

4.14.16 If an opponent doesn’t react to feints, an attack with straight or simple movements is advisable
4.14.17 Feinting is characteristic of the expert fighter. It requires using the eyes, the hands, the body and the legs in a single effort to deceive an opponent. These movements are really decoys and if the opponent attempts to adjust his defence, the expert takes advantage of the openings created. Feinting is also used to ascertain what the opponents’ reaction will be to each movement.
4.15 The object of the feint is to: (why) 4.15.1 To open the line in which one intends to attack. 4.15.2 To make the opponent hesitate while immediately closing the distance. 4.15.3 To deceive the parry that the feint provokes – to trap and hit or to delay the attack and hit as
the opponent moves back to recover. 4.15.4 Feints can also be made in order of false attack to parry the opponents counterattack and
riposte or make a fast return or counter return. 4.15.5 Feinting is an essential part of attack. The more the opponent can be caught off guard, or
more important still, off-balance by means of feints, the better. 4.16 Introduction of the feint: 4.16.1 As a direct thrust. 4.16.2 As an evasive thrust. 4.16.3 As an engagement. 4.16.4 As disengagement. 4.16.5 As pressure. 4.16.6 As a violent pressure. 4.16.7 As a beat. 4.16.8 As a cutover for immobilisation. 4.17 Parries to evade: 4.17.1 Simple 4.17.2 Circular. 4.17.3 Counter or changing. 4.18 Compare all the above for kicking feints and head feints. 4.19 Find an accurate feeling for distance and correct balanced posture while feinting. 5 The beat 5.1 If the opponent is exceptionally fast and will not go for feints, the beat can be used. 5.2 The beat is a crisp movement of the hand made against the opponents to knocking it aside or
obtaining a reaction. Usually the reaction of the fighter to beat back will offer the advantage of staying ahead of the opponents’ movement throughout.
5.3 Because of the distance, the beat cannot be made at will. The correct opportunity must be waited for and seized. The opponents’ continual change of hand position, often in the form of half-feint and false attacks, will bring the hand well within the reach of a beat.
5.4 Although a beat followed by a direct attack can be successful, beats generally bring about a covering movement to the side on which the hand has been beaten. This makes a direct attack a difficult stroke to bring off. It is advisable therefore, to take advantage of such reactions by following the beat with an indirect or compound attack. The beat should be made from a normal guard position into the line in which the action is called a change beat.
5.5 Maker the beat sharp and as close to the hand as possible. There are three purposes to making beats on the hand:
5.6 To open the line by force or by the right amount of crispiness on the opponents ‘tension spring’, to secure thread-like penetration. In this case, the beat on the hand should be made sharply and quickly; practice trapping or hand immobilisation with these two qualities along with the small phasic bent-knee stance.
5.7 As a feint before an attack. In this case, the beat should be light and fast to pass the hand quickly and execute the attack.
5.8 As an invitation to the opponents attack, especially after obtaining his cadence. In this case, it should be made lightly and not too quickly, at the same time being ready to parry the attack, counter-time it or follow with a second light and fast beat to counterattack.
Training: 1 Keep loose and relaxed except when actually fighting. Develop speed, timing and judgement of
distance by many hard workouts with all types of sparring partners. With this, practise your authority; hit confidently and hard.
2 Grading syllabus 2.1 There should be a method of measuring someone's ability, which minimises the dependence of a
grading upon human observation and opinion. Therefore, that two people who have the same grade at opposite ends of the earth have much the same level of ability. Also grading is a method of self-motivation in physical training, it sets a goal to aim for.
3 Grading conventions: 3.1 Rank: A term used in certain martial arts to denote the level of ability. The colour of the belt of
the martial arts uniform indicates the rank of the wearer. 3.2 Belt: The colour of the belt of a uniform represents the level of proficiency attained in an art.
Belts come in many colours, depending on the art. Generally, the white belt signifies a beginner and the black belt the advanced practitioner, with several colours in-between to represent intermediate levels.
3.3 Belt ceremony: When one passes a test in the martial arts, usually some sort of ritual is conducted by the head of the new school to award the student the belt or sash, indicating his new rank.
3.4 Belt, coloured: The ranks below black belt are designated as coloured belts. Every style that uses belts has its own system of colours for specific ranks. Some belt colours are purple, blue, green, brown, yellow, gold, red, and striped.
3.5 Belt, striped: These are sometimes worn by women and children practitioners of martial arts. In some styles, when a person goes beyond a certain level of black belt, he wears a striped belt. The stripes run horizontally around the belt.
3.6 White belt: The white belt is worn by the beginner. In most martial arts, this is the first rank. At one time, there were only two ranks – white (beginner) and black (advanced). At present there are as many as five colour ranks within a single art.
3.7 Instructor: A martial arts instructor must have a wide knowledge of the specific art being taught and of other arts as well. The instructor must be trained in first aid, running a school, performing ceremonies, and grading test. Sensei is the term for instructor in the Japanese martial arts.
3.8 Menkyo: The licensing system of the combative forms of Japanese martial arts such as ju-jitsu; it is comparable to the kyu-Dan ranking in the sportive arts such as judo. Most combat styles have a series of three to five levels of competence, all of which represent the grade of instructor.
4 Grading requirements: 4.1 The number of techniques and combinations one has to learn to pass a grade in a particular
martial arts school varies considerably. One could treat it as an academic subject and treat a move or a combination as a ‘learning outcome’. The number of learning outcomes one must achieve to pass a college course is standard across the world. In order to get a college qualification one must amass academic ‘credits’, for example to get an Honour degree one must usually have 360 credits. Thus, one could treat each move and combination, or even snippet of information about how best to train a ‘credit’. So:
4.2 Level: number of credits = academic equivalent = martial arts belt equivalent = what you have to do.
4.2.1 60 = HNC = white belt = 60 moves at level 4 of the beep test 4.2.2 120 = HND = red belt = 120 moves at level 8 of the beep test 4.2.3 180 = = orange belt = 180 two-move combinations at level 4 of the beep test 4.2.4 240 = Foundation = yellow belt = 240 two-move combinations at level 8 of the beep test 4.2.5 300 = Ordinary degree = green belt = 300 three-move combinations at level 4 of the beep test 4.2.6 360 = Honours degree = blue belt = 360 three-move combinations at level 8 of the beep
test 4.2.7 420 = = indigo belt = 420 four-move combinations at level 4 of the beep test 4.2.8 480 = Postgraduate diploma = violet belt = 480 four-move combinations at level 8 of the beep
test 4.2.9 540 = MSc = brown belt = 540 five-move combinations at level 4 of the beep test 4.2.10 600 = PhD = black belt = 600 five-move combinations at level 8 of the beep test 4.3 That’s an exceptionally harsh and demanding grading system. Frankly, if you know 600
different 5-move combinations and can perform each of them to level eight of the beep test then you are a world-class fighter. Moreover, probably very old by now. ☺ Thus, black belts of this grading system will be very rare. On the plus side, given its difficulty, the credibility of this grading system would be assured. The system ensures there is little room for individual judgement. You can do the combinations or you cant.
4.4 Indigo and violet are rare colours so one could use purple and purple-white instead.

4.5 This also means that comparing grades in different styles is easier. One can choose whichever technique one prefers.
4.6 Appropriate footwork, then a leading move always precedes a viable combination. It should finish with a leading move. Thus, a two-move combination is one-foot movement followed by any leading move, and a three-move combination is one-foot movement followed by two leading moves. A four move combinations is one foot movement followed by a leading move, followed by any move, followed by a leading move.
4.7 Given that one should train ones body for competition as well as learning and performing all the combinations, it wouldn’t hurt if there were a means of measuring fitness as well. So: set out scales for cardiovascular fitness, aerobic fitness and an-aerobic fitness. Getting a grade requires getting a level of martial arts combinations and a level of fitness as well. So an orange belt (3rd level) martial artist would be required to demonstrate 180 2-move combinations and also 3 levels of fitness, say 1 cardiovascular level and two aerobic fitness levels.
4.8 Cardiovascular fitness scale (running, swimming, etc) level: kilometres run (miles) in time measured in minutes.
4.8.1 4.8 km (3miles) in 20 minutes. 4.8.2 9.6 km (6 miles) in 40 minutes. 4.8.3 14.4 km (9 miles) in 60 minutes (1 hour). 4.8.4 19.2 km (12 miles) in 80 minutes (1 hour 20 minutes). 4.8.5 24 km (15 miles) in 100 minutes (1 hour 40 minutes). 4.8.6 28.8 km (18 miles) in 120 minutes (2 hours). 4.8.7 33.6 km (21 miles) in 140 minutes (2 hours 20 minutes). 4.8.8 38.4 km (24 miles) in 160 minutes (2 hours 40 minutes). 4.8.9 43.2 km (27 miles) in 180 minutes (3 hours). 4.8.10 48 km (30 miles) in 200 minutes (3 hours 20 minutes) 4.9 Aerobic fitness scale (press-ups sit-ups, etc: take ten aerobic exercises, do the maximum number
of repetitions as possible for each exercise. Level: number reps of each exercise. 4.9.1 100. 4.9.2 200. 4.9.3 300. 4.9.4 400. 4.9.5 500. 4.9.6 600. 4.9.7 700. 4.9.8 800. 4.9.9 900. 4.9.10 1000. 4.10 An-aerobic fitness scale (weight training) 4.10.1 . 4.10.2 . 4.10.3 . 4.10.4 . 4.10.5 . 4.10.6 . 4.10.7 . 4.10.8 . 4.10.9 . 4.10.10 . 4.11 Flexibility (stretches) level = number of stretches demonstrated. 4.11.1 . 4.11.2 . 4.11.3 . 4.11.4 . 4.11.5 . 4.11.6 . 4.11.7 . 4.11.8 . 4.11.9 . 4.11.10 . 4.12 Standing high jump

4.12.1 1m. 4.12.2 . 4.12.3 . 4.12.4 . 4.12.5 1.5m 4.12.6 . 4.12.7 . 4.12.8 . 4.12.9 . 4.12.10 2m. 4.13 Running high jump 4.13.1 1m. 4.13.2 1.25. 4.13.3 1.5m 4.13.4 1.75m 4.13.5 2m 4.13.6 . 4.13.7 . 4.13.8 . 4.13.9 . 4.13.10 3m. 4.14 Standing long jump 4.14.1 1m 4.14.2 . 4.14.3 . 4.14.4 . 4.14.5 . 4.14.6 . 4.14.7 . 4.14.8 . 4.14.9 . 4.14.10 4m. 4.15 Running long jump 4.15.1 2m. 4.15.2 3m 4.15.3 4m 4.15.4 5m 4.15.5 6m 4.15.6 7m 4.15.7 8m 4.15.8 9m 4.15.9 10m 4.15.10 11m. 5 Sparring conventions: 5.1 Initial movement: In sparring or fighting, the first motion executed by either opponent that
reflects his defensive or offensive position. A good sparring contestant uses many different angles and is constantly in motion; a target in motion is harder to hit than a stationary one. Each initial movement sets the tone for the techniques that are to follow.
5.2 Sparring, basic: This is sparring in which one person does all the attacking and the other all the defending. All the techniques are known beforehand. Basic sparring is more an exercise in tactical application than an actual contest.
5.3 Sparring, freestyle: In this type of match, the two opponents are permitted to execute any techniques, in simulation of a real fight. Neither opponent is warned beforehand about the others techniques. Usually freestyle sparring is practised only after one has reached a high level of proficiency. Some styles do not allow students to participate in freestyle matches until they have achieved the rank of black belt.
5.4 Sparring, mild contact: This is sparring that is usually freestyle, with some mild contact permitted. This type of sparring requires advanced training because it takes a great deal of control and precision to touch the opponent and still not cause injury.
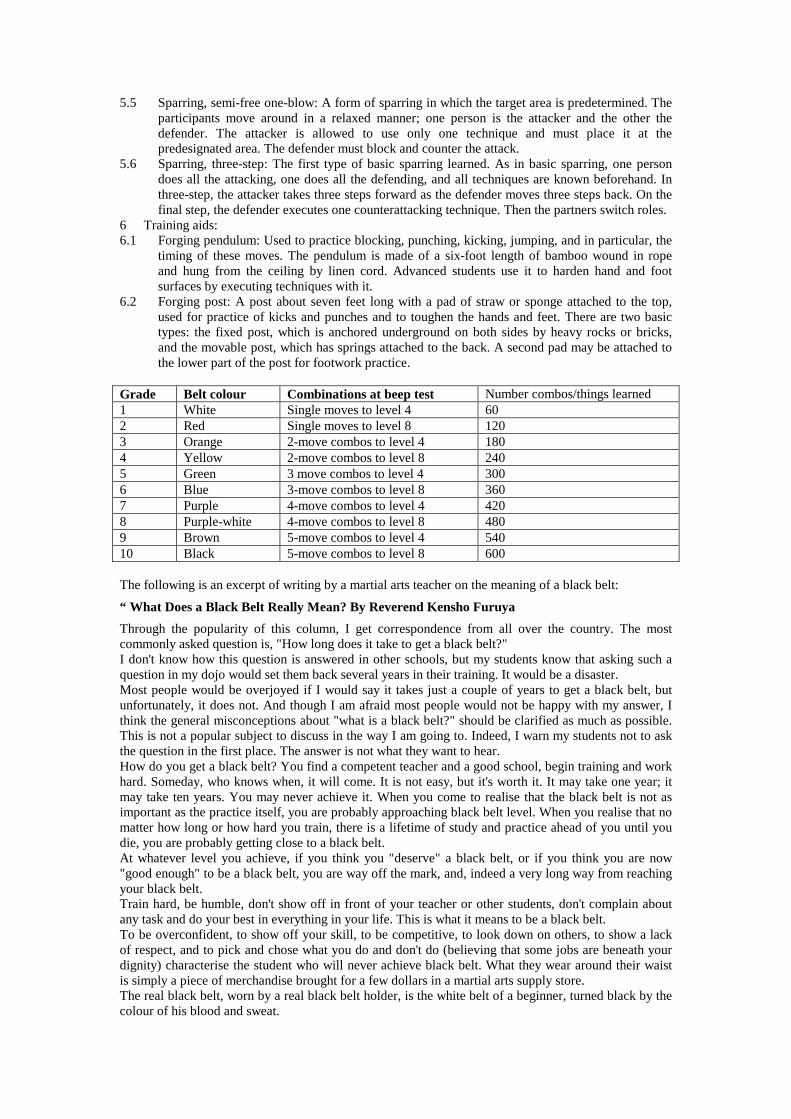
5.5 Sparring, semi-free one-blow: A form of sparring in which the target area is predetermined. The participants move around in a relaxed manner; one person is the attacker and the other the defender. The attacker is allowed to use only one technique and must place it at the predesignated area. The defender must block and counter the attack.
5.6 Sparring, three-step: The first type of basic sparring learned. As in basic sparring, one person does all the attacking, one does all the defending, and all techniques are known beforehand. In three-step, the attacker takes three steps forward as the defender moves three steps back. On the final step, the defender executes one counterattacking technique. Then the partners switch roles.
6 Training aids: 6.1 Forging pendulum: Used to practice blocking, punching, kicking, jumping, and in particular, the
timing of these moves. The pendulum is made of a six-foot length of bamboo wound in rope and hung from the ceiling by linen cord. Advanced students use it to harden hand and foot surfaces by executing techniques with it.
6.2 Forging post: A post about seven feet long with a pad of straw or sponge attached to the top, used for practice of kicks and punches and to toughen the hands and feet. There are two basic types: the fixed post, which is anchored underground on both sides by heavy rocks or bricks, and the movable post, which has springs attached to the back. A second pad may be attached to the lower part of the post for footwork practice.
Grade Belt colour Combinations at beep test Number combos/things learned 1 White Single moves to level 4 60 2 Red Single moves to level 8 120 3 Orange 2-move combos to level 4 180 4 Yellow 2-move combos to level 8 240 5 Green 3 move combos to level 4 300 6 Blue 3-move combos to level 8 360 7 Purple 4-move combos to level 4 420 8 Purple-white 4-move combos to level 8 480 9 Brown 5-move combos to level 4 540 10 Black 5-move combos to level 8 600 The following is an excerpt of writing by a martial arts teacher on the meaning of a black belt:
“ What Does a Black Belt Really Mean? By Reverend Kensho Furuya
Through the popularity of this column, I get correspondence from all over the country. The most commonly asked question is, "How long does it take to get a black belt?" I don't know how this question is answered in other schools, but my students know that asking such a question in my dojo would set them back several years in their training. It would be a disaster. Most people would be overjoyed if I would say it takes just a couple of years to get a black belt, but unfortunately, it does not. And though I am afraid most people would not be happy with my answer, I think the general misconceptions about "what is a black belt?" should be clarified as much as possible. This is not a popular subject to discuss in the way I am going to. Indeed, I warn my students not to ask the question in the first place. The answer is not what they want to hear. How do you get a black belt? You find a competent teacher and a good school, begin training and work hard. Someday, who knows when, it will come. It is not easy, but it's worth it. It may take one year; it may take ten years. You may never achieve it. When you come to realise that the black belt is not as important as the practice itself, you are probably approaching black belt level. When you realise that no matter how long or how hard you train, there is a lifetime of study and practice ahead of you until you die, you are probably getting close to a black belt. At whatever level you achieve, if you think you "deserve" a black belt, or if you think you are now "good enough" to be a black belt, you are way off the mark, and, indeed a very long way from reaching your black belt. Train hard, be humble, don't show off in front of your teacher or other students, don't complain about any task and do your best in everything in your life. This is what it means to be a black belt. To be overconfident, to show off your skill, to be competitive, to look down on others, to show a lack of respect, and to pick and chose what you do and don't do (believing that some jobs are beneath your dignity) characterise the student who will never achieve black belt. What they wear around their waist is simply a piece of merchandise brought for a few dollars in a martial arts supply store. The real black belt, worn by a real black belt holder, is the white belt of a beginner, turned black by the colour of his blood and sweat.
Training Pattern
The first level of black belt in Japanese is called shodan. It literally means, "First level". Sho (first) is an interesting ideograph. It is comprised of two radicals meaning "cloth" and "knife". To make a piece of clothing, one first cuts out the pattern on the cloth. The pattern determines the style and look of the final product. If the pattern is out of proportion or in error, the clothes will look bad and not fit properly. In the same way, your initial training to reach black belt is very important; it determines how you will eventually turn out as a black belt. In my many years of teaching, I have noticed that the students who are solely concerned with getting their black belt discourage easily, as soon as they realise it is harder than they expected. Students, who come in just for practice, without concern for rank and promotion, always do well. They are not crushed by shallow or unrealistic goals. There is a famous story about Yagyu Matajuro, who was a son of the famous Yagyu family of swordsmen in 17th century feudal Japan. He was kicked out of the house for lack of talent and potential, and sought out instruction of the sword master Tsukahara Bokuden, with the hope of achieving mastery of the sword and regaining his family position. On their initial interview, Matajuro asked Tsukahara Bokuden, "How long will it take me to master the sword?" Bokuden replied, "Oh, about five years if you train very hard." "If I train twice as hard, how long will it take?" inquired Matajuro. "In that case, ten years," retorted Bokuden.
Finding a Focus
What do you focus on if you don't focus on attaining your black belt? It is easier said than done, but you must focus your energy on practice. However, to think, "I will concentrate on my training to get a black belt," is simply playing mind games with yourself and will ultimately lead to your own disappointment. Can you simply think, "I forget about rank completely." Can you simply say to yourself that you will never achieve it? Will you always be attached to your black belt, allowing the idea to linger in the back of your mind? In other words, can you simply concentrate on your training without regards for anything else? Can you finally realise that your black belt is nothing more than "something to hold up your pants?" You should also realise that although you master all the requirements, the correct number of techniques, all the required forms and put in the appropriate amount of hours of training, you may still not qualify for black belt. To achieve black belt is not a quantitative entity, which can be measured or weighed like buying string beans in the market. Your black belt has to do with you as a person. How you conduct yourself in and out of the dojo, your attitude to your teacher and fellow students, your goals in life, how you handle the obstacles in your life, and how you persevere in your training are all important conditions of your black belt. At the same time, you become a model to other students and eventually reach the status of teacher or assistant instructor. In the dojo, your responsibilities are greater than the regular students are and you are held accountable to much more than those who are junior to yourself. Your responsibilities are great as a black belt holder.
Achieving Training Focus
How do we focus on our training? Successful training means, to a great degree, that we look at what we do from a reasonable and realistic viewpoint. More often than not, we are not looking at realistic goals but dreams and delusions. Do you want to excel in martial arts as a way to improve yourself and your life, or are you motivated by the latest cops and robbers movie? Is your practice motivated by a strong desire to enlighten yourself, or do you simply want to imitate the latest martial arts movie stars? Although experienced martial artists may snicker; it is amazing how many inquire about martial arts saying they want to be just like Chuck Norris or Steven Seagal. However, those people are themselves by their own efforts. You are yourself. We all have our hero, role models, and our dreams, but we have to separate out fantasies from reality if our training is to be meaningful and successful.
Reality
Training has nothing to do with rank or black belts, trophies or badges. Martial arts are not simply playing out our fantasies. It has to do with your own life and death. It is not only how we protect ourselves in a critical, lethal situation, but how we protect the lives of others as well. You cannot be another person, whether he is a movie star, great teacher or multi-millionaire. You must become yourself - your true self. As much as John Doe dreams about becoming James Dean, Bruce Lee, or Donald Trump, he can only be John Doe. When John Doe becomes John Doe 100 percent, he has

become enlightened to his true self. An average person only lives 50 percent or maybe 80 percent of his life and never knows who he is. A martial artist lives 100 percent of his life and becomes impeccable. This is what the true black belt holder must come to realise within himself. He is no other than himself, and his practice leads to enlightenment into nature of his true self, his real self. This is the essence of out training in martial arts.
Achieving your Black Belt
Think of losing your black belt, not gaining it. Sawaki Kodo, a Zen Master, often said, "To gain is suffering; loss is enlightenment." If someone were to ask the difference between martial artists of previous generations and martial artists today, I would sum it up like this. Martial artists of previous generations looked upon training as "loss". They gave up everything for their art and their practice. They gave up their families, jobs, security, fame, and money, everything, to accomplish themselves. Today, we only think of gain. "I want this, I want that." We want to practice martial arts but we also want money, a nice car, fame, portable telephones and everything that everyone else has. Shakyamuni Buddha gave up his kingdom, his palaces, a beautiful wife, and everything else to finally seek out enlightenment. The first student of Boddhidharma, considered the founder of shaolin Kung Fu, cut off his left arm to study with his teacher. We don't have to take such drastic measures to learn martial arts today, but we should not forget the spirit and determination of the great masters of the past. We must realise that we have to make sacrifices in our own lives in order to pursue our training. While the student looks at his training from the standpoint of loss instead of gain, he comes close to the spirit of mastery, and truly becomes worthy of a black belt. Only when you finally give up all thought of rank, belts, trophies, fame, money and mastery itself, will you achieve what is important in your training. Be humble, be gentle. Care for others and put everyone before yourself. To study martial arts is to study yourself - your true self. It has nothing to do with rank. A great Zen master once said: "To study the self is to forget the self. To forget the self is to understand all things." Edited by K.W.Pang from "Martial Arts Training" (July 1991) This HTML Version by Mark Henderson-Thynne (5/11/94)
“ – End of excerpt.
Styles: A list of martial arts broken down by region and style: 1. Asian and pacific martial arts
1.1. Borneo 1.1.1. Bersilat • Pencak silat or silat ("fighting by using techniques of self-defence") is an Asian martial
art with roots in the culture of the Malay people. This art is widely known in Indonesia and Malaysia but can also be found in varying degrees within countries such as Singapore, Thailand, Brunei, and the Philippines amongst others. It is estimated that there are hundreds of alirans (styles) and thousands of schools. Many of the alirans find their origin in the observation of wild animals fighting. "Harimau" (tiger) and "Monyet" (monkey) are some examples.
• Malayan martial arts, ber means to do and silat means fighting. Bersilat is derived from Indonesian pentjaksilat, which it resembles in many ways. Like Pentjak-silat, Bersilat teaches weapons techniques as well as empty-hand methods, although with the present emphasis on pure sport, the use of weapons has declined. The two main forms of Bersilat are a dance ritual used in public demonstrations, called pulut, and secret combat techniques, called buah.
• There are four main aspects to Pencak silat: • The "Mental-Spiritual" (mental and spiritual) aspect: Pencak silat builds and
develops the personality and noble character of oneself • The "Bela-Diri" (self-defence) aspect: Self-confidence and perseverance are very
important. • The "Seni Budaya" (culture, art) aspect: Culture and performing the "art" of Pencak
silat is very important. This combines Pencak Silat with traditional music and costumes.
• The "Olah Raga" (sport) aspect: This means that the physical aspect of Pencak silat is important. We try to have a sound mind in a sound body. Competitions are part of this aspect. There are full-contact (Tanding) fights, as well as form demonstrations, for one (Tunggal), two (Ganda) or team (Regu) persons.
• The styles and schools of Pencak silat differ from each other with regard to which aspects are emphasised. It is thanks to the sport and self-defence aspects that this sport has become popular in Europe. However, many believe the essence of Pencak Silat is lost, or watered down, when converted to a sport and therefore still focus on traditional or spiritual forms of Silat, not strictly following the PERSILAT way.
• Pencak Silat is a system that consists of Sikap (positions) and Gerak-gerak (movements). When pesilat (silat practitioners) are moving (when fighting) these Sikap and Gerak-gerak change continuously. As soon as one finds an opening in their opponent's defence, they will try to finish the opponent with a fast Serangan (attack).
• Pencak Silat has a wide variety of defence and attacking techniques. Practitioners may use hands, elbows, arms, legs, knees and feet in attacks. Common techniques include kicking, hitting, tripping, sweeps, locks, takedowns, throws, strangles, and joint breaking.
• The pesilat, or silat practitioner, practices with Juru-juru. A Juru is a series of meta-movements for the upper body used as a guide to learn the applications, or buah when done with a partner. The use of Langkah or lower body Meta movements teaches the use of footwork. When combined, it is Dasar Pasan, or whole body flow.
• Pencak Silat has developed rapidly during the 20th century and has become a competition sport under the PERSILAT rules and regulations. Now Pencak Silat is being promoted by PERSILAT in several countries on all five continents. The goal of PERSILAT is to make Pencak Silat an Olympic sport. Apart from the official PERSILAT line of making Pencak Silat a competition sport, there are still many traditional styles practising old forms of Silek and Silat.
• PERSILAT (Persekutuan Pencak Silat Antarabangsa, the International Pencak Silat Federation) is promoting Pencak Silat as an international competition sport. Only members recognised by PERSILAT are allowed to participate at international competitions.

• Now some European national Pencak Silat federations together with PERSILAT have founded a European Pencak Silat Federation. In 1986, the first Pencak Silat World Championship outside of Asia took place in Vienna, Austria. In 2002, Pencak Silat was introduced as part of the exhibition programme at the Asian Games in Busan Korea for the first time. The last World Championships 2002 took place in Penang, Malaysia in December 2002.
• Bersilat is the word given to the act of doing silat. • List of Silat styles:
1.1.1.1. Silek Tuo and Silek Harimau - traditional old styles from the Minangkabau tribe in Western Sumatra meaning "Old Silek" and "Tiger Silek"
1.1.1.2. Pencak Silat Pertempuran - A silat style composed of Pencak Silat Pamur and Sterlak Silat primarily. Other Indo-Malay silat influences include: Seni Bela Diri Silat Jati Wisesa, and Raja Monyet Silat. It translates to Combat Silat.
1.1.1.3. Perguruan Pencak Silat Padjadjaran Nasional - Traditional west-Javanese styles are combined in this aliran; the European branch is represented by Eric Bovelander.
1.1.1.4. Silat Mubai - Muslim Silat 1.1.1.5. Silat Zulfikari - Martial practice of the Qadiri Rifai Tariqa 1.1.1.6. Pukulan Bongkot - a Silat style
1.1.1.6.1. Tji Bandar • A form of the Indonesian martial art Pukulan. Mainly women and children use
this style; it consists of delicate footwork and body movements. 1.1.1.7. Bersilat - Silat from Borneo 1.1.1.8. Maphilindo Silat - a Silat style founded by Dan Inosanto to honour his Silat
teachers. It is composed of styles from Malaysia (Ma), the Philippines (Phil) and Indonesia (Indo).
1.1.1.9. Tongkat Silat- Founded by Maha Guru "Pak Vic" de Thouars in 1957, with the influences of Silat Soempat and Serak.
1.1.1.10. ODF Silat- Founded by Maha Guru "Pak Vic" de Thouars, designed for Law Enforcement, especially direct attacks from the open blade.
1.1.1.11. Pukulan Pentjak Silat Serak (or Sera), a system founded by Pak Sera of the Badui tribe and expanded by Mas Roen and Mas Djoet - Victor de Thouars, teaching the traditional Pukulan Sera(R) in the greater Los Angeles area.
1.1.1.12. Soempat Silat- Pak Tisari Majoeki, founder, developer of the curved rattan stick, Lineage holder Maha Guru "Pak Vic" de Thouars.
1.1.1.13. Bukti Negara, a modern, modified style of Sera designed by Pendekar Paul de Thouars for the weak and elderly
1.1.1.14. Kuntao Silat combines Kuntao and Silat, as taught by Willem de Thouars. 1.1.1.15. Perisai Diri Silat - Indonesian Technique created by Pak Dirdjo. Practical
and Effective technique base on elusive avoidance and maximum power counter attack.
1.1.1.16. Cimande- along with Sera (monkey style) Pamacan (tiger style) and Trumbu (stick fighting) are styles of Pencak Silat founded by Embah Kahir in the late 1700's in West Java. These arts still exist in some villages located on the Cimande River, including the village of Tarik Kolot. Today there are over 300 variations of Cimande.
1.1.1.17. Pukulan Cimande Pusaka- A style of Cimande descended from Mas Jut, taught by Pendekar William Sanders. This style includes the original Embah Kahir arts from Tarik Kolot village.
1.1.1.18. Seni Gayung Fatani - a Malaysian style originating from the Fatani Province in Southern Thailand. One of the four reputedly largest silat school of Malaysia.
1.1.1.19. Gayung Malaysia - One of the four reputedly largest silat school of Malaysia.
1.1.1.20. Silat Cekak - A different kind of silat. It is more to defensive-type of silat because it applies 99% defending technique and only 1% attacking technique. This silat do not have any Bunga, Langkah Gerak or Kuda-kuda. The movements or counter-attacks of this silat are quite unpredictable because it doesn't apply Kuda-kuda in its movements. One of the four reputedly largest silat school of Malaysia.
1.1.1.21. Silat Lincah - One of the four reputedly largest silat school of Malaysia.
1.2. Burma 1.2.1. Bando • Bando is a Burmese martial art quite similar to Muay Thai, but while Muay Thai is called
"the science of the eight limbs" (fists, elbows, shins, feet) Bando is the science of the nine limbs, because it also includes head-butts.
• Bando: Burmese unarmed martial art. Bando techniques include blocking, striking, grappling, locking, and kicking. There are twelve animal-style-striking forms taught only after the student has learned the basic defensive postures. The twelve animals are the boar, bull, cobra, deer, eagle, monkey, paddy bird, panther, python, scorpion, tiger, and viper.
1.2.2. Banshay • Banshay is a term for the various martial arts of Myanmar, which focus on the use of
weapons. • Banshay: Burmese forms of armed combat, mainly with sword, staff, or spear, all of
which have sophisticated schools of technique. It is interesting to note that Burmese swordsmen consider killing or even injuring an opponent poor form. Their objective is merely to disarm the attacker without hurting him.
1.2.3. Lethwei (Burmese boxing) • Lethwei is the original term used for Burmese boxing. 1.2.4. Naban • Naban is a term for the various grappling martial arts of Myanmar. 1.2.5. Krabi-krabong • Krabi-krabong : Burmese stick fighting. The Krabi is a sword, the Krabong a staff. Both
are made of lightweight woods and are used for sportive combat as well as in a dance-like ritual that precedes the contest. The match itself is more a demonstration of formal exercises than actual sparring.
1.2.6. Thaing • Thaing is a Burmese term used to classify the indigenous martial systems of ancient
Burma (now Myanmar). The word "Thaing" loosely translates to "total combat". The overall system has spawned the smaller components known as Lethwei, Banshay, Naban, and sporting versions of Thaing.
• Thaing: The general term for Burmese arts of self-defence, both armed and unarmed. These include unarmed techniques (Bando), boxing (Lethwei), wrestling (Naban), and weapons systems (Banshay). Thaing was not nationally recognised until the Japanese occupation of Burma in 1942. Contact with the Japanese brought influences from Aikido, ju-jutsu, and judo. Thaing is now a popular art in Burma.
• Burmese boxing: Similar to the famous Thai boxing, it is a popular sport in Burma today. This style is hard and offensive, consisting of four rounds that end in a knockout, an admission of defeat by one of the contestants, or a very bloody contestant. It is a dangerous sport, with head butting, throwing permitted, and no gloves are worn. Players may even return to the contest after being knocked out and revived.
1.3. Cambodia 1.3.1. Khmer boxing • Khmer Boxing is a martial art very similar to Muay Thai. Khmers claim that Khmer
Boxing is older than Muay Thai is and that Muay Thai sprang from Khmer Boxing. 1.4. Singapore
1.4.1. Kuen-do • Kuen-Do literally means the way of the fist. However, in the intended Chinese term, the
character "fist" is also synonymous with "style of martial art" and "martial art" itself. The hyphenated term specifically refers to the system founded by Randy Tay, a Singaporean and one of the foremost authorities on the Cho Ga lineage of Wing Chun, a version relatively more popular in South East Asia.
• Often mistaken to be an eclectic or mixed martial arts, Kuen-Do is in fact intended to be a system of self-discovery using the tools of martial arts. Based heavily on the concepts of Wing Chun, primary influences include Kyokushin Karate, Goju-Ryu Karate, Muay Thai (or Thai-style boxing), Hapkido, Aikido, various Chinese style of martial arts and the Theravada school of Buddhism which stresses critical thinking and personal cultivation above all else.
• Today, Kuen-Do is practised in Singapore where it was founded, Australia, Japan, and Canada and recently in the USA (2003).
1.5. China 1.5.1. Internal
1.5.1.1. Hsing-I • Hsing Yi, literally "Form and Thought Boxing") all refer to a northern Chinese
martial art tradition attributed to the legendary Chinese General Yue Fei around 1100 AD.
• Hsing-I: A system of kung-fu, created, according to some legends, by the great Chinese warrior Yueh Fei, who lived during the sung dynasty of 1127-1229 AD. Forceful vertical attacks, closed fist punches, and long and short-range techniques are important in Hsing-I; but this art also stresses the yin-yang complementarities of hard and soft, body and mind, and its moves are very graceful. When you strike with your hand, you are striking with your mind. Literally, Hsing means form, and I means mind or will. The five basic types of movement in Hsing-I are based on the Chinese concept of the five elements: metal is represented by splitting movements, water by drilling, wood by crushing, fire by pounding, and earth by crossing.
• Hsing Yi claims to specialize in deceptively soft, linear, low attacks and quick yet solid footwork appropriate for the battlefield and the military. Although considered by some to be the most simple and linear of the Chinese soft styles (the other styles being Pa Kua Chang and Tai Chi Chuan), Hsing-I is also known as a subtle and sophisticated art form. Its power generation derives directly from the well known spiralling and circling characteristics of the internal Chinese martial arts. The spiralling and circling movements only appear to be linear in the Hsing-I "long arm" approach.
• Hsing-I uses five distinct elements or forms as metaphors assigned to represent the details of different combative methods. These are called, "the five fists" within the context of Hsing-I. These Five Elements or Five Phases (or Wu Hsing) are based on Taoist cosmology. Practitioners of the art are taught that reactions to attacks and counter attacks should be conditioned by which of the elements an attack is considered to be coming from. As combatants or "elements" interact, their conflict is said come to a result predictable by Wu Hsing theory. Proponents also say that in Hsing-I there are at least three outcomes in a combat situation: the constructive, the neutral, and the destructive. Hsing-I students train to react to and execute specific techniques in such a way that a desirable cycle will form based on the constructive, neutral and destructive interactions of Wu Hsing theory. Where to aim, where to hit and with what technique - and how those motions should work defensively - is determined by what point of which cycle they see themselves in.
• The advanced training forms vary and combine the five fists together. Depending on the lineage, some of these advanced forms include linking forms, the "eight hands", the "eight tigers", and twelve animal forms.
• Most practitioners of Tai Chi Chuan, Pa Kua Chang and Hsing Yi consider Hsing Yi to be an internal style, with an emphasis on qi development and coordination in their training. Traditional Chinese weapon training is another feature of Hsing Yi as a martial art.
• Northern styles: The kung-fu systems that developed in northern china are based on the philosophy of Taoism. Cultivation of Chi and good health are the main features of these styles. The most widely known of the northern styles are tai chi, pa kua, and Hsing-I.
• Mixture boxing : Mixture boxing is an advanced Hsing-I exercise of 44 movements, which comprises elements of Wu-Hsing Chuan, Lien Huan Chuan, and Shih-erh Hsing.
• I-Chuan: I-Chuan is a Chinese term meaning will of the fist. This art is more commonly known as Hsing-I.
• I : In Chinese, the will, and an essential concept to all martial arts. For example, Hsing-I means the form of will. The will is necessary to the more spectacular aspects of the arts such as breaking bricks and withstanding powerful blows.
• Tsa shih ch’ui: Term for mixture boxing, an Hsing-I exercises.

• Wu-Hsing: In Chinese philosophy, the five elements, or powers. These are water, fire, wood, metal, and earth, to which everything in the universe is related. Hsing-I kung fu has its roots in this concept.
• Wu-Hsing Chuan: Wu-Hsing means five elements, and these forms compose the basic movements of Hsing-I. Chuan means fist. Movements are based on the Chinese concept of the five universal elements, metal, water, wood, fire, and earth. The endless interaction of the elements is mirrored in the cycle of Wu-Hsing moves, each giving rise to the next. 1. P’ao: One of the five basic movements in Hsing-I, each of which represents one
of the universal elements according to Chinese philosophy. P’ao, or pounding, symbolises fire.
2. P’eng: One of the five basic movements in Hsing-I, each of which represents a universal element from Chinese philosophy. P’eng, or crushing, symbolises wood. It is also one of the basic movements of Tai chi. See ward off.
3. Heng: One of the five basic movements of Hsing-I, each of which represents one of the universal elements ascribed in Chinese philosophy. Heng, or crossing moves, symbolises earth.
4. P’i : One of the five basic moves of Hsing-I. P’i, or splitting, symbolises metal, one of the five universal elements recognised in Chinese philosophy.
5. Ts’uan: One of the five basic movements of Hsing-I, each of which represents one of the universal elements described in Chinese philosophy. Ts’uan, or drilling, symbolises water.
1.5.1.2. Jing • Jing (pinyin) or ching1 is the Chinese word for "essence", more specifically the
kidney essence or semen. According to traditional Chinese medicine, Jing is stored in the kidneys and is the densest physical matter within the body (as opposed to the Shen which is the most volatile). It is said to be the material basis for the physical body and is yin in nature, which means it nourishes, fuels, and cools the body. As such, it is an important concept in the Nei Chia School of the Chinese martial arts. Jing is also believed by some to be the carrier of our heritage (e.g. DNA); in the man the semen and in the woman the menstrual blood are believed to be part of Jing. Theoretically, Jing is consumed continuously in life, by everyday stress, illness, substance abuse, sexual intemperance, etc. Many qigong related disciplines are devoted to replenishing "lost" Jing.
• Jing is often confused by people who don't speak Chinese with the related concept of Ji or power. See Nei Jing.
1.5.1.3. Liu he Ba Fa (Liu He Ba Fa, Lok Hup Ba Fa) • Liu He Ba Fa (six harmonies 'thru' eight methods), (alternately spelled: Liu ho pa
Fa, Liou ho Ba Fah, lyou ho Ba Fah, Liou ho pa Fah, Lok hop pat fat, and abbreviated as: LHBF, LHPF), is a form of Chinese Nei-gong or internal exercise with combat fighting applications. Its' principles are associated with a 'water' exercise method known during, but predating the Song Dynasty (960-1279 n. Ch.); the exercise principles are further associated with a Taoist monk Chen Po (Chen Xi Yi, Chen Hsi-I) and with the Mt. Hua Taoist monastery on Hua Shan in Shensi Province. However, the Liu He Ba Fa exercise-system was probably created during the 20th century by Wu Yi Hui in Shanghai and later in Nanjing. Liu He Ba Fa contains form and principle elements from Ba Gua Zhang, Tai-Chi Chuan and Xing Yi Chuan; all of which were developed after the Song dynasty; each of these exercises also have form-principles extending back to an ancestor exercise and a non-exercise theory.
• The 'core' exercise is usually taught in 66 forms of two parts, for health or martial purposes. The complete Liu-He-Ba-Fa-system, taught in Nanjing by Wu Yi Hui, includes training derived from external-styles reworked to complement the core form: "Liu Hung's Eight-Link Palms", "Coiled Dragon Fist", "Coiled Dragon Swimming", "Dragon and Tiger Fighting", and the "12 'Animal' form". In Nanjing, Wu had associations with other notable teachers: Ch'u Kuei-Ting (Xing-Yi/ Ba Gua), Chiang Jung-Ch'aio (Ba-Gua/ Tai Chi), and Yi Quan- Zhan Zhuan teachers: Wang Xiang-Zhai and Han Xing-Ch’aio (elder brother of Han Xing-Yuan).
1.5.1.4. Nei Jin • Nei Jin, Nei chin or Pinyin: is said to be an internal power or coordination acquired
through the practise of Chinese martial arts. Proponents say that it is characterized by
elasticity, flexibility and coordinated with deep, natural breathing. It is said to be the theoretical opposite of using tension or brute force to perform work with the body. One of features of Nei Jin is allegedly that it involves the entire body working together as a single unit, with no wasted effort anywhere in the musculature when it is being exerted. Chinese soft style martial artists claim that as one ages the power of muscles expanding and contracting in tension gradually decreases but coordinated Nei Jin and its resulting leverage will increase with time if it is cultivated assiduously.
• It is said to be a special feature of Chinese soft styles, alleged to be rarely, if at all, found in other martial arts, although different schools have differing definitions of the term.
• In general, the training used to cultivate Nei Jin is called "Ni Gong" in distinction to external training that is known as "Wu Gong". A famous example of Nei Jin is known as "Fa Ji, a technique trained by practitioners of the internal Chinese martial arts to throw opponents great distances away from them.
1.5.1.5. Pakua Chuan (Pa Kua Chang, Bagua Zhang) • Bagua Zhang: Ba Gu hang) (Pa Kua Chang, Bagua Quan, Pa kua Ch, Bagua, Pakua,
Pakua boxing) is one of the three major internal Chinese martial arts, the other two of which are Xingyiquan and Taijiquan.
• The word 'Baguazhang' literally means "eight trigram palm". The trigrams refer to diagrams from the Yijing, one of the canons of Taoism. These diagrams in turn refer to eight animals, upon which in some styles of Baguazhang movements or fighting systems are based on.
• The trigram and their corresponding animals in martial arts are: 1. Li - Chicken 2. Kun - Qilin (sometimes mistranslated as unicorn or Chinese unicorn) 3. Dui - Monkey 4. Qian - Lion 5. Kan - Snake 6. Gen - Bear 7. Zhen - Long (often translated as Chinese dragon) 8. Xun - Fenghuang (often mistranslated as phoenix or Chinese phoenix)
• Similar types of animal systems exist in other types of Chinese martial arts. • The practice of circle walking is Bagua's characteristic method of stance and
movement training. Practitioners walk around the edge of a circle in a low stance, facing the centre and periodically changing direction as they execute forms. Students first learn flexibility through such exercises, and then move on to forms that are more complex and internal power mechanics. The internal aspects of Bagua are very similar to those of Xingyi and Taiji. Eventually, many distinctive styles of weapons training are practiced, sometimes including the uniquely crescent-shaped deer horn knives. In many schools, students study both Xingyi and Bagua. These may be used together in fighting, as they are often complementary. Bagua contains an extremely wide variety of techniques, including various strikes, low kicks, joint techniques, throws, and distinctively circular footwork.
• Bagua was developed by Dong Haichuan in the early 19th century, who apparently learnt from Taoist and Buddhist masters in the mountains of rural China. There is evidence to suggest a synthesis of several pre-existing martial arts taught and practiced in the region he lived in, combined with Taoist circle walking. (It should be noted that circle walking appears popular among the shamanism traditions, including a version practiced by Siberian shamans). Dong Haichuan taught for many years in Beijing, eventually earning patronage by the Imperial court. Famous disciples of Dong to become teachers were Yin Fu, Cheng Tinghua, Song Changrong (宋宋宋), Liu Fengchun and Ma Weiqi. Although they were all students of the same teacher, their methods of training and expressions of palm techniques differed. The Cheng and Liu styles are said to specialize in "Pushing" the palms, Yin style is known for "Threading" the palms, Song's followers practice "Plum Flower" (Mei Hua) palm technique and Ma style palms are known as "Hammers." Some of Dong Haichuan's students, including Cheng Tinghua (who was killed), participated in the Boxer Rebellion.
• One of the most famous Bagua practitioners of the 20th century was Sun Lutang, who studied Baguazhang under Cheng Tinghua. Sun was also a Xingyiquan disciple of Guo Yunshen and learned Wu/Hao style Taijiquan from Hao Wei-chen. Sun Lutang was reputed among the Taiji professionals of his day to have excelled in his studies and subsequently became well known as the founder of Sun style Taijiquan.
• Baguazhang is also known for sometimes practicing with extremely large weapons, such as the Baguadao, or 'Bagua Broadsword.'
• Few good teachers of Baguazhang are available in the United States, and many do not advertise. Many are conservative and in line with Confucian, didactic tradition will only reveal internal practices to dedicated students.
1.5.1.6. Tai Chi Chuan (T’ai Chi Ch’uan, Taijiquan) • T'ai Chi Ch'uan or Taijiquan is from Chinese literally supreme ultimate fist.
Commonly known as T'ai Chi or Taiji , is a Nei Chia ("internal") Chinese martial art that is known for the claims of health and longevity benefits made by its practitioners and in some recent medical studies. T'ai Chi is known as a soft style martial art. An art applied with as complete a relaxation or "softness" in the musculature as possible, to distinguish its theory and application from that of the hard styles, which use a degree of tension in the muscles.
• Breathing, tai chi: Proper breathing is a very important aspect of Tai chi. Through the development of correct breathing techniques one is able to control and generate chi. The postures of Tai chi are done slowly and rhythmically. The breathing should flow naturally and in a circular path from the head to the t’an tien, or centre of energy, up through the chest and out the nose. There are many martial arts breathing exercises, and some breathing techniques are held secret.
• Chang san-Feng: Chang San-Feng was a legendary martial arts master and Taoist philosopher of the eleventh century AD. He is considered the founder of tai chi and is often referred to as the father of that art. Legend has it that Chang established a monastery on mol don in china, where he combined the thought of Confucius with Taoist philosophy and developed an art based on the concepts of yin and yang. The soft styles of kung fu developed through Chang’s work. One story says that Chang got his ideas through a dream. Another tells of how he watched a battle between a bird and a snake in which the snake, by using very subtly changes in motion, wore out and defeated the bird.
• Chi: A basic Chinese concept of the soft styles of martial arts, chi, or in Japanese Ki, means internal energy, as opposed to the external energy of pure power. It is a universal force which, when harnessed by the individual, brings enlightenment, good health, and the ability to defend oneself. Chi is learned through relaxation and breathing techniques. The term also refers to one of the basic movements of tai chi. see press forward.
• Chien family: Long ago, the members of this Chinese family were the only practitioners of the art of tai chi. This soft form of kung fu was a well-guarded family secret, which the head of the Chien family learned from Wang Tsung Yueh; the founders most advanced student. Not until the time of yang Lu Chan, 1798-1872, did an outsider study the art.
• Chien style of tai chi: The oldest style of tai chi, derived from the Chien family, is the Chien style. Chien style is slow and graceful and usually consists of 108 postures.
• Chuan: A Chinese term literally translated as fist. Its total meaning encompasses the entire person and the power to control ones action. It is through use of Chuan that one is able to experience the full impact of tai chi.
• Grand ultimate: This principle of Chinese philosophy is known as tai chi. The grand ultimate is everything – the beginning, the end, reality, and truth. The grand ultimate is created through the interaction of the two vital forces, yin and yang.
• Kung Chia: Chinese term for the postures and solo exercises of tai chi. • Lu : Lu is one of the basic movements of Tai chi. See roll back. • Mental elucidation of the thirteen postures: A tai-chi treatise written by Wang Chung-Yueh, in
which he relates general and specific observations and recommendations for the proper performance of tai chi.
• Mol don: A mountain in china on which the legendary founder of tai chi, Chang San-Feng, established his monastery and taught the principles of the soft fist.
• Press forward: The press forward is a basic tai-chi movement, used when the opponent is slightly off balance. By pressing forward, you go with the flow of the opponents energy, ‘encouraging’ him to continue in the off-balance direction.
• Push A basic type of movement in tai chi. A push is more forceful than the press-forward action used in tai-chi, but its purpose is the same – to encourage the motion of an opponent who is off balance so that he continues in that direction.
• Roll back: One of the basic actions in tai-chi, roll back is designed to put an opponent off balance by using fluid movements to direct his centre of gravity – and thus the power behind the attack – away from the target.
• Ta Lu: A tai-chi exercise in which two people perform blocks and strikes from either a stationery or a moving position in a very soft manner, following the principles of tai-chi.
• T’an tien: A Taoist term that refers to the energy centre of the body. This centre is located roughly two inches below the navel. As one does chi-building exercises such as tai chi, energy gradually develops and is stored in this area. T’an tien means field of cinnabar, another Taoist term referring to the sleeping energies in people.
• Thirteen postures of tai chi: The development of tai chi was a long process. Originally, there were thirteen postures: eight of these were based on the eight trigram or symbols of pa kua, and the other five were based on the five elements of Chinese philosophy. The original thirteen postures are ward off, roll back, press, push, pull, split, elbow stroke, shoulder stroke, advance, retreat, look right, gaze left, and central equilibrium.
• Wang Tsung-Yueh: The most advanced student of Chang San-Feng, founder of Tai chi. Wang is believed to be the author of the treatise on tai chi Chuan and of the mental elucidation of the thirteen postures. Wang taught chin Chia Kou, head of the Chien family that guarded tai chi as a family secret for many generations.
• Ward off : One of the basic concepts of tai chi is to ward off. The aim of this type of movement is to put the opponent off balance and to redirect the power of his attack upward and away from the target.
• Yang Lu Chan: Founder of the yang style of Tai chi. Yan (1798-1872) broke the wall of secrecy constructed by the Chien family around the secrets of this soft fist style. The story goes that yang insinuated himself into the Chien household by feigning illness. He was taken in, cared for, and given employment. He spied on the tai-chi classes at every opportunity. When he was finally caught, he had become such a master of the art that the Chien’s accepted him. In their turn, yang’s descendants also kept the art a closely guarded secret.
• Yang style of tai chi: Developed by yang Lu Chan (1798-1872. This style is characterised by long, reaching movements. The essence of this style is summed up in two words: sink and relax. The yang method contains the original thirteen postures.
• Tai-chi Chuan: One of the three major internal styles of kung fu, commonly referred to as Tai chi. According to legend, this art was developed by Chang San Feng who conceived of it in a dream. It is based on the principles of the I Ching and the philosophy of Lao-Tzu. Tai chi expresses the concepts of yin and yang through a series of postures ranging from 24 to 128 movements, depending on the style. The movements are continuous; there is no break from one to another. Tai chi is sometimes referred to as the circular exercise, because all movements are based on actions that describe circles, curves, arcs, spirals, and parabolas. Although tai chi is a form of pugilism, with all its movements based on self-defence, it is also a very healthy form of exercise. Its slow, natural movements help to keep the body in balance by relaxing muscles, improving circulation, normalising blood pressure, and regulating breathing. In its advanced stages, tai chi brings the mind and body into harmony. It is designed as a meditation to foster self-awareness and lead finally to enlightenment. Tai-chi Chuan literally means ‘grand ultimate fist’, which is an expression of both its metaphysical and practical aspects.
• Chang Chuan: The most popular group of fist sets included in the official national sports (Wu shu) of the peoples republic of china. Many of the well-known shaolin boxing arts are part of Chang Chuan, which means literally ‘long fist’. This term also refers to a system that is believed to be an ancestor of Tai chi. the consecutive in long boxing movements resemble the never-ending flow of a long river, for which the style was named.
• I Ching : The I-Ching is the book of changes, traditionally attributed to Confucius. This work contains sixty-four six-line symbols, or hexagrams, each composed of two three-line symbols called trigram. Together these symbols represent everything that exists in the universe, and all these elements are in constant flux. Flux, or change, is one of the three guiding principles of the I Ching. The other two concepts are ideas and judgement. The I Ching is used as an oracle by casting sticks or coins and comparing the patterns made by the coins or sticks with the hexagrams in the I Ching. Interpretations in the I Ching are purposely obscure because of its foundation
in the principle of judgement: the I Ching will never tell the seeker what to do but only suggest certain images. The teachings of the I Ching, and its three principles, form the philosophical basis of tai chi and many other styles of kung fu; in fact, the term of tai chi is taken from the I Ching. See tai chi Chuan.
• An: One of the basic movements of Tai chi. See ‘push’. • Tai chi Chuan classic: A series of general and specific statements by the legendary
founder of the art, Chang San-Feng, on the proper performance and mental attitudes for tai chi. An example is, ‘in every movement the body should be light and agile and all its parts connected like a string of pearls.’
• T'ai Chi Ch'uan is best known as the slow motion routines groups of people practice every morning in hundreds of parks across China and, increasingly, other parts of the world. In T'ai Chi classes one is taught awareness of one's own balance and what affects it, awareness of the same in others, and appreciation of the practical value in one's ability to moderate extremes of behaviour and attitude at both mental and physical levels.
• While its practitioners have historically considered it primarily a style of martial art, T'ai Chi Ch'uan is also called an art of moving meditation. T'ai Chi theory and practice is formulated in agreement with many of the principles of traditional Chinese medicine. Besides general health benefits and stress management attributed to beginning and intermediate level T'ai Chi training, many therapeutic interventions along the lines of TCM are taught to advanced T'ai Chi students in traditional schools. T'ai Chi Chuan as physical training is characterized by its requirement for the use of leverage through the joints based on coordination in relaxation rather than muscular tension. The slow, repetitive work involved in that process is said to gently increase and open the internal circulation (breath, body heat, blood, peristalsis, etc.). Over time, proponents say, this enhancement becomes a lasting effect, a direct reversal of the physical effects of stress on the human body. This reversal allows much more of the students' native energy to be available to them, which they may then apply more effectively to the rest of their lives; families, careers, spiritual or creative pursuits, hobbies, etc.
• The study of T'ai Chi Ch'uan involves three primary subjects, in the following order: 1. Health - an unhealthy or otherwise uncomfortable person will find it difficult to
meditate to a state of calmness or to use Tai Chi as a martial art. Tai Chi's health training therefore concentrates on relieving the physical effects of stress on the body and mind.
2. Meditation - the focus meditation and subsequent calmness cultivated by the meditative aspect of T'ai Chi is seen as necessary to maintain optimum health (in the sense of effectively maintaining stress relief or homeostasis) and in order to use it as a soft style martial art.
3. Martial art - the ability to competently use T'ai Chi as a martial art is said to be proof that the health and meditation aspects are working according to the dictates of the theory of T'ai Chi Ch'uan.
• The Mandarin term "T'ai Chi Ch'uan" translates as "Supreme Ultimate Boxing" or "Boundless Fist". Training T'ai Chi involves learning solo routines are known as forms and two person routines known as pushing hands as well as acupressure related manipulations taught by traditional schools. T'ai Chi Ch’uan is seen by many of its schools as a variety of Taoism, and it does seemingly incorporate many Taoist principles into its practice (see below). It is an art form said to date back many centuries (although not reliably documented under that name before 1850), with precursor disciplines dating back thousands of years. The explanation given by the traditional T'ai Chi family schools for why so many of their previous generations have dedicated their lives to the study and preservation of the art is that the discipline it gives its students to dramatically improve the effects of stress in their lives, should hold a useful purpose for people living in a stressful world. They say that once the T'ai Chi principles have been understood and internalised into the bodily framework the practitioner will have an immediately accessible "toolkit" thereby to improve and then maintain their health, to provide a meditative focus, and that can work as an effective and subtle martial art for self-defence.
• Teachers say the study of T'ai Chi Ch'uan is about challenging one's ability to change oneself appropriately in response to outside forces. These principles are taught using
the examples of physics as experienced by two (or more) bodies in combat. In order to be able to protect oneself using change, it is necessary to understand what the consequences are of changing appropriately, changing inappropriately and not changing at all in response to an attack. Students, by this theory, will appreciate the full benefits of the entire art in the fastest way through physical training of the martial art aspect.
• In the 20th century, various people have offered different explanations for the term T'ai Chi Ch'uan. Some have said: 'In terms of self-cultivation, one must train from a point of movement towards a point of quiescence. T'ai Chi comes about through the harmony of yin and yang. In terms of the art of attack and defence then, in the context of transformations of full and empty, one is constantly inwardly latent, not outwardly expressive, as if the yin and yang of T'ai Chi have not divided apart.' Others say: 'every movement of T'ai Chi Ch'uan is based on circles, just like the shape of a T'ai Chi symbol. Therefore, it is called T'ai Chi Ch'uan.' Both explanations are quite reasonable, especially the second, which is fuller."
• Tai chi training and techniques: As the name T'ai Chi Ch'uan is held to be derived from the T'ai Chi symbol, the Taijitu or T'ai Chi t’u, commonly known in the West as the "yin-yang" diagram, T'ai Chi Ch'uan techniques are said therefore to physically and energetically balance yin (receptive) and yang (active) principles: "From ultimate softness comes ultimate hardness."
• The core training involves two primary features: 1. The first being the solo form or Quan, a slow sequence of movements which
emphasise a straight spine, relaxed breathing and a natural range of motion; 2. The second being different styles of pushing hands or Tui shou or t'ui shou for
training "stickiness" and sensitivity in the reflexes through various motions from the forms in concert with a training partner in order to learn leverage, timing, coordination and positioning when interacting with another. Pushing hands is seen as necessary for training the self-defence skills of a soft style such as T'ai Chi by demonstrating the forms' movement principles experientially. In addition, it is said to improve upon the level of conditioning provided by practice of the solo forms by increasing the workload on students while they practise those movement principles.
• The solo form should take the students through a complete, natural, range of motion over their centre of gravity. Accurate, repeated practise of the solo routine is said to retrain posture, encourage circulation throughout the students' bodies, maintain flexibility through their joints and further familiarize students with the martial application sequences implied by the forms. The major styles of T'ai Chi have forms that differ somewhat cosmetically, but there are also many obvious similarities pointing to their common origin. The solo forms, empty-hand and weapon are catalogues of movements that are practised individually in pushing hands and application scenarios to prepare students for self-defence training. In most traditional schools different variations of the solo forms can be practiced; fast/slow, small circle/large circle, square/round (which are different expressions of leverage through the joints), low sitting/high sitting (the degree to which weight-bearing knees are kept bent throughout the form), for example.
• In a fight, if one uses hardness to resist violent force then both sides are certain to be injured, at least to some degree. Such injury, according to T'ai Chi theory, is a natural consequence of meeting brute force with brute force. The collision of two like forces, yang with yang, is known as "double-weighted" in T'ai Chi terminology. Instead, students are taught not to fight or resist an incoming force, but to meet it in softness and "stick" to it, following its motion while remaining in physical contact until the incoming force of attack exhausts itself or can be safely redirected, the result of meeting yang with yin. Done correctly, achieving this yin/yang or yang/yin balance in combat (and, by extension, other areas of one's life) is known as being "single-weighted" and is a primary goal of T'ai Chi Ch'uan training. Lao Zi or Lao Tzu provided the archetype for this in the Tao Te Ching (Dao De Jing in pinyin) when he wrote, "The soft and the pliable will defeat the hard and strong." This soft "neutralization" of an attack can be accomplished very quickly in an actual fight by an adept practitioner. A T'ai Chi student has to be well conditioned by many years of
disciplined training; stable, sensitive and elastic mentally and physically in order to realize this ability, however.
• Other training exercises include: • Weapons training and fencing applications employing the straight sword known
as the Jian or Chien or Gim (Ji � 劍), a heavier curved sabre, sometimes called a broadsword or Tao (Dāo 刀, which is actually considered a big knife), fan, staff (棍), 7 foot spear and 13 foot lance 槍 (both called Qiāng ). Less commonly known weapons still in use are the large Da Dao or Ta Tao (大刀) or Bagua sabre, halberd (j 戟ǐ ), cane, rope-dart, Three sectional staff and steel whip.
• Two-person tournament fighting (san shou 散散); • Breathing exercises; Nei gong or Nei Kung ( 功內 詧 n ōng) or, more commonly,
qigong or Chi Kung (氣功 짦 q #333;ng) to develop qi or chi (氣 쩠 q or "breath energy" in coordination with physical movement. These were formerly taught only to disciples as a separate, complementary training system. In the last 50 years, they have become better known to the public.
• T'ai Chi's martial aspect relies on sensitivity to the opponent's movements and centre of gravity dictating appropriate responses. Effectively affecting or "capturing" the opponent's centre of gravity immediately upon contact is trained as the primary goal of the martial T'ai Chi student, and from their all other technique can follow with seeming effortlessness. The alert calmness required to achieve the necessary sensitivity is acquired over thousands of hours of first yin (slow, repetitive, meditative, low impact) and then later adding yang ("realistic", active, fast, high impact) martial training; forms, pushing hands and sparring. T'ai Chi Ch'uan trains in three basic ranges, close, medium and long, and then everything in between. Pushes and open hand strikes are more common than punches, and kicks are usually to the legs and lower torso, never higher than the hip in most styles. The fingers, fists, palms, sides of the hands, wrists, elbows, shoulders, back, hips, knees and feet are commonly used to strike, with strikes to the eyes, throat, heart, groin and other acupressure points trained by advanced students. There is an extensive repertoire of joint traps, locks and breaks (Chin Na), particularly applied to lock up or break an opponent's elbows, wrists, fingers, ankles, back or neck. Most T'ai Chi teachers expect their students to thoroughly learn defensive or neutralizing skills first, and a student will have to demonstrate proficiency with them before offensive skills will be extensively trained. There is also an emphasis in the traditional schools on kind-heartedness. One is expected to show mercy to one's opponents, as instanced by a poem preserved in some of the T'ai Chi families said to be derived from the Shaolin temple: I would rather maim than kill; Hurt than maim; Intimidate than hurt; Avoid than intimidate."
• Tai chi styles and history: There are five major styles of T'ai Chi Ch’uan, each named after the Chinese family that teaches (or taught) it. The order of popularity is Yang, Wu, Chen, Sun, and Wu/Hao.
1. Chen style 2. Yang style 3. Wu or Wu/Hao style of Wu Yu-Hsiang 4. Wu style of Wu Ch'uan-yü and Wu Chien-ch'üan 5. Sun style
• The five family styles share much underlying theory, but differ in their approaches to training. There are also several groups teaching what they call Wu Tang style T'ai Chi Ch'üan: The designation Wu Tang Ch'üan is also used to broadly distinguish internal or Nei Chia martial arts (said to be a specialty of the monasteries at Wu Tang Shan) from what are known as the external or Wei Chia styles based on Shaolin Ch'üan. The distinction is sometimes disputed by individual schools. In this broad sense, among many T'ai Chi schools all styles of T'ai Chi (as well as related arts such as Pa Kua Chang and Hsing-I Ch'üan) are therefore considered ”Wu Tang style" martial arts. The schools that designate themselves "Wu Tang style" relative to the family styles mentioned above mostly claim to teach an "original style" they say was formulated by a Taoist monk called Chang San-Feng and taught by him in the Taoist monasteries at Wu Tang Shan. Some consider that what is practised under that name today may be a modern back-formation based on stories and popular veneration of Chang San-Feng (see below) as well as the martial fame of the Wu Tang monastery
(there are many other martial art styles historically associated with Wu Tang besides T'ai Chi). There is also a modern T'ai Chi style going by the name Wu dang as a term of convenience that is fairly well-known internationally, especially in the UK and Europe, originally taught by a student of the Wu (吳) style.
• When tracing T'ai Chi Ch’uan formative influences to Taoist and Buddhist monasteries, one has little more to go on than legendary tales from a modern historical perspective. T'ai Chi Ch’uan practical connection to and dependence upon the theories of Sung dynasty Neo-Confucianism (a conscious synthesis of Taoist, Buddhist and Confucian traditions, esp. the teachings of Mencius) is readily apparent to its practitioners. The philosophical and political landscape of that time in Chinese history is fairly well documented, even if the art later to become known as T'ai Chi Ch’uan origin in it is not. T'ai Chi Ch’uan theories and practice are therefore believed by some schools to have been formulated by the Taoist monk Chang San-Feng in the 12th century. A time frame fitting well with when the principles of the Neo-Confucian school were making them selves felt in Chinese intellectual life. Therefore the didactic story is told that Chang San-Feng as a young man studied Tao Yin (dǎoyǐn) breathing exercises from his Taoist teachers and martial arts at the Buddhist Shaolin monastery. Eventually combining the martial forms and breathing exercises to formulate the soft or internal principles, we associate with T'ai Chi Ch'üan and related martial arts. Its subsequent fame attributed to his teaching, Wu Tang monastery was known thereafter as an important martial centre for many centuries, its many styles of internal kung fu preserved and refined at various Taoist temples.
• Family tree: LEGENDARY FIGURES | Zhang San Feng* Circa 12th century WUDANG KUNGFU & NEI CHIA | Tai Yi Zhenren* | Ma Yun Cheng* | Wang Zongyue* TAI CHI CHUAN | Zhang Song Xi* | THE FIVE MAJOR CLASSICAL FAMILY STYLES | Chen Wang Ting 1600-1680 9th generations Chen CHEN STYLE | +---------------------------------------------------+ | | Chen Changxing Chen Youben 1771-1853 14th generation Chen circa 1800s 14th generation Chen Chen Old Frame Chen New Frame | | Yang Lu-ch'an Chen Qingping 1799-1872 1795-1868 YANG STYLE Chen Small Frame, Zhao Bao Frame | | +---------------------+-------------------------+ | | | | | Yang Chien-hou Yang Pan-hou Wu Yu-hsiang 1839-1917 1837-1892 1812-1880 | Yang Small Frame WU/HAO STYLE | | |

Yang Ch'eng-fu Yang Big Frame | | | | 1861-1932 | | SUN STYLE | | | | MODERN FORMS | | | lineage to Chen Old Frame | | | | Cheng Wing-kwong Qi Min-xuan | ????-???? | ????-???? | | | +----+-------------+ | | | | | | Cheng Man-Ching | Cheng Tin-hung 1901-1975 | 1930 Short (37) Form | WUDANG STYLE | Chinese Sports Commission 1956 Beijing 24 Form . . 1989 42 Competition Form (combined from Sun, Wu, Chen, and Yang styles)
• Notes on the family tree: • Names denoted by an asterisk are legendary or semi-legendary figures in the
lineage, which means their involvement in the lineage, while accepted by most of the major schools, isn't independently verifiable from known historical records.
• The Yang Pan-hou lineage is considered senior to the Yang Chien-hou lineage (as reflected by their respective ages), although it may appear otherwise in the formatting of the Family tree table above.
• The Cheng Man-Ching and Chinese Sports Commission short forms are said to be derived from Yang family forms and appear to be in the Yang family transmission above, but neither are recognized as Yang family T'ai Chi Ch'uan by current Yang family teachers. As well, the "Wu dang style" isn't recognized as representative of their style by the Wu family organisation. The Chen, Yang and Wu families are now promoting their own shortened demonstration forms for competitive purposes.
• Tai chi in the present • Recently there has been some divergence between those who say they
practise T'ai Chi primarily for fighting, those who practise it for its aesthetic appeal (as in the shortened, modern, theatrical "Taijiquan" forms of Wu Shu, see below), and those who are more interested in its benefits to physical and mental health. The Wu Shu aspect is primarily for show, the forms taught for those purposes are designed to earn points in competition and are mostly unconcerned with either health maintenance or martial ability. Stylists that are more traditional still see the two aspects of health and martial arts as equally necessary pieces of the puzzle, the yin and yang of T'ai Chi Ch'üan. The T'ai Chi "family" schools therefore still present their teachings in a martial art context even though the majority of their students nowadays profess that they are primarily interested in training for the claimed health benefits. T'ai Chi has become very popular in the last twenty years or so, as the baby boomers age and T'ai Chi's reputation for ameliorating the effects of aging becomes more well-known. Hospitals, clinics, community and senior centres are all hosting T'ai Chi classes in communities around the world.
• Along with Yoga, it is one of the fastest growing fitness and health maintenance activities, in terms of numbers of students enrolling in classes. Since there is no universal certification process, and most Westerners
haven't seen very much T'ai Chi and don't know what to look for, practically anyone can learn or even make up a few moves and call themselves a teacher. Relatively few of these teachers even know that there are martial applications to the T'ai Chi forms. Those who do know that it is a martial art usually don't teach martially themselves. If they do teach self-defence, it is often a mixture of motions which the teachers think look like T'ai Chi Ch'uan with some other system. This is especially evident in schools located outside of China. While this phenomenon may have made some external aspects of T'ai Chi available for a wider audience, the traditional T'ai Chi family schools see the martial focus as a fundamental part of their training, both for health and self-defense purposes. They claim that while the students may not need to practice martial applications themselves to derive a benefit from T'ai Chi training, their teachers at least should know the applications well enough to ensure that the movements they teach are done correctly and safely by their students. Also, working on the ability to protect oneself from physical attack (one of the most stressful things that can happen to a person) certainly falls under the category of complete "health maintenance." For these reasons they feel that a school not teaching those aspects somewhere in their syllabus cannot be said to be actually teaching the art itself, and will be much less likely to be able to reproduce the full health benefits that have made traditional T'ai Chi Ch'uan's reputation in the first place.
• Modern forms • In order to standardize T'ai Chi Ch'uan for its citizens' daily exercise,
and because many of the family T'ai Chi Ch'uan teachers either moved or stopped teaching after the Communist regime was established in 1949, the Chinese Sports Committee brought together four T'ai Chi experts who truncated the Yang family hand form to 24 postures in 1956. They wanted to somehow retain the essential principles of T'ai Chi Ch'uan but make it less difficult to learn than longer (generally 88 to 108 posture) classical family T'ai Chi Ch'uan hand forms. Because shorter forms don't have the conditioning benefits of the classical forms, they wanted more difficult forms for the purposes of further studies and demonstration that didn't have the demanding martial requirements of the traditional family forms. In 1976, the Combined 48 Forms were created by three T'ai Chi experts headed by Professor Men Hui Feng. The combined forms were created based on combining and condensing elements of the classical forms of four of the major styles; Ch'en, Yang, Wu, and Sun. The idea was to take what they felt were distinctive features of these styles and to express them in a short space of time.
• As T'ai Chi again became popular on the Mainland, competitive forms were developed to be completed within a 6 minute time limit. In the late 1980s, the Chinese Sports Committee standardized the many different competition forms. It had chosen the four major styles and combined forms. These five sets of forms were created by different teams, and later approved by a committee of T'ai Chi experts in China, but not by direct representatives of most of the T'ai Chi families themselves. All sets of forms thus created were named after their style, e.g., the Ch'en Style National Competition Form is the 56 Forms, and so on. The combined forms are The 42 Form or simply the Competition Form, as it is known in China. In the 11th Asian Games of 1990, wushu was included as an item for competition for the first time with the 42 Form being chosen to represent T'ai Chi. It is likely to be the official form in the 2008 Summer Olympics. [2] (http://www.egreenway.com/taichichuan/short.htm)[3] (http://www.ohioshaolin.com/China%27s%20Arts/history_of_tai_chi_42_competitio.htm)
• Representatives of some of the traditional families do not necessarily agree with the assessments of the Chinese Sports Committee, however. T'ai Chi Ch'uan has historically been seen by them as a martial art, not a

sport, with competitions mostly entered as a hobby or to promote one's school publicly, but with little bearing on measuring actual accomplishment in the art. Their criticisms of modern forms include that the modern, "government" routines, being what they see as a mostly random combination by committee of some external elements of the traditional styles, have no standardized, internally consistent training requirements. Also, that people studying competition forms rarely train pushing hands or other power generation trainings vital to learning the martial applications of T'ai Chi Ch'uan and thereby lack the quality control traditional teachers say knowing the martial aspect of the art is essential for.
• Tai chi as a form of traditional chinese medicine • Researchers have found that long-term T'ai Chi practice had favorable
effects on the promotion of balance control, flexibility and cardiovascular fitness and reduced the risk of falls in elders. The studies also reported reduced pain, stress and anxiety in healthy subjects. Other studies have indicated improved cardiovascular and respiratory function in healthy subjects as well as those who had undergone coronary artery bypass surgery. Patients also benefited from Tai Chi who suffered from heart failure, high blood pressure, heart attacks, arthritis and multiple sclerosis (See research citations listed below).
• Citations to medical research • Wolf SL, Sattin RW, Kutner M. Intense tai chi exercise training and fall
occurrences in older, transitionally frail adults: a randomized, controlled trial. J Am Geriatr Soc. 2003 Dec; 51(12): 1693-701. PMID 14687346
• Wang C, Collet JP, Lau J. The effect of Tai Chi on health outcomes in patients with chronic conditions: a systematic review. Arch Intern Med. 2004 Mar 8;164(5):493-501. PMID 15006825
1.5.2. External 1.5.2.1. Kung-Fu
• In terms of the martial arts, a Chinese system that teaches not only self-defence but also the best way to live in harmony with the rest of the world. Kung fu incorporates ideas from many disciplines, including wrestling, locks and hods, throws and takedowns; in addition, entire offensive and defensive animal styles (see five animal styles). It also teaches non-martial subjects such as philosophy, geometry, and physics. In a more literal sense, kung fu means high quality, or the best in one field. Thus, Albert Einstein could be considered a kung-fu scientist. The Cantonese pronunciation is Gung-fu.
• Kung-fu system or style: In Kung Fu, there are many different approaches or styles. All formed from a common need for a system of self-defence. Each system was usually based on the size of the people – their height, weight, speed, and agility – and on their environment – the climate, type of land, and geographic variations.
• Family system: In some styles of kung fu, to be accepted as a student is to enter into what is known as the family system. As the name implies, the instructor becomes the father. The other students become older brothers or older sisters if they have been studying with the master for a longer time, or younger brothers or younger sisters if they begin their studies with that master after you.
• Chinese boxing: Popularly known as kung fu. This art sets out to train the whole person, physically as well as mentally. Its primary aim is to condition the body to serve the mind. Kung fu stresses both soft slow moves and fast powerful techniques.
• Boxer rebellion: An outbreak against the spread of western influence in china that took place in 1900 and was led by Ts’ao fu-ti’en. The term boxer was applied to the relatively few kung-fu fighters who participated in the revolt. These fighters belonged to a number of secret societies; the most famous of which was the I-ho-chuan, or righteous and harmonious fists. The boxers achieved a reputation for almost supernatural strength and endurance, and many Chinese believed that their powers would be superior to the modern firearms of the westerners.
• Si-di: Literally, younger brother. In the family system of ranking used in Chinese martial arts, this is the title given to the newer students of a particular master. A woman of this rank is called a si-mu.
• Si-fu: An instructor in kung fu; literally, the word means father, and it is applied to an instructor according to the traditions of the family system of ranks in kung fu. The title is the same for a woman of this rank.
• Si-gung: In the kung-fu family system of ranking, a master is given the title si-gung, or grandfather. A woman of this rank is called si poo.
• Si-hung: Literally, older brother. In the Chinese martial arts, a student who has been a master for a long time acts as older sibling to the newer members of the ‘family’. An older sister is called si-je.
• Si-jo: Title given to the founder of a particular system of kung fu. • Si-suk: Title given in kung fu to an instructor of the junior rank; literally, younger uncle.
A female of this rank is given the title si-goo mui. • Waiting in the garden: Before a person was allowed into a kung-fu temple (in the
modern sense, the kung-fu school), he had to stand outside the monastery entrance and wait. Usually he waited in all kinds of weather. The purpose of this practice was to weed out those who did not have the strongest intent.
• Bok Mei pai: The white eyebrow style of kung fu, named after Bok Mei, who was a monk with white beard, hair and eyebrows. He created a type of kung fu designed mainly for speed. This style is forbidden to members of the shaolin temple because Bok Mei killed his fellow disciples.
• White eyebrow style: See Bok Mei pai kung fu. • Chi hsuan sho: ‘the unusual hand’, a modern style of kung-fu combining elements of chi
hsuan men and tamo sho. There are 36 hand techniques in shi hsuan sho, all aimed at making the hands themselves into lightning-fast ‘iron fans’. The forms are similar to those for iron palm, but the emphasis here is more on speed than on power.
• Chuan fa: A mandarin term meaning way of the fist. This is actually the correct term for what westerners call kung fu, which translates as good worker or artisan. Cantonese pronunciation of this term is ken fat.
• Fut gar: A southern or sil lum style of kung fu. Fut gar, or fo jya, in mandarin, means Buddha family. Fut gar uses both hard and soft techniques. Hand movements are more numerous than foot movements, although kicking techniques are taught, and the open palm is used more often that the fist. Fut gar philosophy states that the open palm is more relaxed, therefore faster, and more powerful than the fist; also, fut gar was created by Buddhist’s, who viewed the fist as a symbol of aggression. The five animal styles are part of fut gar, except that the ape, symbol of foot techniques and mental power, replaces the leopard.
• Fo jya: Mandarin for the fut gar (Buddha family) style of kung-fu • Hung gar: A system of kung fu, also known as tiger style. The tiger stylist has very
strong attack methods, based on the power and agility of the tiger’s claw. This style requires a great deal of physical strength, flexibility and endurance.
• Tigers claw: A kung-fu technique that rips at the opponent. The fingers are spread wide and bent at the knuckles, flexed but tense.
• Hu: Chinese for tiger, one of the five animal styles of kung fu. • Leopards paw: A knuckle strike used in kung-fu. The area between the fist and the first
and second knuckles of the four fingers are bent to resemble the paw of a large cat but are not tucked tightly into a fist. Only the thumb is tucked. This technique is used in close attacks as either a punching movement or a smash with the palm of the hand.
• Liou ho pa fa: The six combinations/ eight methods style of kung-fu. Like the other internal systems of kung fu, liou ho pa fa is based on cultivation of chi, centring, and non-resistance. The six combinations represent the essential qualities of a true kung-fu artist, and the eight methods are the fundamental abilities needed by a fighter to defend himself and to find spiritual harmony.
• The six combinations are 1. body and mind; 2. mind and will; 3. will and chi; 4. chi and spirit; 5. spirit and movement; and 6. movement and emptiness.
• The eight methods are:
1. nurturing chi; 2. training bones to increase internal strength; 3. co-ordinating chi with techniques; 4. using soft defence; 5. raising the chi from the t’an tien; 6. lowering the chi back to t’an tien; 7. controlling physical and mental energy; 8. Concealing techniques until it is advantageous to reveal them.
• Six combinations / eight methods: An internal system of kung fu. See liou ho pa fa. • Choy: One of the five basic southern styles of kung fu. Choy, the monk who originated this
style, is also honoured in the choy li fut form of kung fu, which is a combination of his and the monk li’s arts. The basic ingredients of choy are the five animal styles, intricate hand techniques, circular motion, and a powerful horse stance.
• Choy li fut : A style based on southern shaolin kung fu and created in 1836 by chan heung. Choy and li were masters who gave their names to the styles of kung fu they created, and fut refers to any style that is based on Buddhism. Choy li fut emphasises the practical, for chan heung was a warrior seeking the fastest and most efficient way to train his soldiers. Shoy li fut is a combination of hard and soft styles, with circular movements and 48 long-range hand techniques. There are also 18 techniques for weapons use.
• Chup: Choy li fut term meaning long-hand punch • Hung sing: One of the most popular styles of choy li fut kung fu. Its founder, Chang hung
sing, was a student of the creator of choy li fut, chan heung. • Pa kua: An internal soft northern style of kung fu. pa kua, which means ‘eight trigrams’, is
based on the I-ching. If you can defend yourself at the eight compass points covered by the trigrams, you will be fully protected from attack. Pa kua has many palm techniques in addition to the dodging skills learned by ‘walking the circle’, a basic pa kua exercise.
• Snake strike: A Kung –fu open hand technique. The index and middle fingers are used to strike at vital points. The fingers, which represent the snakes forked tongue, weave in, advance, and retreat pattern in a circular, serpentine fashion.
• Tamo sho: A type of kung fu named for tamo (bodhidharma), the Indian holy man who originated shaolin kung fu. The emphasis is on elaborate hand techniques, including a special type of iron palm, and on great physical strength.
• Tamo’s palms: An iron palm for that is part of tamo sho kung fu. In addition to the physical conditioning of arm and palm, the student learns meditations, combined with breathing exercises to help the chi flow through the arm. Moreover, he is put through rigorous physical training in order to be able to participate in heavy combat.
• High form : A high form style of kung-fu is one in which techniques depend primarily on timing and position rather than on speed and power; high forms require more skill than actual brute force. White crane is a style containing many elements of high form.
• Yim wing chung: Yim, whose name means beautiful springtime, lived in china 00 years ago and studied kung-fu under the Buddhist nun ng mui, who taught her a style based on hard stances and strikes. Legend has it that yim witnessed a fight between a crane and a snake. The style that she developed, called wing Chun, brought together the fighting tactics of both crane and snake, aswell as the direct techniques taught her by ng mui. This flowing, economical style allowed her to preserve her strength and ‘stick’ to her opponent.
• Butterfly knife: A short bladed weapon, usually used in pairs. Historically the butterfly knife was popular in the south of china, where crowded urban conditions made a small, compact weapon desirable. In addition to its size, quick motion with the butterfly knives is an advantage. This weapon is generally used defensively.
• Chi Kung: Control of breath, a system of exercises create by hua t’o, the famous physician of ancient china. The chi Kung exercises were based on hua t’o’s observations of the movements of five animals – tiger, deer, bear, monkey, and bird.
• Ch’inag: An ancient Chinese spear. In 400 BC spears were as much as 18 feet long. They were used in close fighting to block and parry, the crossbow being more effective over distances, and they had a blade for hooking or slicing attached to the tip, which was used for straight thrusts.
• Ch’ih yu-his: The first known Chinese style of martial art, named after the horned monster ch’ih yu. The yellow emperor, huang ti, overpowered the beast using primitive combat methods that came to be known as ch’ih yu-his. This legendary battle took place around 2000 BC.
• Chinese ranking system: There are no belt colours that denote the levels of achievement in the Chinese martial arts. Instead, the family system is used.
• Chung-kuo chuan: See Chinese boxing. • Crabs claw: The thumb and forefinger become the pincers of the crab in this kung fu technique.
Although this move does not carry great power, it is very effective at the proper target, such as the throat.
• Crane wrist: The wrist joint at the back of the hand becomes the striking surface in this technique as the hand is bent inward, with fingertips together in the cranes beak position.
• Cranes beak: A kung-fu strike in which the fingertips are brought together so that they can attack with the powerful pecking action of the crane, which inspired the technique. Power is concentrated in a small area, so that attacks against vital points such as the eyes, ears, or temples are very effective.
• Dah jong: A rigorous kung-fu training regimen for strengthening the forearms, palm, and fists. There are two parts to dah jong – extensive workouts of repeated striking at tough objects, followed by treatments with herbal medicines such as dit da jow. These ointments not only heal bruised limbs but also strengthen them to prevent serious injury.
• Dim muk: The death touch. It is believed that some practitioners of kung fu are able to strike a vital spot on the body in such a manner as to delay the reaction by hours, days, or months. Such an attackers victim would not feel any immediate effects and would think himself unharmed, only to become seriously ill later.
• Dit da jow: An ointment made of medicinal herbs, the exact ingredients vary and are usually secret, used in kung-fu to enhance circulation, so that when applied externally it helps prevent bruises and internal injury. At the same time, it strengthens skin, muscle and bone. The ointment is first heated and then massaged into the skin before and after training sessions. Dit da jow is essential to such activities as iron palm and breaking.
• Double sword: A Chinese weapon whose main strength lies in surprise. The double sword, if drawn properly, looks like a single weapon as it comes out of the scabbard. When the opponent closes in, the two blades are separated, and even the versatile spear is useless against the weapon.
• Double-bladed hook sword: A Chinese weapon that probably had its origin in farm tools. It is a sort of combination sickle, sheep hook, and staff, and it can be used offensively and defensively in several directions simultaneously. This sword looks like a crooked staff with a pointed end and a curved sickle like blade attached at the side. Farm implements were often used as weapons during the periods when possession of true weapons was forbidden by the government.
• Dragons head fist: A kung fu hand technique. The middle joint of the third finger extrudes from the rest of the fist to form a spearhead. This is used as a power strike concentrated at a small target area and is effective against the solar plexus.
• Eagle talons: A kung fu technique in which the thumb and the first and second fingers are bent at the foreknuckle to resemble a three-pronged claw. The other fingers are fully bent in a fist. This is a good technique for grabbing at fleshy parts of the body and for ripping.
• Eye of phoenix: A kung-fu technique in which all the fingers form a perfect fist except for the index finger, which protrudes as a powerful and highly precise weapon. This technique is used in attacks to hollow points such as the throat.
• Finger fan: The thumb is tucked and the fingers spread to rip across the eyes in this devastating technique.
• Five animal styles: The movements of the crane, dragon, leopard, tiger, and snake form the basis of many techniques in kung fu. Each animal style stresses the development of certain skills: the crane is balance and sinews; the dragon, spirit and agility; the leopard, strength; the tiger, bone; and the snake, internal power and the ability to strike at vital points.
• Five elements of Chinese philosophy: See wu-hsing • Forked hand: A kung-fu technique in which the thumb and index finger are used as pincers, like a
crabs claw, to grasp at vulnerable areas. • Gin like: Chinese term relating to the development of internal energy. The soft systems of kung fu
contain many exercises for the cultivation of inner power. • Gung-fu: Cantonese pronunciation of kung-fu • Hard styles: The hard styles of kung fu rely on actual physical strength or muscle power; the
meeting of force with force, as opposed to the yielding movements of the soft styles. Shaolin is the main type of hard style kung fu. Also known as hard fist styles.

• Hei ‘liek: A Chinese term that means outer energy or pure physical strength. As one gets older, outer energy is depleted, and one becomes physically weak. The kung-fu master knows this and trains the student so that his ginliek, or inner energy, takes over as his inner strength dwindles.
• Ho: Chinese for crane, one of the five animal styles of kung-fu • Hua t’o: A famous surgeon of ancient chine, 190-265 AD, traditionally credited with having
created a system of exercise for health and relaxation. Part of the basis for these exercises was hua to’s observation of the deer, tiger, bear, monkey and bird. This system is perhaps one of the earliest ancestors of Chinese martial arts.
• Huang ti: The yellow emperor of the Chou dynasty of 1122-255 BC in china. Huang-ti defeated the horned monster ch’ih yu in battle; the fighting methods he used became ch’ih yu-his, the oldest known Chinese martial art.
• Hung yun: A monk who lived in china during the Ming dynasty of 1368-1644 AD, and created Tien Shan p’ai kung fu. It is said that as a supplicant to join the monastery, hung yun waited outside all night in a blizzard. When he was brought in, unconscious, the following morning, drops of blood fell on the earth outside. When the sun rose, the blood formed a red mist and floated across the sky. Thus, he was called hung yun, which means red cloud. He later founded a temple, and his disciples were instrumental to the Chinese resistance to the Manchurians and their ch’ing dynasty. The temple he founded was named hung yun szu after his death, in his honour.
• Immortal man pointing the way: A kung-fu hand technique in which the index and middle fingers ‘point the way’ to an opponents vital area. The thumb also is extended, and the 4th and 5th fingers are bent.
• Iron fist: Iron fist techniques are the same for iron palm, except that the fist rather than the palm is conditioned as the striking surface.
• Iron palm: A highly lethal technique known for it’s ability to kill with a single blow. The entire forearm must be conditioned gradually over a period of several years. Practice involves punching bags filled with sand, or sometimes buckets of water, and later, containers of pebbles, metal filings, grapeshot, or similar materials. The herbal medicine dit da jow is necessary to protect the arm and help to tone it.
• Joan sien: Chinese for centreline. • Jung hok: Chinese for waiting in the garden. • Kang his: A Chinese scholar of the Han dynasty, 1662-1722AD, who organised the writings of
Confucius and compiled the version of the I Ching presently used by most scholars. • Kuan ti: Traditionally, the Chinese god of war, kuan ti is actually most westerners idea of a god of
peace. For it was he who would protect his people from war and its devastation. Kuan ti is the deified kuan yu, a military hero of the 1st century AD. Kuan Yu is also immortalised in the weapon that he used and that was named for him, the quan do. He is now the patron god of martial arts because he symbolised righteousness, humility, and courage as well as military ability, in short, the honourable warrior.
• Kuen hue hokpai: A kung-fu style also called tiger-crane style. Southern shaolin boxing divided into five basic styles, each named after the master who developed that style. Master hung emphasised the movements of the tiger and crane, and this became known as Kuen hue hokpai. The crane techniques are primarily long-range blows such as the crane delivers with its powerful wings, footwork, and balance exercises. These are complemented by the ripping and powerful hand movements of the tiger, as in the tigers claw move.
• Kuo-sho: Chinese national martial arts. See wu shu. • Kwoon: Chinese for training hall. • Longhand system: Any style of kung fu that stresses the use of full arm extension when executing
techniques, as in the long-hand punch of choy-li fut. • Nui gung: This term means inner power, a concept found in Taoist and Buddhist yoga and later
adopted by kung fu. The methods of nui gung vary among the different styles and are some of the most secret teachings in Chinese martial arts. Nui gung is directly related to chi, for it is the ability to extend your chi beyond your own body. Nui gung is what enables masters to heal injuries of others with the touch of the hand. In its opposite aspect, nui gung is the power behind dim muk, the touch of death.
• P’ai: A term used to designate a school of Chinese martial arts. P’ai is used to describe specific courses of instruction, as in t’ien shan p’ai; it does not refer to a system, such as the shaolin system, which encompasses a philosophical, historical, and technical approach or way of life.
• Phon sao: Chinese for trapping hands.
• Sash: Used in the Chinese martial arts rather than the belt that is used in Japanese systems. The sash is roughly six to nine inches wide and nine to fourteen feet long. In some schools, the sash is long enough and wide enough to be wrapped around the waist with a knot to one side and a long piece hanging down. The sash comes in a variety of colours, but usually the master’s is black and the students white. In some systems, these colours are reversed.
• Shih pa lo Han sho: A Buddhist exercise, the eighteen hands of lo Han. • Shih-erh hsing chuan: A set of exercises related to wu-hsing chuan and based on the natural
movements of 12 animals. Shih-erh means 12, hsing means form, and chuan means fist. The creatures are the dragon, tiger, monkey, horse, tortoise, chicken, sparrowhawk, swallow, snake, pigeon, eagle and bear.
• Short hand system: Any style of kung fu that stresses close fighting or short-range techniques to break through an opponents defence. Many short hand systems have developed in southern china because of crowded urban conditions.
• Shuai chiao: One of the earliest organised fighting systems in china. Shuai chiao dates back to at least 700 BC. Essentially, it is a type of wrestling, although there is no groundwork and few throws. Shuai chiao tournaments were held in many parts of ancient china. Each dynasty contributed to the art, and at present, it is an official sport of the peoples republic and popular in Taiwan.
• Si Bok: Title given to an instructor of senior rank in kung fu, a grandmaster of a style is called si tai gung, or great grandfather; if a woman the title is si-tai-poo.
• So hou shou: Chinese term meaning to lock the hand. See forked hand. • Southern styles: The Chinese martial arts that are based on external power and sparring, the so-
called hard styles, are considered to have originated in southern china. Shaolin kung fu and its many branches are the main types of southern style kung fu.
• Stick: See join. • Taikyoku-ken: Originally, a Chinese fighting art, it is now used mainly for physical exercise. • Three-section staff: This weapon, Chinese in origin, consists of three rods held together by chain
or rope. It can be used to strike, block, and choke, and for many other purposes. • Tien Shan p’ai: An eclectic school of kung fu, which uses elements of shaolin, tai chi, hsing-I, pa
kua, chin-na, and chi Kung. Tien Shan p’ai was created by the holy monk hung yun and named for his monastery, the celestial mountain (Tien Shan); p’ai means school. The concept of yin-yang, union of opposites, is at the heart of Tien Shan p’ai, as evidenced by its borrowings from a hard style such as shaolin and from soft styles such as tai chi and pa kua. Short-range techniques are taught, but long range methods are emphasised. Circular motion is important, as is striking from an angle.
• Soft styles: The soft styles of Kung fu rely on inner force, or chi, the meeting of strength with softness, as compared to the force versus force teachings of the hard styles. Each soft style is based on a particular element of Chinese philosophy. Of the major soft styles, tai chi is based on yin-yang; pa-kua is based on the eight trigrams or symbols of the I ching; and hsing-I is based on the five elements. Also called soft fist styles, they stress flowing, even movements and tranquillity of mind.
• Tien Shan szu: The celestial mountain monastery, where the holy man hung yun lived during the Ming dynasty (1368- 1644 AD) and learned the various martial arts from which he developed Tien Shan p’ai kung fu.
• Tien-hsueh: The Chinese art of striking at vital points, analogous to the Japanese atemi. • Toe-Dai: In kung fu, when the individual is accepted into the temple for training after a period of
waiting in the garden, he is called toe-Dai, or student. • Tung pi: A kung-fu style based on five movements and their combinations – the backhand blow,
slap, thrust, knife hand, and corkscrew strike. Speed and agility are vital to this style. • Twin dragons in search of pearls: A kung fu hand technique in which the index and middle
fingers are used. The fingers bend slightly: they are the twin dragons, and the opponent’s eyes are the pearls.
• Twisting skill : One of the original names for chin-na. • Tzu chi chuan: The first form in Tien Shan p’ai kung fu. Tzu chi has a one person and a two-
person set. The two-person set is similar to the ta lu exercise in tai chi, the object being to remain in constant contact with the partners hands. Both the one and the two person sets are divided into two parts, and each part contains three of the following techniques: stances, punches, palm strikes, short and long range techniques, low and high kicks, takedowns, sweep and chin-na forms.
• Tzu-Jan: A Taoist concept that permeates the martial arts, especially the internal systems of kung fu. Tzu-jan is spontaneity and naturalness; in boxing, it expresses the idea of instinctive response to attack. The martial artist practices techniques constantly so that they will come naturally when needed.
• Wu style of tai chi: This style is a variation of the yang style and was created by wu yu-hsiang (1812-1880 AD).
• Wu shu: The official name for Chinese boxing, in both Taiwan and mainland China. Also called kuo-shu, the literal translation is national sport. Wu shu is composed of two main classifications: the hard styles, or shaolin, and the soft styles – tai chi, pa kua, and hsing-i.
• Wu-wei: A concept of Taoism that also permeates the martial arts, especially the internal styles of kung fu. Wu-wei means non-action in action; in terms of the martial arts, it means responding spontaneously to a situation, rather than preparing to defend oneself.
• Yang: The positive aspect of the universe. Yang relates to fullness, the sun, hardness, day, male, and mobility. It is thought of as the beginning of creation and the opposite of yin. Its representation is the white fish with the black eye in the familiar circular yin-yang symbol.
• Yuan chueh szu: The temple built by hung yun, founder of Tien Shan p’ai kung fu, and named for his master. After hung yun’s death, the name was changed to hung yun szu.
• Ng ying ga: Chinese for five animal styles • The silk-weaving exercises: An alternative warm-up routine: A warm up used in some kung-fu
classes. Hence, the bizarre names. • Loosening sinews.
1. Stand erect, with feet comfortably placed. Relax your arms and hands by allowing them to hang loosely at your sides.
2. Simultaneously shake arms and hands as if you were trying to shake drops of water from your fingertips.
3. Lift your right leg and shake it gently as in the previous movement. 4. Repeat the same procedure with your left leg. 5. Consciously attempt to relax the neck muscles, and then allow your head to drop as far
forward as possible. 6. Slowly revolve your head clockwise for two revolutions. If you are at ease this will crack
your upper spine. 7. Standing erect, slowly bring your hands up from your sides, palms parallel to the floor,
arms held in front of the body. 8. Continue the upward movement of your arms until they are stretched vertically and are on
the same plane as the rest of the body. At the same time, raise yourself as high as you can on the balls of your feet. Hold this position for a count of five, and then slowly allow your arms to return to your sides and your heels to the floor.
9. Return to the position in which you began the exercise. Standing completely still, feel your muscles relax.
• Horse position. 1. Stand erect, spine straight, feet slightly apart, hands open and held loosely at the sides. 2. Keeping the toes stationary, force the heels outward. In the same action, the hands
become fists and are swung to the front of the body at waist level. 3. Keeping the heels stationery, simultaneously force the toes outward and pull the fists
back. 4. Again keeping the toes stationary, pivot the heels outward while bringing the fists in front
of the waist. 5. The heels remain stationary while the toes are swung outward until the feet are parallel to
each other. At the same time, the fists are planted firmly on the upper thighbone. 6. The arms should be drawn back and the fists should face forward. At the same moment,
keeping your back as straight as possible, sink into a crouch. When seen from the side, it should resemble a man sitting in a chair, although no chair is present. At this point consciously, begin the deep-breathing exercise. Initially the position should be held for two minutes. If this becomes difficult, concentrate on your breathing; this will enable you to endure the unfamiliar strain. As your strength increases you may hold it as long as you wish.
• Two hands push the sky. (A.K.A. stretch toward the sky) [calf and forearm stretch] 1. Stand erect, spine straight, feet comfortably apart, hands relaxed at the sides. 2. Inhaling, turn your palms outward and slowly bring them above the head, inscribing a
circle in the air with both arms.
3. By, the end of inhalation, hands are directly over the head and the fingers interlocked. 4. Holding your breath for a moment, turn the palms outward and then over so that they are
now facing the sky, whereas they previously faced your head. 5. Exhaling, slowly push your hands and entire body skyward until you are on the balls of
your feet. 6. Still exhaling, lower yourself until your feet are back on the floor and your hands just
over your head. 7. Again, hold your breath for a moment and flip your palms over so that they are facing
your head. 8. Inhaling, unlock your fingers and slowly let them drop to your sides forming a semicircle
in much the same way you did earlier in the exercise. • Riding horse, use bow and arrow to shoot the eagle. [neck and shoulders stretch]
1. Inhaling, either jump or work your way into the horse position, as described earlier. Hold this pose until your lungs are completely filled.
2. Turning your head to the right, bring your left arm across your chest and hold it in a claw shape, just as if you were clutching the strings of a bow. The right hand is brought up to chest height with the index finger and thumb extended upward and the remaining three fingers bent. The claw position of the left hand counter-exerts in the opposite direction. When the hands have reached this position your lungs should be completely filled.
3. Exhaling, gradually push the right hand out to shoulder height and pull the left hand back, almost as if you were pulling a real bow taut.
4. After the maximum stretch point is reached, relax the bow while exhaling completely. Note how the hands gradually dissolve the bows structure.
5. The bow is dissolved completely as both hands pass in front of the chest and you begin a new cycle of inhalation.
6. Still inhaling, reform the bow on the left side, with the right hand in the claw shape and the left as the energy focal point.
7. Exhaling, pull the bow taut, as it was earlier on the right side of the body. 8. Still exhaling, relax the bow, return the hands to the horse position, and take a deep breath
before going on to repeat the exercise. • One arm raising.
1. Stand erect, spine straight, hands held loosely at the sides, feet spaced comfortably. 2. Inhaling, gradually raise your left arm until it is shoulder high and your palm is facing
skyward. Simultaneously, bring your right arm out and away from your side, the palm facing toward the body.
3. Continue the slow upward movement of the left arm until it is above the head. At the same time, the right arm pivots from the elbow to a position where the flat of the palm is slightly above the navel and is facing the floor.
4. Exhaling, push downward with the right palm and upward with the left. As you begin this movement, gradually raise yourself on your toes – stretch until your arms can go no further and your toes no higher. Remain in this position until exhalation is complete.
5. Inhaling, lower your body and hands until they return to approximately the same position they were in before the stretching manoeuvre.
6. Still inhaling, lower your hands to your sides, and then exhale. This completes the first half of this exercise; the second is identical, except that the movements are reversed.
7. Inhaling, raise your right arm until it is shoulder high and your palm is facing skyward. Simultaneously draw your left arm out and about a foot away from your side, the palm facing toward your body.
8. Continue the slow upward movement of the right arm until it is above the head with the palm still facing skyward. During the same movement, the left arm pivots at the elbow to a position where the palm is slightly above the navel and parallel to the floor.
9. Exhaling, push upward with the right palm and downward with the left. As you begin this movement, gradually raise yourself on your toes, stretching until both your arms and toes can go no higher. Remain in this position until exhalation is complete.
10. Inhaling, lower your body and hands to where they were before the stretching manoeuvre began, then slowly allow them to relax to your sides, following the same path they originally took.
11. When your hands are back in place, exhale. The exercise is complete. • Head and body swinging. [back]
1. Inhaling, either leap or work your way into the horse position.
2. Still inhaling, lean a little forward and place both hands on your thighs just above your knees. Thumb and forefinger should encompass the top part of the thighs while the remaining fingers grip the side of the thighs. This will keep you comfortably braced for the spine-stretching action that follows.
3. Consciously attempt to loosen your spine and back muscles, and then, exhaling, begin a slow clockwise movement with your torso.
4. Still exhaling, concentrate on your breath to allow your spine to stretch to its maximum. The more you concentrate on your breath, the lower you will be able to go.
5. Complete your exhalation; return to the position from which you started your first revolution.
6. Inhaling, repeat the same circular stretching motion, except that this time it is performed counter clockwise.
7. By the time your lungs are full, you should have returned to the original position. • Bending. [back]
1. Stand erect, with feet apart, arms held loosely at the sides. 2. Inhaling, gradually lower the torso until your hands are almost touching the ground. The
back and the legs are held as straight as possible. 3. Maintaining this position, clasp your hands together. 4. Exhaling, gradually assume a standing position, but with your clasped hands and
extended arms held at a ninety-degree angle to the torso. Note: when you straighten up, try to imagine that you are lifting an enormous load with your arms.
5. Inhaling, unclasp your hands and drop your arms to the side. This completes the first part of the exercise.
6. Continuing to inhale, bend your body backward while raising your palms until they are parallel with the floor.
7. Exhaling, and keeping your arms straight throw the arms upward until your palms are over your upper chest and parallel with the floor.
8. Permit your hands to drop along the same arc they travelled to your sides with the palms parallel to the floor, and gradually resume a standing position.
• Punching. [arms] 1. Inhaling, either jump or work your way into the horse position. 2. Exhaling, slowly push your right fist outward. There are two stages to this movement. In
this stage where the fist is halfway out, the wrist has completed a quarter turn and is now held vertical as opposed to the horizontal position seen in the left hand.
3. Completing your exhalation thrust the fist completely forward at shoulder height. Here the fist makes another quarter turn and is again horizontal, but upside down in comparison to the left fist.
4. Inhaling, gradually bring the fist back to the side, following the same path that was covered when it was thrust out.
5. Exhaling, make the left arm and fist follow the same movements as the right. 6. Inhaling, return the left arm to the side and hold the classic horse position once more. 7. Exhaling, raise the upper right arm and using the elbow as a pivotal point, gradually push
out the forearm and the fist and keep them on the same plane as the torso. 8. Emptying your lungs completely, push out the right forearm and fist until the right arm is
parallel to the floor and shoulder high. 9. Inhaling, return the arm to the side, following the same movements that brought it out
from the body, and resume the horse position. 10. Exhaling, push the left arm outward in an identical manner to the right. 11. Inhaling, return the left arm to the side and hold the horse position for a moment until
your lungs are completely filled. This completes one performance. • Beat the sky drum. [back & neck]
1. This exercise begins in a sitting position, with both legs comfortably crossed in front of you. The spine is held straight and the hands rest loosely on the knees. Before beginning the movements that comprise this exercise inhale and exhale once deeply.
2. Inhaling, make two fists and place them alongside the spinal column. 3. Facing forward, begin to gently pound as far up and down the spinal column as you
possibly can, making sure that you do not hit the spine itself, but only the area immediately to each side of it.
4. Gradually turn your head to the right while still pounding the spinal area. Twisting your neck in this position actually manipulates the spine, so push your neck as far as it can go
without feeling too uncomfortable. When you have turned your neck as far as possible, hold the position until your lungs are completely full.
5. Now slowly turn your head in the opposite direction as far as possible, gradually exhaling as you move. When you reach the extreme position, your lungs should be empty; if not, hold your neck there until they are. Do not stop pounding along your spine.
6. Inhaling, turn your head to the right again, slowly inhaling as you go. If your lungs are not full, hold the pose until they are. This completes one performance.
• Four arm movements. [arm] 1. Inhaling, either leap or work your way into the horse position. Maintain this position for a
few seconds or until inhalation is complete. What follows is a series of arm movements that are four in umber, from which the exercise takes its name. The key to the effectiveness of these movements is exhalation. During each motion, you should exhale about ¼ of your lungs capacity so that at the completion of the exercise it’s necessary to inhale again.
2. Still in the horse position, simultaneously draw both fists upward in the flattest arc possible until they are directly over your shoulder bone. If this is done correctly, your forearms should be parallel to the floor. At the completion of this movement, you should have exhaled ¼ of the air in your lungs.
3. Return your fists to your sides, thus resuming the horse position. Your lungs should now be half emptied.
4. Your chest bone is the bony shield over your heart that separates your right pectoral muscles from your left pectoral muscles. Simultaneously bring your right fist to the left side of your chest bone and your left fist left fist to the right of your chest bone – both arms should be parallel to the floor. It doesn’t matter which fist is above the other. Your lungs should now be ¾ empty.
5. Push both elbows outward until they are on the same plane as your torso. Arms should still be parallel to the floor and held at shoulder height. Your lungs should now be completely empty.
6. Inhaling, return the arms to the classic horse position. When your lungs are completely full, repeat the cycle.
• Knee raising. [knee & fingers] 1. Sit down, cross your legs comfortably in front of you, and rest your hands loosely on your
knees. Take one deep breath, letting your lungs gradually fill and empty. 2. Inhaling, draw up your left leg so that it is roughly perpendicular to the floor. 3. Clasp your hands together in front of the leg. Now flip your hands over so that the thumbs
are pointing to the ground but the fingers are still interlocked. 4. Exhaling, pull your leg as close to your chest as possible and then allow it to return to the
floor. 5. Still exhaling, flip your hands back over, unclasp them, return to the original sitting
position and take another deep breath. 6. Now perform the identical operation with the right leg. This constitutes one complete
cycle. • Dragon spies prey. [arm & shoulders]
1. Slowly inhaling, wither leap or work yourself into the horse position. 2. Still inhaling, bring your fists up in two intersecting arcs that cross in front of your face.
If the exercise is being performed properly, your upper arms should be parallel to the floor. From this point, the exercise is essentially a circular movement performed simultaneously with both arms, which inscribe two intersecting circles in the air.
3. Inhaling, continue the arc your fists were making in the previous movement, until they are no longer intersecting and are above your head. Since your arms are moving in a circular fashion, your elbows must be bent. Also, note that up to this point, the back of each hand is facing away from you; this will continue through one more movement and then will change.
4. Exhaling, bring your fists down to eye level, keeping them on the same plane as the torso. Stay in this position until you have exhaled completely.
5. Inhaling, turn your fists outward so that the backs of your hands are now uppermost. Then bring both arms downward in front of your body, forming two circles that will again intersect.
6. As you continue inhaling, the two arms begin to intersect. For this to properly occur it once again becomes necessary to twist the fists so that the back of the hand is the part of
the hand now facing away from the body. At this point, you have now completed one cycle.
7. After completing the cycle, return to the horse position for one inhalation and one exhalation.
• Four body movements. [hamstring] 1. From a standing position, place your hands on your hips and slide you’re left foot
backward (keeping your leg straight) until your right thigh forms a right angle with your right calf.
2. Inhaling, pivot a quarter turn and change your balance so that your weight is now on your bent left leg while your right leg is now straight.
3. Exhaling, again shift your balance by touching your head to your straight right leg. Do not be discouraged if this doesn’t come at once. In time, you will limber up enough to do it. Still exhaling, return to the position shown immediately above.
4. Pivot back to the original position from which you started the movements. At this point, your lunges should be completely empty. This is the first half of the exercise; the second half is a reversal of the first half.
5. Pivot 180 degrees so that the right leg is straight and the left one bent. Repeat the above directions, substituting the word ‘right’ for ‘left’ and vice versa.
• Crane looks behind. [hips] 1. Named for the pivotal motions by which the practitioner ends up facing in the opposite
direction from the one he faced when he started. From a standing position, slide your left foot backward (keeping it as straight as possible) until your right leg bends to the point where the thigh is parallel to the floor. Making a fist, simultaneously extend your left arm above your head while pulling your right arm back. Note that both arms form a straight line.
2. Inhaling, bring your left arm down and begin to pivot to the left on your heels. 3. Continue pivoting until you are facing front. Begin to bring your right arm around and
start to swing your left arm to your side. 4. Still inhaling, pivot still more until you are almost facing in the opposite direction from
the one you were facing when you began. Note that the right leg is now the straight leg and the left one is beginning to bend. The right arm begins to swing upward.
5. Now one should be completely reversed from the starting position – the right arm is now over the head and the left is drawn back and on line with it. At this point, your lungs should be completely filled.
6. Exhaling, pivot in the opposite direction until the original starting position is again reached. This completes one cycle. Upon completion of the exercise, continue exhaling and return to a standing position.
• Tiger stretches its back. [back] 1. From a standing position, slide your left leg back (keeping it as straight as possible) until
your right leg bends so that the thigh is parallel to the floor. Allow your hands to hang loosely at your sides.
2. Inhaling, twist your torso slightly to the left without moving your feet. At the same time, bring both arms up from your sides, the right higher than the left.
3. Keeping your feet in place, twist your torso a quarter turn to the left. Making fists, pivot the arms ninety degrees, bringing the right arm over the head and the left elbow to your upper thigh. Then bend your body as far to the left as possible, keeping it there until your lungs are full.
4. Exhaling, return to the starting position. This is the first half of the exercise. 5. For the second half of the exercise, pivot 180 degrees so the right leg is now extended and
the left one bent. 6. Inhaling, twist your body in the manner described for the first half of the exercise, until
the extreme position is reached. Then slowly exhale while assuming the original starting position. The exercise is complete when, still exhaling, you regain a starting position.
• Leopard reveals its claws. [] 1. The visual effect of this exercise is similar from that of a puppet on a string being pulled
in opposing directions. Stand erect, feet slightly apart, arms held loosely at your sides. 2. Inhaling, move your feet about a foot apart, make a fist with both hands and slowly raise
the right hand until it is directly over your head, with the back of the hand facing away from you.
3. As you exhale, the right fist begins descending while the left fist and the left leg start an upward block and kick motion.
4. As you continue exhaling, the two fists pass each other – the right going down to the right side, and the left above the head with the back of the hand acing away from you. Simultaneously, the left leg is kicking outward until it is waist high; the left hand and the left leg should reach the high points of their swing at the same moment. During the kicking manoeuvre, the leg is held as straight as possible.
5. The left leg returns to the floor and the left fist remains above your head. At this point, your exhalation should be complete.
6. As you inhale, the left fist begins its downward arc to your side and the right fist starts its upward arc. Simultaneously, the right leg kicks upward.
7. Still inhaling, the right fist is now above the head and the right foot is waist high (the left fist has returned to your side).
8. The right leg returns to the ground but the right hand is still held over your head. Your lungs should be completely filled and you should be ready for the next cycle. The exercise is complete when the remaining raised arm is lowered and you gradually expel all the air from your lungs.
• Jeet kune do: Bruce lee style of kung fu – although one of its main tenets is to beware of the limitations caused by following only one style or school. ‘Absorb what is useful; reject what is useless’. Jeet means to stop or intercept, kune means fist, and do means path or way. The way of the intercepting fist contains elements of many arts, from Thai boxing and judo to wrestling, but the main source of lees teachings is wing-chun, which he studied for many years.
• Tao of jeet kune do: A book by Bruce lee to describe his art, jeet kune do. Lee died before completing his work, and his widow and a long-time friend, Dan inosanto, finished it.
1.5.2.2. Black tiger kung fu • Black Tiger Kung Fu was inherited from Sujia Shaolin (non Monk). • The lineage of this Kung Fu style martial art system can be traced from Shizugong
Wang Zhenyuan in Shantung Province, China around 1870, who taught the second generation Sizhu Wang Zijiu. The third Generation was Grandmaster Wang Zhixiao who came to Indonesia with great grand master Wang Zijiu. The fourth generation is master Su Fuyuan (Souw Hok Gwan).
• Several systems of Black Tiger kung fu are existent at the present time. They are not necessarily closely related however. The Siu Lam Black Tiger style was taught by Grandmaster Wong Cheung until his death a few years ago. Some of his students still promote the style, and there is a web site, maintained by Eric Tsai,
• Sigung Wong, aka Kut Shuin, was born in Pun Yu county, Kwangtung province. He was learning his family's Sam Chin "Iron Wire" form at the age of 8. At age 10, he developed small pox. He was moved 50 miles away by his family to the village of a doctor, Leung Shu Cha, who cured his small pox and also taught him the "108 plum-blossom dummy" and the "9-armed grinder dummy." At the age of 14, Sigung Wong went to Canton with his uncle to work in an orchard. While there, he learned Dragon Pa Kwa from Fu Man, the brother of Fu Cheng Sung of Iron Palm fame. In 1920, at the age of 19, Sigung Wong went to Hong Kong where he worked as a gardener for a European family. His co-worker was Fung Ping-Wai, a former monk who had returned to worldly life. Fung was a grandstudent of the founder of the Siu Lam Black Tiger style and agreed to teach Sigung Wong. This association lasted 3 years. Subsequently, Grandmaster Wong studied Chi Kung under Cheung Loy and Lee Kow. He learned the 18 classical weapons, among others, under Pun Fei San. In 1928, he set up his own martial arts school, the Wong Cheung Gymnasium, in Hong Kong. After the war, he moved across the harbor to Kowloon peninsula.
• Sigung Wong was a small man with extremely well-conditioned hands who emphasized stealth and deception over raw power. He was extremely skilled with the staff, and he and an acquaintaince once fought off a large number of dockworkers with this weapon. He left his own unique imprint on his system, integrating hard and soft schools and techniques while maintaining the flavor of the originals. The system is so diverse that no single individual was ever able to learn the entire system, although a great number of forms and training methods are still practiced by a few students and grandstudents. Sigung Wong, as was typical of the time, did not award rank or belts. Rather, the traditional junior/senior method was used in which seniority is determined by the date a student began studying the style.
1.5.2.3. Chin na (actually a feature of many different Chinese styles as well, internal and external)
• Chin Na or Qinna is a Mandarin Chinese term describing joint-manipulation techniques for self-defense. Used in the Chinese martial arts, very often involving the study and use of acupressure points to enhance the efficiency of the techniques applied by the practitioner. While techniques along the lines of chin na are trained to some degree by most martial arts worldwide, many Chinese martial arts are famous for their specialization in such applications. Styles such as Eagle Claw (Yīng Zhǎo Qu), which includes 108 different chin na techniques, Praying Mantis and the "Tiger Claw" techniques of Hung Gar are well known examples.
• "Chin" means to seize or trap, "Na" means to lock or break, and while those actions are very often executed in that order (trap then lock), the two actions can also be performed distinctly in training and self defense. Which is to say, a trap isn't always followed by a lock or break, and a lock or break is not necessarily set up by a trap.
• Chin-na: A Chinese fighting form consisting of 72 grappling and seizing techniques and the counteractions to them. Chin-na resembles judo in many ways and is known as throw-fall art, bone twisting art, and art of sinew dividing. Chin-na techniques generally aim for the vital points on the body.
• Devils hand: One of the original names for chin-na. • Feng-chiu shu: Muscle-splitting skill, one of the original names for chin-na. • Ts’o-ku shu: Chinese for twisting skill, one of the original names for chin-na. • Ti-sha shou: Chinese for devils hand, one of the original names for the art of chin-
na. 1.5.2.4. Choy Lay Fut • Choy Lay Fut, Choy Li Fut , Choy Lee Fut or Tsai Li Fo, is a Chinese martial art
developed by Grandmaster Chan Heung in 1836 at King Mui, and is highly popular in Hong Kong. Learning the basics from a his uncle the Shaolin monk Chan Yeun Wu, Chan Heung enrolled at a Shaolin temple, and, after completing a decade of training, Chan Heung developed his own style.
• Choy Lee Fut is actually the names of people Heung trained under, namely: Masters Choy Fok, and Lee Yau Shan.
• History: • Master Chan Heung, the founder of Choy Li Fut, was born in the Kwang-Tung
province of China in 1806. At the age of seven, he began to study Gung Fu from his uncle, who had trained in the Shaolin temple. By age 15, Chan was the leading boxer in his area. When he was 17, he studied under his uncle's senior classmate, a Shaolin expert named Li Yau Shan. Within several years, Chan had absorbed all the teachings of Master Li. At that point, his teacher sent him to seek further instruction from a reclusive Shaolin priest named Choy Fok.
• According to the popular account, Chan found Choy Fok, but the monk told him that he had given up the practice of Gung Fu to dedicate his life to the study of Buddhism. He invited Chan to join him in his spiritual studies. Instead of being discouraged, Chan Heung humbly accepted the monk's offer to become a disciple of Buddha. After several years, Choy Fok was satisfied with Chan Heung's character and patience, and for the next eight years, taught his new student everything that he knew of Gung Fu.
• At the age of 29, Chan returned to his native village, analyzing and synthesizing everything he had learned from his teachers. In 1836, he founded a new style of fighting, and named it after his two instructors Choy and Li. He added the suffix Fut, which meant Buddha, to pay homage to the Shaolin temple and reflect his years of Buddhist study.
• These were troublesome times in China, with the following decades seeing the first Opium War, the Taiping rebellion, and finally the Boxer rebellion. Choy Li Fut, like other styles, was used by rebels in their struggle against the Manchus in the 1800's, and was driven underground by government interdiction.
• The style was popularized in the United States in the late 20th century by masters such as Lee Koon Hung, Tat Mau Wong, Doc Fai Wong, and others, who represent different contemporary branches (Buck Sing and Hung Sing).
• Technical information:
• Choy Lay Fut is a characterized as a "hard" style, and combines some of the long-range circular movements characteristic of northern styles with the shorter, more direct movements indicative of southern styles. As a traditional shao-lin style, it includes techniques based on animals (e.g., tiger, dragon, crane, leopard, snake); but it is also makes extensive use of long, swinging arm techniques and twisting body motions. The curriculum is designed so that soldiers could quickly gain practical proficiency; it also incorporates a range of weapons, though concentrating most on the sword and spear that would be available to the typical soldier. Several common movements have specific sounds associated with them, supposedly so that friendly forces could recognize each other in battle. Certain sounds/calls are also used to force certain breathing patterns for strikes to help with the specific delivery of the strikes.
• Branches: • Like many styles of Kung Fu, Choy Lay Fut has had several branches issue from the
original founder. These are based on the different lineages of teaching. They differ not only in terms of training and emphasis but also on what they see to be the true history of the style. There are three main branches of Choy Lay Fut: The Hung Sing branch, The Buck Sing branch, and the Chan family branch.
• The Chan family branch: • Chan Heung At seven years old, Chan Heung began learning martial arts under
his Uncle Chan Yuen Woo. Yuen Woo was a famed master from Shaolin Temple, and taught his nephew the Buddha Style Fist or Fut Ga Kuen.
• After years of study with his uncle, Chan Heung had become a consummate warrior by the early age of 15. To further his skills, Chan became a student of Lee Yau San, a Shaolin practitioner of the Lee Family Fist. Yau San was Yuen Woo's sihing or elder brother at Shaolin Temple.
• Becoming proficient in the Lee Family style, Chan Heung was then referred to the Shaolin monk Choi Fook to further his martial arts knowledge. After years of intensive study with the Buddhist recluse, Chan Heung revised what he had learned and formed a new system. He combined his knowledge of 3 martial arts systems and called it "Choi Lee Fut" in honour of his teachers.
• Three styles that constitute Choi Lee Fut are as follows.: Chan Yuen Woo and the Buddha Style Fist Chan Heung learned the Buddha Style Fist, or Fat Ga Kuen, from his uncle Chan Yuen Woo. Yuen Woo was a famed master of Shaolin Temple. The Fut Ga Kuen style specializes in palm techniques. Both the left and right hand are used in attack and defence. Long and short-range footwork is employed.Chuo Jiao
1.5.2.5. Dog kung fu • Dog Kung Fu is a martial arts style from China. This is a southern style of Chinese
boxing that specializes in takedowns and ground fighting. Often favoured by women, the fighter typically assumes a stance that requires that both hands and feet be on the ground, resembling a dog. This form of martial arts also teaches Iron Shirt, and Iron Palm fighting methods, as well as specialized leaping techniques. It is mainly practiced in Fujian Province.
1.5.2.6. Do Pi Kung Fu • Do Pi, or the Style of the Way, was founded by the late legendary boxer Grandmaster
Chan Dau. • The Yu family and the Hung Style Fist Chan Dau began training in martial arts at the
age of nine. He was a native of the Yung Kay district of Canton, and early in his life, he was kidnapped and sold to the powerful Yu family in the nearby town of Toishan.
• Encouraged by the Yu family's grandfather, Chan Dau began learning Hung Kuen, or the Hung Style Fist, under Yu Mui. At that time, Master Yu Mui had just returned from the US, and brought with him Western boxing techniques.
• Chan Dau immersed himself in martial arts and rapidly excelled in Hung Kuen. • Retreat into the monastery. Somewhat of a naughty child, Chan Dau was one day
practising martial arts and happened to hit his grandfather with an accidental blow. His grandfather became enraged, and drove him out of the Yu household.
• With no place to turn, Chan Dau sought refuge in a nearby Buddhist monastery. The place was already familiar to Chan Dau. He had been taking additional lessons from a monk at the monastery on account of his step-grandfather's encouragement.
Homeless and without money, the monastery become Chan Dau's new home and the monk his new teacher.
• For two years, Chan Dau lived at the monastery and learned Hop Gar, or the Fighting System of Gallant Knights, from the monk.
• The return home After two years at the temple, Chan Dau returned to Canton with help from his new mentor.
• Unable to find his family in Canton, Chan Dau was forced to become a peanut-peddler to earn a living. One day, Chan Dau participated in a martial arts exhibition in the streets of Canton, and impressed the students of Charn the Fish-Monger. Chan Dau became a student of the Fish-Monger, and quickly gained a name for himself as one of Canton's "Four Mad Fighters."
• Chan Dau would later make contact with his family, and also furthered his studies under Leung Kwai and Chow Lung.
• Creating the Style of the Way Encouraged by Wong Fay Hung's adopted son, Kwan Kwun Kau, Chan Dau set up a gymnasium in Canton. It is at his time that he combined what he had learned from his teachers and formed his own style of martial arts called Do Pi.
• Years later, he would establish himself in the Sham Shui Po district of Kowloon, Hong Kong. His lineage is succeeded by a number of students most notably his son Chan Ching, his prot駩 Lok So, and Master Paul Chan.
• Do Pi Training Principles Do Pi has a coherent set of training principles and techniques.
• With roots in many different styles such as Hung Kuen, Choi Lee Fut, and Hop Gar, Do Pi is a very unique southern style. The foundation of the system is based on the following nine techniques: chuen, pow, kup, tong, pin, sek, ten, chik, and got.
• In the execution of its techniques, Do Pi employs body movements. Most of the foot and hand techniques are economical in nature. Master Paul Chan recalls that Grandmaster Chan Dau always stressed that simple movements are always the most effective in battle.
• Do Pi has many form routines to help its practitioners progress in their development. The most famous sets include Drunken Eight Fairies and Drunken Fan.
1.5.2.7. Dragon Kung Fu • Dragon Kung Fu (Loong Ying) is one of the five animal styles of Shaolin Kung Fu.
Its movements are based on the mythical Chinese Dragon. • The origin of dragon style kung fu is not known in its entirety so a close
approximation, some of which is based on oral tradition, will have to suffice. It is said that the nun Wu Mui developed the basics of the art in AD 1570. Since then, the style has evolved into a Northern and a Southern variant. In the 17th century, martial artist Gee Sim Sim See taught a martial art called Hakka Kuen in the Guangdong province of China which served as a precursor to the Dragon Style. In the mid 1800's, in a Buddhist temple of the Canton province, a monk named Tai Yut taught the style to Lam Yiu Quai. Lam Yiu Quai spread the southern style to many students through his schools in Guangzhou.
• Overview: The dragon stylist relies on a variety of fighting techniques that can be employed for a wide range of needs. The style uses techniques that can cripple or kill an opponent if the need arises or it can be used simply to control a minor street fighting situation.
• Basics: The Dragon Kung Fu practitioner typically attacks with winding high yang attacks. One signature maneuver is the three finger claw techniques that utilizes the index, thumb and middle fingers, or all five fingers to do hard pinching attacks to the muscles, tendons and acupressure points; and rapid, close in palm attacks. Punching technics can be closed or open handed. Clawing and grappling techniques, in the imagined style of a dragon, are used. Kicks, no higher than waist level, are used to target sensitive areas such as the groin, knee, and foot. The waist, the largest and most central of all human muscles, receives great focus in Dragon Style. Efforts are made to strengthen, coordinate, and utilize this muscle to achieve powerful and quick movements. For example, when striking with the fist, more power can be exerted when the movement originates from the waist first, then flowing through the body, and finally into the fist.
• Footwork: In both the Northern and Southern Dragon Style systems, leg work is characterized by a zig-zag motion that mimics the imagined movement of the mythical Chinese dragon. In Southern style, smaller strides are emphasized to complement the system's short range combat style. In the Northern system, the strides are greater, utilizing the strength of the legs to move in and out of the opponent's range of attack with speed and force.
1.5.2.8. Eagle claw • Eagle Claw is the English name of Yīng Zhǎo Qu a Chinese martial art which
specializes in claw-like grabbing techniques (Chin Na) with the fingers. • Eagle Claw masters have fiercely strong fingers which are the main emphasis in
Eagle Claw training. Usually in Kung Fu movies the evil character in the movie is an Eagle Claw master because of its fierce power and lethal moves. Most Eagle Claw techniques are applied to acupressure points and vital areas on the human body. These techniques are designed to incapacitate, maim, or kill the opponent.
1.5.2.9. Five ancestors • Five Ancestors Fist, also known as Wuzuquan (Mandarin) or Ngor Chor Kun
(Hokkien) is a Southern Chinese martial art based on the techniques of five arts: Monkey, White Crane, Lohan, Damo, and Tai Tzu.
• The history of Wuzuquan is varied and often disputed, with some putting the founding of the art around 1300 AD while other put it as late as the 1800s. While some say that the art was brought to the south of China from the original Shaolin Temple in Henan, Wuzuquan is generally considered to be a Fukien art. It is also believed that Wuzuquan may have had some influence on the Okinawan and Japanese martial arts.
• Wuzuquan is practiced today all around the world with schools in China, Malaysia, the Philippines, Indonesia, Singapore, Australia, New Zealand, Ireland, Sweden, UK, Germany, USA, and Canada.
1.5.2.10. Hung Gar • Hung Gar (or in Mandarin/hanyu pinyin, hong jia, lit. of the Hung family), which
can also be transliterated as 'hung ga', is a Southern Chinese martial art tradition. • It is typically mislabeled as solely an external martial art, relying on brute physical
force rather than the cultivation of qi or ch'i, although traditionally, the student progresses steadily to an internal focus. In Cantonese, Hung is pronounced "hoong", and gar is "gah". This particular character 'hung' (洪) should not to be confused with the characters for 'red' or 'hero', which are homonyms. There are two common uses for this character. The first and most common is an adjective used to describe things that are vast or overwhelming, but commonly used to describe -- as the water radical on its left-half indicates -- a flood. The second use is as a surname.
• In fact, the style is commonly attributed to Hung Hei Gwun, a Fujian tea merchant who learned his art from a monk named Ji Sin Sim Si (pron. Gee Seen Sim See), allegedly one of the survivors of the destruction of the Fujian Shaolin Temple. Hung then traveled to Guangdong, bringing the art with him. As always, in a historical tradition such as that of Chinese martial arts where one's legacy is transmitted by oral and physical traditions, much as in dance, and because much was destroyed over the chaos that befell China over the last 200 years, and most of all since most practitioners in the non-Chinese world do not read Chinese, written documentation is hard to come by that would verify the exact origin of this tradition.
• The hallmarks of the hung gar style are deep, low stances, particularly the horse stance (sei ping ma 四四四), and strong hand techniques, in particular, the bridge hand (kiu sau 橋散), and the versatile tiger claw (fu jaau 虎虎). The student traditionally spends anywhere from months to three years in stance training, often sitting only in horse stance between a half-hour to several hours at one time, before learning any forms. Each form then might take a year or so to learn, with weapons learned last. However, in modernity, this mode of instruction is deemed economically unfeasible and impractical for students, who have other concerns beyond practicing kung fu.
• Traditionally, there are at least three unarmed forms that constitute the core of hung ga instruction. The first, gung ji fuk fu kuen (工工工虎工) (lit., the i-pattern crouching tiger form, sometimes called in English taming the tiger) is a long form that trains the student in the basic techniques of the tradition while building endurance. Gung ji is often attributed to Ji Sin Sim Si. The second, fu hok seung ying kuen (虎虎虎虎工)
(literally, the double form of tiger and crane) builds on the experience of the first form and adds more 'vocabulary' to the hung ga practitioner's repetoire. The tiger-crane form is attributed to Wong Fei Hung ( 飛飛黃 ). The last form, tit sin kuen (鐵鐵工) (iron wire form, pron. teet seen kn), builds the internal power of the student. This form is attributed to a man nicknamed Tit Kiu Saam (鐵橋鐵) (lit., Iron Bridge Three).
• Some lineages (see below) also teach an intermediary form between the tiger-crane form and the iron wire set called ng ying kuen (五虎工), also called ng ying ng hong kuen (五虎五五工), also sometimes called sap ying kuen (十虎工) (sup ying kn, or ten forms). Ng ying means five forms, referring to the five Shaolin Quan animals (tiger, panther, crane, dragon, snake) -- and ng hong refers to the Five Elements (metal, earth, water, wood, and fire). This form serves as a bridge between the external force of tiger crane and the internal focus of iron wire. Due to the different lineages in hung gar, some schools may teach only the first two forms, some may teach only the core three, and still others the four (which they call the 'four pillars of hung gar'), and indeed, others may teach several dozen, even.
• The Southern stylist traditionally learns at least two basic weapons as well: staff (gwan, pron. gwunn 棍) and single broadsword (daan dou 單刀). These weapons are the favorites of the South. Some may also learn their close cousins, the spear (cheung 槍) and straight sword (gim 劍). Other weapons include the butterfly swords (wu dip dou 蝴蝴刀), the chain whip (biin 鞭) and the halberd (guaan dou 關刀, named after Kwan Yu (關關), a hero of the classic Romance of Three Kingdoms). However, over the years, and according to different lineages, more weapons and sets, including two-man sparring sets, have been created, borrowed and/or added to the core by different people to meet different demands, and so, instruction will likely vary by the school and lineage.
• This martial art is widely practiced in Southern China, Taiwan, and increasingly the Americas and Europe. Part of the reason why hung gar is so popular and has so many lineages may have to do with the political history of Southern China. Southern China (Fujian, Guangdong, Guangxi) has historically been a backwater where refugees, criminals, and other colorful characters have fled, including rebels and the politically radical. The destruction of the Fujian Shaolin Temple, which one source describes as a hotbed of anti-Qing activism, could only have inflammed existing Han Chinese sentiments against their Manchurian rulers. This coincided with a period of tremendous rural economic displacement in Southern China. As secret societies capitalized upon popular rural discontent and devestating poverty, their ranks swelled, increasing the need to train their adherents in martial arts for numerous armed insurrections against the Qing, culminating in the calamitous Taiping Rebellion of the mid-19th century. This may account for both the popularity of Southern Chinese martial arts as well as the tremendous variance in lineages. Another reason is that the provinces that have been home to hung gar, Guangdong and Fujian, have been home to travelling, trading peoples who propagated their art abroad.
• Fleeing the poverty and war-stricken South, migrants from Guangdong Province constituted the majority of Chinese overseas for the last 150 years. As they traveled, they brought this martial tradition, and many others, with them abroad. Hung gar has several lineages, the most famous of which is probably the Lam family of Hong Kong, which descends from the legendary hung gar stylist and traditional healer, Wong Fei Hung, and his most famous student, Lam Sai Wing, a former pork butcher. But in the US, among the most foremost teachers are Bucksam Kong (Gong Bak Saan) of Hawaii and Los Angeles, Frank Yee (Yii Jii Waih) of New York City, who descends from the Deng Fong lineage; Y. C. Wong of San Francisco, of the Lam Jou lineage; Kwong Wing Lam (Lam Gwong Wing) of Sunnyvale, CA; Chiu Chi Ling (Jiu Jii Ling) of Alameda, CA; and John Leong of Seattle.
1.5.2.11. Leopard • Leopard Kung Fu, one of the five animals in Shaolin Quan's "Five Form Fist", was
suppopsedly created by Kwok Yuen with help from Pak Yook Fong and an old man named Li.
• Leopards goals are to: • Develop muscle speed for external strength.
• Teach patience. • Use the leopard punch for penetration and lower body springing power.
1.5.2.12. Monkey kung fu • Monkey Kung Fu (猴工) is a martial arts kung fu where the movements imitate
monkeys or apes in fighting. Systems of Monkey Kung Fu like Tai Shing Pek Kwar (大大大大大 寇四) were invented by Kau Sze ( ) during the Qing dynasty. Many other, older styles of monkey kung fu exist as well, some recorded to be as old as the Song Dynasty. This style includes many difficult acrobatic movements and techniques executed while prone.
• The method uses several agile, jerky movements that are both confusing and fun to watch. A famous version of Monkey style is the Drunken Monkey, where the practitioner trains to be able to fight off multiple opponents while appearing completely drunk.
• Monkey Kung Fu is frequently demonstrated in B movies from Asia. 1.5.2.13. My jaw long horn • My Jhong Law Horn (Mandarin: Mizong Luohan) or Lost Track Arhat Fist is a
northern Shaolin style of kung fu based on deception and mobility. It is a combination of two styles (Mizongquan and Luohanquan), with a lineage that can be traced directly back to the Shaolin temple during the Tang dynasty.
• My Jhong Law Horn is an external style, with distinct internal influences. It draws on many aspects of the external northern Shaolin long-fist style, and the internal styles Tai Chi Chuan and Pakua Chuan, which are often taught alongside it in modern times. It is characterized by deceptive hand movements, intricate footwork, varied kicks, and high leaps. In execution, the style changes very quickly.
• The emphasis on flexibility in northern Shaolin styles is the guiding principle of My Jhong, and this is evident in the versatility of its attacks and the extent to which it integrates the concepts of many internal styles. An increased emphasis on mobility often comes at the price of power, but My Jhong compensates for this by providing a means for the dynamic generation of power. My Jhong's unique fa ching (discharging of force) comes from the combination of the internal corkscrew power of Chen-style Tai Chi and the external snapping power of Shaolin long fist. The result is an efficient production of force through the dynamic motion of multiple elements of the body, the mastery of which gives a My Jhong practitioner the capability of generating force quickly and flexibly from any distance.
• This system was presided over by Grandmaster Ye Yu Ting in the twentieth century until his death in 1962 at the age of 70. A number of his students (among them Master Chi-Hung Marr) emigrated to the United States in the 1960's and have continued to teach this system in locations around the U.S. and Canda.
1.5.2.14. Northern praying mantis • The Praying Mantis system of Kung Fu (Tanglangquan) was created by Master
Wang Lang over 350 years ago in the Shandong province of China. This martial art is known for imitating the movements of a praying mantis in combat, in particular using the hands in a 'praying mantis hand' shape. Praying Mantis is especially famous for its speed and continuous attacks. Another prominent feature of the style is the complex footwork, borrowed from Monkey Kung Fu.
• Dil sou: Chinese for praying mantis hand. • Praying mantis hand: This form is similar to cranes beak and can be used
defensively and offensively as a punch or a grab. • Praying mantis style: Legend has it that the 17th century kung-fu artist wong long
witnessed a battle between a praying mantis and a grasshopper. He was so inspired by the strategies and technique of the victorious mantis that he created a fighting system based on these moves and was able to defeat the senior member of his kung-fu class. The main aspects of the mantis style are contained in wongs twelve principles of attack and defence.
• There are several sub-styles of Praying Mantis, of which the most famous are: • Seven Star Praying Mantis (Qixing Tanglangquan): This style is widespread in
Shandong Province and surrounding areas. Luo Guangyu is also famous for having passed down this style to Hong Kong and other parts of South China. Qixing Tanglangquan is known as the 'hardest' of the Praying Mantis styles.
• Taiji/Plum Blossom/Taiji Plum Blossom Praying Mantis (Taiji/Meihua/Taijimeihua Tanglangquan): This style is widespread in Shandong Province and surrounding areas. Most famous is the Taijimeihua Tanglangquan substyle as passed down by Hao Lianyu and his many sons. This style is well-known for its large, two-handed sword, and for being softer than Qixing Tanglangquan.
• Six Combinations Praying Mantis (Liuhe Tanglangquan): Known as the 'softest' of the Praying Mantis styles, in particular, it was passed down by Ding Zicheng, whose students taught in Shandong Province as well as Taiwan. Liuhe Tanglangquan has very different sets from the other styles of Praying Mantis.
• Eight Step Praying Mantis (Babu Tanglangquan): This style was created by Feng Huanyi (馮馮馮 衛衛衛) and passed down by his disciple Wei Xiaotang ( ) in Taiwan. A Praying Mantis style that includes features of other styles, like Baguazhang and Xingyiquan.
• Shiny Board Praying Mantis (Guangban Tanglangquan): Rare style of Praying Mantis.
• Long Fist Praying Mantis (Changquan Tanglangquan) Rare style of Praying Mantis. Influenced strongly by Changquan (Long fist).
• Throwing Hand Praying Mantis (Shuaishou Tanglangquan): This style was passed down by Wang Songting in Shandong Province.
• Secret Gate Praying Mantis (Mimen Tanglangquan): This style was passed down by Zhang Dekui in Taiwan
• Flicking Leg Praying Mantis (Tantui Tanglangquan): The Wah Lum Praying Mantis System, named for the Wah Lum (Forest Garden) Temple in Jinan, China. A skillful martial artist studying there, Lee Kwan Shan, later combined his family style, Tam Tui (emphasizing strong leg movements) with the Wah Lum praying mantis to form a well rounded, effective system known as Wah Lum Tam Tui Northern Praying Mantis Kung Fu. The Wah Lum style incorporates the use of over 30 different types of weapons: long (spear), short (broadsword), flexible (three sectional stick) and double (double daggers), along with many empty hand forms. Wah Lum uses approximately 70% legs, 30% hands.
1.5.2.15. Pak Mei (White eyebrow) • Pak Mei or white eyebrow kung fu was created by the Taoist monk Pak Mei, during
the Ching dynasty in China. • Pak Mei kung fu was passed on to Gwong Wei, the only heir to the system, who
named the style Pak Mei kung fu out of respect for his teacher. The style was then passed to Jok Fat Wan who traveled with his disciple Lin Sang from northern China to southern China, eventually ending up at the Gwong How temple in Canton where grand master Cheung Lai Chun learned.
• Grand master Cheung Lai Chun was undefeated throughout his martial art career. He was one of the famed 3 tigers of the east river region and earned the title of the 7 southern states champion . Master Kwong Man Fong who is a fifth generation inheritor of Pak Mei was the last and the youngest student to train extensively and learn the complete system in its entirety.
• Pak Mei kung fu is one of the few system that combines both Shaolin (Buddhist) and Taoist practices into a single fighting style. It is classified as an internal and external system that emphasizes the combination of the science of combat along with the Taoist principles of using the chi to maximize the generation of power from within the body and to maintain health. In Pak Mei, qigong is incorporated into every aspect of the art, not just supplemental exercises to develop the qi.
• Pak Mei is a highly sophisticated, fast and aggressive system that is rarely seen within the realm of Chinese martial arts today. Pak Mei techniques are executed between short and mid range distances; hand movements are fast and powerful. Pak Mei kung fu also contains a wide assortment of kicks.
• The Monk Pak Mei • The monk Pak Mei was one of the five elder monks of Shaolin Temple,
Songshan, Province of Henan, China. Pak Mei lived during the Ch'ing Dynasty (Emperor Ch'ian Lungera). Very little is known about Pak Mei. Pak Mei,
translated from Cantonese, literally means "white brow". It has been inferred that he must have been an albino, and was probably raised at the monastery from an early age. Consequently, Pak Mei is the only name he is known by. Also, as a senoir Shaolin monk, he was a master of many internal and external martial arts.
• Pak Mei passed on the art to Gong Wai, second generation, in Sichuan province. The art was then passed on to the third generation, Chuk Fat Wan. In Kwong How Temple, Guangzhou, Chuk Fat Wan passed on the art to Cheung Lai Chun, the fourth generation. Traditionally, Pak Mei martial art was only passed on to Buddhist monks. Master Cheung Lai Chun was the first to pass the art on to laymen. Cheung Lai Chun named the style Pak Mei kung fu.
• Cheung Lai Chun, Founder of Pak Mei Kung Fu: Master Cheung Lai Chun was born in 1889, during the Ching Dynasty. He was enthusiastic in practising martial arts. In his life, he had learned martial arts from four martial arts Sifu. The last Sifu was Master Chuk Fat Wan, 3rd generation master of Pak Mei. Though he admired the essence of Pak Mei martial arts, he did not forget the teaching from his former three Sifus. He decided to keep the practical and more useful forms from the former three Sifus and combined it with Pak Mei concepts utilizing the waist, footwork and power. Master Cheung Lai Chun opened his first Lai Chun Martial Art School in Wai On Lane, Guangdong. He also had been a military instructor for Wong Poe Military Academy. After the Second World War, he moved to Hong Kong with his three sons and continued his teaching.
• This poem has been handed down by Pak Mei himself through the generations. There are seven words in each line, and the rhythm and cadence flow quite elegantly; this is completely lost in the English translation.. The English translation is as follows: 1. Respect your kung fu ancestors, before you can claim to respect your kung fu. 2. Learn to be righteous and temper your conduct, before you may learn kung fu. 3. If you know kung fu, you may not commit any illegal offenses. 4. The best kung fu practitioners never hit people, even for the slightest offenses. 5. If you encounter an evil person, 6. Even if you are offered thousands of pounds of gold, you may not teach them. 7. You may not even teach a close relative, if they are not morally decent. 8. You may teach a perfect stranger, as long as they are righteous and decent. 9. If you understand the essence of Pak Mei kung fu, 10. Even a stone is precious like gold.
• Pak Mei Kung Fu Forms: • Shaolin's martial arts organized into eight inner halls (internal martial arts) and eight
outer halls (external martial arts). Pak Mei kung fu is classified as an internal martial art. The essence of Pak Mei kung fu lies in utilizing the inner power (ching), not plain strength. Using ching is intricate and dynamic; using strength is dull and blunt. The principles of Pak Mei stresses six-ching, eight hand techniques, and concept of swallow/spit/float/sink, shocking effect, and evolving continuously.
1.5.2.16. Rat kung fu • Rat Kung Fu, Choy Gar Kuen or Caijia Quan is a Chinese martial art that was
invented by Choy Gau Lee. The original techniques were once from the Shaolin temple. Somewhere in Southern China, a variety of Snake Kung Fu was modified to include lower stances, and swifter foot movement. Choy Gau Lee added more kicks to his style, differentiating some of its longer range techniques thereby from those of its Snake Kung Fu origin. This martial art makes for very good fast closing in movements.
1.5.2.17. San shou • San Shou or San-Da is a relatively new martial art, which was originally developed
by the Chinese military based upon intense study of various traditional methods. • The influences on this rich and diverse style are obvious and originate from Master
Leon Chiu's broad background in martial arts. Most prominent perhaps being his time spent studying the Wing Chun and Hung Gar branches of Shaolin derived Kung Fu as well as Korean Taekwondo.
• He is the founder, chief instructor and examiner of the Chugarkwon Academy. In 1991, China introduced an amateur sport version of San-Da and in 1992 Master Chiu began teaching in London. In 1997, the first attempts were made both in China and in the United States to establish professional matches. These matches are referred to as
San Shou, a newer term which the Chinese use to describe full contact tournament fighting.
• This eclectic martial art teaches traditional formwork, physical and mental development, Shaolin Chin Na, practical self-defense and oriental philosophy. The 1st Degree foundation course consists of ten grades of advancement moving up a ranking system that denotes seniority and experience. Systematically, each grade teaches new aspects of fundamental principles through repetition and application. From 2nd Degree onwards the emphasis on training gradually shifts from the extrinsic to the intrinsic systems including Qigong for promoting health and vitality.
1.5.2.18. Shaolin Quan • Shaolin Quan or Shaolin (in Cantonese Siu Lum Kuen) is the term typically used to
describe the Chinese martial arts that originate from the famous Buddhist Shaolin Temple and monastery at Songshan in Henan, founded in 495 by Tamo.
• It was some 60 years after the founding of the Shaolin temple that an Indian priest named Ta Mo arrived at the temple.
• Tamo, or as he is also known, Bodhidharma, is said to have come to china to introduce the sect of Bhuddism known as Zen in Japan.
• Upon his arrival at the temple he found the monks in poor health and unable to endure the long sessions of meditation he introduced. (There are multiple versions of the Ta Mo story, this is merely one of the more common). Because of this, Tamo introduced two exercise regimens to the monks: The Muscle Tendon Change (I Chin Ching; Yijianjing) and the 18 Lohan Hand Movements. The first was to strengthen the monks internally, and the second externally.
• The monks of Shaolin later combined the movements of Tamo's forms with those of the existing martial arts of the area. This was the birth of what is today known as Shaolin Chu'an (Shaolin Fist). Over the following centuries it evolved, spreading throughout China and East Asia, and has been perhaps the most influential school of Asian martial arts in the world, said to have directly led to hundreds of other widely practised styles, such as Wing Chun and T'ai Chi Ch'uan. Traveling Shaolin priests and practitioners would teach portions of their martial arts here and there, leading to the development of other Asian martial arts such as Korean Tang Soo Do (later Tae Kwon Do) and Japanese Karate.
• Shaolin Quan began to take the shape we see today during the Ming Dynasty (14th-17th centuries). Typically within the Shaolin system, there are ten empty hand "sets" and many different weapons. Weapons training will vary from school to school. Shaolin practitioners are historically well known for their ability to endure hardship as well as their training with the distinctive steel monk's spade, iron staff and spear. Shaolin also became famous in legend for its Five Animals; styles adapted from imitating the motions of the animals in question for martial applications.
• The Five Animals of Shaolin: Ng ga kin: The five formed fist, one of the earliest systematised fighting forms to develop from the exercises taught to the monks at the shaolin temple in china. Traditionally, ch’ueh yuan is acknowledged as being the originator of this style. The five forms are the five animal styles of kung fu – the crane, dragon, leopard, tiger, and snake. There are 170 moves in all.
• Wu chuan: The five boxing sets of shaolin kung fu. 1. Snake • She: Chinese for snake, one of the five animal styles of shaolin kung fu. • Snake: One of the five animal styles of shaolin kung fu. With the snake
exercises, you learn to control your chi and to strike at the opponents vital points. According to legend, the master Chang san-feng created the yang style of tai chi after witnessing a battle between a snake and a crow. The snake evaded the crow with great economy of movement and allowed the crow to exhaust itself, so that it was easily killed by the snake, which had conserved its energy.
2. Crane • Crane: One of the five animal styles of shaolin kung fu. The pecking motions of
the bird become hand techniques whose targets are the vital points of the body. Crane exercises develop the sinews while teaching balance and quick foot movements. The crane is also said to be the inspiration for the wing-chun and white crane styles of kung fu.
3. Leopard • Pao: Chinese for leopard, one of the five animal styles of shaolin kung fu. • Leopard: One of the five animal styles of shaolin kung fu. The leopard style is
for development of power, and the exercises are designed to increase physical strength. The moves are fast and close, with narrow stances and clenched fist.
4. Tiger • Tiger: One of the five animal styles of shaolin kung fu. In learning to claw and
gouge like a tiger, the practitioner strengthens his bones. Movements are short range and hard.
5. Dragon • Lung: Chinese for dragon, one of the five animal styles of shaolin kung fu. • Dragon: One of the five animal styles of shaolin kung fu. The dragon
symbolises spirit. The moves teach agility, grace, and flexibility. The emphasis is less on strength than on proper breathing from the lower abdomen.
• The two main schools of Shaolin Quan are the Temple style and the Northern style (Bak Siu Lum style). Both of these consist of ten hand sets and although similar in technique the sets are completely different. Shuai Chiao (Shuai Jiao)
• Shaolin: The oldest style of kung fu, named for the Chinese temple to which it was brought by the Indian holy man bodhidharma. Today there are five major groups of shaolin kung fu, named for the monks who developed them – hung, low, li, choy, and mok. All types have a common emphasis on external power as opposed to the various internal styles such as tai chi. Legend has it that bodhidharma found the monks in poor physical condition, owing to their hours of extensive, motionless meditation. He taught them a series of 18 exercises to improve circulation as well as enable them to protect themselves against the bandits who roamed the countryside.
• Bei soy: The shaolin temple tournament. • Bodhidharma: An Indian holy man who brought Zen Buddhism to china in 540 AD
according to legend, bodhidharma, or Tamo, found the monks at the shaolin temple in poor physical condition asa result of their long hours of motionless meditation. So he taught them a series of exercises called shih pa lo han sho, or the eighteen hands of the lo han, the lo han are the famous disciples of Buddha. Another legend states that bodhidharma taught them a system of self-defence so that they could defend themselves from roaming bandits. Whatever the reason, these exercises are traditionally recognised as the basis for all shaolin king-fu
• Chi Kung : A shaolin breathing exercise, known in ancient china as ‘the method to repel illness and prolong life’. The idea is to fully circulate vital air (chi) in the body to all organs. Kung in this sense may be translated as exercise.
• Da sum sing: An exercise used in shaolin kun-fu to strengthen the forearms. Two practitioners throw forearm blocks and blows using full power and for extended periods. The use of herbal medicines such as dit do jow complements this exercise.
• Eighteen hands of the lo han: The eighteen-movement exercise introduced around 520 AD by the Indian holy man bodhidharma to the monks at the shaolin temple and believed to form the basis of shaolin kung-fu. According to one legend, bodhidharma gave this set of movements to the monks to remedy the effects of their long hours of motionless meditation and it was not until later that the exercises evolved into a martial art. Another version of the story states that bodhidharma taught the monks self-defence because they were often attacked by wandering bandits. Lo han means the disciples of Buddha, for monks were the first practitioners.
• Lo Han: A Chinese term originally used to describe the 500 disciples of Buddha who had achieved nirvana and were going to return to earth as Buddha’s. Now lo Han is defined as any famous disciples of Buddha. The name of the exercises taught by the Indian holy man bodhidharma to the monks at the shaolin temple was shih pa lo han sho, or the eighteen hands of the lo han. These exercises formed the basis of what we now know as shaolin kung fu.
• Sil lum gung-fu: Cantonese pronunciation of the mandarin term shaolin kung fu. • Temple tournament: In shaolin kung fu, disciples from different temples would
meet for contests called bei soy. In these matches, sparring is full contact, and contestants wear only mask and groin protector. Bei soy serves as a kind of testing ground for disciples.
• Mu-shin: Literally, ‘no mind’, a Zen Buddhist concept used by the samurai to overcome the fear of death. Mu-shin is the condition of being free of the ego, the part of the self that fears death.
• Salutes: Martial arts salutes each tell a story: they indicate the style practised by the individual, and they are movements of respect and humility. In shaolin kung fu, the right fist, representing power, is covered by the left palm, symbolising the sun. The salute shows that the individual is unarmed and without hostile intentions, but the fist is ready for use as self-defence. The tai-chi salute is an extension of the shaolin salute and also a move of preparation as one relaxes and the chi moves to the t’an tien.
1.5.2.19. Snake kung fu • There are several styles of Chinese martial arts which imitate the motions of snakes
as some part of their training system. Proponents claim that adopting the fluidity of snakes allows them to entwine with their opponents in defense and strike them from angles they wouldn't expect in offense. The snake is one of the original five animals of Shaolinquan, and there were many snake stylists known formerly from Wudangshan. Snake style is said to especially lend itself to applications with the Chinese straight sword. T'ai Chi Ch'uan is said by some of its schools to originally have been based on a combination of the Snake and White Crane styles, and the snake is also one of the animal styles emulated in the related arts of Baguazhang and Xingyiquan. The sinuous, fluid motion of the snake lends itself to the practical theory that underlies such soft style martial arts.
• As there are different schools that train based on the motions of snakes, there are different snakes that are imitated; some imitate the Cobra, while others imitate the Python, while some schools will imitate both for different applications.
• Snake style is one of the first five Shaolin animal styles; the other four being tiger, leopard, dragon, and crane.
1.5.2.20. Tantui • Tantui (彈彈潭彈/ ), or "springy legs," is a style based on kicks, created in Northern
China. It is composed of a series of forms, which emphasize blocking, stances, footwork, and most of all, kicks. Tantui exists as a style on its own, but it is more often found used as basic forms for styles like Chaquan.
1.5.2.21. Tiger kung fu • The Tiger is one of the five primary animals of Shaolin Quan. Many of the Chinese
martial arts have at least some "Tiger style" components to them, including such diverse art forms as Hung Gar and T'ai Chi Ch'uan. The philosophy underlying the imitation of the animal which inspired Tiger styles generally is to train to be very yang; aggressive and fearless in the face of the opponent.
• White Tiger Kung Fu, or Bak Fu Pai in Cantonese, is a southern Chinese internal martial art.
• Also known as "The Emperor's Art," White Tiger Kung Fu has been passed down through the Doo family for nearly 400 years. The Doo family served as the right hand to Chinese emperors, and their security force protected the emperor during feudal times. They were responsible for both the emperor's physical safety as well as his health and well-being.
• Believed to have been lost in the 1800's, Bak Fu Pai is still around today. It was said, "that the only time someone saw the White Tiger system was just before death." Considered one of the most secretive, mysterious, and deadly arts in the world, White Tiger has recently been made available to the public through the current grandmaster's certified instructors.
• The History Of Bak Fu Pai • Kung Fu's history, much like that of China's is often ambiguous and filled with
gaps. These gaps are the result of numerous wars, natural disasters, and governments bent on rewriting China's history. As a result, much of China's past has been lost. Western culture, until very recently, has had little interest in eastern history, and therefore most of the history of China that we have and almost all of the history of Kung Fu has been preserved by an oral tradition, that remains even today prevalent throughout Eastern cultures. This oral tradition, while steeped in myth, is derived from stories based on facts. Our picture of Kung-Fu's history is also based on myths, legends, and facts, all intricately
woven together. To separate stories from actual events, myth from fact, can not be done now, for we know so little of what really happened so long ago. As for the White Tiger System, written records date back several thousands of years (some still on the preserved silk that used cuttlefish ink).
• Much of what we do know of Chinese martial art history comes from the Henan Shaolin Temple. The Honan province has been the reputed center of Chinese Boxing activity since 500 AD. We know that an Indian monk, named Bodhidharma, introduced the people of the Honan province to meditative, respiratory, and defensive techniques. These techniques, over time evolved and flourished in Buddhist, and later Taoist monasteries, eventually developing into many separate styles. Chinese religion was a very powerful force, and with many monks single minded dedication, meditation, medicine, and self defense was transformed, refined, and perfected. It is important to note that much of what we call Kung Fu today, is the product of over one thousand years of study and change.
• China's political past was written by the victors. Dynasties rose and fell over its long history. One of the most well known Chinese dynasties was the Ming Dynasty. In the 17th century the Ming Dynasty fell to foreign invaders. The new dynasty was called this Ching (Qing) dynasty. The Emperor of the Qin Dynasty knew that monks had been instrumental in the aiding the overthrow of previous governments. Therefor, the Qin Emperor garnered for support within China's monasteries, using spies, money, and murder where necessary. The thought of foreign rule was unacceptable to many people. Rebellion against the Qin was a constant drain on the government's resources. An air of paranoia grew as more and more, rebellions grew. It was this paranoia, coupled with resentment that caused the Emperor to react by eliminating his internal threats. Many hundreds temples were either killed to a man, or burned, under the pretense of harboring rebellious monks. One such temple was the Fujian Province Shaolin Temple. This temple had gathered a reputation for producing some of China's most skilled martial artists. It was renowned for the skill of its monks. Legend has it that one of its monks had been dismissed for failing to jump high enough to light a lantern. The banished monk lusted for revenge and gained admittance to the Emperors court, where he then falsely confessed that the monks of Fujian Province were planning a rebellion.
• The Emperor, out of fear of rebellion, decided that the monastery should be burned to the ground, with no one surviving. The soldiers carried out the Emperor's orders and burned the monastery to the ground. They could not however, stop and kill all of those who fled the fire. Of those who escaped four master monks, and a master nun managed to gain safety. Their names were Jee Shin Shim Shee, Ng Mui, Fung Doe Duk, Bak Mae, and Mew Hing.
• These monks and nun fled to the southwestern province of Szechwan and sought sanctuary in the Emei mountain monasteries. Two of the monks, Bak Mae and Fong Doe Duk settled in the Doaist Kwong Wai temple. They shed their Buddhist roots and adopted the Doaist tradition, in an effort to remain hidden from the Emperor. For two years Fong Doe Duk traveled through the mountains and nearby deserts gathering knowledge from the nomadic tribes. Over time four of the five escapees developed their own systems of Kung Fu. Jee Shin Shim Shee helped develop the northern Shaolin style of Kung Fu. Ng Mui developed the Plum Flower system. Bak Mae developed the White Eyebrow system, and Fong Doe Duk developed Bak Fu Pai (White Tiger).
• Fong Doe Duk was well liked by the villagers surrounding the monastery. His skills in both Kung Fu, and in herbal medicines earned him the name Jung Shee meaning "accomplished one" or grandmaster. In the late 1600's Fong Doe Duk taught but a few people his art. It is said that on his deathbed Fong Doe Duk passed his title and knowledge to Doo Tin Yin, with the instructions that Doo Tin Yin must teach the art and pass it from generation to generation. And so it has been passed from the late 1600's to today one generation at a time. Doo Wai is the 6th generation Grandmaster and direct descendant of Doo Tin Yin. Along with Grandmaster Doo Wai, his disciple, Jung Shee Joel Rizzo, continues to

teach the tradition that has endured for over 300 years. Only recently has the Grandmaster allowed Bak Fu Pai to be taught to the public.
1.5.2.22. Wing chun • Wing Chun (詠詠 in pinyin: yǒng chūn; in Jyutping: wing4 ceon1), also spelled Ving
Tsun, is a Chinese martial arts system with an emphasis on unarmed close-range fighting, although it includes weapon techniques and techniques suitable for various ranges.
• Wing Chun: Like white crane style, the movements of wing Chun kung fu are based on a fight involving a crane. This time the cranes opponent was a snake. Yim wing Chun, the woman observing the battle, decided to utilise the skills exhibited by both animals – the speed and simplicity of the snake and the economy of movement in the cranes evasions. Wing chun is especially suited for close range fighting, because it emphasises direct attack to the enemies vital points with straight punches and guarding of the centreline. Bruce lee studied wing Chun for many years and based much of his own style, ‘jeet kune do’, on what he learned from wing Chun.
• Bot jum do: Short butterfly knives. In wing Chun kung fu, they are used in pairs and constitute the only weapon other that the pole, see sticky stick, included in that style. These knives originated in the art of bot may kung fu and were later adopted by the wing Chun style. They are well suited to wing Chun. Because they are short and can thus be used as, extensions of the hand in most hand techniques.
• Chi gerk: A wing Chun exercise. sticky legs. • Chi guan: A wing Chun exercise, sticky stick. • Four Corners: A concept used in wing Chun kung fu. The Four Corners are the
outside high gate, inside high gate, outside low gate, and inside low gate. In a defensive stance, the outside gates correspond to the forward hand, and any attack to that area is blocked by the rear hand and to the inside of the body. Within each gate, there is a front area and a rear area. The front hand defends against front area attacks, and the rear hand defends against rear attacks.
• Immovable elbow: A basic concept of wing chun kung-fu. The proper area for delivery of wing-chun hand techniques is bounded by the distance the hand and forearm can reach while the elbow remains stationary three inches in front of the body.
• Pak sao: An exercise used by advanced students of wing Chun kung fu. The aim of pak sao is to develop control over reflex actions in order to use the speed of these reflexes to ones own advantage.
• Sil lim Tao: Literally, little imagination, or little idea. This is the first form in wing Chun kung fu. sil lim Tao contains no stepping movements. It teaches elbow position, centreline protection, and economy of motion, three of the most basic concepts of wing Chun.
• Sticky stick: A wing Chun exercise similar to modern fencing. The weapons used are sticks about nine feet in length, and, as in the other ‘sticky’ exercises, the object is to maintain contact with the opponents stick and to dominate him in that way. The only other weapon used in wing-chun is the butterfly knife.
• Chi sao: An exercise in wing chun kung fu, similar to tao chis ta lu. Chi sao builds co-ordination and sensitivity. Two people practise powerful blocking and striking techniques at a slow, smooth pace, concentrating on the flow of chi, with the arms and hands never breaking contact. Chi sao teaches correct elbow position and economy of motion.
• Sticky legs: A wing Chun exercises similar to chi sai (sticky hands). Sticky legs teaches you to block and attack with the legs, knees, and feet. The object is to achieve a superior position while maintaining constant contact with one of the opponents’ legs. It can be performed simultaneously with sticky hands, to allow the student to use all possible combinations of leg and arm techniques of wing Chun.
• Sticky hands: A kung-fu exercise. See joint hands. • Joint hands: A kung-fu exercise designed to teach the student how to become
sensitive to another persons movements. Joint hands is done by placing the wrist against the partners wrist and trying to stay with him while he moves his arms and wrists, usually in a circular pattern.
•
• History: As with many martial arts, Wing Chun has several stories about how it came to be created. Such stories are normally passed from teacher to student in a sort of oral tradition. Since students are usually more focused on learning the art itself than its history, such legends can easily become romanticised and it is difficult to pin down historical fact. Such legends nevertheless shape every practitioner's idea of what the art is and are therefore worth studying in their own right.
• Origin: • Wing Chun, according to legend, was a style of Chinese martial arts technique
designed by the Shaolin monks for the smaller stature of women fighters. Although there are many legends about the origins of what have become traditional Cantonese martial arts, one legend avers that, after escaping the destruction of the Fujian Shaolin monastery, a nun named Abbess Ng Mui (五五大五 驠 wǔ m d࠳hī; ng5 mui4 daai6 si1) taught her own style of Kung Fu to a young woman whom she adopted named Yim Wing-chun (嚴詠詠 y࠳yǒng chūn; jim4 wing4-ceon1), whose name means "Sing Praise Spring," from whom the style gets its name. Wing-chun was being bullied into marriage by a local warlord but, by learning from Ng Mui, was able to defeat the warlord in hand to hand combat and marry her own chosen fiancé. The style was then passed down their family line.
• Unfortunately, this legendary history cannot be confirmed and has been the subject of debate for decades. Other alternative histories for Wing Chun typically involve connections to the Triads, revolutionary groups, or the Hakka people of southern China.
• One alternative explanation for the distant origins of Wing Chun is not so exotic. This explanation asserts that Wing Chun was practiced by the members of the Red Boat Opera Society, a revolutionary group under cover as travelling entertainers on a riverboat. The explanation is that while they were highly trained martial artists (in the Chinese opera tradition) their tasks as spies and assassins required specialized skills. While actual assassinations would be carried out using poison or knives, the targets would typically be protected by bodyguards. If these guards noticed an unauthorized person at night, they would seize the person, call for help, and disable the person to be held for interrogation. Thus, according to this explanation, Wing Chun was developed. It was designed to deal with an opponent who seized (rather than struck) and it was designed to silence that opponent immediately. This would explain certain technical aspects of Wing Chun (such as the emphasis on close-range combat and the many strikes to the throat or diaphragm).
• The only historical figure generally agreed upon in Wing Chun history is Leung Jan (梁梁 Li � � Z loeng4 zaan3), an herbal doctor who lived in the Chinese city of Foshan in the 19th century. Among his students were Chan Wah-shun (陳陳陳 Ch鮠Hu࠳?an4 waa4 seon6 aka "Money-changer Wa" 找找陳), Woodman Wah (木木陳) and his sons Leung Chun (梁詠 liang2 ?; loeng4 ?) and Leung Bik (梁壁 Li࠳ B࠳loeng4 bik1). Of these, Leung Bik and Chan Wa-shun were the primary teachers of Yip Man.
• Leung Jan is said to have learned from two people, Wong Wah-bo ( 陳華黃 ) and Leung Yee-tai (梁梁梁 Li࠳ ࠳t࠳loeng4 ji6 tai5), both of whom are said to have been experts at different aspects of Wing Chun, and at least one of whom (Leung Yee-tai) was a traveling performer with a Chinese opera troupe which moved from place to place by boat (紅紅紅紅).
• Also of note: The existence of a town in the Fujian province of China that bears the name Yong Chun (永詠 pinyin yǒng chūn jyutping wing6 ceon1) meaning 'forever spring' is of significant coincidence. The Yong (Wing) 永 of the town Yong Chun (Wing Chun) means 'forever', while the Yong (Wing) 詠 in Yong Chun (Wing Chun) actually means 'sing'. Both however have the same radical 水. There are several other styles of kung fu that stem from this region, most notably White Crane that many of the legends ascribing to Wing Chun cite Ng Mui as the creator of. It is noted that there are simillarities between White Crane and Wing Chun kung fu, as well as White Crane's apparent influence in Japanese styles of martial arts.
• Recent history: More recent history can be pinned down with a little more certainty, as the events occurred in living memory. There are still conflicting accounts, though. • Yip Man was the first Wing Chun master to teach the art openly in Hong Kong
on a school fee basis. His students and their students therefore make up the majority of the practitioners of Wing Chun today (see his article for the outline of a family tree). Yip Man died in 1972.
• The last student of Yip Man, Leung Ting, formed a branch called Wing Tsun (rather than his master's Ving Tsun) as an international franchise. This organization has spread to Europe and spwaned several offshoots.
• More recently, beginning in 1970, Bruce Lee was trained in Wing Chun (among other arts), and he incorporated some of its techniques and ideas into his own Jeet Kune Do. His international fame led to a certain amount of international interest in Wing Chun.
• Yuan Kay-shan is another Wing Chun teacher, not from Yip Man's branch, who has passed on his tradition. He did not found a school, but his student, Shum Lung passed on his tradition to many.
• Cho On is another not from Yip Man's branch. He was a native of Panyu province of China who learnt his Wing Chun from his uncle Cho Dak Shing. Cho On met Yip Man in Hong Kong and it was said that Cho introduced Yip to teach at the Restaurant Association. When the finger of opportunity beckons once more, Cho moved to Pulau Pinang, a northern island of Peninsular Malaysia where he began teaching. Among those who inherited his art is Lau Soon Yin and Ku Choi Wah, both residing in Singapore presently. Ku has taught many students including Randy Tay, who founded Kuen-Do based on Cho's lineage of Wing Chun.
• Forms: The central training technique is a drill called "Chi Sao" (sticking arms) which can be compared to a kind of close-range sparring in which the two participants keep their forearms in contact while searching out gaps in each others defence. Years of experience in Chi Sao give the practitioner the arm sensitivity to be successful in combat as well as getting them used to being in close with an attacker. There are also pre-arranged chi sao drills to practise very basic techniques and also some for the legs ("chi gerk" (sticking legs).
• Although initially developed as an unarmed form of combat, the Wing Chun system also incorporated the use of the pole and butterfly swords during its evolution.
• As the style is taught conceptually, rather than with emphasis on techniques, there have been several interpretations of the art over time. This is reflected in the separate schools established by in later years, as listed below.
• There are 3 main empty hand forms typically found within the system, each of which imparts and builds on foundational concepts: 1. Siu Nim Tao (Sil Lum Tao) ("the little idea") 2. Chum Kiu (Chum Kil) ("seeking the bridge") 3. Biu Tze (Bill Jee) ("thrusting fingers") 4. A fourth empty hand form uses a training aid: Mook Yun Jong ("wooden
dummy") Commonly, the wooden dummy form is said to encompass the three sets, while the three sets are said to encompass the wooden dummy form
5. The "six and a half point" pole form and the "eight chopping" knives forms are primarily used to develop and condition the empty hand movements..
• Characteristics and principles. • External versus internal style
• Whether Wing Chun is an external style (relies on body mechanics), or an internal style (nei chia) that makes use of Qi (internal energy) is disputed. This is possibly due to different interpretations of the meaning of the terms internal (also known as soft) and external (also known as hard).
• However, Wing Chun is not as well known for its use internal energy as are Tai Chi, Ba Gua or Hsing Yi.
• In practice, the techniques of Wing Chun may be explained and understood in either in terms of body mechanics or in terms of Qi. Wing Chun does differ from most internal styles in that Wing Chun training is generally vigorous, fast and forceful and often works with partners.
• This is not to say that Wing Chun relies on brute strength. On the contrary, softness (via relaxation) is fundamental to the style, and essential to deflect, negate, and use an opponent's power against him.
• While some say that, even tense, it is possible to use Wing Chun, such an unsophisticated approach is easily defeated by a skilled Wing Chun practitioner.
• Even Chi Sao training can be misused if too much force is used. Yip Man did not lose to his young students in Chi Sao even during his later years, when he was weaker. He used his superior sensitivity and body structure to control their power.
• Such skill does not come automatically. The difference in the application of techniques can be subtle. Proper instruction is crucial.
• Close range • Wing Chun is one of the few styles that emphasizes non-grappling close
range fighting. Ideal Wing Chun fighting distance is fist, elbow and knee range. While the Wing Chun forward kick can be considered a long range technique, Wing Chun practitioners concentrate on "entry techniques" - getting past an opponent's kicks and punches to bring him within range of Wing Chun's rich close range repertoire.
• Other styles reason that you should aim to strike at maximum range - which means kicking. This is because if you do not, your opponent will be able to hit you before you can hit him.
• Wing Chun teaches that it is always possible to get past an opponent's long range technique and close in to fight on Wing Chun's terms. A kick can be jammed before full extension, before it develops full power. A kick can also be jammed when it is being withdrawn, as all kicks inevitably have to be. A Wing Chun practitioner will rush in during these times, using quick footwork to close the distance.
• A favorite Wing Chun saying is "stay as he comes, follow as he goes" to emphasize its close range and stick-to-your-opponent approach to fighting.
• Wing Chun's reputation as a style suitable for smaller sized people arises partly from the advantages close range fighting gives to the smaller person. At close range, a smaller person will still be able to develop full power in punches and kicks, as long as there is sufficient space to fully extend his limbs. A longer-limbed opponent at the same distance will be crowded, unable to extend fully and develop full power.
• Speed • Wing Chun values speed over power. A weak fast punch that is too fast to
be avoided is better than a powerful slow punch that can be dodged or deflected.
• Striking inevitably opens up part of your own body to attack. A fast strike reduces the exposure time.
• A punch is faster than a kick, so punches are emphasized over kicks. Punches are also safer as they do not disrupt the body's centre of gravity as much as kicks do. Kicks are kept low, below or slightly above the waist, so as to not to be grabbed by your opponent's faster hands.
• Wing Chun's emphasis on speed arises naturally from its close range fighting focus. At close range, a punch has less distance to travel and so will arrive more quickly. At close range, hand positions can be difficult to see because of this heightened speed. This is why Chi Sao is used to train a Wing Chun practitioner to sense his opponent's hand position and probe for holes in his defense, from touch alone.
• The Wing Chun stance is also designed for speed. The feet are kept about a shoulder's width apart, forming a good balance between speed and stability. A wider stance would be more stable but would slow down kicks and footwork.
• A highly trained Wing Chun practitioner achieves maximum speed by acting reflexively and instinctively to his opponent's moves. Chi Sao
training will help in this. He does not think "if my opponent does this I will counter with that". Instead, he just reacts.
• Because the range in Wing Chun is typically so close, there is generally no time to react to visual stimuli. The art is essentially tactile, and the practitioner learns the "feel" of correct technique only through extensive partner drills with skilled partners.
• The speed at which Bruce Lee fought in his later movies is not an accurate representation of the speed at which Wing Chun or Jeet Kune Do is conducted. Bruce Lee slowed down to make his movements easier to see. His earlier movies such as Chinese Connection http://www.imdb.com/title/tt0068767/ are more realistic in this regard.
• Vertical punch • This is the defining technique of Wing Chun. Punches are thrown with the
elbow down and in front of the body. The fist is held vertical and the contact points are the bottom three knuckles. The fist is twisted on impact for maximum effect.
• The advantages of the vertical punch are speed, protection, hand strength and force redirection. • Speed. Because the elbow is not swung back behind the body, the
vertical punch is faster than a conventional roundhouse punch. This does mean that the vertical punch is less powerful. Power is traded off for speed. The waist is twisted to add power to the vertical punch, but this is not possible in the chain punch (see below) as it would be too slow.
• Protection. Keeping the elbow low and forward protects the front of the body whereas swinging the elbow back would open up the front of the body to attack.
• Hand strength. The vertical fist places the knuckles forward, allowing them to take the impact of the punch and transmit the force down the back of the hand. A horizontal fist, in contrast, puts the finger joints in front of the knuckles so the impact must be taken there, making it easier to break the fingers. This can be tested by punching a wall with a vertical and then a horizontal fist. Note that the vertical fist can be used to strike a hard wall without causing pain at medium levels of force. This is not possible with a horizontal fist.
• Force redirection. The vertical punch redirects the force from the punch downwards into the puncher's legs and into the ground. In contrast the horizontal punch redirects the force from the punch sideways into the puncher's waist. This gives the vertical punch a more solid foundation.
• The last item above can be easily tested. Hold your fist vertically in front of you, your elbow down, one foot behind the other. Ask someone to push against your fist and you will feel his force being redirected into the ground. Repeat, but with your fist horizontal and your elbow at shoulder height and to the side. You will feel his force twisting you sideways, leaving you with nothing to push back against.
• The vertical punch is so effective that Bruce Lee kept it unchanged, in Jeet Kune Do.
• The vertical punch is the basis for the Wing Chun chain punch - alternate left and right vertical punches thrown in quick succession, resulting in a fast flurry of punches of a few punches per second. The chain punch is simple, effective and difficult to counter.
• Wing Chun students are taught that when in doubt as to which technique to use, they should attack with the chain punch. This avoids the "analysis paralysis" that can occur when an overly-trained martial artist gets into an unstructured street fight.
• Centerline • Wing Chun emphasizes attack and defense along an imaginary vertical line
drawn along the nose, throat, navel and groin. The human body's prime striking targets are considered to be on or near this line.
• A Wing Chun practitioner will strive to protect his centerline and attack his opponent's. Footwork is used to move your centerline away from an opponent's attack and to position your hands and feet to attack his centerline.
• Wing Chun techniques are "closed", the limbs drawn in to protect the centerline and also to maintain balance. The hands should not move beyond the vertical circle that is described by swinging the arms in front, with the hands crossed at the wrists. To reach outside this area, footwork is used.
• One subtle advantage of attacking the centerline is force redirection, or rather the lack of it. Hitting someone on the side (for example the shoulder) will cause the recipient's body to twist, absorbing some of the force. Hitting someone in the center causes more of the shock of the punch to be transmitted to the body.
• Linear movement • Strikes are linear. This is in the belief that the fastest path between two
points is a straight line. Some blocking movements however, can be circular.
• Note that the vertical punch is linear - only straight-line movements are used.
• Simultaneous attack and defence • Whenever possible, both arms will be used to block and strike in one
movement. This allows for fast counter attacks, compared to the conventional block with one hand followed by a counterpunch with the other.
• Independent movement of limbs • A Wing Chun practitioner should be able to punch and kick at the same
time, thereby confusing his opponent. Any combination of punches and kicks can be used, so that his attack will be difficult to predict. His opponent cannot hope that punch A will always be thrown together with kick X as any punch can be used with any kick.
• Even the arms are trained to move independently of each other. This is one of the purposes of the Siu Nim Tao.
• Risk aversion • A life-or-death combat situation is no time to take unnecessary risks. Wing
Chun is conservative in this regard. Equal emphasis is placed on offensive and defensive measures.
• Most hand techniques place one hand close to the chest, to ward off punches that manage to get past the lead hand. The elbows are kept low, to protect the body. The head is tilted forward and down to protect the throat with the chin.
• Proper balance is always maintained. Wing Chun practitioners will not risk their balance by over-reaching to attack an opponent. Strikes should be launched from a solid base. All-or-nothing gambles are not worth the risk.
• Feints are discouraged as these are seen as opening up your body to attack, with no possibility of hitting your opponent in return.
• Balance and body structure • Overall body balance is emphasized as this affects speed. A well balanced
body can move more quickly. The trunk is always kept upright for this purpose.
• A Wing Chun practitioner will not lean sideways in order to throw a high kick to an opponent's head. Changing your body's center of gravity so radically brings grave speed penalties, aside from opening your groin to attack and your foot to grabbing.
• Bobbing and weaving is not used to dodge punches. Footwork is considered faster for dodging, and does not endanger stability or body structure.
• Wing Chun practitioners believe that the person with the better body structure will win.
• Proper body structure is used to redirect horizontal force from a punch, vertically into the ground. This allows more powerful punches to be thrown.

• Proper positioning of arms will close holes in your defense, allowing no avenue for your opponent to strike.
• For example, the forearm in the bong sau should be kept high so as to deflect punches upwards. The bong sau forearm is also kept forward because having it too far back weakens the leverage of the triceps and allows the forearm to be pushed back.
• Wing Chun students are taught how to test each technique against specific attacks so that they can assume the correct positions from actual feedback and not from blindly following their instructor. Proper stances are checked by having someone push against you to check your stability.
• The importance of balance in Wing Chun can be seen in this alternate description of the Wing Chun forms: • Chum Kiu, the second form, consists of techniques to destroy your
opponent's structure and balance, leaving him open to attack. • Biu Tze, the third form, consists of techniques to counter attack when
you are in a disadvantageous situation, when your structure and balance have been compromised.
• Relaxation • Wing Chun techniques are performed in a relaxed manner, during both
training and in actual combat. • Muscles act in pairs in opposition to each other (e.g. biceps and triceps).
If the arm is tensed, maximum punching speed cannot be achieved as the biceps will be opposing the extension of the arm. In essence, a tensed arm must first relax then begin the punching motion. When relaxed at the onset the punch may begin at any time. One motion is always faster than two.
• Unnecessary tension wastes energy, causing fatigue. This can be critical in an extended engagement.
• Tension stiffens the arms, making them less sensitive in Chi Sao and reduces your ability to sense and react to your opponent's intentions.
• A stiff limb provides an easy handle for an opponent to push or pull you with, where a relaxed limb allows you to release their energy.
• The mind should also be relaxed when fighting. The gritted teeth, bulging neck muscles attitude of The Incredible Hulk is not the correct Wing Chun fighting attitude.
• This relaxed approach is extended into the training itself. It would be difficult to teach students to relax if the training atmosphere itself was tense. Wing Chun classes are commonly relaxed and light hearted affairs. Sifus are friendly and open, far from the Hollywood (and Hong Kong) caricature of sadistic inscrutable taskmasters.
• Weapons • Whereas primarily an empty hand style, weapon training has been added to the
style. Such a training is considered dangerous/secret and is thus only taught at master level.
• The two weapons of Wing Chun are • "Dragon Pole" - an eight-foot wooden pole • "Butterfly Swords" - small double Chinese broadswords (Dao)
• Training • Wing Chun students are taught the reasoning behind each technique that they
learn. This avoids them going through the motions without knowing how to apply them. This theoretical grounding also allows them to analyze other styles for strengths and weaknesses.
• Wing Chun as taught by Yip Man was in some ways a socially revolutionary art. There were no ranks or titles in the art. One's standing in the wing chun did not come from "time in grade" or "age"; instead, the "hands did the talking" and made clear who had superior skill. Indeed, one of the first things that one learned was to look straight at the instructor, which could be difficult as Chinese social mores placed emphasis on respect for elders, for example by avoiding direct
gaze. A wing chun kwoon ("training hall") could be likened to a wolf pack rather than to a hierarchical military-style organization.
• Wing Chun also makes use of a number of kuen kuit to teach the art. These are short, often sing-song, sayings or rhymes that indicate principles, or strategies, or even particular responses. Although these can be written in Chinese characters, they are actually Cantonese (so have no real written equivalent). In many cases, their meaning rested on slang that was not necessarily widely known. In others, although the meaning might be "clear", the actual meaning for the art would require that you physically learn something.
• Personalittes • Yip Man was well respected by other martial arts instructors in Hong Kong. He
was the first person to teach Wing Chun to a wider public. After his death, many of his students formed separate schools. In some cases, instructors developed more systematic methodologies of teaching Wing Chun -- however, there is probably no substitute for direct hands-on transmission of the feel of the art. This has led to varying interpretations of the art.
• Yip Man was well-known for having a very quick wit and an acid tongue. His teaching style, along with the very direct nature of the art and its despising of superfluous talk, infuses the art with a certain edginess. This is probably why Wing Chun is well-known for being split into many factions, each of which feel that they are the holders of the true transmission of the art.
• • Yip Man's lineage is not the only one that exists and there are several different
histories which confirm and contradict Yip Man's histories. Yip Man had many peers who passed on the art of Wing Chun resulting in, to name a few, the Yuan Kay-shan Gu Lao and Pan Nam branches. It is said that there are 7 main Wing Chun families in mainland China. Some other branches are found in Malaysia (e.g. Cho Ga Wing Chun), Vietnam, and Taiwan.
• Bruce Lee trained in Wing Chun and later incorporated some of its moves and philosophy into the Jeet Kune Do style he later personally developed. Jeet Kune Do differs greatly from Wing Chun as taught by Yip Man.
1.5.2.23. Wing tsun • Wing Tsun®, often shortened to WT, is a particular school of the Wing Chun style
of Kung Fu developed by a student of Grandmaster Yip Man named Leung Ting. • In the western world most teachers descend from the German Grandmaster Keith
Kernspecht who also developed a simplified but effective brand of WT designed to be learned more quickly called 'Blitz Defence'. Due to an unfortunate split, one of GM Kernspecht's most skilled students, the Turk Emin Boztepe has now formed his own organisation which teaches widely in the USA.
• 1997 another highly skilled student of GM Kernspecht, Sifu Salih Avci, created his own organisation the WTEO. The headquarters of the WTEO are at Eschweiler, Germany. Avci Wing Tsun and Avci Eskrima is currently only instructed in Europe (2004).
• The European headquarters of the EWTO are at Langenzell Castle near Heidelberg in which members of the EWTO conduct intensive training and research into both Asian and European martial arts.
• In practising Wing Tsun, the focus is less on drilling powerful and quick techniques as in many martial arts such as Karate and Tae Kwon Do but so called 'sensitivity drills' where the students learns a softness in the limbs which prevents the restriction in movement created by being permanently tense. The system also stresses minimal movements to achieve the necessary effect so all movement is as efficient as possible.
• One of the characteristics of Wing Tsun is its development of a systematic, progressive system for transmitting the art. The WT system provides for a set of levels of achievement, each of which must be mastered before moving to the next. In the west the system contains 12 student grades which cover the first two forms, Siu Nim Tau and Chum Kiu, applications of the movements of the forms. In the later grades the Chi Sau sentences are introduced. After the student grades are 12 master grades, beginning with the 1st 'Technician' grade - perhaps the equivalent of the WT
black-belt. From this level onwards the student is permitted to learn the advanced forms beginning with the Biu Tze form and later the Mook Yan Chong Fa (Wooden Dummy), Luk Dim Boon Kwun Fa (Long Pole) and Bart Cham Dao (Eight Cutting Broadsword) techniques.
1.5.2.24. White crane • White Crane Kung Fu (白虎工; pinyin: b� 頱 �h u Hokkien: pek hok kun) is one of
the original five animals of Shaolin Quan and one of the styles that constitute Five Ancestors Fist. White Crane style is very well known in Chinese martial arts circles, being said to emphasise high steps and sweeping diversions of attacks with the arms for defense, and high kicks and strikes with the elbows, fingers (in the form of 'the crane's beak') and wrists for offense. The southern school of White Crane is especially associated with the province of Fujian.
• T'ai Chi Ch'uan is said by some of its schools to originally be based on a combination of White Crane and Snake Kung Fu. Also, early Okinawan Karate masters are said to have been strongly influenced by White Crane stylists from China.
• There is another style of White Crane, associated with Tibet, that uses hand and arm attacks of the Crane and footwork of the Ape, as well as some hand and arm techniques of the Ape.
• White crane: A style of kung fu developed about 500 years ago at a Tibetan monastery. According to story, a lama witnessed a fight between a crane and an ape. In which the crane was able to hold back the ape by the agility of its long legs, by beating with its huge wings, and by pecking and clawing. Thus, white crane is an art of mobility, grace, and long-range arm movements.
• Bok hok pai: The white crane style of kung fu. • Burning hand: A technique of white crane kung fu. Burning hand is an open hand
strike that requires years to master. The student who is just beginning to be effective with burning hand can leave a red imprint at the site of the slap. More advanced students leave an actual bruise in the shape of the hand. A master of burning hand can strike and completely remove skin tissue.
1.6. India 1.6.1. Vajramushti • The most famous empty-hand combat system of the kshatrriya, the Indian warrior caste to
which bodhidharma belonged. Vajramushti means ‘one whose clenched fist is adamant’. Although it is reasonably certain that bodhidharma practised this system, the influence of Vajramushti on the exercises he taught to the monks at the shaolin temple is not known.
1.6.2. Chi hsuan men • ‘The unusual style’, created around the 5th century BC by an Indian named Han lo-ming.
Lo-ming devised a fan-like metal weapon, which he called the white jade fan, and with which the opponents sword could be taken away by a scissors motion. Chi hsuan men also teaches the science of vital points, so that after the opponent has been disarmed, he can be overpowered by strikes to the vulnerable points.
1.6.3. Binot • An ancient Indian form of unarmed fighting. Bin means not; ot means something to
protect. Thus, Binot is a system of techniques for the unarmed fighter to use in any situation against armed or unarmed attackers. Ancient texts describe warriors who fought using one arm only, but limited Binot such as is practised today teaches two-arm methods.
1.6.4. Bandesh: • An Indian fighting technique used to defeat an armed attacker without killing him. There
are great varieties of methods by which to manoeuvre the attacker into a position where you can then get him into a body lock and disarm him. Most Indian weapons arts teach bandesh as part of the full training.
1.6.5. Gatka • The exact beginnings of Gatka are not clear. What is clear is that it emerged formally
from its original birthplace in northern India during the times of the 6th Guru of the Sikhs, Guru Hargobind Sahib (early 1600s), who learnt and instructed his Sikhs to learn the martial art. However, Gatka existed long before then. Some have said that Gatka is the original grandparent of all modern martial arts which came out of northern India towards China. The Sikhs mastered Gatka and perfected its use in battle. Many hundreds, if not thousands, of battles were decisively won by the Sikhs, despite almost
always numbering far fewer than the opposing forces. The techniques within Gatka were combined with the spiritual practices of the Sikhs to create a perfect fighting system. Opposing forces are documented to have cursed the awesome Warrior Saints that the Sikhs were!
• Gatka is the traditional Sikh martial art. It is largely weapon-based. The three primary types of weapon are: • Swords • Sticks (from one to three meters in length) • Flexible weapons, such as whips and chains
• Gatka originates from the region of Punjab, in Northern India 1.6.6. Kalaripayatu • Kalarippayattu from southern India is probably the oldest still-practiced martial art form
in the world. As of now, its mostly practiced in Kerala. It is said that Bodhidharma took this art form to China, which it is claimed to have evolved into Kung Fu and other forms of Chinese martial arts.
• Kalaripayattu is practised inside a Kalari, which is an arena akin to a gymnasium or a dojo. The word "Ppayattu" means "practice". These words are in Malayalam language (which was an offshoot of Tamil after 900 AD), the language dominant in Kerala. Most words in Kalari are originally from Tamil_language, including words like "suvadi" (footprint), "vadivu" (stance/pose), "verum kai" (weaponless hand), "mei payattu" (mei=body). This was originally practised by the fighters or warriors of Kerala. In ancient times, arguments between nobles were often decided on the basis of a Kalarippayyattu tournament's outcome. In modern times, Kalarippayyattu is still practiced all around the world due to its popularity in endowing the practitioner with superior physical agility and flexibility. Therefore, it is very popular among dancers who undergo training in this martial art to gain physical flexibility.
• Kalaripayattu also shows a strong influence of Ayurveda and major classical dance forms of Kerala , namely Kathakali. Kalarippayyattu teachers often provide massages with traditional medicinal oils to their students in order to increase their physical flexibility or to treat muscle injuries encountered during practice. Such massages are generally termed "Thirumal " and the unique massage given to increase physical flexibility is known as "Katcha thirumal ".
• Kalarippayattu has two main divisions : VADAKKAN KALARIPPAYATTU [Northern style] and THEKKEN KALARIPPAYATTU [ Southern style ]. Northern style involves more elaborate graceful body movements and southern style involves very rapid economical and yet powerful movements.
• Kalarippayattu training differs from most other martial arts training. Bare hand fighting skills are taught in the end. Since it was originally the martial training given to warriors, the martial art teaches the practitioner to become adept in several different forms of weapons. The stages in which this training is imparted is : 1. Meythari : This is the beginner stage where rigorous body sequences comprising of
twists, stances and complex jumps and turns are to be mastered. These exorcizes are termed as Meyppayattu and they impart excellent neuro muscular co-ordination in the practitioner.
2. Kolthari : Once the student is physically competent enough, he/she is introduced to fighting with a long wooden weapons. The first weapon taught is usually 5 feet in length or up to the forehead of the student from the ground level. The second weapon taught is a short wooden stick of about two and a half feet or three palm spans. This is called the "Cheruvadi" or "Muchan". The third weapon taught is "Otta" which is a wooden staff curved to resemble the trunk of an elephant. The tip is rounded and is used to strike the vital spots in the opponent's body.
3. Ankathari : Once the practitioner has gained confidence with all the wooden weapons , he/she is introduced to metal weapons, which require superior concentration due to the lethal nature of such weapons. The first weapon taught is the metal dagger called "Kadhara" which has a curved blade. Once the dagger is mastered, the master weapon of Kalarippayattu ; the sword and shield is taught to deserving students. The sword is called "Val" and the shield is called "Paricha" This is probably the most beautiful sequence to be seen in the demonstration of this martial art. There are more weapons taught including a wooden spear and the famous

flexible sword called "Urumi" which is an extremely dangerous weapon taught to the rarest of students.
4. Verumkai : After all the weapons have been mastered, the practitioner is taught how to defend his/her person with bare hand techniques. These include strikes to vital points of the body, grapples and arm locks.
• A complete Kalarippayattu training is incomplete without learning the medical aspects. The practitioner who has completed martial training is taught how to treat physical injuries with traditional medicines. A person who is well versed with all these aspects and becomes a complete master is called "GURUKKAL".
1.6.7. Silambam Nillaikalakki • Silambam Nillaikalakki is just one style of Silambam, a southern-India stick fighting
system. It is known in the whole south India under this name, but historically originated fom Kerala.
• SILAMBAM: Silam meaning "hill", and bam being a shortcut for "bamboo" (a marhat word), silambam therefore translates as "the bamboo from the hill", as the first sticks were made out of a kind of filled, yellow bamboo.
• NILLAIKALAKKI: means "breaking the posture", is the name of that school, which distinguishes itself by its intricated, well structured organization of techniques. Seven years of daily committed practice are (officially) necessary just to learn the school, then you can start practicing, a bit like learning a music instrument. This makes this teaching outstanding, as compared to other silambam schools that may be learned in as little as a few months.
• Silambam has to be clearly distinguished from Kalaripayattu, that is also to be found in south India.
• Silambam is about stick fighting, or rather staff fighting, as a 1.68 meter long stick is being used. It is hold at one of its end, right hand close to the butt, left hand about 40 centimeters away. This precise position allows a wealth of possibilities of stick-and-body movements, enabling tricky hits or blockings.
• Movement is also very important, and beginners are taught so-called spinning techniques, and patterns, without stopping the motion of the stick. Later on, a lot of footwork is incorporated to have the practitioner also moving around, in a coherent conjunction with stick movement. The understatement is to be able to tackle with group fighting, and many techniques could be seen as a bit too luxuary for a single oponant duel.
1.7. Indonesia 1.7.1. Kuntao • Kuntao is a term used in Indonesia to describe the Kung Fu and Chinese arts that
migrated to Indonesia. In turn, these were influenced by Indonesia's blade-based culture, and thus changed significantly. Kuntao is descended from Kung Fu, but is known for being distinctive from it.
• A martial art of Indonesia and Malaysia, kun-tao has its roots in Chinese fighting styles brought to these islands by Chinese settlers hundreds of years ago. Although the name suggests empty-hand techniques only (Kun means fist, and tao means way), several weapons are used in kun-tao, which actually encompasses a number of arts. Like Chinese kung fu, kun-tao is a highly secret art, and it consists mainly of animal styles. It uses both hard and soft methods, including the circular movements of pa-kua. At present, practice of kun-tao is illegal in Indonesia.
1.7.2. Silat • Silat: An Indonesian martial art that can be practised on its own but that is better known
as part of Pentjak-silat. Practised as separate art, silat consists of combat oriented exercises that can be performed alone (as Japanese kata are performed) or with a partner..
• An Indonesian martial art created some time before the 7th century AD. Literally, pentjak means skilled and specialised body movements, and silat means to fight by using pentjak. Pentjak by itself is similar to the kata of Japanese martial arts. Silat too can be practised alone, but the movements are faster and less controlled. There are more than 100 known styles of Pentjak-silat, in addition to its Malayan descendant bersilat and its substyles. Pentjak-silat encompasses armed and unarmed techniques as well as spiritual training. The main aspects of Pentjak-silat are: • jurus (use of the body as weapons), Juru : A fundamental aspect of the Indonesian
martial art Pentjak-silat. Jurus are the parts of the body that can be used as weapons –
fingers, knuckles, and edge of the hand, elbows, knees, hips, head, and feet. The student learns all techniques related to the use of these weapons: how to strike with them and the proper target areas for each Juru, for example, use of the knee to strike the abdomen.
• langkah (postures and footwork to accompany jurus), Langkah: One of the fundamentals in the Indonesian martial art Pentjak-silat. Having learned the jurus (parts of the body used as weapons), the student works on langkah, the postures and footwork that accompany the jurus.
• bunga (etiquette used before sparring), Bunga: One of the fundamentals of the Indonesian martial art Pentjak-silat. Bunga are the polite rituals used before beginning practice with a partner. Each one of these formal gestures has its basis in self-protection.
• sambut (sparring), Sambut: In the Indonesian martial art of Pentjak-silat, sambut is sparring. Sambut can be done with one or more partners.
• rahasia (vital points), and Rahasia: An advanced technique of the Indonesian fighting art Pentjak-silat. Rahasia is the science of attacking the opponents vital points and protecting ones own. It is analogous to the Japanese art of atemi and the Chinese tien-hsueh.
• Kebatinan (spiritual training): The final step in training for the Indonesian martial art Pentjak-silat. Kebatinan is spiritual training. Through kebatinan, a Pentjak-silat master is able to perform feats of amazing physical endurance such as withstanding powerful blows and even stabs.
• Tjabang: A weapon used by practitioners of the Indonesian martial art Pentjak-silat. The Tjabang resembles the Okinawan sai. It has two tines extending from an iron shaft. It is usually used in pairs and is very effective as a defensive and an offensive weapon.
• Harimau: The tiger style, Harimau means tiger, of the Indonesian fighting art Pentjak-silat. In this form, contestants crouch low to the ground, like tigers about to pounce. This style originated in a rainy climate, where self-defence in the normal upright position was impractical on the wet, slippery ground.
1.8. Japan 1.8.1. Aikido • Although based on ancient samurai techniques, Aikido is a relatively new martial art,
founded by Morihei Uyeshiba in 1925. Aikido emphasises internal and external harmony with nature, ai, through control of spiritual energy, ki. Do means path or way, hence the term Aikido: ‘the way of harmony through control’. Leverage holds and throws are fundamental to Aikido. These techniques are performed with a circularity and fluidity of movement that give Aikido its characteristic dance-like appearance. In training, one practices with a partner rather than an opponent. The object is to lead the partners’ ki while maintaining the flow of ones own ki.
• Fudo no shisei: In Aikido, the immovable posture, although one is not necessarily motionless. The mind is focused on one point, the body is relaxed, and the ki flows freely. The mind and body work as one.
• Hombu: The headquarters for Aikido, located in Tokyo. In addition, a general term for central offices of any Japanese martial art. Hombu means literally headquarters.
• Irimi : In Aikido, a forward step by which a head-on collision with the partner is avoided. Without resistance, you are able to redirect your partners force.
• Ki na nukeru : A term used in Aikido to denote loss of ki, which is loss of concentration. • Ki wo dasu: In Aikido, allowing the ki to flow. • Ki no neru: In Aikido, this is training, preparation of the ki by concentrating on it fully
by visualising it as being located at the centre of the body. • Ki wo totonoeru: In Aikido, preparation of the ki by maintaining calmness, breathing
correctly, and focusing the mind. • Kokyu : In Aikido, refers not only to the movement of the body as it follows ki but also to
the flux of ki itself. • Ai: Harmony with the universe. Through ai, you achieve a unity of the physical and
intellectual with the spiritual. Opposition and conflict are eliminated, enabling you to combine your partners force with your own and then move as one.
• Tenkan: A circular movement of the body used in Aikido to redirect the partners power, or ki, so that it is dissipate or used against him.
• Hakama: A long divided skirt covering the legs to the feet, used in several Japanese martial arts. One of the reasons for wearing the hakama is so that no one will be able to observe your foot movements.
1.8.2. Aikijutsu • Aikijutsu , also known as aikijujutsu , is a form of Japanese martial arts. In modern times,
the best-known style of aikijutsu is that developed by Sokaku Takeda from Daito Ryu. Some Daito Ryu aikijutsu practitioners claim that this ryū was originally developed during feudal times by the Aizu clan; however the majority of martial arts historians dispute this, citing there is no record of such an unbroken tradition. This style is taught primarily to police officers and the military, and was a central influence in Ueshiba Sensei's development of Aikido.
• The emphasis in training is not on striking, such as Karate, but rather on throws, joint locks, and chokes.
1.8.3. Bu-jutsu • The combat methods of the Japanese warrior. All modern forms of Japanese martial arts
were developed from fighting systems of the bushi. Thus, judo evolved from ju-jutsu, kendo, fencing, from ken-jutsu, and so on. Bu-jutsu was the general term for all the fighting styles of the bushi – with bow and arrow, kyu-jutsu, with sword and spear, to so jutsu, on horseback, ba-jutsu, and many others.
• Iishino choisai: The 15th century warrior who founded the Tenshin shoden kator Shinto-ryu, or heaven-revealed divine style. This school of martial arts, which still exists, emphasises training in yari-jutsu ‘straight spear’, kenjutsu ‘sword’, and Naginata-jutsu ‘curved-blade spear’.
• Bushi: A warrior class of ancient Japan. The bushi functioned as armed protectors for the feudal lords and adhered to a strict moral code known as bushido.
• Budo: Literally, fighting ways. Budo represents the Japanese sportive forms of the martial arts, which developed from the combat forms. As Japan entered a period of peace, the concepts of spiritual growth and self-knowledge became part of the warriors way of life, and this trend was reflected in his fighting styles. All Japanese arts that contain the suffix –do are included in the category of Budo.
• Bugei: Literally, fighting arts. Bugei encompasses the combat forms of Japanese martial arts, from which the modern sportive styles evolved. The Bugei were developed by warrior for use on the battlefield, and these forms are grounded in practicality and self-protection.
• Samurai: A warrior class of ancient Japan similar to European feudal knights. The term samurai replaced bushi during the muromachi period of 1392-1573 AD. Both men and women belonged to this class, and they lived by the honour code called bushido. The main weapons of the samurai were the sword and spear, although bow and arrow were also used.
• Seppuku: Commonly known as hara-kiri, seppuku is the act of ritual suicide, which was the right of the samurai class of ancient Japan. Facing dishonour or capture, a warrior would slit open his stomach with his sword, symbolically baring his soul (believed to reside at the tanden, the point about three inches below the navel) to show its purity. Seppuku was also performed as an act of loyalty to a fallen master. It became a legal institution in the 13th century, and in the 17th century, it was used as a judicial sentence.
• Ryu: Suffix used with Japanese martial arts, meaning school or style. Ryu is used with subsystems of an art; for example, one would not say karate-ryu or judo-ryu, but the style of karate that was developed by the Okinawan master itosu is called itosu-ryu.
1.8.4. Bojutsu • Bojutsu (棒棒) is the martial art of using a staff weapon called bo (abbreviation of roku-
shaku-bo (six-shaku-staff), a shaku being close to one foot long). Staffs are perhaps one of the earliest weapons used by man. They have been in use thousands of years in Eastern Asia.
• Today bojutsu is usually associated either with Okinawan kobudo or with Japanese koryu budo. Japanese bojutsu is one of the core elements of classical martial training. In the Okinawan context, the weapon is frequently referred to as the kon.
• Aikido founder Morihei Ueshiba was known to practise with bo, which later formed the base of aikido's weapon work with a shorter staff, jo.
1.8.5. Bujinkan
• The Bujinkan , or more properly the Bujinkan D?/b> (武武武武武) is a martial arts organization. It is headed and operated by s?/i> Masaaki Hatsumi (初初初初 Hatsumi Masaaki), who learned from Toshitsugu Takamatsu (高高高高 Takamatsu Toshitsugu). The Bujinkan honbu d?/a> is in Noda just outside Tokyo. Bujinkan d?can be found all over the world. Bujinkan plus a few off-shoots are collectively known as the X-kan.
• The Bujinkan D?method is named Bujinkan Bud?ijutsu (武武武武武武棒), and is a collection of nine martial arts family lineages, called ry?The art was previously called Bujinkan Ninp?ijutsu and before that it was known under the more generic name ninjutsu - a name that many serious practitioners of the art today avoid as it has gotten a somewhat bad name. One thing associated with ninjustu is the throwing of shuriken and although it is part of the curriculum of some ry?it is a very tiny facet of a much larger system.
• The training is generally referred to as taijutsu , and is composed of both armed and unarmed methods of fighting. Unarmed methods are broken down into three primary categories, dakentaijutsu (striking forms), j?utsu (grappling forms), and taihenjutsu (body movement skills). Much of the basic taijutsu taught to beginners comes from three or four primary lineages in the Bujinkan compendium, usually Kot??okko-ry?ki Shinden-ry?d Togakure-ry?p>
• Many weapons are taught: sword (shinai made of bamboo, wooden bokken, dull metal sword iait?> or swords made by soft modern materials), staffs of various lengths (b?>, j?>, hanb?>), rope, spear, fan tessen, Japanese halberd (naginata) and more. Weapons are categorized into four primary classes - sticks, blades, flexibles, and projectiles.
• Bujinkan Bud?ijutsu practitioners as a rule do not engage in competitions or contests, as the art is ill-suited to sporting-style competitions.
• The practitioners wear black keikogi, where most other budo arts wear white. Tabi, traditional socks with split toes, are worn on the feet at many schools including most dojos in Japan.
• The Bujinkan D?establishes a series of ten ky? grades below the rank of black belt. Kyu ranks usually wear green or red belts: green for men and red for women, although there is some variety between teachers and dojos. There are 10 dan grades of black belt, but there are different levels of 10th dan and so it is often said that there is 15 dan grades.
• At fifth degree black belt, godan, practitioners submit to a test before thes?/a> to establish that they are able to sense the presence of danger and evade it, considered to be a fundamental survival skill. This is called the sakki test. A teacher who has a rank of at least godan is often referred to as a shidoshi, teacher. A shidoshi is entitled to open his own dojo, and is entitled to handle out ranks up to fourth dan at the premises he wishes. A non-shidoshi might run a dojo or a training group under the supervision of a shidoshi. A person who has been given 10th dan in the Bujinkan is often referred to as a shihan.
• In most other budo arts the steps and time between the grades increase the further you come in the system - but not so in the Bujinkan. Kyu ranks and lower dan ranks are handed out in any way that the teacher (shidoshi) likes, and the variation is big what requirements and pace is concerned. Once you have reached godan, advancement can be quick. A new dan rank every year (if travelling to Japan and training for the head of the style, Masaaki Hatsumi, is not unusual - but unheard of in most other arts, where ranks such as 8th dan often is reserved for senior practitioners who have been training for most of their adult life.
• In addition to the ranking system, a few select senior master practitioners have earned older menkyo kaiden certificates of mastery in individual school lineages. These menkyo kaiden certificates essentially establish that the master practitioner has learned all that there is to learn about the particular lineage. Whereas the ky? ranks are often made public, those select practitioners who have earned menkyo kaiden rarely divulge their status.
1.8.6. Iaido • Iaido (居居武 iaidō), also sometimes called iaijutsu (居居棒 iaijutsu) or battojutsu (抜刀棒
battōjutsu) is the art of drawing the katana, cutting down the opponent, flipping blood from the blade, and then re-sheathing the katana in one fluid movement. Modern day exponents typically use iaito instead of shinken at least in beginning stages of study.
• The emphasis is on drawing the sword and attacking as quickly as possible. Starting positions can be from combative postures or from everyday sitting or standing positions. Practitioners could expect a surprise attack at any time, and the ability to react quickly from an everyday starting position was considered essential.
• The Tenshin Shoden Katori Shinto-ryu included iaijutsu in its curriculum in 15th century, and first schools dedicated exclusively to sword drawing appeared some time during the late 16th or early 17th century. Most modern schools consider a samurai called Hayashizaki Jinsuke Minamoto no Shigenobu (1546-1621) as the originator of iaido. Not much is known about his life, and some scholars doubt his existence as a historical figure. The two largest schools of iaido that are practised today, Muso Shinden-ryu and Muso Jikiden Eishin-ryu, both claim a lineage starting with Hayashizaki.
• While not a hard and fast rule, frequently the word iaido is used to refer to the modern self improvement oriented form taught by the All Japan Kendo Federation (AJKF) and other iaido associations while iaijutsu is used for the older, combative techniques of the koryu. The word iaido itself was coined by Nakayama Hakudo in early 20th century. Before that various other names like battō, battōjutsu, or saya no uchi were used instead.
• The most important part of Iai, sometimes called the 'life of iai', is nukitsuke. This is a very quick draw accomplished by drawing the sword out of the saya (scabbard) while drawing the saya itself back. The blade can be brought out of the scabbard and used in a slashing motion very quickly using nukitsuke.
• Iai-do: A noncombative descendant of Iai-jutsu. It involves the techniques of drawing and resheathing the sword. Iai-do evolved during the peaceful Tokugawa period in Japan of 17th century AD. It stresses the intellectual and spiritual aspects of the art and is directly related to kendo, which encompasses all the sword-fighting methods used between the drawing and resheathing of the sword. Iaido is practised without an opponent. In medieval times, swordfights were often won by the first person to draw his sword. The four basic movements of Iai-do are: 1. Nukisuke: the actual drawing of the sword. First the sword is drawn smoothly 2. Kiritsuke : the initial motion of the newly drawn blade. and then a cut is made. 3. Chiburui : movements for shaking off blood from the sword before returning it to the
sheath. Next the blade is shaken – originally this would have removed the enemies blood
4. Noto: Noto consists of the moves for returning the sword to the scabbard. Finally, the blade is returned to the scabbard with a flourish.
• Omori-ryu Iai : A popular style of Iai-do, developed in the late 17th century as an offshoot of eishin-ryu Iai. There are 11 kata in Omori-ryu, one of which is based on the ancient samurai form of ritual suicide known as seppuku. Smoothness and control of movement, mind and body are the essentials of Omori-ryu.
• The scabbard is the hard case in which the sword is stored. • The hakama is the traditional divided skirt worn for practising Iaido. • The Iaido sword has a blunted blade. . The sword must be the correct length for the
person using it. • Imagining your opponent: to make Iai-do meaningful, you must concentrate and picture
our opponent in your minds eye. Only then can you develop the correct mental attitude. 1. Take up a ready stance with your left hand at the top of the scabbard and your right
hand resting on the sword handle, close to the finger guard. 2. Slide your right foot smoothly forwards and begin drawing the sword. Part of the
sword blade is now exposed. 3. Grasp the handle with both hands as the blade comes free. Now bring the sword
around and into a downward cut. 4. When you have made the cut, hold the top of the scabbard in your left hand and slide
the blade smoothly back and into it. Take your time and be very careful as you return the sword to the scabbard. Hold the top of the scabbard steady with your left hand.
• The two main classical styles (koryu) of iaido practiced worldwide are Muso Jikiden Eishin-ryu and Muso Shinden-ryu. They resemble each other quite strongly because they branched off from one style sometime in the 17th century.
• There are several branches of Muso Jikiden Eishin-ryu that are practised today. One person who is considered to be a headmaster is Miura Takeyuki Hirefusa, who holds a 9th dan in MJER.
• There are several lines of transmission extant for Muso Shinden-ryu also. One of them claims Mitsuzuka Takeshi as the headmaster, second one (those who are affiliated with Nippon Iaido Kyokai) regard Takada Gakudō as their head teacher.
• A newer style of iaijutsu is Toyama-ryu battōjutsu. This is a style originating in the late 19th century, and taught primarily to officers in the Second World War. It is different from the older styles in the sense that it favors quick and sudden, rather than smooth and deliberate, movements. Neither the older styles nor Toyama-ryu can be said to be more effective.
1.8.7. Kendo • The way, do, of the sword, ken. Kendo originated with the bushi, a Japanese warrior class
that predated the samurai. The art was based on the development of the katana, a purely Japanese-designed blade. Kendo is now practised primarily as a sport. Contestants wear lightweight body armour and strike with a bamboo sword to the eight scoring points on the body.
• Bokuto: The solid wooden sword used by intermediate level students in kendo • Bogu: Kendo armours. • Chika-ma: In kendo, the positions at which the opponents are close enough to strike
without taking a step. The position is one of the three types of ma-ai. • Do:
1. Way or path. Do, which is Japanese pronunciation of the Chinese tao, is used to describe a complete philosophical system, as opposed to ryu, which refers to a school that emphasises specific techniques or is a subsystem. For example, shorei-ryu is one school of karate-do.
2. In kendo, the term refers to the chest armour and to the kendo striking points on the side of the chest.
• Dogu: The entire group of kendo equipment; more generally, the equipment gathered together in a travelling bag. The following pieces are included: the keikogi, hakama, tare, do, hachimaki, men, kote, and shinai.
• Gokaku geiko: Practice between two kendoists of equal or similar ability, in the atmosphere of a real match.
• Hanshi: Originally, a term used in kendo to denote the master. It is now used in Japanese martial arts as a title of respect to high-ranking, 8th to 10th Dan masters.
• Hikitate geiko: In kendo, practice between a senior and a beginner. The senior, if attacked with a badly executed technique, defends and counterattacks while pointing out the beginners mistake. If attacked correctly, he allows himself to be hit.
• Issoku-itto no ma: In kendo, the distance at which either kendoist, by taking one step forward, would be able to strike his opponent.
• Jiyu renshi: Kendo free practice. See Keiko. • Kakari geiko : In kendo, after the student has mastered the basic stances and the co-
ordination of arm and foot movements, he or she proceeds to attack practice, or Kakari geiko. In this type of sparring, actual techniques are delivered with mild contact.
• Kamae: The basic sword strokes and stances used in kendo • Katana: The art of kendo was based on the use of this two-handed sword with a single-
edged curved blade, which was developed in ancient Japan. • Keiko: In kendo, free practice. The kendoka, in order to become more familiar with the
various techniques, undertakes offensive and defensive attacks with other students. This enables him to observe and to develop his abilities in a practical way. The three types of free practice are Kakari geiko (attack practice), Gokaku geiko (equals practice), and Hikitate geiko (assistance practice).
• Keikogi: For beginners in kendo, the keikogi is a white, lightweight cotton jacket with black criss-cross stitching. The kendoka of higher rank wears a heavy handmade jacket, usually black or navy blue.
• Kendo armour: A relatively recent development in the art of sword fighting, armour became popular in the 18th century. Through its use, practitioners of kendo are able to employ a variety of direct combat techniques within the framework of a sport. The armour consists of four basic pieces: the men, face-guard; the do, chest armour; kote, hand armour; and tare, waist armour.
• Kendo striking points: The eight locations on the body that score points in a kendo contest. There are three striking points on the head, called men, one point on each wrist, kote, one at the throat, tsuki, and one on either of the torso, do.
• Kendo swords: In the practice of kendo, the student eventually uses three different swords. The beginner uses the bamboo sword, shinai; the intermediate works with the wooden sword, Bokuto; and the advanced kendoist uses the real sword, katana.
• Kendoka: A student of kendo, the art of sword fighting. • Ko-dachi: The short sword used by advanced students of kendo in performing kata. • Kote: In kendo, the hand armour, which consists of two large heavy gloves. This term
also refers to the kendo striking point on the wrist. • Kote: In kendo, the hand armour, which consists of two large heavy gloves. This term
also refers to the kendo striking point on the wrist. • Ma-ai: In kendo, the space between two fencers. There are three types of ma-ai, each
referring to a different distance. These are Issoku-itto no ma, to-ma, and Chika-ma. This term is also used in other Japanese martial arts, such as karate and Aikido, to describe the distance between the two opponents.
• Men: The face guard of the kendo armour; also the kendo striking point to the head. • O-dachi: The long sword used by advanced students of kendo in performing kata. • Shiai: In kendo, a match or contest in which two kendoka use a variety of techniques and
try to score points by attacking the opponent with the shinai (bamboo sword) at the kendo striking points.
• Shinai: A sword used in kendo, made of four bamboo strips. These strips are held together by string at certain points along the length. The shinai has a solid handle with a hand guard for protection of the fingers.
• Suburi: After learning the basic kendo sword strokes and stances, the student advances to Suburi, the co-ordination of arm and foot movements.
• Tare: The hip and groin protector used in kendo. This part of the kendo armour is usually made of heavy quilted cotton to allow for maximum movement.
• To-ma: In kendo, the distance between two opponents at which neither is close enough to strike without taking a step.
• Yodansha: A kendoist who has achieved the rank of black belt or higher. Only those of the Yodansha rank wear an outfit that is all the same coloured.
• Iai-jutsu : This samurai art encompasses all techniques relating to drawing and sheathing of the sword. One learns to begin fighting even as the sword is being drawn and to maintain full alertness and readiness even when one is returning the sword to the scabbard. Study of Iai-jutsu is naturally related to study of ken-jutsu or kendo. Kendo techniques come into play for all that takes place between drawing and resheathing of the sword. Iai-jutsu is said to have been created by the samurai hayashizaki jinsuke shigenobu, who lived during the late sixteenth century. Originally a purely combative art, Iai-jutsu are chiburi, kiritsuke, noto, and nukisuke.
• Hayashizaki jinsuke shigenobu: Japanese warrior, c. 1543 – 1616, traditionally thought to be the founder of Iai-jutsu.
1.8.8. Eishin-ryu Iai : An ancient form of Iai-jutsu developed by one of the students of hayashizaki jinsuke, founder of Iai-jutsu. This style contains four kata, or forms, plus six kenjutsu kata and is very much a style of combat rather than of sport. In certain kata, one is defending against several attackers at once. Eishin-ryu was a secret of the tosa clan of Japan until 1868, as was the less pugilistic style Omori-ryu.
1.8.9. Jujutsu • Jujutsu (also jujitsu , ju jitsu , ju jutsu , or jiu jitsu ; from the Japanese 柔棒 jūjutsu
gentle/yielding/compliant Art") is a Japanese martial art. • Some define jujutsu and similar arts rather narrowly as "unarmed" close combat systems
used to defeat or control an enemy who is similarly unarmed. Basic methods of attack include hitting or striking, thrusting or punching, kicking, throwing, pinning or immobilizing, strangling, and joint-locking. Great pains were also taken by the bushi (classic warriors) to develop effective methods of defense, including parrying or blocking strikes, thrusts and kicks, receiving throws or joint-locking techniques (i.e., falling safely and knowing how to "blend" to neutralize a technique's effect), releasing oneself from an enemy's grasp, and changing or shifting one's position to evade or neutralize an attack.
• From a broader point of view, based on the curricula of many of the classical Japanese arts themselves, however, these arts may perhaps be more accurately defined as unarmed methods of dealing with an enemy who was armed, together with methods of using minor weapons such as the jitte (truncheon; also called jutte), tanto (knife), or kakushi buki
(hidden weapons), such as the ryofundo kusari (weighted chain) or the bankokuchoki (a type of knuckle-duster), to defeat both armed or unarmed opponents.
• Furthermore, the term jujutsu was also sometimes used to refer to tactics for infighting used with the warrior's major weapons: katana or tachi (sword), yari (spear), naginata (glaive), and jo (short staff), bo (quaterstaff). These close combat methods were an important part of the different martial systems that were developed for use on the battlefield. They can be generally characterized as either Sengoku Jidai (Sengoku Period, 1467-1603) katchu bujutsu or yoroi kumiuchi (fighting with weapons or grappling while clad in armor), or Edo Jidai (Edo Period, 1603-1867) suhada bujutsu (fighting while dressed in the normal street clothing of the period, kimono and hakama).
• The beginning • Fighting forms have existed in Japan for centuries. The first references to such
unarmed combat arts or systems can be found in the earliest purported historical records of Japan, the Kojiki (Record of Ancient Matters) and the Nihon Shoki (Chronicles of Japan), which relate the mythological creation of the country and the establishment of the Imperial family. Other glimpses can be found in the older records and pictures depicting sumai (or sumo) no sechie, a rite of the Imperial Court in Nara and Kyoto performed for purposes of divination and to help ensure a bountiful harvest.
• There is a famous story of a warrior Nomi no Sekuni of Izumo who defeated and killed Tajima no Kehaya in Shimane prefecture while in the presence of Emperor Suinin. Descriptions of the techniques used during this encounter included striking, throwing, restraining and weaponry. These systems of unarmed combat began to be known as Nihon koryu jujutsu (japanese old-style jujutsu), among other related terms, during the Muromachi period (1333-1573), according to densho (transmission scrolls) of the various ryuha (martial traditions) and historical records.
• Most of these were battlefield-based systems to be practiced as companion arts to the more common and vital weapon systems. These fighting arts actually used many different names. Kogusoku, yawara, kumiuchi, and hakuda are just a few, but all of these systems fall under the general description of Sengoku jujutsu. In reality, these grappling systems were not really unarmed systems of combat, but are more accurately described as means whereby an unarmed or lightly armed warrior could defeat a heavily armed and armored enemy on the battlefield.
• Methods of combat (as just mentioned above) included striking (kicking, punching), throwing (body throws, joint-lock throws, unbalance throws), restraining (pinning, strangulating, grappling, wrestling) and weaponry. Defensive tactics included blocking, evading, off balancing, blending and escaping. Minor weapons such as the tanto (dagger), ryufundo kusari (weighted chain), jitte (helmet smasher), and kakushi buki (secret or disguised weapons) were almost always included in Sengoku jujutsu.
• In later times, other koryu developed into systems more familiar to the practitioners of Nihon jujutsu commonly seen today. These are correctly classified as Edo jujutsu (founded during the edo period): systems generally designed to deal with opponents neither wearing armor nor in a battlefield environment. For this reason, most systems of Edo jujutsu include extensive use of atemi waza (vital-striking technique). These tactics would obviously be of little use against an armored opponent on a battlefield. They would, however, be quite valuable to anyone confronting an enemy or opponent during peacetime dressed in normal street attire. Occasionally, inconspicuous weapons such as tanto (daggers) or tessen (iron fans) were included in the curriculum of Edo jujutsu.
• Another seldom seen but interesting historical aside is a series of techniques originally included in both Sengoku and Edo jujutsu systems. Referred to as hojo waza (捕捕棒 hojojutsu, nawa jutsu and others), it involves the use of a hojo cord, (sometimes the sageo or tasuke) to restrain or strangle an attacker. These techniques have for the most part faded from use in modern times, but Tokyo police units still train in their use today and continue to carry a hojo cord in addition to handcuffs. The very old Takenouchi Ryu is one of the better-recognized systems that continue extensive training in hojo waza.
• Many other legitimate Nihon jujutsu ryu exist but are not considered koryu (ancient traditions). These are called either Gendai jujutsu or modern jujutsu. Modern jujutsu traditions are founded after or towards the end of the Tokugawa period (1603-1868).
Various traditional ryu and ryuha that are commonly thought of as koryu jujutsu are actually gendai jujutsu. These include Hakko Ryu, Kaze Arashi Ryu, Daito Ryu, and many others. Although modern in formation, gendai jujutsu systems have direct historical links to ancient traditions and are correctly referred to as traditional martial systems or ryu. Their curriculum reflects an obvious bias towards Edo jujutsu systems as opposed to the Sengoku jujutsu systems. The improbability of confronting an armor-clad attacker is the obvious reason for this bias.
• Over time, Gendai jujutsu has been embraced by law enforcement officials worldwide and continues to be the foundation for many specialized systems used by police. Perhaps the most famous of these specialized police systems is the Keisatsujutsu (police art) Taiho jutsu (arresting art) system formulated and employed by the Tokyo Police Department.
• If a Japanese based martial system is formulated in modern times (post Tokugawa) but is only partially influenced by traditional Nihon jujutsu, it may be correctly referred to as goshin (self defense) jujutsu. Goshin jujutsu is usually formulated outside Japan and may include influences from other martial traditions. The popular Gracie jujutsu system, (heavily influenced by modern judo) and Brazilian jujutsu in general are excellent examples of Goshin Jujutsu.
• The development of close combat systems • Regardless of where they live, people spend a great deal of time developing and
perfecting methods of using weapons for hunting and fighting. If successful, personal experiences and insights (often gained on the battlefield) help individuals to establish particular "styles," "schools," or "traditions" — in Japanese, the bujutsu ryu-ha.
• Compared with the empty-handed fighting arts of neighboring China and Korea, Japanese jujutsu systems place more emphasis on throwing, immobilizing and pinning, jointlocking, and strangling techniques. Atemiwaza (striking techniques) are of secondary importance in most Japanese systems, whereas the Chinese ch'uan-fa (kempo) emphasize punching, striking, and kicking.
• It is generally felt that the Japanese systems of hakuda, kempo, and shubaku display some degree of Chinese influence in their particular emphasis on atemiwaza, while systems that are derived from a more purely Japanese source do not show any special preference for such techniques, but will use them as and when appropriate.
• The way an opponent is dealt with is also dependent on the philosophy of the teacher with regard to combat. This translates also in different styles or schools of jujutsu. Because in jujutsu every conceivable technique, including biting, hairpulling, eyegouging etc. is allowed (unlike for instance judo, which does not place emphasis on punching or kicking tactics, or karate, which does not emphasize grappling and throwing) practitioners have an unlimited choice of techniques.
• Some teachers will favor taking an opponent out as fast and hard as possible, while others will favor taking an opponent down in a controlled way and then keeping them under control with jointlocks. Others, like the Gracie jujutsu system, stress the importance on ground work since most fights end up on the ground anyway, while other teachers find it important to avoid a groundfight at all cost, since it can be very dangerous when faced with multiple opponents.
• Although there were and are many ryuha or systems of Japanese jujutsu, there are features that are characteristic of most (if not all) of them. Since there are a number of relatively new martial systems identifying themselves as jujutsu, it is appropriate to look at those characteristics which distinguish a style as traditional Japanese jujutsu.
• Heritage • All Nihon jujutsu have cultural indicators which help give a sense of the traditional
character of a school, and include: • An atmosphere of courtesy and respect, a context intended to help cultivate the
appropriate kokoro, or "heart". • The type of gi or training suit worn, which is usually plain white, often with a
dark hakama (the most colorful uniform might be plain black or the traditional blue of quilted keikogi; you are not likely to see stars and stripes or camouflage uniforms).
• Lack of ostentatious display, with an attempt to achieve or express the sense of rustic simplicity (expressed in such concepts as sabi and wabi in Japanese) common in many of Japan's traditional arts.
• The use of the traditional (e.g., Shoden, Chuden, Okuden, and Menkyo Kaiden levels) ranking system, perhaps as a parallel track to the more contemporary and increasingly common dani (kyu/dan) ranking.
• There is the lack of tournament trophies, long-term contracts, tags and emblems, rows of badges or any other superficial distractions.
• Technical characteristics • Although there is some diversity in the actual look and techniques of the various
traditional jujutsu systems, there are significant technical similarities: • Students learn traditional jujutsu primarily by observation and imitation as patterned
by the ryu's kata (prearranged forms). Most kata emphasize joint-locking techniques, that is threatening a joint's integrity by placing pressure on it in a direction contrary to its normal function, or take-down or throwing techniques, or a combination of take-downs and joint-locks. Very occasionally an atemi (strike) targeted to some particularly vulnerable area will be used to help create kuzushi (break in balance) or otherwise set-up the opponent for a lock, take-down or throw. Force essentially never meets force directly, nor should techniques need to be strong-armed to be effective: rather, there is great emphasis placed on flow (which follows from the art's name, in which ju connotes pliability and suppleness) and technical mastery.
• Movements tend to emphasize circularity, and capitalize on an attacker's momentum and openings in order to place a joint in a compromised position or to break balance as preparatory for a take-down or throw.
• The defender's own body is positioned so as to take optimal advantage of the attacker's weaknesses while simultaneously presenting as few openings or weaknesses of its own.
• The common inclusion in the ryu of cognate weapons training (also using kata as a primary instructional method), stemming from the historical development of jujutsu and other koryu when active battles were waged. Weapons might include, for example, the roku shaku bo (long staff), han bo (short staff), katana (long sword), Wakizashi or kodachi (short sword), and tanto (knife), some of the main repertoire of traditional weaponry. .
• Philosophical dimensions • Although jujutsu and the ancient arts in general often do not have the suffix -do or
"way" to designate them as paths toward spiritual liberation and inner development, there are some philosophical and mental components, which have significance and application in these systems, at least because of their value in developing the actual combat effectiveness of the practitioner.
• These include: an all-encompassing awareness, zanshin (literally "remaining spirit"), in which the practitioner is ready for anything, at any time; the spontaneity of mushin (literally "no mind") which allows immediate action without conscious thought; and a state of equanimity or imperturbability known as fudoshin.
• Together, these states of mind tremendously strengthen the jujutsu practitioner, allowing him the utmost potential for effective action. Such effectiveness and the technical competence and mental mastery on which it stands, however, is possible only after a considerable period of serious and devoted training.
• These various characteristics or components, taken together, largely describe the principal elements of traditional Japanese jujutsu. If most or all of these characteristics are not noticeable in a so-called jujutsu system, then the legitimacy of the system as bona fide Nihon jujutsu would be highly suspect. This is not to say that the system or school in question does not offer a good training program or effective techniques. It simply suggests that such a system may be more accurately labeled with some other term.
• Jujutsu as a sport • Jujutsu as a competitive sport is somewhat controversial. According to most
practitioners, what makes jujutsu jujutsu, is the fact that every conceivable technique to win in combat is allowed - there are no rules or limitations, surviving the fight is what counts.
• This includes some very dangerous techniques, such as throwing a person from a standing position while having an arm in a jointlock, which can result in serious injuries. In order to safely compete in jujutsu, rules have to be made and techniques limited. According to many, this takes away the very heart of what jujutsu is. They claim this would turn jujutsu into a combination of judo and karate, while it is so much more.
• The most popular competition method is called 'fighting system'. This system consist of one round of combat with different phases. In the first phase, only atemi (striking) are allowed. In the next phase, grappling and throwing are added, but continuing on the ground (newaza) is not allowed. In the last phase, groundfighting is allowed, including chokeholds.
• There is only what is called 'half-contact' between opponents, which means it is allowed to actually hit your opponent, but you're not supposed to hit for a knockout (like boxing). Judges award points for techniques used and the fighter with the most points wins.
• Another, less known system, is called 'practical'. In this system, 2 defenders will take their places in the center of the mat (tatami), surrounded by 4 attackers, 1 on each corner of the mat. The attackers will choose who and how to attack. A defender can therefore be faced with 0 to 4 opponents. Attacks must be straightforward, without feints. This is also 'half-contact'. Combat is one round of 2 minutes. There are 3 judges who will indicate at the end of the round which defender did the best job of defending himself.
• The judges watch not only for effectiveness of individual techniques, but also how the defender keeps oversight and control of the situation when faced with multiple attackers. Taking down one opponent with a difficult technique but leaving yourself open for the other attackers will not score very well, while using a simple one throwing your attacker in the way of the other(s) will.
• A third competition method is called 'duo system'. During such a competition, a couple of fighters (same sex or mixed) has to present defences for different predetermined attacks. These defences can be freely chosen and are awarded with points from judges. The attacks are divided into 4 groups of 5 attacks each. The 4 attack groups are gripping, embracing/neck locks, punches/kicks and weapons.
• Whats in a name? • Jujutsu, jujitsu, jiu jitsu — there are a wide range of spellings used in English for this
Japanese martial art. In the native Japanese, jūjutsu is written in kanji (Chinese ideograms) as 柔棒, but the romanization of the Japanese word into the English language has been performed several times using several different systems since Japan was forced out of isolation in 1854 by the United States.
• Jujutsu, the current standard, is derived using the Hepburn romanization system. Before the first half of the 20th century, however, jiu-jitsu and then jujitsu were preferred. Since this corresponded to a period of time when Japanese martial arts first became widely known of in the West, these earlier spellings are still common in many places, though the romanization of the second kanji as jitsu is unfaithful to the Japanese pronunciation, especially since jujitsu means "military preparedness".
• Father of a large family • Because jujutsu is both so encompassing and has its origin hundreds of years old, it
has become the foundation for a variety of styles and derivations today. As each instructor incorporated new techniques and tactics to what was taught to him originally, he could codify and create his own ryu or school. Some of these schools modified the source material so much that they no longer considered themselves a breed of jujutsu. Modern judo is the classic example of an ‘art’, which was derived from jujutsu but is today distinct. Another layer removed, some popular arts had instructors who studied one of these jujutsu-derivatives and made their own derivative on top. This creates an extensive family of martial arts and sports that can trace their lineage to jujutsu in some part.
1.8.10. Jojutsu • Jojutsu (Japanese:杖棒) is a Japanese martial art using staves (jo), similar to bojutsu. The
jo staff is usually about 3 to 5 feet (0.9 to 1.5 m) long, about the average length of a walking stick (providing an effective self-defense for travelers?) Jojutsu is reputed to
have been invented by the great swordsman Muso Gonnosuke about 400 years ago, after a bout with wooden swords won by the legendary Miyamoto Musashi. According to this tradition Gonnosuke withdrew to a Shinto shrine and after a period of purification, meditation, and training with the staff, created the art of the jo, blending techniques of spearfighting and swordsmanship with those of other, minor methods of combat. He named his style Shindo Muso ryu and challenged Musashi again. This time, Gonnosuke mounted an effective defense and penetrated Musashi's own two-sword strategy.
• The modern study of the jo, known as jodo (way of the stick), usually leads to other arts and weapons, such as the short staff (tanjo), the chained sickle (kusarigama), as well as the police truncheon (jitte).
• Today, jojutsu has also been adapted for use in the Japanese police force, who refer to the art as keijo-jutsu, or police stick art.
1.8.11. Ju-jutsu • An ancient Japanese martial art that includes both armed and unarmed techniques. Ju-
jutsu is the grandfather of Aikido and judo, two forms that are more appropriate to sport. Ju-jutsu is primarily a method of combat, originally used by samurai and later formalised by hisamori takenouchi in 1532. The art of striking at vital points us used in ju-jutsu, in addition to a variety of striking, throwing, choking, kicking, kneeing, and joint-locking techniques. From its origins as a method of armed combat, ju-jutsu retains the circularity of motion and the leverage principles used in spear and sword fighting. Like Aikido, it is a technique (jutsu) of harmony (ju).
• Hisamore tekenouchi: In 1532, he founded the art of jujitsu proper by gathering the various samurai combat arts, both armed and unarmed.
• Atemi: The Japanese art of attacking opponents weak points. Atemi is used extensively in sumo and ju-jitsu but is illegal in judo contests. Any part of the body may be used to assault the vital parts. In Chinese martial arts, these methods are known as tien hsueh.
1.8.12. Judo • Judo (Japanese: 柔武 Jūdō) is a martial art, a sport and a philosophy which originated in
Japan. Judo was developed from Jujutsu, and was founded by Jigoro Kano (嘉嘉嘉五嘉) in 1882. The sport became the model of the modern Japanese martial arts, gendai budo, developed from old koryu schools.
• History and philosophy • The early history of Judo and that of its founder, Japanese polymath and educator
Kano Jigoro (surname first in Japanese) (1860-1938), are inseparable. Kano was born into a well-to-do Japanese family. His grandfather was a self-made man, a sake brewer from Shiga prefecture in central Japan; however, Kano's father was not the eldest son and did not inherit the business, but instead became a Shinto priest and government official, with enough influence for his son to enter the second incoming class of Tokyo Imperial University.
• Kano was a small, frail boy, who, even in his twenties, did not weigh more than a hundred pounds, and was often picked on by bullies. He first started pursuing jujitsu (柔棒), at that time a flourishing art, at the age of 17, but met with little success---in part due to difficulties finding a teacher who would take him on as a serious student. When he went off to the University to study literature at the age of 18, he continued his martial efforts, eventually gaining a referral to Hachinosuke Fukuda, a master of the Tenjin Shinyo Ryu (天武天天天) and ancestor of noted Japanese/American judoist Keiko Fukuda, who is one of Kano's oldest surviving students. Fukuda is said to have emphasized technique over formal exercise, sowing the seeds of Kano's emphasis of randori (乱乱り ), or free practice, in Judo.
• Little more than a year after Kano joined Fukuda's school, Fukuda took ill and died. Kano then became a student in another Tenjin Shinyo school, that of Masatomo Iso, who put more emphasis on formal kata than did Fukuda. Through dedication, Kano quickly earned the title "shihan", or master, and became assistant instructor to Iso at the age of 21. Iso, too, took ill, and Kano, feeling that he still had much to learn, took up another style, becoming a student of Tsunetoshi Iikubo of Kito Ryu. Like Fukuda, Iikubo placed much emphasis on free practice; on the other hand, Kito Ryu emphasized ground techniques (matwork) to a much greater degree than Tenjin Shinyo Ryu.
• By this time, Kano was devising new techniques, such as the kata guruma (fireman's carry) and uki goshi (floating hip toss). His thoughts were already on doing more
than expanding the canons of Kito and Tenjin Shinyo Ryu; full of new ideas, in part as a result of his education, Kano had in mind a major reformation of jujitsu, with techniques based on sound scientific principles, and with focus on development of the body, mind, and character of young men in addition to development of martial prowess. At the age of 22, just about to finish his degree at the University, Kano took 9 students from Iikubo's school to study jujitsu under him at the Eishoji Temple. Although two years would pass before it would be called by that name, and Kano had not yet been accorded the title of "master" in the Kito ryu (起起天) -- Iikubo would come to the temple to help teach three days per week, this was the founding of the Kodokan (講武武) or "place for learning the way."
• The word Judo is comprised of two kanji: "ju" (柔), which means gentleness or giving way, and "do" (武), meaning way of life (the same character as the Chinese "tao".) Thus Judo literally means "the gentle way" or "the way of giving way". Judo takes from jujutsu ("gentle art") the principle of using one's opponent's strength against him. Kano saw jujutsu as a disconnected bag of tricks, and sought to unify it according to some principle: he found it in the notion of "maximum efficiency". Jujitsu techniques which relied solely on superior strength were discarded or adapted in favor of those which involved redirecting the opponent's force, off-balancing the opponent, or making use of superior leverage.
• Techniques • Judoka (Judo practitioners) wear white cotton uniforms called Judogi (which means
Judo uniform in Japanese) for practicing Judo. The judogi consists of cotton drawstring slacks and a quilted cotton jacket fastened by a belt indicative of kyu or dan rank. The jacket is intended to withstand the stresses of throwing and grappling, and is resultedly much thicker than that of a karateka. Before competition, a blue judogi is assigned to one judoka per match for ease of distinction by judges and referee.
• The focus in judo is on throwing techniques (nage-waza, 投げ技), with groundwork (katame-waza, 固技) also a major component. Nage-waza is divided in two groups of techniques, standing techniques (tachi-waza, 立技) and sacrifice techniques (sutemi-waza, 捨捨技). Standing techniques are divided in hand techniques (te-waza, 散技), hip techniques (koshi-waza, 腰技) and foot/leg techniques (ashi-waza, 足技). Sacrifice techniques are divided into those in which the thrower falls directly backwards (ma-sutemi-waza, 天捨捨技) and those in which he falls onto his side (yoko-sutemi-waza, 橫捨捨技).
• The groundwork techniques are divided into: attacks against the joints (kansetsu-waza, 関関技) known in English-speaking countries as "leg-" and "armbars", stranglehold (shime-waza, 絞技), and holding techniques (osaekomi-waza, 押押技).
• A kind of sparring is practiced in judo, known as randori (乱乱り ), meaning "free practice". In randori, players (known as judoka) may attack each other with any judo throw or grappling technique. Striking techniques (called atemi-waza) such as kicking and punching, along with knife and sword techniques are retained in the katas taught to higher ranking judoka (for instance, in the kime-no-kata), but are forbidden in contest (and usually prohibited in randori), for reasons of safety. Also for reasons of safety, chokeholds, jointlocking - and the sacrifice (sutemi) techniques, which can be very spectacular, are often subject to age and/or rank restrictions; in the United States, one must be 13 or older to use chokeholds and 17 to use armbars.
• In randori and shiai (tournament) practice, when an opponent successfully executes a chokehold or jointlock, one "taps out" by gently tapping the mat or one's opponent. When this occurs, the match is over, and the tapping player has lost, but the chokehold or jointlock ceases. Because this allows a merciful exit to the match, injuries related to these holds are quite rare.
• Atemi waza: In judo, illegal techniques in which vital points of the body are attacked.
• Batsukari: In judo, practice of techniques without actual execution of the throw. • Black belt: Although there are a number of levels below it, the black belt represents
the first significant rank in many martial arts. The black belt means that the student has finally come to the most basic understanding of the art. There are varying degrees within the rank of black belt, for example, Kano jigoro, the founder of judo, was a twelfth degree black belt.
• Breakfall: Generally the first technique taught in judo are the ones for falling without injuring yourself – the breakfalls, or ukemi waza. The main things to remember are not to put out a hand to break the fall, wrists are very fragile structures, nor let the head hit the ground first. There are four basic breakfalls: backward, front, to the side, and forward rolling breakfall.
• Defensive postures: In judo, there are three basic defensive stances that derive from the natural stance. As in the natural stance, the hands are loosely at the sides and the feet about 12 inches apart. However, for the defensive posture, the knees are bent and the abdomen is thrust forward and downward. Basic defensive posture is called jigo hontai. Right and left variants in which either the right or the left foot is 12 inches forward are called migi jigotai and hidari jigotai respectively.
• Gatame: Judo armlock techniques. See armlock. • Gokyo: The Gokyo comprise five sets of judo throws, with eight throws per set.
These sets were devised by the kodokan, judos central authority. That aim is to teach the student the 40 basic throwing techniques.
• Ground techniques: One of the fundamentals of judo, these are moves used either when one is forced to the ground or deliberately allows himself to fall to the ground in order to execute a move such as a low kick. Ground techniques consist of leg-sweeps, rolls, falls, sweeping kicks, and leg throws.
• Hajime: Literally, ‘begin contest’. This is what the referee in judo and karate meets say to start the match.
• Hidari jigotai : In judo, the left defensive posture. • Hidari Shizentai: In judo, the left natural stance. • Holds: In judo, holding techniques are the first type of groundwork taught.
Groundwork is what you do after you’ve thrown your opponent and before you’ve defeated him completely. Holds are sued to control the opponent without injuring him. Judo teaches that all holds are most effective if you relax totally, thus putting all your weight into the hold. Holds and other groundwork techniques are used in contest to gain points if the actual throw was not perfectly executed. The opponent must be held down for 30 seconds.
• Jigo hontai: In judo, the basic defensive posture. • Judo: The modern, sportive form of ju-jutsu. Judo was developed by Kano jigoro in
1882 to be an organised system of unarmed techniques, primarily leverage throws and holds, whose practitioners would enjoy good health and respect for others. Kano’s two guiding principles were maximum effect with minimum effort, and mutual aid or respect.
• Judogi: The costume worn by practitioners of judo. The jacket is made of heavy cotton so that it will not tear easily when grabbed. Many judo techniques, in simulation of real-life situations, call for grasping of the jacket. The pants come to just below the knee and there are no buttons or snaps on the uniform for safety sake. The belt is about nine feet long, with belt colour denoting the rank of the wearer. See judo belts.
• Judoka: A practitioner of the Japanese martial art of judo. • Kano jigoro : The founder of judo. Kano, 1860-1938, studied ju-jutsu and other
martial arts and decided to create an art based on ju-jutsu techniques but emphasising moral, intellectual, and physical education rather than the combat for which ju-jutsu was originally used by Japanese warrior.
• Kata gatame: In judo, the shoulder hold. • Katame no kata: A judo kata created by the founder of judo, Kano jigoro, and based
on ancient techniques. Katame no kata consists of 15 movements divided into 3 sets. The 1st set uses holding methods; the 2nd is strangleholds; and the 3rd set comprises locking techniques, four armlocks and one leglock.
• Kime no kata: A judo kata dating back to the 16th century. Also called shinken shobu no kata, the kata of real fighting. This advanced form contains moves with sword and dagger, and it is truly self-defensive in nature. It consists of 20 movements divided into two sets: idori, eight techniques performed from a kneeling position, and tachiai, twelve moves from a standing position.
• Kuzushi: In judo, the partner whose balance is broken.
• Mae ukemi: One of the four basic judo moves for breaking a fall. Mae ukemi, a front fall, is not used much in judo, because straight forward throwing, is forbidden.
• Migi jigotai : In judo, the right defensive stance, and a basic defensive posture. • Migi Shizentai: In judo, the left defensive stance. • Randori: In judo, free practice, in which students have the opportunity to use
throwing and holding techniques. Randori is not a contest in judo; there is no winner and no loser. In Aikido, Randori is also free-form exercise, in which a single aikidoka defends him or herself against any number of others. The defensive moves should be fluid and continuous, expressing the harmony (ai) by which ‘attacker’ and ‘attacked’ become partners.
• Osae komi waza: Judo holding techniques. See holds. • Shizen hontai: In judo, the basic natural stances. • Shoulder hold: A basic judo technique that can be used if the opponent manages to
free one arm after having been pinned. The elbow of his freed arm is pushed against the opponents throat in a choking movement.
• Takedown: Techniques in which, through a series of motions and observations, one is able to quickly and accurately bring a person to the ground and retain an advantageous position; one of the fundamentals of judo.
• Tsukuri : In judo, the positioning, or ‘making’, or the throw. Throws are divided into Tsukuri and Kake, which is the actual performance or application of the throw.
• Ukemi: In the Japanese martial arts, such as judo, that use throwing techniques, ukemi is the very important art of falling without being hurt. See breakfall.
• Ushiro ukemi: In judo, the backward breakfall. • Yoko ukemi: In judo, the sideward breakfall. • Zempo kaiten ukemi: In judo, the forward rolling breakfall, very similar to a
somersault. • Nage no kata: A judo kata created by Kano jigoro, the founder of the art. It contains
15 throws divided into five sets: 1. Te waza (hand techniques), 2. koshi waza (hip throws), 3. ashi waza (foot throws), 4. masutemi waza (backward sacrifice throws), and 5. Yoko sutemi waza (sacrifice throws to the side). A sacrifice throw is one in
which the thrower himself does the falling. • Eight directions of unbalance: The objective in judo is to throw the opponent in one
of the following eight directions: 1. straight ahead, 2. straight back, 3. to the left, 4. to the right, 5. to the left front, 6. to the right front, 7. to the left rear or 8. To the right rear.
• Styles • Jigoro Kano's Kodokan Judo (講武武) is the most widespread style of judo. A sub-
style of Kodokan Judo that developed in Japanese inter-scholastic competition is known as Kosen judo (高高柔武), with the same range of techniques but greater latitude permitted for Ne-waza (ground techniques).
• Sport • Although a fully-featured martial art, judo has also developed as a sport. Judo
became an Olympic sport for men in 1964 and, with the persistence of a woman by the name of Rusty Kanokogi, a sport for women as well in 1992. In the west, the sport aspect of judo probably is the most commonly taught. Men and women compete separately (although they often train together), and there are several weight divisions including an open-weight category which anyone may enter.
• The object in a judo-match is to throw your opponent to the ground so that he lands flat on his back. This will score an ippon (一一), a full point that wins the match. Anything else, such as landing your opponent on the hip or shoulder, will be waza-
ari (技技), yuko (技有) or koka (有効) (waza-ari being the highest of the 3, koka the lowest) or even no score. Technically speaking, a waza-ari is a half-point, two of which will earn the match. Yukos and kokas are not fractional points in that they do not accumulate to equal a waza-ari or ippon-- in fact a waza-ari beats any number of yukos and a yuko beats any number of kokas. Rather, they are used as tie-breakers if the match ends before an ippon is scored. At match end, if one player has scored a waza-ari and the other has not, the player with the waza-ari wins, but if they are equal in that regard (both with zero or one) yukos are used to break the tie. If they are also equal in yukos, kokas break the tie. Finally, if both players have identical scores, the match is resolved by the decision (majority vote) of the referee and two corner judges.
• After the throw occurs and is scored, combat may continue on the ground. Pinning an opponent, with both shoulders on the mat, for 25 seconds (20 if you previously scored a waza-ari, since two half-points will complete your whole) results in an ippon. An automatic ippon is also granted when one's opponent submits (which frequently occurs when choke holds are used). If there is no ippon or submission, the one with the most points wins. Groundfights are of relatively short duration in most high-level competition. The referee normally stops it when no clear progress is being made. Penalties may be given by the judges for being inactive during the match or using illegal techniques and fighting must be stopped if both of the participants are outside the designated area on the mat (tatami).
• In competition one judoka wears a blue suit while the other wears white. In some competitions the older system whereby one competitor wears a white sash and the other a blue sash remains in place. In both cases this does not indicate their rank, but is to enable the judges and spectators to tell the opponents apart during a fight. Points are also awarded to white or blue. Assistant judges on the corners of the mat also have a white and blue flag to indicate to which competitor a point should go when it is unclear who it should be awarded to.
• Sport and beyond. • Despite the literal meaning of the name judo, competition judo is one the roughest
and most demanding of sports. A World Championship or Olympic match lasts only 5 minutes, but will leave participants exhausted.
• Without the kicking and punching so common to other martial arts, judo is often portrayed as friendlier than, for instance, karate. Proponents believe this contributes to judo being underrated as a method of self-defense. For instance, while throws executed with proper breakfalls on soft mats can seem light and graceful, their more practical application on a hard surface (and potentially with greater intent to harm) could be very dangerous. Even in the controlled environments of a match or dojo training session, injuries can easily occur due to a lapse in focus or overzealous application of a technique.
• Grading • Judoka are ranked according to skill and knowledge of judo, that grade being
reflected in the color of his belt: There are two divisions of grades, the student grades (kyu, 級), and the master grades (dan, 段). In the west, the kyu colors run from white through yellow, orange, green, blue, and brown. Some European countries additionally use a red belt to signify a complete beginner. In Japan, all adult kyu grades wear either white or brown belts. All dan grades may wear the black belt; sixth- through eighth- dans may alternately wear a red-and-white belt, while those ranked ninth- dan and above may wear a solid red belt. Protocol provides for a double-width white belt to be worn by someone who achieves the twelfth-"dan" but so far no one has been promoted beyond the tenth-"dan." A women's belt has a white stripe at its center. Jigoro Kano was the inventor of the kyu - dan grading system, that soon got adapted by other martial arts such as karate.
• In most Western countries, grades up to the brown belt are awarded by the dojo where the student trains, while the first dan (black belt) is awarded after doing an exam supervised by independent judges of the national judo association. Second to fifth dan can be achieved by taking similar exams.
• Judo belts: The belt colours used in judo, in order of increasing rank are as follows: red, beginner; white, 6th kyu or grade; yellow, 5th kyu; orange, 4th kyu; green 3rd kyu; blue, 2nd kyu; and brown, 1st kyu. Black belt signifies instructors of the 1st upward to
5th Dan; 6th through 8th Dan wear a red and white belt; and 9th and 10th Dan wear red belts, signifying the completed cycle back to beginner. Kano jigoro, founder of judo, was 12th Dan and wore a white belt indicating that he had transcended the ranking system that he created.
• Judo ranks: Judo ranking comprises six beginning grades, or kyu, with 6th kyu being the lowest, and approximately ten senior ranks, or Dan, with 10th Dan being the highest. Kano jigoro was awarded the 12th Dan and the title shihan as a rank unique to the founder of the art.
1.8.13. Karate • Karate or karate-do (空散武) is a budo art, a martial art introduced to the Japanese main
islands from Okinawa in 1922. Karate emphasizes striking techniques (i.e. punching and kicking) over grappling. Karate training can be divided into three major parts, kihon, kumite and kata. Kihon (基一 組散) is the study of basic moves. Kumite ( ) means 'sparring' and develops from well defined forms to the free form. Kata (型) means 'forms' and is a fight against imaginary enemies, expressed as a fixed sequence of moves.
• Literally, empty hand. This art originally developed as a means of self-defence for the unarmed person. It consisted of a series of blocks and counterattacks. Now karate is also popular as a system of balanced exercise. It increases endurance, reflexes, agility, and co-ordination. The character Kara means either china or empty. Because much of the art consists of techniques brought from china to Okinawa, Japan and Korea, the word karate was originally translated as china hand. Today it is interpreted as empty hand to signify the unarmed, non-aggressive nature of the art and to stress the contributions of the non-Chinese nations that have adopted it.
• Karate-do: The way, do, of karate, or the way of the empty hand, Te. Refers to the full philosophical range of the art. It also refers to karate as a way of life.
• Kata: A set pattern of movements in which the martial artist defends himself against a series of imaginary opponents. These exercises develop imagination, timing, focus, balance, and co-ordination.
• Breaking techniques: Any action that has been mastered to such an extent that the practitioner can strike a solid surface, such as a board or brick, and break it without injuring himself. Both arm and leg movements can be used for breaking. The master Oyama Masutatsu introduced breaking to karate.
• Bogu kumite: A type of sparring introduced in tournament karate by onishi eizo, the Japanese koei-kan master. In this type of match, the contestants wear complete protective padding and strikes must be full contact. This method allows the excitement of contact karate without the danger.
• Batsai: Literally, breaking through the fortress. A karate kata that teaches, among other skills, the ability to respond quickly to an attack and to counter with rapid hand movements.
• Eagle hand: A karate technique similar to kung fu’s cranes beak. The fingertips are pressed together to form a birds beak, and a pecking action is used against vital points such as the throat.
• Empi: 1. A karate kata based on the Okinawan wanshu kata. This ‘flying swallow’ kata, as it is
sometimes known, has two forms, one longer and more intricate than the other is. 2. The Japanese word for elbow; for example, Empi Uchi means elbow strike..
• Fore-fist: The most commonly used fist in karate. The fore-fist, or seiken, is generally used for thrust punches. The striking surface is the area from the knuckle to just above the middle joint of the index and third fingers. The arm must form a straight line – a bent wrist not only detracts from the power of the blow but also may become sprained or broken.
• Full-contact karate: A fairly recent development in karate sparring, in which the participants wear protective hand and foot gear and are allowed to make full contact with each other. In classical sparring matches, pints are scored by merely touching the opponent with a properly executed strike. To distinguish this type of sparring from boxing, the contestants must throw a minimum of three kicks in each round.
• Funakoshi gichin: The founder of shotokan, one of the major types of karate practised today. Funakoshi, 1869-1957, introduced this form of unarmed combat from his native
Okinawa to Japan in 1922. He established the first karate school at a Japanese university and was chief instructor of the Japan karate association at its inception in 1955.
• Heian: A karate kata. Heian means safety and peace, and the kata is so named because if you can perform it properly, you will be able to protect yourself and so gain a feeling of safety and peace. There are five-Heian kata in all.
• Iron geta: Iron sandals or clogs, each weighing about five pounds. They are worn by the karate practitioner for development of the leg muscles.
• Jitte: The ten hands karate kata. This form, which is composed of 24 movements, is so named because it should enable the karateka who masters it to defend him against ten attackers simultaneously.
• Jiyu impon kumite: Japanese for freestyle sparring. • Kouh-shang-kouh: A karate kata of 65 moves, named for the Chinese military man
Kouh-shang-kouh. • Nakayama Masatoshi: Born in 1913 in Kanazawa, Japan, Nakayama trained under
Funakoshi gichin, originator of shotokan karate. In 1955, Nakayama was appointed chief instructor of the Japan karate association. He holds an eighth degree black belt.
• Oyama Masutatsu: A famous Korean master of kyokushinkai karate and author of many books on karate. Oyama attracted wide attention in 1953 when he fought a bull and snapped off one of its horns, which was 4 inches in diameter, at the root. Oyama’s main contribution to karate was the introduction of the breaking of solid objects such as boards and bricks. His spectacular demonstrations have done much to popularise the art of breaking.
• Ridge hand: Open hand technique in which the striking surface is the area from just below the base of the index finger to the first joint of the thumb. Ridge hand is used in much the same way as knife hand, to counter attacks and to strike at the temples, the ribs, or the side of the neck. This very powerful technique is used extensively in full-contact karate.
• Rohai: A karate kata, literally, crane standing on a rock. The name derives from the fact that several of the movements are performed in an one-legged stance. There are generally 42 moves in the Rohai kata, which is also known as gankaku.
• Sanchin: A breathing exercise of 20 movements used in Okinawan karate styles. Sanchin teaches you to tense the body almost instantaneously and to control breathing during intense combat.
• Smashing techniques: All moves in karate originated in sword fighting. A smashing motion was used to strike the opponent with the flat part of the sword. In unarmed arts, elbow strikes are usually smashing techniques.
• Sparring: The actual combat experienced in sparring gives the karate student the opportunity to apply his knowledge of the various techniques he had formerly executed by himself.
• Tekki (or tetki) : The iron horse karate kata. This kata is so named because many of the moves are executed in horse stance. There are three Tekki kata.
• Gedan: A term used in the Japanese martial arts to designate the lower area of the body; for example, Gedan zuki is a lower punch.
• Gi: The uniform used by practitioners of Japanese martial arts. Generally, the Gi consists of pants that reach about halfway to the ankle and a loose jacket tied with a sash, or belt. The colour of the belt denotes the rank of the wearer.
• Ippon ken zuki: Japanese for one-knuckle fist. • Jodan: A term used in the Japanese martial arts to designate the upper area of the body,
about the face; for example, Jodan uke means upper block. • Kama: Originally used as an agricultural tool for harvesting rice, the Kama, or sickle, has
a hardwood handle which widens at the end. The blade is short and crescent shaped. As a weapon, the Kama can be employed in chopping, hooking, blocking, and hacking. It is a single-handed weapon, which can be used in pairs.
• K’o shio t’au: Mandarin for karate-do, which are the Japanese and Okinawan forms of unarmed combat. Ko is equivalent to the Japanese Kara, meaning empty; shio (Te in Japanese) means hand; and t’ao (do) means way or path. The actual characters are the same in Japanese and Chinese.
• Nunchaku: Originally used as an agricultural tool, the Nunchaku developed as a weapon in Okinawa. It consists of two equal lengths of hardwood held together at the top by a

cord or chain. The pieces are about 12 to 15 inches in length and are identical. The Nunchaku can be used to block, parry, or to deliver smashing blows. It can be swung, usually in some sort of pattern, or thrust into the opponent. All parts of the Nunchaku can be used as a formidable weapon. The cord is used in choking, and by using the Nunchaku in a scissors fashion; one can effectively catch an opponents punch and break the wrist or arm.
• Tonfa: An Okinawan weapon that originally was a handle to turn a manually operated millstone. The Tonfa has a shaft of hardwood about 20 inches in length, with a grip attached about one fourth of the way down it. It was used as a weapon by being gripped at the handle, so that the shorter end extended out past the knuckles. The longer end swung out freely from under the arm and hit its target. Also known as tui-fa.
• History • Originally, karate was written as 唐散 ("Tang hand" from the Chinese Tang dynasty
or by extension, "Chinese hand") reflecting the Chinese influence on the style. The current way of writing means "empty hand" and karate-do thus "the way of the empty hand". Karate is most likely a mix of a Chinese fighting art brought to Okinawa by merchants and sailors from Fujian Province, with Okinawan martial art. The Okinawans called the style "te", hand. Early Okinawan styles of karate were Shuri-te, Naha-te and Tomari-te, named after the three cities in which they were formed.
• In 1820, Sokon Matsumura blended the three styles of te into "Shaolin" (Chinese 少少) or "Shorin-Ryu" (in Japanese) or "Forest Style" (English). However Matsumura's own students broke the style back down again into more branches and their students continued this break down adding or subtracting whatever suited them. Gichin Funakoshi, a student of one of Matsumura's students Anko Itosu, is said by some to have introduced and popularized karate on the main islands. However, there were many others.
• Funakoshi's karate came from Itosu's version of Matsumura Shorin-ryu, which is commonly called Shorei-ryu. Funakoshi's style of karate was later named Shotokan by others. He was responsible for changing the way of writing the name of the art; he did this to get karate accepted by the budo organisation Dai Nippon Butokukai. In a time of rising Japanese nationalism, it was important not to make karate look foreign as the old way of writing it implied.
• Funakoshi's main adversary was Choki Motobu. • Karate was popularized in Japan and introduced into high schools before World War
II . • Like most martial arts active in Japan, karate made its transition to karate-do at the
beginning of the 20th century. The "do" in "karate-do" means "way," which is analogous to the familiar Chinese concept of tao. As it was adopted into modern Japanese culture, karate was imbued with some elements of zen buddhism, and the practice of karate is sometimes called a form of "moving zen." Classes often begin and end with brief periods of meditation. Also, the repetition of movements, as in kata, is consistent with zen meditation in that it is intended to maximize a student's composure, awareness, and physical presence (speed and power), even while under stress. Karate teachers differ greatly in the way they acknowledge - if at all - the zen influence in karate-do.
• The modernization (and systemization) of karate in Japan also included the adoption of the ubiquitous white uniform (dogi or keikogi) mostly called just gi. Pronounced 'ghee. And colored belt ranks, both of which were originated and popularized by Jigoro Kano, the founder of judo. Photos of early Okinawan practitioners show the masters in the street clothes of the day, or sometimes in briefs.
• Styles • Within karate there are a multitude of different styles or schools. The most renowned
are Shaolin, Shobayashi, Kobayashi-ryu, Matsubayashi-ryu, Matsumura Seito and Matsumura Motobu. From these came the more popular styles we have today such as Chito-ryu, Shorinji-ryu (Kempo) and Shorei-ryu as well as Shotokan, Shotokai, Goju-ryu ("hard-soft way") and Kyokushin ("ultimate truth"). Other mainstream styles include Shorinjiryu, Seido, Wado-ryu ("way of peace"), Uechi Ryu, Shito-ryu, Shudokan, Bushido Goju-Ryu and Isshin-ryu(there are at least 3 different styles of isshinryu). Some styles of karate have teachers that have created hybrids of karate styles such as the JIKC style, which uses a combination of karate styles.
• The Shotokan style of karate is characterised by deep, long stances said to provide stability and powerful movements. At the other end of the spectrum, Wado Ryu prefers quick and subtle body movements (known as 'tai sabaki') to evade attacks and provide swift counter attacks. The Wado Ryu style was introduced to the West by Tatsuo Suzuki.
• In modern Japan, two main branches of Karate dominate. Traditional karate styles like Shotokan, Goju-ryu, Wado-ryu and Shito-ryu are so-called because they were founded at or before the turn of the 20th century. Full contact karate includes Kyokushin-kaikan which was founded by Masutatsu Oyama and other offshoots of Kyokushin, so-called because emphasis in matches is placed on the amount of damage done rather than the quality of technique displayed (although this is also important). Most full contact karate styles or organizations have developed from Kyokushin karate.
• Isshin-ryu: A karate style created in 1955 by Tatsuo shimabuku. Literally translates as the one-heart style. This form is a synthesis of several forms of Okinawan karate.
• Japan karate association: Founded in 1955, 32 years after Funakoshi gichin came from Okinawa to Japan to introduce empty-hand ‘karate’ combat. With Funakoshi as chief instructor, the association had only a few members when it first opened, and all the instructors had been students of Funakoshi. In 1958, the association was incorporated and the first all-Japan tournament held. The JKA today has more than 100000 members and about 300-karate clubs around the world.
• Kobayashi-ryu: One of the five main types of Okinawan karate. Its creator, Kobayashi, studied northern styles of kung fu in a Chinese monastery for many years.
• Wanshu: An Okinawan karate kata named for the Chinese martial arts master wanshu. Wanshu kata was created in shorin-ryu karate, but when it was adopted by the Japanese (through Funakoshi gichin), the name was changed to Empi, or flying swallow kata.
• Shoreiji-ryu : An Okinawan karate style based on southern Chinese boxing techniques.
• Shorin-ryu : A Very light and quick style of karate, with rapid motions to the front and back. The Heian katas, bassai, kanku, Empi, gankaku, and others belong to this system.
• Shotokan: One of the most popular styles of karate. Shotokan was created by the Okinawan master Funakoshi gichin, who introduced it to Japan in 1922, initiating the popularity of karate on a nation-wide basis there. The name shotokan comes from Funakoshi’s pen name, shoto, plus the word for house or hall, Kan. There are four basic techniques in shotokan: punching, striking, kicking, and blocking. Speed and power are fundamental and the stances generally have a broad base to allow for a full range in kicking.
• Shito ryu: An Okinawan karate style developed by kenwa mabuni, who was a fellow student with Funakoshi, founder of shotokan karate. The name Shito is derived from the two karate forms mastered by mabuni, itosu-ryu and to-one ryu. Shito-ryu has much in common with another popular Okinawan style, gojo-ryu.
• Mabuni kenwa: Creator of Shito ryu karate. Mabuni, an Okinawan, studied under the same master, itosu, as did Funakoshi gichin, creator of shotokan karate. In 1930, eight years after funakoshis success in introducing shotokan to Japan, mabuni brought his style to Osaka. The name Shito is derived from the two styles studied by mabuni, itosu-ryu and to-one-ryu.
• Kempo: This is the Japanese pronunciation of ch’uan fa, which in Chinese means way of the fist. Kempo is a form of Chinese karate, in which techniques are based on high-speed blocks and counterattacks, with much emphasis on individual self-defence tactics.
• Chinese karate: See Kempo. • Jodo-ryu: An Okinawan karate style based on a synthesis of northern and southern
Chinese boxing techniques. • Gankaku: A shorei-ryu karate form or kata. See Rohai. • Shorei-ryu: A school of karate characterised by slow, powerful movements;
development of great physical strength is stressed. Some of the major kata taught in
shorei-ryu are Tekki, hangetsu, and jion. The creator of this style, an Okinawan named shorei, studied martial arts at a monastery in southern china for many years.
• Yamaguchi gogen: The karate master nicknamed the cat, which founded Goju-ryu, one of the most important styles of karate. See also Goju-ryu.
• Butokukan: A relatively new and little known style of karate, created in 1961 by reichi keichi. Butokukan differs from most Japanese arts in its emphasis on speed and lightness rather than power. It also borrows concepts of circular movement found in Chinese and Korean arts. Emphasis is on practical self-defence techniques, as well as on the traditional teaching of form, kata, for competition.
• Goju-ryu : One of the four major karate styles developed from the Okinawan art of naha-te. Based on the yin-yang principle, Goju means hard/soft, this style teaches you to yield when the attacker is ‘hard’ and attack when he is ‘soft’. Goju-ryu was developed by Yamaguchi gogen, nicknamed the cat. Yamaguchi studied martial arts all over china for many years and he incorporated into Goju-ryu much of what he learned there.
• Miyagi ghogyun: When Funakoshi gichin left Okinawa to introduce martial arts to Japan, Miyagi assumed leadership of the karate movement on Okinawa. He is the founder of Goju-ryu karate.
• Goju-Shiho: The 54 steps kata of shuri-te karate, an Okinawan style. Traditionally believed to be based on the moves of the mythical bird, the phoenix.
• Karate in the west • Karate, like jujutsu and judo, most likely came to America and then to the rest of the
world through two primary paths: Japanese immigrants to Hawaii and the mainland, where it stayed largely inside the Japanese American community, although to a lesser degree in Hawaii, and by specialized study by members of the police and the military. It would be accurate to say that the biggest boost to the popularization of karate in America came with the American military occupation of Japan after World War II; once American soldiers had assimilated the discipline, they returned with it to the States and began to disseminate it. Many masters went to the United States to popularize their art. These included Tsutomu Ohshima, a student of Gichin Funakoshi, who founded Shotokan Karate of America (SKA).
• Karate as a sport • Karate may also be practiced as a competitive sport, although unlike other martial
arts such as taekwondo or judo it does not possess Olympic status, because there is no head organisation for Karate as whole and no uniform rules among all styles. Competition can be in either kumite or kata; competitors may enter either as individuals or as part of a team.
• In kata, points are awarded by five seated judges, according to the quality of the performance, in a manner analogous to gymnastics or ice skating tournaments. A good kata performance must perform all the movements correctly but also show a personal interpretation of the movements through one's variation in speed. When kata is performed as a team (usually of three), it is also important to match the timing of techniques as closely as possible.
• In kumite there are two fighters paired in a timed fight, usually ranging from two to five minutes. Scores are awarded either by technique or location. Allowed techniques and hitting locations vary from style to style. Further, kumite can be either half-contact (as in Shotokan) or full contact (as in Kyokushinkai).
• In the United States, karate tournaments are a popular part of the sport, ranging in size from small local gatherings to national events. They are typically divided into classes by skill, age and event type (kata, kumite and weapons-kata), and have rules depending on location and the chief style(s) involved.
1.8.14. Kenpo • Kenpo or Kempo (工拳; lit. fighting method) is a category of mixed martial arts that have
a basis in Karate, that incorporates Shaolin Kung Fu and/or Kickboxing to make the art more technically complete. In Japanese Kempo has a long history. Kempo itself is a Japanese word that it the trans lation of the Chinese "fist law." In the west, all Kempo styles (know by their use of the black uniform),can trace their lineage to James Mitose, a Hawaiian born Japanese who taught several students in the late 1930s and early 1940s.
• It is believed that Kempo follows much of the same path Kung Fu takes, but in order to shorten the amount of time to train a person, methods from Karate were used as the basis to quickly allow a person to learn the basics, and techniques. As it often takes 10 to 20 years of continuous effort to master one form of kung fu, Kempo practitioners often can be black belted in around 3 to 5 years, depending on the instructor.
• Normal Karate usually focuses on linear attacks and blocks, or straight moves, with power being more important than learning separate techniques. Kempo emphasizes more circular moves, such as the hook, or the uppercut as main attack methods. Kempo has more grappling moves, and throws than Karate. Both Karate and Kempo use katas, but Kempo katas tend to have more techniques to them, with an emphasis on multiple hits.
• Kempo draws some stances and training techniques from Kung Fu, but changed them to shorten training time. Where some Kung Fu beginning artists can expect to hold stances for an hour or so, Kempo beginners tend to require less time in holding the stances, usually between one to fifteen minutes. Whereas some Kung Fu practitioners use methods like pushing rocks, Kempo uses modern calisthenic techniques like push ups to build up strength.
1.8.15. Kenjutsu • Kenjutsu (Japanese: 剣棒) is a classical Japanese martial art, a koryu budo. There are
many different schools, with the objective to teach efficient use of the Japanese sword in combat.
• The practice is largely done in the form of kata, and also by actual cutting and thrusting of the blade against water-soaked rolled mats and bamboo poles. The practice tool is either bokken (wooden sword) or shinken (real swords such as katana, tachi, etc.).
• Some ancient sword schools still exist, such as Tenshin Shoden Katori Shinto-ryu, Kashima Shinto-ryu, Kashima Shin-ryu, Hyoho Niten Ichi-ryu. As in other koryu arts, belt colour is not used to show the practitioner's ability. Instead of grades, licences such as menkyo kaiden are given.
• Modern budo arts derived from traditional sword work are kendo and iaido. • Kenjutsu: The art of Japanese swordsmanship. Kenjutsu differs from modern kendo in
that the bare sword blade, rather than the bamboo fencing foil of kendo, is actually used. The samurai combat art of kenjutsu has been refined and developed into the modern sport of kendo.
• Bokken: A solid wooden sword used in Japanese arts. The Bokken first became popular as a combat weapon during the Ashikaga period, 15th century AD. It is surprisingly dangerous and can even deliver fatal blows. Thus, as swordsmanship evolved from a battle art to a sport form, the Bokken was largely replaced by the sectioned bamboo fencing foil, the shinai.
1.8.16. Kobudo • In 1609, the Satsuma samurai clan attacked and swept the Okinawan defenses. The
islanders used turtle-shields and short-strabbing daggers, but they were of very little use against horse-backed, sword-carrying samurai or bows. The only instruments the farmers had were their simple farmingtools. The unique martial arts of Okinawan karate and kobudo were born from this background. Over long years, the techniques of Chinese and South East Asian martial arts were incorporated into Okinawa Karate and Kobudo to establish the forms known today. The Chinese methods were a combination of techniques with empty hands and with weapons like the San-Ku-Chu.
1.8.17. Kyudo • Kyudo (弓武) (The "Way of the Bow") is the Japanese art of archery. It is a modern
Japanese martial art (a gendai budo). • In Japan, by most accounts, the number of female kyudo practitioners is at least equal to
and probably greater than the number of male practitioners. • Ogasawara-ryu: A school of Kyudo developed in the 14th century by Ogasawara
nagahide. This style teaches the etiquette as well as the actual techniques of archery. Most of the forms were designed for mounted archers.
• Yagamae: In Kyudo, Japanese archery, the general posture of the archer and the way in which the bow is held before being drawn. The archer’s stance reflects his state of mind, which should be calm, confident, and awesome to the enemy.
• Heki-ryu : A style of Kyudo developed in the late 11th century. Heki-ryu was designed for the foot soldier, as opposed to the older Ogasawara style, with its techniques for the
mounted archer. Heki-ryu stresses the practical aspects of the art more than it does the spiritual and ritual elements.
• Purpose of kyudo: In its most pure form, kyudo is practiced as an art and as a means of moral and spiritual development. Many archers practice kyudo as a sport, with marksmanship being paramount.
• Equipment: • The yumi (Japanese bow) is exceptionally tall (standing over two meters), surpassing
the height of the archer (kyudoka). Yumi are traditionally made of bamboo, wood and leather using techniques which have not changed for centuries, although some archers (particularly, those new to the art) may use synthetic (i.e. laminated wood coated with glassfiber or carbon fiber) yumi.
• Ya (矢, arrow) shafts were traditionally made of bamboo, with either eagle or hawk feathers. Most ya shafts today are still made of bamboo (although some archers will use shafts made of aluminum or carbon fibers), and ya feathers are now obtained from non-endangered birds such as turkeys or swans. Every ya has a gender (male ya are called haya; female ya, otoya); being made from feathers from alternate sides of the bird, the haya spins clockwise upon release while the otoya spins counter-clockwise. Kyudo archers usually shoot two ya per round, with the haya being shot first.
• The kyudo archer wears a glove on the right hand called a yugake. The yugake is typically made of deerskin with a hardened thumb containing a groove at the base used to pull the string (tsuru).
• The kyudo archer will typically begin a practice session by shooting at a straw target (makiwara) at very close range (about seven feet, or the length of the archer's strung yumi when held horizontally from the centerline of his body). Because the target is so close and the shot most certainly will hit, the archer can concentrate on refining his technique rather than on worrying about where the arrow will go. After warming up, the archer may then move on to longer distances; shooting at a target called a mato. Mato sizes and shooting distances vary, but most matos typically measure thirty-six centimeters (or 12 sun, a traditional Japanese measurement equivalent to approximately 3.03cm) in diameter and are shot at from a distance of twenty-eight meters.
• Kyudo technique • All kyudo archers shoot right-handed, so that all archers face the teacher (sensei)
while shooting. • Unlike occidental archers (who draw the bow never further than the cheek bone),
kyudo archers draw the bow so that the drawing hand ends up behind the ear. If done improperly, upon release the string may strike the archer's ear or side of the face.
• Immediately after the shot is released, the bow will (for a practised archer) spin in the hand so that the string touches the archer's outer forearm. This technique (which is strived for as it illustrates the archer's skill) is called yugaeri and is unique to oriental archery.
• Kyudo technique is meticulously prescribed. The Zen Nihon Kyudo Renmei (ZNKR, All Japan Kyudo Federation), the main governing body of kyudo in Japan, have codified the hassetsu (or 'eight stages of shooting') in the Kyudo Kyohon (Kyudo Manual). The eight stages of shooting defined by the ZNKR are: ashibumi (placing the feet), dozukuri (forming the body), yugamae (readying the bow), uchiokoshi (raising the bow), hikiwake (drawing apart), kai (the full draw), hanare (the release), and zanshin (remaining body / mind, the retention of focus after the release).
• The way of the bow. Archery was a major part of ancient Japanese warfare, and kyujutsu was developed as a means to perfect combat techniques with bow and arrow. Kyudo of today retains the rituals of the samurai, but the emphasis is on spiritual awareness, on becoming one with the bow, arrow, and target. Two arrows are fired simultaneously from a sectioned bamboo bow about seven feet long. The grip is about two feet from the bottom of the bow, rather than in the middle, and arrows are shot from the right side. Arrows are made of bamboo also and for an average bow are about a yard long. The six stages of firing an arrow in Kyudo are tsurugami, monomi, uchi-okoshi hikitori, daisan, jiman, and hanare.
1. Tsurugami: In Kyudo, nocking and gripping of the bowstring, the 1st of the six stages of firing an arrow.
2. Monomi: In Kyudo, the phase of viewing the target, the 2nd of the six stages of firing the arrow. Monomi is preceded by tsurugami, or fitting the arrow to the bowstring.
3. Uchi-okoshi hikitori: In Kyudo, the raising and drawing of the bow. This is the 3rd in a series of six movements for firing an arrow. Drawing the bow is divided into three steps: uchi-okoshi hikitori is followed by daisan, in which the draw is completed. Then by jiman, this is the holding of the bow in full draw in preparation for release of the arrow.
4. Daisan: In Kyudo, there are six stages in firing the arrow. Uchi-okoshi hikitori is the 4th, the raising and preliminary drawing of the bow; ‘in disdain one completes the draw’.
5. Jiman: The 5th of 6 stages of firing an arrow in Kyudo. Jiman is the holding of the fully drawn bow in preparation for hanare, the release of the arrow.
6. Hanare: The 6th and final stage of firing an arrow in Kyudo. Hanare is the actual release of the arrow.
• Kyudo rankings: • Using a system typical of most modern martial arts, most Kyudo schools periodically
sponsor tests, which, if the archer passes, results in the issuance of a ranking, or dan (for example, a black belt of a certain degree). At least one school, however, does not rank students, but only recognizes the achievement of instructor status using the older menkyo (license) system of koryu budo. .
1.8.18. Naginata-do • Naginatajutsu (なななな棒 宋刀棒 薙刀棒, or ) is the art of fighting with a Japanese naginata,
a weapon resembling the medieval European glaive. Most naginata practice today is in a modernized form, a gendai budo called naginata-do or atarashii naginata (new naginata), in which competitions also are held.
• Many koryū ryūha (for example the famous Katori Shinto-ryu) include naginatajutsu in their curriculum.
• The way of the Naginata, the curve-bladed spear. Naginata-do is closely related to kendo. The practice spear is similar to the kendo shinai. The armour is the same, with the addition of shingaurds; the target areas are the same, with the addition of the shins (hence the shingaurds), and the rules governing a proper strike in the contest are the same. The sport Naginata-do developed out of Naginata-jutsu, the combat art, when the Naginata was replaced by the straight spear on the battlefield. Women of the warrior class continued to use the Naginata for self-protection, and eventually Naginata-do became primarily a woman’s art.
• Ha-keshi: In Naginata-do, the technique of whirling the spear, Naginata, quickly and with great force.
• Atarashi-naginata: Literally, a new style of Naginata. This is the form of Naginata generally recognised by the all Japan Naginata-do federation. It is more sportive than combative, and the keiko-naginata, or bamboo foil, is used. See Naginata-do.
• Nagemaki: An ancient variation of the Naginata, or curve-bladed spear. The Nagemaki differs from the Naginata in that its blade is longer and heavier than the shaft.
• Naginata: A curve-bladed spear developed in medieval Japan. The Naginata consists of a blade about three feet long and a shaft of slightly more than four feet with an iron butt at the base. As the Naginata was replaced in warfare by the yari, or straight spear, Naginata-do (the way of the spear) became the province of bushi women, who kept the spear at home to protect themselves.
1.8.19. Ninjutsu (Ninjitsu, Ninpo) • This article is about the Japanese espionage martial arts and techniques known as
ninjutsu. Ninjutsu is frequently depicted fancifully in fiction; for these depictions, see the article on ninja.
• Ninjutsu (忍棒), also called shinobi-jutsu (忍び棒), is a collection of techniques originally practiced for espionage purposes. It includes methods of spying, confusing enemies, and gathering information. Ninjutsu can also involve training in disguise, escape, concealment, geography, meteorology, medicine, and explosives. Practitioners of ninjutsu have in the past been seen, at least in legend, as assassins for hire, and have been associated in the public imagination with other activities which are considered criminal
by modern standards. Even though it was influenced by Chinese spying techniques, ninjutsu is believed by its adherents to be of Japanese origin.
• It is properly distinguished from ninpō (忍拳) which has its roots in Shintoism and is concerned more with the realms of the mind (noosphere) and spirit.
• Originally called shinobi or shinobi-jutsu, these are the techniques practised by the ninja. A few of the major ninjutsu arts were as follows: shichi-ho-de, the art of disguise (literally, the seven ways of going); Yoko aruki, or ‘sideways walking’; goton-no-jutsu, five escaping techniques; and horoshijutsu, the art of using fire.
• Shinobi shozoku: The costume worn by the ninja. It consisted of a jacket, a hood, and fitted pants that were tightly tied at the knee and ankle to allow for great mobility. The clothing was reversible, with red or black outside and dark blue, green or white inside. The shoes were lightweight and split at the toe, designed for silence and grip.
• Shinobi-jutsu: The original term for ninjutsu, the art of stealing-in. shinobi means to steal in, and jutsu means technique or art.
• Shinobi: Literally, this word means to steal in. the warrior otomo-no-saijin was awarded this name for his espionage work for Prince Shotoku Taishi during a war that took place between 593-628 AD. The word ninjutsu is derived from shinobi, and in fact, the original word for ninjutsu was shinobi or shinobi-jutsu.
• Ninja : Literally, the stealers-in. ninja were the assassins and military spies of Japan. The art of the ninja originated during the reign of the empress suiko (593-628 AD) and the last time that ninja were used officially was during world war “. The ninja were skilled in many esoteric arts. They were trained from early childhood in arts of disguise, camouflage, stealth, physical endurance, armed and unarmed combat, and survival in even the most barren terrain. There were three ranks of ninja – the jonin, chunin, and genin, the genin being the lowest. The most famous groups of ninja were from the remote Iga and Koga areas of Japan. The shuriken, a sharp-bladed instrument that comes in a variety of shapes, was the preferred weapon of most ninja, although all were required to be proficient with at least three weapons.
• Goton no jutsu: The five escaping techniques of the ninja. These are 1. escape using trees and grasses; 2. using fire; 3. using ground, walls, and stones for hiding; 4. using metal objects for distracting; and 5. Escapes by water. Each of these general categories contained a number of specific
and usually highly secret techniques. An example of using ground for hiding is standing motionless in a field, often for great lengths of time, pretending to be a scarecrow.
• Shichi-ho-de: The seven ways of going. One of the skills of the ninja, this was the art of disguise. The seven characters that the ninja learned to impersonate were a travelling actor, an itinerant priest, a mountain priest, and a Buddhist priest, a travelling entertainer, a farmer, and a merchant.
• Shinso toho no jutsu: One of the more acrobatic of the ninja techniques, this consists of walking on ones hands in order to avoid tripping over anything in the darkness. This translates literally as way of the rabbit in deep grass.
• Yoko aruki : One of the secret ninja walking techniques, Yoko aruki means sideways walking. It is a means of walking whereby footprints do not reveal the direction of the traveller, and one can walk quietly through woods or narrow areas.
• Shuriken: One of the preferred weapons of the ninja. The shuriken is a sharp-pointed, star shaped weapon that comes in many varieties. It is thrown in a disk like manner, with accuracy to about 30 feet. This weapon is also a handy tool for digging and scraping.
• Jonin: The highest rank of the three types of ninja. The jonin was the entrepreneur; it was with him that the individual would contract for the services of a group of ninja. In this group would be the chunin, the leader, and the genin, who actually performed the assignment. See ninja and genin.
• Chunin: The second highest of the three military ranks of ninja. The chunin would lead the group of ninja on assignment. Those whom he led were the despised genin, and the ninja who obtained the assignment was called the jonin.
• Genin: The lowest rank of the three types of ninja. The genin actually performed the assignment, led by the chunin. The genin were considered the lowest class in Japanese
society, and when captured they were frequently tortured before being killed. See also ninja and chunin.
• Koga: An area of Japan famous in medieval times for its ninja. The secrets of the ninjas art were well guarded in this remote region.
• Iga: An area of Japan famous in medieval times for its ninja. The secrets of the ninjas art were well guarded in this remote region.
• Kuro hagi: The name given to the famous group of ninja of the rizuken clan from Sendai in Japan. Literally, the name means black calves.
• Nozaru: The name given to a famous group of ninja of the koshu clan from Yamanashi in medieval Japan. Literally, the Nozaru were the mountain monkeys.
• Rappa: The name given to a famous group of ninja of the joshu clan from Tochigi in medieval Japan. Literally, Rappa means dishevelled waves.
• Suppa: The name given to a famous group of ninja of the shinshu clan from the Nagano region of medieval Japan. Literally, the crystal waves.
• Although the popular view is that ninjutsu is the art of secrecy or stealth, actual practitioners consider it to mean the art of enduring - enduring all of life's hardships. The character nin carries both these meanings.
• A sample curriculum of a ninjutsu school: 1. Seishin-teki kyōyō (spiritual refinement) 2. Taijutsu (unarmed combat) 3. Ninja ken (sword fighting) 4. Bōjutsu (stick and staff fighting) 5. Shurikenjutsu (throwing blades) 6. Sōjutsu (spear fighting) 7. Naginatajutsu (halberd fighting) 8. Kusarigama (chain and sickle weapon) 9. Kayakujutsu (fire and explosives) 10. Hensūjutsu (disguise and impersonation) 11. Shinobi-iri (stealth and entering methods) 12. Bajutsu (horsemanship) 13. Sui-ren (training in water) 14. Bōryaku (military strategy) 15. Chōhō (espionage) 16. Intonjutsu (escaping and concealment) 17. Tenmon (meteorology) 18. Chi-mon (geography)
• Schools of ninjutsu • The Bujinkan Dōjō headed by Masaaki Hatsumi is one of three organisations
generally accepted as teaching ninjutsu. Hatsumi's Bujinkan D?consists of nine separate schools of traditional Japanese martial arts, several of which contain ninjutsu teachings.
• There are two other organisations teaching similar martial arts. These are the Genbukan headed by Shoto Tanemura, ex-student of Hatsumi, and the Jinenkan headed by Fumio Manaka, also ex-student of Hatsumi.
• Other extant traditional martial arts such as the Katori Shintō-ryū contain some aspects of ninjutsu in their curriculum, but are not ninjutsu schools per se.
• The espionage techniques and the like of ninjutsu are rarely focused on these days, since they are strongly bound with the circumstances and culture of feudal Japan.
• Several other schools of Ninjutsu exist, some of which can be traced back to legitimate Japanese origins. Stephen K. Hayes studied under Masaaki Hatsumi but teaches an americanized system, To-Shin Do, in his Quest Centers.
• In Israel, one of the first places where Bujinkan ninjutsu was practiced outside Japan, the A.K.B.A.N organization uses the Bujinkan curriculum at the way it was used when Doron Navon, the first foreign Bujinkan shihan, practiced under Hatsumi sensei.
• However, there are several persons and organizations claiming to teach "ninjutsu" whose validity and lineage have come under question. Such arts may still be "effective," but many hold that they should not accurately be named ninjutsu.
• For example, Ashida Kim is an American who claims the specifics concerning his teacher (whom he calls Shendai) must remain secret. Another self-proclaimed grandmaster whose authenticity is questioned is Frank Dux.
• Other schools, which may or may not directly relate to the genuine Japanese ninja traditions, have different paths. For example, the Temple of the Full Autumn Moon, which teaches Saito Ninjitsu (and defines ninjitsu as something very similar but different from ninjutsu), follows the Wu Shan Fa or "Five Mountain Path of the True Warrior Spirit" (a Chinese name).
• It should also be noted that some historians do not believe that any true ninjutsu ryūha exist today, but not all agree with this view. ..
1.8.20. Shintaido • Shintaido is a body movement art emerged from a research on martial arts and
contemporary visual and performing arts, led by Master Aoki in the 1960s. 1.8.21. Shorinji kempo • Shorinji kempo (少少少工拳) is a martial art form of Kempo was invented by Doshin So
(宗武道 , 1911-1980) in 1947, who incorporated Japanese Zen Buddhism into the fighting style. This form of Kempo literally can be both a religion and a fighting form at the same time much like Shaolin Kung Fu from which it borrows part of its "brand name". It could be seen as a combination of Karate, Judo, Aikido built on Kung Fu framework, except that this art has no killing moves because of its respect for life. It is a form of Kempo that tries to get its practitioners to move through life doing minimal damage whenever possible.
• Three objectives form the basis of its study: • self-defense • spiritual development • better health
• A set of principles guides the practitioner in study. The true meaning (which goes deeper than their "obvious" and quite trivial one) comes with time and practice to become the student's life principles. Among those are "Love and Strength Stand Together" and "Body and Mind are the Same".
• Shorinji Kempo's training emphasizes cooperation and is almost exempt of the bias that competition brings - turning martial arts into sports. Shorinji Kempo competition relies on paired demonstrations called embu where the accuracy, the rhythm, and the realism are noted and compared (with something like "technical" and "artistic" marks, as in gymnastics or ice skating).
• Shorinji Kempo has grown into a popular artform in Japan, US and some European and Asian countries.
1.8.22. Shooto • Shooto both a Mixed Martial Arts Organization in Japan known for it's fighters under 155
pounds, and a style practiced by those who compete in the organization. 1.8.23. Sumo • Sumo (相相 Sumō), or sumo wrestling, is today a competition contact sport wherein two
wrestlers or rikishi face off in a circular area. The sport is of Japanese origin and is surrounded with many rituals. The Japanese consider sumo a gendai budō: a modern Japanese martial art.
• A Japanese wrestling style invented during the Heian period of 974-1140 AD. The contestants, large men trained since early youth, try to push each other to the ground or out of the ring. Some of the throwing techniques are similar to those of judo.
• Ashi-tori : A technique used in sumo contest to bring down the opponent. You simply grab one of the opponents legs ‘ashi’ and hold on to it as he hops around the ring and eventually falls down, thus losing the match.
• Dohyo: The fighting ring in sumo matches. It is about 10 feet in diameter, covered with smooth dirt, and surrounded by bags of straw.
• Dohyo-iri : The formal entrance parade of the contestants in a sumo tournament. Dohyo-iri takes place on every day of the fifteen-day tournament and is a highly ornamental and ritualistic event.
• Gyoji : The referee at a sumo match. The Gyoji wears the traditional samurai kimono and an official hat of the royal court. There are also five judges outside the ring.
• Hataki-komi : A sumo technique used when the contestant senses that the opponent is ready to come in for the kill. By merely stepping aside and slapping the opponent on the back as he goes out of the ring on his own power, the match can be won in about one second.
• Kesho-mawashi: The embroidered ceremonial aprons worn by sumo wrestlers for the Dohyo-iri, or entrance parade to the tournament. These highly ornamented aprons can cost as much as $2000.
• Ketaguri : A sumo technique in which the opponents legs are kicked out from under him as he approaches. The opponent hits the ground and thus loses the match. A contest in which ketaguri is used successfully lasts about one second.
• Kimari-te : The 68 techniques by which a sumo match can be won. A contest is won either if the opponent is pushed from the ring or if any part of the body above and including the knee touches the ground.
• Komusibi: Second to the lowest rank, of five ranks, in a sumo tournament. Komusubi is the junior champion, second class.
• Mae-gashira: The lowest rank of contestant in a sumo tournament, literally, ‘before the head’.
• Ozeki: 1) the champion rank in a sumo tournament 2) the three contestants in this rank. The Ozeki are not the highest level contestants; there is also yokozuna, or grand champion rank.
• Sekiwake: 3rd place rank of five ranks, in a sumo tournament. Sekiwake is the junior champion, first class level.
• Shikirinaoshi: A preliminary ritual in sumo tournaments, in which the contestants scatter salt in the ring as act of purification, size up one another, and decide on their strategy for the match.
• Tsuppari: A sumo technique used to push the opponent out of the ring by a series of very hard slaps. Properly executed, Tsuppari can end a match in one or two seconds. Most sumo matches last about ten seconds.
• Yokozuna: The grand champion rank of a sumo tournament, the highest of the five ranks. • The sumo tradition is very ancient, and even today the sport includes many ritual
elements from when sumo was used in the Shinto religion. • Winning a sumo bout
• The criteria for winning are fairly straightforward: • The first wrestler to touch the ground with any other part of his body than his
feet will lose. • The first wrestler to touch outside the circle will lose. • A wrestler who uses an illegal technique or kinjite loses. • The mawashi becoming completely undone will also result in a loss. • A wrestler may be declared shini-tai ("dead body"), where he loses regardless of
the above rules because he was in an impossible position from which to fight. This rule is very rarely invoked.
• Matches usually last only seconds, as one wrestler is quickly ousted from the circle or thrown to the clay. Each match is preceded by an elaborate ceremonial ritual. The sportsmen themselves are renowned for their great girth, as body mass is a factor in sumo.
• The wrestling ring or dohyo: Sumo matches take place in a ring called a dohyō. The dohyō is made of a mixture of clay and sand spread over the top. It is between 34 and 60 cm high. The circle in which the match takes place is 4.55 meters in diameter and bounded by rice-straw bales called tawara, which are buried in the clay. At the center are two white lines, the shikiri-sen, which the rikishi must position themselves behind at the start of the bout. Around the ring is finely brushed sand called the snake's eye, which can be used to determine if a wrestler has just touched his foot, or other part of his body, outside the ring. The yobidashi ensure it is clean of any previous marks immediately prior to each bout.
• Origins of sumo • Like many forms of wrestling around the world, the roots of sumo are lost in
prehistory. Sumo is mentioned in some of the earliest texts in Japan, from the 8th century A.D. However, these early forms would not be sumo as it is known today, as
in many cases the wrestling had relatively few rules and unarmed fights to the death were still referred to 'sumo'.
• In addition to its use as a trial of strength in combat, it has also been associated with Shinto ritual, and even today certain shines carry out forms of ritual dance where a human ceremonially wrestlers with a kami (a shinto 'spirit' or 'god').
• Over the rest of Japanese recorded history Sumo's popularity has changed according to the whims of its rulers and the need for its use as a training tool in periods of civil strife. The form of wrestling combat probably changed gradually into one where the main aim in victory was to throw your opponent. The concept of pushing him out of a limited defined arena came later.
• It is believed that a ring, defined by more than the area given to the wrestlers by spectators, came into being in the 16th century as a result of a tournament organised by the then principal warlord in Japan Oda Nobunaga, but at this point wrestlers would wear loose loincloths, rather than the much stiffer mawashi of today. Much of the rest of the development came in the early Edo period to give the sport in its current form.
• Professional sumo • Professional sumo can trace its roots back to the Edo Period in Japan as a form of
sporting entertainment. The original wrestlers were probably samurai, often ronin, who needed to find an alternative form of income.
• Currently professional sumo is organised by the Japan Sumo Association. The members of the association, called oyakata, are all former wrestlers, and are the only people entitled to train new wrestlers. All practising wrestlers are members of a training stable run by one of the oyakata, who is the stablemaster for the wrestlers under him. Currently there are around 50 training stables for about 700 wrestlers.
• Sumo wrestling is a strict hierarchy based on sporting merit. The wrestlers are ranked according to a system that dates back hundreds of years, to the Edo period. Wrestlers are promoted or demoted according to their previous performance and a Banzuke listing the full hierarchy is published two weeks prior to each sumo tournament.
• There are six divisions in Sumo: Makuuchi, Juryo, Makushita, Sandanme, Jonidan and Jonokuchi. Wrestlers enter sumo in the lowest Jonokuchi division and, ability permitting, work their way up to the top Makuuchi division. Only wrestlers in the top two divisions are salaried, and they are called sekitori (to have taken the barrier). Wrestlers in the lower divisions are regarded as being in training and receive a subsistence allowance, in return for which they must perform various chores in their training stable.
• The topmost makuuchi division has a number of ranks within it. The majority of wrestlers are Maegashira and are numbered from one (at the top) down to about sixteen or seventeen. Each rank is further subdivided into East and West, with east being slightly more prestigious. Thus maegashira two east is ranked below maegashira one west and above maegashira two west. Above the Maegashira are the champion or titleholder ranks, called the Sanyaku. These are, in ascending order, Komusubi, Sekiwake, Ozeki and, at the pinnacle of the ranking system, Yokozuna.
• Yokozuna, or grand champions, are wrestlers who generally are regularly in competition to win the top division tournament title near the end of a tournament. As such the promotion criteria are very strict. In general, a Ozeki must win for two consecutive tournaments (or an equivalent performance) to be promoted. More details of the criteria can be found in the article on Yokozuna.
• It is a rank held at the moment by only one man, Asashoryu. Other recent yokozuna include Akebono, Musashimaru and Takanohana, who retired in January 2003. In the previous decade, Yokozuna Chiyonofuji retired after winning an astonishing 31 tournaments. That's nearly as many as Akebono and Takanohana won together. Once a wrestler has been promoted to Yokozuna, he can never again be subject to demotion and is expected to retire on his own initiative if he cannot perform to Yokozuna standards.
• There are also special promotion criteria for Ozeki. Usually at least 33 wins are required over three tournaments as a Sekiwake/Komusubi with special attention paid to the most recent tournament record.

• All Sumo wrestlers take wrestling names called shikona (しし名), which may or may not be related to their real names. Often wrestlers have little choice in their name, which is given to them by their trainer (or stablemaster), or by a supporter or family member who encouraged them into the sport. For more information, see Japanese name.
• Professional Sumo is practiced exclusively in Japan, where it originated, but wrestlers of other nationalities participate. The first foreigner to win the top division championship was Takamiyama in the 1970s. He was followed by Konishiki who won the top division title on three occasions, and reached the rank of Ozeki. In 1993 Akebono became the first foreign born yokozuna. These three former wrestlers were all born in Hawaii. Former Yokozuna Musashimaru was the second foreigner to reach sumo's top rank and was born in Samoa. The current yokozuna Asashoryu is Mongolian and is presently (in 2004) the dominant force in the sport. Asashoryu heads a small group of Mongolian wrestlers who have achieved Sekitori status. Furthermore, recently wrestlers from Korea and several former Soviet and Soviet bloc countries have also found success in the upper levels of Sumo.
• Approximately once a year the top ranked wrestlers visit a foreign country to give a display competition. Such display competitions are also regularly held in Japan. None of these displays are taken into account in determining a wrestler's future rank. Rank is determined only by performance in Grand Sumo Tournaments. For 2005, the Sumo association will be making such a display in Las Vegas in early October.
• Professional sumo tournaments • There are six grand sumo tournaments each year: three in Tokyo, and one each in
Osaka, Nagoya and Fukuoka. Tournaments are held every other month. Each tournament begins on a Sunday and runs for 15 days, ending also on a Sunday. Each sekitori ranked wrestler has one match per day, while the lower ranked rikishi compete in seven bouts, approximately one every two days.
• Each day is structured such that the highest-ranked contestants are matched up at the end of the day. Thus wrestling will start in the morning with the Jonokuchi wrestlers, and finish about six o'clock in the evening with bouts involving the Yokozuna. The wrestler who wins the most matches over the fifteen days wins the tournament championship. If two rikishi are tied for the top, they wrestle each other and the winner takes the title. Three-way ties for the top position are rare, at least in the top Makuuchi division. In these cases the three wrestle each other in pairs with the first to win two in a row taking the tournament. More complex systems for championship playoffs involving four or more rikishi also exist, but these are usually only seen in determining the winner of one of the lower divisions.
• For a makuuchi rikishi he will arrive at the stadium in the afternoon and enter the changing room. There are 'East' and 'West' rooms so competing wrestlers do not meet their opponent of the day prior to the match. He will change first into his kesho-mawashi, an ornate, embroidered silk 'apron', which he will wear during the ring entering ceremony, or dohyo-iri. There are four dohyo-iri on each day, two for Juryo and two for Makuuchi ranked wrestlers. In each case there is one for those in the east changing room and one for those in the west. During the ceremony the rikishi are introduced to the crowd one by one in ascending rank order and form a circle around the ring facing outwards. Once the highest ranked wrestler is introduced they turn inwards and perform a brief ritual before filing off and returning to their changing room. Yokozuna have a separate dohyo-iri; see yokozuna.
• Once in the changing room the wrestlers change into their fighting mawashi and await their bout. The wrestlers enter the arena again two bouts prior to their own and sit down at the side of the ring. When it is their turn they will be called into the ring by a yobidashi and they will mount onto the dohyo. The referee or gyoji will coordinate the bout. On mounting onto the doyho the rikishi performs a number of ritual moves involving leg stamps and clapping whilst facing out towards the audience. He also cleans his mouth out with so-called chikara-mizu or power water. He then throws some salt into the ring to purify it. The rikishi perform another brief ritual when facing each other and then adopt a crouch position to "charge" at each other (called the tachi-ai). The wrestlers do not need to charge on the first occasion but can instead stare and return to their corner. This can happen a number of times (about four) until on the last occasion the gyoji informs them they must start the bout.
The total length of time of this preparation and attempts to psyche themselves or opponents is about five minutes for top division wrestlers. In the lowest divisions the wrestlers are expected to start more or less immediately.
• At the tachi-ai both rikishi must jump up from the crouch simultaneously at the start of the bout, and the gyoji can restart the bout if this does not occur. Once the bout is complete the gyoji will point his gunbai or war-fan towards the winning side. The rikishi will return to their start positions and bow to each other before retiring, a winning rikishi may receive additional prize money in envelopes from the gyoji if the matchup has been sponsored. There are a number of shimpan or judges around the ring who can query the referee's decision. If this happens they will meet in the centre of the ring to hold a mono-ii (lit: a talk about things). After reaching a decision they can uphold or reverse the gyoji's decision or order a rematch.
• In contrast to the time in bout preparation, bouts are typically very short, usually less than a minute, and often only a few seconds. Extremely rarely a bout can go on for many minutes, in which case the gyoji may call a mizu-iri or water break. The wrestlers are carefully separated, have a brief break and then return to the exact position they left off in. It is the gyoji's responsibility to do this. If after a further few minutes they are still deadlocked they can have a second break, after which they start from the very beginning. Further deadlock can lead to a draw, which is an exceptionally rare result.
• The last day of the tournament is called senshuraku (lit: the pleasure of a thousand autumns) and the Emperor's cup is presented to the rikishi who wins the top division championship. Numerous other, principally sponsored, prizes are also awarded to him.
• Promotion and Demotion are determined by a wrestler's score over the 15 days. The term kachikoshi indicates a record having more wins than losses. It contrasts with makekoshi, which indicates more losses than wins. In the makuuchi division, kachikoshi means a score of 8–7 or better, while makekoshi means a score of 7–8 or worse. A wrestler who achieves kachikoshi will almost always be promoted further up the ladder, the size of promotion being higher for better scores. Similarly makekoshi almost always results in a demotion. In the sanyaku ranks simple kachikoshi are usually not sufficient to be promoted and as discussed earlier there are special rules for Ozeki and Yokozuna promotions.
• A top division wrestler who is not an Ozeki or Yokozuna and who finishes the tournament with kachikoshi is also eligible to receive one of the three prizes awarded for technique (ginōshō), fighting spirit (kantōshō), and for the defeating the most Yokozuna and Ōzeki (shukunshō).
• Life as a sumo wrestler • Unlike most sports sumo is a highly controlled way of life. The Sumo Association
can prescribe the behaviour of its wrestlers in a way that would be more commonly associated with life in a commune. For example in the wake of a serious car accident involving a senior rikishi the association banned wrestlers from driving their own cars.
• Sumo wrestlers can be identified immediately when in public. On entering sumo, the rikishi are expected to grow their hair long to form a topknot, or chonmage, similar to the samurai hairstyles of the Edo Period. Furthermore they are expected to wear traditional Japanese dress when in public.
• The type and quality of the dress depends on the wrestler's rank. Rikishi in Jonidan and below are allowed to wear only a thin cotton robe called a yukata, even in winter. Furthermore they must wear a form of wooden sandals called geta when outside. These make a clip-clop sound as one walks in them. Wrestlers in the Makushita and Sandanme divisions can wear a form of traditional short overcoat over their yukata and are allowed to wear straw sandals, called zori. The sekitori can wear silk robes of their own choice and the quality of the garb is significantly improved. They also are expected to wear a more elaborate form of topknot on formal occasions.
• Similar distinctions are made in stable life. The junior rikishi must get up earliest, around 5 a.m., for training whereas the sekitori may start around 7 a.m. When the sekitori are training the junior rikishi may have chores to do, such as assisting in cooking the lunch, cleaning and preparing the bath, or holding a sekitori's towel for
him for when he needs it. The ranking hierarchy is preserved for the order of precedence in bathing after training, and in eating lunch.
• Rikishi are not normally allowed to eat breakfast and are expected to have a nap after a large lunch. This regime helps rikishi put on weight so as to compete more effectively.
• In the afternoon the junior rikishi will again usually have cleaning or other chores to do, while their sekitori counterparts may relax, or deal with work related issues related to their fan club. In the evening sekitori may go out with their sponsors while juniors stay at home in the stable, unless they are to accompany the stablemaster or a sekitori as his manservant when he is out (this is normally a more privileged role given to a riikishi who may be nearing sekitori status himself).
• Sekitori also are given their own room in the stable or, if married, may live in their own apartment. The junior rikishi sleep in communal dormitories.
• Thus the world of the sumo wrestler splits broadly into the junior rikishi who serve and the sekitori who are served upon. The life is especially harsh for new recruits, to whom the worst jobs tend to be allocated, and there is a high dropout rate at this stage.
• Amateur sumo • In addition sumo is an amateur sport, with participants in college, high school and
grade school in Japan. As well as college and school tournaments there are also open amateur tournaments. The sport at this level is stripped of most of the ceremony. The most successful amateur wrestlers in Japan can be allowed to enter professional sumo in the Makushita (third division) rather from the very bottom of the ladder. Many of the current Makuuchi rikishi entered professional sumo by this route.
• There is also an International Sumo Federation, who encourage the sports development worldwide, including holding international championships. A key aim of the federation is to have the sumo recognized as an Olympic sport.
1.8.24. Taijutsu • Taijutsu is a method of using the body for self-defense. Actually, taijutsu is the collective
name for any martial art techniques that rely on body dynamics. In some lines of aikido the word taijutsu denotes all aikido work without weapons.
• Taijutsu techniques may include strikes, kicks, joint locks, throws and many of the techniques found in the martial arts like aikido, judo and karate, etc. While most of its aspects appear external, the dedicated student will find many internal aspects as well.
• Taijutsu is commonly associated with the schools that supposedly teach ninjutsu, although there are many koryu schools with no relation to ninjutsu that have taijutsu in their curriculum, for instance Asayama Ichiden ryu. Taijutsu was used by bushi, some ninjas also used their own version of taijutsu.
1.8.25. Taido • Taido is a Japanese martial art or budo created in 1965 by Seiken Shukumine. Taido has
its roots in traditional Okinawan Karate. Seiken Shukukmine first developed a style of Karate called Gensei ryu in 1950, which he then modified over the years until it became Taido.
• There are five types of body movements in Taido: • Sen - Vertical spinning movement • Un - Ascending and descending wave-like movement • Hen - Falling movement • Nen - Horizontal spinning movement • Ten - Rolling movements
• These movements are combined with e.g. punches or kicks. The last category includes several acrobatic movements, like for instance back-flips, which makes Taido very spectacular to watch. Taido has a special kind of foot-work, which is called unsoku.
• Competitions in Taido include Jissen (sparring) and Hokei (which is similar to kata), as well as Tenkai, which is a made up fight, where one "hero" defeats five opponents during the last part of a 30 second bout. In Tenkai the judges give points to the competing teams in a similar manner as is done in e.g. figure skating.
• Taido is practiced in Japan, Sweden, Finland, Portugal, Denmark, France, Great Britain, Holland, Australia and the USA.
1.8.26. Hojutsu
• The Japanese art of firearms. The jutsu ending indicates that it is a combat rather than sportive form.
1.8.27. Tantojutsu • Tantojutsu is a Japanese term for a variety of knife fighting systems. 1.8.28. Te • An Okinawan martial art that began in the early 17th century because of the Japanese
rulers edict forbidding Okinawan to own weapons. At that time there were on Okinawa practitioners of the Chinese art ch’uan fa and others who practised tode, a native style heavily influenced by ch’uan fa. These two groups joined together to form secret societies in resistance to the Japanese government, and the combination of styles became known as te, which means, simply, hand. Because it was illegal, Te developed into an art of great secrecy and violence, and it was not until the 19th century that it evolved into the more humane karate.
• Chikaraishi : The ‘power stone’ of Te, an Okinawan fighting art. A one-foot wooden stick is embedded in a round stone weighing about ten pounds. The Chikaraishi is used as a level bar in exercises to strengthen the arms and abdominal muscles.
• Kanshu: In the Okinawan style of Te, Kanshu, in English: penetration hand, is the equivalent of kung fu’s iron palm.
• Makiage-gu: A training instrument used in Te, an Okinawan fighting art. The Makiage-gu consists of a rack with a horizontal wooden bar from which a weight hangs suspended on a rope. The idea is to raise the weight by turning the bar, using both hands.
• Tode: An ancient Okinawan form of unarmed combat. The forerunner of Te, which was the basis for the various karate styles. Although primarily a native fighting art, tode was heavily influenced by Chinese systems because the king of Okinawa declared his allegiance to the emperor of china in 1372, thus initiating an era of cultural interchange between the two countries.
1.8.29. Tenshin shoden katori shinto • The heaven-revealed divine style, a Japanese school of martial arts – mainly ken-jutsu,
yarijustsu and Naginata-jutsu – founded by iishino choisai, a warrior of the 15th century AD.
1.8.30. Poki Ryu • A Japanese martial art founded by the Buddhist nun suki-ya in the early 16th century. It is
said that one day she observed the temple cat, po, as he appeared to be fighting his own shadow. Later she saw the cat overpower a large dog, using his shadow to confuse the dog. To this shadow manipulation, suki-ya added her method for cultivation of ki, thus creating a style of great litheness and agility combined with a highly meditative series of exercises.
1.8.31. Tegumi • An Okinawan style of wrestling, in which there is no special ring, with bouts taking, place
almost anywhere. The opponents are fully clothed, and they may use grappling and throwing techniques.
1.9. Korea 1.9.1. Hapkido • Hapkido is a Korean martial art. The name means literally "joining-energy-way" and can
be rendered as "the way of co-ordinating energy". • ‘The art of co-ordinated power’. The techniques of hapkido are based on fighting styles of
ancient Korean warrior. Composed primarily of kicking techniques, hapkido’s three basic teachings are non-resistance, circular motion, and the water principle. Certain elements of Aikido and ju-jutsu are also found in hapkido.
• Non-resistance: Also called the principle of harmony, this is one of the three fundamental concepts in hapkido. By yielding, one can avoid the opponents attack and then redirect the power of that attack. This idea is also found in many of the soft styles of martial arts, such as Aikido and tai chi.
• History • Hapkido history is rather confused, but Korean sources attribute it to two Koreans,
Choi Yong Sul and Ji Han Jae. Primarily there are two main beliefs concerning Choi's education in the martial arts. Choi was sent to Japan at a young age. It is claimed that Choi worked as a houseboy for the Daito-ryu Aikijutsu master Takeda Sokaku (Morihei Ueshiba, a famous student of Takeda, went on to found Aikido) and
studied Daitoryu. However, Takeda Sokaku's son Tokimune never knew such a Korean disciple. Some attribute this to the fact of prevailing racism against Koreans in Japan, but this is flatly contradicted by the fact that a number of Koreans were clearly registered by Sokaku, who kept meticulous record of such matter as he charged students for licensing of the art. So far, there is no evidence to show that Choi ever studied Daitoryu except the claim made by Choi himself.
• On his return to Korea, Choi began to teach martial arts. One of his students, Ji Han Jae, claims that he incorporated traditional Korean kicking and punching techniques (from taekyon and hwarangdo) and gave the resulting synthesis the name Hapkido in 1959. Hapkido is the Korean pronunciation of Aikido and Choi Yong Sul opposed the name under which Ueshiba's martial art existed in Japan.
• Korean sources often claim that Hapkido was influenced by supposed Korean indigenous martial arts and some even deny the Aikijujutsu connection. Korean people tried to wipe out Japanese influence in Korea. Korean tendency to deny Japanese origins comes from History of Korea.
• Techniques • Core techniques
• On the "hard-soft" scale of martial arts, Hapkido stands somewhere in the middle, employing "soft" techniques similar to Aikido and "hard" techniques reminiscent of Taekwondo. Even the "hard" techniques, though, emphasise circular rather than linear movements. Hapkido is an eclectic martial art, and different hapkido schools emphasise different techniques. However, some core techniques are found in each school (kwan ), and all techniques should follow the three principles of Hapkido: • Nonresistance ("Hwa") • Circular Motion ("Won") • The Water Principle ("Yu")
• Hwa, or nonresistance, is simply the act of remaining relaxed and not directly opposing an opponent's strength. For example, if an opponent were to push against a Hapkido student's chest, rather than resist and push back, the Hapkido student would avoid a direct confrontation by moving in the same direction as the push and utilizing the opponent's forward momentum to throw him.
• Won, the circular principle, is a concept to gain momentum for executing the techniques in a natural and free-flowing manner. If an opponent attacks in Linear motion, as in a punch or knife thrust, the Hapkido student would redirect the opponent's force by simply leading the attack in a circular pattern, thereby adding the attacker's power to his own. Once he had redirected the power, the Hapkido student could execute any of a variety of techniques to incapacitate his attacker.
• Yu, the water principle, is best described if one pictures the quiet, direct strength in free-flowing water. When you touch water, it is soft; you don't feel anything. But when it comes to water and power, water can be the most powerful thing in the world, turning huge power turbines, or cutting through solid stone to form great canyons. When water is coming down from a stream and meats a rock or other obstruction instead of crashing into it, it always goes around.
• "As the flowing stream penetrates and surrounds its obstructions and as dripping water eventually penetrates the stone, so does the Hapkido strength flow in and through its opponents."
• Yudo: These consist of gentle or forcefull throws and joint control techniques derived largely from Aikijutsu. They are similar to aikido techniques, but in general the circles are smaller. Most techniques work by a combination of unbalancing the attacker and applying pressure to specific places on the body, known as hyul. Hapkido makes use of over 700 preasure points.
• Kicking: The wide variety of kicks in Hapkido differentiate it from Aikido and make it distinctly Korean. In general they are similar to Taekwondo kicks, though again circular motion is emphasised. Some varieties of Hapkido only use kicks to the lower body, but traditional Hapkido also includes high kicks and jumping kicks. The kicks in hapkido are more extensive than in most other Korean arts, including very specialized kicks for all occasions.
• Hand strikes: Like most martial arts, hapkido employs a large number of punches and other hand strikes. A distinctive example of Hapkido hand techniques is "live hand" strike, that focuses energy to the baek hwa hyul in the hand, producing energy strikes and internal strikes.
• Training • Hapkido training takes place in a dojang (Japanese dojo). While training methods
vary, a typical training session will contain technique practice, gymnastics (nakbop), solo form practice (poomse), sparring and exercises to develop internal energy (ki).
• Although hapkido is in some respects a "soft" or "internal" art, training is very vigorous and demanding. However, strength is not a prerequisite of hapkido; what strength and fitness is necessary to perform the techniques develops naturally as a result of training.
1.9.2. Haidong Gumdo • Haidong Gumdo, also spelled Haedong Kumdo (Hanja 海海劍武/Hangul ࠳࠳࠳࠳), is a
name coined around 1982 and used for some Korean martial art organizations that use swords. They are hostile to the Korea Kumdo Association and other organizations, and cause chaos by internal divisions.
• Series of trials involving Haidong Gumdo organizations has exposed the real history of Haidong Gumdo.
• These organizations claim that Haidong Gumdo is rooted in Samurang of Goguryeo, which they claim were elite warriors originally trained by a master called Seolbong. However, Samurang, Seolbong and other terms can never be found in historical sources, and they do not try to explain what happened to Samurang after Goguryeo. Actually trials revealed that these stories were all fabrications.
• The World Haidong Gumdo Federation, but not other organizations, claims that Kim Jeong-Ho, president of the federation, learned Haidong Gumdo from a master called Jangbaeksan (meaning Mount Baitou) in Kwanak Mountain. But it also turned out to be forged by him. Trials revealed that Haidong Gumdo was created by Kim Jeong-Ho and Na Hanil, both of whom learned Gicheonmun from Bak Daeyang and Simgeomdo from Gim Changsik. Around 1984 Na Hanil changed the name of his martial art from Simgeomdo to Haidong Gumdo. Haidong Gumdo remained unpopular until 1989 when Na Hanil played the leading character of a Korean TV drama. It considerably helped to promote Haidong Gumdo but the rapid growth of the organization led to ceaseless internal strifes.
• While Haedong Kumdo is not immune from the factionous strife that characterizes much of the Korean martial arts, dedicated practitioners engage in the practice of kibun (basics), pumsae (forms), yaksuk daeryun (step sparring), sparring hada (free sparring), chingum kyukgum (sparring with live blades), kigong (energy building exercises) and begi (cutting practice). Basic practice is with the mokgum (wooden sword).
• Sparrring practice begins with chukdo (bamboo sword) and progresses to mokgum and chingum. Pumsae within Haedong Kumdo is gleaned from various sword patterns found within the Muye Dobo T'ongshi (Illustrated Manual of Martial Arts), a text which the Koreans obtained from the Chinese in the early 18th Century. Paldo/Ch'akgum forms (drawing/sheathing the sword) were taken from Japanese iaido.
• While indigenous Korean sword forms are contained in the Bonkuk Kumbup (Korean sword method), other kumbup are taught within Haedong Kumdo curricula, including Ssangsu Kumbup (method of using the double handed sword), Shimsang Kumbup (method of using strategy and tactics with the sword), Yedo Kumbup (method of the heart of swordsmanship), Chedok Kumbup (Admiral's sword method), Jangbaek Kumbup (the Jangbaek method), Wae Kumbup (Japanese method), Wuisu Kumbup (method of using the sword with one hand) and Ssang Kumbup (The method of using two swords).
• Korean swordsmanship may be generally characterized as exchanging multiple strikes of the sword for one strike of the sword. The one strike concept characterizes the Japanese method. The Japanese ideal of "one strike, one kill" is prevalent in Japanese kendo (kumdo), even today. The merits and limitations of each of the philosophies may be debated. In international competition, the Japanese tend to excell in sport kumdo (kendo) and the Koreans excell in begi (cutting).
• The essence of Haedong Kumdo is in "shimgum," a concept similar to the that of the Spanish "duende", as coined by the Spanish poet, Federico Garcia Lorca. Shimgum is the
unification of the mind, body and spirit expressing itself through the use of the sword. It implies a technical mastery of the sword but transcends technical limitations. One can be "technically perfect" but still not achieve shimgum. Shimgum is what makes Haedong Kumdo not only a martial science but also a martial art.
• Despite the imperfect nature of the organizations which promote and the individuals who practice Haedong Kumdo, the art is gaining a wide and dedicated following throughout the world.
• World Haidong Gumdo Federation Headquarters 211-1, Neugpyumg-ri, Opo-up, Gwangju City, Gyunggi-do, Korea ?464-892 Tel:031-714-4471~2 Fax:031-715-5433 http://www.hdgd.org/
1.9.3. Hoi Jeon Moo Sool • Hoi Jeon Moo Sool is a Korean martial art which uses circular motions in order to use
the opponent's power against him. Indeed Moo Sool means martial art, and Hoi Jeon means revolving.
1.9.4. Hwa Rang Do • This was the code followed by the members of the hwarang, a Korean group similar to the
knights of feudal Europe. Hwarangdo survived as a martial art in the Buddhist monasteries of Korea, and it was not until 1960 that it was taught outside the temple. The three categories of Hwarangdo techniques lead to inner power ‘negong’, exterior power ‘waygong’, and mental power ‘shingong’.
• Chimgoo sul pup: In Hwarangdo, the science of acupuncture. The use of acupuncture specifically to revive an injured person is known and kookup hwal bub.
• Chuem yan sul: An advanced mental power technique of Hwarangdo by which one can induce sleep in another.
• Danjun ki: One of two methods used in Hwarangdo schools to develop ki. Danjun ki, or air ki, is that which is acquired through breath control. The other type is shin ki, or mental ki.
• Gun shin pup: The Hwarangdo equivalent of Japanese ninjutsu, the art of concealment, deception and camouflage. In Hwarangdo, it is classified as a mental power technique, ‘shingong’.
• Kiapsul: A Hwarangdo mental technique used to improve the ability to break boards and other solid objects. The idea is to co-ordinate physical and mental power with breath control and concentration of ki in order to focus all the body’s different strengths on a single task.
• Kookup hwal bub: A Hwarangdo mental power technique for treating an injured person with acupuncture. The general science of acupuncture is known in Hwarangdo as Chimgoo sul pup.
• Kyuk pa sul: A Hwarangdo mental power technique for utilising the full power of ones mind. As western science has pointed out, most people have available to them only about 10% of their brainpower. Kyuk pa sul teaches you to get in touch with and control much more of the mind.
• Negong: In Hwarangdo, the concept of power is divided into inner, outer and mental. Negong comprises the 21 techniques of inner power. The idea behind all of these techniques (breathing, kicking, punching, choking, for example) is to learn to control breathing and to focus ki. These abilities are the ‘power behind power’. For example, the ability to break solid objects with the hands or feet (or even the head) is considered negong. Because the source of this power is the ability to concentrate on one point, to focus all power on the hand or part of the body that is striking.
• Shingong: In the Korean art of Hwarangdo, the concept of power is divided into inner, outer and mental manifestations. There are six mental power techniques (shingong), all of them based on the utilisation of ki, ones own and that of others. An example of these six is gun shin pup, the art of concealment and deception, similar o the Japan’s ninjutsu.
• Water principle: In the Korean art of Hwarangdo, there are three types of power – inner, outer, and mental. Waygong, the body of external power techniques, is the study of weapons. Among the weapons used in Hwarangdo are the sword (long and short), staff, spear, knife, and shuriken.
1.9.5. Ssireum – Korean sumo wrestling • Ssireum (also called Sirum) is a traditional Korean sport and martial art also called
Korean sumo wrestling in the West. Ssireum symbolizes the national spirit of the
Korean people. Ssireum is a contest of physical strength and technique in which two contestants compete in direct contact against each other. It is a form of wrestling found only in Korea. In the beginning, ssireum was practiced as combat for self-defense against attacks and a part of rituals originating from the ancient tribal states. With the advancement of civilization, the formation of specific rules governed the combat and allowed ssireum to develop into a major national sport for physical competition and entertainment.
1.9.6. Taekyon • Taekyon, or Taek kyon (hangul: ࠳࠳)is a traditional Korean martial art, stemming from
Soobak which was first practiced in Korea during the Koguryo dynasty (37 B.C. - A.D. 668).
• It spread to the Silla kingdom and became the bare handed way of fighting of the Hwarang.
• At the height of its popularity even the king practiced taek kyon and taek kyon matches were frequent. However, the next king outlawed taek kyon matches, motivated by the gambling which took place around them - where people would gamble away their wives and houses, thus making it a purely military art. Soobak eventually separated into different segments - grappling, kicking, etc. Taek kyon being one such segment.
• Taek kyon took a severe blow when Neo-Confucianism grew in popularity, and then the Japanese occupation damaged the art even more. Taek Kyon has had a slight resurge in recent days, getting the classification "Important Intangible Cultural Asset No. 76" in June 1, 1983.
• Taek kyon movements are very fluid and dance-like with the practitioners constantly moving. It does not have the hard, snap kicks of Tae Kwon Do but a softer way of generating power.
• Tae kyon: The ancient Korean unarmed fighting art from which tae-kwon do evolved. Tae kyon was the result of the influence of Chinese boxing techniques, introduced to Korea in the 4th century AD, on the already existing native arts. It became part of the training regimen of the hwarang, or noble warriors. Not until Korea gained independence in 1945 did tae kyon officially become tae-kwon do.
1.9.7. Tae Kwon Do • Taekwondo is the Korean national sport and martial art, and is also one of the world's
most commonly practiced sports. In the Korean language, Tae (태 跆, Hanja ) means "kick or destroy with the foot", kwon (권 工, Hanja ) means "punch or smash with the hand or fist", and Do (도 武, Hanja ) means "way or art". Hence, Taekwondo is taken to mean "the way of the foot and the fist."
• A Korean style of empty hand combat, the modern form of which is similar to Japanese karate. Tae-kwon do is the descendent of tae kyon, a fighting style that developed from the introduction of Chinese boxing techniques in the 4th century AD. When Korea gained independence in 1945, tae kyon officially became tae-kwon do: tae means to kick or smash with the feet; kwon means to punch; and do means way or path. Thus tae-kwon do emphasises both hand and foot techniques in its training, which consists of form practice, competition, breaking and breathing exercises.
• Chang-Hon yu: A school of tae-kwon do. Created by Choi Hong hi. Chang-Hon, which means blue cottage9, is Hi’s pen name. Chang-Hon emphasises footwork and combinations of hard and soft techniques. It contains 20 patterns, or practice forms, called kata. These kata are useful in improving the students agility and skill and have historical or symbolic significance. For example, the yul-hok pattern is named after the 16th century Korean philosopher Yi I. The form has 38 moves, because Yi was born at the 38th latitude. In addition, the footwork diagram is in the shape of the character meaning scholar.
• There are two types of taekwon do, each with its own rules for competition. Olympic taekwondo allows full power kicks to the head, and full power punches to the body. International taekwondo federation (ITF) taekwondo scores with much lighter impact.
• ITF taekwondo: International taekwondo federation competitions involve low impacts wearing head, fist, and foot protection. It is practised by groups that follow the teachings of general choy, an early pioneer of the martial art. It is a lot of fun, although it can be tiring, ITF taekwondo is the safer of the two forms, especially for young people. The object is to score points with skilful strikes delivered to scoring areas of your opponents body.
• Olympic/WTF taekwondo: Olympic, or world taekwondo federation taekwondo, uses full contact blow and kicks to the body and head. Punches into the face are not allowed. Matches can last up to three rounds so they demand a high level of fitness. The object is to score points with a solid hit that knocks your opponent down.
• Taekwondo is popular throughout the world, and the Kukkiwon-World Taekwondo Federation's form of Taekwondo is currently an Olympic sport. While some forms of Taekwondo have received criticism for not teaching enough street-effective techniques, this has more to do with commercialization, rather than with any inherent flaw in the art itself: one of the reasons Taekwondo is so popular is because of its ease in learning and effectiveness as a form of self-defence. It is used in unarmed combat training in some armies (the French army, for instance).
• History • Korea, as a peninsula buffer state between Manchuria, China and Japan, with
incursions by the Mongols and Tatars, among other peoples, has quite a long history of unarmed and armed combat, absorbing various styles, like kung fu, and making them more suitable for their own rugged and mountainous terrain and indigenous combat styles.
• Probably the most influential period of development was during the Three Kingdom period (Goguryeo, Baekje, Silla). Silla is believed to have established diplomatic relations with the Tang Empire in the 7th century.
• However, the influence of Tang dynasty on the martial arts (as it was in almost every other cultural aspect throughout East Asia) was considerable both on Japan and Korea. In this same period, in the kingdom of Koguryo, various carvings into the towers at Kumkongryksa and Kakcjuchung, and the statues of Kumkang Kwon at the entrance of Sokkul-Am at Mt. Toham depict basic stances, such as the nalchigi, of what is now known as taekwondo, but the words subak, taekyon and kwonbeop to describe these traditions were not used until about the mid-Koryo period (about 990-1050 AD), and not standardized until King Injong.
• Under various generals, kwonbeop began to be developed and made mandatory for training in the armed services. By the time of the Ming dynasty, various major schools of kwonbeop reigned -- the sorim temple school, and the songkae school. Sorim temple may have been influenced by the Northern Shaolin Temple, as it was practiced by monks who favored swift, evasive moves and jumping techniques; Songkae, maybe related to Chang Songkae of the Ming Empire and could have been influenced by the Chinese, with techniques divided into three divisions: stun, knock out, and kill. Under the Choson dynasty, however, kwonbeop (as did other martial arts) saw a major decline as the official state policy was to discourage all manner of military affairs. Kwonbeop's center was moved northwest to central Korea and renamed taekwon, which continued in this form, probably largely as a sport or ceremonial art, or existed underground due to annexation, until Korea's independence from Japan in 1945.
• Two other influential Korean unarmed arts are yusul (soft art) and cireum, which are in part related to Chinese arts like shuai chiao and Mongolian wrestling. Yusul was popular between the Koryo and Choson dynasties. Striking arts such as keupso chirigi and pakchigi, which attack vital points, and headbutting, respectively, have been also popular in Korea. As the official state policy in Korea was to discourage all manners of military arts many martial arts masters dispersed to other regions/countries.
• After the Choson dynasty, Korea was annexed by Japan in 1910. As a result, young Koreans were exposed to Japanese version of these old sport arts such as jujitsu, kendo, judo, karate, sumo, et cetera.
• Then after 1945, when Japan was defeated in World War II, there was clearly a concerted effort by martial arts masters to consolidate their resources and develop a uniquely Korean art once again.
• Taekwondo was officially formed on April 11, 1955, when most Korean martial arts masters tried to unite all the various fighting styles (such as Gong Soo, Taekyon, Kwon Beop Soo Bahk Do Tang Soo Do etc.) under the name "Tae Soo Do" . Although not every art joined in the resulting organization, an organization was created with a many of the participants and the backing of the government. Its name was suggested by 1957 9th degree black belt General Choi Hong Hi as Taekwondo.
• The similarities between Taekyon and Taekwondo are the high flying kicks and various other feet action, but this style wasn't completely incorporated until the 1960's. Taekwondo also integrated various aspects of karate. Choi Hong Hi was a 2nd degree black belt in karate (the Shotokan variety) , so it was natural to utilize both karate techniques in Taekwondo. On the contrary, many Koreans had an influence in the development of karate, an example of this would be Choi Yong-I (Mas Oyama) who created Kyokushin Karate.
• Taekwondo most likely came to America in much the same way that karate and kung fu came to the US, being carried there by Korean immigrants, who were not very populous in the US until the 1970s and 1980s, and by American military personnel, who most likely learned the art while stationed in Korea during and after the Korean War. Taekwondo is taught almost everywhere in the US, and may be the most popular martial art in the country.
• It has been argued that Taekwondo originated from another Korean Martial art called Tang Soo Do. The main difference is in how the two are taught. Tang Soo Do focuses mainly on the traditional aspect, while Taekwondo focuses more on being a sport.
• Belts • The International Taekwondo Federation under Master Choi Jung Hwa (General
Choi's son) as well as many other ITF organizations currently use a system of 10 gups and 9 degrees (dan's). The gups start at 10 and go down to 1, from which Degrees are then achieved, and go 1 through 9. (Ex. Someone who just promoted from 2nd gup to 1st gup is now eligible to promote for 1st degree.) The degrees 1-3 are associated with an Assistant Instructor, degrees 4-6 are associated with an Instructor, 7-8 with Master, and 9th degree is held as the rank of Grand Master.
• Even though different Tae Kwon Do styles, associations or schools may make adjustments or additions, traditionally there are ten color belt levels (Gup or Kup) and ten black belt levels(Dan or Poom-under 15 years age black belt, 1-4 Poom levels in Kukkiwon style). Tenth Dan had historically been reserved as a posthumous award, but in recent years has seen presentation to a few living recipients. The original colors are white, yellow, green, blue and red. Between solid colors a crossbar / stripe of the next full color is added to the belt indicating the awarded gup level. Some groups use a solid color alternative instead of stripes (camo, orange, etc.) Gup belt records are kept by the school of origin and Dan/Poom ranks are recorded at the style headquarters registry.
• Previous entry: Belts are very important in taekwondo. Different belts tell you what level you are.The highest belt is 10th degree black belt. The belts go in this order. No belt, white belt, yellow belt, green belt, blue belt, hi-blue belt, red belt, hi-red blet, junior black belt, junior black belt 1 strip, junior black belt 2 strip, junior black belt 3 strip, junior black belt 4 strip, black belt. Then it goes up by a degree in black belt until you reach black belt 10th degree
• Tae-kwon do rankings: In tae-kwon do, the colour of the belt signifies the rank of the wearer. As follows: white belt, 8th to 7th grade (beginner); blue belt, 6th to 5th grade; brown belt, 4th to 1st grade; black belt, 1st to 9th degree (highest level).Kup : the eight grades in tae-kwon do ranking, comparable to the kyu of Japanese arts. The lowest grade is eighth Kup; after achieving 1st Kup, the student works towards degree rankings, or tan, which go from 1st, the lowest, to 9th tan.Simsa: In tae-kwon do, the test for progression among grades (Kup) and degrees (tan). The Simsa for Kup (there are eight levels of Kup) are given approximately every three months. For tan (of which there are nine levels), tests are generally given every two years by a review panel. For first to third tan, the Simsa relates to physical abilities, but from fourth to ninth tan, the emphasis is on theory and contributions to the art.
• Tan: The nine degrees in tae-kwon do, comparable to the Dan ranks of Japanese martial arts. After completing the eight beginning grades, called Kup, the student works toward the rank of first tan, with ninth tan being the highest rank.
• Organisation • Although there are many different federations and associations, Taekwondo can be
broadly divided into two schools: International Taekwondo Federation (ITF, founded 1966), and Kukkiwon-World Taekwondo Federation (Kukkiwon-WTF, founded
1973). Kukkiwon-WTF was created in Korea when General Choi Hong Hi left Korea for Canada, moving the headquarters of ITF in 1972.
• Apart from its history, one difference between ITF Taekwondo and Kukkiwon-WTF Taekwondo is the patterns (the pre-set, formal sequences of movements students learn). ITF has 24 patterns (called tuls) which represent the 24 hours in a day, or the whole of a person's life, while Kukkiwon-WTF uses the Taegeuk forms (which originate from the Chinese book, I_Ching). The main difference between these two styles of pattern is that ITF patterns use a "stepping motion" (known as the "sine wave") -- drawing on Newtonian physics -- for hand techniques and some kicking techniques, which include moving the body in a sinusoidal motion in order to use bodyweight to increase the effectiveness of the techniques. Many people consider the Kukkiwon-WTF style to be more of a sport, focussing on competition sparring, while ITF is considered a true martial art which includes competition-style sparring. In practice, however, it is the instructor that will have the most influence on what and how a student practices. The ITF (International Taekwon-Do Federation) had considerable success in bringing its art to the world through the 60's and early 70's. They currently maintain millions of members in 120+ countries worldwide. Beginning in 1972-73, Kukkiwon and the World Taekwondo Federation (WTF) became the first (1980) Tae Kwon Do organization recognized by the International Olympic Committee (IOC). Kukkiwon-WTF is the only Taekwondo body recognized by the South Korean government and its rules have been adopted by the International Olympic Committee. Only students whose training is recognised by the Kukkiwon-WTF can take part in the Olympic games, highlighting the consideration of the Kukkiwon-WTF form as a sport.
• In addition to the forms recognized for modern competition, there are also a large number of traditional forms, associated with a rich lore and history. These are becoming relatively rare in competition yet are being kept alive by some traditional masters and their students. Students trained in these traditional forms, which emphasise powerful kicks, punches, and blocks, pacing appropriate to the form, fierce concentration upon imaginary opponents, and accurate and stable stances, can do quite well when bringing these skills to their performances of the poomse style forms.
• Since the death of Choi Hong Hi, the International Taekwon-Do Federation has splintered into three major groups and several smaller ones. Choi's son, Choi Jung Hwa, is head of one headquartered in Canada; a second is headquartered in Austria; the third has its headquarters in North Korea. All three groups claim to be the legitimate successor to Gen. Choi. Various court actions are now in process.
• Features • Taekwondo is famed for its employment of leg and jumping techniques, which many
believe distinguishes it from martial arts such as Karate or Kung Fu. The rationale behind this is that the leg is the longest and strongest weapon a martial artist has, and kicks thus have the greatest potential to strike without retaliation. Despite this, hand techniques, and at the higher levels, some grappling and anti-weapon techniques are taught and emphasized (which techniques are taught vary from instructor to instructor). Taekwondo was designed to be effectively employed regardless of a person's sex, height, weight or age, making it popular with people of both sexes and of all ages. The five tenets of Taekwondo (courtesy, integrity, perseverance, self-control, indomitable spirit) show that, like any martial art, Taekwondo is a mental discipline as well as a physical one. An example of the union of mental and physical discipline is the breaking of boards, which requires both physical mastery of the technique and the concentration to focus one's strength.
• Although each Taekwondo club or school will be different, a Taekwondo student can typically expect to take part in most or all of the following: • Learning the techniques and curriculum of Taekwondo • A thorough workout, including lots of stretching • Practical self-defence techniques • Sparring (free-style controlled fighting in a safe environment, usually using
safety gear) Relaxation exercises • Breaking (using the techniques to break boards to gauge your technique and to
improve confidence)
• Regular gradings (tests to progress to the next grade/belt and to gain confidence with your development)
• A friendly and mutually-respectful atmosphere • Daeryung: Competitive practice in tae-kwon do. This includes both free-form
sparring and formalised series of moves, comparable to kata. • Forging bag: These bags are made in large and small sizes, the large being for
punching and kicking, and the small one for kicks only, especially high kicks. The big bag is usually about 4 feet long and 1and a half feet wide. The small one is about one and a half feet by 1 foot. The forging bag and the forging post are the most basic pieces of training equipment used in tae-kwon do.
• Hadan: The tae-kwon do term for the area of the body below the waist, or the low section; equivalent to the Japanese Gedan.
• Ha’I : The pants worn to practice tae-kwon do. They should reach about halfway between knee and ankle; a slit at the side of each leg makes it easier to perform the low stances.
• Hyung: One of the basics of tae-kwon do training, Hyung is the practice of forms. These forms include about twenty-five stances, plus blocking, punching, kicking, striking, and thrusting techniques. Hand and foot forms receive equal emphasis, as suggested by the name of the style; tae means to kick, and kwon means to strike with the hands, do means path or way.
• Kupso: In tae-kwon do, the vital points on the body, equivalent to the Japanese art of atemi and the Chinese tsien-hueh. Kupso recognises 54 vital spots, which are divided into three sections – high section, or sangdan (above the neck); midsection, or chungdan (shoulder to waist), and low section, or Hadan (below the waist).
• Sangi: The shirt worn to practice tae-kwon do. • Tallyon Kong: Korean for punching bag. In tae-kwon do, the bag is used for both
punching and kicking practice, especially to improve timing. The bag either may be round or elongated (oval).
• Tanji : Tae-kwon do term for the jar used to practice gripping. At first, you practice gripping the rim of an empty jar. Gradually you fill the jar with sand or other material.
• Tobok: The suit worn to practice tae-kwon do. It consists of a loose shirt (sang’I), pants (ha-I), and sash (ti).
1.9.8. Tang Soo Do • Tang Soo Do is a popular Korean martial art that was incorporated into Taekwondo. • The three Sino-Korean words translate as follows: Tang: the Tang Dynasty of China;
Tang generally refers to China in old Japanese. Soo: hand, Do: way of life • Essentially meaning: martial way of life from China. As the name suggests (its Japanese
pronunciation is Karatedo), Tang Soo Do is based on Japanese Karate. The previous statement has been argue about for the last fifty years. Most Tang Soo Do Association state that Tang Soo Do is a mix of three major styles; which are Soo Bahk Do (60%), Northern China Kung Fu (30%) and Southern China Kung Fu (10%) and the Okinawan discipline and modified katas of Karate.
• This art was created by Grandmaster Hwang Kee, (1914 - 2002), who originally called it Hwasoodo, but later changed the name to the already popular name Tangsoodo. The full name of this art at that time was Moo duk kwan Tang soo do Hwang Kee was said to have had learned Chinese martial arts while in Manchuria, as well as having been influenced by Japanese karate and Korean Taekkyon . Hwang Kee claims that he was also highly influenced by an old book about martial arts called the Muye dobo tongji . In Korea, Hwang Kee's art is no longer called Tang Soo Do, but is now called Soo Bahk Do.
• Tang Soo Do can be considered quite similar to Taekwondo, but it is practiced according to more traditional guidelines.
• The way of the knife hand, a Korean martial art very similar to the popular Korean style tae-kwon do. Tang soo do was developed in 1949 by hwang kee. It is based on two ancient Korean fighting arts, t’ang Su and subak. Despite its name, tang soo do is composed primarily of kicking techniques, as are most Korean styles. These are approximately 30 basic kicks and variations, which must be mastered before the student proceeds to the hand techniques.
1.10. Laos
1.10.1. Ling Lom • Ling Lom , also known as Air Monkey or Dancing Monkey, is a style of Thai martial arts
that includes both striking and ground-fighting. Ling Lom may have originated near the Chinese border of Thailand.
• Muay Boran is said to have split from Ling Lom in the 1700s. 1.11. Malaysia
1.11.1. Silat see above. 1.12. Mongolia
1.12.1. Mongolian wrestling 1.13. Philippines
1.13.1. Arnis de mano • The most famous of the Philippine martial arts, the ‘harness of the hand’. Arnis, as it is
called, is a weapons art. The three most popular forms are sword and dagger ‘espada y daga’, single stick ‘solo baston’, and last and most difficult, a style that uses two sticks of equal length ‘sinawali’. Arnis practitioners wear no armour, and arm movements are emphasised.
1.13.2. Buno • Buno is a system of Filipino wrestling like Dumog, but it's said to be more refined than
Dumog and utilizing the force of the attacker instead of putting force against force. • The term "buno" is also used in Filipino to describe people killing each other. 1.13.3. Combat judo • The term "combat judo" is also sometimes used to refer to the original judo which still
had the element of self-defense in its curriculum. See: Judo • Combat judo, a kind of Dumog is a Filipino martial art that includes grappling, joint-
locks, pressure point control, sweeps, and throws. 1.13.4. Dumog • Dumog manipulates an attacker by utilizing and redirecting an opponent's own strength
against him or herself. • Dumog is the term used in Eskrima to refer to wrestling techniques. A specific system of
Filipino wrestling, Buno is said to be more advanced. • The term "dumog" is also used in the Philippines to describe dogs, kids or drunk people
wrestling around without any skill. 1.13.5. Eskrima • Names
• There are basically no differences between Arnis, Eskrima and Kali. The general martial arts community uses the different names to refer to any Filipino martial art, although most teachers have a preferred name for their art. Originally, the difference in the name implied the region from which the art originated.
• Eskrima and Arnis are the names primarily used in the Philippines today; the term Eskrima is mostly used in the Visayas region. The name Kali is seldom used except for a few areas in the Southern Philippines, but has seen revival due to the teachings of modern masters such as Dan Inosanto and Cass Magda. The name Eskrima is the Filipino spelling which comes from Spanish-language esgrima, "fencing". The name Arnis is thought to derive from the phrase arn鳠de mano, Spanish for "harness of the hand". The origin of the name Kali is not certain, although some suggest it is related to the traditional weapon called a kris or karis. Another explanation is that the word is a portmanteau of the Filipino words Kamot, meaning hand or body, and Lihok, meaning motion. this explanation may be a more recent innovation, retroactively fitting an acronym to the existing name.
• History • As with most martial arts, the history of Eskrima is surrounded by legends and it is
difficult to pin down facts. This is complicated by the fact that there are actually many different fighting systems with different histories that are called Eskrima (or Kali or Arnis de Mano). The most commonly accepted explanation for the origin of Eskrima systems is that they were originally the fighting systems possessed by every tribe in the Philippines and used by them to fight and defend against each other.
• When the Spanish conquistadors arrived, some tribes fought them, using native weapons and techniques. Magellan, in particular, was killed in the battle of Mactan by forces of the Mactan tribal chief Lapu-Lapu when Magellan landed in Cebu. From
this point sources differ on the history of Eskrima. Certainly by the time the Spanish reached the Philippines, they were extremely experienced conquerors, and had their own highly effective fighting systems, along with higher-quality steel and weapons. The degree to which this affected the practice of the native fighting arts is a matter of debate, but it seems likely that the Filipinos borrowed what worked and discarded what didn't (or at least, the Filipinos that survived to pass on their fighting arts did so).
• Since the time of the Spanish conquest, there have been guerrillas in the Philippines, fighting the Spanish, the American, the Japanese, and finally the native Filipino government (current guerrilla and sometimes considered terrorist groups include the Philippine Revolutionary Army and the Moro Islamic Liberation Front). However, most Eskrima practitioners were farmers training to protect themselves with machetes, flails and other farm tools.
• For the last century, the most important practice of Eskrima has been in dueling, which is common in the Philippines and among Filipinos elsewhere. The founders of most of the currently popular Eskrima systems are famous duelists; legends circulate about how many people so-and-so has killed in duels. Certainly duels did happen and deaths did result. Duels would often be fought with hardwood sticks, to reduce legal problems, but some duels were fought with blades.
• Even today, people in the Philippines are much more likely to carry knives, and much more likely to use them when tempers rise, than people in North America or Europe. As a result, knife-fighting (and to a lesser extent, fighting with machetes) is still very much a living skill there.
• For a more precise history, one must distinguish between the different systems of Eskrima (see below). One must then attempt to trace back the lineage of their teacher as far as possible in order to understand where the techniques came from. Often this is difficult; for example Antonio Illustrisimo seemed to have learned to fight while travelling around the Philippines (and the rest of the Pacific) as a sailor, while Floro Villabrille claimed to have been taught by a blind princess in the mountains. Both teachers have passed away.
• When stick fighting was starting to be taught in actual classes, in California in the 1960s and 1970s, for example, the teachers of this martial art were reprimanded by elder Filipinos, for publicly teaching what had been traditionally kept secret.
• In recent years, there has been an increased interest in martial arts from cultures all over the world, including Eskrima, Capoeira, Savate, Muay Thai and others. As a result, most Eskrima systems have been modified (to varying degrees) to make them more marketable to a worldwide audience. Usually ths involves a greatly increased emphasis on locking, controls and disarms, as well as "self-defense" aspects, along with some influence from Asian martial arts (sometimes in just the name). It also tends to decrease the emphasis on careful footwork and low stances.
• Eskrima has also begun to be practiced as a sport, although there is as yet little standardization or uniformity. The rules, with their corresponding effect on technique, have yet to be decided upon, although several tournaments have been held with various sets of rules.
• Technical aspects • Weapons
• The most obvious feature of an Eskrima class is that it is usually weapon-based. Most systems begin by teaching the student to work with weapons, and only progress to empty-hand techniques once the stick techniques have been learned. This is reasonable because most systems have unified their teaching so that the empty-hand techniques are learned through the same exercises as the weapon techniques.
• The most common weapon used in training is a rattan stick about the length of the practitioner's arm; in the Philippines, these are known as sparring sticks as they are light enough that they can be used for sparring with no protection. Most North American and European schools use protection when sparring with rattan sticks.

• Other sticks used for training and for some duels are made of hardwood that is burned and hardened. They can also be made out of metals such as aluminum or can be padded for training purposes.
• The length of the sticks used in Eskrima classes varies from about 45cm to 70cm for single-handed sticks. Some schools prefer sticks of a particular length, while others expect students to learn which techniques are appropriate for a variety of lengths.
• Many systems in fact begin training with two weapons, either a pair of sticks or a stick and a wooden knife (called espada y daga, Spanish for "sword and dagger"). This is sometimes justified by pointing out that warriors would not have gone into battle with an empty hand; another common explanation is that having two weapons forces the practitioner to use both hands, which is valuable even when working with one weapon: the extra hand is used to control the opponent's weapon and to strike when the range is sufficiently close. (Such uses are banned in modern sport fencing, so sport fencers generally hold the unused hand away from danger.) Historically, people all over the world, including Filipino warriors, samurai and Renaissance fencers often trained with a long weapon in one hand and a short weapon in the other.
• The stick techniques used in Eskrima fall into two categories: the stick techniques that are training for sword fighting, and the stick techniques that are training for stick fighting. As usual, most systems are designed so that the practitioner can adapt their training to either weapon. Other weapons traditionally included in Eskrima training include spears, shields, whips and flails.
• This last item, the flail, is usually called nunchaku, the name for the weapon used in Japanese martial arts. It was popularized by Bruce Lee in several movies and inspired a wave of people to study Japanese arts for using the nunchaku. This is odd, since Bruce Lee was depicted using flail techniques from Eskrima, and the two look rather different: the Eskrima usage focuses on striking, while the Japanese usage focuses on gripping and breaking.
• Ranges • Most systems recognize that the technical nature of combat changes drastically
as the distance between opponents changes, and generally classify the ranges into at least three categories. Each range has its characteristic techniques and footwork. Of course, some systems place more emphasis on certain ranges than others, but almost all recognize that being able to work in any range and to control the range are essential.
• In order to control the range, and for numerous other purposes, good footwork is essential. Most Eskrima systems explain their footwork in terms of triangles: normally two feet occupy two corners of the triangle and the step is to the third corner. The shape and size of the triangle must of course be adapted to the particular situation. The style of footwork and the standing position vary greatly from school to school and from practitioner to practitioner. For a very traditional school, very conscious of battlefield necessities, stances will usually be very low, often with one knee on the ground, and footwork will be complex, involving many careful cross-steps to allow practitioners to cope with multiple opponents. The Villabrille system is usually taught in this way. Systems that have been adapted to duels or sporting matches usually use simpler footwork, focusing on a single opponent. North American schools tend to use much more upright stances, as this is much easier for the legs. There are, of course, many exceptions.
• Drills • Eskrima training is also notable for its emphasis on flowing, looping drills.
Several classes of exercises, such as sumbrada, contrada, siniwali, and hubud-lubud, are expressly designed to allow partners to move quickly and experiment with variations while remaining safe. For example, in a sumbrada, one partner feeds an attack, which the other counters, flowing into a counterattack, which is then countered, flowing into a counterattack, and so on. The hubud-lubud is frequently used as a type of "generator" drill, where one is forced to act and think while fists are already flying. Initially, students learn a specific series of

attacks, counters, and counterattacks. As they advance, they can add minor variations, change the footwork, or switch to completely different attacks; eventually the exercise becomes almost completely free-form. Disarms, take-downs, and other techniques usually break the flow of such a drill, but they are usually practiced beginning from such a sequence of movements in order to force the student to adapt to a variety of situations. A common practice is to begin a drill with each student armed with two weapons; once the drill is flowing, if a student sees an opportunity for to disarm their opponent, they will, but the drill will continue until both students are empty-handed. Some drills for practicing disarms use only a single weapon per pair, and the partners take turns taking it from each other.
• Rhythm is also an essential part of most Eskrima drills; to ensure the safety of the participants, most drills are done at a constant pace, which is of course increased as the students progress. Traditionally, Eskrima classes would have had a drummer beating out a rhythm for the students to follow.
• Subsections • Special terminology is used to refer to some of the subdisciplines of Eskrima.
Some schools teach separate classes in these disciplines, and some schools teach only one.
• Pangamut is the empty hand component. • Dumog is the grappling component; often it emphasizes disabling or control of
the opponent by manipulation of the head and neck (neck breaking is very common). Usually too dangerous to allow free sparring.
• Panantukan is the kickboxing component; it focuses on striking with (empty) hands and feet, although it does not assume the opponent is unarmed.
• Pananjakman is the kicking component; it is a subset of panantukan. • Gunting, meaning scissors, is the component that focuses on destroying the
opponents ability to wield their weapon. This can be done by cutting the hand or wrist with a pair of blades (hence the name) but it can also be done with a single blade or with the empy hand by striking nerves and tensed muscles.
• Espada y daga is the use of a sword and knife (often simulated with a stick and a wooden knife).
• Doble baston is the use of a pair of sticks. • Solo baston is the use of a single stick. • Mano mano is empty hand combat.
• Strikes • Many Filipino systems focus on defending against angles of attack rather than
particular strikes. The theory behind this is that the technique for defending against an attack that comes straight down the center is very similar whether the attacker has an empty hand, a knife, a sword or a spear. Older Filipino systems gave each angle a name, but more recent systems tend to simply number them. Usually a system will have twelve standard angles, although what these angles are and how they are numbered vary from system to system. These standard angles are used to describe exercises; to aid memorization, a standard series of strikes from these angles called an abecederio is often practiced.
• Some angles of attack and some strikes have characteristic names. • San Miguel is a forehand strike with the right hand, moving from the
striker's right shoulder toward their right hip. It is named after Saint Michael or the Angel Michael, who is often depicted holding a sword at this angle. This is the most natural strike for most untrained people.
• A redondo is a strike that whips in a circle to return to its point of origin. Especially useful when using sticks (rather than swords), such a strike allows extremely fast strikes but needs constant practice.
• An abaniko (from the Spanish for "fan") is a strike executed by whipping the stick around the wrist in a fanning motion. Not very forceful and not well suited to swords, this strike can be very quick and arrive from an unexpected angle.
• Hakbang is a general term for footwork. For example, hakbang paiwas is pivoting footwork, while hakbang tatsulok is triangle stepping.
• Perhaps because of its recent history as an art of duelists, Eskrima techniques are generally based on the assumption that both the student and their opponent are very highly trained and well prepared. For this reason, Eskrima technique tends to favor extreme caution, always considering the possibility of a failed technique or an unexpected knife. On the other hand, the practitioner is assumed to be able to strike very precisely and quickly. The general principle is that an opponent's ability to attack should be destroyed (rather than trying to hurt them to convince them to stop). Thus many strikes are to the hands and arms, hoping to break the hand holding the weapon or cut the nerves or tendons controlling it. Strikes to the eyes and legs are also important.
• Major systems of eskrima • Cabales Serrada Eskrima - Founded by Angel Cabales. • Doce Pares Escrima - Founded by the Ca崥 family, headed by Dionision Ca崥. • Inosanto Kali - developed by Dan Inosanto from various other styles; he does not call
it a system in its own right, preferring to refer to his teachers. • Kali Illustrisimo - Founded by Antonio Illustrisimo; important as the ancestor of
many current Eskrima systems. • Lameco Escrima - Founded by Edgar Sulite. The name comes from the three ranges
of the system, largo, medio, and corto. • Pekiti Tirsia - Founded by Leo T. Gaje, the name means "to cut into pieces at close
range", although the system includes techniques for all ranges. • Villabrille System - Founded by Ben Largusa on the teachings of Floro Villabrille,
the system pays an unusual amount of attention to traditional weapons such as the spear or the sword and shield.
• Sayoc Kali (http://www.sayoc.com) - Knife based style of Kali, but contains various weapons. Mainly taught by the Sayoc family. .
1.13.6. Panandata • Panandata is a term used for the martial arts of the Philippines which utilize sticks. This
term is most probably only encountered only on Luzon. 1.13.7. Suntukan • Suntukan is a form of Filipino boxing found in the northern Philippines. 1.13.8. Tat Kun Tao
• Tat Kun Tao is a Filipino Kuntao style which was developed by a Chinese in Cebu City who had previously studied Five Ancestors Kung Fu and Balintawak. He designed Tat Kun Tao to be an empty-handed version of Balintawak. When the founder became older his system became softer and he changed the name to Gokusa.
1.14. Thailand 1.14.1. Krabi Krabong • Krabi Krabong is a Thai fighting system which makes use of various weapons and also
incorporates the empty-hand techniques of Muay Thai. • The empty-hand techniques use pressure points, locks, holds, and throws. The weapons
techniques include training in these weapons: • Krabi, sword • Plong, staff • Ngao, bladed staff • Daab Song Meu, two swords, one in each hand • Mae Sun-Sawk, a pair of clubs which are worn on the forearms.
• Practitioners learn to use each weapon effectively against any other weapon. • The foremost school of Krabi Krabong is the Buddhai Swan Sword Fighting Institute, in
Thailand, which was led by the Grand Master Arjan Sumai until his death in 1998. 1.14.2. Lerdrit • Lerdrit is the martial art taught to the Thai Army. It doesn't utilize strikes with the fists
but with open hands. Forward pressure is a major concept in Lerdrit. 1.14.3. Muay Boran (Ancient Thai boxing) • Muay Boran is the predecessor to Muay Thai, but its focus is on self-defense and it
incorporates techniques which are forbidden in Muay Thai. • Today many schools who claim to offer Muay Boran just teach Muay Thai and sell it
under the name of Muay Boran. 1.14.4. Muay Thai (Thai boxing, Thai kickboxing)
• Muay Thai, also known as Thai boxing or Thai kickboxing, is a martial art originally from Thailand.
• Traditional muay Thai has a long history in Thailand as a martial art used by the military. The military style of muay Thai is called Lerdrit, while today's "sport muay Thai" slightly varies from the original art and uses kicks and punches in a ring and with gloves similar to those used in boxing. Muay Thai is also known as 'The Science of Eight Limbs' as the hands, feet, elbows and knees are all used extensively in this art.
• A hard offensive style that is said to have originated in 1560 and is especially famous for its high kicks. It is also known as the science of the eight limbs (knees, feet, elbows, and hands). Thai boxing is exciting in the same mode as full-contact karate. Kicks to the head and torso are permitted, as are elbowing and kneeing. The goal of the Thai boxer is chai-yen (cool heart), and despite the violence and danger of the sport, character and high moral standards are highly valued.
• Chai-yen: ‘cool heart’, one of the basic spiritual components in Thai boxing. • Techniques
• The basic offensive techniques in muay Thai use hands, elbows, kicks and knees to punch and kick the opponent. To bind the opponent for both offensive and defensive purposes, small amounts of stand-up grappling are used: the clinch. Defensively, the concept of "wall of defense" is used, in which shoulders, arms and legs are used to hinder the attacker from successfully executing his techniques.
• Though the high kicks at the head look spectacular during a competition, insiders of the sport claim that the elbows and the knees are the most damaging, sometimes deadly, to the fighters.
• Two muay Thai techniques became popular in other martial arts: The Thai low kick and the Thai roundhouse kick. The low kick uses a circular movement of the entire body to kick the opponent's leg with the upper part of the shin. When not correctly defended against, this technique often leads to the end of the fight, as the opponent can not stand anymore after a few low-kicks. The Thai roundhouse kick is also unique and was adapted for its efficiency. The kick is carried out with a straight leg and the entire body rotating from the hip, which is "locked" right before the leg makes contact to the opponent. Other martial arts, such as Shotokan Karate tend to prefer "snappy" kicks, which are faster but less powerful. Furthermore, Thai boxers kick with the shin instead of the foot.
• Almost all techniques in muay Thai use the entire body movement, rotating the hip with each kick, punch and block. This results in most techniques being slower but more powerful than techniques from boxing or karate.
• During a competition, the participants perform a lengthy ritual and ceremony before the fight (ram muay). The ritual is both for religious reasons and as a stretching warmup.
• Conditioning • The conditioning regimen in muay Thai is legendary for its intensity and rigour. Its
focus is on hardening the eight anatomical weapons in the muay Thai arsenal to an incredible degree, so much so that getting hit with a shin kick from a muay Thai fighter is often likened to being hit by a baseball bat.
• A quite common, mistakenly held belief is that muay Thai training includes special exercises for hardening shins and other body parts. In reality, muay Thai training does not include any special hardening exercises in addition to heavy bag training.
• History • Muay Thai heavily influenced the development of kickboxing, which was later
created in Japan, Europe and North America. • In the last decade, muay Thai has enjoyed a boost in popularity in the whole world as
it turned out to be very effective in popular no holds barred events, such as the UFC (Ultimate Fighting Championship) competitions. It is widely recognized that a combination of a grappling art, such as Judo or Brazilian Jiu Jitsu, with muay Thai is very effective in such fights.
• There exists a Malaysian derivative of muay Thai known as tomoi that is practised primarily in northern Malaysia, in the states that share a border with Thailand. The ethnic Malays in southern Thailand also refer to muay Thai as tomoi.
• Recently the film Ong-Bak helped to popularize muay Thai.
• The character of Sagat (from the Street Fighter video games) is a muay thai fighter. 1.15. Vietnam
1.15.1. Cuong Nhu • Cuong Nhu (pronounced Kung Nu) is an integrated martial art, developed originally by
Dr. Ngo Dong of Vietnam in 1965 at the University of Hue. He synthesized a system that blends elements of Shotokan Karate, Wing Chun, Judo, Aikido, Tai Chi Chuan, Boxing, and Vo Vi Nam. As the art has matured it has added elements of Neko-Ryu and various weapons forms.
• Cuong Nhu translates as Hard-Soft, and integrates both hard and soft techniques into its own system. Students at lower levels focus on learning hard techniques, blocking, kicking, etc. and then move onto softer styles of blocks and throws.
• Cuong Nhu first came from Vietnam to the United States in 1971 with Dr. Ngo Dong, and finally relocated its headquarters to the U.S. in 1977, following the escape of the doctor and his family. The first U.S. dojo was founded at the University of Florida in Gainesville. The style has spread to 67 dojos across the U.S. and several in other countries. The current head of Cuong Nhu is Grandmaster Quynh Ngo.
• Basic instruction uses Kata (set movement patterns) to teach the student various stances, blocks, punches, kicks, and applications of the movements in self-defense techniques. Cuong Nhu includes at higher levels the study of weapons, including the bo (long staff), tambo (half staff), tonfa, sai, and spear.
1.15.2. Vo Vi Nam • Vo Vi Nam, also known as Vo Vi Nam Viet Vo Dao, is arguably the most famous style
of Vietnamese martial art. Founded by the late Founder Nguyen Loc in 1983, and perfected by Grandmaster Le Sang, Vo Vi Nam is highly systematic and offer a wide range of techniques, but most famous for its "scissors" kicks. Vo Vi Nam concentrates on the Founder's "Revolution of Mind, Body, and Soul" philosophy, and thus it values single techniques, dual fighting, and katas on the same scale - where individual techniques are plans, dual fighting applies those techniques into practical means, and katas help review them.
• Vo Vi Nam growth has escalated in recent years - most noticeably in Russia, North America, and Europe where the French Ministry of Youth, Sports, and Society formally supports it (free renting of studios, financial support for social events, etc.) This trend might be the reflection of Vo Vi Nam's various techniques that attract spectators. These range from soft forms (like those of Taichi), traditional Vietnamese forms, to forms that follows the Founder's philosophy. Vo Vi Nam teaches weapons including the sword, dao, kwandao, fan, axe, machete, knife (and the unique double knives), long and short staff, handgun, and rifle. Vo Vi Nam self-defense techniques have many levels that range from hand-to-hand combat to hand against weapons (praised for it hand against handgun and rifle.)
• Today Vo Vi Nam is present in Africa, Asia, Europe, and North America. On a global scale, Vo Vi Nam has a slowly spread compared to other martial arts, but in return Vo Vi Nam is a strong and concrete community, i.e. there is only one style of Vo Vi Nam - no matter where you go, if there is a Vo Vi Nam school, you will continue your belt level where you left off. There are expected to be Vo Vi Nam studios in coming to Central and South America this year.
1.15.3. Yong Chun: vietnamese for ‘wing chun’ 1.16. Hawaii • Originally a highly secret art of Hawaiian royalty. The basic movements are ship-hand and
blocks as well as the ‘sticky’moves characteristic of tai chi. Lua also teaches the science of the vital points and sanchin breathing exercises. At present, the secrecy surrounding Lua is dwindling as public demonstrations are performed.
2. European 2.1. General
2.1.1. Boxing • Boxing is a combat sport. • Fighting with the fists for sport and spectacle is probably as old as sport itself. Boxing
contests are found throughout antiquity. Greek boxers would wear boxing gloves (not padded) and wrappings on their arms below the elbows, but were otherwise naked when competing. The word "boxing" first came into use in England in the 18th century to distinguish between fighting to settle disputes, and fighting under agreed rules for sport. It
is now used to describe a sport in which two contestants (boxers) wearing padded gloves face each other in a "ring" and fight an agreed number of "rounds" under recognized rules. Although men have always been the most numerous participants, there are some references to fights between women during the 18th century, and women's boxing was organized again at the end of the 20th century.
• Throughout the latter part of the 19th century and the whole of the 20th century, amateur and professional boxing operated in parallel. In the final quarter of the 20th century, however, amateur boxing lost much of its popular support. Traditional concerns about bruises and black eyes gave way to more serious concerns about long-term eye and brain damage. Medical checks on boxers, and medical supervision of their fights, became an increasingly important feature of both amateur and professional boxing.
• Origins • 18th- and early 19th-century pugilism (bare-knuckle fighting) was an important
precursor of boxing in Britain. Boxing, however, probably grew most specifically out of the demonstrations held at the Fives Court and the Tennis Court in London in the early 19th century. These promotions had several features that anticipated the future sport of boxing. The boxers wore "mufflers" (padded gloves), "time" was called after a set period, and the length of the fight was predetermined. Wrestling throws were also barred. None of these features were present in bare-knuckle pugilism.
• "Boxing" as distinct from any other form of fist fighting can be dated from 1867, when John Chambers drafted new rules. There were twelve rules in all, and they specified that fights should be "a fair stand-up boxing match" in a 24-foot ring. Rounds were to be of three minutes duration with one minute between rounds. Ten seconds were allowed for a man to get up if he had gone down during a round. New gloves of "fair-size" were to be worn and "wrestling or hugging" was specifically forbidden. These gloves' purpose is to protect the knuckles. An average pair of boxing gloves appears like a bloated pair of mittens, are often red, and are laced up around the wrists. The rules were published under the patronage of the Marquess of Queensberry, whose name has always been associated with them. The first fighter to win a world title under these rules was "Gentleman Jim" Corbett, who defeated John L. Sullivan in 1892 at the Pelican Athletic Club in New Orleans.
• The success of boxers has always been associated with their size. In the early years of pugilism, however, there was only one "Champion", who always tended to be one of the heaviest. The term "light weight" was in use from the early 19th century and fights were sometimes arranged between the lighter men, but there was no specific Championship for them. The terms lightweight, welterweight, middleweight and heavyweight became common during the late 19th century, but there was no universally recognized definitions of weight class. Throughout the 20th century, new weight classes were added, extending the range down to strawweight and up to superheavyweight but with varying agreement over their definitions.
• In the early days of pugilism, all fighters were "professional" in the sense that few would fight for "love" rather than money. No distinct "amateur" sport existed until 1867, when amateur championships under Marquess of Queensberry Rules were held at Lillie Bridge in London for Lightweights, Middleweights and Heavyweights. By this date, the old professional bare-knuckle "Prize Ring" was in terminal decline. It had always been against the law, but in the early part of the century it survived because it had widespread popular support and because there were many influential men who supported it. By 1867, however, the results of fights were increasingly suspect, and sometimes boxers even failed to turn up for fights. Less money came into the sport and bare-knuckle pugilism slowly died out.
• Conversely, the amateur side of the sport flourished, not only in schools, universities and in the armed forces, but also in the working-class areas of the expanding urban centers.
• With the gradual acceptance of Marquess of Queensberry Rules, two distinct branches of boxing emerged, professional and amateur, and each produced its own local, national and international governing bodies and its own variation of the rules.
• Amateur boxing • In amateur boxing (the version of the sport found at the Olympic Games and
Commonwealth Games) the primary emphasis is on landing scoring punches rather than concern with doing actual physical damage to one's opponent (though it still

occurs). Competitors wear protective headgear, and box for three rounds of three-minutes each. Each punch that lands on the head or torso is awarded a point. A referee monitors the fight to ensure that competitors use only legal blows (a belt worn over the torso represents the lower limit of punches - any boxer repeatedly landing 'low blows' is disqualified). Referees also ensure that the boxers don't use holding tactics to prevent the opponent from swinging (if this occurs, the referee separates the opponents and orders them to continue boxing. Repeated holding can result in a boxer being penalised or, ultimately, disqualified).
• If a competitor is punched sufficiently hard to have trouble continuing the fight, and the opponent inflicted this condition with only legal blows, the match is over and the competitor still standing is declared the winner by knockout. In amateur boxing, referees will readily step in and award knockouts even if the competitor is only relatively lightly injured.
• The Queensberry Amateur Championships continued from 1867 to 1885, and so, unlike their professional counterparts, amateur boxers did not deviate from using gloves once the Queensberry Rules had been published. In Britain, the Amateur Boxing Association (A.B.A.) was formed in 1880 when twelve clubs affiliated. It held its first championships the following year. Four weight classes were contested, Featherweight (9 stone), Lightweight (10 stone), Middleweight (11 stone, 4 pounds) and Heavyweight (no limit). By 1902, American boxers were contesting the titles in the A.B.A. Championships, which, therefore, took on an international complexion. By 1924, the A.B.A. had 105 clubs in affiliation.
• Boxing first appeared at the Olympic Games in 1904 and, apart from the Games of 1912, has always been part of them. Internationally, amateur boxing spread steadily throughout the first half of the 20th century, but when the first international body, the Federation Internationale de Boxe Amateur (International Amateur Boxing Federation) was formed in Paris in 1920, there were only five member nations. In 1946, however, when the International Amateur Boxing Association (A.I.B.A.) was formed in London, twenty-four nations from five continents were represented, and the A.I.B.A. has continued to be the official world federation of amateur boxing ever since. The first World Amateur Boxing Championships were staged in 1974.
• In the late 19th and early 20th century, amateur boxing was encouraged in schools, universities and in the armed forces, but the champions, in the main, came from among the urban poor.
• Women's boxing first appeared in the Olympic Games as a demonstration bout in 1904. For most of the 20th century, however, it was banned in most nations. Its revival was pioneered by the Swedish Amateur Boxing Association, which sanctioned events for women in 1988. The British Amateur Boxing Association sanctioned its first boxing competition for women in 1997. The first event was to be between two thirteen-year-olds, but one of the boxers withdrew because of hostile media attention. Four weeks later, an event was held between two sixteen-year-olds.
• The A.I.B.A. accepted new rules for Women's Boxing at the end of the 20th century and approved the first European Cup for Women in 1999 and the first World Championship for women in 2001. Women's boxing will be an exhibition sport at the 2008 Olympics, and it will become an official Olympic sport at the 2012 Olympics.
• Professional boxing • Professional bouts are far longer (consisting of anything from four to twelve rounds),
headgear is not permitted, and knockout wins are usually only awarded when the competitors are knocked down and stay on the canvas for ten seconds (or are repeatedly knocked down, a "technical knockout", or TKO). At any time, however, the referee may stop the contest if he believes that one participant can not or should not continue to box. In that case, the other participant is also awarded a technical knockout win, which in the boxer's record also counts as a knockout win (or loss). A technical knockout would also be awarded if a fighter lands a punch that opens a cut on the opponent, and the opponent is later deemed not fit to continue by a doctor because of the cut. If a boxer simply quits fighting, or if his corner either tells the referee the boxer will not continue or throws a towel into the ring (signalling they are quitting), then the winning boxer is also awarded a technical knockout.
• In case no knockout or disqualification occurs in professional boxing, the fight must go to the scorecards. Professional fights have three judges each, and each of the
judges must use the 10 point must system: Under this system, each time a boxer wins a round in the judges' eyes, the judge gives that boxer 10 points, and the other 9, with points deducted every time a boxer suffers a knockdown or loses a point because of illegal blows. If the judge deems the round to be a tie, he or she may score it 10-10. When the fight reaches its scheduled distance, all scores are added, round by round, to determine who won on each judges' cards. When all three judges have the same boxer as the winner, this is an unanimous decision. When two judges have one boxer winning the fight and the other one has it a tie, this is called a majority decision. When two judges have one boxer win the fight and the other judge has the other boxer win, this is called a split decision. In the case one judge gives his or her vote to one boxer, another one gives it to the other boxer and the third judge calls it a tie, this is a draw, and it is also a draw when two judges score the fight a tie, regardless of whom did the third judge score the bout for, or when all three judges scored the fight a tie.
• In England, judges might score the fight under a 5 point must system instead, and they might also award half a point to the loser (example 4 and a half points) if desired, except when a world title fight is being held. Although generally referees do not act as judges, in England, referees are sometimes allowed to score too, although they can not score in world title fights held there either.
• In the rare case a fight can not go on because of an injury caused to one of the competitors by a headbutt, there are different rules: If the fight has not reached the end of round three, (in some places, round four), the fight is automatically declared a technical draw. If it has reached beyond the end of round three (or four), then the scorecards are read and whoever is ahead, wins by a technical decision.
• Serious injuries are far more common in professional boxing, a sport with considerable (though waning) spectator appeal, but with a large number of dubious organisations promoting "world championship" bouts and a long connection to organised crime.
• In the past, matches were traditionally fought for up to fifteen rounds in professional boxing, but the tragic death of boxer Duk Koo Kim in November of 1982 after a fight with Ray Mancini began to change that. By 1988, all fights had been reduced to a maximum of 12 rounds only. With the discovery, in April of 2004, that Heavyweight Joe Mesi, a relatively new, undefeated prospect, had suffered several blood clots to his brain during a win against Vassiliy Jirov, more medical testing may be required for professional boxers. However, as of May, 2004, doctors have only said that they will look at the matter. Mesi has expressed desire to continue fighting; his critics say he could face death if he ever fights again.
• However, in spite of the dangers involved, boxing may be better than the real alternative, dueling. There is some reason to believe that English gentlemen quietly promoted boxing as a humane alternative to the deadly Irish Code Duello. Certainly it was promoted by the class of English gentlemen that were prone to duel, and many observers said that dueling with pistols was too dangerous a way to maintain anyone's honor.
• By 1867, when the John Sholto Douglas, 9th Marquess of Queensberry lent his name to John Graham Chambers' rules, sporting fisticuffs had become a nearly perfect replacement for dueling. It made for a satisfyingly brutal and (for the loser) humiliating fight but it was nearly impossible to cause permanent damage. One indication of this movement is that the rule-makers of the time promoted the rules for "amateurs," a code word for noblemen. Another is that swank clubs and gymnasia took it up with a will, leading to its present popularity. Another is that even now, there is a tradition of urging hot-headed young men to "get in the ring, and work it out."
• For a generation following the creation of the Queensberry Rules, bare-knuckle and glove-fights were both promoted. The bare-knuckle fights were usually held under the "New Rules" produced by the Pugilistic Benevolent Society in 1866, which had superseded the "Pugilistic Association's Revised Rules" of 1853. They were often popularly referred to as the "Rules of the London Prize-Ring".
• In 1891, the National Sporting Club (N.S.C.), a private club in London, began to promote professional glove fights at its own premises, and created nine of its own rules to augment the Queensberry Rules. These rules specified more accurately the
role of the officials, and produced a system of scoring that enabled the referee to decide the result of a fight. Previously, all fights ended with a knock-out or, more usually, when one fighter was too exhausted to continue. It was thanks to the N.S.C. Rules that the sport emerged into one of skill rather than one of endurance. The British Boxing Board of Control (B.B.B.C.) was first formed in 1919 with close links to the N.S.C., and was re-formed in 1929 after the N.S.C. closed.
• In 1909, the first of twenty-two belts were presented by the fifth Earl of Lonsdale to the winner of a British title-fight held at the N.S.C. In 1929, the B.B.B.C. continued to award Lonsdale Belts to any British boxer who won three title-fights in the same weight division. The "title fight" has always been the focal point in professional boxing. In the 19th and early 20th centuries, however, there were title-fights at each weight. Promoters who could stage profitable title-fights became influential in the sport. So, too, did boxers' managers. The best promoters and managers have been instrumental in bringing boxing to new audiences and provoking media and public interest. The most famous of all three-way partnership (fighter-manager-promoter) was that of Jack Dempsey (Heavyweight Champion, 1919-1926), his manager Jack Kearns, and the promoter Tex Rickard. Together they grossed US$ 8.4 million in only five fights between 1921 and 1927 and ushered in a "golden age" of popularity for professional boxing in the 1920s. They were also responsible for the first live radio broadcast of a title-fight (Dempsey v. Georges Carpentier, in 1921). In Britain, Jack Solomons' success as a fight promoter helped re-establish professional boxing after the Second World War and made Britain a popular place for title-fights in the 1950s and 1960s.
• In the first part of the 20th century, the United States became the centre for professional boxing. It was generally accepted that the "world champions" were those listed by the Police Gazette. After 1920, the National Boxing Association (N.B.A.) and the New York State Athletic Commission (N.Y.S.A.C.) began to sanction "title-fights". The N.B.A. was renamed in 1962 and became the World Boxing Association (W.B.A.). The following year, a rival body, the World Boxing Council (W.B.C.), was formed. The influence, internationally, of the N.Y.S.A.C. declined. In 1983, another world body, the International Boxing Federation (I.B.F.) was formed and, in 1989, this was followed by yet another, the World Boxing Organisation (W.B.O.). Each body sanctions its own title-fights and recognizes its own "champions". By the end of the 20th century, a boxer had to be recognized by four separate bodies to be the "undisputed champion" of the world, and each year saw over 100 "title-fights" take place in up to seventeen weight divisions.
• Although women fought professionally in many countries, in Britain the B.B.B.C. refused to issue licences to women until 1998. By the end of the century, however, they had issued five such licenses. The first sanctioned bout was in November 1998 at Streatham in London, between Jane Couch and Simona Lukic.
• Personalities • Among British amateur boxers, only those who won Olympic gold medals tended to
achieve recognition beyond the limits of boxing enthusiasts. They included Harry Mallin (Middleweight), 1920 and 1924), Terry Spinks (Flyweight, 1956), Dick McTaggart (Lightweight, 1956) and Christ Finnegan (Middleweight, 1968). In 1908, at the Olympic Games in London, five weight divisions were contested, Bantam weight, Feather weight, Lightweight, Middleweight and Heavyweight. British boxers won them all, and four of the finals were all-British!
• It is the professional side of boxing, however, that has produced the celebrities whose activities the public have generally followed. In the period between bare-knuckle pugilism and post-Queensberry boxing, Jem Mace was important. He carried many of the traditions of the old London Prize-Ring, but promoted the use of gloves and helped to popularize the sport in the United States and Australia. In the post-Queensberry era, the first British fighter to achieve superstar status was Bob Fitzsimmons. He weighed less than 12 stone but won world titles at Middleweight (1892), Light-heavyweight (1903) and Heavyweight (1897) and fought his last bout at the age of fifty-two.
• Successful fighters have provoked fierce local pride. The best example was Jimmy Wilde, a Welsh Flyweight who won the world Flyweight Championship in 1916 and held it until 1923. He once had a sequence of eighty-eight fights without defeat.
Between 1911 and 1923, he won seventy-five of his fights by a knockout. He was idolized in Wales, where they commonly believed him to be the best boxer, pound-for-pound, that ever lived. He was described as the "Mighty Atom" and "the ghost with a hammer in his hand". Freddie Welsh (Freddy Hall Thomas), from Pontypridd, won the Lightweight title in 1912.
• The Scots had a similar pride in Benny Lynch, a Flyweight from Glasgow, who held the world Flyweight title in 1935 and again in 1937. Over the years, Scots have had great success at this weight; Jackie Paterson won the title in 1943 and Walter McGowan in 1966. Ken Buchanan won the Lightweight title in 1971 and Jim Watt in 1980. In Northern Ireland, Rinty Monahan held the Flyweight title from 1947 to 1950 and Barry McGuigan won the W.B.A. Featherweight title in 1985.
• England, too, had its successes at the lighter weights. Among the Flyweights, Jackie Brown won the title in 1932, Peter Kane in 1938 and Terry Allen in 1950 and Naseem Hamed in the 1990s.
• The Welsh had their own featherweight legend Jim Driscoll. His nickname was "Peerless Jim", he was born in the onetime Irish "slum" of Newtown. Jim was the first outright winner of the Lord Lonsdale Belt. Jim had prolific wins of the British, Empire and European titles. Jim is considered by many to be the best pound for pound fighter of all time.
• Britain has had other popular world champions. In the 1930s, Jackie Berg won the Light-Welterweight title; in the 1940s, Freddie Mills won the Light-Heavyweight title; in the 1950s and 1960s, Randy Turpin and Terry Downes won Middle-Weight titles; and in the 1970s, John Conteh and John Stracey won the Light-Heavyweight and Welterweight titles respectively. With so many title-awarding bodies in the 1980s and 1990s, the public became unsure about who actually was the champion. Nevertheless, the successes of Nigel Benn, Chris Eubank and Joe Calzaghe continued to bring extensive media coverage to boxing and sustained a considerable public following.
• The most popular boxers, however, have not always been the world title-holders. Just fighting for the world title in the Heavyweight division can bestow celebrity status, as was shown by Henry Cooper, who twice unsuccessfully fought Muhammad Ali in the 1960s.
• Britain had to wait 100 years to have its first Heavyweight champion since Bob Fitzsimmons lost his title in 1899. Lennox Lewis became undisputed champion in 1999, having first gained the W.B.C. title in 1993. Frank Bruno held the W.B.C. world Heavyweight title shortly between 1995 and 1996, after beating the man who beat Lewis, Oliver McCall. He lost it to Mike Tyson in a rematch of their 1989 title bout.
• Sue Atkins (alias Sue Catkins) helped to pioneer women's boxing in Britain in the 1980s, but without any official recognition. The first British woman to be issued with a license was Jane Couch from Fleetwood, who won the Women's International Boxing Federation (W.I.B.F.) Welterweight title in 1996. Most experts would agree, however, that it was the Christy Martin-Deirdre Gogarty world championship bout, also in 1996, that helped women's boxing popularity grow internationally. Weeks after defeating Gogarty by a six round decision, Martin was featured on the cover of Sports Illustrated.
• Outside the United Kingdom, of course, boxing has also produced many celebrities on a world-wide basis. Muhammad Ali of Louisville, Kentucky, United States, often recognized and self appointed as The Greatest, is probably the best example. Puerto Rico has three boxers to be generally considered national heroes out of a cast of over 50 world champions from that country, these being F鬩x Trinidad, Wilfred Benitez and Wilfredo Gomez. Nicaragua has Alexis Arguello, Mexico, out of over 100 world champions, Ruben Olivares, Salvador Sanchez and Julio Cesar Chavez, Cuba has Jose Napoles and amateur legend Teofilo Stevenson, Argentina Carlos Monzon, Panama Roberto Duran and Eusebio Pedroza, Australia Jeff Fenech, Japan Jiro Watanabe, Ghana Azumah Nelson, South Korea Jung Koo Chang and so on. These are boxers whose fame transcended the boxing borders and became household names among regular folks.
• Medical authorities around the world have consistently argue for a ban on boxing (or at least the changing of the rules to prevent blows to the head) because of the brain
damage found in large fractions of professional boxers, but such calls have not been successful, both on civil liberties grounds and the argument that banning boxing would lead to underground, illegal bouts with far fewer safety regulations than currently.
• In Mississippi City, on February 7, 1882 the last heavyweight boxing championship bareknuckle fight took place.
• In 2004, female boxer Ann Wolfe surpassed Henry Armstrong (until then the only man to hold world titles in three divisions simultaneously), by becoming the only boxer ever to hold world titles in four different categories at the same time. A rule preventing men from holding titles in more than one weight class at the same time is in place since soon after Armstrong held his three titles.
2.1.2. ESDO (European self defence organisation) • ESDO (European Self-Defense Organization) is a European martial art which comes
from the same roots as kickboxing but is geared towards self-defense 2.1.3. Fencing • Fencing encompasses any system of sword-based offence and defence but is most
commonly used to denote styles of European origin. Today it can be considered to refer to the European martial art of swordplay, Olympic sport-fencing, stage-fencing or academic fencing.
• The emergence of modern fencing • Fencing can be traced back as far as ancient Egypt as an entertainment for the Faros
the Greeks and Romans had systems of martial arts and military training that included swordsmanship, and fencing-schools and professional champions were known throughout medieval Europe, the earliest surviving record of Western techniques of fencing is the manuscript known as MS I.33, which was created in southern Germany c. 1300 and today resides at the Royal Armouries in Leeds. Throughout the Middle Ages, masters continued to teach systems for using the sword (together with other weapons and grappling) to noble and non-noble alike. The wearing of the sword with civilian dress (a custom that had begun in late fifteenth-century Spain) gradually gave rise to a new system of civilian swordsmanship based more on the thrust than on the cut, with the aim being to keep the adversary at a distance with the point, and slay him there. This gave rise to systems of using the sixteenth- and seventeenth-century rapier and the seventeenth-and-eighteenth century smallsword. Though swords ceased to be an article of everyday dress after the French Revolution, they continued to be used in warfare and to resolve disputes of honour in formal duels through the nineteenth century and into the twentieth.
• Though antagonistic competition in fencing is as old as the art itself, the modern sport of fencing originated in the first Olympic games in 1896. The first few years of fencing as a sport were chaotic, with important rule disagreements among schools of fencing from different countries, notably the French and Italian schools. This state of affairs ended in 1913, with the foundation of the F餩ration Internationale d'Escrime (F.I.E.) in Paris. The stated purpose of the FIE is to codify and regulate the practice of the sport of fencing, particularly for the purpose of international competition. The foundation of the FIE is a convenient breaking point between the classical and the modern traditions of fencing.
• Modern and classical fencing • As a sport, the emphasis of the modern sporting tradition is on training athletes to
win at competitions with often arbitrarily defined rules, as opposed to the older, "classical" tradition of fencing, seeking to preserve training with the sword as a means of self-defence and for the formal duel.
• The effects of this split, however, have manifested only slowly since initially all training was done by fencing masters of the classical tradition. After over one hundred years of practice, though, the differences may be considerable.
• The weapons • In both its modern and its classical guise, fencing consists of three different weapons: foil , 鰩e and sabre. These three weapons had become standard by the late nineteenth century and all are represented at Olympic-level competition. Additionally, in classical academies, one will often find historical fencing weapons, such as grand canne and rapier and dagger, being taught.
• Foil used to be the first weapon taught to beginners, because the techniques of foil teach, in abstract form, the fundamentals of fencing. Additionally, in the past, women were only allowed to fence foil, and the lightness of the weapon made it easier to handle for children. Today, while it is advisable to gain at least a fundamental grasp of foil, fencers often begin with any of the three weapons.
• While the weapons fencers use differ in size and purpose some basic parts of the weapon remain constant throughout the disciplines. The pommel, a weighted piece of metal at the end of the handle that holds the blade and handle together whilst providing a counter-balance to the weight of the blade (in actual combat situations, the pommel could be used as a sort of bludgeon). The handle can be one of three types: French, Italian, or pistol grip. The French grip is contoured to the curve of the hand and resembles in use the handles of most swords. The Italian grip is similar to the French with the addition of a metal bar through which the fingers slide; this grip has become antiquated due to the amount of torque it places on the wrist. The pistol grip (otherwise known as the anatomical or orthopedic grip), originally developed for a nineteenth-century Belgian master who had lost fingers in a tram accident, contours entirely to one's hand and is held much like a pistol, hence the name. The guard separates the handle from the blade and provides protection for the hand. • Foil
• The modern foil is descended from the training weapon for the small-sword, the common sidearm of the eighteenth-century gentleman. However, it has long since been altered to be similar in length to the 鰩e (averaging 35" or 890 mm). (Rapier and even longsword foils are also known to have been used but they were very different in terms of weight and use.) It is a light weapon, with a tapered, flexible, quadrangular blade, that scores only with the point. (In modern sport fencing, which makes use of electrical scoring apparatus, one must hit the opponent with the tip of the blade, with a force of at least 4.90 newtons (500 grams-force).)
• The valid target area at foil is limited, due to its origins in a time when fencing was practised with limited safety equipment. Hits to the face were dangerous, so the head was removed from valid target. The target was then further reduced to only the trunk of the body, where the vitals are located. A touch which lands on a invalid target stops the bout, but no point is scored.
• Epee • The modern 鰩e is the closest weapon to an actual classical duelling weapon that
is used in modern fencing. Following the great social revolutions of the late eighteenth century, gentlemen no longer commonly wore swords, and so the 鰩e, carried to the field of honour in a case, was developed as a means of settling disputes. The 鰩e is a long, straight and relatively heavy sword (at least compared to the foil), with a triangular, relatively inflexible blade and a large, round, bell-shaped guard.
• Like the foil, the 鰩e is a point weapon. The reason for the large guard is that the hand is valid target, as is the rest of the body. Since double-touches are a possibility — and, since there is no right-of-way (see below) — 鰩e fencing tends to be conservative in the extreme. In electric fencing, in order for a point to register, one must hit the opponent with the point, registering at least 7.35 newtons (750 grams-force) of force. Classical fencers sometimes use a point d'arret, a three-pronged attachment that will actually catch the opponent's jacket.
• Sabre • The modern sabre is descended from the classical northern Italian duelling sabre,
a far lighter weapon than the cavalry sabre. The method and practice of sabre fencing is somewhat different from the other weapons, in that the sabre is an edged weapon. In modern electric scoring, a touch with the sabre, point, flat or edge, to any part of the opponent's valid target (head, torso, or arm) will register a hit.
• The target area originates from duelling sabre training. To attack the opponent's leg would allow him to "slip" that leg back and attack one's exposed arm or head given that the higher line attack will outreach the low line (there is a classic example of the leg slip in Angelo's Hungarian and Highland Broadsword of
1790). The target area is from the waist up excluding the hands. Right-of-way applies, much as it does to foil.
• Right of way • The "right of way" principle in foil and sabre is that the first person to properly
execute an attack has priority. Simply put, if one is attacked, one must defend oneself before counterattacking -- rather than attempting to hit one's opponent even at the risk of being hit oneself. Attacks can be made to fail either by bad luck, misjudgement or by action on the part of the defender. A properly executed parry (deflecting the incoming attack with one's own blade) causes priority to change and the defender has the opportunity to attack (riposte). The original attacker must counterparry the defender's reposte before attacking again, but if the parry is ineffectual (malparry), if the riposte misses, or the defender hesitates before riposting, the attacker can continue his attack (remise or redoublement) without counterparrying.
• For instance, if one fencer attacks, and the other immediately counter-attacks into the attack, and each hits the other, the first fencer's attack is considered successful, while the second is considered to have misjudged. If, however, the second fencer parried the first attack and then responded with an attack of their own, they would have taken the right of way away from the first fencer. It would then be incumbent on the first fencer to defend him - or her - self.
• When electrical scoring equipment is used in the modern sports of foil and sabre, both fencers will register a hit if they contact within a certain time of each other. Then the referee must decide who had right of way at the time of the hits, and therefore who gets a point. If the referee cannot tell, then he will declare the touches null, and restart the bout from where it stopped.
• Double hits are possible in epee as well, but only if both fencers contact within a very short timeframe (40 milliseconds, or 1/25th of a second). In this case, both fencers will receive a point.
• Protective clothing • The clothing which is worn in modern fencing is made of tough cotton, nylon or
Kevlar. It includes the following items of clothing: • Form-fitting jacket, covering groin and with strap (croissard) which goes
between the legs • Half jacket (plastron) which goes underneath the jacket and provides double
protection on the sword arm side and upper arm. • Glove, which prevents swords going up the sleeve and causing injury, as well as
protecting the hand and providing a good grip • Breeches (knickers), to below the knee • Knee-length socks • Mask, including bib which protects the neck
• This equipment serves to protect the fencer. • Traditionally, the uniform is white in colour, to assist the judges in seeing touches
scored (black being the traditional colour for masters). However, recently the FIE rules have been relaxed to allow coloured uniforms. The colour white might also be traced back to times before electric scoring equipment, when the blades were sometimes covered in soot or coloured chalk to make a mark on the opponents clothing.
• The practice of fencing • Fencing takes place on a strip, or piste, with two fencers facing one another. In
modern fencing, the piste is between 1.5 and 2 meters wide, and 14 meters long. Prior to starting a bout it is customary for fencers to salute each other as well as the director and audience. The fencer's salute consists of the blade going vertically before the fencer saluting with the belgard at face level and back to "en garde". Opponents start in the middle of the piste, 4 metres apart, in the en garde position.
• A referee (formerly called president of jury, or director) presides over the contest, called a "bout." The referee's duties include keeping score, keeping time (sabre is usually fenced untimed), awarding points and maintaining the order of the bout. Often, another person will keep score or time. He or she stands on one side of the piste, watching the bout.
• There are many types of modern fencing bouts, but in the two most common formats, the first fencer to score either 5 or 15 touches is declared the winner.
• Modern fencing also includes the addition of cards/flags (or penalties). In foil and sabre, yellow cards are awarded for bodily contact between opponents - the penalty going to the aggressor. Two yellow cards equals one red card, and a touch for the opponent. Black cards can mean disqualification and are given out for overtly aggressive actions such as beating one's opponent with the pommel of the sword as well as breaches of protocol such as failure to salute.
• It is also possible to fence "in the round," meaning that the bout takes place in a circular or square area instead of on a strip, and fencers can circle in addition to moving forward or backward. This style of fencing is mostly practised today by the SCA and exists not at all in FIE tournaments.
• Electronic scoring equipment • Electronic scoring is used in all major national and international, and most local,
sport competitions. (Classical fencing does not use such devices, as classical fencers feel that such devices negatively impact the practice of the art.) The electrical scoring system requires additional clothing for foil and sabre: Foil fencers wear a conducting vest which covers the torso and groin. Sabre fencers wear a conducting jacket, gauntlet (wrist/forearm cuff) and mask. In both weapons, the fencers' weapons are also wired. When a fencer scores a touch on an opponent, this completes an electric circuit which turns on a light and an audible alarm to notify the referee that a touch has been scored. The referee observes the fencers and the scoring machine to determine which fencer has the right-of-way.
• In 鰩e and foil, the fencers carry special weapons with compressible tips. When a touch is scored, the tip of the weapon compresses, completing a circuit and signalling a touch. In foil fencing, the competitors wear special conductive vests covering the target area that allows a "valid" circuit to be completed, and a coloured light (usually red or green) turns on. If the touch lands off of the valid target area, an "off target" circuit is completed, and a white light turns on. In 鰩e fencing, since target area is the entire body, the fencers do not wear special conductive clothing. In both, the strip itself must be grounded, to prevent a touch from scoring when the tip of a weapon hits the strip (as opposed to striking the opponent's toe, for example).
• Fencers connect their weapons to the scoring apparatus via a bodywire, which is threaded from a socket in the guard of the sword, up the sleeve and down to the waist. A spring-loaded spool of cable, placed at the end of the piste, then connects to this bodywire. The springs in the spool ensure that the wiring extends taut from the fencers waist to the rear of the piste, and doesn't interfere with the fencer's movements.
• The use of the electronic scoring system caused an unexpected side effect in foil, the ability to score touches by using the blade like a whip and depress the tip on the back and other obscured target areas on an opponent. The FIE (Federation Internationale d'Escrime) has recently put into place a number of rules to attempt to remove this anomaly.
• Recently, wireless apparatus has been adopted at top competitions (Including the Athens Olympics). This uses a small radio transmitter worn at the waist.
• Although only the most expensive contests bother to ground the piste, each competitor's coquille (hand guard) is always grounded as it is hit often when trying to strike at an opponent's hand.
• Electronic scoring was introduced to 鰩e in 1936, to foil in 1957, and to sabre in 1988.
• Non-electric scoring • Prior to the introduction of electric scoring equipment, the president of jury was
assisted by four judges. Two judges were positioned behind each fencer, one on each side of the strip. The judges watched the fencer opposite to see if he was hit.
• When a judge thought he saw a hit, he raised his hand. The president then stopped the bout and polled the judges to determine whether there was a touch, and (in foil and sabre) whether the touch was valid or invalid. Each judge had one vote, and the president had one and a half votes. Thus, two judges could overrule the president; but if the judges disagreed, or if one judge abstained, the president's opinion ruled.

• Epee fencing was later conducted with red dye on the tip, easily seen on the white uniform. As a bout went on, if a touch was seen, a red mark would appear. Between the halts of the director, judges would inspect each fencer for any red marks. Once one was found, it was circled in a dark pencil to show that it had been already counted. The red dye was not easily removed, preventing any cheating. The only way to remove it was through certain acids such as vinegar. Thus, epee fencers became renown for their reek of vinegar, until the invention of electrical equipment.
2.1.4. Historical fencing • Historical martial arts reconstructions are attempts at reviving martial arts with no
living tradition. In recent years, with the resurgence of interest in martial arts, schools of fighting long since discontinued have generated enough interest for individuals and organizations to reconstruct them from historical sources.
• The reconstruction of a martial art is very difficult indeed, and opinions on how it is best done differ quite a lot. Usually, written material is used, along with paintings and diagrams of movement. This is, however, usually not enough to capture the dynamics of a martial art, and practical experimentation becomes necessary. Normally the people attempting to reconstruct a martial art have experience in some other, similar martial art with a living tradition, and they normally fill in the gaps with this martial art.
• Examples of martial arts reconstruction are Pankration and the various historical European schools of fencing. The term Historical fencing refers to any fencing system that predates the three classical fencing weapons. These systems may reconstructed, or part of a surviving tradition.
2.2. Finland 2.2.1. Kas-pin • Kas-pin is a Finnish martial art that has both weapon and empty-hand techniques. • The history of Kas-pin is not very well known, and what little is known is generally
disputed. • Kas-pin has been passed down in the Valkonen family allegedly for 30 generations.
Current generation family head is Kaarlo Valkonen, who lives in Hankasalmi and travels to teach his art in seminar format across the country.
• Weapons used in Kas-pin are many and varied: • Knife (Finnish puukko) • Bear-spear • Sickle • Karttu (a club with an approximate length of a baseball bat) • Sword • Sotilasvanhus (a doubly curved walking stick, literally old military man) • Remmi aka Remeli (a belt with a weight at the end)
• Kas-pin also includes some rather esoteric and unusual practices, for instance pimeänoppi (using intuition when fighting in complete darkness) and suo-oppi (how to fight on swamp terrain).
2.2.2. Mil fight • Mil Fight is a Finnish martial art. Grounded by Finnish martial art specialist Hannu
Maunula. The first official training of this martial art took place in Vaasa, year 2001. 2.3. France
2.3.1. Savate (boxe francais) • Savate (pronounced s{-"v{t, SAMPA), also known as boxe française (French boxing) or
French kickboxing, is a French martial art which uses both the hands and feet as weapons and contains elements of western boxing, grappling and graceful kicking techniques (only foot kick, no knee, no tibia). Practitioners of savate are called savateurs (men), and savateuses (women).
• Savate takes its name from the French for old boot (heavy footwear used to be worn during fights) and is actually an amalgam of French street fighting techniques from the beginning of the 19th century. At that time, savate was a type of street fighting common in Paris and the north of France. And in the south, especially in the port of Marseille, sailors had developed a form of fighting involving high kicks, which was known as jeu marseillais (game from Marseille), which was later renamed chausson (slipper, after the type of shoes sailors wore). In contrast, at this time in England (the home of boxing and

the Queensberry rules), kicking was seen as unsportsmanlike or as something that only cowards would resort to.
• The two key historical figures in the history of the shift from street fighting to the modern sport of savate are Michel Casseux (also known as "le Pisseux") (1794-1869), and Charles Lecour (1808-1894). Casseux opened the first establishment in 1825 for practicing and promoting a regulated version of chausson and savate (disallowing head butting, gouging etc). However the sport had not yet managed to shake off its reputation as a street fighting technique. A pupil of Casseux's, Charles Lecour was exposed to the English art of boxing around 1830 and felt that he was at a disadvantage, only using his hands to bat his opponent's feet away, rather than punching. He trained in boxing for two years before, in 1832, combining boxing with chausson and savate to create the sport of savate boxe française as we know it today.
• In competitive savate, there are four allowed kinds of kicks, and three kinds of punches • Kicks: 1. fouette (whip kick), high, medium or low 2. chasse (piston-action kick), high, medium or low 3. revers (sole of the shoe makes contact), side or front 4. coup de pied bas (sweeping kick), low • Punches: 1. jab (lead hand) 2. cross (rear hand) 3. hook (bent arm)
• Perhaps the ultimate recognition of the respectability of savate came in 1924 when it was included as a demonstration sport in the Olympic Games in Paris. Despite its roots, savate is a relatively safe sport to learn. According to USA Savate "savate ranks lower in number of injuries when compared to football, hockey, soccer, gymnastics, basketball, baseball and inline skating".
• Today, savate is played all over the world by amateurs: from Australia to the USA and Finland to Britain. Many countries (although the United States is an exception) have national federations devoted to promoting the sport.
• Modern codified savate provides for three levels of competition: assaut, pre-combat, and combat. Assaut requires the competitors to focus on their technique while still making contact; referees assign penalties for the use of excessive force. Pre-combat allows for full-strength fighting so long as the fighters wear protective gear such as helmets and shinguards. Combat, the most intense level, is the same as pre-combat, but protective gear other than groin protection and mouthguards is prohibited.
• Many martial arts provide ranking systems, such as belt colors. Similarly, savate uses glove colors to indicate a fighter's level of proficiency. (Unlike arts such as karate or capoeira, which assign new belts at each promotion, however, savate rank is not actually reflected in the color of one's gloves.) Novices begin at no color. Promotion tests allow the fighter to graduate successfully to blue, green, red, white, and yellow. Competition is restricted to red glove rank and above; fighters at white glove rank are considered to be instructors in training, and yellow gloves are required to teach what they know to others.
2.4. Germany 2.4.1. Anti-terror kampf • Anti Terror Kampf is a self-defense system developed in Germany which mostly
utilizes wrestling, joint locks and especially pressure points. • It can be roughly compared to Aikijutsu.
2.5. Greece 2.5.1. Pankration • Pankration is a sport or martial art introduced in the Olympic games in 648 BC. It
combined striking and grappling, and a match would be won by submission of the opponent. A contestant could signal submission by raising his hand, but sometimes the only form of submission was the death of one of the contestants. Joint locks and choke holds were common techniques of accomplishing this. In fact, there were only two rules: contestants were not allowed to gouge each other's eyes out, or to bite each other. The ancient Olympics also had a less violent pankration contest for young boys.

• Pankration striking was somewhat crude. Large swinging kicks and punches were the method of attack, relying heavily on strength. For this reason, Pankration was the domain of the heavier athletes.
• Ancient sculptures and pottery paintings depicting naked pankration fighters show blade-like hands and crouches reminiscent of modern martial arts.
• Among pankration fighters, Dioxippus was the most famous. He won several Olympic games as no one dared challenge him. He became friends with Alexander the Great, and was challenged by one of Alexander's soldiers named Coragus. Coragus fought with weapons and full armour, but was still defeated by the unarmed Dioxippus; Alexander was ashamed for his army and forced Dioxippus to commit suicide.
• In the lead-up to the 2004 Athens Olympic Games, a modern version of pankration was tipped as being a new sport in the Olympiad, especially due to its being an event in the ancient games. However, its application (along with that of inline skating) was not approved. Rumours were that it was rejected due to its inherently violent nature, even though the modern version is significantly less violent than the original, and, like boxing and wrestling, also ancient Olympic sports, there are an international set of humane rules governing the modern sport.
2.6. Iceland 2.6.1. Glima • Glíma is Icelandic wrestling. • There are three points that differentiate it from other forms of wrestling:
• The opponents must always stand erect. • The opponents step clockwise around each other (looks similar to a waltz). This is to
create opportunities for offense and defense, and to prevent a stalemate. • It is not permitted to fall down on your opponent or to push him down in a forceful
manner, as it is not considered sportsman-like. 2.7. Ireland
2.7.1. Bata • Bata is also a term for Irish stick fighting
2.8. Portugal 2.8.1. Jogo du Pau • Jogo do Pau ("stick fencing" is a possible translation to English) is a Portuguese martial
art which has developed in the Northern Portugal, in the regions of (Alto Minho and Tr࠳os-Montes) focusing on the use of the quarterstaff and its derivatives.The techniques employed can be traced to several origins, most notably to a dance in India. Its propousal was primarily self-defence helping to survive bad encounters with robbers, but in the agricultural areas of the North of Portugal, it was used not only in personal fights but also in fights between people from nearby villages.
• The main reasons for its popularity and use as a weapon of self protection were the facts that a wooden stick was available to anyone, it always carried by many people as a support for the long daily walks, to help crossing the rivers and namely by the shepherds to protect the cattle from the wolves.The are references sayng that this martial art was used during the ocupation of Portugal against the troops of Napoleon in the guerrilla led by Z頤o Telhado.
• There is strong evidence that its technique has most probably derived from a dance in India, which would have been imported and adapted in the time of the Discoveries. A plausible reasoning since it was never practised in Galiza (the neighbouring region of North-West Spain, with close linguistic and cultural ties with the regions of Minho and Tr࠳os-Montes); although some say that its origins are medieval techniques of combat much similar technique in the medieval book "A ensinan硠de bem cavalgar em toda a sela" (The art of being a horseman on any saddle) whose author was D. Duarte, a Portuguese King (1391-1438 AD). Whatever proves to be true it has nothing to do with the dance known as the Pauliteiros de Miranda (related to Asturain folklore).
• In the 20th century the pratide of jogo do pau had a quick decline due to the rise of fascism. In this time it was almost only practiced in organizations dedicated to preserve the folklore, but now jogo do pau' is being praticed not only in Portugal but also in other europeans countries.
2.9. Poland 2.9.1. Combat 56
• Combat 56 designates a fight technique invented by a Polish officer Arkadiusz Kups, former commando unit of elite. This technique was developed for the troop of special elite (the 56th Company) conceived to act behind lines enemies.
• The idea was to create a system that could be simple and quick to learn by trainees. The principal technique consist in to attack all the soft parties of the human body.
2.9.2. Kempo tai jutsu • Kempo Tai Jutsu is a Polish system of self-defense created by Ryszard J棳78;wiak in
1990-1991. 2.9.3. Signum polonicum • Signum Polonicum is a Polish martial art based on historical martial arts with weapon. 2.9.4. Tsunami karate • Tsunami Karate is a Polish style of karate. • The term Tsunami means that it's one of few Japanese words in Polish Language. • Japanese names of techniques and etiquette of dojo are used, although it is Polish karate
founded by Mr. Ryszard Murat. Tsunami was created in Poland, but on the foundations of other styles of karate, and therefore there is Japanese terminology in it. Tsunami is the style of mercy, because in the situation of fight one should gouge one eye, not two.
• There is much street fight in this style. Often the opponent can be knocked down by the look of face of a tsunamist. The looks of faces are completely different from the looks of faces of common people in the situation of fight.
• Specific for this style is using weapon of Polish people: a sickle, a shovel etc. • Styles such as Tsunami (and the people who propagates them) make live more interesting.
2.10. Russia 2.10.1. ROSS • ROSS (Russian: РОСС, short for Росси�йская Оте�чественная Систе�ма Самозащи�ты;
English transliteration: Rossiyskaya Otechestvennaya Sistema Samozashchity; translated as Russian Native System of Self-Defense) is a combat technique, which is essentially the same as systema. ROSS is its official name given by the All-Russian Federation of Russian Martial Arts (RFRMA). It is conceived more as a methodology of performance enhacement for combat, applicable to any martial art, rather than a closed system.
2.10.2. Sambo (Sombo) • Sambo (самбо) -- (also called Sombo and sometimes written in all-caps) is a modern
martial art, combat sport and self-defense system developed in the Soviet Union. • The word Sambo is an abbreviation of САМозащита Без Оружия (SAMozashchita Bez
Oruzhiya) meaning "self-defense without weapons" in Russian. • Although Sambo has its roots in traditional folk wrestling and foreign martial arts like
Judo (the founder of Sambo studied under the founder of Judo and acquired a 2nd degree black belt in this sport), this martial art is new: on November 16, 1938, the sport was recognized by USSR National Committee of Physical Culture.
• Although it was originally a single system, there are now three generally recognized versions of Sambo: • Sport Sambo, which is similar to Judo, Jiu jitsu, or Wrestling. The competition is
similar to Judo, but with some differences in rules, protocol, and uniform. For example, in contrast with Judo, Sambo allows ankle locks, knee locks, and leg locks, while not allowing chokes.
• Self-defense Sambo, which is similar to Aikijutsu or Aikido because it is entirely defensive against attacks by armed and unarmed attackers. Combat Sambo (or Combat Sambo Spetsnaz). Utilized and developed for the military, this is arguably the root of Sambo as it is now known.
• Sambo is a martial art that combines strikes and grappling, with a slight emphasis on the latter. Combat Sambo is more concerned with disabling an opponent quickly, without worrying about finesse or permanent harm; also, Combat Sambo includes weapons practice and disarming techniques.
• A Sambo practitioner normally wears a kurtka, belt, and sambofki. 2.10.3. Systema • Systema ("The System") (also known as Combat Sambo Spetsnaz) is a Russian combat
system also utilized by Spetsnaz. It is designed to be highly adaptive and practical, training using drills and sparring instead of set kata. Because of its open nature, it is effective against many different fighting styles.
• Systema is believed to date back to the 10th century and has been constantly evolving. Since Russia is such a large country, it contains many different ethnic groups, most of which have traditional fighting methods. Also, Russia has had to repel invaders from all directions. Because of this, Russia has absorbed and combined styles from China, Japan, Europe, and even parts of Greco-Roman wrestling. This "best of many worlds" history led to a very powerful fighting style.
• When the Communists came to power in 1917, many Russian traditions were suppressed, and the teaching and practice of Systema was banned from the general public. However, even during this time Systema continued to live.
• While ancient family traditions continued in secret, of particular interest are Sokoli Stalina (Stalin's Falcons). Joseph Stalin's bodyguards used Systema while he was in power for almost 30 years till his death in 1953 and then it was used by the Special Military Operations Units for the highest risk missions in Spetsnaz units (the KGB's Special Forces), the GRU and other government facilities.
• The term "Combat Sambo Spetsnaz" was coined to misdirect Systema's relation to Sambo. There is little relation between the two styles.
• It is due to the strictly-enforced ban on non-sanctioned traditions that it was not until the fall of Communism that Systema became known to the outside world. It is still fairly obscure, but growing in popularity.
• Since the collapse of the Soviet system, many Russian fighting styles have re-emerged through training, competition, and media publicity. These styles include: Sambo, Slaviano-Goretskaya Borba (StormWarrior style), the military style taught by AA Kadochnikov, plus a variety of folk styles (e.g. Busa, Skobar, Forest Warrior, Kozachiy Sploch, Fist fighting by Gruntovsky and many more).
2.11. Spain 2.11.1. Zipota • Zipota is a Basque martial art similar to the French fighting style (Savate) which also
survives and includes some stick-fencing. • Zipota (which means shoe) is a very rough sport, involving a lot of leaping kicks and
throws even in competition. The use of the Basque walking stick, a light five foot shepherd's staff, is taught in an aligned discipline called Makila. Several practitioners have competed very successfully in Savate-Boxe Francaise and la canne de combat.
2.12. Switzerland 2.12.1. Schwingen • Schwingen is a Swiss version of wrestling.
2.13. Uzbekistan 2.13.1. Kurash • Kurash is the native ancient type of upright jacket wrestling practiced in Uzbekistan.
3. Middle eastern martial arts 3.1. Israel
3.1.1. Haganah system • The Haganah system is based on the Israeli Defense Force's combat training. It claims to
be not only a martial art, but a method for enabling someone at a disadvantage to overpower a larger adversary. The system's main goal is to have the combatant enter a "point of reference." This point is a lock/grab around the neck, and the back of the aggressor. Becase of this "point" the combatant is focused and already has a plan instead of relying on fancy manuvers that take time to apply, and difficult to learn. Plain well placed counterstrikes are applied to defeat the adversary. In addition to hand-to-hand combat and ground-fighting, Haganah applies defenses against knives, guns, and multiple weapons and attackers.
• Techniques that Haganah covers include defense against punches and kicks, escapes and releases from chokes, bear hugs, hot weapons, firearms such as automatic weapons, grenades, and multiple attackers. Haganah also covers various hand-to-hand combat techniques such as multiple types of arm blows, and different types of low kicks to the legs, executed with or without shoes.
• There are some ground survival techniques including combat-neutralizing grappling techniques, pinching, tendon and muscle tearing, and for specialized or advanced trained, tactical knife fighting, combat shooting and counter-terrorist strategies and techniques.
3.1.2. Krav maga
• Krav Maga (Hebrew קרב מגע: "contact combat") is a martial art, at first developed in Czechoslovakia in the 1930s. The developer was Imi Lichtenfeld. When Mr. Lichtenfeld came to Palestine prior to the establishment of the state of Israel, he began teaching hand to hand combat to the Haganah, the Jewish underground army. After the establishment of Israel, Krav Maga was adopted by the Israeli armed forces and police as the martial art of choice. The art reached its current form in Israel shortly after its formation. After Mr. Lichtenfeld retired from a long career as chief instructor of close combat in the Israel Defense Forces (IDF), he started teaching Krav Maga to the civilian population. In this way, a civilian version based on the principles of self defense was developed.
• In a nutshell, the basic fighting principles are that every self defense response must meet all of the following criteria: • the fastest • the strongest • the shortest • the most natural • and to the point (for instance, if you mean to escape, escape; if you mean to hit, hit).
• In the given situation, the defense or attack must be • The basic idea is to first deal with the immediate threat (e.g. hands around one's neck),
prevent the attacker from re-attacking, then neutralize the opponent. An emphasis is put on taking the initiative from the attacker as soon as possible. It is considered acceptable to run away (tactical withdrawal), if the situation dictates that. Krav Maga can be used against opponents who are armed, and against multiple opponents. It is also good in closed areas, such as airplanes.
• Krav Maga includes many disarming techniques, and fighting under unusual circumstances is stressed in practice.
• Prior to 1985, the experts in Krav Maga were in Israel. Few foreigners came to Israel to study Krav Maga and no highly skilled Israelis left Israel to run Krav Maga schools. The first non-Israeli known to have operated a school strictly for teaching Krav Maga is Darren Levine, who teaches Krav Maga in Los Angeles. The first non-Israeli, non-Jew who was certified as an expert and instructor was James Keenan, also from the United States.
• Since the death of Mr. Lichtenfeld, a number of different schools and associations of Krav Maga have developed.
• The name in Hebrew is usually translated as "close combat". The word krav means "fight" or "battle". The word maga means "touching" or "in contact". A translation like "contact combat", though, can be miscontrued as something like "kickboxing" or "Full Contact Karate". Krav Maga is not a sport and has no competitive aspect.
• As a historical note, the original name of Krav Maga was Kapap (sounds like "ka-PAP") which was an acronym for Krav Panim el Panim, face-to-face combat.
4. African martial arts 4.1. Egypt
4.1.1. Egyptian stick fencing • Several types of Egyptian stick fencing were practiced during religious ceremonies,
processions, and as sport or game in ancient Egypt. More recently (about the 18th century) it has been reported that similar stick fencing still existed. Stick fencing is still popular, particularly during the month of Ramadan.
4.2. South Africa 4.2.1. Zulu stick fighting • Zulu stick fighting is a martial art traditionally practised by teenage Zulu herdboys in
South Africa. Each combatant is armed with two long sticks, one of which is used for defence and the other for offence. No armour or protective gear is used.
• In recent years, attempts have been made to develop Zulu stick fighting into a regular sport, with rules and competitions.
5. South american martial arts 5.1. Brazil
5.1.1. Brazilian ju-jitsu (BJJ, Gracie ju-jitsu, Machado jiu-jitsu) • Brazilian Jiu-Jitsu (BJJ), also known as Gracie Jiu-Jitsu (GJJ), is a martial art that was
developed in Brazil by the Gracie family during the mid-20th century. Originally based on the Japanese Martial art of Judo as it existed before World War II and the Changes of
Douglas MacArthur acting as Supreme Commander Allied Powers, it has since developed into a relatively independent system with a large emphasis on ground fighting and grappling.
• History • A Japanese judoka, prizefighter, and member of the Kodokan named Mitsuo Maeda
emigrated to Brazil in the 1910s and was helped greatly by a Brazillian politician named Gast� �Gracie. In return for his aid, Maeda taught Judo to Gast s son Carlos, who then taught the art to his brothers, including H鬩o Gracie. Through their own study and development, Carlos and H鬩o are regarded as the originators of Brazilian Jiu-Jitsu as a style of distinct from Kodokan Judo.
• Brazilian Jiu-Jitsu became internationally prominent in the martial arts community in the 1990s, when Brazilian Jiu-Jitsu expert Royce Gracie won several Ultimate Fighting Championships against experienced and much larger opponents using the style.
• Brazilian Jiu-Jitsu inherited an emphasis on using off-balancing, leverage, and the opponent's own power, as well as a majority of it's technique from Kodokan Judo. However, since that time there has been considerable divergence between Judo and Brazilian Jiu-Jitsu, although some argue that the difference is more in the culture and the moral goals of the arts than in the physical principles and techniques of the two arts.
• The main difference is that Judo in it's Olympic Sport form emphasizes throws, while Jiu-Jitsu emphasizes submission. Judo does not allow leg-locks and also has a much higher amount of referee intervention during matches (the competitors are often returned to the standing position, while Jiu-Jitsu generally allows its participants to patiently work towards a submission).
• Factors which contributed to the divergence include the Gracies' desire to create a national martial art, the influence of Brazilian culture, the non-participation of the Gracie schools in sport judo, the postwar closing of the Kodokan (which was only allowed to reopen on the condition that emphasis be shifted towards sport), as well as the Gracies' own additions to the body of technique and opinions regarding self-defense, martial arts and training methods, and, more recently, the influence of mixed-martial-art competitions such as the Ultimate Fighting Championship.
• Techniques • Brazilian Jiu-Jitsu emphasizes ground fighting techniques and submission holds
involving joint locks and chokeholds. The premise is that most of the advantage of a larger, stronger opponent comes from superior reach and more powerful strikes, both of which are largely negated if wrestling on the ground; and if either fighter wants the fight to go to the ground, it will. Once the opponent is on the ground, a number of maneuvers (and counter-maneuvers) are available to manipulate the opponent into suitable position for the application of a submission hold. This system of maneuvering and manipulation can be likened to a form of kinetic chess when contested between two experienced practitioners. A submission hold is the equivalent of checkmate.
• Submission holds can be grouped into two broad categories. Joint locks and chokes. Joint locks typically involve isolating an opponent's limb and creating a lever with your own body position which will force the joint to move past its normal range of motion. Pressure is increased in a controlled manner and if the opponent cannot escape the hold then they may signal defeat by submitting. The commonly accepted form of submission is to tap the opponent, gym mat, or even yourself three times (verbal submission is also acceptable but less common).
• Alternatively, one could apply a chokehold (or more accurately a strangulation), cutting off blood to the brain, causing unconsciousness if the opponent refuses to tap out. Most BJJ "chokes" involve constriction of the carotid artery. This differs from the more instinctive choking movements which generally involve constriction of the windpipe. Though this distinction may at first seem subtle it is in fact very significant (commonly referred to as "blood" and "air" chokes respectively). Air chokes are highly inefficient and may result in damage to the opponent's trachea, sometimes even resulting in death. Contrastingly, blood chokes directly cut the flow of blood off from the opponent's brain causing a rapid shutdown of consciousness without damaging the internal structure. Being "choked-out" in this way is actually relatively
safe as long as the choke is released soon after unconsciousness, letting blood (and therefore oxygen) back into the brain before the damages of oxygen deprivation begin.
• The prevalence of the dangerous "air" chokes has actually led to the banning of chokeholds from some United States police departments. Because of the negative legal connotations of the words choke and even strangulation one is advised to use the term "lateral vascular restraint" when describing a blood choke used in a self-defense situation.
• Brazilian Jiu-Jitsu's emphasis on joint locks and maneuvering rather than strikes means that one's technique can be practiced at full speed and full power, identical to the effort and technique used in a real fight. Training partners can resist and counter just as they would in an actual fight, providing valuable real-world experience should the techniques ever need to be applied in an actual fight. This practice of live training, officially called Randori but commonly known as "rolling" in BJJ circles, is considered by many BJJ practitioners to be the major factor differentiating combat sports (ex. BJJ, Judo, Boxing, Wrestling) from traditional martial arts (ex. Karate, Tae Kwon Do, Aikido).
• In modern times, many forms of sport fighting have come into vogue. During competition, these styles award points for attacking with certain techniques. For example, a competitor may be awarded 2 points for kicking his or her opponent in the body and 3 points for kicks delivered to the head. Coinciding with Brazilian Jiu-Jitsu's considerable surge in popularity, many tournaments now disallow striking in favor of grappling. The rules for these contests reward points to a competitor that has obtained a position considered to be advantageous. In the event that no combatant was submitted outright, the winner will be determined by these points.
• The main emphasis in Brazilian Jiu-Jitsu is to dominate the opponent through skillful application of technique and force them to quit (submit). By using the techniques of Brazilian Jiu-Jitsu, a smaller practitioner, male or female, can control much larger and stronger opponents and actually force that larger opponent to submit.
• Grading • One of the things that separates Brazilian Jiu-Jitsu from other martial arts is the
importance of competition. In Brazilian Jiu-Jitsu you must be able to beat 90% of those in your current belt (those in respective age/weight class). So that on average it takes 1 year to make Blue, 2 more years to Purple, 3 more years to Brown, and 4 more years to Black. It takes 8 - 10 years to make it to Black making it one of the longest and hardest martial arts for Black Belt. All schools vary and there are exceptions but this is the norm.
• The standards for grading and belt promotions vary between schools, but the widely accepted measures of a person's skill and rank in Brazilian Jiu-Jitsu are (1) the amount of technical knowledge they can demonstrate on the mat, and (2) their performance in competition.
• Technical knowledge is judged by the number of techniques a person can perform, and the level of skill with which he performs them. This allows for smaller and older people to be recognized for their knowledge though they may not be the biggest and strongest fighters in the school.
• Competitions play an important role in the grading of Brazilian Jiu-Jitsu, as they allow an instructor to compare the level of his students against those of the same rank in other schools. A belt promotion may be given after success in a competition, particularly at the lower belts. A promotion might also be awarded when a person can submit most people in his school of the same rank, e.g. a white belt who consistently submits most other white belts in sparring.
• The high level of competition between schools and its importance to belt promotion is also considered to be one of the key factors preventing instructors from lowering standards or allowing people to buy their way up the belts.
• Many instructors also take the personality of the person and their behavior outside of class into account, and may refuse to promote someone if they exhibit antisocial or destructive tendancies.
• It is by these and other criteria that most instructors promote their students. A few schools may also have formal testing, and include oral or written exams.
• Childrens belts • White • Yellow • Orange • green
• Adults belts • White • Blue • Purple • Brown • Black
• A green and yellow belt is worn by one fighter during competition for scoring puposes, and may be worn over their normal belt.
• Blue belts are rarely awarded to anyone below the age of 16, though experienced children will usually receive a blue belt when they switch to adult classes. The minimum age for a black belt is 18.
• Stripes, like the belts themselves, tend to be awarded at the instructor's discretion, and may be in recognition of accomplishments like submitting a higher belt in sparring or noticeably improving. Unlike belts however, not all schools award stripes, or award them consistently, so the number of stripes a person has is not necessarily a good measure of their accomplishments or time in training.
• Black belts receive degrees every three years for as long as they train. At 9th degree, the black belt is replaced by an alternately red and black belt, and at 10th degree the belt is replaced with a solid red one.
• As instructors, only black belts can promote others up to black belt level. Some schools allow lower instructor to promote their students to one rank below their own, e.g. a brown can promote his students as high as purple but no further.
5.1.2. Capoeira • Capoeira is a Brazilian martial art developed in the 1500s by slaves. It is marked by deft,
tricky movements often played on the ground or completely inverted. It also has a strong acrobatic component in some versions and is always played with music. The word capoeira has a few meanings, one of which is an area forest or jungle that has been cleared by burning or cutting down. Alternatively, Kongo scholar K. Kia Bunseki Fu-Kiau thinks that capoeira could be a deformation of the kikongo word kipura, which means to flutter, to flit from place to place; to struggle, to fight, to flog. In particular, the term is used to describe rooster's movements in a fight.
• Breakdancing, developed in the 1970s, has many analogous moves; thus, many believe that capoeira is its root. Indeed, many Brazilians had imigrated to the US, and particularly to New York, by that time, and would practice capoeira in the streets where it was able to influence, and probably be influenced by, this new dance form.
• There are two main styles of capoeira that are clearly distinct. One is called Angola, which is characterized by slow, low play with particular attention to the rituals and tradition of capoeira. The other style is Regional (pronounced 'hey-zhow-nao'), known for its fluid acrobatic play, where technique and strategy are the key points. Both styles are marked by the use of feints and subterfuge, and use groundwork extensively, as well as sweeps, kicks, and headbutts.
• Recently, the game was popularized by the addition of the capoeiristas Eddie Gordo and Christie Monteiro in the popular computer games Tekken 3 and Tekken 4, respectively.
• History • During the 1500s, Portugal shipped slaves into South America from Western Africa.
Brazil was the largest contributor to slave migration with 42% of all slaves shipped across the Atlantic. The following peoples were the most commonly sold into Brazil: The Sudanese group, composed largely of Yorubaa and Dahomean people, the Islamised Guinea-Sudanese group of Malesian and Hausa people and the Bantu group (among them Kongos, Kimbundas and Kasanjes) from Angola, Congo and Mozambique.
• There are engravings and writings that describe a now-lost fighting dance in Cuba that reminds us of Capoeira with two Bantu men moving to the yuka drums.

• These people brought their cultural traditions and religion with them to the New World. The homogenization of the African people under the oppression of slavery was the catalyst for Capoeira. Capoeira was developed by the slaves of Brazil as a way to resist their oppressors, secretly practice their art, transmit their culture, and lift their spirits. Some historians believe that the indigenous peoples of Brazil also played an important role in the development of Capoeira.
• After slavery was abolished, the slaves moved to the cities of Brazil, and with no employment to be found, many joined or formed criminal gangs. They continued to practice Capoeira, and it became associated with anti-government or criminal activities. As a result, Capoeira was outlawed in Brazil in 1892. The punishment for practicing Capoeira was extreme, and the police were vicious in their attempt to stamp out the art. Capoeira continued to be practiced, but it moved further underground. Rodas were often held in areas with plenty of escape routes, and a special rhythm called cavalaria were added to the music to warn players that the police were coming. To avoid being persecuted, Capoeira practitioners (Capoeiristas) also gave themselves an apelido or nicknames, often more than one. This made it much harder for the police to discover their true identities. This tradition continues to this day. When a person is baptized into Capoeira at the batizado ceremony, they may be given their apelido.
• In 1937, Mestre Bimba was invited to demonstrate his art in front of the president. After this performance, he was given permission to open the first Capoeira school in Brazil. Since that time, Capoeira has been officially recognized as a national sport, and has spread around the world. Mestre Bimba's systematization and teaching of capoeira made a tremendous contribution to the capoeira community.
• In 1942, Mestre Pastinha opened the first Capoeira Angola school, the Centro Esportivo de Capoeira Angola, located in Bahia. He had his students wear wear black pants and yellow t-shirts, the same color of the "Ypiranga Futebol Clube," his favorite soccer team. Most Angola schools since then follow in this tradition, having their students wear yellow capoeira t-shirts.
• Together, Mestre Bimba and Mestre Pastinha are generally seen as the fathers of modern Capoeira Regional and Capoeira Angola respectively.
• Music • Music is integral to Capoeira. It sets the tempo and style of game that is to be played
within the Roda (pronounced Ho'da). The music is comprised of instruments and song. The tempos differ from very slow (Angola) to very fast (S� Bento Regional). Many of the songs are sung in a call and response format while others are in the form of a narrative. Capoeiristas sing about a wide variety of subjects. Some songs are about history or stories of famous capoeiristas. Other songs attempt to inspire players to play better. Some songs are about what is going on within the roda. Sometimes the songs are about life, or love lost. Others are lighthearted or even silly things, sung just for fun. Capoeiristas change their playing style significantly as the songs or rhythm from the berimbau (below) commands. In this manner, it is truly the music that drives capoeira.
• There are three basic kinds of songs in Capoeira. A ladainha (litany) is a narrative solo usually sung at the begining of a roda, often by the Mestre (a teacher). These ladainhas will often be famous songs previously written by a Mestre, or they may be improvised on the spot. A ladainha is usually followed by a chula, following a call and response pattern that usually thanks God and one's teacher, among other things. Each call is usually repeated word-for-word by the responders. The chula is often ommited in Regional games. Finally, corridos are songs that are sung while a game is being played, again following the call and response pattern. The responses to each call do not simply repeat what was said, however, but change depending on the song. For the words to many of the songs, see Capoeira songs.
• The instruments are played in a row called the bateria. The first three instruments are berimbaus, which look like an archer's bow using a steel string and a gourd for resonation. These three bows are the Berraboi / bass / Gunga, Medio, & Viola, and lead the rhythm. Other instruments in the bateria are: two Pandeiros (tambourines), a Reco-Reco (rasp), and an Agogo (double gong bell). The Atabaque (conga-like drum), a common feature in most Capoeira baterias, is considered an optional instrument, and is not required for a full bateria in some groups.
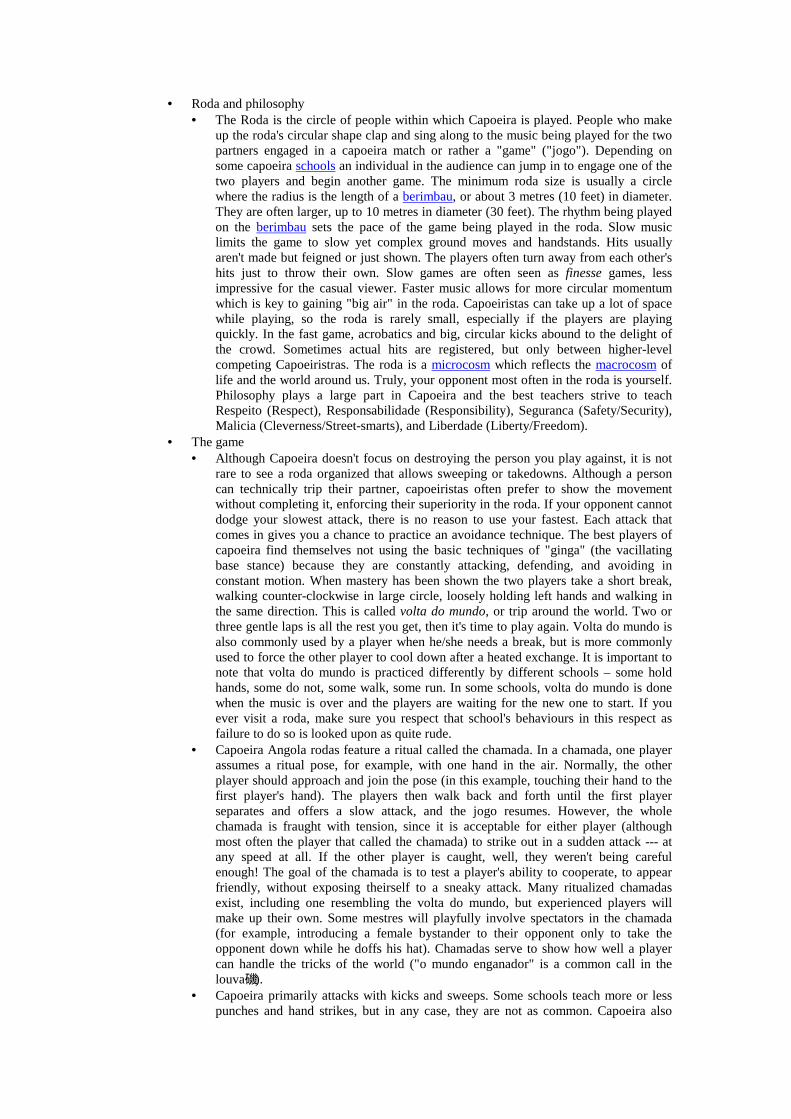
• Roda and philosophy • The Roda is the circle of people within which Capoeira is played. People who make
up the roda's circular shape clap and sing along to the music being played for the two partners engaged in a capoeira match or rather a "game" ("jogo"). Depending on some capoeira schools an individual in the audience can jump in to engage one of the two players and begin another game. The minimum roda size is usually a circle where the radius is the length of a berimbau, or about 3 metres (10 feet) in diameter. They are often larger, up to 10 metres in diameter (30 feet). The rhythm being played on the berimbau sets the pace of the game being played in the roda. Slow music limits the game to slow yet complex ground moves and handstands. Hits usually aren't made but feigned or just shown. The players often turn away from each other's hits just to throw their own. Slow games are often seen as finesse games, less impressive for the casual viewer. Faster music allows for more circular momentum which is key to gaining "big air" in the roda. Capoeiristas can take up a lot of space while playing, so the roda is rarely small, especially if the players are playing quickly. In the fast game, acrobatics and big, circular kicks abound to the delight of the crowd. Sometimes actual hits are registered, but only between higher-level competing Capoeiristras. The roda is a microcosm which reflects the macrocosm of life and the world around us. Truly, your opponent most often in the roda is yourself. Philosophy plays a large part in Capoeira and the best teachers strive to teach Respeito (Respect), Responsabilidade (Responsibility), Seguranca (Safety/Security), Malicia (Cleverness/Street-smarts), and Liberdade (Liberty/Freedom).
• The game • Although Capoeira doesn't focus on destroying the person you play against, it is not
rare to see a roda organized that allows sweeping or takedowns. Although a person can technically trip their partner, capoeiristas often prefer to show the movement without completing it, enforcing their superiority in the roda. If your opponent cannot dodge your slowest attack, there is no reason to use your fastest. Each attack that comes in gives you a chance to practice an avoidance technique. The best players of capoeira find themselves not using the basic techniques of "ginga" (the vacillating base stance) because they are constantly attacking, defending, and avoiding in constant motion. When mastery has been shown the two players take a short break, walking counter-clockwise in large circle, loosely holding left hands and walking in the same direction. This is called volta do mundo, or trip around the world. Two or three gentle laps is all the rest you get, then it's time to play again. Volta do mundo is also commonly used by a player when he/she needs a break, but is more commonly used to force the other player to cool down after a heated exchange. It is important to note that volta do mundo is practiced differently by different schools – some hold hands, some do not, some walk, some run. In some schools, volta do mundo is done when the music is over and the players are waiting for the new one to start. If you ever visit a roda, make sure you respect that school's behaviours in this respect as failure to do so is looked upon as quite rude.
• Capoeira Angola rodas feature a ritual called the chamada. In a chamada, one player assumes a ritual pose, for example, with one hand in the air. Normally, the other player should approach and join the pose (in this example, touching their hand to the first player's hand). The players then walk back and forth until the first player separates and offers a slow attack, and the jogo resumes. However, the whole chamada is fraught with tension, since it is acceptable for either player (although most often the player that called the chamada) to strike out in a sudden attack --- at any speed at all. If the other player is caught, well, they weren't being careful enough! The goal of the chamada is to test a player's ability to cooperate, to appear friendly, without exposing theirself to a sneaky attack. Many ritualized chamadas exist, including one resembling the volta do mundo, but experienced players will make up their own. Some mestres will playfully involve spectators in the chamada (for example, introducing a female bystander to their opponent only to take the opponent down while he doffs his hat). Chamadas serve to show how well a player can handle the tricks of the world ("o mundo enganador" is a common call in the louva磯).
• Capoeira primarily attacks with kicks and sweeps. Some schools teach more or less punches and hand strikes, but in any case, they are not as common. Capoeira also
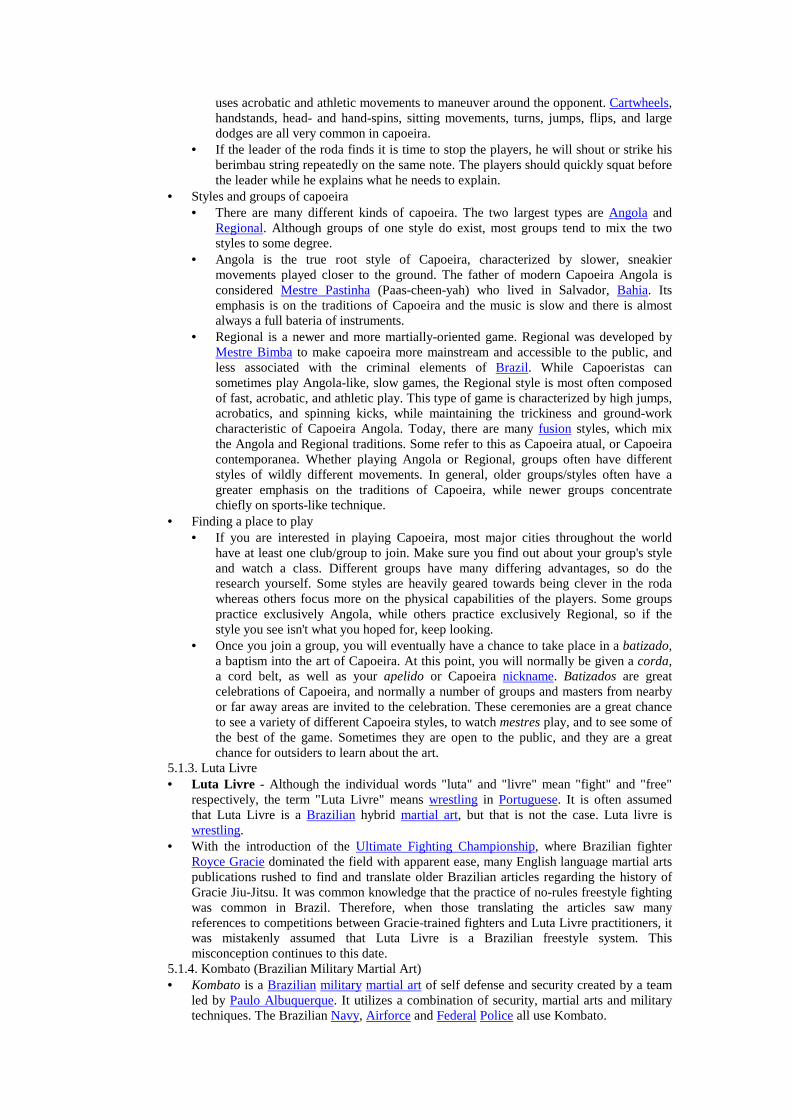
uses acrobatic and athletic movements to maneuver around the opponent. Cartwheels, handstands, head- and hand-spins, sitting movements, turns, jumps, flips, and large dodges are all very common in capoeira.
• If the leader of the roda finds it is time to stop the players, he will shout or strike his berimbau string repeatedly on the same note. The players should quickly squat before the leader while he explains what he needs to explain.
• Styles and groups of capoeira • There are many different kinds of capoeira. The two largest types are Angola and
Regional. Although groups of one style do exist, most groups tend to mix the two styles to some degree.
• Angola is the true root style of Capoeira, characterized by slower, sneakier movements played closer to the ground. The father of modern Capoeira Angola is considered Mestre Pastinha (Paas-cheen-yah) who lived in Salvador, Bahia. Its emphasis is on the traditions of Capoeira and the music is slow and there is almost always a full bateria of instruments.
• Regional is a newer and more martially-oriented game. Regional was developed by Mestre Bimba to make capoeira more mainstream and accessible to the public, and less associated with the criminal elements of Brazil. While Capoeristas can sometimes play Angola-like, slow games, the Regional style is most often composed of fast, acrobatic, and athletic play. This type of game is characterized by high jumps, acrobatics, and spinning kicks, while maintaining the trickiness and ground-work characteristic of Capoeira Angola. Today, there are many fusion styles, which mix the Angola and Regional traditions. Some refer to this as Capoeira atual, or Capoeira contemporanea. Whether playing Angola or Regional, groups often have different styles of wildly different movements. In general, older groups/styles often have a greater emphasis on the traditions of Capoeira, while newer groups concentrate chiefly on sports-like technique.
• Finding a place to play • If you are interested in playing Capoeira, most major cities throughout the world
have at least one club/group to join. Make sure you find out about your group's style and watch a class. Different groups have many differing advantages, so do the research yourself. Some styles are heavily geared towards being clever in the roda whereas others focus more on the physical capabilities of the players. Some groups practice exclusively Angola, while others practice exclusively Regional, so if the style you see isn't what you hoped for, keep looking.
• Once you join a group, you will eventually have a chance to take place in a batizado, a baptism into the art of Capoeira. At this point, you will normally be given a corda, a cord belt, as well as your apelido or Capoeira nickname. Batizados are great celebrations of Capoeira, and normally a number of groups and masters from nearby or far away areas are invited to the celebration. These ceremonies are a great chance to see a variety of different Capoeira styles, to watch mestres play, and to see some of the best of the game. Sometimes they are open to the public, and they are a great chance for outsiders to learn about the art.
5.1.3. Luta Livre • Luta Livre - Although the individual words "luta" and "livre" mean "fight" and "free"
respectively, the term "Luta Livre" means wrestling in Portuguese. It is often assumed that Luta Livre is a Brazilian hybrid martial art, but that is not the case. Luta livre is wrestling.
• With the introduction of the Ultimate Fighting Championship, where Brazilian fighter Royce Gracie dominated the field with apparent ease, many English language martial arts publications rushed to find and translate older Brazilian articles regarding the history of Gracie Jiu-Jitsu. It was common knowledge that the practice of no-rules freestyle fighting was common in Brazil. Therefore, when those translating the articles saw many references to competitions between Gracie-trained fighters and Luta Livre practitioners, it was mistakenly assumed that Luta Livre is a Brazilian freestyle system. This misconception continues to this date.
5.1.4. Kombato (Brazilian Military Martial Art) • Kombato is a Brazilian military martial art of self defense and security created by a team
led by Paulo Albuquerque. It utilizes a combination of security, martial arts and military techniques. The Brazilian Navy, Airforce and Federal Police all use Kombato.
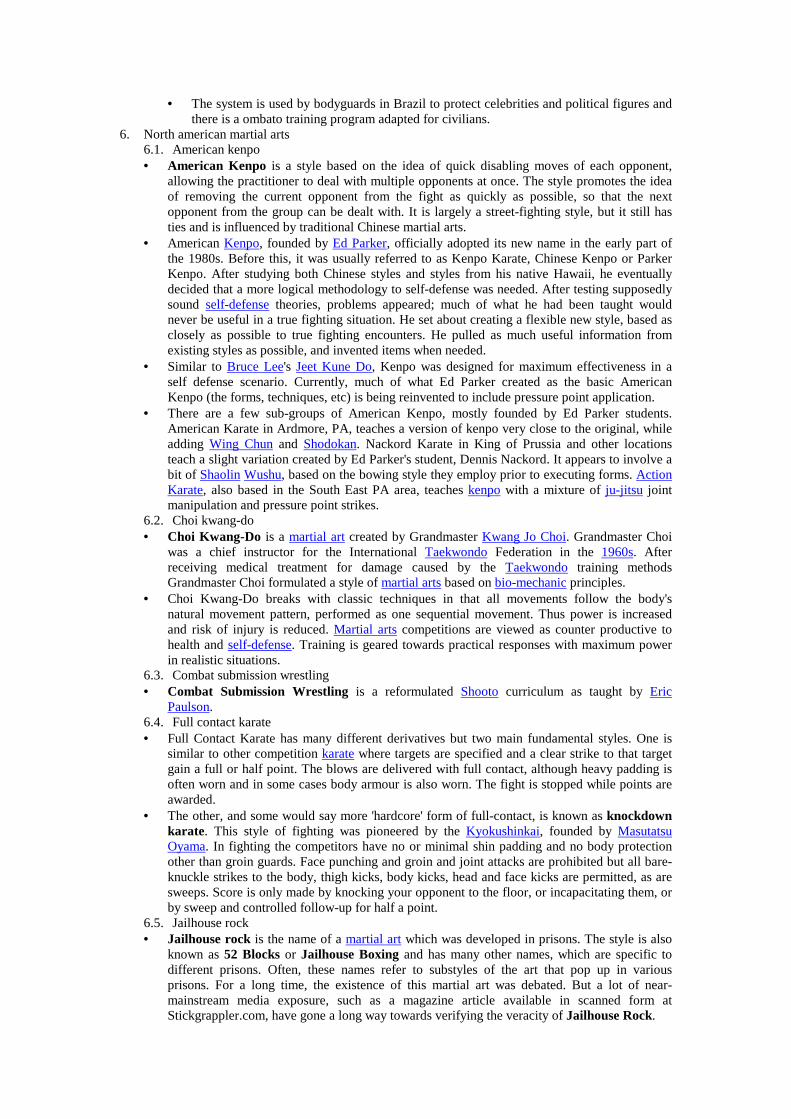
• The system is used by bodyguards in Brazil to protect celebrities and political figures and there is a ombato training program adapted for civilians.
6. North american martial arts 6.1. American kenpo • American Kenpo is a style based on the idea of quick disabling moves of each opponent,
allowing the practitioner to deal with multiple opponents at once. The style promotes the idea of removing the current opponent from the fight as quickly as possible, so that the next opponent from the group can be dealt with. It is largely a street-fighting style, but it still has ties and is influenced by traditional Chinese martial arts.
• American Kenpo, founded by Ed Parker, officially adopted its new name in the early part of the 1980s. Before this, it was usually referred to as Kenpo Karate, Chinese Kenpo or Parker Kenpo. After studying both Chinese styles and styles from his native Hawaii, he eventually decided that a more logical methodology to self-defense was needed. After testing supposedly sound self-defense theories, problems appeared; much of what he had been taught would never be useful in a true fighting situation. He set about creating a flexible new style, based as closely as possible to true fighting encounters. He pulled as much useful information from existing styles as possible, and invented items when needed.
• Similar to Bruce Lee's Jeet Kune Do, Kenpo was designed for maximum effectiveness in a self defense scenario. Currently, much of what Ed Parker created as the basic American Kenpo (the forms, techniques, etc) is being reinvented to include pressure point application.
• There are a few sub-groups of American Kenpo, mostly founded by Ed Parker students. American Karate in Ardmore, PA, teaches a version of kenpo very close to the original, while adding Wing Chun and Shodokan. Nackord Karate in King of Prussia and other locations teach a slight variation created by Ed Parker's student, Dennis Nackord. It appears to involve a bit of Shaolin Wushu, based on the bowing style they employ prior to executing forms. Action Karate, also based in the South East PA area, teaches kenpo with a mixture of ju-jitsu joint manipulation and pressure point strikes.
6.2. Choi kwang-do • Choi Kwang-Do is a martial art created by Grandmaster Kwang Jo Choi. Grandmaster Choi
was a chief instructor for the International Taekwondo Federation in the 1960s. After receiving medical treatment for damage caused by the Taekwondo training methods Grandmaster Choi formulated a style of martial arts based on bio-mechanic principles.
• Choi Kwang-Do breaks with classic techniques in that all movements follow the body's natural movement pattern, performed as one sequential movement. Thus power is increased and risk of injury is reduced. Martial arts competitions are viewed as counter productive to health and self-defense. Training is geared towards practical responses with maximum power in realistic situations.
6.3. Combat submission wrestling • Combat Submission Wrestling is a reformulated Shooto curriculum as taught by Eric
Paulson. 6.4. Full contact karate • Full Contact Karate has many different derivatives but two main fundamental styles. One is
similar to other competition karate where targets are specified and a clear strike to that target gain a full or half point. The blows are delivered with full contact, although heavy padding is often worn and in some cases body armour is also worn. The fight is stopped while points are awarded.
• The other, and some would say more 'hardcore' form of full-contact, is known as knockdown karate. This style of fighting was pioneered by the Kyokushinkai, founded by Masutatsu Oyama. In fighting the competitors have no or minimal shin padding and no body protection other than groin guards. Face punching and groin and joint attacks are prohibited but all bare-knuckle strikes to the body, thigh kicks, body kicks, head and face kicks are permitted, as are sweeps. Score is only made by knocking your opponent to the floor, or incapacitating them, or by sweep and controlled follow-up for half a point.
6.5. Jailhouse rock • Jailhouse rock is the name of a martial art which was developed in prisons. The style is also
known as 52 Blocks or Jailhouse Boxing and has many other names, which are specific to different prisons. Often, these names refer to substyles of the art that pop up in various prisons. For a long time, the existence of this martial art was debated. But a lot of near-mainstream media exposure, such as a magazine article available in scanned form at Stickgrappler.com, have gone a long way towards verifying the veracity of Jailhouse Rock.
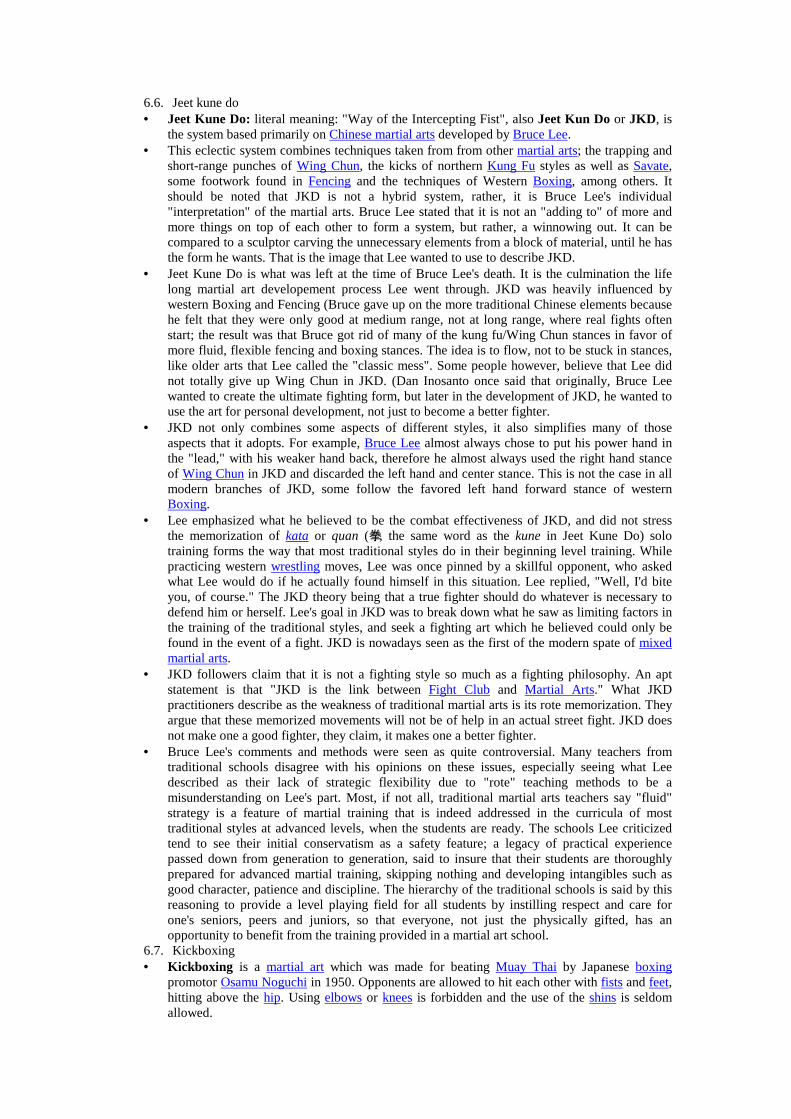
6.6. Jeet kune do • Jeet Kune Do: literal meaning: "Way of the Intercepting Fist", also Jeet Kun Do or JKD , is
the system based primarily on Chinese martial arts developed by Bruce Lee. • This eclectic system combines techniques taken from from other martial arts; the trapping and
short-range punches of Wing Chun, the kicks of northern Kung Fu styles as well as Savate, some footwork found in Fencing and the techniques of Western Boxing, among others. It should be noted that JKD is not a hybrid system, rather, it is Bruce Lee's individual "interpretation" of the martial arts. Bruce Lee stated that it is not an "adding to" of more and more things on top of each other to form a system, but rather, a winnowing out. It can be compared to a sculptor carving the unnecessary elements from a block of material, until he has the form he wants. That is the image that Lee wanted to use to describe JKD.
• Jeet Kune Do is what was left at the time of Bruce Lee's death. It is the culmination the life long martial art developement process Lee went through. JKD was heavily influenced by western Boxing and Fencing (Bruce gave up on the more traditional Chinese elements because he felt that they were only good at medium range, not at long range, where real fights often start; the result was that Bruce got rid of many of the kung fu/Wing Chun stances in favor of more fluid, flexible fencing and boxing stances. The idea is to flow, not to be stuck in stances, like older arts that Lee called the "classic mess". Some people however, believe that Lee did not totally give up Wing Chun in JKD. (Dan Inosanto once said that originally, Bruce Lee wanted to create the ultimate fighting form, but later in the development of JKD, he wanted to use the art for personal development, not just to become a better fighter.
• JKD not only combines some aspects of different styles, it also simplifies many of those aspects that it adopts. For example, Bruce Lee almost always chose to put his power hand in the "lead," with his weaker hand back, therefore he almost always used the right hand stance of Wing Chun in JKD and discarded the left hand and center stance. This is not the case in all modern branches of JKD, some follow the favored left hand forward stance of western Boxing.
• Lee emphasized what he believed to be the combat effectiveness of JKD, and did not stress the memorization of kata or quan (工, the same word as the kune in Jeet Kune Do) solo training forms the way that most traditional styles do in their beginning level training. While practicing western wrestling moves, Lee was once pinned by a skillful opponent, who asked what Lee would do if he actually found himself in this situation. Lee replied, "Well, I'd bite you, of course." The JKD theory being that a true fighter should do whatever is necessary to defend him or herself. Lee's goal in JKD was to break down what he saw as limiting factors in the training of the traditional styles, and seek a fighting art which he believed could only be found in the event of a fight. JKD is nowadays seen as the first of the modern spate of mixed martial arts.
• JKD followers claim that it is not a fighting style so much as a fighting philosophy. An apt statement is that "JKD is the link between Fight Club and Martial Arts." What JKD practitioners describe as the weakness of traditional martial arts is its rote memorization. They argue that these memorized movements will not be of help in an actual street fight. JKD does not make one a good fighter, they claim, it makes one a better fighter.
• Bruce Lee's comments and methods were seen as quite controversial. Many teachers from traditional schools disagree with his opinions on these issues, especially seeing what Lee described as their lack of strategic flexibility due to "rote" teaching methods to be a misunderstanding on Lee's part. Most, if not all, traditional martial arts teachers say "fluid" strategy is a feature of martial training that is indeed addressed in the curricula of most traditional styles at advanced levels, when the students are ready. The schools Lee criticized tend to see their initial conservatism as a safety feature; a legacy of practical experience passed down from generation to generation, said to insure that their students are thoroughly prepared for advanced martial training, skipping nothing and developing intangibles such as good character, patience and discipline. The hierarchy of the traditional schools is said by this reasoning to provide a level playing field for all students by instilling respect and care for one's seniors, peers and juniors, so that everyone, not just the physically gifted, has an opportunity to benefit from the training provided in a martial art school.
6.7. Kickboxing • Kickboxing is a martial art which was made for beating Muay Thai by Japanese boxing
promotor Osamu Noguchi in 1950. Opponents are allowed to hit each other with fists and feet, hitting above the hip. Using elbows or knees is forbidden and the use of the shins is seldom allowed.
• "Kick-boxing" was created by a Japanese promotor of boxing matches in the 1950s, Mr. Osamu Noguchi. He wanted to introduce to the Japanese people what he had seen in Thailand. Therefore he sent some Thai boxers to Japan and founded the Japan Kickboxing Association. He named the new martial art "kick-boxing".
• The first kickboxer around the world is Tadashi Sawamura (real name: Hideki Shiraha) a Japanese karate fighter. Kick-boxing enhances cordination and fitness.
6.8. Kajukenbo • Kajukenbo is an eclectic martial art that combines Karate, Judo, Jujitsu, and Kung fu. It was
invented in 1947 in Hawaii, at the Palama Settlements, to deal with the street fighting and rough streets there. The inventors were Adriano Emperado, P.Y.Y. Choo, Joe Holck, Frank Ordonez, Clarence Chang, all members of the black belt society.
• The name works in two ways: "ka" ("long life"), "ju" ("happiness"), "ken" ("fist"), "bo" ("style") or "ka" ("karate"), "ju" ("judo"/" jujitsu"), "ken" ("kempo"), "bo" ("boxing").
• While the path to black-belt status in Kajukenbo is long, the form has a reputation for teaching a lot of practical self-defense early, being a bit heavier on practical fighting technique than on the more meditative side of martial arts.
• Kajukenbo has many more grappling moves than regular kempo, plus this art is very brutal, it has a lot of joint breaking moves, and low blows. The workouts can easily get the heart rate up and last about two hours. This school of martial arts train with sandbags, boxing gloves, and every male student is given, as part of their uniform, a cup to protect the testicles.
6.9. LINE combat system • The United States Marine Corps as part of its basic training teaches its recruits Marine Corps
LINE Combat system. • LINE Stands for Linear Involuntary Neurological overide Engagement • It's a martial art that relies on training the bodies reflexes. This martial art is considered quite
lethal, and is readily taught to anyone who qualifies to join the Marine Corps. It's made from parts of several other proven Martial Arts that make this hand to hand combat style effective.
• The system has currently been replaced by the Marine Corps Martial Arts Program (MCMAP).
6.10. Red warrior or Tushka-homa • Red Warrior , also known as Tushka-homa, is a martial art created by full blood Choctaw
Indian and Martial Arts Hall of Famer Adrian Roman. It is supposedly a blend of Native American arts and American Kenpo.
6.11. Senshido • Senshido ("Way of 1000 Masters") is a Canadian martial art created in 1994 by Richard
Dimitri . 6.12. Shootboxing • Shooto boxing is a new martial art, which is not only kicking and punching, but also is
allowed to use throwing and standing submission. It was developed from kickboxing by Caesar Takeshi.
6.13. World war 2 combatives • World War II combatives were empty-hand combat techniques taught to allied special
forces in World War II by such famous instructors as Rex Applegate or William Ewart Fairbairn.
6.14. Taebo • Taebo is an exercise routine invented by Billy Blanks. Bill Blanks, born in Erie,
Pennsylvania, has trained in Tae Kwon Do and Karate. In 1989 Blanks combined music with a training exercise routine to develop an intensive workout routine. Millions of Taebo vidoes have been sold.
• TAEBO is an acronym for Total Awarness Excellence Body Obedience. Taebo includes much of the same punches and kicks as Karate does, but is not intended for fighting. Taebo is more for exercise for health than any self defense applications. There are no throws, grappling moves, or ground fighting techniques in Taebo. Its only intent is to increase health through movement.
6.15. Juko ryu • ‘Hard-soft style’. Created by American Rod Sacharnoski, Juko ryu keeps alive the spirit of
samurai combat arts. Juko ryu uses techniques from ju-jutsu, kenpo-jutsu, aiki-jutsu, and kobu-jutsu, but the major element of the style Juko ryu ki. Juko ryu stresses that the way to withstand even the most brutal attacks is through control of muscles and by being able to

focus ki at the point of impact. Juko ryu is not a sport – sparring is meant to simulate actual fight situations and is full contact.
• Juko ryu ki: The special control and development of ki taught in Juko ryu. Practitioners of this art use inhaled air as a sort of cushion against blows. This type of breath control, combined with muscle control techniques, helps to develop Juko ryu ki, the vital energy that is the final ingredient enabling the Juko ryu artist to withstand any strike equal to one that he could execute.
7. Misc 7.1.
Shindai • The ancient and highly secret art of pillow fighting. Shindai is practised by Japanese couples as an
outlet for the tensions and frustrations that build up within the marriage relationship. Despite the ‘softness’ of the weapons, Shindai can be quite rough, and its rules are as carefully defined as are those of the better-known arts. Reconciliation, which is the culmination (and the purpose) of the Shindai match, is also a fully described ritual. This is truly a marital martial art.
WHEN PEOPLE SAY.... THEY REALLY MEAN... Japanese Martial Arts are the BEST! I practise I Japanese Martial Art! This art is Thousands of years old This style is decades old! The Martial Arts are about building better people The Martial Arts are about sweat, bruises and
money! High kicks are stupid I can't do High kicks! Sparring is important! I'm good at fighting and I like it and I can't do
much of anything else I don't believe in grades Nobody ever gives me a high grade! The Martial Arts are about building better evolved characters
LIKE ME! LIKE ME!
Sophisticated arts like Tai Chi and Aikido are far superior
Sparring Frightens me!
My style is the best! I don't know anything about any other styles I hate Martial Arts politics! None of the federations recognise me or have the
slightest interest in my existence! In this Martial Arts Club we make the art fit the person.
In this club, we make the person fit the art!
Forms (patterns or katas) are useless! Bruce Lee said they were useless... SO GO URGUE WITH HIM!
Korean Martial Arts are the best! I do a Korean Martial Art! Chinese Martial Arts are the BEST! I practise a Chinese Martial Arts Martial Arts sucks! And you don't need it to fight! You need Martial Arts to fight... especially if the
person your fighting is bigger and stronger than you are!
That guys a good sensei! That guy teaches in my club! Tournaments aren't important I have never won anything in tournaments! Bruce Lee didn't know what he was talking about! I don't know what Bruce Lee was talking about! The Difference between Boxing and Sex
• Even ugly boxers score regularly. • In boxing you have an instructor to tell you what you're doing wrong, and you get to practice
first before trying it out for real. • You can practice boxing with strangers without getting a bad reputation and you don't have to
spend £20 in the bar getting to know them first. • You are not being insulting if you insist that your sparring partner wear protective gear. • No one expects a boxing bout to last much longer than three minutes and you don't have to
worry afterwards if the other boxer enjoyed it or not. • In boxing you don't have to get your own equipment until you decide whether or not you like
it. • You usually practice boxing in a big; brightly lit room with lots of people in it. • The person you're practising boxing with won't mind if your friends stand around and cheer
for you.
• It is almost impossible to catch a disease from a boxing glove. (Well, in most clubs anyway.) • You can practice boxing in public and no one will laugh. (Well, unless you look like Mr
Bean). • Finally, and perhaps most significantly, in boxing if your opponent doesn’t come, you win.
Spirituality in the martial arts : • Zen: A refinement of Buddhism, which states that through meditation, under the guidance of a
master, one can reach enlightenment, or satori. Founded in about 600 AD, by the Indian monk bodhidharma, Zen makes use of non-rational modes of understanding in its path to awareness.
• Zanshin: A state of mind cultivated in many Japanese martial arts. One is calm and fully alert, aware of every movement, of every detail about the opponent and ones own form.
• Yin-yang: The inseparable forces of the universe according to Taoist philosophy. These two forces are complementary: yin gradually becomes yang, and yang becomes yin, just as night and day continually flow into one another. The yin-yang symbol of a white fish with a black eye and a black fish with a white eye inside one circle expresses the ideas of harmony and balance that permeate the Chinese martial arts.
• Yin: The negative aspect of the universe. Yin relates to negativity, emptiness, softness, night, female, the moon, and immobility. It is the completion of creation and the opposite of yang. Yin is the black fish with the white eye in the circular yin-yang symbol.
• Taoism: The Chinese word Tao means the way. The fundamental teaching of this ancient religion is that there is a natural harmony to all things. Night and day, pain and pleasure, all things lead to balance, as represented in the familiar black and white yin-yang symbol. The founder of this philosophy is the legendary Lao Tzu, author of the tao-te-ching, which relates the basic concepts of Taoism.
• Tao-te-ching: The book of the way and its power, the most important of the Taoist texts. Traditionally ascribed to Lao-Tzu, although current opinion holds it to be a compilation, written in the third century BC. The tao-te ching consists of 81 simply written sections that state the philosophy of Taoism. One of the more famous sayings from the tao-te ching is ‘the way that is spoken is not the true way’.
• Nogare: A series of breathing exercises used in Japanese martial arts to bring calmness in the face of attack.
• Mu: The Buddhist concept of not striving, not wanting or desiring. Mu means ‘nothing’. This principle is found in many martial arts, particularly judo and kendo, which use Mu in the sense of emptying the mind in order to concentrate and respond spontaneously and naturally. Without trying, the correct move will be known instinctively. Mu is derived from Mu-shin, ‘no mind’, a Zen exercise practised by samurai.
• Monk salute: A salutation that represents the peace and tranquillity of the monk. In this salute, the hands are held together in the praying position in front of the body at chest level.
• Inner power: See chi. • Kshatriya: A warrior class of ancient India to which bodhidharma, who first brought Zen
Buddhism and the art of unarmed fighting to china belonged. • Lao Tzu: A legendary character in Chinese history, Lao Tzu is known as the founder of Taoism
and the author of the Taoist ‘bible’, the tao te ching. He was born around 604 BC. • Lien chi: A Chinese term meaning ‘transmitting the breath’. This phrase encompasses all the
Chinese beliefs – and particularly those of Taoism – regarding correct breathing. • Kris: The highly sacred national weapon of Malaysia and Indonesia. The Kris comes in many
forms; it is a double-edged dagger made of layers of iron and steel welded together. The blade is either straight (dapur beser) or wavy (dapur long). The handle is of ornamented wood and is about six inches long. The Kris is believed to possess great magical powers for good or evil, depending on the owner.
• Ki: Japanese term meaning inner energy. See chi. • Internal system: The internal system of Chinese martial arts comprises many styles, some of the
most famous of which are tai chi, pa-kua and hsing-i. What these various forms have in common is the cultivation of internal energy, or chi, by the use of breath control and concentration on the t’an tien.
• Join: A term used to describe the action of adhering to an opponents energy by literally becoming one with the opponents movements. This action when properly executed is one of perfect harmony and balance.
• Harmony: See ai.
• Grand terminus: A concept found in Chinese philosophy. See grand ultimate. • Field of cinnabar: Taoist term referring to the dormant energies in humans; also, the place where
the potion of immortality can be made. • Danjun: Korean term for the area three inches below the navel believed to be the seat of ki in the
body. The Koreans believe the Danjun to be divided into three points. 1. The point one inch below the navel, ki hae, 2. two inches below the navel, kwak won, and 3. Three inches below the navel, suk mon. see also centring and t’an tien.
• Central equilibrium: A state of total harmony and balance, in which ones energy is internal. The body is still, and there is no dissipation of ki.
• Bushido: A moral code in ancient Japan developed to set a high standard in the training of the warrior. Like the chivalrous code of feudal Europe, bushido was based on honour, loyalty, duty and obedience.
• Acupuncture: An ancient system of Chinese medicine based in the doctrine that there are certain important points on the bodies surface which can be treated to restore physical harmony. These points are located on twelve meridians, or ching-lo, the bodies energy pathways. The principle of yin-yang is basic to acupuncture, for it is the imbalance of the yin-yang forces that causes disease. The acupuncturist manipulates the points and meridians by inserting needles at certain locations, depending on the disorder. Knowledge of these points is also used in the martial arts in attacking the opponents most vulnerable areas.
• Ching-lo: In acupuncture, the 12 meridians of the body, on which the key points of treatment, lie and which are connected to the vital organs. The meridians are the bodies energy pathways. Each meridian is either yin, for organs with mainly storage functions such as kidneys, or yang for active working organs such as the large intestine.
• Meridian: A term essential to acupuncture. See also ching-lo. • Kiai: The Kiai is a yell used when performing a technique that requires a great deal of power. The
sound must come from the lower abdomen, and this skill requires proper breath control, timing, and focus. Legend has it that masters of the martial arts were able to yell to stun small game and easily capture the animal for a delicious meal.
• Intro to Buddhism: 4 noble truths: 1. life can suck 2. suffering originates from wants 3. There is a way to rid oneself of suffering. 4. To rid oneself of suffering, follow the eightfold path.
1. Right knowledge. Comprehend the 1st 3 noble truths, a bit circular, but that’s Buddhism for you.
2. Right thinking. Consciously dedicate yourself to a life in harmony with the noble truths. 3. Right speech. If you don’t have anything valuable to say keep your mouth shut. 4. Right conduct: follow the 5 precepts:
1. Don’t kill 2. Don’t steal 3. Don’t lie 4. Don’t cheat on your loved one. 5. Don’t take drugs or drink booze.
5. Right livelihood. Do no harm. Choose a profession that’s harmless to others. 6. Right effort. Conquer the flow of negative thoughts, replacing them with good thoughts. 7. Right mindfulness. Quiet the noises in your head and dwell in the present, achieve
awareness of your body, emotions and mental state. 8. Right concentration. Learn about and practice meditation.
Medicine and health Chinese medicine: The method of diagnosis involves first looking at the patient, then listening, questioning and finally taking the patients pulse. Taking the pulse is not simply counting the heartbeat; it involves measuring a different pulse for each individual organ. The strength and quality of the pulse after passing through an organ determines how perfectly or imperfectly that organ is functioning. According to ‘A summary of the traditional Chinese healing art, by Dr. Ronald Chen’: there are 28 grades of pulse. This, together with such characteristics as strength and quality, reveal the exact nature of any ailment, and the organ that is malfunctioning. For example, the ‘overflowing pulse’ is the pulse associated with stomach upset and intestinal disorder, while the ‘taut pulse’ is produced by liver diseases. Chinese doctors take the pulse by placing three fingers on each radial artery of both forearms. They then use different degrees of pressure to get different responses, such as the overflowing and taut pulses just mentioned. Similarly, pulses are taken at arteries on the legs and the neck. The six conditions of health: You can get a good idea of the shape you are in by taking the following health test: reformulated for westerners by Japanese doctor Sakurazawa Nyoiti, the test is based on six vital questions. A score of one hundred percent affirmative answers to all questions would indicate a mind and body in perfect tune. However, this state is something to aim for rather than expect to achieve. Nyoiti contends that anyone scoring 40% on these questions is in relatively good health by our standards, although functioning nowhere near their ability. The first three criteria are physical guideposts, and are worth ten points apiece. The fourth and fifth are psychological and you may award yourself twenty points for each. The sixth, also psychological, is worth thirty points. 1. Are you free from fatigue? [10 points]:
• Fatigue is a warning from the body that something is not functioning properly or is fighting disease. Healthy people never feel tired. They find working a joy, difficult situations a challenge, and they welcome problems as fresh adventures for their ingenuity to overcome. Always eager to see things through, they rarely experience boredom, which is another name for fatigue. Consequently, they bring enormous energy and a zest for life even to the most trivial difficulty.
2. Do you sleep soundly? [10 points]: • Someone in a healthy condition sleeps soundly and deeply, and wakes completely refreshed
after a few hours sleep. Moreover, such a person falls asleep minutes after his head hits the pillow, regardless of place or circumstances. Talking in ones sleep is an unfavourable sign, as are violent disturbing dreams. Finally, one should be able to awaken at a preset time by simply visualising the hour to get up immediately before going to sleep. The inability to meet these fundamental conditions indicates a basic health problem that needs your attention.
3. Is your appetite good? [10 points]: • Someone should be able to enjoy even the simplest foods with relish. Everything as long as it
has been properly prepared should taste good and leave one satisfied. At the same time, healthy people tend to regulate their appetite and not overindulge. They are not overweight, nor does their weight fluctuate with the seasons by more than a few pounds. A healthy sexual appetite is also a vital sign of good health and internal harmony. A man or woman with weak sexual desires, or one who has difficulty attaining satisfaction is unfit.
4. Are you good humoured? [20 points]: • To lose ones patience quickly, to be cruel or sarcastic, to be bereft of good cheer toward ones
fellow man, to harbour a grudge, to lack enthusiasm, is to be unhealthy. The healthy person retains a sense of wonder and admiration for the working of the world around him. He has achieved a physical and mental balance, which enables him to meet the most trying situation pleasantly and gracefully. Such a person is even kind in his criticism of others, and attempts to learn from his enemies aswell as his friends.
5. Is your memory good? [20 points]: • Memory is the foundation on which we construct our daily lives. A failing memory is a sign
of declining physical health and emotional instability. Conversely, the more encompassing ones memory is, the healthier one is. Contrary to popular belief the ability to remember should grow rather than decline with age.
6. Are you precise in thought and action? [30 points]: • A persons very survival depends on his ability to make sound judgements quickly and to put
them into action with haste. If you are out on the street and a car is coming, or someone has
thrown something at you, your response should be automatic, without a seconds hesitation. The inability to respond to the environment instinctively is a sure indication that it is only a matter of time before the environment will no longer have to respond to you! It is precision of thought, together with memory, that enables man to order the details of his life.

Bibliography: the books I copied into this document! • Judo – Neil Adams. • The language of martial arts – Amy Shapiro. • The young martial arts enthusiast – David Mitchell – Dorling Kindersley. • The Tao of Jeet Kune Do – Bruce Lee. Most of the stuff in Italics is copied directly from Bruce
Lee. • Stretching – Brad Appleton. • The Kung Fu exercise book – Michael Minick – Corgi 1975– The source of most of the Kung fu
stuff in this document.
Glossary/ stuff I haven’t placed in the rest of the document yet: Body feel 1 Body feel suggests a harmonious interplay of body and spirit, each inseparable. 1.1 Body feel in attack: 1.1.1 Physical: 1.1.1.1 Consider balance before, during, after. 1.1.1.2 Consider airtight defence before, during, after. 1.1.1.3 Learn to cut into the opponents moving tools and limit the ground for his agility. 1.1.1.4 Consider aliveness 1.1.2 Mental: 1.1.2.1 Allow the ‘wanting’ to score the target. 1.1.2.2 Back yourself by alertness, awareness to sudden change to defence or counter. 1.1.2.3 Keep a natural watchfulness at all times, always observing the opponents actions and
reactions to fit in. 1.1.2.4 Learn to relay destructiveness (looseness, speed, compactness, and ease) to moving targets. 1.2 Body feel in defence: 1.2.1 Study the opponents delivering method – signs of telegraphing. 1.2.2 Learn to time the opponents second, third moves – read his style and solve the problem should
simple attacks fail. 1.2.3 Read the opponents moment of helplessness. 1.2.4 Take advantage of a common tendency to ‘reach’ with spent tools. 1.2.5 Draw the opponent off balance into ones sensitive aura while keeping your own balance. 1.2.6 Be able to express efficiency while moving backward and experiment with all possibilities
(sidestepping, curving, etc). Stay in balance for finishing blows and kicks. 1.2.7 At the right moment, attack instantaneously with: 1.2.7.1 Correct self-synchronisation 1.2.7.2 Right distance 1.2.7.3 Right timing, all as one. Good form 1 Good form is the most efficient manner to accomplish the purpose of a performance with a
minimum of lost motion and wasted energy. 2 To conserve energy by using the least possible amount of energy to achieve a given result,
eliminate the unnecessary motions and muscle contractions, which fatigue without accomplishing any useful purpose.

Index