Embed Size (px)
Citation preview

Reference Guidefor Ver 1.3x
EN
2
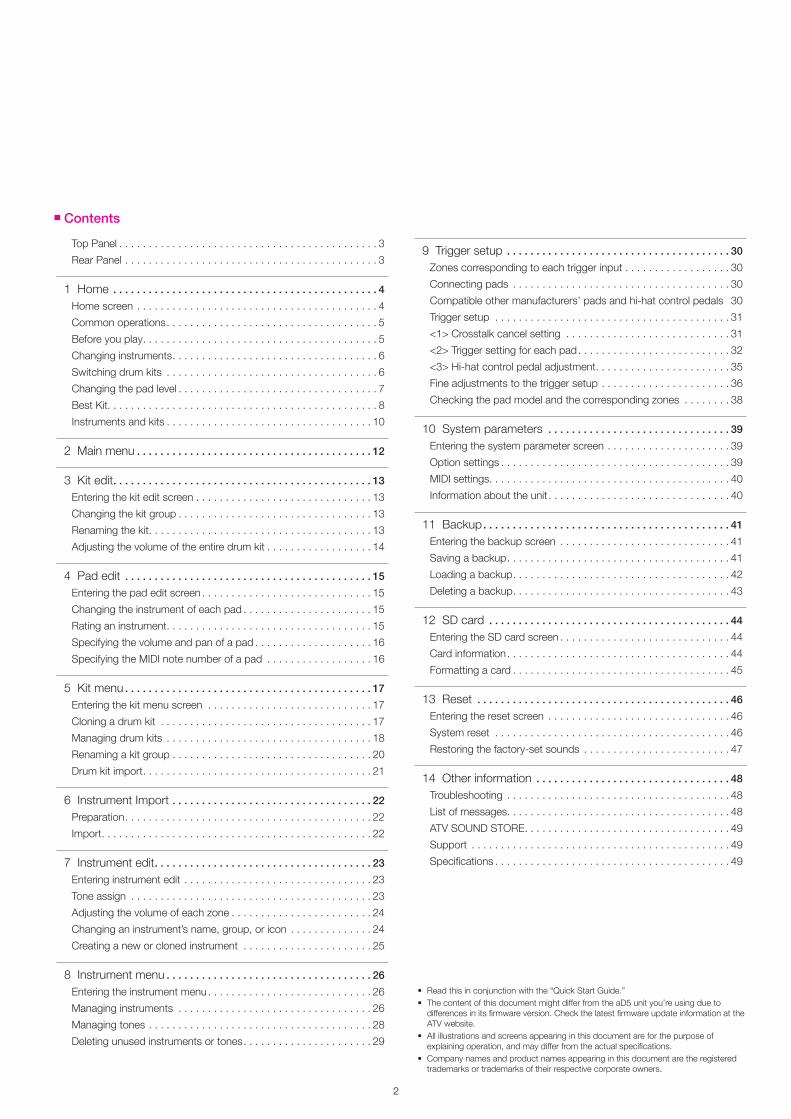
Top Panel 3Rear Panel 3
1 Home 4Home screen 4Common operations 5Before you play 5Changing instruments 6Switching drum kits 6Changing the pad level 7Best Kit 8Instruments and kits 10
2 Main menu 12
3 Kit edit 13Entering the kit edit screen 13Changing the kit group 13Renaming the kit 13Adjusting the volume of the entire drum kit 14
4 Pad edit 15Entering the pad edit screen 15Changing the instrument of each pad 15Rating an instrument 15Specifying the volume and pan of a pad 16Specifying the MIDI note number of a pad 16
5 Kit menu 17Entering the kit menu screen 17Cloning a drum kit 17Managing drum kits 18Renaming a kit group 20Drum kit import 21
6 Instrument Import 22Preparation 22Import 22
7 Instrument edit 23Entering instrument edit 23Tone assign 23Adjusting the volume of each zone 24Changing an instrument’s name, group, or icon 24Creating a new or cloned instrument 25
8 Instrument menu 26Entering the instrument menu 26Managing instruments 26Managing tones 28Deleting unused instruments or tones 29
9 Trigger setup 30Zones corresponding to each trigger input 30Connecting pads 30Compatible other manufacturers’ pads and hi-hat control pedals 30Trigger setup 31<1> Crosstalk cancel setting 31<2> Trigger setting for each pad 32<3> Hi-hat control pedal adjustment 35Fine adjustments to the trigger setup 36Checking the pad model and the corresponding zones 38
10 System parameters 39Entering the system parameter screen 39Option settings 39MIDI settings 40Information about the unit 40
11 Backup 41Entering the backup screen 41Saving a backup 41Loading a backup 42Deleting a backup 43
12 SD card 44Entering the SD card screen 44Card information 44Formatting a card 45
13 Reset 46Entering the reset screen 46System reset 46Restoring the factory-set sounds 47
14 Other information 48Troubleshooting 48List of messages 48ATV SOUND STORE 49Support 49Specifications 49
Contents
• Read this in conjunction with the “Quick Start Guide ”• The content of this document might differ from the aD5 unit you’re using due to
differences in its firmware version. Check the latest firmware update information at the ATV website
• All illustrations and screens appearing in this document are for the purpose of explaining operation, and may differ from the actual specifications.
• Company names and product names appearing in this document are the registered trademarks or trademarks of their respective corporate owners

3
Power buttonLong-press this button to turn the power on/off.
Top Panel
Value knobUsed to change various settings
PHONESConnect your headphones here
Function buttonThe function of each button is shown in the screen These buttons are also used to select items in the screen Available buttons are lit
[OK] buttonConfirms a change made to a setting This button is also used in a confirmation screen.
[CANCEL] buttonCancels a change made to a setting, returning to the previous screen This button is also used in a confirmation
screen [HOME] buttonReturns to the initial screen (home screen) The content you’re editing is saved
VolumeAdjusts the volume of the headphones and the OUTPUT
Rear Panel
AUX 1, 2Additional pads can be connected here to expand your drum kit
QR codeUse this to access the manual, the latest firmware, or sound data
ATV LINKThis has no function at the present time We plan to provide a firmware update that allows this to be connected to other devices
USBThe aD5 can be connected to a Mac or Windows PC, allowing MIDI messages to be transmitted and received Use a USB 2 0 cable
OUTPUTThese jacks output the audio
signal Connect them to powered speakers or a mixer
SD CARDYou can use a card to back up the aD5’s data or to load sound data SD/SDHC cards with a capacity of up to 32 GB are supported
DC INConnect the included AC adapter here
AUDIO INYou can connect your music player
here and listen to its sound mixed with the audio produced by the aD5
MULTI TRIGGERConnect the included multi-trigger cable here to input trigger signals from the pads

4
1 Home
Pad you struck
Drum kit
Instrument group
Instrument
Home screenThe home screen is the screen that appears when you turn on the power From any screen, you can return to the home screen by pressing the [HOME] button When playing drums, make sure that the home screen is displayed
NOTE � When playing in a screen other than the home screen, notes might respond more slowly
� If you insert the SD card while playing, the sound might be interrupted
1 Home
Select a drum kit Edit the drum kit
Main menuFavorite drum kits
Turn side-stick on/off
Change the instrument
Change the pad level
Instrument“Instrument” (INST) refers to the instrument played by each pad, such as a snare drum or ride cymbal You can change the instrument for each pad Instrument groupThe aD5 contains numerous instruments The instruments are organized into instrument groups according to their type Drum kitAll the pads are collectively called a “drum kit ” By switching between various types of drum kit, such as for jazz or for rock, you can change the instruments of all pads in a single action
Select a drum kitThis lets you select a drum kit The KIT SELECT screen appears (p 6)
Edit the drum kitThis lets you rename the drum kit or adjust the volume of the entire drum kit (p 13)
Change the instrumentThis lets you change the instrument played by the pad, and adjust the volume and left/right panning of the pad (p 15)
Change the pad levelThis lets you quickly change the volume of a pad
Side stick (cross stick)If you want to play side stick using a snare pad other than the aDrums aD-S13, turn [SIDE STK] on You’ll be able to switch between rim shot and side stick Even if [SIDE STK] is on, a strongly played rimshot will cause the rimshot sound to be sounded
Favorite drum kits (Best Kit)Drum kits that you use frequently can be registered for convenient recall The BEST KIT screen appears (p 8)
Main menuThis accesses the main menu (p 12)
NOTE � If you’re using the aD-S13 for the snare drum, [SIDE STK] is not shown You can play side stick at any time by striking the side rim The pad model (p 32) must be set to “aD-S13 ”
� Using [SIDE STK] to switch the side stick is effective only on a pad that is connected to the “SN” trigger input For details on using side stick, refer to the owner’s manual for each pad
What you can do in the home screen

5
1 Home
Common operationsFunction buttonsUse the function buttons to select the corresponding items or functions in the screen
Buttons for which there is no corresponding item are unlit
Moving between pagesIf other pages exist at the left or right, press [ PAGE] [PAGE ] to access those pages If you press the page name in the upper left of the screen, a list of the available pages is shown Use the value knob to select a page and then press the [OK] button to confirm; you’ll move to the selected page.
Entering a nameIn screens that allow you to enter a name, use the following buttons After you’ve entered the name, press the [OK] button to confirm. If you decide to cancel the change, press the [CANCEL] button
Function of each buttonButton Function
Moves the character input position to left or right
A,a,1 Switches between types of characters INSERT Inserts a space at the cursor location DELETE Deletes the character at the cursor location CLEAR ALL Deletes all characters Value knob Selects a character
On-screen helpSome pages provide help Press the [HELP] to see an explanation of the parameters in that page Use [ ][ ] to scroll, and use the [X] or [CANCEL] buttons to close the help
Before you play � For details on connecting the pads, refer to “Quick Start Guide” and “9 Trigger setup” (p 30) � Before using the system for the first time, specify the model name of all pads (p. 32) � If striking one pad causes another pad to produce sound, execute the crosstalk cancel wizard (p 31) � Adjust the volume appropriately If the volume is too soft, you’ll tend to strike unnecessarily strongly, possibly injuring your hand or wrist If the volume is too loud, greater stress is placed on your ears, possibly causing hearing loss
� The area near the striking sensor of the pad is extremely sensitive It will be easier for you to control the dynamics if you strike at a distance from the sensor

6
1 Home
Changing instrumentsAs an example, here’s how to switch the instrument of the snare pad to a different snare drum.
1 Strike the snare pad
The instrument assigned to the snare pad appears in the screen
2 Press [INST]
The INST ASSIGN screen appears
3 Use the value knob or [ ][ ] to change the instrument
Strike the snare pad to hear the sound
4 Press the [OK] button to confirm the setting. If you decide not to change the setting, press the [CANCEL] button
You can change the instruments of other pads in the same way
Switching drum kitsBy switching drum kits you can change the instruments of all pads in a single action The aD5 comes with various drum kits in its memory
1 Press [KIT]
The KIT SELECT screen appears
2 Use the function buttons to select a kit
Next page
Select the kit group
� Use [PAGE ] to see the next page � Use [GROUP] to change the kit group If you select ALL, all drum kits are displayed
Kit groupThe drum kits are organized into four groups Use [GROUP] to change the kit group that’s shown If you choose ALL, all drum kits are shown
NOTEDepending on the length of the drum kit name, the entire name might not be shown
NOTEIt takes about 5 seconds for a drum kit to be loaded
NOTE � You can use kit edit (p 13) to change the kit group
� You can rename the kit group (p 20)

7
1 Home
Changing the pad levelIn this screen you can quickly change the level of each pad
1 Strike the pad whose level you want to change
2 Press [LEVEL]
The PAD LEVEL screen appears
3 Use the value knob to change the level
� Striking a pad will select that pad for editing You can also use [ ][ ] or [PAD] to switch between pads � If you press [PIN], the pad being edited stays the same even if you strike a different pad. Press [PIN] again to cancel
� To uniformly raise or lower the level of all pads, press [ALL PAD -/+]
4 Press the [OK] button to confirm the setting.
NOTEFor example, if you want to further raise the level of the snare pad even though it is already at the maximum value, you can use [ALL PAD -/+] to lower the overall level so that the level of the snare pad is relatively higher

8
1 Home
Best KitYou can register your frequently used drum kits so that they can be recalled easily
Recalling
1 In the home screen, press [BEST KIT]
The BEST KIT screen appears
2 Press [1-4], [5-8], or [9-12] to switch tabs
3 Select a drum kit
The home screen appears, and the drum kit is loaded
RegisteringYou can register up to 12 drum kits
1 In the home screen, select the drum kit that you want to register
2 Press [BEST KIT] to access the BEST KIT screen, and press [ ] to access the page menu
3 Use the value knob to select “STORE,” and press the [OK] button
4 Select the number in which you want to register the kit
To register the drum kit in number 5 or later, switch tabs
The drum kit is registered in the selected number
NOTEIf you press the [CANCEL] button, you’ll return to the home screen without changing the drum kit
NOTEDepending on the length of the drum kit name, the entire name might not be shown
NOTEIf you select a number in which a drum kit is already registered, the previous assignment is overwritten

9
1 Home
Deleting
1 In the BEST KIT screen, press [ ] to access the page menu
2 Use the value knob to select “DELETE,” and press the [OK] button
3 Select the number that you want to delete
To delete the registration of number 5 or later, switch tabs
A confirmation screen appears.
4 Press the [OK] button to delete the registration If you decide to cancel without deleting the registration, press the [CANCEL] button

10
1 Home
Instruments and kitsThe aD5 contains a wide variety of instruments such as kicks, snares, and cymbals You can assign these instruments to the pads of each drum kit and play them
Inst
Kick 1Kick 2Kick 3
Snare 1Snare 2Snare 3Snare 4Snare 5
Tom 1Tom 2Tom 3Tom 4 : :
Drum Kit A
Kick 1
Snare 1
Drum Kit B
Kick 2
Snare 3
For example, if the instrument “Snare 3” is played from the two drum kits B and C, editing the “Snare 3” instrument (for example by changing its level) will affect both drum kits B and C.
Inst
Kick 1Kick 2Kick 3
Snare 1Snare 2Snare 3Snare 4Snare 5
Tom 1Tom 2Tom 3Tom 4 : :
Drum Kit B
Kick 2
Snare 3
Drum Kit C
Kick 3
Snare 3
You can clone an instrument In the example above, if you want to edit only the snare of drum kit C, you could create a clone of the instrument “Snare 3” and then edit it
Inst
Kick 1Kick 2Kick 3
Snare 1Snare 2Snare 3Snare 3BSnare 4Snare 5
Tom 1Tom 2Tom 3Tom 4 : :
Drum Kit B
Kick 2
Snare 3
Drum Kit C
Kick 3
Snare 3B
NOTE � For more about cloning an instrument, refer to Clone Instrument (p 25)
� You are free to assign a name to the cloned instrument
NOTEFor more about editing an instrument, refer to Edit Instrument (p 23)
NOTEWe’ll use just the kick and snare for this example

11
1 Home
Editing an instrument (INST)The aD5 lets you edit an instrument directly You can also create a clone of an instrument and save it as another instrument with a slightly different tonal character.You can create several variations of your favorite instruments and assign them to drum kits so that they can be played easily You can also add instruments that you’ve downloaded from the ATV Sound Store (p 22)
ToneAn instrument consists of sound data called “tones ”Three tones are assigned to each instrument These three tones correspond to zones A, B, and C of the pad; for example, zone A is heard when you strike the head, and zone B is heard when you strike the rim.
Inst
Zone A
Zone B
Zone C
TONE
TONE
TONE
By editing an instrument, you can assign the desired tone to each zone You can also modify the level and other characteristics of each tone
By creating and editing instruments in this way, you can build up a collection of your own customized instruments
Pad ZoneA B C
KICK Head - -SNARE Head Rim Side StickTOM 1–3 Head - -HI-HAT Bow Edge FootCRASH Bow Edge -RIDE Bow Edge CupAUX 1–2 Head (Bow) Rim (Edge) -
12
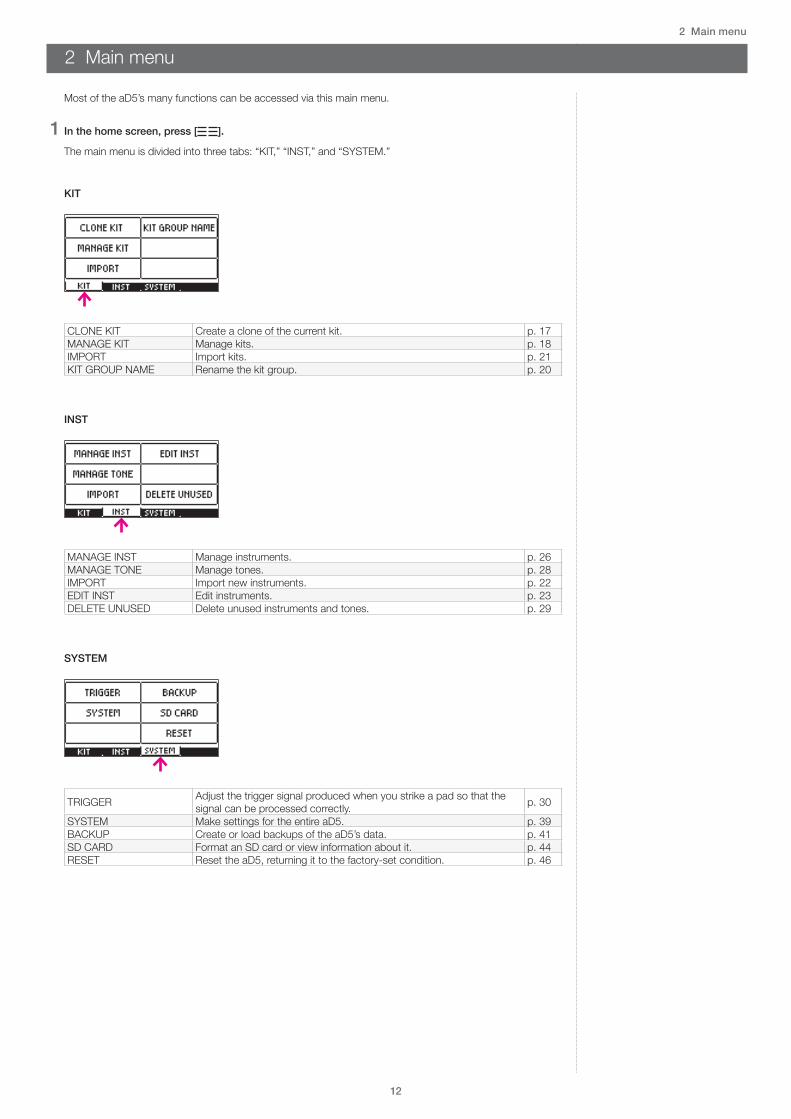
2 Main menu
Most of the aD5’s many functions can be accessed via this main menu
1 In the home screen, press [ ]
The main menu is divided into three tabs: “KIT,” “INST,” and “SYSTEM ”
KIT
CLONE KIT Create a clone of the current kit p 17MANAGE KIT Manage kits p 18IMPORT Import kits p 21KIT GROUP NAME Rename the kit group p 20
INST
MANAGE INST Manage instruments p 26MANAGE TONE Manage tones p 28IMPORT Import new instruments p 22EDIT INST Edit instruments p 23DELETE UNUSED Delete unused instruments and tones p 29
SYSTEM
TRIGGER Adjust the trigger signal produced when you strike a pad so that the signal can be processed correctly p 30
SYSTEM Make settings for the entire aD5 p 39BACKUP Create or load backups of the aD5’s data p 41SD CARD Format an SD card or view information about it p 44RESET Reset the aD5, returning it to the factory-set condition p 46
2 Main menu

13
3 Kit edit
Here you can edit a drum kit’s name or group, and specify the volume of the entire drum kit
Entering the kit edit screen
1 In the home screen, press [EDIT]
The EDIT page appears
2 When you’ve finished editing, be sure to press the [OK] button. If you press the [CANCEL] button, your changes will be discarded
Changing the kit group
1 Press Kit Group
2 Turn the value knob to select a group
Renaming the kit
1 Press Kit Name
The name entry screen appears
2 Enter a name
Function of each buttonButton Function
Moves the character input position to left or right
A,a,1 Switches between types of characters INSERT Inserts a space at the cursor location DELETE Deletes the character at the cursor location CLEAR ALL Deletes all characters Value knob Selects a character
3 Press the [OK] button to confirm the name you entered. If you decide to cancel, press the [CANCEL] button
NOTEA kit name can be up to 16 characters Depending on the screen, it might not be possible to show all 16 characters
NOTETo make settings for each pad, use pad edit (p 15)
3 Kit edit

14
2 Main menu
Adjusting the volume of the entire drum kit
1 Press Kit Volume
2 Turn the value knob to adjust the volume NOTEAdjust the Kit Volume to about 90 If the setting is too high, the audio output might be distorted

15
4 Pad edit
Here you can edit the sound, volume, and pan (stereo position) for each pad of the drum kit
Entering the pad edit screen
1 In the home screen, press [INST]
The INST ASSIGN page appears
2 When you’ve finished editing, be sure to press the [OK] button. If you press the [CANCEL] button, your changes will be discarded
Changing the instrument of each pad
1 Strike the pad that you want to edit
The screen shows the current instrument
2 Use the value knob or [ ][ ] to change the instrument
Number of instruments in the instrument group
� To hear the sound, press [LISTEN] � To change the instrument group, press [GROUP] Use the value knob to make a selection, and press the [OK] button to confirm it.
� To edit a different pad, strike that pad. You can also change pads by pressing [PAD]. Use the value knob to make a selection, and press the [OK] button to confirm it.
Rating an instrumentYou can assign a rating of 0—5 to each instrument. This is a helpful way to find your favorite instruments or frequently-used instruments among the large number of instruments that are provided
1 Press [RATING] several times to change the rating
The screen shows the rating
Rating indication
NOTEFor example you can change the instrument group if you want to assign an instrument other than a snare to the snare pad
NOTEThe instrument rating is stored not for the pad but for the instrument This means that the rating is shown even when you’re editing a different drum kit
4 Pad edit
NOTEThe sound might respond more slowly during pad editing

16
4 Pad edit
Specifying the volume and pan of a pad
1 Press [PAGE ] to access the LEVEL page
2 Press [Level] or [Pan], and use the value knob to specify the setting
You can strike a pad to change the pad that you’re editing You can also change pads by pressing [PAD] Use the value knob to make your selection, and press the [OK] button
Specifying the MIDI note number of a pad
1 Press [PAGE ] to access the MIDI page
2 Press the zone that you want to edit, and use the value knob to specify the note number
You can strike a pad to change the pad that you’re editing You can also change pads by pressing [PAD] Use the value knob to make your selection, and press the [OK] button
NOTE � Adjust the Level setting to about 90 If the setting is too high, the audio output might be distorted
� The Pan setting cannot move the panning completely to the right or left
NOTEIf the same note number is specified more than once, only one of the zones will produce sound when that note number is received
NOTEWhen the aD5 is used to communicate via MIDI with electronic drums from another manufacturer, your performance may not reproduce correctly due to differences in velocity messages and hi-hat control protocols

17
5 Kit menu
Entering the kit menu screen
1 In the home screen, press [ ]
2 Press the [KIT] tab
CLONE KIT Create a clone of the current kit p 17MANAGE KIT Manage kits p 18IMPORT Import kits p 21KIT GROUP NAME Rename the kit group p 20
Cloning a drum kitHere’s how to create a clone of the drum kit that’s shown in the home screen
1 Press [CLONE KIT]
The name entry screen appears
2 Enter a name for the cloned drum kit
Function of each buttonButton Function
Moves the character input position to left or right
A,a,1 Switches between types of characters INSERT Inserts a space at the cursor location DELETE Deletes the character at the cursor location CLEAR ALL Deletes all characters Value knob Selects a character
3 Press the [OK] button to confirm the name you entered.
A confirmation screen appears.
4 Press the [OK] button to clone the drum kit If you decide to cancel without cloning, press the [CANCEL] button
The home screen appears, and the cloned drum kit is loaded
NOTEIf you enter a name that is the same as an existing drum kit, the following message appears “Another kit with the same name has been found ” Enter a different name.
5 Kit menu

18
5 Kit menu
Managing drum kitsHere’s how to view a list of the drum kits You can clone or delete drum kits
1 Press [MANAGE KIT]
The KIT LIST page appears
2 Use the value knob or [ ][ ] to select a drum kit
� Use [GROUP] to change the kit group that is shown If you select “ALL,” all drum kits are shown � You can press [EDIT] or [OK] to enter the kit edit screen There you can edit the kit name or change the group (p 13)
Cloning a drum kitHere’s how to create a clone of the drum kit that’s selected in the kit list
1 Press [ ] to access the page menu
2 Use the value knob to select “CLONE,” and press the [OK] button
The name entry screen appears
3 Enter a name for the cloned drum kit
Function of each buttonButton Function
Moves the character input position to left or right
A,a,1 Switches between types of characters INSERT Inserts a space at the cursor location DELETE Deletes the character at the cursor location CLEAR ALL Deletes all characters Value knob Selects a character
4 Press the [OK] button to confirm the name you entered.If you want to cancel without cloning, press the [CANCEL] button
The cloned drum kit is added to the kit list
NOTEDrum kits are listed in alphabetical order
NOTEIf you enter a name that is the same as an existing drum kit, the following message appears “Another kit with the same name has been found ” Enter a different name.

19
5 Kit menu
Exporting a drum kitHere’s how the drum kit that’s selected in the kit list can be exported to the SD card The exported kit data can be loaded into the aD5 by the Kit Import function (p 21)
1 Press [ ] to access the page menu
2 Use the value knob to select “EXPORT,” and press the [OK] button
The name entry screen appears
3 Enter a name for the exported drum kit
Function of each buttonButton Function
Moves the character input position to left or right
A,a,1 Switches between types of characters INSERT Inserts a space at the cursor location DELETE Deletes the character at the cursor location CLEAR ALL Deletes all characters Value knob Selects a character
4 Press the [OK] button to export If you want to cancel without exporting, press the [CANCEL] button
The kit data is exported in the “Import” folder on your SD card
SD Card
ATV
Import
NOTEThe exported kit data does not include the sound data of the instruments If you import the kit data into a different aD5 unit, the instruments might not be found and sound might not be produced For details, refer to Kit Import (p 21)
NOTEIf you enter a name that is the same as an existing drum kit data, the following message appears “Another kit with the same name has been found ” Enter a different name.
NOTEIf the SD card does not have sufficient free capacity, the following message appears “Not enough memory on the SD card “
NOTEThe exported kit data is written to the “Import” folder so that it can be imported without change

20
5 Kit menu
Deleting a drum kitHere’s how to delete the drum kit that’s selected in the kit list The instruments are not deleted
1 Press [ ] to access the page menu
2 Use the value knob to select “DELETE,” and press the [OK] button
A confirmation screen appears.
3 Press the [OK] button to delete the drum kit If you decide to cancel without deleting, press the [CANCEL] button
Renaming a kit groupHere’s how to rename a kit group
1 Press [KIT GROUP NAME]
The KIT GROUP NAME screen appears
2 Press the button of the kit group that you want to rename
The name entry screen appears
3 Enter a new kit group name
Function of each buttonButton Function
Moves the character input position to left or right
A,a,1 Switches between types of characters INSERT Inserts a space at the cursor location DELETE Deletes the character at the cursor location CLEAR ALL Deletes all characters Value knob Selects a character
4 Press the [OK] button to confirm the name you entered. If you decide to cancel without renaming, press the [CANCEL] button
NOTEYou can’t delete the drum kit that’s currently selected in the home screen
NOTEWe recommend that you make a backup (p 41) so that you don’t lose important data by accidental deletion
NOTEIf you execute Reset System (p 46), the kit group names return to the factory-set names
NOTE � A kit group name can be up to 10 characters long
� Depending on the screen, the kit group name might be shown entirely in uppercase characters
� You can’t assign a name that’s identical to an existing kit group name

21
5 Kit menu
Drum kit importHere’s how a kit exported by the aD5 (p 19) or a kit file downloaded from the ATV website can be imported.
1 If you downloaded a kit, place the kit file (xxxx.ad5kit) in the Import folder of the SD card.
SD Card
ATV
Import
2 In the home screen, press [ ]
3 Select the [KIT] tab, and press [IMPORT]
The IMPORT KIT screen appears
4 Use the value knob to select the kit file that you want to import.
� If you want to import multiple kits, add a check mark to each file that you want to import. � If you press the [ALL] button, all files are selected. If you press the button again, all selections are cleared.
Check/Uncheck
5 Press [IMPORT]
The import is executed A progress bar is shown during the import
If a kit of the same name already exists, a message appears [RENAME]: Rename and import [SKIP]: Skip importing this kit
When the import is completed, the screen indicates “Completed ”
NOTEKit data does not include the sound data of the instruments In the following cases, the instruments might not be found, and sound might not be produced
� If an instrument was deleted after Kit Export � If an instrument was renamed after Kit Export � If kit data was imported from a different aD5 unit � If kit data downloaded from the ATV website was imported, and the necessary instruments were not purchased
If an instrument is not found, the home screen shows the “NO INST FOUND” icon Even in this case, the kit will sound correctly if you import the necessary instrument later, or change to a different instrument.
NOTEWhile a backup saves/loads all kits of the aD5 together, the Kit Export/Import operations save/load individual kits
NOTEIf there is no “Import” folder, insert the SD card into the aD5 once, and the folders will be created

22
6 Instrument Import
Here’s how an instrument that you download from the “ATV Sound Store” website can be imported into the aD5
ATV SOUND STOREThis is a website where additional sounds for the aD5 can be purchased for download
http://store atvcorporation com/
Preparation
1 Place the downloaded instrument file (xxxx.ad5inst) in the Import folder of the SD card.
SD Card
ATV
Import
Import
1 In the home screen, press [ ]
2 Select the [INST] tab, and press [IMPORT]
The IMPORT INST screen appears
3 Use the value knob to select the instrument file that you want to import.
� If you want to import multiple instruments, add a check mark to each file that you want to import. � If you press the [ALL] button, all files are selected. If you press the button again, all selections are cleared.
Check/Uncheck
4 Press [IMPORT]
The import is executed A progress bar is shown during the import
If an instrument of the same name already exists, a message appears [RENAME]: Rename and import [SKIP]: Skip importing this instrument
When the import is completed, the screen indicates “Completed ”
5 Assign the imported instrument to a pad
For the procedure, refer to “4 Pad edit” (p 15)
NOTEFor the product ID that is required when you register an account, refer to “10 System parameters” (p 39), “Information about the unit” (p 40)
NOTEIf there is no “Import” folder, insert the SD card into the aD5 once, and the folders will be created
NOTEThe downloaded instrument file can be imported only into an aD5 of the matching product ID If the product ID does not match, the following message appears “Cannot import this data This aD5 doesn’t have permission to import “xxxx ”
6 Instrument Import

23
7 Instrument edit
In the instrument edit screen you can change the tone that’s played by each zone of the pad, and change the level of the tone You can also rename the instrument, and change the group or icon
Entering instrument edit
1 In the home screen, strike a pad so that the instrument that you want to edit appears in the screen
2 Press [ ] and select the [INST] tab, and press [EDIT INST]
The INST EDIT screen appears You can strike a pad to hear the sound that you’re editing You can hear the sound of the drum kit by striking pads other than the one you’re editing, but this does not switch the instrument that you’re editing
3 When you’ve finished editing, be sure to press the [OK] button. If you press the [CANCEL] button, your changes are discarded
Tone assignHere you can change the tone that’s sounded by each zone (such as the head or rim) of the pad
1 Press [PAGE ] to access the TONE ASSIGN page
2 Press [ZONE] to select the zone that you want to edit
The icon shows the portion of the pad that corresponds to zones A—C * You can also switch zones by striking the pad
Zone icon
3 Press [Tone], and use the value knob to change the tone
Number of tones within the tone group
Tone group
� You can audition the sound by pressing [LISTEN] � You can change tone groups by pressing [GROUP] Use the value knob to make a selection, and press the [OK] button to confirm it.
NOTEThe sound might respond more slowly during instrument editing
NOTEYou can also access instrument edit by pressing [EDIT] in the INST LIST page of MANAGE INST
NOTEWhen you edit an instrument, your edits affect all drum kits to which that instrument is assigned (p 10) Similarly, when the same instrument is assigned to multiple pads of a single drum kit, editing one instrument will affect the others as well.To avoid this, you can clone the instrument before editing it
7 Instrument edit

24
6 Instrument Import
Adjusting the volume of each zone
1 Press [Level], and use the value knob to specify the volume
2 Press [ZONE] to select the zone that you want to edit
The icon shows the portion of the pad that corresponds to zones A—C * You can also switch zones by striking the pad
Changing an instrument’s name, group, or icon
1 Use [ PAGE] [PAGE ] to access the NAME page
2 Select parameters, and use the value knob to edit them
When you press [Name], the name entry screen appears Edit the instrument name, and press [OK]
NOTEAdjust the Level setting to about 90 If the setting is too high, the audio output might be distorted
NOTEAn instrument name can be up to 20 characters Depending on the screen, it might not be possible to show all 20 characters

25
6 Instrument Import
Creating a new or cloned instrumentHere’s how to create a new instrument, or clone an existing instrument
1 Press [ ] to access the page menu
2 Use the value knob to choose “NEW” or “CLONE,” and then press the [OK] button
The name entry screen appears
3 Enter a name for the new instrument
Function of each buttonButton Function
Moves the character input position to left or right
A,a,1 Switches between types of characters INSERT Inserts a space at the cursor location DELETE Deletes the character at the cursor location CLEAR ALL Deletes all characters Value knob Selects a character
4 Press the [OK] button to confirm the name you entered.If you decide to cancel without creating a new or cloned instrument, press the [CANCEL] button
NOTEYou can also create a new or cloned instrument in the MANAGE INST screen
NOTEIt takes approximately 20 seconds to copy an instrument
NOTEIf you choose NEW, an instrument without any tone assigned is created In order for the instrument to produce sound, you must assign a tone
NOTEIf you enter the same name as an existing instrument, the following message appears “Another inst with the same name has been found ” Enter a different name.

26
8 Instrument menu
Entering the instrument menu
1 In the home screen, press [ ]
2 Press the [INST] tab
MANAGE INST Manage instruments p 26MANAGE TONE Manage tones p 28IMPORT Adds (imports) new instruments p 22EDIT INST Edit instruments p 23DELETE UNUSED Delete unused instruments and tones p 29
Managing instrumentsHere you can view a list of instruments, and clone or delete instruments
1 Press [MANAGE INST]
The INST LIST page appears
2 Use the value knob or [ ][ ] to select an instrument
� Use [GROUP] to change the instrument group that’s shown � Press [LISTEN] to audition the sound � To enter the instrument edit screen, press [EDIT] or [OK] (p 23)
Viewing instrument information
1 Press [INFO]
The INST INFO page appears
ParametersGROUP Instrument groupRATING Rating You can press the [RATING] button to change this USED BY KIT Indicates whether this instrument is used by a drum kit
TYPEType of instrumentPRESET: A factory-installed instrumentUSER: A copied or imported instrument
NOTEInstruments are listed in alphabetical order
NOTEIf you enter instrument edit from the INST LIST page, striking any pad will sound the same instrument
8 Instrument menu

27
8 Instrument menu
Creating a new or cloned instrumentHere’s how to create a new instrument, or clone an existing instrument
1 Press [ ] to access the page menu
2 Use the value knob to choose “NEW” or “CLONE,” and then press the [OK] button
The name entry screen appears
3 Enter a name for the newly-created or cloned instrument
Function of each buttonButton Function
Moves the character input position to left or right
A,a,1 Switches between types of characters INSERT Inserts a space at the cursor location DELETE Deletes the character at the cursor location CLEAR ALL Deletes all characters Value knob Selects a character
4 Press the [OK] button to confirm the name you entered.If you decide to cancel without creating or cloning an instrument, press the [CANCEL] button
Deleting an instrument
1 Press [ ] to access the page menu
2 Use the value knob to choose “DELETE,” and press the [OK] button
A confirmation screen appears.
3 Press the [OK] button to delete the instrument If you decide to cancel without deleting, press the [CANCEL] button
NOTEIt takes approximately 20 seconds to clone an instrument
NOTEIf you choose NEW, an instrument without any tone assigned is created In order for the instrument to produce sound, you must assign a tone
NOTEIf you enter the same name as an existing instrument, the following message appears “Another inst with the same name has been found ” Enter a different name.
NOTEWe recommend that you make a backup (p 41) so that you don’t lose important data by accidental deletion
NOTEThe following type of instruments cannot be deleted � Instruments of TYPE=PRESET

28
8 Instrument menu
Managing tonesHere you can view a list of tones You can also delete tones
1 Press [MANAGE TONE]
The TONE LIST page appears
2 Use the value knob or [ ][ ] to select a tone
� Use [GROUP] to change the tone group that’s shown
Viewing tone information
1 Press [INFO]
The TONE INFO screen appears
ParametersGROUP Tone groupUSED BY INST Indicates whether this tone is used by an instrument
TYPEType of tonePRESET: A factory-installed toneATV: A tone downloaded from the ATV sound store
REVISION Tone revision
Deleting a tone
1 Press [ ] to access the page menu
2 Use the value knob to choose “DELETE,” and press the [OK] button
A confirmation screen appears.
3 Press the [OK] button to delete the tone If you decide not to delete the tone, press the [CANCEL] button
NOTEInstruments are listed in alphabetical order
NOTEThe following type of tones cannot be deleted � Tones of TYPE=PRESET � Tones used by an instrument
NOTEWe recommend that you make a backup (p 41) so that you don’t lose important data by accidental deletion

29
8 Instrument menu
Deleting unused instruments or tonesYou can delete instruments that are not used in a drum kit, and tones that are not used in an instrument By deleting these, you can decrease the amount of internal storage that’s being used
1 Press [DELETE UNUSED]
The DELETE UNUSED screen appears
2 Press [INSTS] or [TONES] to select what will be deleted
3 Press [DELETE]
A confirmation screen appears.
4 Press the [OK] button to delete the data If you decide to cancel without deleting, press the [CANCEL] button
NOTEWe recommend that you make a backup (p 41) so that you don’t lose important data by accidental deletion
NOTEInstruments or tones whose Type=PRESET will not be deleted

30
9 Trigger setup
The aD5 is designed to realize its full potential when it is played from connected aDrums series drum/cymbal interfaces Compatible pads made by other manufacturers can also be connected, allowing you to make use of pads that you already own
Zones corresponding to each trigger inputThe aD5 has ten trigger inputs and one hi-hat control pedal input The following table shows the zones (such as head and rim) to which each trigger input corresponds, and how you can play them
aD5trigger input
Corresponding zone
Choke method Notes
KICK (K) Head
SNARE (SN) Head, Rim YES � Supports the side rim of the aD-S13 aDrums snare drum � Choke technique is supported if a cymbal pad is connected
TOM 1 (T1) Head � Rim is not supported for aDrums aD-T10/T13 TOM 2 (T2) Head
TOM 3 (T3) Head
HIHAT (HH) Bow, Edge YES � Bell (cup) is not supported for the aD-H14 aDrums hi-hat Connect EDGE jack only
CRASH (CR) Bow, Edge YES � Bell (cup) is not supported for the aD-C14/C16/C18 aDrums cymbal Connect EDGE jack only
RIDE (RD) Bow, Edge, Cup YES � Supports bell (cup) of the aD-C14/C16/C18 aDrums cymbal Connect both
EDGE and BELL jacks
AUX 1 Head, Rim (Bow, Edge) YES � Supports rim of the aDrums aD-S13, aD-T10, and aD-T13
� The side rim is not supported for the aD-S13 aDrums snare drum � Connect either EDGE or BELL jack for the aD-C14/C16/C18 aDrums cymbal
AUX 2 Head, Rim (Bow, Edge) YES
Connecting padsCheck the connection destination printed on each plug of the aD5’s multi-trigger cable, and connect each of your pads
K Kick (bass drum)SN Snare drumT1 Tom 1T2 Tom 2
T3 Tom 3HH Hi-hatCR Crash cymbalRD Ride cymbal
BEL Ride cymbal bellCTL Hi-hat control pedal
� Connect the CTL plug to the hi-hat control pedal or to the hi-hat open/close sensor � Use the included cable to connect AUX 1 and AUX 2 to your pads � When you use the aDrums aD-H14 hi-hat, also connect the included AC adapter For details, refer to the owner’s manual of the aD-H14
Compatible other manufacturers’ pads and hi-hat control pedalsFor compatible pads and hi-hat control pedals made by other manufacturers, refer to the “Pad Compatibility List” PDF The “Pad Compatibility List” can be downloaded from the following URL
http://products atvcorporation com/drums/ad5/
* For details on connecting and playing pads made by the respective manufacturers, refer to the owner’s manual of each pad * Roland multi-trigger cable does not work right with the aD5
NOTEIf an unconnected plug of the multi-trigger cable comes in contact with metal, false triggering might occur Use tape to protect the unconnected plugs
9 Trigger setup

31
9 Trigger setup
Trigger setupTrigger setup is a very important step that is required in order for the different strike signals of each pad to be correctly interpreted, allowing you to perform comfortably Trigger setup is required not only when setting up your drum kit for the first time, but also when you change pads or when you change the mounting location.You must set the following three items
<1> Crosstalk cancel setting (p 31)
This prevents the “crosstalk” that can occur when the impact of striking a pad reaches another pad, unintentionally triggering it Complete this setting simply by striking each pad as instructed by the crosstalk cancel wizard * Start with this wizard when you set up your drum kit for the first time. * Crosstalk might occur when you change pads or change the mounting location In this
case you should also execute this wizard
<2> Trigger setting for each pad (p 32)
These settings specify the response of each of your pads to ensure that the sound accurately reflects the output of the pad sensor. * Make these settings for each of the pads when you set up the drum kit for the first time.
You can make these settings in either of the following two methods Specify the model name of each pad (p 32)
� Simply select the model name of each pad, and the typical response is specified.Specify using the trigger setup wizard (p 33)
� When you strike each pad as directed by the wizard, the sensor output of each pad is analyzed, and the pad response appropriate for the player is specified.
<3> Hi-hat control pedal adjustment (p 35) Make adjustments so that the hi-hat control pedal operates correctly
Acoustic drum triggerIf you are using a drum trigger, you must also set “DRUM TRIG ADJ” (p 37) in addition to the above items <1> and <2>
<1> Crosstalk cancel settingThis prevents the “crosstalk” in which the impact of striking a pad reaches a different pad, causing it to be inadvertently triggered
1 In the home screen, press [ ]
2 Select the [SYSTEM] tab, and then press [TRIGGER]
The TRIGGER SETUP screen’s WIZARD page appears
3 Press [Crosstalk Cancel Wizard]
4 As directed in the screen, strike the specified pad strongly three times.Specified pad
OK indication
5 When the screen indicates “OK” press [NEXT] to proceed
6 Repeat steps 4—5 in the same way
The aD5 calculates the state of crosstalk for all of the connected pads
KICK > SNARE > TOM 1 > TOM 2 > TOM 3 > HIHAT > CRASH > RIDE > AUX 1 > AUX 2
* If the specified pad is not connected, press [SKIP].
NOTEIf you purchased the aDrums artist <Standard Set> or <Expanded Set>: When it is shipped from the factory, the aD5 is adjusted to typical trigger settings Adjust the crosstalk cancel settings and hi-hat control pedal as necessary
NOTEAn acoustic drum trigger is a sensor that is attached to an acoustic drum It detects strikes on a bass drum, snare drum, or tom, and triggers sounds on the aD5
NOTEIf you press [RETRY], the previous strikes are discarded
NOTEWe recommend that you play a rimshot when striking the snare pad

32
9 Trigger setup
7 When the following screen appears, play the pads to verify that there is no crosstalk, and then press [EXIT]
* If there is crosstalk, press [YES] and repeat the wizard once again
In some cases, it might not be possible to completely eliminate crosstalk The following actions might improve the situation � Increase the distance between the pads � Mount the pads on separate stands � Place the system on a stable floor. � Adjust the tension of the mesh pads
<2> Trigger setting for each padThese settings specify the response of each of your pads to ensure that the sound accurately reflects the output of the pad sensor Make these settings for each of the pads when you set up the drum kit for the first time.You can make these settings in either of the following two methods
Specify the model name of each padSimply select the model name of each pad, and the typical response is specified.
1 In the home screen, press [ ]
2 Select the [SYSTEM] tab, and press [TRIGGER]
3 Press [PAGE ]
The MODEL page appears
Pad being configured
4 Strike the pad that you want to configure.
5 Press [Pad Brand] to select the manufacturer, and press [Model] to select the model name of the pad
* When making settings for the hi-hat pad, you’ll also specify the model name of the hi-hat pedal
Model name of the hi-hat pedal
6 Repeat steps 4—5 in the same way, and configure for all pads.
7 Press the [OK] button to confirm the setting. If you decide not to change the setting, press the [CANCEL] button
NOTEFor the model names of the pads used in drum kits of various manufacturers, refer to the “Pad Compatibility List” PDF

33
9 Trigger setup
Specify using the trigger setup wizardWhen you strike each pad as directed by the wizard, the sensor output of each pad is analyzed, and the pad response appropriate for the player is specified.
1 In the home screen, press [ ]
2 Select the [SYSTEM] tab, and press [TRIGGER]
The TRIGGER SETUP screen’s WIZARD page appears
3 Press [Trigger Setup Wizard]
4 Lightly strike the pad that you want to set up
The pad you strike is shown
5 If the indicated pad is correct, press [NEXT] * If the wrong pad is shown, strike the pad again If the wrong pad is still shown, check the pad connections
6 Specify the manufacturer and model of the pad
Select the item, and use the value knob to specify the correct setting
7 Press [NEXT]
* When making settings for the hi-hat, you’ll also specify the model name of the hi-hat pedal
8 Using the softest shot (pianissimo) that you will play during performance, strike the head three times When the display indicates “OK,” press [NEXT]
In the case of a cymbal, strike the bow Pianissimo is the softest shot during normal performance An example of this is a single shot in drum roll If you fail to hit the head properly, press [RETRY] and you can do it again as many times as needed
NOTEIf you use the trigger setup wizard to make settings, and then change the pad model name, the settings you made using the wizard are discarded
NOTEFor the model names of the pads used in drum kits of various manufacturers, refer to the “Pad Compatibility List” PDF
NOTE � Typically, the region near the pad’s strike sensor has extremely high sensitivity It is easier to control the dynamics if your strikes are some distance away from the sensor
� In this manual, we refer to the strongest shot you’ll use during performance as “fortissimo” (ff), the weakest shot as “pianissimo” (pp), and a medium-strength shot as “mezzo-forte” (mf)

34
9 Trigger setup
9 Using the strongest shot (fortissimo) that you will play during performance, strike the head three times When the display indicates “OK,” press [NEXT]
Do not deliver a rimshot, but hit the head part In the case of a cymbal, strike the bow Fortissimo is the strongest shot during normal performance Usually, strikes in the climax part of a performance are fortissimo You do not need to deliver the strongest possible shot which you will not use during performance If you fail to hit the head properly, press [RETRY] and you can do it again as many times as needed
10 In the same way, use the strongest shot (fortissimo) that you will play during performance to strike the specified zone three times. When the display indicates “OK,” press [NEXT].
When striking the rim, play a rimshot (the method of striking the head and rim simultaneously) You do not need to deliver the strongest possible shot which you will not use during performance If you fail to hit the rimshot properly, press [RETRY] and you can do it again as many times as needed
Specified zone
11 Setup is completed If you want to set up another pad, press [YES]
Make settings for all pads in the same way If you are finished, press [EXIT].

35
9 Trigger setup
<3> Hi-hat control pedal adjustmentHere’s how to make adjustments so that the hi-hat control pedal operates correctly You can also adjust the foot-close and foot-splash volume
1 In the home screen, press [ ]
2 Select the [SYSTEM] tab, and press [TRIGGER]
3 Press the [PAGE ] several times to access the HIHAT PEDAL ADJ page
Meter
Effective working range
Top hi-hat cymbal
Bottom hi-hat cymbal
4 Advance the hi-hat pedal to the closed position, and press [Set Close]
5 Remove your foot from the hi-hat pedal, and press [Set Open]
* Only hi-hats made by a different manufacturer
6 Press [Pedal HH Sens] and adjust the foot-close and foot-splash volume
7 Press the [OK] button to confirm the setting. If you decide not to change the setting, press the [CANCEL] button
NOTE � If you feel that the hi-hat sound does not open even though you reduce the pressure on the pedal, you might be able to improve the situation by pressing [Set Close] while applying fairly strong pressure on the pedal
� If you apply too much pressure on the pedal, it will be difficult to close the hi-hat sound
NOTEIf you’re using the aDrums aD-H14, [Set Open] is not shown All settings are adjusted automatically just by [Set Close]

36
9 Trigger setup
Fine adjustments to the trigger setupIf the relationship between the force of your strike and the resulting sound is not to your liking, or if unintended notes are sounded, you can adjust the following parameters for each pad
Situation Parameter Notes � Volume is small even for a strong strike � High volume is hard to reach even with a strong strike � Sound is fairly loud even with a soft strike
Sensitivity You should also adjust the volume of the aD5
� Sound changes unnaturally between soft and strong strikes � Only the volume in the mf region is too soft or too loud Curve
� Notes are omitted when you play a roll at pp � Unintended notes occur in response to sound from a nearby monitor speaker
� Unintended notes occur in response to sound from a nearby acoustic drum
� Unintended notes occur in response to floor vibrations
ThresholdIf extremely soft shots (pp) do not produce sound, execute the trigger setup wizard once again
� The head also sounds when you play a rimshot � The rim also sounds when you play a head shot Head-Rim Adj This parameter is available only
for a mesh head � The rim shot also sounds when you play on the side rim � The side stick also sounds when you play a rim shot Side Rim Adj This parameter is available only
for the aD-S13 � The rim sound is too soft or too loud in comparison to the head � The edge or cup sounds are too soft or too loud in comparison to the bow
Zone B Sens Zone C Sens
� An acoustic drum trigger produces duplicate (retriggered) notes Retrigger Cancel
This parameter is available only for a drum trigger
ADJUST
1 In the home screen, press [ ]
2 Select the [SYSTEM] tab, and press [TRIGGER]
3 Press [PAGE ] to access the ADJUST page
4 Select parameters and use the value knob to adjust them
Shot meterThe most recent shot is shown at the far right Previous shots move toward the left
Curve
Parameters
Sensitivity
Positive (+) values increase the pad’s sensitivity; negative (-) values decrease the pad’s sensitivity.While watching the shot meter in the screen, adjust this parameter so that the shot meter indicates ff when you play the strongest shot (ff) you’ll use during performance. If the reading is above ff, lower the sensitivity * This changes the sensitivity of all zones A/B/C * In case the sensitivity adjustment range is insufficient, re-execute the trigger setup wizard.
Curve
This parameter compensates the response so that the dynamics of your strikes will correspond linearly to the dynamics of the sound Adjust the parameter so that the meter indicates mf when you play a medium-strength shot (mf)
NORMAL : No compensation+1—3 : Increases the sound of a mf strike -1—3 : Decreases the sound of a mf strike
NOTEEach parameter is reset to its default value when you change the model name of the pad or when you execute the trigger setup wizard
NOTEIn this manual, we refer to the strongest shot you’ll use during performance as “fortissimo” (ff), the weakest shot as “pianissimo” (pp), and a medium-strength shot as “mezzo-forte” (mf)
NOTETypically, the region near the pad’s strike sensor has extremely high sensitivity You’ll be able to make adjustments more accurately if your strikes are some distance away from the sensor

37
9 Trigger setup
FINE ADJUST
1 In the TRIGGER SETUP screen, press the [PAGE ] to access the FINE ADJUST page
2 Select parameters and use the value knob to adjust them
Parameters
ThresholdAdjusts the minimum strike level above which the pad responds With lower settings, the pad responds even to softer strikes If the pad responds to sounds in the environment, increase this value
Zone B Sens Adjust the sensitivity of zone B and zone C Watch the shot meter in the screen, and adjust the setting so that the shot meter indicates “ff” when you play the strongest shot (ff) you’ll use during performance. If the meter indicates higher than “ff,” lower the sensitivity
Zone C Sens
RIM ADJUST
1 In the TRIGGER SETUP screen, press the [PAGE ] to access the RIM ADJUST page
2 Select parameters and use the value knob to adjust them
Parameters
Head-Rim AdjThis parameter is for a mesh head It adjusts the boundary between head shots and rim shots If a rim shot is sounded when you strike the head, adjust this parameter toward H If you find it difficult to play rim shots, adjust this parameter toward R.
Side Rim AdjThis parameter is for the aD-S13 If the rim shot is heard even though you strike the side rim, then adjust this in the “+” direction If a rim shot causes the side stick to sound, then adjust this in the “-” direction
DRUM TRIG ADJThis parameter can be set only for a trigger input to which an acoustic drum trigger is connected
1 In the TRIGGER SETUP screen, press [PAGE ] to access the DRUM TRIG ADJ page
2 Select parameters and use the value knob to adjust them
Cancel time bar
Retrigger
Parameters
Retrigger Cancel
When using a drum trigger, a single strike might produce two notes (retriggering) Retrigger Cancel prevents retriggering by ignoring any additional trigger signals that occur within a fixed time interval from the first trigger signal.The graph in the screen makes it easy to see the time at which retriggering occurs, and to determine the setting that is required for retriggering to be ignored
Procedure1 Minimize the value 2 Strike the drum 3 If the graph shows two or more strikes (retriggering), increase the value until the cancel time bar
covers all of the retriggers * The occurrence of retriggering changes depending on the force and location of the strike * If you increase the value excessively, rolls and flams will be affected.
38
9 Trigger setup
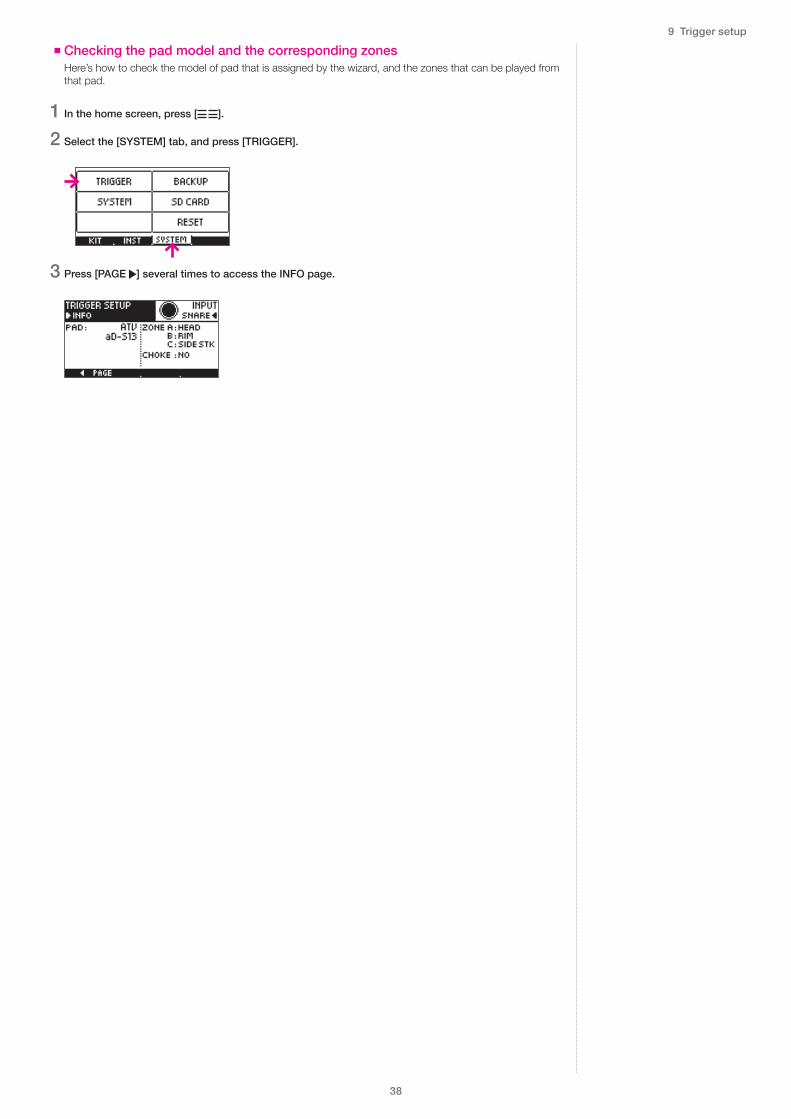
Checking the pad model and the corresponding zonesHere’s how to check the model of pad that is assigned by the wizard, and the zones that can be played from that pad
1 In the home screen, press [ ]
2 Select the [SYSTEM] tab, and press [TRIGGER]
3 Press [PAGE ] several times to access the INFO page

39
10 System parameters
Here you can make settings for the entire aD5
Entering the system parameter screen
1 In the home screen, press [ ]
2 Select the [SYSTEM] tab, and press [SYSTEM]
The SYSTEM screen OPTION page appears
Option settings
1 Use [ ][ ] to select a parameter, and use the value knob to edit the setting
ParametersLCD Contrast Adjusts the contrast of the display LCD Brightness Adjusts the brightness of the display
Output Gain
Adjusts the output gain of OUTPUT and PHONES in a range of 0—+6 dB The default value is “+3 dB ”Depending on your playing style, distortion (clipping) might occur in the drum sound If this occurs, lower the Output Gain * This does not affect the gain of the audio that is input to AUDIO IN. * Starting with firmware version 1.20, the output gain was increased by 3 dB. If you want the gain to
be the same as before, set Output Gain to 0 dB
Auto Power Off
The aD5 automatically turns off the power to save electricity when it has not been played or operated for 30 minutes Here you can specify the time until when the power automatically turns off.30 mins : The power turns off after 30 minutes.4 hours : The power turns off after four hours.DISABLE : The power does not turn off automatically.
10 System parameters

40
10 System parameters
MIDI settings
1 Press [PAGE ] to access the MIDI page
2 Use [ ][ ] to select a parameter, and use the value knob to edit the setting
Parameters
MIDI Channel
Specifies the MIDI channel used to transmit and receive. Normally you’ll set this to channel 10.If this is set to INDIVIDUAL, each pad transmits messages on a different MIDI channel. You can’t individually change the MIDI channel of each pad For reception, sound is produced in response to note messages of all channels (omni mode)
MIDI transmit channels for the INDIVIDUAL settingPad ChKICK 1SNARE 2TOM 1 3TOM 2 4TOM 3 5
Pad ChHIHAT 6CRASH 7RIDE 8AUX 1 9AUX 2 10
Local Control If this is OFF, sound is not produced when you strike the pads; sound is produced in response to incoming MIDI note messages Normally you’ll set this ON
Information about the unit
1 Press [PAGE ] to access the INFO page
ParametersPRODUCT ID Product IDSERIAL NO Serial numberFIRMWARE Version of the firmwareKITS Number of saved drum kitsINSTS Number of saved instrumentsTONES Number of saved tonesSTORAGE USED Amount of internal storage used
NOTEWhen the aD5 is used to communicate via MIDI with electronic drums from another manufacturer, your performance may not reproduce correctly due to differences in velocity messages and hi-hat control protocols
HINTIf you set MIDI Channel to INDIVIDUAL, each pad can be recorded on a separate track when you record MIDI into your DAW
NOTE � When you’re MIDI-recording into a DAW, and the MIDI messages sent from the aD5 are looped-back, notes will be triggered in duplicate Be sure to turn off MIDI loopback in your DAW’s settings
� If you turn the aD5’s Local Control OFF and MIDI-record into a DAW, the aD5 produces sound in response to the MIDI messages that have been routed through the PC (DAW), meaning that there will be latency (notes will be delayed) We recommend that you leave the aD5’s Local Control ON, and turn MIDI loopback off in your DAW
41
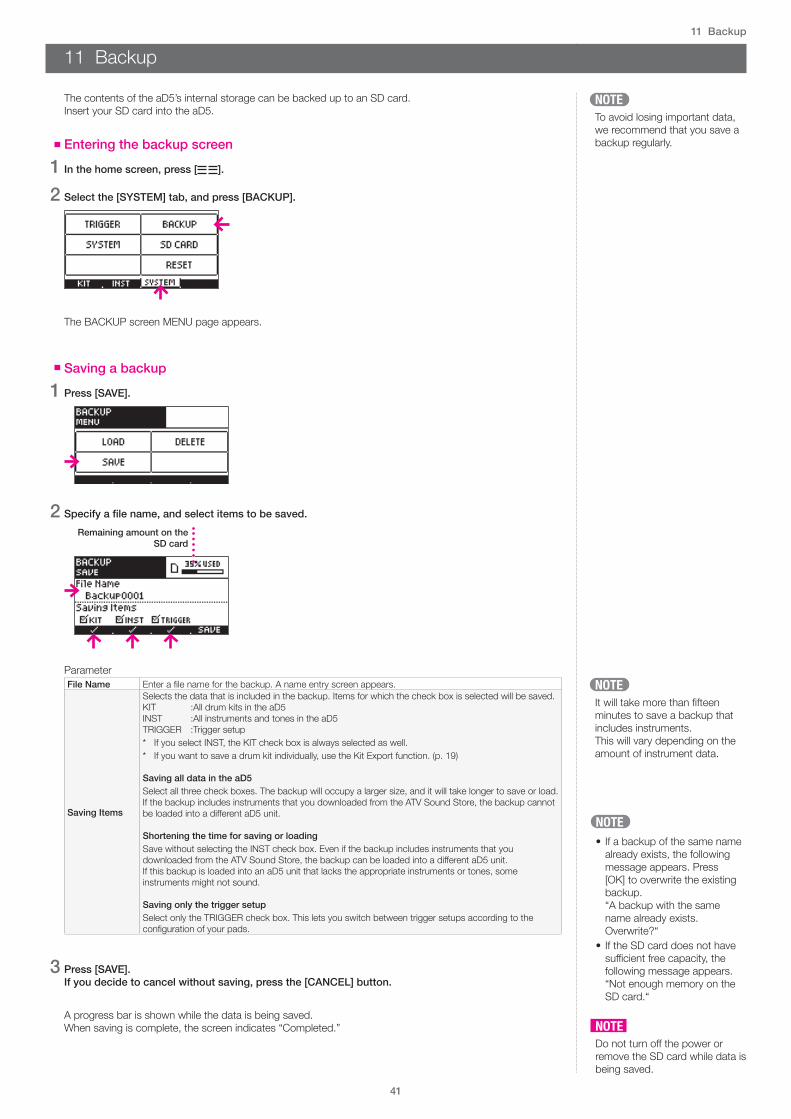
11 Backup
The contents of the aD5’s internal storage can be backed up to an SD card Insert your SD card into the aD5
Entering the backup screen
1 In the home screen, press [ ]
2 Select the [SYSTEM] tab, and press [BACKUP]
The BACKUP screen MENU page appears
Saving a backup
1 Press [SAVE]
2 Specify a file name, and select items to be saved.Remaining amount on the
SD card
ParameterFile Name Enter a file name for the backup. A name entry screen appears.
Saving Items
Selects the data that is included in the backup Items for which the check box is selected will be saved KIT : All drum kits in the aD5INST : All instruments and tones in the aD5TRIGGER : Trigger setup * If you select INST, the KIT check box is always selected as well * If you want to save a drum kit individually, use the Kit Export function (p 19)
Saving all data in the aD5Select all three check boxes The backup will occupy a larger size, and it will take longer to save or load If the backup includes instruments that you downloaded from the ATV Sound Store, the backup cannot be loaded into a different aD5 unit
Shortening the time for saving or loadingSave without selecting the INST check box Even if the backup includes instruments that you downloaded from the ATV Sound Store, the backup can be loaded into a different aD5 unit If this backup is loaded into an aD5 unit that lacks the appropriate instruments or tones, some instruments might not sound
Saving only the trigger setupSelect only the TRIGGER check box This lets you switch between trigger setups according to the configuration of your pads.
3 Press [SAVE] If you decide to cancel without saving, press the [CANCEL] button
A progress bar is shown while the data is being saved When saving is complete, the screen indicates “Completed ”
NOTEIt will take more than fifteen minutes to save a backup that includes instruments This will vary depending on the amount of instrument data
NOTEDo not turn off the power or remove the SD card while data is being saved
NOTE � If a backup of the same name already exists, the following message appears Press [OK] to overwrite the existing backup “A backup with the same name already exists Overwrite?“
� If the SD card does not have sufficient free capacity, the following message appears “Not enough memory on the SD card “
11 Backup
NOTETo avoid losing important data, we recommend that you save a backup regularly

42
11 Backup
Backup save location
The backup is saved as several files in a folder.If you copy the backup, copy the entire folder
Loading a backup
1 Press [LOAD]
2 Use the value knob to select the backup file that you want to load.
Items to be loaded
File size of the selected backup
Number of saved backups
Trigger setup loading on/off
If you want to load only drum kit and instrument data into another aD5 unit, turn trigger setup loading off.
3 Press [LOAD] If you decide to cancel without loading, press the [CANCEL] button
A progress bar is shown while the data is being loaded When loading is complete, the screen indicates “Completed ”
4 Press the power button to turn off the power, and then turn the power on again.
SD Card
ATV
aD5BK
Backup0001
Backup0002
Backup0003
NOTEDo not change the file in the backup folder
NOTEAll data in the aD5 will be deleted
NOTEIn some cases, a backup that includes instruments that were saved on a different aD5 unit cannot be loaded The following message appears “Cannot load this data This aD5 doesn’t have permission to load “XXXX ad5bk”
NOTEIt takes more than fifteen minutes to load a backup that includes the instruments This will vary depending on the amount of instrument data

43
11 Backup
Deleting a backup
1 Press [DELETE]
2 Use the value knob to select the backup file that you want to delete.
Information for the currently selected backup file
Number of backups that are saved
3 Press [DELETE]
A confirmation screen appears.
4 Press the [OK] button to delete the backup file. If you decide to cancel without deleting, press the [CANCEL] button
44
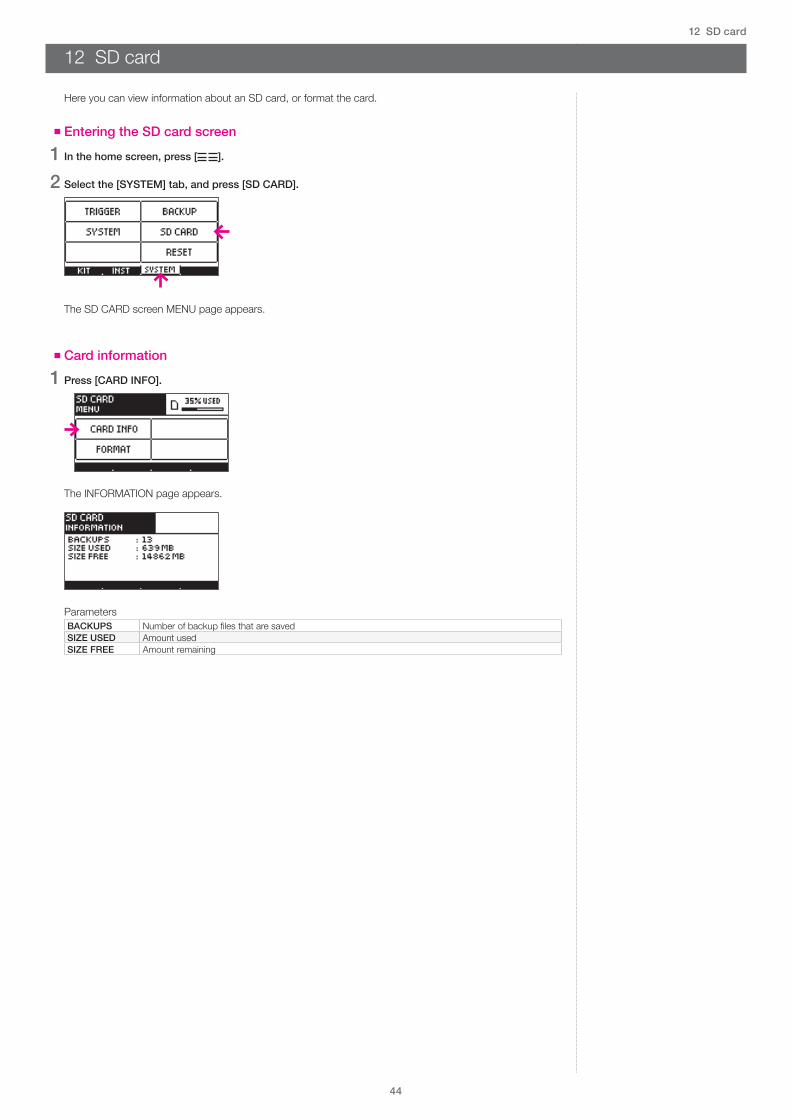
12 SD card
Here you can view information about an SD card, or format the card
Entering the SD card screen
1 In the home screen, press [ ]
2 Select the [SYSTEM] tab, and press [SD CARD]
The SD CARD screen MENU page appears
Card information
1 Press [CARD INFO]
The INFORMATION page appears
ParametersBACKUPS Number of backup files that are savedSIZE USED Amount usedSIZE FREE Amount remaining
12 SD card

45
12 SD card
Formatting a card
1 Press [FORMAT]
The FORMAT page appears
2 Press [FORMAT]
A confirmation screen appears.
3 Press [OK] to execute formatting If you decide to cancel without formatting, press [CANCEL]
When formatting is completed, the screen indicates “Completed ”
WARNINGExecuting the format operation will delete the entire contents of the SD card

46
13 Reset
Entering the reset screen
1 In the home screen, press [ ]
2 Select the [SYSTEM] tab, and press [RESET]
The RESET screen MENU page appears
System resetThis returns the following parameters to their default values � System parameters (Option, MIDI) � Trigger setup parameters � Best kit registrations � Kit group names
1 Press [RESET SYSTEM]
2 Press [RESET]
A confirmation screen appears.
3 Press [OK] to execute system reset If you decide to cancel without resetting, press [CANCEL]
When reset is completed, the screen indicates “Completed ”
4 Press the power button to turn the power off, and then turn the power on again.
13 Reset

47
13 Reset
Restoring the factory-set soundsTo completely return the aD5 to its factory-set state, you can restore the factory sounds To do this, you’ll need an SD card and a factory sound data file which you can download from the ATV website
Steps on your Mac/PC
1 Download the factory sound data file from the ATV website.
http://products atvcorporation com/drums/ad5/
2 Decompress the downloaded file “aD5Sound.zip.”
Decompressing the file creates a folder named “aD5Sound.”
3 Place the “aD5Sound” folder in the “ATV” folder of the SD card
Steps on the aD5
4 Insert the SD card into the aD5
5 Press [RESET FACTORY SOUND]
A message appears, informing you that the drum kits and instruments will be erased
6 Press [NEXT]
The screen shows the steps for the reset
7 Press [NEXT]
The screen shows the steps for the reset
8 Press [RESTORE]
A confirmation screen appears.
9 Press [OK] to execute the factory sound restore operation If you decide to cancel without restoring, press [CANCEL]
When the restore is completed, the screen indicated “Completed ”
10 Press the power button to turn the power off, and then turn the power on again.
The factory-set sounds are restored
NOTEAll of the data in the aD5 will be deleted To safeguard against accidentally deleting important data, we recommend that you make a backup (p 41)
NOTEIf there is no “ATV” folder, insert the SD card into the aD5 once, and the folders will be created
NOTEIt will take 15 minutes or more for the factory sound data to be restored
SD Card
ATV
aD5Sound
48
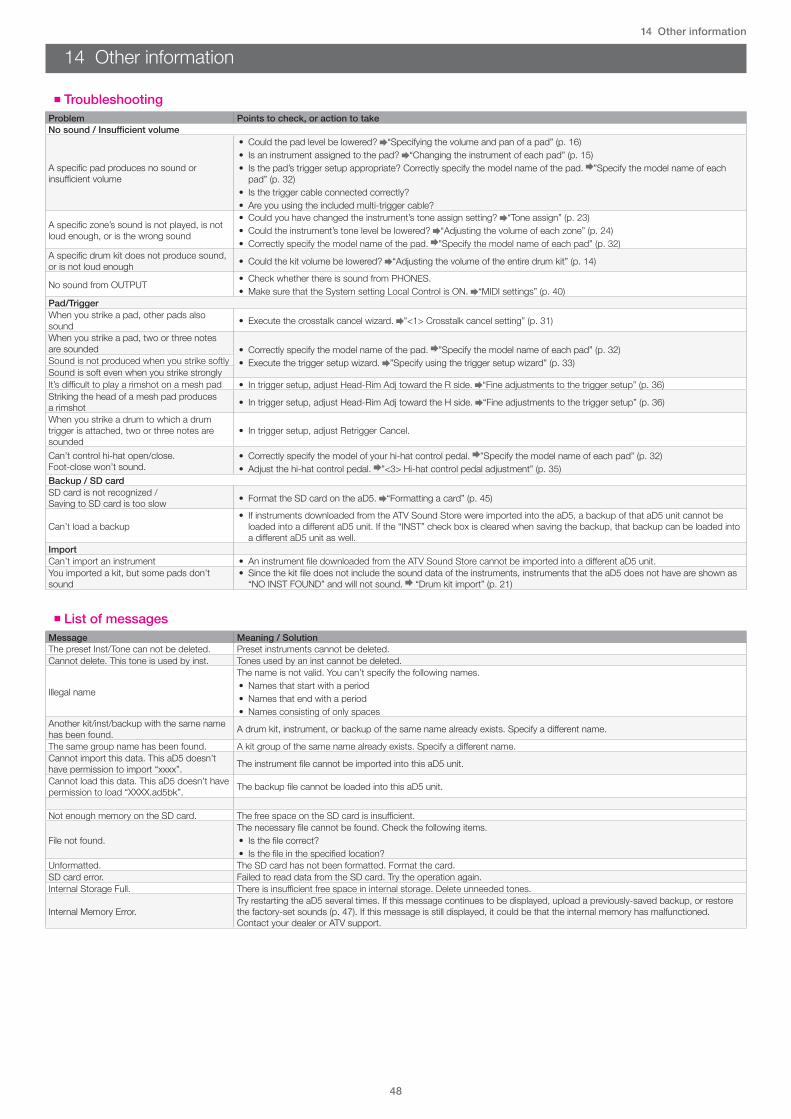
14 Other information
TroubleshootingProblem Points to check, or action to takeNo sound / Insufficient volume
A specific pad produces no sound or insufficient volume
� Could the pad level be lowered? “Specifying the volume and pan of a pad” (p 16) � Is an instrument assigned to the pad? “Changing the instrument of each pad” (p 15) � Is the pad’s trigger setup appropriate? Correctly specify the model name of the pad ”Specify the model name of each pad” (p 32)
� Is the trigger cable connected correctly? � Are you using the included multi-trigger cable?
A specific zone’s sound is not played, is not loud enough, or is the wrong sound
� Could you have changed the instrument’s tone assign setting? “Tone assign” (p 23) � Could the instrument’s tone level be lowered? “Adjusting the volume of each zone” (p 24) � Correctly specify the model name of the pad ”Specify the model name of each pad” (p 32)
A specific drum kit does not produce sound, or is not loud enough � Could the kit volume be lowered? “Adjusting the volume of the entire drum kit” (p 14)
No sound from OUTPUT � Check whether there is sound from PHONES � Make sure that the System setting Local Control is ON “MIDI settings” (p 40)
Pad/TriggerWhen you strike a pad, other pads also sound � Execute the crosstalk cancel wizard ”<1> Crosstalk cancel setting” (p 31)
When you strike a pad, two or three notes are sounded � Correctly specify the model name of the pad ”Specify the model name of each pad” (p 32)
� Execute the trigger setup wizard ”Specify using the trigger setup wizard” (p 33)Sound is not produced when you strike softlySound is soft even when you strike stronglyIt’s difficult to play a rimshot on a mesh pad � In trigger setup, adjust Head-Rim Adj toward the R side “Fine adjustments to the trigger setup” (p 36)Striking the head of a mesh pad produces a rimshot � In trigger setup, adjust Head-Rim Adj toward the H side “Fine adjustments to the trigger setup” (p 36)
When you strike a drum to which a drum trigger is attached, two or three notes are sounded
� In trigger setup, adjust Retrigger Cancel
Can’t control hi-hat open/close Foot-close won’t sound
� Correctly specify the model of your hi-hat control pedal ”Specify the model name of each pad” (p 32) � Adjust the hi-hat control pedal ”<3> Hi-hat control pedal adjustment” (p 35)
Backup / SD cardSD card is not recognized / Saving to SD card is too slow � Format the SD card on the aD5 “Formatting a card” (p 45)
Can’t load a backup � If instruments downloaded from the ATV Sound Store were imported into the aD5, a backup of that aD5 unit cannot be loaded into a different aD5 unit If the “INST” check box is cleared when saving the backup, that backup can be loaded into a different aD5 unit as well
ImportCan’t import an instrument � An instrument file downloaded from the ATV Sound Store cannot be imported into a different aD5 unit You imported a kit, but some pads don’t sound
� Since the kit file does not include the sound data of the instruments, instruments that the aD5 does not have are shown as “NO INST FOUND” and will not sound “Drum kit import” (p 21)
14 Other information
List of messagesMessage Meaning / SolutionThe preset Inst/Tone can not be deleted Preset instruments cannot be deleted Cannot delete This tone is used by inst Tones used by an inst cannot be deleted
Illegal name
The name is not valid You can’t specify the following names � Names that start with a period � Names that end with a period � Names consisting of only spaces
Another kit/inst/backup with the same name has been found A drum kit, instrument, or backup of the same name already exists. Specify a different name.
The same group name has been found A kit group of the same name already exists. Specify a different name.Cannot import this data This aD5 doesn’t have permission to import “xxxx” The instrument file cannot be imported into this aD5 unit
Cannot load this data This aD5 doesn’t have permission to load “XXXX ad5bk” The backup file cannot be loaded into this aD5 unit
Not enough memory on the SD card The free space on the SD card is insufficient.
File not found The necessary file cannot be found. Check the following items.
� Is the file correct? � Is the file in the specified location?
Unformatted The SD card has not been formatted Format the card SD card error Failed to read data from the SD card Try the operation again Internal Storage Full There is insufficient free space in internal storage. Delete unneeded tones.
Internal Memory Error Try restarting the aD5 several times If this message continues to be displayed, upload a previously-saved backup, or restore the factory-set sounds (p 47) If this message is still displayed, it could be that the internal memory has malfunctioned Contact your dealer or ATV support

49
14 Other information
SpecificationsElectronic Drum Sound ModuleModel: aD5
Item Specifications
Connection jacks / Interfaces
OUTPUT L/R: mono phone x 2PHONES: stereo phoneAUDIO IN: stereo mini-phoneMULTI TRIGGER INPUT: dedicated multi-connectorAUX TRIGGER INPUT 1/2: TRS phoneUSB 2 0: type B connector (High Speed)ATV LINK: RJ45 LAN connectorSD CARD: SD/SDHC cardDC IN: only for the included AC adapter
Power supply DC 12 VCurrent consumption 600 mA
Dimensions 197 (W) x 144 (D) x 73 (H) mmWeight 1 1 kg
* Specifications and appearance of this product are subject to change without notice for improvement.
SupportRefer to the following URL for frequently asked questions, firmware updates, and other information.
http://products atvcorporation com/drums/ad5/
ATV SOUND STORENumerous additional sounds (instruments) for the aD5 are available By downloading these and importing them into your aD5, you can immediately play the new instruments
http://store atvcorporation com/

2017 Rev.06© 2015 ATV Corporation All rights reserved.
www.atvcorporation.com