Embed Size (px)
Citation preview

ABLETM
Advanced Bindery Library Exchange
Reference Guide
Volume 2
Library User Guide
Prepared by
Paul Parisi � ACME Bookbinding John Petraglia � Programming Concepts, Inc.
Version 0.1 June 5, 2000
ABLE���� Partnership

ABLE 6 Reference Guide Page 2 Library User Guide
Copyright by ABLE���� Partnership
This reference guide is copyrighted and all rights are reserved. This document may not, in whole or in part, be copied, photocopied, reproduced translated, reduced to any electronic medium or machine readable form without prior consent, in writing, from the ABLE���� Partnership. The information in this document is subject to change without notice. The ABLE���� Partnership assumes no responsibility for errors that may appear in this document.
For more information visit the ABLE���� web site: http://www.programmingconcepts.com/able/
Or contact,
ABLE���� Partnership c/o Paul Parisi
ACME Bookbinding 100 Cambridge Street
Charlestown, MA 02129 (800) 242-1821
For technical support contact:
Programming Concepts, Inc.
web site: http://www.programmingconcepts.com/able/ e-mail: [email protected] telephone: 631-563-3800 x230 fax: 631-563-3898
ABLE���� Partnership Acme Bookbinding
Information Conservation, Inc. Kater-Crafts Bookbinders
Lehmann Bookbinding Mekatronics Inc.
National Library Binding of Georgia Ocker & Trapp Library Bindery Inc.
Programming Concepts, Inc.
ABLE���� is a trademark of Mekatronics, Inc. / Bendror International Inc. 1987-2000

ABLE 6 Reference Guide Page 3 Library User Guide
Table of Contents 1. Introduction............................................................................................................................................................ 8
2. Basic ABLE���� Concepts and Terminology........................................................................................................... 8
2.1 Overview.......................................................................................................................................................... 9 2.2 Definitions & Terminology ............................................................................................................................ 10
ALT, CTL, AND SHIFT ......................................................................................................................................... 10 EMBOSS.............................................................................................................................................................. 10 CASE INSENSITIVE .............................................................................................................................................. 11 CATEGORY CODES ............................................................................................................................................. 11 CLASS CODES ..................................................................................................................................................... 11 COLOR CODES .................................................................................................................................................... 11 FONTS ................................................................................................................................................................ 11 LEAF ATTACHMENT ........................................................................................................................................... 11 LEVEL ................................................................................................................................................................ 11 MENU BARS ....................................................................................................................................................... 12 PLACEMENT CODES............................................................................................................................................ 13 PROMPTS (DEFINED) .......................................................................................................................................... 13 PRINT CODES...................................................................................................................................................... 13 SPACING CODES ................................................................................................................................................. 13 TEXT FITTING RULES.......................................................................................................................................... 14
2.3 Special Characters ............................................................................................................................................ 14 HARD HYPHEN ................................................................................................................................................... 14 LINE BREAK CODE ............................................................................................................................................. 15 REQUIRED SPACE CODE ..................................................................................................................................... 15 SOFT HYPHEN CODE........................................................................................................................................... 16 VERTICAL LINE BREAK ...................................................................................................................................... 16 WIDE SPACE CODE............................................................................................................................................. 17 WIDE WIDTH CODE ............................................................................................................................................ 18
2.4 Entering and Editing Text Fields.................................................................................................................... 18 CAPITAL LETTERS .............................................................................................................................................. 18 TYPING IN ABLE�............................................................................................................................................. 19 �OVERSTRIKE� MODE ........................................................................................................................................ 19 �INSERT� MODE ................................................................................................................................................. 19 ERASING/DELETING............................................................................................................................................ 19 EDITING FIELDS .................................................................................................................................................. 20 SCRIPT L............................................................................................................................................................. 20 TAB & SHIFT TAB .............................................................................................................................................. 20 COMPOSE+ ......................................................................................................................................................... 20 CUT, COPY & PASTE .......................................................................................................................................... 20 DEFAULT VALUES .............................................................................................................................................. 21
2.5 Lettering Control Fields .................................................................................................................................. 21 2.5.1 SPECIAL INSTRUCTIONS FOR CALL NUMBER PLACEMENT........................................................................... 21 2.5.2 AUTOMATIC LETTERING CONTROL CODES FOR ABLE� ............................................................................ 24 2.5.3 LETTERING CONTROL CODES FOR VERTICAL TITLES.................................................................................. 26
2.6 Screen Navigation Functions........................................................................................................................... 30 2.6.1 ADD ITEM ................................................................................................................................................. 32 2.6.2 ADD FORMAT............................................................................................................................................ 32 2.6.3 ADD TITLE ................................................................................................................................................ 32

ABLE 6 Reference Guide Page 4 Library User Guide
2.6.4 UPDATE .................................................................................................................................................... 33 2.6.5 CLEAR....................................................................................................................................................... 33 2.6.6 REMOVE.................................................................................................................................................... 33 2.6.7 → (NEXT) ................................................................................................................................................. 34 2.6.8 ← (PREVIOUS) .......................................................................................................................................... 34 2.6.9 GROUP SEARCH ........................................................................................................................................ 34 2.6.10 VARIABLE (RIGHT MOUSE BUTTON)......................................................................................................... 35 2.6.11 COMMENT (RIGHT MOUSE BUTTON)........................................................................................................ 36 2.6.12 SUBSCRIPT AND SUPERSCRIPT (RIGHT MOUSE BUTTON).......................................................................... 36
2.7 Retrieval Keys.......................................................................................................................................... 36 2.1.1 TEXT KEY................................................................................................................................................. 37 2.1.2 CALL NUMBER KEY .................................................................................................................................. 38 2.1.3 PRIVATE ID KEY ...................................................................................................................................... 40 2.1.4 ISSN/ISBN KEY ....................................................................................................................................... 40 2.1.5 TITLE ID KEY........................................................................................................................................... 40 2.1.6 FORMAT ID KEY ...................................................................................................................................... 40 2.1.7 ITEM KEY................................................................................................................................................. 40
2.8 User Access ..................................................................................................................................................... 41
3. Getting Started ..................................................................................................................................................... 42
3.1 How to Start ABLE� ...................................................................................................................................... 42 3.2 How to Log Out............................................................................................................................................... 42 3.3 How to Navigate Between ABLE� Screens ................................................................................................... 43 3.5 How to Get Help ............................................................................................................................................. 43
3.5.1 TOOL TIPS................................................................................................................................................. 43 3.5.2 INDEX & CONTENTS HELP SERVICES ......................................................................................................... 44
3.5.3 Help Buttons ....................................................................................................................................................45 3.6 How to Purge the Database ............................................................................................................................ 45
4. Title Composition................................................................................................................................................. 46
4.1 How to Retrieve a Title or Format Record ..................................................................................................... 46 4.2 How to Retrieve an Item from a Lot............................................................................................................... 48
4.2.1 SELECT LOT ............................................................................................................................................. 48 4.2.2 RETRIEVE ITEM ........................................................................................................................................ 48
4.3 How to Remove an Item from a Lot ............................................................................................................... 48 4.4 How to Enter Special Collation Instructions .................................................................................................. 49 4.5 How to View a Cover Image .......................................................................................................................... 51 4.6 How to Check Text Fit ................................................................................................................................... 53 4.7 How to Create a Title ..................................................................................................................................... 53 4.8 How to Create a Title using a Format............................................................................................................. 54 4.9 How to Change a Title.................................................................................................................................... 55 4.10 How to Remove a Title Record .................................................................................................................... 55 4.11 How To Create a Format .............................................................................................................................. 56 4.12 How to Create a Lot ..................................................................................................................................... 57 4.13 How to Remove a Lot................................................................................................................................... 58 4.14 How to Create an Item Using a Title Record ............................................................................................... 58 4.15 How to Create an Item Using a Format ........................................................................................................ 59 4.16 How to Create an Item Without Using a Title or Format ............................................................................. 59 4.17 How to Print a Binding Slip (UBS).............................................................................................................. 60 4.18 How to Re-Print a Binding Slip.................................................................................................................... 61 4.19 How to View Binding History...................................................................................................................... 62
5.0 Bindery Transfer............................................................................................................................................... 63

ABLE 6 Reference Guide Page 5 Library User Guide
5.1 Selecting Bindery Transfer............................................................................................................................. 63 5.2 Produce Diskette ............................................................................................................................................ 64 5.3 Restore Diskette ............................................................................................................................................. 64
6.0 Reports............................................................................................................................................................... 65
6.1 Running a Report............................................................................................................................................ 66
7.0 Z-Link ................................................................................................................................................................. 67
7.1 Turning on the Z-Link Service ....................................................................................................................... 67 7.2 Searching for a Title ....................................................................................................................................... 67 7.3 Library Catalog Internet Connection Setup .................................................................................................... 68 7.4 Table Setup and Maintenance ........................................................................................................................ 69
7.4.1 ADDING A NEW TABLE.............................................................................................................................. 70 7.4.2. EDITING A TABLE .................................................................................................................................... 70 7.4.3. CATALOG SYSTEM MAPPING ROWS .......................................................................................................... 71
8.0 A-Link ................................................................................................................................................................. 72
8.1 Turning on the A-Link Service....................................................................................................................... 72 8.2 Searching for a Title ....................................................................................................................................... 72 8.3 Table Setup and Maintenance ........................................................................................................................ 74
8.3.1 ADDING A NEW TABLE.............................................................................................................................. 74 8.3.2 EDITING A TABLE ..................................................................................................................................... 75 8.3.3 A-LINK MAPPING ROWS ........................................................................................................................... 75
Appendix A - Bindery Specific............................................................................................................................... 77
A.1 Fonts ............................................................................................................................................................... 77 A.2 Spacing (Pitch) ............................................................................................................................................... 77 A.3 Category ......................................................................................................................................................... 77 A.4 Level............................................................................................................................................................... 78 A.5 Excluded Text Key Words ............................................................................................................................ 78 A.6 Formats.......................................................................................................................................................... 78 A.7 Extras/Specials .............................................................................................................................................. 79 A.8 Leaf Attachments........................................................................................................................................... 80

ABLE 6 Reference Guide Page 6 Library User Guide Release Notes
v0.1 Preliminary release for review.

ABLE 6 Reference Guide Page 7 Library User Guide
Volumes The ABLE���� Reference Guide is comprised of multiple volumes. The collection of volumes describes the functional and operational characteristics of ABLE����. The volumes are:
Volume Reference Guide File Name 1 Introduction r6-intro.htm 2 Library User r6-library-user.htm 3 User Interface r6-user.htm 4 Title Composition r6-title.htm 6 Reports r6-report.htm 7 Bindery Control Services r6-control.doc 9 File Maintenance r6-maint.htm 10 Bindery Transfer r6-transfer.htm 13 Help r6-help.htm 15 Billing Statistics r6-bill.htm 16 Preventive Maintenance r6-pm.htm 20 Library Installation r6-linstall.htm 21 Bindery Installation r6-binstall.htm 22 E-Z Cut r6-ezcut.htm 23 FTP r6-ftp.htm 24 A-Link r6-alink.htm 25 Z-Link r6-zlink.htm

ABLE 6 Reference Guide Page 8 Library User Guide 1. Introduction
The Advanced Bindery Library Exchange (ABLE����) has been automating the library and bindery for over 15 years. ABLE���� was developed by Mekatronics, Inc. ABLET M 6 is the latest generation of ABLE����. The Internet is the foundation upon which ABLE���� 6 is built. ABLE���� 6 was developed by the ABLE���� 6 Partnership. The partnership consists of binders, Mekatronics, Inc. and Programming Concepts, Inc. (PCI). PCI is the developer of ABLE���� 6. ABLET M provides cost savings, high reliability and a higher level of service than ever before available. Advanced technology along with an innovative system design provides the library and bindery with a sophisticated tool that is both easy to use and efficient in operation. ABLE���� is a hardware/software product that provides both the bindery and the library with a means for communicating binding/rebinding information quickly and accurately. ABLE���� is comprised of two major systems: ABLET MLibrary and ABLET MBindery. The bindery customer (e.g. a library) uses the ABLET MLibrary system and the bindery uses the ABLET MBindery system. The two systems may be utilized independently or as a closely associated pair of systems. Independent operation means that ABLE���� Library can be used by bindery customers independent of the system used by the binders and that ABLE���� Bindery can be used by a bindery independent of the account using ABLE���� Library. When both the bindery customer and the bindery utilize ABLET M systems, the systems are coordinated. This means that the same database information (e.g. titles) would be in both the ABLE���� Library and ABLET MBindery systems. Database information is exchanged, via floppy diskettes or the Internet, whenever a Lot (i.e. collection of volumes to be bound) is sent to the bindery and when the Lot is sent back to the customer. ABLE���� Library provides the bindery customer services for gathering and routing data describing books and periodicals that are to be processed by the bindery. ABLE���� Library is equally effective when used with periodicals or books. ABLE���� Bindery concentrates on eliminating redundant effort within the binding operation and on tighter control of work in progress. This User Guide This Library User Guide is intended to introduce new ABLE���� users to the basic operations of ABLE����. The common terms and concepts are introduced first followed by a system overview. The bulk of the guide are �how to� instructions for the most common operations to get your job done. ABLE���� has more comprehensive guides easily accessed using the online Help facilities. Simply select Help on the menu line or a Help button if it is available on the screen you are using. Both methods will provide detailed specifications so you can solve just about any problem you come across. 2. Basic ABLE���� Concepts and Terminology

ABLE 6 Reference Guide Page 9 Library User Guide 2.1 Overview ABLE���� Library is used to prepare volumes for rebinding (called binding) by the libraries binder. The system can maintains the master record (called titles) and a history of previous bindings for volumes. A volume is a serial or monograph that may require binding. Serials (i.e. periodicals) usually have an associated title record since they are most frequently sent for binding. The volumes requiring binding are collected into bundles called Lots. Each volume in a Lot is called an item. The process of placing items into a lot is called Title Composition. Your binder provides templates (called formats) that will allow you to create Titles and Lot Items with maximum efficiency.
Each volume has an associated piece of paper inserted into it that contains binding instructions and its associated Lot and Item Number. This paper is called the Universal Binding Slip or UBS. The UBS is usually a printed multi-part form. Once a Lot is prepared the next step is to send the electronic Lot file to the bindery. This is done by either producing a diskette with the Lot information or sending the information over the Internet directly to the bindery. This process is called the Bindery Transfer process. The binder processes the Lot at the Bindery. The binder then updates the Lot information as changes are made in the bindery to the data you sent. The binder may change the data due to data entry and text composition problems. The Lot information is returned to you along with the bound volumes. You then read the file into your ABLE���� Library system to update your ABLE���� database. Printed reports may be produced for your records and for management to evaluate the binding process.

ABLE 6 Reference Guide Page 10 Library User Guide 2.2 Definitions & Terminology The following terminology is used in this guide and on the ABLE���� screens. Use Figure 2.2 to view the Title Composition Screen.
Figure 2.2 - Title Composition Screen
Alt, Ctl, and Shift Keys on the PC keyboard used in conjunction with other keys.
Emboss
The process of printing on the cover material.
Example
Alt+F1 to hold down the Alt key and then press F1.

ABLE 6 Reference Guide Page 11 Library User Guide
Case Insensitive You need not worry about what case to use. ABLE���� accepts upper or lower case. ABLE���� may change the case after you enter it for certain fields.
Category Codes The Category code refers to the category of the work being processed. Examples: periodicals, monographs.
Class Codes
The Class codes are used to indicate the binding class for the work. The Class code can determine other binding parameters, such as Leaf Attachment method. Examples: custom, economy.
Color Codes
Color codes are used to specify the cover color to be embossed.
Fonts The embosser fonts available have associated font codes and characteristics (shape, height, width, .)
The bindery has different fonts to choose from. Example: Font 1 is 24 point. Point size refers to the height of the characters in a font.
Leaf Attachment
The Leaf Attachment codes define the binding method used on the volume. Codes assigned to designate Leaf Attachment are structured as 2 characters, as in AB. In this scheme,
A = Attachment and B = Backing.
It is expected that the A code is either numeric digits or letters like O (Oversew), S (Sidesew) and A (Adhesive). The second character must be either an R (for rounded) or an F (for flat).
Examples AR Designates adhesive bound with a rounded
backing. AF Designate adhesive bound with a flat backing.
Level
Levels are the lettering positions used by the binder. The lowest or bottom �Level� is �1�. Level �1� is closest to the shelf on an upright volume. Levels of higher value (e.g.., 23) are higher on the spine of the volume.

ABLE 6 Reference Guide Page 12 Library User Guide
Note Each level change (e.g., from 4 to 3) is equivalent to one backslash �\� between words in the text field. Both the specific level change and the backslash �\� instruct the bindery computer to drop the title down one level or one stamping position.
Use the �Level Matching Chart� (numbered consecutively from 1 to 42) to match the lettering of a previously bound volume. Place the bottom edge of the �Level Matching Chart� even with the bottom edge of the �sample� volume and choose the level number that comes closest to each line of lettering. Type that number in the �Level� field adjacent to the words you type for each line.
Use the �Standard Level Selection Chart� (numbered 14, 17, 20, 23, 26, 29, 32) to determine the level to use for new periodical titles and for sets or series that must match each other. Place the bottom edge of the �Standard Level Selection Chart� even with the bottom edge of the volume to be bound and choose the highest level number panel within which the top edge of the volume falls. If one of the horizontal lines falls exactly even with the top edge of the volume, choose the level number immediately above that line. The number. chosen will indicate the level to use for the title of a volume of that size. If you place the �Level Selection Chart� against this page, you should see �Level 26� as the topmost panel that brackets the top of the page.
Menu Bars
The Menu Bar is the long horizontal bar near the top of the computer screen. It contains the ABLE���� options that are available on the application screens. For example, �File�, �Edit�, and �Setup� are some of the options available. Select an option on the Menu bar by clicking on the name of the option with the mouse. More specific options displayed in the list may be selected by again clicking on the name of that option. If an option is followed by key descriptions (e.g., �Alt+B�), those keys may be used to select the option without using the mouse (see Alt, Ctl, and Shift, above).
In the following document, menu names and items are separated by
colons (e.g., File: Log Out represents the Log Out option as found in the File menu).

ABLE 6 Reference Guide Page 13 Library User Guide
Placement Codes Placement codes specify how the text is to be arranged on the spine. Examples: C for center, V for vertical.
Options Include:
Code Description C Center on spine L The longest line centered - all other lines are aligned left margin
[v3.2] with the longest lines. Note: sometimes used for call numbers.
R The longest line centered - all other lines are aligned with the longest lines right margin [v3.2]
1 margin (.25 inches) [v3.2]- - not valid for System 3 F Left justify on front H Center justify on front [v4.1 - System 3 only] B Right justify on back V Vertical on spine (down spine) - multiple lines center on longest
line 3 Vertical on spine (second down spine vertical panel) - multiple
lines flush to top of first line U Vertical on spine (up spine) [v4.1 - System 3 only] 6 Vertical on spine (second up spine vertical panel) [v4.1 -
System 3 only]
Prompts (Defined) There are title text prompts that have special meaning to ABLE���� for composition and billing requirements. These prompts are:
Title or T Volume's Title
Call or C Volume's Call Number Imp or I Volume's Imprint
In this document, to distinguish text prompts from plain text, the convention used is to enclose the prompt in �Less Than� (�<�) and �Greater Than� (�>�) characters (e.g., Title could be represented as <Title>).
Print Codes
The color codes for the foil used for embossing the characters on the cover.
Spacing Codes
The spacing (pitch) between embossing levels. The actual height on the spine where the embossing occurs is determined by multiplying the pitch by the level.

ABLE 6 Reference Guide Page 14 Library User Guide
Text Fitting Rules
The text fitting rules determine how ABLE���� processes title text that does not fit the spine as indicated.
2.3 Special Characters
Hard Hyphen The Hard Hyphen character �-� is treated by ABLE���� just like any other punctuation character. Hard hyphens will always print, and will adhere to ABLE�����s text fitting rules. The use of a hard or soft hyphen (see below) may cause very different results.
For example:
INTER-\NATIONAL\JOURNAL FOR\PHILOSOPHY\OF\RELIGION would have a text key of �INNAJOFO� and would be lettered as follows if vertical INTER-NATIONAL JOURNAL FOR PHILOSOPHY OF RELIGION
Note Text keys are discussed in the Retrieval Keys section.
Hard hyphens should be used when the hyphen must print, regardless of the orientation of the spine lettering. The letters/characters following a hard hyphen should comprise a complete word or logical part of a title. This is the case with hyphenated names. Several examples of when hard hyphens should be used are as follows.
TITLE TEXT KEY AMERICAN-\ARAB\AFFAIRS AMARAF EIGHTEENTH-\CENTURY\FICTION EICEFI LUSO-\BRAZILIAN\REVIEW LUBRRE MERRILL-\PALMER\QUARTERLY MEPAQU
NUMBERS
1989 - 90 VOL. 1-2 P. 1-2894 NOS. 1-3

ABLE 6 Reference Guide Page 15 Library User Guide
Note Soft Hyphens �=� should NEVER be used with numbers.
Line Break Code The line break code is the character to use on the Title Composition screen to force a new line. The backslash �\� character tells ABLE���� to create a �line break� whenever the backslash �\� character appears. A �line break� tells ABLE���� to drop the information following the backslash �\� character down to the next lower line. Two backslash �\\� characters tell ABLE���� to drop the information following the backslashes �\\� down two lines. The backslash �\� character is equivalent to the �Return� key on a typewriter. It makes the lettered information drop down one line to the next �Level� for lettering.
Note The backslash �\� character is intended for titles that will be lettered horizontally or vertically. ABLE���� will convert all backslash �\� characters into spaces if a title is lettered vertically. Double backslash characters �\\� will be converted into a wide space. A title will be lettered vertically if it uses a �vertical� font, uses a vertical placement, or has a spine thickness too narrow to allow horizontal lettering.
Required Space Code The required space code is the character to use on the Title Composition screen to force a space (blank) character to be embossed. The �+� character tells ABLE���� that you wish to have a required space. ABLE���� normally compresses all contiguous spaces into just one space. If you wish to have more than one contiguous space, you must type the required space �+ � character once for every required space that you want to have separating typed information.
For example:
ABLE compresses Contiguous spaces.
will be lettered as
ABLE compresses contiguous spaces.
whereas
Required spaces are+++not compressed.
will be lettered as
Required spaces are not compressed.

ABLE 6 Reference Guide Page 16 Library User Guide
Soft Hyphen Code The soft hyphen code is the character to use on the Title Composition screen to indicate a soft hyphen. Soft hyphens are replaced by real hyphens if the title text is set horizontally and removed if the title text is placed vertically.
The Soft Hyphen character �=� is used when a word that would not normally be hyphenated must be broken up to fit on the spine of a volume. A soft hyphen �=� will be lettered as a regular (hard) hyphen �-� if the word is lettered horizontally. Soft hyphens �=� will be dropped by ABLE���� if the hyphenated word is switched from horizontal to vertical placement. ABLE���� will disregard the part of the word following the soft hyphen �=� when computing the �Text� key. This is crucial if the Text key is to be a user-friendly mechanism for retrieving titles from the database, since users need not know if or how words are hyphenated in order to determine their Text key. For example: INTER=\NATIONAL\JOURNAL FOR\PHILOSOPHY\OF\RELIGION will be lettered with a hyphen if horizontal
INTER- NATIONAL
JOURNAL FOR PHILOSOPHY
OF RELIGION
or without a hyphen if vertical
INTERNATIONAL JOURNAL FOR PHILOSOPHY OF RELIGION Note: In either case the Test �Key� will be �INJOFOPH�. Since international is one word, which may be hyphenated for practical reasons, the Text �key� disregards the �NA� in national and includes only the �IN� from international.
Vertical Line Break The vertical line break code is the character to use on the Title Composition screen to force a new vertical line when placing the text vertically or when applying the vertical rule.

ABLE 6 Reference Guide Page 17 Library User Guide
The vertical line break character �|� is used to designate the end of one line of vertical text and the beginning of the next vertical line. The vertical line break character �|� is useful if you have already composed a title on the ABLE���� screen and you wish to change the lettering format without retyping the entire title.
For example:
HARD\TIMES,\HARD\MEN\\MAINE\AND\THE\IRISH,\1830-1860 can be lettered as two vertical lines as follows: HARD TIMES, HARD MEN MAINE AND THE IRISH, 1830-1860 by adding a vertical line break (i.e., �|�) after �MEN� HARD\TIMES,\HARD\MEN|MAINE\AND\THE\IRISH,\1830-1860
Wide Space Code The wide space code is the character to use on the Title Composition screen to force a wide space character to be embossed. The wide space character �_� tells ABLE���� that you wish to have five required spaces (by default; see Wide Width Code, below). This is referred to as �wide� space. The wide space �_� character is a time saving device that is useful if you wish to have a number of spaces separate typed information (e.g., Author, Title).
Note The wide space �_� character should only be used when composing vertical titles. It has no meaning if used with a horizontal title. The preferred technique is to always use two backslashes �\\� to separate word groups. This will give the desired result regardless of the orientation of the spine lettering. Note Any title composed with a horizontal format but lettered vertically (for whatever reason) will have 2 or more consecutive backslash �\\� characters converted into a wide space �_�. For example:
VERTICAL TITLE_AUTHOR_PART 1
will be lettered as
VERTICAL TITLE AUTHOR PART 1

ABLE 6 Reference Guide Page 18 Library User Guide
whereas
HORIZONTAL\TITLE\\AUTHOR\\PART 1
will be lettered as
HORIZONTAL TITLE
AUTHOR
PART 1
or
VERTICAL TITLE AUTHOR PART 1
All titles should be composed with the double backslash (\\) character to indicate a break between different word groups. This will guarantee proper formatting of the stamped title whether it is lettered horizontally or vertically. Whereas a double backslash �\\� will automatically convert into a wide space if the title is lettered vertically, the wide space character �_� will not convert to a double line break �\\� if the title is lettered horizontally. ABLE�����s lettering algorithm assumes that horizontal lettering is preferable to vertical lettering and can automatically convert titles composed in horizontal format to vertical format. There is no mechanism to convert vertical titles into horizontal format.
Wide Width Code
The number of spaces that a wide space represents. By default this is 5 spaces.
Note Actual characters listed above to represent codes (e.g., �/� for the line break
character) are the defaults, yet ABLE���� may be configured to use different characters to represent a particular codes.
2.4 Entering and Editing Text Fields
Capital Letters
Be sure to use capital letters when typing title information. Lower case should only be used when you specifically want to have lower case characters (e.g., in �Call� numbers). The bindery will print on your bound volume exactly what you type on the ABLE���� terminal.

ABLE 6 Reference Guide Page 19 Library User Guide
Typing in ABLE���� When typing title information it is necessary to put a backslash character (\) after every word and a double backslash (\\) after every word group that should stand alone (e.g., author, title, subtitle). DO NOT wrap words from one line to the next. Hit the �Enter� key to move the cursor to a new line if you need additional space.
�Overstrike� Mode
When the cursor is thick block, this is called �overstrike� mode. When you place the cursor on top of a character and type, the newly typed character will overstrike or replace the old character.
�Insert� Mode
Normally the cursor is in �Insert� mode. Each time you hit the �Insert� key, the computer will switch cursor status (e.g., from �Overstrike� mode to �Insert� mode). The cursor will be a thin vertical line when it is in the �Insert� mode. When you place the cursor in front of a character and type, the newly typed character will be inserted to the left of the cursor. The �other� character will move to the right to make room for the new character.
Note �Insert� mode is useful to correct typing errors. It lets you �Insert�, or add information between words, without having to retype a whole line.
Erasing/Deleting
There are several ways to erase information.
Replacement When in �Overstrike� mode, hitting a letter, number, or character key will erase the letter, number or character that the cursor is sitting on. Typing will replace the �old� letter, number or character with the �new� character that you type. The cursor will be a wide block if you are in �Overstrike� mode.
Backspace Hitting the �Backspace� key will erase information to the left of the
cursor.
Delete Hitting the �Delete� key will the character that the cursor is sitting on (if in �Overstike� mode) or in front of (if in �Insert� mode), and will pull the character to the right of the cursor back to the left to fill the gap.

ABLE 6 Reference Guide Page 20 Library User Guide
Editing Fields The following keys are used to edit a field:
Key Description
Home Move to first character of the first word on the text line. End Move to last character in text line. Backspace Delete the character behind the cursor. Delete Delete the character in front of the cursor. Cursor Left, Right
Move left/right one character.
Script L
The script L is sometimes needed for call numbers and other lettering situations. Since IBM keyboards do not normally have a script L character available, ABLE���� has selected the left square bracket as a substitute character to designate the script L. Every time you type a left square bracket, ABLE���� will letter a script L on your bound volume. If you wish to bracket spine lettering information, please use parentheses �( )�.
Tab & Shift Tab
Pressing the �Tab� key causes the cursor to move from one field to the next (with one exception, explained below). If you hold the �Shift� key down while pressing the �Tab� key, the cursor moves across fields opposite from its normal direction (again see below for an exception).
In the case that the field is a multi-line text field, one can hold the
�Control� key down while pressing the �Tab� key to move to the next field, or hold the �Control� and �Shift� keys down while pressing the �Tab� key to move to the previous field.
Compose+
There are two modes of screen operation: Compose and Compose+. The Compose mode causes all of the screen fields to be cleared after a Title has been added to the database. The Compose+ mode does not clear the screen fields. A new Title can then be composed using the data from the previous Title record.
The Compose mode is the default mode. The operator can change the mode by changing Setup: User Parameters: Compose and Setup: User Parameters: Compose+.
Cut, Copy & Paste These services are the standard Windows Cut, Copy and Paste services. Text may be Cut, Copy and Pasted within ABLET M and between ABLET M and other programs supporting standard Cut, Copy and Paste.

ABLE 6 Reference Guide Page 21 Library User Guide
Using shortcut keys (standard Windows keys) Alt X Cut Alt C Copy Alt V Paste Using Menu Bar services: Edit: Cut, Edit: Copy and Edit:Paste
Default Values
There are many features for automatically entering field data. The features include:
Formats Templates with predefined fields. Refer to the Format section. Account Data There are default fields in the Account record that automatically causes
Title fields to be entered. Class There are default fields for the Class selected that cause Title fields to be
entered. Refer to the Class section. Font
2.5 Lettering Control Fields
Refer to Figure 2.2 to view the Title Composition screen layout. 2.5.1 Special Instructions for Call number Placement Center Placement Example
will be lettered as:
TITLE
AUTHOR
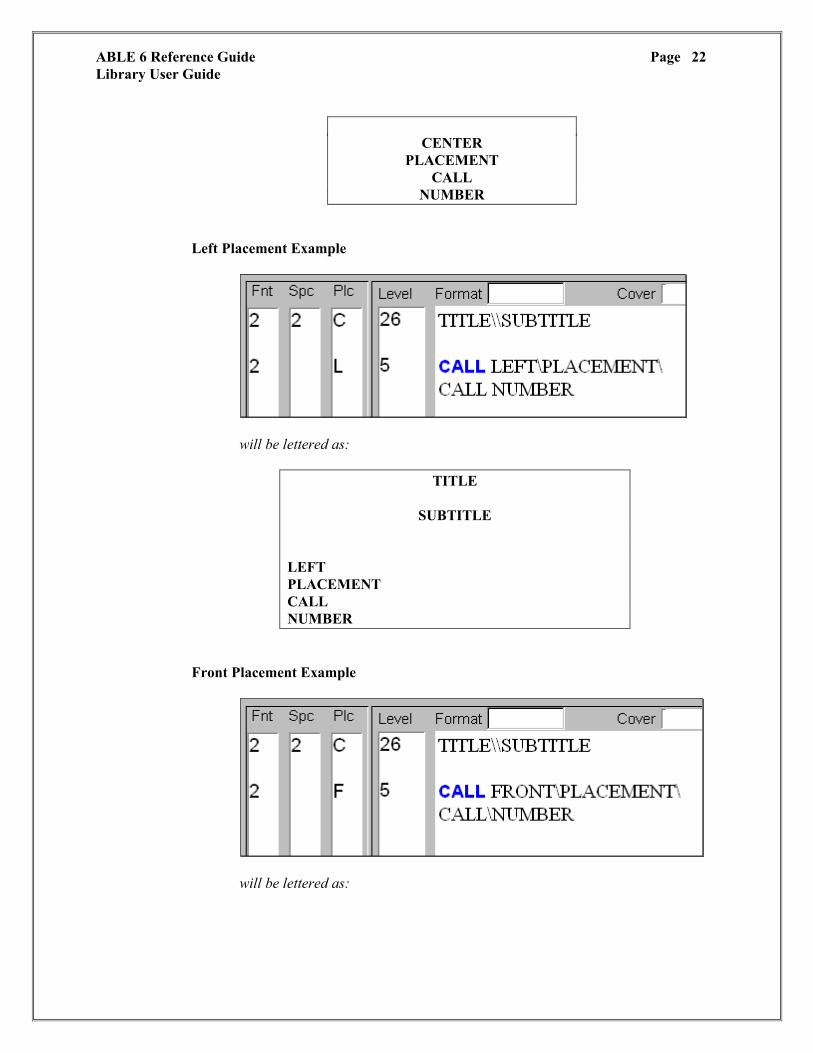
ABLE 6 Reference Guide Page 22 Library User Guide
CENTER
PLACEMENT CALL
NUMBER Left Placement Example
will be lettered as:
TITLE
SUBTITLE
LEFT PLACEMENT CALL NUMBER
Front Placement Example
will be lettered as:

ABLE 6 Reference Guide Page 23 Library User Guide
Note Changing the �Placement� to �C�, �L� or �F� tells ABLE���� to center or left justify the �Call� number panel on the spine, or to move it to the front cover�flush left. Placement �F� (Front cover) is always left justified and positioned at the far left side of the front cover.
TITLE
SUBTITLE FRONT PLACEMENT CALL NUMBER

ABLE 6 Reference Guide Page 24 Library User Guide 2.5.2 Automatic Lettering Control Codes for ABLE����
ABLE���� has several special �Rule� codes that are set as part of the �Library Data� instructions of each title. These �Rule� codes tell ABLE���� how to modify the original lettering control instructions provided by the format or the ABLE���� user so that the title, variables (e.g., volume, months, year), call number, etc. will be appropriately lettered given the size constraints (spine thickness and height) of the bound volume. This includes changing the font style (regular to condensed), the font size (18 point to 14 point), and/or the placement (horizontal centered to vertical, or spine to front cover). ABLE���� automatically adjusts these lettering control commands to suit each volume bound.
Caution �Rule� codes are set by the bindery to comply with established library
preferences. �Rule� codes must NEVER be changed by the library without permission from your binder.
Options include:
Code Rule Explanation C Condense Reduce font size from larger to smaller horizontal fonts (as
necessary). F Front Moves the Call number to the left side of the front cover, left
justified, and at the same level (e.g., �5�). I Imprint Moves the Imprint (i.e., <IMP> or <I>) to the left side of the
front cover, left justified, and at the same level (e.g., �2�) P Vertical Changes the placement and font of the title to vertical (when
necessary). S Switch Moves the Call number to the left side of the front cover, left
justified, and at the top. ABLE���� switches the level from whatever was indicated to an appropriate level near the top of the cover.
T Title to Front Moves the title to the left side of the front cover, left justified,
and at the same level (e.g., �26�). V Vertical Place text vertically. A Title Area Vertical Place only title text area vertically. U Text to Front Places the title text variable panel on the front cover. L Call Vertical Places the call variable panel vertical

ABLE 6 Reference Guide Page 25 Library User Guide
M Imprint Vertical Places the imprint variable panel vertical.
Note Rules allow ABLE���� to treat different �panels� of information to be lettered (e.g., title, call number, imprint) according to established customer preferences. Rules apply automatically, but only when necessary. If the title can be lettered as originally composed, it will be.
Note Rules allow ABLE���� to use the largest, most legible type styles and word
arrangements possible for each volume. This feature saves the ABLE���� user from having to make tedious, difficult decisions regarding the proper layout of lettering information.
Note ABLE�����s rules are applied to �panels� of text that do not fit on the spine as
originally composed. Rules are applied in succession until the textfitting problem is resolved. Rules of �C, P, F� would instruct ABLE���� to correct a textfitting problem by first trying successively smaller (condensed) fonts, then (if necessary) changing to a vertical font, and as a final remedy, moving the call number to the lower left front cover.

ABLE 6 Reference Guide Page 26 Library User Guide 2.5.3 Lettering Control Codes for Vertical Titles
When composing titles that will be lettered vertically, there are lettering control codes that must be understood. Vertical titles can be lettered as one continuous vertical line, two or more parallel vertical lines, or �panels� of vertical lettering that begin at different �Level� positions on the spine of the bound volume. Single Vertical Line Example
will be lettered as:
SINGLE VERTICAL LINE Three Vertical Lines Example
will be lettered as:
FIRST VERTICAL LINE - TITLE SECOND VERTICAL LINE - SUBTITLE THIRD VERTICAL LINE - AUTHOR
Note Unchanged �Level� (e.g., �26�) causes all vertical lines to center on the
longest vertical line

ABLE 6 Reference Guide Page 27 Library User Guide Vertical Line Continuation Example
will be lettered as:
SINGLE VERTICAL LINE CONTINUATION
Note Absence of �Level� causes a vertical line continuation. First Multiple Vertical Panel Example
will be lettered as: VERTICAL CONTINUATION �3� MOVES �PANEL� TO LEVEL �8�
Note �Placement� change from �V� to �3� causes a new panel. Second Multiple Vertical Panel Example

ABLE 6 Reference Guide Page 28 Library User Guide
will be lettered as: VERTICAL LINE CONTINUATION SECOND VERTICAL LINE NEW VERTICAL �PANEL� THIRD VERTICAL LINE Note Placement �V� causes vertical lines within a panel to center on the longest line,
whereas Placement �3� causes multiple vertical lines within a panel to be flush to the top of the first vertical line.
Third Vertical Panel Example
will be lettered as: VERTICAL LINE CONTINUATION SECOND VERTICAL LINE NEW VERTICAL �PANEL� THIRD VERTICAL LINE
Three Vertical Panel Example
will be lettered as:
TOP PANEL #1 MIDDLE PANEL #2 BOTTOM PANEL #3

ABLE 6 Reference Guide Page 29 Library User Guide
Note Alternating the �V� and �3� �Placement� tells ABLE���� to create new panels beginning at the designated �Level� positions (e.g., 26, 18, 6).
Note Values for Lettering Control such as �Fnt� (Font), �Spc� (Spacing), and
�Plc� (Placement) remain effective for all lines of text (until changed) Note Talk to your binder if you are interested in knowing more about
ABLE�����s lettering instruction capabilities.

ABLE 6 Reference Guide Page 30 Library User Guide 2.6 Screen Navigation Functions Important ABLE���� functions are executed using either the,
• Menu Bar selections • Action buttons (shortcuts to Menu Bar functions) • Right mouse button for Text Field Functions
The Menu Bar and Action buttons are close to the top of the ABLE���� screen. The action buttons provide a shortcut for the important ABLE���� functions. Each of the action buttons also have a menu selection equivalent. The action buttons are easier to use. Refer to Figure 2.6.1, 2.6.2 and 2.6.3 while reading about these important functions.
Figure 2.6.1 - Title Composition Screen showing Menu Bar and Action Buttons
Menu Bar and
Action Buttons

ABLE 6 Reference Guide Page 31 Library User Guide
Figure 2.6.2 - Title Composition show Right Mouse Button Menu
Figure 2.6.3 - Title Composition showing Menu Bar Functions
Right Mouse Button Menu
Menu Bar Functions

ABLE 6 Reference Guide Page 32 Library User Guide 2.6.1 Add Item The Add Item function is used to add an �Item� (i.e., a volume or book) to a �Lot� (i.e., a bindery shipment). Add Item causes ABLE���� to assign an �Item number� to the title and variable information that is typed in by the ABLE���� user or pulled from the database and to display the message: �Item (###) Added� in the lower left corner of the screen. Add Item adds the �Item� to the current �Lot� and increases the item count for that �Lot�. (�Lot ID� and �Item� number are displayed in the upper right corner of the screen).
Note Complete ALL information fields that should be part of an item (e.g., title,
author, and special instructions) before selecting Add Item. Note The Add Item button can also cause the binding slip (UBS) to be printed. Note ABLE���� will not allow you to add items to a lot if you are in the Format key. As
a general rule, you should never be in the Format Key when using ABLE����.
2.6.2 Add Format The Add Format function used to add new Formats to ABLE����. For this function to work properly, the �Key� must be set to �Format�. Complete all information fields that should be part of a new �Format� before selecting Add Format.
Caution Formats are set up by the bindery for each class of binding offered. Formats
include important information needed by your binders computer system. Consult with the bindery before attempting to create a new format.
2.6.3 Add Title The Add Title function is used to add new titles to the database of titles stored on the computer�s hard disk. The Add Title key causes ABLE���� to create a new Title ID number and to display the message: �Title (###) Added� in the lower left corner of the screen.
Note Complete ALL information fields that should be part of a title (e.g., title, call number, �Private ID�, and �Comments�), and delete ALL �Variable� prompts that do not apply to a title before selecting Add Title.
Note Certain categories may be designated as �Create Title� categories. All items that have a
�Create Title� category that do not already have a Title ID number will automatically be added to the database by ABLE���� when your diskette is produced. This feature is designed to prevent titles from inadvertently not being added to the database. This feature is meant to be a safety net for unintended user omissions and not to be used as a routine method of adding titles to the database. ABLE���� will blindly add all items with a �Create Title� category that do not have a Title ID number. ABLE���� does not check the database to prevent two, three, or more identical titles from being created. Remember to always select Add Title to add new titles that you have created.

ABLE 6 Reference Guide Page 33 Library User Guide
Note If creating a new title that you do not want to add to the permanent title database, make sure that the �Category� for an item is not designated as a �Create Title� category. ABLE���� will not add any title based on an item which does not have a �Create Title� category. If you do not want to update the permanent title database, make sure that the �Category� for an item is designated as a �No Update Title� category. ABLE���� will not update any title from which the item was based on which has a �No Update Title� category.
2.6.4 Update The Update function is used to change or update the information that is stored in the computer. Update can be used to update an item, a format or a title. For Update to work properly, the �Key� must be set to the correct sub-option in the �Key� field and the record that you wish to update should be called up and modified before selecting Update. A message such as �Title Updated� is displayed in the lower left corner of the screen.
Note ABLE���� will automatically update all titles (i.e., any item with a Title ID number) with all changes made to the last item processed. The title database is updated each time you restore a Lot from the ABLE���� diskette.
If processing a title that has a one-time change that you do not want to save to the permanent title database, ensure the Category field in Library Data is not a �Create Title� and is a �No Update Title� category. ABLE���� will not add or update any title based on an item with a �Create Title� category and will not update any title based on an item with a �No Update Title� category.
2.6.5 Clear
The Clear function is used to clear the screen of information called from the database or typed in. It returns the cursor to the selected �Key� field (e.g., text, item, etc.). Information that is manually typed in is lost when the Clear function is selected, while information from the database is not affected.
2.6.6 Remove
The Remove function is used to permanently remove a record from the database. To remove a record (e.g., title or item), the �Key� must be set to the correct option in the �Key� field and the record that you wish to remove should be called up before Remove. Because this action is irreversible, ABLE���� displays a �Dialog Box� to give you a chance to reconsider before proceeding. If you decide to remove the record, a message such as �Title Deleted� is displayed in the lower left corner of the screen.

ABLE 6 Reference Guide Page 34 Library User Guide 2.6.7 →→→→ (Next) The →→→→ (Next) function is used to call the next record from the database. For example, if the Key is set to �Text�, selecting Next gives you the first record in the text file. Selecting Next again gives you the second title, and so forth. If you call up a specific record (in this case a title), selecting Next gives you the one that comes immediately after it. Most records that are stored in the database (e.g., Item, Text, Call number, Format, Lot, etc.) can be accessed with the Next function. 2.6.8 ←←←← (Previous) The ←←←← (Previous) function is used to call the previous record from the database. For example, if the Key is set to �Item� and you have called up a specific record (in this case �Item� number 22), selecting Previous displays the item that comes immediately before it (i.e., �Item� number 21). Selecting Previous again gives �Item� number 20, and so forth. Most records that are stored in the database (e.g., Item, Text, Call number, Format, Lot, etc.) can be accessed with the Previous function.
2.6.9 Group Search The Group Search function is used to call a group of records from the database. For example, if the Key is set to text and you have typed �AB� in the �text� field, enabling �Enable List Search� in the �Setup: User Parameters� menu causes ABLE���� to display all records in the text file that begin with �AB�. This is an open-ended Group Search. ABLE���� searches for and displays all titles that have AB as the text key for the first word of the title. These titles can be one, two, or more words and will all begin with the letters �AB�. The same logic applies to text key group searches of four, six, or eight characters. (Remember that ABLE���� needs at least two characters to define a word.)
ABLE���� also has a limited Group Search. If the �required space character� is specified after the group search text key, ABLE���� will search only for a limited group of titles. For example (if �+� is the required space character), if you type �AB+� in the text field and enable the �Enable List Search� function, ABLE���� will search the database and display (in alphabetical order) only those titles that are one word and begin with the letters AB.
Note There are several ways to move through a list of titles to the one you wish to select. The �Down arrow� moves the selection down (in this case the selection is highlighted in blue); the �Up arrow� moves the selection up; the �Page Down� key moves the selection down one page at a time; the �Page Up� key moves the selection up one page at a time; the �End� key moves the cursor to the end of the list; and the �Home� key moves the cursor to the beginning.
Once you have placed the cursor on the desired title, hit the �Enter� key to select it. This will clear the �Group Search� screen and display the title you have chosen. If you do not see the title that you want to select, it is not in the database under the �Text-key� you have chosen (i.e., �AB�). Choose the �Cancel� button to clear the �Group Search� screen.

ABLE 6 Reference Guide Page 35 Library User Guide If no titles begin with the letters �AB�, the message �Title not found� will be displayed. If only one title begins with the letters �AB�, that title will be displayed and the �Group Search� screen will not appear.
Note If you cannot find a title that you think is in the database, use a simpler selection key
(e.g., �A�).
2.6.10 Variable (Right Mouse Button) The Variable function creates prompts for the ABLE���� user. These prompts (e.g., <V> for volume, <M> for months, <Y> for year, and <CALL> are reminders that information needs to be typed in to duplicate the information used on previously bound volumes. Recall that variable prompts are denoted here by surrounding them between the �Less Than� (�<�) and the �Greater Than� (�>�) character. In ABLE����, variables appear in blue.
Each time the �Tab� key is pressed, the cursor moves to the next �Variable� prompt. The �Tab� feature makes data entry of variable information quick and easy.
Note All variable prompts print on the ABLE���� binding slip and on the �Lot-Item� report, but
will not be lettered on the spine of the bound volume. If , for example, you have <P.> 1-2086, �1-1086� will be lettered on the spine of the volume, but �P.� will not. If you wish the P. to be lettered, you must have something like <P.>P. 1-2086.
Conversely, ALL information typed onto the ABLE���� �Text� screen is lettered on the spine of the bound volume unless it is a �Variable� prompt. If, for example, the screen shows �<P.>P.�, and you decide that this volume does not require page numbers because it is complete in one volume, you MUST erase the �P.� (following the variable prompt) or is will be lettered on your bound volume.
Note The �Formats� that the binder has installed with ABLE���� automatically give any new title an array of �Variable� prompts (e.g., <Ser>, <V>, <M>, <Y>). You should delete any �Variable� prompts that do not apply to the title you are adding to the database (e.g., <Ser>, <M>), and should add missing �Variable� prompts that are needed (e.g., <Abst>). Every title in the database should include all of the �Variable� prompts needed for that title.
There are two ways to add a new �Variable� prompt. Method one is to type the �Variable� prompt, select the prompt, and then right-click the mouse. From the list, choose �Variable.� The prompt should change to a blue color to indicate it is a �Variable� prompt. Method two is to right-click the mouse, choose �Variable�, and then type the �Variable� prompt (the text should appear blue to indicate it is a �Variable� prompt). When finished typing the variable prompt, again click the right-mouse button, and choose �Normal� (any text hereafter should appear black to indicate normal text).

ABLE 6 Reference Guide Page 36 Library User Guide
2.6.11 Comment (Right Mouse Button)
The Comment function allows the ABLE���� user to leave useful messages on the ABLE���� screen which will not print on the binding slip or be lettered on the bound volume. �Comments� appear pink and italicized. In this document, comments are indicated by surrounding them between �Right-Facing Curly Brace� (�{�) and �Left-Facing Curly Brace� (�}�); e.g., �{This is a comment}�.
Any information needed to process a title for binding can and should be included in a �Comment�. Information which has typically been written on 3" by 5" cards and kept in a file at the library can be stored on the ABLE���� screen. �Comments� can, for example, remind the bindery preparation worker that a volume should be bound every six issues, or that the index should be removed from the January issue and be put at the end of the December issue. To add a �Comment� press the right mouse button and select Comment. Then type the message that you wish to display on the screen (e.g., �{Some volumes need a pocket for maps}�). Then press the right mouse button again, and select Normal.
2.6.12 Subscript and Superscript (Right Mouse Button) The Subscript and Superscript functions tells the binder�s computer that certain letters or characters should be placed in a lower, or �subscript�, or higher, or �superscipt� position relative to other letters or characters. Chemical formulas often include subscripts. ABLE���� shows the subscript and superscript characters as they would appear on the spine.
2.7 Retrieval Keys Record retrieval is the means of displaying an existing Title, Format or Lot Item record. The records retrieved can then be edited (updated), deleted (removed), and used as a data for adding a new item to a Lot. Selection may be made based on any of the following retrieval keys:

ABLE 6 Reference Guide Page 37 Library User Guide Title Keys Item Keys Format Key Text Item Number Format ID Call Number Text Private ID Call Number ISSN/ISBN Title ID 2.1.1 Text Key The Text key selection allows retrieval of: Titles using the text of the Title file, Lot Items from the Lot files, Job Pieces from the Job files. The first four words of the title, that are not excluded, are used to form the key. The rules ABLE���� uses to automatically form a Text key are:
• The key is formed using the first two letters of the first four valid title words.
• The letters selected are alphanumeric (A to Z, 0 to 9, a to z). All others are ignored.
• Any single character word is ignored.
• Any word in the exclusion word list is ignored.
• Soft hyphens are ignored.
ABLE 6 Reference Guide Page 38 Library User Guide
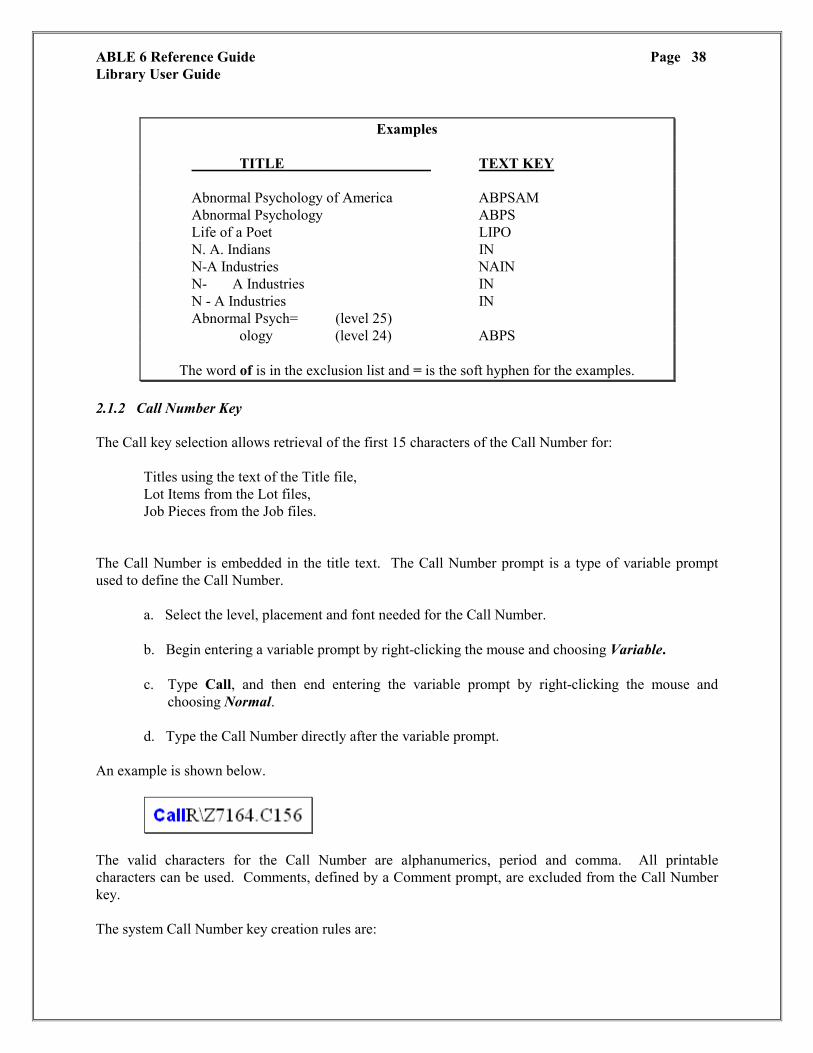
Examples TITLE TEXT KEY Abnormal Psychology of America ABPSAM Abnormal Psychology ABPS Life of a Poet LIPO N. A. Indians IN N-A Industries NAIN N- A Industries IN N - A Industries IN Abnormal Psych= (level 25) ology (level 24) ABPS
The word of is in the exclusion list and = is the soft hyphen for the examples. 2.1.2 Call Number Key The Call key selection allows retrieval of the first 15 characters of the Call Number for: Titles using the text of the Title file, Lot Items from the Lot files, Job Pieces from the Job files. The Call Number is embedded in the title text. The Call Number prompt is a type of variable prompt used to define the Call Number. a. Select the level, placement and font needed for the Call Number. b. Begin entering a variable prompt by right-clicking the mouse and choosing Variable.
c. Type Call, and then end entering the variable prompt by right-clicking the mouse and choosing Normal.
d. Type the Call Number directly after the variable prompt. An example is shown below.
The valid characters for the Call Number are alphanumerics, period and comma. All printable characters can be used. Comments, defined by a Comment prompt, are excluded from the Call Number key. The system Call Number key creation rules are:

ABLE 6 Reference Guide Page 39 Library User Guide
Character Typed Rule A...Za...z A...Za...z [period] [period] [comma] [comma] [space] Omitted [required space] Omitted [wide space] Omitted [line break] Omitted [soft hyphen] [hard hyphen]

ABLE 6 Reference Guide Page 40 Library User Guide
Examples
Characters Typed Rule <CALL>R\Z7164.C156 RZ7164.C156 <Call>W12\321\ <month>DEC W12321 <call>R\+\A123.W21 R+A123.W21
2.1.3 Private ID Key The Private ID key is an accommodation to the needs of interfacing more than one title numbering scheme within the library. The Private ID field allows the library to specify a key that may be used by some other system, such as NOTIS and GEAC. The valid characters for the Private ID are alphanumeric and special characters that can be printed. 2.1.4 ISSN/ISBN Key The ISSN/ISBN key allows the retrieval of titles by the standard serial or book number. This key field may also be used to contain Private ID values if so desired by the library. The valid characters for the ISSN/ISBN are alphanumeric and special characters that can be printed. 2.1.5 Title ID Key The Title ID key allows retrieval of titles by the identifier assigned by the ABLE���� Library system. This key (or RUB number) is unique throughout all titles for a library account. 2.1.6 Format ID Key The Format ID key allows retrieval of Format records for editing, creating and deleting of the formats. The valid characters for the Format ID are alphanumeric. 2.1.7 Item Key The Item Number key allows an item in a Lot Item file to be updated, removed and added as a new Lot Item record.

ABLE 6 Reference Guide Page 41 Library User Guide
2.8 User Access ABLE���� provides the following levels of user access to services:
Administrator (Manager) Supervisor Basic
Table 1 provides an overview of the services for each of the access levels. Refer to the File Maintenance volume for details. Note that services that are not allowed for a specific user appear in gray on the ABLET M screens.
Table 1 - Access Levels and Services
Service Administrator Supervisor Basic Add Update Users Yes No No Update Own Password Yes Yes Yes Standalone Utilities Yes No No File Maintenance � all services - read only
Yes Yes
No Yes
No No
Override User Warning Yes Yes No Title Composition Yes Yes Yes Setup System Parameters Yes Yes No Bindery Transfer Yes Yes Yes Reports Yes Yes Yes

ABLE 6 Reference Guide Page 42 Library User Guide 3. Getting Started This section describes basic operations for using ABLE���� effectively. Refer to Figure 2.2 and Figure 2.6.1 while you read this section. The human interface to ABLE���� is the same interface as from any program executed from a web browser such as Internet Explorer. Therefore, anyone familiar with Internet access and typical Windows programs can easily adapt to ABLE����. 3.1 How to Start ABLE���� The steps for starting ABLE���� are:
a. Power on your computer and login if necessary.
Note The startup procedure will check the hard disk of your computer for damaged files. If the computer displays any messages that include the words �truncated files� or �bad chains�, please call your System Administrator immediately.
b. The Windows screen is displayed. Select the ABLE���� icon on the main screen. c. The ABLET M Login screen with the copyright notice is displayed.
d. Login: Enter your Account ID, User ID, and Password. (The Account ID is
assigned by your bindery)
Figure 3.1 shows the Logon Screen.
Figure 3.1 - Login Screen 3.2 How to Log Out

ABLE 6 Reference Guide Page 43 Library User Guide You may Log out of ABLE���� by selecting the File: Log Out service from the menu bar.
Note: If the user takes too long to select the next operation, the user will be requested to log in again. This will prevent unauthorized use when the user walks away from their workstation.
3.3 How to Navigate Between ABLE���� Screens You navigate from screen to screen using the Window menu bar selection. The Windows selection lists the programs available. Simply select the program you wish to use. Refer to Figure 3.3.
Figure 3.3 - Windows Menu Selections 3.5 How to Get Help ABLE���� has extensive on-line help facilities. There are the following services:
• Tool Tips • Index & Contents Help Services • Help Buttons
3.5.1 Tool Tips
Program Selection Menu

ABLE 6 Reference Guide Page 44 Library User Guide When the cursor is moved onto a screen field label or action button, an explanation of the field/button is displayed. This is referred to as a Tool Tip. Using the Tool Tips is an easy way to understand every field and button on the ABLET M screens. 3.5.2 Index & Contents Help Services Comprehensive online is available using this standard �Windows-like� help facility. Help is invoked by selecting the Help menu bar selection. The Help menu selection provides,
Index Screen Help
Title Collation History Lot or Job Lot Status or Job Status Bindery Transfer Reports
A-Link Z-Link
File Maintenance Billing Statistics Preventive Maintenance FTP
About ABLE
Index The index selection causes a new window to be opened with an alphabetized list of help topics. Selecting a help topic causes the associated help text to be displayed. The help text is a reference (i.e., hyperlink) to a section in an ABLE���� reference document The user can then page up and down the document and utilize the hyperlink capabilities within the document.
Screen Help
Each major ABLE���� screen has an entry in this menu selection. The help text display is identical to the Index help text described above. About ABLE This menu selection provides the ABLE���� version number and miscellaneous ABLE���� information.

ABLE 6 Reference Guide Page 45 Library User Guide 3.5.3 Help Buttons There are a few screens that have help buttons as a convenience for referencing help. The help text display is identical to the Index help text described above. 3.6 How to Purge the Database The Purge screen (see Figure 3.6) allows you to remove information no longer needed from the system.
Figure 3.6 - Purge Screen
Select Purge to start the purge process.
Note It is imperative that you check the system date before beginning the purge routine. An incorrect system date (caused by a dead battery in your computer or an operator error) can inadvertently cause current information to be purged from the database. PLEASE BE VERY CAREFUL when running the Purge routine.

ABLE 6 Reference Guide Page 46 Library User Guide 4. Title Composition
4.1 How to Retrieve a Title or Format Record
a. Select the Key field (Figure 4.1.1) to view the pull down menu with key choices. Select the key you want to use.
Figure 4.1.1 - Title Composition: Retrieval Key Selection b. The cursor automatically moves to the adjacent key entry field.
c. Type the identification for the record you want to display.
d. Press Enter or TAB to display the record.
Example Type JOMEST for the text key for the Journal of Medieval Studies.
Retrieval Key Selection

ABLE 6 Reference Guide Page 47 Library User Guide
Partial Identification: You may type a partial record identification. If there are multiple records matching the partial identification and �Enable List Search� is selected (in the �Setup: User Parameters� menu), the entries are displayed. If �Enable List Search� is not selected, the first matching record is retrieved. The rules for partial matching of records are as follows:
The [required space] character can be used if a trailing space is to be part of the retrieval key. For example, CO[required space] causes fewer titles to be retrieved than CO.
If multiple records are found, they are listed (Figure 4.1.2). Select the one you are looking for and select OK.
Figure 4.1.2 - Title Composition: Search Results Multiple Accounts The Account must be selected before you can retrieve a Title record.
Your ABLE���� system will probably have only one account for your library. Check with your system administrator if this is the case, then your binder has already selected the account to use. If there are multiple accounts then you should select the account by entering entering the Account ID in the �Account� field on the title composition screen, and pressing Tab or Enter.

ABLE 6 Reference Guide Page 48 Library User Guide 4.2 How to Retrieve an Item from a Lot To retrieve an Item record you must first select the Lot with the item record. 4.2.1 Select Lot
a. Select Window: Lot or Alt L or the Lot action button to display the Lot screen (Figure 4.2).
Figure 4.2 - Lot Screen
b. Type the Lot ID of the Lot. c. Press Enter or Tab. d. Select Close to close the Lot screen.. 4.2.2 Retrieve Item
a. Select the Key field (Figure 4.1.1) to view the pull down menu with key choices. Select the Lot: Item key. The cursor automatically moves to the adjacent key entry field.
b. Type the identification for the record you want to display. Press Enter or TAB to display
the record. The record is displayed. 4.3 How to Remove an Item from a Lot
Enter the Lot ID.

ABLE 6 Reference Guide Page 49 Library User Guide
a. Select the Lot using Window: Lot or Alt L or the Lot action button. Enter the Lot ID of the
Lot you want to remove an item from. Select Close to select the Lot and to remove the screen.
b. Select the Key field to view the pull down menu with key choices. c. The cursor automatically moves to the adjacent key entry field.
d. Type the identification for the record you want to display.
e. Select Update: Item: Remove Item or Alt R to remove the Item record.
f. You are asked if you wan to continue the operation. Select Yes.
4.4 How to Enter Special Collation Instructions The Collate screen is a screen displaying collating parameters for the current record displayed.
a. Select Window: Collate or Alt C or the Collation action button to display the Collation screen (Figure 4.4).
b. Type data as you would on any screen.
c. Select the Apply button to update the information.
Figure 4.4 - Collation Screen
Right Mouse Button Display

ABLE 6 Reference Guide Page 50 Library User Guide The Trim/Amount fields specify how much top, bottom and front of the volume is to be trimmed. The codes are: Code Description Amount 0 No trim 0 1 Shave trim 1/16 inch 2 Regular trim 2/16 inch 4 Oversize trim 4/16 inch The collation instructions are: Field Definition Options & Example
Index F=Front B=Back N=Not Present Title Page F=Front B=Back N=Not Present Contents F=Front B=Back N=Not Present Front �Paper Front Covers� I=Bind In O=Out (i.e., remove) F=First front only Only the first front cover should be bound. Back �Paper Back Covers�
I=Bind In O=Out (i.e., remove) Ads Advertisements
I=unpaged ads in O=unpaged ads out A=All ads out
Instructions for an item can be entered by choosing the Instructions button on the title composition screen. This is a free field for you to type any special instructions (Figure 4.4.1).
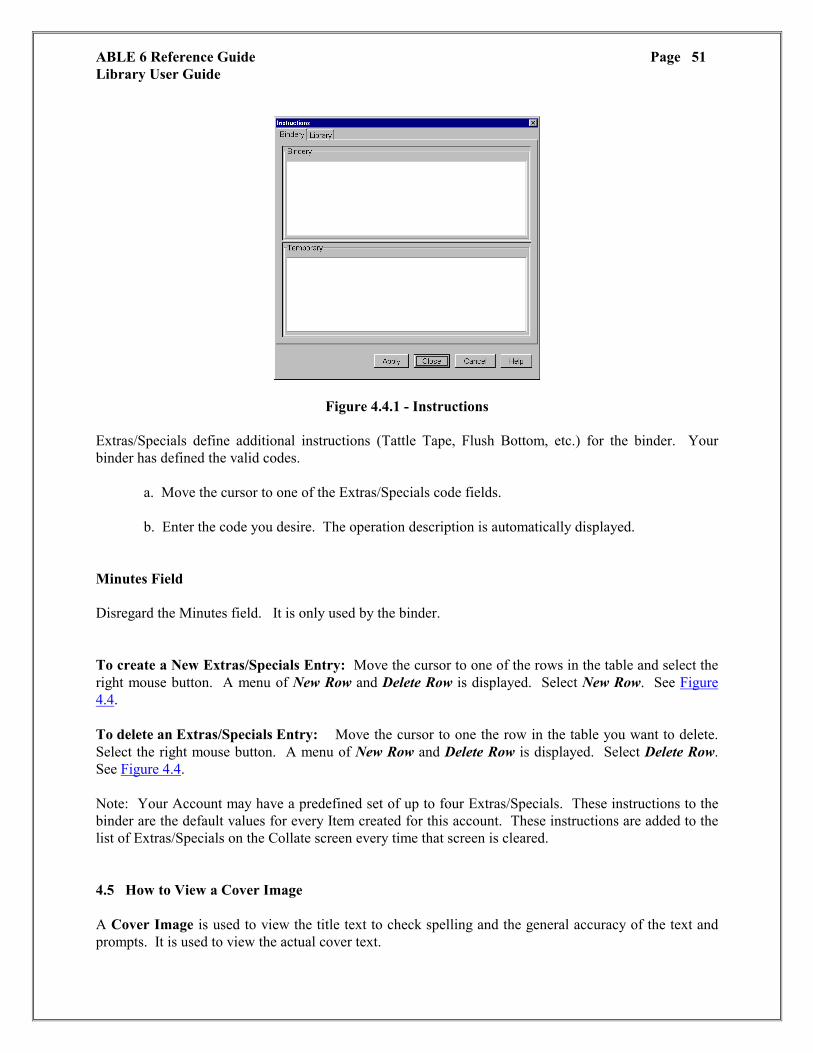
ABLE 6 Reference Guide Page 51 Library User Guide
Figure 4.4.1 - Instructions
Extras/Specials define additional instructions (Tattle Tape, Flush Bottom, etc.) for the binder. Your binder has defined the valid codes. a. Move the cursor to one of the Extras/Specials code fields. b. Enter the code you desire. The operation description is automatically displayed. Minutes Field Disregard the Minutes field. It is only used by the binder. To create a New Extras/Specials Entry: Move the cursor to one of the rows in the table and select the right mouse button. A menu of New Row and Delete Row is displayed. Select New Row. See Figure 4.4. To delete an Extras/Specials Entry: Move the cursor to one the row in the table you want to delete. Select the right mouse button. A menu of New Row and Delete Row is displayed. Select Delete Row. See Figure 4.4. Note: Your Account may have a predefined set of up to four Extras/Specials. These instructions to the binder are the default values for every Item created for this account. These instructions are added to the list of Extras/Specials on the Collate screen every time that screen is cleared. 4.5 How to View a Cover Image A Cover Image is used to view the title text to check spelling and the general accuracy of the text and prompts. It is used to view the actual cover text.

ABLE 6 Reference Guide Page 52 Library User Guide Before a Cover Image is displayed, ABLE���� attempts to text fit the text. The text is displayed if it text fits or not. If it fails a message is displayed indicating the problem. The font information [v3.2] displayed for each text segment are the defined font code and the resulting font code (only if it is different than the defined font code). The defined font is the font assigned to the panel. The resulting font number is the font the system selects based on the text fitting rules.
a. Select Window: Cover Image or Alt I to display the Collation screen (Figure 4.5).
{ TBD � Cover Image Screen }
Figure 4.5 - Cover Image (TBD)

ABLE 6 Reference Guide Page 53 Library User Guide 4.6 How to Check Text Fit Checking the fit of the text on the cover is call Text Fitting. Text fitting of the text can be accomplished just as your binder would do it during the processing of the volume. You can determine if there is going to be a fitting problem and take appropriate action to correct the problem. There must be spine, width, and height measurements and an Embosser Type defined. You can approximate the dimensions to obtain a reasonable text fit. The Embosser Type is set by your binder in the Binder record (Refer to File Maintenance).
a. Select Window: Text Fit or Alt TI to perform a Text Fit. b. If there is a problem you should view the Cover Image. 4.7 How to Create a Title A Title record is created and saved in the database using the Title Composition screen as follows:
a. Select the Clear action button to remove the data on the screen. b. Be sure that the key selection is one of the Title Text Keys.
c. Fill in the fields and text for the new Title.
c. Select Update: Title: Add Title or Alt T or the Add Title action button to save the new Title record.
d. A confirmation dialog box is displayed. Type Yes if you want to save the Title.
Compose+ and Formats If you are entering many Titles with similar characteristics you should consider using Compose+ and Formats. Refer to Compose+ and Using Formats.

ABLE 6 Reference Guide Page 54 Library User Guide The library related fields on the Title Composition screen are:
Field Possible Use Title ID Binder�s field Private ID Notis Number (alternate �Key�) ISSN/ISBN ISSN or Faxon Number Department Location of volume (e.g., Math) Collection Fund Account (e.g., Smith Fund) Category Binder�s Field Bind Freq. How often (e.g., �3� for 3 times per year) Pub. Freq. How often (e.g., �12� for monthly) Class Binder�s field Rules Binder�s field Set of Number of identical copies to be bound
Binding Data is used to give instructions that should become part of the constant information of a title. In most cases, the library leaves these fields blank and the bindery is responsible for making these decisions. If the library does wish to give instructions, these fields are available.
Field Use Example Spine Thickness of the Spine Inches - 1/16�s Height Height of the Volume Inches - 1/8�s Width Width of the Volume Inches - 1/8�s Leaf How pages (leaves) will be held into AF (Adhesive Bind) Attachment the bound volume. Method
4.8 How to Create a Title using a Format Periodical, monographs and other titles are formatted according to library conventions. These rules include type style and size (font), spacing between lines (pitch), placement, levels, cover material and print (foil) color, department, collection and other attributes. To ease the burden of repetitive entry ABLE���� provides the format service. A format is a template used when creating Title records and Item records. Formats are identified with a name called the Format ID. Formats can be created, edited, and deleted. Formats reduce the amount of repetitive information that must be typed in by the library. Each class of binding has a Format code. Using the Format code causes both constant information (e.g., print color, leaf attachment, category) and variable prompts to appear on the screen. The Format code automatically includes the constant information that is relevant for each class of binding offered by the bindery. The library must fill in the appropriate �Variable� fields (e.g., volume, months and year).

ABLE 6 Reference Guide Page 55 Library User Guide Unlike old periodical titles, which are stored in the database; books, paperbacks and new periodical titles are not in the database. Formats streamline the data entry process required for these volumes. If, for example, you always use author, degree and year on the spines of thesis binding, the thesis Format can include those Variable prompts. If you always want your new periodical titles to have white print on the spine, the periodical Formats can include white print.
Your binder provides a basic set of formats. You may define your own as long as the parameters entered conform to your binder's specifications.
a. Select the Clear action button to remove the data on the screen. b. Be sure that the key selection is one of the Title Text Keys.
c. Move the cursor to the Format Field and type the name of the format to use and type the
Enter or Tab key. c. Fill in the fields and text for the new Title.
c. Select Update: Title: Add Title or Alt T or the Add Title action button to save the new Title record.
d. A confirmation dialog box is displayed. Type Yes if you want to save the Title. 4.9 How to Change a Title A Title record may be modified at any time.
a. Retrieve the Title record as provided in a previous section. b. Modify the fields by moving to the fields and typing over the current data.
c. To update the title select either Update: Title: Update Title or Alt U or the Upd Title action
button.
4.10 How to Remove a Title Record A Title record may be deleted from the database.
a. Retrieve the Title record as provided in a previous section. b. To remove the title select either Update: Title: Remove Title or Alt R .
c. A window is displayed asking you to confirm the deletion of the title. Select Yes to remove
the title.

ABLE 6 Reference Guide Page 56 Library User Guide 4.11 How To Create a Format A format is created in a similar manner as a Title record.
a. Select the Clear action button to remove the data on the screen. b. Be sure that the key selection is Format.
c. Enter the format name. You will be asked to confirm adding a Format. Enter Yes to
continue the process of adding a format.
d. Fill in the fields and text for the new Format.
e. Select Update: Format : Add Format or Alt M to save the new Format record.
f. A confirmation dialog box is displayed. Type Yes if you want to save the Format.

ABLE 6 Reference Guide Page 57 Library User Guide 4.12 How to Create a Lot Before a Lot can be processed you must define the Lot characteristics. Refer to Figure 4.12.
a. The Lot screen is used to create a Lot. Select Windows : Lot or Alt L or the Lot action button to display the Lot window. Refer to Figure 4.12.
Figure 4.12 - Lot Screen b. Check to make sure that the Account ID and Binder ID are correct. c. Type the Lot ID of the new Lot in the Lot ID field and the select Enter.
Note New �Lot ID�s� must be unique. The Bindery recommends that you use the date that the �Lot� was created (e.g., 102191 - - month, day, year). Hyphens are allowed. The bindery strongly recommends that you do not use any punctuation or spaces between characters.
You may differentiate between lots for periodicals, lots for monographs, and lots for theses (for example) as follows: 102191P (for periodicals), 102191M (for monographs), and 102191T (for theses). This routine is useful if you expect to send more than one ABLE���� lot per shipment to the bindery or if you need to have separate packing lists (Lot-Item reports) for different types of binding. This convention is particularly useful if you have more than one ABLE���� computer and you do not have a networked system. Remember that ABLE���� requires unique Lot ID�s for all lots (otherwise one lot will overwrite an identically named lot).
Lot Id Field

ABLE 6 Reference Guide Page 58 Library User Guide
d. A confirmation dialog box is displayed. Select Yes to create the Lot. The computer will
create a new �Lot� and set the �Item� count to zero. e. Type in the Date Expected for this lot. The date expected prints in the upper right hand
corner of the binding slip. The Truck Route and Shipping Day fields are used by the bindery and do not need to be filled in.
4.13 How to Remove a Lot A Lot cannot be removed using the Lot screen. The Purge function must be used. Refer to File Maintenance. 4.14 How to Create an Item Using a Title Record Your Title database is used to efficiently create Items for binding. The more accurate your database the easier it will be to create Items for a Lot. a. Select the Lot you want to process. Refer to How to Select a Lot.
b. Retrieve a Title you want to use to compose the Item. Refer to How to Retrieve a Title or Format Record.
c. Place the cursor in the Title Text area in order to fill in the data for the variables and create
an Item.
d. Tab to each variable and type the data indicated.
e. Select Add Item or Alt I to Add the Item to the Lot. ABLE���� displays the Item Number assigned on the lower left part of the screen.

ABLE 6 Reference Guide Page 59 Library User Guide 4.15 How to Create an Item Using a Format A Title record need not be used to create an Item, especially if there is no Title record for the volume you want to process! You can use a Format or just fill in a Title screen. a. Select the Lot you want to process. Refer to How to Select a Lot. b. Use the Clear action button to remove the data from the current screen. c. Tab to the Format ID field and type the Format name you want to use. d. Type the fields you need to create the Item. e. Select Add Item to create the Item. 4.16 How to Create an Item Without Using a Title or Format A Title record need not be used to create an Item, especially if there is no Title record or Format for the volume you want to process. You can fill in a Title screen and add the Item.
a. Select the Lot you want to process. Refer to How to Select a Lot.
b. Use the Clear action button to remove the data from the current screen.
c. Type the fields you need to create the Item.
d. Select Add Item to create the Item.

ABLE 6 Reference Guide Page 60 Library User Guide 4.17 How to Print a Binding Slip (UBS) Binding slips, called Universal Binding Slips (UBS), are used to identify each volume. ABLE���� provides two methods for printing binding slips:
• After adding each Item to the Lot.
• After adding all the Items to the Lot. (Refer to the Reports section.) The binding slip printing functions provided by the Title Composition screen are summarized as follows: Print Options Description Align UBS Adjust the form in the printer. Reprint UBS Print another binding slip. Auto UBS Turn printing on and off. Use UBS Form Select pre-printed forms or standard paper. UBS Copies� Selects the number of copies of the UBS to print on plain paper. You can access these services using the Print Menu Bar selection. Refer to Figure 4.17.
Figure 4.17 � Title Composition : UBS Print Services
Binding Slip Print Options

ABLE 6 Reference Guide Page 61 Library User Guide Setup to Print Binding Slips After Adding an Item:
a. Select Print to display the print options. Select Align UBS to adjust the form in the printer.
b. Select Print to display the print options. Select Auto UBS to check automatic binding slip printing (after adding an item).
Note: If Auto UBS is already checked then do not check since automatic binding slip printing is already turned on.
c. Select Print to display the print options. Select Use UBS Forms if you are using pre-printed
binding slips. If Use UBS Forms is already checked off then do not select it. If you are using plain 8.5" by 11" paper then do not check off Use UBS Forms.
4.18 How to Re-Print a Binding Slip If you need another binding slip for the Item on display the Reprint function is used.
a. Retrieve the Item if it is not already on display. Refer to How to Retrieve an Item.
b. Select Print to display the print options. Select Reprint UBS to print another binding slip.

ABLE 6 Reference Guide Page 62 Library User Guide 4.19 How to View Binding History ABLE���� saves title binding history information. ABLE���� displays all of the available history. The History screen is a screen displayed over the Title Composition screen that contains the historical information.
a. Retrieve the title for the history you want to view. Refer to the Title Retrieval section. b. Select Alt Y or Windows: History or the History action button to view the History screen.
Refer to Figure 4.19.
Figure 4.19 - History Screen
The history menu selection displays history information for the displayed Title record. History information includes the following fields:
Title ID The Title ID for the history data Account ID The Account for the Title. Binder ID Binder ID of the Binder Last Lot The last Lot the Title was part of
Expected The date the Item is expected back from the bindery. Operator ID The library Operator ID responsible for the transferring
the Lot to the Bindery Entry The date the Title record was created.

ABLE 6 Reference Guide Page 63 Library User Guide
Update The date the Title record was modified. History Entries History entries are scrolled when there is not enough
room to display the complete set of entries.
Date The date the history information was recorded. Variable Name/variable data used in the binding process
Remark 5.0 Bindery Transfer The Bindery Transfer program is used to transfer Lot data between the library and bindery using either,
• Diskette • File (local or network) • Internet
5.1 Selecting Bindery Transfer
a. Select Alt B or Windows: Bindery Transfer to display the Bindery Transfer screen. Refer to Figure 5.0.
Figure 5.0 � Bindery Transfer Screen
Select Transfer Method

ABLE 6 Reference Guide Page 64 Library User Guide There are two modes of operation:
• Transfer to Bindery (Produce)
• Receive From Bindery (Restore) 5.2 Produce Diskette
a. Select the transfer mode using the Drive Destination area on the screen. Refer to Figure 5.0. b. Select the Lot to be transferred. Refer to How to Select a Lot.
c. Select Clear/Transfer to Bindery to first clear the unwanted Lot files. For subsequent Lots on the same media, select Transfer to Bindery to start the process.
e. The selected Lot is copied to the diskette or Internet transfer area. 5.3 Restore Diskette
b. Select the transfer mode using the Drive Destination area on the screen. Refer to Figure 5.0.
c. Select Receive From Bindery. The Lots are then read into the system and the title database is updated as needed.

ABLE 6 Reference Guide Page 65 Library User Guide 6.0 Reports The reporting program provides comprehensive means for selecting and printing the data contained in the ABLE���� system.

ABLE 6 Reference Guide Page 66 Library User Guide 6.1 Running a Report
a. Alt P or Window: Reports to select the Report window. Refer to Figure 6.1.
Figure 6.1 � Report Screen
b. Select the report by selecting the Report Type and Sort Criteria. Each report type has different Sort Criteria. Select the Next� button. The screen in Figure 6.2 is displayed.
Figure 6.2 - Second Print Screen c. Select the necessary parameters for the report you selected. d. Select where printing is to be done: To Printer, To Screen, To File.

ABLE 6 Reference Guide Page 67 Library User Guide 7.0 Z-Link The ABLET M Catalog System interface, called Z-Link, provides search and retrieval access to Internet-based library catalogs, specifically designed to support bindery preparation software. Hundreds of libraries around the world provide an open standards-based interface to their library catalogs using the ANSI/NISO Z39.50 protocol. 7.1 Turning on the Z-Link Service
a. The Catalog System interface is turned on and off using the Setup: User Parameters: Enable Z-Link parameter.
b. Choose an active catalog system-mapping table in Setup: User Parameters: Z-Link Table.
The table provides a translation to map between the MARC fields returned by the Catalog System and ABLE����. If no table is active, no translation is used.
c. The creation and definition of the mapping tables is accessible by the menu item Window:
File Maintenance: Z-Link Mapping. Refer to Table Setup and Maintenance. d. Display a Format or existing ABLET M record (either Title, Item or Piece).
7.2 Searching for a Title
a. Select Alt Z or Window: Z-Link. Refer to Figure 7.1.
Figure 7.1 � Catalog System (Z-Link) Screen
Search Criteria
Select the Active Catalog System

ABLE 6 Reference Guide Page 68 Library User Guide
Note: The Catalog System requires an already established Internet connection in order to
connect to a Z39.50 server; attempting to connect to a database will not automatically attempt to establish this connection. See Library Catalog Internet Connection Setup.
b. Fill-in retrieval form. Search criteria can be entered in up to three fields, each of which can query using any search term. The AND Boolean operation is implicitly employed when querying over multiple-field queries (the OR, NOT, etc., Boolean operations are not available).
c. Select the Search button to start the search.
d. The desired catalog record is displayed. Note: When multiple records match the criteria,
either select the record desired or reenter the selection criteria.
e. Select Import to populate the Title Composition screen. The Catalog System retrieval window is closed upon selecting Import.
f. Use standard ABLET M services to save the record.
7.3 Library Catalog Internet Connection Setup
Library Catalog Internet connection setup needs to be completed before using Z-Link. This information is obtained from the Library Catalog Administrator.
a. Select Alt Z or Window: Z-Link. b. Select Database : Add from the Z-Link Search Screen. Refer to Figure 7.2.
Figure 7.2 - Library Catalog Internet Connection Setup Screen

ABLE 6 Reference Guide Page 69 Library User Guide
The fields definitions are as follows:
Pretty Name A description of the Host System; e.g. Library of Congress. Host Name The Library Catalog System Server to attach to. Database The name of the specific Catalog System to attach to. Host The IP address to use to connect to the Catalog System. Port The port to connect to for the Host listed above. Max Records The maximum number of records to retrieve.
c. Select OK to save the information. d. Select the Z-Link Screen: Alt Z or Window: Z-Link.
e. Select the Database field list box option and select the Catalog System to use. Refer to
Figure 7.1.
7.4 Table Setup and Maintenance
Z-Link Mapping Tables are used to associate MARC fields with ABLE���� fields/variables. Multiple Mapping Tables may be defined. Users may select a particular table to use through the Setup: User Parameters: Z-Link Table menu option. The ABLET M Z-Link setup screen allows easy customization of the association between ABLET M variable prompts, ABLET M fields, and MARC fields. MARC subfields can be used to create a custom display of the MARC information. The Marc fields are mapped to ABLET M for the following fields:
• ABLET M screen fields such as ISSN/ISBN, Publication Frequency. • ABLET M variable prompts such as Title, Author, Imprint, Call Number.
Variable prompts are defined as needed for mapping MARC record fields.
a. Select Window : File Maintenance : Z-Link Mapping. Refer to Figure 7.3.

ABLE 6 Reference Guide Page 70 Library User Guide
Figure 7.3 � Catalog System Mapping Screen
7.4.1 Adding a New Table If a table has not been previously defined, begin by entering a name in the Name field. You may use up to 30 alphanumeric characters, including the underscore character. One row will appear in the table and will contain a drop-down list of standard ABLE���� fields: ISSN/ISBN, Private ID, Publication Frequency, Department, Collection. You will want to add rows to the table in order to map MARC fields to ABLE���� variables. To do so, right-click anywhere on the existing row and select "New Row". To complete the row, see the section entitled "Catalog System Mapping Rows". When all rows are complete, click on the "Apply" button to save the table. 7.4.2. Editing a Table Select the table you wish to edit by selecting it from the Name drop-down list. To modify an existing row, place the cursor in the field(s) you wish to change and enter the appropriate information. If necessary, see the section entitled Catalog System Mapping Rows. To add a row, right-click anywhere on the existing row and select "New Row". Populate the new row fields. When you have finished editing the table, click the "Apply" button to save the changes.

ABLE 6 Reference Guide Page 71 Library User Guide 7.4.3. Catalog System Mapping Rows ABLE (max 20 characters)
Enter the variable name, such as Title. The case is not important however the spelling must match exactly. (It is preferable to Title and Call as names when those variables are used.)
MARC (max 30 characters) Enter the identifiers for the MARC field(s) here. This is entered inside square brackets. One or more MARC fields may be associated with an ABLE���� variable. Use a leading zero, if necessary, to ensure a 3-digit MARC field number. For example, [050a][050b] will return subfields a and b from the LC call number in the MARC record. You may also concatenate subfields with spaces, periods, dashes, colons and semi-colons which will be incorporated into the ABLE���� record on import.
Editing The editing field determines how imported data will be placed in the ABLE���� record:
If left empty, MARC data will be added only if the field is empty "Append" will apply data to the end of exiting data, if any. "Insert" will apply data in front of existing data, if any. "Replace" will replace any existing data with the imported MARC data.
Truncation
The truncation field is used to specify how much of a MARC field is imported into the ABLE���� record. For example, if an author appears as "Smith, John" in the MARC record but you only want to see "Smith" in ABLE����, select a comma (,) as the truncation character. You may choose a truncation character from the drop-down list or you may enter a character of your choice.
Uppercase Click the checkbox in this field if you want the imported data to be converted to upper case.
Substitution Space characters in the MARC data will be replaced by the character you have specified in this field. For example, if the MARC data is seen as LITTLE RED RIDING HOOD but you would like LITTLE\RED\RIDING\HOOD to appear in the ABLE���� record, specify a backslash (\) in the substitution field. You may choose a substitution field from the drop-down list or you may enter a character of your choice.

ABLE 6 Reference Guide Page 72 Library User Guide 8.0 A-Link The ABLE���� Import service provides an easy, industry standard, mechanism for importing AVIAC titles into ABLE����. The Import Service operation is similar to Z-Link. Instead of a Z-Link screen, an A-Link screen is displayed. Volumes are retrieved from the import file one at a time. As they are retrieved they are considered processed. The count of items processed is displayed. The bar code scanning of the Library Bar Code, Call Number or ISBN/ISSN is also supported. The Library Bar Code may be saved in the ABLE���� Private ID field. 8.1 Turning on the A-Link Service
a. The A-Liink System interface is turned on and off using the Setup: User Parameters: Enable A-Link parameter.
b. Choose an active A-Link Mapping Table in Setup: User Parameters: A-Link Table.
The table provides a translation to map between the A-Link file fields and ABLE����. If no table is active, no translation is used.
c. The creation and definition of the mapping tables is accessible by the menu item
Window: File Maintenance: A-Link Mapping. Refer to Table Setup and Maintenance.
d. Display a Format or existing ABLET M record (either Title, Item or Piece).
8.2 Searching for a Title
a. Select Alt-Shift-Z or Window: A-Link. Refer to Figure 8.1.

ABLE 6 Reference Guide Page 73 Library User Guide
Figure 8.1 �A-Link Screen
b. Select the file to process by filling in the File Source field. There is a Browse� Button allowing the user to find the desired file using a standard file choice dialog box.
c. Search criteria is then entered. A pull-down list of available selection criteria to use,
offering:
Title ID (Library) Title ID (Bindery) Library Bar Code ISSN/ISBN Title Call Number
Note: The Next and Previous buttons will retrieve the next available volume according to the selection criteria used at the time the Select button was chosen.
d. Select the Select button to retrieve the matching records. If there are more that one matching
records select the one desired using the ← and → buttons (to limit the number of records retrieved, enter a number in the Maximum Records field before choosing Select).
e. Select Import to populate the Title Composition screen. The A-Link retrieval window is
closed upon selecting Import.
f. Use standard ABLET M services to save the record.
Search Criteria
Select the File

ABLE 6 Reference Guide Page 74 Library User Guide 8.3 Table Setup and Maintenance
A-Link Mapping Tables are used to associate A-Link file fields with ABLE���� fields/variables. Multiple Mapping Tables may be defined. Users may select a particular table to use through the Setup: User Parameters: A-Link Table menu option. The ABLET M A-Link setup screen allows easy customization of the association between ABLET M variable prompts, ABLET M fields, and A-Link file fields. a. Select Window : File Maintenance : A-Link Mapping. Refer to Figure 8.3.
Figure 8.3 - A-Link Mapping Table
8.3.1 Adding a New Table If a table has not been previously defined, begin by entering a name in the Name field. You may use up to 30 alphanumeric characters including the underscore character. One row will appear in the table and will contain a drop-down list of standard ABLE���� fields: ISSN/ISBN, Private ID, Department, Collection. You will want to add rows to the table in order to map AVIAC fields to ABLE���� variables. To do so, right-click anywhere on the existing row and select "New Row". To complete the row, see the section entitled A-Link Mapping Rows. When all rows are complete, click on the "Apply" button to save the table.

ABLE 6 Reference Guide Page 75 Library User Guide 8.3.2 Editing a Table Select the table you wish to edit by selecting it from the Name drop-down list. To modify an existing row, place the cursor in the field(s) you wish to change and enter the appropriate information. If necessary, see the section entitled A-Link Mapping Rows. To add a row, right-click anywhere on the existing row and select "New Row". Populate the new row fields. When you have finished editing the table, click the "Apply" button to save the changes. 8.3.3 A-Link Mapping Rows ABLE (max 20 characters)
Enter the variable name, such as Title. The case is not important however the spelling must match exactly. (It is preferable to Title and Call as names when those variables are used.)
AVIAC The AVIAC field is used to specify an AVIAC field. Choose from the list of available fields. For example, "Library Bar Code" corresponds to the library bar code as found in an AVIAC record, while "Title" refers to the title as found in an AVIAC record.
Editing The editing field determines how imported data will be placed in the ABLE���� record:
If left empty, MARC data will be added only if the field is empty "Append" will apply data to the end of exiting data, if any. "Insert" will apply data in front of existing data, if any. "Replace" will replace any existing data with the imported AVIAC data.
Truncation
The truncation field is used to specify how much of a AVIAC field is imported into the ABLE���� record. For example, if an author appears as "Smith, John" in the AVIAC record but you only want to see "Smith" in ABLE����, select a comma (,) as the truncation character. You may choose a truncation character from the drop-down list or you may enter a character of your choice.
Uppercase Click the checkbox in this field if you want the imported data to be converted to upper case.
Substitution

ABLE 6 Reference Guide Page 76 Library User Guide
Space characters in the AVIAC data will be replaced by the character you have specified in this field. For example, if the AVIAC data is seen as LITTLE RED RIDING HOOD but you would like LITTLE\RED\RIDING\HOOD to appear in the ABLE���� record, specify a backslash (\) in the substitution field. You may choose a substitution field from the drop-down list or you may enter a character of your choice.
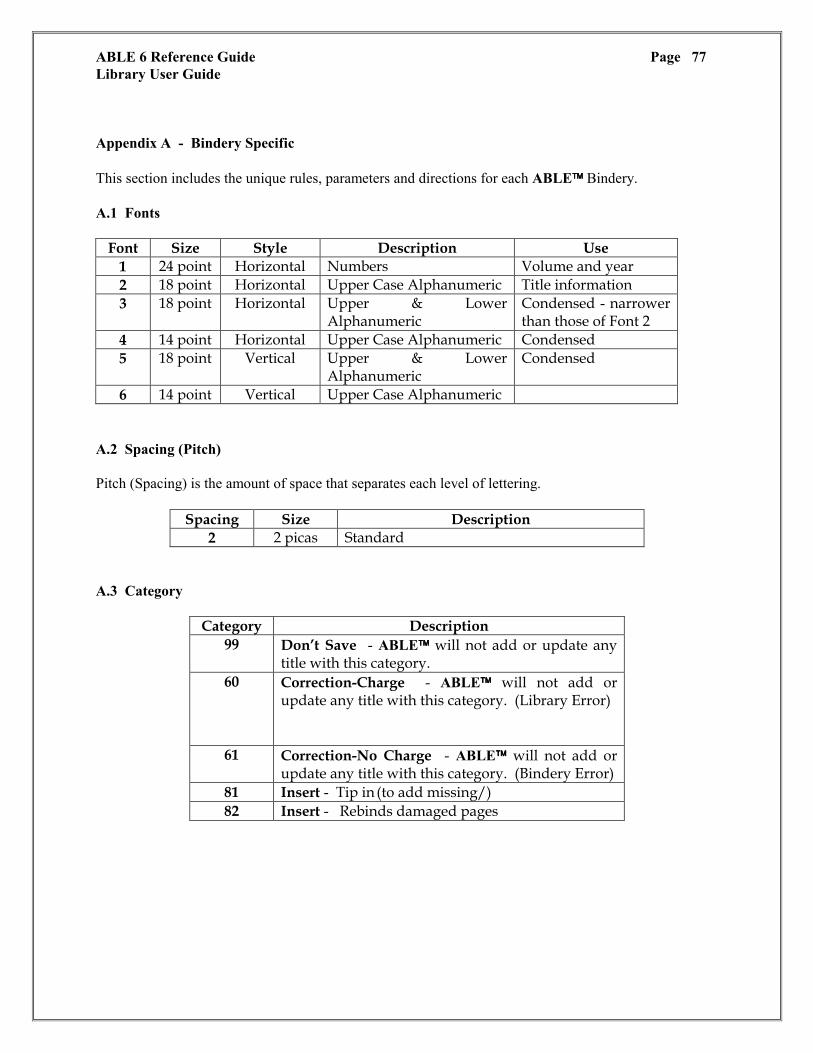
ABLE 6 Reference Guide Page 77 Library User Guide Appendix A - Bindery Specific This section includes the unique rules, parameters and directions for each ABLE���� Bindery. A.1 Fonts
Font Size Style Description Use 1 24 point Horizontal Numbers Volume and year 2 18 point Horizontal Upper Case Alphanumeric Title information 3 18 point Horizontal Upper & Lower
Alphanumeric Condensed - narrower than those of Font 2
4 14 point Horizontal Upper Case Alphanumeric Condensed 5 18 point Vertical Upper & Lower
Alphanumeric Condensed
6 14 point Vertical Upper Case Alphanumeric A.2 Spacing (Pitch) Pitch (Spacing) is the amount of space that separates each level of lettering.
Spacing Size Description 2 2 picas Standard
A.3 Category
Category Description 99 Don�t Save - ABLE���� will not add or update any
title with this category. 60 Correction-Charge - ABLE���� will not add or
update any title with this category. (Library Error)
61 Correction-No Charge - ABLE���� will not add or update any title with this category. (Bindery Error)
81 Insert - Tip in (to add missing/) 82 Insert - Rebinds damaged pages

ABLE 6 Reference Guide Page 78 Library User Guide A.4 Level Use the Level Matching Chart (numbered consecutively from 1 to 42) to match the lettering of a previously bound volume. Place the bottom edge of the Level Matching Chart even with the bottom edge of the �sample� volume and choose the level number that comes closest to each line of lettering. Type that number in the �Level� field adjacent to the words you type for each line.
Use the Standard Level Selection Chart (numbered 14, 17, 20, 23, 26, 29, 32) to determine the level to use for new periodical titles and for sets or series that must match each other. Place the bottom edge of the Standard Level Selection Chart even with the bottom edge of the volume to be bound and choose the highest level number panel within which the top edge of the volume falls. If one of the horizontal lines falls exactly even with the top edge of the volume, choose the level number immediately above that line. The number chosen indicates the level to use for the title of a volume of that size. If you place the Level Selection Chart against this page, you should see �Level 26� as the topmost panel that brackets the top of the page. A.5 Excluded Text Key Words Excluded Words never are part of the Text key of a Title.
Excluded Word Any single letter or character (e.g., �a�)
an and la le les of
the A.6 Formats
Format Code Category Class 01 Periodical Custom 02 Periodical Standard 03 Periodical Budget 04 Periodical Lumbind 05 Book/Paperback Adhesive Bind 08 Book/Paperback Sewing Option 09 Paperback Acmebind 10 Paperback Norcloth 11 Paperback Norlam 12 Pamphlet Clear-Vu 14 Thesis Library

ABLE 6 Reference Guide Page 79 Library User Guide
15 Thesis Personal 17 Phase Box Regular
17LF Phase Box Regular (Tan Lignin-Free) 18 Phase Box Deluxe (Buckram Cover)
18LF Phase Box Deluxe (Tan Lignin-Free) 19 Enclosure Double Tray Box 20 Enclosure Pocket-Book 21 Enclosure Portfolio 22 Photocopy Flat 23 Photocopy Folded 24 Petrim Only (uncut signatures) 27 Newspaper Up to 14 inches tall 28 Newspaper Tabloid 29 Newspaper Standard 32 Sample 45 Textbook 55 Reprint Collected Papers 60 Correction Charge (Library Error) 61 Correction No Charge (Bindery Error) 81 Insert Pages Tip in 82 Insert Pages Rebind 95 Legal Bible Control Volume 97 No Title No Cloth 98 Front Cover Title 99 Don�t Save CP Cloth Parts Music MP Music Parts PP Paper Parts Music UP Uncovered Parts Music
A.7 Extras/Specials
Code Description Code Description AA All Ads Out OC Use Original Cover AT Additional Time P Pretrim BE Binding Slip Error
(Customer) P3 Pocket-3 1/2� Diskette
BS Fill Out Binding Slip P5 Pocket-5 1/4� Diskette CO Covers Out PC Pocket-Cloth EC Extended Cover (Tabs) PK Pocket-Cassette F Folds PL Pocket-Legal (Slot Style)
FB Flush Bottom PM Pocket-Music FT Front Cover Title PO Pocket-Oversize G Greek Title PV Pocket-Video

ABLE 6 Reference Guide Page 80 Library User Guide
HL Hand Stamp Lettering PT Paper Tube (FOB) IO Index Out RL Rolled Lines LF Tan Lignin Free (TLF-phase
box) R1 1-Week Rush
MI Multiple Issues (Books) R2 2-Week Rush ML Match Lettering SE Stubbing-Extra MB Mount Back Cover SH Stubbing-Height MF Mount Front Cover SR Stubbing-Regular MS Mount Spine SW Special Work MP Parts-Music - cloth
covered) S Sponge
CP Parts-Cloth - Music TI TattleTape Installed PP Parts-Paper - Music TL Legal Bible over 2� thick UP Parts-Uncovered - Music
A.8 Leaf Attachments
Code Description Flat / Round
Spine
RF Retain sewing Flat Y RR Retain sewing Round Y HF Hand sew Flat Y CF Center sew Flat Y AF Adhesive bind Flat Y AR Adhesive bind Round Y OF Oversew Flat Y OR Oversew Round Y