Embed Size (px)
Citation preview
Reference Manual(Version 1.5)
UNESCOInformation Society Division
Sector of Communication and Information
© UNESCO, June 2004(This manual refers to Winisis 1.5 build 3)
Revised by: Ben Winnubst, New Zealand (June 2004)
ForewordCDS/ISIS is a menu-driven generalized Information Storage and Retrieval systemdesigned specifically for the computerized management of structured non-numericaldata bases. One of the major advantages offered by the generalized design of the systemis that CDS/ISIS is able to manipulate an unlimited number of data bases each of whichmay consist of completely different data elements. Although some features of CDS/ISISrequire knowledge of and experience with computerized information systems, once anapplication has been designed the system may be used by persons having had little or noprior computer experience. For advanced users, CDS/ISIS offers a wide range ofprogramming facility allowing the development of specialized applications through theuse of its powerful print formats. For real computer programmers, an externalprogramming library, the ISIS_DLL1, provide all necessary tools for developingCDS/ISIS based applications.
The first version of this manual, referring to CDS/ISIS 1.3 for Windows, was written bythe creator of the original CDS/ISIS, Giampaolo Del Bigio. It describes the operationsof the Windows version of CDS/ISIS and is meant to be complementary to otherCDS/ISIS manuals, such as the CDS/ISIS for Windows Handbook and the CDS/ISISReference Manual for the MS-DOS version. In particular, it describes changes and/ornew features which are only available in the Windows version. This version is fullycompatible with the MS-DOS2 version of CDS/ISIS. Data bases created with the latteroperates without change under the Windows version. However, in order to takeadvantage of the new features (e.g. the graphical or hypertext commands of theformatting language) you may want to review and modify your display formats and/orFST’s. This version of CDS/ISIS for Windows includes all the features of the MS-DOS versionand its capabilities are complemented by a number of external programs, such asImpExp2709 or the XML utilities. It is designed as well as for current MS-DOS userswho wish to migrate to the Windows environment, than for new users that will be ableto create and manage their own databases.
Finally, the Windows version of CDS/ISIS is better known as “Winisis”. For somereasons some tend to consider the two as totally distinguished programmes. Winisis isone of today’s available software based on the CDS/ISIS technology.
Davide StortiInformation Society DivisionUNESCO
1 ISIS_DLL is developed by BIREME/PAHO and UNESCO. Available on UNESCO (www.unesco.org/isis) and BIREME’s(www.bireme.br) sites.2 In this manual reference is made to the following trademarks:Microsoft®, MS-DOS® and Windows® are registered trademarks of Microsoft Corporation.
TABLE OF CONTENTS
FOREWORD ................................................................................................................................ 2
1. SYSTEM OVERVIEW ........................................................................................................... 7
A. THE CDS/ISIS DATA BASE................................................................................................... 7B. SYSTEM FUNCTIONS..................................................................................................................7C. DATA BASE STRUCTURE............................................................................................................ 7
1. DATA BASE DEFINITION FILES...................................................................................................82. MASTER FILE........................................................................................................................83. INVERTED FILE...................................................................................................................... 84. ANY FILE...........................................................................................................................95. RELATIONSHIPS BETWEEN THE FILES..........................................................................................9
D. SYSTEM ARCHITECTURE............................................................................................................91. MENUS............................................................................................................................... 92. MULTILINGUAL DIALOGUE..................................................................................................... 103. DIALOG BOXES....................................................................................................................104. WINDOWS..........................................................................................................................11
2. SYSTEM INSTALLATION ................................................................................................. 12
A. HARDWARE REQUIREMENTS.................................................................................................... 12B. INSTALLING CDS/ISIS ON YOUR COMPUTER........................................................................... 12
1. CDS/ISIS SETUP...............................................................................................................122. CDS/ISIS DIRECTORIES...................................................................................................... 133. ISISPAS.PIF...................................................................................................................134. WINDOWS VERSIONS COMPATIBILITY....................................................................................... 13
C. SYSTEM PARAMETER FILES.....................................................................................................151. SYSPAR.PAR: GLOBAL PARAMETERS................................................................................ 152. DBN.PAR: DATA BASE PARAMETERS..................................................................................... 26
D. SYSTEM RESTRICTIONS........................................................................................................... 26
3. CDS/ISIS MENUS ................................................................................................................. 27
A. THE MAIN WINDOW............................................................................................................. 27B. DATABASE MENU....................................................................................................................27C. BROWSE MENU...................................................................................................................... 29D. SEARCH MENU.......................................................................................................................30E. EDIT MENU........................................................................................................................... 31F. CONFIGURE MENU.................................................................................................................. 33G. UTILITIES MENU.................................................................................................................... 36
1. MORE HIDDEN UTILITIES......................................................................................................... 37H. WINDOWS MENU................................................................................................................... 38I. HELP MENU............................................................................................................................39
4. CDS/ISIS WINDOWS ........................................................................................................... 40
A. THE DATABASE WINDOW...................................................................................................... 40B. THE DATA ENTRY WINDOW......................................................................................................43

1. EDITING A FIELD................................................................................................................. 452. ADDING A FIELD..................................................................................................................473. DELETING A FIELD............................................................................................................... 474. FIELD AND RECORD VALIDATION.............................................................................................474. BEGIN AND END CODING.................................................................................................485. PICK LISTS......................................................................................................................... 496. UPDATING THE INVERTED FILE...............................................................................................49
C. THE EXPERT SEARCH WINDOW............................................................................................. 49D. THE GUIDED SEARCH WINDOW............................................................................................. 50E. THE DICTIONARY WINDOW....................................................................................................52
5. CDS/ISIS DIALOG BOXES ................................................................................................ 55
A. OPEN DIALOG BOX................................................................................................................. 55B. SEARCH HISTORY DIALOG BOX...............................................................................................56C. IMPORT DIALOG BOX............................................................................................................ 56D. EXPORT DIALOG BOX........................................................................................................... 59E. INVERTED FILE MAINTENANCE DIALOG BOX........................................................................... 62F. GLOBAL ADD DIALOG BOX....................................................................................................64G. GLOBAL DELETE DIALOG BOX.............................................................................................. 65H. GLOBAL REPLACE DIALOG BOX............................................................................................. 66I. PRINT DIALOG BOX................................................................................................................67
1. GUIDELINES FOR SETTING UP A PRINT RUN................................................................................672. PRINT DIALOG BOX (GENERAL) ............................................................................................683. PRINT DIALOG BOX (PRESENTATION)..................................................................................... 694. PRINT DIALOG BOX (MARGINS)............................................................................................ 705. PRINT DIALOG BOX (LAYOUT).............................................................................................. 716. PRINT DIALOG BOX (SORTING)..............................................................................................73
J. EXPORT TO XML................................................................................................................. 76
6. FIELD DEFINITION TABLE (FDT) ................................................................................. 77
A. INTRODUCTION...................................................................................................................... 77B. GENERAL DATA BASE DESIGN GUIDELINES.................................................................................. 78
1. DATA ELEMENTS.................................................................................................................... 782. FIELDS AND SUBFIELDS........................................................................................................... 793. REPEATABLE FIELDS...............................................................................................................794. CONTROL CHARACTERS...........................................................................................................80
C. FDT PARAMETERS................................................................................................................ 811. FIELD TAG...........................................................................................................................812. FIELD NAME........................................................................................................................ 813. FIELD LENGTH.......................................................................................................................814. FIELD TYPE.......................................................................................................................... 815. REPEATABILITY......................................................................................................................826. SUBFIELDS/PATTERN..............................................................................................................82
D. CREATING A NEW DATABASE.................................................................................................... 831. THE DATABASE DEFINITION WIZARD.......................................................................................83
E. MODIFYING THE FDT............................................................................................................ 86
7. THE SEARCH LANGUAGE ............................................................................................... 87
A. INTRODUCTION...................................................................................................................... 87B. SEARCH EXPRESSIONS............................................................................................................. 87
1. TYPES OF SEARCH TERM....................................................................................................... 872. SEARCH OPERATORS.............................................................................................................883. SYNTAX OF SEARCH EXPRESSIONS.......................................................................................... 904. OPERAND QUALIFIER............................................................................................................ 915. DEVELOPING A SEARCH STRATEGY..........................................................................................92
C. FREE TEXT SEARCHING...........................................................................................................92
8. THE FORMATTING LANGUAGE ................................................................................... 94
A. FIELD SELECTORS................................................................................................................. 951. FIELD COMMAND.................................................................................................................952. SUBFIELD COMMAND............................................................................................................ 953. FIELD OCCURRENCES............................................................................................................954. EXTRACTING A FRAGMENT OF A FIELD OR SUBFIELD..................................................................... 965. FIELD OCCURRENCES...............................................................................................................976. INDENTATION COMMAND..........................................................................................................977. MFN COMMAND................................................................................................................... 97
B. MODE COMMAND....................................................................................................................98C. HORIZONTAL AND VERTICAL SPACING COMMANDS....................................................................... 99D. LITERALS............................................................................................................................... 99E. DUMMY FIELD SELECTORS.......................................................................................................101F. EXPRESSIONS........................................................................................................................101
1. NUMERICAL EXPRESSIONS..................................................................................................... 1022. STRING EXPRESSIONS........................................................................................................... 1033. BOOLEAN EXPRESSIONS........................................................................................................ 103
G. FUNCTIONS........................................................................................................................... 1041. NUMERICAL FUNCTIONS........................................................................................................ 1052. STRING FUNCTIONS.............................................................................................................. 1083. BOOLEAN FUNCTIONS........................................................................................................... 112
H. IF COMMAND.......................................................................................................................113I. REPEATABLE GROUPS.............................................................................................................. 113J. FORMAT ERRORS.................................................................................................................... 115K. INCLUDING AN EXTERNAL FORMAT...........................................................................................116L. FORMAT VARIABLES............................................................................................................... 116M. WHILE COMMAND............................................................................................................ 117N. THE WINDOWS GRAPHIC ENVIRONMENT..................................................................................117
1. FONTS COMMAND.......................................................................................................... 1182. COLS COMMAND.............................................................................................................1183. PARAGRAPH FORMATTING COMMANDS................................................................................... 1194. CHARACTER FORMATTING COMMANDS................................................................................... 1215. APPLYING FORMATTING TO SPECIFIC OBJECTS ONLY..................................................................1216. ADDING HYPERTEXT LINKS TO FORMATS: THE LINK COMMAND...............................................121
9. THE FIELD SELECT TABLE (FST) ................................................................................ 129
A. FST PARAMETERS................................................................................................................1291. DATA EXTRACTION FORMAT.................................................................................................. 1302. INDEXING TECHNIQUES.........................................................................................................1303. FIELD IDENTIFIER.................................................................................................................132
B. INVERTED FILE FST.............................................................................................................132
10. ADAPTING CDS/ISIS TO LOCAL REQUIREMENTS .............................................. 136

A. CREATING A NEW LANGUAGE VERSION....................................................................................1361. CREATING A NEW MENU DATA BASE......................................................................................1362. CREATING A NEW MESSAGE DATA BASE................................................................................. 1373. CREATING A NEW MENU PROFILE.......................................................................................... 137
B. CONVERSION TABLES............................................................................................................1381. OEM TO ANSI CONVERSION TABLE................................................................................... 1392. ANSI TO OEM CONVERSION TABLE................................................................................... 1393. UPPER CASE CONVERSION TABLE (ISISUC.TAB).................................................................1394. ALPHABETIC CHARACTERS TABLE (ISISAC.TAB)................................................................ 139
11. CDS/ISIS PASCAL ........................................................................................................... 140
APP. A - WINDOWS EDITING KEYS ................................................................................. 142
1. System overview
A. The CDS/ISIS Data BaseCDS/ISIS allows you to build and manage structured non-numerical data bases, i.e. data bases whosemajor constituent is text.Although CDS/ISIS deals with text and words, and offers therefore many of the features normally found inword-processing packages, it does more than just text processing. This is because the text that CDS/ISISprocesses is structured into data elements that you define. In the most general terms you may think of a CDS/ISIS data base as a file of related data that you collectto satisfy the information requirements of a given user community. It may be for example a simple file ofaddresses or a more complex file such as a library catalogue or a directory of research projects. Each unitof information stored in a data base consists of discrete data elements, each containing a particularcharacteristic of the entity being described. For example, a bibliographic data base will containinformation on books, reports, journal articles, etc. Each unit will, in this case, consist of such dataelements as author, title, date of publication, etc.Data elements are stored in fields, each of which is assigned a numeric tag indicative of its contents. Youmay think of the tag as the name of the field as it is known by CDS/ISIS. The collection of fields containing all data elements of a given unit of information is called a record. The unique characteristic of CDS/ISIS is that it is specifically designed to handle fields (and consequentlyrecords) of varying length, thus allowing, on the one hand, an optimal utilization of your disk storage and,on the other, a complete freedom in defining the maximum length of each field.A field may be optional (i.e. it may be absent in one or more records), it may contain a single dataelement, or two or more variable length data elements. In the latter case the field is said to containsubfields, each of which is identified by a 2-character subfield delimiter preceding the correspondingdata element. Furthermore a field may be repeatable, i.e. any given record may contain more than oneinstance or occurrence, of the field.
B. System functionsThe major functions provided by CDS/ISIS allow you to: Define data bases containing the required data elements Enter new records into a given data base Modify, correct or delete existing records Automatically build and maintain fast access files for each data base in order to maximize retrieval
speed Retrieve records by their contents, through a sophisticated search language Display the records or portions thereof according to your requirements Sort the records in any sequence desired Print partial or full catalogues and/or indexes
Develop specialized applications using the CDS/ISIS integrated programming facility.
C. Data base structureAlthough a CDS/ISIS data base will appear to you as a single file of information, in actual fact it consistsof a number of logically related but physically distinct computer files. The management of the physicalfiles is the responsibility of CDS/ISIS and you do not normally have to know their structure in detail inorder to operate a data base. However some basic knowledge of the purpose and function of the majorfiles associated with a data base will help you to understand the system better.
1. Data base definition filesBefore a data base can be accessed for processing, it must be made known to CDS/ISIS by definingcertain characteristics of its record structure and contents. The Data base definition services allow you tocreate and/or modify a data base definition. A CDS/ISIS data base definition consists of the following components, each stored in a separate file:Field Definition Table (FDT) : The FDT defines the fields which may be present in the records of the
data base and their characteristics.Data entry worksheet(s) (FMT) : One or more screen layouts used to create and/or update the master
records of the data base. CDS/ISIS provides a specially designed editor to create these worksheets.Display format(s) (PFT): Display formats define precise formatting requirements for either on-line
display of records during searching or for the generation of printed output products such as cataloguesand indexes. CDS/ISIS provides a powerful and comprehensive formatting language which allows youto display the contents of a record in any desired way.
Field Select Table(s) (FST) : One FST defines the fields of the data base to be made searchable throughthe Inverted file. Additional FSTs define the most frequently used sorting requirements for the database.
2. Master fileThe Master file contains all the records of a given data base, each record consisting of a set of variablelength fields. Each record is identified by a unique number, automatically assigned by CDS/ISIS when itis created, called the Master File Number or MFN. In order to provide a fast access to each master file record, CDS/ISIS associates a special file to theMaster file, called the Cross-reference file, which is in fact an index giving the location of each record inthe Master file. You may create, modify or delete Master file records by means of the CDS/ISIS Data Entry services.
3. Inverted fileAlthough a master record can be retrieved directly by its MFN, through the Cross-reference file,additional ways of accessing a record are, of course, necessary. In the retrieval of bibliographic records,for example, it may be desirable to access a record by author, by subject, or by any other data elementoccurring in the record. CDS/ISIS allows you to provide a virtually unlimited number of access points foreach record through the creation of a special file called the Inverted file.The Inverted file contains all terms which may be used as access points during retrieval for a given database, and, for each term, a list of references to the Master file record(s) from which the term wasextracted. The collection of all access points for a given data base is called the dictionary. You may thinkof the Inverted file as an index to the contents of the Master file.For example, four master records (with MFN 18, 204, 766 and 1039) contain the keyword ADULTEDUCATION. The logical structure of the corresponding Inverted file entry would be:
ADULT EDUCATION 18 204 766 1039
Here, ADULT EDUCATION is the access point (or dictionary term), and each reference to the Masterfile record where it appears is called a posting.Because each term will normally have a different number of records indexed under it, the logical recordsin an Inverted file are of varying length. Here again, in order to provide the fast retrieval of each accesspoint, the Inverted file actually consists of several physical files.CDS/ISIS allows selective creation of Inverted files for each data base. You may select fields, subfields orelements thereof. In addition, by specifying appropriate options, you may extract individual words,phrases or descriptors from selected fields.You define the searchable elements for a given data base by means of a Field Select Table (FST), whichcontains the fields to be inverted and the indexing technique to be used for each field.Unlike other Inverted file based retrieval systems, in which there is a separate Inverted file for eachsearchable field, CDS/ISIS uses a single Inverted file for any given data base. Because of the particularstructure of this file, however, it is functionally equivalent to a multiple Inverted file approach. In actual

fact, each posting contains not only the MFN, but also additional information precisely identifying thefield from which the data was extracted, as well as the relative word position within the field.The current implementation provides for access points of up to 30 characters. Elements longer than themaximum length are truncated before an entry is made in the Inverted file.
4. ANY fileAn optional type of file, associated with the Inverted file, is the Any File. It is used in retrieval to linktogether certain related terms. An “any term” is a collective name assigned to a table of search terms.When an ANY term is used in a search, the table with that name is retrieved, and the individual terms inthe table are automatically grouped together.The criterion for the establishment of an ANY term is the likelihood of its frequent occurrence in queries.Geographic groupings will, in most cases, meet this criterion, but other types may qualify equally well. If,for example, you create an ANY term ANY Latin America, which defines the names of all the countriesin Latin America, you may then use this collective name in a search, rather than typing all the names of thevarious countries.
5. Relationships between the filesThe logical relationship between the major files of a CDS/ISIS data base is best perceived by examiningthe way in which retrieval is performed. Retrieval from a data base is done by specifying a set of searchterms which are looked up in the Inverted File to locate the list of MFNs associated with each term. Theselists are then manipulated by the program according to the search operators you have specified in yoursearch formulation until, at the end of the search, a single list, called the hit list, is obtained,corresponding to the MFNs of the records satisfying your search formulation. If at this point you request adisplay of the records retrieved, CDS/ISIS will read each record in the hit list from the Master file, formatit according to the specified format and display it on the screen.You may also save one or more hit lists, which you may later use to print the records using the PrintDialog services. A saved hit list is called a save file.
D. System architectureThe basic component of CDS/ISIS is its menu system, which allows you to call upon the various services.However, in order to manage and operate your data bases you must also learn a number of techniqueswhich are specific to CDS/ISIS, such as the search language or the formatting language. Techniques arein turn implemented by using a set of tools which CDS/ISIS provides for this purpose. For example, ifyou want to carry out a search in a data base, you must first select the appropriate commands in the menusand then formulate your search requirements, which must follow the rules of the CDS/ISIS searchlanguage. You must therefore know this technique. To actually enter the search you use a tool called the”search window”.Whereas a technique entails the intellectual process of transforming a requirement (such as retrievinginformation on the effects of solar radiation on marine fauna) into the specific search language ofCDS/ISIS, a tool is a more mechanical and generally more widely applicable facility (for example theeditor is not only used to enter search formulations but also to create or modify records).
1. MenusYou select the operations to be performed by choosing the relevant command from menus that the systemdisplays on the screen. A command is an instruction that tells CDS/ISIS to perform a certain operation. Amenu is a list of commands from which you will make your choice. Menus are displayed in the menu barat the top of the CDS/ISIS window, just below the title bar. To select a command, first click on theappropriate menu with the left mouse button (this will display the commands available on the selectedmenu). Then point to the desired command and click the left mouse button.
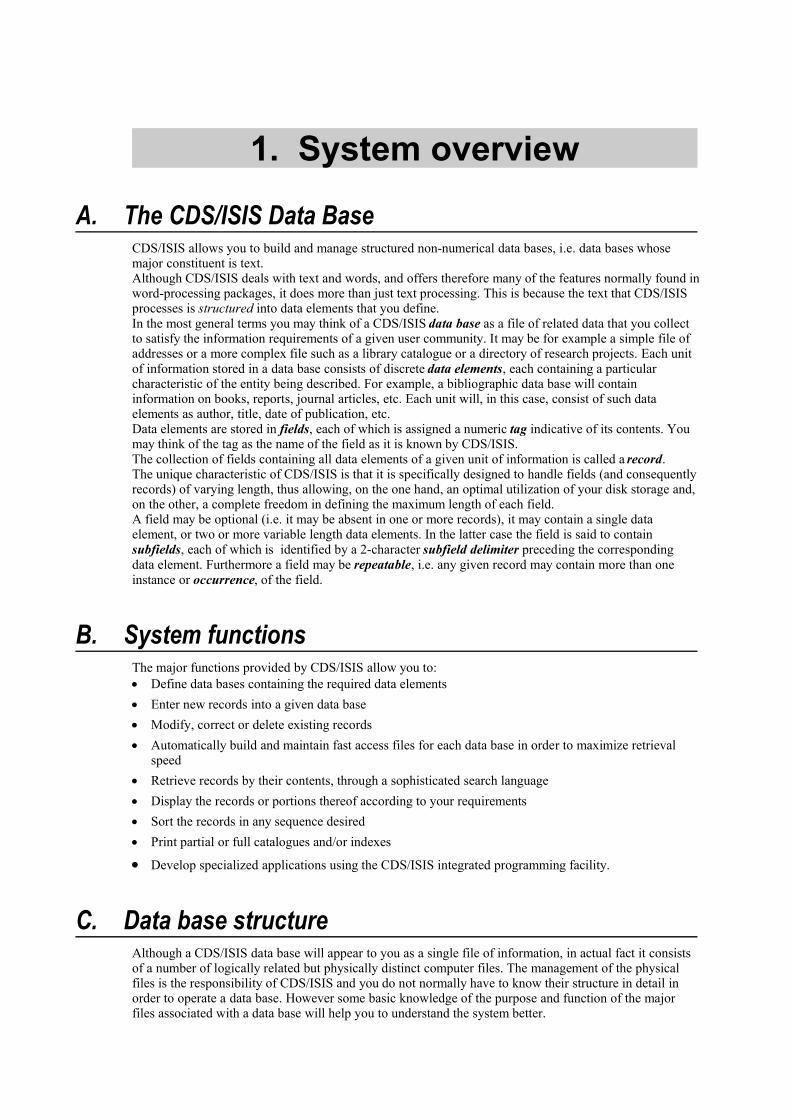
Note that the various menus may in actual fact be different from the ones displayed in this manual, as eachuser may change the layout of menus, as well as the corresponding command descriptions. When a menuis displayed, some commands may appear dimmed (i.e. displayed in a light gray color). These commandsmay not be selected, as they are not operational in that particular context. For example, you may not selectthe Import command from the above menu if no data base has yet been opened. A command followed byan ellipsis (...) indicates that additional information is required to execute the function. In this caseclicking on the command will display a dialog box where this information will be provided.As an example the Data base menu is reproduced below:
Figure 1 - Sample CDS/ISIS menu
2. Multilingual dialogueCDS/ISIS is fully interactive and multilingual. The latter facility is particularly interesting as it allows youto select the language in which the system menus and messages will be displayed.Each time it starts CDS/ISIS displays the menus in the default language selected by your data basemanager when the system was installed on your machine. You may change the dialog language at anytime, by executing the Change Language command in the Configure menu. This will display the list ofavailable languages. To select a language, click on the desired one with the left mouse button. From thatpoint onwards all menus, system messages and prompts will be in the language you have chosen. Note,however, that any open windows will remain in the language being used when they were created.
3. Dialog boxesIn some cases CDS/ISIS needs additional information before it can execute a command. You provide thisinformation by selecting options in a special type of window called a dialog box. For example, the Exportdialog box is shown below:

Figure 2 - Sample CDS/ISIS Dialog Box
4. WindowsCDS/ISIS uses different types of windows which are designed for a specific purpose. For example, todisplay a record of a data base it will use the data base window (see the sample below), to carry out asearch the search window, or to enter data in a record the data entry window. These are automaticallyput on the screen as soon as you select the corresponding menu command.
Figure 3 - Sample Data base window
2. System installation
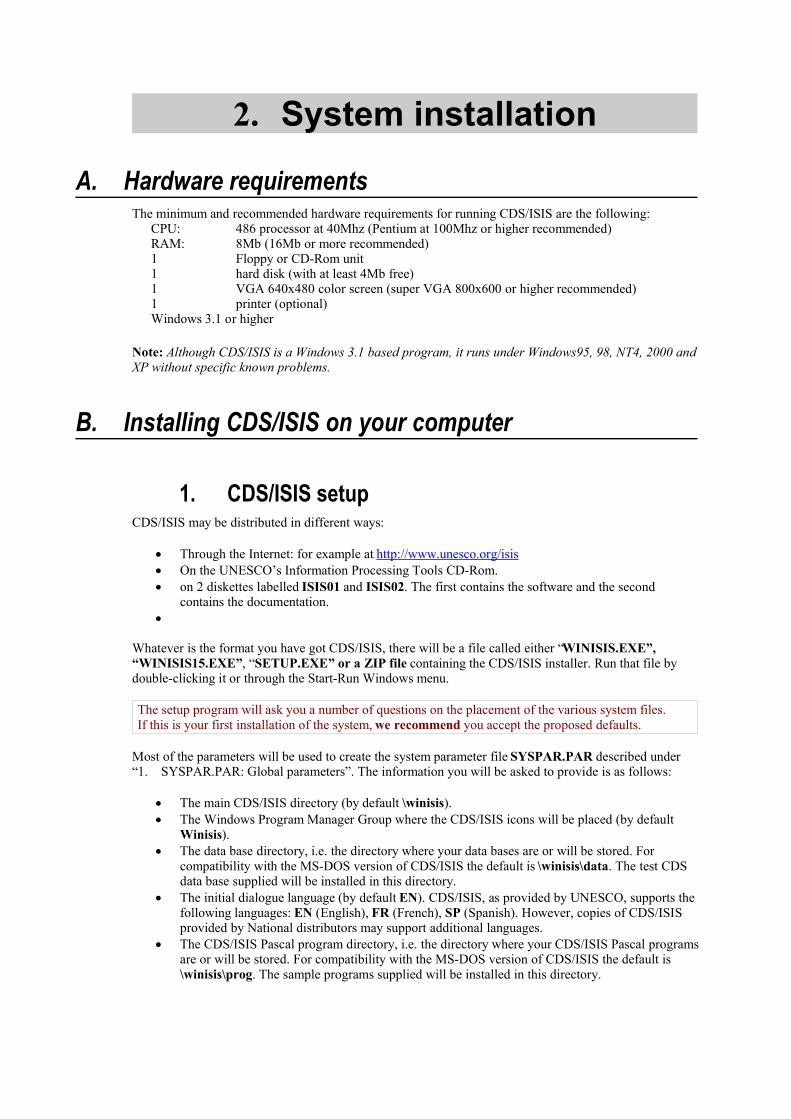
A. Hardware requirementsThe minimum and recommended hardware requirements for running CDS/ISIS are the following:
CPU: 486 processor at 40Mhz (Pentium at 100Mhz or higher recommended)RAM: 8Mb (16Mb or more recommended)1 Floppy or CD-Rom unit1 hard disk (with at least 4Mb free)1 VGA 640x480 color screen (super VGA 800x600 or higher recommended) 1 printer (optional)Windows 3.1 or higher
Note: Although CDS/ISIS is a Windows 3.1 based program, it runs under Windows95, 98, NT4, 2000 andXP without specific known problems.
B. Installing CDS/ISIS on your computer
1. CDS/ISIS setupCDS/ISIS may be distributed in different ways:
Through the Internet: for example at http://www.unesco.org/isis On the UNESCO’s Information Processing Tools CD-Rom. on 2 diskettes labelled ISIS01 and ISIS02. The first contains the software and the second
contains the documentation.
Whatever is the format you have got CDS/ISIS, there will be a file called either “WINISIS.EXE”,“WINISIS15.EXE”, “SETUP.EXE” or a ZIP file containing the CDS/ISIS installer. Run that file bydouble-clicking it or through the Start-Run Windows menu.
The setup program will ask you a number of questions on the placement of the various system files. If this is your first installation of the system, we recommend you accept the proposed defaults.
Most of the parameters will be used to create the system parameter file SYSPAR.PAR described under“1. SYSPAR.PAR: Global parameters”. The information you will be asked to provide is as follows:
The main CDS/ISIS directory (by default \winisis). The Windows Program Manager Group where the CDS/ISIS icons will be placed (by default
Winisis). The data base directory, i.e. the directory where your data bases are or will be stored. For
compatibility with the MS-DOS version of CDS/ISIS the default is \winisis\data. The test CDSdata base supplied will be installed in this directory.
The initial dialogue language (by default EN). CDS/ISIS, as provided by UNESCO, supports thefollowing languages: EN (English), FR (French), SP (Spanish). However, copies of CDS/ISISprovided by National distributors may support additional languages.
The CDS/ISIS Pascal program directory, i.e. the directory where your CDS/ISIS Pascal programsare or will be stored. For compatibility with the MS-DOS version of CDS/ISIS the default is\winisis\prog. The sample programs supplied will be installed in this directory.

2. CDS/ISIS directoriesThe installation procedure described above will create a main CDS/ISIS directory and a number ofsubdirectories, each containing a specific category of files, as follows (default names are given inparentheses).
Main directory (\winisis): contains the executable file (WISIS.EXE) and related files. You must notremove or modify any of the files installed in this directory other than the SYSPAR.PAR filedescribed below.
Program subdirectory (\winisis\prog): contains application programs written in CDS/ISIS Pascal.Menu subdirectory (\winisis\menu): contains menus data bases and system tables.Message subdirectory (\winisis\msg): contains system messages data bases.Work files subdirectory (\winisis\work): contains workfiles generated by CDS/ISIS.Data base subdirectory(\winisis\data): contains data base files (this subdirectory may itself contain
other subdirectories as explained under “Data base parameters” on page 26.Image files subdirectory (\winisis\bg): contains some Winisis background images and serve as the
default directory for images if these are provided without a pathname.
3. ISISPAS.PIFThe setup program installs the file ISISPAS.PIF in your Windows directory and the file ISISPAS.EXE(the CDS/ISIS Pascal compiler) in your main CDS/ISIS directory. The PIF file is required to compileCDS/ISIS Pascal programs with CDS/ISIS. It contains the path to the ISISPAS.EXE file and the name ofthe work directory to be used. If you installed CDS/ISIS in a directory other than \winisis you must editthis file to change the defaults accordingly.Under Windows 3.x proceed as follows:
From Program Manager call the PIF Editor (in the Main window); Open the ISISPAS.PIF file; Modify as appropriate the directory in the Program Filename and in the Start-up Directory
boxes; Close and save the file. Under Windows 95 proceed as follows: Locate the file ISISPAS.PIF using Windows Explorer; Point to the file, click the right mouse button and select Properties; Select the Program tab; Modify the directory in the Cmd line and in the Working boxes as appropriate; Close and save the file.
However, the PIF file may not work under Windows 2000 or XP.
4. Windows versions compatibilityAs mentioned earlier, CDS/ISIS is known to run under all Windows versions without problems. In somecases, however, it may be necessary to install an extra file, if you experience problems such as buttons orwindows incorrectly displayed. To solve these problems you should copy the file CTL3D.DLL (which hasbeen stored in the subdirectory ctl3d of the main CDS/ISIS directory by the setup procedure) to your\windows\system directory.
WARNING: Long file names are NOT supported for data base files. Therefore only 8-characterdirectory names and, for compatibility with the MS-DOS version, 6-character data base namesare accepted (without spaces).
This is particularly important for data base and system directories. It is again recommended to usedefault path names as suggested during the installation procedure.
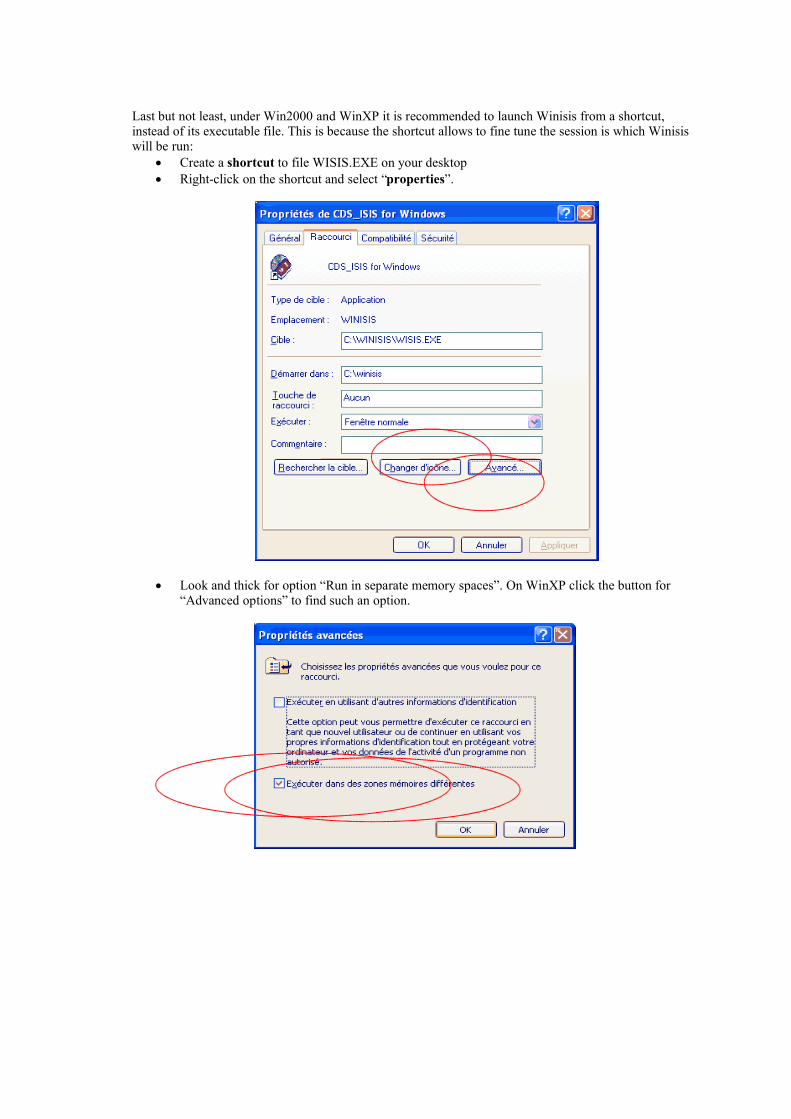
Last but not least, under Win2000 and WinXP it is recommended to launch Winisis from a shortcut,instead of its executable file. This is because the shortcut allows to fine tune the session is which Winisiswill be run:
Create a shortcut to file WISIS.EXE on your desktop Right-click on the shortcut and select “properties”.
Look and thick for option “Run in separate memory spaces”. On WinXP click the button for“Advanced options” to find such an option.

C. System Parameter files
1. SYSPAR.PAR: Global parametersThe system file SYSPAR.PAR contains system setup parameters. It is read each time CDS/ISIS isactivated and may be used to override default values which the system would otherwise apply. When youinitially installed CDS/ISIS, the setup program automatically created a SYSPAR.PAR file with thedefault parameters you supplied. This section describes the format and contents of this file (note thatparameters 1-8 are the same as in the MS-DOS version).SYSPAR.PAR is a text file which may be edited with any text editor such as Notepad. Each parameterstarts on a new line and has the following general format:
n=valuewhere:n is the parameter number (as explained below);value is the corresponding value
The value must immediately follow the equal sign (any space which may follow the equal sign will betaken as being part of the value). When the value consists of a directory name, this will be concatenatedwith the CDS/ISIS file name to build the actual file specification. Therefore the directory name must beterminated by a backslash or else an invalid file name will be generated. For example:
2=\winisis\menu\
Missing parameters, or parameters with a blank value will be assigned the standard system default.Therefore SYSPAR.PAR need only contain those parameters which you wish to change. The parametersmay be given in any order.You may insert comment lines (which will be ignored by CDS/ISIS) by inserting a semicolon (;) at thebeginning of the line. For example:
; Set default databaseNote that comment lines might be destroyed if you edit the system parameter from within Winisis.The complete list of parameters which you may specify is given below. Note, however, that onlyparameters 1 to 5 are normally required, while other parameters may be used to alter the default behaviorof CDS/ISIS, but are not essential.
Parameter 0: SYSPAR.PAR re-directionThis parameter may be used to redirect the SYSPAR.PAR file itself to another drive or directory. Thevalue may be:
1. a full file name, which may optionally include drive and/or directory information; for example:
0=c:\isis\mypar
in this case the actual parameters to be used will be read from the file mypar.par in the directory\isis of drive c:;
2. a question mark (?) or an exclamation mark (!) followed by a prompt; for example:
0=?Enter user name:
in this case CDS/ISIS will first display the prompt and then read the name of theparameter file from the keyboard. You may use this form of the parameter to define the name ofthe parameters file each time you call the program from a given directory. If you use anexclamation mark (!) instead of a question mark, the text typed in response to the prompt will notbe echoed to the screen.
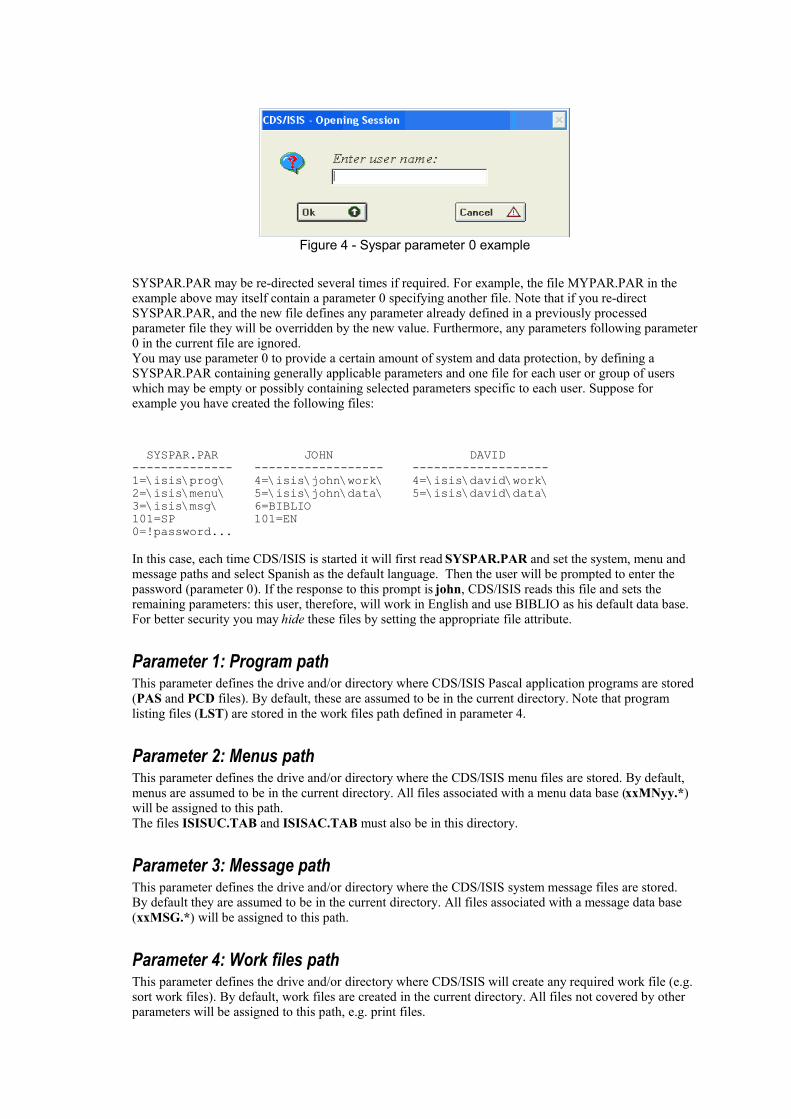
Figure 4 - Syspar parameter 0 example
SYSPAR.PAR may be re-directed several times if required. For example, the file MYPAR.PAR in theexample above may itself contain a parameter 0 specifying another file. Note that if you re-directSYSPAR.PAR, and the new file defines any parameter already defined in a previously processedparameter file they will be overridden by the new value. Furthermore, any parameters following parameter0 in the current file are ignored.You may use parameter 0 to provide a certain amount of system and data protection, by defining aSYSPAR.PAR containing generally applicable parameters and one file for each user or group of userswhich may be empty or possibly containing selected parameters specific to each user. Suppose forexample you have created the following files:
SYSPAR.PAR JOHN DAVID-------------- ------------------ -------------------1=\isis\prog\ 4=\isis\john\work\ 4=\isis\david\work\2=\isis\menu\ 5=\isis\john\data\ 5=\isis\david\data\3=\isis\msg\ 6=BIBLIO101=SP 101=EN0=!password...
In this case, each time CDS/ISIS is started it will first read SYSPAR.PAR and set the system, menu andmessage paths and select Spanish as the default language. Then the user will be prompted to enter thepassword (parameter 0). If the response to this prompt is john, CDS/ISIS reads this file and sets theremaining parameters: this user, therefore, will work in English and use BIBLIO as his default data base.For better security you may hide these files by setting the appropriate file attribute.
Parameter 1: Program pathThis parameter defines the drive and/or directory where CDS/ISIS Pascal application programs are stored(PAS and PCD files). By default, these are assumed to be in the current directory. Note that programlisting files (LST) are stored in the work files path defined in parameter 4.
Parameter 2: Menus pathThis parameter defines the drive and/or directory where the CDS/ISIS menu files are stored. By default,menus are assumed to be in the current directory. All files associated with a menu data base (xxMNyy.*)will be assigned to this path.The files ISISUC.TAB and ISISAC.TAB must also be in this directory.
Parameter 3: Message pathThis parameter defines the drive and/or directory where the CDS/ISIS system message files are stored.By default they are assumed to be in the current directory. All files associated with a message data base(xxMSG.*) will be assigned to this path.
Parameter 4: Work files pathThis parameter defines the drive and/or directory where CDS/ISIS will create any required work file (e.g.sort work files). By default, work files are created in the current directory. All files not covered by otherparameters will be assigned to this path, e.g. print files.

Parameter 5: Data base pathThis parameter defines the drive and/or directory where data base files are stored. By default, data basefiles are assumed to be in the current directory.The following data base files (except for message data bases) will be assigned to this path: ANY, CNT,IFP, L01, L02, N01, N02, MST, XRF, FDT, FST, FMT (data entry worksheets), PFT, STW and SRT.All other data base files such as HIT, LN?, LK? etc. are assigned to the work files path specified inparameter 4.Note that Data base files may themselves be distributed over one or more directories and/or drives bysupplying a dbn.PAR file (see under “Data base parameters” below).
Parameter 6: Default data base nameThis parameter defines the name of the default data base. If specified, the default data base will beautomatically selected upon program initiation. It is particularly convenient for users normally working ona given data base.
Parameter 8: Repeatable fields separatorThis parameter defines the character to be used by CDS/ISIS to separate the occurrences of a repeatablefield during data entry. By default CDS/ISIS will use a percent sign (%), which effectively reserves its usefor this purpose. If you need to enter percent signs as data, you may define here another character to beused instead. Note that, as this character becomes in turn a CDS/ISIS control character, you should chooseone which you are sure will never occur in your data. For example:
8=&defines the character & as the repeatable fields separator.Note that while the MS-DOS version of CDS/ISIS allows only a single character for parameter 8, theWindows version allows you to specify a string of characters. For example:
8=$$$
Parameter 14: Network modeWinisis may work on Windows networks, provided that these are already configured in the hostingmachine. Supported modes are: 14=0 single user mode14=1 multi user modeFor more information, please read the corresponding documentation available on the UNESCO CDS/ISISweb page.
Parameter 101: Default languageThis parameter is a two-letter code defining the initial dialogue language to be used. The initial defaultlanguage is EN (English).
Parameter 102: Default menuThis parameter is a two-letter code specifying the default menu to be used. It allows you to setup limitedprofiles of CDS/ISIS. The parameter gives the last two letters of the menu data base to be used. By defaultthese are DF. For example, if neither parameter 101 or 102 are present, the default menu data base will beMNENDF, whereas if you specify 102=SH it will be MNENSH. In this case, of course, you must havepreviously created this data base.
Parameter 103: Display search detailsThe value of this parameter can be 0 (default) or 1. When set to 1 CDS/ISIS will display a results windowshowing the progress of a search. When set to 0 this window is not displayed.

Parameter 104: Display dictionary optionsThe value of this parameter can be 0 (default) or 1. It affects the display of the dictionary window when afield is selected. When set to 0 (default) CDS/ISIS displays the complete dictionary, however, terms notoccurring in the selected field are displayed in lower case (and will not be selectable). When set to 1 onlyterms occurring in the selected field are displayed.
Parameter 105: Automatic display of search resultsThe value of this parameter can be 0 (default) or 1. When you are using expert search mode and thisparameter is set to 1 CDS/ISIS automatically displays the results of a search as soon as it is executed.When set to 0 (default) CDS/ISIS remains in search mode.
Parameter 106: DOS to Windows conversion tableThis parameter specifies the file name of a conversion table that CDS/ISIS will use to convert charactersfrom DOS to Windows. By default the standard Windows conversion table is used. See under “B. Conversion tables” on page 138 for more details on this option.
Parameter 107: Windows to DOS conversion tableThis parameter specifies the file name of a conversion table that CDS/ISIS will use to convert charactersfrom Windows to DOS. By default the standard Windows conversion table is used.
Parameter 108: Screen orientationThe value of this parameter can be 0 (default) or 1 and defines the default screen orientation. When set to0 the orientation will be left to right, while when set to 1 (e.g. for the Arabic version), the orientation willbe right to left.
Parameter 109: Field edit fontThis parameter specifies the font and/or font size to be used in the field edit box of the data entry window.The general format of this parameter is:
109=font Name[,font size]where:font name is the name of the font. It must be a font known to Windows (you may check this
with a Word processor or by using the Fonts option of the Windows ControlPanel)
font size is the font size in half pointsFor example:
109=Arial Narrow specifies the “Arial Narrow” font with thedefault font size
109=Arial,24 specifies the “Arial” font with a 12 point fontsize.
Note that CDS/ISIS sets this parameter automatically whenever you change the font in the Data EntryWindow
Parameter 110: Formatting defaultsThis parameter may be used to override the default font and color tables used to display data base records.The general format of this parameter is:
110=formatwhere format is a CDS/ISIS format which may only contain the fonts, cols, cf, f, fs in this sequence. Thedefault for this parameter is:
110=fonts((nil,Courier New), (swiss,Arial)), cols((0,0,0)), CL0, F0, FS24Note that this parameter must be contained in a single line. Detailed explanations on the above formattingcommands are given under “N. The Windows graphic environment”.

Parameter 111: Format edit fontThis parameter specifies the font and/or font size to be used in the format edit box of the data basewindow. The general format of this parameter is the same as Parameter 109.
Parameter 112: Printer set upThis parameter is automatically set by CDS/ISIS. It stores the name and port of the latest printer you used.You must not create or edit this parameter directly, but you may modify it by using the Printer setupcommand of the Data base menu.
Parameter 115: Small font definitionThis parameter defines which font should be used as “small” font for some of Winisis’ windows, such asthe Dictionary and the Search windows. This parameter shall be set using the System settings dialog box.The format is:115=Font name, sizeSee parameter 109 for examples.
Parameter 116: Dialogs font definitionThis parameter defines which font should be used as the default font for Winisis’ dialogs, such as the“Open data base” and Import/Export windows. This parameter shall be set using the System settingsdialog box. The format is:116=Font name, sizeSee parameter 109 for examples.
Parameter 117: System font definitionThis font is used for displaying system text such as “group descriptions” and it is usually bigger than thedialog font. This parameter shall be set using the System settings dialog box. The format is:117=Font name, sizeSee parameter 109 for examples.
Parameter 120: Display ToolbarThe value of this parameter can be 0 or 1 (default). When set to 1 CDS/ISIS will display a Toolbar underthe menu bar (a Toolbar consists in a number of buttons giving fast access to the most frequently usedfunctions of CDS/ISIS). When set to 0 the Toolbar is not displayed.
Parameter 121: Display Toolbar HelpThe value of this parameter can be 0 or 1 (default). When set to 1 CDS/ISIS will display a Help message(at the bottom of the screen) each time the mouse passes over a button of the Toolbar indicating itsfunction. When set to 0 the Help message is not displayed.
Parameter 122: CDS/ISIS Window positionThis parameter is used by CDS/ISIS to store the latest status of the main window. You should not createor edit this parameter.
Parameter 123: Show empty fieldsThe value of this parameter can be 0 (default) or 1. In data entry mode, when this parameter is set to 1CDS/ISIS will show all the fields indicated in the data entry worksheet, including empty fields. When thisparameter is set to 0 only fields containing data will be displayed.
Parameter 124: Database window frameThis parameter may alter the default dimension and the position of the data base window. The generalformat is:
124=NoToolbar,left,top,right,bottomNoToolbar (default is 0) will hide data base window’s toolbar is set to 1.Left, Right, Top and Bottom define the position and the dimensions of the data base window. If Right or Bottom values are set to -1, the window will appear maximized.
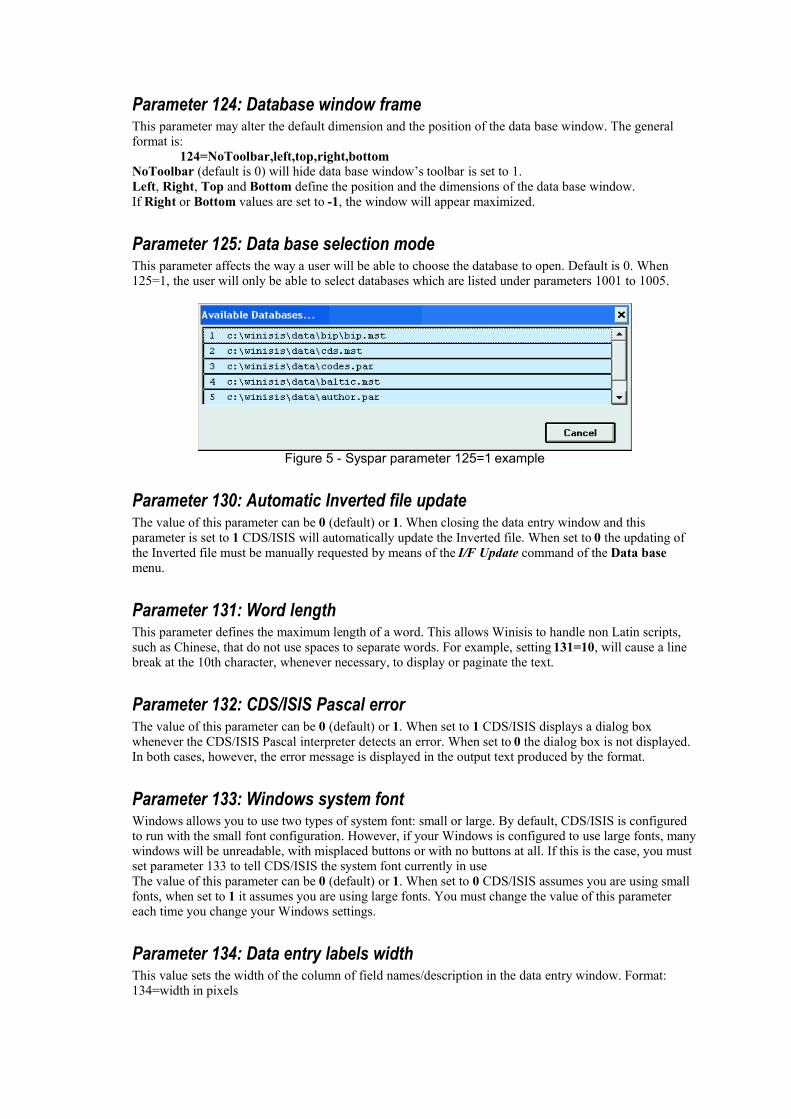
Parameter 125: Data base selection modeThis parameter affects the way a user will be able to choose the database to open. Default is 0. When125=1, the user will only be able to select databases which are listed under parameters 1001 to 1005.
Figure 5 - Syspar parameter 125=1 example
Parameter 130: Automatic Inverted file updateThe value of this parameter can be 0 (default) or 1. When closing the data entry window and thisparameter is set to 1 CDS/ISIS will automatically update the Inverted file. When set to 0 the updating ofthe Inverted file must be manually requested by means of the I/F Update command of the Data basemenu.
Parameter 131: Word lengthThis parameter defines the maximum length of a word. This allows Winisis to handle non Latin scripts,such as Chinese, that do not use spaces to separate words. For example, setting 131=10, will cause a linebreak at the 10th character, whenever necessary, to display or paginate the text.
Parameter 132: CDS/ISIS Pascal errorThe value of this parameter can be 0 (default) or 1. When set to 1 CDS/ISIS displays a dialog boxwhenever the CDS/ISIS Pascal interpreter detects an error. When set to 0 the dialog box is not displayed.In both cases, however, the error message is displayed in the output text produced by the format.
Parameter 133: Windows system fontWindows allows you to use two types of system font: small or large. By default, CDS/ISIS is configuredto run with the small font configuration. However, if your Windows is configured to use large fonts, manywindows will be unreadable, with misplaced buttons or with no buttons at all. If this is the case, you mustset parameter 133 to tell CDS/ISIS the system font currently in useThe value of this parameter can be 0 (default) or 1. When set to 0 CDS/ISIS assumes you are using smallfonts, when set to 1 it assumes you are using large fonts. You must change the value of this parametereach time you change your Windows settings.
Parameter 134: Data entry labels widthThis value sets the width of the column of field names/description in the data entry window. Format:134=width in pixels
Parameter 135: Alternate search results toolbarSetting this parameter to 1 will display a hypertext on the top of each record while browsing a searchresult. A <STOP> hyperlink lets the user return browsing the full data base.
Figure 6 - Alternate search results toolbar
Parameter 136: Record display zoomIt is possible to zoom (in or out) the content of a data base window using this parameter. Format:136=zoom percentage (80-160)
136=140
Parameter 137: Close Data Base confirmationSetting this parameter to 1 will ask for confirmation before closing a data base window.
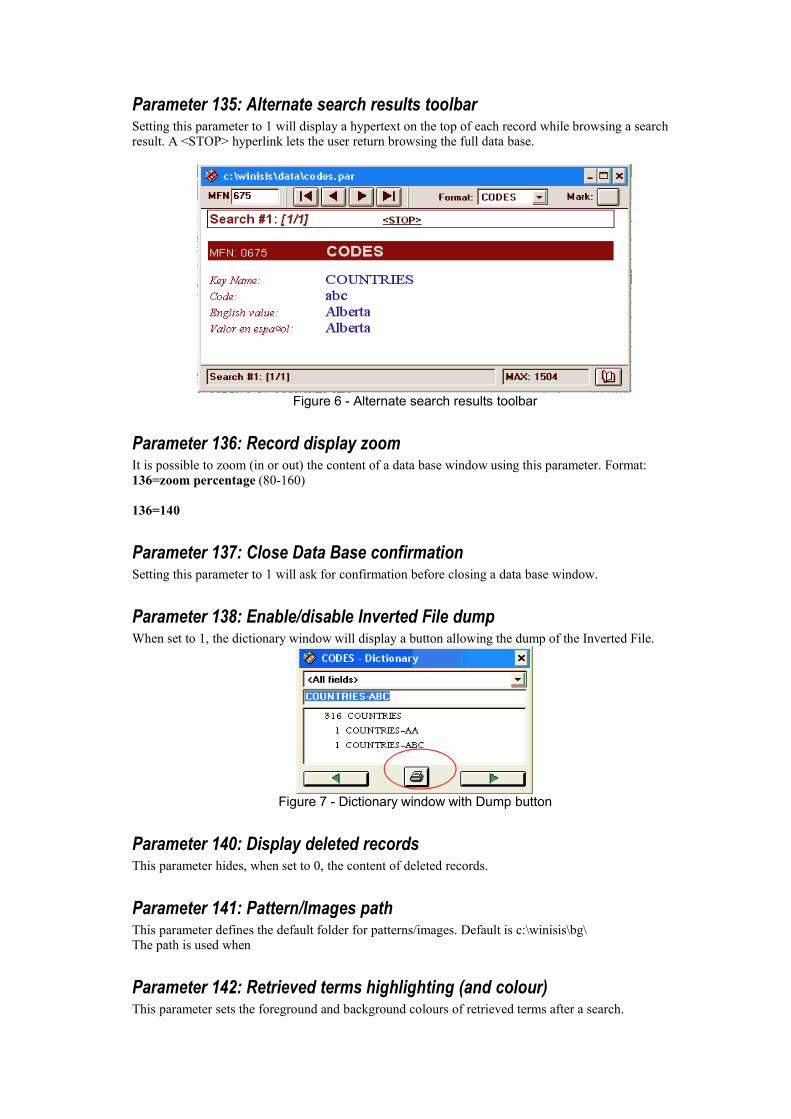
Parameter 138: Enable/disable Inverted File dumpWhen set to 1, the dictionary window will display a button allowing the dump of the Inverted File.
Figure 7 - Dictionary window with Dump button
Parameter 140: Display deleted recordsThis parameter hides, when set to 0, the content of deleted records.
Parameter 141: Pattern/Images pathThis parameter defines the default folder for patterns/images. Default is c:\winisis\bg\The path is used when
Parameter 142: Retrieved terms highlighting (and colour)This parameter sets the foreground and background colours of retrieved terms after a search.
Parameter 144: Force results display in “listing mode”Winisis may display search results in a list. If only one term is retrieved, however, it is usually displayedin a single record window. Setting 144=1 will force the display in a list (thus containing only one item).
Parameter 150: Date formatThis parameter sets how command DATE will display the current system date. Available formats:150=YMD (Year, Month, Day)150=DMY (Day, Month, Year)150=MDY (Month, Day, Year)
Parameter 152: Close print dialog after job is completedSetting this parameter to 1 will automatically close the print dialog once the printing is finished. Default is0.
Parameter 155: Data Entry. Repeatable subfieldsThis parameter enables data entry checking for repeatable subfields:155=0 don’t check156=1 check and show errors
Parameter 156: Date Entry. Record validationThis parameter determines how Winisis will perform record validation:156=0 Validate only modified records156=1 Always validate recordsValidation rules are stored in data base’s VAL file.
Parameter 157: Date Entry. Enable field type and pattern controlField definition (FDT) contains information about each field’s data type and its data entry mask (pattern).For example:Field Code (tag=20, type=alphanumeric, pattern=XX99-AA)This parameter enables/disables control on recognized field types (alphanumeric, alphabetic, numeric) andpatterns.Patterns apply to each type character. Wildcards are:X accepts alphanumeric characters (all chars)A accepts alphabetic characters only9 accepts numeric characters onlyAny other char. Mandatory in the given position
Parameter 160: Start-up plug-in(s)Define the external program(s) to be run when Winisis starts. This parameter is repeatable. Example:
160=mystart.exe160=example.exe
The programs should be located in Winisis’ plug-in folder. Winisis passes to these programs threeparameters:frameID Winisis’ window handleworkpath Winisis’ default work pathversion Winisis’ version number (e.g. 15003 or 14019)
Parameter 161: Shutdown plug-in(s)Define the external program(s) to be run when Winisis is closing. This parameter is repeatable. Example:
161=closeall.exe
161=dosomth.exe
The programs should be located in Winisis’ plug-in folder. Winisis passes to these programs threeparameters:frameID Winisis’ window handleworkpath Winisis’ default work pathversion Winisis’ version number (e.g. 15003 or 14019)
Parameter 902: Debug hypertext commandsSetting this parameter will allow print format hypertext debugging: before executing any hypertextcommand, the command itself will be shown on the screen.
Parameter 910: HELP files pathWinisis 1.5 uses HTML help files (if present). This parameter sets the default folder where these files arelocated.
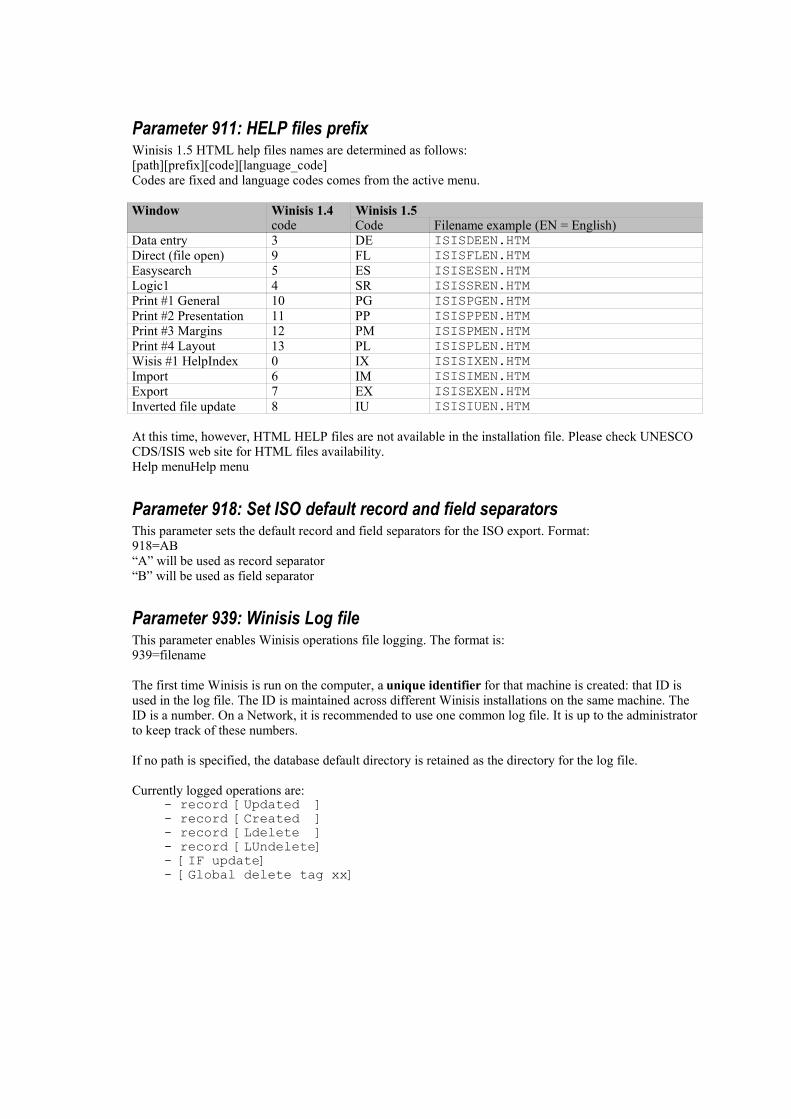
Parameter 911: HELP files prefixWinisis 1.5 HTML help files names are determined as follows:[path][prefix][code][language_code]Codes are fixed and language codes comes from the active menu.
Window Winisis 1.4code
Winisis 1.5Code Filename example (EN = English)
Data entry 3 DE ISISDEEN.HTMDirect (file open) 9 FL ISISFLEN.HTMEasysearch 5 ES ISISESEN.HTMLogic1 4 SR ISISSREN.HTMPrint #1 General 10 PG ISISPGEN.HTMPrint #2 Presentation 11 PP ISISPPEN.HTMPrint #3 Margins 12 PM ISISPMEN.HTMPrint #4 Layout 13 PL ISISPLEN.HTMWisis #1 HelpIndex 0 IX ISISIXEN.HTMImport 6 IM ISISIMEN.HTMExport 7 EX ISISEXEN.HTMInverted file update 8 IU ISISIUEN.HTM
At this time, however, HTML HELP files are not available in the installation file. Please check UNESCOCDS/ISIS web site for HTML files availability.Help menuHelp menu
Parameter 918: Set ISO default record and field separatorsThis parameter sets the default record and field separators for the ISO export. Format:918=AB“A” will be used as record separator“B” will be used as field separator
Parameter 939: Winisis Log fileThis parameter enables Winisis operations file logging. The format is:939=filename The first time Winisis is run on the computer, a unique identifier for that machine is created: that ID isused in the log file. The ID is maintained across different Winisis installations on the same machine. TheID is a number. On a Network, it is recommended to use one common log file. It is up to the administratorto keep track of these numbers.
If no path is specified, the database default directory is retained as the directory for the log file.
Currently logged operations are: - record [Updated ] - record [Created ] - record [Ldelete ] - record [LUndelete] - [IF update] - [Global delete tag xx]

Parameter 945: Create current system’s ASCII tableThis parameter builds current system’s ASCII conversion table. For example, in order to switch fromOEM to ASCII and vice-versa, it is necessary to use conversion tables. While this operation is transparent,in some cases it is necessary to specify the conversion to be applied (during the import, for example).Adding this parameter will force Winisis to create 3 tables:
txt_.tab – from ANSI to OEM (your Windows’ DOS codepage)txt.tab – from OEM (your Windows’ DOS codepage to ANSI)_upcase.tab – the table normally used for conversion to uppercase
The 3 tables are created as soon as Winisis starts. You should delete this parameter afterwards . Format:
945=[any character]
Parameter 980: Display search results in a tableThis parameter affects the way search results are shown to the user. Setting 980=1 will show the results ina table instead of record by record.
Parameters 1001-1005: Recently used data basesThese parameters are used by CDS/ISIS to store the last 5 databases you opened during previous sessions.These names will appear as commands in the Data base Menu. You should not normally set or changethese parameters manually.
2. dbn.PAR: Data base parameters When you open a data base, CDS/ISIS will first try to locate a file called dbn.PAR (where dbn is thedata base name) in the data base path specified in Parameter 5 of SYSPAR.PAR. If this file does not existall data base files are assumed to be in the data base path.dbn.PAR allows you to define individual paths for specific data base files and its format is compatiblewith the MS-DOS version. You may therefore distribute a large data base on two or more disk drives, ifnecessary. dbn.PAR may contain up to 10 parameters (which have the same format as the ones specifiedin SYSPAR.PAR) as follows:
Parameter Drive/path for--------- -------------- 1 XRF 2 MST 3 CNT 4 N01 5 N02 6 L01 7 L02 8 IFP 9 ANY 10 FDT, FST, FMT, PFT, STW, SRT, WPR
Not all parameters need be specified. Files for which you do not define a path will be located in the database path defined in parameter 5 of SYSPAR.PAR. For example, the following parameter file tellsCDS/ISIS that the Master file is on drive d: and the IFP file on drive e: on the indicated directories (theother files of the data base will be in the data base path specified in SYSPAR.PAR):
2=d:\biblio\3=e:\biblio\
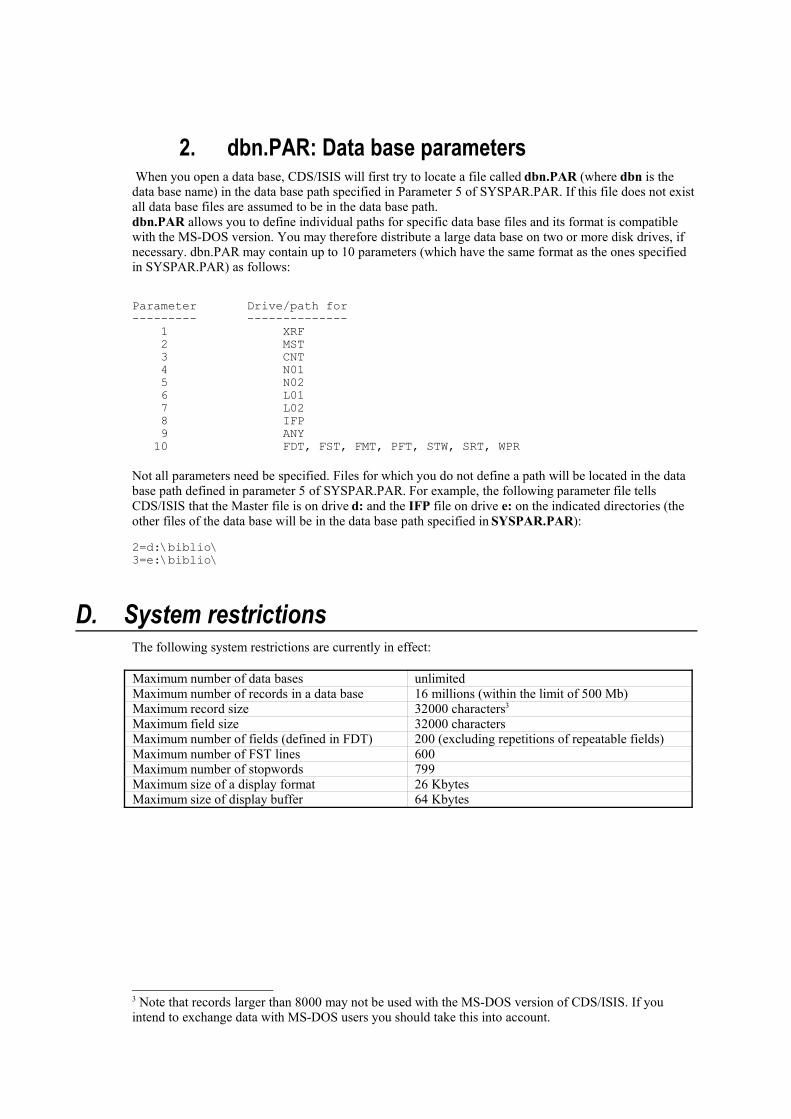
D. System restrictionsThe following system restrictions are currently in effect:
Maximum number of data bases unlimitedMaximum number of records in a data base 16 millions (within the limit of 500 Mb)Maximum record size 32000 characters3
Maximum field size 32000 charactersMaximum number of fields (defined in FDT) 200 (excluding repetitions of repeatable fields)Maximum number of FST lines 600Maximum number of stopwords 799Maximum size of a display format 26 KbytesMaximum size of display buffer 64 Kbytes
3 Note that records larger than 8000 may not be used with the MS-DOS version of CDS/ISIS. If youintend to exchange data with MS-DOS users you should take this into account.

3. CDS/ISIS Menus
A. The Main WindowThis window is displayed each time CDS/ISIS is started. It is normally empty, as shown below, unless adefault data base is selected through parameter 6 of the syspar.par file. In this case the data base windowof the default data base is also automatically opened.
Figure 8 - Main window
The main components of this window are:the window title bar, at the top of the window;the menu bar, which provides access to all the CDS/ISIS functions (some of these functions may also beactivated by clicking on the various buttons of the tool bar);the tool bar, located just under the menu, which provides a quick mouse access to the most frequentlyused functions of CDS/ISIS, such as opening a data base, searching or printing (the tool bar buttons areexplained under The data base window);the status bar, at the bottom of the window, which is normally used to display help messages. The statusbar may be disabled by setting the appropriate option in syspar.par.The following sections describe each menu in detail.
B. Database menuThis menu contains the following commands:
Figure 9 - Database Menu
The bottom part of the menu normally contains the list of the most recently opened data bases. You mayopen any one of them by simply clicking on the corresponding entry.
Title bar
Menu bar
Tool bar
Status bar
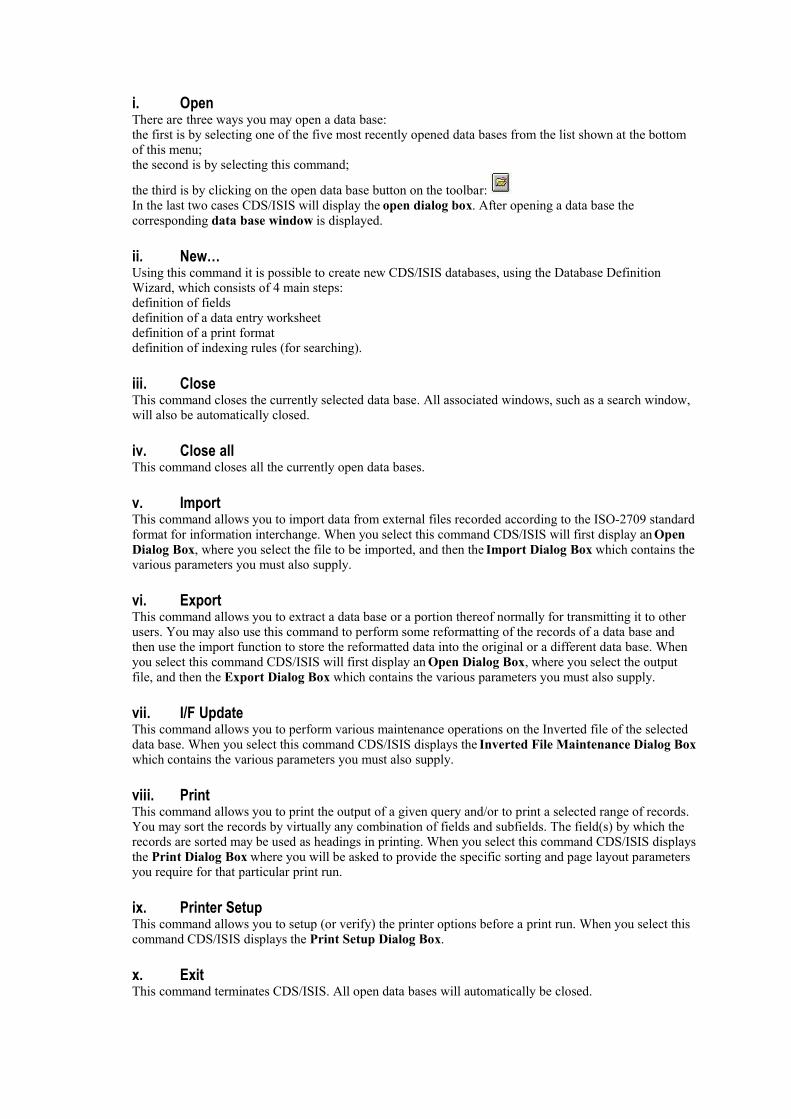
i. OpenThere are three ways you may open a data base: the first is by selecting one of the five most recently opened data bases from the list shown at the bottomof this menu;the second is by selecting this command;
the third is by clicking on the open data base button on the toolbar: In the last two cases CDS/ISIS will display the open dialog box. After opening a data base thecorresponding data base window is displayed.
ii. New…Using this command it is possible to create new CDS/ISIS databases, using the Database DefinitionWizard, which consists of 4 main steps: definition of fieldsdefinition of a data entry worksheetdefinition of a print formatdefinition of indexing rules (for searching).
iii. CloseThis command closes the currently selected data base. All associated windows, such as a search window,will also be automatically closed.
iv. Close allThis command closes all the currently open data bases.
v. ImportThis command allows you to import data from external files recorded according to the ISO-2709 standardformat for information interchange. When you select this command CDS/ISIS will first display an OpenDialog Box, where you select the file to be imported, and then the Import Dialog Box which contains thevarious parameters you must also supply.
vi. ExportThis command allows you to extract a data base or a portion thereof normally for transmitting it to otherusers. You may also use this command to perform some reformatting of the records of a data base andthen use the import function to store the reformatted data into the original or a different data base. Whenyou select this command CDS/ISIS will first display an Open Dialog Box, where you select the outputfile, and then the Export Dialog Box which contains the various parameters you must also supply.
vii. I/F UpdateThis command allows you to perform various maintenance operations on the Inverted file of the selecteddata base. When you select this command CDS/ISIS displays the Inverted File Maintenance Dialog Boxwhich contains the various parameters you must also supply.
viii. PrintThis command allows you to print the output of a given query and/or to print a selected range of records.You may sort the records by virtually any combination of fields and subfields. The field(s) by which therecords are sorted may be used as headings in printing. When you select this command CDS/ISIS displaysthe Print Dialog Box where you will be asked to provide the specific sorting and page layout parametersyou require for that particular print run.
ix. Printer SetupThis command allows you to setup (or verify) the printer options before a print run. When you select thiscommand CDS/ISIS displays the Print Setup Dialog Box.
x. ExitThis command terminates CDS/ISIS. All open data bases will automatically be closed.
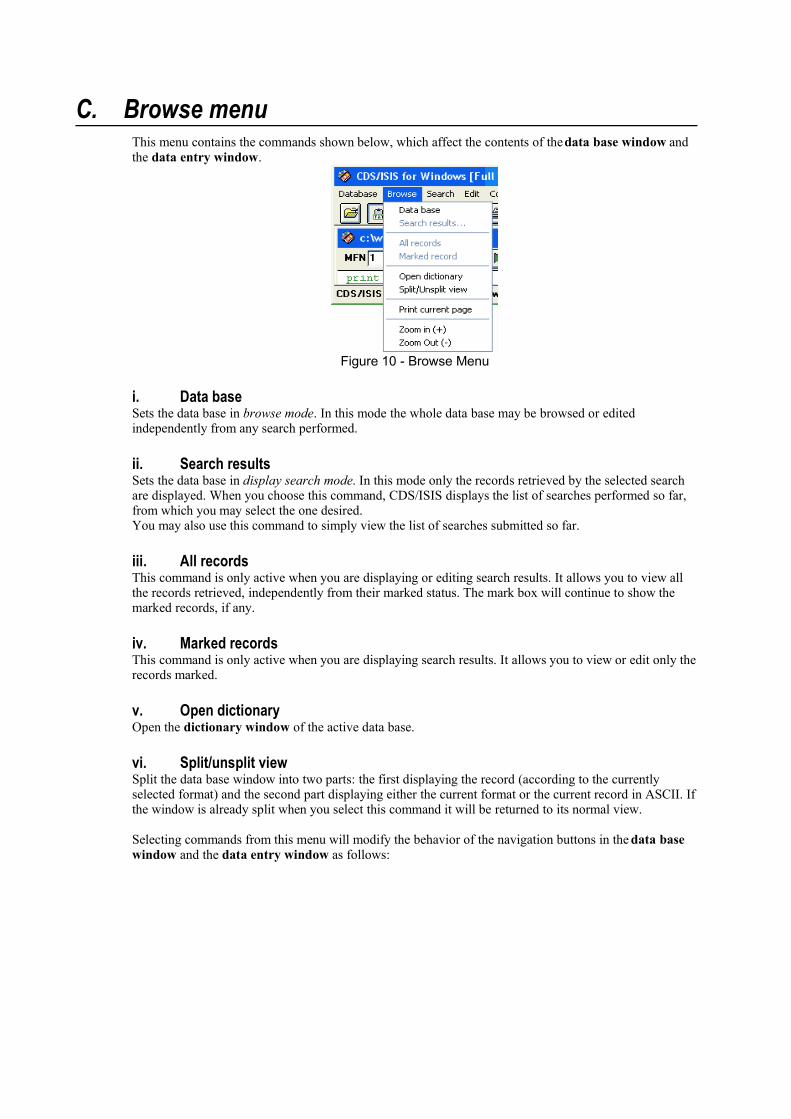
C. Browse menuThis menu contains the commands shown below, which affect the contents of the data base window andthe data entry window.
Figure 10 - Browse Menu
i. Data baseSets the data base in browse mode. In this mode the whole data base may be browsed or editedindependently from any search performed.
ii. Search resultsSets the data base in display search mode. In this mode only the records retrieved by the selected searchare displayed. When you choose this command, CDS/ISIS displays the list of searches performed so far,from which you may select the one desired.You may also use this command to simply view the list of searches submitted so far.
iii. All recordsThis command is only active when you are displaying or editing search results. It allows you to view allthe records retrieved, independently from their marked status. The mark box will continue to show themarked records, if any.
iv. Marked recordsThis command is only active when you are displaying search results. It allows you to view or edit only therecords marked.
v. Open dictionaryOpen the dictionary window of the active data base.
vi. Split/unsplit viewSplit the data base window into two parts: the first displaying the record (according to the currentlyselected format) and the second part displaying either the current format or the current record in ASCII. Ifthe window is already split when you select this command it will be returned to its normal view.
Selecting commands from this menu will modify the behavior of the navigation buttons in the data basewindow and the data entry window as follows:
vii. Print current recordAccess a fast print dialog box for the current record. It is possible to print to the default printer as well asto an ASCII file. It is also possible to choose a different print format.
viii. Zoom (+) (-)Increase or decrease the size of the content of the data base window.
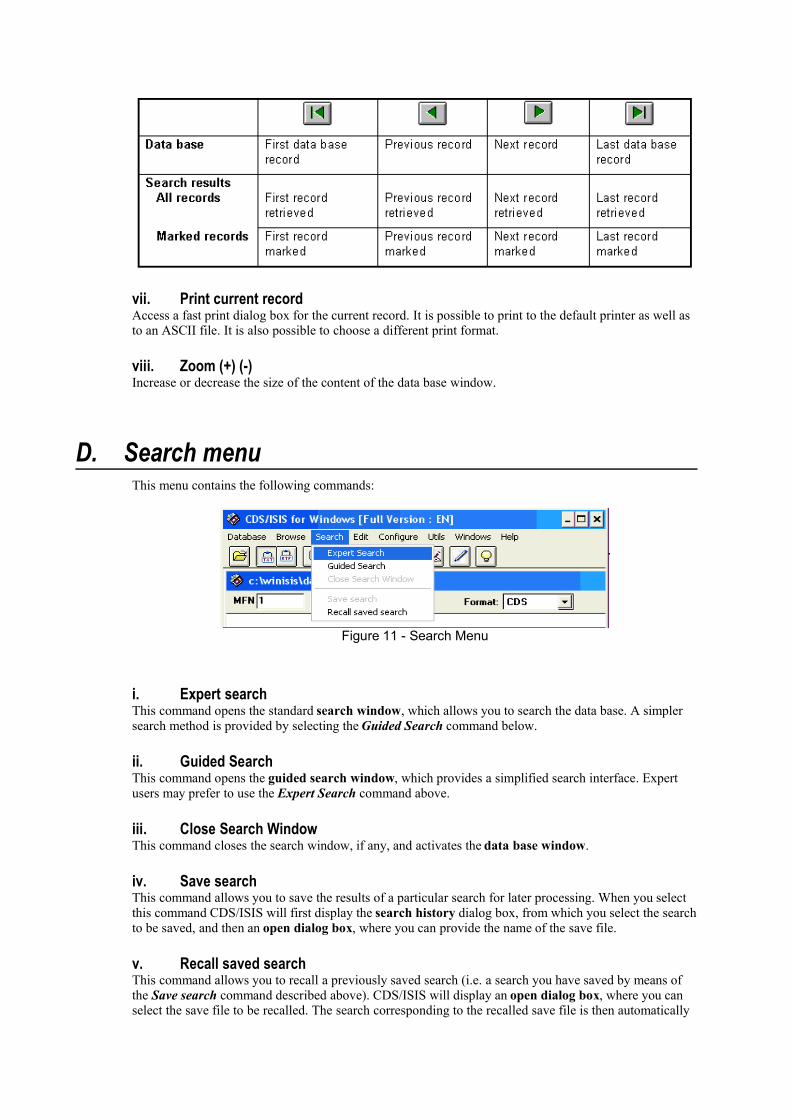
D. Search menuThis menu contains the following commands:
Figure 11 - Search Menu
i. Expert searchThis command opens the standard search window, which allows you to search the data base. A simplersearch method is provided by selecting the Guided Search command below.
ii. Guided SearchThis command opens the guided search window, which provides a simplified search interface. Expertusers may prefer to use the Expert Search command above.
iii. Close Search WindowThis command closes the search window, if any, and activates the data base window.
iv. Save searchThis command allows you to save the results of a particular search for later processing. When you selectthis command CDS/ISIS will first display the search history dialog box, from which you select the searchto be saved, and then an open dialog box, where you can provide the name of the save file.
v. Recall saved searchThis command allows you to recall a previously saved search (i.e. a search you have saved by means ofthe Save search command described above). CDS/ISIS will display an open dialog box, where you canselect the save file to be recalled. The search corresponding to the recalled save file is then automatically
added to the list of current searches and the data base window will display the first record retrieved. Therecalled search becomes therefore the current search.
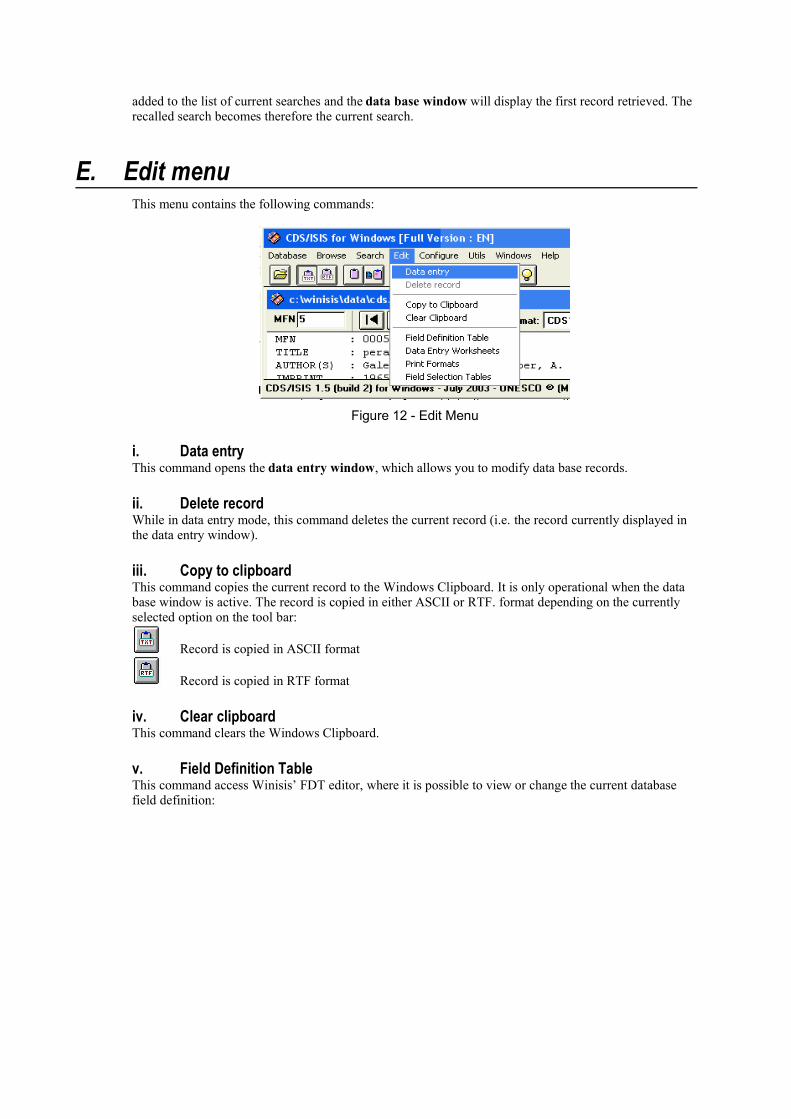
E. Edit menuThis menu contains the following commands:
Figure 12 - Edit Menu
i. Data entryThis command opens the data entry window, which allows you to modify data base records.
ii. Delete recordWhile in data entry mode, this command deletes the current record (i.e. the record currently displayed inthe data entry window).
iii. Copy to clipboardThis command copies the current record to the Windows Clipboard. It is only operational when the database window is active. The record is copied in either ASCII or RTF. format depending on the currentlyselected option on the tool bar:
Record is copied in ASCII format
Record is copied in RTF format
iv. Clear clipboardThis command clears the Windows Clipboard.
v. Field Definition Table This command access Winisis’ FDT editor, where it is possible to view or change the current databasefield definition:
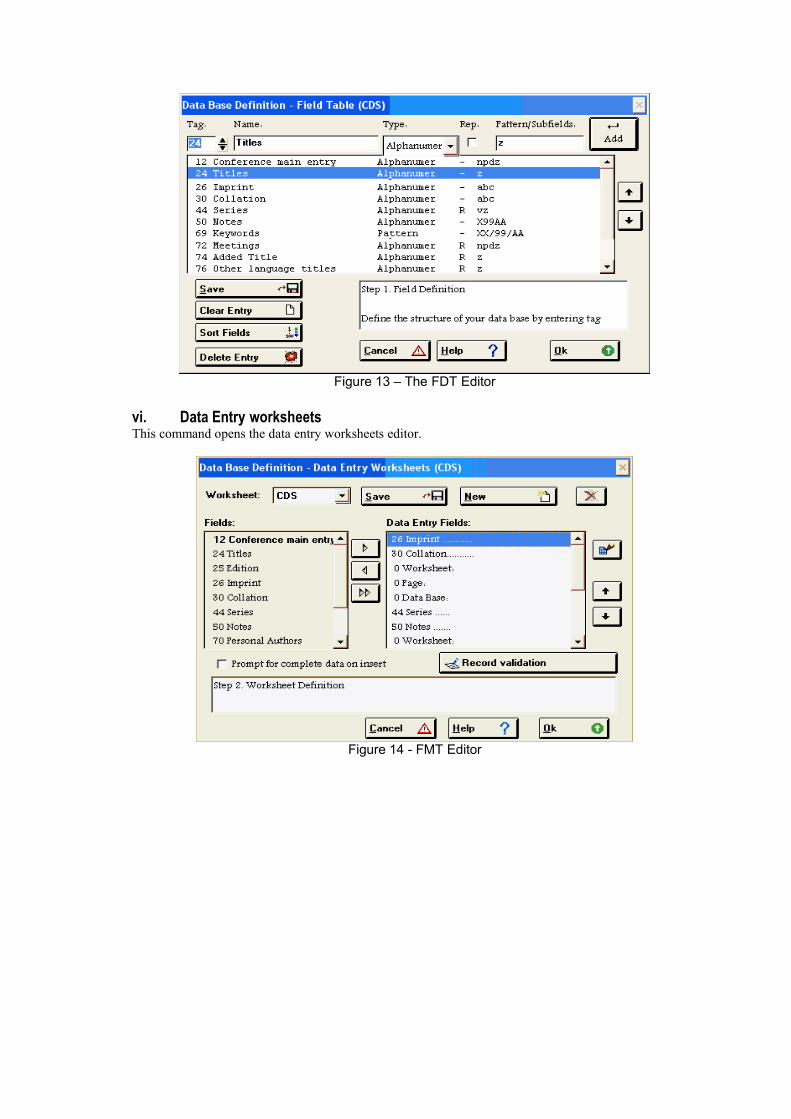
Figure 13 – The FDT Editor
vi. Data Entry worksheetsThis command opens the data entry worksheets editor.
Figure 14 - FMT Editor
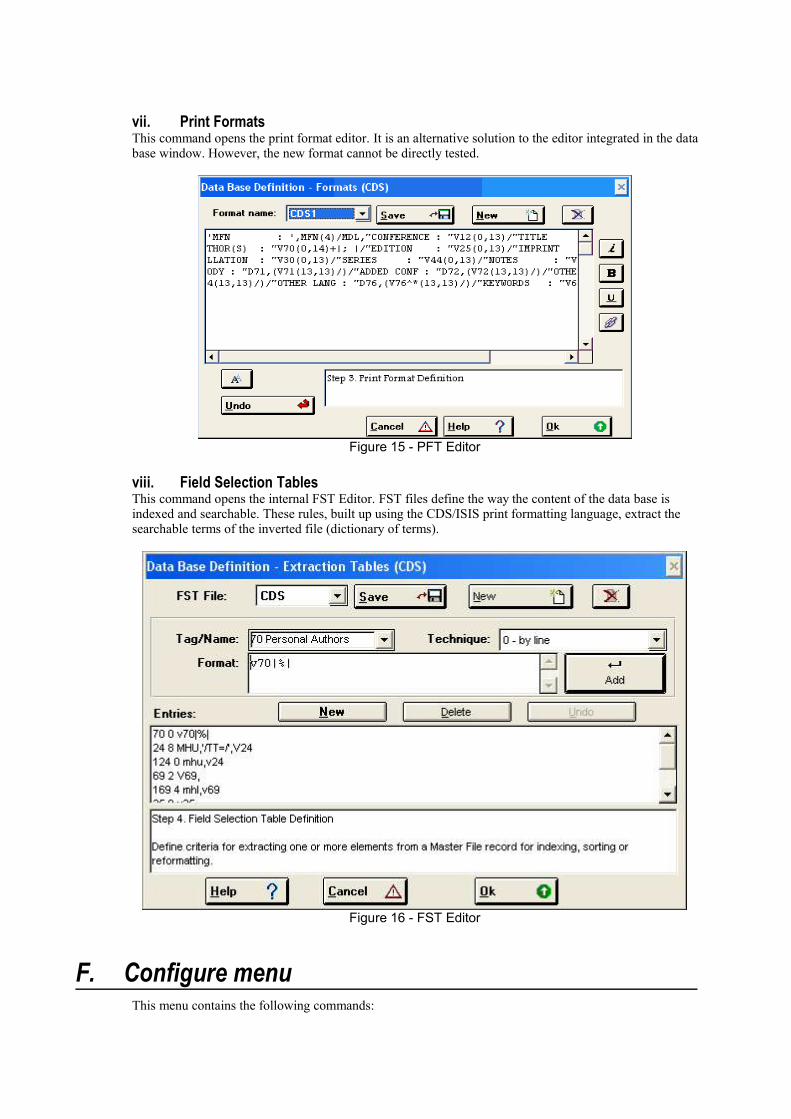
vii. Print FormatsThis command opens the print format editor. It is an alternative solution to the editor integrated in the database window. However, the new format cannot be directly tested.
Figure 15 - PFT Editor
viii. Field Selection TablesThis command opens the internal FST Editor. FST files define the way the content of the data base isindexed and searchable. These rules, built up using the CDS/ISIS print formatting language, extract thesearchable terms of the inverted file (dictionary of terms).
Figure 16 - FST Editor
F. Configure menuThis menu contains the following commands:
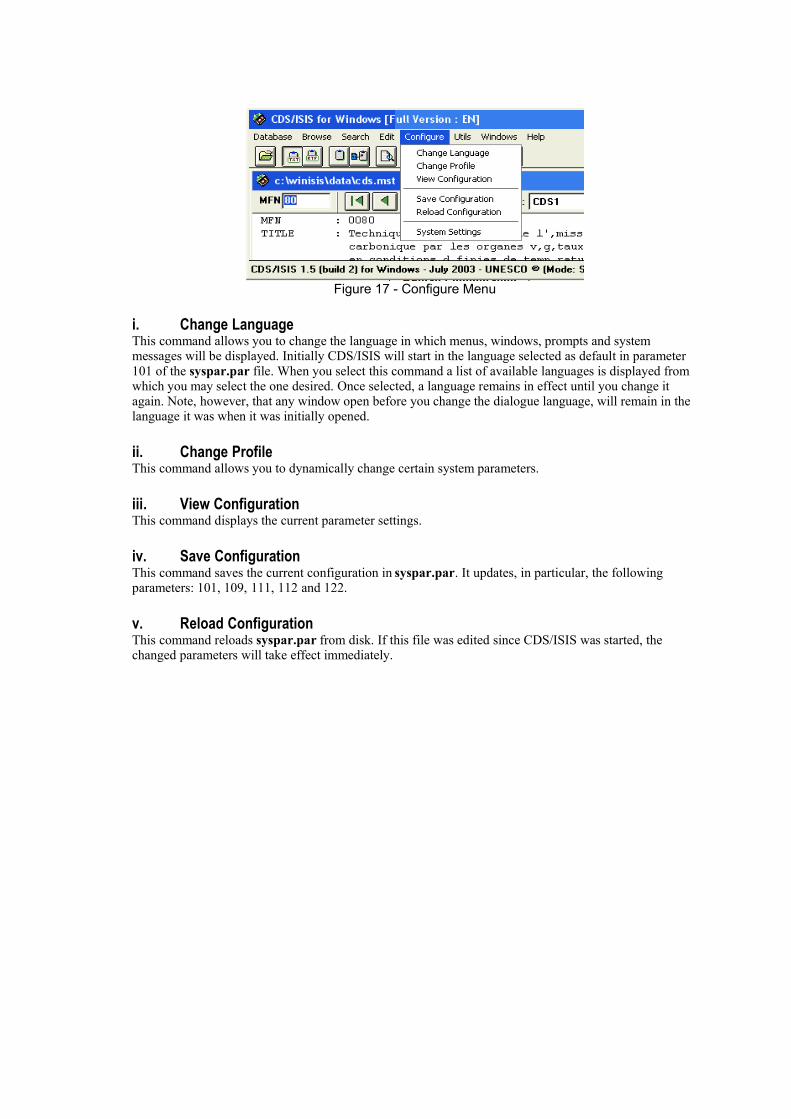
Figure 17 - Configure Menu
i. Change LanguageThis command allows you to change the language in which menus, windows, prompts and systemmessages will be displayed. Initially CDS/ISIS will start in the language selected as default in parameter101 of the syspar.par file. When you select this command a list of available languages is displayed fromwhich you may select the one desired. Once selected, a language remains in effect until you change itagain. Note, however, that any window open before you change the dialogue language, will remain in thelanguage it was when it was initially opened.
ii. Change ProfileThis command allows you to dynamically change certain system parameters.
iii. View ConfigurationThis command displays the current parameter settings.
iv. Save ConfigurationThis command saves the current configuration in syspar.par. It updates, in particular, the followingparameters: 101, 109, 111, 112 and 122.
v. Reload ConfigurationThis command reloads syspar.par from disk. If this file was edited since CDS/ISIS was started, thechanged parameters will take effect immediately.

vi. System settingsOpens the “System settings” dialog box, which allows to change a number of Syspar.par parameters. Itconsists of three screens: the first one concerns pathnames, language, profiles and data base windowposition and size.
Figure 18 - System settings screen 1
The second screen concerns settings affecting the behaviour of Winisis:
Figure 19 - System settings screen 2
The third screen concerns mainly display options, such as font and zoom.
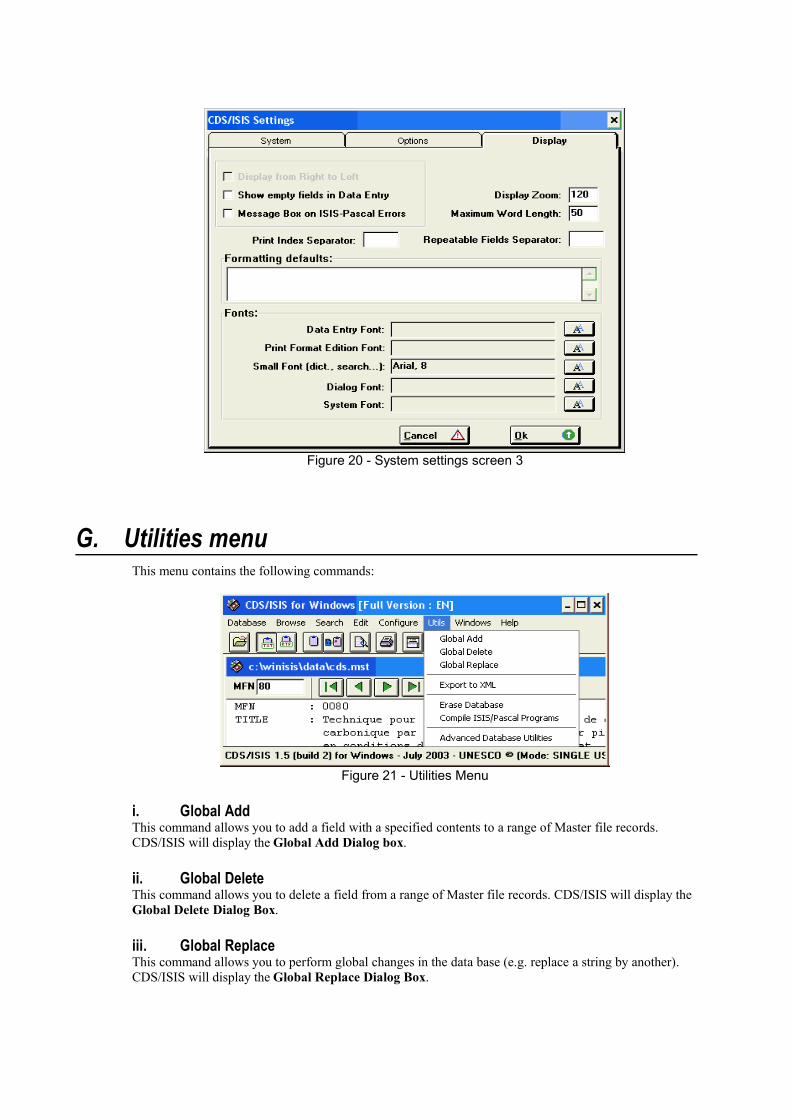
Figure 20 - System settings screen 3
G. Utilities menuThis menu contains the following commands:
Figure 21 - Utilities Menu
i. Global AddThis command allows you to add a field with a specified contents to a range of Master file records.CDS/ISIS will display the Global Add Dialog box.
ii. Global DeleteThis command allows you to delete a field from a range of Master file records. CDS/ISIS will display theGlobal Delete Dialog Box.
iii. Global ReplaceThis command allows you to perform global changes in the data base (e.g. replace a string by another).CDS/ISIS will display the Global Replace Dialog Box.
iv. Export to XMLThis command opens the Export to XML window, which allows defining a wide range of XMLparameters, including the selection of which fields will be treated.
v. Erase databaseCaution: This command completely ERASE the content of the current Master File. It is not possible toundo this operation.
vi. Compile ISIS/Pascal ProgramsThis command allows you to compile a CDS/ISIS Pascal program. CDS/ISIS will first display an opendialog box, where you select the program to be compiled. If the program contains syntax errors, you willbe allowed to edit it and compile it again. The compiler works in DOS window.
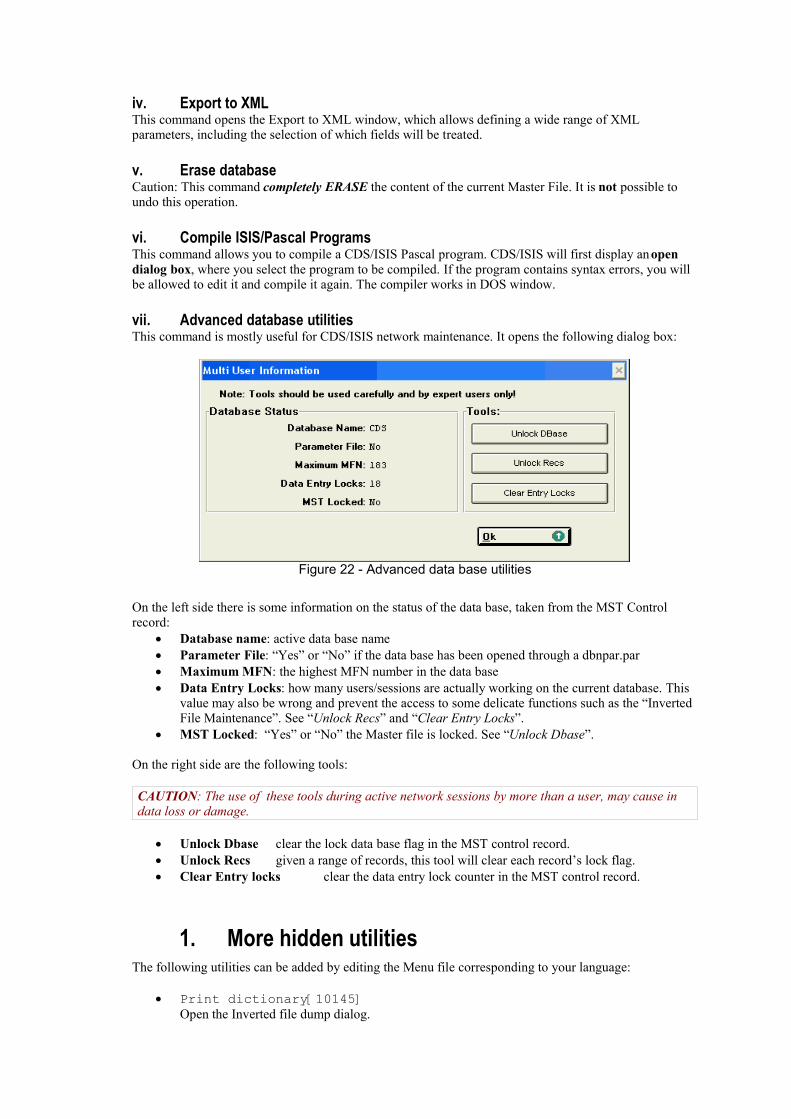
vii. Advanced database utilitiesThis command is mostly useful for CDS/ISIS network maintenance. It opens the following dialog box:
Figure 22 - Advanced data base utilities
On the left side there is some information on the status of the data base, taken from the MST Controlrecord:
Database name: active data base name Parameter File: “Yes” or “No” if the data base has been opened through a dbnpar.par Maximum MFN: the highest MFN number in the data base Data Entry Locks: how many users/sessions are actually working on the current database. This
value may also be wrong and prevent the access to some delicate functions such as the “InvertedFile Maintenance”. See “Unlock Recs” and “Clear Entry Locks”.
MST Locked: “Yes” or “No” the Master file is locked. See “Unlock Dbase”.
On the right side are the following tools:
CAUTION: The use of these tools during active network sessions by more than a user, may cause indata loss or damage.
Unlock Dbase clear the lock data base flag in the MST control record. Unlock Recs given a range of records, this tool will clear each record’s lock flag. Clear Entry locks clear the data entry lock counter in the MST control record.
1. More hidden utilitiesThe following utilities can be added by editing the Menu file corresponding to your language:
Print dictionary[10145]Open the Inverted file dump dialog.

Import from a HIT file[12912]Allows importing the content of a HIT file into a data base. A HIT file, issued from a SORTEDprint run, contains the sort keys and headings.
Show registered plug-in list[10170] Display the list of currently registered plug-ins. A plug-in becomes registered only after a CALLcommand.
H. Windows menuThis menu contains the following commands:
Figure 23 - Windows Menu
i. CascadeArranges windows so that they overlap, starting in the upper-left corner of the main CDS/ISIS window.The title bar of each window remains visible, making it easy to select any window by simply clicking onthe corresponding title bar.
ii. TileArrange the windows side by side, so that each window is visible and no windows overlap.
iii. Arrange itemsArrange all icons in rows.
iv. 1, 2, 3, . . .Select a particular window in the list of currently open data bases. CDS/ISIS changes this part of theWindows menu dynamically, as you open different windows. For each data base you may have up to threewindows listed: the data base window, the search (or guided search window) and the data entry window.Depending on the number of windows open and the size of your screen, some may be hidden behindothers. Selecting the desired window from this list will bring it to the foreground and activate it.
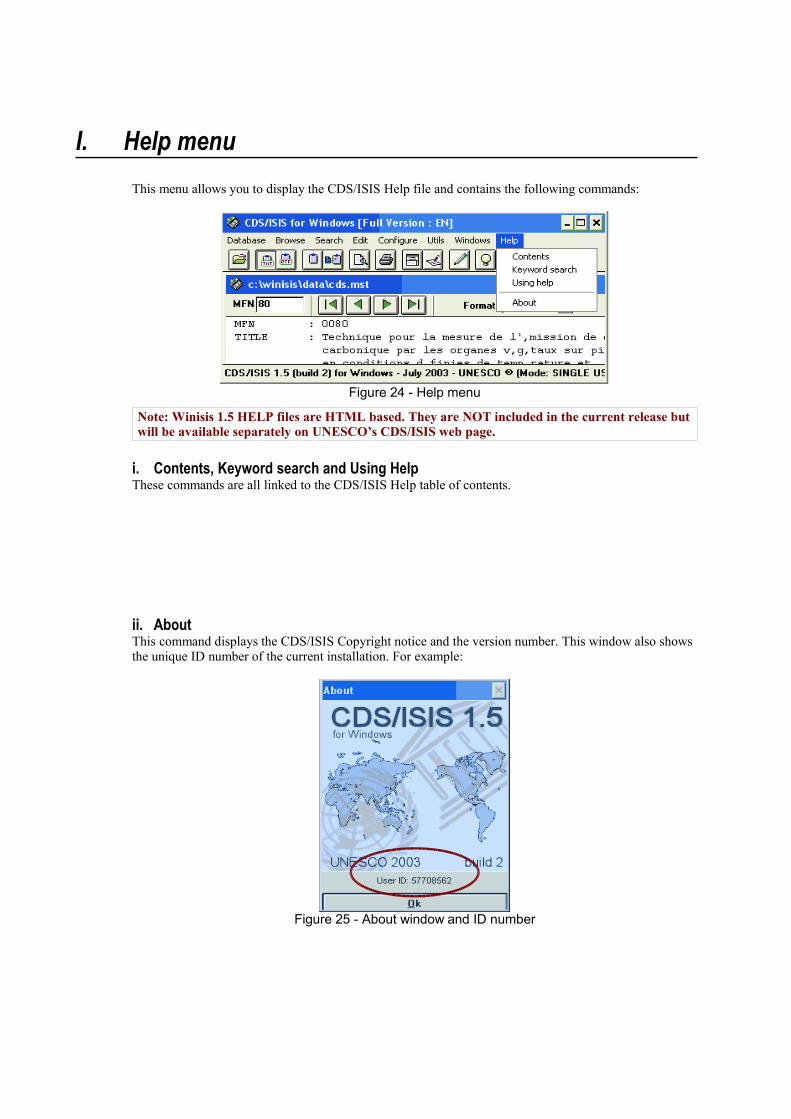
I. Help menuThis menu allows you to display the CDS/ISIS Help file and contains the following commands:
Figure 24 - Help menu
Note: Winisis 1.5 HELP files are HTML based. They are NOT included in the current release butwill be available separately on UNESCO’s CDS/ISIS web page.
i. Contents, Keyword search and Using HelpThese commands are all linked to the CDS/ISIS Help table of contents.
ii. AboutThis command displays the CDS/ISIS Copyright notice and the version number. This window also showsthe unique ID number of the current installation. For example:
Figure 25 - About window and ID number

4. CDS/ISIS Windows
A. The Database WindowThe data base window, a sample of which is shown below, is displayed when you open a data base. Itdisplays the current record according to the currently selected display format. The contents of this windowmay be modified by selecting applicable commands in the Browse menu.
Figure 26 - Data base window
The data base window toolbar contains the following items:This field contains the current MFN number. Clicking on this field allowsyou to display a particular record by typing the desired MFN number andthen pressing the Enter key.Displays the first record. If you are displaying a search result the firstrecord matching the search expression is displayed. If you are browsingthe data base sequentially, the first data base record is displayed.Displays the previous record. If you are displaying a search result theprevious record (if any) matching the search expression is displayed.Displays the next record. If you are displaying a search result the nextrecord (if any) matching the search expression is displayed.Displays the last record. If you are displaying a search result, the lastrecord matching the search expression is displayed. If you are browsingthe data base sequentially, the last data base record is displayed.This field shows which format is currently in use. You can change thedisplay format by first clicking on the field, which will pull down the listof display formats available, and then selecting a new display format. (Thelist of display formats is read from the FDT of the data base).
This feature is available only when displaying a search result. By pressingthis button you can mark or unmark the current record (a "V" appears inthe button when marked). After marking, you can display the currentlymarked records by choosing the Marked Records command from theBrowse menu.
The status bar, at the bottom of the window, contains the following two fields:
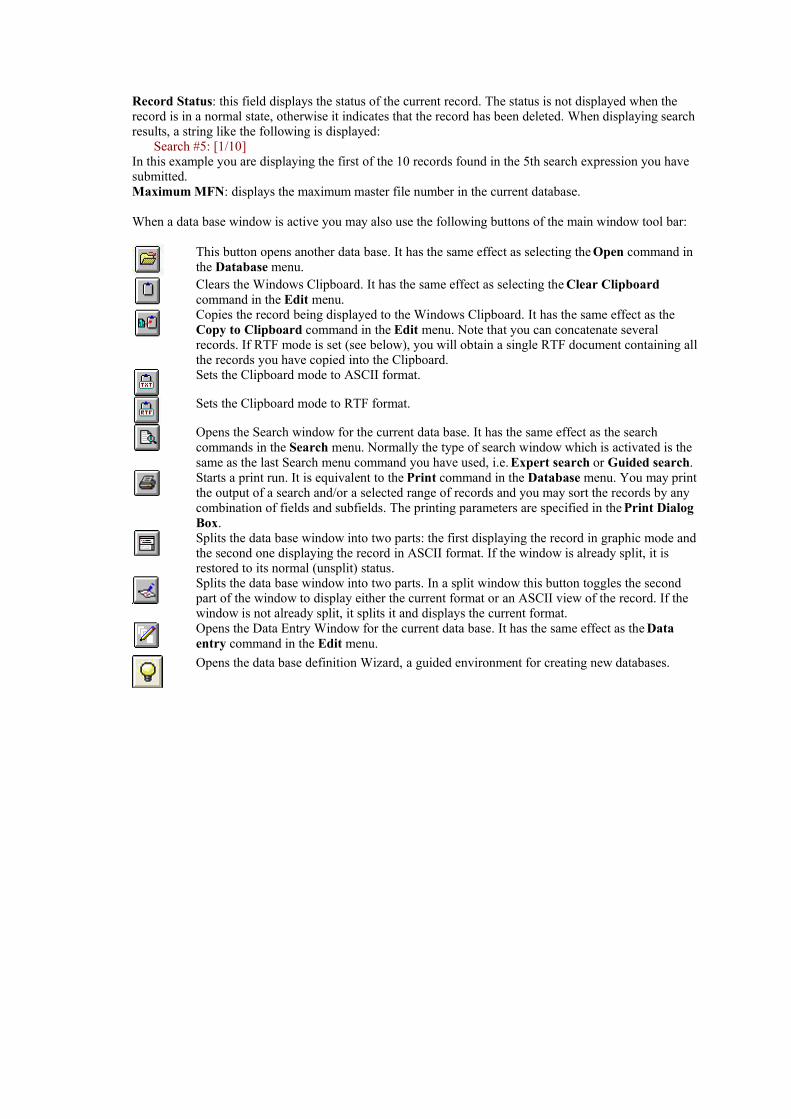
Record Status: this field displays the status of the current record. The status is not displayed when therecord is in a normal state, otherwise it indicates that the record has been deleted. When displaying searchresults, a string like the following is displayed:
Search #5: [1/10]In this example you are displaying the first of the 10 records found in the 5th search expression you havesubmitted.Maximum MFN: displays the maximum master file number in the current database.
When a data base window is active you may also use the following buttons of the main window tool bar:
This button opens another data base. It has the same effect as selecting the Open command inthe Database menu.Clears the Windows Clipboard. It has the same effect as selecting the Clear Clipboardcommand in the Edit menu.Copies the record being displayed to the Windows Clipboard. It has the same effect as theCopy to Clipboard command in the Edit menu. Note that you can concatenate severalrecords. If RTF mode is set (see below), you will obtain a single RTF document containing allthe records you have copied into the Clipboard.Sets the Clipboard mode to ASCII format.
Sets the Clipboard mode to RTF format.
Opens the Search window for the current data base. It has the same effect as the searchcommands in the Search menu. Normally the type of search window which is activated is thesame as the last Search menu command you have used, i.e. Expert search or Guided search.Starts a print run. It is equivalent to the Print command in the Database menu. You may printthe output of a search and/or a selected range of records and you may sort the records by anycombination of fields and subfields. The printing parameters are specified in the Print DialogBox.Splits the data base window into two parts: the first displaying the record in graphic mode andthe second one displaying the record in ASCII format. If the window is already split, it isrestored to its normal (unsplit) status.Splits the data base window into two parts. In a split window this button toggles the secondpart of the window to display either the current format or an ASCII view of the record. If thewindow is not already split, it splits it and displays the current format.Opens the Data Entry Window for the current data base. It has the same effect as the Dataentry command in the Edit menu.Opens the data base definition Wizard, a guided environment for creating new databases.

Using toolbar button “Split” ( ), the data base window will show the current display format:
Figure 27 - Data base window built-in format editor
The user will be able to change, try new commands and save changes to the disk using the followingbuttons:
Save format to the disk
Execute the format as it is. Note that this action does not replace the existing format and that,unless you save it, it will be always possible to return it to its original format.
Change the font used to edit formats. This option is particularly useful in order to be able tosee all format control characters that may not be visible in all fonts.

B. The data entry windowThis window is displayed whenever you select the Data Entry command of the Edit menu.
Figure 28 - The Data Entry Window
When initially opened, this window displays the current record (i.e. the one which is currently displayed inthe corresponding data base window). Its contents, however, may be modified by selecting applicablecommands in the Browse menu.The fields of the record are displayed in the lower part of the window according to the current (or default)data entry worksheet.The data entry window toolbar contains the following items:
This toggle switch allows you to show or remove the second toolbar.
This field contains the current MFN number. Clicking on this fieldallows you to edit a particular record by typing the desired MFN numberand then pressing the Enter key.Displays the first record. If you are editing a search result the first recordmatching the search expression is displayed. If you are editing the database sequentially, the first data base record is displayed.Displays the previous record. If you are editing a search result theprevious record (if any) matching the search expression is displayed.Displays the next record. If you are editing a search result the nextrecord (if any) matching the search expression is displayed.Displays the last record. If you are editing a search result the last recordmatching the search expression is displayed. If you are editing the database sequentially, the last data base record is displayed.Creates a new record. The current worksheet is displayed with all itsfields empty.
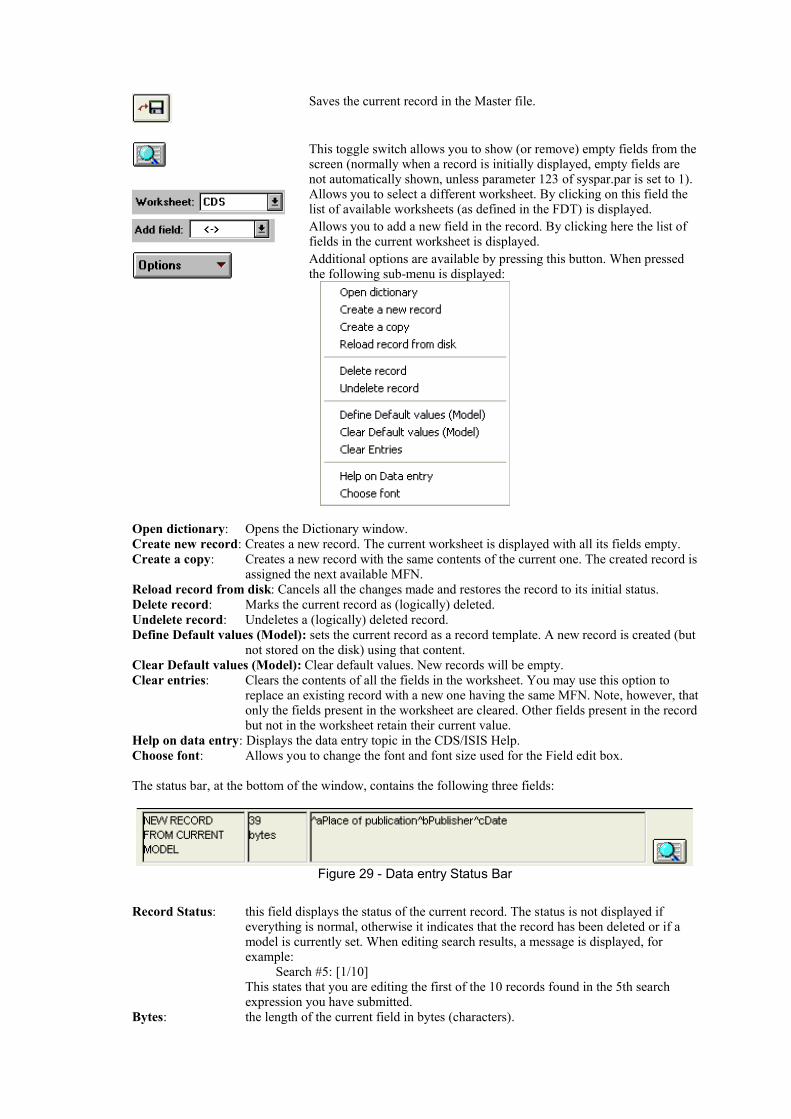
Saves the current record in the Master file.
This toggle switch allows you to show (or remove) empty fields from thescreen (normally when a record is initially displayed, empty fields arenot automatically shown, unless parameter 123 of syspar.par is set to 1).Allows you to select a different worksheet. By clicking on this field thelist of available worksheets (as defined in the FDT) is displayed.Allows you to add a new field in the record. By clicking here the list offields in the current worksheet is displayed.Additional options are available by pressing this button. When pressedthe following sub-menu is displayed:
Open dictionary: Opens the Dictionary window.Create new record: Creates a new record. The current worksheet is displayed with all its fields empty.Create a copy: Creates a new record with the same contents of the current one. The created record is
assigned the next available MFN.Reload record from disk: Cancels all the changes made and restores the record to its initial status.Delete record: Marks the current record as (logically) deleted.Undelete record: Undeletes a (logically) deleted record.Define Default values (Model): sets the current record as a record template. A new record is created (but
not stored on the disk) using that content.Clear Default values (Model): Clear default values. New records will be empty.Clear entries: Clears the contents of all the fields in the worksheet. You may use this option to
replace an existing record with a new one having the same MFN. Note, however, thatonly the fields present in the worksheet are cleared. Other fields present in the recordbut not in the worksheet retain their current value.
Help on data entry: Displays the data entry topic in the CDS/ISIS Help.Choose font: Allows you to change the font and font size used for the Field edit box.
The status bar, at the bottom of the window, contains the following three fields:
Figure 29 - Data entry Status Bar
Record Status: this field displays the status of the current record. The status is not displayed ifeverything is normal, otherwise it indicates that the record has been deleted or if amodel is currently set. When editing search results, a message is displayed, forexample:
Search #5: [1/10]This states that you are editing the first of the 10 records found in the 5th searchexpression you have submitted.
Bytes: the length of the current field in bytes (characters).

Help message: displays the help message, if any, associated with the field being edited.
1. Editing a fieldTo edit a particular field you must first click on the corresponding field button. Its contents will then bebrought up in the field edit box. In editing a field you may use all standard Windows edit function keys(see Appendix A) and, in addition, the three following special keys:
Enter update the field and select the next field;Shift+Enter update the field and select the previous field;F2 delete the field;ESC ignores all changes (field will redisplay as it was before the editing started).
You may change the size of this box by dragging up or down the bar at the bottom of the box. You mayalso change the font used to display the field by selecting the Choose font option from the Options sub-menu.
a. Subfielded fieldsWhen you enter a field containing subfields you must key in the required subfield delimiters in front ofeach subfield. A subfield delimiter is a 2-character code preceding and identifying a variable lengthsubfield within a field. It consists of the character ̂ followed by an alphabetic or numeric character, e.g.^a.If the subfield code is alphabetic, you may enter it in either upper or lower case: CDS/ISIS makes nodifference between ^a and ^A. You may therefore use the most convenient form. Do not insert spaces or punctuation marks either before or after the subfield delimiter, unless you havebeen specifically instructed to do so. Entering spaces or punctuation may adversely affect the printing ofthe field later on.Here is an example of a field with three subfields:
^aUnesco^bParis^c1985
b. Repeatable fieldsIf the field you are entering is repeatable and you need to enter more than one occurrence, enter each
occurrence separately, and click on the repeatable field icon (preceding the field name) for each newoccurrence to be added. Alternatively, you may add as many occurrences as needed in the Field edit box,separating each by a percent (%) sign4. In this case you should not enter spaces around the % sign. If youdo they will be entered in the field. The example below shows an author field with two names:
Brown, J.%Johnson, Archibald
You may use this technique whenever you want to insert a new occurrence between two existing ones.
c. Control charactersCertain characters stored in a field, although keyed in as data, will be interpreted by CDS/ISIS as controlcharacters, rather than data characters, and will normally activate some special type of processing.Control characters are normally reserved for CDS/ISIS use and may not therefore be used as data.Subfield delimiters are an example of control characters. Other control characters recognised byCDS/ISIS are described below.
4 Note that the actual character used to separate occurrences of a repeatable field is an installation-dependent parameter (see Parameter 8 of the syspar.par file in the Section “System Parameter Files”). Ifthis has been re-defined, you must of course use the character assigned to this purpose rather than the %sign.

i. Search term delimitersSearch term delimiters may be used to identify key terms or phrases assigned to each record to enable itsretrieval. Keywords may be delimited in either of two ways: by enclosing them between a pair of slashes(/..../) or by enclosing them in triangular brackets (<....>). The advantage of using triangular brackets overusing slashes, is that, these, unlike slashes, are reserved characters, and CDS/ISIS provides options toeither display the brackets or suppress them, whereas no option is provided to suppress slashes.When brackets are suppressed, they are normally deleted from the displayed version of the field, exceptwhen an open bracket immediately follows a closed one: in this case CDS/ISIS will replace them with asemicolon and a space. For example, by selecting the appropriate display mode the following entry:
<university course><documentation training><library school>will be displayed as follows:
university course; documentation training; library school.Except for the case mentioned above, you must ensure that the required spaces precede and follow theopen and closed bracket respectively. For example when keywords are embedded within other text in thefield as below:
Mission report describing a <university course> in <documentationtraining> at an East African <library school>the spaces surrounding the keywords must be present in order to produce the correct display:
Mission report describing a university course in documentationtraining at an East African library schoolIf the field was entered as follows:
Mission report describing a<university course>in<documentationtraining>at an East African<library school>CDS/ISIS would display it as:
Mission report describing auniversity courseindocumentationtrainingat an East Africanlibrary school
In other words, CDS/ISIS simply ignores the brackets and does not replace them with spaces.
ii. Filing informationWhen producing printed catalogues you will need to sort the contents of one or more fields in order toprint the records in the required sequence. CDS/ISIS will try to produce a sorting sequence according tonormally accepted filing rules, but sometimes this will not be possible. In these cases CDS/ISIS offers youthe possibility to state explicitly how a given field must be sorted by supplying filing information at thetime you enter the data. Filing information is permanently recorded in the field.This facility allows you to instruct CDS/ISIS to replace or ignore any sequence of data characters in afield whenever the field is used as a filing element, by using one of the following specifications:<text-a=text-b> in this case, CDS/ISIS will replace text-a by text-b when the field is used in sorting,
but use text-a (and ignore text-b) when displaying the field;<text-a> in this case text-a will be ignored when sorting and only used to display the field.Below are a few cases in which this facility is normally used (but its use is not restricted to just thesecases):
Entered as Sorted as Displayed as<The> evolution ofinformation systems
EVOLUTION OF INFORMATIONSYSTEMS
The evolution ofinformation systems
<100=onehundred> days ONEHUNDRED DAYS 100 days<Mc=mac>Pherson, J. MACPHERSON J. McPherson, J.
Note that the use of MHL in sort keys will prevent the functioning of the above technique.
d. Inserting dictionary terms in a fieldYou may insert dictionary terms at the current cursor position of the edit box by pressing the Dictionarybutton which will open the Dictionary Window.
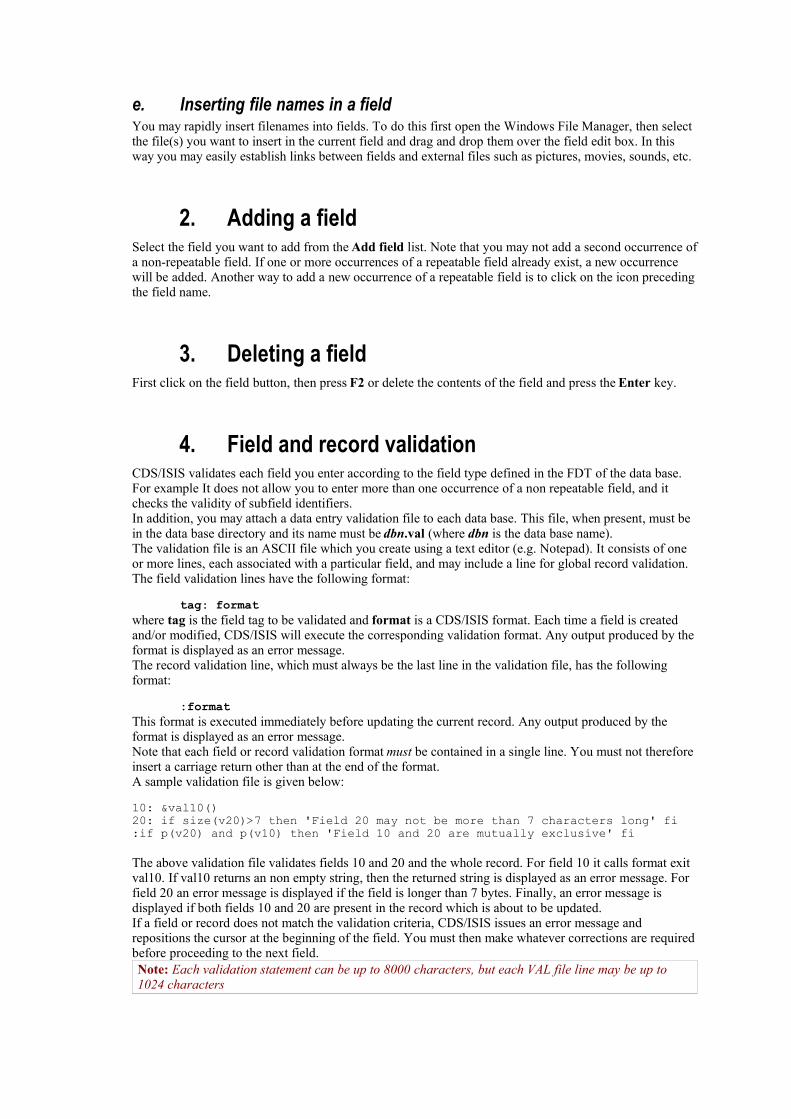
e. Inserting file names in a fieldYou may rapidly insert filenames into fields. To do this first open the Windows File Manager, then selectthe file(s) you want to insert in the current field and drag and drop them over the field edit box. In thisway you may easily establish links between fields and external files such as pictures, movies, sounds, etc.
2. Adding a fieldSelect the field you want to add from the Add field list. Note that you may not add a second occurrence ofa non-repeatable field. If one or more occurrences of a repeatable field already exist, a new occurrencewill be added. Another way to add a new occurrence of a repeatable field is to click on the icon precedingthe field name.
3. Deleting a fieldFirst click on the field button, then press F2 or delete the contents of the field and press the Enter key.
4. Field and record validationCDS/ISIS validates each field you enter according to the field type defined in the FDT of the data base.For example It does not allow you to enter more than one occurrence of a non repeatable field, and itchecks the validity of subfield identifiers.In addition, you may attach a data entry validation file to each data base. This file, when present, must bein the data base directory and its name must be dbn.val (where dbn is the data base name).The validation file is an ASCII file which you create using a text editor (e.g. Notepad). It consists of oneor more lines, each associated with a particular field, and may include a line for global record validation.The field validation lines have the following format:
tag: formatwhere tag is the field tag to be validated and format is a CDS/ISIS format. Each time a field is createdand/or modified, CDS/ISIS will execute the corresponding validation format. Any output produced by theformat is displayed as an error message.The record validation line, which must always be the last line in the validation file, has the followingformat:
:formatThis format is executed immediately before updating the current record. Any output produced by theformat is displayed as an error message.Note that each field or record validation format must be contained in a single line. You must not thereforeinsert a carriage return other than at the end of the format.A sample validation file is given below:
10: &val10()20: if size(v20)>7 then 'Field 20 may not be more than 7 characters long' fi:if p(v20) and p(v10) then 'Field 10 and 20 are mutually exclusive' fi
The above validation file validates fields 10 and 20 and the whole record. For field 10 it calls format exitval10. If val10 returns an non empty string, then the returned string is displayed as an error message. Forfield 20 an error message is displayed if the field is longer than 7 bytes. Finally, an error message isdisplayed if both fields 10 and 20 are present in the record which is about to be updated.If a field or record does not match the validation criteria, CDS/ISIS issues an error message andrepositions the cursor at the beginning of the field. You must then make whatever corrections are requiredbefore proceeding to the next field.Note: Each validation statement can be up to 8000 characters, but each VAL file line may be up to1024 characters

4. BEGIN and END codingIn certain cases it would be desirable to intervene on the record’s content just before or after the usermodifications. For that purpose, the VAL (validation) file contains two sections allowing executing aformat that may change the content of the current record at the beginning of the editing and/or at its end.The format must output a character string compatible with BIREME's CISIS Field Update languagespecifications.
The following commands are available: d. Makes the record logically deletedd* Deletes all fieldsdtt Deletes all occurrences of field ttdtt/occ Deletes occurrence occ of field ttatt#str# Adds string str as a new occurrence of field tt (note that you may use any character as a delimiter
instead of #)htt n str_n Adds string str_n which is n bytes long as a new occurrence of field tt
Example of CDS.VAL file:
begin:if mfn=0 then 'a12#UNESCO#' fiend:if IsChanged() then 'd2a2#',date(2),'#',fiThe first sentence can be used to give a dynamic default value if the record is new (MFN is zero).The second sentence can be used to assign a field with the date of the last modification. Remember thatyou can use parameter 150 to configure the output of function date().
mfn=0 will test if the current edited record is a new one (MFN number has not been assigned yet) or anold one.
The following functions are also available in this context (note that names are case sensitive):
IsChanged() is a Validation-specific function reporting if the record content has changed. Makes sense inEND code only.
StoreMFN(tag) used on new records will store the newly assigned Master File Number to the specifiedfield tag. Makes sense in END code only and exclusively on new records. Warning: this function preventsthe writing checking on new records. Example:
If mfn=0 then StoreMFN(222) fi,
The above line will assign the new MST number to field 222. StoreMFN has not been tested intensively in network environments.
GetWorksheetName() returns the name of the current worksheet between single quotes. For example:
if GetWorksheetName()='CDS' then 'a69#<higher education>#',fi
The following action is also available in this context:
'WORKSHEET:xxxx'/ will change the current worksheet to xxx. It must be followed by a carriagereturn. For example:
if a(v12) then 'WORKSHEET:CDSA'/, else 'WORKSHEET:cds'/,fi
will change the current worksheet to CDSA.FMT if field 12 is absent or to CDS.FMT if not.

5. Pick listsCDS/ISIS for Windows manages data entry pick lists, that can be defined using the VAL (validation) file:
Figure 30 - Pick list example
For more information on how to implement and use pick-lists, please refer to the Pick-lists HOW-TOdocument (separated).
6. Updating the Inverted fileYou should be aware that CDS/ISIS may not automatically update the Inverted file whenever you add,modify or delete a Master file record (this depends on the settings of parameter 130 in the syspar.parfile). It is important to remember this because, until such time as the Inverted file is updated, the followingsituation will exist:new records you have added are not available for retrieval;records you have modified are retrievable, but under the old access points; andrecords you have deleted will still be posted to their access points, although the records themselves are nolonger displayed.However, CDS/ISIS keeps in the Master file all the information required to update the Inverted file andyou may therefore request an Inverted file update at any time by selecting the I/F Update command of theData base menu. This operation may take some time depending on the number of records updated, thecomputer you are using and the average number of search terms generated for each record. After someexperience with a given data base, you will be able to estimate fairly closely the time required to update arecord, and if you find that it is acceptable we advise you to always update the Inverted file after each dataentry session (or before exiting the program).Alternatively, you may defer the updating of the Inverted file to a more convenient time (e.g. at the end ofthe day, of the week, etc.).
C. The Expert Search WindowThis window is displayed by selecting the Expert Search command in the Search menu (see also: TheGuided Search window).
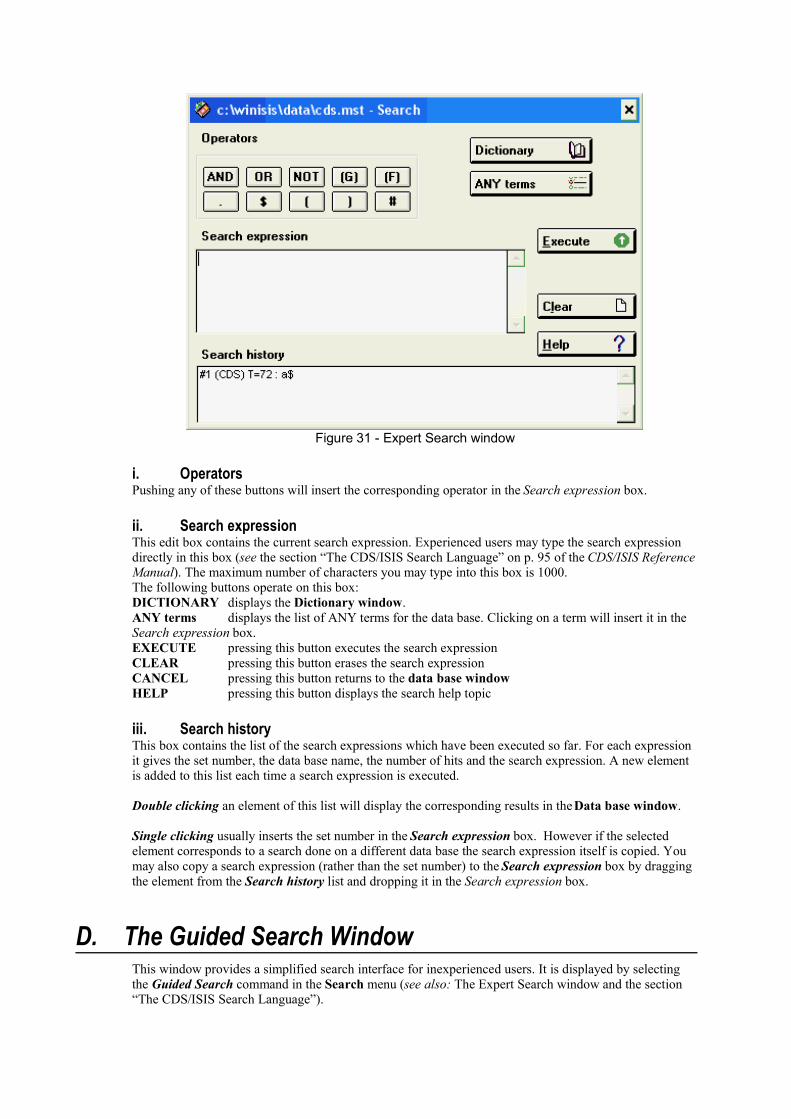
Figure 31 - Expert Search window
i. OperatorsPushing any of these buttons will insert the corresponding operator in the Search expression box.
ii. Search expressionThis edit box contains the current search expression. Experienced users may type the search expressiondirectly in this box (see the section “The CDS/ISIS Search Language” on p. 95 of the CDS/ISIS ReferenceManual). The maximum number of characters you may type into this box is 1000.The following buttons operate on this box:DICTIONARY displays the Dictionary window.ANY terms displays the list of ANY terms for the data base. Clicking on a term will insert it in theSearch expression box.EXECUTE pressing this button executes the search expressionCLEAR pressing this button erases the search expressionCANCEL pressing this button returns to the data base windowHELP pressing this button displays the search help topic
iii. Search historyThis box contains the list of the search expressions which have been executed so far. For each expressionit gives the set number, the data base name, the number of hits and the search expression. A new elementis added to this list each time a search expression is executed.
Double clicking an element of this list will display the corresponding results in the Data base window.
Single clicking usually inserts the set number in the Search expression box. However if the selectedelement corresponds to a search done on a different data base the search expression itself is copied. Youmay also copy a search expression (rather than the set number) to the Search expression box by draggingthe element from the Search history list and dropping it in the Search expression box.
D. The Guided Search WindowThis window provides a simplified search interface for inexperienced users. It is displayed by selectingthe Guided Search command in the Search menu (see also: The Expert Search window and the section“The CDS/ISIS Search Language”).
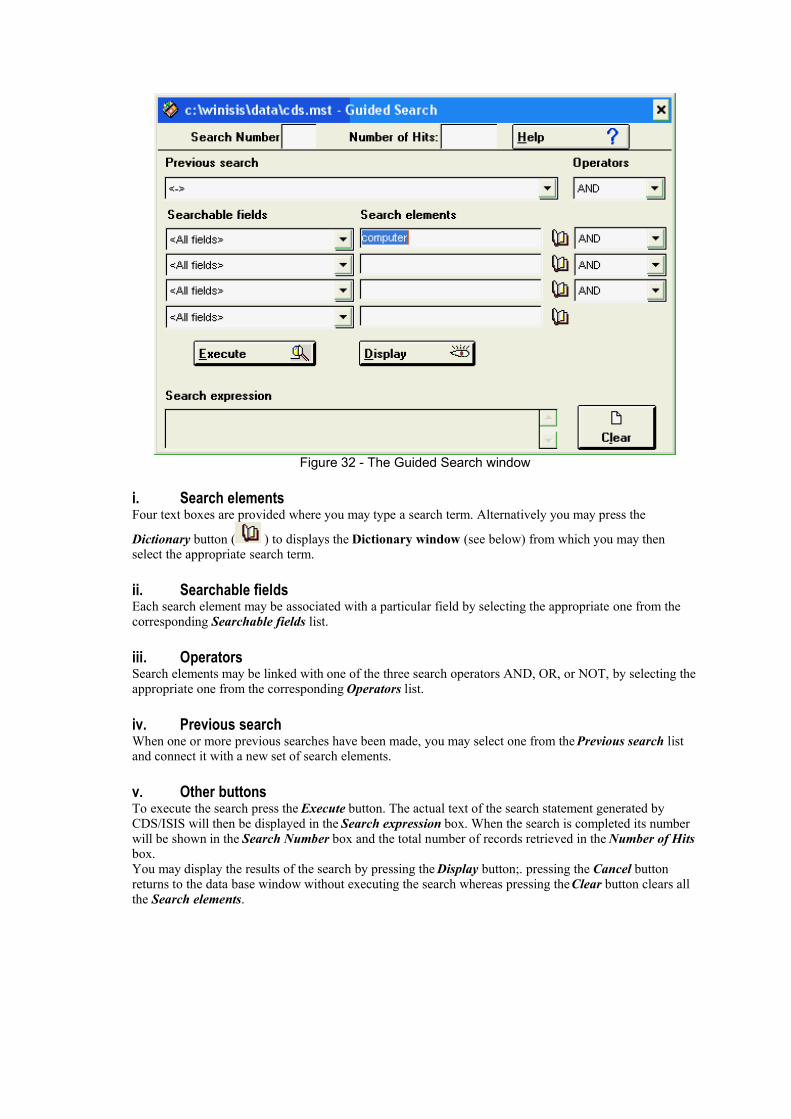
Figure 32 - The Guided Search window
i. Search elementsFour text boxes are provided where you may type a search term. Alternatively you may press the
Dictionary button ( ) to displays the Dictionary window (see below) from which you may thenselect the appropriate search term.
ii. Searchable fieldsEach search element may be associated with a particular field by selecting the appropriate one from thecorresponding Searchable fields list.
iii. OperatorsSearch elements may be linked with one of the three search operators AND, OR, or NOT, by selecting theappropriate one from the corresponding Operators list.
iv. Previous searchWhen one or more previous searches have been made, you may select one from the Previous search listand connect it with a new set of search elements.
v. Other buttonsTo execute the search press the Execute button. The actual text of the search statement generated byCDS/ISIS will then be displayed in the Search expression box. When the search is completed its numberwill be shown in the Search Number box and the total number of records retrieved in the Number of Hitsbox.You may display the results of the search by pressing the Display button;. pressing the Cancel buttonreturns to the data base window without executing the search whereas pressing the Clear button clears allthe Search elements.

E. The Dictionary WindowThis window displays the dictionary of search terms. It is displayed whenever you press the Dictionarybutton on the Expert Search window, the Guided Search window, the Data Entry window or the Database window.
Figure 33 - The Dictionary window
i. Searchable fieldsThis combo box allows you to select the field to be searched when you are in expert search mode.Selecting a field will automatically append the corresponding term qualifier to search terms selectedfrom the dictionary. Selecting <All fields> will search in every field.When a field is selected, the Dictionary window is modified as follows, depending on the setting ofparameter 104 in syspar.par.104=0 (default) the full dictionary is displayed but terms in other fields are displayed in lower case andare not selectable;104=1 only the dictionary terms in the selected field are displayed.
ii. Term boxTyping one or more characters in the Term box will position the dictionary window accordingly (e.g.typing F will show the dictionary terms starting with F).
iii. Dictionary termsDouble clicking on a Dictionary term will select it and, depending on the Window from which theDictionary was called, insert it as follows:Expert Search Window: the term will be inserted at the current cursor position in the Search expression
box. Unless an operator has been previously selected an OR operator isautomatically added if necessary;
Guided Search Window: the term will be inserted in the current Search element box;Data Entry Window: the term will be inserted at the current cursor position in the Field Edit box.Note that the same operation may also be performed by dragging the term to the corresponding window.
Use the method you find most convenient.
Searchable fields
Term box
Dictionary terms
Dump
Page backward and forward
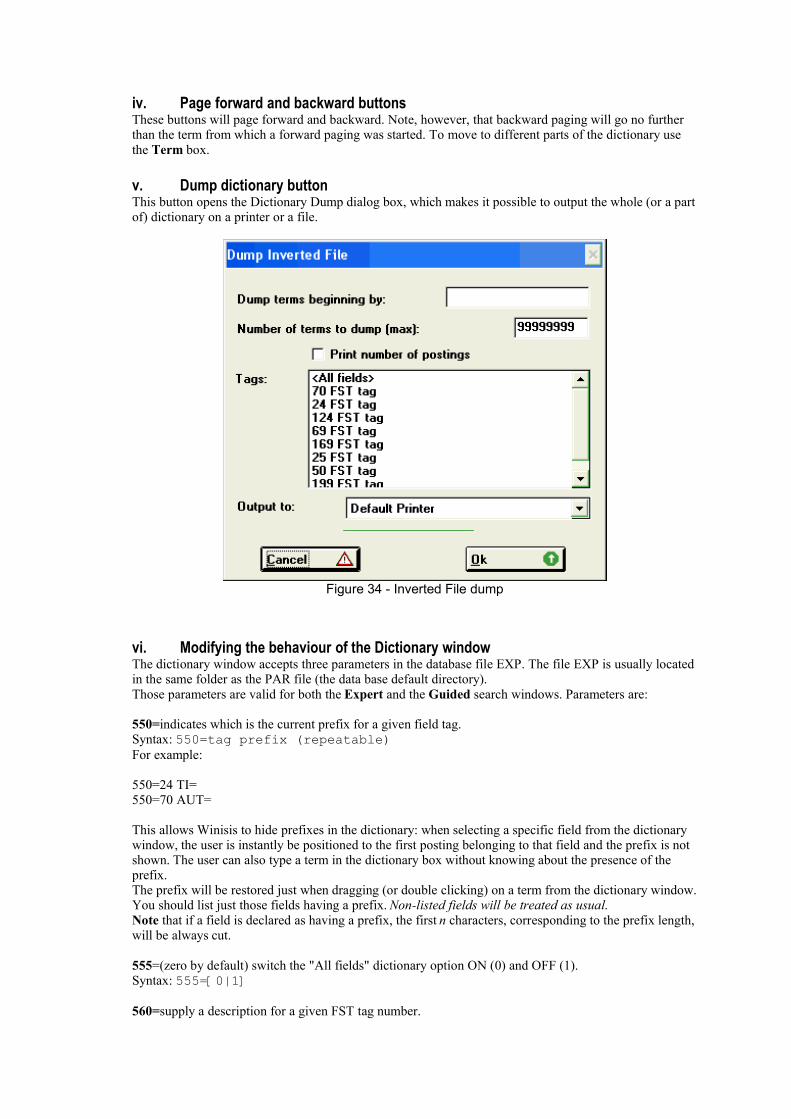
iv. Page forward and backward buttonsThese buttons will page forward and backward. Note, however, that backward paging will go no furtherthan the term from which a forward paging was started. To move to different parts of the dictionary usethe Term box.
v. Dump dictionary buttonThis button opens the Dictionary Dump dialog box, which makes it possible to output the whole (or a partof) dictionary on a printer or a file.
Figure 34 - Inverted File dump
vi. Modifying the behaviour of the Dictionary windowThe dictionary window accepts three parameters in the database file EXP. The file EXP is usually locatedin the same folder as the PAR file (the data base default directory).Those parameters are valid for both the Expert and the Guided search windows. Parameters are:
550=indicates which is the current prefix for a given field tag.Syntax: 550=tag prefix (repeatable)For example:
550=24 TI=550=70 AUT=
This allows Winisis to hide prefixes in the dictionary: when selecting a specific field from the dictionarywindow, the user is instantly be positioned to the first posting belonging to that field and the prefix is notshown. The user can also type a term in the dictionary box without knowing about the presence of theprefix.The prefix will be restored just when dragging (or double clicking) on a term from the dictionary window.You should list just those fields having a prefix. Non-listed fields will be treated as usual.Note that if a field is declared as having a prefix, the first n characters, corresponding to the prefix length,will be always cut.
555=(zero by default) switch the "All fields" dictionary option ON (0) and OFF (1).Syntax: 555=[0|1]
560=supply a description for a given FST tag number.
Syntax: 560=[tag number] [description]
Since a 560 parameter line refers to just one tag, you must put a 560 for each tag you wish to describe.
For example:
560=24 Entire title560=240 Words from title
This allows specifying a description to those FST lines referring non-existing FDT lines (e.g. 240). Ofcourse it is also possible to force a description different from the corresponding FDT line.
Multiple language support
In order to support multiple languages you may provide a list of Tag description for each supportedlanguage. To open a new language section use the following syntax:
560=0 EN
this will open the English section, because in Winisis the language code EN corresponds to English. Allfollowing 560 tags will be English tags, until the end or the next Tag 0 (zero). For example:
560=0 EN560=24 Words from title560=70 All authors
560=0 FR560=24 Mots du titre560=70 Les auteurs560=69 Descripteurs
Note that the English version has no line for Tag 69. Winisis will display its corresponding FDT name.
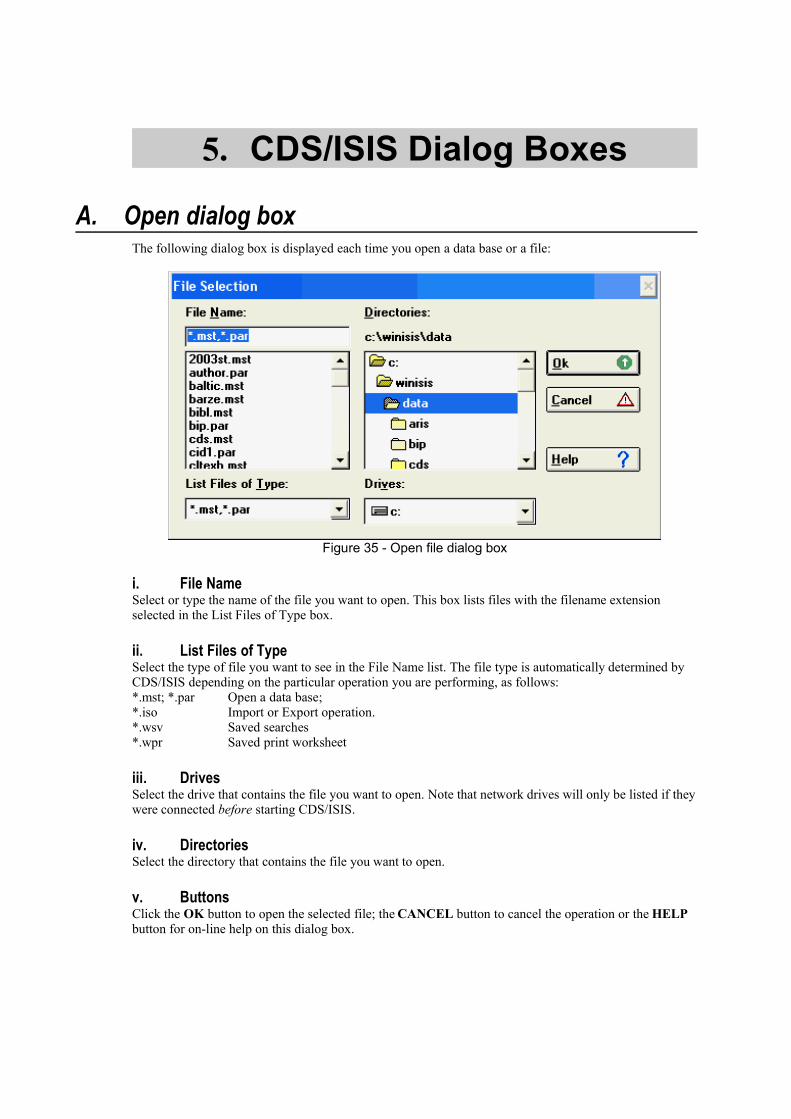
5. CDS/ISIS Dialog Boxes
A. Open dialog boxThe following dialog box is displayed each time you open a data base or a file:
Figure 35 - Open file dialog box
i. File NameSelect or type the name of the file you want to open. This box lists files with the filename extensionselected in the List Files of Type box.
ii. List Files of TypeSelect the type of file you want to see in the File Name list. The file type is automatically determined byCDS/ISIS depending on the particular operation you are performing, as follows:*.mst; *.par Open a data base;*.iso Import or Export operation.*.wsv Saved searches*.wpr Saved print worksheet
iii. DrivesSelect the drive that contains the file you want to open. Note that network drives will only be listed if theywere connected before starting CDS/ISIS.
iv. DirectoriesSelect the directory that contains the file you want to open.
v. ButtonsClick the OK button to open the selected file; the CANCEL button to cancel the operation or the HELPbutton for on-line help on this dialog box.

B. Search History Dialog boxThe search history dialog box, a sample of which is shown below, displays the list of all searchessubmitted so far.
Figure 36 - Search History Dialog box
To select a particular search click on the corresponding button. To cancel the operation click on the firstbutton ( <-> ).
C. Import Dialog BoxThe Import Dialog box is displayed in response to the Import command of the Data base menu. Prior tothis, CDS/ISIS displays an Open Dialog box where you select the file to be imported.
Figure 37 - Import Dialog box
Note: CDS/ISIS for Windows only supports ISO 2709 type 1. For more ISO 2709 types, it isrecommended to use the Isis tool ImpExp2709 available on UNESCO’s website.
i. Name of input ISO fileThis field contains the name of the file you are importing. The file must be in the standard ISO 2709format as described in the CDS/ISIS Reference Manual.
ii. First MFN to be assignedIf you specify this parameter CDS/ISIS will renumber sequentially each input record starting from theMFN you specify. Normally you will enter 1 if you use the Load option, and a number which is onehigher than the highest currently assigned MFN in the data base if you use the Merge or Update options.In the latter case, however, if you specify an already assigned MFN, CDS/ISIS will automatically start

numbering from the next MFN to be assigned in the data base (i.e. the Merge and Update options willbehave in the same manner).
iii. Tag containing MFNAlternatively to the option above (which will be ignored if an Input tag is specified), you may assign theMFN from a field in the input record. In this case you specify here the ISO tag of the field containing theMFN. Note that the field must contain a numeric value and may only be used for this purpose, as it willnot be stored in the records of the receiving data base.
iv. Reformatting FSTThis parameter is optional. If you leave it blank, the fields in the output record will retain their tag andcontents. Alternatively, you may perform a certain amount of reformatting by providing the name of anFST. Note: it is recommended to provide the full path to the FST file to avoid mistakes.The FST, when used as an import reformatting file is interpreted in the following manner: each line of the FST represents an output field;each output field is assigned a tag equal to the field identifier defined in the corresponding FST line;the data extraction format given in the FST defines the contents of the field. In this format you must usethe ISO tag of the fields as defined in the input file. Each line produced by the format (or each element, ifthe FST specifies indexing techniques 2, 3 or 4) will generate a new occurrence of the output field. Notethat the stopword file of the receiving data base, if present, will be used in processing indexing technique4. Assume for example that your input file contains the following fields:
100 Author (repeatable)200 Title300 Keywords (repeatable)400 NotesA reformatting FST for this file could be the following:
1 0 (v100/) [output field 1 same as input field 100]2 0 v200 [output field 2 same as input field 200]3 0 |<|v300|>| [output field 3 contains keywords enclosed in <...>, each keyword taken from one occurrence of input field 300]
v. Gizmo conversion tableThis field may contain the name of a Gizmo conversion table to be used for import. This facility isprovided to facilitate interchange of text containing diacritical marks between different hardware and/orsoftware platforms. A gizmo conversion table is an ASCII text file, which you may create using anyfamiliar text editor, and is defined as follows. The first character of the first line contains the diacritical prefix (normally the @ sign for CDS/ISIS).Each subsequent line has the following format:dxyxyxyxyxy....xywhere : d is the diacritical code (e.g. 7 for acute accent), x is the character to be accented, and y is theaccented character.A sample gizmo conversion table is given below:
@ 6aàeè 7aáeé (([ ))]CDS/ISIS uses this table to provide encoded diacriticals on export (e.g. é will be converted to @7e), andto decode encoded diacriticals on import (e.g. @6a will be converted to à). When a Gizmo conversiontable is used for import, CDS/ISIS will simply strip the diacritical for all those characters not listed in thetable. For example, using the table given above, the input string @7e. will be converted to é, whereas thestring @7y will be converted to y, because y is not listed in line 7.
vi. Using Character conversion tables (tab files) during the importThe GIZMO line may also contain the path to a TAB file, used by Winisis to convert the input into a newcharacter set. Format example: c:\winisis\txt_txt.tab
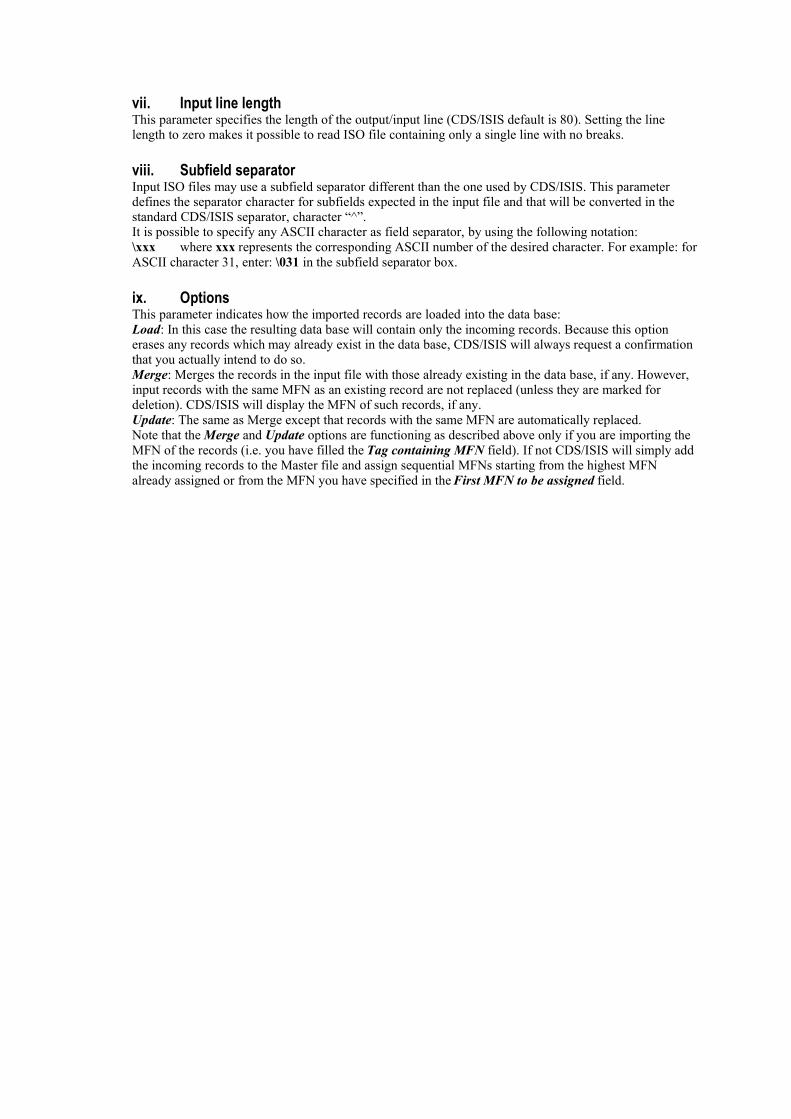
vii. Input line lengthThis parameter specifies the length of the output/input line (CDS/ISIS default is 80). Setting the linelength to zero makes it possible to read ISO file containing only a single line with no breaks.
viii. Subfield separatorInput ISO files may use a subfield separator different than the one used by CDS/ISIS. This parameterdefines the separator character for subfields expected in the input file and that will be converted in thestandard CDS/ISIS separator, character “^”. It is possible to specify any ASCII character as field separator, by using the following notation:\xxx where xxx represents the corresponding ASCII number of the desired character. For example: forASCII character 31, enter: \031 in the subfield separator box.
ix. OptionsThis parameter indicates how the imported records are loaded into the data base:Load: In this case the resulting data base will contain only the incoming records. Because this optionerases any records which may already exist in the data base, CDS/ISIS will always request a confirmationthat you actually intend to do so.Merge: Merges the records in the input file with those already existing in the data base, if any. However,input records with the same MFN as an existing record are not replaced (unless they are marked fordeletion). CDS/ISIS will display the MFN of such records, if any.Update: The same as Merge except that records with the same MFN are automatically replaced.Note that the Merge and Update options are functioning as described above only if you are importing theMFN of the records (i.e. you have filled the Tag containing MFN field). If not CDS/ISIS will simply addthe incoming records to the Master file and assign sequential MFNs starting from the highest MFNalready assigned or from the MFN you have specified in the First MFN to be assigned field.
D. Export Dialog BoxThe Export Dialog box is displayed in response to the Export command of the Data base menu. Prior tothis, CDS/ISIS displays an Open Dialog box where you select the name of the output file.
Figure 38 - Export Dialog box
i. Name of output ISO fileThis field contains the name of the output file you have previously selected. The file will be in thestandard ISO 2709 format as described in the CDS/ISIS Reference Manual.
ii. Field separatorThis field defines the field separator character to be used in the output file. If you leave it empty,CDS/ISIS will use the standard field separator defined in ISO 2709, i.e. the ASCII character 30(hexadecimal 1E). However, if the file to be exported is transmitted over a telecommunication line, thischaracter may be deleted by the communication software. Therefore, CDS/ISIS allows you to redefine thefield separator as a normal ASCII character which will pass through. Note that the character you selectmust be such that it is never used as a data character in the data base to be transmitted.You may also specify any ASCII character as field separator, by using the following notation:\xxx where xxx represents the corresponding ASCII number of the desired character. For example: to specifyas field separator the ASCII character 28, you must enter: \028 in the field separator box.
iii. Record separatorThis field defines the record separator character to be used in the output file. If you leave it empty,CDS/ISIS will use the standard field separator defined in ISO 2709, i.e. the ASCII character 29(hexadecimal 1D). However, if the file to be exported is transmitted over a telecommunication line, thischaracter may be deleted by the communication software. Therefore, CDS/ISIS allows you to redefine therecord separator as a normal ASCII character which will pass through. Note that the character you selectmust be such that it is never used as a data character in the data base to be transmitted.You may also specify any ASCII character as record separator, by using the following notation:\xxx where xxx represents the corresponding ASCII number of your desired character. For example: to specifyas record separator the ASCII character 29, you must enter: \029 in the record separator box.
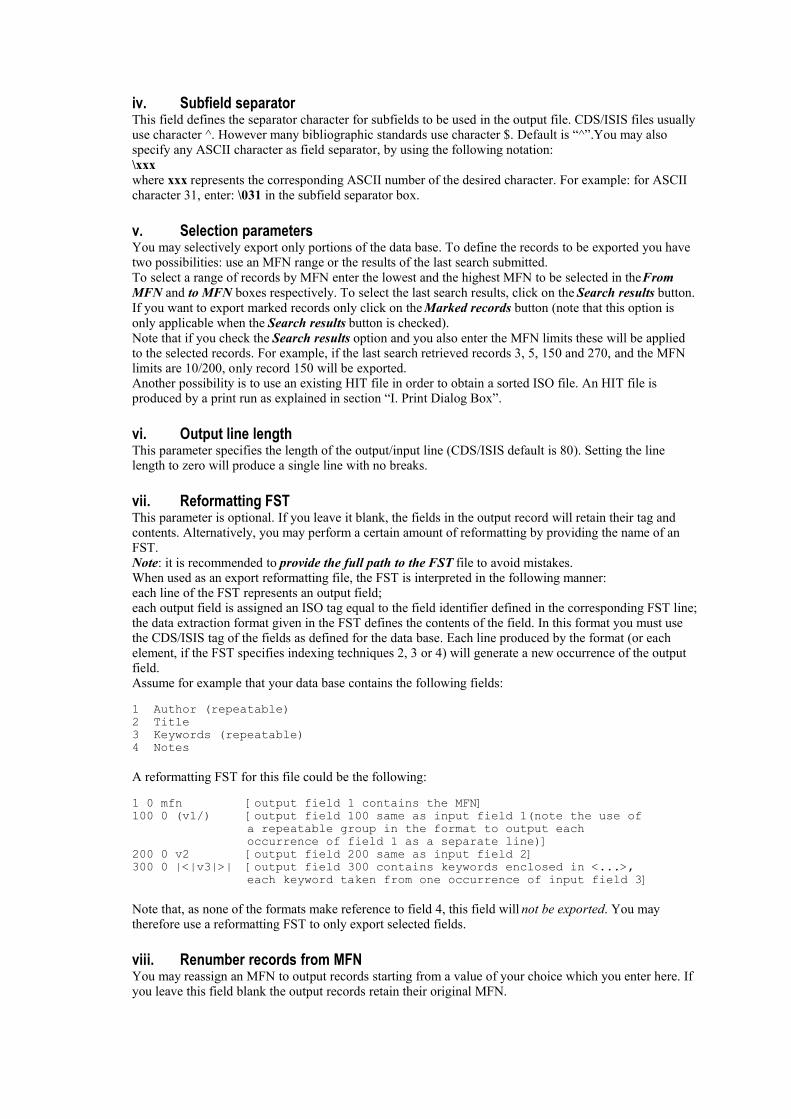
iv. Subfield separatorThis field defines the separator character for subfields to be used in the output file. CDS/ISIS files usuallyuse character ^. However many bibliographic standards use character $. Default is “^”.You may alsospecify any ASCII character as field separator, by using the following notation:\xxx where xxx represents the corresponding ASCII number of the desired character. For example: for ASCIIcharacter 31, enter: \031 in the subfield separator box.
v. Selection parametersYou may selectively export only portions of the data base. To define the records to be exported you havetwo possibilities: use an MFN range or the results of the last search submitted.To select a range of records by MFN enter the lowest and the highest MFN to be selected in the FromMFN and to MFN boxes respectively. To select the last search results, click on the Search results button.If you want to export marked records only click on the Marked records button (note that this option isonly applicable when the Search results button is checked).Note that if you check the Search results option and you also enter the MFN limits these will be appliedto the selected records. For example, if the last search retrieved records 3, 5, 150 and 270, and the MFNlimits are 10/200, only record 150 will be exported.Another possibility is to use an existing HIT file in order to obtain a sorted ISO file. An HIT file isproduced by a print run as explained in section “I. Print Dialog Box”.
vi. Output line lengthThis parameter specifies the length of the output/input line (CDS/ISIS default is 80). Setting the linelength to zero will produce a single line with no breaks.
vii. Reformatting FSTThis parameter is optional. If you leave it blank, the fields in the output record will retain their tag andcontents. Alternatively, you may perform a certain amount of reformatting by providing the name of anFST.Note: it is recommended to provide the full path to the FST file to avoid mistakes.When used as an export reformatting file, the FST is interpreted in the following manner:each line of the FST represents an output field;each output field is assigned an ISO tag equal to the field identifier defined in the corresponding FST line;the data extraction format given in the FST defines the contents of the field. In this format you must usethe CDS/ISIS tag of the fields as defined for the data base. Each line produced by the format (or eachelement, if the FST specifies indexing techniques 2, 3 or 4) will generate a new occurrence of the outputfield.Assume for example that your data base contains the following fields:
1 Author (repeatable)2 Title3 Keywords (repeatable)4 Notes
A reformatting FST for this file could be the following:
1 0 mfn [output field 1 contains the MFN]100 0 (v1/) [output field 100 same as input field 1(note the use of a repeatable group in the format to output each occurrence of field 1 as a separate line)]200 0 v2 [output field 200 same as input field 2]300 0 |<|v3|>| [output field 300 contains keywords enclosed in <...>, each keyword taken from one occurrence of input field 3]
Note that, as none of the formats make reference to field 4, this field will not be exported. You maytherefore use a reformatting FST to only export selected fields.
viii. Renumber records from MFNYou may reassign an MFN to output records starting from a value of your choice which you enter here. Ifyou leave this field blank the output records retain their original MFN.

This option only affects the output ISO file. The records in the data base remain unchanged. Note,however, that this option is only effective if you are exporting the MFN by filling in the field Output Tagcontaining MFN below.
ix. Output Tag containing MFNYou may export the MFN as a field in the output file by assigning here an output tag. This is because theMFN does not correspond to an actual field of the data base (it has no tag and is not defined in the FDT).You may also export the MFN as a field by means of a reformatting FST, as shown in the example above.
x. Gizmo conversion tableThis field may contain the name of a Gizmo conversion table to be used for export.
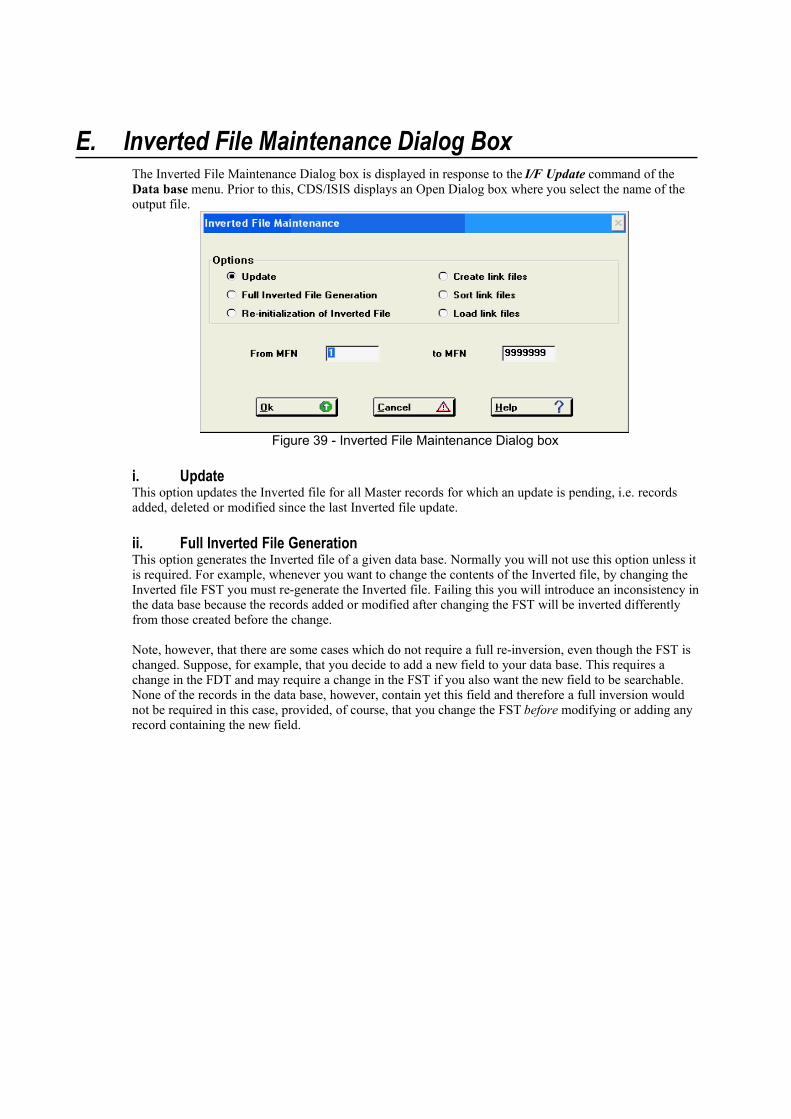
E. Inverted File Maintenance Dialog BoxThe Inverted File Maintenance Dialog box is displayed in response to the I/F Update command of theData base menu. Prior to this, CDS/ISIS displays an Open Dialog box where you select the name of theoutput file.
Figure 39 - Inverted File Maintenance Dialog box
i. UpdateThis option updates the Inverted file for all Master records for which an update is pending, i.e. recordsadded, deleted or modified since the last Inverted file update.
ii. Full Inverted File GenerationThis option generates the Inverted file of a given data base. Normally you will not use this option unless itis required. For example, whenever you want to change the contents of the Inverted file, by changing theInverted file FST you must re-generate the Inverted file. Failing this you will introduce an inconsistency inthe data base because the records added or modified after changing the FST will be inverted differentlyfrom those created before the change.
Note, however, that there are some cases which do not require a full re-inversion, even though the FST ischanged. Suppose, for example, that you decide to add a new field to your data base. This requires achange in the FDT and may require a change in the FST if you also want the new field to be searchable.None of the records in the data base, however, contain yet this field and therefore a full inversion wouldnot be required in this case, provided, of course, that you change the FST before modifying or adding anyrecord containing the new field.

The Inverted file generation process consists of three steps:
1. Creation of the Link files;2. Sorting the Link files; and3. Loading the sorted Link files into the Inverted file.
The link files contain all the information necessary to generate the Inverted file and are created accordingto the Inverted file FST defined for the data base. They contain one entry for each couple searchterm/posting to be stored on the Inverted file. For efficiency, two link files are actually created: onecontaining terms up to 10 characters long and one terms longer than 10 characters. The second step sortsthe Link files into alphabetical order. The purpose of this sort is to collect together all postings related to agiven search term, in preparation of the last step which loads the sorted Link files into the Inverted file.These three steps may also be executed one at a time by using the options Create link files, Sort link filesand Load link files in this order.
This facility is provided for large data bases where the full Inverted file generation may require arelatively long time, and considerable disk space. Note that, in this case, you must not make any change tothe Master file (adding, modifying or deleting any record) until the last step has been executed.You should be aware that CDS/ISIS does not automatically delete the Link files (.LN1, .LN2., .LK1 and .LK2).You may delete them manually at any time, after the Inverted file generation is completed, or, if youperform the inverted file generation in three steps, you may delete the unsorted Link files (.LN1 and .LN2)after executing the Sort link files option and before executing the Load link files option.CDS/ISIS will keep you informed of the step it is executing by displaying appropriate informationmessages on the screen.
iii. Re-initialization of Inverted FileThis option erases the contents of the Inverted File and re-allocates all the associated files to a minimumsize. You may want to use this option before re-generating the Inverted File.
iv. Create link filesThis option generates the Link files as explained above.
v. Sort link filesThis option sorts the Link files produced by the Create link files option. The sorted Link files may then beloaded using the Load link files option.The process of sorting each link file (short and long terms) is the same. During the first step, called phase0, the link file records are sorted in groups as large as can fit in memory. If the whole link file can fit inmemory, then the sort is finished after phase 0. Otherwise the sorted groups are distributed on fourtemporary work files and then merged. Depending on the number of records, there may be one or moremerge steps, called phase 1, 2 , etc., each step producing larger and larger groups of sorted records, until asingle group is obtained.
vi. Load link filesThis option creates the Inverted file from the sorted link files. It can be used after option Sort link files tocomplete the Inverted file generation.
vii. From MFN ... to MFNYou may enter in these fields a range of MFNs to be inverted. You would normally only use this feature totest your inverted file FST. If you enter an actual range only the indicated records will be inverted, and will therefore be searchable.

F. Global Add Dialog BoxWARNING: Use this option with extreme caution. Misuse may cause irreversible damages toyour data. Always make a back up of your data base, by making copies or your MST and XRFfiles at least.
Figure 40 - Global Add dialog box
i. MFN Limits (Lo/Hi)Enter here the lowest and highest MFN of the records to which the operation must be applied. Forexample: 1/20.
ii. Search Set (marked records)Select from the list the search set to which you would like to apply the operation. It is also possible tolimit the scope to marked records (if any).
iii. Field Tag Enter here the tag of the field to be added. Check “add only if not present” to limit the scope of theoperation.
iv. Insert before positionSelecting this checkbox it is possible to specify where in the existing field the new text should be added.Moreover, it is possible to specify which occurrence number should be taken into account. The newparameter has the following behaviour:- Insert before position checked: if the given field tag does not exist, it is automatically createdwith the specified content, unless the option “add only if not present” is also checked.- Position specified: in case the field is long enough, the new text is inserted in the specifiedposition. Otherwise it is appended at the end of the field.- Occurrence num.: if an occurrence number is specified (greater than zero), only the specifiedoccurrence is treated. If the field has not enough occurrences, one new occurrence is created. If“Occurrence num.” is zero, all occurrences will be treated.
v. Field ContentsEnter here the contents of the field to be added.
vi. OK ButtonPress this button to start the operation.

vii. Cancel ButtonPress this button to cancel the operation.
G. Global Delete Dialog BoxWARNING: Use this option with extreme caution. Misuse may cause irreversible damages toyour data. Always make a back up of your data base, by making copies or your MST and XRFfiles at least.
Figure 41 - Global Delete dialog box
i. MFN limits (from/to)Enter here the lowest and highest MFN of the records to which the operation must be applied. Forexample: 1/20.
ii. Search Set (marked records)Select from the list the search set to which you would like to apply the operation. It is also possible tolimit the scope to marked records (if any).
iii. Field TagEnter here the tag of the field to be deleted.
iv. SubfieldSpecify a subfield identifier (one character) in order to limit the scope to that given subfield.
v. OccurrenceIf greater than zero, only the specified occurrence is treated. If set to zero, all occurrences will be treated.
vi. OK ButtonPress this button to start the operation.
vii. Cancel ButtonPress this button to cancel the operation.

H. Global Replace Dialog boxWARNING: Use this option with extreme caution. Misuse may cause irreversible damages toyour data. Always make a back up of your data base, by making copies or your MST and XRFfiles at least.
Figure 42 - Global Replace Dialog box
i. RangeSpecify here either the range of MFN’s to be modified, by selecting MFN Limits and entering the lowestand highest MFN in the range separated by a slash, e.g. 1/100; or a previously executed search, byselecting Search set and then selecting a specific search. In the latter case you may select only markedrecords by checking Marked records.
ii. Text to findEnter here the text to be replaced.
iii. New textEnter here the replacing text. Leaving this box empty will delete the string entered in the Text to find box.
iv. OptionsCheck one of these options if applicable:Case sensitive: will search the text as entered in the Text to find box. If this button is not checked, the textsearch will be case insensitive, e.g. ‘WATER’ is considered equal to ‘water’;Whole words only: will only replace the text when this is preceded and followed by spaces or is at thebeginning or the end of the field (or subfield).Prompt on replace: will ask confirmation before each change.
v. ScopeIf you want to replace text in certain fields only, enter the applicable tag(s), up to a maximum of 10, in theTags box separated by comma (e.g. 100,110,120). If you want to replace text only in certain subfields,enter the applicable subfield code(s) in the Subfields box (e.g. abc). It is also possible to specify to whichoccurrences the change should be applied: 1,2,3 etc…

I. Print Dialog BoxThe Print Dialog box consists of 5 pages:
General where you choose what and where to print and the print format you want to use;Presentation where you define titles, headers and footers for your document;Margins where you define the page printable area;Layout where you define the page layout of your document, such as page numbers and number
of columns;Sorting where you define sorting criteria.
1. Guidelines for setting up a print runBelow are some basic guidelines for setting up a print run, which, at the same time, summarize the mostsalient features of the CDS/ISIS printing and sorting facilities (a more detailed discussion of all thefeatures is given in the following sections).
In the General page:Define the records to be printed: you may print the whole data base or a specific range of records, bygiving the lowest and highest MFN to be printed in the MFN limits field of the print worksheet;alternatively you may print the results of a search which you have previously submitted.Define which fields must be printed: these are specified in the format provided in the Print format fieldof the print worksheet. You may either use a pre-defined format or specify one directly.Define the output medium: you may direct the output to the printer or to a disk file by setting theappropriate value in the Print file name of the print worksheet. If you intend to print the output directly onthe printer, you must ensure that:
the printer is ready and connected; the correct forms for your output are mounted; and there is enough paper available.
In the Presentation page:Define report titles: you may provide up to three title lines which will be printed at the beginning of theoutput. Some or all of these may be repeated as running titles at the top of each page.
In the Margins and Layout pages:Define the page layout: you have full control on the line width, number of lines per page and single ormulti-column printing, as well as on page numbering, by setting the appropriate parameters provided inthe print worksheet.
In the Sorting page:Define the output sequence: by means of the sort worksheet you may define the exact sequence in whichthe records must be printed. Records may be sorted in virtually any desired combination of fields andsubfields.Define the headings: the field(s) by which the records are sorted may be used as headings. For example,if you sort the output by author, the records will be arranged in alphabetical author's name order. If youselect the author to be a heading, each author's name will only be printed once for all records having thesame author. The Sorting page also allows you to define whether your output will feature headings or not,and, if yes, the number of levels of headings you want. You may, for example, arrange a listing ofconference papers by place (first level), date (second level) and conference title (third level).According to the parameters you supply, CDS/ISIS will proceed as follows (steps 1-3 are bypassed if nosorting is specified):
1. using the information you provide in the Sorting page, it first builds a hit file which contains thespecified sort keys and the corresponding headings;
2. it then sorts the hit file;
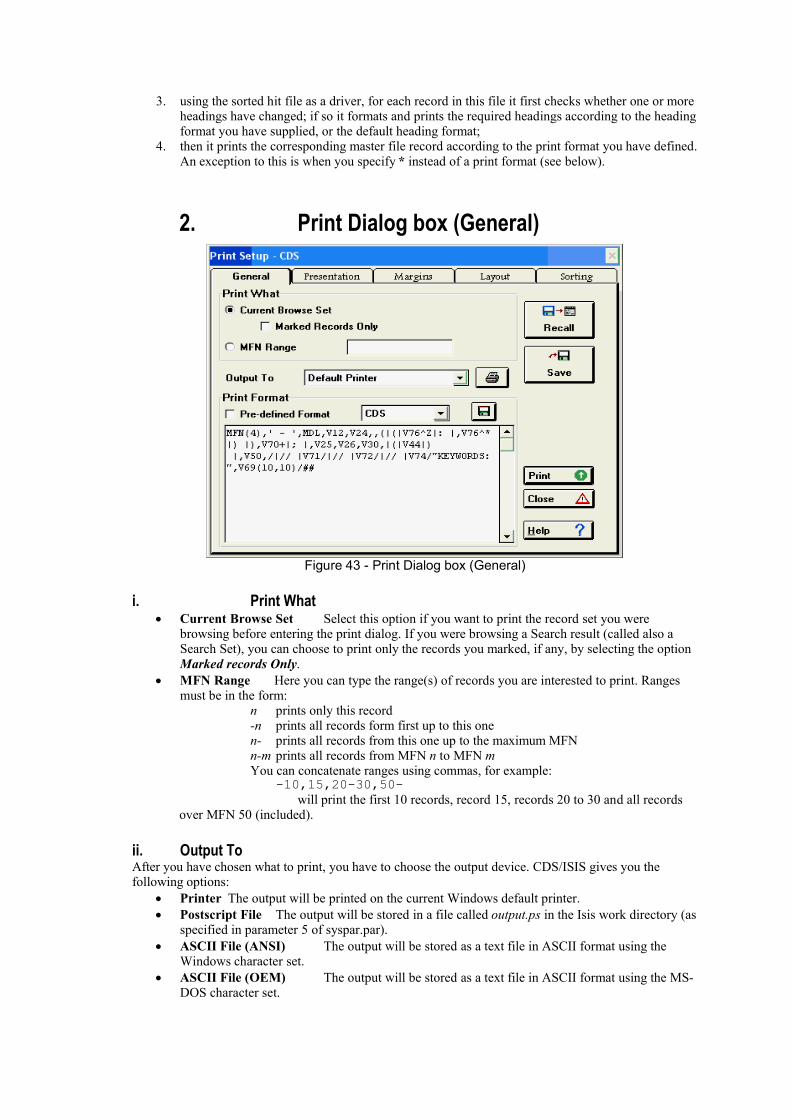
3. using the sorted hit file as a driver, for each record in this file it first checks whether one or moreheadings have changed; if so it formats and prints the required headings according to the headingformat you have supplied, or the default heading format;
4. then it prints the corresponding master file record according to the print format you have defined.An exception to this is when you specify * instead of a print format (see below).
2. Print Dialog box (General)
Figure 43 - Print Dialog box (General)
i. Print What Current Browse Set Select this option if you want to print the record set you were
browsing before entering the print dialog. If you were browsing a Search result (called also aSearch Set), you can choose to print only the records you marked, if any, by selecting the optionMarked records Only.
MFN Range Here you can type the range(s) of records you are interested to print. Rangesmust be in the form:
n prints only this record-n prints all records form first up to this onen- prints all records from this one up to the maximum MFNn-m prints all records from MFN n to MFN mYou can concatenate ranges using commas, for example:
-10,15,20-30,50-will print the first 10 records, record 15, records 20 to 30 and all records
over MFN 50 (included).
ii. Output ToAfter you have chosen what to print, you have to choose the output device. CDS/ISIS gives you thefollowing options:
Printer The output will be printed on the current Windows default printer. Postscript File The output will be stored in a file called output.ps in the Isis work directory (as
specified in parameter 5 of syspar.par). ASCII File (ANSI) The output will be stored as a text file in ASCII format using the
Windows character set. ASCII File (OEM) The output will be stored as a text file in ASCII format using the MS-
DOS character set.

When you print to a file CDS/ISIS will ask you, before starting the print run, to provide the name of theoutput file by means of an Open Dialog box.
iii. Print FormatIn this section you may choose an appropriate print format by selecting one of the pre-defined printformats. The check box Pre-defined format is to let you know if the print format shown below reallycorresponds to the print format name in the combo box. This is because this version of CDS/ISIS lets youmodify an existing print format shortly before printing. After that, you can decide if you want to save the
modified format by pushing the format save button .If the printout you are producing is an index, you have two options:to print one or more data elements of each record under the corresponding headings, you specify in theprint format the elements to be printed; orto only print a short reference to the records under each heading (e.g. the MFN) enter an asterisk (*)instead of a print format. In this case, instead of printing the master file record, CDS/ISIS prints the lastlevel heading (separated by a comma from the previous occurrence and indented by the amount specifiedin the data indention parameter). This facility is useful for producing compact indexes where you onlyprint a short reference to the record, such as the MFN. Note that when you use this option you mustspecify at least two sort keys.
iv. Recall ButtonPress this button to retrieve a previously saved print worksheet.
v. Save ButtonPress this button to save the current print worksheet settings.
vi. Preview ButtonPress this button to preview the first page of your document before it is printed.
3. Print Dialog box (Presentation)
Figure 44 - Print Dialog box (Presentation)
Use this page when you want your document to have titles, headers and footers. At the top of the page acombo box shows the object currently being edited (the text is actually entered in the edit at the bottom ofthe window). You may define and edit any of the following items by clicking on the Editing field: First,
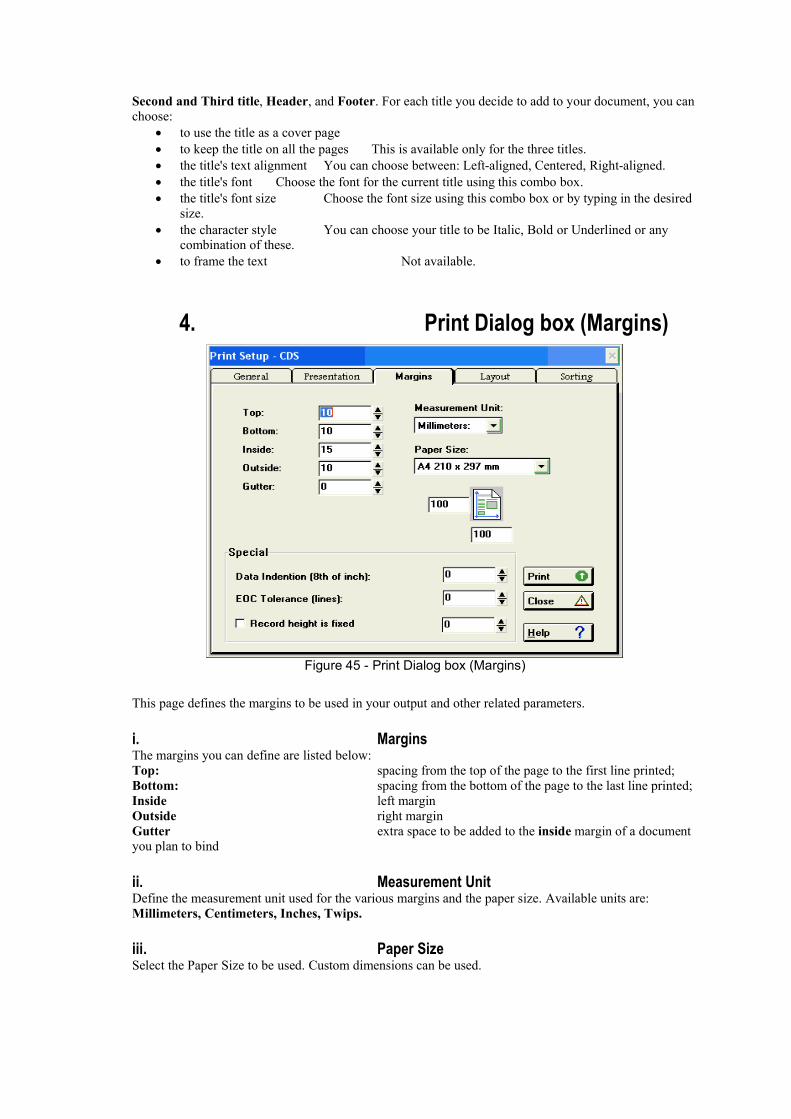
Second and Third title, Header, and Footer. For each title you decide to add to your document, you canchoose:
to use the title as a cover page to keep the title on all the pages This is available only for the three titles. the title's text alignment You can choose between: Left-aligned, Centered, Right-aligned. the title's font Choose the font for the current title using this combo box. the title's font size Choose the font size using this combo box or by typing in the desired
size. the character style You can choose your title to be Italic, Bold or Underlined or any
combination of these. to frame the text Not available.
4. Print Dialog box (Margins)
Figure 45 - Print Dialog box (Margins)
This page defines the margins to be used in your output and other related parameters.
i. MarginsThe margins you can define are listed below:Top: spacing from the top of the page to the first line printed;Bottom: spacing from the bottom of the page to the last line printed;Inside left marginOutside right marginGutter extra space to be added to the inside margin of a documentyou plan to bind
ii. Measurement UnitDefine the measurement unit used for the various margins and the paper size. Available units are:Millimeters, Centimeters, Inches, Twips.
iii. Paper SizeSelect the Paper Size to be used. Custom dimensions can be used.

iv. Data IndentionThis parameter should normally be specified when you use headings. It indicates the indentation of eachlevel of heading with respect to the one of a higher level and of the records with respect to the last levelheading.
v. EOC (End of Column) toleranceThis parameter indicates the minimum number of lines which must be available on the current column (orpage) before printing a record.
vi. Record height is fixedThis parameter fixes the printable area height of each record to a determined value. Useful for printinglabels, etc. Note that this parameter is not precise 100%.
5. Print Dialog box (Layout)
Figure 46 - Print Dialog box (Layout)
i. Number of ColumnsNumber of columns per page (1 - 6).
ii. Columns SpacingSpace between columns (using the current selected measurement unit)
iii. No DecorationsNo additional decorations (such as vertical lines or borders) will be printed on columns.
iv. Line BetweenCDS/ISIS will draw a line between each column.
v. BorderCDS/ISIS will draw a border around each column.
vi. Print Page NumbersSelect this check box if you want CDS/ISIS to print page numbers.

vii. Number on first pageYou may decide if you like numbers to be printed also on the first page. The first page is not the coverpage (if you are using some cover titles)
viii. PositionChoose if you prefer numbers to appear on the top or on the bottom of the page.
ix. AlignmentChoose Left, Centered, Right, Inside, or Outside.
x. Start fromFirst page number to be used.
xi. Apply ZoomThis Zoom value (50-120%) will affect the print format appearance so you will be able to fit more (orless) records on a single page with no changes on your print format.
xii. Don't use titlesTells CDS/ISIS to ignore any information in the Presentation page.
xiii. Don't use sortingTells CDS/ISIS to ignore the Sort page.
xiv. Just make HIT fileTells CDS/ISIS to stop processing just after the sorting of the records. This will produce a file (so calledHIT file) containing the sorted keys and their corresponding MFN numbers. The HIT file can be usedduring the ISO 2709 Export to produce sorted ISO files. A HIT file is composed by two files: <dbasename>.hit<dbasename>.hxfstored in Winisis’ default working directory.
xv. Max records per page/columnPrint at most n record per page. Specify the highest number of record per page after which a New Pagecommand is sent to the printer.
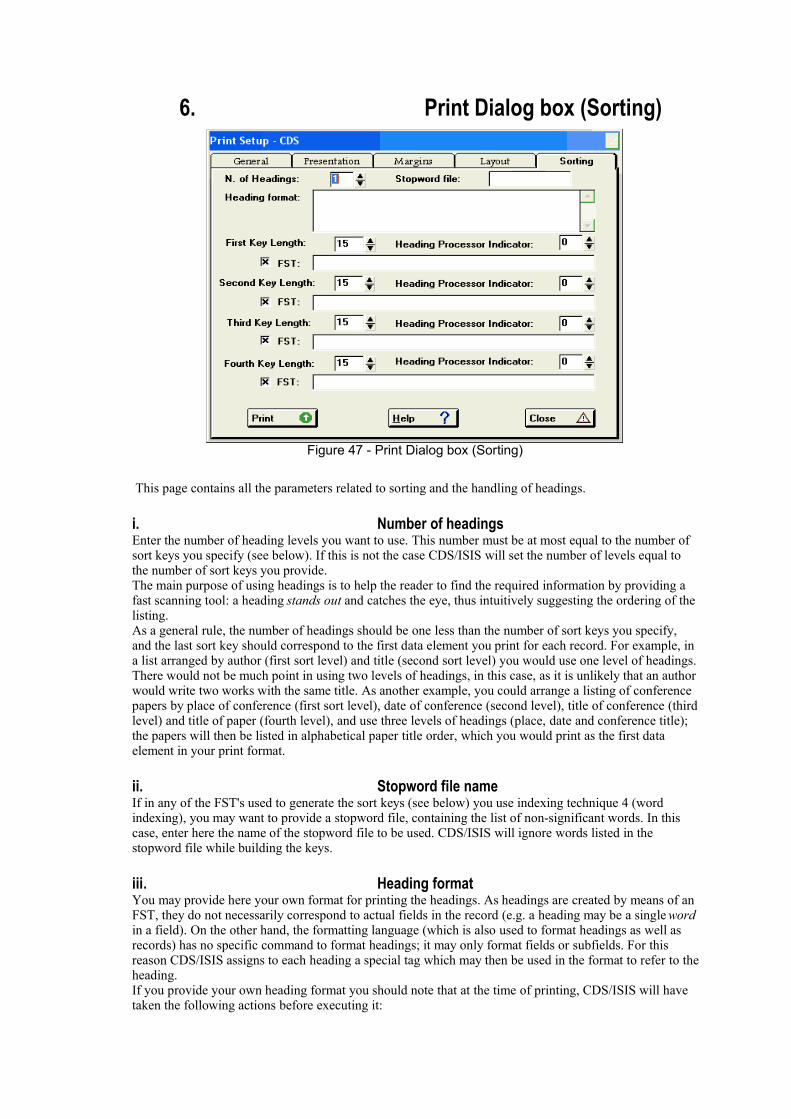
6. Print Dialog box (Sorting)
Figure 47 - Print Dialog box (Sorting)
This page contains all the parameters related to sorting and the handling of headings.
i. Number of headingsEnter the number of heading levels you want to use. This number must be at most equal to the number ofsort keys you specify (see below). If this is not the case CDS/ISIS will set the number of levels equal tothe number of sort keys you provide.The main purpose of using headings is to help the reader to find the required information by providing afast scanning tool: a heading stands out and catches the eye, thus intuitively suggesting the ordering of thelisting.As a general rule, the number of headings should be one less than the number of sort keys you specify,and the last sort key should correspond to the first data element you print for each record. For example, ina list arranged by author (first sort level) and title (second sort level) you would use one level of headings.There would not be much point in using two levels of headings, in this case, as it is unlikely that an authorwould write two works with the same title. As another example, you could arrange a listing of conferencepapers by place of conference (first sort level), date of conference (second level), title of conference (thirdlevel) and title of paper (fourth level), and use three levels of headings (place, date and conference title);the papers will then be listed in alphabetical paper title order, which you would print as the first dataelement in your print format.
ii. Stopword file nameIf in any of the FST's used to generate the sort keys (see below) you use indexing technique 4 (wordindexing), you may want to provide a stopword file, containing the list of non-significant words. In thiscase, enter here the name of the stopword file to be used. CDS/ISIS will ignore words listed in thestopword file while building the keys.
iii. Heading formatYou may provide here your own format for printing the headings. As headings are created by means of anFST, they do not necessarily correspond to actual fields in the record (e.g. a heading may be a single wordin a field). On the other hand, the formatting language (which is also used to format headings as well asrecords) has no specific command to format headings; it may only format fields or subfields. For thisreason CDS/ISIS assigns to each heading a special tag which may then be used in the format to refer to theheading.If you provide your own heading format you should note that at the time of printing, CDS/ISIS will havetaken the following actions before executing it:
1. each heading is assigned a tag equal to the field identifier specified in the FST used to build thecorresponding sort key (note however that when CDS/ISIS uses the default heading format itreassigns to each heading a sequential number starting from 1);
2. the current set of headings is then compared with the previous one and those which did notchange are deleted, as this normally means that they should not be printed. You may thereforeuse conditional formatting to provide the required spacing. Note, however, that headings are notdeleted, even if there was no change, if you specified 2 or 3 in the Heading processingindicator of the corresponding sort key.
Assume for example that the field identifiers assigned to the first and second sort keys are 1 and 2respectively, the following heading format may be used to always provide a blank line before the firstlevel heading and a blank line before the second level heading only when there is no change in the firstheading:
MHL,""#V1(0,4)/""#N1,V2(4,8)(note the use of the dummy field N1 to produce the blank line only when the first heading is missing).Also note that when you provide your own heading format CDS/ISIS will only use the data indentionparameter (supplied on the print worksheet) to offset the records printed under the last level heading. It istherefore your responsibility to provide any required indentation for the headings themselves. If you donot provide a heading format (i.e. you leave this field empty), CDS/ISIS will provide a default systemformat as follows:
MHL,""#V1(0,i)/""#V2(i,2i)/ . . . #where i is the value you have assigned to the data indention parameter on the print worksheet, and V1,V2, etc. are the first, second, etc. heading. The above default format will leave one blank line before eachheading and one blank line before the first record printed under the last level heading.
iv. Sort key parametersYou may specify up to 4 sort keys, which will be treated in a hierarchical manner. The first, or primary,sort key determines the primary sort sequence, the second sort key provides ordering for those recordshaving the same primary sort key, etc. For example, in a listing sorted by author (primary key), you mayarrange the records pertaining to a given author by title, by specifying the title as the second sort key.You should be aware that there is an important difference between the primary key and the second andhigher level keys. Whenever a master file record contains no field corresponding to the primary key, thatrecord will not appear in the listing. This is normally what you would expect: for example, an authorindex will only include entries for those records actually having an author. However, in those cases inwhich you want to ensure that all the selected records will indeed appear in your listing, you must provideadequate alternatives for those records in which the primary key might be missing. The IF statement of theformatting language will help you in achieving this. Records with no field corresponding to the second ora higher level key will be sorted as blanks (i.e. they will appear at the beginning of the corresponding list)and printed normally.For each key you must provide the three parameters described below. Field Select TableA Field Select Table (FST) defines the contents of the sort key and at the same time, if applicable, of thecorresponding heading (remember, however, that you may define more sort keys than headings). Thedifference between a sort key and the heading is that the first is used to arrange records in the requiredorder, whereas the second is used for printing. Although a sort key contains the same data as itscorresponding heading, this data may be represented in a different form. For example, a sort key is alwaysin upper case; if the field from which it was extracted contained filing information, it contains the sortableform of the field; etc. A heading, on the other hand, is output as specified, e.g. it will not be translated toupper case, unless you force upper case translation in the FST format. Furthermore, a heading alwayscontains the printable form of a field if this contains filing information.FSTs are discussed in detail in the CDS/ISIS Reference Manual. You may either supply the name of a pre-defined FST or enter one directly. If you want to use a pre-defined FST enter the name preceded by an atsign (@). The @ sign tells CDS/ISIS that this is a name, rather than an actual FST. To provide an actualFST, you must enter the three components separated by a space in the following order: field identifier,indexing technique, and format. In case you need to enter a multi-line FST, separate each line with a +sign surrounded by spaces. Here are two sample entries: the first one instructs CDS/ISIS to use the pre-
defined FST called AUTHOR; the second instructs the system to create a sort key from field 10 and a sortkey from each descriptor in field 20.
@AUTHOR
1 0 V10 + 1 2 V20In the second example, because the FST specifies two lines, all the generated headings will be sorted in asingle alphabetical sequence. In a multi-line FST you may use different field identifiers and indexingtechniques for each line, e.g.:
1 0 V10 + 2 2 V20If you specify a heading format in this case, the tag to be used in the format must take this into account.For the FST above, you must use V1 to refer to field 10 and V2 to field 20. This may be useful, forexample, to print the heading using different type fonts, depending on its origin.As mentioned above, if one or more fields selected by the FST contain filing information, CDS/ISIS willtake this into account while building the sort key. Heading processing indicatorThis parameter indicates whether CDS/ISIS should build a single sort key or one sort key for each elementproduced by the Field Select Table. In addition, it also indicates whether headings should be unique, i.e.printed only when they change, or printed in all cases.Enter the following:
1. 0 (zero) or 2 for single key generation: in this case the key is built from the first elementproduced by the Field Select Table. For example, if you sort by author you may use this option tospecify that you only want the first author to be used as a sort key, and, consequently, that agiven record should only be printed under the first author;
2. 1 or 3 for multiple key generation: in this case CDS/ISIS will build one key for each elementproduced by the Field Select Table. This option is normally used for the production of indexes.In this case the record from which the keys are extracted will be printed under each of theheadings. For example you may use multiple-key generation to produce an author index or akeyword index. If you request multiple key generation in more than one level, CDS/ISIS willproduce all the required combinations.
To produce unique headings, use the values 0 or 1. The values 2 or 3 will print the headings each time,whether they have changed or not. The latter feature is particularly useful for the production of cataloguecards.
Key lengthThis parameter defines the size of the sort key for this print run. You should select a size which issufficient, depending on the field from which the key is extracted, to produce the correct sequence. Forexample, if you specify a key length of 10 characters for a title, CDS/ISIS will only sort the first 10characters of each title. This may have the following consequences: firstly, all titles which are differentonly from the eleventh position onwards will most likely be in random order as CDS/ISIS will assume thatthey are in fact equal; secondly, if the title is one of the headings, only the first one will be printed becauseCDS/ISIS prints the heading only when there is a change in the corresponding sort key.On the other hand, you should not choose a sort key length which is too large, as this will increase the filesize and hence the time required for sorting. Furthermore there is a maximum limit on the total size of thesort keys, which may not exceed 4096 characters and on the hit file record size, which may not exceed30000 characters. Thus if you need to sort on more than one key you should ensure that the total keylength (for all keys) does not exceed 4096 characters and that the sum of the key length and the length ofthe corresponding headings does not exceed 30000 characters. If this happens, CDS/ISIS issues a warningmessage and ignores over-length records. FST check boxesThis check box tells CDS/ISIS to consider (if selected) or ignore (if not) the related sort key. It may beuseful when you use predefined print worksheets.

J. Export to XMLWinisis may export data in XML format using the following dialog box:
Figure 48- Export to XML Dialog
Note: some Winisis implementations may not include the “Export to XML” option in their menus. Youmay access it by editing your Winisis menu and adding the following item to one of the menus:
Export to XML[10146]
i. MFN limits (from/to)Enter here the lowest and highest MFN of the records to which the operation must be applied. Forexample: 1/20.
ii. Search Set (marked records)Select from the list the search set to which you would like to apply the operation. It is also possible tolimit the scope to marked records (if any).
iii. MFN optionsHere you decide if and how to export the Master File number.
iv. Subfields optionsHere you decide how subfields will be represented in the final XML file and DTD.
v. DTDSelect “Create DTD from FDT” if you wish to create a XML file representing your data base FieldDefinition Table structure.

vi. Other optionsCheck “Consider repeatability” if you wish repeatable fields to generate different XML tags.Check “Use mode proof (MPL)” in order to export the information as it was entered by the user.Check “Use CDATA sections” to avoid problems with special characters, such as < and >Check “Compatible WWWISIS” if you wish to reuse the XML format in external web applications usingWWWISIS.
Clicking “Field Selection” will open the following dialog:
Figure 49 - XML field export options
This dialog allows you to define which fields to export (default is ALL fields) and, if possible, link two ormore databases to output an unique XML file.
6. Field Definition Table (FDT)
A. IntroductionThe Field Definition Table (FDT) provides information on the contents of the master records in a givendata base. In particular it defines the various fields which may be present and a number of parameters foreach field.The FDT is used to control the creation of data entry worksheets for the data base and to validate thecontents of fields, and it is created or modified by means of the Edit > Field Definition Table of the Mainmenu. A sample FDT, as displayed by the line editor, is shown below.
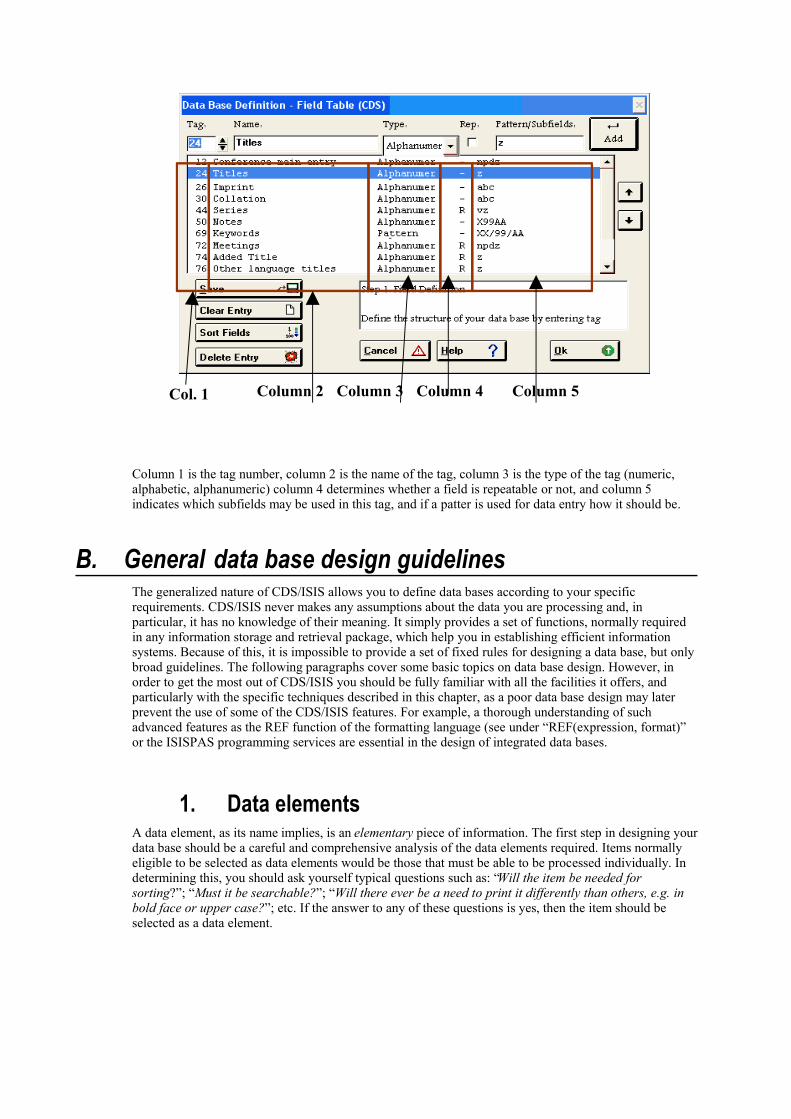
Column 1 is the tag number, column 2 is the name of the tag, column 3 is the type of the tag (numeric,alphabetic, alphanumeric) column 4 determines whether a field is repeatable or not, and column 5indicates which subfields may be used in this tag, and if a patter is used for data entry how it should be.
B. General data base design guidelinesThe generalized nature of CDS/ISIS allows you to define data bases according to your specificrequirements. CDS/ISIS never makes any assumptions about the data you are processing and, inparticular, it has no knowledge of their meaning. It simply provides a set of functions, normally requiredin any information storage and retrieval package, which help you in establishing efficient informationsystems. Because of this, it is impossible to provide a set of fixed rules for designing a data base, but onlybroad guidelines. The following paragraphs cover some basic topics on data base design. However, inorder to get the most out of CDS/ISIS you should be fully familiar with all the facilities it offers, andparticularly with the specific techniques described in this chapter, as a poor data base design may laterprevent the use of some of the CDS/ISIS features. For example, a thorough understanding of suchadvanced features as the REF function of the formatting language (see under “REF(expression, format)”or the ISISPAS programming services are essential in the design of integrated data bases.
1. Data elementsA data element, as its name implies, is an elementary piece of information. The first step in designing yourdata base should be a careful and comprehensive analysis of the data elements required. Items normallyeligible to be selected as data elements would be those that must be able to be processed individually. Indetermining this, you should ask yourself typical questions such as: “Will the item be needed forsorting?”; “Must it be searchable?”; “Will there ever be a need to print it differently than others, e.g. inbold face or upper case?”; etc. If the answer to any of these questions is yes, then the item should beselected as a data element.
Column 5Column 2 Column 3 Column 4Column 1Col. 1
2. Fields and subfieldsData elements may stored in fields or subfields. A field is identified by a numeric tag and is defined in theFDT of the data base. You may think of the tag as the name of the field as it is known by CDS/ISIS. Eachtime you want CDS/ISIS to perform an operation on a particular data element you must supply the tag ofthe field where that data element is stored. For example, in the FDT given above, the title is assigned tag24. If you wanted to display the contents of the title field you would ask CDS/ISIS to display V24 (whichis the formatting language command to display a field).CDS/ISIS normally treats the contents of a field as a continuous string of characters and as a single entity.You may, however, subdivide a field into subfields. In this case the field contains more than one dataelement, each being stored in a different subfield. Unlike fields, subfields are not identified by a tag but bya subfield delimiter.A subfield delimiter is a 2-character code preceding and identifying a variable length subfield within afield. It consists of the character ^ (not sign) followed by an alphabetic or numeric character, e.g., ^a.In the FDT listed above, the Imprint field has been defined as containing the place of publication,publisher and date of publication in the three subfields a, b and c respectively. A sample Imprint could be:
^aParis^bUnesco^cl985
A field containing subfields may be accessed as a single entity, by referring only to the tag of the field(e.g. v26). In this case CDS/ISIS provides options for displaying subfield delimiters (normally forproofreading purposes), or automatically replacing them by punctuation marks. However, becausesubfields are identifiable through their subfield delimiter, you may also access each subfield individually,by specifying both the field tag and the relevant subfield delimiter. For example, V26^b refers to thePublisher subfield of the Imprint field and V26^a to the Place of publication subfield.In designing a data base, remember that the CDS/ISIS formatting language has a facility for automaticallyreplacing subfield delimiters by punctuation marks. Try, if possible, to chose delimiter codes in such away that the replacing punctuation is suitable for the application, otherwise you will have to format eachsubfield individually. The standard delimiter replacement table is given under “Mode command”.Note that the first subfield of a subfielded field need not have a subfield delimiter, provided that it isalways present. For example, if in a title field you wanted to use a subfield for the subtitle, the title part ofthe field, which will obviously always be present, need not have an explicit delimiter. Thus the followingentry for this field would be possible:
Il nome della rosa^bUn manoscritto
3. Repeatable fieldsIn those cases where a given data element may occur more than once in a given record, CDS/ISIS willcreate as many fields as required to hold all the occurrences of the data element. This type of field iscalled a repeatable field. A typical example is the Author field in a bibliographic record. All theoccurrences of a repeatable field have the same tag. CDS/ISIS offers facilities for handling and formattingrepeatable fields. You can access a particular occurrence of a repeatable field individually through theformatting language. If, for example, it is the case, that the first occurrence of a repeatable field needs aparticular treatment (e.g. the first author), it is possible.Repeatable fields may contain subfields, which gives you a facility for handling 2-dimensional tabulardata (one dimension being the field, and the other the subfields).Furthermore, you may define a field to be repeatable even though it contains a single data element. It maybe useful, for example, to be able to break down a relatively long text such as an abstract or a summary,into paragraphs to improve its legibility in a printout. By defining such a field as repeatable, you may thenuse the formatting language facilities, provided for repeatable fields, to indent the first line of eachparagraph. Another example is when you want to be able to search such long fields by words. By enteringeach paragraph as a separate occurrence, you may later use the (F) operator of the search language torestrict to a paragraph the search for two or more words, which you would not be able to do if the fieldwas not repeatable (see under “Field level and proximity search operators”)
4. Control charactersCertain characters stored in a field, although keyed in as data, will be interpreted by CDS/ISIS as controlcharacters, rather than data characters, and will normally activate some special type of processing.Control characters are normally reserved for CDS/ISIS use and may not therefore be used as data.Subfield delimiters are an example of control characters. Other control characters recognised byCDS/ISIS are described below.
a. Search term delimitersSearch term delimiters may be used to identify key terms or phrases assigned to each record to enable itsretrieval. The various techniques which CDS/ISIS provides to index records are described under TheField Select Table (FST). Keywords may be delimited in either of two ways: by enclosing them between apair of slashes (/.../) or by enclosing them in triangular brackets <>. The advantage of using triangularbrackets over using slashes, is that, these, unlike slashes, are reserved characters, and CDS/ISIS providesoptions to either display the brackets or suppress them, whereas no option is provided to suppress slashes.When brackets are suppressed, they are normally deleted from the displayed version of the field, exceptwhen an open bracket immediately follows a closed one: in this case CDS/ISIS will replace them with asemicolon and a space. For example, by selecting the appropriate display mode the following entry:<university course> <documentation training> <library school>
will be displayed as follows:university course; documentation training; library school.
Except for the case mentioned above, you must ensure that the required spaces precede and follow theopen and closed bracket respectively. For example when keywords are embedded within other text in thefield as below:Mission report describing a <university course> in <documentationtraining> at an East African <library school>
the spaces surrounding the keywords must be present in order to produce the correct display:Mission report describing a university course in documentationtraining at an East African library school
If the field was entered as follows:Mission report describing a<university course>in<documentationtraining>at an East African<library school>
CDS/ISIS would display it as:Mission report describing auniversity courseindocumentation trainingat an East African library school
In other words, CDS/ISIS simply ignores the brackets and does not replace them with spaces.
b. Filing informationWhen producing printed catalogues you will need to sort the contents of one or more fields in order toprint the records in the required sequence. CDS/ISIS will try to produce a sorting sequence according tonormally accepted filing rules, but sometimes this will not be possible. In these cases CDS/ISIS offers youthe possibility to state explicitly how a given field must be sorted by supplying filing information at thetime you enter the data. Filing information is permanently recorded in the field.This facility allows you to instruct CDS/ISIS to replace or ignore any sequence of data characters in afield whenever the field is used as a filing element, by using one of the following specifications:
<text-a = text-b> in this case, CDS/ISIS will replace text-a by text-b when the field is used in sorting,but use text-a (and ignore text-b) when displaying the field;
<Text-a> in this case text-a will be ignored when sorting and only used to display the field.
Below are a few cases in which this facility is normally used (but its use is not restricted to just thesecases):
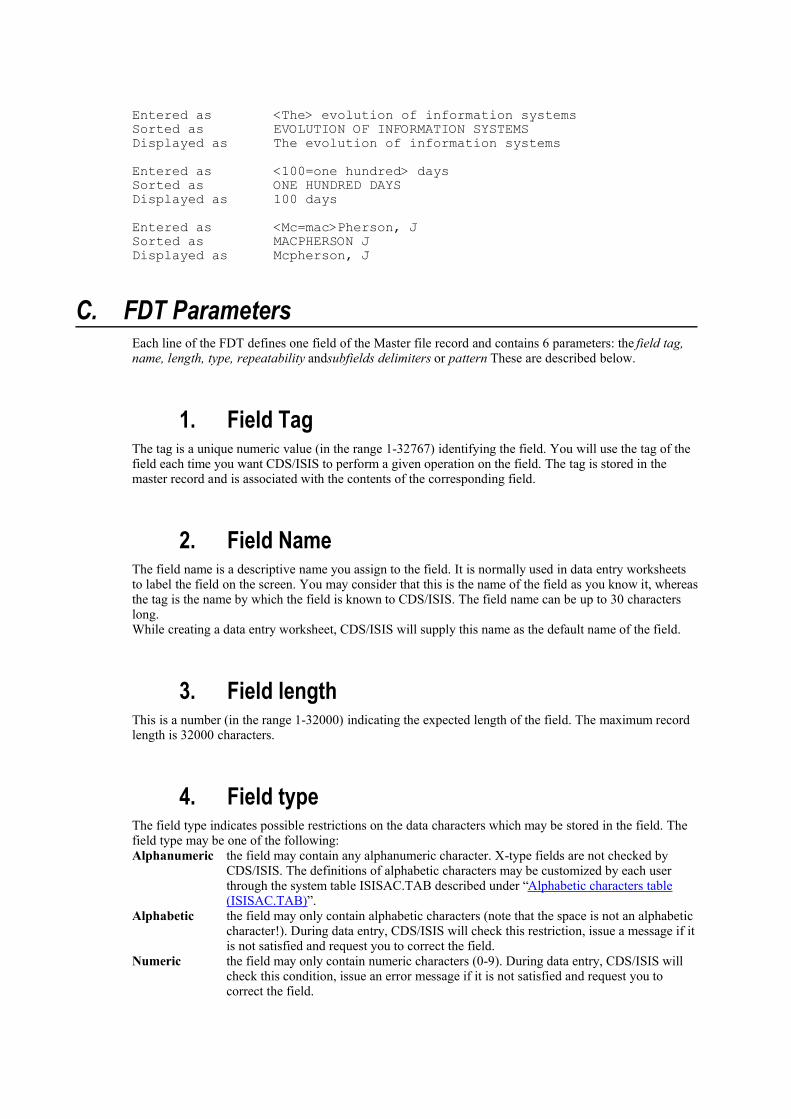
Entered as <The> evolution of information systemsSorted as EVOLUTION OF INFORMATION SYSTEMSDisplayed as The evolution of information systemsEntered as <100=one hundred> daysSorted as ONE HUNDRED DAYSDisplayed as 100 daysEntered as <Mc=mac>Pherson, J Sorted as MACPHERSON JDisplayed as Mcpherson, J
C. FDT ParametersEach line of the FDT defines one field of the Master file record and contains 6 parameters: the field tag,name, length, type, repeatability andsubfields delimiters or pattern These are described below.
1. Field TagThe tag is a unique numeric value (in the range 1-32767) identifying the field. You will use the tag of thefield each time you want CDS/ISIS to perform a given operation on the field. The tag is stored in themaster record and is associated with the contents of the corresponding field.
2. Field NameThe field name is a descriptive name you assign to the field. It is normally used in data entry worksheetsto label the field on the screen. You may consider that this is the name of the field as you know it, whereasthe tag is the name by which the field is known to CDS/ISIS. The field name can be up to 30 characterslong.While creating a data entry worksheet, CDS/ISIS will supply this name as the default name of the field.
3. Field lengthThis is a number (in the range 1-32000) indicating the expected length of the field. The maximum recordlength is 32000 characters.
4. Field typeThe field type indicates possible restrictions on the data characters which may be stored in the field. Thefield type may be one of the following:Alphanumeric the field may contain any alphanumeric character. X-type fields are not checked by
CDS/ISIS. The definitions of alphabetic characters may be customized by each userthrough the system table ISISAC.TAB described under “Alphabetic characters table(ISISAC.TAB)”.
Alphabetic the field may only contain alphabetic characters (note that the space is not an alphabeticcharacter!). During data entry, CDS/ISIS will check this restriction, issue a message if itis not satisfied and request you to correct the field.
Numeric the field may only contain numeric characters (0-9). During data entry, CDS/ISIS willcheck this condition, issue an error message if it is not satisfied and request you tocorrect the field.
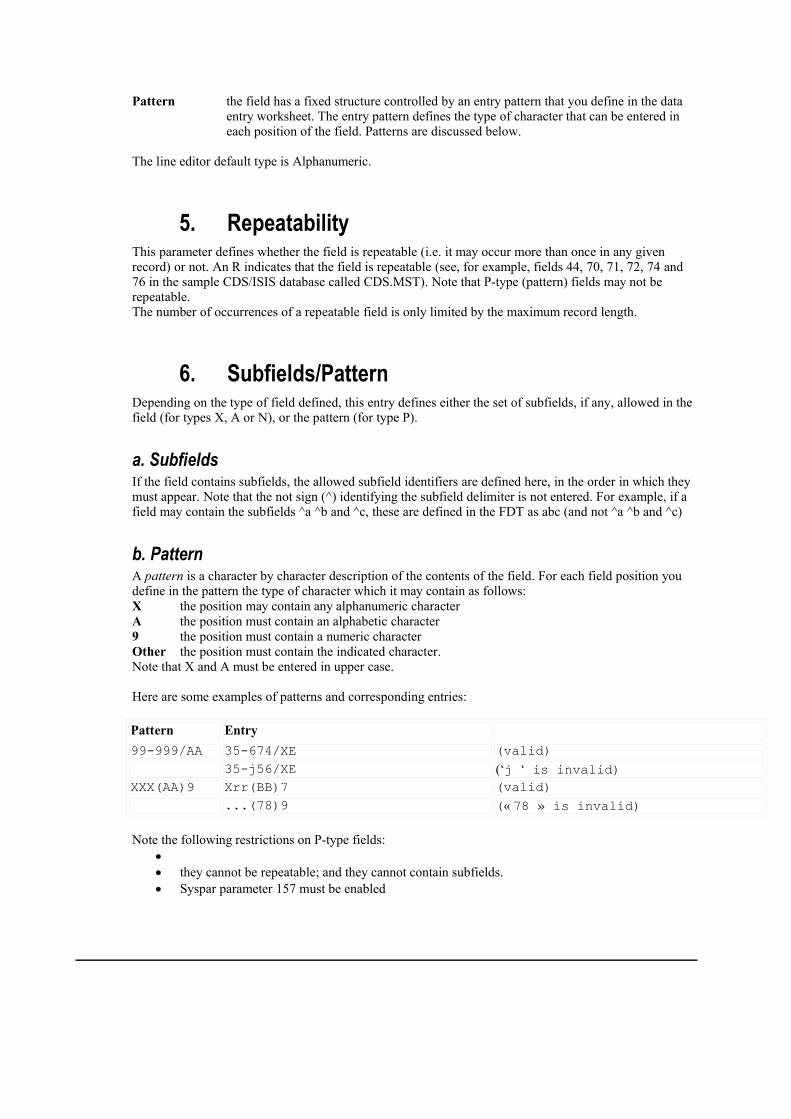
Pattern the field has a fixed structure controlled by an entry pattern that you define in the dataentry worksheet. The entry pattern defines the type of character that can be entered ineach position of the field. Patterns are discussed below.
The line editor default type is Alphanumeric.
5. RepeatabilityThis parameter defines whether the field is repeatable (i.e. it may occur more than once in any givenrecord) or not. An R indicates that the field is repeatable (see, for example, fields 44, 70, 71, 72, 74 and76 in the sample CDS/ISIS database called CDS.MST). Note that P-type (pattern) fields may not berepeatable.The number of occurrences of a repeatable field is only limited by the maximum record length.
6. Subfields/PatternDepending on the type of field defined, this entry defines either the set of subfields, if any, allowed in thefield (for types X, A or N), or the pattern (for type P).
a. SubfieldsIf the field contains subfields, the allowed subfield identifiers are defined here, in the order in which theymust appear. Note that the not sign (^) identifying the subfield delimiter is not entered. For example, if afield may contain the subfields ^a ^b and ^c, these are defined in the FDT as abc (and not ^a ^b and ^c)
b. PatternA pattern is a character by character description of the contents of the field. For each field position youdefine in the pattern the type of character which it may contain as follows:X the position may contain any alphanumeric characterA the position must contain an alphabetic character9 the position must contain a numeric characterOther the position must contain the indicated character.Note that X and A must be entered in upper case.
Here are some examples of patterns and corresponding entries: Pattern Entry99-999/AA 35-674/XE (valid)
35-j56/XE (‘j ‘ is invalid)XXX(AA)9 Xrr(BB)7 (valid)
...(78)9 (« 78 » is invalid)
Note the following restrictions on P-type fields: they cannot be repeatable; and they cannot contain subfields. Syspar parameter 157 must be enabled
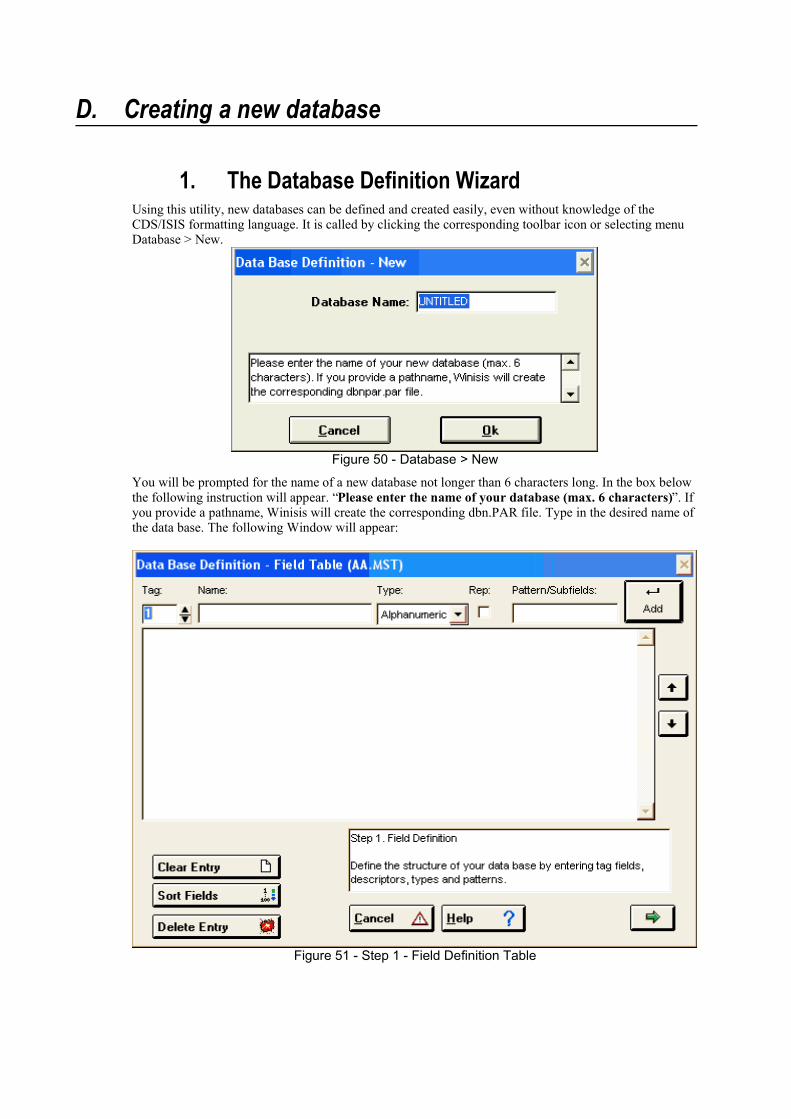
D. Creating a new database
1. The Database Definition WizardUsing this utility, new databases can be defined and created easily, even without knowledge of theCDS/ISIS formatting language. It is called by clicking the corresponding toolbar icon or selecting menuDatabase > New.
Figure 50 - Database > New
You will be prompted for the name of a new database not longer than 6 characters long. In the box belowthe following instruction will appear. “Please enter the name of your database (max. 6 characters)”. Ifyou provide a pathname, Winisis will create the corresponding dbn.PAR file. Type in the desired name ofthe data base. The following Window will appear:
Figure 51 - Step 1 - Field Definition Table

a. Step 1: Field definition table:Define the structure of the new database by entering field tags, field descriptions, types, and patterns.Refer to FDT parameters for a more detailed description of the required parameters. Tag 1 is alreadygiven for the first tag number, but it can be changed to any tag number you prefer.In the “Name” block type a short description of the field for the type of information to be entered there,e.g. Name of person.
In the “Type” block you can select the appropriate type for the field by clicking on the downward arrow.It can either be Alphanumeric, Numeric and Alphabetic. Then indicate whether the field should berepeatable, by clicking in the check mark box “Rep”.In the “Pattern/Subfield“box enter the subfield delimiters if you want to use subfields by entering theletters of numbers of the subfields (e.g. a,b,c or 1,2,3). Then click on Add, and the field will be added inthe box below. Continue to add more fields and the descriptions and parameters as required.Entries can be deleted, fields can be removed from the table, sorted, or the whole process can becancelled. UP and DOWN arrows will change the order of the Tags. Use the “Help” button to guide you.
Press the right arrow to proceed to the next step.
b. Step 2: Creation of data entry worksheetDuring this step the worksheet for adding/modifying records/data to the database is created. CDS/ISISmakes provision for the definition of multiple data entry worksheets for a database. By clicking on theright arrow between the two panels the field is added, and by clicking on the left arrow it is removed. Thedouble arrow will add all defined fields to the worksheet.
It is not necessary to add all fields to a particular worksheet, or have the same order of fields as in theFDT.
By clicking the button , default values, help messages, and field validation can be defined. If allfields should be defined, check the box “Prompt for complete data on insert”.
Figure 52 - Data entry worksheet definition
Default values will be present when a new record is created.The Help message will be displayed during data entry.Record validation: Validation of fields will help to improve the quality of the records during data entry.Make use of the power of the CDS/ISIS formatting language, by adding commands, especially the IF -THEN - ELSE command. Click on ‘OK’ once finished with this window.Pick-lists: it is possible to define lists of pre-defined values for this entry. Pick lists are explained in aseparated document “Pick-lists.doc”.
By clicking the UP and DOWN arrows on the worksheet definition window, the order of the fields on theworksheet can be altered. Just clicking on the “Record Validation” button, will open a window for thedefinition of field validation.The green Left arrow can be used to go back to Step 1 (Field definition), while the green Right arrow willproceed to Step 3 (Display format). The ‘CANCEL’ button will cancel the process of defining thedatabase.
c. Step 3: Display FormatWhen proceeding to this step, you will be prompted whether you want to make use of the “Print formatAssistant”. If you answer “Yes”, this wizard will write a display format for you without any knowledge ofthe CDS/ISIS formatting language. All the fields of the Field definition table will be added. However, youcan edit the format at a later stage by deleting unwanted fields in your display format.
If the answer is “NO”, the display format will have to be defined command by command.Various types of display formats are then available to be Choose from:Normal - a display format without any fancy additions
CDS/ISIS DOS Compatible Format This format can be read by the DOS version of CDS/ISIS.Decorated format a display format with colours, boxes, which can only be used in
CDS/ISIS for Windows.HTML Normal a display format in HTMLHTML Table with headers a display format in HTML tables with table headers.
The format can be changed, e.g., the order of the fields, font, etc. By clicking the buttons on the right handside, one can change the font properties to Italic, Bold, or Underline. The chain button will create aHyperlink. By clicking on the right green arrow the last step will have to be done.
d. Step 4: Defining the Field Select Table (FST)You will be prompted, whether you want to make use of the”Dictionary Assistant”. By answering “Yes”,guidance will be provided in defining the FST; if you say ‘NO’, you can write your own FST.Select the fields which you want to be searchable in the database. It is not necessary to add all the fields ofthe FDT, but only those which you are likely to search for, e.g. Name, Town and Country. Click in thecheckbox to select the searchable fields you need for information retrieval.Then click on “OK’, which will present another window, where the FST can be changed and customised.To change anything, select the line in the FST box by clicking on it, then type in any changes. If theIndexing Technique has to be changed, select the required one, by clicking on the down arrow in theselect box. Nine indexing techniques are available. After the changes have been done, click on the blue“Add” button, to apply the changes in the FST line.
FST lines can be deleted with the ‘Delete button’, while other tags can be added, by making use of the“Add” button. Some changes can be reverted with the “Undo” option. To go back to Step 3, use the greenleft button; to finish the database definition, click on “Terminate”. Click “Yes” when asked “Winisis willnow create the database. Do you want to continue? (C:\isis\data\TEST.MST)”. The database will becreated in this folder, and the necessary TEST.PAR will be created in c:\isis\data\, if parameter 5 in theSYSPAR.PAR file points to this folder.
Note for experienced users: it is possible and recommended to edit FST files using a external ASCIItext editors, such as notepad.exe
E. Modifying the FDTAlthough you may modify an FDT after it is created by using the Edit > Field Definition Table services,you should be aware that certain changes may have severe consequences, especially if you have alreadyentered records in the corresponding data base. Additional changes, however, may be required not only tothe worksheets, but also to the FST’s and the display formats defined for the data base.In case of major modifications of the FDT, changes may be required in the data base itself. If changes arerequired to the data base, you may be able to perform them automatically using the Global Change utilities(on the utilities menu) or the import/export services, or you may have to do them manually. See also thesection on Database Definition Wizard.
Below are some hints on the impact of certain FDT changes:
Adding a field: Add the field to at least one of the data entry worksheets; add the field to at least oneof the display formats; add the field to the Inverted file FST, if required.
Deleting a field: After deleting a field from the FDT, you may want to delete the field from theworksheet(s) in which it occurred by using the Edit > Data entry worksheet services, inorder to prohibit further data entry. Also delete the field from the print formats and theFST in which it is used.

7. The Search Language
A. IntroductionThe search language of CDS/ISIS is based on Boolean algebra, which provides a convenient way ofexpressing logical operations between classes. Each search term associated with a given record, in fact,can be viewed as representing the class of all those records associated with that term. Thus by expressinglogical operations between search terms you can define precisely the class of records to be retrieved inresponse to your needs.The examples given here are not meant to show how to formulate specific queries, but simply to illustratethe capabilities of the CDS/ISIS search language. However, the search language alone is not sufficient toenable you to perform a search in a specific data base. The key to efficient and effective searching is athorough knowledge of the search terms usable for a given data base. It is important, therefore, that youbecome familiar with the dictionary of search terms available for the data base you are querying and withthe rules followed to index the records in that data base.The most efficient way to carry out a search with CDS/ISIS is through the Inverted file (the very reason tomaintain an Inverted file is indeed to permit fast retrieval). You may only do this, however, if your searchrequirements are within the scope of the dictionary of search terms defined for a given data base, i.e. theyhave been anticipated when the contents of the Inverted file was defined. No matter how well thought outyour data base was, however, there will still be cases where you are not able to formulate a search basedon the Inverted file. For these cases, CDS/ISIS provides an alternate search method, called free textsearching, which allows you to satisfy any search requirement independently from the contents of theInverted file. Because this second method is much less efficient it is normally used in conjunction with anInverted file search to refine the search strategy, but may, if necessary be used independently. If you findyourself performing lengthy free text searches relatively often, it may be worth while considering whethera re-definition of the Inverted file would be called for.
B. Search expressions
1. Types of search termIn formulating a search expression you may use the three types of terms described below.
a. Precise termsA precise term is any searchable element defined for a given data base, such as subject descriptors, keywords, key phrases, words in titles, author names, etc. You must be familiar with the search termsavailable for each data base you intend searching.When you use a precise search term you must specify it in exactly the same way it is known to CDS/ISIS.You should normally have a list of search terms at hand when you formulate your query (or use thedictionary window, to display the available search terms).Even minor variations in spelling will cause CDS/ISIS to reject it. Thus, for example, if the term known toCDS/ISIS is COLOR (American spelling), you may not use the English spelling COLOUR as this will berejected.An important point to be remembered is that if a search term contains parentheses or any one of thesearch operators (* + (G) (F) . $ ^) or begins with a number sign (#) you must enclose it in doublequotation marks (") in order to avoid a possible ambiguity. Thus if your search term is:
GERMANY (FEDERAL REPUBLIC)you must enter it as follows:
"GERMANY (FEDERAL REPUBLIC)"or else CDS/ISIS will issue a syntax error message.
b. Right-truncated search termsInstead of specifying a precise search term, you may just give a root. This technique, referred to as rootsearching or right truncation, allows you to search on leading sequences of characters. CDS/ISIS willautomatically perform a logical OR operation between all search terms having the specified root.Right-truncation is indicated by placing a dollar sign ($) immediately after the last root character. Assume,for example, that your list of search terms contains the following set of terms:
FILE ORGANIZATIONFILMFILM INDUSTRYFILM LIBRARIESFILM-MAKERFILM-MAKINGFILM-MAKING TRAININGFILMSTRIPFILTRATIONThen FILM$ is equivalent to:
FILMFILM INDUSTRYFILM LIBRARIESFILM-MAKERFILM-MAKINGFILM-MAKING TRAININGFILMSTRIPwhereas FILM-$ is equivalent to:
FILM-MAKERFILM-MAKINGFILM-MAKING TRAININGAs for precise search terms, if your root contains parentheses, any one of the search operators, orbegins with a number sign (#) you must enclose it in double quotation marks ("). For example, "FILM $"is equivalent to:
FILMFILM INDUSTRYFILM LIBRARIESbut FILM $ (without the surrounding double quotes) would produce an error message.
c. ANY TermsAn ANY term is a collective term standing for a pre-defined set of search terms. Whenever you use anANY term in your search formulation, CDS/ISIS will automatically OR together all search termsassociated with that ANY term.An ANY term consists of the word ANY followed by a unique identifier, usually mnemonic, assigned tothe associated set of terms. For example, the term ANY BENELUX COUNTRY could be used toretrieve records indexed with the individual name of any country in the Benelux group (Belgium,Netherlands, Luxembourg).Before an ANY term can be used in a search formulation, its meaning must be defined by specifying theassociated set of terms. Note that not all data bases need to implement this facility. Therefore beforeattempting to use an ANY term you must ensure that it is indeed available for the data base you arequerying and, if so, that the ANY term you intend to use is actually defined.
2. Search operatorsYou may combine two or more search terms in a search expression by using search operators whichindicate the intended relationship between the terms.

a. Logical OR (inclusive)The logical OR is the class union operator. The result of a logical OR between two classes is the classobtained by merging the two classes, retaining common elements, if any, only once. Thus if A and B aretwo terms, representing the two classes of documents indexed with terms A and B respectively, the logicalOR between these two classes is the class of documents indexed with term A or term B or both, asindicated schematically below:
Figure 53 - Logical OR
The logical OR, therefore, is used to broaden the scope of the search and will, in general, increase thenumber of hits. The symbol used to indicate the logical OR operation is the plus sign (+).Thus, for example, to retrieve documents about the Benelux countries one could use the logical ORoperator as follows:
BELGIUM + NETHERLANDS + LUXEMBOURGNote that the order in which the three countries are given is irrelevant.
b. Logical ANDThe logical AND is the class intersection operator. The symbol used to indicate the logical ANDoperation is the asterisk (*). The result of a logical AND between two classes is the class containing onlythose elements which are common to both classes. Thus, if A and B are two terms, representing the twoclasses of documents indexed with terms A and B respectively, the logical AND between these twoclasses is the class of documents indexed simultaneously with both term A and term B, as indicatedschematically below:
Figure 54 - Logical AND
The logical AND, therefore, is used to narrow the scope of the search by requiring the co-occurrence ofterms and will, in general, decrease the number of hits.Thus, for example, to retrieve documents about 'on-line information retrieval systems' you might use thelogical AND operator as follows:
ON-LINE SYSTEMS * INFORMATION RETRIEVALNote that, as for the logical OR, the order in which the terms are given is irrelevant.The result of a logical AND may be an empty class, i.e. a class containing no elements. In this case norecords are retrieved. In the example above, the empty class would be obtained if no record in the database contained both the term ON-LINE SYSTEMS and the term INFORMATION RETRIEVAL.
c. Field level and proximity search operatorsThese operators are more restrictive types of the logical AND operator and are particularly useful fornatural language searching.The field level and proximity search operators are:

(G) same field (all occurrences of a repeatable field are treated as a single entity), forexample:
water (G) soil will retrieve all records with both water and soil provided that they occur in the samefield;
(F) same field or individual occurrence of a repeatable field, for example:water (F) soil will retrieve all records with both water and soil in the same field or the same
occurrence of a repeatable field ((G) and (F) are equivalent when applied to nonrepeatable fields);
. (period) as (F), but with the additional restriction that the terms are no more than nwords apart, where n is the number of periods plus one. For example:
water . soil adjacentwater . . soil at most one word between water and soilwater . . . soil at most two words between water and soil$ as (F), but with the additional restriction that the terms must be exactly n words apart,
where n is the number of dollars plus one. For example:water $ soil adjacentwater $ $ soil exactly one word between water and soilwater $ $ $ soil exactly two words between water and soil
Note that the operators . and $ must be preceded and followed by one space.
d. Logical NOTThe logical NOT is the class exclusion operator. The result of a logical NOT between two classes is theclass containing all the elements of the first class which do not also belong to the second class. Thus, if Aand B are two terms, representing the two classes of documents indexed with terms A and B respectively,the logical NOT between A and B is the class of documents indexed with term A but not simultaneouslywith term B, as indicated schematically below: The symbol used to indicate the logical NOT operation isthe not sign (^).
Figure 55 - Logical NOT
The logical NOT should be used with extreme caution, since it may easily result in the inadvertent loss ofrelevant material.For example, a search request might concern documents about disadvantaged groups but excludingreferences to disadvantaged children. One might be tempted to formulate the query as follows:
DISADVANTAGED GROUP ^ DISADVANTAGED CHILDRENIt is quite possible, however, for a document on the subject to contain a section on disadvantaged children.This document would then be missed if one formulated the query as above.Note further, that, unlike the logical OR and the logical AND, the logical NOT operation does not give thesame results if the two operands are inverted. Thus, A ^ B is not the same as B ^ A (except in theparticular case in which A and B represent the same class, in which case the result is the empty class).
3. Syntax of Search expressionsYou may form complex search expressions by combining two or more search terms with the searchoperators described above.

As in normal algebra, you may use parentheses to alter the order of evaluation. In the evaluation ofexpressions the priority of the operators is as follows:
(highest) $ and . | (F) | (G) V * and ^(lowest) +
If two or more operators of the same priority appear in the same expression within the same level ofparentheses, they are executed from left to right. Thus, for example, to evaluate the following expression:
A + B * CCDS/ISIS will first evaluate B * C and then evaluate the logical OR between A and (B * C). Whereas toevaluate the following:
(A + B) * Cit will first evaluate A + B and then the logical AND between (A + B) and C. You may nest parentheses, ifrequired, as in the following example:
((A + B) * C + (D + E) + F) ^ GIn forming search expressions you must observe certain simple syntactical rules:1 no two logical operators may be adjacent to each other, except for repeats of " . " and " $
" (which may not, however, be mixed together);1 the parentheses used must be balanced, i.e. the number of open parentheses must be equal to the
number of closed ones and each open parenthesis must have a matching closed one.
4. Operand qualifierYou may use a qualifier to specify the field or group of fields in which you want a term to appear. This isparticularly useful for data bases which may contain the same data in a number of different fields.The qualifier has the following general formats:
search term/(t1,t2,t3, . . . )where t1, t2, t3, . . . is the set of field identifiers where you want the term to be searched.Operand qualifiers can be used in conjunction with search operators to restrict the search to specified field(s) and can also be applied to a right-truncated search term or an ANY term. For example, consider abibliographic data base where terms are generated, on a word by word basis, from all the fields. By simplyANDing it is possible to retrieve any records that contains the terms INTERNATIONAL, EXPERT andMEETING:
INTERNATIONAL * EXPERT * MEETINGHowever, the number of records that satisfy this query may be very large, as each word could appear inany of a number of fields, e.g. title, corporate body, subject, etc. By using the (F) operator:
INTERNATIONAL (F) EXPERT (F) MEETINGthe number of records retrieved would be reduced, but you may still not be certain of the result, as theterms might appear in the summary, the title, the publisher, etc.However, by adding the qualifier /(62):
INTERNATIONAL (F) EXPERT (F) MEETING/(62)only those records having all the terms in the same occurrence of field 62 will be retrieved (note that, inthis case, it is sufficient to qualify only one of the terms). When the operand is a right-truncated searchterm or an ANY term, CDS/ISIS will apply the qualifier to all members of the corresponding set. Thus forexample:
ANY BENELUX COUNTRY/(64)is equivalent to:
BELGIUM/(64) + NETHERLANDS/(64) + LUXEMBOURG/(64)
5. Developing a search strategyThe basic building block of a search formulation is a search expression. In response to a searchexpression CDS/ISIS will:
assign a unique number, called the set number, to the search expression you have just entered(provided it contains no syntactical errors);
display the number of postings for each term in the expression and the number of recordsretrieved.
If the search expression contains an ANY term, the postings of all search terms assigned to the ANY termas well as the aggregate posting value for the ANY term will be displayed. Similarly, if the searchexpression contains a right-truncated search term, all the postings of the individual search terms as wellas the aggregate posting value for the truncated term will be displayed.If you use a term which is not a valid search term, CDS/ISIS will set its posting value to zero and flag theterm with the message:
** NOT FOUND **As was mentioned above, CDS/ISIS assigns a unique number to each search expression. It also saves therecords matching each search expression. In later search expressions you may refer to previously enteredones by simply using the set number assigned by CDS/ISIS preceded by a number sign (#).This facility allows you to develop your search strategy step by step. Breaking the query into elementsalso allows you, not only to check at each step the number of records retrieved, but also to display theretrieved records themselves. Therefore you may verify at any time the logical validity of the searchformulation in terms of the relevance of the records retrieved.Suppose, for example, that after displaying the records retrieved by the search expression (ITALY +FRANCE) * ART you realized that some irrelevant records were retrieved because they dealt with theconservation of monuments. You could then modify the formulation by introducing the following searchexpression:
#1 ^ CONSERVATION OF MONUMENTSA reference to a previously defined search expression is called a backward reference. Note that it ispossible to apply a qualifier to a backward reference. For example,
#1/(64)would select, from the records retrieved by search expression 1, only those in which the search expressionwas verified on field 64.There are no fixed and established rules for formulating a search. You will develop your own habits asyou gain experience in using CDS/ISIS. In general, an inexperienced person should not try to use complexsearch expressions immediately, but rather start with simple ones, which are then combined to produce thefinal search formulation. By referring again to the example above, the same search could have beenformulated in 4 steps, as follows:
set number #1: ARTset number #2: ITALY + FRANCEset number #3: CONSERVATION OF MONUMENTSset number #4: #1 * #2 ^ #3
C. Free text searchingThis technique allows you to specify search requirements on fields which have not been inverted and/or tospecify conditions which you would not otherwise be able to indicate through the type of searchexpressions described above, such as the comparison of fields or comparisons of the numerical value offields.To perform a free text search you must first select the Expert Search command in the Search menu andenter your search statement in the Search expression box of the Expert Search Window. In order todistinguish a free text search statement from a normal search expression, it must be preceded by a questionmark, as follows: ? Boolean expression or ? #n Boolean expression or ? *startMFN,endMFN Boolean expressionwhere:

? identifies this as a free text search#n optionally restricts the free text search to the results of a previously submitted
search (n is the set number of the search, which may be either an Inverted filesearch expression, another free text search or a combination of both); if omittedthe free text search is carried out over the whole data base;
Boolean expression is a CDS/ISIS Boolean expression as defined under the paragraph “Booleanexpressions”.
startMFN,endMFN define the scope of the free text search.
In response to a free text search, CDS/ISIS will compute the Boolean expression for each Master filerecord and build a hit list containing the records satisfying the specified conditions (i.e. all records forwhich the Boolean expression yields the value True). For example:
? v24 : 'unesco' and val(v26^c) >= 1986would retrieve all records containing unesco in field 24 with a date of publication (v26^c) greater or equalto 1986. The following:
? #2 (p(v24) or p(v29)) and v26^b : 'unesco'would retrieve, amongst the records retrieved by search expression #2, only those containing unesco insubfield b of field 26, provided that they contain either field 24 or field 29 or both.Like Inverted file search expressions, each free text search is assigned a set number, which you may lateruse in other search expressions. Note that, although Inverted file search expressions and free text searchexpressions may not be mixed in the same statement, it is possible, using a backward reference, tocombine any number of them in a separate search expression, as in the example below:
set 1 WATER * SOILset 2 ? #1 val(v26^c)>1985set 3 ANY LATIN AMERICAset 4 #2 * #3
Because CDS/ISIS must read each Master file record to check whether the conditions are satisfied, a freetext search may be time consuming, especially when applied to a whole data base.
Another example:
? *10,5670 v0:'Petrarca'
will search through records between 10 and 5670 for those containing the phrase "Petrarca". Rememberthat v0 (v-zero) stands for the "whole record content".It is not possible to use * in conjunction with # (search result).

8. The Formatting LanguageThe formatting language allows you to define precise formatting requirements for data base records.Through this language you may select one or more specific data elements in the order you want andoptionally insert constant text of your choice, e.g. to label some or all the fields, as well as specify verticaland horizontal spacing requirements. A collection of formatting commands in the language described inthis chapter is called a format. In general a format defines a subset of your data base record, which maythen be used by CDS/ISIS to perform a given function. Although formats are primarily used to specify theway records are displayed on the screen or the printer, they are also widely used throughout the systemany time you need to perform specific operations on one or more data elements. For example, in a FieldSelect Table (FST), you use a format to specify to which data a given indexing technique is applied. Theformatting language is therefore the core of many CDS/ISIS operations and an efficient use of CDS/ISISrequires a thorough knowledge of this technique.
To a novice, some formats may appear to be very complex, suggesting that the formatting language itselfis complex. In fact, all formats, even the most complicated ones, are made up of one or more simplecommands or statements, separated by commas or spaces. The apparent complexity stems from the factthat there may be many of these commands in a format. Thus the key to understanding formats is toanalyse each command individually.Although all formats are defined using the same formatting language, they may be categorized, dependingon their intended use, as follows:
Display formats: used for displaying records on the screen or printing records on the printer (in the lattercase they are referred to as print formats);
Extraction formats: used in FSTs to define the data to be indexed.
When CDS/ISIS processes a format, it works with three objects: a data base record, the format and awork area where the output produced by the format is stored. The commands are executed sequentially inthe order they are listed in the format. Some commands produce data (e.g. the contents of a given field),while others produce actions (such as skipping to a new line, leaving one or more blank lines, etc.). Thedata produced are stored as lines of text in the work area, which is then passed to the relevant program forfurther processing, e.g. for printing.
When a format is used to display data, the lines produced are normally restricted to a certain maximumlength (the line width), which is determined by the size of the current window.Unless new lines are forced by explicit formatting commands, CDS/ISIS will output data sequentially andtry to fill each line as much as possible. If a given field exceeds the line width, CDS/ISIS will split it intoas many lines as necessary. When CDS/ISIS breaks data into lines, the break always occurs at word level,i.e. a word will never be split between two lines. All formatting commands may be entered in upper orlower case or a combination of the two.
Unless otherwise noted, all the formatting examples in the following sections refer to the sample recordgiven below, where the content of each field is given as actually stored in the record. This record is takenfrom the sample CDS data base contained in the original CDS/ISIS installation as supplied by UNESCO.MFN = 4 Tag Contents24 <An> Electric hygrometer apparatus for measuring water-
vapour loss from plants in the field26 ^aParis^bUnesco^cl96530 ^ap. 247-257^billus.44 Methodology of plant eco-physiology: proceedings of the
Montpellier Symposium50 Incl. Bibl.

69 Paper On: <hygrometers><plant transpiration><moisture><waterbalance>
70 Grieve, B.J.70 Went, F.W.
A. Field SelectorsField selectors are commands used to extract a specific field or subfield from a record. A specialcommand allows you to extract the MFN of the record, even though the MFN is not, properly speaking, afield (the MFN has no tag and is not defined in the FDT).
1. Field commandTo extract a field from a record code the letter V followed by the tag of the field to be extracted. The V (amnemonic code for Variable length field) is the command telling CDS/ISIS that you want to extract afield. It may be entered indifferently in upper or lower case. Below are some examples. Format Outputv24 <An> Electric hygrometer apparatus for measuring water-
vapour loss from plants in the fieldv26 ^aParis^bUnesco^cl965v30 ^ap. 247-257^billus.v44 Methodology of plant eco-physiology: proceedings of the
Montpellier Symposium
2. Subfield commandTo extract a particular subfield from a given field just append the corresponding subfield delimiter to thetag, as shown in below. Note that you may use the special subfield delimiter ^* to select the first subfield,whichever this may be. In this case the first subfield need not be preceded by an actual subfield delimiter.Note that, as alphabetic subfield delimiters are case insensitive, you may enter the subfield delimiter codein either upper or lower case. Format Outputv26^a Parisv26^b Unescov30^a p. 247-257V26^* Parisv44^* Methodology of plant eco-physiology: proceedings of the
Montpellier Symposium
3. Field occurrencesIt is possible to display specific occurrence of a repeatable field, narrowing the output to one or a range ofoccurrences of a repeatable field by specifying the occurrence number or range, enclosed in squarebrackets, immediately following the field selector.For example:v10[1] retrieves the first occurrence of field 10v10[2..4] retrieves the 2nd through the 4th occurrence of field 10v10[3..] retrieves the 3rd through the last occurrence of field 10v10[1]^a retrieves subfield ^a in the 1st occurrence of field 10
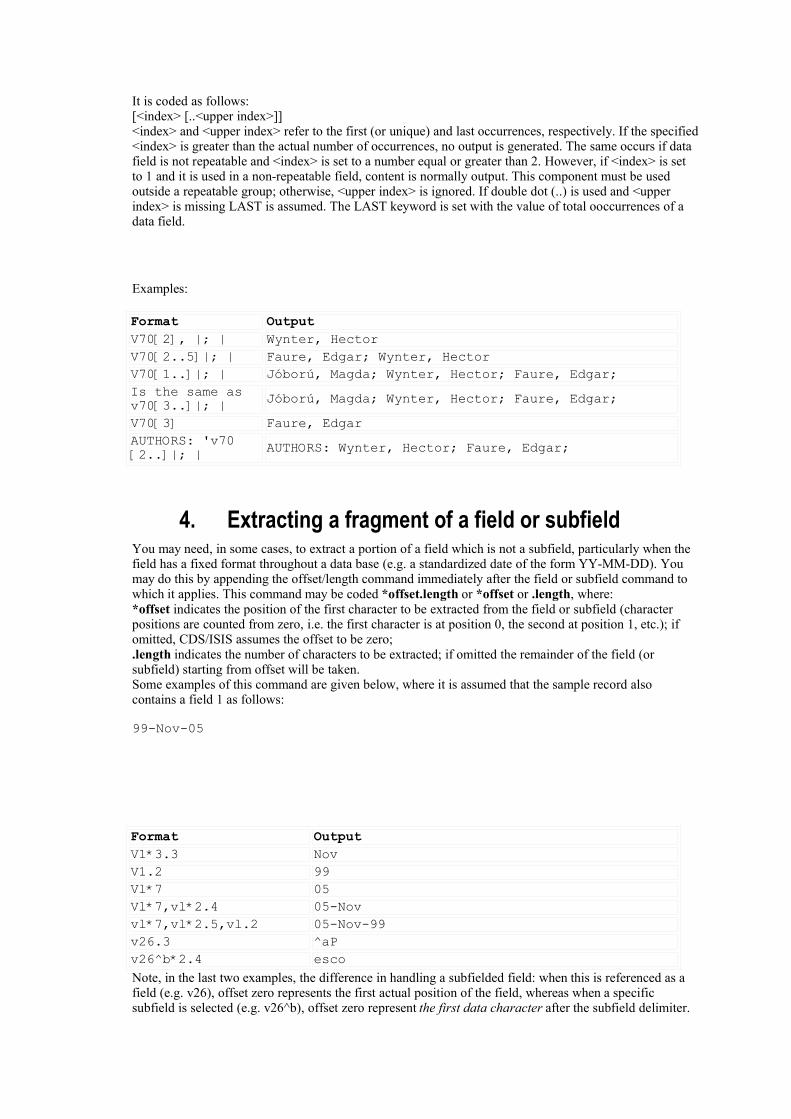
It is coded as follows:[<index> [..<upper index>]]<index> and <upper index> refer to the first (or unique) and last occurrences, respectively. If the specified<index> is greater than the actual number of occurrences, no output is generated. The same occurs if datafield is not repeatable and <index> is set to a number equal or greater than 2. However, if <index> is setto 1 and it is used in a non-repeatable field, content is normally output. This component must be usedoutside a repeatable group; otherwise, <upper index> is ignored. If double dot (..) is used and <upperindex> is missing LAST is assumed. The LAST keyword is set with the value of total ooccurrences of adata field.
Examples: Format OutputV70[2], |; | Wynter, HectorV70[2..5]|; | Faure, Edgar; Wynter, HectorV70[1..]|; | Jóború, Magda; Wynter, Hector; Faure, Edgar;Is the same asv70[3..]|; | Jóború, Magda; Wynter, Hector; Faure, Edgar;V70[3] Faure, EdgarAUTHORS: 'v70[2..]|; | AUTHORS: Wynter, Hector; Faure, Edgar;
4. Extracting a fragment of a field or subfieldYou may need, in some cases, to extract a portion of a field which is not a subfield, particularly when thefield has a fixed format throughout a data base (e.g. a standardized date of the form YY-MM-DD). Youmay do this by appending the offset/length command immediately after the field or subfield command towhich it applies. This command may be coded *offset.length or *offset or .length, where:*offset indicates the position of the first character to be extracted from the field or subfield (characterpositions are counted from zero, i.e. the first character is at position 0, the second at position 1, etc.); ifomitted, CDS/ISIS assumes the offset to be zero;.length indicates the number of characters to be extracted; if omitted the remainder of the field (orsubfield) starting from offset will be taken.Some examples of this command are given below, where it is assumed that the sample record alsocontains a field 1 as follows:
99-Nov-05
Format OutputV1*3.3 NovV1.2 99Vl*7 05Vl*7,vl*2.4 05-Novvl*7,vl*2.5,vl.2 05-Nov-99v26.3 ^aPv26^b*2.4 escoNote, in the last two examples, the difference in handling a subfielded field: when this is referenced as afield (e.g. v26), offset zero represents the first actual position of the field, whereas when a specificsubfield is selected (e.g. v26^b), offset zero represent the first data character after the subfield delimiter.
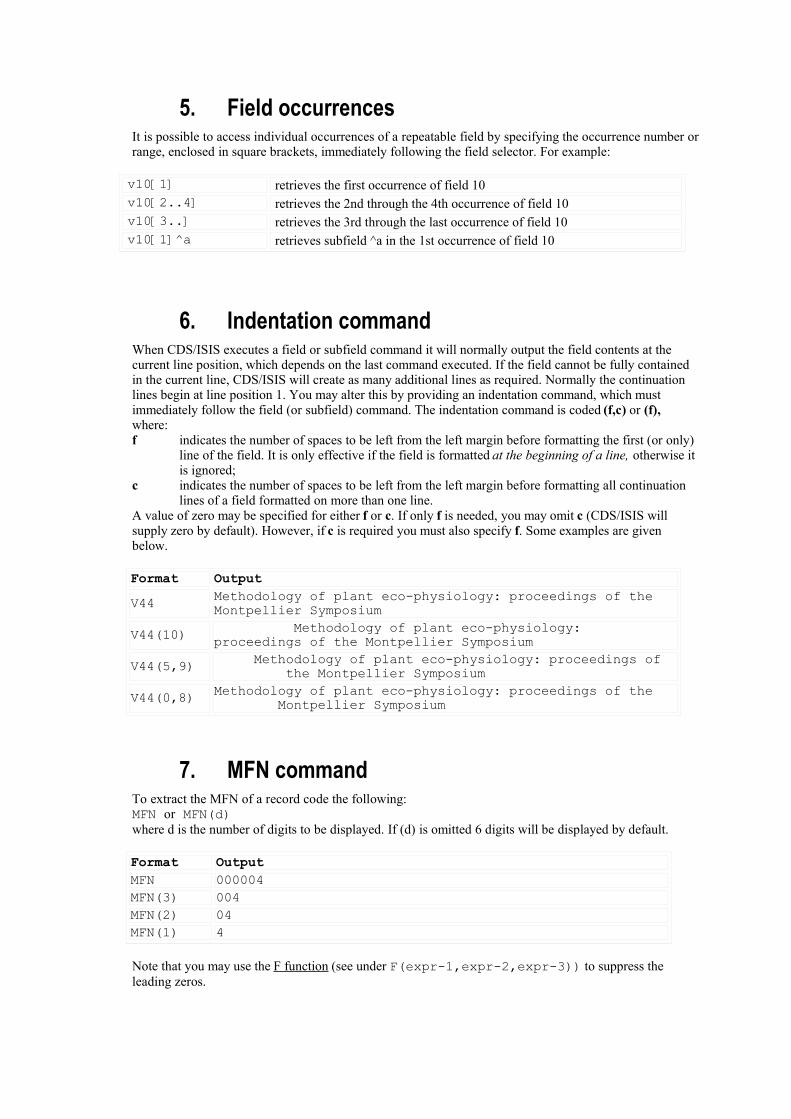
5. Field occurrencesIt is possible to access individual occurrences of a repeatable field by specifying the occurrence number orrange, enclosed in square brackets, immediately following the field selector. For example:
v10[1] retrieves the first occurrence of field 10v10[2..4] retrieves the 2nd through the 4th occurrence of field 10v10[3..] retrieves the 3rd through the last occurrence of field 10v10[1]^a retrieves subfield ^a in the 1st occurrence of field 10
6. Indentation commandWhen CDS/ISIS executes a field or subfield command it will normally output the field contents at thecurrent line position, which depends on the last command executed. If the field cannot be fully containedin the current line, CDS/ISIS will create as many additional lines as required. Normally the continuationlines begin at line position 1. You may alter this by providing an indentation command, which mustimmediately follow the field (or subfield) command. The indentation command is coded (f,c) or (f),where:f indicates the number of spaces to be left from the left margin before formatting the first (or only)
line of the field. It is only effective if the field is formatted at the beginning of a line, otherwise itis ignored;
c indicates the number of spaces to be left from the left margin before formatting all continuationlines of a field formatted on more than one line.
A value of zero may be specified for either f or c. If only f is needed, you may omit c (CDS/ISIS willsupply zero by default). However, if c is required you must also specify f. Some examples are givenbelow. Format OutputV44 Methodology of plant eco-physiology: proceedings of the
Montpellier SymposiumV44(10) Methodology of plant eco-physiology:
proceedings of the Montpellier SymposiumV44(5,9) Methodology of plant eco-physiology: proceedings of
the Montpellier SymposiumV44(0,8) Methodology of plant eco-physiology: proceedings of the
Montpellier Symposium
7. MFN commandTo extract the MFN of a record code the following:MFN or MFN(d)where d is the number of digits to be displayed. If (d) is omitted 6 digits will be displayed by default. Format OutputMFN 000004MFN(3) 004MFN(2) 04MFN(1) 4
Note that you may use the F function (see under F(expr-1,expr-2,expr-3)) to suppress theleading zeros.

B. Mode commandCDS/ISIS may display data in three different modes:
proof mode: in this mode, fields are displayed exactly as they are stored in the record. Note thatCDS/ISIS does not insert any separator between fields or occurrences of a repeatablefield. It is therefore your responsibility to ensure adequate separation of fields by usingspacing commands, literals or repeatable groups as appropriate (see under “Horizontaland vertical spacing commands”, “Literals”, and “Repeatable groups”). This mode isnormally used to display records for proofreading purposes.
heading mode: this mode is normally used for headings when printing catalogues and indexes. Allcontrol characters embedded in the data, such as filing information (see under “Filinginformation”) and descriptor delimiters (< and >) are ignored (except as noted below),whereas subfield delimiters are replaced by punctuation (see below).
data mode: this mode is similar to heading mode, but, in addition, each field is automaticallysuffixed with a full stop (.) followed by two spaces (or just two spaces if the fieldalready ends with a punctuation mark). Note, however, that this automatic punctuationis suppressed if the field selector is followed by a suffix-literal (see under “Literals”).
When CDS/ISIS formats a subfielded field in heading or data mode it will automatically replaceembedded subfield delimiters by punctuation marks (the initial subfield delimiter, if any, is alwaysignored). Furthermore, the special character combination ”> <” is replaced by “;” thus providing a simpleway to format fields containing lists of key phrases enclosed in triangular brackets (and saving keystrokesduring data entry). The standard subfield delimiter replacement table provided is as follows:
^A replaced by “ ;”^B through to ^I replaced by “ ,”all others replaced by “ .”
A mode command is coded Mmc, where:
m specifies the mode as follows:P proof modeH heading modeD data mode
c specifies case translation as follows:U data are converted to upper caseL data are left unchanged
A mode command may appear as many times as necessary in a format, each remaining in effect until it ischanged by a subsequent one. In the absence of an explicit mode command, CDS/ISIS will use MPL bydefault (proof mode, no upper case conversion). Examples of mode commands are given in the tablebelow. Format Outputmpl,v24 <An> Electric hygrometer apparatus for measuring water-
vapour loss from plants in the fieldmhl,v24 An Electric hygrometer apparatus for measuring water-
vapour loss from plants in the fieldmdl,v24 An Electric hygrometer apparatus for measuring water-
vapour loss from plants in the field.mdu,v24 AN ELECTRIC HYGROMETER APPARATUS FOR MEASURING WATER-
VAPOUR LOSS FROM PLANTS IN THE FIELD.mpl,v26 ^aParis^bUnesco^cl965mhl,v26 Paris, UNESCO, 1965mdu,v26 PARIS, UNESCO, 1965.mpl,v69 Paper on: <hygrometers><plant
transpiration><moisture><water balance>
mdl,v26 Paper on: hygrometers; plant transpiration; moisture;water balance.
C. Horizontal and vertical spacing commandsThe formatting language provides five commands to control horizontal and vertical spacing. They aresummarized in the table below:The Xn command inserts n spaces before formatting the next data. However, if less than n positions areavailable on the current line, CDS/ISIS will simply skip to a new line. Thus, for example, if the nextavailable position on the current line is 77 and the defined line width is 80, the execution of the commandX7 will cause the next data to be formatted at the beginning of the next line (and not at the third positionof the next line). (not supported in WINISIS graphical mode, where it has same effect as TAB) The Cn command causes the next data to be formatted starting from position n of the current line. If thecurrent line position is greater than n, then the next data will be formatted starting on position n of thefollowing line. This facility allows you to produce tabular output. Note that if n is greater than the linewidth, the command is ignored.
The / command is similar to a carriage return on a typewriter, i.e. it forces a new line and causes thereforethe next data to be formatted at the beginning of a line. However, unlike a carriage return, multipleadjacent / commands, although syntactically correct, have the same effect as a single / command, i.e. a /will never produce blank lines. The # command is provided for this purpose. It performs the same function as the /, but the skipping to anew line is unconditional. Thus you may use the combination / # to ensure that one (and only one) blankline will appear on the output (note that the combination ## may cause one or two blank lines to beinserted depending on whether the line being formatted when the first # is executed is empty or not).The use of the # command may cause a problem in those cases where the fields selected may be absent.This situation is best illustrated through the following example:
/#V10/#V20/#V30
If all fields are present in the record, the result will be that fields 10, 20 and 30 will each start on a newline and be preceded by a single blank line. However, if field 20 is missing there will be two blank linesbetween field 10 and field 30. This may be undesirable: if, in fact, what you want is a single blank linebetween each field regardless of the presence or absence of some of the fields, then the above format willnot produce the desired results.The % command is provided to solve this problem. Its effect is to suppress all contiguous blank lines (ifany), existing between the current line and the last non-blank line, at the time this command is executed.Thus the following format:
%##V10%##v20%##v30 . . . . . .
will produce one and only one blank line between each field even when one or more of them are absentfrom a given record. A line with absent fields and an unattached Cn or Xn command is not empty.
D. LiteralsA literal is a string of characters, enclosed between appropriate delimiters, which will be inserted as is inthe output. Literals may be used, for example, to label fields.Three types of literals may be specified:
conditional literals: define text which will be output only if the associated field is present in the record. Ifthe associated field selector is a subfield command (e.g. v24^a), the text will be included only if therequested subfield is present in the field. If the associated field selector specifies a repeatable field, thetext will only be included once, regardless of the number of occurrences of the field. Conditional literalsare enclosed in double quotation marks (“”), e.g. "Title: "
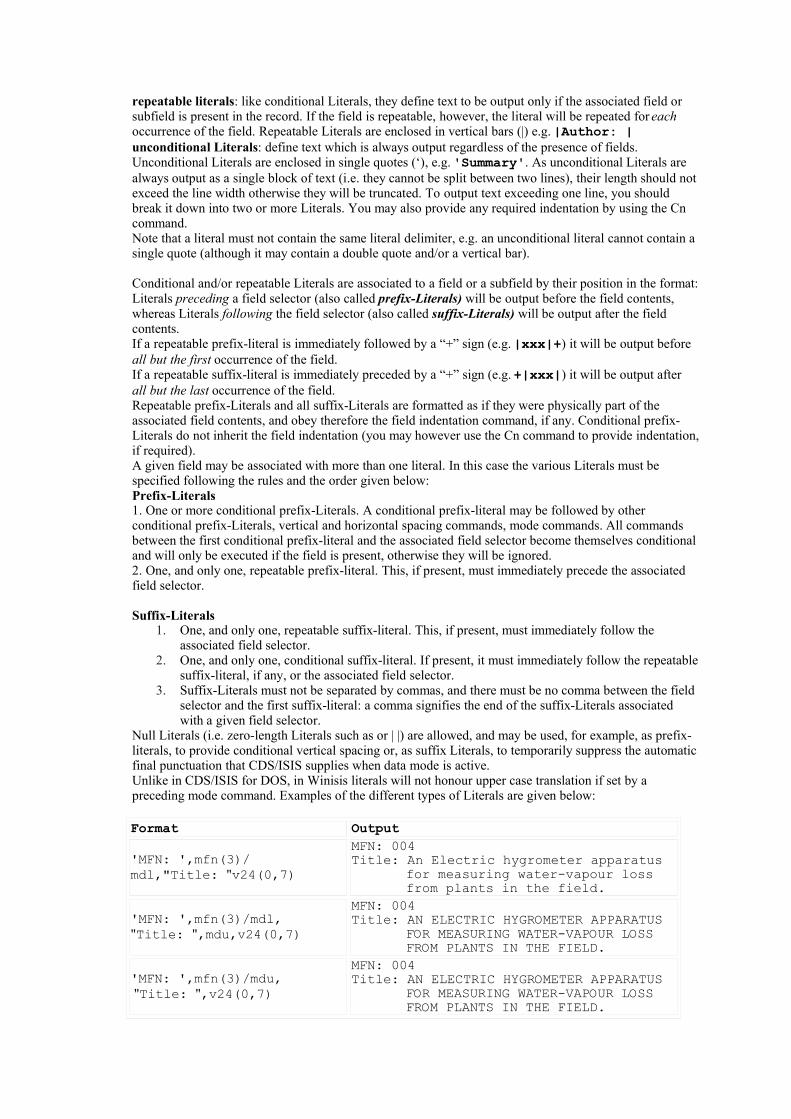
repeatable literals: like conditional Literals, they define text to be output only if the associated field orsubfield is present in the record. If the field is repeatable, however, the literal will be repeated for eachoccurrence of the field. Repeatable Literals are enclosed in vertical bars (|) e.g. |Author: |unconditional Literals: define text which is always output regardless of the presence of fields.Unconditional Literals are enclosed in single quotes (‘), e.g. 'Summary'. As unconditional Literals arealways output as a single block of text (i.e. they cannot be split between two lines), their length should notexceed the line width otherwise they will be truncated. To output text exceeding one line, you shouldbreak it down into two or more Literals. You may also provide any required indentation by using the Cncommand.Note that a literal must not contain the same literal delimiter, e.g. an unconditional literal cannot contain asingle quote (although it may contain a double quote and/or a vertical bar).
Conditional and/or repeatable Literals are associated to a field or a subfield by their position in the format:Literals preceding a field selector (also called prefix-Literals) will be output before the field contents,whereas Literals following the field selector (also called suffix-Literals) will be output after the fieldcontents.If a repeatable prefix-literal is immediately followed by a “+” sign (e.g. |xxx|+) it will be output beforeall but the first occurrence of the field.If a repeatable suffix-literal is immediately preceded by a “+” sign (e.g. +|xxx|) it will be output afterall but the last occurrence of the field.Repeatable prefix-Literals and all suffix-Literals are formatted as if they were physically part of theassociated field contents, and obey therefore the field indentation command, if any. Conditional prefix-Literals do not inherit the field indentation (you may however use the Cn command to provide indentation,if required).A given field may be associated with more than one literal. In this case the various Literals must bespecified following the rules and the order given below:Prefix-Literals1. One or more conditional prefix-Literals. A conditional prefix-literal may be followed by otherconditional prefix-Literals, vertical and horizontal spacing commands, mode commands. All commandsbetween the first conditional prefix-literal and the associated field selector become themselves conditionaland will only be executed if the field is present, otherwise they will be ignored.2. One, and only one, repeatable prefix-literal. This, if present, must immediately precede the associatedfield selector.
Suffix-Literals1. One, and only one, repeatable suffix-literal. This, if present, must immediately follow the
associated field selector.2. One, and only one, conditional suffix-literal. If present, it must immediately follow the repeatable
suffix-literal, if any, or the associated field selector.3. Suffix-Literals must not be separated by commas, and there must be no comma between the field
selector and the first suffix-literal: a comma signifies the end of the suffix-Literals associatedwith a given field selector.
Null Literals (i.e. zero-length Literals such as or | |) are allowed, and may be used, for example, as prefix-literals, to provide conditional vertical spacing or, as suffix Literals, to temporarily suppress the automaticfinal punctuation that CDS/ISIS supplies when data mode is active.Unlike in CDS/ISIS for DOS, in Winisis literals will not honour upper case translation if set by apreceding mode command. Examples of the different types of Literals are given below: Format Output'MFN: ',mfn(3)/mdl,"Title: "v24(0,7)
MFN: 004Title: An Electric hygrometer apparatus
for measuring water-vapour lossfrom plants in the field.
'MFN: ',mfn(3)/mdl,"Title: ",mdu,v24(0,7)
MFN: 004Title: AN ELECTRIC HYGROMETER APPARATUS
FOR MEASURING WATER-VAPOUR LOSSFROM PLANTS IN THE FIELD.
'MFN: ',mfn(3)/mdu, "Title: ",v24(0,7)
MFN: 004Title: AN ELECTRIC HYGROMETER APPARATUS
FOR MEASURING WATER-VAPOUR LOSSFROM PLANTS IN THE FIELD.
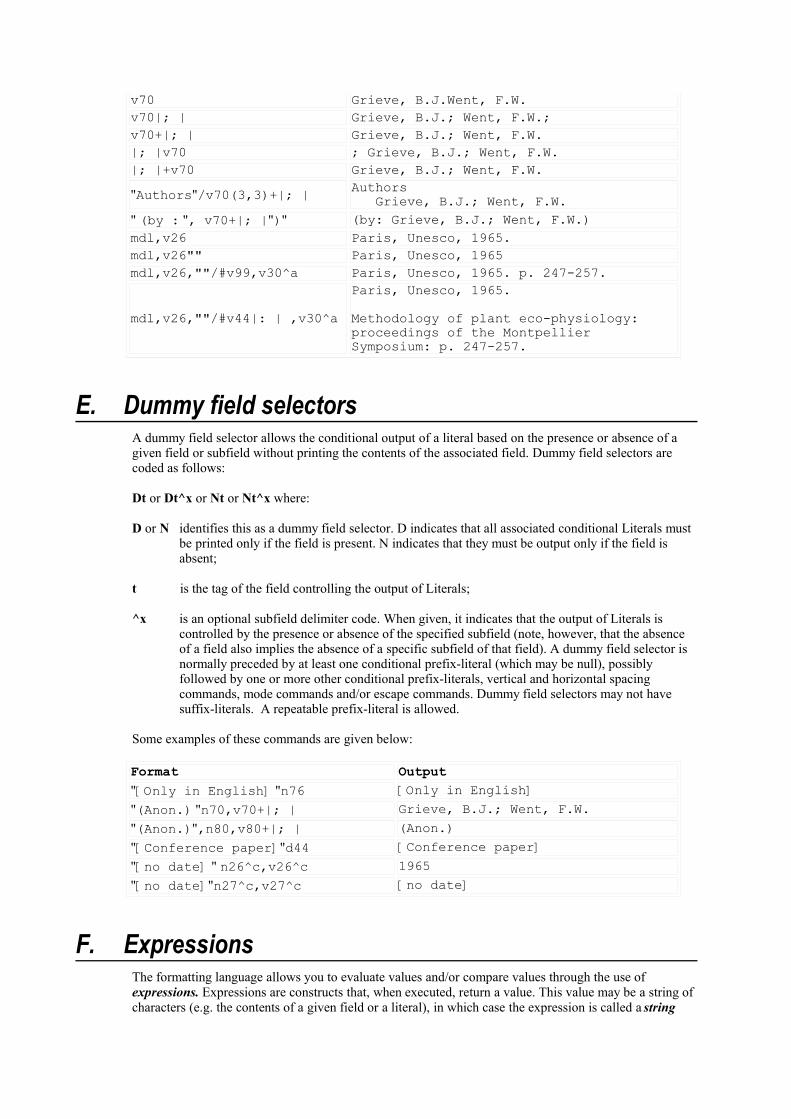
v70 Grieve, B.J.Went, F.W.v70|; | Grieve, B.J.; Went, F.W.;v70+|; | Grieve, B.J.; Went, F.W.|; |v70 ; Grieve, B.J.; Went, F.W.|; |+v70 Grieve, B.J.; Went, F.W."Authors"/v70(3,3)+|; | Authors
Grieve, B.J.; Went, F.W." (by : ", v70+|; |")" (by: Grieve, B.J.; Went, F.W.)mdl,v26 Paris, Unesco, 1965.mdl,v26"" Paris, Unesco, 1965mdl,v26,""/#v99,v30^a Paris, Unesco, 1965. p. 247-257.
mdl,v26,""/#v44|: | ,v30^aParis, Unesco, 1965.Methodology of plant eco-physiology:proceedings of the MontpellierSymposium: p. 247-257.
E. Dummy field selectorsA dummy field selector allows the conditional output of a literal based on the presence or absence of agiven field or subfield without printing the contents of the associated field. Dummy field selectors arecoded as follows:
Dt or Dt^x or Nt or Nt^x where:
D or N identifies this as a dummy field selector. D indicates that all associated conditional Literals mustbe printed only if the field is present. N indicates that they must be output only if the field isabsent;
t is the tag of the field controlling the output of Literals;
^x is an optional subfield delimiter code. When given, it indicates that the output of Literals iscontrolled by the presence or absence of the specified subfield (note, however, that the absenceof a field also implies the absence of a specific subfield of that field). A dummy field selector isnormally preceded by at least one conditional prefix-literal (which may be null), possiblyfollowed by one or more other conditional prefix-literals, vertical and horizontal spacingcommands, mode commands and/or escape commands. Dummy field selectors may not havesuffix-literals. A repeatable prefix-literal is allowed.
Some examples of these commands are given below: Format Output"[Only in English] "n76 [Only in English] "(Anon.) "n70,v70+|; | Grieve, B.J.; Went, F.W."(Anon.)",n80,v80+|; | (Anon.)"[Conference paper]"d44 [Conference paper]"[no date] " n26^c,v26^c 1965"[no date]"n27^c,v27^c [no date]
F. ExpressionsThe formatting language allows you to evaluate values and/or compare values through the use ofexpressions. Expressions are constructs that, when executed, return a value. This value may be a string ofcharacters (e.g. the contents of a given field or a literal), in which case the expression is called a string

expression; a number, in which case the expression is called numerical; or it may be a truth value (Trueor False), in which case the expression is called Boolean. CDS/ISIS also provides a set of functions,which, on the basis of arguments you provide, perform a specific process and return a value. Functionsreturning a number are called numerical function; those returning a string of characters are called stringfunctions; and those returning a truth value are called boolean functions. Only string functions may beused directly as formatting commands. Numerical expressions may be used in booleans expressions or asarguments of functions. Boolean expressions and boolean functions may only be used in the context of anIF command.
1. Numerical expressionsNumerical expressions are formed with operands which have a numerical value and operators specifyingthe calculations to be performed.The operands you may use in a numerical expression are as follows:
numerical constants: such as 5 18 98.65; numerical constants may be represented as optionally signedintegers, decimal numbers, or in scientific exponent notation, e.g. 1.5E5 (meaning 1.5 times 10 power 5,i.e. 150000);numerical functions: such as val(v10) (these are described under “Numerical functions” on page 58);MFN: the value of the MFN of a recordnumerical expressions: when used as an operand, an expression must be enclosed in parentheses, forexample (val(v20)-5).
The available operators are:
+ addition (or unary +);- subtraction (or unary -);* multiplication;/ division.
As in normal algebra, in the absence of parentheses, unary operators are executed first and multiplicationsand divisions are performed before additions and subtractions. A series of two or more operators at thesame level are executed from left to right. You may use parentheses to alter this order of evaluation:expressions enclosed in parentheses are evaluated first and, inner parenthetical expressions are evaluatedbefore outer expressions.
Note that, as field selectors (e.g. v10 or v20^a) yield a string of text, they cannot be used as operands in anumerical expression. The VAL function, however, may be used to convert the contents of a field orsubfield to a numerical value.
Likewise, a numerical expression cannot be displayed directly but must first be converted to a characterstring using the F function.Examples of numerical expressions are given below (where it is assumed that MFN=10, vl^a=10, vl^b=20and v2=30):
Expression Value0.155e+3 1551e-3 0.0012*3+9 152*(3+9) 2410-(4*(2-1 )) 615*0.001 0.015mfn+l00 110val(v2)+val(v1^a)*7.5 105(val(vl^a)-val(v1^b))/100 -0.1

The IBM PC version of CDS/ISIS converts all numbers used in calculations to single precision floatingpoint numbers. This provides a precision of about seven digits with a maximum value of about1.701411E38. For greater precision, use a string expression comparison eg v49<='19970421'
2. String expressionsString expressions are formed with operands which are strings of characters. As CDS/ISIS provides noexplicit string operator, a string expression always consists of a single operand which may be one of thefollowing:
unconditional literals: such as "some text"field selectors: which may include an offset/length command (e.g. v26^c*2.2);string functions: such as S(v24,v25,v26) (these are described under “String functions”).
3. Boolean expressionsBoolean expressions are used to determine whether a set of one or more conditions are true or false andevaluate to a truth value. The operands of a boolean expression can be one of the following:
relational expressions: which compare two values and determine whether a given relationship exists (seebelow), such as MFN <10;boolean functions: such as p(v24), which return a truth value (these are discussed under “Booleanfunctions”).Relational expressions allow you determine whether a certain relationship between two values is verified.The general form of a relational expression is:
expression-1 relational-operator expression-2
where:Expression-1 is either a numerical or a string expression;Relational-operator is one of the following:
= Equals<> Not equal to< Less than<= Less or equal than> Greater than>= Greater or equal than: Contains (may only be used for string expressions)
expression-2 is an expression of the same type as expression-1, i.e. expression-1 and expression-2 mustbe either both numerical or both string expressions.
The relational operators = < > < <= > >= have their normal meaning when applied to numericalexpressions (within the limits of the precision of numerical values defined under “Numerical expression”).When comparing string expressions, the following rules apply:
except for the: (Contains) operator, strings are compared exactly as they occur, i.e. upper case and lowercase letters are compared according to their Corresponding ASCII character code (e.g. A will compareless than a);
two string expressions are not considered equal unless they have the same length. If two expressionsyielding strings of different length are such that they are character for character equal up to the length ofthe shorter one, then the shorter string is considered to be less than the longer one.
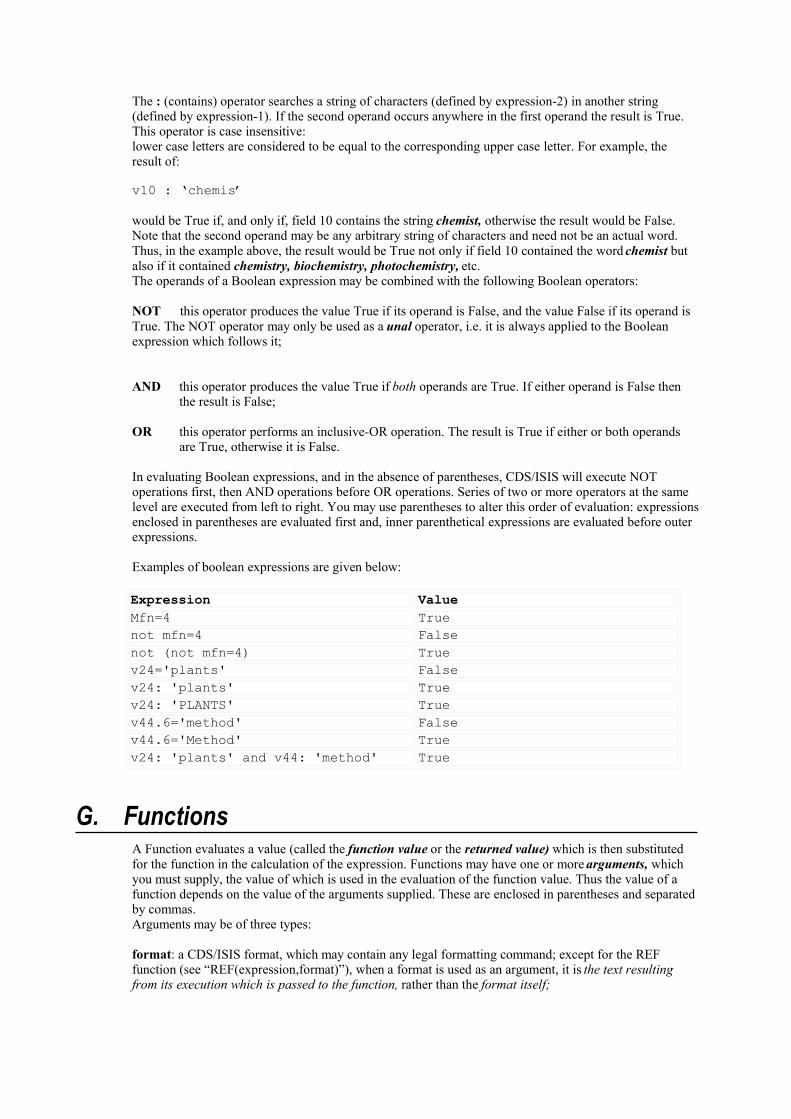
The : (contains) operator searches a string of characters (defined by expression-2) in another string(defined by expression-1). If the second operand occurs anywhere in the first operand the result is True.This operator is case insensitive:lower case letters are considered to be equal to the corresponding upper case letter. For example, theresult of:
v10 : ‘chemis’
would be True if, and only if, field 10 contains the string chemist, otherwise the result would be False.Note that the second operand may be any arbitrary string of characters and need not be an actual word.Thus, in the example above, the result would be True not only if field 10 contained the word chemist butalso if it contained chemistry, biochemistry, photochemistry, etc.The operands of a Boolean expression may be combined with the following Boolean operators: NOT this operator produces the value True if its operand is False, and the value False if its operand isTrue. The NOT operator may only be used as a unal operator, i.e. it is always applied to the Booleanexpression which follows it; AND this operator produces the value True if both operands are True. If either operand is False then
the result is False;
OR this operator performs an inclusive-OR operation. The result is True if either or both operandsare True, otherwise it is False.
In evaluating Boolean expressions, and in the absence of parentheses, CDS/ISIS will execute NOToperations first, then AND operations before OR operations. Series of two or more operators at the samelevel are executed from left to right. You may use parentheses to alter this order of evaluation: expressionsenclosed in parentheses are evaluated first and, inner parenthetical expressions are evaluated before outerexpressions.
Examples of boolean expressions are given below: Expression ValueMfn=4 Truenot mfn=4 Falsenot (not mfn=4) Truev24='plants' Falsev24: 'plants' Truev24: 'PLANTS' Truev44.6='method' Falsev44.6='Method' Truev24: 'plants' and v44: 'method' True
G. FunctionsA Function evaluates a value (called the function value or the returned value) which is then substitutedfor the function in the calculation of the expression. Functions may have one or more arguments, whichyou must supply, the value of which is used in the evaluation of the function value. Thus the value of afunction depends on the value of the arguments supplied. These are enclosed in parentheses and separatedby commas.Arguments may be of three types:
format: a CDS/ISIS format, which may contain any legal formatting command; except for the REFfunction (see “REF(expression,format)”), when a format is used as an argument, it is the text resultingfrom its execution which is passed to the function, rather than the format itself;
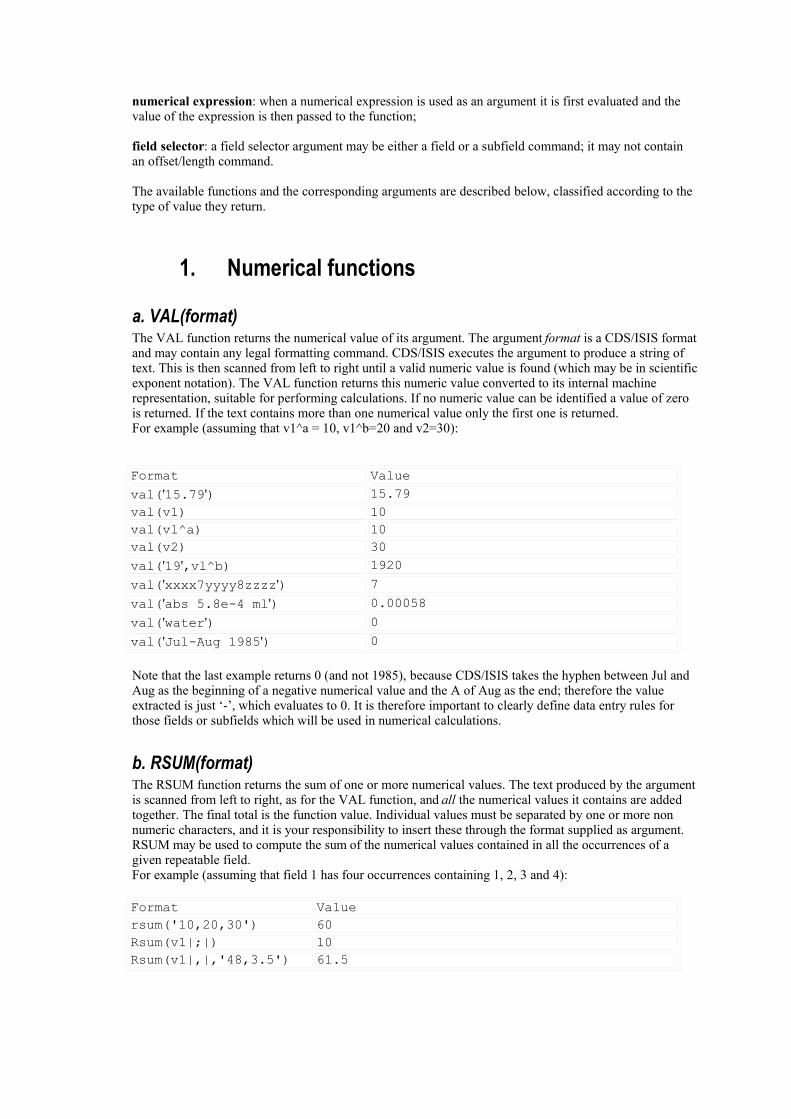
numerical expression: when a numerical expression is used as an argument it is first evaluated and thevalue of the expression is then passed to the function;
field selector: a field selector argument may be either a field or a subfield command; it may not containan offset/length command.
The available functions and the corresponding arguments are described below, classified according to thetype of value they return.
1. Numerical functions
a. VAL(format)The VAL function returns the numerical value of its argument. The argument format is a CDS/ISIS formatand may contain any legal formatting command. CDS/ISIS executes the argument to produce a string oftext. This is then scanned from left to right until a valid numeric value is found (which may be in scientificexponent notation). The VAL function returns this numeric value converted to its internal machinerepresentation, suitable for performing calculations. If no numeric value can be identified a value of zerois returned. If the text contains more than one numerical value only the first one is returned.For example (assuming that v1^a = 10, v1^b=20 and v2=30):
Format Valueval('15.79') 15.79val(v1) 10val(vl^a) 10val(v2) 30val('19',vl^b) 1920val('xxxx7yyyy8zzzz') 7val('abs 5.8e-4 ml') 0.00058val('water') 0val('Jul-Aug 1985') 0
Note that the last example returns 0 (and not 1985), because CDS/ISIS takes the hyphen between Jul andAug as the beginning of a negative numerical value and the A of Aug as the end; therefore the valueextracted is just ‘-’, which evaluates to 0. It is therefore important to clearly define data entry rules forthose fields or subfields which will be used in numerical calculations.
b. RSUM(format)The RSUM function returns the sum of one or more numerical values. The text produced by the argumentis scanned from left to right, as for the VAL function, and all the numerical values it contains are addedtogether. The final total is the function value. Individual values must be separated by one or more nonnumeric characters, and it is your responsibility to insert these through the format supplied as argument.RSUM may be used to compute the sum of the numerical values contained in all the occurrences of agiven repeatable field.For example (assuming that field 1 has four occurrences containing 1, 2, 3 and 4): Format Valuersum('10,20,30') 60Rsum(v1|;|) 10Rsum(v1|,|,'48,3.5') 61.5

c. RMIN(format)The RMIN function returns the minimum value of one or more numerical values. The text produced bythe argument is scanned from left to right, as for the VAL function, and all the numerical values areextracted. The algebrically smallest of these is the function value. Individual values must be separated byone or more non numeric characters, and it is your responsibility to insert these through the formatsupplied as argument. RMIN may be used to compute the minimum of the numerical values contained inall the occurrences of a given repeatable field.For example (assuming that field 1 has four occurrences containing 10, 20, 30 and 40): Format Valuermin('1 ,2,-3') -3rmin(vl|;|) 10rmin(vl|,|, '48,3.5') 3.5
d. RMAX(format)The RMAX function returns the maximum value of one or more numerical values. The text produced bythe argument is scanned from left to right, as for the VAL function, and all the numerical values areextracted. The algebrically largest of these is the function value. Individual values must be separated byone or more non numeric characters, and it is your responsibility to insert these through the formatsupplied as argument. RMAX may be used to compute the maximum of the numerical values contained inall the occurrences of a given repeatable field. For example (assuming that field 1 has four occurrencescontaining 10, 20, 30 and 40): Format Valuermax( '1,2,-3') 2rmax(v1|;|) 40rmax(vl|,|,'48,3.5') 48
e. RAVR(format)The RAVR function returns the average value (arithmetic mean) of one or more numerical values. Thetext produced by the argument is scanned from left to right, as for the VAL function, and all the numericalvalues are extracted. The average value is then computed and returned as the function value. Individualvalues must be separated by one or more non numeric characters, and it is your responsibility to insertthese through the format supplied as argument. RAVR may be used to compute the average value of thenumerical values contained in all the occurrences of a given repeatable field. For example (assuming thatfield 1 has four occurrences containing 10, 20, 30 and 40): Format Valueravr('1,2,-3') 0ravr(vl|; |) 25ravr(v1|,|, '48,3.5') 25.25
f. L(format)The L function uses the text produced by the argument as a search term to the inverted file and returns theMFN of the first posting (if any). Before looking up the inverted file the term is automatically convertedto upper case. If the term is not found the function value is zero. The L function is normally used inconjunction with the REF function to implement table lookup (see under “REF (expression,format)”, forexamples on the use of the L function).Note that the argument format is executed using the current display mode (see “Mode command”). This isimportant because the use of an incorrect mode may result in not finding the term on the inverted file. As ageneral rule you should use the same mode used in the inverted file FST.

g. LR((format)[, from, to])Like the L function, LR searches the inverted file for the term defined by format, and returns all thepostings of the term. For example:
ref(lr((v10)),v1,v2)
will retrieve fields 1 and 2 from all the records posted under the term contained in field 10. You may limitthe range of postings to be retrieved by using the optional from and to parameters. For example:
lr((v10),3,7)
will only retrieve postings 3 to 7. The parameters “from” and “to” are optional and must be valid numericexpressions.
h. NPST(format) Like the L function, NPST searches the inverted file for the term defined by format, and returns thenumber of postings of the term.
i. NOCC(Vtt)Return the number of occurrences of field tt. For example:
f(nocc(v70))
j. OCC The OCC function returns the number of the current occurrence within a repeatable group. It may be usedto produce numbered lists. For example the format:
(v70/)
will produce one line for each occurrence in the field 70. The following format:
(if p(v70) then f(occ,1,0),'. ' fi,v70/)
will produce a numbered list as the following:
1. First Author 2. Second Author 3. Third Author
k. SIZE(format) Return the size of the string generated by format. Note that this function is mode-sensitive. For example, iffield 10 contains 20 characters, then size(mpl,v10) will return 20, however size(mdl,v10) willreturn the value 22, counting, therefore, the period and space automatically generated in data mode.
l. TYPE(type, format) This function tests whether the string generated by format is of the type defined by type and returns 1 ifthe string corresponds to the specified type or 0 if it does not correspond. The TYPE function has twodifferent forms:
TYPE(‘pattern’,format); orTYPE(numerical expression,format).
The first form may be used to test if the string corresponds to a certain pattern. For example:
type(‘XXA-99-99-99’,v10)
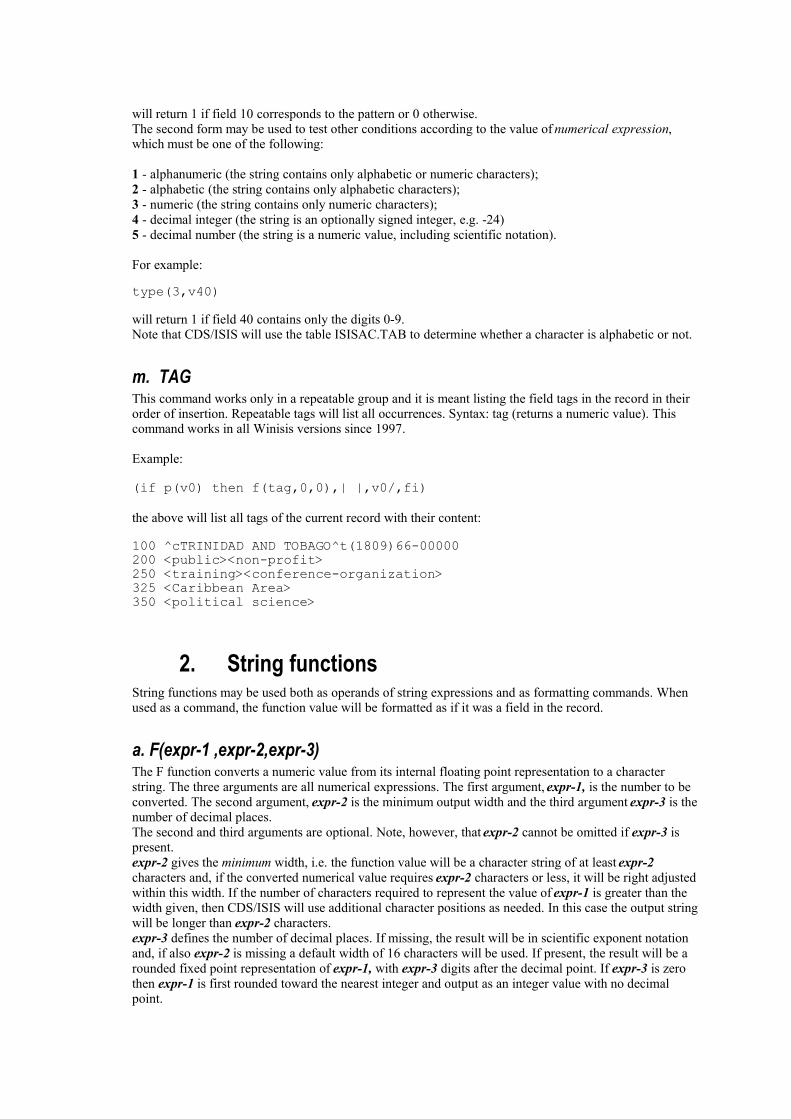
will return 1 if field 10 corresponds to the pattern or 0 otherwise.The second form may be used to test other conditions according to the value of numerical expression,which must be one of the following:
1 - alphanumeric (the string contains only alphabetic or numeric characters);2 - alphabetic (the string contains only alphabetic characters);3 - numeric (the string contains only numeric characters);4 - decimal integer (the string is an optionally signed integer, e.g. -24)5 - decimal number (the string is a numeric value, including scientific notation).
For example:
type(3,v40)will return 1 if field 40 contains only the digits 0-9.Note that CDS/ISIS will use the table ISISAC.TAB to determine whether a character is alphabetic or not.
m. TAG This command works only in a repeatable group and it is meant listing the field tags in the record in theirorder of insertion. Repeatable tags will list all occurrences. Syntax: tag (returns a numeric value). Thiscommand works in all Winisis versions since 1997.
Example:
(if p(v0) then f(tag,0,0),| |,v0/,fi)
the above will list all tags of the current record with their content:
100 ^cTRINIDAD AND TOBAGO^t(1809)66-00000200 <public><non-profit>250 <training><conference-organization>325 <Caribbean Area>350 <political science>
2. String functionsString functions may be used both as operands of string expressions and as formatting commands. Whenused as a command, the function value will be formatted as if it was a field in the record.
a. F(expr-1 ,expr-2,expr-3)The F function converts a numeric value from its internal floating point representation to a characterstring. The three arguments are all numerical expressions. The first argument, expr-1, is the number to beconverted. The second argument, expr-2 is the minimum output width and the third argument expr-3 is thenumber of decimal places.The second and third arguments are optional. Note, however, that expr-2 cannot be omitted if expr-3 ispresent.expr-2 gives the minimum width, i.e. the function value will be a character string of at least expr-2characters and, if the converted numerical value requires expr-2 characters or less, it will be right adjustedwithin this width. If the number of characters required to represent the value of expr-1 is greater than thewidth given, then CDS/ISIS will use additional character positions as needed. In this case the output stringwill be longer than expr-2 characters.expr-3 defines the number of decimal places. If missing, the result will be in scientific exponent notationand, if also expr-2 is missing a default width of 16 characters will be used. If present, the result will be arounded fixed point representation of expr-1, with expr-3 digits after the decimal point. If expr-3 is zerothen expr-1 is first rounded toward the nearest integer and output as an integer value with no decimalpoint.

For fixed point and integer conversion, if the integer part of the number is too large to be represented, theoutput is replaced by a series of asterisks (*).The F function may be used to align a column of numbers on the decimal point by choosing anappropriate with.Examples of the F function are given below. Format ValueF(1) 1.000000000E+00f( 1,10) 1-000E+00F(-l,10,2) -100f( 1,5,2) 1.00F(1,8,2) 1.00f(mfn,1,0) 4F(mfn,2,0) 4F(mfn,3,0) 4
b. REF(expression format)The REF function allows you to extract data from an alternate master file record. The first argument is anumerical expression giving the MFN of the alternate record to be selected and the second argument is theformat to be applied to this record. If the value of expression does not correspond to the MFN of anexisting record in the data base, then REF will produce a null string (i.e. no output). The processperformed by the REF function is represented below, where it is assumed that the current record beingformatted is record 1.As you can see from this example, the REF function is a very powerful device, as it allows you to gathertogether data which is in fact stored in different records of the data base, and make it appear to the user asif stored in the same record. In this first example, records 1 and 98 are linked by specifying in field 4 ofrecord 1 the MFN of the related record, which contains the name of the country in English and French:through your format you may then select either language, by simply specifying the relevant tag in therelated record.In certain cases, the linking of records by means of the MFN may be inconvenient from the point of viewof entering the data. Beside the fact that any typing error in the MFN of the related record will result indisplaying wrong data, it may require time to determine the correct MFN to use. In the case shown in thefigure below, for example, it may well be that the source document from which the data is entered alreadycontains a normalized country code (‘UK’ in our case). Using the MFN as a link to the country record,may therefore require the consultation of listings or a search in the data base to find out that the MFN ofthe record corresponding to ‘UK’ is 98: it would be much more convenient to be able to enter ‘UK’ ratherthan ‘98’. This is in fact possible and you can obtain the same output given in Figure ??, by organizing thedata base in such a way that you may take advantage of the L function .
The L function finds the MFN corresponding to a search term. You may use it therefore to convert acharacter string (such as ‘UK’) to an MFN. In order to be able to use the L function you must establish aunique relationship between a given character string and its corresponding MFN. The Inverted fileprovides such a mechanism (see “Inverted file”). In our example, therefore, it would be sufficient to invertfield 10 of the ‘country’ records to establish a unique relationship between the country code and thecorresponding MFN (note that the concept of uniqueness is important as the L function assumes that thekey it is searching for has one and only one posting. It is your responsibility to make this relationshipunique by using, if necessary, a search term prefix as indicated under “Inverted file FST”). The figurebelow illustrates this technique. It is assumed here that field 10 of the ‘country’ records is inverted withthe prefix ‘CC’.CDS/ISIS makes no assumption as to the nature of a relationship existing between two records. It simplyprovides a mechanism for linking records. A particular implementation would normally convey to the userthe meaning of a relationship through an appropriate use of the formatting language and a specific database design. For example if a bibliographic record must be linked to a supplier record and to a borrowerrecord, you should use two different fields to store the link to the supplier and to the borrower in order toreflect the different nature of these relationships.Note, that furthermore, because the second argument of the REF function is a format, it is possible to usethis function in a recursive manner, to establish hierarchical relationships of higher orders, such as thosethat would be required to display the hierarchical relationships in a Thesaurus.

As many REF function references as wanted may be used in a format5, provided that the output limit (i.e.the size of the work area) is not exceeded. This is currently limited to 65000 characters. Note that thislimitation is an implementation restriction rather than a restriction of the formatting language.
Figure 56 - REF example
c. Alternate data baseThe REF, L, LR and NPST functions may specify a data base qualifier to refer an alternate data base.When the application is so designed, the data base specified in the REF function may be different fromthe one specified in the L or LR functions.The data base qualifier is specified as follows:
->dbrefwhere dbref is the name of the alternate data base (which must be in the data base path specified inparameter 5 of SYSPAR.PAR or for which there is a dbn.PAR in the data base path).For example:
ref->bib(l(v10),v200)ref->bib(l->book(v10),v100,v200)5 Much depends from the available memory. More REF instructions also slow the processing of theinformation and the display of the record. In particular, when making inverted files using REF, Winisismay fail with large amount of data.

in the last example, supposing the current data base is CDS.MST, the different parts of the format will beexecuted as follows:
Format piece DatabaseRef->bib(..) CDSl->book(..),v100,v200) BIBV10 CDS
BOOK’s MFN corresponding to term v10 of CDS is used as reference for the REF function that isretrieving the content of BIB’s v100 and v200.More realistically, you will use more often the following format:
ref->bib(l->bib(v10),v100,v200)
that retrieves from BIB the fields v100 and v200 corresponding to the MFN (in BIB) having a relationshipwith CDS’s v10.
d. S(format)The S function returns the text produced by its argument. As mentioned earlier CDS/ISIS provides noexplicit operators for string expressions. The S function may be used, however, to implement stringconcatenation. It is particularly useful in boolean expressions, where it may be used to implement animplicit OR, which is more efficient (and more concise) than using an explicit OR operator. For example,the two following boolean expressions:
S(mdl,vl0,v20,v30) : ‘water’V10 :‘water’ or v20 : ‘water’ or v30 : ‘water’
are equivalent (they are both True if any of the fields 10, 20 or 30 contain the string ‘water’), but the firstwill execute faster than the second.An indentation command can be added to provide indentation for a group of fields, e.g.
S(v10,v20,v30)(3,3)
e. Substring: SS(pos, length, format)A substring of a string can be produced in two different ways:
1. by using the *offset.length construct with the S function, as in the following example: S(v24,v69)*3.5 (in this case CDS/ISIS will extract 5 characters starting from the 4thposition of the string returned by S);
2. by using the substring function SS(pos,len,format). That function will take the substring of thestring returned by format beginning at position pos and len characters long. For example SS(1,5,v30) will extract the first 5 characters of field 30.
The main difference between the two forms is that in the SS function both pos and len can be numericexpressions, while in the *offset.length construct the values must be numeric constants. Note also that * works with an offset (starting from 0), while SS works with a position (starting from 1).
f. DATE(exp) Returns the current date and/or time in the format specified by the numeric expression exp. The value ofexp can be one of the following:1 - returns a date stamp identical to the one returned by the DATESTAMP function of ISIS Pascal,
i.e. an 18-byte string of the form MM-DD-YY HH:MM:SS (e.g. date(1) could return: 09-30-9715:03:44);
2 - returns only the date (e.g. date(2) could return: 09-30-03);3 - returns only the time (e.g. date(3) could return: 09-30-03).
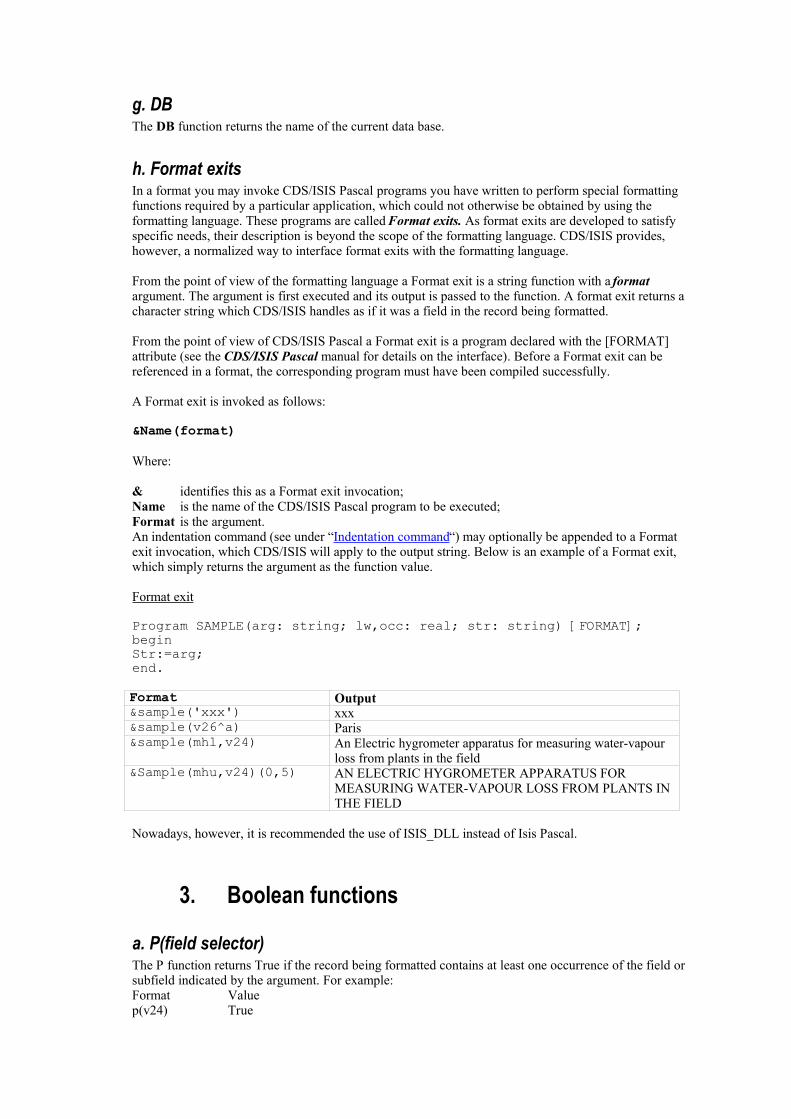
g. DB The DB function returns the name of the current data base.
h. Format exitsIn a format you may invoke CDS/ISIS Pascal programs you have written to perform special formattingfunctions required by a particular application, which could not otherwise be obtained by using theformatting language. These programs are called Format exits. As format exits are developed to satisfyspecific needs, their description is beyond the scope of the formatting language. CDS/ISIS provides,however, a normalized way to interface format exits with the formatting language.
From the point of view of the formatting language a Format exit is a string function with a formatargument. The argument is first executed and its output is passed to the function. A format exit returns acharacter string which CDS/ISIS handles as if it was a field in the record being formatted.
From the point of view of CDS/ISIS Pascal a Format exit is a program declared with the [FORMAT]attribute (see the CDS/ISIS Pascal manual for details on the interface). Before a Format exit can bereferenced in a format, the corresponding program must have been compiled successfully.
A Format exit is invoked as follows:
&Name(format)Where:
& identifies this as a Format exit invocation;Name is the name of the CDS/ISIS Pascal program to be executed;Format is the argument.An indentation command (see under “Indentation command“) may optionally be appended to a Formatexit invocation, which CDS/ISIS will apply to the output string. Below is an example of a Format exit,which simply returns the argument as the function value.
Format exit
Program SAMPLE(arg: string; lw,occ: real; str: string) [FORMAT];beginStr:=arg;end.
Format Output&sample('xxx') xxx&sample(v26^a) Paris&sample(mhl,v24) An Electric hygrometer apparatus for measuring water-vapour
loss from plants in the field&Sample(mhu,v24)(0,5) AN ELECTRIC HYGROMETER APPARATUS FOR
MEASURING WATER-VAPOUR LOSS FROM PLANTS INTHE FIELD
Nowadays, however, it is recommended the use of ISIS_DLL instead of Isis Pascal.
3. Boolean functions
a. P(field selector)The P function returns True if the record being formatted contains at least one occurrence of the field orsubfield indicated by the argument. For example:Format Valuep(v24) True
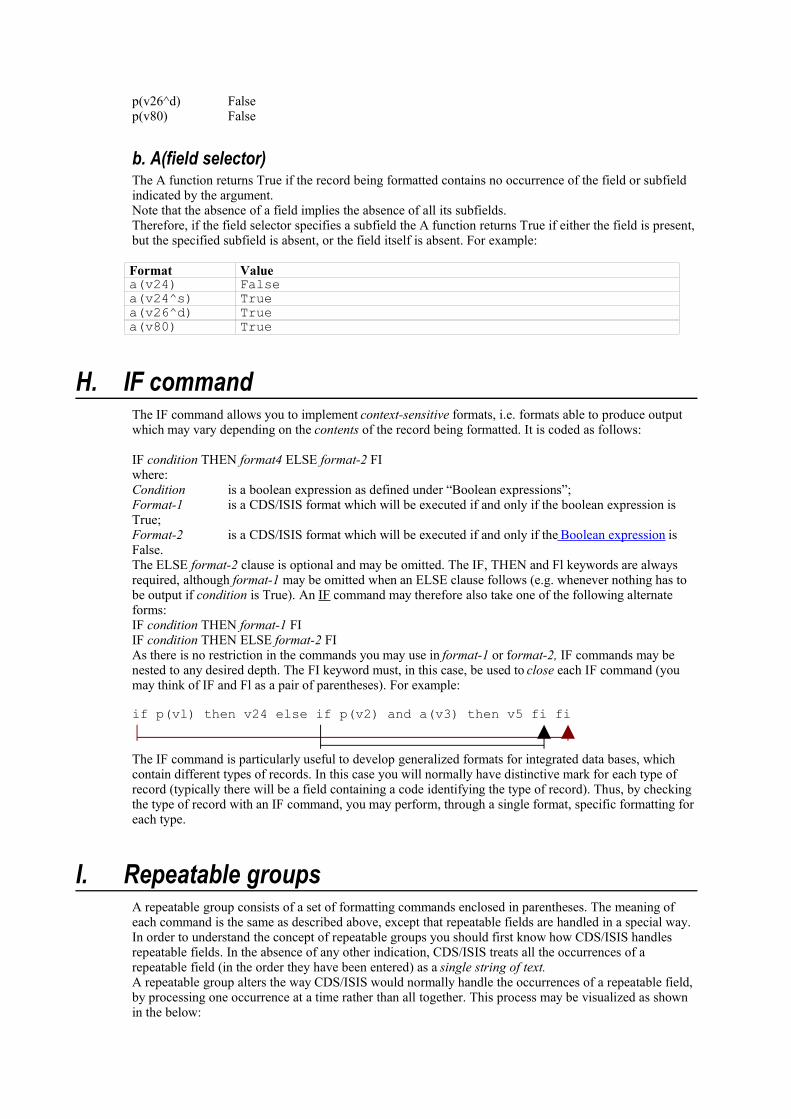
p(v26^d) Falsep(v80) False
b. A(field selector)The A function returns True if the record being formatted contains no occurrence of the field or subfieldindicated by the argument.Note that the absence of a field implies the absence of all its subfields.Therefore, if the field selector specifies a subfield the A function returns True if either the field is present,but the specified subfield is absent, or the field itself is absent. For example:
Format Valuea(v24) Falsea(v24^s) Truea(v26^d) Truea(v80) True
H. IF commandThe IF command allows you to implement context-sensitive formats, i.e. formats able to produce outputwhich may vary depending on the contents of the record being formatted. It is coded as follows:
IF condition THEN format4 ELSE format-2 FIwhere:Condition is a boolean expression as defined under “Boolean expressions”;Format-1 is a CDS/ISIS format which will be executed if and only if the boolean expression isTrue;Format-2 is a CDS/ISIS format which will be executed if and only if the Boolean expression isFalse.The ELSE format-2 clause is optional and may be omitted. The IF, THEN and Fl keywords are alwaysrequired, although format-1 may be omitted when an ELSE clause follows (e.g. whenever nothing has tobe output if condition is True). An IF command may therefore also take one of the following alternateforms:IF condition THEN format-1 FIIF condition THEN ELSE format-2 FIAs there is no restriction in the commands you may use in format-1 or format-2, IF commands may benested to any desired depth. The FI keyword must, in this case, be used to close each IF command (youmay think of IF and Fl as a pair of parentheses). For example:
if p(vl) then v24 else if p(v2) and a(v3) then v5 fi fi
The IF command is particularly useful to develop generalized formats for integrated data bases, whichcontain different types of records. In this case you will normally have distinctive mark for each type ofrecord (typically there will be a field containing a code identifying the type of record). Thus, by checkingthe type of record with an IF command, you may perform, through a single format, specific formatting foreach type.
I. Repeatable groupsA repeatable group consists of a set of formatting commands enclosed in parentheses. The meaning ofeach command is the same as described above, except that repeatable fields are handled in a special way.In order to understand the concept of repeatable groups you should first know how CDS/ISIS handlesrepeatable fields. In the absence of any other indication, CDS/ISIS treats all the occurrences of arepeatable field (in the order they have been entered) as a single string of text.A repeatable group alters the way CDS/ISIS would normally handle the occurrences of a repeatable field,by processing one occurrence at a time rather than all together. This process may be visualized as shownin the below:

When CDS/ISIS encounters the open parentheses of a repeatable group it proceeds as follows:An occurrence counter is initialized to 1.The format enclosed in parentheses is then executed in such a way that all field selectors within the groupwill only output the occurrence of the field corresponding to the current occurrence counter.If no output was produced (i.e. if there were no more occurrences of any of the repeatable fieldsreferenced within the group), then the processing of the repeatable group is terminated. Otherwise theoccurrence counter is increased by 1 and steps 2 and 3 are repeated.
Note that all formatting commands within a repeatable group are processed one occurrence at the time (asexplained above), including, therefore, fields referenced in IF commands, expressions and functions, aswell as in string functions used as commands.Because of the processing explained above, you should not use unconditional literals within a repeatablegroup (if you do, they will be output one time more than you would expect).In most cases the use of simple formatting commands, such as the mode command or repeatable literals, issufficient to adequately handle repeatable fields, as in the examples given below: Format Outputmpl,v70 Grieve, B.J.Went, F.W.mdl,v70 Grieve, B.J. Went, F.W.v70+|; | Grieve, B.J.; Went, F.W.
There are cases, however, where you will need to format repeatable fields in other ways. A frequent caseis, for example, the need to format each occurrence on a new line, which may only be done by using arepeatable group, as shown below: Format Output
v70/v26^a Grieve, B.J.Went, F.W.Paris
(v70/),v26^aGrieve, B.J.Went, F.W.Paris
In the first case the newline command (/) is executed after formatting all the occurrences of field 70;whereas, in the second case, it is executed after each occurrence.The example below shows the handling of repeatable subfielded fields (assuming that the record containstwo occurrences of field 20 as indicated). Here the use of a repeatable group has helped to properlydisplay the various subfields of each occurrence of the repeatable field in a tabular manner.
Record content20 ^aNew York^bMcGraw Hill^cl98820 ^aLondon^bAcademic Press^cl975
Format: /(v20^a,cl3,v20^b,c31,v20^c/)
Output:New York McGraw Hill 1988London Academic Press 1975
Format: /v20^a,c13,v20^b,c31,v20^c/
Output:New YorkLondon
McGraw HillAcademic Press19881975
If you need to output a literal before the data produced by a repeatable group, you may use anunconditional literal or a conditional literal. Note, however, that if you use a conditional literal it must be
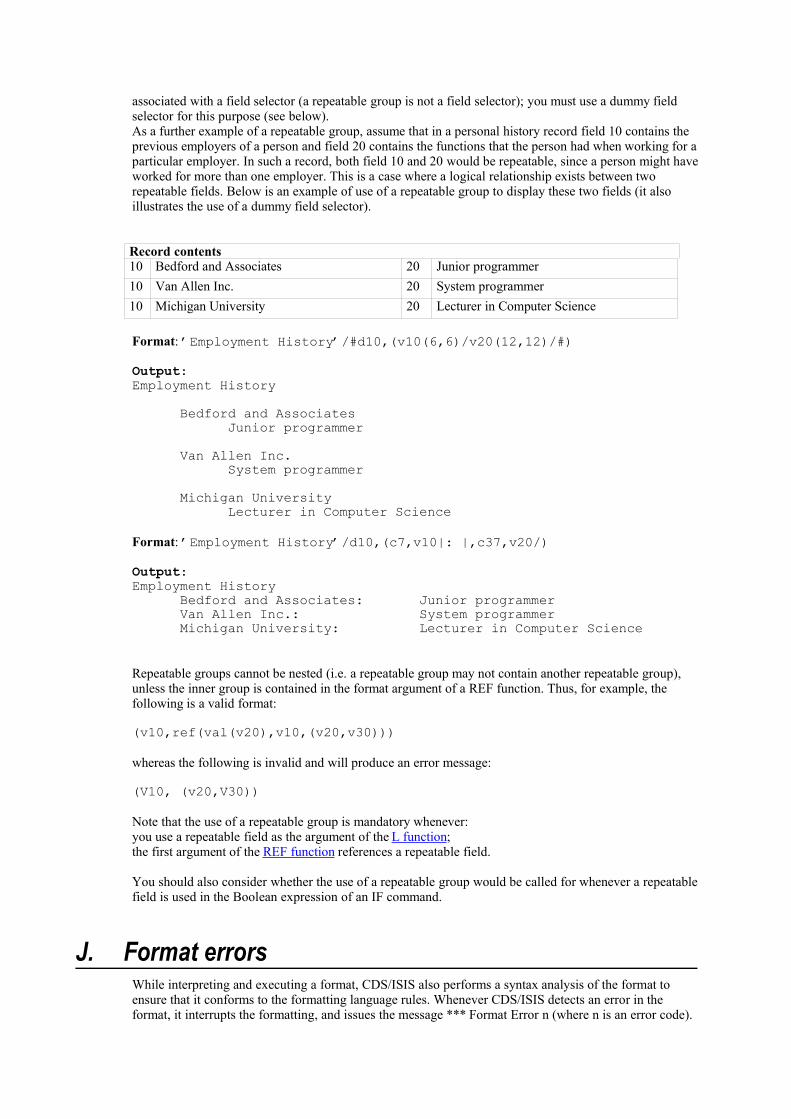
associated with a field selector (a repeatable group is not a field selector); you must use a dummy fieldselector for this purpose (see below).As a further example of a repeatable group, assume that in a personal history record field 10 contains theprevious employers of a person and field 20 contains the functions that the person had when working for aparticular employer. In such a record, both field 10 and 20 would be repeatable, since a person might haveworked for more than one employer. This is a case where a logical relationship exists between tworepeatable fields. Below is an example of use of a repeatable group to display these two fields (it alsoillustrates the use of a dummy field selector).
Record contents10 Bedford and Associates 20 Junior programmer10 Van Allen Inc. 20 System programmer10 Michigan University 20 Lecturer in Computer Science
Format: ’Employment History’/#d10,(v10(6,6)/v20(12,12)/#)
Output: Employment History
Bedford and AssociatesJunior programmer
Van Allen Inc.System programmer
Michigan UniversityLecturer in Computer Science
Format: ’Employment History’/d10,(c7,v10|: |,c37,v20/)
Output: Employment History
Bedford and Associates: Junior programmerVan Allen Inc.: System programmerMichigan University: Lecturer in Computer Science
Repeatable groups cannot be nested (i.e. a repeatable group may not contain another repeatable group),unless the inner group is contained in the format argument of a REF function. Thus, for example, thefollowing is a valid format:
(v10,ref(val(v20),v10,(v20,v30)))
whereas the following is invalid and will produce an error message:
(V10, (v20,V30))
Note that the use of a repeatable group is mandatory whenever:you use a repeatable field as the argument of the L function;the first argument of the REF function references a repeatable field.
You should also consider whether the use of a repeatable group would be called for whenever a repeatablefield is used in the Boolean expression of an IF command.
J. Format errorsWhile interpreting and executing a format, CDS/ISIS also performs a syntax analysis of the format toensure that it conforms to the formatting language rules. Whenever CDS/ISIS detects an error in theformat, it interrupts the formatting, and issues the message *** Format Error n (where n is an error code).

For display or print formats, any output produced before the error is detected will appear before themessage. This, together with the error message, will help you in determining the erroneous part of theformat.The possible error codes are as follows:1 End of format detected while processing a repeatable group. Probably the closing parenthesis
delimiting the group is missing2 Nested repeatable group (i.e. repeatable group inside a repeatable group)8 IF command without THEN19 Unmatched (20 Unmatched ). It may also be caused by an invalid operand in an expression26 The two operands of an operator are of different types (e.g. trying to add a string operand to a
number)28 The first argument supplied to the REF function is not a numerical expression51 Too many literals and/or conditional commands associated with a field selector53 IF command not terminated by FI54 + sign out of context: CDS/ISIS was expecting a repeatable literal following the + sign55 Unmatched FI56 Work area overflow: your format produced too much output which CDS/ISIS cannot handle.
The work area size is limited to 65000 characters. 58 One or more arguments supplied to the F function are not numerical expressions60 A non string function used as command (only string functions may be used as commands)61 The argument supplied to the A or P function is not a field selector99 Unknown command (e.g. a misspelled function name or command); may also be due to a
missing closing literal delimiter101 Stack overflow (probably due to a too complex expression)102 Stack underflow (it may be due to unmatched (. If your format is correct it indicates a
CDS/ISIS software problem)
K. Including an external formatYou may include an external format in a format by using the @name function, where name is the name ofthe format to be included. This format must be in the data base path (as specified in parameter 5 ofSYSPAR.PAR or parameter 10 of dbn.PAR). For example:
if v1=‘BIB’ then @fmt1 else @fmt2 fi
In this example, the contents of field 1 will determine which of fmt1 or fmt2 will be executed.
L. Format variablesCDS/ISIS predefines ten (10) numeric and ten string format variables which you may use in your formatas applicable. The ten numeric variables are named E0 through E9 and the ten string variables are namedS0 through S9. The numeric variables are initialized to 0, while the string variables are initialized to nullstrings, each time a format is executed.
You may assign or change the value of a numeric variable as follows:
En:=numeric expression (for example: e1:=val(v10)+5)
and you may assign or change the value of a string variable as follows:
Sn:=(format) (for example: s5:=(v10)).
Note that the parentheses around format are required.

A numeric variable may be used anywhere a numeric value can be used, e.g. as operand of a numericexpression as in if e1+10<25 then ... fi. As any other numeric value, a numeric variable cannot be directlydisplayed, but must first be converted using the F function.A string variable may be used both as operand of a string expression and as a formatting command.
M. WHILE commandThe WHILE command provides looping capabilities so that you can repeatedly execute a format. It iscoded as follows:WHILE condition (format)where:
condition is a Boolean expression as defined on p. 55 of the CDS/ISIS Reference Manual;format is the CDS/ISIS format to be repeatedly executed while the Boolean expression is True.
If the initial value of condition is False then format will not be executed at all. For the loop to end youmust provide inside “format” whatever commands are necessary to render “condition” False wheneverthe loop must be terminated. If an infinite loop is generated, Winisis will not respond to the user. For example:
e1:=1,e2:=nocc(v70), while e1<=e2 (f(e1,1,0),'. ',v70[e1]/ e1:=e1+1)
The example above displays each occurrence of field 70 on a new line preceded by the number of theoccurrence, e.g.:
1. First Author 2. Second Author 3. Third Author
A more complex example is given below.
s1:=(v69),e0:=size(s1),e1:=1,e3:=1,while e1<e0(while e1<e0 and ss(e1,1,s1)<>'<' (e1:=e1+1)e2:=e1+1,while e2<=e0 and ss(e2,1,s1)<>'>' (e2:=e2+1),s2:=(ss(e1+1,e2-e1-1,s1)), if size(s2)>0 then f(e3,1,0),'. ',s2/ e3:=e3+1 fi,e1:=e2+1)
In this example, we scan field 69 for the occurrences of keywords enclosed in < >, and display eachkeyword preceded by its sequence number, e.g.:
1. First Keyword 2. Second Keyword 3. Third Keyword
N. The Windows graphic environmentMicrosoft Windows, as well as most graphic environments, offers a rich array of text-writing capabilities.For example Windows lets you choose the font6 to be used for text output.CDS/ISIS for Windows provides new commands to manipulate the display using various fonts, includingproportional fonts, and various font sizes and colors. You can add these commands to your existingformats, in order to enhance the typographical quality of both your screen and printed outputs.
6 A font is a collection of characters that have a unique combination of height, width, typeface, characterset, and other attributes. An application uses fonts to display or print text of various faces or sizes. Forexample, word processing applications use fonts to give the user a "what you see is what you get"(WYSIWYG) interface.
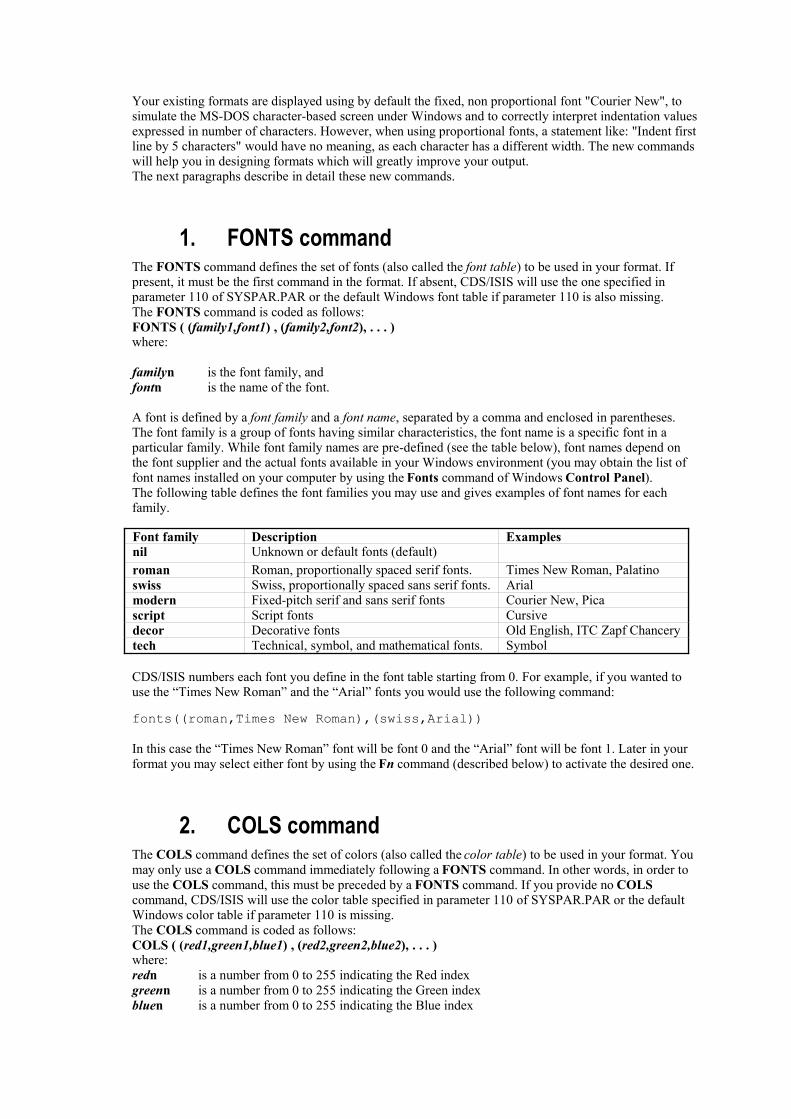
Your existing formats are displayed using by default the fixed, non proportional font "Courier New", tosimulate the MS-DOS character-based screen under Windows and to correctly interpret indentation valuesexpressed in number of characters. However, when using proportional fonts, a statement like: "Indent firstline by 5 characters" would have no meaning, as each character has a different width. The new commandswill help you in designing formats which will greatly improve your output.The next paragraphs describe in detail these new commands.
1. FONTS commandThe FONTS command defines the set of fonts (also called the font table) to be used in your format. Ifpresent, it must be the first command in the format. If absent, CDS/ISIS will use the one specified inparameter 110 of SYSPAR.PAR or the default Windows font table if parameter 110 is also missing.The FONTS command is coded as follows:FONTS ( (family1,font1) , (family2,font2), . . . )where:
familyn is the font family, andfontn is the name of the font.
A font is defined by a font family and a font name, separated by a comma and enclosed in parentheses.The font family is a group of fonts having similar characteristics, the font name is a specific font in aparticular family. While font family names are pre-defined (see the table below), font names depend onthe font supplier and the actual fonts available in your Windows environment (you may obtain the list offont names installed on your computer by using the Fonts command of Windows Control Panel).The following table defines the font families you may use and gives examples of font names for eachfamily.
Font family Description Examplesnil Unknown or default fonts (default)roman Roman, proportionally spaced serif fonts. Times New Roman, Palatinoswiss Swiss, proportionally spaced sans serif fonts. Arialmodern Fixed-pitch serif and sans serif fonts Courier New, Picascript Script fonts Cursivedecor Decorative fonts Old English, ITC Zapf Chancerytech Technical, symbol, and mathematical fonts. Symbol
CDS/ISIS numbers each font you define in the font table starting from 0. For example, if you wanted touse the “Times New Roman” and the “Arial” fonts you would use the following command:
fonts((roman,Times New Roman),(swiss,Arial))
In this case the “Times New Roman” font will be font 0 and the “Arial” font will be font 1. Later in yourformat you may select either font by using the Fn command (described below) to activate the desired one.
2. COLS commandThe COLS command defines the set of colors (also called the color table) to be used in your format. Youmay only use a COLS command immediately following a FONTS command. In other words, in order touse the COLS command, this must be preceded by a FONTS command. If you provide no COLScommand, CDS/ISIS will use the color table specified in parameter 110 of SYSPAR.PAR or the defaultWindows color table if parameter 110 is missing.The COLS command is coded as follows:COLS ( (red1,green1,blue1) , (red2,green2,blue2), . . . )where:redn is a number from 0 to 255 indicating the Red indexgreenn is a number from 0 to 255 indicating the Green indexbluen is a number from 0 to 255 indicating the Blue index

A color is made from a mixture of the three basic colors: red, green and blue, the color index indicatingthe amount of that color in a scale from 0 to 255. The color palette varies from black (0,0,0) to white(255,255,255). For example the color (255,0,0) indicates a pure red.CDS/ISIS numbers each color you define in the color table starting from 0. For example, if you wanted touse the red, green and blue colors you would use the following command:
COLS ( (255,0,0),(0,255,0),(0,0,255) )In this case, red will be color 0, green color 1 and blue color 2. Later in your format you may select thedesired color by using the CLn command (see below).
3. Paragraph formatting commandsThis set of commands concern the alignment of paragraphs (a paragraph being a block of text terminatedby a new line).
a. IndentationYou may use the M command to set a global left margin as follows:M ( indent , flindent )where:indent is the indentation of the paragraph from the left margin, andflindent is the indentation of the first line of the paragraph.
Both measures are expressed in twips (there are 1440 twips in one inch, and 567 twips in a centimeter). This command is similar to the indentation command following a field selector (e.g. V10(5,10)), but itallows you not only to control more precisely the indentation, but also to apply it to more than one field.
b. Tabulation commandYou may use the TAB command to tabulate to a desired position of the line, as follows:TAB orTAB ( value )where:value is the position of the next character expressed in twips from the current left margin.
If (value) is missing, a default value will be taken. This command is similar to the C command, but itallows you to control more precisely the tabulation value.
c. Center commandThis command allows you to center text between the left and the right margin. It is coded as follows:QC
d. Justification commandsQJ this command allows you to justify text between the left and the right margin. It is coded asfollows:QR set current paragraph’s alignment to right-justification.
Example: v24/,qr,v69
e. BOX commandThis command allows you to draw a box around a paragraph. The BOX command has two forms, asfollows:BOXBOX(n)
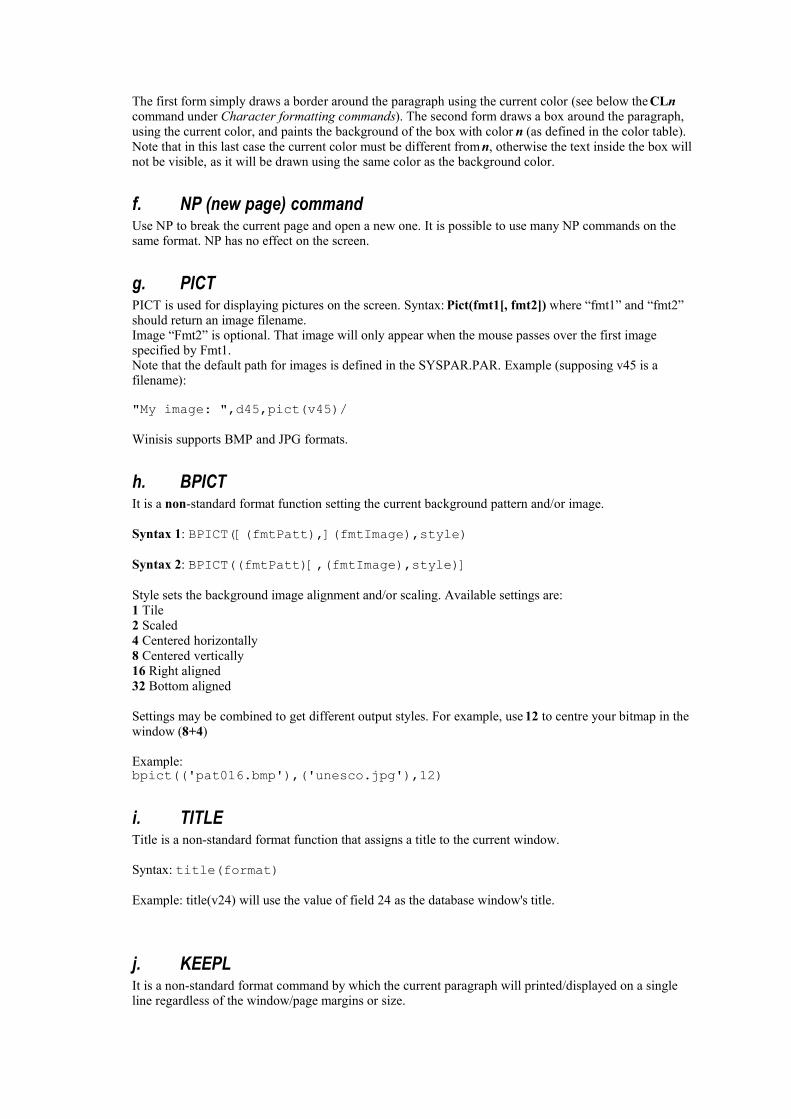
The first form simply draws a border around the paragraph using the current color (see below the CLncommand under Character formatting commands). The second form draws a box around the paragraph,using the current color, and paints the background of the box with color n (as defined in the color table).Note that in this last case the current color must be different from n, otherwise the text inside the box willnot be visible, as it will be drawn using the same color as the background color.
f. NP (new page) commandUse NP to break the current page and open a new one. It is possible to use many NP commands on thesame format. NP has no effect on the screen.
g. PICT PICT is used for displaying pictures on the screen. Syntax: Pict(fmt1[, fmt2]) where “fmt1” and “fmt2”should return an image filename.Image “Fmt2” is optional. That image will only appear when the mouse passes over the first imagespecified by Fmt1. Note that the default path for images is defined in the SYSPAR.PAR. Example (supposing v45 is afilename):
"My image: ",d45,pict(v45)/
Winisis supports BMP and JPG formats.
h. BPICT It is a non-standard format function setting the current background pattern and/or image.
Syntax 1: BPICT([(fmtPatt),](fmtImage),style)
Syntax 2: BPICT((fmtPatt)[,(fmtImage),style)]
Style sets the background image alignment and/or scaling. Available settings are:1 Tile2 Scaled4 Centered horizontally8 Centered vertically16 Right aligned32 Bottom aligned
Settings may be combined to get different output styles. For example, use 12 to centre your bitmap in thewindow (8+4)
Example: bpict(('pat016.bmp'),('unesco.jpg'),12)
i. TITLE Title is a non-standard format function that assigns a title to the current window.
Syntax: title(format)
Example: title(v24) will use the value of field 24 as the database window's title.
j. KEEPL It is a non-standard format command by which the current paragraph will printed/displayed on a singleline regardless of the window/page margins or size.
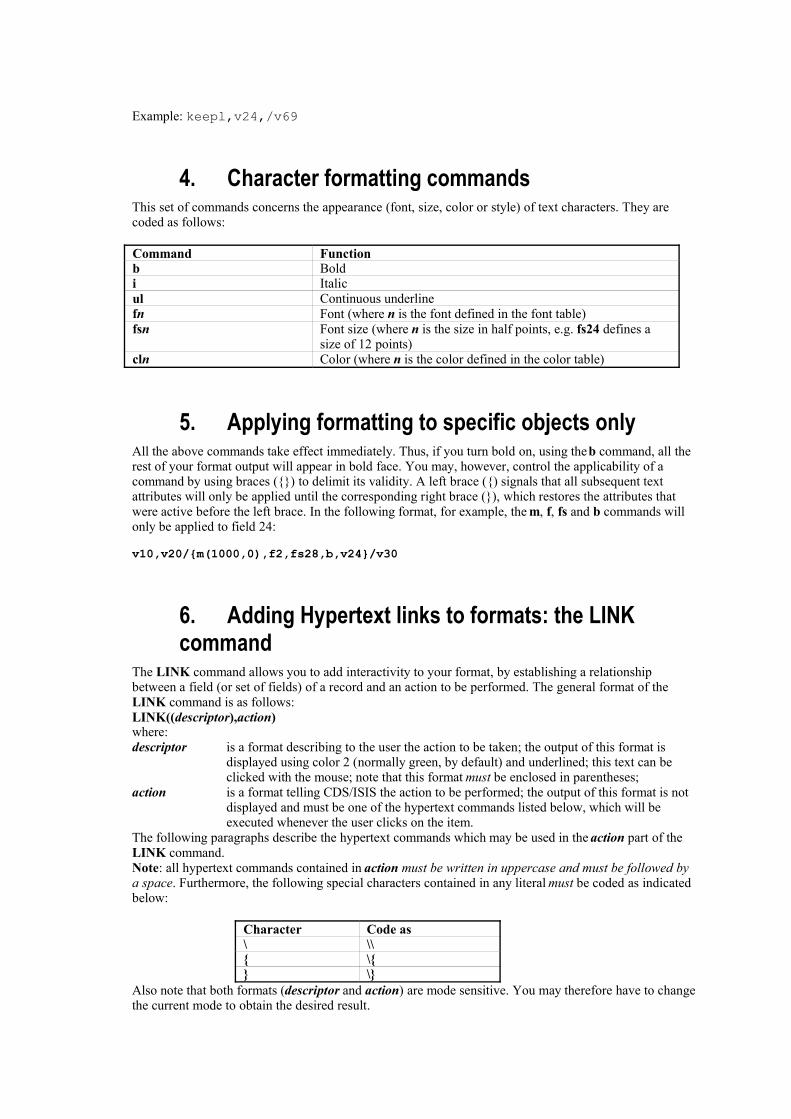
Example: keepl,v24,/v69
4. Character formatting commandsThis set of commands concerns the appearance (font, size, color or style) of text characters. They arecoded as follows:
Command Functionb Boldi Italicul Continuous underlinefn Font (where n is the font defined in the font table)fsn Font size (where n is the size in half points, e.g. fs24 defines a
size of 12 points)cln Color (where n is the color defined in the color table)
5. Applying formatting to specific objects onlyAll the above commands take effect immediately. Thus, if you turn bold on, using the b command, all therest of your format output will appear in bold face. You may, however, control the applicability of acommand by using braces ({}) to delimit its validity. A left brace ({) signals that all subsequent textattributes will only be applied until the corresponding right brace (}), which restores the attributes thatwere active before the left brace. In the following format, for example, the m, f, fs and b commands willonly be applied to field 24:
v10,v20/{m(1000,0),f2,fs28,b,v24}/v30
6. Adding Hypertext links to formats: the LINKcommand
The LINK command allows you to add interactivity to your format, by establishing a relationshipbetween a field (or set of fields) of a record and an action to be performed. The general format of theLINK command is as follows:LINK((descriptor),action)where:descriptor is a format describing to the user the action to be taken; the output of this format is
displayed using color 2 (normally green, by default) and underlined; this text can beclicked with the mouse; note that this format must be enclosed in parentheses;
action is a format telling CDS/ISIS the action to be performed; the output of this format is notdisplayed and must be one of the hypertext commands listed below, which will beexecuted whenever the user clicks on the item.
The following paragraphs describe the hypertext commands which may be used in the action part of theLINK command. Note: all hypertext commands contained in action must be written in uppercase and must be followed bya space. Furthermore, the following special characters contained in any literal must be coded as indicatedbelow:
Character Code as\ \\{ \{} \}
Also note that both formats (descriptor and action) are mode sensitive. You may therefore have to changethe current mode to obtain the desired result.
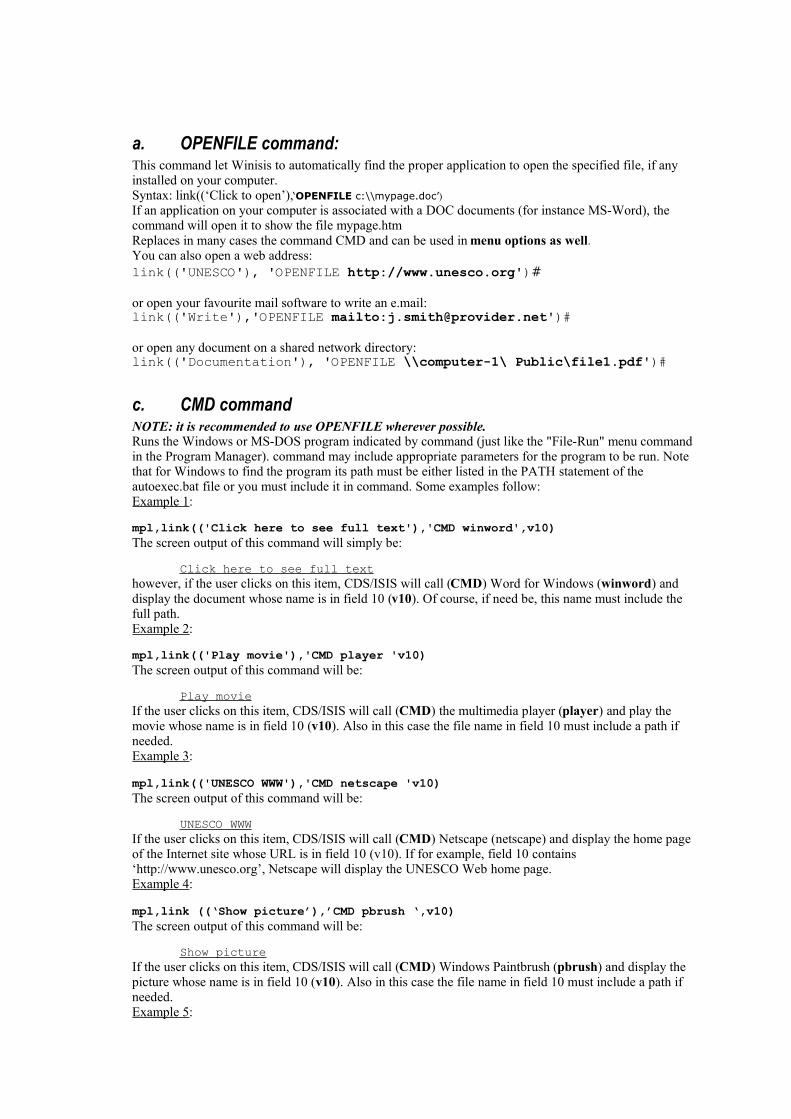
a. OPENFILE command:This command let Winisis to automatically find the proper application to open the specified file, if anyinstalled on your computer.Syntax: link((‘Click to open’),‘OPENFILE c:\\mypage.doc’)If an application on your computer is associated with a DOC documents (for instance MS-Word), thecommand will open it to show the file mypage.htmReplaces in many cases the command CMD and can be used in menu options as well.You can also open a web address:link(('UNESCO'), 'OPENFILE http://www.unesco.org')#
or open your favourite mail software to write an e.mail:link(('Write'),'OPENFILE mailto:[email protected]')#or open any document on a shared network directory:link(('Documentation'), 'OPENFILE \\computer-1\ Public\file1.pdf')#
c. CMD commandNOTE: it is recommended to use OPENFILE wherever possible.Runs the Windows or MS-DOS program indicated by command (just like the "File-Run" menu commandin the Program Manager). command may include appropriate parameters for the program to be run. Notethat for Windows to find the program its path must be either listed in the PATH statement of theautoexec.bat file or you must include it in command. Some examples follow:Example 1:
mpl,link(('Click here to see full text'),'CMD winword',v10)The screen output of this command will simply be:
Click here to see full texthowever, if the user clicks on this item, CDS/ISIS will call (CMD) Word for Windows (winword) anddisplay the document whose name is in field 10 (v10). Of course, if need be, this name must include thefull path.Example 2:
mpl,link(('Play movie'),'CMD player 'v10)The screen output of this command will be:
Play movieIf the user clicks on this item, CDS/ISIS will call (CMD) the multimedia player (player) and play themovie whose name is in field 10 (v10). Also in this case the file name in field 10 must include a path ifneeded.Example 3:
mpl,link(('UNESCO WWW'),'CMD netscape 'v10)The screen output of this command will be:
UNESCO WWWIf the user clicks on this item, CDS/ISIS will call (CMD) Netscape (netscape) and display the home pageof the Internet site whose URL is in field 10 (v10). If for example, field 10 contains‘http://www.unesco.org’, Netscape will display the UNESCO Web home page.Example 4:
mpl,link ((‘Show picture’),’CMD pbrush ‘,v10)The screen output of this command will be:
Show pictureIf the user clicks on this item, CDS/ISIS will call (CMD) Windows Paintbrush (pbrush) and display thepicture whose name is in field 10 (v10). Also in this case the file name in field 10 must include a path ifneeded.Example 5:

Here we assume that field 10 in a data base has three subfields: subfield a which contains the label to bedisplayed, subfield b which contains the program to be executed, and subfield c which contains the filename. For example:
^aMadonna with child^bpbrush^c\pictures\raffael.bmpThe following link command:
mpl,link((v10^a),'CMD ',v10^b,' ',v10^c)would then produce the screen output:
Madonna with childIf the user clicks on this item, CDS/ISIS will call (CMD) Windows Paintbrush (v10^b) and display thepicture ‘\pictures\raffael.bmp’ whose name is in field 10 (v10^c).
MENU EXITCMD can be called from a Winisis menu to open an external application. You should edit your menu file,which is in the MENU directory. For example, English default menus are in file MNENDF.MST. Open itwith Winisis and add somewhere the following field:
Open Notepad[CMD notepad.exe]
Save the record and reload the file by changing the current Winisis language to English again. You will beable to access the new function.
d. GOTO mfnDisplays the record whose MFN is mfn. mfn is a format which must produce a string containing a validMFN for the current data base. For example:
link(('Show link'),'GOTO 'v10)The screen output of this command will be:
Show linkIf the user clicks on this item, CDS/ISIS will display the record whose MFN is given in field 10.
e. LGOTO term This command displays the record corresponding to the first posting of term. term is a format whichdefines the dictionary term to be looked up. For example:
link(('test'),'LGOTO water')The screen output of this command will be:
testIf the user clicks on this item, CDS/ISIS will display the record corresponding to the first posting of‘water’. Note that the example above would have the same effect as:
link(('test'),'GOTO ',f(l(‘water’),1,0))The difference is that LGOTO performs the lookup only in response to the user click, while GOTOperforms it during the execution of the format containing the LINK command. LGOTO will thereforeexecute faster and avoids unnecessary dictionary lookups.
f. LAGOTO[/nn] term The “Approximately Lookup Goto” command looks up for a term and goes to the nearest MFN. Syntaxand parameter description:LAGOTO termLAGOTO/nn termterm: the term to be searched.nn the field in which term should be searched
Very useful used in conjunction with PROMPT to obtain a very simple search engine. For example:
Link((‘search’),'PROMPT LAGOTO acc')will present the first dictionary term's record beginning by 'acc'.
g. GOBACKDisplays the record which was displayed immediately before the current one. For example, suppose youare looking at record 45 and you then move to record 124, by clicking on a hypertext link. You may thennot remember which record you were looking at before. If your application requires it, you may providethis possibility by using the GOBACK command. For example:
link(('[Previous]'),'GOBACK ')
h. FORMAT format-file-name[,old-text, new-text]Changes the current display format to the one specified by format-name. format-name is a format whichdefines the name of the format to be loaded. Note that although this format needs not to be one of thosespecified in the FDT, it must be in the same path of the current data base (as specified in parameter 5 ofSYSPAR.PAR or parameter 10 of dbn.PAR). For example:
link(('Change format'),'FORMAT cds1')The screen output of this command will be:
Change formatIf the user clicks on this item, CDS/ISIS will re-display the current record using the format ‘cds1’. Onceloaded, the format becomes the current format.In the FORMAT command you may use two additional parameters to modify the loaded format before itis executed (old-text and new-text), as explained below under Polymorphic formats.
i. BROWSE database-name[,mfn,format-name]Opens the data base specified by database-name in a new data base window and displays the record mfnusing the format format-name. mfn and format-name are optional parameters. By default mfn is 1 andformat-name is the default format of the data base. database-name, mfn and format-name are formatsproducing the required values. For example:
link(('Open THES'),'BROWSE thes')This will open the THES data base in a new window and display record 1 using the default THES format.
link(('Open CDS'),'BROWSE cds,10,cds1')This will open the CDS data base in a new window and display record 10 using the format CDS1. You may use the mfn parameter without specifying format-name. You must however specify the mfnparameter (or insert a comma) if you want to specify format-name. All the following examples are validspecifications:
link(('Open CDS'),'BROWSE cds,10')link(('Open CDS'),'BROWSE cds,1,cds1')link(('Open CDS'),'BROWSE cds,,cds1')
j. TEXTBOX formatThis command lets you display text, resulting from the execution of format, in a separate window. Thefollowing example shows the basic form of the command:
link(('Open new window'),'TEXTBOX ',v24)when you click on the Open new window hyperlink, a new window will pop up, displaying the contents offield 24.
i. TEXTBOX window typesYou may create TEXTBOX windows in different ways:1) as independent windows,2) as data base child windows,

3) as record child windows.
You may specify the window type by setting the corresponding attribute as follows:
TEXTBOX users may close this window only by clicking its close button or exitingWinisis.
TEXTBOXCHILD the window is declared as "child" of the current database. Closing the database,will also automatically close all its "child" windows.
TEXTBOXRCHILD the window is declared as "child" of the current record. Moving to anotherrecord, or closing the database, will also automatically close all its "child"windows.
Some examples of TEXTBOX are given below:
'TEXTBOX ',v24'TEXTBOXCHILD ',v24/(v70/)'TEXTBOXRCHILD ',@cds1
Note that the format of the TEXTBOX command is executed while displaying the record. Its outputtherefore is stored in the display work area, whose maximum size is 64000 characters. For example, ifyour format produces a string as long as 30000 characters, you must ensure that the TEXTBOX formatwill not produce more than 34000 characters, or an error will occur. Also note that, for implementationreasons, format may not contain any horizontal or vertical spacing commands or graphic commands suchas F, FS, CL, etc. (if it does they will be ignored). If these are required you may use the LOAD keywordas explained below.
ii. Loading format filesTo avoid some of the limitations mentioned above, you may append the keyword LOAD to a TEXTBOXcommand, indicating that the format parameter is a format name rather than an actual format. In this case,the format will not be loaded or executed until the user clicks on the hypertext link. A loaded format, mayproduce a string of up to 64000 characters and may include all legal formatting commands. The LOADkeyword may be applied to any type of TEXTBOX. For example:
link (('Show record'),'TEXTBOXCHILDLOAD cds1')will open a window displaying the text resulting from the execution of format ‘cds1’.Note the difference between the following two links:
link(('Show record'),'TEXTBOX ',@cds1)link(('Show record'),'TEXTBOXLOAD cds1'the first, executes the format ‘cds1’ while displaying the record; the second statement executes ‘cds1’ onlywhen the user clicks on the hypertext link Show record. As a further example consider the followingformats:Format CDS:
if p(v44) then link(('Show SERIES 1'/),'TEXTBOXLOAD cds1') fi, if p(v44) then link(('Show SERIES 2'/),'TEXTBOX ',@cds1) fi,
Format CDS1:
{b,fs30,'SERIES: ',|(|V44|) |}
In this case, the hyperlink Show SERIES 1 (in format CDS) will display field 44 in bold using a 15 pointsfont size, while Show SERIES 2 will display field 44 using normal characters.When you use the LOAD keyword you may also supply format replace parameters as in FORMATcommand (see below under Polymorphic formats).
iii. Displaying picturesYou may display a picture (which, at present, must be a Windows bitmap file with extension BMP) in aTEXTBOX by appending the IMG keyword to the command. For example, the following command:
link(('Show picture'),'TEXBOXIMG c:\\winisis\\ab_jun97')
will open a new window displaying the file “ab_jun97.bmp”You may use the IMG keyword in conjunction with any TEXTBOX type. Note, however, that the LOADand IMG keywords are mutually exclusive. For example:
link(('Show picture'),'TEXBOXCHILDIMG c:\\winisis\\ab_jun97')link(('Show picture'),'TEXBOXRCHILDIMG c:\\winisis\\ab_jun97')
Pictures larger than 500 x 300 pixels will be scaled to fit such size.
iv. How to Prompt the user before executing a Hypertext commandThe PROMPT prefix allows you to query the user before executing a (polymorphic) format at run-time.
The command prefix PROMPTThe command PROMPT can be added prior to any other commands in the Link statement. For example:..,Link(('Test'),'PROMPT TEXTBOX Ciao'),..When clicking the above hypertext, a small textbox appears just beside the clicked term ('Test'). Ablinking cursor indicates that Winisis is listening for the user input.If the focus is moved to a different object, the textbox will disappear.Use ENTER to validate the input and take out the prompt from the screen.
How to use the user inputWinisis will substitute each $$ (double dollar sign) in the rest of the hypertext command with the userinput. For example:..,Link(('Test'),'PROMPT TEXTBOX $$'),..will open a new window containing the string the user typed in.
Consider the following hypertext command:
Base format: TEST.PFTLink(('Click here to search...'), 'TEXTBOXLOAD TESTR')
In response to the user click, it will execute a second external format. Such format will search for a giventerm, opening a new window containing the search results:Loaded format: TESTR.PFTRef(l('water'),v24)
To make this interactive, put the PROMPT prefix in TEST.PFT:Link(('Click here to search...'), 'PROMPT TEXTBOXLOAD TESTR,zzzz,$$')and change TESTR.PFT as follows:Ref(l('zzzz'),v24)
Result: when you click on 'click here to search' you'll get a prompt box; type in your query and pressENTER: a new window will appear with the result.
How it works?Consider the following:It is impossible to delay the execution of the current format;The only way to pass values through formats is by using polymorphic extensions. In other words, themechanism works by doing a double substitution:- the $$ is substituted by the user input (e.g. "Conference"). The hypertext command to be executed nowis: 'TEXTBOXLOAD TESTR,zzzz,Conference'- Winisis loads TESTR.PFT, substituting every zzzz sequence by the string "Conference". The resultingformat is:
Ref(l('Conference'),v24)
Winisis will then look up for Conference and return the field 24 of the retrieved record.

k. VIEW database-file-name[,mfn,format-name]This command is similar to BROWSE, except that the record is displayed in a textbox window rather thana data base window. The main difference is that the window will not contain a toolbar or a status bar andthe user will not be able to use any menu function (such as print, search, data entry) on the data baseopened with VIEW. For example:
link(('Show CDS'),'VIEW cds,15')Note that there is a fundamental difference between TEXTBOX, on the one hand, and BROWSE andVIEW, on the other. The format specified in a TEXTBOX command is always applied to the currentrecord of the data base from which it was activated, while the format specified (or implied) in BROWSEor VIEW applies to the data base opened by these commands.
l. Identifying TEXTBOX and VIEW windowsEach time you click on a TEXTBOX or VIEW hypertext link, CDS/ISIS opens a new window to displaythe corresponding data. However, having too many windows on the screen may be confusing. You mayavoid this by assigning a number to each TEXTBOX and/or VIEW window, so that any further referenceto the same number will re-use the corresponding window rather than opening a new one.The window number (which can be from 1 to 20) must be placed in square brackets immediately after theTEXTBOX or VIEW command, as in the following example:
link(('Show record'),'TEXTBOX[2] ',@cds1)link(('Show record'),'TEXTBOX[1]CHILDLOAD cds1')link(('Show record'),'TEXTBOX[3]LOAD cds1'link(('Show CDS'),'VIEW[1] cds,15')
In all the examples above, the indicated window will pop up the first time the hypertext link is activated,but any subsequent activation will simply replace the data in that same window. Note that a numbered TEXTBOX or VIEW window may be shared by two or more data bases.
m. Polymorphic formatsBoth the FORMAT command and the LOAD keyword of the TEXTBOX command implement thefollowing optional parameters:
FORMAT format-name[,old-text,new-text]TEXTBOXLOAD format-name[,old-text,new-text]which allow you to modify the loaded format before its execution: CDS/ISIS will replace each occurrenceof the string old text by new text. This feature allows you to build formats that will act differentlydepending on the value of new text. For example (assuming that the format cds1 contains the string "xxx")in the following commands:
'FORMAT cds1,xxx,',v24'TEXBOXLOAD cds1,xxx,',v24
CDS/ISIS will replace all occurrences of 'xxx' by the content of the field v24 before executing the format‘cds1’.Note that old text must not itself contain a comma, as the format parser will consider the first commaencountered as the separator between old-text and new text.
n. PRINTTHIS and PRINTSEARCH commandsPRINTSEARCH prints current query results (records) in reversed order through a print dialog option. Incase this command is called out of context, i.e. there is no active query, only the current record will beprinted.PRINTTHIS prints the current page, including the hypertext command itself.
… link((‘print’),’PRINTSEARCH’)…
o. RESETSEARCH (prefix)Disable the “Display Search Results” mode, as the menu option “Browse”-“Data base” does. This forcesWinisis to stop displaying search results. For instance, when search terms highlighting is active, you mayuse RESETSEARCH to stop highlighting words in order to present a new search interface.Syntax and parameter description:Note: RESETSEARCH is a prefix and, at the moment, only applies to command FORMAT.
For example:Link((‘Change’),’RESETSEARCH FORMAT cds1’)
p. MESSAGE commandSends a message to Winisis. Generally it allows opening a data base or a particular dialog box belongingto it. Syntax and parameter description:
MESSAGE message,dbasename,formatname
message: the message to be sent.dbasename: the dbase that should receive the message.formatname: the format to be shown by dbasename.
Every action will open the specified dbase if necessary. Data bases are identified by their name.Available messages are:OPENSEARCH Open the Expert Search.OPENEASYSEARCH Open the Guided Search WindowLANGUAGE-XX Change the actual working language of Winisis XX should be an existinglanguage code!

9. The Field Select Table (FST)A Field Select Table (FST) defines criteria for extracting one or more elements from a master file record.Depending on the context in which an FST is being used, these elements may then be used to createinverted file entries for the record from which they were extracted, for sorting records in the desiredsequence before producing a printed report, or to reformat records during an import or export operation.An element can be generally defined as a fragment of a record resulting from a particular process.Although in many cases elements will be actual data elements, i.e. a field or a subfield, in other cases theymay be words, phrases, or any other piece of data which has a particular meaning to a specific application.
FSTs are created or modified by means of the FST editor under Edit > Field Select Table. A sample FSTis diplayed below:
Field ID Technique Data extraction format24 4 mhl,v2469 2 v6970 0 mhl,v70|%|26 0 "PLACE=",v26^a26 0 "PUBL=",v26^b
An FST consists of one or more lines each defining three parameters:
1. a field identifier (column labelled ID);2. an indexing technique (column labelled IT); and3. a data extraction format coded using the CDS/ISIS formatting language.
Whenever CDS/ISIS is requested to extract elements using an FST, it will read the relevant master filerecords and carry out, for each record and for each FST entry, the following process:
1. execute the format to extract from the record the corresponding data;2. apply the specified indexing technique to the data produced by the format; and3. assign to each element thus produced the specified field identifier.
The process described above is strictly mechanical and is performed exactly as described. There is notransmission of knowledge between one step and the next, only of data, although all steps co-operate inachieving the desired result. For example, the fact that a particular field was extracted during step 1 is notknown to step 2: step 1 uses the full power of the formatting language to produce a string of charactersand pass it on to the step 2. This step operates on this character string according to the specified indexingtechnique. Indexing techniques are defined as processes on character strings, not on records or fields. It isbecause of this generalized design that FSTs may be used for such different purposes as defining thecontents of the Inverted file or specifying the sorting requirements of a printed listing, which mightappear, at first sight, totally unrelated.In the most general terms, you may think of an FST as a device able to produce elements of data requiredto perform a certain task.
A. FST parametersThe three parameters of an FST line are described below in the order they are processed (when editing anFST with the line editor, they are entered in the reverse order).
1. Data extraction formatThis is coded using the CDS/ISIS formatting language described under "The Formatting Language".Because the data produced by this format is not meant to be displayed, but further processed, CDS/ISISdoes not restrict the line width to any particular value and, consequently, it will never split data betweenlines. The concept of lines, however, may be relevant to a particular indexing technique applied to theoutput produced by the format. In this case CDS/ISIS will guarantee that lines will only be created inresponse to explicit new line commands you specify in the format.Because of this, certain formatting commands such as the C, the indentation or the escape sequencecommands would normally be irrelevant in a data extraction format and may, in some cases, produceunexpected results. They should therefore be avoided, unless they are necessary to achieve the intendedresult.On the other hand, the mode (see "Mode command") selected to output certain fields may be instrumentalto the correct functioning of a particular indexing technique: certain techniques require in fact a specificmode (this is indicated under each indexing technique discussed below). It is your responsibility to insertthe appropriate mode command(s) in the data extraction format, if necessary.Also note that requesting upper case translation, may adversely affect other further processes applied tothe data produced by the FST. As a general rule you should not request upper case translation (use modesmpl, mhl or mdl as applicable, rather than mpu, mhu or mdu), unless you are sure it is needed and willnot have any side effects. CDS/ISIS will automatically perform upper case translation whenever needed.For example, all elements generated by the Inverted file FST will be translated to upper case before theyare stored in the dictionary, even when the FST produces them in lower case.
2. Indexing TechniquesAn indexing technique specifies a particular processing to be performed on the data produced by theformat in order to identify the specific elements to be created. There are eight indexing techniques whichyou may use. They are given a numeric code from 0 to 4 as explained below.
a. Indexing technique 0Build an element from each line extracted by the format. This technique is normally used to index wholefields or subfields. Note, however, that CDS/ISIS will build elements from lines, not from fields. This isbecause CDS/ISIS looks upon the output of the format as a string of characters where fields are no longeridentifiable. It is therefore your responsibility to produce the correct data through the format, especiallywhen you are indexing repeatable fields and/or more than one field. In other words, when using thistechnique, your data extraction format should output one line for each element to be indexed.
b. Indexing technique 1Build an element from each subfield or line extracted by the format. As CDS/ISIS will search the outputof the format for subfield delimiter codes, for this technique to work correctly your format must specifyproof mode (or no mode at all, as this is the default mode), because it is the only mode preserving thesubfield delimiter codes on output (remember that heading and data mode replace subfield delimiters bypunctuation marks). Note that indexing technique 1 is in fact a shortcut to using indexing technique 0. Forexample: Record content: ^aParis^bUnesco^c1965
FST Format output Elements produced1 1 mpl,v26 ^aParis^bUnesco^cl
965ParisUnesco1965
1 0mhl,v26^a/v26^b/v26^c
ParisUnesco1965
ParisUnesco1965
1 1 mdl,v26 Paris, Unesco,1965
Paris, Unesco, 1965
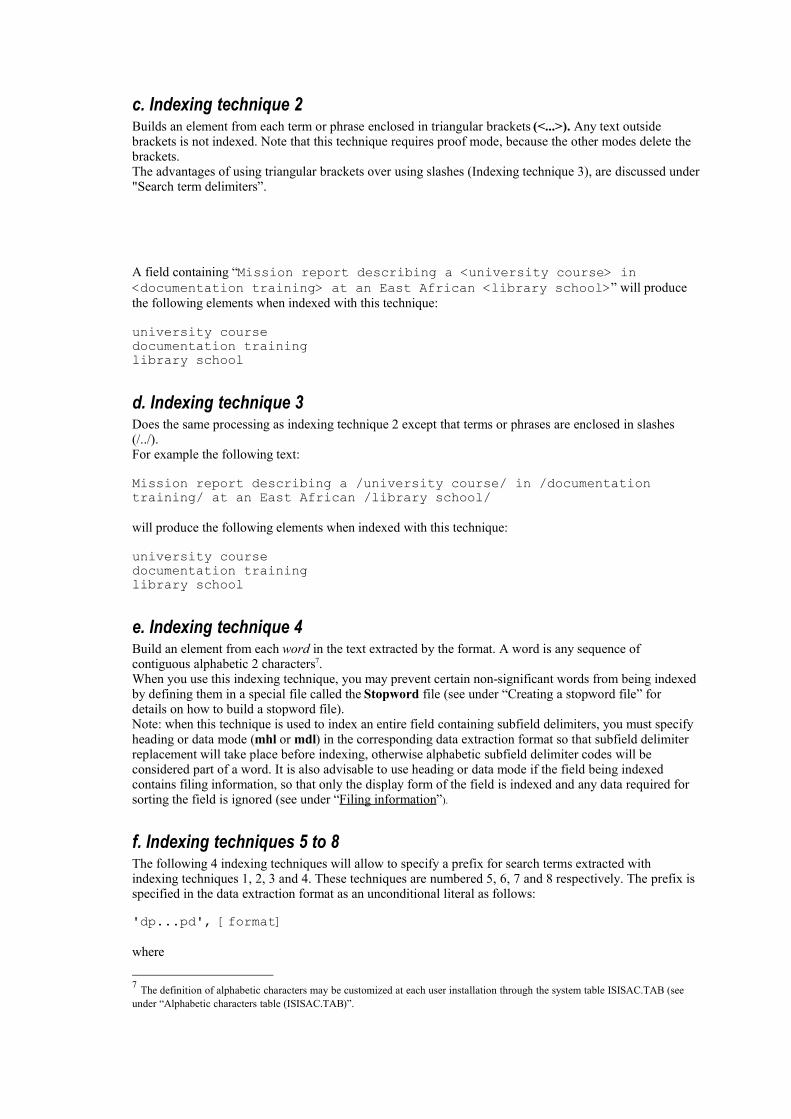
c. Indexing technique 2Builds an element from each term or phrase enclosed in triangular brackets (<...>). Any text outsidebrackets is not indexed. Note that this technique requires proof mode, because the other modes delete thebrackets.The advantages of using triangular brackets over using slashes (Indexing technique 3), are discussed under"Search term delimiters”.
A field containing “Mission report describing a <university course> in<documentation training> at an East African <library school>” will producethe following elements when indexed with this technique:
university course documentation training library school
d. Indexing technique 3Does the same processing as indexing technique 2 except that terms or phrases are enclosed in slashes(/../).For example the following text:
Mission report describing a /university course/ in /documentationtraining/ at an East African /library school/
will produce the following elements when indexed with this technique:
university coursedocumentation traininglibrary school
e. Indexing technique 4Build an element from each word in the text extracted by the format. A word is any sequence ofcontiguous alphabetic 2 characters7.When you use this indexing technique, you may prevent certain non-significant words from being indexedby defining them in a special file called the Stopword file (see under “Creating a stopword file” fordetails on how to build a stopword file).Note: when this technique is used to index an entire field containing subfield delimiters, you must specifyheading or data mode (mhl or mdl) in the corresponding data extraction format so that subfield delimiterreplacement will take place before indexing, otherwise alphabetic subfield delimiter codes will beconsidered part of a word. It is also advisable to use heading or data mode if the field being indexedcontains filing information, so that only the display form of the field is indexed and any data required forsorting the field is ignored (see under “Filing information”).
f. Indexing techniques 5 to 8The following 4 indexing techniques will allow to specify a prefix for search terms extracted withindexing techniques 1, 2, 3 and 4. These techniques are numbered 5, 6, 7 and 8 respectively. The prefix isspecified in the data extraction format as an unconditional literal as follows:
'dp...pd', [format]
where
7 The definition of alphabetic characters may be customized at each user installation through the system table ISISAC.TAB (seeunder “Alphabetic characters table (ISISAC.TAB)”.
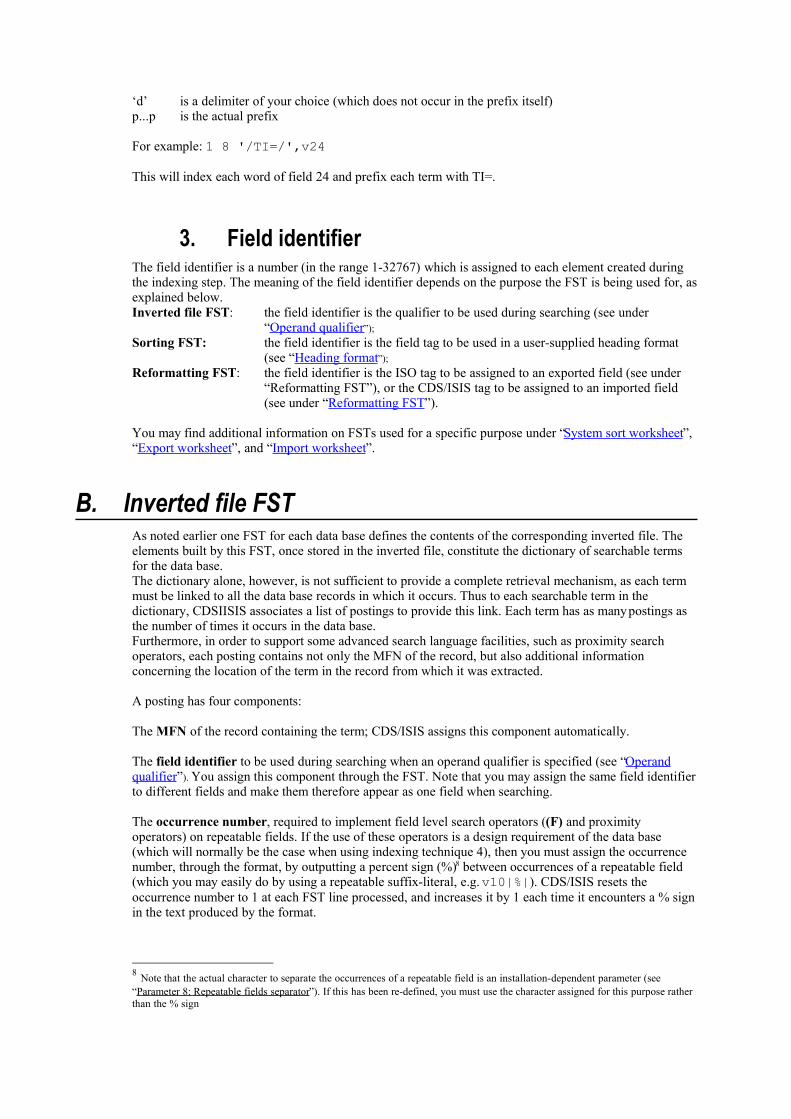
‘d’ is a delimiter of your choice (which does not occur in the prefix itself)p...p is the actual prefix
For example: 1 8 '/TI=/',v24
This will index each word of field 24 and prefix each term with TI=.
3. Field identifierThe field identifier is a number (in the range 1-32767) which is assigned to each element created duringthe indexing step. The meaning of the field identifier depends on the purpose the FST is being used for, asexplained below.Inverted file FST: the field identifier is the qualifier to be used during searching (see under
“Operand qualifier”);Sorting FST: the field identifier is the field tag to be used in a user-supplied heading format
(see “Heading format”);Reformatting FST: the field identifier is the ISO tag to be assigned to an exported field (see under
“Reformatting FST”), or the CDS/ISIS tag to be assigned to an imported field(see under “Reformatting FST”).
You may find additional information on FSTs used for a specific purpose under “System sort worksheet”,“Export worksheet”, and “Import worksheet”.
B. Inverted file FSTAs noted earlier one FST for each data base defines the contents of the corresponding inverted file. Theelements built by this FST, once stored in the inverted file, constitute the dictionary of searchable termsfor the data base.The dictionary alone, however, is not sufficient to provide a complete retrieval mechanism, as each termmust be linked to all the data base records in which it occurs. Thus to each searchable term in thedictionary, CDSIISIS associates a list of postings to provide this link. Each term has as many postings asthe number of times it occurs in the data base.Furthermore, in order to support some advanced search language facilities, such as proximity searchoperators, each posting contains not only the MFN of the record, but also additional informationconcerning the location of the term in the record from which it was extracted.
A posting has four components:
The MFN of the record containing the term; CDS/ISIS assigns this component automatically.
The field identifier to be used during searching when an operand qualifier is specified (see “Operandqualifier”). You assign this component through the FST. Note that you may assign the same field identifierto different fields and make them therefore appear as one field when searching.
The occurrence number, required to implement field level search operators ((F) and proximityoperators) on repeatable fields. If the use of these operators is a design requirement of the data base(which will normally be the case when using indexing technique 4), then you must assign the occurrencenumber, through the format, by outputting a percent sign (%)8 between occurrences of a repeatable field(which you may easily do by using a repeatable suffix-literal, e.g. v10|%|). CDS/ISIS resets theoccurrence number to 1 at each FST line processed, and increases it by 1 each time it encounters a % signin the text produced by the format.
8 Note that the actual character to separate the occurrences of a repeatable field is an installation-dependent parameter (see“Parameter 8: Repeatable fields separator”). If this has been re-defined, you must use the character assigned for this purpose ratherthan the % sign

The term sequence number, required to implement proximity search operators. This is assigned byCDS/ISIS as follows: it is reset to 1 at each FST line processed and each time the occurrence number ischanged; it is increased by 1 for each element created by the specified indexing technique. Assume, forexample, that a data base has a summary in repeatable field 68, containing one paragraph per occurrence,which must be indexed using indexing technique 4. By specifying the data extraction format mdl,v68|%|, the words of the summary will be assigned a sequence number starting from 1 at each paragraph(whereas if the data extraction format was mdl,v68, the words would be numbered sequentially for thewhole summary, e.g. the first word of the second paragraph will have a sequence number which is onehigher than the last word of the first paragraph).
In some cases, certain dictionary terms generated by the Inverted file FST may prove to be meaningless orambiguous for an efficient retrieval. For example, the term IT could be either a pronoun (in which case itwould be useless in retrieval), or the country code of Italy. This would also be true for numeric termssuch as 34, whose meaning may be obscure when isolated from its context. If the field producing suchterms is indexed with technique 0, and 5 to 8, you may add meaning by using a prefix-literal to provide alabel which will then identify the particular usage of the term. For example, when indexing a fieldcontaining a country code, e.g. field 10, you could use the following format: “CC = ”v10 (rather thanv10), so that the country code IT will be inverted as CC=IT (rather than just IT). Likewise, if field 20contained a project number, you could use the format “PROJECT ”,v20, so that you may later search forPROJECT 34 (rather than just 34).
The next tables show the processing of an FST and the full posting assigned to each element before it isstored on the Inverted file.

Elements producedFST line Format output ID element24 4 mhl ,v24 <An> Electric hygrometer
apparatus for measuringwater-vapour loss fromplants in the field
24 An24 Electric24 hygrometer24 apparatus24 for24 measuring24 water24 vapour24 loss24 from24 plants24 in24 the24 field
69 2 v69 Paper on:<hygrometers><planttranspiration><moisture><water balance>
69 hygrometers69 plant transpiration69 moisture69 water balance
70 0 mhl,v70|%| Grieve, B.J.%Went, F.W. 70 Grieve, B.J70 Went, F.W.
26 0 "PLACE="V26^a PLACE=Paris 26 PLACE=Paris
26 0 "PUBL="V26^b PUBL=Unesco 26 PUBL=Unesco
MFN ID OCC SEQ Element4 24 1 1 An4 24 1 2 Electric4 24 1 3 hygrometer4 24 1 4 apparatus4 24 1 5 for4 24 1 6 measuring4 24 1 7 water4 24 1 8 vapour4 24 1 9 loss4 24 1 10 from4 24 1 11 plants4 24 1 12 in4 24 1 13 the4 24 1 14 field
4 69 1 1 hygrometers4 69 1 2 plant transpiration4 69 1 3 moisture4 69 1 4 water balance
4 70 1 1 Grieve, B.J.4 70 2 1 Went, F.W.
4 26 1 1 PLACE=Paris4 26 1 1 PUBL=Unesco

The table below shows the elements and corresponding postings that would be generated if a stopwordfile was used. Note, in this example, that, although stopwords are not output, they are neverthelessaccounted for in the term sequence number.
MFN ID OCC SEQ Element4 24 1 2 Electric4 24 1 3 hygrometer4 24 1 4 apparatus4 24 1 6 measuring4 24 1 7 water4 24 1 8 vapour4 24 1 9 loss4 24 1 11 plants4 24 1 14 field
4 69 1 1 hygrometers4 69 1 2 plant transpiration4 69 1 3 moisture4 69 1 4 water balance
4 70 1 1 Grieve, B.J.4 70 2 1 Went, F.W.
4 26 1 1 PLACE=Paris4 26 1 1 PUBL=Unesco
Stopword fileANFORFROMINTHE
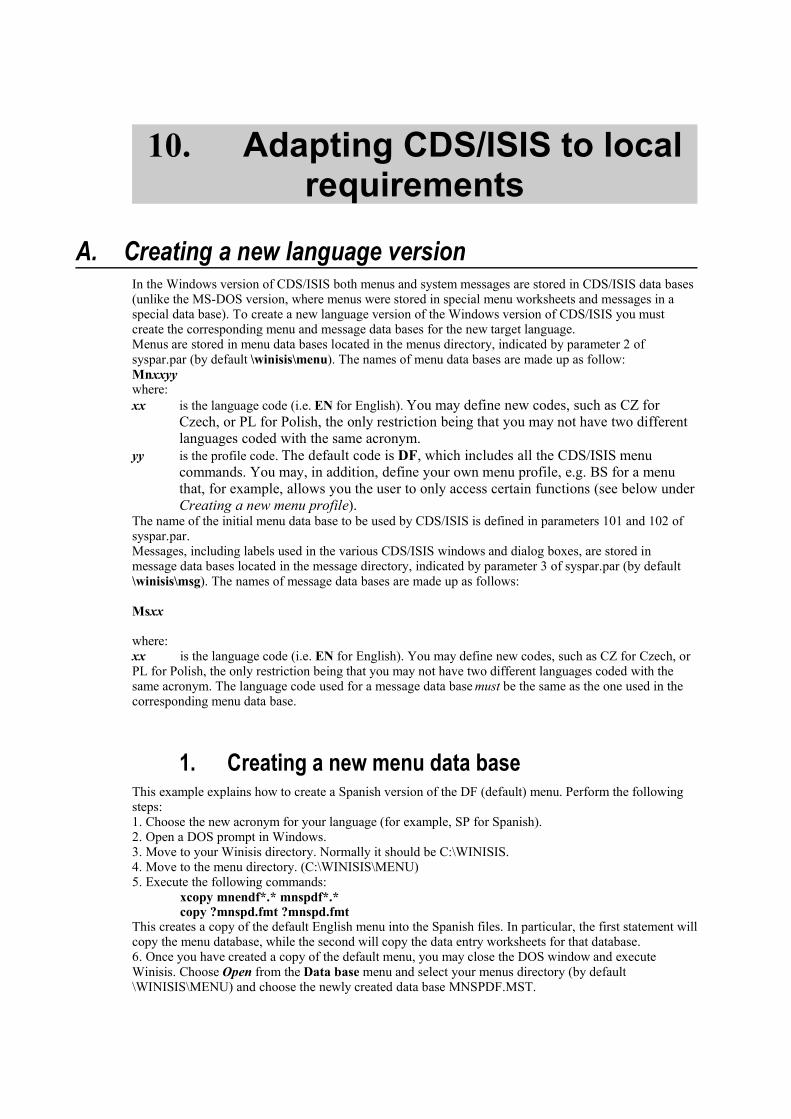
10. Adapting CDS/ISIS to localrequirements
A. Creating a new language versionIn the Windows version of CDS/ISIS both menus and system messages are stored in CDS/ISIS data bases(unlike the MS-DOS version, where menus were stored in special menu worksheets and messages in aspecial data base). To create a new language version of the Windows version of CDS/ISIS you mustcreate the corresponding menu and message data bases for the new target language.Menus are stored in menu data bases located in the menus directory, indicated by parameter 2 ofsyspar.par (by default \winisis\menu). The names of menu data bases are made up as follow:Mnxxyywhere:xx is the language code (i.e. EN for English). You may define new codes, such as CZ for
Czech, or PL for Polish, the only restriction being that you may not have two differentlanguages coded with the same acronym.
yy is the profile code. The default code is DF, which includes all the CDS/ISIS menucommands. You may, in addition, define your own menu profile, e.g. BS for a menuthat, for example, allows you the user to only access certain functions (see below underCreating a new menu profile).
The name of the initial menu data base to be used by CDS/ISIS is defined in parameters 101 and 102 ofsyspar.par.Messages, including labels used in the various CDS/ISIS windows and dialog boxes, are stored inmessage data bases located in the message directory, indicated by parameter 3 of syspar.par (by default\winisis\msg). The names of message data bases are made up as follows:
Msxx
where:xx is the language code (i.e. EN for English). You may define new codes, such as CZ for Czech, orPL for Polish, the only restriction being that you may not have two different languages coded with thesame acronym. The language code used for a message data base must be the same as the one used in thecorresponding menu data base.
1. Creating a new menu data baseThis example explains how to create a Spanish version of the DF (default) menu. Perform the followingsteps:1. Choose the new acronym for your language (for example, SP for Spanish).2. Open a DOS prompt in Windows.3. Move to your Winisis directory. Normally it should be C:\WINISIS.4. Move to the menu directory. (C:\WINISIS\MENU)5. Execute the following commands:
xcopy mnendf*.* mnspdf*.*copy ?mnspd.fmt ?mnspd.fmt
This creates a copy of the default English menu into the Spanish files. In particular, the first statement willcopy the menu database, while the second will copy the data entry worksheets for that database.6. Once you have created a copy of the default menu, you may close the DOS window and executeWinisis. Choose Open from the Data base menu and select your menus directory (by default\WINISIS\MENU) and choose the newly created data base MNSPDF.MST.
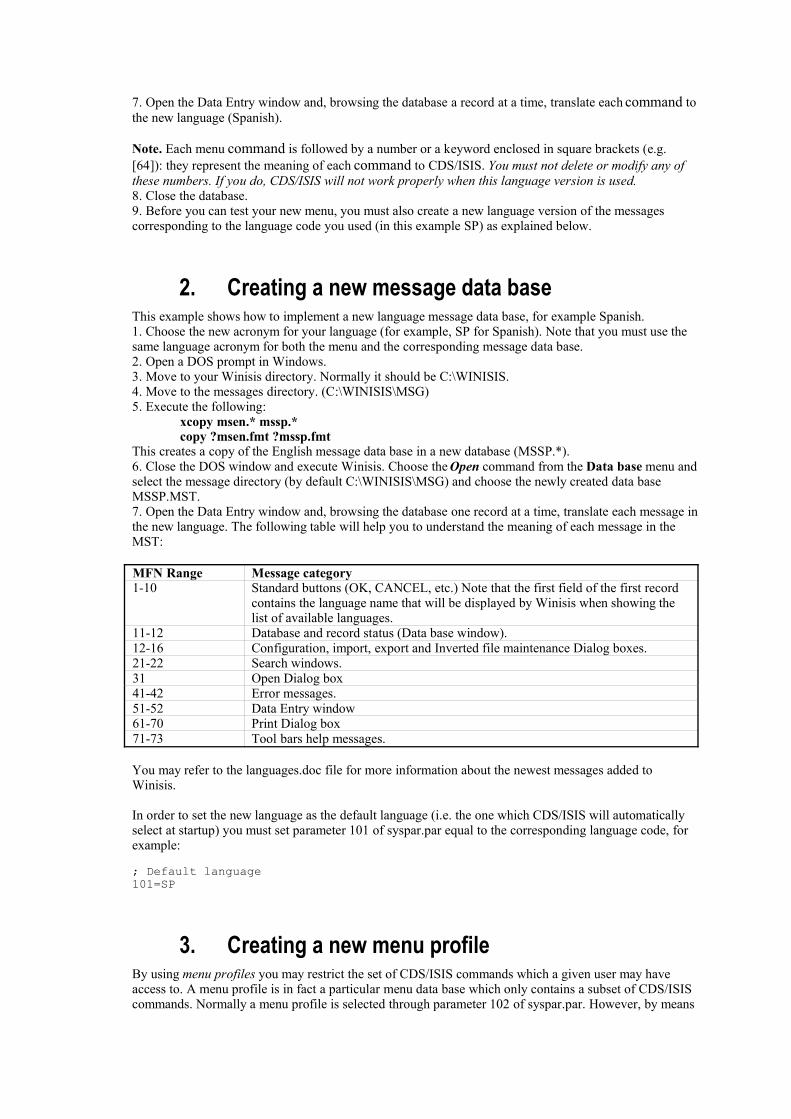
7. Open the Data Entry window and, browsing the database a record at a time, translate each command tothe new language (Spanish).
Note. Each menu command is followed by a number or a keyword enclosed in square brackets (e.g.[64]): they represent the meaning of each command to CDS/ISIS. You must not delete or modify any ofthese numbers. If you do, CDS/ISIS will not work properly when this language version is used.8. Close the database.9. Before you can test your new menu, you must also create a new language version of the messagescorresponding to the language code you used (in this example SP) as explained below.
2. Creating a new message data baseThis example shows how to implement a new language message data base, for example Spanish.1. Choose the new acronym for your language (for example, SP for Spanish). Note that you must use thesame language acronym for both the menu and the corresponding message data base.2. Open a DOS prompt in Windows.3. Move to your Winisis directory. Normally it should be C:\WINISIS.4. Move to the messages directory. (C:\WINISIS\MSG)5. Execute the following:
xcopy msen.* mssp.*copy ?msen.fmt ?mssp.fmt
This creates a copy of the English message data base in a new database (MSSP.*).6. Close the DOS window and execute Winisis. Choose the Open command from the Data base menu andselect the message directory (by default C:\WINISIS\MSG) and choose the newly created data baseMSSP.MST.7. Open the Data Entry window and, browsing the database one record at a time, translate each message inthe new language. The following table will help you to understand the meaning of each message in theMST:
MFN Range Message category1-10 Standard buttons (OK, CANCEL, etc.) Note that the first field of the first record
contains the language name that will be displayed by Winisis when showing thelist of available languages.
11-12 Database and record status (Data base window).12-16 Configuration, import, export and Inverted file maintenance Dialog boxes.21-22 Search windows.31 Open Dialog box41-42 Error messages.51-52 Data Entry window61-70 Print Dialog box71-73 Tool bars help messages.
You may refer to the languages.doc file for more information about the newest messages added toWinisis.
In order to set the new language as the default language (i.e. the one which CDS/ISIS will automaticallyselect at startup) you must set parameter 101 of syspar.par equal to the corresponding language code, forexample:
; Default language101=SP
3. Creating a new menu profileBy using menu profiles you may restrict the set of CDS/ISIS commands which a given user may haveaccess to. A menu profile is in fact a particular menu data base which only contains a subset of CDS/ISIScommands. Normally a menu profile is selected through parameter 102 of syspar.par. However, by means

of parameter 0, you may assign a different profile to each user (or category of users), by redefiningparameter 102 for each secondary syspar.par. By default CDS/ISIS will use the DF profile (data baseMNxxDF), which allows access to all CDS/ISIS functions.To create a new menu profile for an existing language version, perform the following steps:1. Choose the new acronym for your profile (for example, BS).2. Open a DOS prompt in Windows.3. Move to your Winisis directory (by default C:\WINISIS).4. Move to the menu directory. (C:\WINISIS\MENU)5. Execute the following:
xcopy mnendf*.* mnxxbs*.*copy ?mnend.fmt ?mnxxb.fmt
This creates a copy of the xx language menu data base. In particular, the first statement will copy thedatabase, while the second will copy the data entry worksheets for that database.
Note: data entry worksheet names (.FMT files), are composed by a letter indicating the page number andby the first 5 characters of the database name (for example AMNEND.FMT). So, if you have more thanone profile beginning with the letter "B", say MNENBS.MST and MNENBR.MST, you do not need toduplicate the entry worksheets, because in both cases the worksheet name is AMNENB.FMT. This is nota problem and does not cause any conflict between the two profiles.6. Once you have created a copy of the default profile, you may close the DOS window and executeCDS/ISIS. Choose the Open command from the Data base menu, and select your menu directory (bydefault C:\WINISIS\MENU), then choose the newly created MST file, MNENBS.MST.7. Open the Data Entry window and, browsing the database one record at a time, delete all the commandsyou do not want to be available in the new profile.Note: to avoid the user to select the default menu, you should delete the Change language command inthe Configure menu. You should also change the profile name, by editing the first field of the first recordin the database, that normally says: "Full Version".8. Close the database.9. You may now test your new profile, by choosing the new profile from the Change profile command inthe Configure menu. If something is wrong and you cannot return to the full version in order to makeadditional changes, close and reload CDS/ISIS, after removing parameter 102 of syspar.par, if any.10. To set the new profile as the default one, change parameter 102 of syspar.par.
B. Conversion tablesIn order to maintain compatibility with the MS-DOS version, the Windows version of CDS/ISIS maintainsdata bases (on disk) using the MS-DOS character set (known as the OEM character set). The data is thenconverted to the Windows character set (known as the ANSI character set) whenever it is displayed on thescreen and converted back to MS-DOS whenever you update a record. In this manner the same physicaldata base can be operated using both the MS-DOS and the Windows version and can be exchanged withother CDS/ISIS users independently of the version used. Depending on the language of the data base andthe corresponding MS-DOS code page used, you may have to provide conversion tables if the defaultbuilt-in tables are not working properly9. All conversion tables are text files containing 256 integers(except ISISAC.TAB), corresponding to the character codes 0-255. Character conversion is performed byreplacing a given text character by the corresponding code in the table. For example, if the 129th integerin the table is 199, then CDS/ISIS will replace each occurrence of character code 128 with character code199. The conversion tables used by CDS/ISIS are described below.
9 CDS/ISIS uses as default the standard Windows ANSI-to-OEM mappings, which are defined by thekeyboard driver, where this function is implemented. Some keyboard drivers may have different mappingsthan others, depending on the machine environment, and some keyboard driver support loading differentOEM character sets; for example, the standard U.S. keyboard driver for an IBM keyboard supportsloadable code pages, with the default being code page 437 and the most common alternative being codepage 850. (The Windows character set is sometimes referred to as code page 1007.)
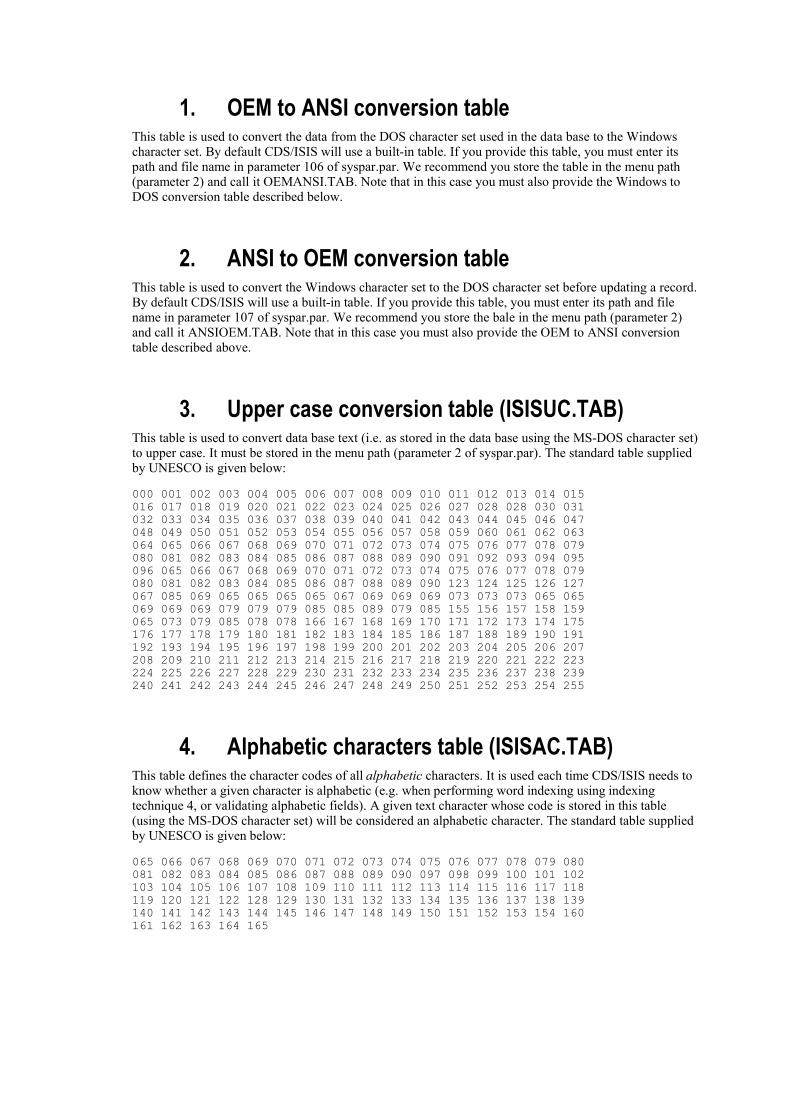
1. OEM to ANSI conversion tableThis table is used to convert the data from the DOS character set used in the data base to the Windowscharacter set. By default CDS/ISIS will use a built-in table. If you provide this table, you must enter itspath and file name in parameter 106 of syspar.par. We recommend you store the table in the menu path(parameter 2) and call it OEMANSI.TAB. Note that in this case you must also provide the Windows toDOS conversion table described below.
2. ANSI to OEM conversion tableThis table is used to convert the Windows character set to the DOS character set before updating a record.By default CDS/ISIS will use a built-in table. If you provide this table, you must enter its path and filename in parameter 107 of syspar.par. We recommend you store the bale in the menu path (parameter 2)and call it ANSIOEM.TAB. Note that in this case you must also provide the OEM to ANSI conversiontable described above.
3. Upper case conversion table (ISISUC.TAB)This table is used to convert data base text (i.e. as stored in the data base using the MS-DOS character set)to upper case. It must be stored in the menu path (parameter 2 of syspar.par). The standard table suppliedby UNESCO is given below:
000 001 002 003 004 005 006 007 008 009 010 011 012 013 014 015016 017 018 019 020 021 022 023 024 025 026 027 028 028 030 031032 033 034 035 036 037 038 039 040 041 042 043 044 045 046 047048 049 050 051 052 053 054 055 056 057 058 059 060 061 062 063064 065 066 067 068 069 070 071 072 073 074 075 076 077 078 079080 081 082 083 084 085 086 087 088 089 090 091 092 093 094 095096 065 066 067 068 069 070 071 072 073 074 075 076 077 078 079080 081 082 083 084 085 086 087 088 089 090 123 124 125 126 127067 085 069 065 065 065 065 067 069 069 069 073 073 073 065 065069 069 069 079 079 079 085 085 089 079 085 155 156 157 158 159065 073 079 085 078 078 166 167 168 169 170 171 172 173 174 175176 177 178 179 180 181 182 183 184 185 186 187 188 189 190 191192 193 194 195 196 197 198 199 200 201 202 203 204 205 206 207208 209 210 211 212 213 214 215 216 217 218 219 220 221 222 223224 225 226 227 228 229 230 231 232 233 234 235 236 237 238 239240 241 242 243 244 245 246 247 248 249 250 251 252 253 254 255
4. Alphabetic characters table (ISISAC.TAB)This table defines the character codes of all alphabetic characters. It is used each time CDS/ISIS needs toknow whether a given character is alphabetic (e.g. when performing word indexing using indexingtechnique 4, or validating alphabetic fields). A given text character whose code is stored in this table(using the MS-DOS character set) will be considered an alphabetic character. The standard table suppliedby UNESCO is given below:
065 066 067 068 069 070 071 072 073 074 075 076 077 078 079 080081 082 083 084 085 086 087 088 089 090 097 098 099 100 101 102103 104 105 106 107 108 109 110 111 112 113 114 115 116 117 118119 120 121 122 128 129 130 131 132 133 134 135 136 137 138 139140 141 142 143 144 145 146 147 148 149 150 151 152 153 154 160161 162 163 164 165
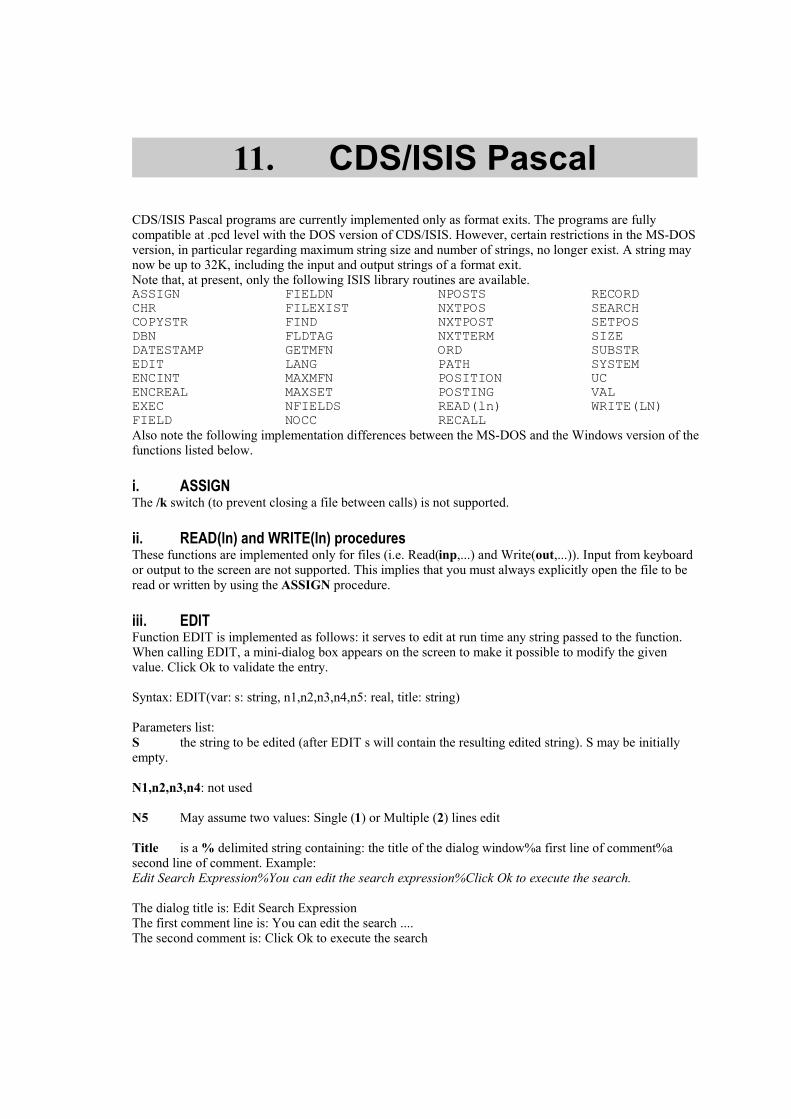
11. CDS/ISIS PascalCDS/ISIS Pascal programs are currently implemented only as format exits. The programs are fullycompatible at .pcd level with the DOS version of CDS/ISIS. However, certain restrictions in the MS-DOSversion, in particular regarding maximum string size and number of strings, no longer exist. A string maynow be up to 32K, including the input and output strings of a format exit.Note that, at present, only the following ISIS library routines are available.ASSIGNCHRCOPYSTRDBNDATESTAMPEDITENCINTENCREALEXECFIELD
FIELDNFILEXISTFINDFLDTAGGETMFNLANGMAXMFNMAXSETNFIELDSNOCC
NPOSTSNXTPOSNXTPOSTNXTTERMORDPATHPOSITIONPOSTINGREAD(ln)RECALL
RECORDSEARCHSETPOSSIZESUBSTRSYSTEMUCVALWRITE(LN)
Also note the following implementation differences between the MS-DOS and the Windows version of thefunctions listed below.
i. ASSIGNThe /k switch (to prevent closing a file between calls) is not supported.
ii. READ(ln) and WRITE(ln) proceduresThese functions are implemented only for files (i.e. Read(inp,...) and Write(out,...)). Input from keyboardor output to the screen are not supported. This implies that you must always explicitly open the file to beread or written by using the ASSIGN procedure.
iii. EDITFunction EDIT is implemented as follows: it serves to edit at run time any string passed to the function.When calling EDIT, a mini-dialog box appears on the screen to make it possible to modify the givenvalue. Click Ok to validate the entry.
Syntax: EDIT(var: s: string, n1,n2,n3,n4,n5: real, title: string)
Parameters list:S the string to be edited (after EDIT s will contain the resulting edited string). S may be initiallyempty.
N1,n2,n3,n4: not used
N5 May assume two values: Single (1) or Multiple (2) lines edit
Title is a % delimited string containing: the title of the dialog window%a first line of comment%asecond line of comment. Example:Edit Search Expression%You can edit the search expression%Click Ok to execute the search.
The dialog title is: Edit Search ExpressionThe first comment line is: You can edit the search ....The second comment is: Click Ok to execute the search

iv. EXEC procedure1. All programs called through EXEC must be of the same type as the original caller (e.g. ifprogram A is a format exit and it calls program B then B must also be a format exit);2. If the calling program (A) is a format exit, then the called program (B) receives as input string(s1), the current value of the output string (s2) of A at the time the EXEC function is executed. Program Breturns a value in the output string (s2). This allows you to pass an input parameter to, and to receiveoutput from the executed program. For example:
Program A(s1: string; lw, occ: real; s2: string) [format];begins2:='xxx';exec('B');{ the value of s2 at this point will be 'xxxyyyzzz' }s2:=s2|'www';end.
Program B(s1: string; lw, occ: real; s2: string) [format];begin{ on entry: s1 will be 'xxx' }s2:=s1|'yyy';exec('C');{ the value of s2 at this point will be 'xxxyyy' }end.
Program C(s1: string; lw, occ: real; s2: string) [format];begin{ on entry: s1 will be 'xxxyyy' }s2:=s1|'zzz';{ the value of s2 at this point will be 'xxxyyyzzz' }end.On exit from A, the value of s2 will be 'xxxyyyzzzwww'.
vi. LANGReturn a two character string containing the current selected language code.
vii. PATH functionNot implemented yet.Until such time as the dbn.par facility will be implemented, the function PATH('DBN',i) returns the pathof the current Master file for all values of i.
viii. SYSTEM procedureThis procedure may execute both DOS and Windows programs. If you are executing a DOS program andyou want it to execute in a window (rather than in full screen mode), you must also create a correspondingPIF file.The program called by the SYSTEM procedure executes asynchronously and control returns immediatelyto your program. This feature may be used, for example, to play a sound file (e.g. a description of therecord) while the record is displayed. Assume for example that field 1 contains the name of a .wav fileassociated with the record. Then the following format, and the associated format exit, will play this filewhile displaying the record:
Format: ............ &play() ..........
Program play(s1: string; lw, occ: real; s2: string);var wav: stringbeginwav:=field(fieldn(1,1));if (size(wav)>0) then system('mplayer /play /close '|wav|'.wav');end.
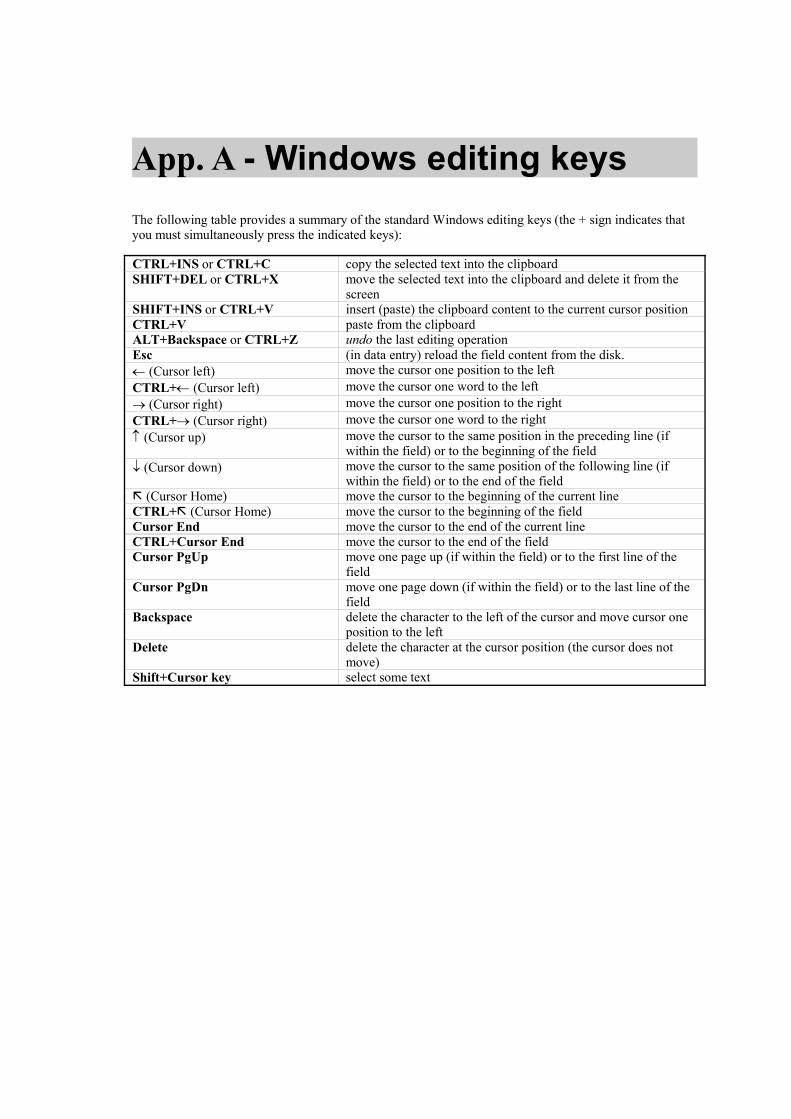
App. A - Windows editing keysThe following table provides a summary of the standard Windows editing keys (the + sign indicates thatyou must simultaneously press the indicated keys):
CTRL+INS or CTRL+C copy the selected text into the clipboardSHIFT+DEL or CTRL+X move the selected text into the clipboard and delete it from the
screenSHIFT+INS or CTRL+V insert (paste) the clipboard content to the current cursor positionCTRL+V paste from the clipboardALT+Backspace or CTRL+Z undo the last editing operationEsc (in data entry) reload the field content from the disk. (Cursor left) move the cursor one position to the leftCTRL+ (Cursor left) move the cursor one word to the left (Cursor right) move the cursor one position to the rightCTRL+ (Cursor right) move the cursor one word to the right (Cursor up) move the cursor to the same position in the preceding line (if
within the field) or to the beginning of the field (Cursor down) move the cursor to the same position of the following line (if
within the field) or to the end of the field (Cursor Home) move the cursor to the beginning of the current lineCTRL+ (Cursor Home) move the cursor to the beginning of the fieldCursor End move the cursor to the end of the current lineCTRL+Cursor End move the cursor to the end of the fieldCursor PgUp move one page up (if within the field) or to the first line of the
fieldCursor PgDn move one page down (if within the field) or to the last line of the
fieldBackspace delete the character to the left of the cursor and move cursor one
position to the leftDelete delete the character at the cursor position (the cursor does not
move)Shift+Cursor key select some text

GlossaryAccess point : see Search term
ANY file : An optional file containing the set of ANY terms defined for a given data base. The ANY fileis a text file which may be created with any text editor (e.g. NOTEPAD or WRITE)
ANY term : A collective term representing an arbitrary (but pre-defined) set of search terms. When usedin a search expression, an ANY term is automatically translated to the set of search terms it representslinked with the logical OR operator. If, for example, the ANY term ANY BENELUX represents thesearch terms BELGIUM, NETHERLANDS and LUXEMBOURG, then when ANY BENELUX is used ina search expression it will be translated to (BELGIUM + NETHERLANDS + LUXEMBOURG). Beforean ANY term can be used in a search expression, it must be defined in the ANY file
ASCII : (American Standard Code for Information Interchange) A 7-bit binary code used to encodecharacters on a computer. ASCII codes range from 0 to 127. On many computers, such as the IBM PC,the code has been extended to 8 bits, providing therefore an additional set of 128 codes from 128 to 255.These are not normally part of the ASCII standard and cannot therefore be expected to be the same on allcomputers
Browsing : the sequential display of Master file records in MFN order, i.e. in the order in which therecords have been entered
Control key : Keys on your keyboard which, when pressed, perform a specific pre-defined action
Cut and paste : An editing operation, available in most word processing packages, consisting in movingone piece of text from one place to another. The CDS/ISIS field editor supports the standard Windows cutand pasting operations
Data base : A file of related data collected to satisfy the information requirements of a given usercommunity. Each unit of information stored in a data base consists of discrete data elements, eachcontaining a particular characteristic of the entity being described. For example, a bibliographic data basewill contain information on books, reports, journal articles, etc. Each unit will, in this case, consist of suchdata elements as author, title, date of publication, etc. Data elements are stored in fields, each of which isassigned a numeric tag indicative of its contents
Data element : An elementary piece of information which CDS/ISIS can identify. A data element may bestored in a field or a subfield
Data entry worksheet : An electronic form used for entering data in a data base
Default value : The pre-defined contents of a field
Dialog box : An electronic form used by CDS/ISIS to collect the parameters for a particular operationsuch as a print run or an export operation
Dialogue language : The language used by CDS/ISIS to interact with the user. CDS/ISIS is designed tosupport an unlimited number of dialogue languages
Dictionary : The set of search terms for a given data base
Display format : see Format
Display mode : The manner in which fields are displayed. CDS/ISIS may display fields in three differentmodes: proof, data or heading mode
Export : The conversion of a data base from the form in which it is stored for processing to a formsuitable for transmission to other users or systems
FDT : see Field Definition Table
Field : The container of a data element
Field Definition table : A table defining the fields of a given data base
Field Select Table : A table defining criteria for extracting one or more elements from a Master filerecord required for a particular process. Field Select Tables may be used for defining the contents of theInverted file, for sorting records before producing a printed report or to reformat records during an importor export operation
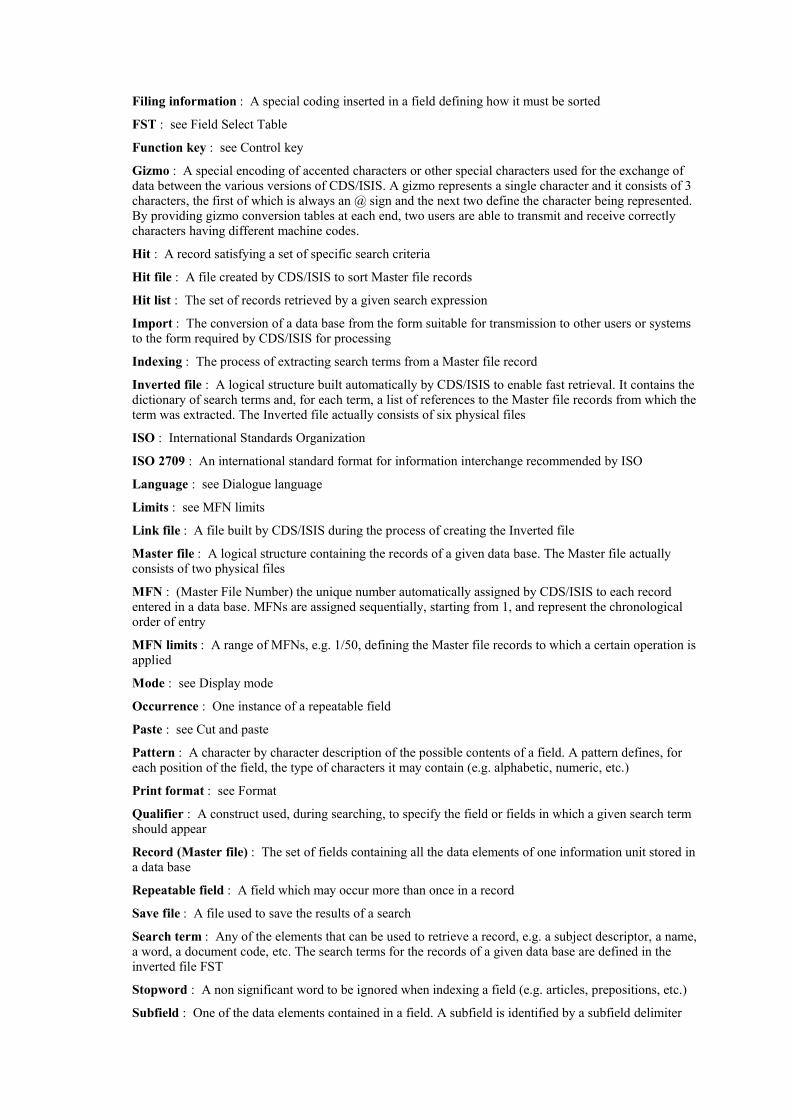
Filing information : A special coding inserted in a field defining how it must be sorted
FST : see Field Select Table
Function key : see Control key
Gizmo : A special encoding of accented characters or other special characters used for the exchange ofdata between the various versions of CDS/ISIS. A gizmo represents a single character and it consists of 3characters, the first of which is always an @ sign and the next two define the character being represented.By providing gizmo conversion tables at each end, two users are able to transmit and receive correctlycharacters having different machine codes.
Hit : A record satisfying a set of specific search criteria
Hit file : A file created by CDS/ISIS to sort Master file records
Hit list : The set of records retrieved by a given search expression
Import : The conversion of a data base from the form suitable for transmission to other users or systemsto the form required by CDS/ISIS for processing
Indexing : The process of extracting search terms from a Master file record
Inverted file : A logical structure built automatically by CDS/ISIS to enable fast retrieval. It contains thedictionary of search terms and, for each term, a list of references to the Master file records from which theterm was extracted. The Inverted file actually consists of six physical files
ISO : International Standards Organization
ISO 2709 : An international standard format for information interchange recommended by ISO
Language : see Dialogue language
Limits : see MFN limits
Link file : A file built by CDS/ISIS during the process of creating the Inverted file
Master file : A logical structure containing the records of a given data base. The Master file actuallyconsists of two physical files
MFN : (Master File Number) the unique number automatically assigned by CDS/ISIS to each recordentered in a data base. MFNs are assigned sequentially, starting from 1, and represent the chronologicalorder of entry
MFN limits : A range of MFNs, e.g. 1/50, defining the Master file records to which a certain operation isapplied
Mode : see Display mode
Occurrence : One instance of a repeatable field
Paste : see Cut and paste
Pattern : A character by character description of the possible contents of a field. A pattern defines, foreach position of the field, the type of characters it may contain (e.g. alphabetic, numeric, etc.)
Print format : see Format
Qualifier : A construct used, during searching, to specify the field or fields in which a given search termshould appear
Record (Master file) : The set of fields containing all the data elements of one information unit stored ina data base
Repeatable field : A field which may occur more than once in a record
Save file : A file used to save the results of a search
Search term : Any of the elements that can be used to retrieve a record, e.g. a subject descriptor, a name,a word, a document code, etc. The search terms for the records of a given data base are defined in theinverted file FST
Stopword : A non significant word to be ignored when indexing a field (e.g. articles, prepositions, etc.)
Subfield : One of the data elements contained in a field. A subfield is identified by a subfield delimiter

Subfield delimiter : A 2-character code preceding and identifying a subfield of a field
Tag : A number uniquely identifying a particular field
LIST OF FIGURES
FIGURE 1 - SAMPLE CDS/ISIS MENU ................................................................................ 10
FIGURE 2 - SAMPLE CDS/ISIS DIALOG BOX ................................................................... 11
FIGURE 3 - SAMPLE DATA BASE WINDOW .................................................................... 11
FIGURE 4 - SYSPAR PARAMETER 0 EXAMPLE .............................................................. 16
FIGURE 5 - SYSPAR PARAMETER 125=1 EXAMPLE ..................................................... 20
FIGURE 6 - ALTERNATE SEARCH RESULTS TOOLBAR ............................................. 21
FIGURE 7 - DICTIONARY WINDOW WITH DUMP BUTTON ....................................... 21
FIGURE 8 - MAIN WINDOW ................................................................................................. 27
FIGURE 9 - DATABASE MENU ............................................................................................. 27
FIGURE 10 - BROWSE MENU ............................................................................................... 29
FIGURE 11 - SEARCH MENU ................................................................................................ 30
FIGURE 12 - EDIT MENU ....................................................................................................... 31
FIGURE 13 – THE FDT EDITOR ........................................................................................... 32
FIGURE 14 - FMT EDITOR .................................................................................................... 32
FIGURE 15 - PFT EDITOR ...................................................................................................... 33
FIGURE 16 - FST EDITOR ...................................................................................................... 33
FIGURE 17 - CONFIGURE MENU ........................................................................................ 34
FIGURE 18 - SYSTEM SETTINGS SCREEN 1 .................................................................... 35
FIGURE 19 - SYSTEM SETTINGS SCREEN 2 .................................................................... 35
FIGURE 20 - SYSTEM SETTINGS SCREEN 3 .................................................................... 36
FIGURE 21 - UTILITIES MENU ............................................................................................ 36
FIGURE 22 - ADVANCED DATA BASE UTILITIES .......................................................... 37
FIGURE 23 - WINDOWS MENU ............................................................................................ 38
FIGURE 24 - HELP MENU ...................................................................................................... 39
FIGURE 25 - ABOUT WINDOW AND ID NUMBER .......................................................... 39
FIGURE 26 - DATA BASE WINDOW .................................................................................... 40
FIGURE 27 - DATA BASE WINDOW BUILT-IN FORMAT EDITOR ............................. 42
FIGURE 28 - THE DATA ENTRY WINDOW ....................................................................... 43
FIGURE 29 - DATA ENTRY STATUS BAR .......................................................................... 44
FIGURE 30 - PICK LIST EXAMPLE ..................................................................................... 49
FIGURE 31 - EXPERT SEARCH WINDOW ......................................................................... 50
FIGURE 32 - THE GUIDED SEARCH WINDOW ............................................................... 51
FIGURE 33 - THE DICTIONARY WINDOW ....................................................................... 52
FIGURE 34 - INVERTED FILE DUMP .................................................................................. 53
FIGURE 35 - OPEN FILE DIALOG BOX .............................................................................. 55
FIGURE 36 - SEARCH HISTORY DIALOG BOX ............................................................... 56
FIGURE 37 - IMPORT DIALOG BOX ................................................................................... 56
FIGURE 38 - EXPORT DIALOG BOX .................................................................................. 59
FIGURE 39 - INVERTED FILE MAINTENANCE DIALOG BOX .................................... 62
FIGURE 40 - GLOBAL ADD DIALOG BOX ........................................................................ 64
FIGURE 41 - GLOBAL DELETE DIALOG BOX ................................................................ 65
FIGURE 42 - GLOBAL REPLACE DIALOG BOX .............................................................. 66
FIGURE 43 - PRINT DIALOG BOX (GENERAL) ............................................................... 68
FIGURE 44 - PRINT DIALOG BOX (PRESENTATION) ................................................... 69

FIGURE 45 - PRINT DIALOG BOX (MARGINS) ................................................................ 70
FIGURE 46 - PRINT DIALOG BOX (LAYOUT) .................................................................. 71
FIGURE 47 - PRINT DIALOG BOX (SORTING) ................................................................. 73
FIGURE 48- EXPORT TO XML DIALOG ............................................................................ 76
FIGURE 49 - XML FIELD EXPORT OPTIONS ................................................................... 77
FIGURE 50 - DATABASE > NEW ........................................................................................... 83
FIGURE 51 - STEP 1 - FIELD DEFINITION TABLE .......................................................... 83
FIGURE 52 - DATA ENTRY WORKSHEET DEFINITION ............................................... 84
FIGURE 53 - LOGICAL OR .................................................................................................... 89
FIGURE 54 - LOGICAL AND .................................................................................................. 89
FIGURE 55 - LOGICAL NOT .................................................................................................. 90
FIGURE 56 - REF EXAMPLE ............................................................................................... 110
INDEX
AAccess points 8Advanced data base utilities 36Alignment of paragraphs 119ANY file 9ANY term 9, 88BBackward reference 93Begin and End coding 43BOX command 119, 120CCDS/ISIS Pascal 13, 140CDS/ISIS Search language 87Center command 119Character Conversion tables 57, 138Character formatting commands 121CLn command 119Color table 118COLS command 118Control characters 45Crossreference file 8DData Base 7Data base definition 8Data base definition services 8Data base name (default) 17Data base parameters file 26Data base structure 7Data element 7dbn.PAR 26Dialog boxes 10
Export 59Global add 64, 65, 76Global Add 64Global Delete 65, 76Global Replace 66Import 56Inverted File Maintenance 62Open 55Print 67PrintExport to XML 76
Dictionary 8Dictionary dump 52Directories 13Display format 94FFDT 8Field 7Field Definition Table 77Field identifier 74
Field level search operators 89Filing information 46FONTS command 118Format 8, 94Free text searching 87, 92FST 8HHeading format 73Hit list 9Hypertext features 121IIndentation 119Inverted file 8JJustify command 119LLogical AND 89Logical NOT 90Logical OR 89MMaster file 8Menus 9, 33
Help menu 39 Utilities menu 36 Windows menu 38Browse menu 29Database menu 27Edit menu 31Search menu 30
MFN 8Multilingual dialogue 10NNumber of headings 73OOperand qualifier 91PParagraph formatting commands 119Precise terms 87Print Dailog box
Layout 71Print Dialog box
Margins 70Presentation 69Sorting 73
Print format editor 40Print run 67Profile 137RRecord 7Repeatable fields 77Right truncated search terms 88SSave file 9
Search expressions 87Syntax 90
Search History Dialog box 56Search operators 88Search strategy 92Search term delimiters 46Sort key 74, 75Sorting 67Stopword file name 73Subfield delimiters 7Subfields 7System functions 7System installation 12System parameters 15System restrictions 26System services 8TTabulation command 119Tag 7Tag (of headings) 73Techniques 9TitlesXML 76Tools 9WWindows 27
Data base 40Data Entry 43Dictionary 52Expert Search 49Guided Search 50
Windows 95 13Worksheets (data entry) 8


![Delft University of Technology Self-Healing Al2O3 ceramics ...Prof. dr. A.J.A. Winnubst USTC/University of Twente ... [6], ceramics [7] or intermetallics [2] to the ceramic matrix](https://img.pdfslide.net/doc/110x75/5e8b2584b74ab414cf0466b7/delft-university-of-technology-self-healing-al2o3-ceramics-prof-dr-aja.jpg)