Embed Size (px)
Citation preview
8/30/13 Page 1
Release of CRIS Information to Patient Portal
Background:
Some Results in CRIS may be released and made viewable to the patient in the NIH Clinical Center’s Patient Portal. This feature is guided by rules and policies. Please note that the patient must have an active Patient Portal account in order to view the results once they have been released.
The Medical Executive Committee (MEC) has determined which types of test results can be released to the Portal.
Only LIP’s, Research Nurses, and Ad Hoc staff given special permission by MRD will have the ability to release test results to the Patient Portal.
Only results which have been assigned a status of Final, Modified or Corrected are eligible to be released to the Patient Portal. Note: tests that were resulted beginning as early as January 1, 2013 may cross over to the Portal; these tests may have been ordered at an earlier date in 2012.
Every orderable test in CRIS is associated with one of three different release policies.
The three release policies are defined as:
1. No Release – the test result can never be released to the Portal. 2. Manual Release – the clinician must manually release the test for it to be viewable in the
Portal. The result will not be available in the Portal if not manually released by the clinician. 3. AutoRelease – the test will be automatically released by the system to the Portal in 7 days
OR may be manually released by the clinician prior to 7 days if desired.
Order Comments that are associated with a Result which has an AutoRelease policy assignment will not be sent to the Portal. Orders Comments associated with a Result which has a Manual Release policy assignment are removed from the Portal 24 hours after Manual Release.
The LIP can recall (remove) a result from the Portal after it has been released if desired. In addition, the LIP can prevent the AutoRelease of a result to the Portal (refer to section II).
Note: Patients can continue to request hard copies of their medical record through the Medical Record Department.

8/30/13 Page 2
I. Results a. How to Check Which Results Have Been Released to the Portal:
1. With the desired patient selected in CRIS, select the Results tab.
2. Select the Release to Patient icon on the tab level toolbar. Note: if the icon is greyed out (not active), this may be due to the patient not having registered for the Portal; staff not having security rights; OR there not being any results eligible to be released.
8/30/13 Page 3
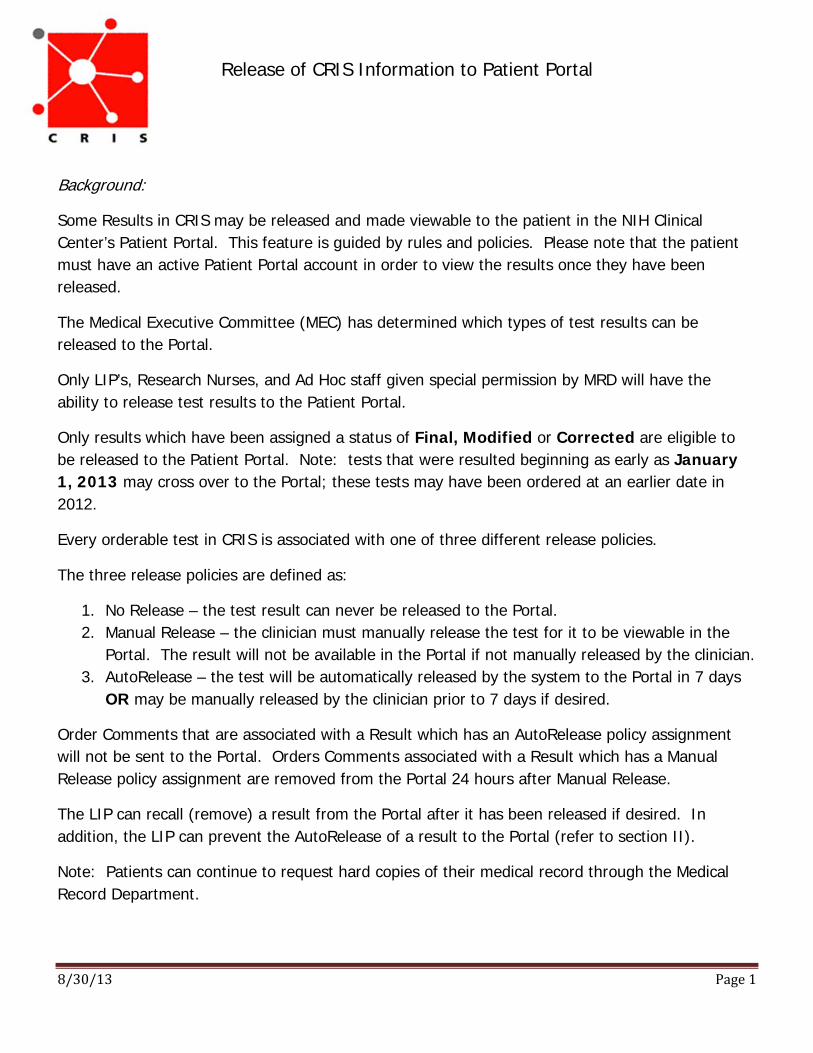
3. Set the Since filter for the desired time frame.
4. Set the Result Selection filter to the desired option.
8/30/13 Page 4
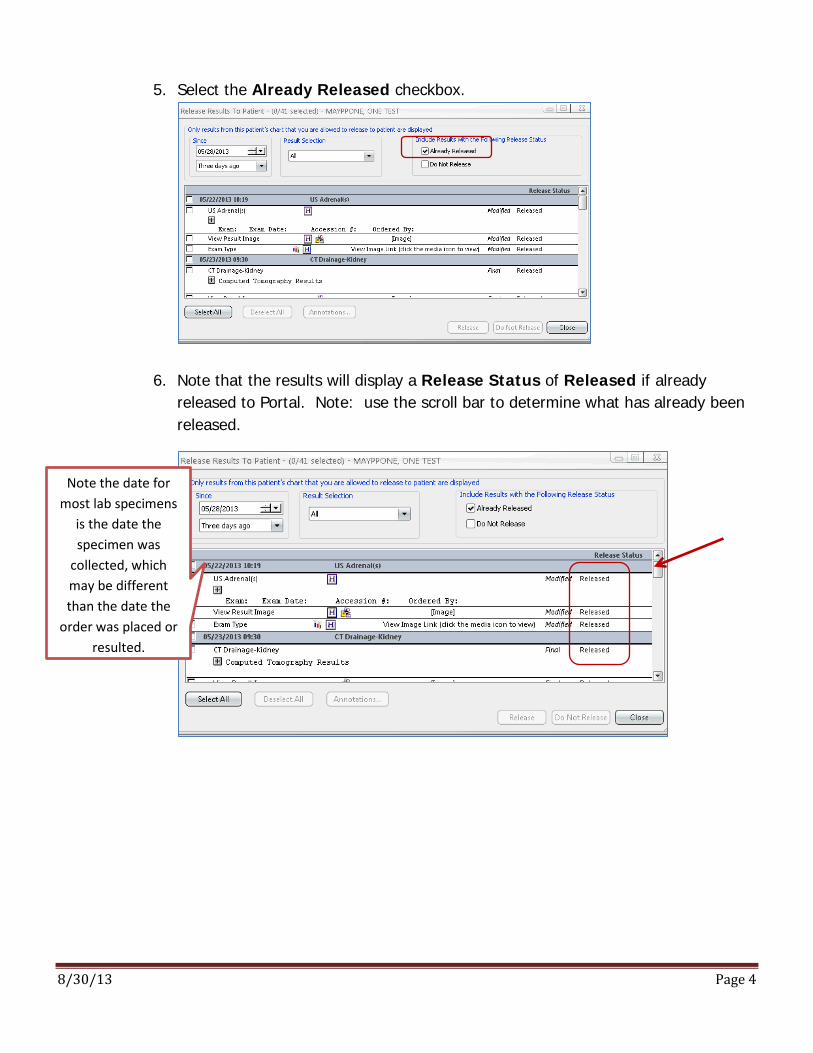
5. Select the Already Released checkbox.
6. Note that the results will display a Release Status of Released if already released to Portal. Note: use the scroll bar to determine what has already been released.
Note the date for most lab specimens
is the date the specimen was
collected, which may be different than the date the
order was placed orresulted.

8/30/13 Page 5
b. How to Check Which Results have been manually set to a status of Do Not Release:
1. With the desired patient selected in CRIS, select the Results tab.
2. Select the Release to Patient icon on the tab level toolbar.
3. Select the Do Not Release checkbox.
8/30/13 Page 6
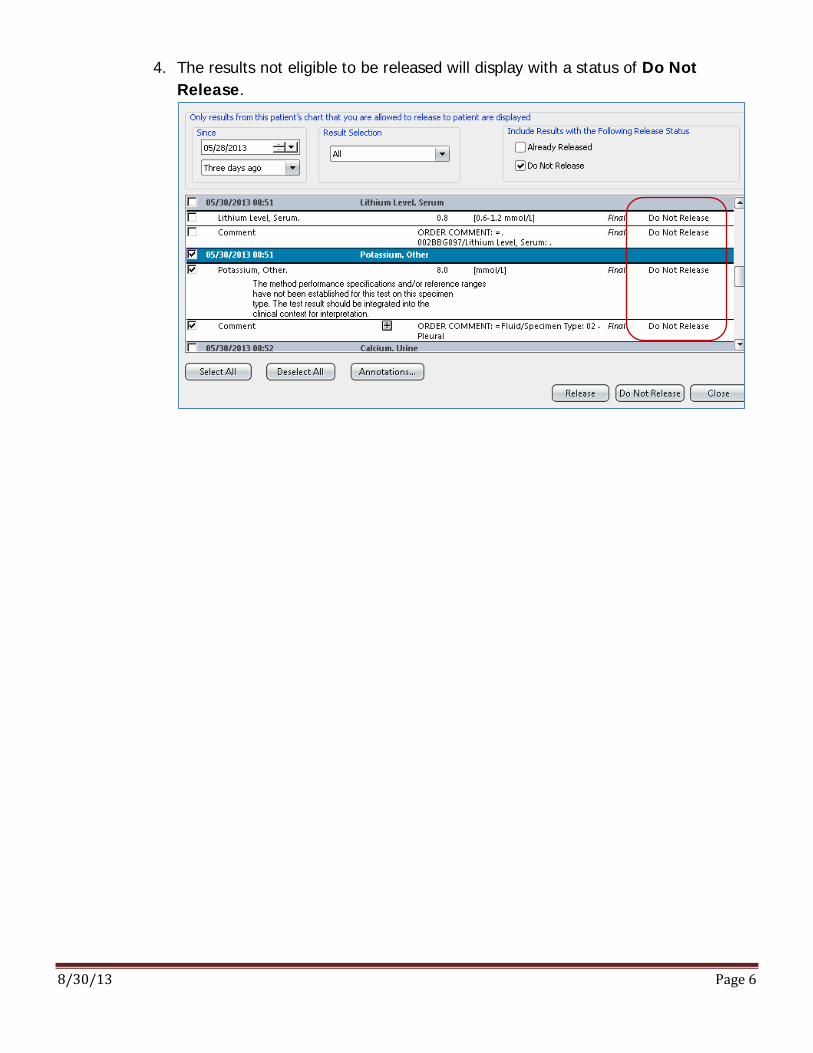
4. The results not eligible to be released will display with a status of Do Not Release.
8/30/13 Page 7
c. How to Manually Release Results to the Patient Portal: (includes results that must be manually released as well as those that will be auto released after 7 days of posting in CRIS as final):
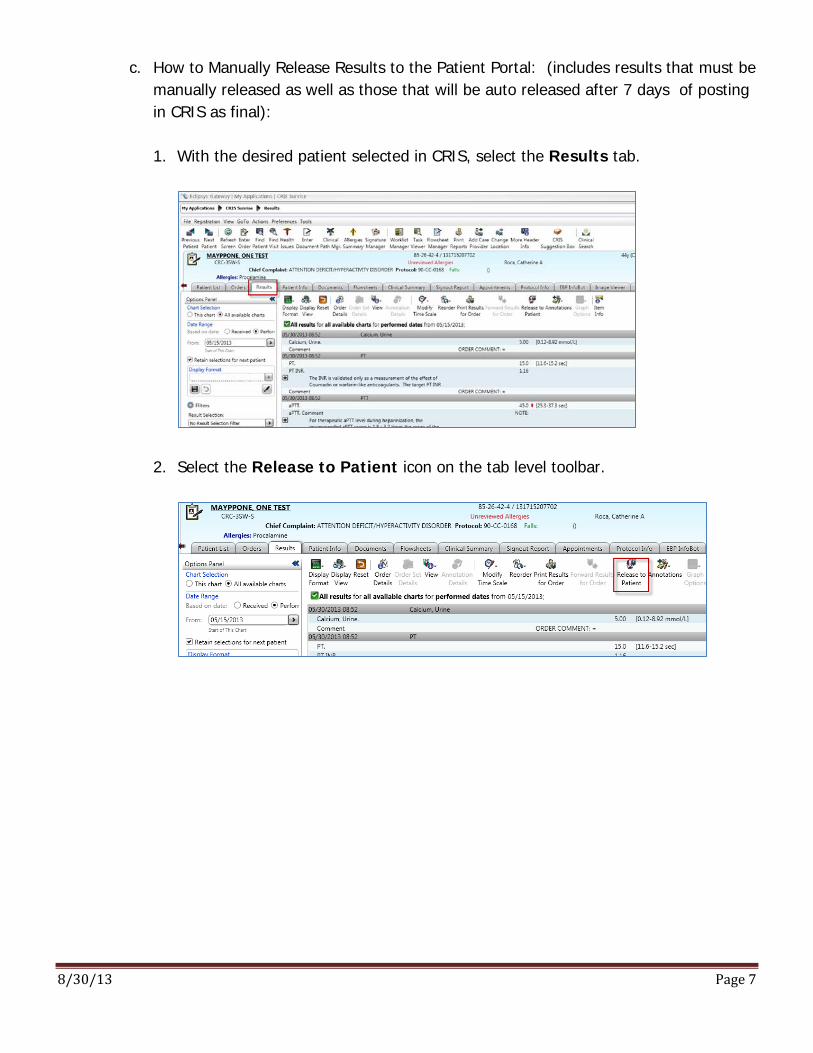
1. With the desired patient selected in CRIS, select the Results tab.
2. Select the Release to Patient icon on the tab level toolbar.

8/30/13 Page 8
3. The Release Results to Patient dialogue window displays. Note: this default list will include all test results that are eligible for release per the MEC (both Manual release and AutoRelease tests are included in this list, but are not differentiated as such).
4. Set the Since field to the desired date (using the calendar).
8/30/13 Page 9
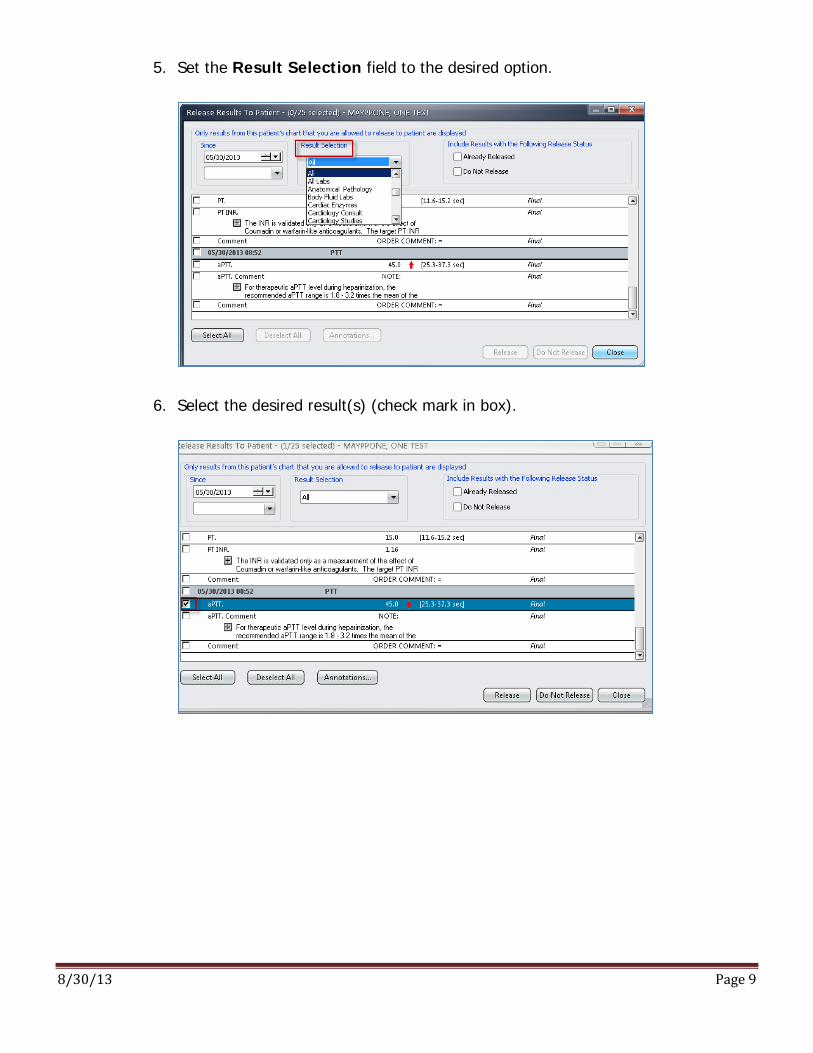
5. Set the Result Selection field to the desired option.
6. Select the desired result(s) (check mark in box).
8/30/13 Page 10
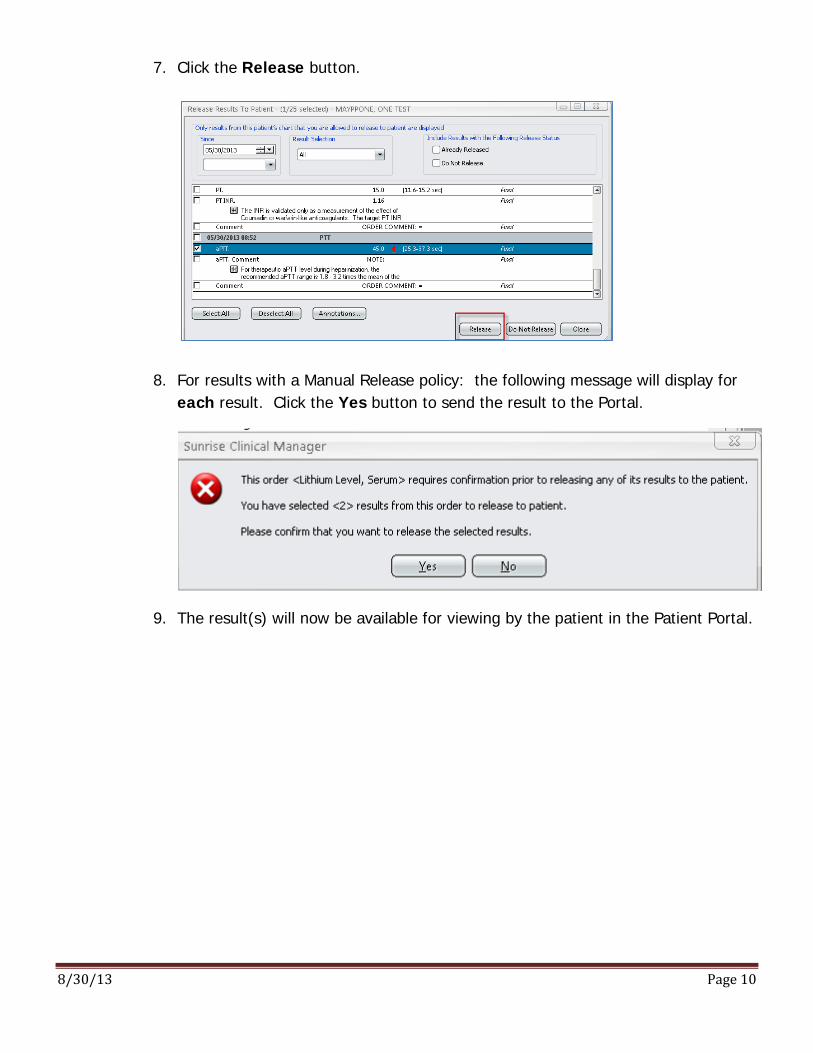
7. Click the Release button.
8. For results with a Manual Release policy: the following message will display for each result. Click the Yes button to send the result to the Portal.
9. The result(s) will now be available for viewing by the patient in the Patient Portal.
8/30/13 Page 11
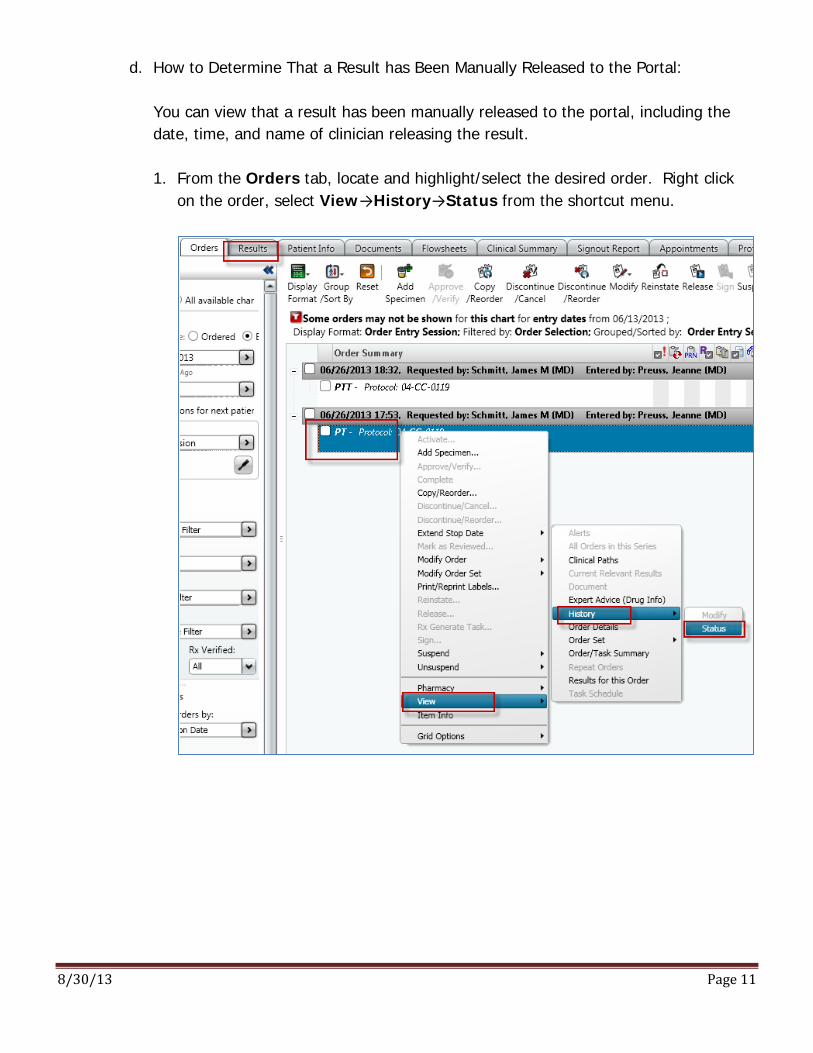
d. How to Determine That a Result has Been Manually Released to the Portal:
You can view that a result has been manually released to the portal, including the date, time, and name of clinician releasing the result.
1. From the Orders tab, locate and highlight/select the desired order. Right click on the order, select View→History→Status from the shortcut menu.
8/30/13 Page 12
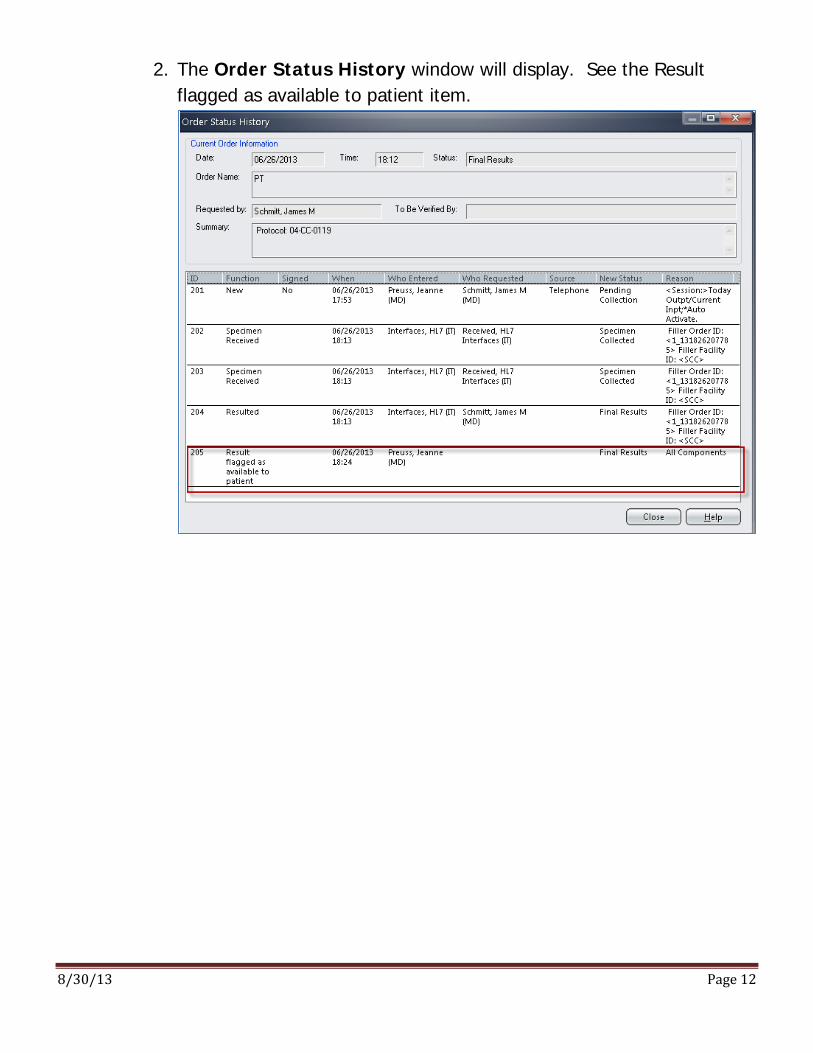
2. The Order Status History window will display. See the Result flagged as available to patient item.
8/30/13 Page 13
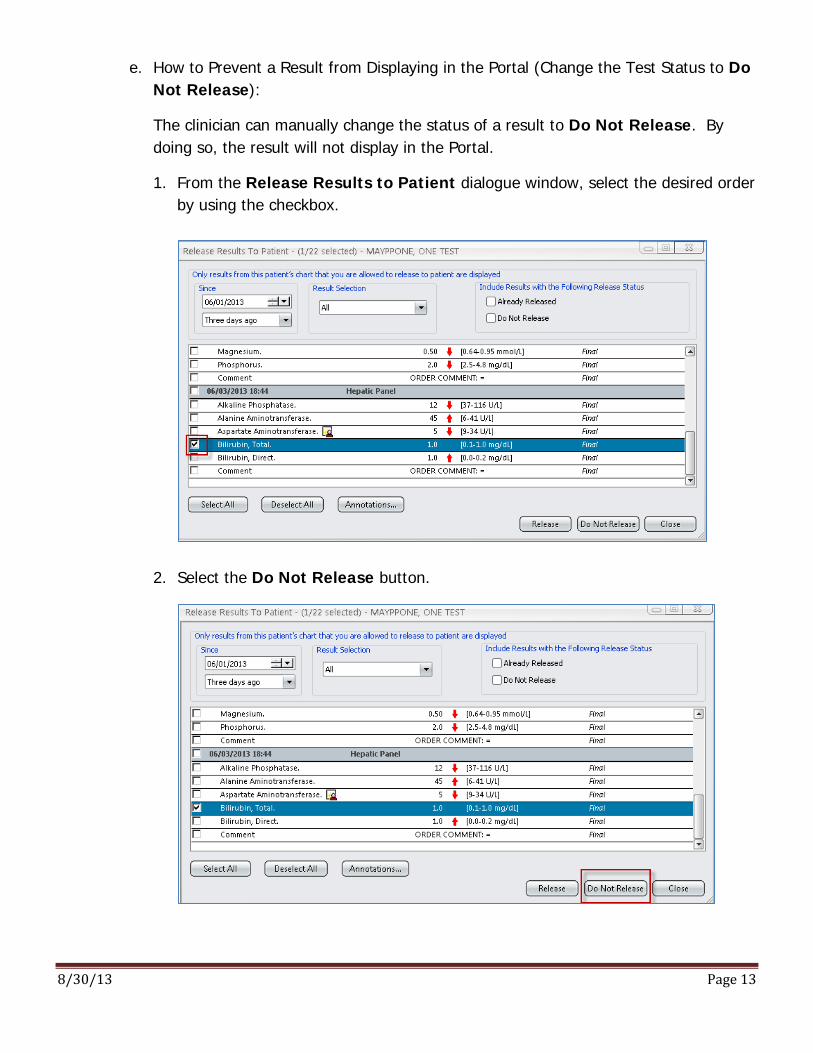
e. How to Prevent a Result from Displaying in the Portal (Change the Test Status to Do Not Release):
The clinician can manually change the status of a result to Do Not Release. By doing so, the result will not display in the Portal.
1. From the Release Results to Patient dialogue window, select the desired order by using the checkbox.
2. Select the Do Not Release button.
8/30/13 Page 14
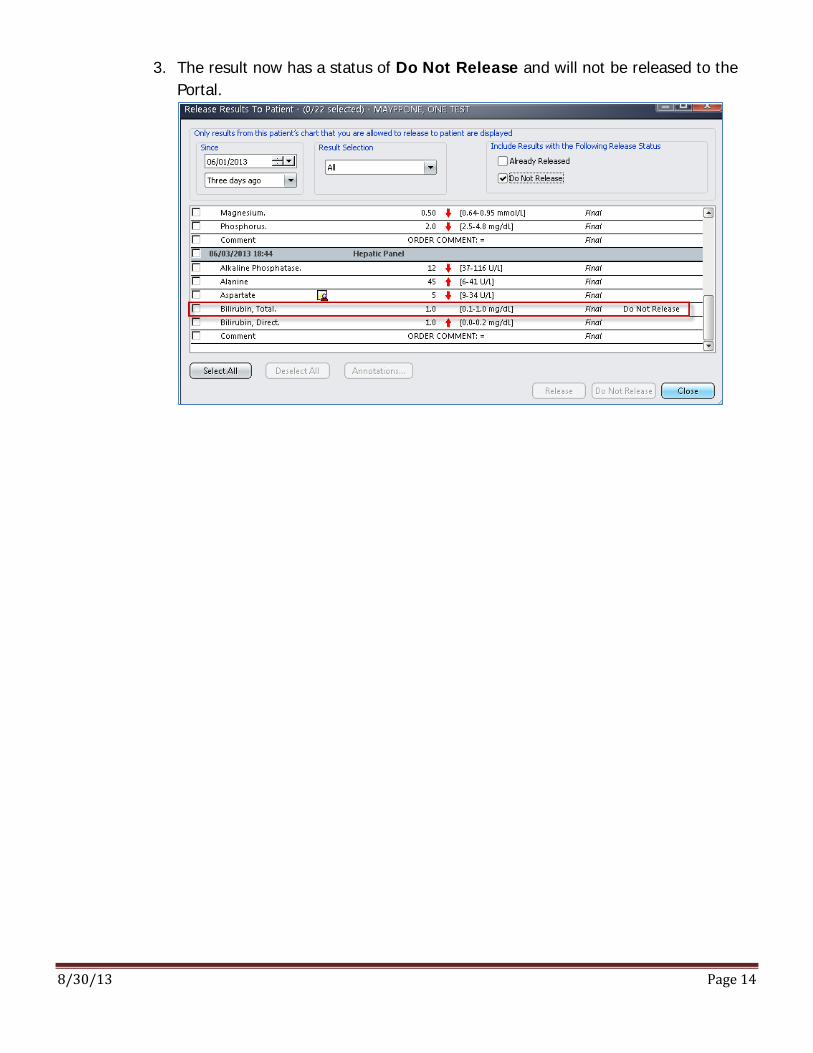
3. The result now has a status of Do Not Release and will not be released to the Portal.
8/30/13 Page 15
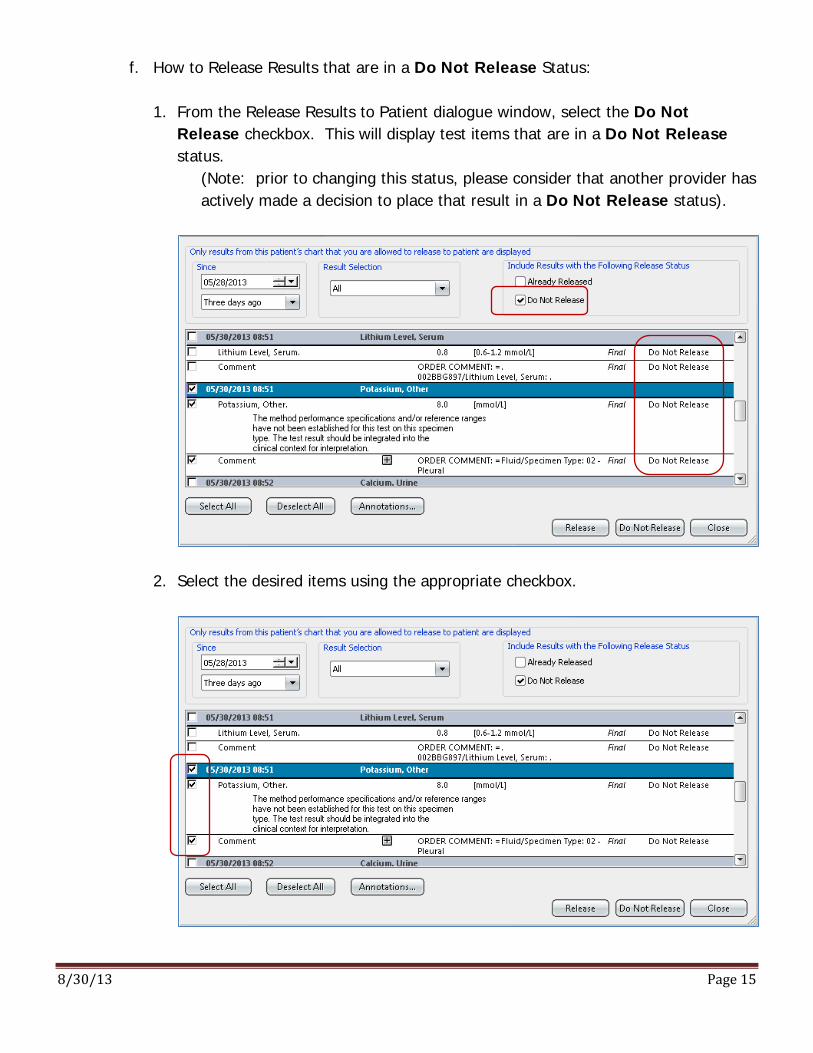
f. How to Release Results that are in a Do Not Release Status:
1. From the Release Results to Patient dialogue window, select the Do Not Release checkbox. This will display test items that are in a Do Not Release status.
(Note: prior to changing this status, please consider that another provider has actively made a decision to place that result in a Do Not Release status).
2. Select the desired items using the appropriate checkbox.
8/30/13 Page 16
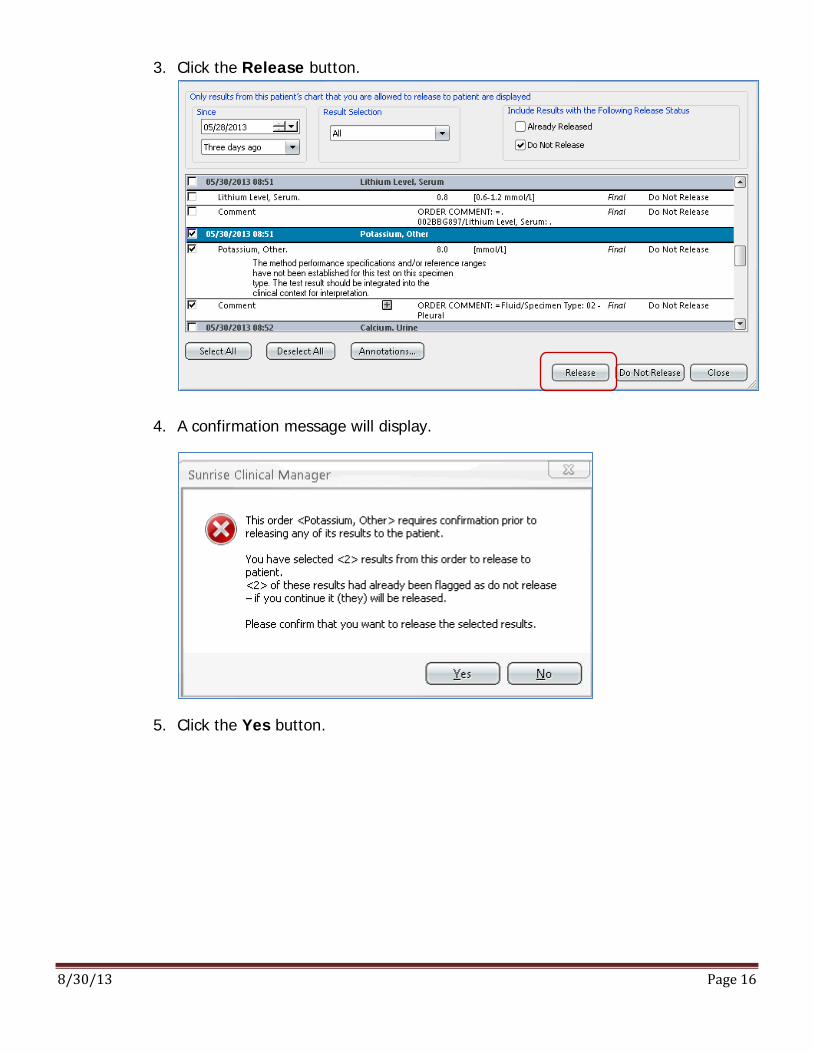
3. Click the Release button.
4. A confirmation message will display.
5. Click the Yes button.
8/30/13 Page 17
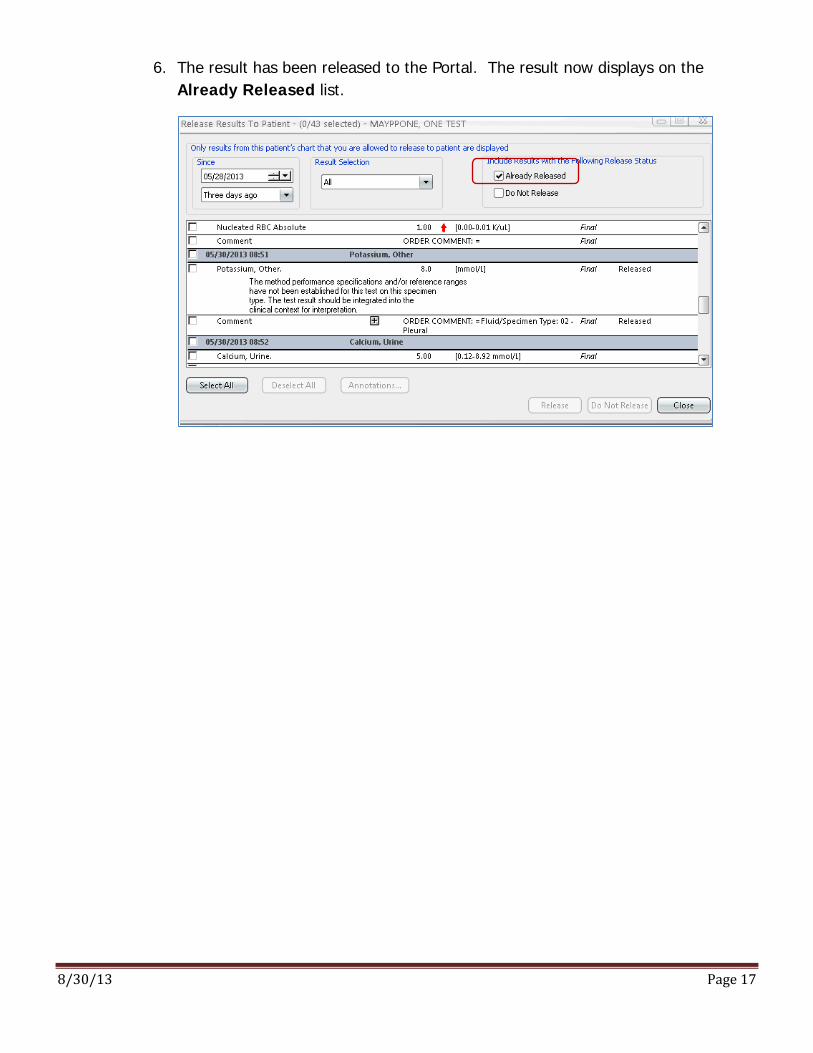
6. The result has been released to the Portal. The result now displays on the Already Released list.
8/30/13 Page 18
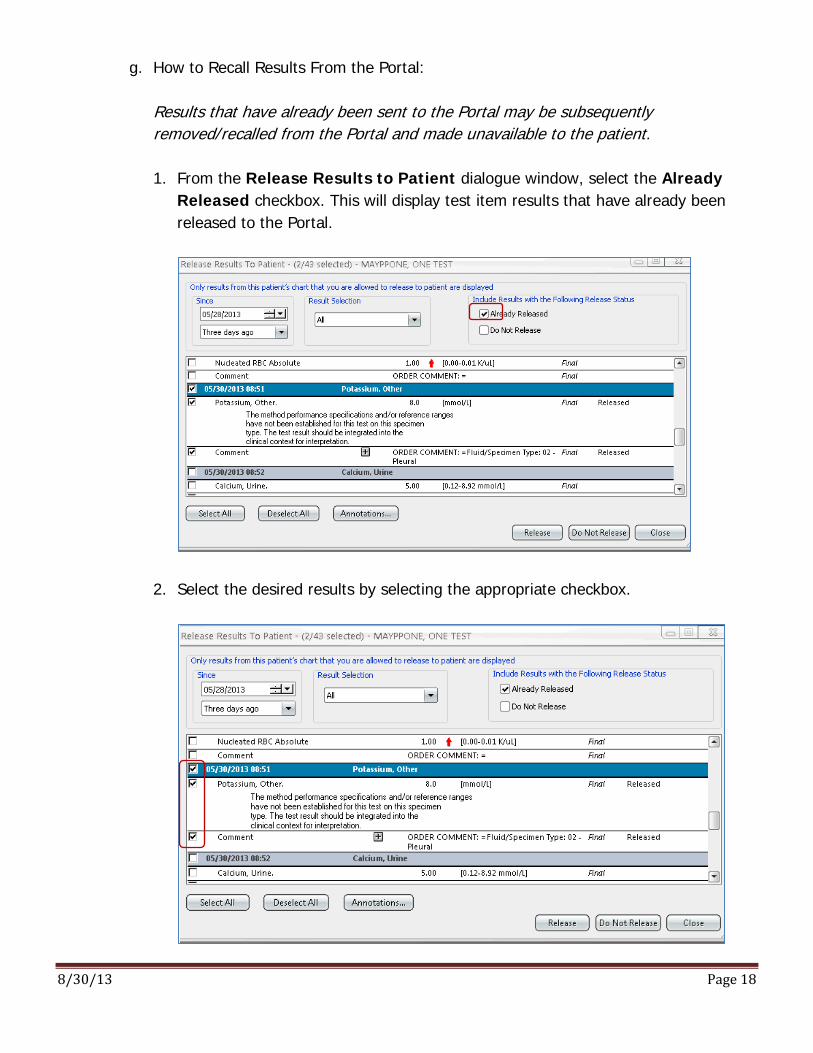
g. How to Recall Results From the Portal:
Results that have already been sent to the Portal may be subsequently removed/recalled from the Portal and made unavailable to the patient.
1. From the Release Results to Patient dialogue window, select the Already Released checkbox. This will display test item results that have already been released to the Portal.
2. Select the desired results by selecting the appropriate checkbox.
8/30/13 Page 19
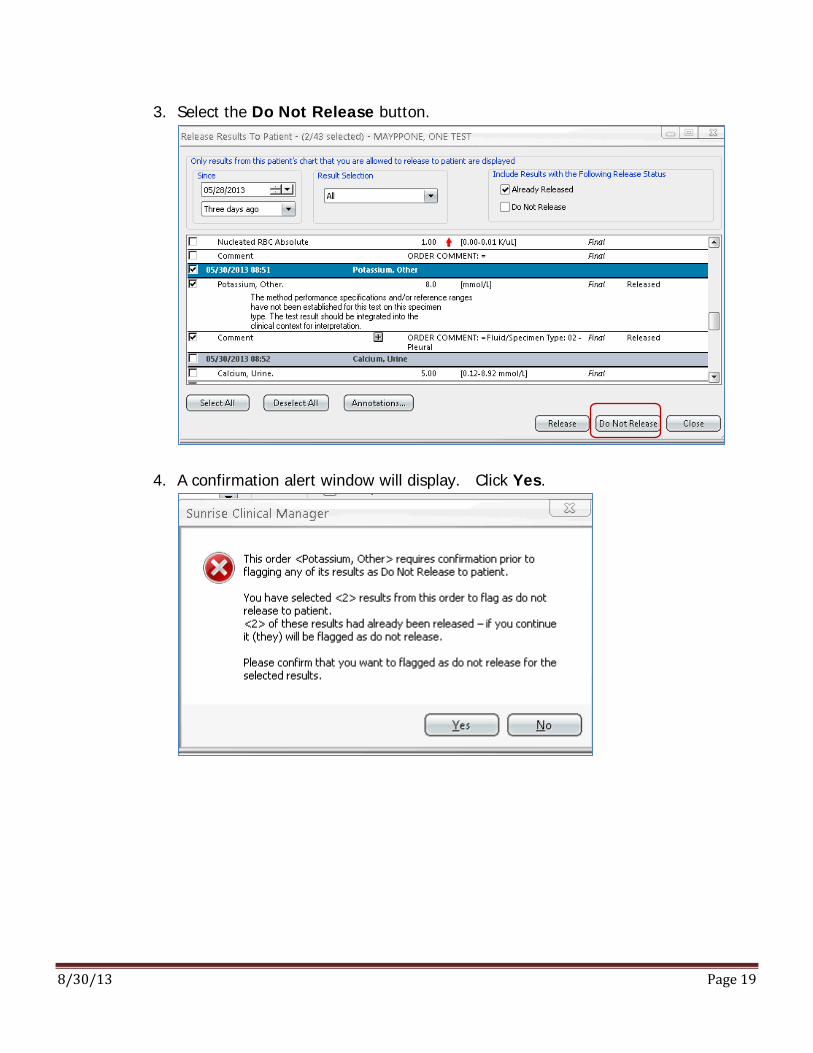
3. Select the Do Not Release button.
4. A confirmation alert window will display. Click Yes.

8/30/13 Page 20
5. The test result has now been removed from the Portal. The test result will now display on the Do Not Release list.
8/30/13 Page 21
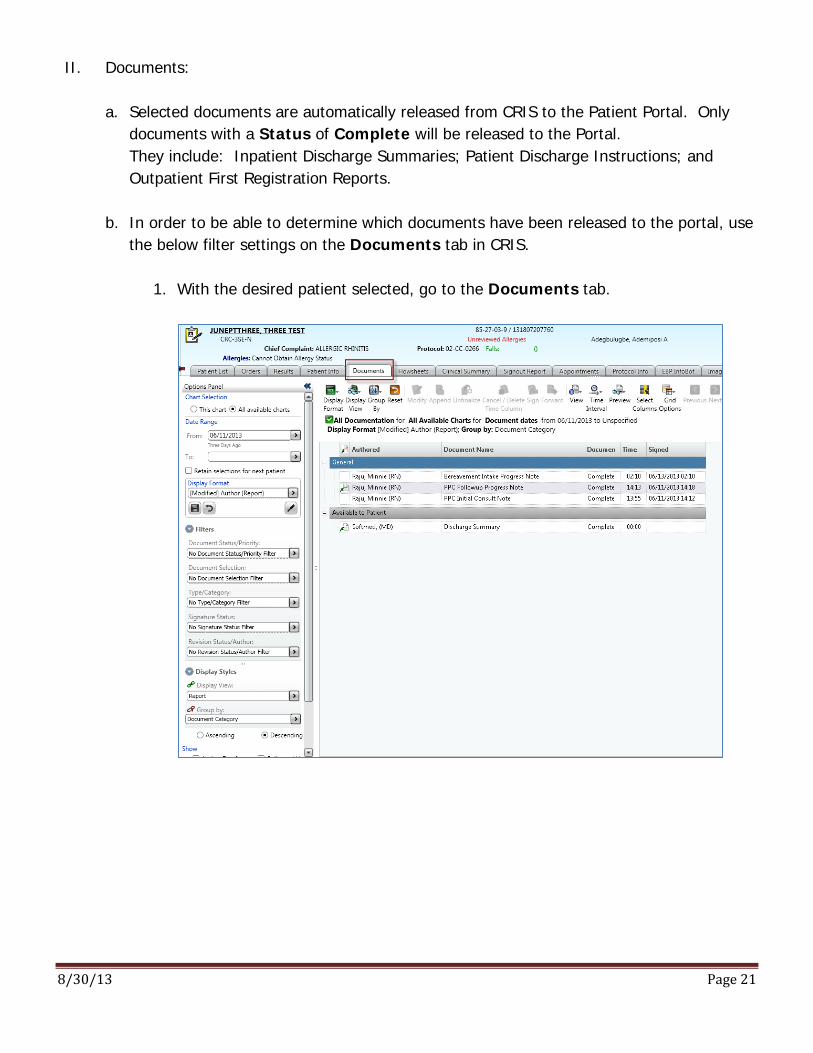
II. Documents:
a. Selected documents are automatically released from CRIS to the Patient Portal. Only documents with a Status of Complete will be released to the Portal. They include: Inpatient Discharge Summaries; Patient Discharge Instructions; and Outpatient First Registration Reports.
b. In order to be able to determine which documents have been released to the portal, use the below filter settings on the Documents tab in CRIS.
1. With the desired patient selected, go to the Documents tab.
8/30/13 Page 22
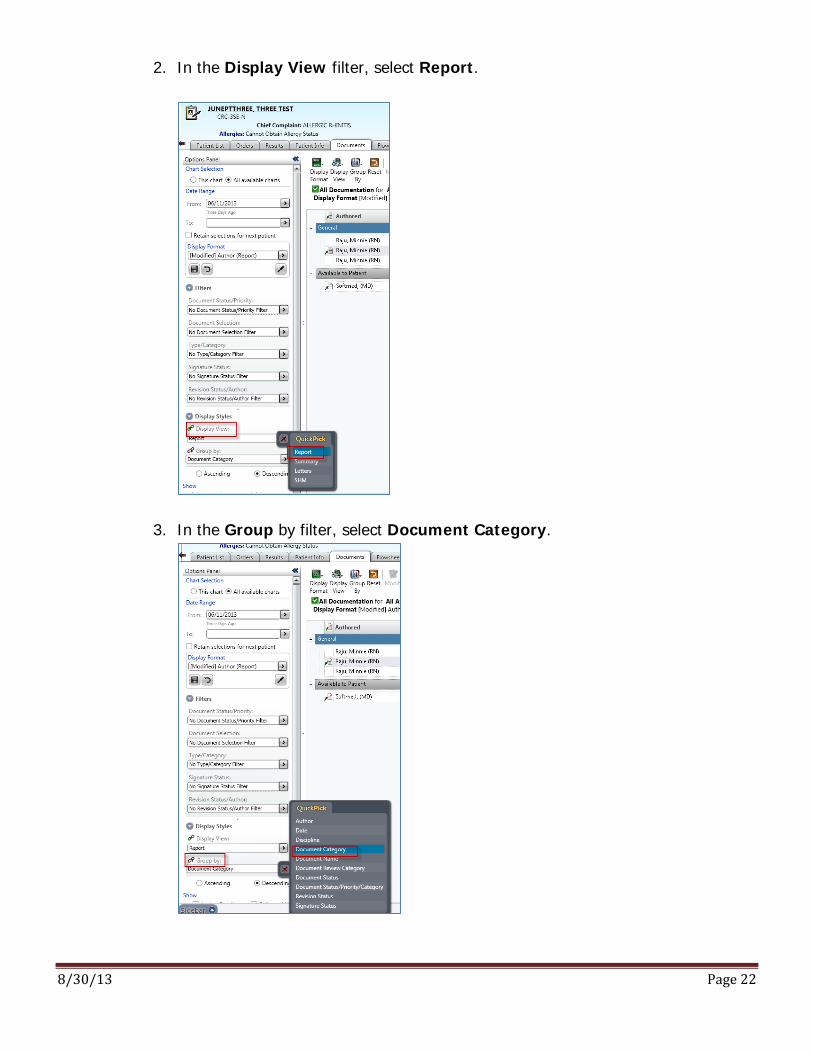
2. In the Display View filter, select Report.
3. In the Group by filter, select Document Category.
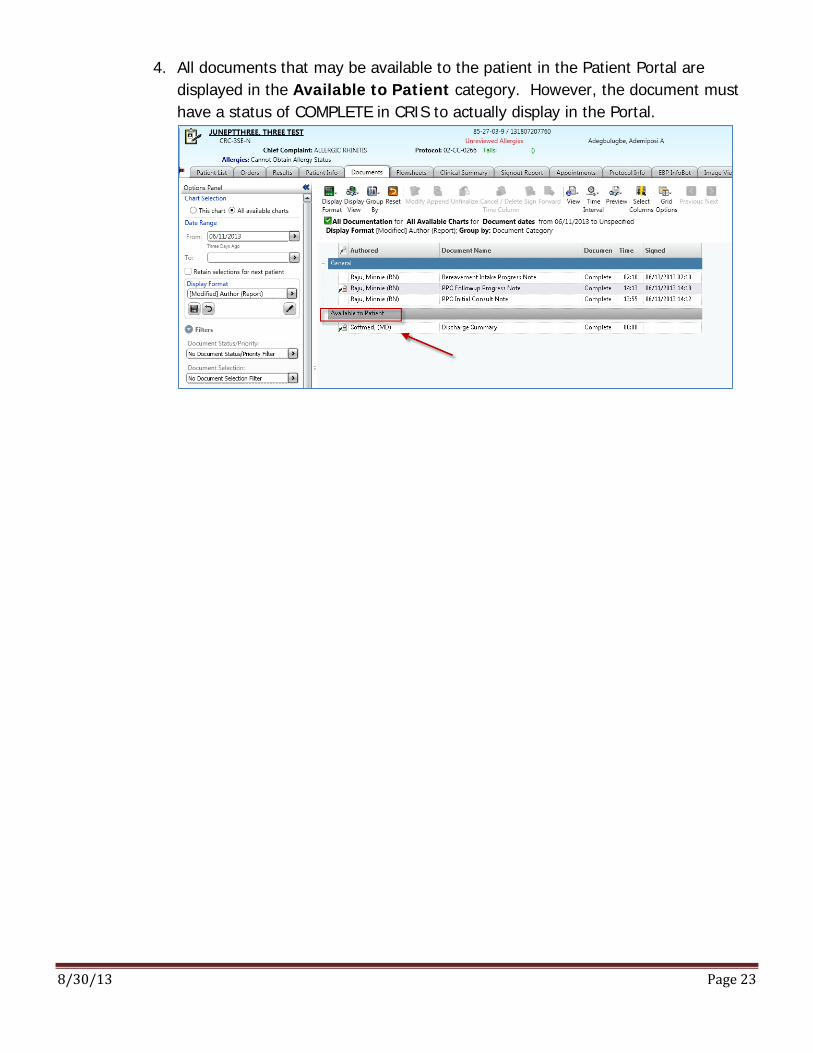
8/30/13 Page 23
4. All documents that may be available to the patient in the Patient Portal are displayed in the Available to Patient category. However, the document must have a status of COMPLETE in CRIS to actually display in the Portal.