Embed Size (px)
Citation preview
Remark Office OMR®
Automation Wizard
User’s Guide
Remark Products Group
301 Lindenwood Drive
Malvern, PA 19355-1772
www.gravic.com
Disclaimer The information contained in this document is subject to change without notice and
should not be construed as a commitment by Gravic, Inc., who assumes no
responsibility for any errors or omissions. Gravic, Inc. reserves the right to revise this
document and to make changes to the products described herein for the purpose of
product improvement at any time, without obligation to notify any person of such
revisions or changes.
Notice The information contained in this document is the exclusive property of Gravic, Inc. This
work is protected under United States Copyright Law and other international copyright
treaties and conventions. No part of this work may be reproduced or transmitted in any
form or by any means, electronic or mechanical, including photocopying and recording,
or by any information storage or retrieval system, except as expressly permitted in
writing by Gravic, Inc. All requests should be sent to: Gravic, Inc., 301 Lindenwood
Drive, Suite 100, Malvern, PA 19355 USA. Attention: Product Manager.
Trademarks Remark Office OMR and Remark Quick Stats are registered trademarks of Gravic, Inc.
Other products mentioned are trademarks of their respective holders.
Copyright Copyright © 2010 Gravic, Inc. All Rights Reserved. Specifications subject to change
without notice.
Contents
1.0 Automation Wizard Overview 1
1.1 Using the Automation Wizard 1
1.1.a Getting Started Options ..........................................2 1.1.b Open Form Templates Options .................................3 1.1.c Read from Scanner Options .....................................5 1.1.d Read from Image Options .......................................8 1.1.e Review Exceptions Options ......................................10 1.1.f Save Data Options ..................................................11 1.1.g Analysis Options ....................................................12 1.1.h Send Files Options .................................................13
1.2 Saving and Executing Automation Wizard Files 14

Remark Office OMR Automation Wizard User's Guide
1
1.0 Automation Wizard Overview Remark Office OMR includes an automation wizard that allows you to automate some of
the functionality of the software. The Automation Wizard allows you to setup automation
files that can be run by another user by simply double clicking a file. You can automate
functions such as opening the software, opening a form template, processing forms,
saving data, running reports and closing the software. This feature is useful for
simplifying tasks for your users.
Tip: The Automation Wizard allows you to automate basic features of the software. These features are described in the main Remark Office OMR user’s guide. Therefore, each feature will not be presented in detail in this user’s guide. You can learn about specific features by locating them in the Remark Office OMR User’s Guide under Start|Programs|Remark Office OMR 8|Documentation.
1.1 Using the Automation Wizard The Automation Wizard is accessed within the Remark Office OMR Data Center. It uses a
wizard-based approach to help you setup a custom automation file.
To use the Automation Wizard
1 From the Remark Office OMR Data Center, select the Tools menu and then click
Automation Wizard.
2 Use the Next>> button to navigate between screens, which are described in the
sections that follow. You may also click the links in the Task Pane in the left portion
of the wizard.
Once you save the Automation Wizard file (.rez file), users simply have to double click
the file to launch the software with the parameters you have specified. You can place
this file anywhere on the system where Remark Office OMR is installed. You can also call
this file up from another application.
Due to the number of potential steps in the wizard, each step is broken into its own
section that follows.
Remark Office OMR Automation Wizard User's Guide
2
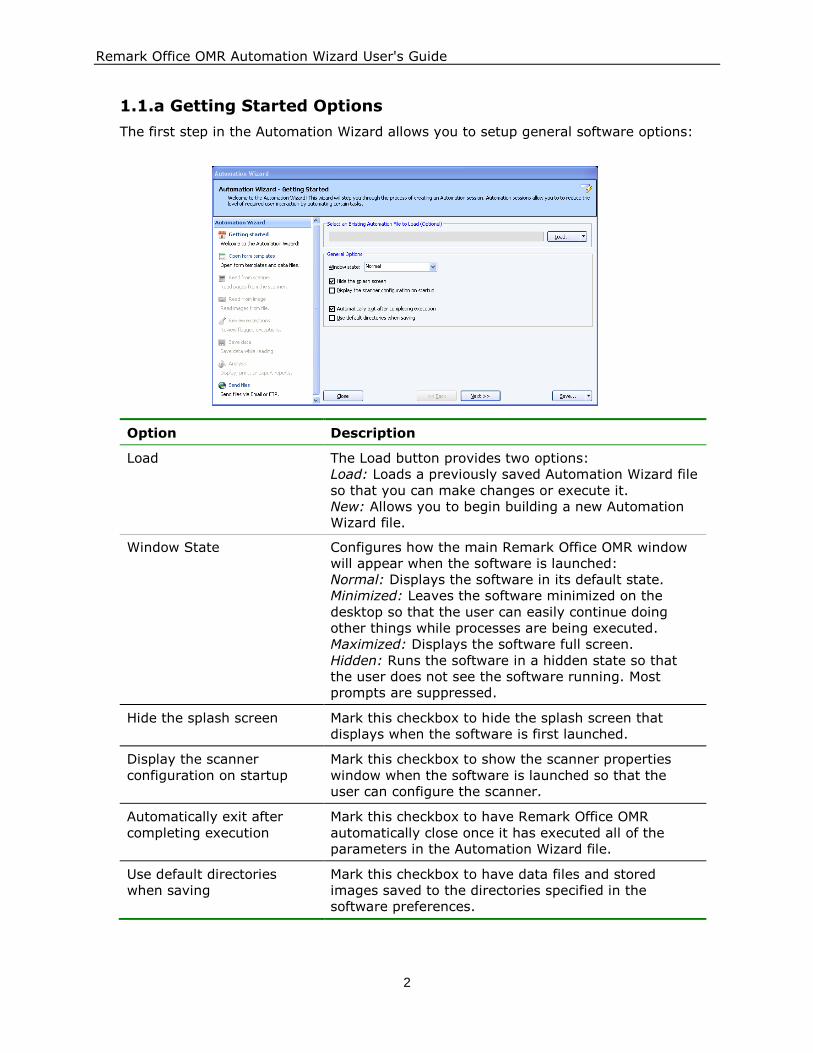
1.1.a Getting Started Options
The first step in the Automation Wizard allows you to setup general software options:
Option Description
Load The Load button provides two options:
Load: Loads a previously saved Automation Wizard file
so that you can make changes or execute it.
New: Allows you to begin building a new Automation
Wizard file.
Window State Configures how the main Remark Office OMR window
will appear when the software is launched:
Normal: Displays the software in its default state.
Minimized: Leaves the software minimized on the
desktop so that the user can easily continue doing
other things while processes are being executed.
Maximized: Displays the software full screen.
Hidden: Runs the software in a hidden state so that
the user does not see the software running. Most
prompts are suppressed.
Hide the splash screen Mark this checkbox to hide the splash screen that
displays when the software is first launched.
Display the scanner
configuration on startup
Mark this checkbox to show the scanner properties
window when the software is launched so that the
user can configure the scanner.
Automatically exit after
completing execution
Mark this checkbox to have Remark Office OMR
automatically close once it has executed all of the
parameters in the Automation Wizard file.
Use default directories
when saving
Mark this checkbox to have data files and stored
images saved to the directories specified in the
software preferences.
Remark Office OMR Automation Wizard User's Guide
3
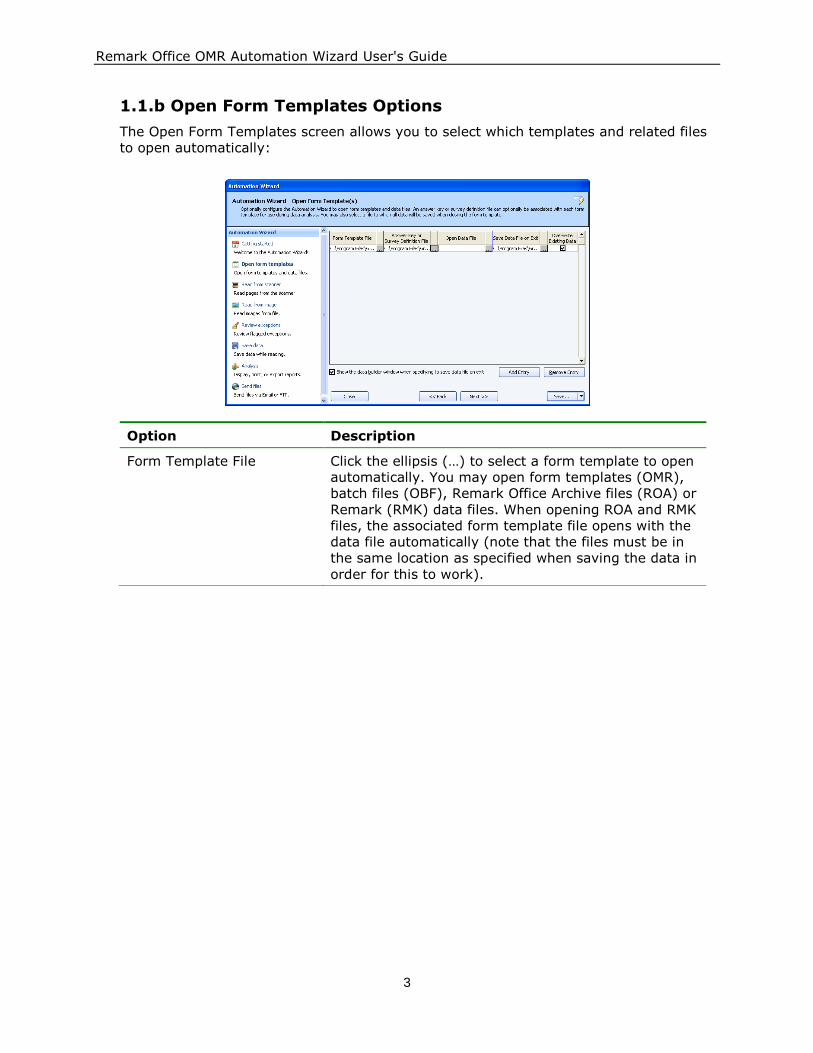
1.1.b Open Form Templates Options
The Open Form Templates screen allows you to select which templates and related files
to open automatically:
Option Description
Form Template File Click the ellipsis (…) to select a form template to open
automatically. You may open form templates (OMR),
batch files (OBF), Remark Office Archive files (ROA) or
Remark (RMK) data files. When opening ROA and RMK
files, the associated form template file opens with the
data file automatically (note that the files must be in
the same location as specified when saving the data in
order for this to work).
Remark Office OMR Automation Wizard User's Guide
4
Option Description
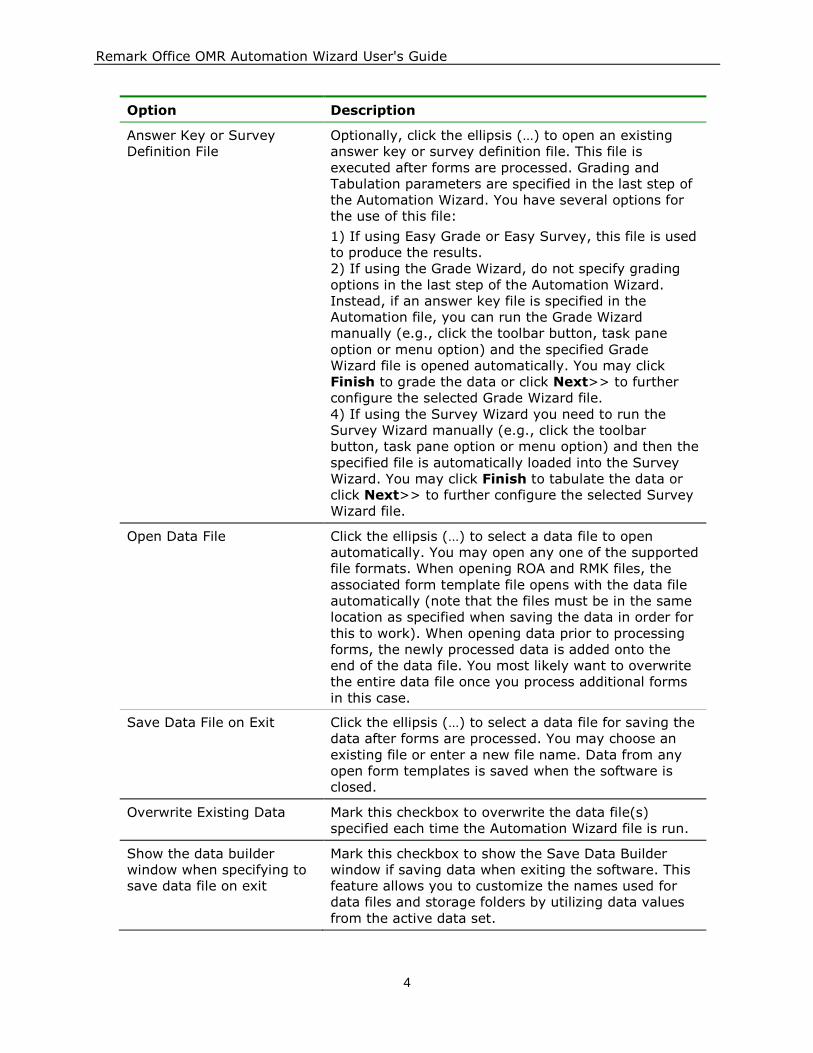
Answer Key or Survey
Definition File
Optionally, click the ellipsis (…) to open an existing
answer key or survey definition file. This file is
executed after forms are processed. Grading and
Tabulation parameters are specified in the last step of
the Automation Wizard. You have several options for
the use of this file:
1) If using Easy Grade or Easy Survey, this file is used
to produce the results.
2) If using the Grade Wizard, do not specify grading
options in the last step of the Automation Wizard.
Instead, if an answer key file is specified in the
Automation file, you can run the Grade Wizard
manually (e.g., click the toolbar button, task pane
option or menu option) and the specified Grade
Wizard file is opened automatically. You may click
Finish to grade the data or click Next>> to further
configure the selected Grade Wizard file.
4) If using the Survey Wizard you need to run the
Survey Wizard manually (e.g., click the toolbar
button, task pane option or menu option) and then the
specified file is automatically loaded into the Survey
Wizard. You may click Finish to tabulate the data or
click Next>> to further configure the selected Survey
Wizard file.
Open Data File Click the ellipsis (…) to select a data file to open
automatically. You may open any one of the supported
file formats. When opening ROA and RMK files, the
associated form template file opens with the data file
automatically (note that the files must be in the same
location as specified when saving the data in order for
this to work). When opening data prior to processing
forms, the newly processed data is added onto the
end of the data file. You most likely want to overwrite
the entire data file once you process additional forms
in this case.
Save Data File on Exit Click the ellipsis (…) to select a data file for saving the
data after forms are processed. You may choose an
existing file or enter a new file name. Data from any
open form templates is saved when the software is
closed.
Overwrite Existing Data Mark this checkbox to overwrite the data file(s)
specified each time the Automation Wizard file is run.
Show the data builder
window when specifying to
save data file on exit
Mark this checkbox to show the Save Data Builder
window if saving data when exiting the software. This
feature allows you to customize the names used for
data files and storage folders by utilizing data values
from the active data set.
Remark Office OMR Automation Wizard User's Guide
5
Option Description
Add Entry Click the Add Entry button to add another row where
you may make further selections (e.g., open another
form template, save data, etc.).
Remove Entry Click the Remove Entry button to remove the
currently selected line of parameters.
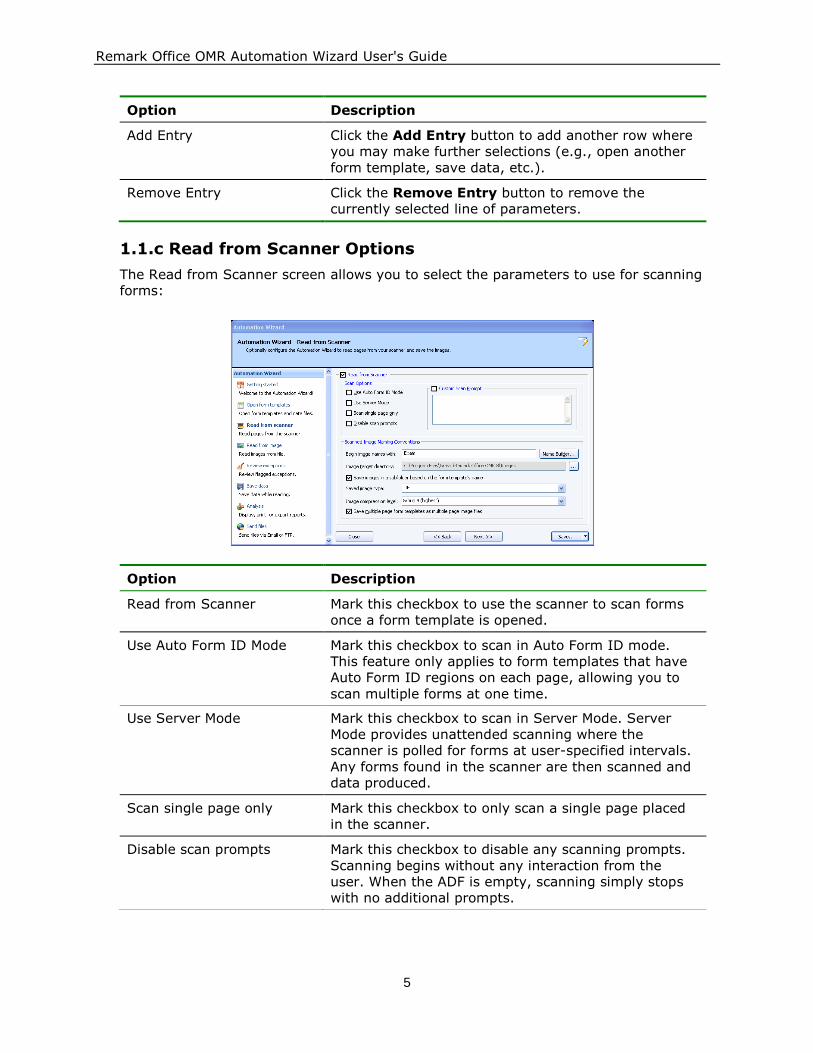
1.1.c Read from Scanner Options
The Read from Scanner screen allows you to select the parameters to use for scanning
forms:
Option Description
Read from Scanner Mark this checkbox to use the scanner to scan forms
once a form template is opened.
Use Auto Form ID Mode Mark this checkbox to scan in Auto Form ID mode.
This feature only applies to form templates that have
Auto Form ID regions on each page, allowing you to
scan multiple forms at one time.
Use Server Mode Mark this checkbox to scan in Server Mode. Server
Mode provides unattended scanning where the
scanner is polled for forms at user-specified intervals.
Any forms found in the scanner are then scanned and
data produced.
Scan single page only Mark this checkbox to only scan a single page placed
in the scanner.
Disable scan prompts Mark this checkbox to disable any scanning prompts.
Scanning begins without any interaction from the
user. When the ADF is empty, scanning simply stops
with no additional prompts.
Remark Office OMR Automation Wizard User's Guide
6
Option Description
Custom Scan Prompt Mark this checkbox to enter your own customized
scanning prompt. Enter the text you wish to display
when scanning begins in the box below the checkbox.
Begin image names with Enter a file base name that the software can use to
name the images stored for this form template as
forms are scanned. You may use any name you like.
We suggest using something that identifies to you that
the images belong to a certain form (e.g., form
template name). The images that are stored all begin
with this base name and then have the page number
(if larger than a one page form template), date and
time appended to them to keep track of the various
images. If you leave the Begin image names with
option blank, your images only have the page number
(if applicable), date and time as the name of each
image.
Image target directory Click the ellipsis (…) to select a location in which to
store the images for this form. You may use the
default directory for images (stored in the software’s
preferences) or select a different directory.
Save images in a subfolder
based on the form
template’s name
Mark this checkbox to have Remark Office OMR
automatically create a folder in which to store these
images. The folder name will be the name of the form
template and the folder will be created in the directory
you have selected in the Image target directory
box.
Remark Office OMR Automation Wizard User's Guide
7
Option Description
Name Builder The Name Builder button allows you to customize the
image base names and storage folders for the scanned
image files by pulling in data values from the active
data set. In the Image Base Name area, you may
choose to add a region from the processed data to the
image base name. Choose the region from the drop-
down list and then click the Add button. If you already
added a region on the previous screen, the Name
Builder allows you to add additional regions. For
example, if processing tests, you could add a Student
ID that is being collected from the form so that your
processed images all have the Student ID number in
them.
In the Image Target Directory area, you may
choose to add a region from the processed data to the
folder structure that holds the processed images.
Choose the region from the drop-down list and then
click the Add button. For example, if processing tests,
you could add a Test ID that is being collected from
the form so that each student’s form images are
stored in a folder containing the Test ID.
In the Name Builder box, click the OK button to
return to the Automation Wizard.
Saved image type Select an image type to use for storing images. The
choices are: PCX/DCX, TIF or PDF.
Image compression level When saving to the PDF or TIF formats, you can
choose the compression rate: Uncompressed, Group
3, Group 3 2d, Group 4 and LZW. Group 4 creates
the most compressed (smallest file size) image.
Save multiple page form
templates as multiple page
images files
Mark this checkbox if you are scanning with a multi-
page form template and would like all of the images
for one complete form saved as one image file.
Remark Office OMR Automation Wizard User's Guide
8
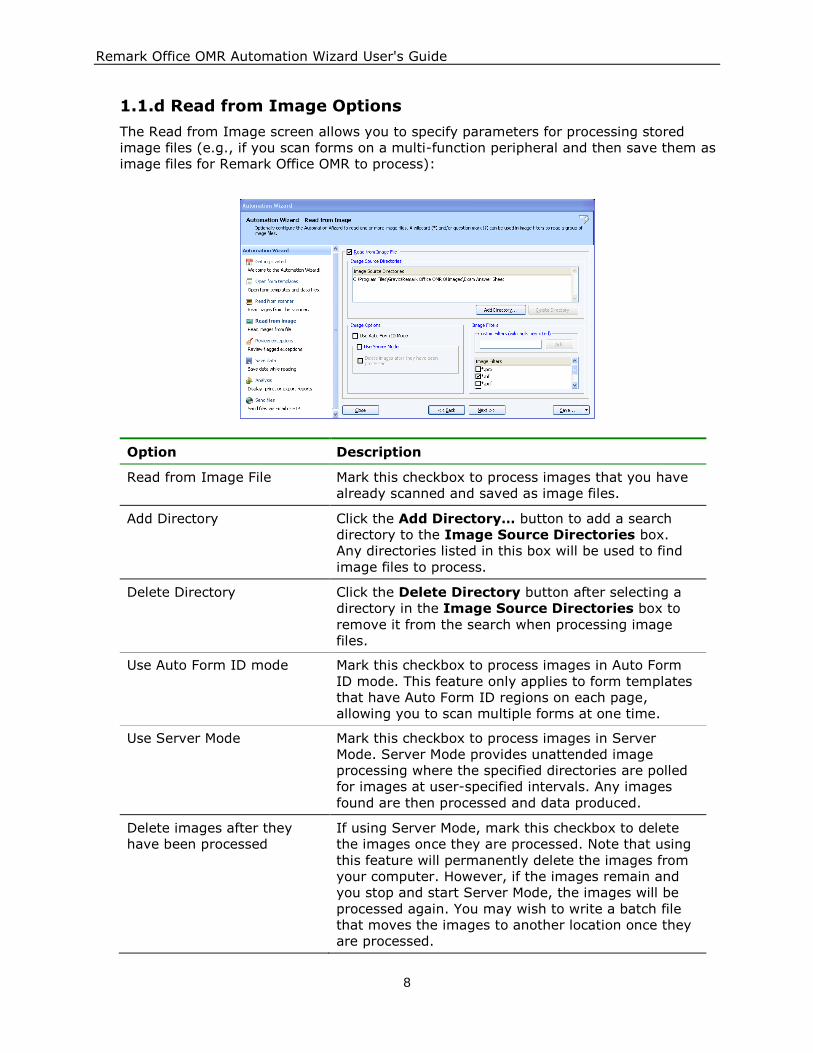
1.1.d Read from Image Options
The Read from Image screen allows you to specify parameters for processing stored
image files (e.g., if you scan forms on a multi-function peripheral and then save them as
image files for Remark Office OMR to process):
Option Description
Read from Image File Mark this checkbox to process images that you have
already scanned and saved as image files.
Add Directory Click the Add Directory… button to add a search
directory to the Image Source Directories box.
Any directories listed in this box will be used to find
image files to process.
Delete Directory Click the Delete Directory button after selecting a
directory in the Image Source Directories box to
remove it from the search when processing image
files.
Use Auto Form ID mode Mark this checkbox to process images in Auto Form
ID mode. This feature only applies to form templates
that have Auto Form ID regions on each page,
allowing you to scan multiple forms at one time.
Use Server Mode Mark this checkbox to process images in Server
Mode. Server Mode provides unattended image
processing where the specified directories are polled
for images at user-specified intervals. Any images
found are then processed and data produced.
Delete images after they
have been processed
If using Server Mode, mark this checkbox to delete
the images once they are processed. Note that using
this feature will permanently delete the images from
your computer. However, if the images remain and
you stop and start Server Mode, the images will be
processed again. You may wish to write a batch file
that moves the images to another location once they
are processed.

Remark Office OMR Automation Wizard User's Guide
9
Option Description
Custom filters Use the Custom Filters box to refine your Image
Filters list. Image filters represent the types of
image files you wish to process. You can specify
specific cases here by using wildcards. For example,
if you wanted to process all images that start with
“English 101” you could enter “English 101*.*” as a
custom filter. Only images that start with this text
will be processed. Type the custom filter into the
Custom Filter box and then click the Add button.
The filter is added to the Image Filters list and
automatically selected. Note that when specifying
image types, an asterisk (*) can be used to indicate
any number of characters (e.g., .jp* would allow any
number of characters after the “jp” such as .jpg and
.jpeg), and the question mark (?) can be used to
indicate any single character in addition to the
specified file extension (e.g., .jp? would only allow
three character extensions such as .jpg),
Image filters Mark the checkboxes corresponding to the types of
images that you wish to process. Only images
corresponding to these file types are read; all others
are ignored.
Remark Office OMR Automation Wizard User's Guide
10
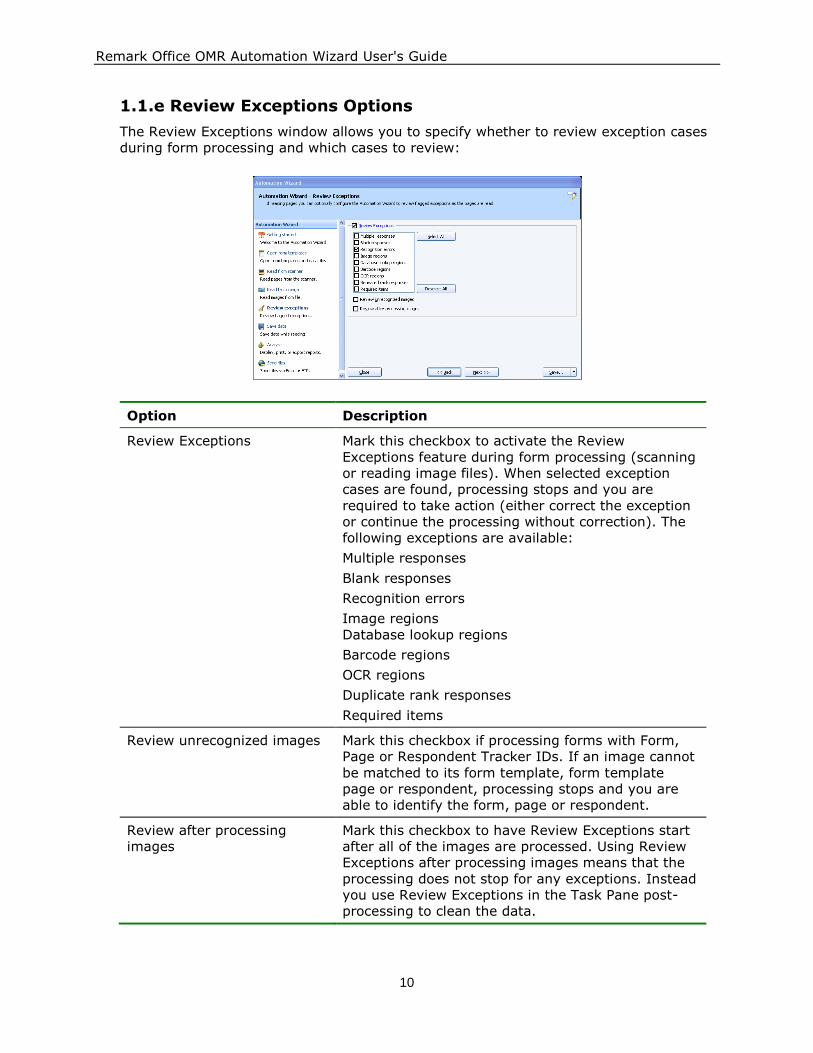
1.1.e Review Exceptions Options
The Review Exceptions window allows you to specify whether to review exception cases
during form processing and which cases to review:
Option Description
Review Exceptions Mark this checkbox to activate the Review
Exceptions feature during form processing (scanning
or reading image files). When selected exception
cases are found, processing stops and you are
required to take action (either correct the exception
or continue the processing without correction). The
following exceptions are available:
Multiple responses
Blank responses
Recognition errors
Image regions
Database lookup regions
Barcode regions
OCR regions
Duplicate rank responses
Required items
Review unrecognized images Mark this checkbox if processing forms with Form,
Page or Respondent Tracker IDs. If an image cannot
be matched to its form template, form template
page or respondent, processing stops and you are
able to identify the form, page or respondent.
Review after processing
images
Mark this checkbox to have Review Exceptions start
after all of the images are processed. Using Review
Exceptions after processing images means that the
processing does not stop for any exceptions. Instead
you use Review Exceptions in the Task Pane post-
processing to clean the data.

Remark Office OMR Automation Wizard User's Guide
11
1.1.f Save Data Options
The Save Data Options screen allows you to specify saving options while forms are being
processed. As each page is processed, the data is written directly to the file specified.
This feature allows you to send data to an external file right as the forms are processed
so that some other action can be taken on the data. Any changes made after
processing the forms are not written to this file.
Option Description
Save data from all open form
templates to a single file
Mark this checkbox to save all data collected to one
data file. Click the ellipsis (…) to select an existing
data file or enter a new file name. Once the file is
selected you are prompted to overwrite or append
to the file each time.
Overwrite existing file or table Mark this checkbox to overwrite the selected data
file each time the Automation Wizard file is
executed.
Name Builder The Name Builder button allows you to further
customize how data files are named and stored. In
the File Name area, you may choose to add a
region from the processed data to the file base
name. Choose the region from the drop-down list
and then click the Add button. For example, if
processing tests, you could add a Student Name
field that is being collected from the form so that
data file names all begin with the students’ names.
In the Target Directory area, you may choose to
add a region from the processed data to the folder
structure that will hold the data files. Choose the
region from the drop-down list and then click the
Add button. For example, if processing tests, you
could add teacher name and student name fields
that are being collected from the form so that each
student’s data is stored in a folder containing the
teacher’s name and then a subfolder containing the
student’s name.
Remark Office OMR Automation Wizard User's Guide
12
Tip: Hover the mouse over the to view details about the file you have
selected.
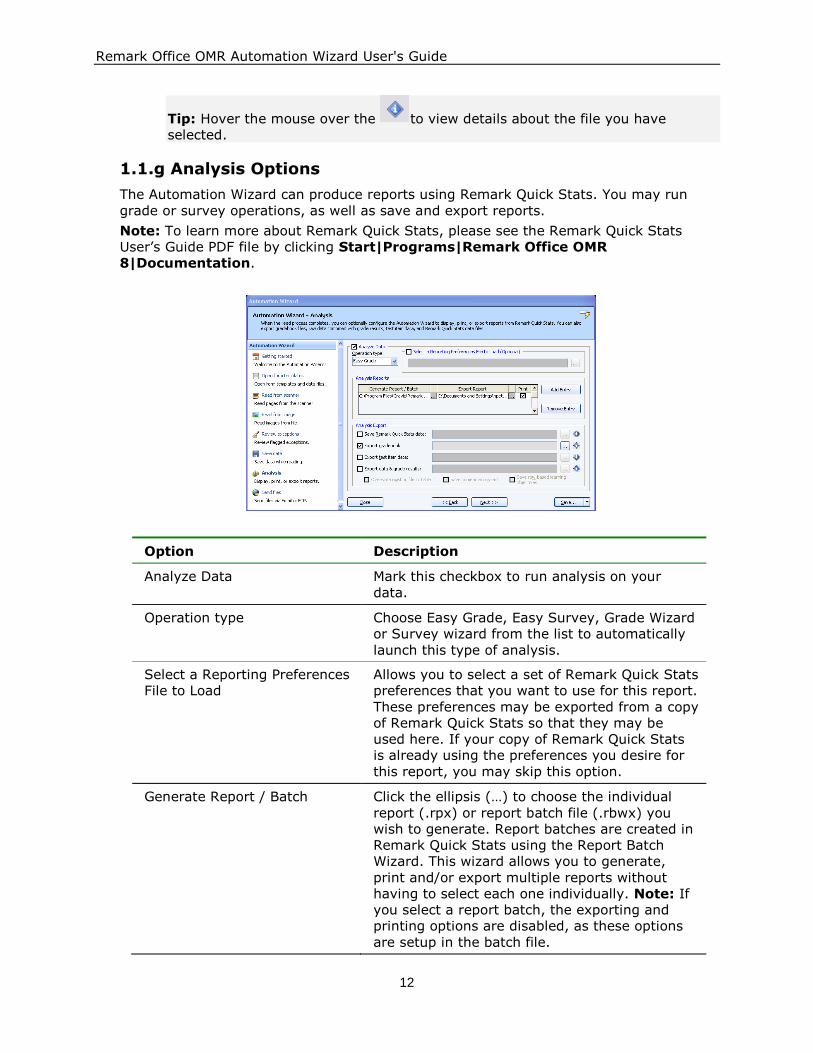
1.1.g Analysis Options
The Automation Wizard can produce reports using Remark Quick Stats. You may run
grade or survey operations, as well as save and export reports.
Note: To learn more about Remark Quick Stats, please see the Remark Quick Stats
User’s Guide PDF file by clicking Start|Programs|Remark Office OMR
8|Documentation.
Option Description
Analyze Data Mark this checkbox to run analysis on your
data.
Operation type Choose Easy Grade, Easy Survey, Grade Wizard
or Survey wizard from the list to automatically
launch this type of analysis.
Select a Reporting Preferences
File to Load
Allows you to select a set of Remark Quick Stats
preferences that you want to use for this report.
These preferences may be exported from a copy
of Remark Quick Stats so that they may be
used here. If your copy of Remark Quick Stats
is already using the preferences you desire for
this report, you may skip this option.
Generate Report / Batch Click the ellipsis (…) to choose the individual
report (.rpx) or report batch file (.rbwx) you
wish to generate. Report batches are created in
Remark Quick Stats using the Report Batch
Wizard. This wizard allows you to generate,
print and/or export multiple reports without
having to select each one individually. Note: If
you select a report batch, the exporting and
printing options are disabled, as these options
are setup in the batch file.
Remark Office OMR Automation Wizard User's Guide
13
Option Description
Export Report Click the ellipsis (…) to choose a file type and
location to which to export the report.
Print Mark this checkbox to print the report once it is
displayed.
Save Remark Quick Stats data Mark this checkbox to save the Remark Quick
Stats data as an RQS file for reuse within
Remark Quick Stats. Then click the ellipsis (…)
to choose a location in which to save the file.
Export gradebook Mark this checkbox to export the grade results
to a gradebook file. Then click the ellipsis (…) to
choose the gradebook type and a location in
which to save the file.
Export test item data Mark this checkbox to export the grade results
to a test item data file. Then click the ellipsis
(…) to choose the file type and a location in
which to save the file.
Export data & grade results Mark this checkbox to export the data and
grade results to a file. Then click the ellipsis (…)
to choose a file type and a location in which to
save the file. If you wish to overwrite an
existing file, mark the checkbox for Overwrite
existing file or table. If you wish to save the
numeric equivalents for the data set, mark the
checkbox for Save numeric equivalent. If you
wish to save the learning objectives in a row
based file (each learning objective per student
is a data record), mark the checkbox for Save
row-based learning objectives.
Tip: For the Analysis Export section, place the mouse over the information
button, , to view details about the file you have selected.
1.1.h Send Files Options
The Automation Wizard can load a Send Wizard configuration file so that you can send
the resulting analysis or data files to an FTP site or by email. We strongly suggest you
read the section on the Send Wizard before trying to use the configuration files within
the Automation Wizard. Once you have a Send Wizard configuration file saved, use the
Send files screen of the Automation Wizard to load it. (You may also create new Send
Wizard configuration files from the Automation Wizard.)
Remark Office OMR Automation Wizard User's Guide
14
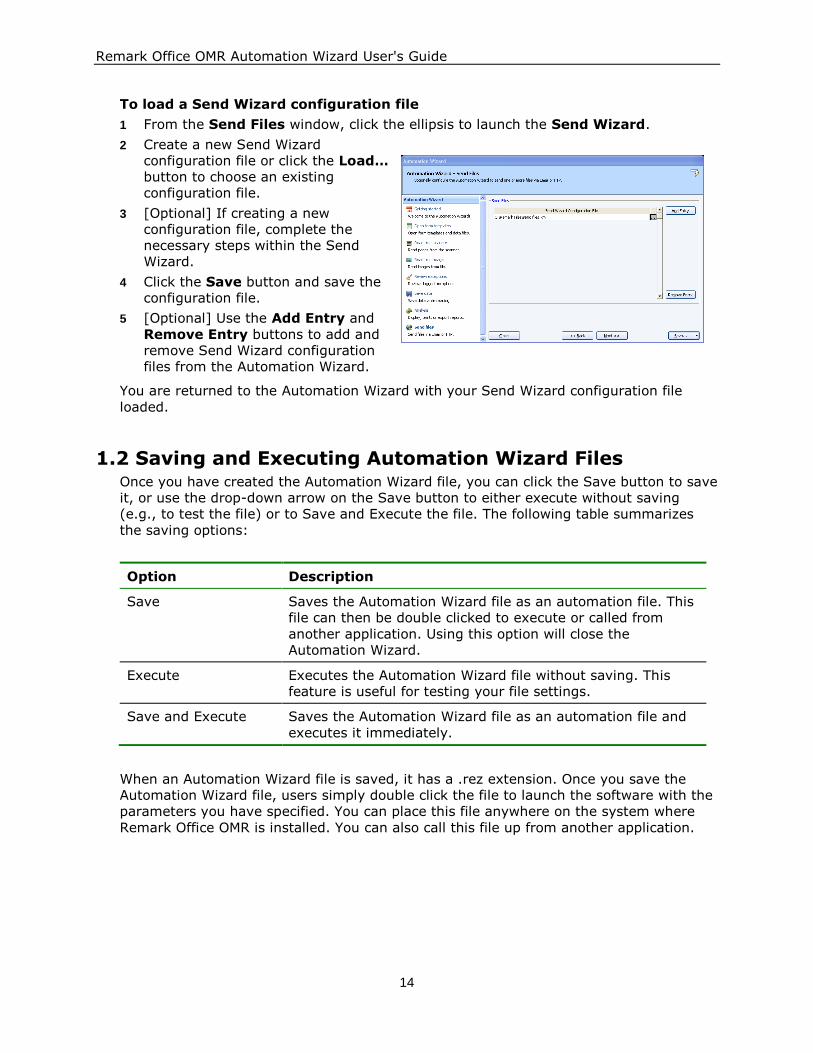
To load a Send Wizard configuration file
1 From the Send Files window, click the ellipsis to launch the Send Wizard.
2 Create a new Send Wizard
configuration file or click the Load…
button to choose an existing
configuration file.
3 [Optional] If creating a new
configuration file, complete the
necessary steps within the Send
Wizard.
4 Click the Save button and save the
configuration file.
5 [Optional] Use the Add Entry and
Remove Entry buttons to add and
remove Send Wizard configuration
files from the Automation Wizard.
You are returned to the Automation Wizard with your Send Wizard configuration file
loaded.
1.2 Saving and Executing Automation Wizard Files Once you have created the Automation Wizard file, you can click the Save button to save
it, or use the drop-down arrow on the Save button to either execute without saving
(e.g., to test the file) or to Save and Execute the file. The following table summarizes
the saving options:
Option Description
Save Saves the Automation Wizard file as an automation file. This
file can then be double clicked to execute or called from
another application. Using this option will close the
Automation Wizard.
Execute Executes the Automation Wizard file without saving. This
feature is useful for testing your file settings.
Save and Execute Saves the Automation Wizard file as an automation file and
executes it immediately.
When an Automation Wizard file is saved, it has a .rez extension. Once you save the
Automation Wizard file, users simply double click the file to launch the software with the
parameters you have specified. You can place this file anywhere on the system where
Remark Office OMR is installed. You can also call this file up from another application.