Embed Size (px)
Citation preview
Copyright © 2020 CyberPower Systems, Inc. All rights reserved. V1.1
Security Guide
The Remote Management Card allows a
UPS system and environmental sensor to
be managed, monitored, and configured.
Remote Management Card
RMCARD205 / RMCARD305
CyberPower Remote Management System
3
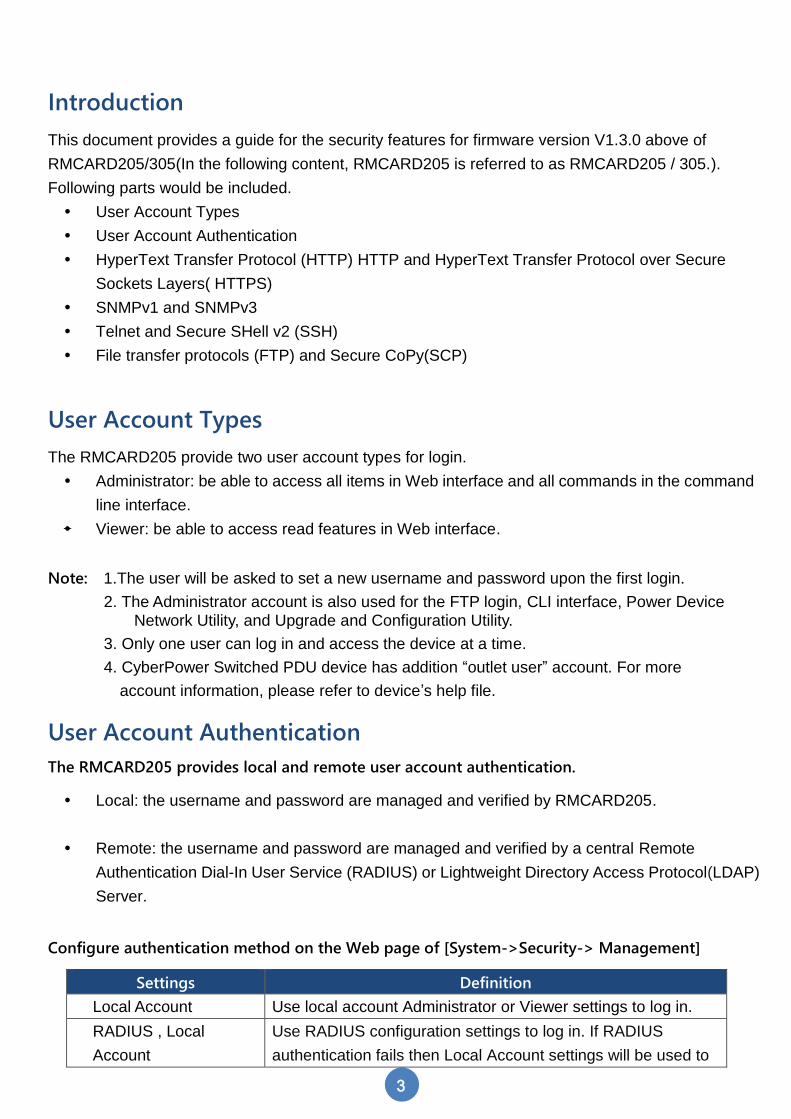
Introduction
This document provides a guide for the security features for firmware version V1.3.0 above of
RMCARD205/305(In the following content, RMCARD205 is referred to as RMCARD205 / 305.).
Following parts would be included.
User Account Types
User Account Authentication
HyperText Transfer Protocol (HTTP) HTTP and HyperText Transfer Protocol over Secure
Sockets Layers( HTTPS)
SNMPv1 and SNMPv3
Telnet and Secure SHell v2 (SSH)
File transfer protocols (FTP) and Secure CoPy(SCP)
User Account Types
The RMCARD205 provide two user account types for login.
Administrator: be able to access all items in Web interface and all commands in the command
line interface.
Viewer: be able to access read features in Web interface.
Note: 1.The user will be asked to set a new username and password upon the first login.
2. The Administrator account is also used for the FTP login, CLI interface, Power Device Network Utility, and Upgrade and Configuration Utility.
3. Only one user can log in and access the device at a time.
4. CyberPower Switched PDU device has addition “outlet user” account. For more
account information, please refer to device’s help file.
User Account Authentication
The RMCARD205 provides local and remote user account authentication.
Local: the username and password are managed and verified by RMCARD205.
Remote: the username and password are managed and verified by a central Remote
Authentication Dial-In User Service (RADIUS) or Lightweight Directory Access Protocol(LDAP)
Server.
Configure authentication method on the Web page of [System->Security-> Management]
Settings Definition
Local Account Use local account Administrator or Viewer settings to log in.
RADIUS , Local
Account
Use RADIUS configuration settings to log in. If RADIUS
authentication fails then Local Account settings will be used to
CyberPower Remote Management System
4
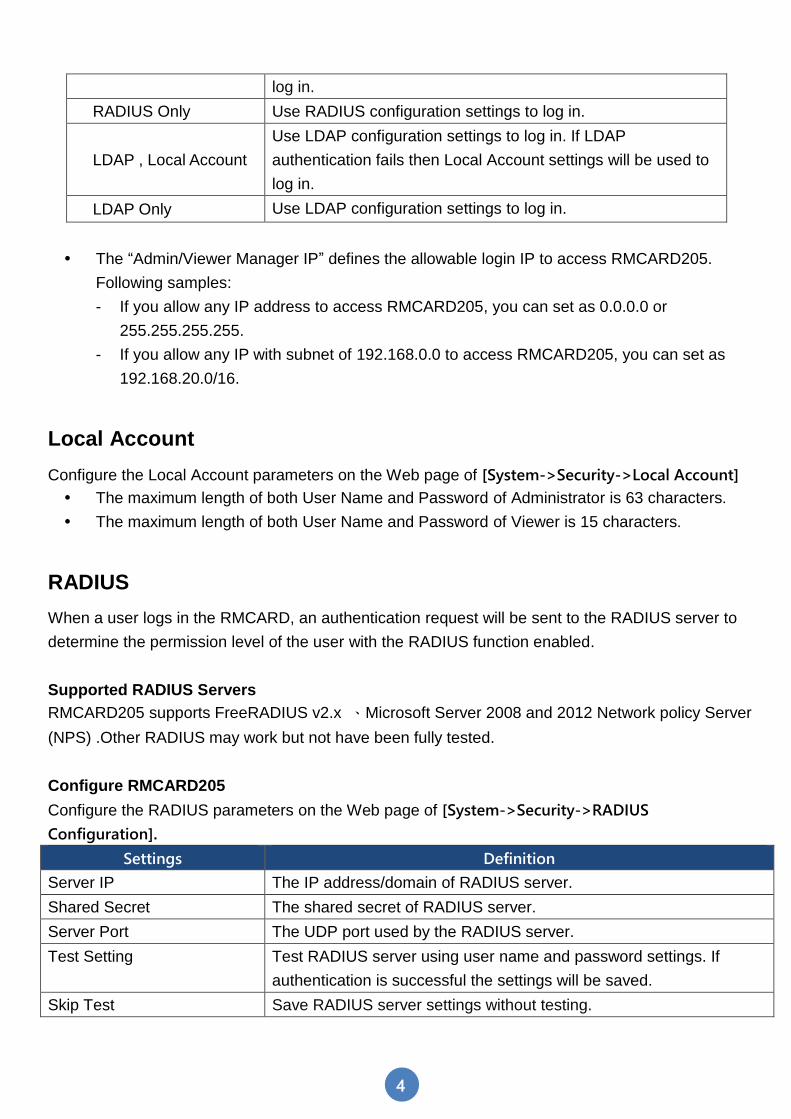
log in.
RADIUS Only Use RADIUS configuration settings to log in.
LDAP , Local Account
Use LDAP configuration settings to log in. If LDAP
authentication fails then Local Account settings will be used to
log in.
LDAP Only Use LDAP configuration settings to log in.
The “Admin/Viewer Manager IP” defines the allowable login IP to access RMCARD205.
Following samples:
- If you allow any IP address to access RMCARD205, you can set as 0.0.0.0 or
255.255.255.255.
- If you allow any IP with subnet of 192.168.0.0 to access RMCARD205, you can set as
192.168.20.0/16.
Local Account
Configure the Local Account parameters on the Web page of [System->Security->Local Account]
The maximum length of both User Name and Password of Administrator is 63 characters.
The maximum length of both User Name and Password of Viewer is 15 characters.
RADIUS
When a user logs in the RMCARD, an authentication request will be sent to the RADIUS server to
determine the permission level of the user with the RADIUS function enabled.
Supported RADIUS Servers
RMCARD205 supports FreeRADIUS v2.x 、Microsoft Server 2008 and 2012 Network policy Server
(NPS) .Other RADIUS may work but not have been fully tested.
Configure RMCARD205
Configure the RADIUS parameters on the Web page of [System->Security->RADIUS
Configuration].
Settings Definition
Server IP The IP address/domain of RADIUS server.
Shared Secret The shared secret of RADIUS server.
Server Port The UDP port used by the RADIUS server.
Test Setting Test RADIUS server using user name and password settings. If
authentication is successful the settings will be saved.
Skip Test Save RADIUS server settings without testing.
CyberPower Remote Management System
5
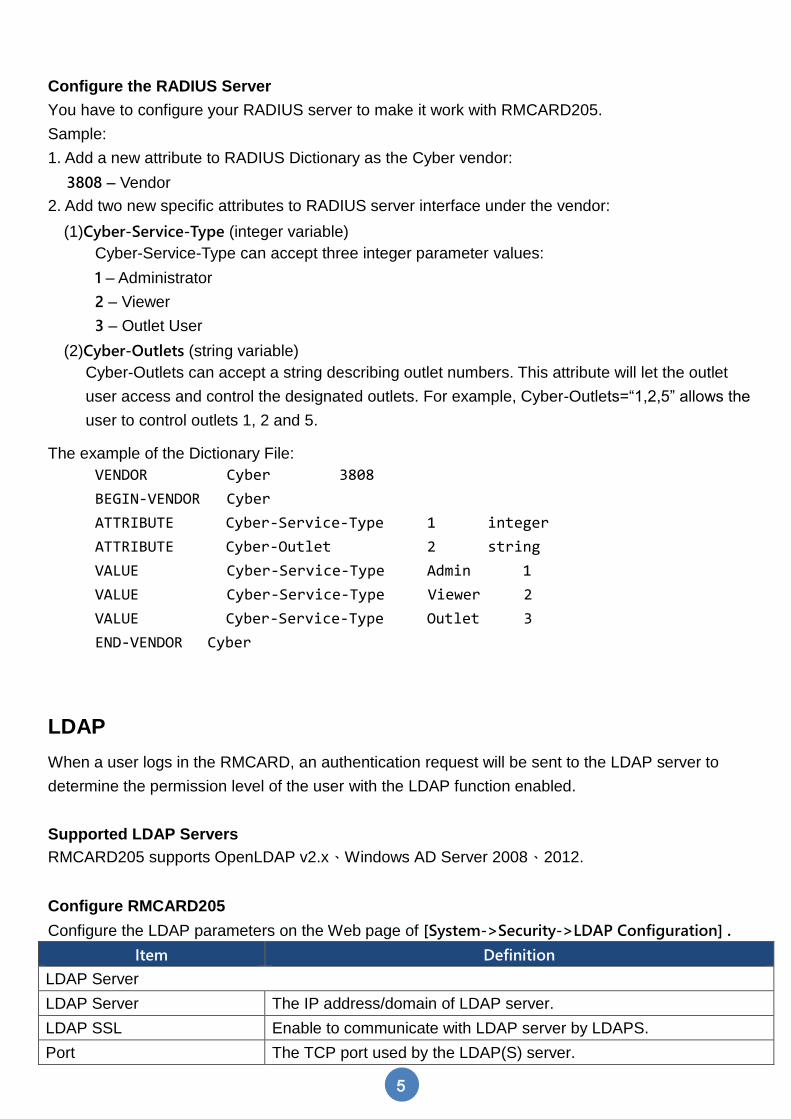
Configure the RADIUS Server
You have to configure your RADIUS server to make it work with RMCARD205.
Sample:
1. Add a new attribute to RADIUS Dictionary as the Cyber vendor:
3808 – Vendor
2. Add two new specific attributes to RADIUS server interface under the vendor:
(1)Cyber-Service-Type (integer variable)
Cyber-Service-Type can accept three integer parameter values:
1 – Administrator
2 – Viewer
3 – Outlet User
(2)Cyber-Outlets (string variable)
Cyber-Outlets can accept a string describing outlet numbers. This attribute will let the outlet
user access and control the designated outlets. For example, Cyber-Outlets=“1,2,5” allows the
user to control outlets 1, 2 and 5.
The example of the Dictionary File:
VENDOR Cyber 3808
BEGIN-VENDOR Cyber
ATTRIBUTE Cyber-Service-Type 1 integer
ATTRIBUTE Cyber-Outlet 2 string
VALUE Cyber-Service-Type Admin 1
VALUE Cyber-Service-Type Viewer 2
VALUE Cyber-Service-Type Outlet 3
END-VENDOR Cyber
LDAP
When a user logs in the RMCARD, an authentication request will be sent to the LDAP server to
determine the permission level of the user with the LDAP function enabled.
Supported LDAP Servers
RMCARD205 supports OpenLDAP v2.x、Windows AD Server 2008、2012.
Configure RMCARD205
Configure the LDAP parameters on the Web page of [System->Security->LDAP Configuration] .
Item Definition
LDAP Server
LDAP Server The IP address/domain of LDAP server.
LDAP SSL Enable to communicate with LDAP server by LDAPS.
Port The TCP port used by the LDAP(S) server.

CyberPower Remote Management System
6
User Base DN The Base DN of LDAP server.
Login Attribute The Login Attribute of LDAP user entry (for example:cn or uid).
LDAP Authentication
Authentication Mode
Identifies the method to use for authentication.
• Anonymous : Bind Request using Simple Authentication with a
zero-length bind DN and a zero-length password.
• Accredited User : Bind Request using Simple Authentication with
a Bind DN and Bind Password.
• By Logon User : Bind Request using Simple Authentication with a
User Base DN and login Password.
LDAP Authorization
Authorization Mode
Identifies the method to use for authorization.
• By User Attribute : Determine access level by User Attribute and
User Attribute Value.
• By Group : Determine access level by group which search DN
information such as the following Group Base DN, Group Attribute
and Group Attribute Value.
LDAP Server Type
Generic LDAP Server Select LDAP server type as OPENLDAP.
Active Directory Select LDAP server type as Windows AD.
AD Domain The AD Domain of the Active Directory server.
LDAP Test
Test Setting Test LDAP(S) server using user name and password settings. If
authentication is successful the settings will be saved.
Skip Test Save LDAP(S) server settings without testing.
Configure the LDAP Server
You have to configure your RADIUS server to make it work with RMCARD205.
Add one of the attributes below to description on the LDAP Server for indicating the user account
type and authentication:
1. cyber_admin (Administrator)
2. cyber_viewer (Viewer)
3. cyber_outlet=“string” (Outlet user)
The string entered in cyber_outlet designates what outlets the Outlet User can access and control.
For example, cyber_outlet=“1,2,5” allows the user to control outlets 1, 2 and 5.
CyberPower Remote Management System
7
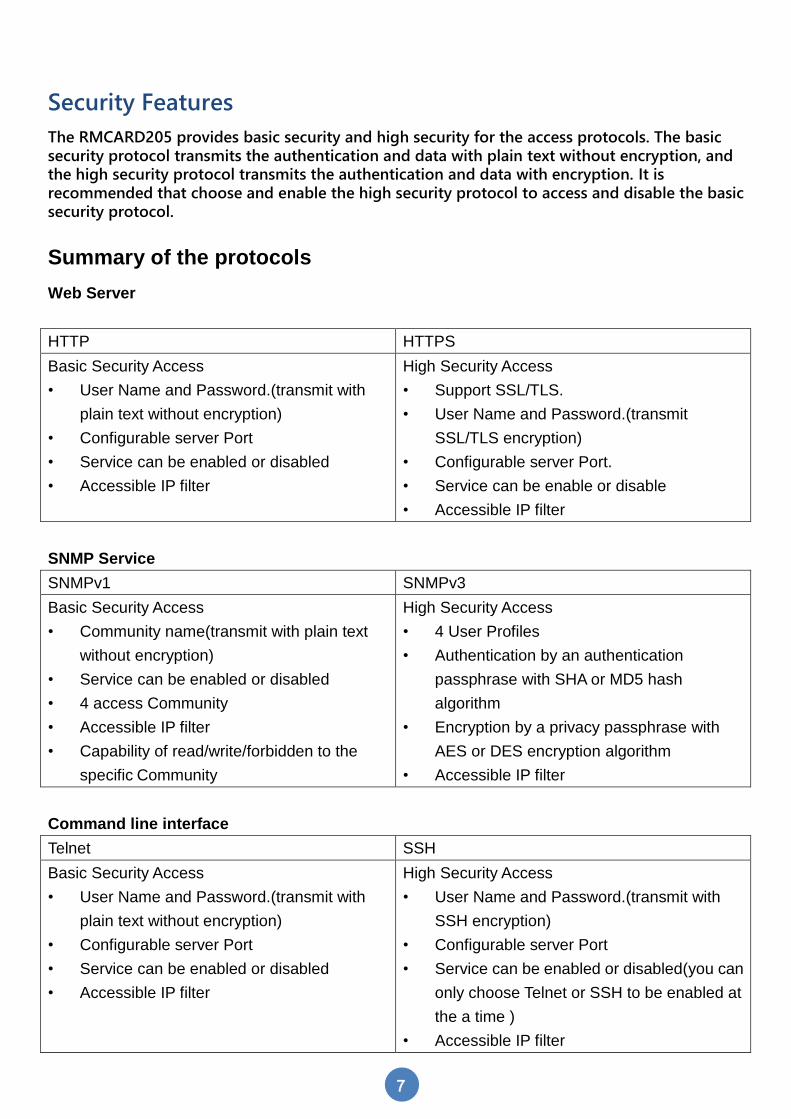
Security Features
The RMCARD205 provides basic security and high security for the access protocols. The basic security protocol transmits the authentication and data with plain text without encryption, and the high security protocol transmits the authentication and data with encryption. It is recommended that choose and enable the high security protocol to access and disable the basic security protocol.
Summary of the protocols
Web Server
HTTP HTTPS
Basic Security Access
• User Name and Password.(transmit with
plain text without encryption)
• Configurable server Port
• Service can be enabled or disabled
• Accessible IP filter
High Security Access
• Support SSL/TLS.
• User Name and Password.(transmit
SSL/TLS encryption)
• Configurable server Port.
• Service can be enable or disable
• Accessible IP filter
SNMP Service
SNMPv1 SNMPv3
Basic Security Access
• Community name(transmit with plain text
without encryption)
• Service can be enabled or disabled
• 4 access Community
• Accessible IP filter
• Capability of read/write/forbidden to the
specific Community
High Security Access
• 4 User Profiles
• Authentication by an authentication
passphrase with SHA or MD5 hash
algorithm
• Encryption by a privacy passphrase with
AES or DES encryption algorithm
• Accessible IP filter
Command line interface
Telnet SSH
Basic Security Access
• User Name and Password.(transmit with
plain text without encryption)
• Configurable server Port
• Service can be enabled or disabled
• Accessible IP filter
High Security Access
• User Name and Password.(transmit with
SSH encryption)
• Configurable server Port
• Service can be enabled or disabled(you can
only choose Telnet or SSH to be enabled at
the a time )
• Accessible IP filter

CyberPower Remote Management System
8
File Transfer protocol
FTP SCP
Basic Security Access
• User Name and Password.(transmit with
plain text without encryption)
• Configurable server Port
• Service can be enabled or disabled
High Security Access
• User Name and Password.(transmit with
SSH encryption)
• Configurable server Port
• Service can be enabled or disabled(Enable
SSH and disable FTP if you choose SCP)
• Accessible IP filter
Web Server
HTTP and HTTPS
HyperText Transfer Protocol (HTTP) provides basic security access with user name、password、
configurable port and accessible IP, but the user name、password and transmitting data are not
encrypted. HyperText Transfer Protocol over Secure Sockets Layers( HTTPS) transmits the user
name, password, and data with encryption and provides authentication of RMCARD205 via digital
certificates.
Configure the HTTP/HTTPS parameters on the Web page of [System->Network Service->Web
Service].
Item Definition
Access
Allow Access
Enable the access to HTTP or HTTPS service. The HTTPS supports
encryption algorithm list as follow:
‧ AES (256/128 bits)
‧ Camellia (256/128 bits)
‧ 3DES (168 bits)
‧ DES (168 bits)
Http Settings
Http Port The TCP/IP port of the Hypertext Transfer Protocol (HTTP) (80 by default)
Https Settings
Https Port The TCP/IP port of the Hypertext Transfer Protocol Secure (HTTPS) (443
by default)
Certificate Status
‧ Valid Certificate (or Invalid Certificate): Click to view Certificate
detailed information.
‧ Upload Certificate: Click to upload a certificate and replace the current
one.

CyberPower Remote Management System
9
Note: 1.The format of uploading digital certificate must be a standard PEM (Privacy Enhanced
Mail).
2.RMCARD205 supports Secure Sockets Layer (SSL) v3.0 and Transport Layer
Security(TLS) V1.0, V1.1 and V1.2.
Following is the example to create the certificate with OpenSSL and upload the certification.
1. Create a folder “CA” and copy openssl.cnf into it.
2. Type “openssl genrsa -des3 -out rootca.key 2048” and input password of key.
3. Type “openssl req -new -key rootca.key -out rootca.req” and input information of RootCA
certificate.
4. Type “openssl x509 -req -days 7305 -sha1 -extfile openssl.cnf -extensions v3_ca -signkey
rootca.key -in rootca.req -out rootca.crt” to create RootCA certificate.
CyberPower Remote Management System
10
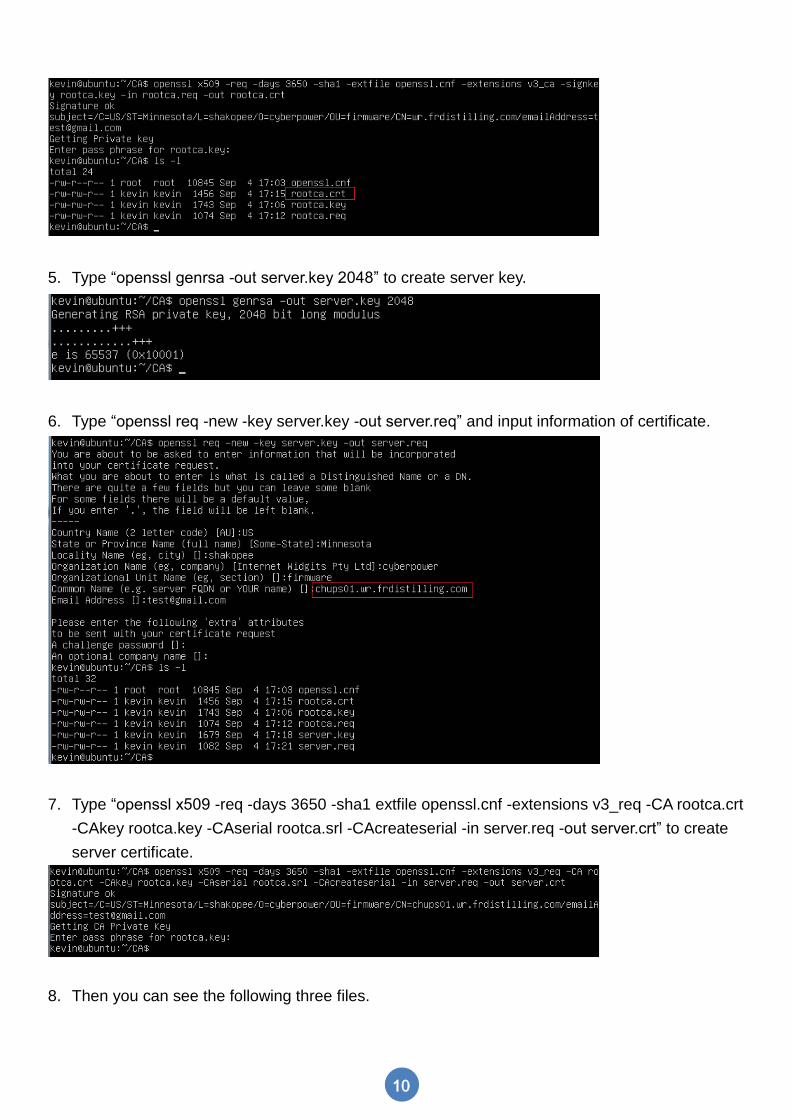
5. Type “openssl genrsa -out server.key 2048” to create server key.
6. Type “openssl req -new -key server.key -out server.req” and input information of certificate.
7. Type “openssl x509 -req -days 3650 -sha1 extfile openssl.cnf -extensions v3_req -CA rootca.crt
-CAkey rootca.key -CAserial rootca.srl -CAcreateserial -in server.req -out server.crt” to create
server certificate.
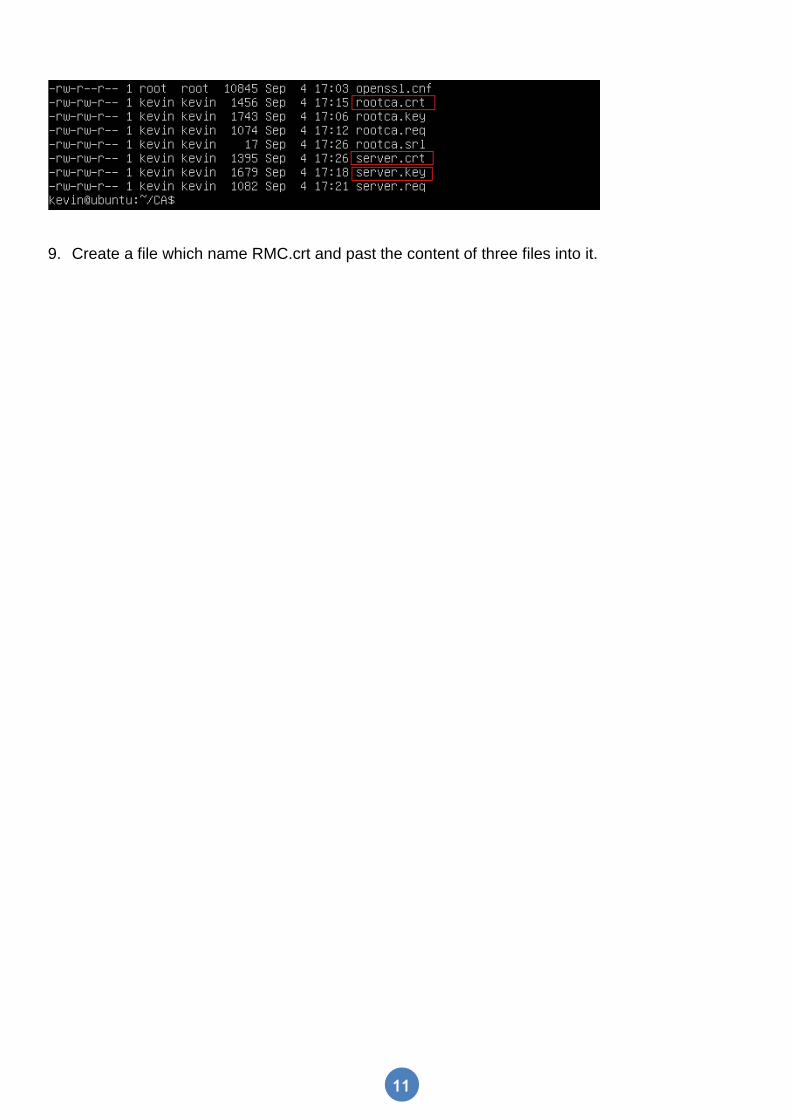
8. Then you can see the following three files.
CyberPower Remote Management System
11
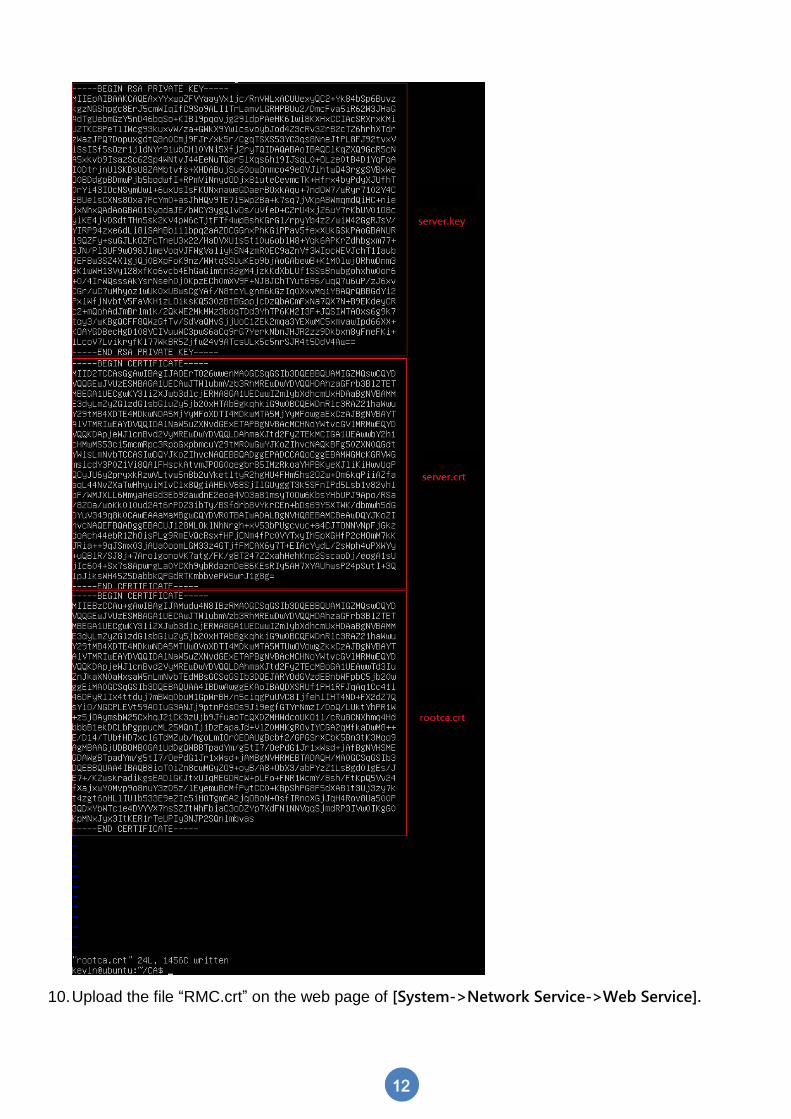
9. Create a file which name RMC.crt and past the content of three files into it.
CyberPower Remote Management System
12
10. Upload the file “RMC.crt” on the web page of [System->Network Service->Web Service].
CyberPower Remote Management System
13
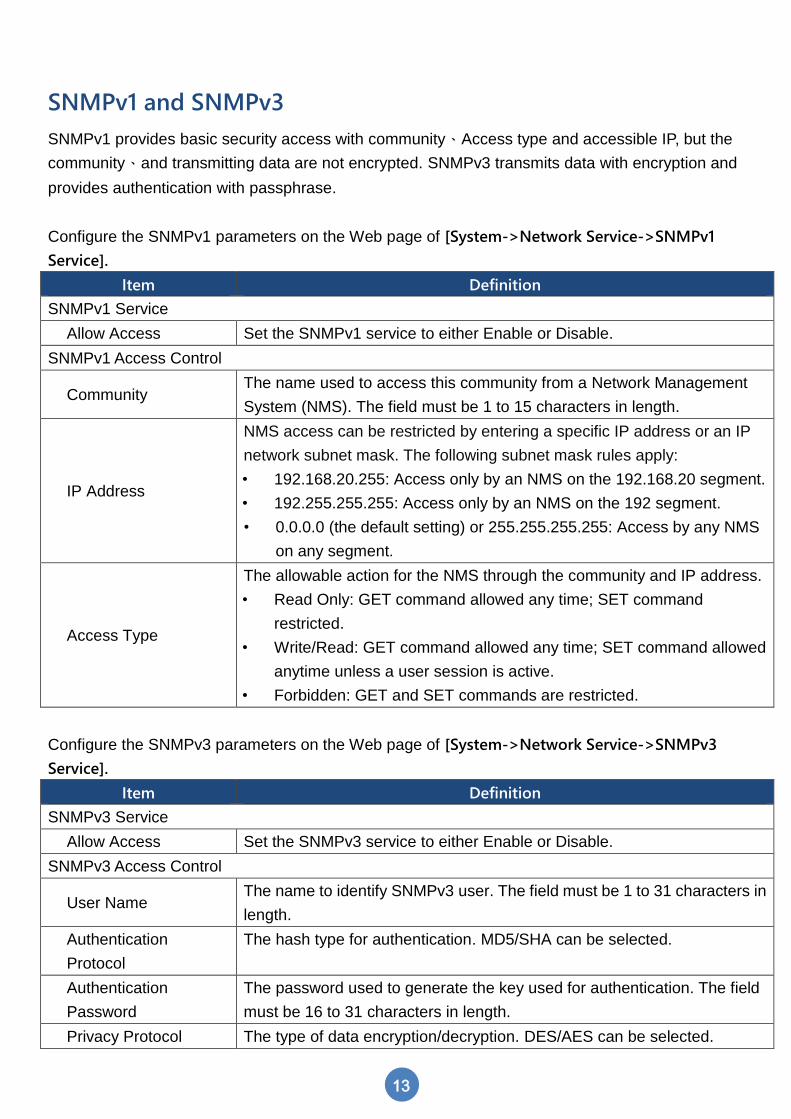
SNMPv1 and SNMPv3
SNMPv1 provides basic security access with community、Access type and accessible IP, but the
community、and transmitting data are not encrypted. SNMPv3 transmits data with encryption and
provides authentication with passphrase.
Configure the SNMPv1 parameters on the Web page of [System->Network Service->SNMPv1
Service].
Item Definition
SNMPv1 Service
Allow Access Set the SNMPv1 service to either Enable or Disable.
SNMPv1 Access Control
Community The name used to access this community from a Network Management
System (NMS). The field must be 1 to 15 characters in length.
IP Address
NMS access can be restricted by entering a specific IP address or an IP
network subnet mask. The following subnet mask rules apply:
• 192.168.20.255: Access only by an NMS on the 192.168.20 segment.
• 192.255.255.255: Access only by an NMS on the 192 segment.
• 0.0.0.0 (the default setting) or 255.255.255.255: Access by any NMS
on any segment.
Access Type
The allowable action for the NMS through the community and IP address.
• Read Only: GET command allowed any time; SET command
restricted.
• Write/Read: GET command allowed any time; SET command allowed
anytime unless a user session is active.
• Forbidden: GET and SET commands are restricted.
Configure the SNMPv3 parameters on the Web page of [System->Network Service->SNMPv3
Service].
Item Definition
SNMPv3 Service
Allow Access Set the SNMPv3 service to either Enable or Disable.
SNMPv3 Access Control
User Name The name to identify SNMPv3 user. The field must be 1 to 31 characters in
length.
Authentication
Protocol
The hash type for authentication. MD5/SHA can be selected.
Authentication
Password
The password used to generate the key used for authentication. The field
must be 16 to 31 characters in length.
Privacy Protocol The type of data encryption/decryption. DES/AES can be selected.
CyberPower Remote Management System
14
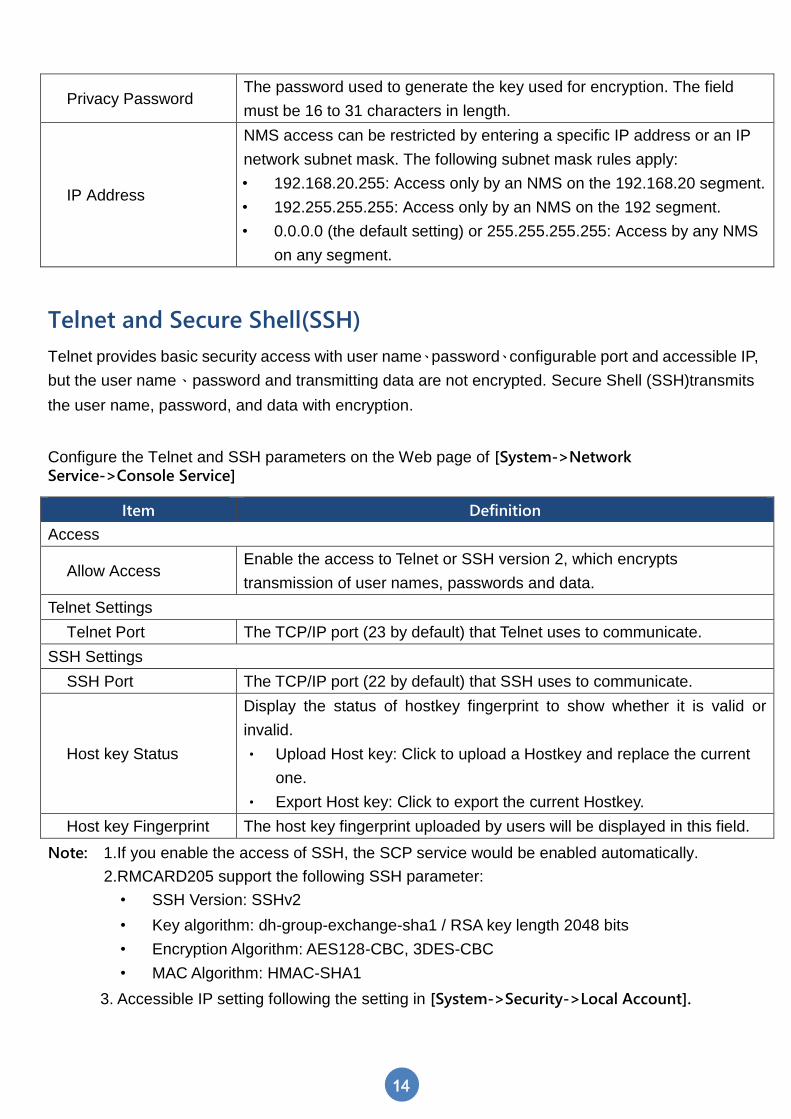
Privacy Password The password used to generate the key used for encryption. The field
must be 16 to 31 characters in length.
IP Address
NMS access can be restricted by entering a specific IP address or an IP
network subnet mask. The following subnet mask rules apply:
• 192.168.20.255: Access only by an NMS on the 192.168.20 segment.
• 192.255.255.255: Access only by an NMS on the 192 segment.
• 0.0.0.0 (the default setting) or 255.255.255.255: Access by any NMS
on any segment.
Telnet and Secure Shell(SSH)
Telnet provides basic security access with user name、password、configurable port and accessible IP,
but the user name、password and transmitting data are not encrypted. Secure Shell (SSH)transmits
the user name, password, and data with encryption.
Configure the Telnet and SSH parameters on the Web page of [System->Network Service->Console Service]
Item Definition
Access
Allow Access Enable the access to Telnet or SSH version 2, which encrypts
transmission of user names, passwords and data.
Telnet Settings
Telnet Port The TCP/IP port (23 by default) that Telnet uses to communicate.
SSH Settings
SSH Port The TCP/IP port (22 by default) that SSH uses to communicate.
Host key Status
Display the status of hostkey fingerprint to show whether it is valid or
invalid.
‧ Upload Host key: Click to upload a Hostkey and replace the current
one.
‧ Export Host key: Click to export the current Hostkey.
Host key Fingerprint The host key fingerprint uploaded by users will be displayed in this field.
Note: 1.If you enable the access of SSH, the SCP service would be enabled automatically.
2.RMCARD205 support the following SSH parameter:
• SSH Version: SSHv2
• Key algorithm: dh-group-exchange-sha1 / RSA key length 2048 bits
• Encryption Algorithm: AES128-CBC, 3DES-CBC
• MAC Algorithm: HMAC-SHA1
3. Accessible IP setting following the setting in [System->Security->Local Account].
CyberPower Remote Management System
15
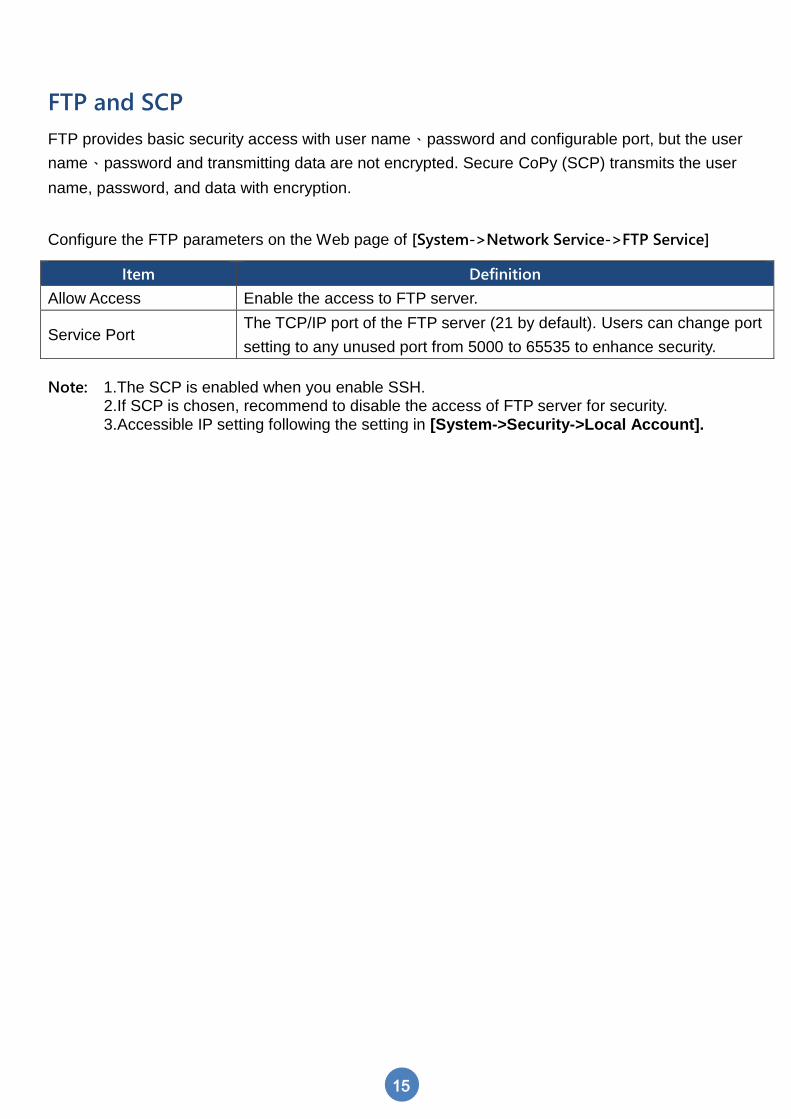
FTP and SCP
FTP provides basic security access with user name、password and configurable port, but the user
name、password and transmitting data are not encrypted. Secure CoPy (SCP) transmits the user
name, password, and data with encryption.
Configure the FTP parameters on the Web page of [System->Network Service->FTP Service]
Item Definition
Allow Access Enable the access to FTP server.
Service Port The TCP/IP port of the FTP server (21 by default). Users can change port
setting to any unused port from 5000 to 65535 to enhance security.
Note: 1.The SCP is enabled when you enable SSH. 2.If SCP is chosen, recommend to disable the access of FTP server for security. 3.Accessible IP setting following the setting in [System->Security->Local Account].
CyberPower Remote Management System
16
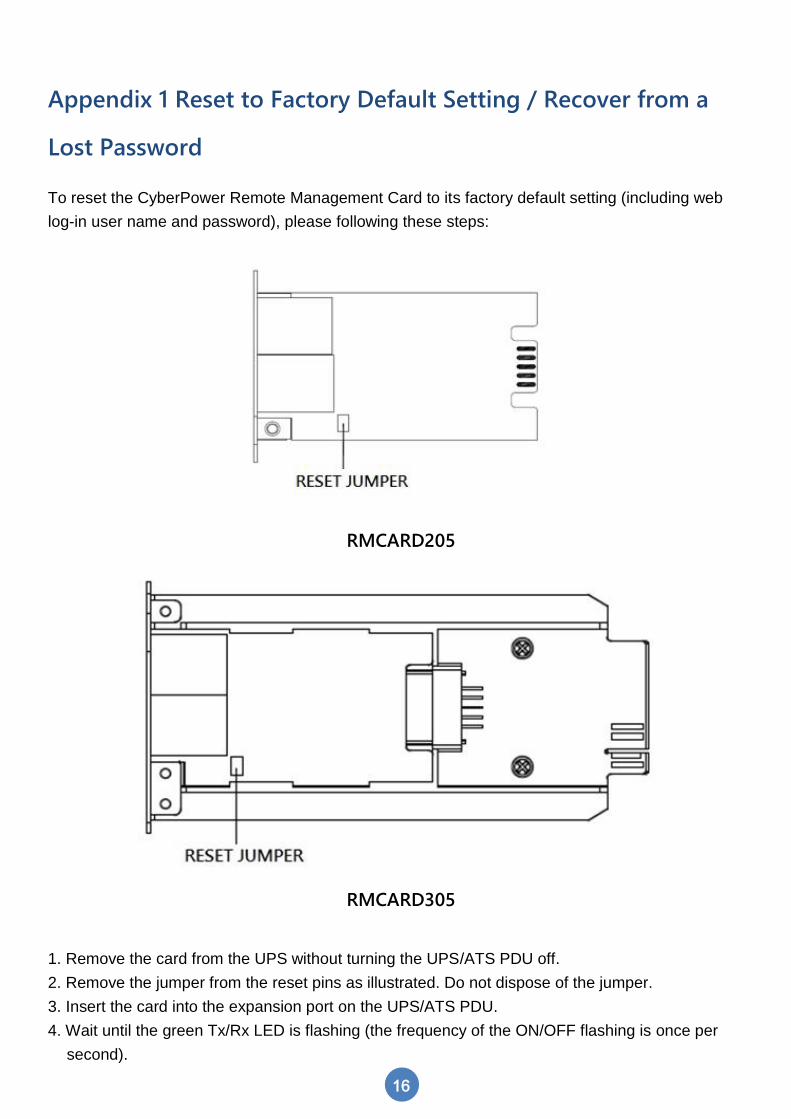
Appendix 1 Reset to Factory Default Setting / Recover from a
Lost Password
To reset the CyberPower Remote Management Card to its factory default setting (including web
log-in user name and password), please following these steps:
RMCARD205
RMCARD305
1. Remove the card from the UPS without turning the UPS/ATS PDU off.
2. Remove the jumper from the reset pins as illustrated. Do not dispose of the jumper.
3. Insert the card into the expansion port on the UPS/ATS PDU.
4. Wait until the green Tx/Rx LED is flashing (the frequency of the ON/OFF flashing is once per
second).

CyberPower Remote Management System
17
5. Remove the card again.
6. Place the jumper back onto the Reset pins.
7. Install card into the expansion port again and tighten the retaining screws.
CyberPower Remote Management System
18
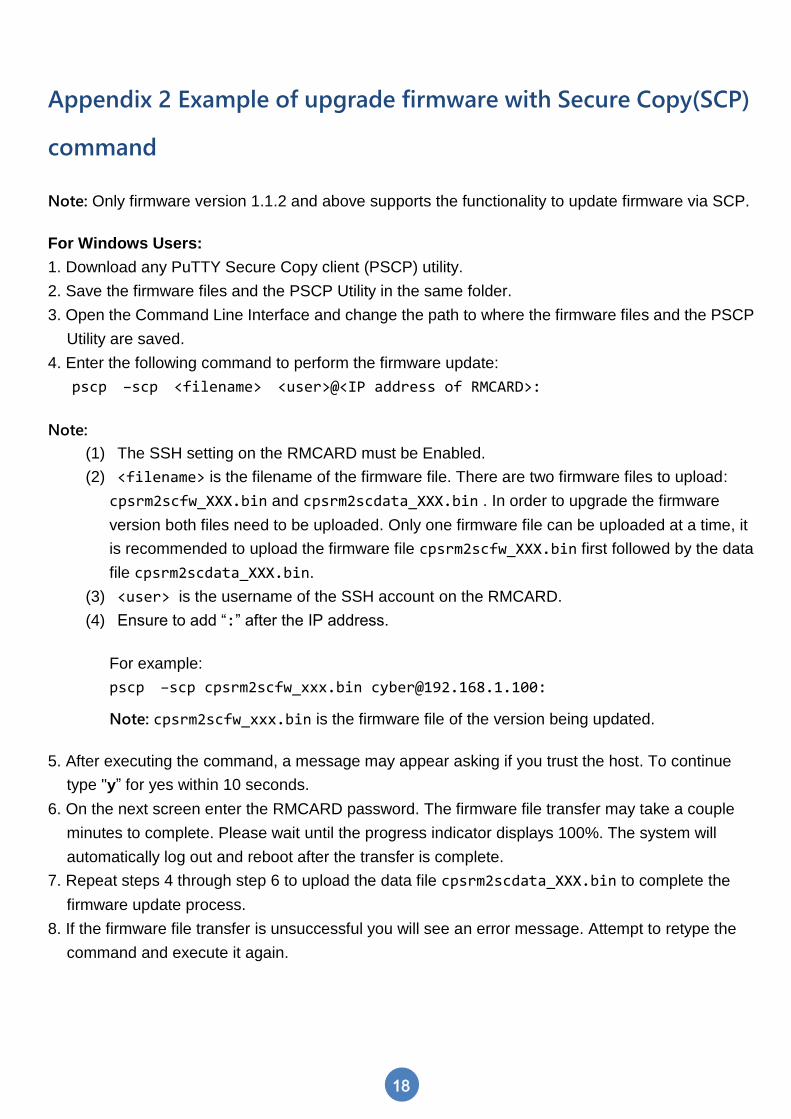
Appendix 2 Example of upgrade firmware with Secure Copy(SCP)
command
Note: Only firmware version 1.1.2 and above supports the functionality to update firmware via SCP.
For Windows Users:
1. Download any PuTTY Secure Copy client (PSCP) utility.
2. Save the firmware files and the PSCP Utility in the same folder.
3. Open the Command Line Interface and change the path to where the firmware files and the PSCP
Utility are saved.
4. Enter the following command to perform the firmware update:
pscp –scp <filename> <user>@<IP address of RMCARD>:
Note:
(1) The SSH setting on the RMCARD must be Enabled.
(2) <filename> is the filename of the firmware file. There are two firmware files to upload:
cpsrm2scfw_XXX.bin and cpsrm2scdata_XXX.bin . In order to upgrade the firmware
version both files need to be uploaded. Only one firmware file can be uploaded at a time, it
is recommended to upload the firmware file cpsrm2scfw_XXX.bin first followed by the data
file cpsrm2scdata_XXX.bin.
(3) <user> is the username of the SSH account on the RMCARD.
(4) Ensure to add “:” after the IP address.
For example:
pscp –scp cpsrm2scfw_xxx.bin [email protected]:
Note: cpsrm2scfw_xxx.bin is the firmware file of the version being updated.
5. After executing the command, a message may appear asking if you trust the host. To continue
type "y” for yes within 10 seconds.
6. On the next screen enter the RMCARD password. The firmware file transfer may take a couple
minutes to complete. Please wait until the progress indicator displays 100%. The system will
automatically log out and reboot after the transfer is complete.
7. Repeat steps 4 through step 6 to upload the data file cpsrm2scdata_XXX.bin to complete the
firmware update process.
8. If the firmware file transfer is unsuccessful you will see an error message. Attempt to retype the
command and execute it again.
CyberPower Remote Management System
19
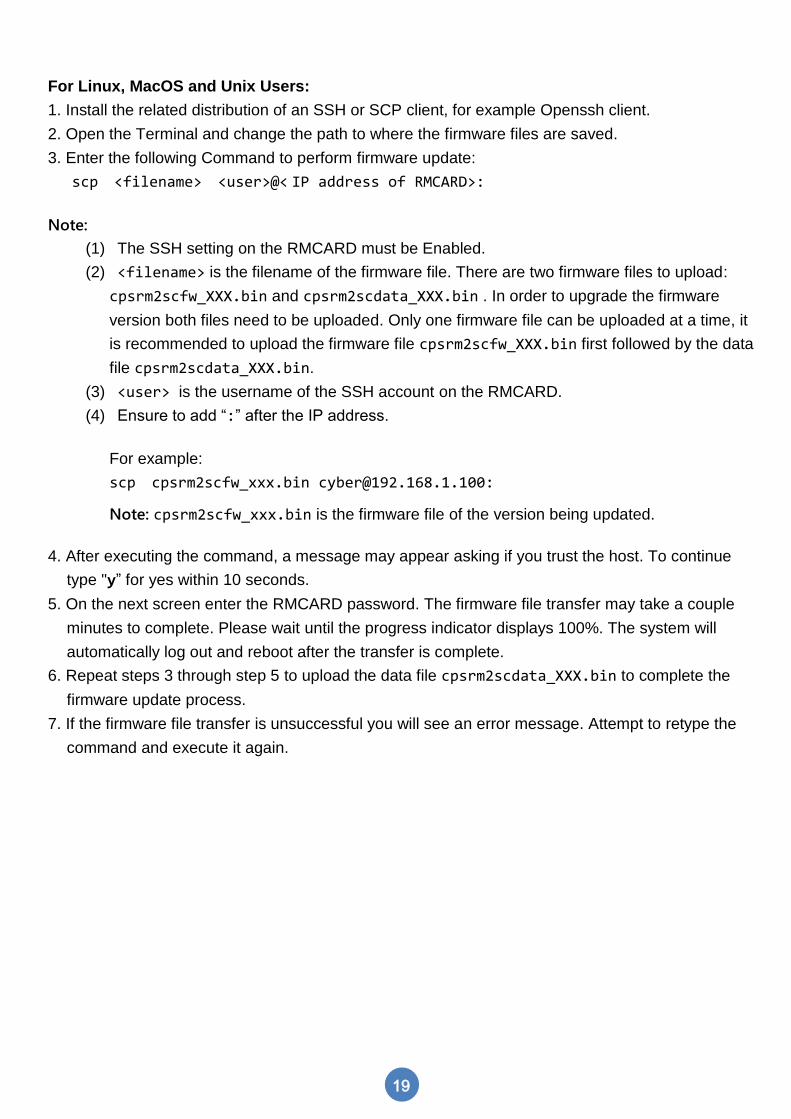
For Linux, MacOS and Unix Users:
1. Install the related distribution of an SSH or SCP client, for example Openssh client.
2. Open the Terminal and change the path to where the firmware files are saved.
3. Enter the following Command to perform firmware update:
scp <filename> <user>@< IP address of RMCARD>:
Note:
(1) The SSH setting on the RMCARD must be Enabled.
(2) <filename> is the filename of the firmware file. There are two firmware files to upload:
cpsrm2scfw_XXX.bin and cpsrm2scdata_XXX.bin . In order to upgrade the firmware
version both files need to be uploaded. Only one firmware file can be uploaded at a time, it
is recommended to upload the firmware file cpsrm2scfw_XXX.bin first followed by the data
file cpsrm2scdata_XXX.bin.
(3) <user> is the username of the SSH account on the RMCARD.
(4) Ensure to add “:” after the IP address.
For example:
scp cpsrm2scfw_xxx.bin [email protected]:
Note: cpsrm2scfw_xxx.bin is the firmware file of the version being updated.
4. After executing the command, a message may appear asking if you trust the host. To continue
type "y” for yes within 10 seconds.
5. On the next screen enter the RMCARD password. The firmware file transfer may take a couple
minutes to complete. Please wait until the progress indicator displays 100%. The system will
automatically log out and reboot after the transfer is complete.
6. Repeat steps 3 through step 5 to upload the data file cpsrm2scdata_XXX.bin to complete the
firmware update process.
7. If the firmware file transfer is unsuccessful you will see an error message. Attempt to retype the
command and execute it again.

CyberPower Remote Management System
20
Appendix 3 Example of save and restore configuration settings
with Secure Copy(SCP) command
Note: Only firmware version 1.1.2 and above supports the functionality to restore configuration via
SCP.
For Windows Users:
1. Download any PuTTY Secure Copy client (PSCP) utility.
2. Save the configuration file and the PSCP Utility in the same folder.
3. Open the Command Line Interface and change the path to where the configuration file and the
PSCP Utility are saved.
4. Enter the following command to restore configuration:
pscp –scp <filename> <user>@<IP address of RMCARD>:
Note:
(1) The SSH setting on the RMCARD must be Enabled.
(2) <filename> is the filename of the configuration file with a default format of
YYYY_MM_DD_HHMM.txt.
(3) <user> is the username of the SSH account on the RMCARD.
(4) Ensure to add “:” after the IP address.
For example:
pscp –scp YYYY_MM_DD_HHMM.txt [email protected]:
Note: YYYY_MM_DD_HHMM.txt is the configuration file to be restored.
5. After executing the command, a message may appear asking if you trust the host. To continue
type "y” for yes within 10 seconds.
6. On the next screen enter the RMCARD password. Please wait until the progress indicator displays
100%. The system will automatically log out and reboot after the transfer is complete.
For Linux, MacOS and Unix Users:
1. Install the related distribution of an SSH or SCP client, for example OpenSSH client.
2. Open the Terminal and change the path to where the configuration files are saved.
3. Enter the following Command to restore configuration:
scp <filename> <user>@< IP address of RMCARD>:
Note:
(1) The SSH setting on the RMCARD must be Enabled.
(2) <filename> is the filename of the configuration file with a default format of
CyberPower Remote Management System
21
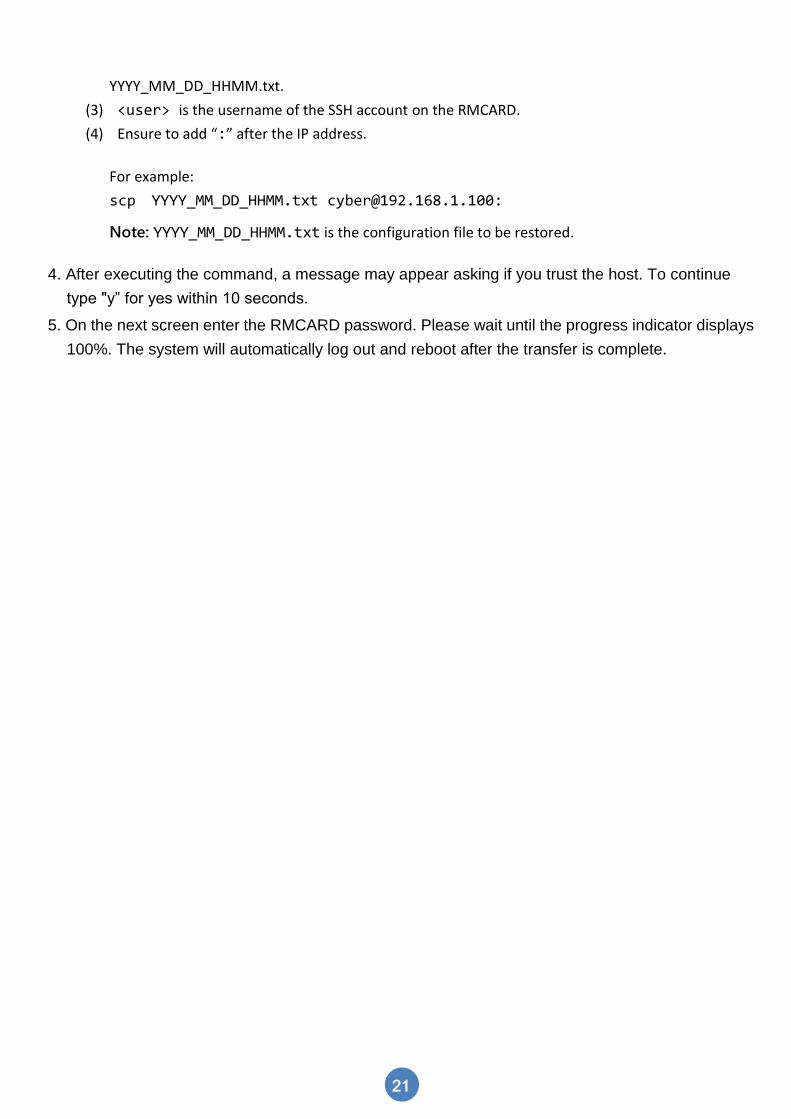
YYYY_MM_DD_HHMM.txt.
(3) <user> is the username of the SSH account on the RMCARD.
(4) Ensure to add “:” after the IP address.
For example:
scp YYYY_MM_DD_HHMM.txt [email protected]:
Note: YYYY_MM_DD_HHMM.txt is the configuration file to be restored.
4. After executing the command, a message may appear asking if you trust the host. To continue
type "y” for yes within 10 seconds.
5. On the next screen enter the RMCARD password. Please wait until the progress indicator displays
100%. The system will automatically log out and reboot after the transfer is complete.
CyberPower Remote Management System
22
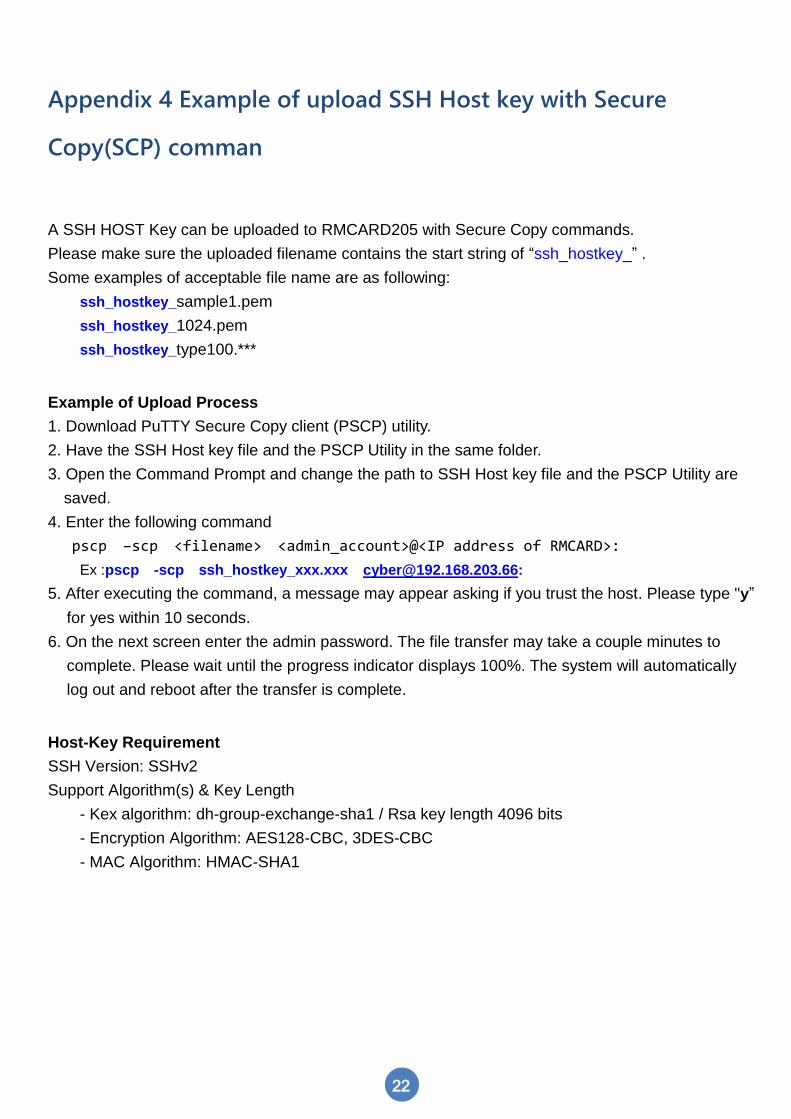
Appendix 4 Example of upload SSH Host key with Secure
Copy(SCP) comman
A SSH HOST Key can be uploaded to RMCARD205 with Secure Copy commands.
Please make sure the uploaded filename contains the start string of “ssh_hostkey_” .
Some examples of acceptable file name are as following:
ssh_hostkey_sample1.pem
ssh_hostkey_1024.pem
ssh_hostkey_type100.***
Example of Upload Process
1. Download PuTTY Secure Copy client (PSCP) utility.
2. Have the SSH Host key file and the PSCP Utility in the same folder.
3. Open the Command Prompt and change the path to SSH Host key file and the PSCP Utility are
saved.
4. Enter the following command
pscp –scp <filename> <admin_account>@<IP address of RMCARD>:
Ex :pscp -scp ssh_hostkey_xxx.xxx [email protected]:
5. After executing the command, a message may appear asking if you trust the host. Please type "y”
for yes within 10 seconds.
6. On the next screen enter the admin password. The file transfer may take a couple minutes to
complete. Please wait until the progress indicator displays 100%. The system will automatically
log out and reboot after the transfer is complete.
Host-Key Requirement
SSH Version: SSHv2
Support Algorithm(s) & Key Length
- Kex algorithm: dh-group-exchange-sha1 / Rsa key length 4096 bits
- Encryption Algorithm: AES128-CBC, 3DES-CBC
- MAC Algorithm: HMAC-SHA1
CyberPower Systems, Inc. www.cyberpowersystems.com
For USA and Canada:
4241 12th Ave East, Suite 400
Shakopee, MN 55379
Toll-free: (877) 297-6937
For all other regions:
Please visit our website for local contact information.