Embed Size (px)
Citation preview
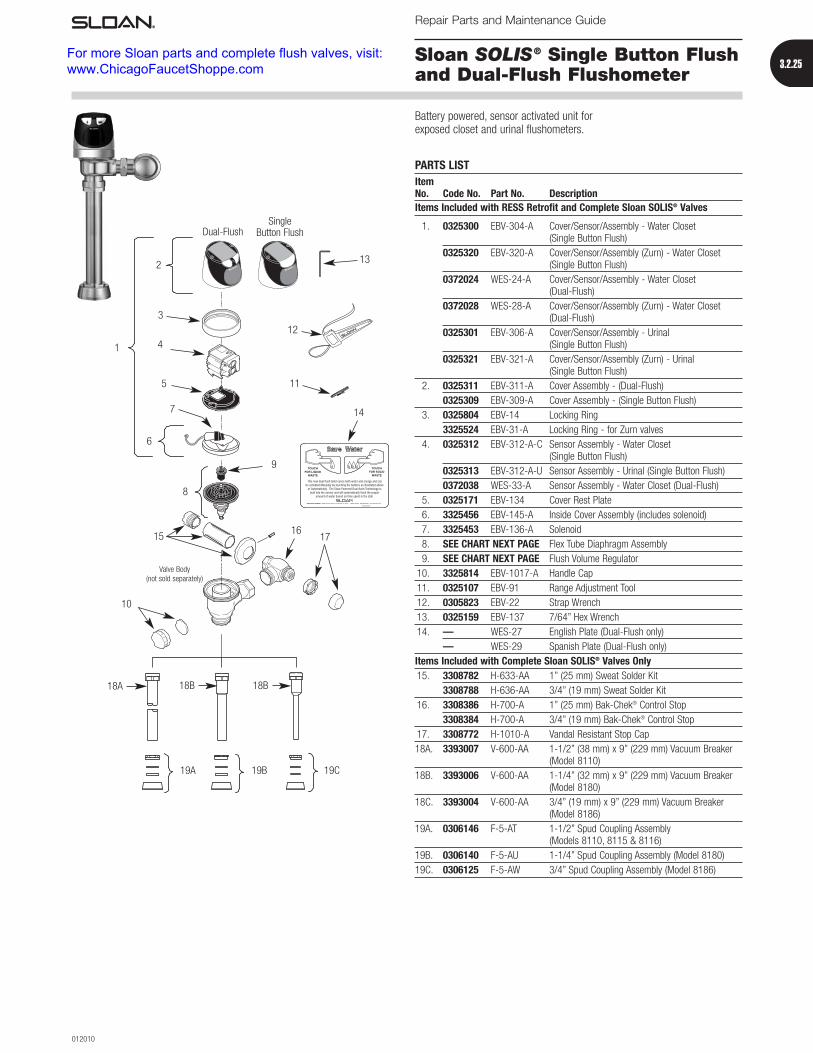
3.2.25
161715
18A
2
18B
19B 19C
3
1
5
6
7
8
12
11
9
13
4
10
19A
18B
14
Sloan SOLIS® Single Button Flushand Dual-Flush Flushometer
Repair Parts and Maintenance Guide
012010
Battery powered, sensor activated unit forexposed closet and urinal flushometers.
PARTS LISTItemNo. Code No. Part No. DescriptionItems Included with RESS Retrofit and Complete Sloan SOLIS® Valves
1. 0325300 EBV-304-A Cover/Sensor/Assembly - Water Closet (Single Button Flush)
0325320 EBV-320-A Cover/Sensor/Assembly (Zurn) - Water Closet(Single Button Flush)
0372024 WES-24-A Cover/Sensor/Assembly - Water Closet (Dual-Flush)
0372028 WES-28-A Cover/Sensor/Assembly (Zurn) - Water Closet(Dual-Flush)
0325301 EBV-306-A Cover/Sensor/Assembly - Urinal (Single Button Flush)
0325321 EBV-321-A Cover/Sensor/Assembly (Zurn) - Urinal (Single Button Flush)
2. 0325311 EBV-311-A Cover Assembly - (Dual-Flush)0325309 EBV-309-A Cover Assembly - (Single Button Flush)
3. 0325804 EBV-14 Locking Ring3325524 EBV-31-A Locking Ring - for Zurn valves
4. 0325312 EBV-312-A-C Sensor Assembly - Water Closet (Single Button Flush)
0325313 EBV-312-A-U Sensor Assembly - Urinal (Single Button Flush)0372038 WES-33-A Sensor Assembly - Water Closet (Dual-Flush)
5. 0325171 EBV-134 Cover Rest Plate6. 3325456 EBV-145-A Inside Cover Assembly (includes solenoid)7. 3325453 EBV-136-A Solenoid8. SEE CHART NEXT PAGE Flex Tube Diaphragm Assembly9. SEE CHART NEXT PAGE Flush Volume Regulator
10. 3325814 EBV-1017-A Handle Cap11. 0325107 EBV-91 Range Adjustment Tool12. 0305823 EBV-22 Strap Wrench13. 0325159 EBV-137 7/64” Hex Wrench14. — WES-27 English Plate (Dual-Flush only)
— WES-29 Spanish Plate (Dual-Flush only)Items Included with Complete Sloan SOLIS® Valves Only15. 3308782 H-633-AA 1” (25 mm) Sweat Solder Kit
3308788 H-636-AA 3/4” (19 mm) Sweat Solder Kit16. 3308386 H-700-A 1” (25 mm) Bak-Chek® Control Stop
3308384 H-700-A 3/4” (19 mm) Bak-Chek® Control Stop17. 3308772 H-1010-A Vandal Resistant Stop Cap18A. 3393007 V-600-AA 1-1/2” (38 mm) x 9” (229 mm) Vacuum Breaker
(Model 8110)18B. 3393006 V-600-AA 1-1/4” (32 mm) x 9” (229 mm) Vacuum Breaker
(Model 8180)18C. 3393004 V-600-AA 3/4” (19 mm) x 9” (229 mm) Vacuum Breaker
(Model 8186)19A. 0306146 F-5-AT 1-1/2” Spud Coupling Assembly
(Models 8110, 8115 & 8116)19B. 0306140 F-5-AU 1-1/4” Spud Coupling Assembly (Model 8180)19C. 0306125 F-5-AW 3/4” Spud Coupling Assembly (Model 8186)
Dual-FlushSingle
Button Flush
Valve Body(not sold separately)
For more Sloan parts and complete flush valves, visit: www.ChicagoFaucetShoppe.com
3.2.26
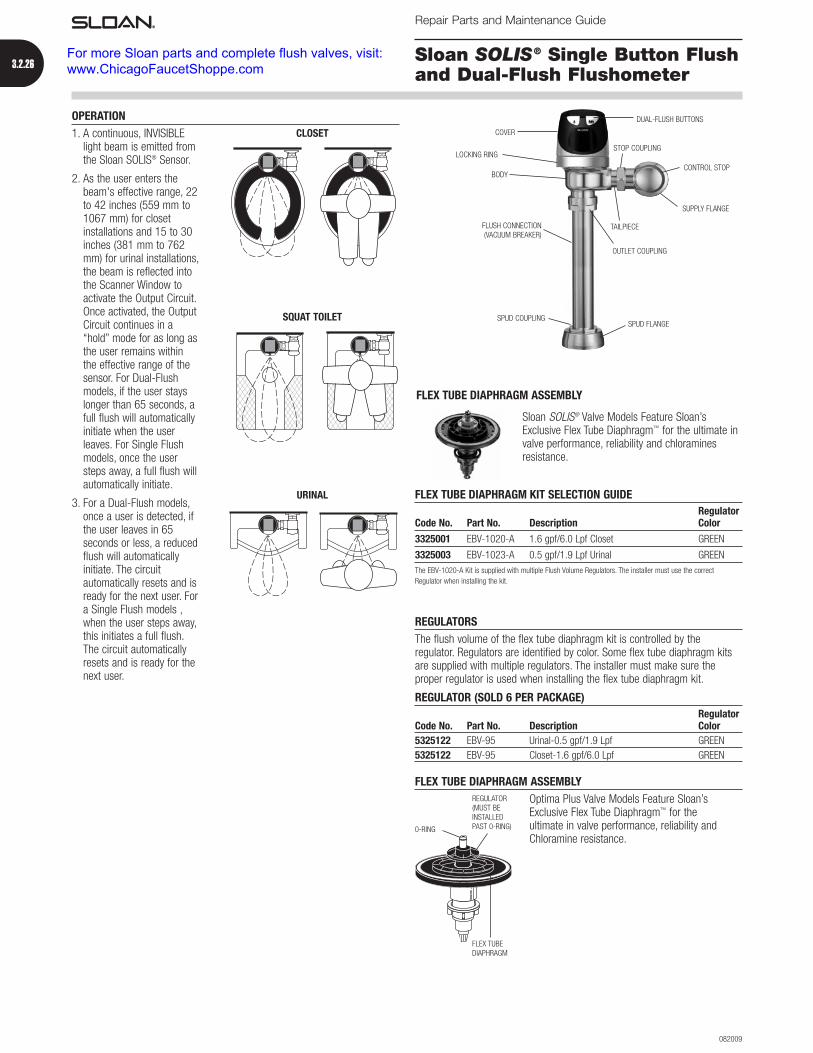
COVER
BODY
FLUSH CONNECTION(VACUUM BREAKER)
SPUD COUPLING
LOCKING RINGSTOP COUPLING
CONTROL STOP
SUPPLY FLANGE
TAILPIECE
OUTLET COUPLING
SPUD FLANGE
DUAL-FLUSH BUTTONS
Sloan SOLIS® Single Button Flushand Dual-Flush Flushometer
Repair Parts and Maintenance Guide
082009
OPERATION1. A continuous, INVISIBLE
light beam is emitted fromthe Sloan SOLIS® Sensor.
2. As the user enters thebeam's effective range, 22to 42 inches (559 mm to1067 mm) for closetinstallations and 15 to 30inches (381 mm to 762mm) for urinal installations,the beam is reflected intothe Scanner Window toactivate the Output Circuit.Once activated, the OutputCircuit continues in a“hold” mode for as long asthe user remains withinthe effective range of thesensor. For Dual-Flushmodels, if the user stayslonger than 65 seconds, afull flush will automaticallyinitiate when the userleaves. For Single Flushmodels, once the usersteps away, a full flush willautomatically initiate.
3. For a Dual-Flush models,once a user is detected, ifthe user leaves in 65seconds or less, a reducedflush will automaticallyinitiate. The circuitautomatically resets and isready for the next user. Fora Single Flush models ,when the user steps away,this initiates a full flush.The circuit automaticallyresets and is ready for thenext user.
SQUAT TOILET
URINAL
CLOSET
0-RING
REGULATOR(MUST BEINSTALLED PAST 0-RING)
FLEX TUBEDIAPHRAGM
REGULATORSThe flush volume of the flex tube diaphragm kit is controlled by theregulator. Regulators are identified by color. Some flex tube diaphragm kitsare supplied with multiple regulators. The installer must make sure theproper regulator is used when installing the flex tube diaphragm kit.
REGULATOR (SOLD 6 PER PACKAGE)Regulator
Code No. Part No. Description Color5325122 EBV-95 Urinal-0.5 gpf/1.9 Lpf GREEN5325122 EBV-95 Closet-1.6 gpf/6.0 Lpf GREEN
FLEX TUBE DIAPHRAGM ASSEMBLYOptima Plus Valve Models Feature Sloan’sExclusive Flex Tube Diaphragm™ for the ultimate in valve performance, reliability and Chloramine resistance.
Sloan SOLIS® Valve Models Feature Sloan’sExclusive Flex Tube Diaphragm™ for the ultimate invalve performance, reliability and chloraminesresistance.
FLEX TUBE DIAPHRAGM ASSEMBLY
FLEX TUBE DIAPHRAGM KIT SELECTION GUIDERegulator
Code No. Part No. Description Color
3325001 EBV-1020-A 1.6 gpf/6.0 Lpf Closet GREEN
3325003 EBV-1023-A 0.5 gpf/1.9 Lpf Urinal GREENThe EBV-1020-A Kit is supplied with multiple Flush Volume Regulators. The installer must use the correctRegulator when installing the kit.
For more Sloan parts and complete flush valves, visit: www.ChicagoFaucetShoppe.com
3.2.27
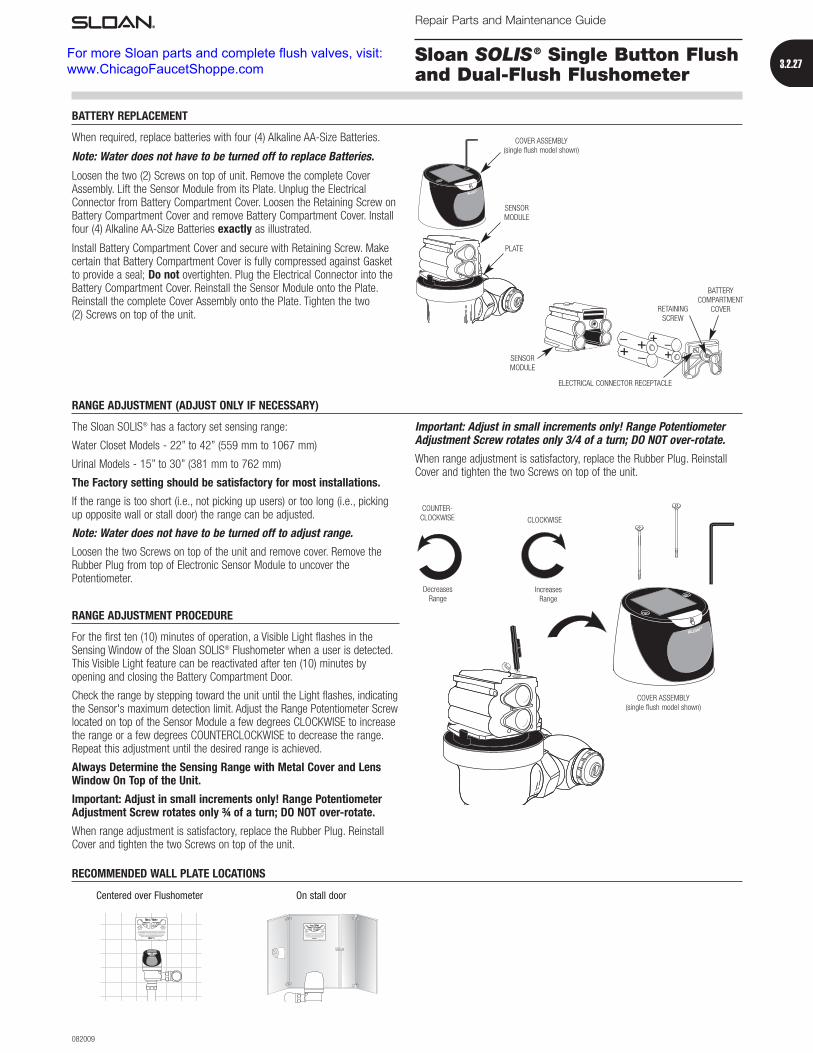
BATTERYCOMPARTMENT
COVER
ELECTRICAL CONNECTOR RECEPTACLE
SENSORMODULE
RETAININGSCREW
Sloan SOLIS® Single Button Flushand Dual-Flush Flushometer
Repair Parts and Maintenance Guide
082009
When required, replace batteries with four (4) Alkaline AA-Size Batteries.
Note: Water does not have to be turned off to replace Batteries.
Loosen the two (2) Screws on top of unit. Remove the complete CoverAssembly. Lift the Sensor Module from its Plate. Unplug the ElectricalConnector from Battery Compartment Cover. Loosen the Retaining Screw onBattery Compartment Cover and remove Battery Compartment Cover. Installfour (4) Alkaline AA-Size Batteries exactly as illustrated.
Install Battery Compartment Cover and secure with Retaining Screw. Makecertain that Battery Compartment Cover is fully compressed against Gasketto provide a seal; Do not overtighten. Plug the Electrical Connector into theBattery Compartment Cover. Reinstall the Sensor Module onto the Plate.Reinstall the complete Cover Assembly onto the Plate. Tighten the two (2) Screws on top of the unit.
The Sloan SOLIS® has a factory set sensing range:
Water Closet Models - 22” to 42” (559 mm to 1067 mm)
Urinal Models - 15” to 30” (381 mm to 762 mm)
The Factory setting should be satisfactory for most installations.
If the range is too short (i.e., not picking up users) or too long (i.e., pickingup opposite wall or stall door) the range can be adjusted.
Note: Water does not have to be turned off to adjust range.
Loosen the two Screws on top of the unit and remove cover. Remove theRubber Plug from top of Electronic Sensor Module to uncover thePotentiometer.
RANGE ADJUSTMENT PROCEDURE
For the first ten (10) minutes of operation, a Visible Light flashes in theSensing Window of the Sloan SOLIS® Flushometer when a user is detected.This Visible Light feature can be reactivated after ten (10) minutes byopening and closing the Battery Compartment Door.
Check the range by stepping toward the unit until the Light flashes, indicatingthe Sensor's maximum detection limit. Adjust the Range Potentiometer Screwlocated on top of the Sensor Module a few degrees CLOCKWISE to increasethe range or a few degrees COUNTERCLOCKWISE to decrease the range.Repeat this adjustment until the desired range is achieved.
Always Determine the Sensing Range with Metal Cover and LensWindow On Top of the Unit.
Important: Adjust in small increments only! Range PotentiometerAdjustment Screw rotates only ¾ of a turn; DO NOT over-rotate.
When range adjustment is satisfactory, replace the Rubber Plug. ReinstallCover and tighten the two Screws on top of the unit.
Important: Adjust in small increments only! Range PotentiometerAdjustment Screw rotates only 3/4 of a turn; DO NOT over-rotate.
When range adjustment is satisfactory, replace the Rubber Plug. ReinstallCover and tighten the two Screws on top of the unit.
RANGE ADJUSTMENT (ADJUST ONLY IF NECESSARY)
RECOMMENDED WALL PLATE LOCATIONS
BATTERY REPLACEMENT
Centered over Flushometer On stall door
COUNTER-CLOCKWISE CLOCKWISE
DecreasesRange
IncreasesRange
COVER ASSEMBLY(single flush model shown)
COVER ASSEMBLY(single flush model shown)
SENSORMODULE
PLATE
For more Sloan parts and complete flush valves, visit: www.ChicagoFaucetShoppe.com
3.2.28
Repair Parts and Maintenance Guide
082009
Repair Parts and Maintenance Guide
1. Sensor Flashes Continuously Only When User Steps Within Range.A. Unit in Start-Up mode; no problem. This feature is active for the first
ten (10) minutes of operation.
2. Valve Does Not Flush; Sensor Not Picking Up User.A. Range too short; increase the range.
3. Valve Does Not Flush; Sensor Picking Up Opposite Wall orSurface, or Only Flushes When Someone Walks By. Light FlashesContinuously for First 10 Minutes Even with No One in Front ofthe Sensor.A. Range too long; shorten range.
4. Valve Does Not Flush Even After Adjustment.A. Range Adjustment Potentiometer set at full “max” or full “min” setting.
Readjust Potentiometer away from full “max” or “min” setting.
B. Batteries completely used up; replace batteries.
C. Problem with Electronic Sensor Module; replace Electronic Sensor Module.
5. Unit Flashes 4 Quick Times When User Steps Within Range.A. Batteries low; replace batteries.
6. Valve Does Not Shut Off.A. Bypass Orifice in Diaphragm is clogged with dirt or debris, or Bypass is
clogged by an invisible gelatinous film due to “over-treated” water.Remove Flex Tube Diaphragm and wash under running water.
Note: Size of Orifice in the Bypass is of utmost importance for theproper metering of water by the valve. DO NOT ENLARGE OR DAMAGETHIS ORIFICE. Replace Flex Tube Diaphragm if cleaning does notcorrect the problem.
B. Dirt or debris fouling Stem or Flex Tube Diaphragm. Remove Flex TubeDiaphragm and wash under running water.
C. O-ring on Stem of Flex Tube Diaphragm is damaged or worn. Replace O-ring if necessary.
D. Problem with Electronic Sensor Module; replace Sensor Module.
7. Not Enough Water to Fixture.A. Wrong Flush Volume Regulator installed in Flex Tube Diaphragm Kit.
Install the correct Regulator (see Step 7 of these instructions).
B. Wrong Sloan SOLIS® model installed; i.e., 1 gpf. Urinal installed on 3.5 gal. Closet fixture. Replace with proper Sloan SOLIS® model.
C. Enlarged Bypass in Diaphragm. Replace Flex Tube Diaphragm.
D. Control Stop not adjusted properly. Readjust Control Stop.
E. Inadequate volume or pressure at supply. Increase water pressure orsupply (flow) to valve. Consult factory for assistance.
8. Too Much Water to Fixture.A. Wrong Flush Volume Regulator installed in Flex Tube Diaphragm Kit.
Install the correct Regulator (see Step 7 of these instructions).
B. Control Stop not adjusted properly. Readjust Control Stop.
C. Wrong Sloan SOLIS® model installed; i.e., 3 gpf. Model installed on 1.0 or 1.5 gal. Urinal fixture. Replace with proper Sloan SOLIS® mode.
D. Dirt in Diaphragm Bypass. Clean under running water or replace Flex Tube Diaphragm.
Note: The EBV-46-A Beam Deflector is not required or available forthe Sloan SOLIS®.
TROUBLESHOOTING GUIDE CARE AND CLEANING INSTRUCTIONS
DO NOT use abrasive or chemical cleaners to clean Flushometers as theymay dull the luster and attack the chrome or special decorative finishes. Use ONLY soap and water, then wipe dry with clean cloth or towel.
While cleaning the bathroom tile, the Flushometer should be protected fromany splattering of cleaner. Acids and cleaning fluids can discolor or removechrome plating.
Sloan SOLIS® Single Button Flushand Dual-Flush Flushometer
For more Sloan parts and complete flush valves, visit: www.ChicagoFaucetShoppe.com