Embed Size (px)
Citation preview

Replacing pick rollers
Paper handling
Maintenance
Troubleshooting
Administration
Index
1Printing
www.lexmark.com
Lexmark W820
The pick rollers come in a package of 15 in the maintenance kit. Replace three in each traywhen the printer issues the 80 Scheduled Maintenance message. If you don’t have a highcapacity feeder, you will have nine pick rollers left over from the package.
A pick roller transports the paper from an input tray to the paper path.
Removing old pick rollers1 Remove trays 1 and 2 from the printer, and trays 3 and 4 from the optional high
capacity input feeder if it is installed. See the following topics to complete this step:
• Behind trays 1, 2, and 3
• Behind Tray 4
2 Set all trays aside.
3 Open tray 5 completely.
Note: The following illustrations show the process of removing old pick rollers;however, the illustrations do not show all the trays removed. Focus on theremoval of the pick rollers. Ignore the trays still in the illustrations.
Replacing pick rollers
Paper handling
Maintenance
Troubleshooting
Administration
Index
2Printing
www.lexmark.com
Lexmark W820
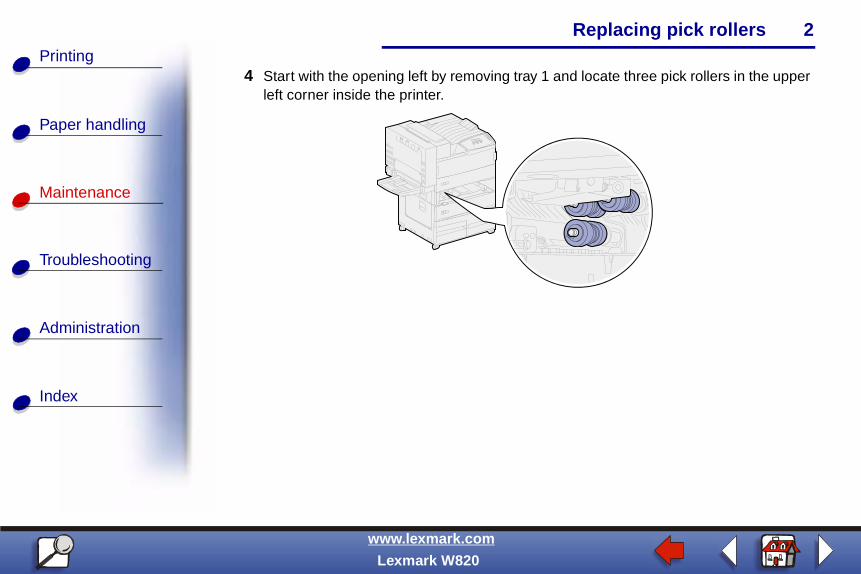
4 Start with the opening left by removing tray 1 and locate three pick rollers in the upperleft corner inside the printer.

Replacing pick rollers
Paper handling
Maintenance
Troubleshooting
Administration
Index
3Printing
www.lexmark.com
Lexmark W820
5 Turn the bottom pick roller counterclockwise until you see the small tab on the end.
6 Push the tab away from the metal bar.
7 Pull the pick roller straight out.

Replacing pick rollers
Paper handling
Maintenance
Troubleshooting
Administration
Index
4Printing
www.lexmark.com
Lexmark W820
8 Locate the spring-loaded metal plate in front of the two top pick rollers.
9 Pull the metal plate down and to the right. Hold it in place.
Replacing pick rollers
Paper handling
Maintenance
Troubleshooting
Administration
Index
5Printing
www.lexmark.com
Lexmark W820
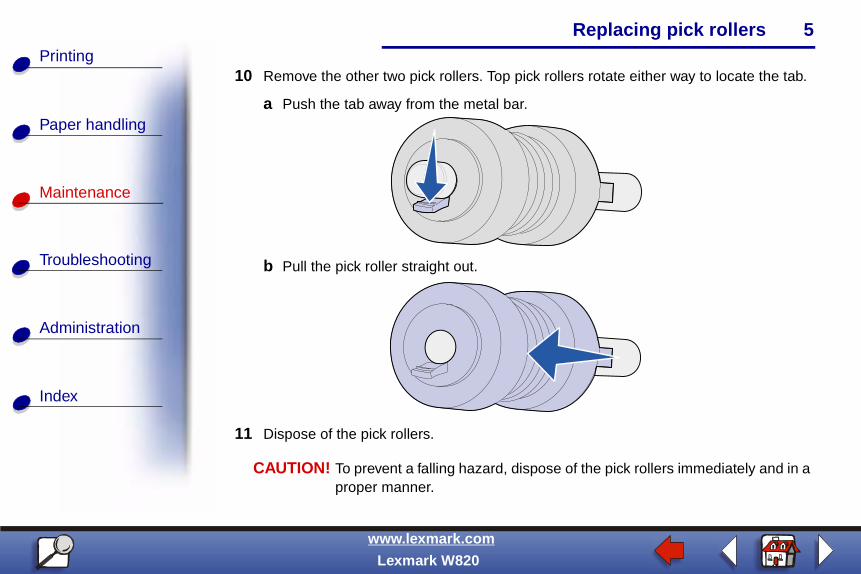
10 Remove the other two pick rollers. Top pick rollers rotate either way to locate the tab.
a Push the tab away from the metal bar.
b Pull the pick roller straight out.
11 Dispose of the pick rollers.
CAUTION! To prevent a falling hazard, dispose of the pick rollers immediately and in aproper manner.
Replacing pick rollers
Paper handling
Maintenance
Troubleshooting
Administration
Index
6Printing
www.lexmark.com
Lexmark W820
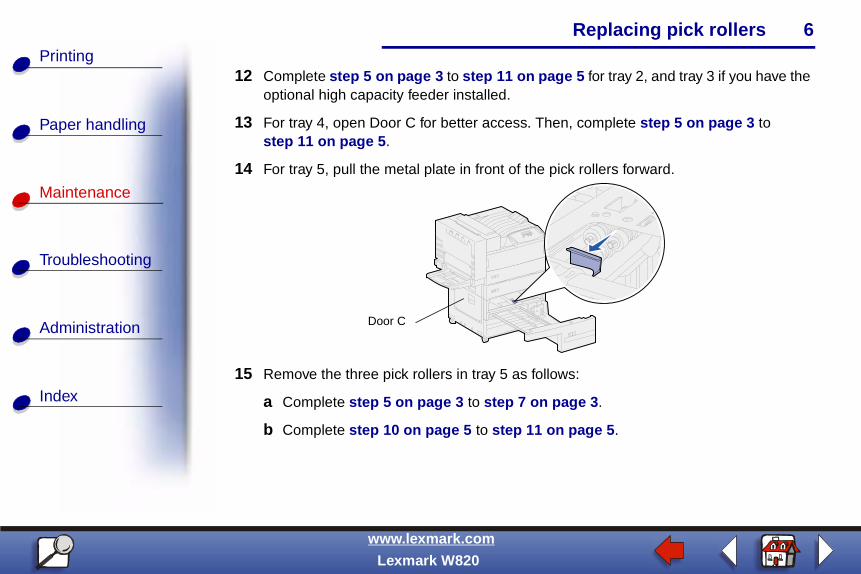
12 Complete step 5 on page 3 to step 11 on page 5 for tray 2, and tray 3 if you have theoptional high capacity feeder installed.
13 For tray 4, open Door C for better access. Then, complete step 5 on page 3 tostep 11 on page 5.
14 For tray 5, pull the metal plate in front of the pick rollers forward.
15 Remove the three pick rollers in tray 5 as follows:
a Complete step 5 on page 3 to step 7 on page 3.
b Complete step 10 on page 5 to step 11 on page 5.
Door C

Replacing pick rollers
Paper handling
Maintenance
Troubleshooting
Administration
Index
7Printing
www.lexmark.com
Lexmark W820
Installing new pick rollers1 Remove the packaging from the new pick rollers.
Note: Complete the following steps for trays 1 and 2, and for trays 3 and 4 if youhave the optional high capacity feeder installed.

Replacing pick rollers
Paper handling
Maintenance
Troubleshooting
Administration
Index
8Printing
www.lexmark.com
Lexmark W820
2 Pull the spring-loaded metal plate down and to the right. Hold it in place.

Replacing pick rollers
Paper handling
Maintenance
Troubleshooting
Administration
Index
9Printing
www.lexmark.com
Lexmark W820
3 Install the top left pick roller:
a Slide the pick roller onto the metal bar until it snaps into place.
b Pull the pick roller gently to see if it is attached. If it pulls loose, then push it back onand turn it clockwise.
4 Repeat the instructions for step 3 to install the top right pick roller.

Replacing pick rollers
Paper handling
Maintenance
Troubleshooting
Administration
Index
10Printing
www.lexmark.com
Lexmark W820
5 Release the metal plate.
6 Slide the bottom pick roller onto its metal bar until it snaps into place.
7 Pull the pick roller gently to see if it is attached. If it pulls loose, then push it back onand turn it counterclockwise.

Replacing pick rollers
Paper handling
Maintenance
Troubleshooting
Administration
Index
11Printing
www.lexmark.com
Lexmark W820
8 For tray 5, pull the metal plate toward you. See step 14 on page 6 for an illustration.
9 Install the top right pick roller:
a Slide the pick roller onto the metal bar until it snaps into place.
b Pull the pick roller gently to see if it is attached. If it pulls loose, then push it back onand turn it clockwise.

Replacing pick rollers
Paper handling
Maintenance
Troubleshooting
Administration
Index
12Printing
www.lexmark.com
Lexmark W820
10 Repeat the instructions for step 9 on page 11 to install the top left pick roller.
11 Slide the bottom pick roller onto its metal bar until it snaps into place.
12 Pull the pick roller gently to see if it is attached. If it pulls loose, then push it back onand turn it counterclockwise.
Replacing pick rollers
Paper handling
Maintenance
Troubleshooting
Administration
Index
13Printing
www.lexmark.com
Lexmark W820
Closing up1 Reinstall trays 1, 2, and 3. See step 5 of Behind trays 1, 2, and 3 or more
information.
2 Reinstall tray 4. See step 6 of Behind Tray 4 for more information.
3 Close tray 5. The action of closing the tray forces the metal plate back into place.
4 If you have already replaced all the items listed in the following note, you may turn theprinter on.
Note: Make sure you also follow the instructions in Replacing the fuser,Replacing the transfer roller, Cleaning the wiper blade, andResetting the maintenance page counter. �