Embed Size (px)
Citation preview

Report on Installation of
Truncated Dome Products in Burlington, Vermont
May 2004
Report Prepared by:
Jon Kaplan, P.E. Local Transportation Facilities
Vermont Agency of Transportation 1 National Life Drive, Drawer 33
Montpelier, VT 05633 (802) 828-0059
VTrans pilot installation of detectable warnings – Summer/Fall 2003 5/14/2004
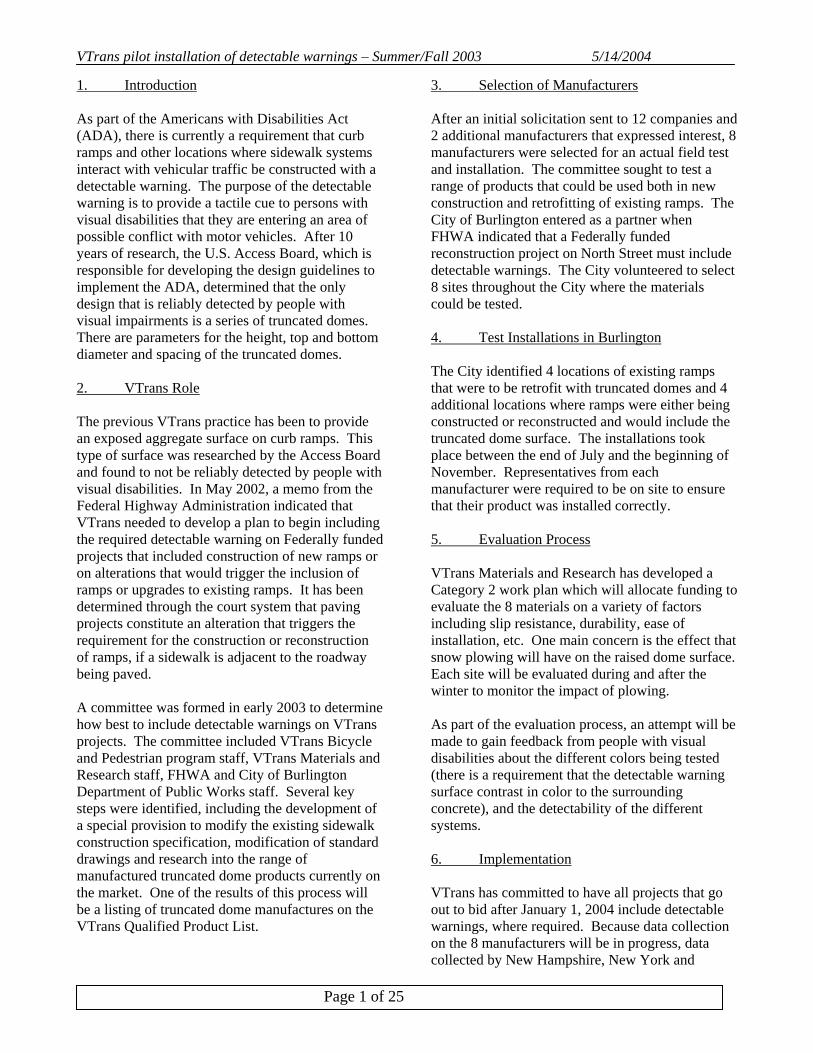
1. Introduction As part of the Americans with Disabilities Act (ADA), there is currently a requirement that curb ramps and other locations where sidewalk systems interact with vehicular traffic be constructed with a detectable warning. The purpose of the detectable warning is to provide a tactile cue to persons with visual disabilities that they are entering an area of possible conflict with motor vehicles. After 10 years of research, the U.S. Access Board, which is responsible for developing the design guidelines to implement the ADA, determined that the only design that is reliably detected by people with visual impairments is a series of truncated domes. There are parameters for the height, top and bottom diameter and spacing of the truncated domes. 2. VTrans Role The previous VTrans practice has been to provide an exposed aggregate surface on curb ramps. This type of surface was researched by the Access Board and found to not be reliably detected by people with visual disabilities. In May 2002, a memo from the Federal Highway Administration indicated that VTrans needed to develop a plan to begin including the required detectable warning on Federally funded projects that included construction of new ramps or on alterations that would trigger the inclusion of ramps or upgrades to existing ramps. It has been determined through the court system that paving projects constitute an alteration that triggers the requirement for the construction or reconstruction of ramps, if a sidewalk is adjacent to the roadway being paved. A committee was formed in early 2003 to determine how best to include detectable warnings on VTrans projects. The committee included VTrans Bicycle and Pedestrian program staff, VTrans Materials and Research staff, FHWA and City of Burlington Department of Public Works staff. Several key steps were identified, including the development of a special provision to modify the existing sidewalk construction specification, modification of standard drawings and research into the range of manufactured truncated dome products currently on the market. One of the results of this process will be a listing of truncated dome manufactures on the VTrans Qualified Product List.
3. Selection of Manufacturers After an initial solicitation sent to 12 companies and 2 additional manufacturers that expressed interest, 8 manufacturers were selected for an actual field test and installation. The committee sought to test a range of products that could be used both in new construction and retrofitting of existing ramps. The City of Burlington entered as a partner when FHWA indicated that a Federally funded reconstruction project on North Street must include detectable warnings. The City volunteered to select 8 sites throughout the City where the materials could be tested. 4. Test Installations in Burlington The City identified 4 locations of existing ramps that were to be retrofit with truncated domes and 4 additional locations where ramps were either being constructed or reconstructed and would include the truncated dome surface. The installations took place between the end of July and the beginning of November. Representatives from each manufacturer were required to be on site to ensure that their product was installed correctly. 5. Evaluation Process VTrans Materials and Research has developed a Category 2 work plan which will allocate funding to evaluate the 8 materials on a variety of factors including slip resistance, durability, ease of installation, etc. One main concern is the effect that snow plowing will have on the raised dome surface. Each site will be evaluated during and after the winter to monitor the impact of plowing. As part of the evaluation process, an attempt will be made to gain feedback from people with visual disabilities about the different colors being tested (there is a requirement that the detectable warning surface contrast in color to the surrounding concrete), and the detectability of the different systems. 6. Implementation VTrans has committed to have all projects that go out to bid after January 1, 2004 include detectable warnings, where required. Because data collection on the 8 manufacturers will be in progress, data collected by New Hampshire, New York and
Page 1 of 25

VTrans pilot installation of detectable warnings – Summer/Fall 2003 5/14/2004
Wisconsin will be used to develop an interim list of “approved” products. The special provision and standard drawings will be complete. 7. Products to be Tested The products to be tested and the test sites are as follows: Tilco-Vanguard Intersection of Faith St. and James Ave. Strongwall Industries – Strongwarn Intersection of Birchcliff Parkway and Alder Lane Cote-L Industries – Safti-Trax Plastic Sheet Intersection of College St. and Champlain St. ADA Tactile Systems – Composite Inline Dome Tile St. Paul Street just south of Maple St. Transpo Industries – StepSafe Tiles Intersection of Heineberg Road and Poirier Place Engineered Plastics, Inc. – Armor-Tile Cast in Place panels Intersection of Heineberg Road and Arlington Court Mexcon, Inc. – Detecto-Tile Intersection of Elmwood Avenue and Grant Street Cote-L Industries – Safti-Trax Mats Intersection of Pine Street and Lakeside Avenue
Page 2 of 25

VTrans pilot installation of detectable warnings – Summer/Fall 2003 5/14/2004
The first test installation occurred on July 30, 2003. The manufacturer is Tilco-Vanguard from Snohomish, Washington. This manufacturer requires that a licensed applicator install their product. The following photos and text illustrate and describe the installation process for this product.
1. The ramp area is masked off in preparation for application of sealer.
2. A two-part epoxy sealer is rolled over the entire ramp area. After the sealer is applied, glass beads are hand spread to provide some mechanical bonding between sealer and base coat. The sealer then must dry completely – 3 ½ to 5 hours drying time.
3. Sealed ramp after drying
4. The base coat is thinned by mixing in a
reducer. Once the catalyst is mixed in, the material must be applied within 3-7 minutes.
5. Some thicker base material is used to fill in low spots.
Page 3 of 25

VTrans pilot installation of detectable warnings – Summer/Fall 2003 5/14/2004
6. After allowing the low spot patches to dry (30 min. – 1 hour), base coat is applied over the entire ramp surface and allowed to dry 30 min. – 1 hour.
7. After the base coat is dry, the masking tape is removed and the rubber mats are laid out to achieve correct coverage.
8. Curved ramp presents somewhat of a challenge to layout the mats.
9. Mats are ready for application of the dome material.
10. A squeegee is used to place the dome material in the dome mold mats.
Page 4 of 25

VTrans pilot installation of detectable warnings – Summer/Fall 2003 5/14/2004
11. As soon as all holes in a mat are filled, the mat is rolled up, leaving the domes on the underlying base coat.
12. Ramp is almost complete. The catalyst causes the domes to dry and harden in about 20 – 30 minutes.
13. Note that there is some inconsistency in the
finished domes.
14. As the domes are drying, the ramp area is masked off once again for a final top coat of thinned base material to ensure uniform color and slip resistance.
15. The final top coat is rolled on.
16. Finished ramp
Page 5 of 25

VTrans pilot installation of detectable warnings – Summer/Fall 2003 5/14/2004
17. Finished ramp around the whole corner radius.
18. Vanguard installer’s trailer and equipment. The new ramps will be open to foot traffic the next day.
Page 6 of 25

VTrans pilot installation of detectable warnings – Summer/Fall 2003 5/14/2004
The second test installation occurred on August 27, 2003. The manufacturer is Strongwall Industries from Ridgewood, New Jersey. This manufacturer sells or leases the rubber mats to contractors who will be doing the installation. Contractors also buy the materials from Strongwall and receive installation training from them. The following photos and text illustrate and describe the installation process for this product. Prior to initiation of the product installation, the existing ramps were pressure washed to remove debris and dirt from their surface.
1. Existing exposed aggregate surface ramp after pressure washing. The first step in the installation is that the ramp surface is wet down with water. The water helps the resin in the dome material bond to the existing concrete through capillary action.
2. The bottom of the mats are sprayed with mineral spirits to keep the dome material from sticking to the mat.
3. The structural repair mortar material is mixed prior to application.
4. Close-up view of dome holes in the mats.
5. Mats are laid out on the ramp.
Page 7 of 25

VTrans pilot installation of detectable warnings – Summer/Fall 2003 5/14/2004
6. Dome material is poured over mats and troweled into the holes.
7. Once the dome holes are filled with material, excess is scraped off and the mats are left in place for approximately 1 ½ hours to let the material cure and bond to the underlying surface.
8. After curing, the mats are lifted off the ramps. Some of the domes stuck to the mat and were lifted off with the mat. To correct this, the mat was repositioned and dome material was re-applied where domes were missing. The mats are simply pressure washed to prepare them for their next use.
9. The manufacturer’s representative indicated that a longer curing time may have prevented the domes from being pulled up. It is possible to use a two-part epoxy to adhere broken domes to the ramp surface.
10. The domes are washed down and the ramp
surface allowed to dry.
Page 8 of 25

VTrans pilot installation of detectable warnings – Summer/Fall 2003 5/14/2004
11. The detectable warning area is masked off in preparation for the top coats of material.
12. The detectable warning “field” is created with hydraulic cement consisting of a vinyl copolymer and fine aggregate which is rolled over the domes.
13. The first top coat is allowed to dry for 30 minutes to 1 hour and the area is re-masked.
14. The top coat consists of a resin color which is similar to the hydraulic cement except that no aggregate is included. The final coat dries for approximately 2 hours.
15. Once the top coat is dry, the ramp is ready to accept foot traffic the next morning. Because the domes are a concrete product, they will gain their full strength in 28 days.
Page 9 of 25
VTrans pilot installation of detectable warnings – Summer/Fall 2003 5/14/2004
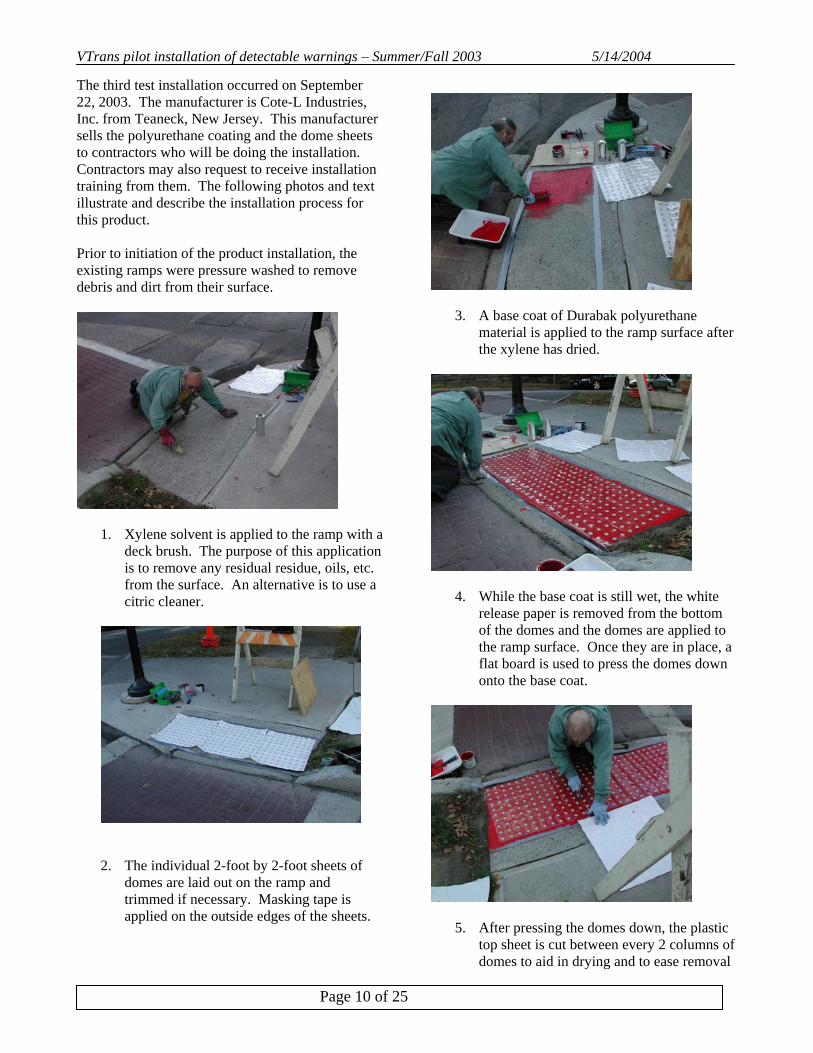
The third test installation occurred on September 22, 2003. The manufacturer is Cote-L Industries, Inc. from Teaneck, New Jersey. This manufacturer sells the polyurethane coating and the dome sheets to contractors who will be doing the installation. Contractors may also request to receive installation training from them. The following photos and text illustrate and describe the installation process for this product. Prior to initiation of the product installation, the existing ramps were pressure washed to remove debris and dirt from their surface.
1. Xylene solvent is applied to the ramp with a deck brush. The purpose of this application is to remove any residual residue, oils, etc. from the surface. An alternative is to use a citric cleaner.
2. The individual 2-foot by 2-foot sheets of domes are laid out on the ramp and trimmed if necessary. Masking tape is applied on the outside edges of the sheets.
3. A base coat of Durabak polyurethane material is applied to the ramp surface after the xylene has dried.
4. While the base coat is still wet, the white release paper is removed from the bottom of the domes and the domes are applied to the ramp surface. Once they are in place, a flat board is used to press the domes down onto the base coat.
5. After pressing the domes down, the plastic top sheet is cut between every 2 columns of domes to aid in drying and to ease removal
Page 10 of 25

VTrans pilot installation of detectable warnings – Summer/Fall 2003 5/14/2004
of the top sheet when the base coat is dry. The approximate drying time is 1-2 hours.
6. Once the base coat has dried, the plastic top sheet is removed. Individual domes may pull up at this point and they are simply reapplied with a small amount of Durabak on the bottom.
7. Odd shaped ramps are easily accommodated by cutting the appropriate shape from the sheets of domes.
8. The top coat of polyurethane Durabak is
mixed prior to application with a roller. A foam cell roller with a plastic core is
required because the xylene that is present in the Durabak will melt the adhesive in a regular paper core roller.
9. The first top coat is applied with a 4 inch
roller to allow for good coverage over and between the domes.
10. After the first top coat is complete, it must dry for 30 minutes to 1 hour. Durabak is a moisture cured product, therefore higher humidity results in a faster drying time.
11. A second top coat is applied with a dry time of 30 minutes to 1 hour.
Page 11 of 25

VTrans pilot installation of detectable warnings – Summer/Fall 2003 5/14/2004
12. A third and final top coat is applied, mostly to give a consistent color to the detectable warning field. Durabak contains recycled rubber tire grit to aid with slip resistance.
13. Once the final coat has dried, the masking tape can be removed. The final coat should dry from 6 to 12 hours before being opened to foot traffic.
Note: The installation of this product on the two ramps across College Street at Champlain St. in Burlington was conducted on an exposed aggregate surface. This is not a recommended application for this product, as it is difficult for the individual dome bases to make adequate contact with the underlying surface. Quite a number of domes had to be hand applied after the plastic top sheet was pulled up. However, the manufacturer’s representative was confident that a good quality installation was achieved.
Page 12 of 25
VTrans pilot installation of detectable warnings – Summer/Fall 2003 5/14/2004
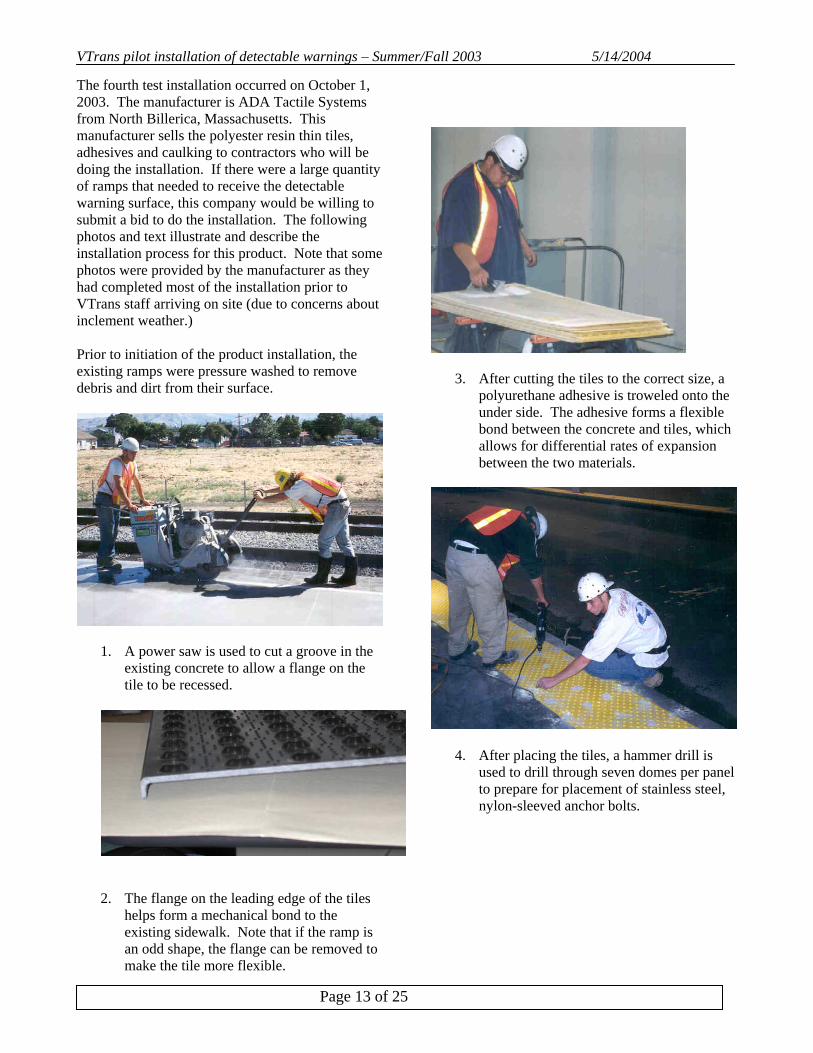
The fourth test installation occurred on October 1, 2003. The manufacturer is ADA Tactile Systems from North Billerica, Massachusetts. This manufacturer sells the polyester resin thin tiles, adhesives and caulking to contractors who will be doing the installation. If there were a large quantity of ramps that needed to receive the detectable warning surface, this company would be willing to submit a bid to do the installation. The following photos and text illustrate and describe the installation process for this product. Note that some photos were provided by the manufacturer as they had completed most of the installation prior to VTrans staff arriving on site (due to concerns about inclement weather.) Prior to initiation of the product installation, the existing ramps were pressure washed to remove debris and dirt from their surface.
1. A power saw is used to cut a groove in the existing concrete to allow a flange on the tile to be recessed.
2. The flange on the leading edge of the tiles helps form a mechanical bond to the existing sidewalk. Note that if the ramp is an odd shape, the flange can be removed to make the tile more flexible.
3. After cutting the tiles to the correct size, a polyurethane adhesive is troweled onto the under side. The adhesive forms a flexible bond between the concrete and tiles, which allows for differential rates of expansion between the two materials.
4. After placing the tiles, a hammer drill is used to drill through seven domes per panel to prepare for placement of stainless steel, nylon-sleeved anchor bolts.
Page 13 of 25

VTrans pilot installation of detectable warnings – Summer/Fall 2003 5/14/2004
5. Anchor bolts.
6. After hammering in the anchor bolts, caulking is placed around the edge of the detectable warning area.
7. Finished ramp. Although the ramp is able to withstand foot traffic immediately, the caulking takes up to 3 hours to dry, depending on weather conditions. This product is easily removable, if repairs or replacement become necessary. Heat is applied
to a tile, which loosens the adhesive and allows the tile to be removed with a flat bladed shovel.
Page 14 of 25

VTrans pilot installation of detectable warnings – Summer/Fall 2003 5/14/2004
The fifth test installation occurred on October 3, 2003. The manufacturer is Transpo Industries, Inc. from New Rochelle, NY. This manufacturer sells the polymer concrete tiles to contractors who will be doing the installation. This product is intended for installation in “green” concrete on a new or replacement curb ramp. The following photos and text illustrate and describe the installation process for this product. Prior to initiation of the product installation, the existing ramps were removed and concrete forms placed as would normally be done for a typical sidewalk curb ramp. No special forms or treatment are necessary.
1. After pouring the concrete, the ramp surface is rough finished prior to installing the detectable warning tiles.
2. To fit the size of the ramp, a concrete saw is used to cut tiles to the correct dimension.
3. The wet concrete is marked to correctly locate the detectable warning tiles.
4. The underside of the tiles have coarse sand bonded to it. The sand helps form a bond with the fresh concrete.
Page 15 of 25

VTrans pilot installation of detectable warnings – Summer/Fall 2003 5/14/2004
5. As the tiles are laid into place, they are pressed down into the wet concrete by hand. Each tile is wiggled to help eliminate any air pockets underneath. A rubber mallet could be used to tamp tiles down as well. A trowel is used to remove excess concrete as the tiles are placed.
6. After all the tiles are in place, the concrete is floated up to the edge of the tiles.
7. Finished tile installation. After the tiles are all in place, normal finishing of the ramp, including a broom finish, is completed.
8. One week after installation, the ramp is ready for use. Note that the adjacent material has only a broom finish adjacent to the detectable warning.
The entire ramp is allowed to cure prior to allowing foot traffic.
Page 16 of 25

VTrans pilot installation of detectable warnings – Summer/Fall 2003 5/14/2004
The sixth test installation occurred on October 9, 2003. The manufacturer is Engineered Plastics, Inc. from Williamsville, NY. The trade name for their detectable warning product is Armor-Tile. This manufacturer sells the fiberglass tiles to contractors who will be doing the installation. This product is intended for installation in “green” concrete on a new or replacement curb ramp. The following photos and text illustrate and describe the installation process for this product. Prior to initiation of the product installation, the existing ramps were removed and concrete forms placed as would normally be done for a typical sidewalk curb ramp. No special forms or treatment are necessary. The Armor-Tile tiles are available in 2 or 3 foot depths and variable lengths to match the width of the ramp being treated. In this case 2-foot by 5-foot tiles were provided.
1. The underside of the tiles have a series of flanges with holes in them. The holes are intended to allow concrete to form a key with the tile.
2. The tiles come with a layer of plastic over the surface to protect it from concrete splatters during installation.
3. After the concrete is poured, it is screeded prior to placement of the tiles.
4. Tiles are positioned on the wet concrete ramp surface.
5. A rubber mallet is used to embed the tile flanges into the wet concrete.
Page 17 of 25

VTrans pilot installation of detectable warnings – Summer/Fall 2003 5/14/2004
6. Tiles are embedded so that the flat surface is roughly at the same grade as the ramp. Their position can be “fine tuned” as the ramp surface receives finishing
7. Weight is placed on the tiles as needed to adjust their position while the remainder of the ramp surface is finished.
8. One week after installation, the ramp is ready for use. Note that the adjacent
material has only a broom finish adjacent to the detectable warning.
The entire ramp is allowed to cure prior to allowing foot traffic.
Page 18 of 25

VTrans pilot installation of detectable warnings – Summer/Fall 2003 5/14/2004
The seventh test installation occurred on October 17, 2003. The manufacturer is Mexcon, Inc. from Worcester, NY and the name of their product is Detecto-Tile. This manufacturer sells the precast concrete tiles to contractors who will be doing the installation. This product is intended for installation in “green” concrete on a new or replacement curb ramp. The following photos and text illustrate and describe the installation process for this product. Prior to initiation of the product installation, the existing ramps were removed and concrete forms placed as would normally be done for a typical sidewalk curb ramp. No special forms or treatment are necessary.
1. Before the concrete is poured, the tiles are laid out and marked for cutting to accommodate the curb radius.
2. A concrete saw is used to cut tiles.
3. After cutting, the underside of the tiles is coated with Weldcrete, a product intended to aid in bonding cured concrete to wet concrete. The coating can take place as much as 24 hours ahead of placement.
4. The underside of the tiles have grooves to help form a bond with the fresh concrete.
5. After pouring, the ramps are floated and allowed to set up for 30 to 45 minutes.
Page 19 of 25

VTrans pilot installation of detectable warnings – Summer/Fall 2003 5/14/2004
6. Once the concrete starts to set up, the area where the tiles will be placed is measured and marked out with a 1 inch deep edger.
7. Using the markings, the area for the detectable warning is scraped out about 1 inch deep.
8. After scraping out the tile area, the concrete is floated to provide a smooth, relatively even receiving surface.
9. Tiles are then placed in the depression.
10. Tiles are arranged to parallel the radius of the curb and the edges of the domes are used to align the tiles so all domes are in line with each other.
11. Adjacent concrete is then finished right up to the edge of the tiles.
Page 20 of 25

VTrans pilot installation of detectable warnings – Summer/Fall 2003 5/14/2004
12. The rest of the ramp is finished in the normal fashion, including a broom finish perpendicular to the line of pedestrian travel. The tiles have a protective coating that will allow any concrete spatters to be cleaned off with a wet sponge.
13. Ramps are open to pedestrian traffic once concrete has hardened.
Page 21 of 25

VTrans pilot installation of detectable warnings – Summer/Fall 2003 5/14/2004
The eighth test installation occurred on November 3, 2003. The manufacturer is Cote-L Industries, Inc. from Teaneck, NJ and the name of their product is Safti-Trax Mats. This manufacturer sells the polyurethane mats and adhesive to contractors who will be doing the installation. This product is intended for installation on cured concrete on a new or existing curb ramp. The following photos and text illustrate and describe the installation process for this product.
1. After cleaning off the ramp area, the 2 foot by 2 foot mats are laid out to determine their optimum placement.
2. Once the final mat location is
determined, the area around the mats is masked off with duct tape.
3. Construction adhesive is applied with a
caulking gun to the ramp at the rate specified by the manufacturer.
4. Adhesive is spread with a notched
trowel.
5. Mats are placed and pressure is applied
with a 1 foot square piece of plywood. The edge of the board is used to apply pressure in between rows of domes.
Page 22 of 25

VTrans pilot installation of detectable warnings – Summer/Fall 2003 5/14/2004
6. The adhesive is evenly spread over the
entire underlying concrete surface.
7. Pressure is applied to the domes with
the flat board.
8. Special care is taken to apply pressure
around the edges of each mat.
9. The masking tape is removed and the
adhesive is allowed to set up overnight before opening the ramp to foot traffic.
Page 23 of 25

VTrans pilot installation of detectable warnings – Summer/Fall 2003 5/14/2004
Installation Summary and Overview In general, none of the truncated dome products that were installed posed any particular difficulty for the installers or the contractors. For the products that were retrofit onto existing ramps, the manufacturers were notified ahead of time that the existing ramp surface was exposed aggregate. None of those manufacturers expressed concern about how this would affect their products performance. However, the uneven nature of that surface did create some challenges during installation. As can be seen in the table below, the ease of installation/time of installation varied considerably among the products. Retrofit Products Product Approx.
Square Feet Total Installation Time
Comments
Tilco-Vanguard 50 9 Hours Must be installed by licensed installer. Strong solvents/chemicals used to create product on site. Fair amount of wasted product resulted – difficult to gauge exact amount needed per ramp. Labor intensive.
Strongwall 20 8 Hours Lengthy process with significant drying time between steps. Requires pressurized water on site. Fair amount of wasted product resulted – difficult to gauge exact amount needed per ramp. Labor intensive.
Cote-L Plastic Sheets 20 8 Hours Lengthy process with significant drying time between steps. Difficult to apply domes on uneven surface.
Cote-L Safti-Trax Mats 10 2 Hours Straightforward installation process. Easy to conform mats to uneven surfaces and ramp shapes.
ADA Tactile Systems 20 ½ Hour Very easy and quick installation process. Very little wasted material. Open to foot traffic immediately.
Products Intended for Installation on new ramps Product Approx.
Square Feet Total Installation Time*
Comments
Step Safe Tiles/ Transpo 20 1 Hour Tiles are easily cut with a concrete saw. Takes some effort to mark out tile area and press tiles into place.
Armor Tile/Engineered Plastics
20 ½ Hour One piece panels make installation very quick.
Detecto-Tile/Mexcon 30 1 ½ Hours Tiles are easily cut with a concrete saw. Moderate effort to scrape out and shape recess in concrete for placement of tiles.
*Installation time does not include setting forms, pouring concrete and finishing of concrete.
Page 24 of 25
VTrans pilot installation of detectable warnings – Summer/Fall 2003 5/14/2004
Conclusion After installation, all of the products provided consistent detectable warning surfaces in terms of contrasting color, dome placement and detectability. A key factor in determining which products will work well in Vermont is how the products retain the required surface features after being exposed to regular winter maintenance practices. A follow up report will summarize product performance during and after winter maintenance.
Page 25 of 25