Embed Size (px)
Citation preview

Reporting 8.1
Deployment Guide

The information contained herein is proprietary and confidential and cannot be disclosed or duplicated without the prior written consent of Genesys Telecommunications Laboratories, Inc.
Copyright © 2001–2015 Genesys Telecommunications Laboratories, Inc. All rights reserved.
About GenesysGenesys is the world's leading provider of customer service and contact center software—with more than 4,000 customers in 80 countries. Drawing on its more than 20 years of customer service innovation and experience, Genesys is uniquely positioned to help companies bring their people, insights and customer channels together to effectively drive today’s customer conversation. Genesys software directs more than 100 million interactions every day, maximizing the value of customer engagement and differentiating the experience by driving personalization and multi-channel customer service—and extending customer service across the enterprise to optimize processes and the performance of customer-facing employees. Go to www.genesys.com for more information.
Each product has its own documentation for online viewing at the Genesys Customer Care website or on the Documentation Library DVD, which is available from Genesys upon request. For more information, contact your sales representative.
NoticeAlthough reasonable effort is made to ensure that the information in this document is complete and accurate at the time of release, Genesys Telecommunications Laboratories, Inc., cannot assume responsibility for any existing errors. Changes and/or corrections to the information contained in this document may be incorporated in future versions.
Your Responsibility for Your System’s SecurityYou are responsible for the security of your system. Product administration to prevent unauthorized use is your responsibility. Your system administrator should read all documents provided with this product to fully understand the features available that reduce your risk of incurring charges for unlicensed use of Genesys products.
TrademarksGenesys and the Genesys logo are registered trademarks of Genesys Telecommunications Laboratories, Inc. All other company names and logos may be trademarks or registered trademarks of their respective holders.
The Crystal monospace font is used by permission of Software Renovation Corporation, www.SoftwareRenovation.com.
Technical Support from VARsIf you have purchased support from a value-added reseller (VAR), please contact the VAR for technical support.
Customer Care from GenesysIf you have purchased support directly from Genesys, please contact Genesys Customer Care. Before contacting Customer Care, please refer to the Genesys Care Program Guide for complete contact information and procedures.
Ordering and Licensing InformationComplete information on ordering and licensing Genesys products can be found in the Genesys Licensing Guide.
Released by
Genesys Telecommunications Laboratories, Inc. www.genesys.com
Document Version: 81rt_dep_11-2015_v8.1.001.00-B

Deployment Guide 3
Table of Contents
Preface ................................................................................................................... 7
Intended Audience..................................................................................... 8Making Comments on This Document ...................................................... 8Contacting Genesys Customer Care......................................................... 8Document Change History ........................................................................ 8
Chapter 1 Reporting Overview................................................................................ 9
What Is Reporting?.................................................................................... 9Reporting Architecture............................................................................. 10
The Reporting Services ...................................................................... 11New In This Release ............................................................................... 21
Chapter 2 Predeployment Measures.................................................................... 23
Prerequisites for Each Reporting Component ......................................... 24Data Sourcer....................................................................................... 24Data Modeling Assistant ..................................................................... 24Data Mart/ETL Runtime ...................................................................... 25Crystal Reports Suite.......................................................................... 25CCPulse+ ........................................................................................... 25
Preparing the Databases ........................................................................ 25Supported RDBMSs ........................................................................... 26Calculating Database Capacity........................................................... 26Calculating the Number of Threads .................................................... 27Preparing Your Database Environment .............................................. 27Estimating ODS Size .......................................................................... 29Estimating Data Mart Size .................................................................. 33
Distributed Architecture ........................................................................... 36Calculating the Number of Collection Units ............................................. 36
Chapter 3 High-Availability Architecture ............................................................. 39
Overview.................................................................................................. 39Planning Considerations.......................................................................... 40

Table of Contents
4 Reporting 8.1
HA Architecture ....................................................................................... 41Primary and Backup Data Sourcer Applications...................................... 42
Hot Standby Mode .............................................................................. 42Deployment ............................................................................................. 43
Configuring the Data Sourcer Application Object ............................... 43Modifying Your Primary Data Sourcer Application Properties
for High Availability ......................................................................... 43Modifying Your Stat Server Application Object for High Availability.... 44
Chapter 4 Installing Historical Reporting Components ..................................... 45
Installing Data Sourcer ............................................................................ 46Installing Data Sourcer on Windows Platforms................................... 48Installing Data Sourcer on UNIX Platforms......................................... 49
Installing Data Modeling Assistant........................................................... 50Installing Data Mart.................................................................................. 51
Installing Data Mart on Windows Platforms ........................................ 53Installing Data Mart on UNIX Platforms .............................................. 55
Chapter 5 Setting Up Historical Reporting .......................................................... 57
Initializing the Data Mart .......................................................................... 57Specifying ETL Service Starter Processes.............................................. 59Deploying ETL Runtime Using DB2 v8+ ................................................. 59Assigning Start-Up Priorities.................................................................... 60
Chapter 6 Starting and Stopping Historical Reporting....................................... 61
Starting and Stopping DMA..................................................................... 61What Must Be Running Prior to Start.................................................. 61Starting DMA on Windows Platforms.................................................. 62Stopping DMA..................................................................................... 64
Starting and Stopping Data Sourcer........................................................ 64What Must Be Running Prior to Start.................................................. 64Starting Data Sourcer from the Solution Control Interface ................. 65Starting Data Sourcer from Windows Platforms ................................. 66Manually Starting Data Sourcer from UNIX Platforms........................ 67Stopping Data Sourcer on Windows Platforms................................... 68Stopping Data Sourcer on UNIX Platforms......................................... 69
Starting and Stopping ETL Assistant....................................................... 69What Must Be Running Prior to Start.................................................. 69Starting ETL Assistant ........................................................................ 70Stopping ETL Assistant ...................................................................... 70
Starting and Stopping ETL Runtime ........................................................ 70What Must Be Running Prior to Start.................................................. 71
Deployment Guide 5
Table of Contents
Starting ETL Runtime Starter from SCI .............................................. 71Starting ETL Runtime Starter from Windows Platforms...................... 71Starting ETL Runtime Starter from UNIX Platforms............................ 73Starting the ETL Runtime Modules Individually .................................. 74Stopping ETL Runtime Starter on Windows Platforms ....................... 75Stopping ETL Runtime Starter on UNIX Platforms ............................. 76
Default Source Path ................................................................................ 76
Chapter 7 Installing Real-Time Reporting............................................................ 77
Chapter 8 Setting Up Real-Time Reporting Users .............................................. 79
Setting Up Users ..................................................................................... 79Setting Up Administrators........................................................................ 80
Chapter 9 Starting and Stopping Real-Time Reporting...................................... 81
Starting and Stopping CCPulse+............................................................. 81What Must Be Running Prior to Start.................................................. 81Starting CCPulse+ .............................................................................. 82Stopping CCPulse+ ............................................................................ 82
Default Source Paths............................................................................... 83
Chapter 10 Uninstalling Reporting Components .................................................. 85
Uninstalling Data Modeling Assistant ...................................................... 85Uninstalling Data Mart ............................................................................. 86Uninstalling Data Sourcer........................................................................ 87Uninstalling CCPulse+............................................................................. 88
Appendix Scaling Your Environment................................................................... 89
Do You Need to Scale Your Environment?.............................................. 89Adding New Collection Units ................................................................... 91Removing Collection Units ...................................................................... 93Problems with Scaling Incorrectly............................................................ 94
Supplements Related Documentation Resources ..................................................... 97
Document Conventions ...................................................................... 100
Index ............................................................................................................... 103

Table of Contents
6 Reporting 8.1

Deployment Guide 7
PrefaceWelcome to the Reporting 8.1 Deployment Guide. This guide provides detailed instructions for configuring, installing, and setting up Historical and Real-Time Reporting. It also includes the following information:
• An overview of the Data Collection, Data Mart, and Information Delivery Services, including a description of their supporting components
• Deployment planning checklists for configuration and installation
• Database preparations, and sizing and scaling guidelines
• General system requirements
• Starting, stopping, and uninstall procedures
This guide is valid only for the 8.1 release of Solution Reporting, which consists of 8.1 Real-Time Reporting components and 8.1 Historical Reporting components.
This preface contains the following sections: Intended Audience, page 8 Making Comments on This Document, page 8 Contacting Genesys Customer Care, page 8 Document Change History, page 8
For information about related resources and about the conventions that are used in this document, see the supplementary material starting on page 97.
Note: For versions of this document created for other releases of this product, visit the Genesys Customer Care website, or request the Documentation Library DVD, which you can order by e-mail from Genesys Order Management at [email protected].

8 Reporting 8.1
Preface Intended Audience
Intended AudienceThis document is primarily intended for [list primary and secondary audience for this document]. It has been written with the assumption that you have a basic understanding of:
• Computer-telephony integration (CTI) concepts, processes, terminology, and applications
• Network design and operation
• Your own network configurations
You should also be familiar with .
Making Comments on This DocumentIf you especially like or dislike anything about this document, feel free to e-mail your comments to [email protected].
You can comment on what you regard as specific errors or omissions, and on the accuracy, organization, subject matter, or completeness of this document. Please limit your comments to the scope of this document only and to the way in which the information is presented. Contact your Genesys Account Representative or Genesys Customer Care if you have suggestions about the product itself.
When you send us comments, you grant Genesys a nonexclusive right to use or distribute your comments in any way it believes appropriate, without incurring any obligation to you.
Contacting Genesys Customer CareIf you have purchased support directly from Genesys, please contact Genesys Customer Care.
Before contacting Customer Care, please refer to the Genesys Care Program Guide for complete contact information and procedures.
Document Change HistoryThis is the first release of the Reporting 8.1 Deployment Guide. In the future, this section will list topics that are new or have changed significantly since the first release of this document.
Deployment Guide 9
Chapter
1 Reporting OverviewThis chapter introduces Genesys Reporting and explains the data collection and organization components that deliver contact center data to CCPulse+ and Contact Center Analyzer (CC Analyzer). These applications provide real-time and historical reporting.
This chapter contains the following sections: What Is Reporting?, page 9 Reporting Architecture, page 10 New In This Release, page 21
What Is Reporting?Genesys Reporting is a powerful tool for viewing and analyzing contact center performance, enabling you to improve enterprise efficiency. It consists of two products, CC Analyzer and CCPulse+, which draw on much of the same data but provide different functional capabilities.
High availability (HA) of historical reporting data—a new feature provided since the Reporting 7.2 release—is intended to minimize the chance of loss of historical reporting data in the event of a single hardware component failure. Refer to Chapter 3, “High-Availability Architecture,” on page 39 for information about how to implement this feature.
A number of components support CC Analyzer and CCPulse+ in their historical reporting functions. These components are organized into two services: the Data Collection Services and the Data Mart Services. A third service, Information Delivery Services, consists of:
• CC Analyzer with SAP Crystal Reports and, if desired, other third-party report-generation tools.
• CCPulse+, which enables users to create real-time and, if desired, historical views. These views can be printed.

10 Reporting 8.1
Chapter 1: Reporting Overview Reporting Architecture
The following sections describe the functions and components of these services.
Reporting ArchitectureCC Analyzer and CCPulse+ rely on information and processes managed by the Genesys Framework layers depicted in Figure 1.
Figure 1: Genesys Framework Architecture
• The Configuration Layer provides information about configuration objects for which statistics are collected.
• CC Analyzer integrates with the Management Layer, where you centrally manage Genesys applications via the Solution Control Interface.
• The Media Layer, the most important component of which is the Genesys T-Server, supplies TEvent information used by other Framework components, such as Stat Server, that then supply data to CC Analyzer and CCPulse+.
• The Services Layer defines statistical parameters and provides the statistical information requested by CC Analyzer and CCPulse+. The Services Layer consists of Stat Server.
Starting with release 7.0, CC Analyzer and CCPulse+ also serve as part of the Customer Interaction Management (CIM) platform, which includes the Genesys Framework, Real-Time Routing via the Genesys Universal Routing Server, and open media interaction handling abilities. Figure 2 illustrates CIM platform components.

Deployment Guide 11
Chapter 1: Reporting Overview Reporting Architecture
Figure 2: Reporting as Part of the CIM Platform
For information on the Reporting architecture including high availability, refer to “HA Architecture” on page 41.
The Reporting Services
Reporting functionality can be conveniently broken down into three services:
• The Data Collection Services collect the data.
• The Data Mart Services then transfer, organize, and store this data.
• The Information Delivery Services request data from the Data Mart and use that data to generate reports that summarize your contact center’s activities.
Each service consists of several components that work together to perform its functions. Figure 3 illustrates Reporting components and their relationships.
CIM
Pla
tfo
rm
Interaction Management
Real-Time Routing
Interaction RoutingDesigner
Universal RoutingServer
Custom Server
E-Mail, Web, OpenMedia Interaction
HandlingInteraction Workflow
DesignerInteraction ServerUniversal Contact
ServerKnowledge ManagerClassification Server
Reporting
CC Analyzer Call Concentrator CCPulse+
Framework
T-Server Management Framework Stat Server

12 Reporting 8.1
Chapter 1: Reporting Overview Reporting Architecture
Figure 3: Reporting Architecture
Data Collection Services
This section focuses primarily on the Data Sourcer component of the Data Collection Services and its relationship with Stat Server, DB Server, and ODS (Operational Data Storage).
The Data Collection Services include:
• Data Sourcer—Collects statistical data from Stat Server and writes it to ODS.

Deployment Guide 13
Chapter 1: Reporting Overview Reporting Architecture
• Data Modeling Assistant (DMA)—A GUI application that you can use to import, export, edit, create, and delete layout templates (defined on page 14).
• ODS—A relational database that serves as the staging area for the Data Mart Services.
The Data Collection Services use these other Genesys components:
• Stat Server—Supplies statistical information to Data Sourcer about interactions and the objects that handle them, such as queues or agents.
• DB Server—DB Server handles database requests from multiple clients. It provides a single interface from its clients to a variety of database engines including Oracle, Microsoft SQL Server, and DB2. As a client of DB Server, Data Sourcer reads information about activated report layouts and writes statistics received from Stat Server to the ODS.
What Is a Collection Unit?
The Data Collection Services are the foundation for the Historical Reporting functionality of both CC Analyzer and CCPulse+. These services consist of one or more collection units—groupings of servers and databases that collect and store data specifically for use by the Data Mart Services.
For contact centers using a Genesys Stat Server to track interactions, each collection unit consists of a Stat Server, Data Sourcer, DB Server, and an ODS located on one of four industry-standard RDBMS servers (see Figure 4). Starting with release 7.2, a collection unit may also be comprised of backup Data Sourcer and Stat Server applications.
Note: See the Framework Stat Server User’s Guide for information on Stat Server, the Framework DB Server User’s Guide for information on DB Server.

14 Reporting 8.1
Chapter 1: Reporting Overview Reporting Architecture
Figure 4: Data Collection Unit
Layout Templates
Data Sourcer uses layout templates to store statistics that are to be collected for selected contact center objects. Each layout template is stored in ODS and specifies:
• Statistics to be included in each new report layout.
• Stat type parameters.
• Time profiles for the schedules to be created.
• A default name for report layouts.
• A default description.
These layout templates control Data Sourcer’s data collection parameters—which statistics to collect, for which objects, on which schedule, and so on.
Data Modeling Assistant
To import, export, edit, create, and delete layout templates, use Data Modeling Assistant. You use DMA to manage layout templates specific to your solution. Layout templates for Genesys Outbound Contact, for instance, contain a set of
Note: Because Data Sourcer handles a very heavy volume of data, Genesys recommends that you dedicate a Stat Server to each Data Sourcer application in your environment.
DMA
ODS
Collection Unit
LayoutTemplates
Configuration Server
Stat Server
Data Sourcer
DB Server
ETL Runtime

Deployment Guide 15
Chapter 1: Reporting Overview Reporting Architecture
statistics that include outbound-specific activities. These include indicators for campaign performance such as the number of callbacks completed, the number of unsuccessful dial attempts, how long a campaign was active, and so forth.
DMA performs the following functions:
• Connects to DB Server to read data from, and write data to, the ODS specified by the server’s database access point, which is defined in Data Sourcer’s configuration.
• Reads information from Configuration Server about all configured Data Sourcer Application objects and their corresponding database access points, as well as all configured objects within the tenant(s), such as agent queues, routing points, and places.
• Updates information about statistical types, time profiles, time ranges, and filters, and sends it to the Configuration Server. Configuration Server then updates the configuration of the corresponding Stat Server application.
• Sends information to Data Sourcer about the activation and deactivation of report layouts.
Report Layouts
Data Sourcer uses the layout templates to create report layouts for tenants within your contact center. You must create and activate report layouts before data collection or the reporting interval begins.
Layouts are automatically created if you enter true as the value for the auto-create-new-tenant-layouts option; and layouts are automatically activated if you enter true as the value for the activate-new-layouts option when you configure the Data Sourcer application. If you set both the auto-create-new-tenant-layouts and activate-new-layouts options to false, create and activate the layouts using Data Modeling Assistant.
Report layouts specify:
• Which contact center objects are to be monitored.
• What statistics are to be collected for these objects.
• How often statistical data is to be collected.
The number of report layouts Data Sourcer can create is bound by database limitations and Data Sourcer performance considerations. Chapter 2 on page 23 shows you how to calculate this number.
Note: When report layouts are first created and a new tenant is connected to Data Sourcer (option auto-create-new-tenant-layouts is set to true), Data Sourcer automatically activates the new report layouts for each new tenant if you have set the Data Sourcer activate-new-layouts configuration option to true. Data Sourcer collects statistical data only for activated report layouts. You can activate or deactivate report layouts at any time using the DMA.

16 Reporting 8.1
Chapter 1: Reporting Overview Reporting Architecture
Time Profile
Data Sourcer collects statistical information about contact center objects on a periodic basis, as specified by a time profile associated with the report layout. This time profile defines the timing and frequency, in consecutive time intervals of constant duration, that Data Sourcer must use to send requests for statistics to Stat Server. For instance, the default time profile, named CollectorDefault, has Data Sourcer sending requests to Stat Server every 15 minutes, starting at midnight (0:00+0:15).
Operational Data Storage
ODS is the staging area for statistical data about objects in Configuration Server. This data is aggregated over the time period (the time profile) you specify, which is every 15 minutes by default. Data Sourcer draws this data from Stat Server and deposits it into ODS.
ODS is a relational database:
• Into which Data Sourcer writes, organizes, and stores this data.
• From which ETL Runtime extracts and, if desired, purges data.
Data Sourcer can use the Genesys DB Server to access an ODS on the following DBMS types:
• DB2
• Microsoft SQL Server
• Oracle
Component Interconnectivity for the Data Collection Services
Data Sourcer, a server itself, is a client of:
• DB Server
• Configuration Server
• Stat Server
DMA is a client of:
• Data Sourcer
• DB Server
• Configuration Server
The sections below present more detailed information about these components.
ConfigurationServer
As a client of Configuration Server, primary and backup Data Sourcer receives information about configuration objects for which statistics are collected. Configuration Server provides information about contact center objects (agents, tenants, places, calling lists, campaigns, and so on), statistical
Note: The ODS schema is proprietary. Genesys reserves the right to alter it from release to release.

Deployment Guide 17
Chapter 1: Reporting Overview Reporting Architecture
parameters (time ranges, time profiles, filters, and statistical types), as well as information about changes to contact center objects. Data Sourcer uses this delta information for ODS upkeep and for creating appropriate report layouts. The “Tracking Configuration Server Objects” chapter in the Reporting 7.6 Data Sourcer User’s Guide discusses in detail what information Data Sourcer collects about your environment.
Stat Server Stat Server tracks information about customer interaction networks that consist of one or more contact centers in conjunction with one or more computer networks. Stat Server receives information from one or more T-Servers and converts the accumulated data for directory numbers, agents, agent groups, and so on, into statistical information.
As a client of Stat Server, Data Sourcer requests historical statistics for objects belonging to particular report layouts and periodically receives statistical values, calculated metrics, and information about whether the reported values are valid.
The statistics measure quantities associated with time intervals rather than single moments of time. These time intervals are specified by the report layout’s time profile (CollectorDefault, by default). For example, Data Sourcer might issue the following request:
How many calls were answered in the past 15 minutes?
but not:
How many calls are currently in queue?
The statistics that Data Sourcer requests from Stat Server for groups of intervals must be calculable from the values for the individual intervals in the group. For example, you can request statistics for an hour, based on four 15-minute collection intervals. You cannot request statistics for a 20-minute period if your collection time profile is every 15 minutes.
Also, you can request statistics for categories, such as TotalTime and TotalNumber, that produce meaningful values when added together. However, some statistical categories, such as AverageTime, are not additive.
Data Sourcer uses only the statistical types defined in Stat Server. As additional statistical types are developed, Data Sourcer inherits the ability to use them.
DB Server DB Server is the Genesys component that handles database requests from multiple client processes. DB Server provides a single interface from the
Note: Data Sourcer does not track individual calls but rather collects aggregated predefined statistics from Stat Server.
Note: In Stat Server, such additive statistics are referred to as cumulative and the categories to which they belong are called cumulative categories.

18 Reporting 8.1
Chapter 1: Reporting Overview Reporting Architecture
clients to a variety of database engines, including Oracle, Microsoft SQL Server, and DB2. As a client of DB Server, Data Sourcer reads information about activated report layouts and writes statistics received from Stat Server to ODS. Also, when operating in a high-availability environment, Data Sourcer uses the DB Server connection to track its current ODS access mode.
Data ModelingAssistant
Data Modeling Assistant (DMA) enables you to use layout templates to choose which standard operational statistics to collect, on what objects, and how often. Additionally, DMA supports the creation of custom business statistics, such as the number of calls received concerning Product X or revenue generated by Agent Group A.
Data Sourcer acts as a server for DMA. Data Sourcer receives commands from DMA on the activation and deactivation of report layouts. When you activate a report layout within DMA, DMA notifies Data Sourcer, which starts collecting data for that report layout. When you deactivate a report layout, DMA notifies Data Sourcer to stop collecting data for that report layout.
Data Mart Services
The components of a collection unit work together to collect and provide temporary storage for historical data until ETL Runtime (Extraction, Transformation, and Loading Runtime) transforms the data and transfers it to the Data Mart, the database where data is permanently housed.
ETL Runtime, ETL Assistant, and the Data Mart are the components of the Data Mart Services.
You can view results of ETL Runtime transformation using ETL Assistant, which manages the metadata in the Data Mart.
This section describes the Data Mart Services as they relate to CC Analyzer and CCPulse+ as a whole, focusing particularly on ETL Runtime.
Component Interrelationships
ETL Runtime is the workhorse of the Data Mart Services as it interacts with the following components to read, write, aggregate, and delete data:
• ODS
• Configuration Server
• ETL Assistant
• Data Mart
Figure 5 illustrates this connectivity.
Note: Reporting 7.6 ETL Assistant Help describes ETL Assistant functionality, and the Reporting 7.6 Physical Data Model describes the table and field structure of the Data Mart for the supported RDBMS types.

Deployment Guide 19
Chapter 1: Reporting Overview Reporting Architecture
ODS ODS, the final component of the Data Collection Services, holds historical data until ETL Runtime transfers it to the Data Mart. Furthermore, if the ETL Runtime dropTransferredTables parameter is used, ETL Runtime deletes the corresponding tables from ODS after it confirms that the data transfer has successfully completed.
Figure 5: Components of the Data Mart Services
ETL Assistant ETL Assistant is the front-end interface you use to communicate with the ETL Runtime server. Using ETL Assistant, you:
• Specify the ODSs from which ETL Runtime is to read data.
• Establish a purge schedule for Data Mart elements.
• Discover the names of the Data Mart tables to which data has been transferred.
• Review Data Mart content.
ETL Assistant accesses the Data Mart using a JDBC driver.
Data Mart The Data Mart is the target database where data is permanently stored for retrieval using report-generation tools such as CCPulse+, SAP Crystal Reports Designer, or other third-party tools. Data is organized in report folders by aggregation level, for quick access. Genesys Reporting supports four DBMS types for your Data Mart: Oracle, Microsoft SQL Server, and DB2.
ETL Runtime
ConfigurationServer
ODS
Data Mart Services
Data Mart
ETL Assistant
CCPulse+ Contact Center Analyzer

20 Reporting 8.1
Chapter 1: Reporting Overview Reporting Architecture
ConfigurationServer
Although Configuration Server is not a part of the Data Mart Services, ETL Runtime connects to this server to:
• Register itself as a Genesys component (all Genesys software is registered in the Configuration Server).
• Track tenant changes, such as tenant additions or deletions.
• Track group changes, such as when new members are added to, or deleted from, a group.
ETL Runtime tracks only those objects, groups, and tenants that you have assigned it to monitor using ETL Assistant.
The Genesys ETLService Starter
Create an ETL Service Starter Application object that you can view and edit using Configuration Manager. When you run the Starter, it schedules the following processes to run:
• Transformation Module
• Aggregation Module
• Configuration–Object Tracking Module
All three processes run continuously until stopped. You can add other modules, such as the Purging module, at your discretion.
You can configure this application to run other ETL Runtime processes on a daily basis. If, however, you want to schedule processes to run beyond today (such as every Sunday at 2:00 AM or on the first day of each month), you must use a third-party scheduler.
Information Delivery Services–CCPulse+
CCPulse+ enables both real-time and historical monitoring of contact center activity. CCPulse+ monitors the status and statistics related to contact center objects (such as agents, queues, routing points, and interaction queues) and displays them on the user’s desktop. Using CCPulse+ you can:
• Customize real-time, historical, and query-based views of contact center objects.
• Monitor the current state and activity of objects throughout the contact center, to help make decisions about staffing, scheduling, and call-routing strategies.
• Create threshold/action associations that generate some kind of notification when a specified activity reaches the threshold level you set.
• Print views, which can then function as basic reports of contact center activity.
CCPulse+ interfaces with the Services and Configuration Layers of the Genesys Framework (refer to Figure 1 on page 10) to monitor agent performance of one or more tenants from one or more sites.
If you are using Historical Reporting, CCPulse+ also connects to the Reporting Data Mart Services.

Deployment Guide 21
Chapter 1: Reporting Overview New In This Release
Figure 6 illustrates the architecture delivering these capabilities. For detailed information on CCPulse+, refer to Reporting 8.1 CCPulse+ Help and the Reporting 8.1 CCPulse+ Administrator’s Guide.
Figure 6: CCPulse+ Architecture
Information Delivery Services—CC Analyzer
CC Analyzer is a powerful and flexible tool for generating historical reports. CC Analyzer is comprised of a Reporting component powered by the SAP Crystal Reports.
Crystal Reports
SAP provides Crystal Reports products that enable the design and delivery of reports by means of client-server connections, the Web, e-mail and more. Genesys Reporting supplies SAP Crystal Reports products that provide powerful Historical Reporting tools. These tools, which draw upon the data stored in the Data Mart, enable you to create a wide range of report types and to customize the data presentation to suit your reporting needs.
New In This ReleaseThis section describes the new or changed functionality that was introduced in release 8.1.0.
Note: For detailed information about SAP Crystal Reports’, refer to the provided Crystal Reports documentation.
Data Mart
CCPulse+
Real-Time Data
Historical Data
Stat Server
Configuration Server

22 Reporting 8.1
Chapter 1: Reporting Overview New In This Release
• For a better management of the CCPulse+ workspaces: CCPulse+ can add new objects (for example, agent group) to an
existing workspace without creating a new workspace. CCPulse+ can associate different workspaces to users sharing the same
application via use of environment variables in storage path. CCPulse+ offers additional enhancements for the Import/Export
wizard (resizable dialog, multi-object selection).
• For a better usability of the CCPulse+ workspaces: CCPulse+ can display information in table views in unsorted mode. CCPulse+ can adjust and manage column width of the grid with
keyboard shortcut.
• For security constraints, CCPulse+ now hides the IP address of servers.
• For performance reasons, CCPulse+ offers the possibility to disable and hide peek statistics button.
• Reporting 8.1 requires JRE 1.6 or JRE 1.7 to be installed.
• Support for the MS SQL Server 2012.

Deployment Guide 23
Chapter
2 Predeployment MeasuresThis chapter describes preparatory steps you should perform before configuring and installing the Genesys Reporting 8.1 components. Be sure to read through this chapter and understand the requirements for each component.
This chapter contains the following sections: Prerequisites for Each Reporting Component, page 24 Preparing the Databases, page 25 Distributed Architecture, page 36 Calculating the Number of Collection Units, page 36
To successfully install any Reporting 8.1 component, you must first:
• Have the Reporting and Reporting Templates CDs at hand.
• Have a current 8.5 version of Configuration Server running in your environment.
• Have administrator privileges to create Application objects in Configuration Server. (User privileges are set using Configuration Manager.)
• Install JRE 1.6 or JRE 1.7 on the same machine on which the Reporting applications run. Supported Operating Systems
Refer to the Genesys Supported Operating Environment Reference Guide for the list of operating systems and database systems supported in Genesys releases 6.x, 7.x, and 8.x. You can find this document on the Genesys Documentation website at http://www.genesyslab.info/wiki/index.php?title=Genesys_Supported_Operating_Environment_Reference_Guide.
For UNIX-based (UNIX) operating systems, also review the list of patches Genesys uses for software product builds, and upgrade your patch configuration if necessary. A description of patch configuration is linked to
Note: You can use Reporting 8.1 with Configuration Server 7.6-8.1.

24 Reporting 8.1
Chapter 2: Predeployment Measures Prerequisites for Each Reporting Component
installation read_me.html files for the Genesys applications that operate on UNIX, and is available within the installation packages.
Prerequisites for Each Reporting Component
Before deploying either the CC Analyzer or CCPulse+, review the requirements for each Reporting component listed in the following sections to verify that you have correctly prepared your environment for installation.
Data Sourcer
The following are required to install Data Sourcer:
• You must have administrative privileges on the target host.
• A database prepared by your database administrator for Data Sourcer (ODS). See “Preparing the Databases” on page 25 for details on preparing the database.
• The user name and password for ODS.
• A running DB Server for Data Sourcer to access the ODS.
• Database user privileges to create, update, and delete tables, and to create procedures and triggers. This database user should not have administrator privileges.
• The DB Server tran_batch_mode configuration option set to OFF.
Data Modeling Assistant
Before installing Data Modeling Assistant, ensure that:
• You have administrator privileges on your Windows platform.
• Microsoft Internet Explorer 6+ is installed on the host machine which will run DMA.
Note: For 7.6 Data Sourcer to operate properly, DB Server version 7.6.000.09 or later is required.
Note: Administrative privileges are required to register Object Linking and Embedding (OLE) Custom Controls (OCXs) to the system registry; DMA cannot operate without the registered OCXs.
Deployment Guide 25
Chapter 2: Predeployment Measures Preparing the Databases
Data Mart/ETL Runtime
Before launching the setup program to install the Data Mart, ensure that:
• JRE 1.6 or JRE 1.7 is installed.
• A supported database is available for the Data Mart. See “Preparing the Databases” on page 25 for details.
• A RDBMS user account for the Data Mart has been created with privileges to create tables, views, and indexes. This account, however, should not be granted DBA privileges.
Crystal Reports Suite
The report-generation tools that you can use with CC Analyzer are offered in cooperation with SAP. The Crystal Reports tool set comes with its own documentation to which you should refer for complete installation requirements.
CCPulse+
Before launching the setup program to install CCPulse+ reporting, ensure that:
• You have administrator privileges on your Windows platform.
• Microsoft Internet Explorer 6+ is installed on the host machine which will run CCPulse+.
• All prior versions of CCPulse+ have been completely uninstalled.
If you intend to use Historical Reporting in CCPulse+, also review the component-specific requirements for Data Sourcer, DMA, and ETL Runtime, which are described on pages 24 and 25.
Preparing the Databases Historical Reporting, whether delivered by CC Analyzer or CCPulse+, requires two databases: ODS and the Data Mart. Both databases must use the same relational database management system.
Refer to the Reporting 7.6 Physical Data Model for your specific RDBMS type to understand Data Mart structure and to the Standard PDM Report for your RDBMS type to understand ODS structure. The standard PDM reports are available in the database directory where Data Sourcer is installed.
Note: Administrator privileges are required to register OCXs to the system registry; CCPulse+ cannot run without the registered OCXs. CCPulse+ users must have access to jscript.dll.

26 Reporting 8.1
Chapter 2: Predeployment Measures Preparing the Databases
In preparing these databases, you complete several preparatory steps including:
• Ensuring that you are using a supported RDBMS.
• Ensuring that database capacity requirements are met.
• Ensuring that a dedicated number of threads exist for Data Sourcer and ETL Runtime.
• Preparing the database environment.
• Appropriately sizing the ODS and Data Mart databases.
Supported RDBMSs
For information on supported relational database management systems see the Solution Reporting page in Genesys Supported Environment Reference Guide, which contains the most recent information.
Calculating Database Capacity
Develop database-capacity requirements as they relate to your system by answering the following questions.
• How much space is needed for the database?
• How much space is to be added in the future?
• How powerful should the database be?
• How will this database be used? (to generate operational reports? analytical reports?)
• When and how often will loading and transformation occur?
• When will aggregation occur?
• How will indexes be managed? For example, do you require separate tablespaces for indexes?
Notes: Ensure that you are using an appropriate version of DB Server that supports your version of DBMS and meets a minimum DB Server version requirement for Data Sourcer to operate properly.
For CC Analyzer to support DB2 9.7, you must use DB Server 8.1.
Note: See pages 29 through 36 for information about estimating the correct size for each database.

Deployment Guide 27
Chapter 2: Predeployment Measures Preparing the Databases
Calculating the Number of Threads
The Data Collection and Data Mart Services use numerous threads to run many functions in parallel. Use this optional procedure if you are using an operating system that has a low limit for the number of threads.
You can calculate the number of threads used by the various components as follows:
• 11 for each Data Sourcer application (primary and backup).
• 17 + (3 x NODSs) for ETL Runtime’s Transformation and Aggregation modules, where NODSs denotes the number of data sources defined to ETL Runtime.
This calculation represents the maximum number of threads ETL Runtime uses. The number of threads ETL Runtime uses decreases in direct relation to the number of writers defined by the numberOfWriters ETL Runtime parameter. (ETL Runtime modules and parameters are described in the Reporting 7.6 ETL Runtime User’s Guide.)
Preparing Your Database Environment
Prior to installation, the requisite database environment must be prepared by a database administrator. Because working with both the Data Collection and the Data Mart Services is database intensive, Genesys also recommends DBA participation during the installation process.
Example: The Oracle Database Environment
The Oracle database environment, for example, is composed of the following:
• A tablespace for ODS (refer to sizing information on page 29 to estimate database size).
• A tablespace for the Data Mart (refer to sizing information on page 33 to estimate database size).
• An additional tablespace for each collection unit, if you plan to operate a second or third Data Sourcer. These additional tablespaces might not be required depending on your level of resource usage. (Refer to page 36 to determine the number of collection units your environment requires.)
Note: During the configuration process, you are prompted for the user name and password of each user created, as well as the RDBMS host and port. For the Oracle database, a system identification number (SID) is required. If you do not have this information, you cannot proceed with the configuration.

28 Reporting 8.1
Chapter 2: Predeployment Measures Preparing the Databases
Preparatory Steps
After developing capacity requirements, prepare databases for ODS and Data Mart using the following procedure.
During the configuration process, you are prompted for the user name and password of each user created, as well as the RDBMS host and port.
1. Create accounts for Data Sourcer and for ETL Runtime. (You must have DBA privileges to create accounts). Consult the documentation for your database and/or your DBA for the procedure.
2. Ensure that the following initialization parameters allow all clients, including Data Sourcer and ETL Runtime, to work with this database instance: open_cursors (default: 49; recommended: 200) dm1_locks (default: 100; recommended: 200)
3. Ensure that the COMPATIBLE parameter for an Oracle ODS and Data Mart reflects the current version of your RDBMS. For example, COMPATIBLE=9.0.1.
DB2 Database Requirements
If you are using a DB2 database, verify that it meets these requirements:
• A buffer pool has been created with page size of at least 16 KB.
• A tablespace is associated with that buffer pool.
• Rights to the tablespace associated with the buffer pool are assigned to the Data Mart owner.
• Given that, in most cases, the default value of the DB2 applheapsz configuration parameter is too low, increase this value as needed.
Note: The Data Collection and Data Mart Services support only single-byte database names.
Note: The accounts for Data Mart and Data Sourcer must not have administrator privileges.

Deployment Guide 29
Chapter 2: Predeployment Measures Preparing the Databases
Microsoft SQL Server Database Recommendation
Setup Steps If you are using Microsoft SQL 2005 for your ODS database, Genesys recommends that you perform the following setup steps:
1. Create a login, or choose an existing one, for Data Sourcer to use to connect to your ODS database.
2. Create a database.
3. Create a new schema in the database; for example, genesys or ods.
4. Create a new user for this database. The user must have the same name as the schema created in Step 3. Map the new user to the login created for Data Sourcer in Step 1, and set the ownership of the new schema to this new user.
5. Grant the required database privileges to the new user.
Modify the DAPApplication
To enable Data Sourcer to retrieve needed configuration parameters, Genesys also recommends modifying the DAP application used to access the ODS database, if:
• You are using a Microsoft SQL Server database for your ODS.
• Your Data Sourcer application is release 7.6.x.
For more information, see the chapter about fine-tuning your Data Sourcer configuration in the Reporting 7.6 Data Sourcer User’s Guide.
Estimating ODS Size
Genesys recommends reserving enough space in ODS for at least two additional days of data collection, in the event data is not removed from ODS as you anticipate. Determining an appropriate size for ODS depends on the number of requests, the time profiles, the average size of record requests, and how often you plan to purge the database.
Use the following formula to estimate the minimum ODS size:
ODSSize = NRequests x NTimesPerDay x RequestsRecordSize x (NDays + 2)
where:
• ODSSize is the size of the Operational Data Storage in bytes.
• NRequests is the number of requests made to Stat Server.
• NTimesPerDay is the number of Collection Time Profiles per day.
• RequestsRecordSize is the request record length in bytes.
• NDays is the number of days data is stored in the ODS.
Note: Data Sourcer does not support case-sensitive collation for ODS database on MS SQL server.

30 Reporting 8.1
Chapter 2: Predeployment Measures Preparing the Databases
Data Sourcer stores the data it requests from Stat Server in OL_DATAn tables in ODS. This table’s record length depends on your relational database management system and its storage parameters. Table 1 provides record length estimates for the supported RDBMSs.
The actual record length in your OL_DATAn tables may differ.
You can calculate the number of requests made to Stat Server as follows:
where:
• NObjects is the number of objects in your report layout.
• NStatistics is the number of statistics collected by each report layout.
• NLayouts is the number of active report layouts in Data Sourcer.
Example
Assume the following: 100,000 requests, a 15-minute time profile, an Oracle RDBMS, and ODS is cleared once daily.
An appropriate database size for this scenario is ~1.2 GB (100,000 x 96 x 42 x [1+2]). Αnd it is a good idea to factor in some extra space.
Calculating the Number of Requests
Table 2 shows some examples of solution-specific layout templates.You can use these templates as starting points for creating report layouts that measure the status and performance of specific contact center objects. The table also
Table 1: Estimated Length of Request Records by RDBMS
Microsoft SQL Oracle DB2
Record length 66 bytes 42 bytes 58 bytes
Note: DMA shows the number of requests for all active report layouts in the Status bar when the topmost report folder (the default name is Report Layouts) is selected on the Folder pane. DMA displays the total number of statistics for a particular report layout when that report layout is selected on the Folder pane.
• NRequests = 100,000
• NDays = 1
• NTimesPerDay = 4 collections/1 hr x 24 hrs/day = 96 collections/day
NRequests NObjectsi NStatisticsi×i 1=
NLayouts
=

Deployment Guide 31
Chapter 2: Predeployment Measures Preparing the Databases
shows the number of statistics collected. For a complete list of templates, please refer to the Reporting Technical Reference Guide.
Note: See “ODS Layout Templates” in the Reporting Technical Reference Guide for more information about the statistics gathered.
Table 2: Solution Layout Templates
Outbound Contact Layout Templates
Enterprise RoutingLayout Templates
Multimedia Solution Email Layout Templates
Template Name Number of
Statistics Collected
Template Name Number of
Statistics Collected
Template Name Number of Statistics Collected
CALL_LS
CMP
CMP_CALL_L
CMP_GR
GROFPLS
GROFQUEUES
O_AGENT
O_AGENT_GR
PLACE
QUEUE
ROUTEPOINT
24
25
24
7
28
11
32
32
28
11
11
AGENT
GROFAGS
GROFPLS
GROQUEUES
PLACE
QUEUE
ROUTEPOINT
28
28
28
11
28
11
11
EMAIL_AG
EMAIL_GAG
EMAIL_GPL
EMAIL_IQ
EMAIL_PL
EMAIL_TEN
11
11
11
5
11
11

32 Reporting 8.1
Chapter 2: Predeployment Measures Preparing the Databases
Example
Consider the following sample environment:
Multimedia Solution Email Layout Templates
Multimedia Solution Voice Layout Templates
Multimedia Solution Live Web Layout Templates
Template Name Number of
Statistics Collected
Template Name Number of
Statistics Collected
Template Name Number of Statistics Collected
EMAIL_AG
EMAIL_GAG
EMAIL_GPL
EMAIL_IQ
EMAIL_PL
EMAIL_TEN
11
11
11
5
11
11
VOICE_A
VOICE_AG
VOICE_GQ
VOICE_P
VOICE_PG
VOICE_Q
VOICE_RP
VOICE_T
22
22
12
22
22
15
15
16
CHAT_A
CHAT_GA
CHAT_GH
CHAT_GP
CHAP_P
13
13
7
13
13
VCB Email Layout Templates
Use the following formula to calculate the number of requests generated for an ODS containing all seven layout templates for Enterprise Routing:
NRequests = (NAGENTs x 28) + (NGROFAGSs x 28) + (NPLACEs x 28) + (NGROFPLS x 28) + (NQUEUEs x 11) + (NROUTEPOINTs x 11) + (NGROFQUEUES x 11)
Template Name Number of
Statistics Collected
VCB_GQ_EV
VCB_GQUEUE
VCB_Q_EV
VCB_QUEUE
VCB_RP
VCB_TENANT
9
12
9
12
12
21
Table 2: Solution Layout Templates (Continued)
Tenant 1 Tenant 2
1,000 agents50 agent groups500 places25 place groups10 queues20 routing points
5 queue groups15-min time profile (NTimesPerDay=96)Oracle RDBMSODS cleared once daily
2,000 agents100 agent groups500 places25 place groups10 queues100 routing points
5 queue groups15-min time profile (NTimesPerDay=96)Oracle RDBMSODS cleared once daily

Deployment Guide 33
Chapter 2: Predeployment Measures Preparing the Databases
Using these figures in the equation on page 30, you calculate the number of requests and ODS size as follows:
NRequests = [(1000 x 28) + (50 x 28) + (500 x 28) + (25 x 28) + (10 x 11)+ (20 x 11) + (5 x 11)] + [(2000 x 28) + (100 x 28) + (500 x 28) + (25 x 28) + (10 x11) + (100 x 11) + (5 x 11)]= 44,485 + 74,765= 119,250
ODSSize = 119,250 x 96 x 42 x (1 + 2)= ~1.4 GB
Estimating Data Mart Size
The appropriate size for Data Mart depends on the number of objects stored, the number of statistics gathered, and how long data is kept. This database is much larger than ODS because:
• It maintains a much longer history of contact center statistics; typically, it stores statistics for one year.
• Presummarized data is generated for several aggregation levels, to improve reporting performance.
To calculate the Data Mart size, you must calculate its raw data size and then factor in whatever amount of overhead is appropriate for your enterprise. Overhead size includes the space required for such things as indexes and metadata and highly variable. Steps for calculating the minimum size for the Data Mart appear in the next section.
As a guideline, note that in addition to storage requirements for raw data, you must also store three default indexes:
• One composite index for the Fact table on the Object and Time foreign keys.
• Two indexes, one each on the primary key indexes for the Dimension tables.
Refer to the Standard PDM documents for your RDBMS for information on these and other Data Mart tables. These three indexes and the two Dimension tables consume approximately one-third again as much space, so the total minimum space required for the Data Mart is calculated as follows:
Calculating Data Mart Size
Calculating the raw data size requires that you first calculate the number of aggregations you are using, and then use this figure in the equation for raw data size.
DMSize RawDataSize 1.33×=

34 Reporting 8.1
Chapter 2: Predeployment Measures Preparing the Databases
Calculating Number of Aggregations
Each report layout star schema contains two dimension tables (object and time) and one Fact table for each aggregation level. Fact tables affect database size more than dimension tables do. All Fact tables hold the number of aggregation periods maintained for each aggregation level.
For example, at the 15-minute aggregation level, Data Mart maintains 35,040 aggregation periods for a one-year period (365 days/year x 24 hours/day x 4 aggregations/hour), while at the one-year aggregation level, the Data Mart maintains just one aggregation period.
The total of all aggregation periods can be represented as follows:
where i represents one of seven default aggregation levels: 15-minute, hour, day, week, month, quarter, and year. The total number of aggregations for these seven aggregation levels is:
Calculating Raw Data Size
For each report layout schema:
• The number of objects multiplied by the total number of aggregation periods translates into the number of rows.
• The number of statistics translates into the number of columns.
In addition, two keys in each row, the Object and Time foreign keys, point to the Dimension tables. Each statistic and the two keys occupy four bytes of space.
To calculate the total size of the raw data in the Data Mart, sum the star schema sizes for each report layout:
where η is the size of the row key (that is, the size of the TIME_KEY and OBJECT_ID fields).
Example
To calculate Data Mart size, assume the following:
• The Data Mart is loaded daily.
• You are using the default aggregation levels.
• You are maintaining a one-year history in the Data Mart.
Tenant characteristics are as follows:
TotalAggs NAggregationsi
i 1=
NLevels
=
TotalAggs 35040 8760 365 52 12 4 1+ + + + + + 44234= =
RawDataSize TotalAggs NObjectsj NStatisticsj 4× η+ ×
j 1=
NLayouts
=

Deployment Guide 35
Chapter 2: Predeployment Measures Preparing the Databases
:
As shown above, the equation is as follows:
You must perform the calculation separately for each layout, using the correct number of objects and number of statistics for each layout. Add these results together to obtain the raw data size.
Total Aggs = 44234 (See the calculation in“Calculating Number of Aggregations” on page 34.)
NLayouts = 7 (Agent, Agent Group, Place, Place Group, Queue, Queue Group, Routing Point)
NObjectsj 3000 agents, 150 agent groups, 1000 places, 50 place groups20 queues, 120 routing points, and 10 queue groups.
NStatisticsj The number of statistics for each layout as shown inTable 2 on page 31.
η = 30 (Row key size)
Using these figures, the raw data size comes to 25.02664458 GB.
The minimum recommended Data Mart size is as follows:
Raw Data Size x 1.33 = 25.02664458 x 1.33 = 33.28543729 GB
Example—Alternative Calculation of Data Mart Size
You can also calculate the minimum Data Mart size as follows:
DMSize = (NRequests x NTimesPerDay x NDays x 8) + 20,000
where:
• DMSize is the size of the Data Mart in bytes.
• NRequests is the total number of requests from all Data Sourcers connected to the Data Mart.
• NTimesPerDay is the number of Collection Time Profiles per day.
• NDays is the number of days data is stored in the Data Mart.
Tenant 1 Tenant 2
1,000 agents50 agent groups500 places25 place groups10 queues20 routing points5 queue groupsOracle row-key size = 30
2,000 agents100 agent groups500 places25 place groups10 queues100 routing points5 queue groupsOracle row-key size = 30
RawDataSize TotalAggs NObjectsj NStatisticsj 4× η+ ×
j 1=
NLayouts
=

36 Reporting 8.1
Chapter 2: Predeployment Measures Distributed Architecture
Using the same number and types of objects as in the previous example, this is calculated as:
DMSize = (119,250 x 96 x 365 x 8) + 20,000 = 33,428,180,000 bytes
To convert the answer to GB, divide by 1,073,741,824. This gives an appropriate database size for this scenario of ~32 GB. Αnd it is a good idea to factor in some extra space.
Distributed ArchitectureIn estimating database- and hardware-sizing requirements, first determine the implementation architecture for the Data Collection Services. In most cases, a centralized configuration easily accommodates interaction volume. For large volumes—more than 30 interactions per second—Genesys recommends a distributed configuration.
Calculating the Number of Collection UnitsBecause Stat Server tracks and maintains statistics in memory, Stat Server can handle only a limited number of statistics. This limitation depends on call volume, RDBMS throughput, CPU speed, and available memory. To scale beyond these limitations, distribute the monitoring and collection of statistics across multiple collection units. Refer to Figure 4 on page 14 for an illustration of collection unit components.
Determining how many collection units to configure requires site-specific information on contact center volume, interaction complexity, and hardware and software environments. In general, configure one collection unit for every contact center or for every tenant in a multi-tenant environment. For a more precise determination of initial distribution, use the following procedure.
Note: The procedure is only a guideline because accurate scaling of collection units requires ongoing monitoring and tuning.
1. Determine the number of calls per second each T-Server handles.
2. Organize the T-Servers into groups whose total call volume adds up to no more than approximately 30 contacts per second:
Note: NRequests is calculated as follows:
[(1,000 x 28) + (50 x 28) + (500 x 28) + (25 x 28) + (10 x 11) + (20 x 11) + (5 x 11)] + [(2,000 x 28) + (100 x 28) + (500 x 28) + (25 x 28) + (10 x 11) + (100 x 11) + (5 x 11)] = 44,485 + 74,765 = 119,250

Deployment Guide 37
Chapter 2: Predeployment Measures Calculating the Number of Collection Units
3. For each group of T-Servers, calculate the number of requests for all report layouts associated with each T-Server:
4. Calculate the number of collection units for each T-Server group by multiplying its number of requests by its total call volume. Then, divide the result by the product of the tested limits for call volume per second and requests for the hardware on which the collection unit will run:
5. Add the sum of collection units for each T-Server group to get the total number of collection units:
6. In the event of fractional results, round up the number of collection units as a cushion for increasing volumes.
Example
Adding to the previous example on page 30, Tenant 1 is serviced out of two equally sized contact centers, each with a T-Server handling contact volume of approximately 10 contacts per second. Tenant 2 is also serviced out of two equally sized sites, each with a T-Server handling 20 contacts per second. The total contact volume is 60 contacts per second, which would overload a single collection unit.
This example is based on a Windows Server environment running on computers with Pentium 400 processors and 256 MB of RAM, which tests have shown to be capable of handling:
• Approximately 30 contacts per second.
• Approximately 50,000 requests per second.
Note: The value for the maximum number of requests per collection unit (NRequestsH) is based on the performance of both Stat Server and Data Sourcer. Performance, in turn, is based on a number of factors including disk space, memory, and whether binding is used, to mention a few. Refer to “Stat Server Performance” and “Data Sourcer Performance” in the “Performance Measurements” chapter of the Reporting 8.0 Reference Manual for more information.
GroupCV 30≤
NRequests NObjectsi NStatisticsi×
i 1=
NLayouts
=
NCollectionUnitsNRequestsT GroupCV×CVMax NRequestsH×
---------------------------------------------------------------------=
TotalCollectionUnits NCollectionUnitsi
i 1=
NGroups
=

38 Reporting 8.1
Chapter 2: Predeployment Measures Calculating the Number of Collection Units
These numbers depend heavily on call complexity, which can vary widely. The tests used contacts of average complexity (for example, few transfers, few conferences, typical amounts of attached data, and so forth).
In making the collection-unit calculation, you could distribute four collection units, one each to the four sites. However, you can optimize the distribution by following this process:
1. The T-Server contact volumes are: T-Server 1: 10 contacts per second. T-Server 2: 10 contacts per second. T-Server 3: 20 contacts per second. T-Server 4: 20 contacts per second.
2. You can pair each Tenant 1 site with a Tenant 2 site: T-Server 1 + T-Server 3: 30 contacts per second T-Server 2 + T-Server 4: 30 contacts per second
3. Since each of the paired sites has the same characteristics, the number of requests is identical:
NRequests
= [(500 x 28) + (25 x 28) + (250 x 28) + (12 x 28) + (5 x 11) + (10 x 11) + (5 x 11)] + [(1000 x 28) + (50 x 28) + (250 x 28) + (12 x 28) + (25 x 11) + (50 x 11) + (5 x 11)]
= 22,256 + 37,616
= 59,872
4. The number of collection units for each T-Server group is calculated as follows:
5. The total number of collection units for the two T-Server groups is calculated as follows:
If 2.4 is rounded up, you would distribute three collection units. In this case, instead of the two pairs of sites above, you could, alternatively, configure one collection unit for Tenant 1’s two sites and a separate one for each of Tenant 2’s two sites.
Tenant 1 (Each Contact Center) Tenant 2 (Each Contact Center)
500 agents25 agent groups250 places12 place groups5 queues10 route points
5 queue groups15-min time profile70-bit record size2 T-Servers10 contacts per second
1,000 agents50 agent groups250 places12 place groups25 queues50 route points
5 queue groups15-min time profile70-bit record size2 T-Servers20 contacts per second
NCollectionUnits59872 30×
1500000--------------------------- 1.2= =
TotalCollectionUnits 1.2 1.2+ 2.4= =

Deployment Guide 39
Chapter
3 High-Availability ArchitectureThis chapter discusses the concept of High-Availability (HA) architecture in Reporting release 8.1. This chapter contains the following sections: Overview, page 39 Planning Considerations, page 40 HA Architecture, page 41 Primary and Backup Data Sourcer Applications, page 42 Deployment, page 43
OverviewThe high-availability architecture in historical reporting is intended to minimize the chance of any loss of historical reporting data, in the event of a single hardware component failure.
The HA reporting architecture consists of two Data Sourcer applications, configured in Hot Standby mode, and connected to two Stat Server applications, an HA T-Server, an ODS, and a Data Mart. The Stat Server applications will collect and send duplicate sets of data to the Data Sourcer pair, although only the Data Sourcer with the ODS lock will write to the ODS.
Data redundancy, connections to backup servers, and components operating in Hot Standby mode, will together ensure high availability of historical reporting data in release 8.1. Figure 7 illustrates the HA reporting architecture.
Note: Reporting 8.1 consists of two products, Contact Center Analyzer 8.1 and CCPulse+ 8.1.

40 Reporting 8.1
Chapter 3: High-Availability Architecture Planning Considerations
Figure 7: High-Availability Reporting Architecture
Planning ConsiderationsProper planning is required to ensure successful implementation of the HA reporting architecture. The following suggestions are guidelines for planning your HA architecture:
• Install your primary and backup reporting components on separate servers, if your hardware boxes are not HA. If possible, physically separate each primary server from each backup server.
• Use HA networks or clustered boxes.
HA T-Server
Stat Server Primary
Stat Server Backup
Data Sourcer Primary
Data Sourcer Backup
DB Server Primary
DB Server Backup
ODS
ETL Runtime Data Mart

Deployment Guide 41
Chapter 3: High-Availability Architecture HA Architecture
• Set up alarms to signal component failures, and create a response plan for handling these alarms.
• Configure your ODS and Data Mart databases to operate in HA mode. It is the responsibility of your DBA to configure both ODS and Data Mart databases in HA mode, to ensure that there is no loss of data from databases on the RDBMS side. For example, in the case of an Oracle database, you can achieve the necessary database level guarantees by using appropriate storage solutions, or by using Oracle Data Guard in maximum protection mode.
HA ArchitectureIn the HA reporting architecture, a primary and backup Data Sourcer pair operates in Hot Standby mode. Each Data Sourcer is connected to both a primary and a backup Stat Server. The complete HA reporting architecture must also include an HA T-Server, an ODS, and an Data Mart database. Refer to Figure 7 on page 40.
To provide data redundancy, primary and backup Stat Server applications collect and send the same set of statistics to each Data Sourcer at the same time. Under normal operating conditions, the data from the primary Stat Server has priority over the data collected from the backup Stat Server. Although each Data Sourcer receives an identical set of statistics, only the primary Data Sourcer will write this data to ODS. An ODS lock mechanism ensures that only one Data Sourcer (primary) is able to write to ODS at one time.
To achieve High Availability in historical reporting data, you must also configure two Stat Server applications in such a way that one Stat Server functions as a backup to the other. Stat Server is now able to accept client connections while running in backup mode. This enables both the primary and backup Stat Servers to collect the same set of statistics, thus ensuring minimal loss of data in the event of primary Stat Server failure.
To enable this connectivity in backup mode, you must set a new configuration option, accept-clients-in-backup-mode, in each Stat Server Application object. In both the primary and backup Data Sourcer applications, configure a connection to the primary Stat Server.
Note: To avoid loss of data, your T-Server, and your ODS and Data Mart databases, must all be in HA mode. Refer to the Deployment Guide for your specific T-Server, and to your DBA, for further information.
Note: If these options are not set, Stat Server will function as it did in previous releases, and you will not have HA in historical reporting data.

42 Reporting 8.1
Chapter 3: High-Availability Architecture Primary and Backup Data Sourcer Applications
Primary and Backup Data Sourcer Applications
You designate Data Sourcer 7.6 applications either as primary or backup in Configuration Server. This initial designation, however, does not actually determine which Data Sourcer application will serve the primary role of writing data to ODS. The initial operating mode of both applications is determined at startup when each application, regardless of its configured state, attempts to gain control of ODS. The successful application becomes the primary Data Sourcer, and it alone writes data to ODS. The other Data Sourcer serves as the backup.
Although a primary Data Sourcer 7.6 application operates in the same manner as a Data Sourcer 7.2 application, a backup Data Sourcer application behaves differently. A backup Data Sourcer collects the same data from Stat Server as does the primary Data Sourcer application. Although the backup Data Sourcer application collects this data at the same time, it does not write this data to ODS. Instead, the backup application periodically checks ODS to see whether Stat Server data has been successfully written to ODS. Upon ensuring this event occurred, the backup Data Sourcer application deletes its duplicate information from memory. The backup Data Sourcer also performs periodic checks of ODS to determine whether the primary Data Sourcer still has control and switches to primary mode if required.
Hot Standby Mode
Hot Standby mode in Genesys Framework implies the existence of redundant applications, and monitoring and control of these applications by the Management Layer (that is, Solution Control Server and Local Control Agent). In the HA reporting architecture, Hot Standby mode is controlled by Data Sourcer and ODS, not by the Genesys Management Layer.
In Hot Standby mode, both backup and primary Data Sourcer applications collect the same data at the same time from both Stat Server applications. If the primary Data Sourcer fails and loses its connection to ODS, for example, the backup Data Sourcer does not automatically switchover to primary mode. Instead, in Hot Standby mode, both Data Sourcer applications will attempt to gain control of ODS. It is the one that is successful that becomes the primary Data Sourcer. Consequently, unlike Hot Standby in other Genesys components, there exists the chance that the Data Sourcer that was primary before the failure will become the primary Data Sourcer again, after reconnection to ODS.
Note: The initial operating mode of Data Sourcer is not static. In the event of a failure, the operating mode of each Data Sourcer can change.

Deployment Guide 43
Chapter 3: High-Availability Architecture Deployment
Data Sourcer does not operate in warm standby mode.
DeploymentDeployment of a high-availability reporting architecture requires configuration and deployment of primary and backup Data Sourcer applications, primary and backup Stat Server applications, and the other high-availability components discussed earlier in this chapter.
To configure and deploy the necessary Reporting components, refer to the following sources for more information:
• Chapter 4, “Installing Historical Reporting Components,” on page 45.
• “Modifying Your Primary Data Sourcer Application Properties for High Availability” on page 43.
• “Modifying Your Stat Server Application Object for High Availability” on page 44.
In addition to configuring primary and backup Data Sourcer applications, you must also set the accept-clients-in-backup-mode configuration option within each Stat Server application to enable each to function in high-availability mode. See page 44 for details.
Configuring the Data Sourcer Application Object
Configure a new primary Data Sourcer Application object, as in previous releases, or to upgrade your existing primary Data Sourcer application from an earlier version. You can also create and configure a backup Data Sourcer application. Once your primary and backup Data Sourcer applications have been created, you must also set some specific properties for these objects and the supporting Stat Server Application object in Configuration Server. Refer to “Modifying Your Primary Data Sourcer Application Properties for High Availability” and “Manually Configuring Stat Server Applications for High Availability” below for further instructions.
Modifying Your Primary Data Sourcer Application Propertiesfor High Availability
Make the following adjustments to the properties of your primary Data Sourcer to enable it to work in Hot Standby mode with the backup Data Sourcer.
1. From your Applications folder, open the Properties of the primary Data Sourcer object.
2. On the Server Info tab, click the Browse button next to the backup Server box. Browse to find your backup Data Sourcer application.
3. Select the backup Data Sourcer application and click OK.

44 Reporting 8.1
Chapter 3: High-Availability Architecture Deployment
4. From the drop-down menu next to the Redundancy Type box, select Hot Standby.
5. On the Server Info tab, click Apply and OK to save your changes.
To complete the CC Analyzer deployment, refer to Chapter 4, “Installing Historical Reporting Components,” on page 45.
To install Data Sourcer 7.6 software, refer to “Installing Data Sourcer on Windows Platforms” on page 48, or “Installing Data Sourcer on UNIX Platforms” on page 49, as appropriate.
Modifying Your Stat Server Application Object for High Availability
Create primary and backup Stat Server Application objects. For them to function in reporting High Availability mode, you must also add the accept-clients-in-backup-mode configuration option to both Stat Server applications, as described below:
1. For the primary and backup Stat Server Application object, enter the following option in the statserver section: Option Name: accept-clients-in-backup-mode Option Value: True or Yes
2. Save your changes.

Deployment Guide 45
Chapter
4 Installing Historical Reporting ComponentsHistorical Reporting components use three separate installations to facilitate the distribution of Data Modeling Assistant, Data Sourcer, and Data Mart over different machines in your network. You can install Data Sourcer and Data Mart on either Windows or UNIX platforms. You can install DMA and ETL Assistant, however, only on Windows platforms.
This chapter provides the steps for installing each component on Windows and UNIX platforms. Before installation, make sure that you have configured Historical Reporting Application objects. You will not be able to install any opponents otherwise.
After installing Historical Reporting components, read Chapter 5, for additional setup prior to starting Historical Reporting for the first time.
This chapter contains the following sections: Installing Data Sourcer, page 46 Installing Data Modeling Assistant, page 50 Installing Data Mart, page 51

46 Reporting 8.1
Chapter 4: Installing Historical Reporting Components Installing Data Sourcer
Installing Data Sourcer
Pre-Installation Steps
1. Ensure that the system parameters such as the Operating System, CPU, memory and disk space requirements for installing the supported releases of DB Server and Stat Server are sufficient. Any outdated releases should be upgraded to the minimum required release prior to performing this installation procedure for Data Sourcer. Refer to the Reporting 8.1 Deployment Guide for the minimum required release information.
2. Ensure that the system parameters such as the Operating System, CPU, memory and disk space requirements for installing Data Sourcer are sufficient.
3. Ensure that there is enough disk space for log files. Detailed log files may be required for some servers if troubleshooting is required, so it is better to have a large amount of disk space reserved for the log files. Genesys recommends a minimum of 100 GB for each server, so a minimum of 200 GB is recommended for the Primary and Backup Data Sourcers.
4. Ensure that there is enough disk space for the Emergency Save Folder. This is dependant on the number of chunks you plan to store and the amount of data in your environment. Genesys recommends a minimum of 1 GB for the Emergency Save Folder.
Installation Steps
Install the new Data Sourcer installation package:
1. Create the Database User for Data Sourcer in your RDBMS environment.
Notes: • Review all steps in this guide and the Genesys Migration Guide before performing any of the steps in this procedure.
• Genesys recommends you review the Release Note for the latest information specific to your release of Data Sourcer about the installation and upgrade process.
• Plan a time when you can complete this deployment, starting with installation step 6, in one continuous session. Several steps can take significant time to complete, and this potentially affects the availability of your Reporting data.
• If you already have an environment that has Primary and Backup DB Server, Primary and Backup Stat Server, Primary and Backup Data Sourcer Configuration Manager Applications, and ODS created, you can reuse your existing environment and can begin this deployment starting from installation step 6.

Deployment Guide 47
Chapter 4: Installing Historical Reporting Components Installing Data Sourcer
2. Create the ODS database and grant access to the Database User created in previous Step 1. This User must have the ability to create and alter database objects such as: tables triggers stored procedures indexes foreign keys synonyms
The User must also have permissions to run commands such as: Select Insert Update Delete Execute stored procedures
for all user tables in the ODS database.
3. Install the Primary and Backup DB Servers and start each DB Server. Refer to the Framework Deployment Guide for instructions on how to install DB Server.
4. Install the Primary and Backup Stat Servers and start each Stat Server. Refer to the Framework 8.5 Stat Server Deployment Guide for instructions on how to install Stat Server.
5. Create and configure the Primary and Backup Data Sourcer applications in Configuration Manager. Make sure you configure the following: collector options, log options, connections, tenants, backup application, and so forth.
6. Install the Primary Data Sourcer. Refer to “Installing Data Sourcer on Windows Platforms” on page 48 or “Installing Data Sourcer on UNIX Platforms” on page 49 for instructions on how to install Data Sourcer. Do NOT start the Primary Data Sourcer.
7. Install the Backup Data Sourcer. Refer to “Installing Data Sourcer on Windows Platforms” on page 48 or “Installing Data Sourcer on UNIX Platforms” on page 49 for instructions on how to install Data Sourcer. Do NOT start the Backup Data Sourcer.
Warning! Genesys strongly recommends setting the chunk-composition-mode option to a value other than legacy. Please choose an appropriate value depending on the type of environment you are using and the amount of statistics that are collected.

48 Reporting 8.1
Chapter 4: Installing Historical Reporting Components Installing Data Sourcer
8. At this point, make sure your RDBMS, DB Servers and Stat Servers are all running. Next, start ONLY the Primary Data Sourcer.
9. Wait until the Primary Data Sourcer ODS initialization is complete. You know it has initialized when the initialization complete message appears in the log file.
10. Stop the Primary Data Sourcer.
11. Start the Primary Data Sourcer again and wait until the initialization complete message appears in the log file.
12. Start the Backup Data Sourcer and wait until the initialization complete message appears in the log file.
13. Install Data Modeling Assistant (DMA). Refer to “Installing Data Modeling Assistant” on page 50 for instructions on how to install DMA.
14. Use DMA to import and create layout templates. Refer to Reporting 7.6 Data Modeling Assistant Help for information on how to import and create layout templates.
15. Use DMA to create your desired layouts. Refer to Reporting 7.6 Data Modeling Assistant Help for information on how to create layouts.
16. Use DMA to activate your layouts. Refer to Reporting 7.6 Data Modeling Assistant Help for information on how to activate layouts.
Installing Data Sourcer on Windows Platforms
To install Data Sourcer on a Windows platform:
1. Run setup.exe, from the installation package (for example, data_sourcer\[operating_system]).
The InstallShield Wizard opens.
2. At the Welcome to the Installation of Data Sourcer screen, read the general information and click Next to proceed.
3. At the Maintenance Setup Type screen, select Install new instance of the application and click Next.
Note: If Data Mart is NOT already installed in your environment, then to complete your CC Analyzer installation, refer to “Installing Data Mart” on page 51 to install Data Mart.
Notes: The installation procedure installs Data Sourcer automatically as a Windows service; you cannot install Data Sourcer in any other manner.
Before installing a release 7.6 Data Sourcer, first read Chapter 3, “High-Availability Architecture,” on page 39.

Deployment Guide 49
Chapter 4: Installing Historical Reporting Components Installing Data Sourcer
4. At the Connection Parameters to the Genesys Configuration Server screen, type the host, port, user name, and password for your Configuration Server in the fields provided. Then, click Next.
5. At the Select Application screen, from the upper list box, select the configured Data Sourcer Application object you want to install and click Next.
The lower list box displays the properties of the Data Sourcer application you selected.
6. At the Choose Destination Location screen, accept the default location, type a desired location, or click Browse to choose the path where Data Sourcer is to be installed, and click Next.
7. At the Ready to Install screen, click Install.
The Wizard displays a progress-of-completion bar on the Installation Status screen while copying the necessary files and registering dlls.
8. At the Installation Complete screen, click Finish.
The Wizard creates a Data Sourcer program group inside Genesys Solutions \Reporting 7.6, with two menu items:
• ReadMe—a shortcut to information about the Data Sourcer installation package
• Start Data Sourcer—a shortcut to the application executable
Once installed, your Data Sourcer application is activated within Configuration Server and ready for immediate use. ODS is initialized by Data Sourcer when you start Data Sourcer the first time.
Installing Data Sourcer on UNIX Platforms
To install Data Sourcer on a UNIX platform:
1. Locate the shell script called install.sh under the appropriate data_sourcer operating_system directory on the Reporting CD.
2. Run this script from the command prompt by typing the sh command and the file name. For example:
sh ./install.sh or ./install.sh
3. When prompted, specify the host name of the computer where Data Sourcer is to be installed or press Enter to accept the provided default, which is the current host.
Note: Data Sourcer does not begin collecting data until report layouts are created and activated within ODS. Refer to Reporting 7.6 Data Modeling Assistant Help for more information about layout templates and report layouts.

50 Reporting 8.1
Chapter 4: Installing Historical Reporting Components Installing Data Modeling Assistant
4. When prompted, specify the following information about your Configuration Server: Host name of the computer where the Configuration Server is running. Network port used by the client applications to connect to
Configuration Server. User name used to log in to Configuration Server. Password used to log in to Configuration Server.
The installation routine then attempts to connect to Configuration Server to gather information about Data Mart applications configured therein. If unable to make this connection, skip to Step 6.
5. From the list of applications of Data Sourcer type configured for this host, type the number of the Data Sourcer applications to install.
6. When prompted, specify the full path where Data Sourcer is to be installed.
If this directory already exists, the installation routine provides you three options to deploy files:
1. Back up all files in the directory 2. Overwrite only the files contained in this package 3. Wipe the directory clean
Choose the appropriate option.
The installation routine extracts Data Sourcer application files to the path you specified.
7. At this prompt:
There are two versions of this product available: 32-bit and 64-bit. Please enter 32 or 64 to select which version to use.
Enter 32 or 64 to specify which version of the executable to use.
As soon as the installation process is complete, a message appears indicating a successful installation. The process places the Data Sourcer in the directory specified during installation.
Installing Data Modeling AssistantThe procedure for installing DMA is the same regardless of whether you have configured a Data Modeling Assistant Application object. However, you can install and operate only one DMA 7.6 application on any given machine. Previous versions of DMA installations did not impose this restriction. Furthermore, Genesys recommends that you install DMA 7.6 in a different directory from any previously installed version(s) of DMA.
1. Invoke setup.exe from the installation package (for example, dma\[operating_system]).
The InstallShield Wizard opens. If the Wizard detects an existing DMA 7.6 version installed on your machine, it displays the Welcome to the

Deployment Guide 51
Chapter 4: Installing Historical Reporting Components Installing Data Mart
Maintenance of DMA screen, where your only option is to remove the existing version:
a. Select the Remove button and click Next. b. At the Confirm Uninstall screen, select Yes or No as appropriate. c. At the Maintenance Complete screen, click Finish.
To reinstall DMA 7.6, re-invoke setup.exe and proceed.
2. At the Welcome to the Installation of DMA screen, read the general information and click Next.
3. At the Choose Destination Location screen, accept the default location, type a desired location, or click Browse to choose the path where DMA is to be installed. Click Next to proceed.
4. At the Ready to Install screen, click Install.
The Wizard displays a progress-of-completion bar on the Installation Status screen while copying the necessary files and registering dlls.
5. At the Installation Complete screen, click Finish.
The Wizard creates a Data Modeling Assistant program group inside Genesys Solutions\Reporting 7.6, with two menu items:
• Start Data Modeling Assistant—a shortcut to the application executable
• ReadMe for Data Modeling Assistant—a shortcut to information about the DMA installation package
Once installed, your DMA application is ready for immediate use.
Installing Data Mart
Notes: • Review all steps in this guide and the Genesys Migration Guide before performing any of the steps in this procedure.
• Genesys recommends you review the Release Note for the latest information specific to your release of Data Mart about the installation and upgrade process.
• Plan a time when you can complete this deployment, starting with installation step 6, in one continuous session. Several steps can take significant time to complete, and this potentially affects the availability of your Reporting data.
• If you already have an environment that has Primary and Backup DB Server, Primary and Backup Stat Server, Configuration Manager Applications, ODS, Data Sourcer installed from the Data Sourcer 7.6.000.15 Deployment Procedure, Data Mart database, and the JDBC Database Access Point (DAP) described below, you can reuse your existing environment and can begin this deployment starting from installation step 6.
52 Reporting 8.1
Chapter 4: Installing Historical Reporting Components Installing Data Mart
Pre-Installation Steps
1. Ensure that the system parameters such as the Operating System, CPU, memory and disk space requirements for installing Data Mart are sufficient.
2. Ensure there is enough disk space for log files. Detailed log files may be required for some servers if troubleshooting is required, so it is better to have a large amount of disk space reserved for the log files. Genesys recommends a minimum of 100 GB for each server.
3. Ensure that you have performed the “Installing Data Sourcer” on page 46 prior to starting this Deployment Procedure.
Installation Steps
Install the new Data Mart installation package:
1. Create the database (schema) for the Data Mart Database.The User that owns the database (schema) should be used in Database Access Point (DAP) configuration below and must have permission to create tables, views, indexes, and synonyms in the database.
2. Create a JDBC DAP that will be used with Data Mart.
3. On the DB Info tab, enter DBMS Name, DBMS Type, Database Name and User Information (User Name and Password).
4. Ensure the JDBC DAP has the following option set correctly to point to the Data Mart Database:[jdbc]
jdbcurl="The JDBC URL in appropriate format for your RDBMS"
In DAP, on the Options tab, configure thejdbc section with the jdbcurl option set for the DB platform:• For Oracle:
jdbc:oracle:thin:@<Oracle server host>:<Oracle listener port>:<SID>
orjdbc:oracle:thin:@<Oracle server host>:<Oracle listener port>/<Service Name>
See the Oracle JDBC driver documentation for more details.• For Microsoft SQL Server:
jdbc:jtds:sqlserver://<MS SQL server host>:<MS SQL TCP/IP listening port>;DatabaseName=<ETL database name>
See the JDTS driver documentation for more details at http://jtds.sourceforge.net/faq.html.
• For DB2 see the IBM DB2 JDBC driver documentation.

Deployment Guide 53
Chapter 4: Installing Historical Reporting Components Installing Data Mart
5. Create an entirely new Data Mart application in Configuration Manager by importing the template and configuring all the required connections and options. Be sure to include the JDBC DAP you have created above. Refer to “Installing Data Mart on Windows Platforms” on page 53 or “Installing Data Mart on UNIX Platforms” on page 55 for more information on how to install and configure the Data Mart application.
6. Install ETL Runtime and ETL Assistant from the Data Mart installation package you received from Genesys.
7. Initialize the Data Mart. Refer to the “Initializing the Data Mart” on page 57 for more information on how to initialize the Data Mart.
8. Using ETL Assistant, configure the ETL options and ODS Data sources as described in the "Specifying a New ODS" topic in Reporting 7.6 ETL Assistant Help.
9. Update the etl.properties file in the Data Mart root directory as required. Refer to the “Specifying ETL Service Starter Processes” on page 59 for more information.
Installing Data Mart on Windows Platforms
To install Data Mart on a Windows platform:
1. Invoke setup.exe from the installation package (for example, data_mart\[operating_system]).
The InstallShield Wizard opens.
2. At the Welcome to the Installation of Data Mart screen, read the general information and click Next to proceed.
3. At the Maintenance Setup Type screen, select Install new instance of the application and click Next.
4. At the Select Components screen, select ETL Runtime, at your discretion, and click Next. The Wizard automatically installs ETL Assistant.
Note: The installation procedure on Windows platforms installs Data Mart automatically as a Windows service; you cannot install Data Mart in any other manner.
You must have supported JRE installed on your computer prior to deploying, configuring, and installing an ETL Runtime application.
Note: InstallShield verifies that supported JRE has been installed. Installation ceases if this check fails. If this happens, restart the Data Mart installation after installing supported JRE.

54 Reporting 8.1
Chapter 4: Installing Historical Reporting Components Installing Data Mart
Skip to Step 7 if you chose to install ETL Assistant only.
5. At the Connection Parameters to the Genesys Configuration Server screen, type the host, port, user name, and password for your Configuration Server in the fields provided. Then, click Next.
6. At the Select Application screen, from the upper list box, select the configured Data Mart Application object you want to install and click Next.
The lower list box displays the properties of the Data Mart application you selected.
7. At the Choose Destination Location screen, accept the default location, type a desired location, or click Browse to choose the path where ETL Runtime is to be installed and click Next.
8. At the Ready to Install screen, click Install.
The Wizard displays a progress-of-completion bar on the Installation Status screen while copying the necessary files and registering dlls.
9. At the Installation Complete screen, click Finish.
The Wizard creates a Data Mart program group inside Genesys Solutions/Reporting 7.6, with two menu items:
• ReadMe for Data Mart—a shortcut to information about the Data Mart installation package
• Start Data Mart—a shortcut to the application executable
Once installed, your Data Mart application is activated within Configuration Server and ready for immediate use.
Note: If you did not initialize your Data Mart during configuration, execute the procedure listed in “Initializing the Data Mart” on page 57 before starting ETL Runtime for the first time. You must also manually specify ODS sources using ETL Assistant. Refer to the “Specifying a New ODS” topic in Reporting 7.6 ETL Assistant Help for more information.

Deployment Guide 55
Chapter 4: Installing Historical Reporting Components Installing Data Mart
Installing Data Mart on UNIX Platforms
Make sure that the two Application objects (of type ETL Proxy and Data Mart) have been created and configured properly in the Configuration Manager.
To install Data Mart on a UNIX platform:
1. Designate a UNIX path for Data Mart.
2. On the Reporting CD in the appropriate data_mart/[operating_system] directory, locate a shell script called install.sh.
3. Run this script from the command prompt by typing the sh command and the file name. For example:
sh ./install.sh
4. When prompted, specify the host name of the computer where Data Mart is to be installed or press Enter to accept the provided default, which is the current host.
5. When prompted, specify the following information about your Configuration Server: Host name of the computer where the Configuration Server is running. Network port used by the client applications to connect to
Configuration Server. User name used to log in to Configuration Server. Password used to log in to Configuration Server.
The installation routine then attempts to connect to Configuration Server to gather information about Data Mart applications configured therein. If unable to make this connection, skip to Step 7.
6. When prompted, from the list of Application objects of the Data Mart type configured for this host, specify the number of the Data Mart Application objects to install.
7. When prompted, specify the full path where Data Mart is to be installed.
If this directory already exists, the installation routine provides you three options to deploy files:
1. Back up all files in the directory 2. Overwrite only the files contained in this package 3. Wipe the directory clean
Notes: You must have supported JRE installed on your computer prior to deploying, configuring, and installing a Data Mart application. Also, set up the CLASSPATH and PATH environment variables properly to run Java.
Refer to “Install JRE 1.6 or JRE 1.7 on the same machine on which the Reporting applications run. Supported Operating Systems” on page 23 for a list of websites from which you can download JRE.

56 Reporting 8.1
Chapter 4: Installing Historical Reporting Components Installing Data Mart
Choose the appropriate option.
The installation routine extracts Data Mart application files to the path you specified.
8. Enter 32 or 64 to specify which version of the executable to use, if prompted:
There are two versions of this product available: 32-bit and 64-bit.
Please enter 32 or 64 to select which version to use.
As soon as the installation routine completes, a message appears indicating a successful installation. On UNIX platforms, you may also need to configure certain parameters, such as CfgAppName, CfgUser, and CfgUserPassword to gain full functionality. Refer to the “Runtime Parameters” chapter in the Reporting 7.6 ETL Runtime User’s Guide for information about these and other parameters.

Deployment Guide 57
Chapter
5 Setting Up Historical ReportingThe procedures described in Chapters 4 configure, install, and activate Data Modeling Assistant, ETL Assistant, Data Mart, and Data Sourcer Application objects. However, if, during installation, you chose any of the following, additional setup is required:
• Not to initialize the Data Mart
• To install ETL Runtime on UNIX
• Not to identify ODS sources within ETL Assistant
• To edit ETL Runtime properties
You should also review the start-up priorities in the Configuration Manager to verify that they reflect the requirements of your environment.
This chapter describes the additional setup required. It contains the following sections: Initializing the Data Mart, page 57 Specifying ETL Service Starter Processes, page 59 Deploying ETL Runtime Using DB2 v8+, page 59 Assigning Start-Up Priorities, page 60
Initializing the Data MartYou can change four database initialization parameters by modifying settings in the createdb.properties file. The properties you can edit are the database user name (user), database password (pass), the JDBC URL (jdbcurl), and the name of the log file (log). Users can also add the log level (loglevel) parameter to the createdb.properties file.

58 Reporting 8.1
Chapter 5: Setting Up Historical Reporting Initializing the Data Mart
To change these parameters and initialize your Data Mart on a Windows platform:
1. Open the createdb.properties file using a text editor.
2. Change database initialization parameters as desired, and save the file.
3. Run the run-createdb.bat batch script.
If errors occur, exceptions are generated and written to the log specified in the createdb.properties file.
Figure 8 illustrates a sample createdb.properties file with settings for five parameters.
Figure 8: Sample createdb.properties File
To change these parameters and initialize your Data Mart on a UNIX platform:
1. Open the createdb.properties file using a text editor.
2. Change database initialization parameters as desired, and save the file.
3. Type ./run-createdb at the command prompt.
If an error occurs, an exception is generated and written to the log you specified. Check for errors using the following command:
grep -i EXCE [logfilename]
where [logfilename] is the name of the log file.
Note: See the “ETL Runtime Parameters” table in the Reporting 7.6 ETL Runtime User’s Guide for parameter definitions.

Deployment Guide 59
Chapter 5: Setting Up Historical Reporting Specifying ETL Service Starter Processes
Specifying ETL Service Starter ProcessesBy default, the Data Mart installation defines the following ETL Runtime processes to run when you invoke the ETL Service Starter:
• ETL_Trans_Only
• ETL_Agg_Only
• ETL_Tracking
To run a different mix of processes, modify the process section of the Genesys ETL Service Starter within Configuration Manager to include the processes you want to run. Be sure to define a separate section for each new process you add.
Refer to “Configuration Options” in the Reporting 7.6 ETL Runtime User’s Guide for information about the various ETL Runtime processes. Refer to “Starting and Stopping ETL Runtime” on page 70 for information about starting ETL Runtime.
Before running ETL Runtime, set the properties by which data should be aggregated and/or transformed in the etl.properties file.
Deploying ETL Runtime Using DB2 v8+Starting with the Reporting 7.5 release (CC Analyzer 7.2), ETL Runtime supports Data Mart operation on DB2 8.1 and 8.2 RDBMSs. The most visible change in the configuration of a DB2 version 8 Data Mart is the port number used for Data Mart connection. The Universal JDBC driver, used in conjunction with this version of DB2, communicates with a DB2 server via an open distributed protocol (DRDA). As such, JDBC server db2jd is no longer necessary and the JDBC URL format remains the same. Use the default DRDA port number, 50000. Use this value instead of 6789.
You can use the following procedure for determining your actual DRDA port value if the default (50000) is not used:
1. Type get DBM CFG at the DB2 command line.
2. Find the line where the SVCENAME configuration parameter is displayed. It will resemble the following:
TCP/IP Service name (SVCENAME) = db2inst1
orTCP/IP Service name (SVCENAME) = 50000
3. Determine the value of SVCNAME:
a. If a numeric value is assigned to SVCENAME, use it for the JDBC URL in ETL Runtime configuration.

60 Reporting 8.1
Chapter 5: Setting Up Historical Reporting Assigning Start-Up Priorities
b. If a symbolic value, such as db2inst1, is used, you must determine the numeric value from either the /etc/services file or the NIS/NIS+ database. Please contact your UNIX administrator for assistance.
c. If no value is assigned at all, contact your DB2 database administrator to modify the configuration of your DB2 server.
Assigning Start-Up PrioritiesGenesys recommends that you assign Data Sourcer a startup priority of at least one number higher than your backup Stat Server. For example, if your Stat Server has a startup priority of 4 and its backup has startup priority of 5, then you should assign Data Sourcer a start-up priority of 6 (or higher). Priorities are assigned at the solution level within Configuration Manager.
Figure 9 provides another example, showing the startup priorities of components belonging to the Production solution. Note that the primary Stat Server application is assigned startup priority of 5. Its backup, StatServerReporting_bk, is assigned 6, and Data Sourcer is assigned 12.
Figure 9: Startup Priorities of the Production Solution
Refer to the “Solutions” section in Framework 8.1 Configuration Manager Help for further information about assigning priorities to the applications in your configuration environment.
Deployment Guide 61
Chapter
6 Starting and Stopping Historical ReportingThis chapter provides the starting and stopping procedures for each component of Historical Reporting. Each section includes “What Must Be Running Prior to Start” so that startup is successful the first time. Starting procedures assume that you have properly configured and installed the application components. If not, refer to Chapters 4. The final section provides a table of default source paths for all Historical Reporting executables mentioned in this guide.
Your entire solution, including the server components of Historical Reporting, may be started from the Solution Control Interface (SCI), which is the recommended approach. Where applicable, this information is also covered in a subsection.
This chapter contains the following sections: Starting and Stopping DMA, page 61 Starting and Stopping Data Sourcer, page 64 Starting and Stopping ETL Assistant, page 69 Starting and Stopping ETL Runtime, page 70 Default Source Path, page 76
Starting and Stopping DMAThis section describes the starting and stopping procedures for Data Modeling Assistant (DMA).
What Must Be Running Prior to Start
• RDBMS with ODS
• Configuration Server

62 Reporting 8.1
Chapter 6: Starting and Stopping Historical Reporting Starting and Stopping DMA
• DB Server for the ODS
Refer to the “Troubleshooting” chapter in the Reporting 7.6 Data Sourcer User’s Guide for information about the data collected when the Data Sourcer to which DMA connects, or the Stat Server assigned to that Data Sourcer, is not running.
Starting DMA on Windows Platforms
On a Windows platform, you can start DMA:
• From the Programs menu.
• From a console window.
• From the Configuration Manager.
From the Programs Menu
1. Select Data Modeling Assistant from the program folder created during installation.
The Welcome to Data Modeling Assistant screen appears with the name of the previous user in the User name field.
2. Type an authorized user name and password to connect to your Configuration Server.
3. Click Details>> to display connection information for your Configuration Server. The Welcome to Data Modeling Assistant screen expands.
4. Enter the DMA application name, the host name and port number of the appropriate Configuration Server, and then click OK.
DMA opens the Select DataSourcer Application screen and displays all applications of type Data Sourcer.
5. Select a Data Sourcer Application object and click OK.
DMA opens a document window that connects to the corresponding ODS. A connection is made to DB Server using the Database Access Point specified when you configured your Data Sourcer Application object. If DMA cannot connect to the specified DB Server, an appropriate message displays. If DMA successfully connects to the DB Server, but the DB Server is connected to a database other than ODS, an SQL error message appears.
Refer to Framework 8.1 Configuration Manager Help for information about Database Access Points.
Note: If a security banner is configured for all Genesys user interfaces, it is displayed before the Login screen.

Deployment Guide 63
Chapter 6: Starting and Stopping Historical Reporting Starting and Stopping DMA
You can have several document windows open simultaneously within DMA. From the File menu, select Open to open another document window. The Select DataSourcer Application screen reappears. Repeat Step 5.
From a Console Window
1. At the command-line prompt, go to the directory where DMA has been installed.
2. Enter dma.exe, which opens the Welcome to Data Modeling Assistant screen.
3. Complete Steps 2–5 (“From the Programs Menu”) starting on page 62.
From the Configuration Manager
You can start DMA from the Configuration Manager by right-clicking any active Data Sourcer Application object to display the context menu, and then selecting Data Modeling Assistant from this menu (see Figure 10). The Configuration Manager marks inactive applications with a red slash ( ).
Figure 10: Starting DMA from the Configuration Manager
To invoke DMA in this manner, your Data Modeling Assistant Application object must be named Data Modeling Assistant. DMA starts and opens a document window with the specified Data Sourcer Application object. DMA connects to the DB Server specified by the Database Access Point without closing any previously opened document windows or existing connection(s), provided that the Configuration Server remains the same.
64 Reporting 8.1
Chapter 6: Starting and Stopping Historical Reporting Starting and Stopping Data Sourcer
Stopping DMA
There are at least two ways to exit DMA:
• From the File menu, select Exit.
• Click the Close button located on the right side of the title bar in the DMA main window.
Starting and Stopping Data SourcerThis section describes the starting and stopping procedures for Data Sourcer. You can start Data Sourcer on a Windows or UNIX platform. Genesys recommends that you start Data Sourcer from SCI.
Refer to the “Troubleshooting” chapter in the Reporting 7.6 Data Sourcer User’s Guide if you experience performance problems in starting and operating Data Sourcer.
Note: If you have upgraded Data Sourcer from release 6, Genesys strongly recommends that you back up your Operational Data Storage (ODS) before starting Data Sourcer 7.6 for the first time.
What Must Be Running Prior to Start
Important! Before starting Data Sourcer for the first time, ensure that you have properly configured your Stat Server Application object in the Configuration Manager. This is especially pertinent if you manually configured this object.
HA Stat Server If you are using two Stat Server applications in a high availability configuration, you must also define the accept-clients-in-backup-mode option in each Stat Server’s configuration. Refer to “Modifying Your Stat Server Application Object for High Availability” on page 44 for further instructions.
For Data Sourcer 7.0.1 and earlier releases, specifically, check that you have set values for the following properties:
• The TimeProfiles section of Stat Server must contain the CollectorDefault option set to 0:00+0:15.
• The TimeRanges section of Stat Server must contain two time ranges: ServiceFactorAbandonedThreshold, with a recommended value set to 0-5, and the ServiceFactorAnsweredThreshold, with a recommended value set to 0-10.
Note: You cannot stop DMA from the Configuration Manager although you can start it from there.

Deployment Guide 65
Chapter 6: Starting and Stopping Historical Reporting Starting and Stopping Data Sourcer
If you attempt to start Data Sourcer without having set options for the Time Ranges or TimeProfiles sections, startup may fail. These settings are not necessary for Data Sourcer 7.0.2 and later releases.
BackupConfiguration
Server
To enable your Data Sourcer application to be restarted when backup Configuration Server switches to the primary mode, you must specify the backup Configuration Server parameters when starting Data Sourcer.
On the command line, specify these parameters using the following two new arguments:
-backup_host hostname
-backup_port port-number
where:
• hostname refers to the name of the computer on which the backup Configuration Server is running.
• port-number refers to the port on which the backup Configuration Server is running.
For more information on starting Data Sourcer from a console window, see “From a Console Window” on page 66 of this guide.
Microsoft SQLServer
If you are starting Data Sourcer 7.2.003.10 (or later) in a Microsoft SQL Server environment, Genesys recommends modifying the DAP application that Data Sourcer uses to access the ODS. This is a manual step that must be performed after installing the Data Sourcer application. See the configuration chapter in the Reporting 7.6 Data Sourcer User’s Guide for more information.
Genesys recommends that you start Data Sourcer with the following applications already running:
• The RDBMS with your ODS
• Your Configuration Server
• The DB Server for your ODS
• The Stat Server assigned to your Data Sourcer and/or the RDBMS with your solution-specific server database (Internet Contact Server Database)
Refer to the “Troubleshooting” chapter in the Reporting 7.6 Data Sourcer User’s Guide for information on the data collected when any or all of these applications are not running. Refer to Chapter 5 for information about startup.
Starting Data Sourcer from the Solution Control Interface
You can start Data Sourcer on any of the supported platforms. To do so from SCI:
1. From the Applications view, select your Data Sourcer Application object in the list pane.

66 Reporting 8.1
Chapter 6: Starting and Stopping Historical Reporting Starting and Stopping Data Sourcer
2. Click the Start button on the toolbar, or select Start either from the Action menu or the context menu. (Right-clicking your Application object displays the context menu.)
3. Click Yes in the confirmation box that appears. Your Data Sourcer application starts.
For information about how to use SCI, refer to Framework 8.1 Solution Control Interface Help.
Starting Data Sourcer from Windows Platforms
On a Windows platform, you can start Data Sourcer:
• Manually from the Programs menu as an application.
• Manually from a console window as an application.
• Automatically or manually as a Windows service.
From the Programs Menu
To start Data Sourcer from the Programs menu as an application, select DataSourcer from the program group created during installation. The application opens a console window and automatically issues the parameters you specified during configuration to start Data Sourcer. The Data Sourcer application name and version appear in the title bar.
From a Console Window
To start Data Sourcer as an application from a console window:
1. At the command-line prompt, go to the directory where Data Sourcer has been installed.
2. Type the name of the Data Sourcer executable followed by the appropriate command-line parameters using the following syntax:
data_sourcer.exe -host hostname -port portno -app application
where: hostname refers to the name of the computer on which Configuration
Server is running. portno refers to the communication port on which Configuration
Server is running.
Note: If you are using a Framework 8.1 environment, if Data Sourcer is connected to the Configuration Server Proxy and if the primary Configuration Server and the Configuration Server Proxy have the appropriate connections, starting Data Sourcer through SCI establishes a connection with the Configuration Server Proxy.

Deployment Guide 67
Chapter 6: Starting and Stopping Historical Reporting Starting and Stopping Data Sourcer
application refers to the name of the Data Sourcer Application object as defined in the Configuration Manager.
For example, to start Data Sourcer with parameters specifying the host as cs-host, port as 2020, and name as Data Sourcer, type:data_sourcer.exe -host "cs-host" -port 2020 -app "Data Sourcer"
As a Windows Service
1. From the task bar, choose Start > Settings > Control Panel > Administrative Tools. The Control Panel folder appears.
2. Double-click the Services icon. The Services screen opens.
3. Right-click your Data Sourcer service from the list and click Start.
Manually Starting Data Sourcer from UNIX Platforms
1. Go to the directory where Data Sourcer has been installed.
2. Type the name of the Data Sourcer executable followed by the appropriate command-line parameters using the following syntax:
./data_sourcer -host hostname -port portno -app application
where: hostname refers to the name of the computer on which Configuration
Server is running. portno refers to the communication port on which Configuration
Server is running.
Note: If the host or application name contains spaces or hyphens (-), enclose it in double quotation marks.
Note: If needed, specify the optional parameters -backup_host and-backup_port.
Note: Since the Local Control Agent (LCA) can be installed as a Windows service with the user interface disabled, all servers started through SCI, in this case, are started without a console unless you specifically select the Allow Service to Interact with Desktop check box for both LCA and Data Sourcer.
Note: You can invoke Data Sourcer only from the directory where it is installed.

68 Reporting 8.1
Chapter 6: Starting and Stopping Historical Reporting Starting and Stopping Data Sourcer
application refers to the name of the Data Sourcer Application object as defined to the Configuration Server.
For example, to start Data Sourcer with parameters specifying the host as cs-host, port as 2020, and name as Data Sourcer, type:./data_sourcer -host "cs-host" -port 2020 -app "Data Sourcer"
When Data Sourcer starts, it writes log messages into stdout, so you can check for errors in its configuration. If Data Sourcer fails to start, a descriptive message with the reason is written to stdout. If you cannot resolve the problem, contact Genesys Customer Care and provide the entire content of the Data Sourcer log.
You can also type the name of the Data Sourcer executable and its command-line parameters into a shell script and execute the script using the following command:
./run.sh [Name of script]
To redirect Data Sourcer output (on most UNIX shells), use the following syntax:
./data_sourcer -host hostname -port portno -app appl > log_file.log
To have both log file and console, within the Configuration Manager add the following to Data Sourcer’s application properties:
• Section: Log.
• Option: all.
• Value: stdout, <log_file_name.log>, network. Instead of stdout, you can also use stderr.
• Add the name of the log file. (It is written into the same directory where Data Sourcer is installed, or indicate the full path where you want it to be written.)
• Separate values with commas.
Stopping Data Sourcer on Windows Platforms
If Data Sourcer is running as an application, switch to its console window and press Control-C (^C) to stop it. If you are running Data Sourcer as a Windows service, you should stop it only from the Microsoft Management Console.
Note: If the host or application name contains spaces or hyphens (-), enclose it in double quotation marks.
Note: If needed, specify the optional parameters -backup_host and -backup_port.

Deployment Guide 69
Chapter 6: Starting and Stopping Historical Reporting Starting and Stopping ETL Assistant
To stop Data Sourcer running as a Windows service:
1. From the task bar, choose Start > Settings > Control Panel > Administrative Tools. The Control Panel folder appears.
2. Double-click the Services icon. The Services screen opens.
3. Right-click your Data Sourcer service from the list and click Stop.
If you use LCA and SCS, you can stop Data Sourcer from SCI. To do so:
1. From the Applications view, select your Data Sourcer Application object in the list pane.
2. Click Stop on the toolbar, or select Stop either from the Action menu or the context menu.
3. Click Yes in the confirmation box that appears.
Stopping Data Sourcer on UNIX Platforms
Stop Data Sourcer on UNIX using either of the following methods:
• On the command line, type kill -9 processid, where processid is Data Sourcer’s UNIX process ID.
• Press ^C from the active Data Sourcer console.
• If LCA and SCS are used, you can stop Data Sourcer from SCI.
Starting and Stopping ETL AssistantThis section describes the starting and stopping procedures for the Extraction, Transformation, and Loading (ETL) Assistant, a component of both Real-Time and Historical Reporting. You can start ETL Assistant from a Windows 2000, Windows XP, or Windows Server 2003 platform.
What Must Be Running Prior to Start
• Configuration Server
• RDBMS for Data Mart
Note: Be sure that the autorestart property is cleared for the Data Sourcer Application object in the Configuration Manager.
Note: Be sure that the autorestart property is cleared for the Data Sourcer Application object in the Configuration Manager.
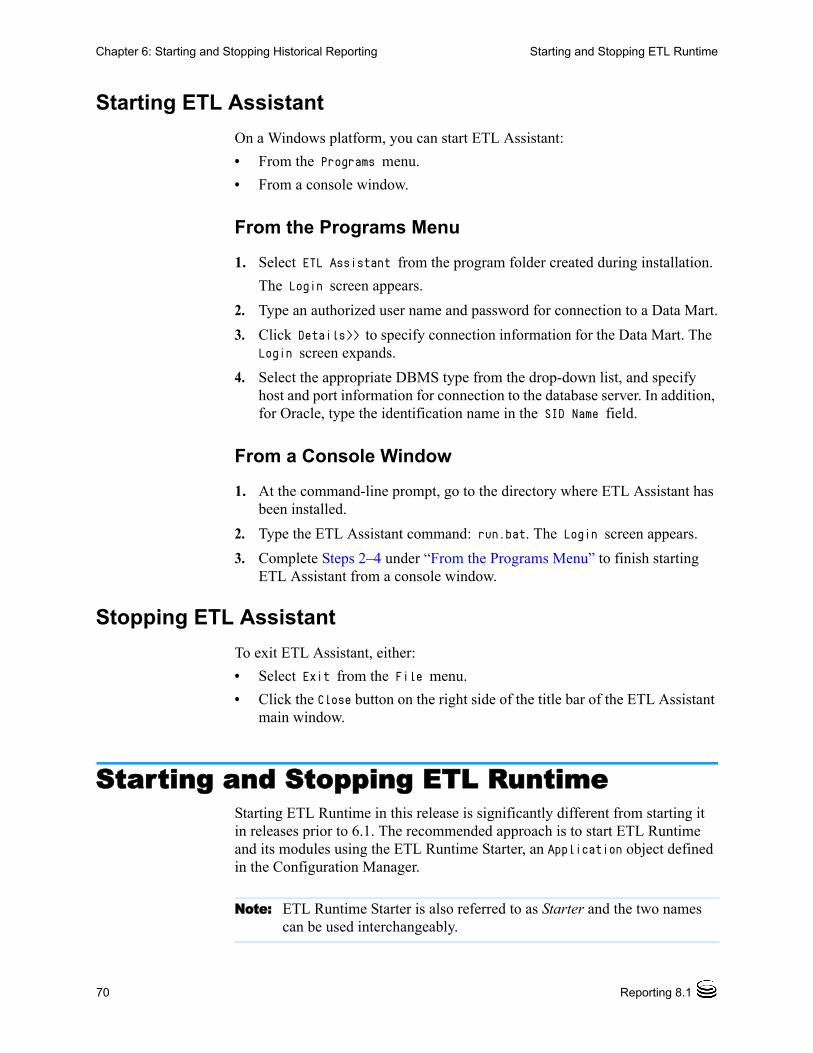
70 Reporting 8.1
Chapter 6: Starting and Stopping Historical Reporting Starting and Stopping ETL Runtime
Starting ETL Assistant
On a Windows platform, you can start ETL Assistant:
• From the Programs menu.
• From a console window.
From the Programs Menu
1. Select ETL Assistant from the program folder created during installation.
The Login screen appears.
2. Type an authorized user name and password for connection to a Data Mart.
3. Click Details>> to specify connection information for the Data Mart. The Login screen expands.
4. Select the appropriate DBMS type from the drop-down list, and specify host and port information for connection to the database server. In addition, for Oracle, type the identification name in the SID Name field.
From a Console Window
1. At the command-line prompt, go to the directory where ETL Assistant has been installed.
2. Type the ETL Assistant command: run.bat. The Login screen appears.
3. Complete Steps 2–4 under “From the Programs Menu” to finish starting ETL Assistant from a console window.
Stopping ETL Assistant
To exit ETL Assistant, either:
• Select Exit from the File menu.
• Click the Close button on the right side of the title bar of the ETL Assistant main window.
Starting and Stopping ETL RuntimeStarting ETL Runtime in this release is significantly different from starting it in releases prior to 6.1. The recommended approach is to start ETL Runtime and its modules using the ETL Runtime Starter, an Application object defined in the Configuration Manager.
Note: ETL Runtime Starter is also referred to as Starter and the two names can be used interchangeably.

Deployment Guide 71
Chapter 6: Starting and Stopping Historical Reporting Starting and Stopping ETL Runtime
You can also start ETL Runtime from the Solution Control Interface on both Windows and UNIX platforms. Optionally, you can start ETL Runtime’s modules individually from the command line of a console window. This section describes all methods for starting ETL Runtime on the Windows and UNIX platforms.
Refer to the “Configuration Options” chapter in the Reporting 7.6 ETL Runtime User’s Guide for more information about ETL Runtime Starter (also known as Starter).
What Must Be Running Prior to Start
• The RDBMS with your ODS
• Your Configuration Server
• The RDBMS with your Data Mart
Starting ETL Runtime Starter from SCI
You can start ETL Runtime Starter on any of the supported platforms. To start it from SCI:
1. From the Applications view, select your ETL Runtime Starter Application object in the List pane.
2. Click Start on the toolbar, or select Start either from the Action menu or the context menu.
3. Click Yes in the confirmation box that appears.
Starting ETL Runtime Starter from Windows Platforms
You can start the ETL Runtime Starter:
• Manually from the Programs menu as an application.
• Manually from a console window as an application.
• Automatically as a Windows service.
From the Programs Menu
Select ETL Runtime Starter from the program group created during installation. ETL Runtime Starter opens a console window and automatically issues the command-line parameters that you specified during configuration, to
Note: If you have upgraded ETL Runtime from release 6, Genesys strongly recommends that you back up your Data Mart before starting ETL Runtime for the first time.

72 Reporting 8.1
Chapter 6: Starting and Stopping Historical Reporting Starting and Stopping ETL Runtime
start ETL Runtime. The ETL Runtime Application object name and version appear in the title bar.
From a Console Window
1. At the command-line prompt, open the directory where you have installed ETL Runtime.
2. Type the name of the Starter executable followed by the appropriate command-line parameters, using the following syntax:
starter.exe -host hostname -port portno -app application
where: hostname refers to the name of the computer on which Configuration
Server is running. portno refers to the communication port on which Configuration
Server is running. application refers to the name of the Data Mart Application object.
You can also type the name of the Starter executable and its command-line parameters into a shell script, and execute the script using the following command:
./run.sh [Name of script]
As a Windows Service
1. From the task bar, choose Start > Settings > Control Panel > Administrative Tools.
2. Double-click the Services icon.
3. Select your ETL Runtime service from the list and click Start.
Note: If the host or application name contains spaces or hyphens (-), enclose it in double quotation marks.
Note: Because you can install LCA as a Windows service with the user interface disabled, all servers started through SCI, in this case, are started without a console, unless you specifically select the Allow Service to Interact with Desktop check box.

Deployment Guide 73
Chapter 6: Starting and Stopping Historical Reporting Starting and Stopping ETL Runtime
Starting ETL Runtime Starter from UNIX Platforms
To start ETL Runtime Starter on a UNIX platform:
1. Go to the directory where ETL Runtime has been installed.
2. Type the name of the Starter executable followed by the appropriate command-line parameters, using the following syntax:
./starter -host hostname -port portno -app application
where: hostname refers to the name of the computer on which Configuration
Server is running. portno refers to the communication port on which Configuration
Server is running. application refers to the name of the Data Mart Application object.
When ETL Runtime Starter starts, it writes log messages into stderr, so you can check for errors in its configuration. If ETL Runtime Starter fails to start, a descriptive message with the reason is written to stderr. If you cannot resolve the problem, contact Genesys Customer Care and provide the entire content of the log.
You can also type the name of the Data Sourcer executable file and its command-line parameters into a shell script, and execute the script using the following command:
./run.sh [Name of script]
To redirect ETL Runtime output (on most UNIX shells), use the following syntax:
./starter -host hostname -port portno -app appl > log_file.log
To have both log file and console working, within the Configuration Manager add the following in the Properties dialog box of the ETL Runtime Starter Application object:
• Section: Log
• Option: all
• Value: stderr, <log_file_name.log>, network. Instead of stderr, you can also use stdout.
Note: You can invoke ETL Runtime Starter (or any of ETL Runtime’s components) only from the directory where it is installed.
Note: If the host or application name contains spaces or hyphens (-), enclose it in double quotation marks.

74 Reporting 8.1
Chapter 6: Starting and Stopping Historical Reporting Starting and Stopping ETL Runtime
• Add the name of the log file (it will be written into the same directory where you installed ETL Runtime, or indicate the full path where you want the log file to be written).
• Separate values with commas.
Starting the ETL Runtime Modules Individually
From the command line in the directory where ETL Runtime is installed, you can start any of the following ETL Runtime modules individually:
• Aggregation
• Data Mart Database Creation
• One-Time Transformation
• Purge
• Tenants Alias Update
• Transformation
• Transformation and Aggregation
Refer to the Reporting 7.6 ETL Runtime User’s Guide for a description of ETL Runtime’s modules and property files.
The command-line syntax for starting ETL Runtime is the following:
java java_options -jar transform.jar -conf properties_file
where
• java_options are those specified in the corresponding properties file (sample batch files provided in Table 3).
• properties_file are any of the properties files listed in Table 3 on page 74.
ETL Runtime parameters can also be issued at the command line for all ETL Runtime modules. Refer to the Reporting 7.6 ETL Runtime User’s Guide for a complete listing of parameters.
Table 3 lists the batch files and corresponding .properties file that you can issue for each module at the command line where ETL Runtime has been installed.
Table 3: Starting ETL Runtime’s Modules
ETL Runtime Module
Batch File Corresponding Property File
Aggregation Windows: run-agg_only.bat
UNIX: run-agg_only
etl.properties
Data Mart Database Creation
Windows: run-createdb.bat
UNIX: run-createdb
createdb.properties
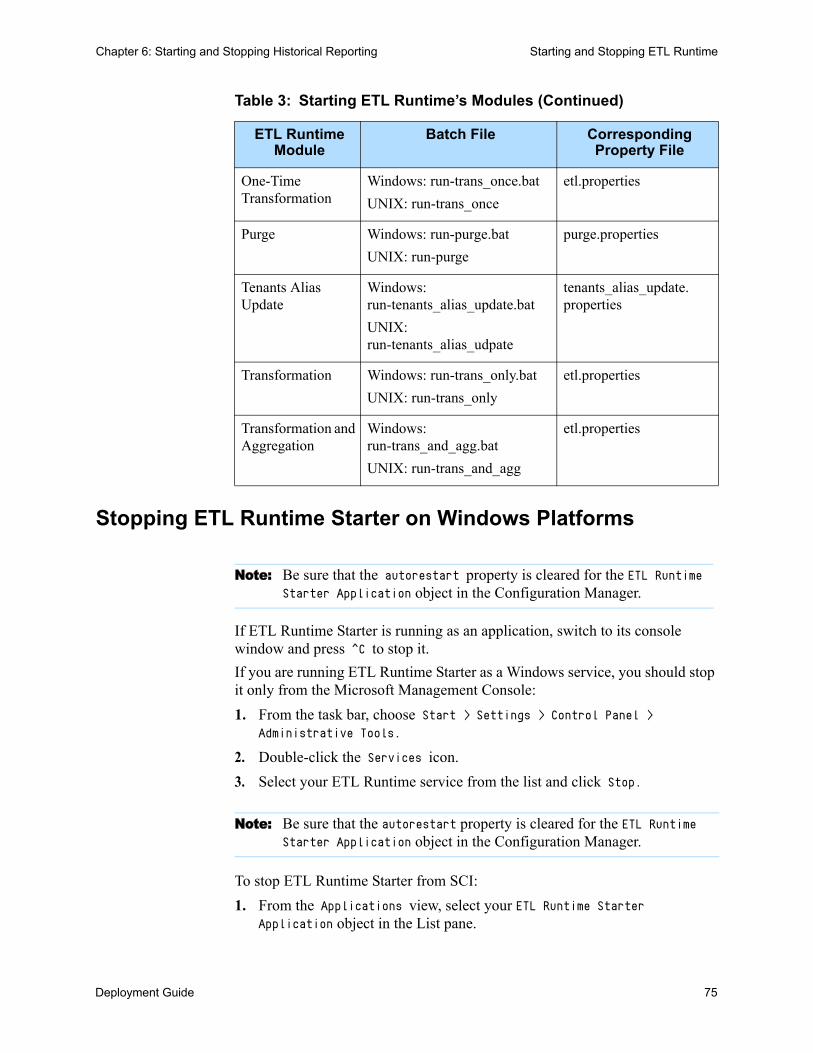
Deployment Guide 75
Chapter 6: Starting and Stopping Historical Reporting Starting and Stopping ETL Runtime
Stopping ETL Runtime Starter on Windows Platforms
If ETL Runtime Starter is running as an application, switch to its console window and press ^C to stop it.
If you are running ETL Runtime Starter as a Windows service, you should stop it only from the Microsoft Management Console:
1. From the task bar, choose Start > Settings > Control Panel > Administrative Tools.
2. Double-click the Services icon.
3. Select your ETL Runtime service from the list and click Stop.
To stop ETL Runtime Starter from SCI:
1. From the Applications view, select your ETL Runtime Starter Application object in the List pane.
One-Time Transformation
Windows: run-trans_once.bat
UNIX: run-trans_once
etl.properties
Purge Windows: run-purge.bat
UNIX: run-purge
purge.properties
Tenants Alias Update
Windows: run-tenants_alias_update.bat
UNIX: run-tenants_alias_udpate
tenants_alias_update.properties
Transformation Windows: run-trans_only.bat
UNIX: run-trans_only
etl.properties
Transformation and Aggregation
Windows: run-trans_and_agg.bat
UNIX: run-trans_and_agg
etl.properties
Table 3: Starting ETL Runtime’s Modules (Continued)
ETL Runtime Module
Batch File Corresponding Property File
Note: Be sure that the autorestart property is cleared for the ETL Runtime Starter Application object in the Configuration Manager.
Note: Be sure that the autorestart property is cleared for the ETL Runtime Starter Application object in the Configuration Manager.

76 Reporting 8.1
Chapter 6: Starting and Stopping Historical Reporting Default Source Path
2. Click Stop on the toolbar, or select Stop either from the Action menu or the context menu.
3. Click Yes in the confirmation box that appears.
Stopping ETL Runtime Starter on UNIX Platforms
Stop ETL Runtime Starter on UNIX using either of the following methods:
• On the command line, type kill -SIGTERM processid where processid is ETL Runtime Starter’s UNIX process ID.
• Press ^C from the active ETL Runtime Starter console.
Default Source PathTable 4 lists the source paths and program groups of Historical Reporting components on Windows platforms created during the installation process if you accepted all default values.
Note: Be sure that the autorestart property is cleared for the ETL Runtime Starter Application object in the Configuration Manager.
Table 4: Default Application Source Paths for Historical Reporting
Reporting Component
Default Source Path/Program Group
Data Sourcer Source Path: C:\Program Files\GCTI\Data Sourcer
Program Group: Genesys Solutions\Reporting 7.6
Data Modeling Assistant
Source Path: C:\Program Files\GCTI\Data Modeling Assistant
Program Group: Genesys Solutions\Reporting 7.6
ETL Assistant Source Path: C:\Program Files\GCTI\Data Mart\etl_assistant
Program Group: Genesys Solutions\Reporting 7.6
ETL Runtime Source Path: C:\Program Files\GCTI\Data Mart\ETL Runtime
Program Group: Genesys Solutions\Reporting 7.6

Deployment Guide 77
Chapter
7 Installing Real-Time ReportingThe installation of Real-Time Reporting involves one component: CCPulse+. This chapter describes the steps for manually installing CCPulse+. Refer to the Reporting 8.1 CCPulse+ Administrator’s Guide for instructions on installing CCPulse+ silently.
Refer to Chapter 2 for preparatory requirements that you must satisfy before installing Real-Time Reporting.
To install Real-Time Reporting:
1. Invoke setup.exe from the Reporting CD.
The InstallShield Wizard opens.
2. At the Welcome to the Installation of CCPulse+ screen, read the general information and click Next to proceed.
3. At the Choose Destination Location screen, accept the default location, type a desired location, or click Browse to choose the path where CCPulse+ is to be installed, and click Next.
4. At the Select Monitoring Agent Activity screen, select whether users can monitor agent activity, and click Next.
5. At the Ready to Install screen, click Install.
The Wizard displays a progress-of-completion bar on the Installation Status screen while copying the necessary files and registering dlls.
6. At the Installation Complete screen, click Finish.
Note: CCPulse+ is a Microsoft Windows application. It is not supported on UNIX platforms.

78 Reporting 8.1
Chapter 7: Installing Real-Time Reporting
The Wizard creates a CCPulse+ program group inside Genesys Solutions/Reporting 8.1, with two menu items:
• ReadMe—a shortcut to information about the CCPulse+ installation package
• Start CCPulse+—a shortcut to the application executable

Deployment Guide 79
Chapter
8 Setting Up Real-Time Reporting UsersCCPulse+ looks to the setting of the Ranks property of Persons objects in Configuration Server to determine whether to grant or restrict access to certain CCPulse+ functionality that is typically reserved for administrator-type operations. This ranking is not to be confused with access to data in the Configuration Database—access which is controlled, in part, by the Security property of the Persons object.
This chapter describes the additional setup required to set up CCPulse+ users and administrators. It contains the following sections: Setting Up Users, page 79 Setting Up Administrators, page 80
Refer to the “Persons” topics in Framework 8.1 Configuration Manager Help for additional information about this object’s properties.
Setting Up UsersCCPulse+ users can select and monitor configuration objects only with a connection to a selected Stat Server and its set of monitored tenants. Any CCPulse+ user can open any workspace against a particular Stat Server application available from Stat Server list.
To set up a new CCPulse+ user within the Configuration Manager:
1. With the Persons folder selected, select File > New > Person.
2. On the General tab, identify the new person by completing the First and Last name fields.
3. On the Ranks tab, click Add and specify the following: Application type: Call Center Pulse Rank: User

80 Reporting 8.1
Chapter 8: Setting Up Real-Time Reporting Users Setting Up Administrators
4. Click OK.
You have now set up a CCPulse+ user.
Setting Up AdministratorsIn addition to the privileges provided by CCPulse+ users, CCPulse+ administrators can:
• Use the CCPulse+ Threshold and Action Wizard to create and/or modify threshold and action scripts.
• Use the CCPulse+ Template Wizard to create and/or modify templates.
• Use the Import/Export Utility.
To set up a new CCPulse+ administrator within the Configuration Manager:
1. With the Persons folder selected, select File > New > Person. The Configuration Manager displays the Person Properties screen.
2. On the General tab, identify the Person by filling in the appropriate fields. Clear the Is Agent check box.
3. Select the Ranks tab, click Add, and specify the following: Application type: Call Center Pulse Rank: Administrator
4. Click OK.
You have now set up a CCPulse+ administrator.
Note: By default, CCPulse+ recognizes all Configuration Manager Persons objects as having the rank of User, if not explicitly identified otherwise.

Deployment Guide 81
Chapter
9 Starting and Stopping Real-Time ReportingThis chapter provides the starting and stopping procedures for Real-Time Reporting and includes a “What Must Be Running Prior to Start” subsection, so that startup is successful the first time. Starting procedures assume that you have properly configured and installed application components. If not, refer to Chapters 4 and 7. The final section provides the default source paths for all Real-Time Reporting executables.
You can start your entire solution, including the server components of Reporting, from SCI, which is the recommended approach. Where applicable, this information is covered in Chapter 6. The historical aspect of Real-Time Reporting is also covered.
This chapter contains the following sections: Starting and Stopping CCPulse+, page 81 Default Source Paths, page 83
Starting and Stopping CCPulse+This section describes the starting and stopping procedures for CCPulse+, a component of Real-Time Reporting.
What Must Be Running Prior to Start
• Configuration Server
• Stat Server
• RDBMS and DB Server for Data Mart, if you intend to operate CCPulse+ in historical as well as real-time mode

82 Reporting 8.1
Chapter 9: Starting and Stopping Real-Time Reporting Starting and Stopping CCPulse+
Starting CCPulse+
On Windows platforms, you can start CCPulse+:
• From the Programs menu.
• From a console window.
From the Programs Menu
To start CCPulse+ from the Programs menu:
1. From the Genesys Solutions\Reporting 8.1 program folder created during installation, select Start CCPulse+.
The Login screen appears with the name of the previous CCPulse+ user in the User name field.
2. Type an authorized user name and password for connection to your Configuration Server.
3. Click the Details>> button to display connection information for your Configuration Server. The CCPulse+ Login screen expands.
4. Type your CCPulse+ application name, host name and port of your Configuration Server, and click OK.
From a Console Window
1. At the command-line prompt, open the directory where CCPulse+ has been installed.
2. Type CallCenter.exe at the command line. The Login screen appears, with the name of the previous user filled in.
3. Complete Steps 2–4 under “From the Programs Menu” to finish starting CCPulse+ from a console window.
Stopping CCPulse+
To exit CCPulse+, either:
• Select Close from the File menu.
• Click the Close button located on the right side of the title bar in the CCPulse+ window.
Note: If a security banner is configured for all Genesys user interfaces, it is displayed before the Login screen.

Deployment Guide 83
Chapter 9: Starting and Stopping Real-Time Reporting Default Source Paths
Default Source PathsTable 5 lists the source path and program group of the CCPulse+ component of Real-Time Reporting on Windows platforms as created during the installation process if you accept all default values.
Refer to Table 4 on page 76 for a listing of Historical Reporting component source paths, which are used for the historical facet of Real-Time Reporting.
Table 5: Default Application Source Paths for Real-Time Reporting
Reporting Component
Default Source Path/Program Group
CCPulse+ Source Path: C:\Program Files\GCTI\CCPulse+
Program Group: Genesys Solutions\Reporting 8.1

84 Reporting 8.1
Chapter 9: Starting and Stopping Real-Time Reporting Default Source Paths

Deployment Guide 85
Chapter
10 Uninstalling Reporting ComponentsTo uninstall applications, you must first stop them. Refer to Chapters 6 and 9 for information about stopping Reporting components.
This chapter contains the following sections: Uninstalling Data Modeling Assistant, page 85 Uninstalling Data Mart, page 86 Uninstalling Data Sourcer, page 87 Uninstalling CCPulse+, page 88
Starting with the 7.0.2 release, you uninstall applications on Windows platforms either from Add/Remove Programs in the Control Panel, or during the maintenance of an existing installation. Previously, you performed this action by selecting the Uninstall menu item from the program group created during installation. Release 7.0.2 installations no longer deploy an Uninstall menu item.
Uninstalling Data Modeling AssistantOn Windows platforms, you can uninstall Data Modeling Assistant:
• From the Control Panel
• During Installation Maintenance
From the Control Panel
To uninstall Data Modeling Assistant from the Control Panel:
1. Open Add or Remove Programs.
2. Select the Genesys Data Modeling Assistant 7.6 application.

86 Reporting 8.1
Chapter 10: Uninstalling Reporting Components Uninstalling Data Mart
3. Click Remove.
During Installation Maintenance
To uninstall Data Modeling Assistant during Installation Maintenance:
1. From the Reporting CD, double-click setup.exe.
2. Navigate to the Maintenance Setup Type screen and select the Maintenance of the existing installation option.
3. Select your Data Modeling Assistant application from the list box and click Next.
4. At the Welcome screen, click Remove, and then Next.
5. At the Confirm Uninstall dialog box, click Next.
6. At the Maintenance Complete screen, click Finish.
7. At the After Installation screen, click Next.
Uninstalling Data MartOn Windows platforms, you can uninstall Data Mart:
• From the Control Panel
• During Installation Maintenance
From the Control Panel
To uninstall Data Mart from the Control Panel:
1. Open Add or Remove Programs.
2. Select the Genesys Data Mart 7.6 application.
3. Click Remove.
During Installation Maintenance
To uninstall Data Mart during Installation Maintenance:
1. From the Reporting CD, double-click setup.exe.
2. Navigate to the Maintenance Setup Type screen and select the Maintenance of the existing installation option.
3. Select your Data Mart application from the list box, and click Next.
4. At the Welcome screen, click Remove, and then Next.
5. At the Confirm Uninstall dialog box, click Next.
6. At the Maintenance Complete screen, click Finish.

Deployment Guide 87
Chapter 10: Uninstalling Reporting Components Uninstalling Data Sourcer
7. At the After Installation screen, click Next.
Note: The Uninstall Wizard does not delete the Data Mart database or the Data Mart Application object in the Configuration Server, so you can reuse them later if desired.
Uninstalling Data SourcerOn Windows platforms, you can uninstall Data Sourcer:
• From the Control Panel
• During Installation Maintenance
From the Control Panel
To uninstall Data Sourcer from the Control Panel:
1. Open Add or Remove Programs.
2. Select the Genesys Data Sourcer 7.6 application.
3. Click Remove.
During Installation Maintenance
To uninstall Data Sourcer during Installation Maintenance:
1. From the Reporting CD, double-click setup.exe.
2. Navigate to the Maintenance Setup Type screen and select the Maintenance of the existing installation option.
3. Select your Data Sourcer application from the list box, and click Next.
4. At the Welcome screen, click Remove, and then Next.
5. At the Confirm Uninstall dialog box, click Next.
6. At the Maintenance Complete screen, click Finish.
7. At the After Installation screen, click Next.
Note: The Uninstall Wizard does not delete ODS or the Data Sourcer Application object in the Configuration Server, so you can reuse them later if desired.

88 Reporting 8.1
Chapter 10: Uninstalling Reporting Components Uninstalling CCPulse+
Uninstalling CCPulse+On Windows platforms, you can uninstall CCPulse+:
• From the Control Panel
• During Installation Maintenance
From the Control Panel
To uninstall CCPulse+ from the Control Panel:
1. Open Add or Remove Programs.
2. Select the Genesys CCPulse+ 8.1 application.
3. Click Remove.
During Installation Maintenance
To uninstall CCPulse+ during Installation Maintenance:
1. From the Reporting CD, double-click setup.exe.
2. Navigate to the Maintenance Setup Type screen and select the Maintenance of the existing installation option.
3. Select your CCPulse+ application from the list box and click Next.
4. At the Welcome screen, click Remove and then Next.
5. At the Confirm Uninstall dialog box, click Next.
6. At the Maintenance Complete screen, click Finish.
7. At the After Installation screen, click Next.

Deployment Guide 89
Appendix
Scaling Your EnvironmentThe original estimates you made for the number of collection units required in your Reporting environment might require modification. For instance, your environment might grow beyond expectations as your company structure changes, or your environment might be splintered as your company is divided into independent business units.
The information provided in Chapter 2 assumes a stable, nonelastic environment and assists you in configuring your original environment.
This chapter assumes otherwise, and it describes how to modify your configuration to effectively use your custom reports or the canned reports provided with each solution so that they continue to yield meaningful results.
This chapter contains the following sections: Do You Need to Scale Your Environment?, page 89 Adding New Collection Units, page 91 Removing Collection Units, page 93 Problems with Scaling Incorrectly, page 94
Do You Need to Scale Your Environment?Ultimately, only you can determine whether to scale up or scale down your environment; however, Table 6 lists a few signs that you can look for when making your assessment.

90 Reporting 8.1
Appendix : Scaling Your Environment Do You Need to Scale Your Environment?
Table 6: Signs to Look for When Determining Whether to Scale Up
Symptom Probable Cause
The emergency save files steadily grow. • Performance problems with the ODS RDBMS.
• Network is slow.
• ODS is not regularly available.
• The number of statistics requested is too large for your environment.
• The number of objects in your Configuration Server has increased.
Data Sourcer chunks are getting larger over time, or chunk write time has increased. (You can review chunk write time in the Data Sourcer log.)
• The number of open statistics has increased.
• The number of objects in your Configuration Server has increased.
Reporting activity overloads your collection unit.
• Stat Server is overloaded (that is, you have reached 100 percent CPU).
• The collection unit is unable to process all of the requests from all activated report layouts within the processing time indicated by the time profile.
Stat Server cannot handle the number of requests made by Data Sourcer.
• Stat Server memory required exceeds the available physical memory.
Memory consumption increases over time.
• You are running other non-Reporting processes concurrent with Reporting.
• The number of objects in your Configuration Server has increased.

Deployment Guide 91
Appendix : Scaling Your Environment Adding New Collection Units
Adding New Collection UnitsIf you intend to create a new collection unit composed of elements completely separate from those in your existing collection unit(s), create the new collection unit as described in Chapter 2. If, however, you intend to move objects between collection units—such as Agent, Place, or Queue objects—use the following procedure. The problem you want to avoid is double counting—that is, having objects considered twice (or more) in the corresponding reports generated by each collection unit.
Note: In this procedure, the N subscript denotes elements in the new collection unit. O indicates elements in the old or existing collection unit.
To add a collection unit to your environment:
1. Map out the Reporting environment as you envision it and determine which objects are to reside in which collection unit. Account for every object in your mapping. Follow the sizing guidelines outlined in Chapter 2.
2. Stop Data Sourcer (DSO).
3. Configure a new Data Sourcer Application object (DSN) for the new collection unit.
4. Install DSN, and then start it to initialize the new ODS (ODSN).
5. When initialization completes, stop DSN.
6. In the Configuration Server, define uniquely named, nonoverlapping groups of objects.
Figure 11 is a simple example showing the Bronze agent group being split into the BronzeInfo and BronzeService agent groups. The six agents previously included in the Bronze group have been assigned to either the BronzeInfo or BronzeService agent groups.

92 Reporting 8.1
Appendix : Scaling Your Environment Adding New Collection Units
Figure 11: Redefining Metagroups
Note: In this example, when the transformation of objects is complete, delete the Bronze agent group.
7. Deactivate the affected report layouts in DMA. Affected report layouts are those that are based on the former metagroup—for example, the Bronze Agent Layout. (There is no quick way to find all affected report layouts.)
8. Using DMA, redefine the affected report layouts to reference the appropriate metagroups. You might have to create new report layouts to complete this task.
For example, in Figure 12 the report layout named Bronze Agent Layout was renamed to BronzeService Agent Layout and its supporting metagroup was changed from All Agents to the BronzeService, which consists of three agents (refer to Figure 11). Then a new agent report layout, BronzeInfo Agent Layout, was created to incorporate the agents belonging to the BronzeInfo agent group.
After you have defined these report layouts, activate them so that data collection can begin when Data Sourcer is started.
9. Start DSN to start data collection in the new ODS (ODSN).
10. Start ETL Assistant and add ODSN to the Data Mart. Define purge rules if they should differ from the default.
When you run the Transformation module, ETL Runtime automatically combines report views from multiple sources.

Deployment Guide 93
Appendix : Scaling Your Environment Removing Collection Units
Figure 12: Redefining Report Layouts
For Reporting 6.1 users, two additional steps are necessary:
1. Run the Tenants Alias Update (TAT) module of ETL Runtime. Do this even if your modified environment remains a single-tenant environment. Running the TAT module combines report views from multiple sources.
2. If you use ETL Runtime Starter, add the TAT process to its definition.
Removing Collection UnitsThere are several reasons why you might consider scaling down your Reporting environment—for example, your company might choose to downsize or restructure its business into smaller and independent business units, or to correct an inefficient environment and make better use of resources.
Note: In this procedure, the D subscript denotes elements in the collection unit to be removed or deleted. R denotes the elements in the remaining collection unit.
To remove a collection unit from your Reporting environment:

94 Reporting 8.1
Appendix : Scaling Your Environment Problems with Scaling Incorrectly
1. Map out the environment you envision and execute the plan during off-peak hours. Follow the guidelines in Chapter 2, to determine if your remaining collection unit(s) can absorb the statistics collected on the objects from the collection unit being removed.
2. Deactivate all affected collection units by stopping their Data Sourcer applications. Affected collection units are those that will either be: Deleted. Modified to take on all or part of the objects from the deleted
collection unit(s).
3. Invoke ETL Assistant and delete the corresponding ODS source (ODSD). This action marks this source for deletion in the Data Mart. Note that ODSD data still resides there.
4. Create object groups in the remaining collection unit and/or modify existing object groups to absorb those objects in the collection unit you are deleting.
5. If you created new object groups in Step 4, create new report layouts based on those object groups and activate them in DMA.
6. If you created new object groups in Step 4, run ETL Runtime’s TAT module to create the new tables necessary for the report views.
7. Reactivate the remaining collection units by starting their Data Sourcer applications.
Be sure to monitor the Data Sourcer log file over the course of a day containing peak periods, to make sure you have not overloaded your resources. If you use the emergency save file, for instance, and have no unexplained network interruptions, resources are probably inadequate to handle the load. Revisit Chapter 2. If all goes smoothly, this procedure frees up the DSD, ODSD, and DBServerD resources.
Problems with Scaling IncorrectlyStatistical double counting might result when two or more collection units share objects and is manifested in the canned reports you generate. For instance, if Bob is defined as an agent both in CU1 and CU2, the calls he receives might be tallied by both collection units. If Bob took any calls during a reported time period, the agent report for that period reports twice the number of calls Bob actually received.
As you modify your Reporting environment, also make sure that the objects you create are uniquely named across all collection units common to one Data Mart. For instance, if you are adding Bob Smith to CU2 and a Bob Smith already exists in CU1, double counting results even if the agents represent two different people. The canned reports are based on the Presentation Name field in the various Object tables (the field with names beginning with O_) of the Data Mart; this field is not unique.
Deployment Guide 95
Appendix : Scaling Your Environment Problems with Scaling Incorrectly
Finally, map out your integration plan thoroughly. You must properly set up:
• All objects in the Configuration Manager.
• Object groups to include all objects.
• Report layouts based on those metagroups.
• All ODS sources within ETL Assistant.
If you do not, CCPulse+ and Contact Center Analyzer cannot possibly generate the results you expect.

96 Reporting 8.1
Appendix : Scaling Your Environment Problems with Scaling Incorrectly

Deployment Guide 97
Supplements
Related Documentation ResourcesThe following resources provide additional information that is relevant to this software. Consult these additional resources as necessary.
Solution Reporting
• Reporting 7.6 Data Modeling Assistant Help, for information about the operation of this component.
• The Reporting 7.6 ETL Runtime User’s Guide, for information about fine-tuning the Data Mart configuration.
• Reporting 8.1 CCPulse+ Help, for information about the operation of this product.
• The Reporting Technical Reference Guide for the Genesys 7.2 Release, for information about the reporting and layout templates provided with Genesys solutions.
• The Reporting 8.1 CCPulse+ Administrator’s Guide, for information about CCPulse+ administrators, installing CCPulse+ silently, and fine-tuning the CCPulse+ configuration.
• The Reporting 8.0 Master Index, which will help you find where other related topics are documented.
• The Genesys Info Mart Deployment Guide, for information about the deployment of Genesys Info Mart.
Management Framework
• The Framework 8.5 Stat Server Deployment Guide, for information related to configuring Stat Server.

98 Reporting 8.1
Related Documentation Resources
SAP Crystal Reports
• SAP Crystal Reports’ documentation set for instructions on installing SAP Crystal Reports, which is used in conjunction with the Genesys-provided report templates included on the Reporting Templates CD. This documentation set also explains the tools available with the SAP Crystal Reports Suite.
Genesys
• Genesys Technical Publications Glossary, available on the Genesys Documentation website and which provides a comprehensive list of the Genesys and computer-telephony integration (CTI) terminology and acronyms used in this document.
• Genesys Migration Guide, which ships on the Genesys Documentation Library DVD, and which provides documented migration strategies for Genesys product releases. Contact Genesys Customer Care for more information.
• Release Notes and Product Advisories for this product, which are available on the Genesys Customer Care website at http://www.genesys.com/customer-care.
Information about supported hardware and third-party software is available on the Genesys Customer Care website in the following documents:
• Genesys Supported Operating Environment Reference Guide
• Genesys Supported Media Interfaces Reference Manual
Consult these additional resources as necessary:
• Genesys Hardware Sizing Guide, which provides information about Genesys hardware sizing guidelines for the Genesys 7.x/8.x releases.
• Genesys Interoperability Guide, which provides information on the compatibility of Genesys products with various Configuration Layer Environments; Interoperability of Reporting Templates and Solutions; and Gplus Adapters Interoperability.
• Genesys Licensing Guide, which introduces you to the concepts, terminology, and procedures relevant to the Genesys licensing system.
• Genesys Database Sizing Estimator 7.6 Worksheets, which provides a range of expected database sizes for various Genesys products.
For additional system-wide planning tools and information, see the release-specific listings of System-Level Documents on the Genesys Documentation website (docs.genesys.com).
Genesys product documentation is available on the:
• Genesys Customer Care website at http://www.genesys.com/customer-care

Deployment Guide 99
Related Documentation Resources
• Genesys Documentation Library DVD, which you can order by e-mail from Genesys Order Management at [email protected].

100 Reporting 8.1
Document Conventions
Document ConventionsThis document uses certain stylistic and typographical conventions—introduced here—that serve as shorthands for particular kinds of information.
Document Version Number
A version number appears at the bottom of the inside front cover of this document. Version numbers change as new information is added to this document. Here is a sample version number:
81fr_ref_11-2014_v8.1.001.00
You will need this number when you are talking with Genesys Customer Care about this product.
Screen Captures Used in This Document
Screen captures from the product graphical user interface (GUI), as used in this document, may sometimes contain minor spelling, capitalization, or grammatical errors. The text accompanying and explaining the screen captures corrects such errors except when such a correction would prevent you from installing, configuring, or successfully using the product. For example, if the name of an option contains a usage error, the name would be presented exactly as it appears in the product GUI; the error would not be corrected in any accompanying text.
Type Styles
Table 7 describes and illustrates the type conventions that are used in this document.

Deployment Guide 101
Document Conventions
Table 7: Type Styles
Type Style Used For Examples
Italic • Document titles
• Emphasis
• Definitions of (or first references to) unfamiliar terms
• Mathematical variables
Also used to indicate placeholder text within code samples or commands, in the special case where angle brackets are a required part of the syntax (see the note about angle brackets on page 101).
Please consult the Genesys Migration Guide for more information.
Do not use this value for this option.
A customary and usual practice is one that is widely accepted and used within a particular industry or profession.
The formula, x +1 = 7 where x stands for . . .
Monospace font
(Looks like teletype or typewriter text)
All programming identifiers and GUI elements. This convention includes:
• The names of directories, files, folders, configuration objects, paths, scripts, dialog boxes, options, fields, text and list boxes, operational modes, all buttons (including radio buttons), check boxes, commands, tabs, CTI events, and error messages.
• The values of options.
• Logical arguments and command syntax.
• Code samples.
Also used for any text that users must manually enter during a configuration or installation procedure, or on a command line.
Select the Show variables on screen check box.
In the Operand text box, enter your formula.
Click OK to exit the Properties dialog box.
T-Server distributes the error messages in EventError events.
If you select true for the inbound-bsns-calls option, all established inbound calls on a local agent are considered business calls.
Enter exit on the command line.
Square brackets ([ ])
A particular parameter or value that is optional within a logical argument, a command, or some programming syntax. That is, the presence of the parameter or value is not required to resolve the argument, command, or block of code. The user decides whether to include this optional information.
smcp_server -host [/flags]
Angle brackets (< >)
A placeholder for a value that the user must specify. This might be a DN or a port number specific to your enterprise.
Note: In some cases, angle brackets are required characters in code syntax (for example, in XML schemas). In these cases, italic text is used for placeholder values.
smcp_server -host <confighost>

102 Reporting 8.1
Document Conventions

Deployment Guide 103
Index
Symbols[] (square brackets). . . . . . . . . . . . . . 101< > (angle brackets) . . . . . . . . . . . . . 101
Aaccept-clients-in-backup configuration option 41accounts
for Data Sourcer . . . . . . . . . . . . . . . 28for ETL Runtime . . . . . . . . . . . . . . . 28
activate-new-layouts configuration option . . 15activating
report layouts . . . . . . . . . . . . . . . . 18adding
collection units. . . . . . . . . . . . . . . . 91administrative privileges
for CCPulse+ . . . . . . . . . . . . . . . . 25for DMA . . . . . . . . . . . . . . . . . . . 24
administratorssetting up in Configuration Manager . . . . 80
Aggregation moduleETL Service Starter . . . . . . . . . . . . . 20
aggregationscalculating number of . . . . . . . . . . . . 34
angle brackets . . . . . . . . . . . . . . . . 101architecture
CCPulse+ . . . . . . . . . . . . . . . . . . 21Framework . . . . . . . . . . . . . . . . . 10real-time reporting . . . . . . . . . . . . . . 21Reporting Services . . . . . . . . . . . . . 11
assigningapplication priorities . . . . . . . . . . . . . 60
audience, for document . . . . . . . . . . . . 8auto-create-new-tenant-layouts configuration
option . . . . . . . . . . . . . . . . 15autorestart . . . . . . . . . . . . . . . . . . 75
Bbackup data sourcer
function . . . . . . . . . . . . . . . . . . . 42-backup_host command-line argument 65, 67, 68-backup_port command-line argument 65, 67, 68brackets
angle . . . . . . . . . . . . . . . . . . . 101square. . . . . . . . . . . . . . . . . . . 101
Ccalculating
Data Mart size . . . . . . . . . . . . . . . 34number of aggregations. . . . . . . . . . . 34number of collection units . . . . . . . . . . 36number of requests . . . . . . . . . . . . . 30raw data size . . . . . . . . . . . . . . . . 34
CCPulse+ . . . . . . . . . . . . . . . . . 19, 20administrative privileges . . . . . . . . . . 25architecture . . . . . . . . . . . . . . . . . 21Internet Explorer required. . . . . . . . . . 25monitoring object status. . . . . . . . . . . 20OCXs . . . . . . . . . . . . . . . . . . . . 25prerequisites . . . . . . . . . . . . . . . . 25uninstalling . . . . . . . . . . . . . . . . . 88
Choose Destination Location . . . . . 49, 54, 77chunk write time . . . . . . . . . . . . . . . .90CLASSPATH environment variable . . . . . .55collecting data . . . . . . . . . . . . . . . . .16collection units
adding. . . . . . . . . . . . . . . . . . . . 91calculating number of . . . . . . . . . . . . 36deactivating . . . . . . . . . . . . . . . . . 94defined . . . . . . . . . . . . . . . . . . . 13for voice interactions . . . . . . . . . . . . 14removing . . . . . . . . . . . . . . . . . . 93
CollectorDefault time profile . . . . . . . . 16, 17command-line arguments
-backup_host . . . . . . . . . . . . 65, 67, 68-backup_port . . . . . . . . . . . . 65, 67, 68

Index
104 Reporting 8.1
commenting on this document . . . . . . . . . 8ConfigServer Proxy . . . . . . . . . . . . . 66Configuration Layer . . . . . . . . . . . .10, 20configuration options
accept-clients-in-backup. . . . . . . . . . . 41activate-new-layouts. . . . . . . . . . . . . 15auto-create-new-tenant-layouts . . . . . . . 15trans_batch_mode. . . . . . . . . . . . . . 24
Configuration Server . . . . . . . . . . . . . 16required version . . . . . . . . . . . . . . . 23
Configuration-Object Tracking moduleETL Service Starter . . . . . . . . . . . . . 20
Contact Server Database . . . . . . . . . . 13conventions
in document . . . . . . . . . . . . . . . . 100type styles . . . . . . . . . . . . . . . . . 101
createdb.properties file . . . . . . . . . . .57, 58creating
database accounts . . . . . . . . . . . . . 28object groups . . . . . . . . . . . . . . 91, 94
cumulative statistical categories . . . . . . . 17
DData Collection Services . . . . . . . . . . . 11
components of. . . . . . . . . . . . . . . . 12defined. . . . . . . . . . . . . . . . . . . . 13distributed architecture . . . . . . . . . . . 36
Data Martcalculating size of . . . . . . . . . . . . . . 33distributed architecture . . . . . . . . . . . 36estimating size of . . . . . . . . . . . . . . 33initializing . . . . . . . . . . . . . . . . . . 57installing on Windows . . . . . . . . . . . . 53prerequisites. . . . . . . . . . . . . . . . . 25tablespaces . . . . . . . . . . . . . . . . . 27uninstalling . . . . . . . . . . . . . . . . . 86
Data Mart Services . . . . . . . . . . . . . . 11Data Modeling Assistant . . . . . . . . . . . 13
See DMA.Data Sourcer
database accounts for . . . . . . . . . . . . 28installing on UNIX . . . . . . . . . . . . . . 49installing on Windows . . . . . . . . . . . . 48manually configuring . . . . . . . . . . . . 43prerequisites. . . . . . . . . . . . . . . . . 24uninstalling . . . . . . . . . . . . . . . . . 87
data sourceroperating mode . . . . . . . . . . . . . . . 42
Data Sourcer serversConfiguration Server . . . . . . . . . . . . 16DB Server . . . . . . . . . . . . . . . . . . 16Stat Server . . . . . . . . . . . . . . . 16, 17
Database Access Points . . . . . . . . . .15, 62databases
capacity requirements . . . . . . . . . . . . 26
creating accounts . . . . . . . . . . . . . . 28DB2 preparation . . . . . . . . . . . . . . 28initialization parameters. . . . . . . . . . . 28Microsoft SQL preparation . . . . . . . . . 29names. . . . . . . . . . . . . . . . . . . . 28number of threads . . . . . . . . . . . . . 27preparations. . . . . . . . . . . . . . . . . 25supported . . . . . . . . . . . . . . . . . . 26
DB Server . . . . . . . . . . . . . . . . . 13, 17DB2
default port number . . . . . . . . . . . . . 59preparations. . . . . . . . . . . . . . . . . 28
deactivatingcollection units . . . . . . . . . . . . . . . 94report layouts . . . . . . . . . . . . . . . . 92
defaultsETL Runtime default processes . . . . . . 59
definingpurge rules . . . . . . . . . . . . . . . . . 92
determiningyour DB2 port . . . . . . . . . . . . . . . . 59
distributed architecturefor Data Collection Services . . . . . . . . 36
DMA . . . . . . . . . . . . . . . . . . . . . .14administrative privileges . . . . . . . . . . 24installing. . . . . . . . . . . . . . . . . . . 50OCXs forprerequisites . . . . . . . . . . . . . . . . 24uninstalling . . . . . . . . . . . . . . . . . 85
documentaudience . . . . . . . . . . . . . . . . . . .8change history . . . . . . . . . . . . . . . .8conventions . . . . . . . . . . . . . . . . 100errors, commenting on . . . . . . . . . . . .8version number . . . . . . . . . . . . . . 100
downloadingJRE . . . . . . . . . . . . . . . . . . . . . 55
dropTransferredTables runtime parameter . .19
Eemergency save files . . . . . . . . . . . . .90environment variables
CLASSPATH . . . . . . . . . . . . . . . . 55PATH . . . . . . . . . . . . . . . . . . . . 55
estimatingData Mart size . . . . . . . . . . . . . . . 33number of collection units . . . . . . . . . . 37ODS size . . . . . . . . . . . . . . . . . . 29
ETL Assistant . . . . . . . . . . . . . . . . .19JDBC driver for . . . . . . . . . . . . . . . 19
ETL Runtimedatabase accounts for . . . . . . . . . . . 28scheduling processes . . . . . . . . . . . . 20TAT module . . . . . . . . . . . . . . . 93, 94Transformation module . . . . . . . . . . . 92

Index
Deployment Guide 105
ETL Runtime processes . . . . . . . . . . . 59ETL Runtime Starter . . . . . . . . . . . .70, 93ETL Service Starter . . . . . . . . . . . . . 20
Aggregation module . . . . . . . . . . . . . 20Configuration-Object Tracking module . . . 20Transformation module . . . . . . . . . . . 20
Ffont styles
italic . . . . . . . . . . . . . . . . . . . . 101monospace . . . . . . . . . . . . . . . . 101
Frameworkarchitecture . . . . . . . . . . . . . . . . . 10
Hhigh availability
architecture . . . . . . . . . . . . . . . . . 41Data Mart database . . . . . . . . . . . . . 41data redundancy. . . . . . . . . . . . . . . 39deployment . . . . . . . . . . . . . . . . . 43ODS database. . . . . . . . . . . . . . . . 41planning considerations . . . . . . . . . . . 40T-Server . . . . . . . . . . . . . . . . . . . 41
hot standby mode . . . . . . . . . . . . . . 42Hyperion Intelligence Server . . . . . . . . . 98Hyperion Query Designer . . . . . . . . . . 98Hyperion tools
prerequisites. . . . . . . . . . . . . . . . . 25
IInformation Delivery Services . . . . . . . . 11initializing
the Data Mart . . . . . . . . . . . . . . . . 57installing
Data Mart . . . . . . . . . . . . . . . . . . 53Data Sourcer . . . . . . . . . . . . . . 48, 49DMA . . . . . . . . . . . . . . . . . . . . . 50
intended audience . . . . . . . . . . . . . . . 8Internet Explorer 6+ . . . . . . . . . . . . . 25italics . . . . . . . . . . . . . . . . . . . . . 101
JJDBC driver
for ETL Assistant . . . . . . . . . . . . . . 19jdbcurl runtime parameter . . . . . . . . . . 57
Llayout templates . . . . . . . . . . . . . .13, 14
limitationsnumber of report layouts . . . . . . . . . . 15
Local Control Agent . . . . . . . . . . . . 67, 69
MManagement Layer . . . . . . . . . . . . . .10Media Layer . . . . . . . . . . . . . . . . . .10memory consumption . . . . . . . . . . . . .90Microsoft Internet Explorer 6+ . . . . . . . . .25Microsoft SQL Server
preparations. . . . . . . . . . . . . . . . . 29monitoring object status
with CCPulse+ . . . . . . . . . . . . . . . 20monospace font . . . . . . . . . . . . . . . 101
Oobject groups
creating . . . . . . . . . . . . . . . . . 91, 94Object Linking and Embedding (OLE) Custom
ControlsSee OCX.
objectstracking . . . . . . . . . . . . . . . . . . . 20
OCX . . . . . . . . . . . . . . . . . . . . . .24for CCPulse+ . . . . . . . . . . . . . . . . 25for DMA
ODS . . . . . . . . . . . . . . . . . . . . . .16estimating size . . . . . . . . . . . . . . . 29tablespaces . . . . . . . . . . . . . . . . . 27
Operational Data Storage . . . . . . . . . . .13See ODS.
Oracledatabase SID required . . . . . . . . . . . 27
Oracle Corporation. . . . . . . . . . . . . . .21overloading
collection units . . . . . . . . . . . . . . . 90
Pparameters
for database initialization . . . . . . . . . . 28pass runtime parameter . . . . . . . . . . . .57PATH environment variable . . . . . . . . . .55Persons object
Ranks property . . . . . . . . . . . . . . . 79Security property . . . . . . . . . . . . . . 79
predeploymentadministrator privileges . . . . . . . . . . . 23CCPulse+ . . . . . . . . . . . . . . . . . . 25component requirements . . . . . . . . . . 24Data Mart . . . . . . . . . . . . . . . . . . 25Data Modeling Assistant . . . . . . . . . . 24

Index
106 Reporting 8.1
Data Sourcer . . . . . . . . . . . . . . . . 24database preparations. . . . . . . . . . . . 25DB2 preparations . . . . . . . . . . . . . . 28Hyperion tools . . . . . . . . . . . . . . . . 25Microsoft SQL Server preparations . . . . . 29
prerequisitesfor starting CCPulse+ . . . . . . . . . . . . 81for starting Data Sourcer . . . . . . . . . . 65for starting ETL Assistant . . . . . . . . . . 69for starting ETL Runtime . . . . . . . . . . 71
prioritiesassigning start-up priorities . . . . . . . . . 60
purge rulesdefining . . . . . . . . . . . . . . . . . . . 92
RRanks property . . . . . . . . . . . . . . . . 79raw data size
calculating . . . . . . . . . . . . . . . . . . 34real-time reporting
architecture . . . . . . . . . . . . . . . . . 21removing
collection units. . . . . . . . . . . . . . . . 93Report Generation Assistant . . . . . . . . . 19report layouts. . . . . . . . . . . . . . . . . 15
activating . . . . . . . . . . . . . . . . 15, 18deactivating . . . . . . . . . . . . . . . . . 92limitation on number of . . . . . . . . . . . 15
Reporting CD. . . . . . . . . . . . . . . . . 23Reporting Services . . . . . . . . . . . . . . 11
architecture . . . . . . . . . . . . . . . . . 11Reporting Templates CD . . . . . . . . . . . 23requests
calculating number of . . . . . . . . . . . . 30run-createdb command . . . . . . . . . . . 58
Sscaling
chunk write time . . . . . . . . . . . . . . . 90collection unit overload . . . . . . . . . . . 90emergency save files . . . . . . . . . . . . 90knowing when to scale up . . . . . . . . . . 90memory consumption . . . . . . . . . . . . 90
scheduling processesETL Runtime . . . . . . . . . . . . . . . . 20
Security property . . . . . . . . . . . . . . . 79Services Layer . . . . . . . . . . . . . . .10, 20setting
the PATH environment variable . . . . . . . 55SID . . . . . . . . . . . . . . . . . . . . . . 70single-byte names
for databases . . . . . . . . . . . . . . . . 28Solution Control Server . . . . . . . . . . . 69
square brackets . . . . . . . . . . . . . . . 101Starter
see ETL Runtime Starterstarting CCPulse+
from a console window . . . . . . . . . . . 82from the Programs menu . . . . . . . . . . 82
starting Data Sourcerfrom the Solution Control Interface . . . . . 65on UNIX platforms . . . . . . . . . . . . . 67on Windows platforms . . . . . . . . . . . 66
starting DMAfrom the Configuration Manager . . . . . . 63
starting ETL Assistant . . . . . . . . . . . . .70starting ETL Runtime Starter
as a Windows service. . . . . . . . . . . . 72from the Solution Control Interface . . . . . 71on UNIX platforms . . . . . . . . . . . . . 73on Windows platforms . . . . . . . . . . . 71
start-up prioritiesfor solution components . . . . . . . . . . 60
Stat Server . . . . . . . . . . . . . . . . . 13, 17manually configuring for HA . . . . . . . . 44memory . . . . . . . . . . . . . . . . . . . 90
stopping CCPulse+ . . . . . . . . . . . . . .82stopping Data Sourcer
from the Microsoft Management Console. . 68on UNIX . . . . . . . . . . . . . . . . . . . 69
stopping DMA . . . . . . . . . . . . . . . . .64stopping ETL Assistant . . . . . . . . . . . .70stopping ETL Runtime
on UNIX platforms . . . . . . . . . . . . . 76stopping ETL Runtime Starter
on Windows platforms . . . . . . . . . . . 75supported databases . . . . . . . . . . . . .26supported operating systems . . . . . . . . .23supported RDBMSs . . . . . . . . . . . . . .16system identification number (SID)
for Oracle . . . . . . . . . . . . . . . . . . 27
Ttablespaces
for Data Mart . . . . . . . . . . . . . . . . 27for ODS . . . . . . . . . . . . . . . . . . . 27
TAT moduleETL Runtime . . . . . . . . . . . . . . 93, 94
Tenant Alias Update moduleSee TAT module.
tenantstracking changes . . . . . . . . . . . . . . 20
threadsnumber required . . . . . . . . . . . . . . 27
time profiles . . . . . . . . . . . . . . . . . .16tracking
monitored objects . . . . . . . . . . . . . . 20tenant changes . . . . . . . . . . . . . . . 20

Index
Deployment Guide 107
trans_batch_mode configuration option . . . 24Transformation module. . . . . . . . . . . . 20
ETL Runtime . . . . . . . . . . . . . . . . 92T-Server . . . . . . . . . . . . . . . . . . . 17type styles
conventions . . . . . . . . . . . . . . . . 101italic . . . . . . . . . . . . . . . . . . . . 101monospace . . . . . . . . . . . . . . . . 101
typographical styles . . . . . . . . . . 100, 101
Uuninstalling
CC Analyzer Data Mart . . . . . . . . . . . 86CC Analyzer Data Modeling Assistant . . . 85CC Analyzer Data Sourcer . . . . . . . . . 87CCPulse+ . . . . . . . . . . . . . . . . . . 88
user runtime parameter . . . . . . . . . . . 57users
setting up . . . . . . . . . . . . . . . . . . 79using SCI
to start Data Sourcer . . . . . . . . . . . . 65to start the ETL Runtime Starter. . . . . . . 71
Vversion numbering, document . . . . . . . . 100

Index
108 Reporting 8.1