Embed Size (px)
Citation preview
This textbook is for the exclusive use of participants of the RRG Rigging Lab.
Pat Rhodes
Rescue Response Gear
Rigging Lab
Sisters, OR
Rope Rescue Course Text
Awareness Level
Operations Level
Technician Level

RRG Rigging Lab Rope Rescue Course Text, © 2011, Rhodes 2
RRG Rigging Lab Rope Rescue Course Text, © 2011, Rhodes 3
Rope Rescue Course Text
Disclaimer: This book is intended for the exclusive use of participants of the RRG Rigging Lab. Rope rescue is inherently dangerous, even if the techniques, procedures and illustrations in this book are diligently followed, serious injury and/or death may result. This book makes no claim to be all-inclusive on the subject of rope rescue. There is no substitute for quality training under the guidance of a qualified instructor. Insofar as the author of this book has no control over the level of expertise of the reader of this material, or the manner this information is used, the author assumes no responsibility for the reader’s use of this book. There is no warranty, either expressed or implied, for the accuracy and/or reliability for the information contained hereof. RRG Rigging Lab, Rope Rescue Course Text, © Copyright 2011, Rhodes. All rights reserved for the contents of this manual. NO unauthorized duplication by any means without prior written permission from the author.

RRG Rigging Lab Rope Rescue Course Text, © 2011, Rhodes 4
RRG Rigging Lab Rope Rescue Course Text, © 2011, Rhodes 5
RescueRig Rope Rescue Course Text
Contents
Section 1 Awareness Level 6
Chapter 1 Commitment to Excellence 6
Chapter 2, Managing a Technical Rescue 12
Definitions 27
Section 2 Operations Level 33
Chapter 3 Equipment 33
Chapter 4 Knot Craft 45
Chapter 5 Anchors 71
Chapter 6 Belay Systems 81
Chapter 7 Mainline Systems 83
Chapter 8 Litter Operations 95
Chapter 9 Rappelling and Ascending 105
Section 3 Technician Level 113
Chapter 10 Force Multipliers 113
Chapter 11 Elevated Anchor Systems 133
Chapter 12 Horizontal Systems 141
Chapter 13 Mid-Wall Pick-offs 155
RRG Rigging Lab Rope Rescue Course Text, © 2011, Rhodes 6
Section 1, Awareness Level
Chapter 1: Commitment to Excellence We will often attempt to maintain a 10:1 safety margin with our rope equipment. In a static state, we will analyze our weakest link in the system and try not to exceed 1/10 of its maximum rating. This is known as the Static System Safety Factor, or SSSF. Although this equipment/system rating will be discussed in depth throughout this book, right now I’m using the SSSF as an analogy to the quality of your team’s training. Put a number, or hypothetical rating between 0 and 100 on the skill level needed to safely and efficiently complete a worse case scenario technical rope rescue that is potentially possible in your area of response. Remember, this is only a self-comparison scale. We will give an example and choose the number 50 to represent a difficult confined space/high angle industrial litter extrication that involves multiple changes in the fall line and challenging focused-floating anchor considerations. Now rate your training. In our example, a rating of 50 or a 1:1 Training Program Safety Factor (TPSF) would mean that our team’s training is scarcely good enough to get the job done. It probably would not be very pretty, it could take an inordinate amount of time, and yes, there would be an excessively large “pucker factor” by almost everyone involved, but hopefully, they would eventually get the job done, and with a bit of luck everyone would go home safely to their families that night. What if our example TPSF rating was only 25 or a ½ : 1? Our training would be deemed extremely insufficient. We might experience a catastrophic system failure resulting in a major injury or death of the victim and/or the rescuer. Instead of you going home at night to your family, your family would get a sorrowful visit from a department representative and our station flags would be flying at half-mast. On the flip side of the coin, what TPSF rating would you anticipate in order to maintain a high degree of skill, efficiency, confidence, and safety? A level of training that would entitle us to be so good that the media would marvel at our expertise, speed, and safety with style! 100? Using our equipment safety margin analogy, this is only a 2:1…still pretty weak. If our rope systems are expected to meet a 10:1 safety margin, why shouldn’t our training do so as well? Isn’t the manner we use our equipment as important, even more important, than the equipment itself? If our TPSF was a 10:1 we would assign a 500 to our training program.
RRG Rigging Lab Rope Rescue Course Text, © 2011, Rhodes 7
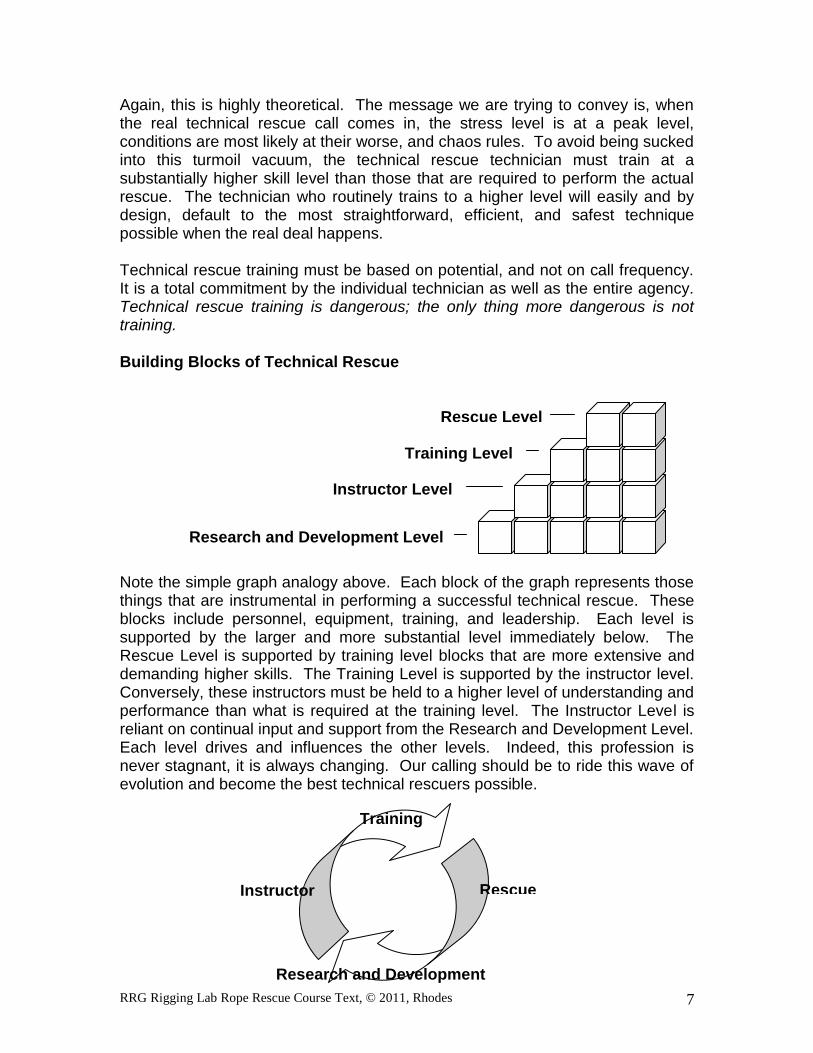
Again, this is highly theoretical. The message we are trying to convey is, when the real technical rescue call comes in, the stress level is at a peak level, conditions are most likely at their worse, and chaos rules. To avoid being sucked into this turmoil vacuum, the technical rescue technician must train at a substantially higher skill level than those that are required to perform the actual rescue. The technician who routinely trains to a higher level will easily and by design, default to the most straightforward, efficient, and safest technique possible when the real deal happens. Technical rescue training must be based on potential, and not on call frequency. It is a total commitment by the individual technician as well as the entire agency. Technical rescue training is dangerous; the only thing more dangerous is not training. Building Blocks of Technical Rescue Note the simple graph analogy above. Each block of the graph represents those things that are instrumental in performing a successful technical rescue. These blocks include personnel, equipment, training, and leadership. Each level is supported by the larger and more substantial level immediately below. The Rescue Level is supported by training level blocks that are more extensive and demanding higher skills. The Training Level is supported by the instructor level. Conversely, these instructors must be held to a higher level of understanding and performance than what is required at the training level. The Instructor Level is reliant on continual input and support from the Research and Development Level. Each level drives and influences the other levels. Indeed, this profession is never stagnant, it is always changing. Our calling should be to ride this wave of evolution and become the best technical rescuers possible.
Rescue Level
Instructor Level
Training Level
Research and Development Level
Rescue Instructor
Training
Research and Development
RRG Rigging Lab Rope Rescue Course Text, © 2011, Rhodes 8
The Bottom Line – Don’t Get Anyone Hurt!
What is the bottom line? As professional technical rescuers, what is our biggest concern? What fears do we have when dealing with these and other technical rescue disciplines? The National Fire Protection Association (NFPA), without question, is the most recognized Firefighter/rescuer general consensus standard in the United States. Although NFPA does not have any authority to enforce or regulate the standards it has published, they do offer substantial guidance for today’s technical rescue technician. To quote NFPA 1670;
“While the NFPA administers the process and establishes rules to promote fairness in the development of consensus, it does not independently test, evaluate, or verify the accuracy of any information or the soundness of any judgments contained in its codes and standards”. “Anyone using this document should rely on his or her own independent judgment or, as appropriate, seek the advice of a competent professional in determining the exercise of reasonable care in any given circumstances”.
“The exercise of reasonable care in any given circumstances” is a key legal phrase in coping with our bottom line – “DON’T GET ANYONE HURT” Don’t get anyone hurt is our number one goal. A distant second place concern is, if someone does get hurt, did we do everything possible to avoid the injury? Finally, if an injury does occur, what will be the interpretation of our legal system? How do we prevent death and injury in a profession that demands us to put our lives on the line? To borrow a training philosophy from the Army, keep it simple, applicable, and repetitive. Safety is everything – when it comes down to it, it’s the only thing. Lack of safety during a rescue becomes an emergency in its own right. It is the responsibility of each team member to be on guard against non-safe situations. Catastrophic failures can always be traced back to the accumulative effect of several “lesser” mess-ups, over-sights, or in many cases, simple lack of knowledge, and training. Safety is a mindset all rescuers must possess. Some of these lesser mess-ups may have their beginnings in the purchase of sub-par equipment. Seek sound judgment and quality training in the use of the best equipment available, no matter what the labeling is.
RRG Rigging Lab Rope Rescue Course Text, © 2011, Rhodes 9
Most equipment standards have little legal impact on the type of equipment we use in technical rescue – more important – did we use the equipment in accordance to the manufactures recommendations. This is not the case with NFPA 1670 Standard on Operations and Training for Technical Rescue Incidents, and NFPA 1006 Standard for Rescue Technician Professional Qualifications. Both of these standards have been adopted by the American National Standards Institute (ANSI), this could become a very good legal source of ammunition for a personal injury attorney. NFPA 1670 applies to technical rescue procedures of the department, while NFPA 1006 is geared more to the skill level of the individual technician. Because these standards were adopted by ANSI, they both point their legal fingers at the Authority Having Jurisdiction (AHJ), or in other words, the local fire department and its leadership. Most fire departments are very good at providing continued education and documenting the training of its members at the technician level, but if the AHJ is to be consistent with 1670, technical rescue awareness level and operational level training and documentation must be addressed as well. Although these standards imply that the AHJ has a tremendous amount of flexibility over what level of rescue it chooses to be involved in, there is one other notable area of liability. NFPA and ANSI require the AHJ to conduct periodic hazard analysis and risk assessment surveys in the organization’s response area for the purpose of identifying the types of technical rescues that are most likely to occur. These hazard analysis and risks assessments shall by reviewed and updated on a scheduled basis and as operational or organizational changes occur.
RRG Rigging Lab Rope Rescue Course Text, © 2011, Rhodes 10
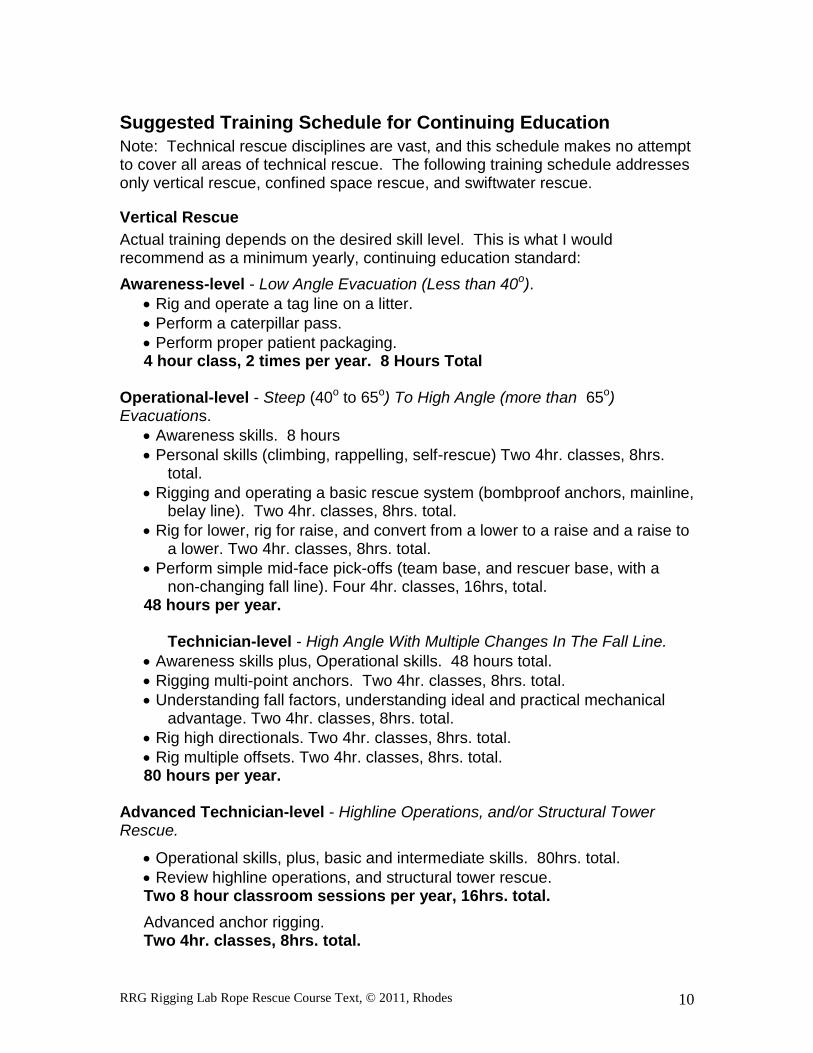
Suggested Training Schedule for Continuing Education
Note: Technical rescue disciplines are vast, and this schedule makes no attempt to cover all areas of technical rescue. The following training schedule addresses only vertical rescue, confined space rescue, and swiftwater rescue.
Vertical Rescue
Actual training depends on the desired skill level. This is what I would recommend as a minimum yearly, continuing education standard:
Awareness-level - Low Angle Evacuation (Less than 40o).
Rig and operate a tag line on a litter.
Perform a caterpillar pass.
Perform proper patient packaging. 4 hour class, 2 times per year. 8 Hours Total
Operational-level - Steep (40o to 65o) To High Angle (more than 65o) Evacuations.
Awareness skills. 8 hours
Personal skills (climbing, rappelling, self-rescue) Two 4hr. classes, 8hrs. total.
Rigging and operating a basic rescue system (bombproof anchors, mainline, belay line). Two 4hr. classes, 8hrs. total.
Rig for lower, rig for raise, and convert from a lower to a raise and a raise to a lower. Two 4hr. classes, 8hrs. total.
Perform simple mid-face pick-offs (team base, and rescuer base, with a non-changing fall line). Four 4hr. classes, 16hrs, total.
48 hours per year.
Technician-level - High Angle With Multiple Changes In The Fall Line.
Awareness skills plus, Operational skills. 48 hours total.
Rigging multi-point anchors. Two 4hr. classes, 8hrs. total.
Understanding fall factors, understanding ideal and practical mechanical advantage. Two 4hr. classes, 8hrs. total.
Rig high directionals. Two 4hr. classes, 8hrs. total.
Rig multiple offsets. Two 4hr. classes, 8hrs. total. 80 hours per year.
Advanced Technician-level - Highline Operations, and/or Structural Tower Rescue.
Operational skills, plus, basic and intermediate skills. 80hrs. total.
Review highline operations, and structural tower rescue. Two 8 hour classroom sessions per year, 16hrs. total.
Advanced anchor rigging. Two 4hr. classes, 8hrs. total.

RRG Rigging Lab Rope Rescue Course Text, © 2011, Rhodes 11
Rig 1, 2, and 4 rope highlines, rig English and Norwegian reeve highlines, horizontal and steep highlines (all one time per year).
8hrs. each, total 32hrs.
2 simulated structural tower rescues per year. 8hrs. total.
152 total hours per year.
RRG Rigging Lab Rope Rescue Course Text, © 2011, Rhodes 12
Chapter 2, Managing a Technical Rescue Elements of a Vertical Emergency An element of a vertical emergency is a factor, condition, or influence that can be redirected, and treated by the rescue team. A strong rescue team will draw from their “skill” toolbox and deal with these elements in a safe and expedient manner. How does a rescue element effect the choices of the rescue team? What elements determine the manpower needed, or the amount of equipment needed at the scene? Too often rescuers make these decisions with little training and experience. Most fire departments have the expertise to perform a low angle carryout. Most technical rescue personnel can rappel, do some basic climbing, and complete a rescue involving a non-changing fall line. But ask yourself, does your team have the skills to perform a mid-face pick-off that includes a fall line with multiple obstacles, or extricate an injured worker off the top of an electrical transmission tower. Some elements are minor some are major. It is the accumulative effect of these elements that change the course of action. A successful rescue is the direct result of a team’s ability to recognize these elements and deal with them with confidence.
Elements of a technical rescue emergency can be divided into three major phases, Primary Assessment, Recon, and Rescue. Primary Assessment Phase Command – Establishment of a strong command structure starts with the first unit on the scene. This includes a complete on the scene report to the dispatch center confirming that you are on the scene, what obvious conditions, exist, and what your initial plan of action will be. Witnesses – If possible, secure witnesses. Witnesses can offer valuable information on the location and condition of the victim. For additional reference, keep reliable witnesses close at hand to the command post. Time of Day – Time of day may be a major element for command to consider. How much daylight is left verses the predicted length of time needed for the rescue may determine such things, as lighting needs, and the possible use of additional resources, such as helicopters.
RRG Rigging Lab Rope Rescue Course Text, © 2011, Rhodes 13
Weather Conditions – Weather conditions, or impending changes in the weather can alter the direction of a rescue operation. Weather conditions can be the primary safety concern for rescue personnel. Vertical Type – Although all vertical rescues have similarities, different types, whether they be mountain/wilderness, urban/industrial or structural towers, can be vastly different in the resources, and skill levels needed. Terrain – Although a true evaluation of the terrain comes from the recon sector, most of the time command can get a good idea of what kind of terrain the rescue may involve. Resources – Based on information at hand, call for the appropriate resources early. When in doubt call for more than you need, you can always turn units around. It is always better to have too much than not enough. Skill Level – As Command, you must have the personnel with the level of skill to bring the rescue to a safe and successful conclusion. Vertical rescue is not unlike other rescue incidents, such as auto accidents, or structural collapse, it isn’t uncommon for treating a trapped patient, even for extended periods of time, while waiting for more advanced extrication specialists to arrive. It is much wiser to wait for members with more advanced rigging skills to arrive, than attempt a difficult vertical extrication with members that may not be up to the task. This does not preclude treating the victim in place. Recon Phase Recon – Command must establish a recon sector as soon as possible. Recon are usually the first rescuers over the edge, or up the mountain. These members become the initial “eyes and ears” of command. Victim Profile – As soon as possible command needs to know what the victim profile is. Is the operation going to be a rescue or a recovery? This element alone will dictate the speed and urgency of the operation.
Other considerations that may play into developing a victim profile is the victim’s location, the victim’s vertical stability, and effects of weather exposure. Recon sector should include paramedic members with the medical equipment available to deliver advanced life support if needed. The recon sector should be capable of evaluating any other victim/patient needs that will promote timely treatment, and extrication, including patient packaging, and litter configuration.

RRG Rigging Lab Rope Rescue Course Text, © 2011, Rhodes 14
Terrain – Command will get its most accurate report of what kind of terrain he/she is dealing with from the recon sector.
Angle and Length of Ascent/Descent – Based initially of recon’s report, the angle and length of the ascent and/or descent will determine the type of rescue profile (low, steep, or high angle), and the skill level of the personnel (non-technical, basic, intermediate, or advanced technical skills).
Horizontal and Vertical Distance From The Fall Line – Does the fall line change? Does the fall line include obstacles? Does the main line and belay line package need to be altered to affect the rescue? If so, the rescue team will need to be versed in performing any number of “offset” evolutions. Helicopters – Is the terrain conducive to helicopter use? Helicopters are some of the most versatile and useful tools known to the rescue world, yet the use of a helicopter in a vertical rescue can be one of the most dangerous. Members must be highly trained, and command must do a complete risk assessment before a helicopter is chosen to extricate the victim.
Rescue Phase Team Base Location, Top or Bottom – As simple as this sounds, the decision on where to start the operation is one of the most important. Starting at the top and working down to the victim is most often the preferred way. But in many scenarios, such as a structural tower, there is simply not enough room to work above the victim. In the case of the “bottom” operation, a limited number of rescuers will work above the victim, setting high directional, and doing the victim packaging, while the bulk of the team is doing a support/rigging operation on the ground or below on a larger working area.
Anchor Profile, – Anchor selection, and who’s building the anchor are the two biggest decisions to be made during the rescue phase. Good “bomb proof” anchors are single point anchors that everyone is happy with, and there is no chance that the anchor will fail. Any well-trained basic technical rescue technician can rig this type of anchor.
Marginal “multi-point” anchors are anchor points, that by them self, are questionable, but when used in combination with each other make for a very strong system anchor. This type of anchor should be handled by members with strong intermediate skills and who have a full understanding in building load sharing, load distribution, back-tie, and focused anchor systems.

RRG Rigging Lab Rope Rescue Course Text, © 2011, Rhodes 15
“Advanced anchor” construction is rare. This is developing an anchor where no apparent anchor exists. Typically this involves several advanced skills such as, back-ties, front-ties, focused, and floating anchor systems, plus the use of bolts, cams, and wedges. Team members with advanced rigging skills should only manage these types of anchors.
Edge Profile/High Directional Needs – The number one enemy of rope is sharp edges. What resources are needed to protect the rope?
A good rescue system will keep the majority of the rope off the ground. The best way to accomplish this is by using some form of a high directional.
A high directional, in addition, to edge protection will also lessen “edge trauma” to team members going over the edge.
Rescue Vertical Direction – Down or up, or any combination of, this element requires skills in setting up and operating a system brake rack, a system belay, a mechanical advantage system, and the technical skill in converting between a lowering and a haul system.
Rescue Vertical Distance – How much rope is needed? This may involve skills in combining lengths of rope in a safe and reliable manner, and the ability to pass knots through the system.
Rescue Horizontal Changes – Is there a need for horizontal systems, add on systems that allow the team to manipulate the main line, and sometimes the belay line in a horizontal manner.
Long Horizontal Distance – On very rare occasions a rescue team may be called upon to build and operate a highline system that facilitates a rescue over a long expanse. This would be that one time that the terrain would not allow the use of a helicopter, and the distance was too long to use offsets. Advanced technical rescue technicians should only attempt this type of rescue.
RRG Rigging Lab Rope Rescue Course Text, © 2011, Rhodes 16
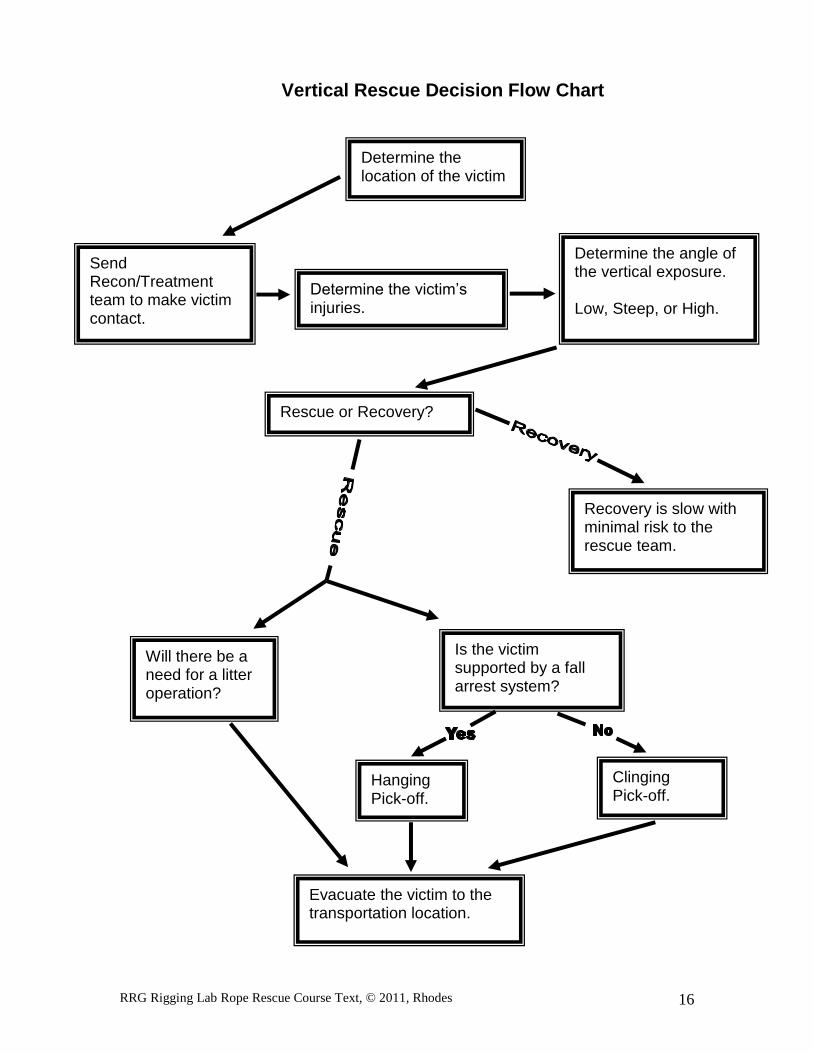
Vertical Rescue Decision Flow Chart
Determine the victim’s injuries.
Determine the location of the victim
Send Recon/Treatment team to make victim contact.
Rescue or Recovery?
Recovery is slow with minimal risk to the rescue team.
Is the victim supported by a fall arrest system?
Determine the angle of the vertical exposure. Low, Steep, or High.
Clinging Pick-off.
Will there be a need for a litter operation?
Hanging Pick-off.
Evacuate the victim to the transportation location.
RRG Rigging Lab Rope Rescue Course Text, © 2011, Rhodes 17
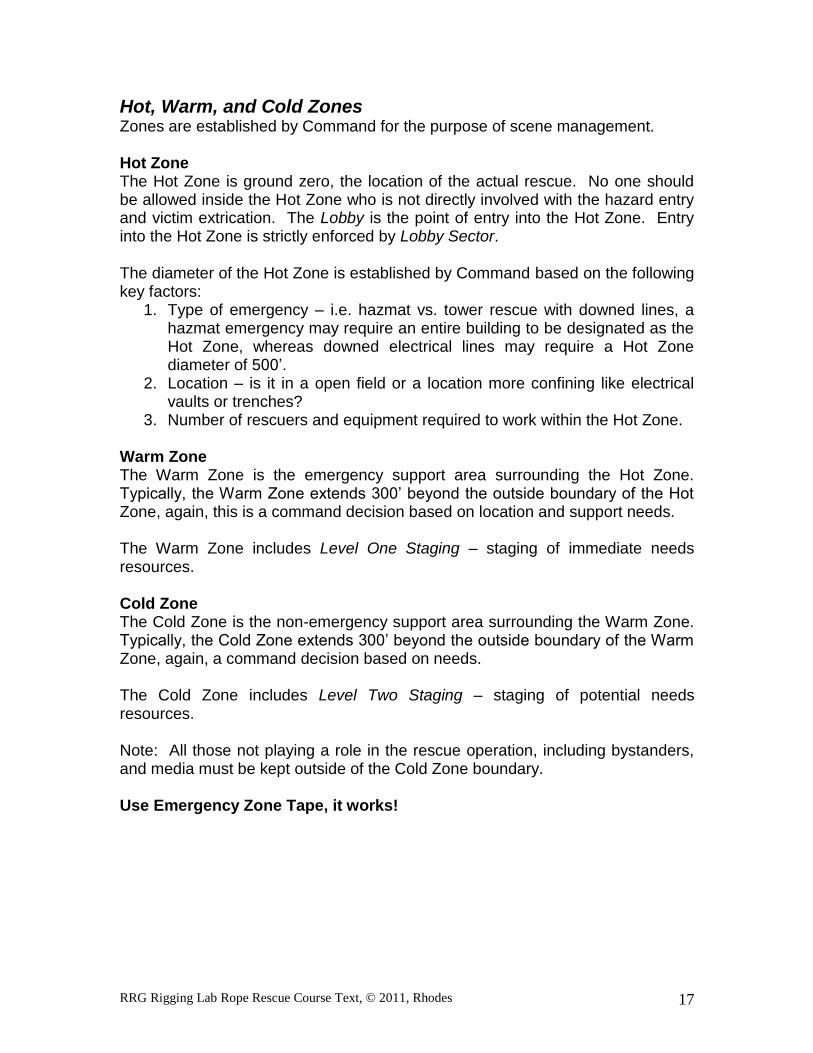
Hot, Warm, and Cold Zones Zones are established by Command for the purpose of scene management. Hot Zone The Hot Zone is ground zero, the location of the actual rescue. No one should be allowed inside the Hot Zone who is not directly involved with the hazard entry and victim extrication. The Lobby is the point of entry into the Hot Zone. Entry into the Hot Zone is strictly enforced by Lobby Sector. The diameter of the Hot Zone is established by Command based on the following key factors:
1. Type of emergency – i.e. hazmat vs. tower rescue with downed lines, a hazmat emergency may require an entire building to be designated as the Hot Zone, whereas downed electrical lines may require a Hot Zone diameter of 500’.
2. Location – is it in a open field or a location more confining like electrical vaults or trenches?
3. Number of rescuers and equipment required to work within the Hot Zone. Warm Zone The Warm Zone is the emergency support area surrounding the Hot Zone. Typically, the Warm Zone extends 300’ beyond the outside boundary of the Hot Zone, again, this is a command decision based on location and support needs. The Warm Zone includes Level One Staging – staging of immediate needs resources. Cold Zone The Cold Zone is the non-emergency support area surrounding the Warm Zone. Typically, the Cold Zone extends 300’ beyond the outside boundary of the Warm Zone, again, a command decision based on needs. The Cold Zone includes Level Two Staging – staging of potential needs resources. Note: All those not playing a role in the rescue operation, including bystanders, and media must be kept outside of the Cold Zone boundary. Use Emergency Zone Tape, it works!
RRG Rigging Lab Rope Rescue Course Text, © 2011, Rhodes 18
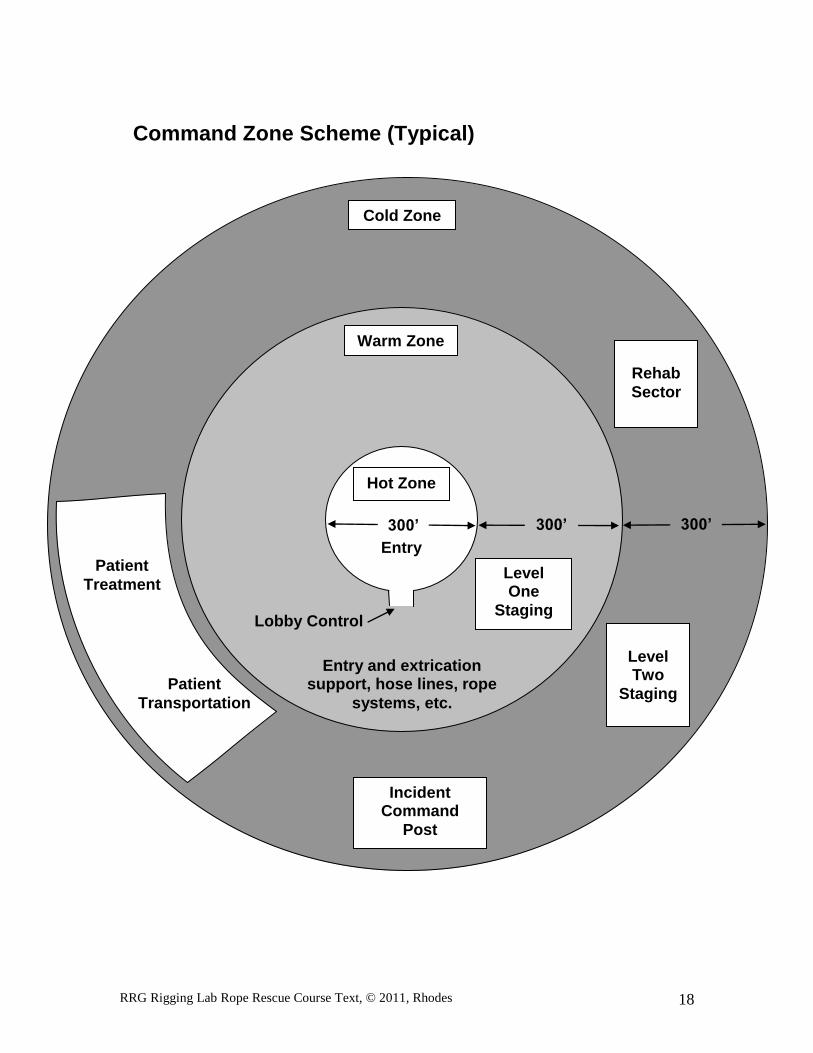
Hot Zone
Cold Zone
Warm Zone
300’ 300’ 300’
Entry
Lobby Control
Level One
Staging
Level Two
Staging
Incident Command
Post
Entry and extrication support, hose lines, rope
systems, etc.
Rehab
Sector
Patient
Treatment
Patient
Transportation
Command Zone Scheme (Typical)
RRG Rigging Lab Rope Rescue Course Text, © 2011, Rhodes 19
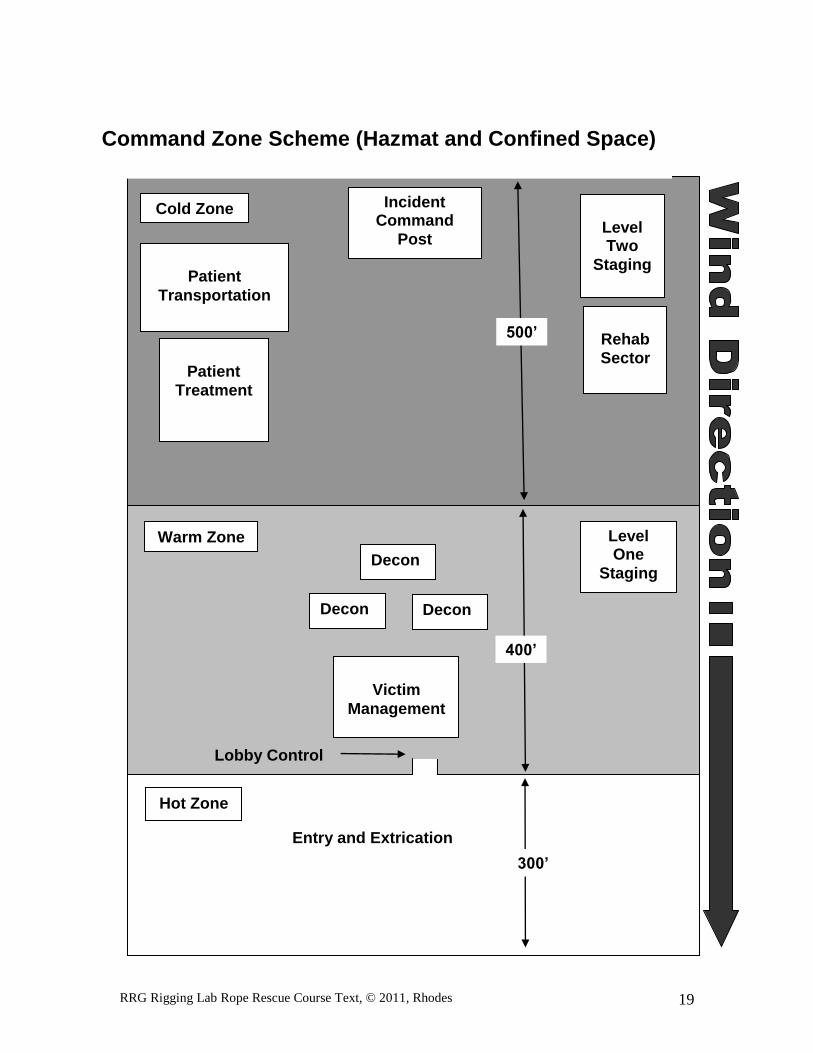
Hot Zone
Cold Zone
Warm Zone
300’
Entry and Extrication
Lobby Control
Level One
Staging
Level Two
Staging
Incident Command
Post
Rehab
Sector Patient
Treatment
Patient
Transportation
Command Zone Scheme (Hazmat and Confined Space)
400’
500’
Victim
Management
Decon
Decon Decon
RRG Rigging Lab Rope Rescue Course Text, © 2011, Rhodes 20
Tactical Worksheet for High Angle Emergencies Phase 1. Size up Primary Assessment
Secure witness/RP. Determine location and number of victims. ID immediate hazards to the public and rescuers. Rescue mode or recovery mode?
Secondary Assessment Type of Structure
Non-technical (<40o) Technical (>40o) Tower
Assess the need for additional resources. Phase 2. Pre-rescue Operations Make general area safe. (Cold Zone) Make rescue area safe. (Warm Zone, Hot Zone if possible)
Establish lobby control and accountability for Hot Zone. Designate a safety officer. Designate a Technical Rescue Officer (TRO).
Equipment Management Technical Safety Mainline Belay Line Qualified Climber/Lead Climber (Tower Rescue) Attendant/Rescuers Edge/High Directional Personnel Offsets/Highlines Other Personnel
Develop incident action plan. Proper personal protective equipment for the rescuers is in use. Appropriate rescue and patient packaging equipment is on scene. Personal protective equipment for the victim in on scene. Pre-rescue briefing. Phase 3. Rescue Operations Technical Rescue Officer (TRO) commences rescue operations.
Complete role call of technical rescue stations. On belay! Rescuer(s) into hazard zone. Rescue Package out of hazard zone. All stop! Rescue complete.
Phase 4. Termination Remove equipment. Personnel Accountability Report (PAR)
RRG Rigging Lab Rope Rescue Course Text, © 2011, Rhodes 21
National Incident Management System – Overview On February 28, 2003 President Bush released HSPH-5 which ordered the creation and implementation of a national incident management system. The National Incident Management System (NIMS) grew out of a notable lack of a unified command structure during 911 as well as Federal concern with the absence of an incident command system that was standard across the nation. While originally ICS was the focus, NIMS soon grew into an entire emergency management organization system. NIMS is extremely similar to the California Standardized Emergency Management System (SEMS) and wildland firefighting command systems. It is the goal of NIMS to provide a consistent nationwide approach for responding to all kinds of incidents – no matter what the size, scope, cause or complexity. Chief benefits of NIMS It is Applicable across jurisdictions and functions.
Used for all types of emergencies
Encourages interoperability
Enhances the ability of different classes of responders to work effective together
Concepts and Principals
NIMS provides a flexible framework that facilitates government and private entities working together to manage domestic incidents.
NIMS provides a set of standardized organizational structures, as well as requirements for processes, procedures, and systems.
NIMS is comprised of several components that work together as a system to provide a national framework for preparing for, preventing, responding to, and recovering from domestic incidents • Command and Management • Preparedness • Resource Management • Communication and Information Management • Supporting Technologies • Ongoing Management and Maintenance
The Incident Commander
Fix the responsibility for Command on a certain individual through a standard identification system, depending on the arrival sequence of employees, rescuers, and supervisors.
Ensure that a strong, direct, and visible Command will be established from the onset of the incident.
RRG Rigging Lab Rope Rescue Course Text, © 2011, Rhodes 22
Establish an effective incident organization defining the activities and responsibilities assigned to the incident commander and the other individuals operating within the Incident Command System.
Provide a system to process information to support incident management, planning, and decision making.
Provide a system for the orderly transfer of Command to subsequent arriving supervisors
Command Tactical Objectives
The incident commander is responsible for the completion of the following tactical objectives:
A. Provide for the continued safety of non-involved personnel and bystanders.
B. Provide for the safety, accountability, and welfare of rescue personnel. This priority is on-going throughout the incident.
C. Remove endangered occupants and treat the injured. D. Stabilize the incident. E. Conserve property.
The Incident Command System is used to facilitate the completion of the tactical objectives. The incident commander is the person who drives the Command system towards that end. The incident commander is responsible for building a Command structure that matches the organizational needs of the incident to achieve the completion of the tactical objectives for the incident. The functions of Command define standard activities that are performed by the incident commander to achieve the tactical objectives.
Functions of Command
The functions of Command include:
Assume and announce Command and establish an effective operating position (Command Post).
Rapidly evaluate the situation (size-up). Initiate, maintain, and control the communications process. Identify the overall strategy, develop an incident management plan,
and assign companies and personnel consistent with plans and standard operating procedures.
Develop an effective Incident Command organization. Review, evaluate, and revise (as needed) the Incident Management
plan. Provide for the continuity, transfer, and termination of Command.
RRG Rigging Lab Rope Rescue Course Text, © 2011, Rhodes 23
The incident commander is responsible for all of these functions. As Command is transferred, so is the responsibility for these functions. The first five (5) functions must be addressed immediately from the initial assumption of Command.
Establishing Command
The first rescuer to arrive at the scene of a major event requiring the rescue, victim treatment, and scene stabilization shall assume Command of the incident*. The initial incident commander shall remain in Command until Command is transferred to a supervisor, higher qualified member/rescuer, or the incident is stabilized and Command is terminated.
When possible the first arriving rescuer initiates the Command process by giving an initial radio report.
The Radio Report should include:
A. Identification of who is on the scene and talking. B. A brief description of the incident situation, (i.e. building size,
occupancy, type of hazard, type of accident, etc.) C. Obvious conditions (flooding, hazmat spill, multiple patients, etc.). D. Brief description of action taken. E. Any obvious safety concerns. F. Assumption and identification of Command. G. Assume & Announce accountability location.
Incident Management Size-up
Size-up is a rapid overview of the obvious, what is observed by everyone, and what is said by witnesses.
C.A.N. report (Conditions, Actions, and Needs)
This is an ongoing communication tool between rescue personnel and Command, the focus is on simple, direct communication.
Level 1 Staging
Level 1 staging is the immediate gathering location of first arriving rescue personnel, typically in close proximity to command, (typically, close enough for voice communication)
Level 2 Staging
Level 2 staging is a location designated by command where continued arriving resources gather and await further assignment. Level 2 staging is typically positioned well outside the field of action, yet close enough to advance forward to the scene within a couple of minutes. This allows for a
RRG Rigging Lab Rope Rescue Course Text, © 2011, Rhodes 24
systematic pooling of equipment, rescue and support personnel without overwhelming the scene with congestion.
Sectors or Groups
Sectors are subdivisions of larger command events that require a manageable span of control by Command. Sectors are named by Command, typically using their location and/or function. i.e. North Sector, West Sector, Sector 2 (2nd floor), Rescue Sector, Hazmat Sector, or Treatment Sector, etc. Each sector will have a Sector Officer who is responsible for communicating with Command (C.A.N. report) and supervising the actions within that sector.
Sections and Branches Sections and Branches are subdivisions designed for extremely large
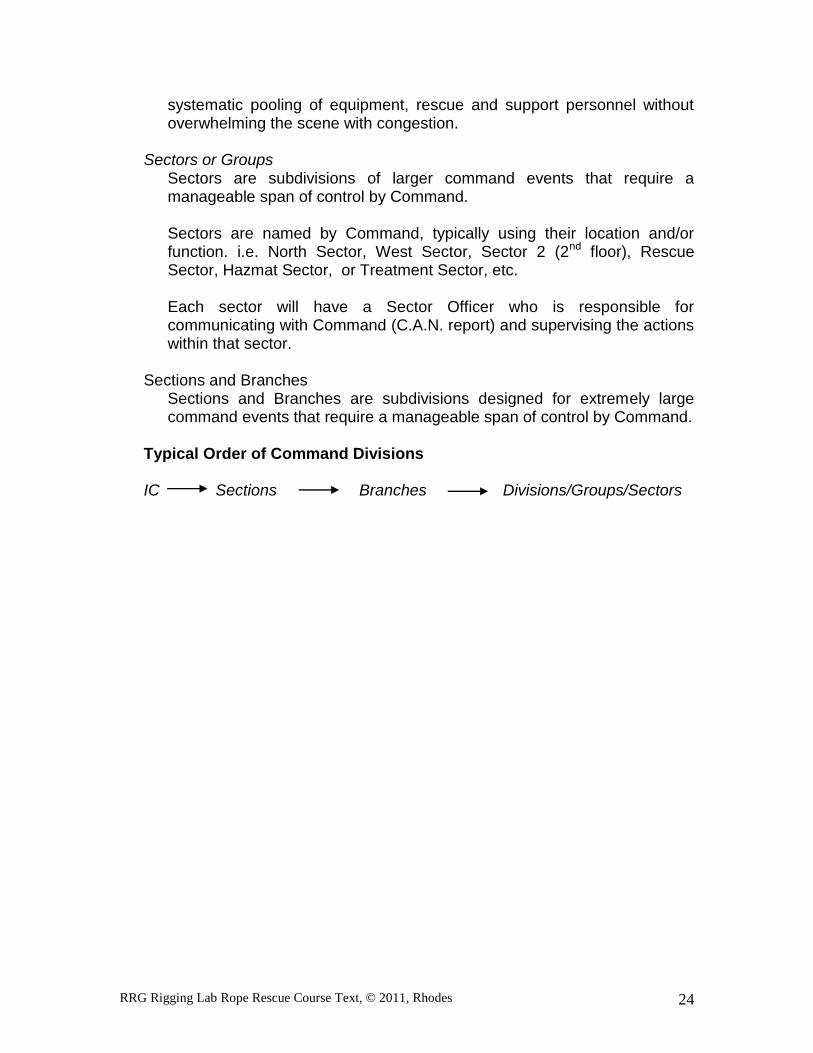
command events that require a manageable span of control by Command. Typical Order of Command Divisions
IC Sections Branches Divisions/Groups/Sectors
RRG Rigging Lab Rope Rescue Course Text, © 2011, Rhodes 25
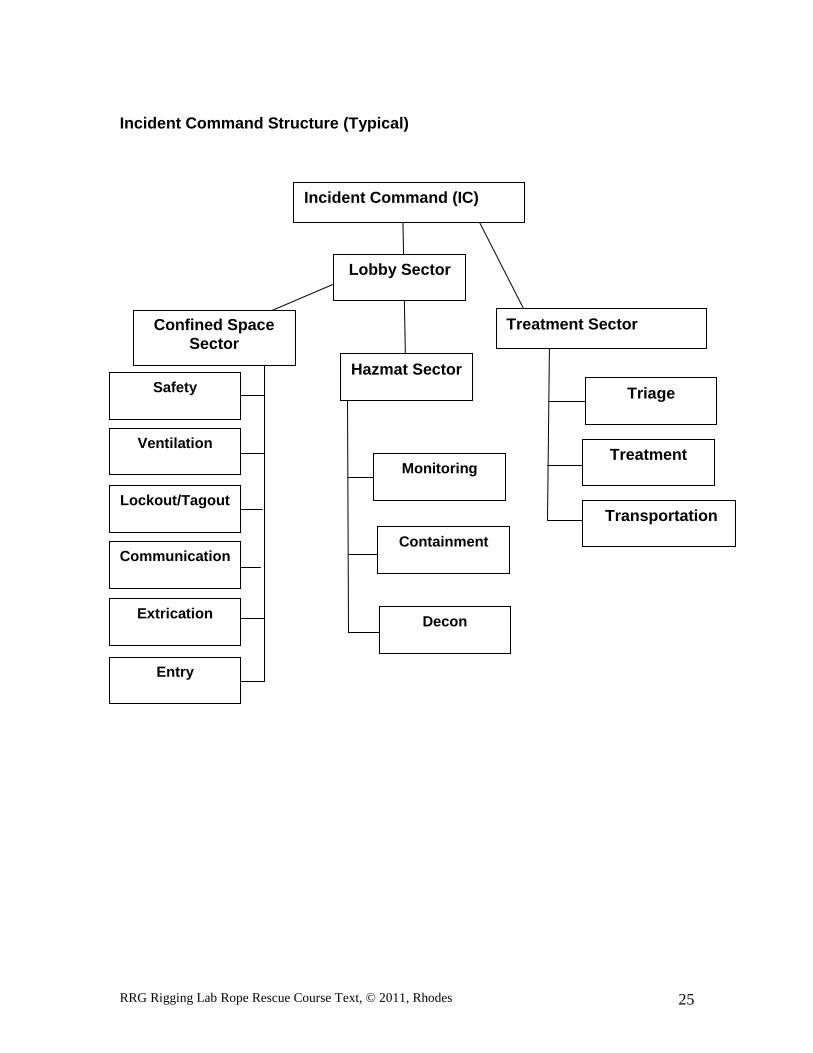
Incident Command Structure (Typical)
Treatment Sector Confined Space
Sector
Hazmat Sector
Transportation
Treatment
Triage Safety
Ventilation
Lockout/Tagout
Communication
Extrication
Entry
Monitoring
Containment
Decon
Incident Command (IC)
Lobby Sector

RRG Rigging Lab Rope Rescue Course Text, © 2011, Rhodes 26
FEMA/Homeland Security NIMS Command Structure (Major Event)
Incident Command (IC)
Planning Section Logistics Section
Finance/Admin. Section Operations Section
Technical Rescue Branch Treatment Branch
Confined Space
Group Hazmat Group
Transportation Group
Treatment Group
Triage Group
Safety Sector
Ventilation
Sector
Lockout/Tagout
Sector
Communication
Sector
Extrication
Sector
Entry
Team Sector
Monitoring
Sector
Containment
Sector
Decon Sector
RRG Rigging Lab Rope Rescue Course Text, © 2011, Rhodes 27
Definitions
Accessory Cord – Any low-stretch cordage [rope] made from nylon, Spectra, or Kevlar fibers and used for any number of purposes. Generally, any cord smaller than 9mm is considered an accessory cord.
Active Protection – Rock climbing protection (camming devices) which have moving parts as part of the camming mechanism. Spring-loaded camming devices are considered “active”.
Air Monitoring – Those actions needed to insure atmospheric safety during a confined space emergency through the use of specialized monitoring equipment. Air monitoring is the single most important diagnostic tool used in making a confined space emergency atmospherically safe. Ventilation is the prescribed treatment. Air monitoring must continue during the full extent of the rescue and must work in harmony with the ventilation sector. The areas of primary concern are:
1. The opening of the space. 2. The source of air being supplied to the space. 3. The air being drafted from the space. 4. The interior of the space (personal monitors on the entry team).
Anchor – Any means of attaching the rope to an object. It may be a natural anchor such as a tree or rock formation, or an artificial anchor provided by the rescuer, such as a bolt or rock protection.
Anchor Types:
1. Single Point” Anchors:
Anchors that originate from one location, such as a pole, tree, bolt, etc. A single point anchor may be bombproof or may be a marginal component of an anchor system.
2. Tensioned Anchors:
Anchors working in harmony by virtue of a back-tie system system.
Hard Ascender – Hardware camming devices which grip the rope in one direction.
Belay System – Protection against a fall by handling a secondary unloaded rope (belay rope) in such a manner that is may be taken in or let out yet can be secured to hold this load in case of failure of the working line or rappel line.
RRG Rigging Lab Rope Rescue Course Text, © 2011, Rhodes 28
Bolt – Artificial, reliable means of anchoring in rock requiring the drilling of holes and the placement of bolts.
Brake Rack – A friction device used for rappelling or the safe control of lowering systems. Typically, the brake rack employs multiple friction bars held in place by a steel frame. The friction bars are capable of collapsing or loosening around the rope, therefore providing the needed friction for the safe control of the descent.
Carabiners – Hardware used for the purpose of connecting any two points of a given rope system. Carabiners typically employ a self-closing, gate as apposed to other connecting hardware that employ manually operated screws that close the opening, see screw-links and tri-links.
Change of Direction Pulley – A change of direction is a pulley on the anchor that directs the last leg of rope to the haul team, notated (cd).
Compound Mechanical Advantage Pulley System – Any pulley system that is made up of two or more simple pulley systems. Example; a compound 6:1 could be a 3:1 pulling on the end of a 2:1, or a 2:1 pulling on a 3:1. The simple components are multiplied to give the compound mechanical advantage.
Cordelettes – Typically, a small rope, typically 8 mm or 9 mm, and approximately 10 meters long, used for rigging. Example; small pulley systems, whipping and frapping, etc.
Critical Point Test – A test rescue teams use to determine the inherent safety within a rope rescue system. In order to pass the Critical Point Test, a system must have no point or single piece of equipment which, were it to fail, would cause catastrophic failure of the entire system.
Directional Pulley – A directional is a pulley or pulleys between the pulley system and the load to be raised, notated (d) or (1:1)
Dynamic System Safety Factors (DSSF) – In a dynamic state, (movement and maximum system stress, with a suspended load) the ratio between the load and the weakest link in a system using the rated breaking strength of each piece of equipment in the system and a theoretical prediction of those factors that will add maximum stress to the system. For instance, any part of a given system will only hold 6000 lbs. and the work being placed on the system is 1000 lbs, including approximately 20’ of rope drag at or over the edge, will in effect double the weight of the load on a raising system. The Safety Factor would then be approximately only a 3:1. A 7: 1 Dynamic System Safety Factor is a realistic goal when a belay rope is present.
Ganged Mechanical Advantage Pulley System – When a separate rope used for a MA system is attached by a haul grab to a second main rope for the purpose of lifting or lowering a load.
Hardware – Those components of a rope system that are made of metal.
RRG Rigging Lab Rope Rescue Course Text, © 2011, Rhodes 29
Haul Field – The haul field is the available distance a hauler or haulers can run out or the space that they have to stand and pull.
High Directional – A means of suspending a loaded rope at least 2 meters above the edge so that edge trauma is reduced. There are structural, natural and artificial high directionals.
Horizontal Systems – Any adjunct rope system that is employed for the purpose of changing the original direction of the mainline and belay line systems.
Loaded Changeover – Those actions needed to convert the mainline from a lowering system to a raising system while the load is suspended and under tension.
Litter – A device used to contain a patient and maintain stability during the extrication process.
Lockout/Tagout – Those actions needed to bring all potential hazards, typically electrical, mechanical, and engulfment, to a neutral state prior to the beginning of any rescue.
Mainline – Also known as the Working Line, it is the main rope system used to do the lowering and raising of the rescue package.
Mechanical Advantage – The increase of the input of power for the purpose of moving objects, typically during rope rescues, this would most often include the use of pulley systems.
Multipoint Anchor System – Any combination of point anchors that are employed to make one reliable anchor. The following are the two major divisions of multipoint anchor systems:
1. Self Distributing: (Also known as Self-equalizing) A multipoint system rigged to where the force of the load is distributed between all the point anchors. Due to friction and many other unseen factors, this distribution is not as equal as most would assumed.
2. Fixed Multi-point: (Also known as “Load Sharing”) A multipoint anchor system which is distributing during the construction of this anchor and is than fixed into place, typically by virtue of an overhand loop.
Passive Protection – Rock climbing protection which has no moving parts (as opposed to active protection, which does). Examples are stoppers, hexcentrics, and tri-cams.
Patient Packaging – Patient packaging is the act of getting the patient ready to be evacuated.
Personal Loads – Any load equal to a single person.
RRG Rigging Lab Rope Rescue Course Text, © 2011, Rhodes 30
Piggyback – A piggyback system is a compound MA that is made up of two or more identical simple MA’s. i.e. a compound 4:1 (2:1)(2:1).
Pulleys – A small grooved wheel used with a rescue rope to change the direction and point of application of a pulling force. They may be used in combinations to employ mechanical advantage especially for the purpose of a raising operation.
Rappelling – The act of descending a fixed rope system in a controlled manner for the purpose of vertical transportation.
Ratchet – A progress capture device employed for the sole purpose of holding the load in place during the reset phase of a raising operation.
Reset – Action taken to re-extend the pulley system for another haul after it has fully collapsed during a raising operation.
Rescue Load – As determined at the Forth Annual Technical Rescue Symposium, 1987, a rescue load is considered to be 200 Kg, 448 lbs. It is the weight of one victim/patient, one rescuer, and associated gear.
Risk/Benefit Analysis – A command decision that determines the type of action needed based on the hazards present and the risk they pose to the team and the victim.
Rope – Typically, kernmantle rope is the most common rope used for rescue operations. (Because of its floating properties polypropylene is sometimes used in swiftwater rescue.) Kernmantle rope is constructed of a load-bearing core, or "kern", of nylon fibers surrounded by a braided, protective outer sheath, or "mantle". The core is completely protected by the mantle and holds most of the load. It has a high strength to weight ratio, and maintains most of its strength when wet (approximately 85%). Kernmantle rope comes in two types; Dynamic and Static.
Dynamic rope consists of twisted or bundles that make up the core. This twisted core provides a high stretch quality. This allows as much as 40% stretch in the rope, depending on the manufacturer. Dynamic rope is very important in rescue work solely for the purpose of belaying a lead climber.
In contrast, static kernmantle rope stretches very little, from 2-4% under load. This type of rope is made from an outer braided sheath (mantle) which is woven over straight nylon fiber core (kern). The core supports 85% of the rope's strength.
"Static" kernmantle rope is used for rigging rescue system because of its high strength, low stretch and handling characteristics.
Rope Grabs – Any device attached to a rope for the purpose of holding or grabbing, may be software or hardware.
Screw-links – Hardware connectors that employ a manually operated screw to close and open the gate.
RRG Rigging Lab Rope Rescue Course Text, © 2011, Rhodes 31
Size-up – The initial evaluation of the emergency scene by the first responder.
Soft Ascenders – Any number of rope hitches which grab the rope in one or both directions.
Software – Any rope system component that is either rope, webbing, or is constructed of rope or webbing.
Static System Safety Factor (SSSF) – In a static state, (no movement, with a suspended load) the ratio between the load and the weakest link in a system using the rated breaking strength of each piece of equipment in the system. For instance, any part of a given system will only hold 5000 lbs. and the work being placed on the system is 1000 lbs.. The Safety Factor is then 5: 1. A 10: 1 Static System Safety Factor is a realistic goal when a belay rope is present.
System Loads – See “Rescue Loads”.
Throw – The throw is the available distance between maximum pulley system extension and the need for a reset.
Tri-links – Triangle shaped, hardware connectors that employ a manually operated screw to close and open the gate. Tri-links are particularly suited for multiple loading in multiple directions.
Webbing – Widely used by rock climbers and rope rescuers, webbing is a flat nylon software that is relatively inexpensive and extremely strong. Although webbing has multiple uses, it is particularly suited for anchor rigging.
Working Line – Also know as “the mainline”, the working line is the main support rope for the rescue operation.
Working Load Limit (WLL) – A rating that is sometimes used in conjunction with hardware, typically screw-links and tri-links.

RRG Rigging Lab Rope Rescue Course Text, © 2011, Rhodes 32


![Pre Rigging - boats-yachts.ro control si... · 01/2010 [B]3.a Pre Rigging Pre Rigging kit examples Pre Rigging kits: Twin digital gauge kit example 2x • Pre Rigging Dual Top Mount](https://img.pdfslide.net/doc/110x75/5b01b56a7f8b9a6a2e8ea25d/pre-rigging-boats-control-si012010-b3a-pre-rigging-pre-rigging-kit-examples.jpg)