Embed Size (px)
Citation preview

1
Research Services Division
Submitting a Grant Application through the Joint Electronic Submission (JE-S) System
For the Research Councils: PPARC, BBSRC, NERC & EPSRC

2
CREATING AN ACCOUNT

Click Create Account

4
Accept the terms and conditions and press submit
If you do not accept the terms and conditions you cannot use the Je-S system.
5
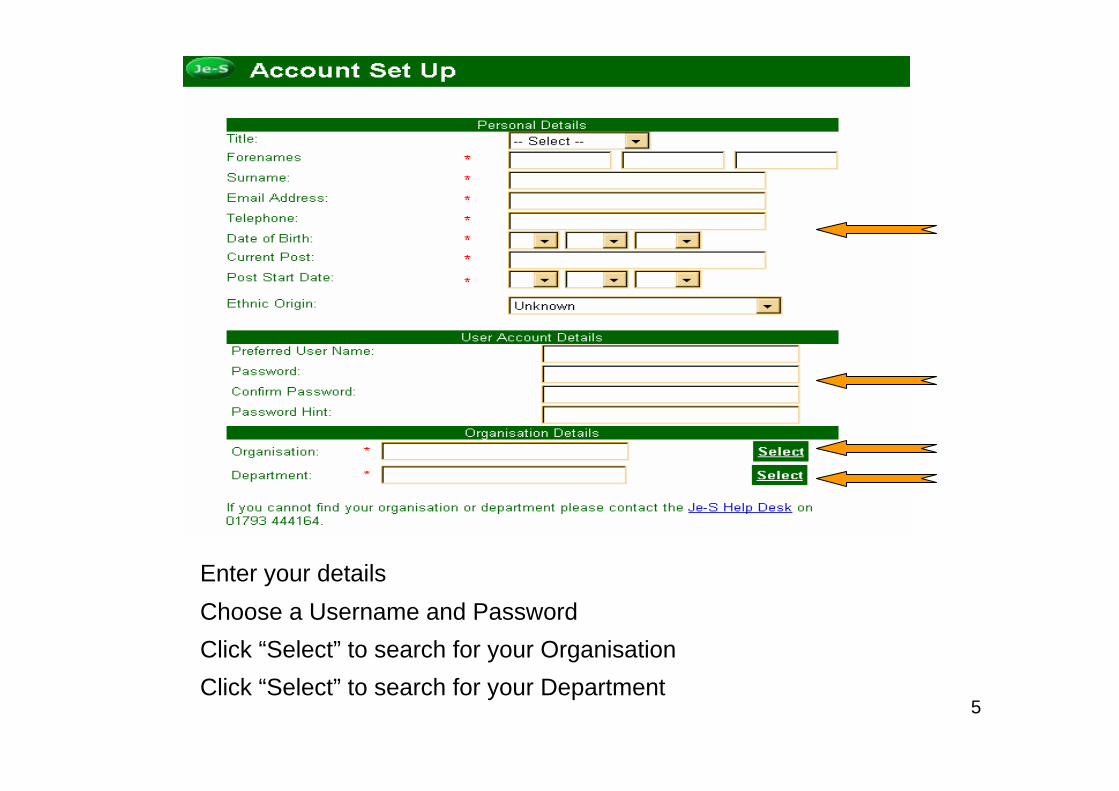
Enter your details
Click “Select” to search for your OrganisationClick “Select” to search for your Department
Choose a Username and Password

6
Example: Searching and Selecting
Example Screen: After clicking “Select Department” and searching for all departments starting with “camb”

7
Select three prompt & response pairs. Example: Dog/Cat, Sun/Moon, Night/Day
If you lock your account by using an incorrect password, you will be asked to provide 2 of the above pairs in order to re-access the account. How the pairs are structured is your own choice.

8Click “Update”
Otherwise do not tick any of the boxes and this will allocate an unregistered account. An unregistered account allows you to create an application and makes your details available on the searchable Je-S database
If you are a P.I./Co-I/Researcher Co-I you must tick the box to “Create a Registered Account”

9
You will be returned to the log-in screen.
Je-S HelpDesk will now request confirmation with RSD that you are eligible for a registered account. Confirmation can take up to three days to be processed by both Je-S and RSD.
When confirmation is complete, you will receive an email from Je-S with your User Id and Password. You can now log-in and begin your application.
In order to submit your completed Je-S application, RSD still requires an RSD-1a/PFACT and a three working day turnaround time.

10
LOGGING IN FIRST TIME

Click on “My Details”
Confirming Personal Details

12
You MUST tick the box and click “Save” to confirm your details.
If you do not confirm your details, any application on which youare named as a Co-I/P.I./ Researcher Co-I will receive an error message upon submission and will NOT be able to submit.

13
SUMMARY SCREEN : Other Functions

Changing your Password
From Document Summary screen, Click “Login Details”
Change password details as appropriate and click “Update”
After a set time period, the system will also automatically prompt you at log-in to change your password
You can also access/edit your Challenge Responses from this screen

15
Changing Personal Details
From Document Summary screen, Click “My Details”
Edit/Add detailsThis is the same screen you used to confirm your details for “Logging in First Time”

16
Changing Address Details
From Personal Details screen, click “Address Details”
Click “Add New Address” Add/Edit details, tick confirmation box, and click “Save”

17
Changing Department/Organisation Details
From Personal Details screen, click “Registered Details”
Click “Select” and search new Organisation and/or Department.
The change is not automatic. Je-S will have to verify the change with the central administration of the new department/organisation.

18
CREATING A GRANT APPLICATION

19
Select your Council, Document Type, and Scheme from the drop-down lists
•
From Document Summary Screen:
Click “Add New Document”
Click “Create Document”

20
Copying an Existing Proposal
To copy a proposal you have already formatted, Select Council, Document Type and Scheme then tick the box for “Copy an Existing Document”
Select from your list of existing proposals which one you require copied. Note: The application you select MUST be for the same Research Council. For example, you cannot copy a BBSRC proposal for a NERC application.

21
DOCUMENT MENU

22
This is the screen from which you will enter details and upload documents for your application. It is the main screen for editing a research proposal document. This screen may look slightly different for different research councils.

23
Edit Project Details
Click “Select Organisation”
Click “Select Department”
Note: If Scheme and/or Call are not selected correctly, the application may not travel to the relevant assessors at the Research Council
Note: “Reference” can be any combination of numbers or letters you require. When submitted RSD will add to or change “Your Reference” to the internal “RG Number”
Add all details as appropriate and click “Save”

24
Edit Investigators
Select type of Investigator to Edit
Click “Add New XXX Investigator”

25
1. Select P.I. from Je-S Database. P.I./Co-I must have a Registered Account.
2. “Post will outlast project” must say “Yes”. See particular RC guidelines.
3. Enter “Total number of hours” as a portion of 1650 hours p.a. full time.
4. If Directly Incurred, select appropriate pay scale, JNCHE or Non-JNCHE
If Directly Allocated, select “Directly Allocated” instead of pay scale.

26
Example: P.I. – Directly Allocated
1. Example: 2 hpw x 44 wpa x 5 = 440 hours worked over duration of the grant.
2. Enter Salary Rate – Actual or by Banding as per PFACT.
3. “Total Number of Hours to be Charged” should equal hours to be charged to the project. This may not be equal to “Hours Worked”.
4. Click “Calculate”. Form will calculate P.I. cost for whole project.
27
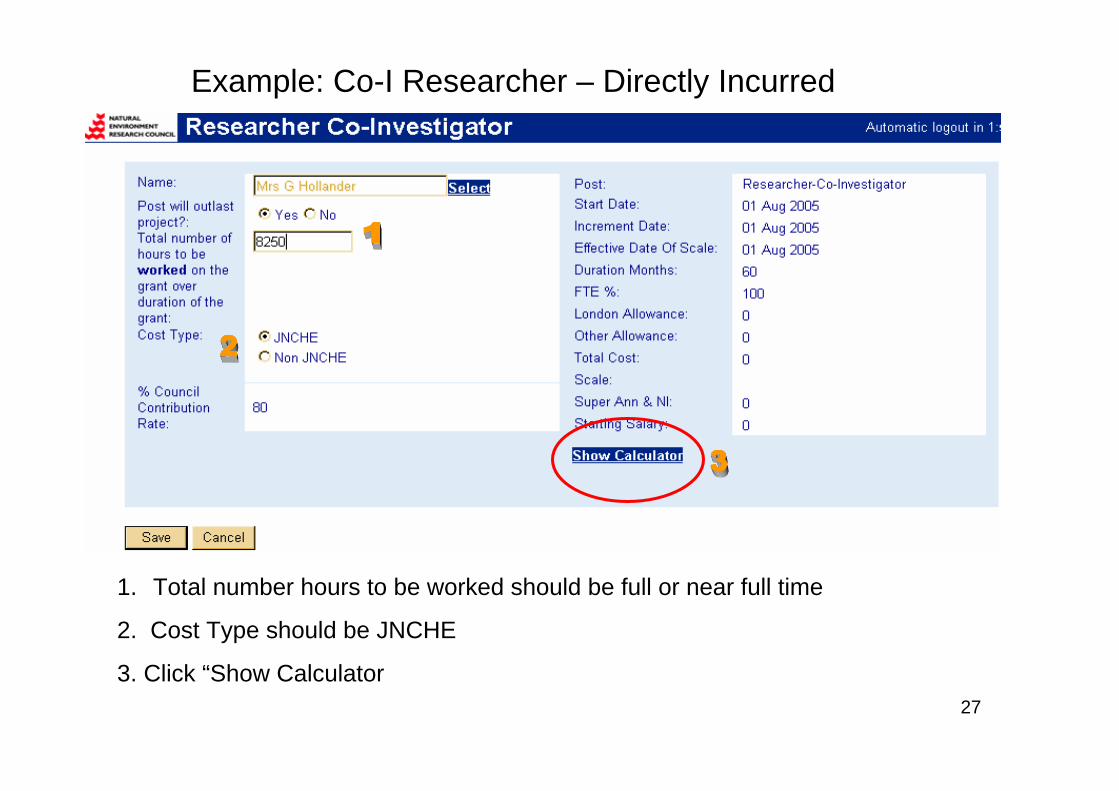
Example: Co-I Researcher – Directly Incurred
1. Total number hours to be worked should be full or near full time
2. Cost Type should be JNCHE
3. Click “Show Calculator

28
Enter details in the drop down/fill in boxes as required i.e. start date, duration, etc.
Click “Calculate”
The lower half of the screen will populate with the appropriate salary figures.
Click “Ok”

29
Shows summary of calculations. Double-check information is correct. If you need to make corrections, click “Show Calculator”

30
Objectives, Summary and Beneficiaries: Fill in as per Council guidelines for your scheme/call.
You can also cut and paste text from a Word document into these sections.

31
Edit Other Support
Click “Add New…..”
Select and Search organisation.
Add support details as appropriate

32
Edit Related Proposals
If the proposal is related to one or more proposals previously submitted to the Council, select “Add new Related Proposals Item”.
Tick the appropriate box and add reference number as requested

33
Edit Joint Proposals
Additional options will appear down the list as you answer “Yes” or “No”.
Example: Partner organisation
Click “Get New Reference”. The system will provide the “joint reference” number
Enter total number of proposals including lead. Click “Save”
Example: Lead Organisation

34
Notes: Joint Proposals
• If you are the Lead Organisation you will have to obtain the joint reference as per the example and then notify your partners of the reference so they can include this on their own applications.
•If you are not the Lead Organisation, you will have to obtain the joint reference from your lead partner.
There is no automatic notification to partners of the joint reference.

35
Edit Resources
Click appropriate category and add necessary costs.
Example: Add Other Directly Incurred Costs

36
Example: Add Equipment
Click “Add New Equipment”
Add details. Include VAT on EU purchased equipment

37
Edit Estate Rates/Indirect Costs
Select “Edit Indirect Costs” or “Edit Estates Costs”
Enter Estate/Indirect Cost as calculated by PFACT

38
Edit Classifications/Referees/Project Partners
Note: For “Other Support”, “Project Partners”, and “Referees” if your “Select” search fails, you will then be given the option to “Add New Organisation/Partner”

39
Example: Searching and Selecting: Adding Information Manually
If “Select” search fails, some data screens will give you the option to “Add New xxxxx” and input information manually.
Note: This option will not appear until the search has failed.
Data Screens that allow this option include “Edit Other Support”, “Edit Project Partners”, and “Edit Referees”

40
View Resource Summary
This is a read-only screen which is populated automatically from the other data screens: staff/resources. It shows the fEC and the RC contribution at 80%

41
Adding Attachments
Click “Edit Attachments”

42
Click “Add New Attachment”
Click “Browse” and navigate to the appropriate file/s on your system. Note the types of files accepted. Once uploaded all files are converted to PDF files. You will need Adobe Acrobat in order to read the files again once uploaded.
You must type a description
You must select a document type either “Case for Support” or “Other”. “Other” may be support letters, cover letters, quotations etc. Click “Upload”

43
STAFF

44
Example: Staff pages All Councils

45
1. Tick the circle next to “Name” if your researcher is in the Je-S database. Tick the circle next to “Post Identifier” if the post is unnamed or not in the database.
2. If your post is a JNCHE (Joint Negotiating Committee for Higher Education) post, tick the “JNCHE Scale” box.
If your post is a non-JNCHE post, leave the box unticked.
3. Click “Show Calculator”

46
Example: JNCHE post
Enter details in the drop down/fill in boxes as required i.e. start date, duration, etc.
Click “Calculate”
The lower half of the screen will populate with the appropriate salary figures.
Click “Ok”

47
Example: Completed JNCHES post summary screen
Check details: start date/increment date etc.
If you need to make amendments or changes click “Show Calculator” to return to the post data screen.

48
Example: Non- JNCHES post data screen
There is no automatic calculation on this screen.
Fill in all details AS PER THE RSD-1a or PFACT.
Click “OK”

49
Example: Completed Non- JNCHES post summary screen
Check details against RSD-1a/PFACT.
If you need to make amendments or changes click “Show Calculator” to return to the post data screen.

50
Question: Do I use JNCHES or Non-JNCHES?
All Nurses
All Clinical Staff
All Clerical/Administrative staff
All Computer Officers
All TechniciansSRA (RA2A) posts (tick the “discretionary points” box on the staff data screen if
you need to include discretionary points)
RA1B posts over national spine point 6 (discretionary)RA1B posts up to national spine point 6
RA1A posts over national spine point 13 (discretionary)RA1A posts up to national spine point 13
Use Non-JNCHESUse JNCHES
Important Points for the JNCHE data screen: •The “Effective Date of Scale” will fill in automatically to the date you have filled in the information. You cannot change this date. •The increment date for unnamed researchers is the anniversary of their start date. •For named researchers already employed at Cambridge, please be sure you have checked their increment date with Personnel or your Departmental Administrator.
Important Points for the Non-JNCHE data screen: •The “Effective Date of Scale” does not fill in automatically. This is the latest date of the national pay award. If you don’t know the effective date of scale it is a yellow box on the RSD-1a staff pages titled “effective date of salary”. •The increment date for technicians is always the October following the post start date providing the post starts by 1 July. (must be in post at least 3 months to receive an increment)•The increment date for Clerical staff is always the July following the post start date providing the post starts by 1 April. (3 month provision)•The increment date for Nurses/Clinical staff is always the April following the post start date providing the post starts by 1 January. (3 month provision).

51
VALIDATION & SUBMISSION

52
Validation
Once completed, you can check that your application meets the electronic system’s requirements by clicking “Validate Document”

53
Example: Validation Failure
“Warnings” are just for information and submission is still allowed if you wish to ignore the warning
“Errors” must be corrected before you are permitted to submit
Clicking “Validate Document” will split the screen. Validation Errors will show at the bottom of the screen.
Errors

54
Participant has not “saved” personal details. See “Logging In First Time”.
Please ensure that all Co-I/P.I/ Researcher Co-Investigators in your application have saved their personal details in the last 12 months or you will NOT be able to submit. There is nothing RSD can do to assist with this error and Je-S HelpDesk is not guaranteed to be able to correct this.
Important: Common Error

55
Submitting
Click “Submit Document”. It will ask you to confirm “Ok” or “Cancel”.
Upon successful submission, an email acknowledgement is sent to all parties involved in the production, approval, and submission of the application.
Reminder: “Submitting” sends the application to RSD or your Head of Department, NOT to the Research Council

56
Note: Submission Process
Research CouncilsSubmitter (RSD)
Submitter (RSD)
Owner(P.I)
Proposal is sent to:Status:
One-stage approval
Research CouncilsSubmitter (RSD)
Submitter (RSD)
Approver (Head of Department)
Approver(Head of Department)
Owner(P.I)
Proposal is sent to:Status:
Two-stage approval
Please check with your departmental administrator to find out if your application will follow the One-Stage or Two-Stage Approval process.
Remember, RSD still requires an RSD-1a/PFACT and three working day turnaround time from receipt of RSD-1a/PFACT and application submission.

57
DOCUMENT MENU: Other Functions

58
Printing
Click “Create Document for Printing”

59
You can select to receive the document by email either as a PDF or as a Word attachment.
Or you can view the document on-line as a PDF or word document
For either option, open the application and Print as normal onceyou have received/viewed the document.

60
Document Status
Document Status shows your current level of access rights to thedocument i.e Edit, Read-Only

61
User Access Privileges
To allow other users (besides Co-Investigators) to view/edit the document, select “User Access Privileges”. You can then “Select” someone or add a “temporary user” using their email address.

62
Document History
To display status of the document throughout the stages of the process Click “Show Document History”.

63
Hiding an Application
Click “Hide Document”.
Please note the “Hide Document” option will only appear if you are the OWNER of the application.
A document that is hidden then becomes READ-ONLY. To edit the document again select “Unhide Document”.

64
Deleting an Application
Click “Delete Document”
Please note the “Delete Document” option will only appear if youhave EDIT privileges on the application.
65
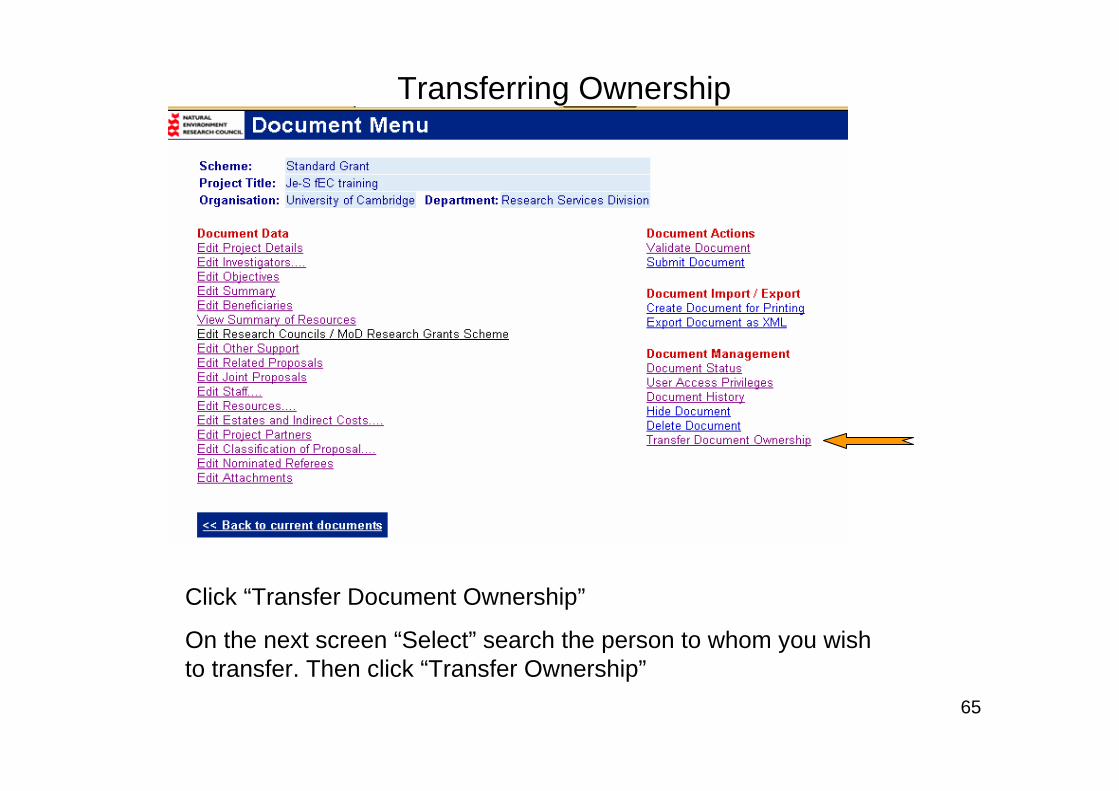
Transferring Ownership
Click “Transfer Document Ownership”
On the next screen “Select” search the person to whom you wish to transfer. Then click “Transfer Ownership”

66
PROBLEMS/NOTES

67
Common Problem
Problem: Application is “Locked” and none of the shared users with edit privileges can edit anything.
Reason 1: Someone is already in the application and is using it.
Reason 2: The last person to access the application did not log out properly. If you leave the application by clicking the “X” (close) button on the window, instead of clicking “Log-Out”, the application can often become locked.
Solution 2: The person who locked the form needs to log back in, access the application, and click “Log-Out” properly. The application should now be accessible again.
If the person who locked the application is unavailable or the above solution does not work, the JeS HelpDesk should be able to unlock it.

68
Suggestions/Notes
If your department has selected to be an “Approver” please ensure that your Head of Department (or applicable delegated administrator) will be available to approve your application electronically.
“Help” function pops up directly to the section that you are in. Also, it contains research council specific Help for relevant sections. Full Help is available at the log-in screen under “System Help”.
Give shared access to your departmental administrator so they will be able to view and assist with your application
If you are using an application as a template only or are not intending to submit, please use the “Hide” function so that the application is not visible on the central system. “Hide” renders the document read-only.
Je-S System Tutorials are available at the log-in screen under “Tutorials”

69
FELLOWSHIPS

70
Click “Update”
Instead of ticking “Create a registered account”, tick “Be a fellowship applicant”. This will complete the registration without attaching the Fellow permanently to University of Cambridge under Je-S.
Creating an Account
The Fellow will shortly receive an email to activate/access the new account.
Complete entry of personal details etc. as per normal grant application

71
Fellowship – Document Menu
Example – EPSRC Fellowship document menu

72
Optional Research Grant – EPSRC Only
If the Fellow is submitting a Research Grant with an EPSRC Fellowship, he/she will need to obtain a joint reference number from the research grant application. See Joint Proposal Instructions page 28.
The joint reference number must then be entered into the Fellowship application.

73
Head of Department Statement
Select/Search Head of Department. This automatically gives the HoD access to the Fellowship application via email in order to complete the necessary support statement.
Please note the Head of Department Statement is NOT confidential. The applicant will be able to access and read the statement.

74
Fellowship – Further Notes/Comments
If there are no active calls for Fellowship proposals, you will not be able to create an application.
Fellowships are currently available only for EPSRC, PPARC, NERC,AHRC & ESRC. BBSRC Fellowships will be available sometime in 2005.
Fellowship applications still require an RSD-1a/PFACT and three working days processing time.

Contacts and Links
•JeS [email protected]
T: 01793 444164Staffed Monday to Friday 9am-5pm
•JeS log-in Homepage https://je-s.rcuk.ac.uk/eforms/secure/Login.asp
Research Services Home Pagewww.rsd.cam.ac.uk
University of Cambridge fEC page http://www.admin.cam.ac.uk/univ/fec/