Embed Size (px)
Citation preview

ResScan™Version 3.10Clinical GuideEnglish

Manufacturer: ResMed Ltd 1 Elizabeth Macarthur Drive Bella Vista NSW 2153 Australia
Distributed by: ResMed Corp 9001 Spectrum Center Boulevard San Diego CA 92123 USA ResMed (UK) Ltd 96 Milton Park Abingdon Oxfordshire OX14 4RY UK
See www.resmed.com for other ResMed locations worldwide.
Important NoticeThis manual, as well as the computer programs described herein, are supplied on the condition that they may only be used in accordance with their stated purpose. The information in this manual is furnished for the purpose of instruction and guidance only, is subject to change without notice, and should not be construed as an alternative to qualified medical advice. ResMed Limited assumes no responsibility or liability for any errors or inaccuracies that may appear in this manual. Other than with the written permission of ResMed Limited, no part of this manual or the computer programs described herein may be reproduced, stored in a retrieval system, or transmitted in any form or by any means, electronic, mechanical, recording, or otherwise.Copyright in the computer programs and their trademarks are owned by the following companies: ResMed Limited: ResScan and AutoScan Microsoft Corporation: Microsoft, Internet Explorer, Windows Explorer, Windows 2000, Windows XP, Windows VistaAdobe Systems Incorporated: Adobe ReaderIntel: PentiumSmartMedia is a trademark of Toshiba.AutoScan, AutoSet, AutoSet CS, AutoSet Respond, AutoSet Spirit, AutoSet T, HumidAire, Mirage, ResLink, ResScan, SmartStart, S6, S7, S7 Elite, S8, S8 AutoScore, S8 AutoSet, S8 AutoSet Respond, S8 AutoSet Spirit, S8 AutoSet Vantage, S8 Elite, S8 Escape, S8 Lightweight, S9, Sullivan, Ultra Mirage, VPAP, VPAP Adapt SV, VPAP Auto, and VPAP Malibu are trademarks of ResMed Ltd. AutoSet, AutoSet CS, AutoSet T, Escape, HumidAire, Mirage, SmartStart, Sullivan, and VPAP are registered in US Patent and Trademark Office.
© 2010 ResMed Ltd. All rights reserved. 318239/1 10 01
CONTENTS
Introduction . . . . . . . . . . . . . . . . . . . . . . . . . . . . . . . . . . . . . . . . . . . . . . . . . . . . . . . . . . . . . 1ResScan Patient Management System 1Intended use 1Compatible Flow Generators 1How to Use this Manual 1
Quick Reference Guide . . . . . . . . . . . . . . . . . . . . . . . . . . . . . . . . . . . . . . . . . . . . . . . . . . . 2Install ResScan 2Start Screen 3Quick Start 3Using the ResScan Screens 4Other Features 5
Installation . . . . . . . . . . . . . . . . . . . . . . . . . . . . . . . . . . . . . . . . . . . . . . . . . . . . . . . . . . . . . . 5Recommended Computer Requirements 5Installing ResScan Software 6Data Card Reader Drivers 7USB Adapter Drivers 9
Navigation . . . . . . . . . . . . . . . . . . . . . . . . . . . . . . . . . . . . . . . . . . . . . . . . . . . . . . . . . . . . . . . 9Toolbar 9Menus 10
Start Screen . . . . . . . . . . . . . . . . . . . . . . . . . . . . . . . . . . . . . . . . . . . . . . . . . . . . . . . . . . . . 11Patient Most Recent Usage Bar 12Follow-ups 12
Quick Start . . . . . . . . . . . . . . . . . . . . . . . . . . . . . . . . . . . . . . . . . . . . . . . . . . . . . . . . . . . . . 12Patient Files . . . . . . . . . . . . . . . . . . . . . . . . . . . . . . . . . . . . . . . . . . . . . . . . . . . . . . . . . . . . 13
Create a patient file 13Open an existing patient file 13Patient File Manager 13Importing Data Files 14Exporting Data Files 15
Download Data . . . . . . . . . . . . . . . . . . . . . . . . . . . . . . . . . . . . . . . . . . . . . . . . . . . . . . . . . 16Connecting the flow generator to the computer 17Connecting a Card Reader to the Computer 17
Profile Screen . . . . . . . . . . . . . . . . . . . . . . . . . . . . . . . . . . . . . . . . . . . . . . . . . . . . . . . . . . 19General Details and Additional Details 20Clinical History 20
Review Screen . . . . . . . . . . . . . . . . . . . . . . . . . . . . . . . . . . . . . . . . . . . . . . . . . . . . . . . . . . 21The Browser 22

Statistics Tab 24Summary Graphs and Detailed Graphs 25
Notes Screen . . . . . . . . . . . . . . . . . . . . . . . . . . . . . . . . . . . . . . . . . . . . . . . . . . . . . . . . . . . 32Writing a Note 32Viewing Notes 33Setting Follow-ups 34
Reports Screen . . . . . . . . . . . . . . . . . . . . . . . . . . . . . . . . . . . . . . . . . . . . . . . . . . . . . . . . . 35Create a Report 35Customize or Create a New Report Template 36Print a Report 38Email a Report 38Save a Report 38
Settings . . . . . . . . . . . . . . . . . . . . . . . . . . . . . . . . . . . . . . . . . . . . . . . . . . . . . . . . . . . . . . . . 38Open the Settings Dialog 38Change Settings 39Implementing Changed Settings 40
Customizing ResScan . . . . . . . . . . . . . . . . . . . . . . . . . . . . . . . . . . . . . . . . . . . . . . . . . . . 40Options Dialog 40Customizing Review Screens 44
Troubleshooting . . . . . . . . . . . . . . . . . . . . . . . . . . . . . . . . . . . . . . . . . . . . . . . . . . . . . . . . . 44Installation 44Downloading 44Reports 47Settings 47
Technical Data . . . . . . . . . . . . . . . . . . . . . . . . . . . . . . . . . . . . . . . . . . . . . . . . . . . . . . . . . . 49Standards 49Symbols 49
Index . . . . . . . . . . . . . . . . . . . . . . . . . . . . . . . . . . . . . . . . . . . . . . . . . . . . . . . . . . . . . . . . . . 50

Introduction
ResScan Patient Management System
The ResScan™ patient management system consists of the ResScan software, ResScan Data Card, ResLink™, and ResScan Serial and USB Adapters. This data collection system is devised to capture data from the flow generator, in order to monitor and optimize patient therapy. The system provides remote access to patient data, and two-way communication between the clinician and the patient’s flow generator.
Data is collected on a data card (SmartMedia™ Card, ResScan Data Card or Secure Digital (SD) Card) that is inserted into a data collection device (the ResLink or flow generator). Clinicians can then download the data from the data card, or directly from the flow generator, onto their computer to be viewed in ResScan.
The ResScan CD contains the ResScan software, card reader drivers, and a wide range of documentation in pdf format. All other components of the ResScan patient management system can be obtained from your ResMed distributor.
The scope of this manual relates to the ResScan software only.
This manual contains special terms and icons to draw your attention to specific and important information.
• Warning alerts you to possible injury.
• Caution explains special measures for the safe and effective use of the device.
• Note is an informative or helpful note.
Intended use
The ResScan software is intended to be used by clinicians or health care providers to download and view therapy data, as well as store therapy information and print reports. ResScan also provides functionality for setting flow generator parameters. ResScan is used with ResMed flow generators that have software incorporating ResMed’s proprietary communication protocol.
!CAUTION (USA ONLY)Federal law restricts this device to sale by or on the order of a physician.
Compatible Flow Generators
A list of devices compatible with ResScan can be found on www.resmed.com on the Products page under Service & Support.
ResMed produces Data Management guides for the compatible flow generators with specific information on the data displayed in ResScan.
Note: Do not connect ResScan to the flow generator while delivering therapy.
How to Use this Manual
Note: This manual is intended to be used in conjunction with the documentation supplied with the corresponding flow generator, the ResLink, SmartMedia card reader, ResScan Data Card Reader, and SD Card reader.
1Introduction

The information about ResScan software in this manual is organized into seven sections: Installation; Navigation; Quick Start; Using the screens; Customizing; Settings; and Troubleshooting.
1. Installation
Before use, you will need to install ResScan software on your computer (see page 5).
2. Navigation
The Navigation chapter describes the functions available in ResScan, including the menus.
3. Quick Start
The Quick Start function is enabled automatically when you connect a flow generator to your PC or insert a Data Card. You will be given the option of downloading data to create a report (see “Quick Start” on page 3).
4 Using the ResScan Screens
The screens in ResScan are organized to facilitate your workflow. Use the Start screen (page 11) or the icons in the toolbar for access to the Profile (page 19), Review (page 21), Notes (page 32), and Reports (page 35) screens.
5. Customizing ResScan
You can import (page 14) patient data files, customize the Review screen graphs (page 44), or create new templates in the Reports screen (page 36).
6. Settings
You can alter flow generator settings via ResScan, either by a direct cable connection with the flow generator or by using a Data Card (see page 38).
7. Troubleshooting
Some of the symptoms of potential problems, and work arounds are suggested in this section. Please contact your equipment provider or ResMed service for further assistance.
Quick Reference Guide
Follow these steps for a quick introduction to ResScan. Refer to the relevant sections in the manual for details.
Install ResScan
!CAUTIONDo not attach the card reader or ResScan USB Adapter until instructed by the Wizard.
1. Insert the ResScan Application CD into the CD drive or download the installation file from the dedicated URL1.
The Install program prompts you through the installation process.
1 Contact your ResMed representative for more information on how to obtain the software.
2
Note: See “Recommended Computer Requirements” on page 5.
2. If required, install the driver for the card reader or ResScan USB Adapter by selecting the appropriate option in the Windows Start menu, and follow the Wizard.
Note: Only drivers required by your operating system are available for installation. See “ResScan Data Card Reader” on page 7.
3. Start ResScan by double-clicking the ResScan icon on your desktop
or
by selecting ResScan in the Windows Start menu.
Notes• You do not need to uninstall AutoScan™ software when installing ResScan. However, do not
install ResScan in the same directory as AutoScan. If upgrading from a previous version of ResScan, do not uninstall the software. Install ResScan in the same directory as the current version. Your custom reports are not deleted during the upgrade.
• Do not have ResScan and AutoScan running at the same time.• You cannot have more than one instance of ResScan open at the same time.
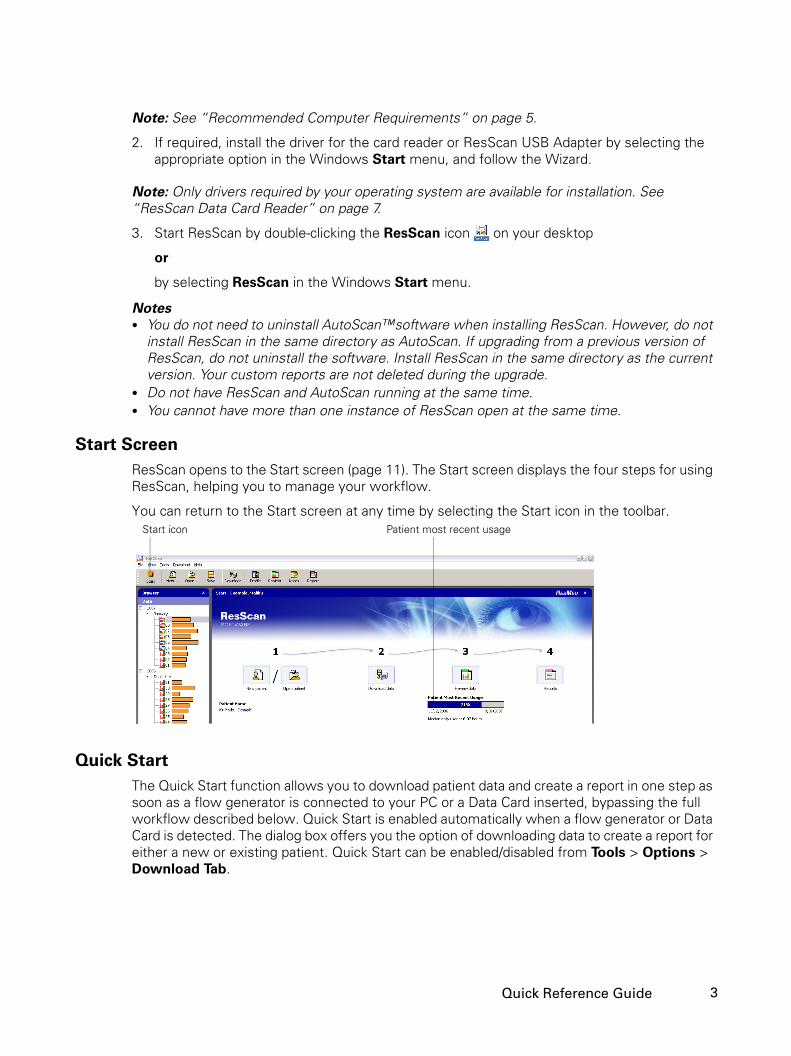
Start Screen
ResScan opens to the Start screen (page 11). The Start screen displays the four steps for using ResScan, helping you to manage your workflow.
You can return to the Start screen at any time by selecting the Start icon in the toolbar.
Quick Start
The Quick Start function allows you to download patient data and create a report in one step as soon as a flow generator is connected to your PC or a Data Card inserted, bypassing the full workflow described below. Quick Start is enabled automatically when a flow generator or Data Card is detected. The dialog box offers you the option of downloading data to create a report for either a new or existing patient. Quick Start can be enabled/disabled from Tools > Options > Download Tab.
Start icon Patient most recent usage
3Quick Reference Guide
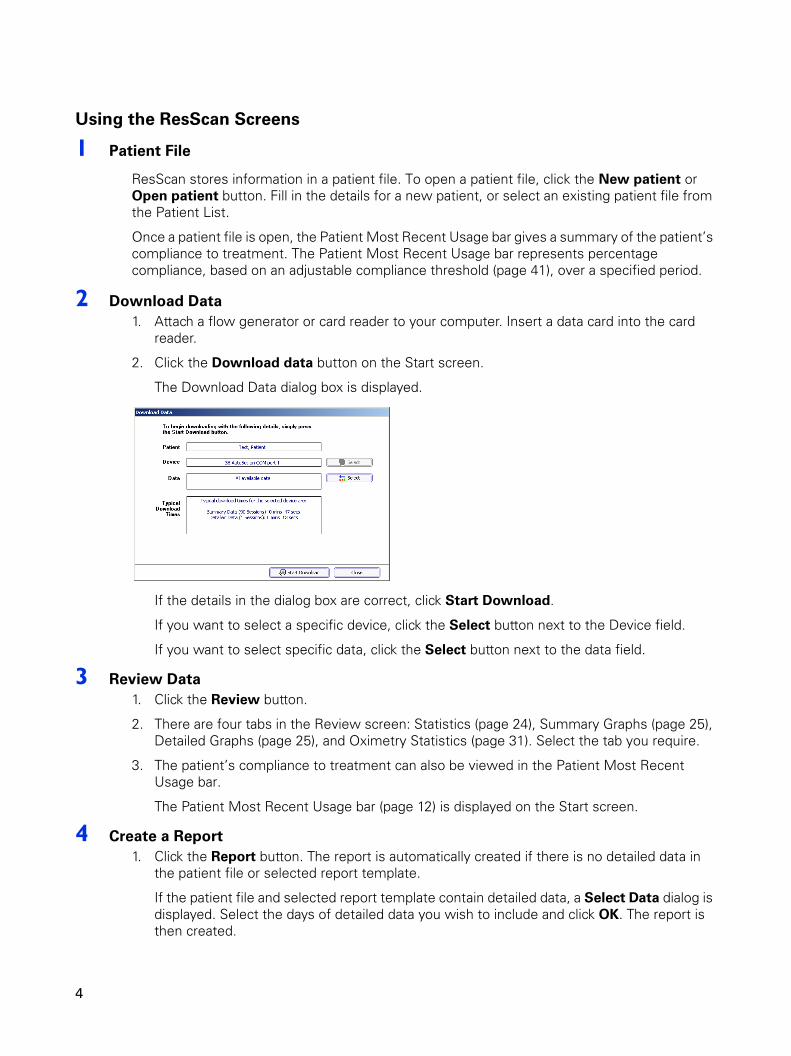
Using the ResScan Screens
1. Patient File
ResScan stores information in a patient file. To open a patient file, click the New patient or Open patient button. Fill in the details for a new patient, or select an existing patient file from the Patient List.
Once a patient file is open, the Patient Most Recent Usage bar gives a summary of the patient’s compliance to treatment. The Patient Most Recent Usage bar represents percentage compliance, based on an adjustable compliance threshold (page 41), over a specified period.
2 Download Data
1. Attach a flow generator or card reader to your computer. Insert a data card into the card reader.
2. Click the Download data button on the Start screen.
The Download Data dialog box is displayed.
If the details in the dialog box are correct, click Start Download.
If you want to select a specific device, click the Select button next to the Device field.
If you want to select specific data, click the Select button next to the data field.
3. Review Data
1. Click the Review button.
2. There are four tabs in the Review screen: Statistics (page 24), Summary Graphs (page 25), Detailed Graphs (page 25), and Oximetry Statistics (page 31). Select the tab you require.
3. The patient’s compliance to treatment can also be viewed in the Patient Most Recent Usage bar.
The Patient Most Recent Usage bar (page 12) is displayed on the Start screen.
4. Create a Report
1. Click the Report button. The report is automatically created if there is no detailed data in the patient file or selected report template.
If the patient file and selected report template contain detailed data, a Select Data dialog is displayed. Select the days of detailed data you wish to include and click OK. The report is then created.
4
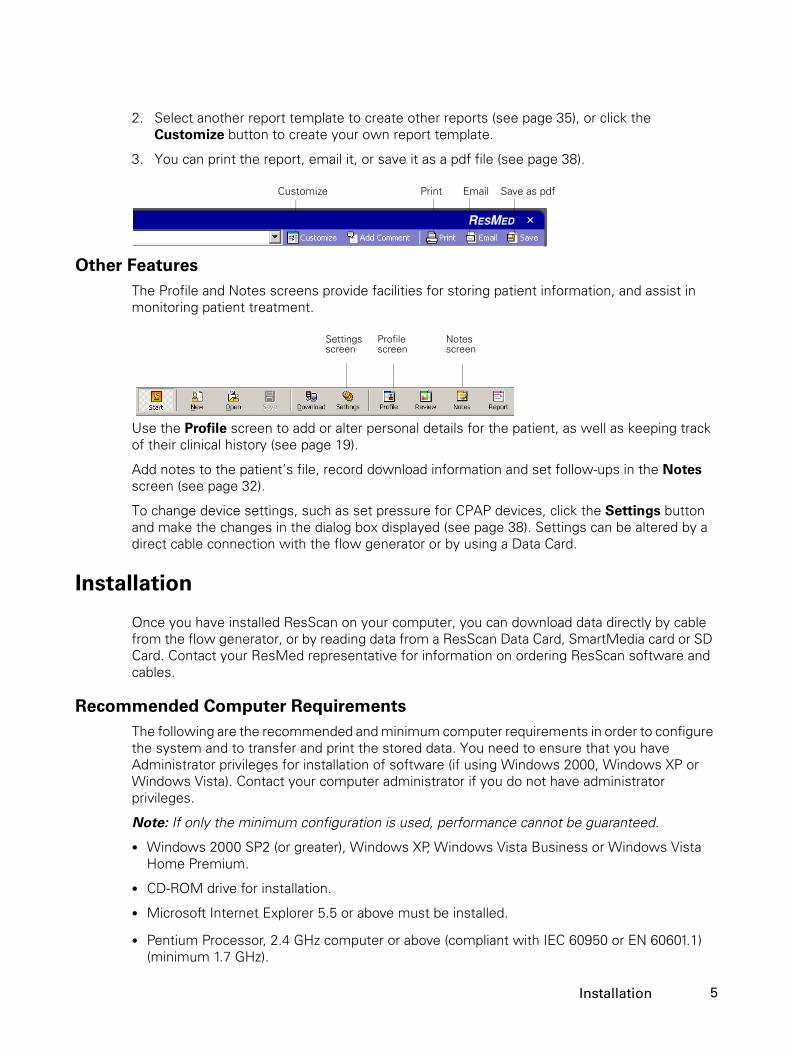
2. Select another report template to create other reports (see page 35), or click the Customize button to create your own report template.
3. You can print the report, email it, or save it as a pdf file (see page 38).
Other Features
The Profile and Notes screens provide facilities for storing patient information, and assist in monitoring patient treatment.
Use the Profile screen to add or alter personal details for the patient, as well as keeping track of their clinical history (see page 19).
Add notes to the patient’s file, record download information and set follow-ups in the Notes screen (see page 32).
To change device settings, such as set pressure for CPAP devices, click the Settings button and make the changes in the dialog box displayed (see page 38). Settings can be altered by a direct cable connection with the flow generator or by using a Data Card.
Installation
Once you have installed ResScan on your computer, you can download data directly by cable from the flow generator, or by reading data from a ResScan Data Card, SmartMedia card or SD Card. Contact your ResMed representative for information on ordering ResScan software and cables.
Recommended Computer Requirements
The following are the recommended and minimum computer requirements in order to configure the system and to transfer and print the stored data. You need to ensure that you have Administrator privileges for installation of software (if using Windows 2000, Windows XP or Windows Vista). Contact your computer administrator if you do not have administrator privileges.
Note: If only the minimum configuration is used, performance cannot be guaranteed.
• Windows 2000 SP2 (or greater), Windows XP, Windows Vista Business or Windows Vista Home Premium.
• CD-ROM drive for installation.
• Microsoft Internet Explorer 5.5 or above must be installed.
• Pentium Processor, 2.4 GHz computer or above (compliant with IEC 60950 or EN 60601.1) (minimum 1.7 GHz).
Customize Print Email Save as pdf
Settings screen
Profilescreen
Notes screen
5Installation
• 1.0 GB RAM (minimum 256 MB).
• At least 250 MB of free hard disk space required for the ResScan application (not including storage for patient files).
• A serial port for RS232 connection, capable of reliable 56 k baud (eg, 16550 UART).
• A USB port for USB device connection.
• Parallel, serial or USB printer port, or network connection for printing.
• Super VGA Monitor/graphic card (1024x768, 256 colors, 8 MB video RAM).
• A PDF reader must be installed (eg, Adobe Reader®).
• Optional: SmartMedia card reader (floppy, USB or PCMCIA).
• Optional: ResScan Data Card reader
• Optional: SD Card reader
• Optional: Microsoft Outlook 2000 for emailing reports.
Installing ResScan Software
ResScan is available on CD, or can be downloaded from the dedicated URL1. Your computer should be running Windows 2000 SP2, Windows XP or Windows Vista. If you are not using one of these operating systems, you must install or upgrade to one of them before installing ResScan.
Ensure that all other applications are closed before beginning ResScan installation.
1. Insert the ResScan CD into the CD drive of your computer. The installation process will start automatically.
2. If installation does not start automatically, select Run from the Start menu and type in the CD-ROM drive location (typically D:) and the name of the installation program—D:\setup.exe—and click the OK button.
Note: You do not need to uninstall AutoScan™ software when installing ResScan. However, do not install ResScan in the same directory as AutoScan. If upgrading from a previous version of ResScan, do not uninstall the software. Install ResScan in the same directory as the current version. Your custom reports are not deleted during the upgrade.
3. The install program prompts you through the installation process. Follow the instructions on the screen.
Notes• During installation, one of the dialogs asks you to choose a Complete or Custom installation.
Choose Custom if you want to change the installation directory from the default location; otherwise, choose Complete.
• During installation, a dialog will ask you whether you want to install the drivers for the ResScan USB Adapter and the ResScan Data Card Reader. This is the preferred method of installing the drivers if they are not already installed on your PC. Alternatively, these drivers can be installed through the ResScan Start menu. To download, go to Start > Programs > ResMed > ResScan > Drivers > Data Card Reader.
1 Contact your ResMed representative for more information on how to obtain the software.
6
When the installation program has completed copying all the necessary files to your computer, the Installation Completed dialog box is displayed.
4. Click the Finish button to close the Installation Completed dialog box.
5. Your computer may need to be restarted. If a dialog box advises you to restart, you must do so in order to have access to the ResScan software.
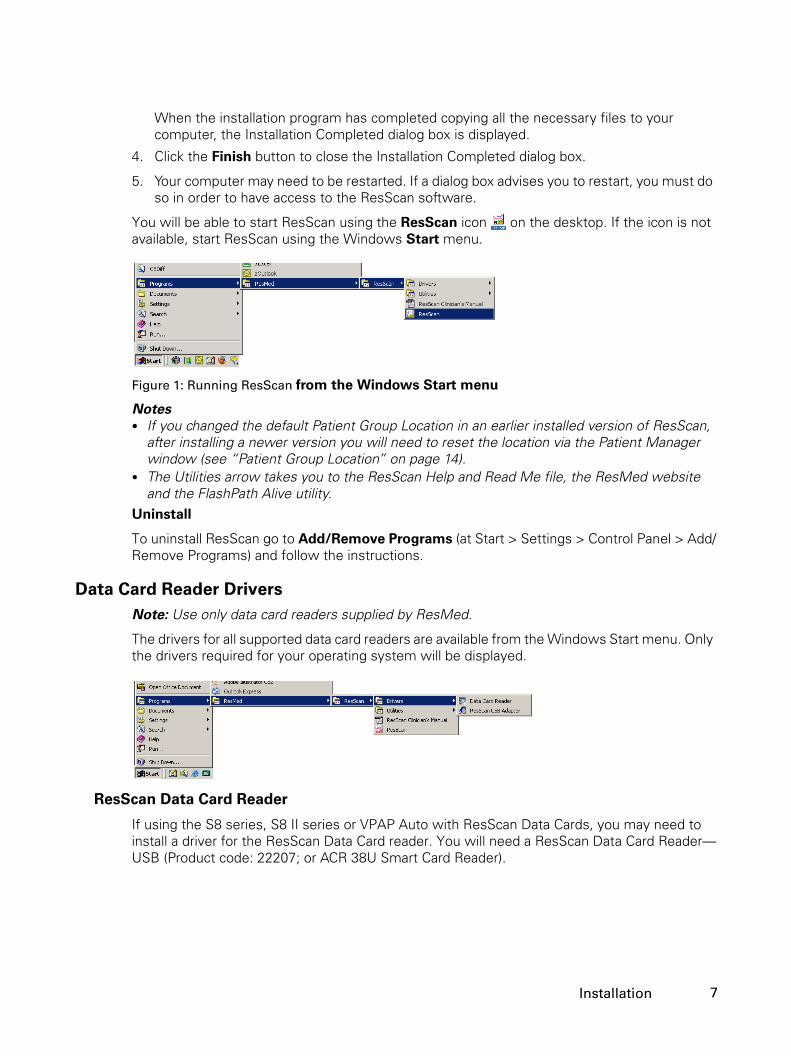
You will be able to start ResScan using the ResScan icon on the desktop. If the icon is not available, start ResScan using the Windows Start menu.
Figure 1: Running ResScan from the Windows Start menu
Notes• If you changed the default Patient Group Location in an earlier installed version of ResScan,
after installing a newer version you will need to reset the location via the Patient Manager window (see “Patient Group Location” on page 14).
• The Utilities arrow takes you to the ResScan Help and Read Me file, the ResMed website and the FlashPath Alive utility.
Uninstall
To uninstall ResScan go to Add/Remove Programs (at Start > Settings > Control Panel > Add/Remove Programs) and follow the instructions.
Data Card Reader Drivers
Note: Use only data card readers supplied by ResMed.
The drivers for all supported data card readers are available from the Windows Start menu. Only the drivers required for your operating system will be displayed.
ResScan Data Card Reader
If using the S8 series, S8 II series or VPAP Auto with ResScan Data Cards, you may need to install a driver for the ResScan Data Card reader. You will need a ResScan Data Card Reader—USB (Product code: 22207; or ACR 38U Smart Card Reader).
7Installation

SmartMedia Card Reader
If you are also using a ResLink with the flow generator, you will need to install a SmartMedia card reader driver. ResMed recommends that you use one of three possible SmartMedia card readers—USB (Product code: 22212; or CR-20), floppy (FlashPath), or PCMCIA. The following table shows typical compatibility for operating systems and types of computing platforms available. It is a guideline only, as you should use the fastest reader that your system can support. USB and PCMCIA readers are recommended where possible.
Contact your ResMed distributor to order the appropriate reader.
Depending on your operating system, you may need to install the driver for the card reader. The driver for the USB SmartMedia card reader is available on the ResScan CD.
FlashPath card reader
If using the FlashPath card reader, activate it by right-clicking the icon at the bottom of your computer screen. Turn on ‘Check A:/B: for card data’. You will be able to hear the drive searching for data if a disk with data is not inserted.
The FlashPath Alive utility keeps the floppy disk ’awake’ so that ResScan can read its data. If you want to alter the pulse interval or turn it off altogether, use the choices in the FlashPath Alive utility. To access the choices in the Alive utility, right-click the task bar icon.
Installing the Data Card Reader Drivers
The instructions below are for the installation of the data card reader drivers. Please use the installation instructions specific to your Windows operating system.
A USB hub may be required if only one USB port on your computer is available for ResMed equipment. The Mini USB Hub (Product code: 22211) allows two data card readers to be connected to a single USB port on your computer.
Windows 2000, Windows XP and Windows Vista
Note: The drivers for ResScan SmartMedia Card reader (CR-20), SD Card reader and Mini USB Hub are already installed on Windows 2000/XP/Vista. You can also check the drivers from manufacturers. If you are using these devices, you can now connect them to any available USB port.
To install the driver for the ResScan Data Card Reader (ACR 38U Smart Card Reader):
1. Do not connect any data card reader to your computer.
2. If not already installed, install ResScan using the ResScan installation CD.
Table 1: SmartMedia card readers
Operating system Desktop with USB ports Desktop without USB ports Laptop
Windows 2000 SP2 USB FlashPath PCMCIA
Windows XP USB FlashPath PCMCIA
Windows Vista USB FlashPath PCMCIA
FlashPath card reader icon
8

3. Select Data Card Reader in the Windows Start menu (Start > Programs > ResMed > ResScan > Drivers > Data Card Reader).
4. In the Installation Wizard, select the Install option and follow the instructions.
Notes• Your computer may need to be re-started. If a dialog box advises you to re-start, then you
will need to in order to access the card reader.• There is further information about the reader in the instructions in the reader package
obtained from ResMed. • When the SmartMedia card reader is successfully attached/inserted, it can be seen as a
drive in Windows Explorer.
USB Adapter Drivers
If you are using a USB adapter with the flow generator, you will need to install the ResScan USB Adapter driver. The driver is available from the Windows Start Menu.
Navigation
Toolbar
ResScan has four main screens—Profile, Review, Notes, and Report. You can display these screens by clicking the corresponding icon in the toolbar.
Figure 2: Navigating the ResScan screen
Toolbar
9Navigation

Menus
File Menu
View Menu
Tools Menu
Download Menu
The operations in the File menu apply to patient files. The menu items are:
New: Creates a new patient file.
Open: Opens the selected patient file.
Close: Closes the currently opened patient file.
Save: Saves the currently opened patient file.
Import: Imports a patient file (ResScan 1.1 or AutoScan). See “Importing Data Files” on page 14.
Export: Exports patient files to a comma separated value (CSV) file. See “Exporting Data Files” on page 15.
Exit: Closes ResScan.
The View menu gives you access to the Start, Profile, Review, Notes and Report screens, and lets you display or hide the Browser. See “The Browser” on page 22.
The Tools menu provides access to customizing tools for formatting information, managing your patient files, and to adjust settings on the flow generator.
Options: Set preferences for graphs and reports. See “Options Dialog” on page 40.
Patient Manager: organize patient files, eg, into groups. See page 13.
Device Settings: Change the settings on the connected flow generator, or load the settings onto a Data Card to change settings on a remote flow generator. See “Settings” on page 38.
Select Download from the Download menu to download data from the connected flow generator or data card.
10

Help Menu
Start Screen
The Start screen guides you through the ResScan software and provides a summary of the open patient file.
Note: The browser (shown on the far left side of the screen below) indicates the availability of data. The length of the bars displayed in the browser provides a quick indicator of usage.
Figure 3: Start screen
The workflow involved in managing patient data is indicated by the flow on the Start screen. Return to the Start screen at any time to move to a different step within the workflow.
Help: Displays the online help file, which has Contents, Index, and Find tabs.
ResMed on the Web: If you have web access, takes you to the ResMed website, where you will find information about all ResMed products and the latest research into sleep-disordered breathing.
Contact Us: Send an email to ResMed.
About: Identifies the software and its version.
Open Patient fileSaved Reports
Browser New Patient button
Open Patient button
Download Data button
Review button
Reports button
Workflow icons
Patient Most Recent Usage for open patient file
Access to Follow-ups
11Start Screen

Patient Most Recent Usage Bar
Once a patient file is open, the Patient Most Recent Usage bar gives a summary of the patient's compliance to treatment. The percentage value displayed in the bar is based on the number of days the patient used the device above the nominated compliance threshold (eg, 4 hours per day), over a specified most recent usage period (eg, 1 week, 1 month, etc). You can set the compliance threshold and usage period in the Tools menu Options dialog (see page 40). The Daily Usage figure displayed is the median value.
Follow-ups
When you set a follow-up, it will be displayed in the Start screen if due today or overdue. You can go straight from the Start screen to the Follow-up screen to see more details by selecting the Go to Follow-up button, or double-clicking the row in the Today’s follow-ups table that corresponds to the Follow-up. Overdue follow-ups appear in red.
For further information about follow-ups, refer to “Setting Follow-ups” on page 34 of this manual.
Quick Start
The Quick Start feature allows you to instantly download patient data and create a report in one step, without navigating through the full four-step workflow. A dialog will appear each time a flow generator is connected to your PC or a Data Card is inserted. You can download data and create a report for either new or existing patients directly from this dialog.
The Quick Start feature is enabled by default, so that the dialog automatically appears whenever you connect a flow generator or insert a Data Card. To disable the QuickStart feature, uncheck “Show this dialog every time a device is attached” in Tools > Options > Download.
Note: Before opening the dialog box, ResScan displays an indexing message. This message is generally brief, however you can cancel indexing by pressing the Cancel button.
12

Patient Files
Create a patient file
To create a patient file, click the New Patient button and fill in the details.
You can also choose New from the File menu or toolbar icon.
If a patient with the same name already exists, a warning dialog appears. You may choose to continue and create a patient file with a duplicate name.
Open an existing patient file
To open a patient file, click the Open Patient button.
Note: Before opening the dialog box, ResScan displays an indexing message. This message is generally brief, however you can cancel indexing by pressing the Cancel button.
The Open box is displayed.
Figure 4: Open patient file dialog box
Select the file from the Patient List. If you have organized your patients into groups, select the group you require and then select the patient file from the Patient List. The open group will be the one used most recently. The Patient File Details shows the size and quantity of individual patient files.
You can also choose Open from the File menu or toolbar icon.
To edit information in an existing patient file, use the Profile screen (see page 19).
Notes• Patient files may only be accessed from a single instance of ResScan. • Any patient file stored on a network drive should not be accessed at the same time by more
than one ResScan user.
Patient File Manager
You can organize your patient files into groups all from within ResScan. You may wish to organize them according to their treating clinician, days of the week, or another principle.
Note: Before opening the dialog box, ResScan displays an indexing message. This message is generally brief, however you can cancel indexing by pressing the Cancel button.
Patient group menu
Patient List
13Patient Files
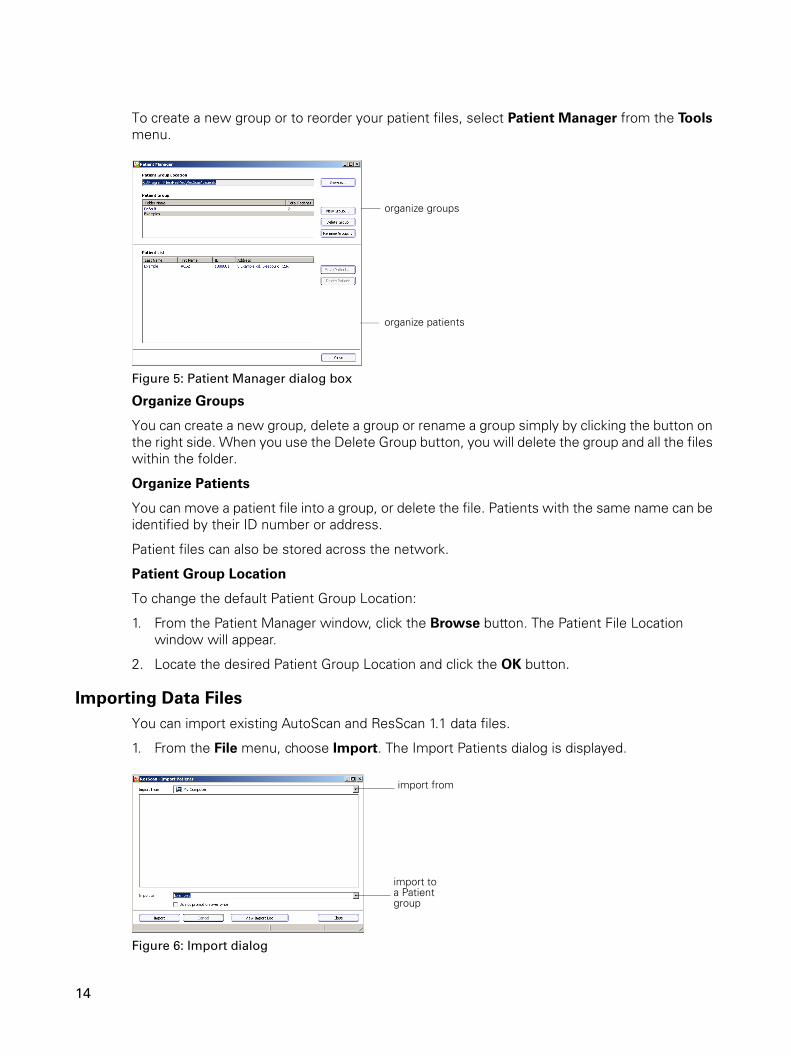
To create a new group or to reorder your patient files, select Patient Manager from the Tools menu.
Figure 5: Patient Manager dialog box
Organize Groups
You can create a new group, delete a group or rename a group simply by clicking the button on the right side. When you use the Delete Group button, you will delete the group and all the files within the folder.
Organize Patients
You can move a patient file into a group, or delete the file. Patients with the same name can be identified by their ID number or address.
Patient files can also be stored across the network.
Patient Group Location
To change the default Patient Group Location:
1. From the Patient Manager window, click the Browse button. The Patient File Location window will appear.
2. Locate the desired Patient Group Location and click the OK button.
Importing Data Files
You can import existing AutoScan and ResScan 1.1 data files.
1. From the File menu, choose Import. The Import Patients dialog is displayed.
Figure 6: Import dialog
organize groups
organize patients
import from
import to a Patient group
14

2. In the Import From field, choose the source of the files and select the files required.
3. In the Import To field, choose the destination of the files from the Patient groups (page 13) displayed.
If you tick the Do not prompt on overwrite box, imported files will overwrite files of the same name that already exist in ResScan.
Exporting Data Files
You can export ResScan summary data from patient file to comma separated value (CSV) files for use with other programs.
1. From the File menu, choose Export. The Export Patient file to CSV dialog is displayed.
Note: Before opening the dialog box, ResScan displays an indexing message. This message is generally brief, however you can cancel indexing by pressing the Cancel button.
Figure 7: Export Patient file to CSV dialog
2. Select the patient group from the Patient Group drop down list.
3. Select the date range from which to generate the CSV files.
4. Select one or more patient files from the list of patients.
5. Click the Export Selected button.
A CSV file is generated for each of the selected patients. The name of the file is that of the patient.
Alternatively, you can export all patient files in a patient group to a single CSV file by clicking the Export All button. The name of the generated CSV file is that of the patient group.
After exporting your files, Windows Explorer automatically launches to the folder to which the files have been saved, either My Documents\ResMed\ResScan\Exports (Windows 2000 or XP) or <Username>\Documents\ResMed\ResScan\Exports (Windows Vista).
Note: You cannot select the units for exported data. Eg, pressures are always exported as cm H2O, even if you have selected hPa in the Options dialog box.
15Patient Files

Download Data
Note: Do not connect ResScan to the flow generator while delivering therapy.
Once you have installed ResScan software you can download data directly from a flow generator or via a data card.
Data is defined either as ‘summary data’ or ‘detailed data’. Summary data can be viewed in the Summary Graphs tab in the Review screen (page 27). Detailed data can be viewed in the Detailed Graphs tab in the Review screen (page 28).
The type of data that can be downloaded from each compatible flow generator is shown in the table below.
Table 2: Type of data available from compatible flow generators
Flow generator1 Summary Data Detailed Data
Flow generator
ResLink (SMC)
ResScan Data Card
SD Card Flow generator2
ResLink (SMC)
ResScan Data Card2
SD Card
AutoSet CS2
S7 AutoSet Respond
S7 AutoSet Spirit
AutoSet T
ResMed CPAP S6 series
S7 Elite
Sullivan V family
VPAP Adapt SV
VPAP II series
VPAP III series
VPAP III ST-A with QuickNav
VPAP Malibu
VPAP Auto
VPAP Auto 25/VPAP IV/VPAP S
S8 Auto 25
VPAP ST/VPAP IV ST
S8 Escape/S8 Lightweight
S8 Elite/S8 AutoScore
S8 AutoSet Spirit/S8 AutoSet Vantage/S8 Respond
S8 Escape II/S8 Escape II Auto
S8 Elite II series/S8 AutoScore II
16

Connecting the flow generator to the computer
In order to download data into ResScan, your computer must be connected by cable to the flow generator.
Plug the cable into the PC connection port on the flow generator and into an available USB or serial port at the back of your computer. Make sure that you are using the correct cable for your flow generator. Turn the flow generator on.
Note: Some ResMed flow generators do not have a power switch.
Table 3: ResMed cables for connecting to the flow generator
Note: Use only the correct ResMed cable for your flow generator. For the S8 series, S8 II series, VPAP IV series, VPAP Auto series, VPAP S and VPAP ST, a ResScan Serial Adapter (Product number: 22201) or ResScan USB Adapter (Product number: 22203) will need to be used. For the S9 series, an S9 USB Adapter (Product number: 36950) should be used.
Connecting a Card Reader to the Computer
ResScan Data Card Reader
Attach the ResScan Data Card reader to the computer as shown on the instructions included with the reader. Insert the ResScan Data Card into the reader, with the gold contacts facing up.
SmartMedia Card reader
See “SmartMedia Card Reader” on page 8 for details on attaching a SmartMedia card reader to your computer. Detailed and summary data from a patient’s flow generator are stored on a SmartMedia card by the ResLink. The data can then be downloaded and viewed in ResScan.
SD Card reader
Attach the SD Card reader to the computer as shown on the instructions included with the reader. Insert the SD card securely into the SD card slot.
S8 AutoSet II series/S8 Respond II
S9 Elite
S9 AutoSet
1 Not all flow generators are available in all regions.2 Low resolution detailed data only (known in AutoScan as Night Profile data).
Flow generator1 Summary Data Detailed Data
Flow generator type ResMed cable
AutoSet CS2, AutoSet series, S7 series, S8 series, S8 II series, VPAP Adapt SV, VPAP III series, VPAP IV series, VPAP Malibu, VPAP Auto series, VPAP S, VPAP ST
Null modem cable (Product number: 17952)
ResMed CPAP S6, SULLIVAN V, VPAP II Smart Cable for PC (Product number: 21933)
S9 series USB cable (Product number: R222-702)
17Download Data

Download Procedure
Select Download from the Download menu, or click the Download Data button on the Start screen. The Download Data dialog box is displayed.
Figure 8: Download data dialog box
Note: If a patient file is not open you will be prompted to open or create one, or proceed without one. If you choose to proceed without a patient file, any downloaded data cannot be saved.
ResScan automatically detects connected devices (flow generators or data cards).
If the details in the dialog box are correct, click Start Download. If you want to select the data type, click the Select button next to the Data field.
If more than one flow generator or data device is connected, click the Select button next to the Device field and select the device to download.
The Typical Download Times field displays an estimate of the time it would typically take to download data, according to the details in the Device and Data fields.
A colored progress bar, download messages, and a percentage progress indicator are displayed during the download.
When the download has finished, click the Close button and view the data in the Review screen.
Note: Download times may vary depending on the flow generator and data stored. Typically, it’s between 1–7 minutes.
Removing the SmartMedia Card
If you use Windows Explorer to copy files from the SmartMedia card to your computer, remove the card using the following instructions.
USB Card Reader
1. In Windows Explorer, left-click on C: drive.
18
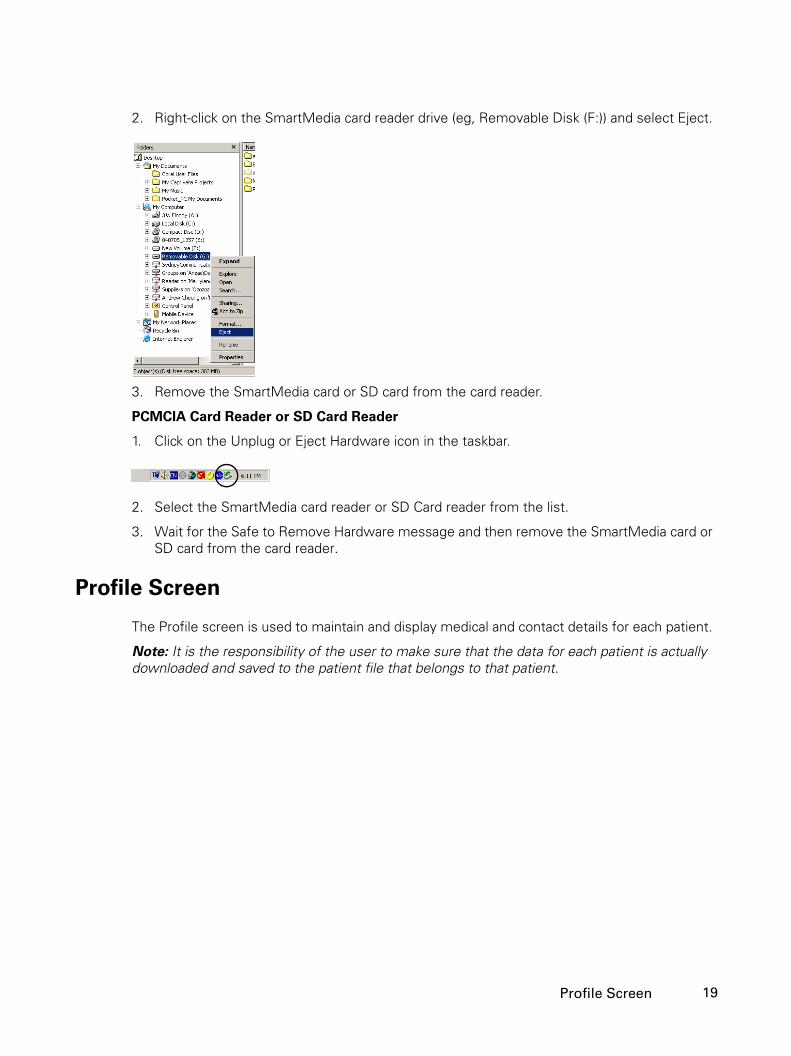
2. Right-click on the SmartMedia card reader drive (eg, Removable Disk (F:)) and select Eject.
3. Remove the SmartMedia card or SD card from the card reader.
PCMCIA Card Reader or SD Card Reader
1. Click on the Unplug or Eject Hardware icon in the taskbar.
2. Select the SmartMedia card reader or SD Card reader from the list.
3. Wait for the Safe to Remove Hardware message and then remove the SmartMedia card or SD card from the card reader.
Profile Screen
The Profile screen is used to maintain and display medical and contact details for each patient.
Note: It is the responsibility of the user to make sure that the data for each patient is actually downloaded and saved to the patient file that belongs to that patient.
19Profile Screen

The Profile Screen contains three tabs: two for the patient’s personal details and one for their clinical history.
Figure 9: The Profile screen, General Details tab
General Details and Additional Details
You can enter the patient’s personal details in the fields in the General details tab (contact address, etc), and information about their insurance provider, treatment devices, and referring doctor in the Additional details tab.
Clinical History
You can enter details about the patient’s diagnostic data and measurements in the Clinical History tab. A patient’s clinical history can be included as part of a report (see “Reports Screen” on page 35).
Figure 10: Clinical History tab, Profile screen
new entry line
new entry line
change units
customize field names
20
To make a new entry
To make a new entry, click on the new entry line. The top line will be empty for you to add your information. Click the tick box when you have completed the entry and it will be added to the list.
To alter an entry
To alter an entry, click the entry in the list. The entry details will be displayed in the top line, where you can make the necessary alterations. Click the tick box to add the new information. The entry will be returned to the list.
Units of measurement
You can display the measurements in metric or imperial units. Click your choice at the bottom of the screen.
Review Screen
Each session in the Review screen reflects usage over a 24-hour period, from 12 noon on a given day to 12 noon on the following day. Downloaded data can be viewed in four different formats. Each tab in the screen is used to display a different format.
The screen contains the following four tabs:
• Statistics
• Summary Graphs
• Detailed Graphs
• Oximetry Statistics.
click to add/alter entry
click to delete entry
21Review Screen

Each tab displays the Product and Serial No. fields near the top of the screen.
Figure 11: Review screen, showing Statistics tab
The Browser
The Browser is used to select the dates for the displayed data in each of the tabs. The Browser displays all the dates for which data has been downloaded for the current patient file. Expand the years and months to display the days. To choose a particular set of days, position the cursor in the first date required and drag down to the last date. The dates will be highlighted in the Browser and the Summary Graphs tab. The Statistics tab will display statistics for the selected dates.
Closing and Opening the Browser
To close the Browser, click either the X in the top right corner or the arrow between the Browser and the main screen. You can also deselect Browser from the View menu.
Browser
Legend
Saved Reports
Product identifies the device nameSerial No. identifies the specific device
click to close and
click to close browser
re-open browser
22
When the Browser is closed, the arrow will be displayed on the far left of the screen. Click it to re-open the Browser, or select Browser from the View menu.
Legends
The legends displayed in the browser (see Figure 11) are described below.
Notes• If certain dates are missing in the browser, this indicates that the device was powered off. • You can hide or show the legend by a right-click in the browser and selecting the legend
option.
Selecting detailed data sessions
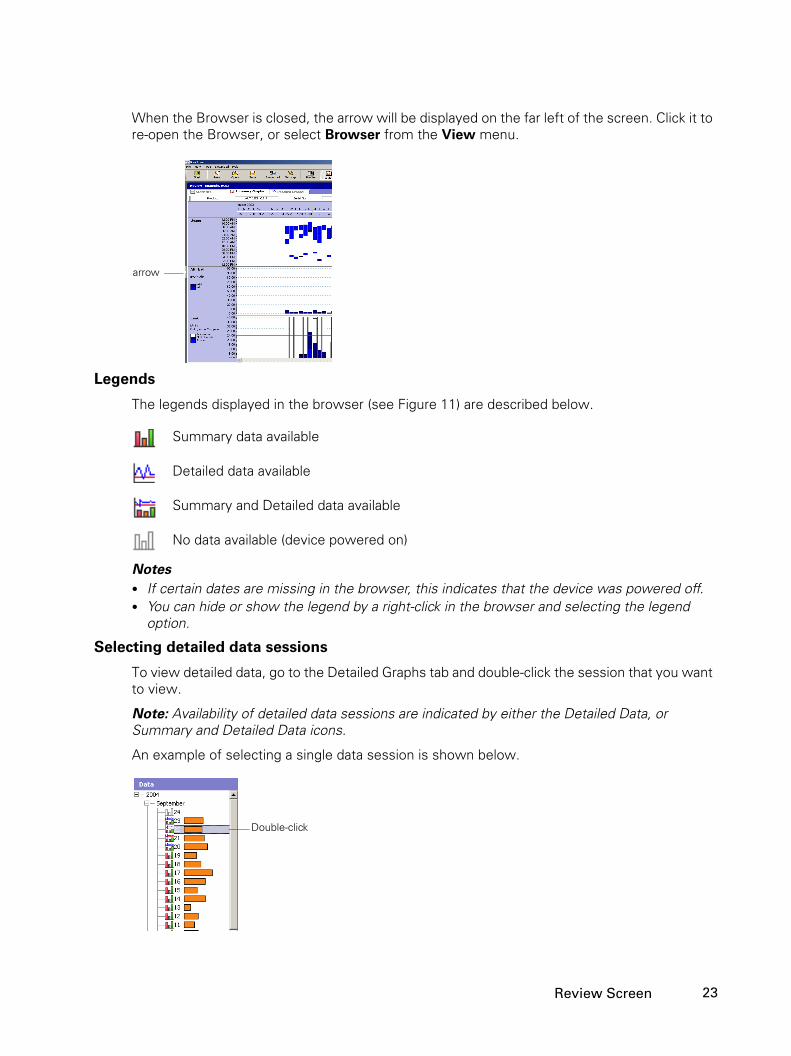
To view detailed data, go to the Detailed Graphs tab and double-click the session that you want to view.
Note: Availability of detailed data sessions are indicated by either the Detailed Data, or Summary and Detailed Data icons.
An example of selecting a single data session is shown below.
arrow
Summary data available
Detailed data available
Summary and Detailed data available
No data available (device powered on)
Double-click
23Review Screen
The length of the bars displayed in the browser also acts as a quick indicator of usage.
You can delete data by right-clicking the date and selecting a delete option.
Viewing Saved Reports
At the bottom of the Browser you will see displayed saved reports in a PDF format (see page 38).
Figure 12: Saved reports in the browser
Double-click a report name to open it; right-click the name to open or delete it.
Statistics Tab
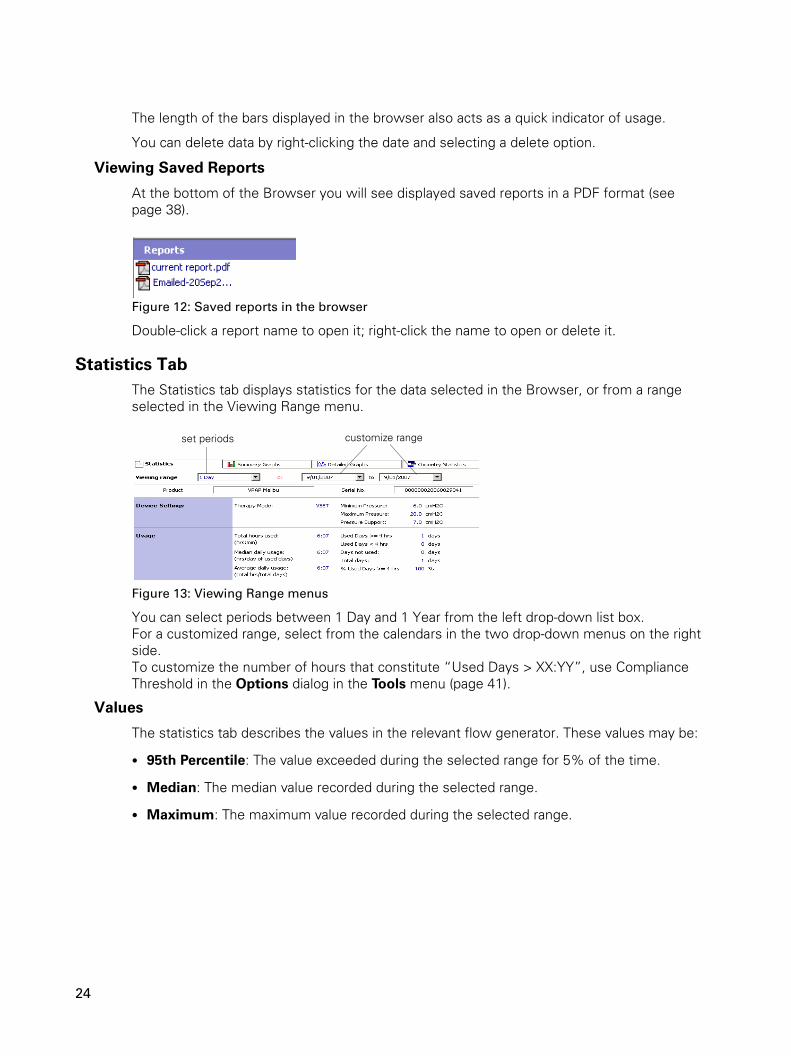
The Statistics tab displays statistics for the data selected in the Browser, or from a range selected in the Viewing Range menu.
Figure 13: Viewing Range menus
You can select periods between 1 Day and 1 Year from the left drop-down list box.For a customized range, select from the calendars in the two drop-down menus on the right side.To customize the number of hours that constitute “Used Days > XX:YY”, use Compliance Threshold in the Options dialog in the Tools menu (page 41).
Values
The statistics tab describes the values in the relevant flow generator. These values may be:
• 95th Percentile: The value exceeded during the selected range for 5% of the time.
• Median: The median value recorded during the selected range.
• Maximum: The maximum value recorded during the selected range.
set periods customize range
24

Changing display order
You can change the display order of the statistics by repositioning the rows. To reposition the rows:
1. Move the cursor over the title area until the pointer changes to a hand.
2. Click and drag the row until the blue arrow(s) appears where you want the row to be positioned, and then release the mouse.
3. Repeat for other rows you want to reposition.
Summary Graphs and Detailed Graphs
Note: The following information applies to both Summary Graphs and Detailed Graphs tabs.
Parameters
Flow generators gather data relevant to the type of treatment being provided. The parameters displayed in the Summary Graphs and Detailed Graphs tabs will depend upon the flow generator from which data has been downloaded. General outlines are provided in Table 2 on page 16. ResMed provides Data Management guides for flow generators to define the range of parameters available.
Tool Tip
As you move the cursor over a trace, a summary box displays a quick numeric summary of data contained in the graph.
Graphing options panel
Click the icon at the top of the screen to turn the Graphing Options panel on or off. This panel has three tabs—Summary, Navigation and Detailed. It allows you to turn traces on or off, and to regulate the number of traces appearing on your screen. Click the checkboxes to display or hide a trace on the screen. Traces not available for a particular flow generator are not displayed.
25Review Screen

Figure 14: Graphing Options panel—Summary Graphs tab
Positioning the Traces
You can arrange the order of traces to group them as required. In the Graphing Options panel, select all the traces you wish to display. To dynamically position the traces:
1. Move the cursor over the title area until the pointer changes to a hand.
2. Click and drag the trace until the blue arrow(s) appears where you want the trace to be positioned, and then release the mouse.
3. Repeat for other traces you want to reposition.
Adjusting the Vertical Range
To view a selected portion of the data:
• Click and drag on the trace scale up or down to the desired vertical range.
26
• Move the cursor over a trace and an up/down arrow may appear in the top right corner. Click the up/down arrows to move the graph vertically to view the portion required.
Double-click the trace scale to return to the default display.
To set the lower and upper limits for the trace, see “Options Dialog” on page 40.
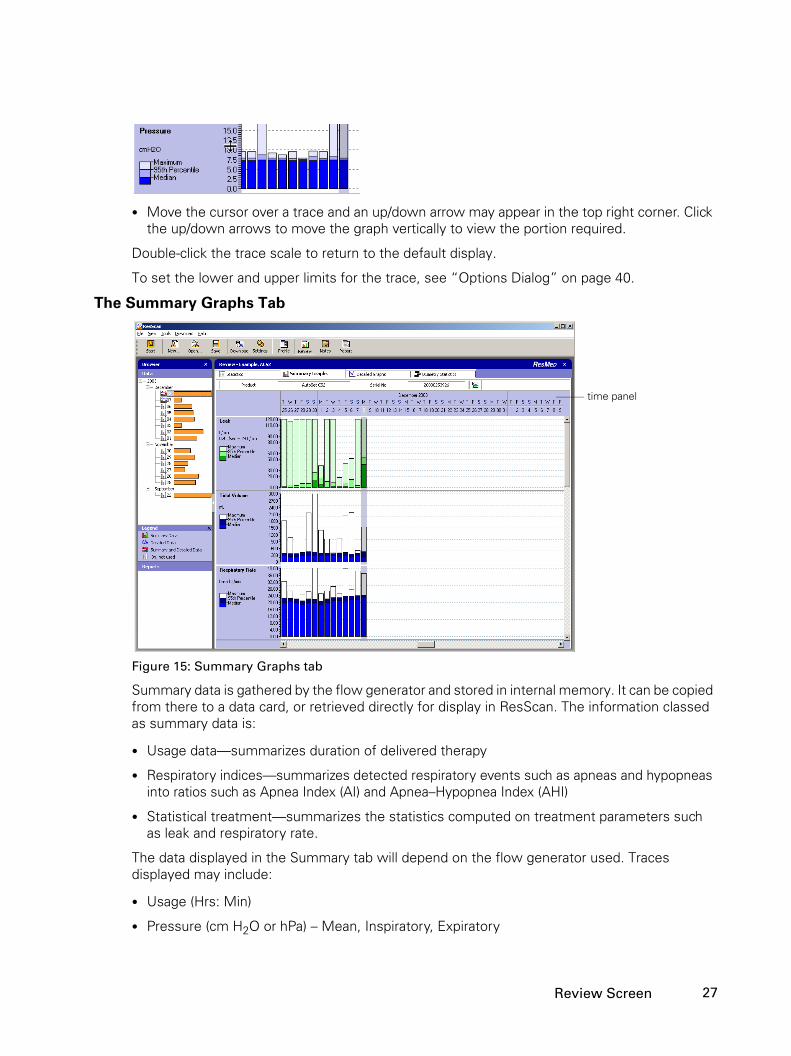
The Summary Graphs Tab
Figure 15: Summary Graphs tab
Summary data is gathered by the flow generator and stored in internal memory. It can be copied from there to a data card, or retrieved directly for display in ResScan. The information classed as summary data is:
• Usage data—summarizes duration of delivered therapy
• Respiratory indices—summarizes detected respiratory events such as apneas and hypopneas into ratios such as Apnea Index (AI) and Apnea–Hypopnea Index (AHI)
• Statistical treatment—summarizes the statistics computed on treatment parameters such as leak and respiratory rate.
The data displayed in the Summary tab will depend on the flow generator used. Traces displayed may include:
• Usage (Hrs: Min)
• Pressure (cm H2O or hPa) – Mean, Inspiratory, Expiratory
time panel
27Review Screen
• Leak (L/min or L/sec)
• Apnea or Hypopnea events
• AHI and AI (Events/hr)
• Minute Ventilation (L/min) and Target Ventilation
• Respiratory Rate (breaths/min)
• Tidal Volume (L/min).
Note: To change the units for Leak and to customize vertical ranges for parameters, see “Options Dialog” on page 40.
View Summary Graphs over time
Use the horizontal scroll bar to move through the 24-month period.
Legends
The legends displayed in the Summary Graphs tab are listed below.
Note: Some parameters may be calculated and displayed as Maximum, 95th Percentile, and Median. Check for the legend in the parameter scale column.
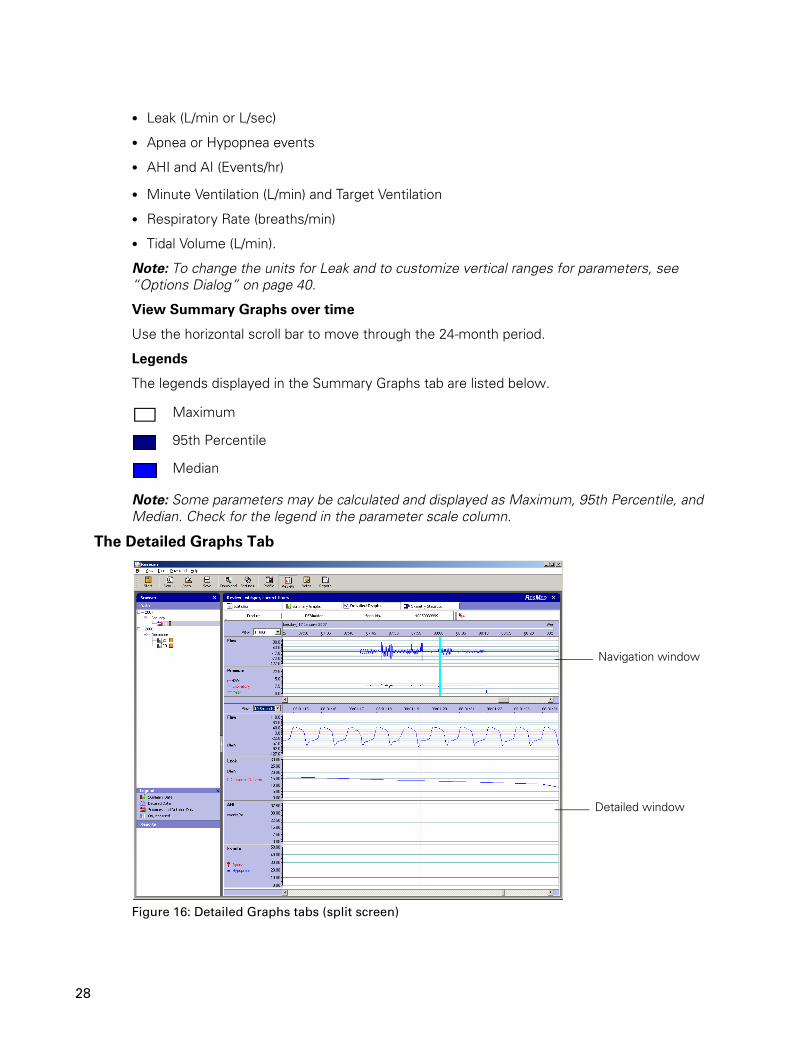
The Detailed Graphs Tab
Figure 16: Detailed Graphs tabs (split screen)
Maximum
95th Percentile
Median
Navigation window
Detailed window
28

Detailed data is gathered by the flow generator and stored in internal memory. It can be copied from there to a data card, or retrieved directly for display in ResScan. The information classed as detailed data is about treatment parameters such as pressure and leak.
The data displayed in the Detailed tab will depend on the flow generator used. Traces displayed may include:
• Pressure (cm H2O or hPa)—can include: Mean, Inspiratory, Expiratory (cm H2O or hPa can be set in Tools > Options > Graphs)
• Flow (L/min or L/sec—can be set in Tools > Options > Graphs)
• AutoSet Pressure (cm H2O or hPa)
• Leak (L/min or L/sec)
• Apnea or Hypopnea events
• AHI and AI (Events/hr)
• Flattening (flat to round)
• Snore (quiet to loud)
• Minute Ventilation (L/min) and Target Ventilation
• Respiratory Rate (breaths/min)
• Tidal Volume (L/min).
Note: To change the units and range for Leak and to customize vertical range for parameters, see “Options Dialog” on page 40.
If there is no data in a section of the graph, the flow generator was not being used at that time. If the oximeter falls off or fails to make contact with the patient at any stage, the Pulse Rate and SpO2 traces will be empty or will show a zero reading.
29Review Screen

Selecting traces
In the Graphing Options panel, use the Navigation tab to select all the traces you wish to display in the top (navigation) window and the Detailed tab to select all the traces you wish to display in the bottom (detailed) window.
Figure 17: Selecting traces for the Detailed Graphs split screen
Displaying high rate data
The split screen facilitates the display of high rate data, allowing the user to zoom in and out, according to the time period selected. Two bright blue vertical lines in the navigation window track the time period displayed in the detailed window, while the vertical red line in the detailed window provides a point of reference.
Set the time period displayed
Use the Detailed tab View drop-down to set a time period between 10 seconds and 24 hours for each half of the split screen. The split screen is designed to display a shorter time period in the detailed window, zooming in on a segment of the total time period displayed in the navigation window.
Navigation
Use the scroll bar at the bottom of each window to navigate horizontally through the data. The data displayed in the detailed window can be more easily navigated using the navigation window. To select or change the specific period of time you wish to display in the detailed window, click in the navigation window at the point you wish to zoom in on.
30

The Oximetry Statistics Tab
Figure 18: Oximetry Statistics tab
Oximetry data is gathered by the oximeter and stored on the SmartMedia card when using ResLink.
This tab displays the length of time the SpO2 levels were below three user-defined values. Change these values by typing in the field provided. Also displayed are the minimum, median, and maximum values for both SpO2 and pulse rate and the oxygen desaturation index (ODI). The ODI represents the mean value of the number of oxygen desaturation events (ie, where the SpO2 decline threshold of 3–4% is reached) per hour during the recorded session. The precise value of this threshold can be set in Tools > Options > Graphs > ODI Detection Parameters.
To view the oximetry statistics, go to the Oximetry Statistics tab and double-click a detailed data session in the Browser.
31Review Screen

Notes Screen
The Notes screen contains a record of all data downloads and notes made in relation to the patient’s treatment. Notes are automatically created by the application, and users can also create notes manually.
Writing a Note
Common tools for arranging and formatting text are included as icons above the text-writing section. Use the Up and Down arrows to scroll through your notes.
Figure 19: Icons for formatting notes
Create a new note
Click the New Note icon in the Notes toolbar. The cursor will flash in the ‘User added text’ section. Write your note in the ‘User added text’ section, and click the Save icon in the Notes toolbar.
Figure 20: Notes screen toolbar
Note summary
Notes toolbar
Automatically added text
User added text
32
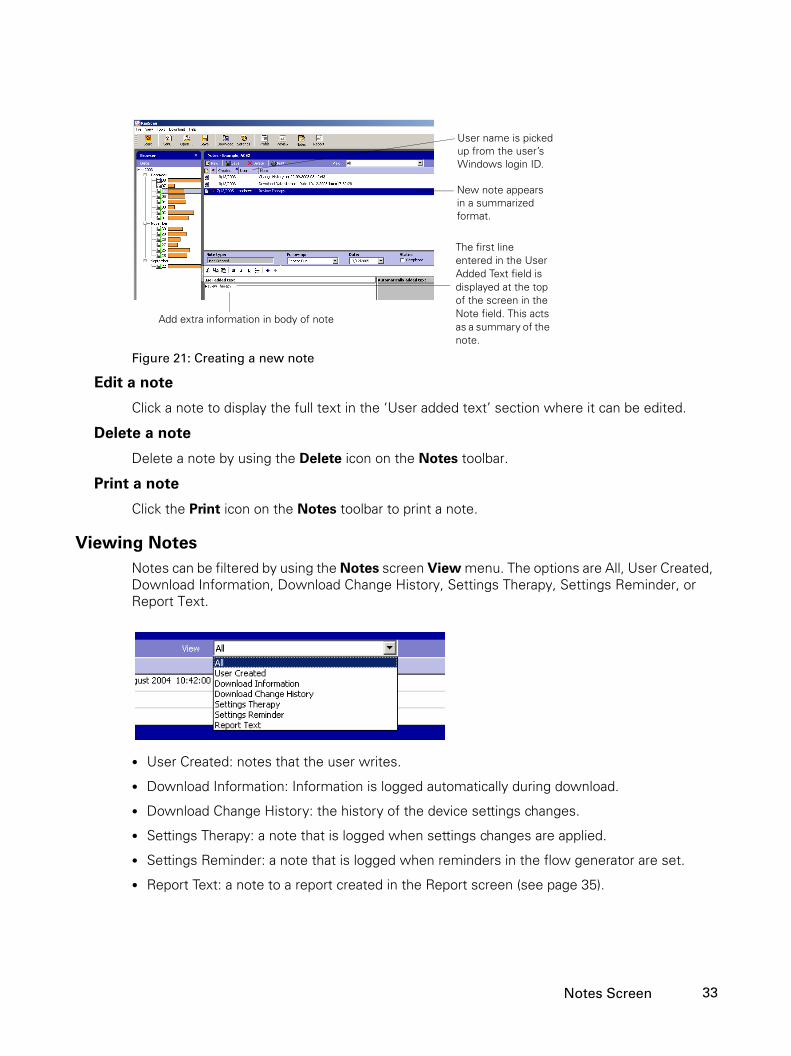
Figure 21: Creating a new note
Edit a note
Click a note to display the full text in the ‘User added text’ section where it can be edited.
Delete a note
Delete a note by using the Delete icon on the Notes toolbar.
Print a note
Click the Print icon on the Notes toolbar to print a note.
Viewing Notes
Notes can be filtered by using the Notes screen View menu. The options are All, User Created, Download Information, Download Change History, Settings Therapy, Settings Reminder, or Report Text.
• User Created: notes that the user writes.
• Download Information: Information is logged automatically during download.
• Download Change History: the history of the device settings changes.
• Settings Therapy: a note that is logged when settings changes are applied.
• Settings Reminder: a note that is logged when reminders in the flow generator are set.
• Report Text: a note to a report created in the Report screen (see page 35).
Add extra information in body of note
New note appearsin a summarized
User name is pickedup from the user’sWindows login ID.
format.
The first line entered in the User Added Text field is displayed at the top of the screen in the Note field. This acts as a summary of the note.
33Notes Screen
Setting Follow-ups
ResScan allows you to set follow-ups to remind you of certain patient management tasks. When a follow-up is set it appears in the Start screen until removed.
Creating a Follow-Up
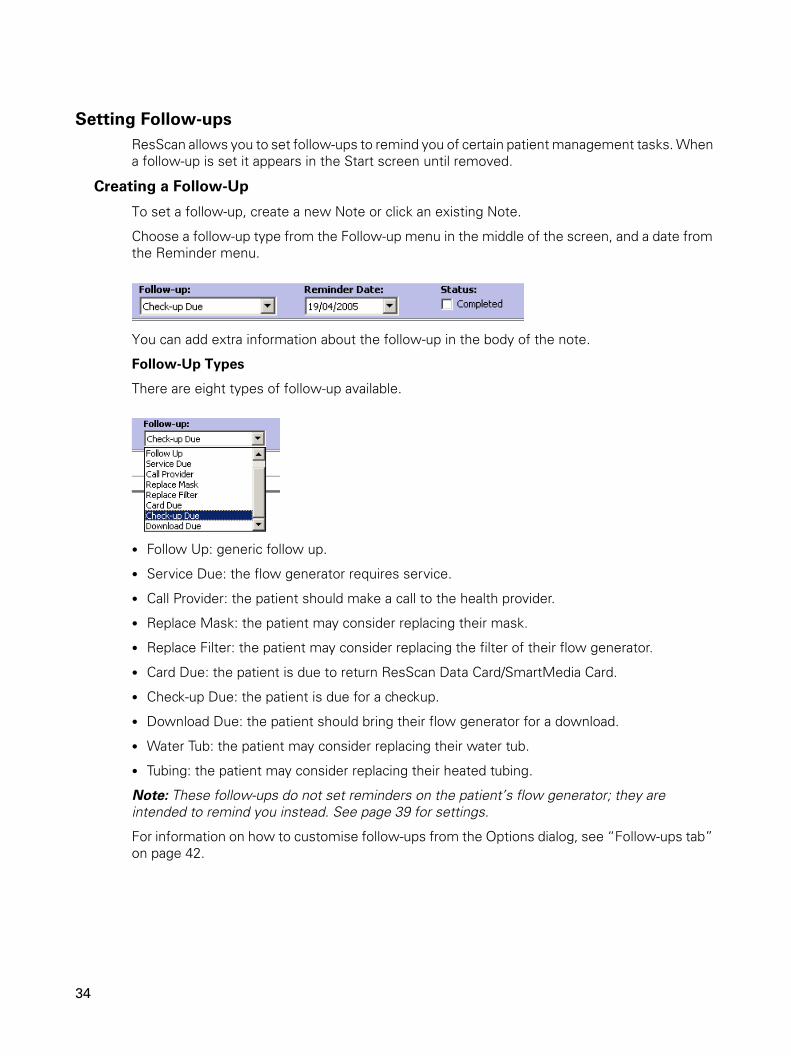
To set a follow-up, create a new Note or click an existing Note.
Choose a follow-up type from the Follow-up menu in the middle of the screen, and a date from the Reminder menu.
You can add extra information about the follow-up in the body of the note.
Follow-Up Types
There are eight types of follow-up available.
• Follow Up: generic follow up.
• Service Due: the flow generator requires service.
• Call Provider: the patient should make a call to the health provider.
• Replace Mask: the patient may consider replacing their mask.
• Replace Filter: the patient may consider replacing the filter of their flow generator.
• Card Due: the patient is due to return ResScan Data Card/SmartMedia Card.
• Check-up Due: the patient is due for a checkup.
• Download Due: the patient should bring their flow generator for a download.
• Water Tub: the patient may consider replacing their water tub.
• Tubing: the patient may consider replacing their heated tubing.
Note: These follow-ups do not set reminders on the patient’s flow generator; they are intended to remind you instead. See page 39 for settings.
For information on how to customise follow-ups from the Options dialog, see “Follow-ups tab” on page 42.
34

Viewing the Follow-up Message
When you set a follow-up, it will be displayed in the Start screen if due today or overdue. You can go straight from the Start screen to the Follow-up screen to see more details by selecting the Go to Follow-up button or double-clicking the row in the Todays Follow-ups table that correspond to the Follow-up. Overdue follow-ups appear in red.
Figure 22: Follow-up messages in Start screen
When you have passed the date for the follow-up or have completed the task, turn off the reminder in the Follow-up screen by clicking the Completed box.
Reports Screen
The Reports screen displays reports for the open patient file. You can use the existing templates, or customize the report to contain only the information you require.
Create a Report
Go to the Report screen and a report is automatically created if there is no detailed data in the patient file or selected report template.
Follow-ups displayed
Double-click to go toFollow-up screen
Click button to goto Follow-up screen
check box toturn off reminder
35Reports Screen

If the patient file and selected report template contain detailed data, a Select Data dialog is displayed. Select the days of detailed data you wish to include. Dates already selected in the Browser are automatically checked.
The report template currently selected is automatically generated. To create a different report, select a report type from the menu.
The menu will include the standard reports plus any report templates that you have created.
Figure 23: Report screen toolbar
Information in the report will depend on the flow generator used and the template selected.
You can add extra comments to standard or customized reports by clicking the New Comment button. The comment will appear at the bottom of the report, and be stored as a note. See “Viewing Notes” on page 33.
Customize or Create a New Report Template
You can customize the report layout to view a specific set of data.
Click Customize in the Report screen toolbar (Figure 23).
The Customize Report dialog box is displayed.
Customize Add comment Print Email Save
36

To create a new report template, either click the New button or select an existing template to update.
Figure 24: Creating a new customized report template
All the available parameters are organized in the tabs in Available Items on the left side. Choose a parameter, click Add, and it will be displayed in the right side. Repeat this procedure until you have all the details you require.
The data items in the report template are not dependant on the flow generator. If you include a parameter in your report template that is not available from the flow generator it will be displayed as blank in the report.
To include data definitions at the end of the report, see “Reports tab” on page 43.
You can then organize your report by using the arrows in Report Layout.
choose items add organize layout of reportnew reportfor report
top-levelparameter
secondary parameters
You can use theMove Up andMove Down buttons to re-order graphsin the template
37Reports Screen

Select the parameter you want to move and click the up or down arrow. When you move a top-level parameter all the secondary parameters will move with it. Secondary parameters can only be moved within their grouping under the top-level parameter.
Click OK to save the report template. You will be prompted to name it.
Print a Report
Click the Print icon (see Figure 23) to view the report in Adobe Reader (or equivalent PDF reader). On the File menu, click Print to open the dialog box and print the report.
Email a Report
Note: ResScan only supports Microsoft Outlook.
Click the Email icon (see Figure 23) and complete the mailing screen.
According to certain regulations, it may be required to de-identify patients when sending their data electronically. If you wish to de-identify a patient report:
1. In the Profile screen, temporarily delete any identifying information.
2. Generate the report.
3. Close the patient file without saving changes.
Save a Report
Click the Save icon (see Figure 23) and name the document. The report will be saved in pdf format as a part of your patient file. Saved reports appear in the Browser (see page 24).
Settings
You can alter flow generator settings via ResScan, either by a direct cable connection with the flow generator or by using a Data Card.
Open the Settings Dialog
To change Settings, click the Settings icon on the toolbar, or select Device Settings from the Tools menu. The Device Settings dialog box is displayed. Click the Select Device button to choose a connected flow generator or inserted Data Card. Only the parameters that apply to the flow generator or Data Card are displayed.
38

Note: Please wait while ResScan is connecting to your device. This may take up to 40 seconds.
Change Settings
Note: If a patient file is not open you will be prompted to open or create one, or proceed without one. If you create or open a patient file, you can track setting changes through the Notes screen. If you choose to proceed without a patient file, no Notes will be created.
1. The connected flow generator or inserted Data Card is shown in the Device field. Check the serial number to make sure you have the correct device. If you want to make the changes on a different device, click the Select Device button and choose from the list. Only connected devices are listed.
Note: When writing to a ResScan Data Card, you may choose to enter the serial number of the target flow generator in the Target Serial Number field. Then, only the target flow generator can process the settings. You can also use the Target Flow Generator drop down list to limit the list of therapies to those relevant to the flow generator selected. These fields will only appear when a ResScan Data Card is connected.
2. The available modes of therapy are listed in the Therapy field. Choose the therapy required.
Note: When writing to a ResScan Data Card, the S8 Escape/Lightweight therapy mode is CPAP Basic. For these products, the custom reminder cannot be set.
Select theParameter
The Device Status and Settings Statusfields are dynamic. The possible values displayed in this field are: Establishing Connection, Connected, Applying Settings, Settings Applied Successfully or Access Failure.
Target flow generator drop down list Target serial number field (optional)
39Settings
3. The current settings are shown in the Settings section. These settings can be changed by using the arrows and, for some settings, by entering a value directly into the text box.
Note: If the value entered is not supported by the flow generator, the value will change to a supported value once the focus leaves the text box.
4. The status of the leak alert or alarms function is shown in the Alert section, and can be altered in the drop-down menu if required.
5. Available mask, humidifier, and tube length options are shown in the Options section. You may also wish to set the local date and time.
6. You can set reminders for some flow generators. Reminders will appear on the flow generator’s LCD on the date you set. For some flow generators, you can also set each reminder to keep re-occurring at a specific time period, starting from the date set for the original reminder.
Note: When using a Data Card, the recurring reminders setting will be ignored by flow generators that do not support it.
7. Once you have changed the required settings, click Apply. You should then check the settings status to ensure they have been successfully applied. The settings status indicates any settings conflicts. When you are finished, click the Close button. Once the settings have been applied, a note will be added.
Implementing Changed Settings
Settings changes made straight to a flow generator will be implemented as soon as you click Apply. If you have made the changes to a Data Card, remove the card from the reader and send it to the patient. The S8 system User’s Manual describes how to insert the Data Card into the Data Card module for their flow generator to load the new settings.1
Customizing ResScan
This section describes how ResScan can be customized.
Options Dialog
The Tools menu, Options dialog, has four tabs: Graphs, Follow-ups, Report and Download.
1 For S8 Series II, refer to the CD included with your device for information on using Data Cards.
40

Graphs tab
Figure 25: Options dialog: Graphs tab
• Leak/Flow units: choose L/sec or L/min (this information is reflected in the Summary and Detailed graphs).
• Compliance threshold: choose the time that defines compliance for the patient. This figure will be used in calculating the display for the Patient Most Recent Usage bar on the Start screen (page 11) and “Used Days > XX:YY” in the Statistics tab (page 24). This value is the minimum number of hours patients need to use the flow generator to demonstrate compliance. This value may vary from region to region.
• Start Screen Usage: set a period between 1 week and 1 year for the calculation of the Patient Most Recent Usage bar display (page 11). This field refers to the period prior to the last available session for which an overview of percentage compliance is displayed in the Start screen.
• ODI Detection Parameters: set a value of 3 or 4% for the SpO2 decline threshold value. The SpO2 decline threshold defines the percentage drop in oxygen saturation necessary for an oxygen desaturation event to be detected.
• Summary Graph Ranges and Detailed Graph Ranges: set the lower and upper limits for the parameters shown in the graphs.
• Time Scale (Summary Graphs only): set the time display to either am/pm or 24-hour.
• Pressure Units: (Statistics, Summary and Detailed Graphs) Set the pressure unit display to cm H2O or hPa.
41Customizing ResScan
Follow-ups tab
Figure 26: Options dialog: Follow-ups tab
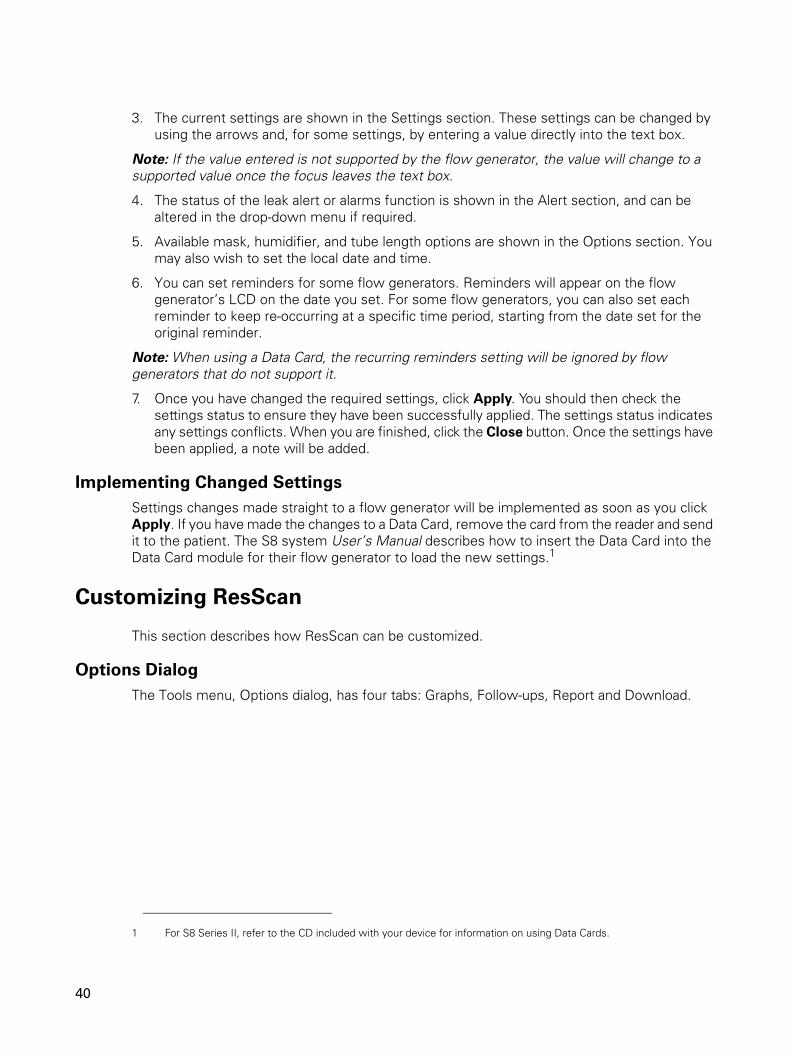
To customize the way follow-up messages appear in ResScan, select Customize Follow-Up
Alerts. When this is selected, the text in both columns will appear blue and can be edited. Editing the text in the first column will change the way Follow-Up Alert Types appear in the Follow-up drop down list on the Notes Screen. Editing the text in the second column will affect the way in which Follow-Up Alert Messages appear both on the Notes screen and on the Start screen.
!CAUTION
Changes made to follow-up types and messages from this tab are applied to
existing and outstanding follow-ups as well as to future ones.
42
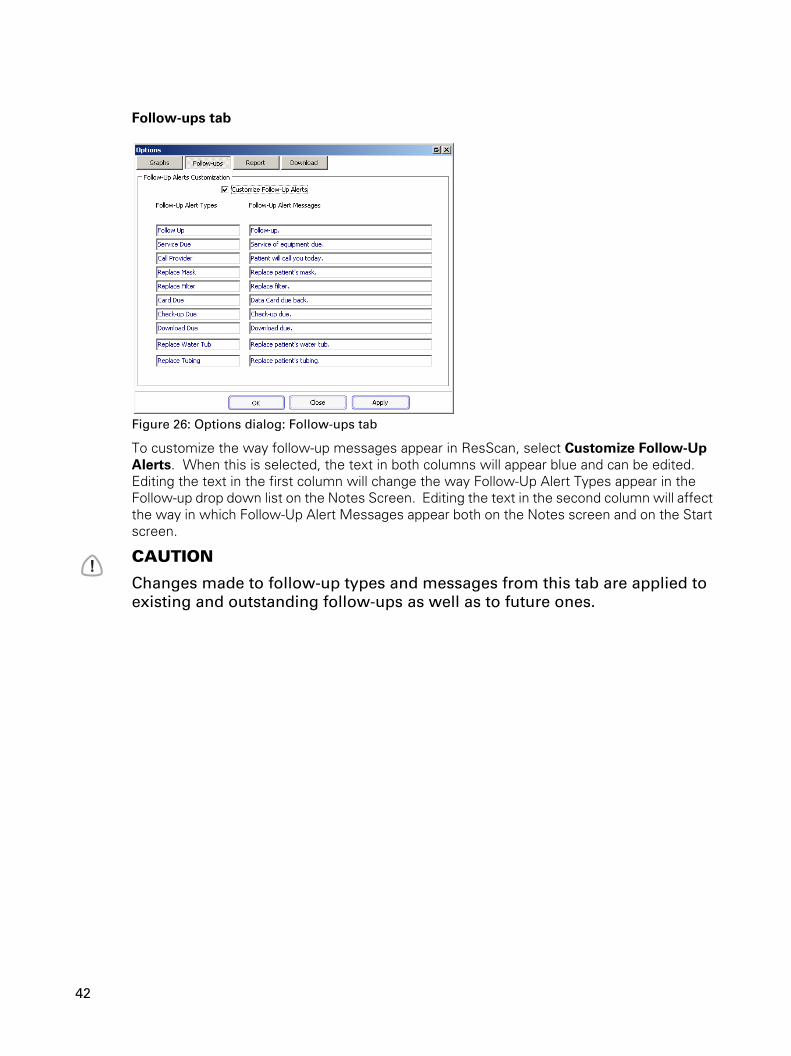
Reports tab
Figure 27: Options dialog: Reports tab
• Details: type name of the health care provider to be printed on the report.
• Logo: add logo to be printed on the report. Click the Select button to open the Select Logo Image dialog box. Choose the graphic and click the Open button to add as the logo. To remove the logo, click the Clear button.
• Definitions: add definitions of commonly used data at the end of the report.
Reports can be customized by creating new templates. See page 36.
Download tab
Figure 28: Options dialog: Download tab
The Download tab allows you to exclude COM ports that have non-ResMed devices connected to them from ResScan’s search list, rather than allowing ResScan to search for ResMed devices through all available COM ports. This minimizes conflict between ResScan and non-ResMed applications which may be using COM ports.
43Customizing ResScan
To exclude a COM port, enter the number in the COM Port box and click Add>>. To remove a port from the list of excluded ports, select the port you wish to remove and click Remove<<. Clear All will delete all entries from the list of excluded ports.
This tab also allows you to enable or disable the Quick Start feature.
Note: Accessing this tab will prompt a warning to appear, advising you that the settings in this tab affect the way in which ResScan seraches for connected flow generators. To continue, click OK.
Customizing Review Screens
You can customize the Review screens by using the following:
• Closing Browser (page 22)
• Changing Statistics tab display order (page 25)
• Changing number and type of traces visible (page 25)
• Positioning the traces (page 26)
• Adjusting the vertical ranges of the traces (page 26).
Troubleshooting
Installation
Downloading
Problem Possible Cause Solution
Errors are observed during installation.
Do not have the correct version of Internet Explorer.
Install Internet Explorer 5.5 (or greater).
ResScan fails to install. Operating system is Windows NT 4.0 SP6.
This operating system is not supported.
Drivers for SmartMedia Card, ResScan Data Card, or SD Card readers are not available for installation.
Drivers are not required by the operating system.
No action required.
Problem Possible Cause Solution
The flow generator is connected to the PC running ResScan but ‘Device’ box in the ‘Download Data’ dialog is empty.
Flow generator switched off. Switch unit on, wait a few seconds for it to perform its self-test.
Data cable not connected. Connect the data cable (see “Connecting the flow generator to the computer”).
Wrong data cable connected. Use only the correct cable for your flow generator.
Inadequate resources. Shut down other applications.
44
Driver for ResScan USB Adapter (if attached to a S8 series flow generator) is not installed.
Install the correct driver software and try again.
Note: The driver software can be found in the ResScan CD.
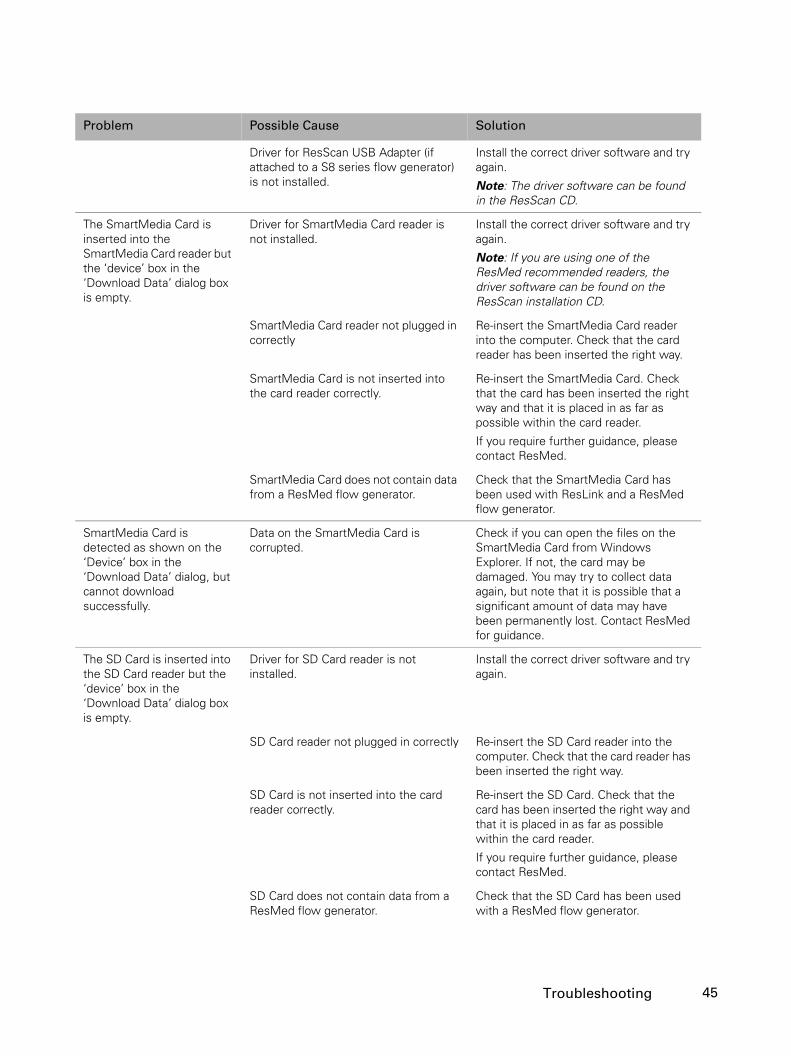
The SmartMedia Card is inserted into the SmartMedia Card reader but the ‘device’ box in the ‘Download Data’ dialog box is empty.
Driver for SmartMedia Card reader is not installed.
Install the correct driver software and try again.
Note: If you are using one of the ResMed recommended readers, the driver software can be found on the ResScan installation CD.
SmartMedia Card reader not plugged in correctly
Re-insert the SmartMedia Card reader into the computer. Check that the card reader has been inserted the right way.
SmartMedia Card is not inserted into the card reader correctly.
Re-insert the SmartMedia Card. Check that the card has been inserted the right way and that it is placed in as far as possible within the card reader.
If you require further guidance, please contact ResMed.
SmartMedia Card does not contain data from a ResMed flow generator.
Check that the SmartMedia Card has been used with ResLink and a ResMed flow generator.
SmartMedia Card is detected as shown on the ‘Device’ box in the ‘Download Data’ dialog, but cannot download successfully.
Data on the SmartMedia Card is corrupted.
Check if you can open the files on the SmartMedia Card from Windows Explorer. If not, the card may be damaged. You may try to collect data again, but note that it is possible that a significant amount of data may have been permanently lost. Contact ResMed for guidance.
The SD Card is inserted into the SD Card reader but the ‘device’ box in the ‘Download Data’ dialog box is empty.
Driver for SD Card reader is not installed.
Install the correct driver software and try again.
SD Card reader not plugged in correctly Re-insert the SD Card reader into the computer. Check that the card reader has been inserted the right way.
SD Card is not inserted into the card reader correctly.
Re-insert the SD Card. Check that the card has been inserted the right way and that it is placed in as far as possible within the card reader.
If you require further guidance, please contact ResMed.
SD Card does not contain data from a ResMed flow generator.
Check that the SD Card has been used with a ResMed flow generator.
Problem Possible Cause Solution
45Troubleshooting

SD Card is detected as shown on the ‘Device’ box in the ‘Download Data’ dialog, but cannot download successfully.
Data on the SD Card is corrupted. Check if you can open the files on the SD Card from Windows Explorer. If not, the card may be damaged. You may try to collect data again, but note that it is possible that a significant amount of data may have been permanently lost. Contact ResMed for guidance.
The ResScan Data Card is inserted into the card reader but the ‘Device’ box in the ‘Download Data’ box is empty.
Driver for the ResScan Data Card is not installed.
Install the correct driver software and try again.
Note: If you are using one of the ResMed recommended readers, the driver software can be found in the ResScan installation CD.
Unsupported operating system. ResScan Data Card readers are not compatible with Windows NT operating systems. You may need to upgrade to newer variants of Windows operating systems (eg, Windows 2000, XP).
Contact ResMed for guidance.
ResScan Data Card reader not plugged in correctly
Re-insert the ResScan Card reader into the computer. Check that the card reader has been inserted the right way.
ResScan Data Card is not inserted into the card reader correctly.
Re-insert the ResScan Data Card. Check that the card has been inserted the right way with the gold contacts facing up and that it is placed in as far as possible into the card reader.
If you require further guidance, please contact ResMed.
ResScan Data Card does not contain data from a ResMed flow generator.
Check that the ResScan Data Card has been used with a ResMed flow generator.
ResScan Data Card is detected as shown on the ‘Device’ box in the ‘Download Data’ dialog, but cannot download successfully.
ResScan Data Card does not contain data from a ResMed flow generator.
Check that the ResScan Data Card has been used with a ResMed flow generator.
Data on the ResScan Data Card is corrupted.
The card may be damaged. You may try to re-collect data. Contact ResMed for Guidance.
Connection error during download. Error dialog is displayed.
Flow generator switched off. Switch unit on, wait a few seconds for it to perform its self-test. Then, try to download again.
Data cable not connected correctly. Connect the data cable correctly (see “Connecting the flow generator to the computer” on page 17).
Wrong data cable connected. Use only the correct cable for your flow generator.
Problem Possible Cause Solution
46
Reports
Settings
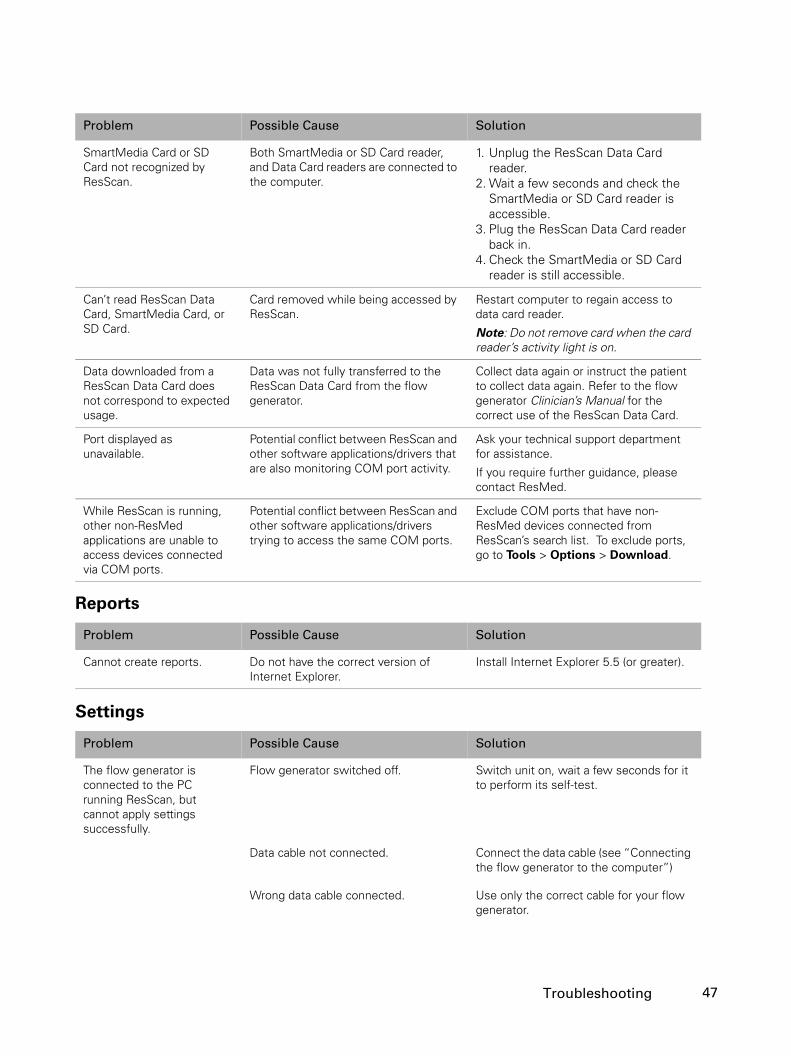
SmartMedia Card or SD Card not recognized by ResScan.
Both SmartMedia or SD Card reader, and Data Card readers are connected to the computer.
1. Unplug the ResScan Data Card reader.
2. Wait a few seconds and check the SmartMedia or SD Card reader is accessible.
3. Plug the ResScan Data Card reader back in.
4. Check the SmartMedia or SD Card reader is still accessible.
Can’t read ResScan Data Card, SmartMedia Card, or SD Card.
Card removed while being accessed by ResScan.
Restart computer to regain access to data card reader.
Note: Do not remove card when the card reader’s activity light is on.
Data downloaded from a ResScan Data Card does not correspond to expected usage.
Data was not fully transferred to the ResScan Data Card from the flow generator.
Collect data again or instruct the patient to collect data again. Refer to the flow generator Clinician’s Manual for the correct use of the ResScan Data Card.
Port displayed as unavailable.
Potential conflict between ResScan and other software applications/drivers that are also monitoring COM port activity.
Ask your technical support department for assistance.
If you require further guidance, please contact ResMed.
While ResScan is running, other non-ResMed applications are unable to access devices connected via COM ports.
Potential conflict between ResScan and other software applications/drivers trying to access the same COM ports.
Exclude COM ports that have non-ResMed devices connected from ResScan’s search list. To exclude ports, go to Tools > Options > Download.
Problem Possible Cause Solution
Cannot create reports. Do not have the correct version of Internet Explorer.
Install Internet Explorer 5.5 (or greater).
Problem Possible Cause Solution
The flow generator is connected to the PC running ResScan, but cannot apply settings successfully.
Flow generator switched off. Switch unit on, wait a few seconds for it to perform its self-test.
Data cable not connected. Connect the data cable (see “Connecting the flow generator to the computer”)
Wrong data cable connected. Use only the correct cable for your flow generator.
Problem Possible Cause Solution
47Troubleshooting

Inadequate resources. Shut down other applications.
Patient experiences no change after the flow generator settings were changed via the cable connection.
The settings were not applied correctly. Review the ‘Settings Therapy’ notes that are automatically added to Notes and verify that the intended settings have been applied. If not, reapply the settings.
Patient experiences no change after the flow generator settings were changed via the ResScan Data Card or SD Card.
The intended settings were not written to the card prior to the card being sent to the patient.
Review the Download Information Notes that are automatically added to Notes (see page 33) and verify that the intended settings have been transferred to the card. If not, regenerate the ResScan Data Card or SD Card with the intended settings and send to the patient.
The intended settings were written to the card but not applied correctly by the patient.
If the ‘Settings Therapy’ notes (see above) show that the intended settings were transferred to the card, instruct the patient to apply the settings again. Refer to the flow generator Clinician’s Manual for the correct application of settings via the ResScan Data Card.
Settings screen is blank. Device has not been selected. To select a device, see “Open the Settings Dialog” on page 38.
Can't set date backwards. There is data stored on the flow generator or data card.
Erase all data from the flow generator or data card.
Note: Erased data cannot be restored. If required, download the data into a patient file prior to erasing it from the flow generator or data card.
ResScan Data Card received from patient doesn’t display current settings.
ResScan only displays the ResScan Data Card’s default values.
Review the ‘Settings Therapy’ notes that are automatically added to Notes for the ResScan Data Card’s current settings.
Can’t read ResScan Data Card, SmartMedia Card or SD Card.
Card removed while being accessed by ResScan.
Restart computer to regain access to data card reader.
Note: Do not remove card when the card reader’s activity light is on.
Problem Possible Cause Solution
48
Technical Data
Standards
ResScan is compliant with the following standards:
• ISO 13485:2003
Medical Devices—Quality Management Systems—Requirements for Regulatory Purposes
• ISO 14971:2000/AMD 1:2003
Medical Devices—Application of risk management to medical devices—Amendment 1: Rationale for requirements
• ISO 15223:2000/AMD 1:2002, AMD 2:2004
Medical devices—Symbols to be used with medical device labels, labeling and information to be sup-plied
Symbols
Software and Packaging
Clinical Guide
Caution, consult accompanying documents
Lot number
Part number
Name and address of manufacturer
Consult clinical guide
Indicates a Warning or Caution and alerts you to a possible injury or explains special measures for the safe and effective use of the device.
LOT
REF
!
49Technical Data

Index
A
AHIDetailed Graphs 29Summary Graphs 28
AIDetailed Graphs 29Summary Graphs 28
ApneaDetailed Graphs 29Summary Graphs 28
AutoScanimport files 14uninstall 3, 6
AutoScan software 3, 6
B
Browser 22closing 22opening 23
C
cablesconnecting to the flow generator 17
changingcompliance threshold 41Detailed Graph range 41Detailed Graphs time period 30device settings 39leak units 41patient details 20patient usage bar display 41statistics display order 25Summary Graph range 41Summary Graphs time display 41trace positions 26trace vertical scale 26
Clinical history tabchange entry 21measurements 21new entry 21
closingBrowser 22patient file 10ResScan 10
compatible flow generators 1compliance
define 41Statistics tab 24
compliance thresholddefine 41Patient Usage bar 12
computer requirements 5creating reports 35customizing reports 36
D
datadeleting data sessions 24selecting data sessions 23
data definitions 43definitions
data 43deleting
data sessions 24Notes 33reports 24
Detailed datadownload 16legend 23
Detailed Graphs 25AHI 29AI 29Apnea 29Flattening 29Hypopnea 29Leak 29Minute Ventilation 29options 25Pressure 29Respiratory Rate 29set time period 30setting range 41Snore 29tab 28Target Ventilation 29Tidal Volume 29
detailed screen 28Device Settings 10, 38download data 18, 47
Detailed data 16Summary data 16
Download menu 10download procedure 18drivers
data card reader installation 7
E
email report 38excluding COM ports 44Exporting Data Files 15
F
File menu 10FlashPath card reader 8Flattening
Detailed Graphs 29flow generator
compatible with ResScan 1connecting to the computer 17
50

Follow-ups 34Call Provider 34Card Due 34Check-up Due 34creating 34Download Due 34reminders 35Replace Filter 34Replace Mask 34Service Due 34Start screen 12view message 35
G
graphsoptions 25setting limits 41
grouping patients 14
H
Help menu 11high rate data
displaying 30humidifier settings 40Hypopnea
Detailed Graphs 29Summary Graphs 28
I
importAutoScan files 14patient file 10ResScan 1.1 files 14
installation 6customize directory 6ResScan Data Card reader 7SmartMedia card reader 8
L
Leakchoosing units 41Detailed Graphs 29Summary Graphs 28
leak alert 40legend
Detailed data 23hide 23no data 23show 23Summary and Detailed data 23Summary data 23Summary Graphs 28
M
mask settings 40Minute Ventilation
Detailed Graphs 29
Summary Graphs 28
N
newFollow-ups 34Notes 32patient file 10, 13report template 37
no datagraphs 29legend 23
Notesautomatic 32creating new 32define views 33deleting 33edit 33formatting text 32print 33screen 32
O
ODI Detection Parameters 41opening
Browser 23patient file 10, 13
options 10download 43follow-ups 42graphs 25reports 43
Oximetry StatisticsSpO2 31tab 31
oxygen desaturation index (ODI) 31oxygen saturation level. See SpO2
P
patient detailschanging 20entering 20
patient fileclosing 10new 10, 13opening 10, 13organizing 14
Patient File Details 13Patient Group Location 14Patient Manager 10, 13
grouping patients 14organizing patients 14
Patient Notes 48Patient Usage bar 12
define display 41positioning
statistics display order 25traces 26
Pressure
51Index
Choosing units 41Detailed Graphs 29Summary Graphs 27
printNotes 33report 38
Profile screen 19Clinical history tab 20patient details 20
Q
Quick Reference Guide 2Quick Start 2, 3, 12
R
recurring reminders 40reminders
flow generator 40Follow-ups 35turn off 35
reportsadding comments 36adding health care provider details 43adding logo 43creating 35customizing 36deleting 24email 38new template 37opening pdfs 24organize using Report Layouts 37print 38save 38save template 38
Reports screen 35ResLink 8Respiratory Rate
Detailed Graphs 29Summary Graphs 28
ResScaninstalling 6intended use 1
ResScan 1.1import files 14
ResScan Data Cardgold contacts 17insert into reader 17
ResScan Data Card readerconnecting to the computer 17Windows 2000 and Windows XP installation 8
Review screen 21
S
save 10report 38report template 38
Secure Digital Card readerconnecting to the computer 17
selectingdata sessions 23
settingsaltering 2changing 39
SmartMedia card reader 8connecting to the computer 17
SnoreDetailed Graphs 29
SpO2Oximetry Statistics 31
Start screen 11Follow-ups 12Patient Usage bar 12
Statisticschanging display order 25compliance 24tab 24viewing range 24
Summary and Detailed datalegend 23
Summary datadownload 16legend 23
Summary Graphs 25AHI 28AI 28Apnea 28Hypopnea 28Leak 28legend 28Minute Ventilation 28options 25Pressure 27Respiratory Rate 28setting range 41tab 27Target Ventilation 28Tidal Volume 28time display 41Usage 27
T
Target VentilationDetailed Graphs 29Summary Graphs 28
Tidal VolumeDetailed Graphs 29Summary Graphs 28
time displaySummary Graphs 41
tool tip 25toolbar 9Tools menu 10trace
changing position 26changing vertical scale 26
troubleshooting 44
52
tube length settings 40
U
uninstall 7Usage
Summary Graphs 27
V
viewFollow-up message 35Notes 33Oximetry Statistics 31saved reports 24Statistics 24
View menu 10
W
website 11
53Index