Embed Size (px)
Citation preview
Florida Department of Education Bureau of Exceptional Education and Student Services
Restraint/Seclusion Reporting School Level User’s Guide 2016-17
Table of Contents Initial Log In ............................................................................................................................................................... 1
Reporting Incidents of Restraint/Seclusion ................................................................................................................. 3
View/Edit Incidents .................................................................................................................................................... 7
Print Incidents ......................................................................................................................................................... 13
Print Reports for Multiple Incidents Occurring in a Single Day ................................................................................... 18
Archive Restraint/Seclusion Incident Reports ........................................................................................................... 22
1
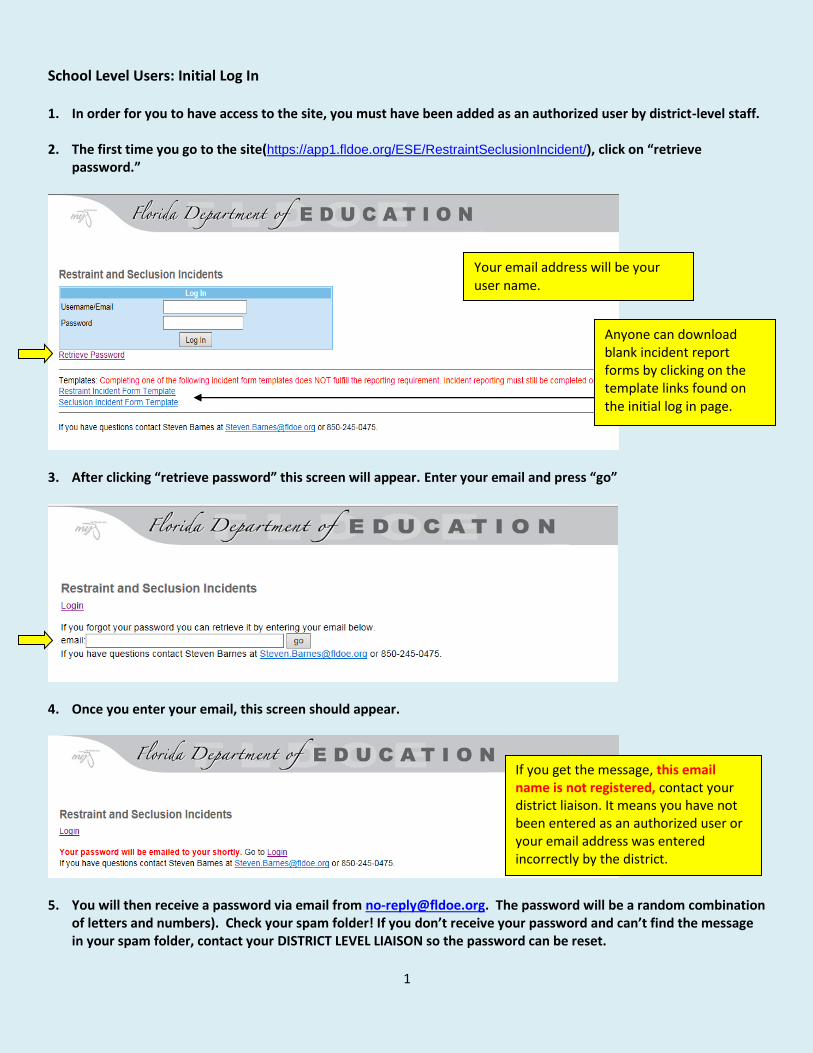
School Level Users: Initial Log In
1. In order for you to have access to the site, you must have been added as an authorized user by district-level staff. 2. The first time you go to the site(https://app1.fldoe.org/ESE/RestraintSeclusionIncident/), click on “retrieve
password.”
3. After clicking “retrieve password” this screen will appear. Enter your email and press “go”
4. Once you enter your email, this screen should appear.
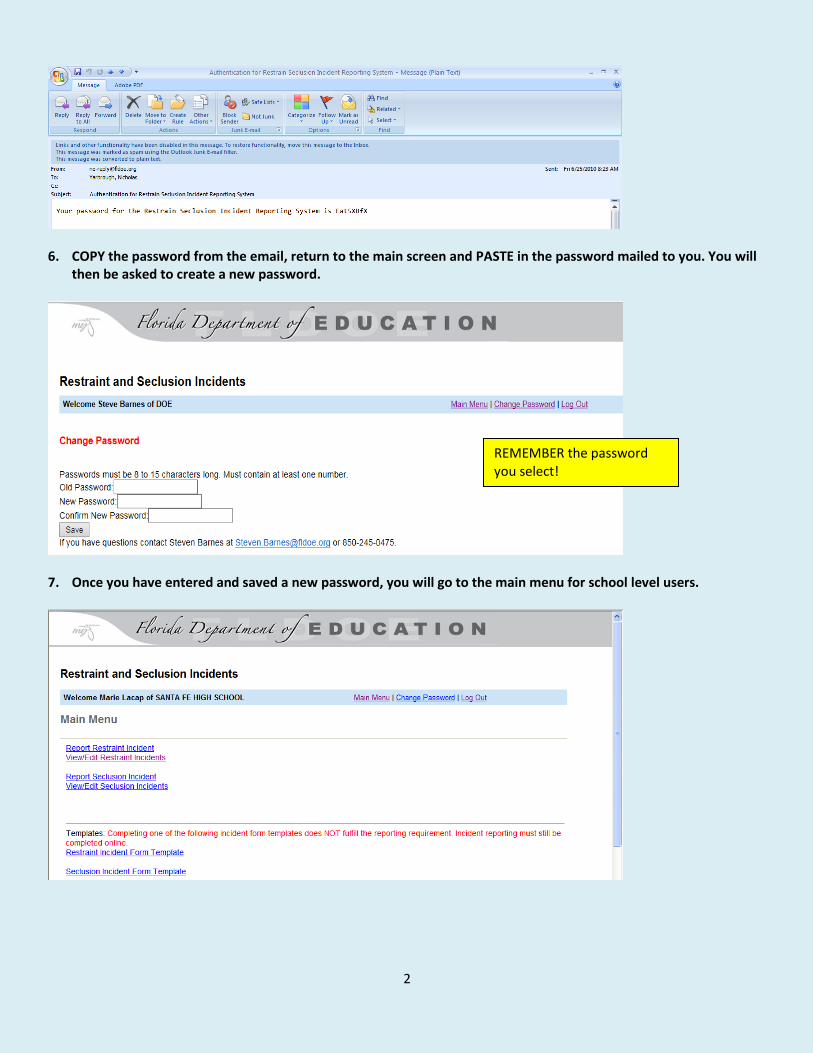
5. You will then receive a password via email from [email protected]. The password will be a random combination
of letters and numbers). Check your spam folder! If you don’t receive your password and can’t find the message in your spam folder, contact your DISTRICT LEVEL LIAISON so the password can be reset.
Your email address will be your user name.
If you get the message, this email name is not registered, contact your district liaison. It means you have not been entered as an authorized user or your email address was entered incorrectly by the district.
Anyone can download blank incident report forms by clicking on the template links found on the initial log in page.
2
6. COPY the password from the email, return to the main screen and PASTE in the password mailed to you. You will then be asked to create a new password.
7. Once you have entered and saved a new password, you will go to the main menu for school level users.
REMEMBER the password you select!
3
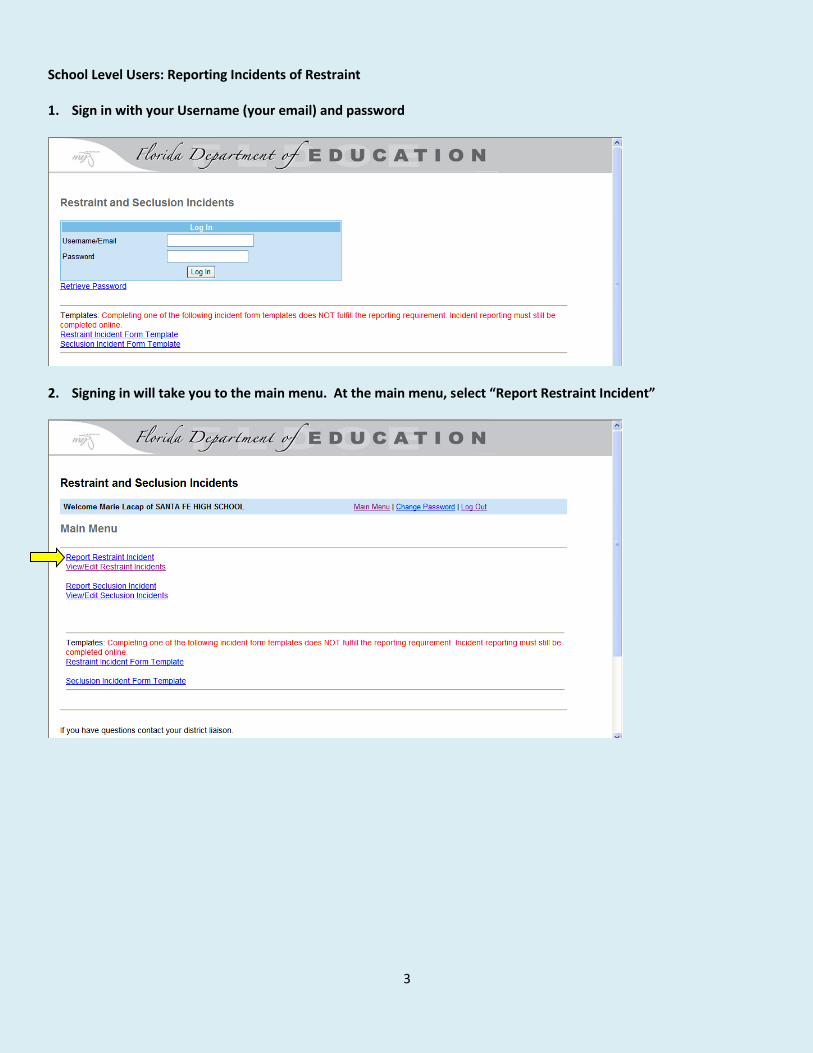
School Level Users: Reporting Incidents of Restraint 1. Sign in with your Username (your email) and password
2. Signing in will take you to the main menu. At the main menu, select “Report Restraint Incident”
4
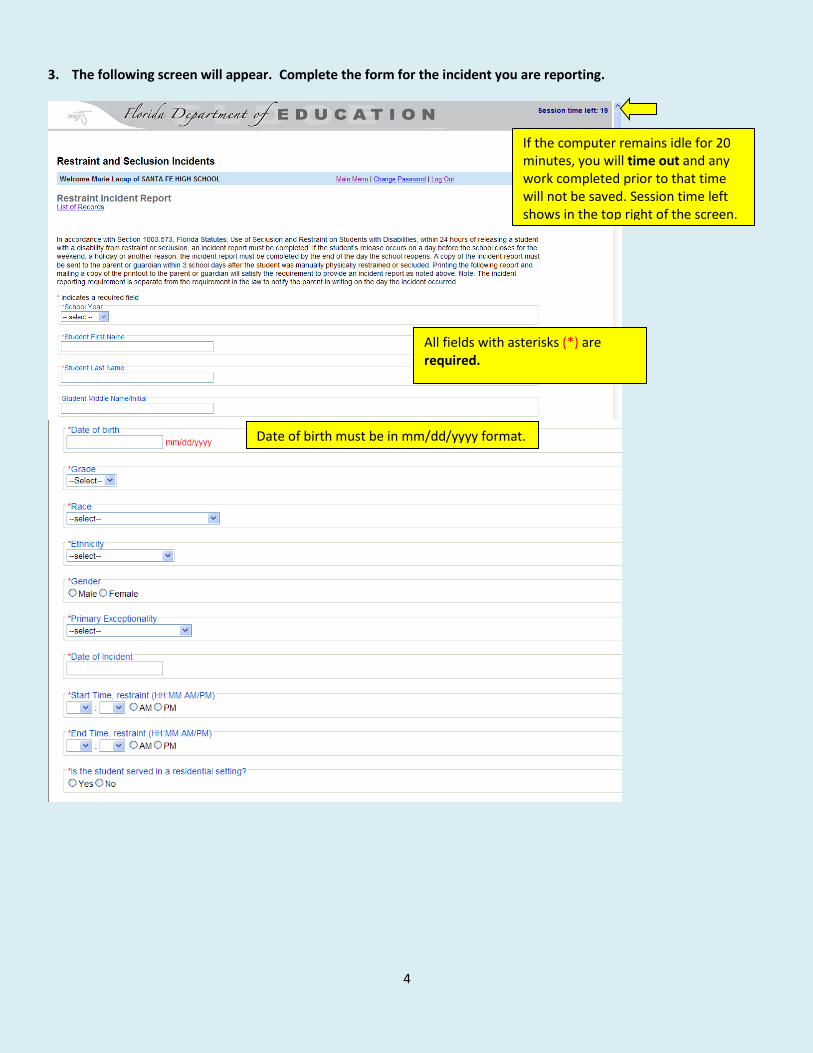
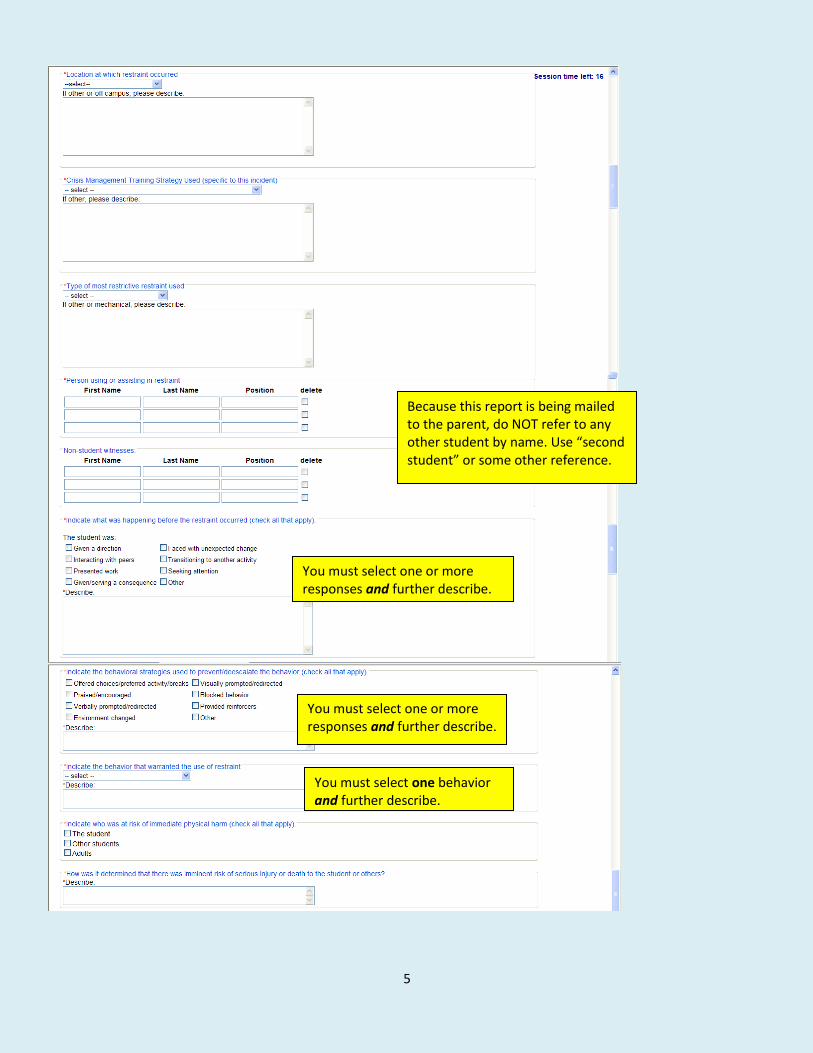
3. The following screen will appear. Complete the form for the incident you are reporting.
All fields with asterisks (*) are required.
Date of birth must be in mm/dd/yyyy format.
If the computer remains idle for 20 minutes, you will time out and any work completed prior to that time will not be saved. Session time left shows in the top right of the screen.
5
Because this report is being mailed to the parent, do NOT refer to any other student by name. Use “second student” or some other reference.
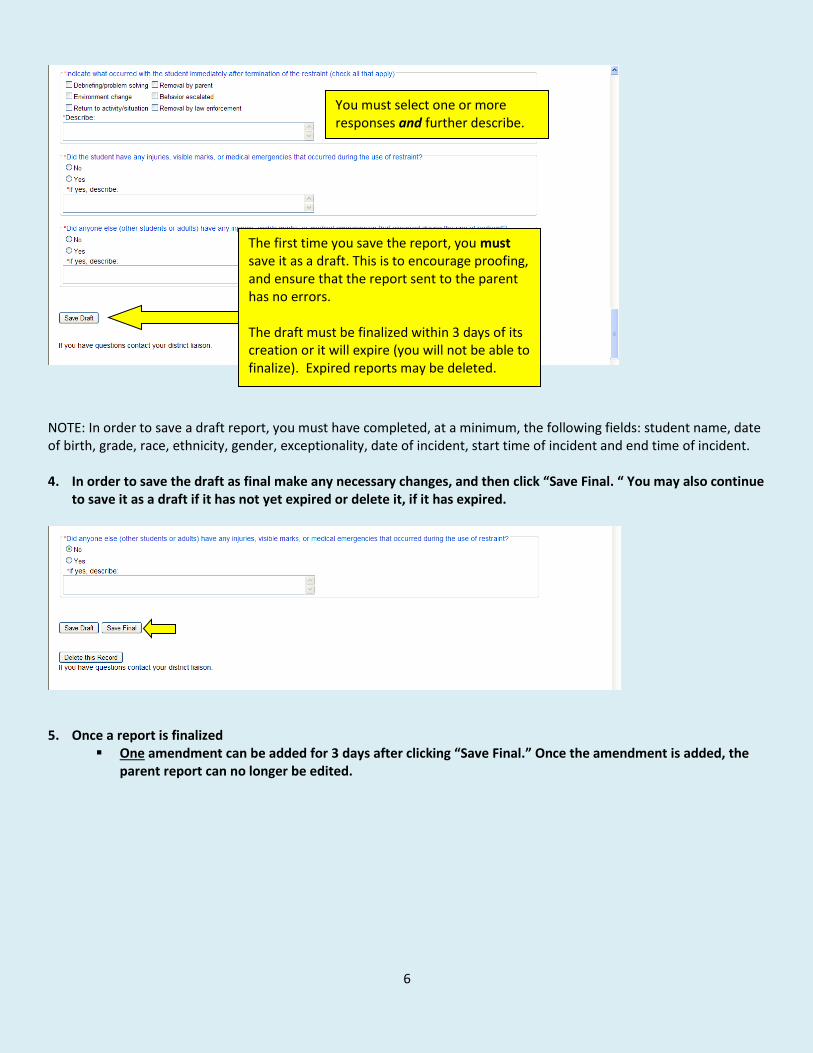
You must select one or more responses and further describe.
You must select one or more responses and further describe.
You must select one behavior and further describe.
6
NOTE: In order to save a draft report, you must have completed, at a minimum, the following fields: student name, date of birth, grade, race, ethnicity, gender, exceptionality, date of incident, start time of incident and end time of incident. 4. In order to save the draft as final make any necessary changes, and then click “Save Final. “ You may also continue
to save it as a draft if it has not yet expired or delete it, if it has expired.
5. Once a report is finalized
One amendment can be added for 3 days after clicking “Save Final.” Once the amendment is added, the parent report can no longer be edited.
The first time you save the report, you must save it as a draft. This is to encourage proofing, and ensure that the report sent to the parent has no errors. The draft must be finalized within 3 days of its creation or it will expire (you will not be able to finalize). Expired reports may be deleted.
You must select one or more responses and further describe.
7
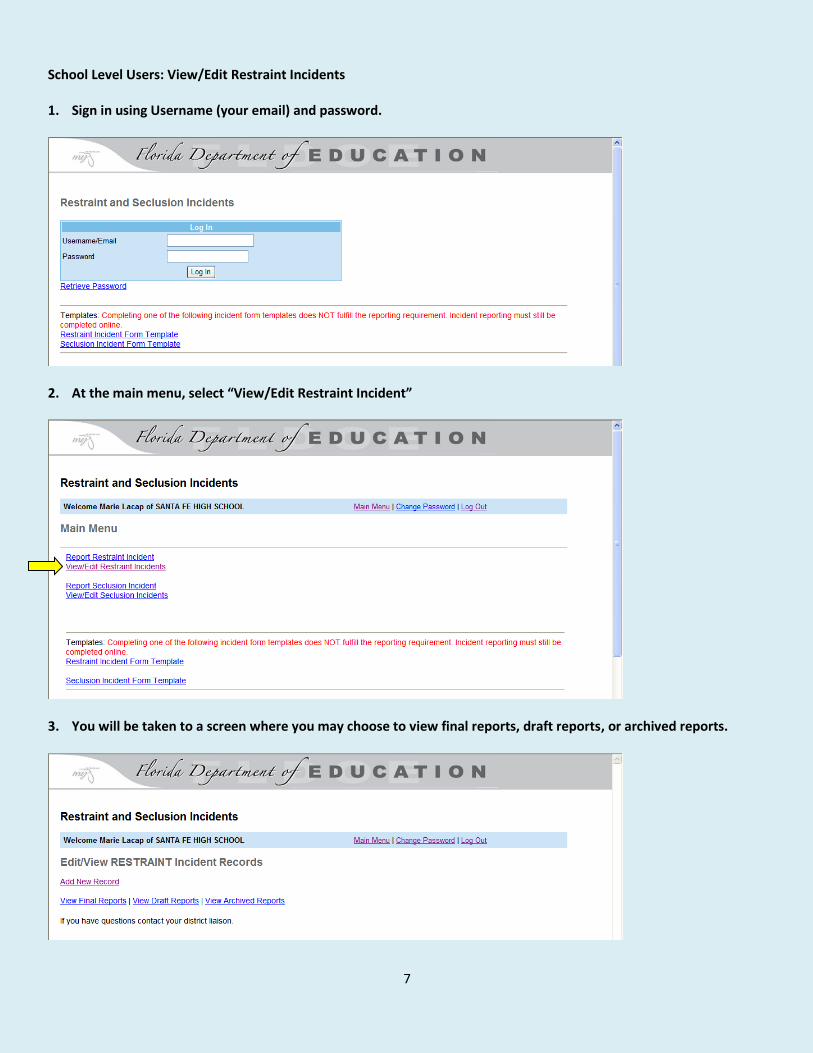
School Level Users: View/Edit Restraint Incidents 1. Sign in using Username (your email) and password.
2. At the main menu, select “View/Edit Restraint Incident”
3. You will be taken to a screen where you may choose to view final reports, draft reports, or archived reports.
8
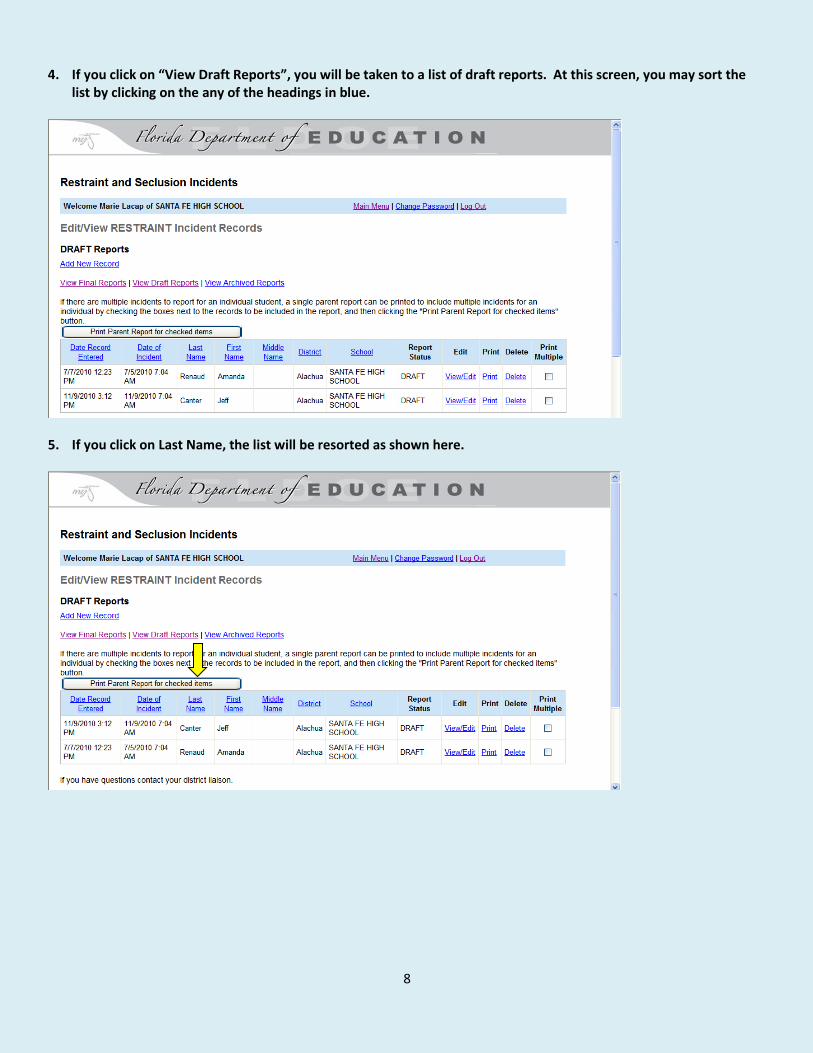
4. If you click on “View Draft Reports”, you will be taken to a list of draft reports. At this screen, you may sort the list by clicking on the any of the headings in blue.
5. If you click on Last Name, the list will be resorted as shown here.
9
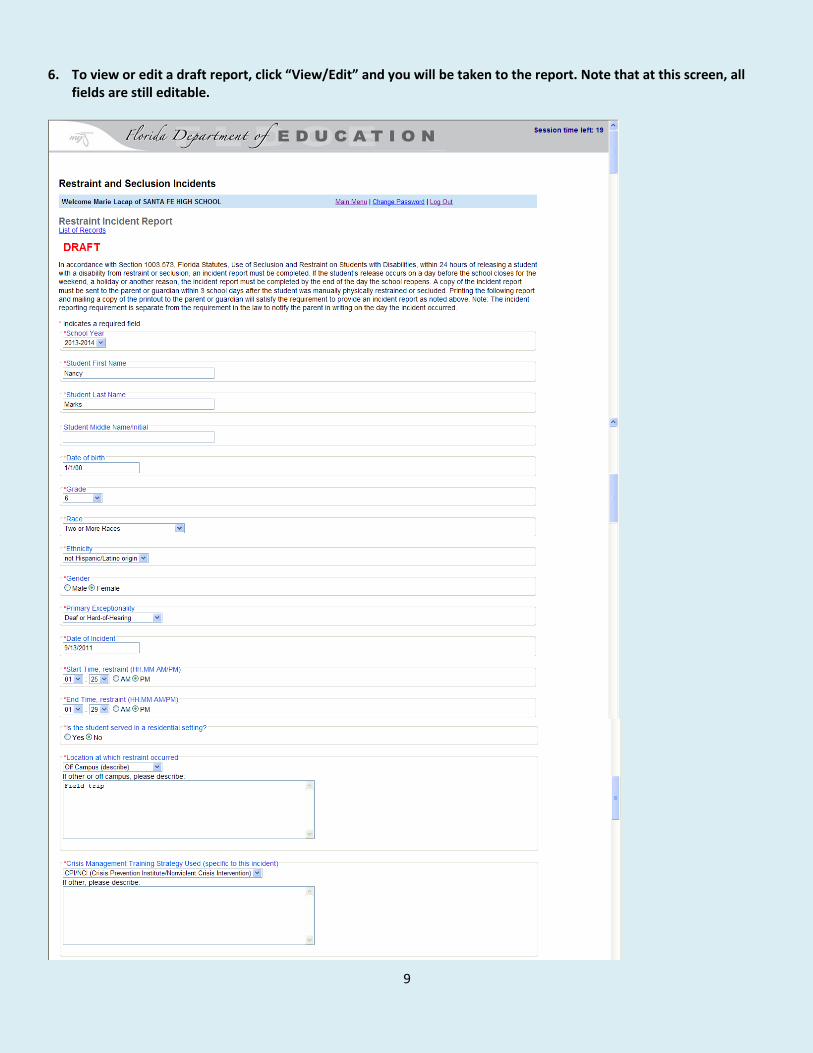
6. To view or edit a draft report, click “View/Edit” and you will be taken to the report. Note that at this screen, all fields are still editable.
10
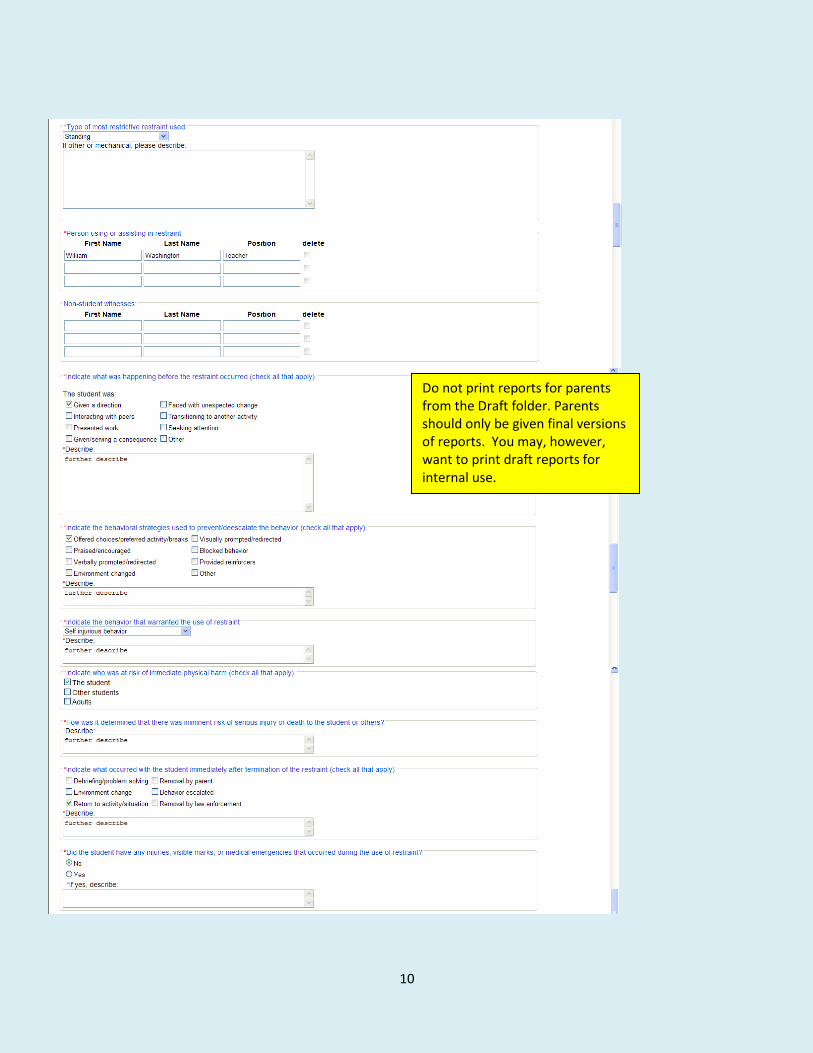
Do not print reports for parents from the Draft folder. Parents should only be given final versions of reports. You may, however, want to print draft reports for internal use.
11
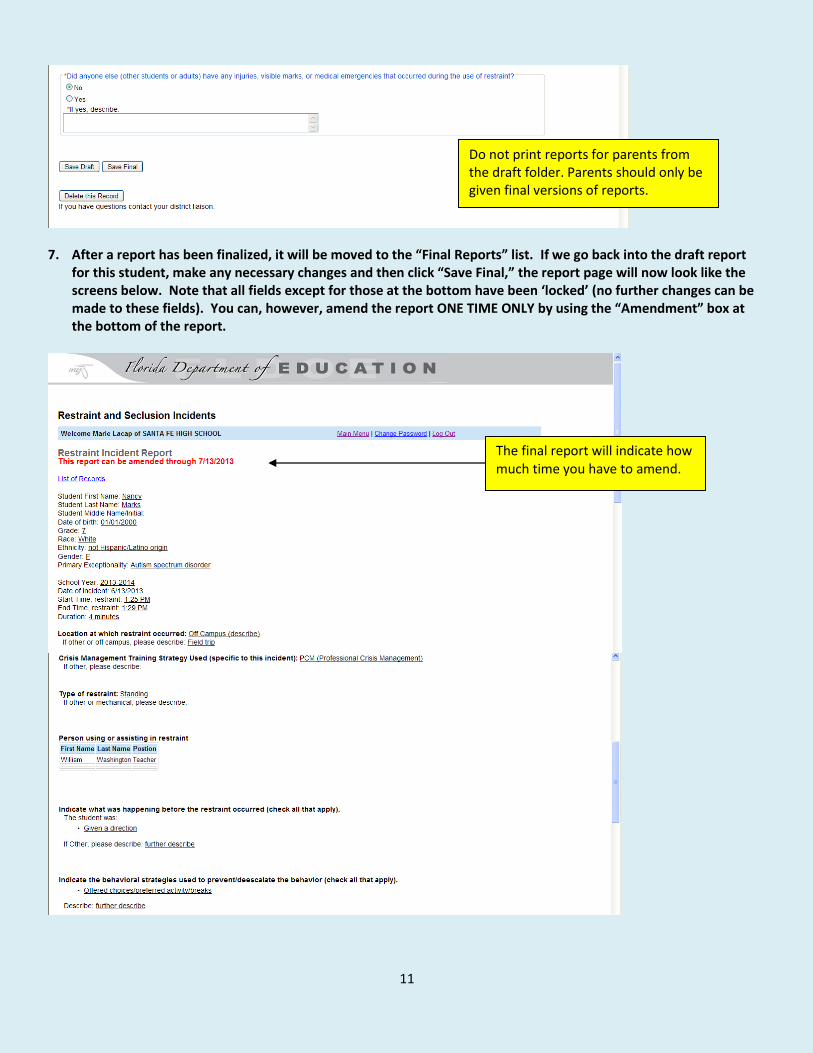
7. After a report has been finalized, it will be moved to the “Final Reports” list. If we go back into the draft report
for this student, make any necessary changes and then click “Save Final,” the report page will now look like the screens below. Note that all fields except for those at the bottom have been ‘locked’ (no further changes can be made to these fields). You can, however, amend the report ONE TIME ONLY by using the “Amendment” box at the bottom of the report.
Do not print reports for parents from the draft folder. Parents should only be given final versions of reports.
The final report will indicate how much time you have to amend.
12
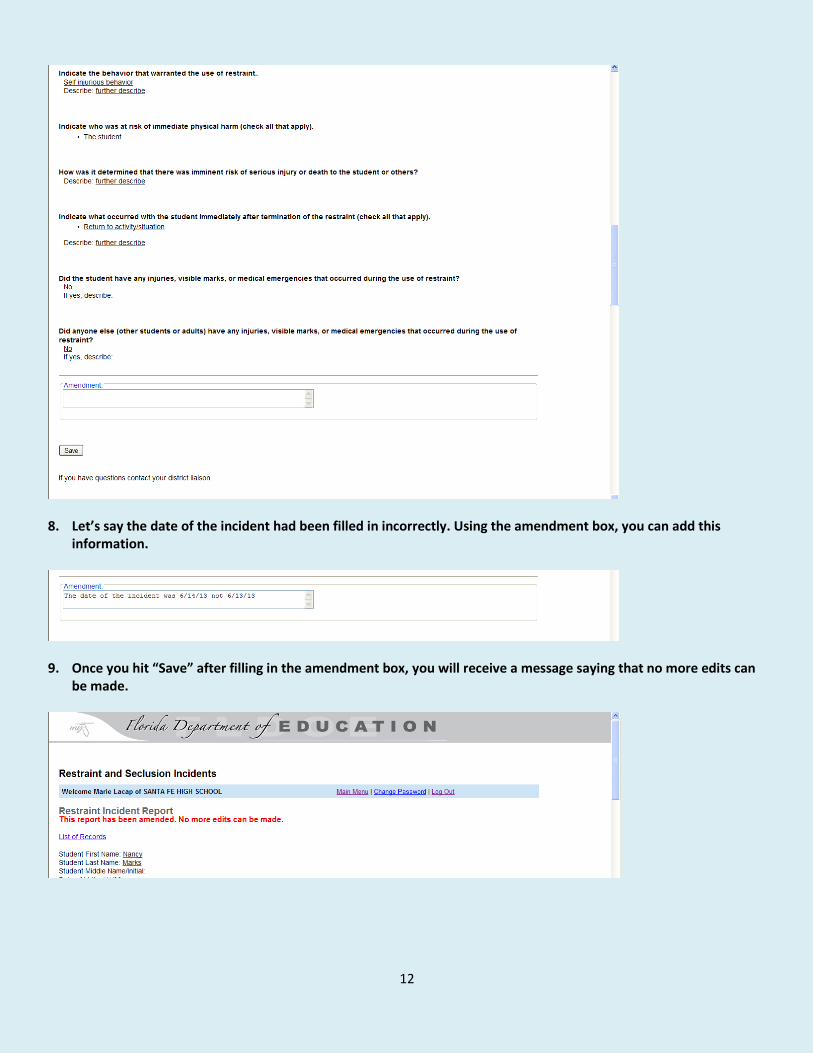
8. Let’s say the date of the incident had been filled in incorrectly. Using the amendment box, you can add this
information.
9. Once you hit “Save” after filling in the amendment box, you will receive a message saying that no more edits can
be made.
13
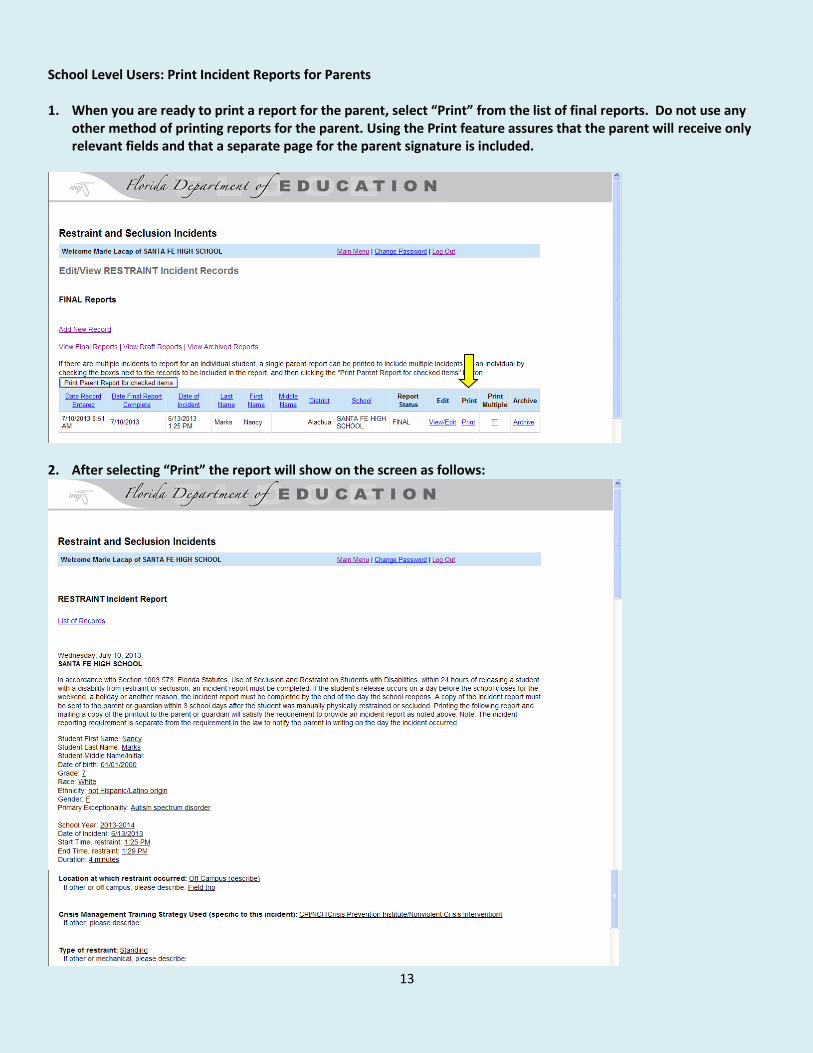
School Level Users: Print Incident Reports for Parents 1. When you are ready to print a report for the parent, select “Print” from the list of final reports. Do not use any
other method of printing reports for the parent. Using the Print feature assures that the parent will receive only relevant fields and that a separate page for the parent signature is included.
2. After selecting “Print” the report will show on the screen as follows:
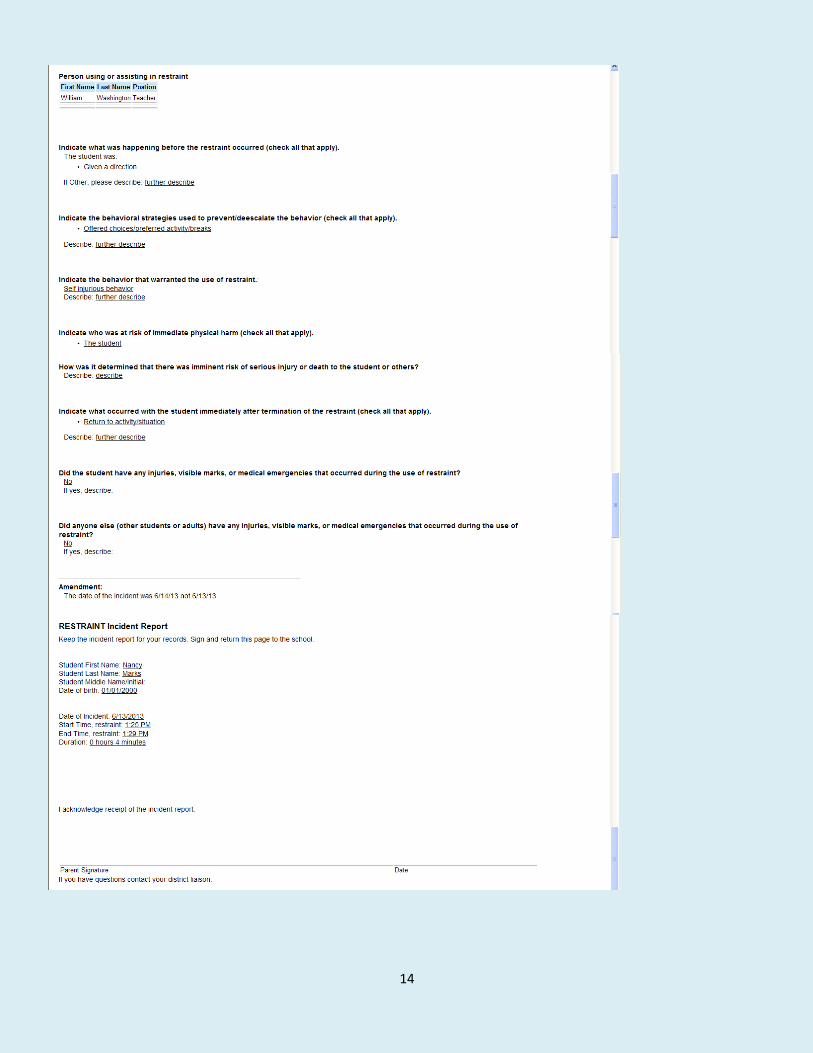
14
15
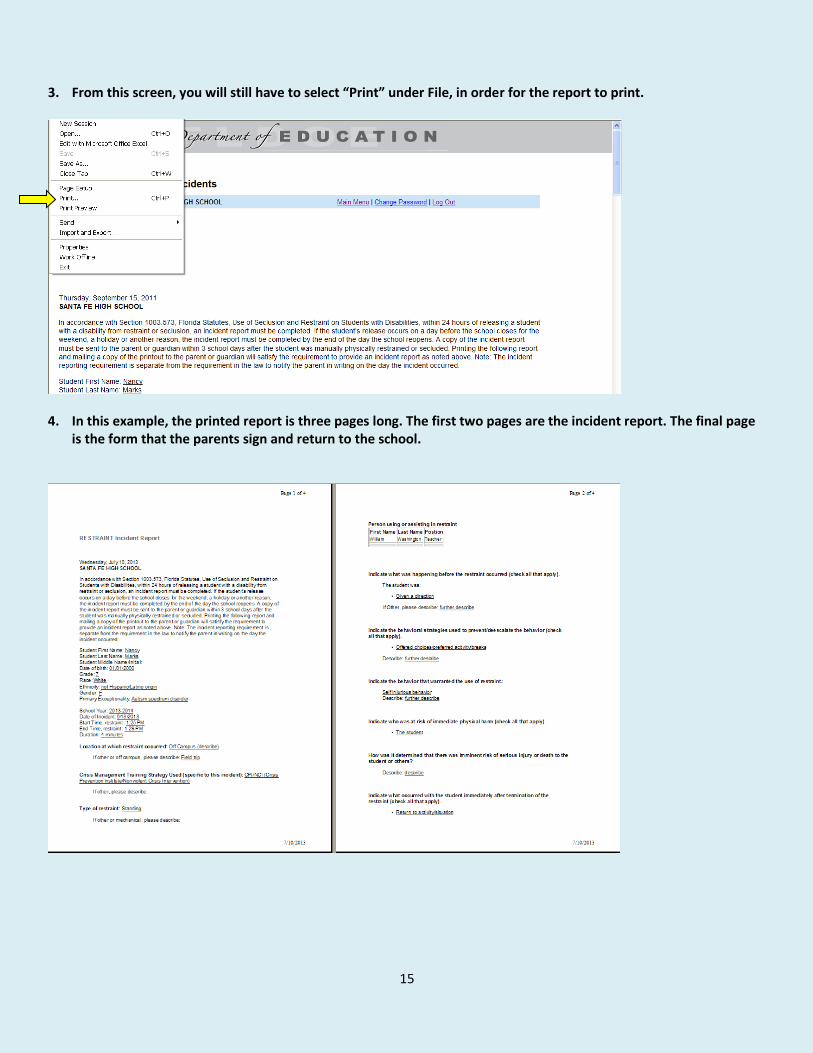
3. From this screen, you will still have to select “Print” under File, in order for the report to print.
4. In this example, the printed report is three pages long. The first two pages are the incident report. The final page
is the form that the parents sign and return to the school.

16
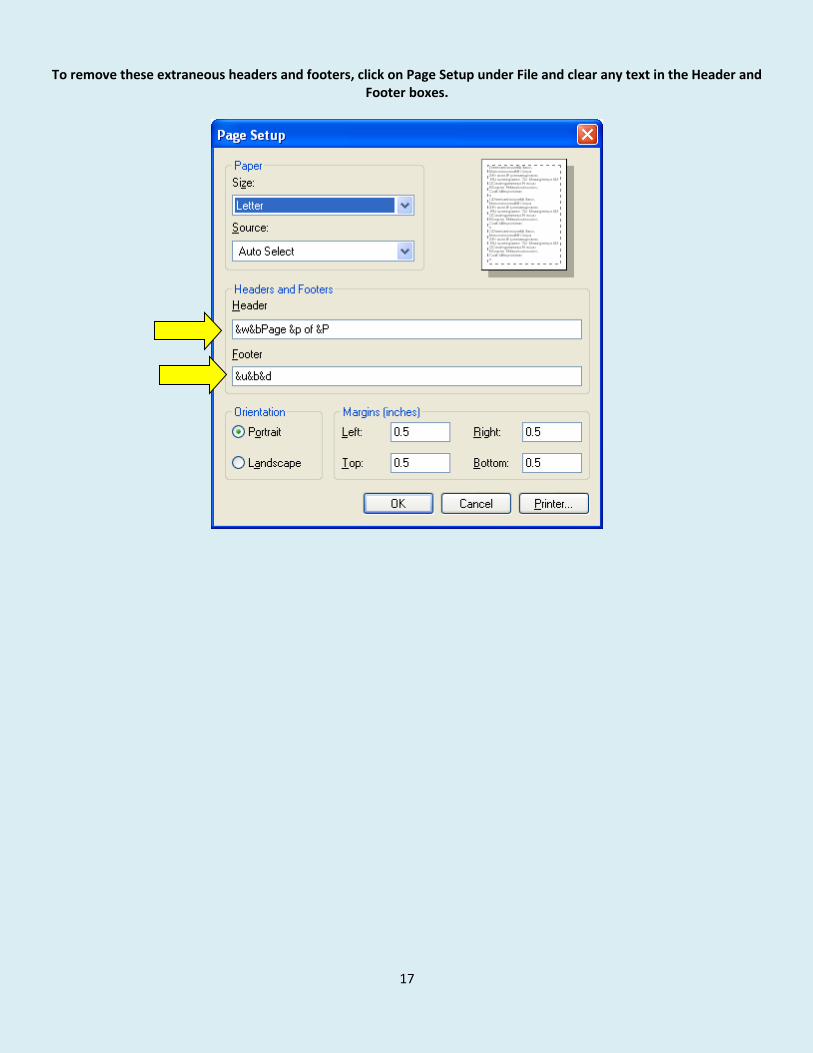
5. Check to see if your printed report is showing headers and footers that could be confusing to parents, like those
below.
17
To remove these extraneous headers and footers, click on Page Setup under File and clear any text in the Header and Footer boxes.
18
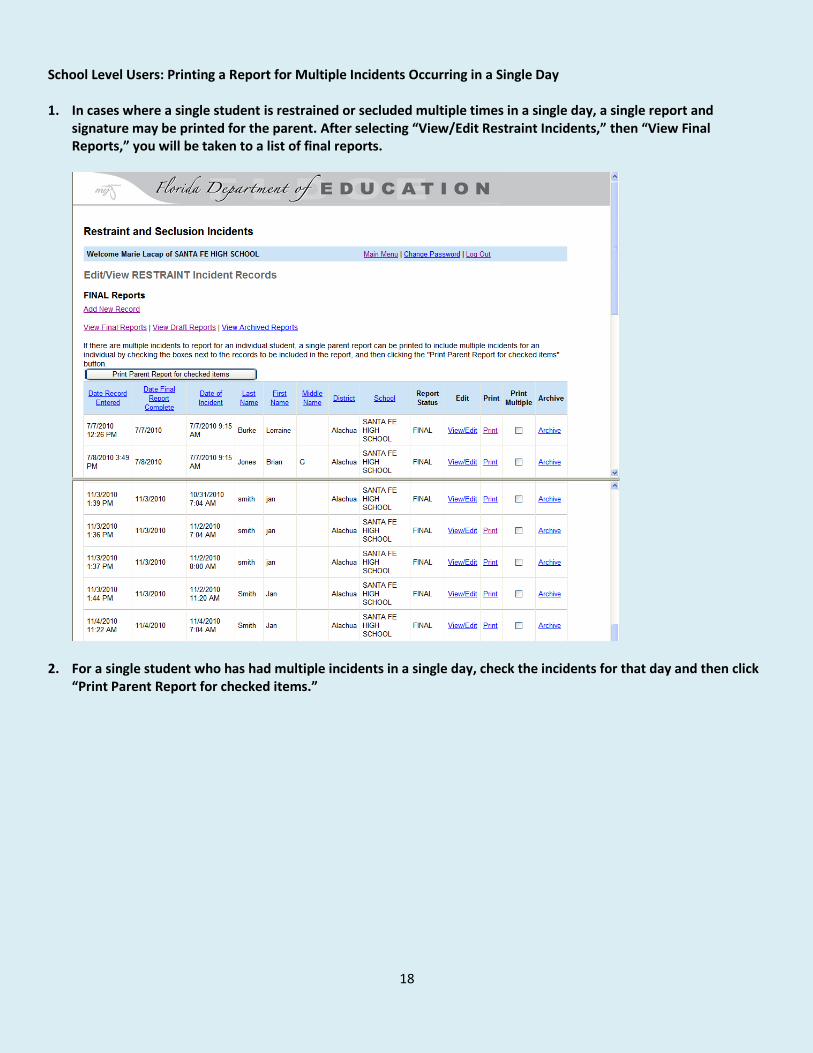
School Level Users: Printing a Report for Multiple Incidents Occurring in a Single Day 1. In cases where a single student is restrained or secluded multiple times in a single day, a single report and
signature may be printed for the parent. After selecting “View/Edit Restraint Incidents,” then “View Final Reports,” you will be taken to a list of final reports.
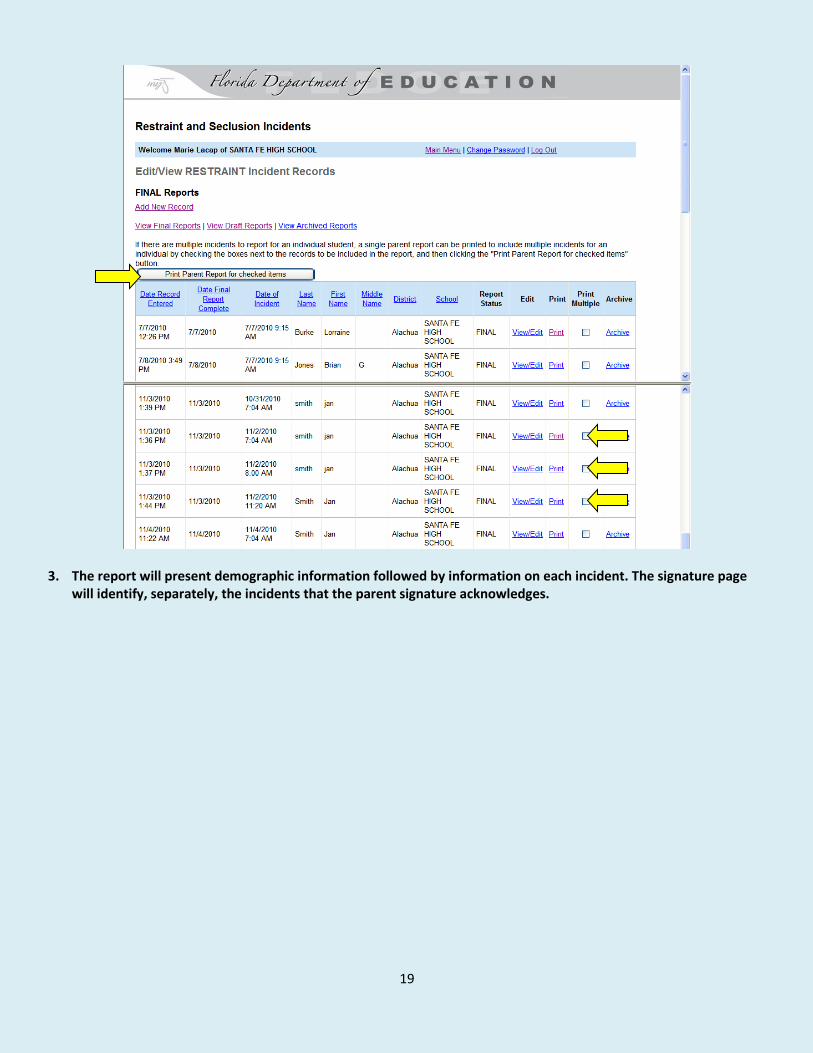
2. For a single student who has had multiple incidents in a single day, check the incidents for that day and then click “Print Parent Report for checked items.”
19
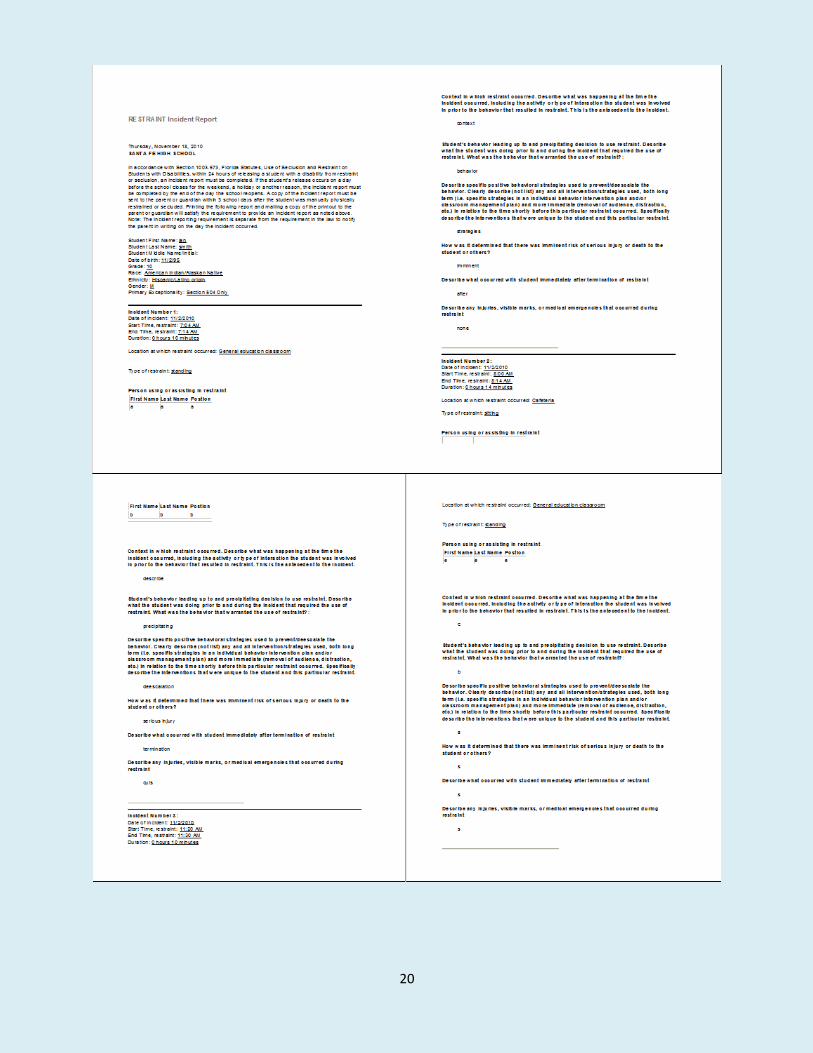
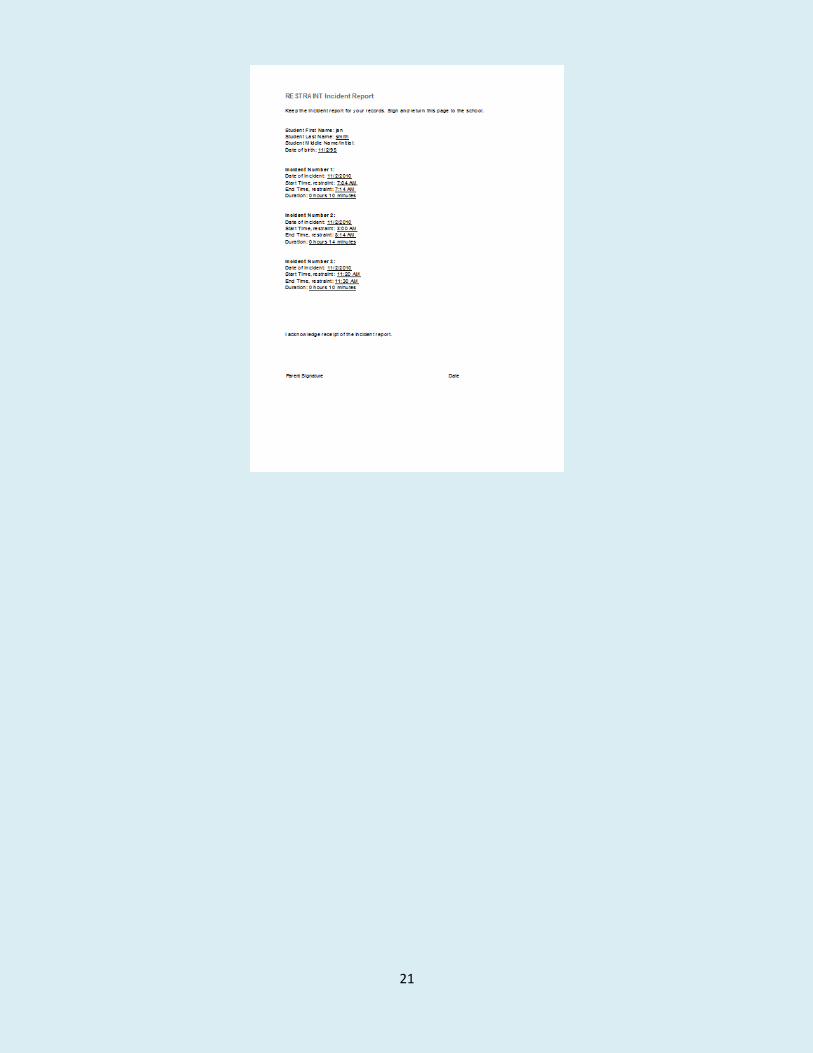
3. The report will present demographic information followed by information on each incident. The signature page will identify, separately, the incidents that the parent signature acknowledges.
20
21

22
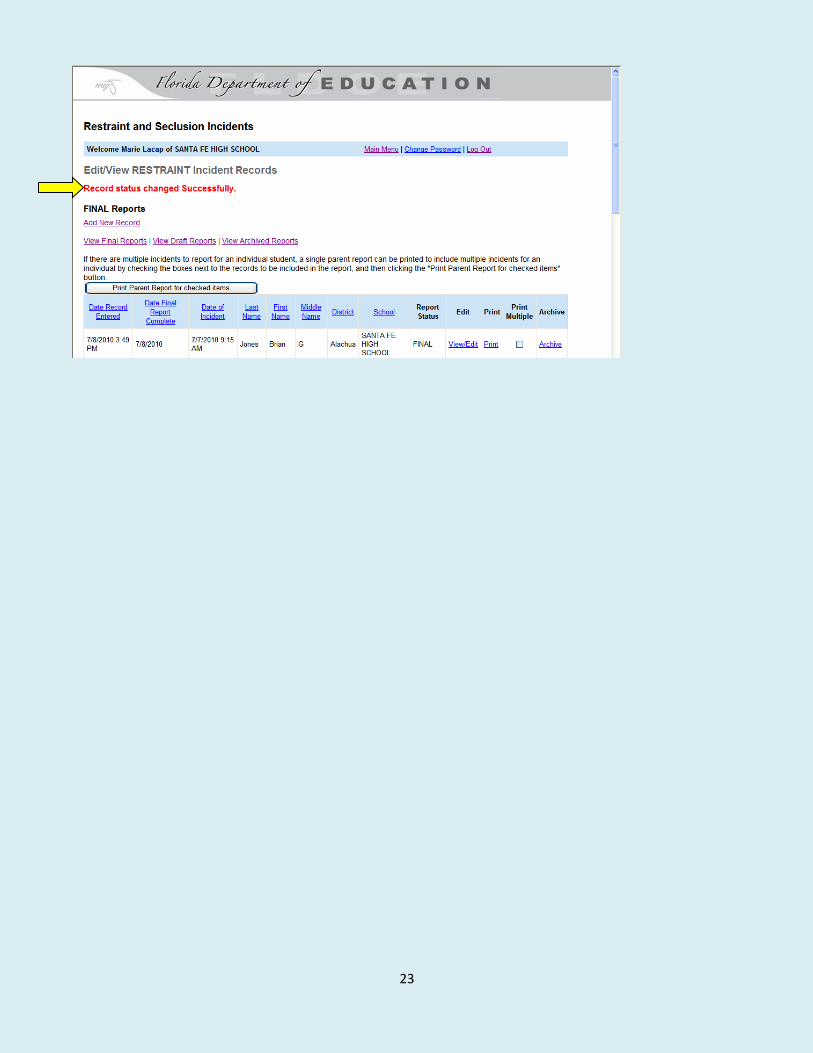
School Level Users: Archiving Incident Reports 1. Schools have the option of archiving reports. The act of archiving incident reports will ensure that school staff can
refer to incident reports if required while keeping the active list of final reports at a manageable length. Districts may choose to archive monthly or at some other interval or not at all. Click on “Archive” for the report you wish to archive.
2. You will be asked if you are sure you want to archive the record.
3. After selecting yes, you will receive a message saying “Record status changed Successfully” and the report will no longer be listed in the final reports.
23