Embed Size (px)
Citation preview
roundbar entrance
pdr 1
pdr 2
windows down to bar
windows down to bar
meet &greet
stairs from lower east terrace
upper east terrace
lower east terrace
lower east terrace
lower
east garden
main function room
steps up to pdr corridor,
main function room and terrace
ResV5 Live Check In User Guide
Admin Guide |
1. Live Check-In1.1 Overview
2. Seating a Booking2.1 Seating a Booking on a Free Table
(flashing orange)
2.1a Suggested Tables of a Different Designation (flashing orange)
2.2 Seating a Booking on a booked table (flashing black)
2.2a Action Popup Options
2.2a1 Reduce
2.2a2 Shuffle
2.2a3 Scan
2.3 Seating a Booking on a Joined Table
2.4 Seating a Booking on a larger table than it has been assigned to
2.5 Seating a Booking on a smaller table than it has been assigned to
2.6 No Show
2.7 Editing a Booking on the Booking (Bkgs) Tab
2.7a Waiting In Bar
3. Seated Bookings3.1 Editing a Booking on the Seated
(Std) Tab
3.1a Swapping Tables
3.2 Setting a Table to Gone
4. Walk Ins4.1 Seating a Walk-In
5. Wait List5.1 Adding a Walk-In to the Wait List
5.2 Seating a Wait List Booking
5.3 Editing A Wait List Booking
5.4 Moving a Wait List Booking onto the Bookings Tab
6. Locking/Unlocking Tables6.1 Locking a Table
6.2 Unlocking a Table
Live Check In Guide | 1. Live Check-In
<< | < | Contents | Search | > | >>
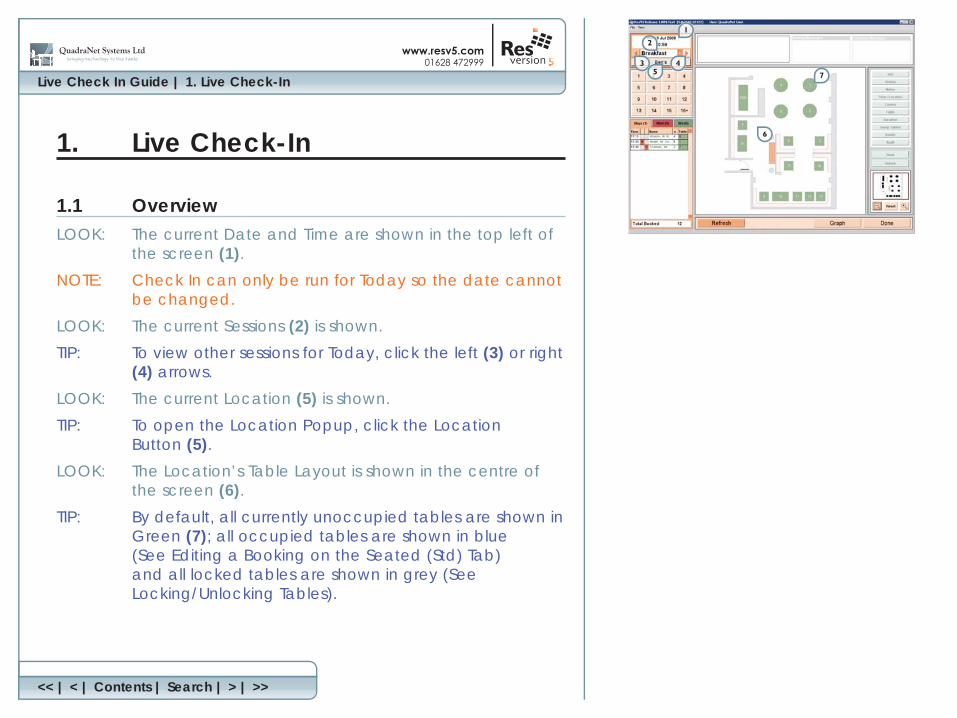
1. Live Check-In
1.1 OverviewLOOK: The current Date and Time are shown in the top left of
the screen (1).
NOTE: Check In can only be run for Today so the date cannot be changed.
LOOK: The current Sessions (2) is shown.
TIP: To view other sessions for Today, click the left (3) or right (4) arrows.
LOOK: The current Location (5) is shown.
TIP: To open the Location Popup, click the Location Button (5).
LOOK: The Location’s Table Layout is shown in the centre of the screen (6).
TIP: By default, all currently unoccupied tables are shown in Green (7); all occupied tables are shown in blue (See Editing a Booking on the Seated (Std) Tab) and all locked tables are shown in grey (See Locking/Unlocking Tables).
Live Check In Guide | 1. Live Check-In (cont.)
<< | < | Contents | Search | > | >>
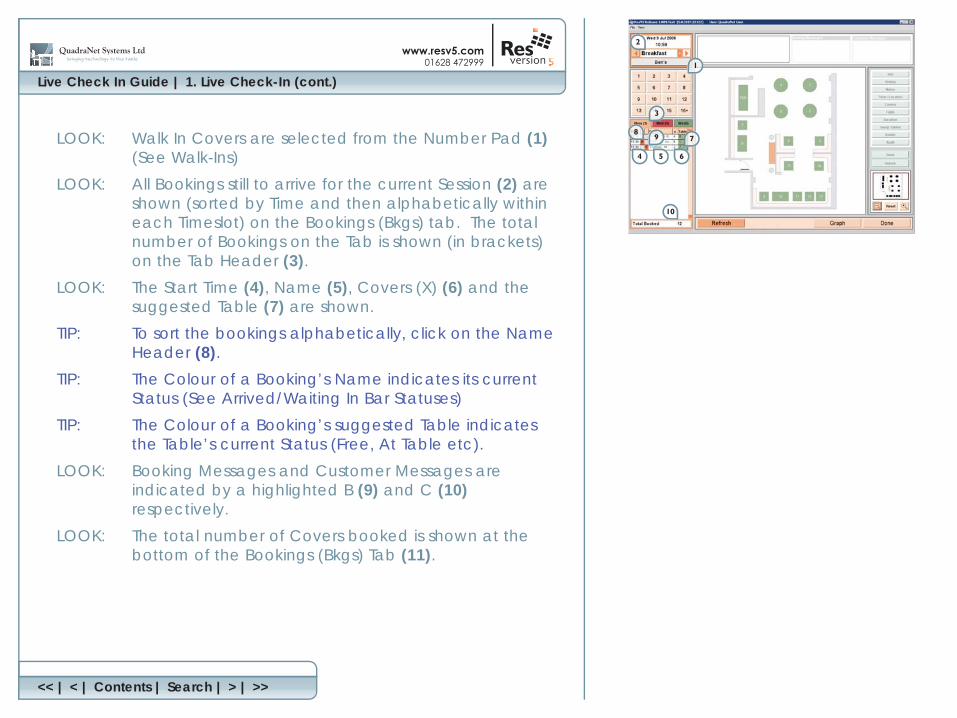
LOOK: Walk In Covers are selected from the Number Pad (1)(See Walk-Ins)
LOOK: All Bookings still to arrive for the current Session (2) are shown (sorted by Time and then alphabetically within each Timeslot) on the Bookings (Bkgs) tab. The total number of Bookings on the Tab is shown (in brackets) on the Tab Header (3).
LOOK: The Start Time (4), Name (5), Covers (X) (6) and the suggested Table (7) are shown.
TIP: To sort the bookings alphabetically, click on the Name Header (8).
TIP: The Colour of a Booking’s Name indicates its current Status (See Arrived/Waiting In Bar Statuses)
TIP: The Colour of a Booking’s suggested Table indicates the Table’s current Status (Free, At Table etc).
LOOK: Booking Messages and Customer Messages are indicated by a highlighted B (9) and C (10)respectively.
LOOK: The total number of Covers booked is shown at the bottom of the Bookings (Bkgs) Tab (11).
Live Check In Guide | 1. Live Check-In (cont.)
<< | < | Contents | Search | > | >>
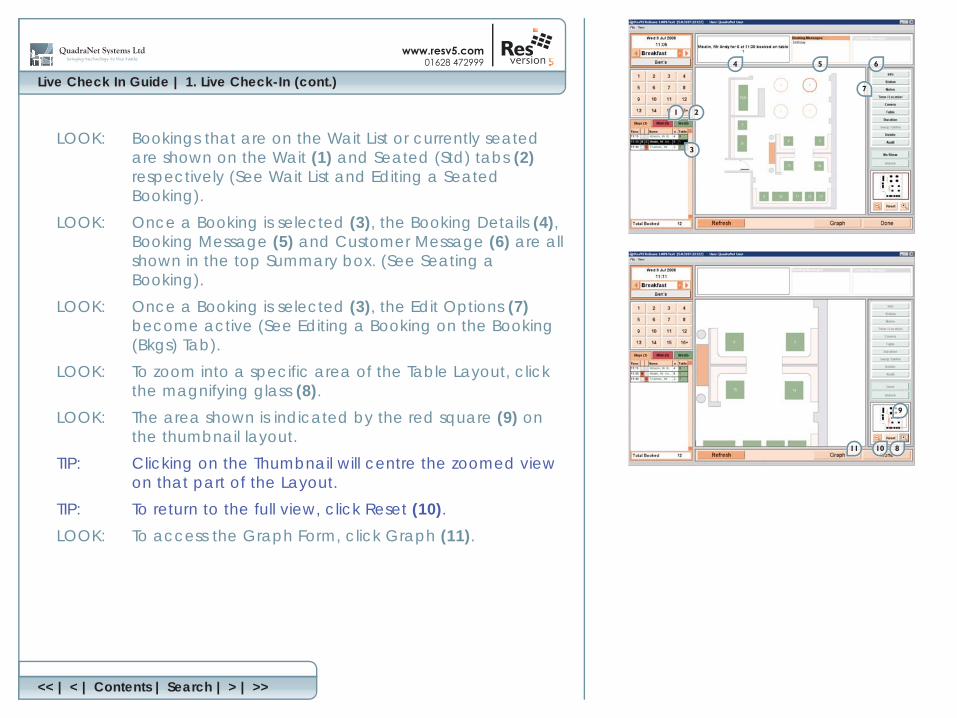
LOOK: Bookings that are on the Wait List or currently seated are shown on the Wait (1) and Seated (Std) tabs (2)respectively (See Wait List and Editing a Seated Booking).
LOOK: Once a Booking is selected (3), the Booking Details (4), Booking Message (5) and Customer Message (6) are all shown in the top Summary box. (See Seating a Booking).
LOOK: Once a Booking is selected (3), the Edit Options (7)become active (See Editing a Booking on the Booking (Bkgs) Tab).
LOOK: To zoom into a specific area of the Table Layout, click the magnifying glass (8).
LOOK: The area shown is indicated by the red square (9) on the thumbnail layout.
TIP: Clicking on the Thumbnail will centre the zoomed view on that part of the Layout.
TIP: To return to the full view, click Reset (10).
LOOK: To access the Graph Form, click Graph (11).
Live Check In Guide | 1. Live Check-In (cont.)
<< | < | Contents | Search | > | >>
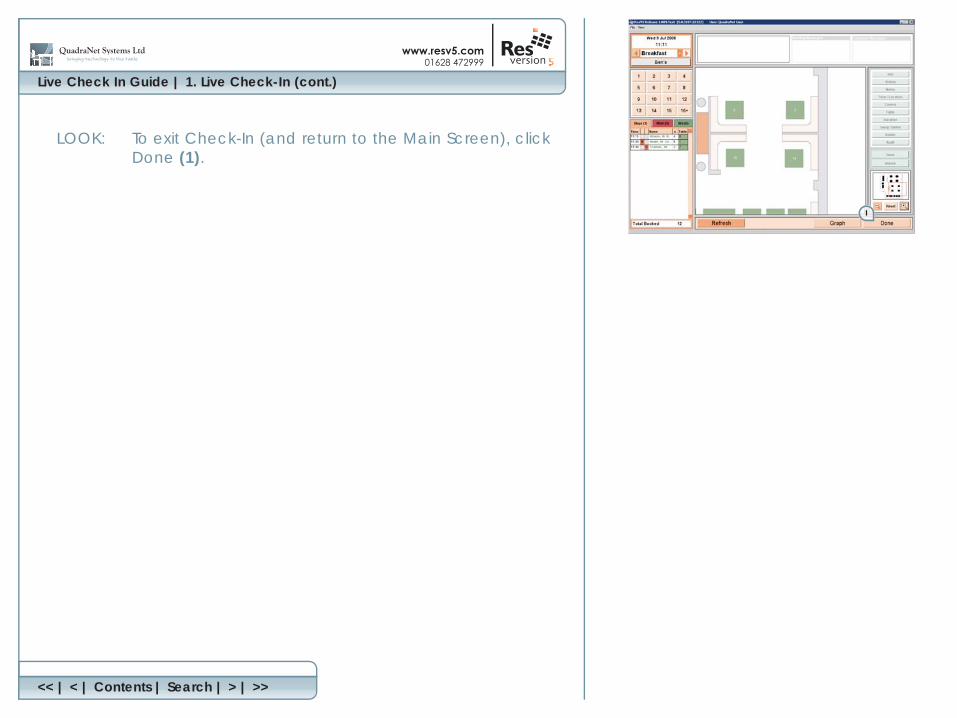
LOOK: To exit Check-In (and return to the Main Screen), click Done (1).
Live Check In Guide | 2. Seating a Booking
<< | < | Contents | Search | > | >>
2. Seating a Booking
2.1 Seating a Booking on a Free Table(flashing orange)
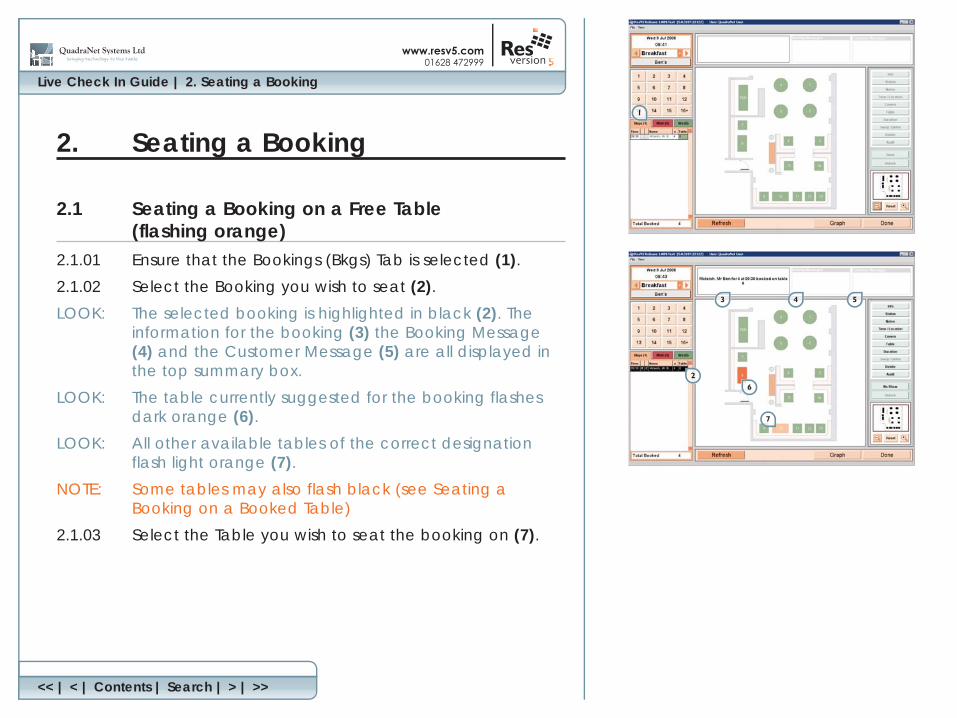
2.1.01 Ensure that the Bookings (Bkgs) Tab is selected (1).
2.1.02 Select the Booking you wish to seat (2).
LOOK: The selected booking is highlighted in black (2). The information for the booking (3) the Booking Message (4) and the Customer Message (5) are all displayed in the top summary box.
LOOK: The table currently suggested for the booking flashes dark orange (6).
LOOK: All other available tables of the correct designation flash light orange (7).
NOTE: Some tables may also flash black (see Seating a Booking on a Booked Table)
2.1.03 Select the Table you wish to seat the booking on (7).
Live Check In Guide | 2. Seating a Booking (cont.)
<< | < | Contents | Search | > | >>
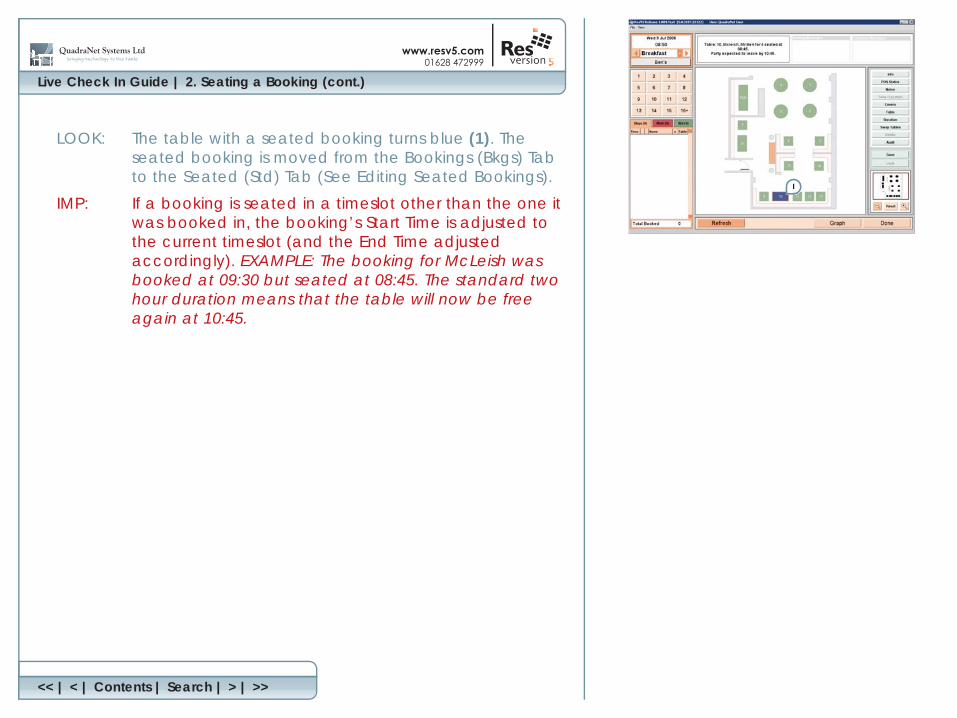
LOOK: The table with a seated booking turns blue (1). The seated booking is moved from the Bookings (Bkgs) Tab to the Seated (Std) Tab (See Editing Seated Bookings).
IMP: If a booking is seated in a timeslot other than the one it was booked in, the booking’s Start Time is adjusted to the current timeslot (and the End Time adjusted accordingly). EXAMPLE: The booking for McLeish was booked at 09:30 but seated at 08:45. The standard two hour duration means that the table will now be free again at 10:45.
Live Check In Guide | 2. Seating a Booking (cont.)
<< | < | Contents | Search | > | >>
2.1a Suggested Tables of a Different Designation(flashing orange)
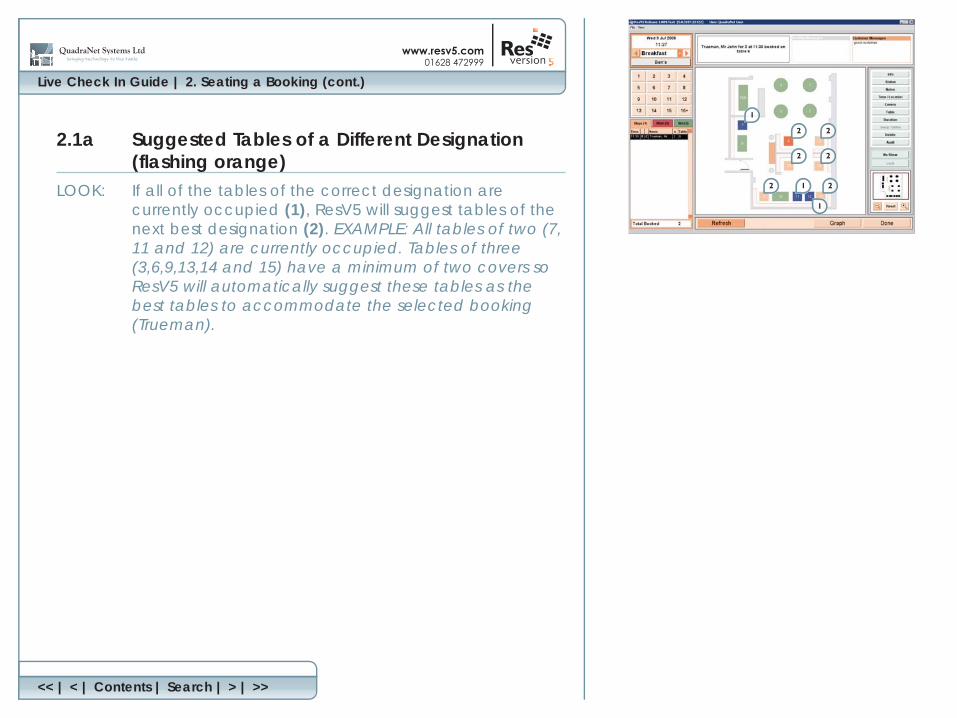
LOOK: If all of the tables of the correct designation are currently occupied (1), ResV5 will suggest tables of the next best designation (2). EXAMPLE: All tables of two (7, 11 and 12) are currently occupied. Tables of three (3,6,9,13,14 and 15) have a minimum of two covers so ResV5 will automatically suggest these tables as the best tables to accommodate the selected booking (Trueman).
Live Check In Guide | 2. Seating a Booking (cont.)
<< | < | Contents | Search | > | >>
2.2 Seating a Booking on a booked table (flashing black)
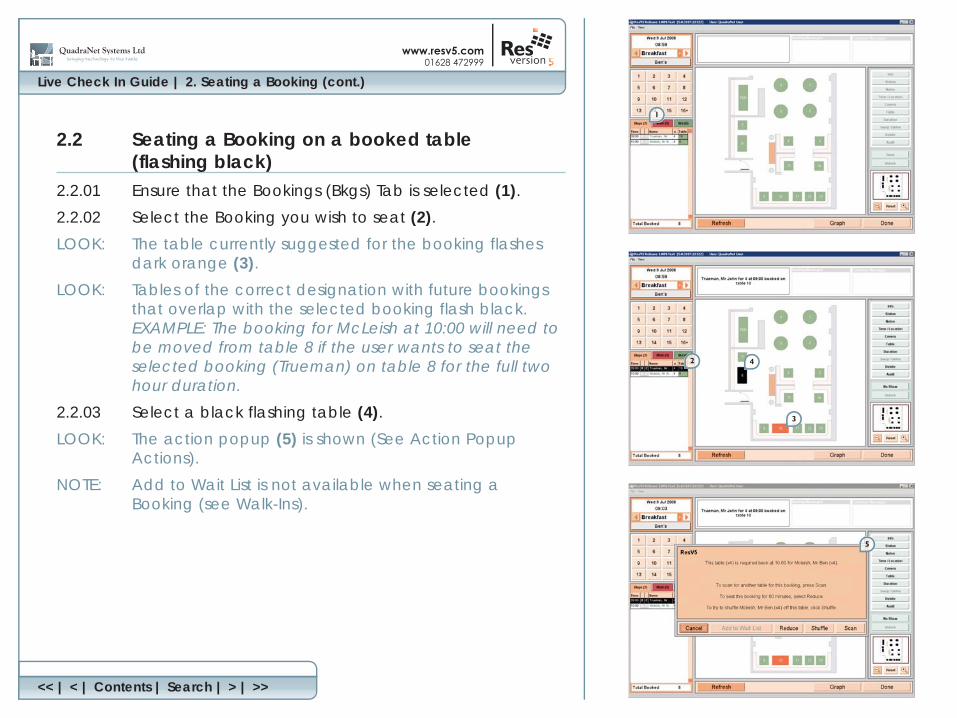
2.2.01 Ensure that the Bookings (Bkgs) Tab is selected (1).
2.2.02 Select the Booking you wish to seat (2).
LOOK: The table currently suggested for the booking flashes dark orange (3).
LOOK: Tables of the correct designation with future bookings that overlap with the selected booking flash black. EXAMPLE: The booking for McLeish at 10:00 will need to be moved from table 8 if the user wants to seat the selected booking (Trueman) on table 8 for the full two hour duration.
2.2.03 Select a black flashing table (4).
LOOK: The action popup (5) is shown (See Action Popup Actions).
NOTE: Add to Wait List is not available when seating a Booking (see Walk-Ins).
Live Check In Guide | 2. Seating a Booking (cont.)
<< | < | Contents | Search | > | >>
2.2a Action Popup Options
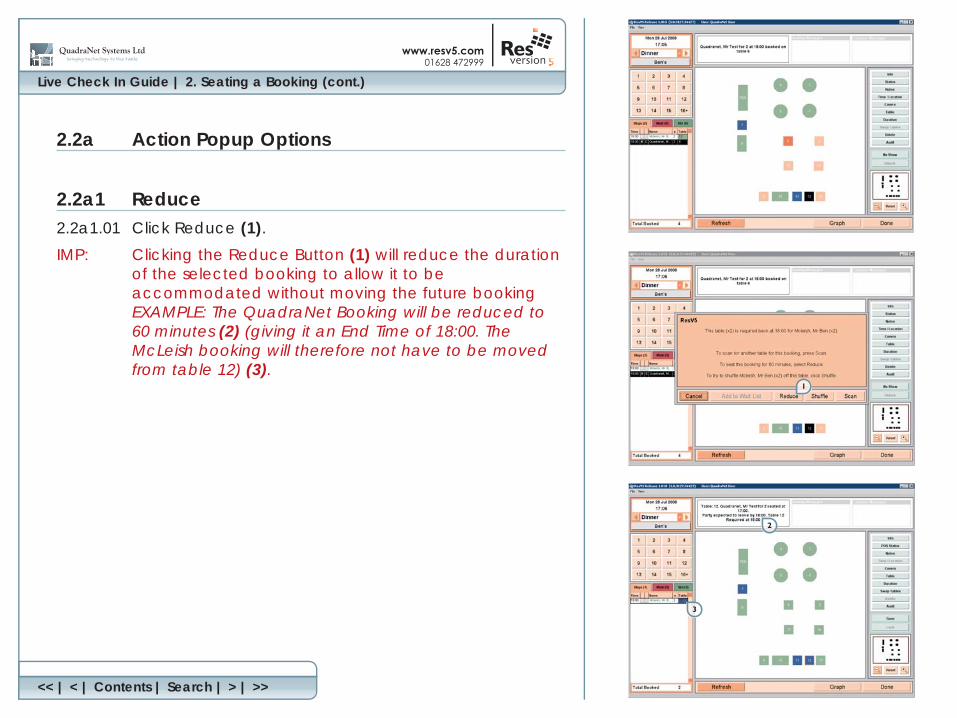
2.2a1 Reduce2.2a1.01 Click Reduce (1).
IMP: Clicking the Reduce Button (1) will reduce the duration of the selected booking to allow it to be accommodated without moving the future bookingEXAMPLE: The QuadraNet Booking will be reduced to 60 minutes (2) (giving it an End Time of 18:00. The McLeish booking will therefore not have to be moved from table 12) (3).
Live Check In Guide | 2. Seating a Booking (cont.)
<< | < | Contents | Search | > | >>
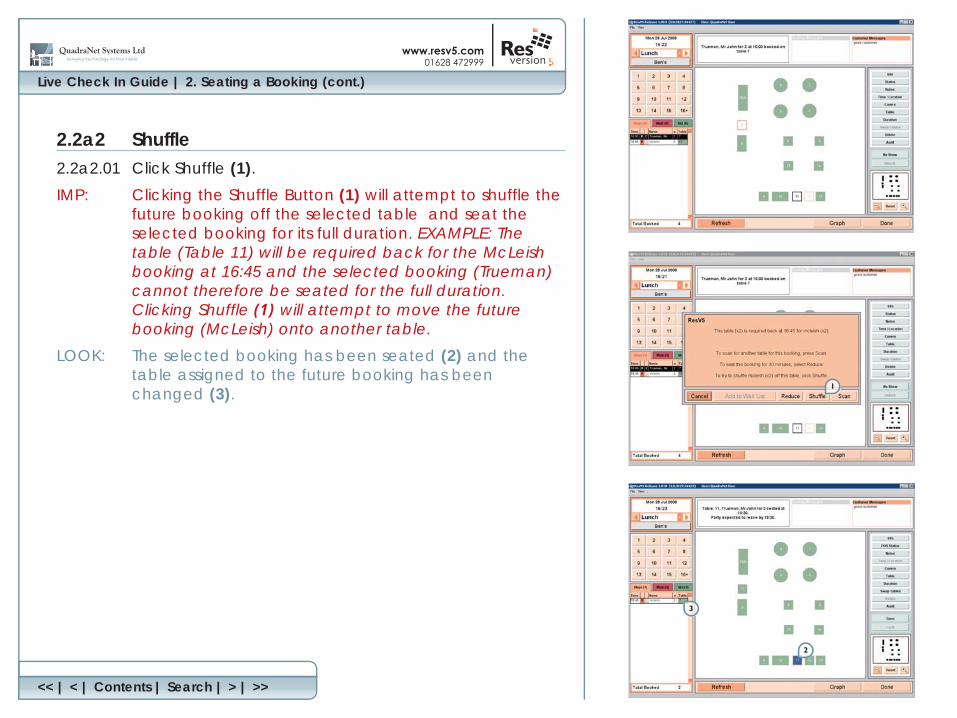
2.2a2 Shuffle2.2a2.01 Click Shuffle (1).
IMP: Clicking the Shuffle Button (1) will attempt to shuffle the future booking off the selected table and seat the selected booking for its full duration. EXAMPLE: The table (Table 11) will be required back for the McLeish booking at 16:45 and the selected booking (Trueman) cannot therefore be seated for the full duration. Clicking Shuffle (1) will attempt to move the future booking (McLeish) onto another table.
LOOK: The selected booking has been seated (2) and the table assigned to the future booking has been changed (3).
Admin Guide |
<< | < | Contents | Search | > | >>
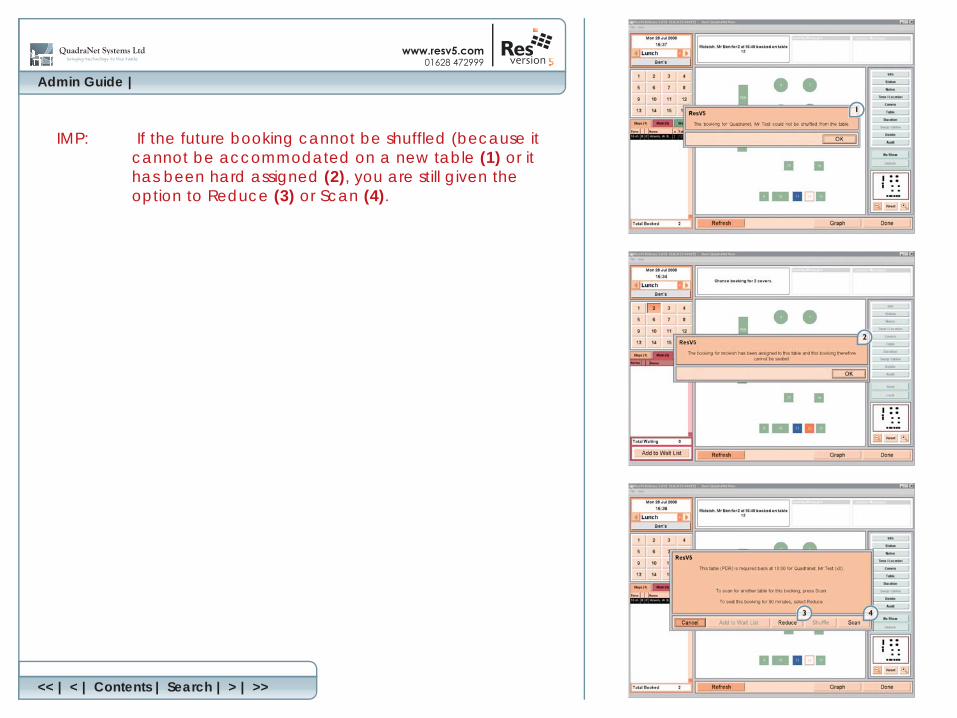
IMP: If the future booking cannot be shuffled (because it cannot be accommodated on a new table (1) or it has been hard assigned (2), you are still given the option to Reduce (3) or Scan (4).
Live Check In Guide | 2. Seating a Booking (cont.)
<< | < | Contents | Search | > | >>
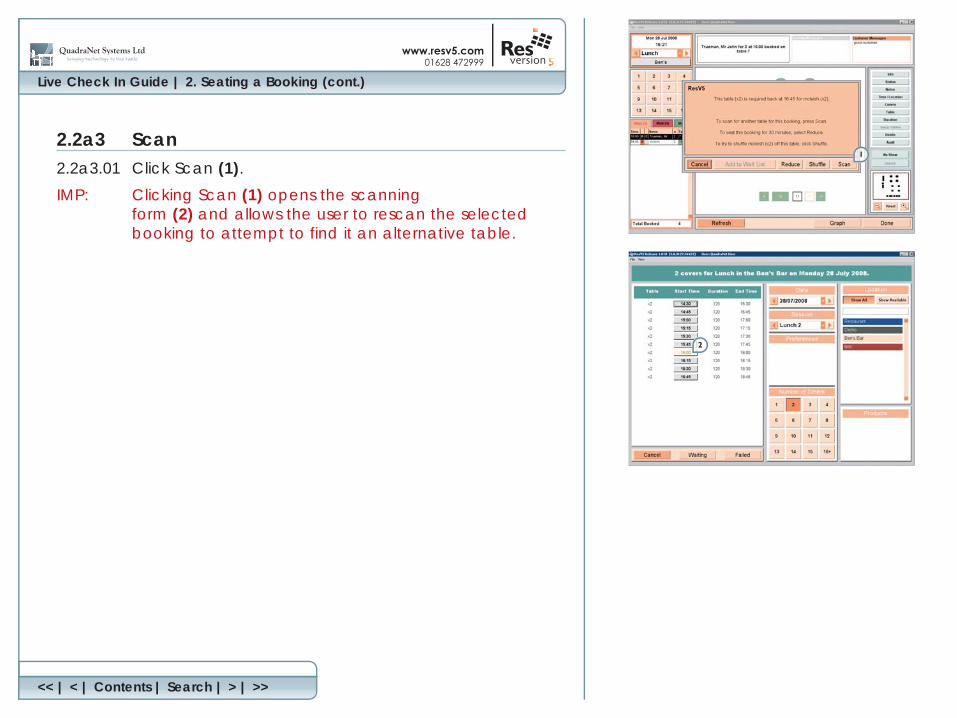
2.2a3 Scan2.2a3.01 Click Scan (1).
IMP: Clicking Scan (1) opens the scanning form (2) and allows the user to rescan the selected booking to attempt to find it an alternative table.
Live Check In Guide | 2. Seating a Booking (cont.)
<< | < | Contents | Search | > | >>
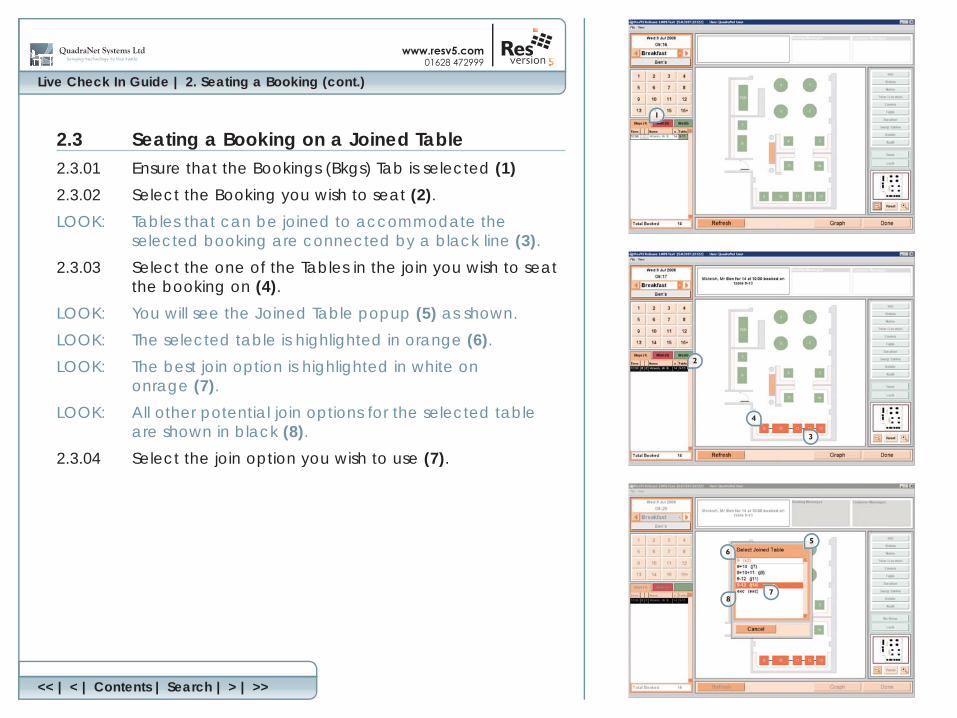
2.3 Seating a Booking on a Joined Table2.3.01 Ensure that the Bookings (Bkgs) Tab is selected (1)
2.3.02 Select the Booking you wish to seat (2).
LOOK: Tables that can be joined to accommodate the selected booking are connected by a black line (3).
2.3.03 Select the one of the Tables in the join you wish to seat the booking on (4).
LOOK: You will see the Joined Table popup (5) as shown.
LOOK: The selected table is highlighted in orange (6).
LOOK: The best join option is highlighted in white on onrage (7).
LOOK: All other potential join options for the selected table are shown in black (8).
2.3.04 Select the join option you wish to use (7).
Live Check In Guide | 2. Seating a Booking (cont.)
<< | < | Contents | Search | > | >>
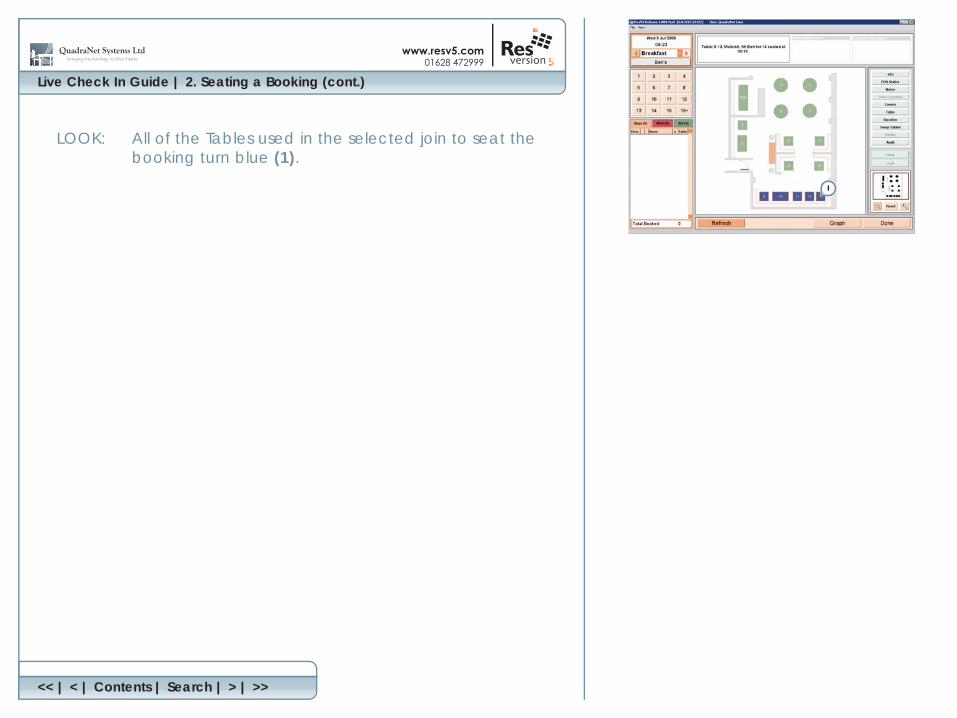
LOOK: All of the Tables used in the selected join to seat the booking turn blue (1).
Live Check In Guide | 2. Seating a Booking (cont.)
<< | < | Contents | Search | > | >>
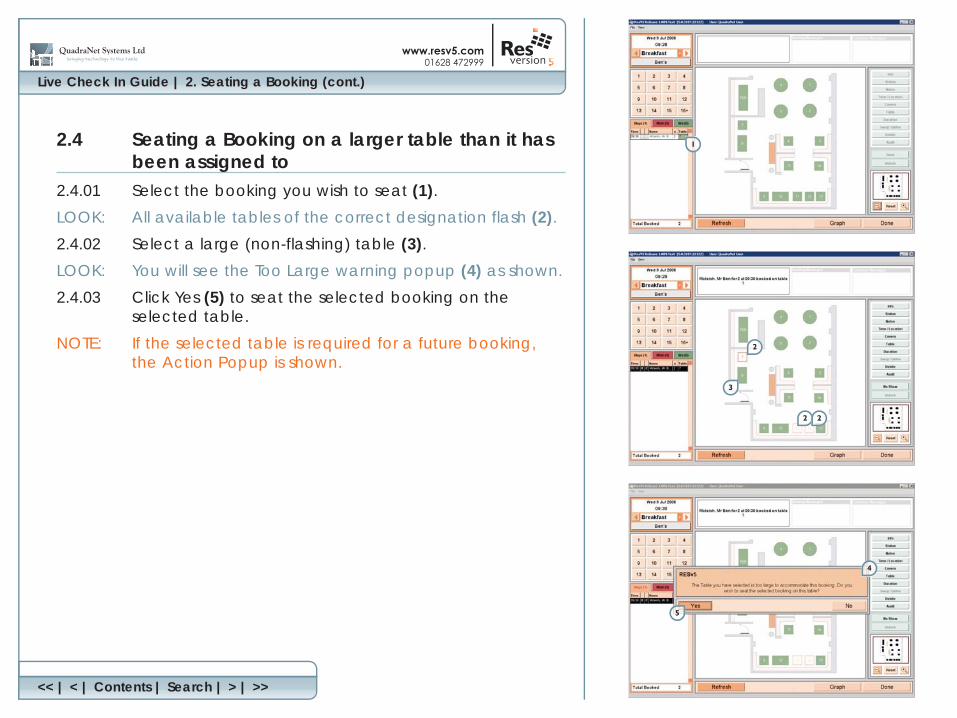
2.4 Seating a Booking on a larger table than it has been assigned to
2.4.01 Select the booking you wish to seat (1).
LOOK: All available tables of the correct designation flash (2).
2.4.02 Select a large (non-flashing) table (3).
LOOK: You will see the Too Large warning popup (4) as shown.
2.4.03 Click Yes (5) to seat the selected booking on the selected table.
NOTE: If the selected table is required for a future booking, the Action Popup is shown.
Live Check In Guide | 2. Seating a Booking (cont.)
<< | < | Contents | Search | > | >>
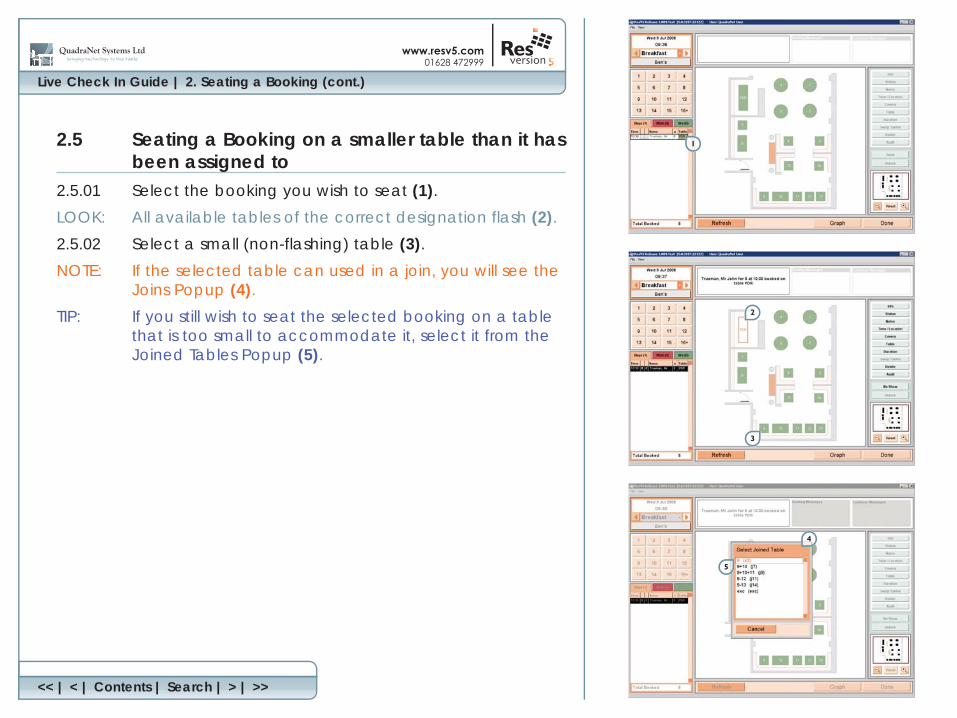
2.5 Seating a Booking on a smaller table than it has been assigned to
2.5.01 Select the booking you wish to seat (1).
LOOK: All available tables of the correct designation flash (2).
2.5.02 Select a small (non-flashing) table (3).
NOTE: If the selected table can used in a join, you will see the Joins Popup (4).
TIP: If you still wish to seat the selected booking on a table that is too small to accommodate it, select it from the Joined Tables Popup (5).
Live Check In Guide | 2. Seating a Booking (cont.)
<< | < | Contents | Search | > | >>
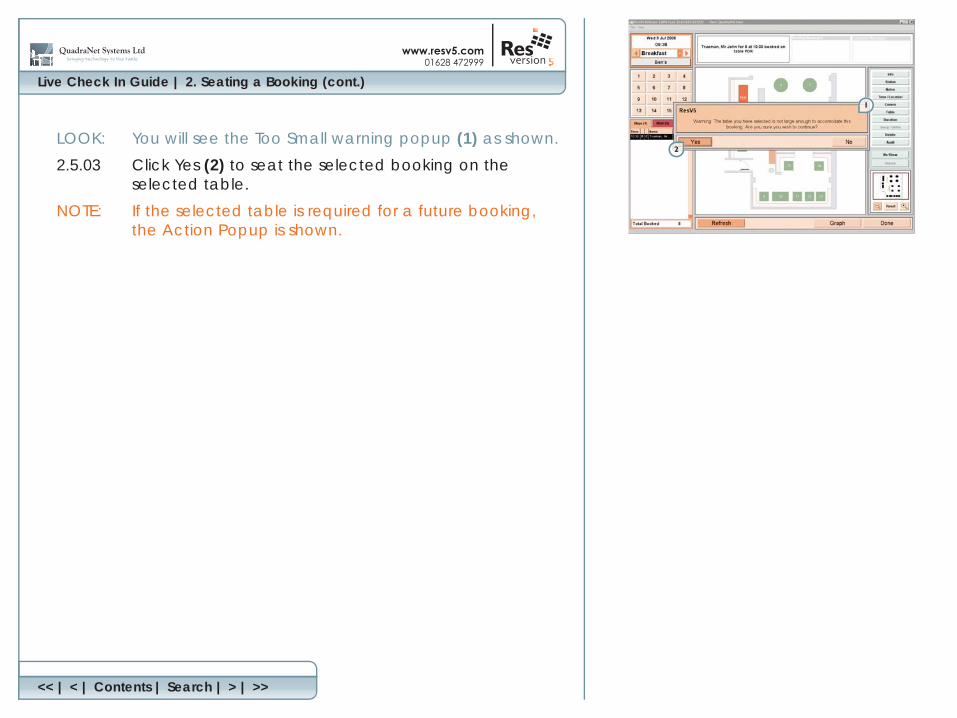
LOOK: You will see the Too Small warning popup (1) as shown.
2.5.03 Click Yes (2) to seat the selected booking on the selected table.
NOTE: If the selected table is required for a future booking, the Action Popup is shown.
Live Check In Guide | 2. Seating a Booking (cont.)
<< | < | Contents | Search | > | >>
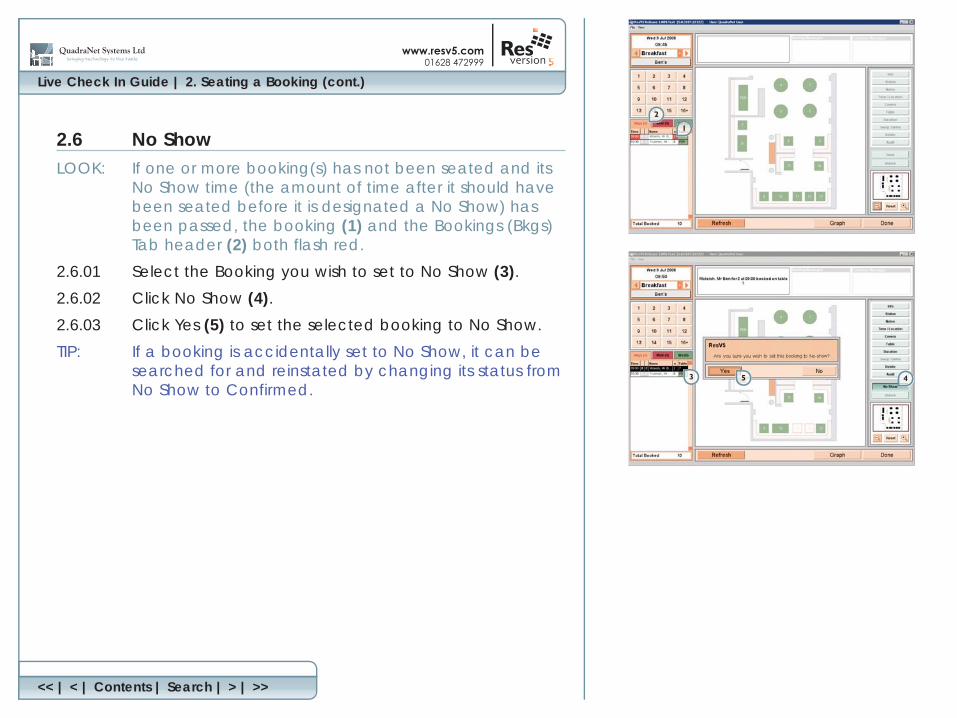
2.6 No ShowLOOK: If one or more booking(s) has not been seated and its
No Show time (the amount of time after it should have been seated before it is designated a No Show) has been passed, the booking (1) and the Bookings (Bkgs) Tab header (2) both flash red.
2.6.01 Select the Booking you wish to set to No Show (3).
2.6.02 Click No Show (4).
2.6.03 Click Yes (5) to set the selected booking to No Show.
TIP: If a booking is accidentally set to No Show, it can be searched for and reinstated by changing its status from No Show to Confirmed.
Live Check In Guide | 2. Seating a Booking (cont.)
<< | < | Contents | Search | > | >>
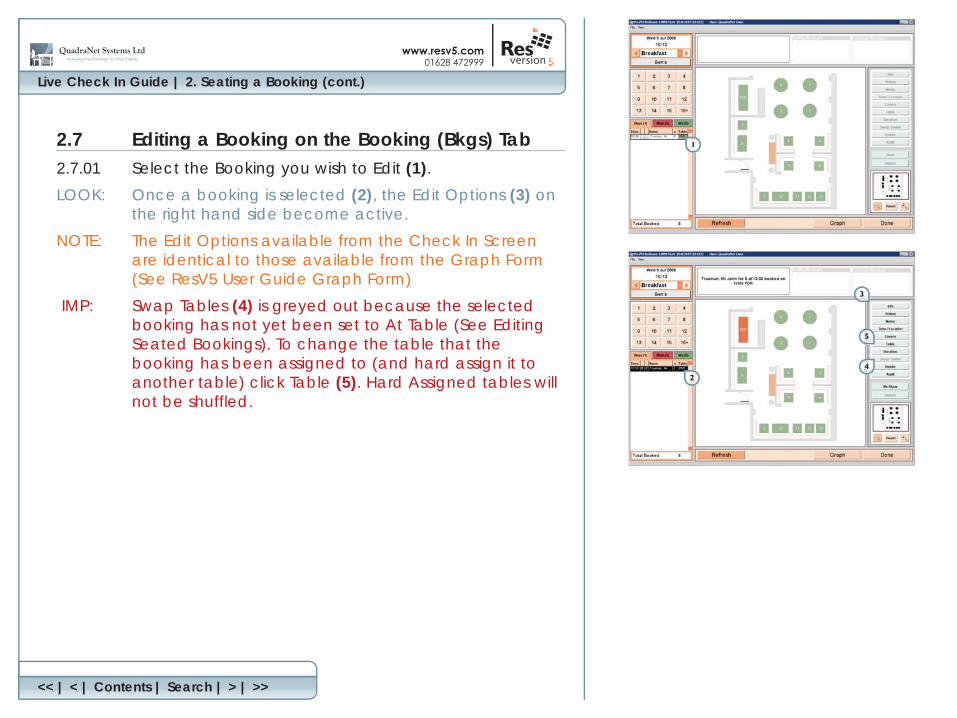
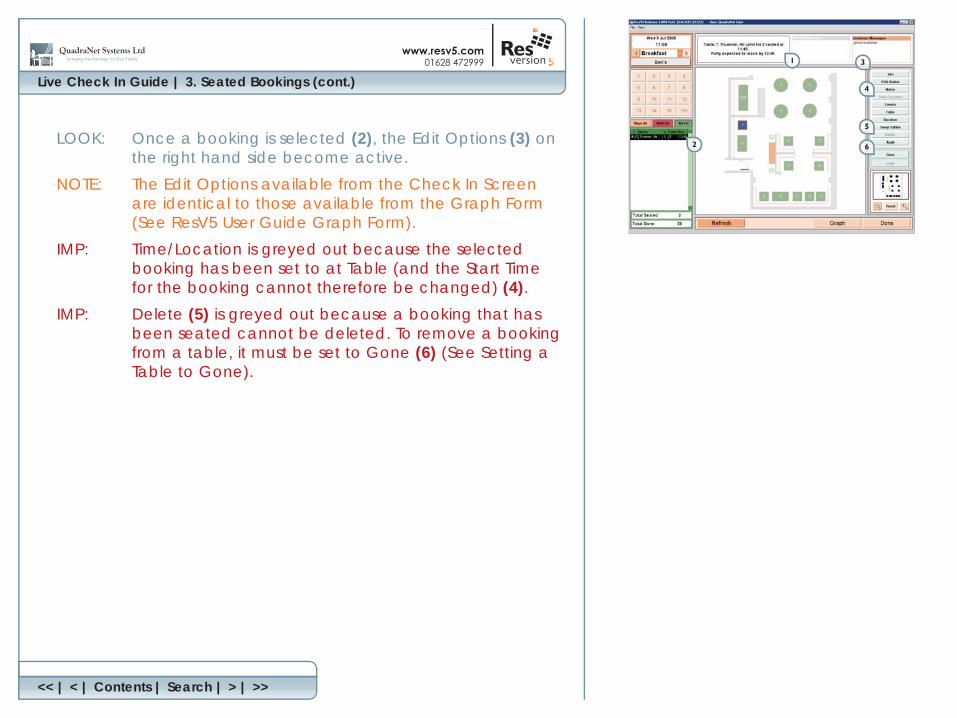
2.7 Editing a Booking on the Booking (Bkgs) Tab2.7.01 Select the Booking you wish to Edit (1).
LOOK: Once a booking is selected (2), the Edit Options (3) on the right hand side become active.
NOTE: The Edit Options available from the Check In Screen are identical to those available from the Graph Form (See ResV5 User Guide Graph Form)
IMP: Swap Tables (4) is greyed out because the selected booking has not yet been set to At Table (See Editing Seated Bookings). To change the table that the booking has been assigned to (and hard assign it to another table) click Table (5). Hard Assigned tables will not be shuffled.
Live Check In Guide | 2. Seating a Booking (cont.)
<< | < | Contents | Search | > | >>
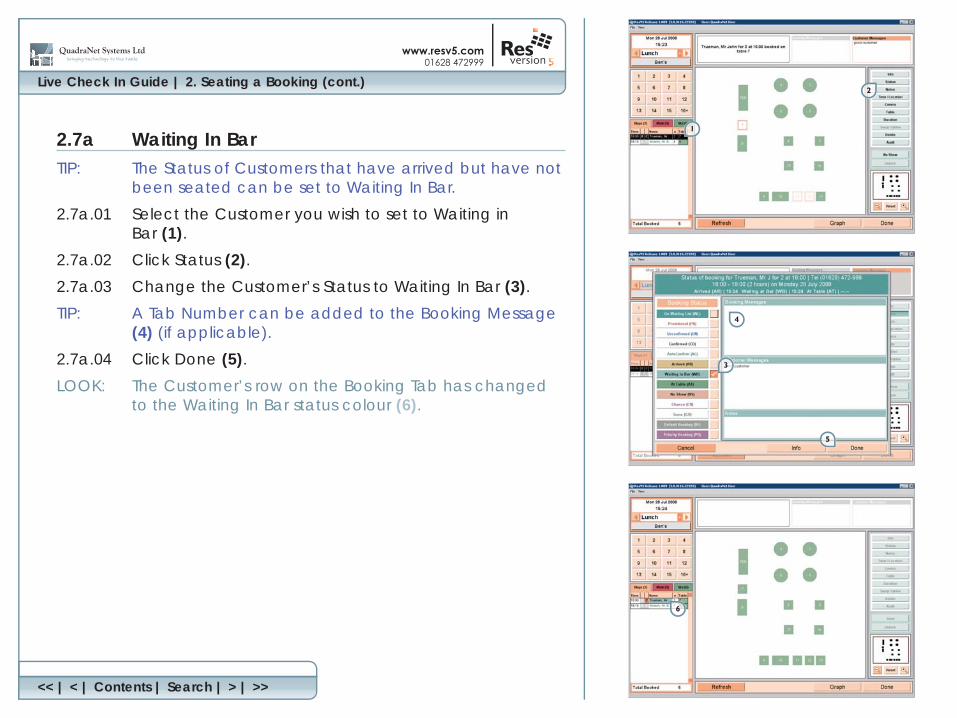
2.7a Waiting In BarTIP: The Status of Customers that have arrived but have not
been seated can be set to Waiting In Bar.
2.7a.01 Select the Customer you wish to set to Waiting in Bar (1).
2.7a.02 Click Status (2).
2.7a.03 Change the Customer’s Status to Waiting In Bar (3).
TIP: A Tab Number can be added to the Booking Message (4) (if applicable).
2.7a.04 Click Done (5).
LOOK: The Customer’s row on the Booking Tab has changed to the Waiting In Bar status colour (6).
Live Check In Guide | 3. Seated Bookings
<< | < | Contents | Search | > | >>
3. Seated Bookings
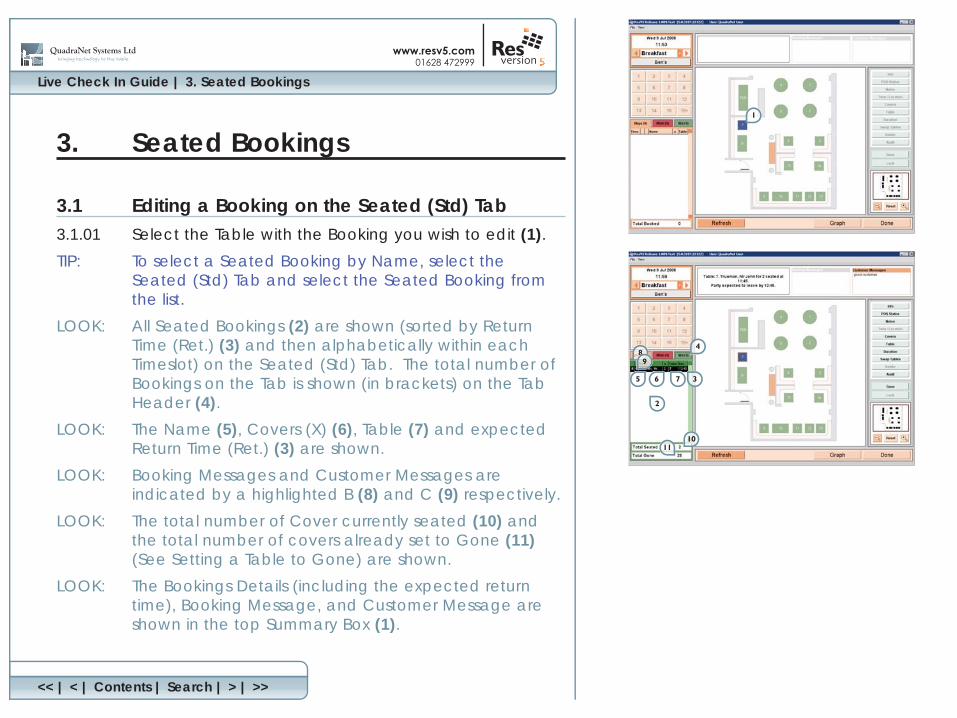
3.1 Editing a Booking on the Seated (Std) Tab3.1.01 Select the Table with the Booking you wish to edit (1).
TIP: To select a Seated Booking by Name, select theSeated (Std) Tab and select the Seated Booking from the list.
LOOK: All Seated Bookings (2) are shown (sorted by Return Time (Ret.) (3) and then alphabetically within eachTimeslot) on the Seated (Std) Tab. The total number of Bookings on the Tab is shown (in brackets) on the Tab Header (4).
LOOK: The Name (5), Covers (X) (6), Table (7) and expected Return Time (Ret.) (3) are shown.
LOOK: Booking Messages and Customer Messages are indicated by a highlighted B (8) and C (9) respectively.
LOOK: The total number of Cover currently seated (10) and the total number of covers already set to Gone (11)(See Setting a Table to Gone) are shown.
LOOK: The Bookings Details (including the expected return time), Booking Message, and Customer Message are shown in the top Summary Box (1).
Live Check In Guide | 3. Seated Bookings (cont.)
<< | < | Contents | Search | > | >>
LOOK: Once a booking is selected (2), the Edit Options (3) on the right hand side become active.
NOTE: The Edit Options available from the Check In Screen are identical to those available from the Graph Form (See ResV5 User Guide Graph Form).
IMP: Time/Location is greyed out because the selected booking has been set to at Table (and the Start Time for the booking cannot therefore be changed) (4).
IMP: Delete (5) is greyed out because a booking that has been seated cannot be deleted. To remove a booking from a table, it must be set to Gone (6) (See Setting a Table to Gone).
Live Check In Guide | 3. Seated Bookings (cont.)
<< | < | Contents | Search | > | >>
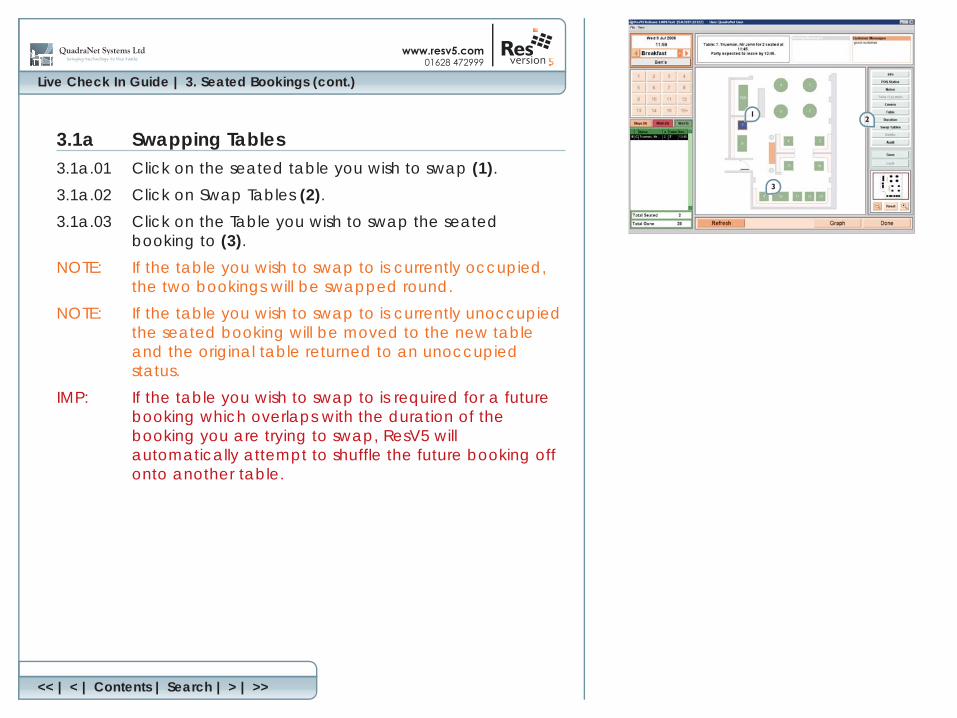
3.1a Swapping Tables3.1a.01 Click on the seated table you wish to swap (1).
3.1a.02 Click on Swap Tables (2).
3.1a.03 Click on the Table you wish to swap the seated booking to (3).
NOTE: If the table you wish to swap to is currently occupied, the two bookings will be swapped round.
NOTE: If the table you wish to swap to is currently unoccupied the seated booking will be moved to the new table and the original table returned to an unoccupied status.
IMP: If the table you wish to swap to is required for a future booking which overlaps with the duration of the booking you are trying to swap, ResV5 will automatically attempt to shuffle the future booking off onto another table.

Live Check In Guide | 3. Seated Bookings (cont.)
<< | < | Contents | Search | > | >>
IMP: If the future booking cannot be shuffled, you will see the Reduce Popup (1) as shown. Clicking Reduce will reduce the duration of the selected booking so that it can be swapped onto the new table without disturbing the future booking. EXAMPLE: The selected Seated Booking (McLeish) cannot be swapped onto the selected Table (Table 10) as it is required for an exclusive hire (Trueman) before the expected Return Time of the selected Seated Booking (McLeish). The selected Seated Booking (McLeish) can only be swapped onto the selected Table (Table 10) if its duration is reduced.
Live Check In Guide | 3. Seated Bookings (cont.)
<< | < | Contents | Search | > | >>
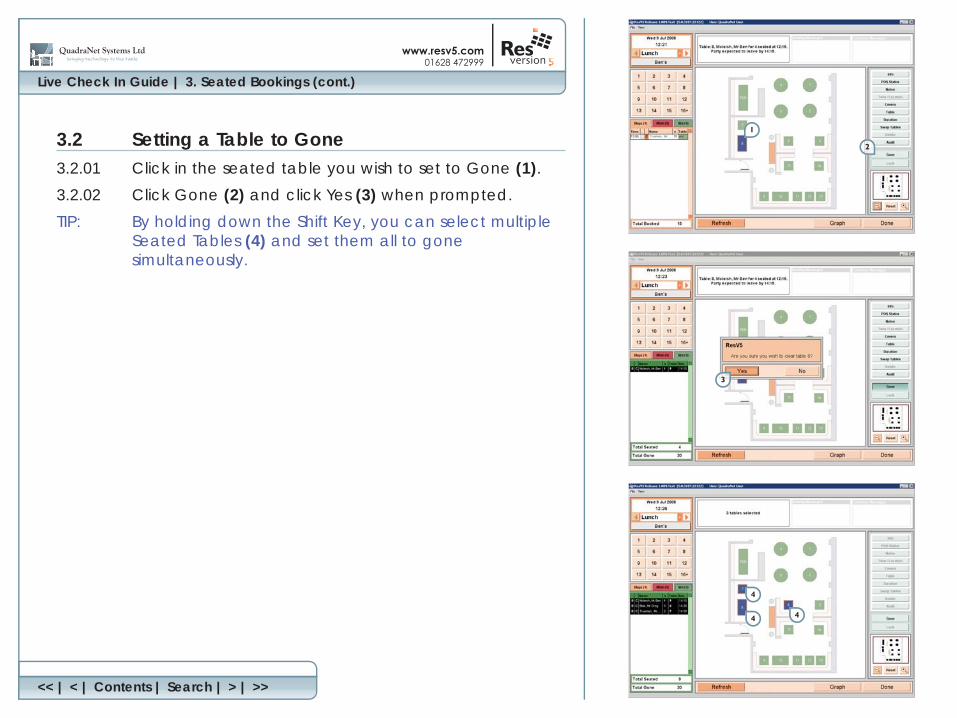
3.2 Setting a Table to Gone3.2.01 Click in the seated table you wish to set to Gone (1).
3.2.02 Click Gone (2) and click Yes (3) when prompted.
TIP: By holding down the Shift Key, you can select multiple Seated Tables (4) and set them all to gone simultaneously.
Live Check In Guide | 4. Walk Ins
<< | < | Contents | Search | > | >>
4. Walk Ins
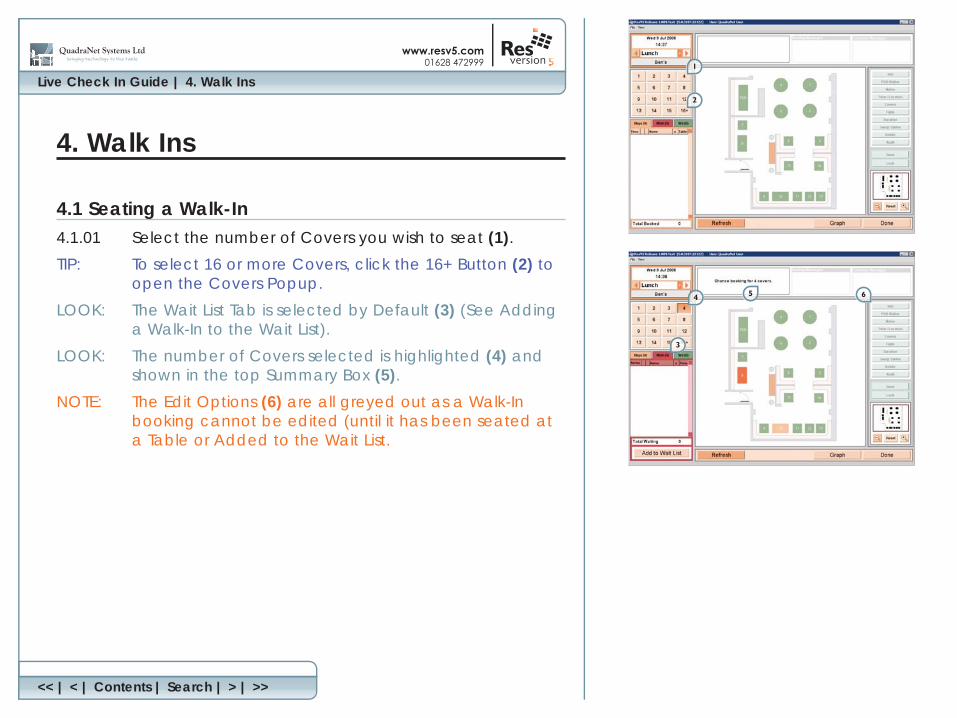
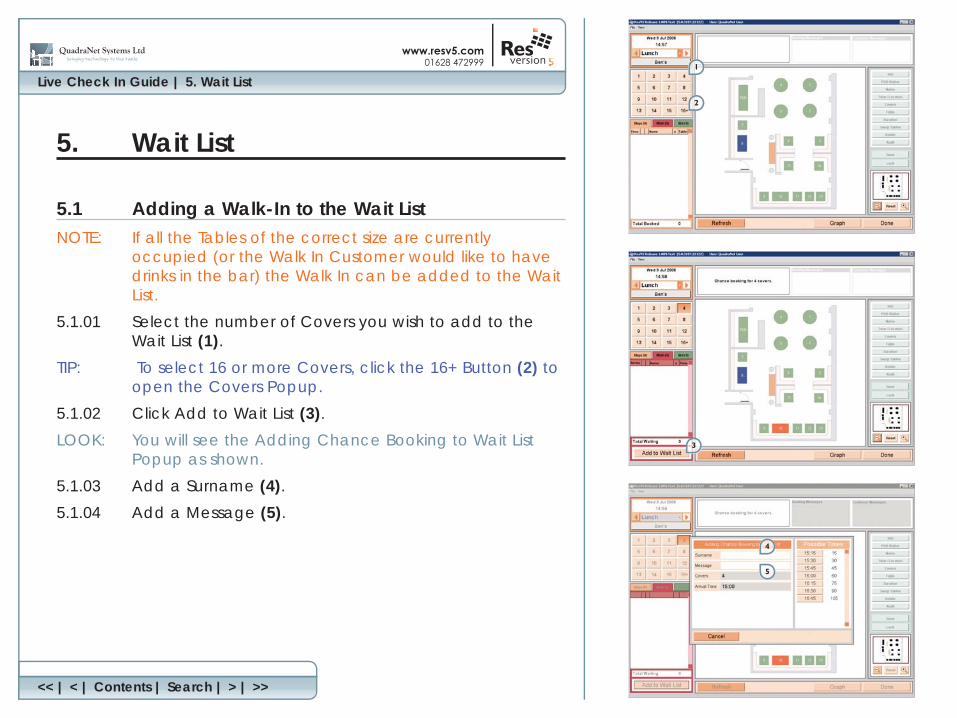
4.1 Seating a Walk-In4.1.01 Select the number of Covers you wish to seat (1).
TIP: To select 16 or more Covers, click the 16+ Button (2) to open the Covers Popup.
LOOK: The Wait List Tab is selected by Default (3) (See Adding a Walk-In to the Wait List).
LOOK: The number of Covers selected is highlighted (4) and shown in the top Summary Box (5).
NOTE: The Edit Options (6) are all greyed out as a Walk-In booking cannot be edited (until it has been seated at a Table or Added to the Wait List.
Live Check In Guide | 4. Walk Ins (cont.)
<< | < | Contents | Search | > | >>
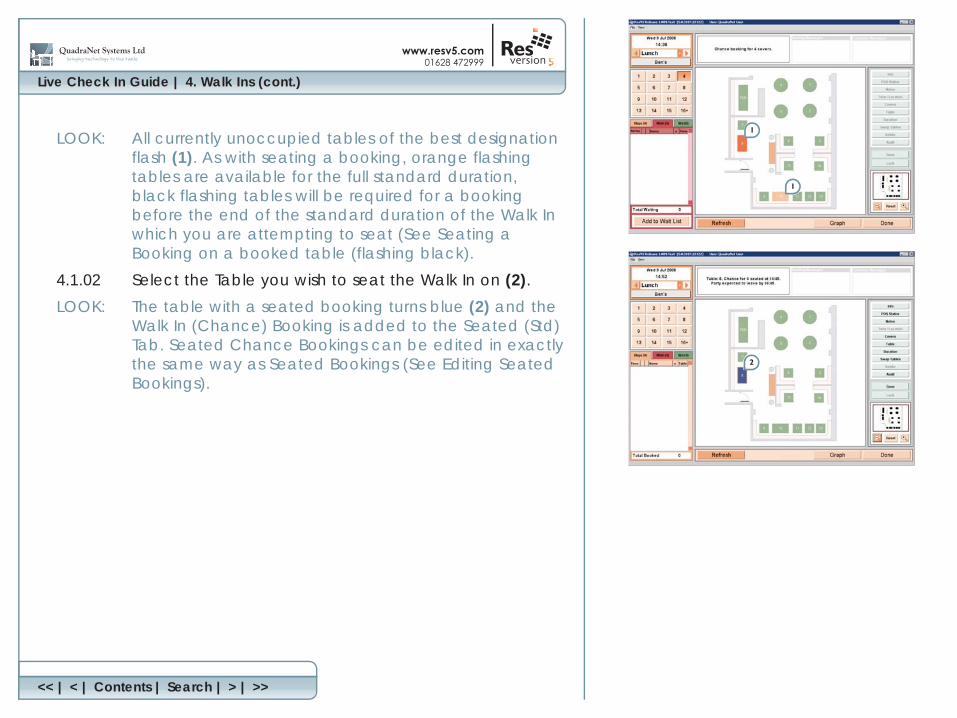
LOOK: All currently unoccupied tables of the best designation flash (1). As with seating a booking, orange flashing tables are available for the full standard duration, black flashing tables will be required for a booking before the end of the standard duration of the Walk In which you are attempting to seat (See Seating a Booking on a booked table (flashing black).
4.1.02 Select the Table you wish to seat the Walk In on (2).
LOOK: The table with a seated booking turns blue (2) and the Walk In (Chance) Booking is added to the Seated (Std) Tab. Seated Chance Bookings can be edited in exactly the same way as Seated Bookings (See Editing Seated Bookings).
Live Check In Guide | 5. Wait List
<< | < | Contents | Search | > | >>
5. Wait List
5.1 Adding a Walk-In to the Wait ListNOTE: If all the Tables of the correct size are currently
occupied (or the Walk In Customer would like to have drinks in the bar) the Walk In can be added to the Wait List.
5.1.01 Select the number of Covers you wish to add to the Wait List (1).
TIP: To select 16 or more Covers, click the 16+ Button (2) to open the Covers Popup.
5.1.02 Click Add to Wait List (3).
LOOK: You will see the Adding Chance Booking to Wait List Popup as shown.
5.1.03 Add a Surname (4).
5.1.04 Add a Message (5).
Live Check In Guide | 5. Wait List (cont.)
<< | < | Contents | Search | > | >>
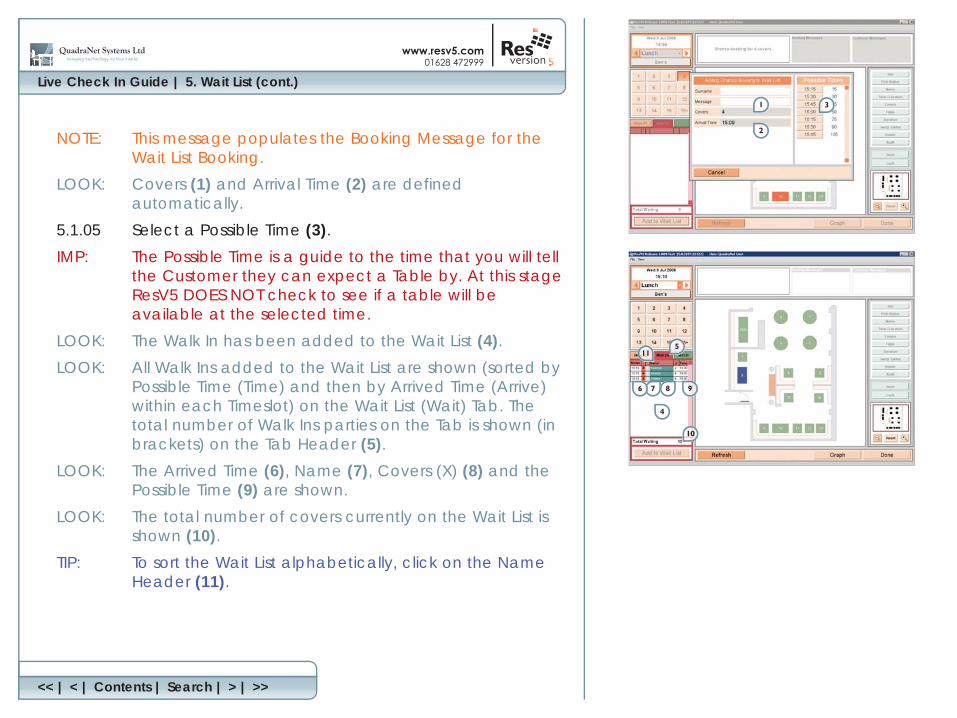
NOTE: This message populates the Booking Message for the Wait List Booking.
LOOK: Covers (1) and Arrival Time (2) are defined automatically.
5.1.05 Select a Possible Time (3).
IMP: The Possible Time is a guide to the time that you will tell the Customer they can expect a Table by. At this stage ResV5 DOES NOT check to see if a table will be available at the selected time.
LOOK: The Walk In has been added to the Wait List (4).
LOOK: All Walk Ins added to the Wait List are shown (sorted by Possible Time (Time) and then by Arrived Time (Arrive) within each Timeslot) on the Wait List (Wait) Tab. The total number of Walk Ins parties on the Tab is shown (in brackets) on the Tab Header (5).
LOOK: The Arrived Time (6), Name (7), Covers (X) (8) and the Possible Time (9) are shown.
LOOK: The total number of covers currently on the Wait List is shown (10).
TIP: To sort the Wait List alphabetically, click on the Name Header (11).

Live Check In Guide | 5. Wait List (cont.)
<< | < | Contents | Search | > | >>
NOTE: Once the first Wait List Booking’s Possible Time has been reached, the Booking (and the Wait List (Wait) Tab Header) will flash red until the booking is either seated or the Possible Time is amended (See Amend Time).
Live Check In Guide | 5. Wait List (cont.)
<< | < | Contents | Search | > | >>
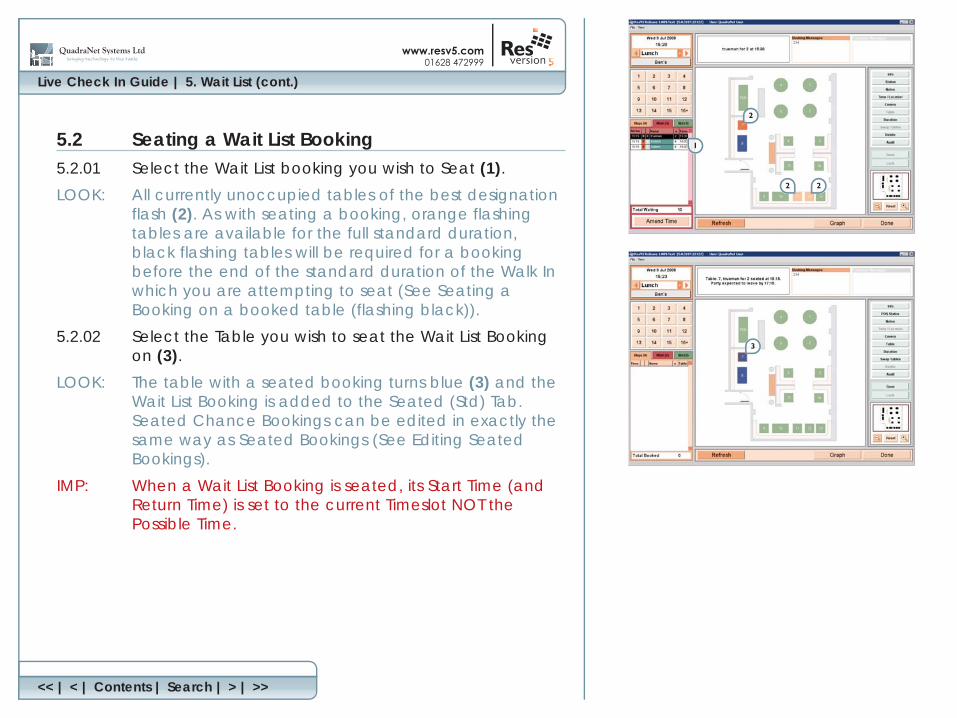
5.2 Seating a Wait List Booking5.2.01 Select the Wait List booking you wish to Seat (1).
LOOK: All currently unoccupied tables of the best designation flash (2). As with seating a booking, orange flashing tables are available for the full standard duration, black flashing tables will be required for a booking before the end of the standard duration of the Walk In which you are attempting to seat (See Seating a Booking on a booked table (flashing black)).
5.2.02 Select the Table you wish to seat the Wait List Booking on (3).
LOOK: The table with a seated booking turns blue (3) and the Wait List Booking is added to the Seated (Std) Tab. Seated Chance Bookings can be edited in exactly the same way as Seated Bookings (See Editing Seated Bookings).
IMP: When a Wait List Booking is seated, its Start Time (and Return Time) is set to the current Timeslot NOT the Possible Time.

Live Check In Guide | 5. Wait List (cont.)
<< | < | Contents | Search | > | >>
5.3 Editing A Wait List Booking5.3.01 Select the wait List Booking you wish to Edit (1).
LOOK: Once a booking is selected (2), the Edit Options (3) on the right hand side become active.
NOTE: The Edit Options available from the Check In Screen are identical to those available from the Graph Form (See ResV5 User Guide Graph Form).
IMP: Swap Tables (4) is greyed out because the selected booking has not yet been set to At Table (See Editing Seated Bookings).
IMP: Table (5) is greyed out because a Wait List Booking cannot have a table assigned to it.
Admin Guide |
<< | < | Contents | Search | > | >>
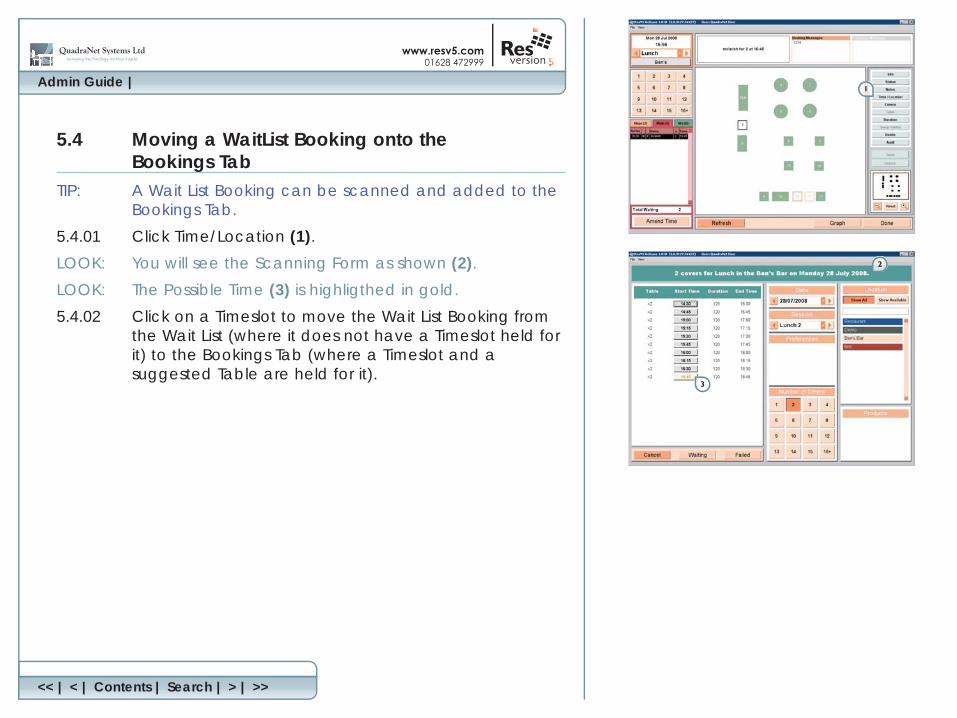
5.4 Moving a WaitList Booking onto the Bookings Tab
TIP: A Wait List Booking can be scanned and added to the Bookings Tab.
5.4.01 Click Time/Location (1).
LOOK: You will see the Scanning Form as shown (2).
LOOK: The Possible Time (3) is highligthed in gold.
5.4.02 Click on a Timeslot to move the Wait List Booking from the Wait List (where it does not have a Timeslot held for it) to the Bookings Tab (where a Timeslot and a suggested Table are held for it).
Live Check In Guide | 6. Locking/Unlocking Tables
<< | < | Contents | Search | > | >>
6. Locking/Unlocking Tables
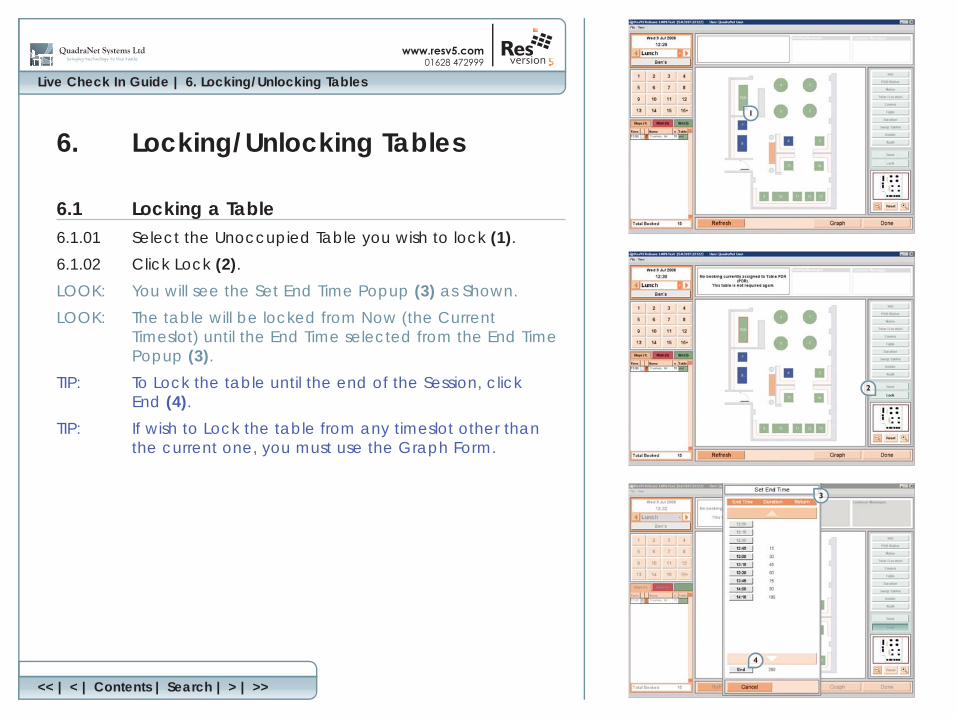
6.1 Locking a Table6.1.01 Select the Unoccupied Table you wish to lock (1).
6.1.02 Click Lock (2).
LOOK: You will see the Set End Time Popup (3) as Shown.
LOOK: The table will be locked from Now (the Current Timeslot) until the End Time selected from the End Time Popup (3).
TIP: To Lock the table until the end of the Session, click End (4).
TIP: If wish to Lock the table from any timeslot other than the current one, you must use the Graph Form.
Live Check In Guide | 6. Locking/Unlocking Tables (cont.)
<< | < | Contents | Search | > | >>
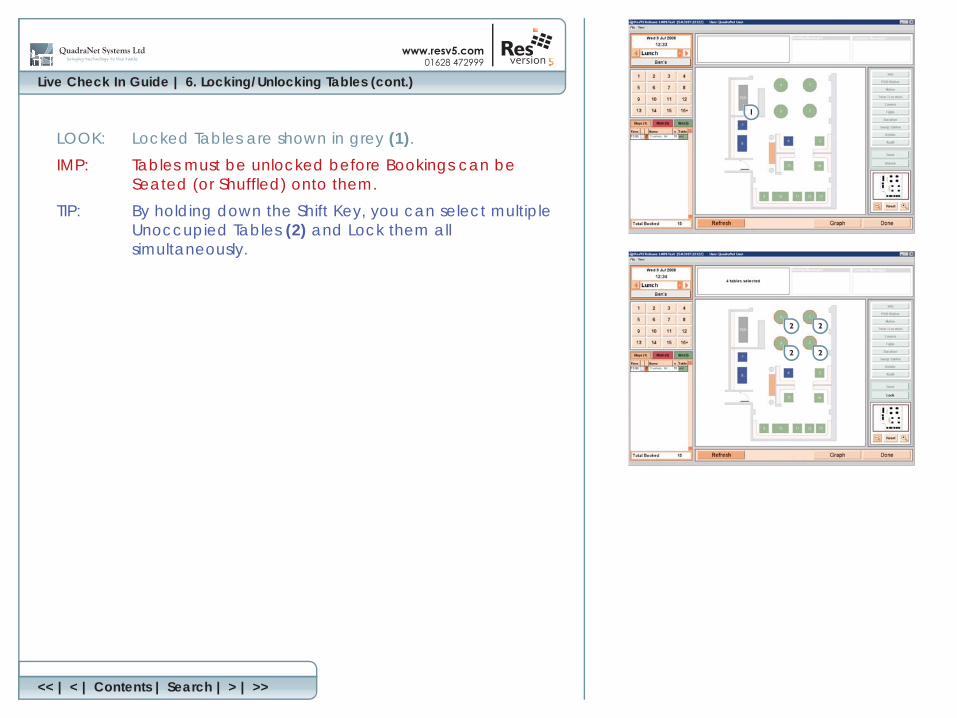
LOOK: Locked Tables are shown in grey (1).
IMP: Tables must be unlocked before Bookings can be Seated (or Shuffled) onto them.
TIP: By holding down the Shift Key, you can select multiple Unoccupied Tables (2) and Lock them all simultaneously.
Live Check In Guide | 6. Locking/Unlocking Tables (cont.)
<< | < | Contents | Search | > | >>
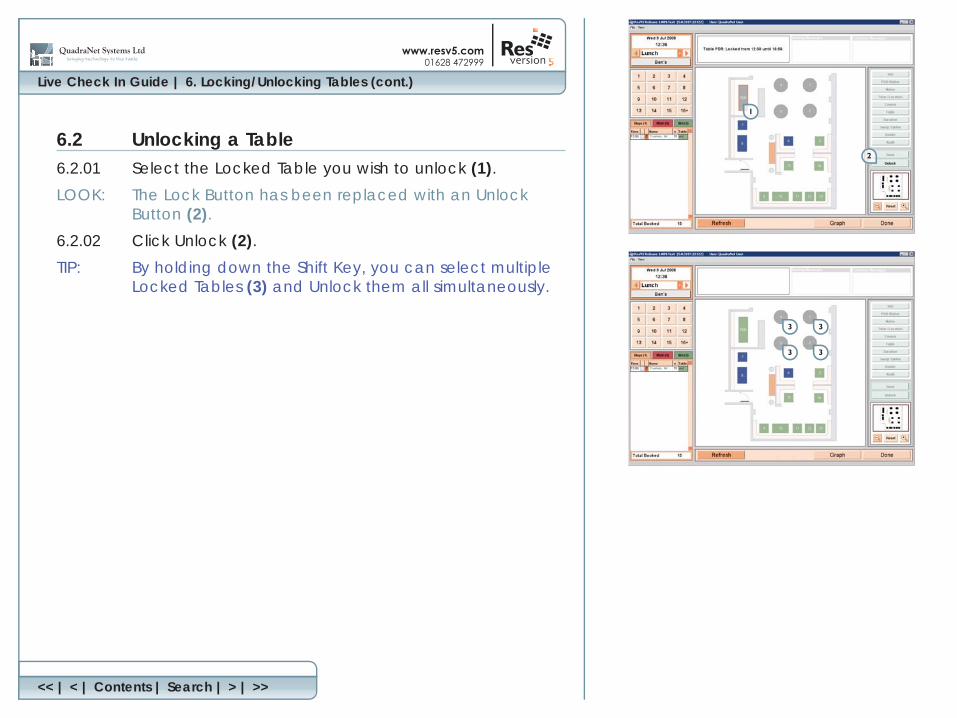
6.2 Unlocking a Table6.2.01 Select the Locked Table you wish to unlock (1).
LOOK: The Lock Button has been replaced with an Unlock Button (2).
6.2.02 Click Unlock (2).
TIP: By holding down the Shift Key, you can select multiple Locked Tables (3) and Unlock them all simultaneously.