Embed Size (px)
Citation preview
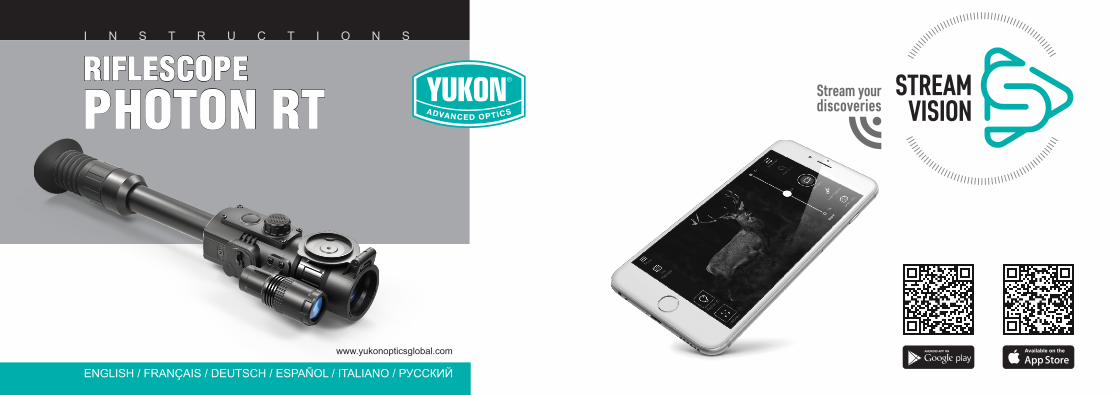

Riflescope Photon RT..................................................................................................................1-26
Viseur Photon RT.........................................................................................................................27-54
Cannocchiale Photon RT.............................................................................................................109-134
Прицел Photon RT......................................................................................................................135-164
ITALIANO
Zielfernrohr Photon RT.................................................................................................................55-82
Visor Photon RT...........................................................................................................................83-108
21
SPECIFICATIONS
Model PhotonOptical characteristicsMagnification, xDigital zoomObjective lens, mmField of view, degreesExit pupil, mmEye relief, mmClose-up range, m
Eyepiece dioptre adjustment, DMax. observation range of an animal 1.7 m high (built-in IR on), m / y Electronic characteristicsSensor type Sensor resolution, pixel Display type / Resolution, pixelBuilt-in IR Illuminator Type / Wavelength, nmOperating range Operational characteristicsTube diameter, mmOperating voltage, V / BatteryExternal power supply, V
, Max. operating time on a set of batteries (at t=22°C) hDegree of protection, IP code (IEC60529)Max. shock resistance, JoulesOperating temperatureDimensions (LxWxH), mm / inchWeight (with / without batteries), kg // ozVideo recorderVideo resolution, pixels
, pixelsPhoto resolutionVideo / Photo formatBuilt-in memoryMemory capacityWi-Fi channelFrequencyStandardLine-of-sight reception range , m
ENGLISHSKU#
* Actual capacity may differ.
PACKAGE CONTENTS
Riflescope Photon RTCarrying case User manual USB cable
DESCRIPTION
Photon RT digital riflescope designed for the use in the twilight and nighttime. The riflescope is s areequipped with an electronic reticle featuring a number of shape and colour options. The riflescopes can be mounted using regular mounting brackets for day sights. The riflescope has a built-in LED IR Illuminator with a wavelength of nm or nm for operation in total darkness. 850 (visible range) 940 (invisible range) Photon RT digital riflescopes are designed for hunting, sports shooting, security, general observation.
2
Spare battery container Battery container pouchLens clothWarranty card
FEATURES
Enhanced night sensitivity Nighttime observation range up to 280 mShock resistant on heavy calibers: cal. 12, 9.3x64, .375H&HSix reticle shapesVariable digital zoomWi-Fi remote review and operation using smartphoneYoutube. Recording and live YouTube streamingOnboard video/sound recordingPossible use of any standard mounts for daylight sights
3
The design and firmware of this product are subject to change for development purposes.The latest edition of this user manual is available at www.yukonopticsglobal.com
RT 4.5х42 S
26391 26392 26393 26394
RT 4.5х42 RT 6х50 S RT 6х50
4.5 / 9x2424.3 (at 4.5x)57010+/-4
200 / 219
CMOS768х576LCD / 640х480
LED / 850visible
303.8-6.3V (4xAA)53.5IPX56000-15 °С...+50 °С / 5 °F... 122 °F 421x100x92 / 16.6x3.9x3.60.87 / 0.75 // 30.7 / 26.5
320x240; 640х480320х240; 640х480; 1280х960avi / jpg8Gb 1Gb / approx. 40 min*
2.4GHz802.11 b/g/n15
4.5 / 9x2424.3 (at 4.5x)57010+/-4
140 / 153
CMOS768х576LCD / 640х480
LED / 940invisible
303.8-6.3V (4xAA)53.5IPX56000
avi / jpg8Gb
2.4GHz802.11 b/g/n15
6 / 12x2503.3 (at 6x)57010+/-4
280 / 306
CMOS768х576LCD / 640х480
LED / 850visible
303.8-6.3V (4xAA)53.5IPX56000-15 °С...+50 °С /5 °F... 122 °F 458x100x92 / 18x3.9x3.60.93 / 0.82 // 32.8x28.9
320x240; 640х480320х240; 640х480; 1280х960avi / jpg8Gb 1Gb / approx. 40 min*
2.4GHz802.11 b/g/n15
6 / 12x2503.3 (at 6x)57010+/-4
180 / 197
CMOS768х576LCD / 640х480
LED / 940invisible
303.8-6.3V (4xAA)53.5IPX56000
avi / jpg8Gb
2.4GHz802.11 b/g/n15
43
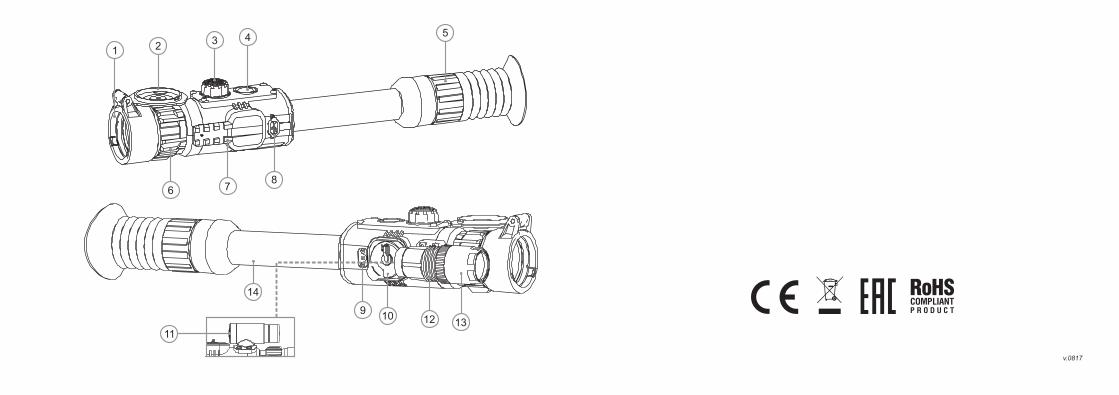
5
6
7
8
1
2
3
4
Objective lens
Lens cover
Controller
Button ON
Dioptre adjustment ring
Lens focusing ring
Side rail Weaver
USB port
Built-in microphone
Battery container
Button REC
Built-in IR Illuminator’s locking ring
Built-in IR Illuminator’s hood
Tube for mounting rings
4
9
10
11
12
13
Quick-release battery containerLightweight and compactEasy operationSuitable for day useWater resistant microUSB portUpdatable featuresCompatible with Stream Vision software
EXTERNAL VIEW AND CONTROLS
14
5
ON
Controller
REC
Riflescope is off
Display Off Mode
Video
Photo
Turns riflescope on
Switches display on
Turns Wi-Fi on
Turns Wi-Fi on
Switches display off
(Display OFF)/
Turns riflescope off
Switch between modes
Brightness, IR Illuminator, Digital Zoom
Switches to Photo mode
Riflescope is on, Video / Photo Turns Wi-Fi on
Review
Enters/Exits the menu
Video
Photo
Review
Starts video recording Stops video recording
Takes a picture Switches to Review mode
Starts photo and videoreview
Pauses photo and videoreview
Switches to Video mode
Rotation
Riflescope is on, Review File deletion prompt Refer to Review mode
description
Turns Wi-Fi off
—
—
Changes
parameter:
Brightness,
IR, Zoom
—
Attention! 10 sec after the IR or digital zoom icons disappear, the controller is blocked and will not allow setup of IR Illuminator and digital zoom. You can set up brightness by rotating the controller. Resume access to the IR Illuminator and digital zoom setup with a short press of the controller. The display shows the icon of the functions adjusted last.
DESCRIPTION OF CONTROLS
Operating mode st1 short press nd2 short press Long pressButton
6BATTERY INSTALLATION
Turn the knob (10) of the battery compartment cover 90° counterclockwise to the Open position and remove the battery container by raising it by its lug (see Fig. on the flyleaf).
Slide in four АА batteries so that the “+” and “-” match the polarity on the container.
Insert the battery container into its place and turn the knob 90° clockwise.
Battery charge level is shown in the status bar.
In case of complete battery discharge, red icon flashes in the status bar .
Warning! Remove the Battery pack from NV device during storage/transportation.
To prevent short circuit, carry the Battery Pack in a supplied pouch.
Note. Using the DNV Pulsar Battery Double Pack (#79176) you can significantly
extend the self-contained operating time of your riflescope.
7
Connect the external power supply to the USB port (8) of the riflescope.
Connect the second plug of the USB port to the Power Bank or PC.
The riflescope switches to operation from external power supply.
If the operates on external power supply, icon is shown. riflescope
Detailed description of powering from Power bank and PC is in section 13.
EXTERNAL POWER SUPPLY
The riflescope can be powered with an external power supply such as Power Bank (5V) or PC.
65
8
To ensure precise shooting, the riflescope should be correctly mounted on a rifle. Please follow these steps.
Install the mounting rings (bought separately) on the riflescope's tube and tighten the screws with the help of a hex-nut wrench. If the eye relief is not sufficient, you can use mount Yukon SW-30 (#29048). Install the riflescope on the rail of your rifle and make sure it is securely fixed. The riflescope should be mounted as low as possible without touching either the barrel or the receiver. Before tightening the mount rings make sure you have the necessary eye relief that allows you to see a full field of view.
WARNING: if the riflescope does not have sufficient eye relief, its rearward motion may injure the shooter when shooting.
MOUNTING RIFLESCOPE ON A RIFLE
Note. Please check that your sight is duly zeroed after changing mounting rings.
9POWERING ON AND IMAGE SETUP
Open the lens cover (2).
Turn the unit on with a short press of the ON (4) button. Within a couple of seconds the display will light up.
To switch the display off, keep pressed the ON button for a second.
The display will go out, message “Display off” will appear.
To switch the display on, press briefly the ON button.
To switch the riflescope off, keep pressed the ON button for three seconds.
Message Display off and countdown from 3 to 1 appear on the screen, then the riflescope turns off.
To obtain a crisp image of the icons and the reticle on the display, rotate the dioptre adjustment ring (5).

87
To focus on the object being observed rotate the lens focusing ring (6).
After this adjustment no further dioptre adjustment should be required, regardless of distance or other
factors. Adjust the image with the lens focusing ring only.
Rotate the controller (3) to adjust display brightness: clockwise – to increase brightness; counterclockwise – to decrease brightness. Brightness adjustment range is from 0 to 20.
In low light conditions or in complete darkness turn on the built-in IR Illuminator. Detailed description of
the IR operation is in section 10.
To focus the IR Illuminator, rotate the IR hood (13).
To activate the digital zoom, press twice and rotate the controller.
To start video recording, press briefly the REC (11) button.
10
The unit is equipped with IR Illuminator a wavelength of 850nm or nm 940 .
You can control the IR Illuminator in the VIDEO and PHOTO modes.
Upon powering on the IR Illuminator always turn on to its lowest power degree - IR1.
Setting IR Illuminator power level:
Press briefly the controller to unblock it - brightness, IR, and magnification icons appear on the
screen:
Press the controller to select icon IR.
BUILT-IN IR ILLUMINATOR
20 4.5xIR1
To change power level (from 1 to 10), rotate the controller.
To turn the IR Illuminator off, rotate the controller to postion “off”. Upon turning the IR off, a crossed out
icon appears .
The power level of the IR Illuminator is not saved in riflescope’s memory.
To focus the IR spot, rotate the IR Illuminator hood (13).
In order to align the IR spot vertically or horizontally, turn the locking ring (12) 5-10 degrees
counterclockwise. Move the IR Illuminator hood (13) to match the spot with the image seen through the
riflescope. Tighten the locking ring (12).
/
* You cannot control the IR Illuminator when operating the unit in REVIEW mode.
Upon activation of REVIEW mode, the IR Illuminator switches off, the power level is saved, and the icon is
not shown on the display. Upon exiting REVIEW mode, the IR Illuminator reverts to the power level
selected before deactivation, with the corresponding icon shown on the display.
11DIGITAL ZOOM FUNCTION
This function allows you to control the unit's ZOOM mode. The display shows the full magnification value
which is the production of the optical and digital magnification. You can use the ZOOM function only in VIDEO and PHOTO modes. To activate the zoom, briefly press twice the controller to select zoom icon (4.5x / 6x). Cycle through the available full magnification options by rotating the controller: 4.5x->9x->4.5x (4.5x models); 6x->12x->6x (6x models). Setting retention. The digital zoom value is retained only during the current session. When the unit is next switched on, the full magnification value reverts to 4.5x / 6x depending on the model.
109
12
This function deactivates the display, which allows you to eliminate light exposure caused by the glowing
display.
You can operate the DISPLAY OFF function in two modes: VIDEO and PHOTO.To turn the display off, press and hold down the ON (4) button for more than a second.The message Display Off appears on the black display. To activate the display, briefly press the ON button.
When the DISPLAY OFF function is activated:
All controls are inactive (except for the ON button).Video recording continues (if video was recording before activating the DISPLAY OFF function).The Wi-Fi function keeps running.
The DISPLAY OFF function deactivates when:
The ON button is briefly pressed.
The unit is connected to a PC via the USB port or to an external portable power supply (in this case the
display should activate and the unit switches to operating mode).
DISPLAY OFF FUNCTION
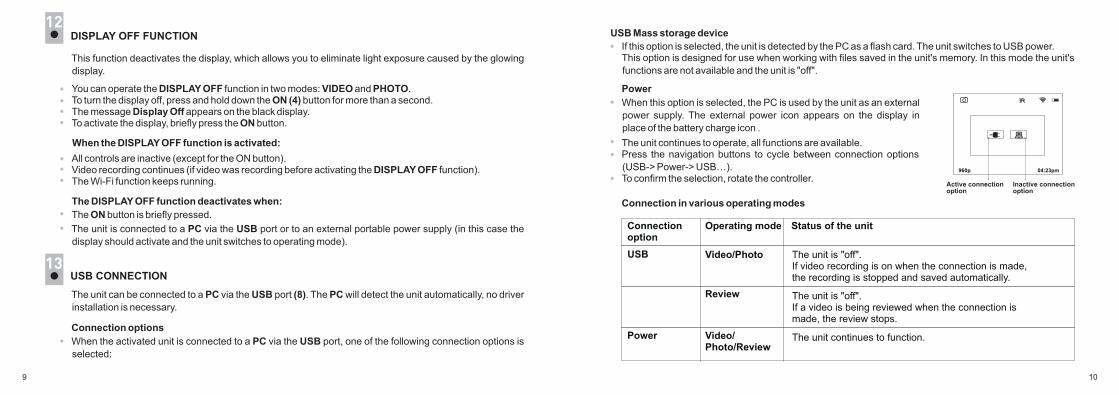
13USB CONNECTION
The unit can be connected to a PC via the USB port (8). The PC will detect the unit automatically, no driver
installation is necessary.
Connection options
When the activated unit is connected to a PC via the USB port, one of the following connection options is
selected:
USB Mass storage device
If this option is selected, the unit is detected by the PC as a flash card. The unit switches to USB power. This option is designed for use when working with files saved in the unit's memory. In this mode the unit's
functions are not available and the unit is "off".
Power
When this option is selected, the PC is used by the unit as an external
power supply. The external power icon appears on the display in
place of the battery charge icon .
The unit continues to operate, all functions are available. Press the navigation buttons to cycle between connection options
(USB-> Power-> USB…).To confirm the selection, rotate the controller.
960p 04:23pm
Active connectionoption
Inactive connection option
Power Video/Photo/Review
The unit continues to function.
Connection in various operating modes
Connection option
Operating mode Status of the unit
USB Video/Photo
Review
The unit is "off".If video recording is on when the connection is made, the recording is stopped and saved automatically.
The unit is "off".If a video is being reviewed when the connection is made, the review stops.
11 12
USB disconnection.
In USB Mass storage device connection mode. On disconnection the unit remains "off". The unit must be switched on to continue operation.
In Power connection mode
Once disconnected from PC, the unit switches off. Once the unit is disconnected from a power bank or AC
power adapter, the unit will automatically switch to internal batteries, provided the batteries are fitted and
have sufficient charge. If the unit is switched off on connection to a PC, the display does not show anything. The unit will not be
detected by the PC until it is switched on (brief press of the ON button).
14OPERATING MODES
Video (video recording)
Photo (image capture)
eviewR (video and image review)
The operating modes are as follows:
When first switched on, the unit is in Video mode. Switch between operating modes by a long press of the
REC (11) button. This enables you to cycle between modes (Video->Photo->Review->Video…)
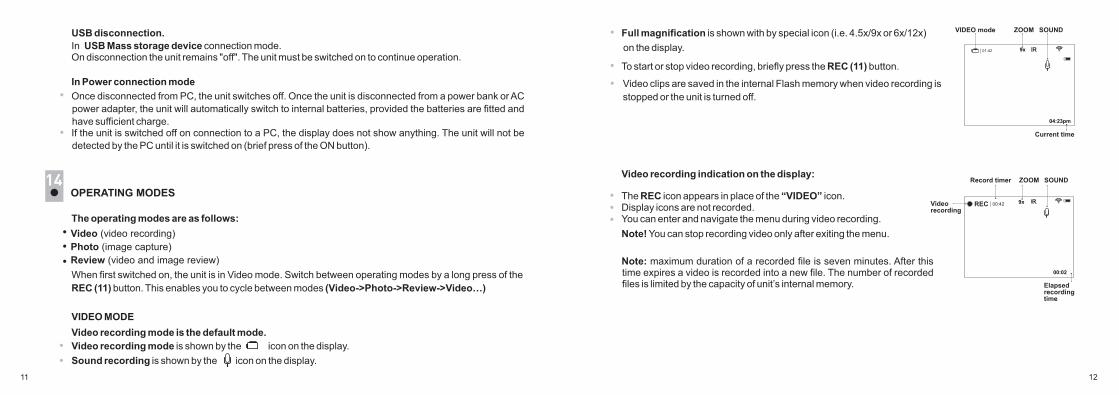
VIDEO MODE
Video recording mode is the default mode.
Video recording mode is shown by the icon on the display.
Sound recording is shown by the icon on the display.
Full magnification is shown with by special icon (i.e. 4.5x/9x or 6x/12x)
on the display.
To start or stop video recording, briefly press the REC (11) button.
Video clips are saved in the internal Flash memory when video recording is
stopped or the unit is turned off.
9x
04:23pm
VIDEO mode SOUNDZOOM
Current time
01:42
Video recording indication on the display:
The REC icon appears in place of the “VIDEO” icon. Display icons are not recorded.You can enter and navigate the menu during video recording.
Note! You can stop recording video only after exiting the menu.
9x
Record timer SOUNDZOOM
Videorecording
REC 00:42
Note: maximum duration of a recorded file is seven minutes. After this time expires a video is recorded into a new file. The number of recorded files is limited by the capacity of unit’s internal memory.
00:02
Elapsed recordingtime
1413
Built-in microphone
Activation of the built-in microphone is shown in the top right
corner of the display.
Image counter*
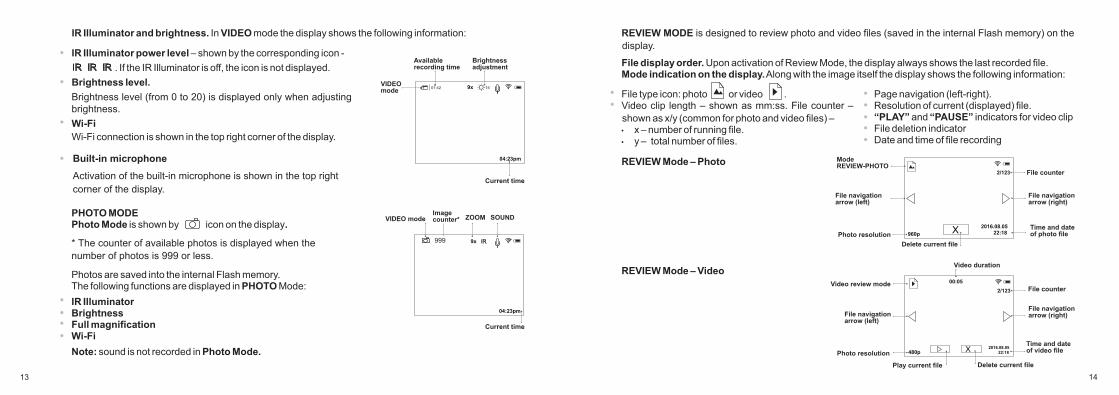
IR Illuminator and brightness. In VIDEO mode the display shows the following information:
04:23pm
Brightness adjustment
Current time
15
IR Illuminator power level – shown by the corresponding icon -
. If the IR Illuminator is off, the icon is not displayed.
Brightness level.
Brightness level (from 0 to 20) is displayed only when adjusting brightness.
Wi-Fi
Wi-Fi connection is shown in the top right corner of the display.
9xVIDEOmode
01:42
Availablerecording time
PHOTO MODE Photo Mode is shown by icon on the display.
9x
VIDEO mode SOUNDZOOM
999
Photos are saved into the internal Flash memory.The following functions are displayed in PHOTO Mode:
IR IlluminatorBrightnessFull magnificationWi-Fi
04:23pm
Note: sound is not recorded in Photo Mode.
Current time
* The counter of available photos is displayed when the
number of photos is 999 or less.
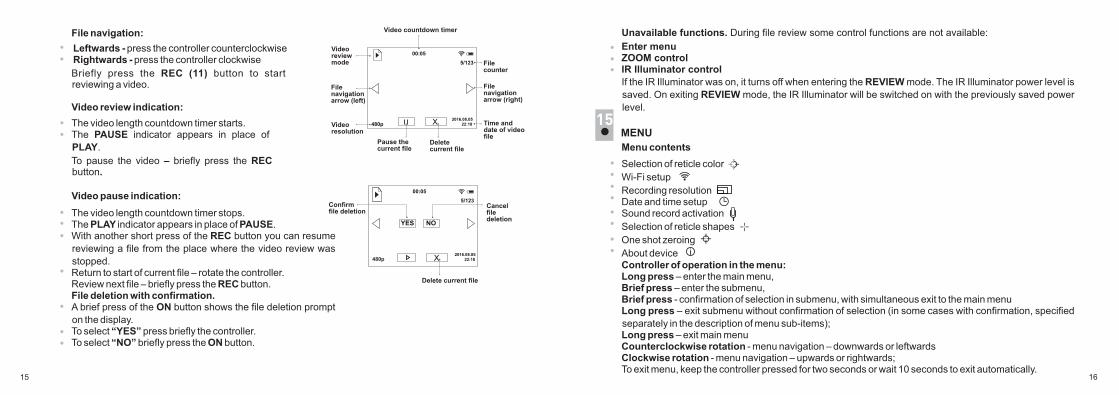
REVIEW MODE is designed to review photo and video files (saved in the internal Flash memory) on the
display.
File display order. Upon activation of Review Mode, the display always shows the last recorded file. Mode indication on the display. Along with the image itself the display shows the following information:
File type icon: photo or video .Video clip length – shown as mm:ss. File counter –
shown as x/y (common for photo and video files) – x – number of running file. y – total number of files.
REVIEW Mode – Photo
960p
Delete current file
Photo resolution
File navigationarrow (left)
ModeREVIEW-PHOTO
2/123
Time and dateof photo file
File counter
File navigationarrow (right)
22:182016.08.05
Page navigation (left-right).Resolution of current (displayed) file. “PLAY” and “PAUSE” indicators for video clipFile deletion indicatorDate and time of file recording
REVIEW Mode – Video
480p
Play current file Delete current file
File navigation arrow (left)
00:05
Video duration
Video review mode
Photo resolutionХ
2/123
File navigation arrow (right)
Time and dateof video file
File counter
22:182016.08.05
1615
Cancel file deletion
File counter
Time and date of video file
File navigationarrow (right)
Briefly press the REC (11) button to start reviewing a video.
Video review indication:
The video length countdown timer starts. The PAUSE indicator appears in place of
PLAY.
To pause the video – briefly press the REC button.
Video pause indication:
The video length countdown timer stops.The PLAY indicator appears in place of PAUSE. With another short press of the REC button you can resume
reviewing a file from the place where the video review was
stopped. Return to start of current file – rotate the controller.Review next file – briefly press the REC button. File deletion with confirmation. A brief press of the ON button shows the file deletion prompt
on the display. To select “YES” press briefly the controller. To select “NO” briefly press the ON button.
5/123
480p
Pause the current file
00:05
Video countdown timer
5/123Confirmfile deletion
00:05
Video review mode
Video resolution
Delete current file
File navigationarrow (left)
Х 22:182016.08.05
File navigation:
Leftwards - press the controller counterclockwise Rightwards - press the controller clockwise
Delete current file
480p
YES NO
Х 22:182016.08.05
Enter menuZOOM controlIR Illuminator control
If the IR Illuminator was on, it turns off when entering the REVIEW mode. The IR Illuminator power level is
saved. On exiting REVIEW mode, the IR Illuminator will be switched on with the previously saved power
level.
Unavailable functions. During file review some control functions are not available:
15
Controller of operation in the menu: Long press – enter the main menu,Brief press – enter the submenu,Brief press - confirmation of selection in submenu, with simultaneous exit to the main menuLong press – exit submenu without confirmation of selection (in some cases with confirmation, specified
separately in the description of menu sub-items);Long press – exit main menuCounterclockwise rotation - menu navigation – downwards or leftwardsClockwise rotation - menu navigation – upwards or rightwards;To exit menu, keep the controller pressed for two seconds or wait 10 seconds to exit automatically.
Menu contents
MENU
Selection of reticle color
Wi-Fi setup
Recording resolution Date and time setupSound record activation
Selection of reticle shapes
One shot zeroing
About device i
1817
Stream Vision TechnologyWith the help of Stream Vision technology you can stream images from the display of your Photon RT unit via Wi-Fi to a smartphone or PC tablet. You can find further guidelines on Stream Vision
on our web site www.yukonopticsglobal.comNote. When transmitting image to the display of a mobile device via Stream Vision, The display shows only one shape reticle. Available reticle colors are black or white.Menu icons are not shown on the display and are not recorded.
Setting Wi-Fi access levels
This option allows you to set required access level of the Stream Vision application to your device.
Access level Owner . Stream Vision user has the complete access to all device’s functions.
Access level Guest . Stream Vision user has the access only to the video stream from the device.
Wi-Fi Setup
This menu item allows you to set a password for the access point. This password is used to connect an
external device (such as a smartphone, for example) to your unit.
Enter the submenu with a short press of the controller (3).
A password appears on the display – by default “12345”.
Rotate the controller to set your desired password (clockwise to increase the value; counterclockwise to decrease the value). To switch between digits,
briefly press the controller.
To save the password and exit the submenu hold down the controller for longer than one second.
Wi-Fi operation is shown by an icon on the display:
Wi-Fi icon glows – Wi-Fi is on;Wi-Fi icon blinks – connection is established.
Selection of recording resolution This menu item allows you to select the resolution of a video recording or photo shot, depending on the
active mode.
Video Mode. Available resolution options for video recording (pixels):320x240; 640x480
Photo Mode. Available resolution options for photo capture (pixels):
320x240; 640x480; 1280x960
To enter the submenu, press briefly the controller (3).To select resolution, rotate the controller. Confirm your choice with a brief press of the controller.
The selected resolution is shown on the display as follows:240p (for 320x240); 480p (for 640x480); 960p (for 1280x960)Resolution is displayed only in the REVIEW mode. The selected value is saved. When the unit is next switched on, the display will show the last saved value.
Once the riflescope is on, turn Wi-Fi on with a short press of the ON (4) button.
Enter the menu with a long press of the controller (3).
Rotate the controller to select option . Press the controller to confirm.
Selection of reticle color
Enter the main menu with a long press of the controller.
Enter the submenu “Reticle color” rotating the controller.
Rotate the controller to select the required reticle colour (black (B), white (W), red (R) or green (G)). Press the controller to confirm your choice. Confirm you selection with a short press of the controller.To exit menu, keep the controller pressed for two seconds or wait 10 seconds to exit automatically.
2019
Time setup
Enter the submenu with a brief press of the controller.Time format is displayed as: “format mm/hh” (24 06:51)Rotate the controller to select the required time format - 24/AM/PM. To set the hour value, briefly press the
controller . Rotate the controller to select the hour value (clockwise to increase the value; counterclockwise to
decrease the value).To set the minute value, briefly press the controller.Rotate the controller to select the minute value (clockwise to increase the value; counterclockwise to
decrease the value).To save the time settings and to exit the submenu, press and hold down the controller for more than one
second. Current time in the format selected is shown on the display.The set value is saved. When the unit is next switched on, the display shows the last saved value.
Sound record activation
This menu option allows you to activate/deactivate sound recording only during video recording.
Enter the submenu with a short press of the controller.Use the navigation buttons to select one of the options:
Yes – to activate sound recording.No – to deactivate sound recording.
Confirm your selection with a short press of the controller.When activating sound recording, the icon appears on the display. Icon is shown when sound is
deactivated.The sound record icon is shown on the display in the VIDEO and PHOTO modes. The set value is saved. When the unit is next switched on, the display shows the last saved value.
Selection of reticle shapes
Enter the main menu with a long press of the controller.
Enter the submenu “Reticle type” rotating the controller.
Select the desired reticle shape out of the list of 6 reticles rotating the controller.
The reticle types change as the cursor goes down the reticle list.
Confirm you selection with a short press of the controller.
When changing the digital zoom, the reticle does not change.
To exit menu, keep the controller pressed for two seconds or wait 10 seconds to exit automatically.
The list of available reticles can be found at www.yukonopticsglobal.com
The riflescope features “one shot” zeroing method. Zeroing should be done at operating temperatures,
by following the order of these steps:
Mount the rifle with the sight installed on a bench rest.
Set a target at a distance of about 100m.
Adjust the riflescope according to the instructions of section “OPERATION”.
One shot zeroing
Date and time setup
This menu option allows you to set the current date and time, and time format.
Date setup
Enter the submenu with a brief press of controller.Date format is displayed as: yyyy/mm/dd (2017/06/12)Rotate the controller to select desired value (clockwise to increase the value; counterclockwise to
decrease the value). To move from one digit to another briefly press the controller. To save the date and go to time setup, press and hold down the controller for more than one second.
2221
Using live ammunition, take a shot, continually aiming at the same hit point on the target.
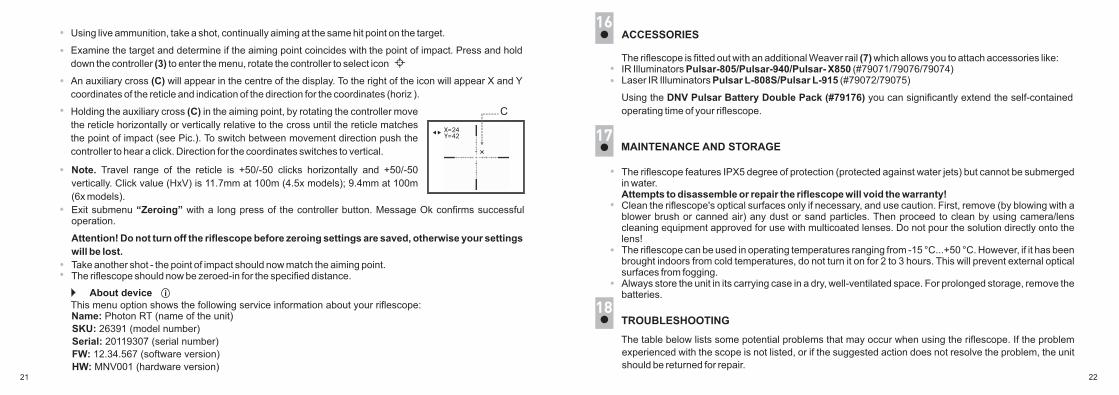
E the . Press and hold xamine the target and determine if the aiming point coincides with point of impact
down (3) , rotate the controller to select iconthe controller to enter the menu
An auxiliary cross (С) will appear in the centre of the display. To the right of the icon will appear X and Y
coordinates of the reticle and indication of the direction for the coordinates (horiz ).
Holding the auxiliary cross (С) in the aiming point, by rotating the controller move
the reticle horizontally or vertically relative to the cross until the reticle matches
the point of impact (see Pic.). To switch between movement direction push the
controller to hear a click. Direction for the coordinates switches to vertical.
Note. Travel range of the reticle is +50/-50 clicks horizontally and +50/-50
vertically. Click value (HxV) is 11.7mm at 100m (4.5x models); 9.4mm at 100m
(6x models).
Exit submenu “Zeroing” with a long press of the controller button. Message Ok confirms successful operation.
Attention! Do not turn off the riflescope before zeroing settings are saved, otherwise your settings
will be lost.
Take another shot - the point of impact should now match the aiming point. The riflescope should now be zeroed-in for the specified distance.
Name: (name of the unit)Photon RT
SKU: 9 (model number)263 1
Serial: 20119307 (serial number)
FW: 12.34.567 (software version)
HW: MNV001 (hardware version)
About deviceThis menu option shows the following service information about your riflescope:
i
C
16ACCESSORIES
The riflescope is fitted out with an additional Weaver rail (7) which allows you to attach accessories like:IR Illuminators Pulsar-805/Pulsar-940/Pulsar- X850 (#79071/79076/79074)Laser IR Illuminators Pulsar L-808S/Pulsar L-915 (#79072/79075)
Using the DNV Pulsar Battery Double Pack (#79176) you can significantly extend the self-contained
operating time of your riflescope.
The riflescope features IPX5 degree of protection (protected against water jets) but cannot be submerged in water. Attempts to disassemble or repair the riflescope will void the warranty!Clean the riflescope's optical surfaces only if necessary, and use caution. First, remove (by blowing with a blower brush or canned air) any dust or sand particles. Then proceed to clean by using camera/lens cleaning equipment approved for use with multicoated lenses. Do not pour the solution directly onto the lens!The riflescope can be used in operating temperatures ranging from -15 °C...+50 °C. However, if it has been brought indoors from cold temperatures, do not turn it on for 2 to 3 hours. This will prevent external optical surfaces from fogging.Always store the unit in its carrying case in a dry, well-ventilated space. For prolonged storage, remove the batteries.
17MAINTENANCE AND STORAGE
TROUBLESHOOTING
The table below lists some potential problems that may occur when using the riflescope. If the problem
experienced with the scope is not listed, or if the suggested action does not resolve the problem, the unit
should be returned for repair.
18
2423
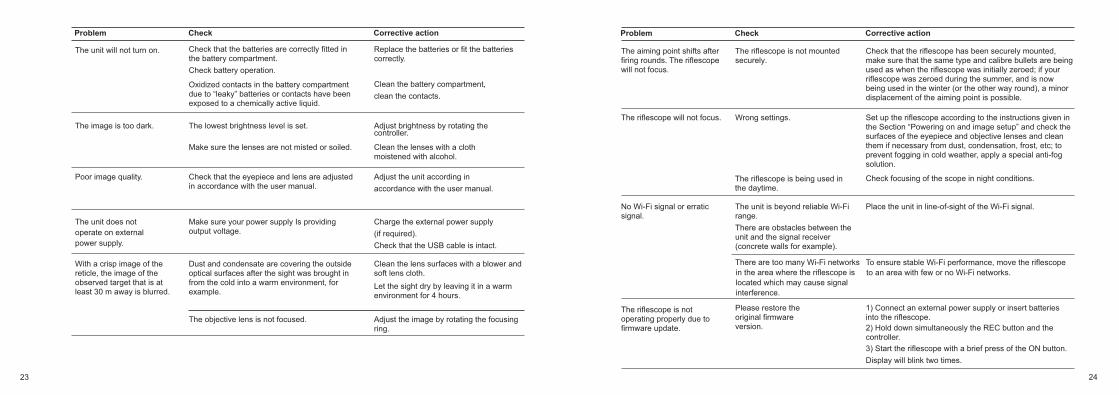
The unit will not turn on. Check that the batteries are correctly fitted in the battery compartment.
Check battery operation.
Oxidized contacts in the battery compartment due to “leaky” batteries or contacts have been exposed to a chemically active liquid.
Replace the batteries or fit the batteries correctly.
Check Corrective actionProblem
Clean the battery compartment,
clean the contacts.
Poor image quality. Check that the eyepiece and lens are adjusted in accordance with the user manual.
Adjust the unit according in
accordance with the user manual.
Adjust brightness by rotating the controller.
The lowest brightness level is set.The image is too dark.
Make sure the lenses are not misted or soiled. Clean the lenses with a cloth moistened with alcohol.
The unit does not
operate on external
power supply.
Make sure your power supply Is providing output voltage.
Charge the external power supply
(if required).
Check that the USB cable is intact.
Clean the lens surfaces with a blower and soft lens cloth.
Let the sight dry by leaving it in a warm environment for 4 hours.
Adjust the image by rotating the focusing ring.
Dust and condensate are covering the outside optical surfaces after the sight was brought in from the cold into a warm environment, for example.
The objective lens is not focused.
With a crisp image of the reticle, the image of the observed target that is at least 30 m away is blurred.
No Wi-Fi signal or erratic signal.
The unit is beyond reliable Wi-Fi range.
There are obstacles between the unit and the signal receiver (concrete walls for example).
Place the unit in line-of-sight of the Wi-Fi signal.
Check that the has been securely mounted, riflescopemake sure that the same type and calibre bullets are being used as when the was initially zeroed; if your riflescoperiflescope was zeroed during the summer, and is now being used in the winter (or the other way round), a minordisplacement of the aiming point is possible.
The is not mounted riflescopesecurely.
The aiming point shifts after firing rounds. The riflescope will not focus.
Set up the riflescope according to the instructions given in the Section “Powering on and image setup” and check the surfaces of the eyepiece and objective lenses and clean them if necessary from dust, condensation, frost, etc; to prevent fogging in cold weather, apply a special anti-fog solution.
Check focusing of the scope in night conditions.
Wrong settings.The riflescope will not focus.
Check Corrective actionProblem
There are too many Wi-Fi networks
in the area where the riflescope is
located which may cause signal
interference.
To ensure stable Wi-Fi performance, move the riflescope
to an area with few or no Wi-Fi networks.
The riflescope is not operating properly due to firmware update.
Please restore the original firmware version.
1) Connect an external power supply or insert batteries into the riflescope.
2) Hold down simultaneously the REC button and the controller.
3) Start the riflescope with a brief press of the ON button.
Display will blink two times.
The riflescope is being used in the daytime.
2625
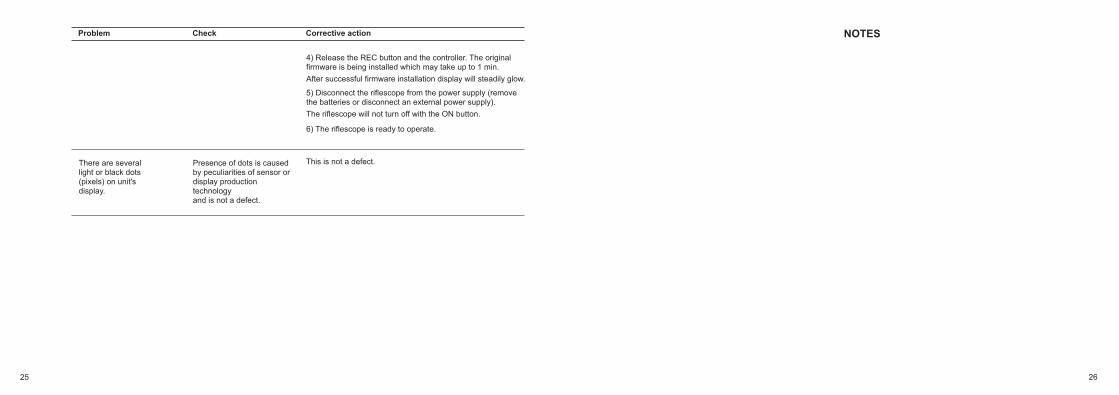
4) Release the REC button and the controller. The original firmware is being installed which may take up to 1 min.
After successful firmware installation display will steadily glow.
5) Disconnect the riflescope from the power supply (remove the batteries or disconnect an external power supply).
The riflescope will not turn off with the ON button.
6) The riflescope is ready to operate.
There are several light or black dots (pixels) on unit's display.
Presence of dots is caused by peculiarities of sensor or display production technology and is not a defect.
This is not a defect.
Check Corrective actionProblem NOTES