Embed Size (px)
Citation preview
Roblox Creator Challenge Learn how to design a multiplayer map for a game in which players stomp down cities
for points. Creating this map is great practice if you want to learn how to build battle
royales or other combat games down the road.
Download Roblox Studio To complete the Creator Challenge, you’ll need Roblox Studio, which is used to create
every game on the Roblox platform and is available free for PC and Mac. We strongly
recommend using a 3-button mouse with a scroll-wheel for navigating in 3D space.
1. Go to the Create page and click the Start Creating button to download Studio.
2. After installing, double-click the desktop icon (Windows) or click the dock icon
(Mac).
3. On the login screen, enter your Roblox username and password, then click Log
In.
Creating a New Account

If you’re completely new to Roblox, sign up and remember these safety tips:
● Never share your password, even with a real life friend.
● Make your password hard to guess — If your username is
“bloxcool,” your password should not be “bloxcool123.”
● Roblox employees will never ask for your password— Report
anyone who asks using the Report Abuse feature.
● There’s no such thing as free Robux — Never trust players or sites
who say they have a secret way to get free Robux!
For more tips, please see Keeping Your Account Safe.
Three Lessons, Three Prizes To build the map, follow along with each of these step-by-step tutorials.
Lesson 1
Getting Started
Lesson 2
Building and Testing
Lesson 3
Polishing and Publishing
After each lesson, you’ll get the chance to earn virtual prizes by playing a quiz game on
Roblox.
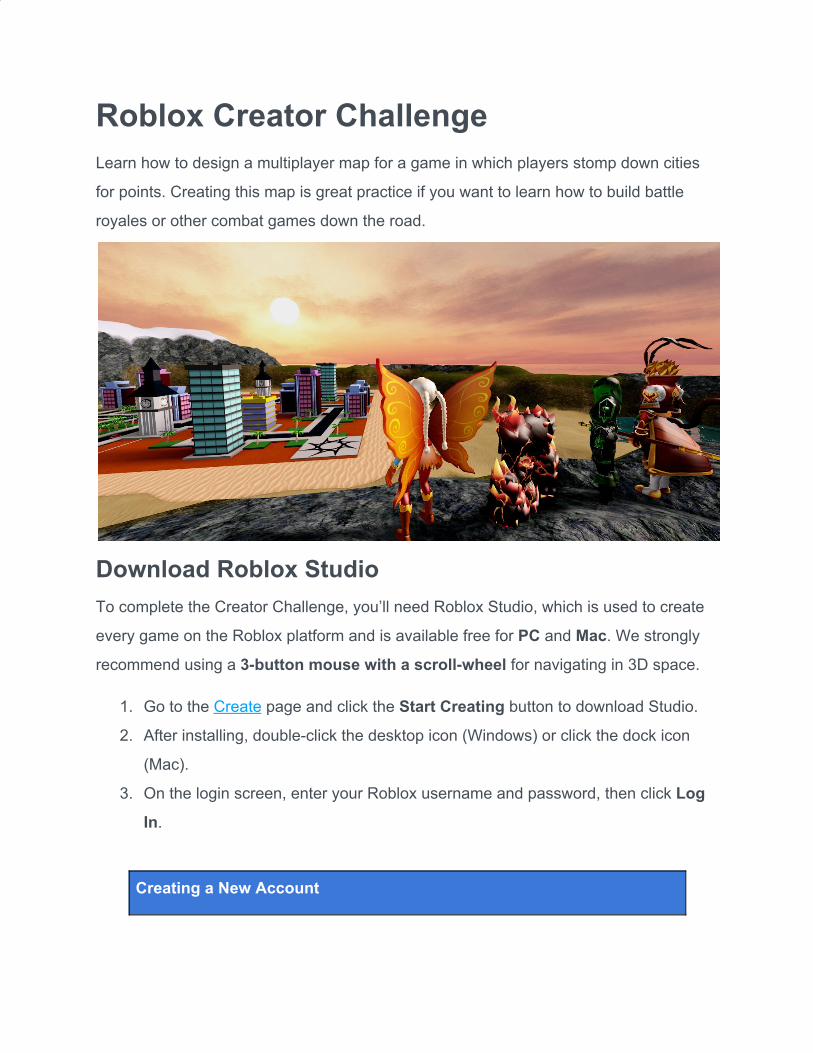
Designing a Balanced Map Most popular games are made by teams of people with different skills working together.
One role on teams is the world builder, sometimes also called the level designer.
World builders shape the game environment. In competitive games, they make sure
maps are balanced and fair for all players.
For this challenge, you’ll become a world builder and turn a blank starter map into a city
ripe for smashing for four players.
Starter Map Finished Map
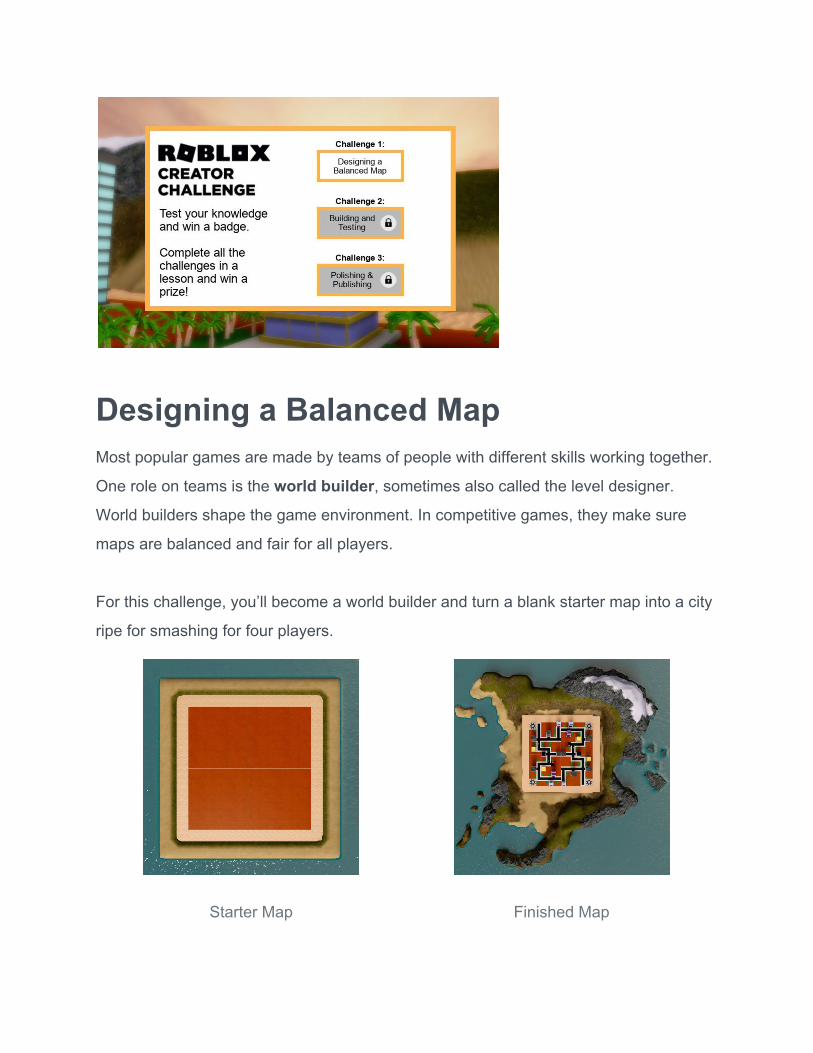
Symmetrical Map Design One way world builders design multiplayer maps to be fair is by building half the map,
and then duplicating and rotating it to create the second half. This is called symmetrical
design since it divides the map into two equal halves.
Asymmetrical Map Design
As you gain more experience, you can start working with non-symmetrical
map shapes and maps designed for dozens of players.
Open the Template Time to open Roblox Studio! If you need to, download Studio and come back to this
page when you’re ready. This game will be using the Create and Destroy template.
1. Open Roblox Studio.
2. Click the Create and Destroy template to open it.
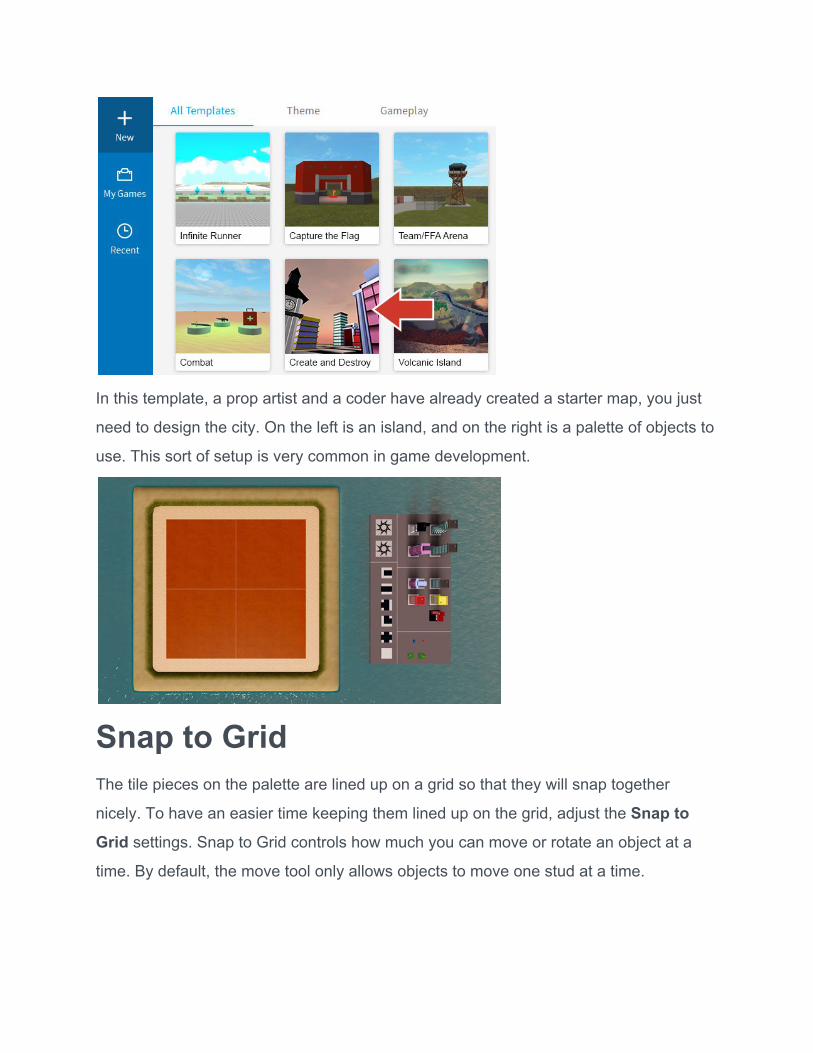
In this template, a prop artist and a coder have already created a starter map, you just
need to design the city. On the left is an island, and on the right is a palette of objects to
use. This sort of setup is very common in game development.
Snap to Grid The tile pieces on the palette are lined up on a grid so that they will snap together
nicely. To have an easier time keeping them lined up on the grid, adjust the Snap to
Grid settings. Snap to Grid controls how much you can move or rotate an object at a
time. By default, the move tool only allows objects to move one stud at a time.
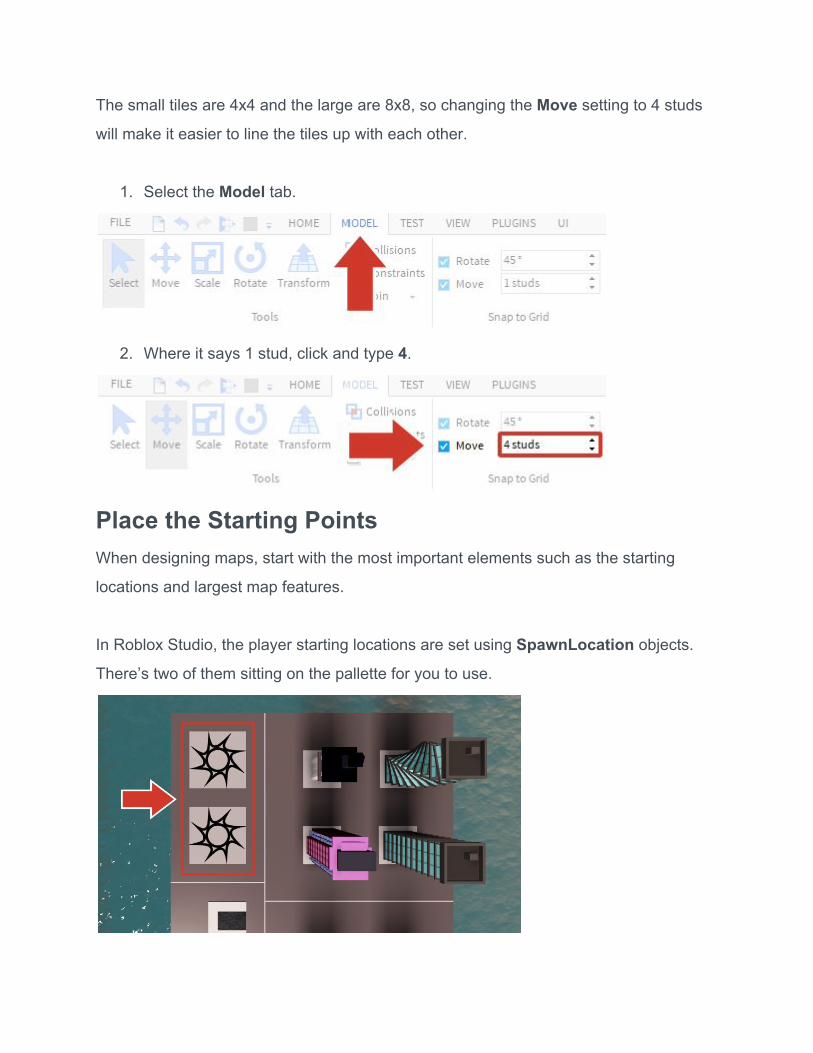
The small tiles are 4x4 and the large are 8x8, so changing the Move setting to 4 studs
will make it easier to line the tiles up with each other.
1. Select the Model tab.
2. Where it says 1 stud, click and type 4.
Place the Starting Points When designing maps, start with the most important elements such as the starting
locations and largest map features.
In Roblox Studio, the player starting locations are set using SpawnLocation objects.
There’s two of them sitting on the pallette for you to use.
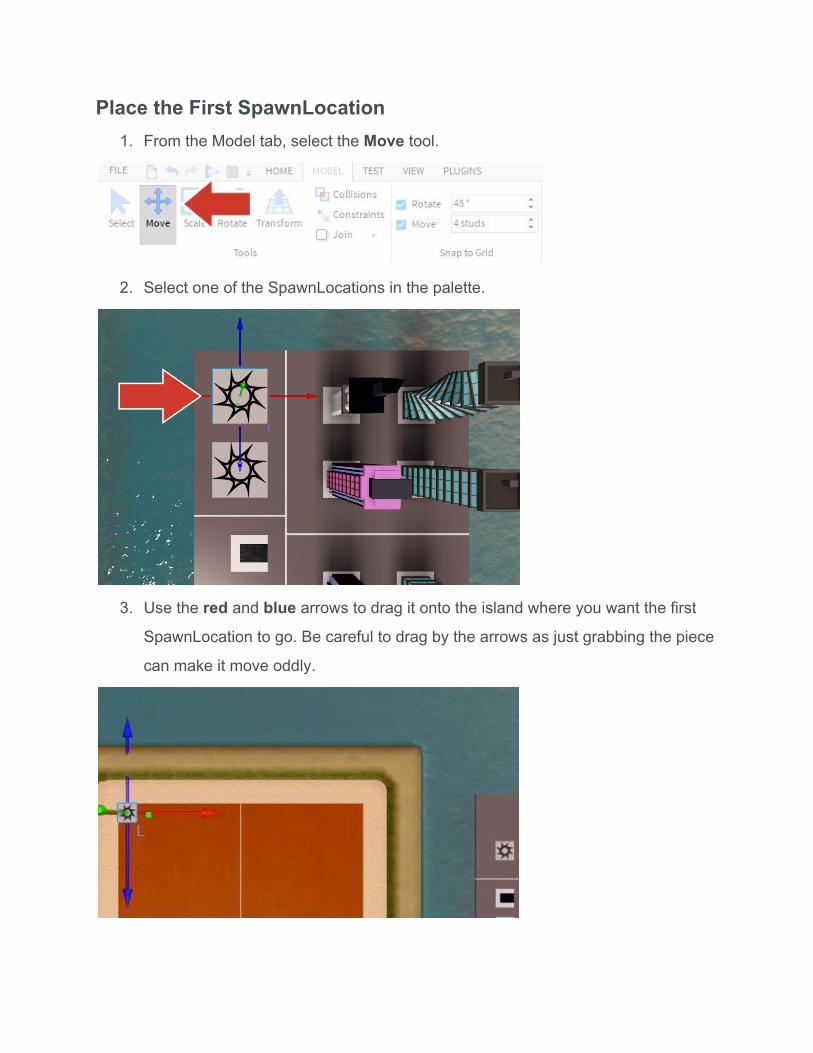
Place the First SpawnLocation 1. From the Model tab, select the Move tool.
2. Select one of the SpawnLocations in the palette.
3. Use the red and blue arrows to drag it onto the island where you want the first
SpawnLocation to go. Be careful to drag by the arrows as just grabbing the piece
can make it move oddly.
Undo
If the SpawnLocation moves in a way you don’t want, just Ctrl + Z or
Command ⌘ + Z to undo and set it back to where it was.
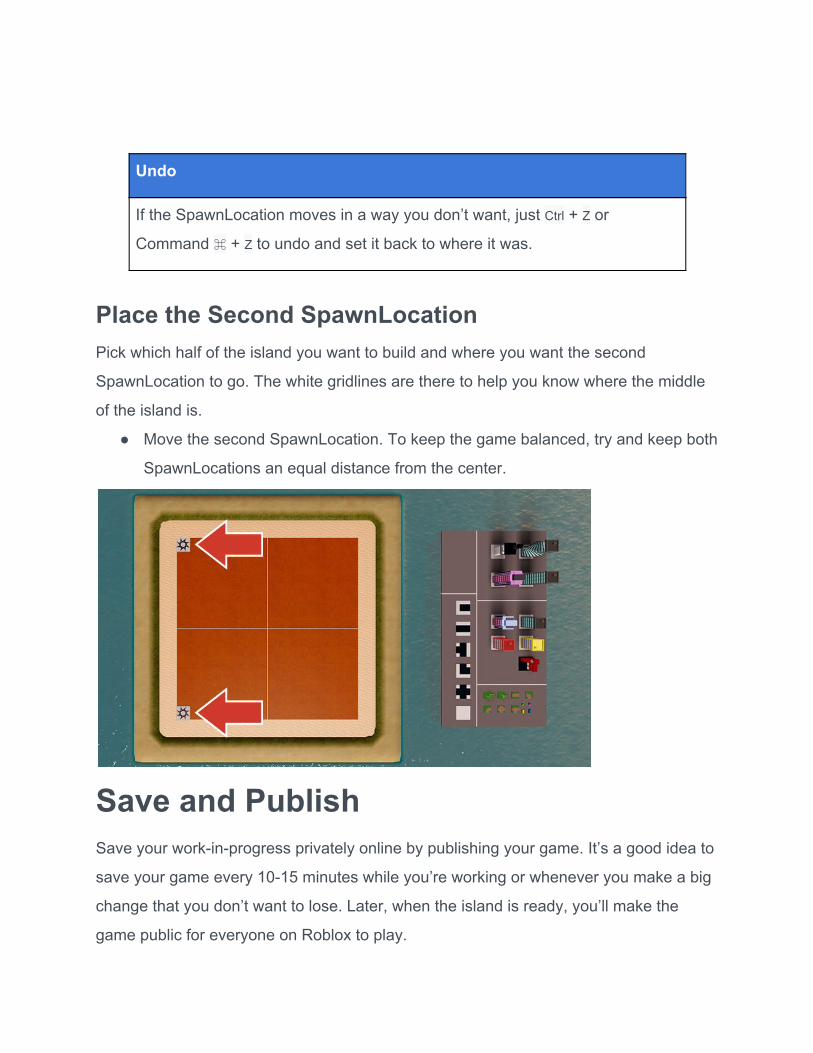
Place the Second SpawnLocation Pick which half of the island you want to build and where you want the second
SpawnLocation to go. The white gridlines are there to help you know where the middle
of the island is.
● Move the second SpawnLocation. To keep the game balanced, try and keep both
SpawnLocations an equal distance from the center.
Save and Publish Save your work-in-progress privately online by publishing your game. It’s a good idea to
save your game every 10-15 minutes while you’re working or whenever you make a big
change that you don’t want to lose. Later, when the island is ready, you’ll make the
game public for everyone on Roblox to play.
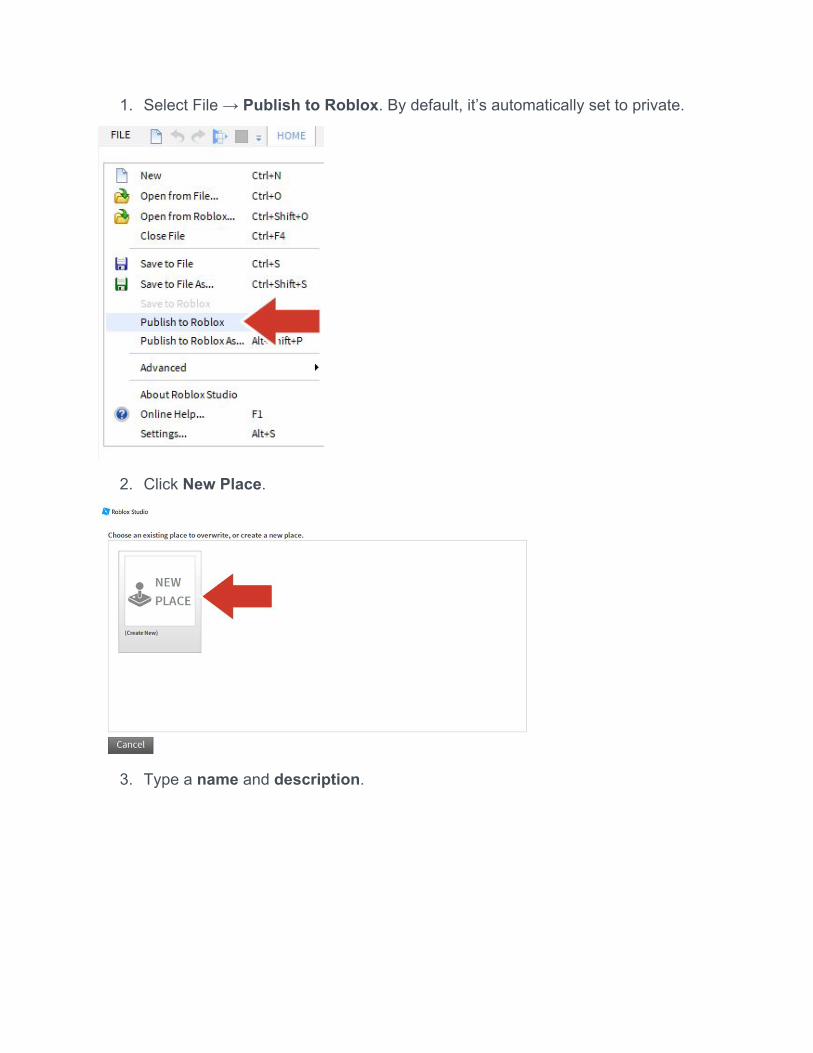
1. Select File → Publish to Roblox. By default, it’s automatically set to private.
2. Click New Place.
3. Type a name and description.
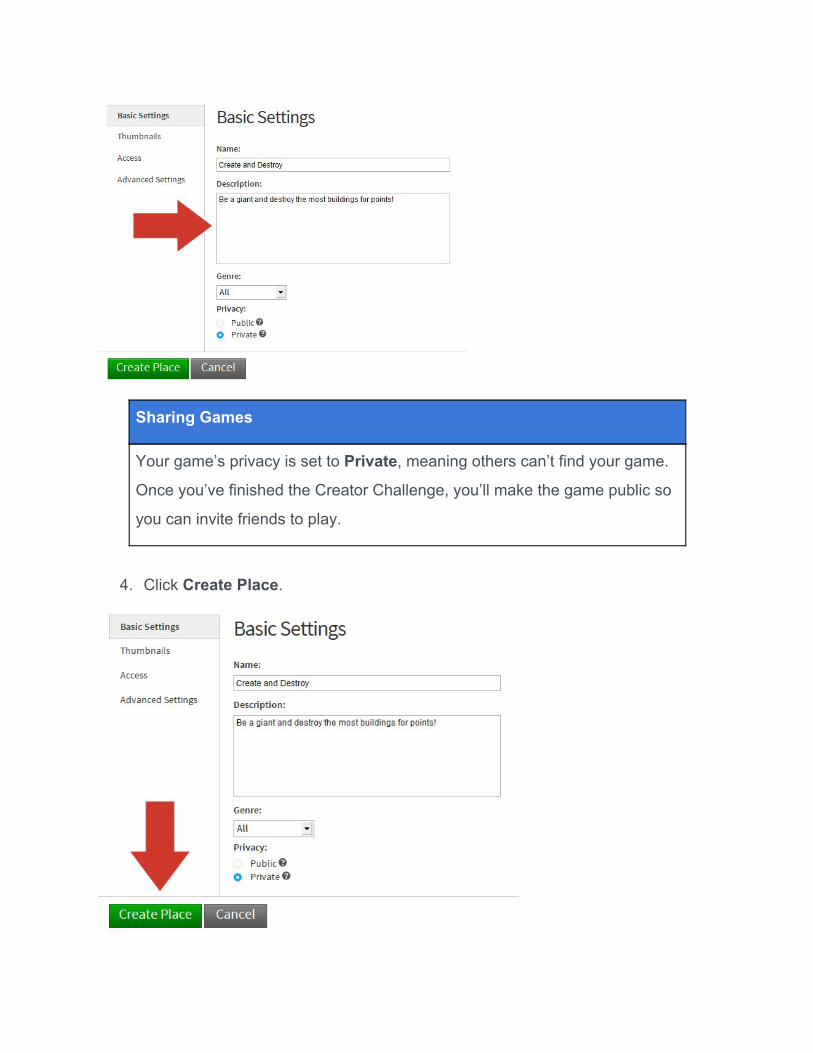
Sharing Games
Your game’s privacy is set to Private, meaning others can’t find your game.
Once you’ve finished the Creator Challenge, you’ll make the game public so
you can invite friends to play.
4. Click Create Place.
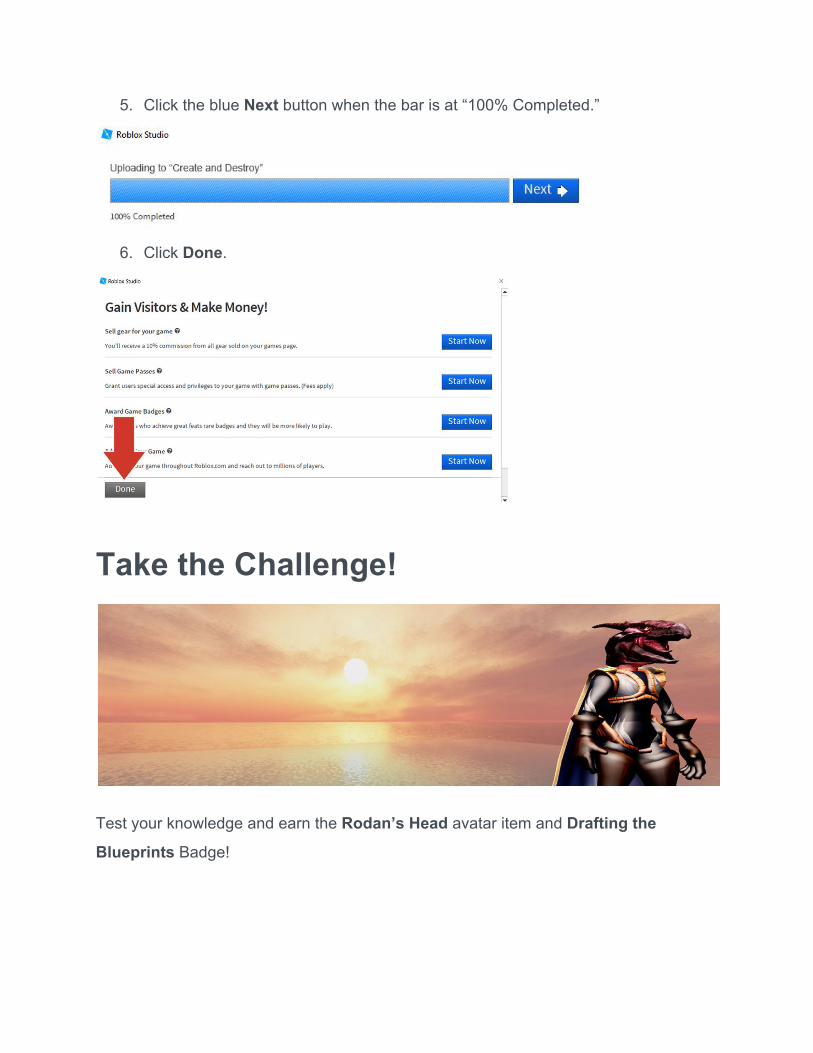
5. Click the blue Next button when the bar is at “100% Completed.”
6. Click Done.
Take the Challenge!
Test your knowledge and earn the Rodan’s Head avatar item and Drafting the
Blueprints Badge!
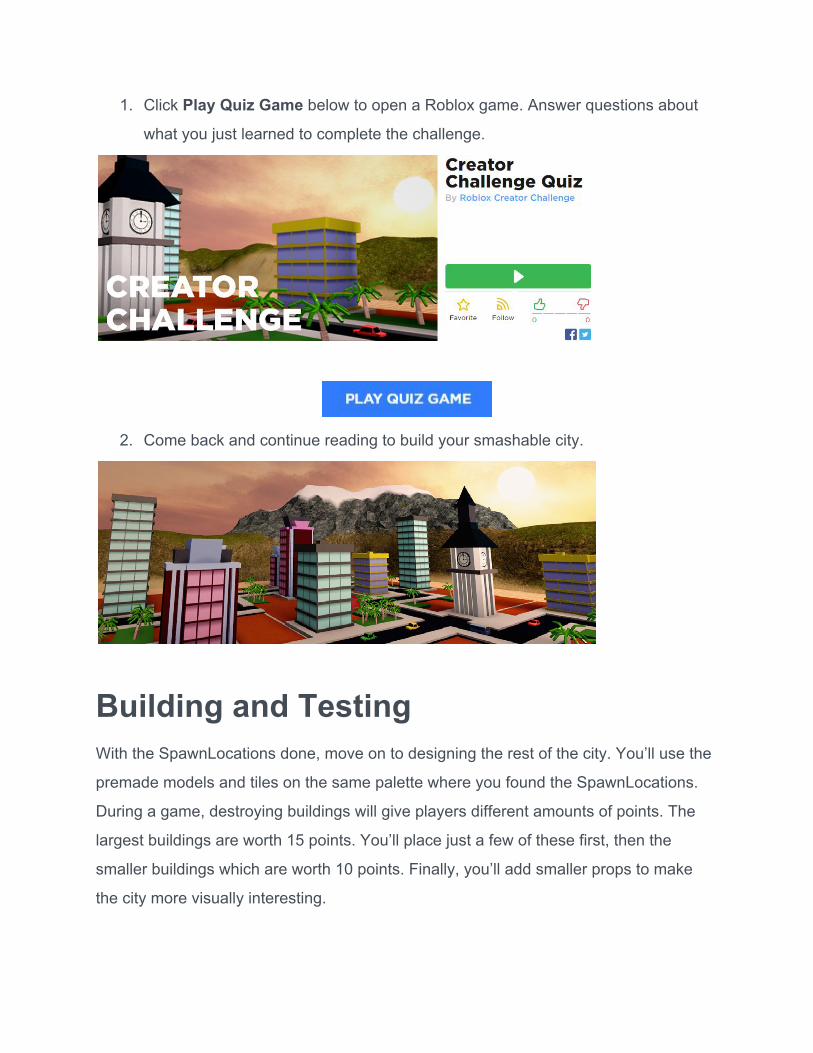
1. Click Play Quiz Game below to open a Roblox game. Answer questions about
what you just learned to complete the challenge.
2. Come back and continue reading to build your smashable city.
Building and Testing With the SpawnLocations done, move on to designing the rest of the city. You’ll use the
premade models and tiles on the same palette where you found the SpawnLocations.
During a game, destroying buildings will give players different amounts of points. The
largest buildings are worth 15 points. You’ll place just a few of these first, then the
smaller buildings which are worth 10 points. Finally, you’ll add smaller props to make
the city more visually interesting.
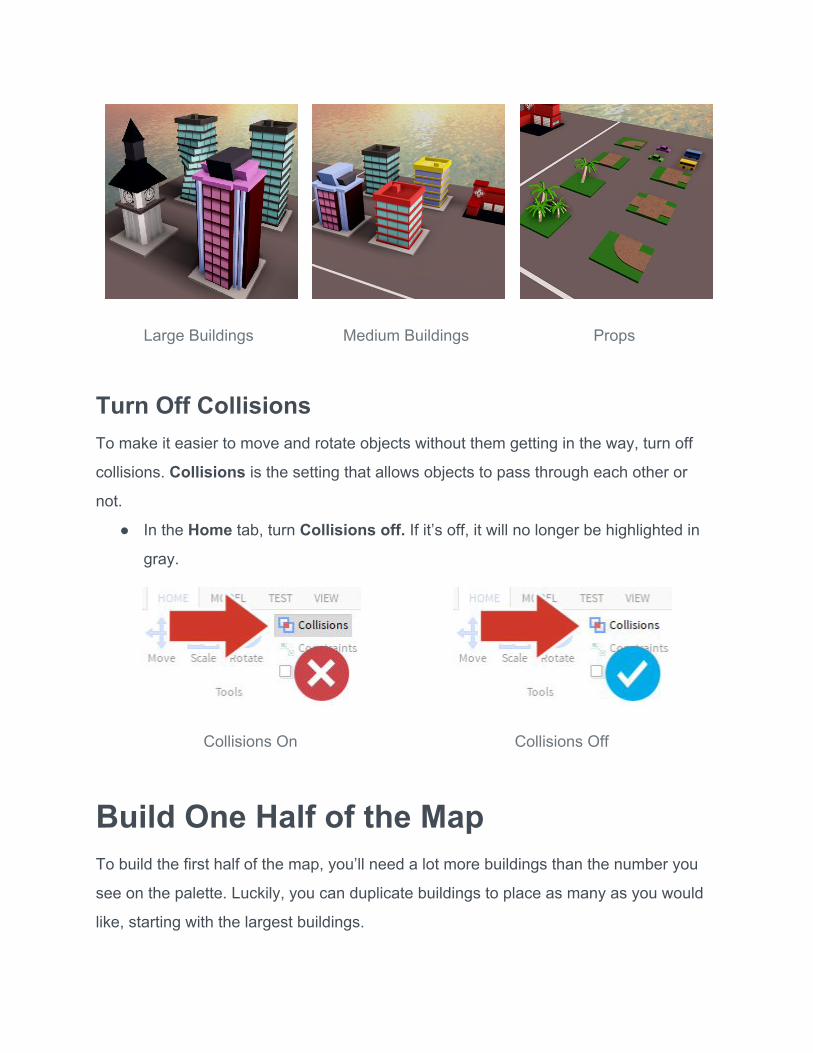
Large Buildings Medium Buildings Props
Turn Off Collisions To make it easier to move and rotate objects without them getting in the way, turn off
collisions. Collisions is the setting that allows objects to pass through each other or
not.
● In the Home tab, turn Collisions off. If it’s off, it will no longer be highlighted in
gray.
Collisions On Collisions Off
Build One Half of the Map To build the first half of the map, you’ll need a lot more buildings than the number you
see on the palette. Luckily, you can duplicate buildings to place as many as you would
like, starting with the largest buildings.
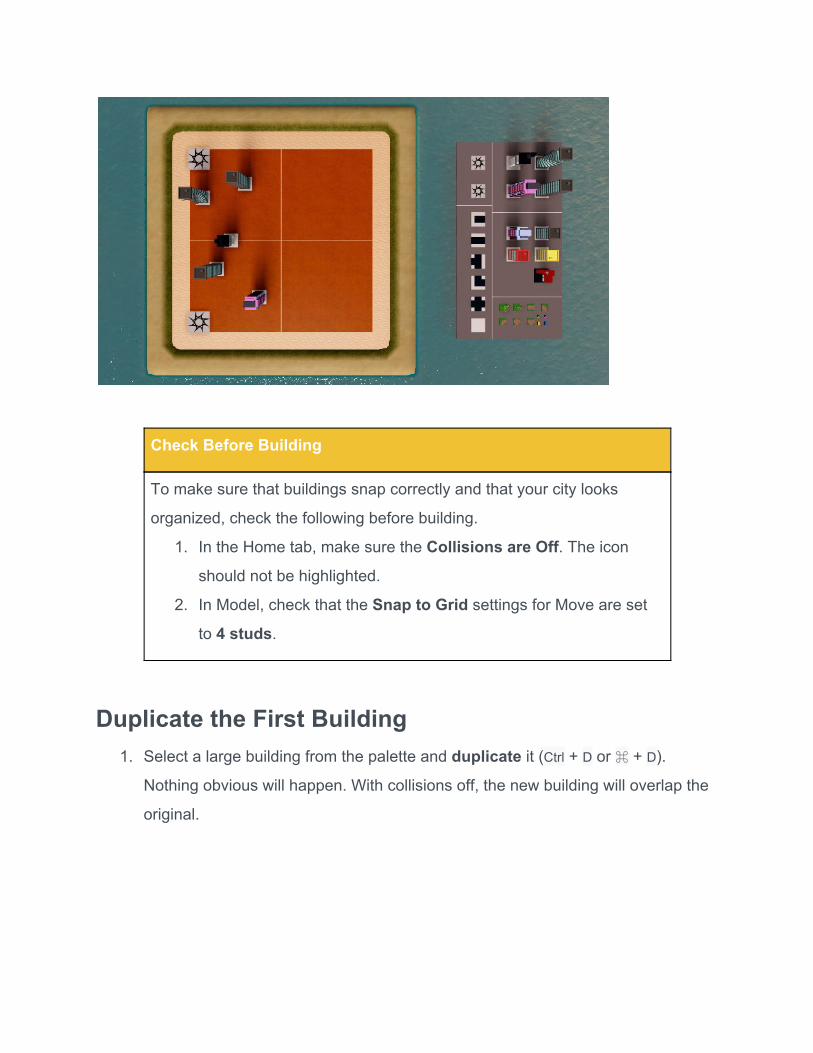
Check Before Building
To make sure that buildings snap correctly and that your city looks
organized, check the following before building.
1. In the Home tab, make sure the Collisions are Off. The icon
should not be highlighted.
2. In Model, check that the Snap to Grid settings for Move are set
to 4 studs.
Duplicate the First Building 1. Select a large building from the palette and duplicate it (Ctrl + D or ⌘ + D).
Nothing obvious will happen. With collisions off, the new building will overlap the
original.
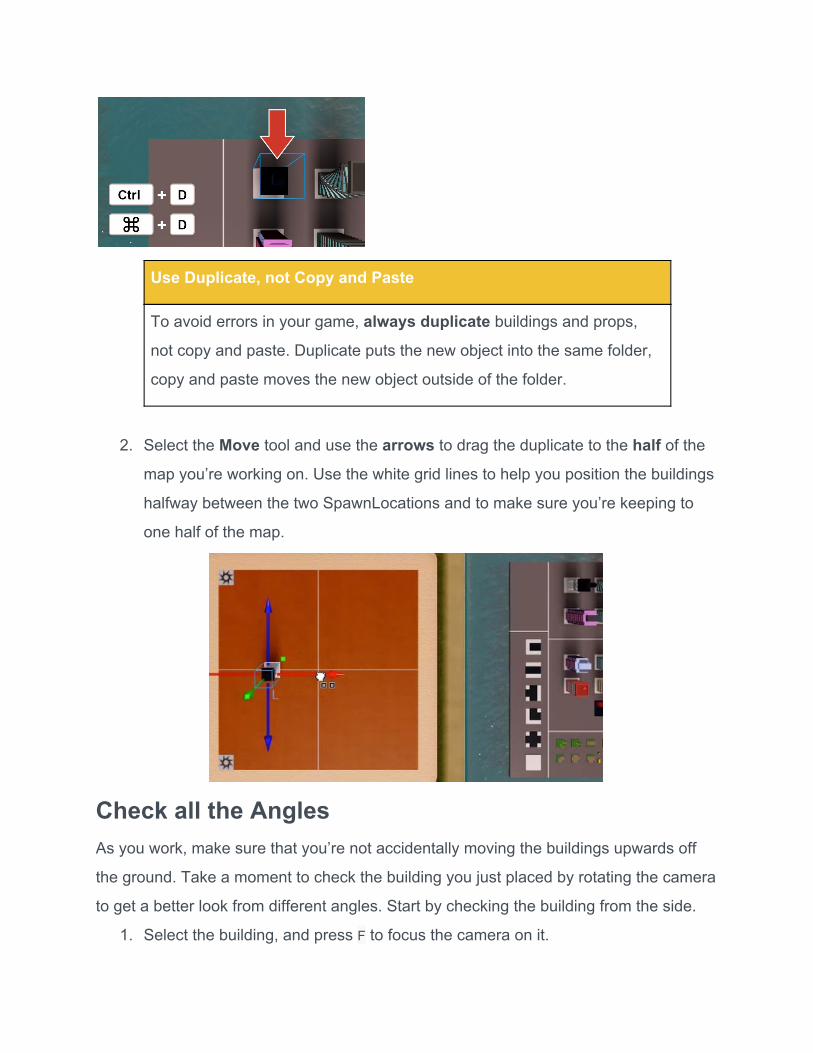
Use Duplicate, not Copy and Paste
To avoid errors in your game, always duplicate buildings and props,
not copy and paste. Duplicate puts the new object into the same folder,
copy and paste moves the new object outside of the folder.
2. Select the Move tool and use the arrows to drag the duplicate to the half of the
map you’re working on. Use the white grid lines to help you position the buildings
halfway between the two SpawnLocations and to make sure you’re keeping to
one half of the map.
Check all the Angles As you work, make sure that you’re not accidentally moving the buildings upwards off
the ground. Take a moment to check the building you just placed by rotating the camera
to get a better look from different angles. Start by checking the building from the side.
1. Select the building, and press F to focus the camera on it.
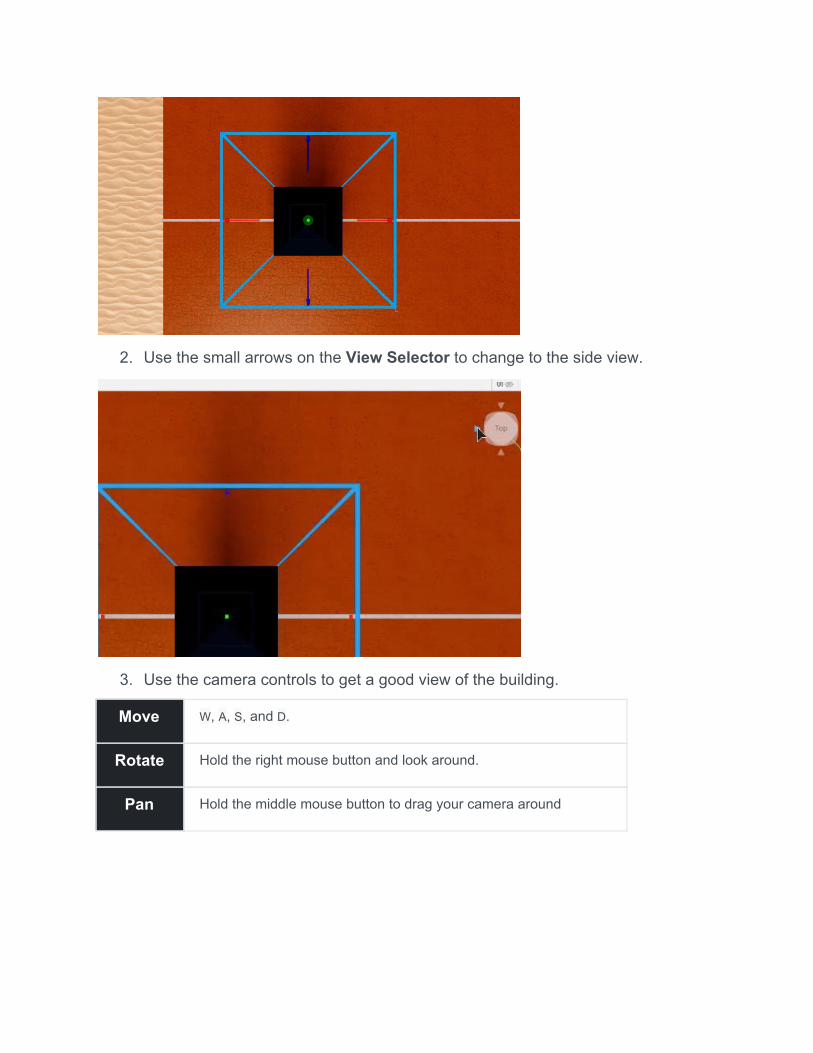
2. Use the small arrows on the View Selector to change to the side view.
3. Use the camera controls to get a good view of the building.
Move W, A, S, and D.
Rotate Hold the right mouse button and look around.
Pan Hold the middle mouse button to drag your camera around
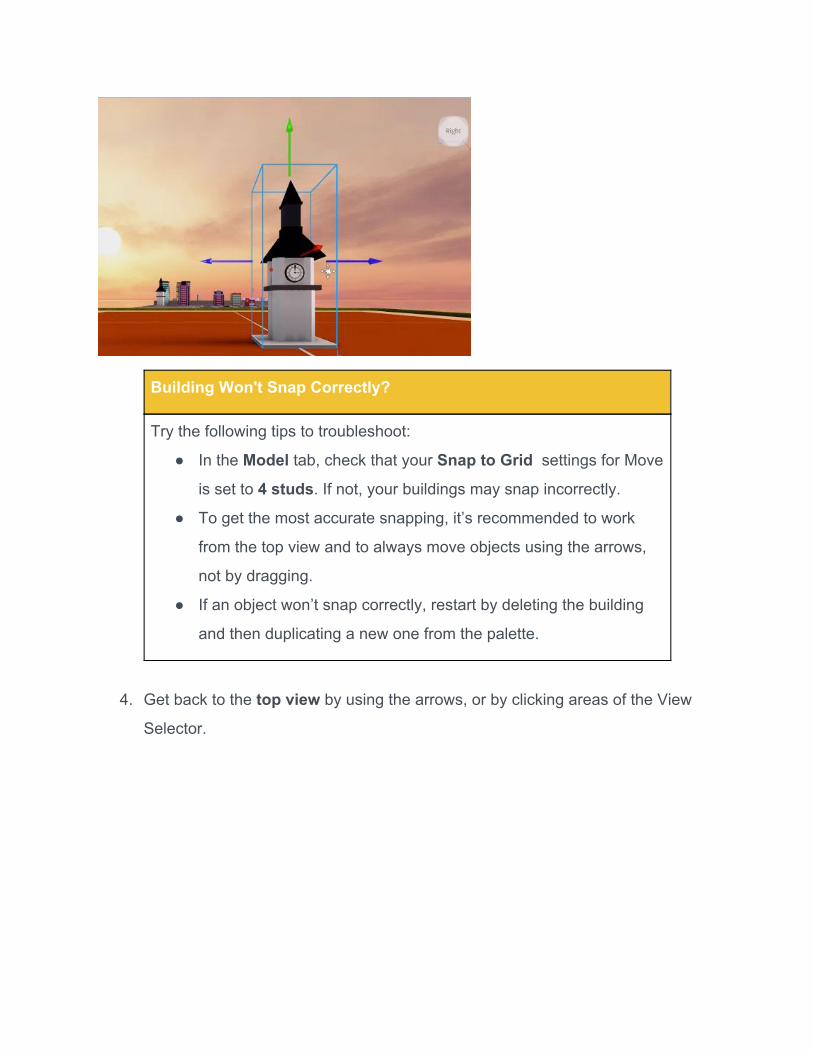
Building Won't Snap Correctly?
Try the following tips to troubleshoot:
● In the Model tab, check that your Snap to Grid settings for Move
is set to 4 studs. If not, your buildings may snap incorrectly.
● To get the most accurate snapping, it’s recommended to work
from the top view and to always move objects using the arrows,
not by dragging.
● If an object won’t snap correctly, restart by deleting the building
and then duplicating a new one from the palette.
4. Get back to the top view by using the arrows, or by clicking areas of the View
Selector.
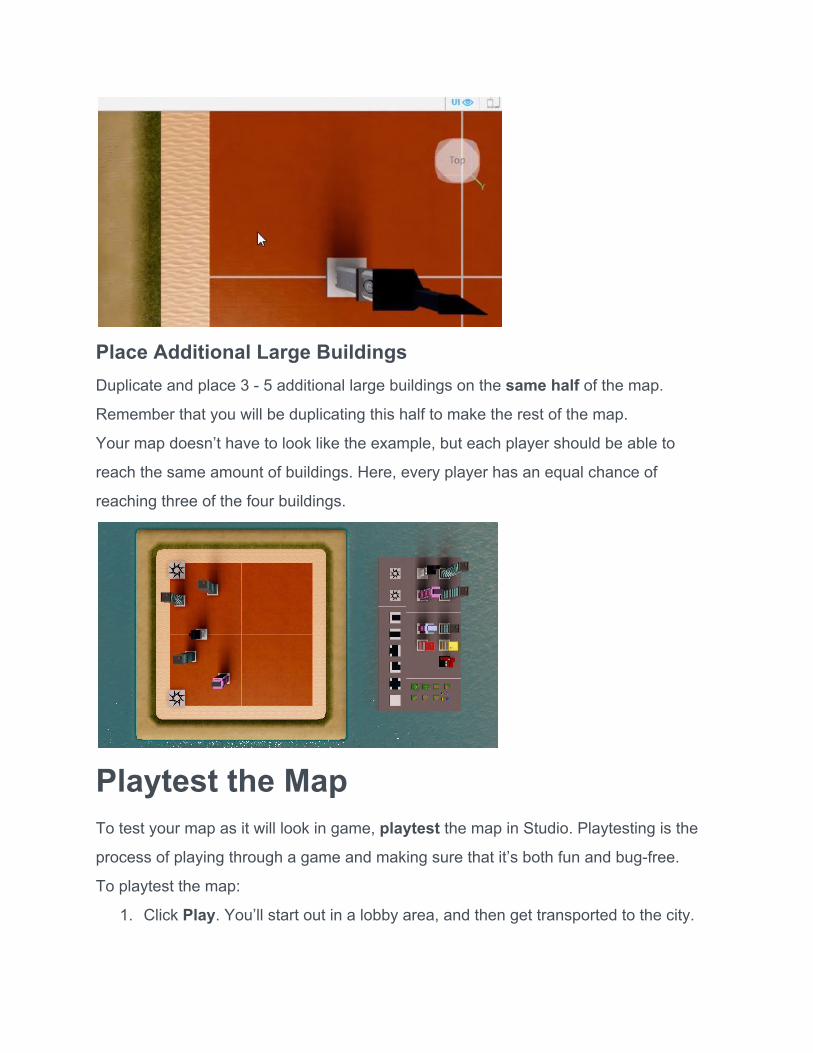
Place Additional Large Buildings Duplicate and place 3 - 5 additional large buildings on the same half of the map.
Remember that you will be duplicating this half to make the rest of the map.
Your map doesn’t have to look like the example, but each player should be able to
reach the same amount of buildings. Here, every player has an equal chance of
reaching three of the four buildings.
Playtest the Map To test your map as it will look in game, playtest the map in Studio. Playtesting is the
process of playing through a game and making sure that it’s both fun and bug-free.
To playtest the map:
1. Click Play. You’ll start out in a lobby area, and then get transported to the city.
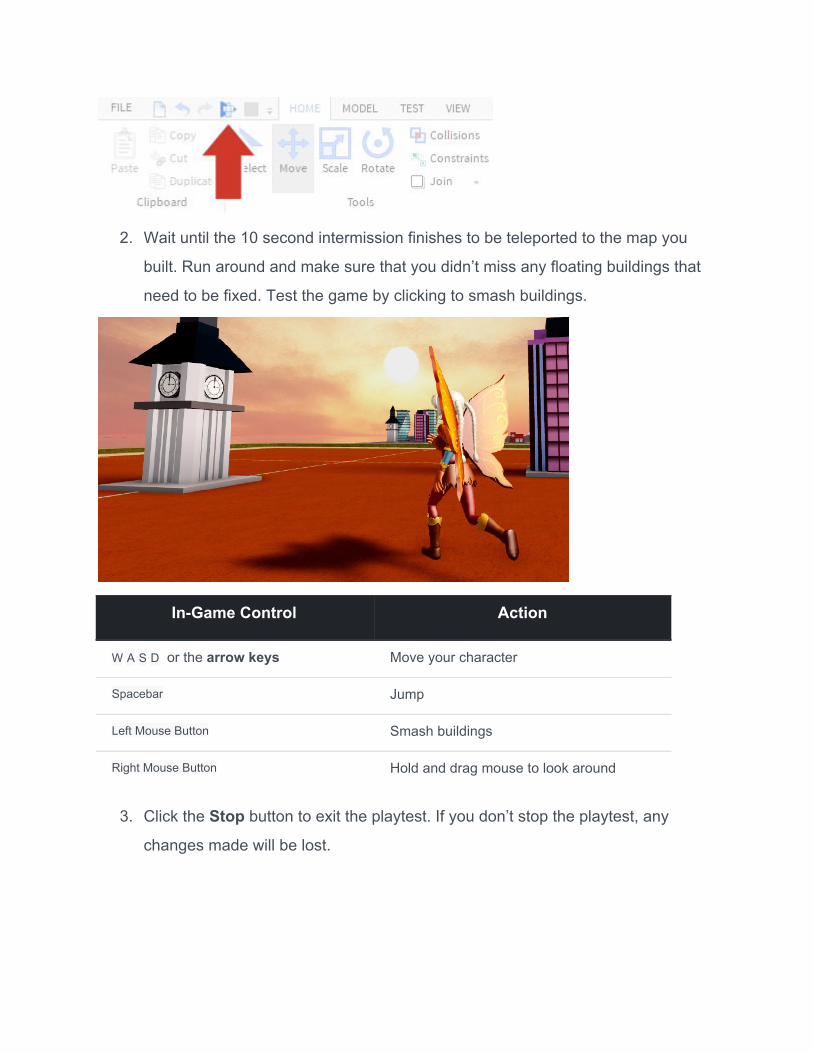
2. Wait until the 10 second intermission finishes to be teleported to the map you
built. Run around and make sure that you didn’t miss any floating buildings that
need to be fixed. Test the game by clicking to smash buildings.
In-Game Control Action
W A S D or the arrow keys Move your character
Spacebar Jump
Left Mouse Button Smash buildings
Right Mouse Button Hold and drag mouse to look around
3. Click the Stop button to exit the playtest. If you don’t stop the playtest, any
changes made will be lost.
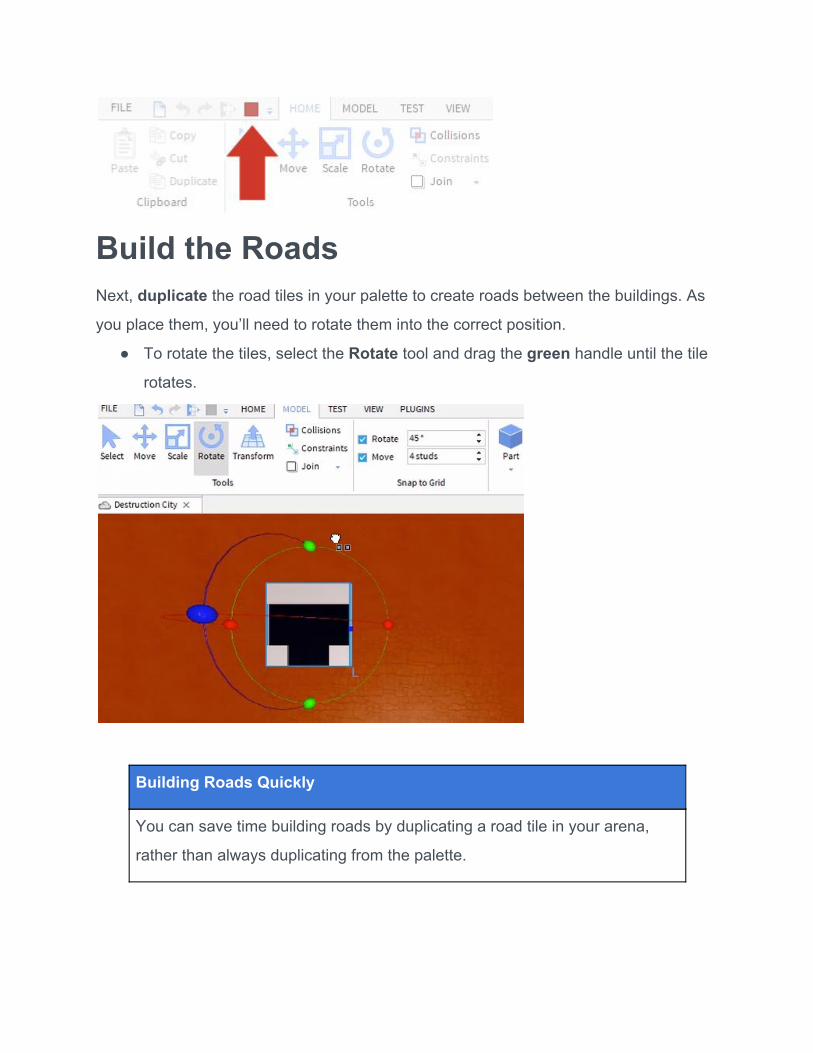
Build the Roads Next, duplicate the road tiles in your palette to create roads between the buildings. As
you place them, you’ll need to rotate them into the correct position.
● To rotate the tiles, select the Rotate tool and drag the green handle until the tile
rotates.
Building Roads Quickly
You can save time building roads by duplicating a road tile in your arena,
rather than always duplicating from the palette.
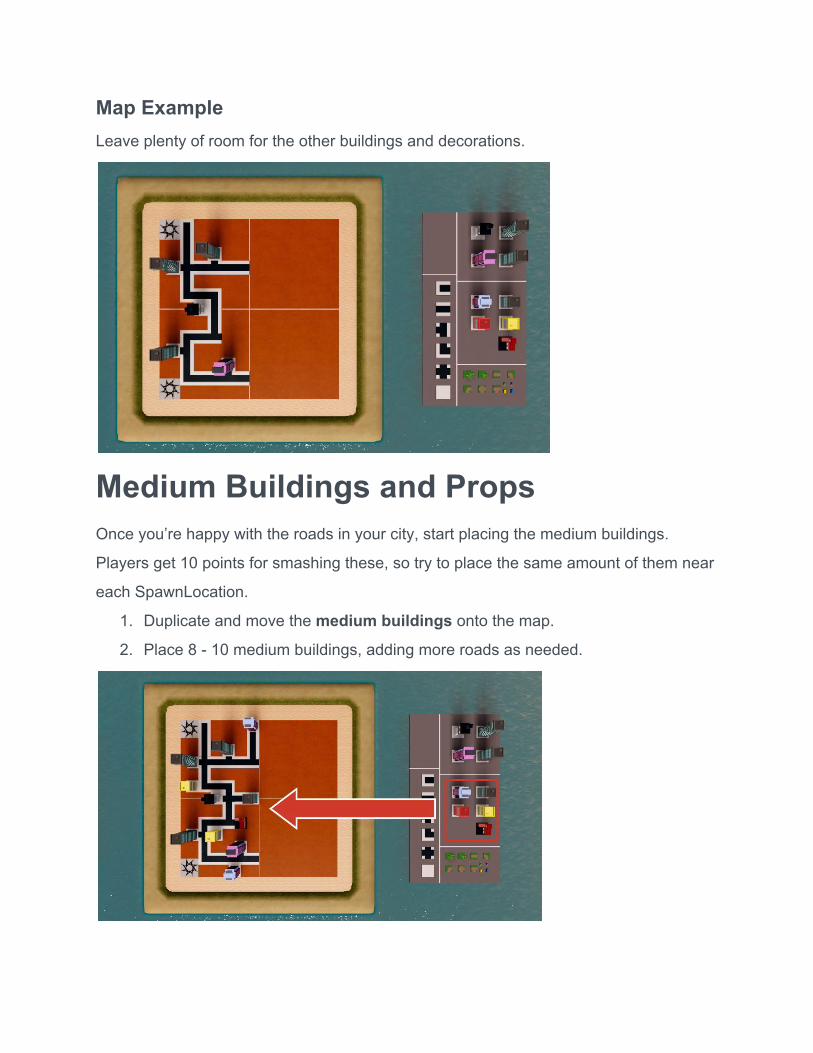
Map Example Leave plenty of room for the other buildings and decorations.
Medium Buildings and Props Once you’re happy with the roads in your city, start placing the medium buildings.
Players get 10 points for smashing these, so try to place the same amount of them near
each SpawnLocation.
1. Duplicate and move the medium buildings onto the map.
2. Place 8 - 10 medium buildings, adding more roads as needed.
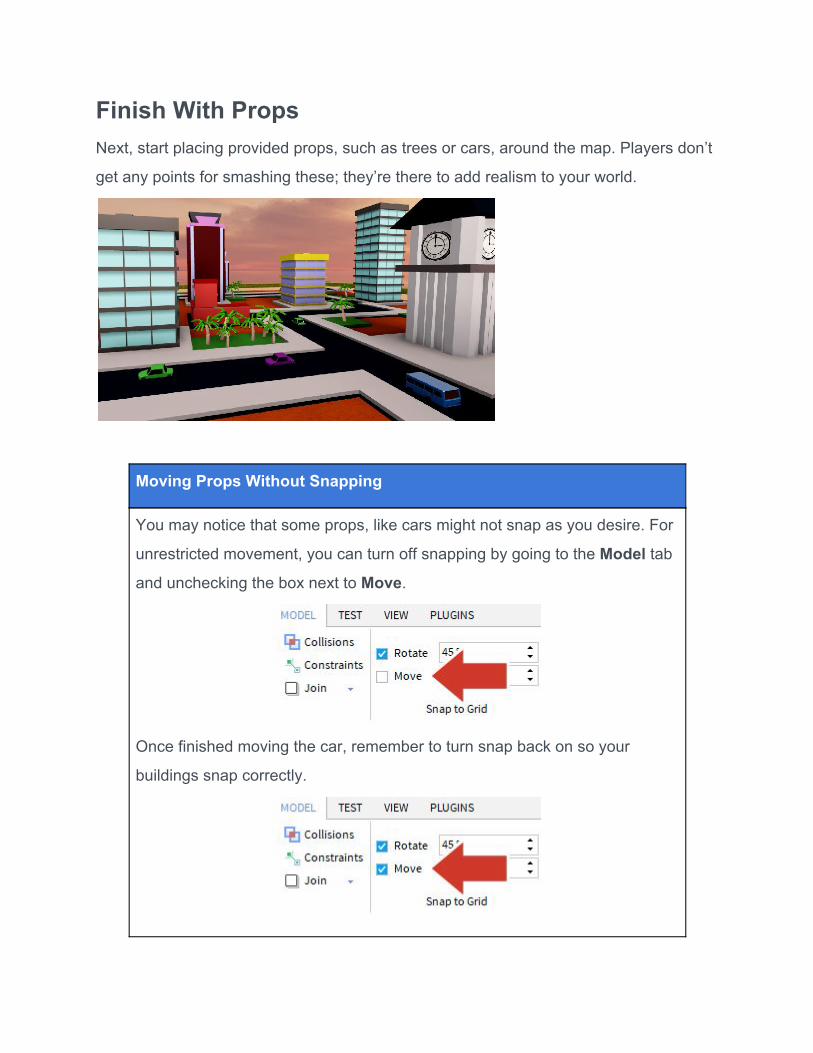
Finish With Props Next, start placing provided props, such as trees or cars, around the map. Players don’t
get any points for smashing these; they’re there to add realism to your world.
Moving Props Without Snapping
You may notice that some props, like cars might not snap as you desire. For
unrestricted movement, you can turn off snapping by going to the Model tab
and unchecking the box next to Move.
Once finished moving the car, remember to turn snap back on so your
buildings snap correctly.
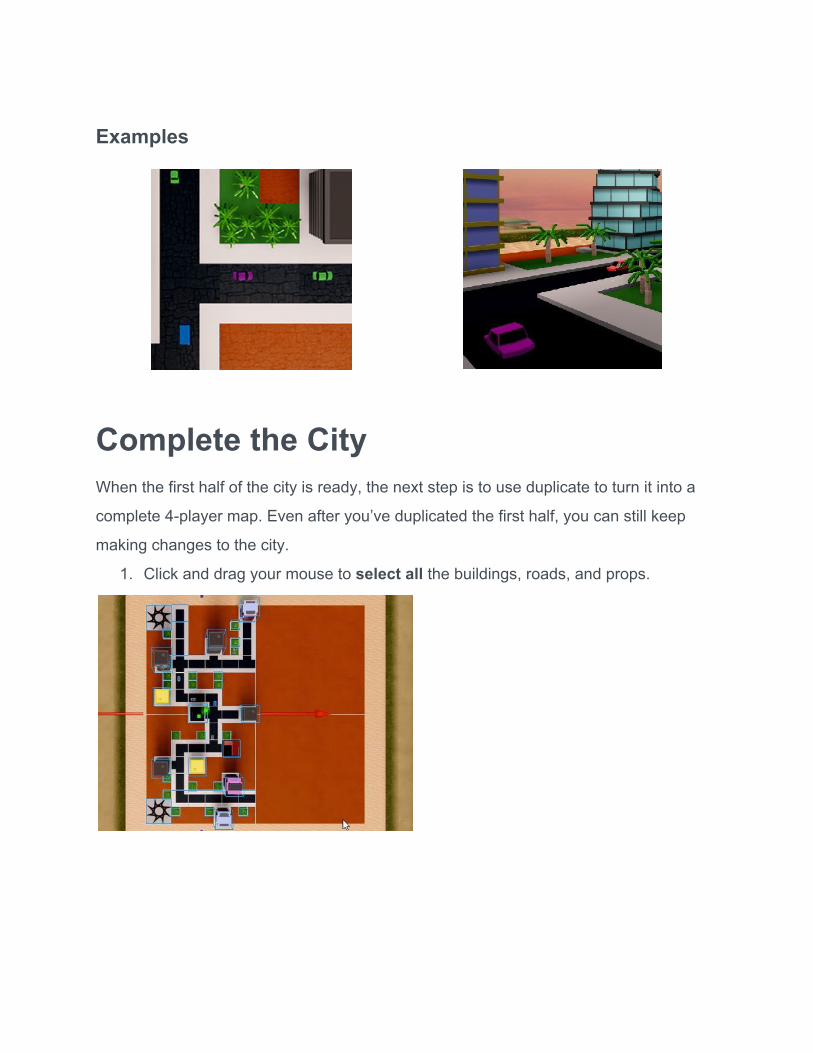
Examples
Complete the City When the first half of the city is ready, the next step is to use duplicate to turn it into a
complete 4-player map. Even after you’ve duplicated the first half, you can still keep
making changes to the city.
1. Click and drag your mouse to select all the buildings, roads, and props.
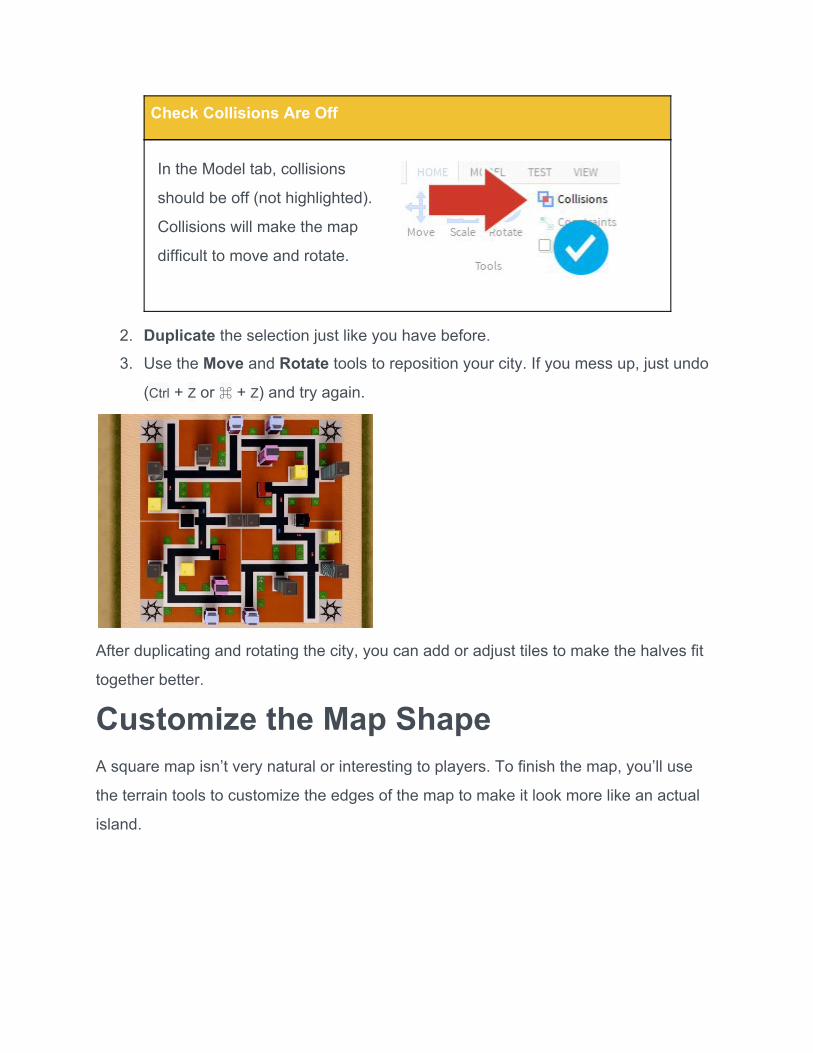
Check Collisions Are Off
In the Model tab, collisions
should be off (not highlighted).
Collisions will make the map
difficult to move and rotate.
2. Duplicate the selection just like you have before.
3. Use the Move and Rotate tools to reposition your city. If you mess up, just undo
(Ctrl + Z or ⌘ + Z) and try again.
After duplicating and rotating the city, you can add or adjust tiles to make the halves fit
together better.
Customize the Map Shape A square map isn’t very natural or interesting to players. To finish the map, you’ll use
the terrain tools to customize the edges of the map to make it look more like an actual
island.
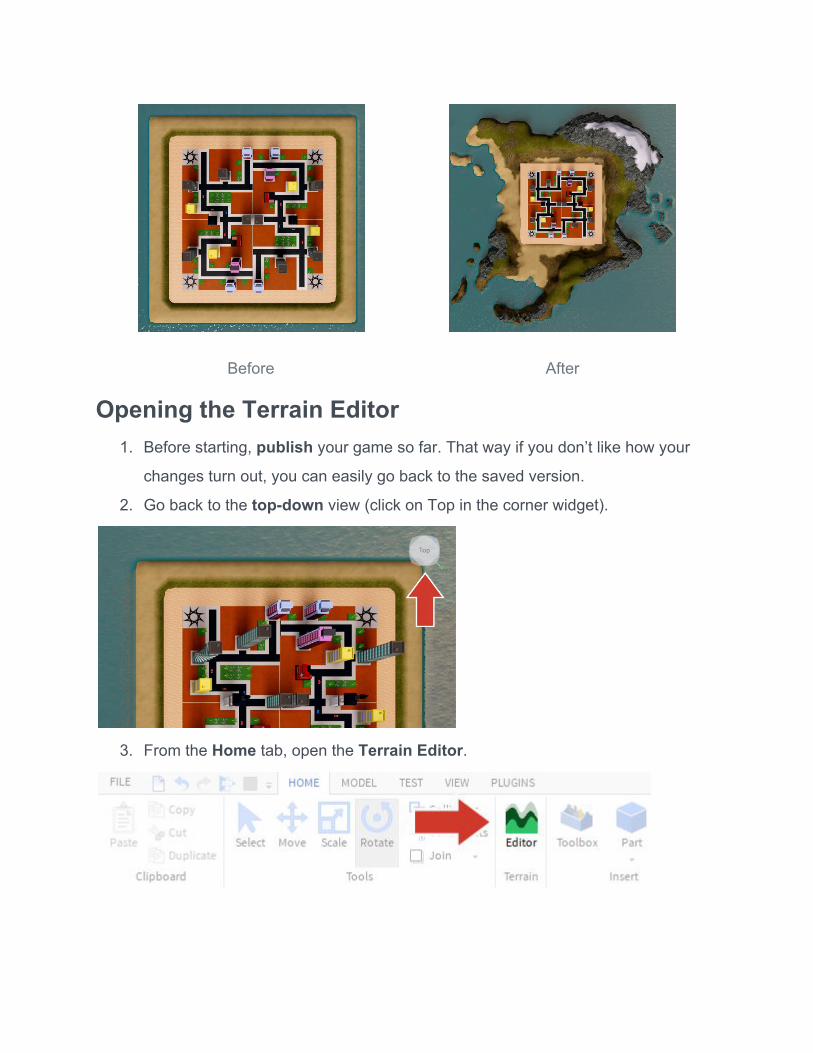
Before After
Opening the Terrain Editor 1. Before starting, publish your game so far. That way if you don’t like how your
changes turn out, you can easily go back to the saved version.
2. Go back to the top-down view (click on Top in the corner widget).
3. From the Home tab, open the Terrain Editor.
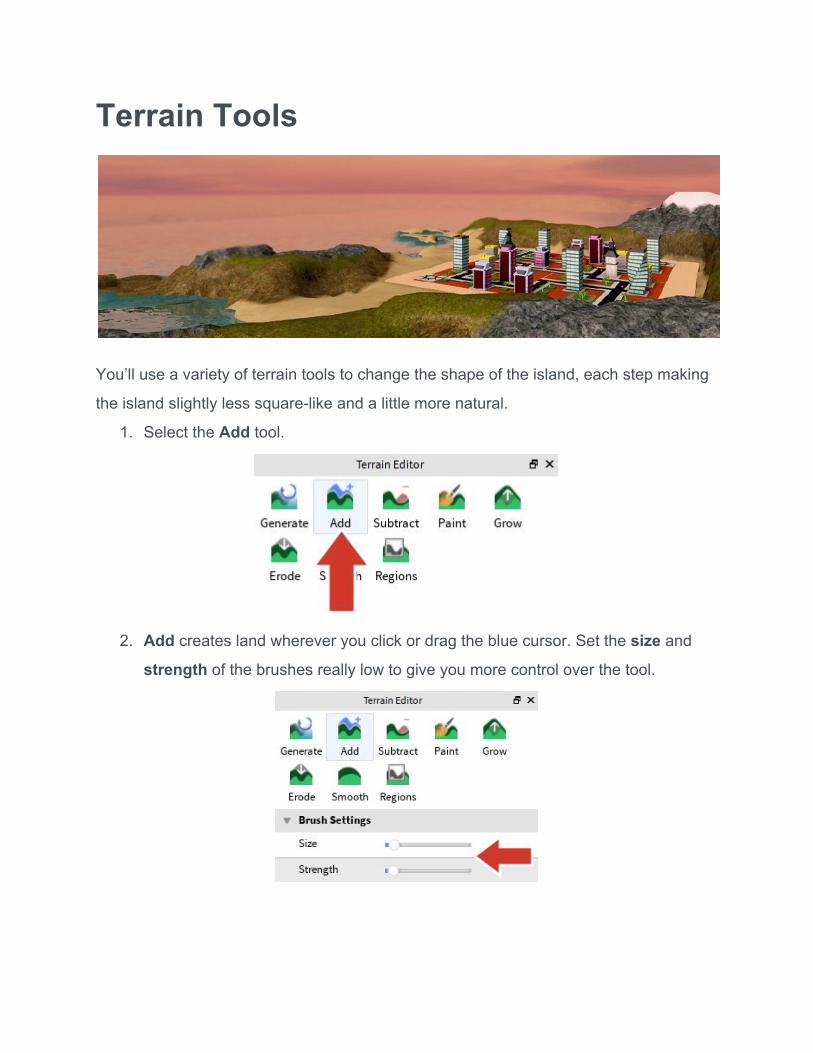
Terrain Tools
You’ll use a variety of terrain tools to change the shape of the island, each step making
the island slightly less square-like and a little more natural.
1. Select the Add tool.
2. Add creates land wherever you click or drag the blue cursor. Set the size and
strength of the brushes really low to give you more control over the tool.
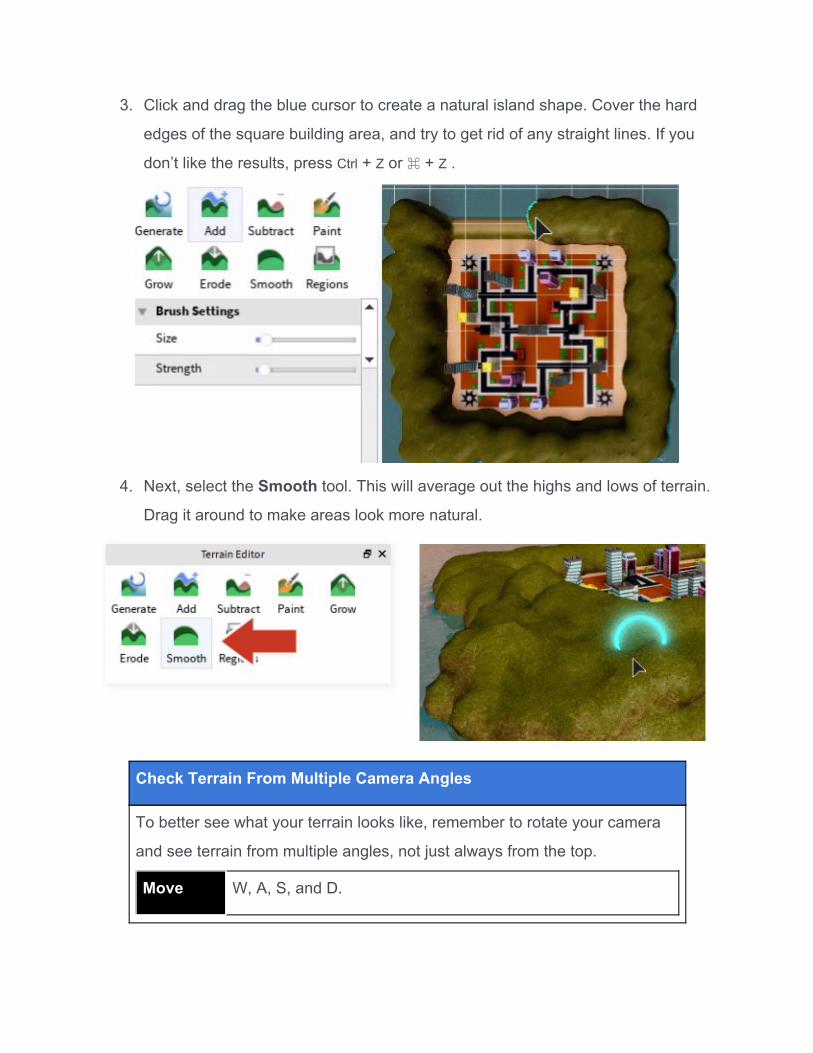
3. Click and drag the blue cursor to create a natural island shape. Cover the hard
edges of the square building area, and try to get rid of any straight lines. If you
don’t like the results, press Ctrl + Z or ⌘ + Z .
4. Next, select the Smooth tool. This will average out the highs and lows of terrain.
Drag it around to make areas look more natural.
Check Terrain From Multiple Camera Angles
To better see what your terrain looks like, remember to rotate your camera
and see terrain from multiple angles, not just always from the top.
Move W, A, S, and D.

Rotate Hold the right mouse button and look around.
Pan Hold the middle mouse button to drag your camera around
5. Remove unwanted terrain with the Subtract tool. This can be useful to quickly
delete terrain that’s overtaken the city.
6. Paint sand and mud on the edges to create beaches. Paint changes the texture
without changing the shape.
Take the Challenge!
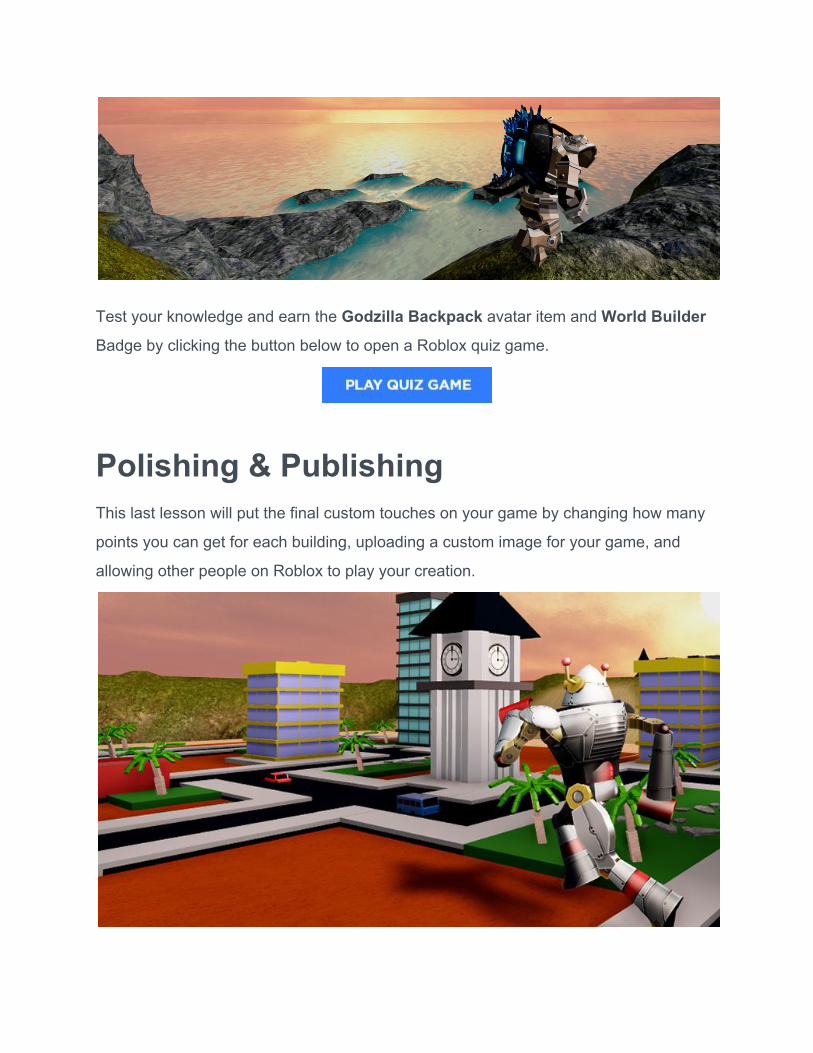
Test your knowledge and earn the Godzilla Backpack avatar item and World Builder
Badge by clicking the button below to open a Roblox quiz game.
Polishing & Publishing This last lesson will put the final custom touches on your game by changing how many
points you can get for each building, uploading a custom image for your game, and
allowing other people on Roblox to play your creation.
Change the Points Given Besides just the map, other aspects of Create and Destroy can be customized. Would
you like players to earn hundreds of points every time they knock down a building or a
tree? Make that happen by changing numbers in a script, an object that holds code.
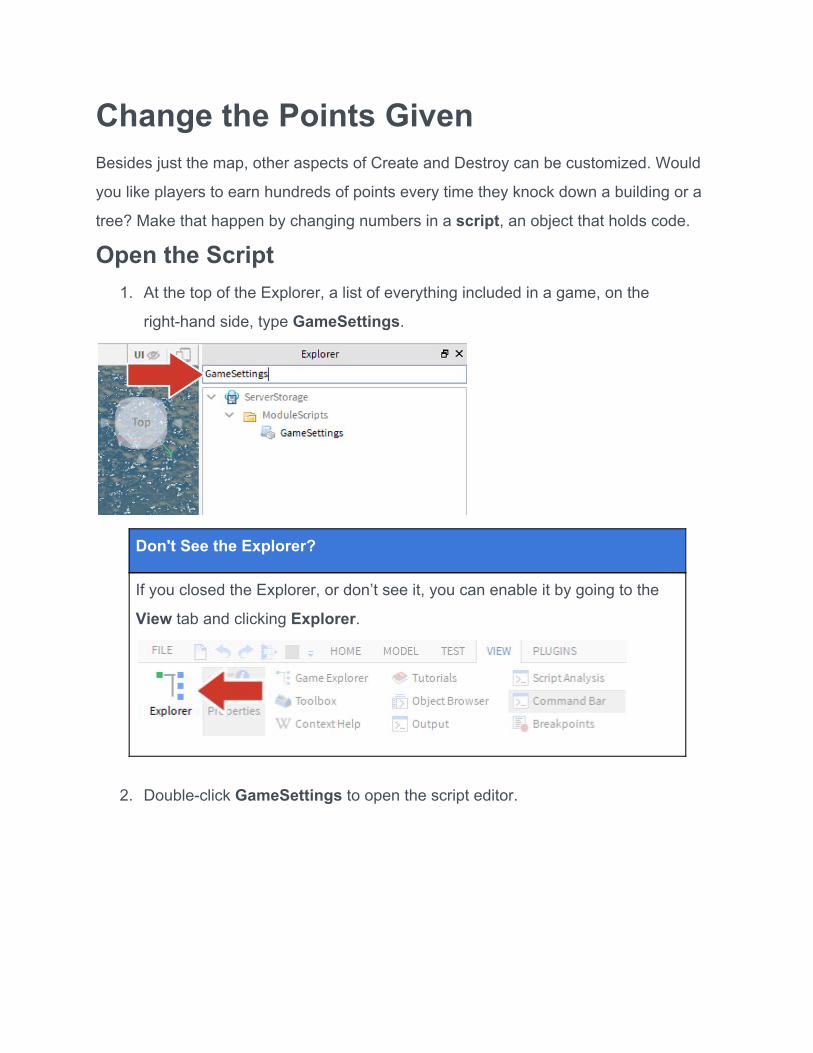
Open the Script 1. At the top of the Explorer, a list of everything included in a game, on the
right-hand side, type GameSettings.
Don't See the Explorer?
If you closed the Explorer, or don’t see it, you can enable it by going to the
View tab and clicking Explorer.
2. Double-click GameSettings to open the script editor.
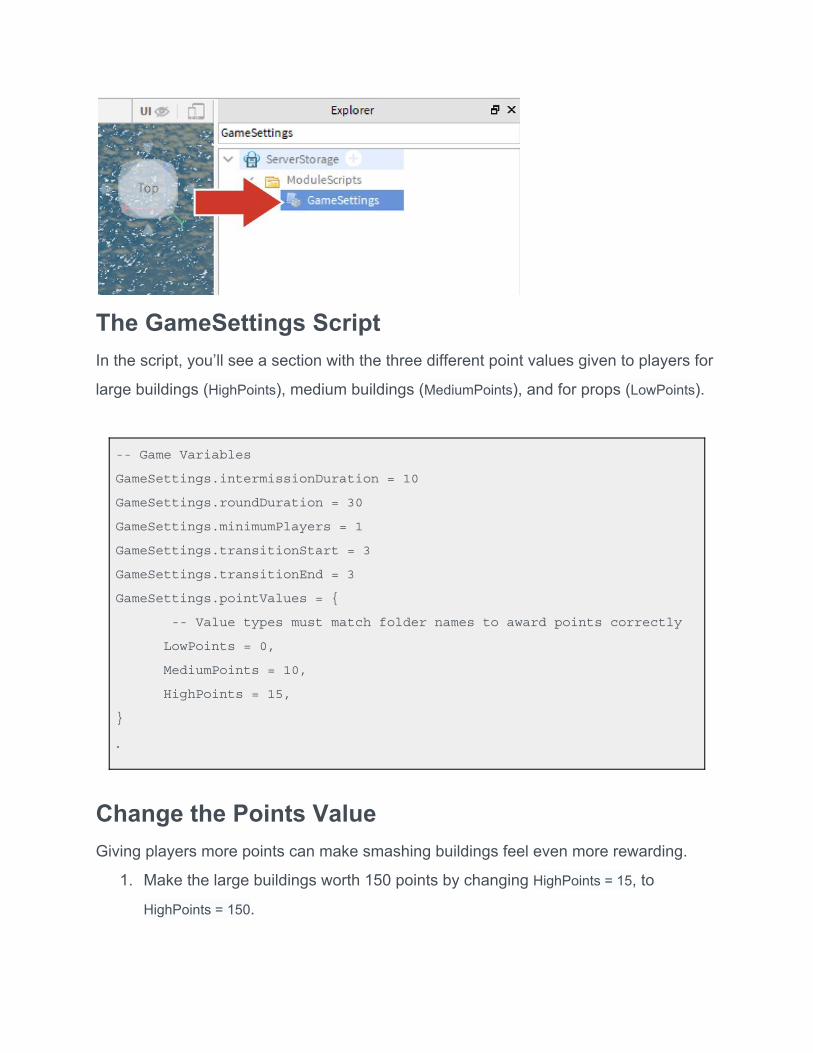
The GameSettings Script In the script, you’ll see a section with the three different point values given to players for
large buildings (HighPoints), medium buildings (MediumPoints), and for props (LowPoints).
-- Game Variables
GameSettings.intermissionDuration = 10
GameSettings.roundDuration = 30
GameSettings.minimumPlayers = 1
GameSettings.transitionStart = 3
GameSettings.transitionEnd = 3
GameSettings.pointValues = {
-- Value types must match folder names to award points correctly
LowPoints = 0,
MediumPoints = 10,
HighPoints = 15,
}
.
Change the Points Value Giving players more points can make smashing buildings feel even more rewarding.
1. Make the large buildings worth 150 points by changing HighPoints = 15, to
HighPoints = 150.
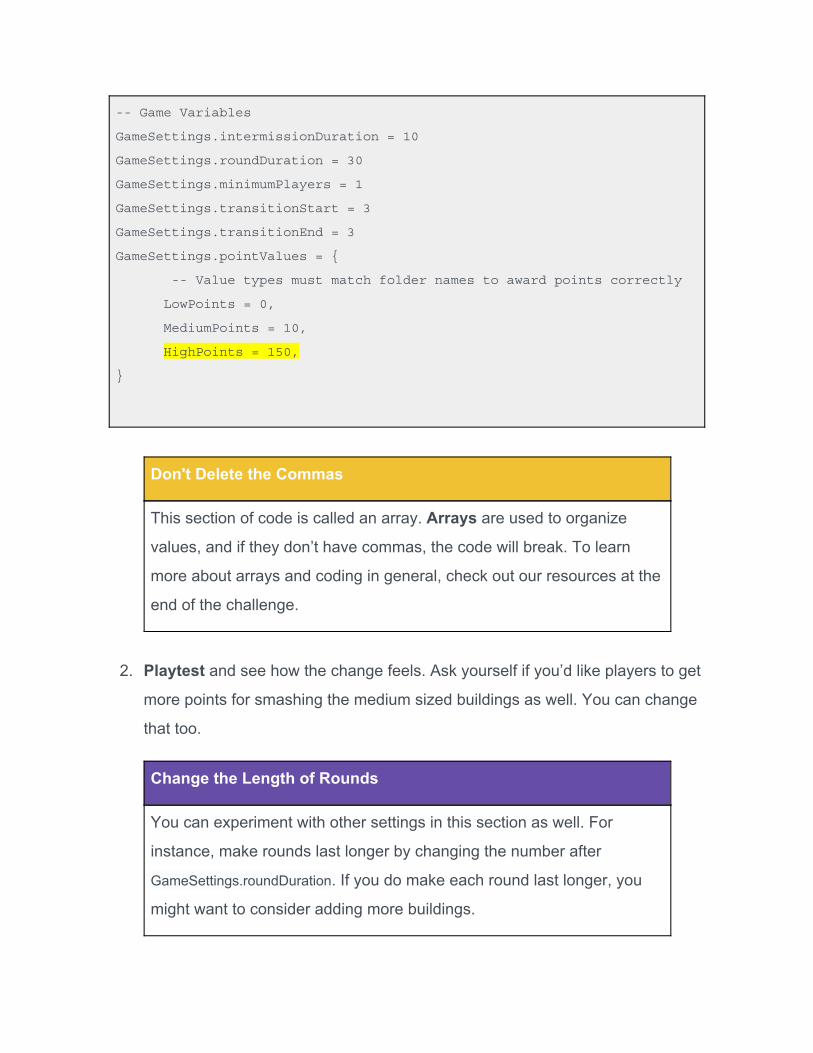
-- Game Variables
GameSettings.intermissionDuration = 10
GameSettings.roundDuration = 30
GameSettings.minimumPlayers = 1
GameSettings.transitionStart = 3
GameSettings.transitionEnd = 3
GameSettings.pointValues = {
-- Value types must match folder names to award points correctly
LowPoints = 0,
MediumPoints = 10,
HighPoints = 150,
}
Don't Delete the Commas
This section of code is called an array. Arrays are used to organize
values, and if they don’t have commas, the code will break. To learn
more about arrays and coding in general, check out our resources at the
end of the challenge.
2. Playtest and see how the change feels. Ask yourself if you’d like players to get
more points for smashing the medium sized buildings as well. You can change
that too.
Change the Length of Rounds
You can experiment with other settings in this section as well. For
instance, make rounds last longer by changing the number after
GameSettings.roundDuration. If you do make each round last longer, you
might want to consider adding more buildings.
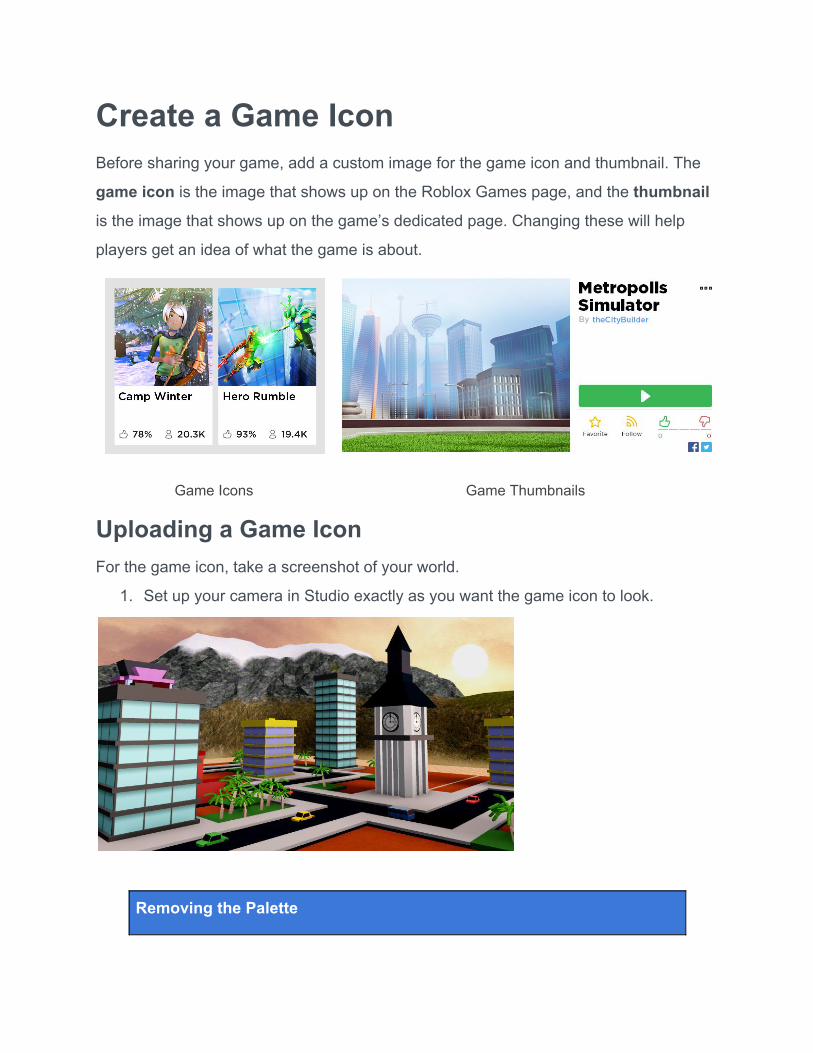
Create a Game Icon Before sharing your game, add a custom image for the game icon and thumbnail. The
game icon is the image that shows up on the Roblox Games page, and the thumbnail
is the image that shows up on the game’s dedicated page. Changing these will help
players get an idea of what the game is about.
Game Icons Game Thumbnails
Uploading a Game Icon For the game icon, take a screenshot of your world.
1. Set up your camera in Studio exactly as you want the game icon to look.
Removing the Palette
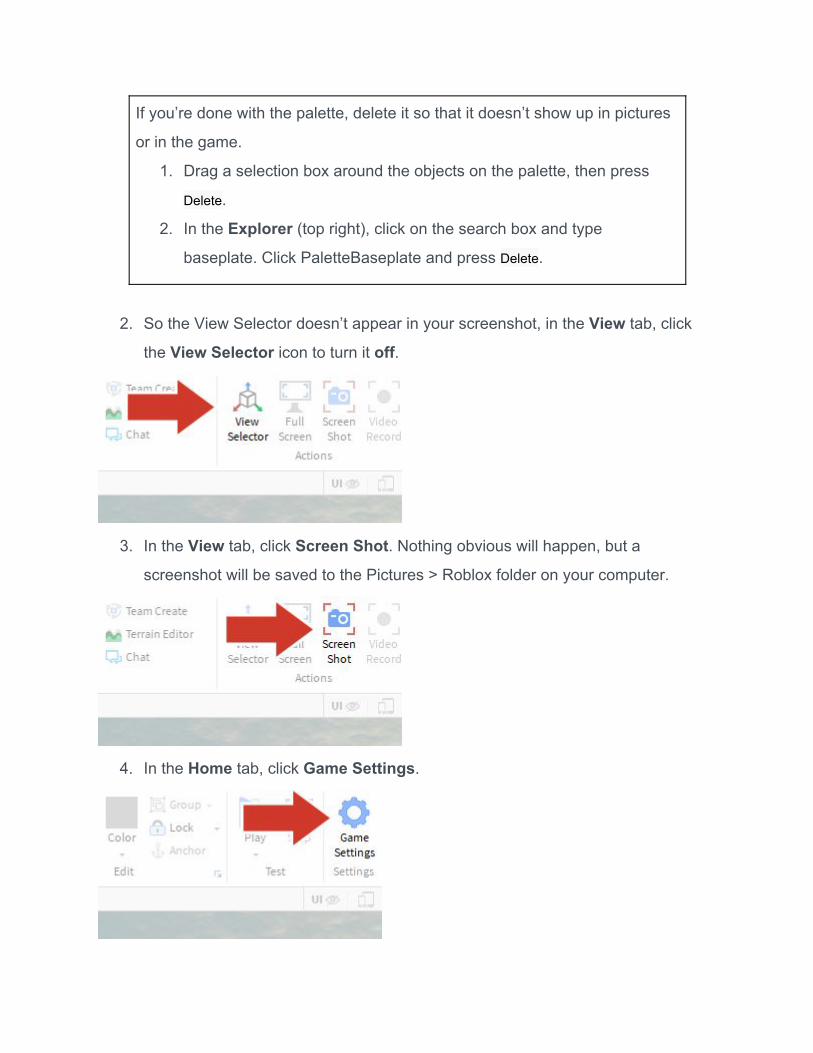
If you’re done with the palette, delete it so that it doesn’t show up in pictures
or in the game.
1. Drag a selection box around the objects on the palette, then press
Delete.
2. In the Explorer (top right), click on the search box and type
baseplate. Click PaletteBaseplate and press Delete.
2. So the View Selector doesn’t appear in your screenshot, in the View tab, click
the View Selector icon to turn it off.
3. In the View tab, click Screen Shot. Nothing obvious will happen, but a
screenshot will be saved to the Pictures > Roblox folder on your computer.
4. In the Home tab, click Game Settings.
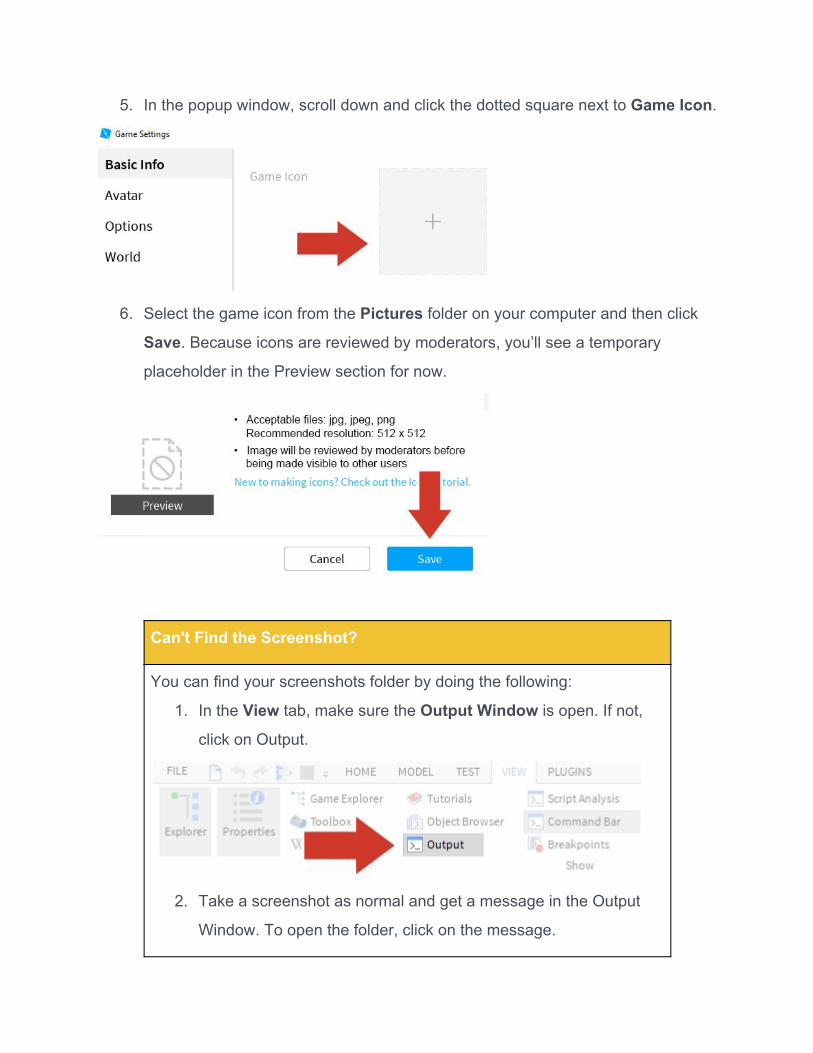
5. In the popup window, scroll down and click the dotted square next to Game Icon.
6. Select the game icon from the Pictures folder on your computer and then click
Save. Because icons are reviewed by moderators, you’ll see a temporary
placeholder in the Preview section for now.
Can't Find the Screenshot?
You can find your screenshots folder by doing the following:
1. In the View tab, make sure the Output Window is open. If not,
click on Output.
2. Take a screenshot as normal and get a message in the Output
Window. To open the folder, click on the message.
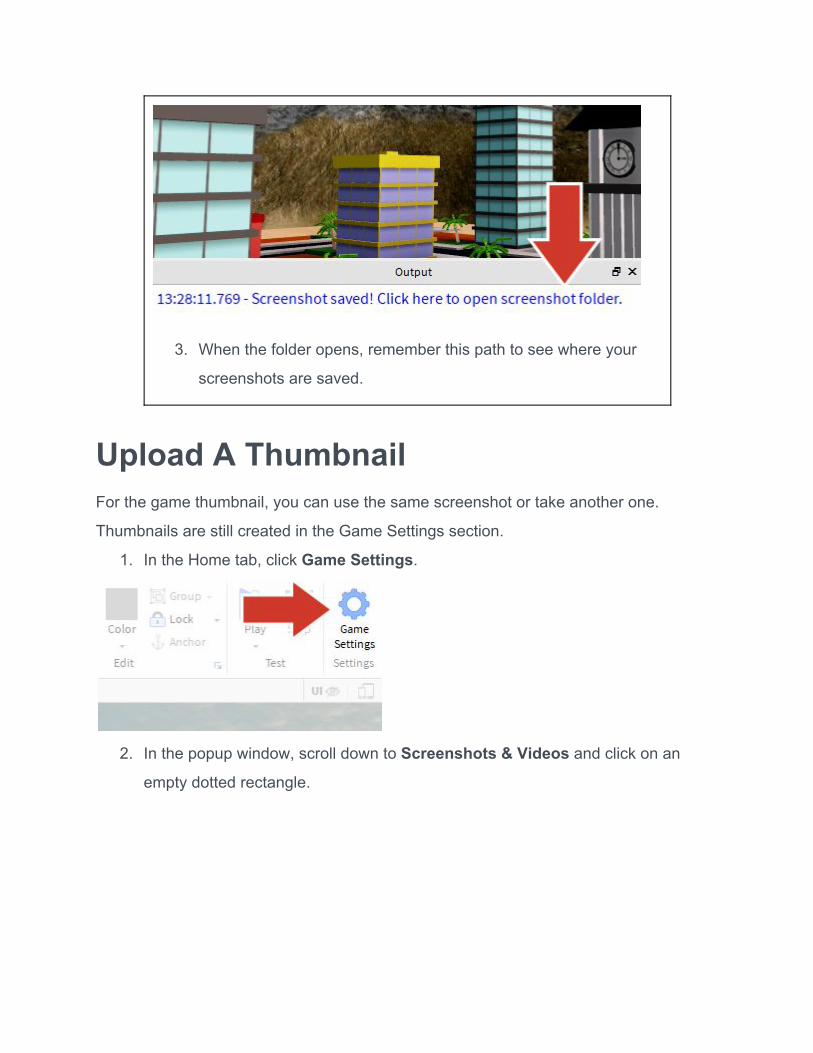
3. When the folder opens, remember this path to see where your
screenshots are saved.
Upload A Thumbnail For the game thumbnail, you can use the same screenshot or take another one.
Thumbnails are still created in the Game Settings section.
1. In the Home tab, click Game Settings.
2. In the popup window, scroll down to Screenshots & Videos and click on an
empty dotted rectangle.
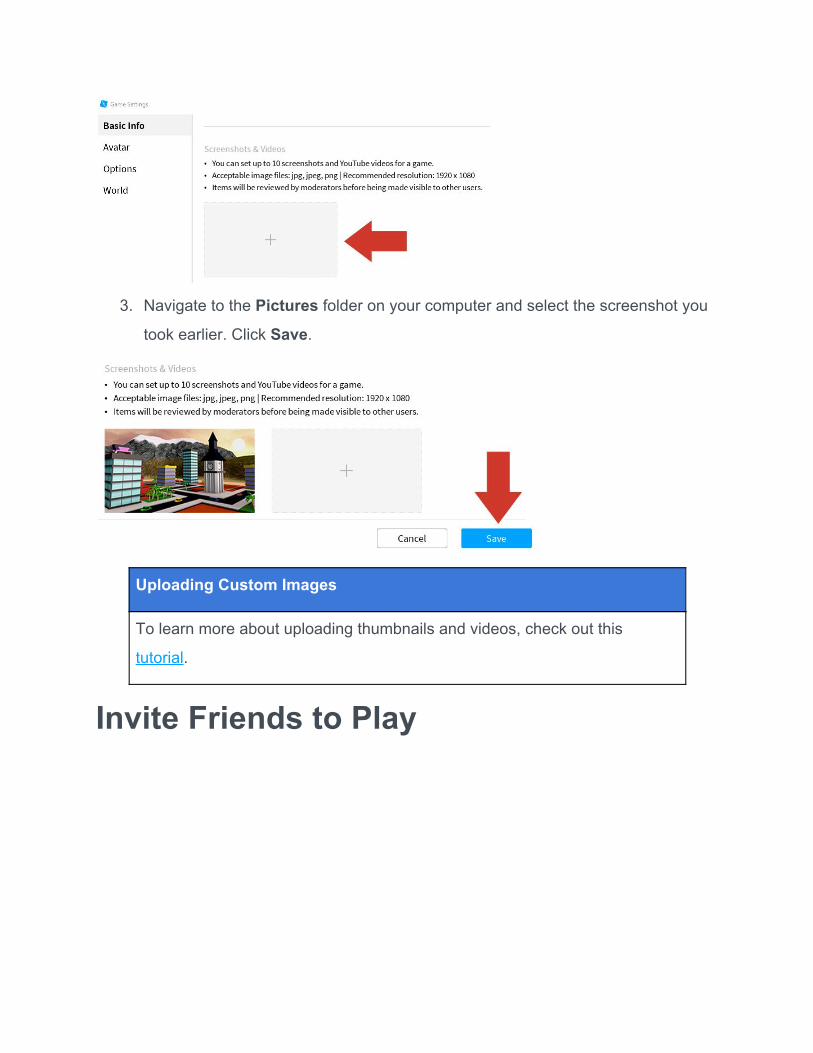
3. Navigate to the Pictures folder on your computer and select the screenshot you
took earlier. Click Save.
Uploading Custom Images
To learn more about uploading thumbnails and videos, check out this
tutorial.
Invite Friends to Play

When you first publish a game, it’s automatically set to private. Before you make it
public for others to play, take a moment to tidy the game by deleting unused items as
well as the palette shelf.
1. Publish your game so your friends will get your latest changes.
2. In the Home tab, click Game Settings.
3. Scroll down to the Playability section and click Public.
4. Click Save.

Take the Challenge!
Test your knowledge and earn the Ghidorah’s Wings avatar item and Architect of
Destruction Badge by clicking the button below to open a Roblox quiz game.
Finish the Challenge
Congrats! You’ve completed the Creator Challenge. This is just the beginning. Below
are a few ways in which you can continue to learn and customize your games.
Below is supplemental content:
Adding Models to the Game Any model can be destroyed for points, but it must be placed into a specific folder. You
can even copy and paste objects from other Studio files into the template.
To add objects to the game:
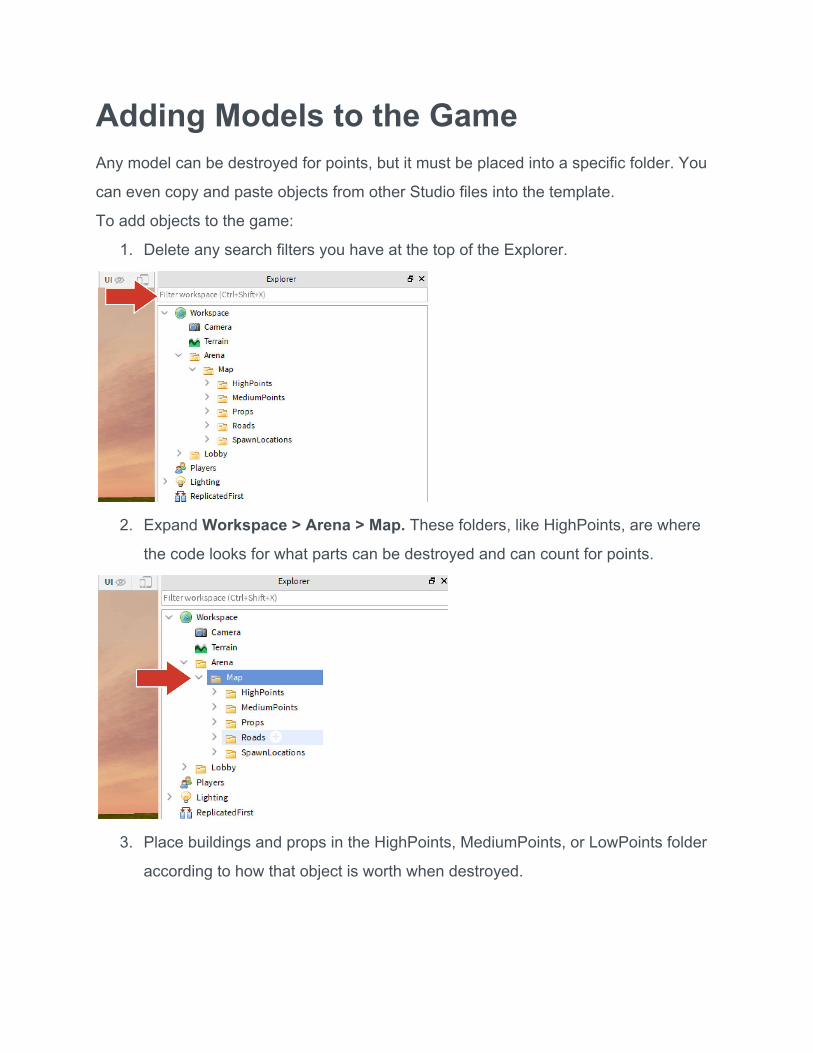
1. Delete any search filters you have at the top of the Explorer.
2. Expand Workspace > Arena > Map. These folders, like HighPoints, are where
the code looks for what parts can be destroyed and can count for points.
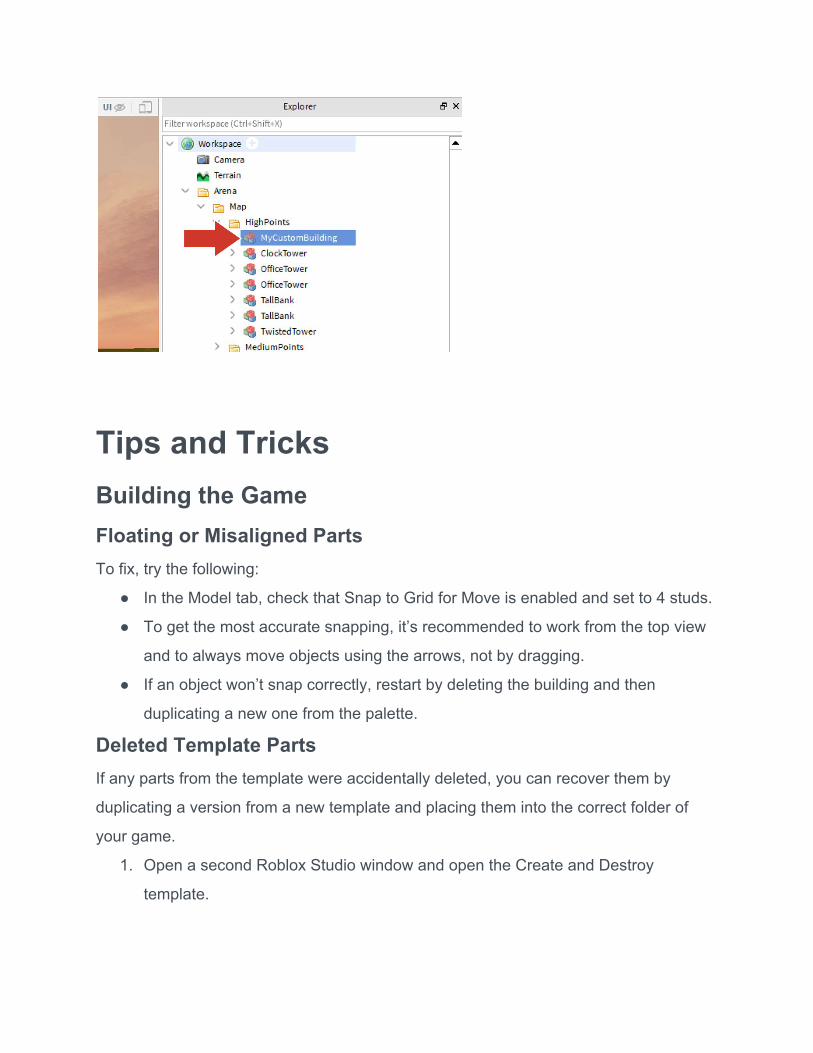
3. Place buildings and props in the HighPoints, MediumPoints, or LowPoints folder
according to how that object is worth when destroyed.
Tips and Tricks Building the Game Floating or Misaligned Parts To fix, try the following:
● In the Model tab, check that Snap to Grid for Move is enabled and set to 4 studs.
● To get the most accurate snapping, it’s recommended to work from the top view
and to always move objects using the arrows, not by dragging.
● If an object won’t snap correctly, restart by deleting the building and then
duplicating a new one from the palette.
Deleted Template Parts If any parts from the template were accidentally deleted, you can recover them by
duplicating a version from a new template and placing them into the correct folder of
your game.
1. Open a second Roblox Studio window and open the Create and Destroy
template.
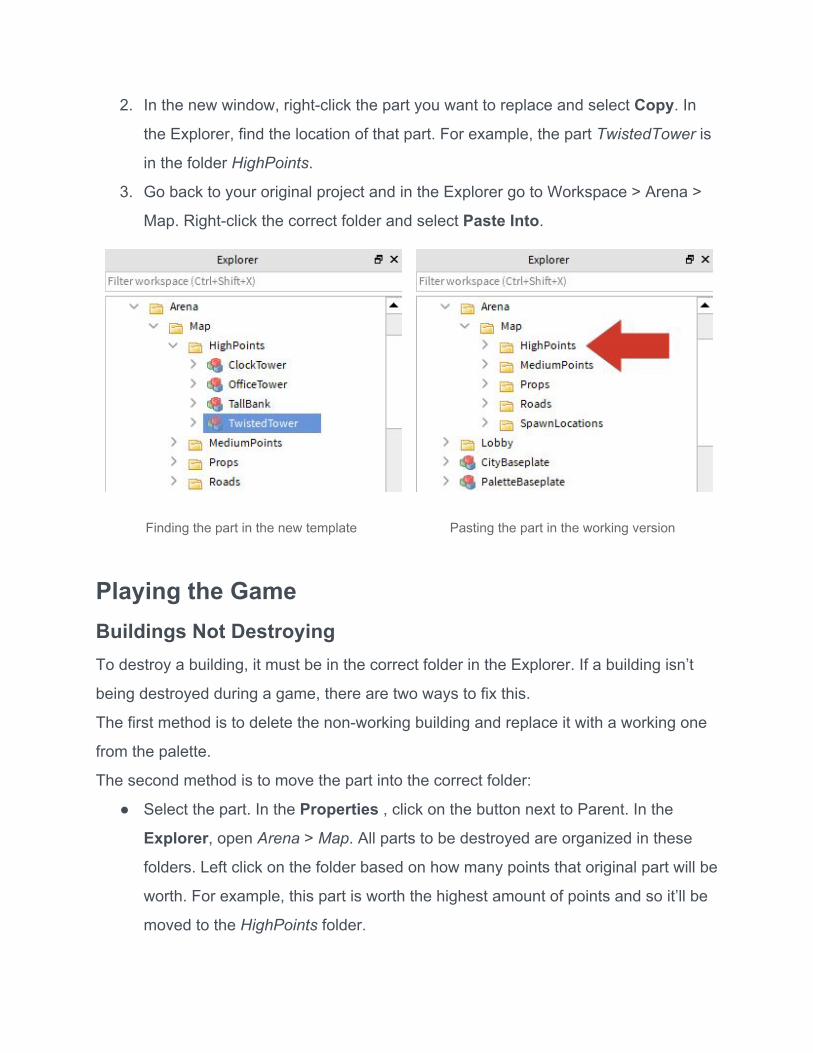
2. In the new window, right-click the part you want to replace and select Copy. In
the Explorer, find the location of that part. For example, the part TwistedTower is
in the folder HighPoints.
3. Go back to your original project and in the Explorer go to Workspace > Arena >
Map. Right-click the correct folder and select Paste Into.
Finding the part in the new template Pasting the part in the working version
Playing the Game Buildings Not Destroying To destroy a building, it must be in the correct folder in the Explorer. If a building isn’t
being destroyed during a game, there are two ways to fix this.
The first method is to delete the non-working building and replace it with a working one
from the palette.
The second method is to move the part into the correct folder:
● Select the part. In the Properties , click on the button next to Parent. In the
Explorer, open Arena > Map. All parts to be destroyed are organized in these
folders. Left click on the folder based on how many points that original part will be
worth. For example, this part is worth the highest amount of points and so it’ll be
moved to the HighPoints folder.
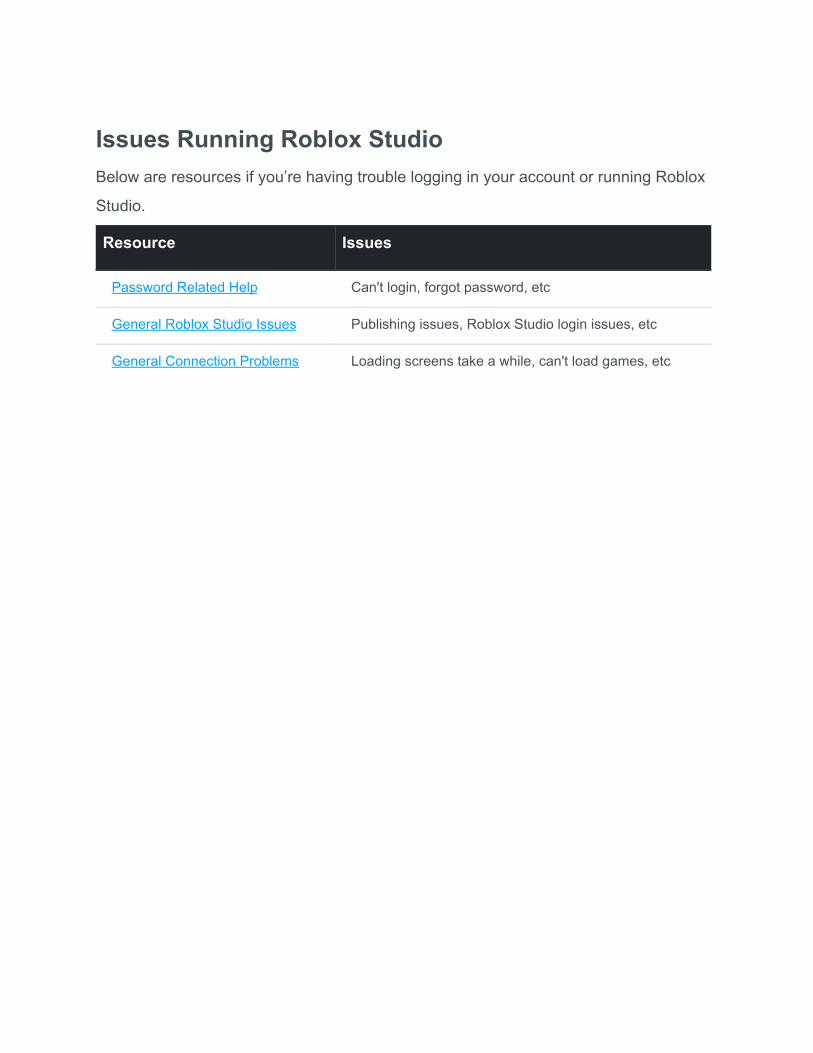
Issues Running Roblox Studio Below are resources if you’re having trouble logging in your account or running Roblox
Studio.
Resource Issues
Password Related Help Can't login, forgot password, etc
General Roblox Studio Issues Publishing issues, Roblox Studio login issues, etc
General Connection Problems Loading screens take a while, can't load games, etc