Embed Size (px)
Citation preview


DIODE
Controls direction of current flow. For this class the 1N4001-1Nxxxx family should work fine.
Note:
Depending on the load you can substitute an LED (light emitting diode) for a regular diode.
Control is the Arduino Signal = Pin 9 for example


LAB 5: Shift Registers: Using 3 pins on the Arduino board to drive 8 LEDs
See https://www.youtube.com/watch?v=bqfPZXEuyuc for more details
Demonstrate Parts A and B.
Your breadboard might look something like this:
Note:
The shift register has a little notch missing at the "top". That notch on the right in this diagram.

LAB A.
/* --------------------------------------------------------- * Drive 8 LEDS using 3 pins. (Chip used: 74HC595 Shift Register)* ---------------------------------------------------------
* * We have already controlled 8 LEDs however this does it in a slightly* different manner. Rather than using 8 pins we will use just three* and an additional chip. Hint: This is what is used in the LED cubes.
*/
//Pin Definitions //Pin Definitions //The 74HC595 uses a serial communication //link which has three pins int data = 2; int clock = 3; int latch = 4;
/* * setup() - this function runs once when you turn your Arduino on* We set the three control pins to outputs
*/ void setup() { pinMode(data, OUTPUT); pinMode(clock, OUTPUT); pinMode(latch, OUTPUT); }
/* * loop() - this function will start after setup finishes and then repeat* we set which LEDs we want on then call a routine which sends the states to the* 74HC595
*/ void loop() // run over and over again { int delayTime = 100; //the number of milliseconds to delay between LED updates for(int i = 0; i < 256; i++){ updateLEDs(i); delay(delayTime); } }
/* updateLEDs() - sends the LED states set in ledStates to the 74HC595 * sequence
*/ void updateLEDs(int value){ digitalWrite(latch, LOW); //Pulls the chips latch low shiftOut(data, clock, MSBFIRST, value); //Shifts out the 8 bits to the shift register digitalWrite(latch, HIGH); //Pulls the latch high displaying the data }
LAB B. Making it better: Replace the Loop () code. Lights light up one after another and off in a similar manner.
void loop() // run over and over again { int delayTime = 100; for(int i = 0; i < 8; i++){ changeLED(i,ON);

delay(delayTime); } for (int i = 0; i < 8; i++){ changeLED(i,OFF); delay(delayTime); }
Here is the changeLED function. You can create your own functions for different LED patterns
//Used for single LED manipulation int ledState = 0; const int ON = HIGH; const int OFF = LOW; //These are declared before void setup ()
//These are used in the bitwise math that we use to change individual LEDs //For more details http://en.wikipedia.org/wiki/Bitwise_operation int bits[] = {B00000001, B00000010, B00000100, B00001000,
B00010000, B00100000, B01000000, B10000000}; int masks[] = {B11111110, B11111101, B11111011, B11110111,
B11101111, B11011111, B10111111, B01111111}; /* * changeLED(int led, int state) - changes an individual LED* LEDs are 0 to 7 and state is either 0 - OFF or 1 - ON
*/ void changeLED(int led, int state){ ledState = ledState & masks[led]; //clears ledState of the bit we are addressing
//if the bit is on we will add it to ledState if(state == ON){ledState = ledState | bits[led];} updateLEDs(ledState); //send the new LED state to the shift register }
Notice this function will just change the 1 bit in the 8 bit pattern. It works with an existing pattern called ledState. Let's consider the first couple of loops:
1. changeLED (0, ON)o result of ledState = ledState & mask[0]
&
ledState 0 0 0 0 0 0 0 0
mask[0] 1 1 1 1 1 1 1 0
ledState (result) 0 0 0 0 0 0 0 0
o Notice that each bit is AND 'd together. 0 AND 1 = 0 0 AND 0 = 0
o result of ledState = ledState | bits[0]
|

ledState 0 0 0 0 0 0 0 0
bits[0] 0 0 0 0 0 0 0 1
ledState (result) 0 0 0 0 0 0 0 1
o Notice that each bit is OR 'd together. 0 OR 1 = 1 0 OR 0 = 0
o The LSB LED will be turned on here
2. changeLED (1, ON)o result of ledState = ledState & mask[1]
&
ledState 0 0 0 0 0 0 0 1
mask[1] 1 1 1 1 1 1 0 1
ledState (result) 0 0 0 0 0 0 0 1
o Notice that each bit is AND 'd together. 0 AND 1 = 0 0 AND 0 = 0 1 AND 1 = 1
o result of ledState = ledState | bits[1]
|
ledState 0 0 0 0 0 0 0 1
bits[1] 0 0 0 0 0 0 1 0
ledState (result) 0 0 0 0 0 0 1 1
o Notice that each bit is OR 'd together. 0 OR 1 = 1 1 OR 0 = 1 0 OR 0 = 0
o the two LSB LED's will be turned on here
Notice that the loop code turns on one LED at a time until all of the LEDs are turned on and then turns each LED off one at a time. changeLED only changes the value of one LED at a time.


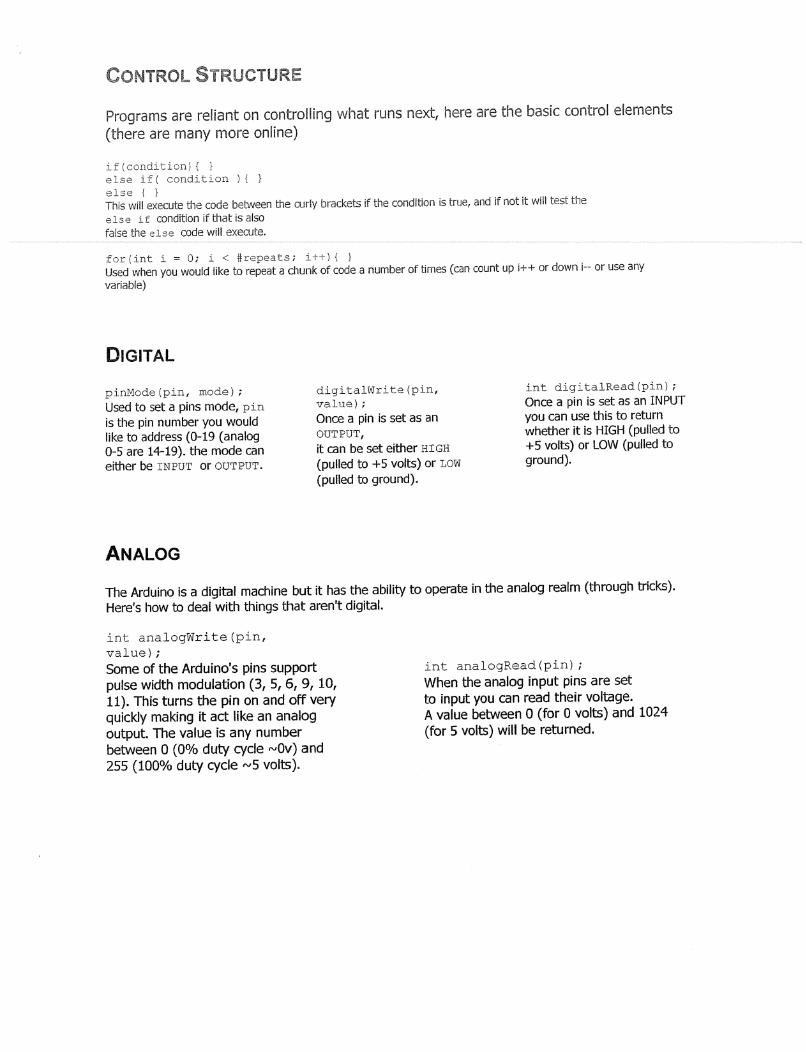
Photo Resistors
A photoresistor or photocell is a light-controlled variable resistor. The resistance of a photoresistor decreases with increasing incident light intensity. A photoresistor can be applied in light-sensitive detector circuits, and light- and dark-activated switching circuits. It's also called light-dependent resistor (LDR).
Note: You can use various resistor values. You will however get different values at the analog output so keep this in mind.