Embed Size (px)
Citation preview

Romfor International Ltd..
HANDLING
TUBULARS
HANDLING
TUBULAR
Backup Backup
S
HA
ND
LIN
G T
UB
UL
AR
S
HandHand

Romfor International Ltd.
HANDLING
TUBULARS
HANDLING
TUBULARS
Backup HandBackup Hand
CA
SIN
G
CASINGCASING
Romfor International Ltd. Backup Hand
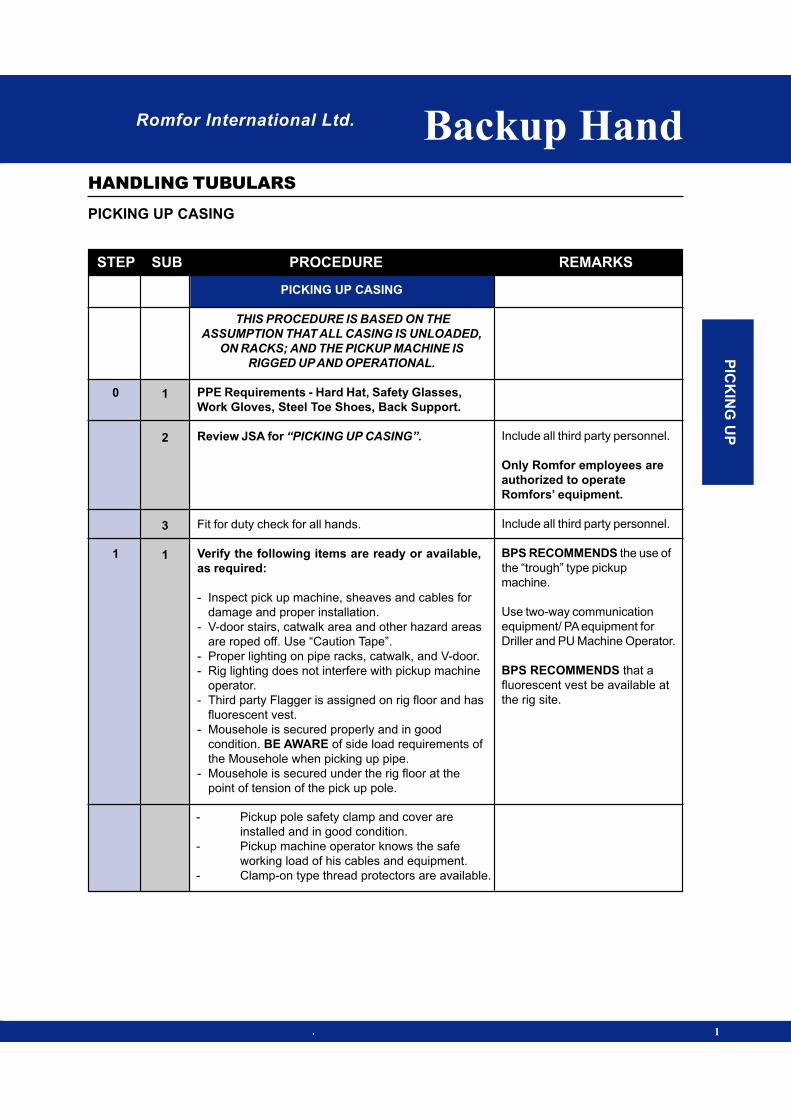
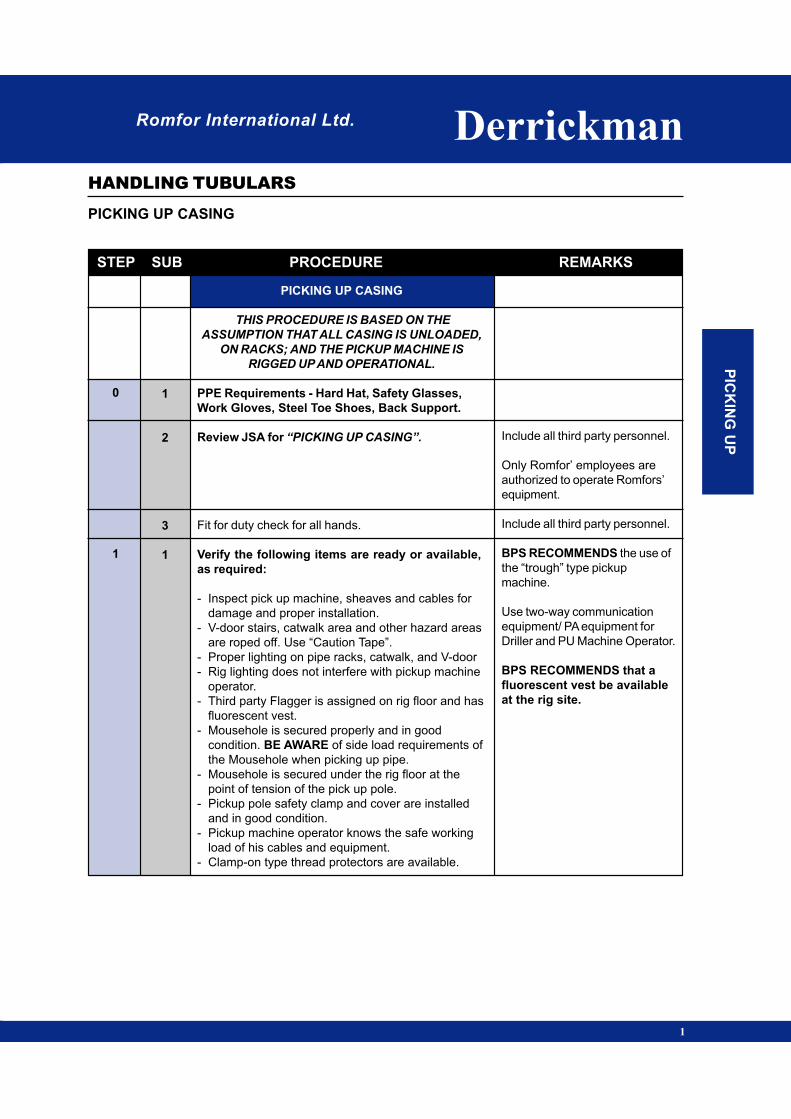
STEP SUB PROCEDURE REMARKS
PICKING UP CASING
HANDLING TUBULARS
. 1
PICKING UP CASING
THIS PROCEDURE IS BASED ON THE
ASSUMPTION THAT ALL CASING IS UNLOADED,
ON RACKS; AND THE PICKUP MACHINE IS
RIGGED UP AND OPERATIONAL.
PPE Requirements - Hard Hat, Safety Glasses,
Work Gloves, Steel Toe Shoes, Back Support.
Review JSA for “PICKING UP CASING”.
Fit for duty check for all hands.
Verify the following items are ready or available,
as required:
- Inspect pick up machine, sheaves and cables for
damage and proper installation.
- V-door stairs, catwalk area and other hazard areas
are roped off. Use “Caution Tape”.
- Proper lighting on pipe racks, catwalk, and V-door.
- Rig lighting does not interfere with pickup machine
operator.
- Third party Flagger is assigned on rig floor and has
fluorescent vest.
- Mousehole is secured properly and in good
condition. BE AWARE of side load requirements of
the Mousehole when picking up pipe.
- Mousehole is secured under the rig floor at the
point of tension of the pick up pole.
Include all third party personnel.
Only Romfor employees are
authorized to operate
Romfors’ equipment.
Include all third party personnel.
BPS RECOMMENDS the use of
the “trough” type pickup
machine.
Use two-way communication
equipment/ PA equipment for
Driller and PU Machine Operator.
BPS RECOMMENDS that a
fluorescent vest be available at
the rig site.
0
1
1
2
3
1
PIC
KIN
G U
P
- Pickup pole safety clamp and cover are
installed and in good condition.
- Pickup machine operator knows the safe
working load of his cables and equipment.
- Clamp-on type thread protectors are available.
STEP SUB PROCEDURE REMARKS
PICKING UP CASING
HANDLING TUBULARS
Romfor International LTd. Backup Hand
2
2
3
Verify the size, weight, grade, connection, and joint
count of the tubulars. The pipe is in the proper order
for picking up.
Establish communication links between pickup
machine operator and personnel working the pipe
racks.
Discuss emergency shut down procedures.
READY TO PICKUP CASING
Remove chocks from the casing on pipe rack, using a
metal hook.
It is recommended to roll all casing from the
ground level.
If this is not possible, and personnel are required
to be on top of the casing; then the use of
walkways are recommended. DO NOT walk on
bare casing, use the walkway.
Access the walkways from the end opposite the
catwalk using a secured ladder or stairs.
PICK UP WITH PICKUP MACHINE:
Roll the joint to the pickup machine using a pipe roller.
Install casing thread protector.
Use two-way communication
equipment/ PA equipment for
pipe rollers and PU Machine
Operator.
Use Romfors’ angle iron type
chocks.
DO NOT UNDER ANY
CONDITION attempt to stop or
step over rolling tubulars.
Rig Manager Authorization is
required before any
personnel are permitted to
go on top of the casing.
JSA must be reviewed with
direct supervision by the Rig
Manager.
DO NOT walk across pipe racks
from catwalk.
MOVE ONLY ONE JOINT of
casing at a time.
DO NOT use feet or hands to
move pipe while on top of the
pipe racks.
2
3
0
1
2
Romfor International Ltd. Backup Hand
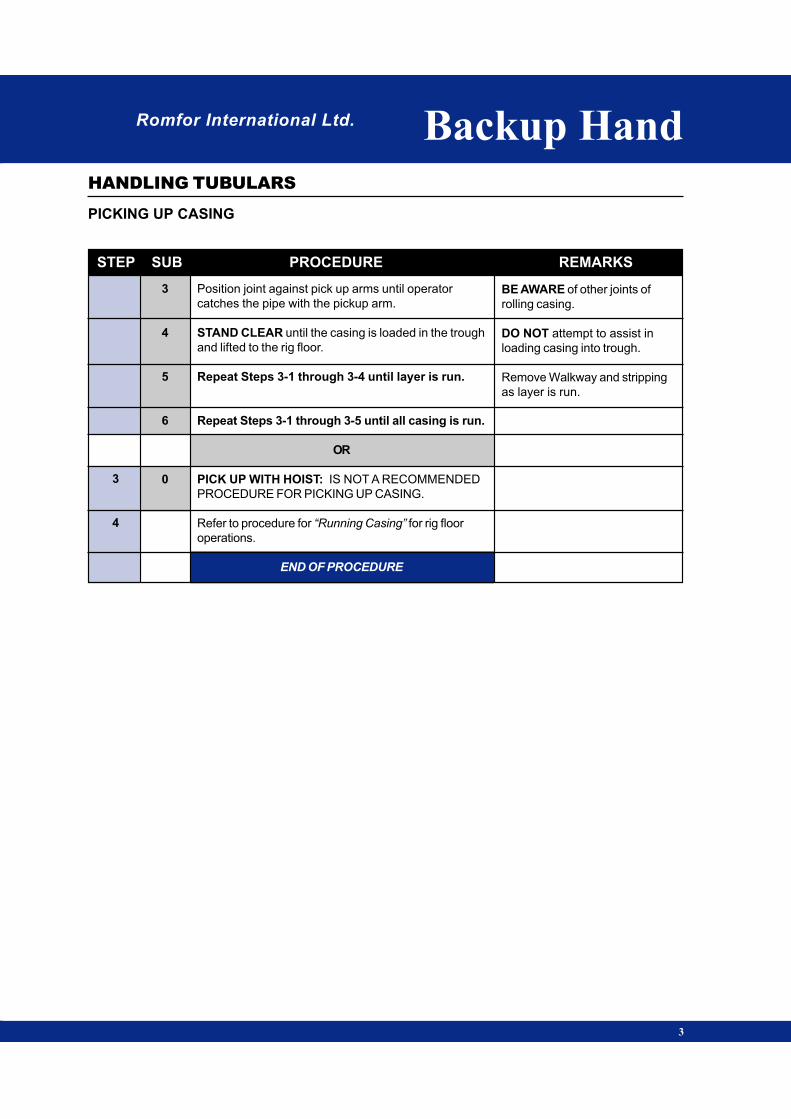
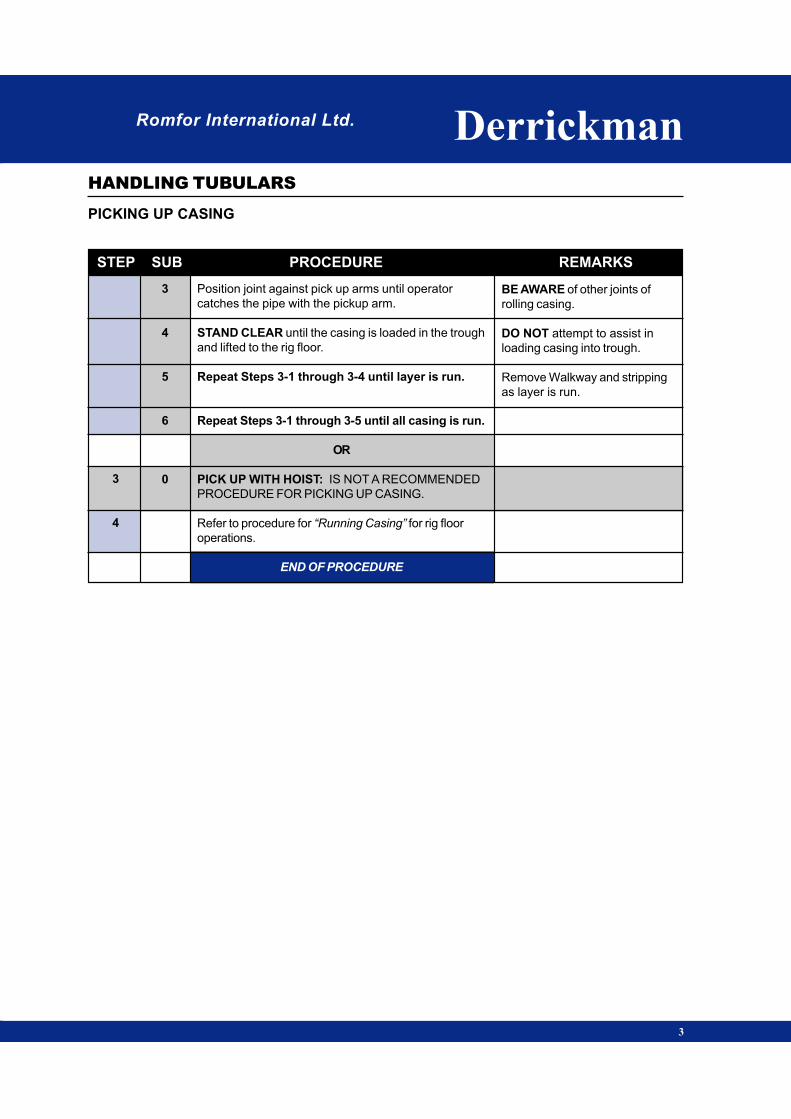
STEP SUB PROCEDURE REMARKS
PICKING UP CASING
HANDLING TUBULARS
3
BE AWARE of other joints of
rolling casing.
DO NOT attempt to assist in
loading casing into trough.
Remove Walkway and stripping
as layer is run.
3
4
3
4
5
6
0
Position joint against pick up arms until operator
catches the pipe with the pickup arm.
STAND CLEAR until the casing is loaded in the trough
and lifted to the rig floor.
Repeat Steps 3-1 through 3-4 until layer is run.
Repeat Steps 3-1 through 3-5 until all casing is run.
OR
PICK UP WITH HOIST: IS NOT A RECOMMENDED
PROCEDURE FOR PICKING UP CASING.
Refer to procedure for “Running Casing” for rig floor
operations.
END OF PROCEDURE

Romfor International Ltd. Backup Hand
STEP SUB PROCEDURE REMARKS
UNLOADING CASING
HANDLING TUBULARS
. 1
RECEIVING TUBULARS
DISCUSS TUBULAR REQUIREMENTS PRIOR TO
ARRIVAL OF GOODS TO LOCATION. PLAN FOR
REQUIRED SPACE AND SIZE OF FORKLIFT.
PPE Requirements - Hard Hat, Safety Glasses,
Work Gloves, Steel Toe Shoes, Back Support.
Review JSA for RECEIVING TUBULARS
Discuss procedures with Rig Manager to include:
- Manifest / material transfer requirements
- Location of tubulars.
- Unloading procedure.
- Number and position of trucks on location.
- Size of forklift required (Capacity & length of
forks).
- Pipe racks, stripping (in good condition), and
proper chocks.
Verify the following items are ready or available,
as required:
- Forklift is ready for operation.
- Pipe racks are level with Catwalk, equipped
with end stops of the proper height to
accommodate all layers of pipe.
- Catwalks are level and pinned together.
- Stripping is available.
- Chocks are available.
- Tally tape and Tally book.
Verify the size, weight, grade, connection, and joint
count of the tubulars against the manifest.
The Rig Manager and Operator Representative should
discuss the unloading sequence to assure that the
proper weights and grades are placed in the correct
order on the pipe racks.
BPS RECOMMENDS 18” or
shorter pipe racks. BPS
RECOMMENDS that the box-end
faces the truck cab and all tubulars
are stripped and chocked.
DO NOT UNDER ANY
CONDITIONS attempt to stop or
step over rolling tubulars.
Include all third party personnel.
It is NOT A RECOMMENDED
procedure to unload tubulars with
a crane. Only one truck load of
tubulars on location at one time.
When positioning pipe racks,
plan for room to handle casing
tools on catwalk.
Refer to forklift operational
procedures. Verify that backup
signal, brakes and emergency
brake are operational.
Use Nabors’ angle iron type
chocks.
Verify that thread protectors are
installed on both the pin end and
box end of the pipe.
Refer to Operator’s casing
program.
0
1
1
2
3
1
2
3
UN
LO
AD
ING
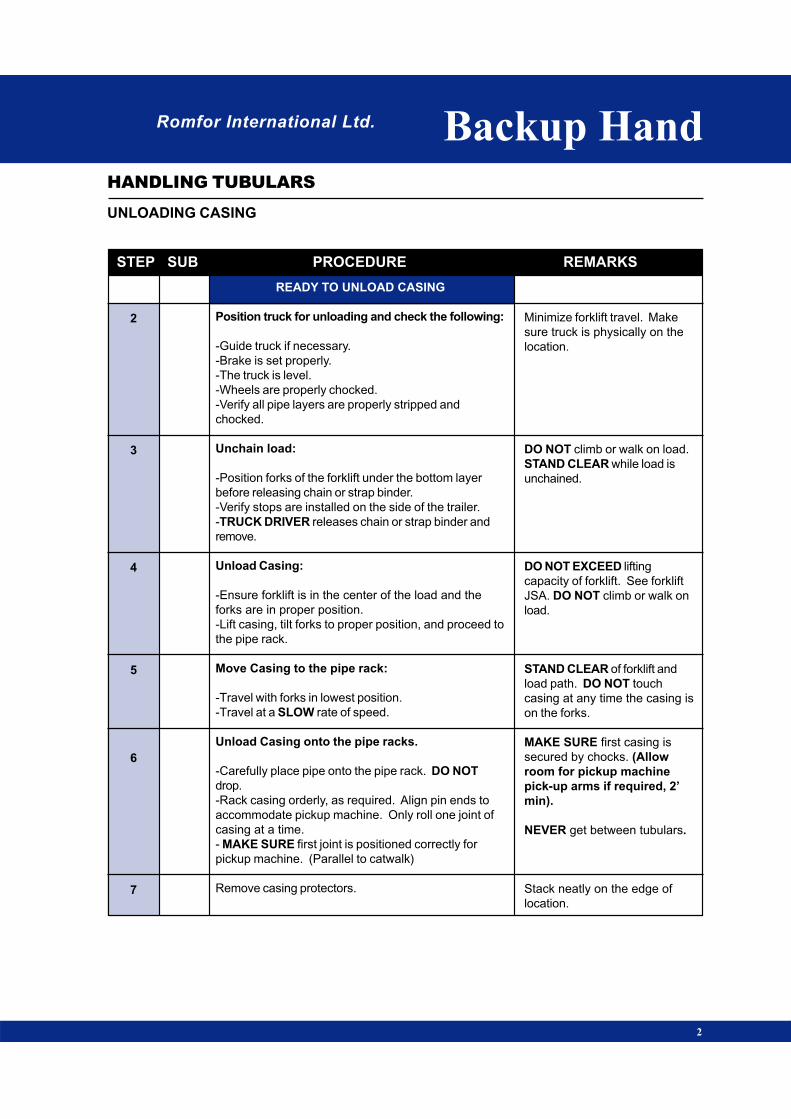
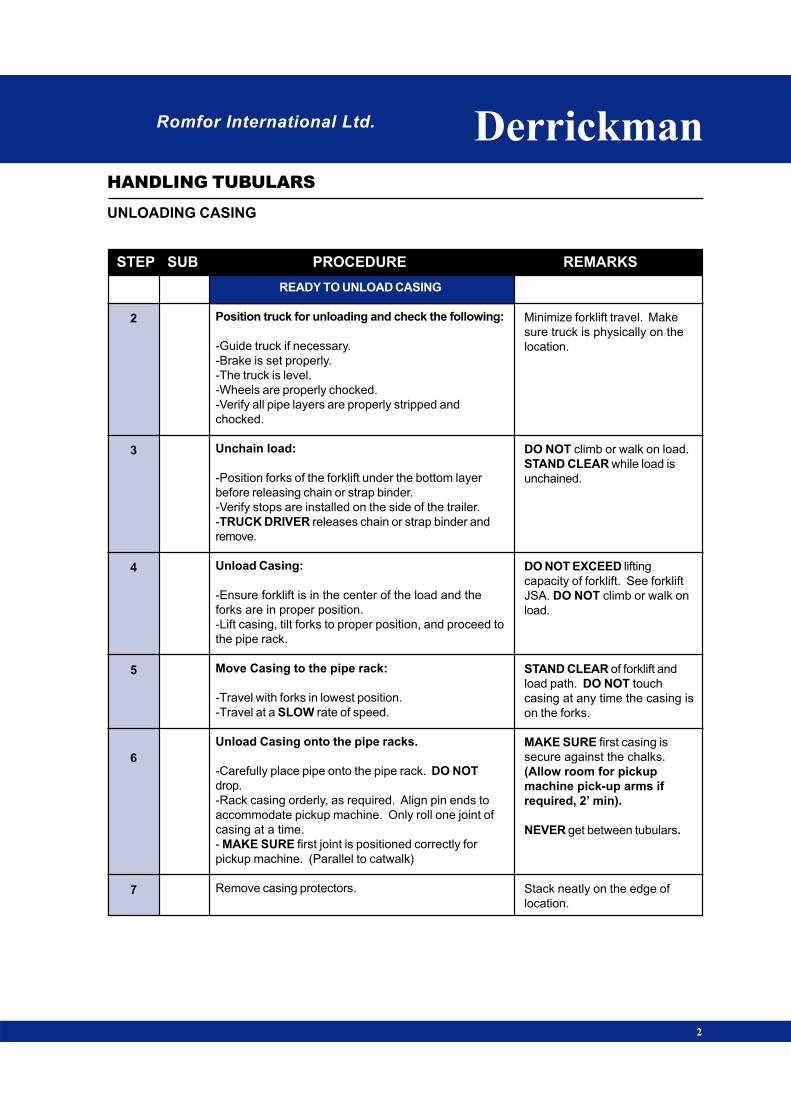
STEP SUB PROCEDURE REMARKS
UNLOADING CASING
HANDLING TUBULARS
Romfor International Ltd. Backup Hand
2
2
3
4
5
6
7
READY TO UNLOAD CASING
Position truck for unloading and check the following:
-Guide truck if necessary.
-Brake is set properly.
-The truck is level.
-Wheels are properly chocked.
-Verify all pipe layers are properly stripped and
chocked.
Unchain load:
-Position forks of the forklift under the bottom layer
before releasing chain or strap binder.
-Verify stops are installed on the side of the trailer.
-TRUCK DRIVER releases chain or strap binder and
remove.
Unload Casing:
-Ensure forklift is in the center of the load and the
forks are in proper position.
-Lift casing, tilt forks to proper position, and proceed to
the pipe rack.
Move Casing to the pipe rack:
-Travel with forks in lowest position.
-Travel at a SLOW rate of speed.
Unload Casing onto the pipe racks.
-Carefully place pipe onto the pipe rack. DO NOT
drop.
-Rack casing orderly, as required. Align pin ends to
accommodate pickup machine. Only roll one joint of
casing at a time.
- MAKE SURE first joint is positioned correctly for
pickup machine. (Parallel to catwalk)
Remove casing protectors.
Minimize forklift travel. Make
sure truck is physically on the
location.
DO NOT climb or walk on load.
STAND CLEAR while load is
unchained.
DO NOT EXCEED lifting
capacity of forklift. See forklift
JSA. DO NOT climb or walk on
load.
STAND CLEAR of forklift and
load path. DO NOT touch
casing at any time the casing is
on the forks.
MAKE SURE first casing is
secured by chocks. (Allow
room for pickup machine
pick-up arms if required, 2’
min).
NEVER get between tubulars.
Stack neatly on the edge of
location.
Romfor International Ltd. Backup Hand
STEP SUB PROCEDURE REMARKS
UNLOADING CASING
HANDLING TUBULARS
3
Use wood stripping only. MAKE
SURE first joint is positioned
correctly for pickup machine.
(Parallel to catwalk)
Rig Manager Authorization is
required before any personnel
are permitted to go on top of
the casing.
JSA must be reviewed with
direct supervision by the Rig
Manager.
DO NOT walk across pipe racks
from catwalk.
Two walkways are recommended
for large OD casing.
DO NOT use feet or hands to roll
casing. DO NOT get in front of,
step over or attempt to stop:
rolling casing.
Rocks are not chocks! Use
proper chocks.
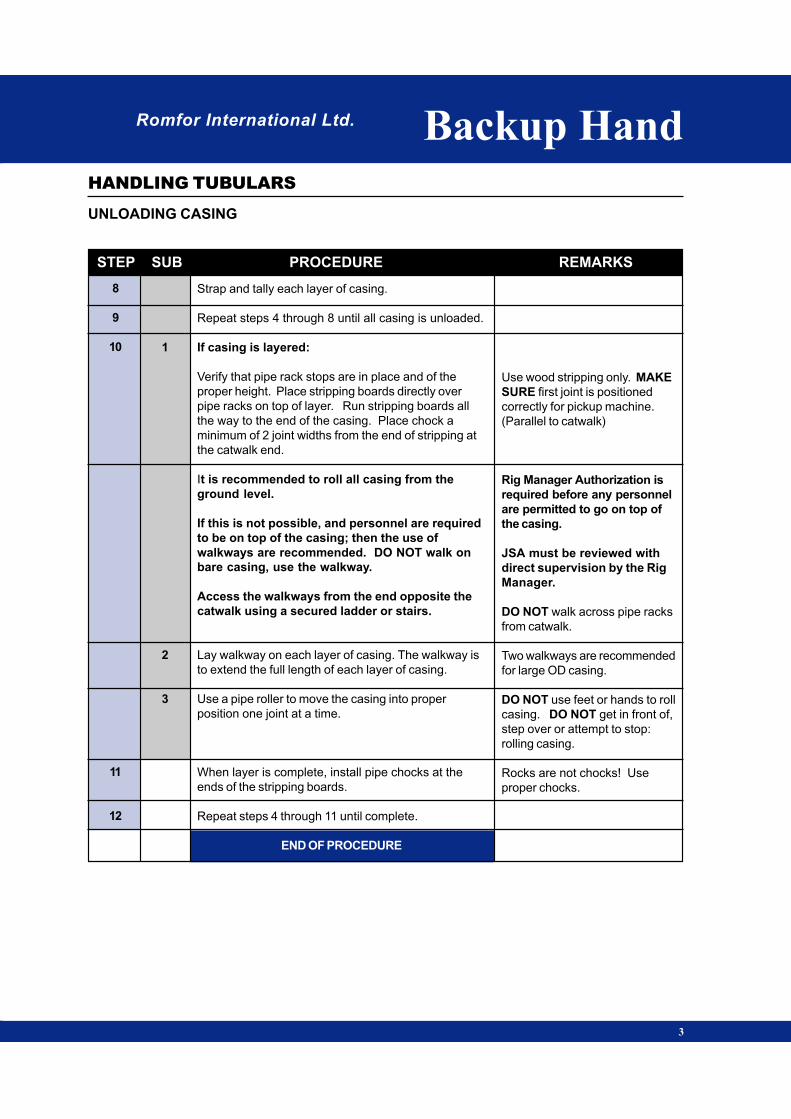
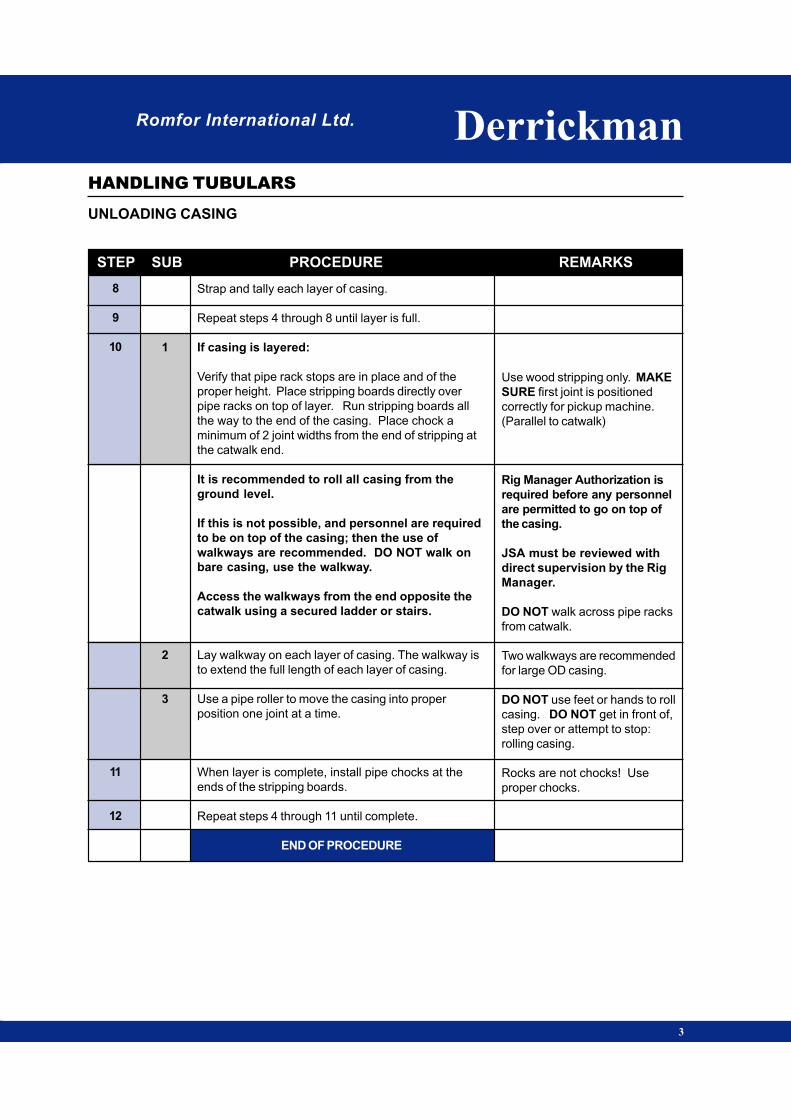
8
9
10
11
12
1
2
3
Strap and tally each layer of casing.
Repeat steps 4 through 8 until all casing is unloaded.
If casing is layered:
Verify that pipe rack stops are in place and of the
proper height. Place stripping boards directly over
pipe racks on top of layer. Run stripping boards all
the way to the end of the casing. Place chock a
minimum of 2 joint widths from the end of stripping at
the catwalk end.
It is recommended to roll all casing from the
ground level.
If this is not possible, and personnel are required
to be on top of the casing; then the use of
walkways are recommended. DO NOT walk on
bare casing, use the walkway.
Access the walkways from the end opposite the
catwalk using a secured ladder or stairs.
Lay walkway on each layer of casing. The walkway is
to extend the full length of each layer of casing.
Use a pipe roller to move the casing into proper
position one joint at a time.
When layer is complete, install pipe chocks at the
ends of the stripping boards.
Repeat steps 4 through 11 until complete.
END OF PROCEDURE
ROMFOR INTERNATIONAL LTD.
HANDLING
TUBULARS
HANDLING
TUBULARS
Backup HandBackup Hand
DR
IL
L C
OL
LA
RS
DRILL COLLARSDRILL COLLARS

ROMFOR INTERNATIONAL LTD.
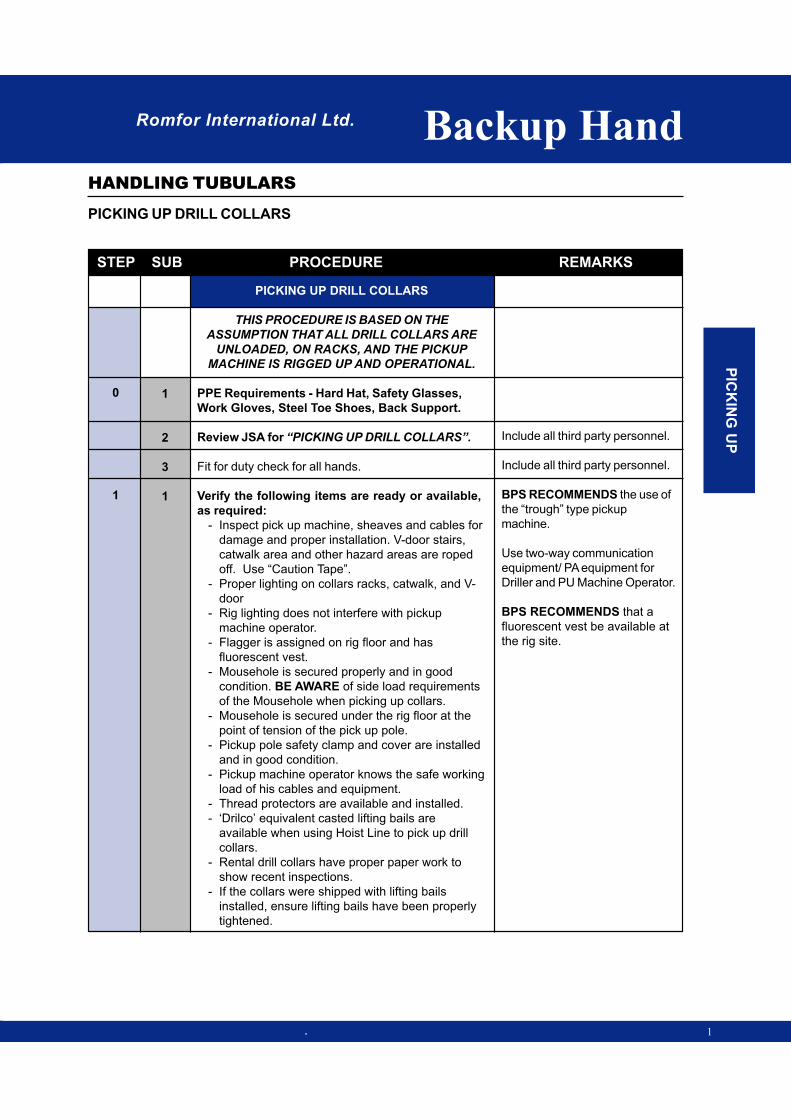
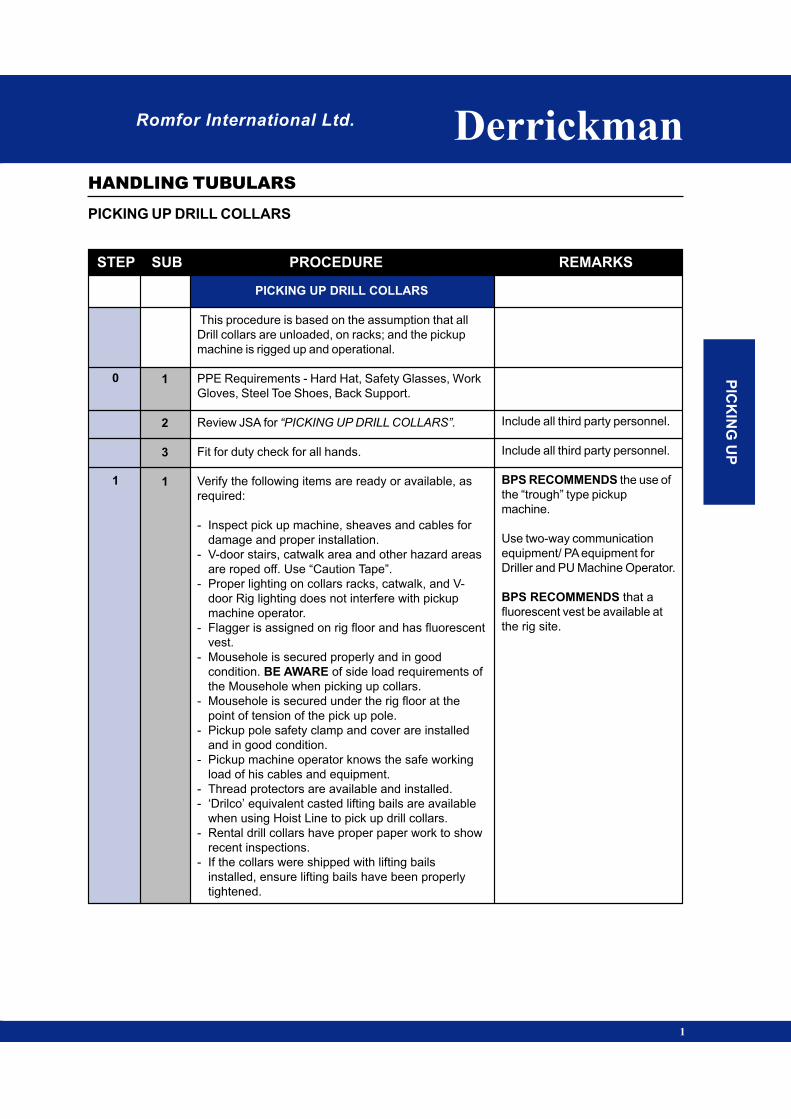
PRACTICE: PICKING UP DRILL COLLARS
POSITION: UPDATE FOR ALL POSITIONS
THREAD PROTECTORS
WITH LIFTING BAIL (CAST STEEL)
Made from steel castings meeting ASTM Specification
No. A27 Grade 60-30 (60,000 psi tensile — 30,000 psi
yield), with heavy bails suitable for picking up
and laying down drill collars with cat line. Threads and
shoulders are precision machined.
BoxPin
DRILCO
Romfor International Ltd. Backup Hand
STEP SUB PROCEDURE REMARKS
PICKING UP DRILL COLLARS
HANDLING TUBULARS
. 1
PICKING UP DRILL COLLARS
THIS PROCEDURE IS BASED ON THE
ASSUMPTION THAT ALL DRILL COLLARS ARE
UNLOADED, ON RACKS, AND THE PICKUP
MACHINE IS RIGGED UP AND OPERATIONAL.
PPE Requirements - Hard Hat, Safety Glasses,
Work Gloves, Steel Toe Shoes, Back Support.
Review JSA for “PICKING UP DRILL COLLARS”.
Fit for duty check for all hands.
Verify the following items are ready or available,
as required:
- Inspect pick up machine, sheaves and cables for
damage and proper installation. V-door stairs,
catwalk area and other hazard areas are roped
off. Use “Caution Tape”.
- Proper lighting on collars racks, catwalk, and V-
door
- Rig lighting does not interfere with pickup
machine operator.
- Flagger is assigned on rig floor and has
fluorescent vest.
- Mousehole is secured properly and in good
condition. BE AWARE of side load requirements
of the Mousehole when picking up collars.
- Mousehole is secured under the rig floor at the
point of tension of the pick up pole.
- Pickup pole safety clamp and cover are installed
and in good condition.
- Pickup machine operator knows the safe working
load of his cables and equipment.
- Thread protectors are available and installed.
- ‘Drilco’ equivalent casted lifting bails are
available when using Hoist Line to pick up drill
collars.
- Rental drill collars have proper paper work to
show recent inspections.
- If the collars were shipped with lifting bails
installed, ensure lifting bails have been properly
tightened.
Include all third party personnel.
Include all third party personnel.
BPS RECOMMENDS the use of
the “trough” type pickup
machine.
Use two-way communication
equipment/ PA equipment for
Driller and PU Machine Operator.
BPS RECOMMENDS that a
fluorescent vest be available at
the rig site.
0
1
1
2
3
1
PIC
KIN
G U
P
STEP SUB PROCEDURE REMARKS
PICKING UP DRILL COLLARS
HANDLING TUBULARS
Romfor International Ltd. Backup Hand
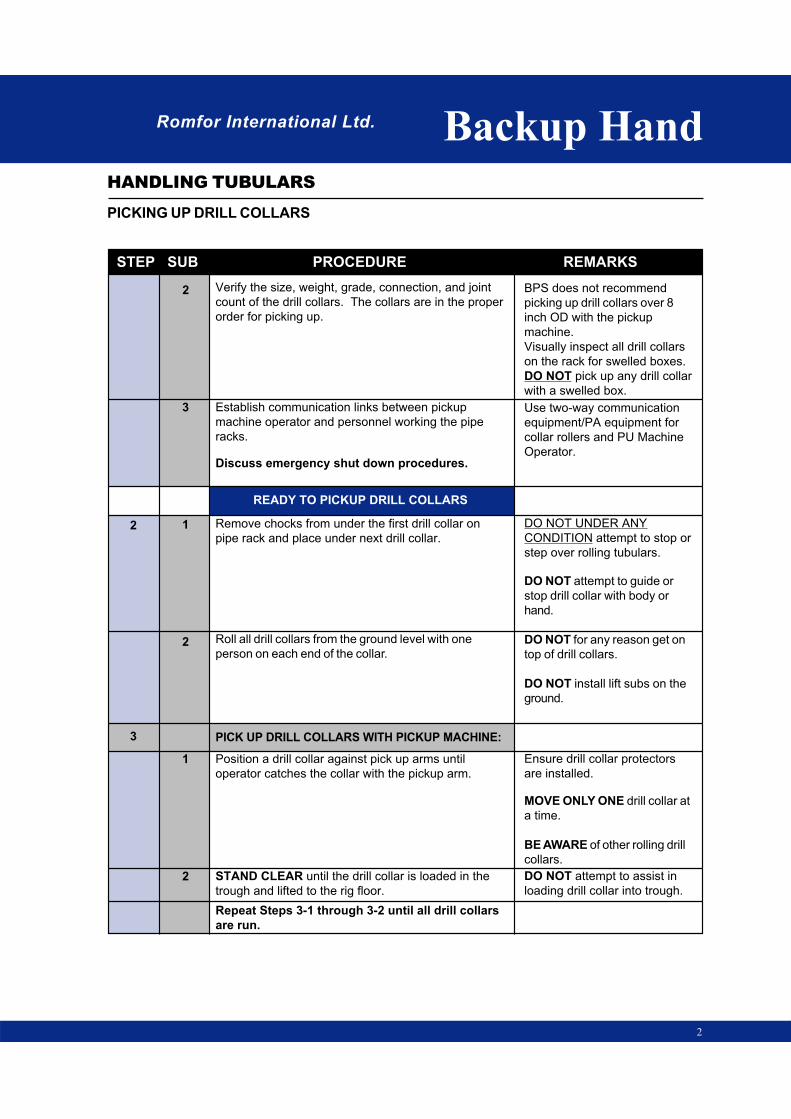
2
2
3
Verify the size, weight, grade, connection, and joint
count of the drill collars. The collars are in the proper
order for picking up.
Establish communication links between pickup
machine operator and personnel working the pipe
racks.
Discuss emergency shut down procedures.
READY TO PICKUP DRILL COLLARS
Remove chocks from under the first drill collar on
pipe rack and place under next drill collar.
Roll all drill collars from the ground level with one
person on each end of the collar.
PICK UP DRILL COLLARS WITH PICKUP MACHINE:
Position a drill collar against pick up arms until
operator catches the collar with the pickup arm.
STAND CLEAR until the drill collar is loaded in the
trough and lifted to the rig floor.
Repeat Steps 3-1 through 3-2 until all drill collars
are run.
BPS does not recommend
picking up drill collars over 8
inch OD with the pickup
machine.
Visually inspect all drill collars
on the rack for swelled boxes.
DO NOT pick up any drill collar
with a swelled box.
Use two-way communication
equipment/PA equipment for
collar rollers and PU Machine
Operator.
DO NOT UNDER ANY
CONDITION attempt to stop or
step over rolling tubulars.
DO NOT attempt to guide or
stop drill collar with body or
hand.
DO NOT for any reason get on
top of drill collars.
DO NOT install lift subs on the
ground.
Ensure drill collar protectors
are installed.
MOVE ONLY ONE drill collar at
a time.
BE AWARE of other rolling drill
collars.
DO NOT attempt to assist in
loading drill collar into trough.
2
3
1
2
1
2
Romfor International Ltd. Backup Hand
STEP SUB PROCEDURE REMARKS
PICKING UP DRILL COLLARS
HANDLING TUBULARS
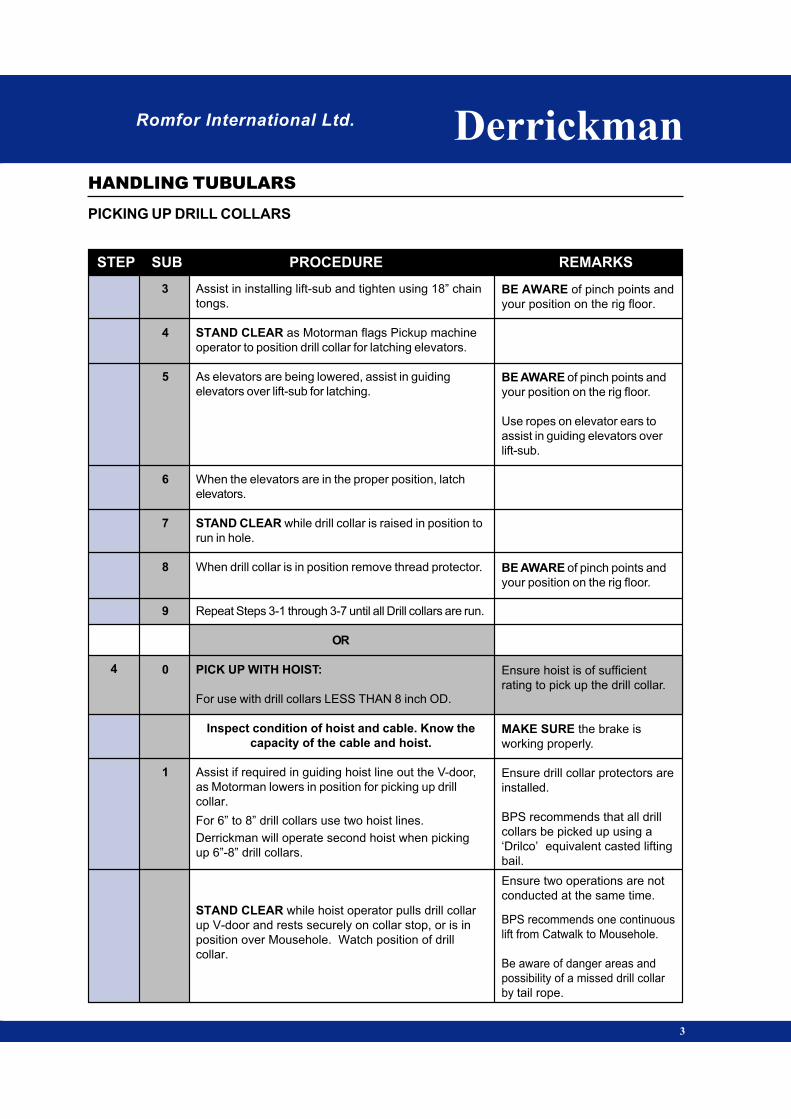
4
5
3
OR
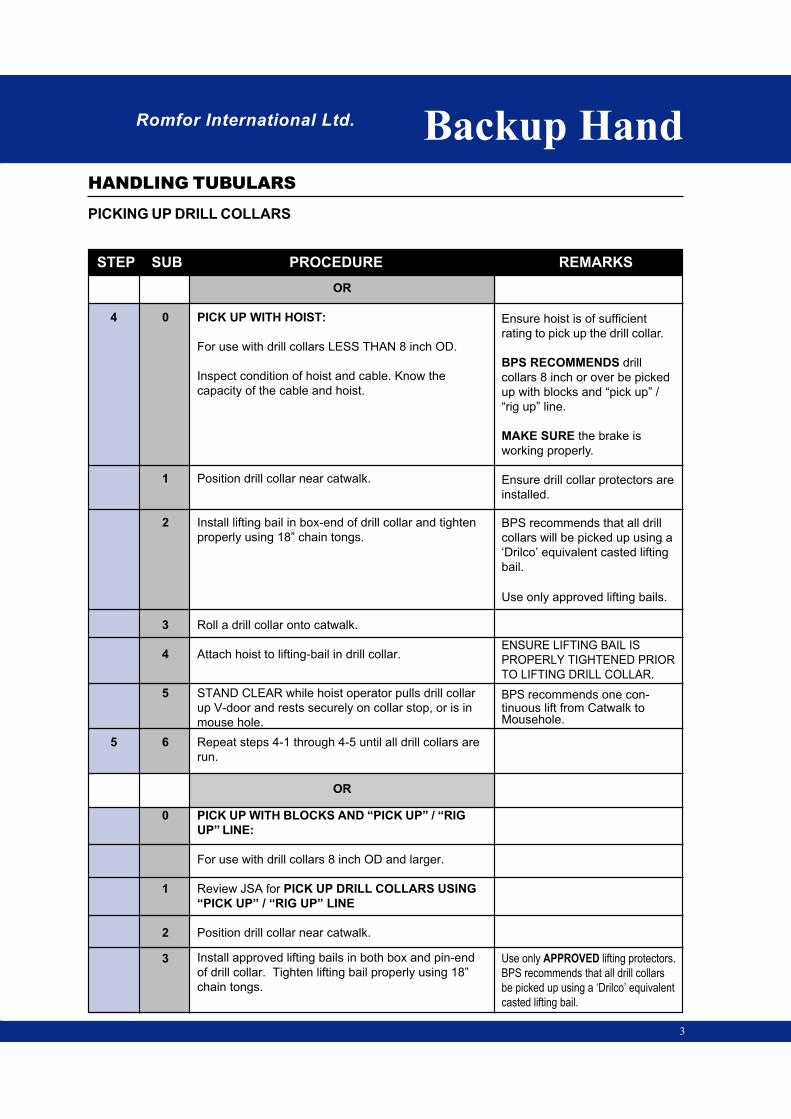
PICK UP WITH HOIST:
For use with drill collars LESS THAN 8 inch OD.
Inspect condition of hoist and cable. Know the
capacity of the cable and hoist.
Position drill collar near catwalk.
Install lifting bail in box-end of drill collar and tighten
properly using 18” chain tongs.
Roll a drill collar onto catwalk.
Attach hoist to lifting-bail in drill collar.
STAND CLEAR while hoist operator pulls drill collar
up V-door and rests securely on collar stop, or is in
mouse hole.
Repeat steps 4-1 through 4-5 until all drill collars are
run.
OR
PICK UP WITH BLOCKS AND “PICK UP” / “RIG
UP” LINE:
For use with drill collars 8 inch OD and larger.
Review JSA for PICK UP DRILL COLLARS USING
“PICK UP” / “RIG UP” LINE
Position drill collar near catwalk.
Install approved lifting bails in both box and pin-end
of drill collar. Tighten lifting bail properly using 18”
chain tongs.
Ensure hoist is of sufficient
rating to pick up the drill collar.
BPS RECOMMENDS drill
collars 8 inch or over be picked
up with blocks and “pick up” /
“rig up” line.
MAKE SURE the brake is
working properly.
Ensure drill collar protectors are
installed.
BPS recommends that all drill
collars will be picked up using a
‘Drilco’ equivalent casted lifting
bail.
Use only approved lifting bails.
ENSURE LIFTING BAIL IS
PROPERLY TIGHTENED PRIOR
TO LIFTING DRILL COLLAR.
BPS recommends one con-tinuous lift from Catwalk toMousehole.
Use only APPROVED lifting protectors.
BPS recommends that all drill collars
be picked up using a ‘Drilco’ equivalent
casted lifting bail.
0
1
2
3
4
5
6
0
1
2
3

STEP SUB PROCEDURE REMARKS
PICKING UP DRILL COLLARS
HANDLING TUBULARS
Romfor International Ltd. Backup Hand
4
6
Roll a drill collar onto catwalk.
Attach “PICK UP” / “RIG UP” Line to lifting-bail in drill
collar on box-end.
Attach lay down line to pin-end lifting protector, using
snatch block.
Stand clear of catwalk, V-door, and stair area.
Repeat steps 5-1 through 5-7 until all drill collars are
run.
Refer to procedure for Tripping In The Hole or Making
A Connection for rig floor operations.
END OF PROCEDURE
Ensure two operations are not
conducted at the same time.
Use only approved lifting
protectors.
4
5
6
7
8

Romfor International Ltd. Backup Hand
STEP SUB PROCEDURE REMARKS
LAY DOWN DRILL COLLARS
HANDLING TUBULARS
LA
YIN
G D
OW
N
1
LAYING DOWN DRILL COLLARS WITHLAY-DOWN MACHINE
THIS PROCEDURE IS BASED ON THE ASSUMPTION
THAT THE LAYDOWN MACHINE IS RIGGED UP AND
THE CONNECTION IS BROKEN, SPUN OUT AND
HANGING IN ELEVATORS.
PPE Requirements - Hard Hat, Safety Glasses, WorkGloves, Steel Toe Shoes, Back Support.
Review JSA for “LAYING DOWN DRILL COLLARS”.
Fit for duty check for all hands.
Verify the following items are ready or available, asrequired:
- Inspect lay-down machine, sheaves and
cables for damage and proper installation.
- V-door stairs, catwalk area and other hazard
areas are roped off. Use “Caution Tape”.
- Proper lighting on collars racks, catwalk, and
V-door
- Rig lighting does not interfere with lay-down
machine operator.
- Flagger is assigned on rig floor and has
fluorescent vest.
- Mousehole is secured properly and in good
condition. BE AWARE of side load
requirements of the Mousehole when laying
down collars.
- Mousehole is secured under the rig floor at the
point of tension of the lay-down pole.
- Lay-down pole safety clamp and cover are
installed and in good condition.
- Lay-down machine operator knows the safe
working load of his cables and equipment.
- Thread protectors are available.
- Proper chocks and stripping are available.
- Chain tongs are available and ready for use.
Use proper size for the job.
Refer to BPS “Trip Out OfHole Procedure”.
Refer to BPS “Rig Up Pick up/ Lay-down Machine”
DO NOT UNDER ANYCONDITION attempt to stop orstep over a rolling tubulars.
Include all third party personnel.
Include all third party personnel.
BPS RECOMMENDS:
The Toolpusher be on the rig floorany time the BHA is handled.
The use of the “trough” type lay-down machine.
Use two-way communicationequipment/ PA equipment forDriller and LD Machine Operator.
BPS RECOMMENDS that afluorescent vest be availableat the rig site.
BPS RECOMMENDS that boxand pin have protectorsinstalled when laying down.
Use Romfor's angle iron typechocks.
0
1
1
2
3
1

STEP SUB PROCEDURE REMARKS
LAY DOWN DRILL COLLARS
HANDLING TUBULARS
Romfor International Ltd. Backup Hand
2
2
3
4
5
5
6
7
Establish communication links between lay-down
machine operator and rig personnel.
Discuss emergency shut down procedures.
It is recommended to roll only one drill collar at a time
from ground level.
BE AWARE of new obstacles, (lay-down pole, etc.)
READY TO LAY-DOWN DRILL COLLARS WITH
LAY DOWN MACHINE
Assist as required in installing pin-end thread
protector.
Attach hoist line to collar.
STAND CLEAR while Driller and Motorman position
the drill collar into trough. If required, assist in guiding
drill collar into trough using tag line.
After pin of the collar is stopped and resting in the
trough, remove hoist line and tag lines (if used).
Secure hoist line.
STAND CLEAR while Driller lowers collar into trough
and elevators are unlatched from lift sub.
After lay down machine operator has lowered drill
collar in position, attach hoist line to lift sub.
Use two-way communication
equipment/ PA equipment for
collars rollers and LD Machine
Operator.
DO NOT walk on or get on top
of drill collars for any reason.
DO NOT position yourself
between lay-down pole and
tongs and or elevators
DO NOT stand in path of
trough. Always be aware of the
position of the trough.
BE AWARE of turning rotary
table, stand clear until it is
stopped.
BE AWARE of pinch points.
BE AWARE of your position on
the rig floor.
Attach tag line to hoist line.
2
Romfor International Ltd. Backup Hand
STEP SUB PROCEDURE REMARKS
LAY DOWN DRILL COLLARS
HANDLING TUBULARS
8
9
10
11
12
13
3
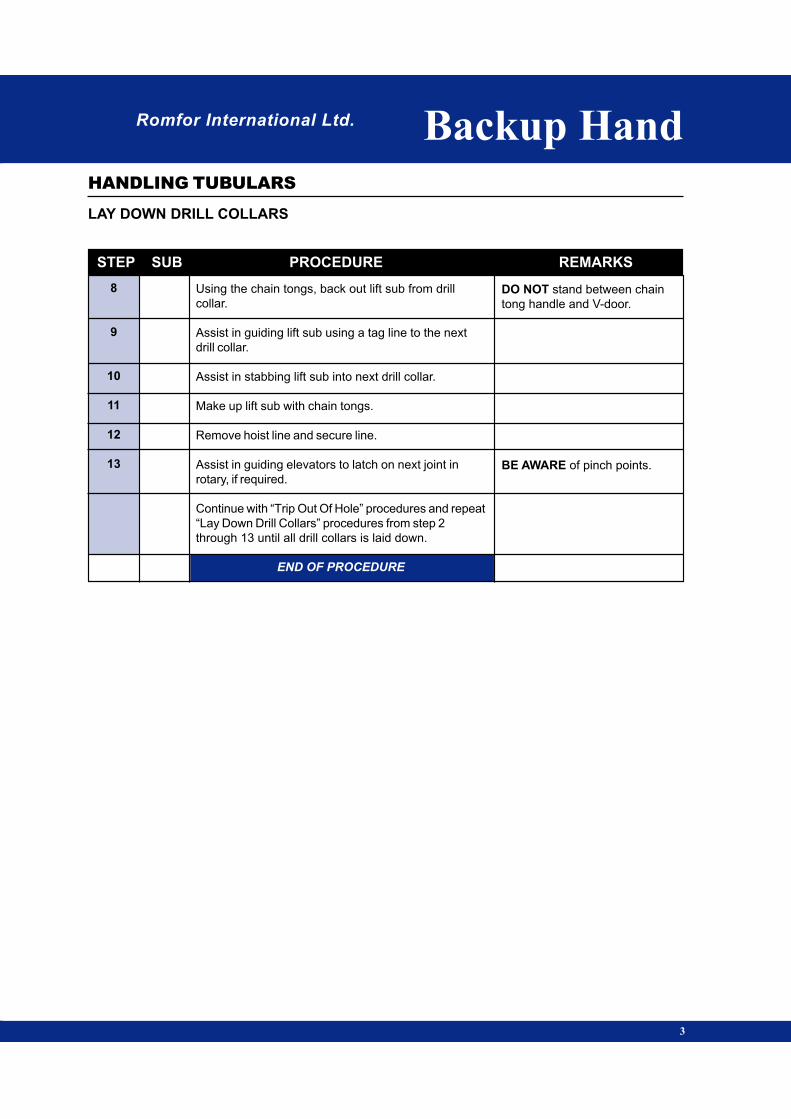
Using the chain tongs, back out lift sub from drill
collar.
Assist in guiding lift sub using a tag line to the next
drill collar.
Assist in stabbing lift sub into next drill collar.
Make up lift sub with chain tongs.
Remove hoist line and secure line.
Assist in guiding elevators to latch on next joint in
rotary, if required.
Continue with “Trip Out Of Hole” procedures and repeat
“Lay Down Drill Collars” procedures from step 2
through 13 until all drill collars is laid down.
END OF PROCEDURE
DO NOT stand between chain
tong handle and V-door.
BE AWARE of pinch points.
Romfor International Ltd. Backup Hand
STEP SUB PROCEDURE REMARKS
LOADING DRILL COLLARS
HANDLING TUBULARS
. 1
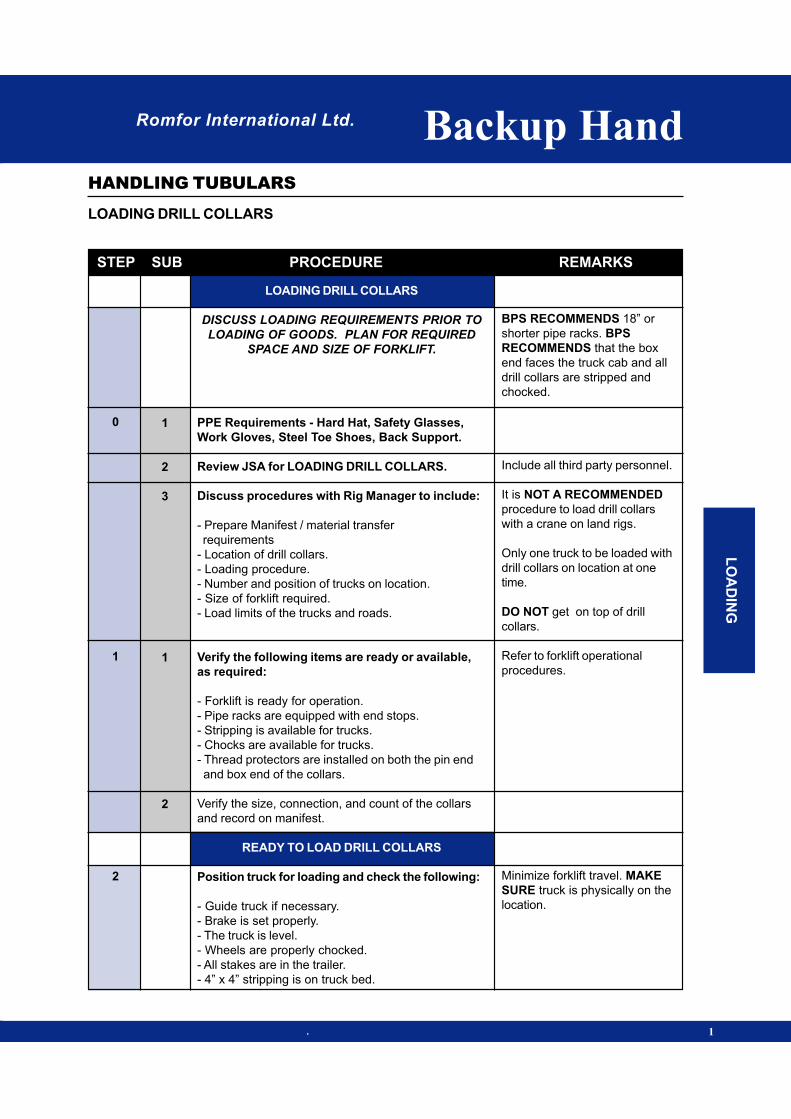
LOADING DRILL COLLARS
DISCUSS LOADING REQUIREMENTS PRIOR TO
LOADING OF GOODS. PLAN FOR REQUIRED
SPACE AND SIZE OF FORKLIFT.
PPE Requirements - Hard Hat, Safety Glasses,
Work Gloves, Steel Toe Shoes, Back Support.
Review JSA for LOADING DRILL COLLARS.
Discuss procedures with Rig Manager to include:
- Prepare Manifest / material transfer
requirements
- Location of drill collars.
- Loading procedure.
- Number and position of trucks on location.
- Size of forklift required.
- Load limits of the trucks and roads.
Verify the following items are ready or available,
as required:
- Forklift is ready for operation.
- Pipe racks are equipped with end stops.
- Stripping is available for trucks.
- Chocks are available for trucks.
- Thread protectors are installed on both the pin end
and box end of the collars.
Verify the size, connection, and count of the collars
and record on manifest.
READY TO LOAD DRILL COLLARS
Position truck for loading and check the following:
- Guide truck if necessary.
- Brake is set properly.
- The truck is level.
- Wheels are properly chocked.
- All stakes are in the trailer.
- 4” x 4” stripping is on truck bed.
BPS RECOMMENDS 18” or
shorter pipe racks. BPS
RECOMMENDS that the box
end faces the truck cab and all
drill collars are stripped and
chocked.
Include all third party personnel.
It is NOT A RECOMMENDED
procedure to load drill collars
with a crane on land rigs.
Only one truck to be loaded with
drill collars on location at one
time.
DO NOT get on top of drill
collars.
Refer to forklift operational
procedures.
Minimize forklift travel. MAKE
SURE truck is physically on the
location.
0
1
2
1
2
3
1
2
LO
AD
ING

STEP SUB PROCEDURE REMARKS
LOADING DRILL COLLARS
HANDLING TUBULARS
Romfor International Ltd. Backup Hand
2
3
4
5
6
7
8
9
10
11
Load Drill Collars from the pipe racks.
- Ensure forklift is in the center of the load and the
forks are in proper position.
-Lift drill collars, tilt forks to proper position, and
proceed to the truck.
Move Drill Collars to the truck:
-Travel with forks in lowest position.
-Travel at a SLOW rate of speed.
Load Drill Collars onto the truck.
-Carefully place collars onto 4”x4” stripping on the
truck. DO NOT drop.
-Rack drill collars orderly with forklift, as required.
Repeat steps 3 through 5 until layer is full.
Chock 4” x 4” stripping to secure bottom layer.
Place stripping boards directly over 4” x 4” bed
stripping.
Install pipe chocks at the ends of the stripping boards.
Repeat steps 3 through 9 until loaded.
Load is secured by TRUCK DRIVER.
END OF PROCEDURE
DO NOT EXCEED lifting
capacity of forklift. See forklift
JSA.
DO NOT UNDER ANY
CONDITION attempt to stop
or step over rolling tubulars.
STAND CLEAR of forklift and
load path. DO NOT touch drill
collars at any time the collars
are on the forks.
MAKE SURE first drill collar is
secure against the bed stakes.
NEVER get on or between drill
collars. DO NOT climb onto
truck or load.
Rocks are not chocks! Use
proper chocks.
Use wood stripping only. Make
sure stripping is used for each
layer. DO NOT stack without
stripping.
Rocks are not chocks! Use
proper chocks.
Romfor International Ltd. Backup Hand
STEP SUB PROCEDURE REMARKS
UNLOADING DRILL COLLARS
HANDLING TUBULARS
UN
LO
AD
ING
1
RECEIVING TUBULARS
DISCUSS TUBULAR REQUIREMENTS PRIOR TO
ARRIVAL OF GOODS TO LOCATION. PLAN FOR
REQUIRED SPACE AND SIZE OF FORKLIFT.
PPE Requirements - Hard Hat, Safety Glasses,
Work Gloves, Steel Toe Shoes, Back Support.
Review JSA for “RECEIVING TUBULARS”
Discuss procedures with Rig Manager to include:
- Manifest / material transfer requirements
- Location of tubulars.
- Unloading procedure.
- Number and position of trucks on location.
- Size of forklift required (Capacity & length
of forks).
- Pipe racks, stripping, chocks.
Verify the following items are ready or available,
as required:
- Forklift is ready for operation.
- Pipe racks are level with Catwalk, equipped
with end stops of the proper height to accommodate
all layers of pipe.
- Catwalks are level and pinned together.
- Stripping is available.
- Chocks are available.
- Tally tape and Tally book.
Verify the size, weight, grade, connection, and joint
count of the tubulars against the manifest.
READY TO UNLOAD DRILL COLLARS
BPS RECOMMENDS 18” or
shorter pipe racks. BPS
RECOMMENDS that the box-end
faces the truck cab and all tubulars
are stripped and chocked.
Include all third party personnel.
IT IS NOT RECOMMENDED
PROCEDURE to unload
tubulars with a crane. Only one
truck load of tubulars on location
at one time.
Refer to forklift operational
procedures. Verify that backup
signal, brakes and emergency
brake are operational.
Use Romfors’ angle iron type
chocks.
VERIFY that thread protectors
are installed on both the pin end
and box end of the collars.
0
1
1
2
3
1
2
STEP SUB PROCEDURE REMARKS
UNLOADING DRILL COLLARS
HANDLING TUBULARS
Romfor International Ltd. Backup Hand
2
2
3
4
5
6
7
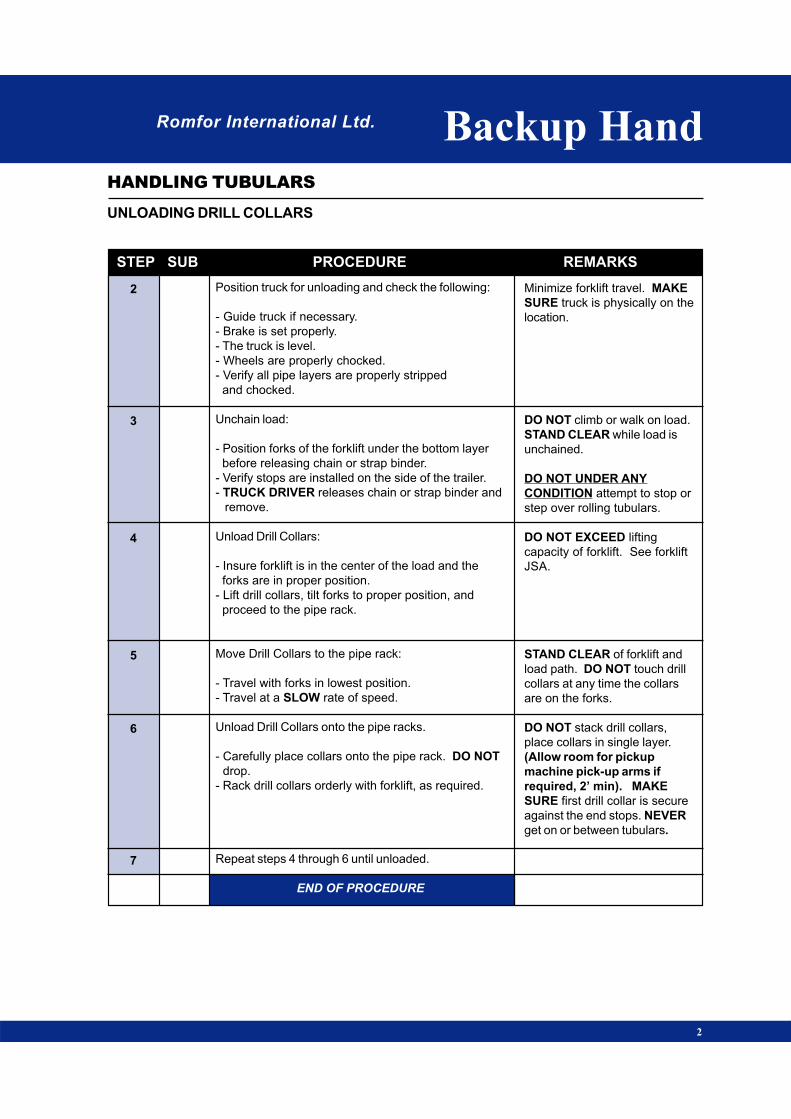
Position truck for unloading and check the following:
- Guide truck if necessary.
- Brake is set properly.
- The truck is level.
- Wheels are properly chocked.
- Verify all pipe layers are properly stripped
and chocked.
Unchain load:
- Position forks of the forklift under the bottom layer
before releasing chain or strap binder.
- Verify stops are installed on the side of the trailer.
- TRUCK DRIVER releases chain or strap binder and
remove.
Unload Drill Collars:
- Insure forklift is in the center of the load and the
forks are in proper position.
- Lift drill collars, tilt forks to proper position, and
proceed to the pipe rack.
Move Drill Collars to the pipe rack:
- Travel with forks in lowest position.
- Travel at a SLOW rate of speed.
Unload Drill Collars onto the pipe racks.
- Carefully place collars onto the pipe rack. DO NOT
drop.
- Rack drill collars orderly with forklift, as required.
Repeat steps 4 through 6 until unloaded.
END OF PROCEDURE
Minimize forklift travel. MAKE
SURE truck is physically on the
location.
DO NOT climb or walk on load.
STAND CLEAR while load is
unchained.
DO NOT UNDER ANY
CONDITION attempt to stop or
step over rolling tubulars.
DO NOT EXCEED lifting
capacity of forklift. See forklift
JSA.
STAND CLEAR of forklift and
load path. DO NOT touch drill
collars at any time the collars
are on the forks.
DO NOT stack drill collars,
place collars in single layer.
(Allow room for pickup
machine pick-up arms if
required, 2’ min). MAKE
SURE first drill collar is secure
against the end stops. NEVER
get on or between tubulars.

ROMFOR INTERNATIONAL LTD.
HANDLING
TUBULARS
HANDLING
TUBULARS
Backup HandBackup Hand
DR
IL
L P
IP
E
DRILL PIPEDRILL PIPE
ROMFOR INTERNATIONAL LTD. Backup Hand
STEP SUB PROCEDURE REMARKS
PICKING UP DRILL PIPE
HANDLING TUBULARS
PIC
KIN
G U
P
1
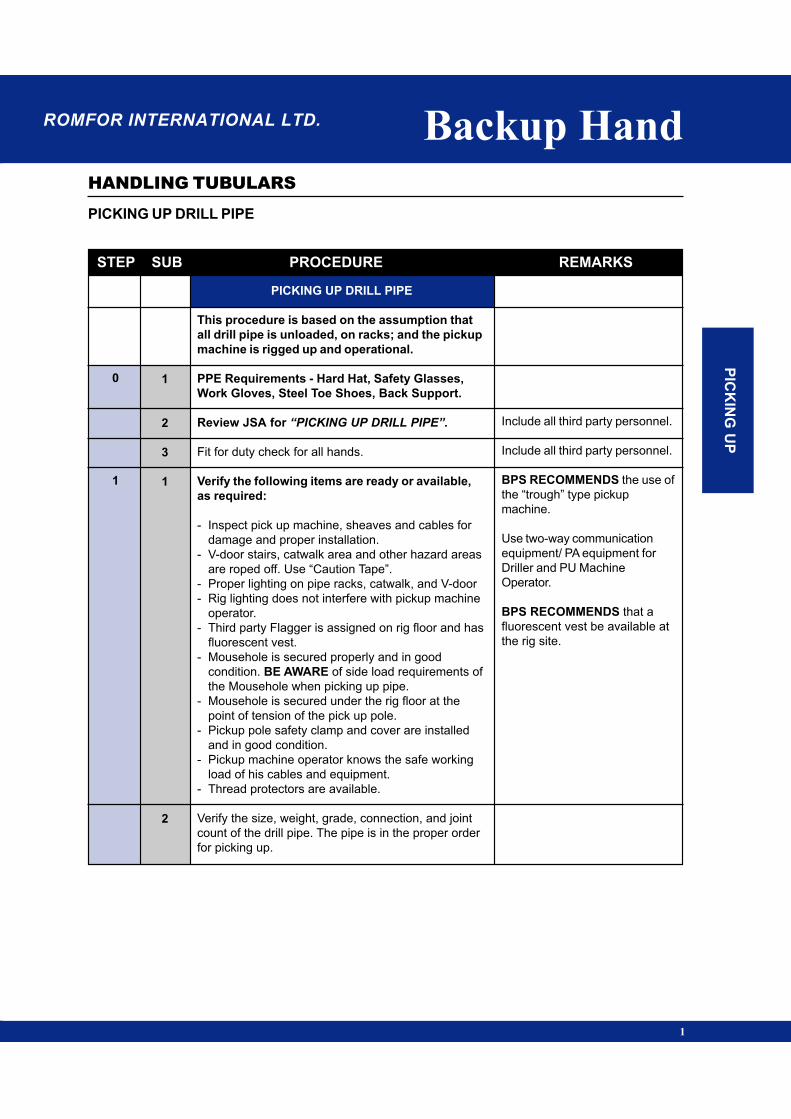
PICKING UP DRILL PIPE
This procedure is based on the assumption that
all drill pipe is unloaded, on racks; and the pickup
machine is rigged up and operational.
PPE Requirements - Hard Hat, Safety Glasses,
Work Gloves, Steel Toe Shoes, Back Support.
Review JSA for “PICKING UP DRILL PIPE”.
Fit for duty check for all hands.
Verify the following items are ready or available,
as required:
- Inspect pick up machine, sheaves and cables for
damage and proper installation.
- V-door stairs, catwalk area and other hazard areas
are roped off. Use “Caution Tape”.
- Proper lighting on pipe racks, catwalk, and V-door
- Rig lighting does not interfere with pickup machine
operator.
- Third party Flagger is assigned on rig floor and has
fluorescent vest.
- Mousehole is secured properly and in good
condition. BE AWARE of side load requirements of
the Mousehole when picking up pipe.
- Mousehole is secured under the rig floor at the
point of tension of the pick up pole.
- Pickup pole safety clamp and cover are installed
and in good condition.
- Pickup machine operator knows the safe working
load of his cables and equipment.
- Thread protectors are available.
Verify the size, weight, grade, connection, and joint
count of the drill pipe. The pipe is in the proper order
for picking up.
Include all third party personnel.
Include all third party personnel.
BPS RECOMMENDS the use of
the “trough” type pickup
machine.
Use two-way communication
equipment/ PA equipment for
Driller and PU Machine
Operator.
BPS RECOMMENDS that a
fluorescent vest be available at
the rig site.
0
1
1
2
3
1
2
STEP SUB PROCEDURE REMARKS
PICKING UP DRILL PIPE
HANDLING TUBULARS
Romfor International Ltd. Backup Hand
2
3
3
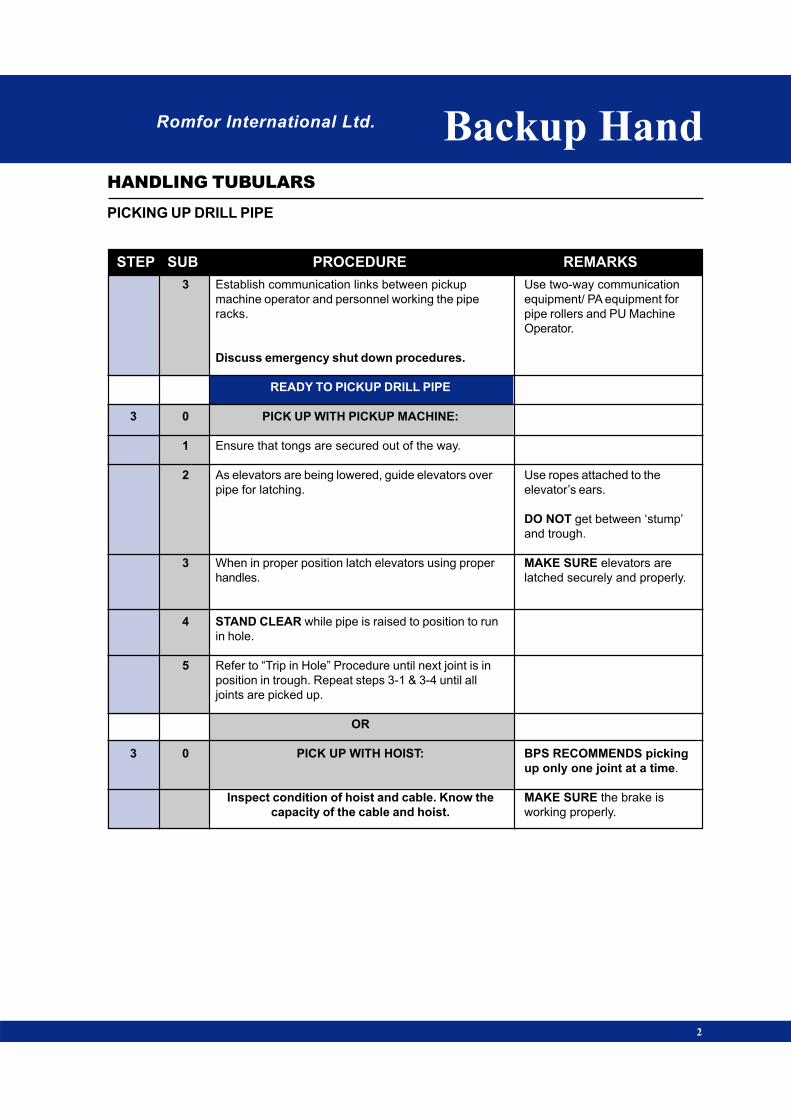
Establish communication links between pickup
machine operator and personnel working the pipe
racks.
Discuss emergency shut down procedures.
READY TO PICKUP DRILL PIPE
PICK UP WITH PICKUP MACHINE:
Ensure that tongs are secured out of the way.
As elevators are being lowered, guide elevators over
pipe for latching.
When in proper position latch elevators using proper
handles.
STAND CLEAR while pipe is raised to position to run
in hole.
Refer to “Trip in Hole” Procedure until next joint is in
position in trough. Repeat steps 3-1 & 3-4 until all
joints are picked up.
OR
PICK UP WITH HOIST:
Inspect condition of hoist and cable. Know the
capacity of the cable and hoist.
Use two-way communication
equipment/ PA equipment for
pipe rollers and PU Machine
Operator.
Use ropes attached to the
elevator’s ears.
DO NOT get between ‘stump’
and trough.
MAKE SURE elevators are
latched securely and properly.
BPS RECOMMENDS picking
up only one joint at a time.
MAKE SURE the brake is
working properly.
3
0
1
2
3
4
5
0
Romfor International Ltd. Backup Hand
STEP SUB PROCEDURE REMARKS
PICKING UP DRILL PIPE
HANDLING TUBULARS
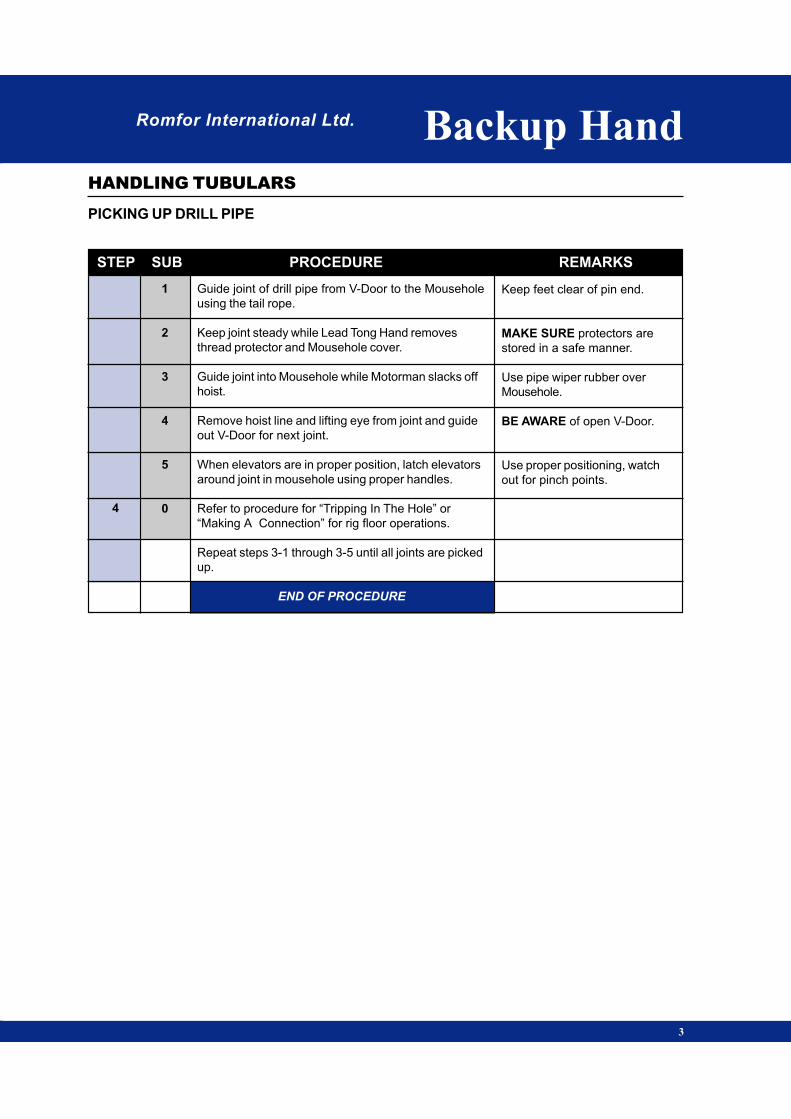
3
Keep feet clear of pin end.
MAKE SURE protectors are
stored in a safe manner.
Use pipe wiper rubber over
Mousehole.
BE AWARE of open V-Door.
Use proper positioning, watch
out for pinch points.
4
1
2
3
4
5
0
Guide joint of drill pipe from V-Door to the Mousehole
using the tail rope.
Keep joint steady while Lead Tong Hand removes
thread protector and Mousehole cover.
Guide joint into Mousehole while Motorman slacks off
hoist.
Remove hoist line and lifting eye from joint and guide
out V-Door for next joint.
When elevators are in proper position, latch elevators
around joint in mousehole using proper handles.
Refer to procedure for “Tripping In The Hole” or
“Making A Connection” for rig floor operations.
Repeat steps 3-1 through 3-5 until all joints are picked
up.
END OF PROCEDURE
Romfor International Ltd. Backup Hand
STEP SUB PROCEDURE REMARKS
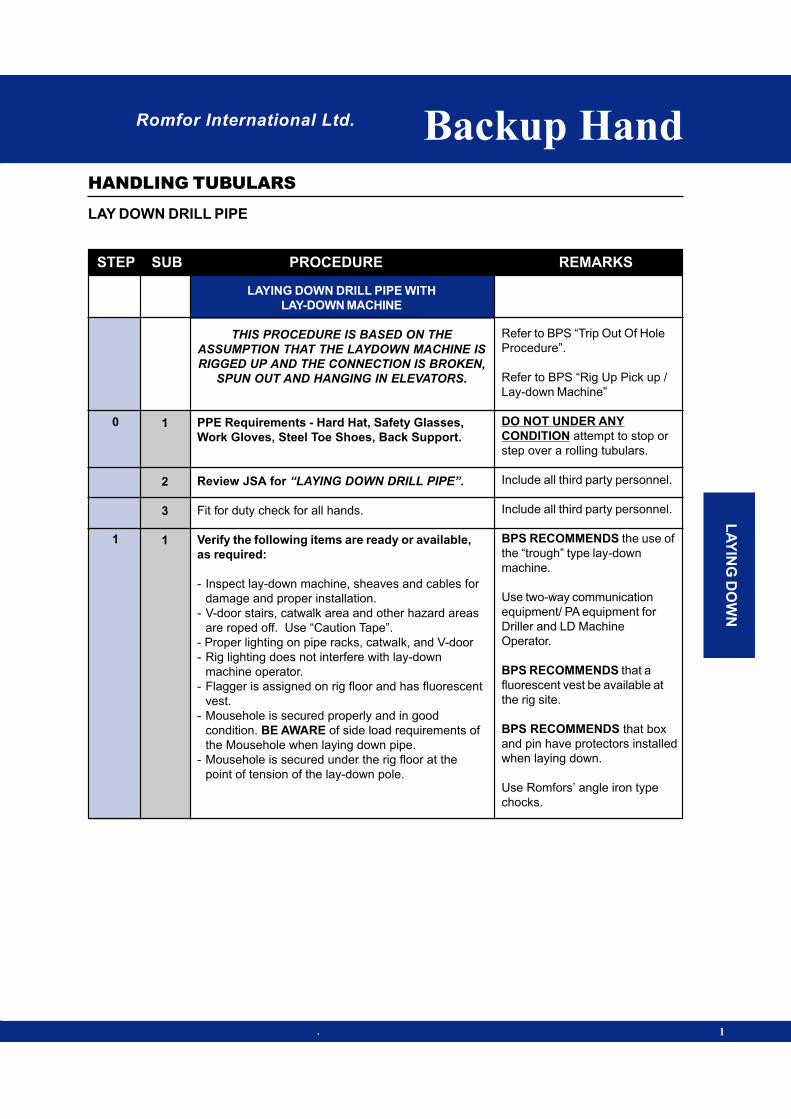
LAY DOWN DRILL PIPE
HANDLING TUBULARS
. 1
LAYING DOWN DRILL PIPE WITH
LAY-DOWN MACHINE
THIS PROCEDURE IS BASED ON THE
ASSUMPTION THAT THE LAYDOWN MACHINE IS
RIGGED UP AND THE CONNECTION IS BROKEN,
SPUN OUT AND HANGING IN ELEVATORS.
PPE Requirements - Hard Hat, Safety Glasses,
Work Gloves, Steel Toe Shoes, Back Support.
Review JSA for “LAYING DOWN DRILL PIPE”.
Fit for duty check for all hands.
Verify the following items are ready or available,
as required:
- Inspect lay-down machine, sheaves and cables for
damage and proper installation.
- V-door stairs, catwalk area and other hazard areas
are roped off. Use “Caution Tape”.
- Proper lighting on pipe racks, catwalk, and V-door
- Rig lighting does not interfere with lay-down
machine operator.
- Flagger is assigned on rig floor and has fluorescent
vest.
- Mousehole is secured properly and in good
condition. BE AWARE of side load requirements of
the Mousehole when laying down pipe.
- Mousehole is secured under the rig floor at the
point of tension of the lay-down pole.
Refer to BPS “Trip Out Of Hole
Procedure”.
Refer to BPS “Rig Up Pick up /
Lay-down Machine”
DO NOT UNDER ANY
CONDITION attempt to stop or
step over a rolling tubulars.
Include all third party personnel.
Include all third party personnel.
BPS RECOMMENDS the use of
the “trough” type lay-down
machine.
Use two-way communication
equipment/ PA equipment for
Driller and LD Machine
Operator.
BPS RECOMMENDS that a
fluorescent vest be available at
the rig site.
BPS RECOMMENDS that box
and pin have protectors installed
when laying down.
Use Romfors’ angle iron type
chocks.
0
1
1
2
3
1
LA
YIN
G D
OW
N
STEP SUB PROCEDURE REMARKS
LAY DOWN DRILL PIPE
HANDLING TUBULARS
Romfor International Ltd. Backup Hand
2
2
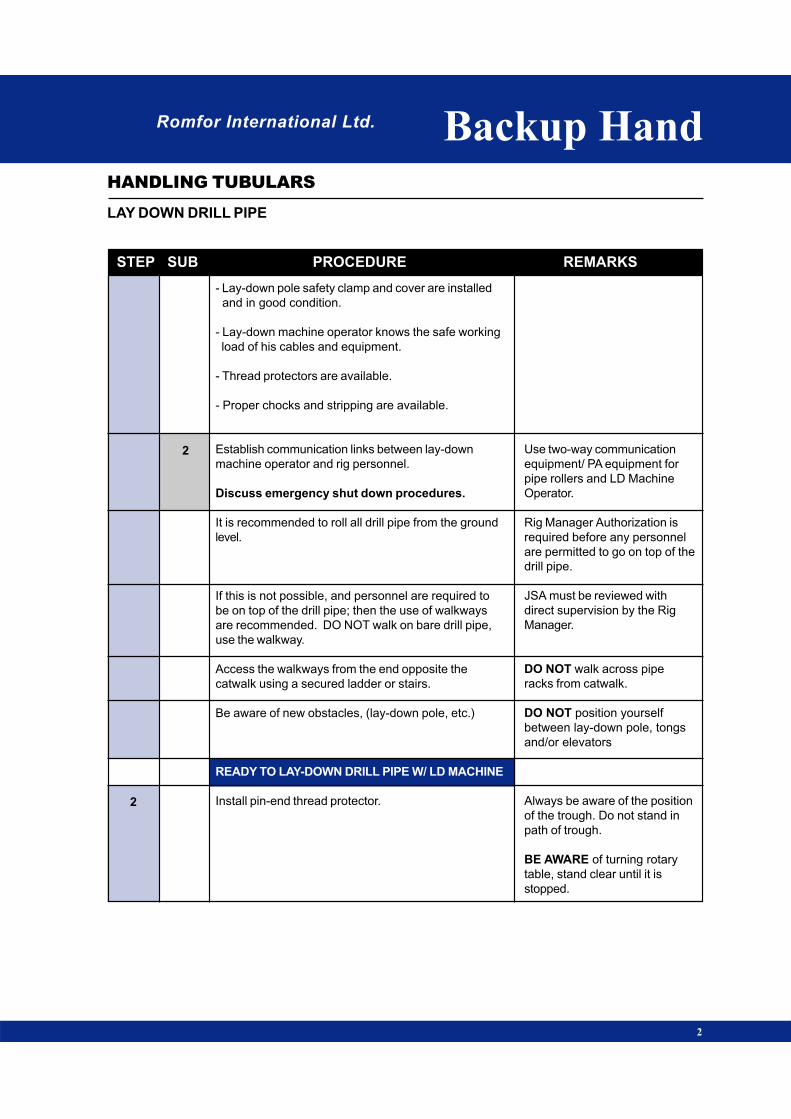
- Lay-down pole safety clamp and cover are installed
and in good condition.
- Lay-down machine operator knows the safe working
load of his cables and equipment.
- Thread protectors are available.
- Proper chocks and stripping are available.
Establish communication links between lay-down
machine operator and rig personnel.
Discuss emergency shut down procedures.
It is recommended to roll all drill pipe from the ground
level.
If this is not possible, and personnel are required to
be on top of the drill pipe; then the use of walkways
are recommended. DO NOT walk on bare drill pipe,
use the walkway.
Access the walkways from the end opposite the
catwalk using a secured ladder or stairs.
Be aware of new obstacles, (lay-down pole, etc.)
READY TO LAY-DOWN DRILL PIPE W/ LD MACHINE
Install pin-end thread protector.
Use two-way communication
equipment/ PA equipment for
pipe rollers and LD Machine
Operator.
Rig Manager Authorization is
required before any personnel
are permitted to go on top of the
drill pipe.
JSA must be reviewed with
direct supervision by the Rig
Manager.
DO NOT walk across pipe
racks from catwalk.
DO NOT position yourself
between lay-down pole, tongs
and/or elevators
Always be aware of the position
of the trough. Do not stand in
path of trough.
BE AWARE of turning rotary
table, stand clear until it is
stopped.
2
Romfor International Ltd. Backup Hand
STEP SUB PROCEDURE REMARKS
LAY DOWN DRILL PIPE
HANDLING TUBULARS
3
4
5
6
2
3
4
5
3
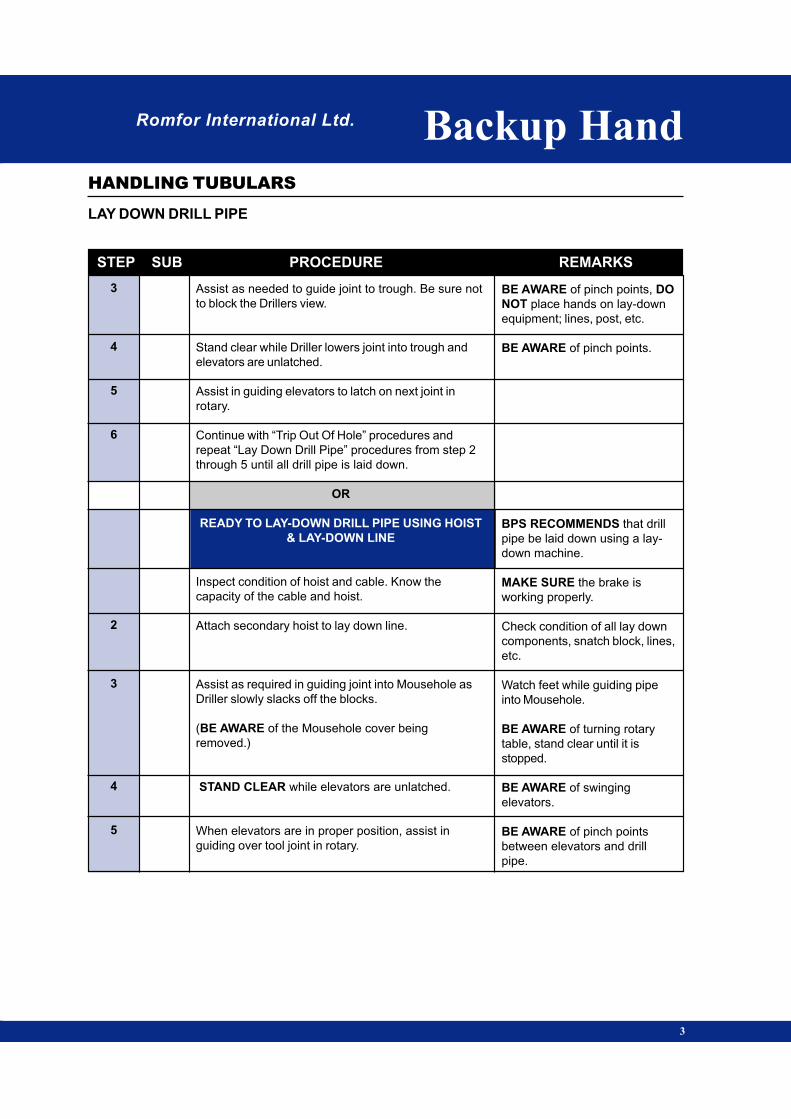
Assist as needed to guide joint to trough. Be sure not
to block the Drillers view.
Stand clear while Driller lowers joint into trough and
elevators are unlatched.
Assist in guiding elevators to latch on next joint in
rotary.
Continue with “Trip Out Of Hole” procedures and
repeat “Lay Down Drill Pipe” procedures from step 2
through 5 until all drill pipe is laid down.
OR
READY TO LAY-DOWN DRILL PIPE USING HOIST
& LAY-DOWN LINE
Inspect condition of hoist and cable. Know the
capacity of the cable and hoist.
Attach secondary hoist to lay down line.
Assist as required in guiding joint into Mousehole as
Driller slowly slacks off the blocks.
(BE AWARE of the Mousehole cover being
removed.)
STAND CLEAR while elevators are unlatched.
When elevators are in proper position, assist in
guiding over tool joint in rotary.
BE AWARE of pinch points, DO
NOT place hands on lay-down
equipment; lines, post, etc.
BE AWARE of pinch points.
BPS RECOMMENDS that drill
pipe be laid down using a lay-
down machine.
MAKE SURE the brake is
working properly.
Check condition of all lay down
components, snatch block, lines,
etc.
Watch feet while guiding pipe
into Mousehole.
BE AWARE of turning rotary
table, stand clear until it is
stopped.
BE AWARE of swinging
elevators.
BE AWARE of pinch points
between elevators and drill
pipe.
STEP SUB PROCEDURE REMARKS
LAY DOWN DRILL PIPE
HANDLING TUBULARS
Romfor International Ltd. Backup Hand
4
6
7
8
9
10
11
12
13
14
15
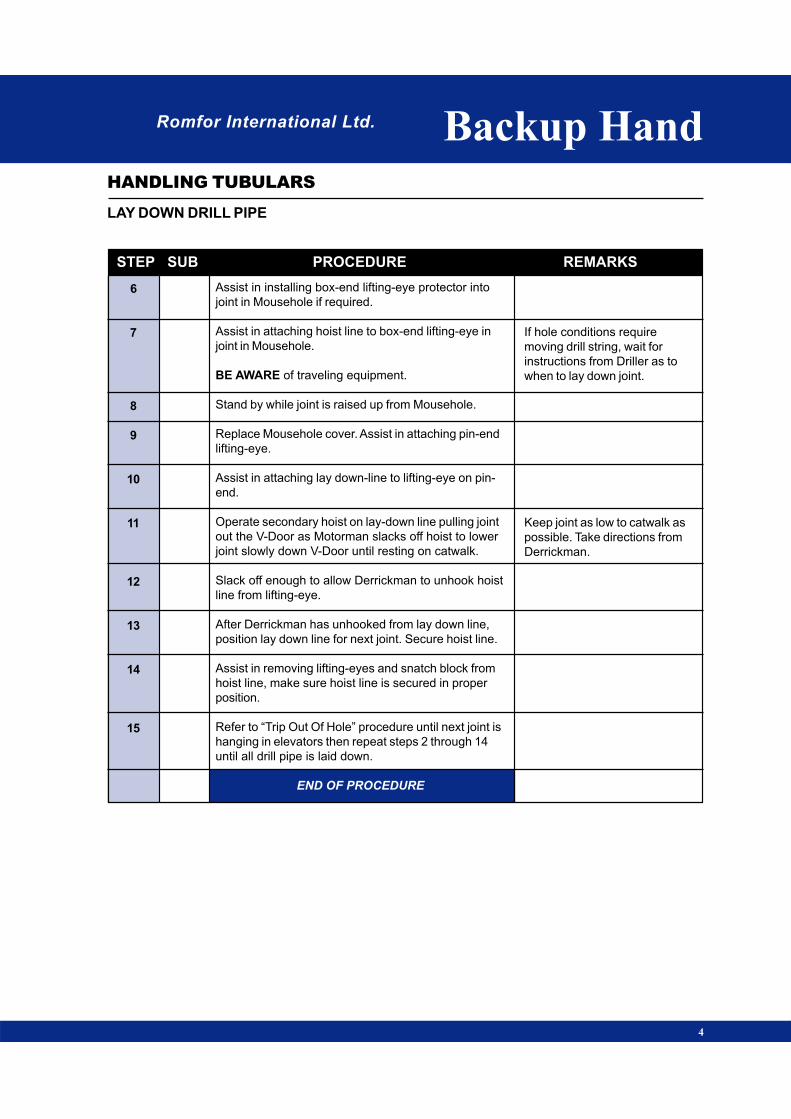
Assist in installing box-end lifting-eye protector into
joint in Mousehole if required.
Assist in attaching hoist line to box-end lifting-eye in
joint in Mousehole.
BE AWARE of traveling equipment.
Stand by while joint is raised up from Mousehole.
Replace Mousehole cover. Assist in attaching pin-end
lifting-eye.
Assist in attaching lay down-line to lifting-eye on pin-
end.
Operate secondary hoist on lay-down line pulling joint
out the V-Door as Motorman slacks off hoist to lower
joint slowly down V-Door until resting on catwalk.
Slack off enough to allow Derrickman to unhook hoist
line from lifting-eye.
After Derrickman has unhooked from lay down line,
position lay down line for next joint. Secure hoist line.
Assist in removing lifting-eyes and snatch block from
hoist line, make sure hoist line is secured in proper
position.
Refer to “Trip Out Of Hole” procedure until next joint is
hanging in elevators then repeat steps 2 through 14
until all drill pipe is laid down.
END OF PROCEDURE
If hole conditions require
moving drill string, wait for
instructions from Driller as to
when to lay down joint.
Keep joint as low to catwalk as
possible. Take directions from
Derrickman.
Romfor International Ltd. Backup Hand
STEP SUB PROCEDURE REMARKS
LOADING DRILL PIPE
HANDLING TUBULARS
. 1
LOADING DRILL PIPE
Discuss LOADING requirements prior to loading
of goods. Plan for required space and size of
forklift.
PPE Requirements - Hard Hat, Safety Glasses,
Work Gloves, Steel Toe Shoes, Back Support.
Review JSA for “LOADING TUBULARS”.
Discuss procedures with Rig Manager to include:
- Prepare manifest / material transfer requirements
- Location of tubulars.
- Loading procedure.
- Number and position of trucks on location.
- Size of forklift required (capacity & length of forks).
- Load limits of the trucks and roads.
Verify the following items are ready or available,
as required:
- Forklift is ready for operation.
- Pipe racks are equipped with end stops.
- Stripping is available for trucks.
- Chocks are available for trucks.
- Thread protectors are installed on both the pin end
and box end of the pipe.
Verify the size, weight, grade, connection, and joint
count of the tubulars and record on manifest.
READY TO LOAD DRILL PIPE
BPS RECOMMENDS 18” or
shorter pipe racks. BPS
RECOMMENDS that the box
end faces the truck cab and all
tubulars are stripped and
chocked.
DO NOT UNDER ANY
CONDITION attempt to stop or
step over rolling tubulars.
Include all third party personnel.
It is NOT A RECOMMENDED
procedure to load tubulars with a
crane on land rigs.
Only one truck to be loaded with
tubulars on location at one time.
Handle all layered pipe from the
ground.
DO NOT get on top of pipe.
Refer to forklift operational
procedures. Verify that backup
signal, brakes and emergency
brake are operational.
0
1
1
2
3
1
2
LO
AD
ING
STEP SUB PROCEDURE REMARKS
LOADING DRILL PIPE
HANDLING TUBULARS
Romfor International Ltd. Backup Hand
2
2
3
4
5
6
7
8
9
Position truck for loading and check the
following:
-Guide truck into safe position.
-Brake is set properly.
-The truck is level.
-Wheels are properly chocked.
-All stakes are in the trailer.
-4” x 4” stripping is on truck bed.
Load Drill Pipe from the pipe racks.
- Ensure forklift is in the center of the load and the
forks are in proper position.
-Lift drill pipe, tilt forks to proper position, and proceed
to the truck.
Move Drill Pipe to the truck:
-Travel with forks in lowest position.
-Travel at a SLOW rate of speed.
Load Drill Pipe onto the truck.
-Carefully place pipe onto 4”x4” stripping on the truck.
DO NOT drop pipe.
-Rack drill pipe orderly with forklift, as required.
Repeat steps 3 through 5 until layer is full.
Chock 4” x 4” stripping to secure bottom layer.
Place stripping boards directly over 4” x 4” bed
stripping.
Install pipe chocks at the ends of the stripping boards.
Minimize forklift travel. Make
sure truck is physically on the
location.
DO NOT EXCEED lifting
capacity of forklift. See forklift
JSA.
STAND CLEAR of forklift and
load path.
DO NOT touch drill pipe at any
time the pipe is on the forks.
MAKE SURE first drill pipe is
secure against the bed stakes.
NEVER get on or between
tubulars.
DO NOT climb onto truck or
load.
Rocks are not chocks! Use
proper chocks.
Use wood stripping only. Make
sure stripping is used for each
layer.
DO NOT stack without
stripping.
Rocks are not chocks! Use
proper chocks.
Romfor International Ltd. Backup Hand
STEP SUB PROCEDURE REMARKS
LOADING DRILL PIPE
HANDLING TUBULARS
3
10
11
Repeat steps 3 through 9 until loaded.
Load is secured by TRUCK DRIVER.
END OF PROCEDURE

Romfor International Ltd. Backup Hand
STEP SUB PROCEDURE REMARKS
UNLOADING DRILL PIPE
HANDLING TUBULARS
. 1
RECEIVING DRILL PIPE
DISCUSS DRILL PIPE REQUIREMENTS PRIOR
TO ARRIVAL OF GOODS TO LOCATION. PLAN
FOR REQUIRED SPACE AND SIZE OF FORKLIFT.
PPE Requirements - Hard Hat, Safety Glasses,
Work Gloves, Steel Toe Shoes, Back Support.
Review JSA for “RECEIVING DRILL PIPE”
Discuss procedures with Rig Manager to include:
- Manifest / material transfer requirements
- Location of Drill Pipe.
- Unloading procedure.
- Number and position of trucks on location.
- Size of forklift required (Capacity & length of forks).
- Pipe racks, stripping, chocks.
Verify the following items are ready or available,
as required:
- Forklift is ready for operation.
- Pipe racks are level with Catwalk, equipped with end
stops of the proper height to accommodate all layers
of pipe.
- Catwalks are level and pinned together.
- Stripping is available.
- Chocks are available.
- Tally tape and Tally book.
Verify the size, weight, grade, connection, and joint
count of the Drill Pipe against the manifest.
READY TO UNLOAD DRILL PIPE
BPS RECOMMENDS 18” or
shorter pipe racks. BPS
RECOMMENDS that the box
end faces the truck cab and all
tubulars are stripped and
chocked.
DO NOT UNDER ANY
CONDITION attempt to stop or
step over rolling tubulars.
Include all third party personnel.
It is NOT A RECOMMENDED
procedure to unload Drill Pipe
with a crane. Only one truck
load of Drill Pipe on location at
one time.
Refer to forklift operational
procedures. Verify that backup
signal, brakes and emergency
brake are operational.
Use Romfor's angle iron type
chocks.
Verify that thread protectors are
installed on both the pin end and
box end of the pipe.
0
1
1
2
3
1
2
UN
LO
AD
ING

STEP SUB PROCEDURE REMARKS
UNLOADING DRILL PIPE
HANDLING TUBULARS
Romfor International Ltd. Backup Hand
2
2
3
4
5
6
7
8
Position truck for unloading and check the following:
- Guide truck if necessary.
- Brake is set properly.
- The truck is level.
- Wheels are properly chocked.
- Verify all pipe layers are properly stripped and
chocked.
Unchain load:
- Position forks of the forklift under the bottom layer
before releasing chain or strap binder, if necessary.
- Verify stops are installed on the side of the trailer.
- TRUCK DRIVER releases chain or strap binder and
remove.
Unload Drill Pipe:
- Ensure forklift is in the center of the load and the
forks are in proper position.
- Lift drill pipe, tilt forks to proper position, and
proceed to the pipe rack.
Move Drill Pipe to the pipe rack:
- Travel with forks in lowest position.
- Travel at a SLOW rate of speed.
Unload Drill Pipe onto the pipe racks.
- Carefully place pipe onto the pipe rack. DO NOT
drop.
- Rack drill pipe orderly, as required.
Repeat steps 4 through 6 until layer is full.
If Drill Pipe is layered:
Verify that pipe rack stops are in place and of the
proper height. Place stripping boards directly over
pipe racks on top of layer. Run stripping boards all
the way to the end of the Drill Pipe. Place chock a
minimum of 2 joint widths from the end of stripping at
the catwalk end.
Minimize forklift travel. Make
sure truck is physically on the
location.
DO NOT climb or walk on load.
STAND CLEAR while load is
unchained.
DO NOT EXCEED lifting
capacity of forklift. See forklift
JSA. DO NOT climb or walk on
load.
STAND CLEAR of forklift and
load path. DO NOT touch drill
pipe at any time the pipe is on
the forks.
Allow room for pickup
machine pick-up arms if
required, 2’ min.
NEVER get between tubulars.
Use wood stripping only.
MAKE SURE first joint is
positioned correctly for pickup
machine. (Parallel to catwalk)

Romfor International Ltd. Backup Hand
STEP SUB PROCEDURE REMARKS
UNLOADING DRILL PIPE
HANDLING TUBULARS
3
Rig Manager Authorization is
required before any personnel
are permitted to go on top of
the drill pipe.
JSA must be reviewed with
direct supervision by the Rig
Manager.
DO NOT walk across pipe racks
from catwalk.
Two walkways are recommended
for large OD tubulars.
DO NOT use feet or hands to
roll Drill Pipe. DO NOT get in
front of, step over, or attempt to
stop rolling tubulars.
9
2
3
It is recommended to roll all drill pipe from the
ground level.
If this is not possible, and personnel are required
to be on top of the drill pipe; then the use of
walkways are recommended. DO NOT walk on
bare pipe, use the walkway.
Access the walkways from the end opposite the
catwalk using a secured ladder or stairs.
Lay walkway on each layer of drill pipe. The walkway
is to extend the full length of each layer of pipe.
Use a pipe roller to move the Drill Pipe into proper
position one joint at a time.
Repeat steps 4 through 8 until complete.
END OF PROCEDURE
Romfor International Ltd.
HANDLING
TUBULARS
HANDLING
TUBULARS
Backup HandBackup Hand
PICKUP/
LAYDOWN
MACHINE
PICKUP/
LAYDOWN
MACHINE
PIC
KU
P/L
AY
DO
WN
MA
CH
IN
E
Romfor International Ltd. Backup Hand
STEP SUB PROCEDURE REMARKS
RIGGING DOWN PICKUP/LAYDOWN MACHINE
HANDLING TUBULARS
. 1
RIGGING DOWN PU MACHINE
NOTE :
THIS PROCEDURE IS BASED ON THE
ASSUMPTIONS THAT THE PICKUP TROUGH AND
HYDRAULIC PICKUP ARMS ARE RIGGED DOWN
BY THE PICKUP CREW AND OUT OF THE WAY.
WHEN OPERATIONS ALLOW USE THE BLOCKS TO
LAY DOWN THE POLE FROM THE MOUSEHOLE.
PPE Requirements - Hard Hat, Safety Glasses,
Work Gloves, Steel Toe Shoes, Back Support.
Review JSA for Rigging down Pick-Up machine.
Ensure that this is the only operation being done at
this time.
Fit for duty check for all hands.
Inspect the following items as required:
V-door stairs, catwalk area and other hazard areas are
roped off.
Proper lighting on pipe racks, catwalk, and V-door.
Rig lighting does not interfere with pickup machine
operator
Flagger is assigned on rig floor and has fluorescent
vest.
READY TO RIG DOWN PICKUP POLE
Using the rig blocks, attach “pick-up” / “rig-up” line to
the pickup pole. Assist pickup crew in rigging down
and preparing pickup pole to lay down.
Include all third party personnel
and review third party JSA.
Only Romfor employees are
authorized to operate
Romfors’ equipment.
Include all third party personnel.
DO NOT wrap any line over
sharp edges, use snatch blocks.
0
1
2
1
2
3
1
2
3
4
RIG
GIN
G D
OW
N

STEP SUB PROCEDURE REMARKS
RIGGING DOWN PICKUP/LAYDOWN MACHINE
HANDLING TUBULARS
Romfor International Ltd. Backup Hand
2
3
4
5
6
Raise pickup pole out of the mousehole. When the
pickup pole is in the proper position, assist (if needed)
in attaching the fast line from pickup machine to the
bottom of the pole using Snatch Block.
Slack off blocks as pickup machine operator pulls the
pole out the V-door with fast line until in proper
position on catwalk.
When the pickup pole is in proper position slack off
blocks and remove the “pick-up” / “rig-up” line.
Pick Up crew will complete the remaining rig down.
END OF PROCEDURE
DO NOT wrap any line over
sharp edges.
Have flagger in fluorescent vest
in position to signal Driller and
pickup machine operator.
STAND CLEAR when
assistance is not needed.
STAND CLEAR when support is
not needed.
Romfor International Ltd. Backup Hand
STEP SUB PROCEDURE REMARKS
RIG UP PICKUP/LAYDOWN MACHINE
HANDLING TUBULARS
. 1
RIG
GIN
G U
P
RIGGING UP PU MACHINE
THIS PROCEDURE IS BASED ON THE
ASSUMPTION THAT ALL CASING IS UNLOADED
AND ON RACKS. BPS RECOMMENDS THE USE
OF THE “TROUGH” TYPE PICKUP MACHINE.
PPE Requirements - Hard Hat, Safety Glasses,
Work Gloves, Steel Toe Shoes, Back Support.
Review JSA for Rigging up Pick-Up machine.
Fit for duty check for all hands.
Inspect the following items for capacity and
serviceability, as required:
V-door stairs, catwalk area and other hazard areas are
roped off.
Proper lighting on pipe racks, catwalk, and V-door.
Flagger is assigned on rig floor and has fluorescent
vest.
Pickup machine is inspected for damaged lines and
sheaves and overall condition. Make sure the truck is
properly chocked.
Inspect condition of hoist and cable. Know the
capacity of the cable and hoist. Make sure the hoist
brake is working properly.
Mousehole is secured properly and in good condition.
Include all third party personnel
and review third party JSA.
Only Romfor employees are
authorized to operate
Romfors’ equipment.
Include all third party personnel.
Use “Caution Tape”
Rig lighting does not interfere
with pickup machine operator.
BPS RECOMMENDS that a
fluorescent vest be available
at the rig site.
DO NOT get on the truck. Do a
walk around inspection.
BE AWARE of side load
requirements of the Mousehole
when picking up pipe.
0
1
1
2
3
1
2
3
4
5
6
STEP SUB PROCEDURE REMARKS
RIG UP PICKUP/LAYDOWN MACHINE
HANDLING TUBULARS
Romfor International Ltd. Backup Hand
2
2
3
4
5
6
7
8
Mousehole is secured under the rig floor at the point of
tension of the pick up pole.
Pickup pole, safety clamp and cover are in good
condition.
Pickup machine operator knows the safe working load
of his cables and equipment.
READY TO RIG UP PICKUP POLE
Using the air hoist, attach line to pickup pole and pull
it out of truck and slide to bottom of the V-door.
Attach pickup machine fast line to the bottom of the
pickup pole using a snatch block.
Using the rig blocks, attach “pick-up” / “rig up” line to
the pickup pole and stand clear while Driller raises it to
the rig floor. (Pickup machine operator will hold snub
on pole.)
When the pickup pole is in the proper position, remove
the snub line.
Stab pickup pole into Mousehole through Mousehole
plate. Assist as required while casing crew secures
pole in the proper position using a safety clamp.
Remove the rig up line.
Pick Up crew will complete the remaining rig up.
END OF PROCEDURE
Check rating of air hoist and
cable.
DO NOT wrap any line over
sharp edges.
DO NOT wrap any line over
sharp edges, use snatch
blocks.
Use a drill collar type clamp.
Inspect installation of the clamp.
Use proper fall protection to
remove line, as required.
STAND CLEAR when support is
not needed.
NEVER GET UNDER THE
TROUGH OR IN THE PATH OF
THE TROUGH FOR ANY
REASON.
7
8
9
Romfor International Ltd.
HANDLING
TUBULARS
HANDLING
TUBULARS
HA
ND
LIN
G T
UB
UL
AR
S
DerrickmanDerrickman

Romfor International Ltd.
HANDLING
TUBULARS
HANDLING
TUBULARS
DerrickmanDerrickman
CA
SIN
G
CASINGCASING
Romfor International Ltd. Derrickman
STEP SUB PROCEDURE REMARKS
PICKING UP CASING
HANDLING TUBULARS
PIC
KIN
G U
P
1
PICKING UP CASING
THIS PROCEDURE IS BASED ON THE
ASSUMPTION THAT ALL CASING IS UNLOADED,
ON RACKS; AND THE PICKUP MACHINE IS
RIGGED UP AND OPERATIONAL.
PPE Requirements - Hard Hat, Safety Glasses,
Work Gloves, Steel Toe Shoes, Back Support.
Review JSA for “PICKING UP CASING”.
Fit for duty check for all hands.
Verify the following items are ready or available,
as required:
- Inspect pick up machine, sheaves and cables for
damage and proper installation.
- V-door stairs, catwalk area and other hazard areas
are roped off. Use “Caution Tape”.
- Proper lighting on pipe racks, catwalk, and V-door
- Rig lighting does not interfere with pickup machine
operator.
- Third party Flagger is assigned on rig floor and has
fluorescent vest.
- Mousehole is secured properly and in good
condition. BE AWARE of side load requirements of
the Mousehole when picking up pipe.
- Mousehole is secured under the rig floor at the
point of tension of the pick up pole.
- Pickup pole safety clamp and cover are installed
and in good condition.
- Pickup machine operator knows the safe working
load of his cables and equipment.
- Clamp-on type thread protectors are available.
Include all third party personnel.
Only Romfor’ employees are
authorized to operate Romfors’
equipment.
Include all third party personnel.
BPS RECOMMENDS the use of
the “trough” type pickup
machine.
Use two-way communication
equipment/ PA equipment for
Driller and PU Machine Operator.
BPS RECOMMENDS that a
fluorescent vest be available
at the rig site.
0
1
1
2
3
1
STEP SUB PROCEDURE REMARKS
PICKING UP CASING
HANDLING TUBULARS
Romfor International Ltd. Derrickman
2
2
3
Verify the size, weight, grade, connection, and joint
count of the tubulars. The pipe is in the proper order
for picking up.
Establish communication links between pickup
machine operator and personnel working the pipe
racks.
Discuss emergency shut down procedures.
READY TO PICKUP CASING
Remove chocks from the casing on pipe rack, using a
metal hook.
It is recommended to roll all casing from the
ground level.
If this is not possible, and personnel are required
to be on top of the casing; then the use of
walkways are recommended. DO NOT walk on
bare casing, use the walkway.
Access the walkways from the end opposite the
catwalk using a secured ladder or stairs.
PICK UP WITH PICKUP MACHINE:
Roll the joint to the pickup machine using a pipe roller.
Install casing thread protector.
Use two-way communication
equipment/ PA equipment for
pipe rollers and PU Machine
Operator.
Use Romfors’ angle iron type
chocks.
DO NOT UNDER ANY
CONDITION attempt to stop
or step over rolling tubulars.
Rig Manager Authorization is
required before any
personnel are permitted to
go on top of the casing.
JSA must be reviewed with
direct supervision by the Rig
Manager.
DO NOT walk across pipe racks
from catwalk.
MOVE ONLY ONE JOINT of
casing at a time.
DO NOT use feet or hands to
move pipe while on top of the
pipe racks.
2
3
0
1
2
Romfor International Ltd. Derrickman
STEP SUB PROCEDURE REMARKS
PICKING UP CASING
HANDLING TUBULARS
3
BE AWARE of other joints of
rolling casing.
DO NOT attempt to assist in
loading casing into trough.
Remove Walkway and stripping
as layer is run.
3
4
3
4
5
6
0
Position joint against pick up arms until operator
catches the pipe with the pickup arm.
STAND CLEAR until the casing is loaded in the trough
and lifted to the rig floor.
Repeat Steps 3-1 through 3-4 until layer is run.
Repeat Steps 3-1 through 3-5 until all casing is run.
OR
PICK UP WITH HOIST: IS NOT A RECOMMENDED
PROCEDURE FOR PICKING UP CASING.
Refer to procedure for “Running Casing” for rig floor
operations.
END OF PROCEDURE

Romfor International Ltd. Derrickman
STEP SUB PROCEDURE REMARKS
UNLOADING CASING
HANDLING TUBULARS
. 1
RECEIVING TUBULARS
DISCUSS TUBULAR REQUIREMENTS PRIOR TO
ARRIVAL OF GOODS TO LOCATION. PLAN FOR
REQUIRED SPACE AND SIZE OF FORKLIFT.
PPE Requirements - Hard Hat, Safety Glasses,
Work Gloves, Steel Toe Shoes, Back Support.
Review JSA for RECEIVING TUBULARS
Discuss procedures with Rig Manager to include:
- Manifest / material transfer requirements
- Location of tubulars.
- Unloading procedure.
- Number and position of trucks on location.
- Size of forklift required (Capacity & length of
forks).
- Pipe racks, stripping (in good condition), and
proper chocks.
Verify the following items are ready or available,
as required:
- Forklift is ready for operation.
- Pipe racks are level with Catwalk, equipped
with end stops of the proper height to
accommodate all layers of pipe.
- Catwalks are level and pinned together.
- Stripping is available.
- Chocks are available.
- Tally tape and Tally book.
Verify the size, weight, grade, connection, and joint
count of the tubulars against the manifest.
The Rig Manager and Operator Representative should
discuss the unloading sequence to assure that the
proper weights and grades are placed in the correct
order on the pipe racks.
BPS RECOMMENDS 18” or
shorter pipe racks. BPS
RECOMMENDS that the box-end
faces the truck cab and all tubulars
are stripped and chocked.
DO NOT UNDER ANY
CONDITION attempt to stop or
step over rolling tubulars.
Include all third party personnel.
It is NOT A RECOMMENDED
procedure to unload tubulars with
a crane. Only one truck load of
tubulars on location at one time.
When positioning pipe racks,
plan for room to handle casing
tools on catwalk.
Refer to forklift operational
procedures. Verify that backup
signal, brakes and emergency
brake are operational.
Use Romfor's angle iron type
chocks.
Verify that thread protectors are
installed on both the pin end and
box end of the pipe.
Refer to Operator’s casing
program.
0
1
1
2
3
1
2
3
UN
LO
AD
ING
STEP SUB PROCEDURE REMARKS
UNLOADING CASING
HANDLING TUBULARS
Romfor International Ltd. Derrickman
2
2
3
4
5
6
7
READY TO UNLOAD CASING
Position truck for unloading and check the following:
-Guide truck if necessary.
-Brake is set properly.
-The truck is level.
-Wheels are properly chocked.
-Verify all pipe layers are properly stripped and
chocked.
Unchain load:
-Position forks of the forklift under the bottom layer
before releasing chain or strap binder.
-Verify stops are installed on the side of the trailer.
-TRUCK DRIVER releases chain or strap binder and
remove.
Unload Casing:
-Ensure forklift is in the center of the load and the
forks are in proper position.
-Lift casing, tilt forks to proper position, and proceed to
the pipe rack.
Move Casing to the pipe rack:
-Travel with forks in lowest position.
-Travel at a SLOW rate of speed.
Unload Casing onto the pipe racks.
-Carefully place pipe onto the pipe rack. DO NOT
drop.
-Rack casing orderly, as required. Align pin ends to
accommodate pickup machine. Only roll one joint of
casing at a time.
- MAKE SURE first joint is positioned correctly for
pickup machine. (Parallel to catwalk)
Remove casing protectors.
Minimize forklift travel. Make
sure truck is physically on the
location.
DO NOT climb or walk on load.
STAND CLEAR while load is
unchained.
DO NOT EXCEED lifting
capacity of forklift. See forklift
JSA. DO NOT climb or walk on
load.
STAND CLEAR of forklift and
load path. DO NOT touch
casing at any time the casing is
on the forks.
MAKE SURE first casing is
secure against the chalks.
(Allow room for pickup
machine pick-up arms if
required, 2’ min).
NEVER get between tubulars.
Stack neatly on the edge of
location.
Romfor International Ltd. Derrickman
STEP SUB PROCEDURE REMARKS
UNLOADING CASING
HANDLING TUBULARS
3
Use wood stripping only. MAKE
SURE first joint is positioned
correctly for pickup machine.
(Parallel to catwalk)
Rig Manager Authorization is
required before any personnel
are permitted to go on top of
the casing.
JSA must be reviewed with
direct supervision by the Rig
Manager.
DO NOT walk across pipe racks
from catwalk.
Two walkways are recommended
for large OD casing.
DO NOT use feet or hands to roll
casing. DO NOT get in front of,
step over or attempt to stop:
rolling casing.
Rocks are not chocks! Use
proper chocks.
8
9
10
11
12
1
2
3
Strap and tally each layer of casing.
Repeat steps 4 through 8 until layer is full.
If casing is layered:
Verify that pipe rack stops are in place and of the
proper height. Place stripping boards directly over
pipe racks on top of layer. Run stripping boards all
the way to the end of the casing. Place chock a
minimum of 2 joint widths from the end of stripping at
the catwalk end.
It is recommended to roll all casing from the
ground level.
If this is not possible, and personnel are required
to be on top of the casing; then the use of
walkways are recommended. DO NOT walk on
bare casing, use the walkway.
Access the walkways from the end opposite the
catwalk using a secured ladder or stairs.
Lay walkway on each layer of casing. The walkway is
to extend the full length of each layer of casing.
Use a pipe roller to move the casing into proper
position one joint at a time.
When layer is complete, install pipe chocks at the
ends of the stripping boards.
Repeat steps 4 through 11 until complete.
END OF PROCEDURE

Romfor International Ltd.
HANDLING
TUBULARS
HANDLING
TUBULARS
DerrickmanDerrickman
DR
IL
L C
OL
LA
RS
DRILL COLLARSDRILL COLLARS

Romfor International Ltd.
PRACTICE: PICKING UP DRILL COLLARS
POSITION: UPDATE FOR ALL POSITIONS
THREAD PROTECTORS
WITH LIFTING BAIL (CAST STEEL)
Made from steel castings meeting ASTM Specification
No. A27 Grade 60-30 (60,000 psi tensile — 30,000 psi
yield), with heavy bails suitable for picking up
and laying down drill collars with cat line. Threads and
shoulders are precision machined.
BOXPIN
DRILCO
Romfor International Ltd. Derrickman
STEP SUB PROCEDURE REMARKS
PICKING UP DRILL COLLARS
HANDLING TUBULARS
PIC
KIN
G U
P
1
PICKING UP DRILL COLLARS
This procedure is based on the assumption that all
Drill collars are unloaded, on racks; and the pickup
machine is rigged up and operational.
PPE Requirements - Hard Hat, Safety Glasses, Work
Gloves, Steel Toe Shoes, Back Support.
Review JSA for “PICKING UP DRILL COLLARS”.
Fit for duty check for all hands.
Verify the following items are ready or available, as
required:
- Inspect pick up machine, sheaves and cables for
damage and proper installation.
- V-door stairs, catwalk area and other hazard areas
are roped off. Use “Caution Tape”.
- Proper lighting on collars racks, catwalk, and V-
door Rig lighting does not interfere with pickup
machine operator.
- Flagger is assigned on rig floor and has fluorescent
vest.
- Mousehole is secured properly and in good
condition. BE AWARE of side load requirements of
the Mousehole when picking up collars.
- Mousehole is secured under the rig floor at the
point of tension of the pick up pole.
- Pickup pole safety clamp and cover are installed
and in good condition.
- Pickup machine operator knows the safe working
load of his cables and equipment.
- Thread protectors are available and installed.
- ‘Drilco’ equivalent casted lifting bails are available
when using Hoist Line to pick up drill collars.
- Rental drill collars have proper paper work to show
recent inspections.
- If the collars were shipped with lifting bails
installed, ensure lifting bails have been properly
tightened.
Include all third party personnel.
Include all third party personnel.
BPS RECOMMENDS the use of
the “trough” type pickup
machine.
Use two-way communication
equipment/ PA equipment for
Driller and PU Machine Operator.
BPS RECOMMENDS that a
fluorescent vest be available at
the rig site.
0
1
1
2
3
1
STEP SUB PROCEDURE REMARKS
PICKING UP DRILL COLLARS
HANDLING TUBULARS
Romfor International Ltd. Derrickman
2
2
3
Verify the size, weight, grade, connection, and joint
count of the drill collar. The collars are in the proper
order for picking up.
Establish communication links between pickup
machine operator and crewmembers.
Discuss emergency shut down procedures.
READY TO PICKUP DRILL COLLARS
All crew members are to refer to the Best Practice
procedure for each position on “Picking up Drill
Collars”.
Make sure that all procedures are understood and
followed.
Assist if required to remove chocks from under the
first drill collar on pipe rack.
If required, assist in rolling drill collars from the
ground level with one person on each end of the
collar.
PICK UP DRILL COLLARS WITH PICKUP MACHINE:
Ensure tongs are secure and out of the way, tie hoist
line to lift-sub using two wraps.
When drill collar is in proper position in the V-door,
assist in removing box-end protector.
BPS DOES NOT RECOMMEND
picking up drill collars over 8
inch OD with the pickup
machine.
Visually inspect all drill collars
on the rack for swelled boxes.
DO NOT pick up any drill collar
with a swelled box.
Use two-way communication
equipment/ PA equipment for
rig crew members and PU
Machine Operator.
DO NOT UNDER ANY
CONDITION attempt to stop
or step over rolling tubulars.
DO NOT attempt to guide or
stop drill collar with body or
hand.
DO NOT for any reason get on
top of Drill collar.
DO NOT install lift subs on the
ground.
Ensure drill collar protectors
are installed. BPS
RECOMMENDS the use of
“Choker Hook” on hoist line.
2
3
1
2
3
1
2
Romfor International Ltd. Derrickman
STEP SUB PROCEDURE REMARKS
PICKING UP DRILL COLLARS
HANDLING TUBULARS
4
3
Assist in installing lift-sub and tighten using 18” chain
tongs.
STAND CLEAR as Motorman flags Pickup machine
operator to position drill collar for latching elevators.
As elevators are being lowered, assist in guiding
elevators over lift-sub for latching.
When the elevators are in the proper position, latch
elevators.
STAND CLEAR while drill collar is raised in position to
run in hole.
When drill collar is in position remove thread protector.
Repeat Steps 3-1 through 3-7 until all Drill collars are run.
OR
PICK UP WITH HOIST:
For use with drill collars LESS THAN 8 inch OD.
Inspect condition of hoist and cable. Know the
capacity of the cable and hoist.
Assist if required in guiding hoist line out the V-door,
as Motorman lowers in position for picking up drill
collar.
For 6” to 8” drill collars use two hoist lines.
Derrickman will operate second hoist when picking
up 6”-8” drill collars.
STAND CLEAR while hoist operator pulls drill collar
up V-door and rests securely on collar stop, or is in
position over Mousehole. Watch position of drill
collar.
BE AWARE of pinch points and
your position on the rig floor.
BE AWARE of pinch points and
your position on the rig floor.
Use ropes on elevator ears to
assist in guiding elevators over
lift-sub.
BE AWARE of pinch points and
your position on the rig floor.
Ensure hoist is of sufficient
rating to pick up the drill collar.
MAKE SURE the brake is
working properly.
Ensure drill collar protectors are
installed.
BPS recommends that all drill
collars be picked up using a
‘Drilco’ equivalent casted lifting
bail.
Ensure two operations are not
conducted at the same time.
BPS recommends one continuous
lift from Catwalk to Mousehole.
Be aware of danger areas and
possibility of a missed drill collar
by tail rope.
3
4
5
6
7
8
9
0
1
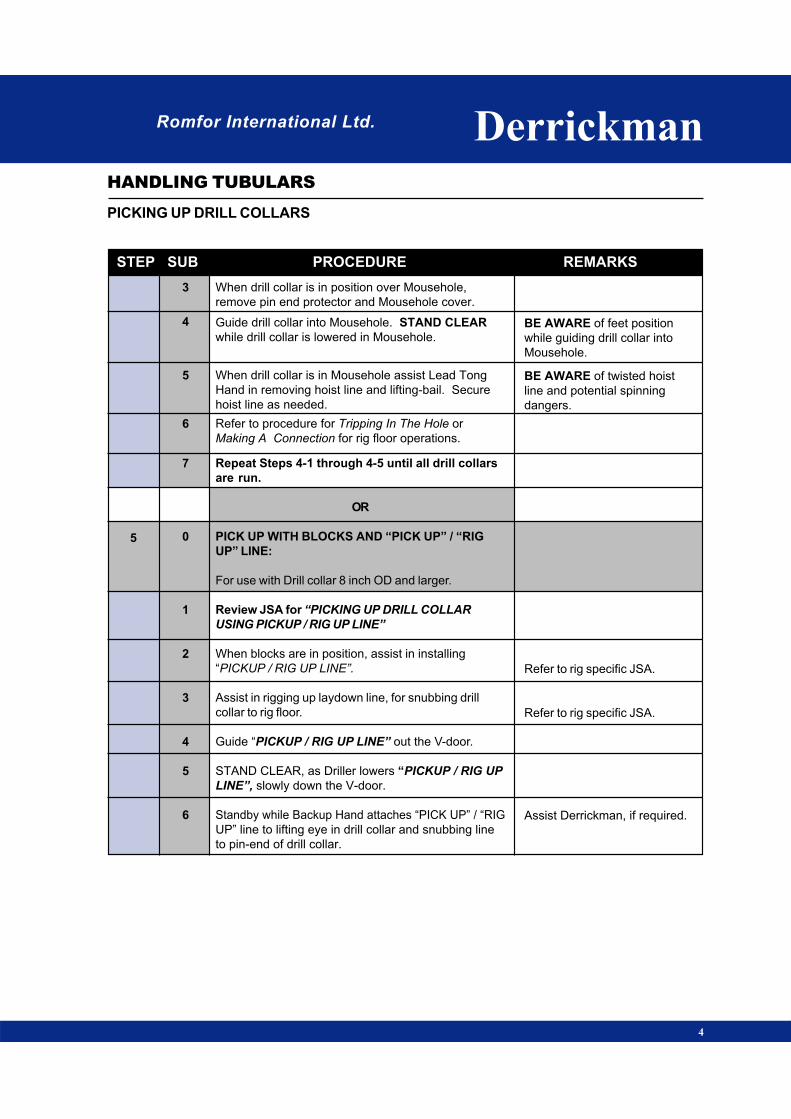
STEP SUB PROCEDURE REMARKS
PICKING UP DRILL COLLARS
HANDLING TUBULARS
Romfor International Ltd. Derrickman
4
5
When drill collar is in position over Mousehole,
remove pin end protector and Mousehole cover.
Guide drill collar into Mousehole. STAND CLEAR
while drill collar is lowered in Mousehole.
When drill collar is in Mousehole assist Lead Tong
Hand in removing hoist line and lifting-bail. Secure
hoist line as needed.
Refer to procedure for Tripping In The Hole or
Making A Connection for rig floor operations.
Repeat Steps 4-1 through 4-5 until all drill collars
are run.
OR
PICK UP WITH BLOCKS AND “PICK UP” / “RIG
UP” LINE:
For use with Drill collar 8 inch OD and larger.
Review JSA for “PICKING UP DRILL COLLAR
USING PICKUP / RIG UP LINE”
When blocks are in position, assist in installing
“PICKUP / RIG UP LINE”.
Assist in rigging up laydown line, for snubbing drill
collar to rig floor.
Guide “PICKUP / RIG UP LINE” out the V-door.
STAND CLEAR, as Driller lowers “PICKUP / RIG UP
LINE”, slowly down the V-door.
Standby while Backup Hand attaches “PICK UP” / “RIG
UP” line to lifting eye in drill collar and snubbing line
to pin-end of drill collar.
BE AWARE of feet position
while guiding drill collar into
Mousehole.
BE AWARE of twisted hoist
line and potential spinning
dangers.
Refer to rig specific JSA.
Refer to rig specific JSA.
Assist Derrickman, if required.
3
4
5
6
7
0
1
2
3
4
5
6

Romfor International Ltd. Derrickman
STEP SUB PROCEDURE REMARKS
PICKING UP DRILL COLLARS
HANDLING TUBULARS
6
5
If requested, flag Driller.
STAND CLEAR while drill collar is raised and
snubbed into position over Mousehole.
Remove snub line, pin end protector and Mousehole
cover.
USING TAIL ROPE, assist in guiding drill collar into
Mousehole.
Once drill collar is stabbed into Mousehole, the tail
rope is removed.
STAND CLEAR as blocks are lowered and until there
is “slack” in the “PICKUP / RIG UP LINE”.
Assist in removing “PICKUP / RIG UP LINE” and box-
end lifting-eye.
Assist in securing “PICKUP / RIG UP LINE”.
Repeat Steps 5-2 through 3-14 until all Drill collars
are run.
Refer to procedure for Tripping In The Hole or Making
A Connection for rig floor operations.
END OF PROCEDURE
Most experienced Floorhand
should be the flagger.
Ensure two operations are not
conducted at the same time.
BE AWARE of feet position
while guiding drill collar into
Mousehole.
Be aware of danger areas and
possibility of a missed drill collar
by tail rope.
BE AWARE of twisted hoist line
and potential spinning dangers.
7
8
9
10
11
12
13
14
15
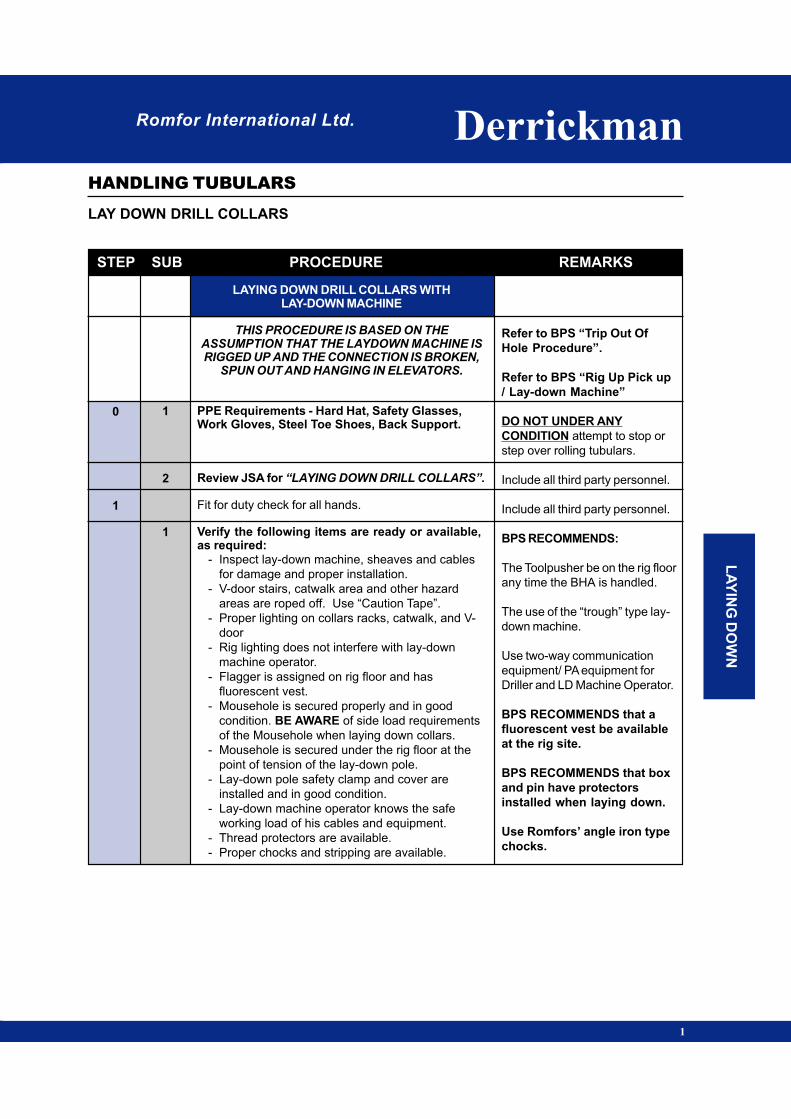
Romfor International Ltd. Derrickman
STEP SUB PROCEDURE REMARKS
LAY DOWN DRILL COLLARS
HANDLING TUBULARS
LA
YIN
G D
OW
N
1
LAYING DOWN DRILL COLLARS WITHLAY-DOWN MACHINE
THIS PROCEDURE IS BASED ON THE
ASSUMPTION THAT THE LAYDOWN MACHINE IS
RIGGED UP AND THE CONNECTION IS BROKEN,
SPUN OUT AND HANGING IN ELEVATORS.
PPE Requirements - Hard Hat, Safety Glasses,Work Gloves, Steel Toe Shoes, Back Support.
Review JSA for “LAYING DOWN DRILL COLLARS”.
Fit for duty check for all hands.
Verify the following items are ready or available,as required:
- Inspect lay-down machine, sheaves and cables
for damage and proper installation.
- V-door stairs, catwalk area and other hazard
areas are roped off. Use “Caution Tape”.
- Proper lighting on collars racks, catwalk, and V-
door
- Rig lighting does not interfere with lay-down
machine operator.
- Flagger is assigned on rig floor and has
fluorescent vest.
- Mousehole is secured properly and in good
condition. BE AWARE of side load requirements
of the Mousehole when laying down collars.
- Mousehole is secured under the rig floor at the
point of tension of the lay-down pole.
- Lay-down pole safety clamp and cover are
installed and in good condition.
- Lay-down machine operator knows the safe
working load of his cables and equipment.
- Thread protectors are available.
- Proper chocks and stripping are available.
Refer to BPS “Trip Out Of
Hole Procedure”.
Refer to BPS “Rig Up Pick up
/ Lay-down Machine”
DO NOT UNDER ANY
CONDITION attempt to stop or
step over rolling tubulars.
Include all third party personnel.
Include all third party personnel.
BPS RECOMMENDS:
The Toolpusher be on the rig floor
any time the BHA is handled.
The use of the “trough” type lay-
down machine.
Use two-way communication
equipment/ PA equipment for
Driller and LD Machine Operator.
BPS RECOMMENDS that a
fluorescent vest be available
at the rig site.
BPS RECOMMENDS that box
and pin have protectors
installed when laying down.
Use Romfors’ angle iron type
chocks.
0
1
1
2
1
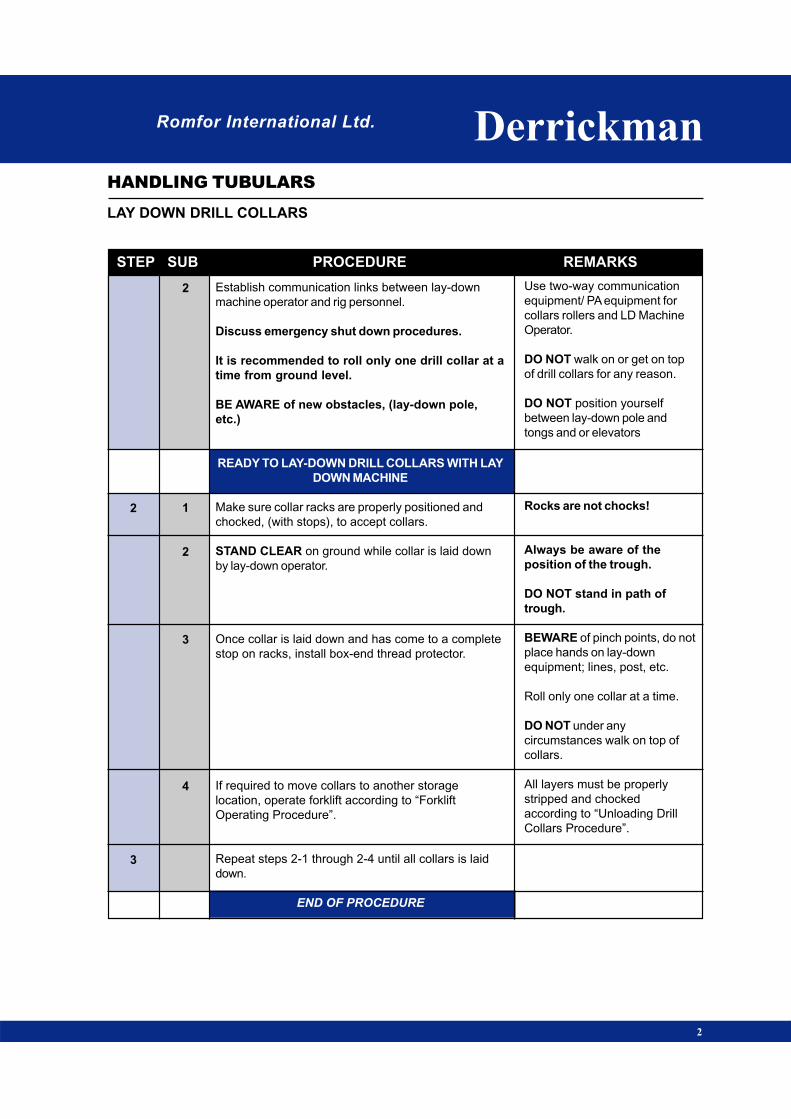
STEP SUB PROCEDURE REMARKS
LAY DOWN DRILL COLLARS
HANDLING TUBULARS
Romfor International Ltd. Derrickman
2
2
3
Establish communication links between lay-down
machine operator and rig personnel.
Discuss emergency shut down procedures.
It is recommended to roll only one drill collar at a
time from ground level.
BE AWARE of new obstacles, (lay-down pole,
etc.)
READY TO LAY-DOWN DRILL COLLARS WITH LAY
DOWN MACHINE
Make sure collar racks are properly positioned and
chocked, (with stops), to accept collars.
STAND CLEAR on ground while collar is laid down
by lay-down operator.
Once collar is laid down and has come to a complete
stop on racks, install box-end thread protector.
If required to move collars to another storage
location, operate forklift according to “Forklift
Operating Procedure”.
Repeat steps 2-1 through 2-4 until all collars is laid
down.
END OF PROCEDURE
Use two-way communication
equipment/ PA equipment for
collars rollers and LD Machine
Operator.
DO NOT walk on or get on top
of drill collars for any reason.
DO NOT position yourself
between lay-down pole and
tongs and or elevators
Rocks are not chocks!
Always be aware of the
position of the trough.
DO NOT stand in path of
trough.
BEWARE of pinch points, do not
place hands on lay-down
equipment; lines, post, etc.
Roll only one collar at a time.
DO NOT under any
circumstances walk on top of
collars.
All layers must be properly
stripped and chocked
according to “Unloading Drill
Collars Procedure”.
2
1
2
3
4
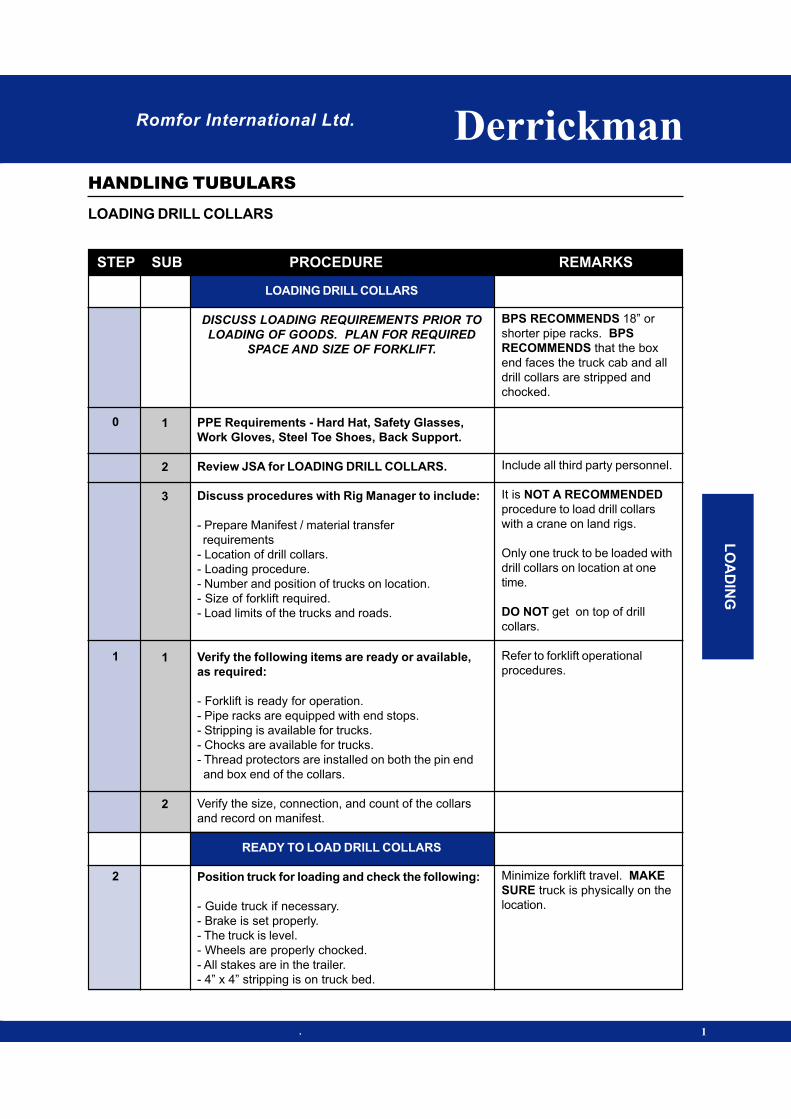
Romfor International Ltd. Derrickman
STEP SUB PROCEDURE REMARKS
LOADING DRILL COLLARS
HANDLING TUBULARS
. 1
LOADING DRILL COLLARS
DISCUSS LOADING REQUIREMENTS PRIOR TO
LOADING OF GOODS. PLAN FOR REQUIRED
SPACE AND SIZE OF FORKLIFT.
PPE Requirements - Hard Hat, Safety Glasses,
Work Gloves, Steel Toe Shoes, Back Support.
Review JSA for LOADING DRILL COLLARS.
Discuss procedures with Rig Manager to include:
- Prepare Manifest / material transfer
requirements
- Location of drill collars.
- Loading procedure.
- Number and position of trucks on location.
- Size of forklift required.
- Load limits of the trucks and roads.
Verify the following items are ready or available,
as required:
- Forklift is ready for operation.
- Pipe racks are equipped with end stops.
- Stripping is available for trucks.
- Chocks are available for trucks.
- Thread protectors are installed on both the pin end
and box end of the collars.
Verify the size, connection, and count of the collars
and record on manifest.
READY TO LOAD DRILL COLLARS
Position truck for loading and check the following:
- Guide truck if necessary.
- Brake is set properly.
- The truck is level.
- Wheels are properly chocked.
- All stakes are in the trailer.
- 4” x 4” stripping is on truck bed.
BPS RECOMMENDS 18” or
shorter pipe racks. BPS
RECOMMENDS that the box
end faces the truck cab and all
drill collars are stripped and
chocked.
Include all third party personnel.
It is NOT A RECOMMENDED
procedure to load drill collars
with a crane on land rigs.
Only one truck to be loaded with
drill collars on location at one
time.
DO NOT get on top of drill
collars.
Refer to forklift operational
procedures.
Minimize forklift travel. MAKE
SURE truck is physically on the
location.
0
1
2
1
2
3
1
2
LO
AD
ING
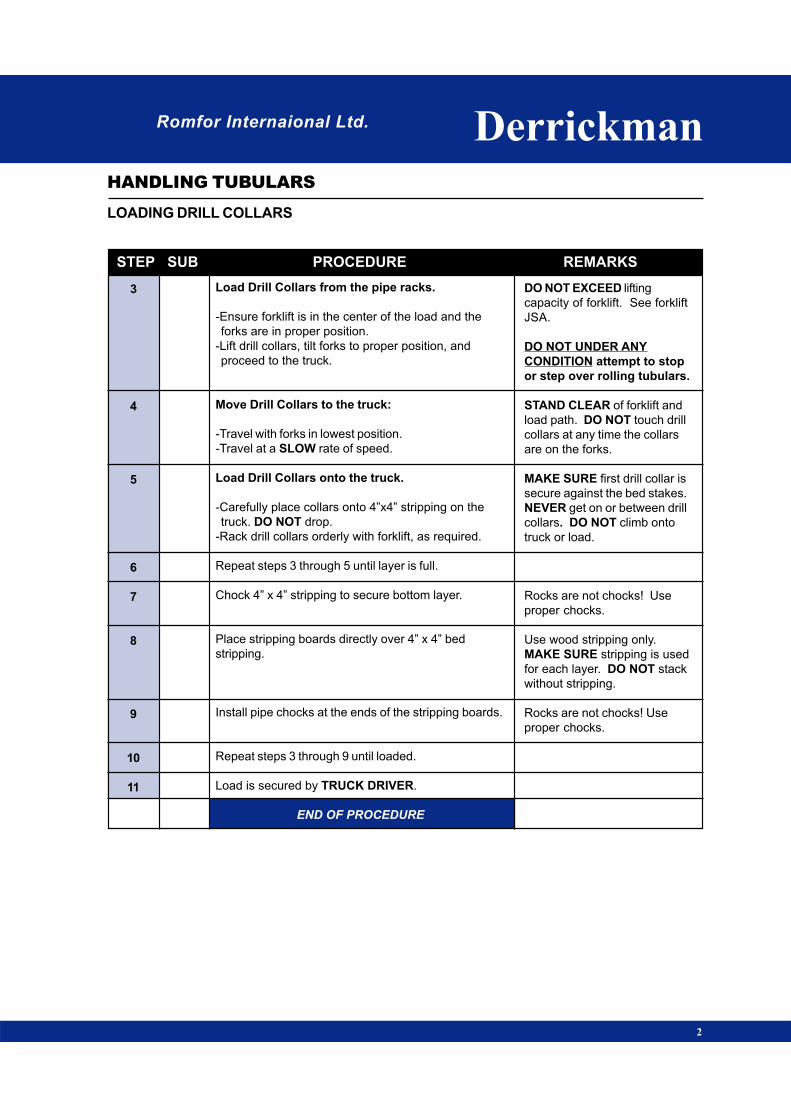
STEP SUB PROCEDURE REMARKS
LOADING DRILL COLLARS
HANDLING TUBULARS
Romfor Internaional Ltd. Derrickman
2
3
4
5
6
7
8
9
10
11
Load Drill Collars from the pipe racks.
-Ensure forklift is in the center of the load and the
forks are in proper position.
-Lift drill collars, tilt forks to proper position, and
proceed to the truck.
Move Drill Collars to the truck:
-Travel with forks in lowest position.
-Travel at a SLOW rate of speed.
Load Drill Collars onto the truck.
-Carefully place collars onto 4”x4” stripping on the
truck. DO NOT drop.
-Rack drill collars orderly with forklift, as required.
Repeat steps 3 through 5 until layer is full.
Chock 4” x 4” stripping to secure bottom layer.
Place stripping boards directly over 4” x 4” bed
stripping.
Install pipe chocks at the ends of the stripping boards.
Repeat steps 3 through 9 until loaded.
Load is secured by TRUCK DRIVER.
END OF PROCEDURE
DO NOT EXCEED lifting
capacity of forklift. See forklift
JSA.
DO NOT UNDER ANY
CONDITION attempt to stop
or step over rolling tubulars.
STAND CLEAR of forklift and
load path. DO NOT touch drill
collars at any time the collars
are on the forks.
MAKE SURE first drill collar is
secure against the bed stakes.
NEVER get on or between drill
collars. DO NOT climb onto
truck or load.
Rocks are not chocks! Use
proper chocks.
Use wood stripping only.
MAKE SURE stripping is used
for each layer. DO NOT stack
without stripping.
Rocks are not chocks! Use
proper chocks.

Romfor International Ltd. Derrickman
STEP SUB PROCEDURE REMARKS
UNLOADING DRILL COLLARS
HANDLING TUBULARS
. 1
RECEIVING TUBULARS
DISCUSS TUBULAR REQUIREMENTS PRIOR TO
ARRIVAL OF GOODS TO LOCATION. PLAN FOR
REQUIRED SPACE AND SIZE OF FORKLIFT.
PPE Requirements - Hard Hat, Safety Glasses,
Work Gloves, Steel Toe Shoes, Back Support.
Review JSA for “RECEIVING TUBULARS”
Discuss procedures with Rig Manager to include:
- Manifest / material transfer requirements
- Location of tubulars.
- Unloading procedure.
- Number and position of trucks on location.
- Size of forklift required (Capacity & length
of forks).
- Pipe racks, stripping, chocks.
Verify the following items are ready or available,
as required:
- Forklift is ready for operation.
- Pipe racks are level with Catwalk, equipped
with end stops of the proper height to accommodate
all layers of pipe.
- Catwalks are level and pinned together.
- Stripping is available.
- Chocks are available.
- Tally tape and Tally book.
Verify the size, weight, grade, connection, and joint
count of the tubulars against the manifest.
READY TO UNLOAD DRILL COLLARS
BPS RECOMMENDS 18” or
shorter pipe racks. BPS
RECOMMENDS that the box-end
faces the truck cab and all tubulars
are stripped and chocked.
Include all third party personnel.
IT IS NOT A RECOMMENDED
PROCEDURE to unload
tubulars with a crane. Only one
truck load of tubulars on location
at one time.
Refer to forklift operational
procedures. Verify that backup
signal, brakes and emergency
brake are operational.
Use Romfors’ angle iron type
chocks.
Verify that thread protectors are
installed on both the pin end and
box end of the collars.
0
1
1
2
3
1
2
UN
LO
AD
ING

STEP SUB PROCEDURE REMARKS
UNLOADING DRILL COLLARS
HANDLING TUBULARS
Romfor International Ltd. Derrickman
2
2
3
4
5
6
7
Position truck for unloading and check the following:
- Guide truck if necessary.
- Brake is set properly.
- The truck is level.
- Wheels are properly chocked.
- Verify all pipe layers are properly stripped
and chocked
Unchain load:
- Position forks of the forklift under the bottom layer
before releasing chain or strap binder.
- Verify stops are installed on the side of the trailer.
- TRUCK DRIVER releases chain or strap binder and
remove.
Unload Drill Collars:
- Ensure forklift is in the center of the load and the
forks
are in proper position.
- Lift drill collars, tilt forks to proper position, and
proceed to the pipe rack.
Move Drill Collars to the pipe rack:
- Travel with forks in lowest position.
- Travel at a SLOW rate of speed.
Unload Drill Collars onto the pipe racks.
- Carefully place collars onto the pipe rack. DO NOT
drop.
- Rack drill collars orderly with forklift, as required.
Repeat steps 4 through 6 until unloaded.
END OF PROCEDURE
Minimize forklift travel. MAKE
SURE truck is physically on the
location.
DO NOT climb or walk on load.
STAND CLEAR while load is
unchained.
DO NOT UNDER ANY
CONDITION attempt to stop or
step over rolling tubulars.
DO NOT EXCEED lifting
capacity of forklift. See forklift
JSA.
STAND CLEAR of forklift and
load path. DO NOT touch drill
collars at any time the collars
are on the forks.
DO NOT stack drill collars,
place collars in single layer.
(Allow room for pickup
machine pick-up arms if
required, 2’ min). MAKE
SURE first drill collar is secure
against the end stops. NEVER
get on or between tubulars.

Romfor International Ltd.
HANDLING
TUBULARS
HANDLING
TUBULARS
DerrickmanDerrickman
DR
IL
L P
IP
E
DRILL PIPEDRILL PIPE

Romfor International Ltd. Derrickman
STEP SUB PROCEDURE REMARKS
PICKING UP DRILL PIPE
HANDLING TUBULARS
PIC
KIN
G U
P
1
PICKING UP DRILL PIPE
This procedure is based on the assumption that
all drill pipe is unloaded, on racks; and the pickup
machine is rigged up and operational.
PPE Requirements - Hard Hat, Safety Glasses,
Work Gloves, Steel Toe Shoes, Back Support.
Review JSA for “PICKING UP DRILL PIPE”.
Fit for duty check for all hands.
Verify the following items are ready or available,
as required:
- Inspect pick up machine, sheaves and cables for
damage and proper installation.
-V-door stairs, catwalk area and other hazard areas
are roped off. Use “Caution Tape”.
-Proper lighting on pipe racks, catwalk, and V-door
-Rig lighting does not interfere with pickup machine
operator.
-Third party Flagger is assigned on rig floor and has
fluorescent vest.
-Mousehole is secured properly and in good
condition. BE AWARE of side load requirements of
the Mousehole when picking up pipe.
-Mousehole is secured under the rig floor at the point
of tension of the pick up pole.
-Pickup pole safety clamp and cover are installed
and in good condition.
-Pickup machine operator knows the safe working
load of his cables and equipment.
-Thread protectors are available.
Verify the size, weight, grade, connection, and joint
count of the drill pipe. The pipe is in the proper order
for picking up.
Include all third party personnel.
Include all third party personnel.
BPS RECOMMENDS the use of
the “trough” type pickup
machine.
Use two-way communication
equipment/ PA equipment for
Driller and PU Machine
Operator.
BPS RECOMMENDS that a
fluorescent vest be available
at the rig site.
0
1
1
2
3
1
2
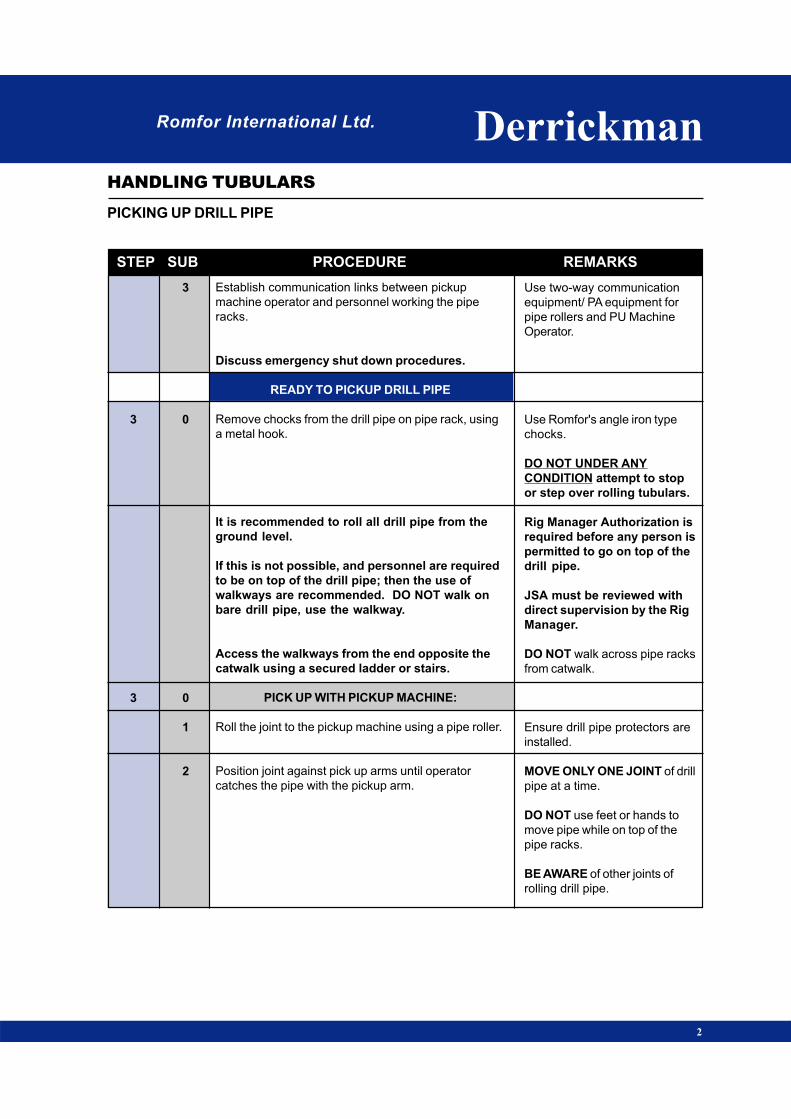
STEP SUB PROCEDURE REMARKS
PICKING UP DRILL PIPE
HANDLING TUBULARS
Romfor International Ltd. Derrickman
2
3
3
Establish communication links between pickup
machine operator and personnel working the pipe
racks.
Discuss emergency shut down procedures.
READY TO PICKUP DRILL PIPE
Remove chocks from the drill pipe on pipe rack, using
a metal hook.
It is recommended to roll all drill pipe from the
ground level.
If this is not possible, and personnel are required
to be on top of the drill pipe; then the use of
walkways are recommended. DO NOT walk on
bare drill pipe, use the walkway.
Access the walkways from the end opposite the
catwalk using a secured ladder or stairs.
PICK UP WITH PICKUP MACHINE:
Roll the joint to the pickup machine using a pipe roller.
Position joint against pick up arms until operator
catches the pipe with the pickup arm.
Use two-way communication
equipment/ PA equipment for
pipe rollers and PU Machine
Operator.
Use Romfor's angle iron type
chocks.
DO NOT UNDER ANY
CONDITION attempt to stop
or step over rolling tubulars.
Rig Manager Authorization is
required before any person is
permitted to go on top of the
drill pipe.
JSA must be reviewed with
direct supervision by the Rig
Manager.
DO NOT walk across pipe racks
from catwalk.
Ensure drill pipe protectors are
installed.
MOVE ONLY ONE JOINT of drill
pipe at a time.
DO NOT use feet or hands to
move pipe while on top of the
pipe racks.
BE AWARE of other joints of
rolling drill pipe.
3
0
0
1
2
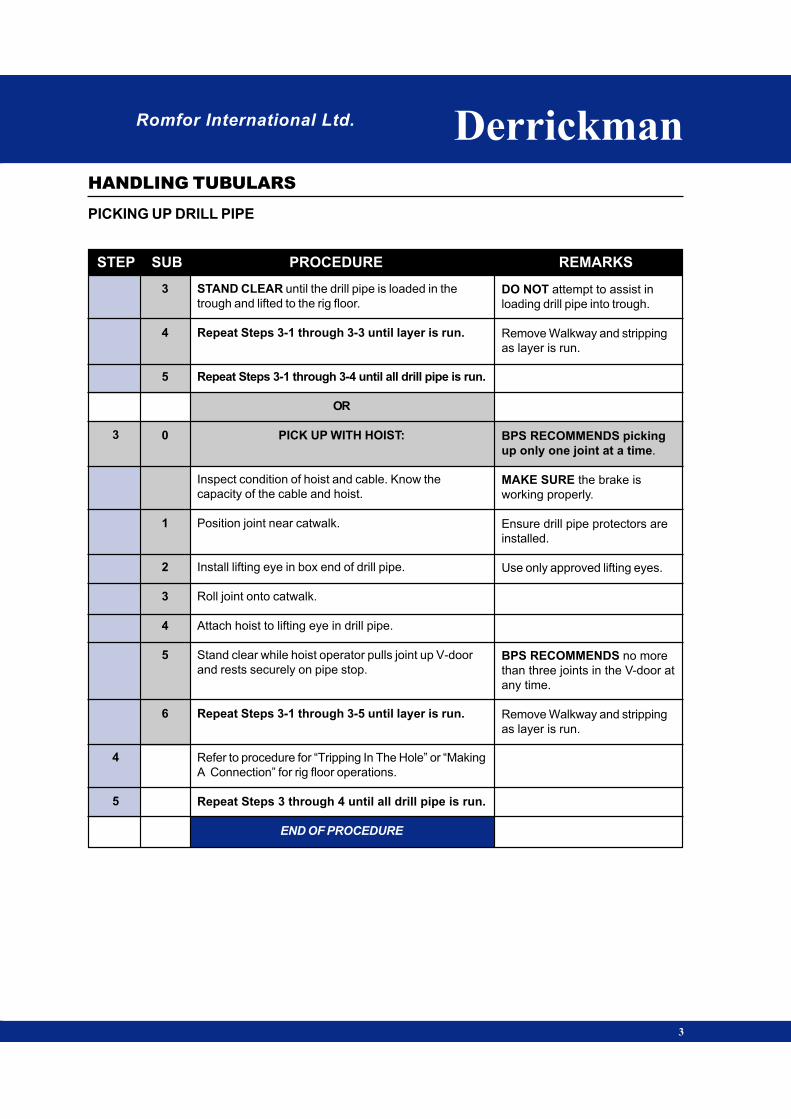
Romfor International Ltd. Derrickman
STEP SUB PROCEDURE REMARKS
PICKING UP DRILL PIPE
HANDLING TUBULARS
3
DO NOT attempt to assist in
loading drill pipe into trough.
Remove Walkway and stripping
as layer is run.
BPS RECOMMENDS picking
up only one joint at a time.
MAKE SURE the brake is
working properly.
Ensure drill pipe protectors are
installed.
Use only approved lifting eyes.
BPS RECOMMENDS no more
than three joints in the V-door at
any time.
Remove Walkway and stripping
as layer is run.
3
4
5
3
4
5
0
1
2
3
4
5
6
STAND CLEAR until the drill pipe is loaded in the
trough and lifted to the rig floor.
Repeat Steps 3-1 through 3-3 until layer is run.
Repeat Steps 3-1 through 3-4 until all drill pipe is run.
OR
PICK UP WITH HOIST:
Inspect condition of hoist and cable. Know the
capacity of the cable and hoist.
Position joint near catwalk.
Install lifting eye in box end of drill pipe.
Roll joint onto catwalk.
Attach hoist to lifting eye in drill pipe.
Stand clear while hoist operator pulls joint up V-door
and rests securely on pipe stop.
Repeat Steps 3-1 through 3-5 until layer is run.
Refer to procedure for “Tripping In The Hole” or “Making
A Connection” for rig floor operations.
Repeat Steps 3 through 4 until all drill pipe is run.
END OF PROCEDURE
Romfor International Ltd. Derrickman
STEP SUB PROCEDURE REMARKS
LAY DOWN DRILL PIPE
HANDLING TUBULARS
. 1
LAYING DOWN DRILL PIPE WITH
LAY-DOWN MACHINE
THIS PROCEDURE IS BASED ON THE
ASSUMPTION THAT THE LAYDOWN MACHINE IS
RIGGED UP AND THE CONNECTION IS BROKEN,
SPUN OUT AND HANGING IN ELEVATORS.
PPE Requirements - Hard Hat, Safety Glasses,
Work Gloves, Steel Toe Shoes, Back Support.
Review JSA for “LAYING DOWN DRILL PIPE”.
Fit for duty check for all hands.
Verify the following items are ready or available,
as required:
- Inspect lay-down machine, sheaves and cables for
damage and proper installation.
-V-door stairs, catwalk area and other hazard areas
are roped off. Use “Caution Tape”.
-Proper lighting on pipe racks, catwalk, and V-door
-Rig lighting does not interfere with lay-down
machine operator.
-Flagger is assigned on rig floor and has fluorescent
vest.
-Mousehole is secured properly and in good
condition. BE AWARE of side load requirements of
the Mousehole when laying down pipe.
-Mousehole is secured under the rig floor at the point
of tension of the lay-down pole.
Refer to BPS “Trip Out Of Hole
Procedure”.
Refer to BPS “Rig Up Pick up /
Lay-down Machine”
DO NOT UNDER ANY
CONDITION attempt to stop or
step over rolling tubulars.
Include all third party personnel.
Include all third party personnel.
BPS RECOMMENDS the use of
the “trough” type lay-down
machine.
Use two-way communication
equipment/ PA equipment for
Driller and LD Machine
Operator.
BPS RECOMMENDS that a
fluorescent vest be available at
the rig site.
BPS RECOMMENDS that box
and pin have protectors
installed when laying down.
Use Romfors’ angle iron type
chocks.
0
1
1
2
3
1
LA
Y D
OW
N
STEP SUB PROCEDURE REMARKS
LAY DOWN DRILL PIPE
HANDLING TUBULARS
Romfor International Ltd. Derrickman
2
2
-Lay-down pole safety clamp and cover are installed
and in good condition.
-Lay-down machine operator knows the safe working
load of his cables and equipment.
-Thread protectors are available.
-Proper chocks and stripping are available.
Establish communication links between lay-down
machine operator and rig personnel.
Discuss emergency shut down procedures.
It is recommended to roll all drill pipe from the ground
level.
If this is not possible, and personnel are required to
be on top of the drill pipe; then the use of walkways
are recommended. DO NOT walk on bare drill pipe,
use the walkway.
Access the walkways from the end opposite the
catwalk using a secured ladder or stairs.
BE AWARE of new obstacles, (lay-down pole, etc.)
READY TO LAY-DOWN DRILL PIPE W/ LD MACHINE
Make sure pipe racks are properly positioned and
chocked, (with stops), to accept tubulars.
STAND CLEAR on ground while joint is laid down by
lay-down operator.
Use two-way communication
equipment/ PA equipment for
pipe rollers and LD Machine
Operator.
Rig Manager Authorization is
required before any personnel
are permitted to go on top of the
drill pipe.
JSA must be reviewed with
direct supervision by the Rig
Manager.
DO NOT walk across pipe
racks from catwalk.
DO NOT position yourself
between lay-down pole and
tongs and or elevators
Always BE AWARE of the
position of the trough. DO
NOT stand in path of trough.
2
1
2
Romfor International Ltd. Derrickman
STEP SUB PROCEDURE REMARKS
LAY DOWN DRILL PIPE
HANDLING TUBULARS
2
3
4
1
2
3
4
5
6
7
3
Once joint is laid down and has come to a complete
stop on racks, install box-end thread protector and roll
joint into position to move with forklift.
If required to move pipe to another storage location,
operate forklift according to “Forklift Operating
Procedure”.
OR
READY TO LAY-DOWN DRILL PIPE USING HOIST &
LAY-DOWN LINE
Inspect condition of hoist and cable. Know the
capacity of the cable and hoist.
STAND CLEAR on ground (not on catwalk) while joint
is laid down by rig crew on floor.
Once joint is laid down and has come to a complete
stop on catwalk, unhook lay down line and remove pin-
end lifting-eye.
Carry pin-end lifting-eye and lay-down hook to the box
end. Remove hoist line and box-end lifting-eye from the
box end of joint. Attach both lifting-eyes and lay-down
hook to the hoist line.
Get down from catwalk. Roll joint of pipe off catwalk
onto pipe racks while standing on the ground.
STAND CLEAR while lifting eyes are lifted to rig floor
by hoist.
Install thread protectors.
BE AWARE of pinch points, do
not place hands on lay-down
equipment; lines, post, etc.
All layers must be properly
stripped and chocked according
to “Unloading Drill Pipe
Procedure”.
BPS RECOMMENDS that drill
pipe be laid down using a lay-
down machine.
MAKE SURE the brake is
working properly.
DO NOT stand in path of pipe.
BE AWARE of pinch points.
Boards may be used on catwalk
to allow clearance to unscrew
lifting eyes.
BE AWARE of trip hazards and
slack in lay-down line.
DO NOT roll pipe with feet.
DO NOT stand on catwalk while
eyes are lifted.
All layers must be properly
stripped and chocked according
to “Unloading Drill Pipe
Procedure”.
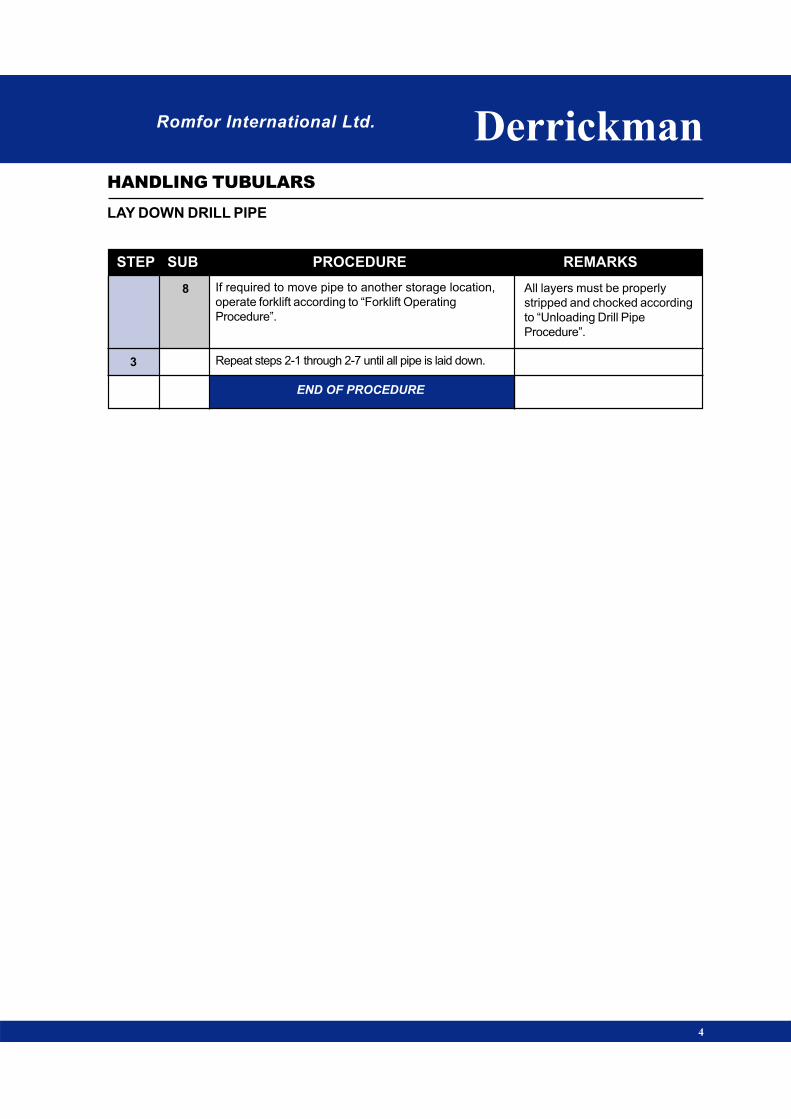
STEP SUB PROCEDURE REMARKS
LAY DOWN DRILL PIPE
HANDLING TUBULARS
Romfor International Ltd. Derrickman
4
3
If required to move pipe to another storage location,
operate forklift according to “Forklift Operating
Procedure”.
Repeat steps 2-1 through 2-7 until all pipe is laid down.
END OF PROCEDURE
All layers must be properly
stripped and chocked according
to “Unloading Drill Pipe
Procedure”.
8

Romfor Inernational Ltd. Derrickman
STEP SUB PROCEDURE REMARKS
LOADING DRILL PIPE
HANDLING TUBULARS
. 1
LO
AD
ING
LOADING DRILL PIPE
Discuss LOADING requirements prior to loading
of goods. Plan for required space and size of
forklift.
PPE Requirements - Hard Hat, Safety Glasses,
Work Gloves, Steel Toe Shoes, Back Support.
Review JSA for “LOADING TUBULARS”.
Discuss procedures with Rig Manager to include:
- Prepare manifest / material transfer requirements
- Location of tubulars.
- Loading procedure.
- Number and position of trucks on location.
- Size of forklift required (capacity & length of forks).
- Load limits of the trucks and roads.
Verify the following items are ready or available,
as required:
- Forklift is ready for operation.
- Pipe racks are equipped with end stops.
- Stripping is available for trucks.
- Chocks are available for trucks.
- Thread protectors are installed on both the pin end
and box end of the pipe.
Verify the size, weight, grade, connection, and joint
count of the tubulars and record on manifest.
READY TO LOAD DRILL PIPE
BPS RECOMMENDS 18” or
shorter pipe racks. BPS
RECOMMENDS that the box
end faces the truck cab and all
tubulars are stripped and
chocked.
DO NOT UNDER ANY
CONDITION attempt to stop or
step over rolling tubulars.
Include all third party personnel.
It is NOT A RECOMMENDED
procedure to load tubulars with a
crane on land rigs.
Only one truck to be loaded with
tubulars on location at one time.
Handle all layered pipe from the
ground.
DO NOT get on top of pipe.
Refer to forklift operational
procedures. Verify that backup
signal, brakes and emergency
brake are operational.
0
1
1
2
3
1
2

STEP SUB PROCEDURE REMARKS
LOADING DRILL PIPE
HANDLING TUBULARS
Romfor International Ltd. Derrickman
2
2
3
4
5
6
7
8
9
Position truck for loading and check the
following:
-Guide truck into safe position.
-Brake is set properly.
-The truck is level.
-Wheels are properly chocked.
-All stakes are in the trailer.
-4” x 4” stripping is on truck bed.
Load Drill Pipe from the pipe racks.
- Ensure forklift is in the center of the load and the
forks are in proper position.
-Lift drill pipe, tilt forks to proper position, and proceed
to the truck.
Move Drill Pipe to the truck:
-Travel with forks in lowest position.
-Travel at a SLOW rate of speed.
Load Drill Pipe onto the truck.
-Carefully place pipe onto 4”x4” stripping on the truck.
DO NOT drop pipe.
-Rack drill pipe orderly with forklift, as required.
Repeat steps 3 through 5 until layer is full.
Chock 4” x 4” stripping to secure bottom layer.
Place stripping boards directly over 4” x 4” bed
stripping.
Install pipe chocks at the ends of the stripping boards.
Minimize forklift travel. MAKE
SURE truck is physically on the
location.
DO NOT EXCEED lifting
capacity of forklift. See forklift
JSA.
STAND CLEAR of forklift and
load path.
DO NOT touch drill pipe at any
time the pipe is on the forks.
MAKE SURE first drill pipe is
secure against the bed stakes.
NEVER get on or between
tubulars.
DO NOT climb onto truck or
load.
Rocks are not chocks! Use
proper chocks.
Use wood stripping only. MAKE
SURE stripping is used for each
layer.
DO NOT stack without
stripping.
Rocks are not chocks! Use
proper chocks.

Romfor International Ltd. Derrickman
STEP SUB PROCEDURE REMARKS
LOADING DRILL PIPE
HANDLING TUBULARS
3
10
11
Repeat steps 3 through 9 until loaded.
Load is secured by TRUCK DRIVER.
END OF PROCEDURE
Romfor International Ltd. Derrickman
STEP SUB PROCEDURE REMARKS
UNLOADING DRILL PIPE
HANDLING TUBULARS
. 1
RECEIVING DRILL PIPE
DISCUSS DRILL PIPE REQUIREMENTS PRIOR
TO ARRIVAL OF GOODS TO LOCATION. PLAN
FOR REQUIRED SPACE AND SIZE OF FORKLIFT.
PPE Requirements - Hard Hat, Safety Glasses,
Work Gloves, Steel Toe Shoes, Back Support.
Review JSA for “RECEIVING DRILL PIPE”
Discuss procedures with Rig Manager to include:
- Manifest / material transfer requirements
- Location of Drill Pipe.
- Unloading procedure.
- Number and position of trucks on location.
- Size of forklift required (Capacity & length of forks).
- Pipe racks, stripping, chocks.
Verify the following items are ready or available,
as required:
- Forklift is ready for operation.
- Pipe racks are level with Catwalk, equipped with end
stops of the proper height to accommodate all layers
of pipe.
- Catwalks are level and pinned together.
- Stripping is available.
- Chocks are available.
- Tally tape and Tally book.
Verify the size, weight, grade, connection, and joint
count of the Drill Pipe against the manifest.
READY TO UNLOAD DRILL PIPE
BPS RECOMMENDS 18” or
shorter pipe racks. BPS
RECOMMENDS that the box
end faces the truck cab and all
tubulars are stripped and
chocked.
DO NOT UNDER ANY
CONDITION attempt to stop or
step over rolling tubulars.
Include all third party personnel.
It is NOT A RECOMMENDED
procedure to unload Drill Pipe
with a crane. Only one truck
load of Drill Pipe on location at
one time.
Refer to forklift operational
procedures. Verify that backup
signal, brakes and emergency
brake are operational.
Use Romfors’ angle iron type
chocks.
Verify that thread protectors are
installed on both the pin end and
box end of the pipe.
0
1
1
2
3
1
2
UN
LO
AD
ING
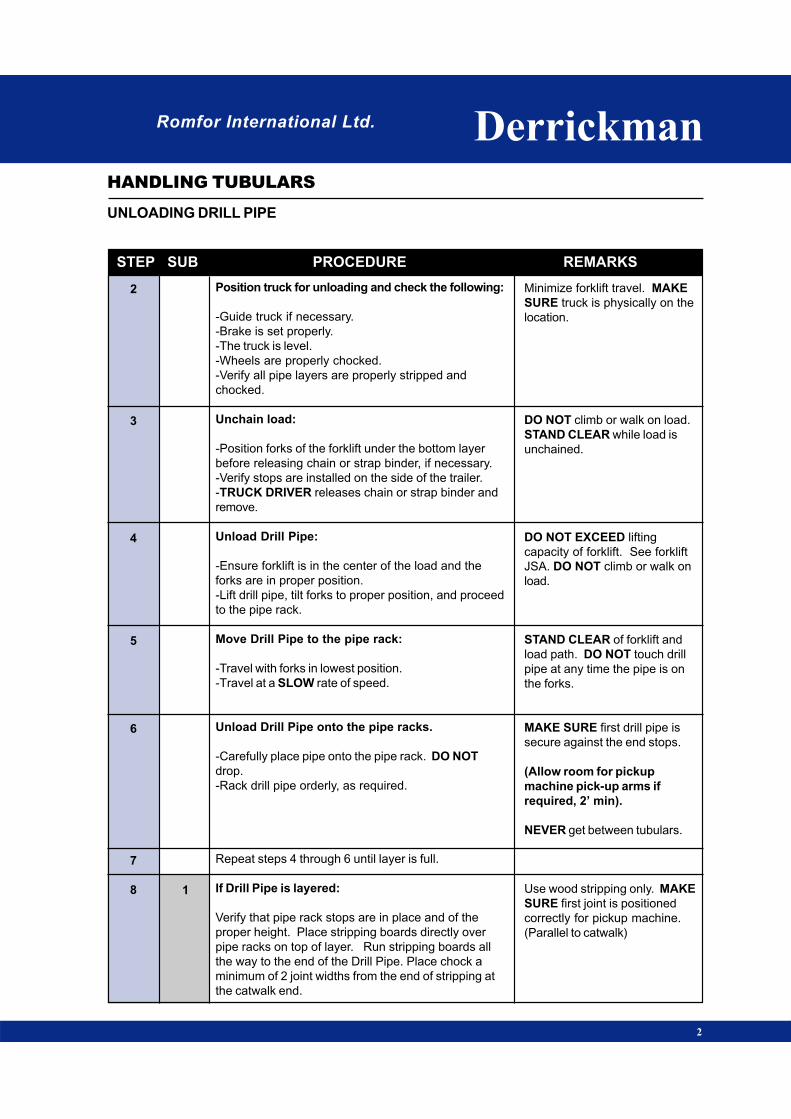
STEP SUB PROCEDURE REMARKS
UNLOADING DRILL PIPE
HANDLING TUBULARS
Romfor International Ltd. Derrickman
2
2
3
4
5
6
7
8
Position truck for unloading and check the following:
-Guide truck if necessary.
-Brake is set properly.
-The truck is level.
-Wheels are properly chocked.
-Verify all pipe layers are properly stripped and
chocked.
Unchain load:
-Position forks of the forklift under the bottom layer
before releasing chain or strap binder, if necessary.
-Verify stops are installed on the side of the trailer.
-TRUCK DRIVER releases chain or strap binder and
remove.
Unload Drill Pipe:
-Ensure forklift is in the center of the load and the
forks are in proper position.
-Lift drill pipe, tilt forks to proper position, and proceed
to the pipe rack.
Move Drill Pipe to the pipe rack:
-Travel with forks in lowest position.
-Travel at a SLOW rate of speed.
Unload Drill Pipe onto the pipe racks.
-Carefully place pipe onto the pipe rack. DO NOT
drop.
-Rack drill pipe orderly, as required.
Repeat steps 4 through 6 until layer is full.
If Drill Pipe is layered:
Verify that pipe rack stops are in place and of the
proper height. Place stripping boards directly over
pipe racks on top of layer. Run stripping boards all
the way to the end of the Drill Pipe. Place chock a
minimum of 2 joint widths from the end of stripping at
the catwalk end.
Minimize forklift travel. MAKE
SURE truck is physically on the
location.
DO NOT climb or walk on load.
STAND CLEAR while load is
unchained.
DO NOT EXCEED lifting
capacity of forklift. See forklift
JSA. DO NOT climb or walk on
load.
STAND CLEAR of forklift and
load path. DO NOT touch drill
pipe at any time the pipe is on
the forks.
MAKE SURE first drill pipe is
secure against the end stops.
(Allow room for pickup
machine pick-up arms if
required, 2’ min).
NEVER get between tubulars.
Use wood stripping only. MAKE
SURE first joint is positioned
correctly for pickup machine.
(Parallel to catwalk)
1
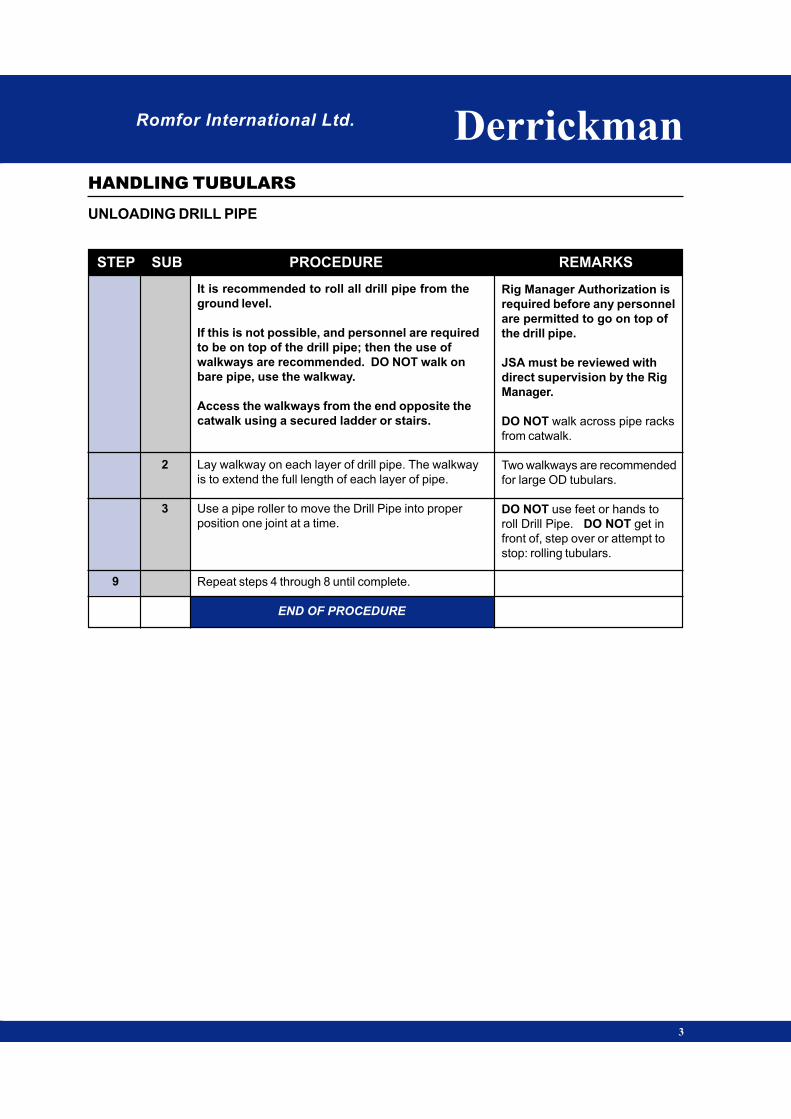
Romfor International Ltd. Derrickman
STEP SUB PROCEDURE REMARKS
UNLOADING DRILL PIPE
HANDLING TUBULARS
3
Rig Manager Authorization is
required before any personnel
are permitted to go on top of
the drill pipe.
JSA must be reviewed with
direct supervision by the Rig
Manager.
DO NOT walk across pipe racks
from catwalk.
Two walkways are recommended
for large OD tubulars.
DO NOT use feet or hands to
roll Drill Pipe. DO NOT get in
front of, step over or attempt to
stop: rolling tubulars.
9
2
3
It is recommended to roll all drill pipe from the
ground level.
If this is not possible, and personnel are required
to be on top of the drill pipe; then the use of
walkways are recommended. DO NOT walk on
bare pipe, use the walkway.
Access the walkways from the end opposite the
catwalk using a secured ladder or stairs.
Lay walkway on each layer of drill pipe. The walkway
is to extend the full length of each layer of pipe.
Use a pipe roller to move the Drill Pipe into proper
position one joint at a time.
Repeat steps 4 through 8 until complete.
END OF PROCEDURE

Romfor International Ltd.
HANDLING
TUBULARS
HANDLING
TUBULARS
DerrickmanDerrickman
PICKUP/
LAYDOWN
MACHINE
PICKUP/
LAYDOWN
MACHINE
PIC
KU
P/L
AY
DO
WN
MA
CH
IN
E
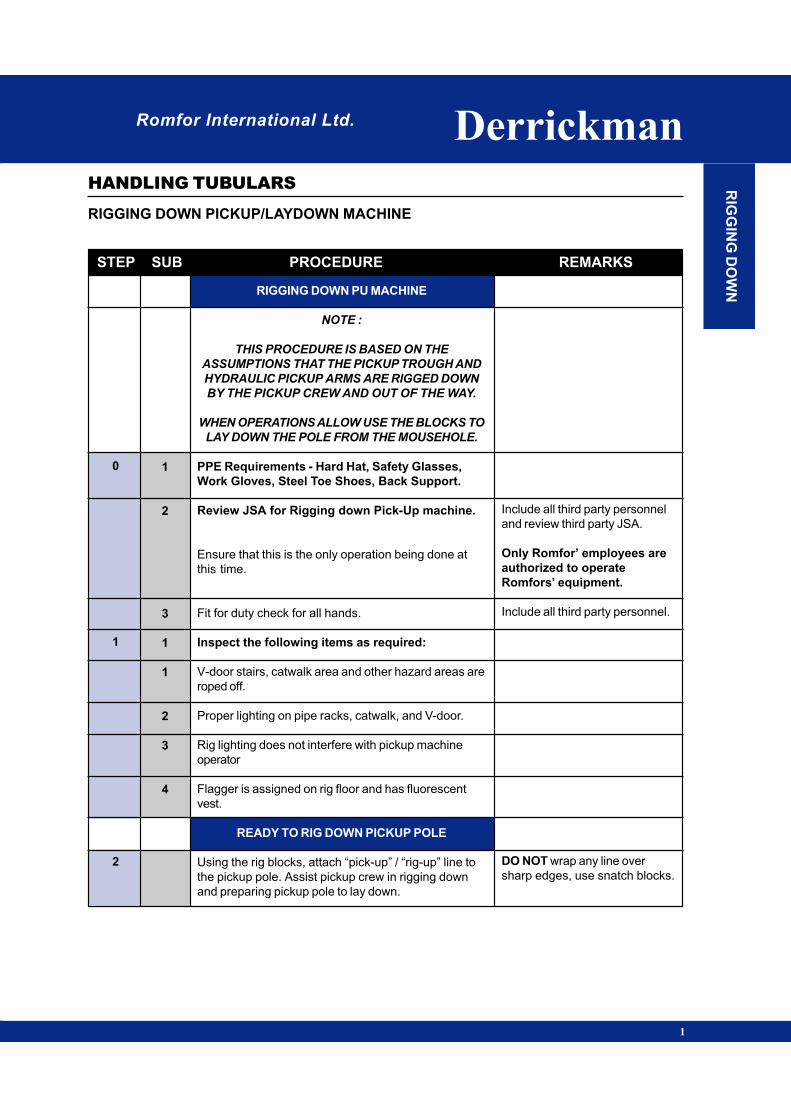
Romfor International Ltd. Derrickman
STEP SUB PROCEDURE REMARKS
RIGGING DOWN PICKUP/LAYDOWN MACHINE
HANDLING TUBULARS RIG
GIN
G D
OW
N
1
RIGGING DOWN PU MACHINE
NOTE :
THIS PROCEDURE IS BASED ON THE
ASSUMPTIONS THAT THE PICKUP TROUGH AND
HYDRAULIC PICKUP ARMS ARE RIGGED DOWN
BY THE PICKUP CREW AND OUT OF THE WAY.
WHEN OPERATIONS ALLOW USE THE BLOCKS TO
LAY DOWN THE POLE FROM THE MOUSEHOLE.
PPE Requirements - Hard Hat, Safety Glasses,
Work Gloves, Steel Toe Shoes, Back Support.
Review JSA for Rigging down Pick-Up machine.
Ensure that this is the only operation being done at
this time.
Fit for duty check for all hands.
Inspect the following items as required:
V-door stairs, catwalk area and other hazard areas are
roped off.
Proper lighting on pipe racks, catwalk, and V-door.
Rig lighting does not interfere with pickup machine
operator
Flagger is assigned on rig floor and has fluorescent
vest.
READY TO RIG DOWN PICKUP POLE
Using the rig blocks, attach “pick-up” / “rig-up” line to
the pickup pole. Assist pickup crew in rigging down
and preparing pickup pole to lay down.
Include all third party personnel
and review third party JSA.
Only Romfor’ employees are
authorized to operate
Romfors’ equipment.
Include all third party personnel.
DO NOT wrap any line over
sharp edges, use snatch blocks.
0
1
2
1
2
3
1
1
2
3
4
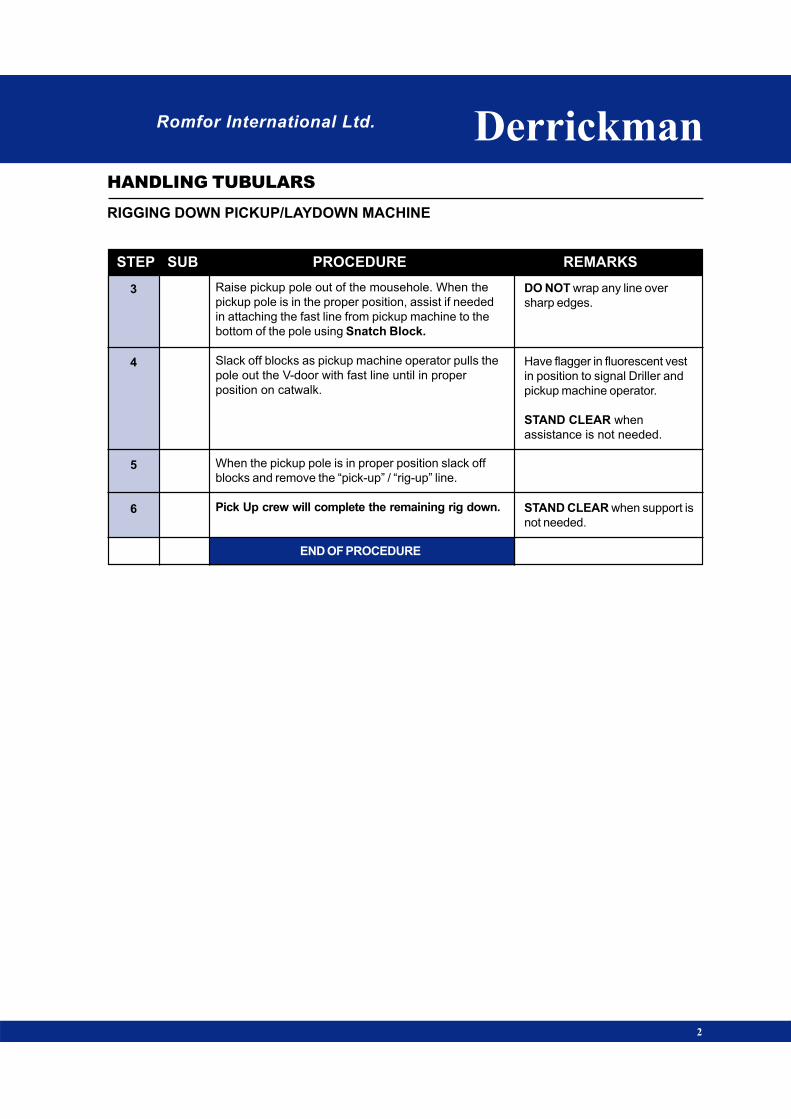
STEP SUB PROCEDURE REMARKS
RIGGING DOWN PICKUP/LAYDOWN MACHINE
HANDLING TUBULARS
Romfor International Ltd. Derrickman
2
3
4
5
6
Raise pickup pole out of the mousehole. When the
pickup pole is in the proper position, assist if needed
in attaching the fast line from pickup machine to the
bottom of the pole using Snatch Block.
Slack off blocks as pickup machine operator pulls the
pole out the V-door with fast line until in proper
position on catwalk.
When the pickup pole is in proper position slack off
blocks and remove the “pick-up” / “rig-up” line.
Pick Up crew will complete the remaining rig down.
END OF PROCEDURE
DO NOT wrap any line over
sharp edges.
Have flagger in fluorescent vest
in position to signal Driller and
pickup machine operator.
STAND CLEAR when
assistance is not needed.
STAND CLEAR when support is
not needed.

Romfor International Ltd. Derrickman
STEP SUB PROCEDURE REMARKS
RIG UP PICKUP/LAYDOWN MACHINE
HANDLING TUBULARS
. 1
RIG
GIN
G U
P
RIGGING UP PU MACHINE
THIS PROCEDURE IS BASED ON THE
ASSUMPTION THAT ALL CASING IS UNLOADED
AND ON RACKS. BPS RECOMMENDS THE USE
OF THE “TROUGH” TYPE PICKUP MACHINE.
PPE Requirements - Hard Hat, Safety Glasses,
Work Gloves, Steel Toe Shoes, Back Support.
Review JSA for Rigging up Pick-Up machine.
Fit for duty check for all hands.
Inspect the following items for capacity and
serviceability, as required:
V-door stairs, catwalk area and other hazard areas are
roped off.
Proper lighting on pipe racks, catwalk, and V-door.
Flagger is assigned on rig floor and has fluorescent
vest.
Pickup machine is inspected for damaged lines and
sheaves and overall condition. Make sure the truck is
properly chocked.
Inspect condition of hoist and cable. Know the
capacity of the cable and hoist. Make sure the hoist
brake is working properly.
Mousehole is secured properly and in good condition.
Include all third party personnel
and review third party JSA.
Only Romfor employees are
authorized to operate
Romfors’ equipment.
Include all third party personnel.
Use “Caution Tape”
Rig lighting does not interfere
with pickup machine operator.
BPS RECOMMENDS that a
fluorescent vest be available
at the rig site.
DO NOT get on the truck. Do a
walk around inspection.
BE AWARE of side load
requirements of the Mousehole
when picking up pipe.
0
1
1
2
3
1
2
3
4
5
6

STEP SUB PROCEDURE REMARKS
RIG UP PICKUP/LAYDOWN MACHINE
HANDLING TUBULARS
Romfor International Ltd. Derrickman
2
2
3
4
5
6
7
8
Mousehole is secured under the rig floor at the point of
tension of the pick up pole.
Pickup pole, safety clamp and cover are in good
condition.
Pickup machine operator knows the safe working load
of his cables and equipment.
READY TO RIG UP PICKUP POLE
Using the air hoist, attach line to pickup pole and pull
it out of truck and slide to bottom of the V-door.
Attach pickup machine fast line to the bottom of the
pickup pole using a snatch block.
Using the rig blocks, attach “pick-up” / “rig up” line to
the pickup pole and stand clear while Driller raises it to
the rig floor. (Pickup machine operator will hold snub
on pole.)
When the pickup pole is in the proper position, remove
the snub line.
Stab pickup pole into Mousehole through Mousehole
plate. Assist as required while casing crew secures
pole in the proper position using a safety clamp.
Remove the rig up line.
Pick Up crew will complete the remaining rig up.
END OF PROCEDURE
Check rating of air hoist and
cable.
DO NOT wrap any line over
sharp edges.
DO NOT wrap any line over
sharp edges, use snatch
blocks.
Use a drill collar type clamp.
Inspect installation of the clamp.
Use proper fall protection to
remove line, as required.
STAND CLEAR when support is
not needed.
NEVER GET UNDER THE
TROUGH OR IN THE PATH OF
THE TROUGH FOR ANY
REASON.
7
8
9

Romfor International Ltd.
HANDLING
TUBULARS
HANDLING
TUBULARS
HA
ND
LIN
G T
UB
UL
AR
S
DrillerDriller
Romfor Inernational Ltd.
HANDLING
TUBULARS
HANDLING
TUBULARS
DrillerDriller
CA
SIN
G
CASINGCASING
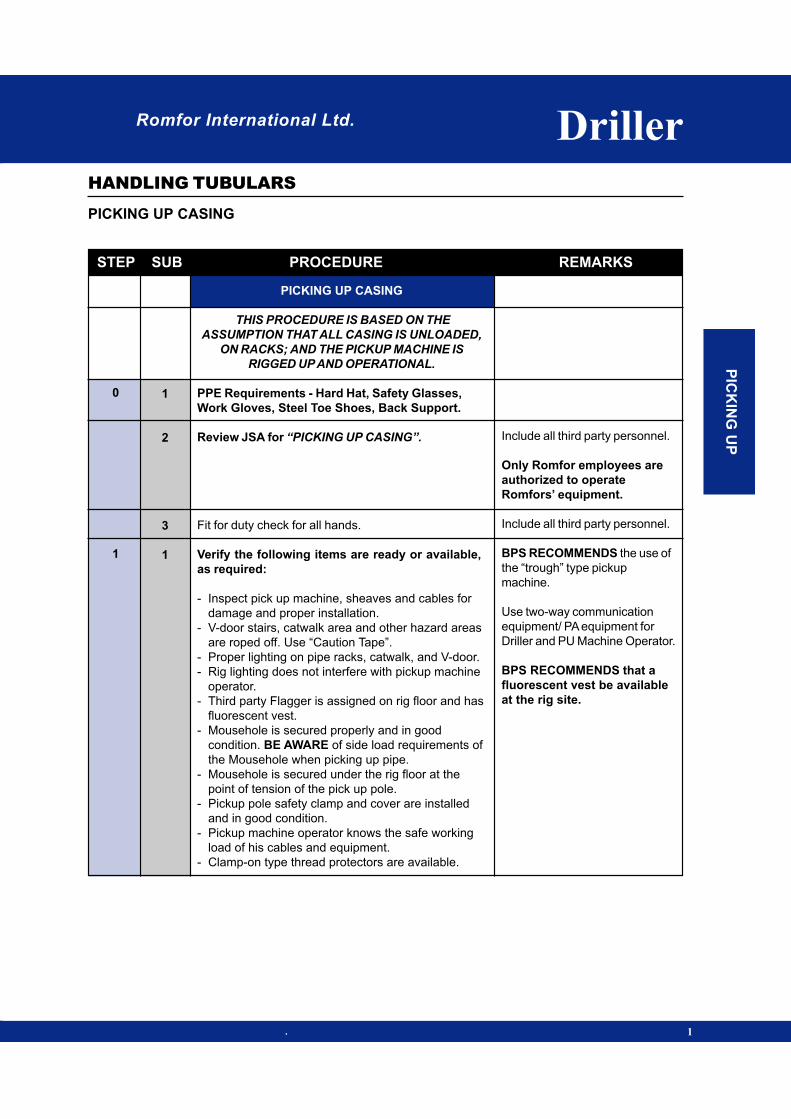
Romfor International Ltd. Driller
STEP SUB PROCEDURE REMARKS
PICKING UP CASING
HANDLING TUBULARS
. 1
PICKING UP CASING
THIS PROCEDURE IS BASED ON THE
ASSUMPTION THAT ALL CASING IS UNLOADED,
ON RACKS; AND THE PICKUP MACHINE IS
RIGGED UP AND OPERATIONAL.
PPE Requirements - Hard Hat, Safety Glasses,
Work Gloves, Steel Toe Shoes, Back Support.
Review JSA for “PICKING UP CASING”.
Fit for duty check for all hands.
Verify the following items are ready or available,
as required:
- Inspect pick up machine, sheaves and cables for
damage and proper installation.
- V-door stairs, catwalk area and other hazard areas
are roped off. Use “Caution Tape”.
- Proper lighting on pipe racks, catwalk, and V-door.
- Rig lighting does not interfere with pickup machine
operator.
- Third party Flagger is assigned on rig floor and has
fluorescent vest.
- Mousehole is secured properly and in good
condition. BE AWARE of side load requirements of
the Mousehole when picking up pipe.
- Mousehole is secured under the rig floor at the
point of tension of the pick up pole.
- Pickup pole safety clamp and cover are installed
and in good condition.
- Pickup machine operator knows the safe working
load of his cables and equipment.
- Clamp-on type thread protectors are available.
Include all third party personnel.
Only Romfor employees are
authorized to operate
Romfors’ equipment.
Include all third party personnel.
BPS RECOMMENDS the use of
the “trough” type pickup
machine.
Use two-way communication
equipment/ PA equipment for
Driller and PU Machine Operator.
BPS RECOMMENDS that a
fluorescent vest be available
at the rig site.
0
1
1
2
3
1
PIC
KIN
G U
P
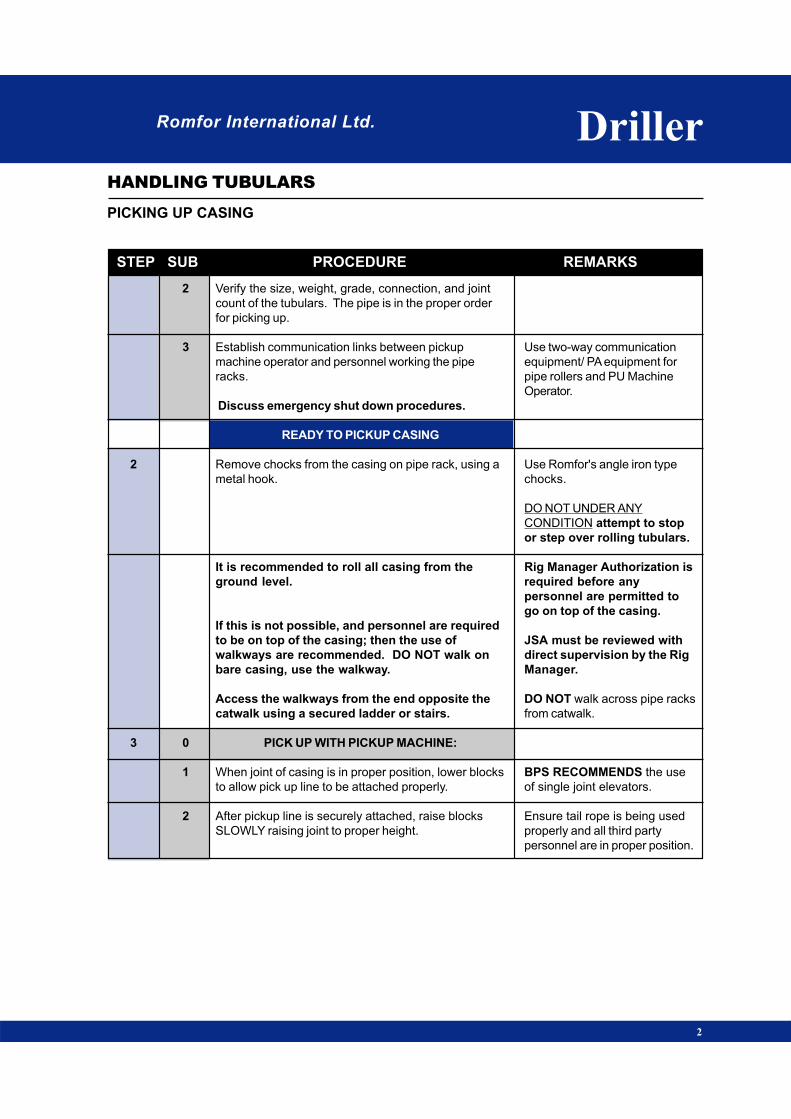
STEP SUB PROCEDURE REMARKS
PICKING UP CASING
HANDLING TUBULARS
Romfor International Ltd. Driller
2
2
3
Verify the size, weight, grade, connection, and joint
count of the tubulars. The pipe is in the proper order
for picking up.
Establish communication links between pickup
machine operator and personnel working the pipe
racks.
Discuss emergency shut down procedures.
READY TO PICKUP CASING
Remove chocks from the casing on pipe rack, using a
metal hook.
It is recommended to roll all casing from the
ground level.
If this is not possible, and personnel are required
to be on top of the casing; then the use of
walkways are recommended. DO NOT walk on
bare casing, use the walkway.
Access the walkways from the end opposite the
catwalk using a secured ladder or stairs.
PICK UP WITH PICKUP MACHINE:
When joint of casing is in proper position, lower blocks
to allow pick up line to be attached properly.
After pickup line is securely attached, raise blocks
SLOWLY raising joint to proper height.
Use two-way communication
equipment/ PA equipment for
pipe rollers and PU Machine
Operator.
Use Romfor's angle iron type
chocks.
DO NOT UNDER ANY
CONDITION attempt to stop
or step over rolling tubulars.
Rig Manager Authorization is
required before any
personnel are permitted to
go on top of the casing.
JSA must be reviewed with
direct supervision by the Rig
Manager.
DO NOT walk across pipe racks
from catwalk.
BPS RECOMMENDS the use
of single joint elevators.
Ensure tail rope is being used
properly and all third party
personnel are in proper position.
2
3
0
1
2

Romfor Interantional Ltd. Driller
STEP SUB PROCEDURE REMARKS
PICKING UP CASING
HANDLING TUBULARS
3
3
4
3
4
0
Refer to “Running Casing” for further procedures.
Repeat steps 3-1 through 3-3 until all casing is run.
OR
PICK UP WITH HOIST: IS NOT A RECOMMENDED
PROCEDURE FOR PICKING UP CASING.
Refer to procedure for “Running Casing” for rig floor
operations.
END OF PROCEDURE
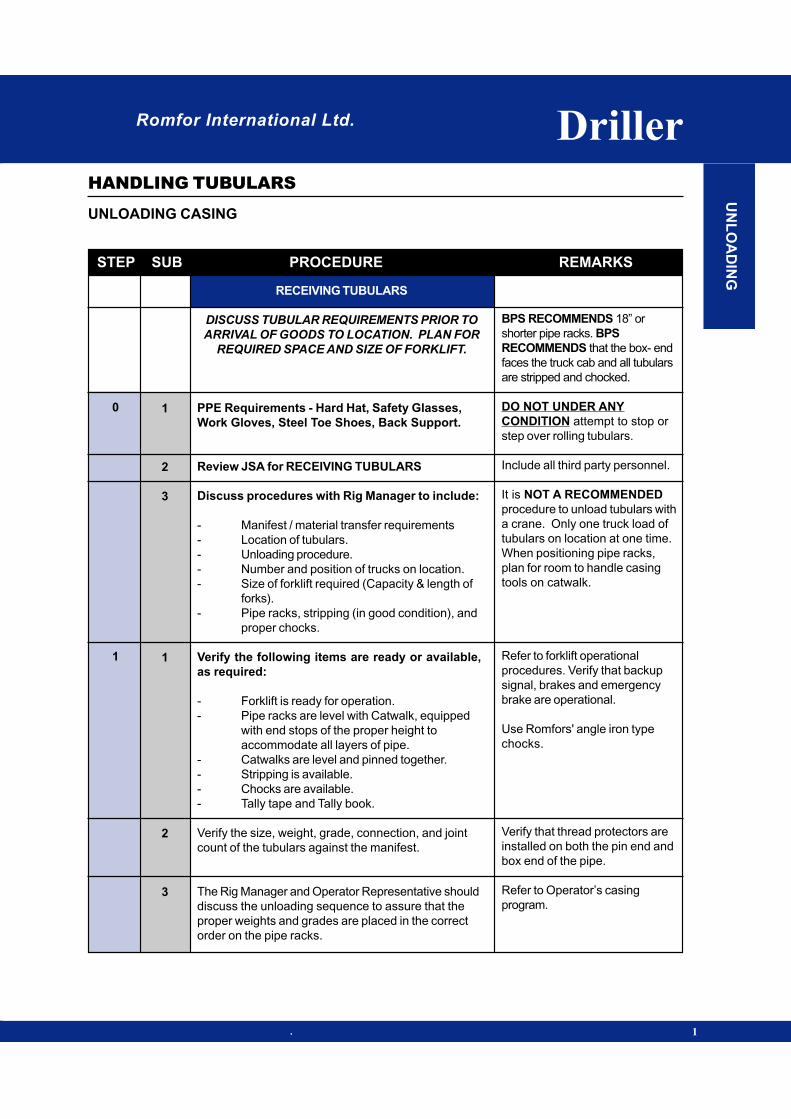
Romfor International Ltd. Driller
STEP SUB PROCEDURE REMARKS
UNLOADING CASING
HANDLING TUBULARS
. 1
RECEIVING TUBULARS
DISCUSS TUBULAR REQUIREMENTS PRIOR TO
ARRIVAL OF GOODS TO LOCATION. PLAN FOR
REQUIRED SPACE AND SIZE OF FORKLIFT.
PPE Requirements - Hard Hat, Safety Glasses,
Work Gloves, Steel Toe Shoes, Back Support.
Review JSA for RECEIVING TUBULARS
Discuss procedures with Rig Manager to include:
- Manifest / material transfer requirements
- Location of tubulars.
- Unloading procedure.
- Number and position of trucks on location.
- Size of forklift required (Capacity & length of
forks).
- Pipe racks, stripping (in good condition), and
proper chocks.
Verify the following items are ready or available,
as required:
- Forklift is ready for operation.
- Pipe racks are level with Catwalk, equipped
with end stops of the proper height to
accommodate all layers of pipe.
- Catwalks are level and pinned together.
- Stripping is available.
- Chocks are available.
- Tally tape and Tally book.
Verify the size, weight, grade, connection, and joint
count of the tubulars against the manifest.
The Rig Manager and Operator Representative should
discuss the unloading sequence to assure that the
proper weights and grades are placed in the correct
order on the pipe racks.
BPS RECOMMENDS 18” or
shorter pipe racks. BPS
RECOMMENDS that the box- end
faces the truck cab and all tubulars
are stripped and chocked.
DO NOT UNDER ANY
CONDITION attempt to stop or
step over rolling tubulars.
Include all third party personnel.
It is NOT A RECOMMENDED
procedure to unload tubulars with
a crane. Only one truck load of
tubulars on location at one time.
When positioning pipe racks,
plan for room to handle casing
tools on catwalk.
Refer to forklift operational
procedures. Verify that backup
signal, brakes and emergency
brake are operational.
Use Romfors' angle iron type
chocks.
Verify that thread protectors are
installed on both the pin end and
box end of the pipe.
Refer to Operator’s casing
program.
0
1
1
2
3
1
2
3
UN
LO
AD
ING
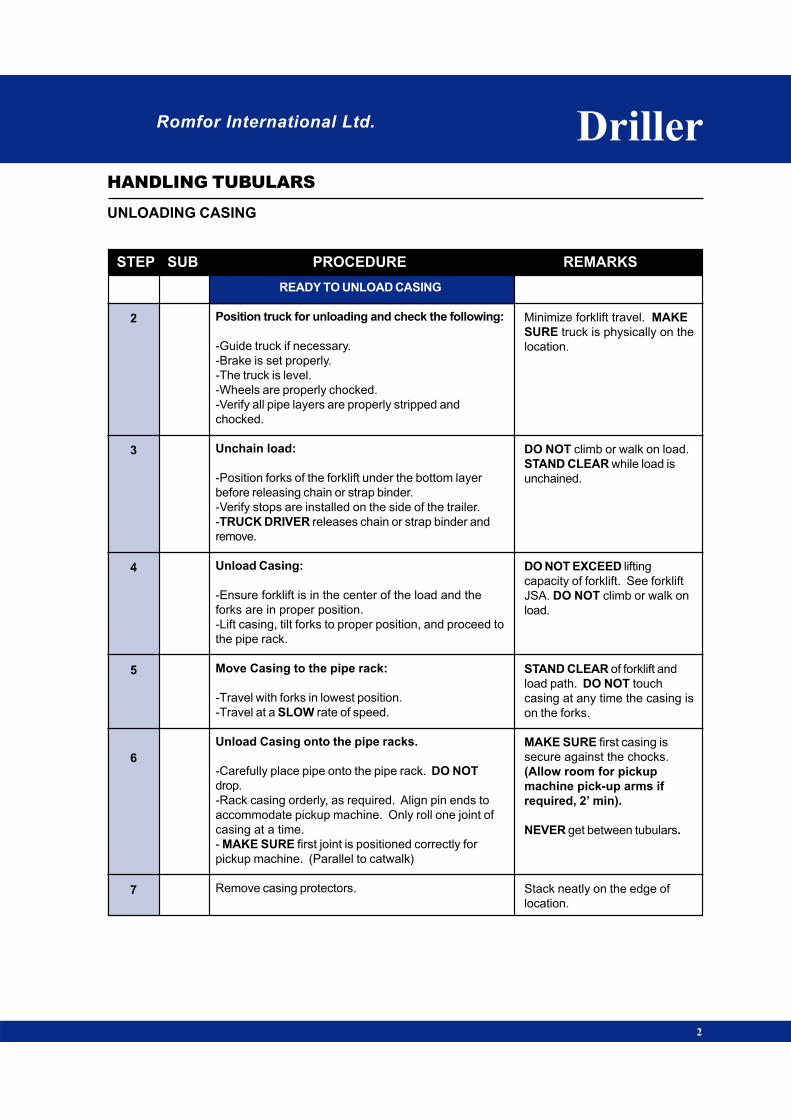
STEP SUB PROCEDURE REMARKS
UNLOADING CASING
HANDLING TUBULARS
Romfor International Ltd. Driller
2
2
3
4
5
6
7
READY TO UNLOAD CASING
Position truck for unloading and check the following:
-Guide truck if necessary.
-Brake is set properly.
-The truck is level.
-Wheels are properly chocked.
-Verify all pipe layers are properly stripped and
chocked.
Unchain load:
-Position forks of the forklift under the bottom layer
before releasing chain or strap binder.
-Verify stops are installed on the side of the trailer.
-TRUCK DRIVER releases chain or strap binder and
remove.
Unload Casing:
-Ensure forklift is in the center of the load and the
forks are in proper position.
-Lift casing, tilt forks to proper position, and proceed to
the pipe rack.
Move Casing to the pipe rack:
-Travel with forks in lowest position.
-Travel at a SLOW rate of speed.
Unload Casing onto the pipe racks.
-Carefully place pipe onto the pipe rack. DO NOT
drop.
-Rack casing orderly, as required. Align pin ends to
accommodate pickup machine. Only roll one joint of
casing at a time.
- MAKE SURE first joint is positioned correctly for
pickup machine. (Parallel to catwalk)
Remove casing protectors.
Minimize forklift travel. MAKE
SURE truck is physically on the
location.
DO NOT climb or walk on load.
STAND CLEAR while load is
unchained.
DO NOT EXCEED lifting
capacity of forklift. See forklift
JSA. DO NOT climb or walk on
load.
STAND CLEAR of forklift and
load path. DO NOT touch
casing at any time the casing is
on the forks.
MAKE SURE first casing is
secure against the chocks.
(Allow room for pickup
machine pick-up arms if
required, 2’ min).
NEVER get between tubulars.
Stack neatly on the edge of
location.
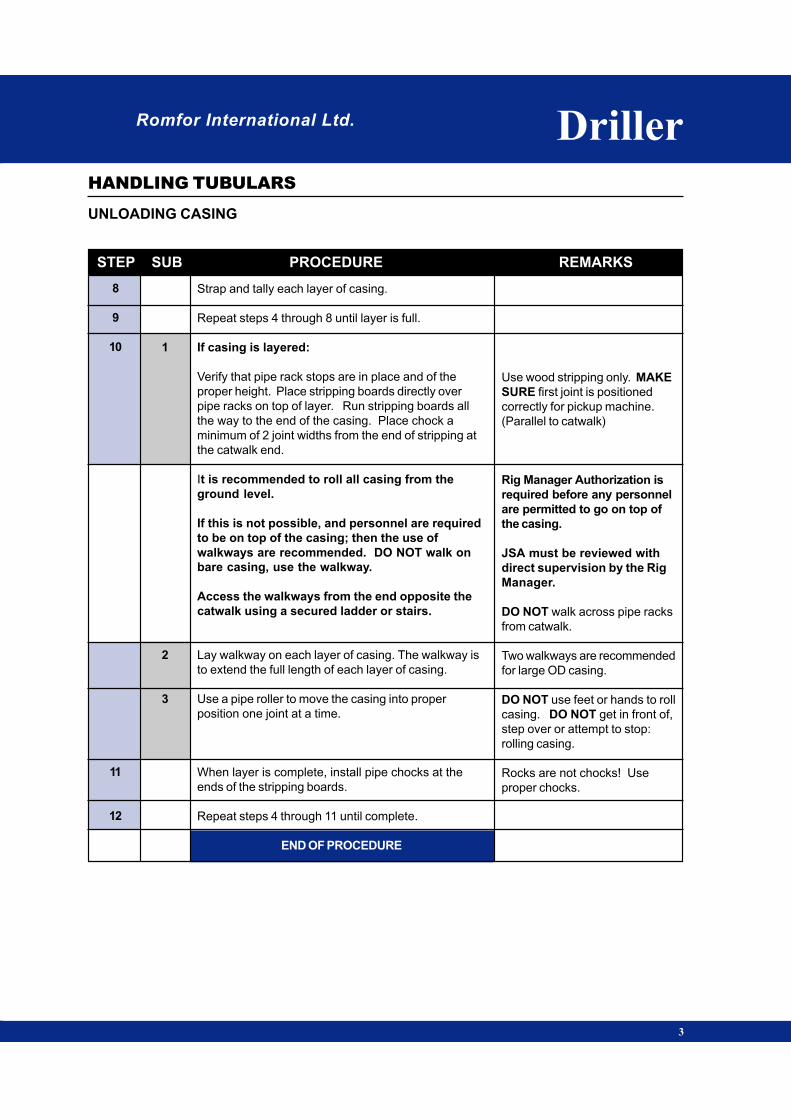
Romfor International Ltd. Driller
STEP SUB PROCEDURE REMARKS
UNLOADING CASING
HANDLING TUBULARS
3
Use wood stripping only. MAKE
SURE first joint is positioned
correctly for pickup machine.
(Parallel to catwalk)
Rig Manager Authorization is
required before any personnel
are permitted to go on top of
the casing.
JSA must be reviewed with
direct supervision by the Rig
Manager.
DO NOT walk across pipe racks
from catwalk.
Two walkways are recommended
for large OD casing.
DO NOT use feet or hands to roll
casing. DO NOT get in front of,
step over or attempt to stop:
rolling casing.
Rocks are not chocks! Use
proper chocks.
8
9
10
11
12
1
2
3
Strap and tally each layer of casing.
Repeat steps 4 through 8 until layer is full.
If casing is layered:
Verify that pipe rack stops are in place and of the
proper height. Place stripping boards directly over
pipe racks on top of layer. Run stripping boards all
the way to the end of the casing. Place chock a
minimum of 2 joint widths from the end of stripping at
the catwalk end.
It is recommended to roll all casing from the
ground level.
If this is not possible, and personnel are required
to be on top of the casing; then the use of
walkways are recommended. DO NOT walk on
bare casing, use the walkway.
Access the walkways from the end opposite the
catwalk using a secured ladder or stairs.
Lay walkway on each layer of casing. The walkway is
to extend the full length of each layer of casing.
Use a pipe roller to move the casing into proper
position one joint at a time.
When layer is complete, install pipe chocks at the
ends of the stripping boards.
Repeat steps 4 through 11 until complete.
END OF PROCEDURE

Romfor Interantional Ltd.
HANDLING
TUBULARS
HANDLING
TUBULARS
DrillerDriller
DR
IL
L C
OL
LA
RS
DRILL COLLARSDRILL COLLARS

Romfor International Ltd.
PRACTICE: PICKING UP DRILL COLLARS
POSITION: UPDATE FOR ALL POSITIONS
THREAD PROTECTORS
WITH LIFTING BAIL (CAST STEEL)
Made from steel castings meeting ASTM Specification
No. A27 Grade 60-30 (60,000 psi tensile — 30,000 psi
yield), with heavy bails suitable for picking up
and laying down drill collars with cat line. Threads and
shoulders are precision machined.
BOXPIN
DRILCO

Romfor Internatinal Ltd. Driller
STEP SUB PROCEDURE REMARKS
PICKING UP DRILL COLLARS
HANDLING TUBULARS
PIC
KIN
G U
P
1
PICKING UP DRILL COLLARS
THIS PROCEDURE IS BASED ON THE
ASSUMPTION THAT ALL DRILL COLLARS ARE
UNLOADED, ON RACKS; AND THE PICKUP
MACHINE IS RIGGED UP AND OPERATIONAL.
PPE Requirements - Hard Hat, Safety Glasses,
Work Gloves, Steel Toe Shoes, Back Support.
Review JSA for “PICKING UP DRILL COLLARS”.
Fit for duty check for all hands.
Verify the following items are ready or available,
as required:
- Inspect pick up machine, sheaves and cables for
damage and proper installation.
-V-door stairs, catwalk area and other hazard areas
are roped off. Use “Caution Tape”.
-Proper lighting on collars racks, catwalk, and V-door
-Rig lighting does not interfere with pickup machine
operator.
-Flagger is assigned on rig floor and has fluorescent
vest.
-Mousehole is secured properly and in good
condition. BE AWARE of side load requirements of
the Mousehole when picking up collars.
-Mousehole is secured under the rig floor at the point
of tension of the pick up pole.
-Pickup pole safety clamp and cover are installed
and in good condition.
-Pickup machine operator knows the safe working
load of his cables and equipment.
-Thread protectors are available and installed.
- ‘Drilco’ equivalent casted lifting bails are available
when using Hoist Line to pick up drill collars.
-Rental drill collars have proper paper work to show
recent inspections.
- If the collars were shipped with lifting bails installed,
ensure lifting bails have been properly tightened.
Include all third party personnel.
Include all third party personnel.
BPS RECOMMENDS:
The Toolpusher be on the rig floor
any time the BHA is handled.
The use of the “trough” type
pickup machine.
Use two-way communication
equipment/ PA equipment for
Driller and PU Machine Operator.
BPS RECOMMENDS that a
fluorescent vest be available
at the rig site.
0
1
1
2
3
1
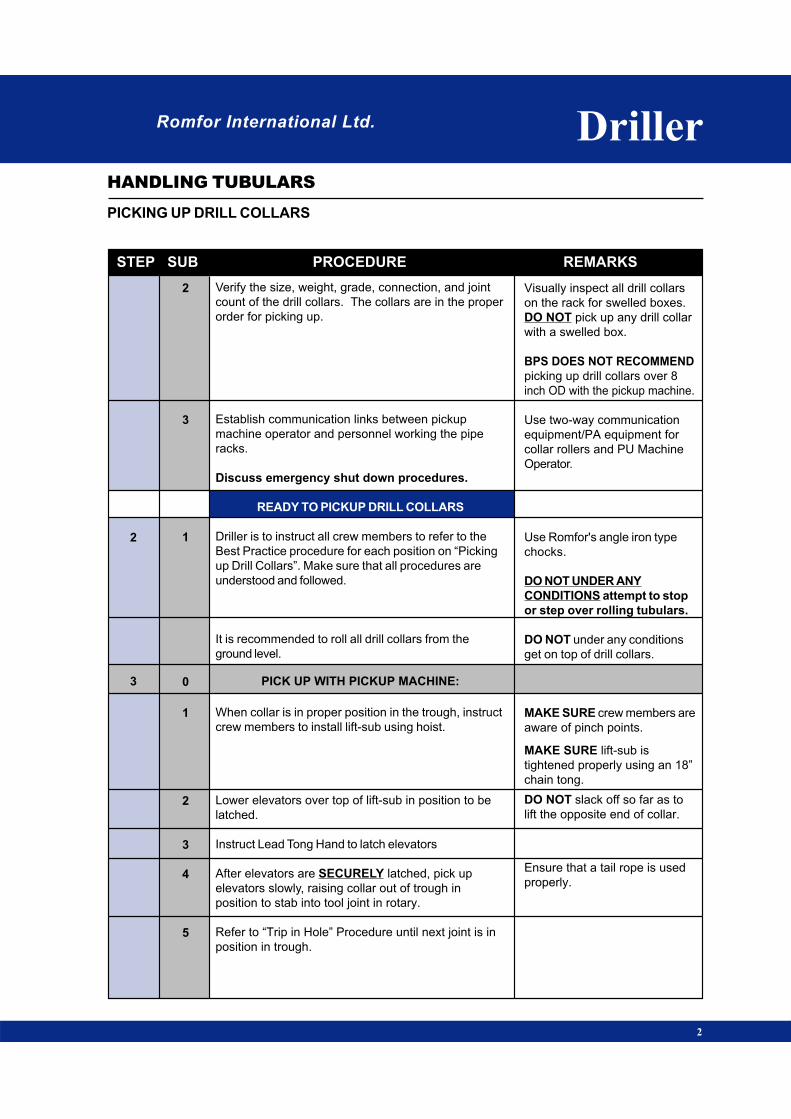
STEP SUB PROCEDURE REMARKS
PICKING UP DRILL COLLARS
Romfor International Ltd.
HANDLING TUBULARS
Driller
2
2
3
Verify the size, weight, grade, connection, and joint
count of the drill collars. The collars are in the proper
order for picking up.
Establish communication links between pickup
machine operator and personnel working the pipe
racks.
Discuss emergency shut down procedures.
READY TO PICKUP DRILL COLLARS
Driller is to instruct all crew members to refer to the
Best Practice procedure for each position on “Picking
up Drill Collars”. Make sure that all procedures are
understood and followed.
It is recommended to roll all drill collars from the
ground level.
PICK UP WITH PICKUP MACHINE:
When collar is in proper position in the trough, instruct
crew members to install lift-sub using hoist.
Lower elevators over top of lift-sub in position to be
latched.
Instruct Lead Tong Hand to latch elevators
After elevators are SECURELY latched, pick up
elevators slowly, raising collar out of trough in
position to stab into tool joint in rotary.
Refer to “Trip in Hole” Procedure until next joint is in
position in trough.
Visually inspect all drill collars
on the rack for swelled boxes.
DO NOT pick up any drill collar
with a swelled box.
BPS DOES NOT RECOMMEND
picking up drill collars over 8
inch OD with the pickup machine.
Use two-way communication
equipment/PA equipment for
collar rollers and PU Machine
Operator.
Use Romfor's angle iron type
chocks.
DO NOT UNDER ANY
CONDITIONS attempt to stop
or step over rolling tubulars.
DO NOT under any conditions
get on top of drill collars.
MAKE SURE crew members are
aware of pinch points.
MAKE SURE lift-sub is
tightened properly using an 18”
chain tong.
DO NOT slack off so far as to
lift the opposite end of collar.
Ensure that a tail rope is used
properly.
2
3
1
0
1
2
3
4
5
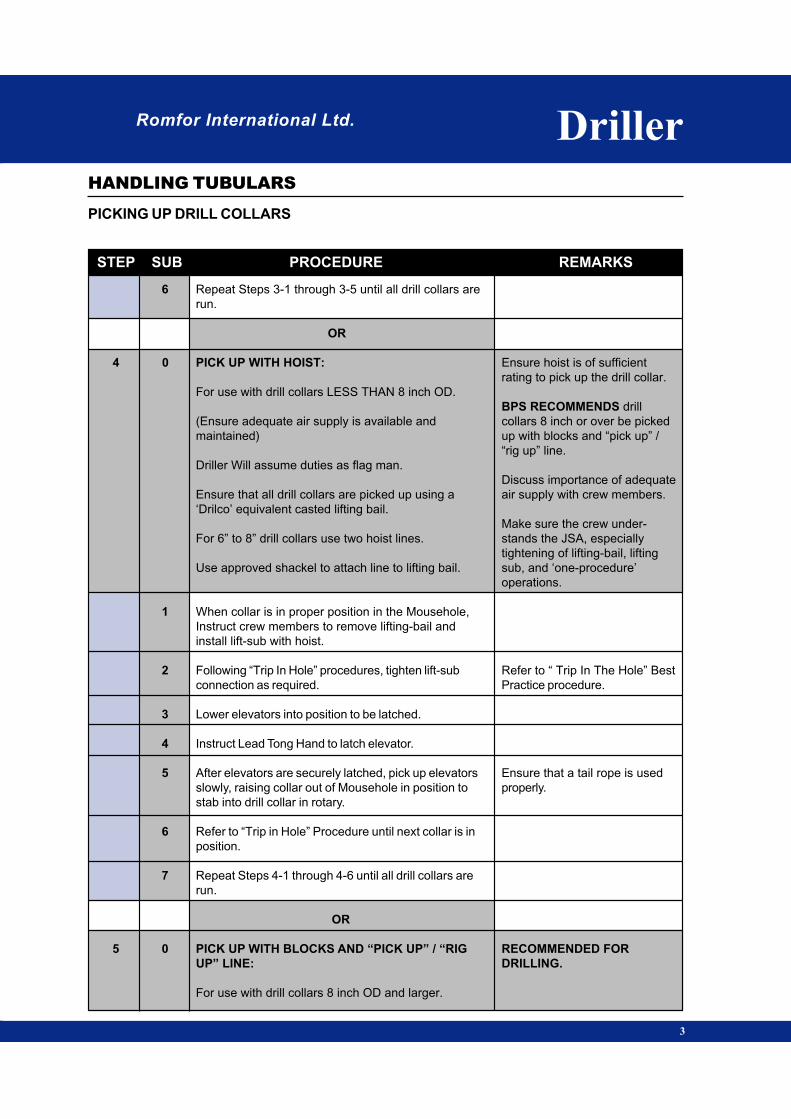
Romfor International Ltd. Driller
STEP SUB PROCEDURE REMARKS
PICKING UP DRILL COLLARS
HANDLING TUBULARS
4
5
3
Repeat Steps 3-1 through 3-5 until all drill collars are
run.
OR
PICK UP WITH HOIST:
For use with drill collars LESS THAN 8 inch OD.
(Ensure adequate air supply is available and
maintained)
Driller Will assume duties as flag man.
Ensure that all drill collars are picked up using a
‘Drilco’ equivalent casted lifting bail.
For 6” to 8” drill collars use two hoist lines.
Use approved shackel to attach line to lifting bail.
When collar is in proper position in the Mousehole,
Instruct crew members to remove lifting-bail and
install lift-sub with hoist.
Following “Trip In Hole” procedures, tighten lift-sub
connection as required.
Lower elevators into position to be latched.
Instruct Lead Tong Hand to latch elevator.
After elevators are securely latched, pick up elevators
slowly, raising collar out of Mousehole in position to
stab into drill collar in rotary.
Refer to “Trip in Hole” Procedure until next collar is in
position.
Repeat Steps 4-1 through 4-6 until all drill collars are
run.
OR
PICK UP WITH BLOCKS AND “PICK UP” / “RIG
UP” LINE:
For use with drill collars 8 inch OD and larger.
Ensure hoist is of sufficient
rating to pick up the drill collar.
BPS RECOMMENDS drill
collars 8 inch or over be picked
up with blocks and “pick up” /
“rig up” line.
Discuss importance of adequate
air supply with crew members.
Make sure the crew under-
stands the JSA, especially
tightening of lifting-bail, lifting
sub, and ‘one-procedure’
operations.
Refer to “ Trip In The Hole” Best
Practice procedure.
Ensure that a tail rope is used
properly.
RECOMMENDED FOR
DRILLING.
6
0
1
2
3
4
5
6
7
0
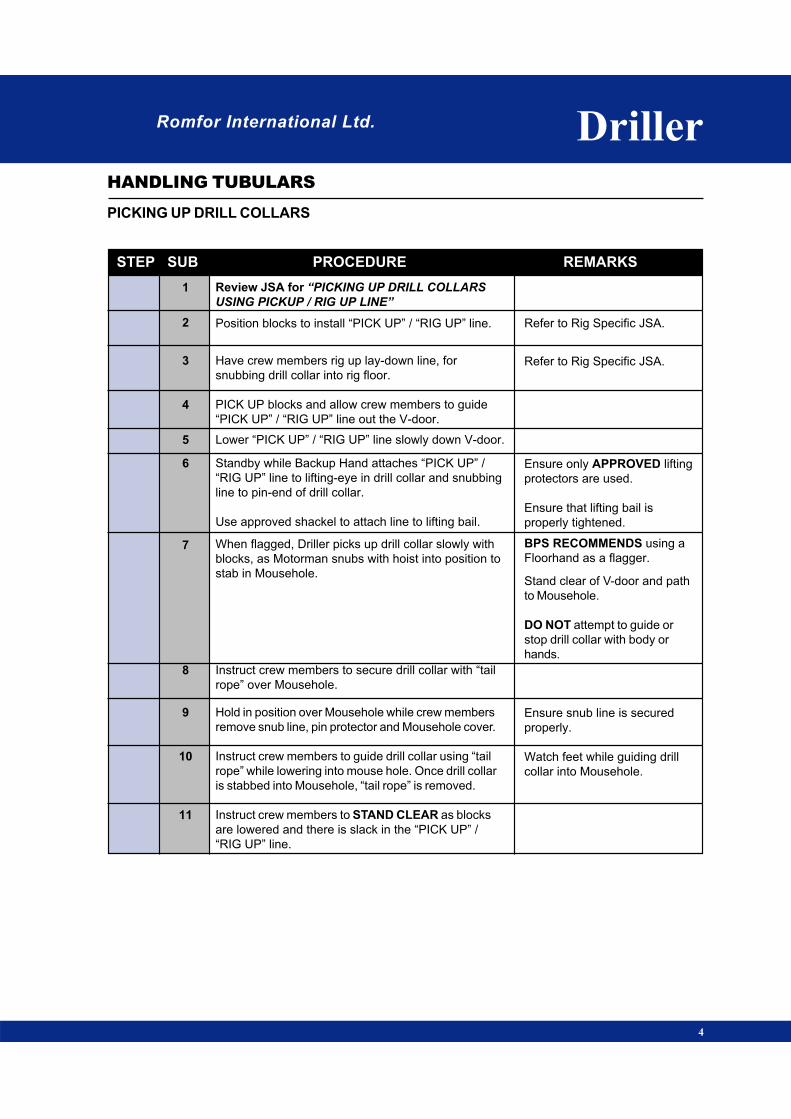
STEP SUB PROCEDURE REMARKS
PICKING UP DRILL COLLARS
Romfor International Ltd.
HANDLING TUBULARS
Driller
4
Review JSA for “PICKING UP DRILL COLLARS
USING PICKUP / RIG UP LINE”
Position blocks to install “PICK UP” / “RIG UP” line.
Have crew members rig up lay-down line, for
snubbing drill collar into rig floor.
PICK UP blocks and allow crew members to guide
“PICK UP” / “RIG UP” line out the V-door.
Lower “PICK UP” / “RIG UP” line slowly down V-door.
Standby while Backup Hand attaches “PICK UP” /
“RIG UP” line to lifting-eye in drill collar and snubbing
line to pin-end of drill collar.
Use approved shackel to attach line to lifting bail.
When flagged, Driller picks up drill collar slowly with
blocks, as Motorman snubs with hoist into position to
stab in Mousehole.
Instruct crew members to secure drill collar with “tail
rope” over Mousehole.
Hold in position over Mousehole while crew members
remove snub line, pin protector and Mousehole cover.
Instruct crew members to guide drill collar using “tail
rope” while lowering into mouse hole. Once drill collar
is stabbed into Mousehole, “tail rope” is removed.
Instruct crew members to STAND CLEAR as blocks
are lowered and there is slack in the “PICK UP” /
“RIG UP” line.
Refer to Rig Specific JSA.
Refer to Rig Specific JSA.
Ensure only APPROVED lifting
protectors are used.
Ensure that lifting bail is
properly tightened.
BPS RECOMMENDS using a
Floorhand as a flagger.
Stand clear of V-door and path
to Mousehole.
DO NOT attempt to guide or
stop drill collar with body or
hands.
Ensure snub line is secured
properly.
Watch feet while guiding drill
collar into Mousehole.
1
2
3
4
5
6
7
8
9
10
11
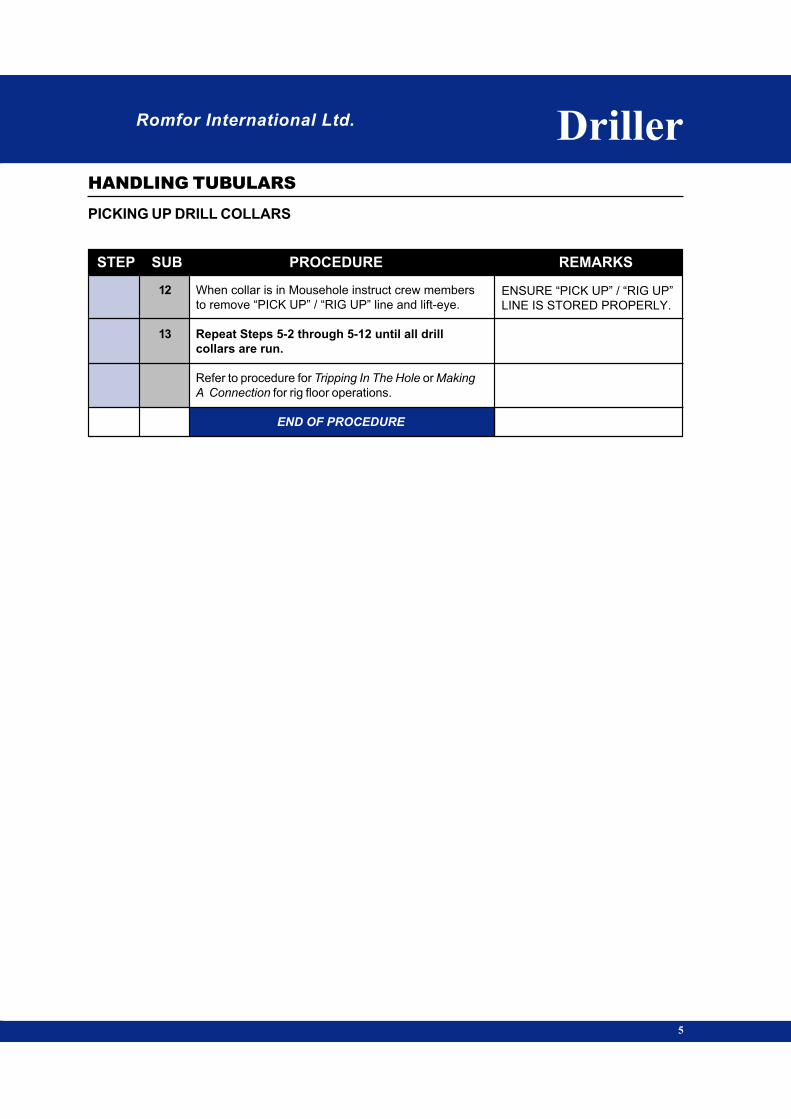
Romfor International Ltd. Driller
STEP SUB PROCEDURE REMARKS
PICKING UP DRILL COLLARS
HANDLING TUBULARS
5
When collar is in Mousehole instruct crew members
to remove “PICK UP” / “RIG UP” line and lift-eye.
Repeat Steps 5-2 through 5-12 until all drill
collars are run.
Refer to procedure for Tripping In The Hole or Making
A Connection for rig floor operations.
END OF PROCEDURE
ENSURE “PICK UP” / “RIG UP”
LINE IS STORED PROPERLY.
12
13
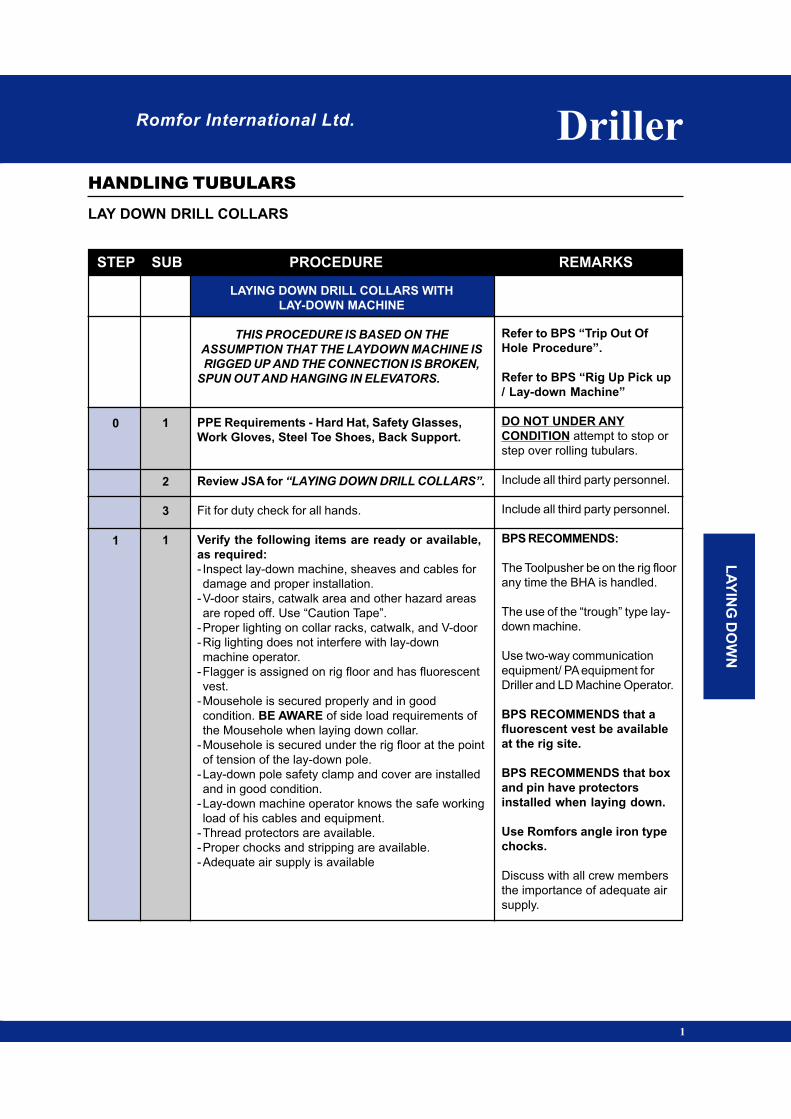
Romfor International Ltd. Driller
STEP SUB PROCEDURE REMARKS
LAY DOWN DRILL COLLARS
HANDLING TUBULARS
LA
YIN
G D
OW
N
1
LAYING DOWN DRILL COLLARS WITH
LAY-DOWN MACHINE
THIS PROCEDURE IS BASED ON THE
ASSUMPTION THAT THE LAYDOWN MACHINE IS
RIGGED UP AND THE CONNECTION IS BROKEN,
SPUN OUT AND HANGING IN ELEVATORS.
PPE Requirements - Hard Hat, Safety Glasses,
Work Gloves, Steel Toe Shoes, Back Support.
Review JSA for “LAYING DOWN DRILL COLLARS”.
Fit for duty check for all hands.
Verify the following items are ready or available,
as required:
- Inspect lay-down machine, sheaves and cables for
damage and proper installation.
-V-door stairs, catwalk area and other hazard areas
are roped off. Use “Caution Tape”.
-Proper lighting on collar racks, catwalk, and V-door
-Rig lighting does not interfere with lay-down
machine operator.
-Flagger is assigned on rig floor and has fluorescent
vest.
-Mousehole is secured properly and in good
condition. BE AWARE of side load requirements of
the Mousehole when laying down collar.
-Mousehole is secured under the rig floor at the point
of tension of the lay-down pole.
-Lay-down pole safety clamp and cover are installed
and in good condition.
-Lay-down machine operator knows the safe working
load of his cables and equipment.
-Thread protectors are available.
-Proper chocks and stripping are available.
-Adequate air supply is available
Refer to BPS “Trip Out Of
Hole Procedure”.
Refer to BPS “Rig Up Pick up
/ Lay-down Machine”
DO NOT UNDER ANY
CONDITION attempt to stop or
step over rolling tubulars.
Include all third party personnel.
Include all third party personnel.
BPS RECOMMENDS:
The Toolpusher be on the rig floor
any time the BHA is handled.
The use of the “trough” type lay-
down machine.
Use two-way communication
equipment/ PA equipment for
Driller and LD Machine Operator.
BPS RECOMMENDS that a
fluorescent vest be available
at the rig site.
BPS RECOMMENDS that box
and pin have protectors
installed when laying down.
Use Romfors angle iron type
chocks.
Discuss with all crew members
the importance of adequate air
supply.
0
1
1
2
3
1

STEP SUB PROCEDURE REMARKS
LAY DOWN DRILL COLLARS
HANDLING TUBULARS
Romfor International Ltd. Driller
2
2
3
4
5
6
7
Establish communication links between lay-down
machine operator and rig personnel.
Discuss emergency shut down procedures.
READY TO LAY-DOWN DRILL COLLARS
WITH LD MACHINE
It is recommended to roll only one drill collar at a time
from ground level.
Hold collar stationary while pin end thread protector is
installed.
For drill collars bigger than 4-3/4” Outer Diameter,
attach hoist line to collars and Instruct hoist operator
to guide collar to trough.
Slowly lower the collar to the trough until the pin of the
collar is safely resting in the trough. Stop and instruct
Hands to disconnect hoist line.
Continue to lower collar into trough slowly.
When elevators are in proper position, install a rope to
elevators to enable crews to unlatch.
When collar is in proper position, instruct hands to
unlatch elevators using rope.
Use two-way communication
equipment/ PA equipment for
collar rollers and LD Machine
Operator.
BPS RECOMMENDS that all
drill collars be laid down with a
trough type lay down machine.
DO NOT walk on or get on top
of drill collars for any reason.
MAKE SURE rotary table is
completely stopped.
BEWARE of pinch points, do not
allow crew members to place
their hands on lay-down
equipment; lines, post, etc.
If additional guidance is needed
use tag lines.
BE AWARE of block’s position
at all times.
Make sure all crewmen are
clear before lowering collar.
Rope needs to be in good
condition and proper length (not
too long).
MAKE SURE collar is stopped
and securely resting in trough.
2
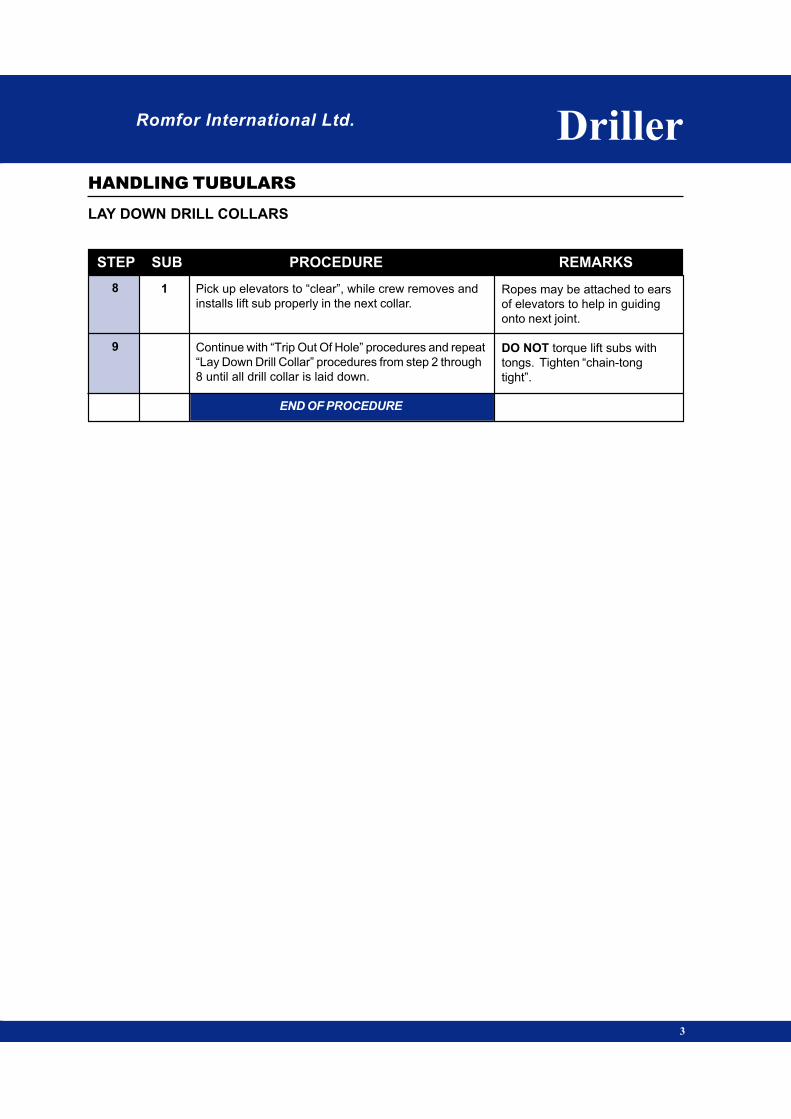
Romfor International Ltd. Driller
STEP SUB PROCEDURE REMARKS
LAY DOWN DRILL COLLARS
HANDLING TUBULARS
8
9
3
Pick up elevators to “clear”, while crew removes and
installs lift sub properly in the next collar.
Continue with “Trip Out Of Hole” procedures and repeat
“Lay Down Drill Collar” procedures from step 2 through
8 until all drill collar is laid down.
END OF PROCEDURE
Ropes may be attached to ears
of elevators to help in guiding
onto next joint.
DO NOT torque lift subs with
tongs. Tighten “chain-tong
tight”.
1
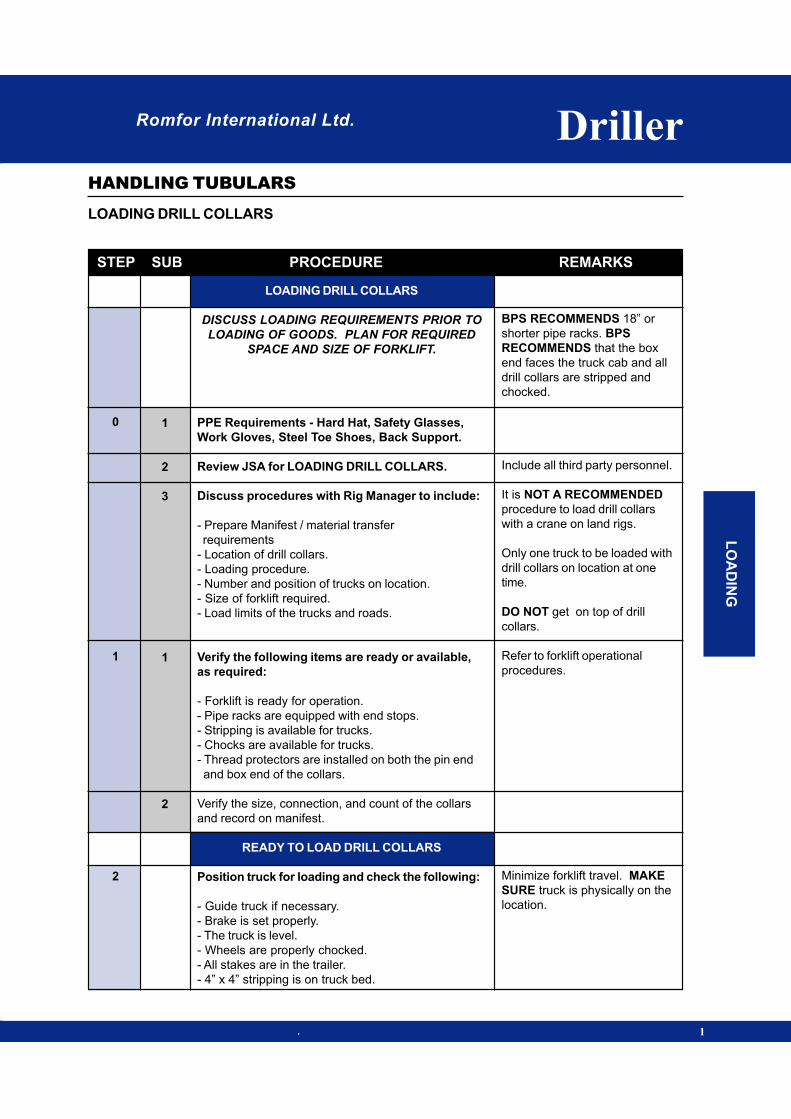
Romfor International Ltd. Driller
STEP SUB PROCEDURE REMARKS
LOADING DRILL COLLARS
HANDLING TUBULARS
. 1
LOADING DRILL COLLARS
DISCUSS LOADING REQUIREMENTS PRIOR TO
LOADING OF GOODS. PLAN FOR REQUIRED
SPACE AND SIZE OF FORKLIFT.
PPE Requirements - Hard Hat, Safety Glasses,
Work Gloves, Steel Toe Shoes, Back Support.
Review JSA for LOADING DRILL COLLARS.
Discuss procedures with Rig Manager to include:
- Prepare Manifest / material transfer
requirements
- Location of drill collars.
- Loading procedure.
- Number and position of trucks on location.
- Size of forklift required.
- Load limits of the trucks and roads.
Verify the following items are ready or available,
as required:
- Forklift is ready for operation.
- Pipe racks are equipped with end stops.
- Stripping is available for trucks.
- Chocks are available for trucks.
- Thread protectors are installed on both the pin end
and box end of the collars.
Verify the size, connection, and count of the collars
and record on manifest.
READY TO LOAD DRILL COLLARS
Position truck for loading and check the following:
- Guide truck if necessary.
- Brake is set properly.
- The truck is level.
- Wheels are properly chocked.
- All stakes are in the trailer.
- 4” x 4” stripping is on truck bed.
BPS RECOMMENDS 18” or
shorter pipe racks. BPS
RECOMMENDS that the box
end faces the truck cab and all
drill collars are stripped and
chocked.
Include all third party personnel.
It is NOT A RECOMMENDED
procedure to load drill collars
with a crane on land rigs.
Only one truck to be loaded with
drill collars on location at one
time.
DO NOT get on top of drill
collars.
Refer to forklift operational
procedures.
Minimize forklift travel. MAKE
SURE truck is physically on the
location.
0
1
2
1
2
3
1
2
LO
AD
ING
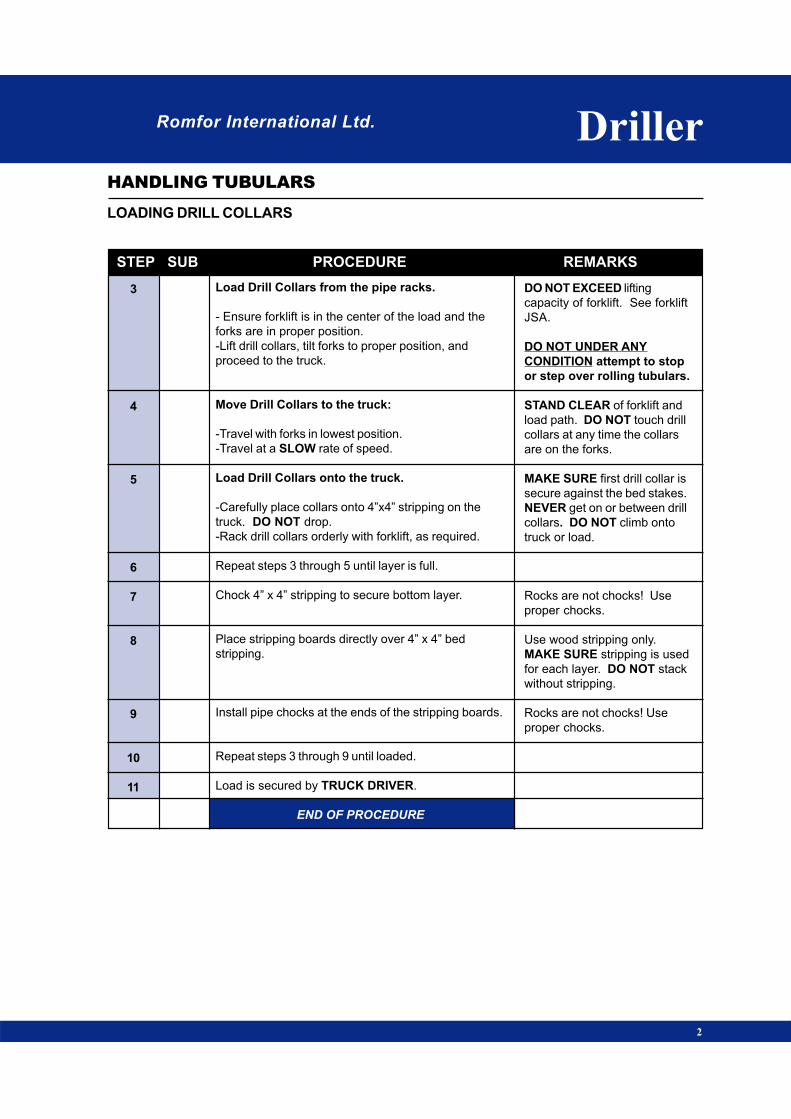
STEP SUB PROCEDURE REMARKS
LOADING DRILL COLLARS
HANDLING TUBULARS
Romfor International Ltd. Driller
2
3
4
5
6
7
8
9
10
11
Load Drill Collars from the pipe racks.
- Ensure forklift is in the center of the load and the
forks are in proper position.
-Lift drill collars, tilt forks to proper position, and
proceed to the truck.
Move Drill Collars to the truck:
-Travel with forks in lowest position.
-Travel at a SLOW rate of speed.
Load Drill Collars onto the truck.
-Carefully place collars onto 4”x4” stripping on the
truck. DO NOT drop.
-Rack drill collars orderly with forklift, as required.
Repeat steps 3 through 5 until layer is full.
Chock 4” x 4” stripping to secure bottom layer.
Place stripping boards directly over 4” x 4” bed
stripping.
Install pipe chocks at the ends of the stripping boards.
Repeat steps 3 through 9 until loaded.
Load is secured by TRUCK DRIVER.
END OF PROCEDURE
DO NOT EXCEED lifting
capacity of forklift. See forklift
JSA.
DO NOT UNDER ANY
CONDITION attempt to stop
or step over rolling tubulars.
STAND CLEAR of forklift and
load path. DO NOT touch drill
collars at any time the collars
are on the forks.
MAKE SURE first drill collar is
secure against the bed stakes.
NEVER get on or between drill
collars. DO NOT climb onto
truck or load.
Rocks are not chocks! Use
proper chocks.
Use wood stripping only.
MAKE SURE stripping is used
for each layer. DO NOT stack
without stripping.
Rocks are not chocks! Use
proper chocks.
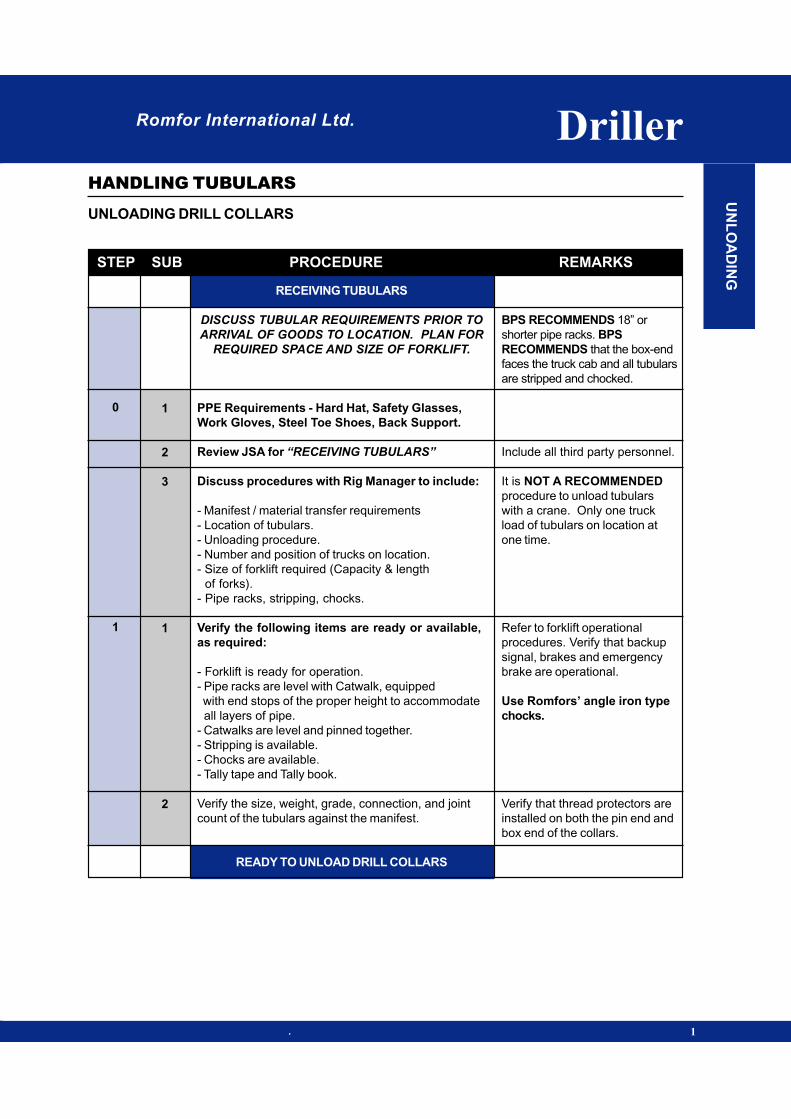
Romfor International Ltd. Driller
STEP SUB PROCEDURE REMARKS
UNLOADING DRILL COLLARS
HANDLING TUBULARS
. 1
RECEIVING TUBULARS
DISCUSS TUBULAR REQUIREMENTS PRIOR TO
ARRIVAL OF GOODS TO LOCATION. PLAN FOR
REQUIRED SPACE AND SIZE OF FORKLIFT.
PPE Requirements - Hard Hat, Safety Glasses,
Work Gloves, Steel Toe Shoes, Back Support.
Review JSA for “RECEIVING TUBULARS”
Discuss procedures with Rig Manager to include:
- Manifest / material transfer requirements
- Location of tubulars.
- Unloading procedure.
- Number and position of trucks on location.
- Size of forklift required (Capacity & length
of forks).
- Pipe racks, stripping, chocks.
Verify the following items are ready or available,
as required:
- Forklift is ready for operation.
- Pipe racks are level with Catwalk, equipped
with end stops of the proper height to accommodate
all layers of pipe.
- Catwalks are level and pinned together.
- Stripping is available.
- Chocks are available.
- Tally tape and Tally book.
Verify the size, weight, grade, connection, and joint
count of the tubulars against the manifest.
READY TO UNLOAD DRILL COLLARS
BPS RECOMMENDS 18” or
shorter pipe racks. BPS
RECOMMENDS that the box-end
faces the truck cab and all tubulars
are stripped and chocked.
Include all third party personnel.
It is NOT A RECOMMENDED
procedure to unload tubulars
with a crane. Only one truck
load of tubulars on location at
one time.
Refer to forklift operational
procedures. Verify that backup
signal, brakes and emergency
brake are operational.
Use Romfors’ angle iron type
chocks.
Verify that thread protectors are
installed on both the pin end and
box end of the collars.
0
1
1
2
3
1
2
UN
LO
AD
ING
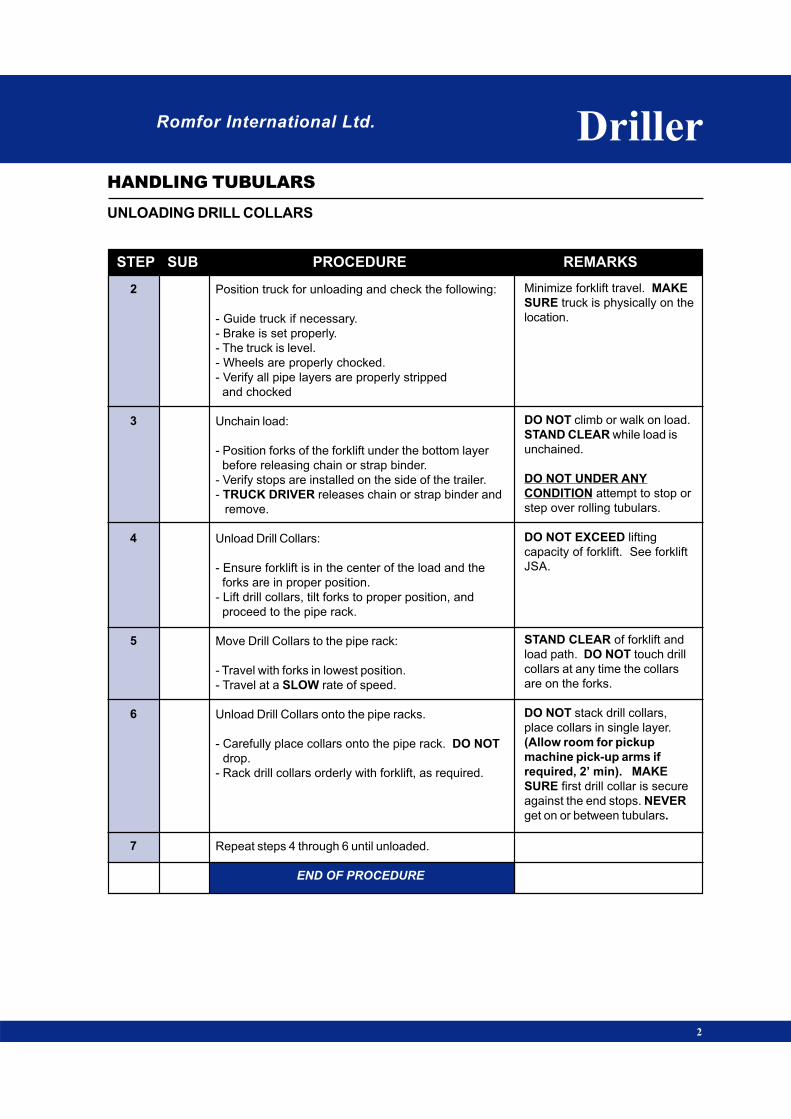
STEP SUB PROCEDURE REMARKS
UNLOADING DRILL COLLARS
HANDLING TUBULARS
Romfor International Ltd. Driller
2
2
3
4
5
6
7
Position truck for unloading and check the following:
- Guide truck if necessary.
- Brake is set properly.
- The truck is level.
- Wheels are properly chocked.
- Verify all pipe layers are properly stripped
and chocked
Unchain load:
- Position forks of the forklift under the bottom layer
before releasing chain or strap binder.
- Verify stops are installed on the side of the trailer.
- TRUCK DRIVER releases chain or strap binder and
remove.
Unload Drill Collars:
- Ensure forklift is in the center of the load and the
forks are in proper position.
- Lift drill collars, tilt forks to proper position, and
proceed to the pipe rack.
Move Drill Collars to the pipe rack:
- Travel with forks in lowest position.
- Travel at a SLOW rate of speed.
Unload Drill Collars onto the pipe racks.
- Carefully place collars onto the pipe rack. DO NOT
drop.
- Rack drill collars orderly with forklift, as required.
Repeat steps 4 through 6 until unloaded.
END OF PROCEDURE
Minimize forklift travel. MAKE
SURE truck is physically on the
location.
DO NOT climb or walk on load.
STAND CLEAR while load is
unchained.
DO NOT UNDER ANY
CONDITION attempt to stop or
step over rolling tubulars.
DO NOT EXCEED lifting
capacity of forklift. See forklift
JSA.
STAND CLEAR of forklift and
load path. DO NOT touch drill
collars at any time the collars
are on the forks.
DO NOT stack drill collars,
place collars in single layer.
(Allow room for pickup
machine pick-up arms if
required, 2’ min). MAKE
SURE first drill collar is secure
against the end stops. NEVER
get on or between tubulars.
Romfor Internation Ltd.
HANDLING
TUBULARS
HANDLING
TUBULARS
DrillerDriller
DR
IL
L P
IP
E
DRILL PIPEDRILL PIPE
Romfor International Ltd. Driller
STEP SUB PROCEDURE REMARKS
PICKING UP DRILL PIPE
HANDLING TUBULARS
PIC
KIN
G U
P
1
PICKING UP DRILL PIPE
This procedure is based on the assumption that
all drill pipe is unloaded, on racks; and the pickup
machine is rigged up and operational.
PPE Requirements - Hard Hat, Safety Glasses,
Work Gloves, Steel Toe Shoes, Back Support.
Review JSA for “PICKING UP DRILL PIPE”.
Fit for duty check for all hands.
Verify the following items are ready or available,
as required:
- Inspect pick up machine, sheaves and cables for
damage and proper installation.
-V-door stairs, catwalk area and other hazard areas
are roped off. Use “Caution Tape”.
-Proper lighting on pipe racks, catwalk, and V-door
-Rig lighting does not interfere with pickup machine
operator.
-Third party Flagger is assigned on rig floor and has
fluorescent vest.
-Mousehole is secured properly and in good
condition. BE AWARE of side load requirements of
the Mousehole when picking up pipe.
-Mousehole is secured under the rig floor at the point
of tension of the pick up pole.
-Pickup pole safety clamp and cover are installed
and in good condition.
-Pickup machine operator knows the safe working
load of his cables and equipment.
-Thread protectors are available.
Verify the size, weight, grade, connection, and joint
count of the drill pipe. The pipe is in the proper order
for picking up.
Include all third party personnel.
Include all third party personnel.
BPS RECOMMENDS the use of
the “trough” type pickup
machine.
Use two-way communication
equipment/ PA equipment for
Driller and PU Machine
Operator.
BPS RECOMMENDS that a
fluorescent vest be available
at the rig site.
0
1
1
2
3
1
2
STEP SUB PROCEDURE REMARKS
PICKING UP DRILL PIPE
HANDLING TUBULARS
Romfor International Ltd. Driller
2
3
3
Establish communication links between pickup
machine operator and personnel working the pipe
racks.
Discuss emergency shut down procedures.
READY TO PICKUP DRILL PIPE
Driller is to instruct all crew members to refer to the
Best Practice procedure for each position on “Picking
up Drill Pipe”. Make sure that all procedures are
understood and followed.
It is recommended to roll all drill pipe from the
ground level.
If this is not possible, and personnel are required
to be on top of the drill pipe; then the use of
walkways are recommended. DO NOT walk on
bare drill pipe, use the walkway.
Access the walkways from the end opposite the
catwalk using a secured ladder or stairs.
PICK UP WITH PICKUP MACHINE:
When joint is in proper position in the trough, lower
elevators over top of joint in position to be latched.
After elevators are securely latched, pick up
elevators slowly, raising joint out of trough in position
to stab into tool joint in rotary.
Use two-way communication
equipment/ PA equipment for
pipe rollers and PU Machine
Operator.
Use Romfor's angle iron type
chocks.
DO NOT UNDER ANY
CONDITION attempt to stop
or step over rolling tubulars.
Rig Manager Authorization is
required before any person is
permitted to go on top of the drill
pipe.
JSA must be reviewed with
direct supervision by the Rig
Manager.
DO NOT walk across pipe racks
from catwalk.
Ensure drill pipe protectors are
installed.
DO NOT slack off so far as to
lift the opposite end of pipe.
Ensure that a tail rope is used
properly.
3
0
1
2

Romfor International Ltd. Driller
STEP SUB PROCEDURE REMARKS
PICKING UP DRILL PIPE
HANDLING TUBULARS
3
BPS RECOMMENDS picking
up only one joint at a time.
MAKE SURE the brake is
working properly.
Ensure drill pipe protectors are
installed.
Ensure that a tail rope is used
properly.
3
3
4
0
1
2
3
4
Refer to “Trip in Hole” Procedure until next joint is in
position in trough. Repeat steps 3-1 & 3-2 until all
joints are picked up.
Repeat Steps 3-1 through 3-3 until all drill pipe is run.
OR
PICK UP WITH HOIST:
Inspect condition of hoist and cable. Know the
capacity of the cable and hoist.
When joint is in proper position in the Mousehole,
lower elevators to position to be latched.
After elevators are securely latched, pick up elevators
slowly, raising joint out of Mousehole in position to
stab into tool joint in rotary.
Refer to “Trip in Hole” Procedure until next joint is in
position in trough. Repeat steps 3-1 & 3-2 until all
joints are picked up.
Repeat Steps 3-1 through 3-3 until all drill pipe is run.
END OF PROCEDURE
Romfor Inernational Ltd. Driller
STEP SUB PROCEDURE REMARKS
LAY DOWN DRILL PIPE
HANDLING TUBULARS
LA
Y D
OW
N
1
LAYING DOWN DRILL PIPE WITH
LAY-DOWN MACHINE
THIS PROCEDURE IS BASED ON THE
ASSUMPTION THAT THE LAYDOWN MACHINE IS
RIGGED UP AND THE CONNECTION IS BROKEN,
SPUN OUT AND HANGING IN ELEVATORS.
PPE Requirements - Hard Hat, Safety Glasses,
Work Gloves, Steel Toe Shoes, Back Support.
Review JSA for “LAYING DOWN DRILL PIPE”.
Fit for duty check for all hands.
Verify the following items are ready or available,
as required:
- Inspect lay-down machine, sheaves and cables for
damage and proper installation.
-V-door stairs, catwalk area and other hazard areas
are roped off. Use “Caution Tape”.
-Proper lighting on pipe racks, catwalk, and V-door
-Rig lighting does not interfere with lay-down
machine operator.
-Flagger is assigned on rig floor and has fluorescent
vest.
-Mousehole is secured properly and in good
condition. BE AWARE of side load requirements of
the Mousehole when laying down pipe.
-Mousehole is secured under the rig floor at the point
of tension of the lay-down pole.
-Lay-down pole safety clamp and cover are installed
and in good condition.
-Lay-down machine operator knows the safe working
load of his cables and equipment.
-Thread protectors are available.
-Proper chocks and stripping are available.
Refer to BPS “Trip Out Of Hole
Procedure”.
Refer to BPS “Rig Up Pick up /
Lay-down Machine”
DO NOT UNDER ANY
CONDITION attempt to stop or
step over rolling tubulars.
Include all third party personnel.
Include all third party personnel.
BPS RECOMMENDS the use of
the “trough” type lay-down
machine.
Use two-way communication
equipment/ PA equipment for
Driller and LD Machine
Operator.
BPS RECOMMENDS that a
fluorescent vest be available at
the rig site.
BPS RECOMMENDS that box
and pin have protectors
installed when laying down.
Use Nabors’ angle iron type
chocks.
0
1
1
2
3
1
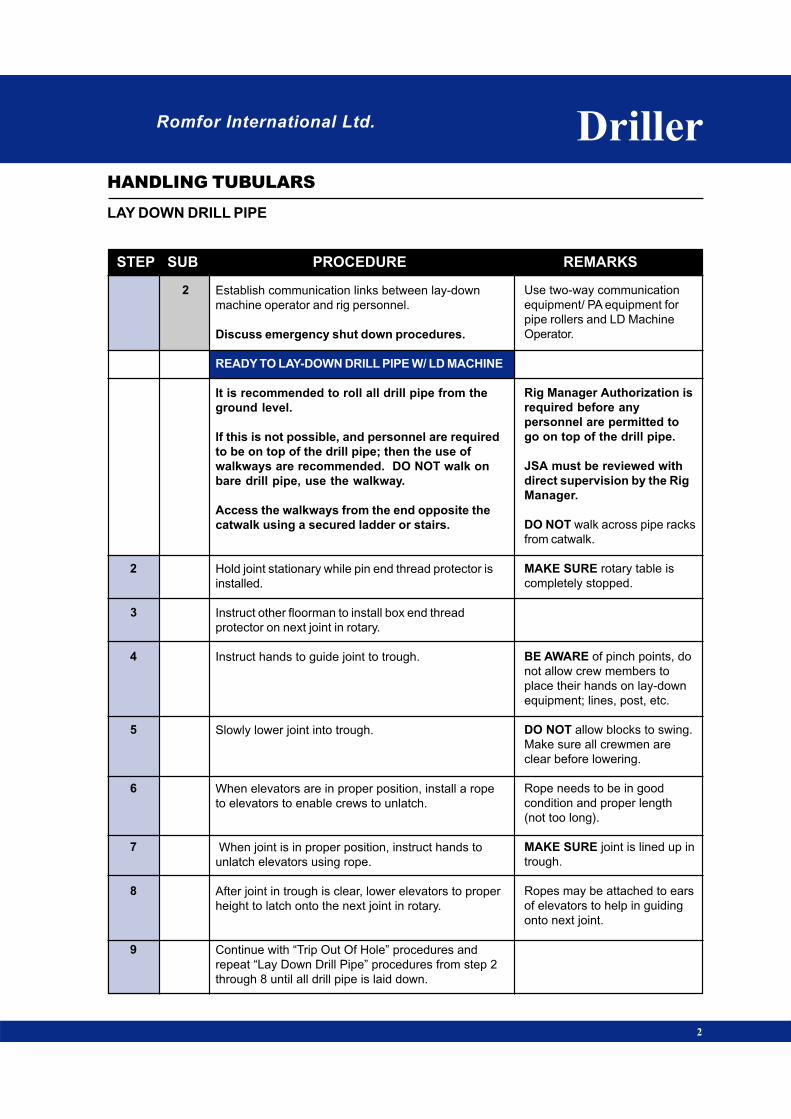
STEP SUB PROCEDURE REMARKS
LAY DOWN DRILL PIPE
HANDLING TUBULARS
Romfor International Ltd. Driller
2
2
3
4
5
6
7
8
9
Establish communication links between lay-down
machine operator and rig personnel.
Discuss emergency shut down procedures.
READY TO LAY-DOWN DRILL PIPE W/ LD MACHINE
It is recommended to roll all drill pipe from the
ground level.
If this is not possible, and personnel are required
to be on top of the drill pipe; then the use of
walkways are recommended. DO NOT walk on
bare drill pipe, use the walkway.
Access the walkways from the end opposite the
catwalk using a secured ladder or stairs.
Hold joint stationary while pin end thread protector is
installed.
Instruct other floorman to install box end thread
protector on next joint in rotary.
Instruct hands to guide joint to trough.
Slowly lower joint into trough.
When elevators are in proper position, install a rope
to elevators to enable crews to unlatch.
When joint is in proper position, instruct hands to
unlatch elevators using rope.
After joint in trough is clear, lower elevators to proper
height to latch onto the next joint in rotary.
Continue with “Trip Out Of Hole” procedures and
repeat “Lay Down Drill Pipe” procedures from step 2
through 8 until all drill pipe is laid down.
Use two-way communication
equipment/ PA equipment for
pipe rollers and LD Machine
Operator.
Rig Manager Authorization is
required before any
personnel are permitted to
go on top of the drill pipe.
JSA must be reviewed with
direct supervision by the Rig
Manager.
DO NOT walk across pipe racks
from catwalk.
MAKE SURE rotary table is
completely stopped.
BE AWARE of pinch points, do
not allow crew members to
place their hands on lay-down
equipment; lines, post, etc.
DO NOT allow blocks to swing.
Make sure all crewmen are
clear before lowering.
Rope needs to be in good
condition and proper length
(not too long).
MAKE SURE joint is lined up in
trough.
Ropes may be attached to ears
of elevators to help in guiding
onto next joint.
2
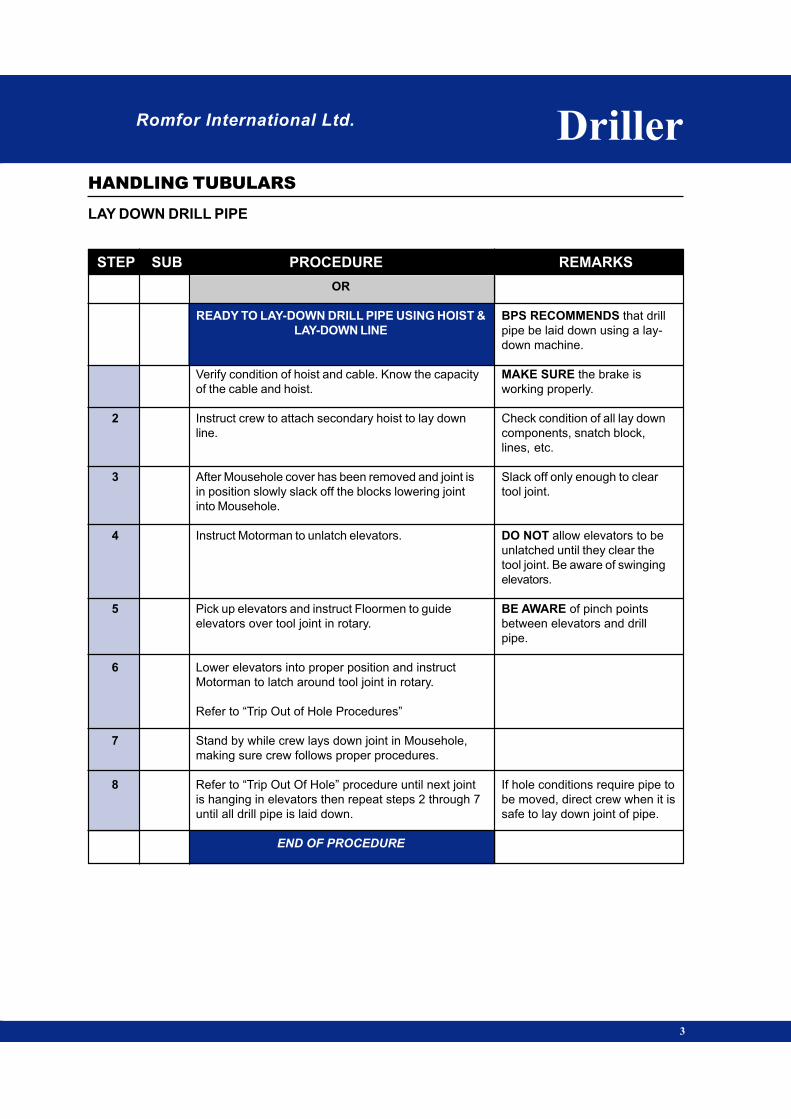
Romfor International Ltd. Driller
STEP SUB PROCEDURE REMARKS
LAY DOWN DRILL PIPE
HANDLING TUBULARS
2
3
4
5
6
7
8
3
OR
READY TO LAY-DOWN DRILL PIPE USING HOIST &
LAY-DOWN LINE
Verify condition of hoist and cable. Know the capacity
of the cable and hoist.
Instruct crew to attach secondary hoist to lay down
line.
After Mousehole cover has been removed and joint is
in position slowly slack off the blocks lowering joint
into Mousehole.
Instruct Motorman to unlatch elevators.
Pick up elevators and instruct Floormen to guide
elevators over tool joint in rotary.
Lower elevators into proper position and instruct
Motorman to latch around tool joint in rotary.
Refer to “Trip Out of Hole Procedures”
Stand by while crew lays down joint in Mousehole,
making sure crew follows proper procedures.
Refer to “Trip Out Of Hole” procedure until next joint
is hanging in elevators then repeat steps 2 through 7
until all drill pipe is laid down.
END OF PROCEDURE
BPS RECOMMENDS that drill
pipe be laid down using a lay-
down machine.
MAKE SURE the brake is
working properly.
Check condition of all lay down
components, snatch block,
lines, etc.
Slack off only enough to clear
tool joint.
DO NOT allow elevators to be
unlatched until they clear the
tool joint. Be aware of swinging
elevators.
BE AWARE of pinch points
between elevators and drill
pipe.
If hole conditions require pipe to
be moved, direct crew when it is
safe to lay down joint of pipe.
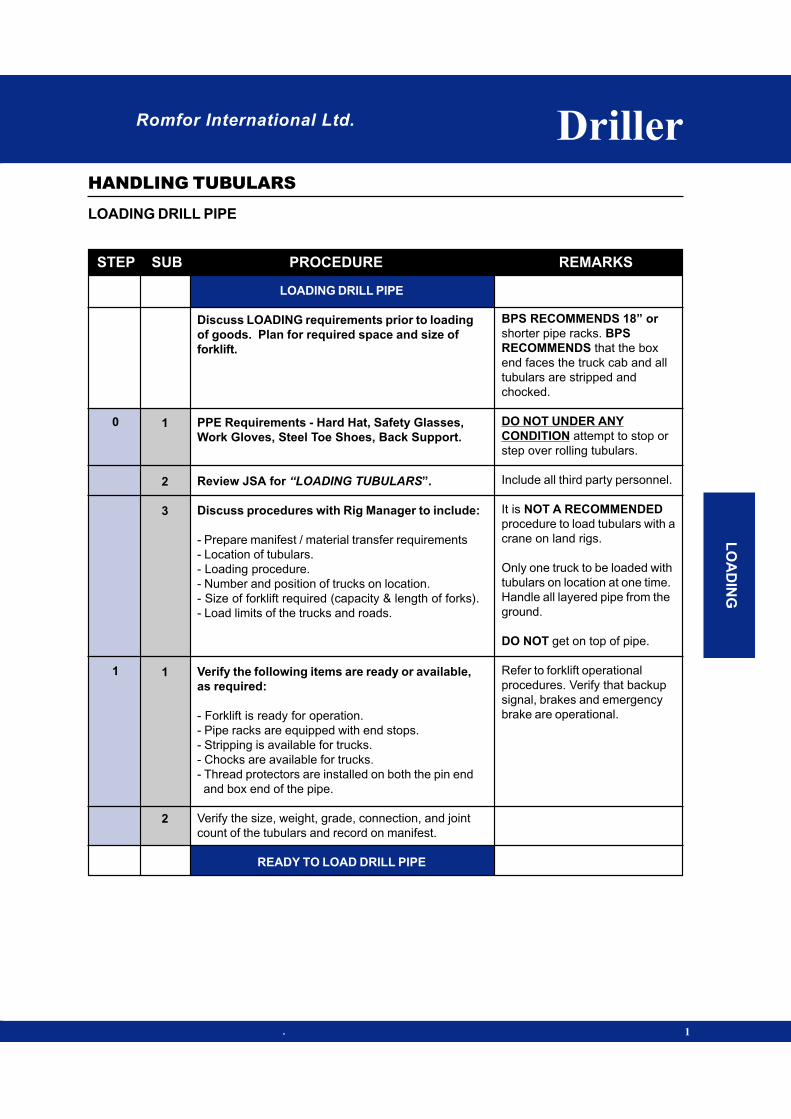
Romfor International Ltd. Driller
STEP SUB PROCEDURE REMARKS
LOADING DRILL PIPE
HANDLING TUBULARS
. 1
LO
AD
ING
LOADING DRILL PIPE
Discuss LOADING requirements prior to loading
of goods. Plan for required space and size of
forklift.
PPE Requirements - Hard Hat, Safety Glasses,
Work Gloves, Steel Toe Shoes, Back Support.
Review JSA for “LOADING TUBULARS”.
Discuss procedures with Rig Manager to include:
- Prepare manifest / material transfer requirements
- Location of tubulars.
- Loading procedure.
- Number and position of trucks on location.
- Size of forklift required (capacity & length of forks).
- Load limits of the trucks and roads.
Verify the following items are ready or available,
as required:
- Forklift is ready for operation.
- Pipe racks are equipped with end stops.
- Stripping is available for trucks.
- Chocks are available for trucks.
- Thread protectors are installed on both the pin end
and box end of the pipe.
Verify the size, weight, grade, connection, and joint
count of the tubulars and record on manifest.
READY TO LOAD DRILL PIPE
BPS RECOMMENDS 18” or
shorter pipe racks. BPS
RECOMMENDS that the box
end faces the truck cab and all
tubulars are stripped and
chocked.
DO NOT UNDER ANY
CONDITION attempt to stop or
step over rolling tubulars.
Include all third party personnel.
It is NOT A RECOMMENDED
procedure to load tubulars with a
crane on land rigs.
Only one truck to be loaded with
tubulars on location at one time.
Handle all layered pipe from the
ground.
DO NOT get on top of pipe.
Refer to forklift operational
procedures. Verify that backup
signal, brakes and emergency
brake are operational.
0
1
1
2
3
1
2
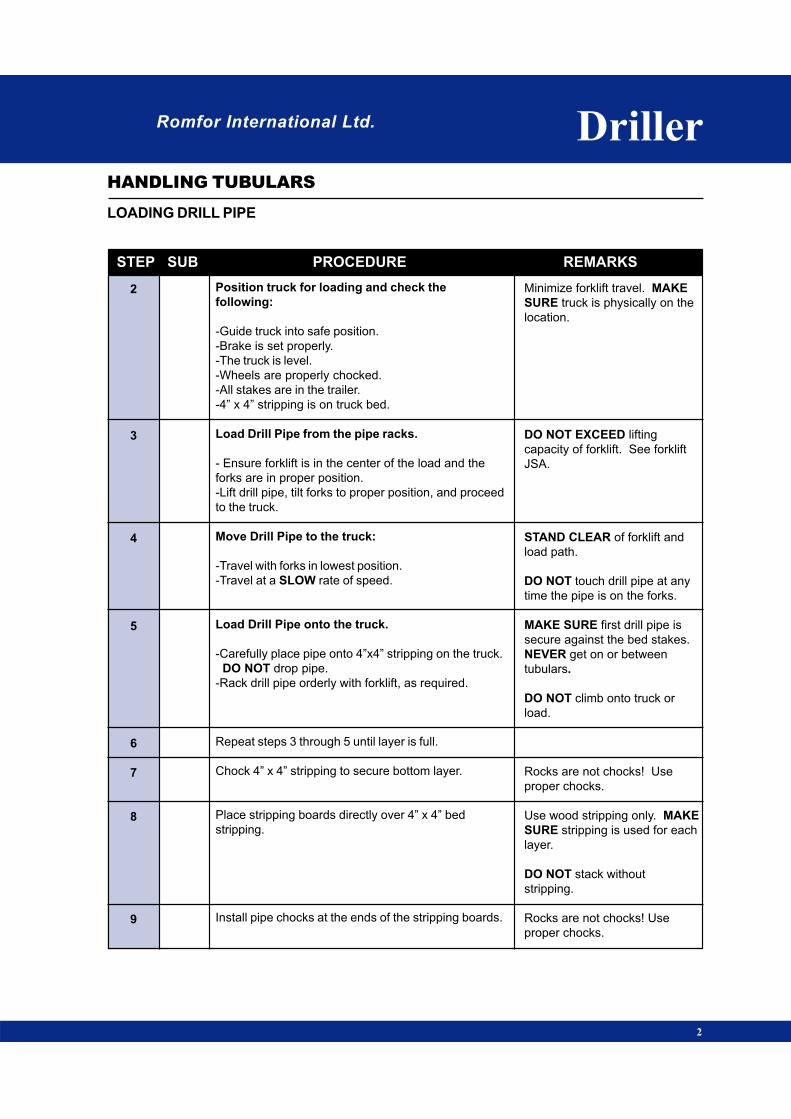
STEP SUB PROCEDURE REMARKS
LOADING DRILL PIPE
HANDLING TUBULARS
Romfor International Ltd. Driller
2
2
3
4
5
6
7
8
9
Position truck for loading and check the
following:
-Guide truck into safe position.
-Brake is set properly.
-The truck is level.
-Wheels are properly chocked.
-All stakes are in the trailer.
-4” x 4” stripping is on truck bed.
Load Drill Pipe from the pipe racks.
- Ensure forklift is in the center of the load and the
forks are in proper position.
-Lift drill pipe, tilt forks to proper position, and proceed
to the truck.
Move Drill Pipe to the truck:
-Travel with forks in lowest position.
-Travel at a SLOW rate of speed.
Load Drill Pipe onto the truck.
-Carefully place pipe onto 4”x4” stripping on the truck.
DO NOT drop pipe.
-Rack drill pipe orderly with forklift, as required.
Repeat steps 3 through 5 until layer is full.
Chock 4” x 4” stripping to secure bottom layer.
Place stripping boards directly over 4” x 4” bed
stripping.
Install pipe chocks at the ends of the stripping boards.
Minimize forklift travel. MAKE
SURE truck is physically on the
location.
DO NOT EXCEED lifting
capacity of forklift. See forklift
JSA.
STAND CLEAR of forklift and
load path.
DO NOT touch drill pipe at any
time the pipe is on the forks.
MAKE SURE first drill pipe is
secure against the bed stakes.
NEVER get on or between
tubulars.
DO NOT climb onto truck or
load.
Rocks are not chocks! Use
proper chocks.
Use wood stripping only. MAKE
SURE stripping is used for each
layer.
DO NOT stack without
stripping.
Rocks are not chocks! Use
proper chocks.
Romfor International Ltd. Driller
STEP SUB PROCEDURE REMARKS
LOADING DRILL PIPE
HANDLING TUBULARS
3
10
11
Repeat steps 3 through 9 until loaded.
Load is secured by TRUCK DRIVER.
END OF PROCEDURE

Romfor International Ltd. Driller
STEP SUB PROCEDURE REMARKS
UNLOADING DRILL PIPE
HANDLING TUBULARS
. 1
RECEIVING DRILL PIPE
DISCUSS DRILL PIPE REQUIREMENTS PRIOR
TO ARRIVAL OF GOODS TO LOCATION. PLAN
FOR REQUIRED SPACE AND SIZE OF FORKLIFT.
PPE Requirements - Hard Hat, Safety Glasses,
Work Gloves, Steel Toe Shoes, Back Support.
Review JSA for “RECEIVING DRILL PIPE”
Discuss procedures with Rig Manager to include:
- Manifest / material transfer requirements
- Location of Drill Pipe.
- Unloading procedure.
- Number and position of trucks on location.
- Size of forklift required (Capacity & length of forks).
- Pipe racks, stripping, chocks.
Verify the following items are ready or available,
as required:
- Forklift is ready for operation.
- Pipe racks are level with Catwalk, equipped with end
stops of the proper height to accommodate all layers
of pipe.
- Catwalks are level and pinned together.
- Stripping is available.
- Chocks are available.
- Tally tape and Tally book.
Verify the size, weight, grade, connection, and joint
count of the Drill Pipe against the manifest.
READY TO UNLOAD DRILL PIPE
BPS RECOMMENDS 18” or
shorter pipe racks. BPS
RECOMMENDS that the box
end faces the truck cab and all
tubulars are stripped and
chocked.
DO NOT UNDER ANY
CONDITION attempt to stop or
step over rolling tubulars.
Include all third party personnel.
It is not recommended
procedure to unload Drill Pipe
with a crane. Only one truck
load of Drill Pipe on location at
one time.
Refer to forklift operational
procedures. Verify that backup
signal, brakes and emergency
brake are operational.
Use ROMFOR'S angle iron type
chocks.
Verify that thread protectors are
installed on both the pin end and
box end of the pipe.
0
1
1
2
3
1
2
UN
LO
AD
ING

STEP SUB PROCEDURE REMARKS
UNLOADING DRILL PIPE
HANDLING TUBULARS
Romfor International Ltd. Driller
2
2
3
4
5
6
7
8
Position truck for unloading and check the following:
- Guide truck if necessary.
- Brake is set properly.
- The truck is level.
- Wheels are properly chocked.
- Verify all pipe layers are properly stripped and
chocked.
Unchain load:
- Position forks of the forklift under the bottom layer
before releasing chain or strap binder, if necessary.
- Verify stops are installed on the side of the trailer.
- TRUCK DRIVER releases chain or strap binder and
remove.
Unload Drill Pipe:
- Ensure forklift is in the center of the load and the
forks are in proper position.
- Lift drill pipe, tilt forks to proper position, and
proceed to the pipe rack.
Move Drill Pipe to the pipe rack:
- Travel with forks in lowest position.
- Travel at a SLOW rate of speed.
Unload Drill Pipe onto the pipe racks.
- Carefully place pipe onto the pipe rack. DO NOT
drop.
- Rack drill pipe orderly, as required.
Repeat steps 4 through 6 until layer is full.
If Drill Pipe is layered:
Verify that pipe rack stops are in place and of the
proper height. Place stripping boards directly over
pipe racks on top of layer. Run stripping boards all
the way to the end of the Drill Pipe. Place chock a
minimum of 2 joint widths from the end of stripping at
the catwalk end.
Minimize forklift travel. Make
sure truck is physically on the
location.
DO NOT climb or walk on load.
STAND CLEAR while load is
unchained.
DO NOT EXCEED lifting
capacity of forklift. See forklift
JSA. DO NOT climb or walk on
load.
STAND CLEAR of forklift and
load path. DO NOT touch drill
pipe at any time the pipe is on
the forks.
MAKE SURE first drill pipe is
secure against the chocks.
(Allow room for pickup
machine pick-up arms if
required, 2’ min).
NEVER get between tubulars.
Use wood stripping only. MAKE
SURE first joint is positioned
correctly for pickup machine.
(Parallel to catwalk)

Romfor International Ltd. Driller
STEP SUB PROCEDURE REMARKS
UNLOADING DRILL PIPE
HANDLING TUBULARS
3
Rig Manager Authorization is
required before any personnel
are permitted to go on top of
the drill pipe.
JSA must be reviewed with
direct supervision by the Rig
Manager.
DO NOT walk across pipe racks
from catwalk.
Two walkways are recommended
for large OD tubulars.
DO NOT use feet or hands to
roll Drill Pipe. DO NOT get in
front of, step over or attempt to
stop: rolling tubulars.
9
2
3
It is recommended to roll all drill pipe from the
ground level.
If this is not possible, and personnel are required
to be on top of the drill pipe; then the use of
walkways are recommended. DO NOT walk on
bare pipe, use the walkway.
Access the walkways from the end opposite the
catwalk using a secured ladder or stairs.
Lay walkway on each layer of drill pipe. The walkway
is to extend the full length of each layer of pipe.
Use a pipe roller to move the Drill Pipe into proper
position one joint at a time.
Repeat steps 4 through 8 until complete.
END OF PROCEDURE

Romfor International Ltd..
HANDLING
TUBULARS
HANDLING
TUBULARS
DrillerDriller
PICKUP/
LAYDOWN
MACHINE
PICKUP/
LAYDOWN
MACHINE
PIC
KU
P/L
AY
DO
WN
MA
CH
IN
E
Romfor International Ltd. Driller
STEP SUB PROCEDURE REMARKS
RIGGING DOWN PICKUP/LAYDOWN MACHINE
HANDLING TUBULARS RIG
GIN
G D
OW
N
1
RIGGING DOWN PU MACHINE
NOTE :
THIS PROCEDURE IS BASED ON THE
ASSUMPTIONS THAT THE PICKUP TROUGH AND
HYDRAULIC PICKUP ARMS ARE RIGGED DOWN
BY THE PICKUP CREW AND OUT OF THE WAY.
WHEN OPERATIONS ALLOW USE THE BLOCKS TO
LAY DOWN THE POLE FROM THE MOUSEHOLE.
PPE Requirements - Hard Hat, Safety Glasses,
Work Gloves, Steel Toe Shoes, Back Support.
Review JSA for Rigging down Pick-Up machine.
Ensure that this is the only operation being done at
this time.
Fit for duty check for all hands.
Inspect the following items as required:
V-door stairs, catwalk area and other hazard areas are
roped off.
Proper lighting on pipe racks, catwalk, and V-door.
Rig lighting does not interfere with pickup machine
operator
Flagger is assigned on rig floor and has fluorescent
vest.
READY TO RIG DOWN PICKUP POLE
Using the rig blocks, attach “pick-up” / “rig-up” line to
the pickup pole. Assist pickup crew in rigging down
and preparing pickup pole to lay down.
Include all third party personnel
and review third party JSA.
Only Romfor’ employees are
authorized to operate
Romfors’ equipment.
Include all third party personnel.
DO NOT wrap any line over
sharp edges, use snatch blocks.
0
1
2
1
2
3
1
1
2
3
4
STEP SUB PROCEDURE REMARKS
RIGGING DOWN PICKUP/LAYDOWN MACHINE
HANDLING TUBULARS
Romfor International Ltd. Driller
2
3
4
5
6
Raise pickup pole out of the mousehole. When the
pickup pole is in the proper position, assist if needed
in attaching the fast line from pickup machine to the
bottom of the pole using Snatch Block.
Slack off blocks as pickup machine operator pulls the
pole out the V-door with fast line until in proper
position on catwalk.
When the pickup pole is in proper position slack off
blocks and remove the “pick-up” / “rig-up” line.
Pick Up crew will complete the remaining rig down.
END OF PROCEDURE
DO NOT wrap any line over
sharp edges.
Have flagger in fluorescent vest
in position to signal Driller and
pickup machine operator.
STAND CLEAR when
assistance is not needed.
STAND CLEAR when support is
not needed.

Romfor International Ltd. Driller
STEP SUB PROCEDURE REMARKS
RIG UP PICKUP/LAYDOWN MACHINE
HANDLING TUBULARS
. 1
RIG
GIN
G U
P
RIGGING UP PU MACHINE
THIS PROCEDURE IS BASED ON THE
ASSUMPTION THAT ALL CASING IS UNLOADED
AND ON RACKS. BPS RECOMMENDS THE USE
OF THE “TROUGH” TYPE PICKUP MACHINE.
PPE Requirements - Hard Hat, Safety Glasses,
Work Gloves, Steel Toe Shoes, Back Support.
Review JSA for Rigging up Pick-Up machine.
Fit for duty check for all hands.
Inspect the following items for capacity and
serviceability, as required:
V-door stairs, catwalk area and other hazard areas are
roped off.
Proper lighting on pipe racks, catwalk, and V-door.
Flagger is assigned on rig floor and has fluorescent
vest.
Pickup machine is inspected for damaged lines and
sheaves and overall condition. Make sure the truck is
properly chocked.
Inspect condition of hoist and cable. Know the
capacity of the cable and hoist.
Mousehole is secured properly and in good condition.
Include all third party personnel
and review third party JSA.
Only Romfor employees are
authorized to operate
Romfors’ equipment.
Include all third party personnel.
Use “Caution Tape”
Rig lighting does not interfere
with pickup machine operator.
BPS RECOMMENDS that a
fluorescent vest be available
at the rig site.
DO NOT get on the truck. Do a
walk around inspection.
MAKE SURE the brake is
working properly.
BE AWARE of side load
requirements of the Mousehole
when picking up pipe.
0
1
1
2
3
1
2
3
4
5
6
STEP SUB PROCEDURE REMARKS
RIG UP PICKUP/LAYDOWN MACHINE
HANDLING TUBULARS
Romfor International Ltd. Driller
2
2
3
4
5
6
7
8
Mousehole is secured under the rig floor at the point of
tension of the pick up pole.
Pickup pole, safety clamp and cover are in good
condition.
Pickup machine operator knows the safe working load
of his cables and equipment.
READY TO RIG UP PICKUP POLE
Using the air hoist, attach line to pickup pole and pull
it out of truck and slide to bottom of the V-door.
Attach pickup machine fast line to the bottom of the
pickup pole using a snatch block.
Using the rig blocks, attach “pick-up” / “rig up” line to
the pickup pole and stand clear while Driller raises it to
the rig floor. (Pickup machine operator will hold snub
on pole.)
When the pickup pole is in the proper position, remove
the snub line.
Stab pickup pole into Mousehole through Mousehole
plate. Assist as required while casing crew secures
pole in the proper position using a safety clamp.
Remove the rig up line.
Pick Up crew will complete the remaining rig up.
END OF PROCEDURE
Check rating of air hoist and
cable.
DO NOT wrap any line over
sharp edges.
DO NOT wrap any line over
sharp edges, use snatch
blocks.
Use a drill collar type clamp.
Inspect installation of the clamp.
Use proper fall protection to
remove line, as required.
STAND CLEAR when support is
not needed.
NEVER GET UNDER THE
TROUGH OR IN THE PATH OF
THE TROUGH FOR ANY
REASON.
7
8
9
Romfor International Ltd.
HANDLING
TUBULARS
HANDLING
TUBULARS
HA
ND
LIN
G T
UB
UL
AR
S
Lead TongLead Tong
Romfor International Ltd.
Lead Tong
Hand
Lead Tong
Hand
HANDLING
TUBULARS
HANDLING
TUBULARS
CA
SIN
G
CASINGCASING
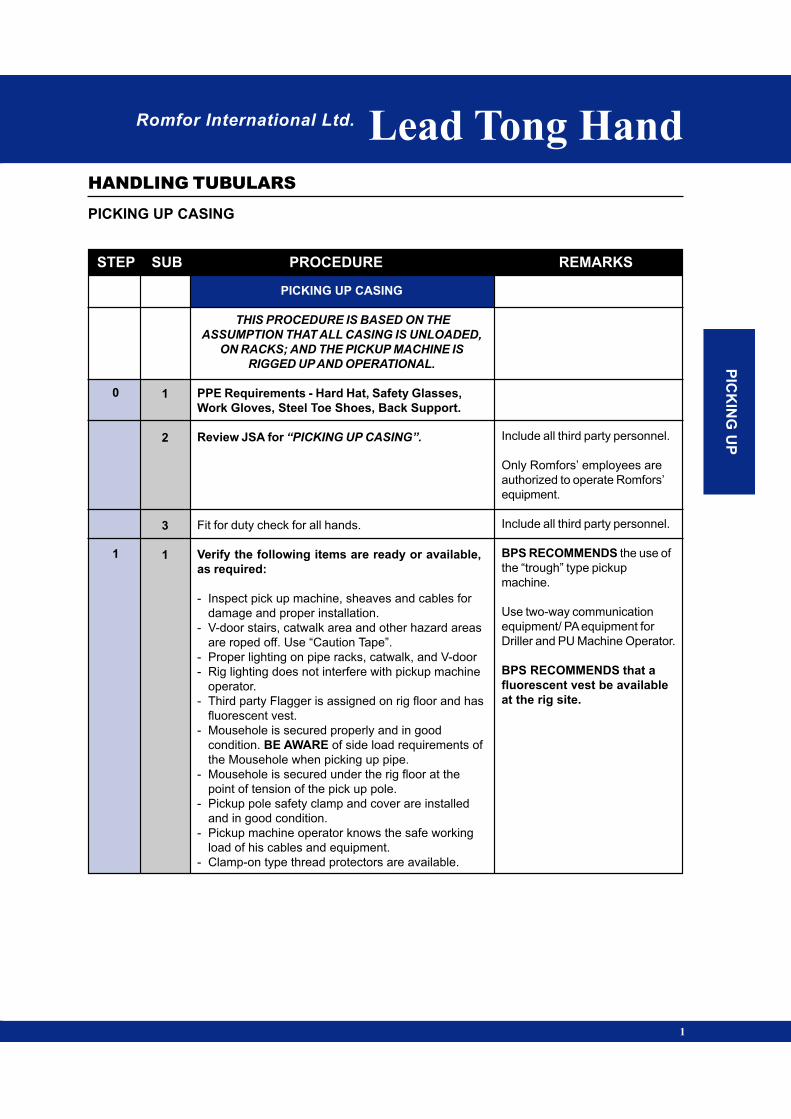
Romfor International Ltd. Lead Tong Hand
STEP SUB PROCEDURE REMARKS
PICKING UP CASING
HANDLING TUBULARS
PIC
KIN
G U
P
1
PICKING UP CASING
THIS PROCEDURE IS BASED ON THE
ASSUMPTION THAT ALL CASING IS UNLOADED,
ON RACKS; AND THE PICKUP MACHINE IS
RIGGED UP AND OPERATIONAL.
PPE Requirements - Hard Hat, Safety Glasses,
Work Gloves, Steel Toe Shoes, Back Support.
Review JSA for “PICKING UP CASING”.
Fit for duty check for all hands.
Verify the following items are ready or available,
as required:
- Inspect pick up machine, sheaves and cables for
damage and proper installation.
- V-door stairs, catwalk area and other hazard areas
are roped off. Use “Caution Tape”.
- Proper lighting on pipe racks, catwalk, and V-door
- Rig lighting does not interfere with pickup machine
operator.
- Third party Flagger is assigned on rig floor and has
fluorescent vest.
- Mousehole is secured properly and in good
condition. BE AWARE of side load requirements of
the Mousehole when picking up pipe.
- Mousehole is secured under the rig floor at the
point of tension of the pick up pole.
- Pickup pole safety clamp and cover are installed
and in good condition.
- Pickup machine operator knows the safe working
load of his cables and equipment.
- Clamp-on type thread protectors are available.
Include all third party personnel.
Only Romfors’ employees are
authorized to operate Romfors’
equipment.
Include all third party personnel.
BPS RECOMMENDS the use of
the “trough” type pickup
machine.
Use two-way communication
equipment/ PA equipment for
Driller and PU Machine Operator.
BPS RECOMMENDS that a
fluorescent vest be available
at the rig site.
0
1
1
2
3
1

STEP SUB PROCEDURE REMARKS
PICKING UP CASING
HANDLING TUBULARS
Romfor International Ltd. Lead Tong Hand
2
2
3
Verify the size, weight, grade, connection, and joint
count of the tubulars. The pipe is in the proper order
for picking up.
Establish communication links between pickup
machine operator and personnel working the pipe
racks.
Discuss emergency shut down procedures.
READY TO PICKUP CASING
Remove chocks from the casing on pipe rack, using a
metal hook.
It is recommended to roll all casing from the
ground level.
If this is not possible, and personnel are required
to be on top of the casing; then the use of
walkways are recommended. DO NOT walk on
bare casing, use the walkway.
Access the walkways from the end opposite the
catwalk using a secured ladder or stairs.
PICK UP WITH PICKUP MACHINE:
Roll the joint to the pickup machine using a pipe roller.
Install casing thread protector.
Use two-way communication
equipment/ PA equipment for
pipe rollers and PU Machine
Operator.
Use Romfors’ angle iron type
chocks.
DO NOT UNDER ANY
CONDITION attempt to stop or
step over rolling tubulars.
Rig Manager Authorization is
required before any
personnel are permitted to
go on top of the casing.
JSA must be reviewed with
direct supervision by the Rig
Manager.
DO NOT walk across pipe racks
from catwalk.
MOVE ONLY ONE JOINT of
casing at a time.
DO NOT use feet or hands to
move pipe while on top of the
pipe racks.
2
3
0
1
2
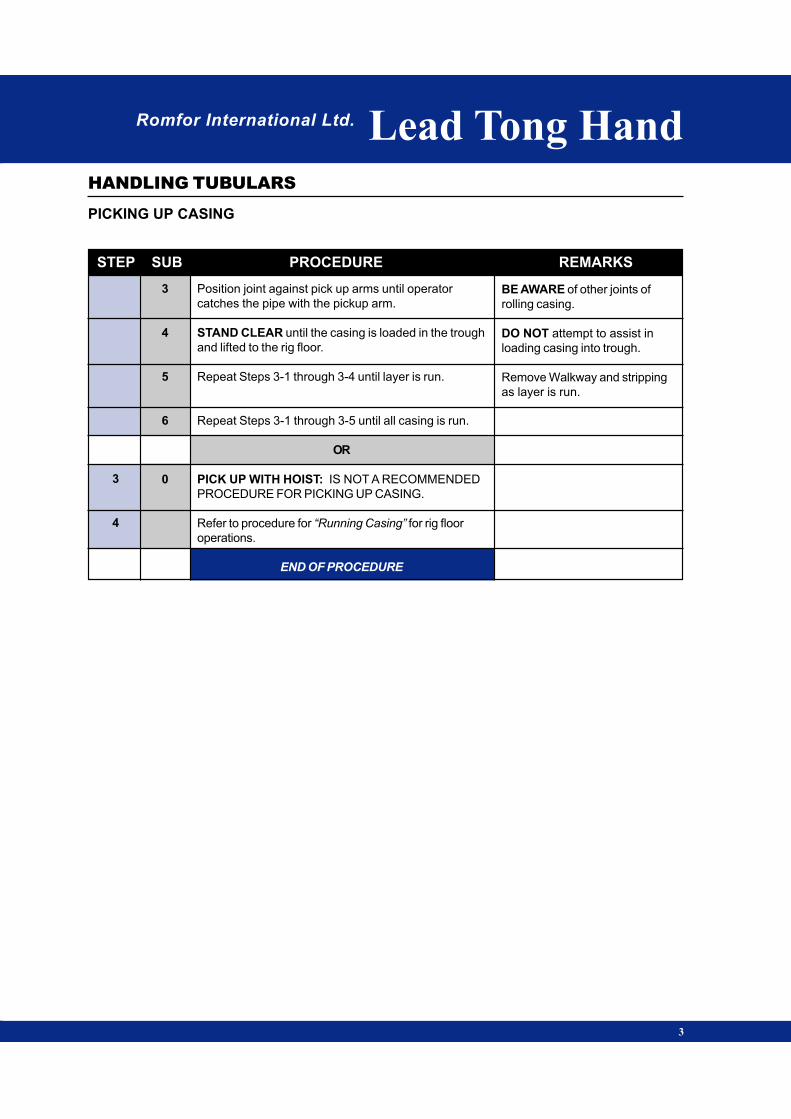
Romfor International Ltd. Lead Tong Hand
STEP SUB PROCEDURE REMARKS
PICKING UP CASING
HANDLING TUBULARS
3
BE AWARE of other joints of
rolling casing.
DO NOT attempt to assist in
loading casing into trough.
Remove Walkway and stripping
as layer is run.
3
4
3
4
5
6
0
Position joint against pick up arms until operator
catches the pipe with the pickup arm.
STAND CLEAR until the casing is loaded in the trough
and lifted to the rig floor.
Repeat Steps 3-1 through 3-4 until layer is run.
Repeat Steps 3-1 through 3-5 until all casing is run.
OR
PICK UP WITH HOIST: IS NOT A RECOMMENDED
PROCEDURE FOR PICKING UP CASING.
Refer to procedure for “Running Casing” for rig floor
operations.
END OF PROCEDURE
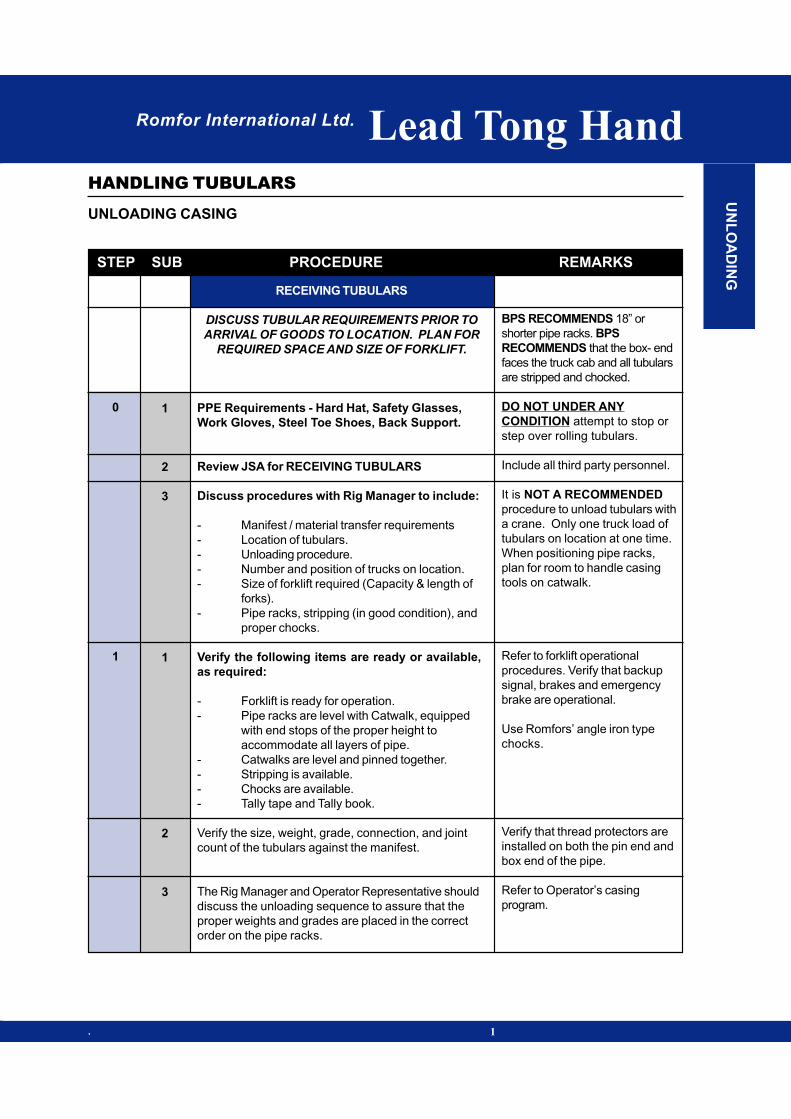
Romfor International Ltd. Lead Tong Hand
STEP SUB PROCEDURE REMARKS
UNLOADING CASING
HANDLING TUBULARS
. 1
RECEIVING TUBULARS
DISCUSS TUBULAR REQUIREMENTS PRIOR TO
ARRIVAL OF GOODS TO LOCATION. PLAN FOR
REQUIRED SPACE AND SIZE OF FORKLIFT.
PPE Requirements - Hard Hat, Safety Glasses,
Work Gloves, Steel Toe Shoes, Back Support.
Review JSA for RECEIVING TUBULARS
Discuss procedures with Rig Manager to include:
- Manifest / material transfer requirements
- Location of tubulars.
- Unloading procedure.
- Number and position of trucks on location.
- Size of forklift required (Capacity & length of
forks).
- Pipe racks, stripping (in good condition), and
proper chocks.
Verify the following items are ready or available,
as required:
- Forklift is ready for operation.
- Pipe racks are level with Catwalk, equipped
with end stops of the proper height to
accommodate all layers of pipe.
- Catwalks are level and pinned together.
- Stripping is available.
- Chocks are available.
- Tally tape and Tally book.
Verify the size, weight, grade, connection, and joint
count of the tubulars against the manifest.
The Rig Manager and Operator Representative should
discuss the unloading sequence to assure that the
proper weights and grades are placed in the correct
order on the pipe racks.
BPS RECOMMENDS 18” or
shorter pipe racks. BPS
RECOMMENDS that the box- end
faces the truck cab and all tubulars
are stripped and chocked.
DO NOT UNDER ANY
CONDITION attempt to stop or
step over rolling tubulars.
Include all third party personnel.
It is NOT A RECOMMENDED
procedure to unload tubulars with
a crane. Only one truck load of
tubulars on location at one time.
When positioning pipe racks,
plan for room to handle casing
tools on catwalk.
Refer to forklift operational
procedures. Verify that backup
signal, brakes and emergency
brake are operational.
Use Romfors’ angle iron type
chocks.
Verify that thread protectors are
installed on both the pin end and
box end of the pipe.
Refer to Operator’s casing
program.
0
1
1
2
3
1
2
3
UN
LO
AD
ING
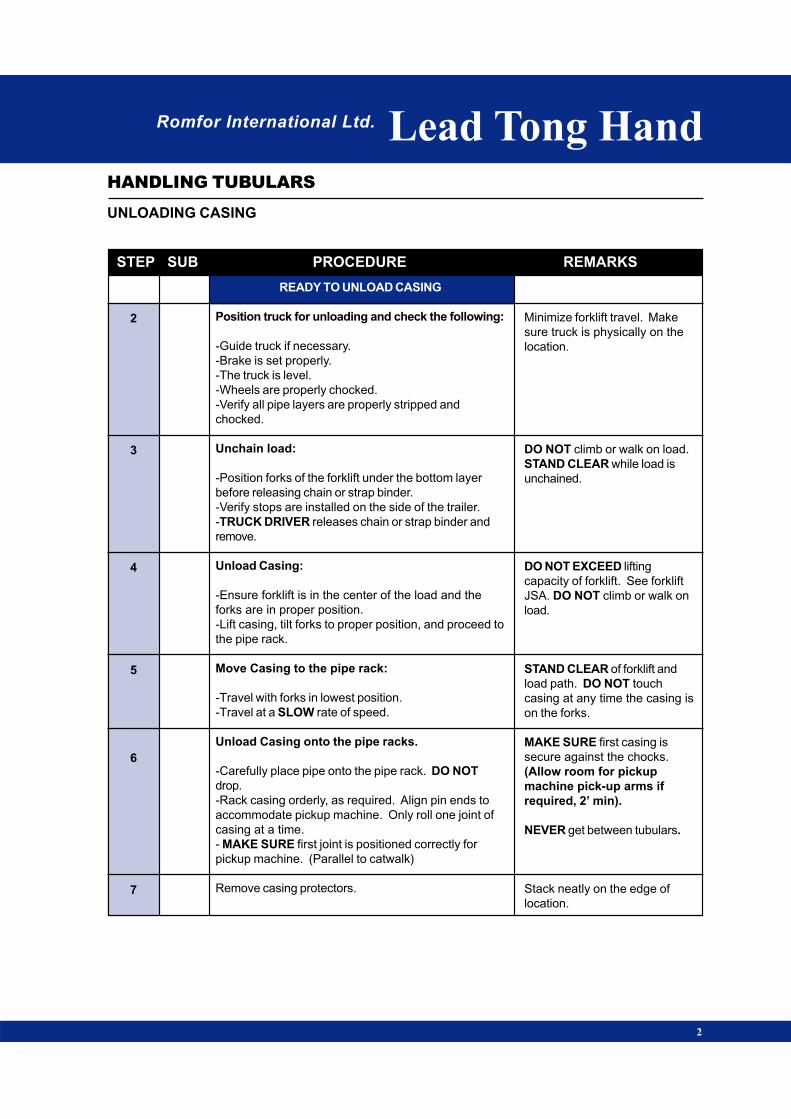
STEP SUB PROCEDURE REMARKS
UNLOADING CASING
HANDLING TUBULARS
Romfor International Ltd. Lead Tong Hand
2
2
3
4
5
6
7
READY TO UNLOAD CASING
Position truck for unloading and check the following:
-Guide truck if necessary.
-Brake is set properly.
-The truck is level.
-Wheels are properly chocked.
-Verify all pipe layers are properly stripped and
chocked.
Unchain load:
-Position forks of the forklift under the bottom layer
before releasing chain or strap binder.
-Verify stops are installed on the side of the trailer.
-TRUCK DRIVER releases chain or strap binder and
remove.
Unload Casing:
-Ensure forklift is in the center of the load and the
forks are in proper position.
-Lift casing, tilt forks to proper position, and proceed to
the pipe rack.
Move Casing to the pipe rack:
-Travel with forks in lowest position.
-Travel at a SLOW rate of speed.
Unload Casing onto the pipe racks.
-Carefully place pipe onto the pipe rack. DO NOT
drop.
-Rack casing orderly, as required. Align pin ends to
accommodate pickup machine. Only roll one joint of
casing at a time.
- MAKE SURE first joint is positioned correctly for
pickup machine. (Parallel to catwalk)
Remove casing protectors.
Minimize forklift travel. Make
sure truck is physically on the
location.
DO NOT climb or walk on load.
STAND CLEAR while load is
unchained.
DO NOT EXCEED lifting
capacity of forklift. See forklift
JSA. DO NOT climb or walk on
load.
STAND CLEAR of forklift and
load path. DO NOT touch
casing at any time the casing is
on the forks.
MAKE SURE first casing is
secure against the chocks.
(Allow room for pickup
machine pick-up arms if
required, 2’ min).
NEVER get between tubulars.
Stack neatly on the edge of
location.

Romfor Internatinal Ltd. Lead Tong Hand
STEP SUB PROCEDURE REMARKS
UNLOADING CASING
HANDLING TUBULARS
3
Use wood stripping only. MAKE
SURE first joint is positioned
correctly for pickup machine.
(Parallel to catwalk)
Rig Manager Authorization is
required before any personnel
are permitted to go on top of
the casing.
JSA must be reviewed with
direct supervision by the Rig
Manager.
DO NOT walk across pipe racks
from catwalk.
Two walkways are recommended
for large OD casing.
DO NOT use feet or hands to roll
casing. DO NOT get in front of,
step over or attempt to stop:
rolling casing.
Rocks are not chocks! Use
proper chocks.
8
9
10
11
12
1
2
3
Strap and tally each layer of casing.
Repeat steps 4 through 8 until layer is full.
If casing is layered:
Verify that pipe rack stops are in place and of the
proper height. Place stripping boards directly over
pipe racks on top of layer. Run stripping boards all
the way to the end of the casing. Place chock a
minimum of 2 joint widths from the end of stripping at
the catwalk end.
It is recommended to roll all casing from the
ground level.
If this is not possible, and personnel are required
to be on top of the casing; then the use of
walkways are recommended. DO NOT walk on
bare casing, use the walkway.
Access the walkways from the end opposite the
catwalk using a secured ladder or stairs.
Lay walkway on each layer of casing. The walkway is
to extend the full length of each layer of casing.
Use a pipe roller to move the casing into proper
position one joint at a time.
When layer is complete, install pipe chocks at the
ends of the stripping boards.
Repeat steps 4 through 11 until complete.
END OF PROCEDURE
Romfor International Ltd.
Lead Tong
Hand
Lead Tong
Hand
HANDLING
TUBULARS
HANDLING
TUBULARS
DR
IL
L C
OL
LA
RS
DRILL COLLARSDRILL COLLARS
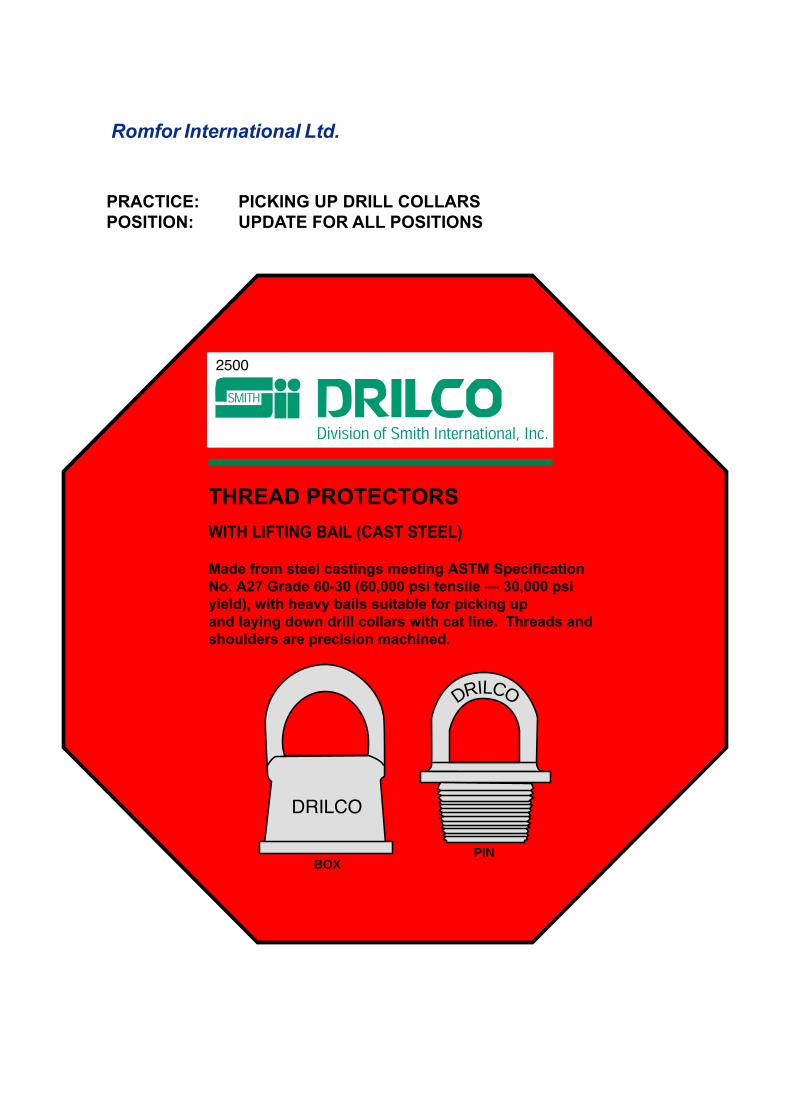
Romfor International Ltd.
PRACTICE: PICKING UP DRILL COLLARS
POSITION: UPDATE FOR ALL POSITIONS
THREAD PROTECTORS
WITH LIFTING BAIL (CAST STEEL)
Made from steel castings meeting ASTM Specification
No. A27 Grade 60-30 (60,000 psi tensile — 30,000 psi
yield), with heavy bails suitable for picking up
and laying down drill collars with cat line. Threads and
shoulders are precision machined.
BOXPIN
DRILCO

Romfor International Ltd. Lead Tong Hand
STEP SUB PROCEDURE REMARKS
PICKING UP DRILL COLLARS
HANDLING TUBULARS
PIC
KIN
G U
P
1
PICKING UP DRILL COLLARS
THIS PROCEDURE IS BASED ON THE
ASSUMPTION THAT ALL DRILL COLLARS ARE
UNLOADED, ON RACKS; AND THE PICKUP
MACHINE IS RIGGED UP AND OPERATIONAL.
PPE Requirements - Hard Hat, Safety Glasses,
Work Gloves, Steel Toe Shoes, Back Support.
Review JSA for “PICKING UP DRILL COLLARS”.
Fit for duty check for all hands.
Verify the following items are ready or available,
as required:
- Inspect pick up machine, sheaves and cables for
damage and proper installation.
- V-door stairs, catwalk area and other hazard areas
are roped off. Use “Caution Tape”.
- Proper lighting on collars racks, catwalk, and
V-door Rig lighting does not interfere with pickup
machine operator.
- Flagger is assigned on rig floor and has fluorescent
vest.
- Mousehole is secured properly and in good
condition. BE AWARE of side load requirements of
the Mousehole when picking up collars.
- Mousehole is secured under the rig floor at the
point of tension of the pick up pole.
- Pickup pole safety clamp and cover are installed
and in good condition.
- Pickup machine operator knows the safe working
load of his cables and equipment.
- Thread protectors are available and installed.
- ‘Drilco’ equivalent casted lifting bails are available
when using Hoist Line to pick up drill collars.
- Rental drill collars have proper paper work to show
recent inspections.
- If the collars were shipped with lifting bails
installed, ensure lifting bails have been properly
tightened.
Include all third party personnel.
Include all third party personnel.
BPS RECOMMENDS the use of
the “trough” type pickup
machine.
Use two-way communication
equipment/ PA equipment for
Driller and PU Machine Operator.
BPS RECOMMENDS that a
fluorescent vest be available
at the rig site.
0
1
1
2
3
1
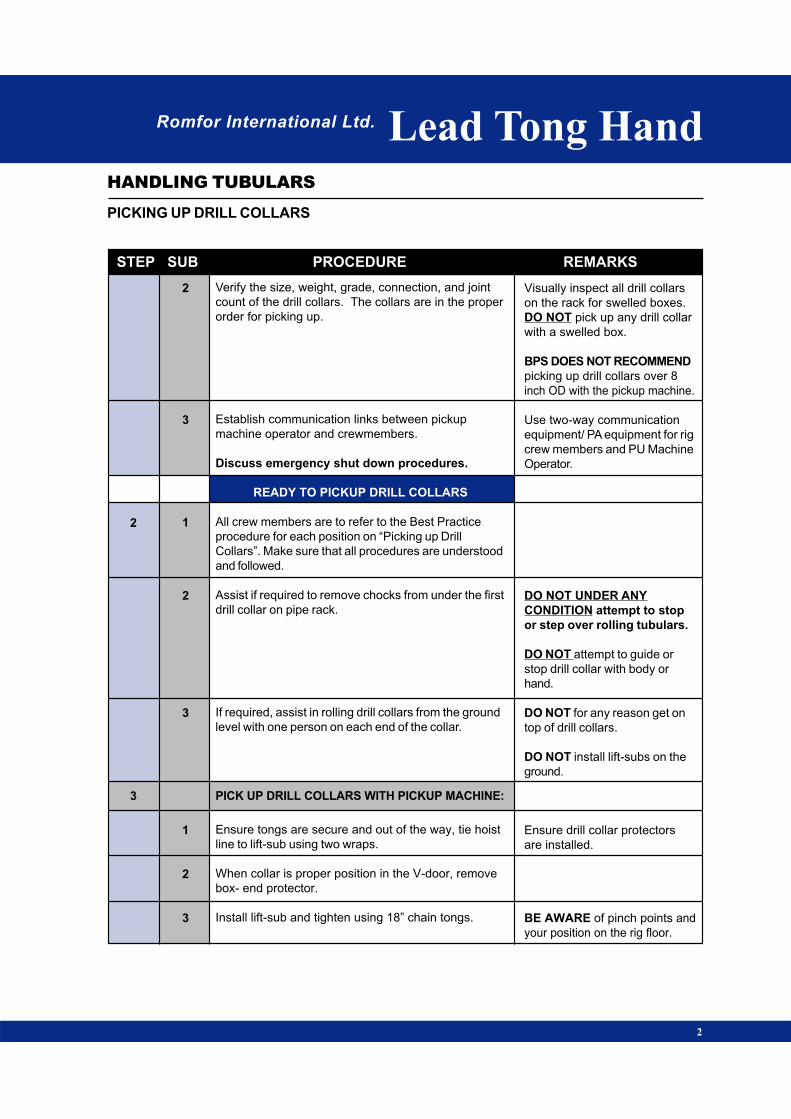
STEP SUB PROCEDURE REMARKS
PICKING UP DRILL COLLARS
HANDLING TUBULARS
Romfor International Ltd. Lead Tong Hand
2
2
3
Verify the size, weight, grade, connection, and joint
count of the drill collars. The collars are in the proper
order for picking up.
Establish communication links between pickup
machine operator and crewmembers.
Discuss emergency shut down procedures.
READY TO PICKUP DRILL COLLARS
All crew members are to refer to the Best Practice
procedure for each position on “Picking up Drill
Collars”. Make sure that all procedures are understood
and followed.
Assist if required to remove chocks from under the first
drill collar on pipe rack.
If required, assist in rolling drill collars from the ground
level with one person on each end of the collar.
PICK UP DRILL COLLARS WITH PICKUP MACHINE:
Ensure tongs are secure and out of the way, tie hoist
line to lift-sub using two wraps.
When collar is proper position in the V-door, remove
box- end protector.
Install lift-sub and tighten using 18” chain tongs.
Visually inspect all drill collars
on the rack for swelled boxes.
DO NOT pick up any drill collar
with a swelled box.
BPS DOES NOT RECOMMEND
picking up drill collars over 8
inch OD with the pickup machine.
Use two-way communication
equipment/ PA equipment for rig
crew members and PU Machine
Operator.
DO NOT UNDER ANY
CONDITION attempt to stop
or step over rolling tubulars.
DO NOT attempt to guide or
stop drill collar with body or
hand.
DO NOT for any reason get on
top of drill collars.
DO NOT install lift-subs on the
ground.
Ensure drill collar protectors
are installed.
BE AWARE of pinch points and
your position on the rig floor.
2
3
1
2
3
1
2
3
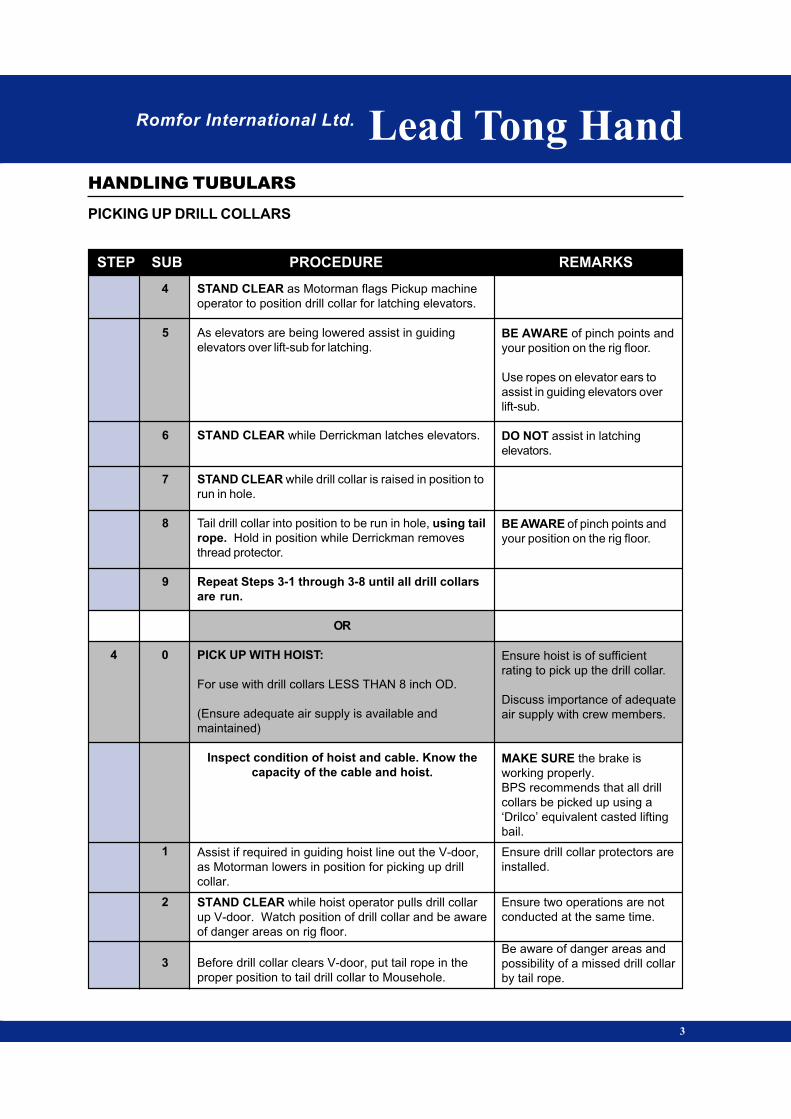
Romfor International Ltd. Lead Tong Hand
STEP SUB PROCEDURE REMARKS
PICKING UP DRILL COLLARS
HANDLING TUBULARS
4
3
STAND CLEAR as Motorman flags Pickup machine
operator to position drill collar for latching elevators.
As elevators are being lowered assist in guiding
elevators over lift-sub for latching.
STAND CLEAR while Derrickman latches elevators.
STAND CLEAR while drill collar is raised in position to
run in hole.
Tail drill collar into position to be run in hole, using tail
rope. Hold in position while Derrickman removes
thread protector.
Repeat Steps 3-1 through 3-8 until all drill collars
are run.
OR
PICK UP WITH HOIST:
For use with drill collars LESS THAN 8 inch OD.
(Ensure adequate air supply is available and
maintained)
Inspect condition of hoist and cable. Know the
capacity of the cable and hoist.
Assist if required in guiding hoist line out the V-door,
as Motorman lowers in position for picking up drill
collar.
STAND CLEAR while hoist operator pulls drill collar
up V-door. Watch position of drill collar and be aware
of danger areas on rig floor.
Before drill collar clears V-door, put tail rope in the
proper position to tail drill collar to Mousehole.
BE AWARE of pinch points and
your position on the rig floor.
Use ropes on elevator ears to
assist in guiding elevators over
lift-sub.
DO NOT assist in latching
elevators.
BE AWARE of pinch points and
your position on the rig floor.
Ensure hoist is of sufficient
rating to pick up the drill collar.
Discuss importance of adequate
air supply with crew members.
MAKE SURE the brake is
working properly.
BPS recommends that all drill
collars be picked up using a
‘Drilco’ equivalent casted lifting
bail.
Ensure drill collar protectors are
installed.
Ensure two operations are not
conducted at the same time.
Be aware of danger areas and
possibility of a missed drill collar
by tail rope.
4
5
6
7
8
9
0
1
2
3

STEP SUB PROCEDURE REMARKS
PICKING UP DRILL COLLARS
HANDLING TUBULARS
Romfor International Ltd. Lead Tong Hand
4
5
Hold drill collar in position while Derrickman removes
pin-end protector.
USING TAIL ROPE, assist in guiding drill collar into
Mousehole.
Once drill collar is stabbed into Mousehole, remove tail
rope.
STAND CLEAR while drill collar is lowered into
Mousehole.
When the drill collar is in Mousehole remove hoist line
and lift eye. Secure hoist line as needed.
Refer to procedure for Tripping In The Hole or Making
A Connection for rig floor operations.
Repeat Steps 4-2 through 4-8 until all drill collars
are run.
OR
PICK UP WITH BLOCKS AND “PICK UP” / “RIG
UP” LINE:
For use with Drill collar 8 inch OD and larger.
Review JSA for PICKING UP DRILL COLLARS
USING “PICKUP” / “RIG UP” LINE.
When blocks are in position, install “PICKUP / RIG
UP LINE”
Rig up laydown line, for snubbing drill collar to rig floor.
Guide “PICKUP / RIG UP LINE” out the V-door.
STAND CLEAR, as Driller lowers “PICKUP / RIG UP
LINE”, slowly down the V-door.
BE AWARE of feet position
while guiding drill collar into
Mousehole.
BE AWARE of twisted hoist line
and potential spinning dangers.
Refer to rig specific JSA.
Refer to rig specific JSA.
4
5
6
7
8
9
10
0
1
2
3
4
5
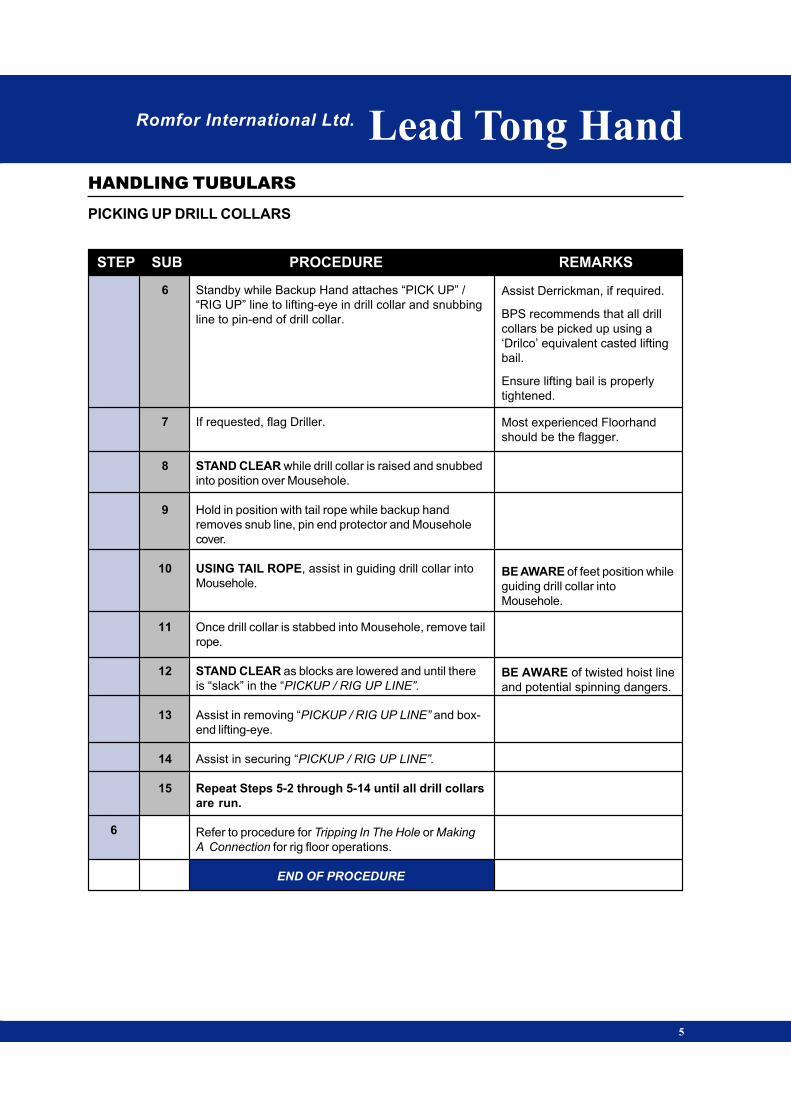
Romfor International Ltd. Lead Tong Hand
STEP SUB PROCEDURE REMARKS
PICKING UP DRILL COLLARS
HANDLING TUBULARS
6
5
Standby while Backup Hand attaches “PICK UP” /
“RIG UP” line to lifting-eye in drill collar and snubbing
line to pin-end of drill collar.
If requested, flag Driller.
STAND CLEAR while drill collar is raised and snubbed
into position over Mousehole.
Hold in position with tail rope while backup hand
removes snub line, pin end protector and Mousehole
cover.
USING TAIL ROPE, assist in guiding drill collar into
Mousehole.
Once drill collar is stabbed into Mousehole, remove tail
rope.
STAND CLEAR as blocks are lowered and until there
is “slack” in the “PICKUP / RIG UP LINE”.
Assist in removing “PICKUP / RIG UP LINE” and box-
end lifting-eye.
Assist in securing “PICKUP / RIG UP LINE”.
Repeat Steps 5-2 through 5-14 until all drill collars
are run.
Refer to procedure for Tripping In The Hole or Making
A Connection for rig floor operations.
END OF PROCEDURE
Assist Derrickman, if required.
BPS recommends that all drill
collars be picked up using a
‘Drilco’ equivalent casted lifting
bail.
Ensure lifting bail is properly
tightened.
Most experienced Floorhand
should be the flagger.
BE AWARE of feet position while
guiding drill collar into
Mousehole.
BE AWARE of twisted hoist line
and potential spinning dangers.
6
7
8
9
10
11
12
13
14
15
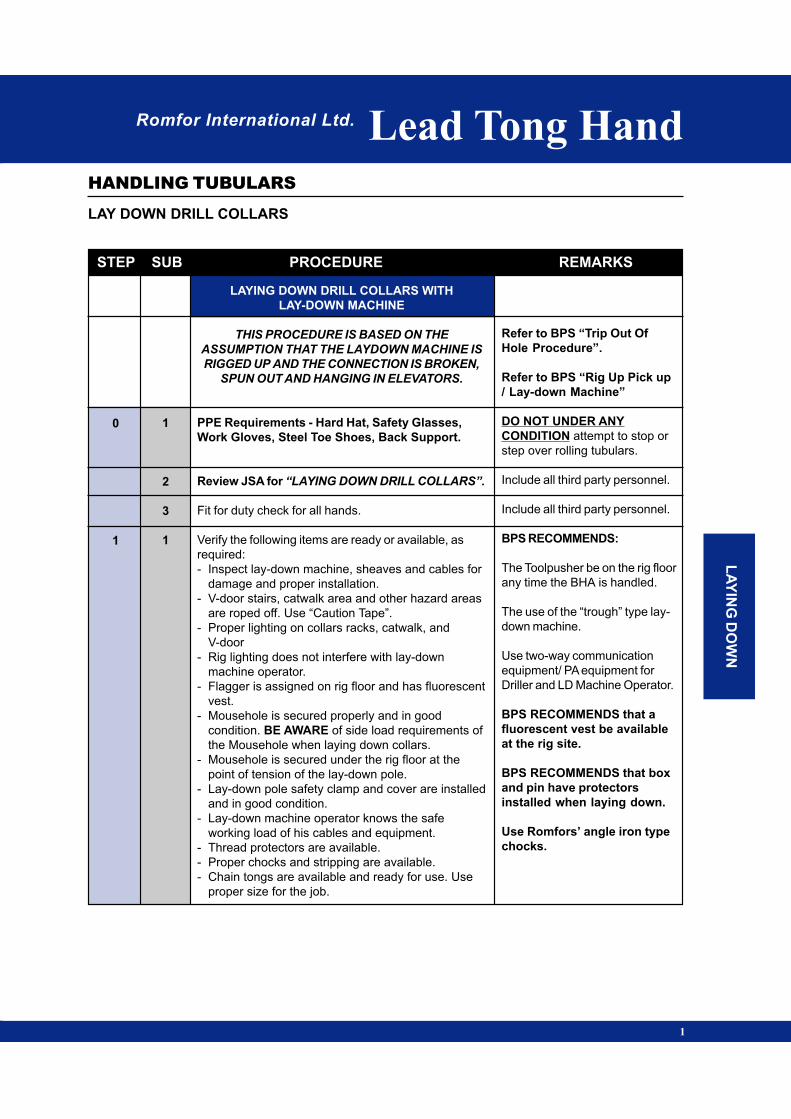
Romfor International Ltd. Lead Tong Hand
STEP SUB PROCEDURE REMARKS
LAY DOWN DRILL COLLARS
HANDLING TUBULARS
LA
YIN
G D
OW
N
1
LAYING DOWN DRILL COLLARS WITH
LAY-DOWN MACHINE
THIS PROCEDURE IS BASED ON THE
ASSUMPTION THAT THE LAYDOWN MACHINE IS
RIGGED UP AND THE CONNECTION IS BROKEN,
SPUN OUT AND HANGING IN ELEVATORS.
PPE Requirements - Hard Hat, Safety Glasses,
Work Gloves, Steel Toe Shoes, Back Support.
Review JSA for “LAYING DOWN DRILL COLLARS”.
Fit for duty check for all hands.
Verify the following items are ready or available, as
required:
- Inspect lay-down machine, sheaves and cables for
damage and proper installation.
- V-door stairs, catwalk area and other hazard areas
are roped off. Use “Caution Tape”.
- Proper lighting on collars racks, catwalk, and
V-door
- Rig lighting does not interfere with lay-down
machine operator.
- Flagger is assigned on rig floor and has fluorescent
vest.
- Mousehole is secured properly and in good
condition. BE AWARE of side load requirements of
the Mousehole when laying down collars.
- Mousehole is secured under the rig floor at the
point of tension of the lay-down pole.
- Lay-down pole safety clamp and cover are installed
and in good condition.
- Lay-down machine operator knows the safe
working load of his cables and equipment.
- Thread protectors are available.
- Proper chocks and stripping are available.
- Chain tongs are available and ready for use. Use
proper size for the job.
Refer to BPS “Trip Out Of
Hole Procedure”.
Refer to BPS “Rig Up Pick up
/ Lay-down Machine”
DO NOT UNDER ANY
CONDITION attempt to stop or
step over rolling tubulars.
Include all third party personnel.
Include all third party personnel.
BPS RECOMMENDS:
The Toolpusher be on the rig floor
any time the BHA is handled.
The use of the “trough” type lay-
down machine.
Use two-way communication
equipment/ PA equipment for
Driller and LD Machine Operator.
BPS RECOMMENDS that a
fluorescent vest be available
at the rig site.
BPS RECOMMENDS that box
and pin have protectors
installed when laying down.
Use Romfors’ angle iron type
chocks.
0
1
1
2
3
1

STEP SUB PROCEDURE REMARKS
LAY DOWN DRILL COLLARS
HANDLING TUBULARS
Romfor International Ltd. Lead Tong Hand
2
2
3
4
5
Establish communication links between lay-down
machine operator and rig personnel.
Discuss emergency shut down procedures.
It is recommended to roll only one drill collar at a time
from ground level.
BE AWARE of new obstacles, (lay-down pole, etc.)
READY TO LAY-DOWN DRILL COLLARS WITH
LAY DOWN MACHINE
Assist as required in installing pin-end thread
protector.
Assist in attaching hoist line to collar.
STAND CLEAR while Driller and Motorman position
the drill collar into trough. If required, assist in guiding
drill collar into trough using tag line.
After pin of the collar is stopped and resting in the
trough, assist in removing hoist line and tag lines (if
used).
Use two-way communication
equipment/ PA equipment for
collars rollers and LD Machine
Operator.
DO NOT walk on or get on top
of drill collars for any reason.
DO NOT position yourself
between lay-down pole and
tongs and or elevators
Always be aware of the position
of the trough. Do not stand in
path of trough.
BE AWARE of turning rotary
table, stand clear until it is
stopped.
BE AWARE of pinch points.
BE AWARE of your position on
the rig floor.
2
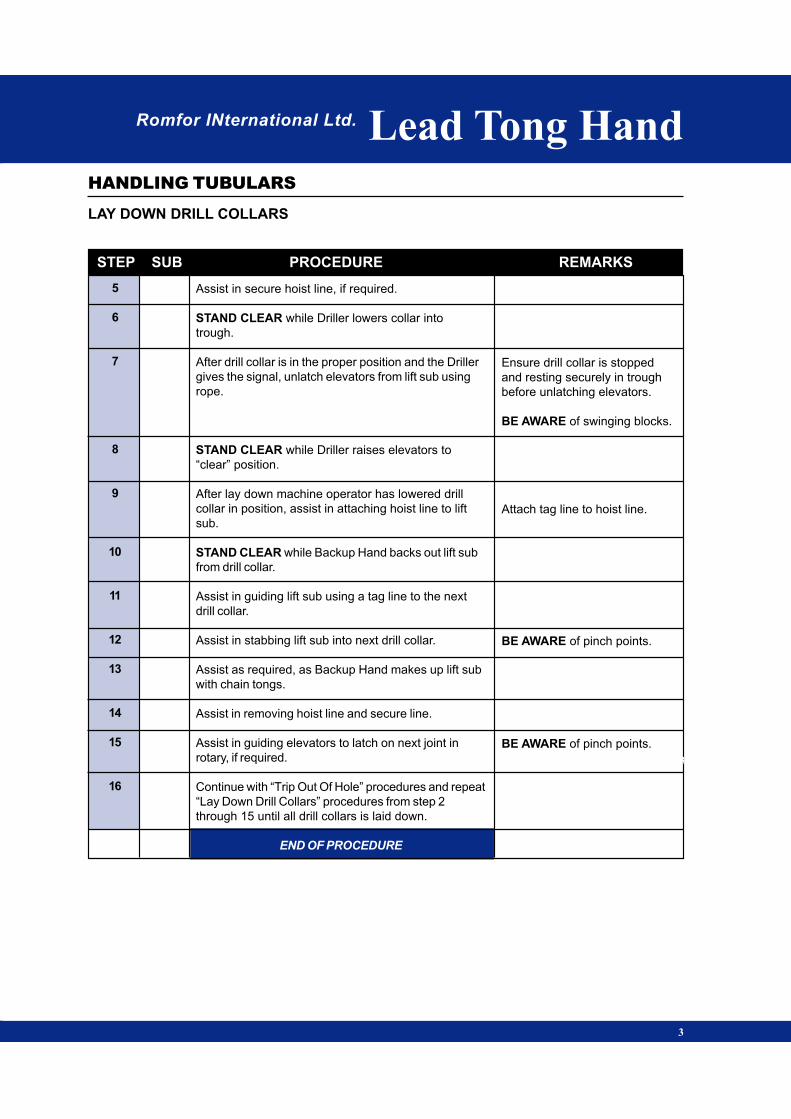
Romfor INternational Ltd. Lead Tong Hand
STEP SUB PROCEDURE REMARKS
LAY DOWN DRILL COLLARS
HANDLING TUBULARS
5
6
7
8
9
10
11
12
13
14
15
16
3
3
Assist in secure hoist line, if required.
STAND CLEAR while Driller lowers collar into
trough.
After drill collar is in the proper position and the Driller
gives the signal, unlatch elevators from lift sub using
rope.
STAND CLEAR while Driller raises elevators to
“clear” position.
After lay down machine operator has lowered drill
collar in position, assist in attaching hoist line to lift
sub.
STAND CLEAR while Backup Hand backs out lift sub
from drill collar.
Assist in guiding lift sub using a tag line to the next
drill collar.
Assist in stabbing lift sub into next drill collar.
Assist as required, as Backup Hand makes up lift sub
with chain tongs.
Assist in removing hoist line and secure line.
Assist in guiding elevators to latch on next joint in
rotary, if required.
Continue with “Trip Out Of Hole” procedures and repeat
“Lay Down Drill Collars” procedures from step 2
through 15 until all drill collars is laid down.
END OF PROCEDURE
Ensure drill collar is stopped
and resting securely in trough
before unlatching elevators.
BE AWARE of swinging blocks.
Attach tag line to hoist line.
BE AWARE of pinch points.
BE AWARE of pinch points.
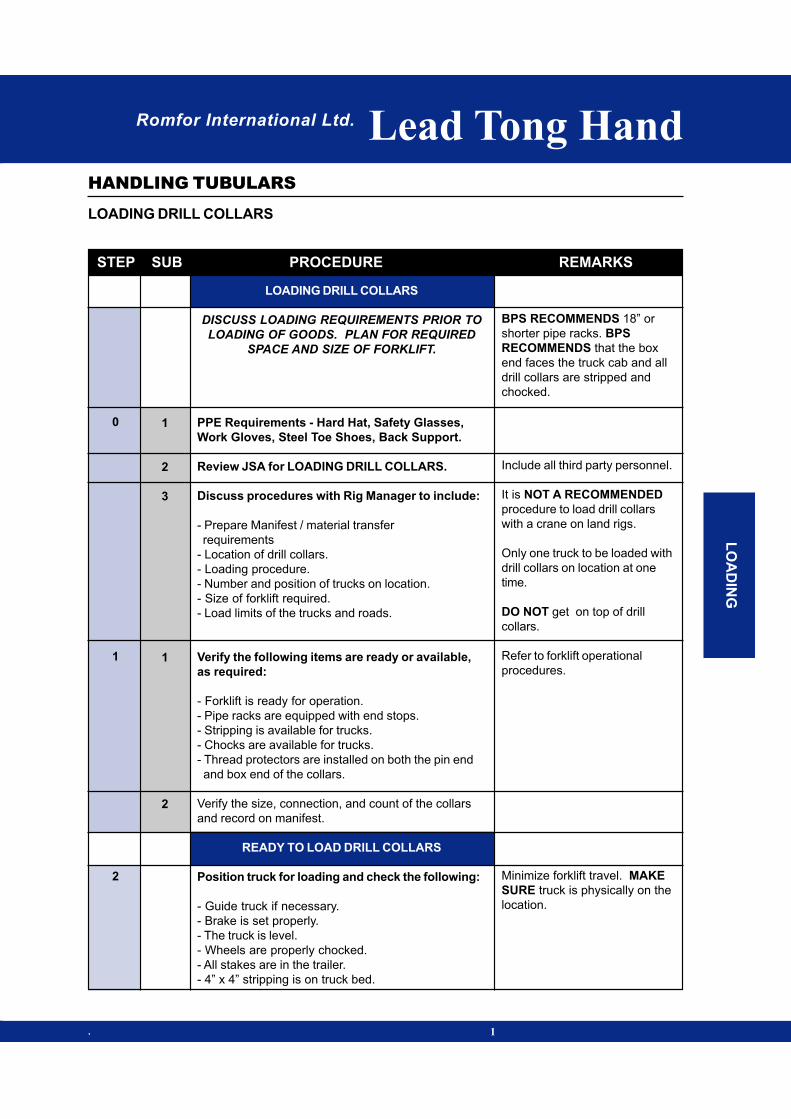
Romfor International Ltd. Lead Tong Hand
STEP SUB PROCEDURE REMARKS
LOADING DRILL COLLARS
HANDLING TUBULARS
. 1
LOADING DRILL COLLARS
DISCUSS LOADING REQUIREMENTS PRIOR TO
LOADING OF GOODS. PLAN FOR REQUIRED
SPACE AND SIZE OF FORKLIFT.
PPE Requirements - Hard Hat, Safety Glasses,
Work Gloves, Steel Toe Shoes, Back Support.
Review JSA for LOADING DRILL COLLARS.
Discuss procedures with Rig Manager to include:
- Prepare Manifest / material transfer
requirements
- Location of drill collars.
- Loading procedure.
- Number and position of trucks on location.
- Size of forklift required.
- Load limits of the trucks and roads.
Verify the following items are ready or available,
as required:
- Forklift is ready for operation.
- Pipe racks are equipped with end stops.
- Stripping is available for trucks.
- Chocks are available for trucks.
- Thread protectors are installed on both the pin end
and box end of the collars.
Verify the size, connection, and count of the collars
and record on manifest.
READY TO LOAD DRILL COLLARS
Position truck for loading and check the following:
- Guide truck if necessary.
- Brake is set properly.
- The truck is level.
- Wheels are properly chocked.
- All stakes are in the trailer.
- 4” x 4” stripping is on truck bed.
BPS RECOMMENDS 18” or
shorter pipe racks. BPS
RECOMMENDS that the box
end faces the truck cab and all
drill collars are stripped and
chocked.
Include all third party personnel.
It is NOT A RECOMMENDED
procedure to load drill collars
with a crane on land rigs.
Only one truck to be loaded with
drill collars on location at one
time.
DO NOT get on top of drill
collars.
Refer to forklift operational
procedures.
Minimize forklift travel. MAKE
SURE truck is physically on the
location.
0
1
2
1
2
3
1
2
LO
AD
ING

STEP SUB PROCEDURE REMARKS
LOADING DRILL COLLARS
HANDLING TUBULARS
Romfor International Ltd. Lead Tong Hand
2
3
4
5
6
7
8
9
10
11
Load Drill Collars from the pipe racks.
- Ensure forklift is in the center of the load and the
forks are in proper position.
-Lift drill collars, tilt forks to proper position, and
proceed to the truck.
Move Drill Collars to the truck:
-Travel with forks in lowest position.
-Travel at a SLOW rate of speed.
Load Drill Collars onto the truck.
-Carefully place collars onto 4”x4” stripping on the
truck. DO NOT drop.
-Rack drill collars orderly with forklift, as required.
Repeat steps 3 through 5 until layer is full.
Chock 4” x 4” stripping to secure bottom layer.
Place stripping boards directly over 4” x 4” bed
stripping.
Install pipe chocks at the ends of the stripping boards.
Repeat steps 3 through 9 until loaded.
Load is secured by TRUCK DRIVER.
END OF PROCEDURE
DO NOT EXCEED lifting
capacity of forklift. See forklift
JSA.
DO NOT UNDER ANY
CONDITION attempt to stop
or step over rolling tubulars.
STAND CLEAR of forklift and
load path. DO NOT touch drill
collars at any time the collars
are on the forks.
MAKE SURE first drill collar is
secure against the bed stakes.
NEVER get on or between drill
collars. DO NOT climb onto
truck or load.
Rocks are not chocks! Use
proper chocks.
Use wood stripping only. Make
sure stripping is used for each
layer. DO NOT stack without
stripping.
Rocks are not chocks! Use
proper chocks.
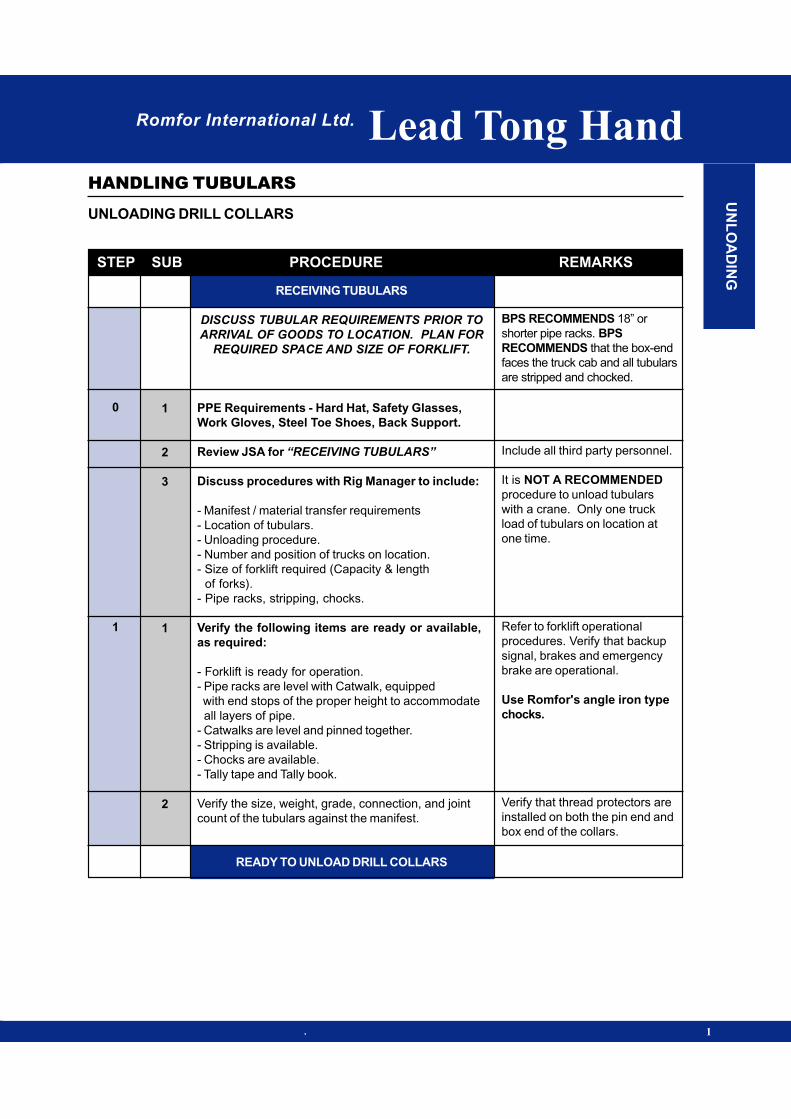
Romfor International Ltd. Lead Tong Hand
STEP SUB PROCEDURE REMARKS
UNLOADING DRILL COLLARS
HANDLING TUBULARS
. 1
RECEIVING TUBULARS
DISCUSS TUBULAR REQUIREMENTS PRIOR TO
ARRIVAL OF GOODS TO LOCATION. PLAN FOR
REQUIRED SPACE AND SIZE OF FORKLIFT.
PPE Requirements - Hard Hat, Safety Glasses,
Work Gloves, Steel Toe Shoes, Back Support.
Review JSA for “RECEIVING TUBULARS”
Discuss procedures with Rig Manager to include:
- Manifest / material transfer requirements
- Location of tubulars.
- Unloading procedure.
- Number and position of trucks on location.
- Size of forklift required (Capacity & length
of forks).
- Pipe racks, stripping, chocks.
Verify the following items are ready or available,
as required:
- Forklift is ready for operation.
- Pipe racks are level with Catwalk, equipped
with end stops of the proper height to accommodate
all layers of pipe.
- Catwalks are level and pinned together.
- Stripping is available.
- Chocks are available.
- Tally tape and Tally book.
Verify the size, weight, grade, connection, and joint
count of the tubulars against the manifest.
READY TO UNLOAD DRILL COLLARS
BPS RECOMMENDS 18” or
shorter pipe racks. BPS
RECOMMENDS that the box-end
faces the truck cab and all tubulars
are stripped and chocked.
Include all third party personnel.
It is NOT A RECOMMENDED
procedure to unload tubulars
with a crane. Only one truck
load of tubulars on location at
one time.
Refer to forklift operational
procedures. Verify that backup
signal, brakes and emergency
brake are operational.
Use Romfor's angle iron type
chocks.
Verify that thread protectors are
installed on both the pin end and
box end of the collars.
0
1
1
2
3
1
2
UN
LO
AD
ING

STEP SUB PROCEDURE REMARKS
UNLOADING DRILL COLLARS
HANDLING TUBULARS
Romfor International Ltd. Lead Tong Hand
2
2
3
4
5
6
7
Position truck for unloading and check the following:
- Guide truck if necessary.
- Brake is set properly.
- The truck is level.
- Wheels are properly chocked.
- Verify all pipe layers are properly stripped
and chocked.
Unchain load:
- Position forks of the forklift under the bottom layer
before releasing chain or strap binder.
- Verify stops are installed on the side of the trailer.
- TRUCK DRIVER releases chain or strap binder and
remove.
Unload Drill Collars:
- Ensure forklift is in the center of the load and the
forks are in proper position.
- Lift drill collars, tilt forks to proper position, and
proceed to the pipe rack.
Move Drill Collars to the pipe rack:
- Travel with forks in lowest position.
- Travel at a SLOW rate of speed.
Unload Drill Collars onto the pipe racks.
- Carefully place collars onto the pipe rack. DO NOT
drop.
- Rack drill collars orderly with forklift, as required.
Repeat steps 4 through 6 until unloaded.
END OF PROCEDURE
Minimize forklift travel. MAKE
SURE truck is physically on the
location.
DO NOT climb or walk on load.
STAND CLEAR while load is
unchained.
DO NOT UNDER ANY
CONDITIONS attempt to stop
or step over rolling tubulars.
DO NOT EXCEED lifting
capacity of forklift. See forklift
JSA.
STAND CLEAR of forklift and
load path. DO NOT touch drill
collars at any time the collars
are on the forks.
DO NOT stack drill collars,
place collars in single layer.
(Allow room for pickup
machine pick-up arms if
required, 2’ min). MAKE
SURE first drill collar is secure
against the end stops. NEVER
get on or between tubulars.
Romfor International Ltd..
Lead Tong
Hand
Lead Tong
Hand
HANDLING
TUBULARS
HANDLING
TUBULARS
DR
IL
L P
IP
E
DRILL PIPEDRILL PIPE

Romfor International Ltd. Lead Tong Hand
STEP SUB PROCEDURE REMARKS
PICKING UP DRILL PIPE
HANDLING TUBULARS
. 1
PICKING UP DRILL PIPE
This procedure is based on the assumption that
all drill pipe is unloaded, on racks; and the pickup
machine is rigged up and operational.
PPE Requirements - Hard Hat, Safety Glasses,
Work Gloves, Steel Toe Shoes, Back Support.
Review JSA for “PICKING UP DRILL PIPE”.
Fit for duty check for all hands.
Verify the following items are ready or available,
as required:
- Inspect pick up machine, sheaves and cables for
damage and proper installation.
- V-door stairs, catwalk area and other hazard areas
are roped off. Use “Caution Tape”.
- Proper lighting on pipe racks, catwalk, and V-door
- Rig lighting does not interfere with pickup machine
operator.
- Third party Flagger is assigned on rig floor and has
fluorescent vest.
- Mousehole is secured properly and in good
condition. BE AWARE of side load requirements of
the Mousehole when picking up pipe.
- Mousehole is secured under the rig floor at the
point of tension of the pick up pole.
- Pickup pole safety clamp and cover are installed
and in good condition.
- Pickup machine operator knows the safe working
load of his cables and equipment.
- Thread protectors are available.
Verify the size, weight, grade, connection, and joint
count of the drill pipe. The pipe is in the proper order
for picking up.
Include all third party personnel.
Include all third party personnel.
BPS RECOMMENDS the use of
the “trough” type pickup
machine.
Use two-way communication
equipment/ PA equipment for
Driller and PU Machine
Operator.
BPS RECOMMENDS that a
fluorescent vest be available
at the rig site.
0
1
2
1
2
3
1
PIC
KIN
G U
P

STEP SUB PROCEDURE REMARKS
PICKING UP DRILL PIPE
HANDLING TUBULARS
Romfor International Ltd. Lead Tong Hand
2
3
4
4
Establish communication links between pickup
machine operator and personnel working the pipe
racks.
Discuss emergency shut down procedures.
READY TO PICKUP DRILL PIPE
PICK UP WITH PICKUP MACHINE:
Ensure that tongs are secured out of the way.
As elevators are being lowered, assist in guiding
elevators over pipe for latching.
STAND CLEAR while pipe is raised to position to run
in hole.
Refer to “Trip in Hole” Procedure until next joint is in
position in trough. Repeat steps 3-1 & 3-4 until all
joints are picked up.
OR
PICK UP WITH HOIST:
Inspect condition of hoist and cable. Know the
capacity of the cable and hoist.
STAND CLEAR while pipe is raised and positioned
over Mousehole.
Use two-way communication
equipment/ PA equipment for
pipe rollers and PU Machine
Operator.
Use ropes attached to the
elevator’s ears.
DO NOT get between ‘stump’
and trough.
BPS RECOMMENDS picking
up only one joint at a time.
MAKE SURE the brake is
working properly.
1
2
3
4
1
2
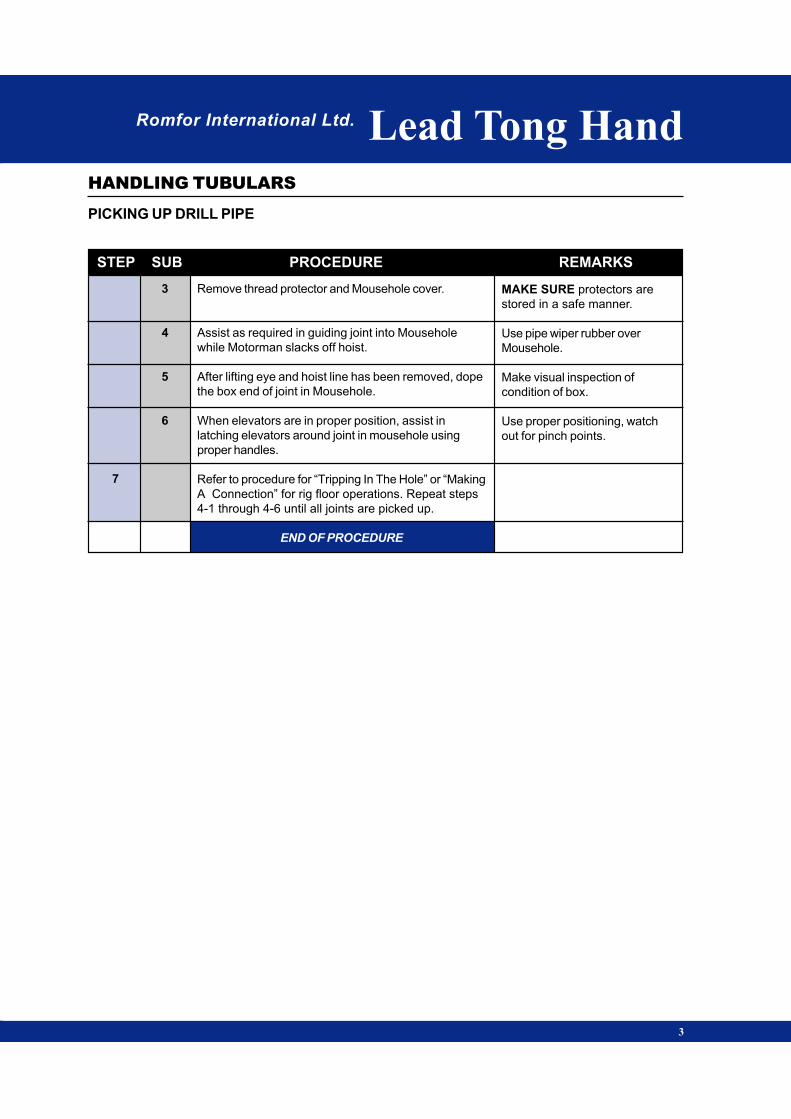
Romfor International Ltd. Lead Tong Hand
STEP SUB PROCEDURE REMARKS
PICKING UP DRILL PIPE
HANDLING TUBULARS
3
MAKE SURE protectors are
stored in a safe manner.
Use pipe wiper rubber over
Mousehole.
Make visual inspection of
condition of box.
Use proper positioning, watch
out for pinch points.
7
3
4
5
6
Remove thread protector and Mousehole cover.
Assist as required in guiding joint into Mousehole
while Motorman slacks off hoist.
After lifting eye and hoist line has been removed, dope
the box end of joint in Mousehole.
When elevators are in proper position, assist in
latching elevators around joint in mousehole using
proper handles.
Refer to procedure for “Tripping In The Hole” or “Making
A Connection” for rig floor operations. Repeat steps
4-1 through 4-6 until all joints are picked up.
END OF PROCEDURE
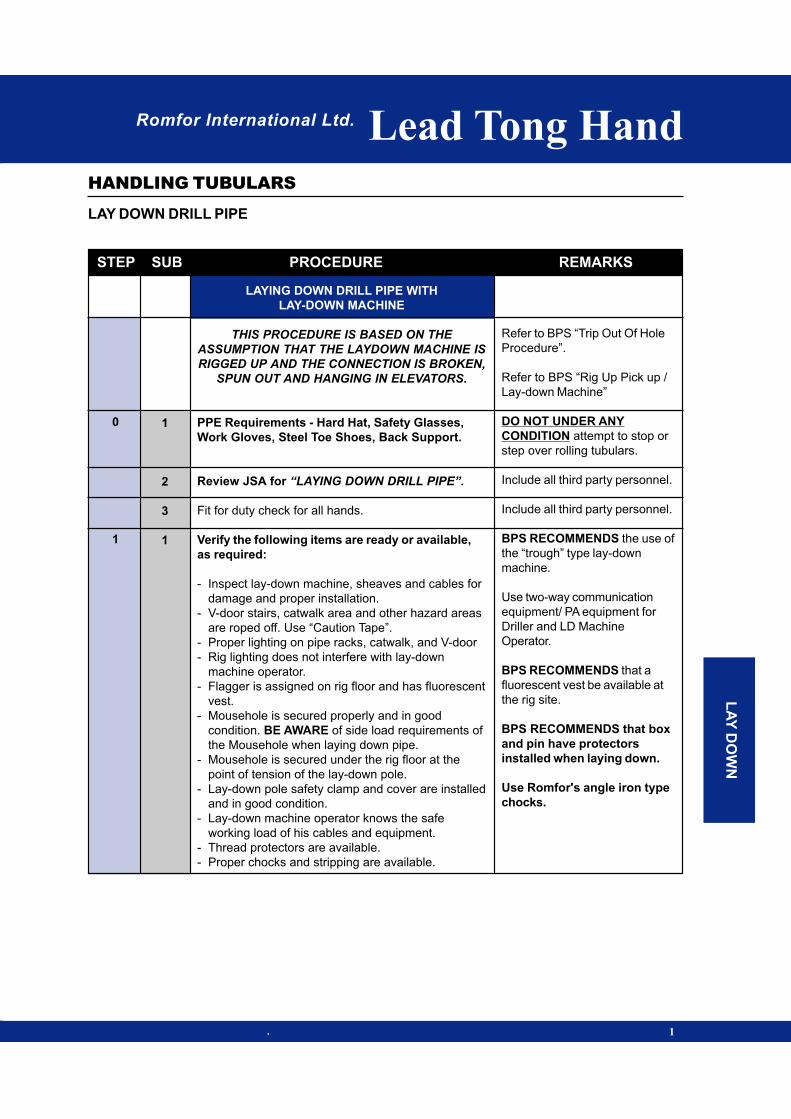
Romfor International Ltd. Lead Tong Hand
STEP SUB PROCEDURE REMARKS
LAY DOWN DRILL PIPE
HANDLING TUBULARS
. 1
LAYING DOWN DRILL PIPE WITH
LAY-DOWN MACHINE
THIS PROCEDURE IS BASED ON THE
ASSUMPTION THAT THE LAYDOWN MACHINE IS
RIGGED UP AND THE CONNECTION IS BROKEN,
SPUN OUT AND HANGING IN ELEVATORS.
PPE Requirements - Hard Hat, Safety Glasses,
Work Gloves, Steel Toe Shoes, Back Support.
Review JSA for “LAYING DOWN DRILL PIPE”.
Fit for duty check for all hands.
Verify the following items are ready or available,
as required:
- Inspect lay-down machine, sheaves and cables for
damage and proper installation.
- V-door stairs, catwalk area and other hazard areas
are roped off. Use “Caution Tape”.
- Proper lighting on pipe racks, catwalk, and V-door
- Rig lighting does not interfere with lay-down
machine operator.
- Flagger is assigned on rig floor and has fluorescent
vest.
- Mousehole is secured properly and in good
condition. BE AWARE of side load requirements of
the Mousehole when laying down pipe.
- Mousehole is secured under the rig floor at the
point of tension of the lay-down pole.
- Lay-down pole safety clamp and cover are installed
and in good condition.
- Lay-down machine operator knows the safe
working load of his cables and equipment.
- Thread protectors are available.
- Proper chocks and stripping are available.
Refer to BPS “Trip Out Of Hole
Procedure”.
Refer to BPS “Rig Up Pick up /
Lay-down Machine”
DO NOT UNDER ANY
CONDITION attempt to stop or
step over rolling tubulars.
Include all third party personnel.
Include all third party personnel.
BPS RECOMMENDS the use of
the “trough” type lay-down
machine.
Use two-way communication
equipment/ PA equipment for
Driller and LD Machine
Operator.
BPS RECOMMENDS that a
fluorescent vest be available at
the rig site.
BPS RECOMMENDS that box
and pin have protectors
installed when laying down.
Use Romfor's angle iron type
chocks.
0
1
1
2
3
1
LA
Y D
OW
N

STEP SUB PROCEDURE REMARKS
LAY DOWN DRILL PIPE
HANDLING TUBULARS
Romfor International Ltd. Lead Tong Hand
2
2
Establish communication links between lay-down
machine operator and rig personnel.
Discuss emergency shut down procedures.
It is recommended to roll all drill pipe from the
ground level.
If this is not possible, and personnel are required
to be on top of the drill pipe; then the use of
walkways are recommended. DO NOT walk on
bare drill pipe, use the walkway.
Access the walkways from the end opposite the
catwalk using a secured ladder or stairs.
READY TO LAY-DOWN DRILL PIPE W/ LD MACHINE
Assist as needed to guide joint to trough. Be sure not
to block the Driller’s view.
Stand clear while Driller lowers joint into trough. When
elevators are in proper position, install a rope to
elevator latch.
When joint is in proper position unlatch elevators
using rope attached to latch.
(Make sure no one is standing beneath pipe when
unlatching elevators.)
Assist in guiding elevators and latch on next joint in
rotary.
Continue with “Trip Out Of Hole” procedures and
repeat “Lay Down Drill Pipe” procedures from step 2
through 6 until all drill pipe is laid down.
Use two-way communication
equipment/ PA equipment for
pipe rollers and LD Machine
Operator.
Rig Manager Authorization is
required before any
personnel are permitted to
go on top of the drill pipe.
JSA must be reviewed with
direct supervision by the Rig
Manager.
DO NOT walk across pipe racks
from catwalk.
BE AWARE of pinch points, do
not place hands on lay-down
equipment; lines, post, etc.
Rope needs to be in good
condition and proper length (not
too long).
BE AWARE of swinging blocks.
Make sure joint is aligned with
trough before unlatching
elevators.
BE AWARE of pinch points.
2
1
2
3
4
5
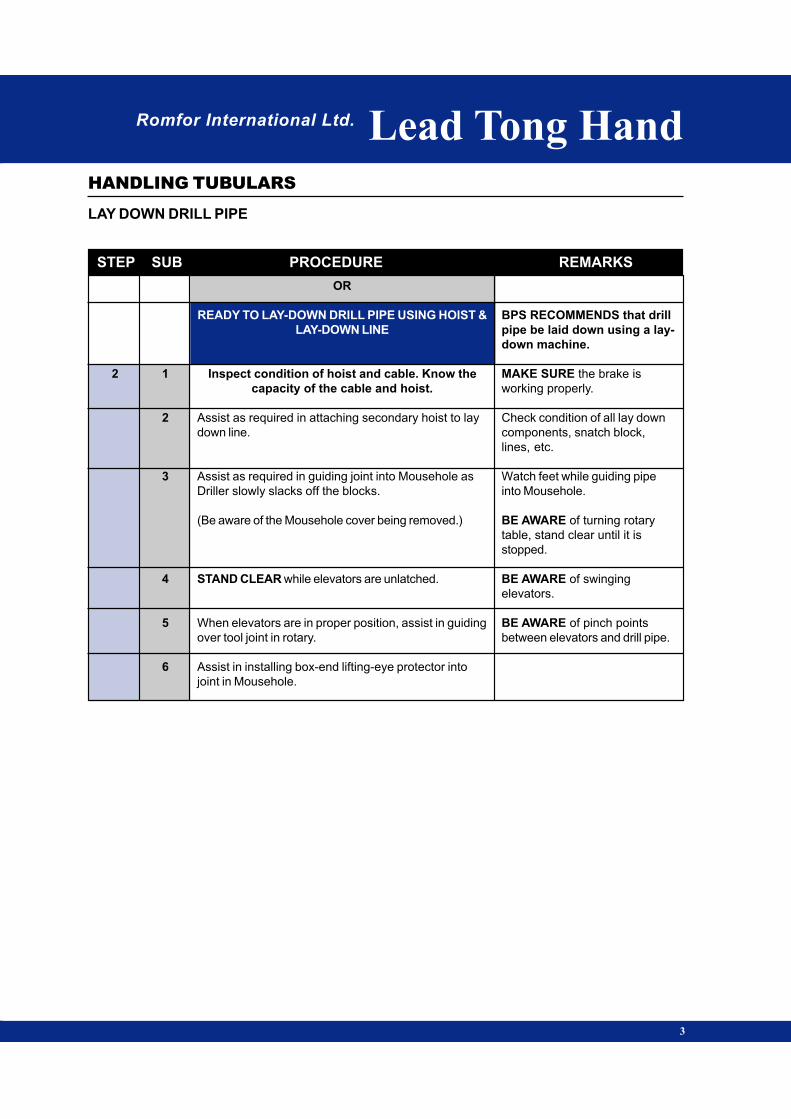
Romfor International Ltd. Lead Tong Hand
STEP SUB PROCEDURE REMARKS
LAY DOWN DRILL PIPE
HANDLING TUBULARS
2 1
2
3
4
5
6
3
OR
READY TO LAY-DOWN DRILL PIPE USING HOIST &
LAY-DOWN LINE
Inspect condition of hoist and cable. Know the
capacity of the cable and hoist.
Assist as required in attaching secondary hoist to lay
down line.
Assist as required in guiding joint into Mousehole as
Driller slowly slacks off the blocks.
(Be aware of the Mousehole cover being removed.)
STAND CLEAR while elevators are unlatched.
When elevators are in proper position, assist in guiding
over tool joint in rotary.
Assist in installing box-end lifting-eye protector into
joint in Mousehole.
BPS RECOMMENDS that drill
pipe be laid down using a lay-
down machine.
MAKE SURE the brake is
working properly.
Check condition of all lay down
components, snatch block,
lines, etc.
Watch feet while guiding pipe
into Mousehole.
BE AWARE of turning rotary
table, stand clear until it is
stopped.
BE AWARE of swinging
elevators.
BE AWARE of pinch points
between elevators and drill pipe.
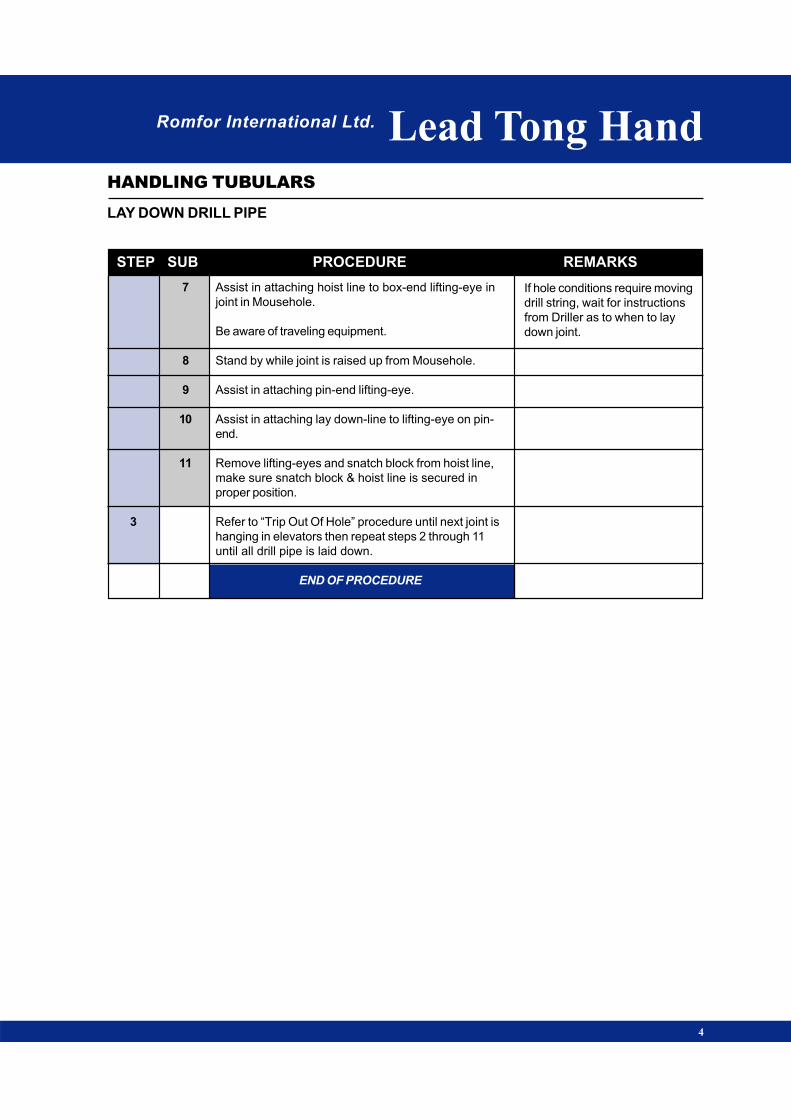
STEP SUB PROCEDURE REMARKS
LAY DOWN DRILL PIPE
HANDLING TUBULARS
Romfor International Ltd. Lead Tong Hand
4
3
Assist in attaching hoist line to box-end lifting-eye in
joint in Mousehole.
Be aware of traveling equipment.
Stand by while joint is raised up from Mousehole.
Assist in attaching pin-end lifting-eye.
Assist in attaching lay down-line to lifting-eye on pin-
end.
Remove lifting-eyes and snatch block from hoist line,
make sure snatch block & hoist line is secured in
proper position.
Refer to “Trip Out Of Hole” procedure until next joint is
hanging in elevators then repeat steps 2 through 11
until all drill pipe is laid down.
END OF PROCEDURE
If hole conditions require moving
drill string, wait for instructions
from Driller as to when to lay
down joint.
7
8
9
10
11

Romfor International Ltd. Lead Tong Hand
STEP SUB PROCEDURE REMARKS
LOADING DRILL PIPE
HANDLING TUBULARS
. 1
LO
AD
ING
LOADING DRILL PIPE
Discuss LOADING requirements prior to loading
of goods. Plan for required space and size of
forklift.
PPE Requirements - Hard Hat, Safety Glasses,
Work Gloves, Steel Toe Shoes, Back Support.
Review JSA for “LOADING TUBULARS”.
Discuss procedures with Rig Manager to include:
- Prepare manifest / material transfer requirements
- Location of tubulars.
- Loading procedure.
- Number and position of trucks on location.
- Size of forklift required (capacity & length of forks).
- Load limits of the trucks and roads.
Verify the following items are ready or available,
as required:
- Forklift is ready for operation.
- Pipe racks are equipped with end stops.
- Stripping is available for trucks.
- Chocks are available for trucks.
- Thread protectors are installed on both the pin end
and box end of the pipe.
Verify the size, weight, grade, connection, and joint
count of the tubulars and record on manifest.
READY TO LOAD DRILL PIPE
BPS RECOMMENDS 18” or
shorter pipe racks. BPS
RECOMMENDS that the box
end faces the truck cab and all
tubulars are stripped and
chocked.
DO NOT UNDER ANY
CONDITION attempt to stop or
step over rolling tubulars.
Include all third party personnel.
It is NOT A RECOMMENDED
procedure to load tubulars with a
crane on land rigs.
Only one truck to be loaded with
tubulars on location at one time.
Handle all layered pipe from the
ground.
DO NOT get on top of pipe.
Refer to forklift operational
procedures. Verify that backup
signal, brakes and emergency
brake are operational.
0
1
1
2
3
1
2

STEP SUB PROCEDURE REMARKS
LOADING DRILL PIPE
HANDLING TUBULARS
Romfor International Ltd. Lead Tong Hand
2
2
3
4
5
6
7
8
9
Position truck for loading and check the
following:
-Guide truck into safe position.
-Brake is set properly.
-The truck is level.
-Wheels are properly chocked.
-All stakes are in the trailer.
-4” x 4” stripping is on truck bed.
Load Drill Pipe from the pipe racks.
- Ensure forklift is in the center of the load and the
forks are in proper position.
-Lift drill pipe, tilt forks to proper position, and proceed
to the truck.
Move Drill Pipe to the truck:
-Travel with forks in lowest position.
-Travel at a SLOW rate of speed.
Load Drill Pipe onto the truck.
-Carefully place pipe onto 4”x4” stripping on the truck.
DO NOT drop pipe.
-Rack drill pipe orderly with forklift, as required.
Repeat steps 3 through 5 until layer is full.
Chock 4” x 4” stripping to secure bottom layer.
Place stripping boards directly over 4” x 4” bed
stripping.
Install pipe chocks at the ends of the stripping boards.
Minimize forklift travel. Make
sure truck is physically on the
location.
DO NOT EXCEED lifting
capacity of forklift. See forklift
JSA.
STAND CLEAR of forklift and
load path.
DO NOT touch drill pipe at any
time the pipe is on the forks.
MAKE SURE first drill pipe is
secure against the bed stakes.
NEVER get on or between
tubulars.
DO NOT climb onto truck or
load.
Rocks are not chocks! Use
proper chocks.
Use wood stripping only. Make
sure stripping is used for each
layer.
DO NOT stack without
stripping.
Rocks are not chocks! Use
proper chocks.

Romfor International Ltd. Lead Tong Hand
STEP SUB PROCEDURE REMARKS
LOADING DRILL PIPE
HANDLING TUBULARS
3
10
11
Repeat steps 3 through 9 until loaded.
Load is secured by TRUCK DRIVER.
END OF PROCEDURE

Romfor International Ltd. Lead Tong Hand
STEP SUB PROCEDURE REMARKS
UNLOADING DRILL PIPE
HANDLING TUBULARS
. 1
RECEIVING DRILL PIPE
DISCUSS DRILL PIPE REQUIREMENTS PRIOR
TO ARRIVAL OF GOODS TO LOCATION. PLAN
FOR REQUIRED SPACE AND SIZE OF FORKLIFT.
PPE Requirements - Hard Hat, Safety Glasses,
Work Gloves, Steel Toe Shoes, Back Support.
Review JSA for “RECEIVING DRILL PIPE”
Discuss procedures with Rig Manager to include:
- Manifest / material transfer requirements
- Location of Drill Pipe.
- Unloading procedure.
- Number and position of trucks on location.
- Size of forklift required (Capacity & length of forks).
- Pipe racks, stripping, chocks.
Verify the following items are ready or available,
as required:
- Forklift is ready for operation.
- Pipe racks are level with Catwalk, equipped with end
stops of the proper height to accommodate all layers
of pipe.
- Catwalks are level and pinned together.
- Stripping is available.
- Chocks are available.
- Tally tape and Tally book.
Verify the size, weight, grade, connection, and joint
count of the Drill Pipe against the manifest.
READY TO UNLOAD DRILL PIPE
BPS RECOMMENDS 18” or
shorter pipe racks. BPS
RECOMMENDS that the box
end faces the truck cab and all
tubulars are stripped and
chocked.
DO NOT UNDER ANY
CONDITION attempt to stop or
step over rolling tubulars.
Include all third party personnel.
It is NOT A RECOMMENDED
procedure to unload Drill Pipe
with a crane. Only one truck
load of Drill Pipe on location at
one time.
Refer to forklift operational
procedures. Verify that backup
signal, brakes and emergency
brake are operational.
Use Romfor's angle iron type
chocks.
Verify that thread protectors are
installed on both the pin end and
box end of the pipe.
0
1
1
2
3
1
2
UN
LO
AD
ING

STEP SUB PROCEDURE REMARKS
UNLOADING DRILL PIPE
HANDLING TUBULARS
Romfor International Ltd. Lead Tong Hand
2
2
3
4
5
6
7
8
Position truck for unloading and check the following:
- Guide truck if necessary.
- Brake is set properly.
- The truck is level.
- Wheels are properly chocked.
- Verify all pipe layers are properly stripped and
chocked.
Unchain load:
- Position forks of the forklift under the bottom layer
before releasing chain or strap binder, if necessary.
- Verify stops are installed on the side of the trailer.
- TRUCK DRIVER releases chain or strap binder and
remove.
Unload Drill Pipe:
- Ensure forklift is in the center of the load and the
forks are in proper position.
- Lift drill pipe, tilt forks to proper position, and
proceed to the pipe rack.
Move Drill Pipe to the pipe rack:
- Travel with forks in lowest position.
- Travel at a SLOW rate of speed.
Unload Drill Pipe onto the pipe racks.
- Carefully place pipe onto the pipe rack. DO NOT
drop.
- Rack drill pipe orderly, as required.
Repeat steps 4 through 6 until layer is full.
If Drill Pipe is layered:
Verify that pipe rack stops are in place and of the
proper height. Place stripping boards directly over
pipe racks on top of layer. Run stripping boards all
the way to the end of the Drill Pipe. Place chock a
minimum of 2 joint widths from the end of stripping at
the catwalk end.
Minimize forklift travel. MAKE
SURE truck is physically on the
location.
DO NOT climb or walk on load.
STAND CLEAR while load is
unchained.
DO NOT EXCEED lifting
capacity of forklift. See forklift
JSA. DO NOT climb or walk on
load.
STAND CLEAR of forklift and
load path. DO NOT touch drill
pipe at any time the pipe is on
the forks.
MAKE SURE first drill pipe is
secure against the chocks.
(Allow room for pickup
machine pick-up arms if
required, 2’ min).
NEVER get between tubulars.
Use wood stripping only. MAKE
SURE first joint is positioned
correctly for pickup machine.
(Parallel to catwalk)
1
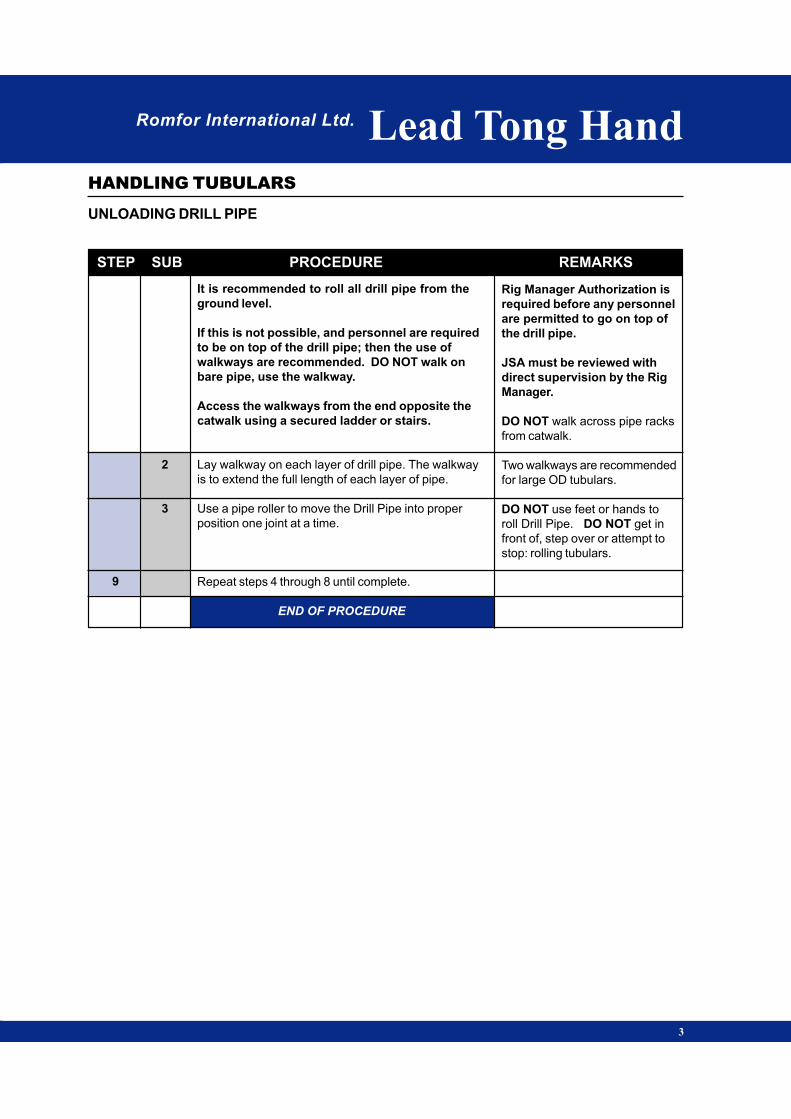
Romfor International Ltd. Lead Tong Hand
STEP SUB PROCEDURE REMARKS
UNLOADING DRILL PIPE
HANDLING TUBULARS
3
Rig Manager Authorization is
required before any personnel
are permitted to go on top of
the drill pipe.
JSA must be reviewed with
direct supervision by the Rig
Manager.
DO NOT walk across pipe racks
from catwalk.
Two walkways are recommended
for large OD tubulars.
DO NOT use feet or hands to
roll Drill Pipe. DO NOT get in
front of, step over or attempt to
stop: rolling tubulars.
9
2
3
It is recommended to roll all drill pipe from the
ground level.
If this is not possible, and personnel are required
to be on top of the drill pipe; then the use of
walkways are recommended. DO NOT walk on
bare pipe, use the walkway.
Access the walkways from the end opposite the
catwalk using a secured ladder or stairs.
Lay walkway on each layer of drill pipe. The walkway
is to extend the full length of each layer of pipe.
Use a pipe roller to move the Drill Pipe into proper
position one joint at a time.
Repeat steps 4 through 8 until complete.
END OF PROCEDURE

Romfor International Ltd.
Lead Tong
Hand
Lead Tong
Hand
HANDLING
TUBULARS
HANDLING
TUBULARS
PICKUP/
LAYDOWN
MACHINE
PICKUP/
LAYDOWN
MACHINE
PIC
KU
P/L
AY
DO
WN
MA
CH
IN
E
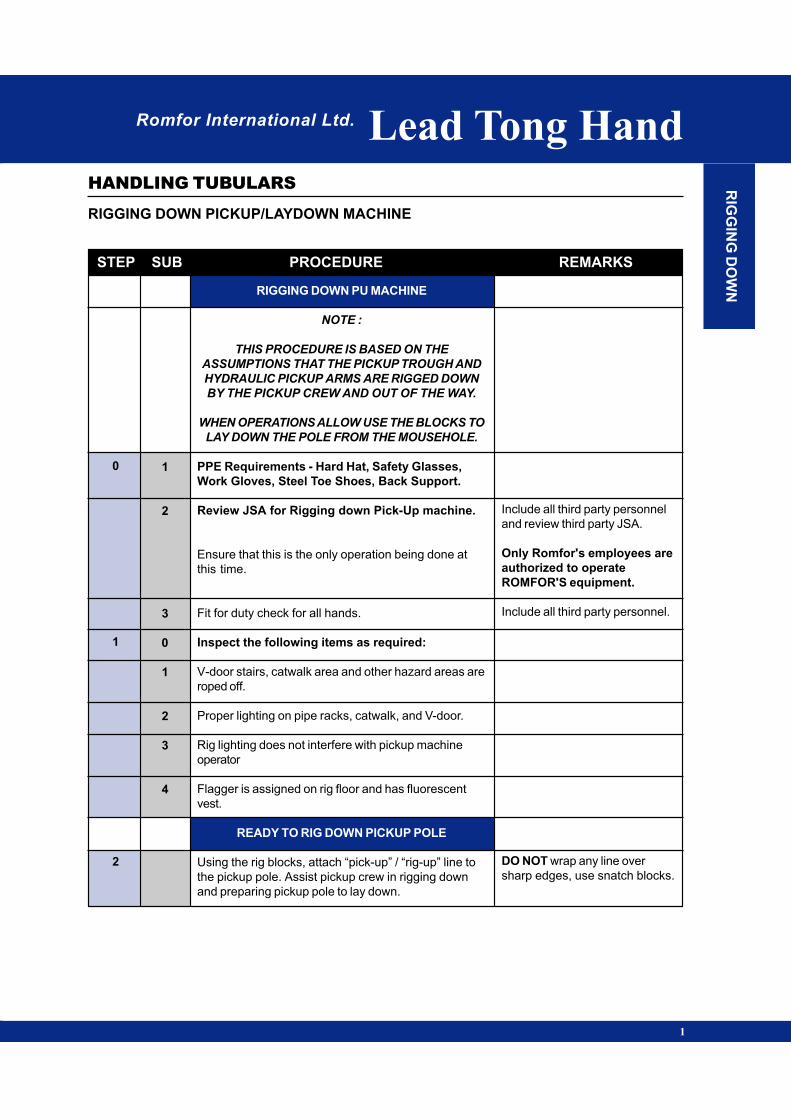
Romfor International Ltd. Lead Tong Hand
STEP SUB PROCEDURE REMARKS
RIGGING DOWN PICKUP/LAYDOWN MACHINE
HANDLING TUBULARS RIG
GIN
G D
OW
N
1
RIGGING DOWN PU MACHINE
NOTE :
THIS PROCEDURE IS BASED ON THE
ASSUMPTIONS THAT THE PICKUP TROUGH AND
HYDRAULIC PICKUP ARMS ARE RIGGED DOWN
BY THE PICKUP CREW AND OUT OF THE WAY.
WHEN OPERATIONS ALLOW USE THE BLOCKS TO
LAY DOWN THE POLE FROM THE MOUSEHOLE.
PPE Requirements - Hard Hat, Safety Glasses,
Work Gloves, Steel Toe Shoes, Back Support.
Review JSA for Rigging down Pick-Up machine.
Ensure that this is the only operation being done at
this time.
Fit for duty check for all hands.
Inspect the following items as required:
V-door stairs, catwalk area and other hazard areas are
roped off.
Proper lighting on pipe racks, catwalk, and V-door.
Rig lighting does not interfere with pickup machine
operator
Flagger is assigned on rig floor and has fluorescent
vest.
READY TO RIG DOWN PICKUP POLE
Using the rig blocks, attach “pick-up” / “rig-up” line to
the pickup pole. Assist pickup crew in rigging down
and preparing pickup pole to lay down.
Include all third party personnel
and review third party JSA.
Only Romfor's employees are
authorized to operate
ROMFOR'S equipment.
Include all third party personnel.
DO NOT wrap any line over
sharp edges, use snatch blocks.
0
1
2
1
2
3
0
1
2
3
4
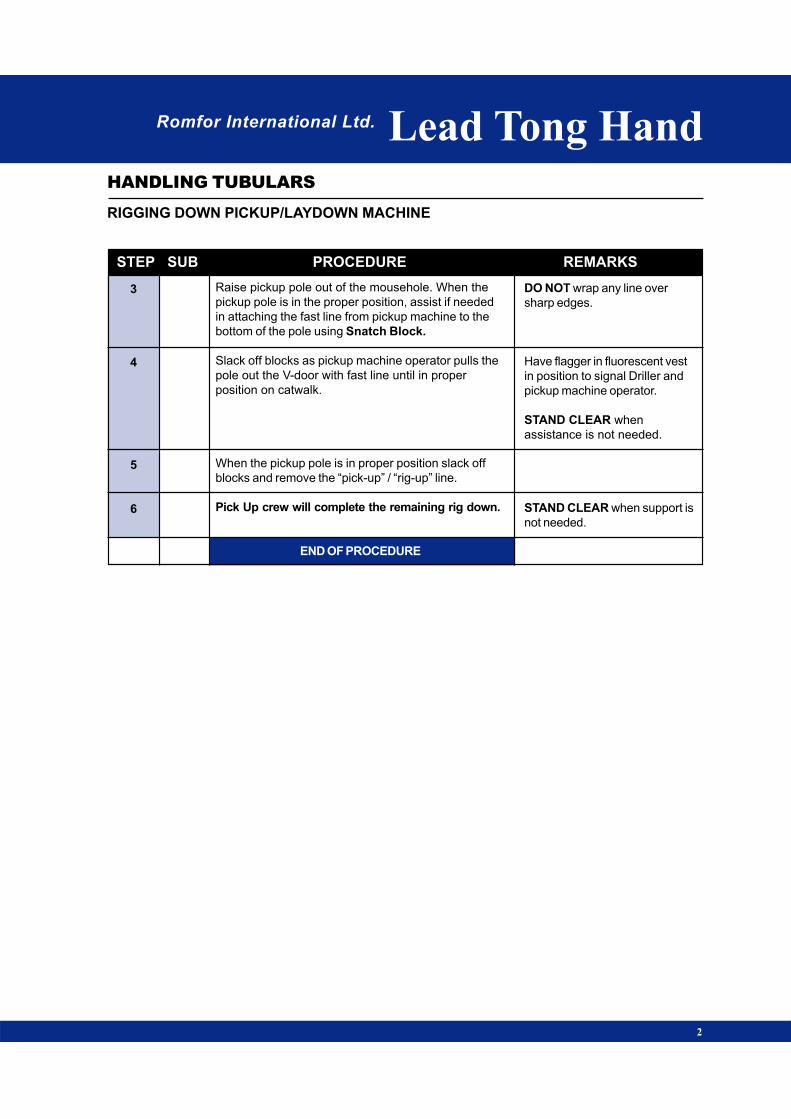
STEP SUB PROCEDURE REMARKS
RIGGING DOWN PICKUP/LAYDOWN MACHINE
HANDLING TUBULARS
Romfor International Ltd. Lead Tong Hand
2
3
4
5
6
Raise pickup pole out of the mousehole. When the
pickup pole is in the proper position, assist if needed
in attaching the fast line from pickup machine to the
bottom of the pole using Snatch Block.
Slack off blocks as pickup machine operator pulls the
pole out the V-door with fast line until in proper
position on catwalk.
When the pickup pole is in proper position slack off
blocks and remove the “pick-up” / “rig-up” line.
Pick Up crew will complete the remaining rig down.
END OF PROCEDURE
DO NOT wrap any line over
sharp edges.
Have flagger in fluorescent vest
in position to signal Driller and
pickup machine operator.
STAND CLEAR when
assistance is not needed.
STAND CLEAR when support is
not needed.

Romfor International Ltd. Lead Tong Hand
STEP SUB PROCEDURE REMARKS
RIG UP PICKUP/LAYDOWN MACHINE
HANDLING TUBULARS
. 1
RIG
GIN
G U
P
RIGGING UP PU MACHINE
THIS PROCEDURE IS BASED ON THE
ASSUMPTION THAT ALL CASING IS UNLOADED
AND ON RACKS. BPS RECOMMENDS THE USE
OF THE “TROUGH” TYPE PICKUP MACHINE.
PPE Requirements - Hard Hat, Safety Glasses,
Work Gloves, Steel Toe Shoes, Back Support.
Review JSA for Rigging up Pick-Up machine.
Fit for duty check for all hands.
Inspect the following items for capacity and
serviceability, as required:
V-door stairs, catwalk area and other hazard areas are
roped off.
Proper lighting on pipe racks, catwalk, and V-door.
Flagger is assigned on rig floor and has fluorescent
vest.
Pickup machine is inspected for damaged lines and
sheaves and overall condition. Make sure the truck is
properly chocked.
Inspect condition of hoist and cable. Know the
capacity of the cable and hoist. Make sure the hoist
brake is working properly.
Mousehole is secured properly and in good condition.
Include all third party personnel
and review third party JSA.
Only Romfor's employees are
authorized to operate
Romfor's’ equipment.
Include all third party personnel.
Use “Caution Tape”
Rig lighting does not interfere
with pickup machine operator.
BPS RECOMMENDS that a
fluorescent vest be available
at the rig site.
DO NOT get on the truck. Do a
walk around inspection.
BE AWARE of side load
requirements of the Mousehole
when picking up pipe.
0
1
1
2
3
1
2
3
4
5
6
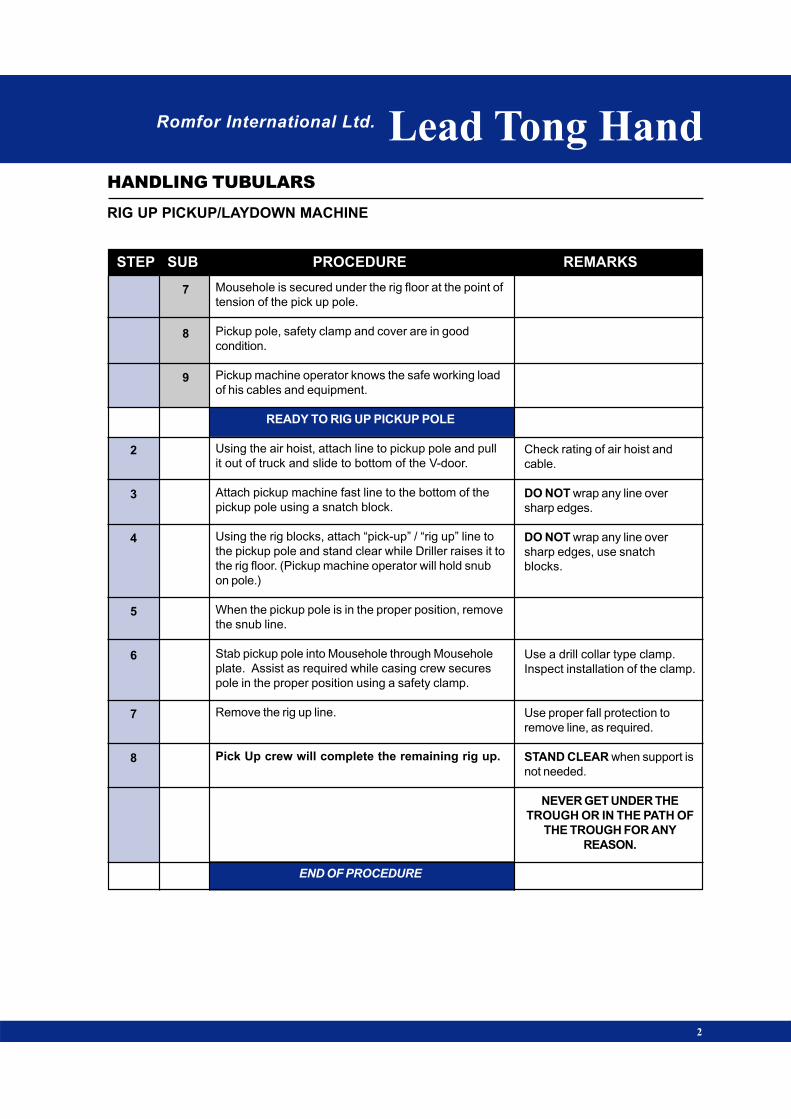
STEP SUB PROCEDURE REMARKS
RIG UP PICKUP/LAYDOWN MACHINE
HANDLING TUBULARS
Romfor International Ltd. Lead Tong Hand
2
2
3
4
5
6
7
8
Mousehole is secured under the rig floor at the point of
tension of the pick up pole.
Pickup pole, safety clamp and cover are in good
condition.
Pickup machine operator knows the safe working load
of his cables and equipment.
READY TO RIG UP PICKUP POLE
Using the air hoist, attach line to pickup pole and pull
it out of truck and slide to bottom of the V-door.
Attach pickup machine fast line to the bottom of the
pickup pole using a snatch block.
Using the rig blocks, attach “pick-up” / “rig up” line to
the pickup pole and stand clear while Driller raises it to
the rig floor. (Pickup machine operator will hold snub
on pole.)
When the pickup pole is in the proper position, remove
the snub line.
Stab pickup pole into Mousehole through Mousehole
plate. Assist as required while casing crew secures
pole in the proper position using a safety clamp.
Remove the rig up line.
Pick Up crew will complete the remaining rig up.
END OF PROCEDURE
Check rating of air hoist and
cable.
DO NOT wrap any line over
sharp edges.
DO NOT wrap any line over
sharp edges, use snatch
blocks.
Use a drill collar type clamp.
Inspect installation of the clamp.
Use proper fall protection to
remove line, as required.
STAND CLEAR when support is
not needed.
NEVER GET UNDER THE
TROUGH OR IN THE PATH OF
THE TROUGH FOR ANY
REASON.
7
8
9
Romfor International Ltd.
HANDLING
TUBULARS
HANDLING
TUBULARS
HA
ND
LIN
G T
UB
UL
AR
S
MotormanMotorman
Romfor International Ltd.
HANDLING
TUBULARS
HANDLING
TUBULARS
MotormanMotorman
CA
SIN
G
CASINGCASING
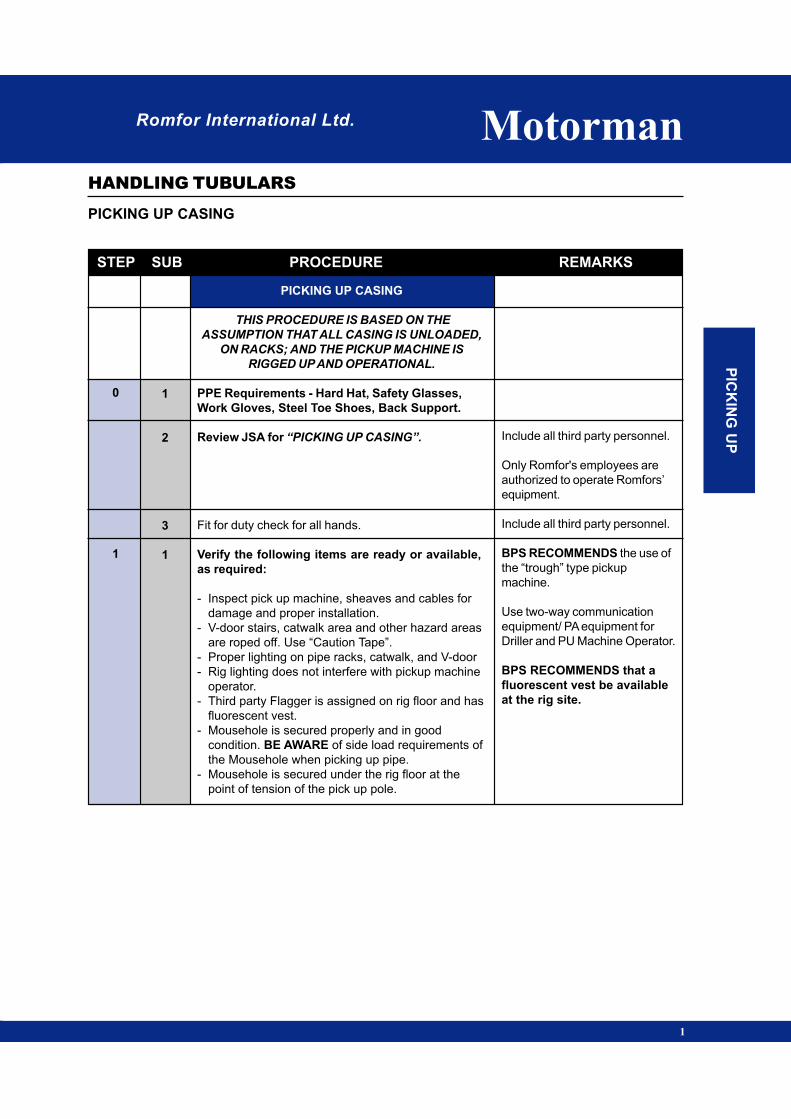
Romfor International Ltd. Motorman
STEP SUB PROCEDURE REMARKS
PICKING UP CASING
HANDLING TUBULARS
PIC
KIN
G U
P
1
PICKING UP CASING
THIS PROCEDURE IS BASED ON THE
ASSUMPTION THAT ALL CASING IS UNLOADED,
ON RACKS; AND THE PICKUP MACHINE IS
RIGGED UP AND OPERATIONAL.
PPE Requirements - Hard Hat, Safety Glasses,
Work Gloves, Steel Toe Shoes, Back Support.
Review JSA for “PICKING UP CASING”.
Fit for duty check for all hands.
Verify the following items are ready or available,
as required:
- Inspect pick up machine, sheaves and cables for
damage and proper installation.
- V-door stairs, catwalk area and other hazard areas
are roped off. Use “Caution Tape”.
- Proper lighting on pipe racks, catwalk, and V-door
- Rig lighting does not interfere with pickup machine
operator.
- Third party Flagger is assigned on rig floor and has
fluorescent vest.
- Mousehole is secured properly and in good
condition. BE AWARE of side load requirements of
the Mousehole when picking up pipe.
- Mousehole is secured under the rig floor at the
point of tension of the pick up pole.
Include all third party personnel.
Only Romfor's employees are
authorized to operate Romfors’
equipment.
Include all third party personnel.
BPS RECOMMENDS the use of
the “trough” type pickup
machine.
Use two-way communication
equipment/ PA equipment for
Driller and PU Machine Operator.
BPS RECOMMENDS that a
fluorescent vest be available
at the rig site.
0
1
1
2
3
1
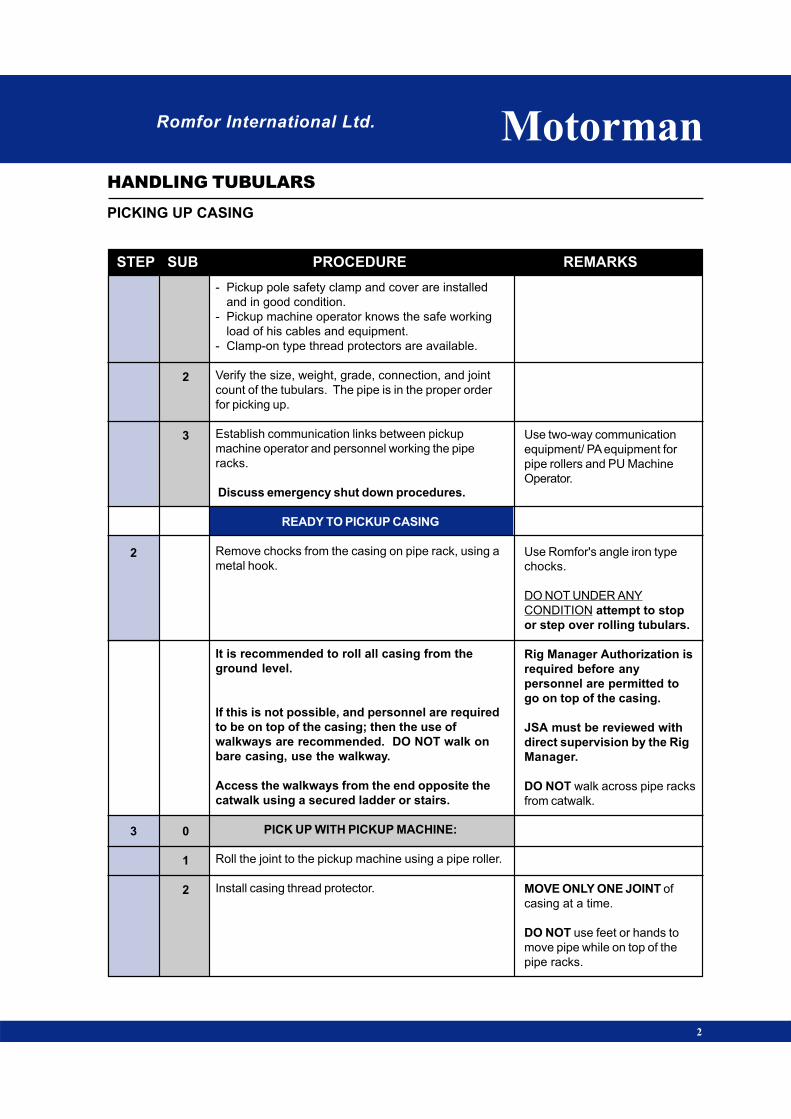
STEP SUB PROCEDURE REMARKS
PICKING UP CASING
HANDLING TUBULARS
Romfor International Ltd. Motorman
2
2
3
- Pickup pole safety clamp and cover are installed
and in good condition.
- Pickup machine operator knows the safe working
load of his cables and equipment.
- Clamp-on type thread protectors are available.
Verify the size, weight, grade, connection, and joint
count of the tubulars. The pipe is in the proper order
for picking up.
Establish communication links between pickup
machine operator and personnel working the pipe
racks.
Discuss emergency shut down procedures.
READY TO PICKUP CASING
Remove chocks from the casing on pipe rack, using a
metal hook.
It is recommended to roll all casing from the
ground level.
If this is not possible, and personnel are required
to be on top of the casing; then the use of
walkways are recommended. DO NOT walk on
bare casing, use the walkway.
Access the walkways from the end opposite the
catwalk using a secured ladder or stairs.
PICK UP WITH PICKUP MACHINE:
Roll the joint to the pickup machine using a pipe roller.
Install casing thread protector.
Use two-way communication
equipment/ PA equipment for
pipe rollers and PU Machine
Operator.
Use Romfor's angle iron type
chocks.
DO NOT UNDER ANY
CONDITION attempt to stop
or step over rolling tubulars.
Rig Manager Authorization is
required before any
personnel are permitted to
go on top of the casing.
JSA must be reviewed with
direct supervision by the Rig
Manager.
DO NOT walk across pipe racks
from catwalk.
MOVE ONLY ONE JOINT of
casing at a time.
DO NOT use feet or hands to
move pipe while on top of the
pipe racks.
2
3
0
1
2

Romfor International Ltd. Motorman
STEP SUB PROCEDURE REMARKS
PICKING UP CASING
HANDLING TUBULARS
3
BE AWARE of other joints of
rolling casing.
DO NOT attempt to assist in
loading casing into trough.
Remove Walkway and stripping
as layer is run.
3
4
3
4
5
6
0
Position joint against pick up arms until operator
catches the pipe with the pickup arm.
STAND CLEAR until the casing is loaded in the trough
and lifted to the rig floor.
Repeat Steps 3-1 through 3-4 until layer is run.
Repeat Steps 3-1 through 3-5 until all casing is run.
OR
PICK UP WITH HOIST: IS NOT A RECOMMENDED
PROCEDURE FOR PICKING UP CASING.
Refer to procedure for “Running Casing” for rig floor
operations.
END OF PROCEDURE
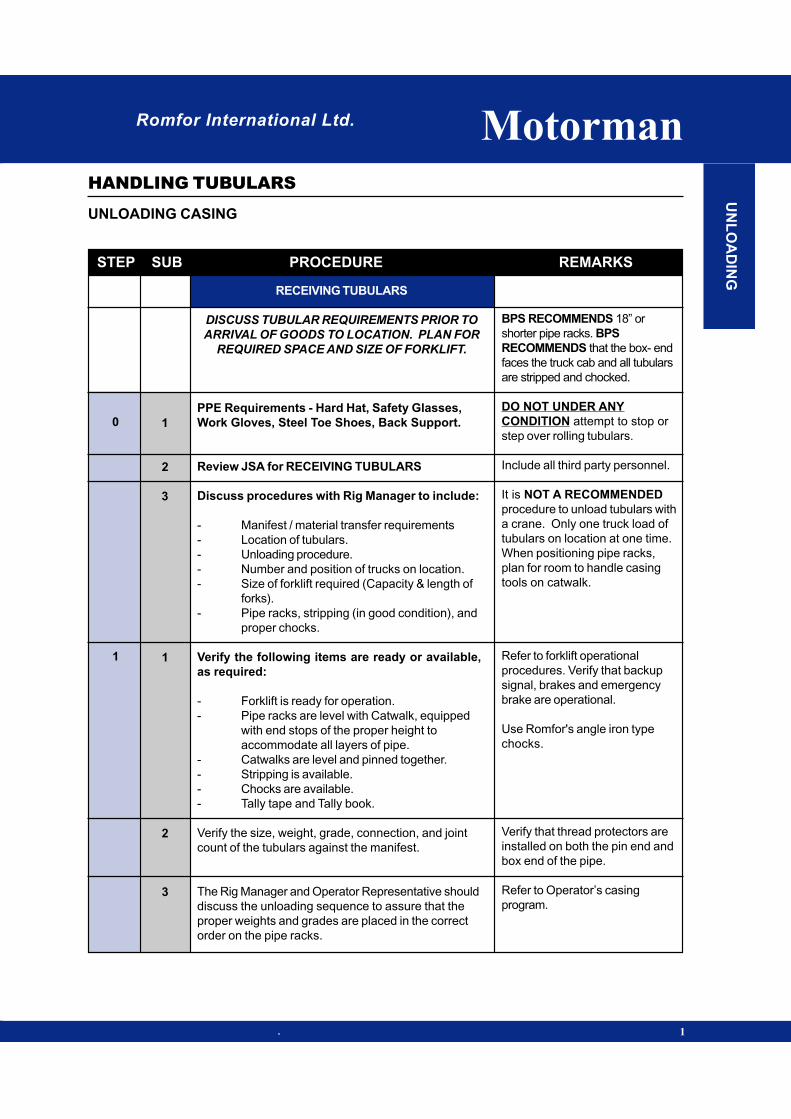
Romfor International Ltd. Motorman
STEP SUB PROCEDURE REMARKS
UNLOADING CASING
HANDLING TUBULARS
. 1
RECEIVING TUBULARS
DISCUSS TUBULAR REQUIREMENTS PRIOR TO
ARRIVAL OF GOODS TO LOCATION. PLAN FOR
REQUIRED SPACE AND SIZE OF FORKLIFT.
PPE Requirements - Hard Hat, Safety Glasses,
Work Gloves, Steel Toe Shoes, Back Support.
Review JSA for RECEIVING TUBULARS
Discuss procedures with Rig Manager to include:
- Manifest / material transfer requirements
- Location of tubulars.
- Unloading procedure.
- Number and position of trucks on location.
- Size of forklift required (Capacity & length of
forks).
- Pipe racks, stripping (in good condition), and
proper chocks.
Verify the following items are ready or available,
as required:
- Forklift is ready for operation.
- Pipe racks are level with Catwalk, equipped
with end stops of the proper height to
accommodate all layers of pipe.
- Catwalks are level and pinned together.
- Stripping is available.
- Chocks are available.
- Tally tape and Tally book.
Verify the size, weight, grade, connection, and joint
count of the tubulars against the manifest.
The Rig Manager and Operator Representative should
discuss the unloading sequence to assure that the
proper weights and grades are placed in the correct
order on the pipe racks.
BPS RECOMMENDS 18” or
shorter pipe racks. BPS
RECOMMENDS that the box- end
faces the truck cab and all tubulars
are stripped and chocked.
DO NOT UNDER ANY
CONDITION attempt to stop or
step over rolling tubulars.
Include all third party personnel.
It is NOT A RECOMMENDED
procedure to unload tubulars with
a crane. Only one truck load of
tubulars on location at one time.
When positioning pipe racks,
plan for room to handle casing
tools on catwalk.
Refer to forklift operational
procedures. Verify that backup
signal, brakes and emergency
brake are operational.
Use Romfor's angle iron type
chocks.
Verify that thread protectors are
installed on both the pin end and
box end of the pipe.
Refer to Operator’s casing
program.
0
1
1
2
3
1
2
3
UN
LO
AD
ING

STEP SUB PROCEDURE REMARKS
UNLOADING CASING
HANDLING TUBULARS
Romfor International Ltd. Motorman
2
2
3
4
5
6
7
READY TO UNLOAD CASING
Position truck for unloading and check the following:
-Guide truck if necessary.
-Brake is set properly.
-The truck is level.
-Wheels are properly chocked.
-Verify all pipe layers are properly stripped and
chocked.
Unchain load:
-Position forks of the forklift under the bottom layer
before releasing chain or strap binder.
-Verify stops are installed on the side of the trailer.
-TRUCK DRIVER releases chain or strap binder and
remove.
Unload Casing:
-Ensure forklift is in the center of the load and the
forks are in proper position.
-Lift casing, tilt forks to proper position, and proceed to
the pipe rack.
Move Casing to the pipe rack:
-Travel with forks in lowest position.
-Travel at a SLOW rate of speed.
Unload Casing onto the pipe racks.
-Carefully place pipe onto the pipe rack. DO NOT
drop.
-Rack casing orderly, as required. Align pin ends to
accommodate pickup machine. Only roll one joint of
casing at a time.
- MAKE SURE first joint is positioned correctly for
pickup machine. (Parallel to catwalk)
Remove casing protectors.
Minimize forklift travel. MAKE
SURE truck is physically on the
location.
DO NOT climb or walk on load.
STAND CLEAR while load is
unchained.
DO NOT EXCEED lifting
capacity of forklift. See forklift
JSA. DO NOT climb or walk on
load.
STAND CLEAR of forklift and
load path. DO NOT touch
casing at any time the casing is
on the forks.
MAKE SURE first casing is
secure against the chocks.
(Allow room for pickup
machine pick-up arms if
required, 2’ min).
NEVER get between tubulars.
Stack neatly on the edge of
location.

Romfor International Ltd. Motorman
STEP SUB PROCEDURE REMARKS
UNLOADING CASING
HANDLING TUBULARS
3
Use wood stripping only. MAKE
SURE first joint is positioned
correctly for pickup machine.
(Parallel to catwalk)
Rig Manager Authorization is
required before any personnel
are permitted to go on top of
the casing.
JSA must be reviewed with
direct supervision by the Rig
Manager.
DO NOT walk across pipe racks
from catwalk.
Two walkways are recommended
for large OD casing.
DO NOT use feet or hands to roll
casing. DO NOT get in front of,
step over, or attempt to stop
rolling casing.
Rocks are not chocks! Use
proper chocks.
8
9
10
11
12
1
2
3
Strap and tally each layer of casing.
Repeat steps 4 through 8 until layer is full.
If casing is layered:
Verify that pipe rack stops are in place and of the
proper height. Place stripping boards directly over
pipe racks on top of layer. Run stripping boards all
the way to the end of the casing. Place chock a
minimum of 2 joint widths from the end of stripping at
the catwalk end.
It is recommended to roll all casing from the
ground level.
If this is not possible, and personnel are required
to be on top of the casing; then the use of
walkways are recommended. DO NOT walk on
bare casing, use the walkway.
Access the walkways from the end opposite the
catwalk using a secured ladder or stairs.
Lay walkway on each layer of casing. The walkway is
to extend the full length of each layer of casing.
Use a pipe roller to move the casing into proper
position one joint at a time.
When layer is complete, install pipe chocks at the
ends of the stripping boards.
Repeat steps 4 through 11 until complete.
END OF PROCEDURE

Romfor International Ltd.
HANDLING
TUBULARS
HANDLING
TUBULARS
MotormanMotorman
DR
IL
L C
OL
LA
RS
DRILL COLLARSDRILL COLLARS

Romfor International Ltd.
PRACTICE: PICKING UP DRILL COLLARS
POSITION: UPDATE FOR ALL POSITIONS
THREAD PROTECTORS
WITH LIFTING BAIL (CAST STEEL)
Made from steel castings meeting ASTM Specification
No. A27 Grade 60-30 (60,000 psi tensile — 30,000 psi
yield), with heavy bails suitable for picking up
and laying down drill collars with cat line. Threads and
shoulders are precision machined.
BOXPIN
DRILCO

Romfor International Ltd. Motorman
STEP SUB PROCEDURE REMARKS
PICKING UP DRILL COLLARS
HANDLING TUBULARS
PIC
KIN
G U
P
1
PICKING UP DRILL COLLARS
THIS PROCEDURE IS BASED ON THE
ASSUMPTION THAT ALL DRILL COLLARS ARE
UNLOADED, ON RACKS; AND THE PICKUP
MACHINE IS RIGGED UP AND OPERATIONAL.
PPE Requirements - Hard Hat, Safety Glasses,
Work Gloves, Steel Toe Shoes, Back Support.
Review JSA for “PICKING UP DRILL COLLARS”.
Fit for duty check for all hands.
Verify the following items are ready or available,
as required:
- Inspect pick up machine, sheaves and cables for
damage and proper installation.
- V-door stairs, catwalk area and other hazard areas
are roped off. Use “Caution Tape”.
- Proper lighting on collars racks, catwalk, and V-
door
- Rig lighting does not interfere with pickup machine
operator.
- Flagger is assigned on rig floor and has fluorescent
vest.
- Mousehole is secured properly and in good
condition. BE AWARE of side load requirements of
the Mousehole when picking up collars.
- Mousehole is secured under the rig floor at the
point of tension of the pick up pole.
- Pickup pole safety clamp and cover are installed
and in good condition.
- Pickup machine operator knows the safe working
load of his cables and equipment.
- Thread protectors are available and installed.
- ‘Drilco’ equivalent casted lifting bails are available
when using Hoist Line to pick up drill collars.
- Rental drill collars have proper paper work to show
recent inspections.
- If the collars were shipped with lifting bails installed,
ensure lifting bails have been properly tightened.
Include all third party personnel.
Include all third party personnel.
BPS RECOMMENDS:
The Toolpusher be on the rig floor
any time the BHA is handled.
The use of the “trough” type
pickup machine.
Use two-way communication
equipment/ PA equipment for
Driller and PU Machine Operator.
BPS recommends that a
fluorescent vest be available
at the rig site.
0
1
1
2
3
1
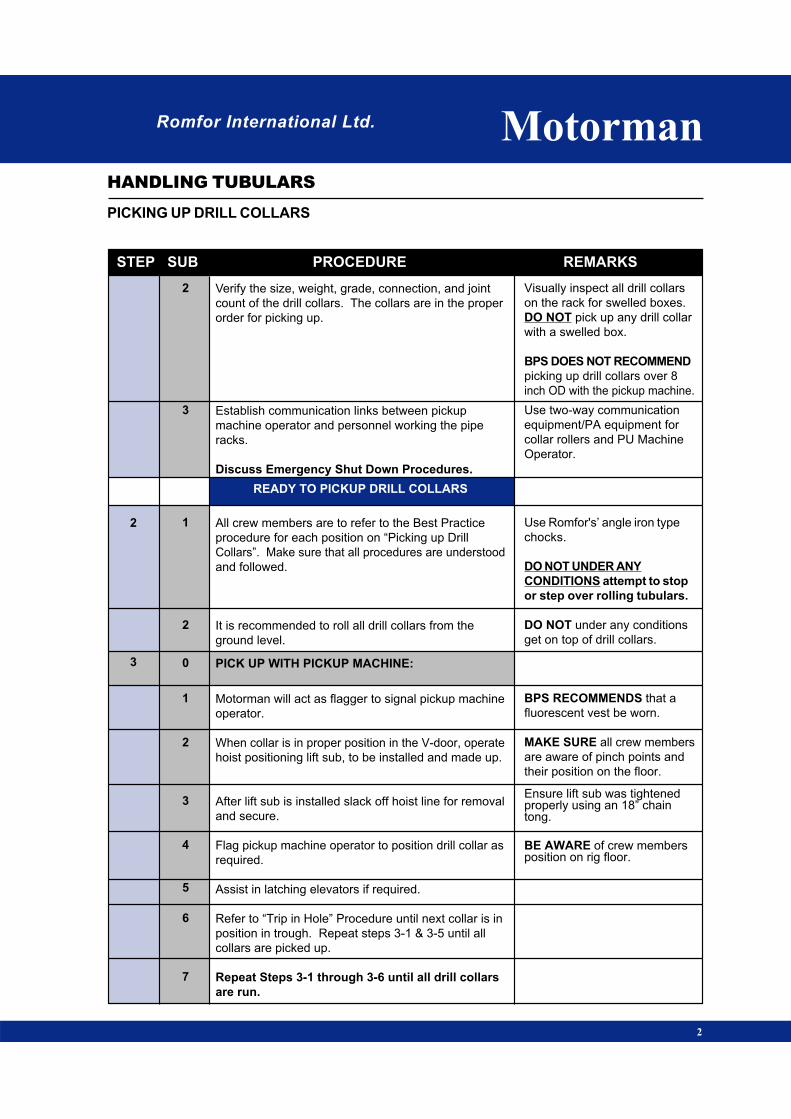
STEP SUB PROCEDURE REMARKS
PICKING UP DRILL COLLARS
Romfor International Ltd.
HANDLING TUBULARS
Motorman
2
2
3
Verify the size, weight, grade, connection, and joint
count of the drill collars. The collars are in the proper
order for picking up.
Establish communication links between pickup
machine operator and personnel working the pipe
racks.
Discuss Emergency Shut Down Procedures.
READY TO PICKUP DRILL COLLARS
All crew members are to refer to the Best Practice
procedure for each position on “Picking up Drill
Collars”. Make sure that all procedures are understood
and followed.
It is recommended to roll all drill collars from the
ground level.
PICK UP WITH PICKUP MACHINE:
Motorman will act as flagger to signal pickup machine
operator.
When collar is in proper position in the V-door, operate
hoist positioning lift sub, to be installed and made up.
After lift sub is installed slack off hoist line for removal
and secure.
Flag pickup machine operator to position drill collar as
required.
Assist in latching elevators if required.
Refer to “Trip in Hole” Procedure until next collar is in
position in trough. Repeat steps 3-1 & 3-5 until all
collars are picked up.
Repeat Steps 3-1 through 3-6 until all drill collars
are run.
Visually inspect all drill collars
on the rack for swelled boxes.
DO NOT pick up any drill collar
with a swelled box.
BPS DOES NOT RECOMMEND
picking up drill collars over 8
inch OD with the pickup machine.
Use two-way communication
equipment/PA equipment for
collar rollers and PU Machine
Operator.
Use Romfor's’ angle iron type
chocks.
DO NOT UNDER ANY
CONDITIONS attempt to stop
or step over rolling tubulars.
DO NOT under any conditions
get on top of drill collars.
BPS RECOMMENDS that a
fluorescent vest be worn.
MAKE SURE all crew members
are aware of pinch points and
their position on the floor.
Ensure lift sub was tightenedproperly using an 18” chaintong.
BE AWARE of crew membersposition on rig floor.
2
3
1
2
0
1
2
3
4
5
6
7
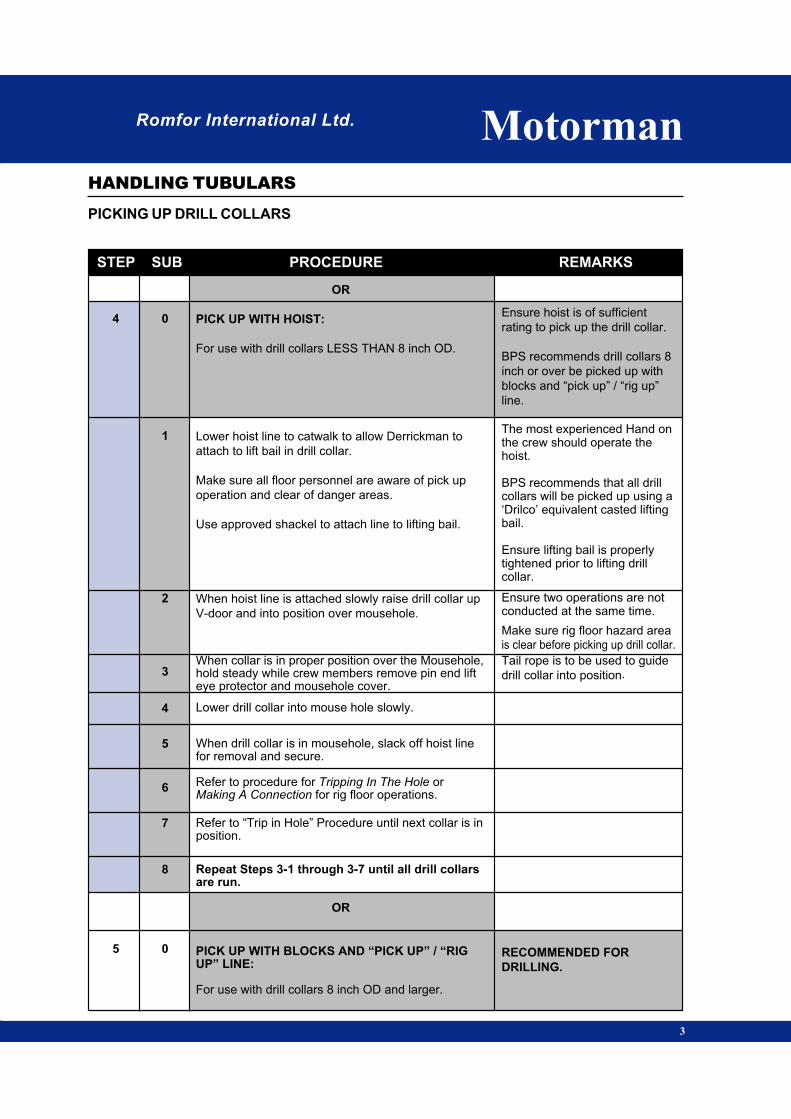
Romfor International Ltd. Motorman
STEP SUB PROCEDURE REMARKS
PICKING UP DRILL COLLARS
HANDLING TUBULARS
4
5
3
OR
PICK UP WITH HOIST:
For use with drill collars LESS THAN 8 inch OD.
Lower hoist line to catwalk to allow Derrickman to
attach to lift bail in drill collar.
Make sure all floor personnel are aware of pick up
operation and clear of danger areas.
Use approved shackel to attach line to lifting bail.
When hoist line is attached slowly raise drill collar up
V-door and into position over mousehole.
When collar is in proper position over the Mousehole,hold steady while crew members remove pin end lifteye protector and mousehole cover.
Lower drill collar into mouse hole slowly.
When drill collar is in mousehole, slack off hoist linefor removal and secure.
Refer to procedure for Tripping In The Hole orMaking A Connection for rig floor operations.
Refer to “Trip in Hole” Procedure until next collar is inposition.
Repeat Steps 3-1 through 3-7 until all drill collarsare run.
OR
PICK UP WITH BLOCKS AND “PICK UP” / “RIGUP” LINE:
For use with drill collars 8 inch OD and larger.
Ensure hoist is of sufficient
rating to pick up the drill collar.
BPS recommends drill collars 8
inch or over be picked up with
blocks and “pick up” / “rig up”
line.
The most experienced Hand onthe crew should operate thehoist.
BPS recommends that all drillcollars will be picked up using a‘Drilco’ equivalent casted liftingbail.
Ensure lifting bail is properlytightened prior to lifting drillcollar.
Ensure two operations are notconducted at the same time.
Make sure rig floor hazard areais clear before picking up drill collar.
Tail rope is to be used to guide
drill collar into position.
RECOMMENDED FOR
DRILLING.
0
1
2
3
4
5
6
7
8
0

STEP SUB PROCEDURE REMARKS
PICKING UP DRILL COLLARS
Romfor International Ltd.
HANDLING TUBULARS
Motorman
4
Review JSA for “PICKING UP DRILL COLLARS
USING PICK UP / RIG UP LINE”
When blocks are in position install “PICK UP” / “RIGUP” line.
Rig up lay down line, for snubbing drill collar into rigfloor.
Guide “PICK UP” / “RIG UP” line out of the V-door.
Stand clear and signal Driller as required while Driller
lowers “PICK UP” / “RIG UP” line slowly down V-door.
Standby while Backup Hand attaches “PICK UP” /
“RIG UP” line to lifting bail in drill collar and snubbing line
to pin end of drill collar.
Use approved shackel to attach line to lifting bail.
Snub with hoist into position to stab in Mousehole.
Hold in position over mousehole while crew members
attach tail rope.
After tail rope is in place, slack off hoist line for
removal and secure.
Refer to procedure for Tripping In The Hole or
Making A Connection for rig floor operations.
Repeat Steps 5-2 through 5-10 until all drill collars
are run.
END OF PROCEDURE
Refer to Rig Specific JSA.
Refer to Rig Specific JSA.
Ensure two operations are not
conducted at the same time.
Ensure only APPROVED lifting
protectors are used.
BPS recommends that all drill
collars be picked up using a
‘Drilco’ equivalent casted lifting
bail.
Verify lifting bail is properly
tightened before attaching
“pickup”/”rig up” line.
Be aware of danger areas and
possibility of a missed drill
collar by tail rope.
BPS RECOMMENDS using a
Floorhand as a flagger.
1
2
3
4
5
6
7
8
9
10
11
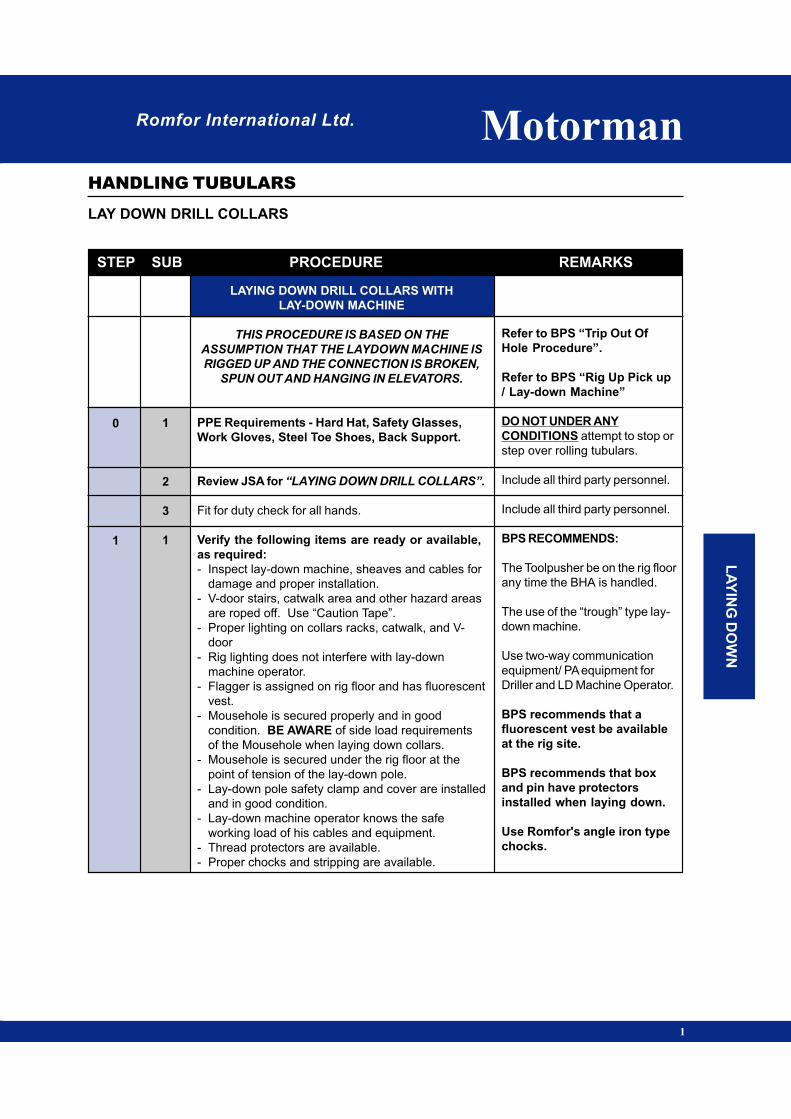
Romfor International Ltd. Motorman
STEP SUB PROCEDURE REMARKS
LAY DOWN DRILL COLLARS
HANDLING TUBULARS
LA
YIN
G D
OW
N
1
LAYING DOWN DRILL COLLARS WITH
LAY-DOWN MACHINE
THIS PROCEDURE IS BASED ON THE
ASSUMPTION THAT THE LAYDOWN MACHINE IS
RIGGED UP AND THE CONNECTION IS BROKEN,
SPUN OUT AND HANGING IN ELEVATORS.
PPE Requirements - Hard Hat, Safety Glasses,
Work Gloves, Steel Toe Shoes, Back Support.
Review JSA for “LAYING DOWN DRILL COLLARS”.
Fit for duty check for all hands.
Verify the following items are ready or available,
as required:
- Inspect lay-down machine, sheaves and cables for
damage and proper installation.
- V-door stairs, catwalk area and other hazard areas
are roped off. Use “Caution Tape”.
- Proper lighting on collars racks, catwalk, and V-
door
- Rig lighting does not interfere with lay-down
machine operator.
- Flagger is assigned on rig floor and has fluorescent
vest.
- Mousehole is secured properly and in good
condition. BE AWARE of side load requirements
of the Mousehole when laying down collars.
- Mousehole is secured under the rig floor at the
point of tension of the lay-down pole.
- Lay-down pole safety clamp and cover are installed
and in good condition.
- Lay-down machine operator knows the safe
working load of his cables and equipment.
- Thread protectors are available.
- Proper chocks and stripping are available.
Refer to BPS “Trip Out Of
Hole Procedure”.
Refer to BPS “Rig Up Pick up
/ Lay-down Machine”
DO NOT UNDER ANY
CONDITIONS attempt to stop or
step over rolling tubulars.
Include all third party personnel.
Include all third party personnel.
BPS RECOMMENDS:
The Toolpusher be on the rig floor
any time the BHA is handled.
The use of the “trough” type lay-
down machine.
Use two-way communication
equipment/ PA equipment for
Driller and LD Machine Operator.
BPS recommends that a
fluorescent vest be available
at the rig site.
BPS recommends that box
and pin have protectors
installed when laying down.
Use Romfor's angle iron type
chocks.
0
1
1
2
3
1
STEP SUB PROCEDURE REMARKS
LAY DOWN DRILL COLLARS
HANDLING TUBULARS
Romfor International Ltd. Motorman
2
2
3
4
5
6
7
8
Establish communication links between lay-down
machine operator and rig personnel.
Discuss emergency shut down procedures.
It is recommended to roll only one drill collar at a time
from ground level.
Be aware of new obstacles, (lay-down pole, etc.)
READY TO LAY-DOWN DRILL COLLARS WITH
LAY DOWN MACHINE
Assist as required as pin-end thread protector is
installed.
After crew member attaches hoist line to collar,
operate hoist to guide joint to trough as Driller slacks
off.
Once drill collar pin end is stopped and resting in
trough, slack off hoist so crew member can remove
hoist line.
Secure hoist line.
STAND CLEAR while Driller lowers collar into trough
and elevators unlatched.
Flag signals to Lay-Down machine operator to lower
collar into position to remove lift sub.
Operate hoist while crew members attach line to lift
sub.
Use two-way communication
equipment/ PA equipment for
collars rollers and LD Machine
Operator.
DO NOT walk on or get on top
of drill collars for any reason.
DO NOT position yourself
between lay-down pole and
tongs and or elevators
Always be aware of the position
of the trough. Do not stand in
path of trough.
BE AWARE of turning rotary
table, stand clear until it is
stopped.
BE AWARE of other crew
members’ position on rig floor.
2
Romfor International Ltd. Motorman
STEP SUB PROCEDURE REMARKS
LAY DOWN DRILL COLLARS
HANDLING TUBULARS
9
10
11
12
13
14
3
Hold tension on line while crew members back-out
and remove lift sub from collar.
After lift sub is removed, raise sub to proper position
for stabbing into next drill collar.
Lower lift sub into collar.
After crew members remove hoist line, secure line.
Assist in guiding elevators to latch on next joint in
rotary, if required.
Continue with “Trip Out Of Hole” procedures and repeat
“Lay Down Drill Collars” procedures from step 2
through 13 until all drill collars is layed down.
END OF PROCEDURE
BE AWARE of pinch points.
Romfor International Ltd. Motorman
STEP SUB PROCEDURE REMARKS
LOADING DRILL COLLARS
HANDLING TUBULARS
. 1
LOADING DRILL COLLARS
DISCUSS LOADING REQUIREMENTS PRIOR TO
LOADING OF GOODS. PLAN FOR REQUIRED
SPACE AND SIZE OF FORKLIFT.
PPE Requirements - Hard Hat, Safety Glasses,
Work Gloves, Steel Toe Shoes, Back Support.
Review JSA for LOADING DRILL COLLARS.
Discuss procedures with Rig Manager to include:
- Prepare Manifest / material transfer
requirements
- Location of drill collars.
- Loading procedure.
- Number and position of trucks on location.
- Size of forklift required.
- Load limits of the trucks and roads.
Verify the following items are ready or available,
as required:
- Forklift is ready for operation.
- Pipe racks are equipped with end stops.
- Stripping is available for trucks.
- Chocks are available for trucks.
- Thread protectors are installed on both the pin end
and box end of the collars.
Verify the size, connection, and count of the collars
and record on manifest.
READY TO LOAD DRILL COLLARS
Position truck for loading and check the following:
- Guide truck if necessary.
- Brake is set properly.
- The truck is level.
- Wheels are properly chocked.
- All stakes are in the trailer.
- 4” x 4” stripping is on truck bed.
BPS RECOMMENDS 18” or
shorter pipe racks. BPS
RECOMMENDS that the box
end faces the truck cab and all
drill collars are stripped and
chocked.
Include all third party personnel.
It is NOT A RECOMMENDED
procedure to load drill collars
with a crane on land rigs.
Only one truck to be loaded with
drill collars on location at one
time.
DO NOT get on top of drill
collars.
Refer to forklift operational
procedures.
Minimize forklift travel. MAKE
SURE truck is physically on the
location.
0
1
2
1
2
3
1
2
LO
AD
ING

STEP SUB PROCEDURE REMARKS
LOADING DRILL COLLARS
HANDLING TUBULARS
Romfor International Ltd. Motorman
2
3
4
5
6
7
8
9
10
11
Load Drill Collars from the pipe racks.
- Ensure forklift is in the center of the load and the
forks are in proper position.
-Lift drill collars, tilt forks to proper position, and
proceed to the truck.
Move Drill Collars to the truck:
-Travel with forks in lowest position.
-Travel at a SLOW rate of speed.
Load Drill Collars onto the truck.
-Carefully place collars onto 4”x4” stripping on the
truck. DO NOT drop.
-Rack drill collars orderly with forklift, as required.
Repeat steps 3 through 5 until layer is full.
Chock 4” x 4” stripping to secure bottom layer.
Place stripping boards directly over 4” x 4” bed
stripping.
Install pipe chocks at the ends of the stripping boards.
Repeat steps 3 through 9 until loaded.
Load is secured by TRUCK DRIVER.
END OF PROCEDURE
DO NOT EXCEED lifting
capacity of forklift. See forklift
JSA.
DO NOT UNDER ANY
CONDITION attempt to stop
rolling tubulars.
STAND CLEAR of forklift and
load path. DO NOT touch drill
collars at any time the collars
are on the forks.
MAKE SURE first drill collar is
secure against the bed stakes.
NEVER get on or between drill
collars. DO NOT climb onto
truck or load.
Rocks are not chocks! Use
proper chocks.
Use wood stripping only. MAKE
SURE stripping is used for each
layer. DO NOT stack without
stripping.
Rocks are not chocks! Use
proper chocks.
Romfor International Ltd. Motorman
STEP SUB PROCEDURE REMARKS
UNLOADING DRILL COLLARS
HANDLING TUBULARS
. 1
RECEIVING TUBULARS
DISCUSS TUBULAR REQUIREMENTS PRIOR TO
ARRIVAL OF GOODS TO LOCATION. PLAN FOR
REQUIRED SPACE AND SIZE OF FORKLIFT.
PPE Requirements - Hard Hat, Safety Glasses,
Work Gloves, Steel Toe Shoes, Back Support.
Review JSA for “RECEIVING TUBULARS”
Discuss procedures with Rig Manager to include:
- Manifest / material transfer requirements
- Location of tubulars.
- Unloading procedure.
- Number and position of trucks on location.
- Size of forklift required (Capacity & length
of forks).
- Pipe racks, stripping, chocks.
Verify the following items are ready or available,
as required:
- Forklift is ready for operation.
- Pipe racks are level with Catwalk, equipped
with end stops of the proper height to accommodate
all layers of pipe.
- Catwalks are level and pinned together.
- Stripping is available.
- Chocks are available.
- Tally tape and Tally book.
Verify the size, weight, grade, connection, and joint
count of the tubulars against the manifest.
READY TO UNLOAD DRILL COLLARS
BPS RECOMMENDS 18” or
shorter pipe racks. BPS
RECOMMENDS that the box-end
faces the truck cab and all tubulars
are stripped and chocked.
Include all third party personnel.
It is NOT A RECOMMENDED
procedure to unload tubulars
with a crane. Only one truck
load of tubulars on location at
one time.
Refer to forklift operational
procedures. Verify that backup
signal, brakes and emergency
brake are operational.
Use Romfor's angle iron type
chocks.
Verify that thread protectors are
installed on both the pin end and
box end of the collars.
0
1
1
2
3
1
2
UN
LO
AD
ING

STEP SUB PROCEDURE REMARKS
UNLOADING DRILL COLLARS
HANDLING TUBULARS
Romfor International Ltd. Motorman
2
2
3
4
5
6
7
Position truck for unloading and check the following:
- Guide truck if necessary.
- Brake is set properly.
- The truck is level.
- Wheels are properly chocked.
- Verify all pipe layers are properly stripped
and chocked.
Unchain load:
- Position forks of the forklift under the bottom layer
before releasing chain or strap binder.
- Verify stops are installed on the side of the trailer.
- TRUCK DRIVER releases chain or strap binder and
remove.
Unload Drill Collars:
- Ensure forklift is in the center of the load and the
forks are in proper position.
- Lift drill collars, tilt forks to proper position, and
proceed to the pipe rack.
Move Drill Collars to the pipe rack:
- Travel with forks in lowest position.
- Travel at a SLOW rate of speed.
Unload Drill Collars onto the pipe racks.
- Carefully place collars onto the pipe rack. DO NOT
drop.
- Rack drill collars orderly with forklift, as required.
Repeat steps 4 through 6 until unloaded.
END OF PROCEDURE
Minimize forklift travel. MAKE
SURE truck is physically on the
location.
DO NOT climb or walk on load.
STAND CLEAR while load is
unchained.
DO NOT UNDER ANY
CONDITION attempt to stop or
step over rolling tubulars.
DO NOT EXCEED lifting
capacity of forklift. See forklift
JSA.
STAND CLEAR of forklift and
load path. DO NOT touch drill
collars at any time the collars
are on the forks.
DO NOT stack drill collars,
place collars in single layer.
(Allow room for pickup
machine pick-up arms if
required, 2’ min). MAKE
SURE first drill collar is secure
against the chocks. NEVER get
on or between tubulars.
Romfor International Ltd.
HANDLING
TUBULARS
HANDLING
TUBULARS
MotormanMotorman
DR
IL
L P
IP
E
DRILL PIPEDRILL PIPE
Romfor International Ltd. Motorman
STEP SUB PROCEDURE REMARKS
PICKING UP DRILL PIPE
HANDLING TUBULARS
. 1
PICKING UP DRILL PIPE
This procedure is based on the assumption that
all drill pipe is unloaded, on racks; and the pickup
machine is rigged up and operational.
PPE Requirements - Hard Hat, Safety Glasses,
Work Gloves, Steel Toe Shoes, Back Support.
Review JSA for “PICKING UP DRILL PIPE”.
Fit for duty check for all hands.
Verify the following items are ready or available,
as required:
- Inspect pick up machine, sheaves and cables for
damage and proper installation.
- V-door stairs, catwalk area and other hazard areas
are roped off. Use “Caution Tape”.
- Proper lighting on pipe racks, catwalk, and V-door
- Rig lighting does not interfere with pickup machine
operator.
- Third party Flagger is assigned on rig floor and has
fluorescent vest.
- Mousehole is secured properly and in good
condition. BE AWARE of side load requirements of
the Mousehole when picking up pipe.
- Mousehole is secured under the rig floor at the
point of tension of the pick up pole.
- Pickup pole safety clamp and cover are installed
and in good condition.
- Pickup machine operator knows the safe working
load of his cables and equipment.
- Thread protectors are available.
Verify the size, weight, grade, connection, and joint
count of the drill pipe. The pipe is in the proper order
for picking up.
Include all third party personnel.
Include all third party personnel.
BPS RECOMMENDS the use of
the “trough” type pickup
machine.
Use two-way communication
equipment/ PA equipment for
Driller and PU Machine
Operator.
BPS RECOMMENDS that a
fluorescent vest be available
at the rig site.
0
1
1
2
3
1
2
PIC
KIN
G U
P
STEP SUB PROCEDURE REMARKS
PICKING UP DRILL PIPE
HANDLING TUBULARS
Romfor International Ltd.
.
Motorman
2
3
3
Establish communication links between pickup
machine operator and personnel working the pipe
racks.
Discuss emergency shut down procedures.
READY TO PICKUP DRILL PIPE
Driller is to instruct all crew members to refer to the
Best Practice procedure for each position on “Picking
up Drill Pipe”. Make sure that all procedures are
understood and followed.
It is recommended to roll all drill pipe from the
ground level.
If this is not possible, and personnel are required
to be on top of the drill pipe; then the use of
walkways are recommended. DO NOT walk on
bare drill pipe, use the walkway.
Access the walkways from the end opposite the
catwalk using a secured ladder or stairs.
PICK UP WITH PICKUP MACHINE:
Signal directions to the Pick up Machine Operator as
required.
Assist in guiding elevators over pipe in trough as
required.
Use two-way communication
equipment/ PA equipment for
pipe rollers and PU Machine
Operator.
Use Romfor’s angle iron type
chocks.
DO NOT UNDER ANY
CONDITION attempt to stop
or step over rolling tubulars.
Rig Manager Authorization is
required before any person is
permitted to go on top of the drill
pipe.
JSA must be reviewed with
direct supervision by the Rig
Manager.
DO NOT walk across pipe racks
from catwalk.
Wear fluorescent vest for
visibility.
BE AWARE of pinch points.
Use ropes attached to the
elevator’s ears.
3
0
1
2
Romfor International Ltd. Motorman
STEP SUB PROCEDURE REMARKS
PICKING UP DRILL PIPE
HANDLING TUBULARS
3
BPS RECOMMENDS picking
up only one joint at a time.
MAKE SURE the brake is
working properly.
BE AWARE of open V-Door.
Ensure drill pipe protectors are
installed.
BE AWARE of the position of
Backup Hand.
MAKE SURE Derrickman is
clear of Catwalk.
Refer to JSA on proper
operations of hoist.
MAKE SURE Backup Hand is in
proper position to tail pipe.
DO NOT ever leave hoist
unattended while supporting
load.
DO NOT throw protectors off rig
floor.
3
3
4
5
0
1
2
3
4
5
5
Tail pipe from trough to rotary using a tail rope.
Hold joint steady while Lead Tong Hand removes pin
protector.
Refer to “Trip in Hole” Procedure until next joint is in
position in trough. Repeat steps 3-1 & 3-4 until all
joints are picked up.
OR
PICK UP WITH HOIST:
Inspect condition of hoist and cable. Know the
capacity of the cable and hoist.
After Backup Hand has guided hoist line with lifting
eye to V-Door slack off line.
Slack off hoist enough so Derrickman can attach to
joint on Catwalk.
After Derrickman has attached hoist and is clear, pick
up on hoist raising joint into V-Door slowly.
Continue raising joint to proper height for tailing
position.
Hold steady with brake while Lead Tong Hand removes
thread protector,
After protector is removed and hands are clear, slowly
lower joint into Mousehole.
STEP SUB PROCEDURE REMARKS
PICKING UP DRILL PIPE
HANDLING TUBULARS
Romfor International Ltd. Motorman
4
After the line and lifting eye are removed and the line is
moved to V-door by the Backup Hand, lower line to
Catwalk.
Repeat steps 3-1 & 3-6 until all joints are picked up.
Refer to procedure for “Tripping In The Hole” or “Making
A Connection” for rig floor operations. Repeat steps 3
through 4 until all joints are picked up.
END OF PROCEDURE
6
4

Romfor International Ltd. Motorman
STEP SUB PROCEDURE REMARKS
LAY DOWN DRILL PIPE
HANDLING TUBULARS
.
LA
YIN
G D
OW
N
1
LAYING DOWN DRILL PIPE WITH
LAY-DOWN MACHINE
THIS PROCEDURE IS BASED ON THE
ASSUMPTION THAT THE LAYDOWN MACHINE IS
RIGGED UP AND THE CONNECTION IS BROKEN,
SPUN OUT AND HANGING IN ELEVATORS.
PPE Requirements - Hard Hat, Safety Glasses,
Work Gloves, Steel Toe Shoes, Back Support.
Review JSA for “LAYING DOWN DRILL PIPE”.
Fit for duty check for all hands.
Verify the following items are ready or available,
as required:
- Inspect lay-down machine, sheaves and cables for
damage and proper installation.
- V-door stairs, catwalk area and other hazard areas
are roped off. Use “Caution Tape”.
- Proper lighting on pipe racks, catwalk, and V-door
- Rig lighting does not interfere with lay-down
machine operator.
- Flagger is assigned on rig floor and has fluorescent
vest.
- Mousehole is secured properly and in good
condition. BE AWARE of side load requirements of
the Mousehole when laying down pipe.
- Mousehole is secured under the rig floor at the
point of tension of the lay-down pole.
Refer to BPS “Trip Out Of Hole
Procedure”.
Refer to BPS “Rig Up Pick up /
Lay-down Machine”
DO NOT UNDER ANY
CONDITION attempt to stop or
step over rolling tubulars.
Include all third party personnel.
Include all third party personnel.
BPS RECOMMENDS the use of
the “trough” type lay-down
machine.
Use two-way communication
equipment/ PA equipment for
Driller and LD Machine
Operator.
BPS RECOMMENDS that a
fluorescent vest be available at
the rig site.
BPS RECOMMENDS that box
and pin have protectors
installed when laying down.
Use ROMFOR'S angle iron type
chocks.
0
1
1
2
3
1
STEP SUB PROCEDURE REMARKS
LAY DOWN DRILL PIPE
HANDLING TUBULARS
Romfor International Ltd. Motorman
2
2
- Lay-down pole safety clamp and cover are installed
and in good condition.
- Lay-down machine operator knows the safe
working load of his cables and equipment.
- Thread protectors are available.
- Proper chocks and stripping are available.
Establish communication links between lay-down
machine operator and rig personnel.
Discuss emergency shut down procedures.
It is recommended to roll all drill pipe from the
ground level.
If this is not possible, and personnel are required
to be on top of the drill pipe; then the use of
walkways are recommended. DO NOT walk on
bare drill pipe, use the walkway.
Access the walkways from the end opposite the
catwalk using a secured ladder or stairs.
READY TO LAY-DOWN DRILL PIPE W/ LD MACHINE
Assist as required as pin-end thread protector is
installed.
Guide joint to trough. Be sure to not block the Driller
view.
Use two-way communication
equipment/ PA equipment for
pipe rollers and LD Machine
Operator.
Rig Manager Authorization is
required before any
personnel are permitted to
go on top of the drill pipe.
JSA must be reviewed with
direct supervision by the Rig
Manager.
DO NOT walk across pipe racks
from catwalk.
Always be aware of the
position of the trough. DO
NOT stand in path of trough.
BE AWARE of turning rotary
table, stand clear until it is
stopped.
BE AWARE of pinch points, do
not place hands on lay-down
equipment; lines, post, etc.
2
1
2
Romfor International Ltd. Motorman
STEP SUB PROCEDURE REMARKS
LAY DOWN DRILL PIPE
HANDLING TUBULARS
2
3
4
5
1
2
3
4
5
6
3
STAND CLEAR while Driller lowers joint into
trough and elevators unlatched.
Assist in guiding elevators to latch on next joint in
rotary.
Continue with “Trip Out Of Hole” procedures and repeat
“Lay Down Drill Pipe” procedures from step 2 through 5
until all drill pipe is laid down.
OR
READY TO LAY-DOWN DRILL PIPE USING
HOIST & LAY-DOWN LINE
Inspect condition of hoist and cable. Know the
capacity of the cable and hoist.
Assist in attaching secondary hoist to lay down line.
Remove Mousehole cover and guide joint into
Mousehole as Driller slowly slacks off the blocks.
When elevators are in proper position, unlatch using
proper handles
When elevators are in proper position, guide over tool
joint in rotary and latch elevators.
Refer to “Trip Out of Hole Procedures”
Stand by to operate hoist while crewmen install box-
end lifting-eye protector into joint in mouse hole.
Flag signals to Lay-Down
machine operator as required.
BE AWARE of pinch points.
BPS RECOMMENDS that drill
pipe be laid down using a lay-
down machine.
MAKE SURE the brake is
working properly.
Check condition of all lay down
components, snatch block,
lines, etc.
Watch feet while guiding pipe
into Mousehole.
DO NOT unlatch elevators until
they clear the tool joint. Be
aware of swinging elevators.
BE AWARE of pinch points
between elevators and drill pipe.

STEP SUB PROCEDURE REMARKS
LAY DOWN DRILL PIPE
HANDLING TUBULARS
Romfor International Ltd. Motorman
4
3
After hoist line has been attached to lifting-eye,
operate hoist lifting joint out of Mousehole.
Be aware of traveling equipment.
When in position, hold joint stationary using hoist
brake while floormen replace Mousehole cover and
install pin-end lifting-eye.
Hold joint stationary with hoist brake while lead tong
hand attaches lay down line to lifting-eye on pin-end.
As back up hand picks up on lay-down line pulling
joint out the V-Door slack off hoist to lower joint
slowly down V-Door until resting on catwalk.
Slack off enough to allow Derrickman to unhook hoist
line from lifting-eye.
After Derrickman has removed lifting-eyes from joint
and hooked eyes back into hoist; pick up on hoist
bringing snatch block and lifting-eyes back to rig floor.
After Floorman has removed eyes and snatch block,
make sure hoist line is secured in proper position.
Refer to “Trip Out Of Hole” procedure until next joint
is hanging in elevators then repeat steps 2-2 through
2-13 until all drill pipe is laid down.
END OF PROCEDURE
If hole conditions require moving
drill string, wait for instructions
from Driller as to when to lay
down joint.
Hold joint high enough for crew
to install eye.
DO NOT leave hoist unattended
while supporting a load.
Keep joint as low to catwalk as
possible. Take directions from
Derrickman.
MAKE SURE Derrickman is
clear of catwalk before raising
lifting eyes to rig floor.
7
8
9
10
11
12
13
Romfor International Ltd. Motorman
STEP SUB PROCEDURE REMARKS
LOADING DRILL PIPE
HANDLING TUBULARS
. 1
LO
AD
ING
LOADING DRILL PIPE
Discuss LOADING requirements prior to loading
of goods. Plan for required space and size of
forklift.
PPE Requirements - Hard Hat, Safety Glasses,
Work Gloves, Steel Toe Shoes, Back Support.
Review JSA for “LOADING TUBULARS”.
Discuss procedures with Rig Manager to include:
- Prepare manifest / material transfer requirements
- Location of tubulars.
- Loading procedure.
- Number and position of trucks on location.
- Size of forklift required (capacity & length of forks).
- Load limits of the trucks and roads.
Verify the following items are ready or available,
as required:
- Forklift is ready for operation.
- Pipe racks are equipped with end stops.
- Stripping is available for trucks.
- Chocks are available for trucks.
- Thread protectors are installed on both the pin end
and box end of the pipe.
Verify the size, weight, grade, connection, and joint
count of the tubulars and record on manifest.
READY TO LOAD DRILL PIPE
BPS RECOMMENDS 18” or
shorter pipe racks. BPS
RECOMMENDS that the box
end faces the truck cab and all
tubulars are stripped and
chocked.
DO NOT UNDER ANY
CONDITION attempt to stop or
step over rolling tubulars.
Include all third party personnel.
It is NOT A RECOMMENDED
procedure to load tubulars with a
crane on land rigs.
Only one truck to be loaded with
tubulars on location at one time.
Handle all layered pipe from the
ground.
DO NOT get on top of pipe.
Refer to forklift operational
procedures. Verify that backup
signal, brakes and emergency
brake are operational.
0
1
1
2
3
1
2

STEP SUB PROCEDURE REMARKS
LOADING DRILL PIPE
HANDLING TUBULARS
Romfor International Ltd. Motorman
2
2
3
4
5
6
7
8
9
Position truck for loading and check the
following:
-Guide truck into safe position.
-Brake is set properly.
-The truck is level.
-Wheels are properly chocked.
-All stakes are in the trailer.
-4” x 4” stripping is on truck bed.
Load Drill Pipe from the pipe racks.
- Ensure forklift is in the center of the load and the
forks are in proper position.
-Lift drill pipe, tilt forks to proper position, and proceed
to the truck.
Move Drill Pipe to the truck:
-Travel with forks in lowest position.
-Travel at a SLOW rate of speed.
Load Drill Pipe onto the truck.
-Carefully place pipe onto 4”x4” stripping on the truck.
DO NOT drop pipe.
-Rack drill pipe orderly with forklift, as required.
Repeat steps 3 through 5 until layer is full.
Chock 4” x 4” stripping to secure bottom layer.
Place stripping boards directly over 4” x 4” bed
stripping.
Install pipe chocks at the ends of the stripping boards.
Minimize forklift travel. MAKE
SURE truck is physically on the
location.
DO NOT EXCEED lifting
capacity of forklift. See forklift
JSA.
STAND CLEAR of forklift and
load path.
DO NOT touch drill pipe at any
time the pipe is on the forks.
MAKE SURE first drill pipe is
secure against the bed stakes.
NEVER get on or between
tubulars.
DO NOT climb onto truck or
load.
Rocks are not chocks! Use
proper chocks.
Use wood stripping only. MAKE
SURE stripping is used for
each layer.
DO NOT stack without
stripping.
Rocks are not chocks! Use
proper chocks.

Romfor International Ltd. Motorman
STEP SUB PROCEDURE REMARKS
LOADING DRILL PIPE
HANDLING TUBULARS
3
10
11
Repeat steps 3 through 9 until loaded.
Load is secured by TRUCK DRIVER.
END OF PROCEDURE

Romfor International Ltd. Motorman
STEP SUB PROCEDURE REMARKS
UNLOADING DRILL PIPE
HANDLING TUBULARS
. 1
RECEIVING DRILL PIPE
DISCUSS DRILL PIPE REQUIREMENTS PRIOR
TO ARRIVAL OF GOODS TO LOCATION. PLAN
FOR REQUIRED SPACE AND SIZE OF FORKLIFT.
PPE Requirements - Hard Hat, Safety Glasses,
Work Gloves, Steel Toe Shoes, Back Support.
Review JSA for “RECEIVING DRILL PIPE”
Discuss procedures with Rig Manager to include:
- Manifest / material transfer requirements
- Location of Drill Pipe.
- Unloading procedure.
- Number and position of trucks on location.
- Size of forklift required (Capacity & length of forks).
- Pipe racks, stripping, chocks.
Verify the following items are ready or available,
as required:
- Forklift is ready for operation.
- Pipe racks are level with Catwalk, equipped with end
stops of the proper height to accommodate all layers
of pipe.
- Catwalks are level and pinned together.
- Stripping is available.
- Chocks are available.
- Tally tape and Tally book.
Verify the size, weight, grade, connection, and joint
count of the Drill Pipe against the manifest.
READY TO UNLOAD DRILL PIPE
BPS RECOMMENDS 18” or
shorter pipe racks. BPS
RECOMMENDS that the box
end faces the truck cab and all
tubulars are stripped and
chocked.
DO NOT UNDER ANY
CONDITION attempt to stop or
step over rolling tubulars.
Include all third party personnel.
It is NOT A RECOMMENDED
procedure to unload Drill Pipe
with a crane. Only one truck
load of Drill Pipe on location at
one time.
Refer to forklift operational
procedures. Verify that backup
signal, brakes and emergency
brake are operational.
Use ROMFOR'S angle iron type
chocks.
Verify that thread protectors are
installed on both the pin end and
box end of the pipe.
0
1
1
2
3
1
2
UN
LO
AD
ING
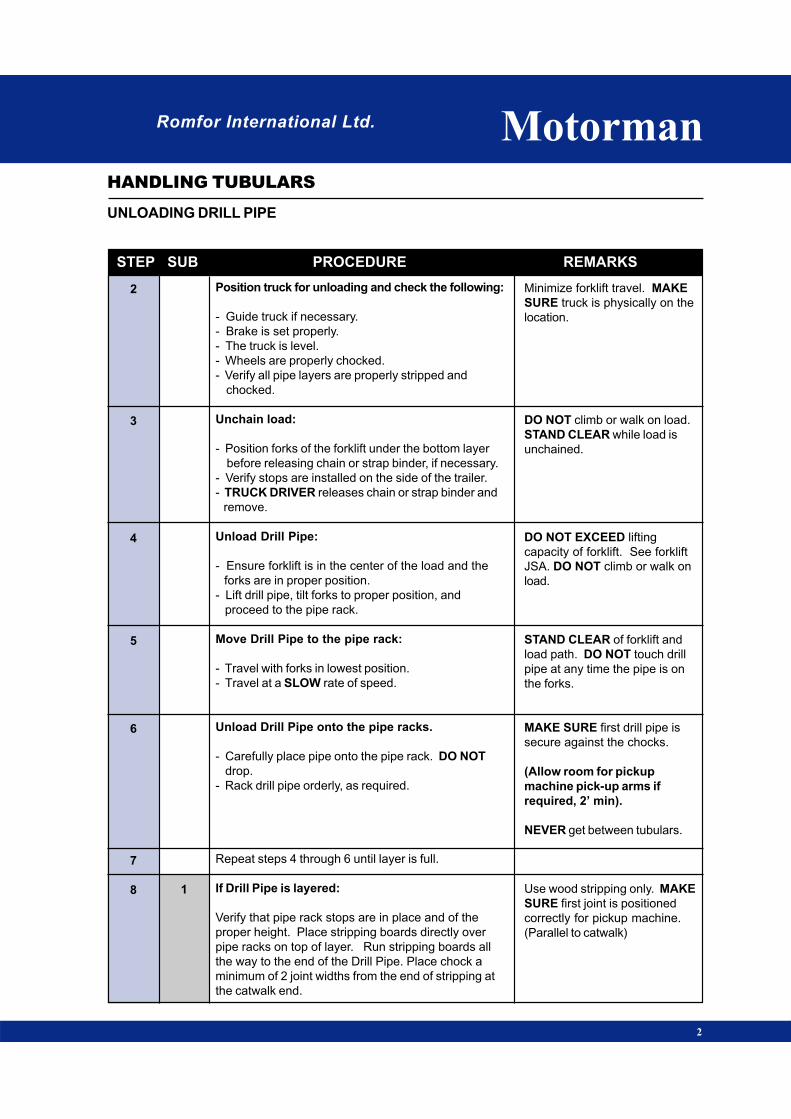
STEP SUB PROCEDURE REMARKS
UNLOADING DRILL PIPE
HANDLING TUBULARS
Romfor International Ltd. Motorman
2
2
3
4
5
6
7
8
Position truck for unloading and check the following:
- Guide truck if necessary.
- Brake is set properly.
- The truck is level.
- Wheels are properly chocked.
- Verify all pipe layers are properly stripped and
chocked.
Unchain load:
- Position forks of the forklift under the bottom layer
before releasing chain or strap binder, if necessary.
- Verify stops are installed on the side of the trailer.
- TRUCK DRIVER releases chain or strap binder and
remove.
Unload Drill Pipe:
- Ensure forklift is in the center of the load and the
forks are in proper position.
- Lift drill pipe, tilt forks to proper position, and
proceed to the pipe rack.
Move Drill Pipe to the pipe rack:
- Travel with forks in lowest position.
- Travel at a SLOW rate of speed.
Unload Drill Pipe onto the pipe racks.
- Carefully place pipe onto the pipe rack. DO NOT
drop.
- Rack drill pipe orderly, as required.
Repeat steps 4 through 6 until layer is full.
If Drill Pipe is layered:
Verify that pipe rack stops are in place and of the
proper height. Place stripping boards directly over
pipe racks on top of layer. Run stripping boards all
the way to the end of the Drill Pipe. Place chock a
minimum of 2 joint widths from the end of stripping at
the catwalk end.
Minimize forklift travel. MAKE
SURE truck is physically on the
location.
DO NOT climb or walk on load.
STAND CLEAR while load is
unchained.
DO NOT EXCEED lifting
capacity of forklift. See forklift
JSA. DO NOT climb or walk on
load.
STAND CLEAR of forklift and
load path. DO NOT touch drill
pipe at any time the pipe is on
the forks.
MAKE SURE first drill pipe is
secure against the chocks.
(Allow room for pickup
machine pick-up arms if
required, 2’ min).
NEVER get between tubulars.
Use wood stripping only. MAKE
SURE first joint is positioned
correctly for pickup machine.
(Parallel to catwalk)
1
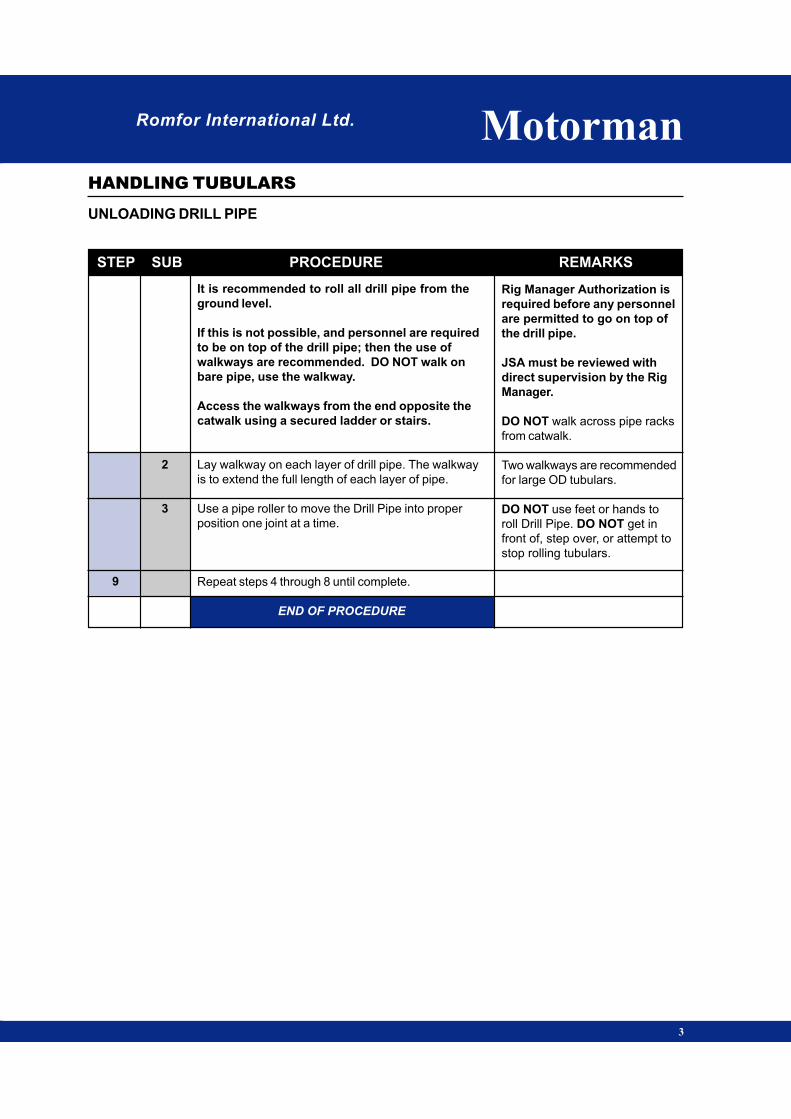
Romfor International Ltd. Motorman
STEP SUB PROCEDURE REMARKS
UNLOADING DRILL PIPE
HANDLING TUBULARS
3
Rig Manager Authorization is
required before any personnel
are permitted to go on top of
the drill pipe.
JSA must be reviewed with
direct supervision by the Rig
Manager.
DO NOT walk across pipe racks
from catwalk.
Two walkways are recommended
for large OD tubulars.
DO NOT use feet or hands to
roll Drill Pipe. DO NOT get in
front of, step over, or attempt to
stop rolling tubulars.
9
2
3
It is recommended to roll all drill pipe from the
ground level.
If this is not possible, and personnel are required
to be on top of the drill pipe; then the use of
walkways are recommended. DO NOT walk on
bare pipe, use the walkway.
Access the walkways from the end opposite the
catwalk using a secured ladder or stairs.
Lay walkway on each layer of drill pipe. The walkway
is to extend the full length of each layer of pipe.
Use a pipe roller to move the Drill Pipe into proper
position one joint at a time.
Repeat steps 4 through 8 until complete.
END OF PROCEDURE

Romfor International Ltd.
HANDLING
TUBULARS
HANDLING
TUBULARS
MotormanMotorman
PICKUP/
LAYDOWN
MACHINE
PICKUP/
LAYDOWN
MACHINE
PIC
KU
P/L
AY
DO
WN
MA
CH
IN
E

Romfor International Ltd. Motorman
STEP SUB PROCEDURE REMARKS
RIGGING DOWN PICKUP/LAYDOWN MACHINE
HANDLING TUBULARS RIG
GIN
G D
OW
N
1
RIGGING DOWN PU MACHINE
NOTE :
THIS PROCEDURE IS BASED ON THE
ASSUMPTIONS THAT THE PICKUP TROUGH AND
HYDRAULIC PICKUP ARMS ARE RIGGED DOWN
BY THE PICKUP CREW AND OUT OF THE WAY.
WHEN OPERATIONS ALLOW USE THE BLOCKS TO
LAY DOWN THE POLE FROM THE MOUSEHOLE.
PPE Requirements - Hard Hat, Safety Glasses,
Work Gloves, Steel Toe Shoes, Back Support.
Review JSA for Rigging down Pick-Up machine.
Ensure that this is the only operation being done at
this time.
Fit for duty check for all hands.
Inspect the following items as required:
V-door stairs, catwalk area and other hazard areas are
roped off.
Proper lighting on pipe racks, catwalk, and V-door.
Rig lighting does not interfere with pickup machine
operator
Flagger is assigned on rig floor and has fluorescent
vest.
READY TO RIG DOWN PICKUP POLE
Using the rig blocks, attach “pick-up” / “rig-up” line to
the pickup pole. Assist pickup crew in rigging down
and preparing pickup pole to lay down.
Include all third party personnel
and review third party JSA.
Only Romfor’ employees are
authorized to operate
Romfor’ equipment.
Include all third party personnel.
DO NOT wrap any line over
sharp edges, use snatch blocks.
0
1
2
1
2
3
1
1
2
3
4
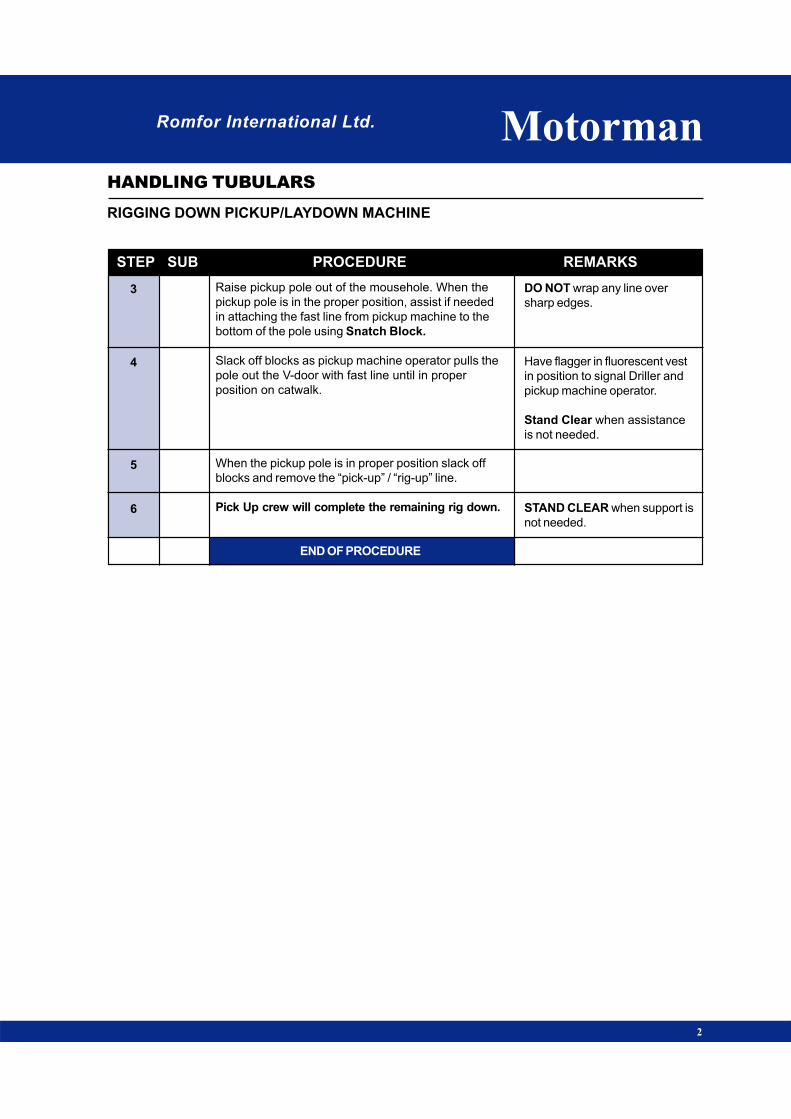
STEP SUB PROCEDURE REMARKS
RIGGING DOWN PICKUP/LAYDOWN MACHINE
HANDLING TUBULARS
Romfor International Ltd. Motorman
2
3
4
5
6
Raise pickup pole out of the mousehole. When the
pickup pole is in the proper position, assist if needed
in attaching the fast line from pickup machine to the
bottom of the pole using Snatch Block.
Slack off blocks as pickup machine operator pulls the
pole out the V-door with fast line until in proper
position on catwalk.
When the pickup pole is in proper position slack off
blocks and remove the “pick-up” / “rig-up” line.
Pick Up crew will complete the remaining rig down.
END OF PROCEDURE
DO NOT wrap any line over
sharp edges.
Have flagger in fluorescent vest
in position to signal Driller and
pickup machine operator.
Stand Clear when assistance
is not needed.
STAND CLEAR when support is
not needed.
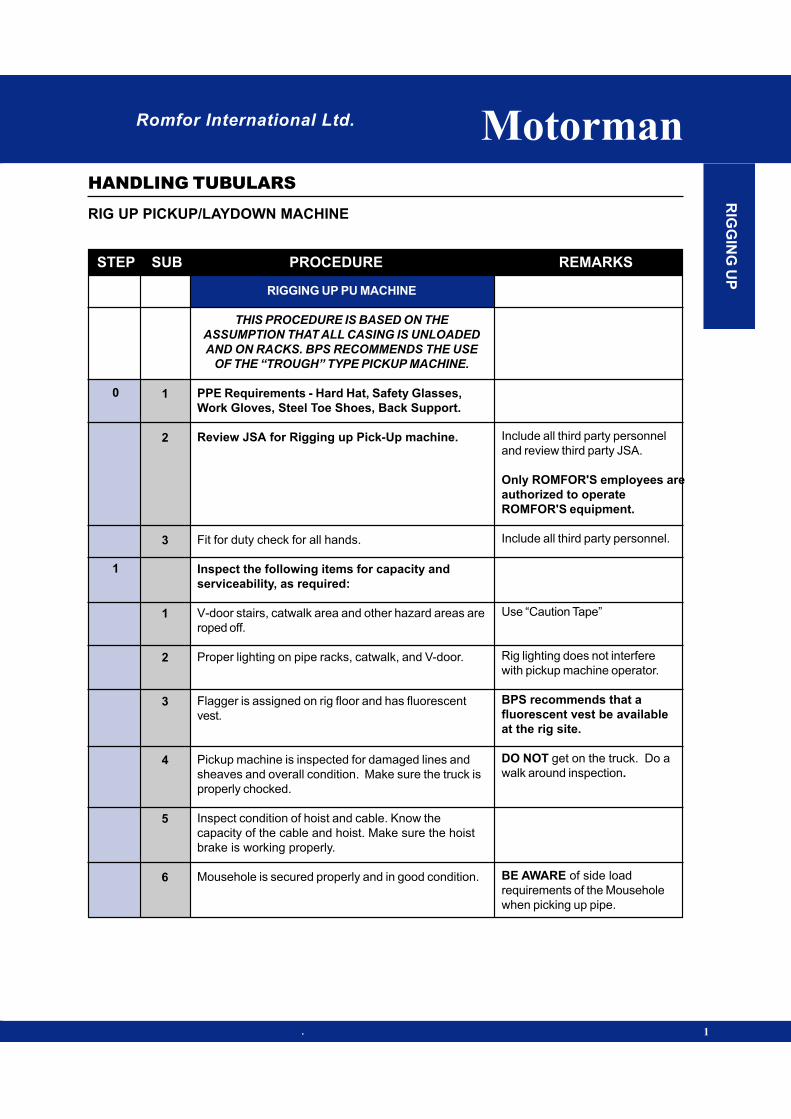
Romfor International Ltd. Motorman
STEP SUB PROCEDURE REMARKS
RIG UP PICKUP/LAYDOWN MACHINE
HANDLING TUBULARS
. 1
RIG
GIN
G U
P
RIGGING UP PU MACHINE
THIS PROCEDURE IS BASED ON THE
ASSUMPTION THAT ALL CASING IS UNLOADED
AND ON RACKS. BPS RECOMMENDS THE USE
OF THE “TROUGH” TYPE PICKUP MACHINE.
PPE Requirements - Hard Hat, Safety Glasses,
Work Gloves, Steel Toe Shoes, Back Support.
Review JSA for Rigging up Pick-Up machine.
Fit for duty check for all hands.
Inspect the following items for capacity and
serviceability, as required:
V-door stairs, catwalk area and other hazard areas are
roped off.
Proper lighting on pipe racks, catwalk, and V-door.
Flagger is assigned on rig floor and has fluorescent
vest.
Pickup machine is inspected for damaged lines and
sheaves and overall condition. Make sure the truck is
properly chocked.
Inspect condition of hoist and cable. Know the
capacity of the cable and hoist. Make sure the hoist
brake is working properly.
Mousehole is secured properly and in good condition.
Include all third party personnel
and review third party JSA.
Only ROMFOR'S employees are
authorized to operate
ROMFOR'S equipment.
Include all third party personnel.
Use “Caution Tape”
Rig lighting does not interfere
with pickup machine operator.
BPS recommends that a
fluorescent vest be available
at the rig site.
DO NOT get on the truck. Do a
walk around inspection.
BE AWARE of side load
requirements of the Mousehole
when picking up pipe.
0
1
1
2
3
1
2
3
4
5
6
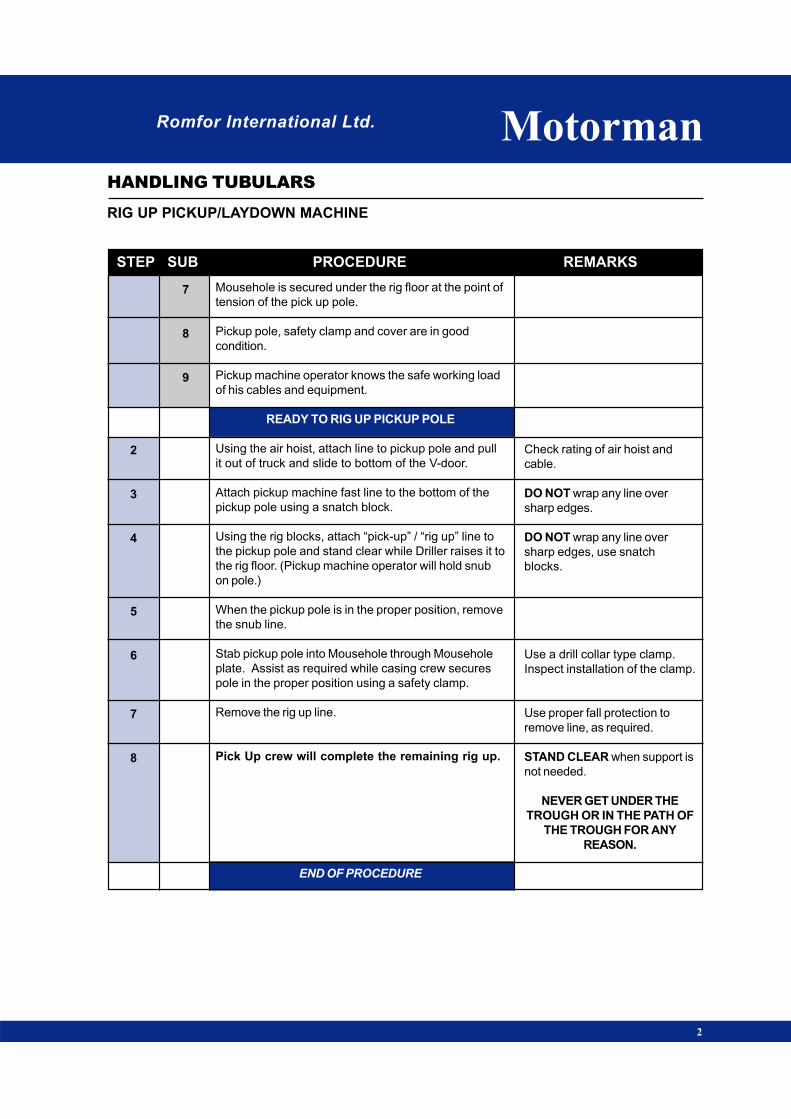
STEP SUB PROCEDURE REMARKS
RIG UP PICKUP/LAYDOWN MACHINE
HANDLING TUBULARS
Romfor International Ltd. Motorman
2
2
3
4
5
6
7
8
Mousehole is secured under the rig floor at the point of
tension of the pick up pole.
Pickup pole, safety clamp and cover are in good
condition.
Pickup machine operator knows the safe working load
of his cables and equipment.
READY TO RIG UP PICKUP POLE
Using the air hoist, attach line to pickup pole and pull
it out of truck and slide to bottom of the V-door.
Attach pickup machine fast line to the bottom of the
pickup pole using a snatch block.
Using the rig blocks, attach “pick-up” / “rig up” line to
the pickup pole and stand clear while Driller raises it to
the rig floor. (Pickup machine operator will hold snub
on pole.)
When the pickup pole is in the proper position, remove
the snub line.
Stab pickup pole into Mousehole through Mousehole
plate. Assist as required while casing crew secures
pole in the proper position using a safety clamp.
Remove the rig up line.
Pick Up crew will complete the remaining rig up.
END OF PROCEDURE
Check rating of air hoist and
cable.
DO NOT wrap any line over
sharp edges.
DO NOT wrap any line over
sharp edges, use snatch
blocks.
Use a drill collar type clamp.
Inspect installation of the clamp.
Use proper fall protection to
remove line, as required.
STAND CLEAR when support is
not needed.
NEVER GET UNDER THE
TROUGH OR IN THE PATH OF
THE TROUGH FOR ANY
REASON.
7
8
9