Embed Size (px)
Citation preview

INS
TALL
ATIO
N
MA
NU
AL
RoomWizard® IIScheduling System

Information in this document is subject to change without notice. Reproduction in any manner without written permission of Steelcase Corporation is forbidden. Steelcase Corporation reserves the right to make changes in product design, or detail, and to discontinue any product or material without notice. RoomWizard is a trademark of Steelcase, Inc. All other registered trademarks and trademarks used herein are the property of their respective owners.
Order number 10-0003133©2010 Steelcase Inc.All rights reserved.

1INSTALLATION MANUAL | RoomWizard
CONTENTS
3 WELCOME
4 HOW TO INSTALL
4 Preparing to install
6 Drywall mounting
9 Glass mounting
11 Universal mounting
16 COMPLETING INSTALLATION
17 TECHNICAL SUPPORT
18 INDEX

2 RoomWizard | INSTALLATION MANUAL
3INSTALLATION MANUAL | RoomWizard
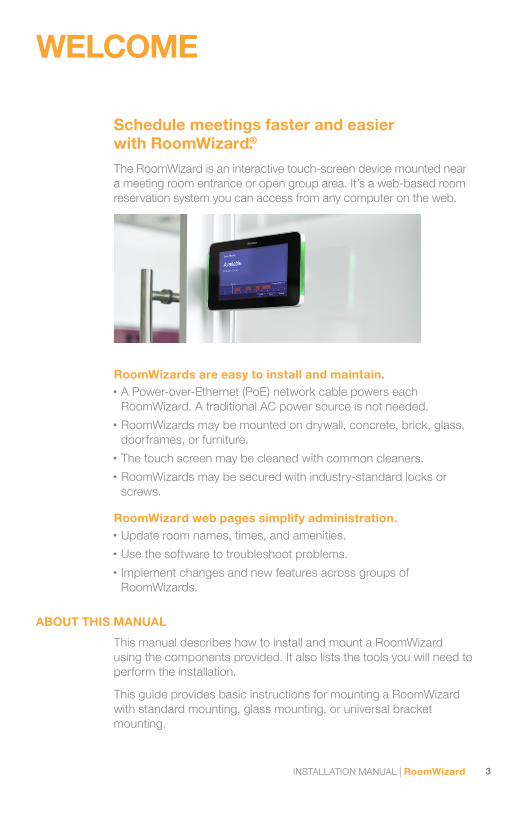
Schedule meetings faster and easier with RoomWizard®. The RoomWizard is an interactive touch-screen device mounted near a meeting room entrance or open group area. It’s a web-based room reservation system you can access from any computer on the web.
RoomWizards are easy to install and maintain.• A Power-over-Ethernet (PoE) network cable powers each
RoomWizard. A traditional AC power source is not needed.• RoomWizards may be mounted on drywall, concrete, brick, glass,
doorframes, or furniture.• The touch screen may be cleaned with common cleaners.• RoomWizards may be secured with industry-standard locks or
screws.
RoomWizard web pages simplify administration.• Update room names, times, and amenities.• Use the software to troubleshoot problems.• Implement changes and new features across groups of
RoomWizards.
ABOUT THIS MANUAL
This manual describes how to install and mount a RoomWizard using the components provided. It also lists the tools you will need to perform the installation.
This guide provides basic instructions for mounting a RoomWizard with standard mounting, glass mounting, or universal bracket mounting.
WELCOME
4 RoomWizard | INSTALLATION MANUAL
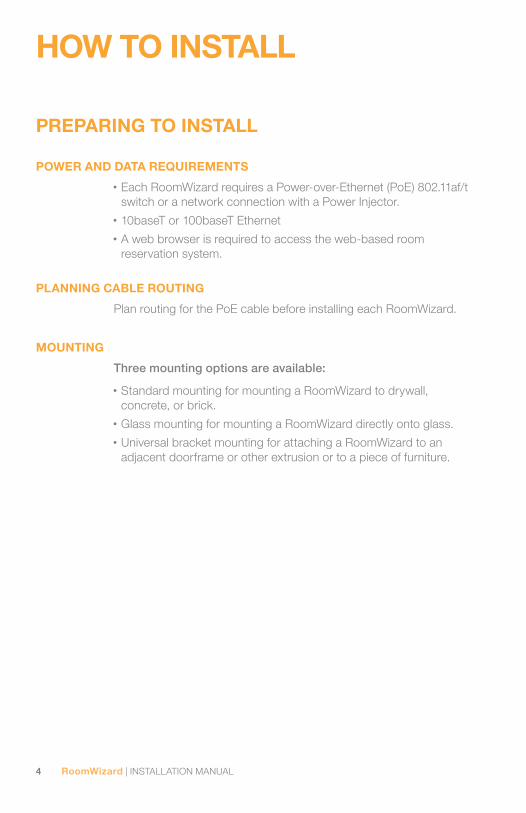
PREPARING TO INSTALL
POWER AND DATA REQUIREMENTS
• Each RoomWizard requires a Power-over-Ethernet (PoE) 802.11af/t switch or a network connection with a Power Injector.
• 10baseT or 100baseT Ethernet• A web browser is required to access the web-based room
reservation system.
PLANNING CABLE ROUTING
Plan routing for the PoE cable before installing each RoomWizard.
MOUNTING
Three mounting options are available:
• Standard mounting for mounting a RoomWizard to drywall, concrete, or brick.
• Glass mounting for mounting a RoomWizard directly onto glass.• Universal bracket mounting for attaching a RoomWizard to an
adjacent doorframe or other extrusion or to a piece of furniture.
HOW TO INSTALL
5INSTALLATION MANUAL | RoomWizard
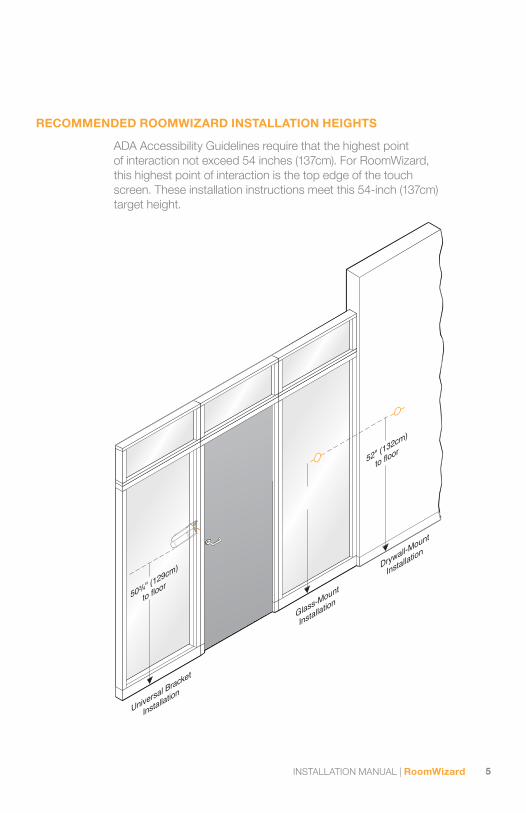
RECOMMENDED ROOMWIZARD INSTALLATION HEIGHTS
ADA Accessibility Guidelines require that the highest point of interaction not exceed 54 inches (137cm). For RoomWizard, this highest point of interaction is the top edge of the touch screen. These installation instructions meet this 54-inch (137cm) target height.
511/4" (130cm)
to floor
Universal Bracket
Installation
Glass-Mount
Installation
Drywall-Mount
Installation
503/4" (129cm)
to floor
52" (132cm)
to floor
6 RoomWizard | INSTALLATION MANUAL
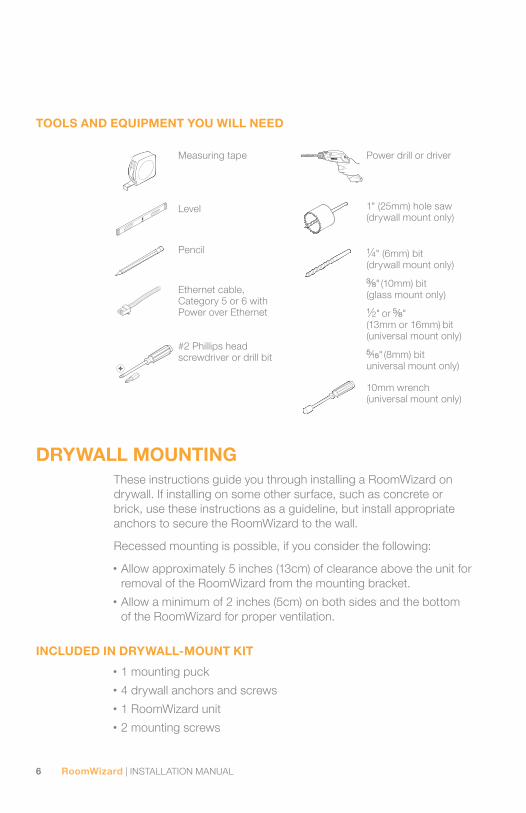
TOOLS AND EQUIPMENT YOU WILL NEED
Measuring tape
Level
Pencil
Ethernet cable, Category 5 or 6 with Power over Ethernet
#2 Phillips head screwdriver or drill bit
Power drill or driver
1" (25mm) hole saw (drywall mount only)
¼" (6mm) bit (drywall mount only)
3/8" (10mm) bit (glass mount only)
½" or 5/8" (13mm or 16mm) bit (universal mount only)
5/16" (8mm) bit universal mount only)
10mm wrench (universal mount only)
DRYWALL MOUNTINGThese instructions guide you through installing a RoomWizard on drywall. If installing on some other surface, such as concrete or brick, use these instructions as a guideline, but install appropriate anchors to secure the RoomWizard to the wall.
Recessed mounting is possible, if you consider the following:
• Allow approximately 5 inches (13cm) of clearance above the unit for removal of the RoomWizard from the mounting bracket.
• Allow a minimum of 2 inches (5cm) on both sides and the bottom of the RoomWizard for proper ventilation.
INCLUDED IN DRYWALL-MOUNT KIT
• 1 mounting puck• 4 drywall anchors and screws• 1 RoomWizard unit• 2 mounting screws
7INSTALLATION MANUAL | RoomWizard
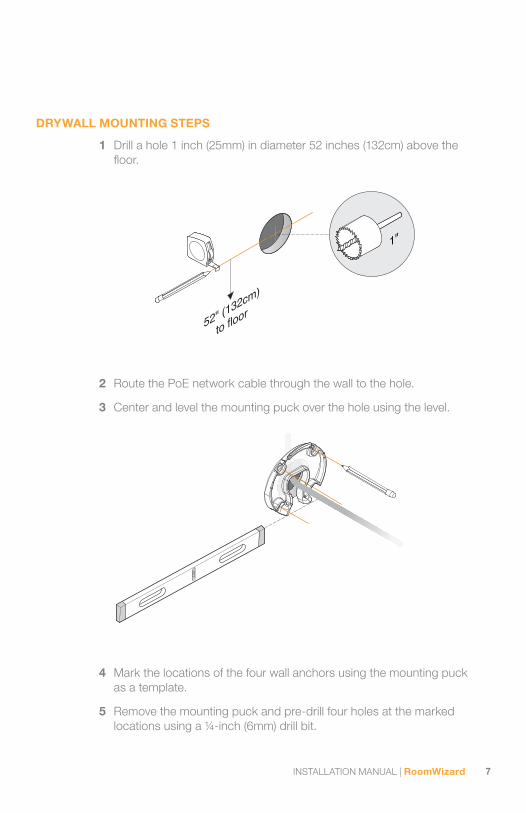
DRYWALL MOUNTING STEPS
1 Drill a hole 1 inch (25mm) in diameter 52 inches (132cm) above the floor.
52" (132cm)
to floor
1"
2 Route the PoE network cable through the wall to the hole.
3 Center and level the mounting puck over the hole using the level.
4 Mark the locations of the four wall anchors using the mounting puck as a template.
5 Remove the mounting puck and pre-drill four holes at the marked locations using a ¼-inch (6mm) drill bit.
8 RoomWizard | INSTALLATION MANUAL
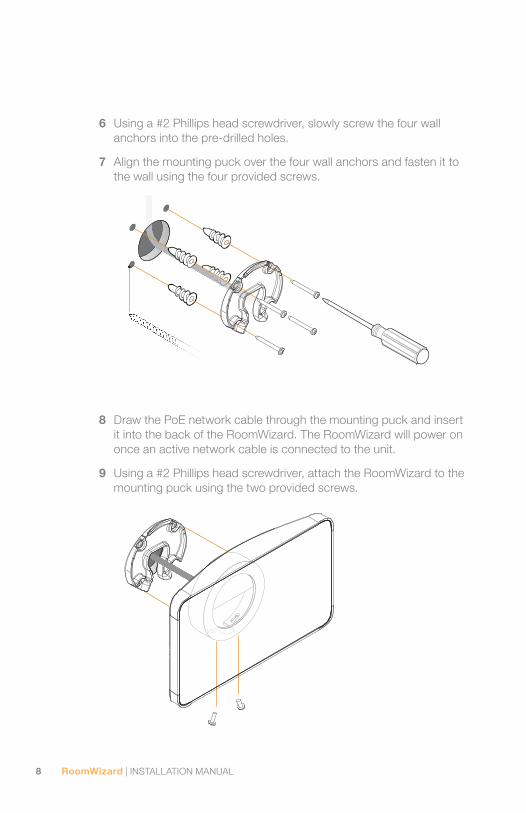
6 Using a #2 Phillips head screwdriver, slowly screw the four wall anchors into the pre-drilled holes.
7 Align the mounting puck over the four wall anchors and fasten it to the wall using the four provided screws.
8 Draw the PoE network cable through the mounting puck and insert it into the back of the RoomWizard. The RoomWizard will power on once an active network cable is connected to the unit.
9 Using a #2 Phillips head screwdriver, attach the RoomWizard to the mounting puck using the two provided screws.
9INSTALLATION MANUAL | RoomWizard
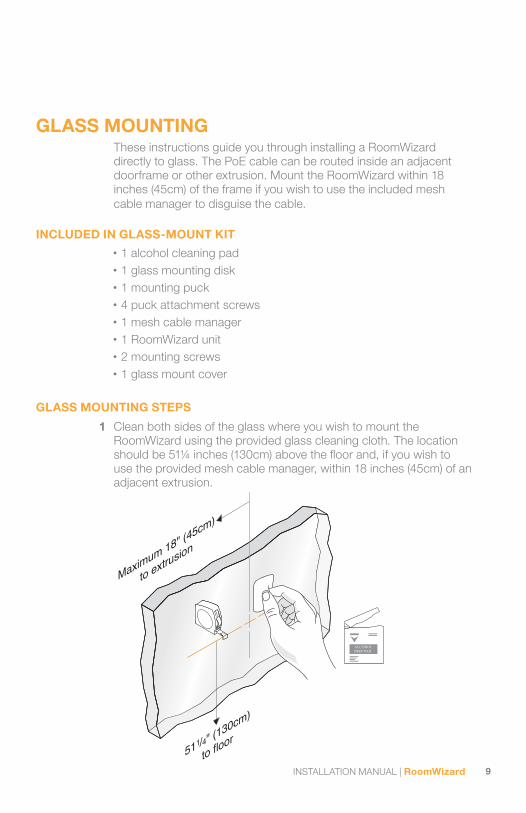
GLASS MOUNTINGThese instructions guide you through installing a RoomWizard directly to glass. The PoE cable can be routed inside an adjacent doorframe or other extrusion. Mount the RoomWizard within 18 inches (45cm) of the frame if you wish to use the included mesh cable manager to disguise the cable.
INCLUDED IN GLASS-MOUNT KIT• 1 alcohol cleaning pad• 1 glass mounting disk• 1 mounting puck• 4 puck attachment screws• 1 mesh cable manager• 1 RoomWizard unit• 2 mounting screws• 1 glass mount cover
GLASS MOUNTING STEPS
1 Clean both sides of the glass where you wish to mount the RoomWizard using the provided glass cleaning cloth. The location should be 51¼ inches (130cm) above the floor and, if you wish to use the provided mesh cable manager, within 18 inches (45cm) of an adjacent extrusion.
511/4" (130cm)
to floor
Maximum 18" (45cm)
to extrusion
ALCOHOLPREP PAD
10 RoomWizard | INSTALLATION MANUAL
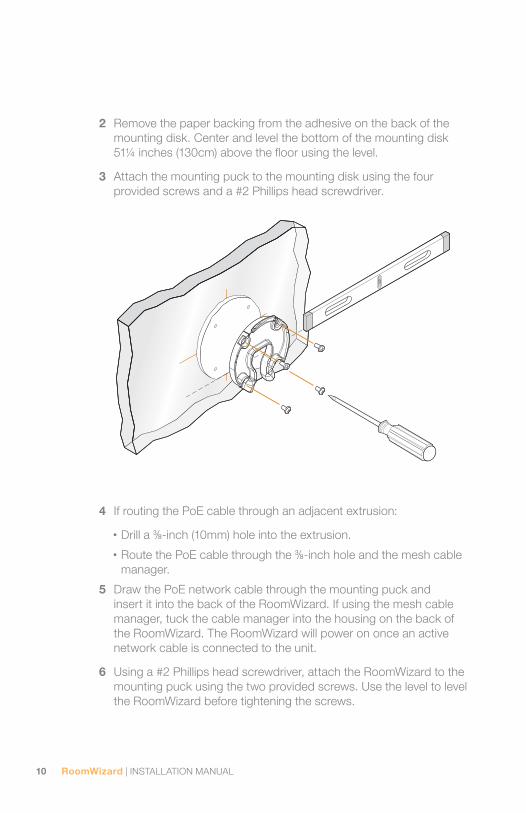
2 Remove the paper backing from the adhesive on the back of the mounting disk. Center and level the bottom of the mounting disk 51¼ inches (130cm) above the floor using the level.
3 Attach the mounting puck to the mounting disk using the four provided screws and a #2 Phillips head screwdriver.
4 If routing the PoE cable through an adjacent extrusion:
• Drill a 3/8-inch (10mm) hole into the extrusion.
• Route the PoE cable through the 3/8-inch hole and the mesh cable manager.
5 Draw the PoE network cable through the mounting puck and insert it into the back of the RoomWizard. If using the mesh cable manager, tuck the cable manager into the housing on the back of the RoomWizard. The RoomWizard will power on once an active network cable is connected to the unit.
6 Using a #2 Phillips head screwdriver, attach the RoomWizard to the mounting puck using the two provided screws. Use the level to level the RoomWizard before tightening the screws.
11INSTALLATION MANUAL | RoomWizard
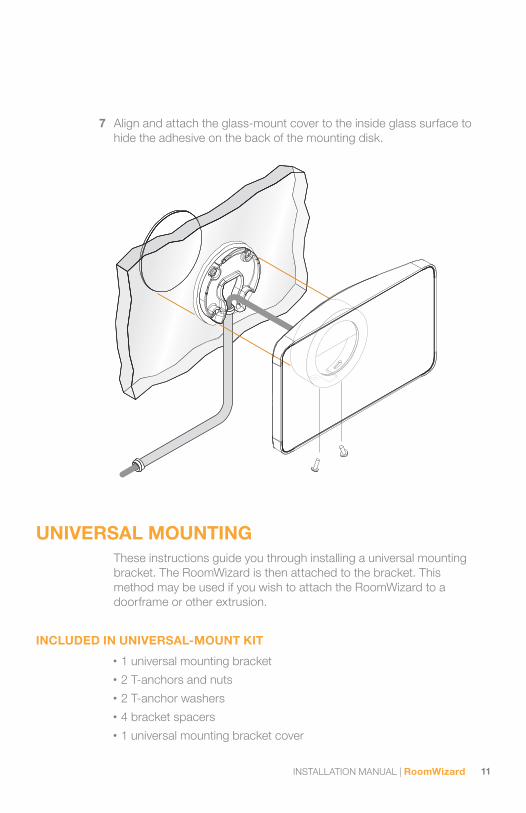
7 Align and attach the glass-mount cover to the inside glass surface to hide the adhesive on the back of the mounting disk.
UNIVERSAL MOUNTINGThese instructions guide you through installing a universal mounting bracket. The RoomWizard is then attached to the bracket. This method may be used if you wish to attach the RoomWizard to a doorframe or other extrusion.
INCLUDED IN UNIVERSAL-MOUNT KIT
• 1 universal mounting bracket• 2 T-anchors and nuts• 2 T-anchor washers• 4 bracket spacers• 1 universal mounting bracket cover
12 RoomWizard | INSTALLATION MANUAL
• 1 mounting puck• 4 puck attachment screws• 1 RoomWizard unit• 2 mounting screws
UNIVERSAL BRACKET MOUNTING STEPS
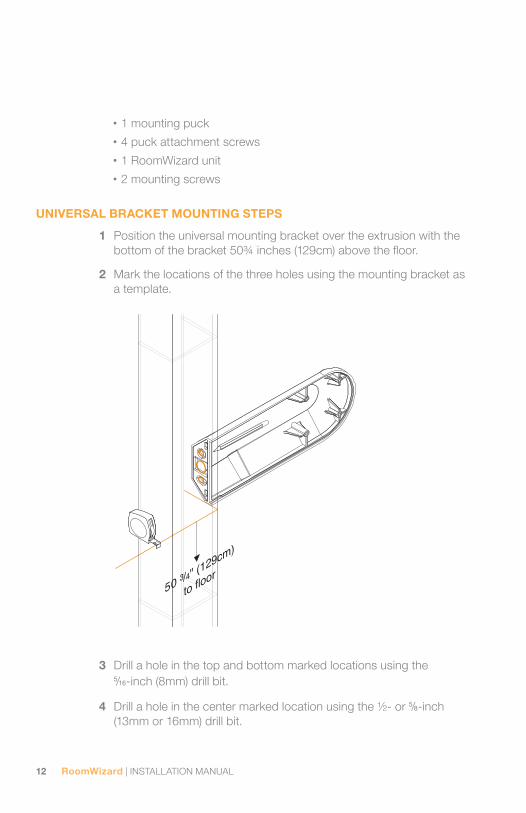
1 Position the universal mounting bracket over the extrusion with the bottom of the bracket 50¾ inches (129cm) above the floor.
2 Mark the locations of the three holes using the mounting bracket as a template.
50 3/4" (129cm)
to floor
3 Drill a hole in the top and bottom marked locations using the 5/16-inch (8mm) drill bit.
4 Drill a hole in the center marked location using the ½- or 5/8-inch (13mm or 16mm) drill bit.
13INSTALLATION MANUAL | RoomWizard
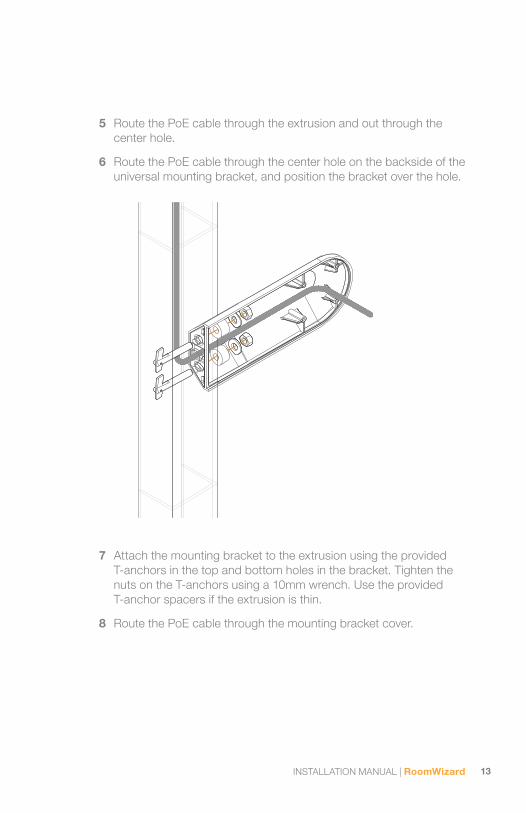
5 Route the PoE cable through the extrusion and out through the center hole.
6 Route the PoE cable through the center hole on the backside of the universal mounting bracket, and position the bracket over the hole.
7 Attach the mounting bracket to the extrusion using the provided T-anchors in the top and bottom holes in the bracket. Tighten the nuts on the T-anchors using a 10mm wrench. Use the provided T-anchor spacers if the extrusion is thin.
8 Route the PoE cable through the mounting bracket cover.
14 RoomWizard | INSTALLATION MANUAL
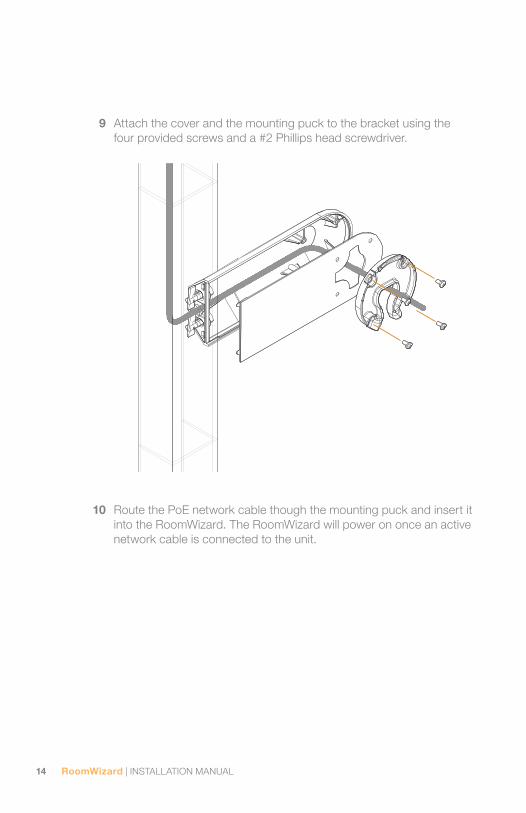
9 Attach the cover and the mounting puck to the bracket using the four provided screws and a #2 Phillips head screwdriver.
10 Route the PoE network cable though the mounting puck and insert it into the RoomWizard. The RoomWizard will power on once an active network cable is connected to the unit.

15INSTALLATION MANUAL | RoomWizard
11 Using a #2 Phillips head screwdriver, attach the RoomWizard to the mounting puck using the two provided screws. Use the level to level the RoomWizard before tightening the screws.
16 RoomWizard | INSTALLATION MANUAL
In most installations, RoomWizard installation is now complete. Depending on your installation, you may need to complete additional steps.
SECURING A ROOMWIZARD
Each RoomWizard includes a Kensington Security Slot (K-slot or Kensington Lock) to accept a Kensington or similar brand security cable and lock. If desired, insert your cable locking device into the slot on the bottom of the RoomWizard.
For additional security, tamper-resistent or security screws may be used to attach the RoomWizard to the mounting puck. Use M3.5-0.6 screws.
SUPPORTING THE VISUALLY IMPAIRED
A RoomWizard can accommodate a Braille sticker indicating the name of the room on the aluminum frame below the touch screen. For more information on how to create and apply Braille stickers, email Steelcase technical support at [email protected].
COMPLETING INSTALLATION

17INSTALLATION MANUAL | RoomWizard
In the USA and Canada, contact Steelcase USA Technical Support:
• Phone: 1.800.334.4922 (24-hour support Monday through Friday)• Email: [email protected]• URL: www.steelcase.com
Outside North America, contact Steelcase Europe/Asia Technical Support:
• Phone: +33 3 88 13 36 36 (Support available in English, French, German, and Spanish, Monday through Friday, 7:00 to 19:00 US Central Standard Time.)
• Fax: +32 (0)89 32 31 31• Email: [email protected]• URL: www.steelcase.com
TECHNICAL SUPPORT
18 RoomWizard | INSTALLATION MANUAL
INDEX
AAmericans with Disabilities
Act (ADA) 5
BBraille sticker 16
CCable routing 4
EEthernet (PoE) 3, 4
GGroups of rooms 3
MMounting 4, 6, 9, 11
PPowering on and off 8, 10, 14
SSecuring a RoomWizard 16
TTechnical support 17
VVentilation 6

19INSTALLATION MANUAL | RoomWizard

©2010 Steelcase Inc. All rights reserved. All specifications subject to change without notice. Printed in U.S.A. on 30% post-consumer recycled paper. Trademarks used herein are the property of Steelcase Inc. or of their respective owners.
Call 800.333.9939 or visit www.steelcase.com/roomwizard for product demonstrations and documentation, firmware downloads and more.