Embed Size (px)
Citation preview

Sears, Roebuck and Co., Hoffman Estates, IL 60179
Owner’s Manual
ROTARY POWER TOOLS
• Safety• Operation• Maintenance• Parts• Español, p. 23
Caution:Before using this product,read this manual and followall its Safety Rules andOperating Instructions.
2610921557 07/04
Model No. 572.611200

2
FULL ONE YEAR WARRANTY ON CRAFTSMAN ROTARY POWER TOOL
If this Craftsman Rotary Power Tool fails to give complete satisfaction within oneyear from the date of purchase, RETURN IT TO THE NEAREST SEARS STOREIN THE UNITED STATES, and Sears will repair it, free of charge.
If this Craftsman Rotary Power Tool is used for commercial or rental purposes, thiswarranty applies for only 90 days from the date of purchase.
This warranty gives you specific legal rights, and you may also have other rightswhich vary from state to state.
Sears, Roebuck and Co., Dept. 817 WA, Hoffman Estates, IL 60179
Table of Contents Page
Warranty . . . . . . . . . . . . . . . . . . . . . . . . . . . . . . . . . . . . . . . . . . . . . . . . . . . . . . . .2
Power Tool Safety Rules . . . . . . . . . . . . . . . . . . . . . . . . . . . . . . . . . . . . . . . . . .3-5
Symbols . . . . . . . . . . . . . . . . . . . . . . . . . . . . . . . . . . . . . . . . . . . . . . . . . . . . . . . . .6Functional Description and Specifications . . . . . . . . . . . . . . . . . . . . . . . . . . . . . . . . .7Assembly . . . . . . . . . . . . . . . . . . . . . . . . . . . . . . . . . . . . . . . . . . . . . . . . . . . . . .8-9
Operating Instructions . . . . . . . . . . . . . . . . . . . . . . . . . . . . . . . . . . . . . . . . . . .9-10
Speed Settings . . . . . . . . . . . . . . . . . . . . . . . . . . . . . . . . . . . . . . . . . . . . . . . .11-13
Maintenance . . . . . . . . . . . . . . . . . . . . . . . . . . . . . . . . . . . . . . . . . . . . . . . . . .14-15
Accessories . . . . . . . . . . . . . . . . . . . . . . . . . . . . . . . . . . . . . . . . . . . . . . . . . .16-18
Attachments . . . . . . . . . . . . . . . . . . . . . . . . . . . . . . . . . . . . . . . . . . . . . . . . . .19-22
Service Parts . . . . . . . . . . . . . . . . . . . . . . . . . . . . . . . . . . . . . . . . . . . . . . . . . . . .23
Español . . . . . . . . . . . . . . . . . . . . . . . . . . . . . . . . . . . . . . . . . . . . . . . . . . . . .24-48

3
Read and understand all instructions. Failure to follow all instructionslisted below, may result in electric shock, fire and/or serious personal injury.
SAVE THESE INSTRUCTIONS
POWER TOOL SAFETY RULES
! WARNING
WORK AREAKeep your work area clean and well lit.Cluttered benches and dark areas inviteaccidents.
Do not operate power tools in explosiveatmospheres, such as in the presence offlammable liquids, gases, or dust. Powertools create sparks which may ignite thedust or fumes.
Keep bystanders, children, and visitorsaway while operating a power tool.Distractions can cause you to lose control.
Electrical SafetyDouble Insulated tools are equipped witha polarized plug (one blade is wider thanthe other.) This plug will fit in a polarizedoutlet only one way. If the plug does notfit fully in the outlet, reverse the plug. If itstill does not fit, contact a qualifiedelectrician to install a polarized outlet.Do not change the plug in any way.Double Insulation eliminates the need forthe three wire grounded power cord andgrounded power supply system. Beforeplugging in the tool, be certain the outletvoltage supplied is within the voltagemarked on the nameplate. Do not use “AConly” rated tools with a DC power supply.
Avoid body contact with groundedsurfaces such as pipes, radiators, rangesand refrigerators. There is an increasedrisk of electric shock if your body isgrounded. If operating the power tool indamp locations is unavoidable, a GroundFault Circuit Interrupter must be used tosupply the power to your tool. Electrician’srubber gloves and footwear will furtherenhance your personal safety.
Don't expose power tools to rain or wetconditions. Water entering a power tool willincrease the risk of electric shock.
Do not abuse the cord. Never use thecord to carry the tools or pull the plugfrom an outlet. Keep cord away from heat,oil, sharp edges or moving parts. Replacedamaged cords immediately. Damagedcords increase the risk of electric shock.
When operating a power tool outside, usean outdoor extension cord marked "W-A"or "W." These cords are rated for outdooruse and reduce the risk of electric shock.
Personal SafetyStay alert, watch what you are doing anduse common sense when operating apower tool. Do not use tool while tired orunder the influence of drugs, alcohol, ormedication. A moment of inattention whileoperating power tools may result in seriouspersonal injury.
Dress properly. Do not wear looseclothing or jewelry. Contain long hair.Keep your hair, clothing, and gloves awayfrom moving parts. Loose clothes, jewelry,or long hair can be caught in moving parts.Keep handles dry, clean and free from oiland grease.
Avoid accidental starting. Be sure switchis “OFF” before plugging in. Carrying toolswith your finger on the switch or plugging intools that have the switch “ON” invitesaccidents.
Remove adjusting keys or wrenchesbefore turning the tool ON. A wrench or akey that is left attached to a rotating part ofthe tool may result in personal injury.
Do not overreach. Keep proper footingand balance at all times. Proper footingand balance enables better control of the toolin unexpected situations.
Use safety equipment. Always wear eyeprotection. Dust mask, non-skid safetyshoes, hard hat, or hearing protection mustbe used for appropriate conditions.
Tool Use and CareUse clamps or other practical way tosecure and support the workpiece to astable platform. Holding the work by handor against your body is unstable and maylead to loss of control.
Do not force tool. Use the correct tool foryour application. The correct tool will do thejob better and safer at the rate for which it isdesigned.
Do not use tool if switch does not turn itON or OFF. Any tool that cannot becontrolled with the switch is dangerous andmust be repaired.
Disconnect the plug from the powersource before making any adjustments,changing accessories, or storing the tool.Such preventive safety measures reduce the

4
Accessories must be rated for at least thespeed recommended on the tool warninglabel. Wheels and other accessories runningover rated speed can fly apart and causeinjury.
Hold tool by insulated gripping surfaceswhen performing an operation where thecutting tool may contact hidden wiring orits own cord. Contact with a "live" wire willmake exposed metal parts of the tool "live"and shock the operator. If cutting into existingwalls or other blind areas where electricalwiring may exist is unavoidable, disconnectall fuses or circuit breakers feeding thisworksite.
Do not operate the flexible shaft with asharp bend. Over bending the shaft cangenerate excessive heat on the jacket orhand piece. The recommended minimum is6" radius.
Always disconnect the power cord fromthe power source before making anyadjustments or attaching any accessories.You may unexpectedly cause the tool to startleading to serious personal injury.
Be aware of the switch location, whenplacing the tool down or when picking thetool up. You may accidentally activate theswitch.
Always hold the hand piece firmly in yourhands during the start-up. The reactiontorque of the motor, as it accelerates to fullspeed, can cause the shaft to twist.
Always wear safety goggles and dust
mask. Use only in well ventilated area.Using personal safety devices and working insafe environment reduces risk of injury.
After changing the bits or making anyadjustments, make sure the collet nut andany other adjustment devices are securelytightened. Loose adjustment device canunexpectedly shift, causing loss of control,loose rotating components will be violentlythrown.
Do not reach in the area of the spinningbit. The proximity of the spinning bit to yourhand may not always be obvious.
Allow brushes to run at operating speedfor at least one minute before usingwheel. During this time no one is to standin front or in line with the brush. Loosebristles or wires will be discharged during therun-in time.
Wire and bristle brushes must never beoperated at speeds greater than15,000/min. Direct the discharge of thespinning wire brush away from you. Smallparticles and tiny wire fragments may bedischarged at high velocity during the“cleaning” action with these brushes and maybecome imbedded in your skin. Bristles orwires will be discharged from the brush athigh speeds.
Carefully handle both the tool andindividual grinding wheels to avoidchipping or cracking. Install a new wheelif tool is dropped while grinding. Do notuse a wheel that may be damaged.
risk of starting the tool accidentally.
Store idle tools out of reach of childrenand other untrained persons. Tools aredangerous in the hands of untrained users.
Maintain tools with care. Keep cuttingtools sharp and clean. Properly maintainedtools, with sharp cutting edges are less likelyto bind and are easier to control. Anyalteration or modification is a misuse andmay result in a dangerous condition.
Check for misalignment or binding ofmoving parts, breakage of parts, and anyother condition that may affect the toolsoperation. If damaged, have the toolserviced before using. Many accidents arecaused by poorly maintained tools. Developa periodic maintenance schedule for yourtool.
Use only accessories that arerecommended by the manufacturer for
your model. Accessories that may besuitable for one tool, may becomehazardous when used on another tool.
ServiceTool service must be performed only byqualified repair personnel. Service ormaintenance performed by unqualifiedpersonnel could result in a risk of injury. Forexample: internal wires may be misplaced orpinched, safety guard return springs may beimproperly mounted.
When servicing a tool, use only identicalreplacement parts. Follow instructions inthe Maintenance section of this manual.Use of unauthorized parts or failure to followMaintenance Instructions may create a riskof electric shock or injury. Certain cleaningagents such as gasoline, carbontetrachloride, ammonia, etc. may damageplastic parts.
SAFETY RULES FOR ROTARY TOOLS
Fragments from a wheel that bursts duringoperation will fly away at great velocitypossibly striking you or bystanders.
Never use dull or damaged bits. Sharpbits must be handled with care. Damagedbits can snap during use. Dull bits requiremore force to push the tool, possibly causingthe bit to break.
Use clamps to support workpiecewhenever practical. Never hold a smallworkpiece in one hand and the tool in theother hand while in use. Allow forsufficient space, at least 6", between yourhand and the spinning bit. Round materialsuch as dowel rods, pipes or tubing have atendency to roll while being cut, and maycause the bit to “bite” or jump toward you.Clamping a small workpiece allows you touse both hands to control the tool.
Inspect your workpiece before cutting.When cutting irregularly shapedworkpieces, plan your work so it will notslip and pinch the bit and be torn fromyour hand. For example, if carving wood,make sure there are no nails or foreignobjects in the workpiece. Nails or foreignobjects can cause the bit to jump.
Never start the tool when the bit isengaged in the material. The bit cuttingedge may grab the material causing loss ofcontrol of the cutter.
Avoid bouncing and snagging the wheel,especially when working corners, sharpedges etc. This can cause loss of controland kick-back.
The direction of feed with the bit into thematerial when carving, routing or cuttingis very important. Always feed the bit intothe material in the same direction as thecutting edge is exiting from the material(which is the same direction as the chipsare thrown). Feeding the tool in the wrongdirection, causes the cutting edge of the bit toclimb out of the work and pull the tool in thedirection of this feed.
If the workpiece or bit becomes jammedor bogged down, turn the tool “OFF” bythe switch. Wait for all moving parts tostop and unplug the tool, then work tofree the jammed material. If the switch tothe tool is left “ON” the tool could restartunexpectedly causing serious personal injury.
Do not leave a running tool unattended,turn power off. Only when tool comes to acomplete stop it is safe to put it down.
Do not grind or sand near flammablematerials. Sparks from the wheel could ignitethese materials.
Do not touch the bit or collet after use.After use the bit and collet are too hot to betouched by bare hands.
Regularly clean the tool's air vents withcompressed air. Excessive accumulation ofpowdered metal inside the motor housingmay cause electrical failures.
Do not allow familiarity gained fromfrequent use of your rotary tool to becomecommonplace. Always remember that acareless fraction of a second is sufficient toinflict severe injury.
Do not alter or misuse tool. Any alterationor modification is a misuse and may result inserious personal injury.
This product is not intended for use as adental drill, in human or veterinarymedical applications. Serious injury mayresult.
When using the steel saws, cutoff wheels,high speed cutters or tungsten carbidecutters, always have the work securelyclamped. Never attempt to hold the workwith one hand while using any of theseaccessories. The reason is that thesewheels will grab if they become slightlycanted in the groove, and can kickbackcausing loss of control resulting in serious in-jury. Your second hand should be used tosteady and guide the hand holding the tool.When a cutoff wheel grabs, the wheel itselfusually breaks. When the steel saw, highspeed cutters or tungsten carbide cutter grab,it may jump from the groove and you couldlose control of the tool.
Some dust created bypower drilling and other
construction activities, containschemicals known to cause cancer, birthdefects or other reproductive harm. Someexamples of these chemicals are:
• Lead from lead-based paints,
• Crystalline silica from bricks and cementand other masonry products, and
• Arsenic and chromium from chemicallytreated lumber.
Your risk from these exposures varies,depending on how often you do this type ofwork. To reduce your exposure to thesechemicals, work in a well ventilated area, andwork with approved safety equipment, suchas those dust masks that are speciallydesigned to filter out microscopic particles.
Use only accessories that are sold bySears for your model. Accessories that maybe suitable for one tool may becomehazardous when used on another tool.
5
! WARNING

6
SYMBOLS
IMPORTANT! Some of the following symbols may be used on your tool. Please studythem and learn their meaning. Proper interpretation of these symbols will allow you tooperate the tool better and safer.
Symbol Name Designation/Explanation
V Volts Voltage (potential)
A Amperes Current
Hz Hertz Frequency (cycles per second)
W Watt Power
kg Kilograms Weight
min Minutes Time
s Seconds Time
Diameter Size of drill bits, grinding wheels,etc.
n0 No load speed Rotational speed, at no load
.../min Revolutions or reciprocation Revolutions, strokes, surface speed, per minute orbits etc. per minute
0 Off position Zero speed, zero torque...
1, 2, 3, ... Selector settings Speed, torque or position settings.I, II, III, Higher number means greater speed
Infinitely variable selector with off Speed is increasing from 0 setting
Arrow Action in the direction of arrow
Alternating current Type or a characteristic of current
Direct current Type or a characteristic of current
Alternating or direct current Type or a characteristic of current
Class II construction Designates Double Insulated Construction tools.
Earthing terminal Grounding terminal
Warning symbol Alerts user to warning messages
Ni-Cad RBRC seal Designates Ni-Cad battery recyclingprogram
0
This symbol designatesthat this tool is listed byUnderwriters Laboratories.
This symbol designatesthat this tool is listed bythe Canadian StandardsAssociation.
This symbol designatesthat this tool is listed bythe Canadian StandardsAssociation, and is listedto US Standards by CSA.
This symbol designatesthat this tool is listed toCanadian Standards byUnderwritersLaboratories.
This symboldesignatesthatthis toolcompliesto NOMMexicanStandards.
This symbol designates thatthis tool is listed byUnderwriters Laboratories,and listed to CanadianStandards by UnderwritersLaboratories.

7
FUNCTIONAL DESCRIPTION AND SPECIFICATIONS
Shaft Lock Button
On/Off Switch
Collet Wrench
Collet Nut
Collet
Brush Cover(one each side)
Housing Cap
Ventilation Openings
Hanger Power Cord
Variable Speed Switch
Unpacking & Checking ContentsTo avoid injury fromunexpected starting or
electrical shock, always remove plugfrom wall outlet when tool is not in use.
Separate all loose parts from packingmaterials and check each item with thecontents listed on the carton to make sure allitems are accounted for before discardingany packing material.
DescriptionThe Rotary Tool incorporates both high-speed and performance to serve as acarver, grinder, polisher, sander, cutter,power brush, drill, and more.
The tool utilizes a small, but effective DC
motor. The large variety of availableaccessories includes abrasive wheels, drillbits, wire and nylon brushes, engraving andcarving cutters, router bits, polishing pointsand more. The ability to add differentattachments adds to the multi-faceted usesof the tool. The variety of projects you cando with the tool is limitless.
The Rotary Tool is a high-speed tool andoperates at speeds 5,000 to 35,000 RPM. (Atypical electric drill operates only up to 2500RPM!). When used with accessories andattachments, the rotary tool’s high speedperformance allows you to work on even themost demanding projects without having toexert undue pressure on the tool. The tooldoes the work for you.
WARNING!
NOTE:! For tool specifications, refer to the nameplate on your tool.

8
ASSEMBLY
Shaft Lock Button
Collet Wrench
ToTighten
ToLoosen
Collet Nut
1/8" Collet (480)
3/32" Collet (481)
1/16" Collet (482)
1/32" Collet (483)
Collet Nut
Always use the colletwhich matches the shank
size of the accessory you plan to use. Donot force a larger diameter shank into asmaller collet.
Always unplug rotarytool before changing
accessories, changing collets, orservicing the tool.
WARNING!
ColletsThe Craftsman accessories available for therotary tool come with various shank sizes.
Four size collets are available toaccommodate the different shank sizes.Collet sizes are identified by the rings on theback of the collet:
• 1/32" collet has 1 ring (No. 483)
• 1/16" collet has 2 rings (No. 482)
• 3/32" collet has 3 rings (No. 481)
• 1/8" collet has no rings (No. 480)
NOTE: Some rotary tool kits may not includeall four collet sizes. Collets are availableseparately.
2. With the shaft lock button engaged,loosen and remove the collet nut. Usethe collet wrench if necessary.
3. Remove the collet by pulling it free fromthe shaft.
4. Install the appropriate size collet fullyinto the shaft and reinstall the collet nutfinger tight. Do not fully tighten the nutwhen there is no bit or accessoryinstalled.
Changing Collets1. Press the shaft lock button, hold down
and rotate the shaft by hand until itengages the shaft.
Do not engage the shaftlock button while rotary
tool is running.
CAUTION!
WARNING!
Changing Accessories1. Press the shaft lock button and rotate
the shaft by hand until it engages theshaft lock.
Do not engage the shaftlock button while rotary
tool is running.
2. With the shaft lock button engaged,loosen (do not remove) the collet nut.Use the collet wrench if necessary.
3. Insert the bit or accessory shank fullyinto the collet.
4. With the shaft lock button engaged,finger tighten the collet nut until the bit oraccessory shank is gripped by the collet.
NOTE: Be sure to read the instructionssupplied with your Craftsman accessory forfurther information on its use.
WARNING!
Shaft Lock Button

9
ASSEMBLY (CONTINUED)
OPERATING INSTRUCTIONSLearning To Use the Rotary Tool
Getting the most out of your rotary tool is amatter of learning how to let the speed andthe feel of the tool in your hands work foryou.
The first step inlearning to use therotary tool is to getthe “feel” of it. Hold itin your hand and feelits weight andbalance. Feel the
taper of the housing. This taper permits thetool to be grasped much like a pen or pencil.The unique comfort grip on the nose allowsfor added comfort and control during use.
Always hold the toolaway from your face.
Accessories can be damaged duringhandling and can fly apart as they comeup to speed. This is not common, but itdoes happen.
When holding tool, do notcover the air vents with
your hand. Blocking the air vents couldcause the motor to overheat.
IMPORTANT! Practice on scrap materialfirst to see how the tool’s high-speed actionperforms. Keep in mind that your rotary toolwill perform best by allowing the speed,along with the correct Craftsman accessoryand attachment, do the work for you. Do notput pressure on the tool during use, ifpossible.
Instead, lower the spinning accessory lightlyto the work surface and allow it to touch thepoint at which you want to begin.Concentrate on guiding the tool over the
WARNING!
CAUTION!
work using very little pressure from yourhand. Allow the accessory to do the work.
Usually it is better to make a series ofpasses with the tool rather than to do theentire job with one pass. A gentle touchgives the best control and reduces thechance for error.
24
2
4
For best control in close work, grip the rotarytool like a pencil between your thumb andforefinger.
The “golf” grip method is used for moreaggressive operations such as grinding orcutting.
Keyless ChuckThe keyless chuck is used in place of thestandard collet and collet nut to easily andquickly remove and install some accessories.
The keyless chuck holds various accessorieswith shank sizes 1/32" to 1/8" and is intendedfor light duty accessories such as drill bits,sanding drums, polishing accessories, wireand bristle brushes and cut-off wheels.
1. See steps 1—3, Changing Collets onpage 8 to install the keyless chuck.
2. Thread the keyless chuck onto the rotarytool shank.
Keyless Chuck
3. Use the supplied wrench to completelytighten the keyless chuck if you areunable to apply sufficient tighteningpressure to hold the bit or accessory.

10
OPERATING INSTRUCTIONS (CONTINUED)
2
4
Operating SpeedsTo achieve the best results when workingwith different materials, set the variablespeed control to suit the job. To select theright speed for the accessory in use, practicewith scrap material first.
NOTE: Speed is affected by voltage changes. Areduced incoming voltage will slow the RPM ofthe tool, especially at the lowest setting. If your toolappears to be running slowly, increase the speedsetting accordingly. The tool may not start at thelowest switch setting in areas where outlet voltageis less than 120 volts. Simply move the speedsetting to a higher position to begin operation.
The Rotary Tool switch settings are markedon the speed control dial. Refer to the SpeedSettings tables on pages 11 thru 13 for thecorrect speeds for specific accessories andmaterials.
Most jobs can be accomplished using thetool at the highest setting. However, certainmaterials (some plastics and metals) can bedamaged by high-speed generated heat andshould be worked on at relatively slowspeeds.
Slow speed operation (15,000 RPM or less)is usually best for polishing operationsemploying the felt polishing accessories,delicate wood carving and fragile modelparts. All brushing applications require lowerspeeds to avoid wire discharge from theholder. Let the performance of the tool do thework for you when using lower speedsettings.
Higher speeds are better for drilling, carving,cutting, routing, shaping, cutting dadoes orrabbets in wood. Hardwoods, metals andglass require high speed operation also.
The settings for approximate RPM’s are:
Switch Setting Speed Range RPM
2 5,000-8,000
4 9,000-11,000
6 12,000-17,000
8 18,000-24,000
10 25,000-35,000
Some guidelines regarding tool speed:
• There is no accessory for the CraftsmanRotary tool that will drill or cut glass.
• Plastic and other materials that melt at lowtemperatures should be cut at low speeds.
• Polishing, buffing and cleaning with a wirebrush must be done at speeds not greaterthan 15,000 RPM to prevent damage tothe brush and your material.
• Wood should be cut at high speed.
• Iron or steel should be cut at high speed.
• If a high speed steel cutter starts tovibrate, it usually indicates that it isrunning too slow.
• Aluminum, copper alloys, lead alloys, zincalloys and tin may be cut at variousspeeds, depending on the type of cuttingbeing done. Use a paraffin (not water) orother suitable lubricant on the cutter toprevent the cut material from adhering tothe cutter teeth.
NOTE: Increasing pressure on the tool is notthe answer when it is not performingproperly. Try a different accessory or speedsetting to achieve the desired result. Pleaserefer to the following Speed Setting tables.
Set the Speed Control to the desired setting.

11
SPEED SETTINGS
CatalogNumber2501425012, 5307025011, 530882508825016
Soft Hard Laminates Steel Aluminum, Shell Ceramic GlassWood Wood Plastic Brass, etc. Stone
10 6 4 6 6 - - -10 10 4 6 10 - - -10 6 4 6 610 10 4 6 6 - - -10 6 4 6 6 - - -
High Speed Cutters
CatalogNumber530745311253076
Soft Hard Laminates Steel Aluminum, Shell Ceramic GlassWood Wood Plastic Brass, etc. Stone
10 10 6 8 6 - - -10 10 6 8 6 - - -10* 10* 6* 8 3 - - -
Small Engraving Cutters
CatalogNumber53137
Soft Hard Laminates Steel Aluminum, Shell Ceramic GlassWood Wood Plastic Brass, etc. Stone
10 8 - - - 10 10 10
Diamond Wheel Points
CatalogNumber53108, 53138
Soft Hard Laminates Steel Aluminum, Shell Ceramic GlassWood Wood Plastic Brass, etc. Stone
10 8 4 - 6 - - -
Structured Tooth Tungsten Carbide Cutters
CatalogNumber53071, 53072,5310453073, 53105
Soft Hard Laminates Steel Aluminum, Shell Ceramic GlassWood Wood Plastic Brass, etc. Stone
10 8 4 10 6 8 8-10 8-10
- - - - - 8 8-10 8-10
Tungsten Carbide Cutters
Use only Craftsman, high performance accessories.
CatalogNumber53071, 7309653111, 53090,5309153092
Soft Hard Laminates Steel Aluminum, Shell Ceramic GlassWood Wood Plastic Brass, etc. Stone
10 6 - - - - - -10 10 - - - - - -
10 8 - - - - - -
High Speed Router Bits(Use with cutting guide or shaper/router table)
CatalogNumber53079, 25062,25063
Soft Hard Laminates Steel Aluminum, Shell Ceramic GlassWood Wood Plastic Brass, etc. Stone
- - 6 10 4 6 10 10
Silicon Carbide Grinding Stones

12
SPEED SETTINGS (CONTINUED)
Soft Hard Laminates Steel Aluminum, Shell Ceramic GlassWood Wood Plastic Brass, etc. Stone
- - - 6 6 6 6 6- - - 6-8 6-8 6-8 6-8 6-84 4 2-4 6 6 - - -- 4 - 4 - - - -6 6 2 6 6 - - -
4 4 - 4 4 4 - -
CatalogNumber5308226033531105312025038,25039,5308753131
Polishing Accessories
CatalogNumber25024, 53114,5308853165531345313453136
Soft Hard Laminates Steel Aluminum, Shell Ceramic GlassWood Wood Plastic Brass, etc. Stone8-10 8-10 2-4 10 10 10 10 -
10 8-10 2-4 - - - - -For use on drywall. For best results, use at 35,000 rpm.
6-10 6-10 2-4 - 10 - - -- - - - - - 10 -
Cutting Accessories(See Warning-page 6)
CatalogNumber53116, 53117,5311825042, 53083,2504353084
Soft Hard Laminates Steel Aluminum, Shell Ceramic GlassWood Wood Plastic Brass, etc. Stone2-10 2-10 2-6 10 10 2-10 2-10 -
2-10 2-10 2-6 10 10 2-10 2-10 -
8 8 2-4 - 2- 4 - - -
Sanding Bands and Discs
CatalogNumber25046, 25049,2505325057, 25059
Soft Hard Laminates Steel Aluminum, Shell Ceramic GlassWood Wood Plastic Brass, etc. Stone
10 10 - 8 4 6 10 -
10 10 - 8 4 6 10 -
Aluminum Oxide Grinding Stones
CatalogNumber36581, 36583
Soft Hard Laminates Steel Aluminum, Shell Ceramic GlassWood Wood Plastic Brass, etc. Stone
- - - 10 - - - -
Chain Saw Sharpening Stones
Use only Craftsman, high performance accessories.

13
SPEED SETTINGS (CONTINUED)
CatalogNumber53138, 53162
Soft Hard Laminates Steel Aluminum, Shell Ceramic GlassWood Wood Plastic Brass, etc. Stone
10 8 2 10 8-10 - - -
Flapwheels
CatalogNumber53164
Soft Hard Laminates Steel Aluminum, Shell Ceramic GlassWood Wood Plastic Brass, etc. Stone
6 6 4 6 6 - - -
Finishing Abrasive Buffs
CatalogNumber53166
Soft Hard Laminates Steel Aluminum, Shell Ceramic GlassWood Wood Plastic Brass, etc. Stone
For use on wall and floor grout. - 6-8Use with grout removal cutting guide.
Grout Removal Bits
Use only Craftsman, high performance accessories.

14
MAINTENANCE
"V" Notch
Preventative maintenanceperformed by unauthorized
personnel may result in misplacing ofinternal wires and components which couldcause serious hazard. We recommend thatall tool service be performed by a SearsParts and Repair Centers.
To avoid injury fromunexpected starting or
electrical shock, always remove plugfrom wall outlet before performingservice or cleaning.
Carbon BrushesThe brushes in your tool have beenengineered for many hours of dependableservice.
To prepare the brushes for use, run the toolat full speed for 5 minutes under no load.This will properly “seat” the brushes, andextend the life of the tool.
To maintain peak efficiency of the motor,examine the brushes for wear every 50-60hours.
Using the tool with wornbrushes will permanently
damage the motor.
Use only original Craftsman replacementbrushes.
Inspect the rotary tool brushes after 40-50hours of use. If the rotary tool runserratically, loses power, or makes unusualnoises check the brushes for wear andpossible replacement. Remember: brushesin the rotary tool are similar to oil in a car;the more you check/service, the better theperformance.
Follow these steps to check/change therotary tool brushes.
1. With the power cord unplugged, placethe tool on a clean surface. Use the toolwrench to pry up and release the clip onthe brush cover (Figure A).
2. Remove the brushes from the tool bypulling the shunt and brass clip whichare attached to the brush (Figure B).
NOTE: Be sure to note how the brass clipslides out of the slot next to the brushpocket. Also, note how the detent on brassclip fits into brush pocket slot, which securesthe brass clip into proper position.
3. Check each brush for wear. If brush isless than 3/8" long, or if contact end isrough or pitted, replace the brush.
WARNING!
WARNING!
2
4
Removing Brush Cover
Removing/Inspecting Brushes
Installing Brushes
CAUTION!
A
B
C

15
MAINTENANCE (CONTINUED)
4. Install existing or new brushes so thecurved surface of the brush endmatches the curvature of the motorcommutator (as seen through the brushopening).
NOTE: The detent on the brass clip must fitinto the slot on the side of the brush pocket,which secures the brass clip in the properposition (Figure C).
5. Reinstall brush covers by angling thenon-clip end into the opening. Makecertain brush spring is centered in the“V” notch on brush, then snap closedthe clip end of the brush cover.
6. Plug power cord into a wall outlet. Runthe rotary tool at ful l speed for 5minutes under no load. This wil lproperly seat the brushes and extendthe life of the tool.
Tool LubricationThere is no need to lubricate the rotary tool.
Cleaning The ToolVentilation openings and switch levers mustbe kept clean and free of foreign matter. Donot attempt to clean by inserting pointedobjects through openings.
The tool may be cleanedwith compressed air.Always wear safety goggleswhen cleaning tool withcompressed air.
Certain cleaning agentsand solvents will damage
plastic parts. Some of these are:gasoline, carbon tetrachloride,chlorinated cleaning solvents, ammoniaand household detergents that containammonia.
Clean the “soft grip” areas of the tool using adamp cloth. Tougher soiled areas mayrequire more than one wipe application toget clean.
CAUTION!
16
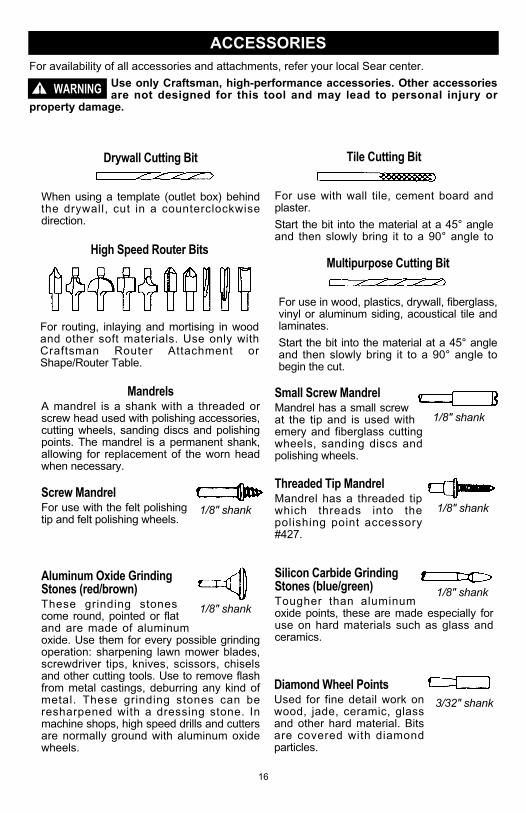
For availability of all accessories and attachments, refer your local Sear center.
Use only Craftsman, high-performance accessories. Other accessoriesare not designed for this tool and may lead to personal injury or
property damage.
Screw MandrelFor use with the felt polishingtip and felt polishing wheels.
MandrelsA mandrel is a shank with a threaded orscrew head used with polishing accessories,cutting wheels, sanding discs and polishingpoints. The mandrel is a permanent shank,allowing for replacement of the worn headwhen necessary.
Drywall Cutting Bit
When using a template (outlet box) behindthe drywall, cut in a counterclockwisedirection.
Multipurpose Cutting Bit
For use in wood, plastics, drywall, fiberglass,vinyl or aluminum siding, acoustical tile andlaminates.
Start the bit into the material at a 45° angleand then slowly bring it to a 90° angle tobegin the cut.
High Speed Router Bits
For routing, inlaying and mortising in woodand other soft materials. Use only withCraftsman Router Attachment orShape/Router Table.
WARNING!
Tile Cutting Bit
For use with wall tile, cement board andplaster.
Start the bit into the material at a 45° angleand then slowly bring it to a 90° angle to
Small Screw MandrelMandrel has a small screwat the tip and is used withemery and fiberglass cuttingwheels, sanding discs andpolishing wheels.
Threaded Tip Mandrel Mandrel has a threaded tipwhich threads into thepolishing point accessory#427.
Diamond Wheel PointsUsed for fine detail work onwood, jade, ceramic, glassand other hard material. Bitsare covered with diamondparticles.
Aluminum Oxide GrindingStones (red/brown)These grinding stonescome round, pointed or flatand are made of aluminumoxide. Use them for every possible grindingoperation: sharpening lawn mower blades,screwdriver tips, knives, scissors, chiselsand other cutting tools. Use to remove flashfrom metal castings, deburring any kind ofmetal. These grinding stones can beresharpened with a dressing stone. Inmachine shops, high speed drills and cuttersare normally ground with aluminum oxidewheels.
Silicon Carbide GrindingStones (blue/green)Tougher than aluminumoxide points, these are made especially foruse on hard materials such as glass andceramics.
1/8" shank
1/8" shank
1/8" shank
1/8" shank
1/8" shank
3/32" shank
ACCESSORIES
17
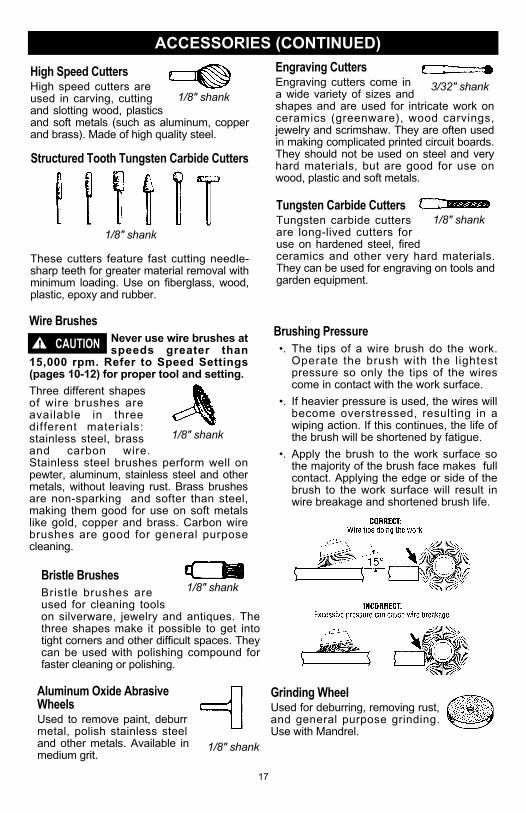
Wire BrushesNever use wire brushes atspeeds greater than
15,000 rpm. Refer to Speed Settings(pages 10-12) for proper tool and setting.
Three different shapesof wire brushes areavailable in threedifferent materials:stainless steel, brassand carbon wire.Stainless steel brushes perform well onpewter, aluminum, stainless steel and othermetals, without leaving rust. Brass brushesare non-sparking and softer than steel,making them good for use on soft metalslike gold, copper and brass. Carbon wirebrushes are good for general purposecleaning.
Tungsten Carbide CuttersTungsten carbide cuttersare long-lived cutters foruse on hardened steel, firedceramics and other very hard materials.They can be used for engraving on tools andgarden equipment.
High Speed CuttersHigh speed cutters areused in carving, cuttingand slotting wood, plasticsand soft metals (such as aluminum, copperand brass). Made of high quality steel.
Engraving CuttersEngraving cutters come ina wide variety of sizes andshapes and are used for intricate work onceramics (greenware), wood carvings,jewelry and scrimshaw. They are often usedin making complicated printed circuit boards.They should not be used on steel and veryhard materials, but are good for use onwood, plastic and soft metals.
Structured Tooth Tungsten Carbide Cutters
These cutters feature fast cutting needle-sharp teeth for greater material removal withminimum loading. Use on fiberglass, wood,plastic, epoxy and rubber.
Bristle BrushesBristle brushes areused for cleaning toolson silverware, jewelry and antiques. Thethree shapes make it possible to get intotight corners and other difficult spaces. Theycan be used with polishing compound forfaster cleaning or polishing.
CAUTION!Brushing Pressure•. The tips of a wire brush do the work.
Operate the brush with the lightestpressure so only the tips of the wirescome in contact with the work surface.
•. If heavier pressure is used, the wires willbecome overstressed, resulting in awiping action. If this continues, the life ofthe brush will be shortened by fatigue.
•. Apply the brush to the work surface sothe majority of the brush face makes fullcontact. Applying the edge or side of thebrush to the work surface will result inwire breakage and shortened brush life.
Aluminum Oxide AbrasiveWheelsUsed to remove paint, deburrmetal, polish stainless steeland other metals. Available inmedium grit.
Grinding WheelUsed for deburring, removing rust,and general purpose grinding.Use with Mandrel.
1/8" shank
1/8" shank
1/8" shank
1/8" shank
1/8" shank
3/32" shank
1/8" shank
ACCESSORIES (CONTINUED)

18
ACCESSORIES (CONTINUED)
ATTACHMENTS
Sanding AccessoriesSanding discs in fine,medium and coarsegrades are made to fitmandrel. They can beused for nearly any small sanding job frommodel making to fine furniture finishing.
In addition, the drum sander makes itpossible to shape wood, smooth fiberglass,sand inside curves and other difficult places.Drum bands are replaceable and come infine and coarse grades.
The following attachments are part of the Craftsman Rotary Tool System; increasing theversatility of your rotary tool.
Flapwheels grind and polish flat orcontoured surfaces. They are used mosteffectively as a finishing sander, afterheavier surface sanding and materialremoval is completed. Flapwheels come infine and coarse grades.
Buffs are a great finishing accessory forcleaning and light sanding. They workeffectively on metal, glass, wood, aluminumand plastics. Buffs are available in mediumand coarse grades.
MultiSawThe MultiSaw turns your rotary tool into a multipurpose saw thatwill allow you to make straight and curved cuts in a variety ofmaterials. Scroll cutting patterns is now fast and easy. Usingstandard jigsaw blades, you can cut soft & hard wood, plywood,metal, PVC, plastic, and much more!
1/8" shank
PlanerConvert your corded rotary tool into a planer.
• The planer is designed for two types of planing: straightplaning and 45° planing, up to 2-18".
• In addition, the straight planing technique can be used forlimited shaping and carving.
• Ideal for fixing a warped or stuck door!
6,000 - 35,000 RPM
Flex LightThe flex light uses Lithium Ion batteries(batteries included).
• LED lighting provides visibility in dimly litareas and increases light on detailedprojects
• Easy to attach, no confusing wires orconnections
• Attaches to Workstation and PlungeRouter.

19
ATTACHMENTS (CONTINUED)
Flex Shaft Ideal for hard-to-reach places and fine detail work.
• Quick connect attach system
• 36" long cable with new 5" bend radius provides more flexibility
• Comfort grip hand piece
• Integrated shaft lock button
• Holds up to 1/8" shank
76
54
33
21
Plunge RouterConverts you corded rotary tool into a plunge router.
• Clear base
• Two depth stop
• Includes edge guide and circle guide
• Rout circles, parallel to edge, signs, inlay work,and lettering template adapters
Work StationCombines the versatility of the flex shaft holder with the utility of thedrill press.
• Can be used as a stand-alone unit or mounted to a workbench
• Aluminum base for tough endurance
• Drill at 90° vertical and in increments of 15° up to 90° horizontal.
• Also functions as a flex shaft tool holder and a stationary toolholder
• Convenient holder for wrench, accessories, drill bits and pointbits
5" Radius
Grout RemovalFast and easy way to regrout any room or replace abroken tile!
• Multiple side depth adjustment
• 30° angle for control cutting
• Guides 180° apart to keep bit centered betweentiles
• Easy screw mounting
• Includes 1/16" grout removal bit

20
Lawn / Garden SharpenerThe fastest, easiest, safest way to sharpen your lawn mowerblade and other garden tools.
• Guide provides optimum sharpening angle
• Sharpens most rotary lawn mower blades
• Includes sharpening stone
30o
30o
GAGE
Chain Saw Sharpener• Easily sharpen the dullest of chains
• Contains: sharpening attachment, 3 sharpening stones,gauge, 2 spacers, wrench, instruction manual
3/4
1/2
1/4
0
Cutting GuideProvides controlled cutting in a variety of materials
• Allows for sturdy controlled cuts with maximumvisibility
• Easy depth adjustment. Set to the correct cuttingdepth for the project material.
Shaper / Router TableConverts your corded rotary tool into a benchmounted wood shaper.
• Features an adjustable fence and large 8" x 6"worktable
• Slot, groove, sand and trim edges
ATTACHMENTS (CONTINUED)

21
Tool Holder and Base• Firmly holds rotary tools in any position
• Control workpiece (hands free) for better results.
Right AngleEnhances the versatility of the rotary tool by allowing you toget into hard-to-reach places.
• Ball bearings and spiral gears provide smooth and cooloperation
• Coupling system allows you to orient the attachment onyour tool in 12 different directions
• Quick disconnect system easily attaches to your rotary toolin place of the housing cap, no wrenches required
Flex Shaft Tool HolderConveniently suspends any Dremel rotary tool above yourworkbench.
• Perfect for use with the Flex-Shaft attachment
• Clamps to workbenches up to 1-3/4" thick, and adjusts inheight from 12" to 42"
• Store extra bits on base
ATTACHMENTS (CONTINUED)

22
SERVICE PARTS
1
1
2
5
3
10
10
16
17
18
19
20
25
25
22
24
2325
25
30
28
27
24
4
Ref. Part No. Description1 2610920980 Housing Set2 2610920701 Field Assembly3 2610920702 Armature and
Bearing Assembly4 2615990962 Wrench5 2615294041 Cord10 2610920705 Brush Spring (Pair)16 261920709 Brush Holder
Assembly17 2610920972 Collet Lock & Spring
Ref. Part No. Description18 2610922763 Collet Nut19 2615110480 1/8" Collet (In Tool)20 2610920710 Switch Assembly22 2610914379 Rubber Bearing
Sleeve23 2610920718 Hanger24 2615294035 Screws (Individual)25 2610921563 Brush Door (Pair)27 2610920716 Glamour Cap28 2640920711 Speed Control30 2610920717 Housing Cap
Craftsman Rotary Tool Model 572.611200

Para pedir servicio de reparacióna domicilio, y para ordenar piezas:
1-888-SU-HOGARSM
(1-888-784-6427)
Au Canada pour service en français:1-800-LE-FOYERMC
(1-800-533-6937)www.sears.ca
To purchase a protection agreement on a product serviced by Sears:
1-800-827-6655 (U.S.A.) 1-800-361-6665 (Canada)
Our HomeFor repair of carry-in products like vacuums, lawn equipment,
and electronics, call or go on-line for the nearestSears Parts and Repair Center.
1-800-488-1222 Anytime, day or night (U.S.A. only)
www.sears.com
Your HomeFor repair in your home of all major brand appliances,
lawn and garden equipment, or heating and cooling systems,no matter who made it, no matter who sold it!
For the replacement parts, accessories andowner’s manuals that you need to do-it-yourself.
For Sears professional installation of home appliancesand items like garage door openers and water heaters.
1-800-4-MY-HOME®
(1-800-469-4663) www.sears.com
Anytime, day or night (U.S.A. and Canada)
www.sears.ca
yGet it fixed, at our home or ours!
© Sears, Roebuck and Co.
® Registered Trademark / TM Trademark / SM Service Mark of Sears, Roebuck and Co.® Marca Registrada / TM Marca de F· brica / SM Marca de Servicio de Sears, Roebuck and Co.MC Marque de commerce / MD Marque déposée de Sears, Roebuck and Co.