Embed Size (px)
Citation preview

RPBS-1 Portable Scale
User Guide
WARRANTY & LIMITATION OF LIABILITY
1. ROTEM warrants that the product shall be free of defects in materials or workmanship and will conform to the technical specification for a period of 1 (one) year from the date of initial installation on site (the "warranty period").
2. Load cells are not covered by ROTEM’s warranty.
3. ROTEM warrants that during said warranty period, any item/items or part/parts of equipment found defective with respect to materials or workmanship or which do not conform to the technical specification shall be repaired or replaced (at ROTEM's sole discretion), free of charge.
4. During the warranty period, in the event of an alleged defect, authorized resellers in relevant regions should be notified as soon as possible from the date of noticing the said defect, but no longer than thirty (30) days from such a discovery. The report shall include (1) a short description of the defects noticed (2) type of card / component and its matching serial number.
5. ROTEM's sole liability under this warranty is the repair or replacement of the defective item of product.
Conditions and Limitations
1. ROTEM will not be responsible for any labor costs or expenses associated with replacement of defective items or other parts of the product or repair.
2. This warranty shall not cover: (i) product or part therein which has been modified (without prior written approval of ROTEM), or (ii) product or part therein which has not handled or installed by an authorized reseller of ROTEM or (iii) product or part therein which has either handled or installed not in strict accordance with ROTEM's instructions, (iv) products which were used for function other than agriculture industry.
3. This warranty will not apply in the following cases: (i) if all components of the product are not originally supplied by ROTEM (ii) the defect is the result of an act of nature, lighting strikes, electrical power surge or interruption of electricity (iii) the defect is the result of accident, misuse, abuse, alteration, neglect, improper or unauthorized maintenance or repair.
ROTEM warns and alerts all users that the Product is inherently complex and may not be completely free of errors. ROTEM's products are designed and manufactured to provide reliable operation. Strict tests and quality control procedures are applied to every product. However, the possibility that something may fail beyond our control exists. Since these products are designed to operate climate control and other systems in confined livestock environments, where failure may cause severe damage, the user should provide adequate backup and alarm systems. These are to operate critical systems even in case of a ROTEM system failure. Neglecting to provide such a backup will be regarded as the user’s willingness to accept the risk of loss, injury and financial damage.
In no event will ROTEM be liable to a user or any third party for any direct, indirect, special, consequential or incidental damages, including but not limited to any damage or injury to business earnings, lost profits or goodwill, personal injury, costs of delay, any failure of delivery, costs of lost or damaged data or documentation, lost or damaged products or goods, lost sales, lost orders, lost income.
Except for the above express warranty, ROTEM makes no other warranties, express or implied, relating to the products. ROTEM disclaims and excludes the implied warranties of merchantability and fitness for a particular purpose. No person is authorized to make any other warranty or representation concerning the performance of the products other than as provided by ROTEM.
Software Version: 3.4
Document Version: 2.0
Recycle raw materials instead of disposing as waste. The controller, accessories and packaging should be sorted for environmental-friendly recycling. The plastic components are labeled for categorized recycling.

TABLE OF CONTENTS
Getting Started ........................................................................................ 4
Features ................................................................................................................... 4
Physical Attributes ................................................................................. 5
Exterior Features ..................................................................................................... 5
Faceplate Detail ....................................................................................................... 6
Quick Guide ............................................................................................. 7
Change Weighing Unit ............................................................................................ 7
Initial Startup ........................................................................................................... 7
Scale Calibration ..................................................................................................... 8
Operating Principles ............................................................................... 9
Farm, House, Flock, Day......................................................................................... 9
History .....................................................................................................................10
Communication ......................................................................................................10
Print .........................................................................................................................11
General Features................................................................................... 12
Setting Up Bird Classification ...............................................................................12
A/D Count Test .......................................................................................................13
Hidden Parameters ............................................................................... 14
Hidden Parameters Description ............................................................................14
Accessing Hidden Parameters ..............................................................................15
Maintenance .......................................................................................... 16
Charging the RPBS-1 .............................................................................................16
Factory Default Settings ........................................................................................16
Replacement Part List ...........................................................................................17
Concepts ............................................................................................... 18
Standard Deviation ................................................................................................18
Coefficient of Variation ..........................................................................................19
Uniformity (Homogeneity or Evenness) ...............................................................19
RPBS-1 PORTABLE SCALE 2.0 4
Getting Started
Thank you for choosing ROTEM RPBS-1 portable scale. It is important to read the entire manual before initial use to avoid operational mistakes.
The RPBS-1 is a portable poultry scale system for weighing broilers and breeders. The RPBS-1 is easy to operate and user friendly. You can weigh birds individually, or by batch using the special curved metal hook. It is recommended to hang the RPBS-1 in a convenient place and height to perform the bird weighing process.
Features
RPBS-1 features include:
Average weight
Multiple weights
Data storage by farm, house, flock and day
Standard deviation, C.V and uniformity
Bird’s age
Bird classification by weight
PC communication
10,000 weights memory
Printer connection
Stainless steel enclosure
10 kg (22 Lb.) or 30Kg (66Lb.) maximum load
AC/DC power supply
Battery backup
Rechargeable batteries
5 RPBS-1 PORTABLE SCALE 2.0
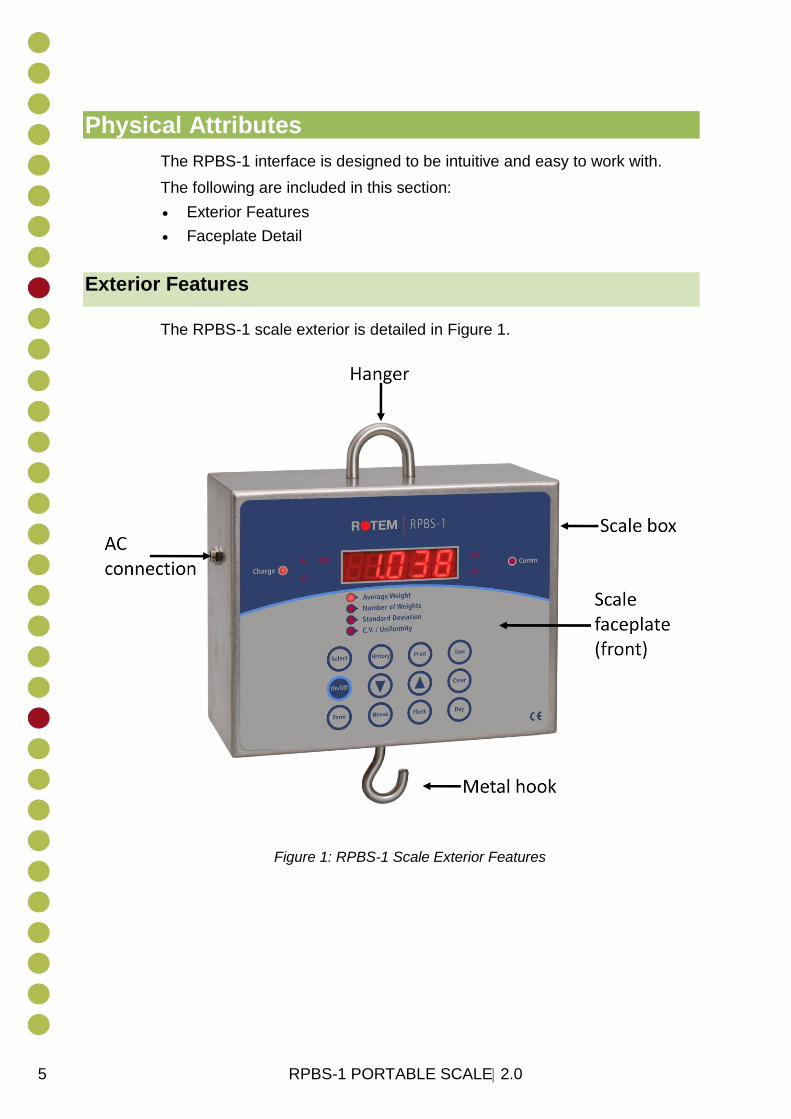
Physical Attributes
The RPBS-1 interface is designed to be intuitive and easy to work with.
The following are included in this section:
Exterior Features
Faceplate Detail
Exterior Features
The RPBS-1 scale exterior is detailed in Figure 1.
Figure 1: RPBS-1 Scale Exterior Features

RPBS-1 PORTABLE SCALE 2.0 6
Faceplate Detail
The RPBS-1 scale faceplate is detailed in Figure 2.
Figure 2: RPBS-1 Scale Faceplate Detail
7 RPBS-1 PORTABLE SCALE 2.0
Quick Guide
The RPBS-1 arrives fully calibrated and ready to work. In this quick guide section, we provide the necessary steps to begin weighing properly and easily from the first time.
The following are included in this section:
Change Weighing Unit
Initial Start
Scale Calibration
Change Weighing Unit
The RPBS-1 portable scale can be set for kilograms (kg) or pounds (lbs). The default setting is kg.
To change the weighing units (kg>lbs):
1. Enter the hidden parameters menu.
NOTE: To display the hidden parameters, the RPBS-1 must be on average weight display.
2. Press the UP and DOWN directional arrow buttons until the “0 <blink> -A-“ message appears.
3. Use the UP and DOWN directional arrow buttons to select the desired weight unit. The desired weight unit is indicated to the right of the display.
4. Press the SELECT button several times to cycle through the hidden parameter options and exit the menu
Initial Startup
Upon initial startup of the RPBS-1 it is important to perform a tare procedure and clear the device’s memory.
To initially startup the RPBS-1:
1. Position the RPBS-1 and connect the electrical connections.
2. Press the ON/OFF button. The message “PLEASE TARE” appears.
3. Press the TARE button. The message “TARE no” appears.
4. Hang a weighing basket on the bottom metal hook of the RPBS-1 and use the UP and DOWN arrow buttons to select “TARE YES”.
5. Press the SELECT button. The RPBS-1 performs the tare procedure.
6. Press the CLEAR button. The “CLEAR no” message appears.
RPBS-1 PORTABLE SCALE 2.0 8
7. Use the UP and DOWN arrow buttons to select the “CLEAR ALL” message and press the SELECT button. The message “SURE no” appears.
8. Select “CLEAR LAST” to clear only the last weight.
9. Use the UP and DOWN directional arrow buttons to select the “SURE YES” message and press the SELECT button.
NOTE: The RPBS-1 history is erased without calibration alteration.
10. To double-check the RPBS-1 calibration, place a known weight on the weighing basket and check the results.
11. When the unit is accurate, repeat Steps 7-9 to clear the weighing history.
12. To recalibrate the RPBS-1, see Scale Calibration on page 8.
NOTE: The RPBS-1 queries you to perform the tare procedure after every power on, 300 weights or changing a flock/house/farm. To not perform the tare procedure, take the first weight measurement without pressing on the TARE button and the message stops.
Scale Calibration
This procedure should be performed only if the RPBS-1 does not display the correct weight of a known weight. Scale calibration should also be preformed after every Cold Start.
To calibrate the RPBS-1 scale:
1. Press the UP directional arrow and TARE buttons. The message “TARE/CALIB” appears.
2. Press the SELECT button. The RPBS-1 performs a tare procedure to prevent a negative calibration.
3. Place a known weight on the weight scale pan and use the UP and DOWN directional arrow buttons to set the weight for the known weight.
4. Press the SELECT button. The RPBS-1 performs a calibration and the message “GOOD Calibration” is displayed.
5. If the message “BAD Calibration” appears repeat Steps 1-4.
6. Press the SELECT button to exit.

9 RPBS-1 PORTABLE SCALE 2.0
Operating Principles
This section helps you define the RPBS-1 to your own personal needs and illustrates more complex RPBS-1features.
The following are discussed in this section:
Farm, House, Flock, Day
History
Communication
Farm, House, Flock, Day
You can use the RPBS-1 on a daily basis to manage your flock and easily view a sample of your bird’s weight and receive an overall picture of the flock throughout the growth period.
The RPBS-1 is designed to gather weight from different farms/houses/flocks/days to avoid mixing information from one flock or growth day with another.
Before performing weights, check that you are gathering information for the correct farm/house/flock/day.
Program the RPBS-1 according to your farm’s structure and make necessary changes daily.
Before adding new weight information, follow Steps 1-3 to enter the correct section and begin weighing.
To change Farm/House/Flock/Day:
1. Press either the FARM, HOUSE, FLOCK or DAY button. The selection and current farm/house/flock/day number appears.
2. To exit without changes, press the SELECT button.
3. When your selection appears, use the UP or DOWN directional arrows to change the selected value.
4. Press the SELECT button to set the selected changes.
RPBS-1 PORTABLE SCALE 2.0 10
History
The RPBS-1 can gather and display bird historical data such as average weight, number of birds weighed, standard deviation, C.V. and uniformity.
Before viewing historical data, enter the farm, house and flock you wish to check according to the instructions above.
To view historical data:
1. Press the HISTORY button. “HIS” is displayed and alternates with the growth day value.
2. Use the UP and DOWN directional arrow buttons to navigate through growth days.
3. Use the SELECT button to switch between average weights, number of weights, standard deviation and C.V. information for the selected day.
4. To exit, press the HISTORY button and “-ESC-“ appears.
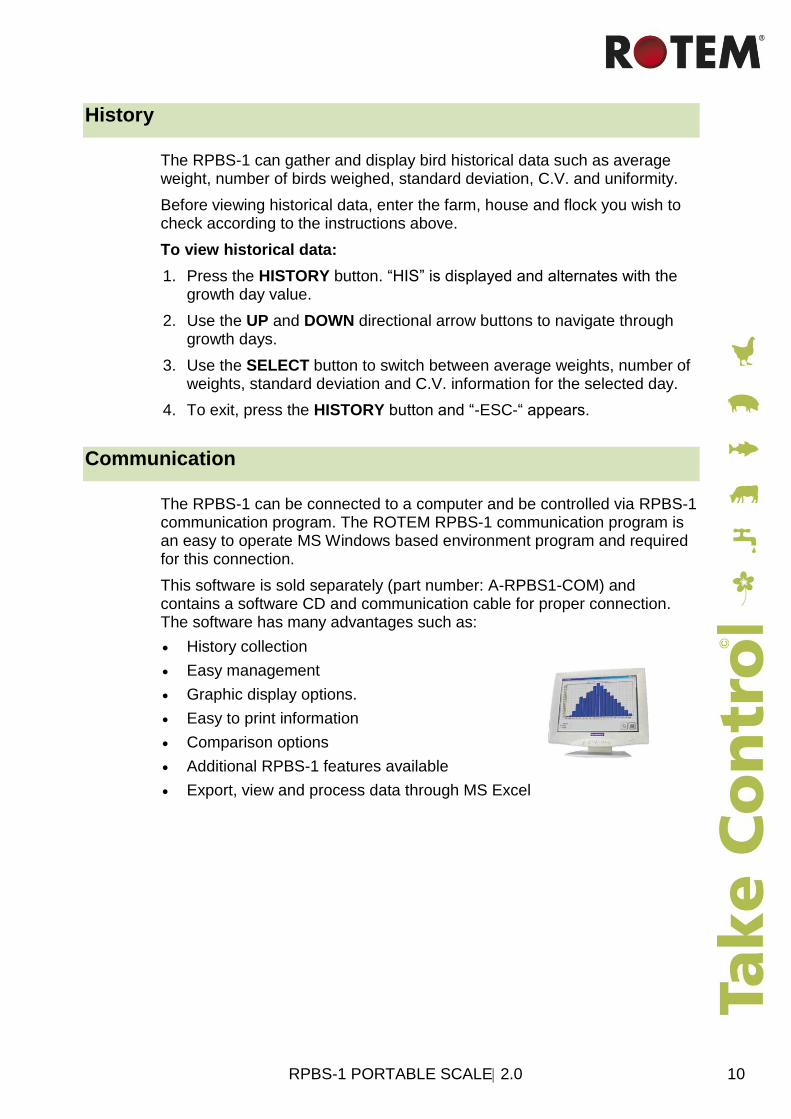
Communication
The RPBS-1 can be connected to a computer and be controlled via RPBS-1 communication program. The ROTEM RPBS-1 communication program is an easy to operate MS Windows based environment program and required for this connection.
This software is sold separately (part number: A-RPBS1-COM) and contains a software CD and communication cable for proper connection. The software has many advantages such as:
History collection
Easy management
Graphic display options.
Easy to print information
Comparison options
Additional RPBS-1 features available
Export, view and process data through MS Excel
11 RPBS-1 PORTABLE SCALE 2.0
The RPBS-1 can connect and print reports directly from a special serial printer available from your dealer. You can select from the following for printed reports:
Day
Flock
House
Farm
All
To print data reports:
1. Press the PRINT button. “PRINT no” is displayed.
2. Use the UP directional arrow button to change the print mode to “DAY”.
3. Press the SELECT button to print all information for the present day.
4. Press the UP directional arrow button and “FLOCK” is displayed.
5. Press the SELECT button to print all information for the current flock.
6. Press the UP directional arrow button and “HOUSE” is displayed.
7. Press the SELECT button to print all information for the current house.
8. Press the UP directional arrow button and “FARM” is displayed.
9. Press the SELECT button to print all information for the current farm.
10. Press the UP directional arrow button and “ALL” is displayed.
11. Press the SELECT button to print all information in the RPBS-1 memory.
12. To cancel the print job at any point, press the SELECT button for several seconds.
RPBS-1 PORTABLE SCALE 2.0 12
General Features
The following are included in this section:
Setting Up Bird Classification
A/D Count Test
Setting Up Bird Classification
This feature enables you to manage flock weight and provides an overall flock view.
The RPBS-1 can automatically classify bird weights in to four user-defined groups.
To create deferent groups follow the next easy instructions:
1. Simultaneously press the UP directional arrow and HISTORY buttons. The message “CLASS no” appears on the display.
2. Use the UP and DOWN directional arrow buttons to select the message “CLASS YES”, and press the SELECT button. The number “-1-” (indicating Class 1) alternating with a weight value is displayed.
3. Press the UP and DOWN directional arrow buttons to change the weight range. This sets the low limit of the first class value.
4. Press the SELECT button to enter Class 2 and use the UP and DOWN directional arrow buttons to change the weight range and set the low limit for Class 2. The low value of this class is the upper value of Class 1.
5. Repeat Step 1 through Step 5 to adjust Class 3 and Class 4.
To exit bird classification mode:
Repeat Steps 1-2 above and select “CLASS no” in Step 2.
After creating different classes, the RPBS-1 automatically sorts weights according to their proper classes. The main display indicates the group number instead of weight.
To view the number of weight per class:
Browse by pressing the SELECT button to the number of weights and use the UP and DOWN direction arrow to leaf through classes.
You can view the same information through the printer output or connected computer.
NOTE: If Class 1’s low limit is set higher than 0, some weights that are lighter than the low user-determined limit do not belong in any group or are not considered.

13 RPBS-1 PORTABLE SCALE 2.0
A/D Count Test
The RPBS-1 can display A/D counts on the main screen.
To display A/D count:
1. Press the UP directional button and the CLEAR button simultaneously.
2. Place a weight in the weight pan and notice if the A/D count changes. If the A/D count does not change, restart the system and repeat Step 1 and Step 2. If the problem persists contact your local dealer for assistance.
3. Press the SELECT button to exit.
RPBS-1 PORTABLE SCALE 2.0 14
Hidden Parameters
The RPBS-1 has hidden parameters for weight calculations and measurements that are generally set and not routinely adjusted. These parameters have a different access format to protect them from being accidentally altered.
The following are included in this section:
Hidden Parameters
Accessing Hidden Parameters
Hidden Parameters Description
The following are descriptions of RPBS-1 hidden parameters:
A. Weight unit of measure. Displays the weight units in kilograms (Kg) and or pounds (Lb). Select from 0 for kg, 1 for lbs. Default value is 0.
B. Scale calibration number. After calibration, the RPBS-1 provides a calibration number that overwrites the default value. Note the number and use it instead of calibration after a cold start. Default value is 6500.
C. Number of individuals per weighing (1-10). To weigh more than one bird at a time, change this value and the RPBS-1 calculates the individual weight of each bird. Default value is 1.
D. Scale sensitivity (expressed in percent). The RPBS-1 sensitivity value is a tolerance percent above and below A/D count average to perform the weighing. When set at a low percentage setting, shifting and strong movement prevents accurate weighing. The RPBS-1 performs the weighing only after stabilization and halt in bird movement more than the set percent above and below. A low percent setting results in higher weight accuracy and slower operation. Higher values indicate less accuracy and quicker weighing. Default value is 2.
E. Uniformity percentage range. Default value is 10%. Alter the range (in percent) for calculating uniformity according to this formula:
Uniformity = number of bird weights within ±10% (to 30%) of average
X 100 Number of weights

15 RPBS-1 PORTABLE SCALE 2.0
Accessing Hidden Parameters
NOTE: To display the hidden parameters, the RPBS-1 must be on average weight display.
To enter the hidden parameters menu:
1. Press the UP and DOWN directional arrow buttons simultaneously until a blinking “-A->0” message is displayed. This indicates parameter A, weight unit.
2. Press the UP directional arrow key to select pounds (Lb), press the DOWN directional key to select kilograms (Kg).
3. Press the SELECT key several times to cycle through the hidden parameters and exit the hidden parameters menu.

RPBS-1 PORTABLE SCALE 2.0 16
Maintenance
The RPBS-1 has minor maintenance requirements, mostly concerned with DC current, factory default settings, and peripheral connections.
The following are included in this section:
Charging the RPBS-1
Factory Default Settings
Replacement Part List
Charging the RPBS-1
The RPBS-1 unit is operates with NiMH batteries in configuration of 2.4V 2300 mAH. Contact your local dealer for replacement battery package if needed (part number SP-RPBS1-BAT).
Initial use: Charge the device for 14 hours DC using the supplied charger.
Low battery unit should be charged for 14 hours using the supplied charger.
When the low battery led blinks the scale has reserve power for 30 minutes and then turns off until recharged or batteries replaced.
Factory Default Settings
Perform a Cold Start to reset the RPBS-1 to the factory default settings. Perform a Scale Calibration after a Cold Start. Refer to Page 8.
To perform a Cold Start: (or after changing EPROM):
1. Turn off the RPBS-1.
2. Press and simultaneously hold down the HISTORY, PRINT and TARE buttons and turn the RPBS-1 on.
3. Release the buttons when the term COLD is displayed. The RPBS-1 is reset to the factory default settings.
17 RPBS-1 PORTABLE SCALE 2.0
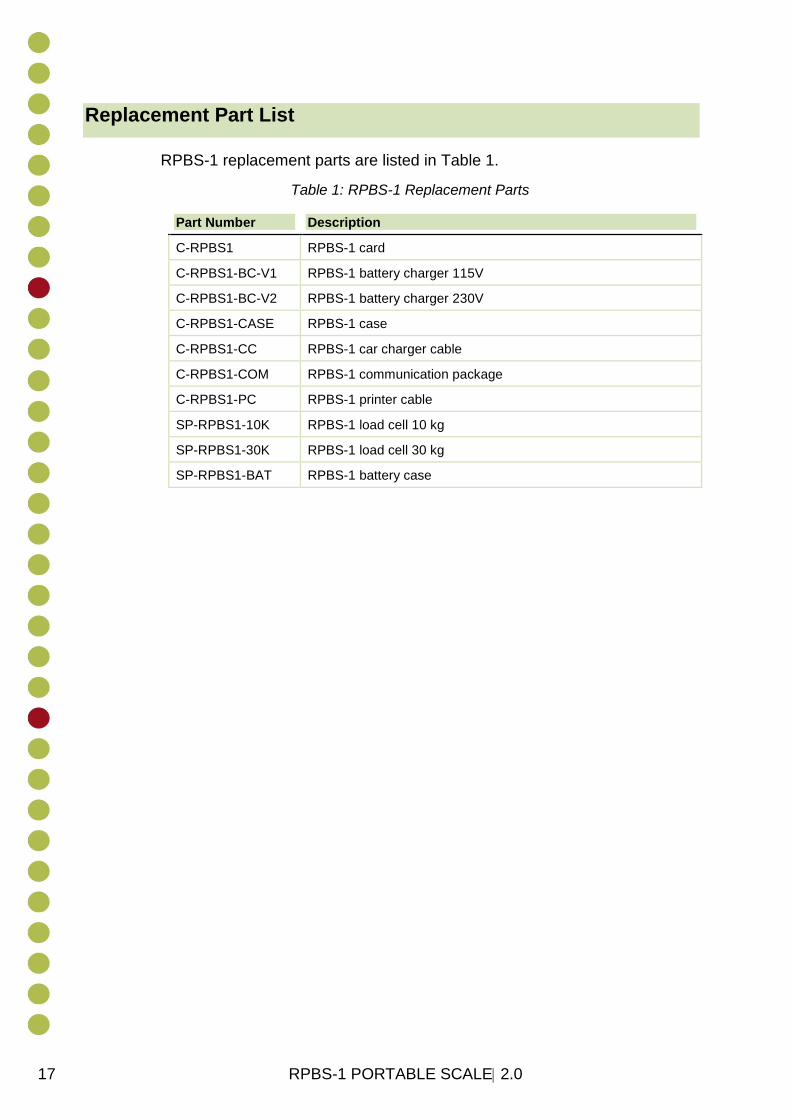
Replacement Part List
RPBS-1 replacement parts are listed in Table 1.
Table 1: RPBS-1 Replacement Parts
Part Number Description
C-RPBS1 RPBS-1 card
C-RPBS1-BC-V1 RPBS-1 battery charger 115V
C-RPBS1-BC-V2 RPBS-1 battery charger 230V
C-RPBS1-CASE RPBS-1 case
C-RPBS1-CC RPBS-1 car charger cable
C-RPBS1-COM RPBS-1 communication package
C-RPBS1-PC RPBS-1 printer cable
SP-RPBS1-10K RPBS-1 load cell 10 kg
SP-RPBS1-30K RPBS-1 load cell 30 kg
SP-RPBS1-BAT RPBS-1 battery case
RPBS-1 PORTABLE SCALE 2.0 18
Concepts
The following concepts are included in this section:
Standard Deviation
Coefficient of Variation
Uniformity (Homogeneity or Evenness)
Standard Deviation
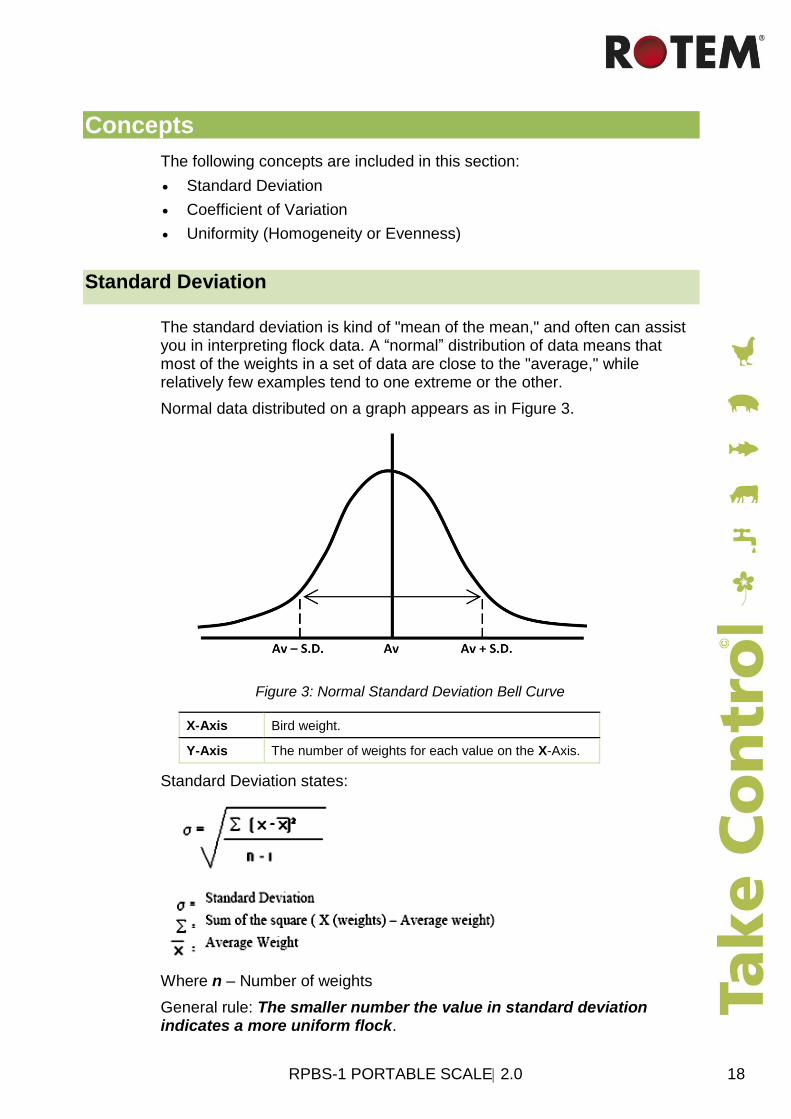
The standard deviation is kind of "mean of the mean," and often can assist you in interpreting flock data. A “normal” distribution of data means that most of the weights in a set of data are close to the "average," while relatively few examples tend to one extreme or the other.
Normal data distributed on a graph appears as in Figure 3.
Figure 3: Normal Standard Deviation Bell Curve
X-Axis Bird weight.
Y-Axis The number of weights for each value on the X-Axis.
Standard Deviation states:
Where n – Number of weights
General rule: The smaller number the value in standard deviation indicates a more uniform flock.
19 RPBS-1 PORTABLE SCALE 2.0
Coefficient of Variation
The CV value is obtained by expressing the standard deviation as a percentage of the average weight. This value describes the variation among the recorded body weights in a single value.
The coefficient of variation (CV) percentage is calculated by the following formula:
CV= standard deviation
X 100 average
Uniformity (Homogeneity or Evenness)
The Uniformity value is obtained by counting birds with body weight, within a range of either ±10% or ±15% of the average body weight. The number of birds in this range is expressed as a percentage of the total number of weights. In Europe most managers use the ±10% range but the fact that different ranges are used does sometimes cause confusion. This method of describing a variation is easy to practice but it does not accurately account for all variations the way that CV does.
The formula for Uniformity is calculated by the following formula:
Uniformity= number of birds within ±10% of average
X 100 number of weights