Embed Size (px)
Citation preview
1
RS-232 Serial to BluetoothAdapterQuick Installation Guide
04-0775B
IntroductionThe RS-232 to Bluetooth Converter is designed toallow any RS-232 device to communicatewirelessly. It supports baud rate of up to 921Kb/s, wireless transmission up to 300 feet and featuresauto pairing and selectable Master or Slave mode.
Key Features and Benefits• Full Bluetooth 2.0 + EDR compliant• Selectable as Slave or Master mode• Bluetooth Class 1- 100M (300 feet)• Baud rate: up to 921.6Kb/s• Frequency: 2.400 to 2.4835 GHz
System Requirements• Windows 8 (32-/64-bit) / 7 (32-/64-bit) /
Vista (32-/64-bit) / XP (32-/64-bit) / Server2003 & 2008 (32-/64-bit) / Server 2008 R2/ 2000
2
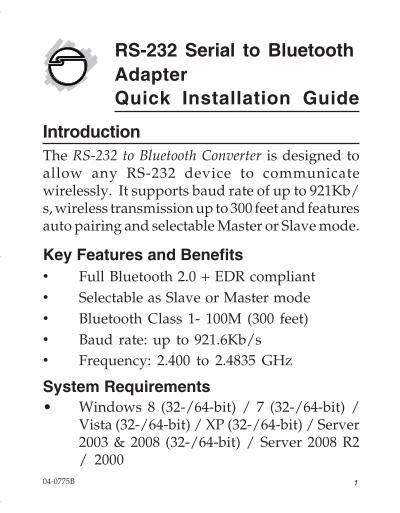
Package Contents• RS-232 Serial to Bluetooth Adapter• External Dipole Antenna• USB Cable• Battery power line and connector• Quick installation guide
Layout
Figure 1
USB Connector
Power source
switch
Power line
connector
Reset
DCE/DTE
switch
Status LEDPower LED
Group (G/NG)S (slave) / M (master)
Antenna
Connector
RS-232 Serial Port

3
LED Indicators
Antenna ConnectorSimply connect it to a 2.0dBi, 50 Ohms impedancedipole antenna to support 2.4 GHz frequency.The Antenna is changeable for high gain Antenna.See Figure 2.
Table 1
Figure2
LED status Description
Power LED off No power supply
Power LED on Power input is equal or larger than 3.5 Volt
Power LED blinking Power input is lower than 3.5 Volt
Status LED off No pairing established
Status LED on Connection established
Status LED fast blinkingIn 0.1 sec interval: Pairing (in either slave or mastermode)In 0.3 sec interval: Discoverable (in slave mode)
Status LED slow blinkingIn 0.9 sec interval: Inquring (in master mode)In 1.2 sec interval: Connecting (in master mode)

4
RS-232 Serial PortConnect the RS-232 port into any computer orserial device.
Reset ButtonUse a tip of a pen or other sharp object to accessthe reset button.
• To restore to factory default settings: pressand hold down the reset button for over 3seconds to get back to the default settings:- Baud rate: 19200 bps- Data bit: 8- Parity: none- Stop bit: 1- Flow control: none- Bluetooth PIN code is "1234"
• To disconnect and reconnect the wirelessconnection: press the reset button quickly.
USB ConnectorConnect USB connector with your PC by usingthe included USB cable for external power supply.

5
One to one
With Bluetooth USB Dongle
Bluetooth USB Dongle
Bluetooth - master Bluetooth - slave
Bluetooth- slave
DCE/DTE SwitchUse the DCE/DTE dip switch to switch betweenDCE and DTE mode. Switch to DTE mode, forData Terminal Equipment (PCs for example);switch to DCE mode, for Data CommunicationEquipment (Modem for example). Move theswitch in the direction of antenna for DCE, andmove it in the direction of RS-232 port for DTE.
Applications
Figure3
Figure4

6
Hardware Installation1. Fasten the antenna to the Adapter.2. Connect the Adapter to the serial port of
your PC or serial device.3. Follow one method below to connect to an
external power source:A - Use the included USB cable to connectthe Adapter's mini USB connector to a USBport of your PC.B - Use a Powered DB9 connector (Pin 9) asthe power supply. This is often used in POSsystem.C - Connect the included battery power lineto the Adapter's Power Line Connector,and connect the other end of the power lineto batteries (three A / AA / AAA batteries,or one 3~3.7VDC Li-Polymer battery). SeeFigure 5.
Figure5

7
4. Switch the Power Source Switch to "USB/Battery" when powering up the Adapterthrough USB or Battery.Switch the Power Source Switch to "DB9-Pin9 (5V)" when powering up the Adapterthrough powered DB9.
5. The Power LED shows steady red lightindicating the power is on. Once power isconfirmed, go to the next section for COMport configuration and connection.
COM Port Configuration1. Configure the parameters of the COM port
through HyperTerminal or other terminalsoftware. To configure the adapter,initiate HyperTerminal from the Start Menu.
Note: The configuration windows belowcome from software HyperTerminal. Forother terminal software, the windows maybe slightly different.
2. Type in "Name", then click OK. See Figure6.

8
Figure 6
3. Scroll to choose the COM port you are usingto connect with the Adapter, and click OK.
Name
OK
Figure 7
OK
Select the COM port
4. Confirm the parameters as the following,then click OK. To pair two devices for anexclusive connection between them.

9
Flow control: None
Baud rate: 19200 bps
Data bit: 8
Parity: none
Stop bit: 1
Figure 8
4. Follow the instructions in the next section:"Master/Slave Mode Setup" to set theAdapter mode.
5. Enable the bluetooth function of the PC,search the Serial Adapter and make aconnection to it.
Master/Slave Mode SetupSet the Adapter to be in "Master" mode or "Slave"mode through terminal software- ROLEcommand or DIP command.Note: Slave mode is the default setting.
10
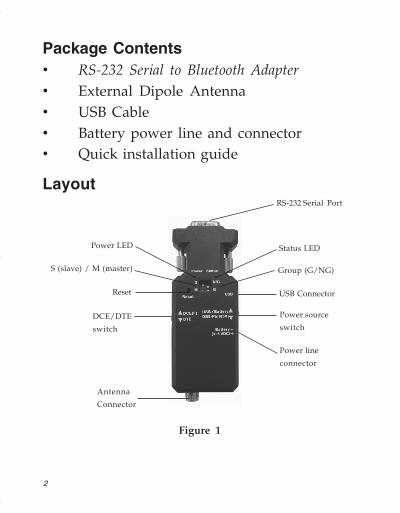
ROLE Command1. Type ROLE=M to set the Adapter to the
master role. (Type ROLE=S to set back tothe default.)
Figure9
Figure10
2. Press Enter to see "OK". This means thesetup is successful.
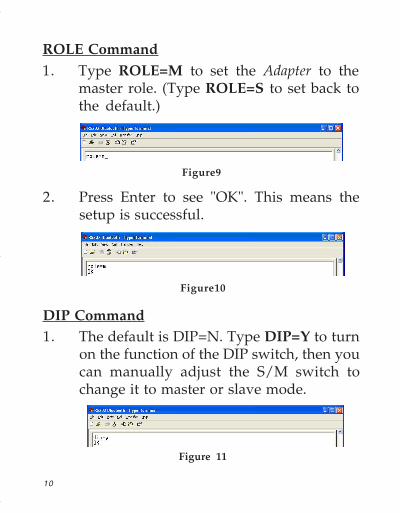
DIP Command1. The default is DIP=N. Type DIP=Y to turn
on the function of the DIP switch, then youcan manually adjust the S/M switch tochange it to master or slave mode.
Figure 11

11
Group Mode SetupThe adapter is in N/G mode by default. Theadapter can be set to G mode if you have morethan two RS-232 Serial to Bluetooth Adapters,meaning this adapter is able to perform single tomultiple transmission.Follow the steps to set the adapter to Group modeby terminal software:Type DIP=Y to turn on the function of the DIPswitch.After the function of DIP switch has turned on,you can adjust the switch to "G".

12
Setup commands reference tableRefer to the following table for more applications:Note: Use all capital or all lowercase letters, donot mix, when typing the commands.
Command Value Description
<<< Set the local adapter change the data mode into commandmode.
<<<Switch the data mode to the command.The time interval between each character will be more than thetime: [500ms] "<" [500ms] "<" [500ms] "<" [1500ms]
<<<= ? Inquire the current setting.
(Default) Y Turn on the "<<<" command
N Turn off the "<<<" command
>>>Set the remote adapter change the data mode into commandmode from the local adapter in connecting status. Thecommand is available after 500 ms when data transferringfinished.
>>>Switch the remote adapter from the data mode to the command.The time interval between each character will be more than thetime: [1 sec] ">" [1 sec] ">" [1 sec] ">" [2 sec]
>>>= ? Inquire the setting status of the ">>>" command.
(Default) Y Turn on the ">>>" command
N Turn off the ">>>" command

13
ADDRESS= Used to display the Bluetooth address of t he local adapter.
? Inquire the Bluetooth address of the local adapter.
ATCheck the connection status between control terminal and theRS-232 adapter. Response: "ERROR" when the connection is notcorrect.
AT Test the RS-232 status when first connect the adapter with thecontroller.
AUTO=
Used to enable/disable auto-connection feature. It's availableonly when the adapter is in master mode.The command is available when DIP=N. The system will notrestart after the change.
Y The Master role adapter will connect the latest paired Bluetoothdevice automatically.
(Default) N The user will connect the Bluetooth device manually.
? Inquire the current setting.
BAUD= Used to specify the baud rate of COM port. The command willhave 200ms delay.
1200 1200 bps
2400 2400 bps
4800 4800 bps
9600 9600 bps
(Default) 19200 19200 bps
38400 38400 bps
57600 57600 bps
115200 115200 bps
230400 230400 bps
460800 460800 bps
921600 921600 bps
R Restore the default settings. (Baud rate= 19200bps)
? Inquire the current baud rate.

14
CONNEC-T=
Used to establish a connection manually. It is available onlywhen the adapter is in the master mode.
DEVICE Connect the adapter to a specified Bluetooth manually. It'savailable only when "DEVICE=xxxxxxxxxxxx" is executed.
1~8 Connect the adapter to a Bluetooth device in the Environmentwhich found by "SEARCH=?"
xxxxxx-xxxxxx
Connect the remote adapter by typing the MAC address directlywithout searching.
? Display the MAC address of the latest paired device.
Y Recover the latest connection in the command mode.
N Disconnect the two adapters in the command mode.
P Connect the previous connected adapter.
DEFAULT= Used to detect the Voltage of the power supply and set the alertvalue of low power.
Y Restore the default settings (e.g. 19200bps)The command will restart the system for 1 second.
DETECT= Used to detect the Voltage of the power supply and set the alertvalue of low power.
(Default) N Disable the Voltage detection.
Y Enable the Voltage detection.
R Restore the default value (3.5 Volt)
xx Setup the range of Voltage detection from 3.0 to 3.7 Volt. The"X" indicates the number.
? Inquire the setting status.
DEVICE=
For security purpose, this command is used to specify a uniqueremote Bluetooth serial adapter to be connected. In the masterrole, the adapter pairs and connects with the designated remoteslave address. If the adapter is in the slave mode, this commandis a filter used to accept the inquiry of the master device.
xxxxxx-xxxxxx "xxxxxxxxxxxx" is a string of 12 hexadecimal digits.

15
R Restore the status in which the adapter can connect with anyremote address.
? Inquiry the designated address that can be paired and connected.
DIP= Set the DIP switch function.
? Inquire the setting status of the DIP switch function.
Y Turn on the function of the DIP switch. The "ROLE" and "AUTO"command are not available to set the "Master" or "Slave".
(Default) N Turn off the function of the DIP switch. The "ROLE" and "AUTO"command are available when the DIP=N.
DISCOVER-=
Used to specify whether the adapter can be discovered orconnected by remote devices.This command is available only when the adapter is in the slaverole.
NThe adapter enters the undiscoverable mode. If a pair has beenmade, the original connection can be resumed. But other remotemaster device cannot discover this adapter.
(Default) Y The adapter enters the discoverable mode.
? Inquire the current setting.
ECHO=This command is used to specify whether the adapter echoescharacters received from the UART back to the DTE/DCE.
N Command characters received from the UART are not echoedback to the DTE/DCE.
(Default) Y Command characters received from the UART are echoed back tothe DTE/DCE.
? Inquire the current setting.
FLOW=This command enable or disable flow control signals (CTS/RTS)of the UART port. Note: the setting is not affected by DEFAULT.The command will need 1 second delay.
(Default) N Disable flow control.
Y Enable flow control.
? Inquire the current setting

16
NAME=
Used to specify a name for the adapter.You can specify a friendly name using 0 to 9, A to Z, a to z,space and -, which are all valid characters. (Note: Using Space or- as first or last space isn't permitted.) The default name is "SerialAdapter".
(Default) SerialAdapter Default device name
xx....xx "xx...xx" is a character string with the length from 2 to 30.
R Restore the default settings name="Serial Adapter".
? Inquire the name of the local adapter.
PARITY= This command is used to specify parity bit setting of COM port.The command will need 200 ms delay.
(Default) N None parity bit
O Odd parity
E Even parity
? Inquire the current setting.
PIN=
Used to designate a PIN. The default PIN is "1234". Pairedadapters should have the same PIN. This command is used todesignate a PIN. The default PIN is "1234" and the digits shouldnot be less than 4. Paired adapters should have the same PIN.The PIN can be set up with combinations of numbers, Englishcharacters or both.
(Default) 1234
xx....xx "xx....xx" is a 4~16 digit string or English character (with capitalor lower case characters)
N Cancel authentication by PIN.
R Restore the default settings PIN="1234".
? Inquire the current PIN.
PROMPT=
Used to decide whether result messages are prompted whenSetup commands are executed. The result messages are:OK/ERROR for command execution, orCONNECT/DISCONNECT/Try Connect Device for connectionstatus.

17
(Default) Y Prompt result messages.
N Don't prompt result messages.
? Inquire the current setting.
RECONNE-CT= Used to re-connect the lost link for the Master adapter.
? Inquire the current setting.
(Default) N Re-connect is disable
Y Re-connect is Enable
ROLE=
Used to specify whether the adapter is in the master or slaverole. If the device role is changed, the adapter will reboot andall paired addresses will be cleared. The command is availablewhen the adapter is in DIP=N status. The command will have1 second delay.
M Set the adapter to the master role.
(Default) S Set the adapter to the slave role.
? Inquire the current role of the adapter.
RSSI= Received signal strength indication.
?
Display the strength of signal received in command modewhen connected.1. Strong: RSSI>-92. Medium:-9>RSSI>-203.Weak:RSSI<-20
SEARCH=
Used to search for any Bluetooth device in the environmentwithin one minute. If any device is found, its name and its 12-digit-address will be listed. The search ends with a message"Inquiry ends. xx device(s) found." This command is availableonly when the adaptor is in the master role by manual.
? Inquire Bluetooth devices in the environment, listing 8 devicesmaximum
STATUS= Inquire all the current setting of the adapter.
Y Inquire the inner temperature of the IC in centigrade
? Display the current setting of the adapter
18
STOP=Used to specify one or two stop bits of COM port. (Will have200ms delay.)
(Default) 1 One stop bit.
2 Two stop bits.
? Inquire the current setting.
VERSION= Used to inquire the firmware version.
? Inquire the version codes.
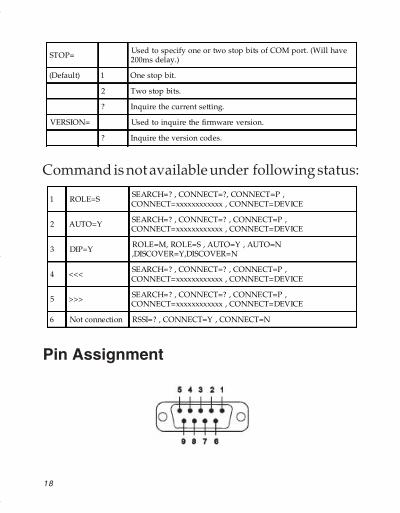
Command is not available under following status:
1 ROLE=SSEARCH=? , CONNECT=?, CONNECT=P ,CONNECT=xxxxxxxxxxxx , CONNECT=DEVICE
2 AUTO=Y SEARCH=? , CONNECT=? , CONNECT=P ,CONNECT=xxxxxxxxxxxx , CONNECT=DEVICE
3 DIP=YROLE=M, ROLE=S , AUTO=Y , AUTO=N,DISCOVER=Y,DISCOVER=N
4 <<<SEARCH=? , CONNECT=? , CONNECT=P ,CONNECT=xxxxxxxxxxxx , CONNECT=DEVICE
5 >>> SEARCH=? , CONNECT=? , CONNECT=P ,CONNECT=xxxxxxxxxxxx , CONNECT=DEVICE
6 Not connection RSSI=? , CONNECT=Y , CONNECT=N
Pin Assignment
19
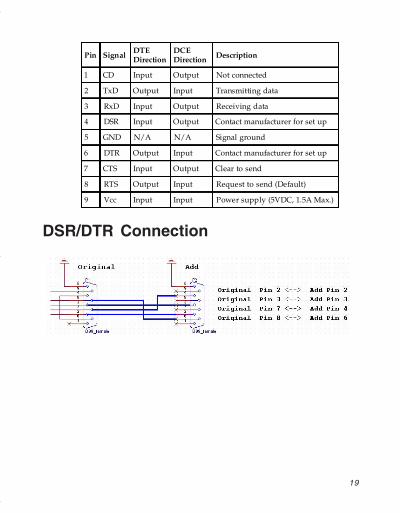
DSR/DTR Connection
Pin Signal DTEDirection
DCEDirection Description
1 CD Input Output Not connected
2 TxD Output Input Transmitting data
3 RxD Input Output Receiving data
4 DSR Input Output Contact manufacturer for set up
5 GND N/A N/A Signal ground
6 DTR Output Input Contact manufacturer for set up
7 CTS Input Output Clear to send
8 RTS Output Input Request to send (Default)
9 Vcc Input Input Power supply (5VDC, 1.5A Max.)

20
FAQQ: My RS-232 device is not connecting to the
Bluetooth adapter.A: Follow the steps below to check if the
connections between 2 PCs work well ornot. One PC should be equipped withBluetooth function, and another one needsone available RS-232 port.(1) Connect the Serial to Bluetooth Adapter tothe PC with RS-232 port. Configure theparameters of RS-232 Serial to BluetoothAdapter as following: Role=Slave, Dipswitch=DCE(F). Baud rate, parity, stop bitsvalues should be set to the same values asyour RS-232 device.(2) After the connection between the 2 PCsare established, PC with bluetooth will show2 COM ports. Only one of the COM portcan work normally.(3) If the connection between 2 PCs workswell, change the connection to your RS-232devices. (Note: Please don't forget to changeAdapter back to DTE)

21
Blank Page

22
Blank Page

23
Technical Support and WarrantyQUESTIONS? SIIG’ s Online Support has answers! Simply visit our web site atwww.siig.com and click Support. Our online support database is updated daily withnew drivers and solutions. Answers to your questions could be just a few clicks away.You can also submit questions online and a technical support analyst will promptlyrespond.
SIIG offers a three-year manufacturer warranty with this product. This warranty coversthe original purchaser and guarantees the product to be free of any defects in materialsor workmanship for three(3) years from the date of purchase of the product.
SIIG will, at our discretion, repair or replace (with an identical product or producthaving similar features and functionality) the product if defective in materials orworkmanship. This warranty gives you specific legal rights, and you may also have otherrights which vary from state to state. Please see our web site for more warranty details.
If you encounter any problems with this product, please follow the procedures below.A) If it is within the store's return policy period, please return the product to the storewhere you purchased from.
B) If your purchase has passed the store's return policy period, please follow the stepsbelow to have the product repaired or replaced.
Step 1: Submit your RMA request.Go to www.siig.com, click Support, then REQUEST A PRODUCT REPLACEMENTto submit a request to SIIG RMA or fax a request to 510-657-5962. Your RMA requestwill be processed, if the product is determined to be defective, an RMA number willbe issued.
Step 2: After obtaining an RMA number, ship the product.• Properly pack the product for shipping. All accessories that came with the
original package must be included.• Clearly write your RMA number on the top of the returned package. SIIG will
refuse to accept any shipping package, and will not be responsible for a productreturned without an RMA number posted on the outside of the shippingcarton.
• You are responsible for the cost of shipping to SIIG. Ship the product to thefollowing address:SIIG, Inc.6078 Stewart AvenueFremont, CA 94538-3152, USARMA #:
• SIIG will ship the repaired or replaced product via Ground in the U.S. andInternational Economy outside of the U.S. at no cost to the customer.

PRODUCT NAMERS-232 Serial to Bluetooth Adapter
FCC RULES: TESTED TO COMPLY WITH FCC PART 15, CLASS BOPERATING ENVIRONMENT: FOR HOME OR OFFICE USE
FCC COMPLIANCE STATEMENT:
This device complies with part 15 of the FCC Rules. Operation is subjectto the following two conditions: (1) This device may not cause harmfulinterference, and (2) this device must accept any interference received,including interference that may cause undesired operation.
THE PARTY RESPONSIBLE FOR PRODUCT COMPLIANCE
SIIG, Inc.6078 Stewart AvenueFremont, CA 94538-3152, USAPhone: 510-657-8688
RS-232 Serial to Bluetooth Adapter is a trademark of SIIG, Inc. SIIG and the SIIG logo areregistered trademarks of SIIG, Inc. All other names used in this publication are for identificationonly and may be trademarks of their respective owners.
March, 2013 Copyright © 2013 by SIIG, Inc. All rights reserved
About SIIG, Inc.Founded in 1985, SIIG, Inc. is a leading manufacturer of IT connectivity solutions(including Serial ATA and Ultra ATA Controllers, FireWire, USB, and legacy I/O adapters) that bridge the connection between Desktop/Notebook systems andexternal peripherals. SIIG continues to grow by adding A/V and DigitalSignage connectivity solutions to our extensive portfolio.SIIG products offer comprehensive user manuals, many user-friendly features,and are backed by an extensive manufacturer warranty. High quality controlstandards are evident by the overall ease of installation and compatibility ofour products, as well as one of the lowest defective return rates in the industry.SIIG products can be found in computer retail stores, mail order catalogs,through major distributors, system integrators, and VARs in the Americas andthe UK, and through e-commerce sites.