Embed Size (px)
Citation preview
RTI Connext DDS
Prototyper with Lua
(Experimental Feature)
Getting Started Guide
Version 5.1.0

© 2013 Real-Time Innovations, Inc. All rights reserved.
Printed in U.S.A. First printing. December 2013.
TrademarksReal-Time Innovations, RTI, DataBus, and Connext are trademarks or registered trademarks of Real-Time Innovations, Inc. All other trademarks used in this document are the property of their respective owners.
Copy and Use RestrictionsNo part of this publication may be reproduced, stored in a retrieval system, or transmitted in any form (including electronic, mechanical, photocopy, and facsimile) without the prior written permission of Real-Time Innovations, Inc. The software described in this document is furnished under and subject to the RTI software license agreement. The software may be used or copied only under the terms of the license agreement.Copyright © 1994–2013 Lua.org, PUC-Rio.Permission is hereby granted, free of charge, to any person obtaining a copy of this software and associated documentation files (the "Software"), to deal in the Software without restriction, including without limitation the rights to use, copy, modify, merge, publish, distribute, sublicense, and/or sell copies of the Software, and to permit persons to whom the Software is furnished to do so, subject to the following conditions:The above copyright notice and this permission notice shall be included in all copies or substantial portions of the Software.THE SOFTWARE IS PROVIDED "AS IS", WITHOUT WARRANTY OF ANY KIND, EXPRESS OR IMPLIED, INCLUDING BUT NOT LIMITED TO THE WARRANTIES OF MERCHANTABILITY, FITNESS FOR A PARTICULAR PURPOSE AND NONINFRINGEMENT. IN NO EVENT SHALL THE AUTHORS OR COPYRIGHT HOLDERS BE LIABLE FOR ANY CLAIM, DAMAGES OR OTHER LIABILITY, WHETHER IN AN ACTION OF CONTRACT, TORT OR OTHERWISE, ARISING FROM, OUT OF OR IN CONNECTION WITH THE SOFTWARE OR THE USE OR OTHER DEALINGS IN THE OFTWARE.
Technical Support Real-Time Innovations, Inc.232 E. Java Drive Sunnyvale, CA 94089Phone: (408) 990-7444Email: [email protected]: https://support.rti.com/

Contents1 Introduction.......................................................................................................................................................1
2 “Hello World” with RTI Connext Prototyper ...........................................................................................32.1 Hello World Example.............................................................................................................................3
2.1.1 Run Prototyper...........................................................................................................................32.1.2 Examine the XML Configuration File.....................................................................................52.1.3 Default Behavior of Prototyper for the HelloWorld Application.......................................7
2.2 An Example using RTI Shapes Demo..................................................................................................72.2.1 Run Prototyper...........................................................................................................................82.2.2 Examine the XML Configuration File...................................................................................12
2.3 Lua Scripting Example.........................................................................................................................142.3.1 Run Prototyper with Lua........................................................................................................15
3 Using Prototyper.............................................................................................................................................17
4 Understanding Prototyper ............................................................................................................................194.1 Workflow ...............................................................................................................................................204.2 Configuration Files Parsed by Prototyper ........................................................................................21
5 Configuring Prototyper Behavior Using Lua ...........................................................................................225.1 Specifying the Lua Code......................................................................................................................225.2 Lua Execution Triggers ........................................................................................................................24
6 Lua Component Programming Model .......................................................................................................246.1 WRITER API..........................................................................................................................................246.2 READER API.........................................................................................................................................266.3 CONTEXT API......................................................................................................................................286.4 Data Access API ...................................................................................................................................30
6.4.1 Examples of Data Access ........................................................................................................31
7 Examples of Lua Scripting with Prototyper .............................................................................................327.1 ShapePublisher Configuration ..........................................................................................................337.2 ShapeSubscriber Configuration..........................................................................................................357.3 ShapePubSub Configuration ..............................................................................................................38
7.3.1 Splitter “Delay and Average” Example ...............................................................................41
8 Configuring Prototyper Behavior Using XML ........................................................................................458.1 Shapes Demo Example Continued ....................................................................................................45
8.1.1 Run with Shapes Demo Application ....................................................................................458.1.2 Behavior of Prototyper for Shapes Demo Application ......................................................51
8.2 Data Values Written by Prototyper ...................................................................................................548.2.1 Values Set by Default Data-Generation Algorithm on Non-Key Members....................54
iii

8.2.2 Values Set by the Default Data-Generation Algorithm on Key Members ......................568.2.3 Controlling the Data Values Written by Prototyper ..........................................................56
9 Using Monitoring with Prototyper .............................................................................................................60
iv
Welcome to Prototyper!
1 Introduction
RTI Connext Prototyper is a tool to accelerate RTI Connext application development and scenario testing. It provides Connext application developers with a quick and easy-to-use mechanism to try out realistic scenarios on their own computer systems and networks, and get immediate information on the expected performance, resource usage, and behavior of their system.
Starting with version 5.1.0, Prototyper includes an embedded Lua scripting language engine. Luais a powerful, fast, lightweight, scripting language that combines simple procedural syntax with powerful data description constructs based on associative arrays and extensible semantics. To learn more about Lua, visit www.lua.org.
The Lua interpreter allows developers to prototype complex application behaviors without recompiling applications. This allows for rapid development of test functionality, including sending variable rates of data, data that is only sent based on events, or other scenarios that can-not be modeled with simple periodic data.
By embedding a Lua interpreter, Prototyper provides an easy and powerful way to define the data and behavior of distributed application components. The integration is seamless. A Lua script implementing the desired behavior can be embedded directly in the XML or stored in an external file that is loaded at run-time.
With the traditional approach, if you want to try a specific Connext distributed application design and determine Key Performance Indicators (KPIs), you would have to spend significant time and effort to develop a custom prototype that could determine KPIs such as:
❏ Validation of the basic approach for building a distributed system
❏ Suitability of the data model
❏ Suitability of QoS settings
❏ Memory a particular application is likely to use.
This document assumes you have a basic understanding of RTI® Connext™ application development and concepts such as a DDS Domain, DomainParticipant, Topic, DataWriter and DataReader. For an overview of these concepts, please see the RTI Connext Core Libraries and Utilities Getting Started Guide (<Connext installation directory>/ndds.<version>/doc/PDF/RTI_CoreLibrariesAndUtilities_GettingStarted.pdf).
Part of this document also assumes that you have a basic understanding of the Lua script-ing language. Examples are provided later in the document. For a complete guide to the Lua language, please see the Lua Reference manual at http://www.lua.org/manual/.
1
Introduction
❏ Time it will take for discovery to complete.
❏ System bandwidth the running application will consume.
❏ The CPU usage it will take for a particular application to publish its data at a certain rate, or to receive a certain set of Topics.
❏ The impact of changing data types, topics, Quality of Service, and other design parame-ters.
Prototyper significantly simplifies this process. Instead of writing custom code, you can:
1. Describe the system in an XML file (or files),
2. Run Prototyper on each computer, specifying the particular configuration for that com-puter,
3. Create a working distributed application, and
4. Observe the behavior of the running system and read the KPIs from the RTI Monitor tool.
Prototyper is a command-line executable application. Once installed, Prototyper can be found in the scripts1 directory. Prototyper takes several command-line parameters, which allow you to specify the XML configuration file, the specific DomainParticipant configuration to use, and other run-time parameters. You must start Prototyper manually on each machine where you would like to run it, specifying the appropriate parameters.
The XML file-format used by Prototyper is compatible with the one used for the Connext XML-Based Application Creation feature. This means that your investment in describing your system via XML can be fully leveraged during your application development. Only the application components that need to be optimized or have special requirements would need to be re-implemented in a compiled programming language (C/C++, Java, C++, C#). Other application components can be implemented in the Prototyper using the dynamic Lua scripting language. The result is much faster application development. For those application components that are reimplemented in a compiled programming language, the data types, Topics, DomainParticipants, and other entities described in the XML file can be directly created from application code and integrated into your final application without the need to recode them in the source files. See the RTI Connext XML-Based Application Creation Getting Started Guide(<Connext installation directory>/ndds.<version>/doc/PDF/RTI_CoreLibrariesAndUtilities_XML_AppCreation_GettingStarted.pdf) for a description of this feature and the format used to describe Connext applications in XML.
1. <Connext installation directory>/ndds.<version>/scripts
2
“Hello World” with RTI Connext Prototyper
2 “Hello World” with RTI Connext Prototyper
2.1 Hello World Example
The files for this example are located in <Connext installation directory>/ndds.<version>/example/prototyper/HelloWorld.
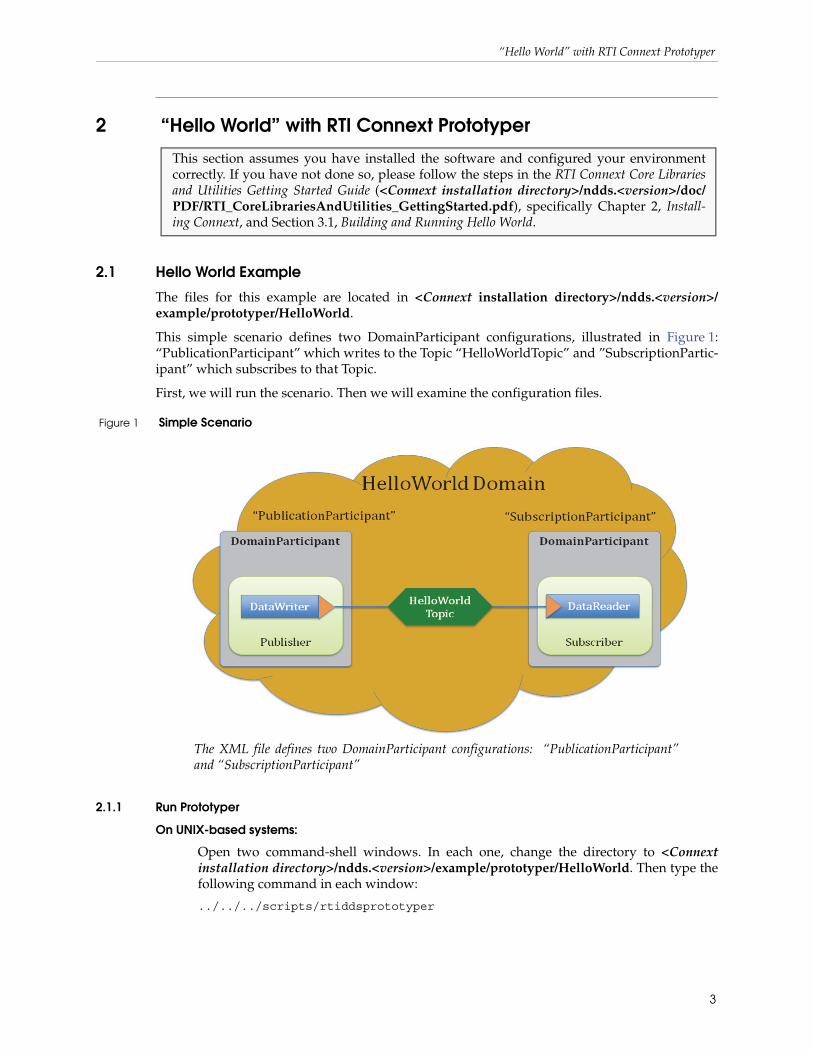
This simple scenario defines two DomainParticipant configurations, illustrated in Figure 1: “PublicationParticipant” which writes to the Topic “HelloWorldTopic” and ”SubscriptionPartic-ipant” which subscribes to that Topic.
First, we will run the scenario. Then we will examine the configuration files.
2.1.1 Run Prototyper
On UNIX-based systems:
Open two command-shell windows. In each one, change the directory to <Connextinstallation directory>/ndds.<version>/example/prototyper/HelloWorld. Then type the following command in each window:
../../../scripts/rtiddsprototyper
This section assumes you have installed the software and configured your environment correctly. If you have not done so, please follow the steps in the RTI Connext Core Libraries and Utilities Getting Started Guide (<Connext installation directory>/ndds.<version>/doc/PDF/RTI_CoreLibrariesAndUtilities_GettingStarted.pdf), specifically Chapter 2, Install-ing Connext, and Section 3.1, Building and Running Hello World.
The XML file defines two DomainParticipant configurations: “PublicationParticipant” and “SubscriptionParticipant”
Figure 1 Simple Scenario
3
“Hello World” with RTI Connext Prototyper
On Windows systems:
Open two command-prompt windows. In each one, change the directory to <Connextinstallation directory>\ndds.<version>\example\prototyper\HelloWorld. Then type the following command in each window:
..\..\..\scripts\rtiddsprototyper.bat
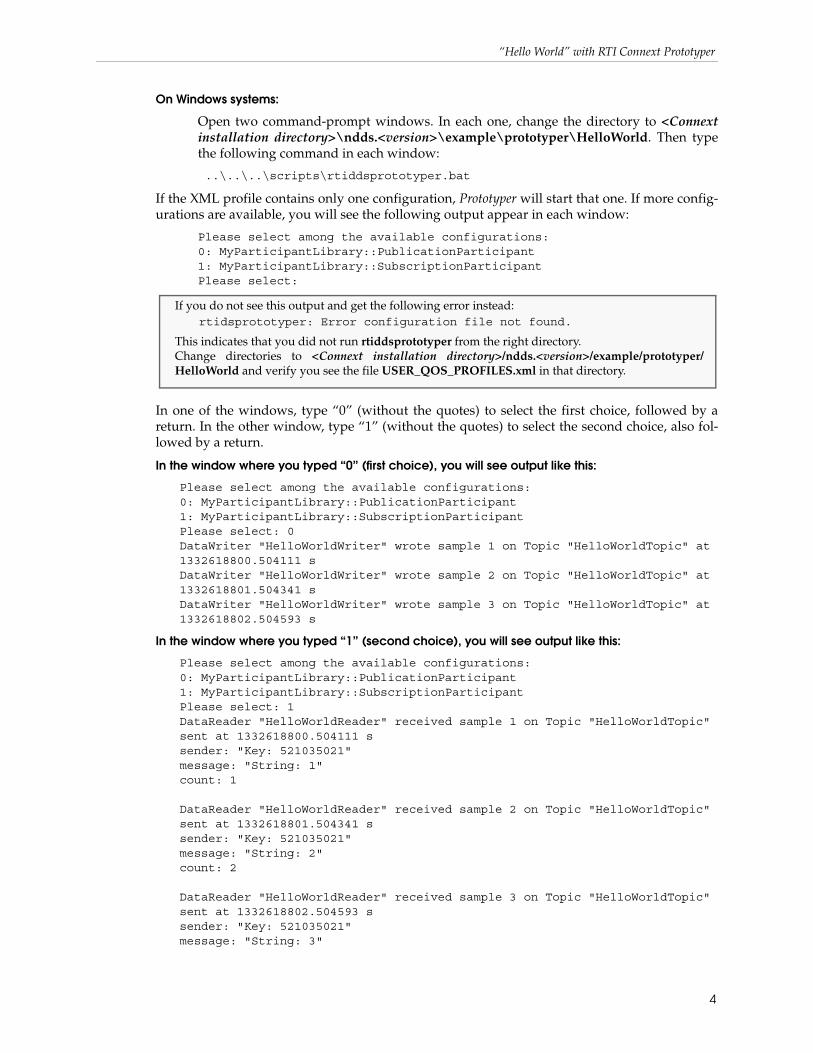
If the XML profile contains only one configuration, Prototyper will start that one. If more config-urations are available, you will see the following output appear in each window:
Please select among the available configurations:0: MyParticipantLibrary::PublicationParticipant1: MyParticipantLibrary::SubscriptionParticipantPlease select:
In one of the windows, type “0” (without the quotes) to select the first choice, followed by a return. In the other window, type “1” (without the quotes) to select the second choice, also fol-lowed by a return.
In the window where you typed “0” (first choice), you will see output like this:
Please select among the available configurations:0: MyParticipantLibrary::PublicationParticipant1: MyParticipantLibrary::SubscriptionParticipantPlease select: 0DataWriter "HelloWorldWriter" wrote sample 1 on Topic "HelloWorldTopic" at 1332618800.504111 sDataWriter "HelloWorldWriter" wrote sample 2 on Topic "HelloWorldTopic" at 1332618801.504341 sDataWriter "HelloWorldWriter" wrote sample 3 on Topic "HelloWorldTopic" at 1332618802.504593 s
In the window where you typed “1” (second choice), you will see output like this:
Please select among the available configurations:0: MyParticipantLibrary::PublicationParticipant1: MyParticipantLibrary::SubscriptionParticipantPlease select: 1DataReader "HelloWorldReader" received sample 1 on Topic "HelloWorldTopic" sent at 1332618800.504111 ssender: "Key: 521035021"message: "String: 1"count: 1
DataReader "HelloWorldReader" received sample 2 on Topic "HelloWorldTopic" sent at 1332618801.504341 ssender: "Key: 521035021"message: "String: 2"count: 2
DataReader "HelloWorldReader" received sample 3 on Topic "HelloWorldTopic" sent at 1332618802.504593 ssender: "Key: 521035021"message: "String: 3"
If you do not see this output and get the following error instead:rtidsprototyper: Error configuration file not found.
This indicates that you did not run rtiddsprototyper from the right directory. Change directories to <Connext installation directory>/ndds.<version>/example/prototyper/HelloWorld and verify you see the file USER_QOS_PROFILES.xml in that directory.
4
“Hello World” with RTI Connext Prototyper
count: 3
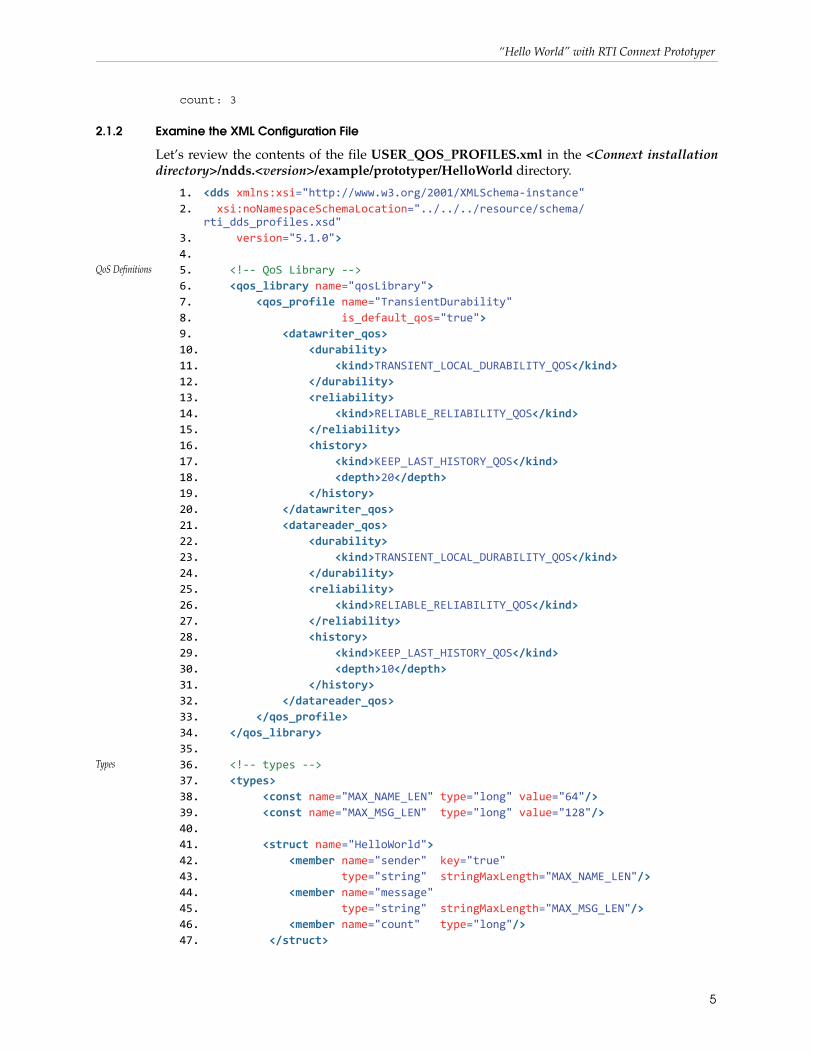
2.1.2 Examine the XML Configuration File
Let’s review the contents of the file USER_QOS_PROFILES.xml in the <Connext installation directory>/ndds.<version>/example/prototyper/HelloWorld directory.
1. <dds xmlns:xsi="http://www.w3.org/2001/XMLSchema-instance" 2. xsi:noNamespaceSchemaLocation="../../../resource/schema/
rti_dds_profiles.xsd"3. version="5.1.0"> 4.
QoS Definitions 5. <!-- QoS Library --> 6. <qos_library name="qosLibrary"> 7. <qos_profile name="TransientDurability" 8. is_default_qos="true"> 9. <datawriter_qos> 10. <durability> 11. <kind>TRANSIENT_LOCAL_DURABILITY_QOS</kind> 12. </durability> 13. <reliability> 14. <kind>RELIABLE_RELIABILITY_QOS</kind> 15. </reliability> 16. <history> 17. <kind>KEEP_LAST_HISTORY_QOS</kind> 18. <depth>20</depth> 19. </history> 20. </datawriter_qos> 21. <datareader_qos> 22. <durability> 23. <kind>TRANSIENT_LOCAL_DURABILITY_QOS</kind> 24. </durability> 25. <reliability> 26. <kind>RELIABLE_RELIABILITY_QOS</kind> 27. </reliability> 28. <history> 29. <kind>KEEP_LAST_HISTORY_QOS</kind> 30. <depth>10</depth> 31. </history> 32. </datareader_qos> 33. </qos_profile> 34. </qos_library> 35.
Types 36. <!-- types --> 37. <types> 38. <const name="MAX_NAME_LEN" type="long" value="64"/> 39. <const name="MAX_MSG_LEN" type="long" value="128"/> 40. 41. <struct name="HelloWorld"> 42. <member name="sender" key="true" 43. type="string" stringMaxLength="MAX_NAME_LEN"/> 44. <member name="message" 45. type="string" stringMaxLength="MAX_MSG_LEN"/> 46. <member name="count" type="long"/> 47. </struct>
5

“Hello World” with RTI Connext Prototyper
48. </types> 49.
Domain Library 50. <!-- Domain Library --> 51. <domain_library name="MyDomainLibrary" > 52. 53. <domain name="HelloWorldDomain" domain_id="0"> 54. <register_type name="HelloWorldType" kind="dynamicData" 55. type_ref="HelloWorld" /> 56. 57. <topic name="HelloWorldTopic" 58. register_type_ref="HelloWorldType"/> 59. </domain> 60. </domain_library> 61.
Participant Library
62. <!-- Participant library --> 63. <participant_library name="MyParticipantLibrary"> 64. 65. <domain_participant name="PublicationParticipant" 66. domain_ref="MyDomainLibrary::HelloWorldDomain"> 67. 68. <publisher name="MyPublisher"> 69. <data_writer name="HelloWorldWriter" 70. topic_ref="HelloWorldTopic"> 71. <datawriter_qos name="HelloWorld_writer_qos" 72. base_name="qosLibrary::TransientDurability"/> 73. </data_writer> 74. </publisher> 75. </domain_participant> 76. 77. <domain_participant name="SubscriptionParticipant" 78. domain_ref="MyDomainLibrary::HelloWorldDomain"> 79. 80. <subscriber name="MySubscriber"> 81. 82. <data_reader name="HelloWorldReader" 83. topic_ref="HelloWorldTopic"> 84. <datareader_qos name="HelloWorld_reader_qos" 85. base_name="qosLibrary::TransientDurability"/>86. </data_reader> 87. </subscriber> 88. </domain_participant> 89. 90. </participant_library> 91. 92. </dds>
The configuration file contains four main sections:
❏ QoS definition section (<qos_library> tag).
❏ Type definition section (<types> tag).
❏ Domain definition section (<domain_library> tag).
6
“Hello World” with RTI Connext Prototyper
❏ Participant definition section (<participant_library> tag).
Examining the file we can see that it defines:
❏ A QoS library named qosLibrary that contains a QoS Profile named TransientDurability.
❏ A data type named HelloWorld with members sender, message, and count.
❏ A domain library named MyDomainLibrary containing a single domain named HelloWorldDomain with Topic HelloWorldTopic.
❏ A DomainParticipant library named MyParticipantLibrary that contains two DomainParticipant configurations, PublicationParticipant and SubscriptionParticipant:
• The PublicationParticipant publishes the HelloWorldTopic
• The SubscriptionParticipant subscribes to the HelloWorldTopic
These definitions correspond to the distributed application shown in Figure 1.
2.1.3 Default Behavior of Prototyper for the HelloWorld Application
Prototyper gets its configuration from a set of XML files. By default, Prototyper will look in the current working directory for a file named USER_QOS_PROFILES.xml and read it to deter-mine the defined participant configurations and offer them as choices.
In this example, Prototyper found two participant configurations and offered them as choices on the command line: MyParticipantLibrary::PublicationParticipant and MyParticipantLibrary::SubscriptionParticipant.
You can control this behavior via the command-line options so that Prototyper reads a different file and/or automatically starts a particular participant configuration. For example, you can type the following on the command line to start the MyParticipantLibrary::PublicationParticipant:
On UNIX-based systems:
../../../scripts/rtiddsprototyper –cfgName “MyParticipantLibrary::PublicationParticipant”
On Windows systems:
..\..\..\scripts\rtiddsprototyper –cfgName “MyParticipantLibrary::PublicationParticipant”
Please see An Example using RTI Shapes Demo (Section 2.2) for more details on the behavior of Prototyper and its command-line options.
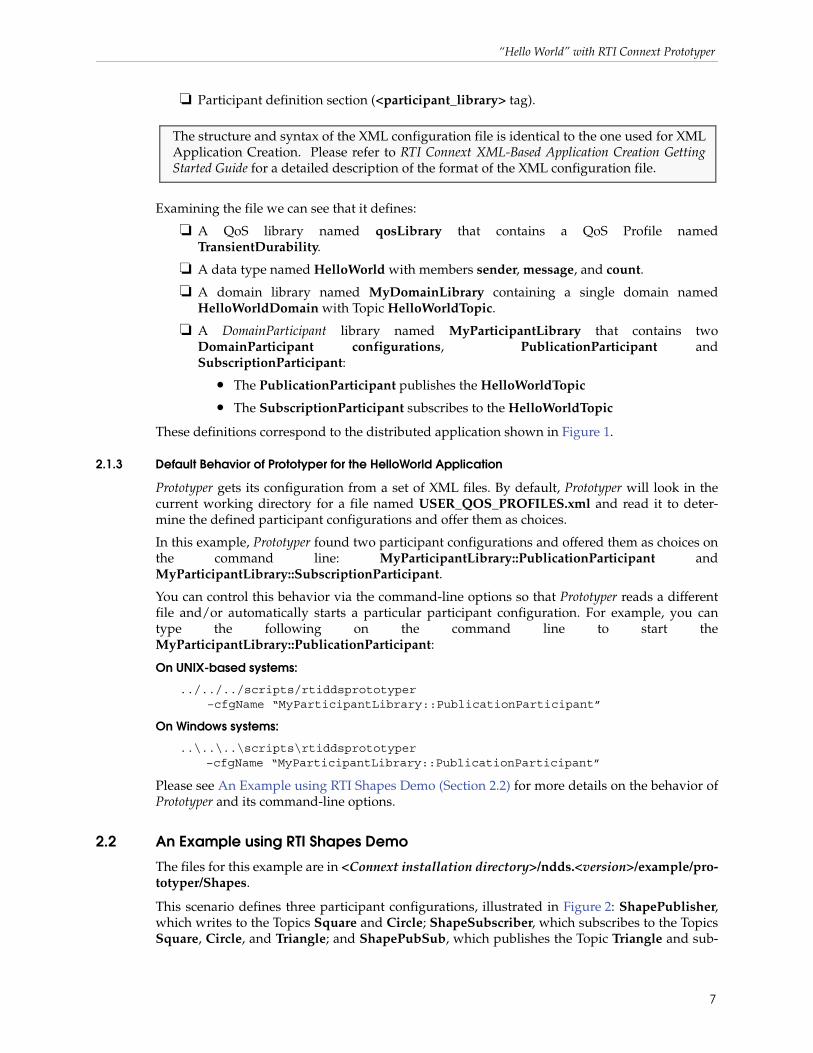
2.2 An Example using RTI Shapes Demo
The files for this example are in <Connext installation directory>/ndds.<version>/example/pro-totyper/Shapes.
This scenario defines three participant configurations, illustrated in Figure 2: ShapePublisher, which writes to the Topics Square and Circle; ShapeSubscriber, which subscribes to the Topics Square, Circle, and Triangle; and ShapePubSub, which publishes the Topic Triangle and sub-
The structure and syntax of the XML configuration file is identical to the one used for XML Application Creation. Please refer to RTI Connext XML-Based Application Creation Getting Started Guide for a detailed description of the format of the XML configuration file.
7

“Hello World” with RTI Connext Prototyper
scribes to the Topic Circle. The DDS domain is defined with the same Topics and data-types used by RTI Shapes Demo such that it can be used in conjunction with it.
2.2.1 Run Prototyper
On UNIX-based systems:
Open two command-shell windows. In each one, change the directory to <Connextinstallation directory>/ndds.<version>/example/prototyper/Shapes. Then type the following command in each window:
../../../scripts/rtiddsprototyper
On Windows systems:
Open three command-prompt windows. In each one, change the directory to <Connextinstallation directory>\ndds.<version>\example\prototyper\Shapes. Then type the following command in each window:
..\..\..\scripts\rtiddsprototyper.bat
You will see the following output appear on each window:
Please select among the available configurations:0: MyParticipantLibrary::ShapePublisher1: MyParticipantLibrary::ShapeSubscriber2: MyParticipantLibrary::ShapePubSub
Shape Domain contains three participant configurations: ShapePublisher, ShapeSubscriber, and ShapePubSub
Figure 2 Three DomainParticipants
8
“Hello World” with RTI Connext Prototyper
Please select:
In the first window, type “0” (without the quotes) to select the first choice, followed by a return.
In the second window, type “1” (without the quotes) to select the second choice, also followed by a return.
In the third window, type “2”.
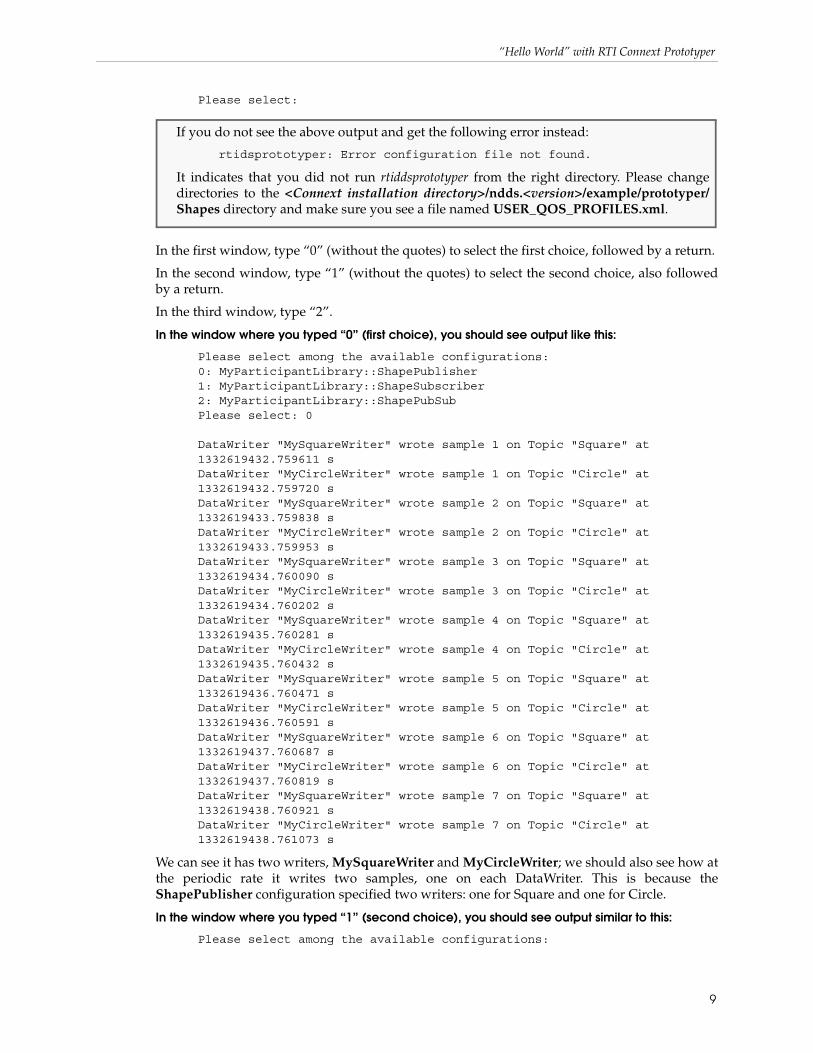
In the window where you typed “0” (first choice), you should see output like this:
Please select among the available configurations:0: MyParticipantLibrary::ShapePublisher1: MyParticipantLibrary::ShapeSubscriber2: MyParticipantLibrary::ShapePubSubPlease select: 0
DataWriter "MySquareWriter" wrote sample 1 on Topic "Square" at 1332619432.759611 sDataWriter "MyCircleWriter" wrote sample 1 on Topic "Circle" at 1332619432.759720 sDataWriter "MySquareWriter" wrote sample 2 on Topic "Square" at 1332619433.759838 sDataWriter "MyCircleWriter" wrote sample 2 on Topic "Circle" at 1332619433.759953 sDataWriter "MySquareWriter" wrote sample 3 on Topic "Square" at 1332619434.760090 sDataWriter "MyCircleWriter" wrote sample 3 on Topic "Circle" at 1332619434.760202 sDataWriter "MySquareWriter" wrote sample 4 on Topic "Square" at 1332619435.760281 sDataWriter "MyCircleWriter" wrote sample 4 on Topic "Circle" at 1332619435.760432 sDataWriter "MySquareWriter" wrote sample 5 on Topic "Square" at 1332619436.760471 sDataWriter "MyCircleWriter" wrote sample 5 on Topic "Circle" at 1332619436.760591 sDataWriter "MySquareWriter" wrote sample 6 on Topic "Square" at 1332619437.760687 sDataWriter "MyCircleWriter" wrote sample 6 on Topic "Circle" at 1332619437.760819 sDataWriter "MySquareWriter" wrote sample 7 on Topic "Square" at 1332619438.760921 sDataWriter "MyCircleWriter" wrote sample 7 on Topic "Circle" at 1332619438.761073 s
We can see it has two writers, MySquareWriter and MyCircleWriter; we should also see how at the periodic rate it writes two samples, one on each DataWriter. This is because the ShapePublisher configuration specified two writers: one for Square and one for Circle.
In the window where you typed “1” (second choice), you should see output similar to this:
Please select among the available configurations:
If you do not see the above output and get the following error instead:
rtidsprototyper: Error configuration file not found.
It indicates that you did not run rtiddsprototyper from the right directory. Please change directories to the <Connext installation directory>/ndds.<version>/example/prototyper/Shapes directory and make sure you see a file named USER_QOS_PROFILES.xml.
9
“Hello World” with RTI Connext Prototyper
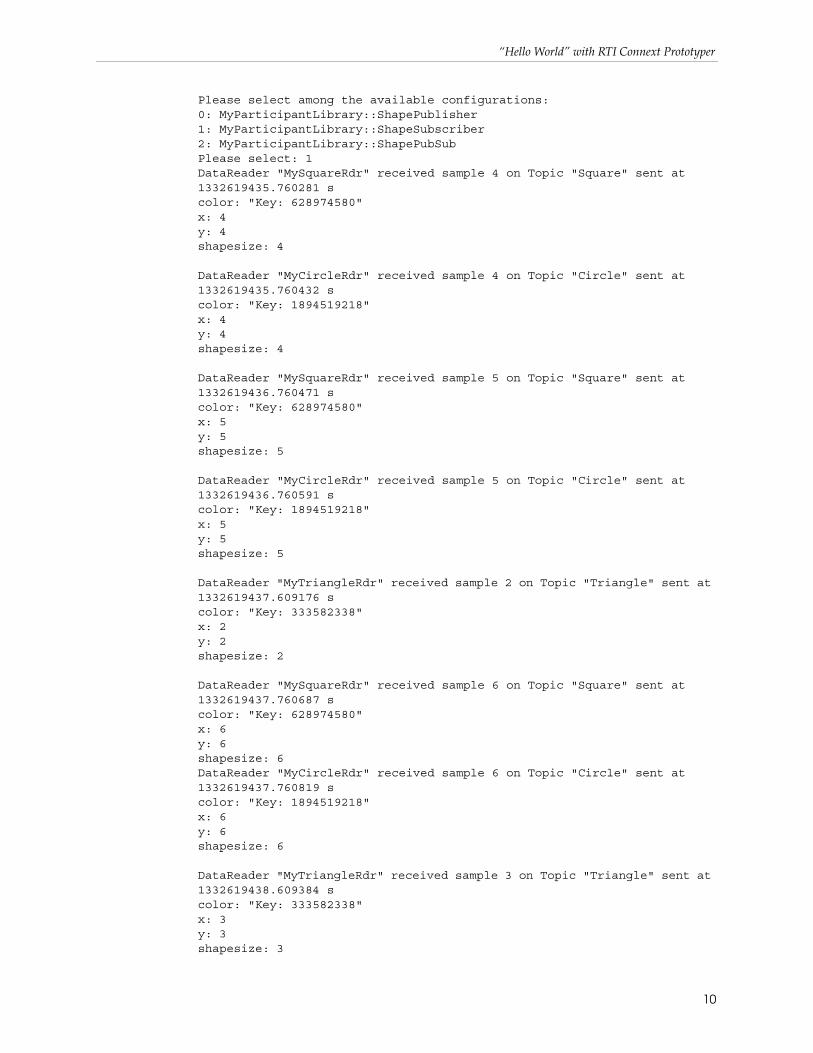
Please select among the available configurations:0: MyParticipantLibrary::ShapePublisher1: MyParticipantLibrary::ShapeSubscriber2: MyParticipantLibrary::ShapePubSubPlease select: 1DataReader "MySquareRdr" received sample 4 on Topic "Square" sent at 1332619435.760281 scolor: "Key: 628974580"x: 4y: 4shapesize: 4
DataReader "MyCircleRdr" received sample 4 on Topic "Circle" sent at 1332619435.760432 scolor: "Key: 1894519218"x: 4y: 4shapesize: 4
DataReader "MySquareRdr" received sample 5 on Topic "Square" sent at 1332619436.760471 scolor: "Key: 628974580"x: 5y: 5shapesize: 5
DataReader "MyCircleRdr" received sample 5 on Topic "Circle" sent at 1332619436.760591 scolor: "Key: 1894519218"x: 5y: 5shapesize: 5
DataReader "MyTriangleRdr" received sample 2 on Topic "Triangle" sent at 1332619437.609176 scolor: "Key: 333582338"x: 2y: 2shapesize: 2
DataReader "MySquareRdr" received sample 6 on Topic "Square" sent at 1332619437.760687 scolor: "Key: 628974580"x: 6y: 6shapesize: 6DataReader "MyCircleRdr" received sample 6 on Topic "Circle" sent at 1332619437.760819 scolor: "Key: 1894519218"x: 6y: 6shapesize: 6
DataReader "MyTriangleRdr" received sample 3 on Topic "Triangle" sent at 1332619438.609384 scolor: "Key: 333582338"x: 3y: 3shapesize: 3
10
“Hello World” with RTI Connext Prototyper
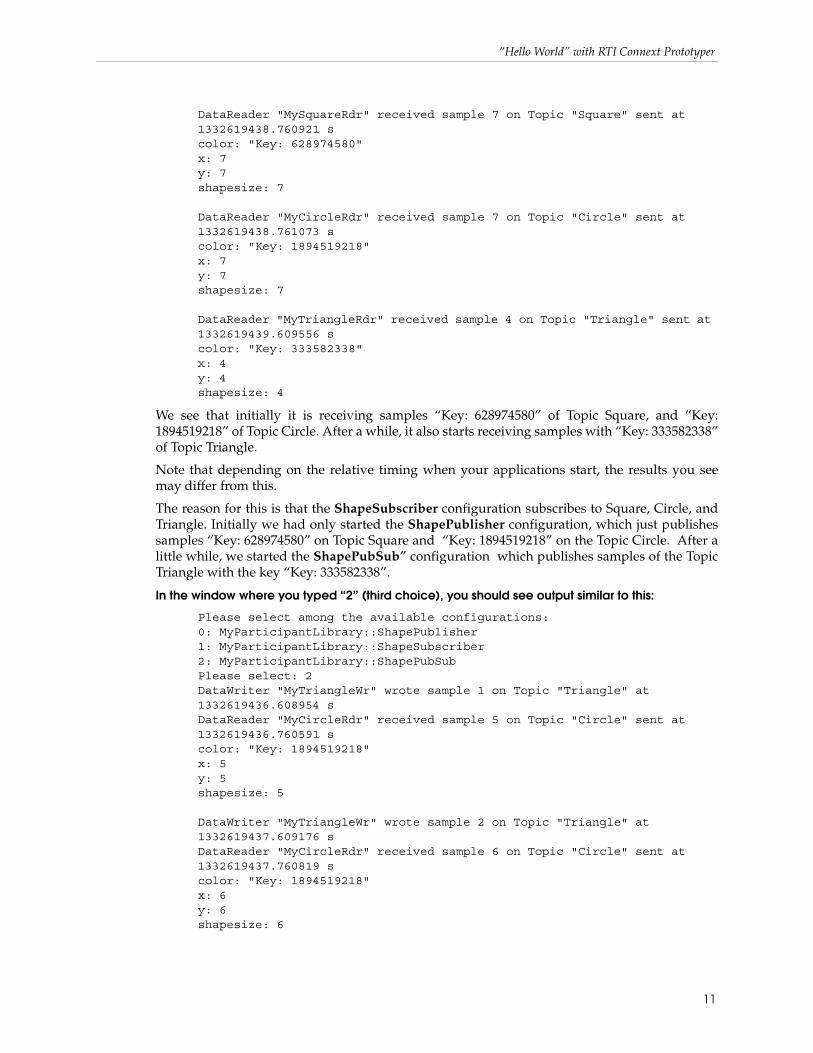
DataReader "MySquareRdr" received sample 7 on Topic "Square" sent at 1332619438.760921 scolor: "Key: 628974580"x: 7y: 7shapesize: 7
DataReader "MyCircleRdr" received sample 7 on Topic "Circle" sent at 1332619438.761073 scolor: "Key: 1894519218"x: 7y: 7shapesize: 7
DataReader "MyTriangleRdr" received sample 4 on Topic "Triangle" sent at 1332619439.609556 scolor: "Key: 333582338"x: 4y: 4shapesize: 4
We see that initially it is receiving samples “Key: 628974580” of Topic Square, and “Key: 1894519218” of Topic Circle. After a while, it also starts receiving samples with “Key: 333582338” of Topic Triangle.
Note that depending on the relative timing when your applications start, the results you see may differ from this.
The reason for this is that the ShapeSubscriber configuration subscribes to Square, Circle, and Triangle. Initially we had only started the ShapePublisher configuration, which just publishes samples “Key: 628974580” on Topic Square and “Key: 1894519218” on the Topic Circle. After a little while, we started the ShapePubSub” configuration which publishes samples of the Topic Triangle with the key “Key: 333582338”.
In the window where you typed “2” (third choice), you should see output similar to this:
Please select among the available configurations:0: MyParticipantLibrary::ShapePublisher1: MyParticipantLibrary::ShapeSubscriber2: MyParticipantLibrary::ShapePubSubPlease select: 2DataWriter "MyTriangleWr" wrote sample 1 on Topic "Triangle" at 1332619436.608954 sDataReader "MyCircleRdr" received sample 5 on Topic "Circle" sent at 1332619436.760591 scolor: "Key: 1894519218"x: 5y: 5shapesize: 5
DataWriter "MyTriangleWr" wrote sample 2 on Topic "Triangle" at 1332619437.609176 sDataReader "MyCircleRdr" received sample 6 on Topic "Circle" sent at 1332619437.760819 scolor: "Key: 1894519218"x: 6y: 6shapesize: 6
11
“Hello World” with RTI Connext Prototyper
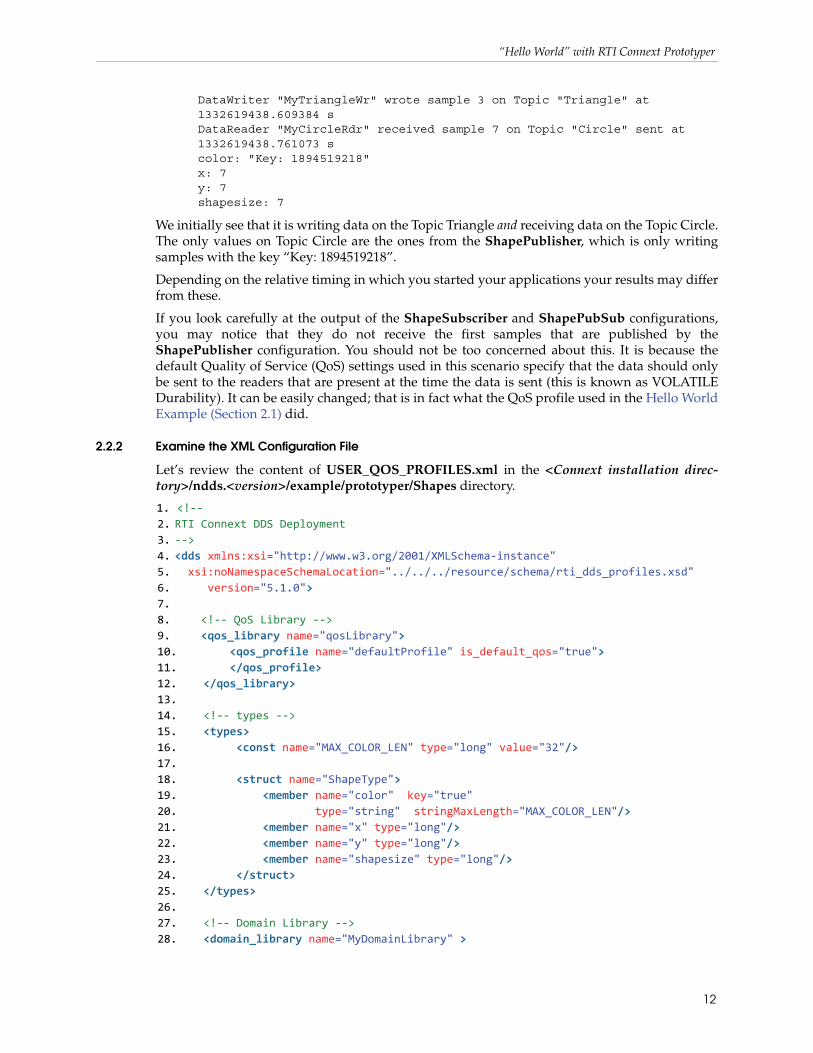
DataWriter "MyTriangleWr" wrote sample 3 on Topic "Triangle" at 1332619438.609384 sDataReader "MyCircleRdr" received sample 7 on Topic "Circle" sent at 1332619438.761073 scolor: "Key: 1894519218"x: 7y: 7shapesize: 7
We initially see that it is writing data on the Topic Triangle and receiving data on the Topic Circle. The only values on Topic Circle are the ones from the ShapePublisher, which is only writing samples with the key “Key: 1894519218”.
Depending on the relative timing in which you started your applications your results may differ from these.
If you look carefully at the output of the ShapeSubscriber and ShapePubSub configurations, you may notice that they do not receive the first samples that are published by the ShapePublisher configuration. You should not be too concerned about this. It is because the default Quality of Service (QoS) settings used in this scenario specify that the data should only be sent to the readers that are present at the time the data is sent (this is known as VOLATILE Durability). It can be easily changed; that is in fact what the QoS profile used in the Hello World Example (Section 2.1) did.
2.2.2 Examine the XML Configuration File
Let’s review the content of USER_QOS_PROFILES.xml in the <Connext installation direc-tory>/ndds.<version>/example/prototyper/Shapes directory.
1. <!-- 2. RTI Connext DDS Deployment 3. --> 4. <dds xmlns:xsi="http://www.w3.org/2001/XMLSchema-instance" 5. xsi:noNamespaceSchemaLocation="../../../resource/schema/rti_dds_profiles.xsd"6. version="5.1.0"> 7. 8. <!-- QoS Library --> 9. <qos_library name="qosLibrary"> 10. <qos_profile name="defaultProfile" is_default_qos="true"> 11. </qos_profile> 12. </qos_library> 13. 14. <!-- types --> 15. <types> 16. <const name="MAX_COLOR_LEN" type="long" value="32"/> 17. 18. <struct name="ShapeType"> 19. <member name="color" key="true" 20. type="string" stringMaxLength="MAX_COLOR_LEN"/> 21. <member name="x" type="long"/> 22. <member name="y" type="long"/> 23. <member name="shapesize" type="long"/> 24. </struct> 25. </types> 26. 27. <!-- Domain Library --> 28. <domain_library name="MyDomainLibrary" >
12

“Hello World” with RTI Connext Prototyper
29. 30. <domain name="ShapeDomain" domain_id="0"> 31. <register_type name="ShapeType" kind="dynamicData" 32. type_ref="ShapeType" /> 33. 34. <topic name="Square" register_type_ref="ShapeType"/> 35. <topic name="Circle" register_type_ref="ShapeType"/> 36. <topic name="Triangle" register_type_ref="ShapeType"/> 37. 38. </domain> 39. </domain_library> 40. 41. <!-- Participant library --> 42. <participant_library name="MyParticipantLibrary"> 43. 44. <!-- 1st participant: publishes Square and Circle 45. --> 46. <domain_participant name="ShapePublisher" 47. domain_ref="MyDomainLibrary::ShapeDomain"> 48. 49. <publisher name="MyPublisher"> 50. <data_writer name="MySquareWriter" topic_ref="Square"/> 51. <data_writer name="MyCircleWriter" topic_ref="Circle"/>52. </publisher> 53. </domain_participant> 54. 55. <!-- 2nd participant: subscribes Square, Circle, and Triangle 56. --> 57. <domain_participant name="ShapeSubscriber" 58. domain_ref="MyDomainLibrary::ShapeDomain"> 59. 60. <subscriber name="MySubscriber"> 61. <data_reader name="MySquareRdr" topic_ref="Square"/> 62. <data_reader name="MyCircleRdr" topic_ref="Circle"/> 63. <data_reader name="MyTriangleRdr" topic_ref="Triangle"/>64. </subscriber> 65. </domain_participant> 66. 67. <!-- 3rd participant: publishes Triangle and subscribes Circle 68. --> 69. <domain_participant name="ShapePubSub" 70. domain_ref="MyDomainLibrary::ShapeDomain">71. 72. <publisher name="MyPublisher"> 73. <data_writer name="MyTriangleWr" topic_ref="Triangle"/> 74. </publisher> 75. 76. <subscriber name="MySubscriber"> 77. <data_reader name="MyCircleRdr" topic_ref="Circle"/> 78. </subscriber> 79. </domain_participant> 80. 81. </participant_library> 82.</dds>
13
“Hello World” with RTI Connext Prototyper
Similar to what we saw in the HelloWorld example, the configuration file contains four main sections:
❏ QoS definition section (<qos_library> tag).❏ Type definition section (<types> tag).❏ Domain definition section (<domain> tag).❏ Participant definition section (<participant_library> tag).
Examining the file, we can see that it defines:
❏ A QoS library, qosLibrary, containing a single QoS Profile, defaultProfile .
❏ A data type ShapeType with fields color, x, y, and shapesize.
❏ A domain library, MyDomainLibrary, containing a single domain, ShapeDomain, with topics Square, Circle, and Triangle. All these topics use the same registered data type, ShapeType.
❏ A DomainParticipant library, MyParticipantLibrary, containing three DomainParticipant configurations: ShapePublisher, ShapeSubscriber, and ShapePubSub.
• The ShapePublisher configuration publishes the topics Square and Circle.
• The ShapeSubscriber configuration subscribes to topics Square, Circle, and Triangle
• The ShapePubSub configuration publishes topic Triangle and subscribes to topic Circle.
These definitions correspond to the distributed application shown in Figure 2.
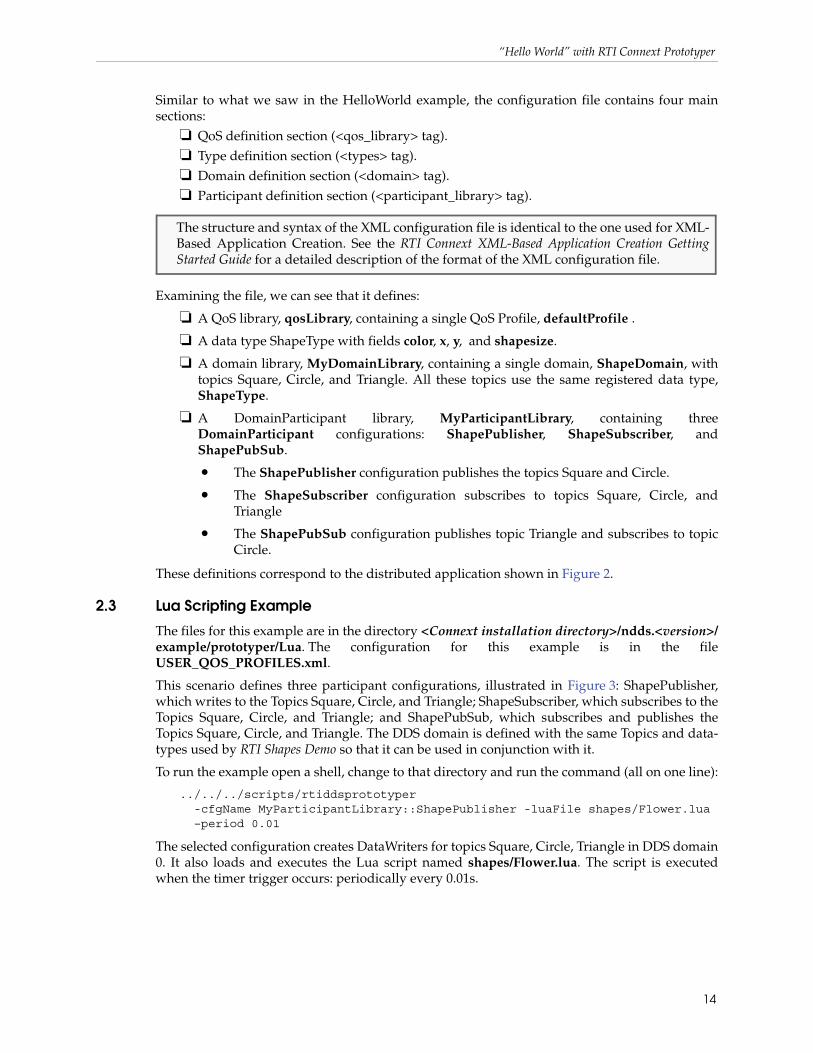
2.3 Lua Scripting Example
The files for this example are in the directory <Connext installation directory>/ndds.<version>/example/prototyper/Lua. The configuration for this example is in the file USER_QOS_PROFILES.xml.
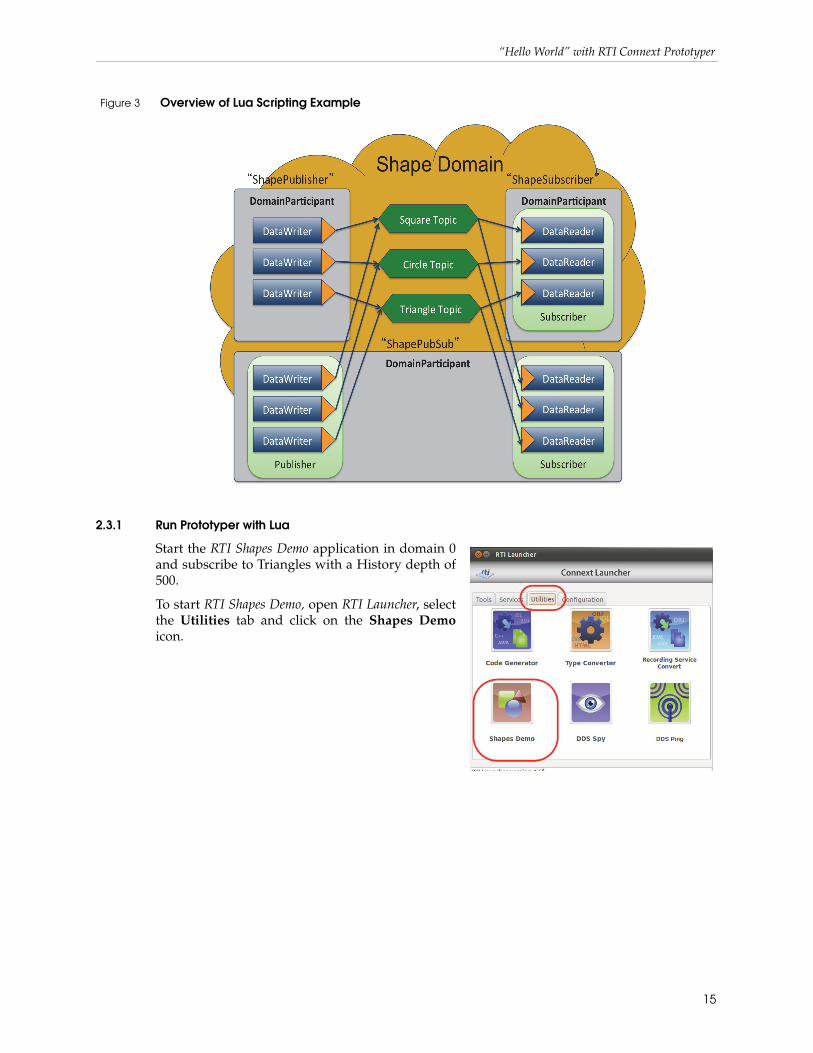
This scenario defines three participant configurations, illustrated in Figure 3: ShapePublisher, which writes to the Topics Square, Circle, and Triangle; ShapeSubscriber, which subscribes to the Topics Square, Circle, and Triangle; and ShapePubSub, which subscribes and publishes the Topics Square, Circle, and Triangle. The DDS domain is defined with the same Topics and data-types used by RTI Shapes Demo so that it can be used in conjunction with it.
To run the example open a shell, change to that directory and run the command (all on one line):
../../../scripts/rtiddsprototyper -cfgName MyParticipantLibrary::ShapePublisher -luaFile shapes/Flower.lua –period 0.01
The selected configuration creates DataWriters for topics Square, Circle, Triangle in DDS domain 0. It also loads and executes the Lua script named shapes/Flower.lua. The script is executed when the timer trigger occurs: periodically every 0.01s.
The structure and syntax of the XML configuration file is identical to the one used for XML-Based Application Creation. See the RTI Connext XML-Based Application Creation Getting Started Guide for a detailed description of the format of the XML configuration file.
14
“Hello World” with RTI Connext Prototyper
2.3.1 Run Prototyper with Lua
Start the RTI Shapes Demo application in domain 0 and subscribe to Triangles with a History depth of 500.
To start RTI Shapes Demo, open RTI Launcher, select the Utilities tab and click on the Shapes Demoicon.
Figure 3 Overview of Lua Scripting Example
15
“Hello World” with RTI Connext Prototyper
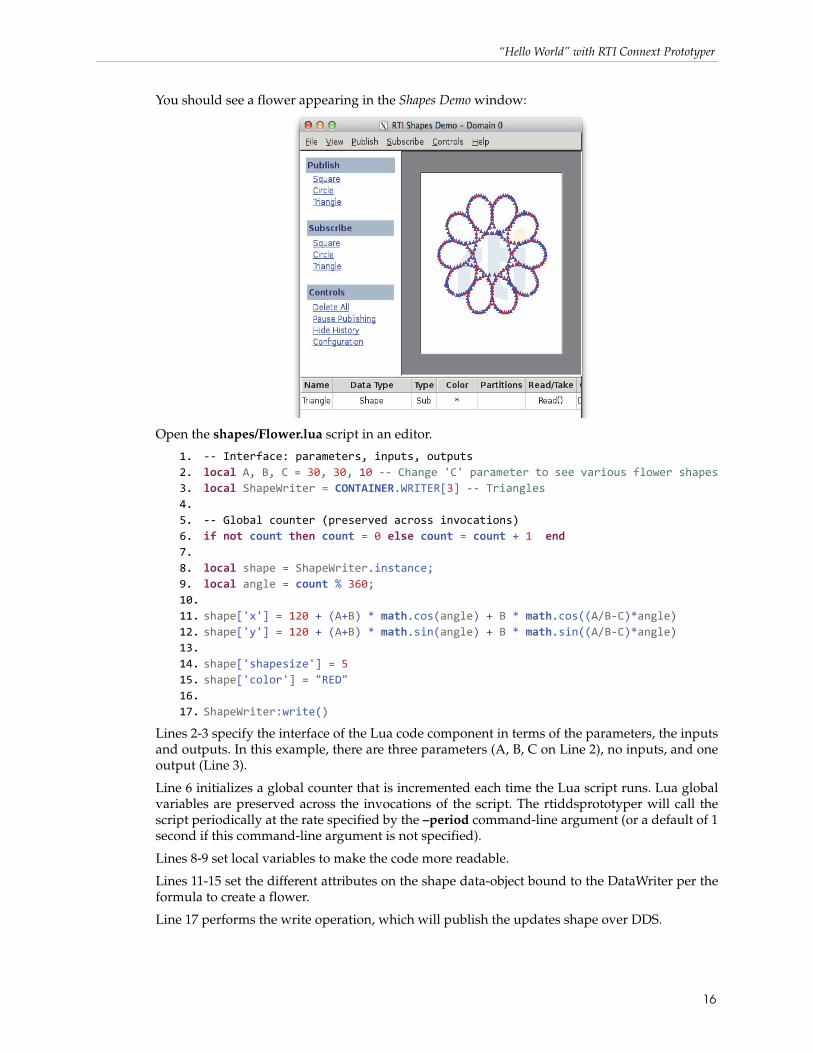
You should see a flower appearing in the Shapes Demo window:
Open the shapes/Flower.lua script in an editor.
1. -- Interface: parameters, inputs, outputs2. local A, B, C = 30, 30, 10 -- Change 'C' parameter to see various flower shapes3. local ShapeWriter = CONTAINER.WRITER[3] -- Triangles4.5. -- Global counter (preserved across invocations) 6. if not count then count = 0 else count = count + 1 end 7.8. local shape = ShapeWriter.instance;9. local angle = count % 360;10.11. shape['x'] = 120 + (A+B) * math.cos(angle) + B * math.cos((A/B-C)*angle)12. shape['y'] = 120 + (A+B) * math.sin(angle) + B * math.sin((A/B-C)*angle)13.14. shape['shapesize'] = 515. shape['color'] = "RED"16.17. ShapeWriter:write()
Lines 2-3 specify the interface of the Lua code component in terms of the parameters, the inputs and outputs. In this example, there are three parameters (A, B, C on Line 2), no inputs, and one output (Line 3).
Line 6 initializes a global counter that is incremented each time the Lua script runs. Lua global variables are preserved across the invocations of the script. The rtiddsprototyper will call the script periodically at the rate specified by the –period command-line argument (or a default of 1 second if this command-line argument is not specified).
Lines 8-9 set local variables to make the code more readable.
Lines 11-15 set the different attributes on the shape data-object bound to the DataWriter per the formula to create a flower.
Line 17 performs the write operation, which will publish the updates shape over DDS.
16

Using Prototyper
Using the code editor, change the value of the parameter C on Line 2 to -10 and save the file. Watch the flower change in real-time. Try dif-ferent values of C to see various flower shapes. Note that Prototyperdoes not need to be restarted to change the Lua code being exe-cuted. This shows the Dynamic Code Editing capabilities to create real-time behavior changes.
3 Using PrototyperPrototyper is a command-line tool. You can control its behavior via command-line options. You can invoke Prototyper with the -help option to see a list of the valid options and a short summary of each:
On UNIX-based systems:
<Connext installation directory>/ndds.<version>/scripts/rtiddsprototyper –help
On Windows systems:
<Connext installation directory>\ndds.<version>\scripts\rtiddsprototyper –help
The command-line options are summarized in Table 3.1.
Note: Command-line options override the corresponding setting, if any, specified in the configuration file.
17
Using Prototyper
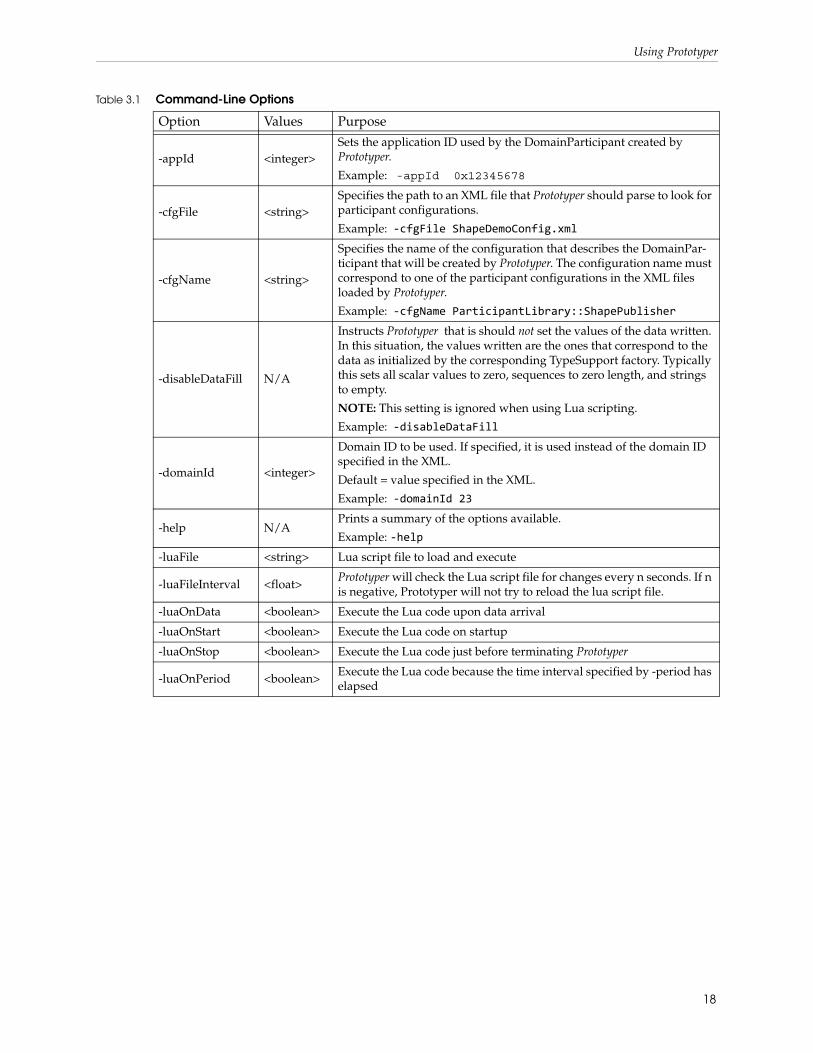
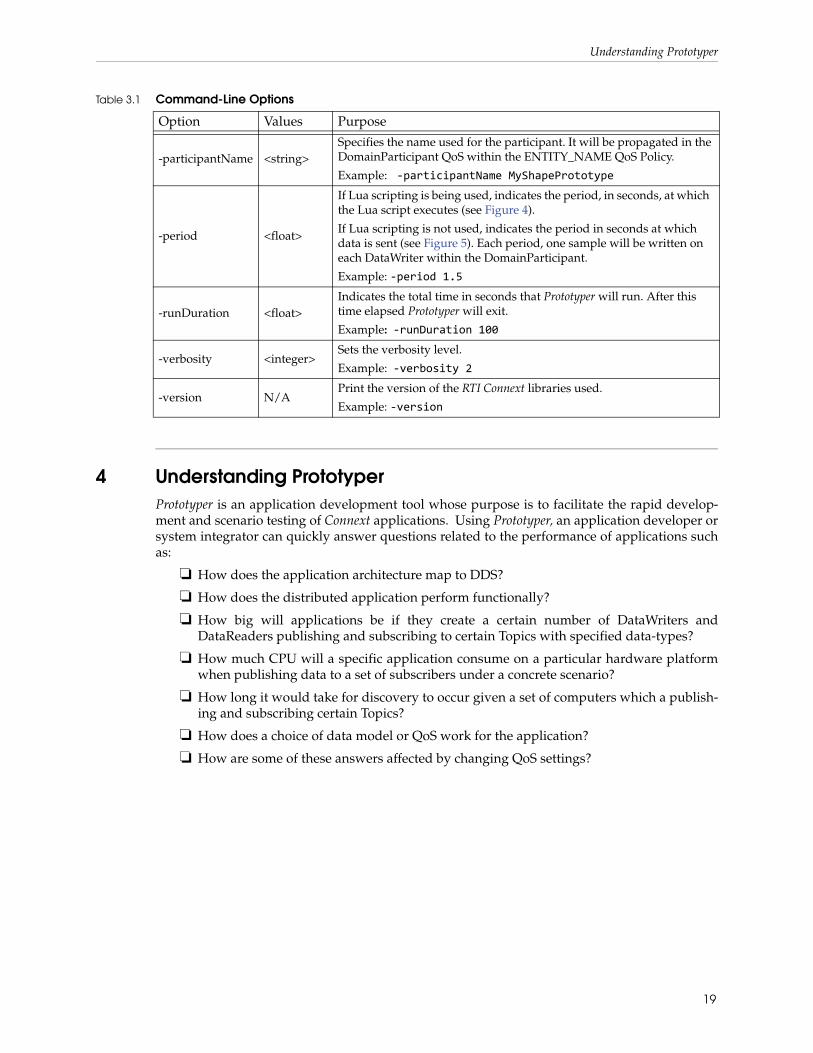
Table 3.1 Command-Line Options
Option Values Purpose
-appId <integer>Sets the application ID used by the DomainParticipant created by Prototyper.
Example: -appId 0x12345678
-cfgFile <string>Specifies the path to an XML file that Prototyper should parse to look for participant configurations.
Example: -cfgFile ShapeDemoConfig.xml
-cfgName <string>
Specifies the name of the configuration that describes the DomainPar-ticipant that will be created by Prototyper. The configuration name must correspond to one of the participant configurations in the XML files loaded by Prototyper.
Example: -cfgName ParticipantLibrary::ShapePublisher
-disableDataFill N/A
Instructs Prototyper that is should not set the values of the data written. In this situation, the values written are the ones that correspond to the data as initialized by the corresponding TypeSupport factory. Typically this sets all scalar values to zero, sequences to zero length, and strings to empty.
NOTE: This setting is ignored when using Lua scripting.
Example: -disableDataFill
-domainId <integer>
Domain ID to be used. If specified, it is used instead of the domain ID specified in the XML.
Default = value specified in the XML.
Example: -domainId 23
-help N/APrints a summary of the options available.
Example: -help
-luaFile <string> Lua script file to load and execute
-luaFileInterval <float> Prototyper will check the Lua script file for changes every n seconds. If n is negative, Prototyper will not try to reload the lua script file.
-luaOnData <boolean> Execute the Lua code upon data arrival
-luaOnStart <boolean> Execute the Lua code on startup
-luaOnStop <boolean> Execute the Lua code just before terminating Prototyper
-luaOnPeriod <boolean> Execute the Lua code because the time interval specified by -period has elapsed
18
Understanding Prototyper
4 Understanding PrototyperPrototyper is an application development tool whose purpose is to facilitate the rapid develop-ment and scenario testing of Connext applications. Using Prototyper, an application developer or system integrator can quickly answer questions related to the performance of applications such as:
❏ How does the application architecture map to DDS?
❏ How does the distributed application perform functionally?
❏ How big will applications be if they create a certain number of DataWriters and DataReaders publishing and subscribing to certain Topics with specified data-types?
❏ How much CPU will a specific application consume on a particular hardware platform when publishing data to a set of subscribers under a concrete scenario?
❏ How long it would take for discovery to occur given a set of computers which a publish-ing and subscribing certain Topics?
❏ How does a choice of data model or QoS work for the application?
❏ How are some of these answers affected by changing QoS settings?
-participantName <string>Specifies the name used for the participant. It will be propagated in the DomainParticipant QoS within the ENTITY_NAME QoS Policy.
Example: -participantName MyShapePrototype
-period <float>
If Lua scripting is being used, indicates the period, in seconds, at which the Lua script executes (see Figure 4).
If Lua scripting is not used, indicates the period in seconds at which data is sent (see Figure 5). Each period, one sample will be written on each DataWriter within the DomainParticipant.
Example: -period 1.5
-runDuration <float>Indicates the total time in seconds that Prototyper will run. After this time elapsed Prototyper will exit.
Example: -runDuration 100
-verbosity <integer>Sets the verbosity level.
Example: -verbosity 2
-version N/APrint the version of the RTI Connext libraries used.
Example: -version
Table 3.1 Command-Line Options
Option Values Purpose
19
Understanding Prototyper
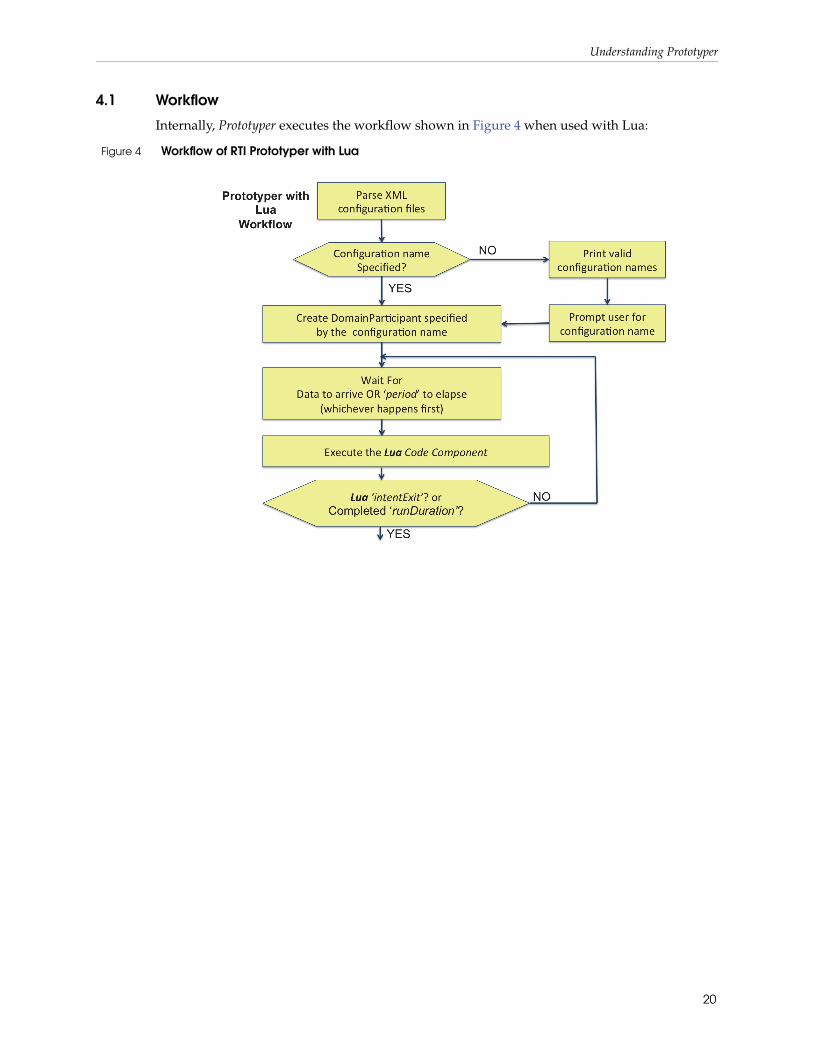
4.1 Workflow
Internally, Prototyper executes the workflow shown in Figure 4 when used with Lua:
Figure 4 Workflow of RTI Prototyper with Lua
20
Understanding Prototyper
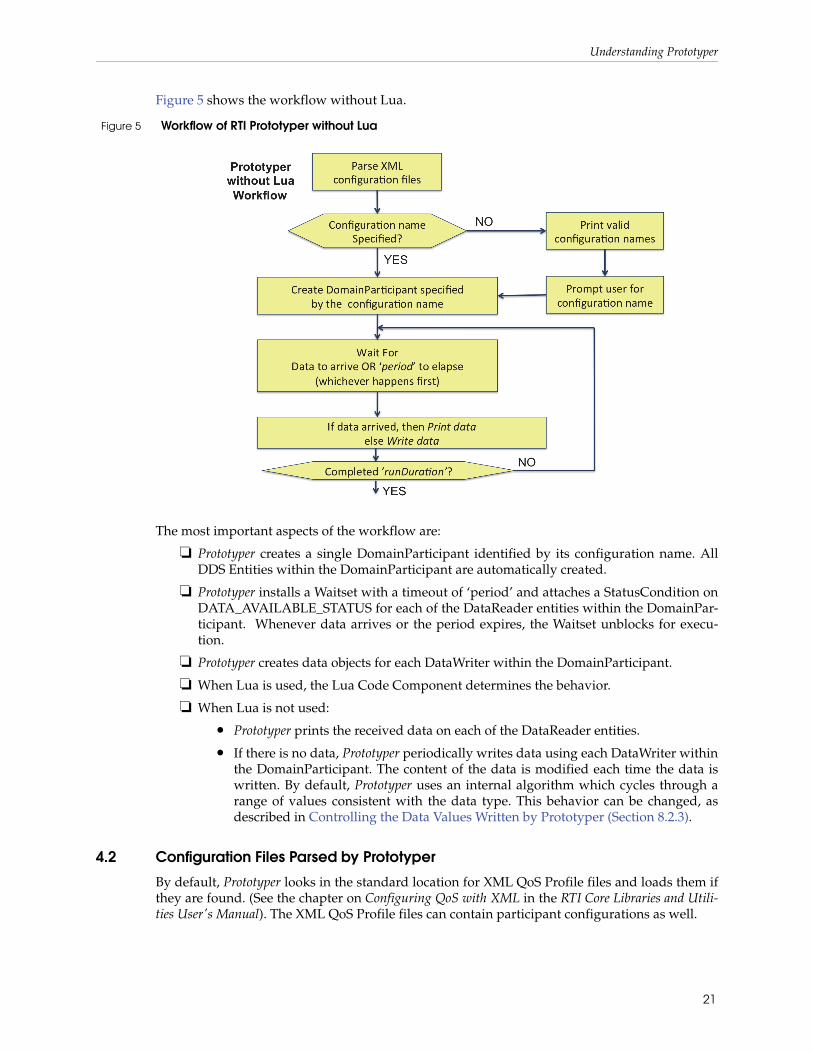
Figure 5 shows the workflow without Lua.
The most important aspects of the workflow are:
❏ Prototyper creates a single DomainParticipant identified by its configuration name. All DDS Entities within the DomainParticipant are automatically created.
❏ Prototyper installs a Waitset with a timeout of ‘period’ and attaches a StatusCondition on DATA_AVAILABLE_STATUS for each of the DataReader entities within the DomainPar-ticipant. Whenever data arrives or the period expires, the Waitset unblocks for execu-tion.
❏ Prototyper creates data objects for each DataWriter within the DomainParticipant.
❏ When Lua is used, the Lua Code Component determines the behavior.
❏ When Lua is not used:
• Prototyper prints the received data on each of the DataReader entities.
• If there is no data, Prototyper periodically writes data using each DataWriter within the DomainParticipant. The content of the data is modified each time the data is written. By default, Prototyper uses an internal algorithm which cycles through a range of values consistent with the data type. This behavior can be changed, as described in Controlling the Data Values Written by Prototyper (Section 8.2.3).
4.2 Configuration Files Parsed by Prototyper
By default, Prototyper looks in the standard location for XML QoS Profile files and loads them if they are found. (See the chapter on Configuring QoS with XML in the RTI Core Libraries and Utili-ties User's Manual). The XML QoS Profile files can contain participant configurations as well.
Figure 5 Workflow of RTI Prototyper without Lua
21
Configuring Prototyper Behavior Using Lua
These locations are:
❏ <Connext installation directory>/ndds.<version>/resource/qos_profiles_<version>/xml/NDDS_QOS_PROFILES.xml:
This file contains the RTI Connext DDS default QoS values; it is loaded automatically if it exists. If present, this is the first file loaded.
❏ File specified in the NDDS_QOS_PROFILES Environment Variable:
The files (or XML strings) separated by semicolons referenced in this environment vari-able, if any, are loaded automatically. These files are loaded after the NDDS_QOS_PROFILES.xml and they are loaded in the order they appear listed in the environment variable.
❏ <working directory>/USER_QOS_PROFILES.xml:
This file is loaded automatically if it exists in the ‘working directory’ of the application, that is, the directory from which the application is run. This file is loaded last.
In addition, Prototyper will load the XML file specified by the command-line option -cfgFile (see An Example using RTI Shapes Demo (Section 2.2)).
Prototyper will look for participant configurations in all these files. Prototyper will exit, printing an error message if no participant configurations are found, or if the participant configuration specified by the command-line option, -cfgName, is not found within the loaded files.
5 Configuring Prototyper Behavior Using Lua Prototyper allows arbitrary behavior to be associated with of the application structure defined in the XML configuration. Custom behavior can be defined using the Lua programming language, thus making it possible to create sophisticated applications that process data of the fly.
Configuring Prototyper to use Lua Scripting is straightforward. All you have to do is specify the Lua code to be executed and the triggers that specify when the code is to be executed.
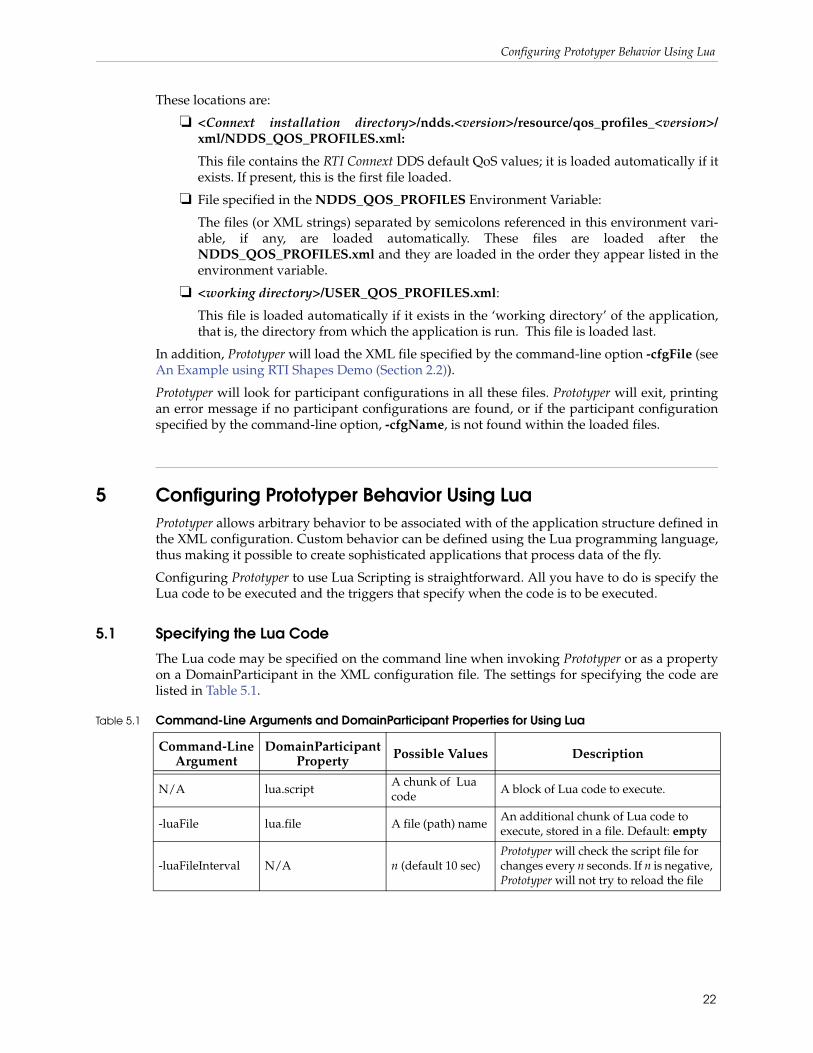
5.1 Specifying the Lua Code
The Lua code may be specified on the command line when invoking Prototyper or as a property on a DomainParticipant in the XML configuration file. The settings for specifying the code are listed in Table 5.1.
Table 5.1 Command-Line Arguments and DomainParticipant Properties for Using Lua
Command-Line Argument
DomainParticipant Property Possible Values Description
N/A lua.scriptA chunk of Lua code
A block of Lua code to execute.
-luaFile lua.file A file (path) name An additional chunk of Lua code to execute, stored in a file. Default: empty
-luaFileInterval N/A n (default 10 sec)Prototyper will check the script file for changes every n seconds. If n is negative, Prototyper will not try to reload the file
22
Configuring Prototyper Behavior Using Lua
Prototyper looks for Lua code to execute in the following places, in the following order:
1. A lua script embedded in the XML configuration file, specified as the value of the lua.script property on a DomainParticipant.
2. A lua file:
a. Specified using the command line option –luaFile <filename>
b. Or, if –luaFile is not specified on the command line, a property called lua.file on the selected DomainParticipant, specified in the XML configuration file.
Note that both an embedded script and a file may be specified. The embedded script specified in the XML is always executed before the external file. Together, the two Lua chunks form the code block executed by the Lua engine when execution is triggered.
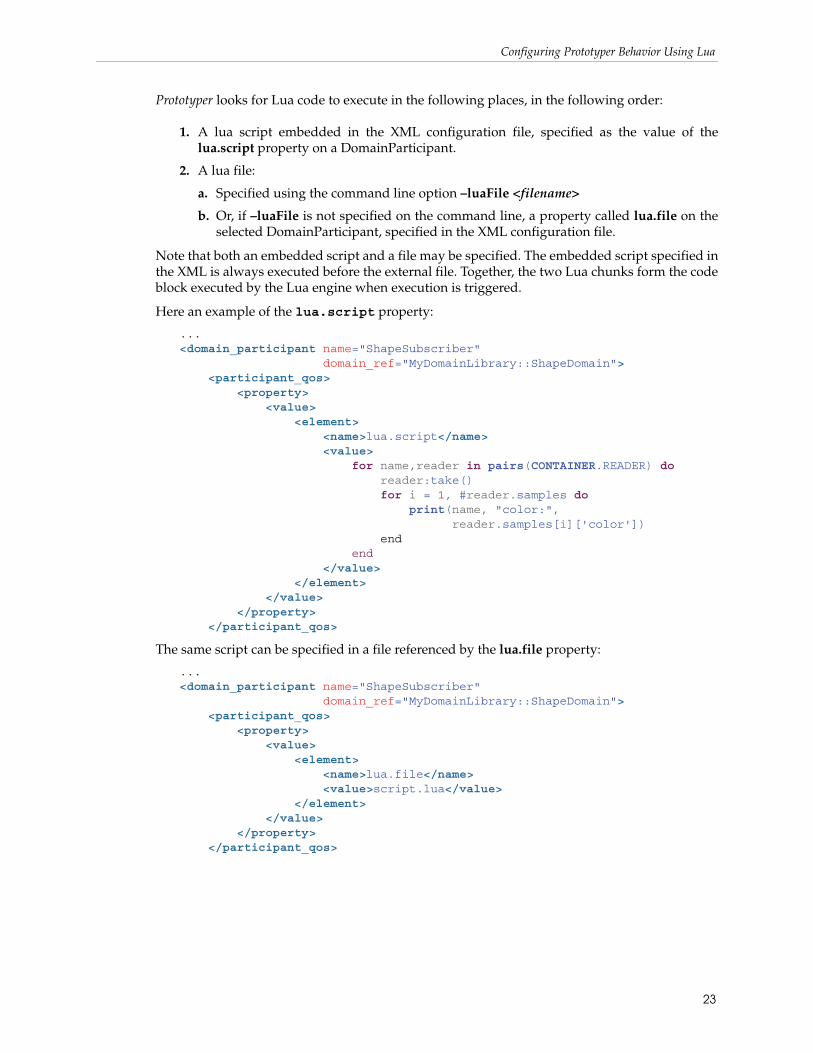
Here an example of the lua.script property:
... <domain_participant name="ShapeSubscriber" domain_ref="MyDomainLibrary::ShapeDomain"> <participant_qos> <property> <value> <element> <name>lua.script</name> <value> for name,reader in pairs(CONTAINER.READER) do reader:take() for i = 1, #reader.samples do print(name, "color:", reader.samples[i]['color']) end end </value> </element> </value> </property> </participant_qos>
The same script can be specified in a file referenced by the lua.file property:
...<domain_participant name="ShapeSubscriber" domain_ref="MyDomainLibrary::ShapeDomain"> <participant_qos> <property> <value> <element> <name>lua.file</name> <value>script.lua</value> </element> </value> </property> </participant_qos>
23
Lua Component Programming Model
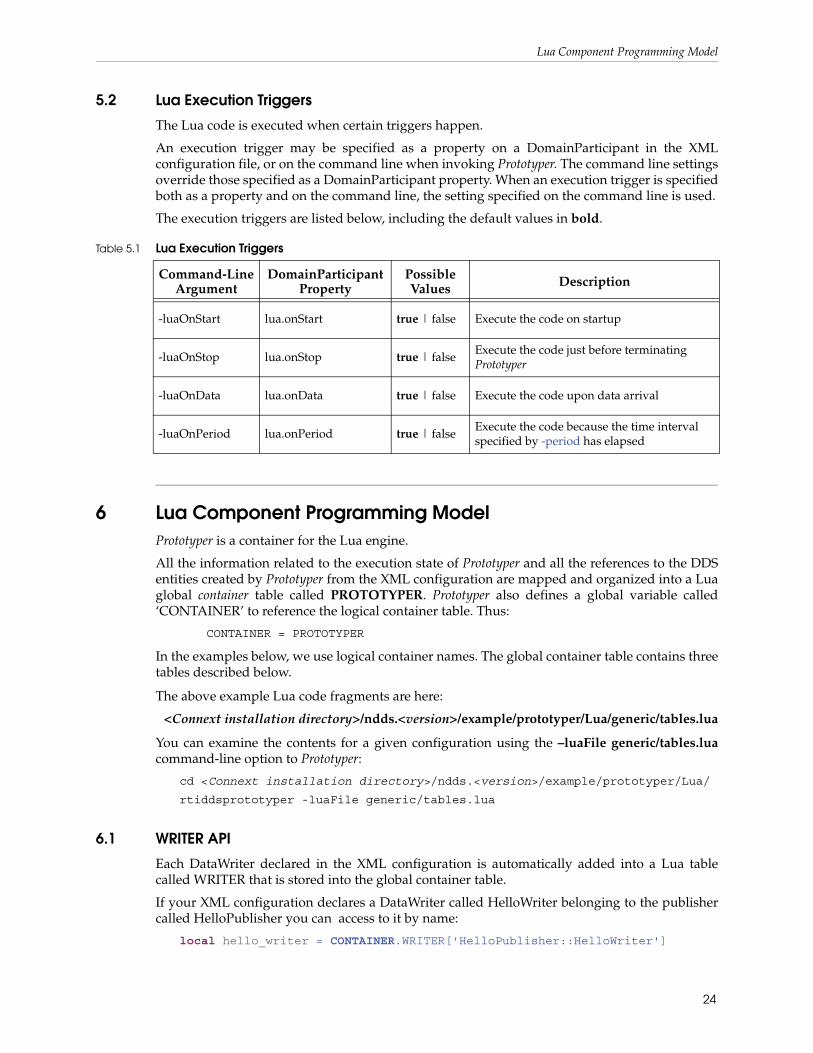
5.2 Lua Execution Triggers
The Lua code is executed when certain triggers happen.
An execution trigger may be specified as a property on a DomainParticipant in the XML configuration file, or on the command line when invoking Prototyper. The command line settings override those specified as a DomainParticipant property. When an execution trigger is specified both as a property and on the command line, the setting specified on the command line is used.
The execution triggers are listed below, including the default values in bold.
6 Lua Component Programming ModelPrototyper is a container for the Lua engine.
All the information related to the execution state of Prototyper and all the references to the DDS entities created by Prototyper from the XML configuration are mapped and organized into a Lua global container table called PROTOTYPER. Prototyper also defines a global variable called ‘CONTAINER’ to reference the logical container table. Thus:
CONTAINER = PROTOTYPER
In the examples below, we use logical container names. The global container table contains three tables described below.
The above example Lua code fragments are here:
<Connext installation directory>/ndds.<version>/example/prototyper/Lua/generic/tables.lua
You can examine the contents for a given configuration using the –luaFile generic/tables.luacommand-line option to Prototyper:
cd <Connext installation directory>/ndds.<version>/example/prototyper/Lua/
rtiddsprototyper -luaFile generic/tables.lua
6.1 WRITER API
Each DataWriter declared in the XML configuration is automatically added into a Lua table called WRITER that is stored into the global container table.
If your XML configuration declares a DataWriter called HelloWriter belonging to the publisher called HelloPublisher you can access to it by name:
local hello_writer = CONTAINER.WRITER['HelloPublisher::HelloWriter']
Table 5.1 Lua Execution Triggers
Command-Line Argument
DomainParticipant Property
Possible Values Description
-luaOnStart lua.onStart true | false Execute the code on startup
-luaOnStop lua.onStop true | false Execute the code just before terminating Prototyper
-luaOnData lua.onData true | false Execute the code upon data arrival
-luaOnPeriod lua.onPeriod true | false Execute the code because the time interval specified by -period has elapsed
24
Lua Component Programming Model
It’s also possible access a DataWriter by index. The index, starts from 1 and it is a number that represent the DataWriter creation order:
local hello_writer = CONTAINER.WRITER[1]
It is important to note that the writer obtained is still a Lua table.
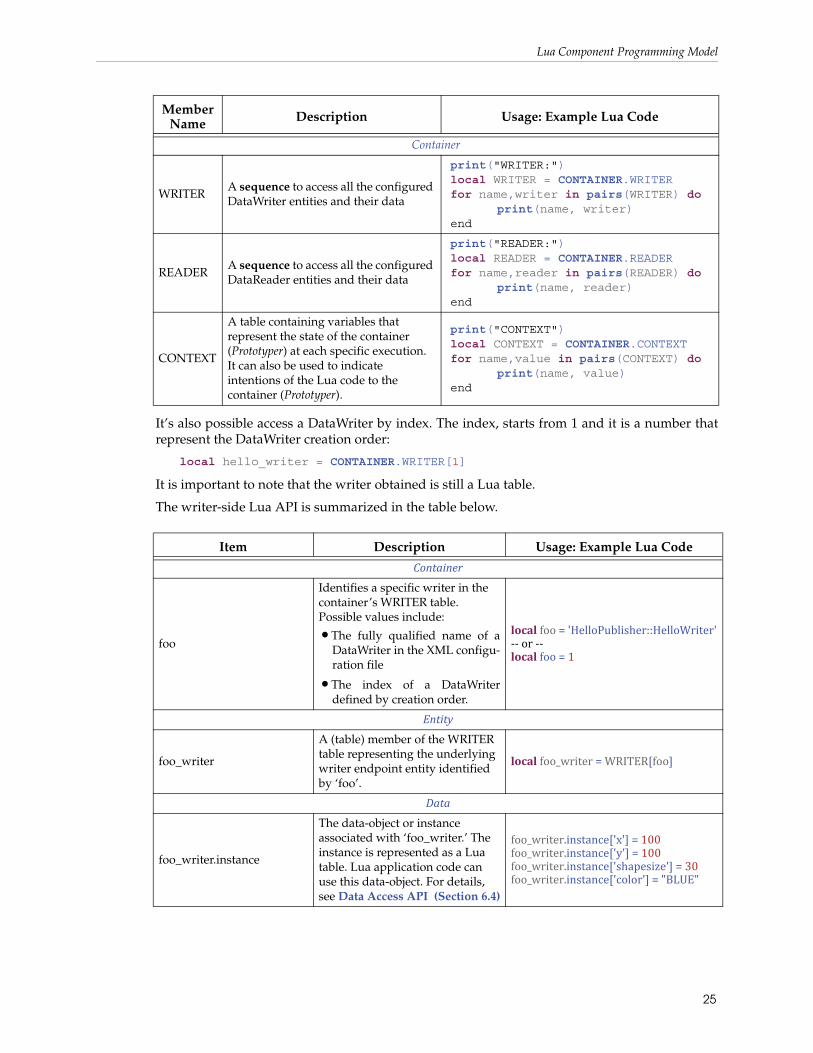
The writer-side Lua API is summarized in the table below.
Member Name Description Usage: Example Lua Code
Container
WRITERA sequence to access all the configured DataWriter entities and their data
print("WRITER:")local WRITER = CONTAINER.WRITERfor name,writer in pairs(WRITER) do print(name, writer)end
READERA sequence to access all the configured DataReader entities and their data
print("READER:")local READER = CONTAINER.READERfor name,reader in pairs(READER) do print(name, reader)end
CONTEXT
A table containing variables that represent the state of the container (Prototyper) at each specific execution. It can also be used to indicate intentions of the Lua code to the container (Prototyper).
print("CONTEXT")local CONTEXT = CONTAINER.CONTEXTfor name,value in pairs(CONTEXT) do print(name, value)end
Item Description Usage: Example Lua Code
Container
foo
Identifies a specific writer in the container’s WRITER table. Possible values include:
•The fully qualified name of a DataWriter in the XML configu-ration file
•The index of a DataWriter defined by creation order.
local foo = 'HelloPublisher::HelloWriter'-- or --local foo = 1
Entity
foo_writer
A (table) member of the WRITER table representing the underlying writer endpoint entity identified by ‘foo’.
local foo_writer = WRITER[foo]Data
foo_writer.instance
The data-object or instance associated with ‘foo_writer.’ The instance is represented as a Lua table. Lua application code can use this data-object. For details, see Data Access API (Section 6.4)
foo_writer.instance['x'] = 100 foo_writer.instance['y'] = 100 foo_writer.instance['shapesize'] = 30 foo_writer.instance['color'] = "BLUE"
25

Lua Component Programming Model
6.2 READER API
Each DataReader declared in the XML configuration is automatically added into a Lua table called READER that is stored into the global container table.
If your XML configuration declares a DataReader called HelloReader belonging to the subscriber called HelloSubscriber you can access to it by name:
local hello_reader = CONTAINER.READER[‘HelloSubscriber::HelloReader’]
It’s also possible to access a DataReader by index. The index starts at 1 and is a number that rep-resent the DataReader creation order:
local hello_reader = CONTAINER.READER[1]
It is important to note that the reader obtained is still a Lua table.
The reader-side Lua API is summarized in the table below.
Operations
foo_writer:clear_members()
Clears the contents of all data members of the object associated with foo_writer, including key members
foo_writer:clear_members()foo_writer:write()
Updates foo_writer.instance in the data space
foo_writer:write()foo_writer:dispose()
Disposes foo_writer.instance in the data space
foo_writer:dispose()foo_writer:unregister()
Unregisters foo_writer.instance in the data space
foo_writer:unregister()
Item Description Usage: Example Lua Code
Item Description Usage: Example Lua CodeContainer
foo
Identifies a specific reader in the container’s READER table. Possible values include:
•The fully qualified name of a DataReader in the XML con-figuration file
•The index of a DataReader defined by creation order.
local foo = 'HelloPublisher::HelloReader'
-- or --
local foo = 1
Entity
foo_reader
A (table) member of the READER table representing the underlying reader endpoint entity identified by ‘foo’.
local foo_reader = READER[foo]
Data
#foo_reader.infos
#foo_reader.samples
Number of infos or samples.
The samples and infos sequences populated by the take() or read() operations and guaranteed to have the same length.
print("Number of infos:", #foo_reader.infos)print("Number of samples:",#foo_reader.samples)
26
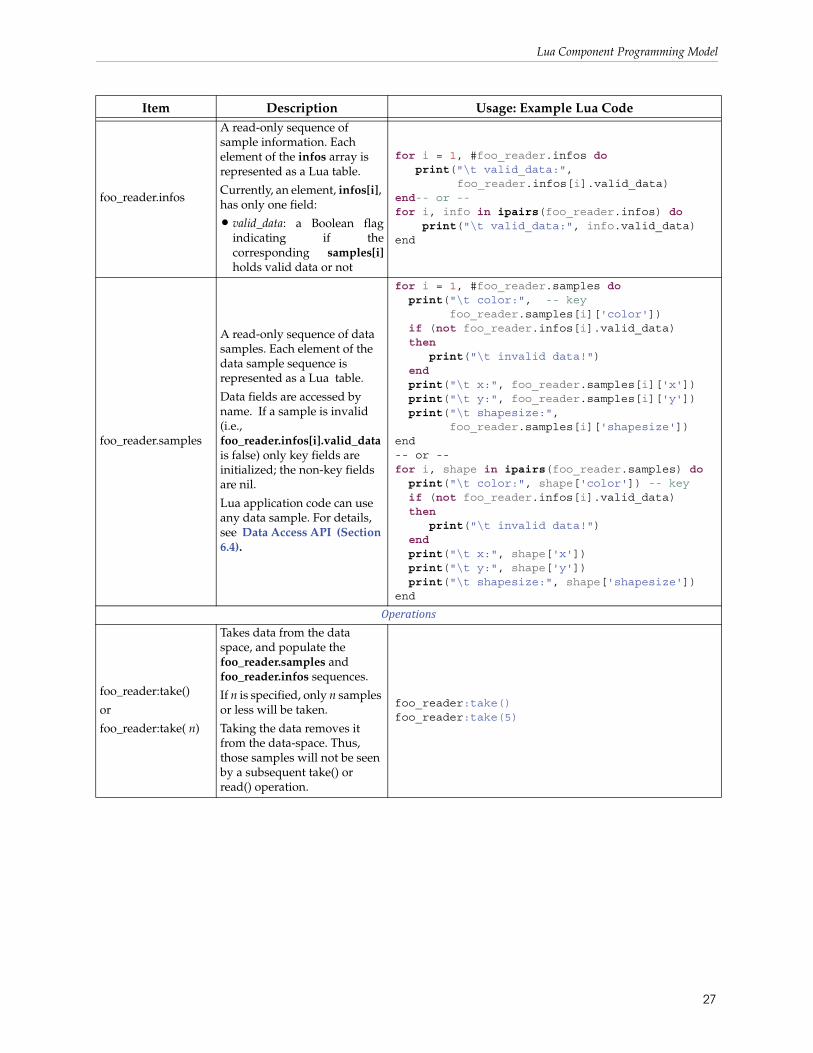
Lua Component Programming Model
foo_reader.infos
A read-only sequence of sample information. Each element of the infos array is represented as a Lua table.
Currently, an element, infos[i], has only one field:
• valid_data: a Boolean flag indicating if the corresponding samples[i]holds valid data or not
for i = 1, #foo_reader.infos do print("\t valid_data:", foo_reader.infos[i].valid_data)end-- or --for i, info in ipairs(foo_reader.infos) do print("\t valid_data:", info.valid_data)end
foo_reader.samples
A read-only sequence of data samples. Each element of the data sample sequence is represented as a Lua table.
Data fields are accessed by name. If a sample is invalid (i.e., foo_reader.infos[i].valid_data is false) only key fields are initialized; the non-key fields are nil.
Lua application code can use any data sample. For details, see Data Access API (Section 6.4).
for i = 1, #foo_reader.samples do print("\t color:", -- key foo_reader.samples[i]['color']) if (not foo_reader.infos[i].valid_data) then print("\t invalid data!") end print("\t x:", foo_reader.samples[i]['x']) print("\t y:", foo_reader.samples[i]['y']) print("\t shapesize:", foo_reader.samples[i]['shapesize'])end-- or --for i, shape in ipairs(foo_reader.samples) do print("\t color:", shape['color']) -- key if (not foo_reader.infos[i].valid_data) then print("\t invalid data!") end print("\t x:", shape['x']) print("\t y:", shape['y']) print("\t shapesize:", shape['shapesize'])end
Operations
foo_reader:take()
or
foo_reader:take( n)
Takes data from the data space, and populate the foo_reader.samples and foo_reader.infos sequences.
If n is specified, only n samples or less will be taken.
Taking the data removes it from the data-space. Thus, those samples will not be seen by a subsequent take() or read() operation.
foo_reader:take()foo_reader:take(5)
Item Description Usage: Example Lua Code
27
Lua Component Programming Model
This example illustrates the above code fragments:
<Connext installation directory>/ndds.<version>/example/prototyper/Lua/generic/gsg.lua
You can run these code fragments using the Prototyper –luaFile generic/gsg.lua option:
cd <Connext installation directory>/ndds.<version>/example/prototyper/Lua/
rtiddsprototyper -cfgName MyParticipantLibrary::ShapePubSub -luaFile generic/gsg.lua
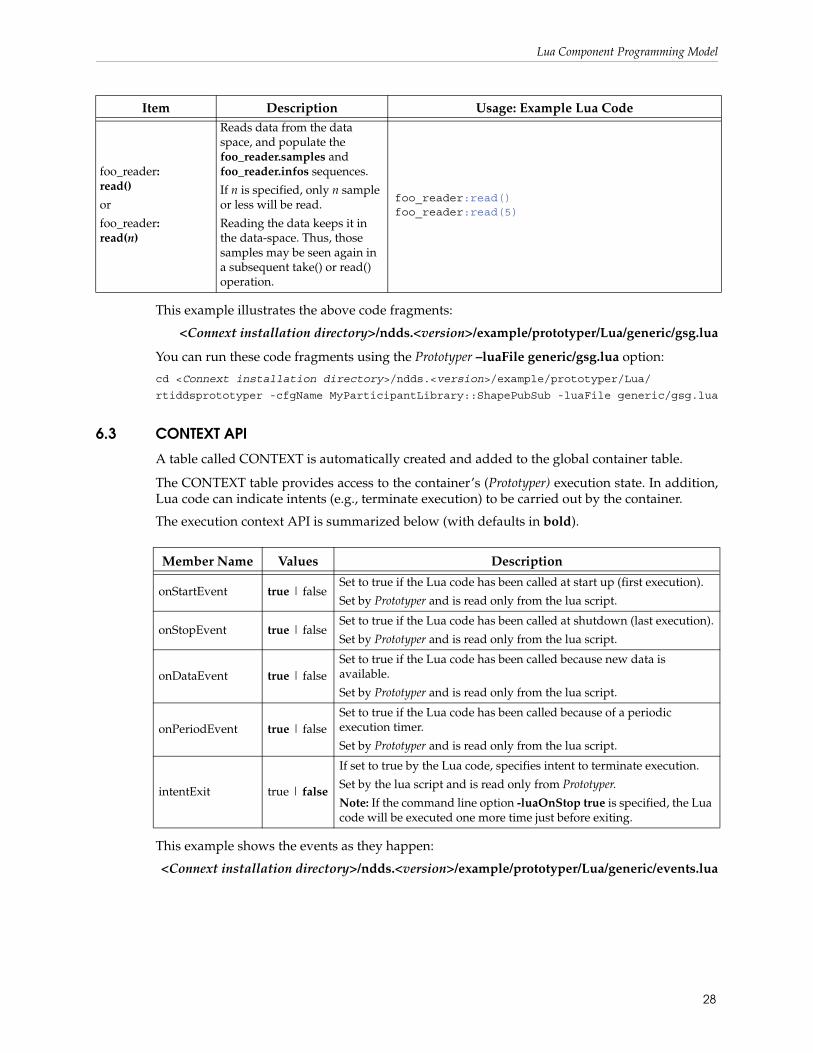
6.3 CONTEXT API
A table called CONTEXT is automatically created and added to the global container table.
The CONTEXT table provides access to the container’s (Prototyper) execution state. In addition, Lua code can indicate intents (e.g., terminate execution) to be carried out by the container.
The execution context API is summarized below (with defaults in bold).
This example shows the events as they happen:
<Connext installation directory>/ndds.<version>/example/prototyper/Lua/generic/events.lua
foo_reader: read()
or
foo_reader: read(n)
Reads data from the data space, and populate the foo_reader.samples and foo_reader.infos sequences.
If n is specified, only n sample or less will be read.
Reading the data keeps it in the data-space. Thus, those samples may be seen again in a subsequent take() or read() operation.
foo_reader:read()foo_reader:read(5)
Item Description Usage: Example Lua Code
Member Name Values Description
onStartEvent true | falseSet to true if the Lua code has been called at start up (first execution).
Set by Prototyper and is read only from the lua script.
onStopEvent true | falseSet to true if the Lua code has been called at shutdown (last execution).
Set by Prototyper and is read only from the lua script.
onDataEvent true | falseSet to true if the Lua code has been called because new data is available.
Set by Prototyper and is read only from the lua script.
onPeriodEvent true | falseSet to true if the Lua code has been called because of a periodic execution timer.
Set by Prototyper and is read only from the lua script.
intentExit true | false
If set to true by the Lua code, specifies intent to terminate execution.
Set by the lua script and is read only from Prototyper.
Note: If the command line option -luaOnStop true is specified, the Lua code will be executed one more time just before exiting.
28
Lua Component Programming Model
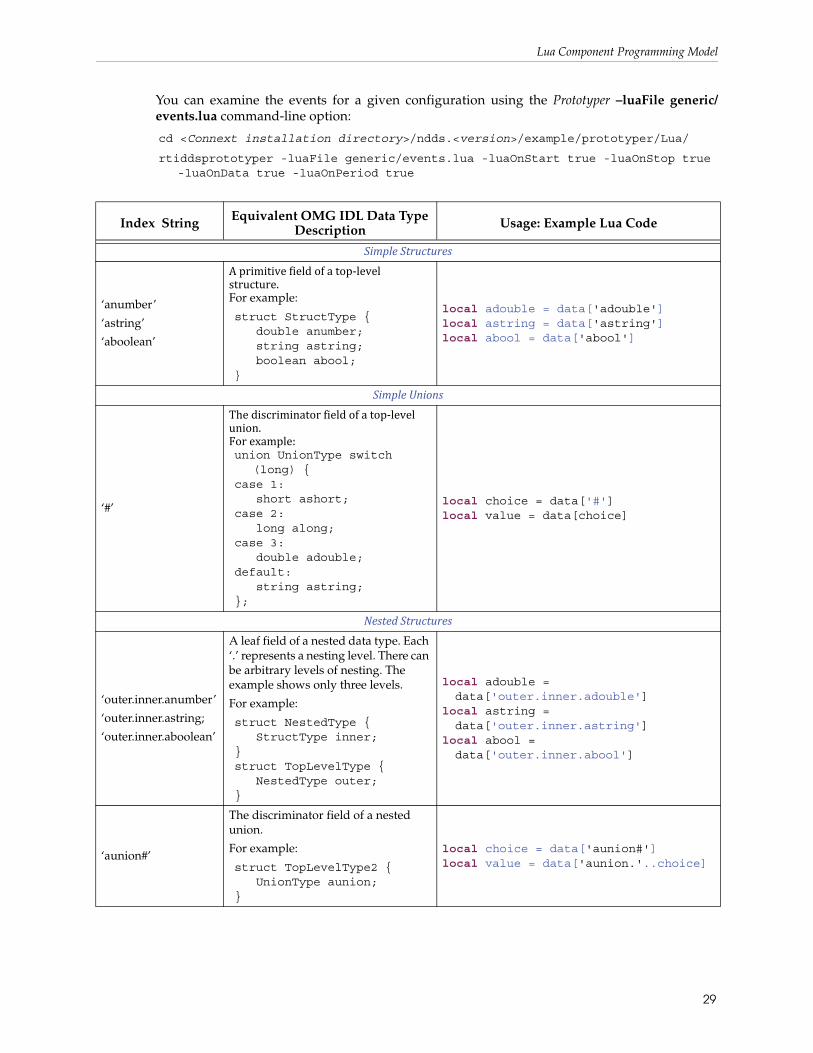
You can examine the events for a given configuration using the Prototyper –luaFile generic/events.lua command-line option:
cd <Connext installation directory>/ndds.<version>/example/prototyper/Lua/
rtiddsprototyper -luaFile generic/events.lua -luaOnStart true -luaOnStop true -luaOnData true -luaOnPeriod true
Index String Equivalent OMG IDL Data Type Description Usage: Example Lua Code
Simple Structures
‘anumber’
‘astring’
‘aboolean’
A primitive field of a top-level structure. For example:
struct StructType { double anumber; string astring; boolean abool;}
local adouble = data['adouble']local astring = data['astring']local abool = data['abool']
Simple Unions
‘#’
The discriminator field of a top-level union.For example:union UnionType switch
(long) {case 1: short ashort;case 2: long along;case 3: double adouble;default: string astring;};
local choice = data['#']local value = data[choice]
Nested Structures
‘outer.inner.anumber’
‘outer.inner.astring;
‘outer.inner.aboolean’
A leaf field of a nested data type. Each ‘.’ represents a nesting level. There can be arbitrary levels of nesting. The example shows only three levels.
For example:
struct NestedType { StructType inner;}struct TopLevelType { NestedType outer;}
local adouble = data['outer.inner.adouble']
local astring = data['outer.inner.astring']
local abool = data['outer.inner.abool']
‘aunion#’
The discriminator field of a nested union.
For example:
struct TopLevelType2 { UnionType aunion;}
local choice = data['aunion#']local value = data['aunion.'..choice]
29
Lua Component Programming Model
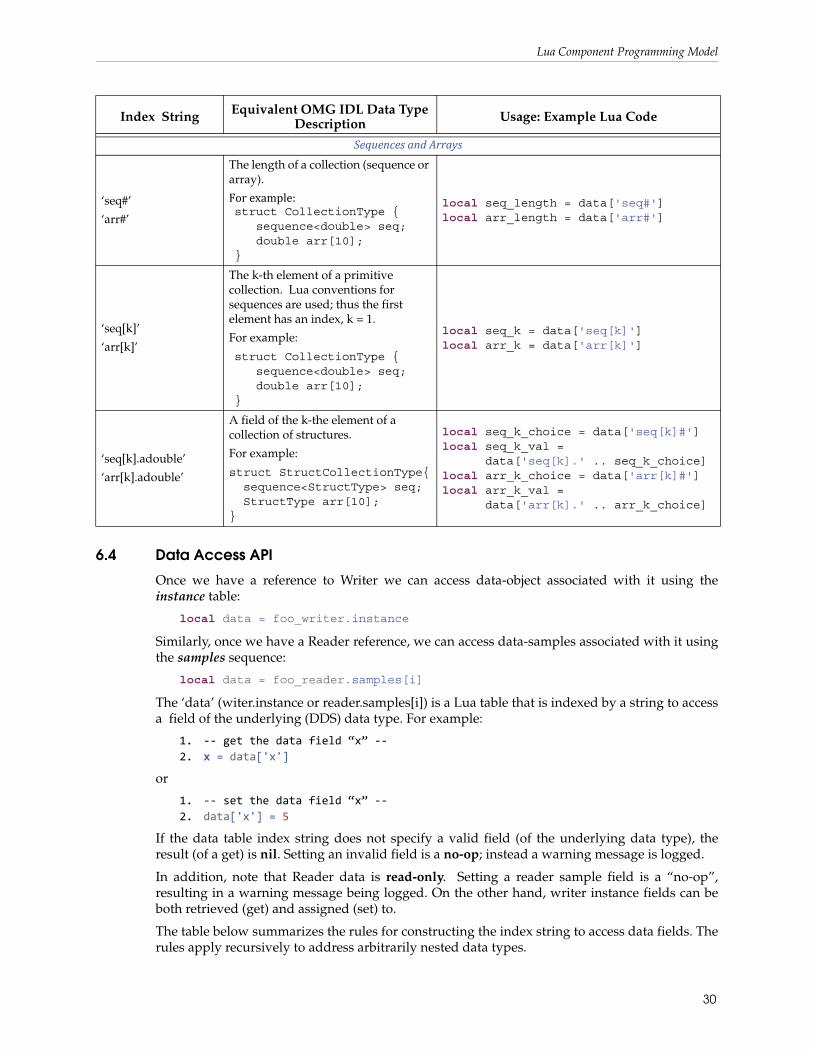
6.4 Data Access API
Once we have a reference to Writer we can access data-object associated with it using the instance table:
local data = foo_writer.instance
Similarly, once we have a Reader reference, we can access data-samples associated with it using the samples sequence:
local data = foo_reader.samples[i]
The ‘data’ (witer.instance or reader.samples[i]) is a Lua table that is indexed by a string to access a field of the underlying (DDS) data type. For example:
1. -- get the data field “x” -- 2. x = data['x']
or
1. -- set the data field “x” -- 2. data['x'] = 5
If the data table index string does not specify a valid field (of the underlying data type), the result (of a get) is nil. Setting an invalid field is a no-op; instead a warning message is logged.
In addition, note that Reader data is read-only. Setting a reader sample field is a “no-op”, resulting in a warning message being logged. On the other hand, writer instance fields can be both retrieved (get) and assigned (set) to.
The table below summarizes the rules for constructing the index string to access data fields. The rules apply recursively to address arbitrarily nested data types.
Sequences and Arrays
‘seq#’
‘arr#’
The length of a collection (sequence or array).For example:struct CollectionType { sequence<double> seq; double arr[10];}
local seq_length = data['seq#']local arr_length = data['arr#']
‘seq[k]’
‘arr[k]’
The k-th element of a primitive collection. Lua conventions for sequences are used; thus the first element has an index, k = 1.
For example:
struct CollectionType { sequence<double> seq; double arr[10];}
local seq_k = data['seq[k]']local arr_k = data['arr[k]']
‘seq[k].adouble’
‘arr[k].adouble’
A field of the k-the element of a collection of structures.
For example:
struct StructCollectionType{ sequence<StructType> seq; StructType arr[10];}
local seq_k_choice = data['seq[k]#']local seq_k_val = data['seq[k].' .. seq_k_choice]local arr_k_choice = data['arr[k]#']local arr_k_val = data['arr[k].' .. arr_k_choice]
Index String Equivalent OMG IDL Data Type Description Usage: Example Lua Code
30
Lua Component Programming Model
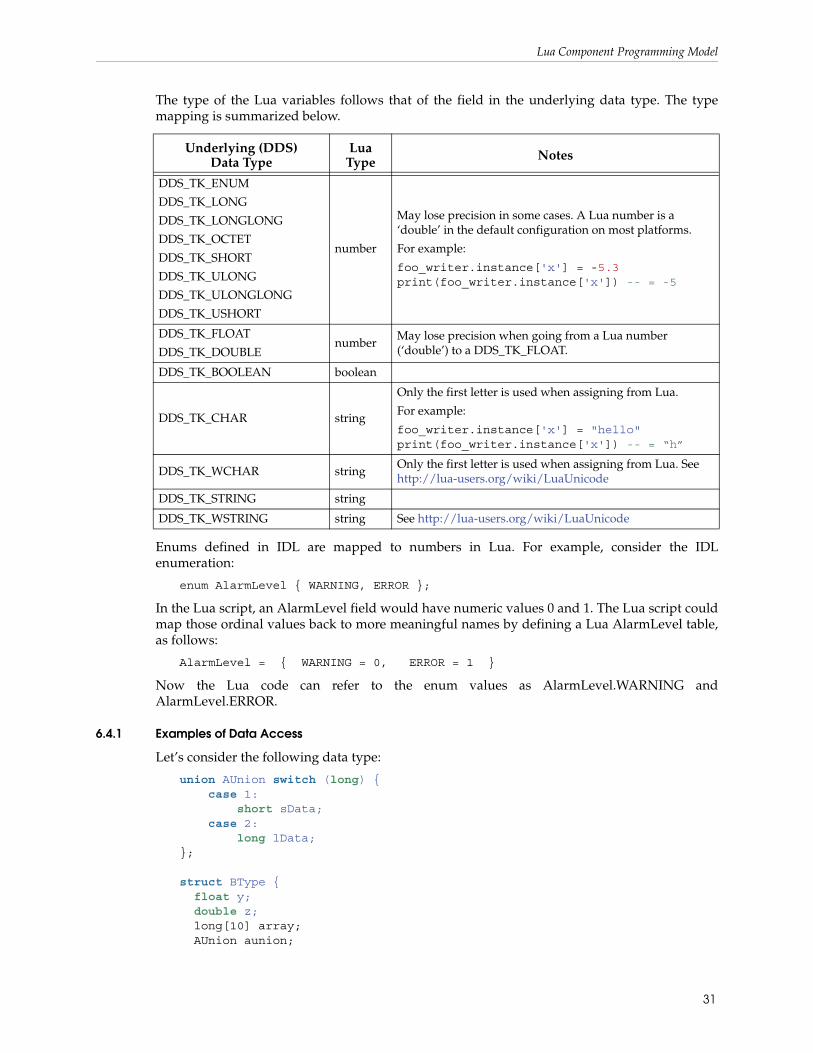
The type of the Lua variables follows that of the field in the underlying data type. The type mapping is summarized below.
Enums defined in IDL are mapped to numbers in Lua. For example, consider the IDL enumeration:
enum AlarmLevel { WARNING, ERROR };
In the Lua script, an AlarmLevel field would have numeric values 0 and 1. The Lua script could map those ordinal values back to more meaningful names by defining a Lua AlarmLevel table, as follows:
AlarmLevel = { WARNING = 0, ERROR = 1 }
Now the Lua code can refer to the enum values as AlarmLevel.WARNING and AlarmLevel.ERROR.
6.4.1 Examples of Data Access
Let’s consider the following data type:
union AUnion switch (long) { case 1: short sData; case 2: long lData; };
struct BType { float y; double z; long[10] array; AUnion aunion;
Underlying (DDS) Data Type
Lua Type Notes
DDS_TK_ENUM
DDS_TK_LONG
DDS_TK_LONGLONG
DDS_TK_OCTET
DDS_TK_SHORT
DDS_TK_ULONG
DDS_TK_ULONGLONG
DDS_TK_USHORT
number
May lose precision in some cases. A Lua number is a ‘double’ in the default configuration on most platforms.
For example:
foo_writer.instance['x'] = -5.3print(foo_writer.instance['x']) -- = -5
DDS_TK_FLOAT
DDS_TK_DOUBLEnumber
May lose precision when going from a Lua number (‘double’) to a DDS_TK_FLOAT.
DDS_TK_BOOLEAN boolean
DDS_TK_CHAR string
Only the first letter is used when assigning from Lua.
For example:
foo_writer.instance['x'] = "hello" print(foo_writer.instance['x']) -- = “h”
DDS_TK_WCHAR stringOnly the first letter is used when assigning from Lua. See http://lua-users.org/wiki/LuaUnicode
DDS_TK_STRING string
DDS_TK_WSTRING string See http://lua-users.org/wiki/LuaUnicode
31
Examples of Lua Scripting with Prototyper
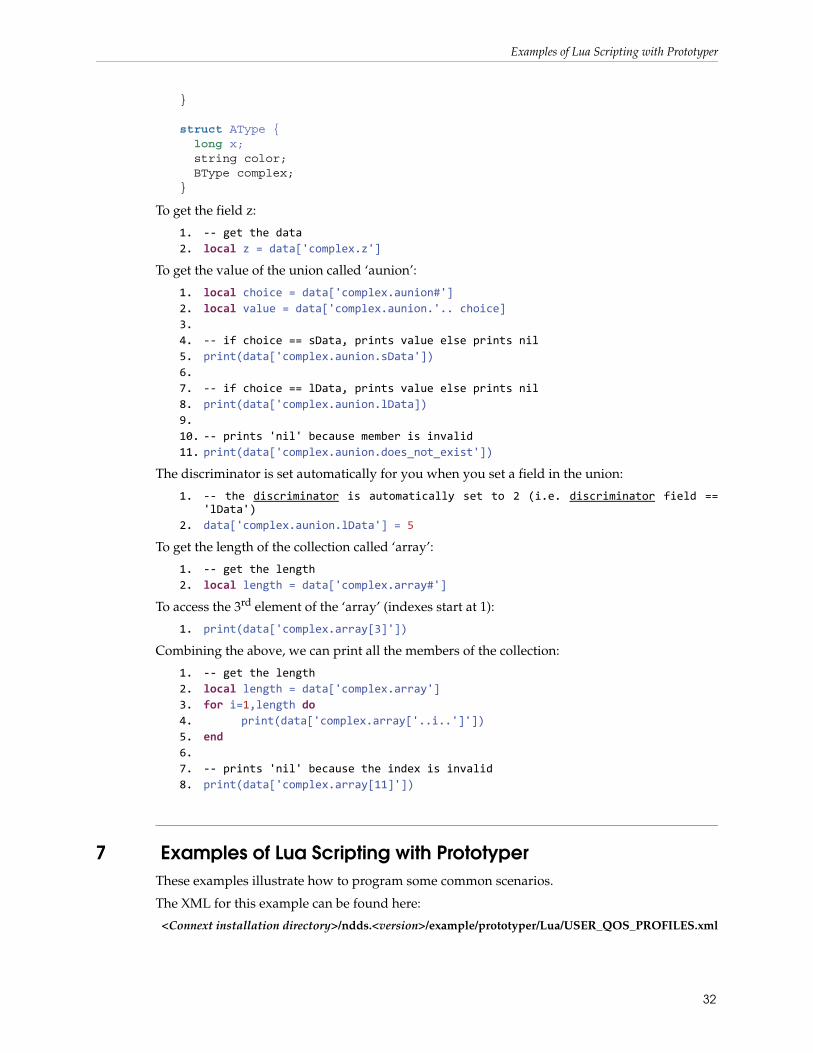
} struct AType { long x; string color; BType complex; }
To get the field z:
1. -- get the data 2. local z = data['complex.z']
To get the value of the union called ‘aunion’:
1. local choice = data['complex.aunion#']2. local value = data['complex.aunion.'.. choice]3.4. -- if choice == sData, prints value else prints nil5. print(data['complex.aunion.sData']) 6.7. -- if choice == lData, prints value else prints nil8. print(data['complex.aunion.lData]) 9.10. -- prints 'nil' because member is invalid11. print(data['complex.aunion.does_not_exist'])
The discriminator is set automatically for you when you set a field in the union:
1. -- the discriminator is automatically set to 2 (i.e. discriminator field == 'lData')
2. data['complex.aunion.lData'] = 5
To get the length of the collection called ‘array’:
1. -- get the length 2. local length = data['complex.array#']
To access the 3rd element of the ‘array’ (indexes start at 1):
1. print(data['complex.array[3]'])
Combining the above, we can print all the members of the collection:
1. -- get the length 2. local length = data['complex.array']3. for i=1,length do4. print(data['complex.array['..i..']'])5. end 6.7. -- prints 'nil' because the index is invalid8. print(data['complex.array[11]'])
7 Examples of Lua Scripting with PrototyperThese examples illustrate how to program some common scenarios.
The XML for this example can be found here:
<Connext installation directory>/ndds.<version>/example/prototyper/Lua/USER_QOS_PROFILES.xml
32
Examples of Lua Scripting with Prototyper
To execute the examples:
cd <Connext installation directory>/ndds.<version>/example/Lua/
../../../scripts/rtiddsprototyper
You will see the following prompt:
Please select among the available configurations:0: MyParticipantLibrary::ShapePublisher1: MyParticipantLibrary::ShapeSubscriber2: MyParticipantLibrary::ShapePubSubPlease select:
Let’s examine these in more detail.
7.1 ShapePublisher Configuration
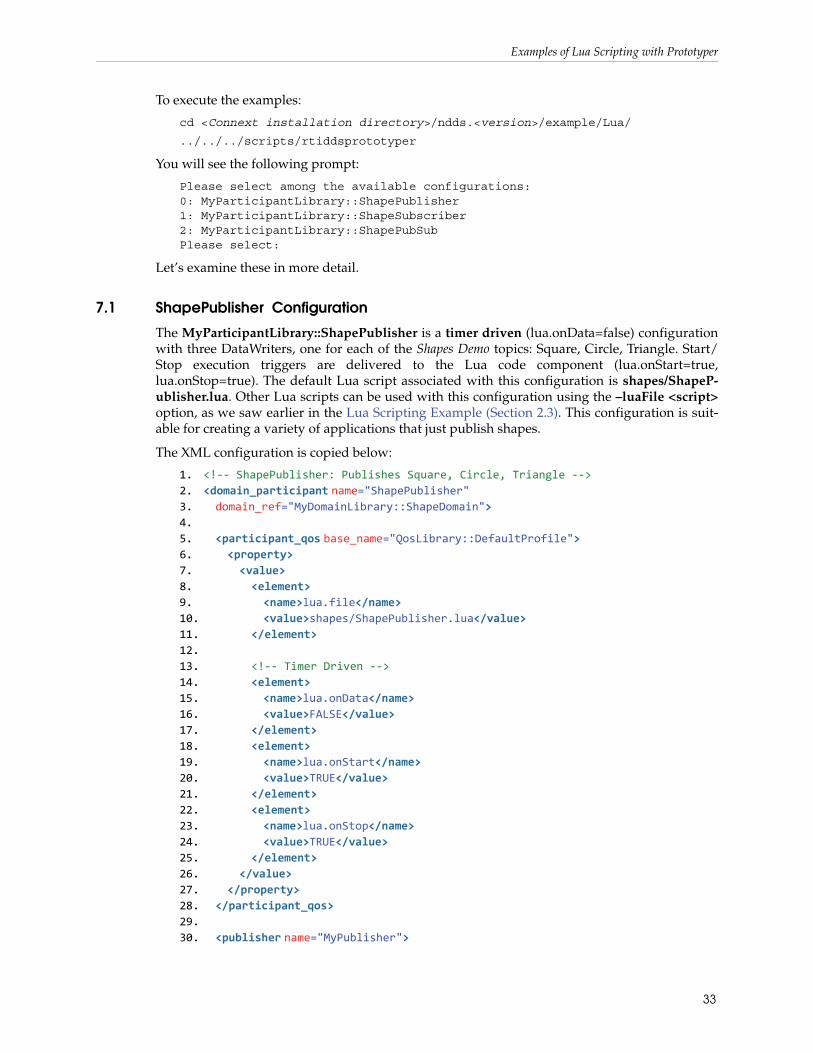
The MyParticipantLibrary::ShapePublisher is a timer driven (lua.onData=false) configuration with three DataWriters, one for each of the Shapes Demo topics: Square, Circle, Triangle. Start/Stop execution triggers are delivered to the Lua code component (lua.onStart=true, lua.onStop=true). The default Lua script associated with this configuration is shapes/ShapeP-ublisher.lua. Other Lua scripts can be used with this configuration using the –luaFile <script>option, as we saw earlier in the Lua Scripting Example (Section 2.3). This configuration is suit-able for creating a variety of applications that just publish shapes.
The XML configuration is copied below:
1. <!-- ShapePublisher: Publishes Square, Circle, Triangle --> 2. <domain_participant name="ShapePublisher" 3. domain_ref="MyDomainLibrary::ShapeDomain"> 4. 5. <participant_qos base_name="QosLibrary::DefaultProfile"> 6. <property> 7. <value> 8. <element> 9. <name>lua.file</name> 10. <value>shapes/ShapePublisher.lua</value> 11. </element> 12. 13. <!-- Timer Driven --> 14. <element> 15. <name>lua.onData</name> 16. <value>FALSE</value> 17. </element> 18. <element> 19. <name>lua.onStart</name> 20. <value>TRUE</value> 21. </element> 22. <element> 23. <name>lua.onStop</name> 24. <value>TRUE</value> 25. </element> 26. </value> 27. </property> 28. </participant_qos> 29. 30. <publisher name="MyPublisher">
33
Examples of Lua Scripting with Prototyper
31. <data_writer name="MySquareWriter" topic_ref="Square" /> 32. <data_writer name="MyCircleWriter" topic_ref="Circle" /> 33. <data_writer name="MyTriangleWriter" topic_ref="Triangle" /> 34. </publisher> 35. </domain_participant>
Lines 9-10 set the name of the file containing the default script. Lines 14-17 turn off execution upon data arrival (it is somewhat moot because this configuration does not have DataReaders). Lines 18-21 and 22-25 configure execution to also occur of the start and stop events. Lines 31-33 define three DataWriters: for Squares, Circles and Triangles respectively.
Examples that use this configuration are listed below:
❏ shapes/ShapePublisher.lua (default)
❏ shapes/Flower.lua (Lua Scripting Example (Section 2.3))
❏ shapes/Figure8.lua
❏ shapes/FileInputAdapter.lua
Let’s examine the default Lua script, shapes/ShapePublisher.lua, associated with this configu-ration.
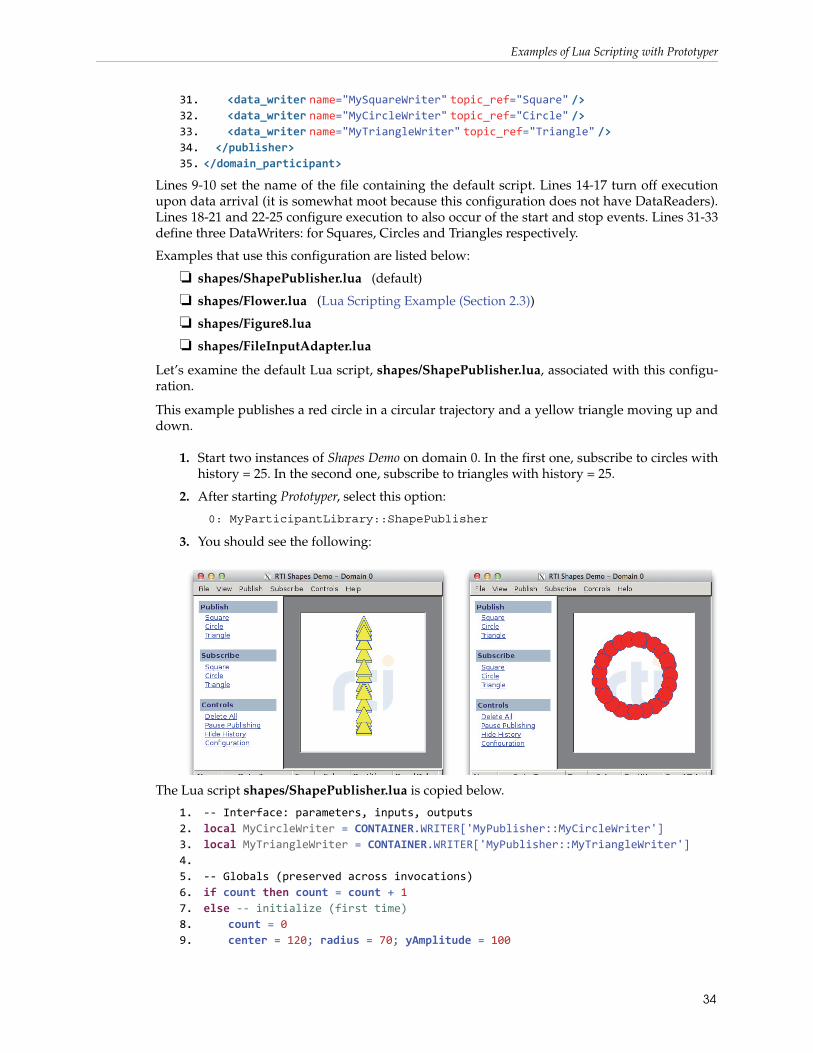
This example publishes a red circle in a circular trajectory and a yellow triangle moving up and down.
1. Start two instances of Shapes Demo on domain 0. In the first one, subscribe to circles with history = 25. In the second one, subscribe to triangles with history = 25.
2. After starting Prototyper, select this option:
0: MyParticipantLibrary::ShapePublisher
3. You should see the following:
The Lua script shapes/ShapePublisher.lua is copied below.
1. -- Interface: parameters, inputs, outputs2. local MyCircleWriter = CONTAINER.WRITER['MyPublisher::MyCircleWriter']3. local MyTriangleWriter = CONTAINER.WRITER['MyPublisher::MyTriangleWriter']4.5. -- Globals (preserved across invocations)6. if count then count = count + 1 7. else -- initialize (first time)8. count = 09. center = 120; radius = 70; yAmplitude = 100
34
Examples of Lua Scripting with Prototyper
10. end11. -- print("*** iteration ", count, "***")12.13.14. -- Write a RED circle on a 'circular' trajectory 15. local circle = MyCircleWriter.instance16. circle['color'] = 'RED'17. circle['x'] = center + radius * math.sin(count)18. circle['y'] = center + radius * math.cos(count) 19. circle['shapesize'] = 3020.21. MyCircleWriter:write()22.23.24. -- Write a YELLOW Triangle on a 'vertical' trajectory 25. local triangle = MyTriangleWriter.instance26. triangle['color'] = "YELLOW"27. triangle['x'] = center -- radius * math.sin(count);28. triangle['y'] = center + yAmplitude * math.cos(count)29. triangle['shapesize'] = 3030.31. MyTriangleWriter:write()32.33.34.35. -- Dispose the data objects upon stopping:36. if CONTAINER.CONTEXT.onStopEvent then37. print("disposing")38. MyCircleWriter:dispose()39. MyTriangleWriter:dispose()40. end41.42. -- stop the simulation after N iterations43. if count > 25 then CONTAINER.CONTEXT.intentExit = true end
Lines 1-3 define the Lua component interface by declaring the inputs (readers), outputs (writ-ers), and the parameters used by the component as local variables. Lines 8-9 initialize global variables including a counter. Line 6 increments the global counter. The global variables are pre-served across invocations of the code.
Lines 15 and 25 create local variables for convenience. Lines 16-19 setup new state of a circle data-object, and Line 21 publishes it. Lines 26-29 setup new state of a triangle data-object, and Line 31 publishes it. Lines 38-39 dispose the two shapes when a stop event occurs.
Stopping Prototyper using ^C will trigger execution of the stop event. Line 43 terminates the execution after 25 times. Termination will also trigger the stop event.
7.2 ShapeSubscriber Configuration
The MyParticipantLibrary::ShapeSubscriber is a data driven (lua.onPeriod=false) configura-tion with three DataReaders, one for each of the Shapes Demo topics: Square, Circle, Triangle. Start/Stop execution triggers are delivered to the Lua code component (lua.onStart=true, lua.onStop=true). The default Lua script associated with this configuration is shapes/ShapeSub-scriber.lua. Other Lua scripts can be used with this configuration using the –luaFile <script>option, as we saw earlier in Lua Scripting Example (Section 2.3). This configuration is suitable
35
Examples of Lua Scripting with Prototyper
for creating a variety of applications that just subscribe to shapes.
The XML configuration is copied below:
1. <!-- ShapeSubscriber: Subscribes to Square, Circle, and Triangle --> 2. <domain_participant name="ShapeSubscriber" 3. domain_ref="MyDomainLibrary::ShapeDomain"> 4. 5. <participant_qos base_name="QosLibrary::DefaultProfile"> 6. <property> 7. <value> 8. <element> 9. <name>lua.file</name> 10. <value>shapes/ShapeSubscriber.lua</value> 11. </element> 12. 13. <!-- Data Driven --> 14. <element> 15. <name>lua.onPeriod</name> 16. <value>FALSE</value> 17. </element> 18. <element> 19. <name>lua.onStart</name> 20. <value>TRUE</value> 21. </element> 22. <element> 23. <name>lua.onStop</name> 24. <value>TRUE</value> 25. </element> 26. </value> 27. </property> 28. </participant_qos> 29. 30. <subscriber name="MySubscriber"> 31. <data_reader name="MySquareReader" topic_ref="Square" /> 32. <data_reader name="MyCircleReader" topic_ref="Circle" /> 33. <data_reader name="MyTriangleReader" topic_ref="Triangle" /> 34. </subscriber> 35. </domain_participant>
Lines 9-10 set the name of the file containing the default script. Lines 14-17 turn off periodic exe-cution---the execution happens only upon data arrival (data-driven). Lines18-21 and 22-25 con-figure execution to also occur of the start and stop events. Lines 31-33 define three DataReaders: for Squares, Circles and Triangles respectively.
Examples that use this configuration are listed below.
❏ shapes/ShapeSubscriber.lua (default)
Let’s examine the default lua script, shapes/ShapeSubscriber.lua, associated with this configu-ration.
This example prints the shapes published by Shapes Demo.
1. Run ShapesDemo on domain 0 and publish a Square, a Circle and a Triangle.
2. After starting Prototyper as explained before, select option 1:
1: MyParticipantLibrary::ShapeSubscriber
36
Examples of Lua Scripting with Prototyper
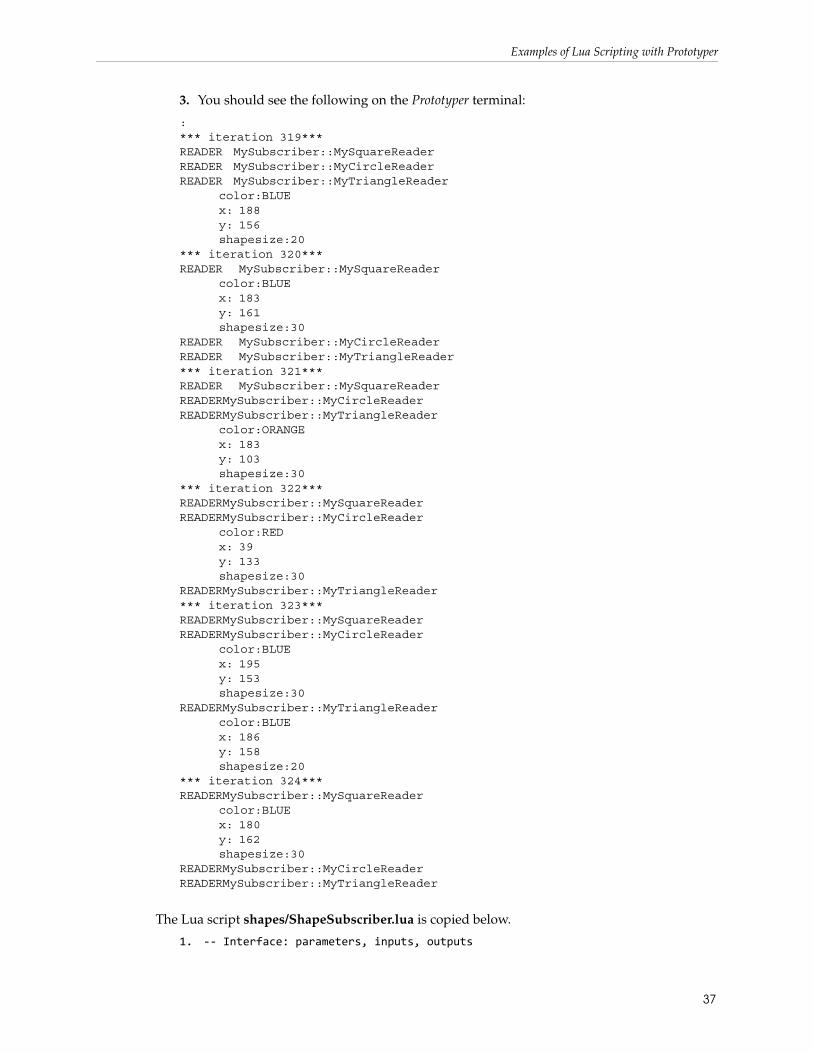
3. You should see the following on the Prototyper terminal:
:*** iteration 319***READER MySubscriber::MySquareReaderREADER MySubscriber::MyCircleReaderREADER MySubscriber::MyTriangleReader
color:BLUE x: 188 y: 156 shapesize:20
*** iteration 320***READER MySubscriber::MySquareReader
color:BLUE x: 183 y: 161 shapesize:30
READER MySubscriber::MyCircleReaderREADER MySubscriber::MyTriangleReader*** iteration 321***READER MySubscriber::MySquareReaderREADERMySubscriber::MyCircleReaderREADERMySubscriber::MyTriangleReader
color:ORANGE x: 183 y: 103 shapesize:30
*** iteration 322***READERMySubscriber::MySquareReaderREADERMySubscriber::MyCircleReader
color:RED x: 39 y: 133 shapesize:30
READERMySubscriber::MyTriangleReader*** iteration 323***READERMySubscriber::MySquareReaderREADERMySubscriber::MyCircleReader
color:BLUE x: 195 y: 153 shapesize:30
READERMySubscriber::MyTriangleReader color:BLUE x: 186 y: 158 shapesize:20
*** iteration 324***READERMySubscriber::MySquareReader
color:BLUE x: 180 y: 162 shapesize:30
READERMySubscriber::MyCircleReaderREADERMySubscriber::MyTriangleReader
The Lua script shapes/ShapeSubscriber.lua is copied below.
1. -- Interface: parameters, inputs, outputs
37

Examples of Lua Scripting with Prototyper
2. -- Input: All the configured readers3.4. -- Globals (preserved across invocations)5. if not count then count = 0 else count = count + 1 end6. print("*** iteration ", count, "***")7.8. -- Iterate over all the readers9. for name,reader in pairs(CONTAINER.READER) do 10.11. print("READER", name)12. reader:take()13.14. for i, shape in ipairs(reader.samples) do15.16. print("\t color:", shape['color']) -- key17.18. if (not reader.infos[i].valid_data) then19. print("\t invalid data!")20. end21.22. print("\t x:", shape['x']) 23. print("\t y:", shape['y'])24. print("\t shapesize:", shape['shapesize'])25.26. end27. end
This script illustrates how to use Lua iterators to access all the readers and samples. Line 9 uses the Lua pairs() iterator to traverse over all the entries in the CONTAINER.READER table. The local variables name and reader are bound to each record in the table. Thus, the scripts iterates over all the data readers in the XML configuration.
Line 11 prints the reader’s name. Line 12 takes all the samples from the data space. Lines 14-26 print the contents of each sample taken from the data space. Note that for samples with invalid data, the non-key fields (i.e. x, y, shapesize) will be nil.
Line 14 shows the use of the Lua ipairs() iterator to traverse over the samples in the reader.samples array. The local variables i and shape are bound to each record in the array. Thus, the for loop iterates over all the samples.
For more details on the Lua pairs() and ipairs() iterators, please refer to Chapter 7 - Iterators and the Generic for in the excellent book Programming in Lua.
7.3 ShapePubSub Configuration
The MyParticipantLibrary::ShapePubSup is a data and timer driven (default) configuration with three DataReaders and three DataWriters, for each of the ShapeDemo topics: Square, Circle, Tri-angle. Start/stop execution triggers are delivered to the Lua code component (lua.onStart=true, lua.onStop=true). The default Lua script associated with this configuration is shapes/ShapeP-ubSub.lua. Other Lua scripts can be used with this configuration using the –luaFile <script>option, as we saw earlier in the Lua Scripting Example (Section 2.3). This configuration is suit-able for creating a variety of applications that publish and subscribe to shapes.
The xml configuration is copied below:
1. <!-- ShapePubSub: Publishes & Subscribes Square, Circle, Triangle --> 2. <domain_participant name="ShapePubSub"
38
Examples of Lua Scripting with Prototyper
3. domain_ref="MyDomainLibrary::ShapeDomain"> 4. 5. <participant_qos base_name="QosLibrary::DefaultProfile"> 6. <property> 7. <value> 8. <element> 9. <name>lua.file</name> 10. <value>shapes/ShapePubSub.lua</value> 11. </element> 12. 13. <!-- Data and Timer Driven (default) --> 14. <element> 15. <name>lua.onStart</name> 16. <value>TRUE</value> 17. </element> 18. <element> 19. <name>lua.onStop</name> 20. <value>TRUE</value> 21. </element> 22. </value> 23. </property> 24. </participant_qos> 25. 26. <publisher name="MyPublisher"> 27. <data_writer name="MySquareWriter" topic_ref="Square" /> 28. <data_writer name="MyCircleWriter" topic_ref="Circle" /> 29. <data_writer name="MyTriangleWriter" topic_ref="Triangle" /> 30. </publisher> 31. 32. <subscriber name="MySubscriber"> 33. <data_reader name="MySquareReader" topic_ref="Square" /> 34. <data_reader name="MyCircleReader" topic_ref="Circle" /> 35. <data_reader name="MyTriangleReader" topic_ref="Triangle" /> 36. </subscriber> 37. </domain_participant>
Lines 9-10 set the name of the file containing the default script. The execution happens when either data arrives or a periodic timer event to occur (default). Lines 14 -17 and 18-21 configure execution to also occur of the start and stop events. Lines 27-29 define three DataWriters: for Squares, Circles and Triangles respectively. Lines 33-35 define three DataReaders: for Squares, Circles and Triangles respectively.
Examples that use this configuration are:
❏ shapes/ShapePubSub.lua (default)
❏ shapes/Aggregator.lua
❏ shapes/Correlator.lua
❏ shapes/SplitterDelayNAverage.lua
Let’s examine the default Lua script, shapes/ShapePubSub.lua, associated with this configura-tion. This example subscribes to Squares and transforms them into Triangles of a different size, while preserving the color and the location.
1. Start Shapes Demo on domain 0, and publish Squares of different colors.
2. Start another instance of Shapes Demo in domain 0 and subscribe to Triangles.
39
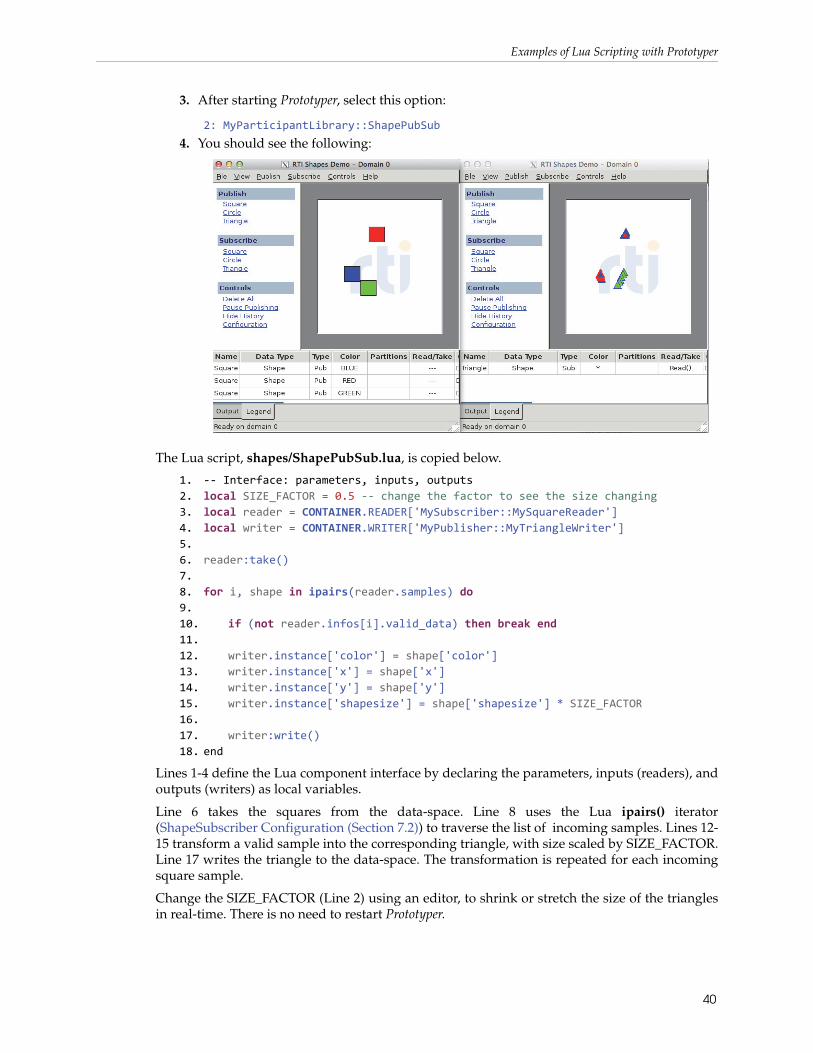
Examples of Lua Scripting with Prototyper
3. After starting Prototyper, select this option:
2: MyParticipantLibrary::ShapePubSub 4. You should see the following:
The Lua script, shapes/ShapePubSub.lua, is copied below.
1. -- Interface: parameters, inputs, outputs2. local SIZE_FACTOR = 0.5 -- change the factor to see the size changing3. local reader = CONTAINER.READER['MySubscriber::MySquareReader'] 4. local writer = CONTAINER.WRITER['MyPublisher::MyTriangleWriter']5.6. reader:take()7.8. for i, shape in ipairs(reader.samples) do9.10. if (not reader.infos[i].valid_data) then break end11.12. writer.instance['color'] = shape['color']13. writer.instance['x'] = shape['x']14. writer.instance['y'] = shape['y']15. writer.instance['shapesize'] = shape['shapesize'] * SIZE_FACTOR16.17. writer:write() 18. end
Lines 1-4 define the Lua component interface by declaring the parameters, inputs (readers), and outputs (writers) as local variables.
Line 6 takes the squares from the data-space. Line 8 uses the Lua ipairs() iterator (ShapeSubscriber Configuration (Section 7.2)) to traverse the list of incoming samples. Lines 12-15 transform a valid sample into the corresponding triangle, with size scaled by SIZE_FACTOR. Line 17 writes the triangle to the data-space. The transformation is repeated for each incoming square sample.
Change the SIZE_FACTOR (Line 2) using an editor, to shrink or stretch the size of the triangles in real-time. There is no need to restart Prototyper.
40
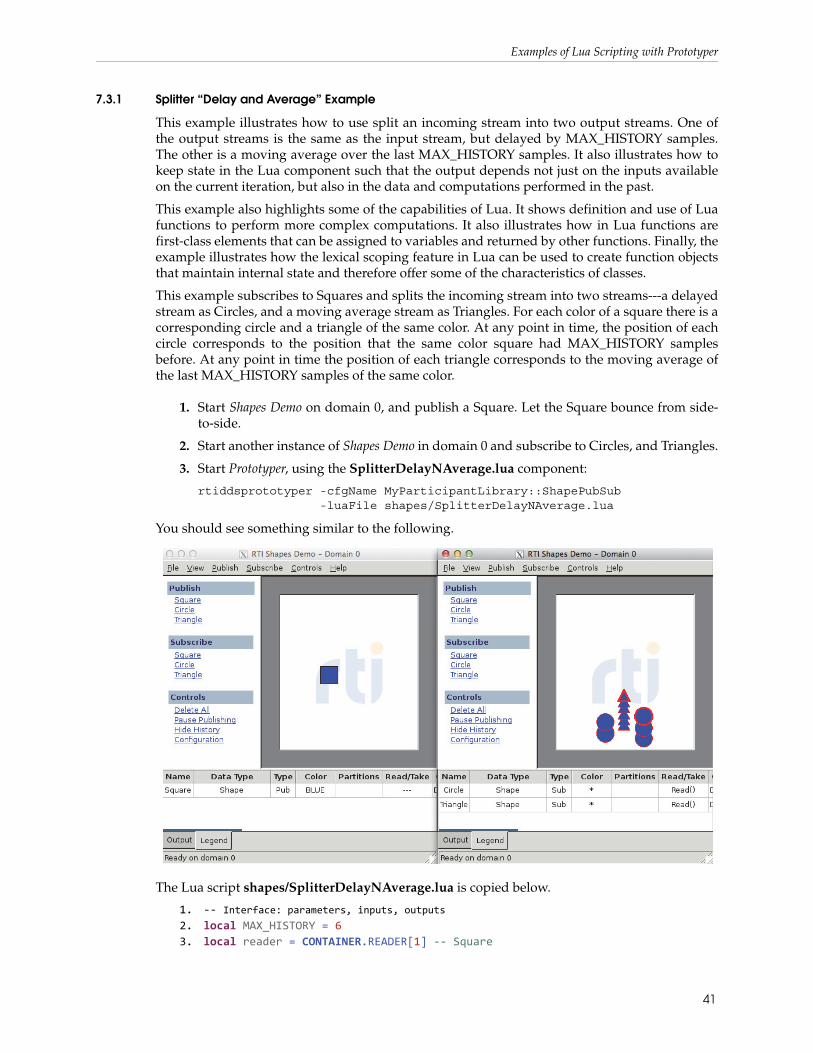
Examples of Lua Scripting with Prototyper
7.3.1 Splitter “Delay and Average” Example
This example illustrates how to use split an incoming stream into two output streams. One of the output streams is the same as the input stream, but delayed by MAX_HISTORY samples. The other is a moving average over the last MAX_HISTORY samples. It also illustrates how to keep state in the Lua component such that the output depends not just on the inputs available on the current iteration, but also in the data and computations performed in the past.
This example also highlights some of the capabilities of Lua. It shows definition and use of Lua functions to perform more complex computations. It also illustrates how in Lua functions are first-class elements that can be assigned to variables and returned by other functions. Finally, the example illustrates how the lexical scoping feature in Lua can be used to create function objects that maintain internal state and therefore offer some of the characteristics of classes.
This example subscribes to Squares and splits the incoming stream into two streams---a delayed stream as Circles, and a moving average stream as Triangles. For each color of a square there is a corresponding circle and a triangle of the same color. At any point in time, the position of each circle corresponds to the position that the same color square had MAX_HISTORY samples before. At any point in time the position of each triangle corresponds to the moving average of the last MAX_HISTORY samples of the same color.
1. Start Shapes Demo on domain 0, and publish a Square. Let the Square bounce from side-to-side.
2. Start another instance of Shapes Demo in domain 0 and subscribe to Circles, and Triangles.
3. Start Prototyper, using the SplitterDelayNAverage.lua component:
rtiddsprototyper -cfgName MyParticipantLibrary::ShapePubSub -luaFile shapes/SplitterDelayNAverage.lua
You should see something similar to the following.
The Lua script shapes/SplitterDelayNAverage.lua is copied below.
1. -- Interface: parameters, inputs, outputs2. local MAX_HISTORY = 63. local reader = CONTAINER.READER[1] -- Square
41

Examples of Lua Scripting with Prototyper
4. local delay_writer = CONTAINER.WRITER[#CONTAINER.WRITER-1] -- Circle5. local average_writer = CONTAINER.WRITER[#CONTAINER.WRITER] -- Triangle 6.7. -- Function-object (closure) to maintain a first-in-first-out (FIFO) queue 8. function newFifo (max_h)9. local index = 010. local history = {}11. local max_history = max_h12. return function (element)13. if index == max_history then index = 1 else index=index+1 end14. oldest = history[index] 15. history[index] = element16. return oldest, #history17. end 18. end19.20. --- Re-publish input delayed by MAX_HISTORY samples21. function delay()22. -- Globals (preserved across invocations)23. if not delay_size_history then 24. delay_x_history = {} 25. delay_y_history = {} 26. delay_size_history = {} 27. end 28.29. -- Iterate over each sample we got 30. for i, shape in ipairs(reader.samples) do 31. local color = shape['color']32. local x = shape['x']33. local y = shape['y']34. local size = shape['shapesize']35.36. -- SKIP sample if data is not valid37. if not x then break end38.39. -- If a new color create FIFOs to hold the last positions and averages 40. if not delay_size_history[color] then 41. delay_x_history[color] = newFifo(MAX_HISTORY) 42. delay_y_history[color] = newFifo(MAX_HISTORY) 43. delay_size_history[color] = newFifo(MAX_HISTORY) 44. end 45.46. -- Push a new value to the FIFO returning the oldest value and 47. -- the number of elements in the FIFO, including the new one just pushed 48. local oldest_x, samplesInHistory = delay_x_history[color](x) 49. local oldest_y = delay_y_history[color](y) 50. local oldest_size = delay_size_history[color](size) 51.52. -- write only if we have accumulated enough history and gotten 53. -- something out of the FIFO 54. if oldest_x then 55. shape = delay_writer.instance56. shape['color'] = color57. shape['x'] = oldest_x
42
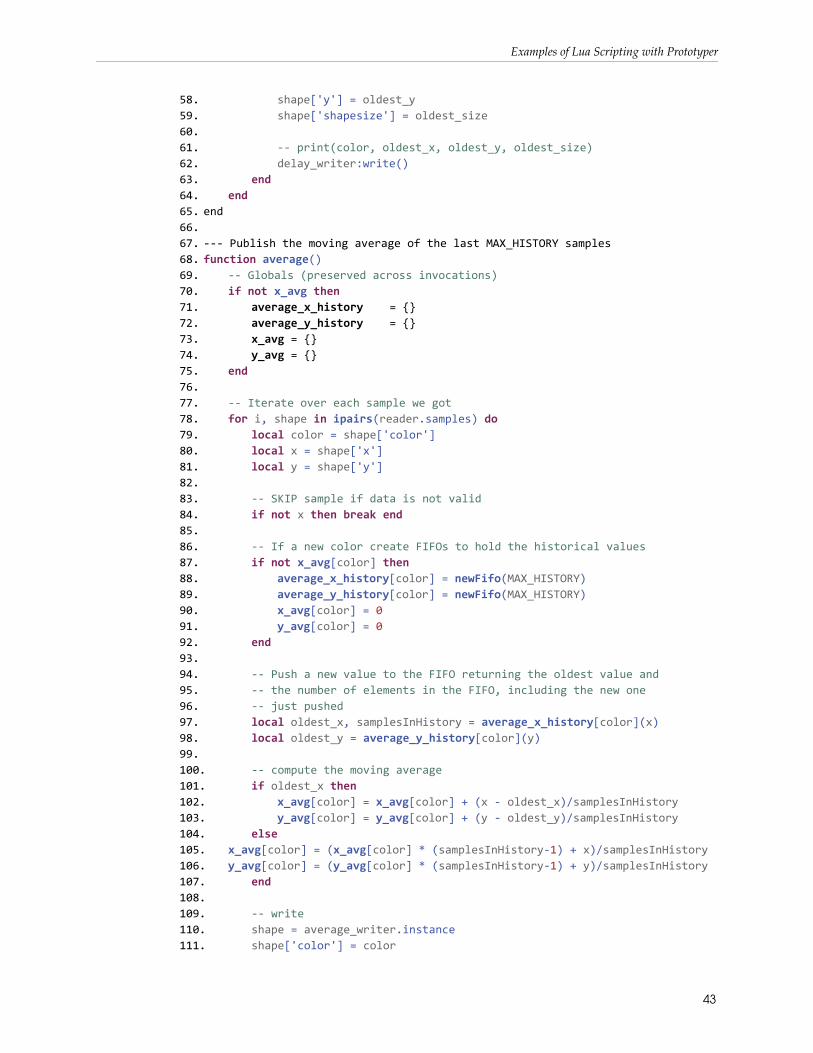
Examples of Lua Scripting with Prototyper
58. shape['y'] = oldest_y 59. shape['shapesize'] = oldest_size60.61. -- print(color, oldest_x, oldest_y, oldest_size)62. delay_writer:write() 63. end 64. end 65. end66.67. --- Publish the moving average of the last MAX_HISTORY samples68. function average()69. -- Globals (preserved across invocations)70. if not x_avg then 71. average_x_history = {} 72. average_y_history = {} 73. x_avg = {}74. y_avg = {}75. end76.77. -- Iterate over each sample we got 78. for i, shape in ipairs(reader.samples) do79. local color = shape['color']80. local x = shape['x']81. local y = shape['y']82.83. -- SKIP sample if data is not valid84. if not x then break end85.86. -- If a new color create FIFOs to hold the historical values 87. if not x_avg[color] then 88. average_x_history[color] = newFifo(MAX_HISTORY) 89. average_y_history[color] = newFifo(MAX_HISTORY) 90. x_avg[color] = 091. y_avg[color] = 0 92. end 93.94. -- Push a new value to the FIFO returning the oldest value and 95. -- the number of elements in the FIFO, including the new one 96. -- just pushed 97. local oldest_x, samplesInHistory = average_x_history[color](x) 98. local oldest_y = average_y_history[color](y) 99.100. -- compute the moving average101. if oldest_x then 102. x_avg[color] = x_avg[color] + (x - oldest_x)/samplesInHistory103. y_avg[color] = y_avg[color] + (y - oldest_y)/samplesInHistory104. else105. x_avg[color] = (x_avg[color] * (samplesInHistory-1) + x)/samplesInHistory106. y_avg[color] = (y_avg[color] * (samplesInHistory-1) + y)/samplesInHistory107. end108.109. -- write110. shape = average_writer.instance111. shape['color'] = color
43
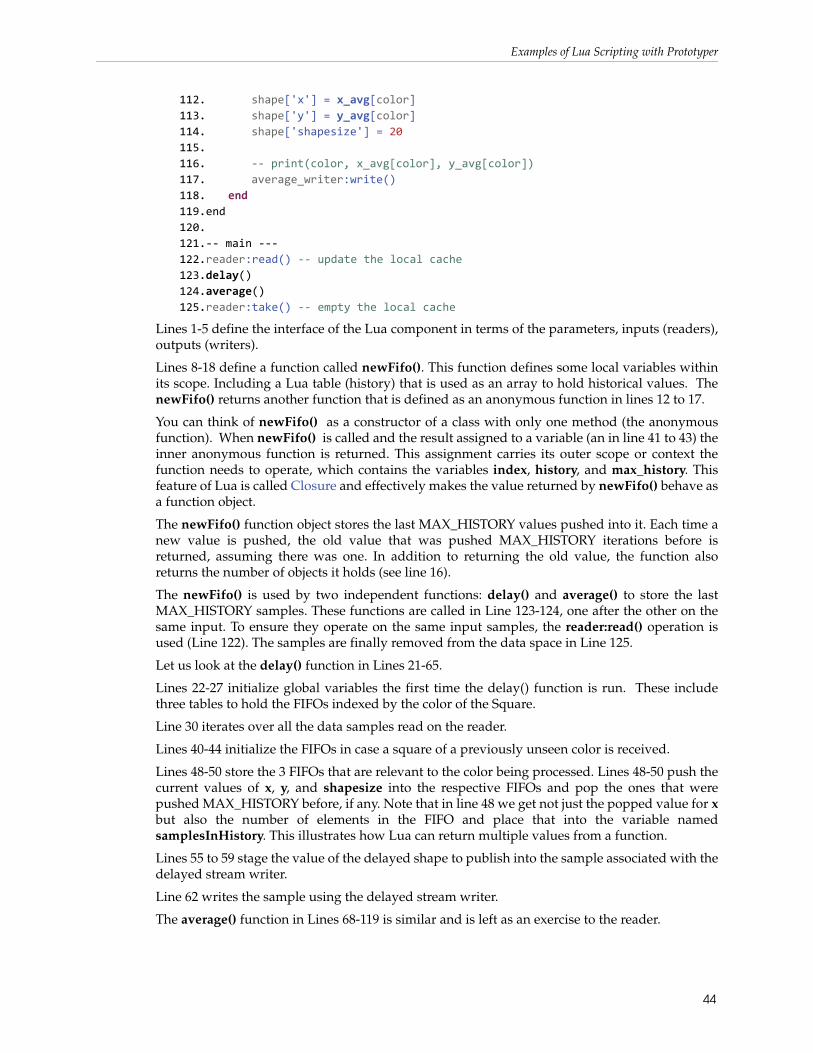
Examples of Lua Scripting with Prototyper
112. shape['x'] = x_avg[color]113. shape['y'] = y_avg[color]114. shape['shapesize'] = 20115.116. -- print(color, x_avg[color], y_avg[color])117. average_writer:write()118. end119.end120.121.-- main ---122.reader:read() -- update the local cache123.delay()124.average()125.reader:take() -- empty the local cache
Lines 1-5 define the interface of the Lua component in terms of the parameters, inputs (readers), outputs (writers).
Lines 8-18 define a function called newFifo(). This function defines some local variables within its scope. Including a Lua table (history) that is used as an array to hold historical values. The newFifo() returns another function that is defined as an anonymous function in lines 12 to 17.
You can think of newFifo() as a constructor of a class with only one method (the anonymous function). When newFifo() is called and the result assigned to a variable (an in line 41 to 43) the inner anonymous function is returned. This assignment carries its outer scope or context the function needs to operate, which contains the variables index, history, and max_history. This feature of Lua is called Closure and effectively makes the value returned by newFifo() behave as a function object.
The newFifo() function object stores the last MAX_HISTORY values pushed into it. Each time a new value is pushed, the old value that was pushed MAX_HISTORY iterations before is returned, assuming there was one. In addition to returning the old value, the function also returns the number of objects it holds (see line 16).
The newFifo() is used by two independent functions: delay() and average() to store the last MAX_HISTORY samples. These functions are called in Line 123-124, one after the other on the same input. To ensure they operate on the same input samples, the reader:read() operation is used (Line 122). The samples are finally removed from the data space in Line 125.
Let us look at the delay() function in Lines 21-65.
Lines 22-27 initialize global variables the first time the delay() function is run. These include three tables to hold the FIFOs indexed by the color of the Square.
Line 30 iterates over all the data samples read on the reader.
Lines 40-44 initialize the FIFOs in case a square of a previously unseen color is received.
Lines 48-50 store the 3 FIFOs that are relevant to the color being processed. Lines 48-50 push the current values of x, y, and shapesize into the respective FIFOs and pop the ones that were pushed MAX_HISTORY before, if any. Note that in line 48 we get not just the popped value for xbut also the number of elements in the FIFO and place that into the variable named samplesInHistory. This illustrates how Lua can return multiple values from a function.
Lines 55 to 59 stage the value of the delayed shape to publish into the sample associated with the delayed stream writer.
Line 62 writes the sample using the delayed stream writer.
The average() function in Lines 68-119 is similar and is left as an exercise to the reader.
44
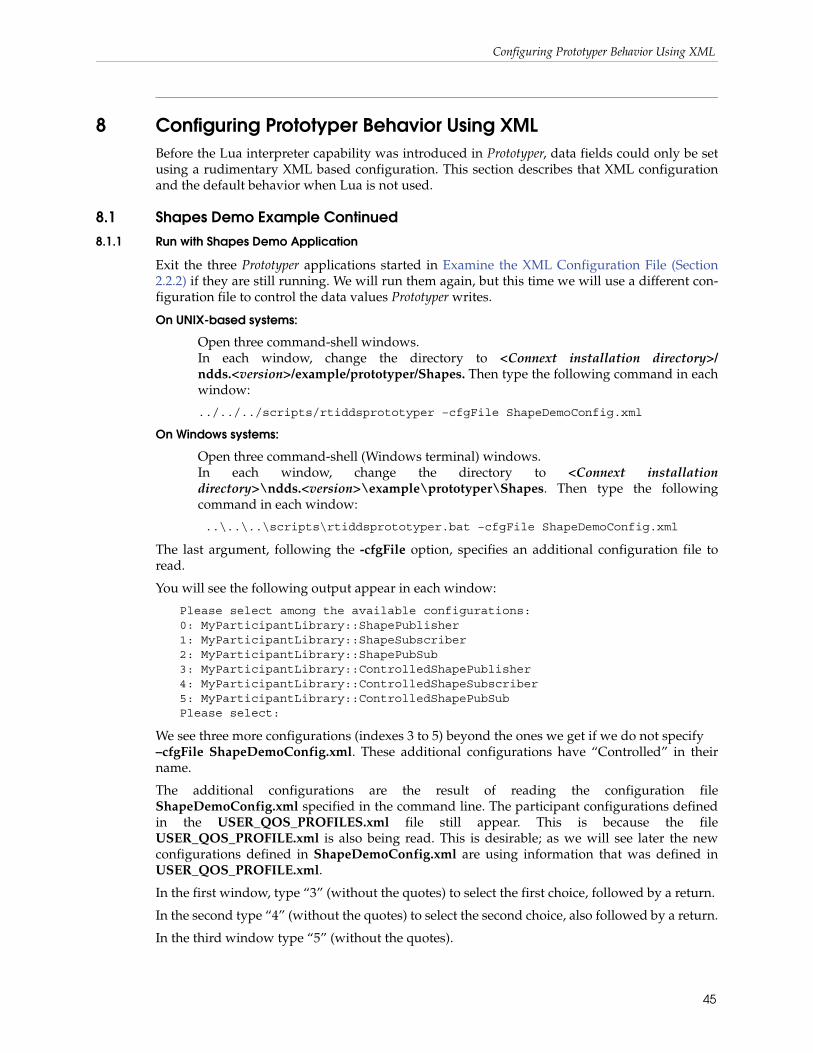
Configuring Prototyper Behavior Using XML
8 Configuring Prototyper Behavior Using XML Before the Lua interpreter capability was introduced in Prototyper, data fields could only be set using a rudimentary XML based configuration. This section describes that XML configuration and the default behavior when Lua is not used.
8.1 Shapes Demo Example Continued
8.1.1 Run with Shapes Demo Application
Exit the three Prototyper applications started in Examine the XML Configuration File (Section 2.2.2) if they are still running. We will run them again, but this time we will use a different con-figuration file to control the data values Prototyper writes.
On UNIX-based systems:
Open three command-shell windows. In each window, change the directory to <Connext installation directory>/ndds.<version>/example/prototyper/Shapes. Then type the following command in each window:
../../../scripts/rtiddsprototyper –cfgFile ShapeDemoConfig.xml
On Windows systems:
Open three command-shell (Windows terminal) windows. In each window, change the directory to <Connext installation directory>\ndds.<version>\example\prototyper\Shapes. Then type the following command in each window:
..\..\..\scripts\rtiddsprototyper.bat –cfgFile ShapeDemoConfig.xml
The last argument, following the -cfgFile option, specifies an additional configuration file to read.
You will see the following output appear in each window:
Please select among the available configurations:0: MyParticipantLibrary::ShapePublisher1: MyParticipantLibrary::ShapeSubscriber2: MyParticipantLibrary::ShapePubSub3: MyParticipantLibrary::ControlledShapePublisher4: MyParticipantLibrary::ControlledShapeSubscriber5: MyParticipantLibrary::ControlledShapePubSubPlease select:
We see three more configurations (indexes 3 to 5) beyond the ones we get if we do not specify –cfgFile ShapeDemoConfig.xml. These additional configurations have “Controlled” in their name.
The additional configurations are the result of reading the configuration file ShapeDemoConfig.xml specified in the command line. The participant configurations defined in the USER_QOS_PROFILES.xml file still appear. This is because the file USER_QOS_PROFILE.xml is also being read. This is desirable; as we will see later the new configurations defined in ShapeDemoConfig.xml are using information that was defined in USER_QOS_PROFILE.xml.
In the first window, type “3” (without the quotes) to select the first choice, followed by a return.
In the second type “4” (without the quotes) to select the second choice, also followed by a return.
In the third window type “5” (without the quotes).
45
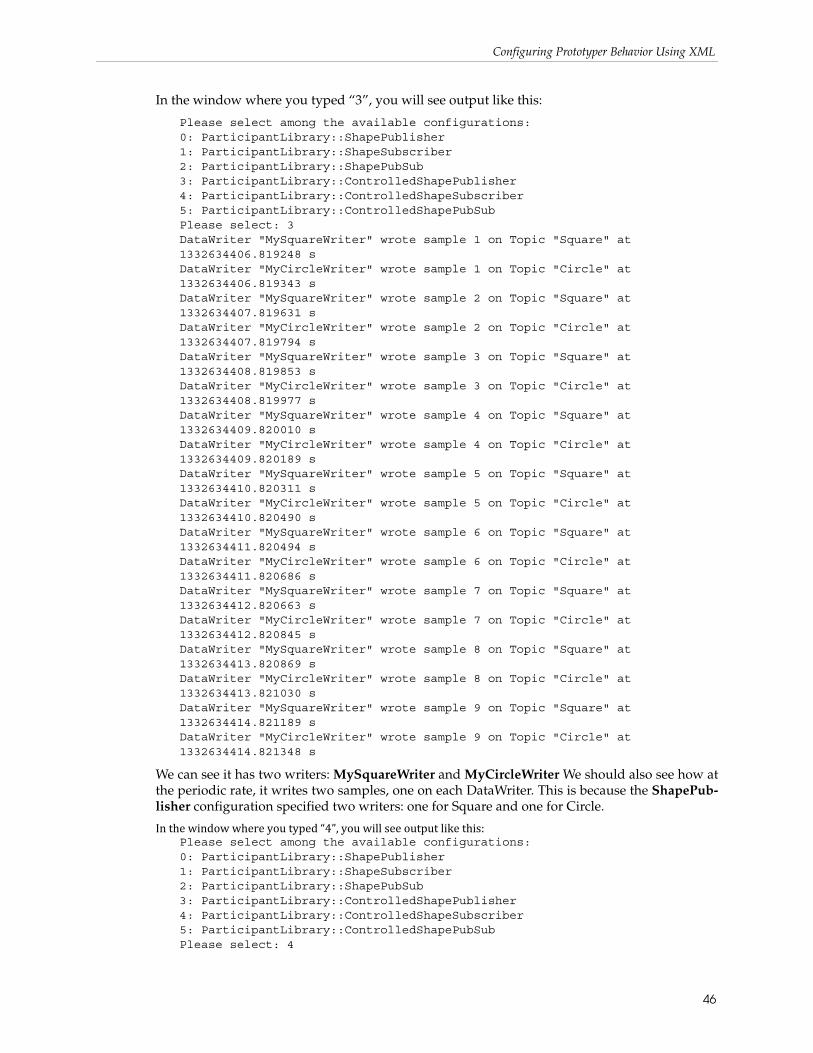
Configuring Prototyper Behavior Using XML
In the window where you typed “3”, you will see output like this:
Please select among the available configurations:0: ParticipantLibrary::ShapePublisher1: ParticipantLibrary::ShapeSubscriber2: ParticipantLibrary::ShapePubSub3: ParticipantLibrary::ControlledShapePublisher4: ParticipantLibrary::ControlledShapeSubscriber5: ParticipantLibrary::ControlledShapePubSubPlease select: 3DataWriter "MySquareWriter" wrote sample 1 on Topic "Square" at 1332634406.819248 sDataWriter "MyCircleWriter" wrote sample 1 on Topic "Circle" at 1332634406.819343 sDataWriter "MySquareWriter" wrote sample 2 on Topic "Square" at 1332634407.819631 sDataWriter "MyCircleWriter" wrote sample 2 on Topic "Circle" at 1332634407.819794 sDataWriter "MySquareWriter" wrote sample 3 on Topic "Square" at 1332634408.819853 sDataWriter "MyCircleWriter" wrote sample 3 on Topic "Circle" at 1332634408.819977 sDataWriter "MySquareWriter" wrote sample 4 on Topic "Square" at 1332634409.820010 sDataWriter "MyCircleWriter" wrote sample 4 on Topic "Circle" at 1332634409.820189 sDataWriter "MySquareWriter" wrote sample 5 on Topic "Square" at 1332634410.820311 sDataWriter "MyCircleWriter" wrote sample 5 on Topic "Circle" at 1332634410.820490 sDataWriter "MySquareWriter" wrote sample 6 on Topic "Square" at 1332634411.820494 sDataWriter "MyCircleWriter" wrote sample 6 on Topic "Circle" at 1332634411.820686 sDataWriter "MySquareWriter" wrote sample 7 on Topic "Square" at 1332634412.820663 sDataWriter "MyCircleWriter" wrote sample 7 on Topic "Circle" at 1332634412.820845 sDataWriter "MySquareWriter" wrote sample 8 on Topic "Square" at 1332634413.820869 sDataWriter "MyCircleWriter" wrote sample 8 on Topic "Circle" at 1332634413.821030 sDataWriter "MySquareWriter" wrote sample 9 on Topic "Square" at 1332634414.821189 sDataWriter "MyCircleWriter" wrote sample 9 on Topic "Circle" at 1332634414.821348 s
We can see it has two writers: MySquareWriter and MyCircleWriter We should also see how at the periodic rate, it writes two samples, one on each DataWriter. This is because the ShapePub-lisher configuration specified two writers: one for Square and one for Circle.In the window where you typed “4”, you will see output like this:
Please select among the available configurations:0: ParticipantLibrary::ShapePublisher1: ParticipantLibrary::ShapeSubscriber2: ParticipantLibrary::ShapePubSub3: ParticipantLibrary::ControlledShapePublisher4: ParticipantLibrary::ControlledShapeSubscriber5: ParticipantLibrary::ControlledShapePubSubPlease select: 4
46
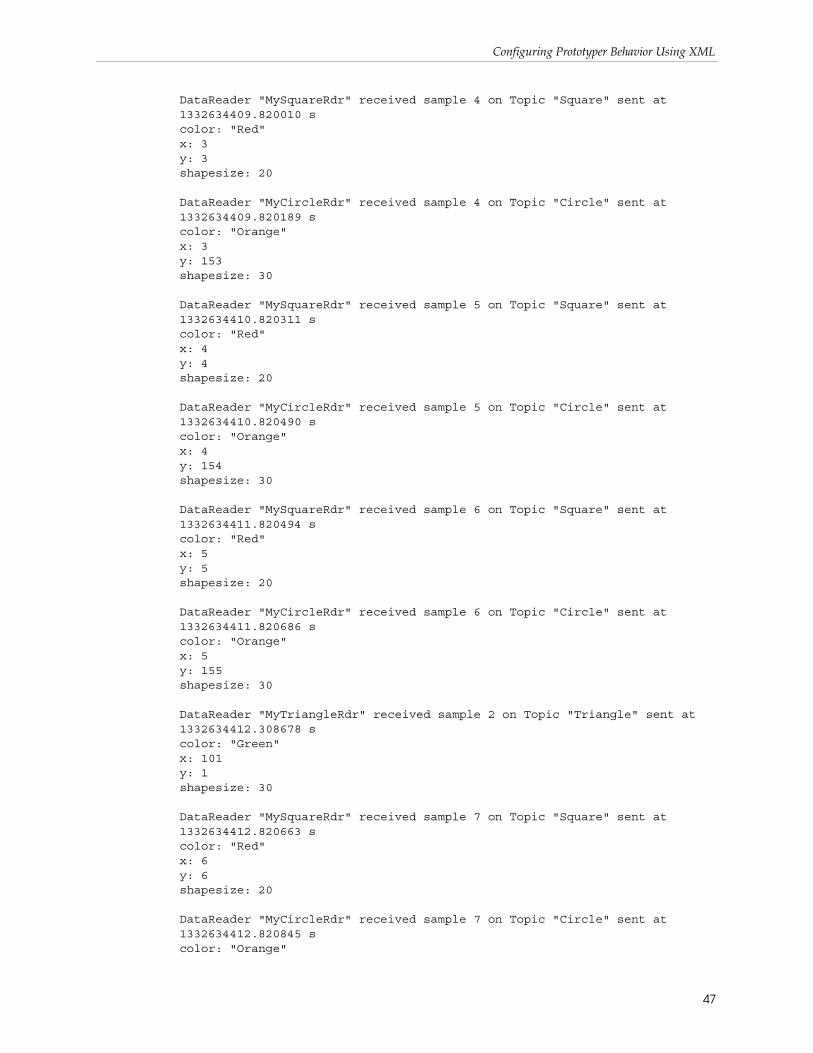
Configuring Prototyper Behavior Using XML
DataReader "MySquareRdr" received sample 4 on Topic "Square" sent at 1332634409.820010 scolor: "Red"x: 3y: 3shapesize: 20
DataReader "MyCircleRdr" received sample 4 on Topic "Circle" sent at 1332634409.820189 scolor: "Orange"x: 3y: 153shapesize: 30
DataReader "MySquareRdr" received sample 5 on Topic "Square" sent at 1332634410.820311 scolor: "Red"x: 4y: 4shapesize: 20
DataReader "MyCircleRdr" received sample 5 on Topic "Circle" sent at 1332634410.820490 scolor: "Orange"x: 4y: 154shapesize: 30
DataReader "MySquareRdr" received sample 6 on Topic "Square" sent at 1332634411.820494 scolor: "Red"x: 5y: 5shapesize: 20
DataReader "MyCircleRdr" received sample 6 on Topic "Circle" sent at 1332634411.820686 scolor: "Orange"x: 5y: 155shapesize: 30
DataReader "MyTriangleRdr" received sample 2 on Topic "Triangle" sent at 1332634412.308678 scolor: "Green"x: 101y: 1shapesize: 30
DataReader "MySquareRdr" received sample 7 on Topic "Square" sent at 1332634412.820663 scolor: "Red"x: 6y: 6shapesize: 20
DataReader "MyCircleRdr" received sample 7 on Topic "Circle" sent at 1332634412.820845 scolor: "Orange"
47
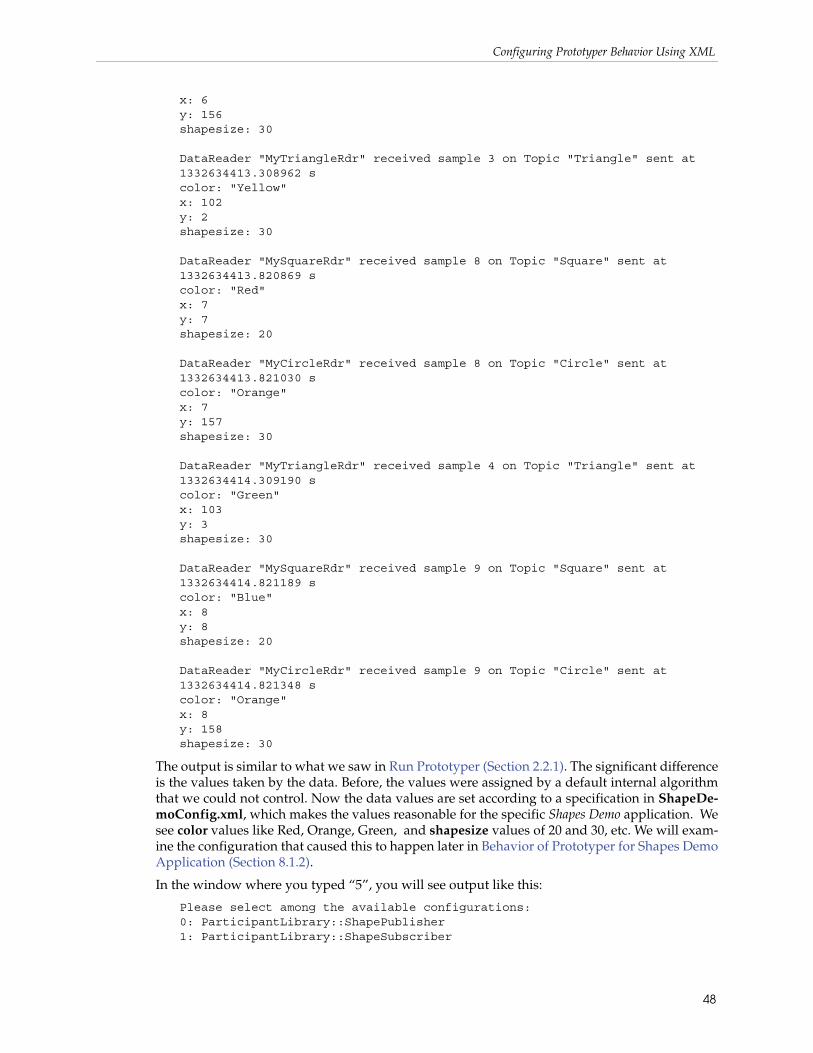
Configuring Prototyper Behavior Using XML
x: 6y: 156shapesize: 30
DataReader "MyTriangleRdr" received sample 3 on Topic "Triangle" sent at 1332634413.308962 scolor: "Yellow"x: 102y: 2shapesize: 30
DataReader "MySquareRdr" received sample 8 on Topic "Square" sent at 1332634413.820869 scolor: "Red"x: 7y: 7shapesize: 20
DataReader "MyCircleRdr" received sample 8 on Topic "Circle" sent at 1332634413.821030 scolor: "Orange"x: 7y: 157shapesize: 30
DataReader "MyTriangleRdr" received sample 4 on Topic "Triangle" sent at 1332634414.309190 scolor: "Green"x: 103y: 3shapesize: 30
DataReader "MySquareRdr" received sample 9 on Topic "Square" sent at 1332634414.821189 scolor: "Blue"x: 8y: 8shapesize: 20
DataReader "MyCircleRdr" received sample 9 on Topic "Circle" sent at 1332634414.821348 scolor: "Orange"x: 8y: 158shapesize: 30
The output is similar to what we saw in Run Prototyper (Section 2.2.1). The significant difference is the values taken by the data. Before, the values were assigned by a default internal algorithm that we could not control. Now the data values are set according to a specification in ShapeDe-moConfig.xml, which makes the values reasonable for the specific Shapes Demo application. We see color values like Red, Orange, Green, and shapesize values of 20 and 30, etc. We will exam-ine the configuration that caused this to happen later in Behavior of Prototyper for Shapes Demo Application (Section 8.1.2).
In the window where you typed “5”, you will see output like this:
Please select among the available configurations:0: ParticipantLibrary::ShapePublisher1: ParticipantLibrary::ShapeSubscriber
48
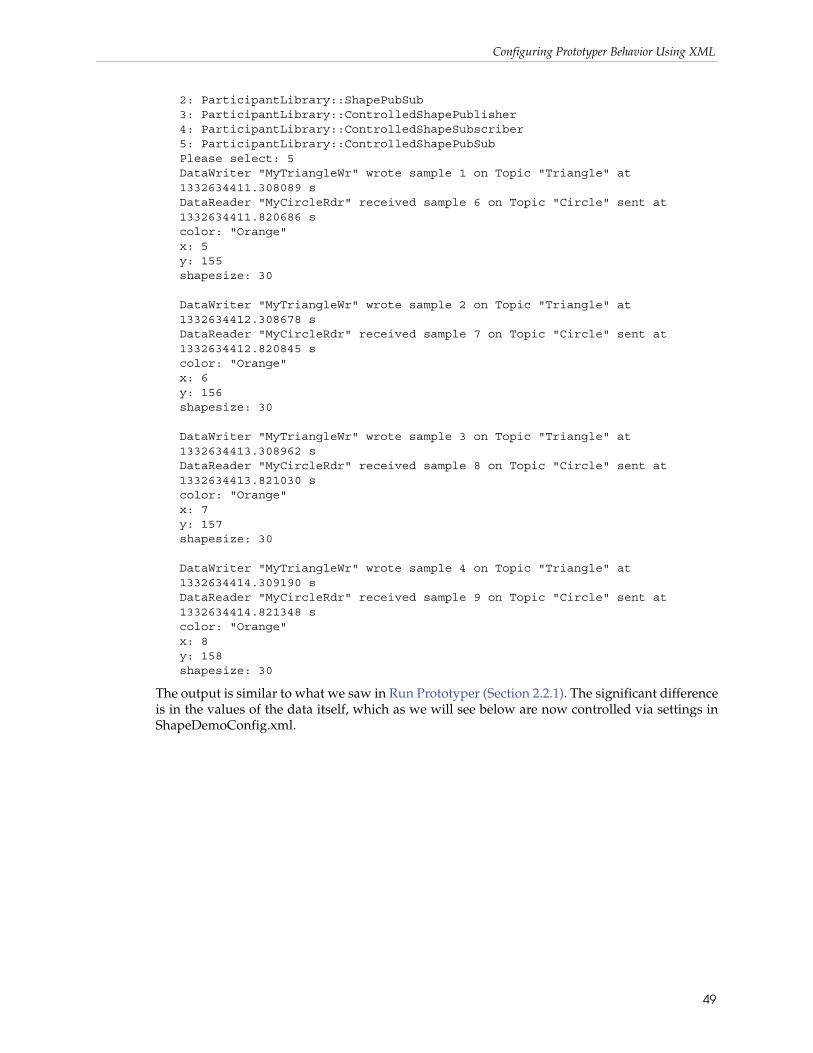
Configuring Prototyper Behavior Using XML
2: ParticipantLibrary::ShapePubSub3: ParticipantLibrary::ControlledShapePublisher4: ParticipantLibrary::ControlledShapeSubscriber5: ParticipantLibrary::ControlledShapePubSubPlease select: 5 DataWriter "MyTriangleWr" wrote sample 1 on Topic "Triangle" at 1332634411.308089 sDataReader "MyCircleRdr" received sample 6 on Topic "Circle" sent at 1332634411.820686 scolor: "Orange"x: 5y: 155shapesize: 30
DataWriter "MyTriangleWr" wrote sample 2 on Topic "Triangle" at 1332634412.308678 sDataReader "MyCircleRdr" received sample 7 on Topic "Circle" sent at 1332634412.820845 scolor: "Orange"x: 6y: 156shapesize: 30
DataWriter "MyTriangleWr" wrote sample 3 on Topic "Triangle" at 1332634413.308962 sDataReader "MyCircleRdr" received sample 8 on Topic "Circle" sent at 1332634413.821030 scolor: "Orange"x: 7y: 157shapesize: 30
DataWriter "MyTriangleWr" wrote sample 4 on Topic "Triangle" at 1332634414.309190 sDataReader "MyCircleRdr" received sample 9 on Topic "Circle" sent at 1332634414.821348 scolor: "Orange"x: 8y: 158shapesize: 30
The output is similar to what we saw in Run Prototyper (Section 2.2.1). The significant difference is in the values of the data itself, which as we will see below are now controlled via settings in ShapeDemoConfig.xml.
49
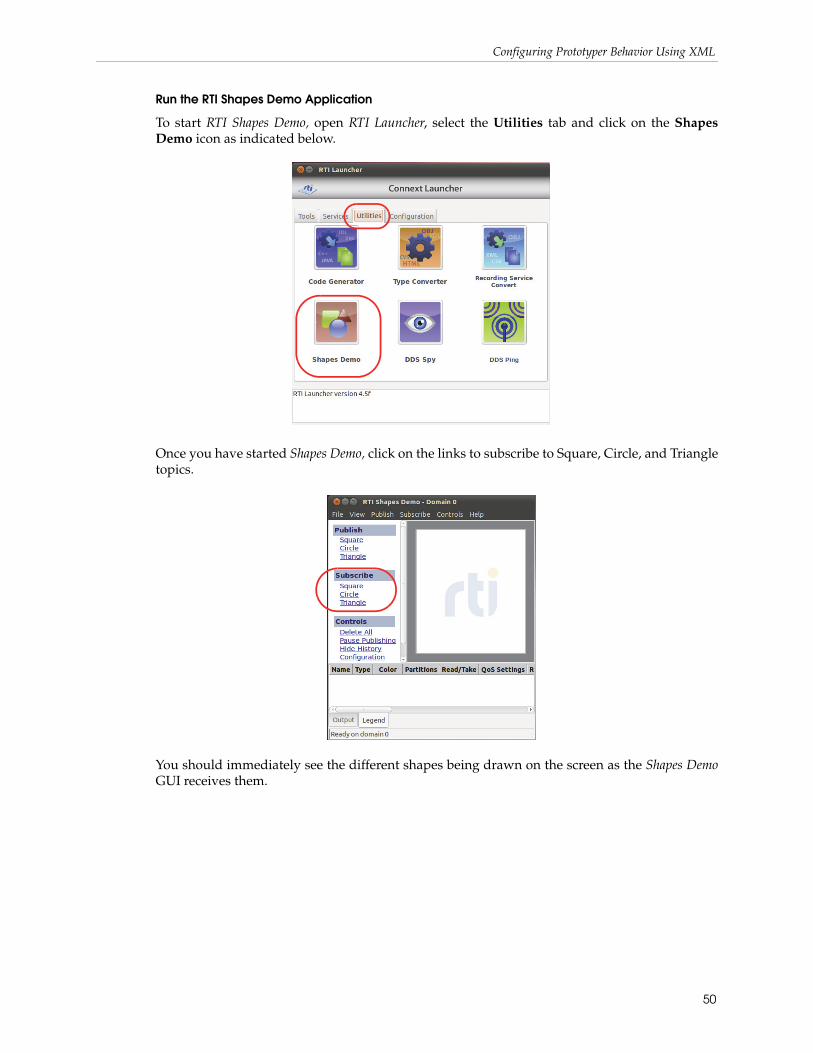
Configuring Prototyper Behavior Using XML
Run the RTI Shapes Demo Application
To start RTI Shapes Demo, open RTI Launcher, select the Utilities tab and click on the Shapes Demo icon as indicated below.
Once you have started Shapes Demo, click on the links to subscribe to Square, Circle, and Triangle topics.
You should immediately see the different shapes being drawn on the screen as the Shapes DemoGUI receives them.
50
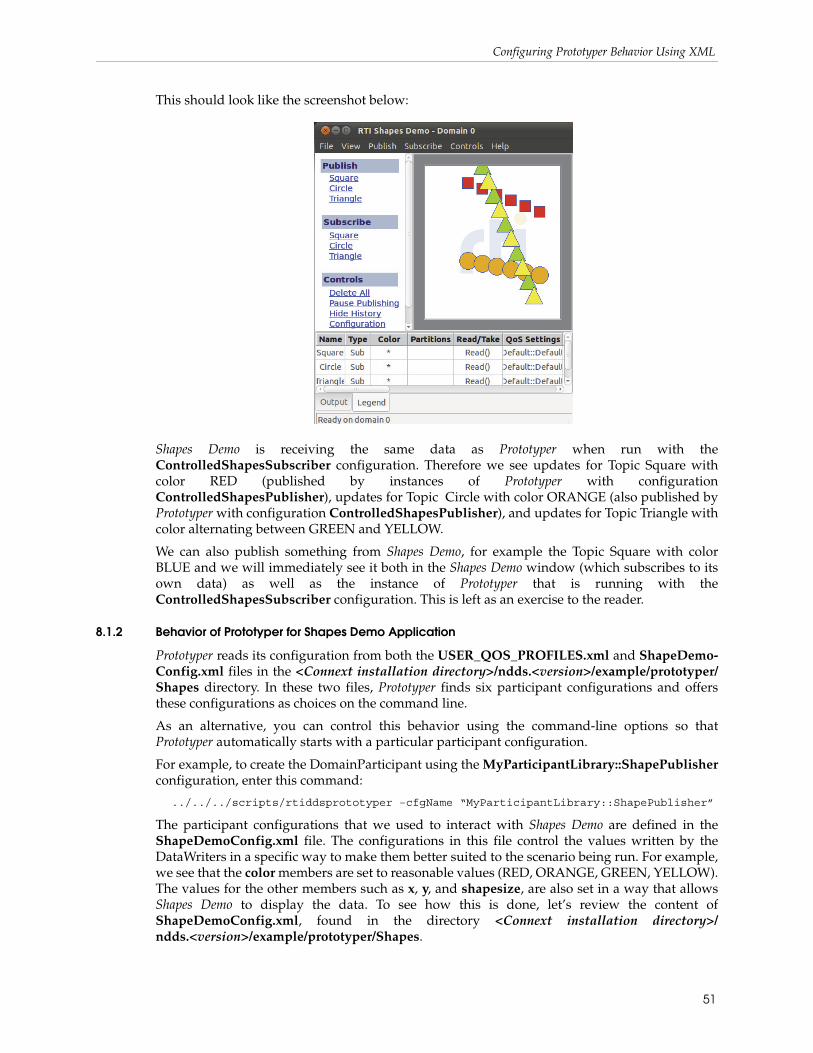
Configuring Prototyper Behavior Using XML
This should look like the screenshot below:
Shapes Demo is receiving the same data as Prototyper when run with the ControlledShapesSubscriber configuration. Therefore we see updates for Topic Square with color RED (published by instances of Prototyper with configuration ControlledShapesPublisher), updates for Topic Circle with color ORANGE (also published by Prototyper with configuration ControlledShapesPublisher), and updates for Topic Triangle with color alternating between GREEN and YELLOW.
We can also publish something from Shapes Demo, for example the Topic Square with color BLUE and we will immediately see it both in the Shapes Demo window (which subscribes to its own data) as well as the instance of Prototyper that is running with the ControlledShapesSubscriber configuration. This is left as an exercise to the reader.
8.1.2 Behavior of Prototyper for Shapes Demo Application
Prototyper reads its configuration from both the USER_QOS_PROFILES.xml and ShapeDemo-Config.xml files in the <Connext installation directory>/ndds.<version>/example/prototyper/Shapes directory. In these two files, Prototyper finds six participant configurations and offers these configurations as choices on the command line.
As an alternative, you can control this behavior using the command-line options so that Prototyper automatically starts with a particular participant configuration.
For example, to create the DomainParticipant using the MyParticipantLibrary::ShapePublisherconfiguration, enter this command:
../../../scripts/rtiddsprototyper –cfgName “MyParticipantLibrary::ShapePublisher”
The participant configurations that we used to interact with Shapes Demo are defined in the ShapeDemoConfig.xml file. The configurations in this file control the values written by the DataWriters in a specific way to make them better suited to the scenario being run. For example, we see that the color members are set to reasonable values (RED, ORANGE, GREEN, YELLOW). The values for the other members such as x, y, and shapesize, are also set in a way that allows Shapes Demo to display the data. To see how this is done, let’s review the content of ShapeDemoConfig.xml, found in the directory <Connext installation directory>/ndds.<version>/example/prototyper/Shapes.
51
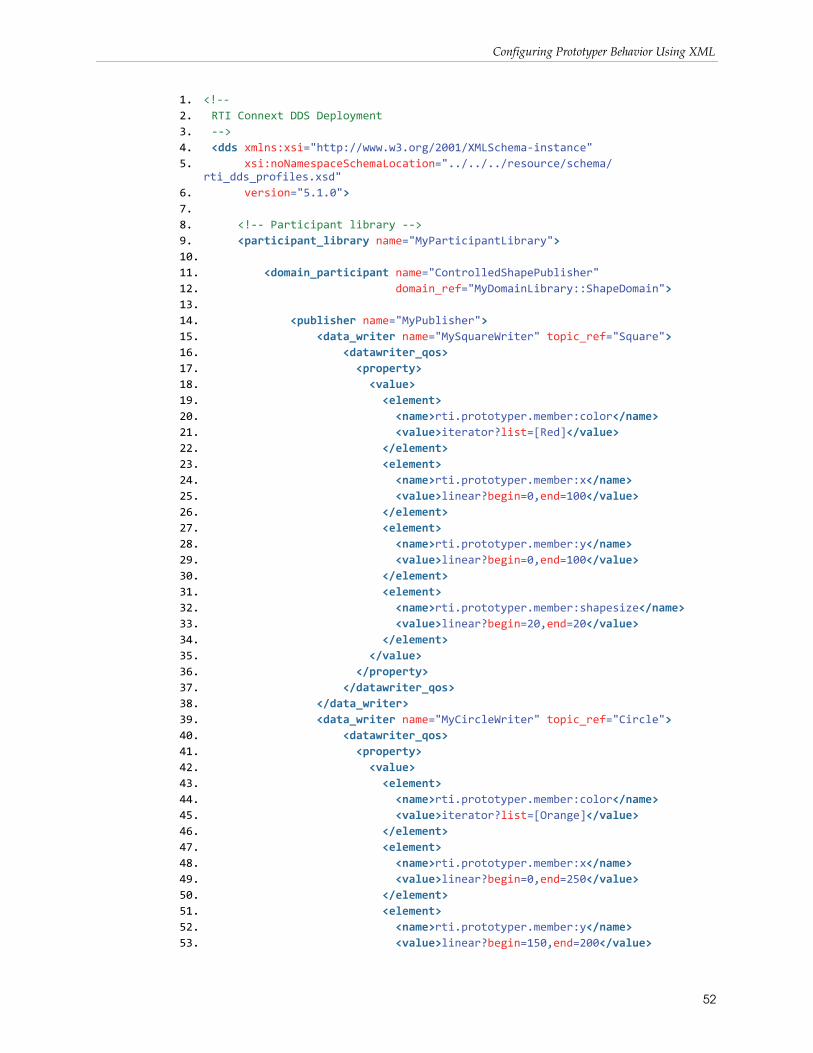
Configuring Prototyper Behavior Using XML
1. <!-- 2. RTI Connext DDS Deployment 3. --> 4. <dds xmlns:xsi="http://www.w3.org/2001/XMLSchema-instance" 5. xsi:noNamespaceSchemaLocation="../../../resource/schema/
rti_dds_profiles.xsd" 6. version="5.1.0"> 7. 8. <!-- Participant library --> 9. <participant_library name="MyParticipantLibrary"> 10. 11. <domain_participant name="ControlledShapePublisher" 12. domain_ref="MyDomainLibrary::ShapeDomain"> 13. 14. <publisher name="MyPublisher"> 15. <data_writer name="MySquareWriter" topic_ref="Square"> 16. <datawriter_qos> 17. <property> 18. <value> 19. <element> 20. <name>rti.prototyper.member:color</name>21. <value>iterator?list=[Red]</value> 22. </element> 23. <element> 24. <name>rti.prototyper.member:x</name>25. <value>linear?begin=0,end=100</value> 26. </element> 27. <element> 28. <name>rti.prototyper.member:y</name> 29. <value>linear?begin=0,end=100</value> 30. </element> 31. <element> 32. <name>rti.prototyper.member:shapesize</name>33. <value>linear?begin=20,end=20</value> 34. </element> 35. </value> 36. </property> 37. </datawriter_qos> 38. </data_writer> 39. <data_writer name="MyCircleWriter" topic_ref="Circle"> 40. <datawriter_qos> 41. <property> 42. <value> 43. <element> 44. <name>rti.prototyper.member:color</name> 45. <value>iterator?list=[Orange]</value> 46. </element> 47. <element> 48. <name>rti.prototyper.member:x</name> 49. <value>linear?begin=0,end=250</value> 50. </element> 51. <element> 52. <name>rti.prototyper.member:y</name> 53. <value>linear?begin=150,end=200</value>
52
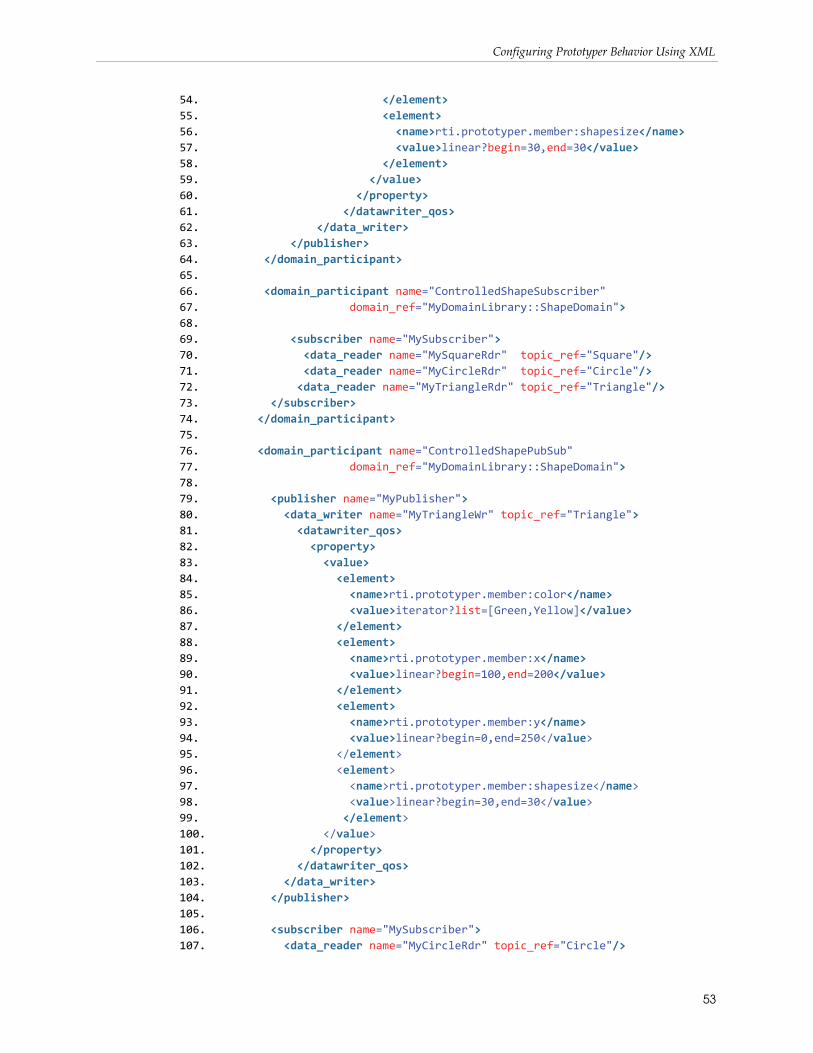
Configuring Prototyper Behavior Using XML
54. </element> 55. <element> 56. <name>rti.prototyper.member:shapesize</name>57. <value>linear?begin=30,end=30</value> 58. </element> 59. </value> 60. </property> 61. </datawriter_qos> 62. </data_writer> 63. </publisher> 64. </domain_participant> 65. 66. <domain_participant name="ControlledShapeSubscriber" 67. domain_ref="MyDomainLibrary::ShapeDomain">68. 69. <subscriber name="MySubscriber"> 70. <data_reader name="MySquareRdr" topic_ref="Square"/> 71. <data_reader name="MyCircleRdr" topic_ref="Circle"/>72. <data_reader name="MyTriangleRdr" topic_ref="Triangle"/> 73. </subscriber> 74. </domain_participant> 75. 76. <domain_participant name="ControlledShapePubSub" 77. domain_ref="MyDomainLibrary::ShapeDomain"> 78. 79. <publisher name="MyPublisher"> 80. <data_writer name="MyTriangleWr" topic_ref="Triangle"> 81. <datawriter_qos> 82. <property> 83. <value> 84. <element> 85. <name>rti.prototyper.member:color</name> 86. <value>iterator?list=[Green,Yellow]</value> 87. </element> 88. <element> 89. <name>rti.prototyper.member:x</name> 90. <value>linear?begin=100,end=200</value> 91. </element> 92. <element> 93. <name>rti.prototyper.member:y</name> 94. <value>linear?begin=0,end=250</value> 95. </element> 96. <element> 97. <name>rti.prototyper.member:shapesize</name>98. <value>linear?begin=30,end=30</value> 99. </element> 100. </value> 101. </property> 102. </datawriter_qos> 103. </data_writer> 104. </publisher> 105.106. <subscriber name="MySubscriber"> 107. <data_reader name="MyCircleRdr" topic_ref="Circle"/>
53
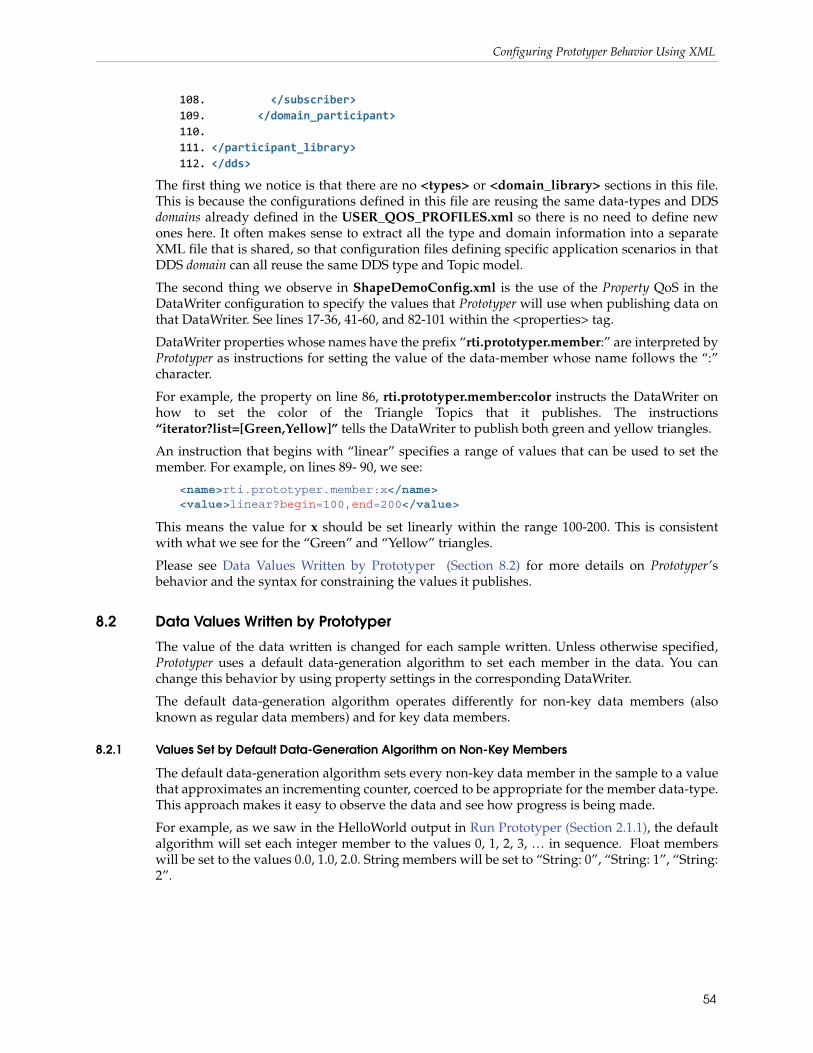
Configuring Prototyper Behavior Using XML
108. </subscriber> 109. </domain_participant> 110.111. </participant_library> 112. </dds>
The first thing we notice is that there are no <types> or <domain_library> sections in this file. This is because the configurations defined in this file are reusing the same data-types and DDS domains already defined in the USER_QOS_PROFILES.xml so there is no need to define new ones here. It often makes sense to extract all the type and domain information into a separate XML file that is shared, so that configuration files defining specific application scenarios in that DDS domain can all reuse the same DDS type and Topic model.
The second thing we observe in ShapeDemoConfig.xml is the use of the Property QoS in the DataWriter configuration to specify the values that Prototyper will use when publishing data on that DataWriter. See lines 17-36, 41-60, and 82-101 within the <properties> tag.
DataWriter properties whose names have the prefix “rti.prototyper.member:” are interpreted by Prototyper as instructions for setting the value of the data-member whose name follows the “:” character.
For example, the property on line 86, rti.prototyper.member:color instructs the DataWriter on how to set the color of the Triangle Topics that it publishes. The instructions “iterator?list=[Green,Yellow]” tells the DataWriter to publish both green and yellow triangles.
An instruction that begins with “linear” specifies a range of values that can be used to set the member. For example, on lines 89- 90, we see:
<name>rti.prototyper.member:x</name> <value>linear?begin=100,end=200</value>
This means the value for x should be set linearly within the range 100-200. This is consistent with what we see for the “Green” and “Yellow” triangles.
Please see Data Values Written by Prototyper (Section 8.2) for more details on Prototyper’s behavior and the syntax for constraining the values it publishes.
8.2 Data Values Written by Prototyper
The value of the data written is changed for each sample written. Unless otherwise specified, Prototyper uses a default data-generation algorithm to set each member in the data. You can change this behavior by using property settings in the corresponding DataWriter.
The default data-generation algorithm operates differently for non-key data members (also known as regular data members) and for key data members.
8.2.1 Values Set by Default Data-Generation Algorithm on Non-Key Members
The default data-generation algorithm sets every non-key data member in the sample to a value that approximates an incrementing counter, coerced to be appropriate for the member data-type. This approach makes it easy to observe the data and see how progress is being made.
For example, as we saw in the HelloWorld output in Run Prototyper (Section 2.1.1), the default algorithm will set each integer member to the values 0, 1, 2, 3, … in sequence. Float members will be set to the values 0.0, 1.0, 2.0. String members will be set to “String: 0”, “String: 1”, “String: 2”.
54

Configuring Prototyper Behavior Using XML
The following table describes how the default algorithm sets each regular (non-key) member.
Member Type Values Set by Default Data-Generation Function Example
Integer types:
Octet,
short, unsigned short,
long, unsigned long,
long long,
unsigned long long
Integer values starting from 0 and incrementing by 1 each sample written.
Member:long x;
x will be set to: 0, 1, 2, 3, 4, …
Floating point types:
float, double
Floating point values starting with 0.0 and incremented by 1.0 each sample written.
Member:float x;
x will be set to: 0.0, 1.0, 2.0, 3.0, 4.0, …
String types:
string, wstring
String that follows the pattern:
“String: %d”
where %d is replaced by the value of a counter that starts at 0 and increments by 1 for each sample written.
Member:string x;
x will be set to:
“String: 0”, “String: 1”, “String: 2”, “String: 3”, “String: 4”, …
Enumerated type
Each value of the enumeration, starting with the first and cycling back to the beginning when all the values have been generated.
enum EnumType { A, B, C};Member:EnumType x;
x will be set to: A, B, C, A, B, …
Union type
Union discriminator set to always select the last member.
The value of the last member is set according to its type using the default data-generation function.
union UnionType (long) { case 1: long along; case 2: float afloat; case 3: string aString;};Member:UnionType x;
x will always be set as case 3, with x.aString taking these values:
“String: 0”, “String: 1”, “String: 2”, “String: 3”, …
Array type
Set all elements to the same value using the default data-generation function for the element.
Member:long x[3];
x[0], x[1], x[2] will be set to the same incrementing values, e.g.:
x[0] = x[1] = x[2] = 0x[0] = x[1] = x[2] = 1x[0] = x[1] = x[2] = 2
Sequence type
Sets the length to 1 and the single element to a value using the default data-generation function for non-key members of that type.
Member:sequence<long,10> x;
Set length to 2 and x[0]=x[1]=0,1,2,3,…
55
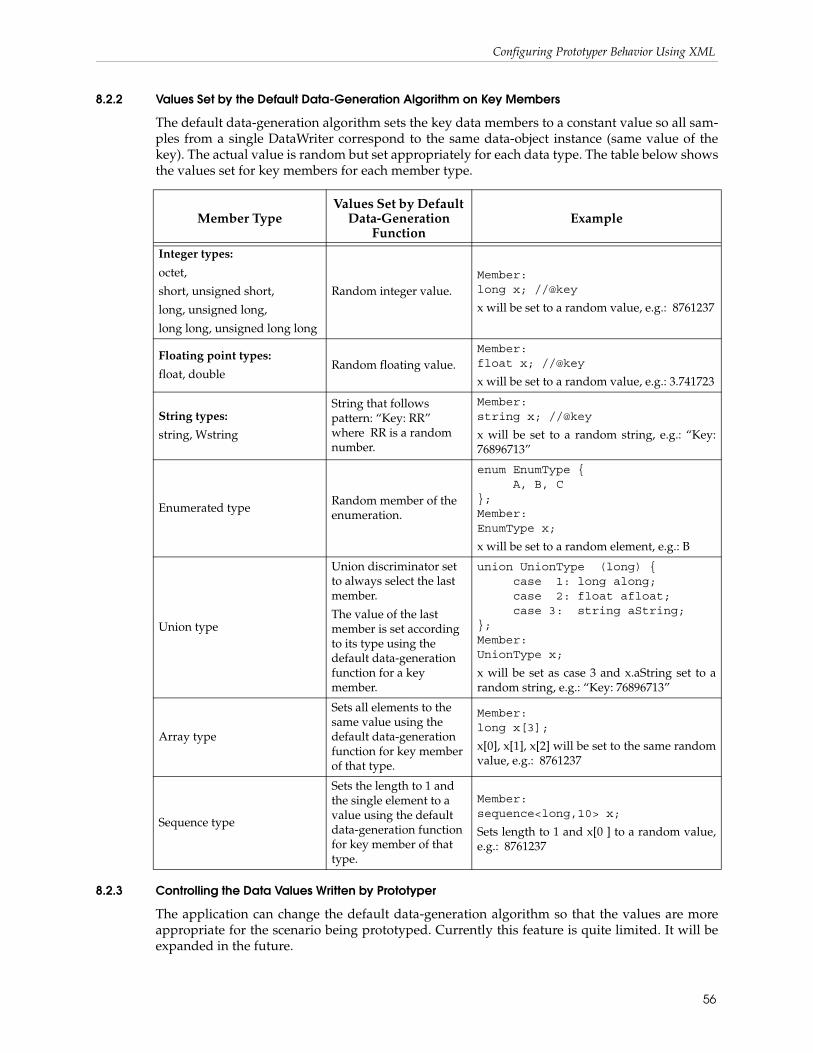
Configuring Prototyper Behavior Using XML
8.2.2 Values Set by the Default Data-Generation Algorithm on Key Members
The default data-generation algorithm sets the key data members to a constant value so all sam-ples from a single DataWriter correspond to the same data-object instance (same value of the key). The actual value is random but set appropriately for each data type. The table below shows the values set for key members for each member type.
8.2.3 Controlling the Data Values Written by Prototyper
The application can change the default data-generation algorithm so that the values are more appropriate for the scenario being prototyped. Currently this feature is quite limited. It will be expanded in the future.
Member TypeValues Set by Default
Data-Generation Function
Example
Integer types:
octet,
short, unsigned short,
long, unsigned long,
long long, unsigned long long
Random integer value.Member:long x; //@key
x will be set to a random value, e.g.: 8761237
Floating point types:
float, doubleRandom floating value.
Member:float x; //@key
x will be set to a random value, e.g.: 3.741723
String types:
string, Wstring
String that follows pattern: “Key: RR” where RR is a random number.
Member:string x; //@key
x will be set to a random string, e.g.: “Key: 76896713”
Enumerated typeRandom member of the enumeration.
enum EnumType { A, B, C};Member:EnumType x;
x will be set to a random element, e.g.: B
Union type
Union discriminator set to always select the last member.
The value of the last member is set according to its type using the default data-generation function for a key member.
union UnionType (long) { case 1: long along; case 2: float afloat; case 3: string aString;};Member:UnionType x;
x will be set as case 3 and x.aString set to a random string, e.g.: “Key: 76896713”
Array type
Sets all elements to the same value using the default data-generation function for key member of that type.
Member:long x[3];
x[0], x[1], x[2] will be set to the same random value, e.g.: 8761237
Sequence type
Sets the length to 1 and the single element to a value using the default data-generation function for key member of that type.
Member:sequence<long,10> x;
Sets length to 1 and x[0 ] to a random value, e.g.: 8761237
56
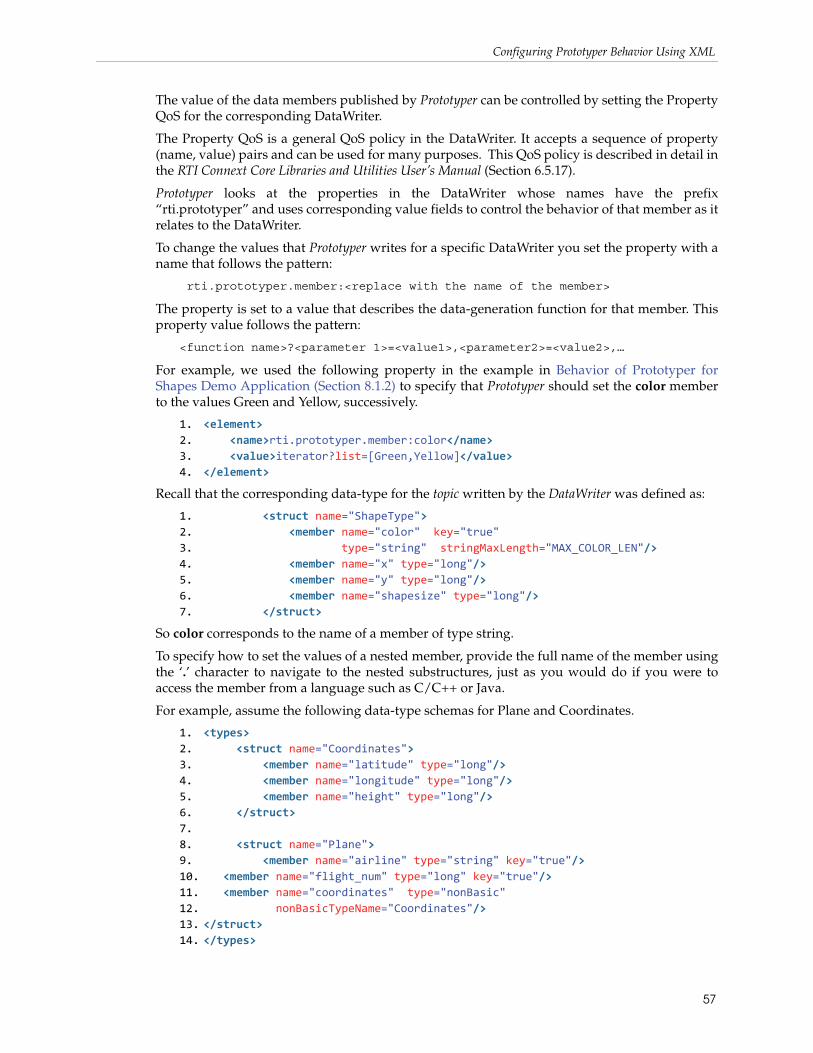
Configuring Prototyper Behavior Using XML
The value of the data members published by Prototyper can be controlled by setting the Property QoS for the corresponding DataWriter.
The Property QoS is a general QoS policy in the DataWriter. It accepts a sequence of property (name, value) pairs and can be used for many purposes. This QoS policy is described in detail in the RTI Connext Core Libraries and Utilities User’s Manual (Section 6.5.17).
Prototyper looks at the properties in the DataWriter whose names have the prefix “rti.prototyper” and uses corresponding value fields to control the behavior of that member as it relates to the DataWriter.
To change the values that Prototyper writes for a specific DataWriter you set the property with a name that follows the pattern:
rti.prototyper.member:<replace with the name of the member>
The property is set to a value that describes the data-generation function for that member. This property value follows the pattern:
<function name>?<parameter 1>=<value1>,<parameter2>=<value2>,…
For example, we used the following property in the example in Behavior of Prototyper for Shapes Demo Application (Section 8.1.2) to specify that Prototyper should set the color member to the values Green and Yellow, successively.
1. <element> 2. <name>rti.prototyper.member:color</name> 3. <value>iterator?list=[Green,Yellow]</value> 4. </element>
Recall that the corresponding data-type for the topic written by the DataWriter was defined as:
1. <struct name="ShapeType"> 2. <member name="color" key="true" 3. type="string" stringMaxLength="MAX_COLOR_LEN"/> 4. <member name="x" type="long"/> 5. <member name="y" type="long"/> 6. <member name="shapesize" type="long"/> 7. </struct>
So color corresponds to the name of a member of type string.
To specify how to set the values of a nested member, provide the full name of the member using the ‘.’ character to navigate to the nested substructures, just as you would do if you were to access the member from a language such as C/C++ or Java.
For example, assume the following data-type schemas for Plane and Coordinates.
1. <types> 2. <struct name="Coordinates"> 3. <member name="latitude" type="long"/> 4. <member name="longitude" type="long"/> 5. <member name="height" type="long"/> 6. </struct> 7. 8. <struct name="Plane"> 9. <member name="airline" type="string" key="true"/> 10. <member name="flight_num" type="long" key="true"/>11. <member name="coordinates" type="nonBasic" 12. nonBasicTypeName="Coordinates"/> 13. </struct> 14. </types>
57
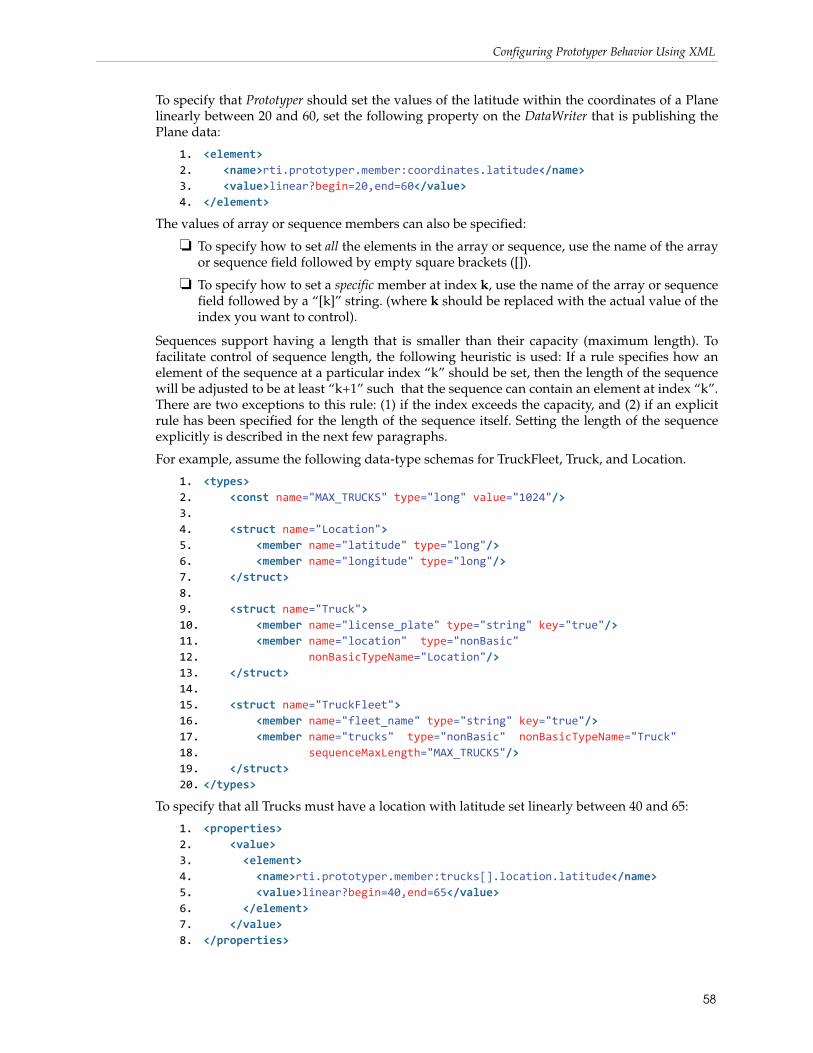
Configuring Prototyper Behavior Using XML
To specify that Prototyper should set the values of the latitude within the coordinates of a Plane linearly between 20 and 60, set the following property on the DataWriter that is publishing the Plane data:
1. <element> 2. <name>rti.prototyper.member:coordinates.latitude</name> 3. <value>linear?begin=20,end=60</value> 4. </element>
The values of array or sequence members can also be specified:
❏ To specify how to set all the elements in the array or sequence, use the name of the array or sequence field followed by empty square brackets ([]).
❏ To specify how to set a specific member at index k, use the name of the array or sequence field followed by a “[k]” string. (where k should be replaced with the actual value of the index you want to control).
Sequences support having a length that is smaller than their capacity (maximum length). To facilitate control of sequence length, the following heuristic is used: If a rule specifies how an element of the sequence at a particular index “k” should be set, then the length of the sequence will be adjusted to be at least “k+1” such that the sequence can contain an element at index “k”. There are two exceptions to this rule: (1) if the index exceeds the capacity, and (2) if an explicit rule has been specified for the length of the sequence itself. Setting the length of the sequence explicitly is described in the next few paragraphs.
For example, assume the following data-type schemas for TruckFleet, Truck, and Location.
1. <types> 2. <const name="MAX_TRUCKS" type="long" value="1024"/> 3. 4. <struct name="Location"> 5. <member name="latitude" type="long"/> 6. <member name="longitude" type="long"/> 7. </struct> 8. 9. <struct name="Truck"> 10. <member name="license_plate" type="string" key="true"/> 11. <member name="location" type="nonBasic" 12. nonBasicTypeName="Location"/> 13. </struct> 14. 15. <struct name="TruckFleet"> 16. <member name="fleet_name" type="string" key="true"/> 17. <member name="trucks" type="nonBasic" nonBasicTypeName="Truck"18. sequenceMaxLength="MAX_TRUCKS"/> 19. </struct> 20. </types>
To specify that all Trucks must have a location with latitude set linearly between 40 and 65:
1. <properties> 2. <value> 3. <element> 4. <name>rti.prototyper.member:trucks[].location.latitude</name> 5. <value>linear?begin=40,end=65</value> 6. </element> 7. </value> 8. </properties>
58
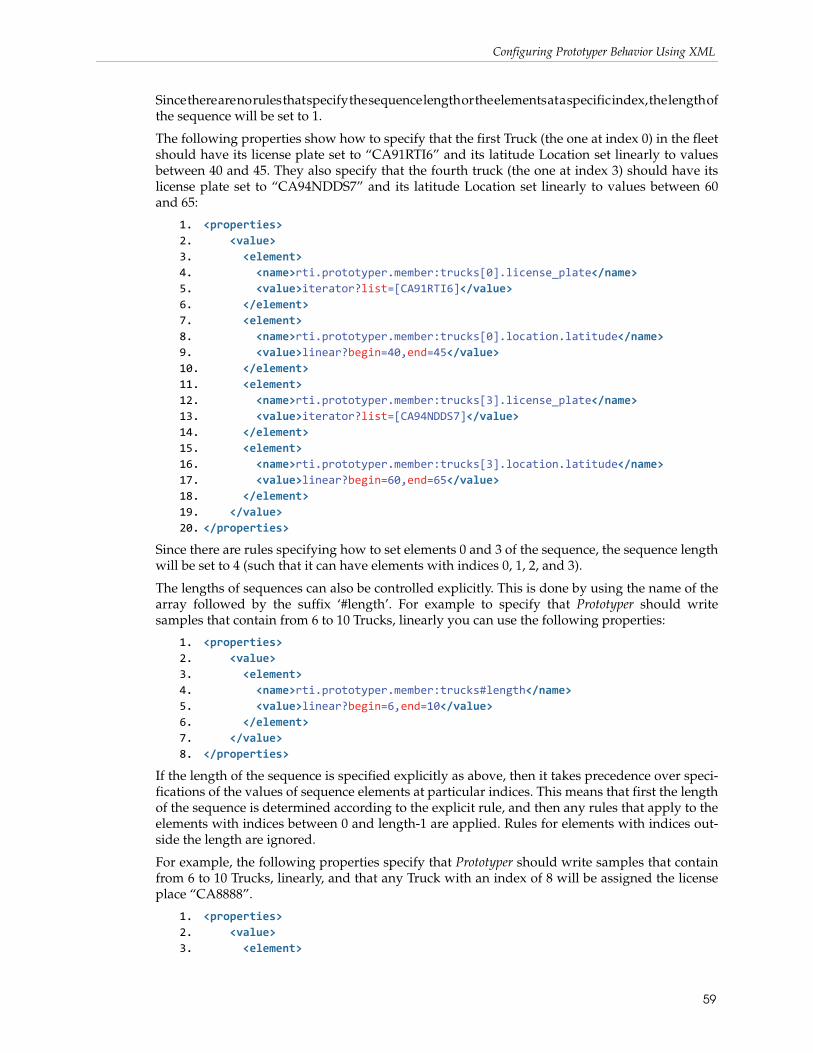
Configuring Prototyper Behavior Using XML
Since there are no rules that specify the sequence length or the elements at a specific index, the length of the sequence will be set to 1.
The following properties show how to specify that the first Truck (the one at index 0) in the fleet should have its license plate set to “CA91RTI6” and its latitude Location set linearly to values between 40 and 45. They also specify that the fourth truck (the one at index 3) should have its license plate set to “CA94NDDS7” and its latitude Location set linearly to values between 60 and 65:
1. <properties> 2. <value> 3. <element> 4. <name>rti.prototyper.member:trucks[0].license_plate</name> 5. <value>iterator?list=[CA91RTI6]</value> 6. </element> 7. <element> 8. <name>rti.prototyper.member:trucks[0].location.latitude</name> 9. <value>linear?begin=40,end=45</value> 10. </element> 11. <element> 12. <name>rti.prototyper.member:trucks[3].license_plate</name> 13. <value>iterator?list=[CA94NDDS7]</value> 14. </element> 15. <element> 16. <name>rti.prototyper.member:trucks[3].location.latitude</name> 17. <value>linear?begin=60,end=65</value> 18. </element> 19. </value> 20. </properties>
Since there are rules specifying how to set elements 0 and 3 of the sequence, the sequence length will be set to 4 (such that it can have elements with indices 0, 1, 2, and 3).
The lengths of sequences can also be controlled explicitly. This is done by using the name of the array followed by the suffix ‘#length’. For example to specify that Prototyper should write samples that contain from 6 to 10 Trucks, linearly you can use the following properties:
1. <properties> 2. <value> 3. <element> 4. <name>rti.prototyper.member:trucks#length</name> 5. <value>linear?begin=6,end=10</value> 6. </element> 7. </value> 8. </properties>
If the length of the sequence is specified explicitly as above, then it takes precedence over speci-fications of the values of sequence elements at particular indices. This means that first the length of the sequence is determined according to the explicit rule, and then any rules that apply to the elements with indices between 0 and length-1 are applied. Rules for elements with indices out-side the length are ignored.
For example, the following properties specify that Prototyper should write samples that contain from 6 to 10 Trucks, linearly, and that any Truck with an index of 8 will be assigned the license place “CA8888”.
1. <properties> 2. <value> 3. <element>
59

Using Monitoring with Prototyper
4. <name>rti.prototyper.member:trucks#length </name> 5. <value> linear?begin=6,end=10</value> 6. </element> 7. <element> 8. <name>rti.prototyper.member:trucks[8].license_plate</name> 9. <value>iterator?list=[CA8888]</value> 10. </element> 11. </value> 12. </properties>
In the example above, successive TruckFleet samples will set the trucks sequence to a length of 7, 8, 9, and 10. Samples with lengths 9 and 10 will set the license_plate member of the Truck at index 8 to “CA 8888”. Samples with 6, 7, and 8 Trucks will not set that member because its index exceeds what the trucks array can accommodate.
The choices available for the data-generation algorithms are listed in the table below. As mentioned, this feature is currently limited. It will be extended in future releases.
9 Using Monitoring with PrototyperThe Prototyper is statically linked with the RTI Connext libraries. It defines a pre-compiled envi-ronment variable called NDDS_MONITOR that can be used to enable monitoring of a Domain-Participant.
To monitor a DomainParticipant, you can enable the monitoring-related properties in the <participant_qos> as follows.
<!-- Begin Monitoring --><property>
<value><element>
<name>rti.monitor.library</name><value>rtimonitoring</value>
</element><element>
<name>rti.monitor.create_function_ptr</name><value>$(NDDS_MONITOR)</value>
</element></value>
</property><!-- End Monitoring -->
For an example, see <Connext installation directory>/ndds.<version>/example/prototyper/Lua/USER_QOS_PROFILES.xml.
Generation Function Parameters Example Description
linearbegin, end, numsteps
linear?begin=0,end=100, numsteps=50
Generates ‘numsteps’ linearly spaced values between and including ‘begin’ and ‘end’.
iterator listiterator?list= [RED,GREEN,BLUE]
Set each element in the list in sequence
Init N/A InitSet the value to the initialization value for the type. This is typically zero for atomic types, zero length sequences, etc.
60

Using Monitoring with Prototyper
For details on configuring the monitoring library, please see the RTI Monitoring Library Getting Started Guide.
For details on using the RTI Monitor tool, please see the RTI Monitor Getting Started Guide.
61