Embed Size (px)
Citation preview

RUGGED MOBILE
4CH STANDALONE DVR SYSTEM
MANUAL 2010 Feb. V1.0

2
CONTENTS
A、FEATURE .............................................................................................................3 B、SPECIFICATIONS ...............................................................................................3 C、FRONT PANEL ....................................................................................................4 D、REAR PANEL .......................................................................................................5 E、OPERATING MANUAL.......................................................................................6
1、 Main Menu .............................................................................................6 2、 Camera Setup.........................................................................................6 3、 Record Setup..........................................................................................6 4、 Alarm Setup ..........................................................................................7 5、 Motion Detection Setup....................................................................7 6、 Screen Setup ..........................................................................................8 7、 Audio Setup ............................................................................................8 8、 System Setup .........................................................................................8 9、 Time Search..........................................................................................10 10、 Language...........................................................................................10 11、 Exit ......................................................................................................10
F、RECORDING PROCEDURE .........................................................................11 G、4-CH CONTINOUS RECORDING HOURS ON SATA 400GB HDD ....11 H、DVR VIEWER USER GUIDE ...........................................................................11

3
A、FEATURE Compliances with Automotive Industry and Voltage Ranges for All. Easy Swapped HDD Tray in Front. 2.5” SATA HDD and SSD HDD Support. Certified 1.0G HDD Anti-Shock Design Patent. Extreme Temperature and Ruggedness Approved for Installation in All Cars. Most Reliable MJPEG Chip 5 Years Working Guaranty. Synchronization Video Recording and Hidden Audio Recording Support. Continuous Recording, Motion Recording and Schedule Recording. Hard Drive Indicator on Fascia. Prompt Recording upon Boot-up. Ending File Protection While Unexpected Power Cut. Power Restored, Recording Restored. FUHO Made Cameras Power Supplied by DVR.
B、SPECIFICATIONS Item Description
Video Format NTSC/PAL OS Embedded RTOS
Video Input BNC x4 (1Vp-p 75Ω) Video Output BNC x2 (Monitor Output) Audio Input RCA x1
Audio Output RCA x1 Menu Interface Multi-lingual Option
NTSC 120 fps (4x30 fps) Live Frame Rate PAL 100 fps (4x25 fps) NTSC 60 fps Recording Frame Rate PAL 50 fps
Retrieving Mode Duplex (Recording & Playback) NTSC 640 x 480 Live PAL 640 x 544 NTSC 640 x 240 Resolution
Recording PAL 640 x 272 Normal 12K Bytes / Frame
High 15K Bytes / Frame Compression Modified MJPEG
Highest 20K Bytes / Frame Hard Drive 2.5” SATA Hard Drive x1
Mode Time/Date & Event List Search Full Screen Yes Alarm Input Yes
Motion Detection Yes Video Loss Alert Yes Auto Switching Yes
Buzzer Alert Yes Brightness Adjustment Yes
Contrast Adjustment Yes Air Connectors Camera Video Input Cable x4 (DC12V Max. 0.5A)
System Monitor Power Restored Recording Restored Power Input DC 8V~28V
Dimension 195mm X 265mm X 65mm (L X W X H ) Weight 4.1KG ( Including bracket, w/o HDD )
Shock Factor 1.0 G Operating Temperature -15 ~ +70

4
C、FRONT PANEL
CONTROL BUTTONS in the VIEW MODE
Menu: Enter the MENU MODE for the system setup.
Record: Activate the recording.(No recording must be set in Record
Schedule Setup).
Play: Event List.
Auto Switching Channels: Enable / Disable the auto switching function.
Quad Display: Monitor will be displayed as a quad display.
Channel 1: Channel 1 full screen display.
Channel 2: Channel 2 full screen display.
Channel 3: Channel 3 full screen display.
Channel 4: Channel 4 full screen display.
CONTROL BUTTONS in the RECORD MODE
Menu: Enter the MENU MODE for the system setup.
Key lock: Push the button 5 times to lock/unlock the STOP RECORDING key.
(While the STOP Key is locked, there will be a letter L showed on the left-down
corner).
Stop: Stop the recording.
Auto Switching Channels: Enable / Disable the auto switching function.
Quad Display: Monitor will be displayed as a quad display.
Channel 1: Channel 1 full screen display.
Channel 2: Channel 2 full screen display.
Channel 3: Channel 3 full screen display.
Channel 4: Channel 4 full screen display.
CONTROL BUTTONS in the MENU MODE
Menu: Exit the MENU setup.
Select: Select items.
Up Arrow: Navigate up through menu options.

5
Right Arrow: R Navigate right through menu options.
Select items: Select items.
Down Arrow: Navigate down through menu options.
Left Arrow: Navigate left through menu options.
Select items: Select items.
CONTROL BUTTONS in the PLAY MODE
Menu: Enter the MENU MODE for the system setup.
Play: Play the video stream in normal speed.
Pause: Pause the playing.
Stop: Stop the playing, and go to the VIEW MODE.
Channels Switching: Channels Switching: Switch CH1→CH2→CH3→CH4 as full screen and press again to show the quad display.
No function.
Fast Forward: Playback fast forward.
No function.
Fast Reverse: Playback fast reverse.
D、REAR PANEL
1 POWER INPUT: DC8~28V.
2 4P POWER INPUT/OUTPUT: Power input/output. The power cable for car is attached.(providing overcurrent protection) and the cable supplies power to camera.
3 Air 10P connector: Support 4CH ALARM IN、Audio outpu/Input and Video Output.4 RS-232: RS-232 (Option).
5 Air 16P connector: Find the attached 1S air connector line to connect DVR and cameras of S connector.
6 VIDEO OUT: Video Output. 7 AUDIO IN: Audio Input. 8 AUDIO OUT: Audio Output. 9 VIDEO IN: Video Input.

6
E、OPERATING MANUAL 1、 Main Menu
2、 Camera Setup
(1) Channel:The diagram above shows Channel 1. (2) Display:Turn On/Off the camera signal (3) Brightness/Contrast/Hue/Saturation: Adjust brightness, contrast, hue, and
saturation of channel display. The center point is factory default.
3、 Record Setup
(1) Record Speed: Set the number of frame per second (fps). NTSC:default: 15 fps,maximum total frame: 60 fps. PAL :default: 12 fps,maximum total frame:50 fps.
(2) Record Quality:Choose video record quality: Highest, High, or Normal. (3) Event Rec Duration:5、10、15、20、25、30 seconds,default: 10 seconds. (4) Record Schedule Setup:
Press , to select items.
Press to enter.
Press MENU to exit.
Press to select items.
Press to enter.
Press MENU to exit.
Press to select items.
Press to enter.
Press MENU to exit.

7
Press to select left and right of time, Press to change rec. status,
Press to change all rec. status. Range: 0-24 hours. Set “White” for no recording. Set “red”for continuous recording. Set “green” for motion recording. Set “yellow” for sensor. Set “yellow + Green” for motion + sensor.
(5) Car No.:The number of car.
4、 Alarm Setup
(1) Alarm Duration:Set alarm duration when alarm is triggered. (2) Disable:Disable Alarm trigger. (3) N/Open:Alarm device is normal open mode. (4) N/Close:Alarm device is normal close mode.
5、 Motion Detection Setup
1、 Channel:Select the camera to setup (Default is CH1). 2、 Sensitivity:Set Off, or 1 to 4, default is Off. 3、 Alarm Duration:Set alarm duration when alarm is triggered by a moving object:
Off, 5, 10, 15, 20, 25, 30 seconds, or continuous. 4、 Motion Area:Select motion detection area. 5、 Smart Record:Default is disable. Set enable, system will start recording in
3fps when the motion detection is not triggered. When motion detection is triggered, the recording fps is according to user’s setup.
If you want to enable motion recording, please finish the setup procedure a and b.
a:Set SENSITIVITY level from 1 to 4 in Motion Detection Setup. b:Set MOTION RECORDING (Green) in Record Schedule Setup.
Press to select items.
Press to enter.
Press MENU to exit.
Press to select items.
Press to enter.
Press MENU to exit.

8
6、 Screen Setup
(1) Border: Turn On/Off,or show divided lines in quad mode. (2) Video Adjustment: Adjust the position of screen display shown. (3) Auto Switching: Set the duration of each channel: Off, 1 to 10 seconds.
7、 Audio Setup
(1) Channel:Select the channel that you want to record the audio. (2) Audio Record:On / Off. (3) Mute:On/Off. (4) Input Volume:Adjust input volume. (5) Output Volume:Adjust output volume.
8、 System Setup
(1) Hard Disk Setup
(1.1) Overwrite Enable: Enable overwrite when HDD capacity is full: Yes: When HDD overwrite is taking place, the data is stored in
duration of 4 hours per event and being recorded continuously. No: Stop recording
(1.2) Format HDD: When choose this item, DVR will request for 6 numbers
Press to select items.
Press to enter.
Press MENU to exit.
Press to select items.
Press to enter.
Press MENU to exit.
Press to select items.
Press to enter.
Press MENU to exit.

9
password. If the password is accepted, the DVR will start formatting the HDD. A message, “wrong password" would appear in the screen when the password is entered incorrectly.
(1.3) HDD Status Indicates current HDD status, including total capacity and percentage of space being used.
* Factory default password setting: 111111 * The HDD must be formatted when first time in use.
(2) Password Change:Password Setup
When current password is entered incorrectly, a message, “Wrong
Password" will appear in the screen. Factory default Password Setting: 111111.
(3) Time Set
(3.1) Time Set:YYYY/MM/DD HH:MM:SS (3.2) Apply:Update and save all changes.
(4) Event List
(4.1)Playback by searching an event from event list. (4.2)TIME:Each event is recorded and listed every 4 hours automatically. (4.3)MOTION:Motion event list.
Current Password:______ New Password :_________ Confirm Password:_______

10
(5) Password Check On/Off : System requests or don’t request password for entering menu setup.
(6) Buzzer Alarm On/Off : Video Loss (Motion detected) Buzzer alarms or don’t alarm.
(7) F/W Upgrade
Please save updated firmware on a USB flash drive. Stick it into USB port. The screen will show both current version and new version of firmware.
When update is in progress, please DO NOT operate the unit or remove the USB flash drive to prevent malfunction or system error. After it is completed, turn off and restart the unit.
There must have a hard drive to store new firmware. Be sure a hard drive must be installed.
9、 Time Search
(1) Set Search of time, then press "play" button to start playback. (2) Playback:
Press button for fast forward. Press one more time for faster speed.
Total three variable speeds. Press button for fast reverse. Press one more time for faster speed and total three variable speeds.
Press button to pause. Press button to stop playback.
10、 Language Select a language.
11、 Exit
(1) Exit & Save Changes:Save all setting and exit menu. (2) Exit without saving:Exit without saving changes. (3) Load Setup Default: Load factory default setup

11
F、RECORDING PROCEDURE 1、 When DVR is recording by time, motion or sensor, the mark
will be shown on the up right corner of each channel on screen.
2、 When DVR is recording and system is in live model, if no any operation with keys within 5 minutes, all keys will be locked and there will be a letter L showed on the left-down corner. To unlock the keys, Press for 5 times.
Remark: If record is setup in the system, keys will be locked after booting up
the DVR.
G、4-CH CONTINOUS RECORDING HOURS ON SATA
400GB HDD The chart of estimated record time listed below is for reference only. The length of time recorded can be varied duo to variation in image size may be somewhat different.
Recording Results in NTSC Standard
Video Standard Video Quality 60fps 30fps 15fps 1fps
Highest 50 Hrs 100 Hrs 200 Hrs 3,000 Hrs
High 80 Hrs 160 Hrs 320 Hrs 4,800 HrsNTSC
Normal 105 Hrs 210 Hrs 420 Hrs 6,300 Hrs
Recording Results in PAL Standard
Video Standard Video Quality 50fps 25fps 12fps 1fps
Highest 45 Hrs 90 Hrs 180 Hrs 2,250 Hrs
High 75 Hrs 150 Hrs 300 Hrs 3,750 HrsPAL
Normal 100 Hrs 200 Hrs 400 Hrs 5,000 Hrs
H、DVR VIEWER USER GUIDE 1、 Playback Recorded File
12
(1.1) Execute VVF Player. (1.2) Playback : Click the right button of mouse control, select ”Auto play”. System
will choose the HDD for DVR automatically, and then press “Play” for playback.
(1.3) Playback : Click the right button of mouse control. Select “Open Disk” and choose HDD, PLEASE CHOOSE THE HDD FOR DVR, NOT HDD FOR PC. If it is wrongly chosen, player won’t work and the data in the HDD won’t be damaged.
Remark:It will take some time to examine the data in the HDD by the Player, please wait. The number on the right side of time is Car No. (For example : ZZZ00000)
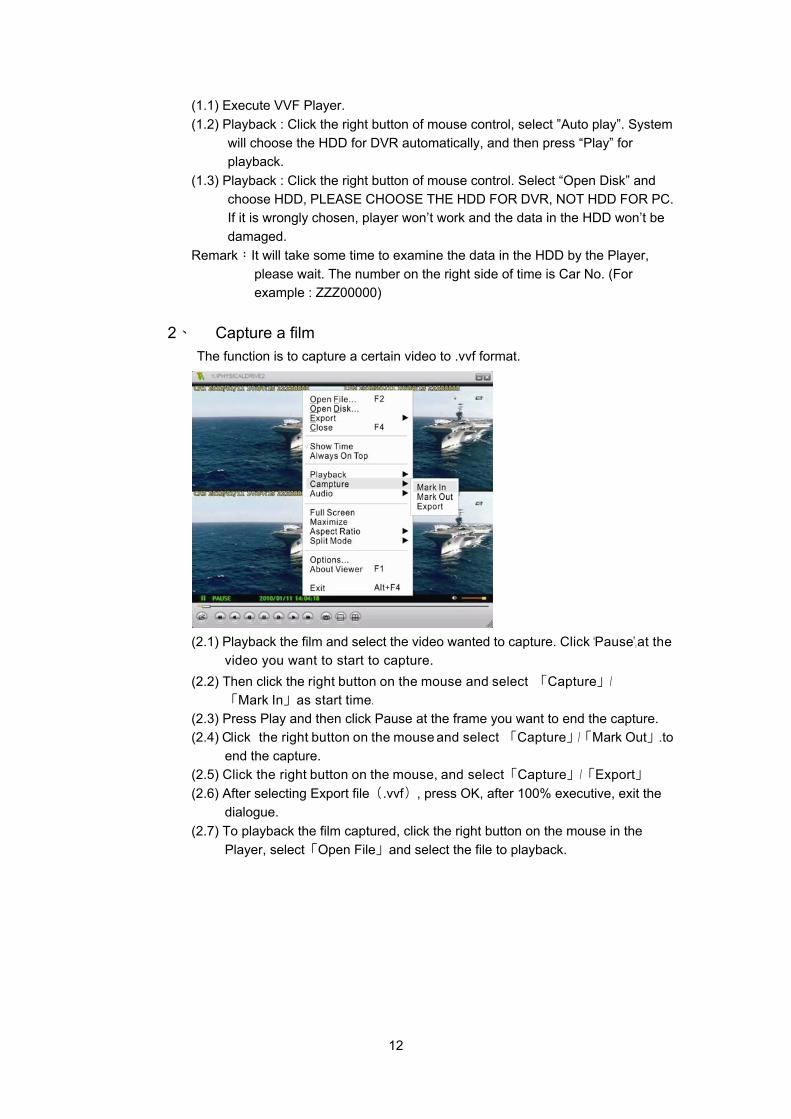
2、 Capture a film The function is to capture a certain video to .vvf format.
(2.1) Playback the film and select the video wanted to capture. Click “Pause”, at the
video you want to start to capture. (2.2) Then click the right button on the mouse and select 「Capture」/
「Mark In」as start time. (2.3) Press Play and then click Pause at the frame you want to end the capture. (2.4) Click the right button on the mouse and select 「Capture」/「Mark Out」.to
end the capture. (2.5) Click the right button on the mouse, and select「Capture」/「Export」 (2.6) After selecting Export file(.vvf), press OK, after 100% executive, exit the
dialogue. (2.7) To playback the film captured, click the right button on the mouse in the
Player, select「Open File」and select the file to playback.

13
3、 Convert File to AVI Format
(3.1) Click the right button on the mouse, and select「Export」/「AVI」 (3.2) Set Input/Output File 、Compression、Export Channel and Audio. (3.3) Click “OK” to start converting file to AVI format. (3.4) It can’t be used to convert file in the HDD to AVI format directly. For the
function, please refer to 2. Capture a file (above).
4、 Options
(4.1) Always on top:Screen always keeps on top.
(4.2) Use DirectDraw:DirectDraw, a part of Microsoft's DirectX is used to
rendergraphics in applications where top performance is important.
(4.3) Show playback time.
(4.4) Repeat playback.
(4.5) On screen display date/time format.
(4.6) Path for still capture:The film path where the pictures (captures) are saved in
your computer.