Embed Size (px)
Citation preview
P r o p h e t S t o r
ProphetStor Federator
Runbook for Mirantis FUEL 4.1 Revision 078282014
ProphetStor

Federator Installation and Configuration Guide V1 1
ProphetStor Federator
Figure ................................................................................................................................................................................... 2
Table ..................................................................................................................................................................................... 2
Copyright & Legal Trademark Notices ..................................................................................................................... 3
Preface ................................................................................................................................................................................. 3
Target Audiences ............................................................................................................................................................. 3
Document History ............................................................................................................................................................ 3
Introduction ....................................................................................................................................................................... 4
Deployment Modes ................................................................................................................................................................................... 4
Hardware Requirements............................................................................................................................................... 6
FUEL Server ................................................................................................................................................................................................. 6
Federator ...................................................................................................................................................................................................... 6
Flexvisor Storage Hypervisor .............................................................................................................................................................. 6
Management Browsers ........................................................................................................................................................................... 7
Additional Resources ............................................................................................................................................................................... 7
Storage Network ....................................................................................................................................................................................... 7
In a Standalone Deployment ................................................................................................................................................ 7
In a Deployment with OpenStack ...................................................................................................................................... 8
Installation ......................................................................................................................................................................... 9
Create FUEL Server ................................................................................................................................................................. 9
Boot up all deploy nodes ..................................................................................................................................................... 10
Design a Cloud Environment ............................................................................................................................................. 10
Deploy the Cloud Environment ........................................................................................................................................ 15
Delete the Cloud Environment.......................................................................................................................................... 20
Activating Trial or Purchased License .................................................................................................................. 21
References ....................................................................................................................................................................... 21
ProphetStor Flexvisor .......................................................................................................................................................................... 23
Preparation for Pool Import & Provisioning .............................................................................................................. 23
NetApp (FAS series) .............................................................................................................................................................................. 23
Preparation for Discovery & Register ............................................................................................................................ 23
Preparation for Pool Import & Provisioning .............................................................................................................. 25
Nexenta ....................................................................................................................................................................................................... 30
Preparation for Discovery & Register ............................................................................................................................ 30
Preparation for Pool Import & Provisioning .............................................................................................................. 31
FalconStor ................................................................................................................................................................................................. 34
Preparation for Discovery .................................................................................................................................................. 34
2 Federator Installation and Configuration Guide
ProphetStor Federator @Copyright 2014
Figure Figure 1: Management and Storage Networks .........................................................................................8 Figure 2: OpenStack network setup example with FUEL ........................................................................9 Figure 3: Boot up nodes to deploy .........................................................................................................10
Figure 4. Name and Release...................................................................................................................11 Figure 5. Deployment Mode ..................................................................................................................11
Figure 6. Compute Mode .......................................................................................................................12 Figure 7. Network Mode ........................................................................................................................12 Figure 8. Storage Backend Mode ...........................................................................................................13
Figure 9. Additional service ...................................................................................................................13 Figure 10. Finish to create Environment ................................................................................................14
Figure 11. Networks settings .................................................................................................................15 Figure 12. Settings .................................................................................................................................16 Figure 13. Assign Roles .........................................................................................................................17
Figure 14. Configure Interface ...............................................................................................................19 Figure 15. Deploy changes .....................................................................................................................19
Figure 16. Access Portal ........................................................................................................................20 Figure 17. Access Portal ........................................................................................................................20 Figure 18. Steps to obtain license for Federator ....................................................................................21
Figure 19. Operation Flow. ....................................................................................................................22 Figure 20. Network setup for NetApp ....................................................................................................25
Figure 21. Create Aggregate for NetApp ...............................................................................................26 Figure 22. Create FlexVol for NetApp .................................................................................................27
Figure 23. Setup Storage interface for NetApp ......................................................................................28 Figure 24. Create VIF for NetApp .........................................................................................................30 Figure 25. Setup appliance init for Nexenta ...........................................................................................31
Figure 26. Create Volume for Nexenta ..................................................................................................33 Figure 27. Create TPG for Nexenta .......................................................................................................34
Figure 28. Setup network configuration for FalconStor ........................................................................35 Figure 29. Create Storage Pool for FalconStor ......................................................................................36 Figure 30. Setup Default Portal for FalconStor......................................................................................37
Table Table 1. Minimum requirements for FUEL Server .................................................................................6 Table 2. Minimum requirements for Federator .......................................................................................6 Table 3. Minimum requirements for Flexvisor ........................................................................................7
Table 4. Browser Support for Federator Dashboard ................................................................................7 Table 5. OpenStack network setup sample with FUEL ...........................................................................8
Table 6. Role Policy ...............................................................................................................................17 Table 7. Deployment Policy ...................................................................................................................19 Table 8. Array and protocol support list ................................................................................................23
Table 9. Connection information for NetApp ........................................................................................24 Table 10. Comparison list For NetAppPP ..............................................................................................25
Table 11. Connection information for Nexenta .....................................................................................30 Table 12. Comparison list for Nexenta ..................................................................................................32 Table 13. Connection information for FalconStor .................................................................................34
Table14. Comparison list for FalconStor ...............................................................................................35
Federator Installation and Configuration Guide V1 3
ProphetStor Federator
Copyright & Legal Trademark Notices
FUEL® is a trademark of Mirantis.
IPStor® is a trademark of FalconStor.
Nexenta® is a trademark of Nexanta.
OpenStack® is a trademark of OpenStack consortium.
ProphetStor Federator and Flexvisor are registered trademarks of ProphetStor Data Services, Inc.
Preface This document provides instructions on how to install and configure ProphetStor Federator to manage
heterogeneous storage arrays such as NetApp, FalconStor IPStor, Nexenta, or ProphetStor Flexvisor to work in standalone mode or to work with virtualization environments such as OpenStack.
Target Audiences This document is intended for storage managers/architects or OpenStack administrators, with interests in
Cinder specific storage. Readers are assumed to have relevant knowledge or experience about TCP/IP network, storage arrays and concepts about OpenStack deployment and its block storage, Cinder.
Document History The following table lists the revisions of this document
Revision Date Description
31th March, 2014 Release 2.0
16th July, 2014 Revised to serve as a runbook for Mirantis
20th July, 2014 Minor revision with feedback
Introduction Federator is a Software-Defined Storage controller that simplifies and automates storage management in data centers, most Cloud Computing environments, or Big Data environments. Federator provides storage discovery, abstraction, pooling, offering, self-provisioning, metering and monitoring. It is designed to provide
agile and elastic storage to let storage managers and architects harness the full potential of their storage investments. Federator is a storage orchestration technology that discovers both enterprise storage arrays and scale-out storage such as CEPH. It recognizes multiple heterogeneous storage arrays, classifies storage arrays into pools by characteristics, and offers a user friendly browser console for storage management, usage metering
and monitoring, security management, and data migration. Federator also comes with a rich set of Restful APIs that enable development of automated enterprise data services to meet diversified storage challenges in both Cloud Computing and in the emerging Big Data industry. The Software-Defined Storage features Federator provides:
• Automatic discovery of storage systems, and abstraction of physical resources into virtual pools • Supports enterprise storage arrays and commodity scale-out storage such as CEPH • Classification of storage pools by their capabilities such as performance, latency, protection, etc. • Self-provisioning storage upon request • Policy based automatic storage provisioning
• Supports SMI-S and CDMI industry standard management protocols • Supports block and file storage through iSCSI, FC, NFS, and CIFS protocols* • Open HTTP REST API’s to enable development of customized data services • Built for OpenStack, enabling storage services with unified management for storage systems
Note *: Ahwahnee Release supports iSCSI block storage only.
Deployment Modes
Federator can be deployed in a standalone environment to manage storage in data centers or IT back offices. Federator delivers storage to all physical or virtual hosts that support FC or iSCSI. A user requests desired storage through a Federator User Dashboard.
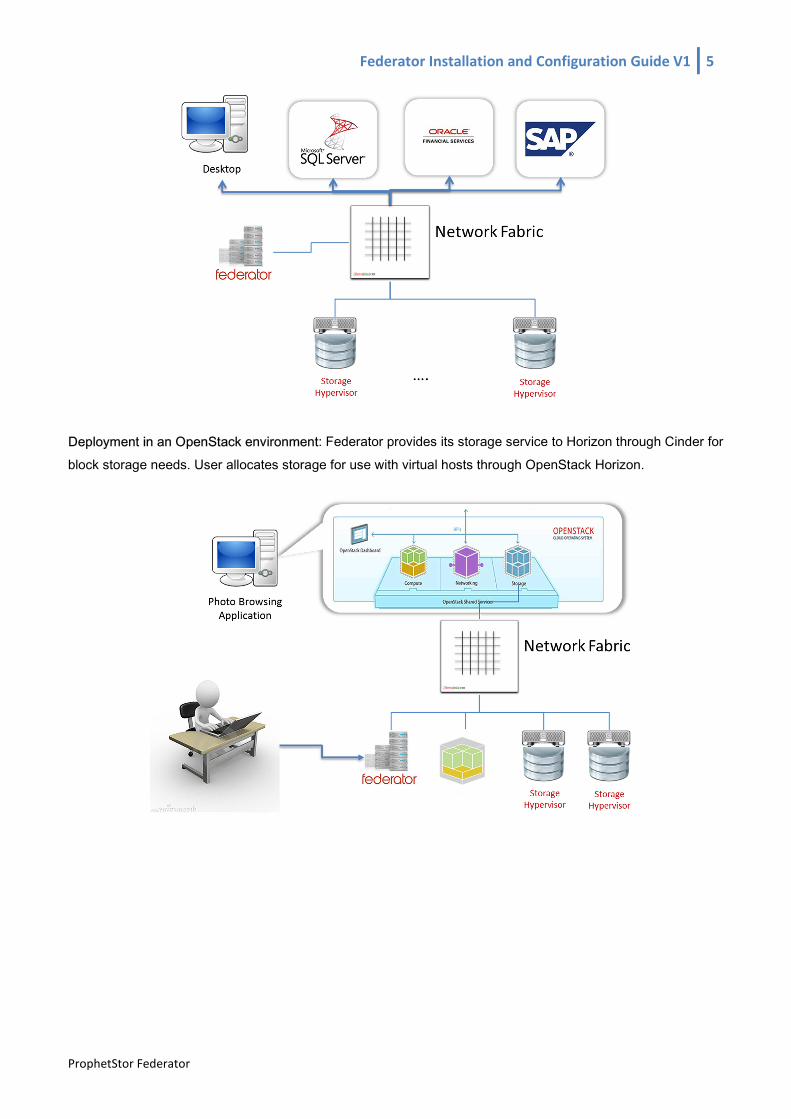
Federator Installation and Configuration Guide V1 5
ProphetStor Federator
Deployment in an OpenStack environment: Federator provides its storage service to Horizon through Cinder for block storage needs. User allocates storage for use with virtual hosts through OpenStack Horizon.
Hardware Requirements
FUEL Server
Mirantis FUEL is an OpenStack deployment tool that manages the deployment of OpenStack over hundreds of bare metal machines. Federator and Flexvisor deployments are deeply integrated with FUEL to provide two
modes of deployment, i.e. the standalone mode and the OpenStack mode. In OpenStack mode, Federator provisions its storage through cinder interface and serves volume requests from Horizon. It is tightly integrated with OpenStack seamlessly. The standalone mode puts Federator in an enterprise environment and provisions storage to both bare metal or virtual hosts with iSCSI or FC interface regardless it is OpenStack, VMware or HyperV.
Table 1. Minimum requirements for FUEL Server
Minimum Recommended
CPU Xeon E5-2600 x 1 Xeon E5-2600 x 2
Memory 2GB 4GB or more
Disk 50GB 128GB or more
Network controllers 2 2
Federator
ProphetStor Federator is a Software-Defined Storage controller that provides agile, elastic and scale-out storage orchestration for ever-growing data centers. Table 2. Minimum requirements for Federator
Minimum Recommended
CPU Xeon E5-2600 x 1 Xeon E5-2600 x 2
Memory 4GB 8GB or more
Disk 50GB 50GB or more
Network Card(s) 2 2 +
OS Ubuntu 12.04LTS 64Bit Ubuntu 12.04LTS 64Bit
* Currently Federator supports all storage systems listed in Table 8. Array and Protocol support list
Flexvisor Storage Hypervisor
ProphetStor Flexvisor is a storage hypervisor that turns commodity x86 servers into storage servers and offers
enterprise grade storage services such as snapshots, recovery, replication, compression, encryption, replication, deduplication and various data protection schemes, etc.
Federator Installation and Configuration Guide V1 7
ProphetStor Federator
Table 3. Minimum requirements for Flexvisor
Minimum Recommended
CPU Xeon E5-2600 x 1 Xeon E5-2600 x 2
Memory 2GB 4GB or more
Disk 1x 20GB(for OS), 1x 20GB(for data) 20GB(for OS), more disks(for data)
Network controllers 2 2 +
OS Ubuntu 12.04LTS 64Bit Ubuntu 12.04LTS 64Bit
Management Browsers
Table 4. Browser Support for Federator Dashboard
Browers Support Versions
Google Chrome > 31.0.1650.57
Firefox > 25.0.1
Microsoft IE 11
Additional Resources
OpenStack is a Cloud Management System that manages pools of compute, storage, and networking
resources. Users can use “Hardware Bill of Materials Calculator ” to determine how much hardware is needed for a OpenStack cloud and compare different configurations aggregating equipment from a range of vendors..
Storage Network
In a Standalone Deployment
In most IP based storage systems, two types of network should be considered: the management network and the storage network.
• Management Network: Most users can configure storage systems via this network interface using a web browser or CLI. Some storage systems, however, have multiple management networks. Federator
needs to connect to the storage system via the REST API, CDMI, SMI-S or any other way that Federator supports to create, abstract and offer storage.
• Storage Network: This is the data path through which most storage systems provide a file, block or object storage device.
8 Federator Installation and Configuration Guide
ProphetStor Federator @Copyright 2014
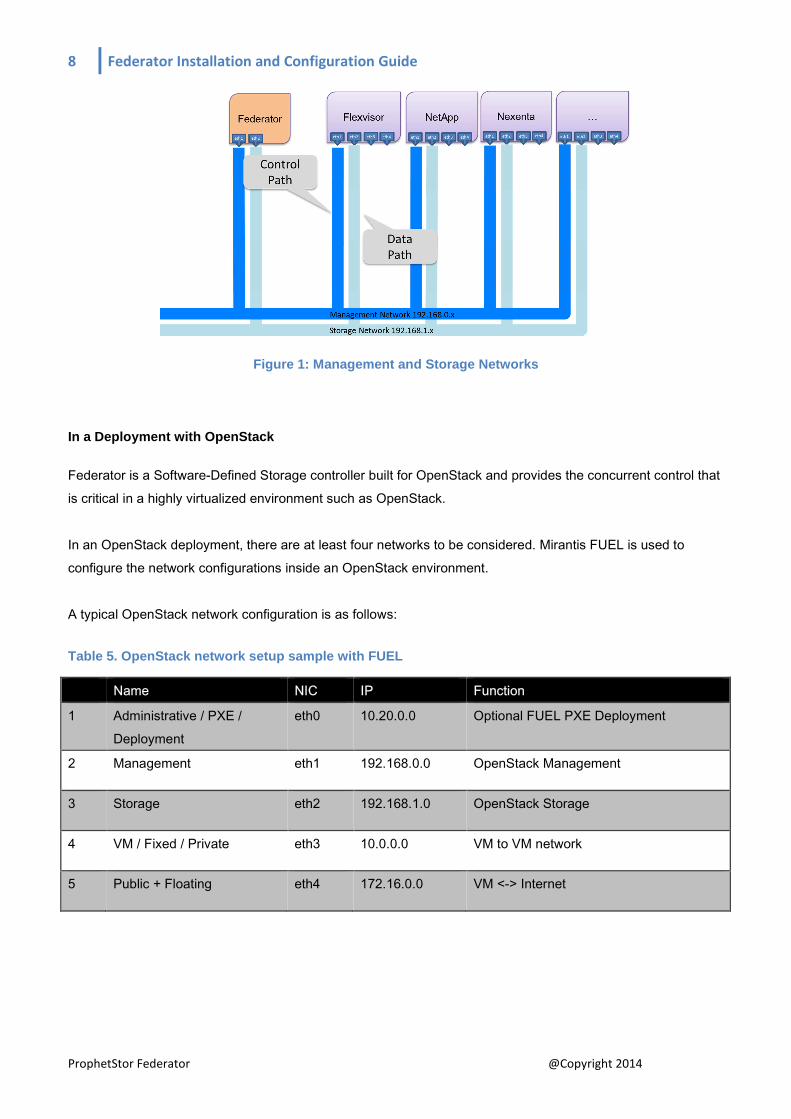
Figure 1: Management and Storage Networks
In a Deployment with OpenStack
Federator is a Software-Defined Storage controller built for OpenStack and provides the concurrent control that is critical in a highly virtualized environment such as OpenStack.
In an OpenStack deployment, there are at least four networks to be considered. Mirantis FUEL is used to configure the network configurations inside an OpenStack environment. A typical OpenStack network configuration is as follows:
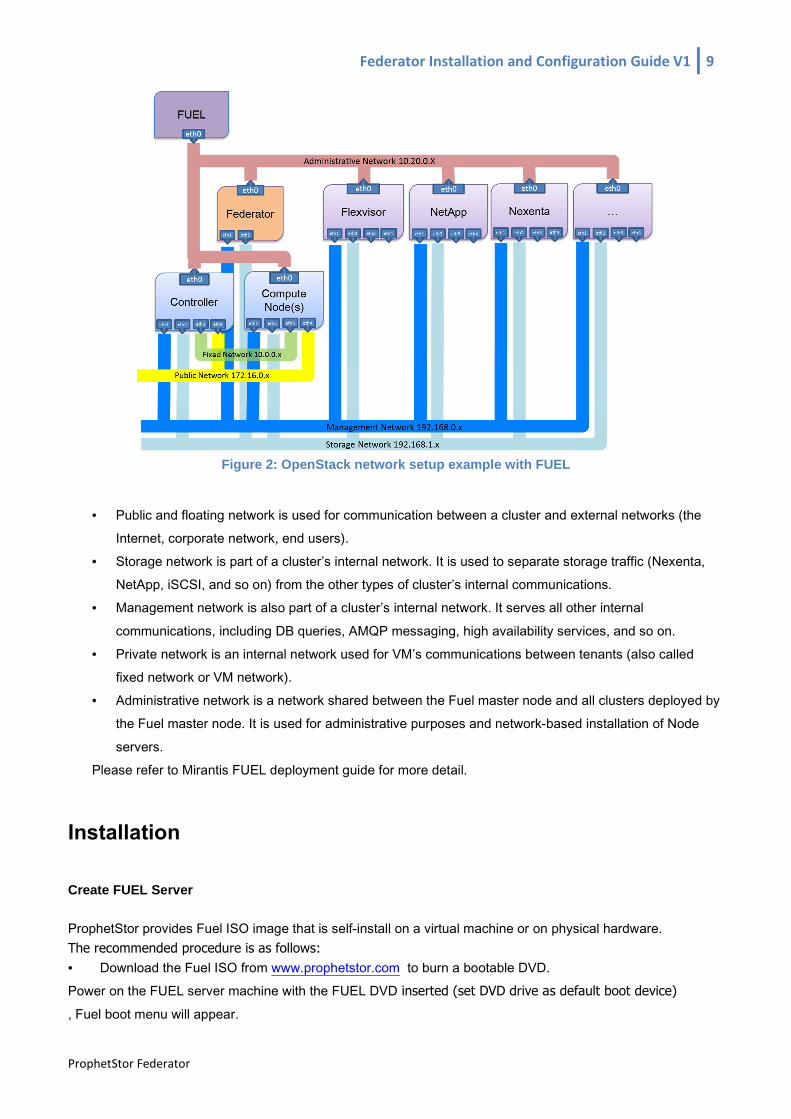
Table 5. OpenStack network setup sample with FUEL
Name NIC IP Function
1 Administrative / PXE / Deployment
eth0 10.20.0.0 Optional FUEL PXE Deployment
2 Management eth1 192.168.0.0 OpenStack Management
3 Storage eth2 192.168.1.0 OpenStack Storage
4 VM / Fixed / Private eth3 10.0.0.0 VM to VM network
5 Public + Floating eth4 172.16.0.0 VM <-> Internet
Federator Installation and Configuration Guide V1 9
ProphetStor Federator
Figure 2: OpenStack network setup example with FUEL
• Public and floating network is used for communication between a cluster and external networks (the Internet, corporate network, end users).
• Storage network is part of a cluster’s internal network. It is used to separate storage traffic (Nexenta, NetApp, iSCSI, and so on) from the other types of cluster’s internal communications.
• Management network is also part of a cluster’s internal network. It serves all other internal
communications, including DB queries, AMQP messaging, high availability services, and so on. • Private network is an internal network used for VM’s communications between tenants (also called
fixed network or VM network). • Administrative network is a network shared between the Fuel master node and all clusters deployed by
the Fuel master node. It is used for administrative purposes and network-based installation of Node
servers. Please refer to Mirantis FUEL deployment guide for more detail.
Installation
Create FUEL Server
ProphetStor provides Fuel ISO image that is self-install on a virtual machine or on physical hardware. The recommended procedure is as follows: • Download the Fuel ISO from www.prophetstor.com to burn a bootable DVD. Power on the FUEL server machine with the FUEL DVD inserted (set DVD drive as default boot device)
, Fuel boot menu will appear.
10 Federator Installation and Configuration Guide
ProphetStor Federator @Copyright 2014
• After Fuel completes the installation, point your browser to the default Fuel UI URL: http://10.20.0.2:8000. • If you wish to modify the network configuration, etc. , you can use “fuelmenu” to modify the network
configuration then point your browser to the IP address and port number that you specified. In the VMware network configuration, it uses host only connection to isolate the FUEL deployment from rest of company network for protection. If it is deployed in a physical network environment, the fuelmenu could be accessed from another machine have access to the 10.20.0.x network.
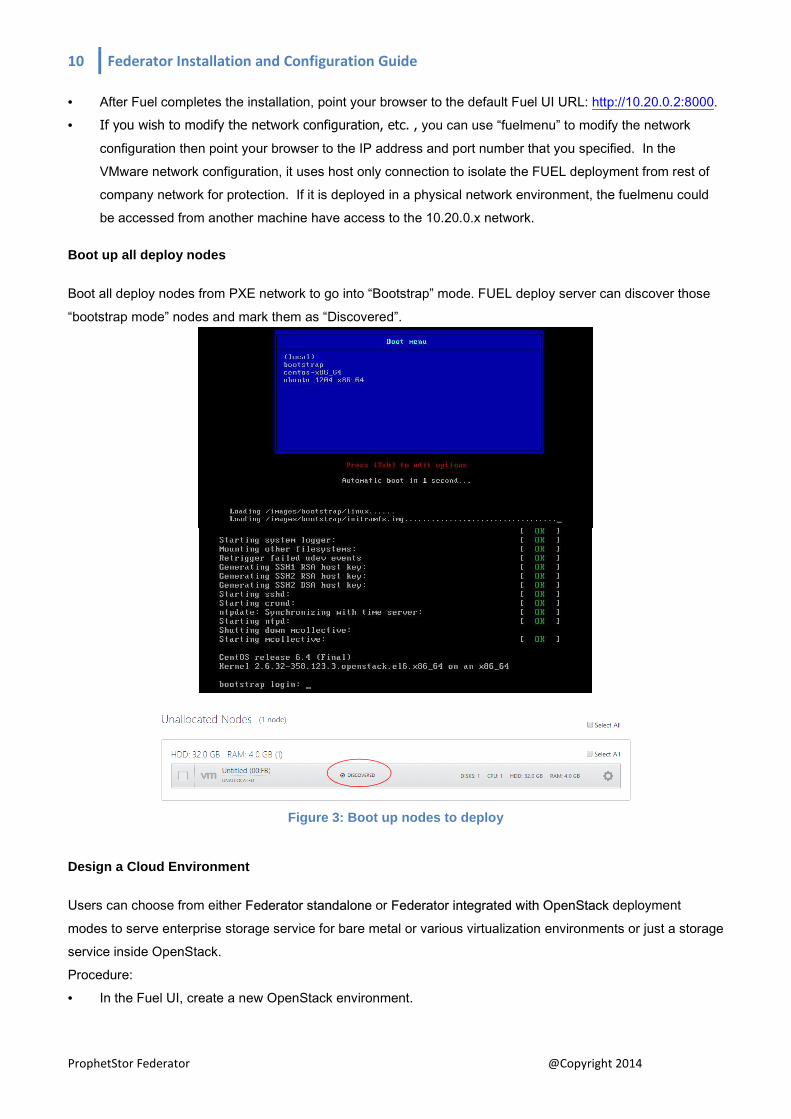
Boot up all deploy nodes
Boot all deploy nodes from PXE network to go into “Bootstrap” mode. FUEL deploy server can discover those
“bootstrap mode” nodes and mark them as “Discovered”.
Figure 3: Boot up nodes to deploy
Design a Cloud Environment
Users can choose from either Federator standalone or Federator integrated with OpenStack deployment
modes to serve enterprise storage service for bare metal or various virtualization environments or just a storage service inside OpenStack. Procedure: • In the Fuel UI, create a new OpenStack environment.
Federator Installation and Configuration Guide V1 11
ProphetStor Federator
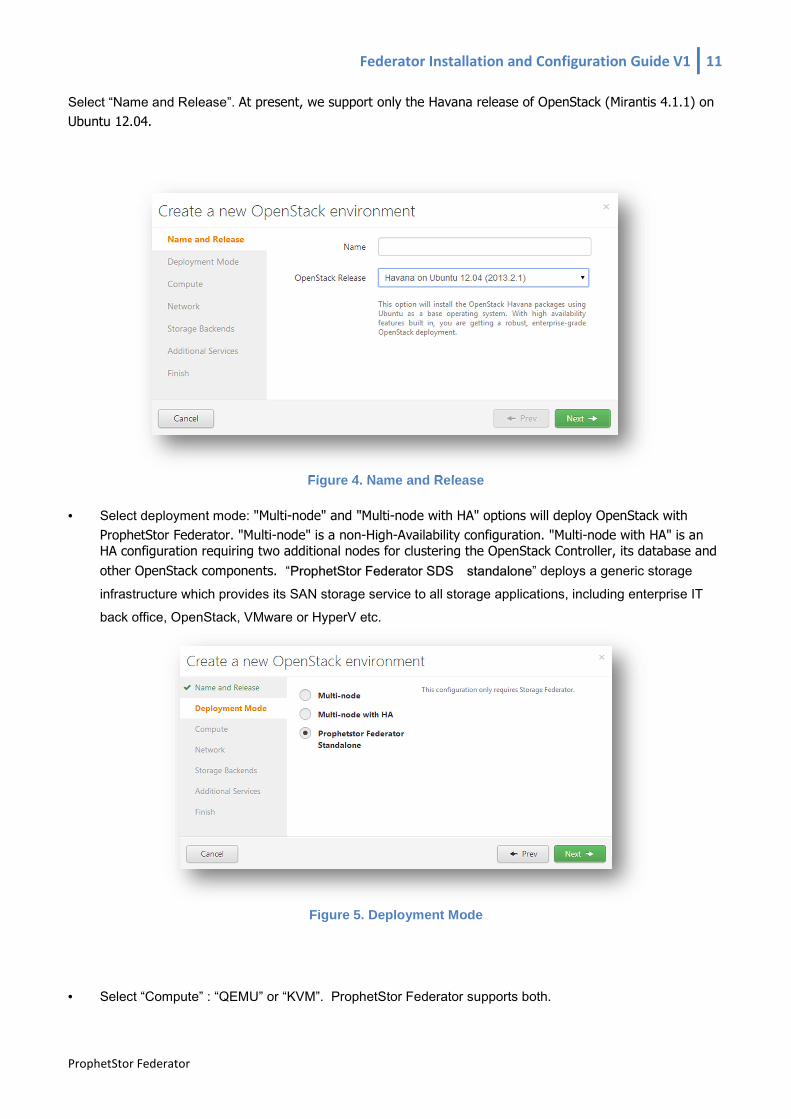
Select “Name and Release”. At present, we support only the Havana release of OpenStack (Mirantis 4.1.1) on
Ubuntu 12.04.
Figure 4. Name and Release
• Select deployment mode: "Multi-node" and "Multi-node with HA" options will deploy OpenStack with
ProphetStor Federator. "Multi-node" is a non-High-Availability configuration. "Multi-node with HA" is an HA configuration requiring two additional nodes for clustering the OpenStack Controller, its database and
other OpenStack components. “ProphetStor Federator SDS standalone” deploys a generic storage infrastructure which provides its SAN storage service to all storage applications, including enterprise IT back office, OpenStack, VMware or HyperV etc.
Figure 5. Deployment Mode
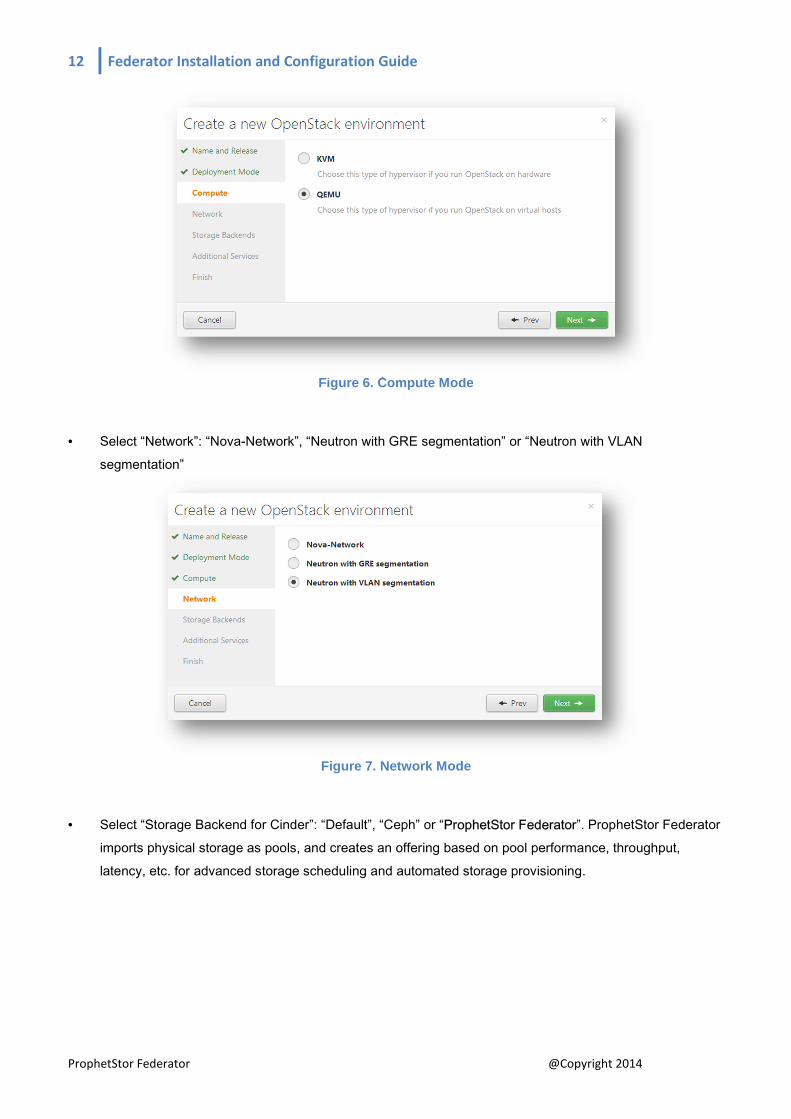
• Select “Compute” : “QEMU” or “KVM”. ProphetStor Federator supports both.
12 Federator Installation and Configuration Guide
ProphetStor Federator @Copyright 2014
Figure 6. Compute Mode
• Select “Network”: “Nova-Network”, “Neutron with GRE segmentation” or “Neutron with VLAN segmentation”
Figure 7. Network Mode
• Select “Storage Backend for Cinder”: “Default”, “Ceph” or “ProphetStor Federator”. ProphetStor Federator
imports physical storage as pools, and creates an offering based on pool performance, throughput, latency, etc. for advanced storage scheduling and automated storage provisioning.
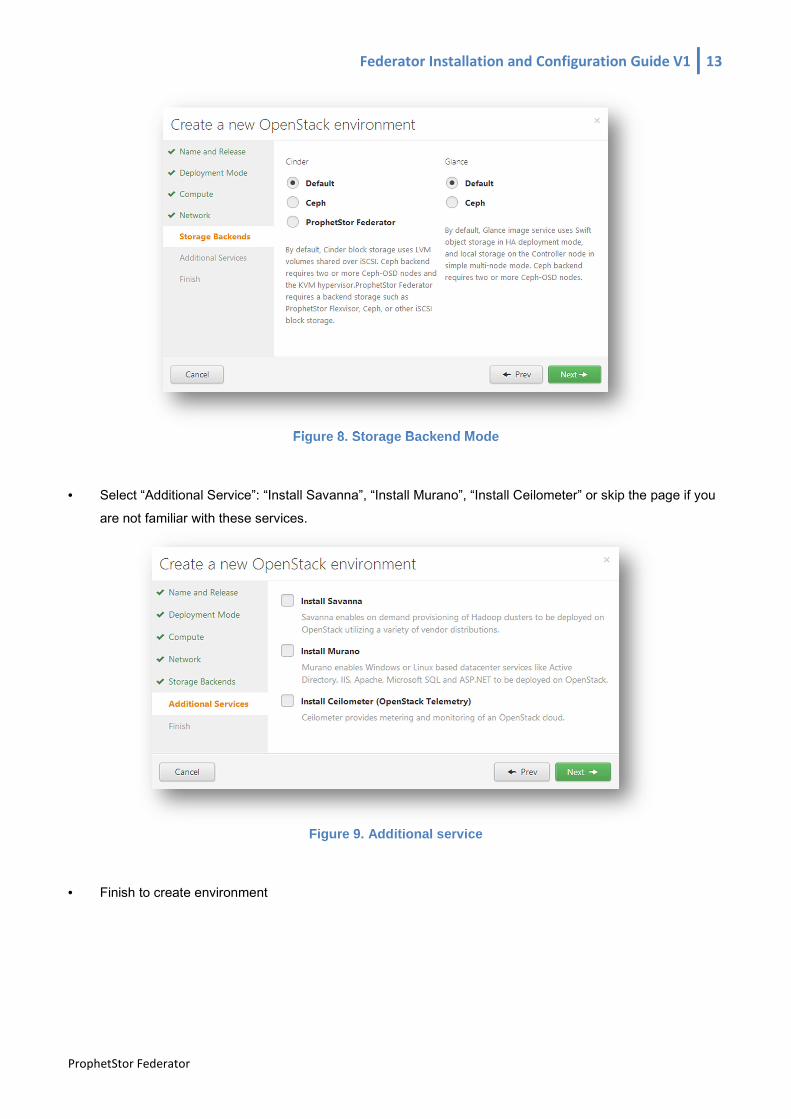
Federator Installation and Configuration Guide V1 13
ProphetStor Federator
Figure 8. Storage Backend Mode
• Select “Additional Service”: “Install Savanna”, “Install Murano”, “Install Ceilometer” or skip the page if you
are not familiar with these services.
Figure 9. Additional service
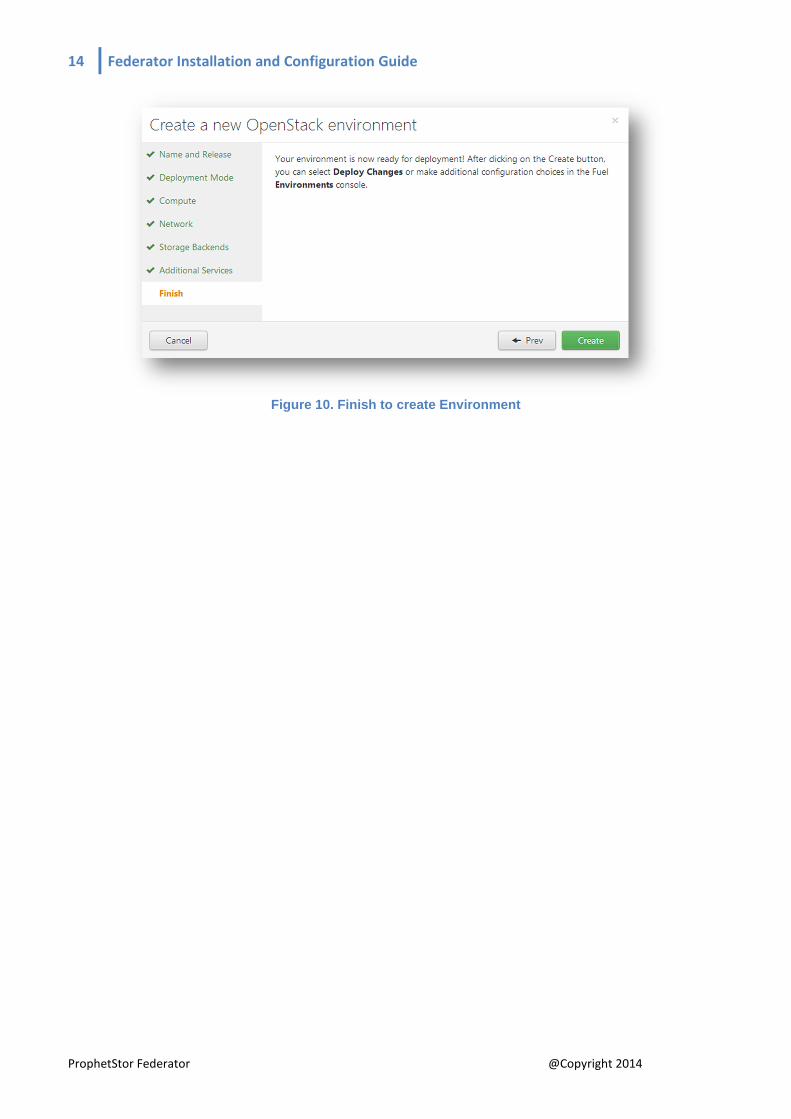
• Finish to create environment
14 Federator Installation and Configuration Guide
ProphetStor Federator @Copyright 2014
Figure 10. Finish to create Environment
Federator Installation and Configuration Guide V1 15
ProphetStor Federator
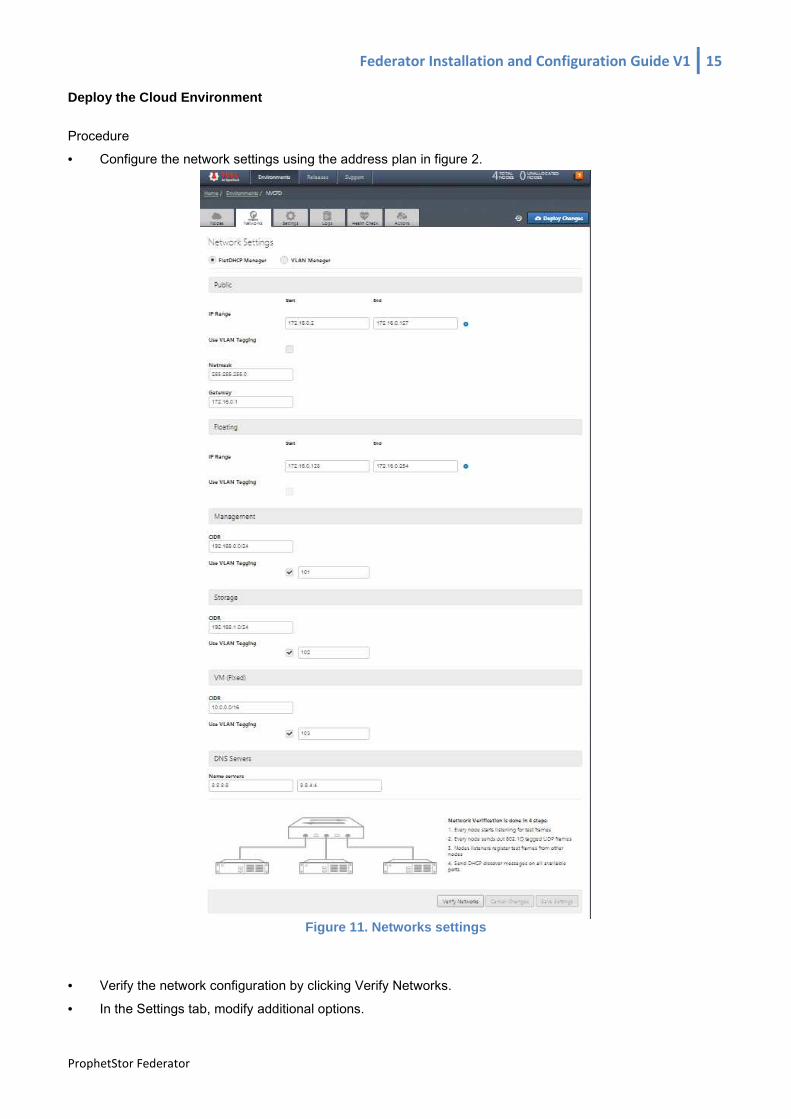
Deploy the Cloud Environment
Procedure • Configure the network settings using the address plan in figure 2.
Figure 11. Networks settings
• Verify the network configuration by clicking Verify Networks.
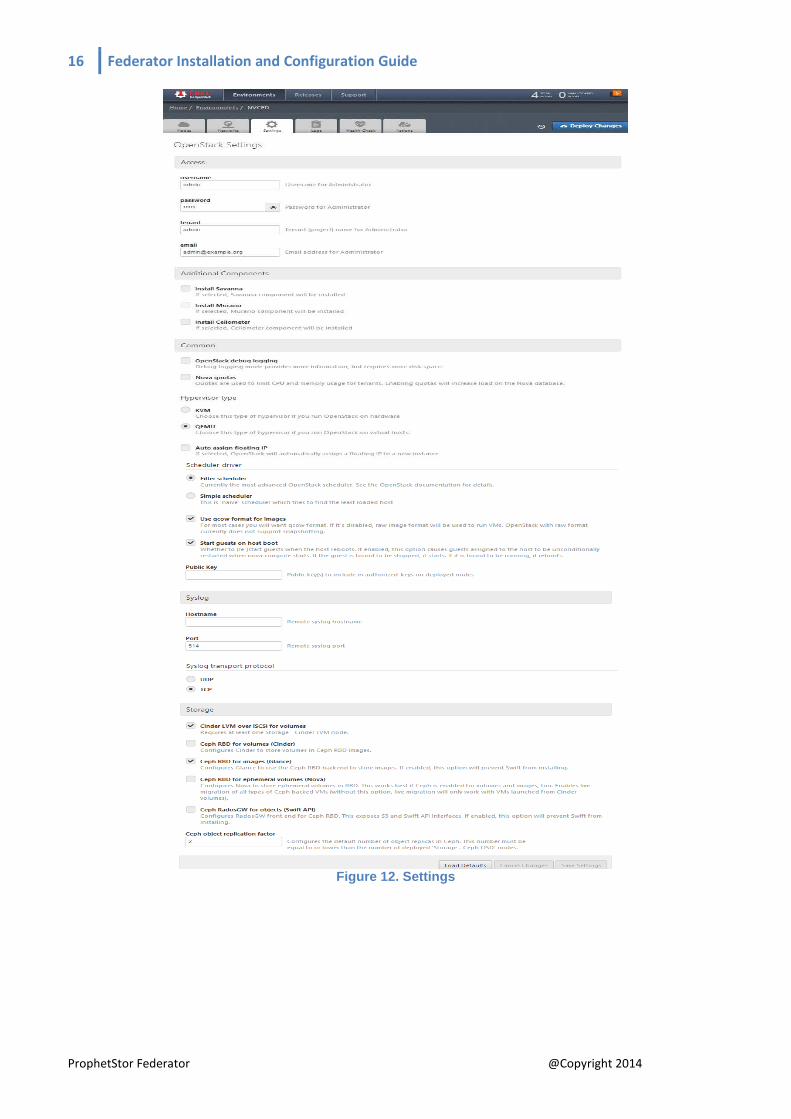
• In the Settings tab, modify additional options.
16 Federator Installation and Configuration Guide
ProphetStor Federator @Copyright 2014
Figure 12. Settings
Federator Installation and Configuration Guide V1 17
ProphetStor Federator
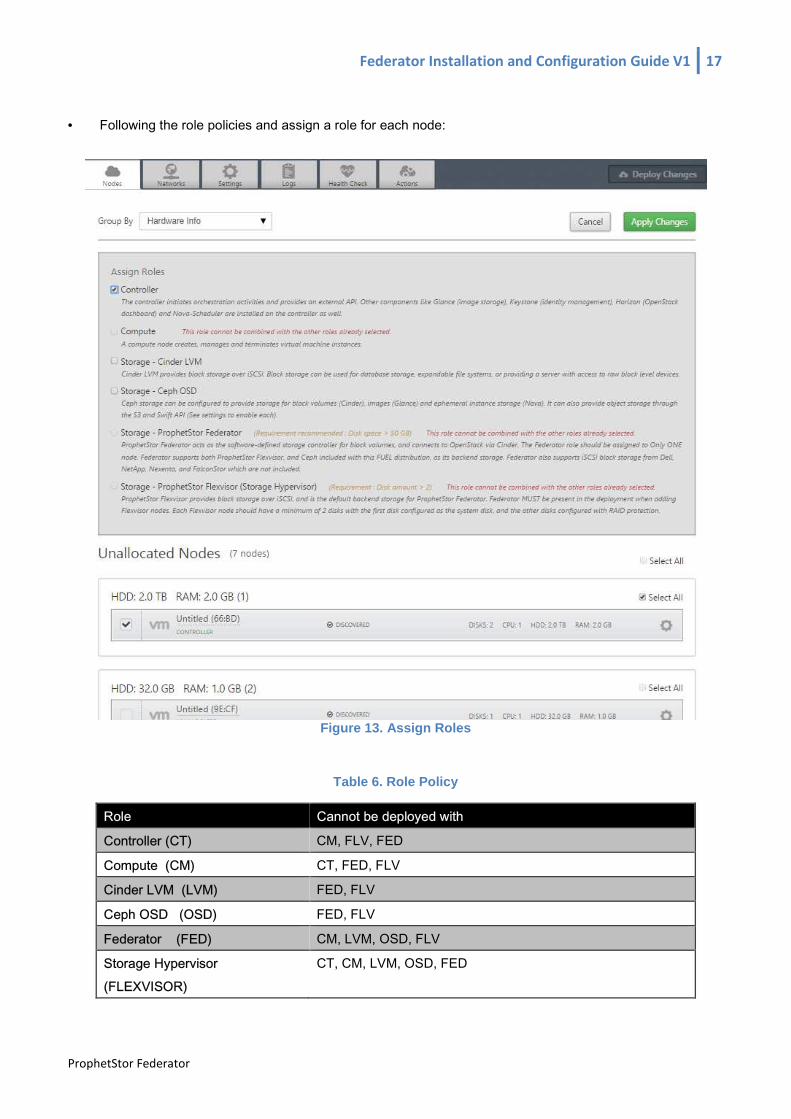
• Following the role policies and assign a role for each node:
Figure 13. Assign Roles
Table 6. Role Policy
Role Cannot be deployed with
Controller (CT) CM, FLV, FED
Compute (CM) CT, FED, FLV
Cinder LVM (LVM) FED, FLV
Ceph OSD (OSD) FED, FLV
Federator (FED) CM, LVM, OSD, FLV
Storage Hypervisor (FLEXVISOR)
CT, CM, LVM, OSD, FED

18 Federator Installation and Configuration Guide
ProphetStor Federator @Copyright 2014
Federator Installation and Configuration Guide V1 19
ProphetStor Federator
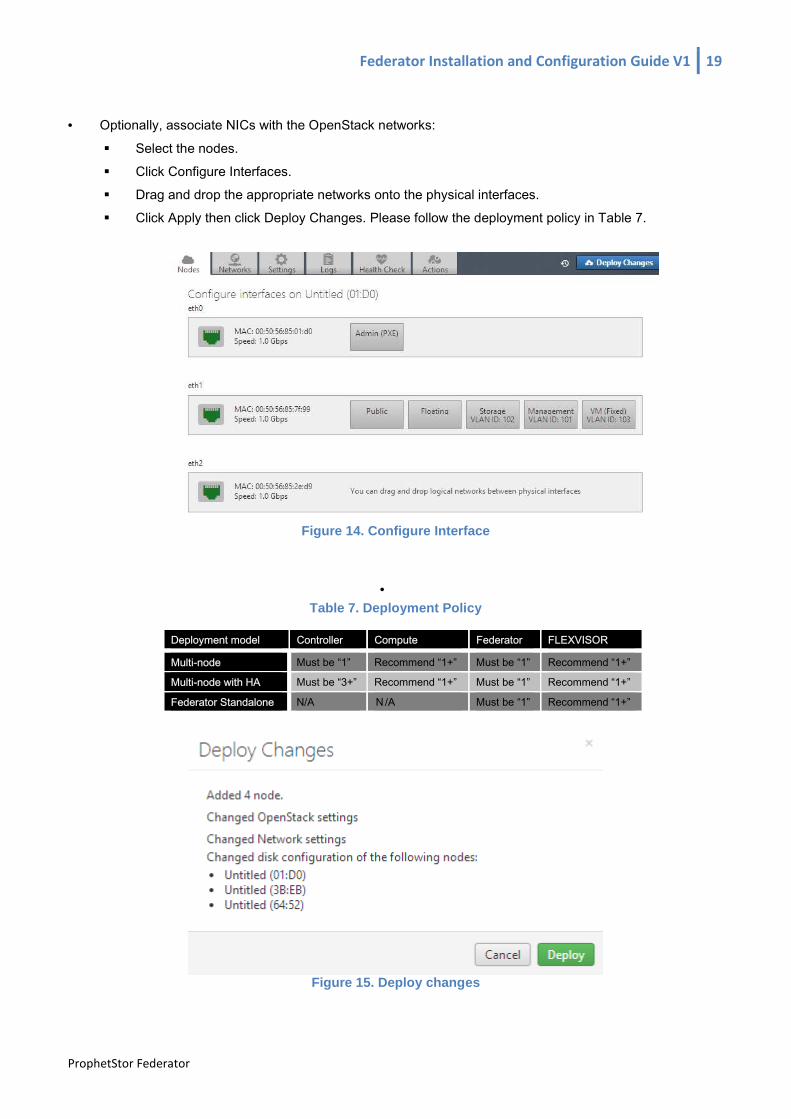
• Optionally, associate NICs with the OpenStack networks:
� Select the nodes. � Click Configure Interfaces. � Drag and drop the appropriate networks onto the physical interfaces. � Click Apply then click Deploy Changes. Please follow the deployment policy in Table 7.
Figure 14. Configure Interface
•
Table 7. Deployment Policy
Deployment model Controller Compute Federator FLEXVISOR
Multi-node Must be “1” Recommend “1+” Must be “1” Recommend “1+”
Multi-node with HA Must be “3+” Recommend “1+” Must be “1” Recommend “1+”
Federator Standalone N/A N/A Must be “1” Recommend “1+”
Figure 15. Deploy changes
20 Federator Installation and Configuration Guide
ProphetStor Federator @Copyright 2014
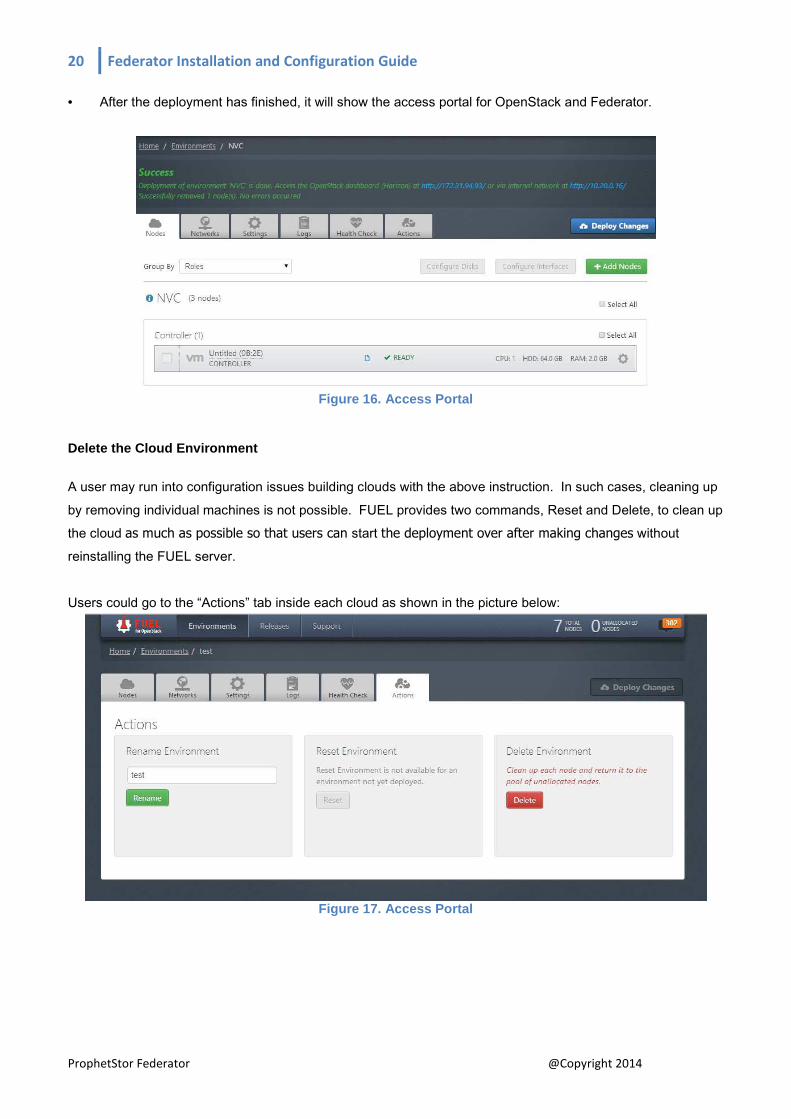
• After the deployment has finished, it will show the access portal for OpenStack and Federator.
Figure 16. Access Portal
Delete the Cloud Environment
A user may run into configuration issues building clouds with the above instruction. In such cases, cleaning up
by removing individual machines is not possible. FUEL provides two commands, Reset and Delete, to clean up the cloud as much as possible so that users can start the deployment over after making changes without reinstalling the FUEL server. Users could go to the “Actions” tab inside each cloud as shown in the picture below:
Figure 17. Access Portal
Federator Installation and Configuration Guide V1 21
ProphetStor Federator
Activating Trial or Purchased License
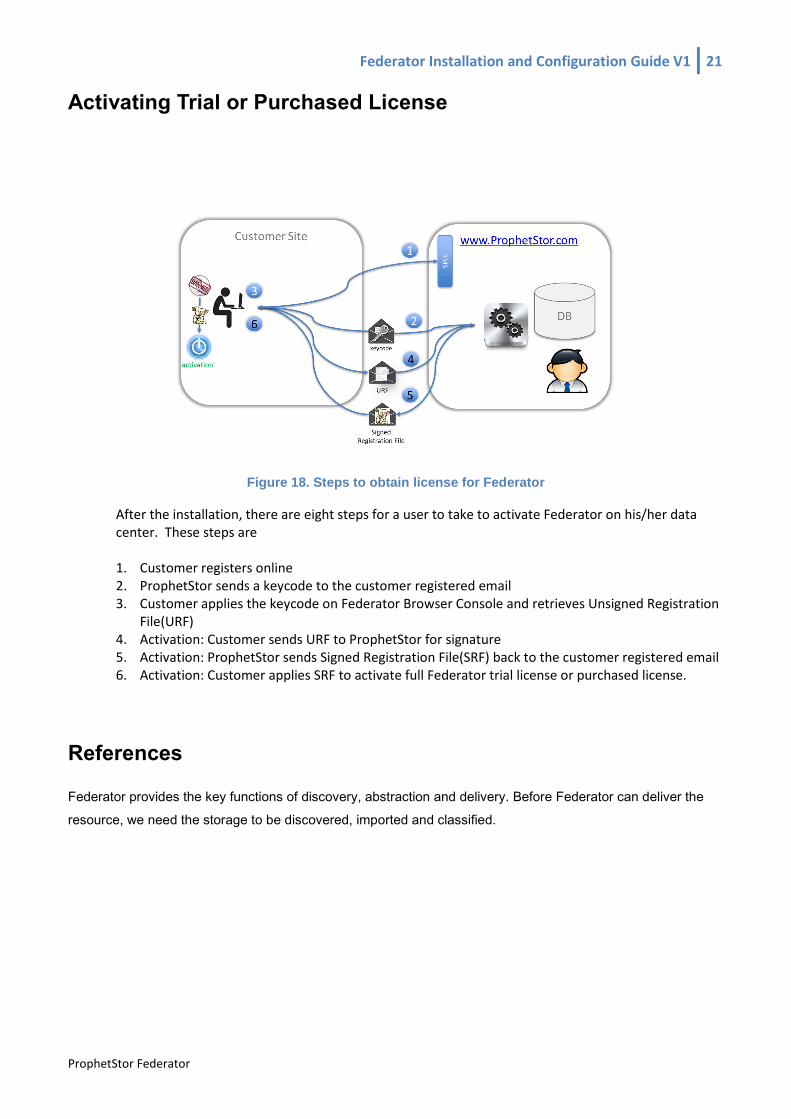
Figure 18. Steps to obtain license for Federator
After the installation, there are eight steps for a user to take to activate Federator on his/her data
center. These steps are
1. Customer registers online
2. ProphetStor sends a keycode to the customer registered email
3. Customer applies the keycode on Federator Browser Console and retrieves Unsigned Registration
File(URF)
4. Activation: Customer sends URF to ProphetStor for signature
5. Activation: ProphetStor sends Signed Registration File(SRF) back to the customer registered email
6. Activation: Customer applies SRF to activate full Federator trial license or purchased license.
References
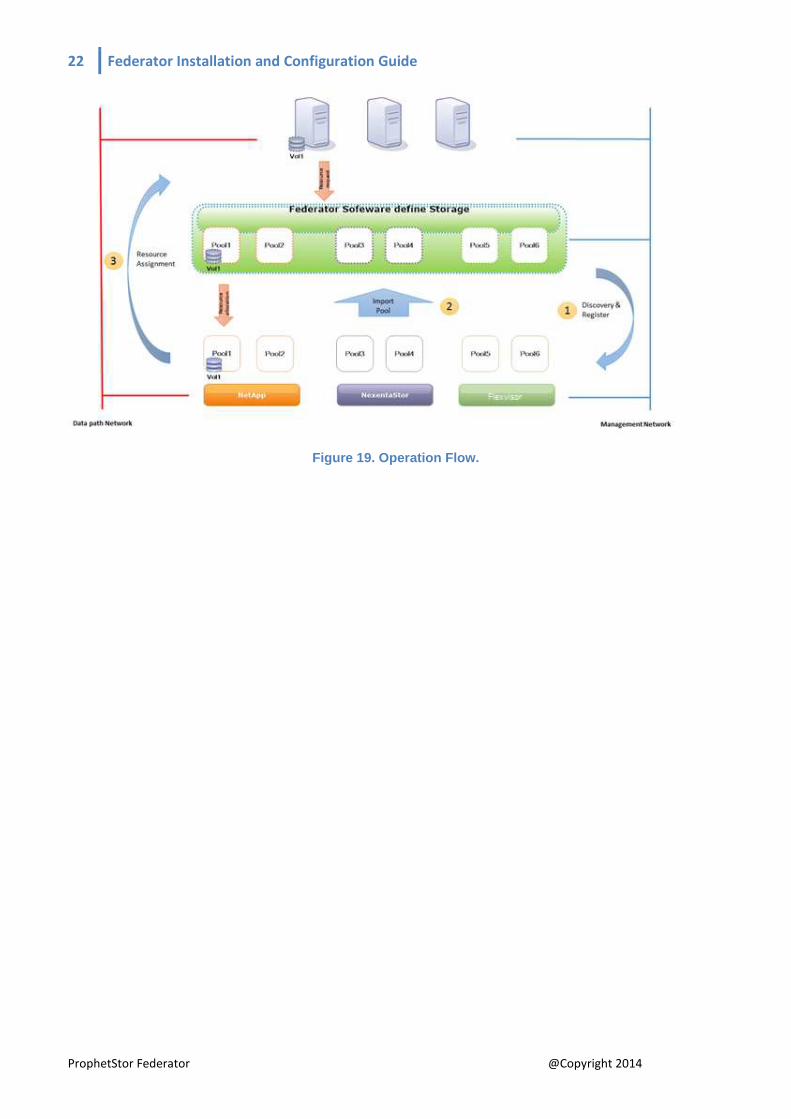
Federator provides the key functions of discovery, abstraction and delivery. Before Federator can deliver the resource, we need the storage to be discovered, imported and classified.
22 Federator Installation and Configuration Guide
ProphetStor Federator @Copyright 2014
Figure 19. Operation Flow.
Federator Installation and Configuration Guide V1 23
ProphetStor Federator
Table 8. Ahwahnee Release supports iSCSI block storage only
Array Support Versions Support protocols
NetApp ONTAP 8.1.1, 8.2 7-mode iSCSI
NexentaStor Enterprise 3.1.5 Community 4.0
iSCSI
FalconStor IPStor NSSVA 7.0, 6.5 iSCSI
FLEXVISOR FLEXVISOR 2.0 iSCSI
CEPH 0.67 iSCSI
ProphetStor Flexvisor
The storage pool in ProphetStor Flexvisor is configured automatically after the license is added and configured. A default pool is created including all data disks by RAIDZ0. If you want to change the Pool configuration, you
can make this change via the command line. Please refer to the Administration Guide for details.
Preparation for Pool Import & Provisioning
Once user obtains license keys following steps in Activating Trial or Purchased License, he/she could login to console of Flexvisor to add license if you want to use it. Now there is no UI for Flexvisor. Please use
command “flvcli” to operate the Flexvisor.
� Use “flvcli add-license -- lic xxxxxxxxx --user admin --password password” to add license. � Use “flvcli get-license-list --user admin -- password password” to check license.
� Use “flvcli get-pool-list --user admin --password password” to list pool. If the pool was created, the Flexvisor is ready to operate by Federator.
PS. ssh login by password authentication” is disable by default deployment Username / password of OS of Flexvisor is “root / r00tme” Username / password of operation of Flexvisor is “admin / password”
NetApp (FAS series)
Preparation for Discovery & Register
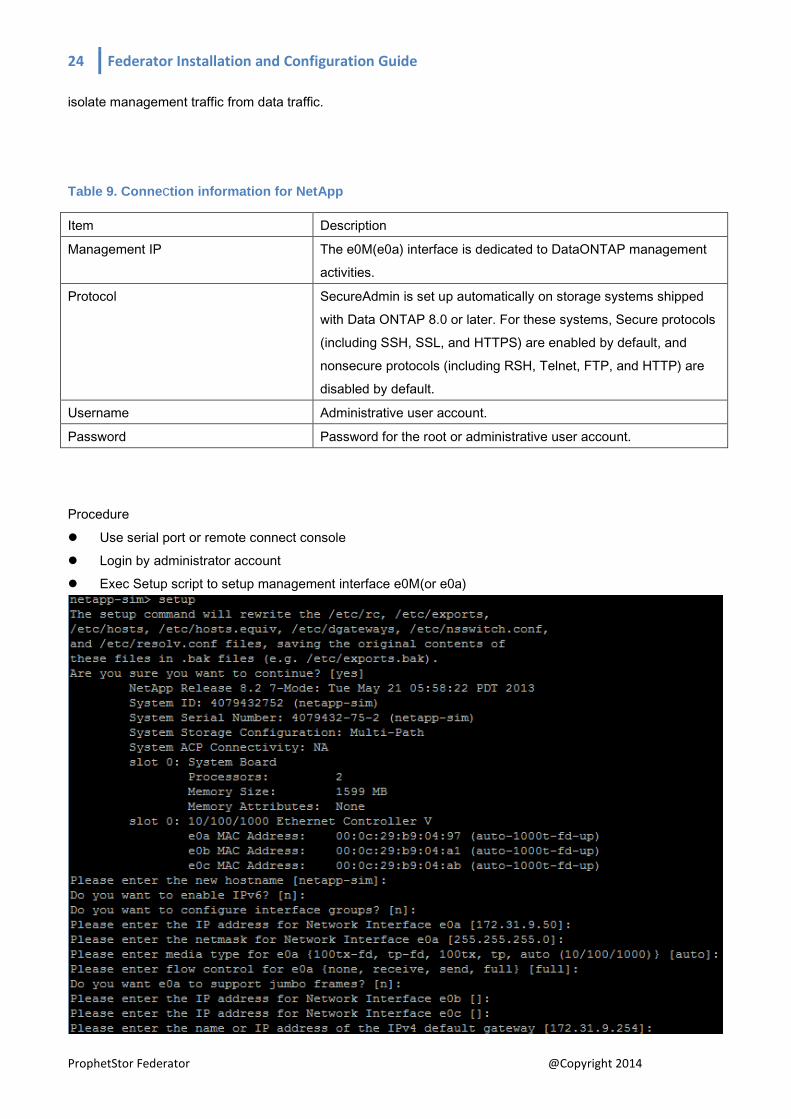
You need to prepare the following information for registering and importing pools to Federator. When you set up a NetApp system that includes the e0M interface, the Data ONTAP setup script recommends that you use
the e0M as the preferred management interface for environments. The purpose of the dedicated LANs is to
24 Federator Installation and Configuration Guide
ProphetStor Federator @Copyright 2014
isolate management traffic from data traffic.
Table 9. Connection information for NetApp
Item Description
Management IP The e0M(e0a) interface is dedicated to DataONTAP management activities.
Protocol SecureAdmin is set up automatically on storage systems shipped with Data ONTAP 8.0 or later. For these systems, Secure protocols (including SSH, SSL, and HTTPS) are enabled by default, and nonsecure protocols (including RSH, Telnet, FTP, and HTTP) are disabled by default.
Username Administrative user account.
Password Password for the root or administrative user account.
Procedure
� Use serial port or remote connect console � Login by administrator account � Exec Setup script to setup management interface e0M(or e0a)
Federator Installation and Configuration Guide V1 25
ProphetStor Federator
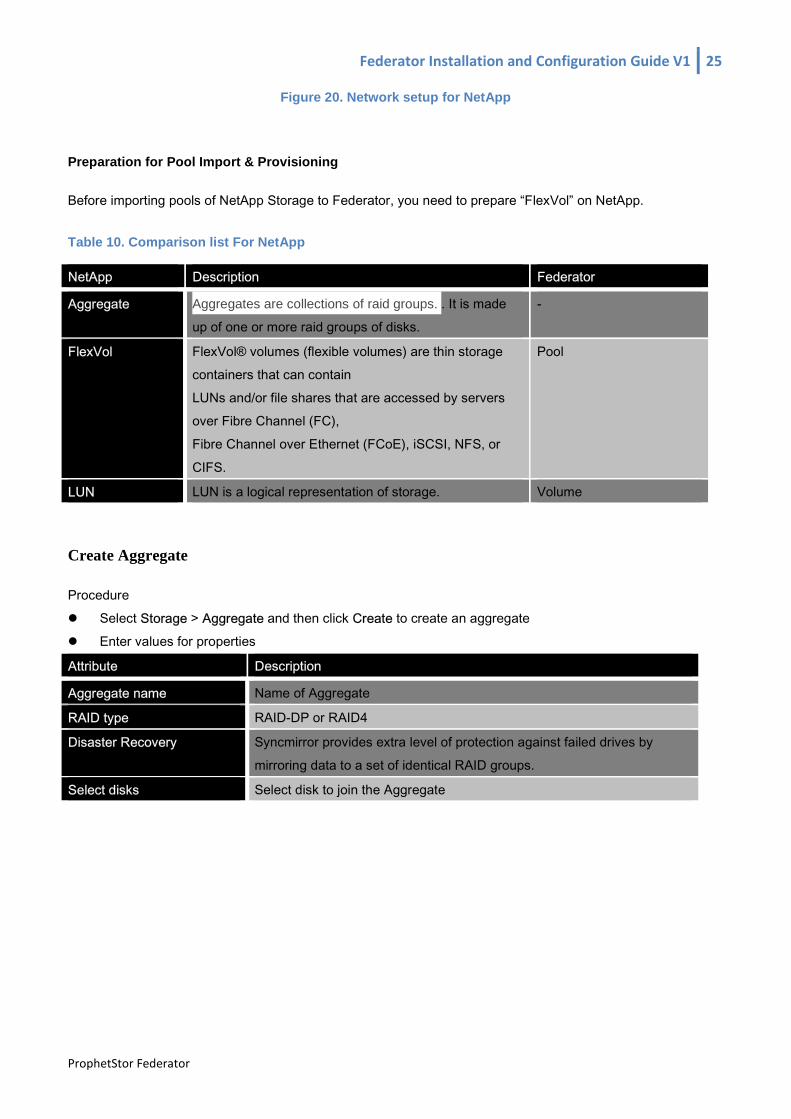
Figure 20. Network setup for NetApp
Preparation for Pool Import & Provisioning
Before importing pools of NetApp Storage to Federator, you need to prepare “FlexVol” on NetApp. Table 10. Comparison list For NetApp
NetApp Description Federator
Aggregate Aggregates are collections of raid groups. . It is made up of one or more raid groups of disks.
-
FlexVol FlexVol® volumes (flexible volumes) are thin storage containers that can contain LUNs and/or file shares that are accessed by servers over Fibre Channel (FC), Fibre Channel over Ethernet (FCoE), iSCSI, NFS, or
CIFS.
Pool
LUN LUN is a logical representation of storage. Volume
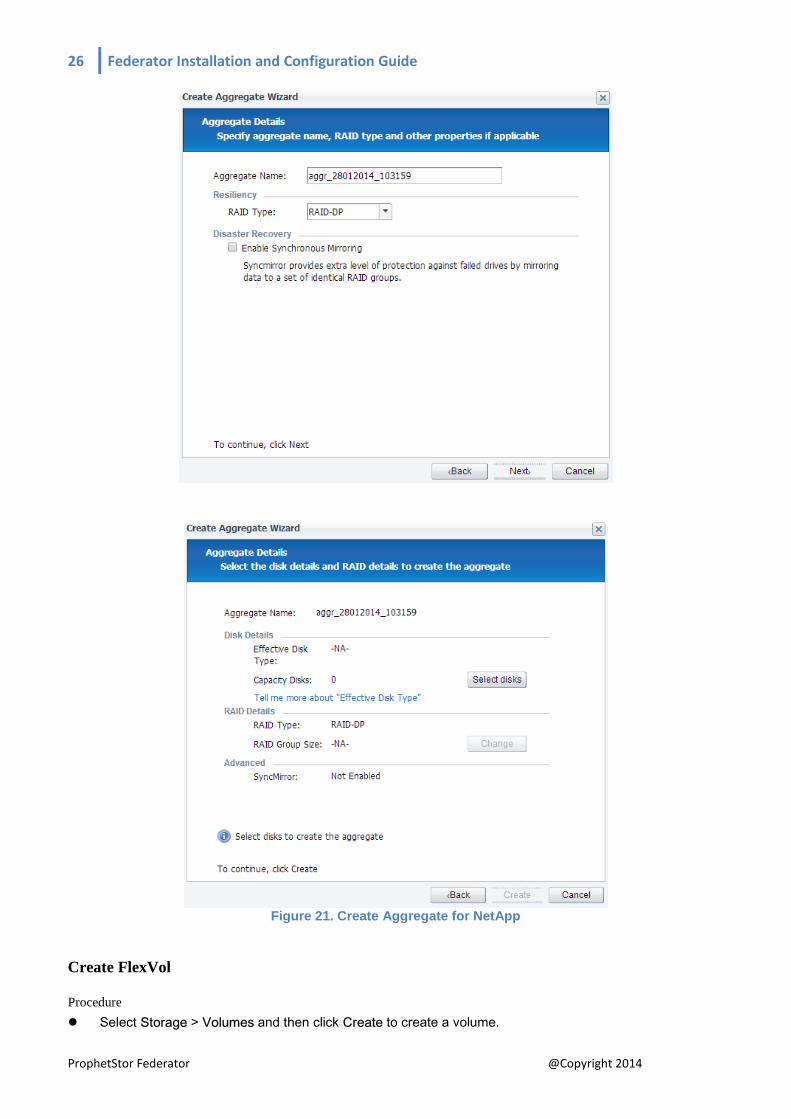
Create Aggregate
Procedure � Select Storage > Aggregate and then click Create to create an aggregate � Enter values for properties
Attribute Description
Aggregate name Name of Aggregate
RAID type RAID-DP or RAID4
Disaster Recovery Syncmirror provides extra level of protection against failed drives by mirroring data to a set of identical RAID groups.
Select disks Select disk to join the Aggregate
26 Federator Installation and Configuration Guide
ProphetStor Federator @Copyright 2014
Figure 21. Create Aggregate for NetApp
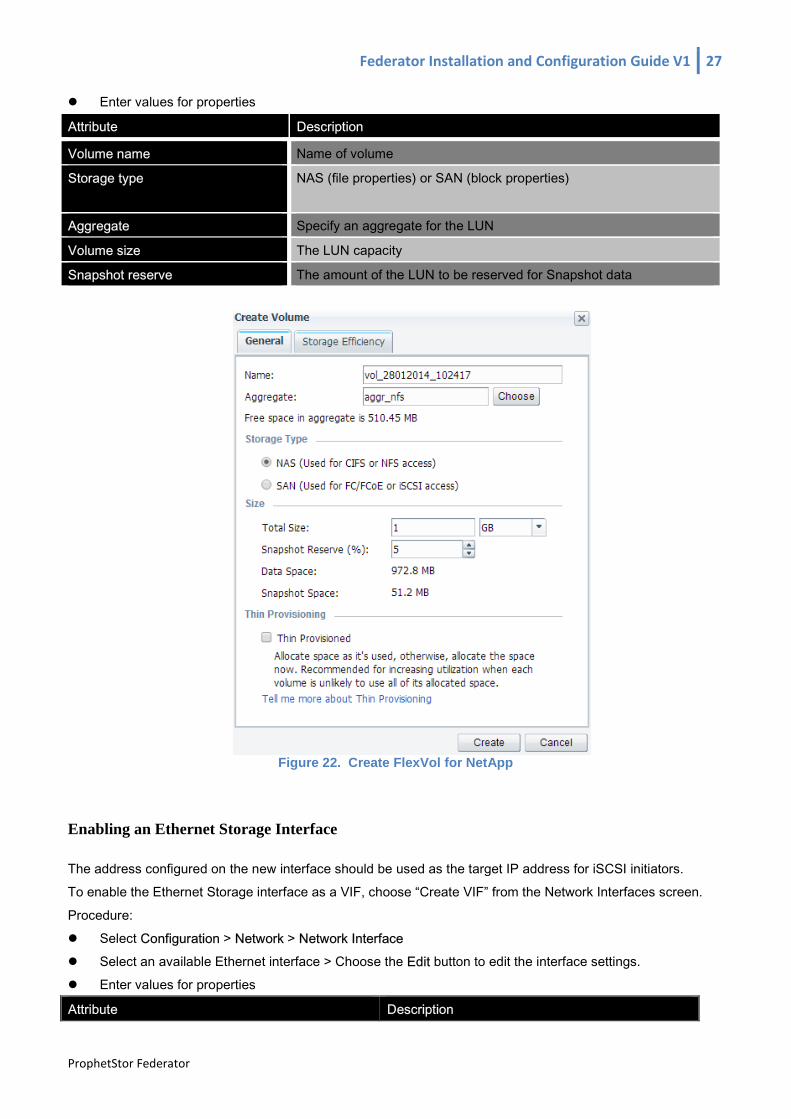
Create FlexVol
Procedure
� Select Storage > Volumes and then click Create to create a volume.
Federator Installation and Configuration Guide V1 27
ProphetStor Federator
� Enter values for properties
Attribute Description
Volume name Name of volume
Storage type NAS (file properties) or SAN (block properties)
Aggregate Specify an aggregate for the LUN
Volume size The LUN capacity
Snapshot reserve The amount of the LUN to be reserved for Snapshot data
Figure 22. Create FlexVol for NetApp
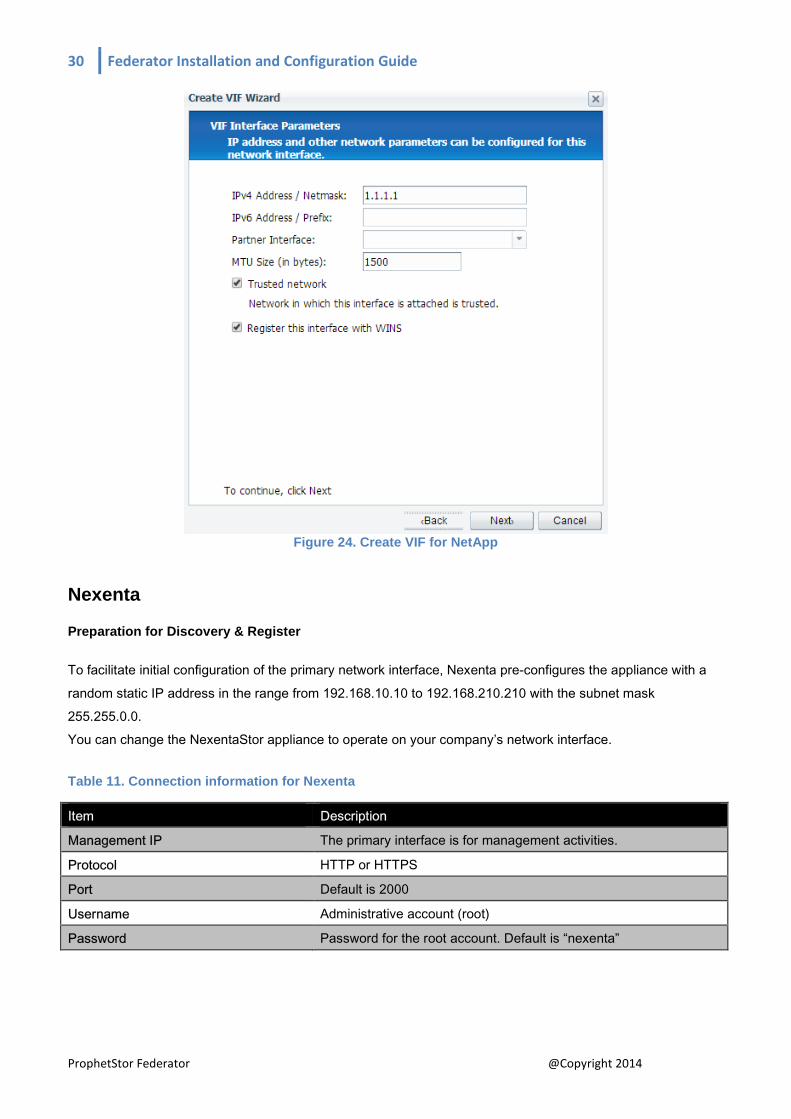
Enabling an Ethernet Storage Interface
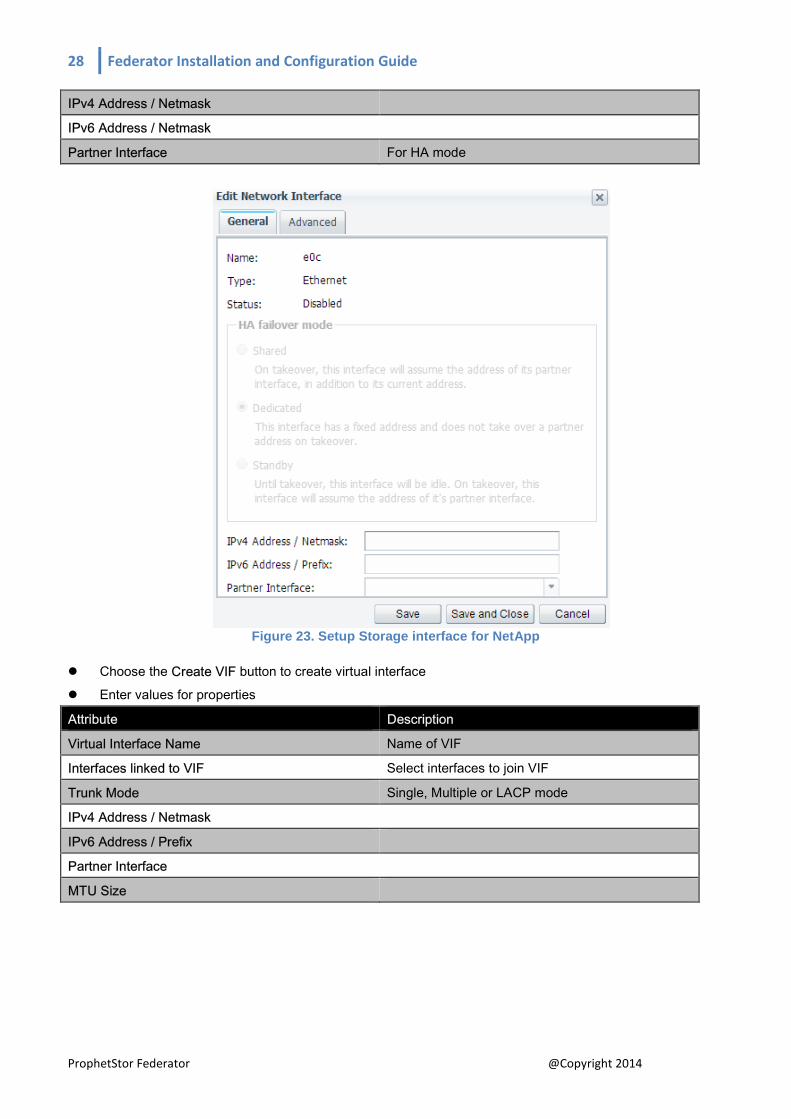
The address configured on the new interface should be used as the target IP address for iSCSI initiators. To enable the Ethernet Storage interface as a VIF, choose “Create VIF” from the Network Interfaces screen.
Procedure: � Select Configuration > Network > Network Interface � Select an available Ethernet interface > Choose the Edit button to edit the interface settings. � Enter values for properties
Attribute Description
28 Federator Installation and Configuration Guide
ProphetStor Federator @Copyright 2014
IPv4 Address / Netmask
IPv6 Address / Netmask
Partner Interface For HA mode
Figure 23. Setup Storage interface for NetApp
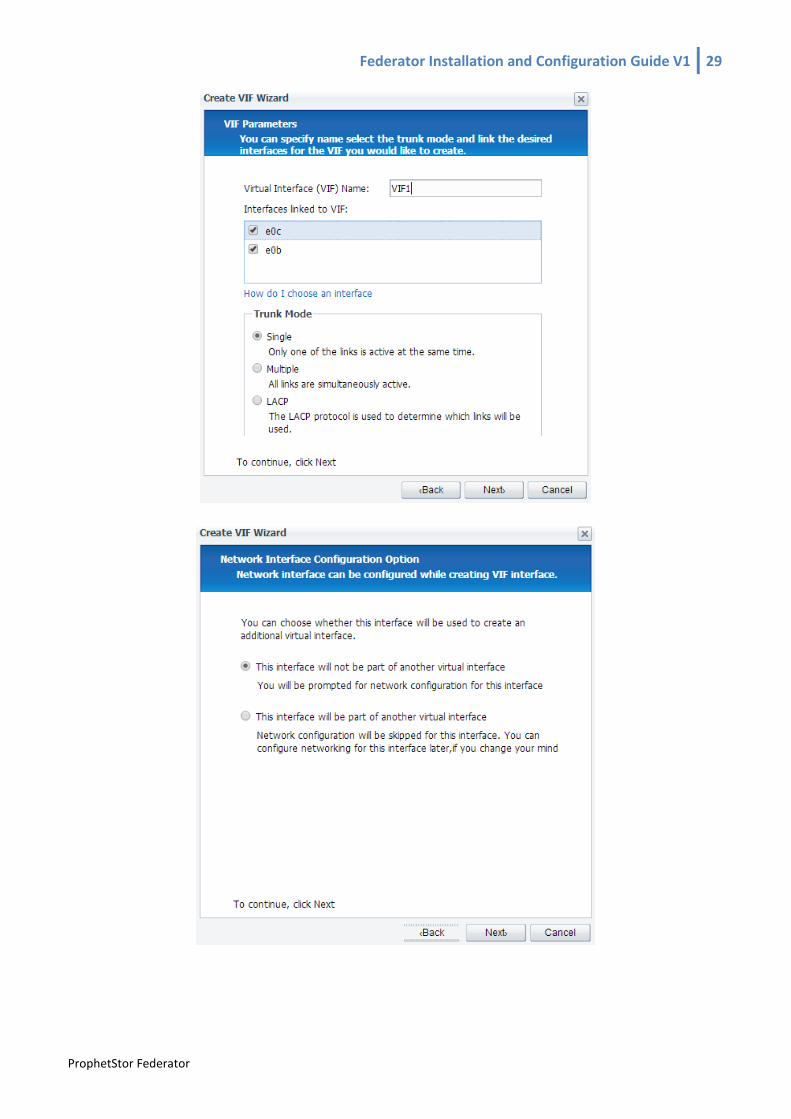
� Choose the Create VIF button to create virtual interface
� Enter values for properties
Attribute Description
Virtual Interface Name Name of VIF
Interfaces linked to VIF Select interfaces to join VIF
Trunk Mode Single, Multiple or LACP mode
IPv4 Address / Netmask
IPv6 Address / Prefix
Partner Interface
MTU Size
Federator Installation and Configuration Guide V1 29
ProphetStor Federator
30 Federator Installation and Configuration Guide
ProphetStor Federator @Copyright 2014
Figure 24. Create VIF for NetApp
Nexenta
Preparation for Discovery & Register
To facilitate initial configuration of the primary network interface, Nexenta pre-configures the appliance with a
random static IP address in the range from 192.168.10.10 to 192.168.210.210 with the subnet mask 255.255.0.0. You can change the NexentaStor appliance to operate on your company’s network interface. Table 11. Connection information for Nexenta
Item Description
Management IP The primary interface is for management activities.
Protocol HTTP or HTTPS
Port Default is 2000
Username Administrative account (root)
Password Password for the root account. Default is “nexenta”
Federator Installation and Configuration Guide V1 31
ProphetStor Federator
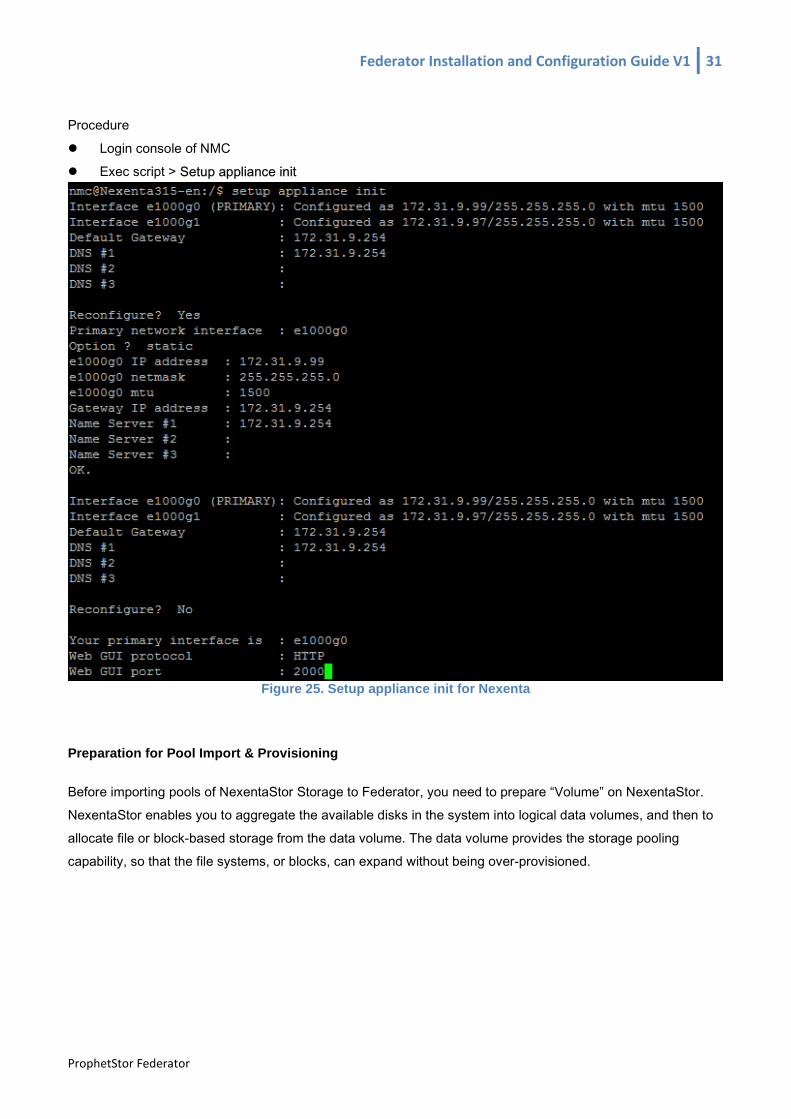
Procedure
� Login console of NMC � Exec script > Setup appliance init
Figure 25. Setup appliance init for Nexenta
Preparation for Pool Import & Provisioning
Before importing pools of NexentaStor Storage to Federator, you need to prepare “Volume” on NexentaStor. NexentaStor enables you to aggregate the available disks in the system into logical data volumes, and then to allocate file or block-based storage from the data volume. The data volume provides the storage pooling capability, so that the file systems, or blocks, can expand without being over-provisioned.
32 Federator Installation and Configuration Guide
ProphetStor Federator @Copyright 2014
Table 12. Comparison list for Nexenta
Nexenta Description Federator
Volume volume provides redundancy capabilities similar in concept to the RAID features of other storage systems. Redundancy options are: • none
• mirrored • RAID-Z1 (single parity) • RAID-Z2 (double parity) • RAID-Z3 (triple parity)
Pool
Zvol zvol is a virtual block device on a volume. In effect, it is a LUN that is remotely accessible through iSCSI. The zvol can be managed, compressed, replicated, have snapshots taken of it, and so on.
volume
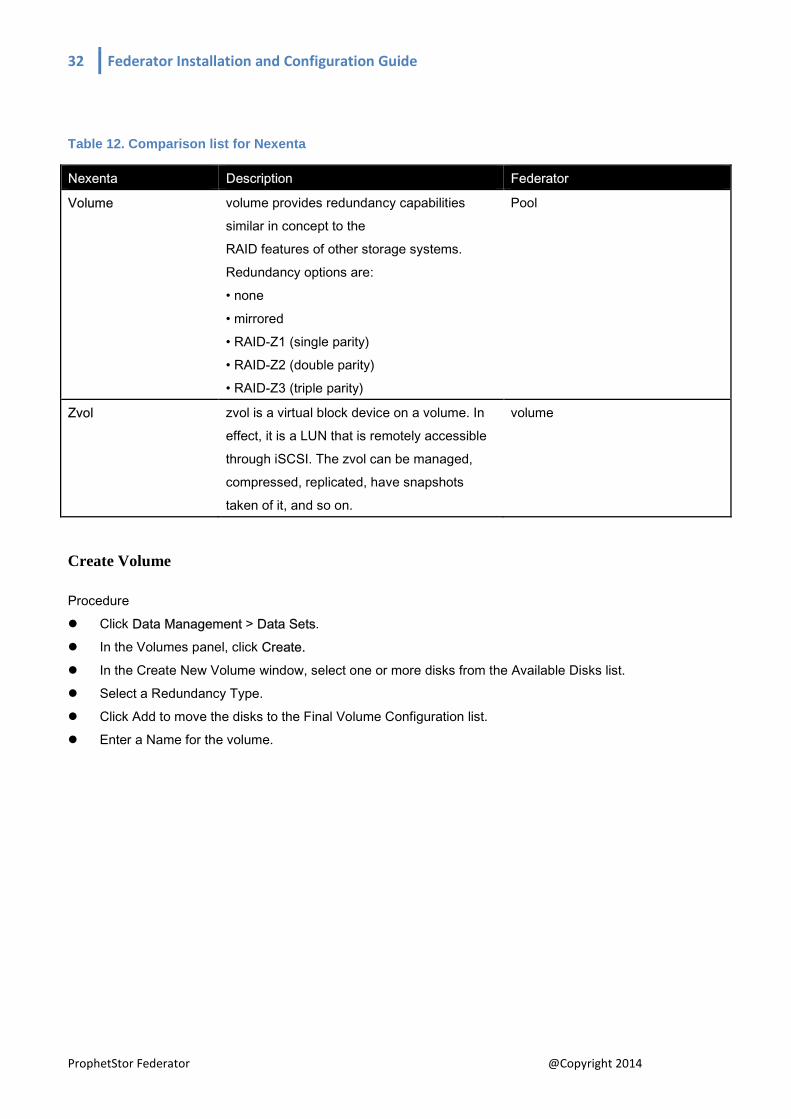
Create Volume
Procedure � Click Data Management > Data Sets. � In the Volumes panel, click Create.
� In the Create New Volume window, select one or more disks from the Available Disks list. � Select a Redundancy Type. � Click Add to move the disks to the Final Volume Configuration list. � Enter a Name for the volume.
Federator Installation and Configuration Guide V1 33
ProphetStor Federator
Figure 26. Create Volume for Nexenta
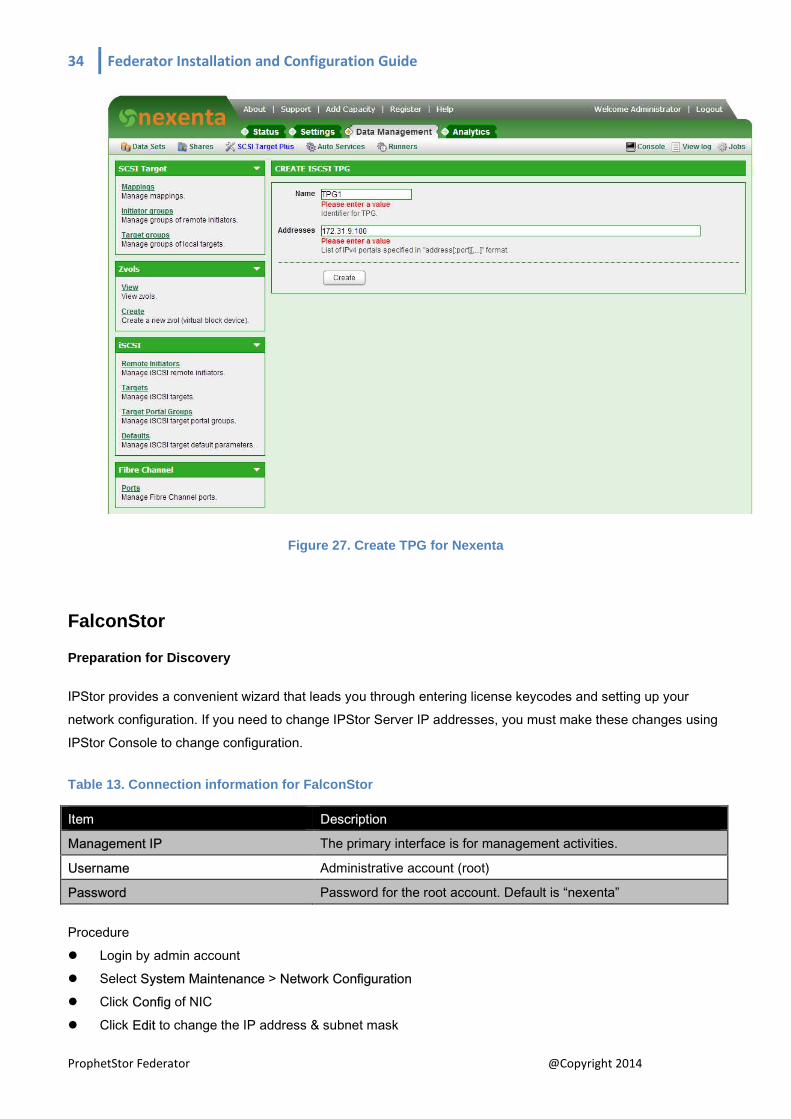
Creating a Target Portal Group
Before creating a SCSI target, you assign a particular network interface (NIC) for iSCSI traffic. You do this by configuring a Target Portal Group (TPG). Procedure:
� Click Data Management > SCSI Target. � In the iSCSI panel, click Target Portal Groups. � In the Manage iSCSI TPGs window, click here. � In the Create iSCSI TPG window, type a name for the TPG, and also type at least one IP address of a
NIC that you are going to use for iSCSI traffic, then click Create.
34 Federator Installation and Configuration Guide
ProphetStor Federator @Copyright 2014
Figure 27. Create TPG for Nexenta
FalconStor
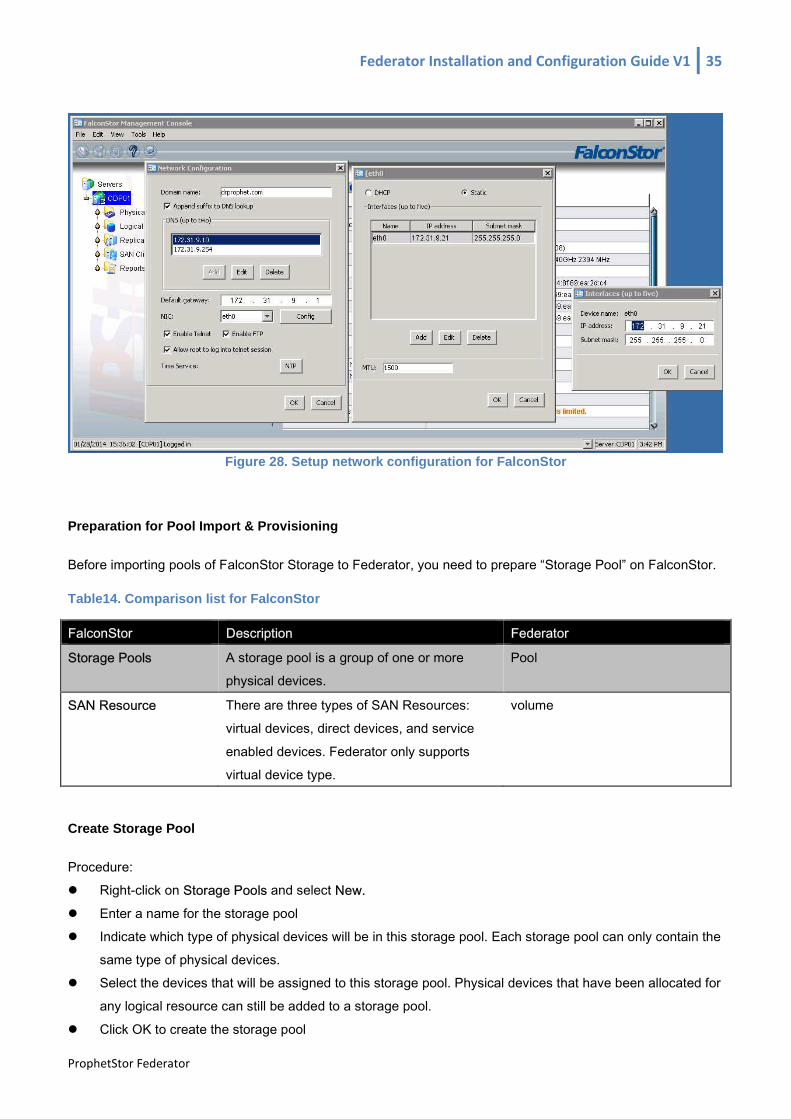
Preparation for Discovery
IPStor provides a convenient wizard that leads you through entering license keycodes and setting up your network configuration. If you need to change IPStor Server IP addresses, you must make these changes using IPStor Console to change configuration. Table 13. Connection information for FalconStor
Item Description
Management IP The primary interface is for management activities.
Username Administrative account (root)
Password Password for the root account. Default is “nexenta”
Procedure � Login by admin account � Select System Maintenance > Network Configuration � Click Config of NIC
� Click Edit to change the IP address & subnet mask
Federator Installation and Configuration Guide V1 35
ProphetStor Federator
Figure 28. Setup network configuration for FalconStor
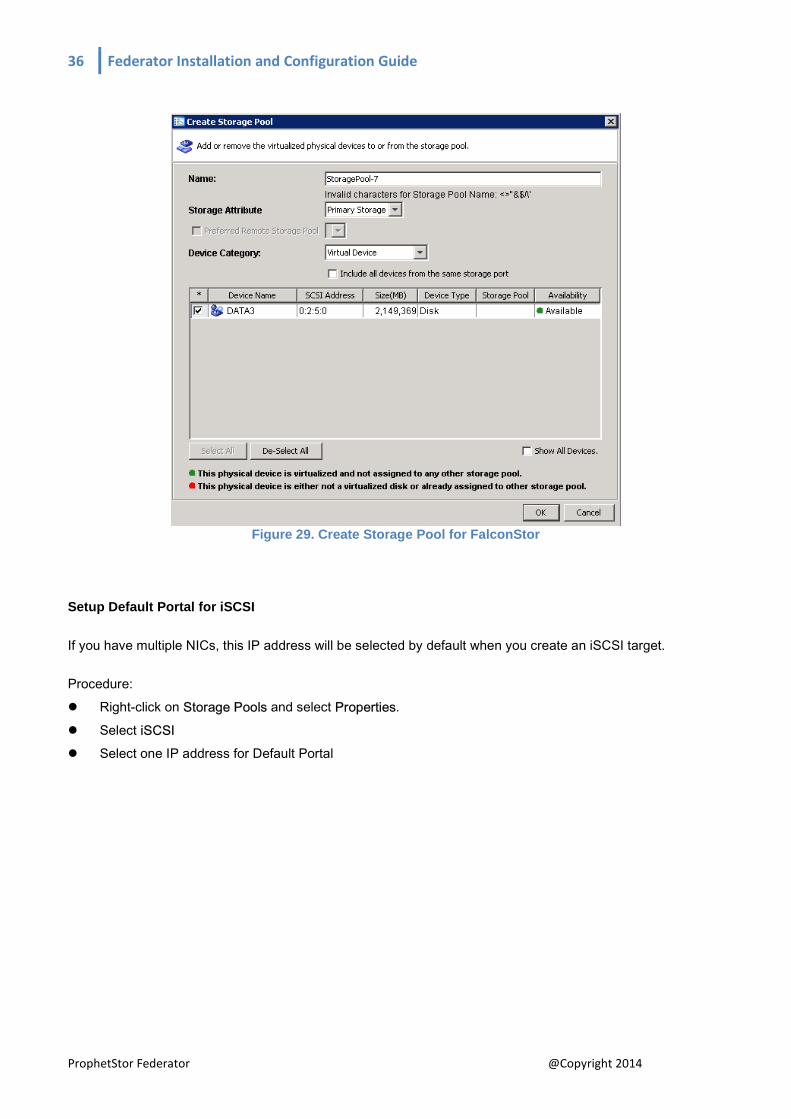
Preparation for Pool Import & Provisioning
Before importing pools of FalconStor Storage to Federator, you need to prepare “Storage Pool” on FalconStor. Table14. Comparison list for FalconStor
FalconStor Description Federator
Storage Pools A storage pool is a group of one or more physical devices.
Pool
SAN Resource There are three types of SAN Resources: virtual devices, direct devices, and service
enabled devices. Federator only supports virtual device type.
volume
Create Storage Pool
Procedure: � Right-click on Storage Pools and select New.
� Enter a name for the storage pool � Indicate which type of physical devices will be in this storage pool. Each storage pool can only contain the
same type of physical devices. � Select the devices that will be assigned to this storage pool. Physical devices that have been allocated for
any logical resource can still be added to a storage pool.
� Click OK to create the storage pool
36 Federator Installation and Configuration Guide
ProphetStor Federator @Copyright 2014
Figure 29. Create Storage Pool for FalconStor
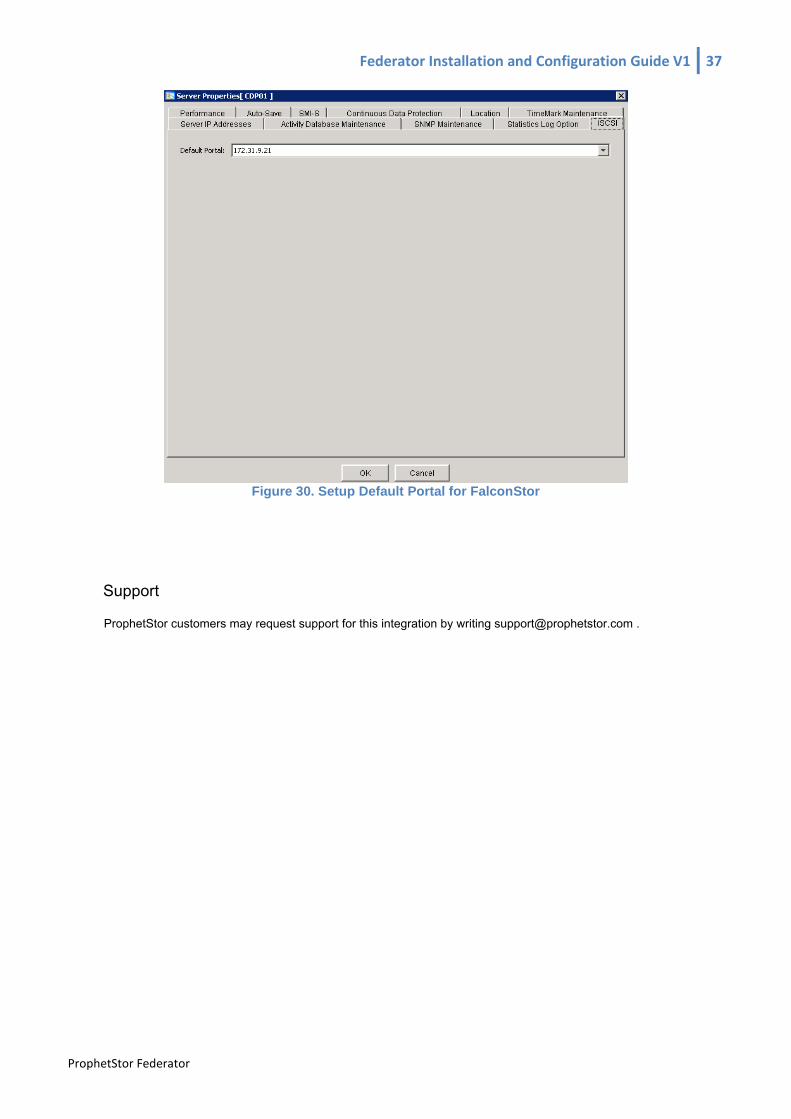
Setup Default Portal for iSCSI
If you have multiple NICs, this IP address will be selected by default when you create an iSCSI target.
Procedure: � Right-click on Storage Pools and select Properties.
� Select iSCSI � Select one IP address for Default Portal
Federator Installation and Configuration Guide V1 37
ProphetStor Federator
Figure 30. Setup Default Portal for FalconStor
Support
ProphetStor customers may request support for this integration by writing [email protected] .


![Challenges Distributed Information Retrieval [RBY] (ICDE 2007 Turkey)](https://img.pdfslide.net/doc/110x75/5441e2f1afaf9f4e208b47f9/challenges-distributed-information-retrieval-rby-icde-2007-turkey.jpg)


