Embed Size (px)
DESCRIPTION
This white paper walks users through the process of creating a personal "sandbox" environment for Hyperion Planning and Essbase where they can learn, test and explore. It includes step-by-step instructions with screenshots to simplify the process.
Citation preview
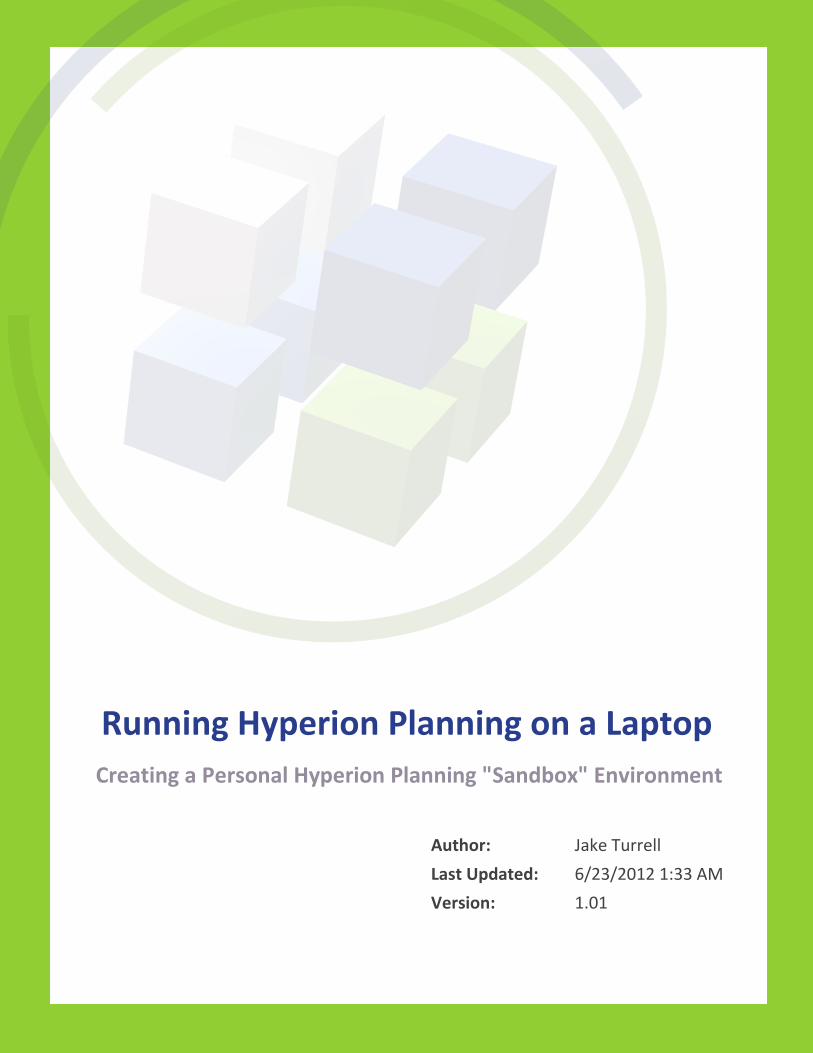
Running Hyperion Planning on a Laptop
Creating a Personal Hyperion Planning "Sandbox" Environment
Author: Jake Turrell
Last Updated: 6/23/2012 1:33 AM
Version: 1.01

TABLE OF CONTENTS
INTRODUCTION ..................................................................................................................... 4
DISCLAIMER ................................................................................................................................................................. 6 RANDOM TIPS FOR SUCCESS ............................................................................................................................................ 6 WHERE TO GET ADDITIONAL HELP ................................................................................................................................... 6
THE SHOPPING LIST ............................................................................................................... 7
INGREDIENTS ................................................................................................................................................................ 7 COSTS ......................................................................................................................................................................... 7 OTHER CONSIDERATIONS ................................................................................................................................................ 8
PREPARING THE KITCHEN ...................................................................................................... 9
DOWNLOADING ORACLE EPMS 11.1.2.2 SOFTWARE ......................................................................................................... 9 ORGANIZING THE ORACLE SOFTWARE ............................................................................................................................. 12 INSTALLING VMWARE WORKSTATION ............................................................................................................................. 13
THE GUEST LIST ................................................................................................................... 17
CREATING THE VIRTUAL MACHINE .................................................................................................................................. 17 CONFIGURING THE GUEST OPERATING SYSTEM ................................................................................................................. 22
Initial Configuration ....................................................................................................................................... 22 Disabling UAC ................................................................................................................................................ 24 Mapping a Drive from Guest to Host............................................................................................................. 25 Installing the Microsoft Loopback Adapter ................................................................................................... 26 Taking a Snapshot ......................................................................................................................................... 27
INSTALLING SQL SERVER .............................................................................................................................................. 28
GET COOKING! .................................................................................................................... 35
CREATE APP REPOSITORIES ........................................................................................................................................... 35 Creating a SQL Server User ............................................................................................................................ 36 Creating the Repositories .............................................................................................................................. 37 Preparing the Repositories ............................................................................................................................ 38
INSTALLING PLANNING ................................................................................................................................................. 40 CONFIGURING PLANNING.............................................................................................................................................. 44
Configuring Foundation Services ................................................................................................................... 44 Configuring Essbase and EAS ......................................................................................................................... 49 Configuring EPMA ......................................................................................................................................... 51 Configuring Planning ..................................................................................................................................... 53 Configuring Calc Manager ............................................................................................................................. 55 Configuring Financial Reports ....................................................................................................................... 57 Deploying the App Server .............................................................................................................................. 59 Configuring the Web Server .......................................................................................................................... 62
LA PIÈCE DE RÉSISTANCE! .................................................................................................... 64
CONFIGURING THE SERVICES.......................................................................................................................................... 64 LOGGING INTO WORKSPACE .......................................................................................................................................... 65 CREATING A TEST PLANNING APP ................................................................................................................................... 68 SUGGESTED NEXT STEPS ............................................................................................................................................... 75
Jake Turrell Page 4 Running Hyperion Planning On a Laptop
Introduction
If you work with Hyperion Planning long enough, you will eventually come to the conclusion that you
need your own personal "sandbox" where you can play around with the software, install the latest
versions, apply the latest patches, and generally do things you wouldn't want to do in a "real"
environment. There are several approaches to creating your own personal Hyperion Planning
"sandbox":
1. Setup a cloud environment.
2. Install a server operating system on your PC/laptop.
3. Install virtualization software on your PC/laptop.
Option #1 - Planning Environments in the Cloud
The Cloud option is very compelling. Users generally "rent" time in an environment by the hour, and
fully configured Hyperion environments are available. Users who want to explore this option should
check out the following links:
John Booth's Amazon Web Services AMI
Cameron Lackpour's Blog Post on John's AMI
Full 360
Amazon Web Services
So why not just go with a cloud option and be done with it? It's the fastest, least painful, and probably
the cheapest way to get up and running with Hyperion Planning. Read on, as this option is not for
everyone.
Option #2 - Install a Server O/S on Your Laptop
I've seen this option used by Oracle pre-sales consultants. With a server operating system installed on a
laptop, users can install the entire EPM stack directly. While this can be a viable option, server
operating systems aren't generally made to run on laptops. There can be issues with driver support.
Some anti-virus vendors require more expensive licenses for server operating systems. In addition, this
option fails to provide a key feature that we will discuss later called "snapshots".
Jake Turrell Page 5 Running Hyperion Planning On a Laptop
Option #3 - Go Virtual
When developers install virtualization software on their laptops, they open a world of options for
experimenting and learning with the Oracle EPM stack. Here are the top reasons why developers
should consider skipping the cloud and install Hyperion Planning right on their laptops:
Good Excuse for a New Laptop
Running virtual machines on your laptop does take a bit of memory, and a CPU that supports
virtualization is required. If your laptop is a dinosaur, this could be the perfect excuse to
upgrade. Remember, you are investing in your career and future earning potential.
Snapshots
While this feature is also available in the cloud, it deserves specific mention. At any point during
the installation on a virtual machine, developers can take a "snapshot" (and should do so
frequently). This feature allows the developer to have a free "do-over" should something go
wrong. Restoring back to a previous snapshot is quick and easy. It's so easy, that I find myself
trying things that might potentially blow up my entire environment, because restoring is a piece
of cake. Snapshots allow developers to experiment free from worries.
Demos . . . No Internet Required
So you're at a conference or a user group meeting, and you're getting ready to give your
presentation. Like all good presenters, you have a live demo. Unfortunately, every member of
the audience has a smart phone, tablet or laptop and they're all using the same wireless internet
connection you are using. If you're using a cloud-based service, you're at the mercy of your
internet connection. No matter how good it is . . . all internet connections eventually go down,
and Murphy's Law clearly states that it will go down during your demo. If you have Planning
installed on your laptop, you avoid this risk.
No Pain . . . No Gain
Installing Hyperion Planning from scratch will give you a much greater understanding of the
overall toolset. Yes, it's mildly difficult. And it isn't the cheapest option. But in the end, you'll
have your own test environment on your own laptop that you installed yourself. Who knows
what that sense of accomplishment might lead to?

Jake Turrell Page 6 Running Hyperion Planning On a Laptop
Disclaimer
This document is intended to guide users through the process of setting up a personal Hyperion Planning sandbox environment.
This document is not suitable for Production, Test or Development environments. For these types of environments, please retain the services of an experienced EPM infrastructure consultant.
This White Paper is provided for informational purposes only, and is provided "as is" with no warranty of any kind, expressed or implied.
Random Tips for Success
This document describes the step-by-step process for building a personal Hyperion Planning sandbox environment. This environment should not require heavy-handed security measures. Keep passwords simple. Store all relevant passwords in a text file on the guest operating system desktop. If the environment is used infrequently, this will come in very handy.
Make use of Task Manager on the guest operating system. This will give the developer a good idea of when individual services have completed their startup, as CPU utilization will drop to zero.
Do not attempt to follow this guide using unsupported software. While success might be possible, every little issue will leave the developer wondering if version incompatibility might be the cause. Using unsupported software is generally a big waste of time.
Don't skimp on laptop memory. 8 GB is recommended.
Where to Get Additional Help
OTN Discussion Forum: Planning and Budgeting
Network54 Essbase User Forum
John Goodwin's Blog
Jake Turrell Page 7 Running Hyperion Planning On a Laptop
The Shopping List
As with all recipes, some users may choose to substitute certain ingredients for others. There are a lot
of ways to bake a cake. So if you don't like my particular choice for virtualization software, by all means
try your own. Maybe you prefer Linux over Windows? There is no "right" answer. With that said, the
ingredients below generally offer the "path of least resistance". All examples in this document will
reference the following products:
Ingredients
Laptop running Windows. Preferably Windows 7, 64-bit. Preferably 8 GB RAM or more.
VMware Workstation 8
Microsoft Windows Server 2008 R2
Microsoft SQL Server 2008 R2
Oracle EPMS 11.1.2.2 for Windows x64
Costs
The cost of the ingredients above isn't necessarily straight forward. This is because there are multiple
ways to license each.
As of April 17, 2012, the cost of VMware Workstation 8 was $169.17.
Microsoft Windows Server R2 is expensive if purchased individually. There are inexpensive options for SQL Server Developer.
Microsoft offers subscription services for developers. These licenses typically offer usage for testing scenarios only:
o MSDN (More Expensive – Approx. $1200 per year. Different packages available.)
o Technet (Less Expensive – Approx. $200 per year. Different packages available.)
o Note that Microsoft has a specific definition of the testing scenarios allowed under these subscriptions, so make sure these will meet your needs.
Another option is to join the Microsoft Partner Network and purchase an "Action Pack" subscription. These are less expensive than MSDN, but generally more expensive than Technet. The primary benefit is that in addition to licenses that cover testing scenarios, there are some licenses for production use as well. This can be a good option for independent consultants as you must have a “company”.
Total cost of VMware 8 and the least expensive Technet subscription is going to be less than $400. Keep in mind that subscription services need to be renewed each year.
Your mileage may vary. Prices change. Make sure you get the licenses that are appropriate for your usage scenarios.
Jake Turrell Page 8 Running Hyperion Planning On a Laptop
Other Considerations
Not all laptop CPU's support virtualization, although most modern ones do.
Check the processor compatibility list on Intel’s website to see if your CPU supports Intel VT-x.
Changes to BIOS settings may be required to enable virtualization. If this is the case, VMware will provide a warning and a simple setting change will enable the feature.
Jake Turrell Page 9 Running Hyperion Planning On a Laptop
Preparing the Kitchen
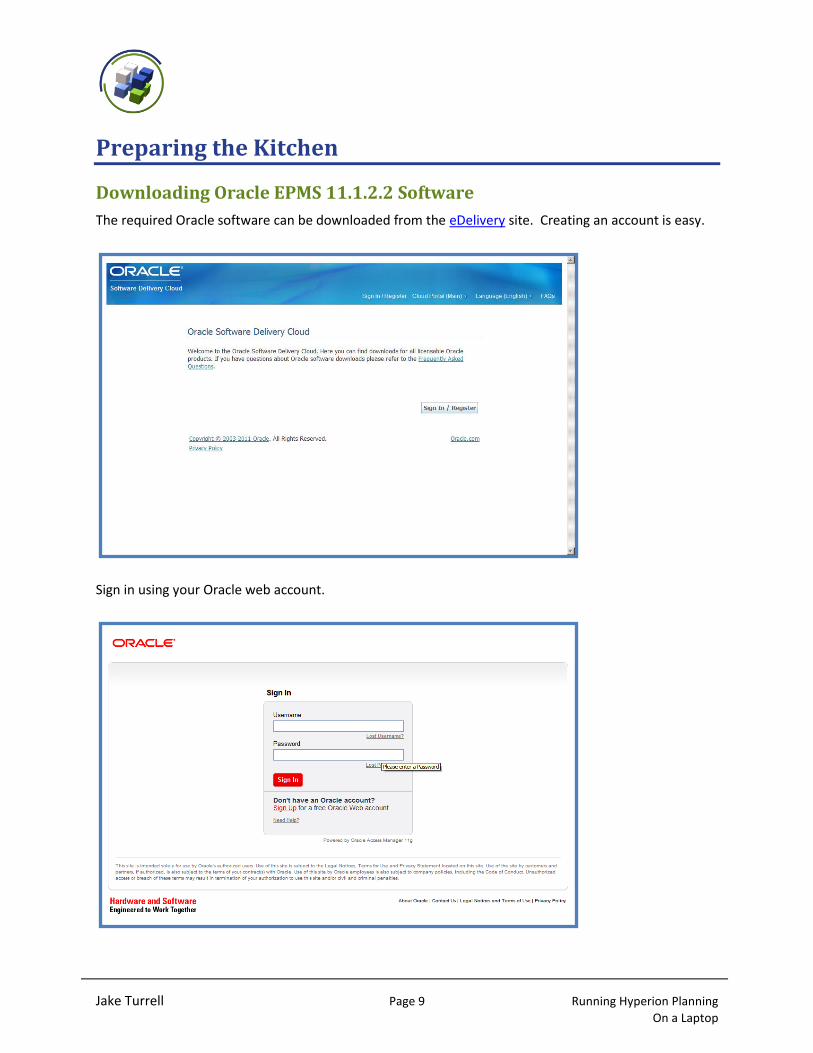
Downloading Oracle EPMS 11.1.2.2 Software
The required Oracle software can be downloaded from the eDelivery site. Creating an account is easy.
Sign in using your Oracle web account.
Jake Turrell Page 10 Running Hyperion Planning On a Laptop
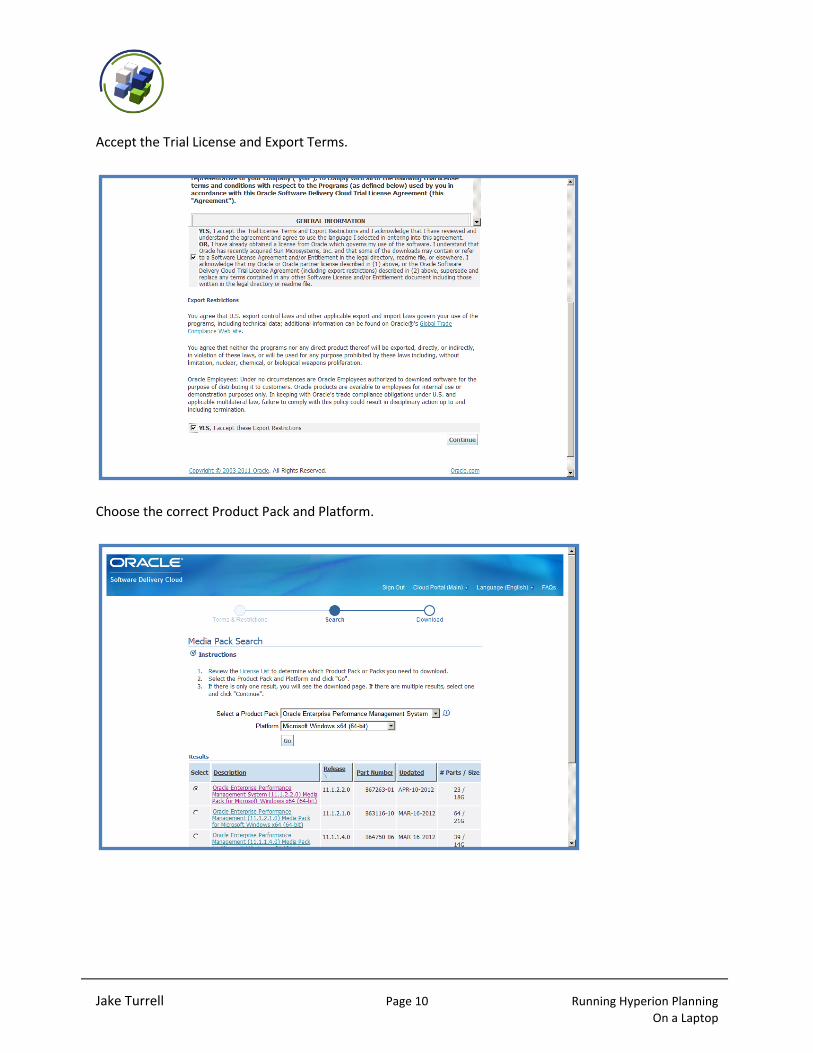
Accept the Trial License and Export Terms.
Choose the correct Product Pack and Platform.
Jake Turrell Page 11 Running Hyperion Planning On a Laptop
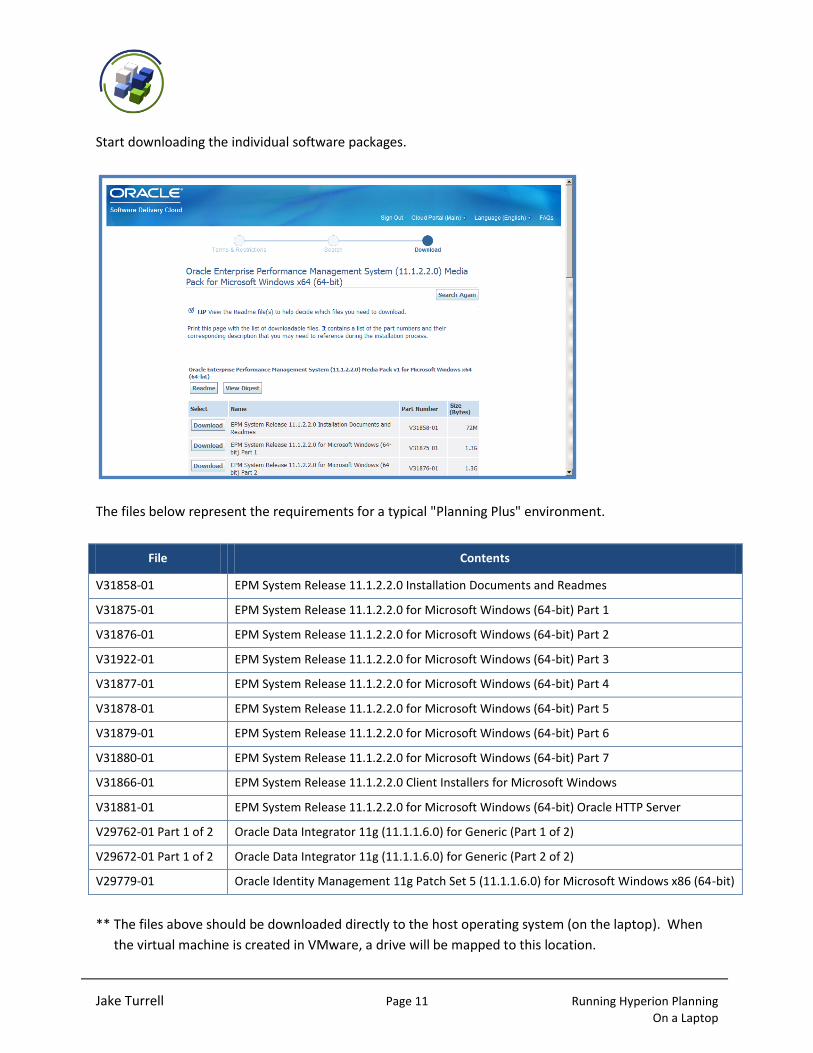
Start downloading the individual software packages.
The files below represent the requirements for a typical "Planning Plus" environment.
File Contents
V31858-01 EPM System Release 11.1.2.2.0 Installation Documents and Readmes
V31875-01 EPM System Release 11.1.2.2.0 for Microsoft Windows (64-bit) Part 1
V31876-01 EPM System Release 11.1.2.2.0 for Microsoft Windows (64-bit) Part 2
V31922-01 EPM System Release 11.1.2.2.0 for Microsoft Windows (64-bit) Part 3
V31877-01 EPM System Release 11.1.2.2.0 for Microsoft Windows (64-bit) Part 4
V31878-01 EPM System Release 11.1.2.2.0 for Microsoft Windows (64-bit) Part 5
V31879-01 EPM System Release 11.1.2.2.0 for Microsoft Windows (64-bit) Part 6
V31880-01 EPM System Release 11.1.2.2.0 for Microsoft Windows (64-bit) Part 7
V31866-01 EPM System Release 11.1.2.2.0 Client Installers for Microsoft Windows
V31881-01 EPM System Release 11.1.2.2.0 for Microsoft Windows (64-bit) Oracle HTTP Server
V29762-01 Part 1 of 2 Oracle Data Integrator 11g (11.1.1.6.0) for Generic (Part 1 of 2)
V29672-01 Part 1 of 2 Oracle Data Integrator 11g (11.1.1.6.0) for Generic (Part 2 of 2)
V29779-01 Oracle Identity Management 11g Patch Set 5 (11.1.1.6.0) for Microsoft Windows x86 (64-bit)
** The files above should be downloaded directly to the host operating system (on the laptop). When
the virtual machine is created in VMware, a drive will be mapped to this location.
Jake Turrell Page 12 Running Hyperion Planning On a Laptop
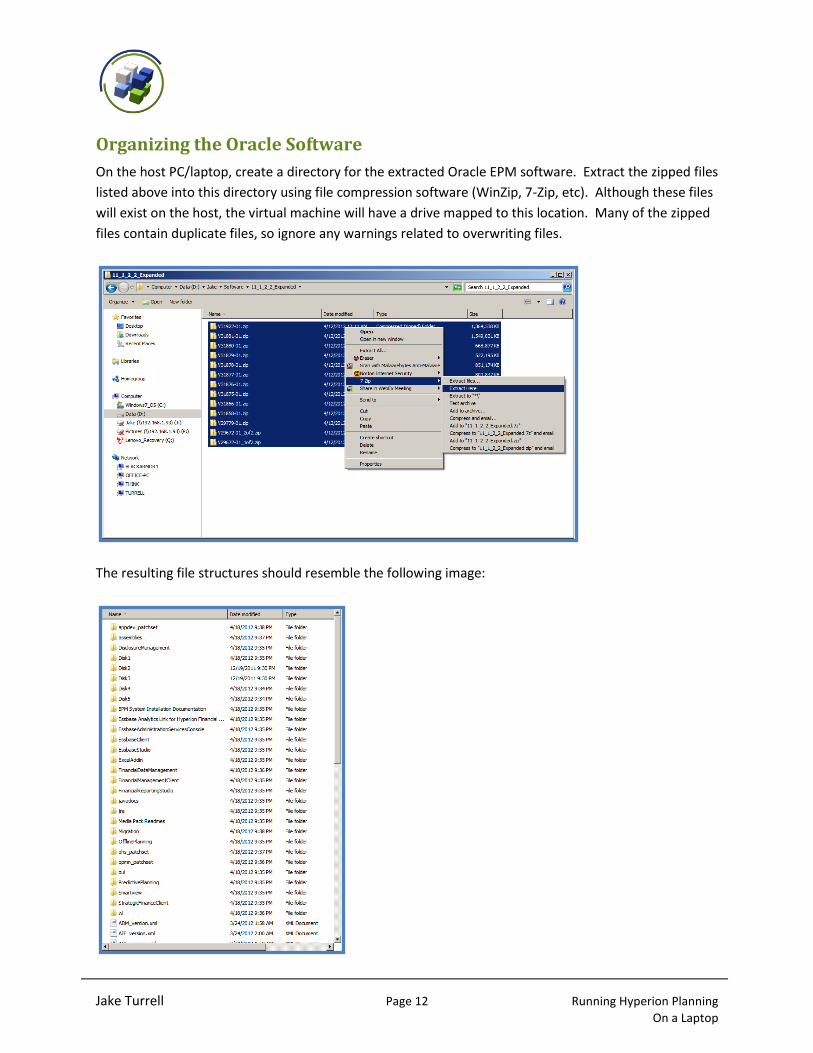
Organizing the Oracle Software
On the host PC/laptop, create a directory for the extracted Oracle EPM software. Extract the zipped files
listed above into this directory using file compression software (WinZip, 7-Zip, etc). Although these files
will exist on the host, the virtual machine will have a drive mapped to this location. Many of the zipped
files contain duplicate files, so ignore any warnings related to overwriting files.
The resulting file structures should resemble the following image:
Jake Turrell Page 13 Running Hyperion Planning On a Laptop
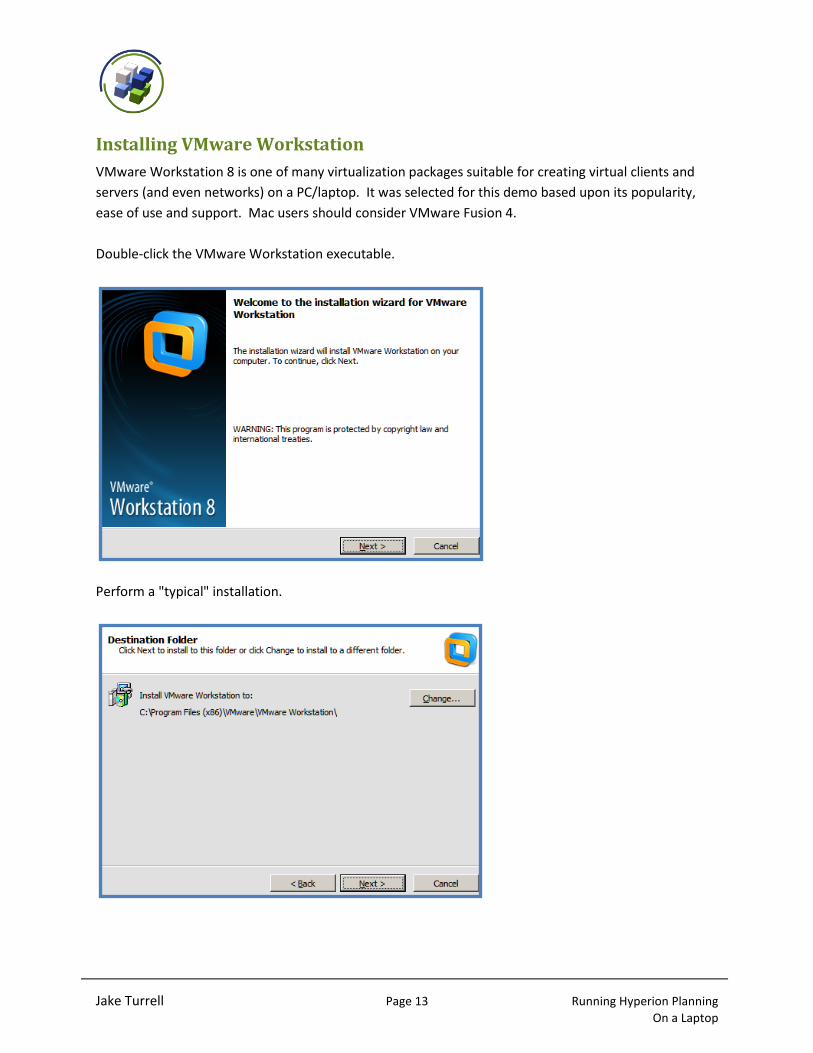
Installing VMware Workstation
VMware Workstation 8 is one of many virtualization packages suitable for creating virtual clients and
servers (and even networks) on a PC/laptop. It was selected for this demo based upon its popularity,
ease of use and support. Mac users should consider VMware Fusion 4.
Double-click the VMware Workstation executable.
Perform a "typical" installation.
Jake Turrell Page 14 Running Hyperion Planning On a Laptop
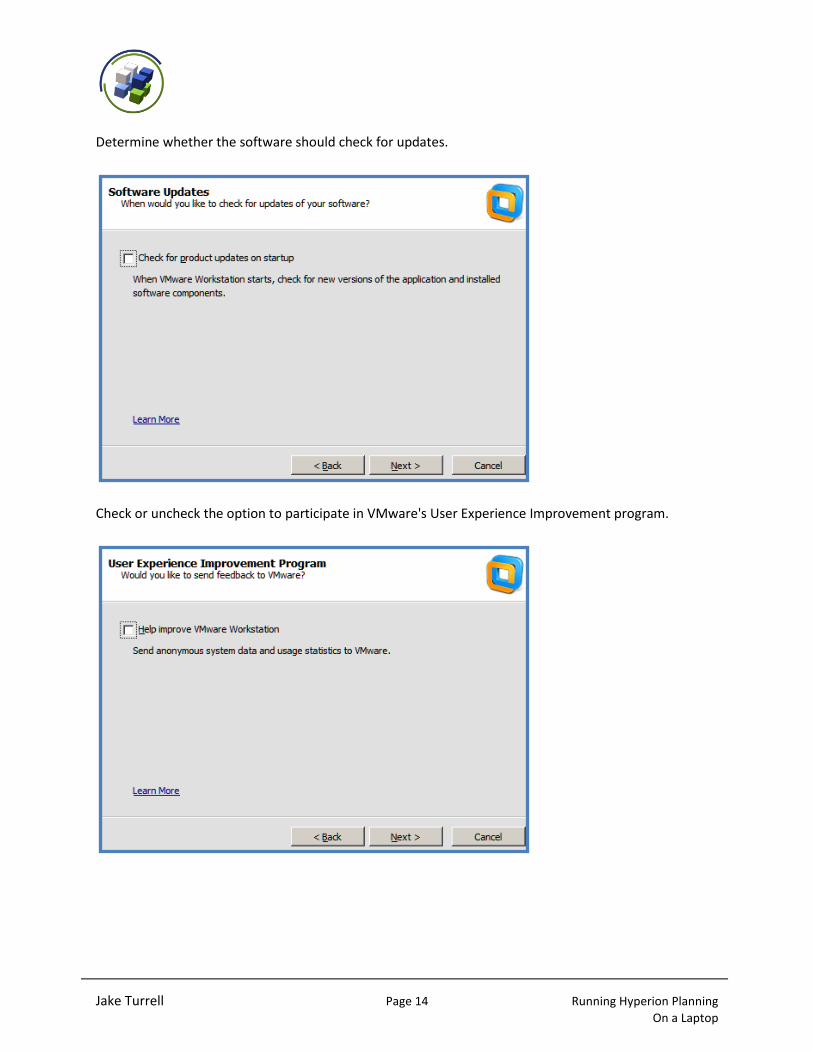
Determine whether the software should check for updates.
Check or uncheck the option to participate in VMware's User Experience Improvement program.
Jake Turrell Page 15 Running Hyperion Planning On a Laptop
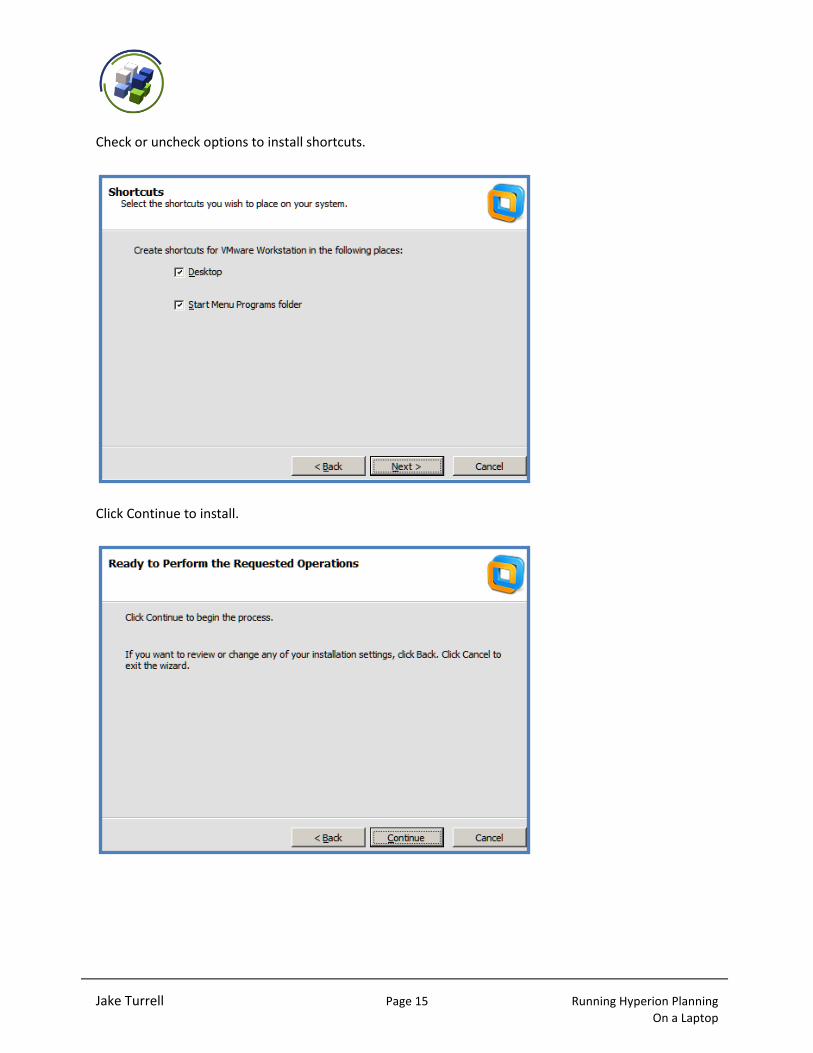
Check or uncheck options to install shortcuts.
Click Continue to install.
Jake Turrell Page 16 Running Hyperion Planning On a Laptop
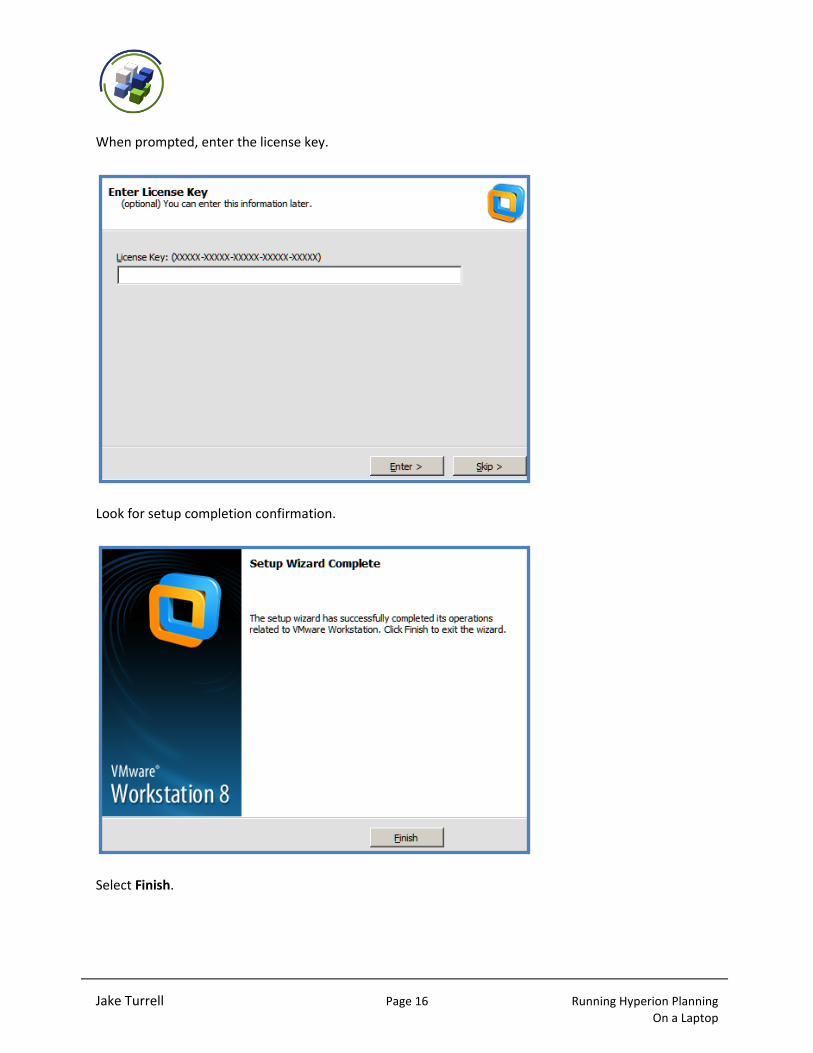
When prompted, enter the license key.
Look for setup completion confirmation.
Select Finish.
Jake Turrell Page 17 Running Hyperion Planning On a Laptop
The Guest List
Creating the Virtual Machine
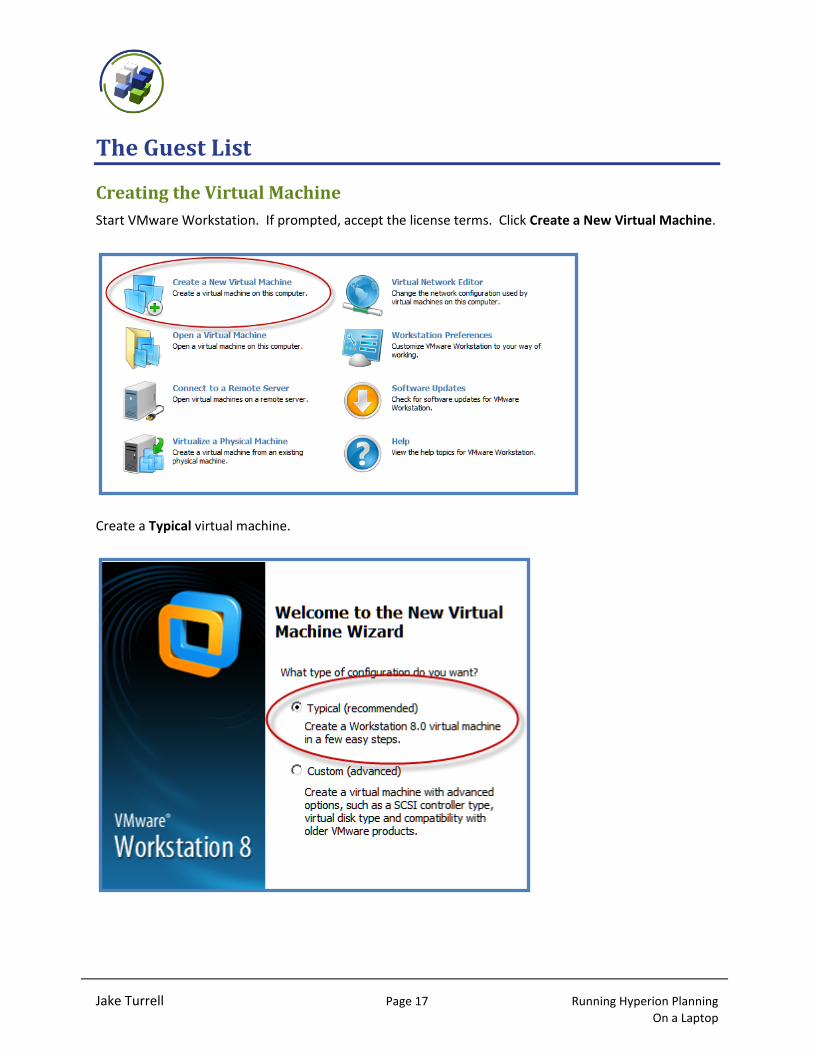
Start VMware Workstation. If prompted, accept the license terms. Click Create a New Virtual Machine.
Create a Typical virtual machine.
Jake Turrell Page 18 Running Hyperion Planning On a Laptop
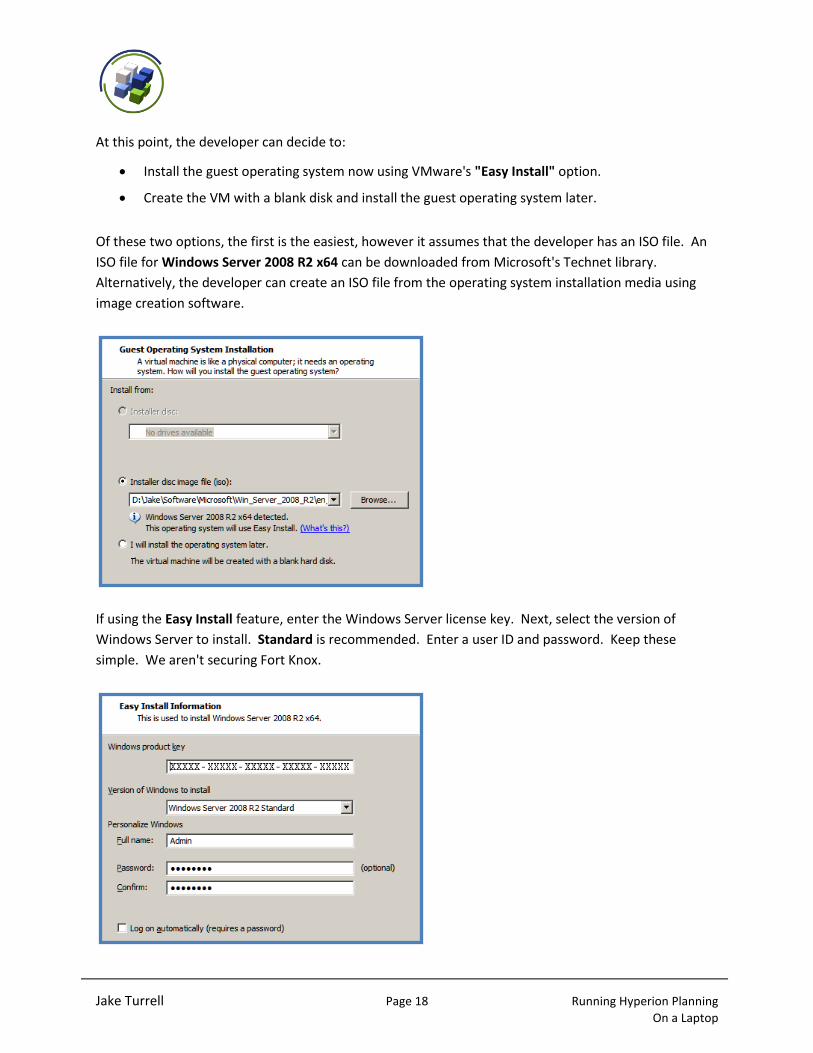
At this point, the developer can decide to:
Install the guest operating system now using VMware's "Easy Install" option.
Create the VM with a blank disk and install the guest operating system later.
Of these two options, the first is the easiest, however it assumes that the developer has an ISO file. An
ISO file for Windows Server 2008 R2 x64 can be downloaded from Microsoft's Technet library.
Alternatively, the developer can create an ISO file from the operating system installation media using
image creation software.
If using the Easy Install feature, enter the Windows Server license key. Next, select the version of
Windows Server to install. Standard is recommended. Enter a user ID and password. Keep these
simple. We aren't securing Fort Knox.
Jake Turrell Page 19 Running Hyperion Planning On a Laptop
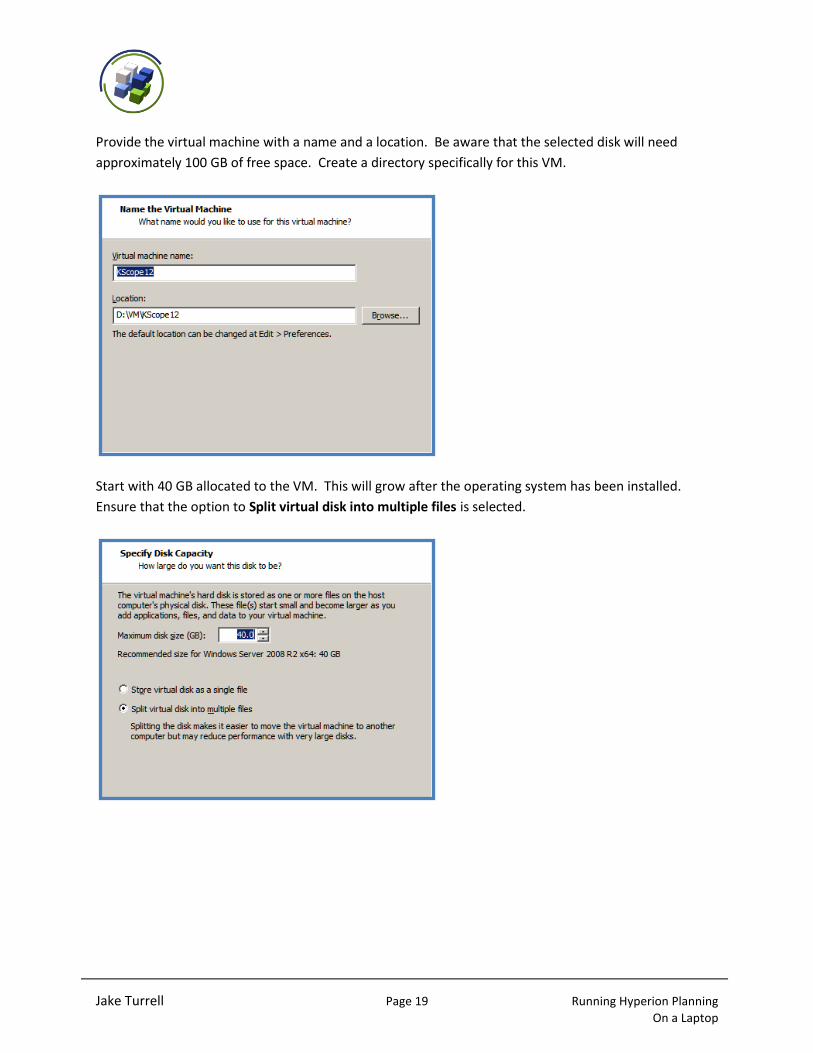
Provide the virtual machine with a name and a location. Be aware that the selected disk will need
approximately 100 GB of free space. Create a directory specifically for this VM.
Start with 40 GB allocated to the VM. This will grow after the operating system has been installed.
Ensure that the option to Split virtual disk into multiple files is selected.
Jake Turrell Page 20 Running Hyperion Planning On a Laptop
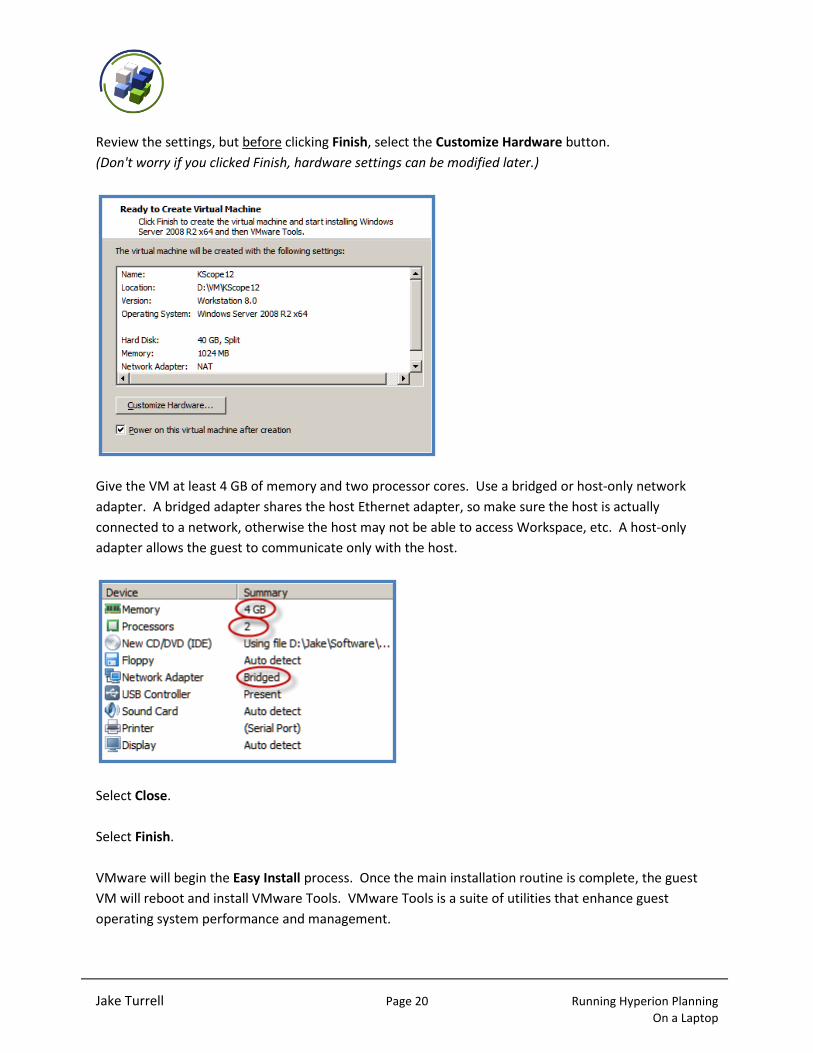
Review the settings, but before clicking Finish, select the Customize Hardware button.
(Don't worry if you clicked Finish, hardware settings can be modified later.)
Give the VM at least 4 GB of memory and two processor cores. Use a bridged or host-only network
adapter. A bridged adapter shares the host Ethernet adapter, so make sure the host is actually
connected to a network, otherwise the host may not be able to access Workspace, etc. A host-only
adapter allows the guest to communicate only with the host.
Select Close.
Select Finish.
VMware will begin the Easy Install process. Once the main installation routine is complete, the guest
VM will reboot and install VMware Tools. VMware Tools is a suite of utilities that enhance guest
operating system performance and management.

Jake Turrell Page 21 Running Hyperion Planning On a Laptop
Login to the virtual machine with the user ID and password created above. To login, the developer must
click on the VM window and press CNTL-ALT-INS. Note - this is control, alt, insert (not delete).
Jake Turrell Page 22 Running Hyperion Planning On a Laptop
Configuring the Guest Operating System
Initial Configuration
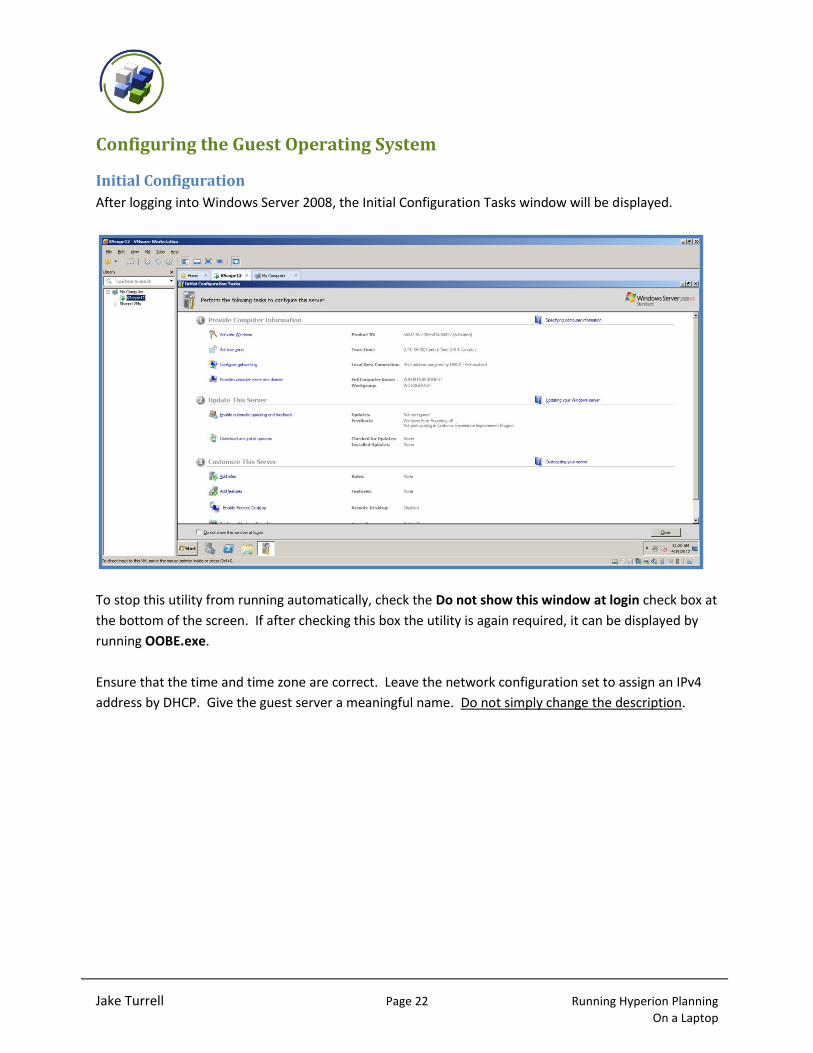
After logging into Windows Server 2008, the Initial Configuration Tasks window will be displayed.
To stop this utility from running automatically, check the Do not show this window at login check box at
the bottom of the screen. If after checking this box the utility is again required, it can be displayed by
running OOBE.exe.
Ensure that the time and time zone are correct. Leave the network configuration set to assign an IPv4
address by DHCP. Give the guest server a meaningful name. Do not simply change the description.
Jake Turrell Page 23 Running Hyperion Planning On a Laptop
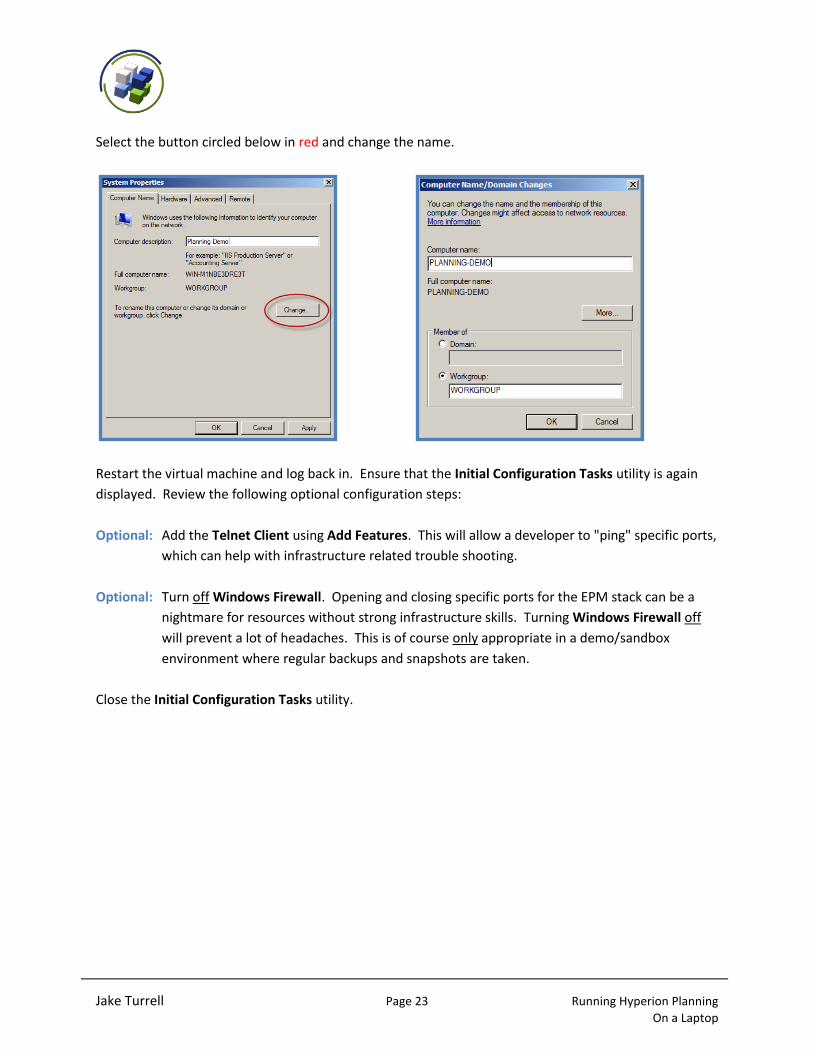
Select the button circled below in red and change the name.
Restart the virtual machine and log back in. Ensure that the Initial Configuration Tasks utility is again
displayed. Review the following optional configuration steps:
Optional: Add the Telnet Client using Add Features. This will allow a developer to "ping" specific ports,
which can help with infrastructure related trouble shooting.
Optional: Turn off Windows Firewall. Opening and closing specific ports for the EPM stack can be a
nightmare for resources without strong infrastructure skills. Turning Windows Firewall off
will prevent a lot of headaches. This is of course only appropriate in a demo/sandbox
environment where regular backups and snapshots are taken.
Close the Initial Configuration Tasks utility.
Jake Turrell Page 24 Running Hyperion Planning On a Laptop
Disabling UAC
User Account Control (UAC) is a feature in Windows that limits software to running under standard user
privileges unless an administrator explicitly grants access to run as an administrator via a prompt. UAC
should be disabled when installing Planning.
The following steps should be completed on the guest operating system:
Select Start, Control Panel.
Select User Accounts.
Select Change User Account Control settings.
Move the slider bar on the left side of the window all the way down to Never notify.
Select OK.
Restart the virtual machine and log back in.
Jake Turrell Page 25 Running Hyperion Planning On a Laptop
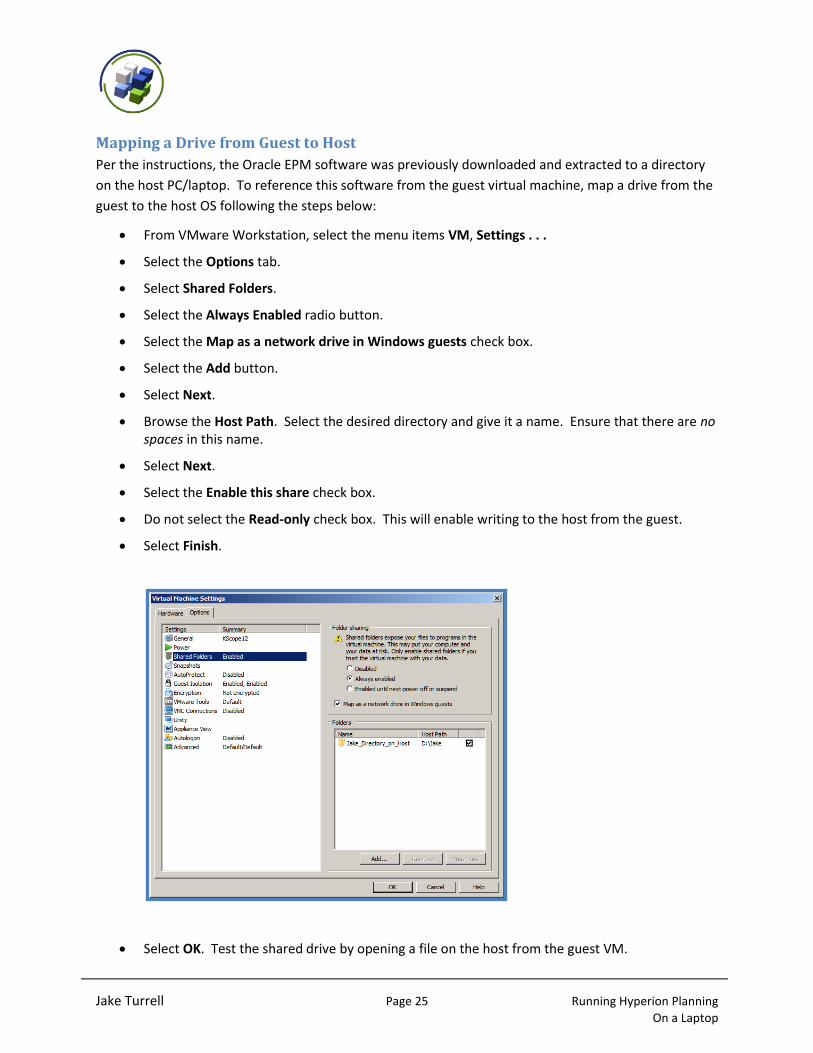
Mapping a Drive from Guest to Host
Per the instructions, the Oracle EPM software was previously downloaded and extracted to a directory
on the host PC/laptop. To reference this software from the guest virtual machine, map a drive from the
guest to the host OS following the steps below:
From VMware Workstation, select the menu items VM, Settings . . .
Select the Options tab.
Select Shared Folders.
Select the Always Enabled radio button.
Select the Map as a network drive in Windows guests check box.
Select the Add button.
Select Next.
Browse the Host Path. Select the desired directory and give it a name. Ensure that there are no spaces in this name.
Select Next.
Select the Enable this share check box.
Do not select the Read-only check box. This will enable writing to the host from the guest.
Select Finish.
Select OK. Test the shared drive by opening a file on the host from the guest VM.
Jake Turrell Page 26 Running Hyperion Planning On a Laptop
Installing the Microsoft Loopback Adapter
An important prerequisite when installing the EPM stack is that the installer should resolve a host name,
and not an IP address. The easiest way to tackle this prerequisite (given the server configuration in this
example) is to install the Microsoft Loopback Adapter. The Loopback Adapter is essentially a virtual
network card. (Many thanks to John Goodwin for illustrating this technique on the OTN Planning and
Budgeting forum.)
The following steps should be completed on the guest operating system:
Select Start, Control Panel.
Select Hardware.
Select Device Manager.
Right-click the Server Name (top-most parent in the hierarchy). Select Add Legacy Hardware.
Select Next.
Select the radio button Install the hardware that I manually select from a list.
Select Next.
Select Network adapters, then Next.
Select Microsoft, then Microsoft Loopback Adapter.
Select Next.
Select Next, then Finish.
Jake Turrell Page 27 Running Hyperion Planning On a Laptop
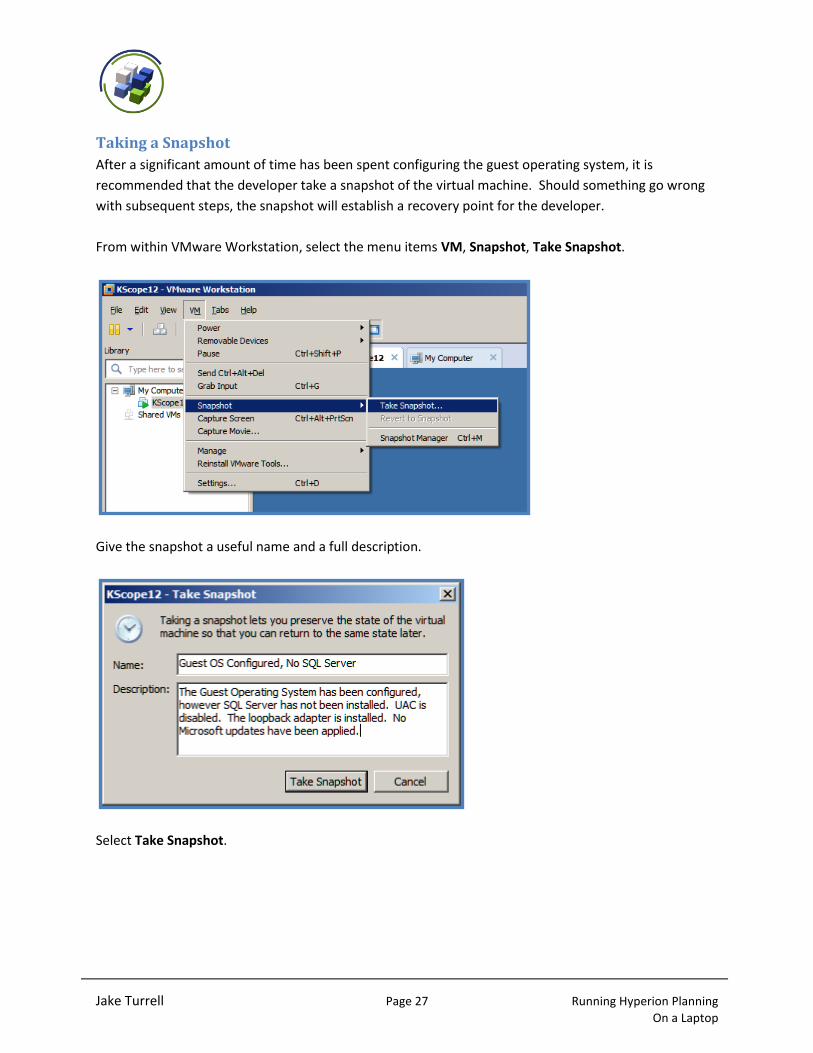
Taking a Snapshot
After a significant amount of time has been spent configuring the guest operating system, it is
recommended that the developer take a snapshot of the virtual machine. Should something go wrong
with subsequent steps, the snapshot will establish a recovery point for the developer.
From within VMware Workstation, select the menu items VM, Snapshot, Take Snapshot.
Give the snapshot a useful name and a full description.
Select Take Snapshot.
Jake Turrell Page 28 Running Hyperion Planning On a Laptop
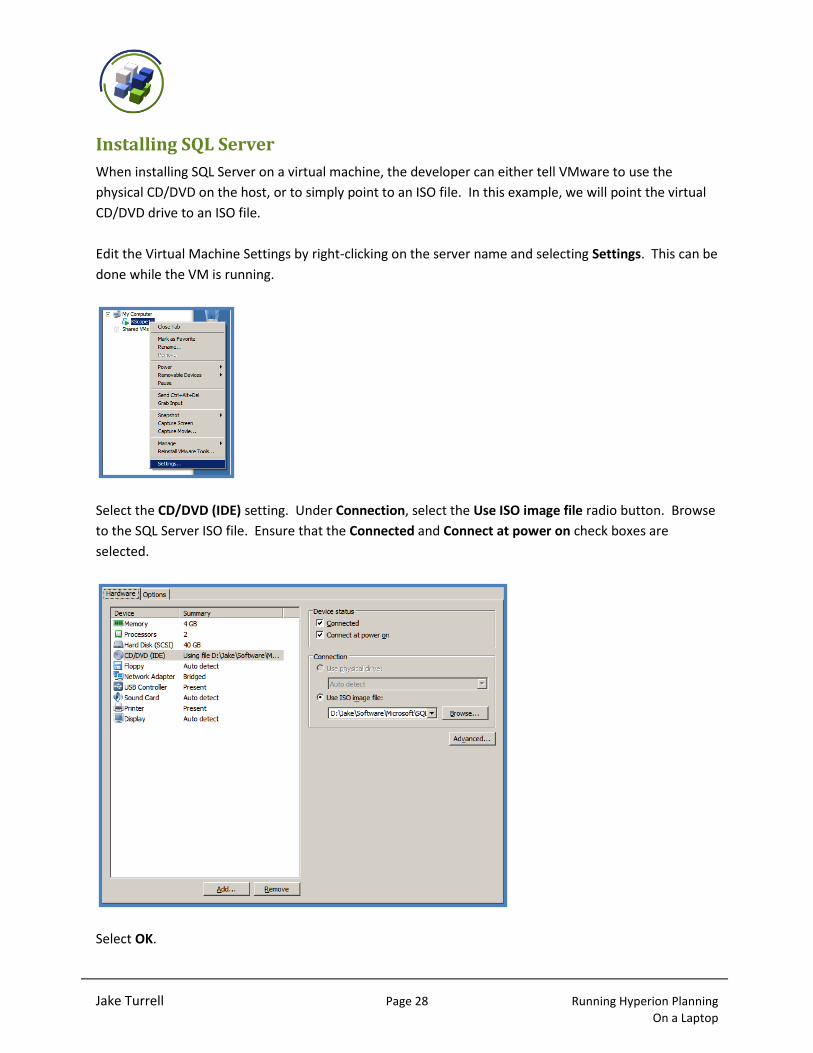
Installing SQL Server
When installing SQL Server on a virtual machine, the developer can either tell VMware to use the
physical CD/DVD on the host, or to simply point to an ISO file. In this example, we will point the virtual
CD/DVD drive to an ISO file.
Edit the Virtual Machine Settings by right-clicking on the server name and selecting Settings. This can be
done while the VM is running.
Select the CD/DVD (IDE) setting. Under Connection, select the Use ISO image file radio button. Browse
to the SQL Server ISO file. Ensure that the Connected and Connect at power on check boxes are
selected.
Select OK.
Jake Turrell Page 29 Running Hyperion Planning On a Laptop
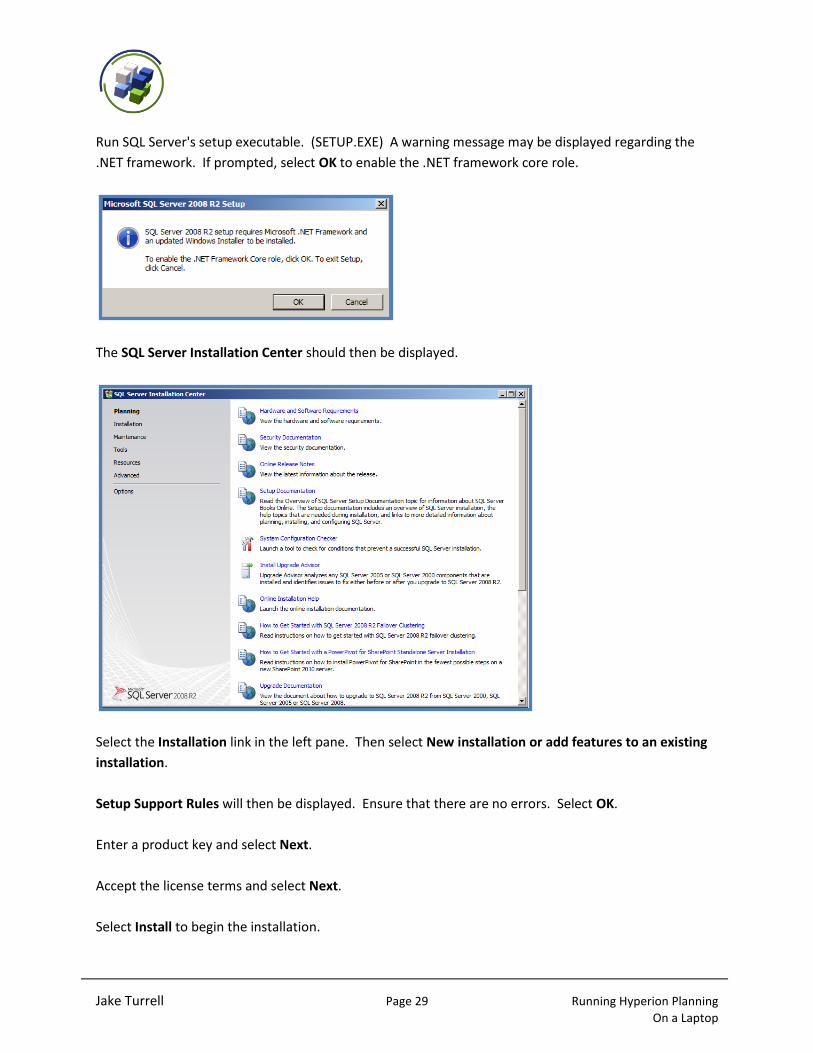
Run SQL Server's setup executable. (SETUP.EXE) A warning message may be displayed regarding the
.NET framework. If prompted, select OK to enable the .NET framework core role.
The SQL Server Installation Center should then be displayed.
Select the Installation link in the left pane. Then select New installation or add features to an existing
installation.
Setup Support Rules will then be displayed. Ensure that there are no errors. Select OK.
Enter a product key and select Next.
Accept the license terms and select Next.
Select Install to begin the installation.
Jake Turrell Page 30 Running Hyperion Planning On a Laptop
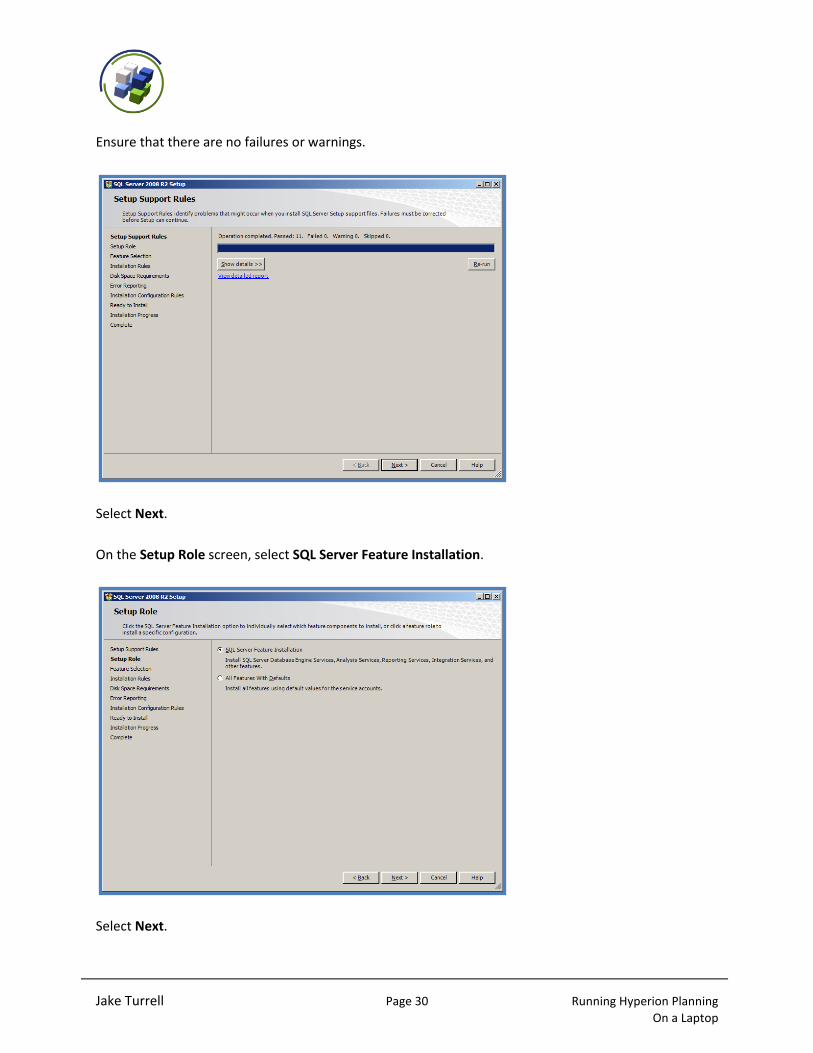
Ensure that there are no failures or warnings.
Select Next.
On the Setup Role screen, select SQL Server Feature Installation.
Select Next.
Jake Turrell Page 31 Running Hyperion Planning On a Laptop
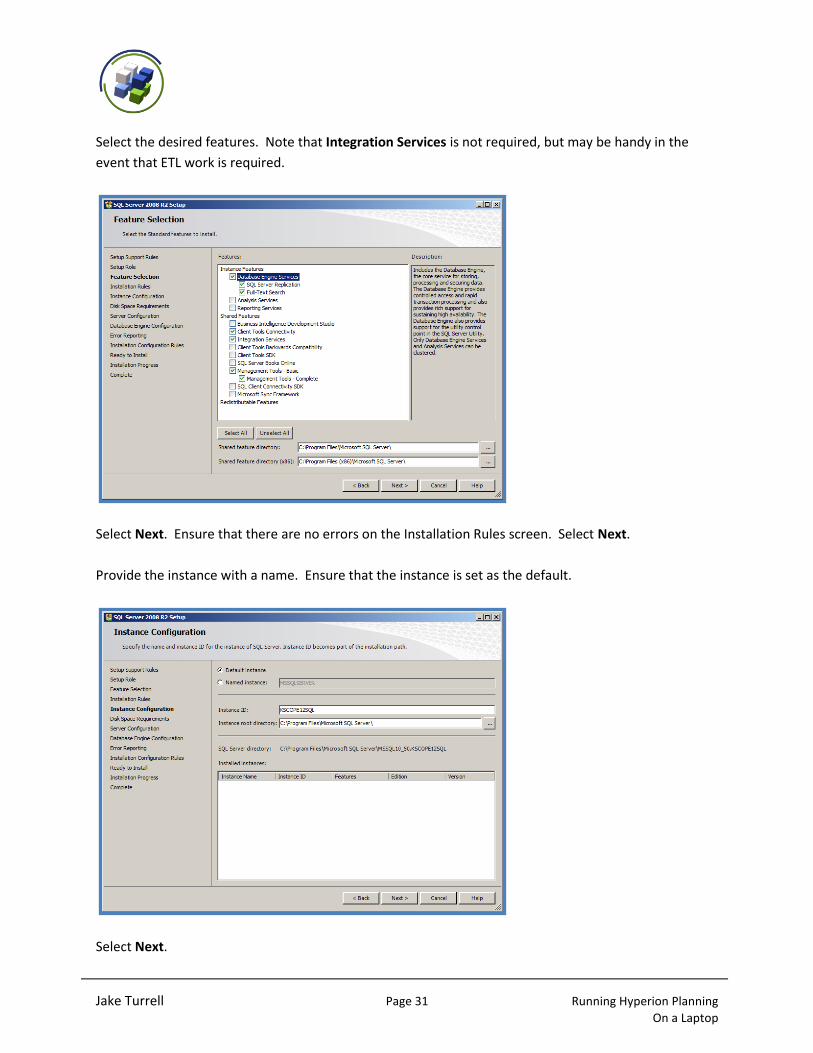
Select the desired features. Note that Integration Services is not required, but may be handy in the
event that ETL work is required.
Select Next. Ensure that there are no errors on the Installation Rules screen. Select Next.
Provide the instance with a name. Ensure that the instance is set as the default.
Select Next.
Jake Turrell Page 32 Running Hyperion Planning On a Laptop
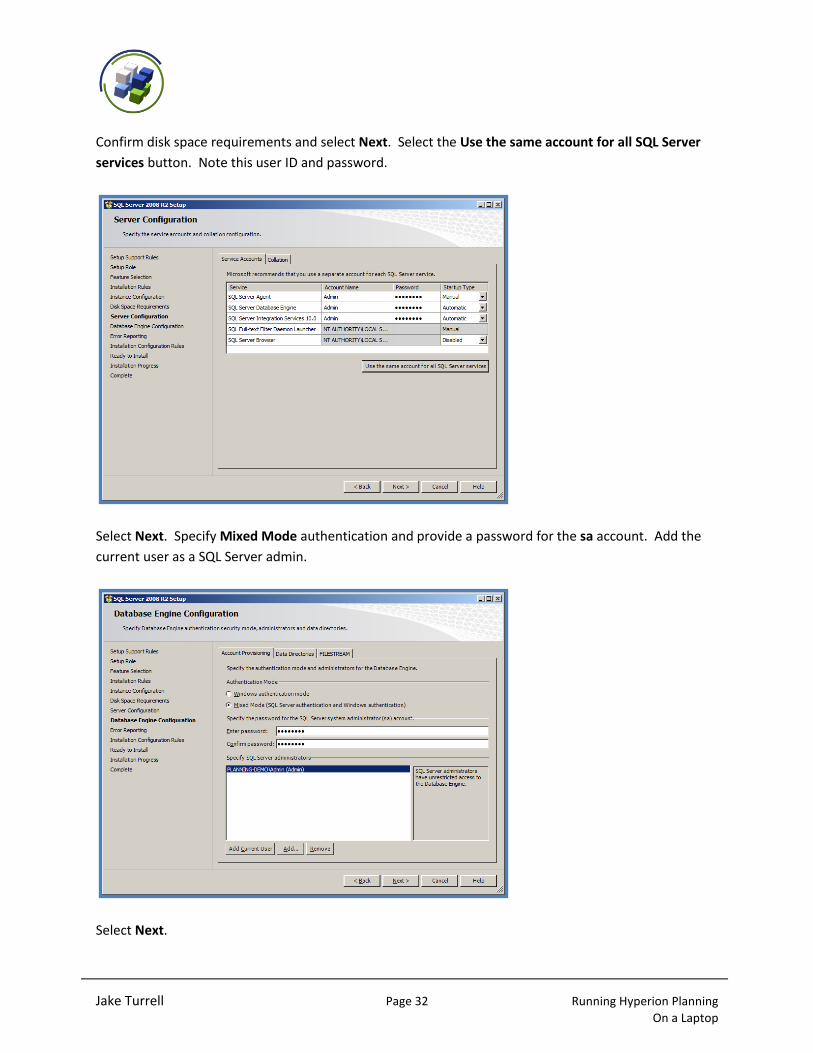
Confirm disk space requirements and select Next. Select the Use the same account for all SQL Server
services button. Note this user ID and password.
Select Next. Specify Mixed Mode authentication and provide a password for the sa account. Add the
current user as a SQL Server admin.
Select Next.

Jake Turrell Page 33 Running Hyperion Planning On a Laptop
Opt in or out of Error Reporting. Select Next.
Ensure that there are no errors. Select Next.
Confirm features to be installed.
Select Install. Look for a successful completion notice.
Jake Turrell Page 34 Running Hyperion Planning On a Laptop
At this point, it may be a good idea to take another snapshot. This snapshot in particular is important as
the next step (although optional) is to apply Windows Updates.
Select the Start menu, then All Programs, then Windows Update. Next select Check for Updates.
Install the desired updates and restart the virtual machine. This will likely take multiple update/restart
cycles.
Jake Turrell Page 35 Running Hyperion Planning On a Laptop
Get Cooking!
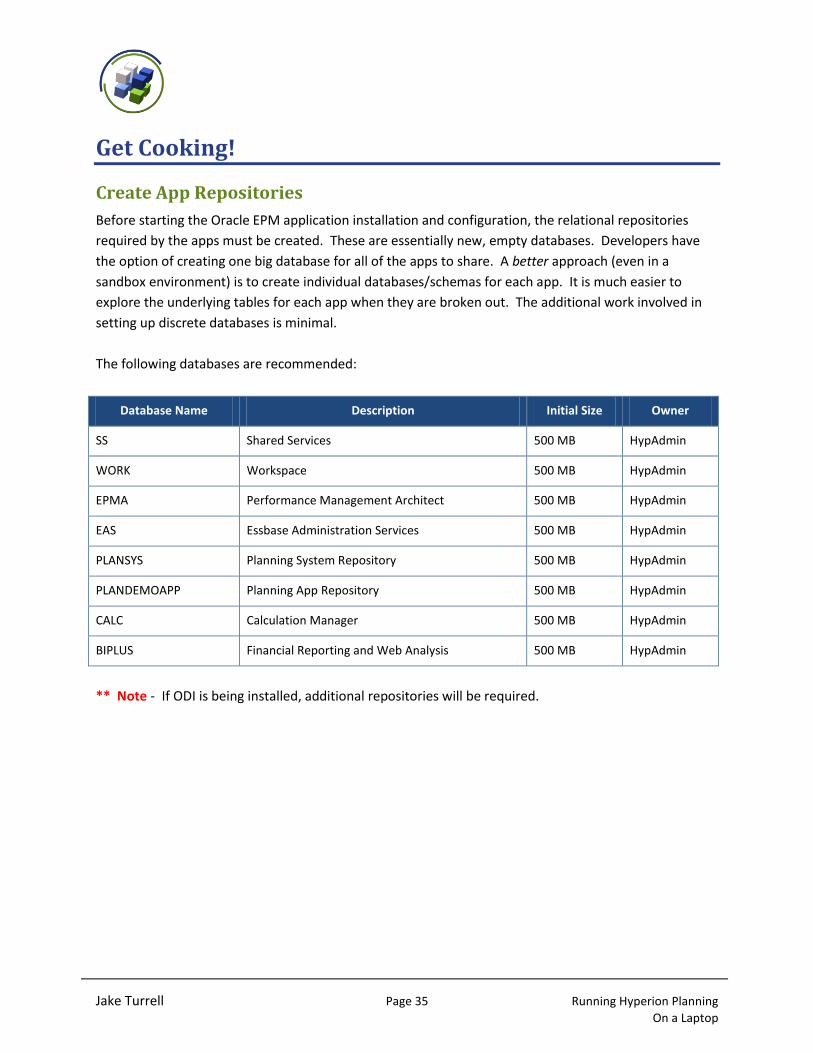
Create App Repositories
Before starting the Oracle EPM application installation and configuration, the relational repositories
required by the apps must be created. These are essentially new, empty databases. Developers have
the option of creating one big database for all of the apps to share. A better approach (even in a
sandbox environment) is to create individual databases/schemas for each app. It is much easier to
explore the underlying tables for each app when they are broken out. The additional work involved in
setting up discrete databases is minimal.
The following databases are recommended:
Database Name Description Initial Size Owner
SS Shared Services 500 MB HypAdmin
WORK Workspace 500 MB HypAdmin
EPMA Performance Management Architect 500 MB HypAdmin
EAS Essbase Administration Services 500 MB HypAdmin
PLANSYS Planning System Repository 500 MB HypAdmin
PLANDEMOAPP Planning App Repository 500 MB HypAdmin
CALC Calculation Manager 500 MB HypAdmin
BIPLUS Financial Reporting and Web Analysis 500 MB HypAdmin
** Note - If ODI is being installed, additional repositories will be required.
Jake Turrell Page 36 Running Hyperion Planning On a Laptop
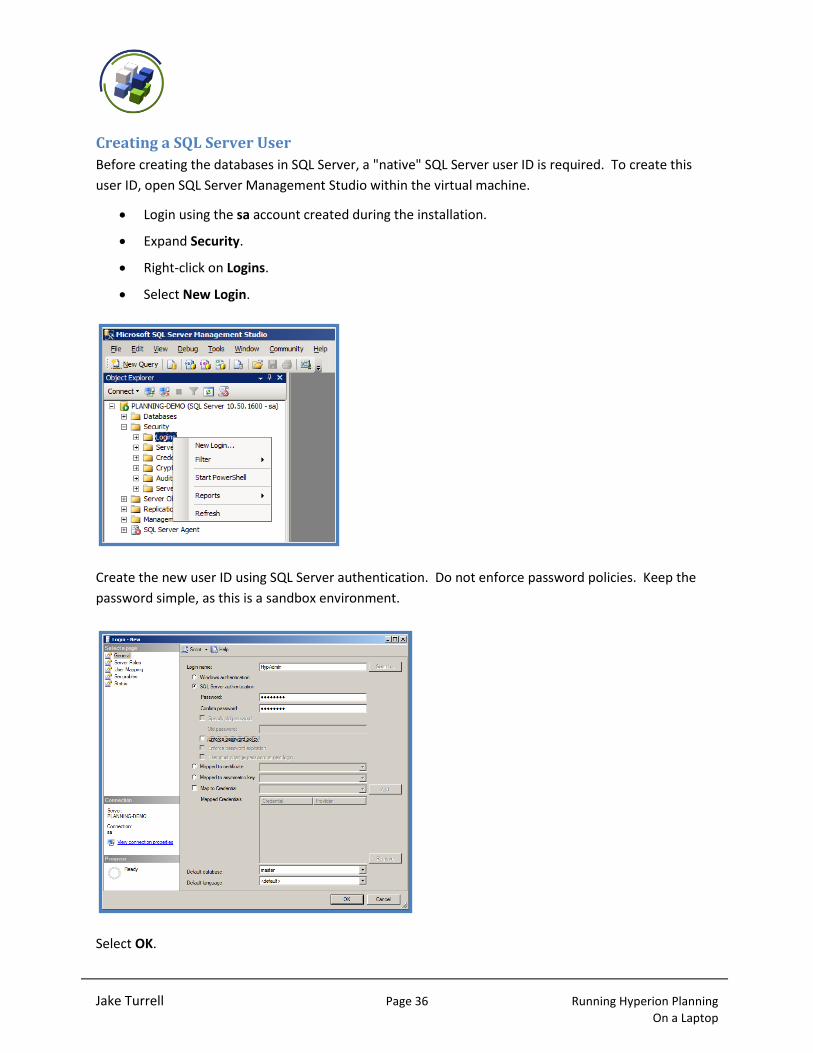
Creating a SQL Server User
Before creating the databases in SQL Server, a "native" SQL Server user ID is required. To create this
user ID, open SQL Server Management Studio within the virtual machine.
Login using the sa account created during the installation.
Expand Security.
Right-click on Logins.
Select New Login.
Create the new user ID using SQL Server authentication. Do not enforce password policies. Keep the
password simple, as this is a sandbox environment.
Select OK.
Jake Turrell Page 37 Running Hyperion Planning On a Laptop
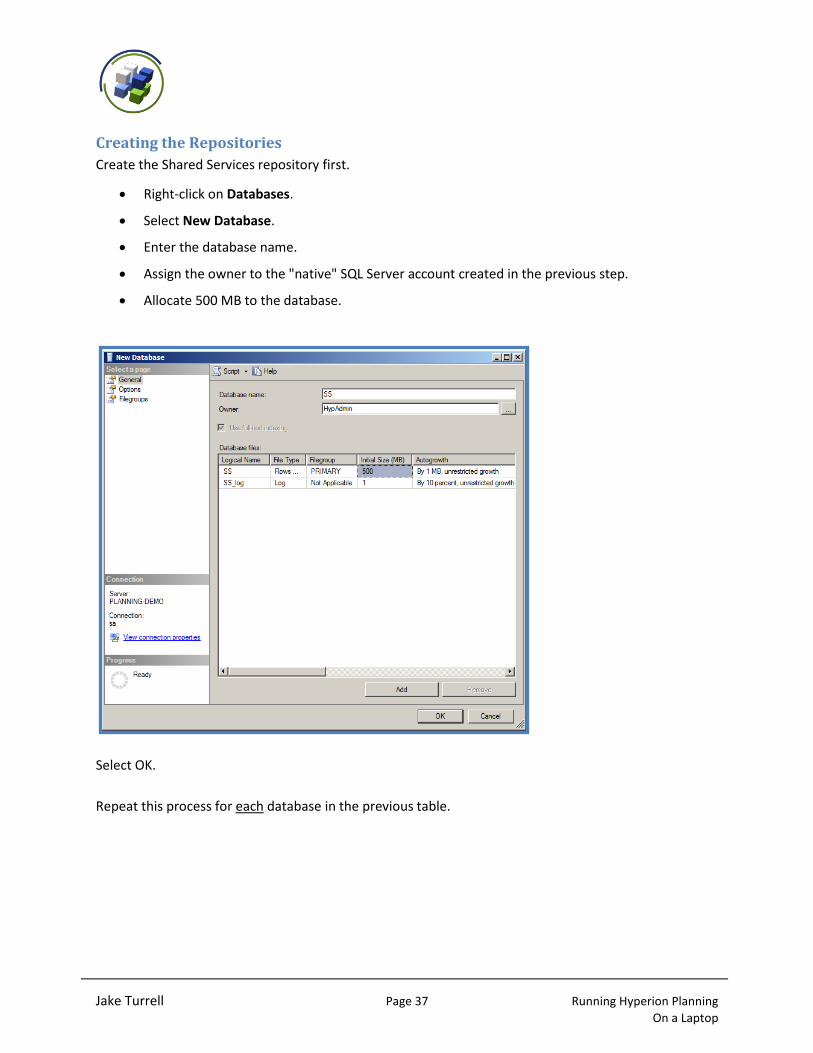
Creating the Repositories
Create the Shared Services repository first.
Right-click on Databases.
Select New Database.
Enter the database name.
Assign the owner to the "native" SQL Server account created in the previous step.
Allocate 500 MB to the database.
Select OK.
Repeat this process for each database in the previous table.
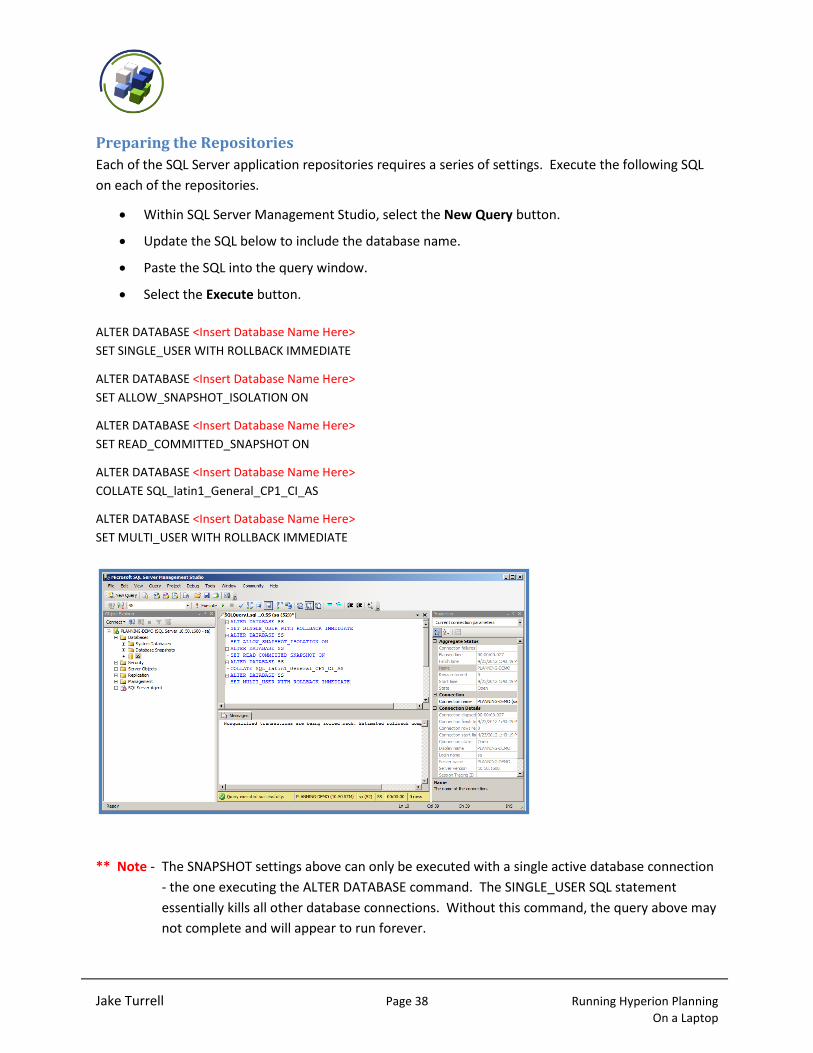
Jake Turrell Page 38 Running Hyperion Planning On a Laptop
Preparing the Repositories
Each of the SQL Server application repositories requires a series of settings. Execute the following SQL
on each of the repositories.
Within SQL Server Management Studio, select the New Query button.
Update the SQL below to include the database name.
Paste the SQL into the query window.
Select the Execute button.
ALTER DATABASE <Insert Database Name Here>
SET SINGLE_USER WITH ROLLBACK IMMEDIATE
ALTER DATABASE <Insert Database Name Here>
SET ALLOW_SNAPSHOT_ISOLATION ON
ALTER DATABASE <Insert Database Name Here>
SET READ_COMMITTED_SNAPSHOT ON
ALTER DATABASE <Insert Database Name Here>
COLLATE SQL_latin1_General_CP1_CI_AS
ALTER DATABASE <Insert Database Name Here>
SET MULTI_USER WITH ROLLBACK IMMEDIATE
** Note - The SNAPSHOT settings above can only be executed with a single active database connection
- the one executing the ALTER DATABASE command. The SINGLE_USER SQL statement
essentially kills all other database connections. Without this command, the query above may
not complete and will appear to run forever.

Jake Turrell Page 39 Running Hyperion Planning On a Laptop
For additional information on these commands, please refer to the Installation Start Here document.
See the section titled Microsoft SQL Server Database Creation Requirements.
Execute these commands on each application repository.
Jake Turrell Page 40 Running Hyperion Planning On a Laptop
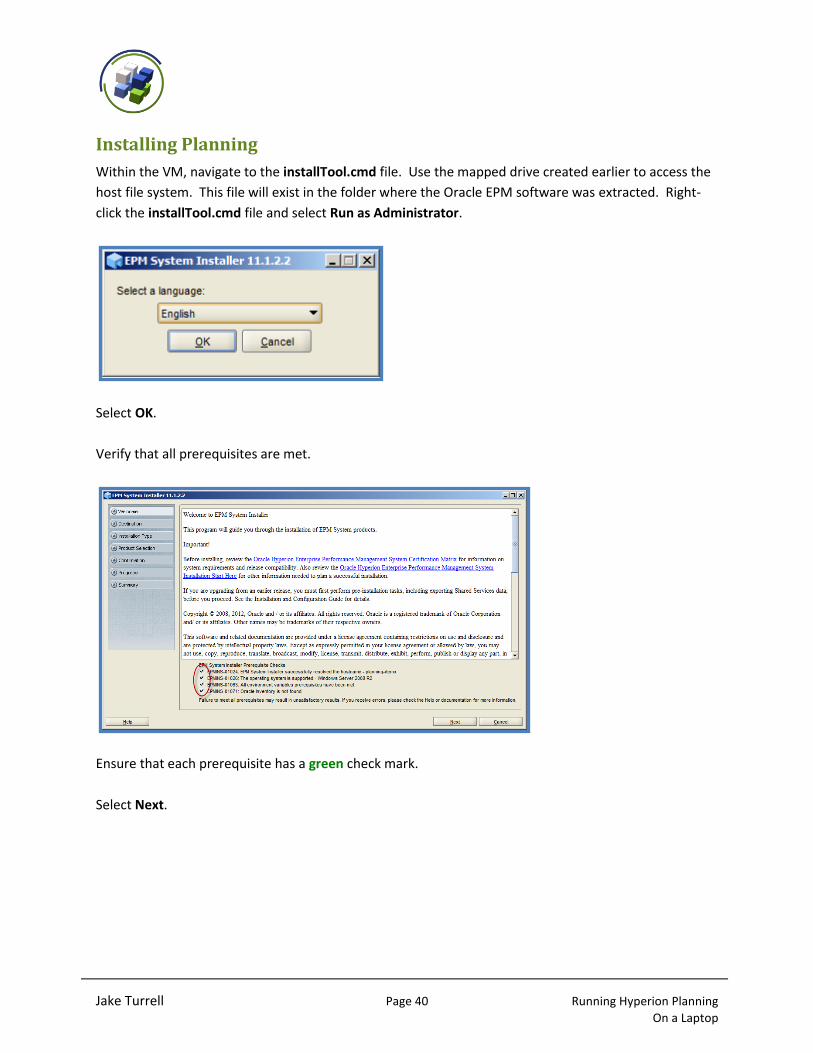
Installing Planning
Within the VM, navigate to the installTool.cmd file. Use the mapped drive created earlier to access the
host file system. This file will exist in the folder where the Oracle EPM software was extracted. Right-
click the installTool.cmd file and select Run as Administrator.
Select OK.
Verify that all prerequisites are met.
Ensure that each prerequisite has a green check mark.
Select Next.
Jake Turrell Page 41 Running Hyperion Planning On a Laptop
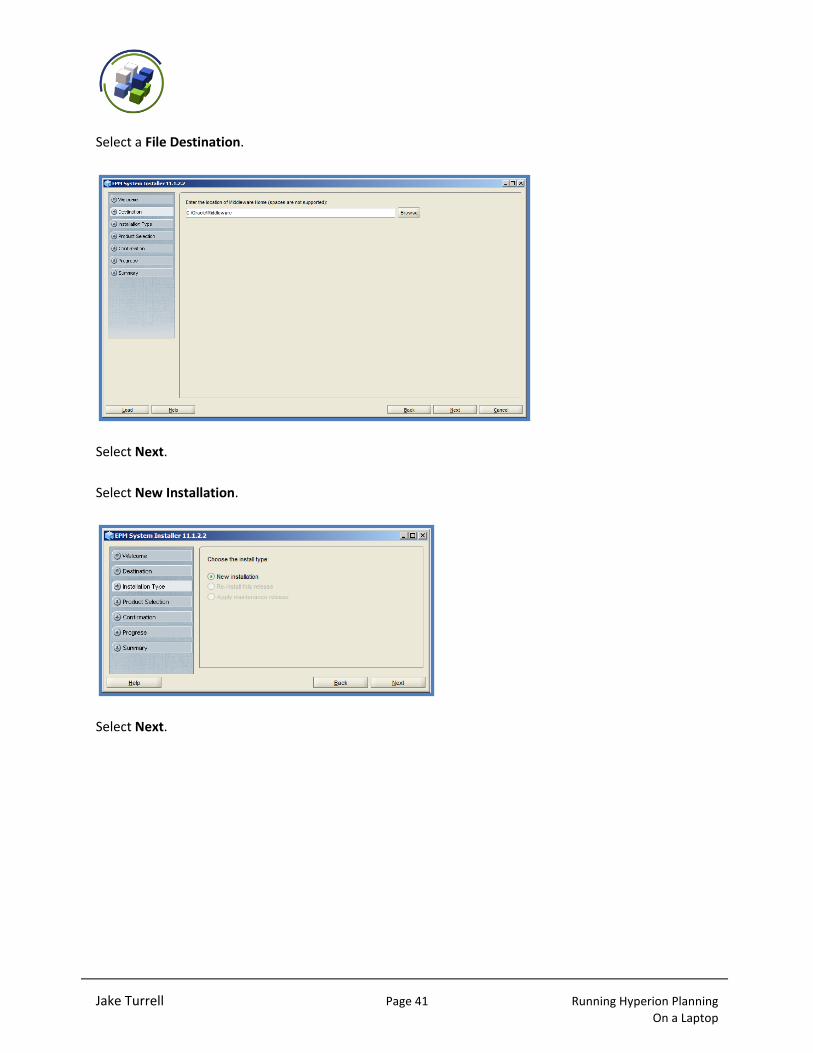
Select a File Destination.
Select Next.
Select New Installation.
Select Next.
Jake Turrell Page 42 Running Hyperion Planning On a Laptop
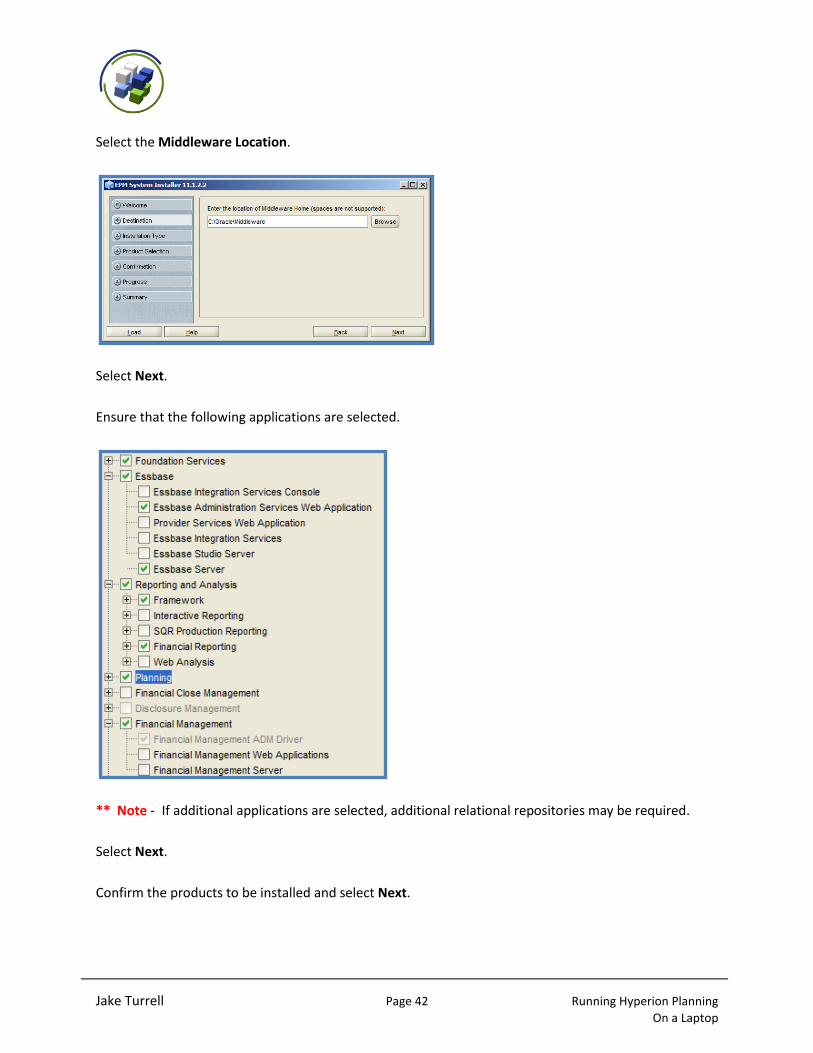
Select the Middleware Location.
Select Next.
Ensure that the following applications are selected.
** Note - If additional applications are selected, additional relational repositories may be required.
Select Next.
Confirm the products to be installed and select Next.
Jake Turrell Page 43 Running Hyperion Planning On a Laptop
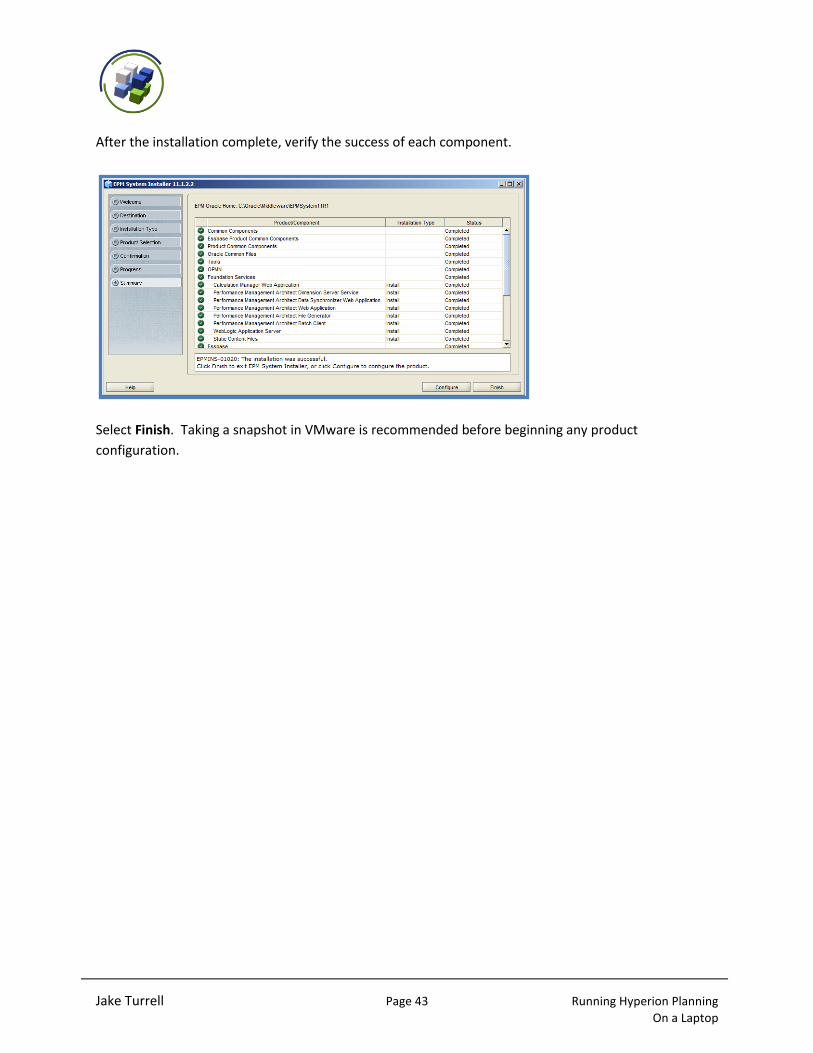
After the installation complete, verify the success of each component.
Select Finish. Taking a snapshot in VMware is recommended before beginning any product
configuration.
Jake Turrell Page 44 Running Hyperion Planning On a Laptop
Configuring Planning
Within the VM, create a shortcut to the config tool. This tool will be used often. The config tool is
located in: C:\Oracle\Middleware\EPMSystem11R1\common\config\11.1.2.0.
In this example, products will be configured independently instead of configuring everything at once.
This will allow developers to give each application its own relational repository. This is a best practice
(even in a sandbox environment) because it makes the relevant tables much easier to browse.
While each application will have its own relational repository, the web apps will be deployed to a single
managed server (aka "compact deployment"). This will dramatically reduce memory requirements.
Configuring Foundation Services
** Note - Before moving forward, make sure a snapshot has been taken.
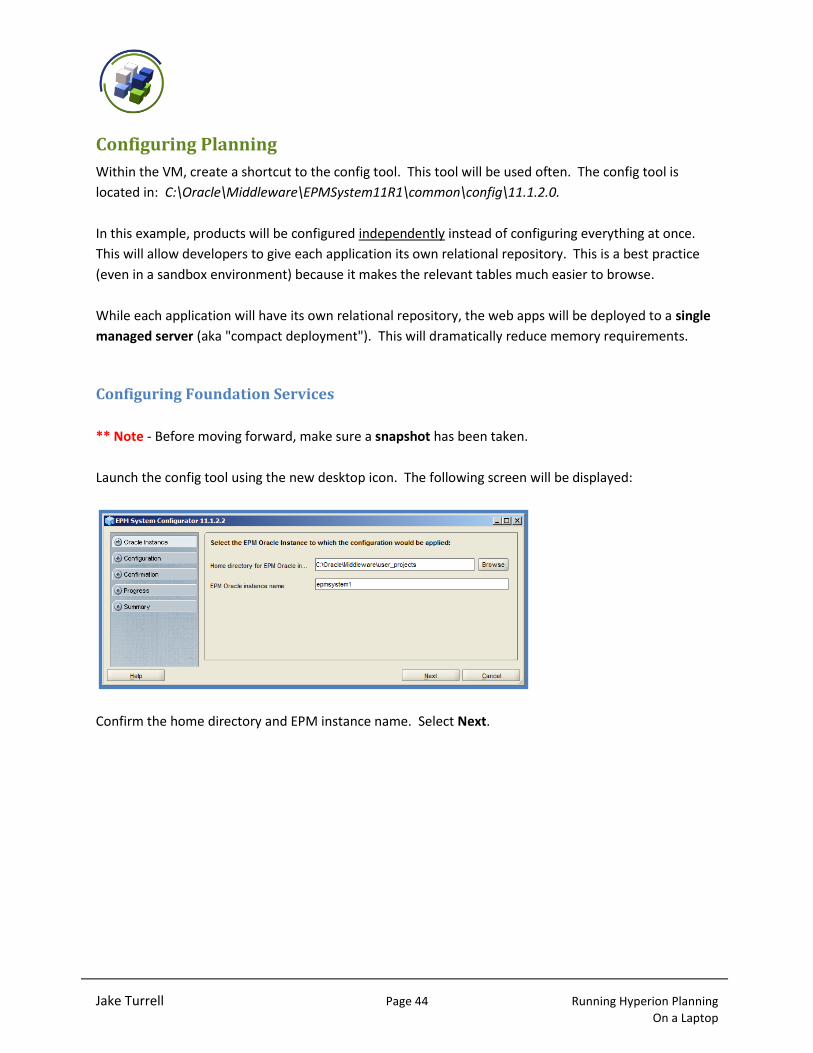
Launch the config tool using the new desktop icon. The following screen will be displayed:
Confirm the home directory and EPM instance name. Select Next.
Jake Turrell Page 45 Running Hyperion Planning On a Laptop
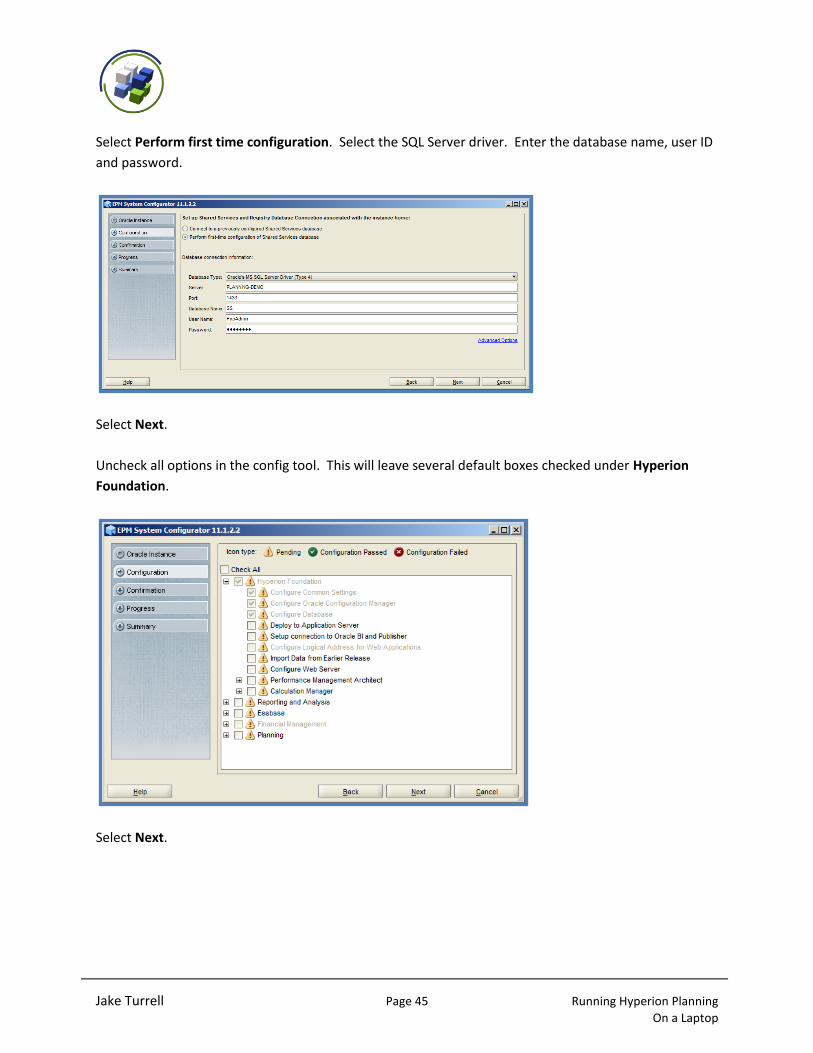
Select Perform first time configuration. Select the SQL Server driver. Enter the database name, user ID
and password.
Select Next.
Uncheck all options in the config tool. This will leave several default boxes checked under Hyperion
Foundation.
Select Next.
Jake Turrell Page 46 Running Hyperion Planning On a Laptop
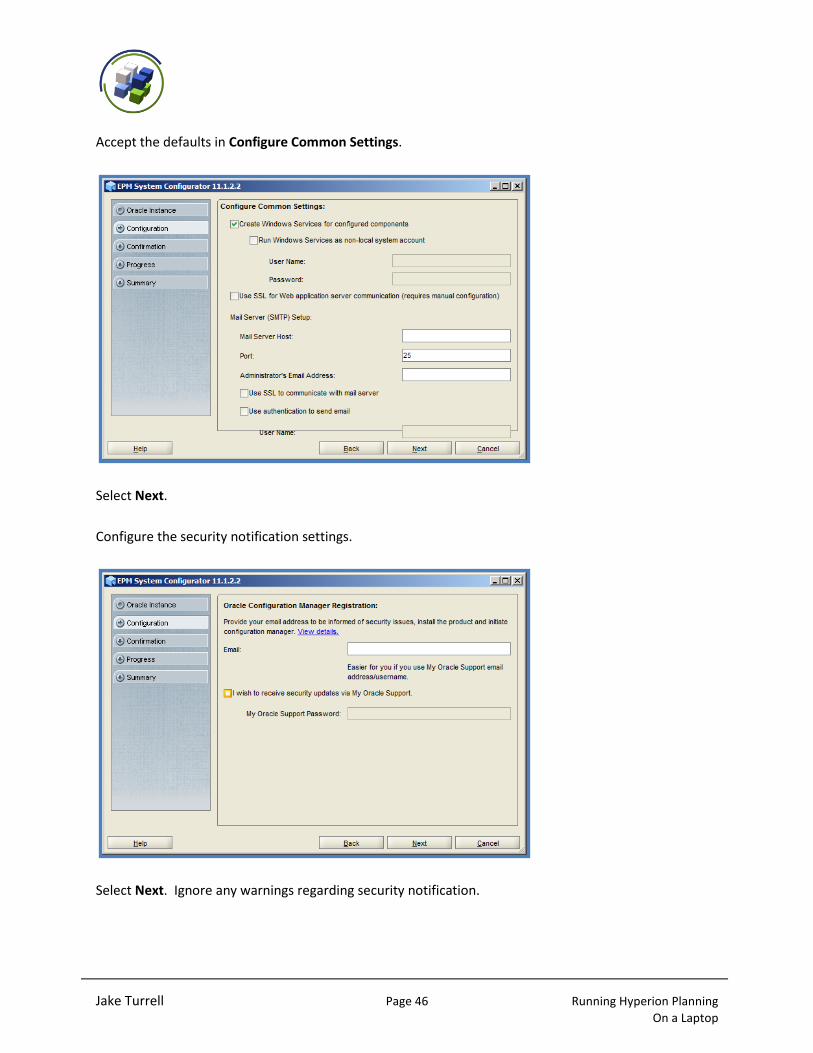
Accept the defaults in Configure Common Settings.
Select Next.
Configure the security notification settings.
Select Next. Ignore any warnings regarding security notification.
Jake Turrell Page 47 Running Hyperion Planning On a Laptop
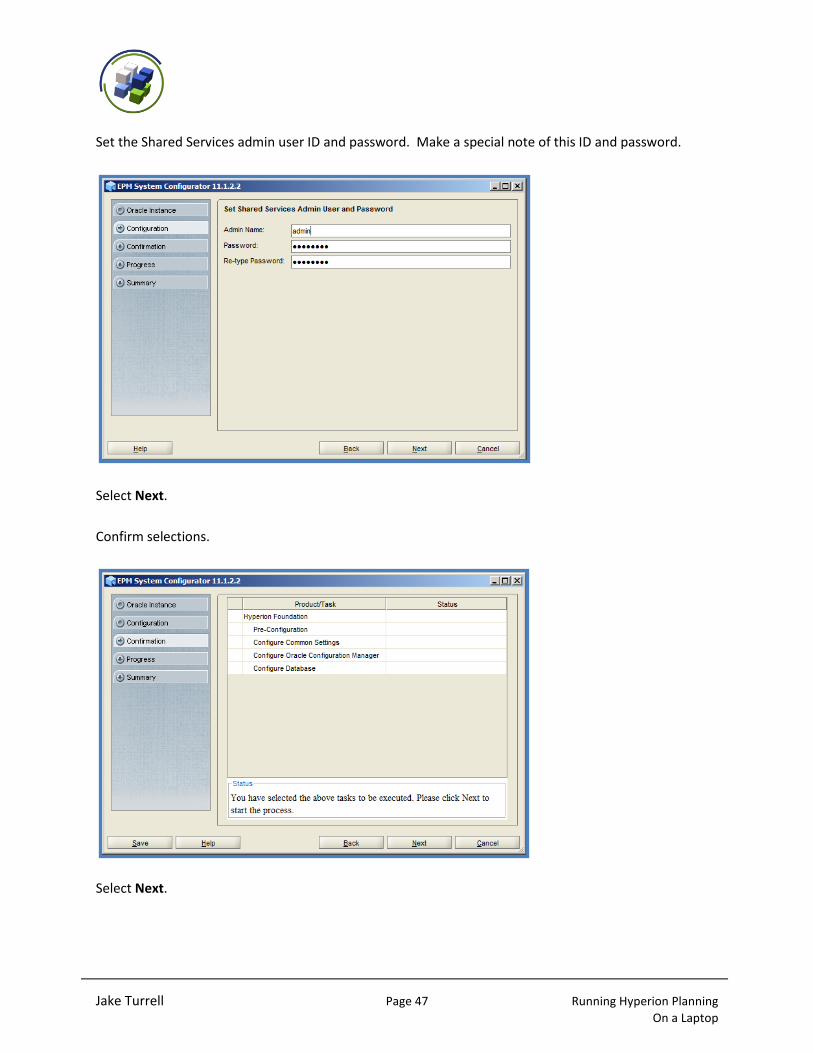
Set the Shared Services admin user ID and password. Make a special note of this ID and password.
Select Next.
Confirm selections.
Select Next.
Jake Turrell Page 48 Running Hyperion Planning On a Laptop
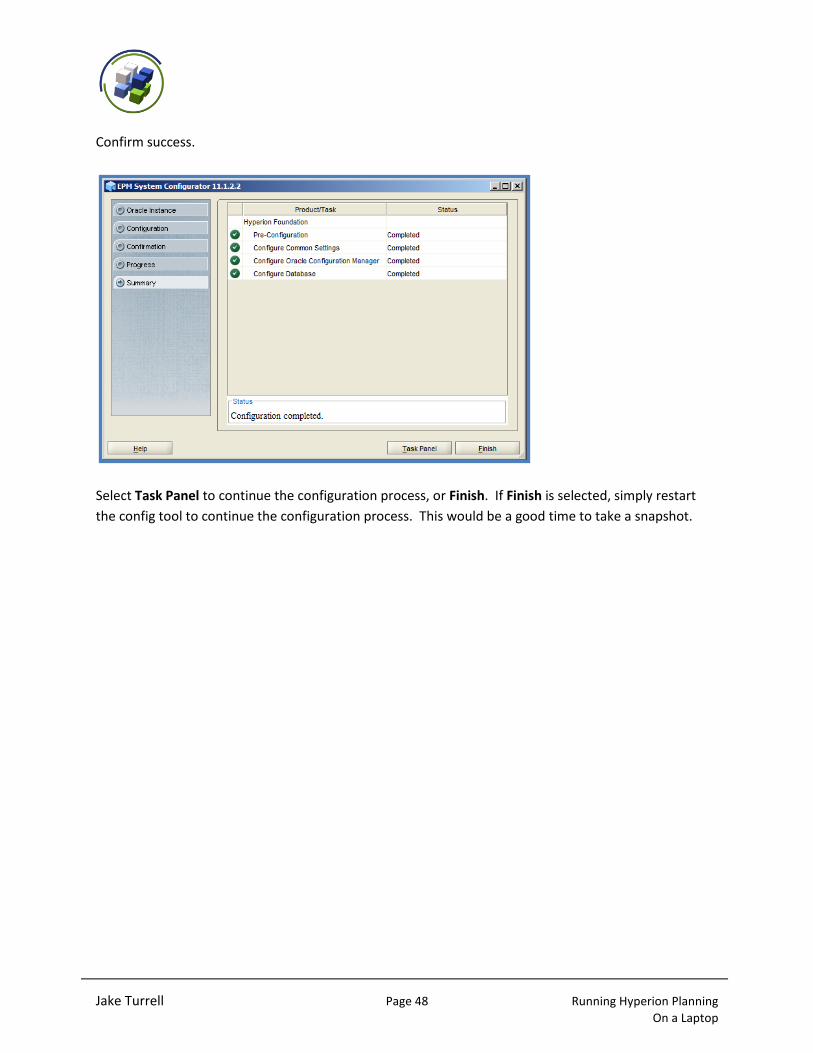
Confirm success.
Select Task Panel to continue the configuration process, or Finish. If Finish is selected, simply restart
the config tool to continue the configuration process. This would be a good time to take a snapshot.
Jake Turrell Page 49 Running Hyperion Planning On a Laptop
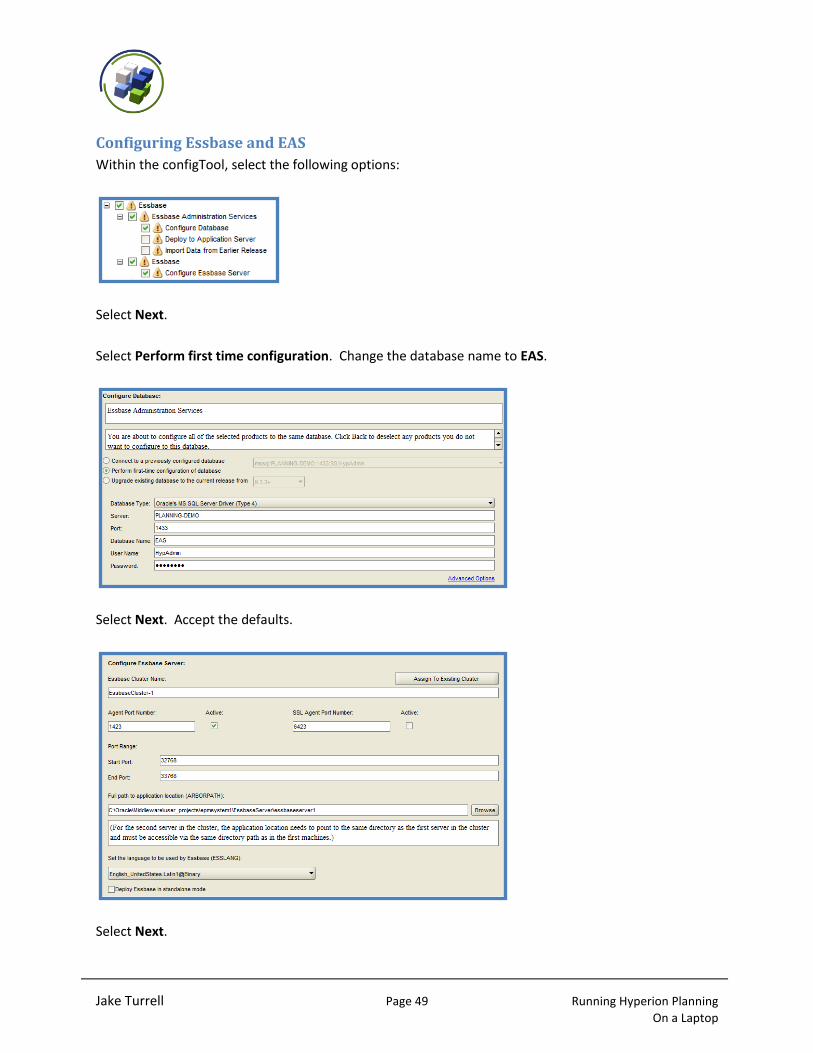
Configuring Essbase and EAS
Within the configTool, select the following options:
Select Next.
Select Perform first time configuration. Change the database name to EAS.
Select Next. Accept the defaults.
Select Next.
Jake Turrell Page 50 Running Hyperion Planning On a Laptop
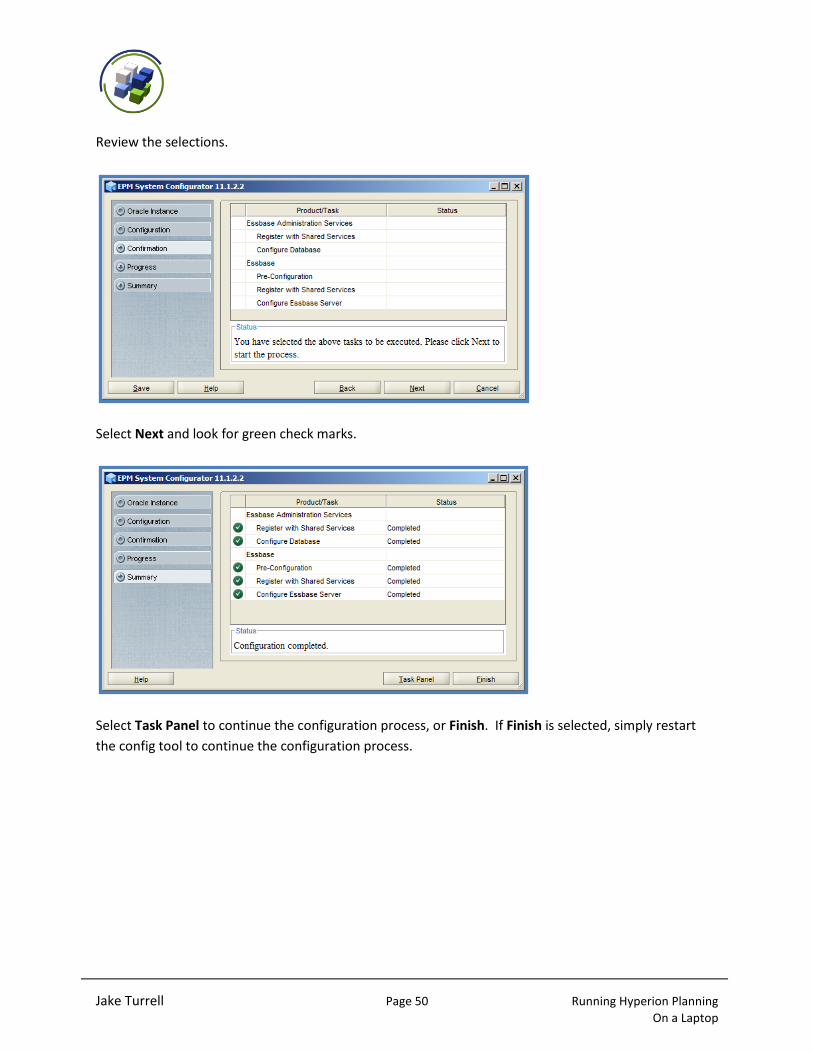
Review the selections.
Select Next and look for green check marks.
Select Task Panel to continue the configuration process, or Finish. If Finish is selected, simply restart
the config tool to continue the configuration process.
Jake Turrell Page 51 Running Hyperion Planning On a Laptop
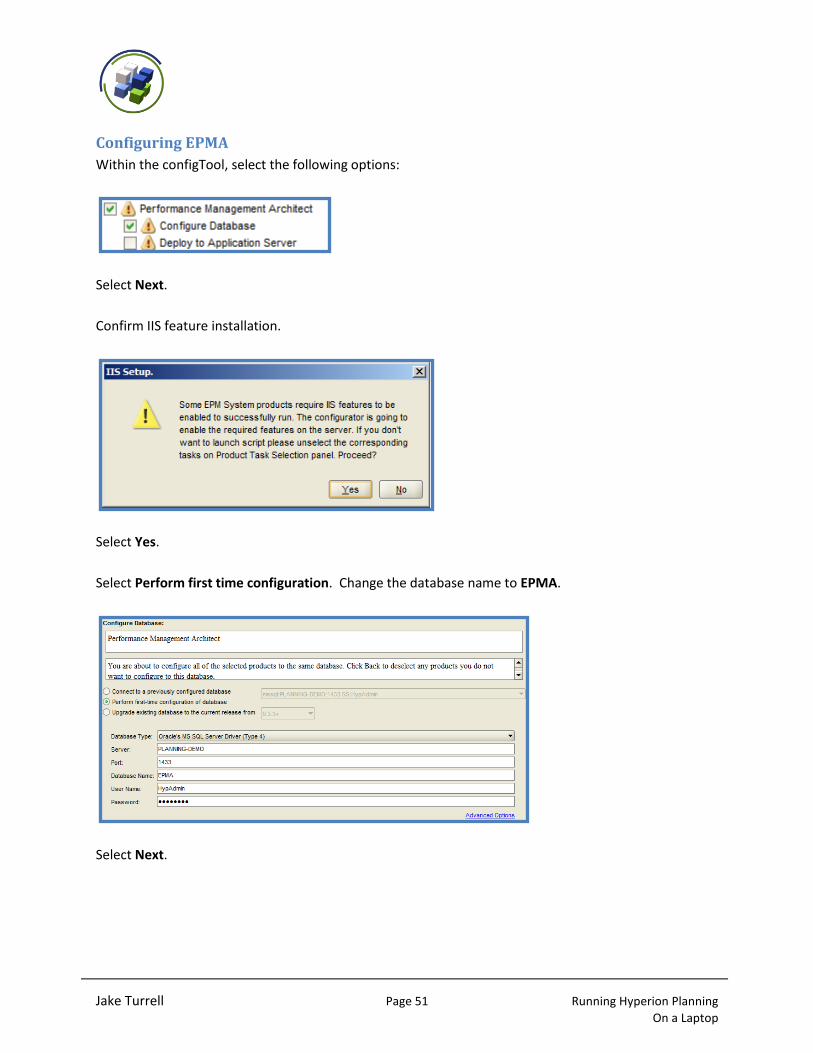
Configuring EPMA
Within the configTool, select the following options:
Select Next.
Confirm IIS feature installation.
Select Yes.
Select Perform first time configuration. Change the database name to EPMA.
Select Next.
Jake Turrell Page 52 Running Hyperion Planning On a Laptop
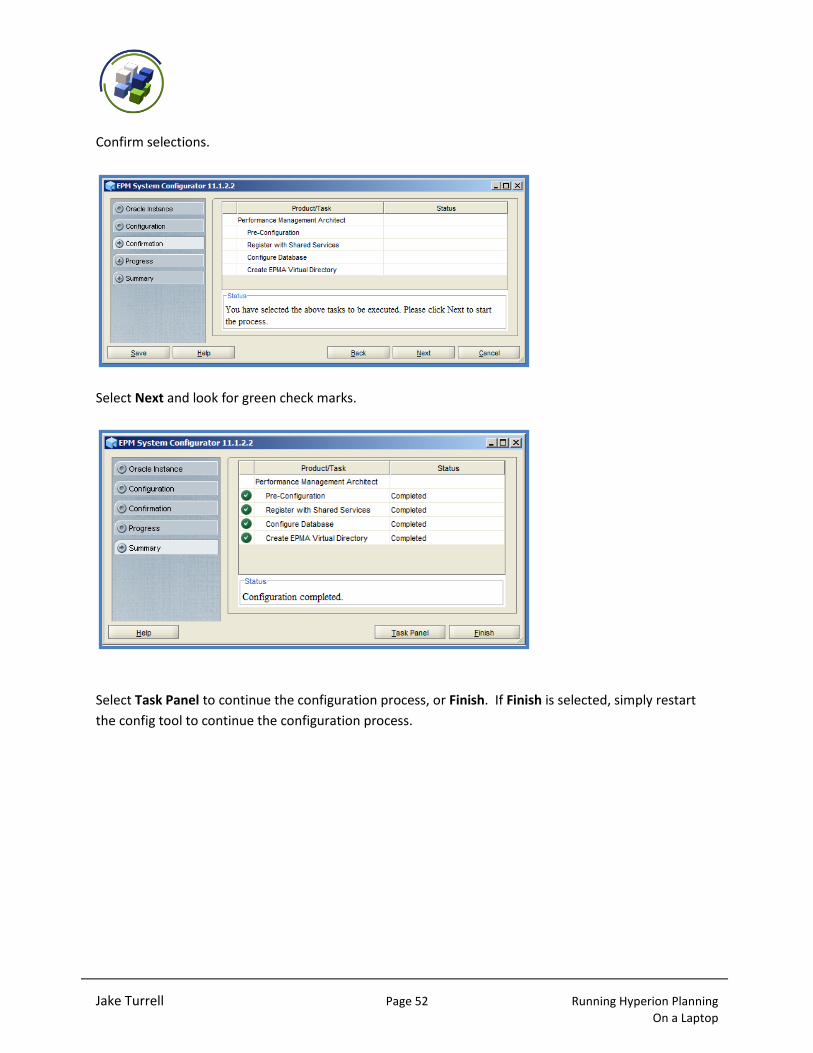
Confirm selections.
Select Next and look for green check marks.
Select Task Panel to continue the configuration process, or Finish. If Finish is selected, simply restart
the config tool to continue the configuration process.
Jake Turrell Page 53 Running Hyperion Planning On a Laptop
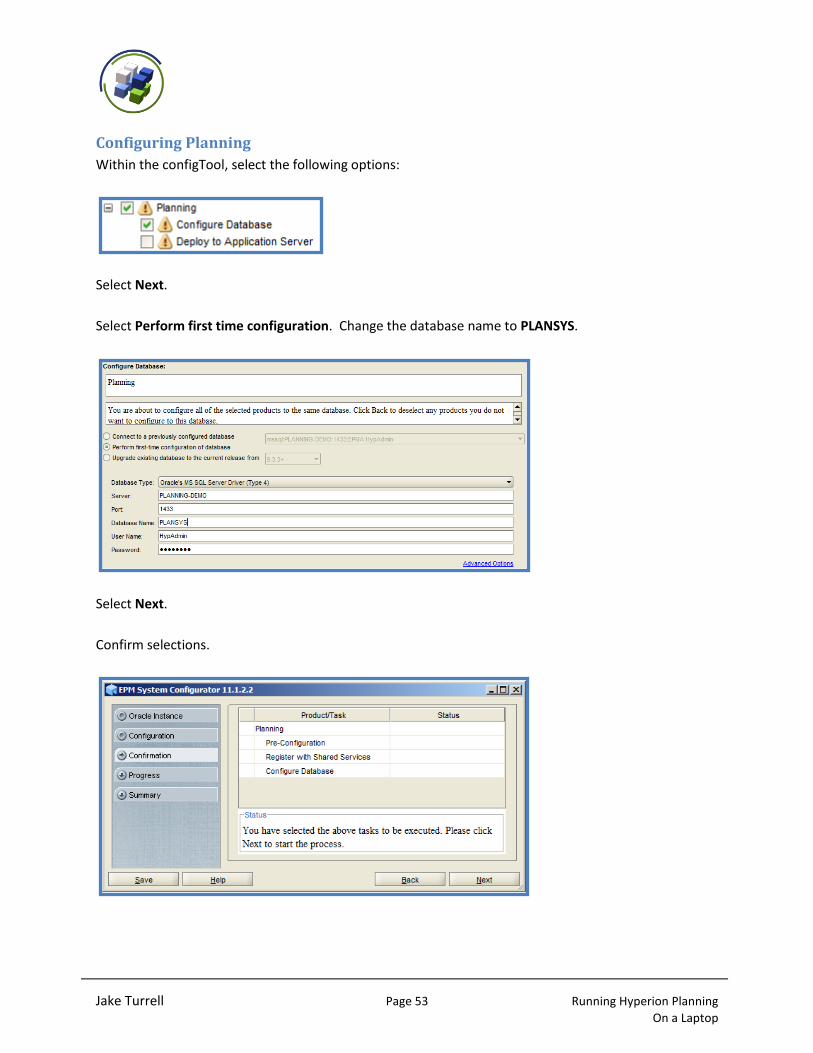
Configuring Planning
Within the configTool, select the following options:
Select Next.
Select Perform first time configuration. Change the database name to PLANSYS.
Select Next.
Confirm selections.
Jake Turrell Page 54 Running Hyperion Planning On a Laptop
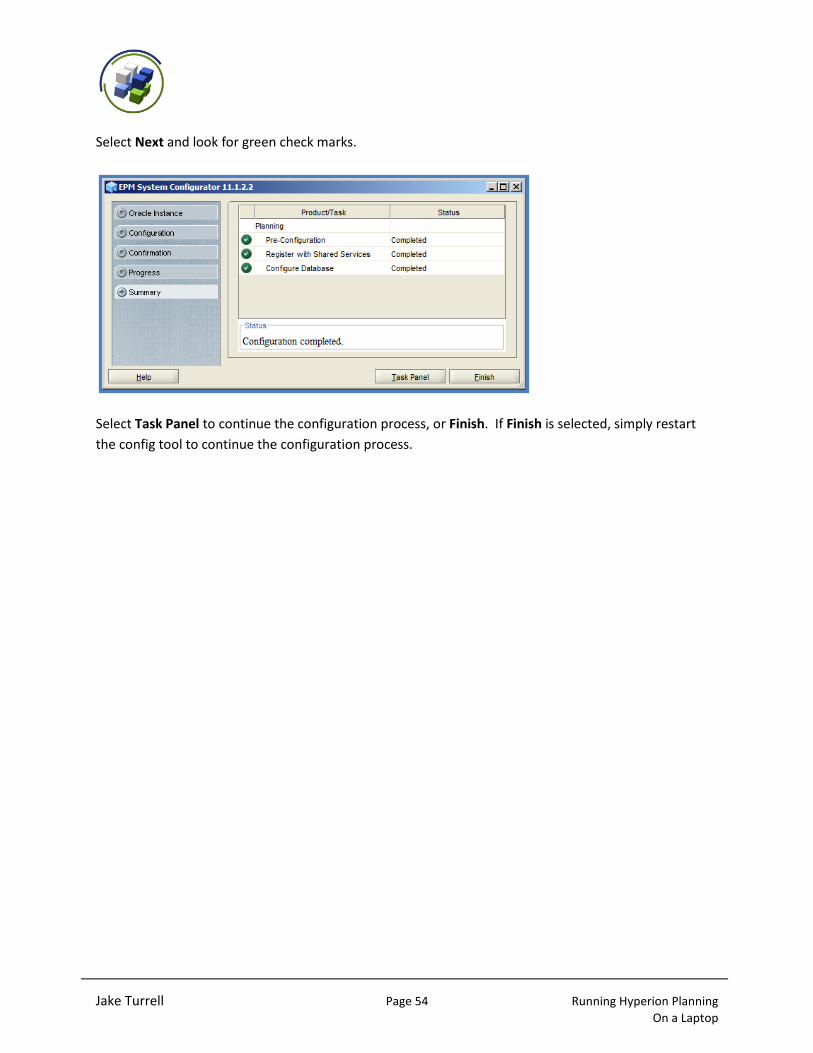
Select Next and look for green check marks.
Select Task Panel to continue the configuration process, or Finish. If Finish is selected, simply restart
the config tool to continue the configuration process.
Jake Turrell Page 55 Running Hyperion Planning On a Laptop
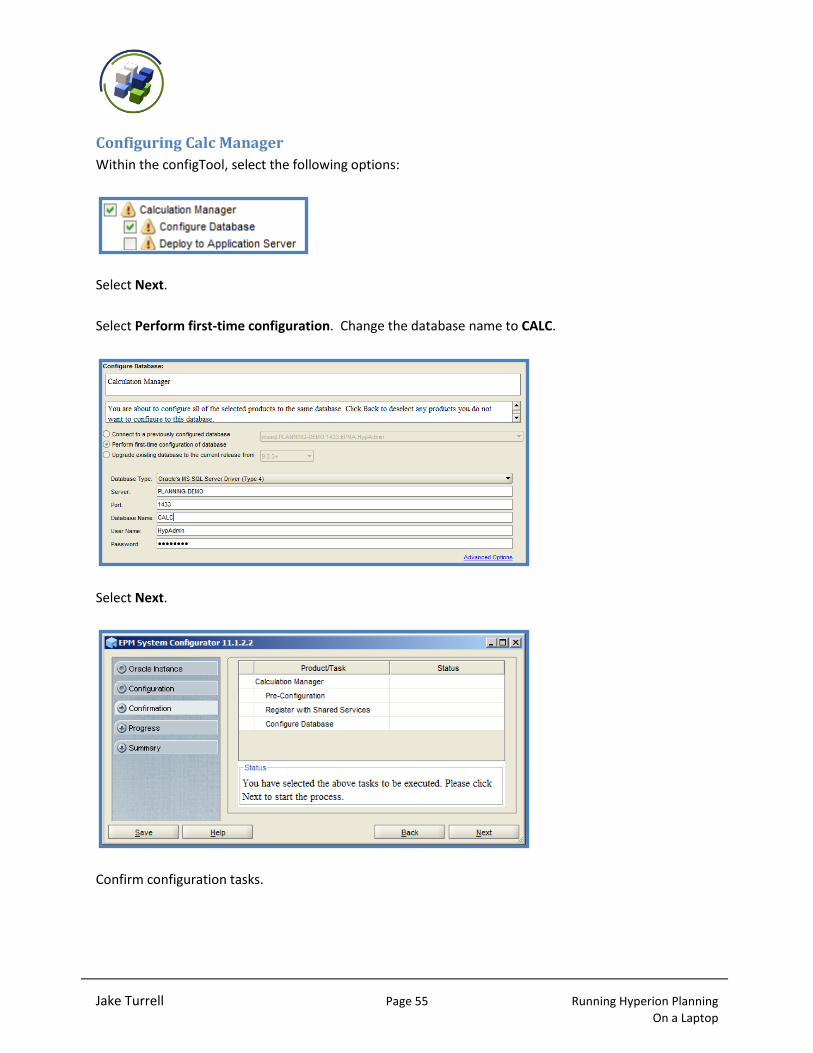
Configuring Calc Manager
Within the configTool, select the following options:
Select Next.
Select Perform first-time configuration. Change the database name to CALC.
Select Next.
Confirm configuration tasks.
Jake Turrell Page 56 Running Hyperion Planning On a Laptop
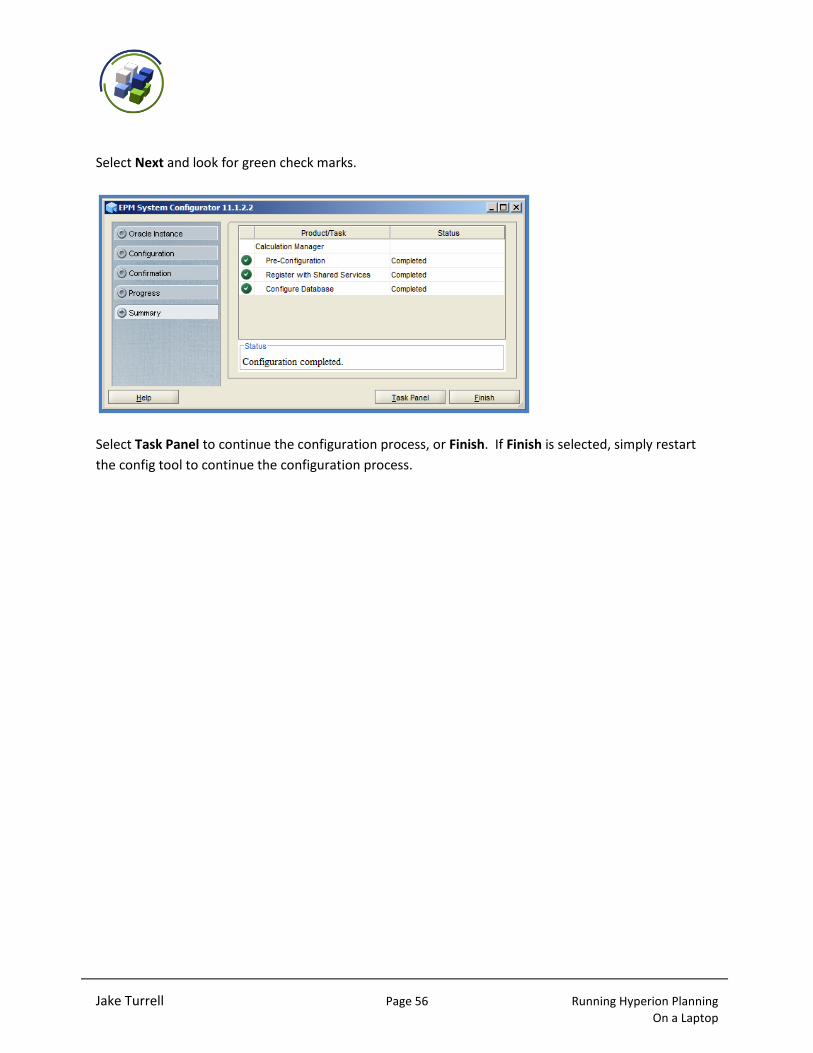
Select Next and look for green check marks.
Select Task Panel to continue the configuration process, or Finish. If Finish is selected, simply restart
the config tool to continue the configuration process.
Jake Turrell Page 57 Running Hyperion Planning On a Laptop
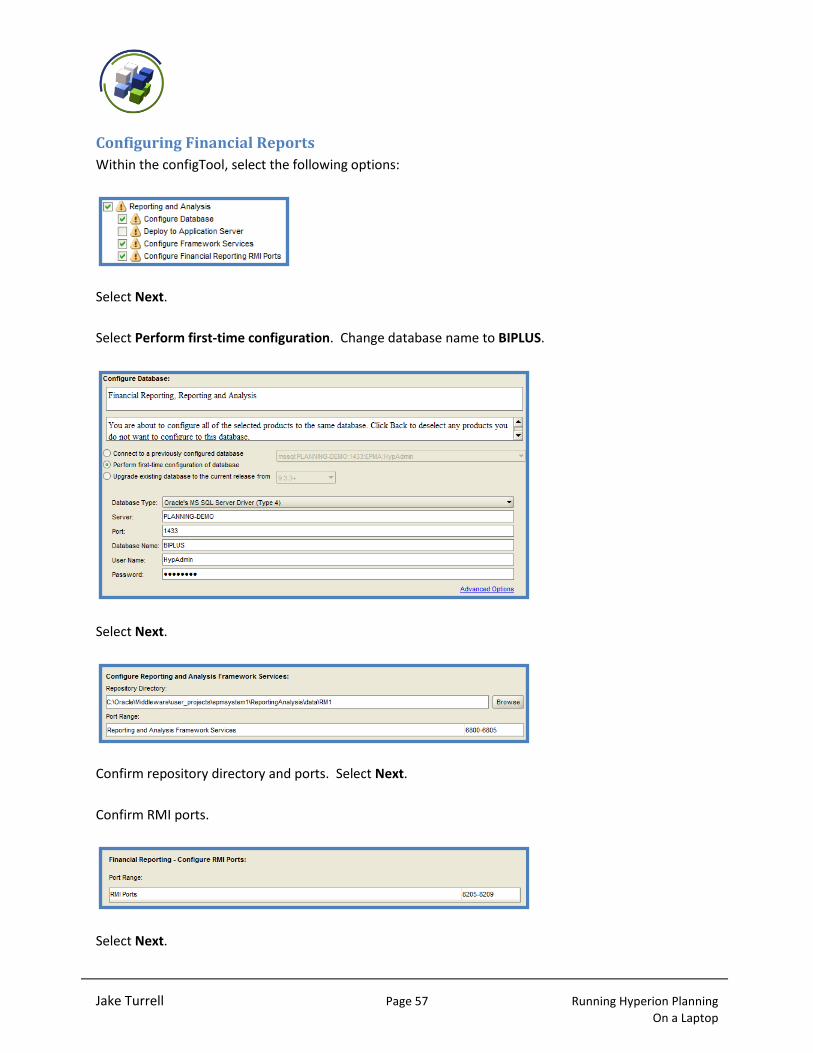
Configuring Financial Reports
Within the configTool, select the following options:
Select Next.
Select Perform first-time configuration. Change database name to BIPLUS.
Select Next.
Confirm repository directory and ports. Select Next.
Confirm RMI ports.
Select Next.
Jake Turrell Page 58 Running Hyperion Planning On a Laptop
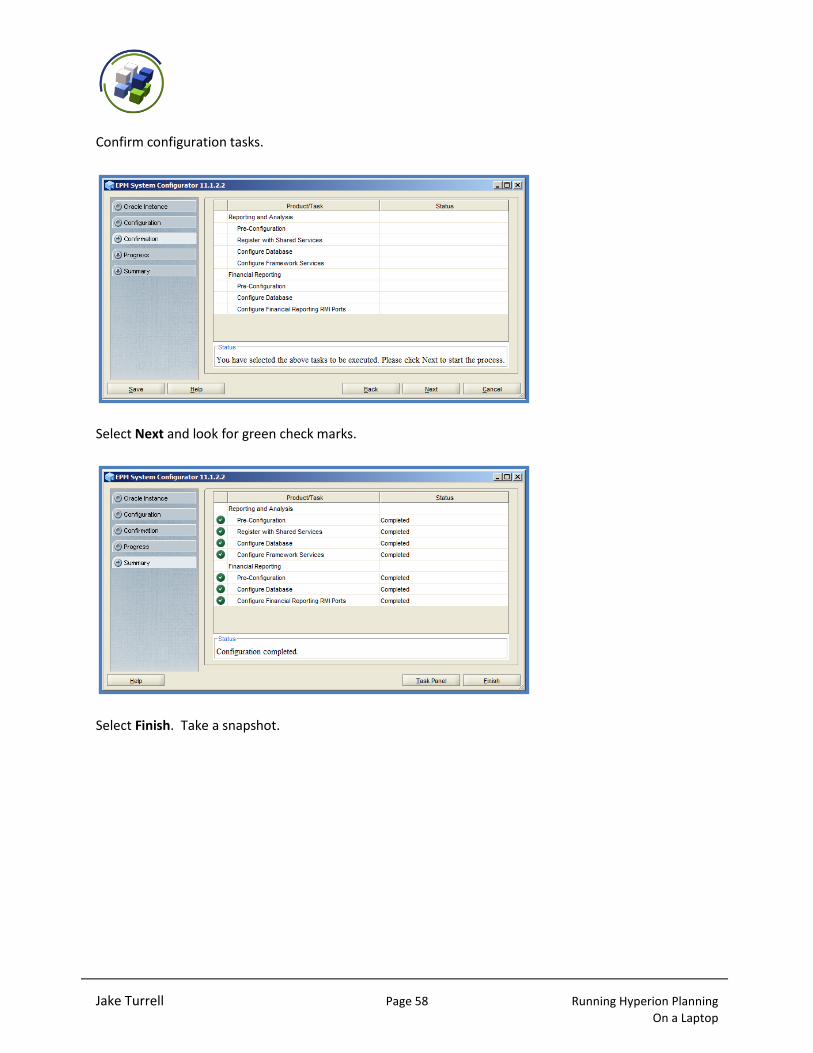
Confirm configuration tasks.
Select Next and look for green check marks.
Select Finish. Take a snapshot.
Jake Turrell Page 59 Running Hyperion Planning On a Laptop
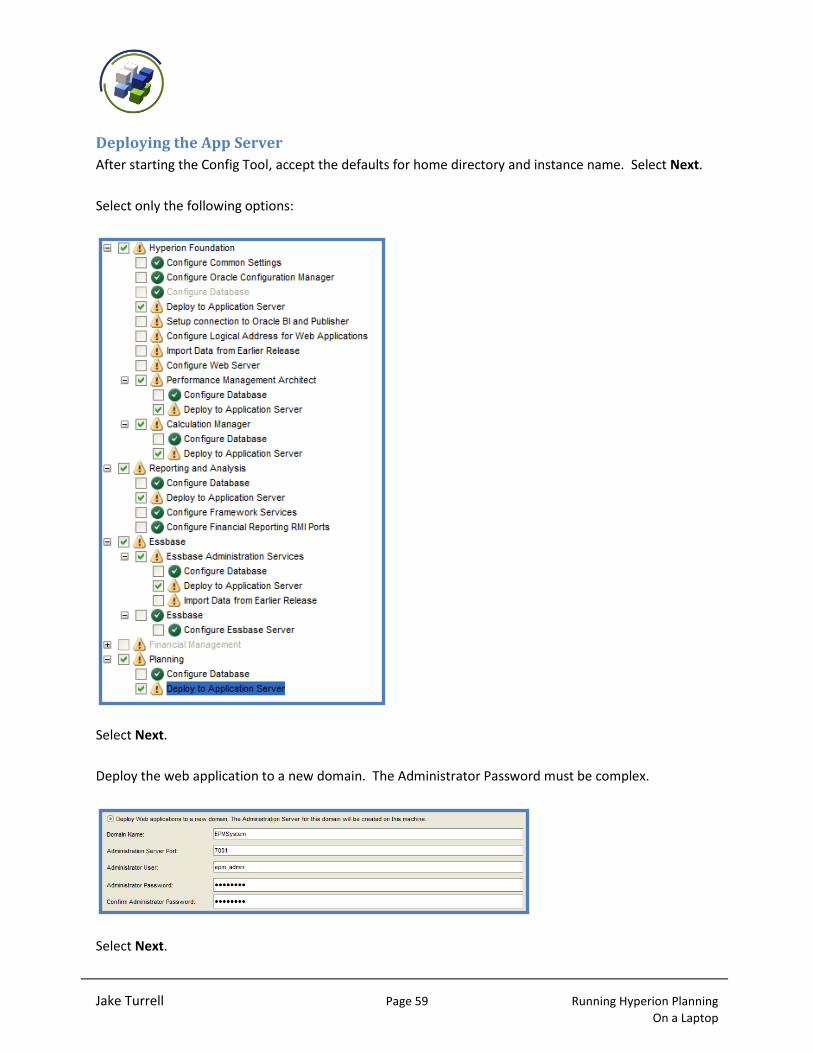
Deploying the App Server
After starting the Config Tool, accept the defaults for home directory and instance name. Select Next.
Select only the following options:
Select Next.
Deploy the web application to a new domain. The Administrator Password must be complex.
Select Next.
Jake Turrell Page 60 Running Hyperion Planning On a Laptop
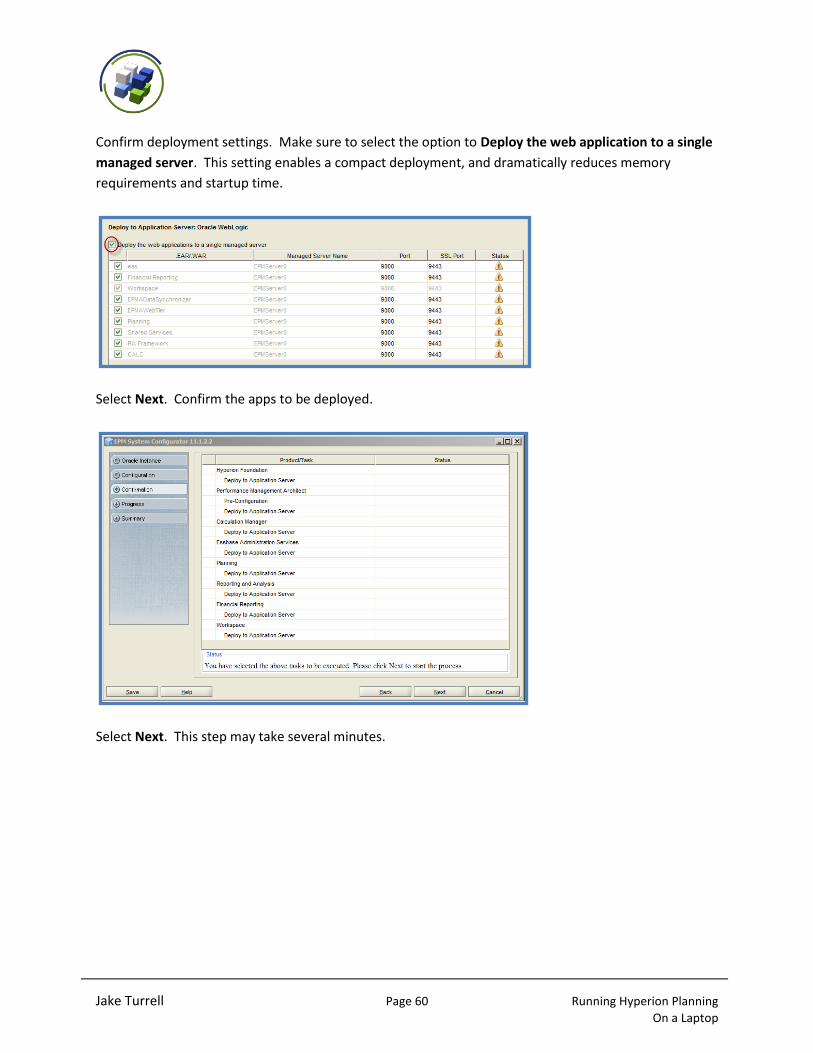
Confirm deployment settings. Make sure to select the option to Deploy the web application to a single
managed server. This setting enables a compact deployment, and dramatically reduces memory
requirements and startup time.
Select Next. Confirm the apps to be deployed.
Select Next. This step may take several minutes.
Jake Turrell Page 61 Running Hyperion Planning On a Laptop
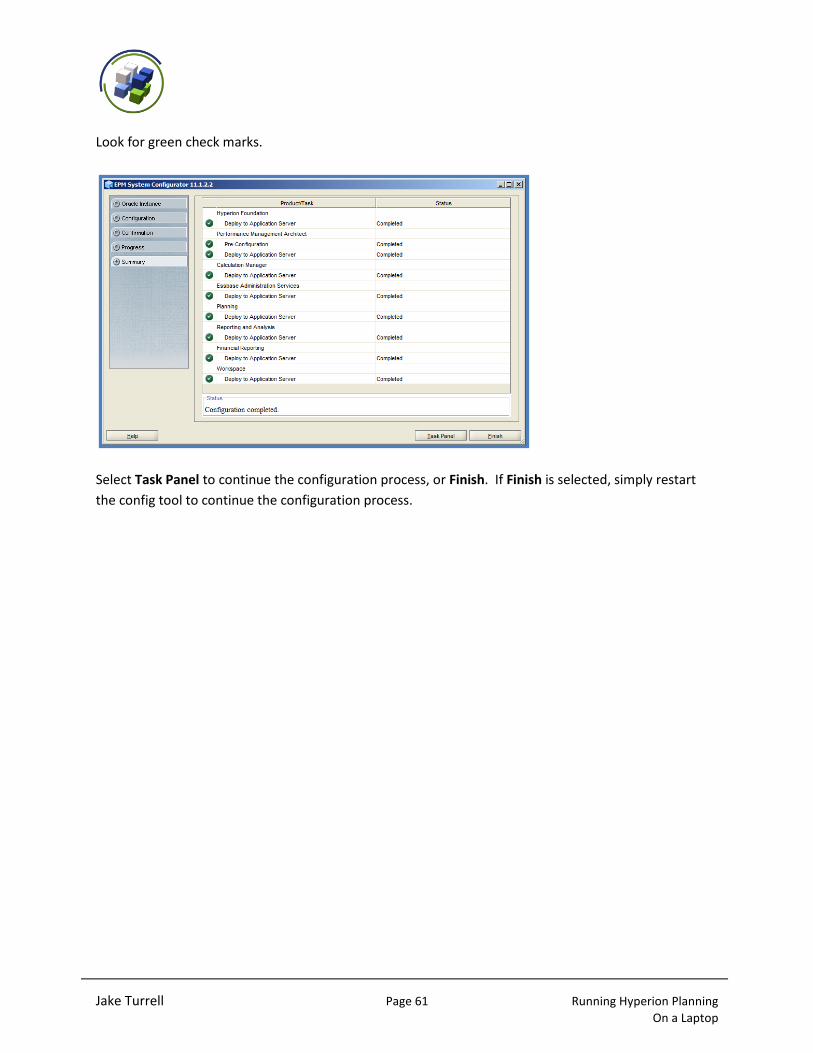
Look for green check marks.
Select Task Panel to continue the configuration process, or Finish. If Finish is selected, simply restart
the config tool to continue the configuration process.
Jake Turrell Page 62 Running Hyperion Planning On a Laptop
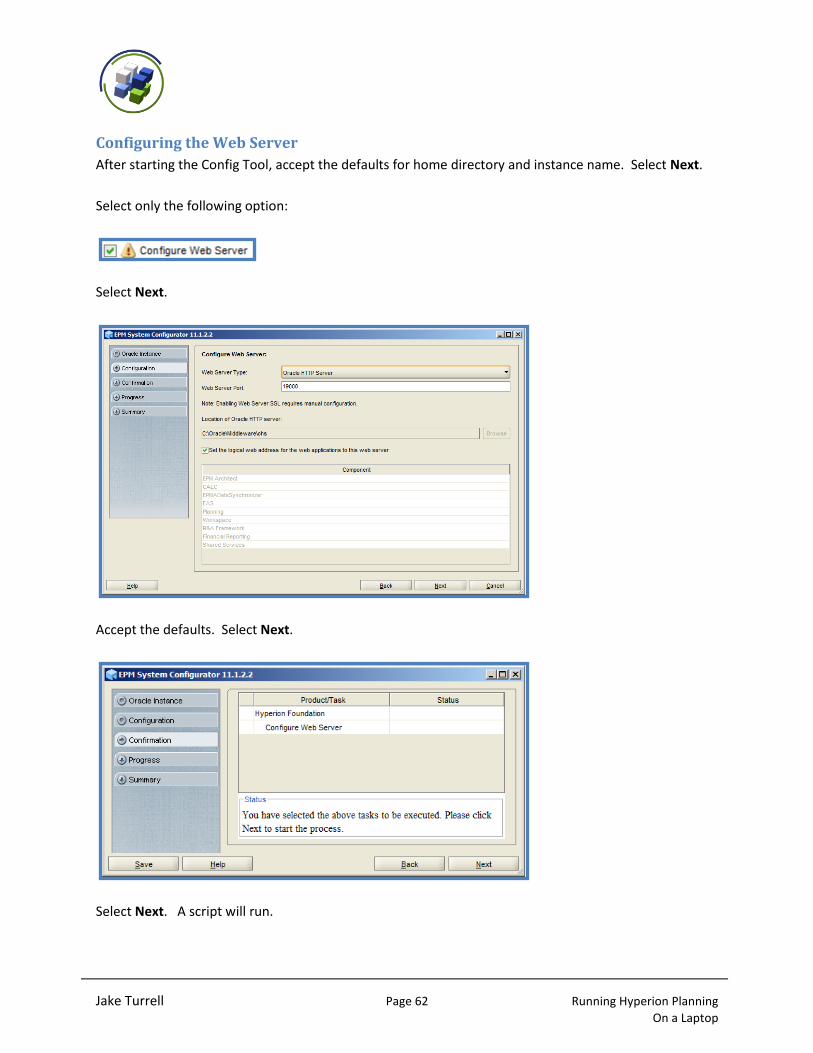
Configuring the Web Server
After starting the Config Tool, accept the defaults for home directory and instance name. Select Next.
Select only the following option:
Select Next.
Accept the defaults. Select Next.
Select Next. A script will run.
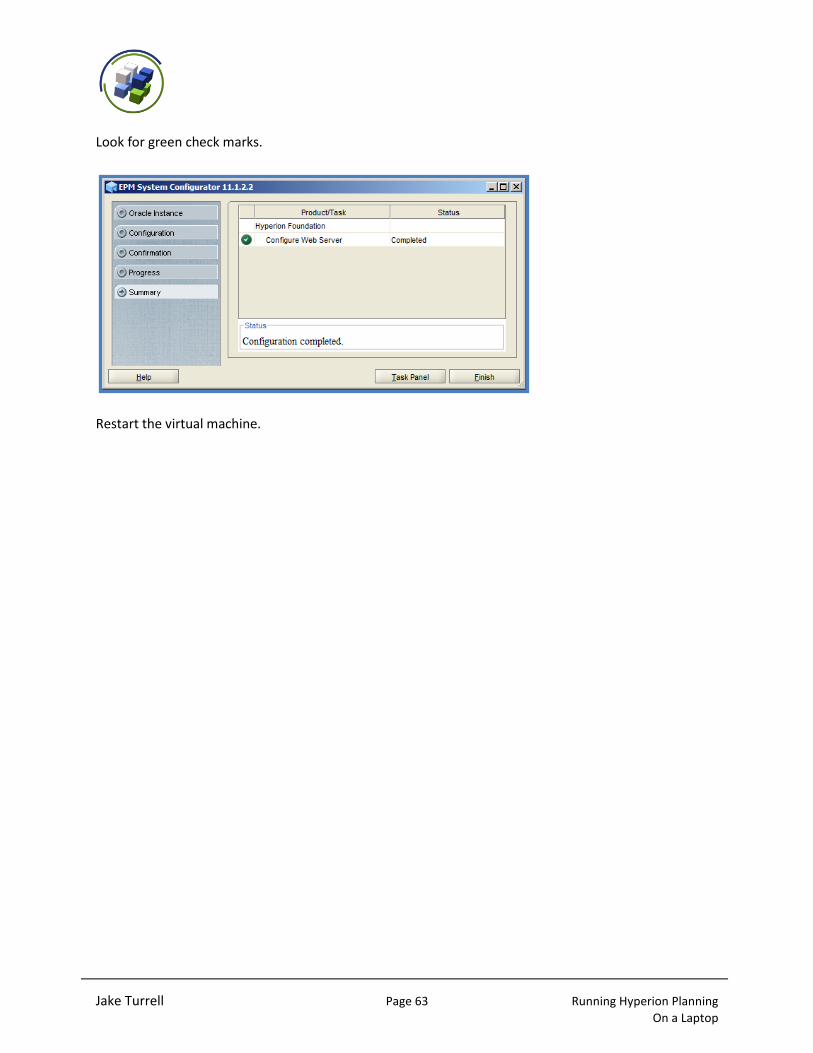
Jake Turrell Page 63 Running Hyperion Planning On a Laptop
Look for green check marks.
Restart the virtual machine.
Jake Turrell Page 64 Running Hyperion Planning On a Laptop
La Pièce de Résistance!
Configuring the Services
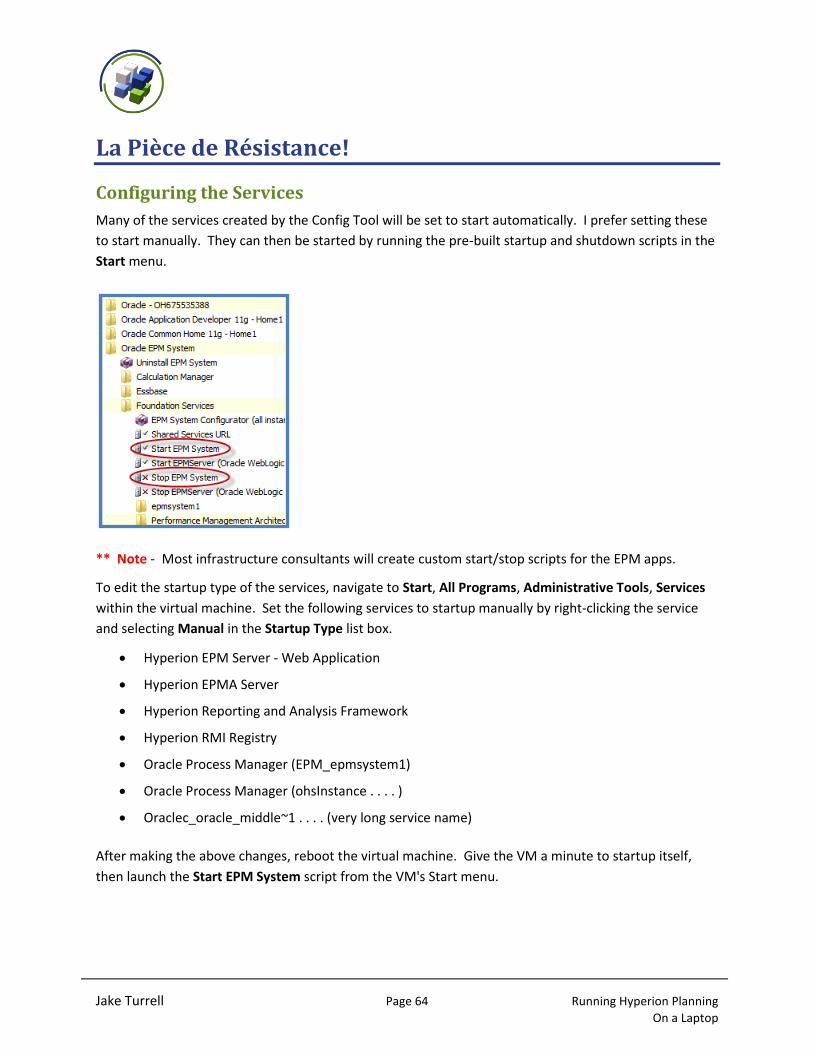
Many of the services created by the Config Tool will be set to start automatically. I prefer setting these
to start manually. They can then be started by running the pre-built startup and shutdown scripts in the
Start menu.
** Note - Most infrastructure consultants will create custom start/stop scripts for the EPM apps.
To edit the startup type of the services, navigate to Start, All Programs, Administrative Tools, Services
within the virtual machine. Set the following services to startup manually by right-clicking the service
and selecting Manual in the Startup Type list box.
Hyperion EPM Server - Web Application
Hyperion EPMA Server
Hyperion Reporting and Analysis Framework
Hyperion RMI Registry
Oracle Process Manager (EPM_epmsystem1)
Oracle Process Manager (ohsInstance . . . . )
Oraclec_oracle_middle~1 . . . . (very long service name)
After making the above changes, reboot the virtual machine. Give the VM a minute to startup itself,
then launch the Start EPM System script from the VM's Start menu.
Jake Turrell Page 65 Running Hyperion Planning On a Laptop
Logging Into Workspace
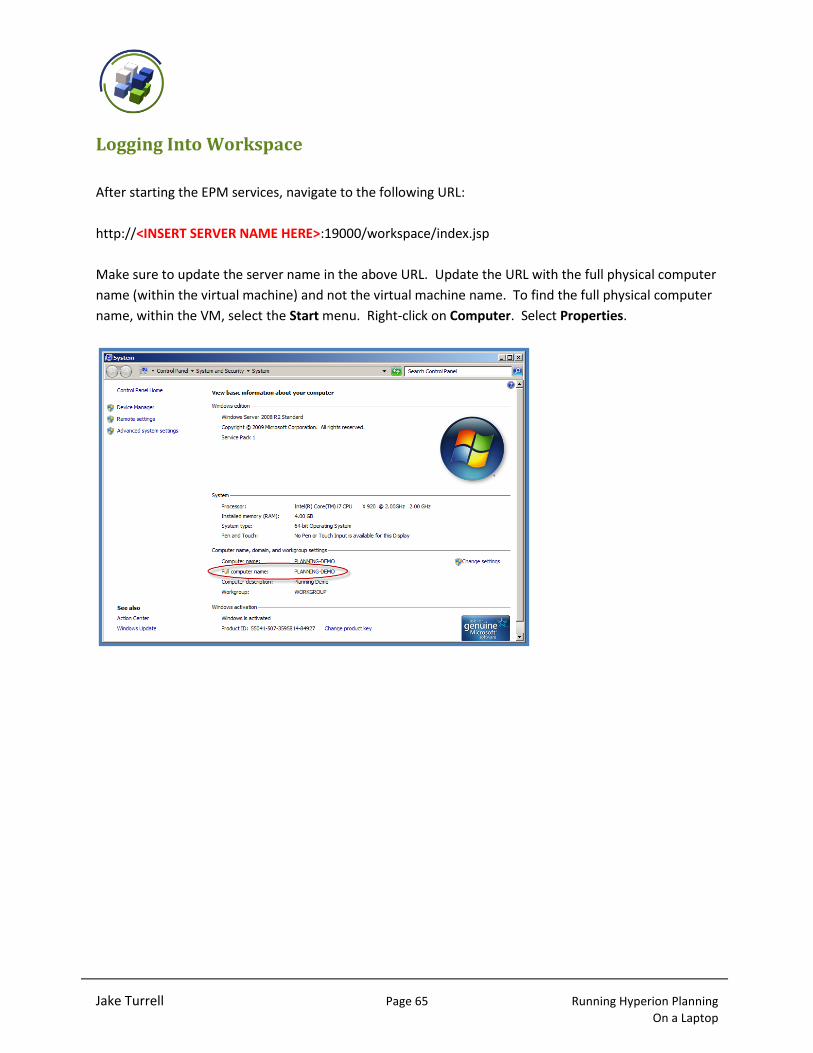
After starting the EPM services, navigate to the following URL:
http://<INSERT SERVER NAME HERE>:19000/workspace/index.jsp
Make sure to update the server name in the above URL. Update the URL with the full physical computer
name (within the virtual machine) and not the virtual machine name. To find the full physical computer
name, within the VM, select the Start menu. Right-click on Computer. Select Properties.
Jake Turrell Page 66 Running Hyperion Planning On a Laptop
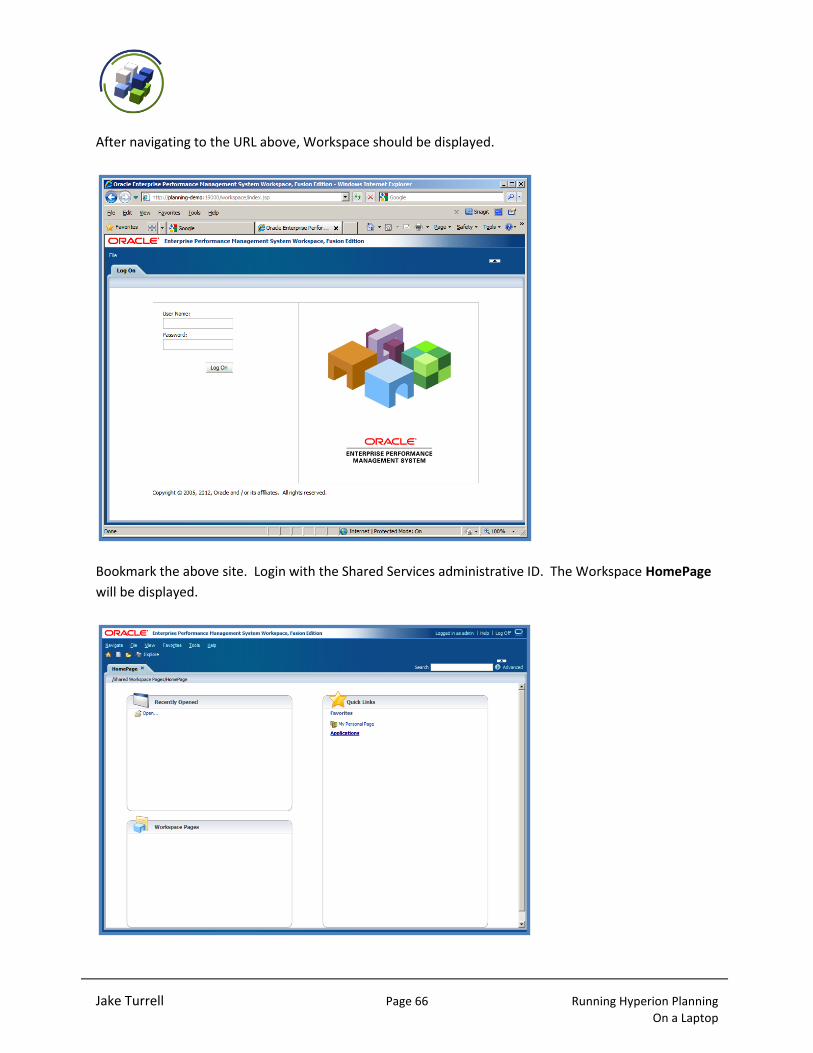
After navigating to the URL above, Workspace should be displayed.
Bookmark the above site. Login with the Shared Services administrative ID. The Workspace HomePage
will be displayed.
Jake Turrell Page 67 Running Hyperion Planning On a Laptop
At this point, developers may notice that menus in Hyperion Planning are not functioning as expected.
To rectify this issue, navigate to Tools, Internet Options within Internet Explorer. Select the Security
tab. Select the Trusted Sites check box. Select the Sites button. An Add button will be available that
lists the URL to the physical computer name on the virtual machine. Select this button. Select Close
then OK.
Close the browser and re-login to Workspace. Menus should now function as expected.
Jake Turrell Page 68 Running Hyperion Planning On a Laptop
Creating a Test Planning App
Before a test Planning application can be created there are two prerequisites that must be met.
Planning Application Relational Repository Created
Planning Application Creator User Provisioned
If the developer has been following this tutorial from the beginning, both prerequisites will already have
been met. This is because the relational app schema (PLANDEMOAPP) was created when the
application schemas were created. The Shared Services administrator (created during the Shared
Services configuration) will have the Planning Application Creator role assigned by default.
Planning applications can be created as "EPMA" apps, or as "Classic" apps. For the purposes of this
tutorial, EPMA will be used. Should a "Classic" application be required, Oracle Data Integrator should be
installed for loading metadata.
Sign into Workspace as the Shared Services administrator. Select the menu items Navigate, Administer,
Application Library. An information message will be displayed stating that no applications were found.
Select OK.
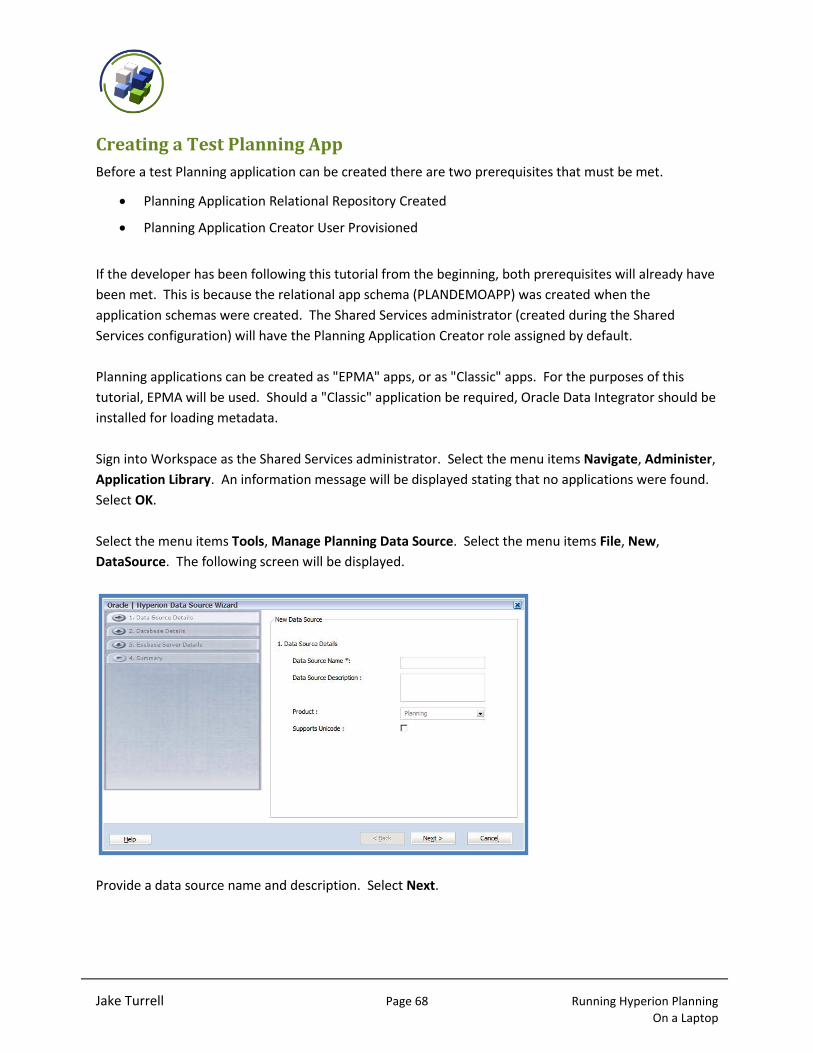
Select the menu items Tools, Manage Planning Data Source. Select the menu items File, New,
DataSource. The following screen will be displayed.
Provide a data source name and description. Select Next.
Jake Turrell Page 69 Running Hyperion Planning On a Laptop
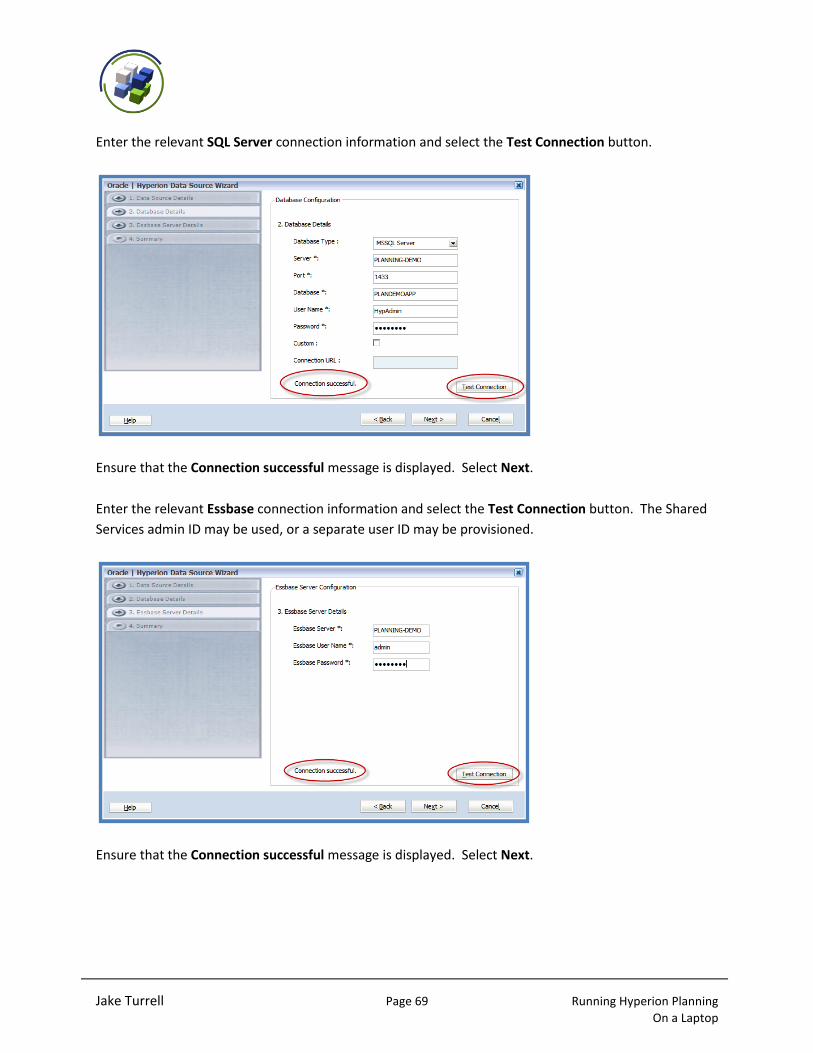
Enter the relevant SQL Server connection information and select the Test Connection button.
Ensure that the Connection successful message is displayed. Select Next.
Enter the relevant Essbase connection information and select the Test Connection button. The Shared
Services admin ID may be used, or a separate user ID may be provisioned.
Ensure that the Connection successful message is displayed. Select Next.

Jake Turrell Page 70 Running Hyperion Planning On a Laptop
Look for a success confirmation message.
Select Finish.
Return to the Application Library tab. Select the menu items File, New, Application.
Enter the relevant application information. Pay special attention to this screen, as there are several
options which cannot be changed later without having to recreate the application.
Select Next.
Jake Turrell Page 71 Running Hyperion Planning On a Laptop
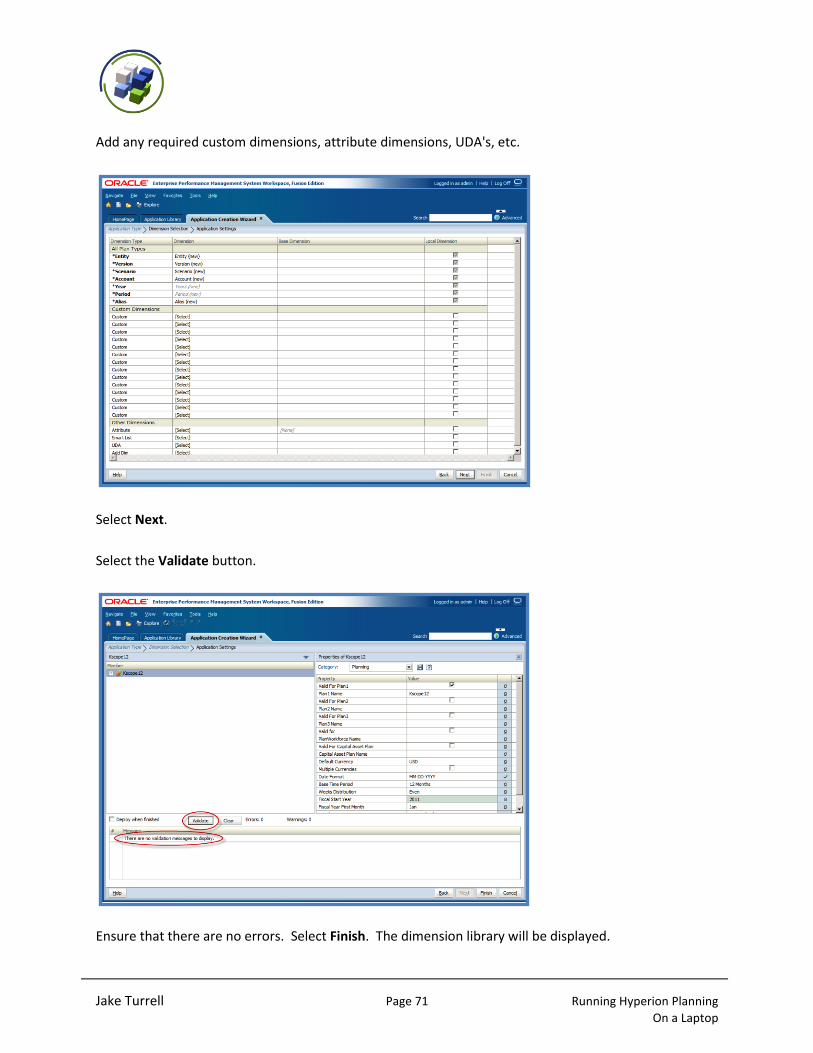
Add any required custom dimensions, attribute dimensions, UDA's, etc.
Select Next.
Select the Validate button.
Ensure that there are no errors. Select Finish. The dimension library will be displayed.
Jake Turrell Page 72 Running Hyperion Planning On a Laptop
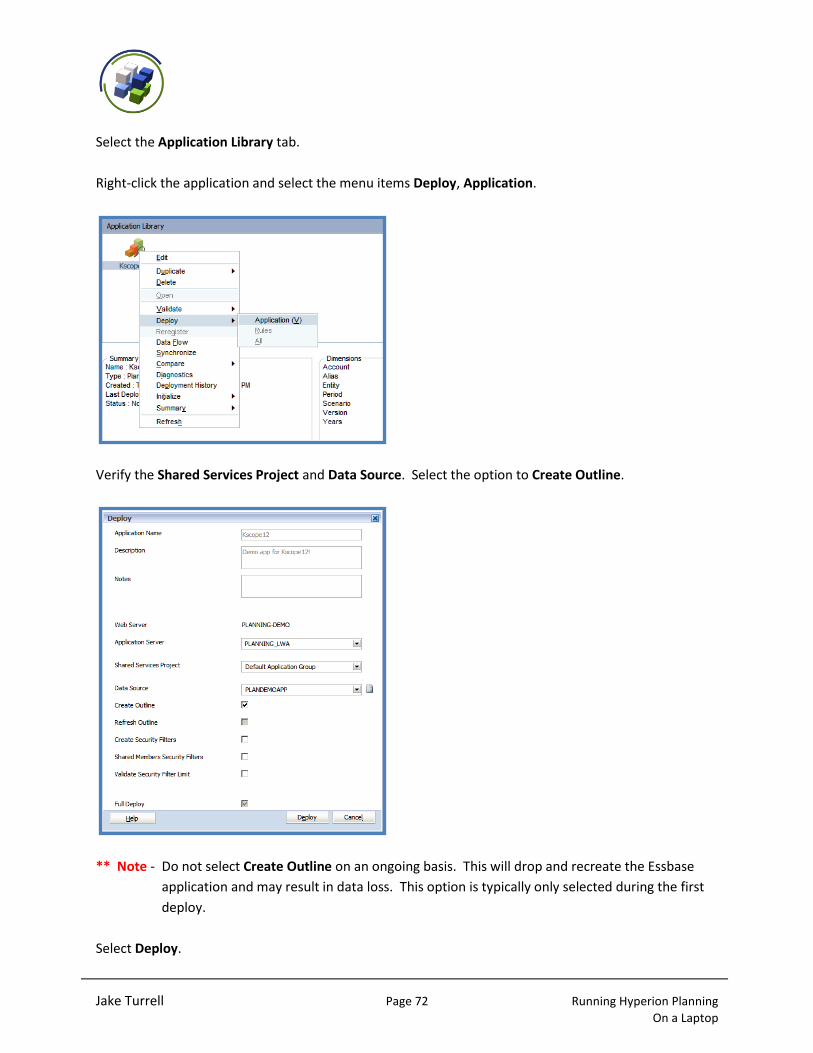
Select the Application Library tab.
Right-click the application and select the menu items Deploy, Application.
Verify the Shared Services Project and Data Source. Select the option to Create Outline.
** Note - Do not select Create Outline on an ongoing basis. This will drop and recreate the Essbase
application and may result in data loss. This option is typically only selected during the first
deploy.
Select Deploy.
Jake Turrell Page 73 Running Hyperion Planning On a Laptop
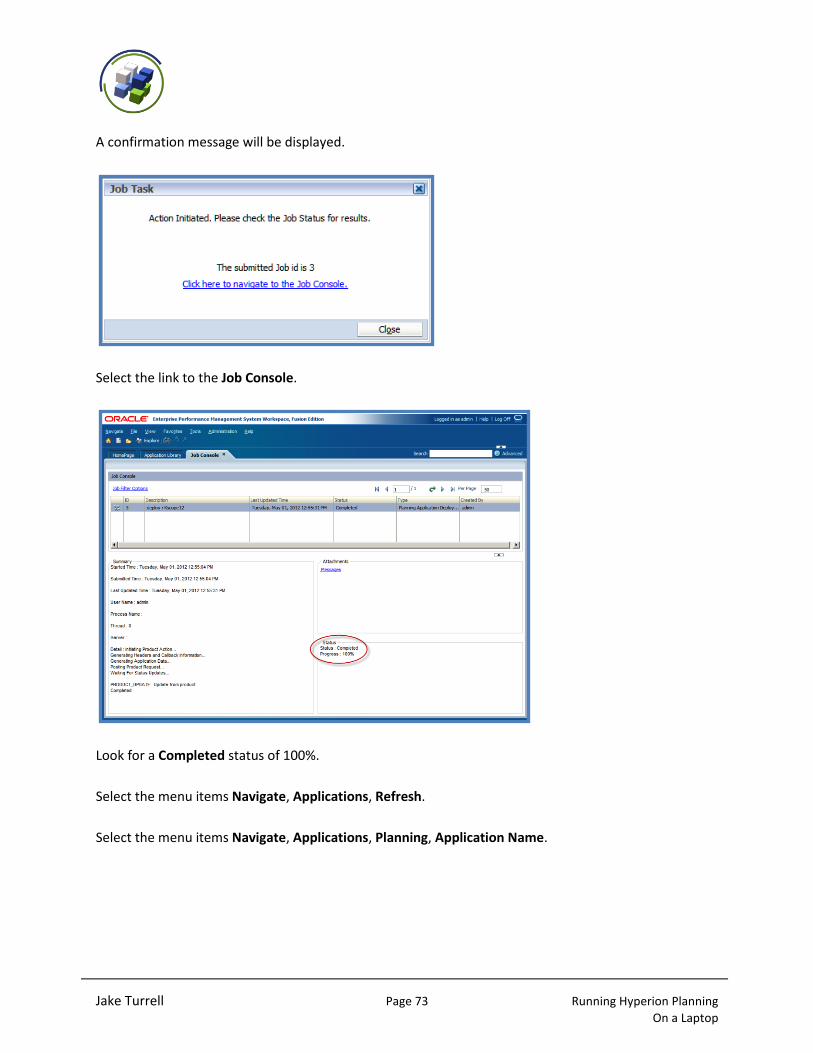
A confirmation message will be displayed.
Select the link to the Job Console.
Look for a Completed status of 100%.
Select the menu items Navigate, Applications, Refresh.
Select the menu items Navigate, Applications, Planning, Application Name.
Jake Turrell Page 74 Running Hyperion Planning On a Laptop
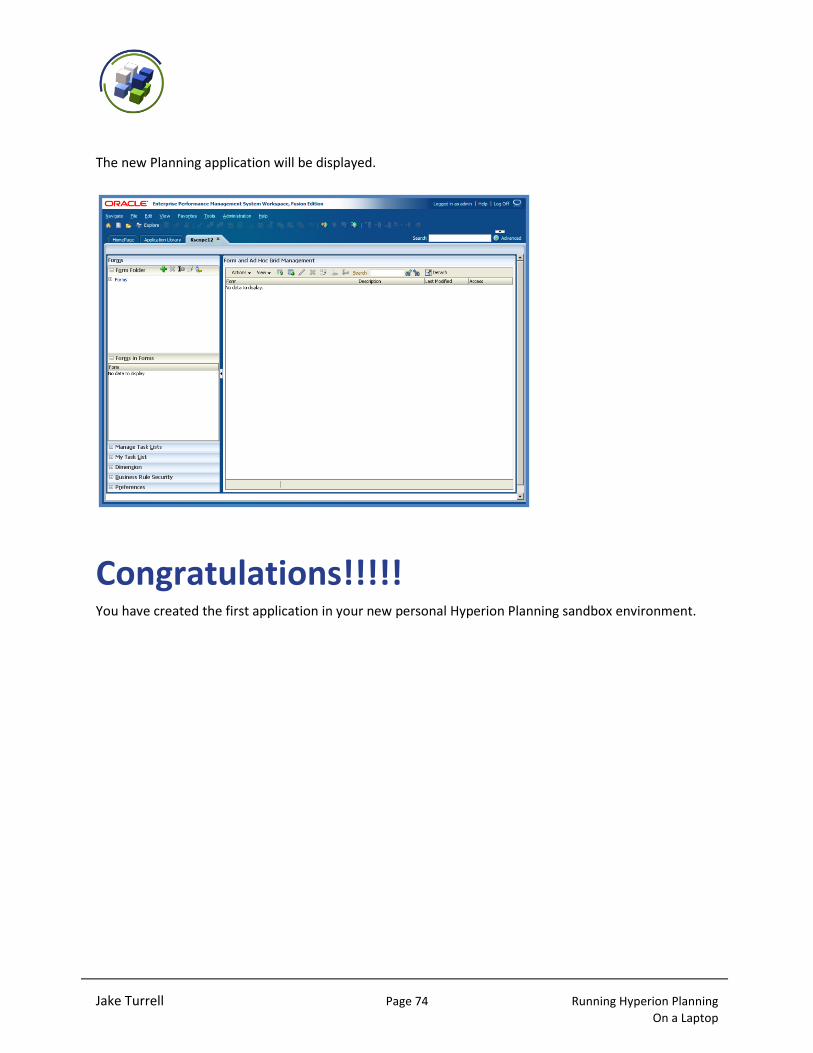
The new Planning application will be displayed.
Congratulations!!!!! You have created the first application in your new personal Hyperion Planning sandbox environment.
Jake Turrell Page 75 Running Hyperion Planning On a Laptop
Suggested Next Steps
Install client software for EAS, Financial Reports, Smart View, etc.
Build out your dimensions in the Dimension Library.
Create some input forms.
Provision some users and groups.
Load some Actuals data into Essbase.
Build some business rules in Calc Manager.
Create some task lists.
Test out the new Approvals process.
Test different Java Heap settings for improved web app performance.
Install Oracle Data Integrator and create a "Classic" Planning application.
URL’s
Reference URL
John Booth’s Amazon Web
Services AMI
http://www.metavero.com/index.php?option=com_content&view=article&id=
54:epm-test-drive-redux&catid=1:latest-news&Itemid=50
Cameron Lackpour’s Blog Post on
John’s AMI
http://camerons-blog-for-essbase-hackers.blogspot.com/2011/04/yeah-yeah-
11121-is-here-so-what_12.html
Full 360 http://full360.com/
Amazon Web Services http://aws.amazon.com/what-is-aws/
OTN Discussion Forum: Planning
and Budgeting
https://forums.oracle.com/forums/forum.jspa?forumID=408
Network54 Essbase User Forum http://www.network54.com/Forum/58296/
John Goodwin’s Blog http://john-goodwin.blogspot.com/
Intel CPU Virtualization Support http://ark.intel.com/VTList.aspx
Oracle E-Delivery https://edelivery.oracle.com/