Embed Size (px)
Citation preview

PRODUCT DATA
65-0262® U.S. Registered TrademarkCopyright © 2001 Honeywell • All Rights Reserved
S7999 ControLinks™Display Module
APPLICATIONThe S7999 ControLinks™ Display Module (DM) provides local or remote annunciation of system operation, fault information, diagnostic information, actuator settings and configuration settings of the ControLinks™ System.
FEATURES• Communication interface capability to the
ControLinks™ System.
• Dependable, long-term operation provided by microcomputer technology.
• Local or remote system annunciation provided by a 2-row by 20-column display.
• Operating Status:
— Source of demand/control.— Actuator positions.— Hold status.— Total cycles.— Total hours of operation.— Run time.
• Fault history of six most recent faults.
— Fault code.— Fault message.— Cycles at time of fault.
• Diagnostic information:
— Input/Output status.— Demand/control input and position.— Fuel selection.— Fuel position.
• Motor settings:
— Light-off position of fuel, air and FGR.— purge position of fuel, air and FGR.— Programmed stop position of fuel, air and FGR.
• Configuration settings:
— Low Fire Hold input (XmA).— FGR Purge position.— Manual potentiometer limit enabled/disabled.— R7999 hardware/software revision.— Display Module (DM) software revision.
ContentsApplication ........................................................................ 1Features ........................................................................... 1Specifications ................................................................... 2Ordering Information ........................................................ 2Installation ........................................................................ 3Wiring ............................................................................... 4Display Module Operation ................................................ 5Troubleshooting ................................................................ 10

S7999 CONTROLINKS™ DISPLAY MODULE
65-0262 2
ORDERING INFORMATIONWhen purchasing replacement and modernization products from your TRADELINE® wholesaler or distributor, refer to the TRADELINE® Catalog or price sheets for complete ordering number.
If you have additional questions, need further information, or would like to comment on our products or services, please write or phone:
1. Your local Home and Building Control Sales Office (check white pages of your phone directory).2. Home and Building Control Customer Relations
Honeywell, 1885 Douglas Drive NorthMinneapolis, Minnesota 55422-4386
In Canada—Honeywell Limited/Honeywell Limitée, 35 Dynamic Drive, Scarborough, Ontario M1V 4Z9.International Sales and Service Offices in all principal cities of the world. Manufacturing in Australia, Canada, Finland, France, Germany, Japan, Mexico, Netherlands, Spain, Taiwan, United Kingdom, U.S.A.
SPECIFICATIONSElectrical Ratings:Voltage and Frequency: 13 Vdc peak full wave rectified
(+20/-15%).Power Dissipation: 7W maximum.VA Consumption: 2 VA maximum.
Terminal Ratings:Power: 13 Vdc peak full wave rectified.Earth Ground.
Environmental Ratings:Ambient Temperature Ranges:
Operating: -40°F (-40°C) to +140°F (+60°C).Storage: -60°F (-51°C) to +150°F (+66°C).
Humidity: 85 percent relative humidity continuous, noncondensing.
Vibration: 0.5G environment.
Mechanical:Dimensions: See Fig. 1.Weight: 4 ounces (124 grams), unpacked.
Display:40 character (2 rows by 20 columns).
Approvals:Underwriters Laboratories Inc.: Component Recognized. IRI: Acceptable.Federal Communications Commission:
Part 15, Class B emissions.EN60730: For compliance with remote DM mounting
requirements, provide electrical insulation separation by insulation using double or reinforced insulation. Do this by: Optically isolating the communication or remote reset lines from the control cabinet, or provide physical separation from the communication or remote display cover assembly (part number 204718A) or other suitable enclosure that meets the IP40 class of protection.
Accessories:203541 ControlBus 5-wire Electrical Connector.203765 Remote Display Mounting Bracket.204718A NEMA 4 Cover Assembly for S7999 DM.204718B NEMA 1 Cover Assembly for S7999 DM.205321B Remote Display Flush Mount Kit.203968A DM Remote Power Supply.
Fig. 1. Approximate dimensions of S7999 ControLinks™ DM in in. (mm).
M20041
SCROLL
ControLinks™
����
����� �
4-27/32 (123)
2-3/4(69)
5/32(4)
29/32(23)
5/16(8)
4-3/32 (104)
19/32(15)
1-1/4 (32)
1-1/32(26)
1-15/16(49)
2-7/16 (62)
29/32(23)
5/32 (4)
1/2(13)
2-1/32(52)
15/32(12)
13/32(11)
3-7/8 (99)
7/16 (11)
5/15(8)

S7999 CONTROLINKS™ DISPLAY MODULE
3 65-0262
INSTALLATION
WARNINGElectrical Shock Hazard.Can cause serious injury or death.Disconnect the power supply before beginning installation to prevent electrical shock and equipment damage. More than one power supply disconnect can be involved.
When Installing This Product…1. Read these instructions carefully. Failure to follow
them could damage the product or cause a hazardous condition.
2. Check the ratings given in the instructions and marked on the product to make sure the product is suitable for your application.
3. Installer must be a trained, experienced, flame safeguard service technician.
4. After installation is complete, check out the product operation as provided in these instructions.
5. Be sure wiring complies with all applicable codes, ordinances and regulations.
6. See Fig. 5, 6 and 7 for S7999 unique wiring connections.
IMPORTANT1. This equipment generates, uses and can radiate
radio frequency energy and, if not installed and used in accordance with the instructions, can cause interference to radio communications. It has been tested and found to comply with the limits for a Class B computing device of Part 15 of FCC rules which are designed to provided reasonable protection against such interference when operated in a commercial environment. Operation of this equipment in a residential area can cause interference, in which case, users, at their own expense, can be required to take whatever measures are required to correct this interference.
2. This digital apparatus does not exceed the Class B limits for radio noise for digital apparatus set out in the Radio Interference Regulations of the Canadian Department of Communications.
HumidityInstall the S7999 where the relative humidity never reaches the saturation point. The S7999 ControLinks™ is designed to operate in a maximum 85% RH continuous, noncondensing, moisture environment.
VibrationDo not install the S7999 where it can be subjected to vibration in excess of 0.5G continuous maximum vibration.
WeatherThe S7999 is not designed to be weather tight. If installed outdoors, the S7999 must be protected by an approved weather-tight enclosure such as the 204718A or 204718C NEMA 4 Enclosure listed in Accessories.
Remote Mounting DMThe DM can be mounted either on the face of a panel door or on other remote locations. See Fig. 2. When mounting the DM on the face of a door panel, closely follow these instructions:
Fig. 2. Panel mounting of a display module.
1. Select the location on the door panel for flush mounting.2. Pay attention to the insertion dimensions of the two DM
screws, two interlocking ears, and the two plug-in connections to allow for sufficient clearance.
3. Use the DM or Data ControlBus Module™ as a template (Fig. 16) and mark the two screw locations, interlocking ear locations and the two plug-in connector locations.
4. Drill the pilot holes for the mounting screws.5. Cut holes in the door panel for the interlocking ears and
the two plug-in connectors.6. Mount the DM, securing it with the two screws provided
in the DM bag assembly.Use the 203765 Remote Display Mounting Bracket when mounting the DM on a wall or remote location:
1. Use the 203765 Remote Display Mounting Bracket as a template to mark the four screw locations.
2. Drill the pilot holes for the four mounting screws.3. Mount the 203765 Remote Display Mounting Bracket by
securing the four no. 6 screws (M3.5 x 0.6). See Fig. 3.
4. Mount the DM by aligning the two interlocking ears with the two mating slots on the remote mounting bracket.
5. Insert the two interlocking ears into the two mating slots.6. Push on the lower corners of the DM to secure it to the
remote mounting bracket.7. Make sure the DM is firmly in place.

S7999 CONTROLINKS™ DISPLAY MODULE
65-0262 4
Fig. 3. Remote mounting of a Display Module using a 203765 Remote Display Mounting Bracket.
WIRING
WARNINGElectrical Shock Hazard.Can cause serious injury or death.To prevent electrical shock and equipment damage, disconnect the power supply from the main disconnect before beginning installation. More than one disconnect can be involved.
1. Refer to Fig.4, 5 and 6 for proper wiring.2. Make sure all wiring complies with all applicable
electrical codes, ordinances and regulations.3. For recommended wire size and type, see Table 1.4. For Recommended grounding practices, see Table 2.5. For DM: The DM is powered from a low voltage,
energy-limited source. It can be mounted outside of a control panel if it is protected from mechanical damage.
NOTE: A 13 Vdc power supply must be used any time the DM is used.
Table 1. Recommended Wire Size and Part Number.
Table 2. Recommended Grounding Practices.
6. Recommended wire routing:a. Display Module:
(1) Do not route the Display Module wiring in conduits that carry line voltage circuits.
(2) Avoid routing the Display Module wiring close to ignition transformer leadwires.
(3) Route the Display Module wiring outside of conduit if properly supported and protected from damage.
7. Maximum wire lengths:a. DM: The maximum length interconnecting wire is
4000 ft (1219m).8. Install all electrical connectors.9. Restore power to the panel.
Fig. 4. Wiring the display module.
Application Recommended Wire Size Recommended Part Number
Display Module 22 AWG two-wire twisted pair with ground or five-wire. Belden 8723 shielded cable or equivalent.
13 Vdc full wave rectified transformer power input.
18 AWG wire insulated for voltages and temperatures for given application.
TTW60C, THW75C, THHN90C.
Ground Type Recommended Practice
Signal ground (DM) Use the shield of the signal wire to ground the device to the signal ground terminal of each device. Connect the shield at both ends of the daisy chain to ground.
L1 (HOT)L2
1
1 POWER SUPPLY. PROVIDE DISCONNECT MEANS AND OVERLOAD PROTECTION AS REQUIRED. M17923
1
A B C (
std)
A B C
+ 1
3 vd
c
2
S7999
R7999
3
1 2 3
54
S7999 CONTROLINKS™ DISPLAY MODULE
5 65-0262
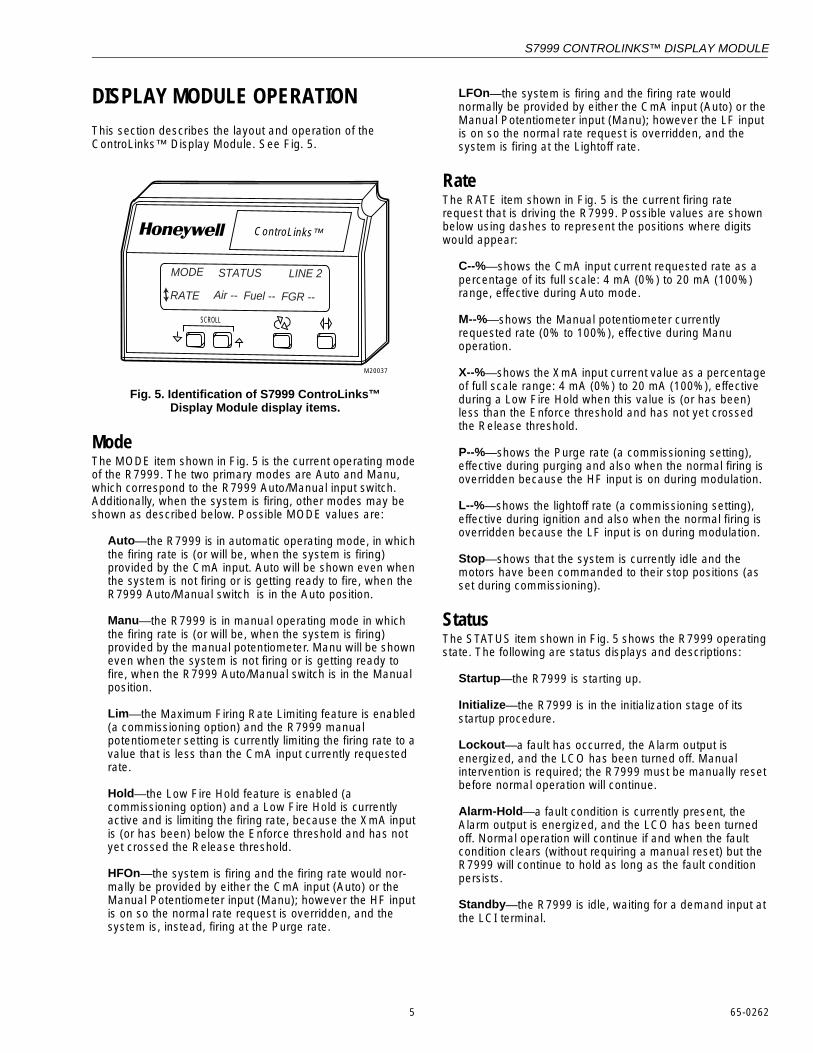
DISPLAY MODULE OPERATIONThis section describes the layout and operation of the ControLinks™ Display Module. See Fig. 5.
Fig. 5. Identification of S7999 ControLinks™ Display Module display items.
ModeThe MODE item shown in Fig. 5 is the current operating mode of the R7999. The two primary modes are Auto and Manu, which correspond to the R7999 Auto/Manual input switch. Additionally, when the system is firing, other modes may be shown as described below. Possible MODE values are:
Auto—the R7999 is in automatic operating mode, in which the firing rate is (or will be, when the system is firing) provided by the CmA input. Auto will be shown even when the system is not firing or is getting ready to fire, when the R7999 Auto/Manual switch is in the Auto position.
Manu—the R7999 is in manual operating mode in which the firing rate is (or will be, when the system is firing) provided by the manual potentiometer. Manu will be shown even when the system is not firing or is getting ready to fire, when the R7999 Auto/Manual switch is in the Manual position.
Lim—the Maximum Firing Rate Limiting feature is enabled (a commissioning option) and the R7999 manual potentiometer setting is currently limiting the firing rate to a value that is less than the CmA input currently requested rate.
Hold—the Low Fire Hold feature is enabled (a commissioning option) and a Low Fire Hold is currently active and is limiting the firing rate, because the XmA input is (or has been) below the Enforce threshold and has not yet crossed the Release threshold.
HFOn—the system is firing and the firing rate would nor-mally be provided by either the CmA input (Auto) or the Manual Potentiometer input (Manu); however the HF input is on so the normal rate request is overridden, and the system is, instead, firing at the Purge rate.
LFOn—the system is firing and the firing rate would normally be provided by either the CmA input (Auto) or the Manual Potentiometer input (Manu); however the LF input is on so the normal rate request is overridden, and the system is firing at the Lightoff rate.
RateThe RATE item shown in Fig. 5 is the current firing rate request that is driving the R7999. Possible values are shown below using dashes to represent the positions where digits would appear:
C--%—shows the CmA input current requested rate as a percentage of its full scale: 4 mA (0%) to 20 mA (100%) range, effective during Auto mode.
M--%—shows the Manual potentiometer currently requested rate (0% to 100%), effective during Manu operation.
X--%—shows the XmA input current value as a percentage of full scale range: 4 mA (0%) to 20 mA (100%), effective during a Low Fire Hold when this value is (or has been) less than the Enforce threshold and has not yet crossed the Release threshold.
P--%—shows the Purge rate (a commissioning setting), effective during purging and also when the normal firing is overridden because the HF input is on during modulation.
L--%—shows the lightoff rate (a commissioning setting), effective during ignition and also when the normal firing is overridden because the LF input is on during modulation.
Stop—shows that the system is currently idle and the motors have been commanded to their stop positions (as set during commissioning).
StatusThe STATUS item shown in Fig. 5 shows the R7999 operating state. The following are status displays and descriptions:
Startup—the R7999 is starting up.
Initialize—the R7999 is in the initialization stage of its startup procedure.
Lockout—a fault has occurred, the Alarm output is energized, and the LCO has been turned off. Manual intervention is required; the R7999 must be manually reset before normal operation will continue.
Alarm-Hold—a fault condition is currently present, the Alarm output is energized, and the LCO has been turned off. Normal operation will continue if and when the fault condition clears (without requiring a manual reset) but the R7999 will continue to hold as long as the fault condition persists.
Standby—the R7999 is idle, waiting for a demand input at the LCI terminal.
M20037
SCROLL
ControLinks™
MODE
RATE
STATUS
Air -- Fuel -- FGR --
LINE 2

S7999 CONTROLINKS™ DISPLAY MODULE
65-0262 6
Proc-Demand—the R7999 has detected an input at the LCI terminal and is processing a demand request from the burner control by moving the actuators to the position requested by the HF ( or LF) inputs.
Purge—the R7999 has completed moving the actuators to the Purge position, in response to the LCI and HF inputs, and has turned on the HFP (High Fire Proven) output.
Lightoff—the R7999 has completed moving the actuators to the lightoff position, in response to the LCI and LF inputs, and has turned on the LFP (Lightoff Position Proven) output.
Modulate—the R7999 has detected that the LCI and MV inputs are on, and the HF and LF inputs are off, and is therefore controlling the firing rate, using either automatic or manual mode.
Run-Lightoff—the R7999 would be in the Modulate position, except that the LF input is also on. Therefore, the R7999 is ignoring its normal rate inputs (CmA or the Manual Potentiometer) and is, instead, firing at the lightoff rate.
Run Purge—the R7999 would be in the Modulate condition, except that the HF input is also on. Therefore, it is ignoring the normal rate inputs (CmA or the Manual Potentiometer) and, instead, is firing at the Purge rate.
Post-Purge—the R7999 recently left the Modulate condition because LCI turned off and is moving (or has finished moving) the actuators to the position commanded by the HF and LF inputs. It assumes that the burner control is post-purging the combustion chamber and continues to display “Post-Purge” for the time determined by an R7999 commissioning parameter (even though the burner control may have a different actual postpurge time.
Wait-XXX—the R7999 has detected an unusual input condition at its LCI, HF, LF and MV inputs that is not part of a normal sequence of operation. It is in a hold condition in which it keeps LCO turned off, and waits for the condition to be resolved. The “XXX” part of the status message describes the inputs that are on; for example in the abnormal condition where the MV input is on even though LCI is off, the displayed status will be “Wait-MV”.
LINE2The LINE2 item shown in Fig. 5 normally describes the contents of the second line of the display; however, when the display is first powered up, this area is used to indicate the progress of the initialization of the S7999 display itself.
Fig. 6. Display module LINE2 area during display initialization.
After the display is first energized or connected, it must wait to receive 15 different configuration information records from the R7999 before it is fully functional. Although the R7999 transmits its active status once per second, it transmits a complete set of its configuration information (which does not change) at a much slower rate, sending only part of it each time that it transmits a message.
When the display is initially powered up or connected to an R7999, it shows a spinning line to indicate that it is actively receiving these initial messages, and it shows a countdown value that goes from 15 to 0, indicating the progress in receiving all of the information that it needs. When the last information record has been received and the countdown reaches zero, then the LINE2 field reverts to its normal function of describing the second line, and the up/down scroll prompt appears in the lower left corner of the display, indicating that scrolling is now possible.
In addition to the configuration information records, the R7999 also transmits information about the points on the fuel/air/FGR curve. These records are ignored by the S7999, but they do interrupt the countdown process. While the point information records are being received (and ignored), the spinning line changes to a display of letters (A, B, C, ..., for example) and the countdown holds. There will be as many letter codes as there are points on the curve.
During normal operation, after the display has finished its own initialization, the LINE2 area shows one of the following:
Blank—when the LINE2 area is blank then the display is showing an item from the top-level menu in its second line.
IO—Input/Output: the display is showing an item from the Input/Output submenu in its second line.
MS—Motor Settings: the display is showing an item from the Motor Settings submenu in its second line.
CS—Configuration Settings: the display is showing an item from the Configuration Settings submenu in its second line.
H1...H6—Fault History: the display is showing an item from the Fault History in its second line. H1 is the most recent fault and H6 is the oldest fault.
M20042

S7999 CONTROLINKS™ DISPLAY MODULE
7 65-0262
Air-Fuel-FGRThis area of the display shows the current positions of the actuators as a percentage of their closed-to-open range, from “00%” to “100%”.
A--%—shows the air actuator position.
F--%—shows the position of the currently selected fuel actuator.
R--% or H--%—shows the position of the FGR actuator. If the system does not included an FGR actuator, then this item is blank. The “H” indicates that an FGR hold (an option enabled during commissioning) is currently active because the R7999 XmA input is (or has been) below the Enforce threshold and has not yet crossed the Release threshold, whereas “R” indicates normal, no-hold FGR operation.
PushbuttonsThe two lefthand (SCROLL) pushbuttons scroll the second line up and down through a list of menu items.
The third pushbutton ( ) provides a toggle function.
The fourth pushbutton ( ) provides a change level function.
In the top-level menu, an item that provides access to a submenu is indicated by a right-pointing arrowhead ( ) following the submenu description (Inputs/Outputs, Motor Settings, Configuration Settings, Fault History and Line 2 Legend). Pressing the change level button when a submenu description is displayed will shown the first item of submenu information and will cause an identifier for the submenu to appear in the LINE2 area in the top right corner of the display. Each submenu item has a left-pointing arrowhead ( ) to indicate that the change level pushbutton may be used to exit the submenu and return to the top-level menu. In the top-level menu, the LINE2 area is blank.
The toggle button cycles the second line of the display between the main display and whichever second line was most recently shown by using the scroll and change level pushbuttons. This provides a way to quickly return to the main display. The toggle button may also be used to compare the main display to some other item by quickly toggling between them.
NOTE: If the display has just been powered up, or if the scroll buttons have been used to return to the main display, then there is no other second line as described above for the toggle pushbutton. In this case the Run Time item from the top-level menu is used.
The top-level menu and each of the submenus wrap around, that is, scrolling down beyond the last item causes the first item to appear; and scrolling up beyond the first item causes the last item to appear.
The pushbuttons are disabled while the display is starting up. An up/down arrow indicator appears in the lower left corner of the display after initialization is complete and the buttons are enabled.
All of the selectable second line messages are shown in Table 3. Submenu items are shown indented under their top-level menu description.

S7999 CONTROLINKS™ DISPLAY MODULE
65-0262 8
Table 3. Selectable Messages.
Selectable Message/Display Description Possible States/Range Comments
Total Cycles Total number of equipment operating cycles
0 to 999999 Cycle will be updated each time main valve is energized.
Run Time Total number of equipment operating time (hours:minutes)
0:00 to 999999:00 Hours:minutes will be updated while main valve input is energized.
Inputs/Outputs: Top-level prompt for diagnostic information.
Press the Change Level button to enter the submenu.
CmA Controller Input 4.0 to 20.0 mA Firing Rate input.
ManPot Manual Potentiometer 4.0 to 20.0 mA Manual control potentiometer.
XmA Auxiliary Input 4.0 to 20.0 mA Temperature sensor input current.
XmA Temp Auxiliary Input -40°F to +1400°F Temperature sensor input in degrees Fahrenheit.
Current Fuel Current fuel selected. Fuel 1 or Fuel 2 The fuel selection as determined at ControLinks™ System startup.
F2(1) Position Fuel actuator position for currently inactive fuel.
00% to 100%. Either F2 or F1 will be shown, whichever is the inactive fuel.
Manual T4 Manual/Auto Input On/Off ON indicates Manual is selected; OFF indicates Auto is selected.
FSelect1 T5 Fuel 1 Input On/Off
FSelect2 T6 Fuel 2 Input On/Off
Alarm T7 Alarm Output On/Off
HFP T8 High Fire Proven Output On/Off
LFP T9 Low Fire Proven Output On/Off
HF T10 High Fire Input On/Off
MV T11 Main Valve Input On/Off
LF T12 Low Fire Input On/Off
LCI T13 Limit/Control Input On/Off
LCO T14 Limit/Control Output On/Off
Motor Settings Top level prompt for motor setting information.
Press the Change Level button to enter the submenu.
Lightoff F1(2) Indicates fuel actuator programmed position during Lightoff.
00% to 100% Either F1 or F2 will be shown, whichever is the active fuel.
Lightoff Air Indicates air actuator programmed position during Lightoff.
00% to 100%
Lightoff FGR Indicates FGR actuator programmed position during Lightoff.
00% to 100%
Purge F1(2) Indicates fuel actuator programmed position during Purge.
00% to 100% Either F1 or F2 will be shown, whichever is the active fuel.
Purge Air Indicates air actuator programmed position during Purge.
00% to 100%
Purge FGR Indicates FGR actuator programmed position during Purge.
00% to 100%
Prog Stop F1(2) Programmed stop of actuator. 00% to 100 Either F1 or F2 will be shown, whichever is the active fuel.
Prog Stop Air Programmed stop of actuator. 00% to 100

S7999 CONTROLINKS™ DISPLAY MODULE
9 65-0262
a If XmA Hold is configured as “None”, temperature may show other values outside the -40°F to +1400°F range for S7999 software builds prior to 2007.
b UNKNOWN will be displayed for R7999 software builds prior to 170.
Prog Stop FGR Programmed stop of actuator. 00% to 100
F2(1) Idle Stop Current inactive fuel 00% to 100 Either F2 or F1 will be shown, whichever is the inactive fuel.
Config Settings Top level prompt for configuration parameter settings.
Press the Change Level button to enter the submenu.
XmA Hold Temperature Sensor hold NoneLOPFGRLOP + FGR
Indicates if auxiliary temperature sensor is used and type of hold: lightoff point, FGR closed, or both.
XmA Minimum Temperature Sensor minimum input
-40°F to +1400°Fa
N/ANot Applicable (N/A) is indicated if XmA Hold is configured as None.
XmA Maximum Temperature Sensor maximum input
-40°F to +1400°Fa
N/ANot Applicable (N/A) is indicated if XmA Hold is configured as None.
XmA Enforce Temperature Sensor setting to enforce XmA Hold condition.
-40°F to +1400°Fa
N/ANot Applicable (N/A) is indicated if XmA Hold is configured as None.
XmA Release Temperature Sensor setting to release the XmA Hold condition.
-40°F to +1400°Fa
N/ANot Applicable (N/A) is indicated if XmA Hold is configured as None.
Purge FGR FGR Actuator position during PURGE
On curveClosedb
Man Limit Manual Limit configuration setting.
EnabledDisabledb
Indicates if the R7999 was commissioned to enable the Manual Potentiometer to limit the maximum
firing rate.
CL Rev. M.NvV BBB ControLinks™ R7999 software revision and build code
M = major; N = minor; V = version; BBB = build code.
Display Rev. BBB Display S7999 Software Build Code
BBB = build code.
DiagCode Diagnostic Codes Possibly useful for debugging display problems.
Fault History(Six most recent faults)
Top level prompt for fault history information.
Press the Change Level button to enter the submenu.
*Fault Code nn* Fault Code Number 0-94 For fault descriptions, see form 65-0238, R7999A,B ControLinks™
Controller.*Fault Message* Description of the fault code.
*In (state)* State in which the fault occurred.
*Fault Cycle nnn* Cycle when fault occurred. 0 to 999999
Line 2 Legend Top level prompt for on-line help to describe letter codes on the second line of the main display.
The Line 2 legend submenu describes each of the letter codes that may appear on the second line of the main display. Each item in this submenu shows a flashing letter code on the second line, in the position where it normally appears on the main display, along with a description of the letter code in the first line of the display.
Table 3. Selectable Messages.
Selectable Message/Display Description Possible States/Range Comments

S7999 CONTROLINKS™ DISPLAY MODULE
65-0262 10
TROUBLESHOOTINGAfter the DM is installed, return the ControLinks™ to normal operation and restore power. For complete Troubleshooting and System Checkout information, see form 65-0238.
NOTE: If the DM display is scrambled, cycle the power to the DM and reset the R7999 by pressing the Reset button on the controller.
ControLinks™ System DiagnosticsTroubleshooting control system equipment failures is made easier with the S7999 ControLinks™ Display Module, which provides diagnostics and annunciation. The S7999 will display total cycles, run time, inputs/outputs, motor settings, configuration settings and fault history.
Historical Information The S7999 ControLinks™ displays historical information for the six most recent faults. H1 is the most recent and H6 is the oldest fault that has been stored in the historical information. the fault code, fault description, operating status when the fault occurred, and cycle at which the fault occurred will be displayed for each historical file.
Fault MessagesThere are three conditions that cause a fault message to be displayed:
• Lockout.• Alarm Hold.• Normal Operation with Fault.The S7999 will cycle through three messages on the display module second line when a fault is present:
1. Main display showing current rate and motor positions.2. Fault code.3. Fault message with fault code description.
Fig. 7 through 9 show a lockout condition that illustrates the three display module messages.
Pressing the scroll or toggle buttons will suspend the cycling of the fault messages until either the buttons are used to return to the main display or 60 seconds elapse with no buttons pressed.
Special Condition DisplaysSeven special condition display can be shown that preclude normal system operation, as described below:
1. Waiting for Connection—the display shows waiting for connection and the software revision of the display. Check wiring and connection.
2. Incompatible Device—the display software revision and R7999 software are incompatible. Upgrade the S7999 software.
3. Not Commissioned—the R7999 has not been commissioned. Commission the R7999.
4. Low Voltage Hold—the R7999 supply voltage is below the minimum requirements. Check the R7999 voltage supply.
5. Factory Test Mode—the R7999 is in the factory test mode. Replace the R7999.
6. Commissioning—the R7999 has not been completely commissioned. Complete the commissioning process.
7. Waiting for Valid Fuel Selection—the R7999 does not have a valid fuel selection. Check for proper fuel selection and that only one fuel has been selected.
Fig. 7. Second Line—main display.
.
Fig. 8. Second Line—fault code.
Fig. 9. Second Line—fault message.
NOTE: For further explanation of Lockout Messages, Troubleshooting and Checkout, refer to form 65-0238, R7999A,B ControLinks™ Controller.
M20040
SCROLL
ControLinks™
Manu: Lockout
M37% A--% F42% R30%
M20038
SCROLL
ControLinks™
Manu: Lockout
*Fault Code: 84*
M20039
SCROLL
ControLinks™
Manu: Lockout
*F1 No Response*

S7999 CONTROLINKS™ DISPLAY MODULE
11 65-0262
Fault/Blink Codes and Actions.The Fault/Blink Codes and respective corrective actions are found in form 65-0238.
Fig. 10. Display module flush mounting outline.
��
��
���
��
M5082B
1/8 in. DIA. (2)(3.175 mm)

65-0262 G.R. 08-01 www.honeywell.com/bbc
Home and Building Control Home and Building ControlHoneywell Honeywell Limited-Honeywell Limitée1985 Douglas Drive North 35 Dynamic DriveGolden Valley, MN 55422 Scarborough, Ontario
M1V 4Z9
Printed in U.S.A. on recycled paper containing at least 10% post-consumer paper fibers.