Embed Size (px)
Citation preview

Sonoma County Office of Education
Information Technology
INTERIM
SACS2017ALL
MANUAL
PART 1 OF 2
IT Department
October 20, 2017

Interim Reporting Page 2
BLANK PAGE

Interim Reporting Page 3
INTERIM SACS2017ALL MANUAL
Part 1 of 2
TABLE OF CONTENTS
Part 1 – Preparing the First Interim Report
SECTION 1.A – SEQUENCE OVERVIEW FOR SACS2017ALL……………………… 4-6
SECTION 1.B – UPDATE SACS2017ALL VALIDATION TABLES…………………….. 7-8
SECTION 1.C – IMPORT ADOPTED BUDGET INTO SACS2017ALL…………………. 10-11
SECTION 1.D – EXTRACT/DOWNLOAD INTERIM FINANCIAL DATA ………………. 12-15
1.D.1 - EXTRACT FROM ESCAPE
1.D.2 - IMPORT INTO SACS2017ALL
Part 2 – Reference Information
SECTION 2.A – SACS SOFTWARE USER GUIDE……………………………………. 16
SECTION 2.B – HOW TO CLEAN UP ACCOUNTS IN ESCAPE
2.B.1 - ACCOUNTS RECEIVABLES (A/R) CLEARING ………………………… 17-18
2.B.2 - ACCOUNTS PAYABLE (A/P) CLEARING……………………………… 19
2.B.3 – GENERAL JOURNAL CLEARING ……..……………………………… 20
2.B.4 - INVALID/EXPIRED ACCOUNTS WITH BALANCES ………….…………. 21-23
2.B.5 – RESTRICTED/UNRESTRICTED ACCOUNT VERIFICATION…………… 24
SECTION 2.C – HOW TO UPDATE BUDGET IN ESCAPE
2.C.1 – BUDGET TRANSFERS ……………………………………………….. 25
2.C.2 – SPREADSHEET IMPORT METHOD ………………………………… 26-27
2.C.3 – BUDGET MODEL REVISIONS METHOD……………………………… 28-30
SECTION 2.D – SACS2017ALL KNOWN ISSUES…………………………………….. 31
http://www.cde.ca.gov/fg/sf/fr/SACS2017ALLprobfix.asp
***Open Lab October 27, 2017 1-4 pm for LCFF and Budget Model Revisions***

Interim Reporting Page 4
Part 1 – Preparing the First and Second Interim Report
Section 1.a - Sequence Overview
For the interim report process, this sequence of events seems to produce the best results with the least amount of extra work. If you do have problems, contact your IT analyst or your SCOE accountant for assistance.
Pages 18-25 of the Software Users Guide contain a more detailed version of the
Interim process. Go to Table of Contents and use Ctrl+Click to get to section in guide.
a) Complete the update of the SACS2017ALL Validation Tables for the new state codes and combinations. The current software, SACS2017ALL, contains tables from the early June 2017 release and there may have been several state matrix updates since that time.
b) Export/Import – Export budget data from the SACS2017 Budget software to import into the SACS2017ALL software. The addition of the budget data file from the SACS2017 software will allow the interim software to automatically pull the 2017-2018 Original Budget data when needed.
c) Make changes to any of your budget data forms in the Budget period (preference reporting period, Single Budget, July 1) of the SACS2017ALL software. Your accountants will have notified you if there are any updates that should be made to your data before starting into the Interim process.
d) Define the LEA and Reporting Period. Remember to change your software preferences to reflect the interim period before you actually import the Excel file from Escape. The date on the preference screen will automatically change to the correct fiscal year when you select the Interim button. If your periods do not match during the import process a warning message will appear stating that the “Importation has been discontinued due to Errors found during Prescan.”
e) Import the Excel file you created from the Escape system. Remember both the name and location of your exported file. The import process is done from within the Import section of the File menu. Locate your file name from whichever folder you saved it by using the “browse” function located on the Import screen. Once identified, select the file and click twice. The select the black “import” button at the bottom of the resulting screen. Close the menu screen upon completion.
f) Open the Supplemental section within the Forms menu.
g) Select the Al-Average Daily Attendance form. Open the form and enter the information required. Save and print the form. This must be done as the ADA figures are pulled over to the Criteria and Standards Review form and used for identifying your required reserve level.
h) A Cash Flow report is required. Watch that you do not open and save this form
if you will not be using the software version. IF you are using this form, watch for changes in the format. You should be reviewing cash flow on an ongoing basis. Fill in the form, save and print it. You can use your own form or you can use the one provided by the State software within the Supplemental section of the Forms menu.

Interim Reporting Page 5
The software version of the report will carry forward to the second Interim period without the need to re-key the data.
i) Perform all four TRC module edits. (Type of Data section) This will provide validation for all general ledger data, SACS codes and combinations of codes for all columns of the Interim form. This will allow you a chance to correct any Escape data before moving too deeply into the Interim process.
***Make sure to update SACS2017ALL software***
Need TLC for TRCs? Contact your SCOE Accountant to get help to clear TRCs
j) Once you are satisfied with the general ledger information, select and complete the Components of Ending Fund Balance by resource. Each new download of G/L information may change these components so remember to review this section and save any changes before moving to the Funds and Acct Group section.
k) Open the Funds and Acct Groups section within the Forms menu.
l) Select the 01l-General Fund Interim Report. No entry is required on this form but it must be opened and saved as a part of the process. You will need to print all
three sorts: Unrestricted, Restricted, and Summary. You must open and save this
form for the data to be extracted into the Multiyear Projection (MYPI) and
Criteria and Standards Review (O1CSI) forms.
m) A Multiyear Projection is required by the State for the current year and the subsequent two years. You can use either the form available within the SACS software (MYPI) or you may use the Excel spreadsheet available from your SCOE
accountant. Watch that you do not open and save this form if you will not be
using the software version. TRC errors will be created that will require an explanation if the form is saved and not used. These errors will require and explanation.
If you are using the SACS provided form, you will need to complete the forms in sequence to allow the summary level reports to calculate correctly. If you are using the software version Forms 01 and Form AI must be completed and saved before opening the MYPI. You will need to complete the multiyear projection spreadsheets for all unrestricted, restricted, and combined information. Save and print the forms.
If you are not using the SACS form you must include the spreadsheet as an attachment to your email containing the remaining required interim forms.
n) Complete and Save Form MYPIO, if using the SACS format, for each fund other than the general fund, with a projected negative ending fund balance.
o) Open the Criteria and Standards Review under the Forms menu. Scroll through the form to verify extracted data. Enter any additional data required and completely explain any variance where necessary, such as Status of Negotiations, FTE’s, Long Term Debt, Etc. Save and print the form. Forms 01I, Form AI, Form CASH (if using software version) and Form MYPI (if using software version) must be opened and saved before completing the Criteria and Standards Review.
p) Select and open the Cl - Certification form. Enter the date of your board meeting
and certification choice. Review the Criteria and Standards Review Summary for
any areas of potential concern for fiscal solvency. Save and print the form.

Interim Reporting Page 6
q) From the Forms tab, select the Table of Contents – Print or review the form to insure all applicable forms have been completed. This form is automatically updated as you open and save the various forms you complete during the interim process. You may find it helpful to compare the Table of Contents to Attachment A in the Software User Guide, page 265, for completeness. In addition, all individual forms can be printed from the Table of Contents.
r) Select the Technical Review Checklist (TRC) tab menu. Again, run all four of the TRC modules in the Types of Data section for a final validation of SACS codes and combinations of codes, forms that have unbalanced or incomplete data and forms that will need to be reopened and saved due to dependency checks. Fatal exceptions must be corrected; warning exceptions must be either corrected or explained; informational exceptions should be corrected or explained. Print the corrected results.
s) Export .dat file by deadline December 15, 2017 (First Interim) and March
15,2018 (Second Interim) . See list of items to submit to your SCOE Accountant in Part 2 of 2 Manual.
NOTE: The Special Education Maintenance of Effort report (Report SEMAI), found within the Reports menu of the Interim reporting periods, should be completed only after all the above steps relating to fund reporting are completed.

Interim Reporting Page 7
Section 1.b - Update of the SACS2017ALL Validation Tables
It's important to update SACS2017ALL software with the latest version.
Step 1 -- Downloading the Most Current Tables 1. Go the website www.cde.ca.gov/fg/ac/ac/validationtables.asp
2. Click on Validation Table Files (EXE; Revised 6-Oct-2017) 3. A "File Download" or "Save As" window will open, depending on your operating system 4. Click "Save” to save in your C:\SACS2017ALL\Update folder 5. Close the Download Complete box and close your Internet browser.
Step 2 -- Unzipping the Vtables.exe Files
1. Locate the file in your Downloads to Unzip.
2. Double-click on the vtables.exe file to open the WinZip self-extractor window. The default folder for the unzipped files should be C:\SACS2017ALL\Update.

Interim Reporting Page 8
3. Make sure the "Overwrite Silently" box is checked to overwrite the existing validation tables with the current ones, and then click on Extract.
4. Close the WinZip Self-Extractor window.
5. Verify that your Update directory has 12 updated .txt files, one .xls file and one .doc file. The .doc file is a Microsoft Word document that explains the validation table changes in detail. The .xls file is an Excel spreadsheet that contains a summarized list of the code combinations affected by this table update. If anything else is present in this folder the update process (next step) in the SACS2017ALL software will not complete successfully.
6. The easiest way to verify that the files have been updated successfully is to see the dates of the files displayed on the right should reflect the date of latest file update.

Interim Reporting Page 9
Step 3 -- Running the Update
After the validation tables have been downloaded from the CDE and unzipped into the Update subdirectory, the SACS software Update Validation routine must be run.
1. Open the SACS2017ALL software on your desktop
2. Go to File; Click Update Validation
3. Click “Yes” for the Directory ALL the latest combination and description file in C:\SACS2017ALL\Update
4. This process will take several minutes. You will be able to see the program finding the files and then replacing them with the new ones.
5. Once the Update is Complete, Click on Close, then click on OK “The validation table has been updated”.

Interim Reporting Page 10
Section 1.c - Import Adopted Budget Data into SACS2017ALL
Districts can export the Budget period data from the SACS2017 Budget Software into the SACS2017ALL Budget Software. Allowing the budget period data to be available for extraction into the Interim Criteria and Standards Review Form (Form 01CSI), significantly reducing the amount of data key entry required on the form. The Budget period data may be exported using either the “Official” or “Other” option in SACS2017 Budget Software, the state recommends importing only the Officially exported budget period data into the SACS2017ALL Budget Software to ensure the most clean and accurate budget data extract into the interim Criteria and Standards Review Form.
1. How to import the Budget file into SACS2017ALL
There are two methods for 1st Interim Only:
Method 1 Locate the previously exported Budget File (aka .dat file), the one that was sent to the accountants.
Method 2 IF Unable to locate the .dat file that was sent to your accountants.
Go to SACS2017ALL Budget Software Open the SACS2017 Budget Software
Go to Setup
Preferences
Go to File
Select Export
LEA Preferences Tab should have your district listed as the LEA. If it does not make sure to select your district.
Select the correct Budget reporting period, example: “Budget, July 1”
Save/Close
Create a new official .dat file
Remember to note the folder where the .dat file is exported to.
Click the Export Box
Go to File, Select Import Close the SACS2017 Budget Software
Click on the Official Import Option
Click on the Other for the import designation if your file is not an Official export.
Open the SACS2017ALL Software
Select Setup from the Main Menu options
Go to Setup Preferences
LEA Preferences Tab should have your district listed as the LEA. If it does not make sure to select your district.
Choice of
“Official” or
“Other”

Interim Reporting Page 11
CONTINUE METHOD 1
Click on the Browse button to locate the budget period Data file that was officially exported from the SACS2017 Software
Click on the Import Button (left
bottom)
CONTINUE METHOD 2
Select the correct Budget reporting period, example: “Budget, July 1”
Save/Close
Go to File, Select Import
Click on the Official Import Option
Click on the Other for the import designation if your file is not an Official export.
Click on the Browse button to locate the budget period Data file that was officially exported from the SACS2017 Software
Click on the Import Button (left bottom)
2. To view the Budget period data, keep the LEA Preferences set to the budget reporting period.
If changes are needed to the budget Criteria and Standards and other budget forms it is
recommended that you make those changes. Make the changes in the budget period of the
SACS2017ALL software. It is not necessary to go back to the SACS2017 Budget Software, at this
point make all corrections in the SACS2017ALL Budget Software.
3. Once you change Preferences in the SACS2017ALL Software to the 1st Interim reporting period
and have opened and saved any required Interim Forms opened the Interim Criteria and
Standards Review Form the applicable data from the budget period will automatically extract
into any forms/sections that pull data from the budget period.
4. Budget period data WILL NOT extract into the Unaudited Actuals reporting period.

Interim Reporting Page 12
Section 1.d.1 - Extract Interim Data from Escape
The SACS extraction path for Escape is as follows:
1. Go to Finance - Reports – Fiscal- Fiscal 51 SACS Extract
2. Section 2- User Options
Fiscal Yr. = 2018 {2017/2018} (Is default)
3. Skip Section 3- Original Budget Reporting Period
4. Section 4- Interim Budget Reporting Period select-
Reporting Period = Above example is for 1st Interim,
but you have the following options depending upon
the actual Interim Reporting Period
10/31/2017 or later depending
on Board Approval
Create a
Favorite!
Save Time

Interim Reporting Page 13
Beginning Fund Balance from Adopted (column IO)? = Y (Yes-Use Adopted Budget amounts) to use the estimated Beginning Balance from Budget Adoption
Board Approved Operating Budget = 10/31/2017 (First Interim ) / January 31, 2018 (Second Interim) or later depending on the Board Approved Budget updates (Column B of SACS Form 01I)
Projected Year Totals Date = Leave Blank to default to Board Approved Operating Budget date or later date to capture all necessary Budget updates to be included in Interim report (Column D of SACS Form 01I)
This is “as of” transaction date for journal entries affecting revised budget accounts.
***Leave all other report sections as they are***
Click on “Go/Export” icon at the top Escape menu bar
-Select the Excel Data option
The report will appear on your screen: (usually behind your open Escape session)

Interim Reporting Page 14
5. From the File tab in Excel, select Save As-
a. Save As: Save the file anywhere on your computer (recommend to your
desktop)- The saving default is to a temp folder so be sure to note/remember
where you save it.
b. File Name: Name the file – The file name should be meaningful to you.
c. Save As Type: Formatted Text (Space delimited) (*.prn)
6. Save your file. The file will save as a .prn file that the SACS software can import
Remember that as you save this file the Excel program will let you know some of
the features will not be the same as your original file, save the file anyway.

Interim Reporting Page 15
Section 1.d.2 - Import Escape Data to SACS2017ALL
1. Open SAC2017ALL Software
2. Select the LEA
3. Reporting Period: First Interim
4. Save/Close
5. Go to File; Select Import
6. Browse for the location and file name of your saved Escape 1st Interim file
7. Click Import on bottom of page
8. Click Close and Go to Technical Review
If you have errors here you will need to correct them in Escape and then perform the Extract and Import process again. Preparation here will save you time later on during the completion of the Interim forms.

Interim Reporting Page 16
Part 2 - Reference Information
Section 2.a - State Software User Guide Key Reference Pages
After you have downloaded SACS2017ALL the Software User Guide can be found in your ( C) Drive in Calendars and Manuals folder. From the SACS Manual Table of Contents use Ctrl +F to find key words, when highlighted use Ctrl + Click on mouse to bring to page in manual.
These are key items to have ready to help make the process easier to complete.
1.Budget Narrative Tips Refer to Manual Part 2 of 2
6. Multiyear Projection/Other Funds –
Form MYPI0 Software User Guide, page 144
2. Average Daily Attendance - Form Al Software User Guide, page 78
7. Criteria and Standards – Form 01CSI Software User Guide, page 146
3. Cashflow Worksheet – Form CASH Software User Guide, page 87
8. Long Term Commitments – Audit Report Software User Guide, page 101
4. Certification Page – Form CI Software User Guide, page 139
5. Multiyear Projection – Form MYPI Software User Guide, page 140
9. Charter School Financial Reports Software User Guide, page 14
Interim Period Form Dependencies
Dependent
Forms
(save these forms in this order)
Dependent on
Forms Funds (GL)
01I 01
CASH 01, 62
MYPI 01I, AI
MYPIO All applicable funds except 01
01CSI 01I, AI, CASH, MYPI All applicable funds
CI 01CSI
SEMAI 01, 09, 62
To avoid a cyclical CHK-DEPENDENCY Exception, the forms should be opened and saved in
the order listed above in the "Dependent Forms" column.

Interim Reporting Page 17
Section 2.b.1 - Clean up Prior Year Accounts Receivables (A/R)
Begin Reviewing Prior Year AR/Payables and clear out as many as possible prior to October 31.
Go to Finance – Reports – Ledger – Ledger02 Receivables/Liabilities Activity
Section 2 – User Options
Closing Year – 2017 {2016/2017}
A/R or A/P – From drop down select one or both
Cleared Items – NO to limit items that have not cleared
Unposted JE? - YES to review unposted Journal Entries
After review of the report you may need to reverse the system created AR or Prior Year Accounts Payable journals. The following is the standard process to cancel or manually complete any AR’s or Prior Year Payables needing attention.
Create
Favorites for
A/P and A/R
Save Time!

Interim Reporting Page 18
AR Clearing
9229 – Accounts Receivable (Current Year)
9210 – Accounts Receivable (Prior Year)
The year-end closing Asset/Liability Roll moves the entire balance from 9229 object code and creates the beginning balance for 9210 object code in the new fiscal year.
Clear AR Procedures
When an AR Invoice was setup and not received (Manually Complete)
Go to Finance – AR - Invoices
o Blank out the Fiscal Year field on search screen
o Enter the AR needing to be closed
o Make no changes to the Accounts tab
o From the Task menu, select Manually Complete
****Do Not Return to Open from the Task menu) ***
o A system journal will be created in the new fiscal year that will credit 9210 and
debit 8XXX revenue for the amount that was not received and clear the
Ledger02 Report

Interim Reporting Page 19
Section 2.b.2 - Clean up Prior Year Accounts Payables (A/P)
AP Clearing
9529 – Accounts Payable Setup (Current Year)
9510 – Accounts Payable (Prior Year)
The year-end closing Asset/Liability Roll moves the entire balance from 9529 object code and creates the beginning balance for 9510 object code in the new fiscal year.
Clear AP Procedures
When a Prior Year Payable was setup and not paid against (Manually Complete)
Go to Finance – Requisitions – Vendor Requisitions
o Blank out the Fiscal Year field on search screen o Enter the vendor requisition needing to be closed Make no alterations to the
Accounts tab
o From the Task menu, select Manually Complete if the requisition has not been paid against
***DO NOT Return to Open from the Task menu***
o A journal will be created in the new fiscal year that will debit the 9510 object and credit the expense by the amount either over or under the established amounts and clear the Ledger02.

Interim Reporting Page 20
Section 2.b.3 – General Journal Clearing
Manual A/R or A/P journals created during year-end will need to be reversed manually in
2017/2018 fiscal year once the accrued dollars have been received or have been determined
they will not be received.
Two methods: Task to Reverse or create new JE to Reverse Accounts
Go To Finance – Fiscal – Journal Entries
Search for the JE to Reverse
From the list go to TASK to select Reverse
**Be careful because it will reverse all JEs on the list**
This will create a new JE that will reverse all the lines
Go to Task to Submit or Approval Override
Go To Finance – Fiscal – Journal Entries
Click NEW to create a manual JE for accounts that need to be reversed
Enter a Comment
Go to TASK to Submit or Approval Override
Don’t forget Escape How-To or Tutorial Tools if you need assistance or send an
email to [email protected].

Interim Reporting Page 21
Section 2.b.3 - Invalid/Expired Accounts with Dollars
As part of your cleanup process, you will want to review invalid or expired accounts that may have balances.
The Fiscal 50 report should be reviewed for invalid account combinations that have associated dollars.
**If you have errors on this report you will have errors on SACS TRC report**
Go to Finance – Reports - Fiscal - Fiscal50 SACS Component Validation Errors
Fiscal Year: 2018 {2017/2018}
Show: Both problems by Account and accounts by Problem
Activity: No-DO NOT show Accounts with no activity
For this reporting period concentrate on the errors that have balances as shown below.
You will want to do Journal Entry to correct the expenses prior to beginning the interim process to be sure your fund statements are as correct as possible.

Interim Reporting Page 22
Example: Management code ZERR is used in Escape for mapping errors in Payroll and AP Processing so that production is not stopped, but is invalid for SACS Reporting. If balances exist in these accounts, you will want to do a JE to correct expenses.
Run PAY10 Labor Distribution Detail Go to HR/Payroll-Reports-Payroll-PAY10
Starting Pay Date: 7/1/2017
Ending Pay Date: 6/30/2018
3 - Account Selection:
Object: 1-3 is default
Management: ZERR
This report will allow you to see employee activity to help determine where to journal the expense.
NOTE: ZERR is due to an invalid account on a position, then you will want to update
account in position. DO NOT journal the encumbrance, it will correct itself when Payroll is processed.

Interim Reporting Page 23
Find Expired Accounts With Balances
Go to Finance –Setup - Chart of Accounts – Accounts
Section 2 – Other
Include Expired: YES
Review if expired accounts have dollars attached
Need to journal expense or “unexpired” the account
Or use TASK to Clear the Expiration Date
Be careful because this will expire the list of accounts in the selection, may want
to narrow search.

Interim Reporting Page 24
Section 2.b.4 - Restricted/Unrestricted Account Code Verification
The Fiscal 13 can be run for Restricted and Unrestricted accounts as verification of your SACS statements. If the reports do not match, check for account strings that have defaulted to Restricted that should not be. NOTE: For all components, except for Resource the restricted flag should always be NO
Go to Finance – Setup – Chart of Accounts – Account Components
Enter the Component = Management
Select Go
This situation occurs when you add a new component and do not change the Restricted field before you save the entry. It is very easy to miss that you need to change the flag because this is not a required field.
Go to Finance – Setup – Chart of Accounts – Accounts Components
Enter the Component Value that needs to be changed
Click Go
Once the screen appears change the Restricted field from Yes to No.
Save/Close Once you change the component to Unrestricted any account code strings that were created while the component was considered Restricted will automatically now become Unrestricted.

Interim Reporting Page 25
Section 2.C - Ways to Update the Budget in Escape
Budget Update Processes
Review/clean up your budget prior to beginning the Interim process. You are looking to
present the most up to date financial position of your district on October 31, 2017. At this time we will be referring to those items you would normally be updating prior to the end of the Interim period.
Four different activities within Escape that can be used to update your budget prior to Interims or at any time you would need to make a significant amount of entries to your budget.
Methods: Budget Transfers, Journal Import, Budget Model and Budget Entry
Section 2.c.1 - Budget Transfer Method
This is the typical way that Budget Revisions are posted throughout the fiscal year
Go to Finance – Budget – Budget Transfers
Click New
Enter Comment
In Items section Click New to add account information
In the Change column to increase or decrease accounts that need to be revised
TASK to Submit or Approval Override if you have permissions

Interim Reporting Page 26
Section 2.c.2 - Spread Sheet Budget Revision Method
This method is good for times when you have already created a spreadsheet for budget changes. Unlike the Budget Management method, the spreadsheet method does not do any math for you nor does it post the journal automatically.
Here are the criteria needed to format an Excel Spread Sheet to import into the Budget Import Process in Escape.
For Templates Go to Online Resources – Templates – Journal Entry Import
NO HEADER - Remove Header before importing
Column A – Org Id field: Numeric
Column B – Fiscal Year 2018
Column C – Journal Type = BudRev (Numeric, 8 characters)
Column D – Department Id (Numeric, 8 characters)
In most cases it is Business
Column E - No entry for this field (numeric, 12 characters)
Column F – Transaction Date formatted as 10/31/2017 and requires the /’s
Column G - Full account string with dashes (up to 60 characters)
Column H – Debit field (Decrease Budget)
Column I – Credit field (Increase Budget)
are the numeric fields you are using for changing your budget.
Each field must have an entry (debit/credit/zero)
May include decimals but not commas
Column J - Description if you require a different description per line
Otherwise the system takes the comment from the import screen.
Save the file as both and Excel file and a .CSV file.
The import process requires the .CSV format but if changes are needed then modify at the Excel level and then resave as the .CSV file.
Keep your naming convention simple and remember where you save files
You can see that the .CSV file below has been modified and no longer actually looks like the Excel file we actually saved.

Interim Reporting Page 27
Once the file is saved, go to the journal import activity.
Go To Finance – Processes – Journal Import
Click in File to Import field to browse the .CVS file
Enter a Comment
Click Go
Review the import before going to the next step.
Click on TASK to Create Journal Entry
To POST the Journal Entry Import:
Once the journal is created, review before posting.
In an account lookup you can see the new balance for account. This amount can be manually changed if needed.
Go to TASK to Submit or Approval Override if permitted
Note: The use of the Journal Import Process created an entry based exactly on the spreadsheet
you created. The system did not do any math or change your entry.
Interim Reporting Page 28
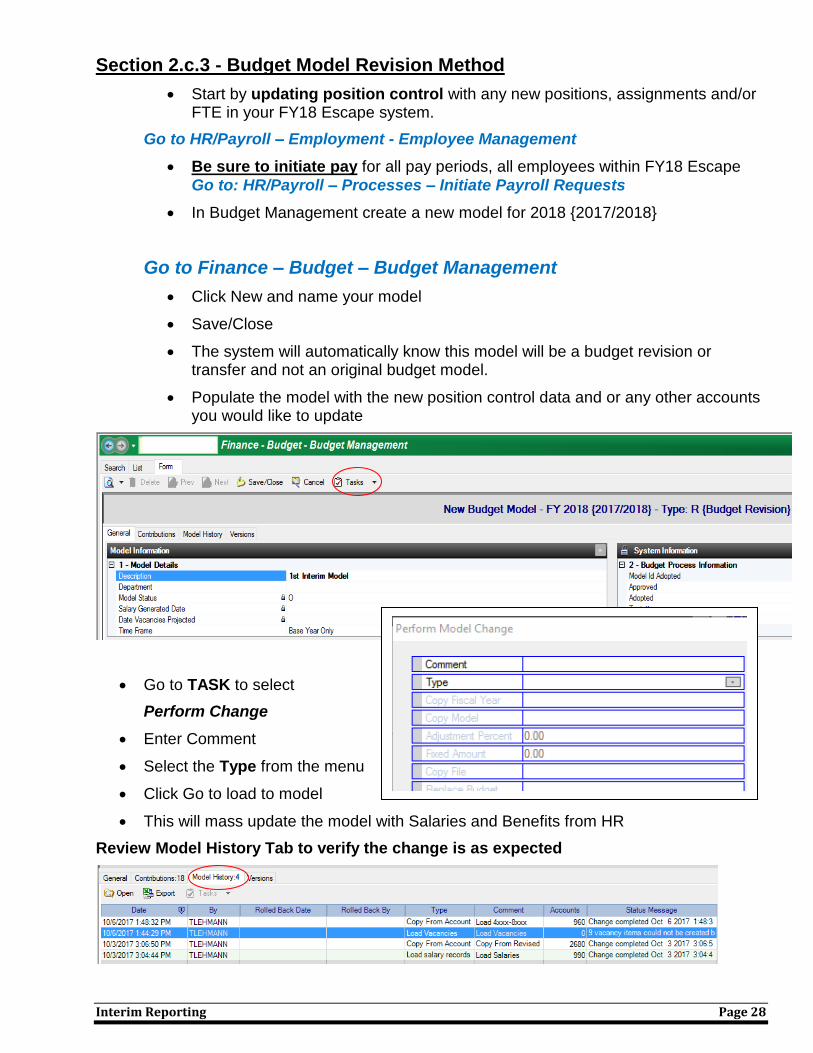
Section 2.c.3 - Budget Model Revision Method
Start by updating position control with any new positions, assignments and/or FTE in your FY18 Escape system.
Go to HR/Payroll – Employment - Employee Management
Be sure to initiate pay for all pay periods, all employees within FY18 Escape Go to: HR/Payroll – Processes – Initiate Payroll Requests
In Budget Management create a new model for 2018 {2017/2018}
Go to Finance – Budget – Budget Management
Click New and name your model
Save/Close
The system will automatically know this model will be a budget revision or transfer and not an original budget model.
Populate the model with the new position control data and or any other accounts you would like to update
Go to TASK to select
Perform Change
Enter Comment
Select the Type from the menu
Click Go to load to model
This will mass update the model with Salaries and Benefits from HR
Review Model History Tab to verify the change is as expected

Interim Reporting Page 29
Load Types into Budget Model
Go to TASK and select
Perform Change
Enter Comment – Example: Load Salaries
In the Type field use the drop down to select from various transactions to Load into the Model
Click GO to Load
Click YES to continue
Repeat “Perform Change” for
each type that is needed in
Model
Once you have all transactions complete Close Model
Example: Load Vacancies
Type field : 10 Load Vacancies
Click GO to Load
Click YES to continue
Load Accounts Other than Payroll
Example: Load 4XXX-8XXX
Type field : 08 Copy Accounts from Revised
Click GO to Load
Click YES to continue
Replace Budget: 2 {Replace Same Item Types} Default
Object Code: 4- 8

Interim Reporting Page 30
Budget Entry Activity for Budget Model Revision Method
This allows you to make manual changes to accounts that were loaded into the new model.
Go to Finance – Budget – Budget Entry
Select the Interim Model
Select Search Criteria for accounts to be modified
Click GO
Click Open to modify the Budget Amount
Click New to Add to Budget Amount
Small Save/Close
Big Save/Close
Don’t forget to POST your model once you have made all your modifications with 10/31/2017 Date or later depending on Board Approval!
Click on TASK to select Post This Model

Interim Reporting Page 31
Section 2.d – SACS2017ALL Known Issues
Problem: Import, Export, and TRC Menu Options Disabled for Some Windows 7/8/10 Users
Right after installing the Standardized Account Code Structure (SACS) software, some users are unable to import, export, or run the Technical Review Check (TRC) because the File–Import, File–Export, and TRC–Technical Review menu options are disabled.
Fix: Some Windows 7/8/10 users have encountered this problem, and applying one or more of the following solutions has been effective:
Ensure that the SACS software was installed correctly:
o Temporarily change the user's level of access to that of the system administrator;
o Have the user log onto the network;
o Install the software;
o Change the user's level of access back to its original setting; and
o Restart the computer.
Register the RICHTX32.OCX file. This should be done by information staff only.
Change the SACS software to run in compatibility mode using Windows XP (Service Pack 3). To do this, right-click on the SACS software desktop icon;
select Properties; select the Compatibility tab; if not already active, click on the Run
this program in compatibility mode: check box; when the drop down menu activates,
select Windows XP (Service Pack 3); press the Apply button and then OK.
Problem: Known Printing Issues Relating to Windows 7
After the SACS software was modified to mitigate the worst of its incompatibilities with Windows 7, many software testers encountered a remaining printing problem where a fund form, supplemental form, or report is sent to the printer, and the SACS software print status window freezes. (This is not an issue when printing the Technical Review Checklist (TRC), the import log, or from the User Data Input/Review screen.)
Workaround: Anticipating this problem for all Windows 7 users, the California Department of
Education's (CDE’s) workaround is to print first to Microsoft XPS Document Writer or
Adobe PDF, then send the document to the printer.


![Best Practices for Blogs: Subdirectory vs. Subdomain [Infographic]](https://img.pdfslide.net/doc/110x75/55a90c641a28abd6178b46cd/best-practices-for-blogs-subdirectory-vs-subdomain-infographic.jpg)
