Embed Size (px)
Citation preview
SAFEBOX USER MANUAL (Version: 1.1, March 2014)
This guide explains how to use the basic functionalities of the SafeBox v 1.0.
Legal notice The information in this manual is furnished for informational use only. No part of this manual may be reproduced or transmitted in any form or by any
means, electronic or mechanical, for any purpose, without the prior written permission of DMT Ltd.
The software, described in this manual, is owned by DMT Ltd. It is protected by Bulgarian Copyright Law, as well as by international copyright treaties, and
may be used or copied only in accordance with the license agreement.
DMT Ltd. provides this manual “as is” without any warranty, either express, or implied.
This publication may contain typographical errors or technical inaccuracies. While every precaution has been taken in the preparation of this document,
DMT Ltd. assumes no responsibility for errors or omissions. Nor is any liability assumed for damages, resulting from the use of the information, contained
herein. Changes are periodically made to the information herein. They will be incorporated in new versions of the manual. Please, check the PlayBox
website regularly for User Manual updates.
DMT Ltd. may introduce changes or improvements in the products, described in this manual at any time, without any special notice.
Please, address your comments or questions to:
Digital Media Technologies Ltd.
7 Iskarsko shose Blvd.
Building 15, 5th Floor
1528 Sofia, Bulgaria
Tel.: +359 2 9703050
Fax: +359 2 9717700
www.playbox.tv
Contents LEGAL NOTICE ........................................................................................... 2 CONTENTS.................................................................................................. 3 PREFACE...................................................................................................... 4 STYLE CONVENTIONS............................................................................... 5 GETTING STARTED .......................................................................................................... 6
Installation ....................................................................................................................................................................................................................... 6 USER INTERFACE.................................................................................................................... 6 SAFEBOX OPTIONS ............................................................................................................... 7
General.............................................................................................................................................................................................................................. 7 Removal ............................................................................................................................................................................................................................ 9 Schedule ......................................................................................................................................................................................................................... 10 OML .................................................................................................................................................................................................................................. 11 Attached files ................................................................................................................................................................................................................ 12
EXPORT MEDIA INFO .......................................................................................................... 12

Preface
Dear PlayBox customer,
Thank you for purchasing our product! We would like to assure you that you have chosen the most cost-effective and versatile TV
automation system on the market. As always, we are trying to stay close to our customers’ needs, making sure they all receive adequate
support and satisfaction. Your opinion about our product is an exceptionally valuable source of information for us. The ease of working
with the PlayBox products results mainly from the suggestions and comments of our current respected customers.
This manual is structured into several sequential chapters, each aiming to ease the installation, fine tuning, and use of our products. We
hope that you will enjoy working with it, and we are anxiously looking forward to receiving your feedback.
Please, send your questions, suggestions, and assistance requests to:
General feedback:
Helpdesk fax number: +359 2 9717700
Style Conventions File names, software, documents or terms are written in italics
The data is written in the settings.ini file.
The file is located in C:\Program Files\DMT\AirBox
For further information read Shortcuts reference book.
The VTR is controlled via RS-422.
Direct quotations from the computer screen are presented as follows:
Menu Items and commands
Tab/Page names
Column names (i.e. in a playlist or another grid) Field names, check boxes
Buttons Screen readings are written in [square brackets]
The keyboard keys are enclosed in <> signs
Terms are defined in the Glossary at the end of the manual
The arrows, used in the setting procedures mean as follows:
A menu item follows;
A page(tab) name follows;
A field name, a check box name, or a value name follows.
Except for arrows, you can distinguish between the relevant menu categories also by the styles, listed above.
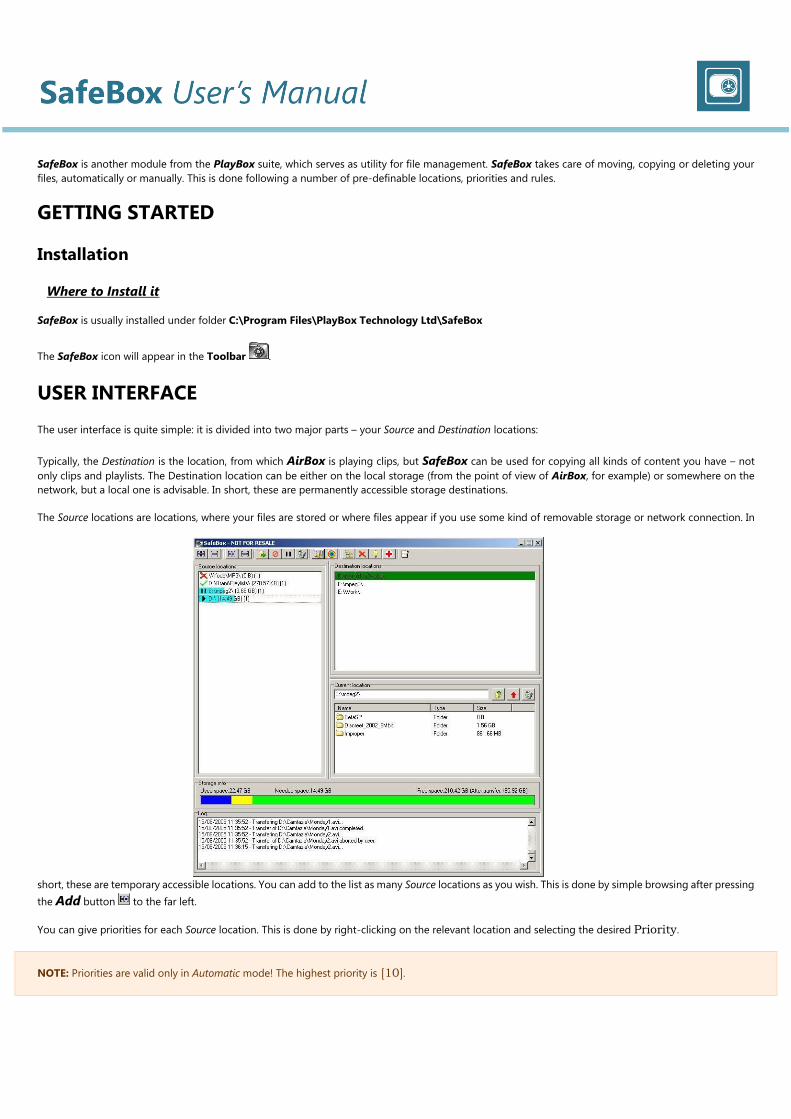
SafeBox is another module from the PlayBox suite, which serves as utility for file management. SafeBox takes care of moving, copying or deleting your
files, automatically or manually. This is done following a number of pre-definable locations, priorities and rules.
GETTING STARTED
Installation
Where to Install it
SafeBox is usually installed under folder C:\Program Files\PlayBox Technology Ltd\SafeBox
The SafeBox icon will appear in the Toolbar .
USER INTERFACE
The user interface is quite simple: it is divided into two major parts – your Source and Destination locations:
Typically, the Destination is the location, from which AirBox is playing clips, but SafeBox can be used for copying all kinds of content you have – not
only clips and playlists. The Destination location can be either on the local storage (from the point of view of AirBox, for example) or somewhere on the
network, but a local one is advisable. In short, these are permanently accessible storage destinations.
The Source locations are locations, where your files are stored or where files appear if you use some kind of removable storage or network connection. In
short, these are temporary accessible locations. You can add to the list as many Source locations as you wish. This is done by simple browsing after pressing
the Add button to the far left.
You can give priorities for each Source location. This is done by right-clicking on the relevant location and selecting the desired Priority.
NOTE: Priorities are valid only in Automatic mode! The highest priority is [10].
Along the upper part of the main window are situated the control buttons. The first pair of plus and minus signs is used for adding/deleting Source
locations. The second pair is designed for the Destination locations.
Further on are situated the transfer control buttons. They provide hints at pointing at them.
SafeBox allows multiple assignments, i.e. you can transmit a given source content to more than one destination location: select a Source location (it will
be marked in dotted-line frame) then select the desired online location in the list to the right. Press the Assign/Decline button. The assigned
destination line will become green. You can view the assigned destination(s) of a source location by selecting its row. All destinations will go green. You
can decline a destination location by pressing the Assign/Decline button once again.
After assigning all destinations, select one or more of the Source location and press button to start the file transfer manually.
The transfer could be canceled at any time by selecting the desired Source location and pressing the button. If you want just to pause/resume the
transfer, press button.
Press button to remove content of the selected Source location.
Press the About button to check the information about the current software version and your dongle.
In case you need to generate a PlayBox Doctor report, press the Red Cross button to start it. Just fill-in the mandatory fields, everything else will be done
automatically. You can read more about the PlayBox Doctor in the Basic PlayBox manual.
A sign in front of a given Source location means that it is currently accessible.
A sign in front of a Source location means that it is currently inaccessible. When a source location is being transferred, a symbol representing the currently
executed action appears in front of it. A colored bar in its line displays the progress of transfer.
Along the lower mid-window is situated a colored bar that represents the distribution of the storage (Destination location) space. The blue section stands
for Used space; the yellow one – the space needed for transfer of the selected offline content; and the green one represents the free space, which will
remain after the transfer.
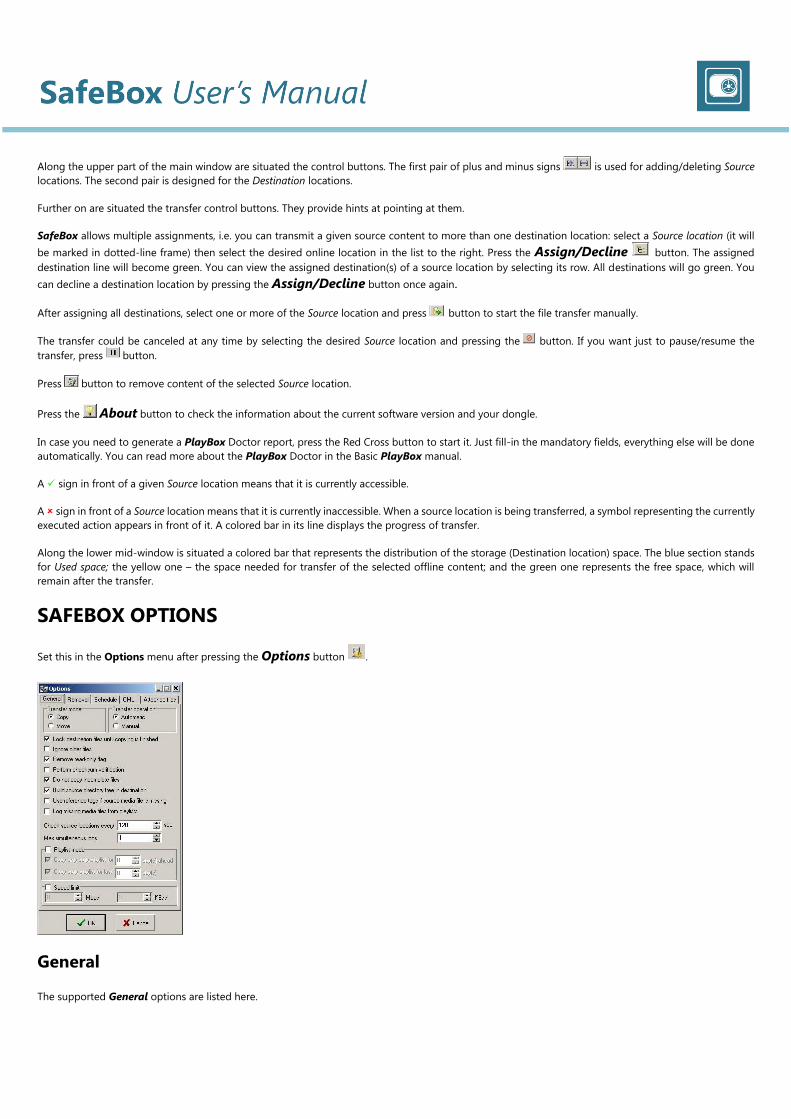
SAFEBOX OPTIONS
Set this in the Options menu after pressing the Options button .
General
The supported General options are listed here.
Transfer mode – select Copy, if you just want to copy files from Source location to Destination location and select Move, if you want to move the files.
Transfer operation - SafeBox could perform all necessary actions manually (select Manual radio button) or automatically (select Automatic).
Lock destination files until copying is finished – this check will not “allow” AirBox to start playing out a file that is currently being copied. This will
prevent unexpected end of the video when the copied part of the file is over.
Ignore older files – this means “Do Not Copy Older Files”. Thus, if the same file has different “last modified” date on the Source and the
Destination folder, and the Source file is older, SafeBox will not copy it to the Destination. SafeBox will log a message every time a newer file is replaced
with an older file.
NOTE: This option is un-checked by default which means that SafeBox will overwrite the newer files in the Destination folder with older files from the
Source folder!
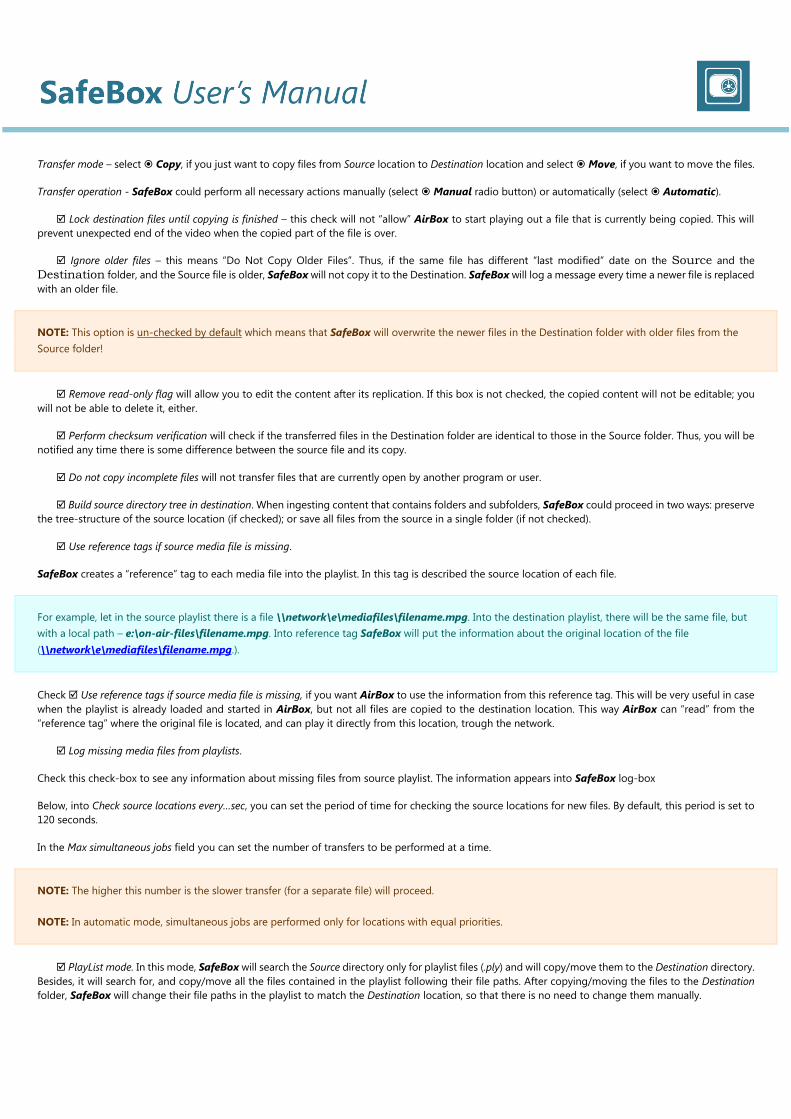
Remove read-only flag will allow you to edit the content after its replication. If this box is not checked, the copied content will not be editable; you
will not be able to delete it, either.
Perform checksum verification will check if the transferred files in the Destination folder are identical to those in the Source folder. Thus, you will be
notified any time there is some difference between the source file and its copy.
Do not copy incomplete files will not transfer files that are currently open by another program or user.
Build source directory tree in destination. When ingesting content that contains folders and subfolders, SafeBox could proceed in two ways: preserve
the tree-structure of the source location (if checked); or save all files from the source in a single folder (if not checked).
Use reference tags if source media file is missing.
SafeBox creates a “reference” tag to each media file into the playlist. In this tag is described the source location of each file.
For example, let in the source playlist there is a file \\network\e\mediafiles\filename.mpg. Into the destination playlist, there will be the same file, but
with a local path – e:\on-air-files\filename.mpg. Into reference tag SafeBox will put the information about the original location of the file
(\\network\e\mediafiles\filename.mpg.).
Check Use reference tags if source media file is missing, if you want AirBox to use the information from this reference tag. This will be very useful in case
when the playlist is already loaded and started in AirBox, but not all files are copied to the destination location. This way AirBox can “read” from the
“reference tag” where the original file is located, and can play it directly from this location, trough the network.
Log missing media files from playlists.
Check this check-box to see any information about missing files from source playlist. The information appears into SafeBox log-box
Below, into Check source locations every…sec, you can set the period of time for checking the source locations for new files. By default, this period is set to
120 seconds.
In the Max simultaneous jobs field you can set the number of transfers to be performed at a time.
NOTE: The higher this number is the slower transfer (for a separate file) will proceed.
NOTE: In automatic mode, simultaneous jobs are performed only for locations with equal priorities.
PlayList mode. In this mode, SafeBox will search the Source directory only for playlist files (.ply) and will copy/move them to the Destination directory.
Besides, it will search for, and copy/move all the files contained in the playlist following their file paths. After copying/moving the files to the Destination
folder, SafeBox will change their file paths in the playlist to match the Destination location, so that there is no need to change them manually.
NOTE: The playlist(s) and their related files will be copied/moved to the same Destination directory.
NOTE: In PlayList mode, the option “Build source directory tree in destination“ will work only if the Destination directory contains the same root folder,
as the Source directory.
For example, if your playlist Source folder is \\PC_Name\video\playlists and the related video files are located in its subfolders (
\\PC_Name\video\playlists\folder1; \\PC_Name\video\playlists\folder2; etc.), then into the Destination, you must have the same folder,
PC_Name\video\playlists. Only in this case SafeBox can build the same folder tree in the Destination.
WARNING! Make sure to use real network paths when creating your playlists! Do not use mapped drives when pointing to the media files locations!
Thus, you will ensure that all files needed for the playlists are visible from the SafeBox PC and will be copied properly.
In order not to clog the Destination directory, you can check Copy only daily playlists for… box and specify the number of days in the spin-box to the
right.
Check the Speed limit box if you wish to change the process duration. Below, you can either use the spin-boxes to set the transfer rate, or type it directly
in the relevant field. The values in the Mbps filed will be converted into KB/s automatically and vice-versa.
NOTE: The higher you set the transfer rate values, the higher CPU usage will occur.
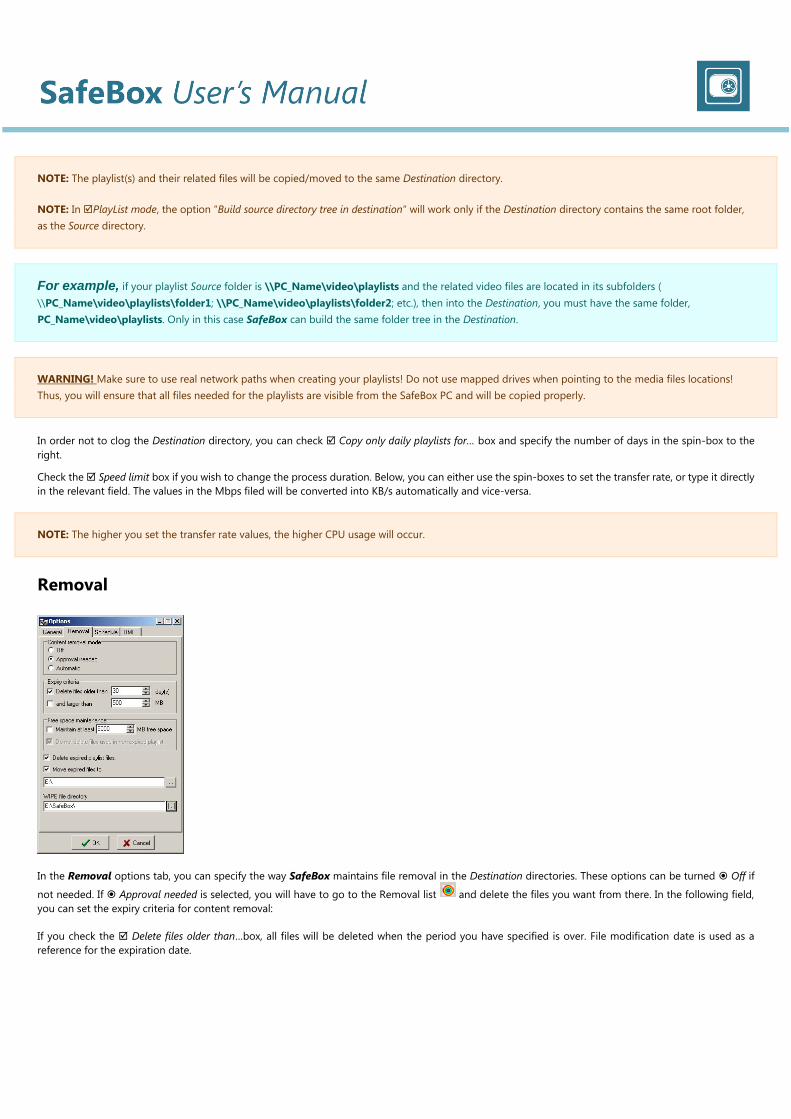
Removal
In the Removal options tab, you can specify the way SafeBox maintains file removal in the Destination directories. These options can be turned Off if
not needed. If Approval needed is selected, you will have to go to the Removal list and delete the files you want from there. In the following field,
you can set the expiry criteria for content removal:
If you check the Delete files older than…box, all files will be deleted when the period you have specified is over. File modification date is used as a
reference for the expiration date.
IMPORTANT: The number of days must not be less that 1 (one)!
If you check the box underneath as well, only files larger than the specified size will be deleted.
You could also manage files according to the free disc space on your computer:
Maintain at least […] MB free space will delete any files, regardless their type, in order to achieve the required space.
Delete log file if it is larger than …MB – here you have to enter the maximum allowed size of the SafeBox log file. All files larger than this size will be
deleted.
The next check-box concerns the management of playlist files (*.ply) that fit the expiration criteria.
If Delete expired playlist files is checked, all playlist files in the Destination directory that fit the expiration criteria will be deleted without notification. If
not checked, the playlist files will not be deleted even if they have expired according to the criteria set above.
You can move all expired files to a specified folder. Just check Move expired files to and browse for the folder’s location or enter its path in the string
below.
NOTE: The removal list that controls all removal/move operations is updated each hour or at clicking OK in the Options dialog. Therefore, deleting and
moving files will start about one hour after their expiry!
SafeBox can remove files according to predefined removal lists in .csv file format. Put your WIPE.CSV removal files in a folder and browse for it in the WIPE
file directory string.
IMPORTANT: If the file name here is different from WIPE.CSV, it will not be recognized by SafeBox.
At detecting such a file in the WIPE directory, SafeBox will check whether the files listed in it are used in non-expired playlists. If yes, the files will not be
deleted. If not, SafeBox will delete them automatically.
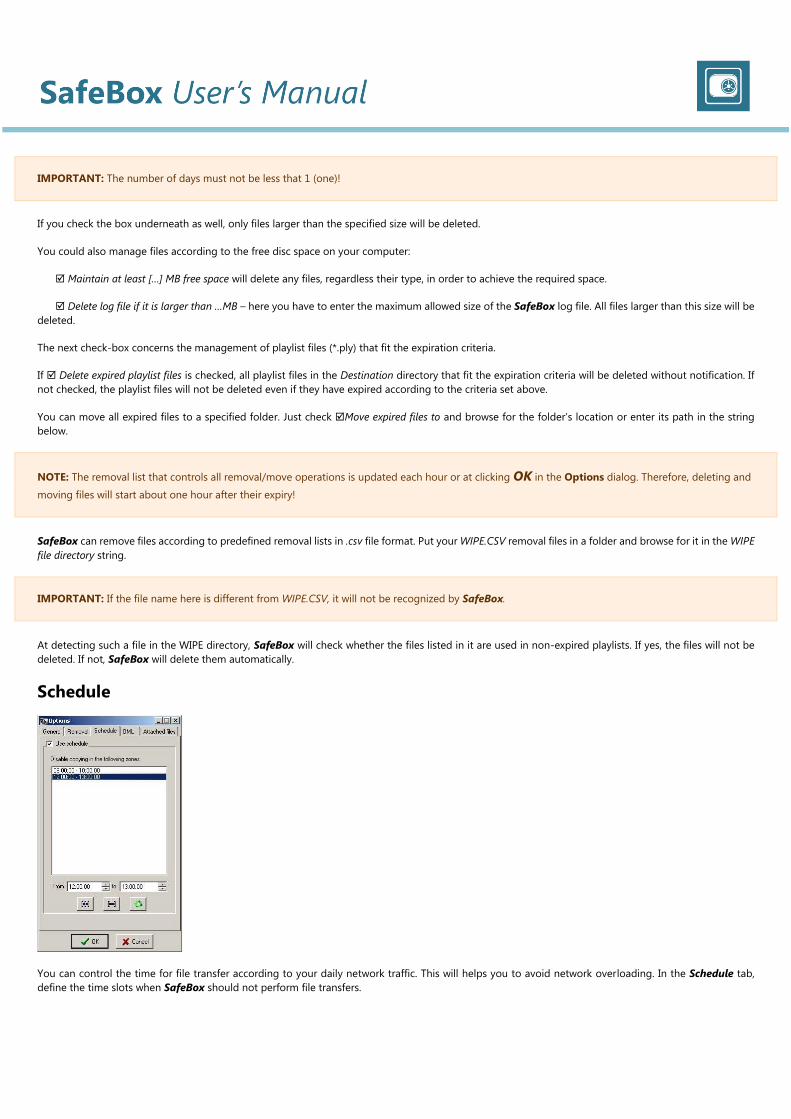
Schedule
You can control the time for file transfer according to your daily network traffic. This will helps you to avoid network overloading. In the Schedule tab,
define the time slots when SafeBox should not perform file transfers.
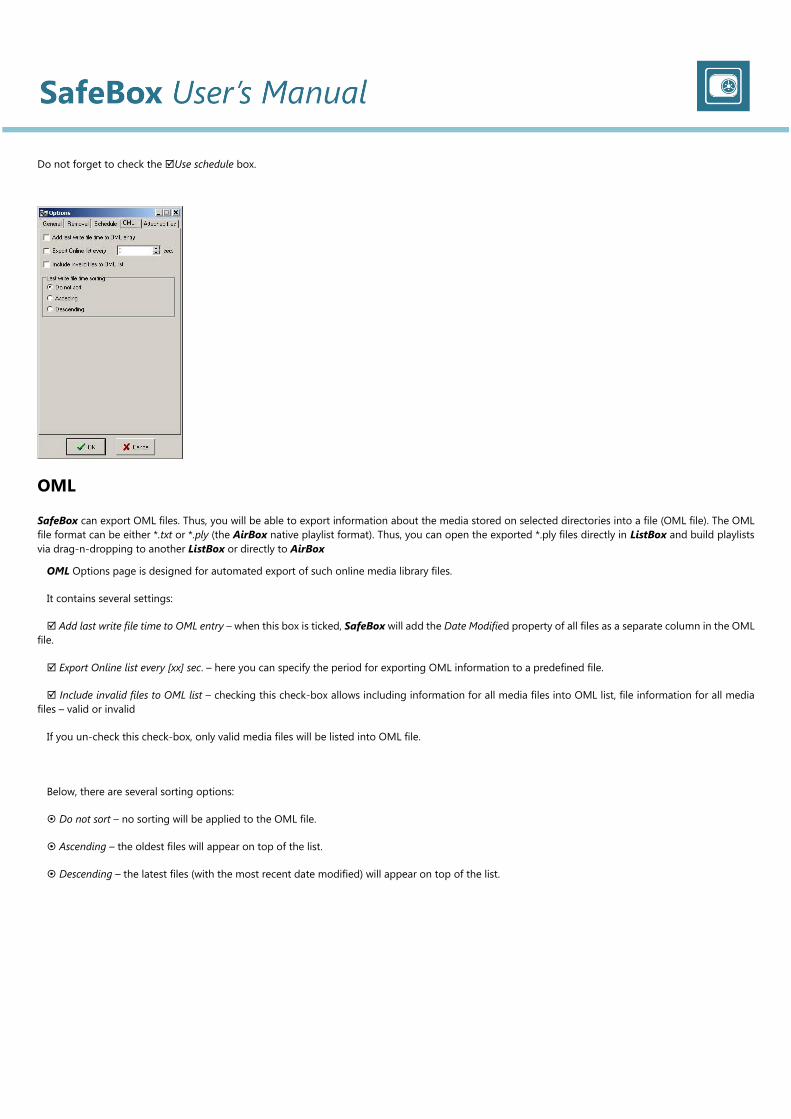
Do not forget to check the Use schedule box.
OML
SafeBox can export OML files. Thus, you will be able to export information about the media stored on selected directories into a file (OML file). The OML
file format can be either *.txt or *.ply (the AirBox native playlist format). Thus, you can open the exported *.ply files directly in ListBox and build playlists
via drag-n-dropping to another ListBox or directly to AirBox
OML Options page is designed for automated export of such online media library files.
It contains several settings:
Add last write file time to OML entry – when this box is ticked, SafeBox will add the Date Modified property of all files as a separate column in the OML
file.
Export Online list every [xx] sec. – here you can specify the period for exporting OML information to a predefined file.
Include invalid files to OML list – checking this check-box allows including information for all media files into OML list, file information for all media
files – valid or invalid
If you un-check this check-box, only valid media files will be listed into OML file.
Below, there are several sorting options:
Do not sort – no sorting will be applied to the OML file.
Ascending – the oldest files will appear on top of the list.
Descending – the latest files (with the most recent date modified) will appear on top of the list.
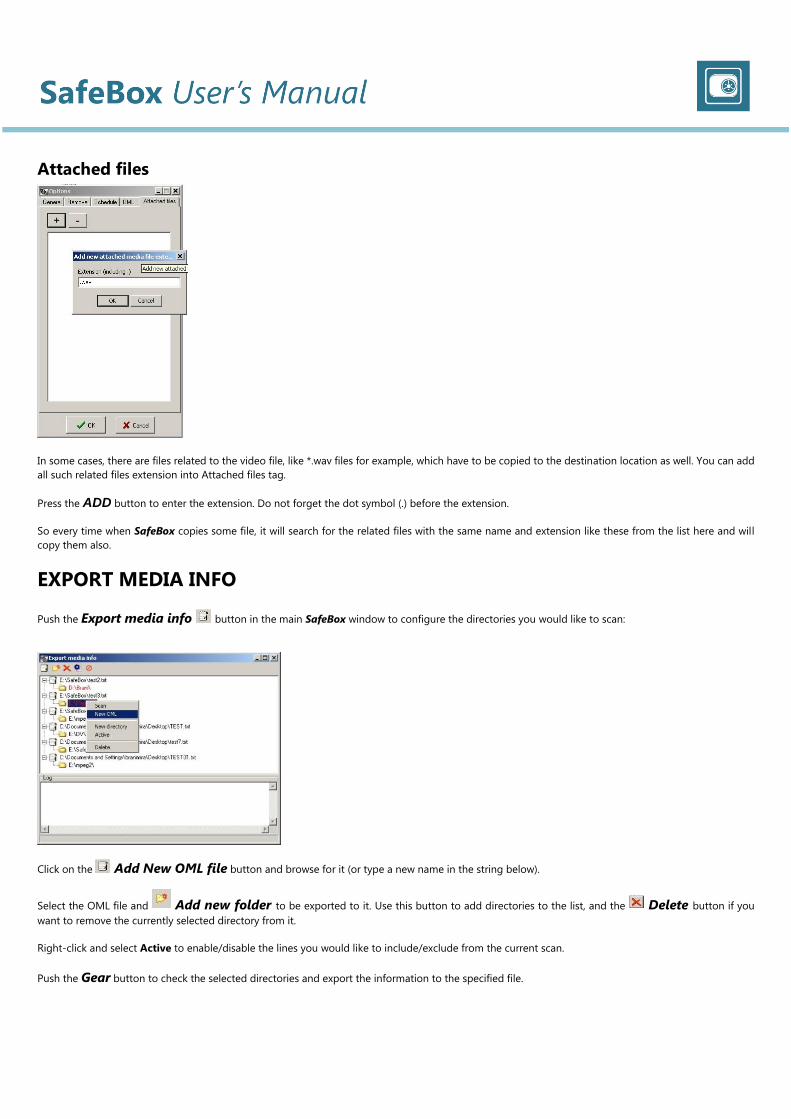
Attached files
In some cases, there are files related to the video file, like *.wav files for example, which have to be copied to the destination location as well. You can add
all such related files extension into Attached files tag.
Press the ADD button to enter the extension. Do not forget the dot symbol (.) before the extension.
So every time when SafeBox copies some file, it will search for the related files with the same name and extension like these from the list here and will
copy them also.
EXPORT MEDIA INFO
Push the Export media info button in the main SafeBox window to configure the directories you would like to scan:
Click on the Add New OML file button and browse for it (or type a new name in the string below).
Select the OML file and Add new folder to be exported to it. Use this button to add directories to the list, and the Delete button if you
want to remove the currently selected directory from it.
Right-click and select Active to enable/disable the lines you would like to include/exclude from the current scan.
Push the Gear button to check the selected directories and export the information to the specified file.
Beneath the Destination locations list you can view detailed information about the currently selected entry. Its path is displayed in the Current location
string and below are listed all sub-directories contained in it.
There are three buttons to the right of the Current location string. To browse for a new destination location, use the first one. Push the second one to go
one level up the current directory. The third button will erase all the content from the selected Destination location
www.playbox.tv
Digital Media Technologies Ltd.
7 Iskarsko shose Blvd.
Building 15, 5th Floor
1528 Sofia, Bulgaria
Tel.: +359 2 9703050
Fax: +359 2 9717700
www.playbox.tv
All rights reserved copyright © 1999-2014


![hawaii's rainwater catchment services directory - ctahr directory... · [ Page 1 ] Hawaii’s Rainwater atchment Services Directory HAWAII’S RAINWATER CATCHMENT SERVICES DIRECTORY](https://img.pdfslide.net/doc/110x75/5a81030c7f8b9a38478ceb57/hawaiis-rainwater-catchment-services-directory-ctahr-directory-page-1-hawaiis.jpg)