Embed Size (px)
Citation preview
SafeGuard EnterpriseAdministrator help
Product version: 6Document date: February 2012
Contents
1 About SafeGuard Management Center....................................................................................................4
2 Log on to SafeGuard Management Center..............................................................................................5
3 Security best practices ............................................................................................................................10
4 Licenses....................................................................................................................................................13
5 Working with multiple database configurations...................................................................................19
6 Creating the organizational structure....................................................................................................23
7 SafeGuard Enterprise Security Officers.................................................................................................34
8 SafeGuard Enterprise Keys and Certificates..........................................................................................51
9 Company Certificate Change Orders.....................................................................................................62
10 Working with policies...........................................................................................................................65
11 Working with configuration packages.................................................................................................76
12 Power-on Authentication (POA).........................................................................................................79
13 Administrative access to endpoint computers.....................................................................................89
14 Service Account Lists for Windows logon...........................................................................................90
15 POA users for POA logon.....................................................................................................................95
16 Policy settings......................................................................................................................................101
17 SafeGuard Configuration Protection.................................................................................................135
18 Full disk encryption............................................................................................................................165
19 File Share.............................................................................................................................................169
20 SafeGuard Data Exchange..................................................................................................................179
21 Cloud Storage......................................................................................................................................189
22 User-computer assignment.................................................................................................................192
23 Tokens and smartcards.......................................................................................................................197
24 Secure Wake on LAN (WOL).............................................................................................................213
25 Recovery options.................................................................................................................................215
2

26 Recovery with Local Self Help............................................................................................................216
27 Recovery with Challenge/Response....................................................................................................221
28 System Recovery..................................................................................................................................238
29 Restore a corrupt SafeGuard Management Center installation........................................................243
30 Restore a corrupt database configuration..........................................................................................244
31 Inventory and status data...................................................................................................................245
32 Reports.................................................................................................................................................252
33 Scheduling tasks..................................................................................................................................265
34 SafeGuard Enterprise and BitLocker Drive Encryption....................................................................275
35 SafeGuard Enterprise and BitLocker To Go......................................................................................280
36 SafeGuard Enterprise and self-encrypting, Opal-compliant hard drives........................................281
37 Events available for reports.................................................................................................................284
38 SGMERR codes in Windows event log..............................................................................................295
39 Technical support................................................................................................................................311
40 Legal notices........................................................................................................................................312
3
1 About SafeGuard Management Center
The SafeGuard Management Center is the central instrument for managing computers encryptedwith SafeGuard Enterprise. With SafeGuard Management Center you can implement acompany-wide security strategy and apply it to the endpoint computers. SafeGuard ManagementCenter enables you to:
■ Create or import the organizational structure.
■ Create security officers.
■ Define policies.
■ Export and import configurations.
■ Monitor computers through comprehensive logging functionality.
■ Recover passwords and access to encrypted computers.
With SafeGuard Management Center you have Multi Tenancy support for managing multipledomains and databases. You can administrate different SafeGuard Enterprise Databases andmaintain different configurations.
Only privileged users - security officers - can access the SafeGuard Management Center. Severalsecurity officers can work with the data simultaneously. The various security officers can performactions in accordance with the roles and rights assigned to them.
You can customize SafeGuard Enterprise policies and settings to your needs. After new settingshave been saved to the database, they can be transferred to the endpoint computers where theybecome active.
4
SafeGuard Enterprise
2 Log on to SafeGuard Management Center
During SafeGuard Enterprise initial configuration, an account is created for a Master SecurityOfficer. This account is required the first time you log on to SafeGuard Management Center. Tostart SafeGuard Management Center, the user must know the password for the certificate storeand have the certificate's private key.
For further information see the SafeGuard Enterprise Installation guide.
The logon procedure varies depending on whether you run the SafeGuard Management Centeras connected to one database (Single Tenancy) or to multiple databases (Multi Tenancy).
Note:
Two security officers must not use the same Windows account on the same computer. Otherwiseit is not possible to separate their access rights properly.
2.1 Warning when company certificate expires
At logon SafeGuard Management Center starts to display a warning six months before the companycertificate will expire and prompts you to renew it and deploy it on the endpoints. Without a validcompany certificate an endpoint cannot connect to the server.
You can renew the company certificate at any time. Even if the company certificate has alreadyexpired. An expired company certificate will also be indicated by a message box. For informationon how to renew the company certificate, see Renew the company certificate (page 62).
2.2 Log on in Single Tenancy mode
1. Start SafeGuard Management Center from the product folder of the Start menu. A logon dialogis displayed.
2. Log on as MSO (Master Security Officer) and enter the certificate store password specifiedduring initial configuration. Click OK.
The SafeGuard Management Center is opened.
Note:
If you enter an incorrect password, an error message is displayed and a delay will be imposed forthe next logon attempt. The delay period is increased with each failed logon attempt. Failed attemptsare logged.
5
Administrator help
2.3 Log on in Multi Tenancy mode
The logon process to SafeGuard Management Center is extended when you have configured severaldatabases (Multi Tenancy), see Working with multiple database configurations (page 19).
1. Start the SafeGuard Management Center from the product folder of the Start menu. The SelectConfiguration dialog is displayed.
2. Select the database configuration you want to use from the drop-down list and click OK.
The selected database configuration is connected to the SafeGuard Management Center andbecomes active.
3. To authenticate at SafeGuard Management Center, you are prompted to select the securityofficer name for this configuration and enter their certificate store password. Click OK.
The SafeGuard Management Center is opened and connected to the selected database configuration.
Note: If you enter an incorrect password, an error message is displayed and a delay is imposedfor the next logon attempt. The delay period is increased with each failed logon attempt. Failedattempts are logged.
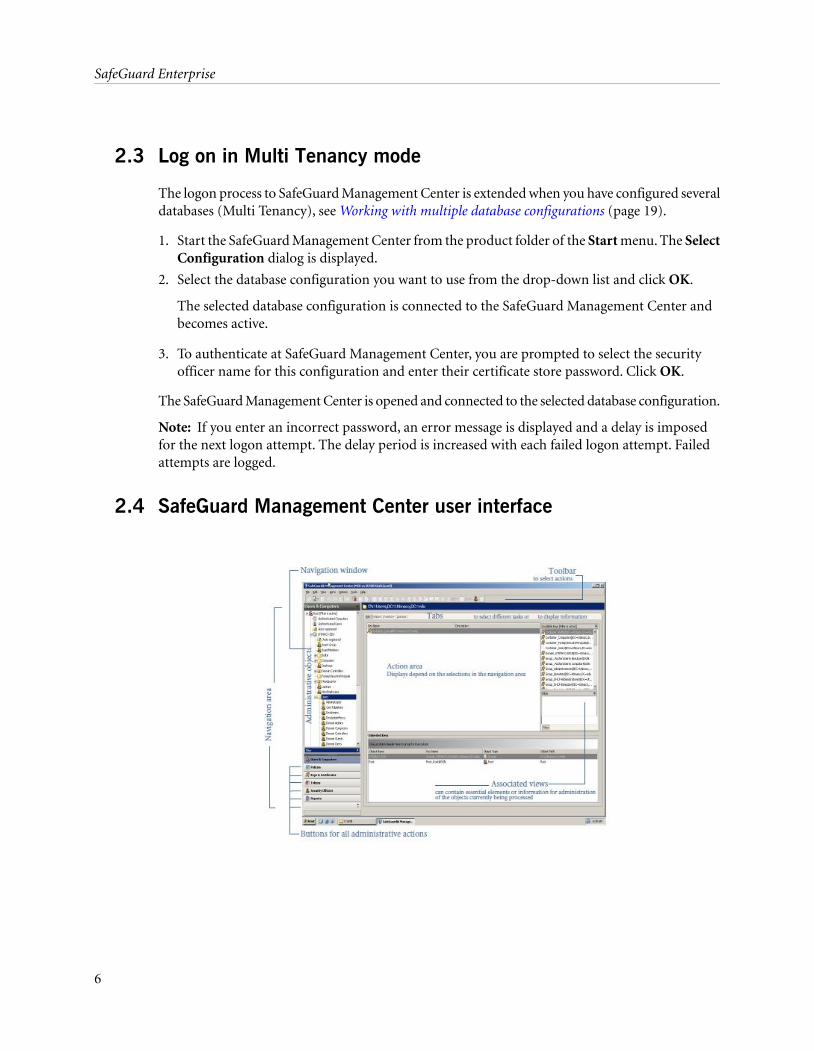
2.4 SafeGuard Management Center user interface
6
SafeGuard Enterprise
Navigation area
The navigation area contains buttons for all administrative actions:
■ Users and Computers
To import groups and users from an active directory, from the domain or from an individualcomputer.
■ Policies
To create policies.
■ Keys and Certificates
To manage keys and certificates.
■ Tokens
To manage tokens and smartcards
■ Security Officers
To create new security officers or roles and define actions which require additional authorization.
■ Reports
To create and manage records of all security-related events.
Navigation window
Objects which are to be processed or can be created are displayed in the navigation window (ActiveDirectory objects such as OUs, users and computers, policy items etc.). The objects displayeddepend on the selected task.
Note: In Users and Computers, the objects shown in the navigation window directory tree dependon the security officer's access rights for directory objects. The directory tree only shows objectsthe logged on security officer has access to. Objects that are denied are not shown, except if thereare nodes lower in the tree that the security officer has access rights for. In this case the deniedobjects are greyed out. If the security officer has Full access rights, the object is displayed in black.Objects with Read only access are displayed in blue.
Action area
In the action area, you define settings for the objects selected in the navigation window. The actionarea contains various tabs for processing objects and specifying settings.
The action area also includes information about the selected objects.
Associated views
In these views, additional objects and information are displayed. They provide useful informationfor system administration and make use of the system easier. You can for example assign keys toobjects by using drag-and-drop.
7
Administrator help
Toolbar
Contains symbols for the different SafeGuard Management Center actions. Symbols are displayedas and when they are available for the selected object.
After logon, SafeGuard Management Center always opens with the view in which it was closed.
2.5 Displaying SafeGuard Management Center help system
The SafeGuard Management Center help system is displayed in your browser. It providescomprehensive features such as context-specific help as well as a full-text search. It is configuredfor full functionality of the help system content pages enabling JavaScript in your browser.
With Microsoft Internet Explorer, the behaviour is as follows:
■ Windows XP/Windows Vista/Windows 7 - Internet Explorer 6 or above - Default security:
You do not see a Security Bar informing you that Internet Explorer has blocked scriptingfrom running.
JavaScript is running.
■ Windows 2003 Server Enterprise Edition- Internet Explorer 6 - Enhanced Security Configuration(default installation configuration):
An information box is displayed informing you that the Enhanced Security Configurationis enabled and the page is running scripting. You can disable this message.
JavaScript is running.
Note:
Even with JavaSript disabled, you can still display and navigate the SafeGuard Management Centerhelp system. However, certain functionality such as the Search cannot be displayed.
2.6 Language settings
The language settings for the SafeGuard Management Center and SafeGuard Enterprise encryptionsoftware on the endpoint computers are as follows:
SafeGuard Management Center language
You can set the language of SafeGuard Management Center as follows:
■ In SafeGuard Management Center, click menu Tools > Options > General. Select Use userdefined language and select an available language. English, German, French and Japanese aresupported.
■ Restart SafeGuard Management Center. It is displayed in the selected language.
8
SafeGuard Enterprise
SafeGuard Enterprise language on endpoint computers
You set the language of SafeGuard Enterprise on the endpoint computer in a policy of type Generalin the SafeGuard Management Center, setting Customization > Language used on client:
■ If the language of the operating system is selected, SafeGuard Enterprise uses the languagesetting of the operating system. If the operating system language is not available in SafeGuardEnterprise, the SafeGuard Enterprise language defaults to English.
■ If one of the available languages is selected, SafeGuard Enterprise functions are displayed inthe selected language on the endpoint computer.
9
Administrator help
3 Security best practices
SafeGuard Enterprise provides powerful data protection through encryption and additional logonauthentication.
By following the simple steps described here, you can mitigate risks and keep your company's datasecure and protected at all times.
To operate SafeGuard Enterprise in a certification-compliant mode, see the SafeGuard EnterpriseManual for certification-compliant operation.
Avoid sleep mode.
On Sophos SafeGuard protected computers, encryption keys might be accessible to attackers incertain sleep modes where the computer's operating system is not shut down properly andbackground processes are not terminated. Protection is enhanced when the operating system isalways shut down or hibernated properly.
Train users accordingly or consider centrally disabling sleep mode on endpoint computers thatare unattended or not in use:
■ Avoid sleep (stand-by/suspend) mode as well as hybrid sleep mode on Windows 7/WindowsVista. Hybrid sleep mode combines hibernation and sleep. Setting an additional passwordprompt after resume does not provide full protection.
■ Avoid locking desktops and switching off monitors or closing laptop lids as modes of protectionwhen not followed by a proper shut down or hibernation. Setting an additional passwordprompt after resume does not provide sufficient protection.
■ Instead, shut down or hibernate computers. Power-on Authentication is always activated whenthe computer is used the next time, thus providing full protection.
Note: It is important that the hibernation file resides on an encrypted volume. Typically itresides on C:\.
You can configure the appropriate power management settings centrally using Group PolicyObjects or locally through the Power Options Properties dialog on the computer's SystemControl. Set the Sleep button action to Hibernate or Shut down.
Implement a strong password policy.
Implement a strong password policy and force password changes at regular intervals, particularlyfor computer logon.
Passwords should not be shared with anyone nor written down.
Train users to choose strong passwords. A strong password follows these rules:
■ It is long enough to be secure: Minimum 10 characters.
■ It contains a mixture of letters (upper and lower case), numbers and special characters/symbols.
■ It does not contain a commonly used word or name.
10
SafeGuard Enterprise
■ It is hard to guess but easy to remember and type accurately.
Do not disable Power-on Authentication.
Power-on Authentication provides additional logon protection on the endpoint computer. WithSafeGuard full disk encryption, it is installed and enabled by default. For full protection, do notdisable it.
Protect against code injection.
Code injection, for example DLL pre-loading attacks might be possible when an attacker is ableto place malicious code, for example executables, in directories that may be searched for legitimatecode by the Sophos SafeGuard encryption software. To mitigate this threat:
■ Install middleware loaded by the encryption software, for example token middleware indirectories that are inaccessible to external attackers. These are typically all sub-folders of theWindows and Programs directories.
■ The PATH environment variable should not contain components that point to folders accessibleto external attackers (see above).
■ Regular users should not have administration rights. Avoid Power Users group rights for regularusers under Windows XP.
Encryption best practices
■ Ensure that all drives have a drive letter assigned.
Only drives that have a drive letter assigned are considered for disk encryption/decryption.Consequently, drives without a drive letter assigned may be abused to leak confidential datain plain text.
To mitigate this threat: Do not allow users to change drive letter assignments. Set their userrights accordingly. Regular Windows users do not have this right by default.
■ Apply Fast Initial Encryption cautiously.
Sophos SafeGuard offers Fast Initial Encryption to reduce the time for initial encryption ofvolumes by only accessing the space that is actually in use. This mode leads to a less secure stateif a volume has been in use before it was encrypted with SafeGuard Enterprise. Due to theirarchitecture, Solid State Disks (SSD) are affected even stronger than regular hard disks. Thismode is disabled by default.
■ Only use algorithm AES-256 for data encryption.
■ Use SSL/TLS (SSL version 3 or above) for protection of the client/server communication.For further information, see the SafeGuard Enterprise Installation guide.
■ Prevent uninstallation.
To provide extra protection for endpoint computers you can prevent local uninstallation ofSophos SafeGuard in a Machine specific settings policy. Set Uninstallation allowed to No
11
Administrator help
and deploy the policy on the endpoint computers. Uninstallation attempts are cancelled andthe unauthorized attempts are logged.
If you use a demo version, make sure that you set Uninstallation allowed to Yes before thedemo version expires.
Apply Sophos Tamper Protection to endpoint computers using Sophos Endpoint Security andControl version 9.5 or higher.
12
SafeGuard Enterprise
4 Licenses
To use SafeGuard Enterprise with the SafeGuard Management Center as a live system, you needa valid license. In the SafeGuard Enterprise Database for example, a valid license is a prerequisitefor sending policies to the endpoint computers. The appropriate token licenses are also requiredfor token management.
You can obtain license files from your sales partner. These files must be imported into the SafeGuardEnterprise Database after installation.
The license file contains among other information:
■ The number of licenses purchased per module.
■ The name of the licensee.
■ A specified tolerance limit for exceeding the number of licenses.
If the number of available licenses or the tolerance limit is exceeded, relevant warning/errormessages are displayed when you start the SafeGuard Management Center.
In the Users & Computers area, the SafeGuard Management Center provides an overview of thelicense status of the installed SafeGuard Enterprise system. The license status display is availablein the Licenses tab of the root node, for domains, OUs, container objects and workgroups. Here,security officers find detailed information about the license status. If they have sufficient rights,they can import licenses to the SafeGuard Enterprise Database.
4.1 License file
The license file you receive for import into the SafeGuard Enterprise Database is an .XML file witha signature. The file includes the following information:
■ Company name
■ Additional information (for example, department, subsidiary)
■ Date issued
■ Number of licenses per module
■ Token license information
■ License expiry date
■ License type (demo or full license)
■ Signature with license signature certificate
13
Administrator help
4.2 Token licenses
To manage tokens or smartcards, the appropriate token licenses are required. If the appropriatelicenses are not available, you cannot create polices for tokens in the SafeGuard ManagementCenter.
4.3 Evaluation and demo licenses
The default license file (evaluation license) or individual demo license files can be used forevaluation or initial rollout. These licenses are only valid for a certain period of time and have anexpiration date, but there are no functional restrictions.
Note:
Evaluation and demo licenses must not be used for normal working operation.
4.3.1 Default license files
When the SafeGuard Management Center is installed, a default license file is automatically loaded.This evaluation license (named SafeGuard Enterprise Evaluation License) holds five licenses foreach module and has a time limit of two years as of the release date of the SafeGuard Enterpriseversion in question.
Default license file for SafeGuard Cloud Storage and SafeGuard File Share
When the SafeGuard Management Center 6 is installed, an additional default license for SafeGuardCloud Storage and SafeGuard File Share is automatically loaded. This evaluation license holds fivelicenses for each of the two modules and has a time limit of two years as of the release date ofSafeGuard Enterprise 6.
Note: When upgrading from SafeGuard Enterprise 5.x to SafeGuard Enterprise 6, you need toimport this license file manually into the SafeGuard Enterprise database.
4.3.2 Individual demo license files
If the default license file is insufficient for evaluation, you can also obtaining a demo licensecustomized to your specific needs. To obtain an individual demo license file, please contact yoursales partner. This type of demo license is also subject to a time limit. The license is also restrictedto the number of licenses per module agreed upon with your sales partner.
When you start the SafeGuard Management Center, a warning message indicates that you areusing demo licenses. If the number of available licenses specified in the demo license is exceeded,or if the time limit is reached, an error message is displayed.
14
SafeGuard Enterprise
4.4 License status overview
To display the license status overview:
1. In the SafeGuard Management Center navigation area, click Users & Computers.
2. In the navigation window on the left-hand side, click the root node, the domain, the OU, thecontainer object or the workgroup.
3. In the action area, switch to the Licenses tab on the right-hand side.
The license status is displayed.
The display is divided into three areas. The upper area shows the name of the customer for whomthe license has been issued, plus the issue date.
The middle area provides license details. The individual columns contain the following information:
ExplanationColumn
An icon shows the license status (validity, warning message, errormessage) for the module in question.
Status (icon)
Shows the installed module.Feature
Shows the number of licenses purchased for the installed module.Purchased Licenses
Shows the number of licenses used for the installed module.Used Licenses
Shows the license's expiry date.Expires
Shows the license type, demo or regular license.Type
Shows the tolerance limit specified for exceeding the number ofpurchased licenses.
Tolerance Limit
If you display the Licenses tab for a domain/OU, the overview shows the status based on thecomputer in the relevant branch.
Beneath this overview are details of the licensed token modules.
In the lower area, a message with a status-specific background color (green = valid, yellow =warning, red = error) and an icon show the global status of the license regardless of the domainor OU selected. If this area shows a warning or error message, it also shows information on howto regain a valid license status.
The icons shown in the Licences tab mean the following:
Valid license
15
Administrator help
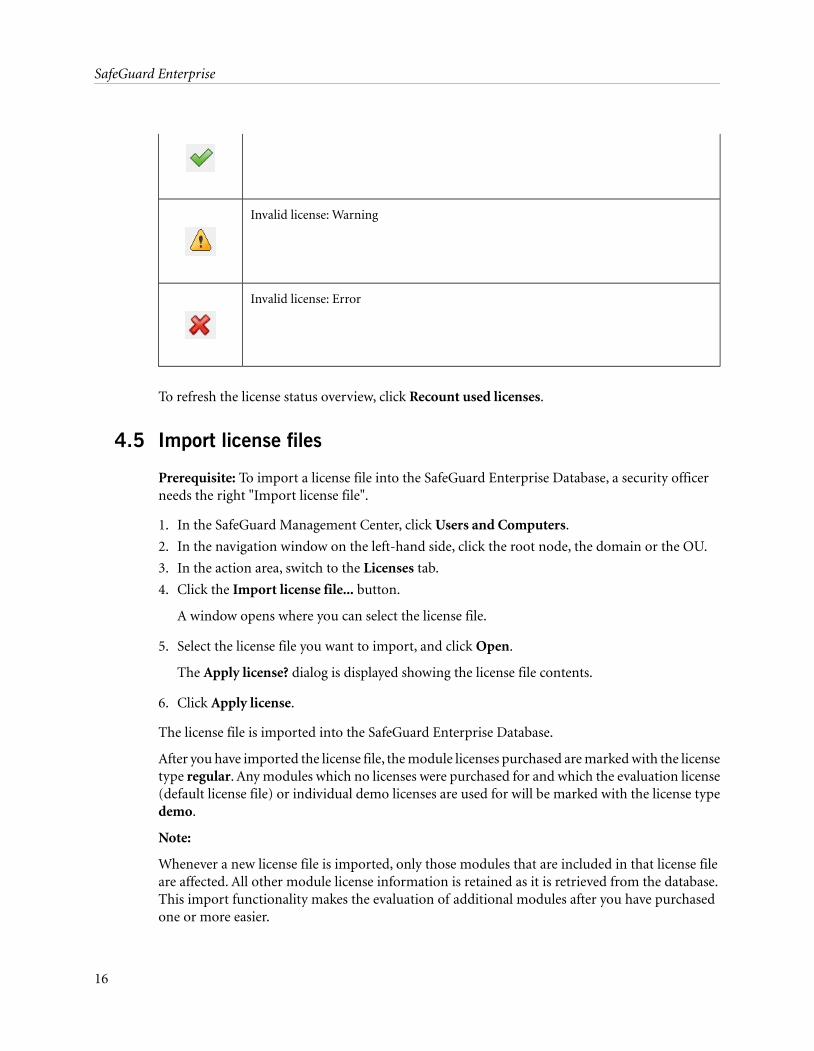
Invalid license: Warning
Invalid license: Error
To refresh the license status overview, click Recount used licenses.
4.5 Import license files
Prerequisite: To import a license file into the SafeGuard Enterprise Database, a security officerneeds the right "Import license file".
1. In the SafeGuard Management Center, click Users and Computers.
2. In the navigation window on the left-hand side, click the root node, the domain or the OU.
3. In the action area, switch to the Licenses tab.
4. Click the Import license file... button.
A window opens where you can select the license file.
5. Select the license file you want to import, and click Open.
The Apply license? dialog is displayed showing the license file contents.
6. Click Apply license.
The license file is imported into the SafeGuard Enterprise Database.
After you have imported the license file, the module licenses purchased are marked with the licensetype regular. Any modules which no licenses were purchased for and which the evaluation license(default license file) or individual demo licenses are used for will be marked with the license typedemo.
Note:
Whenever a new license file is imported, only those modules that are included in that license fileare affected. All other module license information is retained as it is retrieved from the database.This import functionality makes the evaluation of additional modules after you have purchasedone or more easier.
16
SafeGuard Enterprise
4.6 License exceeded
In your license file, a tolerance value has been set for exceeding the number of licenses purchasedand the license validity period. If the number of available licenses per module or the validity periodis exceeded, first of all a warning message is displayed. This does not impact the system's liveoperation and there is no restriction on functionality.You can review the license status and upgradeor renew your license. The tolerance value is usually set to 10% of the number of licenses purchased(the minimum value is 5, the maximum value is 5,000).
If the tolerance value is exceeded, an error message is displayed. In this case, functionality isrestricted. The deployment of policies to the endpoint computers is disabled. This cannot bemanually reversed in the SafeGuard Management Center. The license has to be upgraded orrenewed before you can use all the functions again. Apart from disabling policy deployment, thefunctional restriction does not have an impact on the endpoint computers. Policies assignedremain active. Clients can also be uninstalled.
The following sections describe how the system behaves if licenses are exceeded and how toovercome the functional restriction.
4.6.1 Invalid license: Warning
If the number of available licenses is exceeded, a warning message is displayed when you start theSafeGuard Management Center.
The SafeGuard Management Center opens and displays the license status overview in the Licensestab in the Users & Computers area.
A warning message tells you that the license is invalid. With the detailed information shown aboutthe license file you can identify the module for which the number of available licenses has beenexceeded. This license status can be changed by extending, renewing or upgrading the license.
4.6.2 Invalid License: Error
If the tolerance value for the number of licenses or the period of validity set in the license isexceeded, the SafeGuard Management Center displays an error message.
In the SafeGuard Management Center, the deployment of policies to endpoint computers isdisabled.
An error message is displayed in the Licenses tab in the Users & Computers area.
With the detailed information shown about the license file you can identify the module for whichthe number of available licenses has been exceeded.
To overcome the functionality restriction, you can:
■ Redistribute licenses
17
Administrator help
To make licenses available, you can uninstall the software on unused computers and therebyremove the computers from the SafeGuard Enterprise Database.
■ Upgrade/renew licenses
Contact your sales partner to get your license upgraded or renewed. You will receive a newlicense file for import into the SafeGuard Enterprise Database.
■ Import a new license file
If you have renewed or upgraded your license, you can import the license file into the SafeGuardEnterprise Database. This newly imported file replaces the invalid license file.
As soon as you redistribute licenses or import a valid license file, the functional restriction isreversed and the system runs normally again.
18
SafeGuard Enterprise
5 Working with multiple database configurations
SafeGuard Management Center allows for use of multiple database configurations (Multi Tenants).If you want to use this feature, you need to enable it during installation. For further information,see the SafeGuard Enterprise Installation guide.
With Multi Tenancy, you can configure different SafeGuard Enterprise Database configurationsand maintain them for one instance of the SafeGuard Management Center. This is particularlyuseful, if you want to maintain different configurations for different domains, organizational unitsor company locations.
Prerequisite: The feature Multi Tenancy must have been installed by a Complete installation.SafeGuard Management Center initial configuration must have been carried out.
To ease configuration, you can:
■ Create several database configurations.
■ Select previously created database configurations.
■ Delete database configurations from the list.
■ Import a previously created database configuration from a file.
■ Export a database configuration to be reused later.
5.1 Create further database configurations
To create a further SafeGuard Enterprise Database configuration after initial configuration:
1. Start the SafeGuard Management Center.
The Select Configuration dialog is displayed.
2. Click New.
The SafeGuard Management Center Configuration Wizard starts automatically. The Wizardguides you through the necessary steps of creating a new database configuration.
3. Specify your settings as required.
The new database configuration is created.
4. To authenticate at the SafeGuard Management Center, you are prompted to select the securityofficer name for this configuration and enter their certificate store password. Click OK.
The SafeGuard Management Center is opened and connected to the new database configuration.When the SafeGuard Management Center is started for the next time, the new databaseconfiguration can be selected from the list.
19
Administrator help
5.2 Connect to an existing database configuration
To work with an existing SafeGuard Enterprise Database configuration:
1. Start the SafeGuard Management Center.
The Select Configuration dialog is displayed
2. Select the required database configuration from the drop-down list and click OK.
The selected database configuration is connected to the SafeGuard Management Center andbecomes active.
3. To authenticate at the SafeGuard Management Center, you are prompted to select the securityofficer name for this configuration and to enter their certificate store password. Click OK.
The SafeGuard Management Center is launched and connected to the selected databaseconfiguration.
5.3 Export a configuration to a file
To save or reuse a database configuration, you can export it to a file:
1. Start the SafeGuard Management Center.
The Select Configuration dialog is displayed.
2. Select the respective configuration from the list and click Export...
3. To secure the configuration file, you are prompted to enter and confirm a password thatencrypts the parts configuration file. Click OK.
4. Specify a file name and storage location for the exported configuration file *.SGNConfig.
If this configuration already exists, you are asked if you want to overwrite the existingconfiguration.
The database configuration file is saved to the specified storage location.
5.4 Import a configuration from a file
To use or change a database configuration, you can import a previously created configurationinto the SafeGuard Management Center. There are two ways to do so:
■ with the SafeGuard Management Center (for Multi Tenancy)■ by double-clicking the configuration file (for Single and Multi Tenancy).
20
SafeGuard Enterprise
5.5 Import a configuration with the SafeGuard Management Center
1. Start the SafeGuard Management Center.
The Select Configuration dialog is displayed.
2. Click Import..., locate the required configuration file and click Open.
3. Enter the password for the configuration file defined during the export and click OK.
The selected configuration is displayed.
4. To activate the configuration, click OK.
5. To authenticate at the SafeGuard Management Center, you are prompted to select the securityofficer name for this configuration and to enter their certificate store password. Click OK.
The SafeGuard Management Center is opened and connected to the imported databaseconfiguration.
5.6 Import a configuration by double-clicking the configuration file(Single and Multi Tenancy)
Note:
This task is available in Single Tenancy and Multi Tenancy mode.
You can also export a configuration and distribute it to several security officers. The securityofficers then only need to double-click the configuration file to open a fully configured SafeGuardManagement Center.
This is useful when you use SQL authentication for the database and want to avoid that everyadministrator knows the SQL password. In this case, you only need to enter it once, create aconfiguration file and distribute it to the respective security officers’ computers.
Prerequisite: The initial configuration of the SafeGuard Management Center must have beencarried out. For details see the SafeGuard Enterprise Installation manual.
1. Start the SafeGuard Management Center.
2. Select Options from the Tools menu and select the Database tab.
3. Enter or confirm the credentials for the SQL Database Server connection.
4. Click Export configuration to export this configuration to a file.
5. Enter and confirm a password for the configuration file.
6. Enter a file name and select a storage location.
7. Distribute this configuration file to the security officers’ computers. Let them know the passwordfor this file as well as the certificate store password needed to authenticate at the SafeGuardManagement Center.
8. The security officers just need to double-click the configuration file.
21
Administrator help
9. They are prompted to enter the password for the configuration file.
10. To authenticate at the SafeGuard Management Center, they are prompted to enter theircertificate store password.
The SafeGuard Management Center starts with the imported configuration. This configurationis the new default configuration.
5.7 Fast switching of database configurations
To ease administrative task for several tenants, SafeGuard Management Center allows for fastswitching of database configurations.
Note:
This task is also available in Single Tenancy mode.
1. In the SafeGuard Management Center, select Change configuration... from the File menu.
2. Select the database you want to switch to from the drop-down list and click OK.
The SafeGuard Management Center is automatically restarted with the selected configuration.
5.8 Check database integrity
When you log on to the database, database integrity is automatically verified. If this check resultsin any errors, the Verify Database Integrity dialog is displayed.
You can also start the database integrity check manually at any time after logon, to display theVerify Database Integrity dialog:
1. In the SafeGuard Management Center, select Tools > Database integrity from the menu bar.
2. Check the tables by clicking Check all or Check selected.
Erroneous tables are marked in the dialog. To repair them, click Repair.
22
SafeGuard Enterprise
6 Creating the organizational structure
The organizational structure can be reflected in SafeGuard Management in two ways:
■ You can import an existing organizational structure into the SafeGuard Enterprise Database,for example through an Active Directory.
■ You can manually create your organizational structure by creating workgroups and domainsalong with a structure for managing policy items.
6.1 Import from Active Directory
You can import an existing organizational structure into the SafeGuard Enterprise Database, forexample through an Active Directory.
We recommend that you create one dedicated Windows service account that is used for all importand synchronization tasks, to ensure correct import and to prevent accidental deletion of objectsin the SafeGuard Enterprise Database. To assign the necessary rights, seehttp://www.sophos.com/support/knowledgebase/article/107979.html.
6.1.1 Import the organizational structure
Note:
With the SafeGuard Management Task Scheduler, you can create periodic tasks for automaticsynchronization between Active Directory and SafeGuard Enterprise. Your product deliverycontains a predefined script template for this purpose. For further information, see Schedulingtasks (page 265) and Predefined scripts for periodic tasks (page 271).
1. In the SafeGuard Management Center, select Tools > Options.
2. Select the Directory tab and click Add.
3. In LDAP Authentication, do the following:
a) For Server name or IP, enter the NetBIOS name of the domain controller or its IP address.
b) For User Credentials, enter your Windows user name and password for the (test)environment.
c) Click OK.
Note:
For Windows single computers, a directory must be shared to enable a connection throughLDAP.
4. Click Users & Computers.
5. In the left-hand navigation window, click the root directory Root [filter is active].
6. In the action area on the right, select the Synchronize tab.
23
Administrator help
7. Select the required directory from the Directory DSN list and click the magnifier icon (topright).
A graphical representation of the Active Directory structure of the organizational units (OU)in your company is displayed.
8. You do not need to import the entire contents of the Active Directory. Check the organizationalunits (OU) to be synchronized.
9. To also synchronize memberships, select the check box Synchronize memberships. To alsosynchronize the user enabled state, select the check box Synchronize user enabled state.
10. At the bottom of the action area, click Synchronize.
Note:
When synchronizing users and their group memberships, the membership to a "primary group"is not synchronized as it is not visible for the group.
The domains are synchronized. Synchronization details are displayed. You can view asynchronization protocol in the status bar on the left. Click on the protocol, to copy it to theclipboard and paste it into an e-mail or file.
Note:
If elements have been moved from one subtree to another in Active Directory, both subtrees haveto be synchronized with the SQL database. Synchronizing just one subtree will result in deletinginstead of moving the objects.
Note:
We recommend that you divide the import of more than 400,000 objects from AD into multipleoperations. This might not be possible if there are more than 400,000 objects in a singleorganizational unit.
6.1.2 Import a new domain from an Active Directory
1. In the left-hand navigation window, click the root directory Root [filter is active].
2. Select File > New > Import new domain from AD.
3. In the action area on the right, select Synchronize.
4. Select the required directory from the Directory DSN list and click the magnifier icon (topright).
A graphical representation of the Active Directory structure of the organizational units (OU)in your company is displayed.
5. Check the domain to be synchronized and click Synchronize at the bottom of the navigationarea.
Note:
24
SafeGuard Enterprise
If elements have been moved from one subtree to another in Active Directory, then both subtreeshave to be synchronized with the SQL database. Synchronizing just one subtree results in deletinginstead of moving the objects.
Note:
AD synchronization does not synchronize the pre-Windows 2000 (NetBIOS) name of the domain,if the Domain Controller is configured with an IP address. Configure the Domain Controller touse the server name (NetBIOS or DNS) instead. The client (on which the AD synchronization isrunning) must be either part of the domain, or it has to be ensured that it can resolve the DNSname to the target Domain Controller.
6.1.3 Security officer access rights and Active Directory import
The following applies for importing the organizational structure from an Active Directory as faras required access rights are concerned:
■ For Active Directory connection handling, the following applies, if you add an Active Directoryconnection to a domain that already exists:
If you have Full access rights for the domain (DNS), the directory connection credentialsare updated.
If you have Read only rights or less for the domain (DNS), the credentials are not updated,but you can use existing credentials for synchronization purposes.
■ For Active Directory import and synchronization, the access rights to a container or a domainare projected to the domain tree you can import or synchronize. If you do not have Full accessrights for a sub-tree, it cannot be synchronized. If a sub-tree cannot be modified, it is not shownin the synchronization tree.
■ Regardless of your security officer access rights for directory objects, you can import a newdomain from the Active Directory, if it does not exist in the SafeGuard Enterprise Databaseyet.You and your superior security officers will be granted Full access rights to the new domainautomatically.
■ If you select a sub-container for synchronization, synchronization has to be done all the wayup to the root. In the synchronization tree, all relevant containers are selected automatically,even if there are any containers above the sub-container that are Read only or Denied accordingto your access rights. If you deselect a sub container, you also may have to deselect containersup to the root, depending on your access rights.
If a group with Read only or Denied access is included in a synchronization process the followinghappens:
The group's memberships are not updated.
If the group was deleted in the Active Directory, it will nevertheless not be deleted from theSafeGuard Enterprise Database.
25
Administrator help
If the group was moved in the Active Directory however, it will be moved within theSafeGuard Enterprise Structure, even to a container you do not have Full access rights for.
If a container with Read only or Denied access is included in the synchronization because itis on the way up to the root and the container contains a group with Full access, this groupwill be synchronized. Groups with Read only or Denied access will not.
6.2 Creating workgroups and domains
Security officers with the necessary rights can manually create workgroups or domains which havenot yet been imported to manage automatically registered users and computers along with astructure for managing policy items. It is also possible to assign policies and/or encryption policiesto local users.
New users/computers who log on to SafeGuard Enterprise are displayed under their correspondingcontainers after initial synchronization with the database in the SafeGuard Management Center.Security officers can then manage them in exactly the same way as imported objects.
The directory for these users/computers (.Auto registered) is automatically created in the rootdirectory and under each domain/workgroup. It cannot be renamed nor moved. Objects assignedto this directory cannot be moved manually either.
6.2.1 Register as a new user
For information on logging on as a new user, see Power-on Authentication (POA) (page 79). Whena new user logs on to SafeGuard Enterprise for the first time, their database status is checked duringinitial synchronization with the database and the new object is displayed under the respectivecontainer in accordance with the information in the database. If no new workgroup or domainhas been created, the new user is added in Auto.registered under the Root directory. If a domainhas been created, but the user/computer has not yet been imported, they are added inAuto.registered under the domain.
Note:
Local users cannot log on to SafeGuard Enterprise with an empty password. Local users who logon to SafeGuard Enterprise with an empty password remain guest users and are not saved to thedatabase. If Windows Autologin is activated for these users, logon is denied. For a successful logonat SafeGuard Enterprise, a new password must be created in this case and Windows Autologinmust be deactivated in the registry of the endpoint computer.
Displayed in the SafeGuard Management CenterDatabase statusLogon informationabout the localobject
Under master directory, .Auto registered newlyadded under its computer
Local users not knownLocal users
26
SafeGuard Enterprise
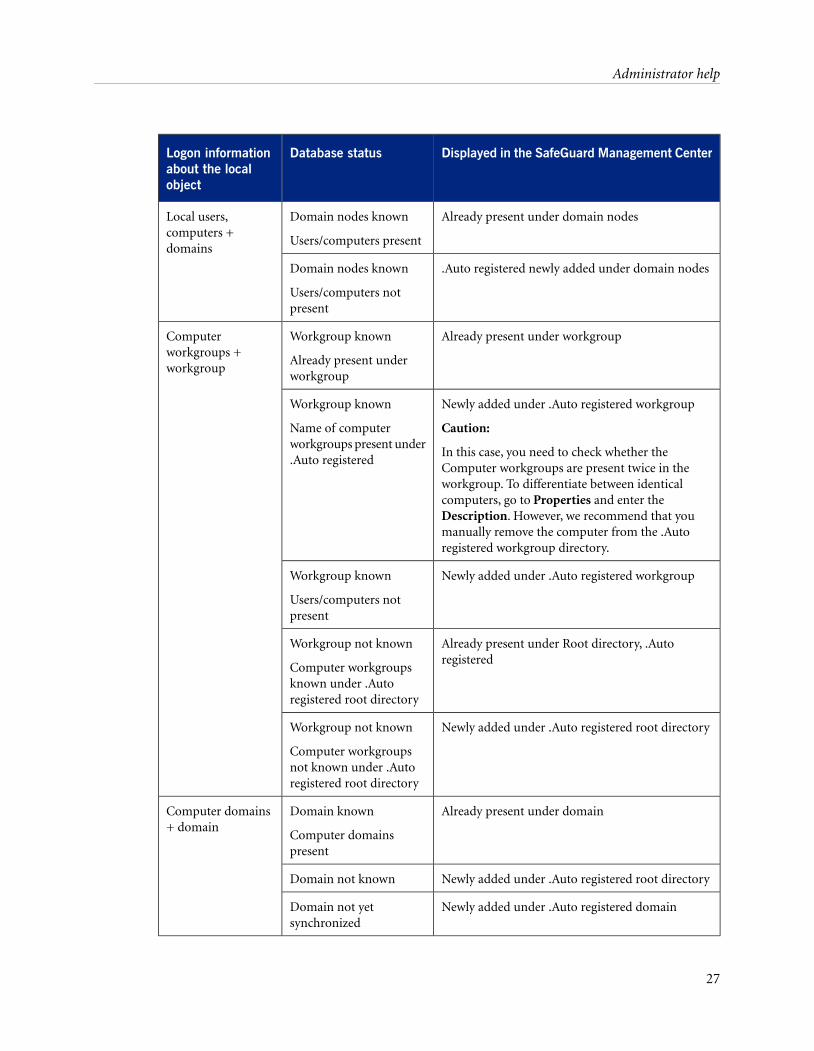
Displayed in the SafeGuard Management CenterDatabase statusLogon informationabout the localobject
Already present under domain nodesDomain nodes known
Users/computers present
Local users,computers +domains
.Auto registered newly added under domain nodesDomain nodes known
Users/computers notpresent
Already present under workgroupWorkgroup known
Already present underworkgroup
Computerworkgroups +workgroup
Newly added under .Auto registered workgroup
Caution:
Workgroup known
Name of computerworkgroups present under.Auto registered
In this case, you need to check whether theComputer workgroups are present twice in theworkgroup. To differentiate between identicalcomputers, go to Properties and enter theDescription. However, we recommend that youmanually remove the computer from the .Autoregistered workgroup directory.
Newly added under .Auto registered workgroupWorkgroup known
Users/computers notpresent
Already present under Root directory, .Autoregistered
Workgroup not known
Computer workgroupsknown under .Autoregistered root directory
Newly added under .Auto registered root directoryWorkgroup not known
Computer workgroupsnot known under .Autoregistered root directory
Already present under domainDomain known
Computer domainspresent
Computer domains+ domain
Newly added under .Auto registered root directoryDomain not known
Newly added under .Auto registered domainDomain not yetsynchronized
27
Administrator help
6.2.2 Sample use cases for auto-registration
Below you find two use cases for the behavior of auto-registered objects.
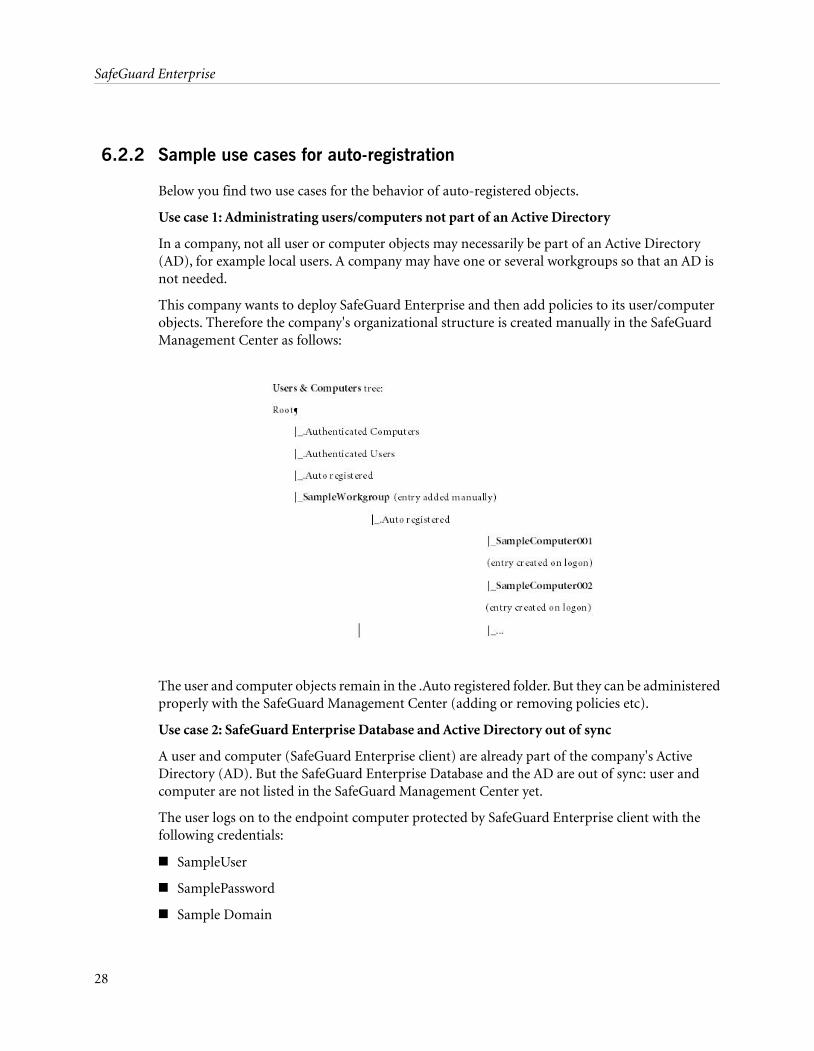
Use case 1: Administrating users/computers not part of an Active Directory
In a company, not all user or computer objects may necessarily be part of an Active Directory(AD), for example local users. A company may have one or several workgroups so that an AD isnot needed.
This company wants to deploy SafeGuard Enterprise and then add policies to its user/computerobjects. Therefore the company's organizational structure is created manually in the SafeGuardManagement Center as follows:
The user and computer objects remain in the .Auto registered folder. But they can be administeredproperly with the SafeGuard Management Center (adding or removing policies etc).
Use case 2: SafeGuard Enterprise Database and Active Directory out of sync
A user and computer (SafeGuard Enterprise client) are already part of the company's ActiveDirectory (AD). But the SafeGuard Enterprise Database and the AD are out of sync: user andcomputer are not listed in the SafeGuard Management Center yet.
The user logs on to the endpoint computer protected by SafeGuard Enterprise client with thefollowing credentials:
■ SampleUser
■ SamplePassword
■ Sample Domain
28
SafeGuard Enterprise
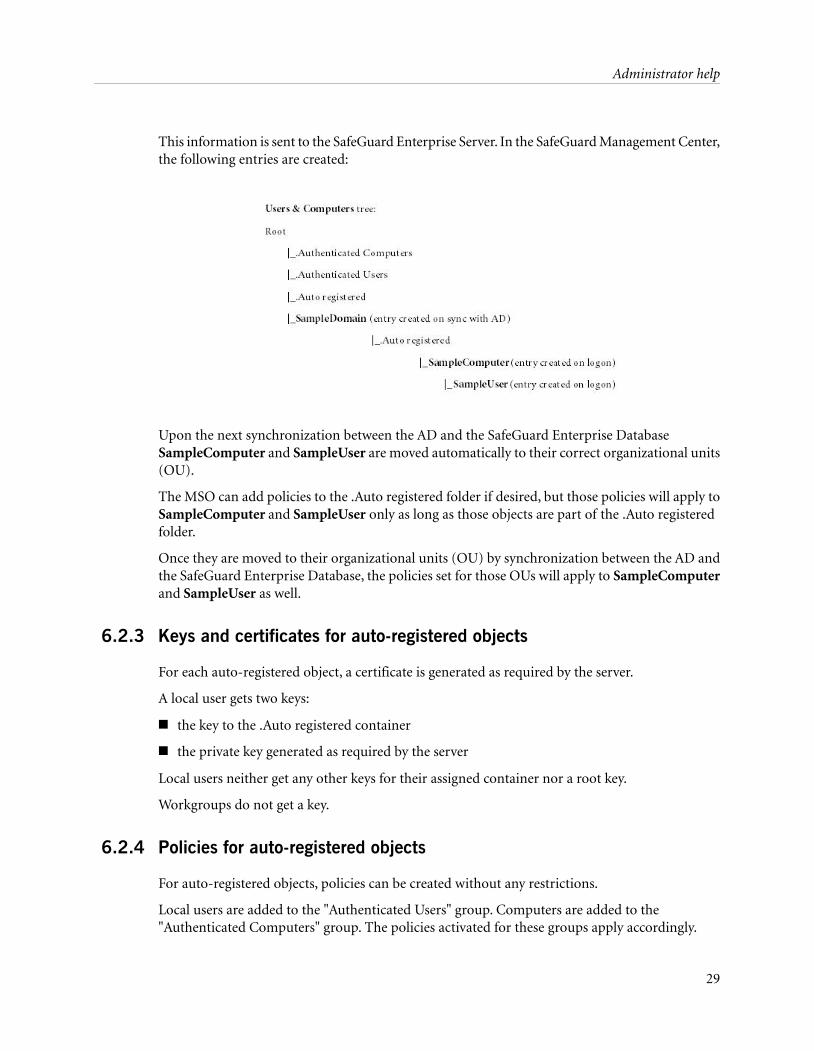
This information is sent to the SafeGuard Enterprise Server. In the SafeGuard Management Center,the following entries are created:
Upon the next synchronization between the AD and the SafeGuard Enterprise DatabaseSampleComputer and SampleUser are moved automatically to their correct organizational units(OU).
The MSO can add policies to the .Auto registered folder if desired, but those policies will apply toSampleComputer and SampleUser only as long as those objects are part of the .Auto registeredfolder.
Once they are moved to their organizational units (OU) by synchronization between the AD andthe SafeGuard Enterprise Database, the policies set for those OUs will apply to SampleComputerand SampleUser as well.
6.2.3 Keys and certificates for auto-registered objects
For each auto-registered object, a certificate is generated as required by the server.
A local user gets two keys:
■ the key to the .Auto registered container
■ the private key generated as required by the server
Local users neither get any other keys for their assigned container nor a root key.
Workgroups do not get a key.
6.2.4 Policies for auto-registered objects
For auto-registered objects, policies can be created without any restrictions.
Local users are added to the "Authenticated Users" group. Computers are added to the"Authenticated Computers" group. The policies activated for these groups apply accordingly.
29
Administrator help
6.2.5 Create workgroups
Security officers with the required rights can create a container under the root directory whichrepresents a Windows workgroup. Workgroups do not have a key. They cannot be renamed.
1. In the SafeGuard Management Center, click Users and Computers.
2. In the navigation window on the left, right-click Root [filter is active] and select New > Createnew workgroup (auto registration).
3. Under Common information, enter the following:
a) Enter a Full name for the workgroup.
b) Optionally you can add a description.
c) The object type is displayed under Connection state, in this case Workgroup.
d) To prevent policy inheritance, you can select Block Policy Inheritance.
e) Click OK.
The workgroup is created. The default .Auto registered directory is automatically created underthe workgroup container. It cannot be renamed or deleted.
6.2.6 Delete workgroups
To delete workgroups you need Full access rights for the workgroup concerned. Members assignedto the workgroup are also deleted. They are automatically re-registered at next logon.
To delete a workgroup, you need Full access rights for all objects involved.
1. In the SafeGuard Management Center, click Users and Computers.
2. In the navigation window on the left, right-click the workgroup you want to delete and selectDelete.
3. Click Yes to confirm.
The workgroup is deleted. Any members are also deleted.
Note: If you do not have Full access rights for all members of the work group, deleting the workgroup fails and an error message is displayed.
6.2.7 Create a new domain
Security officers with the required rights can create a new domain under the root directory. Youonly have to create a new domain, if you do not want to or you cannot import a domain from theActive Directory (AD) (for example because there is no AD available).
1. In the SafeGuard Management Center, click Users and Computers.
30
SafeGuard Enterprise
2. In the navigation window on the left, right-click Root [filter is active] and select New > Createnew domain (auto registration).
3. Under Common information, enter the following information about the domain controller.
All three name entries must be correct. Otherwise the domain will not be synchronized.
a) Full name: For example computer name.domain.com or the IP address of the domaincontroller
b) Distinguished name: DNS name, for exampleDC=computername3,DC=domain,DC=country
c) A domain description (optional)
d) Netbios name: Name of the domain controller
e) The object type is displayed under Connection state, in this case Domain.
f) To prevent policy inheritance, you can select Block Policy Inheritance.
g) Click OK.
The new domain is created. Users and/or computers are automatically assigned to this domainduring auto-registration. The default .Auto registered directory is automatically created underthe domain container. It cannot be renamed or deleted.
6.2.8 Rename a domain
Security officers with the required rights can rename a domain and define additional properties.You need Full access rights for the relevant domain.
1. In the SafeGuard Management Center, click Users & Computers.
2. In the navigation window on the left, right-click the domain you want to rename and selectProperties.
3. In Common information under Full name, change the domain name and the description.
4. You can change the name of the domain controller in Netbios name.
5. You can also define the Wake on LAN mode for automatic restart in the Container Settingstab.
6. Click OK to confirm.
The changes are now saved.
6.2.9 Delete a domain
Security officers with the required rights can delete domains. To delete a domain, you need Fullaccess rights for the domain concerned.
Note:
31
Administrator help
Members assigned to the domain are also deleted.
1. In the SafeGuard Management Center, click Users and Computers.
2. In the navigation window on the left, right-click the domain you want to delete and selectDelete.
3. Click Yes.
The domain is deleted. Any members are also deleted.
Note: If you have less than Full access rights for all members of the domain, deleting the domainfails and an error message is displayed.
6.2.10 Deleting auto registered computers
When an auto-registered computer is deleted, all local users of this computer are also deleted.They are automatically re-registered the next time they log on to this computer.
6.2.11 Filter for local objects
6.2.11.1 Users and Computers
In Users & Computers, you can filter the view in the navigation area on the left according to localusers or search for specific local users.
1. In the SafeGuard Management Center, click Users and Computers.
2. In the bottom left of the navigation window, click Filter.
3. Select Local User as Type. If you are looking for a specific user, enter the name of this user.
4. Click the magnifier icon.
The Users and Computers view is filtered according to the criteria.
6.2.11.2 Logging
Successful/unsuccessful registrations of users, computers or workgroups are logged. You can viewa list of this information in the SafeGuard Management Center under Reports in the event viewer.
6.3 Search for users, computers and groups in the SafeGuard EnterpriseDatabase
To display objects in the Find Users, Computers and Groups dialog, you need Read only or Fullaccess rights for the relevant objects.
In Users and Computers, you can search for objects using different filters. For example, you caneasily identify duplicates that may have been caused by an AD synchronization process with theDuplicate users and computers filter. This filter shows all computers with the same name in onedomain and all users with the same name, logon name or pre-2000 logon name in one domain.
32
SafeGuard Enterprise
To search for objects:
1. In the navigation area of the SafeGuard Management Center, click Users and Computers.
2. In the Users and Computers navigation area, select the required container.
3. In the SafeGuard Management Center menu bar, click Edit > Find.
The Find Users, Computers and Groups dialog is displayed.
4. Select the required filter from the Find drop-down list.
5. In the In field, the selected container is displayed.
You can change this by selecting a different option from the drop-down list.
6. If you search for a specific object, enter the required search name in the Search Name field.
7. With the Clear results after each search check box, specify whether results should be clearedafter each search process.
8. Click Find now.
The results are displayed in the Find Users, Computers and Groups dialog. If you click on oneof the results in this dialog, the relevant entry is marked in the Users and Computers tree structure.If you have searched for duplicates for example, you can now easily delete them.
6.4 Display object properties in User and Computers
To display object properties, you need Full access or Read only rights for the objects concerned.
1. In the navigation area of the SafeGuard Management Center, click Users and Computers.
2. In the navigation window of Users and Computers, right-click the required object and selectProperties.
The properties of the selected object are displayed. If you have Read only access rights for therelevant object, the properties information is greyed out in the dialog and you cannot edit them.
33
Administrator help
7 SafeGuard Enterprise Security Officers
SafeGuard Enterprise can be administered by one or more security officers. The role-basedmanagement of SafeGuard Enterprise allows splitting administration among several users. Anyuser may be assigned one or more roles. To enhance security, additional authorization of an actioncan be assigned to an officer's role.
During initial configuration of the SafeGuard Management Center, a top-level administrator, theMaster Security Officer (MSO), with all the rights and a certificate is created by default. The MSOcertificate does not expire. Further security officers can be assigned for specific tasks such as helpdesk or auditing.
In the SafeGuard Management Center navigation area, you can arrange security officershierarchically to reflect your company's organizational structure. However, this does not implyany hierarchy in terms of rights and roles.
Note:
Two security officers must not use the same Windows account on the same computer. Otherwiseit is not possible to separate their access rights properly. Additional authentication may only beuseful when security officers must authenticate with cryptographic tokens/smartcards.
7.1 Security officer roles
For easy operation, SafeGuard Enterprise offers predefined security officer roles with a variety offunctions. Security officers with the necessary rights can define new roles from a list of actions/rightsand assign them to particular security officers.
The following types of roles are provided:
■ Master Security Officer (MSO) role
■ Predefined roles
■ Customized roles
7.1.1 Master Security Officer
After installing SafeGuard Enterprise, a Master Security Officer (MSO) is created by default duringinitial configuration of the SafeGuard Management Center. The Master Security Officer is thetop-level security officer, possesses all rights and is able to access all objects (similar to a Windowsadministrator). The Master Security Officer rights cannot be modified.
There may be several Master Security Officers created for one instance of the SafeGuardManagement Center. We strongly recommend to create at least one additional MSO for securityreasons. Additional MSOs may be deleted, but there must always remain one user with the roleof MSO who has been explicitly created as MSO in the SafeGuard Enterprise Database.
34
SafeGuard Enterprise
A Master Security Officer can delegate tasks to another person. There are two ways to do this:
■ A new security officer can be created in Security Officers.
■ A user or all members of a container imported from the Active Directory and visible in theSafeGuard Management Center in the root directory can be promoted to security officer inUsers and Computers.
One or more roles and domains can then be assigned to them. For example, a user may be assignedthe role of Supervising Officer plus the role of Helpdesk Officer.
However, the Master Security Officer can also create custom roles and assign them to particularusers.
7.1.2 Predefined roles
In the SafeGuard Management Center, the following security officer roles (apart from the MSO)are predefined. The assignment of rights to these predefined roles cannot be changed. For example,if a predefined role has the right to "Create policy items and policy groups", this right cannot notbe deleted from the role. Neither can a new right be added to a predefined role. Additional officerauthentication however, may be assigned to predefined roles at any time.
■ Supervising Officer
Supervising Officers can see their own node in the Security Officers area and have the rightto manage security officers belonging to their node.
■ Security Officer
Security Officers dispose of extensive rights including SafeGuard Enterprise configuration,policy and key management, permissions for monitoring and recovery.
■ Helpdesk Officer
Helpdesk Officers have the rights to perform recovery actions. Additionally, they may displaymost function areas of the SafeGuard Management Center.
■ Audit Officer
To monitor SafeGuard Enterprise, Audit Officers may display most function areas of theSafeGuard Management Center.
■ Recovery Officer
Recovery Officers have the rights to repair the SafeGuard Enterprise Database.
7.1.3 Customized roles
As a security officer with the required rights, you can define new roles from a list of actions/rightsand assign them to an existing or new security officer. As with predefined roles, you may enablethe additional officer authentication for a function of the role any time.
35
Administrator help
When you assign a new role, note the following regarding additional authentication:
Note:
If a user has two roles with the same rights and additional authentication is assigned to one of theroles, this automatically applies to the other role.
A security officer with the required rights may add or delete rights to or from a custom role. Unlikepredefined roles, custom roles can even be deleted as required. If the role is deleted, it is no longerassigned to any user. If a user only has one role assigned and this role is deleted, the user can nolonger log on at the SafeGuard Management Center.
Note:
The role and the actions defined within it determine what a user may and may not do. This is alsotrue if the user has been assigned more than one role. After the user has logged on to the SafeGuardManagement Center only those areas are activated and displayed that are needed for the respectiverole. This also applies to the scripts and API areas. It is therefore important to always activatedisplaying the area in which the respective actions are defined. Actions are sorted by function areaand hierarchically structured. This structure shows which actions are required before certain otheractions can be performed.
7.1.4 Additional officer authentication
Additional officer authentication (also referred to as two persons rule) may be assigned to specificactions of a role. This means that the user of this role is only permitted to perform a certain actionif a user of another role is present and confirms it.
Additional authentication may be assigned to both predefined and custom roles. As soon as thereare at least two officers with the same role, also the own role can be selected.
The role which is to perform the additional authorization must have been assigned to a user andthere need to be at least two security officers in the SafeGuard Enterprise Database. Once additionalauthentication is required for an action, it is required no matter if the user owns another role thatdoes not require additional authentication for this action.
If an officer without the right to change the additional authentication creates a role, settings foradditional authentication of the new role will be pre-filled to match those set for the creatingofficer.
7.2 Create a role
Prerequisite: To create a new role, you need the right to display and create security officer roles.To assign additional authentication you need the right to "Change additional authenticationsettings".
1. In the SafeGuard Management Center, select Security Officers.
2. Right-click Custom Roles and select New > New custom role.
36
SafeGuard Enterprise
3. In New custom role, enter a name and description for the role.
4. Assign the actions to this role: Select the boxes next to the required action in the Active column.
Actions are sorted by function area and hierarchically structured. This structure shows whichactions are required before certain other actions can be performed.
5. If required, assign Additional officer authentication: Click the default setting None and selectthe required role from the list.
If an officer without the right to change the additional authentication creates a role, then theadditional authentication is prefilled depending on the additional authentication set for theofficer's roles. Additional authentication can be selected, if set to more than one role of theofficer.
6. Click OK.
The new role is displayed in the navigation window under Custom Roles. When you click therole, the permitted actions are displayed in the action area on the right.
7.3 Assign a role to a security officer
Prerequisite: To assign a role, you need the right to display and modify security officers.
1. Select the respective officer in the navigation window.
Their properties are displayed in the action area on the right.
2. Assign the required roles by selecting the relevant boxes next to the available roles.
Predefined roles are displayed in bold.
3. Click the double-headed arrow symbol Refresh in the toolbar.
The role is assigned to the security officer.
7.4 Display officer and role properties
Prerequisite: To get an overview of the security officer properties or the role assignment, youneed the right to display security officers and security officer roles.
To display security officer and role properties:
1. In the SafeGuard Management Center, click Security Officers.
2. In the navigation area on the left, double-click the object you want to get an overview of.
The information displayed in the action area on the right depends on the object selected.
37
Administrator help
7.4.1 Display MSO properties
The general and modification information of the MSO is displayed.
7.4.2 Display security officers properties
The general and modification information for the security officer is displayed.
1. In Properties, select the Actions tab to display a summary of actions permitted and the rolesassigned to the security officer.
7.4.3 Display security officers rights and roles
A summary of actions of all roles assigned to the security officer is displayed. The tree view showswhat actions are required before certain other actions can be performed. Additionally, the assignedroles can be displayed.
1. In Actions, select an action to display all assigned roles that contain this action.
2. Double-click a role to close the Properties dialog and then display the role's properties.
7.4.4 Display role properties
The general and modification information for the role are displayed.
1. In Properties, select the Assignment tab to display the security officers assigned to this role.
7.4.5 Display role assignment
1. In Assignment, double-click a security officer to close the Properties dialog and then displaythe security officer's general data and roles.
7.5 Modifying a role
You can do the following:
■ Modify additional authentication only.
■ Modify all properties of the role.
The icon next to the roles shows which action is available:
38
SafeGuard Enterprise

DescriptionIcon
The role can be modified (add/remove actions).
Additional authentication can be changed.
Both modifications are available.
Note:
Predefined roles and the actions assigned to them cannot be modified. If additional authenticationis activated, it can be modified for any role, even for predefined roles.
7.5.1 Modify additional authentication only
Prerequisite: To assign additional authentication, you need the right to display security officerroles and to "Change additional authentication settings".
1. In the SafeGuard Management Center, select Security Officers.
2. In the navigation window under Custom Roles, click the role you want to change. In the actionarea on the right, click the required setting in the Additional security officer authenticationcolumn and select a different role from the list.
Predefined roles are displayed in bold.
3. Click the Save icon in the toolbar to save your changes to the database.
Additional officer authentication has been changed for this role.
7.5.2 Modify all properties of a role
Prerequisite: To change a custom role, you need the right to display and modify security officerroles. To reassign additional authentication, you also need the right to "Change additionalauthentication settings".
1. In the SafeGuard Management Center, select Security Officers.
2. In the navigation window under Custom Roles, right-click the role you want to change andselect Modify custom role.
3. Change the properties as required. Change additional authentication properties by clickingthe value in this column and selecting the required role.
39
Administrator help
4. Click the Save icon in the toolbar to save your changes to the database.
The role has been modified.
7.6 Copy a role
To create a new role that has similar properties as an existing role, you can use the existing roleas a template for the new role. You can select a predefined or custom role as a template.
Prerequisite: You can only use existing roles as templates, if the currently authenticated securityofficer has all the rights contained in the specific role template. So, this function may be disabledfor officers with a limited set of actions.
1. In the SafeGuard Management Center, select Security Officers.
2. In the navigation window, right-click the role you want to copy and select New > New copyof role. In New custom role, all properties of the existing role are already preselected.
3. Enter a new name for this role and change the properties as required.
4. Click the Save icon in the toolbar to save your changes to the database.
The new role is created.
7.7 Delete a role
Note:
Predefined roles cannot be deleted.
Prerequisite: To delete a role, you need the right to display and delete security officer roles.
1. In the SafeGuard Management Center, select Security Officers.
2. In the navigation window under Custom Roles, right-click the role you want to delete andselect Delete. Depending on the role's properties a corresponding warning message will bedisplayed.
Note:
When you delete a role, all security officers this role is assigned to lose it. If the role is the onlyone assigned to a security officer, the security officer can no longer log on to the SafeGuardManagement Center unless a superior security officer assigns a new role to the security officer.If the role is used for additional authentication, the MSO will be requested to perform additionalauthentication.
3. To delete the role, click Yes in the warning message.
4. Click the Save icon in the toolbar to save your changes to the database.
The role is deleted from the navigation window and from the database.
40
SafeGuard Enterprise
7.8 Create a Master Security Officer
Prerequisite: To create a new Master Security Officer, you need the right to display and createsecurity officers.
1. In the SafeGuard Management Center, select Security Officers.
2. In the navigation window, right-click the Master Security Officers node and select New > NewMaster Security Officer.
41
Administrator help
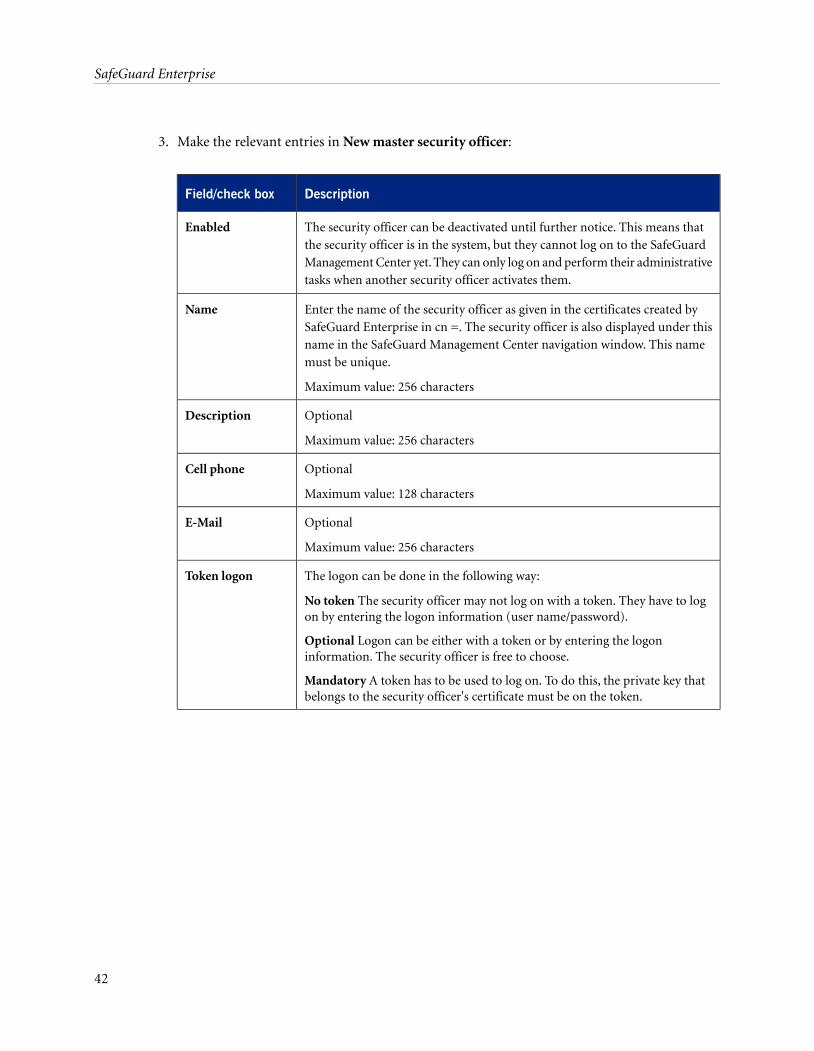
3. Make the relevant entries in New master security officer:
DescriptionField/check box
The security officer can be deactivated until further notice. This means thatthe security officer is in the system, but they cannot log on to the SafeGuard
Enabled
Management Center yet. They can only log on and perform their administrativetasks when another security officer activates them.
Enter the name of the security officer as given in the certificates created bySafeGuard Enterprise in cn =. The security officer is also displayed under this
Name
name in the SafeGuard Management Center navigation window. This namemust be unique.
Maximum value: 256 characters
Optional
Maximum value: 256 characters
Description
Optional
Maximum value: 128 characters
Cell phone
Optional
Maximum value: 256 characters
The logon can be done in the following way:
No token The security officer may not log on with a token. They have to logon by entering the logon information (user name/password).
Token logon
Optional Logon can be either with a token or by entering the logoninformation. The security officer is free to choose.
Mandatory A token has to be used to log on. To do this, the private key thatbelongs to the security officer's certificate must be on the token.
42
SafeGuard Enterprise
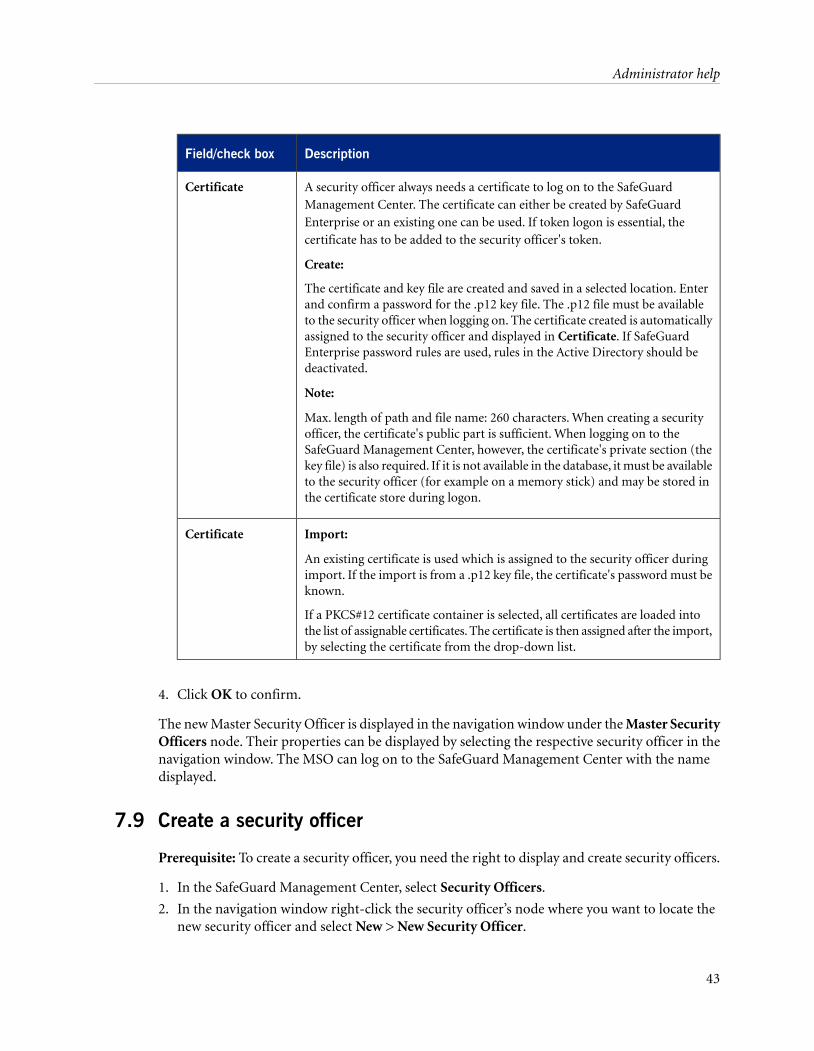
DescriptionField/check box
A security officer always needs a certificate to log on to the SafeGuardManagement Center. The certificate can either be created by SafeGuardEnterprise or an existing one can be used. If token logon is essential, thecertificate has to be added to the security officer's token.
Create:
The certificate and key file are created and saved in a selected location. Enterand confirm a password for the .p12 key file. The .p12 file must be availableto the security officer when logging on. The certificate created is automaticallyassigned to the security officer and displayed in Certificate. If SafeGuardEnterprise password rules are used, rules in the Active Directory should bedeactivated.
Note:
Max. length of path and file name: 260 characters. When creating a securityofficer, the certificate's public part is sufficient. When logging on to theSafeGuard Management Center, however, the certificate's private section (thekey file) is also required. If it is not available in the database, it must be availableto the security officer (for example on a memory stick) and may be stored inthe certificate store during logon.
Certificate
Import:
An existing certificate is used which is assigned to the security officer duringimport. If the import is from a .p12 key file, the certificate's password must beknown.
If a PKCS#12 certificate container is selected, all certificates are loaded intothe list of assignable certificates. The certificate is then assigned after the import,by selecting the certificate from the drop-down list.
Certificate
4. Click OK to confirm.
The new Master Security Officer is displayed in the navigation window under the Master SecurityOfficers node. Their properties can be displayed by selecting the respective security officer in thenavigation window. The MSO can log on to the SafeGuard Management Center with the namedisplayed.
7.9 Create a security officer
Prerequisite: To create a security officer, you need the right to display and create security officers.
1. In the SafeGuard Management Center, select Security Officers.
2. In the navigation window right-click the security officer’s node where you want to locate thenew security officer and select New > New Security Officer.
43
Administrator help
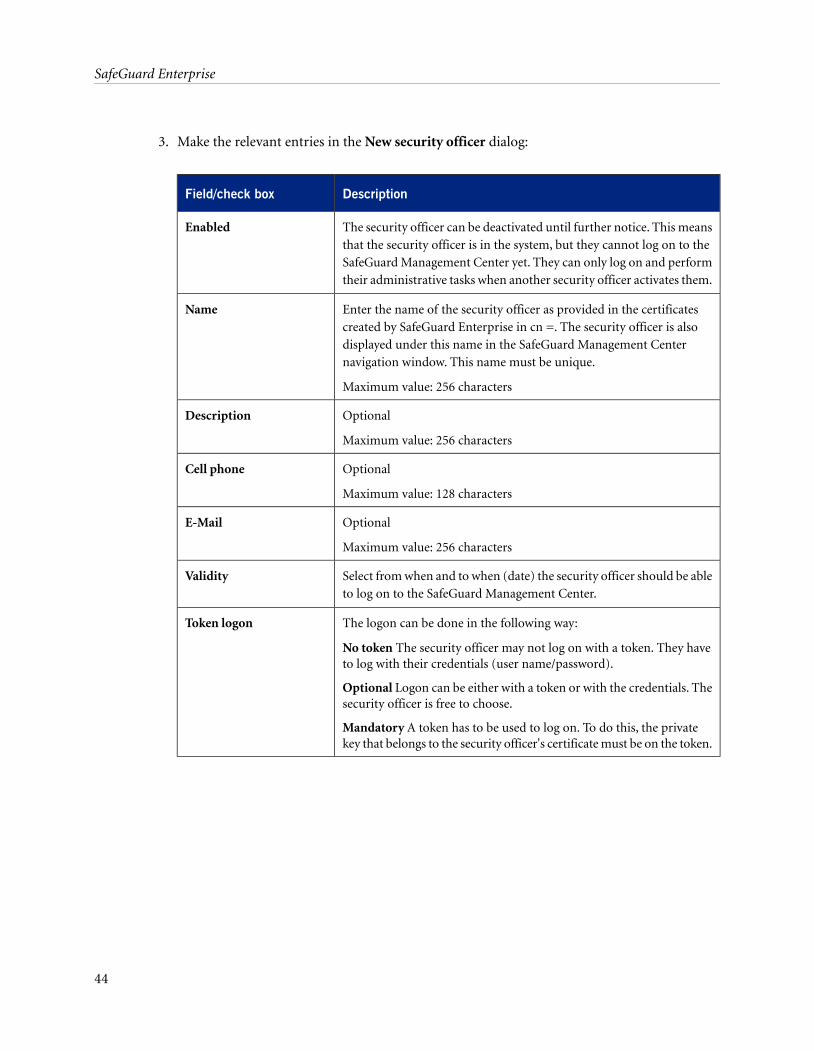
3. Make the relevant entries in the New security officer dialog:
DescriptionField/check box
The security officer can be deactivated until further notice. This meansthat the security officer is in the system, but they cannot log on to the
Enabled
SafeGuard Management Center yet. They can only log on and performtheir administrative tasks when another security officer activates them.
Enter the name of the security officer as provided in the certificatescreated by SafeGuard Enterprise in cn =. The security officer is also
Name
displayed under this name in the SafeGuard Management Centernavigation window. This name must be unique.
Maximum value: 256 characters
Optional
Maximum value: 256 characters
Description
Optional
Maximum value: 128 characters
Cell phone
Optional
Maximum value: 256 characters
Select from when and to when (date) the security officer should be ableto log on to the SafeGuard Management Center.
Validity
The logon can be done in the following way:
No token The security officer may not log on with a token. They haveto log with their credentials (user name/password).
Token logon
Optional Logon can be either with a token or with the credentials. Thesecurity officer is free to choose.
Mandatory A token has to be used to log on. To do this, the privatekey that belongs to the security officer's certificate must be on the token.
44
SafeGuard Enterprise
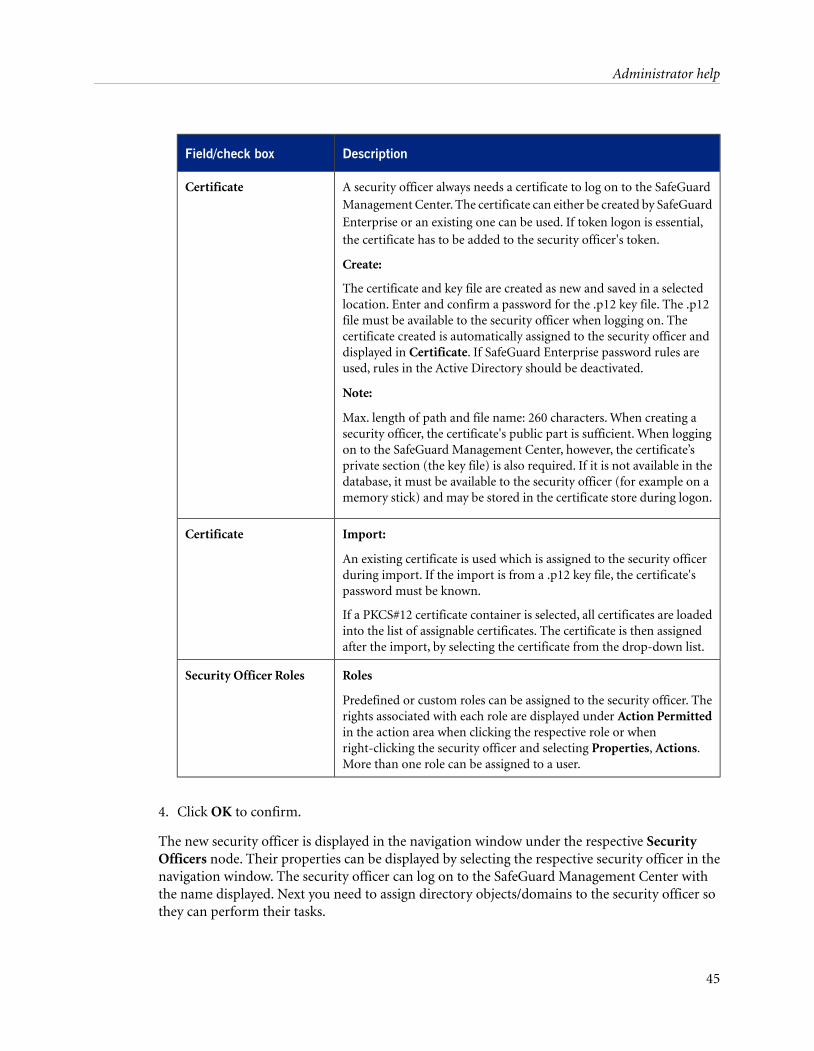
DescriptionField/check box
A security officer always needs a certificate to log on to the SafeGuardManagement Center. The certificate can either be created by SafeGuardEnterprise or an existing one can be used. If token logon is essential,the certificate has to be added to the security officer's token.
Create:
The certificate and key file are created as new and saved in a selectedlocation. Enter and confirm a password for the .p12 key file. The .p12file must be available to the security officer when logging on. Thecertificate created is automatically assigned to the security officer anddisplayed in Certificate. If SafeGuard Enterprise password rules areused, rules in the Active Directory should be deactivated.
Note:
Max. length of path and file name: 260 characters. When creating asecurity officer, the certificate's public part is sufficient. When loggingon to the SafeGuard Management Center, however, the certificate’sprivate section (the key file) is also required. If it is not available in thedatabase, it must be available to the security officer (for example on amemory stick) and may be stored in the certificate store during logon.
Certificate
Import:
An existing certificate is used which is assigned to the security officerduring import. If the import is from a .p12 key file, the certificate'spassword must be known.
If a PKCS#12 certificate container is selected, all certificates are loadedinto the list of assignable certificates. The certificate is then assignedafter the import, by selecting the certificate from the drop-down list.
Certificate
Roles
Predefined or custom roles can be assigned to the security officer. Therights associated with each role are displayed under Action Permittedin the action area when clicking the respective role or whenright-clicking the security officer and selecting Properties, Actions.More than one role can be assigned to a user.
Security Officer Roles
4. Click OK to confirm.
The new security officer is displayed in the navigation window under the respective SecurityOfficers node. Their properties can be displayed by selecting the respective security officer in thenavigation window. The security officer can log on to the SafeGuard Management Center withthe name displayed. Next you need to assign directory objects/domains to the security officer sothey can perform their tasks.
45
Administrator help
7.10 Assign directory objects to a security officer
For security officers to be able to perform their tasks they need to have access rights to directoryobjects. Access rights can be granted to domains, organizational units (OUs) and user groups aswell as to the ".Autoregistered" node under the Root directory.
In Users and Computers, you can change the access rights of another security officer if you havefull access for the relevant container and are responsible for the security officer in question. Youcannot change your own access rights. If you assign a security officer to a directory object for thefirst time, the security officer inherits your access rights for this container.
Note: You cannot grant higher access rights than your own access rights to other security officers.
Prerequisite: If you want to grant/deny a security officer the right to access and manage directoryobjects, you need the "Users and Computers" rights "Display security officers access rights" and"Grant/deny access rights to directory". In addition, you need Full access rights for the relevantdirectory objects.
1. In the SafeGuard Management Center, select Users and Computers.
2. In the navigation window on the left, select the required directory objects.
Note: The navigation tree only shows the directory objects you have access rights for. If youhave Full access rights, the object is displayed in black. Objects with Read only access aredisplayed in blue. A node that is greyed out cannot be accessed but is still shown, if there arenodes below that you have access to.
3. In the action area on the right, click the Access tab.
4. To assign rights for the selected objects, drag the required officer from the far right into theAccess table.
5. In the Access Rights column, select the rights you want to grant the security officer for theselected objects:
■ Full Access■ Read only■ Denied
To unassign the rights granted for the selected objects, drag the security officer back to theOfficers table.
6. Click the Save icon in the toolbar to save the changes to the database.
The selected objects are available to the relevant security officer.
Note: If two security officers are working on the same SafeGuard Enterprise Database at the sametime and one is changing access rights, a message is displayed to inform the other security officerand any unsaved changes are lost. If a security officer loses the access rights for a node completely,access is no longer granted and a relevant message is displayed. The navigation window is refreshedaccordingly.
46
SafeGuard Enterprise
7.10.1 View security officer rights for directory objects
The access rights assigned to security officers for directory objects are displayed in the Access tabof the relevant objects in Users and Computers.
Note: The Access tab only shows the access rights for containers you have access rights for.Likewise, it only shows the security officers you are responsible for.
The Access tab shows the following information:
■ Types and names of the officers assigned to the directory objects.
■ The security officer who has assigned the access rights.
■ The Assignment Date
■ The Access Rights column shows the rights granted: Full Access, Denied or Read only.
■ The Origin column shows the full name of the node where the access right was assigned to thecorresponding officer. For example: If the right was assigned to a parent node of the directoryobject selected, the parent node is displayed here. In this case, the security officer has inheritedthe access right for the selected directory object by the assignment to its parent node.
■ The Status column shows how the security officer has received the access right:
Inherited (blue text color): The access right has been inherited from a parent node.
Overwritten (brown text color): The access right has been inherited from a parent node,but changed at the selected node by direct assignment.
Directly assigned (black text color): The access right has been assigned directly at theselected node.
For inherited rights, you can display a tooltip in the Status column showing the origin of therelevant right.
7.11 Promoting security officers
You may do the following:
■ Promote a user to security officer in the Users and Computers area.
■ Promote a security officer to Master Security Officer in the Security Officers area.
7.11.1 Prerequisites for promoting a user
A security officer with the required rights can promote users to security officers and assign rolesto them.
Security officers created in this way can log on to the SafeGuard Management Center with theirWindows credentials or their token/smartcard PIN. They can operate and be administrated justlike any other security officers.
47
Administrator help
The following prerequisites must be met:
■ Users to be promoted must have been imported from an Active Directory and need to be visiblein the SafeGuard Management Center Users and Computers area.
■ To enable a promoted user to log on to the SafeGuard Management Center as security officer,a user certificate is required. You can create this certificate when you promote the user, seePromote a user to security officer (page 48). For logon on with the Windows credentials, the.p12 file containing the private key must exist in the SafeGuard Enterprise Database. For logonwith token or smartcard PIN, the .p12 file containing the private key must reside on the tokenor smartcard.
7.11.2 Promote a user to security officer
Prerequisite: To promote a user, you need to be a Master Security Officer or a security officerwith the required rights.
1. In the SafeGuard Management Center, select Users & Computers.
2. Right-click the user you want to promote to security officer and select Make this user a SecurityOfficer.
3. The next step depends on whether a user certificate is available for the selected user.
■ If a user certificate has already been assigned to this user, the Select role(s) dialog is displayed.Continue with step 4.
■ If no user certificate is available, a message is displayed asking you whether a self-signedkey pair should be created for this user. Click Yes and enter and confirm a password in thePassword for new certificate dialog. Now the Select role(s) dialog is displayed.
4. In the Select role(s) dialog, select the required roles and click OK.
The user is now promoted and displayed in the Security Officers area with their user name. Theirproperties can be displayed by selecting the respective officer in the navigation window. If theuser's private key is stored in the database, No token is activated. If the user's private key resideson the token or smartcard, Optional is activated.
You may drag-and-drop the security officer to the required position in the Security Officers treeview if required.
The security officer can log on to the SafeGuard Management Center with the name displayed.
7.11.3 Promote a security officer to Master Security Officer
Prerequisite: To promote a security officer, you need the right display and modify security officers.
1. In the SafeGuard Management Center, select Security Officers.
2. In the navigation window, right-click the security officer you want to promote and selectPromote to Master Security Officer.
48
SafeGuard Enterprise
3. If the promoted officer has children you are prompted to select a new parent node for thechildren.
The security officer is promoted and displayed under the Master Security Officers node. As aMaster Security Officer, the promoted officer will receive all rights to all objects and thus lose allassigned roles and all individually granted domain access in Users and Computers.
7.12 Demote Master Security Officers
Prerequisite: To demote Master Security Officers to security officers you need to be a MasterSecurity Officer.
1. In the SafeGuard Management Center, select Security Officers.
2. In the navigation window, right-click the Master Security Officer you want to demote andselect Demote to security officer.
3. You are prompted to select a parent node for the officer and to assign at least one role.
The security officer is demoted and displayed under the selected Security Officers node. Thedemoted officer loses all rights to all objects and only receive those rights that are assigned to theirrole(s). A demoted officer does not have any rights on domains. You need to individually grantdomain access rights in the Users and Computers area under the Access tab.
7.13 Change the security officer certificate
Prerequisite: To change the certificate of a security officer or Master Security Officer, you needthe right to display and modify security officers.
1. In the SafeGuard Management Center, select Security Officers.
2. In the navigation window, click the security officer you want to change the certificate for. Thecurrent certificate assigned is displayed in the action area on the right under Certificates.
3. In the action area, click the Certificates drop-down list and select a different certificate.
4. Click the Save icon in the toolbar to save the changes to the database.
7.14 Arrange security officers in the tree view
Security officers can be hierarchically arranged in the Security Officers navigation window toreflect the company's organizational structure.
The tree view can be arranged for all security officers, except for Master Security Officers. MSOsare displayed in a flat list under the MSO node. The security officers node contains a tree viewwhere each node represents a security officer. However, this does not imply any hierarchy in termsof rights and roles.
49
Administrator help
Prerequisite: To move a security officer in the tree view you need the right to display and modifysecurity officers.
1. In the SafeGuard Management Center, select Security Officers.
2. In the navigation window, drag-and-drop the officer you want to move to the respective node.
All children of the selected officer will also be moved.
7.15 Fast switching of security officers
For your convenience, you may quickly restart the SafeGuard Management Center, to log on asa different officer.
1. In the SafeGuard Management Center, select File > Change Officer. The SafeGuard ManagementCenter is restarted and the logon dialog is displayed.
2. Select the security officer you want to use to log on to the SafeGuard Management Center andenter their password. If you are working in Multi Tenancy mode, you are logged on to the samedatabase configuration.
The SafeGuard Management Center is restarted displaying the view assigned to the logged onofficer.
7.16 Delete a security officer
Prerequisite: To delete a security officer or Master Security Officer, you need the right to displayand delete security officers.
1. In the SafeGuard Management Center, select Security Officers.
2. In the navigation window, right-click the security officer or Master Security Officer you wantto delete and select Delete. Note that you cannot delete the officer you are logged on with.
3. If the officer has children, you are prompted to select a new parent node for the children.
The officer is deleted from the database.
Note:
One Master Security Officer explicitly created as an officer and not only promoted to securityofficer must always remain in the database. If a user promoted to security officer is deleted fromthe database, their user account is deleted from the database as well.
Note:
If the officer to be deleted has been assigned a role that includes additional authentication and theofficer is the only one this role is assigned to, the officer will be deleted nonetheless. It is assumedthat the Master Security Officer will be able to take over additional authorization.
50
SafeGuard Enterprise
8 SafeGuard Enterprise Keys and Certificates
When importing the directory structure, SafeGuard Enterprise in its default setting automaticallygenerates keys for:
■ Domains
■ Containers/OUs
and assigns them to the corresponding objects. Computer and user keys are generated as required.
Keys for groups
In its default setting, SafeGuard Enterprise does not automatically generate keys for groups. Thisbehavior is deactivated by default. As a security officer, you can change this behavior on the Keystab by selecting Tools > Options. If Groups is checked on the Keys tab, SafeGuard Enterpriseautomatically generates group keys, when the database is synchronized. At the bottom of theSynchronization tab it is indicated for which items keys are generated when synchronization isperformed.
Keys cannot be deleted! They are retained permanently in the SafeGuard Enterprise Database.
The first time an endpoint computer is started, SafeGuard Enterprise generates a computer keyfor that computer (defined machine key).
Note: The defined machine key is only generated when volume-based encryption is installed onthe endpoint computer.
Each user obtains all their keys at logon from their user key ring. The user key ring comprises thefollowing:
■ the keys of the groups of which the user is a member
■ the keys of the overall Container/OUs of the groups of which the user is a member.
The keys in the user key ring determine the data which that user can access. The user can accessonly that data for which they have a specific key.
Note:
To avoid that too many unused group keys are shown in the user's key ring, you can specify keysto be hidden. For further information, see Hide keys (page 53).
To display all keys for a user, click Users and Computers and select the Keys tab.
To display all keys, click Keys and Certificates in the SafeGuard Management Center and selectKeys. You can generate lists for Assigned Keys and Inactive Keys.
Note: The Assigned Keys list only shows the keys assigned to objects for which you have Readonly or Full access rights. The Keys view indicates the number of all available keys, regardless ofyour access rights. The Assigned Keys list shows the number of keys visible according to youraccess rights.
1. Click Users and Computers to open the display
51
Administrator help
2. The keys of a selected object are displayed in the action area and in the respective views.
3. The display in the action area depends on what is selected in the navigation area. All keysassigned to the selected object are displayed.
4. Under Available Keys, all available keys are displayed. Keys already assigned to the selectedobject are grayed out. Select Filter to switch between keys already assigned to an object (active)and keys not yet assigned to an object (inactive).
After the import, each user receives a number of keys which can be used for data encryption.
8.1 Keys for data encryption
Users are assigned keys for the encryption of specific volumes when defining policies of the typeDevice Protection.
In a policy of the type Device Protection, you can specify the setting Key to be used for encryptionfor each media.
Here you decide which keys a user can or must use for encryption:
■ Any key in user key ring
After users have logged on to Windows, they can select the keys they would like to use to encrypta particular volume. A dialog is displayed in which users can select the required key.
■ Any key in user key ring, except user key
Users may not use their own personal key to encrypt data.
■ Any group key in user key ring
Users may only select one of the group keys in their user key ring.
■ Defined machine key
The defined machine key is the unique key generated exclusively for this computer by SafeGuardEnterprise during the first startup. The user has no other options. A defined machine key istypically used for the boot and system partition and for drives on which Documents and Settingsare located.
■ Defined key on list
This option allows you to define a specific key which the user must use for encryption. Tospecify a key for a user in this way, you must define a key under Defined key for encryption.This option is displayed once you select Defined key on list.
Click the [...] button next to Defined key for encryption to display a dialog in which you canspecify a key. Make sure that the user also has the corresponding key.
Mark the selected key and click OK. The selected key will be used for encryption on the endpointcomputer.
52
SafeGuard Enterprise
8.2 Assign keys in Users and Computers
To assign keys to users, you need Full access rights for the relevant object.
To assign a new key to users:
1. In the SafeGuard Management Center, click Users and Computers.
2. In the navigation area, select the required object (for example user, group or container).
3. Right-click in the Keys tab and select Assign new key from the context menu.
4. In the Assign new key dialog:
a) Enter a Symbolic Name and Description for the key.
b) To hide the key in the user’s key ring, select the Hide key check box. For further information.
5. Click OK.
The key is assigned and displayed in the Key tab.
8.3 Hide keys
To avoid that too many unused group keys are shown in a user's key ring on the endpoint computer,you can define keys to be hidden. Keys which are not shown in the user’s key ring can still be usedto access encrypted files, but not to encrypt new ones.
To hide keys:
1. In the SafeGuard Management Center, click Keys and Certificates.
2. In the navigation area, click Keys and select Assigned Keys.
The Assigned Keys view is displayed showing the Hide Key column.
3. There are two ways to specify that keys are to be hidden:
■ Select the check box in the Hide Key column for the required key.
■ Select one or several keys and right-click to open a context menu.
Select Hide Key From User.
4. Save your changes to the database.
The specified keys are not shown in the user's key ring.
For information on displaying the user's key ring on the endpoint computer, see the SafeGuardEnterprise User help, chapter System Tray Icon and tool tips.
Note:
If a policy specifies a hidden key to be used for encryption, the Hide Key setting does not affectencryption on the endpoint computer.
53
Administrator help
8.4 Personal Keys for file-based encryption by File Share
A Personal Key is a special type of encryption key that is created for a specific user and cannot beshared with other users. A Personal Key that is active for a specific user is called an active PersonalKey. Active Personal Keys cannot be assigned to other users.
In File Share policies, you can define encryption rules that use the placeholder Personal Keyinstead of a key name. For such rules, the encryption key to be used is the active Personal Key ofthe user.
When you define an encryption rule for the path C:\encrypt to be encrypted with the PersonalKey, different keys are used for different users. You can thereby ensure that information in specificfolders is private for users. For further information on File Share, see File Share (page 169).
If a File Share encryption rule defines a Personal Key to be used for encryption, Personal Keys arecreated automatically for the relevant users, if they do not have active Personal Keys yet.
As a security officer with the required rights, you can create Personal Keys for selected users or allusers in selected groups in the SafeGuard Management Center.You can also demote active PersonalKeys, for example when a user leaves the company.
8.4.1 Automatic creation of Personal Keys
If a File Share encryption rule defines a Personal Key to be used for encryption and the user doesnot have an active Personal Key yet, the SafeGuard Enterprise Server automatically creates it.During the timeframe between policy receipt on the endpoint computer and the required activePersonal Key becoming available, the user is not allowed to create new files in the folders coveredby the File Share encryption rule.
For initial deployment of File Share policies with encryption rules using Personal Keys to a largergroup of users (hundreds or more) who do not have active Personal Keys yet, we recommend tocreate Personal Keys in the SafeGuard Management Center (see Create Personal Keys for multipleusers (page 55)). This reduces the load on the SafeGuard Enterprise Server.
8.4.2 Create a Personal Key for a single user
To create a Personal Key, you need the rights Create keys and Assign keys. In addition, you needFull access rights for the object involved. To replace an active Personal Key, you need the rightManage Personal Keys.
1. In the SafeGuard Management Center, select Users and Computers.
2. In the navigation area, select the required user.
3. Right-click in the Keys tab and select Assign new key from the context menu.
54
SafeGuard Enterprise

4. In the Assign new key dialog:
a) Enter a description for the Personal Key.
b) To hide the Personal Key in the user's key ring, select Hide key.
5. Depending on whether you are creating a Personal Key for a user who does not have an activePersonal Key yet, or for a user who does, the Assign new key dialog shows different checkboxes. Select the check box displayed, to define the newly created key as a Personal Key:
■ Personal Key: This check box is displayed for users who do not have an active Personal Keyyet.
■ Replace active Personal Key: This checkbox is displayed for users who already have anactive Personal Key.
6. Click OK.
The Personal Key is created for the selected user. In the Key tab, the key is shown as the ActivePersonal Key for the user. For a user who already had an active Personal Key before, the existingkey is demoted and the user receives the new one. The demoted Personal Key remains in the user'skey ring. The active Personal Key cannot be assigned to other users.
8.4.3 Create Personal Keys for multiple users
To create Personal Keys, you need the rights Create keys and Assign keys. In addition, you needFull access rights for the objects involved. To replace existing active Personal Keys, you need theright Manage Personal Keys.
1. In the SafeGuard Management Center, click Users and Computers.
2. In the navigation area, right-click the node for which you want to create Personal Keys:
■ a domain node,■ the .Autoregistered node in the root or in domains or■ an Organizational Unit node.
3. From the context menu, select Create Personal Keys for users .
4. In the Create Personal Key for Users dialog:
a) Enter a description for the Personal Keys.
b) To hide the Personal Keys in the users' key rings, select Hide key.
c) To replace existing active Personal Keys with the new ones, select Replace existing activePersonal Keys.
5. Click OK.
The Personal Keys are created as for all users in the selected node. In the Key tab, the keys areshown as Active Personal Keys for the users. If users already had active Personal Keys before andyou have selected Replace existing active Personal Keys, the existing keys are demoted and the
55
Administrator help
users receive new ones. The demoted Personal Keys remain in the users' key rings. The individualactive Personal Keys cannot be assigned to other users.
8.4.4 Demote active Personal Keys
To demote active Personal Keys manually, you need the rights Modify Keys and Manage PersonalKeys. By default, the right Manage Personal Keys has been assigned to the predefined role MasterSecurity Officer, but it can also be assigned to new user-defined roles. In addition, you need Fullaccess rights for the object involved.
You can demote active Personal Keys manually, for example if a user leaves the company. Providedthat you have the right Manage Personal Keys you can assign the demoted Personal Key of thisuser to other users to give them read-only access to files encrypted with this key. But they cannotuse this key for encrypting files.
Note: This cannot be undone. A demoted Personal Key can never become an Active Personal Keyfor any user again.
1. In the SafeGuard Management Center, select Users and Computers.
2. In the navigation area, select the required user.
3. In the Key tab, right-click the required Active Personal Key and select Demote Personal Keyfrom the context menu.
The key is demoted. It is still a Personal Key, but cannot be used as an active Personal Key anymore.If a File Share encryption rule defines Personal Key to be used for encryption and the user doesnot have an active Personal Key, the SafeGuard Enterprise Server automatically creates it.
8.5 Certificates
■ A user can only have one certificate assigned. If this user certificate is stored on a token, thenusers can only log on to their endpoint using this token (cryptographic token - Kerberos).
■ SafeGuard Enterprise can be verified with signed SHA1, MD2 and MD5 certificates.
■ If Certification Authority (CA) certificates are deleted in the database and you do not wish touse them again, you should remove these certificates manually from all Administrator PCs inthe local store.
■ SafeGuard Enterprise can then only communicate with expired certificates if old and new keysare present on the same card.
■ The combination of CA certificates and CRL (Certificate Revocation List) on a smartcard mustmatch. Otherwise users cannot log on to the respective computers. Please check that thecombination is correct. SafeGuard Enterprise does not carry out this check!
■ The logon certificates for security officers must be located in “MY”.
56
SafeGuard Enterprise
■ CA certificates cannot be obtained from a token and stored in the database or certificate store.If you wish (or need) to use CA certificates, they need to be available as files, not just on atoken. The same applies for CRLs.
■ Note that, when importing a user certificate, the certificate's public and private sections areboth imported. If only the public part is imported, only token authentication is supported.
■ Certificates provided by the customer and imported into SafeGuard Enterprise are currentlynot verified according to RFC3280. For example, we do not prevent using signature certificatesfor encryption purposes.
Note: The Assigned Certificates list in Keys and Certificates only shows the certificates assignedto objects for which you have Read only or Full access rights. The Certificate view indicates thenumber of all available certificates, regardless of your access rights. The Assigned Certificates listshows the number of certificates available according to your access rights.
To modify certificates, you need Full access rights to the container the users resides in.
8.6 Exporting company and Master Security Officer certificates
In a SafeGuard Enterprise installation, the following two items are critical and must be backed upin a safe location:
■ The company certificate stored in the SafeGuard Database.
■ The Master Security Officer (MSO) certificate residing in the certificate store of the computeron which the SafeGuard Management Center is installed.
You can export both certificates in form of .p12 files for backup purposes. To restore installations,you can import the relevant company and security officer certificate as .p12 files and use themwhen you set up a new database. This avoids restoring the whole database.
Note:
We recommend that you carry out this task right after initial configuration of the SafeGuardManagement Center.
8.6.1 Export the company certificates
Note:
Only Master Security Officers are entitled to export company certificates for backup purposes.
1. In the SafeGuard Management Center menu bar, select Tools > Options.
2. Select the Certificates tab and click Export in the Company Certificate section.
3. You are prompted to enter a password for securing the exported file. Enter a password, confirmit and click OK.
4. Enter a file name and storage location for the file and click OK.
57
Administrator help
The company certificate is exported as a .p12 file to the defined location and can be used forrecovery purposes.
8.6.2 Export the Master Security Officer certificate
To back up the Master Security Officer certificate of the MSO logged on to the SafeGuardManagement Center:
1. In the SafeGuard Management Center menu bar, select Tools > Options.
2. Select the Certificates tab and click Export in the Certificate of <administrator> section.
3. You are prompted to enter a password for securing the exported file. Enter a password, confirmit and click OK.
4. Enter a file name and storage location for the file to be exported and click OK.
The Master Security Officer certificate of the currently logged on MSO is exported as a .p12 fileto the defined location and can be used for recovery purposes.
8.7 Virtual Clients
Virtual Clients are specific encrypted key files that can be used for recovery in a Challenge/Responseprocedure when the required user information is not available and Challenge/Response wouldusually not be supported (for example when the POA is corrupted).
To enable a Challenge/Response procedure in this complex recovery situation, specific files calledVirtual Clients can be created. They must be distributed to the user before the Challenge/Responsesession is carried out. Using Virtual Clients, Challenge/Response can be initiated with a key recoverytool on the endpoint computer. The user only needs to inform the helpdesk officer of the requiredkey or keys and enter the response code in order to regain access to encrypted volumes.
Recovery is either possible by using a single key or an encrypted key file containing several keys.
In the SafeGuard Management Center Keys & Certificates area you can:
■ Create and export Virtual Clients.
■ Create and export encrypted key files containing several keys.
■ Display and filter Virtual Clients and exported key files.
■ Delete Virtual Clients.
8.7.1 Create Virtual Clients
Virtual Client files can be used by different computers and for several Challenge/Response sessions.
1. In SafeGuard Management Center, click Keys & Certificates.
2. In the left-hand navigation window, click Virtual Clients.
58
SafeGuard Enterprise
3. In the toolbar, click Add Virtual Client.
4. Enter a unique name for the Virtual Client and click OK.
The Virtual Clients are identified in the database by these names.
5. In the toolbar, click the Save icon to save the Virtual Client to the database.
The new Virtual Client is displayed in the action area.
8.7.2 Export Virtual Clients
After you have created the Virtual Client you need to export it to a file. This file is always calledrecoverytoken.tok and must be distributed to the help desk. This file must be available in theendpoint computer environment to initiate a Challenge/Response session with a recovery tool(for example when the POA is corrupted). The user must place the Virtual Client filerecoverytoken.tok in the same folder as the recovery tool so that a Challenge/Response can besupported.
1. In SafeGuard Management Center, click Keys & Certificates.
2. In the left-hand navigation window, click Virtual Clients.
3. In the action area, search for the respective Virtual Client by clicking the magnifier icon. Theavailable Virtual Clients are displayed.
4. Select the required entry in the action area and click Export Virtual Client in the toolbar.
5. Select a location to store the file recoverytoken.tok and click OK. A success message is displayed.
6. Distribute this Virtual Client file recoverytoken.tok to the respective SafeGuard Enterpriseusers.
Store the file in a save place, for example on a memory stick. When a Challenge/Response isinitiated, this file needs to be located in the same folder as the recovery tool.
8.7.3 Create and export key files for Virtual Client recovery
When multiple keys are needed to recover access to encrypted volumes during a Virtual Clientrecovery, the security officer can combine them in one exported file. This key file is encryptedwith a random password which is stored in the database. The password is unique for each createdkey file.
The encrypted key file needs to be transferred to the user and must be available to the user whenstarting a Challenge/Response session with a recovery tool.
In the Challenge/Response session, the password for the key file is transmitted with the responsecode. The key file can be decrypted with the password and all volumes encrypted with the availablekeys can be accessed again.
To export key files, you need Full access rights for the objects the relevant keys are assigned to.
1. In SafeGuard Management Center, click Keys and Certificates.
59
Administrator help
2. In the left-hand navigation window, click Virtual Clients and then Exported Key Files.
3. In the toolbar, click Export keys to a key file.
4. In Export keys to a key file, enter the following:
a) Directory: Click [...] to select a location for the key file.
b) File name: The key file is encrypted with a random password which is displayed here, inFile name. You cannot change this name.
c) Click Add key or Remove key to add or remove keys. A popup window is displayed tosearch for and select the required keys. Click OK to confirm the selection.
d) Click OK to confirm all entries.
5. Distribute this key file to the respective endpoint computer environment. It must be availablebefore the response code is entered on the endpoint computer.
8.7.4 Displaying and filtering Virtual Client views
To find the requested Virtual Client or keys more easily during a Challenge/Response, there areseveral filter and search possibilities in the SafeGuard Management Center under Keys &Certificates.
8.7.5 Views for Virtual Clients
1. Click Virtual Clients in the left-hand navigation window.
2. Click the magnifier icon to generate a complete list of all Virtual Clients.
3. Filter the Virtual Clients by Symbolic name or Key GUID.
8.7.6 Views for exported key files
1. In SafeGuard Management Center, click Virtual Clients, then Exported Key Files.
2. Click the magnifier icon to generate a complete list of all exported key files.
3. Click the + icon next to the required key file to display the keys contained in the file.
8.7.7 Delete Virtual Clients
1. Open the SafeGuard Management Center and click Keys & Certificates.
2. Click Virtual Clients in the left-hand navigation window.
3. In the action area, search for the respective Virtual Client by clicking the magnifier icon. Theavailable Virtual Clients are displayed.
4. Select the required entry in the action area and click Delete Virtual Client in the toolbar.
5. Save the changes to the database by clicking the Save icon in the toolbar.
60
SafeGuard Enterprise

The Virtual Client is deleted from the database.
61
Administrator help
9 Company Certificate Change Orders
Company Certificate Change Orders (CCOs) are used in the following cases:
■ To renew the company certificate in case it will expire soon.
Renewing the company certificate is possible for managed endpoints and standalone endpointsbut can only be triggered from the management console.
■ To move unmanaged endpoints to a different environment, for example if you have twodifferent Sophos SafeGuard environments and want to merge them into one Sophos SafeGuardenvironment where always one of the two environments has to be the target environment.
This is done by exchanging the company certificate of the endpoints of one environment withthe company certificate of the target environment.
Note: Only Master Security Officers are allowed to create CCOs. To give other security officersthe permission to create CCOs, the MSO must create a custom role and assign the right toManage CCOs to this role.
9.1 Renew the company certificate
A company certificate that is about to expire can be renewed in SafeGuard Management Center.At logon, SafeGuard Management Center starts to display a warning six months before the companycertificate expires. Without a valid company certificate an endpoint cannot connect to the server.Renewing the company certificate involves three steps:
■ Creating a Certificate Change Order (CCO).
■ Creating a configuration package including the CCO.
■ Restarting the servers and distributing and deploying the configuration packages on theendpoints.
To renew a company certificate:
1. In the SafeGuard Management Center menu bar, select Tools > Options.
2. Select the Certificates tab and click Update in the Request section.
3. The Update Company certificate dialog appears. To renew the company certificate you haveto create a Company Certificate Change Order (CCO) which afterwards has to be deployedon the endpoints using configuration packages.
4. Enter a name for the CCO and specify a backup path. Enter a password for the P12 file andretype it. Optionally enter a comment and click Create.
5. A dialog appears stating that this change cannot be reverted and that all configuration packagescreated after this company certificate update need this CCO included to be operable on alreadyinstalled endpoints. Click Yes to confirm.
6. A dialog is displayed confirming the update was successful and that a CCO to be included inall configuration packages has been created. Click OK.
62
SafeGuard Enterprise
7. In the SafeGuard Management Center, on the Tools menu, click Configuration Package Tool.
8. Select Managed client packages.
9. Click Add Configuration Package.
10. Enter a name of your choice for the configuration package.
11. Assign a primary SafeGuard Enterprise Server (the secondary server is not necessary).
12. Select the CCO you created beforehand to update the company certificate.
13. Select the Transport Encryption mode defining how the connection between SafeGuardEnterprise Client and SafeGuard Enterprise Server is to be encrypted, either Sophos encryptionor SSL encryption.
14. Specify an output path for the configuration package (MSI).
15. Click Create Configuration Package.
The configuration package (MSI) has now been created in the specified directory. Make sure thatyou restart all SGN servers. You now need to distribute this package to the SafeGuard EnterpriseClient (managed) endpoint computers and deploy it on them.
9.2 Replace the company certificate
Replacing the company certificate is necessary when you want to move an endpoint from onestandalone environment to a different one. The endpoint to be moved needs to have the companycertificate of the environment it is to be moved to. Otherwise the endpoint does not accept policiesof the new environment. The tasks required to replace the company certificate can be carried outin both the SafeGuard Management Center and the SafeGuard Policy Editor. In the followingdescription the term management tool is used to mean both the Management Center and thePolicy Editor, since the replacement of the company certificate is identical in both cases.
The following prerequisites must be met:
Decide which is your source and which is your target Management Center/Policy Editorenvironment. The source Management Center/Policy Editor is the one you used for creating theconfiguration packages for the endpoints that are to be moved. The target ManagementCenter/Policy Editor is the one the endpoints will be moved to.
To replace the company certificate:
1. On the target management tool, export the company certificate: On the Tools menu, clickOptions. Select the Certificates tab and click the Export button under Company Certificate.Enter and confirm a password for the certificate backup when prompted and select a destinationdirectory and filename when prompted. The company certificate is exported (cer file).
2. On the source management tool, on the Tools menu, click Options and select Create... in theRequest section. In the Create CCO dialog, browse for the target company certificate youexported on the target management tool (step 1). Make sure that it is the desired certificate.Click Create and select a destination directory and file name for the .cco file. Confirm that youwant to place a Company Certificate Change Order. Please note that a CCO is not linked tospecific endpoints. Using a CCO any client of the source environment can be moved.
63
Administrator help
3. On the target management tool you have to import the CCO created on the source ManagementCenter. On the Tools menu, click Configuration Package Tool and select the CCOs tab. ClickImport.
4. In the Import CCO dialog select the CCO you created on the source management tool andenter a CCO name and optionally a description. Click OK.
5. On the target management tool, create a configuration package: On the Tools menu, clickConfiguration Package Tool > Standalone client packages and add a new configurationpackage. Select the imported CCO from the drop-down menu in the CCO column. Specify alocation under Configuration Package output path. Click Create Configuration package.The configuration package is created on the specified location.
6. Install this configuration package on all endpoints you want to move from the sourceenvironment to the target environment.
9.3 Managing Company Certificate Change Orders
In the SafeGuard Management Center, on the Tools menu, click Configuration Package Tool.All created CCOs are displayed on the CCOs tab.
Detailed information on the selected CCO are displayed in the lower part of the dialog.
In case the CCO was created for updating the company certificate, the Source company certificateis the one to be renewed. In case the CCO was created to move endpoints, it is the companycertificate of the environment which endpoints you want to move to a different environment.
The Destination company certificate is the new company certificate in case the CCO was createdfor updating the company certificate or the company certificate of the environment the endpointsare to be moved to.
Below the certificate details it is shown for which tasks the selected CCO can be used.
Note: For managing CCOs you need the right to Manage CCOs.
9.3.1 Import
Before a CCO that was created by a different management tool in order to change the companycertificate can be selected when creating configuration packages, it has to be imported.
Clicking Import... opens a dialog in which you can select and name the CCO. The name you enterhere is displayed on the CCOs tab of the Configuration package Tool.
9.3.2 Export
Using the Export functionality, CCOs stored in the database can be exported and are then availableas .cco files.
64
SafeGuard Enterprise
10 Working with policies
The following sections describe the administrative tasks concerning policies, for example creating,grouping and backing up policies.
Note: For assigning, removing or editing policies, you need Full access rights to the relevantobjects as well as to any group that is activated for the policies involved.
For a description of all policy settings available with SafeGuard Enterprise, see Policy settings (page101).
10.1 Create policies
1. Log on to the SafeGuard Management Center with the password set during initial configuration.
2. In the navigation area, click Policies.
3. In the navigation window, right-click Policy Items and select New.
4. Select the policy type.
A dialog for naming the new policy is displayed.
5. Enter a name and optionally a description for the new policy.
Policies for Device Protection:
If you create a policy for device protection, you must also specify the target for device protection.Possible targets are:
Mass storage (boot volumes/other volumes)
Removable media
Optical drives
Storage device models
Distinct storage devices
Cloud storage
For each target, a separate policy has to be created. Later on you can combine the individualpolicies in a policy group named Encryption, for example.
6. Click OK.
The new policy is displayed in the navigation window below Policy Items. In the action area, allsettings for the selected policy type are displayed and can be changed.
10.2 Editing policy settings
When you select a policy in the navigation window, you can edit the policy settings in the actionarea.
65
Administrator help
Note:
A red icon in front of a not configured setting indicates that for this policy settinga value has to be defined. To be able to save the policy, you first have to select asetting other than not configured.
Setting policy settings to default values
In the toolbar the following icons are available for setting policy settings:
Displays default values for policy settings that have not been configured (setting notconfigured).
Sets marked policy setting to not configured.
Sets all policy settings in an area to not configured.
Sets the default value for the marked policy.
Sets all policy settings in an area to the default value.
Differentiating between machine- and user-specific policies
Policy is applied to machines only, not users.Policy color blue
Policy is applied to machines and usersPolicy color black
10.3 Policy groups
SafeGuard Enterprise policies can be combined in policy groups. A policy group may containdifferent policy types.
66
SafeGuard Enterprise
If you put policies of the same type in a group, the settings are merged automatically. In this case,you can define priorities for using the settings. The settings of a policy with a higher priorityoverwrite the settings of a policy with a lower priority.
A defined policy setting will overwrite settings from other policies, if
■ the policy with that setting has a higher priority.
■ the policy setting has not been defined yet (not configured).
Note:
Overlapping policies assigned to a group might result in incorrect calculation of the priorities.Ensure that you use disjunctive policy settings.
Exception concerning device protection:
Policies for device protection are only merged, if they were defined for the same target (for exampleboot volume). If they are for different targets, the settings will be added.
10.3.1 Combine policies into groups
Prerequisite: The individual policies of different types must have been created beforehand.
1. In the navigation area, click Policies.
2. In the navigation window, right-click Policy Groups and select New.
3. Click New Policy Group. A dialog for naming the policy group is displayed.
4. Enter a name and optionally a description for the policy group. Click OK.
5. The new policy group is displayed in the navigation window under Policy Groups.
6. Select the policy group. The action area shows all elements required for grouping the policies.
7. To add the policies to the group, drag them from the list of available policies to the policy area.
8. You can define a priority for each policy by arranging the policies in order using the contextmenu.
If you put policies of the same type in a group, the settings are merged automatically. In thiscase, you can define priorities for using the settings. The settings of a policy with a higherpriority overwrite the settings of a policy with a lower priority. If an option is set to notconfigured, the setting is not overwritten in a policy of a lower priority.
Exception concerning device protection:
Policies for device protection are only merged, if they were defined for the same target (forexample boot volume). If they are for different targets, the settings are added.
9. Save the policy with File > Save.
The policy group now contains the settings of all the individual policies.
67
Administrator help

10.3.2 Policy grouping results
The result of policy grouping is displayed separately.
To display the result, click the Resulting tab.
■ For each policy type a separate tab is shown.
The settings resulting from combining the individual policies into a group are displayed.
■ For policies for device protection, a tab is shown for each policy target (for example bootvolumes, drive X etc.).
10.4 Back up policies and policy groups
You can create backups of policies and policy groups as XML files. If necessary, the relevantpolicies/policy groups can then be restored from these XML files.
1. In the navigation window, select the policy/policy group under Policy Items or Policy Groups.
2. Right-click to display the context menu and select Backup Policy.
Note:
The Backup Policy command is also available in the Actions menu.
3. In the Save As dialog, enter a file name for the XML file and select the a storage location forthe file. Click Save.
The backup of the policy/policy group is stored as an XML file in the specified directory.
10.5 Restore policies and policy groups
To restore a policy/policy group from an XML file:
1. In the navigation window, select Policy Items/Policy Groups.
2. Right-click to display the context menu and select Restore Policy.
Note:
The Restore Policy command is also available in the Actions menu.
3. Select the XML file from which the policy/policy group is to be restored and click Open.
The policy/policy group is restored.
68
SafeGuard Enterprise
10.6 Assign policies
To assign policies, you need Full access rights to the objects involved.
1. Click Users and Computers.
2. In the navigation window, select the required container object (for example OU or domain).
3. Switch to the Policies tab.
All items required for policy assignment are displayed in the action area.
4. To assign a policy, drag the policy from the list into the Policies tab.
5. You can define a Priority for each policy by arranging the policies in order using the contextmenu. The settings of higher-ranked policies override those below. If you select No Overridefor a policy, its settings will not be overridden by those from other policies.
Note:
If you select No Override for a low-priority policy, this policy will take higher priority than ahigher-ranking policy.
To change the Priority or the No Override setting for policies in Users and Computers, youneed Full Access rights for all objects the policies are assigned to. If you do not have Full Accessrights for all objects, the settings are not editable. If you try to edit these fields, an info messageis displayed.
6. The .Authenticated users and .Authenticated computers are displayed in the activation area.
The policy applies to all groups within the OU and/or domain.
10.6.1 Activate policies for individual groups
Policies are always assigned to an OU, a domain or a workgroup. They apply by default to allgroups in those container objects (.Authenticated users and .Authenticated computers groups aredisplayed in the activation area).
However, you can also define policies and activate them for one or more groups. These policiesthen apply exclusively to these groups.
Note: To activate policies for individual groups, you need Full access rights for the relevant group.
1. Assign the policy to the OU the group is contained in.
2. .Authenticated Users and .Authenticated Computers are displayed in the Activation area.
3. Drag these two groups from the activation area to Available Groups list. In this constellation,the policy is neither effective for users nor computers.
4. Now drag the required group (or multiple groups) from the Available Groups list into theactivation area.
This policy now applies exclusively to this group.
69
Administrator help

If policies have also been assigned to the higher-ranking OU, this policy applies to this group inaddition to those defined for the whole OU.
10.7 Manage policies in Users and Computers
Apart from the Policies area in the SafeGuard Management Center, you can also view and modifythe contents of a policy where policy assignment is done, in Users and Computers.
1. Click Users and Computers.
2. In the navigation area, select the required container object.
3. You can open policies for viewing/modifying them from two locations.
■ Switch to the Policies tab, or■ switch to the RSOP tab.
4. Right-click the required assigned or available policy and select Open from the context menu.
The policy dialog is displayed and you can view and edit the policy settings.
5. Click OK to save your changes.
6. To display the policy properties, right-click the required policy and select Properties from thecontext menu.
The Properties dialog for the policy is displayed. Here you can view General and Assignmentinformation.
10.8 Disabling policy deployment
As a security officer, you can disable the deployment of policies to the endpoint computers. Todo so, click the Enable/disable policy deployment button in the SafeGuard Management Centertoolbar or select Enable/disable policy deployment from the Edit menu. After disabling policydeployment, no policies are sent to the endpoint computers. To reverse the disabling of policydeployment, click the button or select the command again.
Note:
To disable policy deployment, a security officer needs the right "Enable/disable policy deployment".By default, this right has been assigned to the predefined roles Master Security Officer and SecurityOfficer, but it can also be assigned to new user-defined roles.
10.9 Rules for assigning and analyzing policies
The management and analysis of policies is carried out according to the rules described in thissection.
70
SafeGuard Enterprise
10.9.1 Assigning and activating policies
To enable a policy to be implemented for a user/computer, you need to assign it to a containerobject (root nodes, domain, OU, BuiltIn container or workgroup). For the policy assigned to theuser/computer to become effective, when you assign a policy anywhere in the hierarchy, allcomputers (authenticated computers) and all users (authenticated users) are activated automatically(assignment without activation is not enough). All users and all computers are combined intothese groups.
10.9.2 Policy inheritance
Policies can only be passed on between container objects. Policies can be activated within a containerprovided it contains no further container objects (at group level). Inheritance between groups isnot possible.
10.9.3 Policy inheritance hierarchy
Where policies are assigned along a hierarchy chain, the policy closest to a target object(user/computer) is the highest ranking. This means that as the distance to the target object increasesa policy will be superseded by any policies that are closer.
10.9.4 Direct assignment of policies
The user/computer obtains a policy which is assigned directly to the container object in which itis located (membership as a user of a group located in another container object is not sufficient).The container object has not inherited this policy!
10.9.5 Indirect assignment of policies
The user/computer obtains a policy which the container object in which it is actually located(membership as a user of a group located in another container object is not sufficient) has inheritedfrom a higher-ranking container object.
10.9.6 Activating/deactivating policies
For a policy to be effective for a computer/user, it has to be activated at group level (policies canonly be activated at group levels). It makes no difference if this group is in the same containerobject or not. All that matters is that the user or computer has been directly or indirectly (throughinheritance) assigned to the policy.
If a computer or user is outside an OU or inheritance line and is a member of a group which isinside this OU, this activation does not apply to this user/computer. Because there is no validassignment for this user or computer (directly or indirectly). The group was, indeed, activated
71
Administrator help
but an activation can only apply to users and machines for which there is also a policy assignment.This means that the activation of policies cannot go beyond container boundaries if there is nodirect or indirect policy assignment for that object.
A policy becomes effective when it has been activated for user groups or computer groups. Theuser groups and then the computer groups are analyzed (authenticated users and authenticatedcomputers are also groups). Both results are OR-linked. If this OR-link gives a positive value forthe computer/user relationship, the policy applies.
Note: If more than one policy is active for an object, the individual policies are, while complyingwith the rules described, merged. This means that the actual settings for an object can be composedof multiple different policies.
A group can have the following activation settings:
■ Activated
A policy has been assigned. The group is displayed in the activation area of the SafeGuardManagement Center.
■ Not activated
A policy has been assigned. The group is not in the activation area.
If a policy is assigned to a container, the activation setting for a group (activated) determineswhether that policy for that container feeds into the calculation of the resulting policy.
Inherited policies cannot be controlled by these activations. Block policy inheritance would haveto be set at the more local OU so the more global policy cannot be effective here.
10.9.7 User/group settings
Policy settings for users (shown in black in the SafeGuard Management Center) take priority overpolicy settings for computers (shown in blue in the SafeGuard Management Center). If usersettings are specified in a policy for computers, those settings are overridden by the policy for theuser.
Note:
Only the user settings are overridden. If a policy for users also includes machine settings (shownin blue), they are not overridden by a user policy!
Example 1:
If password length 4 has been defined for a computer group, the user group is assigned value 3for the same setting and this user is subject to password length 3 on a computer in the computergroup.
Example 2:
If a server interval of 1 minute is defined for a user group, and the value 3 for a machine group,value 3 is used because value 1 minute is a machine setting which was defined in a policy for users.
72
SafeGuard Enterprise
10.9.8 Contradictory encryption policies
Two policies (P1 and P2) are created. File-based encryption for Drive E:\ was defined for P1, andvolume-based encryption for Drive E:\ was defined for P2. P1 is assigned the OU FBE-User andP2 the OU VBE-User.
Case 1: A user from OU FBE-User logs on first to the Client XP-100 (container computer). DriveE:\ is file-based encrypted. If a user from the OU VBE-User then logs on to Client XP-100, DriveE:\ will be volume-based encrypted. If both users have the same key, both can access the drives orfiles.
Case 2: A user from OU VBE-User logs on first to the computer XP-100 (container computer).The drive is volume-based encrypted. If, now, a user from OU FBE-User logs on and has the samekey as users from OU VBE-User, Drive E:\ will be file-based encrypted within the volume-basedencryption (the volume-based encryption is kept). However, if the user from OU FBE-User doesnot have the same key, they cannot access Drive E:\.
10.9.9 Priority within an assignment
Within an assignment, the policy with the highest priority (1) ranks above a policy with a lesserpriority.
Note:
If a policy with a lesser priority, but with the property No Override is assigned to the same levelas a higher ranking policy, this policy will take priority despite its lower ranking.
10.9.10 Priority within a group
Within a group, the policy with the highest priority (1) ranks above a policy with a lesser priority.
10.9.11 Status indicators
Setting status indicators allows the standard rules for policies to be changed.
■ Block policy inheritance
Set for containers for which you do not want higher-ranking policies to apply (right-handmouse click the object in the Properties navigation window).
If you do not want a container object to inherit a policy from a higher object, select BlockPolicy Inheritance to prevent this. If Block Policy Inheritance has been selected for a containerobject it will not be affected by higher-ranking policy settings (exception: No Override activatedwhen policy was assigned).
■ No Override
Set during assignment process this policy cannot be overridden by another policy.
73
Administrator help

The further away the policy assignment with No Override is from the target object, the strongerthe effect of this policy for all the lower-ranking container objects will be. This means that ahigher ranking container subject to No Override overrides the policy settings of a lower rankingcontainer. So, for example a domain policy can be defined whose settings cannot be overridden,even if Block policy inheritance has been set for an OU!
Note:
If a policy with a lesser priority but which has been designated No Override is assigned to thesame level as a higher ranking policy, this policy will take priority despite its lower ranking.
10.9.12 Settings in policies
10.9.12.1 Replay Machine Settings
You can find this setting under:
Policy Items > policy of the type General Settings > Loading of settings > Policy loopback.
If you select Replay Machine Settings in the field Policy Loopback of a policy of the type GeneralSettings and the policy comes from a computer (Replay Machine Settings does not affect userpolicies), this policy is replayed at the end of the analysis. This then overrides any user settingsand the machine settings apply. All machine settings inherited directly or indirectly by the machine(including policies which have not been applied by the Replay Machine Settings policy loopback)are rewritten.
10.9.12.2 Ignore User
You can find this setting under:
Policy Items > policy of the type General Settings > Loading of settings > Policy loopback.
If you select Ignore User for a policy for a computer in the field Policy Loopback of a policy ofthe type General Settings and the policy comes from a machine, only the machines settings areanalyzed. User settings are not analyzed.
10.9.12.3 No loopback
You can find this setting under:
Policy Items > policy of the type General Settings > Loading of Settings > Policy Loopback.
No Loopback describes the standard behavior. User policies take priority over computer policies.
10.9.12.4 Analyzing the settings "Ignore User" and "Replay Machine Settings"
If there are active policy assignments, the machine policies are analyzed and consolidated first. If,with the Policy Loopback option, this amalgamation of individual policies results in the valueIgnore User, the policies that would have been fixed for the user will not be analyzed. This meansthat the same policies apply both for the user and for the machine.
74
SafeGuard Enterprise
If, after merging the individual machine policies, the value with the Policy Loopback attribute isReplay machine settings, the user policies are merged with the machine policies. After the merge,the machine policies are rewritten and, where appropriate, override settings from the user policies.If a setting is present in both policies, the machine policy value overrides the user policy value.
If the consolidation of the individual machine policies results in the standard value (No PolicyLoopback), user settings take priority over machine settings.
10.9.12.5 Order of the execution of policies
Ignore User Computers
Replay Machine Settings Computer -> User -> Computer. The first "machine execution" isrequired for the policies which are written before user logon (for example background image atlogon).
No Loopback (standard setting): Computer -> User
10.9.13 Other definitions
The decision as to whether it is a user or machine policy depends on the policy's origin. A userobject "brings" a user policy, while a computer "brings" a computer policy. The same policy canbe a machine or a user policy, depending on the perspective.
■ User policy
Any policy provided by the user for analysis. If a policy is implemented through only one user,the machine-related settings of that policy are not applied, this means that computer-relatedsettings do not apply. Default values do.
■ Computer policy
Any policy provided by the machine for analysis. If a policy is implemented through just onecomputer, the user-specific settings for this policy are also applied! The computer policytherefore represents a policy "for all users".
75
Administrator help
11 Working with configuration packages
In the SafeGuard Management Center, you can create the following types of configuration packages:
■ Configuration package for managed computers
Computers that have a connection to the SafeGuard Enterprise Server receive their policiesthrough this server. For successful operation after installation of the SafeGuard EnterpriseClient software, you need to create a configuration package for managed computers and deployit to them.
After the first configuration of the endpoint computer by the configuration package, thecomputer receives policies through the SafeGuard Enterprise Server after you have assignedthem in the Users & Computer area of the SafeGuard Management Center.
■ Configuration package for unmanaged computers
Unmanaged computers are never connected to the SafeGuard Enterprise Server at any pointin time, they operate in standalone mode. They receive their policies by configuration packages.For successful operation, you need to create a configuration package containing the relevantpolicy groups and distribute it to the endpoint computers by company distribution mechanisms.Whenever you change any policy settings, you have to create new configuration packages anddistribute them to the endpoint computers.
■ Configuration package for the SafeGuard Enterprise Server
For successful operation, you need to create a configuration package for the SafeGuardEnterprise Server, defining the database and SSL connection, enabling the scripting API andso on.
■ Configuration package for Macs
Macs receive the server address and the company certificate through this package. They reporttheir status information which is displayed in the SafeGuard Management Center.
For a detailed description on how to create the different kinds of configuration packages, see theSafeGuard Enterprise Installation manual.
Note:
Check your network and computers in regular intervals for outdated or unused configurationpackages and make sure that you delete them for security reasons. Always make sure that youuninstall the outdated configuration packages before installing the new one on the computer/server.
11.1 Create configuration package for managed computers
Prerequisites
■ In the Users and Computers navigation area, under the Inventory tab, check if a companycertificate change is required for the computers that should receive the new configurationpackage. If the field Current Company Certificate is not checked, the currently active company
76
SafeGuard Enterprise
certificates in the SafeGuard Enterprise Database and on the computer differ and a companycertificate change is therefore required.
1. In the SafeGuard Management Center, on the Tools menu, click Configuration Package Tool.
2. Select Managed client packages.
3. Click Add Configuration Package.
4. Enter a name of your choice for the configuration package.
5. Assign a primary SafeGuard Enterprise Server (the secondary server is not necessary).
6. If required, specify a policy group which must have been created beforehand in the SafeGuardManagement Center to be applied to the computers. If you want to use service accounts forpost-installation tasks on the computer, make sure that you include the respective policy settingin this first policy group, see Service Account Lists for Windows logon (page 90).
7. If the currently active company certificate in the SafeGuard Enterprise Database differs fromthe one on the computers that should receive the new configuration package, select theappropriate CCO (Company Certificate Change Order). In Users & Computers, in theInventory tab of the relevant domain, OU or computer a missing check mark under CurrentCompany Certificate indicates that a company certificate change is required. You can findinformation on the required CCO in the CCOs tab of the Configuration Package Tool in theTools menu.
Note: Deployment of the new configuration package on the computer will fail, if the currentlyactive company certificates in the SafeGuard Enterprise Database and on the computer do notmatch and no appropriate CCO is included.
8. Select the Transport Encryption mode defining how the connection between SafeGuardEnterprise Client and SafeGuard Enterprise Server is to be encrypted, either Sophos encryptionor SSL encryption.
The advantage of SSL is that it is a standard protocol and that a faster connection can be achievedas when using SafeGuard transport encryption.
9. Specify an output path for the configuration package (MSI).
10. Click Create Configuration Package.
The configuration package (MSI) has now been created in the specified directory. You now needto distribute this package to the endpoint computers and deploy it on them.
11.2 Create configuration package for unmanaged computers
1. In the SafeGuard Management Center, on the Tools menu, click Configuration Package Tool.
2. Select Standalone client packages.
3. Click Add Configuration Package.
4. Enter a name of your choice for the configuration package.
5. Specify a Policy Group which must have been created beforehand in the SafeGuard ManagementCenter to be applied to the computers.
77
Administrator help
6. Under Key Backup Location, specify or select a shared network path for storing the key recoveryfile. Enter the share path in the following form: \\network computer\, for example\\mycompany.edu\. If you do not specify a path here, the end user is prompted to name astorage location for this file when first logging on to the endpoint computer after installation.
The key recovery file (XML) is needed to enable recovery of Sophos SafeGuard protectedcomputers and is generated on each Sophos SafeGuard protected computer.
Note:
Make sure to save this key recovery file at a file location accessible to the helpdesk. Alternatively,the files can be provided to the helpdesk by different mechanisms. This file is encrypted by thecompany certificate. It can therefore be saved to any external media or to the network to provideit to the help desk for recovery purposes. It can also be sent by e-mail.
7. Under POA Group, you can select a POA user group to be assigned to the endpoint computer.POA users can access the endpoint for administrative tasks after the Power-on Authenticationhas been activated. To assign POA users, the POA group must have been created beforehandin the Users and Computers area of the SafeGuard Management Center.
8. Specify an output path for the configuration package (MSI).
9. Click Create Configuration Package.
The configuration package (MSI) has now been created in the specified directory. You now needto distribute this package to the endpoint computers and deploy it on them.
11.3 Create configuration package for MacsA configuration package for a Mac contains the server information and the company certificate.The Mac uses this information to report status information (POA on/off, encryption state, ...).Status information is displayed in the SafeGuard Management Center.
1. In the SafeGuard Management Center, on the Tools menu, click Configuration Package Tool.
2. Select Managed client packages.
3. Click Add Configuration Package.
4. Enter a name of your choice for the configuration package.
5. Assign a primary SafeGuard Enterprise Server (the secondary server is not necessary).
6. Select SSL as Transport Encryption for the connection between the endpoint and SafeGuardEnterprise Server. Sophos as Transport Encryption is not supported for Mac.
7. Specify an output path for the configuration package (ZIP).
8. Click Create Configuration Package.
The configuration package (ZIP) has now been created in the specified directory. You now needto distribute this package to your Macs and deploy it on them.
78
SafeGuard Enterprise
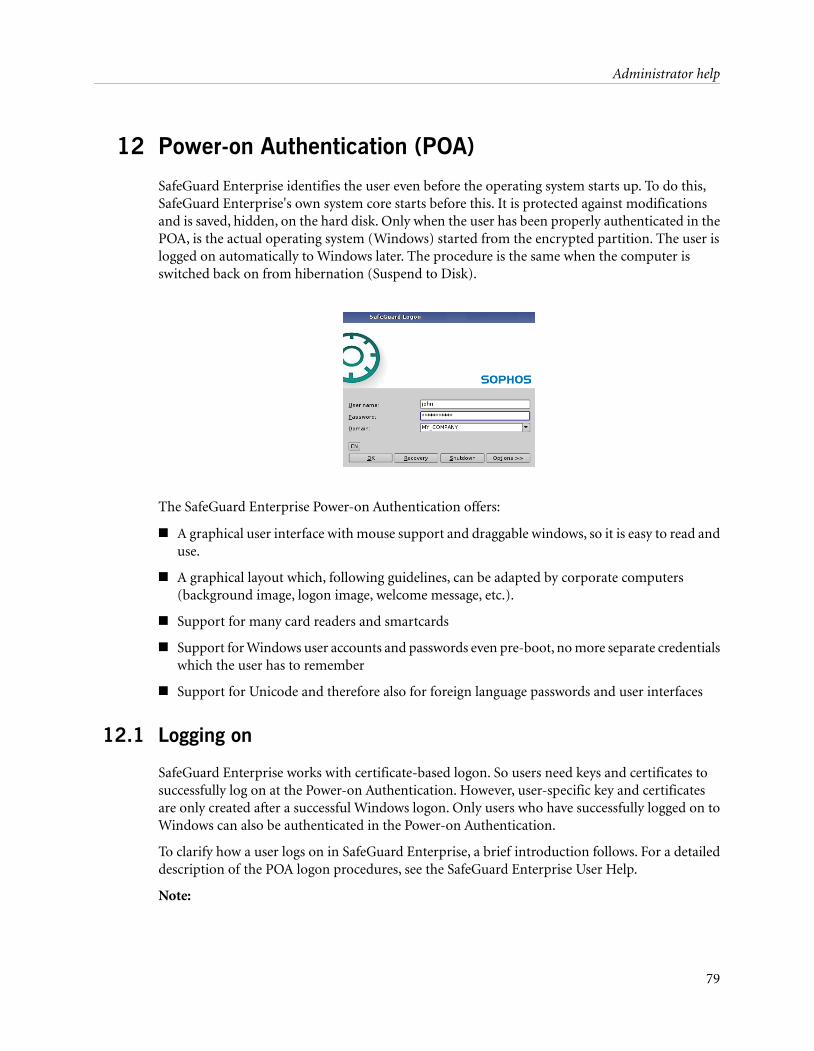
12 Power-on Authentication (POA)
SafeGuard Enterprise identifies the user even before the operating system starts up. To do this,SafeGuard Enterprise's own system core starts before this. It is protected against modificationsand is saved, hidden, on the hard disk. Only when the user has been properly authenticated in thePOA, is the actual operating system (Windows) started from the encrypted partition. The user islogged on automatically to Windows later. The procedure is the same when the computer isswitched back on from hibernation (Suspend to Disk).
The SafeGuard Enterprise Power-on Authentication offers:
■ A graphical user interface with mouse support and draggable windows, so it is easy to read anduse.
■ A graphical layout which, following guidelines, can be adapted by corporate computers(background image, logon image, welcome message, etc.).
■ Support for many card readers and smartcards
■ Support for Windows user accounts and passwords even pre-boot, no more separate credentialswhich the user has to remember
■ Support for Unicode and therefore also for foreign language passwords and user interfaces
12.1 Logging on
SafeGuard Enterprise works with certificate-based logon. So users need keys and certificates tosuccessfully log on at the Power-on Authentication. However, user-specific key and certificatesare only created after a successful Windows logon. Only users who have successfully logged on toWindows can also be authenticated in the Power-on Authentication.
To clarify how a user logs on in SafeGuard Enterprise, a brief introduction follows. For a detaileddescription of the POA logon procedures, see the SafeGuard Enterprise User Help.
Note:
79
Administrator help
Under Windows Vista, users must first press CTRL+ALT+DEL to start autologon and logon. Theadministrator can deactivate this setting in the MMC console in the group policy object editorunder Windows Settings > Security Settings > Local Policies > Deactivate Security Options (forinteractive logon CTRL+ALT+DEL is not required).
SafeGuard Autologon
When logging on for the first time, SafeGuard Enterprise autologon appears after starting theendpoint computer.
What happens?
1. An autouser is logged on.
2. The client is automatically registered on the SafeGuard Enterprise Server.
3. The machine key is sent to the SafeGuard Enterprise Server and stored in the SafeGuardEnterprise Database.
4. Machine policies are sent to the endpoint computer.
Windows logon
The Windows logon dialog is displayed. The user logs on.
What happens?
1. User ID and a hash of the user’s credentials are sent to the server.
2. User policies, certificates and keys are created and sent to the endpoint computer.
3. The POA is activated.
POA logon
When the endpoint computer restarts, the POA appears.
What happens?
1. Certificates and keys are available for the user and they can log on at the POA.
2. All the data is securely encrypted with the user's public RSA key.
3. Any other users who want to log on must first be imported to the POA.
12.1.1 Logon delay
On a SafeGuard Enterprise protected computer, a logon delay applies if a user provides incorrectcredentials during authentication at Windows or at the Power-on Authentication. With everyfailed logon attempt the delay is increased. After a failed logon a dialog displays the remainingdelay time.
Note:
If a user enters an incorrect PIN during token logon, there is no delay.
You can specify the number of logon attempts allowed in a policy of the type Authenticationusing the Maximum no. of failed logons option. When the maximum number of failed logon
80
SafeGuard Enterprise
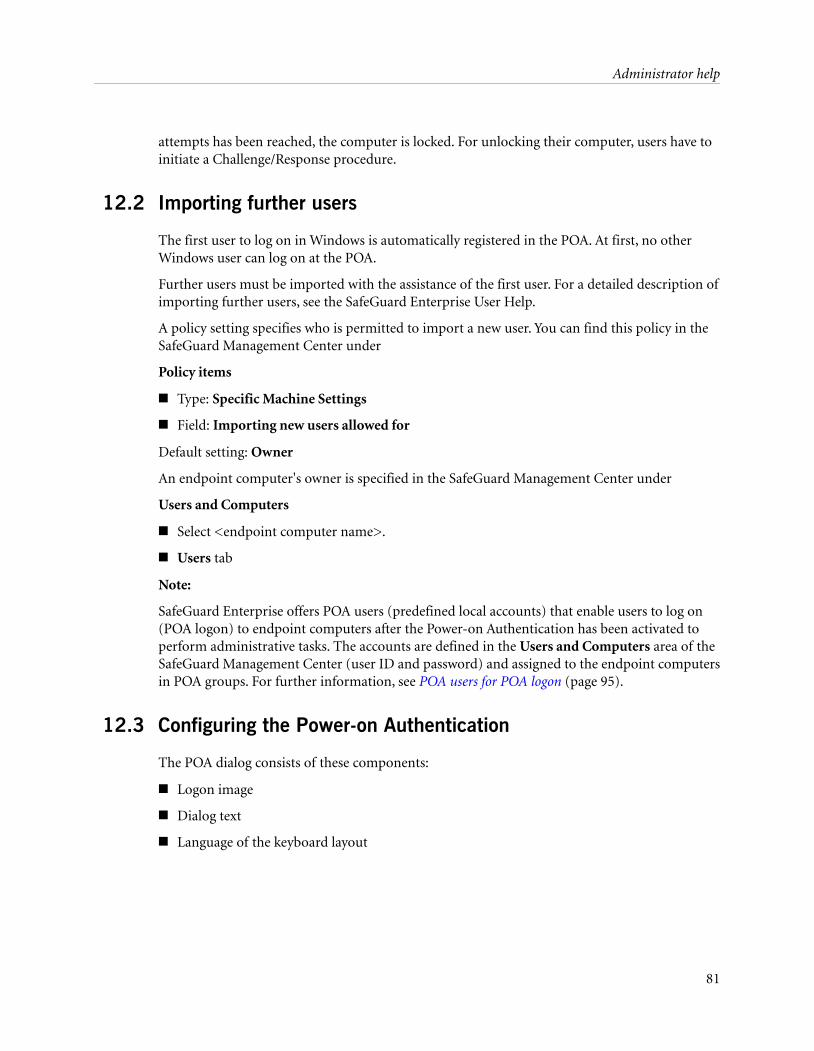
attempts has been reached, the computer is locked. For unlocking their computer, users have toinitiate a Challenge/Response procedure.
12.2 Importing further users
The first user to log on in Windows is automatically registered in the POA. At first, no otherWindows user can log on at the POA.
Further users must be imported with the assistance of the first user. For a detailed description ofimporting further users, see the SafeGuard Enterprise User Help.
A policy setting specifies who is permitted to import a new user. You can find this policy in theSafeGuard Management Center under
Policy items
■ Type: Specific Machine Settings
■ Field: Importing new users allowed for
Default setting: Owner
An endpoint computer's owner is specified in the SafeGuard Management Center under
Users and Computers
■ Select <endpoint computer name>.
■ Users tab
Note:
SafeGuard Enterprise offers POA users (predefined local accounts) that enable users to log on(POA logon) to endpoint computers after the Power-on Authentication has been activated toperform administrative tasks. The accounts are defined in the Users and Computers area of theSafeGuard Management Center (user ID and password) and assigned to the endpoint computersin POA groups. For further information, see POA users for POA logon (page 95).
12.3 Configuring the Power-on Authentication
The POA dialog consists of these components:
■ Logon image
■ Dialog text
■ Language of the keyboard layout
81
Administrator help
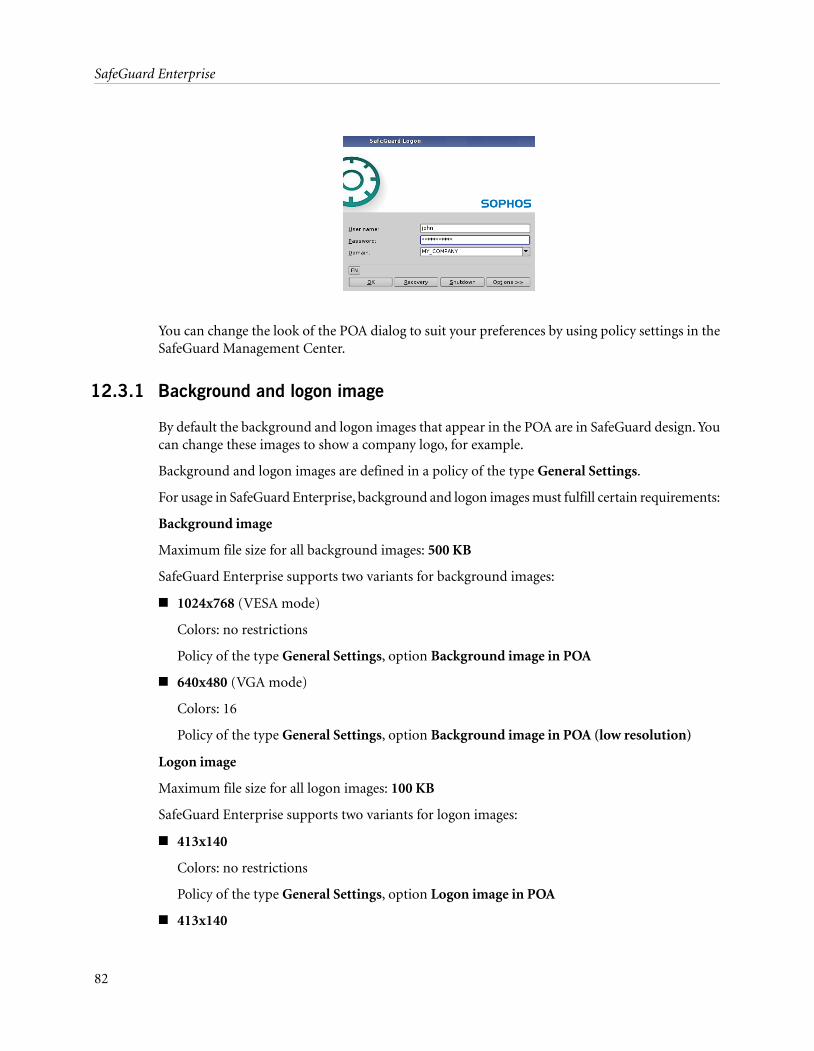
You can change the look of the POA dialog to suit your preferences by using policy settings in theSafeGuard Management Center.
12.3.1 Background and logon image
By default the background and logon images that appear in the POA are in SafeGuard design. Youcan change these images to show a company logo, for example.
Background and logon images are defined in a policy of the type General Settings.
For usage in SafeGuard Enterprise, background and logon images must fulfill certain requirements:
Background image
Maximum file size for all background images: 500 KB
SafeGuard Enterprise supports two variants for background images:
■ 1024x768 (VESA mode)
Colors: no restrictions
Policy of the type General Settings, option Background image in POA
■ 640x480 (VGA mode)
Colors: 16
Policy of the type General Settings, option Background image in POA (low resolution)
Logon image
Maximum file size for all logon images: 100 KB
SafeGuard Enterprise supports two variants for logon images:
■ 413x140
Colors: no restrictions
Policy of the type General Settings, option Logon image in POA
■ 413x140
82
SafeGuard Enterprise
Colors: 16
Policy of the type General Settings, option Logon image in POA (low resolution)
Images have to be created as files (BMP, PNG, JPG) first and can then be registered in the navigationwindow.
12.3.1.1 Register images
1. In the Policies navigation area, right-click Images and select New > Image.
2. Enter a name for the image in the Image name field.
3. Click [...] to select the previously created image.
4. Click OK.
The new image is shown as a subnode of Images in the policy navigation area. If you select theimage, it is displayed in the action area. The image can now be selected when creating policies.
Proceed as described to register further images. All registered images are shown as subnodes.
Note:
You can use the Modify Image button to change the picture assigned.
12.3.2 User-defined information text in the POA
You can customize the POA to display the following user-defined information texts:
■ Information text to be displayed upon initiating a Challenge/Response procedure for logonrecovery (for example: “Please contact Support Desk on telephone number 01234-56789.”)
You can set an information text by using the option Information text in a policy of the typeGeneral Settings.
■ Legal notices to be displayed after logging on to the POA
You can set a legal notice text by using the option Legal notice text in a policy of the typeSpecific Machine Settings.
■ Text for additional information to be displayed after logging on to the POA
You can set an additional information text by using the option Additional information textin a policy of the type Specific Machine Settings.
12.3.2.1 Register information texts
The text files containing the required information have to be created before registering them inthe SafeGuard Management Center. The maximum file size for information texts is 50 KB.SafeGuard Enterprise only uses Unicode UTF-16 coded texts. If you do not create the text files inthis format, they will be automatically converted when they are registered. Special charactersshould therefore be used with caution in the information texts created for the POA. Some of thesecharacters may not be displayed properly.
83
Administrator help
To register information texts:
1. In the Policies navigation area, right-click Information text and select New > Text.
2. Enter a name for the text to be displayed in the Text item name field.
3. Click [...] to select the previously created text file. If the file needs to be converted, a messagewill be displayed.
4. Click OK.
The new text item is displayed as a subnode below Information text in the policy navigation area.If you select a text item, its contents will be displayed in the window on the right-hand side. Thetext item can now be selected when creating policies.
Proceed as described to register further text items. All registered text items will be shown assubnodes.
Note:
You can use the Modify text button to add new text to existing text. When you click this buttona dialog is displayed for selecting another text file. The text contained in this file is appended tothe existing text.
12.3.3 Language for POA dialog text
After installation of the SafeGuard Enterprise encryption software, the POA dialog text is displayedin the default language set in Windows' Regions and Language Options on the endpoint computerwhen SafeGuard Enterprise was installed.
You can change the language of the POA dialog text after SafeGuard Enterprise has been installedby using one of the two following methods:
■ Change the default language in the Windows Regions and Language Options on the endpointcomputer. After the user has restarted the computer twice, the new language setting is activein the POA.
■ Create a policy of the type General Settings, set the language in the field Language used onclient and deploy the policy to the endpoint computer.
Note: If you define a policy and deploy it to the endpoint computer, the language set in the policyapplies instead of the language specified by Windows' Regions and Language Options.
12.3.4 Keyboard layout
Almost every country has its own keyboard layout. The keyboard layout in the POA is significantwhen entering user names, passwords and response code.
As the default, SafeGuard Enterprise adopts the keyboard layout in the POA which was set inWindows' Regional and Language Options for the Windows default user at the time SafeGuardEnterprise was installed. If "German" is the keyboard layout set under Windows, the Germankeyboard layout will be used in the POA.
84
SafeGuard Enterprise
The language of the keyboard layout being used is displayed in the POA, for example "EN" forEnglish. Apart from the default keyboard layout, the US keyboard layout (English) can also beused.
There are certain exceptions:
■ The keyboard layout is supported, but the absence of a font (for example for Bulgarian) meansthat only special characters are displayed in the User Name field.
■ No specific keyboard layout is available (for example Dominican Republic). In these cases, thePOA falls back on the original keyboard layout. For the Dominican Republic, this is "Spanish".
■ When the user name and password consist of characters that are not supported by the chosenkeyboard layout or the fallback layout, the user cannot log on at the POA.
Note:
All unsupported keyboard layouts use the US keyboard layout as the default. This also means thatthe only characters that are recognized and can be keyed in are those which are supported in theUS keyboard layout. So users can only log on to the POA if their user name and password iscomposed of characters that are supported by the US keyboard layout or the respective fallbackkeyboard of their language.
Virtual keyboard
SafeGuard Enterprise provides a virtual keyboard which users can show/hide at the POA andwhich allows them to use on-screen keys to enter credentials.
As a security officer, you can activate/deactivate the display of the virtual keyboard in a policy ofthe type Specific Machine Settings using the Virtual Keyboard in POA option.
Virtual keyboard support must be activated/deactivated with a policy setting.
The virtual keyboard supports different layouts and it will be possible to change the layout usingthe same options as for changing the POA keyboard layout.
12.3.4.1 Change the keyboard layout
The Power-on Authentication keyboard layout, including the virtual keyboard layout, can bechanged retrospectively.
1. Select Start > Control Panel > Regional and Language Options > Advanced.
2. In the Regional Options tab, select the required language.
3. In the Advanced tab, select Apply all settings to the current user account and to the defaultuser profile under Default user account settings.
4. Click OK.
The POA remembers the keyboard layout used for the last successful logon and automaticallyenables it for the next logon. This requires two restarts of the endpoint computer. If the rememberedkeyboard layout is deactivated in Regional and Language Options, it is still used until the userselects a different one.
85
Administrator help
Note:
You must change the language of the keyboard layout for non-Unicode programs.
If the language you want is not available on the computer, Windows may prompt you to installit. After you have done so, you must restart the computer twice so that the Power-on Authenticationcan read in the new keyboard layout and can set it.
You can change the required keyboard layout for the Power-on Authentication using the mouseor keyboard (Alt+Shift).
To see which languages are installed and available on the system, select Start > Run > regedit >HKEY_USERS\.DEFAULT\Keyboard Layout\Preload.
12.4 Supported Hotkeys in the Power-on Authentication
Certain hardware settings and functionalities can lead to problems when starting endpointcomputers, causing the system to hang. The Power-on Authentication supports a number ofhotkeys for modifying these hardware settings and deactivating functionalities. Furthermore, greyand black lists covering functions known to cause problems are integrated in the .msi file installedon the computer.
We recommend that you install an updated version of the POA configuration file before anysignificant deployment of SafeGuard Enterprise. The file is updated on a monthly basis and madeavailable to download from: http://www.sophos.com/support/knowledgebase/article/65700.html.
You can customize this file to reflect the hardware of a particular environment.
Note:
When you define a customized file, only this will be used instead of the one integrated in the .msifile. The default file will be applied only when no POA configuration file is defined or found.
To install the POA configuration file, enter the following command:
MSIEXEC /i <Client MSI package> POACFG=<path of the POA configuration file>
You can help us improve hardware compatibility by executing a tool that we provide to collecthardware relevant information only. The tool is very easy to use. The collected information isadded to the hardware configuration file.
For further information, see http://www.sophos.com/support/knowledgebase/article/110285.html.
The following hotkeys are supported in the POA:
■ Shift F3 = USB Legacy Support (on/off)
■ Shift F4 = VESA graphic mode (off/on)
■ Shift F5 = USB 1.x and 2.0 support (off/on)
■ Shift F6 = ATA Controller (off/on)
■ Shift F7 = USB 2.0 support only (off/on)
86
SafeGuard Enterprise
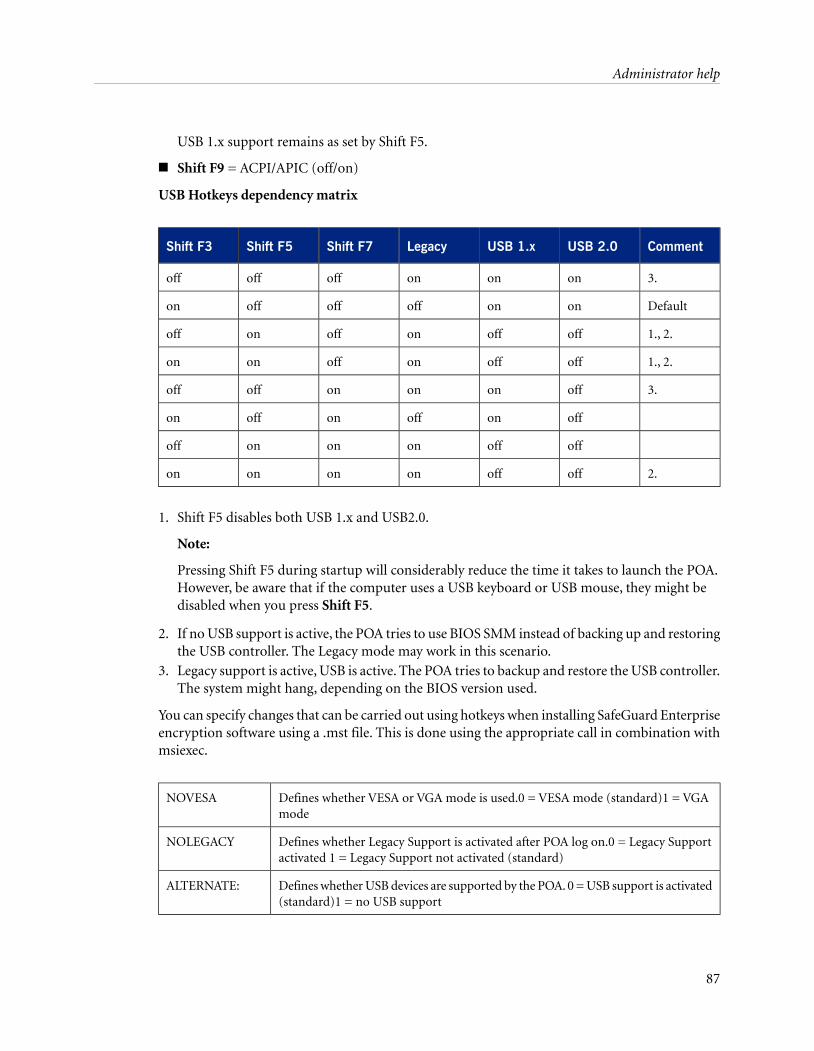
USB 1.x support remains as set by Shift F5.
■ Shift F9 = ACPI/APIC (off/on)
USB Hotkeys dependency matrix
CommentUSB 2.0USB 1.xLegacyShift F7Shift F5Shift F3
3.onononoffoffoff
Defaultononoffoffoffon
1., 2.offoffonoffonoff
1., 2.offoffonoffonon
3.offonononoffoff
offonoffonoffon
offoffonononoff
2.offoffonononon
1. Shift F5 disables both USB 1.x and USB2.0.
Note:
Pressing Shift F5 during startup will considerably reduce the time it takes to launch the POA.However, be aware that if the computer uses a USB keyboard or USB mouse, they might bedisabled when you press Shift F5.
2. If no USB support is active, the POA tries to use BIOS SMM instead of backing up and restoringthe USB controller. The Legacy mode may work in this scenario.
3. Legacy support is active, USB is active. The POA tries to backup and restore the USB controller.The system might hang, depending on the BIOS version used.
You can specify changes that can be carried out using hotkeys when installing SafeGuard Enterpriseencryption software using a .mst file. This is done using the appropriate call in combination withmsiexec.
Defines whether VESA or VGA mode is used.0 = VESA mode (standard)1 = VGAmode
NOVESA
Defines whether Legacy Support is activated after POA log on.0 = Legacy Supportactivated 1 = Legacy Support not activated (standard)
NOLEGACY
Defines whether USB devices are supported by the POA. 0 = USB support is activated(standard)1 = no USB support
ALTERNATE:
87
Administrator help
Defines whether int13 device driver is used.0 = standard ATA device driver (default)1= Int13 device driver
NOATA
Defines whether ACPI/APIC support is used.0 = no ACPI/APIC support (default)1= ACPI/APIC support active
ACPIAPIC
12.5 Disabled POA and Lenovo Rescue and Recovery
If the Power-on Authentication is disabled on the computer, the Rescue and Recoveryauthentication should be enabled to protect against access to encrypted files from the Rescue andRecovery environment.
For details on activating the Rescue and Recovery authentication, refer to the Lenovo Rescue andRecovery documentation.
88
SafeGuard Enterprise
13 Administrative access to endpoint computers
SafeGuard Enterprise uses two types of accounts to enable users to log on to endpoint computersand carry out administrative tasks after SafeGuard Enterprise has been installed.
■ Service accounts for Windows logon
With service accounts, administrators can log on (Windows logon) to endpoint computersafter the installation of SafeGuard Enterprise without activating the Power-on Authenticationand without being added as users to the computers. Service accounts lists are defined in thePolicies area of the SafeGuard Management Center and assigned in policies to the endpointcomputers. Users included on a service account list are treated as guest users when logging onat the endpoint computer.
Note:
Service account lists are assigned to endpoint computers in policies. They should be assignedin the first SafeGuard Enterprise configuration package you create for the configuration of theendpoint computers.
For further information, see Service Account Lists for Windows logon (page 90).
■ POA users for POA logon
POA users are predefined local accounts that enable users to log on (POA logon) to endpointcomputers after the Power-on Authentication has been activated to perform administrativetasks. The accounts are defined in the Users and Computers area of the SafeGuard ManagementCenter (user ID and password) and assigned to the endpoint computers by means of POAgroups included in configuration packages.
For further information, see POA users for POA logon (page 95).
89
Administrator help
14 Service Account Lists for Windows logon
A typical scenario for most implementations is that a rollout team installs new computers in anenvironment including the installation of SafeGuard Enterprise. For installation or verificationreasons, rollout operators may log on to the respective computer before the end user receives thenew machine and is able to activate the Power-on Authentication.
Thus, the scenario may be as follows:
1. SafeGuard Enterprise is installed on an endpoint computer.
2. After restarting the computer, the rollout operator logs on.
3. The rollout operator is added to the POA and the POA becomes active. The rollout operatorbecomes owner of the computer.
When the end user receives the computer, they will not be able to log on to the POA. The userneeds to perform a Challenge/Response procedure.
To prevent that administrative operations on a SafeGuard Enterprise protected computer lead toan activation of the Power-on Authentication and the addition of rollout operators as users andmachine owners to the computer, SafeGuard Enterprise allows you to create service account listsfor SafeGuard Enterprise protected computers. The users included in these lists are treated asSafeGuard Enterprise guest users.
With service accounts the scenario is as follows:
1. SafeGuard Enterprise is installed on an endpoint computer.
2. After restarting the computer, a rollout operator included on a service account list logs on(Windows logon).
3. According to the service account list applied to the computer the user is identified as a serviceaccount and is treated as a guest user.
The rollout operator is not added to the POA and the POA does not become active. The rolloutoperator does not become owner of the computer. The end user can log on and activate the POA.
Note:
Service account lists are assigned to endpoint computers in policies. They should be assigned inthe first SafeGuard Enterprise configuration package you create for the configuration of theendpoint computers.
14.1 Create service account lists and add users
1. In the navigation area, click Policies.
2. In the policy navigation window, select Service Account Lists.
3. In the context menu of Service Account Lists, click New > Service account list.
4. Enter a name for the service account list and click OK.
5. Select the new list under Service account lists in the policy navigation window.
90
SafeGuard Enterprise
6. Right-click in the action area to open the context menu for the service account list. In thecontext menu, select Add.
A new user line is added.
7. Enter the User Name and the Domain Name in the respective columns and press Enter. Toadd further users, repeat this step.
8. Save your changes by clicking the Save icon in the toolbar.
The service account list is now registered and can be selected for assignment when creating a policy.
14.2 Additional information for entering user and domain names
There are different methods for specifying users in service account lists using the two fields UserName and Domain Name. Restrictions also apply for valid input in these fields.
Covering different combinations for logging on
The two separate fields User Name and Domain Name per list entry allow you to cover all availablecombinations for logging on, for example "user@domain" or "domain\user".
To handle several user name/domain name combinations, you can use asterisks (*) as wildcards.An asterisk is allowed as the first sign, the last sign and the only sign.
For example:
■ User Name: Administrator
■ Domain Name: *
This combination specifies all users with the user name "Administrator" who log on to any networkor local machine.
The predefined domain name [LOCALHOST] available in the drop-down list of the DomainName field stands for the logon on any local computer.
For example:
■ User Name: "*admin"
■ Domain Name: [LOCALHOST]
This combination specifies all users whose user names end on "admin" and who log on to anylocal machine.
Users may log on in different ways, for example:
■ user: test, domain: mycompany or
■ user: test, domain: mycompany.com.
91
Administrator help
As domain specifications in the service account lists are not automatically resolved, there are threepossible ways to specify the domain correctly:
■ You know exactly how the user is going to log on and enter the domain accordingly.
■ You create several service account list entries.
■ You use wildcards to cover all the different cases (user: test, domain: mycompany*).
Note:
To avoid any problems caused by the fact that Windows may not use the same character sequence,but truncate names, we recommend that you enter the FullQualifiedName and the NetBIOS nameor use wildcards.
Restrictions
Asterisks are only allowed as the first sign, the last sign and the only sign. Following are examplesfor valid and invalid strings using asterisks:
■ Valid strings include admin*, *, *strator, *minis*.
■ Invalid strings include **, Admin*trator, Ad*minst*.
In addition, the following restrictions apply:
■ The character ? is not allowed in user logon names.
■ The characters / \ [ ] : ; | = , + * ? < > " are not allowed in domain names.
14.3 Editing and deleting service account lists
As a security officer with the Modify service account lists right, you can edit or delete serviceaccount lists at any time:
■ To edit a service account list, double-click it in the policy navigation window. The serviceaccount list is opened and you can add, delete or modify user names on the list.
■ To delete a service account list, select it in the policy navigation window, open the contextmenu and select Delete.
14.4 Assign a service account list in a policy
1. Create a new policy of the type Authentication or select an existing one.
2. Under Logon Options, select the required service account list from the Service Account Listdrop-down list.
Note: The default setting is [No list], this means that no service account list applies. Rolloutoperators logging on to the computer after installation of SafeGuard Enterprise are not treatedas guest users and may activate Power-on Authentication and be added to the computer. Toundo the assignment of a service account list, select the [No list] option.
92
SafeGuard Enterprise
3. Save your changes by clicking the Save icon in the toolbar.
You can now transfer the policy to the respective computers to make the service accounts availableon them.
Note:
If you select different service account lists in different policies which are all relevant according tothe RSOP (Resulting Set of Policies, the settings valid for a specific computer/group), the serviceaccount list assigned in the last policy applied overrules all previously assigned service accountlists. Service account lists are not merged. To view the RSOP in Users and Computers, you needat least Read Only access rights for the relevant objects.
14.5 Transferring the policy to the endpoint computer
The service account list functionality is especially helpful and important during initial installationin the rollout phase of an implementation. We therefore recommend that you transfer the serviceaccount settings to the endpoint computer immediately after installation. To make the serviceaccount list available on the endpoint computer at this point, include a policy of the typeAuthentication when you create the initial configuration package for configuring the endpointcomputer after installation.
You can change the service account list settings at any time, create a new policy and transfer it toendpoint computers.
14.6 Logging on to an endpoint computer using a service account
At the first Windows logon after restarting the computer, a user included on a service account listlogs on to the computer as a SafeGuard Enterprise guest user. This first Windows logon to thecomputer neither triggers a pending Power-on Authentication nor adds the user to the computer.The SafeGuard Enterprise System Tray icon balloon tool tip "Initial user synchronization completed"is not displayed.
Service account status display on the endpoint computer
The guest user logon status is also available through the System Tray Icon. For further information,see the SafeGuard Enterprise User help, chapter System Tray icon and balloon tool tip (descriptionof the user state field).
14.7 Log events
Actions performed regarding service account lists are reported by the following log events:
SafeGuard Management Center
■ Service account list <name> created
■ Service account list <name> modified
93
Administrator help
■ Service account list <name> deleted
SafeGuard Enterprise protected computer
■ Windows user <domain/user name> logged on at <timestamp> to machine<domain/workstation name> as SGN service account.
■ New service account list <name> imported.
■ Service account list <name> deleted.
94
SafeGuard Enterprise
15 POA users for POA logon
After SafeGuard Enterprise has been installed and the Power-on Authentication (POA) has beenactivated, access to endpoint computers to perform administrative tasks may be required. WithPOA users, users (for example members of the IT team) can log on at the Power-on Authenticationon endpoint computers for administrative tasks without having to initiate a Challenge/Responseprocedure. There is no automatic logon to Windows. The users logging on with POA user accountslog on to Windows with their existing Windows accounts.
You can create POA users, group them into POA groups and assign groups to endpoint computers.The users, this means the POA users, included in the POA group, are added to the POA and canlog on using their predefined user name and password.
Note: To manage POA users and POA groups you need Full access rights for the POA node underUsers and Computers.
15.1 Create POA users
To create POA users, you need Full access rights for the POA node under Users and Computers.
1. In the navigation area of the SafeGuard Management Center, click Users and Computers.
2. In the Users and Computers navigation window under POA, select POA Users.
3. In the context menu of POA Users, click New > Create new user.
The Create new user dialog is displayed.
4. In the Full name field, enter a name (the logon name) for the new POA user.
5. Optionally, enter a description for the new POA user.
6. Enter a password for the new POA user and confirm it.
Note:
To enhance security, the password should adhere to certain minimum complexity requirements,for example minimum length of 8 characters, mixture of numerical and alphanumericalcharacters etc. If the password you have entered is too short, a warning message is displayed.
7. Click OK.
The new POA user is created and displayed under POA Users in the Users and Computersnavigation area.
15.2 Change the password for a POA user
To edit POA users, you need Full access rights for the POA node under Users and Computers.
1. Click Users and Computers in the navigation area of the SafeGuard Management Center.
95
Administrator help
2. In the Users and Computers navigation window under POA, POA Users, select the relevantPOA user.
3. In the context menu of the POA user, select Properties.
The properties dialog for the POA user is displayed.
4. On the General tab under User Password, enter the new password and confirm it.
5. Click OK.
The new password applies for the relevant POA user.
15.3 Delete POA users
To delete POA users, you need Full access rights for the POA node under Users and Computers.
1. In the navigation area of the SafeGuard Management Center, click Users and Computers.
2. In the Users and Computers navigation window under POA, POA Users, select the relevantPOA user.
3. Right-click on the POA user and select Delete from the context menu.
The POA user is deleted. It is no longer displayed in the Users and Computers navigation window.
Note:
If the user is part of one or several POA groups, the POA user is also removed from all groups.However, the POA user is still available on the endpoint computer until the POA group has beenunassigned.
15.4 Create POA groups
To create POA groups, you need Full access rights for the POA node under Users and Computers.
To assign POA users to endpoint computers, the accounts must be arranged in groups.
1. In the navigation area of the SafeGuard Management Center, click Users & Computers.
2. In the Users and Computers navigation area under POA, select POA Groups.
3. In the context menu of POA Groups, click New > Create new group.
The Create new group dialog is displayed.
4. In the Full name field, enter a name for the new POA group.
5. Optionally, enter a description.
6. Click OK.
The new POA group is created. It is displayed under POA Groups in the Users and Computersnavigation area. You can now add POA users to the POA group.
96
SafeGuard Enterprise
15.5 Add users to POA groups
To edit POA groups, you need Full access rights for the POA node under Users and Computers.
1. In the navigation area of the SafeGuard Management Center, click Users and Computers.
2. In the Users and Computers navigation window under POA, POA Groups, select the relevantPOA group.
In the action area of the SafeGuard Management Center on the right-hand side, the Memberstab is displayed.
3. In the SafeGuard Management Center toolbar, click the Add icon (green plus sign).
The Select member object dialog is displayed.
4. Select the user you want to add to the group.
5. Click OK.
The POA user is added to the group and displayed in the Members tab.
Note:
You can also add POA users to groups by selecting the user in the navigation window and followingthe steps described above. The only difference is that the action area displays theMember of tabafter selecting the user. This tab shows the groups the user has been assigned to. The basic workflowis identical.
15.6 Remove users from POA groups
To edit POA groups, you need Full access rights for the POA node under Users and Computers.
1. In the navigation area of the SafeGuard Management Center, click Users and Computers.
2. In the Users and Computers navigation window under POA, POA Group, select the relevantPOA group.
In the action area of the SafeGuard Management Center on the right-hand side, the Memberstab is displayed.
3. Select the user you want to remove from the group.
4. In the SafeGuard Management Center toolbar, click the Remove (Delete) icon (red cross sign).
The user is removed from the group.
Note:
You can also remove members from groups by selecting the POA user in the navigation windowand following the steps described above. The only difference is that the action area displays theMember of tab after selecting the user. This tab shows the groups the user has been assigned to.The basic workflow is identical.
97
Administrator help
15.7 Assigning POA users to endpoint computers
Note:
In order to assign POA users to endpoint computers, the accounts must be arranged in groups.
How you assign and unassign POA users to endpoint computers depends on the type of computer:
■ For managed endpoint computers, POA groups can be assigned in the POA Group Assignmenttab in Users and Computers.
■ For unmanaged endpoint computers which run in standalone mode and are not connectedto the SafeGuard Enterprise Server, a configuration package with a POA group must be createdand deployed.
15.7.1 Assign POA users to managed endpoint computers
To assign POA users to managed computers, you need Full access or Read only rights for therelevant POA group and Full access rights for the relevant containers.
Note:
Assignment of POA users is only valid for managed SafeGuard Enterprise endpoint computersfrom version 5.60.
1. In the navigation area of the SafeGuard Management Center, click Users and Computers.
2. In the Users and Computers navigation window, select the required container.
3. In the action area of the SafeGuard Management Center, select the POA Group Assignmenttab.
Under POA Groups on the right-hand side, all available POA groups are displayed.
4. Drag the required POA group from POA Groups into the POA Group Assignment actionarea.
The POA group’s GroupName and Group DSN are displayed in the work area.
5. Save your changes to the database.
All members of the POA group assigned are deployed to all endpoint computers in the containerselected.
You can unassign a POA group or change the assigned POA group by proceeding as describedand dragging groups from and to the action area of the POA Group Assignment tab and the POAGroups area.
After you have saved your changes in the database, the new assignment applies.
98
SafeGuard Enterprise
15.7.2 Assign POA users to unmanaged endpoint computers
To assign POA users to unmanaged endpoint computers, you need Read only or Full access rightsfor the relevant POA group.
POA users are assigned to unmanaged endpoint computers (computers operating in standalonemode) in configuration packages.
1. In the SafeGuard Management Center, select Configuration Package Tool from the Toolsmenu.
2. Select an existing configuration package or create a new one.
3. Specify a POA Group created beforehand in the Users and Computers area of the SafeGuardManagement Center, to be applied to the computers.
The default setting for the POA group is No Group.
An empty group is available for selection by default. This group can be used to delete a POAgroup assignment on endpoint computers.
4. Specify an output path for the configuration package.
5. Click Create Configuration Package.
6. Deploy the configuration package to the endpoint computers.
By installing the configuration package, the users included in the group are added to the POA onthe endpoint computers. The POA users are available for POA logon.
Note:
When you upgrade unmanaged endpoint computers to managed, the POA users remain active,if they have also been assigned in the SafeGuard Management Center. The passwords set in thePOA groups deployed in configuration packages are set to the ones specified in the SafeGuardManagement Center. Passwords changed using F8 are overwritten. For further information onupgrading unmanaged endpoint computers to managed, see the SafeGuard Enterprise Installationmanual.
15.7.3 Unassign POA users from unmanaged endpoint computers
POA users can be deleted from unmanaged endpoint computers by assigning an empty POAgroup:
1. In the SafeGuard Management Center, select the Configuration Package Tool from the Toolsmenu.
2. Select an existing configuration package or create a new one.
3. Specify an empty POA Group created beforehand in the Users and Computers area of theSafeGuard Management Center, or select the empty POA group that is available by default inthe Configuration Package Tool.
4. Specify an output path for the configuration package.
99
Administrator help

5. Click Create Configuration Package.
6. Deploy the configuration package to the endpoint computers.
By installing the configuration package, all POA users are removed from the endpoint computers,so all relevant users are removed from the POA.
15.7.4 Change POA users assignments on unmanaged endpoint computers
1. Create a new POA group or modify an existing one.
2. Create a new configuration package and select the new or modified POA group.
3. Deploy the new configuration package to the endpoint computer.
The new POA group is available on the endpoint computer and all users included are added tothe POA. The new group overwrites the old one. POA groups are not merged.
15.8 Log on on to an endpoint computer using a POA user
1. Switch on the computer.
The Power-on Authentication logon dialog is displayed.
2. Enter the User name and the Password of the predefined POA user.
You are not automatically logged on to Windows. The Windows logon dialog is displayed.
3. In the Domain field, select the domain <POA>.
4. Log on to Windows using your existing Windows user account.
15.8.1 Local password change
If the password of a POA user has been changed with F8, the change is not synchronized withother endpoint computers. The administrator must change the password for this user centrally.
100
SafeGuard Enterprise
16 Policy settings
SafeGuard Enterprise policies include all settings needed to implement a company-wide securitypolicy on endpoint computers.
SafeGuard Enterprise policies can incorporate settings for the following areas (policy types):
■ General Settings
Settings for transfer rate, customization, logon recovery, background images, etc.
■ Authentication
Settings for logon mode, device lock, etc.
■ PIN
Defines requirements for used PINs.
■ Passwords
Defines requirements for used passwords.
■ Passphrase
Defines requirements for passphrases used for SafeGuard Data Exchange.
■ Device Protection
Settings for volume- or file-based encryption (including settings for SafeGuard Data Exchangeand SafeGuard Portable): algorithms, keys, the drives on which data is to be encrypted, etc.
■ Specific Machine Settings
Settings for Power-on Authentication (activate/deactivate), secure Wake on LAN, displayoptions, etc.
■ Logging
Defines events to be logged and their output destinations.
■ Configuration Protection
Settings (allow/block) for the usage of ports and peripheral devices (PDAs, removable media,printers, etc.).
■ File Share
Settings for file-based encryption on local drives and network locations, especially for workgroups on network shares.
101
Administrator help
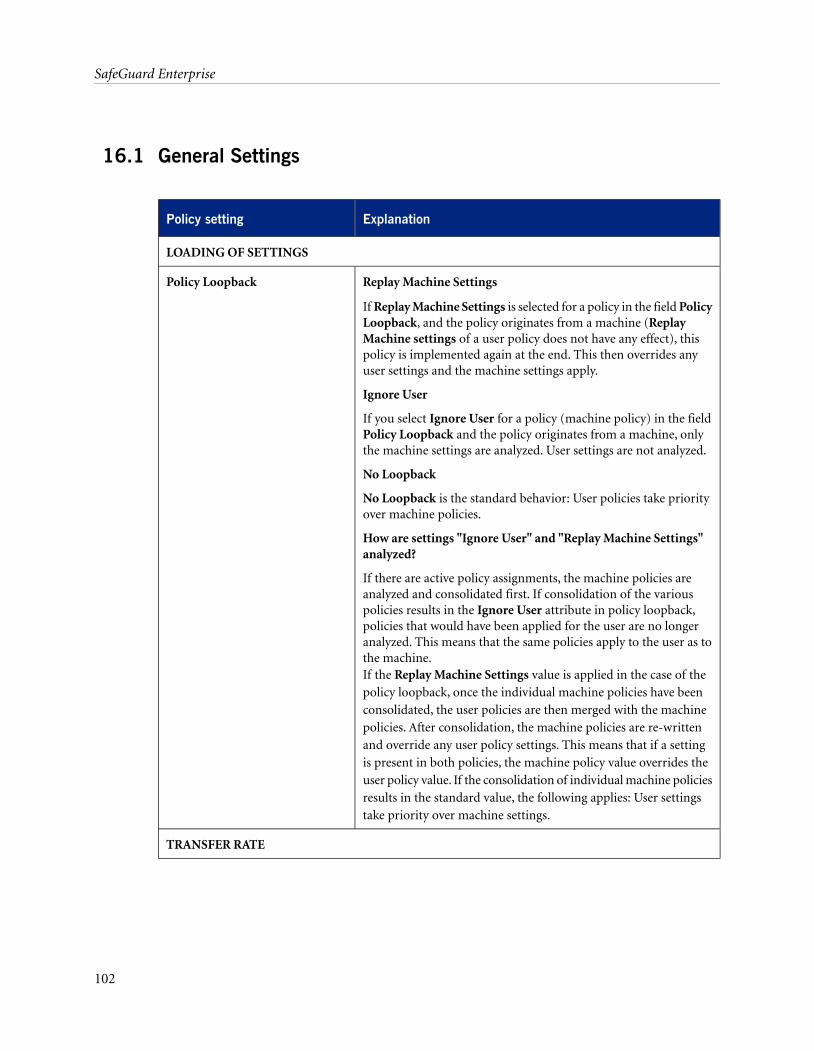
16.1 General Settings
ExplanationPolicy setting
LOADING OF SETTINGS
Replay Machine Settings
If Replay Machine Settings is selected for a policy in the field PolicyLoopback, and the policy originates from a machine (Replay
Policy Loopback
Machine settings of a user policy does not have any effect), thispolicy is implemented again at the end. This then overrides anyuser settings and the machine settings apply.
Ignore User
If you select Ignore User for a policy (machine policy) in the fieldPolicy Loopback and the policy originates from a machine, onlythe machine settings are analyzed. User settings are not analyzed.
No Loopback
No Loopback is the standard behavior: User policies take priorityover machine policies.
How are settings "Ignore User" and "Replay Machine Settings"analyzed?
If there are active policy assignments, the machine policies areanalyzed and consolidated first. If consolidation of the variouspolicies results in the Ignore User attribute in policy loopback,policies that would have been applied for the user are no longeranalyzed. This means that the same policies apply to the user as tothe machine.If the Replay Machine Settings value is applied in the case of thepolicy loopback, once the individual machine policies have beenconsolidated, the user policies are then merged with the machinepolicies. After consolidation, the machine policies are re-writtenand override any user policy settings. This means that if a settingis present in both policies, the machine policy value overrides theuser policy value. If the consolidation of individual machine policiesresults in the standard value, the following applies: User settingstake priority over machine settings.
TRANSFER RATE
102
SafeGuard Enterprise
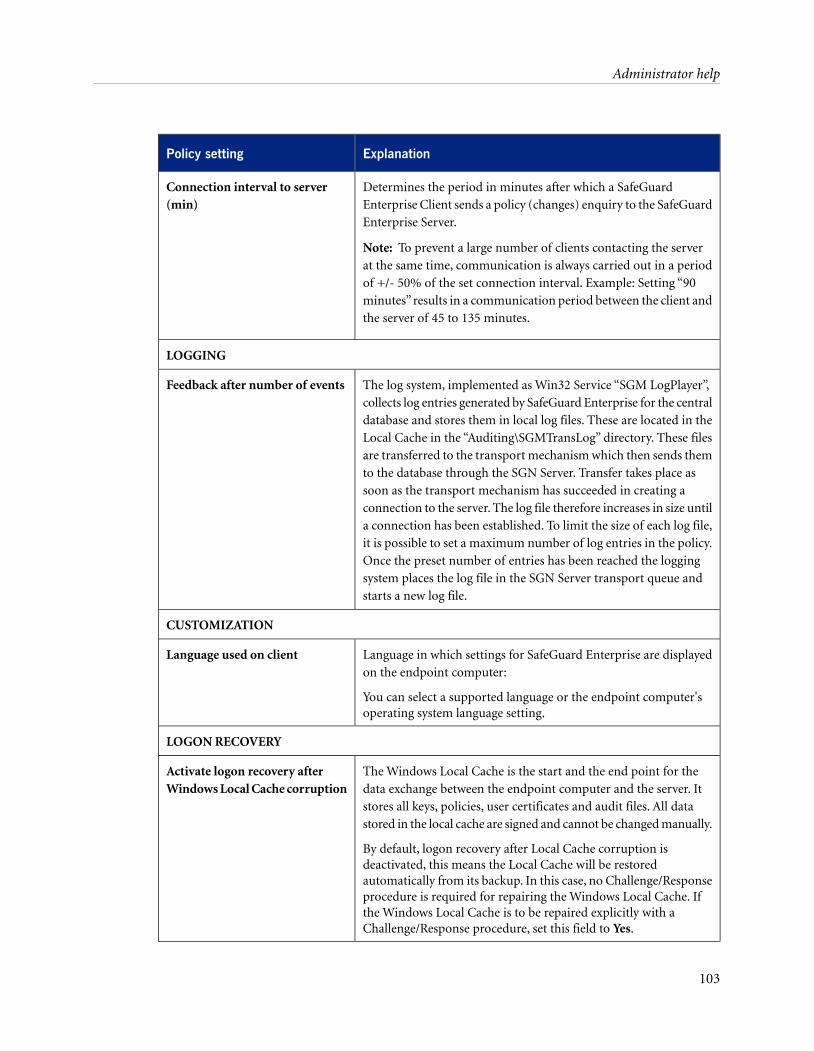
ExplanationPolicy setting
Determines the period in minutes after which a SafeGuardEnterprise Client sends a policy (changes) enquiry to the SafeGuardEnterprise Server.
Note: To prevent a large number of clients contacting the serverat the same time, communication is always carried out in a period
Connection interval to server(min)
of +/- 50% of the set connection interval. Example: Setting “90minutes” results in a communication period between the client andthe server of 45 to 135 minutes.
LOGGING
The log system, implemented as Win32 Service “SGM LogPlayer”,collects log entries generated by SafeGuard Enterprise for the central
Feedback after number of events
database and stores them in local log files. These are located in theLocal Cache in the “Auditing\SGMTransLog” directory. These filesare transferred to the transport mechanism which then sends themto the database through the SGN Server. Transfer takes place assoon as the transport mechanism has succeeded in creating aconnection to the server. The log file therefore increases in size untila connection has been established. To limit the size of each log file,it is possible to set a maximum number of log entries in the policy.Once the preset number of entries has been reached the loggingsystem places the log file in the SGN Server transport queue andstarts a new log file.
CUSTOMIZATION
Language in which settings for SafeGuard Enterprise are displayedon the endpoint computer:
You can select a supported language or the endpoint computer'soperating system language setting.
Language used on client
LOGON RECOVERY
The Windows Local Cache is the start and the end point for thedata exchange between the endpoint computer and the server. It
Activate logon recovery afterWindows Local Cache corruption
stores all keys, policies, user certificates and audit files. All datastored in the local cache are signed and cannot be changed manually.
By default, logon recovery after Local Cache corruption isdeactivated, this means the Local Cache will be restoredautomatically from its backup. In this case, no Challenge/Responseprocedure is required for repairing the Windows Local Cache. Ifthe Windows Local Cache is to be repaired explicitly with aChallenge/Response procedure, set this field to Yes.
103
Administrator help
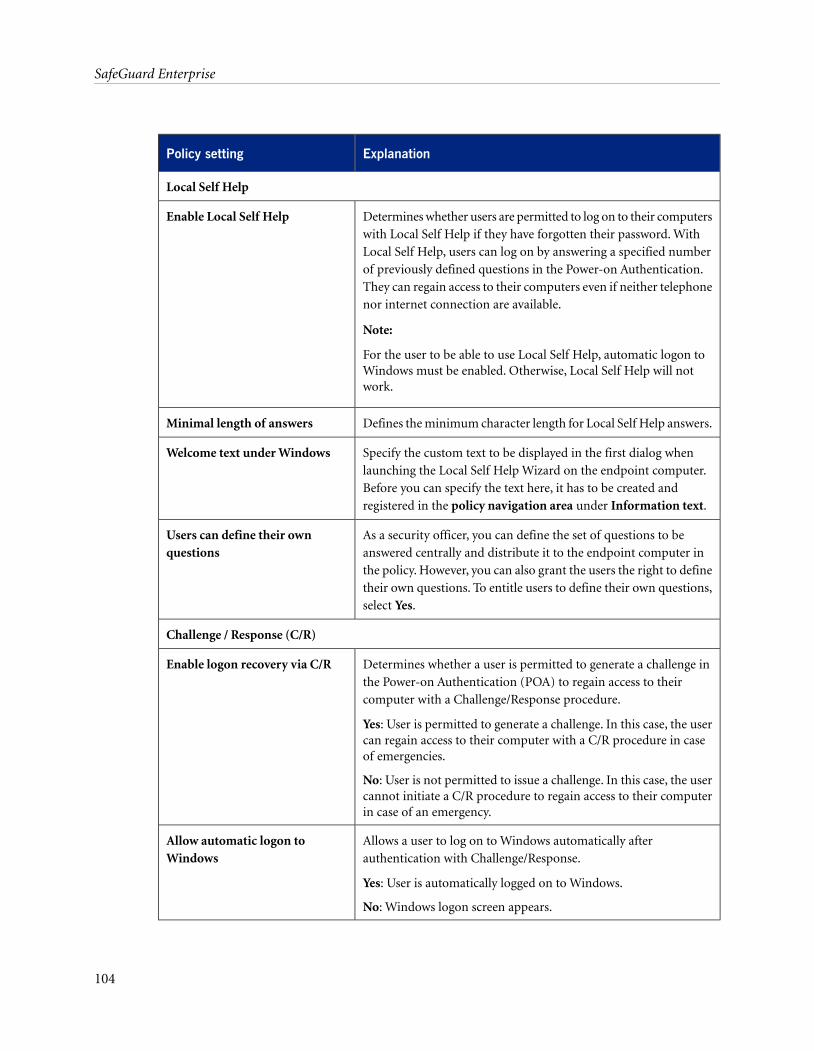
ExplanationPolicy setting
Local Self Help
Determines whether users are permitted to log on to their computerswith Local Self Help if they have forgotten their password. With
Enable Local Self Help
Local Self Help, users can log on by answering a specified numberof previously defined questions in the Power-on Authentication.They can regain access to their computers even if neither telephonenor internet connection are available.
Note:
For the user to be able to use Local Self Help, automatic logon toWindows must be enabled. Otherwise, Local Self Help will notwork.
Defines the minimum character length for Local Self Help answers.Minimal length of answers
Specify the custom text to be displayed in the first dialog whenlaunching the Local Self Help Wizard on the endpoint computer.
Welcome text under Windows
Before you can specify the text here, it has to be created andregistered in the policy navigation area under Information text.
As a security officer, you can define the set of questions to beanswered centrally and distribute it to the endpoint computer in
Users can define their ownquestions
the policy. However, you can also grant the users the right to definetheir own questions. To entitle users to define their own questions,select Yes.
Challenge / Response (C/R)
Determines whether a user is permitted to generate a challenge inthe Power-on Authentication (POA) to regain access to theircomputer with a Challenge/Response procedure.
Yes: User is permitted to generate a challenge. In this case, the usercan regain access to their computer with a C/R procedure in caseof emergencies.
Enable logon recovery via C/R
No: User is not permitted to issue a challenge. In this case, the usercannot initiate a C/R procedure to regain access to their computerin case of an emergency.
Allows a user to log on to Windows automatically afterauthentication with Challenge/Response.
Yes: User is automatically logged on to Windows.
Allow automatic logon toWindows
No: Windows logon screen appears.
104
SafeGuard Enterprise
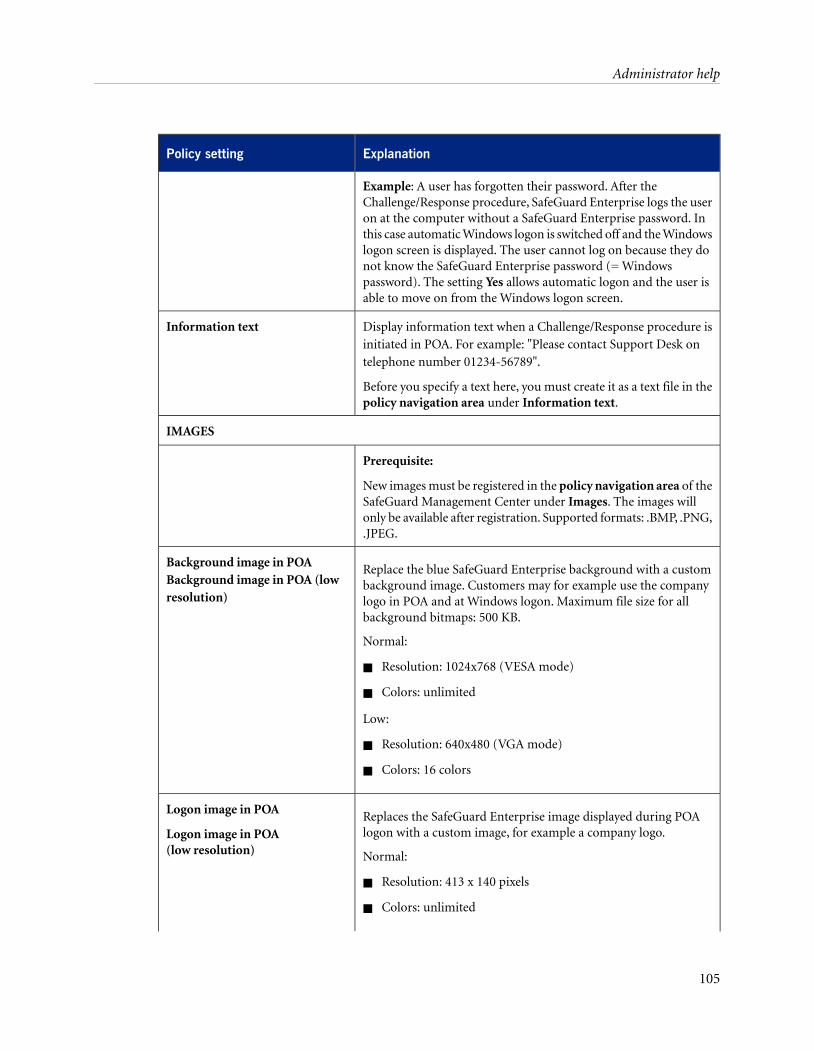
ExplanationPolicy setting
Example: A user has forgotten their password. After theChallenge/Response procedure, SafeGuard Enterprise logs the useron at the computer without a SafeGuard Enterprise password. Inthis case automatic Windows logon is switched off and the Windowslogon screen is displayed. The user cannot log on because they donot know the SafeGuard Enterprise password (= Windowspassword). The setting Yes allows automatic logon and the user isable to move on from the Windows logon screen.
Display information text when a Challenge/Response procedure isinitiated in POA. For example: "Please contact Support Desk ontelephone number 01234-56789".
Before you specify a text here, you must create it as a text file in thepolicy navigation area under Information text.
Information text
IMAGES
Prerequisite:
New images must be registered in the policy navigation area of theSafeGuard Management Center under Images. The images willonly be available after registration. Supported formats: .BMP, .PNG,.JPEG.
Replace the blue SafeGuard Enterprise background with a custombackground image. Customers may for example use the company
Background image in POABackground image in POA (lowresolution) logo in POA and at Windows logon. Maximum file size for all
background bitmaps: 500 KB.
Normal:
■ Resolution: 1024x768 (VESA mode)
■ Colors: unlimited
Low:
■ Resolution: 640x480 (VGA mode)
■ Colors: 16 colors
Replaces the SafeGuard Enterprise image displayed during POAlogon with a custom image, for example a company logo.
Logon image in POA
Logon image in POA(low resolution) Normal:
■ Resolution: 413 x 140 pixels
■ Colors: unlimited
105
Administrator help
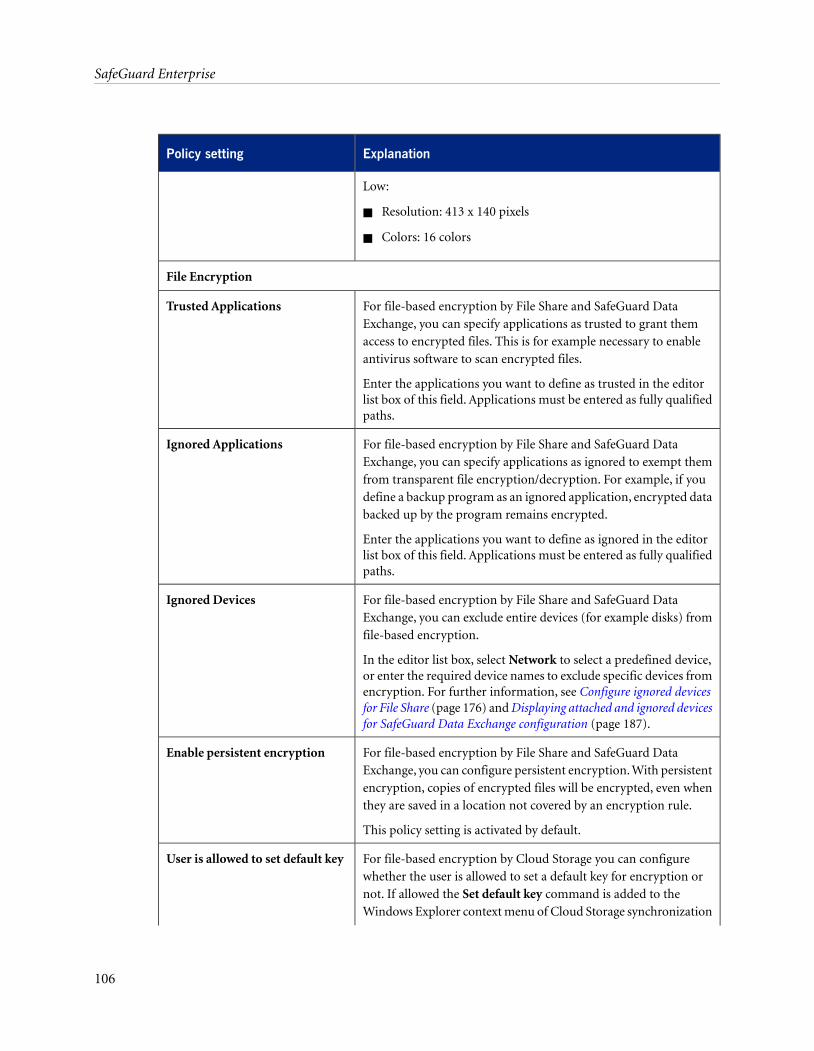
ExplanationPolicy setting
Low:
■ Resolution: 413 x 140 pixels
■ Colors: 16 colors
File Encryption
For file-based encryption by File Share and SafeGuard DataExchange, you can specify applications as trusted to grant them
Trusted Applications
access to encrypted files. This is for example necessary to enableantivirus software to scan encrypted files.
Enter the applications you want to define as trusted in the editorlist box of this field. Applications must be entered as fully qualifiedpaths.
For file-based encryption by File Share and SafeGuard DataExchange, you can specify applications as ignored to exempt them
Ignored Applications
from transparent file encryption/decryption. For example, if youdefine a backup program as an ignored application, encrypted databacked up by the program remains encrypted.
Enter the applications you want to define as ignored in the editorlist box of this field. Applications must be entered as fully qualifiedpaths.
For file-based encryption by File Share and SafeGuard DataExchange, you can exclude entire devices (for example disks) fromfile-based encryption.
In the editor list box, select Network to select a predefined device,or enter the required device names to exclude specific devices from
Ignored Devices
encryption. For further information, see Configure ignored devicesfor File Share (page 176) and Displaying attached and ignored devicesfor SafeGuard Data Exchange configuration (page 187).
For file-based encryption by File Share and SafeGuard DataExchange, you can configure persistent encryption. With persistent
Enable persistent encryption
encryption, copies of encrypted files will be encrypted, even whenthey are saved in a location not covered by an encryption rule.
This policy setting is activated by default.
For file-based encryption by Cloud Storage you can configurewhether the user is allowed to set a default key for encryption or
User is allowed to set default key
not. If allowed the Set default key command is added to theWindows Explorer context menu of Cloud Storage synchronization
106
SafeGuard Enterprise
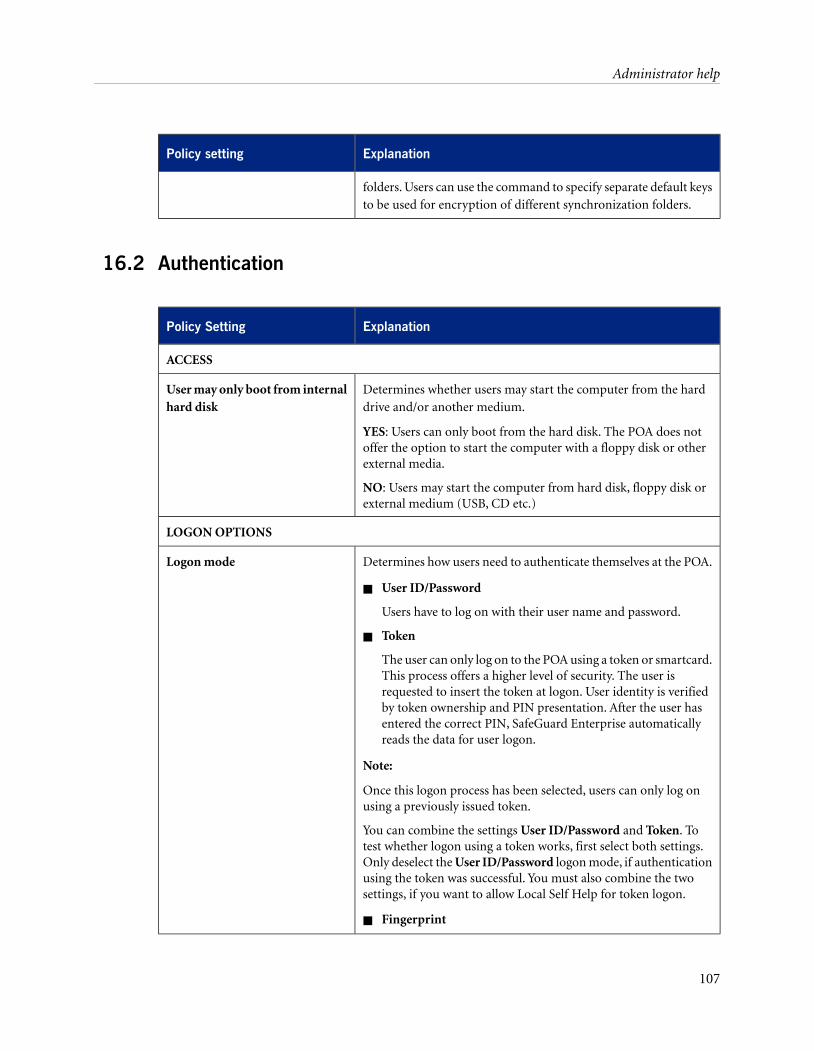
ExplanationPolicy setting
folders. Users can use the command to specify separate default keysto be used for encryption of different synchronization folders.
16.2 Authentication
ExplanationPolicy Setting
ACCESS
Determines whether users may start the computer from the harddrive and/or another medium.
YES: Users can only boot from the hard disk. The POA does notoffer the option to start the computer with a floppy disk or otherexternal media.
User may only boot from internalhard disk
NO: Users may start the computer from hard disk, floppy disk orexternal medium (USB, CD etc.)
LOGON OPTIONS
Determines how users need to authenticate themselves at the POA.Logon mode
■ User ID/Password
Users have to log on with their user name and password.
■ Token
The user can only log on to the POA using a token or smartcard.This process offers a higher level of security. The user isrequested to insert the token at logon. User identity is verifiedby token ownership and PIN presentation. After the user hasentered the correct PIN, SafeGuard Enterprise automaticallyreads the data for user logon.
Note:
Once this logon process has been selected, users can only log onusing a previously issued token.
You can combine the settings User ID/Password and Token. Totest whether logon using a token works, first select both settings.Only deselect the User ID/Password logon mode, if authenticationusing the token was successful. You must also combine the twosettings, if you want to allow Local Self Help for token logon.
■ Fingerprint
107
Administrator help
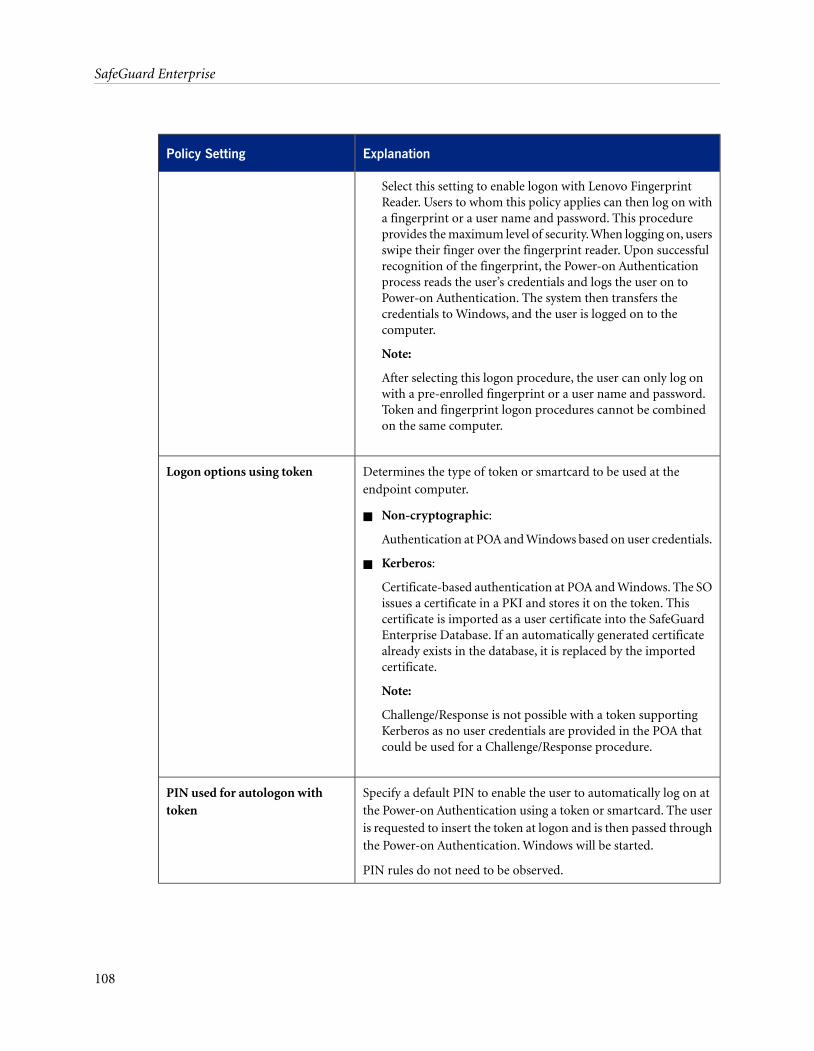
ExplanationPolicy Setting
Select this setting to enable logon with Lenovo FingerprintReader. Users to whom this policy applies can then log on witha fingerprint or a user name and password. This procedureprovides the maximum level of security. When logging on, usersswipe their finger over the fingerprint reader. Upon successfulrecognition of the fingerprint, the Power-on Authenticationprocess reads the user’s credentials and logs the user on toPower-on Authentication. The system then transfers thecredentials to Windows, and the user is logged on to thecomputer.
Note:
After selecting this logon procedure, the user can only log onwith a pre-enrolled fingerprint or a user name and password.Token and fingerprint logon procedures cannot be combinedon the same computer.
Determines the type of token or smartcard to be used at theendpoint computer.
Logon options using token
■ Non-cryptographic:
Authentication at POA and Windows based on user credentials.
■ Kerberos:
Certificate-based authentication at POA and Windows. The SOissues a certificate in a PKI and stores it on the token. Thiscertificate is imported as a user certificate into the SafeGuardEnterprise Database. If an automatically generated certificatealready exists in the database, it is replaced by the importedcertificate.
Note:
Challenge/Response is not possible with a token supportingKerberos as no user credentials are provided in the POA thatcould be used for a Challenge/Response procedure.
Specify a default PIN to enable the user to automatically log on atthe Power-on Authentication using a token or smartcard. The user
PIN used for autologon withtoken
is requested to insert the token at logon and is then passed throughthe Power-on Authentication. Windows will be started.
PIN rules do not need to be observed.
108
SafeGuard Enterprise

ExplanationPolicy Setting
Note:
■ This option is only available, if Token has been selected as Logonmode.
■ If this option is selected, then Pass through to Windows mustbe set to Disable pass-through to Windows.
Displays (setting: Yes) after logon at POA and Windows a dialogshowing information on the last failed logon (user name/date/time).
Display unsuccessful logons forthis user
Displays (setting: Yes) after logon at POA and Windows a dialogshowing information on the
Display last user logon
■ last successful logon (user name/date/time)
■ last user credentials of the logged on user
If users wish to exit the endpoint computer for a short time only,they can click Block workstation to block the computer for other
Disable "forced logoff " inworkstation lock
users and unlock it with the user password. No: The user who haslocked the computer as well as an administrator can unlock it. Ifan administrator unlocks the computer, the currently logged onuser is logged off automatically. Yes: Changes this behavior. In thiscase, only the user can unlock the computer. The administratorcannot unlock it and the user will not be logged off automatically.
Note:
This setting only takes effect under Windows XP.
Yes: The POA saves the user name and domain of the last loggedon user. Users therefore do not need to enter their user names everytime they log on.
No: The POA does not save the user name and the domain of thelast logged on user.
Activate user/domain preselection
To prevent administrative operations on a SafeGuard Enterpriseprotected computer leading to an activation of the Power-on
Service Account List
Authentication and the addition of rollout operators as users to thecomputer, SafeGuard Enterprise allows you to create service accountlists for Windows logon at SafeGuard Enterprise endpointcomputers. The users listed are treated as SafeGuard Enterpriseguest users.
Before you select a list here you must first create the lists in thePolicies navigation area under Service Account Lists.
109
Administrator help
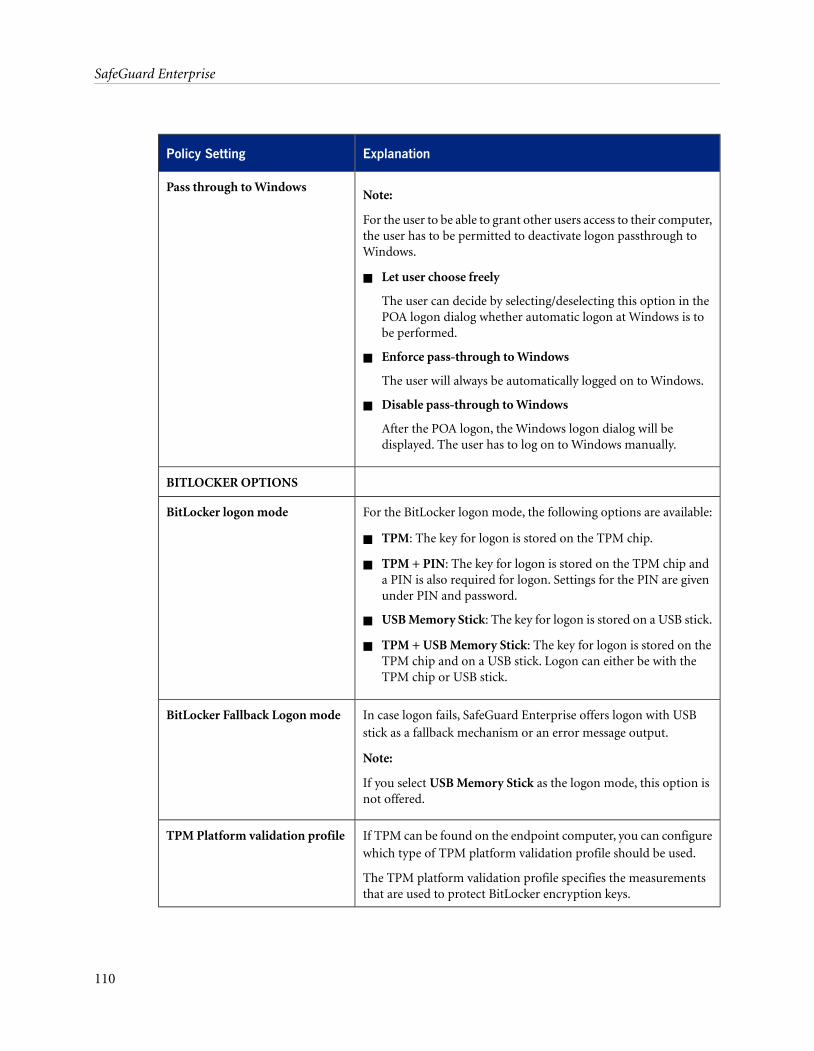
ExplanationPolicy Setting
Note:
For the user to be able to grant other users access to their computer,the user has to be permitted to deactivate logon passthrough toWindows.
Pass through to Windows
■ Let user choose freely
The user can decide by selecting/deselecting this option in thePOA logon dialog whether automatic logon at Windows is tobe performed.
■ Enforce pass-through to Windows
The user will always be automatically logged on to Windows.
■ Disable pass-through to Windows
After the POA logon, the Windows logon dialog will bedisplayed. The user has to log on to Windows manually.
BITLOCKER OPTIONS
For the BitLocker logon mode, the following options are available:BitLocker logon mode
■ TPM: The key for logon is stored on the TPM chip.
■ TPM + PIN: The key for logon is stored on the TPM chip anda PIN is also required for logon. Settings for the PIN are givenunder PIN and password.
■ USB Memory Stick: The key for logon is stored on a USB stick.
■ TPM + USB Memory Stick: The key for logon is stored on theTPM chip and on a USB stick. Logon can either be with theTPM chip or USB stick.
In case logon fails, SafeGuard Enterprise offers logon with USBstick as a fallback mechanism or an error message output.
Note:
If you select USB Memory Stick as the logon mode, this option isnot offered.
BitLocker Fallback Logon mode
If TPM can be found on the endpoint computer, you can configurewhich type of TPM platform validation profile should be used.
The TPM platform validation profile specifies the measurementsthat are used to protect BitLocker encryption keys.
TPM Platform validation profile
110
SafeGuard Enterprise
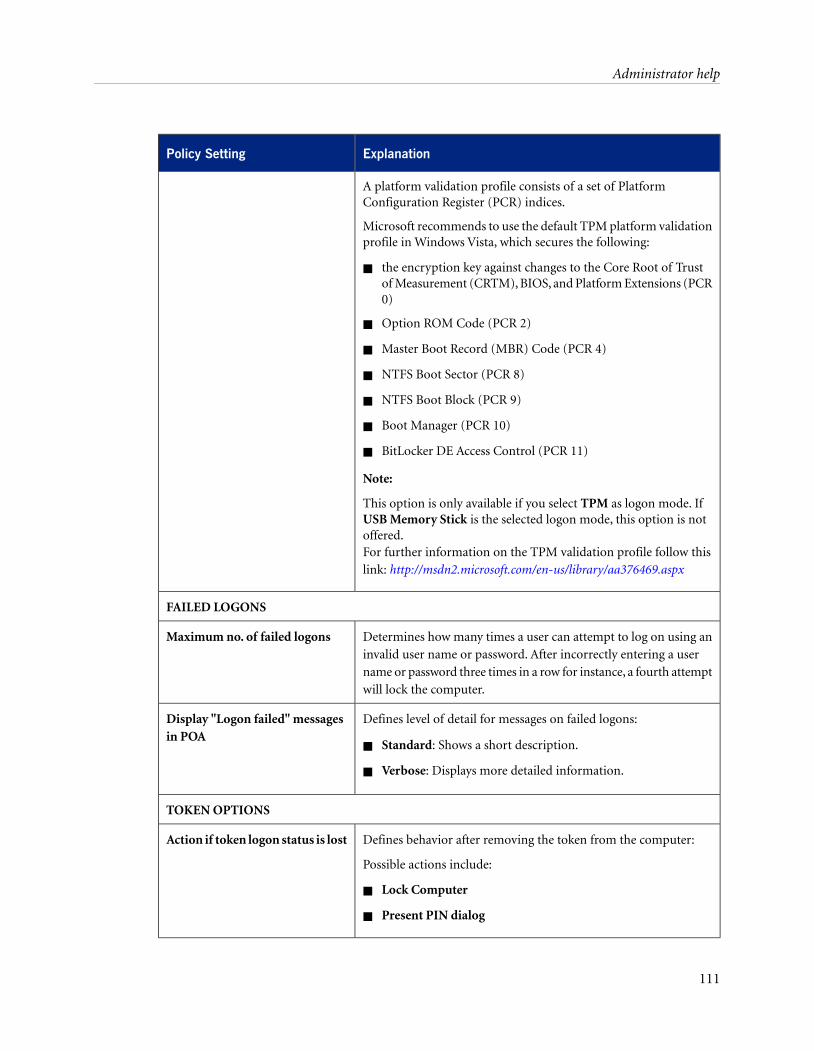
ExplanationPolicy Setting
A platform validation profile consists of a set of PlatformConfiguration Register (PCR) indices.
Microsoft recommends to use the default TPM platform validationprofile in Windows Vista, which secures the following:
■ the encryption key against changes to the Core Root of Trustof Measurement (CRTM), BIOS, and Platform Extensions (PCR0)
■ Option ROM Code (PCR 2)
■ Master Boot Record (MBR) Code (PCR 4)
■ NTFS Boot Sector (PCR 8)
■ NTFS Boot Block (PCR 9)
■ Boot Manager (PCR 10)
■ BitLocker DE Access Control (PCR 11)
Note:
This option is only available if you select TPM as logon mode. IfUSB Memory Stick is the selected logon mode, this option is notoffered.For further information on the TPM validation profile follow thislink: http://msdn2.microsoft.com/en-us/library/aa376469.aspx
FAILED LOGONS
Determines how many times a user can attempt to log on using aninvalid user name or password. After incorrectly entering a user
Maximum no. of failed logons
name or password three times in a row for instance, a fourth attemptwill lock the computer.
Defines level of detail for messages on failed logons:Display "Logon failed" messagesin POA
■ Standard: Shows a short description.
■ Verbose: Displays more detailed information.
TOKEN OPTIONS
Defines behavior after removing the token from the computer:
Possible actions include:
Action if token logon status is lost
■ Lock Computer
■ Present PIN dialog
111
Administrator help
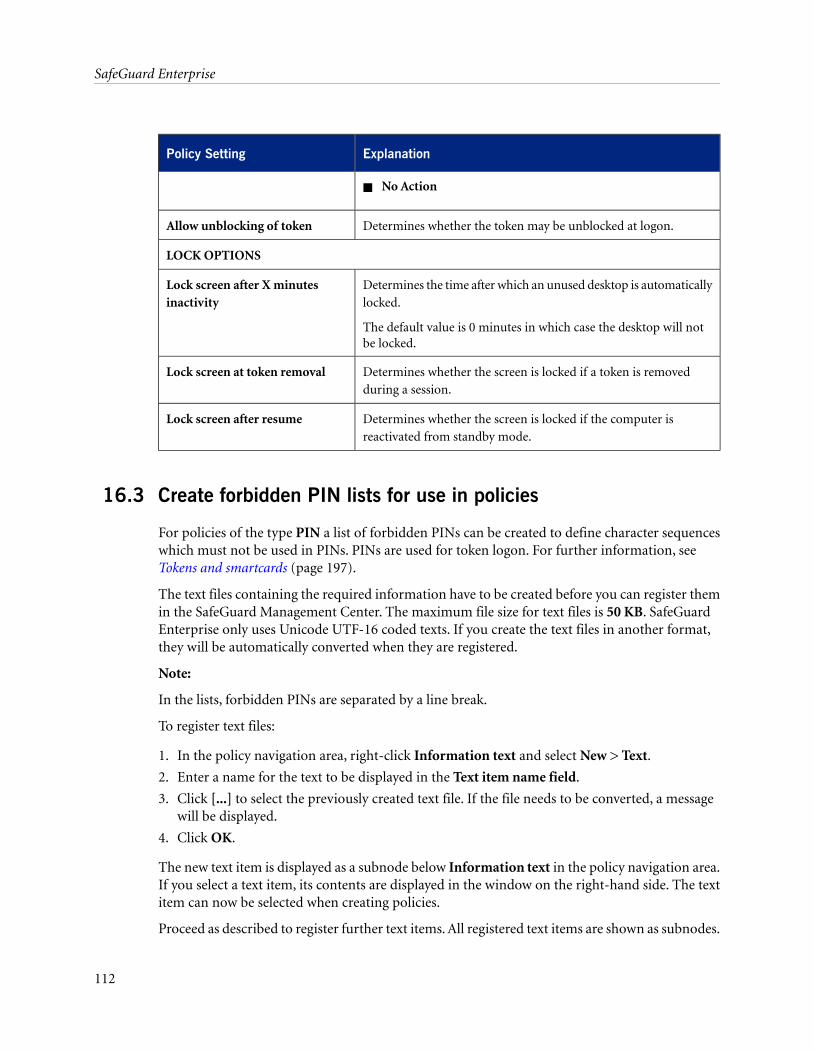
ExplanationPolicy Setting
■ No Action
Determines whether the token may be unblocked at logon.Allow unblocking of token
LOCK OPTIONS
Determines the time after which an unused desktop is automaticallylocked.
The default value is 0 minutes in which case the desktop will notbe locked.
Lock screen after X minutesinactivity
Determines whether the screen is locked if a token is removedduring a session.
Lock screen at token removal
Determines whether the screen is locked if the computer isreactivated from standby mode.
Lock screen after resume
16.3 Create forbidden PIN lists for use in policies
For policies of the type PIN a list of forbidden PINs can be created to define character sequenceswhich must not be used in PINs. PINs are used for token logon. For further information, seeTokens and smartcards (page 197).
The text files containing the required information have to be created before you can register themin the SafeGuard Management Center. The maximum file size for text files is 50 KB. SafeGuardEnterprise only uses Unicode UTF-16 coded texts. If you create the text files in another format,they will be automatically converted when they are registered.
Note:
In the lists, forbidden PINs are separated by a line break.
To register text files:
1. In the policy navigation area, right-click Information text and select New > Text.
2. Enter a name for the text to be displayed in the Text item name field.
3. Click [...] to select the previously created text file. If the file needs to be converted, a messagewill be displayed.
4. Click OK.
The new text item is displayed as a subnode below Information text in the policy navigation area.If you select a text item, its contents are displayed in the window on the right-hand side. The textitem can now be selected when creating policies.
Proceed as described to register further text items. All registered text items are shown as subnodes.
112
SafeGuard Enterprise
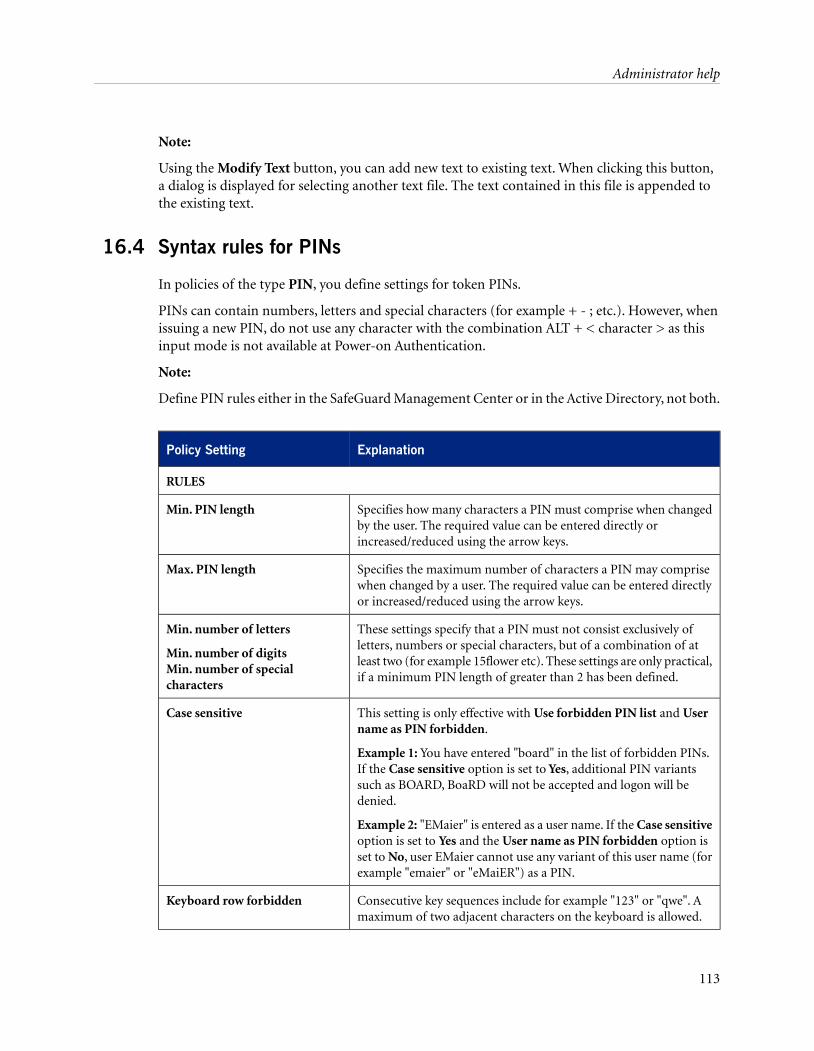
Note:
Using the Modify Text button, you can add new text to existing text. When clicking this button,a dialog is displayed for selecting another text file. The text contained in this file is appended tothe existing text.
16.4 Syntax rules for PINs
In policies of the type PIN, you define settings for token PINs.
PINs can contain numbers, letters and special characters (for example + - ; etc.). However, whenissuing a new PIN, do not use any character with the combination ALT + < character > as thisinput mode is not available at Power-on Authentication.
Note:
Define PIN rules either in the SafeGuard Management Center or in the Active Directory, not both.
ExplanationPolicy Setting
RULES
Specifies how many characters a PIN must comprise when changedby the user. The required value can be entered directly orincreased/reduced using the arrow keys.
Min. PIN length
Specifies the maximum number of characters a PIN may comprisewhen changed by a user. The required value can be entered directlyor increased/reduced using the arrow keys.
Max. PIN length
These settings specify that a PIN must not consist exclusively ofletters, numbers or special characters, but of a combination of at
Min. number of letters
Min. number of digitsleast two (for example 15flower etc). These settings are only practical,if a minimum PIN length of greater than 2 has been defined.
Min. number of specialcharacters
This setting is only effective with Use forbidden PIN list and Username as PIN forbidden.
Example 1: You have entered "board" in the list of forbidden PINs.If the Case sensitive option is set to Yes, additional PIN variants
Case sensitive
such as BOARD, BoaRD will not be accepted and logon will bedenied.
Example 2: "EMaier" is entered as a user name. If the Case sensitiveoption is set to Yes and the User name as PIN forbidden option isset to No, user EMaier cannot use any variant of this user name (forexample "emaier" or "eMaiER") as a PIN.
Consecutive key sequences include for example "123" or "qwe". Amaximum of two adjacent characters on the keyboard is allowed.
Keyboard row forbidden
113
Administrator help
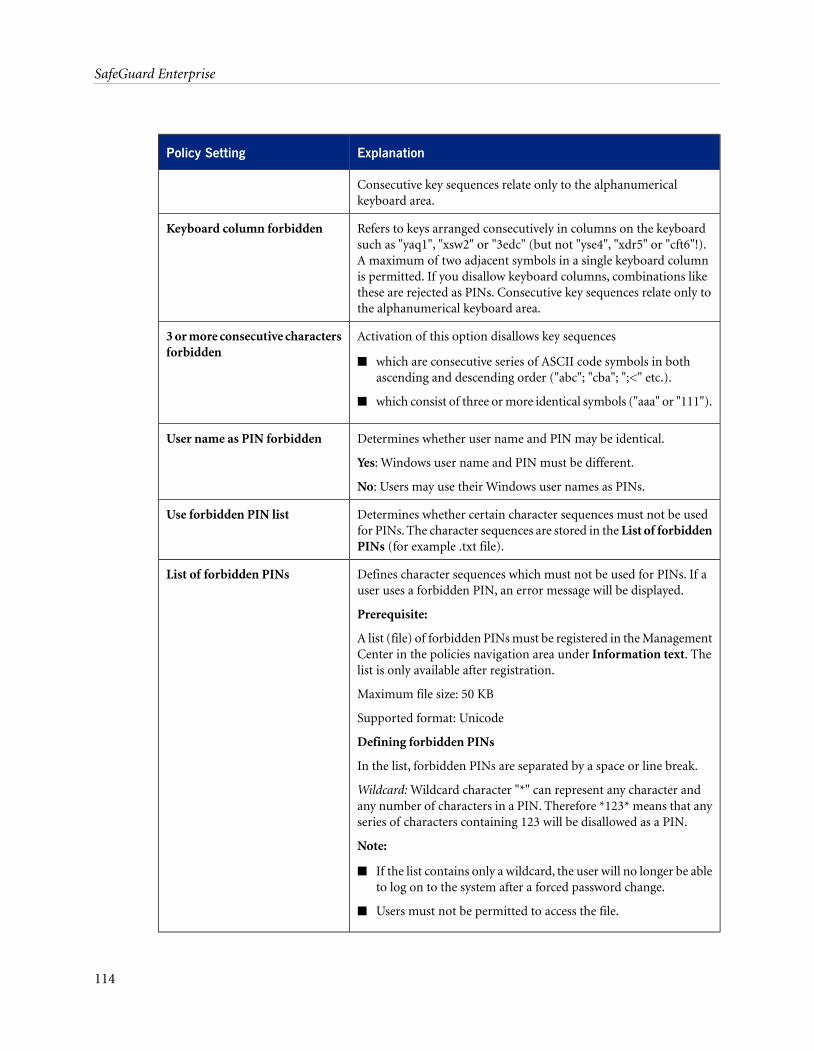
ExplanationPolicy Setting
Consecutive key sequences relate only to the alphanumericalkeyboard area.
Refers to keys arranged consecutively in columns on the keyboardsuch as "yaq1", "xsw2" or "3edc" (but not "yse4", "xdr5" or "cft6"!).
Keyboard column forbidden
A maximum of two adjacent symbols in a single keyboard columnis permitted. If you disallow keyboard columns, combinations likethese are rejected as PINs. Consecutive key sequences relate only tothe alphanumerical keyboard area.
Activation of this option disallows key sequences3 or more consecutive charactersforbidden
■ which are consecutive series of ASCII code symbols in bothascending and descending order ("abc"; "cba"; ";<" etc.).
■ which consist of three or more identical symbols ("aaa" or "111").
Determines whether user name and PIN may be identical.
Yes: Windows user name and PIN must be different.
User name as PIN forbidden
No: Users may use their Windows user names as PINs.
Determines whether certain character sequences must not be usedfor PINs. The character sequences are stored in the List of forbiddenPINs (for example .txt file).
Use forbidden PIN list
Defines character sequences which must not be used for PINs. If auser uses a forbidden PIN, an error message will be displayed.
Prerequisite:
List of forbidden PINs
A list (file) of forbidden PINs must be registered in the ManagementCenter in the policies navigation area under Information text. Thelist is only available after registration.
Maximum file size: 50 KB
Supported format: Unicode
Defining forbidden PINs
In the list, forbidden PINs are separated by a space or line break.
Wildcard: Wildcard character "*" can represent any character andany number of characters in a PIN. Therefore *123* means that anyseries of characters containing 123 will be disallowed as a PIN.
Note:
■ If the list contains only a wildcard, the user will no longer be ableto log on to the system after a forced password change.
■ Users must not be permitted to access the file.
114
SafeGuard Enterprise
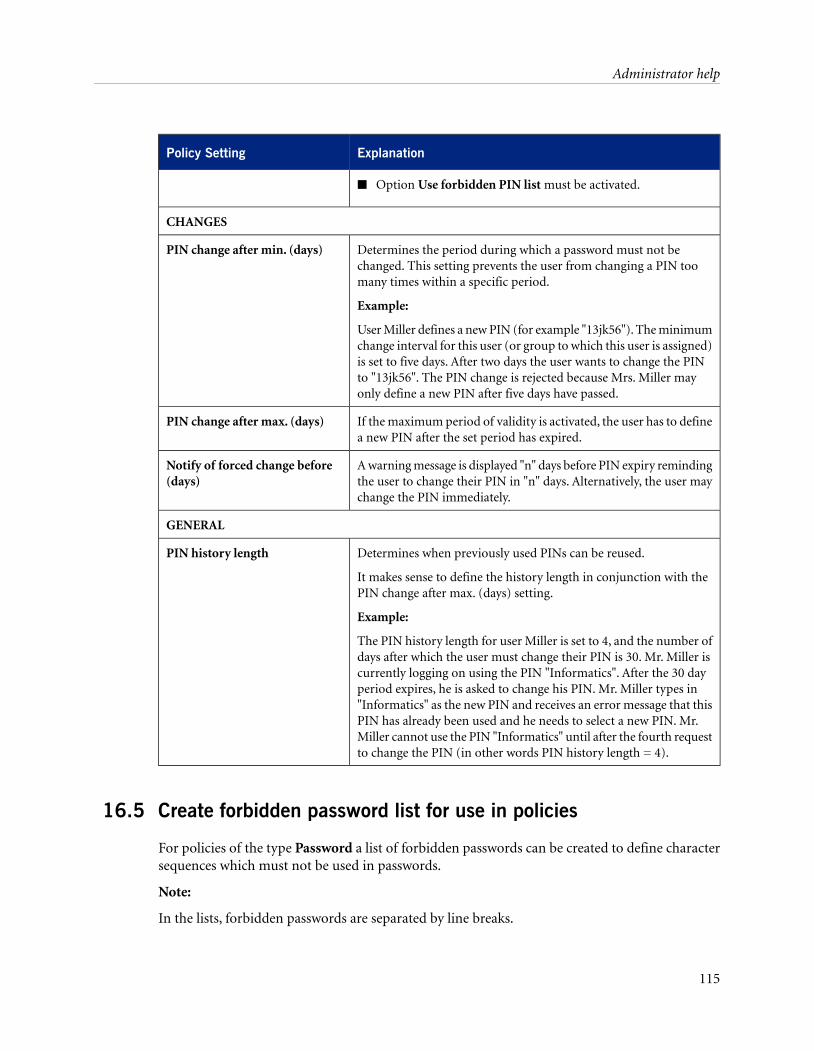
ExplanationPolicy Setting
■ Option Use forbidden PIN list must be activated.
CHANGES
Determines the period during which a password must not bechanged. This setting prevents the user from changing a PIN toomany times within a specific period.
Example:
PIN change after min. (days)
User Miller defines a new PIN (for example "13jk56"). The minimumchange interval for this user (or group to which this user is assigned)is set to five days. After two days the user wants to change the PINto "13jk56". The PIN change is rejected because Mrs. Miller mayonly define a new PIN after five days have passed.
If the maximum period of validity is activated, the user has to definea new PIN after the set period has expired.
PIN change after max. (days)
A warning message is displayed "n" days before PIN expiry remindingthe user to change their PIN in "n" days. Alternatively, the user maychange the PIN immediately.
Notify of forced change before(days)
GENERAL
Determines when previously used PINs can be reused.
It makes sense to define the history length in conjunction with thePIN change after max. (days) setting.
PIN history length
Example:
The PIN history length for user Miller is set to 4, and the number ofdays after which the user must change their PIN is 30. Mr. Miller iscurrently logging on using the PIN "Informatics". After the 30 dayperiod expires, he is asked to change his PIN. Mr. Miller types in"Informatics" as the new PIN and receives an error message that thisPIN has already been used and he needs to select a new PIN. Mr.Miller cannot use the PIN "Informatics" until after the fourth requestto change the PIN (in other words PIN history length = 4).
16.5 Create forbidden password list for use in policies
For policies of the type Password a list of forbidden passwords can be created to define charactersequences which must not be used in passwords.
Note:
In the lists, forbidden passwords are separated by line breaks.
115
Administrator help
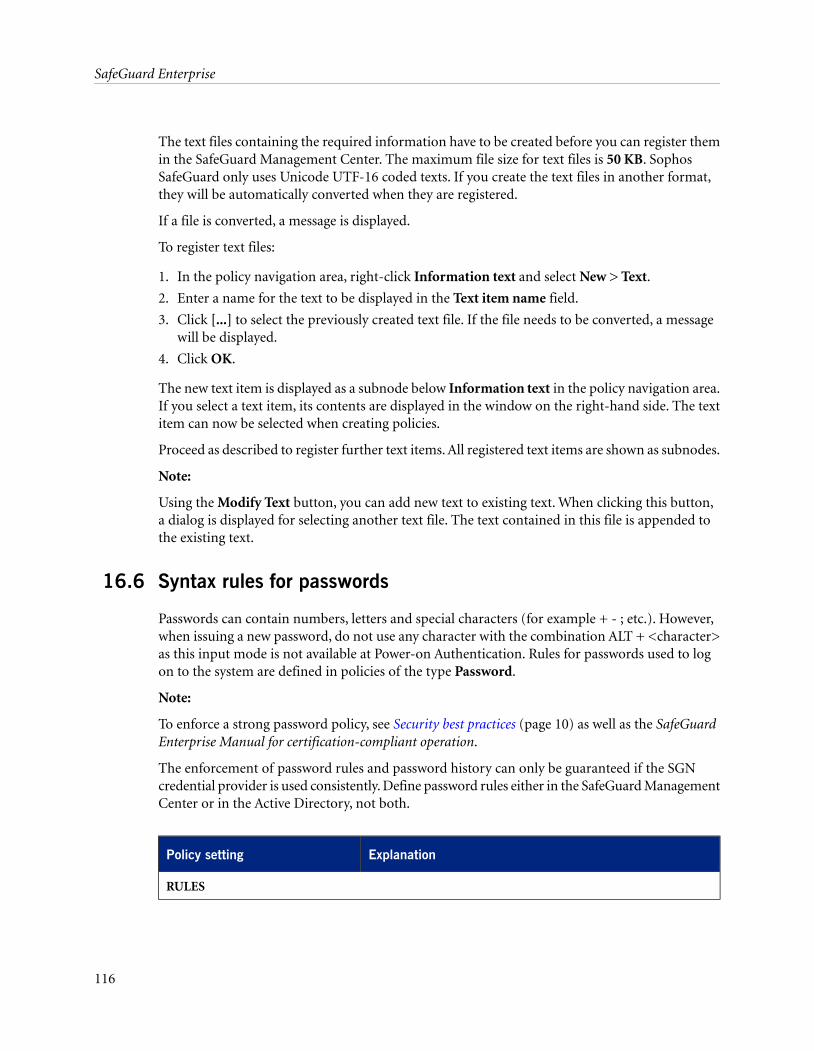
The text files containing the required information have to be created before you can register themin the SafeGuard Management Center. The maximum file size for text files is 50 KB. SophosSafeGuard only uses Unicode UTF-16 coded texts. If you create the text files in another format,they will be automatically converted when they are registered.
If a file is converted, a message is displayed.
To register text files:
1. In the policy navigation area, right-click Information text and select New > Text.
2. Enter a name for the text to be displayed in the Text item name field.
3. Click [...] to select the previously created text file. If the file needs to be converted, a messagewill be displayed.
4. Click OK.
The new text item is displayed as a subnode below Information text in the policy navigation area.If you select a text item, its contents are displayed in the window on the right-hand side. The textitem can now be selected when creating policies.
Proceed as described to register further text items. All registered text items are shown as subnodes.
Note:
Using the Modify Text button, you can add new text to existing text. When clicking this button,a dialog is displayed for selecting another text file. The text contained in this file is appended tothe existing text.
16.6 Syntax rules for passwords
Passwords can contain numbers, letters and special characters (for example + - ; etc.). However,when issuing a new password, do not use any character with the combination ALT + <character>as this input mode is not available at Power-on Authentication. Rules for passwords used to logon to the system are defined in policies of the type Password.
Note:
To enforce a strong password policy, see Security best practices (page 10) as well as the SafeGuardEnterprise Manual for certification-compliant operation.
The enforcement of password rules and password history can only be guaranteed if the SGNcredential provider is used consistently. Define password rules either in the SafeGuard ManagementCenter or in the Active Directory, not both.
ExplanationPolicy setting
RULES
116
SafeGuard Enterprise
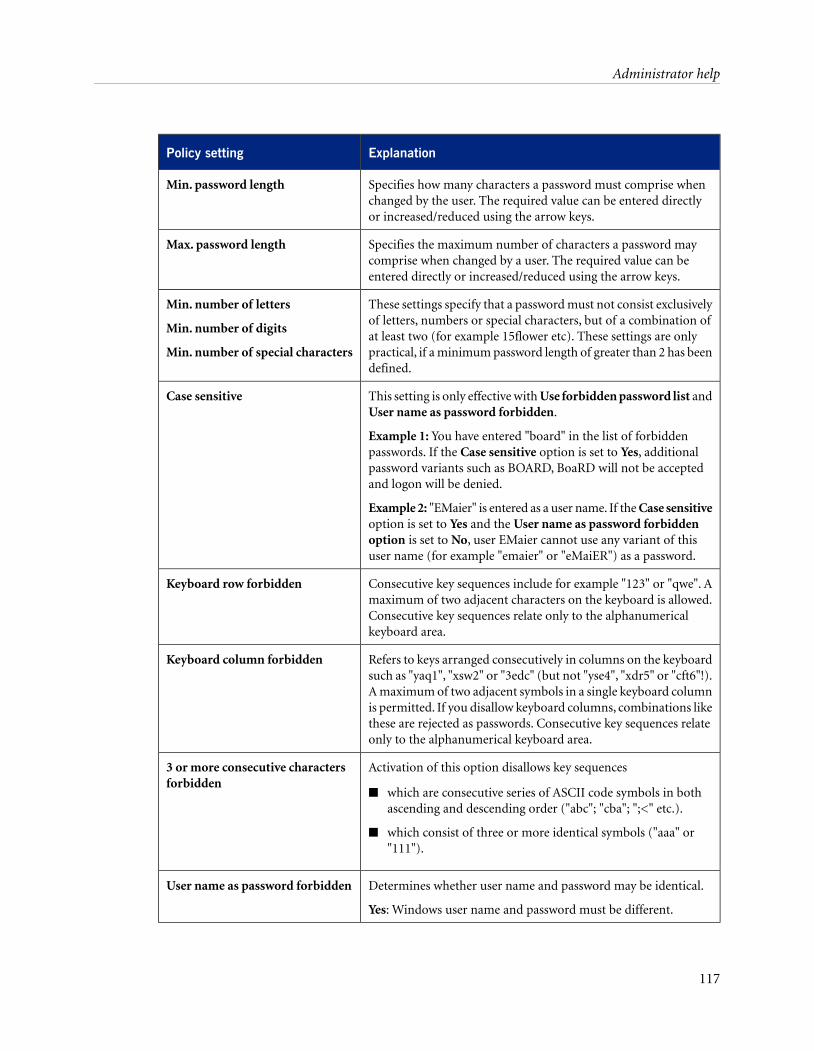
ExplanationPolicy setting
Specifies how many characters a password must comprise whenchanged by the user. The required value can be entered directlyor increased/reduced using the arrow keys.
Min. password length
Specifies the maximum number of characters a password maycomprise when changed by a user. The required value can beentered directly or increased/reduced using the arrow keys.
Max. password length
These settings specify that a password must not consist exclusivelyof letters, numbers or special characters, but of a combination of
Min. number of letters
Min. number of digitsat least two (for example 15flower etc). These settings are only
Min. number of special characters practical, if a minimum password length of greater than 2 has beendefined.
This setting is only effective with Use forbidden password list andUser name as password forbidden.
Example 1: You have entered "board" in the list of forbiddenpasswords. If the Case sensitive option is set to Yes, additional
Case sensitive
password variants such as BOARD, BoaRD will not be acceptedand logon will be denied.
Example 2: "EMaier" is entered as a user name. If the Case sensitiveoption is set to Yes and the User name as password forbiddenoption is set to No, user EMaier cannot use any variant of thisuser name (for example "emaier" or "eMaiER") as a password.
Consecutive key sequences include for example "123" or "qwe". Amaximum of two adjacent characters on the keyboard is allowed.
Keyboard row forbidden
Consecutive key sequences relate only to the alphanumericalkeyboard area.
Refers to keys arranged consecutively in columns on the keyboardsuch as "yaq1", "xsw2" or "3edc" (but not "yse4", "xdr5" or "cft6"!).
Keyboard column forbidden
A maximum of two adjacent symbols in a single keyboard columnis permitted. If you disallow keyboard columns, combinations likethese are rejected as passwords. Consecutive key sequences relateonly to the alphanumerical keyboard area.
Activation of this option disallows key sequences3 or more consecutive charactersforbidden
■ which are consecutive series of ASCII code symbols in bothascending and descending order ("abc"; "cba"; ";<" etc.).
■ which consist of three or more identical symbols ("aaa" or"111").
Determines whether user name and password may be identical.
Yes: Windows user name and password must be different.
User name as password forbidden
117
Administrator help
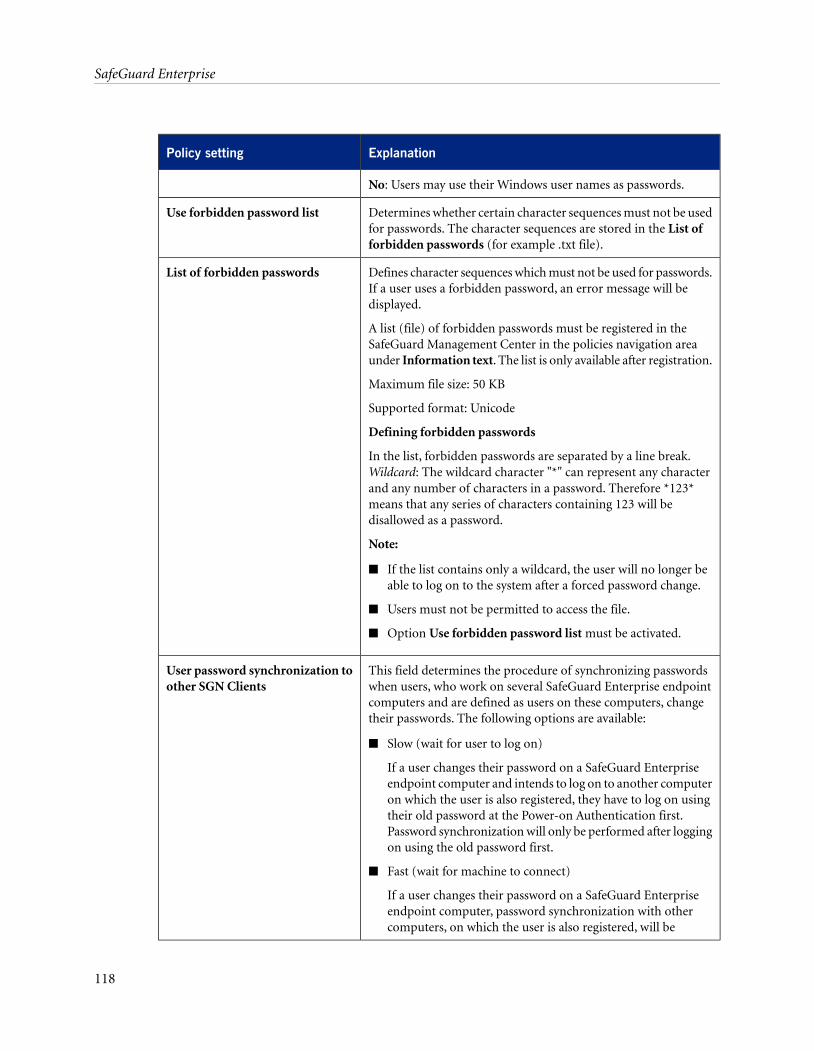
ExplanationPolicy setting
No: Users may use their Windows user names as passwords.
Determines whether certain character sequences must not be usedfor passwords. The character sequences are stored in the List offorbidden passwords (for example .txt file).
Use forbidden password list
Defines character sequences which must not be used for passwords.If a user uses a forbidden password, an error message will bedisplayed.
A list (file) of forbidden passwords must be registered in theSafeGuard Management Center in the policies navigation areaunder Information text. The list is only available after registration.
List of forbidden passwords
Maximum file size: 50 KB
Supported format: Unicode
Defining forbidden passwords
In the list, forbidden passwords are separated by a line break.Wildcard: The wildcard character "*" can represent any characterand any number of characters in a password. Therefore *123*means that any series of characters containing 123 will bedisallowed as a password.
Note:
■ If the list contains only a wildcard, the user will no longer beable to log on to the system after a forced password change.
■ Users must not be permitted to access the file.
■ Option Use forbidden password list must be activated.
This field determines the procedure of synchronizing passwordswhen users, who work on several SafeGuard Enterprise endpoint
User password synchronization toother SGN Clients
computers and are defined as users on these computers, changetheir passwords. The following options are available:
■ Slow (wait for user to log on)
If a user changes their password on a SafeGuard Enterpriseendpoint computer and intends to log on to another computeron which the user is also registered, they have to log on usingtheir old password at the Power-on Authentication first.Password synchronization will only be performed after loggingon using the old password first.
■ Fast (wait for machine to connect)
If a user changes their password on a SafeGuard Enterpriseendpoint computer, password synchronization with othercomputers, on which the user is also registered, will be
118
SafeGuard Enterprise
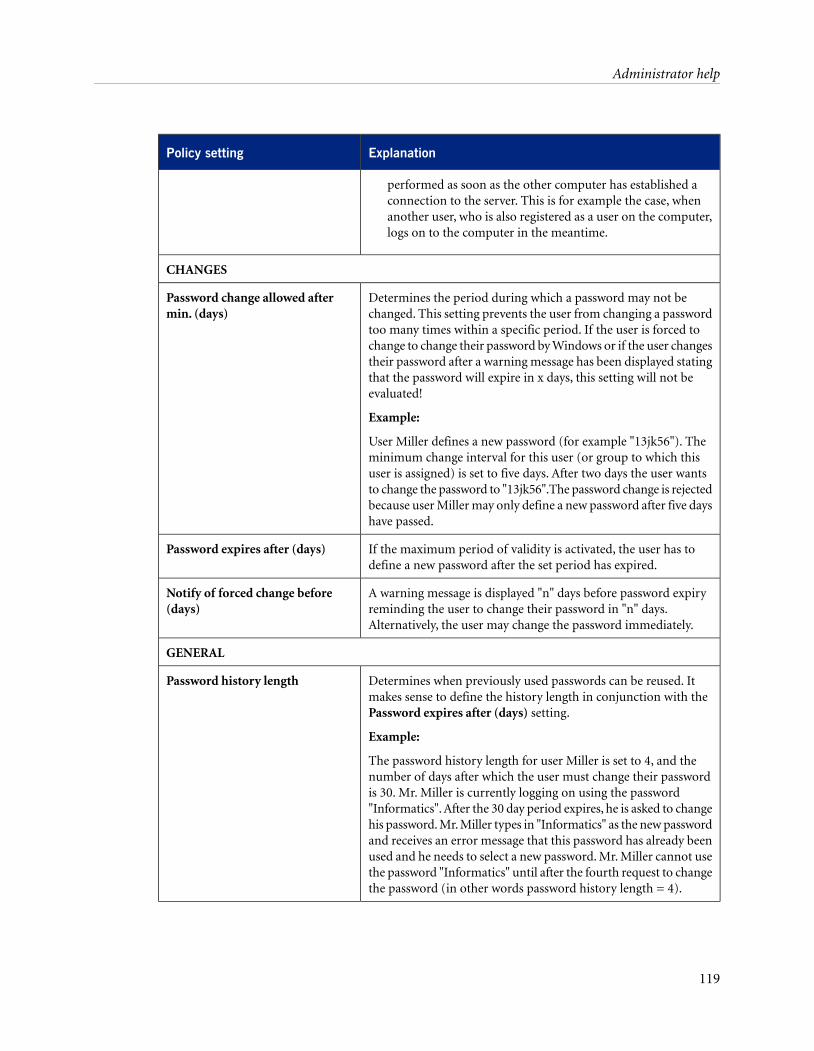
ExplanationPolicy setting
performed as soon as the other computer has established aconnection to the server. This is for example the case, whenanother user, who is also registered as a user on the computer,logs on to the computer in the meantime.
CHANGES
Determines the period during which a password may not bechanged. This setting prevents the user from changing a password
Password change allowed aftermin. (days)
too many times within a specific period. If the user is forced tochange to change their password by Windows or if the user changestheir password after a warning message has been displayed statingthat the password will expire in x days, this setting will not beevaluated!
Example:
User Miller defines a new password (for example "13jk56"). Theminimum change interval for this user (or group to which thisuser is assigned) is set to five days. After two days the user wantsto change the password to "13jk56".The password change is rejectedbecause user Miller may only define a new password after five dayshave passed.
If the maximum period of validity is activated, the user has todefine a new password after the set period has expired.
Password expires after (days)
A warning message is displayed "n" days before password expiryreminding the user to change their password in "n" days.Alternatively, the user may change the password immediately.
Notify of forced change before(days)
GENERAL
Determines when previously used passwords can be reused. Itmakes sense to define the history length in conjunction with thePassword expires after (days) setting.
Example:
Password history length
The password history length for user Miller is set to 4, and thenumber of days after which the user must change their passwordis 30. Mr. Miller is currently logging on using the password"Informatics". After the 30 day period expires, he is asked to changehis password. Mr. Miller types in "Informatics" as the new passwordand receives an error message that this password has already beenused and he needs to select a new password. Mr. Miller cannot usethe password "Informatics" until after the fourth request to changethe password (in other words password history length = 4).
119
Administrator help
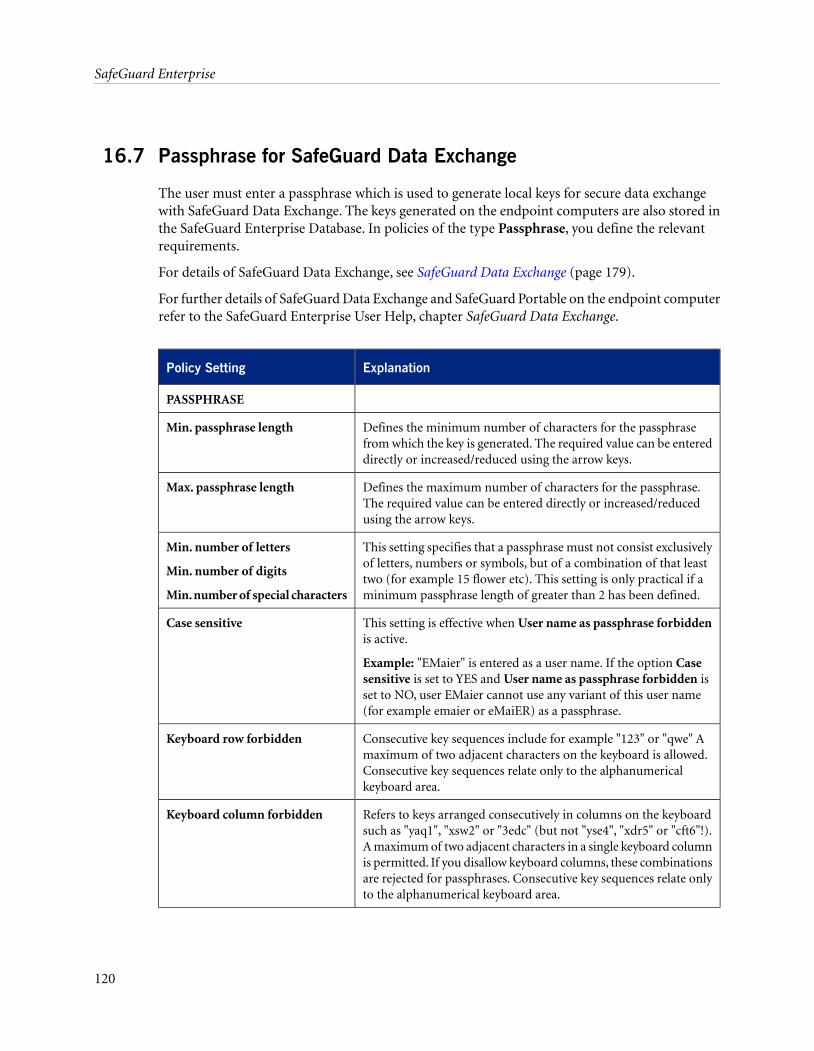
16.7 Passphrase for SafeGuard Data Exchange
The user must enter a passphrase which is used to generate local keys for secure data exchangewith SafeGuard Data Exchange. The keys generated on the endpoint computers are also stored inthe SafeGuard Enterprise Database. In policies of the type Passphrase, you define the relevantrequirements.
For details of SafeGuard Data Exchange, see SafeGuard Data Exchange (page 179).
For further details of SafeGuard Data Exchange and SafeGuard Portable on the endpoint computerrefer to the SafeGuard Enterprise User Help, chapter SafeGuard Data Exchange.
ExplanationPolicy Setting
PASSPHRASE
Defines the minimum number of characters for the passphrasefrom which the key is generated. The required value can be entereddirectly or increased/reduced using the arrow keys.
Min. passphrase length
Defines the maximum number of characters for the passphrase.The required value can be entered directly or increased/reducedusing the arrow keys.
Max. passphrase length
This setting specifies that a passphrase must not consist exclusivelyof letters, numbers or symbols, but of a combination of that least
Min. number of letters
Min. number of digitstwo (for example 15 flower etc). This setting is only practical if aminimum passphrase length of greater than 2 has been defined.Min. number of special characters
This setting is effective when User name as passphrase forbiddenis active.
Example: "EMaier" is entered as a user name. If the option Casesensitive is set to YES and User name as passphrase forbidden is
Case sensitive
set to NO, user EMaier cannot use any variant of this user name(for example emaier or eMaiER) as a passphrase.
Consecutive key sequences include for example "123" or "qwe" Amaximum of two adjacent characters on the keyboard is allowed.
Keyboard row forbidden
Consecutive key sequences relate only to the alphanumericalkeyboard area.
Refers to keys arranged consecutively in columns on the keyboardsuch as "yaq1", "xsw2" or "3edc" (but not "yse4", "xdr5" or "cft6"!).
Keyboard column forbidden
A maximum of two adjacent characters in a single keyboard columnis permitted. If you disallow keyboard columns, these combinationsare rejected for passphrases. Consecutive key sequences relate onlyto the alphanumerical keyboard area.
120
SafeGuard Enterprise

ExplanationPolicy Setting
Activation of this option disallows key sequences3 or more consecutive charactersforbidden
■ which are consecutive series of ASCII code symbols in bothascending and descending order ("abc"; "cba"; ";<" etc.).
■ which consist of three or more identical symbols ("aaa" or "111").
Determines whether the user name and passphrase may be identical.
Yes: Windows user name and passphrase must be different.
User name as passphraseforbidden
No: Users may use their Windows user names as passphrases.
16.8 White Lists for Device Protection policies for file-based encryption
In the SafeGuard Management Center, you can select White Lists as targets for policies of the typeDevice Protection for file-based encryption. This allows you to create encryption policies forspecific device models or even for distinct devices.
Before you select a White List as a target for a Device Protection policy, you have to create andregister it in the SafeGuard Management Center. You can define White Lists for specific storagedevice models (for example iPod, USB devices from a specific vendor etc.) or for distinct storagedevices according to serial number. You can add the devices to White Lists manually or use theresults of a SafeGuard Port Auditor scan. For further information, refer to the SafeGuard PortAuditor User Guide.
Afterwards, you can select the White List as a target when you create a Device Protection policy.
Note:
If you select a White List as a target for a policy of the type Device Protection, you can only selectFile-Based or No Encryption as the Media encryption mode. If you select No Encryption for aDevice Protection policy with a White List, this policy does not exclude a device from encryption,if another policy applies that specifies volume-based encryption.
Note:
For SafeStick devices from BlockMaster special requirements apply. These devices have differentIDs for administrators and users without administrator privileges. For consistent handling withinSafeGuard Enterprise, you must add both IDs to White Lists. SafeGuard Port Auditor detects bothIDs, if a SafeStick device has been opened at least once on the computer scanned by SafeGuardPort Auditor.
16.8.1 Create White Lists for Device Protection policies for file-based encryption
1. In the Policies navigation area, select White List.
121
Administrator help
2. In the context menu of White List, click New > White List.
3. Select the White List type:
■ To create a White List for specific device models, select Storage Device Models.■ To create a White List for specific devices according to serial number, select Distinct Storage
Devices.
4. Under Source of White List, specify how you want to create the White List:
■ To enter devices manually, select Create White List manually.
When you click OK, an empty White List is opened in the SafeGuard Management Center.In this empty White List, you can create entries manually. To add a new entry, click thegreen Add (Insert) icon in the SafeGuard Management Center toolbar.
Note:
To retrieve the relevant strings for a device with the Windows Device Manager, open theProperties window for the device and look at the values for the Hardware Ids and DeviceInstance Path properties. Only the following interfaces are supported: USB, 1394, PCMCIAand PCI.
■ If you want to use the result of a scan of endpoint computers by SafeGuard PortAuditor asa source, select Import from SafeGuard Port Auditor Result.
The results of the SafeGuard Port Auditor scan have to be available (XML file), if you wantto create the White List based on this source. To select the file, click the [...] button.
For further information refer to the SafeGuard Port Auditor User Guide.
Click OK, to display the contents of the imported file in the SafeGuard Management Center.
The White List is displayed under White Lists in the Policies navigation area. You can select itwhen you create policies of the type Device Protection for file-based encryption.
16.8.2 Select White Lists as targets for Device Protection policies for file-basedencryption
Prerequisite: The required White List must have been created in the SafeGuard ManagementCenter.
1. In the navigation area of the SafeGuard Management Center, click Policies.
2. In the navigation window, right-click Policy Items and select New.
3. Select Device Protection.
A dialog for naming the new policy is displayed.
4. Enter a name and optionally a description for the new policy.
122
SafeGuard Enterprise
5. Under Device protection target, select the relevant White List:
■ If you have created a White List for storage device models, it is displayed under StorageDevice Models.
■ If you have created a White List for distinct storage devices, it is displayed under DistinctStorage Devices.
6. Click OK.
The White List has been selected as a target for the Device Protection policy. After the policy hasbeen transferred to the endpoint computers, the encryption mode selected in the policy applies.
16.9 Device Protection
Policies of the type Device Protection cover the settings for data encryption on different datastorage devices. Encryption can be volume- or file-based with different keys and algorithms.Policies of the type Device Protection also include settings for SafeGuard Data Exchange, SafeGuardCloud Storage and SafeGuard Portable. For further information on SafeGuard Data Exchange,see SafeGuard Data Exchange (page 179). For further information on SafeGuard Cloud Storage,see Cloud Storage (page 189). For further details on SafeGuard Data Exchange, SafeGuard CloudStorage and SafeGuard Portable on the endpoint computer, refer to the SafeGuard Enterprise UserHelp.
When creating a policy for device protection, you first have to specify the target for deviceprotection. Possible targets are:
■ Mass storage (boot volumes/other volumes)
■ Removable media
■ Optical drives
■ Storage device models
■ Distinct storage devices
■ Cloud Storage Definitions
For each target, create a separate policy.
Note:
Target removable media: A policy that specifies volume-based encryption of removable drivesand allows the user to choose a key from a list (for example Any key in user key ring) can becircumvented by the user by not choosing a key. To make sure that removable drives are alwaysencrypted, either use a file-based encryption policy, or explicitly set a key in the volume-basedencryption policy.
123
Administrator help
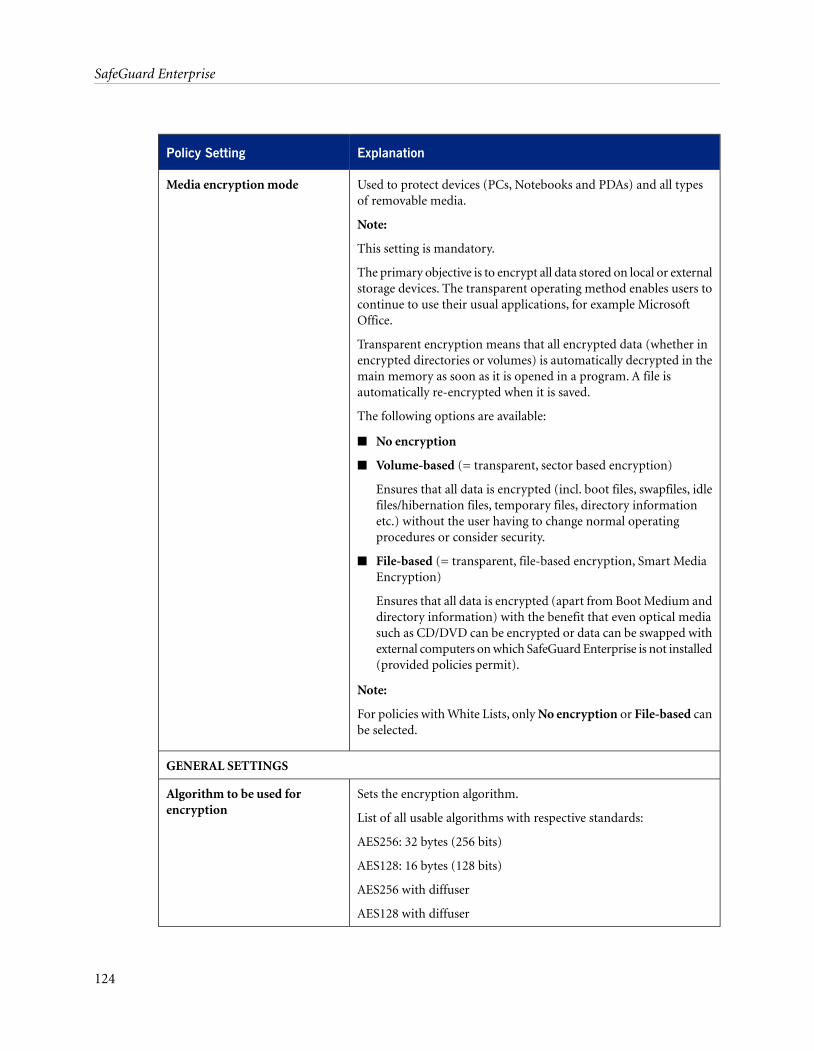
ExplanationPolicy Setting
Used to protect devices (PCs, Notebooks and PDAs) and all typesof removable media.
Note:
This setting is mandatory.
Media encryption mode
The primary objective is to encrypt all data stored on local or externalstorage devices. The transparent operating method enables users tocontinue to use their usual applications, for example MicrosoftOffice.
Transparent encryption means that all encrypted data (whether inencrypted directories or volumes) is automatically decrypted in themain memory as soon as it is opened in a program. A file isautomatically re-encrypted when it is saved.
The following options are available:
■ No encryption
■ Volume-based (= transparent, sector based encryption)
Ensures that all data is encrypted (incl. boot files, swapfiles, idlefiles/hibernation files, temporary files, directory informationetc.) without the user having to change normal operatingprocedures or consider security.
■ File-based (= transparent, file-based encryption, Smart MediaEncryption)
Ensures that all data is encrypted (apart from Boot Medium anddirectory information) with the benefit that even optical mediasuch as CD/DVD can be encrypted or data can be swapped withexternal computers on which SafeGuard Enterprise is not installed(provided policies permit).
Note:
For policies with White Lists, only No encryption or File-based canbe selected.
GENERAL SETTINGS
Sets the encryption algorithm.
List of all usable algorithms with respective standards:
Algorithm to be used forencryption
AES256: 32 bytes (256 bits)
AES128: 16 bytes (128 bits)
AES256 with diffuser
AES128 with diffuser
124
SafeGuard Enterprise
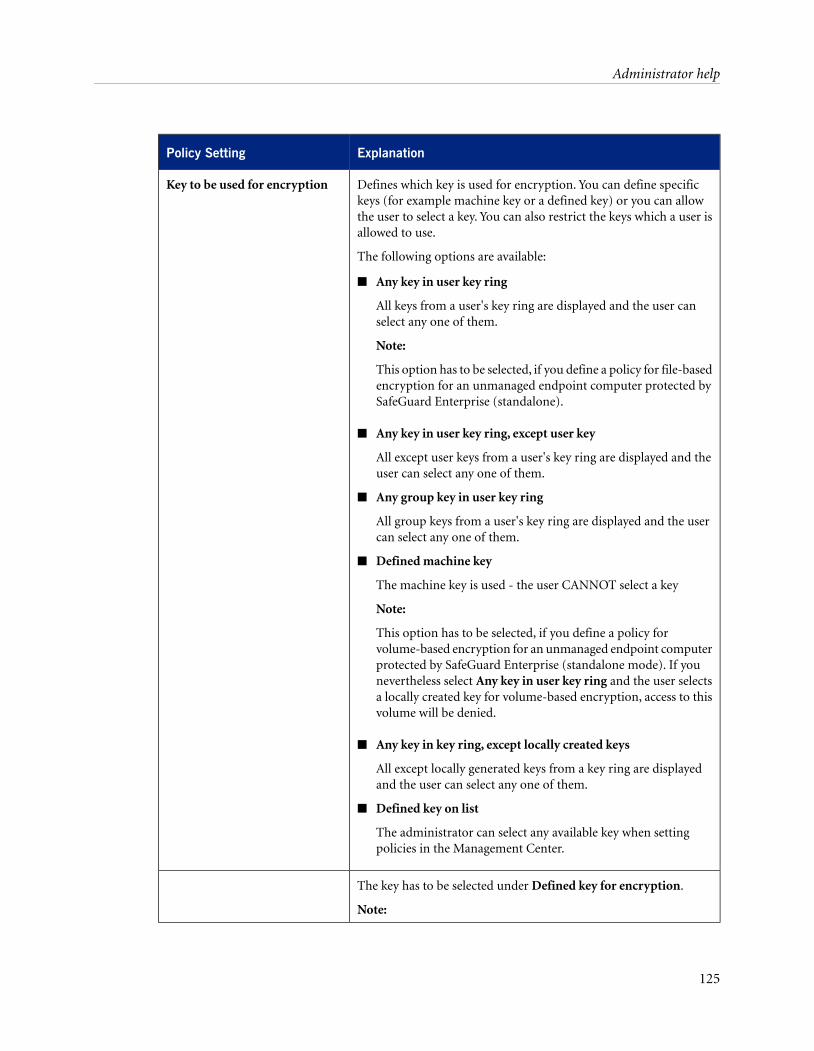
ExplanationPolicy Setting
Defines which key is used for encryption. You can define specifickeys (for example machine key or a defined key) or you can allow
Key to be used for encryption
the user to select a key. You can also restrict the keys which a user isallowed to use.
The following options are available:
■ Any key in user key ring
All keys from a user's key ring are displayed and the user canselect any one of them.
Note:
This option has to be selected, if you define a policy for file-basedencryption for an unmanaged endpoint computer protected bySafeGuard Enterprise (standalone).
■ Any key in user key ring, except user key
All except user keys from a user's key ring are displayed and theuser can select any one of them.
■ Any group key in user key ring
All group keys from a user's key ring are displayed and the usercan select any one of them.
■ Defined machine key
The machine key is used - the user CANNOT select a key
Note:
This option has to be selected, if you define a policy forvolume-based encryption for an unmanaged endpoint computerprotected by SafeGuard Enterprise (standalone mode). If younevertheless select Any key in user key ring and the user selectsa locally created key for volume-based encryption, access to thisvolume will be denied.
■ Any key in key ring, except locally created keys
All except locally generated keys from a key ring are displayedand the user can select any one of them.
■ Defined key on list
The administrator can select any available key when settingpolicies in the Management Center.
The key has to be selected under Defined key for encryption.
Note:
125
Administrator help
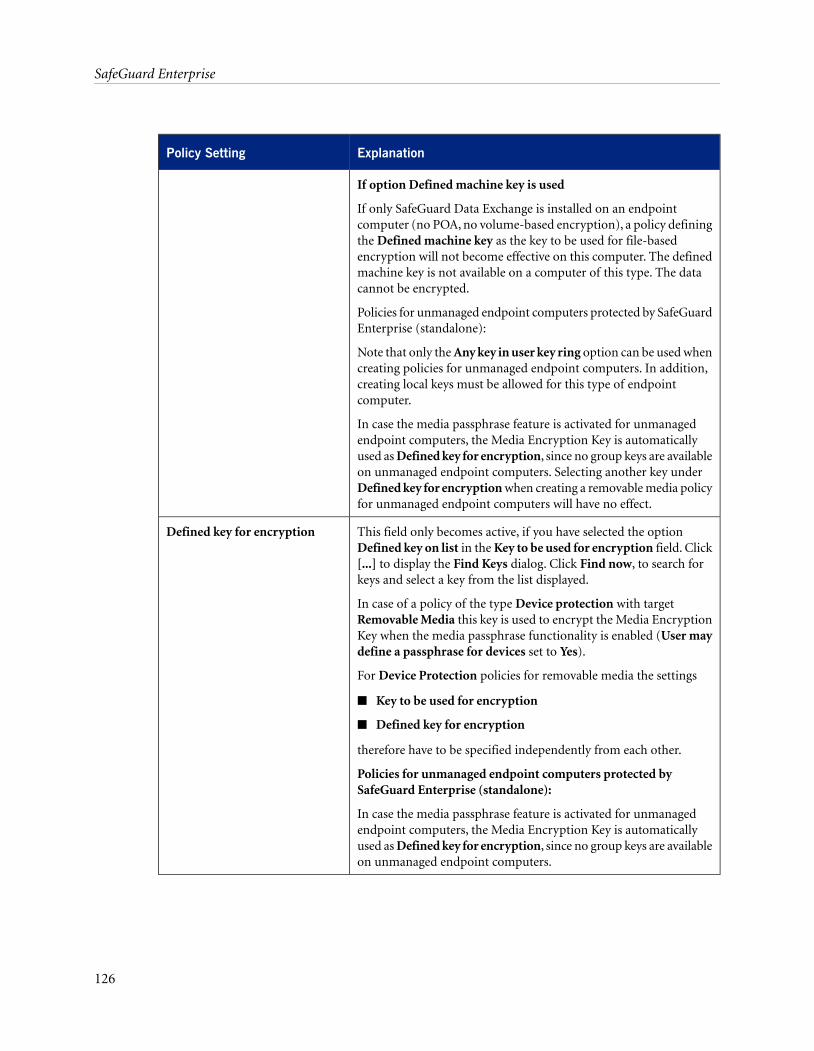
ExplanationPolicy Setting
If option Defined machine key is used
If only SafeGuard Data Exchange is installed on an endpointcomputer (no POA, no volume-based encryption), a policy definingthe Defined machine key as the key to be used for file-basedencryption will not become effective on this computer. The definedmachine key is not available on a computer of this type. The datacannot be encrypted.
Policies for unmanaged endpoint computers protected by SafeGuardEnterprise (standalone):
Note that only the Any key in user key ring option can be used whencreating policies for unmanaged endpoint computers. In addition,creating local keys must be allowed for this type of endpointcomputer.
In case the media passphrase feature is activated for unmanagedendpoint computers, the Media Encryption Key is automaticallyused as Defined key for encryption, since no group keys are availableon unmanaged endpoint computers. Selecting another key underDefined key for encryption when creating a removable media policyfor unmanaged endpoint computers will have no effect.
This field only becomes active, if you have selected the optionDefined key on list in the Key to be used for encryption field. Click
Defined key for encryption
[...] to display the Find Keys dialog. Click Find now, to search forkeys and select a key from the list displayed.
In case of a policy of the type Device protection with targetRemovable Media this key is used to encrypt the Media EncryptionKey when the media passphrase functionality is enabled (User maydefine a passphrase for devices set to Yes).
For Device Protection policies for removable media the settings
■ Key to be used for encryption
■ Defined key for encryption
therefore have to be specified independently from each other.
Policies for unmanaged endpoint computers protected bySafeGuard Enterprise (standalone):
In case the media passphrase feature is activated for unmanagedendpoint computers, the Media Encryption Key is automaticallyused as Defined key for encryption, since no group keys are availableon unmanaged endpoint computers.
126
SafeGuard Enterprise
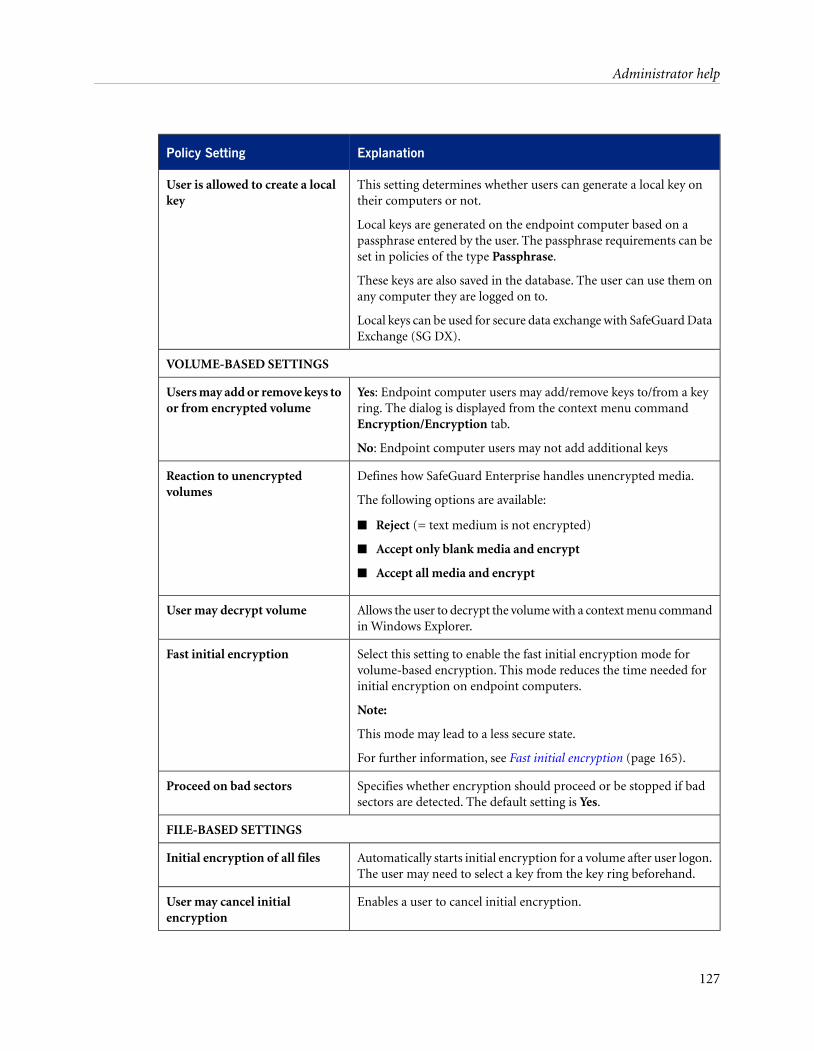
ExplanationPolicy Setting
This setting determines whether users can generate a local key ontheir computers or not.
Local keys are generated on the endpoint computer based on apassphrase entered by the user. The passphrase requirements can beset in policies of the type Passphrase.
User is allowed to create a localkey
These keys are also saved in the database. The user can use them onany computer they are logged on to.
Local keys can be used for secure data exchange with SafeGuard DataExchange (SG DX).
VOLUME-BASED SETTINGS
Yes: Endpoint computer users may add/remove keys to/from a keyring. The dialog is displayed from the context menu commandEncryption/Encryption tab.
No: Endpoint computer users may not add additional keys
Users may add or remove keys toor from encrypted volume
Defines how SafeGuard Enterprise handles unencrypted media.
The following options are available:
Reaction to unencryptedvolumes
■ Reject (= text medium is not encrypted)
■ Accept only blank media and encrypt
■ Accept all media and encrypt
Allows the user to decrypt the volume with a context menu commandin Windows Explorer.
User may decrypt volume
Select this setting to enable the fast initial encryption mode forvolume-based encryption. This mode reduces the time needed forinitial encryption on endpoint computers.
Note:
This mode may lead to a less secure state.
Fast initial encryption
For further information, see Fast initial encryption (page 165).
Specifies whether encryption should proceed or be stopped if badsectors are detected. The default setting is Yes.
Proceed on bad sectors
FILE-BASED SETTINGS
Automatically starts initial encryption for a volume after user logon.The user may need to select a key from the key ring beforehand.
Initial encryption of all files
Enables a user to cancel initial encryption.User may cancel initialencryption
127
Administrator help
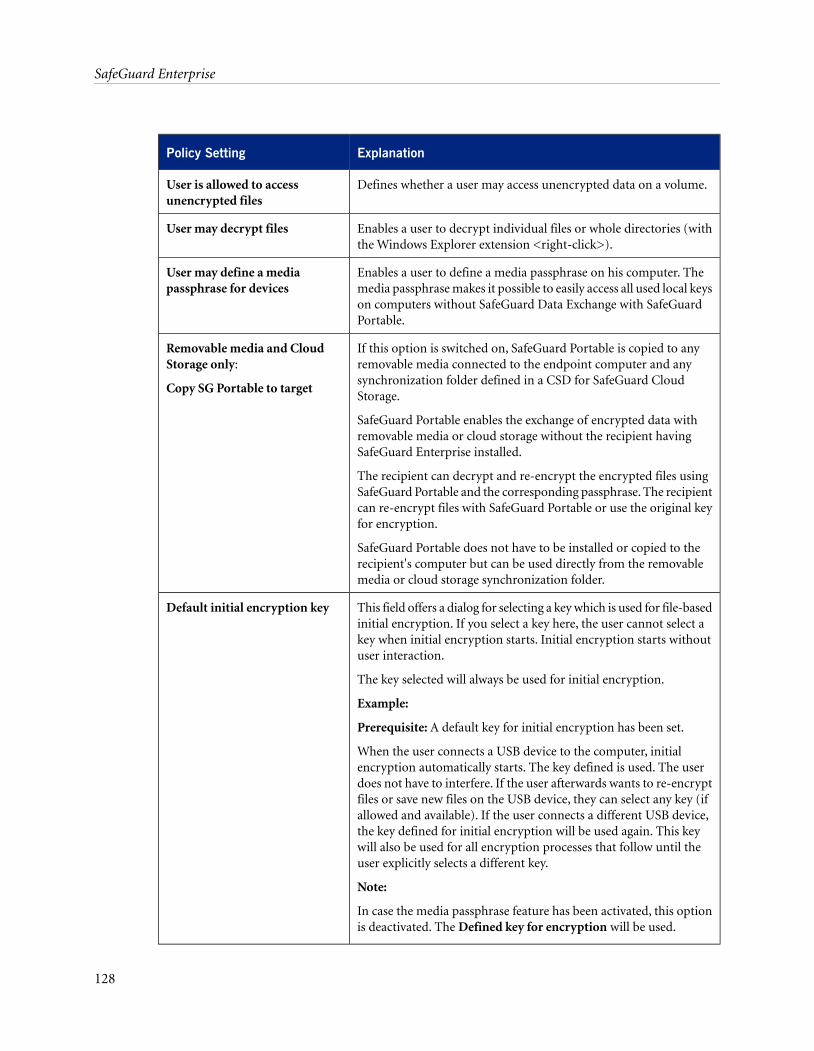
ExplanationPolicy Setting
Defines whether a user may access unencrypted data on a volume.User is allowed to accessunencrypted files
Enables a user to decrypt individual files or whole directories (withthe Windows Explorer extension <right-click>).
User may decrypt files
Enables a user to define a media passphrase on his computer. Themedia passphrase makes it possible to easily access all used local keys
User may define a mediapassphrase for devices
on computers without SafeGuard Data Exchange with SafeGuardPortable.
If this option is switched on, SafeGuard Portable is copied to anyremovable media connected to the endpoint computer and any
Removable media and CloudStorage only:
Copy SG Portable to targetsynchronization folder defined in a CSD for SafeGuard CloudStorage.
SafeGuard Portable enables the exchange of encrypted data withremovable media or cloud storage without the recipient havingSafeGuard Enterprise installed.
The recipient can decrypt and re-encrypt the encrypted files usingSafeGuard Portable and the corresponding passphrase. The recipientcan re-encrypt files with SafeGuard Portable or use the original keyfor encryption.
SafeGuard Portable does not have to be installed or copied to therecipient's computer but can be used directly from the removablemedia or cloud storage synchronization folder.
This field offers a dialog for selecting a key which is used for file-basedinitial encryption. If you select a key here, the user cannot select a
Default initial encryption key
key when initial encryption starts. Initial encryption starts withoutuser interaction.
The key selected will always be used for initial encryption.
Example:
Prerequisite: A default key for initial encryption has been set.
When the user connects a USB device to the computer, initialencryption automatically starts. The key defined is used. The userdoes not have to interfere. If the user afterwards wants to re-encryptfiles or save new files on the USB device, they can select any key (ifallowed and available). If the user connects a different USB device,the key defined for initial encryption will be used again. This keywill also be used for all encryption processes that follow until theuser explicitly selects a different key.
Note:
In case the media passphrase feature has been activated, this optionis deactivated. The Defined key for encryption will be used.
128
SafeGuard Enterprise

ExplanationPolicy Setting
The folder specified here will be created on all removable media,mass storage devices and cloud storage synchronization folder. Filesthat are copied to this folder will always stay plain.
Plaintext folder
You can allow the user to decide about encryption of files onremovable media and mass storage devices:
User is allowed to decide aboutencryption
■ If you set this option to Yes, users are prompted to decidewhether data should be encrypted. For mass storage devices, theprompt is displayed after each logon, for removable media theprompt is displayed when they plug in removable media.
■ If you set this option to Yes, remember user setting, users canselect the option Remember this setting and do not show thisdialog again to have their choice remembered for the relevantdevice. In this case, the dialog will not be displayed for therelevant device again.
If the user selects No in the dialog displayed on the endpointcomputer, neither initial nor transparent encryption occurs.
16.10 Specific machine settings - basic settings
ExplanationPolicy Settings
POWER-ON AUTHENTICATION (POA)
Defines whether the POA is permanently switched on or off.
Note:
For security reasons we strongly recommend that you keep thePOA switched on. Deactivating the POA reduces the system
Enable Power-on Authentication
security to Windows logon security and increases the risk ofunauthorized access to encrypted data.
Refuses POA logon if the computer has not been connected tothe server for longer than a set period.
Access denied if no connection tothe server (days) (0 = no check)
Defines whether guest users can log on to Windows on theendpoint computer.
Forbid guest user
Determines whether another user can be added to the POA.Differentiates between simply machine owners or any user presentin the POA.
Import of new users allowed for
129
Administrator help
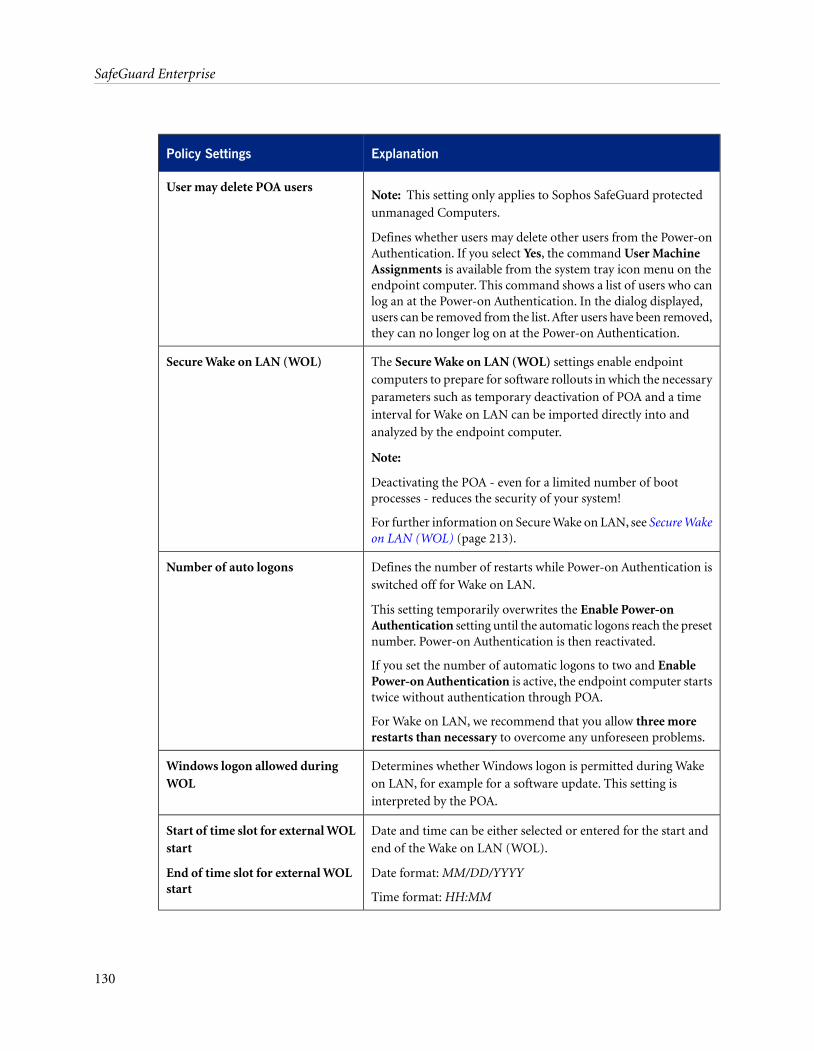
ExplanationPolicy Settings
Note: This setting only applies to Sophos SafeGuard protectedunmanaged Computers.
User may delete POA users
Defines whether users may delete other users from the Power-onAuthentication. If you select Yes, the command User MachineAssignments is available from the system tray icon menu on theendpoint computer. This command shows a list of users who canlog an at the Power-on Authentication. In the dialog displayed,users can be removed from the list. After users have been removed,they can no longer log on at the Power-on Authentication.
The Secure Wake on LAN (WOL) settings enable endpointcomputers to prepare for software rollouts in which the necessary
Secure Wake on LAN (WOL)
parameters such as temporary deactivation of POA and a timeinterval for Wake on LAN can be imported directly into andanalyzed by the endpoint computer.
Note:
Deactivating the POA - even for a limited number of bootprocesses - reduces the security of your system!
For further information on Secure Wake on LAN, see Secure Wakeon LAN (WOL) (page 213).
Defines the number of restarts while Power-on Authentication isswitched off for Wake on LAN.
This setting temporarily overwrites the Enable Power-onAuthentication setting until the automatic logons reach the presetnumber. Power-on Authentication is then reactivated.
Number of auto logons
If you set the number of automatic logons to two and EnablePower-on Authentication is active, the endpoint computer startstwice without authentication through POA.
For Wake on LAN, we recommend that you allow three morerestarts than necessary to overcome any unforeseen problems.
Determines whether Windows logon is permitted during Wakeon LAN, for example for a software update. This setting isinterpreted by the POA.
Windows logon allowed duringWOL
Date and time can be either selected or entered for the start andend of the Wake on LAN (WOL).
Date format: MM/DD/YYYY
Start of time slot for external WOLstart
End of time slot for external WOLstart
Time format: HH:MM
130
SafeGuard Enterprise
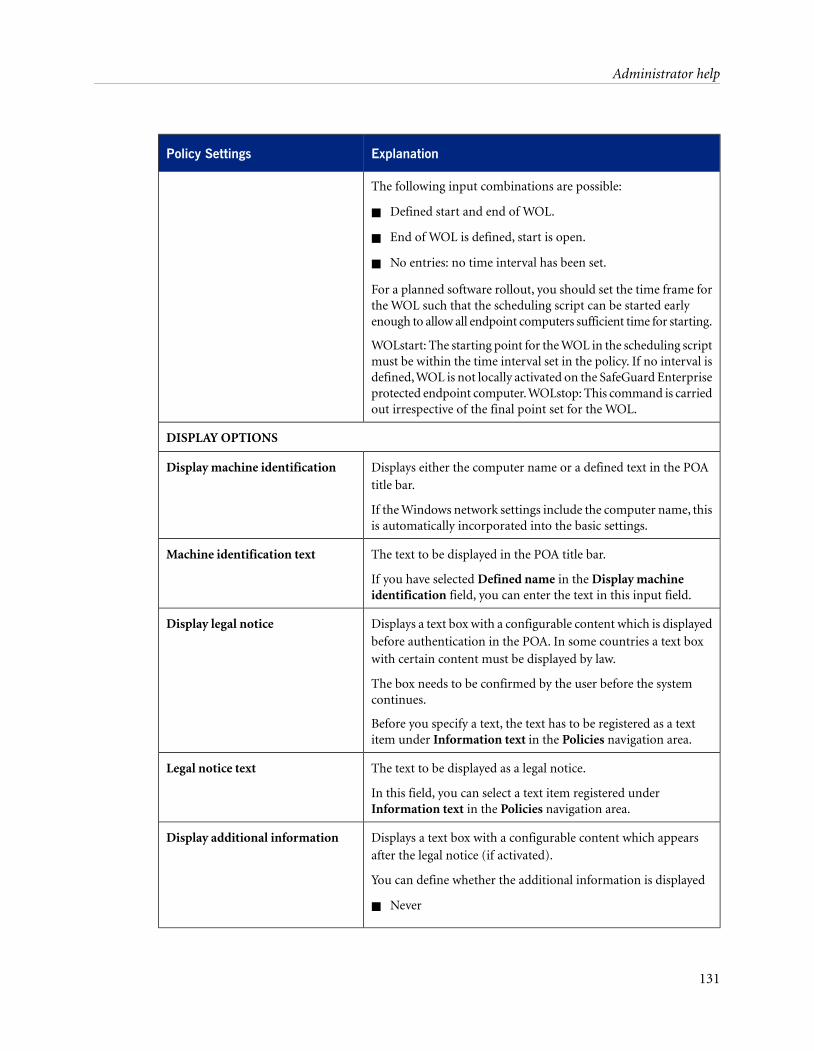
ExplanationPolicy Settings
The following input combinations are possible:
■ Defined start and end of WOL.
■ End of WOL is defined, start is open.
■ No entries: no time interval has been set.
For a planned software rollout, you should set the time frame forthe WOL such that the scheduling script can be started earlyenough to allow all endpoint computers sufficient time for starting.
WOLstart: The starting point for the WOL in the scheduling scriptmust be within the time interval set in the policy. If no interval isdefined, WOL is not locally activated on the SafeGuard Enterpriseprotected endpoint computer.WOLstop: This command is carriedout irrespective of the final point set for the WOL.
DISPLAY OPTIONS
Displays either the computer name or a defined text in the POAtitle bar.
If the Windows network settings include the computer name, thisis automatically incorporated into the basic settings.
Display machine identification
The text to be displayed in the POA title bar.
If you have selected Defined name in the Display machineidentification field, you can enter the text in this input field.
Machine identification text
Displays a text box with a configurable content which is displayedbefore authentication in the POA. In some countries a text boxwith certain content must be displayed by law.
The box needs to be confirmed by the user before the systemcontinues.
Display legal notice
Before you specify a text, the text has to be registered as a textitem under Information text in the Policies navigation area.
The text to be displayed as a legal notice.
In this field, you can select a text item registered underInformation text in the Policies navigation area.
Legal notice text
Displays a text box with a configurable content which appearsafter the legal notice (if activated).
You can define whether the additional information is displayed
Display additional information
■ Never
131
Administrator help
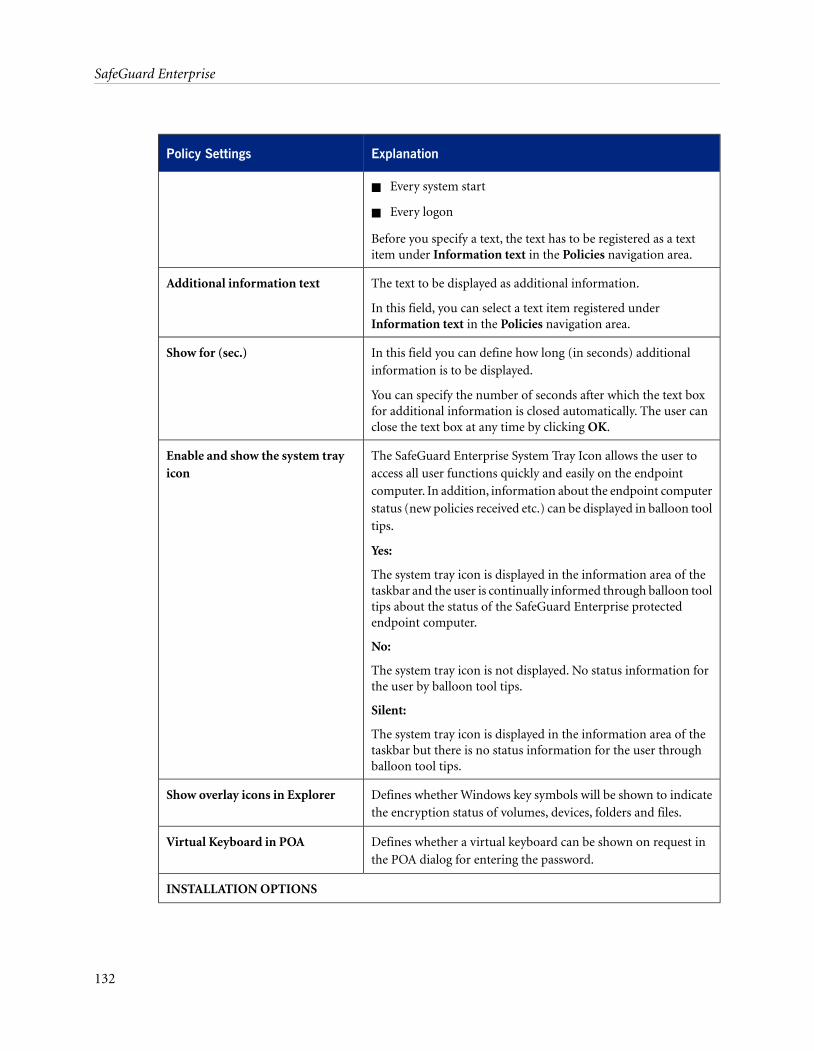
ExplanationPolicy Settings
■ Every system start
■ Every logon
Before you specify a text, the text has to be registered as a textitem under Information text in the Policies navigation area.
The text to be displayed as additional information.
In this field, you can select a text item registered underInformation text in the Policies navigation area.
Additional information text
In this field you can define how long (in seconds) additionalinformation is to be displayed.
You can specify the number of seconds after which the text boxfor additional information is closed automatically. The user canclose the text box at any time by clicking OK.
Show for (sec.)
The SafeGuard Enterprise System Tray Icon allows the user toaccess all user functions quickly and easily on the endpoint
Enable and show the system trayicon
computer. In addition, information about the endpoint computerstatus (new policies received etc.) can be displayed in balloon tooltips.
Yes:
The system tray icon is displayed in the information area of thetaskbar and the user is continually informed through balloon tooltips about the status of the SafeGuard Enterprise protectedendpoint computer.
No:
The system tray icon is not displayed. No status information forthe user by balloon tool tips.
Silent:
The system tray icon is displayed in the information area of thetaskbar but there is no status information for the user throughballoon tool tips.
Defines whether Windows key symbols will be shown to indicatethe encryption status of volumes, devices, folders and files.
Show overlay icons in Explorer
Defines whether a virtual keyboard can be shown on request inthe POA dialog for entering the password.
Virtual Keyboard in POA
INSTALLATION OPTIONS
132
SafeGuard Enterprise
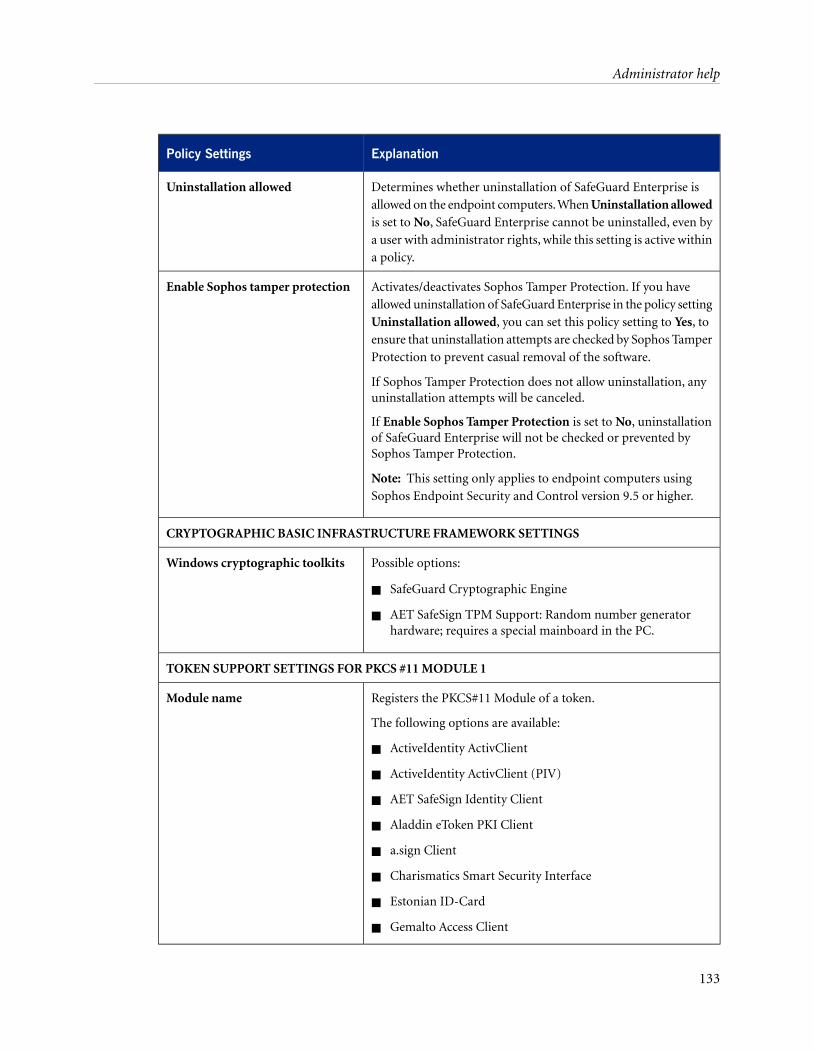
ExplanationPolicy Settings
Determines whether uninstallation of SafeGuard Enterprise isallowed on the endpoint computers.When Uninstallation allowed
Uninstallation allowed
is set to No, SafeGuard Enterprise cannot be uninstalled, even bya user with administrator rights, while this setting is active withina policy.
Activates/deactivates Sophos Tamper Protection. If you haveallowed uninstallation of SafeGuard Enterprise in the policy setting
Enable Sophos tamper protection
Uninstallation allowed, you can set this policy setting to Yes, toensure that uninstallation attempts are checked by Sophos TamperProtection to prevent casual removal of the software.
If Sophos Tamper Protection does not allow uninstallation, anyuninstallation attempts will be canceled.
If Enable Sophos Tamper Protection is set to No, uninstallationof SafeGuard Enterprise will not be checked or prevented bySophos Tamper Protection.
Note: This setting only applies to endpoint computers usingSophos Endpoint Security and Control version 9.5 or higher.
CRYPTOGRAPHIC BASIC INFRASTRUCTURE FRAMEWORK SETTINGS
Possible options:Windows cryptographic toolkits
■ SafeGuard Cryptographic Engine
■ AET SafeSign TPM Support: Random number generatorhardware; requires a special mainboard in the PC.
TOKEN SUPPORT SETTINGS FOR PKCS #11 MODULE 1
Registers the PKCS#11 Module of a token.
The following options are available:
Module name
■ ActiveIdentity ActivClient
■ ActiveIdentity ActivClient (PIV)
■ AET SafeSign Identity Client
■ Aladdin eToken PKI Client
■ a.sign Client
■ Charismatics Smart Security Interface
■ Estonian ID-Card
■ Gemalto Access Client
133
Administrator help
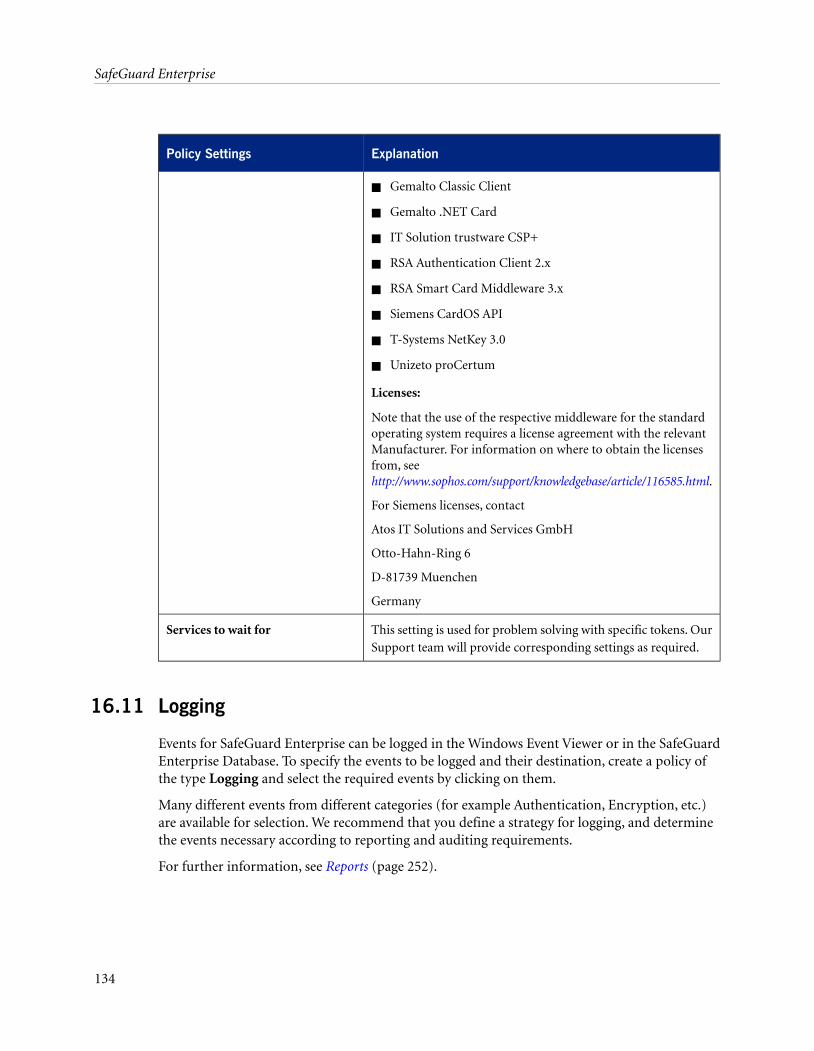
ExplanationPolicy Settings
■ Gemalto Classic Client
■ Gemalto .NET Card
■ IT Solution trustware CSP+
■ RSA Authentication Client 2.x
■ RSA Smart Card Middleware 3.x
■ Siemens CardOS API
■ T-Systems NetKey 3.0
■ Unizeto proCertum
Licenses:
Note that the use of the respective middleware for the standardoperating system requires a license agreement with the relevantManufacturer. For information on where to obtain the licensesfrom, seehttp://www.sophos.com/support/knowledgebase/article/116585.html.
For Siemens licenses, contact
Atos IT Solutions and Services GmbH
Otto-Hahn-Ring 6
D-81739 Muenchen
Germany
This setting is used for problem solving with specific tokens. OurSupport team will provide corresponding settings as required.
Services to wait for
16.11 Logging
Events for SafeGuard Enterprise can be logged in the Windows Event Viewer or in the SafeGuardEnterprise Database. To specify the events to be logged and their destination, create a policy ofthe type Logging and select the required events by clicking on them.
Many different events from different categories (for example Authentication, Encryption, etc.)are available for selection. We recommend that you define a strategy for logging, and determinethe events necessary according to reporting and auditing requirements.
For further information, see Reports (page 252).
134
SafeGuard Enterprise

17 SafeGuard Configuration Protection
Enterprise networks are currently characterized by a proliferation of easily accessible computerports, such as USB, FireWire and PCMCIA. In addition, a variety of communication adapters(such as Bluetooth, IrDA, and WLAN) and device types (such as storage devices, printers, digitalcameras, smart phones, and PDAs) all enable effortless access to endpoints using these ports anddevices.
These devices enable optimal accessibility and productivity, but they leave endpoints wide opento infiltration. With the amount of corporate data residing on endpoints estimated at over 60%,endpoints may be the most valuable, and vulnerable, part of the enterprise network.
Today, enterprise IT is focusing on the trade-offs between productivity and security. Enterprises'need for productivity attracts them to innovative devices and security concepts. But they areseverely challenged to maintain the ultimate precautionary measures against leakage, theft, fraud,virus invasion, eavesdropping and the general misuse of information and resources.
According to Vista research, 70% of IT security breaches originate from within the enterprise.Thus, enterprises today are making internal security, especially internal access to network resources,their highest priority, even above gateway solutions like antivirus and firewalls. Today's greatestenterprise security challenge is providing access to key information without exposing it to riskand trusting internal users while retaining enough control over their actions to verify their reliability.
True protection can only be obtained by establishing a "digital wall" around each computer andby intelligently protecting its ports, while judiciously allowing access of approved devices.
17.1 The SafeGuard Configuration Protection solution
Together with SafeGuard PortAuditor (see the SafeGuard PortAuditor User Guide), SafeGuardConfiguration Protection provides a comprehensive solution which enables organizations to seewhat ports and devices are being used in their organization (visibility), to define a policy thatcontrols their usage and to protect data in motion.
SafeGuard Configuration Protection controls every endpoint and every device, over every networkor interface. It monitors real-time traffic and applies customized, highly-granular security policiesover all physical, wireless and storage device interfaces, including:
1. Physical interfaces:
USB
FireWire
PCMCIA
Secure Digital (SD)
Parallel
Serial
Modem
135
Administrator help
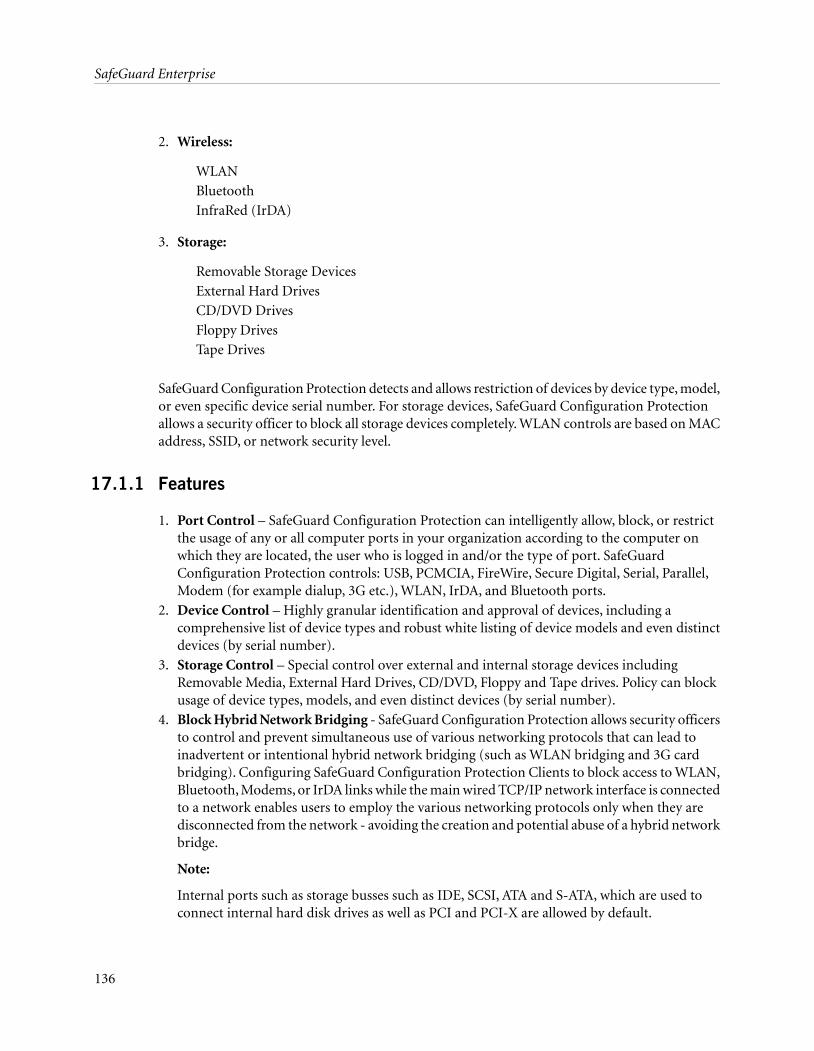
2. Wireless:
WLAN
Bluetooth
InfraRed (IrDA)
3. Storage:
Removable Storage Devices
External Hard Drives
CD/DVD Drives
Floppy Drives
Tape Drives
SafeGuard Configuration Protection detects and allows restriction of devices by device type, model,or even specific device serial number. For storage devices, SafeGuard Configuration Protectionallows a security officer to block all storage devices completely. WLAN controls are based on MACaddress, SSID, or network security level.
17.1.1 Features
1. Port Control – SafeGuard Configuration Protection can intelligently allow, block, or restrictthe usage of any or all computer ports in your organization according to the computer onwhich they are located, the user who is logged in and/or the type of port. SafeGuardConfiguration Protection controls: USB, PCMCIA, FireWire, Secure Digital, Serial, Parallel,Modem (for example dialup, 3G etc.), WLAN, IrDA, and Bluetooth ports.
2. Device Control – Highly granular identification and approval of devices, including acomprehensive list of device types and robust white listing of device models and even distinctdevices (by serial number).
3. Storage Control – Special control over external and internal storage devices includingRemovable Media, External Hard Drives, CD/DVD, Floppy and Tape drives. Policy can blockusage of device types, models, and even distinct devices (by serial number).
4. Block Hybrid Network Bridging - SafeGuard Configuration Protection allows security officersto control and prevent simultaneous use of various networking protocols that can lead toinadvertent or intentional hybrid network bridging (such as WLAN bridging and 3G cardbridging). Configuring SafeGuard Configuration Protection Clients to block access to WLAN,Bluetooth, Modems, or IrDA links while the main wired TCP/IP network interface is connectedto a network enables users to employ the various networking protocols only when they aredisconnected from the network - avoiding the creation and potential abuse of a hybrid networkbridge.
Note:
Internal ports such as storage busses such as IDE, SCSI, ATA and S-ATA, which are used toconnect internal hard disk drives as well as PCI and PCI-X are allowed by default.
136
SafeGuard Enterprise
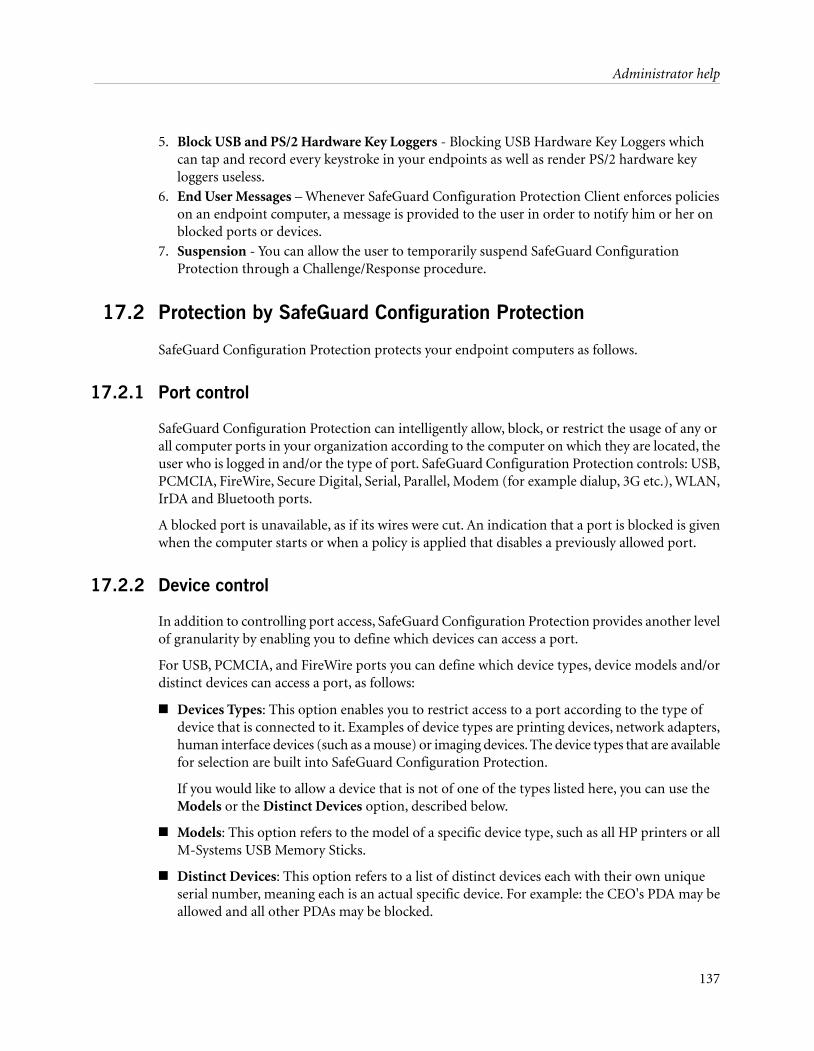
5. Block USB and PS/2 Hardware Key Loggers - Blocking USB Hardware Key Loggers whichcan tap and record every keystroke in your endpoints as well as render PS/2 hardware keyloggers useless.
6. End User Messages – Whenever SafeGuard Configuration Protection Client enforces policieson an endpoint computer, a message is provided to the user in order to notify him or her onblocked ports or devices.
7. Suspension - You can allow the user to temporarily suspend SafeGuard ConfigurationProtection through a Challenge/Response procedure.
17.2 Protection by SafeGuard Configuration Protection
SafeGuard Configuration Protection protects your endpoint computers as follows.
17.2.1 Port control
SafeGuard Configuration Protection can intelligently allow, block, or restrict the usage of any orall computer ports in your organization according to the computer on which they are located, theuser who is logged in and/or the type of port. SafeGuard Configuration Protection controls: USB,PCMCIA, FireWire, Secure Digital, Serial, Parallel, Modem (for example dialup, 3G etc.), WLAN,IrDA and Bluetooth ports.
A blocked port is unavailable, as if its wires were cut. An indication that a port is blocked is givenwhen the computer starts or when a policy is applied that disables a previously allowed port.
17.2.2 Device control
In addition to controlling port access, SafeGuard Configuration Protection provides another levelof granularity by enabling you to define which devices can access a port.
For USB, PCMCIA, and FireWire ports you can define which device types, device models and/ordistinct devices can access a port, as follows:
■ Devices Types: This option enables you to restrict access to a port according to the type ofdevice that is connected to it. Examples of device types are printing devices, network adapters,human interface devices (such as a mouse) or imaging devices. The device types that are availablefor selection are built into SafeGuard Configuration Protection.
If you would like to allow a device that is not of one of the types listed here, you can use theModels or the Distinct Devices option, described below.
■ Models: This option refers to the model of a specific device type, such as all HP printers or allM-Systems USB Memory Sticks.
■ Distinct Devices: This option refers to a list of distinct devices each with their own uniqueserial number, meaning each is an actual specific device. For example: the CEO's PDA may beallowed and all other PDAs may be blocked.
137
Administrator help
17.2.3 Protection against Hardware Key Loggers
Hardware Key Loggers are devices that can be placed by a hostile entity between a keyboard andits host computer in order to tap and record keyboard input and steal vital information, especiallyidentity and password.
With SafeGuard Configuration Protection you can immunize your users against this threat:SafeGuard Configuration Protection can detect hardware key loggers connected to a USB or PS/2port, and your policy can specify whether hardware key loggers should be blocked when detected.
17.2.4 Storage control
Storage control provides an additional level of detail in which to specify the security requirementsof your organization. This can apply to all storage devices, internal or external, fixed or detachable.You can block storage devices completely.
Similarly to non-storage devices, described in the previous section, storage devices can be alsoapproved according to their type, model, or distinct ID.
17.2.5 Autorun control
With SafeGuard Configuration Protection, you can let your end-users use their new sophisticatedstorage devices, while ensuring your endpoints are not exposed to potential exploits and riskyapplications these devices may carry. You can easily block auto-launch activities as part of yoursecurity policy. Using our unique granular Client technology, you can still allow smart storagedevices to be used and block only their auto-run functionality which may be unsafe.
17.2.6 WLAN control
WLAN control ensures that users only connect to approved networks. You can specify whichnetworks or ad hoc links are allowed for access. You can specify the MAC address of the accesspoints, SSID of the network, authentication method and encryption methods to define approvedlinks.
17.2.7 SafeGuard PortAuditor
Although not an integral part of SafeGuard Configuration Protection, SafeGuard PortAuditor isa tool that goes hand in hand with SafeGuard Configuration Protection and completes it byproviding you with a full view of what ports, devices and networks are (or were previously) in useby your organization's users. You use the output of a SafeGuard PortAuditor scan to select thedevices and networks whose usage you want to approve.
More detail is provided in the SafeGuard PortAuditor User Guide.
138
SafeGuard Enterprise

17.3 Configuration protection policies
A configuration protection policy specifies which ports are allowed, blocked, or restricted.Restricted means that only specified device types, device models, distinct devices, or WLANconnections can gain access through this port.
A policy specifies the access permissions of storage device types, storage device models, and distinctstorage devices, as well as WLAN connections, enabling you to specify whether they are allowed,blocked, or restricted (in the same manner as for devices).
A policy can also block Hardware Key Loggers that are connected to a USB or a PS/2 port.Hardware Key Loggers are devices that can be placed by a hostile entity between a keyboard andits host computer in order to log keyboard input. Your policy can specify whether hardware keyloggers should be blocked when detected by SafeGuard Configuration Protection.
You can allow the user to temporarily suspend SafeGuard Configuration Protection through aChallenge/Response procedure.
SafeGuard Configuration Protection takes a positive security approach, meaning all devices areallowed unless you define a policy blocking their access.
Note:
Roaming profiles are not supported.
In the sections that follow we describe how to define a policy.
17.3.1 Defining Configuration Protection policies: workflow
The following is an overview of the workflow for defining a new policy. A reference is providedfrom each of these steps to a sub-section that describes it in detail.
The workflow suggests a simple and straightforward order for performing these steps, from whichyou can deviate, if you prefer.
■ Step 1: Scan computers and detect port/device/WLAN usage: use SafeGuard PortAuditor toscan the computers in your network in order to detect the devices and WLAN networks thatare currently connected and those that were previously connected (specified in their computer'sregistry), as described in the SafeGuard PortAuditor User Guide. You will use this informationwhen defining a policy in order to easily specify which ports and devices are allowed, blocked,or restricted.
■ Step 2: Plan your policy describes the information that you should gather in order to properlyplan the best endpoint protection policy for your organization.
■ Step 3: Create a policy describes how to create a new policy. You can create as many policiesas needed, one for your entire organization or a different one for each group of computers orusers.
139
Administrator help
■ Step 4: Define port control describes how to define the port control aspect of your policy,meaning which ports are allowed, which are blocked and which are restricted to be used onlyby certain devices. In addition, this section describes how to prevent hybrid network bridging.
■ Step 5: Define device control describes how to define more specifically which devices areallowed to connect through the restricted ports on your endpoints.
■ Step 6: Define storage control describes how to define more specifically which storage devicesare allowed to connect to your endpoints.
■ Step 7: Define WLAN control describes how to define which WLAN connections are approved.
■ Step 8: Define file control describes how to define the permissions for file types transferredfrom and to storage devices.
■ Step 9: Define display options describes how to define if the user is allowed to suspend theSafeGuard Configuration Protection policy on the endpoint computer.
■ Step 10: Save and publish the policy describes the options for saving the policy in the policydatabase and publishing it so it can be associated to the relevant endpoint computers.
17.3.2 Step 1: Scan computers and detect port/device/WLAN usage
Although not an integral part of SafeGuard Configuration Protection, SafeGuard PortAuditor isa tool that goes hand in hand with SafeGuard Configuration Protection and completes it byproviding you with a full view of what ports, devices and networks are (or were previously) in useby your organization's users. You use the output of a SafeGuard PortAuditor scan to select thedevices and networks whose usage you want to approve.
17.3.3 Step 2: Plan your policy
Before you start defining your policy, you should take the time to plan the policy best suited toyour organization. The best SafeGuard Configuration Protection policy for your organization isone that meets its security needs while still fulfilling the requirements of the people who needaccess through the ports of your organization's computers.
The first thing to plan for is the types of OU (Organizational Units) and groups to which thepolicies will apply.
17.3.3.1 User and computer policies
By default, SafeGuard Configuration Protection uses User Group and Computer Group definitionsthat are controlled by Active Directory. Each option has its own benefits, as described below.
■ Per user groups: Defining your policies per user groups enables you to be specific regardingthe permissions for each user.
Policies that apply to users override policies that apply to computers.
140
SafeGuard Enterprise
If you decide to manage your organization by assigning policies to user groups, we recommendthat you still define one or more general policies for computers. This enables the protectionof each computer port even when no user is logged in. Using the combination of user policiesand computer policies means that, for example, you can block USB storage devices on all theCustomer Service department's computers, but you can allow the manager of the departmenta more permissive policy according to his/her user name and password, regardless of thecomputer into which he/she is logged.
■ Per computer groups: Defining your policies by computers enables the protection of theendpoints of your organization's computers regardless of the user who is logged in.
SafeGuard Configuration Protection enforces policies as follows: it first applies a user policy, ifone exists for the user that is currently logged in. If not, SafeGuard Configuration Protection looksfor a policy that applies to the computer, and uses it, if found. This means that when no user islogged in, the computer-bound policy is used. It is therefore advised to distribute user-basedpolicies, so that a user is given the same policy regardless of the computer into which he or she islogged, and to set computer-based policies that are more restrictive. These computer-based policiesshould still grant access to devices such as a mouse and keyboard, to be used when no user, or auser outside of the domain, is logged in.
The initial configuration of the SafeGuard Configuration Protection Client allows all port anddevice activity, meaning that nothing is blocked. A permissive configuration is necessary so thatall port activity is not automatically blocked immediately following the installation of the SafeGuardConfiguration Protection Client.
This means that until you actually define and distribute policies to your endpoints (per user orper computer), the machine that was just installed with SafeGuard Configuration Protection Clientwill continue to operate as before (no blocking of ports and devices).
Note:
The machine policy is used as fallback policy in case the user policy cannot be used or is beingtampered. It is therefore recommended to create both machine and user policy while the userpolicy is the more permissive one.
Note:
Depending on the endpoint computer, it can take several seconds for the SafeGuard ConfigurationProtection Client to enforce a change of policies after logon. This means in case the machine policyis more restrictive than the user policy it takes a few seconds before the user gains access to thedevices.
17.3.4 Step 3: Create a policy
Policies are created as described for all other policies.
17.3.5 Step 4: Define port control
This step includes setting port permissions as well as hybrid network bridging permissions.
141
Administrator help
17.3.5.1 Port permissions
SafeGuard Configuration Protection enables positive security by allowing access to all ports in allcomputers to which a policy is distributed unless that policy specifies that access to that port isblocked, as follows. For each port (USB, FireWire, PCMCIA, Secure Digital, Serial, Parallel, Modem,WLAN, IrDA, or Bluetooth), you can specify the following:
■ Allow: This option specifies that the port can be used for any purpose, without any restrictionson this communication channel.
■ Block: This option means that no access can be performed through this port. The port isunavailable as if its wires were cut.
■ Restrict: For USB, FireWire, PCMCIA, and WLAN ports you also have the option to specifythat access to ports of this type is Restricted. A Restricted setting enables you to define morespecifically (meaning with higher granularity) which devices or connections are allowed toaccess the port. For example, you can specify that only USB devices of a specific model or evenspecific USB devices (meaning distinct devices with a unique serial number) are allowed access.For physical ports, this is done using the Device Control option described in Step 5: DefineDevice Control and the Storage Control option described in Step 6: Define Storage Control.For wireless ports, this is done using the WLAN Control option described in Step 7: DefineWLAN Control.
Note:
The Device Control and WLAN Control aspects of a policy only apply to ports that are restricted.The Storage Control aspect of a policy applies both to restricted and allowed ports.
For each port, specify whether its action type is Allow, Block, or Restrict by selecting theappropriate option in the drop-down menu.
Note:
Internal ports such as storage busses such as IDE, SCSI, ATA and S-ATA, which are used to connectinternal hard disk drives as well as PCI and PCI-X are allowed by default.
Note:
The settings for SecureDigital in the Physical Ports section are relevant when SecureDigital is usedas a port. In case SecureDigital is connected through a USB adapter, it becomes a USB mass storagedevice. If SecureDigital is connected directly to the PC or laptop, recognition depends on theactual PC or laptop model.
17.3.5.2 Hybrid Network Bridging permissions
SafeGuard Configuration Protection allows administrators to control and prevent simultaneoususe of various networking protocols that can lead to inadvertent or intentional hybrid networkbridging (such as WLAN bridging and 3G card bridging). Configuring SafeGuard ConfigurationProtection Clients to block access to WLAN, Bluetooth, Modems, or IrDA links while the mainwired TCP/IP network interface is connected to a network enables users to employ certainnetworking protocols only when they are disconnected from the network - avoiding the creationand potential abuse of a hybrid network bridge.
142
SafeGuard Enterprise
Hybrid Network Bridging permissions are set in the Anti Hybrid Network Bridging section.
17.3.6 Step 5: Define device control
In the Port Control section, for USB, FireWire, and PCMCIA ports you can specify that access toports of these types is restricted (this is true for WLAN ports, too, which is discussed in Step 8:Define WLAN Control). Selecting Restrict enables you to define more specifically, using the DeviceControl section, which devices are allowed to access these ports.
The Device Control section enables you to specify which device types are allowed access, and toassign the corresponding White List, which you use to specify which device models or distinctdevices are allowed access. If a device is not defined as allowed in one of the ways described below,then it is blocked. The Device Control aspect of a policy applies to all the ports that are Restricted.
17.3.6.1 Device Control - settings
■ All Devices (top area): in this area you can Allow, Restrict, or Block access to all device types.If you select Allow or Block for All Devices, the rest of the section is disabled. You can alsoAllow or Block hardware key loggers.
■ Devices Types (middle area): if you have selected the Restrict option for All Devices as describedin the previous paragraph, this option enables you to allow or restrict access to a device accordingto its type. For example: Printing Devices, Network Adapters, or Imaging Devices.
The device types available for selection are built into SafeGuard Configuration Protection. Ifyou would like to allow a device that is not of one of the types listed here, add it to your list ofapproved devices – the White List - using the Approved Model or the Distinct Devices option,described below. A description of the supported Device Types is provided in Supported DeviceTypes.
■ Unknown Devices (bottom area): This option enables you to determine whether access tounknown devices is granted or not.
17.3.6.2 Device Control - White List
The section offers to assign a White List for Device Models and/or a White List for Distinct Devices:
■ White List for Device Models: This option refers to the model of a specific device type, suchas a specific model of HP printers, such as LaserJet 4050N. Specify a White List file containingsuch devices.
■ White List for Distinct Devices: This option refers to distinct devices with a unique serialnumber, meaning an actual specific device. Specify a White List file containing such devices.For example: the CEO's personal printer may be permitted to connect, while other printingdevices are not.
Note:
This section is disabled whenever you select Allow or Block in the All Devices option. See DefiningDevice Control.
143
Administrator help
Note:
In cases where a device belongs to more than one group, and those groups have the samepermissions, SafeGuard Configuration Protection will choose between the groups arbitrarily.
17.3.6.3 Define device control
1. In the All Devices section, specify in the drop-down menu whether All Devices are Allowed,Restricted, or Blocked.
Note:
Select Allow or Block when you do not want to apply granular device control at this point intime. Alternatively, use this option when you wish to override existing granular definitions butwant to return to them at a later time.
2. If you select Allow or Block for All Devices, there is nothing more you need to do in the DeviceControl section and you can now skip to Step 6: Define Storage Control.
3. If you selected Restrict for All Devices, define whether Hardware Key Loggers are Allowed orBlocked.
Note:
If the SafeGuard Configuration Protection Client suspects a USB Hardware Key Logger isconnected to the keyboard, and Hardware Key Loggers are Blocked, the keyboard is blocked,too. To activate the keyboard, advise the user to connect it directly to the computer.
Note:
When you block Hardware Key Loggers, both USB and PS/2 Key Loggers are blocked. WhenSafeGuard Configuration Protection Client protects against PS/2 Key Loggers, no user messageis displayed. Nevertheless, the Key Logger device is rendered useless, since the information itlogs is scrambled. In addition, note that when a PS/2 Key Logger is blocked while working witha PS/2 Keyboard Video Mouse (KVM), the KVM switching between computers will not workfrom the keyboard. You can switch computers by pressing the KVM itself.
4. If you selected Restrict for All Devices, set permissions for each Device Type in the DeviceTypes section as follows:
a) Allow: allows all devices of this type.
b) Restrict: all devices are blocked unless they are specifically approved in the White Listdescribed in Approving Devices and WLAN Connections.
5. Select the White List for Device Models and White List for Distinct Devices to add to yourallowed devices in the White List as described in White Lists - Approving Devices and WLANConnections.
17.3.7 Step 6: Define storage control
Storage devices may typically be the main conduits for information leakage in an organization.
144
SafeGuard Enterprise
SafeGuard Configuration Protection enables you to control access by allowing full access, orblocking any device that is identified as a storage device. This includes removable media such asUSB Memory Sticks, digital cameras and so on, as well as traditional devices, such as floppy drives,CD/ DVD drives, external hard drives, and tape drives.
The Storage Control aspect of a policy is enforced across all ports through which a storage devicecan connect. This includes Allowed or Restricted ports, as well as ports that are not protected bySafeGuard Configuration Protection. On a port that is Blocked all storage devices are blocked,since blocking a port is similar to cutting its wires.
Note:
Since attacks and leakage directly through internal hard drives is not common, SafeGuardConfiguration Protection does not handle blocking or restricting of these drives, so as not todisrupt ongoing work.
17.3.7.1 Storage control - settings
This section includes the following areas:
1. All Storage Devices: in this area you can Allow, Restrict, or Block access to all storage devices.If you select Allow or Block for All Storage Devices, the rest of the section is disabled. Youcan also determine whether you want to allow or block the Autorun feature available on somestorage devices such as CD/DVD.
2. Storage Types: if you have selected the Restrict option for All Storage Devices, this optionenables you to allow, or restrict access to a storage device according to its type. For example:Removable Devices or CD/DVD Drives. The device types available for selection are built intoSafeGuard Configuration Protection and include the following types and options:
Removable Media: Applies to all plug-and-play storage devices, such as USB Memory Sticks,Digital Camera, Portable MP3 players, and so on.
Allow smart functionality of Removable Media: Set this option to Allow to allow the usageof removable media that implement smart functionality. Set this option to Block to blockthe smart functionality of such devices.
External Hard DrivesCD/DVD DrivesFloppy DevicesTape Devices
Removable Media, External Hard Drives, CD/DVD Drives and Floppy Drives can additionally beset to Read Only.
Use the White List to approve the usage of specific Storage Models or Distinct Storage Devices.A description of the supported Device Types is provided in Supported Device Types. For anexplanation of how to define options in this section refer to Defining Storage Control.
145
Administrator help
17.3.7.2 Storage Control - White List
This section offers to assign a White List for Storage Device Models and/or a White List for DistinctStorage Devices:
1. White List for Storage Device Models: This option refers to the model of a specific storagedevice type, such as a specific USB Memory Stick model.
2. White List for Distinct Storage Devices: Distinct storage devices with a unique serial number,meaning an actual specific device. For example: the CEO's personal USB Memory Stick maybe permitted to connect, while other USB Memory Sticks are not.
Note:
This section is disabled whenever you select the Allow or Block option for All Storage Devices.
Note:
Select Allow or Block when you do not want to apply granular storage device control at this pointin time, but plan to define it later on. Alternatively, use this option when you wish to overrideexisting granular definitions but want to return to them at a later time.
17.3.8 Step 7: Define WLAN control
In addition to devices, SafeGuard Configuration Protection controls and monitors your WLANconnections in order to ensure that endpoint computers use authorized, secure connections only.In the Port Control section, you can specify that access to a WLAN port is Restricted. SelectingRestricted enables you to define more specifically, using the WLAN Connection Types section,which networks are allowed to access this port.
Note:
When restricting the use of WLAN as a port, SafeGuard Configuration Protection monitors andregulates WLAN connections over Microsoft WZC infrastructure. Any device driver that wouldtry to access the network card, not using WZC will be blocked.
Note:
If you are using a lot of WLAN cards which enforce proprietary drivers you can only Allow orBlock WLAN as a port.
17.3.8.1 WLAN Control - settings
WLAN Connection Types: this option enables you to Allow or Restrict access to WLAN networks,and to Allow or Block WLAN Peer-to-Peer connections. In the case of WLAN networks, if youchoose Restrict you may further specify which specific networks are approved.
17.3.8.2 WLAN Control - White List
White List for WLAN: This option refers to distinct networks, including their authentication andencryption properties.
Note:
146
SafeGuard Enterprise
This section is disabled whenever you select the Allow option for networks.
17.3.8.3 Define WLAN control
1. Go to the WLAN option in the Wireless Ports section. Set WLAN to Restrict. This enablesthe options below WLAN Connection Types.
2. In the WLAN Connection Types section set permissions for WLAN Networks (Infrastructure)as follows:
a) Allow: allows connection to all WLAN networks.
b) Restrict: all networks are blocked unless they are specifically approved in the White List asdescribed in White Lists - Approving Devices and WLAN Connections.
3. In the WLAN Connection Types section set permissions for Peer-to-Peer (Ad Hoc) as follows:
a) Allow: allows all peer-to-peer WLAN connections.
b) Block: blocks all peer-to-peer WLAN connections.
In this option, more granular permissions are not available.
17.3.9 Step 8: Define File Control
SafeGuard Configuration Protection allows you to set permissions not only for storage devices,but also for the files transferred to and from these devices. This is achieved by inspecting files fortheir type as they are transferred to/from external storage devices. This technology allows for highlyreliable classification of files by inspecting the file header contents rather than using file extensions,thus preventing users from easily bypassing the protection by renaming file extensions.
By inspecting both files downloaded to external storage devices and those uploaded to the protectedendpoint, multiple benefits can be achieved:
■ An additional protection layer to prevent data leakage
■ Prevention of the introduction of viruses/malware through external storage devices
■ Prevention of the introduction of inappropriate content through external storage devices, forexample unlicensed software, unlicensed content (for example music and movies), nonwork-related content such as private pictures etc.
With this feature, you can define policies which approve/block specific file types on the inboundand outbound channels.
SafeGuard Configuration Protection’s File Control includes the following:
■ File Type Control - the ability to control transfer of files according to their type.
File Control is applicable to removable storage devices, external hard disks and CD/DVD.
147
Administrator help
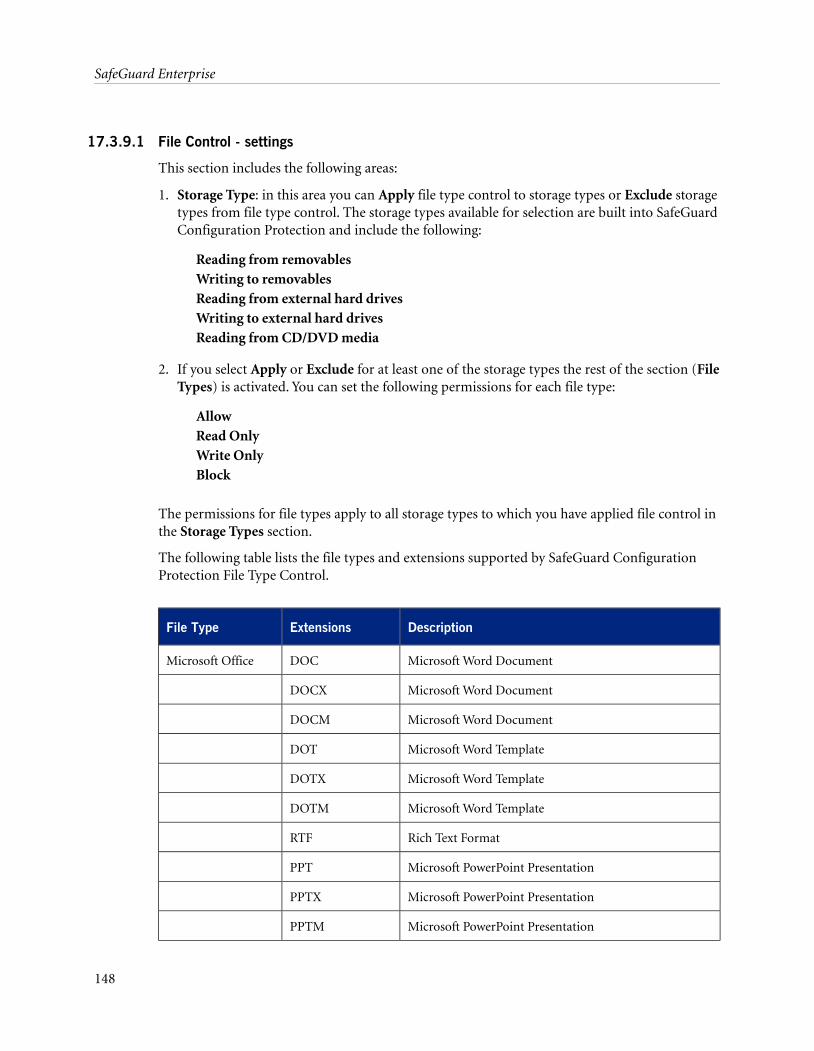
17.3.9.1 File Control - settings
This section includes the following areas:
1. Storage Type: in this area you can Apply file type control to storage types or Exclude storagetypes from file type control. The storage types available for selection are built into SafeGuardConfiguration Protection and include the following:
Reading from removablesWriting to removablesReading from external hard drivesWriting to external hard drivesReading from CD/DVD media
2. If you select Apply or Exclude for at least one of the storage types the rest of the section (FileTypes) is activated. You can set the following permissions for each file type:
AllowRead OnlyWrite OnlyBlock
The permissions for file types apply to all storage types to which you have applied file control inthe Storage Types section.
The following table lists the file types and extensions supported by SafeGuard ConfigurationProtection File Type Control.
DescriptionExtensionsFile Type
Microsoft Word DocumentDOCMicrosoft Office
Microsoft Word DocumentDOCX
Microsoft Word DocumentDOCM
Microsoft Word TemplateDOT
Microsoft Word TemplateDOTX
Microsoft Word TemplateDOTM
Rich Text FormatRTF
Microsoft PowerPoint PresentationPPT
Microsoft PowerPoint PresentationPPTX
Microsoft PowerPoint PresentationPPTM
148
SafeGuard Enterprise
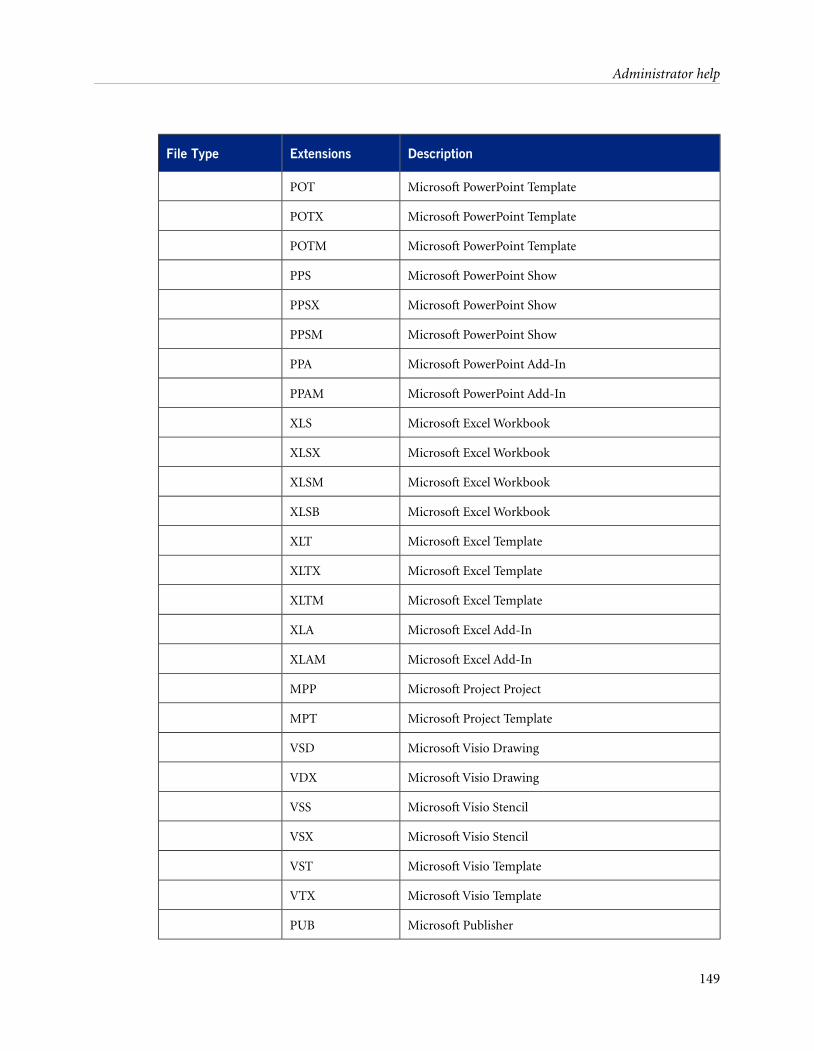
DescriptionExtensionsFile Type
Microsoft PowerPoint TemplatePOT
Microsoft PowerPoint TemplatePOTX
Microsoft PowerPoint TemplatePOTM
Microsoft PowerPoint ShowPPS
Microsoft PowerPoint ShowPPSX
Microsoft PowerPoint ShowPPSM
Microsoft PowerPoint Add-InPPA
Microsoft PowerPoint Add-InPPAM
Microsoft Excel WorkbookXLS
Microsoft Excel WorkbookXLSX
Microsoft Excel WorkbookXLSM
Microsoft Excel WorkbookXLSB
Microsoft Excel TemplateXLT
Microsoft Excel TemplateXLTX
Microsoft Excel TemplateXLTM
Microsoft Excel Add-InXLA
Microsoft Excel Add-InXLAM
Microsoft Project ProjectMPP
Microsoft Project TemplateMPT
Microsoft Visio DrawingVSD
Microsoft Visio DrawingVDX
Microsoft Visio StencilVSS
Microsoft Visio StencilVSX
Microsoft Visio TemplateVST
Microsoft Visio TemplateVTX
Microsoft PublisherPUB
149
Administrator help
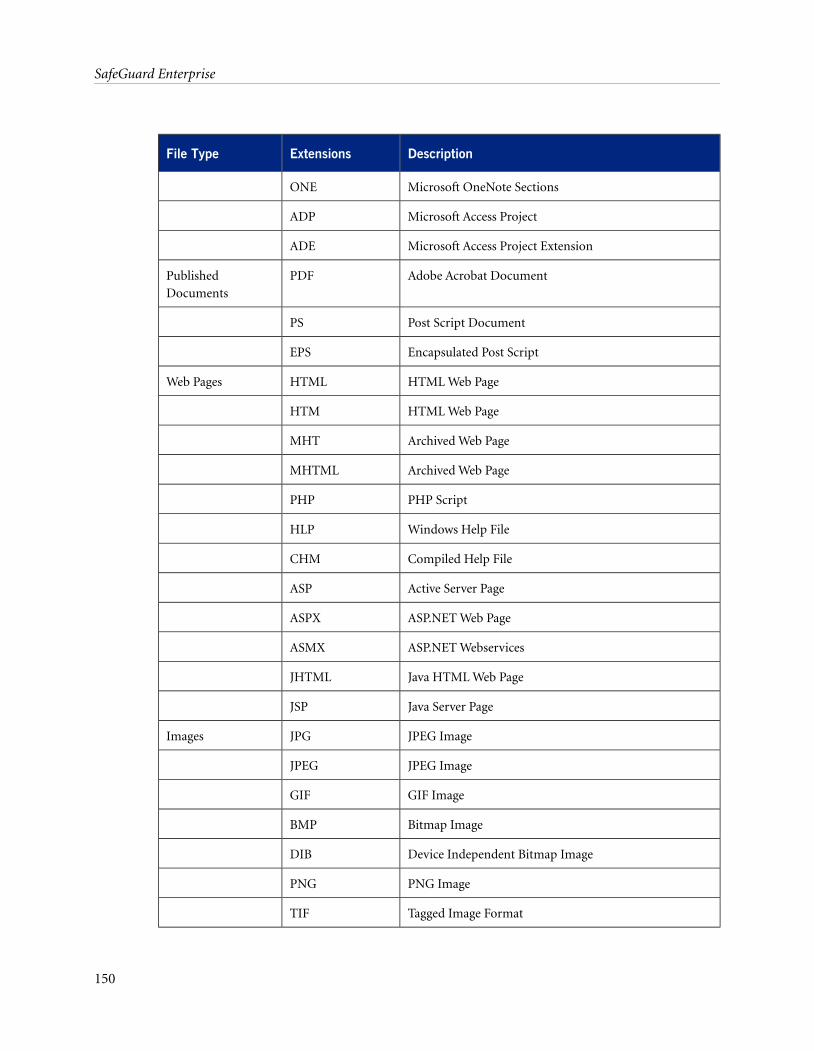
DescriptionExtensionsFile Type
Microsoft OneNote SectionsONE
Microsoft Access ProjectADP
Microsoft Access Project ExtensionADE
Adobe Acrobat DocumentPDFPublishedDocuments
Post Script DocumentPS
Encapsulated Post ScriptEPS
HTML Web PageHTMLWeb Pages
HTML Web PageHTM
Archived Web PageMHT
Archived Web PageMHTML
PHP ScriptPHP
Windows Help FileHLP
Compiled Help FileCHM
Active Server PageASP
ASP.NET Web PageASPX
ASP.NET WebservicesASMX
Java HTML Web PageJHTML
Java Server PageJSP
JPEG ImageJPGImages
JPEG ImageJPEG
GIF ImageGIF
Bitmap ImageBMP
Device Independent Bitmap ImageDIB
PNG ImagePNG
Tagged Image FormatTIF
150
SafeGuard Enterprise
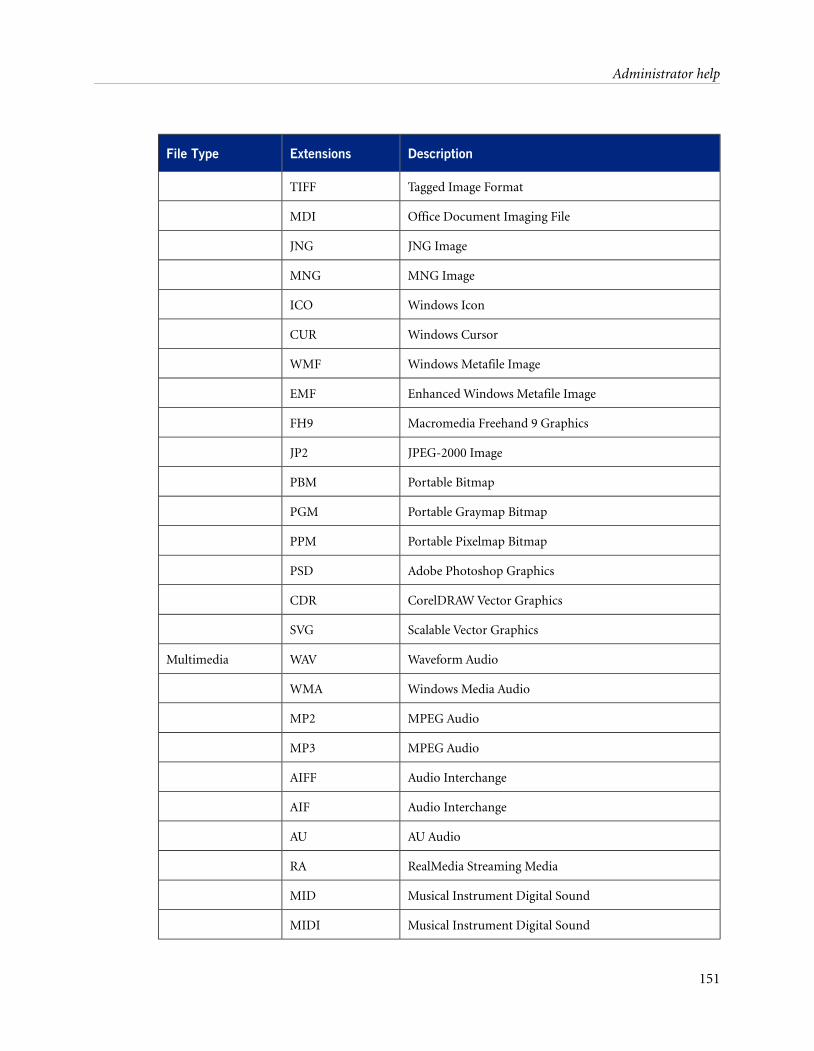
DescriptionExtensionsFile Type
Tagged Image FormatTIFF
Office Document Imaging FileMDI
JNG ImageJNG
MNG ImageMNG
Windows IconICO
Windows CursorCUR
Windows Metafile ImageWMF
Enhanced Windows Metafile ImageEMF
Macromedia Freehand 9 GraphicsFH9
JPEG-2000 ImageJP2
Portable BitmapPBM
Portable Graymap BitmapPGM
Portable Pixelmap BitmapPPM
Adobe Photoshop GraphicsPSD
CorelDRAW Vector GraphicsCDR
Scalable Vector GraphicsSVG
Waveform AudioWAVMultimedia
Windows Media AudioWMA
MPEG AudioMP2
MPEG AudioMP3
Audio InterchangeAIFF
Audio InterchangeAIF
AU AudioAU
RealMedia Streaming MediaRA
Musical Instrument Digital SoundMID
Musical Instrument Digital SoundMIDI
151
Administrator help
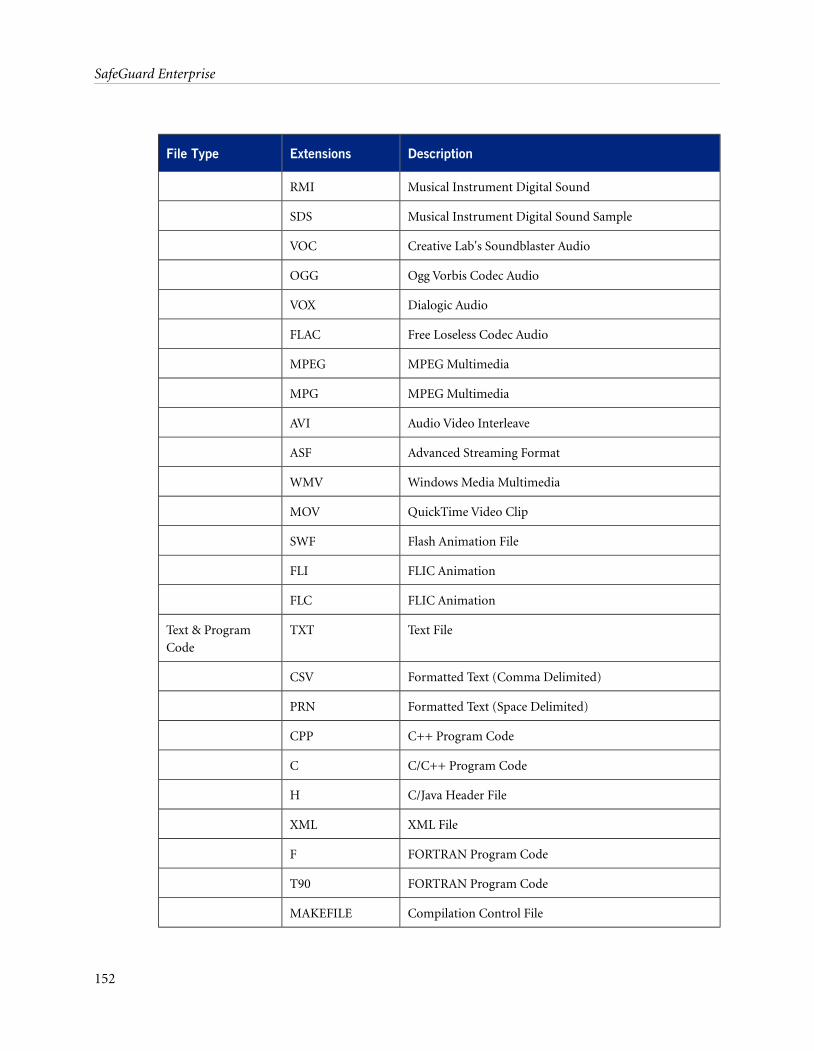
DescriptionExtensionsFile Type
Musical Instrument Digital SoundRMI
Musical Instrument Digital Sound SampleSDS
Creative Lab's Soundblaster AudioVOC
Ogg Vorbis Codec AudioOGG
Dialogic AudioVOX
Free Loseless Codec AudioFLAC
MPEG MultimediaMPEG
MPEG MultimediaMPG
Audio Video InterleaveAVI
Advanced Streaming FormatASF
Windows Media MultimediaWMV
QuickTime Video ClipMOV
Flash Animation FileSWF
FLIC AnimationFLI
FLIC AnimationFLC
Text FileTXTText & ProgramCode
Formatted Text (Comma Delimited)CSV
Formatted Text (Space Delimited)PRN
C++ Program CodeCPP
C/C++ Program CodeC
C/Java Header FileH
XML FileXML
FORTRAN Program CodeF
FORTRAN Program CodeT90
Compilation Control FileMAKEFILE
152
SafeGuard Enterprise
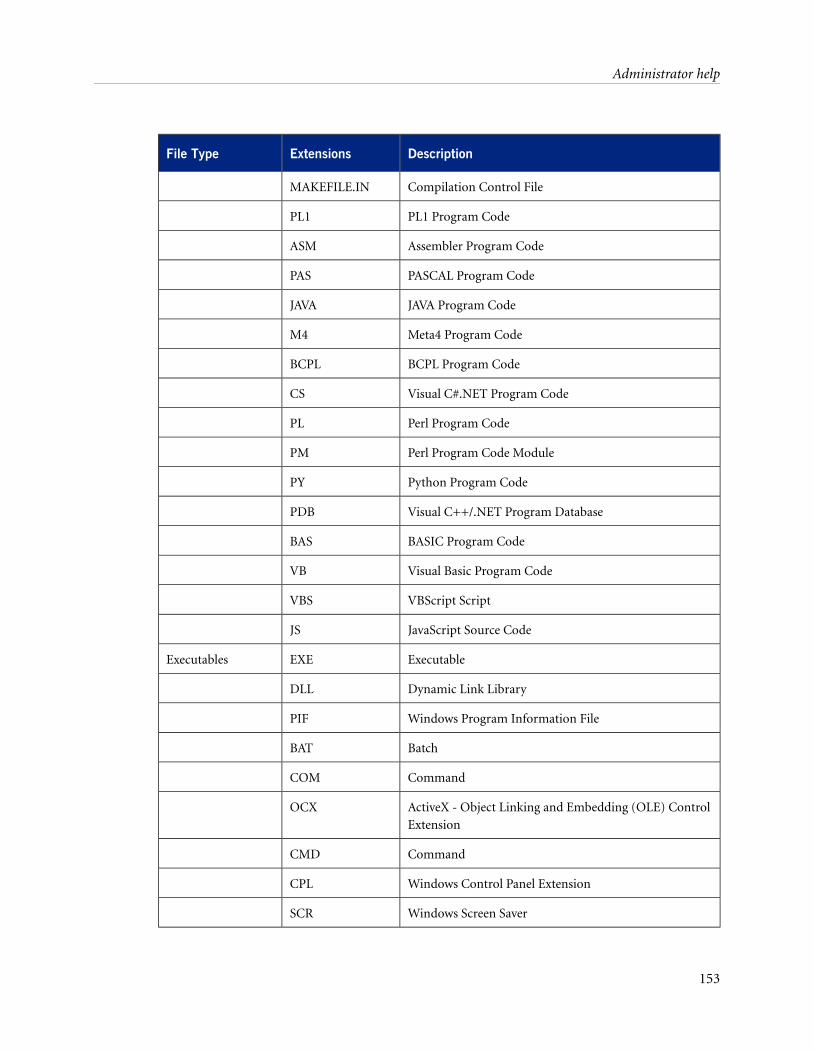
DescriptionExtensionsFile Type
Compilation Control FileMAKEFILE.IN
PL1 Program CodePL1
Assembler Program CodeASM
PASCAL Program CodePAS
JAVA Program CodeJAVA
Meta4 Program CodeM4
BCPL Program CodeBCPL
Visual C#.NET Program CodeCS
Perl Program CodePL
Perl Program Code ModulePM
Python Program CodePY
Visual C++/.NET Program DatabasePDB
BASIC Program CodeBAS
Visual Basic Program CodeVB
VBScript ScriptVBS
JavaScript Source CodeJS
ExecutableEXEExecutables
Dynamic Link LibraryDLL
Windows Program Information FilePIF
BatchBAT
CommandCOM
ActiveX - Object Linking and Embedding (OLE) ControlExtension
OCX
CommandCMD
Windows Control Panel ExtensionCPL
Windows Screen SaverSCR
153
Administrator help
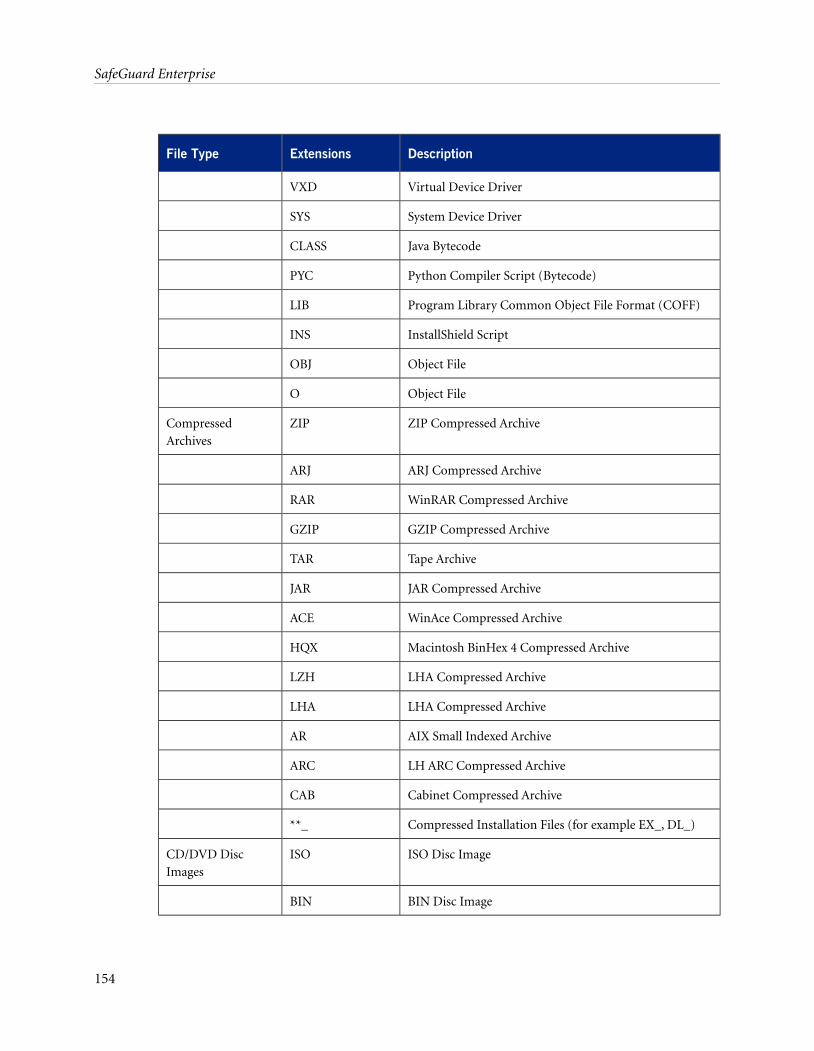
DescriptionExtensionsFile Type
Virtual Device DriverVXD
System Device DriverSYS
Java BytecodeCLASS
Python Compiler Script (Bytecode)PYC
Program Library Common Object File Format (COFF)LIB
InstallShield ScriptINS
Object FileOBJ
Object FileO
ZIP Compressed ArchiveZIPCompressedArchives
ARJ Compressed ArchiveARJ
WinRAR Compressed ArchiveRAR
GZIP Compressed ArchiveGZIP
Tape ArchiveTAR
JAR Compressed ArchiveJAR
WinAce Compressed ArchiveACE
Macintosh BinHex 4 Compressed ArchiveHQX
LHA Compressed ArchiveLZH
LHA Compressed ArchiveLHA
AIX Small Indexed ArchiveAR
LH ARC Compressed ArchiveARC
Cabinet Compressed ArchiveCAB
Compressed Installation Files (for example EX_, DL_)**_
ISO Disc ImageISOCD/DVD DiscImages
BIN Disc ImageBIN
154
SafeGuard Enterprise
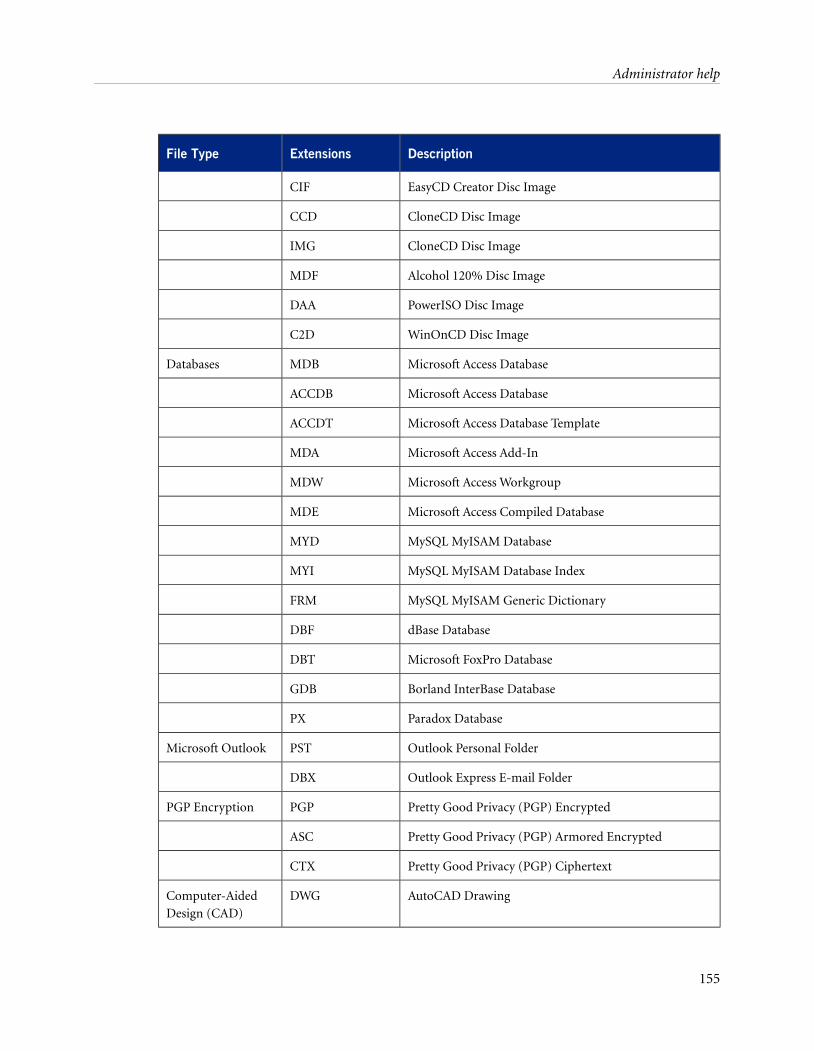
DescriptionExtensionsFile Type
EasyCD Creator Disc ImageCIF
CloneCD Disc ImageCCD
CloneCD Disc ImageIMG
Alcohol 120% Disc ImageMDF
PowerISO Disc ImageDAA
WinOnCD Disc ImageC2D
Microsoft Access DatabaseMDBDatabases
Microsoft Access DatabaseACCDB
Microsoft Access Database TemplateACCDT
Microsoft Access Add-InMDA
Microsoft Access WorkgroupMDW
Microsoft Access Compiled DatabaseMDE
MySQL MyISAM DatabaseMYD
MySQL MyISAM Database IndexMYI
MySQL MyISAM Generic DictionaryFRM
dBase DatabaseDBF
Microsoft FoxPro DatabaseDBT
Borland InterBase DatabaseGDB
Paradox DatabasePX
Outlook Personal FolderPSTMicrosoft Outlook
Outlook Express E-mail FolderDBX
Pretty Good Privacy (PGP) EncryptedPGPPGP Encryption
Pretty Good Privacy (PGP) Armored EncryptedASC
Pretty Good Privacy (PGP) CiphertextCTX
AutoCAD DrawingDWGComputer-AidedDesign (CAD)
155
Administrator help
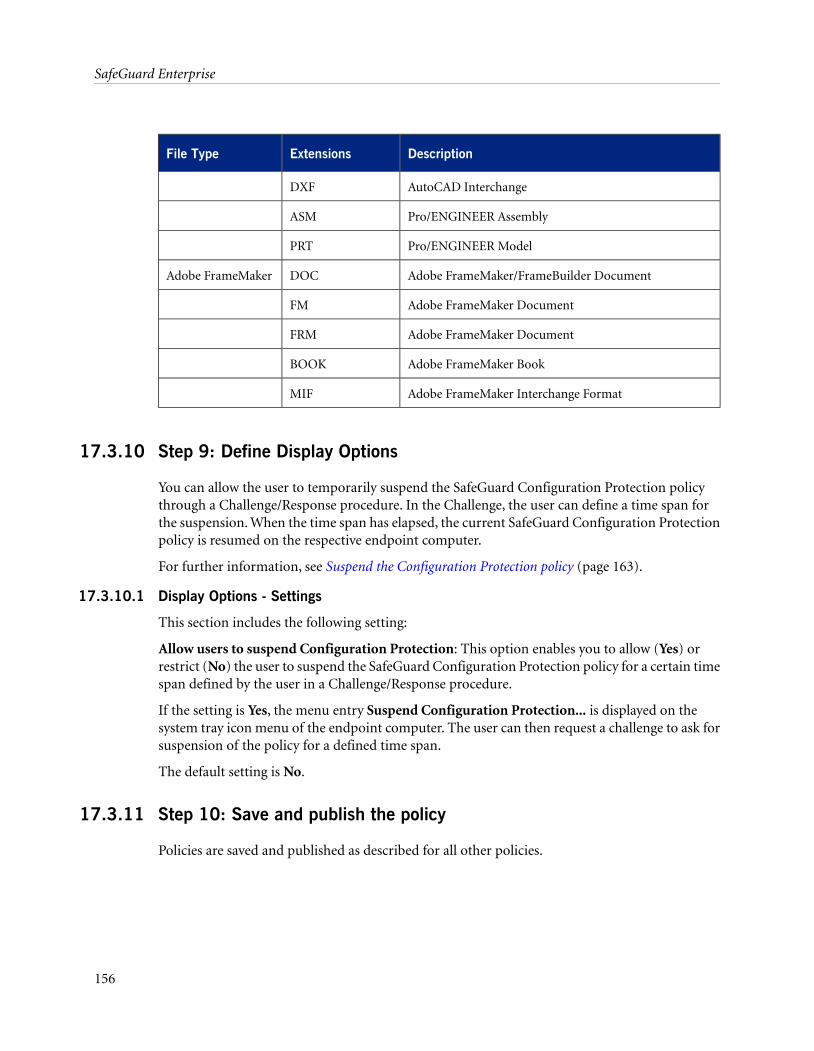
DescriptionExtensionsFile Type
AutoCAD InterchangeDXF
Pro/ENGINEER AssemblyASM
Pro/ENGINEER ModelPRT
Adobe FrameMaker/FrameBuilder DocumentDOCAdobe FrameMaker
Adobe FrameMaker DocumentFM
Adobe FrameMaker DocumentFRM
Adobe FrameMaker BookBOOK
Adobe FrameMaker Interchange FormatMIF
17.3.10 Step 9: Define Display Options
You can allow the user to temporarily suspend the SafeGuard Configuration Protection policythrough a Challenge/Response procedure. In the Challenge, the user can define a time span forthe suspension. When the time span has elapsed, the current SafeGuard Configuration Protectionpolicy is resumed on the respective endpoint computer.
For further information, see Suspend the Configuration Protection policy (page 163).
17.3.10.1 Display Options - Settings
This section includes the following setting:
Allow users to suspend Configuration Protection: This option enables you to allow (Yes) orrestrict (No) the user to suspend the SafeGuard Configuration Protection policy for a certain timespan defined by the user in a Challenge/Response procedure.
If the setting is Yes, the menu entry Suspend Configuration Protection... is displayed on thesystem tray icon menu of the endpoint computer. The user can then request a challenge to ask forsuspension of the policy for a defined time span.
The default setting is No.
17.3.11 Step 10: Save and publish the policy
Policies are saved and published as described for all other policies.
156
SafeGuard Enterprise
17.4 White Lists - approving devices and WLAN connections
The explanations in the following sections refer to adding approved devices to the Device ControlWhite List and adding approved storage devices to the Storage Control White List. Wheredifferences exist between adding storage and non-storage devices, they are pointed out andexplained.
Explanations on how to add approved WLAN networks can be found in Adding WLAN Connections.
SafeGuard Configuration Protection provides you with three levels of permissions:
■ Device Types and Storage Types: This option enables you to allow or restrict access to anendpoint according to the type of device that is connected. For example: Removable Media,Network Adapters, Human Interface devices (such as a mouse), or Imaging Devices. The devicetypes and storage types available for selection are built into SafeGuard Configuration Protectionand are found in the Device Control section and the Storage Control section. A device typemay be allowed (default), blocked, or restricted. If you restrict a device type, all devices ofthis type are blocked unless specifically approved in a White List.
■ White List for Device Models: This option refers to approving models of devices or storagedevices, such as all HP printers or all M-Systems USB Memory Sticks.
■ White List for Distinct Devices: This option refers to approving distinct devices or storagedevices, each with its own unique serial number, meaning each is an actual specific device. Forexample, if you wish to approve the use of the CEO's USB Memory Stick and block all otherUSB Memory Stick devices, you should set the Removable Media storage type to Restrict, andthen enter the identifying parameters of the CEO's USB Memory Stick in a White List forspecific Distinct Storage Devices.
As a security officer you can create several White Lists. All applied White Lists will be merged.This way you can create different White Lists in different Configuration Protection policies andyou can be sure that the complete set of White Lists is applied on the SafeGuard Enterprise endpointcomputer. Security Officers can review the list of applied White Lists in the resulting set of policies(RSOP) tab in Users and Computers.
Note: To view the RSOP (Resulting Set of Polices, the settings valid for a specific computer/group),you need at least Read Only access rights for the relevant objects.
Note:
The No Override option does not affect White Lists. You can use this option when you assignpolicies to prevent them from being overwritten. White Lists are merged in any case.
This section describes how to
■ create a White List and
■ how to add approved models or distinct devices to a White List either from the list of deviceswhose usage was detected in your organization by SafeGuard PortAuditor, or manually.
157
Administrator help
17.4.1 Create White Lists
To register a White List:
1. In the Policies navigation area, select White List.
2. In the context menu of White List, click New > White List.
3. In White List name enter a name for the White List.
4. Select the White List type
White Lists can be created for:
■ Device Models■ Distinct Devices■ Storage Device Models■ Distinct Storage Devices■ WLAN Networks
The individual White Lists can be selected when defining policy settings.
5. Under Source of White List, specify whether you want to create the White List manually orwhether you intend to use the result of a scan of the computers by SafeGuard PortAuditor asa source.
Note:
The results of the SafeGuard PortAuditor scan have to be available (XML file), if you intendto create the White List based on this source.
■ Create White List manually
If you select this option, an empty White List will be opened in the SafeGuard ManagementCenter after clicking OK. In this empty White List you can create entries manually. To addnew entries, click the green Add (Insert) icon in the SafeGuard Management Center toolbar.
■ Import from SafeGuard Port Auditor Result
If you select this option, the result of the scan by SafeGuard PortAuditor will be imported.
You can select the file provided by SafeGuard PortAuditor by using the [...] button.
After clicking OK the contents of the imported file will be displayed in the SafeGuard ManagementCenter.
17.4.2 Add a device using a SafeGuard PortAuditor file
Prerequisite: Creating a device information file
In order to create a file that contains the information about the devices you wish to approve, useSafeGuard PortAuditor to scan the required computers. SafeGuard PortAuditor scans the selectedcomputers and reports on all devices and WLAN networks currently or previously connected to
158
SafeGuard Enterprise
those computers. The audit results are stored in an .XML file. To learn about SafeGuardPortAuditor, see SafeGuard PortAuditor 3.2 User Guide.
17.4.2.1 Step 1: Get device information
In this step you specify the file from which to gather the information about devices that will beadded (the location of the SafeGuard PortAuditor .XML file that contains the required deviceinformation). After you have selected the required file using [...], click OK to continue.
17.4.2.2 Step 2: Select devices
Step 2 displays a table of the devices detected on the endpoints in your network and enables youto select the ones to add. The table is divided into categories, depending on whether the WhiteList to which you are adding devices is a Device Models White List or a Distinct Devices WhiteList, and whether you are adding storage devices or non-storage devices.
Selectable devices have a check box beside them which you should check if you want to approvethe device model or the distinct device, as the case may be. You can also select or deselect all ormarked devices when you right-click in the table.
Note:
You cannot add storage devices to the Device Control White List.
Note:
You cannot add devices or storage devices without a distinct ID to a Distinct Devices White List.
Occasionally, a device may not be identified as a storage device by SafeGuard PortAuditor. Thismay happen, for example, when a device class has not been embedded by the manufacturer. Inthis case, if you know that it is in fact storage, you may add it to your policy's storage white list.
You must avoid adding storage devices to a Device Control White List or adding non-storagedevices to a Storage Control White List, as they will be ignored by the SafeGuard ConfigurationProtection Client.
Note:
When you add a device that already belongs to another device White List in this policy, and theWhite List permissions differ, the most permissive will apply.
17.4.2.3 Step 3: Save White List
Save the White List by clicking the Save icon in the SafeGuard Enterprise toolbar.
Using the Modify contents button you can insert the contents from another file into the WhiteList.
New entries will be appended at the end of the White List. The White List can now be used in aConfiguration Protection policy.
17.4.2.4 Add a device manually
If you have created an empty White List, you have to add the entries manually.
159
Administrator help
If you want to add devices to an existing White List, as in the case of devices that have not beenconnected to any endpoint in your organization and therefore do not appear in the SafeGuardPortAuditor audit results, you also have to add them manually.
The following instructions apply both when adding storage devices (in Storage Control) and whenadding non-storage devices (in Device Control).
Note:
When you add a device that already belongs to another device White List in this policy, and theWhite List permissions differ, the most permissive will apply.
We strongly recommend that you keep the number of allowed devices at a manageable level in awhite list. Adding substantially more than 1,000 devices to a white list can considerably impactthe computer‘s performance when evaluating the policy.
To add a device manually:
1. Click the Add (Insert) icon in the SafeGuard Management Center toolbar to add a new entryto the White List.
2. Enter the required information in the following fields:
a) Port – optional
b) Description – optional
c) Device Information – optional
d) Vendor (Vendor ID) – optional
e) Product (Product ID) – optional
f) Hardware ID/Instance ID – required
Double-check that you have entered the correct data in all fields and save the White List.
Selecting an entry and clicking the Delete icon in the SafeGuard Enterprise toolbar removes theentry from the White List.
Note:
Vendor ID (VID), Product ID (PID), Hardware ID (HID) and Instance ID (IID) can be found inthe SafeGuard PortAuditor scan results, on a sticker attached to the product itself or in WindowsDevice Manager.
17.4.3 Adding WLAN connections
WLAN links are added to the WLAN Network White List in much the same way this is done inthe case of devices; add a WLAN White list, then add approved links to this White List using thedata from the SafeGuard Port Auditor file, or manually.
160
SafeGuard Enterprise
17.4.3.1 Add a WLAN link manually
If you want to add WLAN links that were not detected by SafeGuard PortAuditor, and as a resultcannot be added using the import mechanism, you can do so manually.
By entering the WLAN network information you define the parameters a network must match inorder for it to be approved for connection.
You can identify a network by its name and/or by its MAC address. After you enter a networkname or a MAC address, you can also specify authentication and data encryption parameterswhich must be matched. Only networks matching all the parameters are approved.
To add a WLAN link manually:
1. Open the White List for WLAN connections.
2. Click the Add (Insert) icon in the SafeGuard Management Center toolbar to add a new entryto the White List.
3. Enter Network Name, MAC Address or both. It is required to add information to at least oneof the two fields.
4. If you want to specify the Network Name only, enter the name and continue with step 6.
5. If you want to specify the MAC Address only, enter the address and continue with step 6.
6. To define security settings, specify the required Authentication and Data Encryption settingsfrom the drop-down list. Adding information to these fields is optional.
Note:
The Data Encryption options available in the drop-down list depend on the selectedAuthentication type. For example, for WPA authentication, the encryption options are TKIPor AES, whereas in the case of 802.1X authentication only WEP encryption is available forselection.
7. Double-check that you have entered the correct data in all the fields and save the White List.
17.5 Supported device types
This chapter lists the device types that SafeGuard Configuration Protection provides for yourselection when building a policy.
For non-storage devices you can restrict the usage of devices on USB, FireWire, and PCMCIAports. SafeGuard Configuration Protection provides a selection of built-in types in the DeviceControl window to enable you to define which types of devices are approved or blocked. If yourequire control of a device type that is not listed here, you can use the Distinct Device restrictionfeature described in White Lists -Approving Devices and WLAN Connections.
For storage devices, SafeGuard PortAuditor is mostly able to identify whether a device is a storagedevice or a non-storage device, by detecting its volume, or using its embedded class data. Thisability helps categorize and organize device lists into storage devices and simple (non-storage)devices for your selection, thus enabling you to define your policy more easily. SafeGuard
161
Administrator help
Configuration Protection provides a selection of built-in types in the Storage Control window toenable you to define which types of devices will be approved or blocked.
The following device type lists are divided into non-storage devices and storage devices.
17.5.1 Non-storage device types
The following lists the non-storage built-in device types for which a policy can be defined inSafeGuard Configuration Protection.
Note:
Device Control for non-storage devices can only be defined for USB, FireWire, and PCMCIAports.
1. Human Interface Device – devices used to control the operation of computer systems. Typicalexamples include keyboards and pointing devices, such as: mouse, trackballs, and joysticks.
2. Printing Devices – Printers connected over USB, PCMCIA, or FireWire.
3. Personal Data Assistants (PDAs) - These include:
Windows Mobile / Pocket PC Devices
Blackberry Devices
Palm OS Devices
4. Mobile Phones – New models of cellular phones, categorized in USB as 'Wireless USB Devices'.
5. Network Adapters - Communication devices such as: Ethernet network adapters, WLANadapters, and USB-connected ADSL and cable modems.
6. Imaging Devices - Primarily devices such as scanners and digital still cameras.
7. Audio/Video Devices - devices such as: microphones, telephones, volume controls, webcameras, digital camcorders, digital television tuners and digital still-image cameras that supportvideo streaming.
8. Smartcards - smartcard devices.
9. Content Security Devices - used to provide special security features, such as strongauthentication, biometric identification and software licensing.
17.5.2 Storage device types
Protection of storage devices applies to all non-blocked ports, meaning that it applies to thespecified storage device no matter to which port it is connected as long as that port is not definedas blocked.
Note:
Device Control for storage devices can be defined for any port type including, for example, parallelports, USB, FireWire, and PCMCIA ports.
162
SafeGuard Enterprise
The following lists the storage built-in device types that are supported by SafeGuard ConfigurationProtection.
■ Removable Media – These devices range from storage-only devices, such as USB MemorySticks and SD flash cards, to devices that have a unique purpose, but appear to the computeras a new storage drive, such as portable digital music players, digital cameras and PDAs.
■ External Hard Drives – hard disk devices which are externally attached (for example by USB).
■ CD/DVD Drives – both internally and externally attached.
■ Floppy Devices – both internally and externally attached.
■ Tape Devices – both internally and externally attached.
17.6 Challenge/Response for suspending the Configuration Protectionpolicy
SafeGuard Configuration Protection can be suspended on the endpoint computer using aChallenge/Response procedure.
This involves the following:
■ The endpoint computer on which the Challenge will be requested.
■ The SafeGuard Management Center where, as a help desk officer with sufficient rights, youcreate a response code that authorizes the user to suspend the policy for a specified time spanon their computer.
17.6.1 Suspend the Configuration Protection policy
■ The user must have the right to suspend the Configuration Protection Policy (ConfigurationProtection policy, setting Display Options, Allow users to suspend Configuration Protectionset to Yes).
■ The help desk must have the following right assigned: Use suspension tool.
■ The help desk officer must have Full access rights for the relevant computer.
To suspend the policy:
1. On the endpoint computer, the user clicks the system tray icon and selects SuspendConfiguration Protection.
2. In Suspend Configuration Protection, the user selects the desired time span for suspension.The challenge code is generated automatically. It is valid for 30 minutes. The user provides theuser information, challenge code and desired suspension period to the help desk.
3. In the SafeGuard Management Center, on the Tools menu, select Suspend.
4. In the Suspension Wizard, on the User page, select or enter the user information the user hasprovided and click Next. The user information is confirmed.
163
Administrator help
5. On the Challenge page, enter the challenge code the user has provided or copy it from theclipboard by clicking Paste Challenge. Select the suspension time span as provided by the user.The time span must match the one the user has entered on the endpoint computer. Click Next.
The challenge code is confirmed and the response code is generated.
6. On the Response page, the response code, the granted action and suspension time span isdisplayed. Provide this information to the user. You can either use the spelling aid or copy theinformation to the clipboard to send it by e-mail or text message.
7. Click Finish.
8. On the endpoint computer, in Suspend Configuration Protection, the user enters or copiesthe response code the help desk has provided. The user must make sure that the time spanmatches the one the help desk has provided. The user clicks OK.
The Configuration Protection policy is suspended for the specified time span. It can be resumedin two ways:
■ During the specified suspension time, on the endpoint computer, the user clicks the systemtray icon and selects Resume Configuration Protection.
■ After the specified suspension time has elapsed, the current Configuration Protection policyis resumed automatically.
164
SafeGuard Enterprise
18 Full disk encryption
The core of SafeGuard Enterprise is the encryption of data on different data storage devices. Fulldisk encryption can be volume or file-based with different keys and algorithms.
Files are encrypted transparently. When users open, edit and save files, they are not prompted forencryption or decryption.
As a security officer, you specify the settings for encryption in a security policy of the type DeviceProtection. For further information, see Working with policies (page 65), and see Device Protection(page 123).
18.1 Volume-based full disk encryption
With volume-based full disk encryption, all data on a volume (including boot files, pagefiles,hibernation files, temporary files, directory information etc.) are encrypted. Users do not have tochange normal operating procedures or consider security.
To apply volume-based encryption to endpoint computers, create a policy of the type DeviceProtection and set the Media encryption mode to Volume-based. For further information, seeDevice Protection (page 123).
Note:
■ Volume-based encryption/decryption is not supported for drives without a drive letter assigned.
■ If an encryption policy exists for a volume or a volume type and encryption of the volume fails,the user is not allowed to access it.
■ Endpoints can be shut down and restarted during encryption/decryption.
■ If decryption is followed by an uninstallation, we recommend that the endpoint is not suspendedor hibernated during decryption.
■ If after volume encryption a new policy is applied to an endpoint computer that allowsdecryption, the following applies: After a complete volume-based encryption, the endpointcomputer must be restarted at least once before decryption can be started.
18.1.1 Fast initial encryption
SafeGuard Enterprise offers fast initial encryption as a special mode for volume-based encryption.It reduces the time needed for initial encryption (or final decryption) of volumes on endpointcomputers by accessing only disk space that is actually in use.
For fast initial encryption, the following prerequisites apply:
■ Fast initial encryption only works on NTFS-formatted volumes.
■ NTFS-formatted volumes with a cluster size of 64 KB cannot be encrypted with the fast initialencryption mode.
165
Administrator help
Note:
This mode leads to a less secure state if a disk has been used before its current usage with SafeGuardEnterprise. Unused sectors may still contain data. Fast initial encryption is therefore disabled bydefault.
To enable fast initial encryption, select the setting Fast initial encryption in a policy of the typeDevice Protection.
Note:
For volume decryption, the fast initial encryption mode will always be used, regardless of thespecified policy setting. For decryption, the prerequisites listed also apply.
18.1.2 Volume-based encryption and Windows 7 system partition
For Windows 7 Professional, Enterprise and Ultimate, a system partition is created on endpointcomputers without a drive letter assigned. This system partition cannot be encrypted by SafeGuardEnterprise.
18.1.3 Volume-based encryption and Unidentified File System Objects
Unidentified File System Objects are volumes that cannot be clearly identified as plain ordevice-encrypted by SafeGuard Enterprise. If an encryption policy exists for an Unidentified FileSystem Object, access to this volume will be denied. If no encryption policy exists, the user canaccess the volume.
Note:
If an encryption policy with Key to be used for encryption set to an option that enables keyselection (for example, Any key in user key ring) exists for an Unidentified File System Objectvolume, there is a period of time between the key selection dialog being displayed and access beingdenied. During this time period the volume can be accessed. As long as the key selection dialog isnot confirmed, the volume is accessible. To avoid this, specify a preselected key for encryption.For further information on the relevant policy settings, see Device Protection (page 123). This periodof time also occurs for Unidentified File System Object volumes connected to an endpointcomputer, if the user has already opened files on the volume when an encryption policy takeseffect. In this case, it cannot be guaranteed that access to the volume will be denied as this couldlead to data loss.
18.1.4 Encryption of volumes with enabled Autorun functionality
If you apply an encryption policy to volumes for which Autorun is enabled, the following canoccur:
■ The volume is not encrypted.
■ If the volume is an Unidentified File System Object, access is not denied.
166
SafeGuard Enterprise
18.1.5 Access to BitLocker To Go encrypted volumes
If SafeGuard Enterprise is used with BitLocker To Go support enabled and a SafeGuard Enterpriseencryption policy exists for a BitLocker To Go encrypted volume, access to the volume will bedenied. If no SafeGuard Enterprise encryption policy exists, the user can access the volume.
Note:
If the Autorun settings for a BitLocker To Go encrypted USB stick are set to the default values, itcan occur that access will not be denied although a SafeGuard Enterprise encryption policy exists.This only occurs under Windows Vista.
For further information on BitLocker To Go, see SafeGuard Enterprise and BitLocker To Go (page280).
18.2 File-based full disk encryption
File-based encryption ensures that all data is encrypted, apart from Boot Medium and directoryinformation. With file-based encryption, even optical media such as CD/DVD can be encrypted.Also, data can be exchanged with external computers on which SafeGuard Enterprise is not installed,if policies permit, see SafeGuard Data Exchange (page 179).
Note:
Data encrypted using “file-based encryption” cannot be compressed. Nor can compressed databe file-based encrypted.
Note:
Boot volumes are never file-based encrypted. They are automatically exempted from file-basedencryption, even if a corresponding rule is defined.
To apply file-based encryption to endpoint computers, create a policy of the type Device Protectionand set the Media encryption mode to File-based.
18.2.1 Default behavior when saving files
Since applications behave differently when saving files, SafeGuard Enterprise offers two ways forhandling encrypted files, that have been modified.
If a file is encrypted with a different key than the default key of the volume and you edit the fileand save it, you may expect the original encryption key to be preserved, since you are editing afile, not creating a new one. But many applications save files by performing a combination of save,delete, and rename operations (for example Microsoft Office). If they do so, the default SafeGuardEnterprise setting is to use the default key for this encryption task and therefore change the keyused for encryption.
If you want to change this behavior and preserve the key used for encryption in any case, you canmodify a registry key on the endpoint computer.
167
Administrator help
To always use the same key as before when saving modified files:
[HKEY_LOCAL_MACHINE\SYSTEM\CurrentControlSet\Control\UTIMACO\SGLCENC]"ActivateEncryptionTunneling"=dword:00000001
To allow the use of a different key (default key) when saving modified files. This is the defaultsetting after installation:
[HKEY_LOCAL_MACHINE\SYSTEM\CurrentControlSet\Control\UTIMACO\SGLCENC]"ActivateEncryptionTunneling"=dword:00000000
Note:
Changes in this setting require a restart of the endpoint computer to become active.
168
SafeGuard Enterprise
19 File Share
The SafeGuard Enterprise module File Share offers file-based encryption on local drives andnetwork locations, mainly for work groups on network shares.
In the SafeGuard Management Center, you define the rules for file-based encryption in File Sharepolicies. In these File Share encryption rules, you specify the folders that are to be handled by FileShare, the encryption mode and the key to be used for encryption. In General Settings policies,you can define how specific applications and file systems are handled on endpoint computers inthe context of File Share. You can specify ignored and trusted applications as well as ignoreddevices. You can also enable persistent encryption for File Share.
For encryption, Personal Keys can be used. A Personal Key that is active for a user only applies tothis particular user and cannot be shared with or assigned to any other users. You can createPersonal Keys in the SafeGuard Management Center under Users and Computers.
After a File Share policy has been assigned to endpoint computers, files in the locations coveredby the policy are transparently encrypted without user interaction:
■ New files in the relevant locations are encrypted automatically.
■ If users have the key for an encrypted file, they can read and modify the content.
■ If users do not have the key for an encrypted file, access is denied.
■ If a user accesses an encrypted file on an endpoint computer where File Share is not installed,the encrypted content is shown.
Already existing files in the locations covered by the encryption policy are not encryptedautomatically. Users have to carry out an initial encryption in the SafeGuard File EncryptionWizard on the endpoint computer. For further information, see the SafeGuard Enterprise userhelp.
Note: SafeGuard File Share is not compatible with Windows built-in EFS encryption and filecompression. If EFS is enabled, it has priority over any applicable File Share encryption rule andfiles that are created in the relevant folder cannot be encrypted by File Share. If compression isenabled, File Share encryption has a higher priority and files are encrypted but not compressed.To encrypt the files by File Share, EFS encryption or data compression has to be removedbeforehand. This can be done manually or by running the SafeGuard Enterprise Initial EncryptionWizard.
19.1 Configure encryption rules in File Share policies
You define the rules for file-based encryption on network locations in a policy of the type FileShare.
169
Administrator help

Note: Certain folders (for example c:\program files) may prevent the operating system orapplications from running when encrypted. When you define encryption rules, make sure thatthese folders are not encrypted.
1. In the Policies navigation area, create a new policy of the type File Share or select an existingone.
The File Share policy rules table is displayed.
2. In the Path column, set the path (that is the folder) to be handled by File Share:
■ Click the drop-down button and select a folder name placeholder from the list of availableplaceholders.
Note: By hovering your cursor over the list entries, you can display tooltips telling you howa placeholder is typically presented on an endpoint computer. You can only enter validplaceholders. For a description of all available placeholders, see Placeholders for paths in FileShare encryption rules (page 172).
Note: Encrypting the whole user profile with the placeholder <User Profile> may result inan unstable Windows desktop on the endpoint.
■ Click the Browse button to browse the file system and select the required folder.■ Alternatively, just enter a path name.
Note: For useful information on configuring paths in File Share rules, see Additional informationfor configuring paths in File Share encryption rules (page 171).
3. In the Scope column, select
■ Only this folder to apply the rule only to the folder indicated by the Path column, or■ Include subfolders to also apply the rule to all its subfolders.
4. In the Mode column, define how File Share should handle the folder indicated in the Pathcolumn:
■ Select Encrypt to encrypt new files in the folder. The content of the existing encrypted filesare decrypted transparently when a user with the required key accesses them. If the userdoes not have the required key, access is denied.
■ If you select Exclude, new files in the folder are not encrypted. You might use this optionto exclude a subfolder from encryption if the parent folder is already covered by a rule withthe Encrypt option.
■ If you select Ignore, files in the folder are not handled by File Share at all. New files aresaved in plain. If a user accesses already encrypted files in this folder, the encrypted contentis displayed, regardless whether the user has the required key or not.
170
SafeGuard Enterprise
5. In the Key column, select the key to be used for the Encrypt mode. You can use keys createdand applied in Users and Computers:
■ Click the Browse button to open the Find Keys dialog. Click Find now to display a list ofall available keys and select the required key.
Note: Machine keys are not shown in the list. They cannot be used by File Share as theyare only available on a single machine and can therefore not be used to enable groups ofusers to access the same data.
■ Click the Personal Key button with the key icon, to insert the Personal Key placeholder inthe Key column. On the endpoint computer, this placeholder will be resolved to the activePersonal Key of the logged on SafeGuard Enterprise user. If the relevant users do not haveactive Personal Keys yet, they are created automatically. You can create Personal Keys forsingle or multiple users in Users and Computers. For further information, see PersonalKeys for file-based encryption by File Share (page 54).
6. Add further encryption rules as required and save your changes.
Note: All File Share encryption rules that are assigned by policies and activated forusers/computers at different nodes in Users and Computers are cumulated. The order ofencryption rules within a File Share policy is not relevant for their evaluation on the endpointcomputer. Within a File Share policy, you can drag the rules into order to gain a better overview.
19.1.1 Additional information for configuring paths in File Share encryption rules
When configuring paths in File Share encryption rules, consider the following.
■ A path can only contain characters that can also be used in file systems. Characters like <, >,* and $ are not allowed.
■ You can only enter valid placeholders. For a list of all supported placeholders, see Placeholdersfor paths in File Share encryption rules (page 172).
Note: Names of environment variables are not checked by the SafeGuard Management Center.They only need to be present on the endpoint computer.
■ The Path field always indicates a folder.You cannot specify a rule for a single file or use wildcardsfor folder names, file names or file extensions.
■ Absolute and relative rules
You can define absolute and relative rules. An absolute rule exactly defines a specific folder,for example C:\encrypt. A relative rule does not include UNC server/share information, driveletter information or parent folder information. An example for a path used in a relative ruleis encrypt_sub. In this case, all files on all drives (including network locations) that reside ina folder encrypt_sub (or one of its subfolders) are covered by the rule.
■ Long folder names and 8.3 notation
171
Administrator help
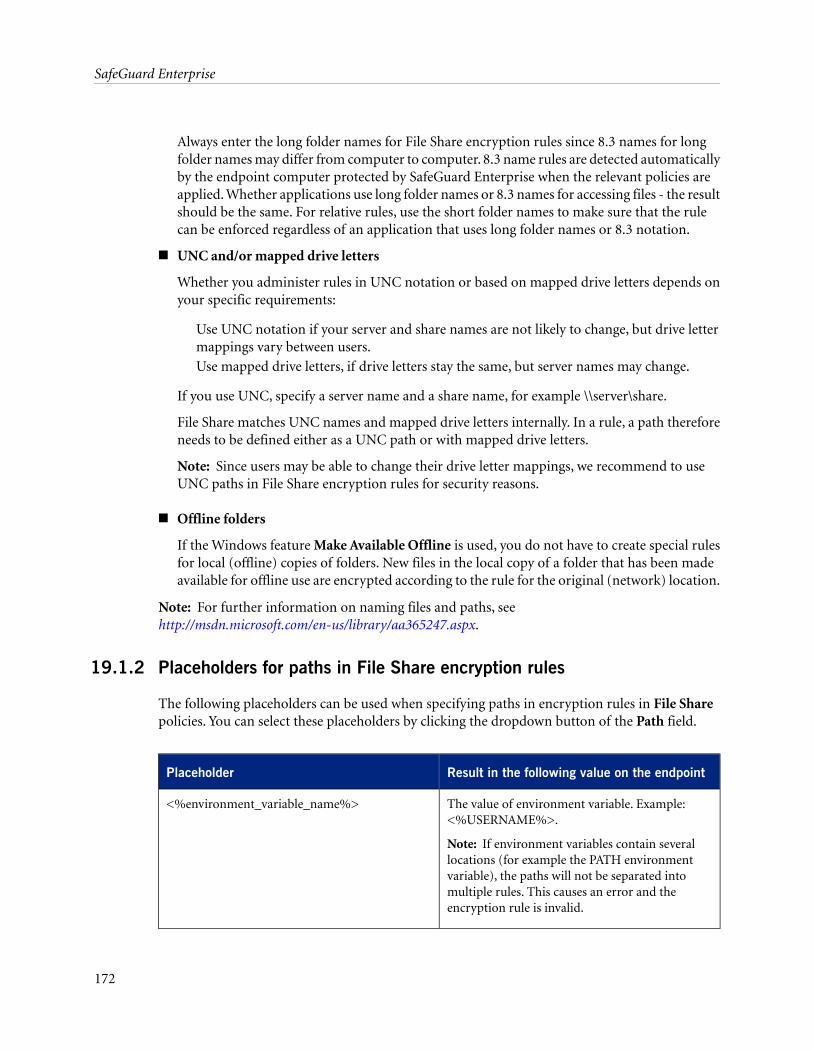
Always enter the long folder names for File Share encryption rules since 8.3 names for longfolder names may differ from computer to computer. 8.3 name rules are detected automaticallyby the endpoint computer protected by SafeGuard Enterprise when the relevant policies areapplied. Whether applications use long folder names or 8.3 names for accessing files - the resultshould be the same. For relative rules, use the short folder names to make sure that the rulecan be enforced regardless of an application that uses long folder names or 8.3 notation.
■ UNC and/or mapped drive letters
Whether you administer rules in UNC notation or based on mapped drive letters depends onyour specific requirements:
Use UNC notation if your server and share names are not likely to change, but drive lettermappings vary between users.
Use mapped drive letters, if drive letters stay the same, but server names may change.
If you use UNC, specify a server name and a share name, for example \\server\share.
File Share matches UNC names and mapped drive letters internally. In a rule, a path thereforeneeds to be defined either as a UNC path or with mapped drive letters.
Note: Since users may be able to change their drive letter mappings, we recommend to useUNC paths in File Share encryption rules for security reasons.
■ Offline folders
If the Windows feature Make Available Offline is used, you do not have to create special rulesfor local (offline) copies of folders. New files in the local copy of a folder that has been madeavailable for offline use are encrypted according to the rule for the original (network) location.
Note: For further information on naming files and paths, seehttp://msdn.microsoft.com/en-us/library/aa365247.aspx.
19.1.2 Placeholders for paths in File Share encryption rules
The following placeholders can be used when specifying paths in encryption rules in File Sharepolicies. You can select these placeholders by clicking the dropdown button of the Path field.
Result in the following value on the endpointPlaceholder
The value of environment variable. Example:<%USERNAME%>.
Note: If environment variables contain severallocations (for example the PATH environment
<%environment_variable_name%>
variable), the paths will not be separated intomultiple rules. This causes an error and theencryption rule is invalid.
172
SafeGuard Enterprise
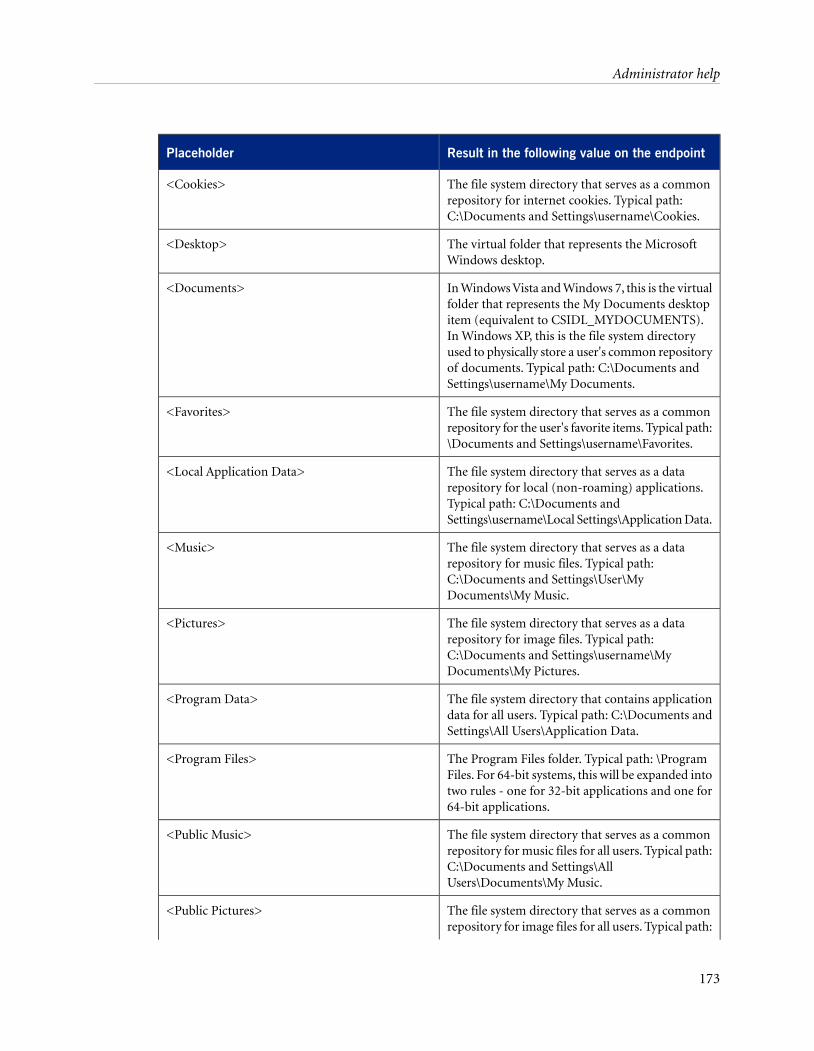
Result in the following value on the endpointPlaceholder
The file system directory that serves as a commonrepository for internet cookies. Typical path:C:\Documents and Settings\username\Cookies.
<Cookies>
The virtual folder that represents the MicrosoftWindows desktop.
<Desktop>
In Windows Vista and Windows 7, this is the virtualfolder that represents the My Documents desktop
<Documents>
item (equivalent to CSIDL_MYDOCUMENTS).In Windows XP, this is the file system directoryused to physically store a user's common repositoryof documents. Typical path: C:\Documents andSettings\username\My Documents.
The file system directory that serves as a commonrepository for the user's favorite items. Typical path:\Documents and Settings\username\Favorites.
<Favorites>
The file system directory that serves as a datarepository for local (non-roaming) applications.
<Local Application Data>
Typical path: C:\Documents andSettings\username\Local Settings\Application Data.
The file system directory that serves as a datarepository for music files. Typical path:
<Music>
C:\Documents and Settings\User\MyDocuments\My Music.
The file system directory that serves as a datarepository for image files. Typical path:
<Pictures>
C:\Documents and Settings\username\MyDocuments\My Pictures.
The file system directory that contains applicationdata for all users. Typical path: C:\Documents andSettings\All Users\Application Data.
<Program Data>
The Program Files folder. Typical path: \ProgramFiles. For 64-bit systems, this will be expanded into
<Program Files>
two rules - one for 32-bit applications and one for64-bit applications.
The file system directory that serves as a commonrepository for music files for all users. Typical path:
<Public Music>
C:\Documents and Settings\AllUsers\Documents\My Music.
The file system directory that serves as a commonrepository for image files for all users. Typical path:
<Public Pictures>
173
Administrator help
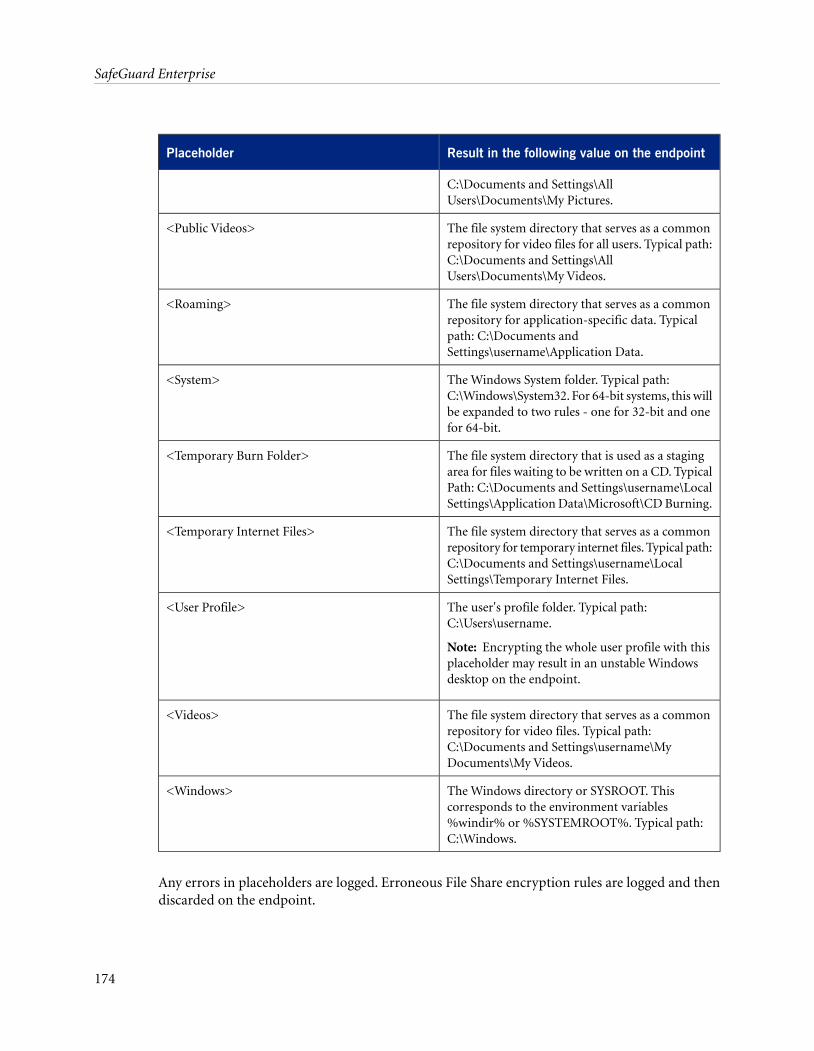
Result in the following value on the endpointPlaceholder
C:\Documents and Settings\AllUsers\Documents\My Pictures.
The file system directory that serves as a commonrepository for video files for all users. Typical path:
<Public Videos>
C:\Documents and Settings\AllUsers\Documents\My Videos.
The file system directory that serves as a commonrepository for application-specific data. Typical
<Roaming>
path: C:\Documents andSettings\username\Application Data.
The Windows System folder. Typical path:C:\Windows\System32. For 64-bit systems, this will
<System>
be expanded to two rules - one for 32-bit and onefor 64-bit.
The file system directory that is used as a stagingarea for files waiting to be written on a CD. Typical
<Temporary Burn Folder>
Path: C:\Documents and Settings\username\LocalSettings\Application Data\Microsoft\CD Burning.
The file system directory that serves as a commonrepository for temporary internet files. Typical path:
<Temporary Internet Files>
C:\Documents and Settings\username\LocalSettings\Temporary Internet Files.
The user's profile folder. Typical path:C:\Users\username.
Note: Encrypting the whole user profile with thisplaceholder may result in an unstable Windowsdesktop on the endpoint.
<User Profile>
The file system directory that serves as a commonrepository for video files. Typical path:
<Videos>
C:\Documents and Settings\username\MyDocuments\My Videos.
The Windows directory or SYSROOT. Thiscorresponds to the environment variables
<Windows>
%windir% or %SYSTEMROOT%. Typical path:C:\Windows.
Any errors in placeholders are logged. Erroneous File Share encryption rules are logged and thendiscarded on the endpoint.
174
SafeGuard Enterprise
19.2 Configure File Encryption settings in General Settings policies
In addition to the encryption rules defined in File Share policies, you can configure the followingFile Encryption settings for File Share in policies of the type General Settings:
■ Trusted Applications
■ Ignored Applications
■ Ignored Devices
■ Enable persistent encryption
19.2.1 Configure trusted and ignored applications for File Share
You can define applications as trusted to grant them access to encrypted files. This is for examplenecessary to enable antivirus software to scan encrypted files.
You can also define applications as ignored to exempt them from transparent fileencryption/decryption. For example, if you define a backup program as an ignored application,encrypted data backed up by the program remains encrypted.
Note: Child processes will not be trusted/ignored.
1. In the Policies navigation area, create a new policy of the type General Settings or select anexisting one.
2. Under File Encryption, click the dropdown button of the Trusted Applications or IgnoredApplications field.
3. In the editor list box, enter the applications to be defined as trusted/ignored.
■ You can define multiple trusted/ignored applications in one policy. Each line in the editorlist box defines one application.
■ Application names must end with .exe.
■ Application names must be specified as fully qualified paths including drive/directoryinformation, for example "c:\dir\example.exe". Entering the file name only (for example"example.exe") is not sufficient. For better usability the single line view of the applicationlist only shows the file names separated by semicolons.
■ Application names can contain the same placeholder names for Windows shell folders andenvironment variables as encryption rules in File Share policies. For a description of allavailable placeholders, see Placeholders for paths in File Share encryption rules (page 172).
4. Save your changes.
Note: The Trusted Applications and Ignored Applications policy settings are machine settings.The policy must therefore be assigned to machines, not to users. Otherwise the settings do notbecome active.
175
Administrator help
19.2.2 Configure ignored devices for File Share
You can define devices as ignored to exclude them from the file encryption process. You can onlyexclude entire devices.
1. In the Policies navigation area, create a new policy of the type General Settings or select anexisting one.
2. Under File Encryption, click the dropdown button of the Ignored Devices field.
3. In the editor list box:
a) Select Network to not encrypt data on the network at all. If you select this option, thefollowing networks are excluded from encryption:
■ Windows XP: Citrix Client Drive Mapping, Client for Microsoft networks, MicrosoftClient for NetWare, Novell Client for NetWare
■ Windows Vista/Windows 7: Multiple UNC Provider
Note: Starting with Windows Vista, the individual redirectors were replaced by MultipleUNC Provider. It is therefore no longer possible to exclude individual network filesystems from encryption.You can either exclude all network file systems from encryptionor enable encryption for all network file systems.
b) Enter the required device names to exclude specific devices from encryption. This may beuseful when you need to exclude systems from third party suppliers.
Note: You can display the names of the devices currently used in the system by using thirdparty tools (for example OSR's Device Tree). SafeGuard Enterprise logs all devices it attachesto and you can display a list of attached and ignored devices by using registry keys. Forfurther information, see Displaying ignored and attached devices for File Share configuration(page 176).
Note: You can exclude individual (network) disk drives from encryption by creating a FileShare encryption rule in a File Share policy and set the encryption Mode to Ignore.
19.2.2.1 Displaying ignored and attached devices for File Share configuration
To help you when defining ignored devices, you can use registry keys to show which devices arebeing considered for encryption (attached devices) and which devices are currently being ignored.The list of ignored devices shows only devices that are actually available on the computer and arebeing ignored. If a device is set to be ignored in a policy and the device is not available on thecomputer, the device is not listed.
Use the following registry keys to display attached and ignored devices:
■ HKLM\System\CurrentControlSet\Control\Utimaco\SGLCENC\Log\AttachedDevices
■ HKLM\System\CurrentControlSet\Control\Utimaco\SGLCENC\Log\IgnoredDevices
176
SafeGuard Enterprise
19.2.3 Configure persistent encryption for File Share
The content of files encrypted by File Share are decrypted on-the-fly, if the user owns the requiredkey. When the content is saved as a new file in a location that is not covered by an encryption rule,the resulting file will not be encrypted.
With persistent encryption, copies of encrypted files will be encrypted, even when they are savedin a location not covered by an encryption rule.
You can configure persistent encryption in policies of the type General Settings. The policy settingEnable persistent encryption is activated by default.
Note: If files are copied or moved to an ignored device or to a folder to which a policy withencryption mode Ignore applies, the Enable persistent encryption setting has no effect.
19.3 Multiple File Share policies
All File Share encryption rules that are assigned by policies and activated for users/computers atdifferent nodes in Users and Computers in the SafeGuard Management Center are cumulated.
You can assign a general File Share policy at the root node that includes rules relevant for all users,and more specific policies at specific subnodes. All rules in all policies assigned to users/computersare cumulated and enforced on the endpoint computer.
19.3.1 File Share policies in the RSOP
If several File Share policies apply to a user/computer, the RSOP (Resulting Set of Policies) tabin Users and Computers shows the sum of all File Share encryption rules of all File Share policies.The rules are sorted in the order of encryption rule evaluation on the endpoint computer (seeEvaluation of File Share encryption rules on endpoints (page 177)).
The Policy Name column shows where the individual rules originate from.
For duplicate rules, the second (and third etc.) rule is marked by an icon. This icon also providesa tooltip informing you that the rule will be discarded on the endpoint computer as it is a duplicateof a rule with a higher priority.
19.4 Evaluation of File Share encryption rules on endpoints
On endpoints, File Share encryption rules are sorted in an order that causes the more specificallydefined locations to be evaluated first:
■ If two rules with the same Path and Scope settings originate from policies that are assigned todifferent nodes, the rule from the policy nearest to the user object in Users and Computers isapplied.
177
Administrator help
■ If two rules with the same Path and Scope settings originate from policies that are assigned tothe same node, the rule from the policy with the highest priority is applied.
■ Absolute rules are evaluated before relative rules, for example c\encrypt before encrypt. Forfurther information, see Additional information for configuring paths in File Share encryptionrules (page 171).
■ Rules with a path containing more subdirectories are evaluated before rules with a pathcontaining less subdirectories.
■ Rules defined with UNC are evaluated before rules with drive letter information.
■ Rules with Only this folder activated are evaluated before rules without this option.
■ Rules with mode Ignore are evaluated before rules with mode Encrypt or Exclude.
■ Rules with mode Exclude are evaluated before rules with mode Encrypt.
■ If two rules are equal regarding the criteria listed, the one that comes first in alphabetical orderis evaluated before the other rule.
19.5 Conflicting File Share Rules
As multiple File Share policies can be assigned to a user/computer, conflicts may occur. Two rulesare considered as conflicting, if they have the same values for path, mode and subdirectory, butthe key to be used is different. In this case the rule from the File Share policy with the higherpriority applies. The other rule is discarded.
19.6 File Share and SafeGuard Data Exchange
SafeGuard Data Exchange is used to encrypt data stored on removable media connected to acomputer and to exchange this data with other users. For SafeGuard Data Exchange file-basedencryption is used.
If both SafeGuard Data Exchange and File Share are installed on an endpoint, it may occur thata SafeGuard Data Exchange encryption policy is defined for a drive on the computer and FileShare policies are defined for folders on the same drive. If this is the case, the SafeGuard DataExchange encryption policy overrules the File Share policies. New files are encrypted accordingto the SafeGuard Date Exchange encryption policy.
For further information on SafeGuard Data Exchange, see SafeGuard Data Exchange (page 179).
178
SafeGuard Enterprise
20 SafeGuard Data Exchange
SafeGuard Data Exchange is used to encrypt data stored on removable media connected to acomputer and to exchange this data with other users. All encryption and decryption processes runtransparently and involve minimum user interaction.
Only users who have the appropriate keys can read the contents of the encrypted data. Allsubsequent encryption processes run transparently.
In central administration, you define how data on removable media are handled.
As a security officer you define the specific settings in a policy of the type Device Protection withRemovable media as Device protection target.
For SafeGuard Data Exchange file-based encryption has to be used.
20.1 Group keys
To exchange encrypted data between users, SafeGuard Enterprise group keys have to be used. Ifthe group key is in the users’ key rings, the users get full transparent access to removable mediaconnected to their computers.
On computers without SafeGuard Enterprise, it is not possible to access encrypted data onremovable media, except the centrally defined domain/group key which can be used together withthe media passphrase.
Note:
To use/share encrypted data on removable media also on/with computers/users that do not haveSafeGuard Enterprise, SafeGuard Portable can be used. SafeGuard Portable requires the usage oflocal keys or a media passphrase.
20.2 Local keys
SafeGuard Data Exchange supports encryption using local keys. Local keys are created on thecomputers and can be used to encrypt data on removable media. They are created by entering apassphrase and are backed up in the SafeGuard Enterprise Database.
Note: By default a user is allowed to create local keys. If users should not be able to do so, youhave to disable this option explicitly. This has to be done in a policy of the type Device Protectionwith Local Storage Devices as Device protection target (General Settings > User is allowed tocreate a local key > No).
If local keys are used to encrypt files on removable media, these files can be decrypted usingSafeGuard Portable on a computer without SafeGuard Data Exchange. When the files are openedwith SafeGuard Portable, the user is prompted to enter the passphrase that was specified whenthe key was created. If the user knows the passphrase, they can open the file.
179
Administrator help

Using SafeGuard Portable every user who knows the passphrase can get access to an encryptedfile on removable media. This way it is also possible to share encrypted data with partners whodo not have SafeGuard Enterprise installed. They only need to be provided with SafeGuard Portableand the passphrase for the files they should have access to.
If different local keys are used to encrypt files on removable media, you can even restrict accessto files. For example: You encrypt the files on a USB stick using a key with passphrase my_localkeyand encrypt a single file named ForMyPartner.doc using the passphrase partner_localkey. If yougive the USB stick to a partner and provide them with the passphrase partner_localkey, they willonly have access to ForMyPartner.doc.
Note:
By default SafeGuard Portable is automatically copied to all removable media connected to thesystem. If you do not want SafeGuard Portable to be automatically copied to removable media,deactivate the Copy SG Portable to target option in a policy of the type Device Encryption.
20.3 Media passphrase
SafeGuard Data Exchange allows you to specify that one single media passphrase for all removablemedia - except optical media - has to be created on the computers. The media passphrase providesaccess to the centrally defined domain/group key as well as to all local keys used in SafeGuardPortable. The user only has to enter one single passphrase and gets access to all encrypted files inSafeGuard Portable, regardless of the local key used for encryption.
On every computer, a unique Media Encryption Key for data encryption is automatically createdfor each device. This key is protected with the media passphrase and a centrally defineddomain/group key. On a computer with SafeGuard Data Exchange it is therefore not necessaryto enter the media passphrase to access encrypted files on the removable media. Access is grantedautomatically if the appropriate key is part of the user's key ring.
The domain/group key to be used has to be specified under Defined key for encryption.
Media passphrase functionality is available when the User may define a media passphrase fordevices option is activated in a policy of the type Device Protection.
When this setting becomes active on the computer, the user is automatically prompted to entera media passphrase, when he connects removable media for the first time. The media passphraseis valid on every computer the user is allowed to log on to. The user may also change the mediapassphrase and it will be synchronized automatically when the passphrase known on the computerand the media passphrase of the removable media are out of sync.
If the user forgets the media passphrase, it can be recovered by the user without any need of a helpdesk.
Note:
To enable the media passphrase, activate the User may define a media passphrase for devicesoption in a policy of the type Device Protection. This is only available, if you have selectedRemovable media as Device protection target.
180
SafeGuard Enterprise
20.3.1 Media passphrase and unmanaged endpoint computers
On an unmanaged endpoint computer (computers operating in standalone mode) without anactivated media passphrase feature, no keys are available after installation since unmanagedendpoint computers only use local keys. Before encryption can be used, the user has to create akey.
If the media passphrase feature is activated in a removable media policy for these computers, themedia encryption key is created automatically on the computer and can be used for encryptionimmediately after installation has been completed. It is available as a predefined key in the user'skey ring and displayed as <user name> in dialogs for key selection.
If available, the media encryption keys is also used for all initial encryption tasks.
20.4 Best practice
This section describes some typical use cases for SafeGuard Data Exchange and how to implementthem by creating the appropriate policies.
Bob and Alice are two employees of the same company and have SafeGuard Data Exchangeinstalled, Joe is an external partner and does not have SafeGuard Enterprise installed on hiscomputer.
20.4.1 Company internal use only
Bob wants to share encrypted data on removable media with Alice. Both belong to the same groupand therefore have the appropriate group key in their SafeGuard Enterprise key ring. As they areusing the group key, they can access the encrypted files transparently without the need to enter apassphrase.
You have to specify the settings in a policy of the type Device Protection\Removable media:
■ Media encryption mode: File-based
■ Key to be used for encryption: Defined key on list
Defined key on list: <group/domain key > (for example, group_users_Bob_Alice@DC=...)to ensure that both share the same key.
If company policies additionally define that all files on removable media have to be encrypted inany situation, add the following settings:
■ Initial encryption of all files: Yes
Ensures that files on removable media are encrypted as soon as the media is connected to thesystem for the first time.
■ User may cancel initial encryption: No
181
Administrator help

The user cannot cancel initial encryption, for example to postpone it.
■ User is allowed to access unencrypted files: No
If plain files on removable media are detected, access to them will be denied.
■ User may decrypt files: No
The user is not permitted to decrypt files on removable media.
■ Copy SG Portable to removable media: No
As long as data on removable media are shared within the workgroup, SafeGuard Portable isnot necessary. Also, SafeGuard Portable would allow to decrypt files on computers withoutSafeGuard Enterprise.
The users can share data just by exchanging their devices. When they connect the devices to theircomputers they have transparent access to encrypted files.
Note:
This use case can be fulfilled by using SafeGuard Enterprise Device Encryption where the wholeremovable device is sector-based encrypted.
20.4.2 Home office or personal use on 3rd party computers
■ Home office:
Bob wants to use his encrypted removable media on his home computer, where SafeGuardEnterprise is not installed. On his home computer, Bob decrypts files using SafeGuard Portable.By defining one media passphrase for all of Bob's removable media, he only has to openSafeGuard Portable and enter the media passphrase. Afterwards, Bob has transparent accessto all encrypted files regardless of the local key used to encrypt them.
■ Personal use on 3rd party computers
Bob plugs in the removable device on Joe's (external partner) computer and enters the mediapassphrase to get access to the encrypted files stored on the device. Bob can now copy the files,either encrypted or unencrypted, to Joe's computer.
Behavior on endpoint computer
■ Bob plugs in the removable device for the first time.
■ The Media Encryption Key, which is unique for each device, is created automatically.
■ Bob is prompted to enter the media passphrase for offline use with SafeGuard Portable.
■ There is no need to bother the user with knowledge about the keys to be used or the key ring.The Media Encryption Key will always be used for data encryption without any user interaction.The Media Encryption Key is not even visible to the user, but only the centrally definedgroup/domain key.
182
SafeGuard Enterprise
■ Bob and Alice within the same group or domain have transparent access since they share thesame group/domain key.
■ If Bob wants to access encrypted files on a removable device on a computer without SafeGuardData Exchange, he can use the media passphrase within SafeGuard Portable.
You have to specify the settings in a policy of the type Device Protection\Removable media:
■ Media encryption mode: File-based
■ Key to be used for encryption: Defined key on list
Defined key on list: <group/domain key > (for example group_users_Bob_Alice@DC=...)to ensure that both share the same key.
■ User may define a media passphrase for devices: Yes
The user defines one media passphrase on their computer which is valid for all their removablemedia.
■ Copy SG Portable to removable media: Yes
SafeGuard Portable gives the user access to all encrypted files on the removable media byentering a single media passphrase on the system without SafeGuard Data Exchange.
If the company policies additionally define that all files on removable media have to be encryptedin any situation, add the following settings:
■ Initial encryption of all files: Yes
Ensures that files on removable media are encrypted as soon as the media is connected to thesystem for the first time.
■ User may cancel initial encryption: No
The user cannot cancel initial encryption, for example to postpone it.
■ User is allowed to access unencrypted files: No
If plain files on removable media are detected, access to them will be denied.
■ User may decrypt files: No
The user is not permitted to decrypt files on removable media.
At work, Bob and Alice have transparent access to encrypted files on removable media. At homeor on 3rd party computers, they can use SafeGuard Portable to open encrypted files. The usersonly have to enter the media passphrase to access all encrypted files. This is a simple but effectiveway to encrypt data on all removable media. The goal of this configuration is to reduce userinteraction to a minimum while encrypting each and every file on removable media and givingthe user access to the encrypted files in offline mode. The user is not permitted to decrypt files onremovable media.
Note:
183
Administrator help
In this configuration, users are not allowed to create local keys since it is not necessary for thatuse case. This has to be specified in a policy of the type Device Protection with Local StorageDevices as Device protection target (General Settings > User is allowed to create a local key >No).
■ Copy SG Portable to removable media: No.
As long as data on removable media are shared in the workgroup SafeGuard Portable is notnecessary. Also, SafeGuard Portable would allow to decrypt files without SafeGuard Enterprise.
At work, the user has transparent access to encrypted files on removable media. At home, theyuse SafeGuard Portable to open encrypted files. The user only has to enter the media passphraseto access all encrypted files, regardless of the key used for encrypting them.
20.4.3 Share removable media with external party
Bob wants to hand out an encrypted device to Joe (external party) who does not have SafeGuardData Exchange installed and therefore has to use SafeGuard Portable. Under the assumption thatBob does not want to give Joe access to all encrypted files on the removable media, he can createa local key and encrypt the files with this local key. Joe can now use SafeGuard Portable and openthe encrypted files with the passphrase of the local key, whereas Bob still can use the mediapassphrase to access any encrypted file on the removable device.
Behavior on the computer
■ Bob plugs in the removable device for the first time. The Media Encryption Key, which isunique for each device, is created automatically.
■ Bob is prompted to enter the media passphrase for offline use.
■ The Media Encryption Key is used for data encryption without any user interaction, but…
■ Bob can now create or select a local key (for example JoeKey) for the encryption of specificfiles that shall be exchanged with Joe.
■ Bob and Alice within the same group or domain have transparent access since they share thesame group/domain key.
■ If Bob wants to access encrypted files on a removable device on a computer without SafeGuardData Exchange, he can use the media passphrase within SafeGuard Portable.
■ Joe can access the specific files by entering the passphrase of the JoeKey without having accessto the whole removable media.
You have to specify the settings in a policy of the type Device Protection\Removable Media:
■ Media encryption mode: File-based
■ Key to be used for encryption: Any key in user key ring
Allows the user to choose different keys for encrypting files on their removable media
184
SafeGuard Enterprise
Defined key for encryption: <group/domain key > (for examplegroup_users_Bob_Alice@DC=...). To ensure that the user can share data in their workgroup and to give them transparent access to removable media when they connect them totheir computer at work.
■ User may define a media passphrase for devices: Yes
The user defines one media passphrase on their computer which is valid for all their removablemedia.
■ Copy SG Portable to removable media: Yes
SafeGuard Portable gives the user access to all encrypted files on the removable media byentering a single media passphrase on the system without SafeGuard Data Exchange.
If the company policies additionally define that all files on removable media have to be encryptedin any situation, add the following settings:
■ Initial encryption of all files: Yes
Ensures that files on removable media are encrypted as soon as the media is connected to thesystem for the first time.
■ User may cancel initial encryption: No
The user cannot cancel initial encryption, for example to postpone it.
■ User is allowed to access unencrypted files: No
If plain files on removable media are detected, access to them will be denied.
■ User may decrypt files: No
The user is not permitted to decrypt files on removable media.
At work, Bob and Alice have transparent access to encrypted files on removable media. At home,they can use SafeGuard Portable to open encrypted files by entering the media passphrase. If Bobor Alice wants to hand out the removable media to a 3rd party computer that does not haveSafeGuard Data Exchange installed, they can use local keys to ensure that the external party canaccess only some specific files. This is an advanced configuration, which means more interactionfor the user by allowing them to create local keys on their computer.
Note:
A prerequisite for this example is that the user is allowed to create local keys (default setting inSafeGuard Enterprise).
20.5 Configure trusted and ignored applications for SafeGuard DataExchange
You can define applications as trusted to grant them access to encrypted files. This is for examplenecessary to enable antivirus software to scan encrypted files.
185
Administrator help

You can also define applications as ignored to exempt them from transparent fileencryption/decryption. For example, if you define a backup program as an ignored application,encrypted data backed up by the program remains encrypted.
Note: Child processes will not be trusted/ignored.
1. In the Policies navigation area, create a new policy of the type General Settings or select anexisting one.
2. Under File Encryption, click the dropdown button of the Trusted Applications or IgnoredApplications field.
3. In the editor list box, enter the applications to be defined as trusted/ignored.
■ You can define multiple trusted/ignored applications in one policy. Each line in the editorlist box defines one application.
■ Application names must end with .exe.
■ Application names must be specified as fully qualified paths including drive/directoryinformation. Entering the file name only (for example "example.exe") is not sufficient. Forbetter usability the single line view of the application list only shows the file names separatedby semicolons.
4. Save your changes.
Note: The Trusted Applications and Ignored Applications policy settings are machine settings.The policy must therefore be assigned to machines, not to users. Otherwise the settings do notbecome active.
20.6 Configure ignored devices for SafeGuard Data Exchange
You can define devices as ignored to exclude them from the file encryption process. You can onlyexclude entire devices.
1. In the Policies navigation area, create a new policy of the type General Settings or select anexisting one.
2. Under File Encryption, click the dropdown button of the Ignored Devices field.
3. In the editor list box, enter the required device names to exclude specific devices fromencryption. This may be useful when you need to exclude systems from third party suppliers.
Note: You can display the names of the devices currently used in the system by using thirdparty tools (for example OSR's Device Tree). SafeGuard Enterprise logs all devices it attachesto and you can display a list of attached and ignored devices by using registry keys.
186
SafeGuard Enterprise
20.6.1 Displaying attached and ignored devices for SafeGuard Data Exchangeconfiguration
To help you when defining ignored devices, you can use registry keys to show which devices arebeing considered for encryption (attached devices) and which devices are currently being ignored.The list of ignored devices shows only devices that are actually available on the computer and arebeing ignored. If a device is set to be ignored in a policy and the device is not available on thecomputer, the device is not listed.
Use the following registry keys to display attached and ignored devices:
■ HKLM\System\CurrentControlSet\Control\Utimaco\SGLCENC\Log\AttachedDevices
■ HKLM\System\CurrentControlSet\Control\Utimaco\SGLCENC\Log\IgnoredDevices
20.7 Configure persistent encryption for SafeGuard Data Exchange
The content of files encrypted by SafeGuard Data Exchange is being decrypted on-the-fly, if theuser owns the required key. When the content is saved as a new file in a location that is not coveredby an encryption rule, the resulting file will be not be encrypted.
With persistent encryption, copies of encrypted files will be encrypted, even when they are savedin a location not covered by an encryption rule.
You can configure persistent encryption in policies of the type General Settings. The policy settingEnable persistent encryption is activated by default.
Note:
■ If files are copied or moved to an ignored device or to a folder to which a policy with encryptionMode Ignore applies, the Enable persistent encryption setting has no effect.
■ Copy operations are detected based on file names. When a user saves an encrypted file withSave As under a different file name in a location not covered by an encryption rule, the filewill be plain text.
20.8 Tracking files accessed on removable media
You can track files accessed on removable media by using the Reports function of the SafeGuardManagement Center. File access can be tracked regardless of any encryption policy applying tofiles on removable media.
In a policy of the type Logging you can define the following:
■ An event to be logged when a file or directory is created on a removable device.
■ An event to be logged when a file or directory is renamed on a removable device.
■ An event to be logged when a file or directory is deleted from a removable device.
187
Administrator help
For further information, see File access report for removable media (page 257).
20.9 SafeGuard Data Exchange and File Share
The SafeGuard Enterprise module File Share offers file-based encryption on network locations,especially for work groups on network shares.
If both SafeGuard Data Exchange and File Share are installed on an endpoint computer, it mayoccur that a SafeGuard Data Exchange encryption policy is defined for a drive on the computerand File Share policies are defined for folders on the same drive. If this is the case, the SafeGuardData Exchange encryption policy overrules the File Share policies. New files are encrypted accordingto the SafeGuard Data Exchange encryption policy.
For further information on File Share, see File Share (page 169).
188
SafeGuard Enterprise
21 Cloud Storage
The SafeGuard Enterprise module Cloud Storage offers file-based encryption of data stored in thecloud.
It does not change the way users work with data stored in the cloud. Users are still using the samevendor specific synchronization applications to send data to or receive data from the cloud. Thepurpose of Cloud Storage is to make sure that the local copies of data stored in the cloud isencrypted transparently and will therefore always be stored in the cloud in encrypted form.
In the SafeGuard Management Center, you create Cloud Storage Definitions (CSDs) and usethem as target in Device protection policies.
After a Cloud Storage policy has been assigned to endpoints, files in locations covered by the policyare transparently encrypted without user interaction:
■ Encrypted files will be synchronized into the cloud.
■ Encrypted files received from the cloud can be modified by applications as usual.
To access Cloud Storage encrypted files on endpoint computers without SafeGuard EnterpriseCloud Storage, SafeGuard Portable can be used to read encrypted files.
Note: Cloud Storage only encrypts new data stored in the cloud. If data is already stored in thecloud before installing Cloud Storage, this data will not automatically be encrypted. If you wantto encrypt this data, you have to remove it from the cloud first and then enter it again afterinstallation of Cloud Storage.
21.1 Requirements for Cloud Storage vendor software
To enable encryption of data stored in the cloud, the software provided by the cloud storagevendor:
■ must run on the computer where Cloud Storage is installed.
■ must have an application (or system service) that is stored on the local file system andsynchronizes data between the cloud and the local system.
■ must store the synchronized data on the local file system.
21.2 Create Cloud Storage Definitions (CSDs)
Note: Certain folders (for example the Dropbox installation folder ) may prevent the operatingsystem or applications from running when encrypted. When you create Cloud Storage Definitionsfor device protection policies, make sure that these folders are not encrypted.
1. In the Policies navigation area, select Cloud Storage Definitions.
2. In the context menu of Cloud Storage Definitions, click New > Cloud Storage Definition.
189
Administrator help
3. The New Cloud Storage Definition dialog appears. Enter a name for the Cloud StorageDefinition.
4. Click OK. The Cloud Storage Definition appears with the entered name under the CloudStorage Definitions root node in the Policies navigation area.
5. Select the Cloud Storage Definition. In the work area on the right-hand side the content of aCloud Storage Definition is displayed:
■ Target name:Is the name you entered initially. It is used for referencing the Cloud Storage Definition astarget in a policy of type Device Protection.
■ Synchronization application:
Enter path and application that synchronizes the data with the cloud (e.g.:<Desktop>\dropbox\dropbox.exe). The application must reside on a local drive.
■ Synchronization folder:Enter the folder(s) that will be synchronized with the cloud. Only local paths are supported.
Note: For paths in the Synchronization application and Synchronization folder settings,the same placeholders as for File Share are supported, see Placeholders for paths in File Shareencryption rules (page 172).
21.2.1 Placeholders for cloud storage provider
As a security officer you can make use of placeholders for cloud storage providers to definesynchronization applications and synchronization folders. These placeholders represent supported3rd party cloud storage applications. You can use the placeholder to specify a certain 3rd partyapplication as synchronization application and even use the same placeholder to point to thesynchronization folders the 3rd party application actually uses for synchronization.
Placeholders for cloud storage provider are encapsulated by <! and !>.
Currently supported placeholders:
<!Dropbox!>
Example:
In case you use Dropbox as your cloud storage provider you can simply enter <!Dropbox!>for Synchronization application. If you do not explicitly specify a synchronization folder,<!Dropbox!> is also copied into the list of folders under Synchronization folder.
Assume that you used the placeholders <!Dropbox!> as synchronization application and<!Dropbox!>\encrypt as synchronization folder in the Cloud Storage Definition. Dropbox isinstalled on the endpoint and the user has d:\dropbox configured as folder to be synchronizedwith Dropbox:
When the SafeGuard Enterprise protected endpoint receives a policy with a CSD like this, it willautomatically translate the placeholders in the CSD to match the path of Dropbox.exe for the
190
SafeGuard Enterprise
synchronization application and it will read the Dropbox configuration and set the encryptionpolicy on the folder d:\dropbox\encrypt.
21.2.2 Export and import Cloud Storage Definitions
As a security officer you can export and import Cloud Storage Definitions (CSD). A CSD will beexported as an XML file.
■ To export a CSD click Export Cloud Storage Definition... from the context menu of the desiredCloud Storage Definition in the Policy area.
■ To import a CSD click Import Cloud Storage Definition... from the context menu of the CloudStorage Definition node in the Policy area.
Both commands can also be found in the Actions menu of the SafeGuard Management Center.
21.3 Create a device protection policy with a target Cloud Storage
The Cloud Storage Definitions must have been created beforehand.
You define the settings to encrypt cloud storage data in a policy of the type Device protection.
1. In the Policies navigation area, create a new policy of the type Device protection.
2. Select a Cloud Storage Definition you created beforehand as a target.
3. Click OK. The new policy is displayed in the navigation window below Policy Items. In theaction area, all settings for the Device Protection policy are displayed and can be changed.
4. For the Media encryption mode setting select File based. Volume-based encryption is notsupported.
5. Under Algorithm to be used for encryption select the algorithm to be used for encrypting thedata in the synchronization folders defined in the CSD.
6. Settings Key to be used for encryption and Defined key for encryption are used to define thekey or the keys that shall be used for encryption. For further information, see Device Protection(page 123).
7. If you activate the Copy SG Portable to target setting, SafeGuard Portable is copied to eachsynchronization folder. SafeGuard Portable is an application that can be used to read encryptedfiles on Windows computers that do not have SafeGuard Enterprise installed.
Note: To share encrypted data stored in the cloud with users that do not have SafeGuardEnterprise installed, users should be allowed to create local keys, see Local keys (page 179).
8. The Plaintext folder setting allows you to define a folder that will be excluded from encryption.Data stored in subfolders of the defined plain text folder will also be excluded from encryption.SafeGuard Cloud Storage automatically creates empty plain folders in all synchronizationfolders defined in the Cloud Storage Definition.
191
Administrator help
22 User-computer assignment
SafeGuard Enterprise manages the information about the users who are allowed to log on to aparticular machine in a list which is referred to as the UMA (User-Machine-Assignment).
For a user to be included in the UMA, they must have logged on once to a computer on whichSafeGuard Enterprise has been installed and be registered in the SafeGuard Management Centeras a "full" user in terms of SafeGuard Enterprise. A "full" user is one for whom a certificate hasbeen generated after the first logon and for whom a key ring has been created. Only then can thisuser data be replicated on other computers. After replication, the user can log on to this computerat the POA.
If the default setting applies, the first user to log on to the computer after the installation ofSafeGuard Enterprise is entered as the owner of that computer in the UMA.
This attribute allows the user, after they have authenticated at Power-on Authentication, to enableother users to log on to that computer (see Importing further users (page 81)). They will also beadded to the UMA for this computer.
An automatic list is generated which determines which user is allowed to log on to which computer.This list can be edited in the SafeGuard Management Center.
22.1 User-computer assignment in the SafeGuard Management Center
Users can be allocated to specific computers in the SafeGuard Management Center. If a user isassigned to a computer in the SafeGuard Management Center (or vice versa) this allocation isincorporated into the UMA. The user data (certificate, key, etc.) is replicated on this computerand the user can log on to this computer. When a user is removed from the UMA, all user data isautomatically deleted from the POA. The user can no longer log on at the POA with their username and password.
Note: In Users and Computers, to view the assignment of users and computers you need at leastRead only access rights for one of the objects (user or computer) involved. To define or changethe assignment, you need Full access rights for both of the objects involved. The UMA displayshowing available users/machines is filtered according to your access rights. In the UMA griddisplay, which shows the users assigned to computers and vice versa, objects for which you do nothave the required access rights are shown for your information, but the assignment cannot bemodified.
When you assign a user to a computer, you can also specify who can allow other users to log onto this computer.
Under Type the SafeGuard Management Center indicates how the user was added to the SafeGuardEnterprise Database. Adopted means that the user has been added to the UMA on an endpointcomputer.
Note:
192
SafeGuard Enterprise
If no one is assigned in the SafeGuard Management Center and no user is specified as the owner,the first user to log on after the installation of SafeGuard Enterprise on the computer is enteredas the owner. This user can allow further users to log on to this computer, see Importing furtherusers (page 81). If users are assigned to this computer in the SafeGuard Management Center at alater date, they can log on at the Power-on Authentication. Nevertheless, such users must be fullusers (with existing certificate and key). The owner of the computer does not need to assign accessentitlements in this case.
The following settings are used to specify who is allowed to add users to the UMA:
■ Ownership: If this setting is selected, the user can be registered as the owner of a computer.
■ User is Owner: This setting means that this user is entered in the UMA as the owner. No furtherusers can be included in the UMA. Only one user per computer can be entered in the UMA asthe owner.
The Import of new users allowed for policy setting in policies of the type Specific MachineSettings determines who is allowed to add further users to the UMA.
■ Import of new users allowed for
Nobody
Even the user entered as the owner cannot add more users to the UMA. The option for anowner to add further users is deactivated.
Owner (default setting)
Note:
A security officer can always add users in the SafeGuard Management Center.
Everybody
Lifts the restriction that users may only be added by the owner.
Example:
The following example shows how you can assign logon entitlements in the SafeGuard ManagementCenter to just three users (User_a, User_b, User_c) for Computer_ABC.
First: Specify the response you require in SafeGuard Management Center. SafeGuard Enterpriseis installed on all endpoint computers during the night. In the morning, the users should be ableto log on to the computer with their credentials.
1. In the SafeGuard Management Center, assign User_a, User_b and User_c to Computer_ABC.(Users & Computers -> Select computer_ABC -> Assign user by drag-and-drop). By doingthis, you have specified a UMA.
2. In a computer policy, select the setting Import of new users allowed for to Nobody. SinceUser_a, User_b and User_c are not allowed to add new users is not necessary to specify a useras an owner.
3. Assign the policy to the computer and/or to a point within the directory structure at which itwill be active for the computer.
193
Administrator help
When the first user logs on to Computer_ABC, an autologon is implemented for the POA. Thecomputer policies are sent to the endpoint computer. Since User_a is included in the UMA andwill become a full user when logging on to Windows. The user's policies, certificates and keys aresent to the endpoint computer. The POA is activated.
Note:
The user can check the status message in the SafeGuard System Tray Icon (balloon tool tip) whenthis process has completed.
User_a is now a full user in terms of SafeGuard Enterprise and after the first logon can authenticateat the POA and is automatically logged on.
User_a now leaves the computer and User_b wants to log on. As the POA is activated, there is nomore autologon.
User_b and User_c have two options for gaining access to this computer.
■ User_a deactivates the Pass through to Windows option in the POA logon dialog and logs on.
■ User_b uses Challenge/Response to log on at the POA.
In both cases, the Windows logon dialog is displayed.
User_b can enter their Windows credentials. The user's policies, certificates and keys are sent tothe endpoint computer. The user is activated in the POA. User_b is now a full user in terms ofSafeGuard Enterprise and after the first logon can authenticate themselves at the POA and will beautomatically logged on.
While the computer policy specifies that no one can import users to this computer, since theseusers are already in the UMA, User_b and User_c nevertheless gain "full" user status at the Windowslogon and are activated in the POA.
No other users will be added to the UMA or will ever be able to authenticate themselves at thePower-on Authentication. Any users logging on to Windows who are not User_a, User_b or User_care excluded from the UMA in this scenario and will never be active in the POA.
Users can always be added later on in the SafeGuard Management Center. However, their key ringwill not be available after the first logon as synchronization will only be triggered by this first logon.After logging on again, the key ring will be available and the users can access their computersaccording to policies applying. If they have never successfully logged on to an endpoint computer,they can be added as described above.
22.1.1 Block User
If you select the check box in the Block User column, the user is no longer allowed to log on tothe relevant computer. The computer is shut down, if the relevant user is logged on when thepolicy with this setting becomes active on the computer.
194
SafeGuard Enterprise

22.1.2 Groups
In the SafeGuard Management Center, computer groups can be assigned to a user (account)and/or user groups can be assigned to a computer.
To create a group: In Users and Computers, right-click the relevant object node where you wantto create the group and select New, Create new group. In Create new group, in Full name, enterthe name of the group and optionally a description. Click OK.
Example: Maintenance account
It is for example possible to use a single maintenance account to service a large number ofcomputers. For this purpose the computers concerned must be in a single group. This group isthen assigned to a maintenance account (user). The owner of the maintenance account can logon to all computers within this group
Also, by assigning a group containing different users, these users can log on to a specific computerin a single step.
22.2 Assignment of user and computer groups
In Users and Computers, to view the assignment of user and computer groups you need at leastRead only access rights for one of the objects (user or computer group) involved. To define orchange the assignment, you need Full access rights for both of the objects involved. The UMAdisplay showing available users/machines is filtered according to your access rights.
Note: You can assign individual users to a computer or vice versa using the same process as forgroups.
1. Click Users and Computers.
2. To assign a group of computers to single user, select the user.
3. Click the Computer tab in the action area.
All computers and computer groups are displayed under Available computers.
4. Drag the selected groups from the Available Groups list into the action area.
5. A dialog is displayed asking whether the user should be the owner of all computers.
If there is no specified owner in the SafeGuard Management Center, the first user to log on tothis computer is automatically entered as the owner. The user is the entitled to allow otherusers to access this computer. The condition is that the user Can Become Owner.
■ If you answer Yes, the first user to log on to this computer becomes the owner and canallow access to other users.
■ If you answer No, the user is not the owner of this computer.
It is not generally necessary for a service account owner to be the owner of the computer. Thissetting can be changed after initial assignment.
195
Administrator help

All computers from the assigned group are displayed in the action area.
The user can log on to all computers assigned in this way.
A user group can be assigned to a single computer in the same way.
196
SafeGuard Enterprise
23 Tokens and smartcards
Tokens and smartcards are hardware components that help an authorized user with theauthentication process on a computer system. They can be used to store certificates, digitalsignatures and biometric details. Data cannot be manipulated.
Nowadays, authentication with a user name and password often no longer meets the customer'sneed to have the best possible protection against external access. So, as an alternative and toimprove security, SafeGuard Enterprise provides logon using tokens and smartcards. Token logonis based on the principle of a two-stage authentication: A user has a token (ownership), but canonly use the token, if they know the specific token password (knowledge). When a token orsmartcard is used, users only need the token and a PIN for authentication.
Note: From SafeGuard Enterprise's perspective, smartcards and tokens are treated in the sameway. So the terms “token” and “smartcard” can be understood as the same thing in the productand in the manual.
Tokens are supported:
■ in the Power-on Authentication
■ at operating system level
■ to log on to the SafeGuard Management Center
When a token is issued to a user, data such as the manufacturer, type, serial number, logon dataand certificates are stored in the SafeGuard Enterprise Database. Tokens are identified by the serialnumber and then recognized in SafeGuard Enterprise.
There are significant benefits:
■ It is evident which tokens are in circulation and which users they are assigned to.
■ It is evident when they were issued.
■ If a token is lost, the security officer can identify it and block it. This prevents the misuse ofdata.
■ The security officer can nevertheless use Challenge/Response to temporarily allow logon withouta token, for example, if a user has forgotten the PIN.
23.1 Smartcards
To be able to use a smartcard with SafeGuard Enterprise, a card reader and a card driver for thecomputer are both required as well as the smartcard. Also, for the smartcards and card readers tocommunicate with SafeGuard Enterprise, certain middleware in the form of a PKCS#11 module,is required.
197
Administrator help
23.1.1 Smartcards and smartcard readers/drivers
SafeGuard Enterprise supports non-cryptographic and cryptographic logon procedures withPower-on Authentication. With non-cryptographic smartcards, user ID and password are storedon the card. Cryptographic smartcards are used to authenticate RSA key pairs (certificates).
■ Windows
On the Windows operating system level, PC/SC-compatible card readers are supported. ThePC/SC interface regulates the communication between the PC and smartcard. Many of thesecard readers are already a part of the Windows installation. Smartcards require PKCS#11compatible smartcard drivers if they are to be supported by SafeGuard Enterprise.
■ Power-on Authentication
Refer to the Release Notes for a detailed list of all the supported smartcards, smartcard readersand smartcard drivers.
With Power-on Authentication, the PC/SC interface is supported which regulates thecommunication between PC and smartcard. The supported smartcard drivers are a fixedimplementation and users may not add other drivers. The appropriate smartcard drivers haveto be enabled by means of a policy in SafeGuard Enterprise.
he interface for smartcard readers is standardized and many card readers have a USB interfaceor an ExpressCard/54 interface and implement the CCID standard. In SafeGuard Enterprisethis is a prerequisite to be supported with Power-on Authentication. Plus, on the driver side,the PKCS#11 module has to be supported.
23.1.2 Supported smartcards with Power-on Authentication
SafeGuard Enterprise supports a large number of smartcards and smartcard readers, plus commonsmartcard drivers with Power-on Authentication. With SafeGuard Enterprise, tokens/smartcardswhich support 2.048-bit RSA operations are supported. As support for smartcards is enhancedfrom release to release, the tokens and smartcards supported in whatever is the current version ofSafeGuard Enterprise are listed in the Release Notes.
23.1.3 Supported middleware
The middleware in the list below is supported by the relevant PKCS#11 module. PKCS#11 is astandardized interface for connecting cryptographic tokens/smartcards to different software. Here,it is used for the communication between cryptographic token/smartcard, the smartcard readerand SafeGuard Enterprise.
MiddlewareManufacturer
a.sign ClientA-Trust
198
SafeGuard Enterprise
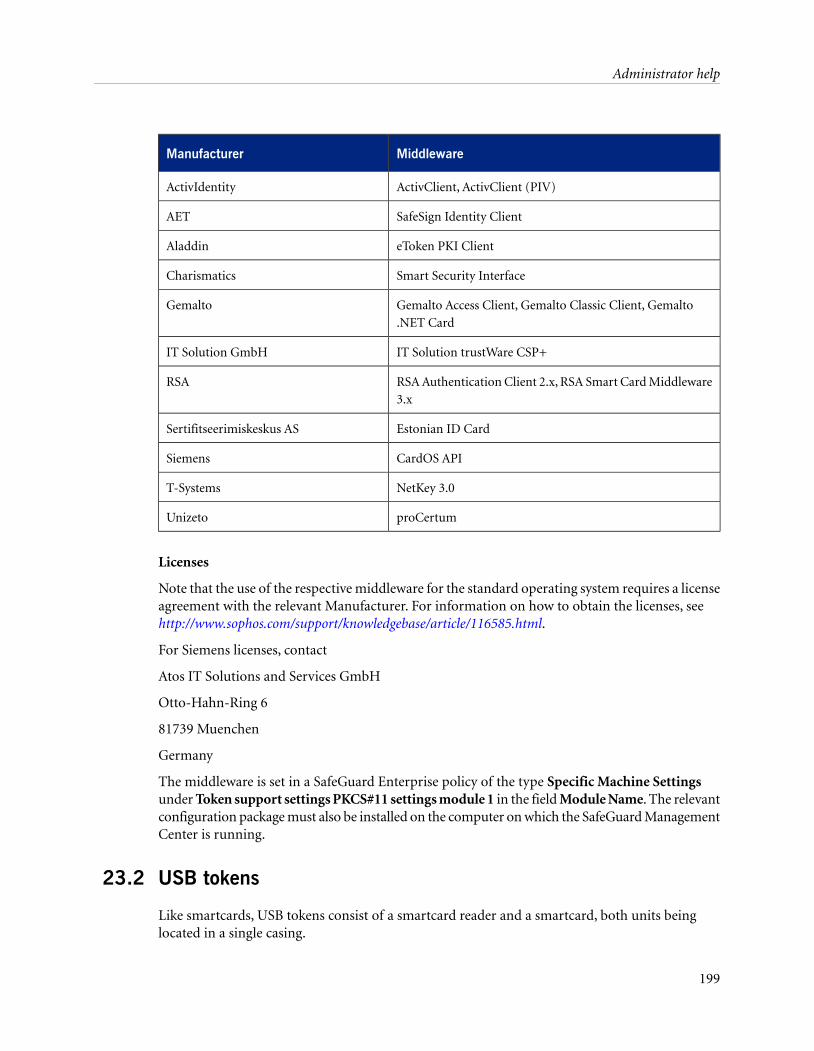
MiddlewareManufacturer
ActivClient, ActivClient (PIV)ActivIdentity
SafeSign Identity ClientAET
eToken PKI ClientAladdin
Smart Security InterfaceCharismatics
Gemalto Access Client, Gemalto Classic Client, Gemalto.NET Card
Gemalto
IT Solution trustWare CSP+IT Solution GmbH
RSA Authentication Client 2.x, RSA Smart Card Middleware3.x
RSA
Estonian ID CardSertifitseerimiskeskus AS
CardOS APISiemens
NetKey 3.0T-Systems
proCertumUnizeto
Licenses
Note that the use of the respective middleware for the standard operating system requires a licenseagreement with the relevant Manufacturer. For information on how to obtain the licenses, seehttp://www.sophos.com/support/knowledgebase/article/116585.html.
For Siemens licenses, contact
Atos IT Solutions and Services GmbH
Otto-Hahn-Ring 6
81739 Muenchen
Germany
The middleware is set in a SafeGuard Enterprise policy of the type Specific Machine Settingsunder Token support settings PKCS#11 settings module 1 in the field Module Name. The relevantconfiguration package must also be installed on the computer on which the SafeGuard ManagementCenter is running.
23.2 USB tokens
Like smartcards, USB tokens consist of a smartcard reader and a smartcard, both units beinglocated in a single casing.
199
Administrator help
23.2.1 Supported USB tokens with Power-on Authentication
SafeGuard Enterprise supports a wide range of USB tokens. As a prerequisite, the smartcard usedmust be supported by the Power-on Authentication of SafeGuard Enterprise and the respectivedrivers must also be supported. The USB tokens also have to be supported by the relevantmiddleware.
As support for tokens is enhanced from release to release, the tokens and smartcards supportedin the respective version of SafeGuard Enterprise are listed in the Release Notes.
23.2.2 Cryptographic tokens - Kerberos
With cryptographic tokens, the user is authenticated at the POA by the certificate stored on thetoken.
For this type of token logon you have to provide users with fully issued tokens. To log on to thesystem, users only have to enter the token PIN.
If you specify this logon type for the endpoint computers, users can only log on with the token.
23.3 Working with tokens
To use tokens for authentication:
1. Initialize empty tokens
2. Issue tokens for users and security officers
3. Write certificates and keys on tokens
4. Define policies for tokens
You can also use tokens that have data from a different application for authentication providedthat there is enough storage space for the certificates and logon information on them.
For easy token administration, SafeGuard Enterprise offers the following features:
■ Display and filter token information
■ Initialize, change, reset and block PINs
■ Read and delete token data
■ Block token
Note: To issue and manage tokens or modify data on issued tokens you need Full access rightsto the relevant users. The Issued Tokens view only shows tokens for users for whom you haveRead only or Full access rights.
200
SafeGuard Enterprise
23.4 Initializing a token
Before an "empty", unformatted token can be issued to a user in SafeGuard Enterprise, it needsto be prepared for use (initialized) according to the instructions provided by the tokenmanufacturer. When it is initialized, basic information, for example the standard PIN, is writtento it. This is done with the token manufacturer's initialization software.
For further information, refer to the token manufacturer concerned.
23.4.1 Installing middleware
Next install the correct middleware, both on the computer with SafeGuard Management Centerinstalled as well as on the relevant endpoint computer. For supported middleware, see Supportedmiddleware (page 198).
Restart the computers where you installed the new middleware.
23.4.2 Activate middleware (PKCS#11 module)
Before issuing the token you need to assign the correct middleware in form of the PKCS#11 moduleby defining a policy in the SafeGuard Management Center. You should do this both for thecomputer which the SafeGuard Management Center is running on and for the endpoint computer.Only then can SafeGuard Enterprise communicate with the token. You can define the setting forPKCS#11 module, using a policy, as follows.
Prerequisite: The middleware is installed on the relevant computer and the token has beeninitialized. The SafeGuard Enterprise Client configuration package must also be installed on thecomputer on which the SafeGuard Management Center is running.
1. In the SafeGuard Management Center, click Policies.
2. Create a new policy of the type Specific Machine Settings or select an existing policy of thistype.
3. In the work area on the right-hand side, select the appropriate middleware under Token supportsettings > Module Name. Save the settings.
4. Assign the policy.
SafeGuard Enterprise can now communicate with the token and administer the token. The tokencan now be issued.
23.5 Issuing a token
When a token is issued in SafeGuard Enterprise, data which is used for authentication is writtenon the token. This data consists of credentials and certificates.
201
Administrator help
In SafeGuard Enterprise, tokens can be issued for these user roles:
■ Tokens for normal users
■ Tokens for security officers (SO)
Both user and security officers (SO) can access the token. The user is the one who should use thetoken. Only the user can access private objects and keys. The SO can only access public objects,but can reset the user's PIN.
23.5.1 Issue a token or smartcard to a user
Prerequisites:
■ The token must be initialized and the relevant PKCS#11 module must be activated.
■ The SafeGuard Enterprise Client configuration package must also be installed on the computeron which the SafeGuard Management Center is running.
■ You need Full access rights for the relevant user.
1. In the SafeGuard Management Center, click Users and Computers.
2. Connect the token to the USB interface. SafeGuard Enterprise reads in the token.
3. Select the user for whom the token is to be issued, and open the Token Data tab in the workarea on the right-hand side.
4. In the Token Data tab, do the following:
a) Select the User ID and Domain of the relevant user and enter your Windows Password.
b) Click Issue Token.
The Issue Token dialog is displayed.
5. Select the appropriate slot for the token from the Available slots drop-down list.
6. Issue a new User PIN and repeat the entry.
7. Under SO PIN, enter the standard PUK received from the manufacturer or the PIN issuedwhen the token was initialized.
Note:
If you only fill in the User PIN (required) field, the user PIN must match the PIN which wasissued when the token was initialized. In this case, you do not have to repeat the user PIN andenter an SO PIN.
8. Click Issue token now.
The token is issued, the logon information written on the token and the token information savedin the SafeGuard Enterprise Database. You can display the data in the Token area in the TokenInformation tab.
202
SafeGuard Enterprise
23.5.2 Issue a token or smartcard to a security officer
When SafeGuard Enterprise is installed for the first time, the first security officer (SO) can issuea token for themselves and specify the logon mode (see SafeGuard Enterprise Installation Guide).For all other security officers, tokens are issued in the SafeGuard Management Center.
Prerequisite:
■ The token must be initialized and the relevant PKCS#11 module must be activated.
■ You need the rights to make entries for the SO.
1. In the SafeGuard Management Center, click Security Officers.
2. Connect the token to the USB interface. SafeGuard Enterprise reads in the token.
3. In the navigation window on the left, mark Security Officer and select New > New securityofficer from the context menu.
The New security officer dialog is displayed.
4. With the Token logon field, specify the type of logon for the SO:
■ To enable the SO to authenticate either with or without a token, select Optional.■ To make token logon mandatory for the SO, select Mandatory.
With this setting, the private key remains on the token. The token must always be pluggedin, or the system will need to be restarted.
5. Next you specify the SO certificate.
■ To create a new certificate, click the Create button next to the Certificate drop-down list.
Enter the password for the certificate twice and click OK to confirm it.
Specify the location for saving the certificate.■ To import certificates, click the Import next to the Certificate drop-down list and open
the relevant certificate file.
Searching is first done in a certificate file, then on the token. The certificates may remainin whatever the storage location is.
6. Under Roles, activate the roles that are to be assigned to the SO.
7. Confirm the entries with OK.
The SO is created, the token is issued, the logon data is written on the token (depending on thesetting), and the token information is saved in the SafeGuard Enterprise Database. You can displaythe data in the Token area in the Token Information tab.
203
Administrator help
23.6 Putting certificates on a token or smartcard
Not only logon information but also certificates can be written to a token. Just the private part ofthe certificate (.p12 file) can be saved on the token. However, users then can only log on with thetoken. We recommend that you use PKI certificates.
You can assign authentication data to different types of token:
■ by generating certificates directly on the token
■ by assigning data which is already on the token
■ by importing certificates from a file
Note:
CA certificates cannot be obtained from a token and stored in the database or certificate store. Ifyou need to use CA certificates, these need to be available as files and not just on a token. Thisalso applies to CRLs (Certificate Revocation List). Moreover, the CA certificates must match theCRL on the token before users can log on to the computers concerned. Check that the CA andCRL are correct. SafeGuard Enterprise does not carry out this check! SafeGuard Enterprise canthen only communicate with expired certificates if old and new keys are present on the same card.
23.6.1 Generate certificates from tokens
To generate certificates from tokens, you need Full access rights for the relevant user.
You can generate new certificates straight from the token if, for example, there is no certificatestructure present.
Note:
If only the private part of the certificate is written on to the token, the user can only access theirprivate key with the token. The private key then only resides on the token. If the token is lost, theprivate key can no longer be accessed.
Prerequisite: The token is issued.
1. In the SafeGuard Management Center, click Users and Computers.
2. Plug the token into the USB interface.
SafeGuard Enterprise reads in the token.
3. Mark the user for whom a certificate is to be generated, and open the Certificate tab in thework area on the right-hand side.
4. Click Generate and assign certificate by token. Note that the length of the key must matchthe size of the token.
5. Select the slot and enter the token PIN.
6. Click Create.
204
SafeGuard Enterprise
The token generates the certificate and assigns it to the user.
23.6.2 Assign token certificates to a user
Prerequisites:
■ The token is issued.
■ You have Full access rights for the relevant user.
To assign a certificate available on the token to a user:
1. In the SafeGuard Management Center, click Users and Computers.
2. Plug the token into the USB interface.
SafeGuard Enterprise reads in the token.
3. Select the user to whom you want to assign a certificate, and open the Certificate tab in thework area on the right-hand side.
4. Click the Assign a certificate from a token icon in the SafeGuard Management Center toolbar.
5. Select the relevant certificate from the list and enter the token's PIN.
6. Click OK.
The certificate is assigned to the user. A user can only have one certificate assigned.
23.6.3 Put a certificate from a file onto the token
Prerequisite: The token is issued.
To add the private part of the certificate (.p12 file) from a file to the token:
1. In the SafeGuard Management Center, click Tokens.
2. Plug the token into the USB interface.
SafeGuard Enterprise reads in the token.
3. Mark the token to which you want to add the private part of the certificate and, in the workarea on the right, open the Logon Information & Certificates tab.
4. Click the P12 to token icon in the SafeGuard Management Center toolbar.
5. Select the relevant certificate file.
6. Enter the token's PIN and the password for the .p12 file and click OK to confirm.
The private part of the certificate is added to the token. Now you need to assign it to a user, seeAssign token certificates to a user (page 205). Users can then only log on with this token.
Note:
205
Administrator help
You need to select this procedure for a token with Kerberos support. The certificate must berecognized by SafeGuard Enterprise and added to the token. If there is already an auto-generatedcertificate, the imported certificate will overwrite it.
23.6.4 Change a user's certificate
You can change or renew certificates required for logon by assigning a new certificate in theSafeGuard Management Center. The certificate is assigned as a standby certificate alongside theexisting certificate. By logging on with the new certificate, the user changes the certificate on theendpoint computer.
Note:
If users have lost their tokens or tokens have been compromised, do not exchange tokens byassigning new certificates as described here. Otherwise problems may occur. For example, the oldtoken certificate may still be valid for Windows logon. As long as the old certificate is still valid,logon to Windows is still possible and the computer can be unlocked. Instead, block the token toprevent logon.
Standby certificates can be used in the following cases:
■ Change (cryptographic) token generated certificates.
■ Switch from auto-generated certificates to token generated certificates.
■ Switch from user name/password authentication to cryptographic token (Kerberos)authentication.
Prerequisites:
■ The new token is issued.
■ Only one certificate is assigned to the user.
■ You have Full access rights for the relevant user.
To change a user's certificate for token logon:
1. In the SafeGuard Management Center, click Users & Computers.
2. Plug the token into the USB interface.
SafeGuard Enterprise reads in the token.
3. Select the user for whom you want to change the certificate and open the Certificate tab in thework area on the right-hand side.
4. On the toolbar, click the appropriate icon for the action you want to perform.
5. Select the relevant certificate and enter the token's PIN.
6. Click OK.
7. Provide the user with the new token.
206
SafeGuard Enterprise

The certificate is assigned to the user as a standby certificate. This is indicated by a tick in theStandby column of the user's Certificates tab.After synchronization between the endpoint computer and the SafeGuard Enterprise Server, thestatus dialog on the endpoint computer indicates that the computer is Ready for certificate change.
The user now has to initiate a certificate change on the endpoint computer. For further information,see the SafeGuard Enterprise User help.
After the user has changed the certificate on the endpoint computer the certificate is also renewedon the SafeGuard Enterprise Server during the next synchronization. This removes the old tokenfrom the user's Certificates tab in the SafeGuard Management Center. The new token becomesthe standard token for the user.
Note:
In the SafeGuard Management Center, both certificates can be deleted separately. If only a standbycertificate is available, the next certificate is assigned as the standard certificate.
23.7 Assigning policies for tokens
When you assign policies you can specify other token options. These relate to:
■ PINs
■ Logon mode
■ Defining token PINs for POA autologon
■ What happens when the status of the token is no longer recognized
■ Unblocking the token
■ The middleware to be used (PKCS#11 module)
23.8 Using tokens to log on at the Power-on Authentication
Prerequisite: Make sure that the USB support is activated in the BIOS. The token support mustbe initialized and the token issued for you.
1. Plug the token into the USB interface.
2. Switch on the computer and wait until the Power-on Authentication stops.
3. Enter the token PIN.
You are logged on to SafeGuard Enterprise.
23.8.1 Logon mode at the Power-on Authentication
There are two ways of logging on using a token. A combination of both logon methods is possible.
■ Logging on with user ID/password
207
Administrator help
■ Logging on with token
When logging on with token/smartcard, you can either select the non-cryptographic methodor the Kerberos (cryptographic) method. With Kerberos, Challenge/Response procedures arenot possible, as there is no logon information available in the POA.
As a security officer, you specify the method to be used for users and computers in a policy of typeAuthentication.
23.9 Enable POA autologon with default token PINs
A default token PIN that is distributed by policy enables automatic user logon at the Power-onAuthentication. This avoids the need to issue each single token separately and enables users toautomatically log on at the Power-on Authentication without any user interaction.
When a token is used at logon and a default PIN is assigned to the computer, the user ispassed-through at the Power-on Authentication without having to enter a PIN.
As a security officer you can set the specific PIN in a policy of the type Authentication and assignit to different computers or computer groups, for example to all computers residing in the samelocation.
To enable autologon with a default token PIN:
1. In the SafeGuard Management Center, click Policies.
2. Select a policy of the type Authentication.
3. Under Logon Options in Logon mode, select Token.
4. In PIN used for autologon with token, specify the default PIN to be used for autologon. PINrules do not need to be observed in this case.
Note:
This setting is only available if you select Token as possible Logon Mode.
5. In Pass-through to Windows set Disable pass-through to Windows. If you do not select thissetting when a default PIN is specified, you will not be able to save the policy.
If you want to enable the Pass-through to Windows option, you can later create another policyof the type Authentication with this option enabled and assign it to the same computer group,so that the RSOP has both policies active.
6. Optionally specify further token settings.
7. Save your settings and assign the policy to the relevant computers or computer groups.
If the autologon on the endpoint computer has been successful, Windows is started.
If the autologon on the endpoint computer has failed, the user is prompted to enter the token PINat the Power-on Authentication.
208
SafeGuard Enterprise
23.10 Initializing, changing and blocking PINs
As a security officer, you can change both the user PIN and the SO PIN, and also force the userPIN to be changed. This is usually required when a token is first issued. You can also initializePINs (issue them as new and block them).
Note: To initialize, change and block PINs, you need Full access rights for the relevant users.
You can use policies to specify other PIN options for the endpoint computer.
Note:
When you change a PIN, note that some token manufacturers specify their own PIN rules whichmay contradict SafeGuard Enterprise PIN rules. So it may not be possible to change a PIN in theway you want, even if it complies with the SafeGuard Enterprise PIN rules. You should alwaysrefer to the token manufacturer's PIN rules. These are displayed in the Token area under TokenInformation in the SafeGuard Management Center.
PINs are managed in the SafeGuard Management Center under Tokens. The token is plugged inand marked in the navigation window on the left.
23.10.1 Initialize user PIN
Prerequisites:
■ The SO PIN must be known.
■ You need Full access rights for the relevant user.
1. In the SafeGuard Management Center toolbar, click the Initialize user PIN icon.
2. Enter the SO PIN.
3. Enter the new user PIN, repeat the entry and click OK to confirm.
The user PIN is initialized.
23.10.2 Change an SO PIN
Prerequisite: The previous SO PIN must be known.
1. In the SafeGuard Management Center toolbar, click the Change SO PIN icon.
2. Enter the old SO PIN.
3. Enter the new SO PIN, repeat the entry and click OK.
The SO PIN has been changed.
209
Administrator help
23.10.3 Change a user PIN
Prerequisite:
■ The user PIN must be known.
■ You need Full access rights for the relevant user.
1. In the SafeGuard Management Center toolbar, click the Change user PIN icon.
2. Enter the old and the new user PIN, repeat the new user PIN, and click OK.
The user PIN is changed. If you have changed the PIN for another user, inform them about thechange.
23.10.4 Force PIN change
To force a PIN change, you need Full access rights for the relevant user.
1. In the SafeGuard Management Center toolbar, click the Force PIN change icon.
The next time the user logs on with the token, they have to change their user PIN.
23.10.5 PIN history
The PIN history can be deleted. To do this, click the Delete PIN history icon in the SafeGuardManagement Center toolbar.
23.11 Managing tokens and smartcards
In the Tokens area of the SafeGuard Management Center, the security officer can:
■ Get an overview of tokens and certificates that have been issued.
■ Filter overviews.
■ Block tokens for authentication
■ Read or delete the data on a token.
23.11.1 Display token/smartcard information
As a security officer, you can display information about all or individual tokens that have beenissued. You can also filter overviews.
Prerequisite: The token must be plugged in.
1. In the SafeGuard Management Center, click Tokens.
210
SafeGuard Enterprise
2. To display information about an individual token, select the relevant token in the navigationarea under Token Slots.
The manufacturer, type, serial number, hardware details and PIN rules are displayed underToken Information. You can also see which user the token is assigned to.
Note: Under Token Slots, issued tokens are displayed regardless of your access rights to therelevant users, so you can see, if the token is in use or not. If you have no or Read only accessrights to the assigned user, all token data in the Token Information and Credentials andCertificates tabs are greyed out and you cannot manage this token.
3. To display an overview on tokens, select Issued Tokens. You can display all the tokens thathave been issued or filter the overview by user.
The token's serial number, the assigned users and the issue date are displayed. You can alsosee if the token is blocked.
Note: The Issued Tokens view shows the tokens for all users you have Read only or Full accessrights for.
23.11.2 Block token or smartcard
As a security officer you can block tokens. This is for example useful if a token has been lost.
To block a token, you need Full access rights for the relevant user.
1. In the SafeGuard Management Center, click Tokens.
2. In the navigation area on the left, select Issued Tokens on the left of the navigation area.
3. Select the token to be blocked and click the Block token icon in the SafeGuard ManagementCenter toolbar.
The token is blocked for authentication and the assigned user can no longer use it to log on. Thetoken can only be unblocked with the SO PIN.
23.11.3 Delete token/smartcard information
As a security officer, you can delete the information that has been written on the token by SafeGuardEnterprise.
Prerequisite:
■ The token must be plugged in.
■ You need Full access rights for the relevant user.
1. In the SafeGuard Management Center, click Tokens.
2. In the navigation area on the left, select the token concerned under Token Slots.
3. In the SafeGuard Management Center toolbar, click the Wipe token icon.
211
Administrator help

4. Enter the SO Pin that was assigned to the token and click OK to confirm.
All data managed by SafeGuard Enterprise is deleted. Certificates remain on the token.
The user PIN is reset to 1234.
Deleted tokens are thus automatically deleted from the list of issued tokens.
23.11.4 Read token/smartcard information
As a security officer you can read the data on the token by using the user PIN.
Prerequisite:
■ The token must be plugged in. The security officer must know the PIN. Or it must be initialized,see Initialize user PIN (page 209).
■ You need Read only or Full access rights for the relevant user.
1. In the SafeGuard Management Center, click Tokens.
2. On the left of the navigation area select the relevant token under Token Slots and select theCredentials & Certificates tab.
3. Click the Get user credentials icon and enter the user PIN for the token.
The data on the token is displayed.
212
SafeGuard Enterprise
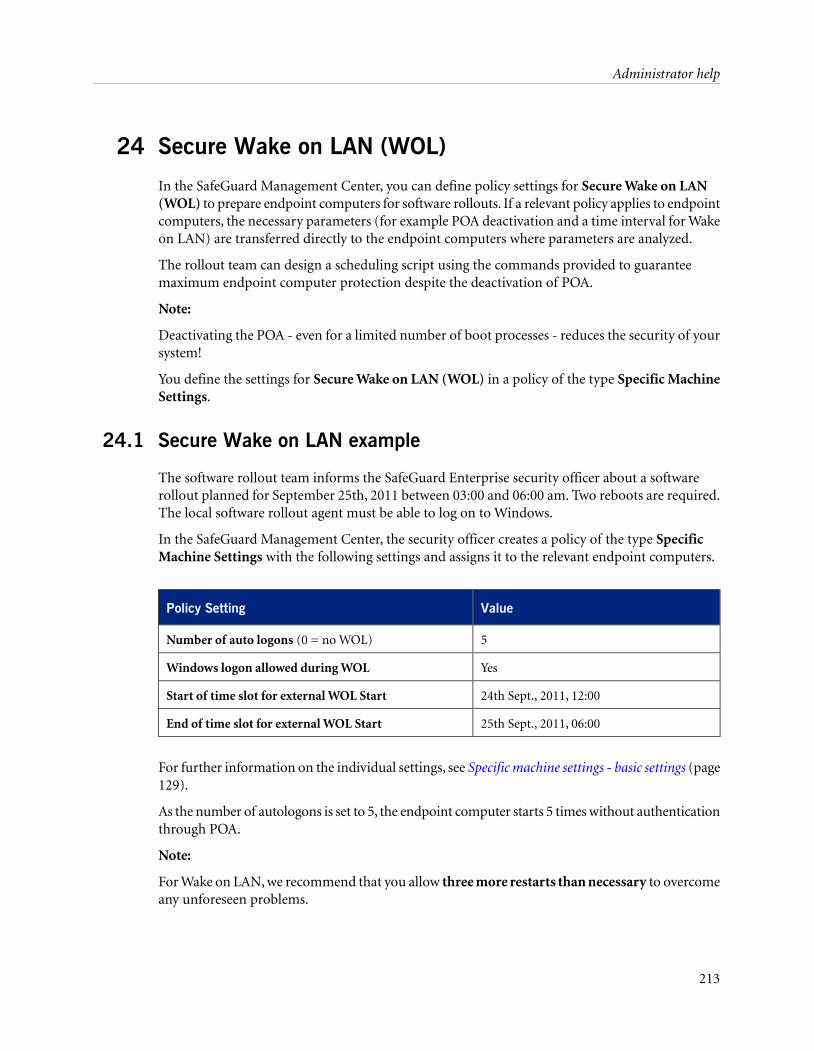
24 Secure Wake on LAN (WOL)
In the SafeGuard Management Center, you can define policy settings for Secure Wake on LAN(WOL) to prepare endpoint computers for software rollouts. If a relevant policy applies to endpointcomputers, the necessary parameters (for example POA deactivation and a time interval for Wakeon LAN) are transferred directly to the endpoint computers where parameters are analyzed.
The rollout team can design a scheduling script using the commands provided to guaranteemaximum endpoint computer protection despite the deactivation of POA.
Note:
Deactivating the POA - even for a limited number of boot processes - reduces the security of yoursystem!
You define the settings for Secure Wake on LAN (WOL) in a policy of the type Specific MachineSettings.
24.1 Secure Wake on LAN example
The software rollout team informs the SafeGuard Enterprise security officer about a softwarerollout planned for September 25th, 2011 between 03:00 and 06:00 am. Two reboots are required.The local software rollout agent must be able to log on to Windows.
In the SafeGuard Management Center, the security officer creates a policy of the type SpecificMachine Settings with the following settings and assigns it to the relevant endpoint computers.
ValuePolicy Setting
5Number of auto logons (0 = no WOL)
YesWindows logon allowed during WOL
24th Sept., 2011, 12:00Start of time slot for external WOL Start
25th Sept., 2011, 06:00End of time slot for external WOL Start
For further information on the individual settings, see Specific machine settings - basic settings (page129).
As the number of autologons is set to 5, the endpoint computer starts 5 times without authenticationthrough POA.
Note:
For Wake on LAN, we recommend that you allow three more restarts than necessary to overcomeany unforeseen problems.
213
Administrator help
The security officer sets the time interval to 12 o'clock midday on the day before the softwarerollout. In this way, the scheduling script SGMCMDIntn.exe is started in time and WOL startsno later than the 25th September at 3:00 am.
The software rollout team creates two commands for the scheduling script:
■ Starting 24th Sept.2011, 12:15 am, SGMCMDIntn.exe -WOLstart
■ Starting 26th Sept.2011, 09.00 am SGMCMDIntn.exe -WOLstop
The software rollout script is dated 25.09.2011, 03:00. WOL can be explicitly deactivated again atthe end of the script by using SGMCMDIntn.exe -WOLstop.
All endpoint computers which log on before the 24th of September 2011 and which connect tothe rollout servers will receive the new policy and the scheduling commands.
Any endpoint computer on which the schedule triggers the command SGMCMDIntn -WOLstartbetween 24th Sept. 2011, 12:00 midday and 25th Sept. 2011, 06:00 am falls within the WOL timeinterval and therefore Wake on LAN will be activated.
214
SafeGuard Enterprise
25 Recovery options
For recovery, SafeGuard Enterprise offers different options that are tailored to different scenarios:
■ Logon recovery with Local Self Help
Local Self Help enables users who have forgotten their password to log on to their computerswithout the assistance of a help desk. Even in situations where neither telephone nor networkconnections are available (for example aboard an aircraft), users can regain access to theircomputers. To log on, they answer a predefined number of questions in the Power-onAuthentication.
Local Self Help reduces the number of calls concerning logon recovery, thus freeing the helpdesk staff from routine tasks and allowing them to concentrate on more complex supportrequests.
For further information, see Recovery with Local Self Help (page 216).
■ Recovery with Challenge/Response
The Challenge/Response recovery mechanism is a secure and efficient recovery system thathelps users who cannot log on to their computers or access encrypted data. During theChallenge/Response procedure, the user provides a challenge code generated on the endpointcomputer to the help desk officer who in turn generates a response code that authorizes theuser to perform a specific action on the computer.
With recovery with Challenge/Response, SafeGuard Enterprise offers different workflows fortypical recovery scenarios requiring help desk assistance.
For further information, see Recovery with Challenge/Response (page 221).
■ System recovery
SafeGuard Enterprise offers different methods and tools for recovery from problems withcrucial system components and SafeGuard Enterprise components, for example:
■ Corrupted MBR
■ SafeGuard Enterprise kernel problems
■ Volume access problems
■ Windows boot problems
■ GINA problems
For further information, see System Recovery (page 238).
215
Administrator help
26 Recovery with Local Self Help
SafeGuard Enterprise offers Local Self Help to enable users who have forgotten their password tolog on to their computers without the assistance of the help desk. Local Self Help reduces thenumber of calls concerning logon recovery, thus freeing the help desk staff from routine tasks andallowing them to concentrate on more complex support requests.
With Local Self Help, users can, for example, regain access to their laptops in situations whereneither telephone nor network connections are available and where they cannot use aChallenge/Response procedure (for example, aboard an aircraft). Users can log on to their computerby answering a predefined number of questions in the Power-on Authentication.
As a security officer, you can define the set of questions to be answered centrally and distribute itto the computer in a policy. We provide you with a predefined question theme as a template. Youcan use this question theme as it is or modify it. In the relevant policy, you can also grant the usersthe right to define their own questions.
When Local Self Help has been enabled by the policy, a Local Self Help Wizard is available to guidethe end users through providing initial answers and editing the questions.
Recovery with Local Self Help is available for the following logon methods in the Power-onAuthentication:
■ Logon with user ID and password
■ Logon with fingerprint
■ Logon with non-cryptographic token, provided that logon with user ID and password has alsobeen enabled in a policy of the type Authentication.
For a detailed description of Local Self Help on the endpoint computer see the SafeGuard EnterpriseUser Help, chapter Recovery with Local Self Help.
26.1 Defining Local Self Help settings in a policy
You define the settings for Local Self Help in a policy of the type General Settings under LogonRecovery - Local Self Help. This is where you enable the function to be used on the endpointcomputers and define further rights and parameters.
Enabling Local Self Help
To activate Local Self Help for use on endpoint computers, select Yes in the Enable Local SelfHelp field.
After the policy has become effective on the computers, this setting entitles the users to use LocalSelf Help for logon recovery. To be able to use Local Self Help, the users now have to activate thisrecovery method by answering a specified number of questions from the set of questions receivedor by creating and answering their own questions, depending on permission.
216
SafeGuard Enterprise
For this purpose, the Local Self Help Wizard is available from the System Tray Icon in the Windowstaskbar after the computer has received the policy and been restarted.
Configuring Local Self Help
You can set the following options for Local Self Help in a policy of the type General Settings:
■ Minimal length of answers
Define the minimum length of the answers in characters. The default is 1.
■ Welcome text under Windows
You can specify the individual information text to be displayed in the first dialog when theLocal Self Help Wizard is launched on the computer. Before you specify the text here, it has tobe created and registered.
■ Users can define their own questions
There are the following possible scenarios for the definition of questions for Local Self Help:
■ As a security officer, you define the questions and distribute them to the users. The usersare not permitted to define their own questions.
■ As a security officer, you define the questions and distribute them to the users. In addition,the users are permitted to define their own questions. When answering the minimumnumber of questions required for activating Local Self Help, the users can choose betweenpredefined questions and their own questions or use a combination of both.
■ You entitle the users to define their own questions. The users activate Local Self Help ontheir computers by defining and answering their own questions.
To entitle users to define their own questions, select Yes in the Users can define their own questionsfield.
26.2 Defining questions
To be able to use Local Self Help on the endpoint computer, the user has to answer and save apredefined number of questions. As a security officer with the required rights, you can specifyhow many questions the user has to answer to activate Local Self Help on the endpoint computer.You can also specify how many questions will be selected randomly in the POA. To log on at thePOA with Local Self Help, the user has to answer all questions displayed in the POA correctly.
As a security officer with the required rights, you can register and edit Local Self Help questionsin the SafeGuard Management Center.
217
Administrator help
26.3 Define the number of questions to be answered
You can define the number of questions to be answered during Local Self Help configuration andin the POA.
1. In the Policies navigation area, select Local Self Help questions.
2. In the action area under Local Self Help parameters, you can specify two different values forthe number of Local Self Help questions:
a) In the Minimum number of available questions/answers field, specify the number ofquestions the user has to answer in the Local Self Help Wizard to activate Local Self Helpon the endpoint computer.
The number of questions specified in this field must be available with answers on theendpoint computer for Local Self Help to be active.
b) In the Number of questions presented in POA field, specify the number of questions theuser has to answer in the POA when logging on with Local Self Help.
The questions displayed in the POA are selected randomly from the questions the user hasanswered in the Local Self Help Wizard.
The number specified in Minimum number of available questions/answers field must behigher than the number specified in Number of questions presented in POA field. If this isnot the case, an error message is displayed when you save your changes.
The defaults are:
■ Minimum number of available questions/answers: 10
■ Number of questions presented in POA: 5
3. Save your changes to the database.
The number of questions applies to the Local Self Help configuration deployed to endpointcomputers.
26.4 Using the template
A predefined question theme is available for Local Self Help. You find this question theme in theSafeGuard Management Center under Local Self Help questions.
You can use the predefined question theme as it is, edit it or delete it.
218
SafeGuard Enterprise

26.5 Import question themes
Using the import procedure, you can import your own question lists created as .XML files.
1. Create a new question theme (see Create a new question theme and add questions (page 219)).
2. In the Policies navigation area, select the new question theme under Local Self Help questions.
3. Right-click in the action area to open the context menu for the question theme. In the contextmenu, select Import.
4. Select the required directory and question theme and click Open.
The imported questions are displayed in the action area. You can now save the question theme asit is or edit it.
26.6 Create a new question theme and add questions
You can create new question themes covering different topics, to provide users with several differentquestion themes to suite their preferences.
1. In the Policies navigation area, select Local Self Help questions.
2. Right-click Local Self Help questions and select New > Question Theme.
3. Enter a name for the question theme and click OK.
4. In the Policies navigation area, select the new question theme under Local Self Help questions.
5. Right-click in the action area to open the context menu for the question theme. In the contextmenu, select Add.
A new question line is added.
6. Enter your question and press Enter. To add further questions, repeat this step.
7. To save your changes, click the Save icon in the toolbar.
Your question theme is registered. It is automatically transferred with the policy of the type GeneralSettings that enables Local Self Help on the endpoint computers.
26.7 Edit question themes
1. In the Policies navigation area, select the required question theme under Local Self Helpquestions.
219
Administrator help
2. You can now add, modify or delete questions.
■ To add questions, right-click in the action area, to display the context menu. In the contextmenu, click Add. A new line is added to the question list. Enter your question on the line.
■ To modify questions, click the required question text in the action area. The question ismarked by a pencil icon. Enter your changes on the question line.
■ To delete questions, select the required question by clicking on the grey box at the beginningof the question line in the action area and click Remove in the context menu of the question.
3. To save your changes, click the Save icon in the toolbar.
The modified question theme is registered. It is transferred with the policy of the type GeneralSettings that enables Local Self Help on the endpoint computers.
26.8 Deleting question themes
To delete an entire question theme, right-click the required theme under Local Self Help questionsin the Policies navigation area, and select Delete.
Note:
If you delete a question theme after users have answered some of these questions to activate LocalSelf Help on their computers, the users’ answers become invalid, as the questions no longer exist.
26.9 Register welcome texts
You can register a welcome text to be displayed in the first dialog of the Local Self Help Wizard.
The text files containing the required information have to be created before registering them inthe SafeGuard Management Center. The maximum file size for information texts is 50 KB.SafeGuard Enterprise only uses Unicode UTF-16 coded texts. If you do not create the text files inthis format, they will be automatically converted when they are registered.
1. In the Policies navigation area, right-click Information text and select New > Text.
2. Enter a name for the text to be displayed in the Text item name field.
3. Click [...] to select the previously created text file. If the file needs to be converted, a messageis displayed.
4. Click OK.
The new text item is displayed as a subnode below Information text in the Policies navigationarea. If you select a text item, its contents are displayed in the window on the right-hand side. Thetext item can now be selected when creating policies.
Proceed as described to register further text items. All registered text items are shown as subnodes.
220
SafeGuard Enterprise
27 Recovery with Challenge/Response
To smoothen the workflow and to reduce help desk costs, SafeGuard Enterprise provides aChallenge/Response recovery solution. SafeGuard Enterprise offers help to users who fail to logon or to access encrypted data by providing a user-friendly Challenge/Response mechanism.
This functionality is integrated in the SafeGuard Management Center as a Recovery Wizard.
Benefits of Challenge/Response
The challenge/response mechanism is a secure and efficient recovery system to fall back on.
■ No confidential data is exchanged in unencrypted form throughout the entire process.
■ There is no point in third parties eavesdropping on this procedure because the data they spyout cannot be used at any later point in time or on any other devices.
■ The computer to be accessed does not need an online network connection. The Response CodeWizard for the help desk also runs on an unmanaged computer without any SafeGuardEnterprise Server connection. There is no need for a complex infrastructure.
■ The user can start working again quickly. No encrypted data is lost just because the passwordhas been forgotten.
Typical situations requiring help desk assistance
■ A user has forgotten the password for logging on and the computer has been locked.
■ A user has forgotten or lost the token/smartcard.
■ The Power-on Authentication local cache is partly damaged.
■ A user is not available at the moment due to illness or vacation but the data on the computermust be accessible to a colleague.
■ A user wants to access a volume encrypted with a key that is not available on the computer.
SafeGuard Enterprise offers different recovery workflows for these typical scenarios enabling theusers to access their computers again.
27.1 Challenge/Response workflow
The Challenge/Response procedure is based on two components:
■ The endpoint computer on which the Challenge code is generated.
■ The SafeGuard Management Center where, as a help desk officer with sufficient rights, youcreate a response code that authorizes the user to perform the requested action on theircomputer.
221
Administrator help
Note: For a Challenge/Response process, you need Full access rights for the computers/usersinvolved.
1. On the endpoint computer, the user requests the challenge code. Depending on the recoverytype, this is either requested in the Power-on Authentication or in the KeyRecovery Tool.
A challenge code in form of an ASCII character string is generated and displayed.
2. The user contacts the help desk and provides them with the necessary identification and thechallenge code.
3. The help desk launches the Recovery Wizard in the SafeGuard Management Center.
4. The help desk selects the appropriate recovery type, confirms the identification informationand the challenge code and selects the required recovery action.
A response code in form of an ASCII character string is generated and displayed.
5. The help desk provides the user with the response code, for example by phone or text message.
6. The user enters the response code. Depending on the recovery type, this is either done in thePOA or in the KeyRecovery Tool.
The user is then permitted to perform the authorized action, for example resetting the password,and can resume working.
27.2 User password change requirements
As part of the SafeGuard Enterprise recovery process users may be forced to change their Windowspasswords. The following table provides details on when changing the password will be required.The first four columns show specific conditions which can occur during the Challenge/Responseprocedure. The last column indicates whether the user is forced to change the Windows passwordbased on the conditions indicated in the previous columns.
Result: User isforced to changeWindowspassword
Condition: Showpassword optiondeclined by user
Condition:Domaincontrolleravailable
Condition: C/Rissued with userlogon
Condition: C/Rissued with userlogon and showpassword option
NoNoYesYesYes
YesYesYesYesYes
NoYesNoYesYes
Yesn/aYesYesNo
Non/aNoYesNo
Non/aNoNoNo
222
SafeGuard Enterprise
27.3 Launch the Recovery Wizard
To be able to perform a recovery procedure, make sure you have the required rights andpermissions.
1. Log on to the SafeGuard Management Center.
2. Click Tools > Recovery in the menu bar.
The Recovery Wizard is started. You can select which type of recovery you want to use.
27.4 Recovery types
Select which type of recovery you want to use. The following recovery types are provided:
■ SafeGuard Enterprise Clients (managed)
Challenge/Response for computers that are centrally managed by the SafeGuard ManagementCenter. They are listed in the Users & Computers area in the SafeGuard Management Center.
■ Virtual Clients
For complex recovery situation, for example when the POA is corrupted, access to encrypteddata can easily be regained with Challenge/Response. Specific files called Virtual Clients areused in this case. This type is available for managed and unmanaged computers.
■ Sophos SafeGuard Clients (standalone)
Challenge/Response for unmanaged computers. They never have any connection to theSafeGuard Enterprise Server. The required recovery information is based on the key recoveryfile. On each endpoint computer this file is generated during deployment of the SophosSafeGuard encryption software. To provide Challenge/Response in this case, the key recoveryfile must be accessible to the Sophos SafeGuard help desk, for example on a shared networkpath.
Note:
Also see the logon recovery method Local Self Help that does not require any help desk assistance.
27.5 Challenge/Response for SafeGuard Enterprise Clients (managed)
SafeGuard Enterprise offers recovery for SafeGuard Enterprise protected endpoint computersregistered in the database in various recovery scenarios, such as password recovery or accessingdata by booting from external media.
Challenge/Response is supported for both SafeGuard Enterprise native computers and BitLockerencrypted endpoint computers. The system dynamically determines which type of computer is inuse. The recovery workflow is adjusted accordingly.
223
Administrator help
27.5.1 Recovery actions for SafeGuard Enterprise Clients
The recovery workflow depends on the type of endpoint computer that recovery is requested for.
Note:
For BitLocker encrypted computers the only recovery action is to recover the key used to encrypta specific volume. No password recovery is provided.
27.5.1.1 Recovering the password at POA level
One of the most common scenarios is that users have forgotten their password. By default,SafeGuard Enterprise is installed with an activated Power-on Authentication (POA). The POApassword for accessing the computer is the same as the Windows password.
If the user has forgotten the password at POA level, the SafeGuard Enterprise helpdesk officer willgenerate a response for Booting SGN client with user logon, but without displaying the userpassword. However, in this case, after entering the response code the computer will boot into theoperating system. The user has to change the password at Windows level provided that the domainis accessible. The user can then log on to Windows as well as to the Power-on Authentication withthe new password.
27.5.1.2 Best practice for recovering the password at POA level
We recommend that you use the following methods when the user has forgotten their passwordto avoid that the password has to be centrally reset:
■ Use Local Self Help.
With recovery with Local Self Help the user can have the current password displayed and maycontinue using this password without having to reset it and without any help desk assistance.
■ When using Challenge/Response on SafeGuard Enterprise Clients (managed):
We recommend that you avoid to reset the password in the Active Directory before theChallenge/Response procedure. Avoiding this ensures that the password remains synchronizedbetween Windows and SafeGuard Enterprise. Make sure that the Windows help desk is educatedaccordingly.
As a SafeGuard Enterprise help desk officer, generate a response for Booting SGN client with userlogon with the Display user password option. This is useful as the password does not have to bereset in the Active Directory. The user can continue working with the old password and changeit locally afterwards.
27.5.1.3 Displaying the user password
SafeGuard Enterprise offers users to have their password displayed during Challenge/Response.This is useful as the password does not have to be reset in the Active Directory. The option is onlyavailable if Booting SGN client with user logon is requested.
224
SafeGuard Enterprise
27.5.1.4 A different user needs to start the SafeGuard Enterprise protected computer
In this case, the user who needs to access the computer starts the computer and enters their username. The user then requests a Challenge. The SafeGuard help desk generates a Response of thetype Booting SGN client without user logon and Passthrough to Windows enabled. The user islogged on and can use the computer.
27.5.1.5 Accessing data by booting from external media
Challenge/Response can also be used to boot a computer from external media such as WinPE. Todo so, the user has to select the option Floppy Disk/External Medium in the field ContinueBooting from of the POA logon dialog and initiate the Challenge. When the user receives theresponse, they can enter the credentials in the POA as usual and continue booting from externalmedium.
The following requirements must be fulfilled to access an encrypted volume:
■ The device to be used must contain the SafeGuard Enterprise filter driver. A detailed descriptionon how to create such a driver CD can be found in our knowledge database:http://www.sophos.com/support/knowledgebase/article/108805.html
■ The user must boot from the external medium and must have the right to do so. This right canbe granted to the user by defining a policy in the SafeGuard Management Center and assigningit to the computer (policy type Authentication > User may only boot from internal hard diskmust be set to No). By default the right to boot from external media is not assigned.
■ The endpoint computer must generally support booting from different media other than afixed hard drive.
■ Only volumes encrypted with the defined machine key can be accessed. This key encryptiontype can be defined in a device encryption policy in the SafeGuard Management Center andassigned to the computer.
Please note that using external media such as a WinPE to access an encrypted drive will only partlyallow access to the volume.
27.5.1.6 Restoring the SafeGuard Enterprise policy cache
This procedure is necessary, if the SafeGuard policy cache is damaged. The local cache stores allkeys, policies, user certificates and audit files. By default, logon recovery is deactivated when thelocal cache is corrupted. It is restored automatically from its backup. In this case, noChallenge/Response procedure is required for repairing the local cache. If the local cache is to berepaired by using a Challenge/Response procedure, logon recovery can be activated by policy. Inthis case, the user is automatically prompted to initiate a Challenge/Response procedure, if thelocal cache is corrupted.
27.5.1.7 SafeGuard Data Exchange: Recover a forgotten password
SafeGuard Data Exchange without Device Encryption does not provide Challenge/Responserecovery, when the user has forgotten their password. In this case, you must change the passwordin the Active Directory. Log on to the computer without a Sophos Credential Provider and restorethe user configuration on the client.
225
Administrator help
27.5.2 Response for SafeGuard Enterprise Clients
1. On the Recovery type page, select SafeGuard Enterprise Client (managed).
2. Under Domain, select the required domain from the list.
3. Under Computer enter or select the required computer name. There are several possibilitiesto do so:
■ To select a name, click [...]. Then click Find now. A list of computers is displayed. Selectthe required computer and click OK. The computer name is displayed on the Recoverytype page.
■ Type the short name of the computer directly into the field. When you click Next, thedatabase is searched for this name. If it is found, the distinguished computer name isdisplayed.
■ Enter the computer name directly in the distinguished name format, for example:
CN=Desktop1,OU=Development,OU=Headquarter,DC=Sophos,DC=edu
4. Click Next.
5. Select the domain of the user.
6. Enter the required user name. There are several possibilities to do so:
■ To select the user name click [...] in the User information section of the Logon recoverypage. Then click Find now. A list of users is displayed. Select the required name and clickOK. The user name is displayed on the Recovery type page.
■ Enter the name of the user directly. Make sure the name is spelled correctly.
7. Click Next.
A page is displayed where you can enter the challenge code.
8. Enter the challenge code the user has passed on to you and click Next. The challenge code isverified. If the code has been entered incorrectly, Invalid challenge is displayed below the blockcontaining the error.
9. If the challenge code has been entered correctly, the recovery action requested by the SafeGuardEnterprise Client and the possible recovery actions on the client are displayed. The possibleactions for response depend on the actions requested on the client side when calling thechallenge. For example, if Crypto token requested is required on the client side, the availableactions for response are Boot SGN client with user logon and Boot SGN client without userlogon.
10. Select the action the user needs to perform.
11. If Booting SGN client with user logon has been selected, you can additionally select Showuser password to have the password displayed on the target computer.
12. Click Next.
13. A response code is generated. Provide the response code to the user. A spelling aid is provided.You can also copy the response code to the clipboard.
226
SafeGuard Enterprise
The user can enter the response code on the endpoint computer and perform the authorizedaction.
27.5.3 Response for BitLocker encrypted SafeGuard Enterprise Clients
For BitLocker encrypted computers a volume that cannot be accessed any more may be recovered.
1. On the Recovery type page, select SafeGuard Enterprise Client (managed).
2. Under Domain, select the required domain from the list.
3. Under Computer enter or select the required computer name. There are several possibilitiesto do so:
■ To select a name, click [...]. Then click Find Now. A list of computers is displayed. Selectthe required computer and click OK. The computer name is displayed in the Recovery typewindow under Domain.
■ Type the short name of the computer directly into the field. When you click Next, thedatabase is searched for this name. If it is found, the distinguished computer name isdisplayed.
■ Enter the computer name directly in distinguished name format, for example:
CN=Desktop1,OU=Development,OU=Headquarter,DC=Utimaco,DC=edu
4. Click Next.
5. Select the volume to be accessed from the list and click Next.
6. The Recovery Wizard displays the corresponding 48-digit recovery key.
7. Provide this key to the user.
The user can enter the key to recover the BitLocker encrypted volume on the endpoint computer.
27.6 Challenge/Response using Virtual Clients
With Virtual Client recovery SafeGuard Enterprise offers recovery of encrypted volumes even incomplex disaster situations, for example when the POA is corrupted. It can be applied to managedclients as well as to standalone computers.
Note:
Virtual Client recovery should only be used to resolve complex disaster situations. If for exampleonly a key is missing to recover a volume, the best way to recover the volume would simply be toassign the missing key to the respective user’s key ring.
27.6.1 Recovery workflow using Virtual Clients
To access the encrypted computer, the following general workflow applies:
1. Obtain the SafeGuard Enterprise recovery disk from technical support.
227
Administrator help
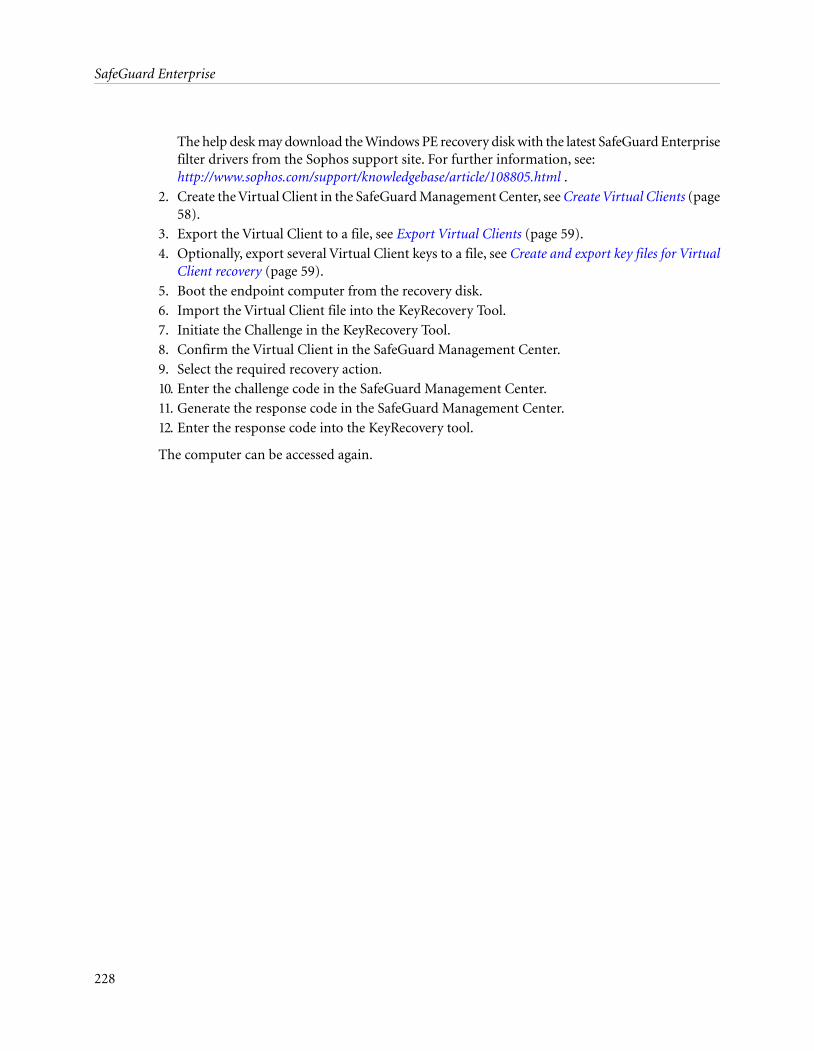
The help desk may download the Windows PE recovery disk with the latest SafeGuard Enterprisefilter drivers from the Sophos support site. For further information, see:http://www.sophos.com/support/knowledgebase/article/108805.html .
2. Create the Virtual Client in the SafeGuard Management Center, see Create Virtual Clients (page58).
3. Export the Virtual Client to a file, see Export Virtual Clients (page 59).
4. Optionally, export several Virtual Client keys to a file, see Create and export key files for VirtualClient recovery (page 59).
5. Boot the endpoint computer from the recovery disk.
6. Import the Virtual Client file into the KeyRecovery Tool.
7. Initiate the Challenge in the KeyRecovery Tool.
8. Confirm the Virtual Client in the SafeGuard Management Center.
9. Select the required recovery action.
10. Enter the challenge code in the SafeGuard Management Center.
11. Generate the response code in the SafeGuard Management Center.
12. Enter the response code into the KeyRecovery tool.
The computer can be accessed again.
228
SafeGuard Enterprise
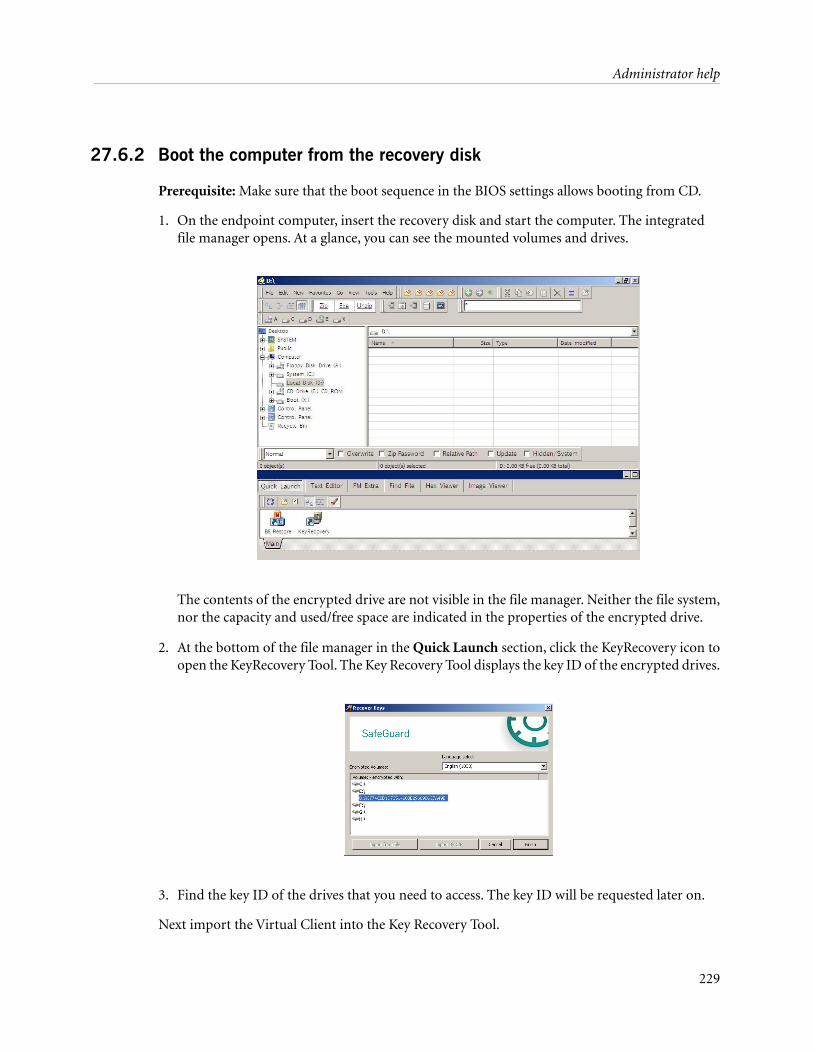
27.6.2 Boot the computer from the recovery disk
Prerequisite: Make sure that the boot sequence in the BIOS settings allows booting from CD.
1. On the endpoint computer, insert the recovery disk and start the computer. The integratedfile manager opens. At a glance, you can see the mounted volumes and drives.
The contents of the encrypted drive are not visible in the file manager. Neither the file system,nor the capacity and used/free space are indicated in the properties of the encrypted drive.
2. At the bottom of the file manager in the Quick Launch section, click the KeyRecovery icon toopen the KeyRecovery Tool. The Key Recovery Tool displays the key ID of the encrypted drives.
3. Find the key ID of the drives that you need to access. The key ID will be requested later on.
Next import the Virtual Client into the Key Recovery Tool.
229
Administrator help
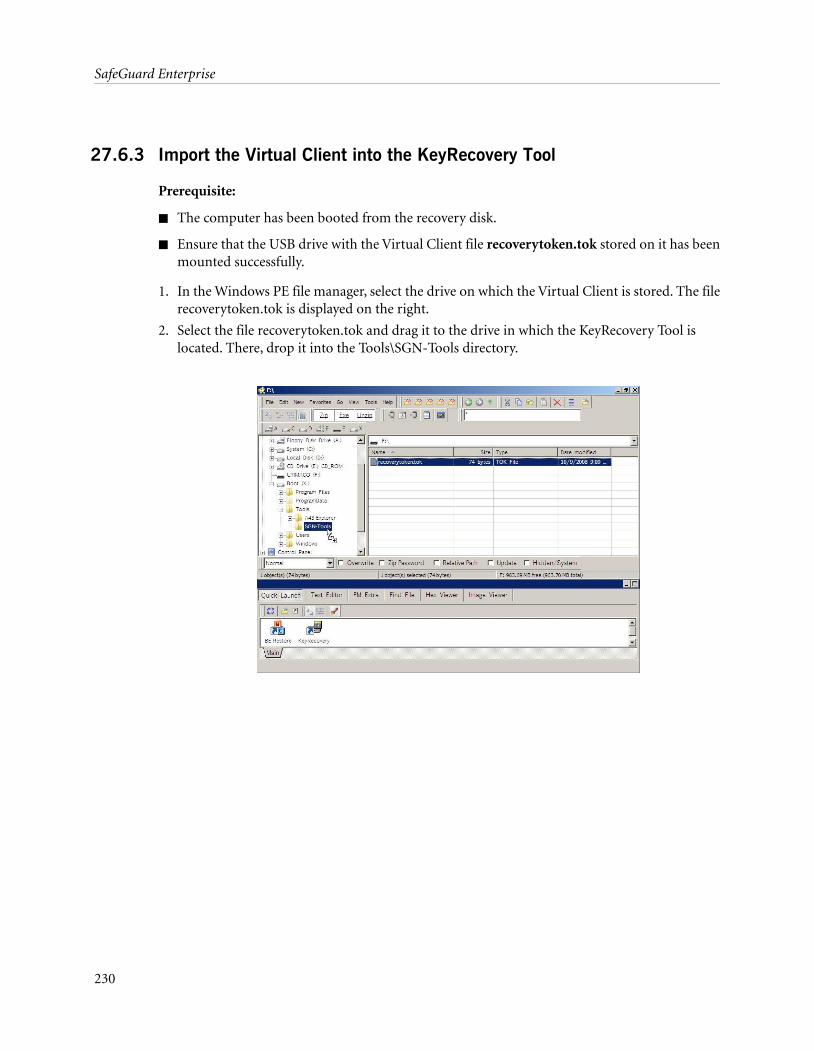
27.6.3 Import the Virtual Client into the KeyRecovery Tool
Prerequisite:
■ The computer has been booted from the recovery disk.
■ Ensure that the USB drive with the Virtual Client file recoverytoken.tok stored on it has beenmounted successfully.
1. In the Windows PE file manager, select the drive on which the Virtual Client is stored. The filerecoverytoken.tok is displayed on the right.
2. Select the file recoverytoken.tok and drag it to the drive in which the KeyRecovery Tool islocated. There, drop it into the Tools\SGN-Tools directory.
230
SafeGuard Enterprise
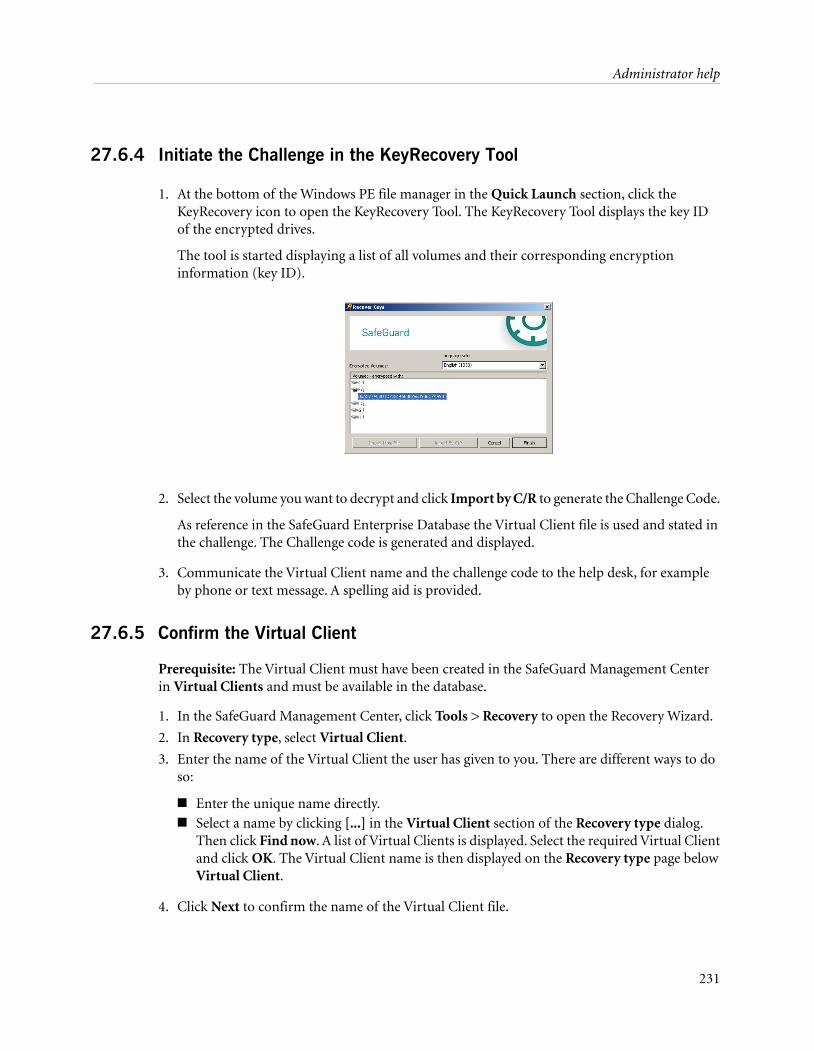
27.6.4 Initiate the Challenge in the KeyRecovery Tool
1. At the bottom of the Windows PE file manager in the Quick Launch section, click theKeyRecovery icon to open the KeyRecovery Tool. The KeyRecovery Tool displays the key IDof the encrypted drives.
The tool is started displaying a list of all volumes and their corresponding encryptioninformation (key ID).
2. Select the volume you want to decrypt and click Import by C/R to generate the Challenge Code.
As reference in the SafeGuard Enterprise Database the Virtual Client file is used and stated inthe challenge. The Challenge code is generated and displayed.
3. Communicate the Virtual Client name and the challenge code to the help desk, for exampleby phone or text message. A spelling aid is provided.
27.6.5 Confirm the Virtual Client
Prerequisite: The Virtual Client must have been created in the SafeGuard Management Centerin Virtual Clients and must be available in the database.
1. In the SafeGuard Management Center, click Tools > Recovery to open the Recovery Wizard.
2. In Recovery type, select Virtual Client.
3. Enter the name of the Virtual Client the user has given to you. There are different ways to doso:
■ Enter the unique name directly.■ Select a name by clicking [...] in the Virtual Client section of the Recovery type dialog.
Then click Find now. A list of Virtual Clients is displayed. Select the required Virtual Clientand click OK. The Virtual Client name is then displayed on the Recovery type page belowVirtual Client.
4. Click Next to confirm the name of the Virtual Client file.
231
Administrator help
Next select the requested recovery action.
27.6.6 Select required recovery action
1. On the Virtual Client, Requested Action page, select one of the following options:
■ Select Key requested to recover a single key for accessing an encrypted volume on thecomputer.
This option is available for unmanaged and managed endpoint computers.■ Select Password for key file requested to recover multiple keys for accessing encrypted
volumes on the computer. The keys are stored in one file which is encrypted with a randompassword stored in the database. The password is unique for each created key file. Withinthe response code the password is transferred to the target computer.
This option is only available for managed endpoint computers.
2. Click Next.
27.6.7 Select the requested key (single key)
Prerequisite:
You must have selected the required Virtual Client in the SafeGuard Management Center RecoveryWizard and the recovery action Key requested.
1. In the Recovery Wizard, on the Virtual Client page, select if the action is requested by a managedor standalone computer:
■ For managed computers, select Recovery key for SafeGuard Enterprise Client managed.Click [...]. In Find Keys, you can either display the keys by key ID or by symbolic name.Click Find now, select the key and click OK.
Note:
A response can only be initiated for assigned keys. If a key is inactive, this means that thekey is not assigned to at least one user, a Virtual Client Response is not possible. In this case,the inactive key can be reassigned to any other user and a response for this key can begenerated again.
■ For unmanaged computers, select Recovery key for Sophos SafeGuard Client standalone.Click [...] next to this option to browse for the respective file. For easier identification therecovery files carry the name of the computer: computername.GUID.xml. Select the fileand click Open.
Note:
The required key recovery file needed to regain access to the computer must be accessibleto the help desk, for example on a network share.
232
SafeGuard Enterprise
2. Click Next. The page for entering the challenge code is displayed.
The requested key is transferred to the user environment within the response code.
27.6.8 Select the requested key file (several keys)
Prerequisite:
This option is only available for managed computers.
You must have created the key file beforehand in the SafeGuard Management Center in Keys andCertificates and the password encrypting the key file must have been stored in the database.
You must have selected the required Virtual Client file in the SafeGuard Management CenterRecovery Wizard and the recovery action Password for key file requested.
1. To select a key file, click [...] next to this option. In Key file, click Find now. Select the key fileand click OK.
2. Click Next to confirm.
The page for entering the challenge code is displayed.
27.6.9 Enter the challenge code and generate the response code
Prerequisite:
You must have selected the required Virtual Client in the SafeGuard Management Center RecoveryWizard and the required recovery action.
1. Enter the challenge code the user has passed on to you and click Next. The challenge code isverified.
If the challenge code has been entered correctly, the response code is generated. If the code hasbeen entered incorrectly, Invalid challenge is displayed below the block containing the error.
2. Pass the response code on to the user. A spelling aid is provided. You can also copy the responsecode to the clipboard.
When you have selected Key requested as recovery action, the requested key is transferred to theuser environment within the response code.
When you have selected Password for key file requested as recovery action, the password for theencrypted key file is transferred within the response code. The key file is then deleted.
233
Administrator help
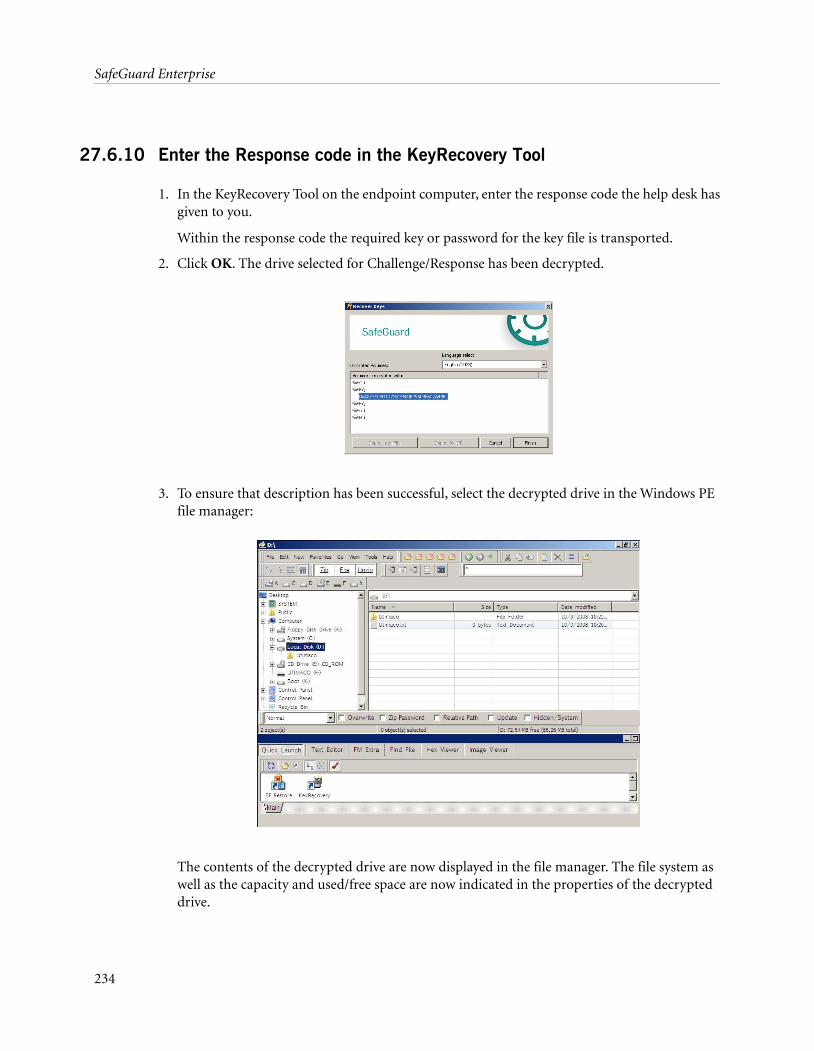
27.6.10 Enter the Response code in the KeyRecovery Tool
1. In the KeyRecovery Tool on the endpoint computer, enter the response code the help desk hasgiven to you.
Within the response code the required key or password for the key file is transported.
2. Click OK. The drive selected for Challenge/Response has been decrypted.
3. To ensure that description has been successful, select the decrypted drive in the Windows PEfile manager:
The contents of the decrypted drive are now displayed in the file manager. The file system aswell as the capacity and used/free space are now indicated in the properties of the decrypteddrive.
234
SafeGuard Enterprise
Access to the data stored on this partition is recovered. As a result of the successful decryptionyou can read, write and copy data from or to the drive.
27.7 Challenge/Response for Sophos SafeGuard Clients (standalone)
SafeGuard Enterprise also provides Challenge/Response for unmanaged computers (SophosSafeGuard Clients standalone), when the user has forgotten the password or entered the passwordincorrectly too often. Unmanaged computers never have any connection to the SafeGuardEnterprise Server, not even temporarily. They operate in standalone mode.
Recovery information needed for a Challenge/Response is in this case based on the key recoveryfile. On each unmanaged endpoint computer, this key recovery file is generated during deploymentof the SafeGuard Enterprise encryption software. The key recovery file must be accessible to theSophos SafeGuard help desk, for example on a shared network path.
To facilitate searching and grouping of the recovery files the files will carry the name of thecomputer: computername.GUID.xml in their file names. This allows for wild card search withasterisks (*), for example: *.GUID.xml.
Note:
When a computer is renamed, it will not be renamed accordingly in the computer's local cache.The local cache stores all keys, policies, user certificates and audit files. The new computer nametherefore has to be removed from the local cache so that only the previous name will remain, evenif a computer is renamed under Windows.
27.7.1 Recovery actions for Sophos SafeGuard Clients (standalone)
Challenge/Response for an endpoint computer can be initiated in the following situations:
■ The user has entered the password incorrectly too often.
■ The user has forgotten the password.
■ A corrupted cache needs to be repaired.
For an unmanaged computer no user key is available in the database. Therefore, the only recoveryaction possible in a Challenge/Response session is Booting SGN client without user logon.
The Challenge/Response procedure enables the computer to boot through Power-onAuthentication. The user is then able to log on to Windows
Potential recovery use cases:
The user has entered the password incorrectly too often at POA level and the computer hasbeen locked. But the user still knows the password.
The computer is locked, and the user is prompted to initiate a Challenge/Response procedure tounlock the computer. As the user still knows the correct password, there is no need to reset it. TheChallenge/Response procedure enables the computer to boot through Power-on Authentication.
235
Administrator help
The user can then type the password correctly into the Windows logon dialog and is logged on toWindows.
The user has forgotten the password
Note:
We recommend that you use Local Self Help to recover a forgotten password. Local Self Helpallows users to have the current password displayed and to continue using it. This avoids the needto reset the password or to involve the help desk.
When recovering a forgotten password with Challenge/Response a password reset is required.
1. The Challenge/Response procedure enables the computer to boot through Power-onAuthentication.
2. In the Windows logon dialog, the user does not know the correct password. The passwordneeds to be reset at Windows level. This requires further recovery actions outside the scope ofSafeGuard Enterprise, using standard Windows means.
Note:
We recommend that you avoid resetting the password centrally before to the Challenge/Responseprocedure. Avoiding this ensures that the password remains synchronized between Windowsand SafeGuard Enterprise. Make sure that the Windows help desk is educated accordingly.
We recommend the following methods to reset the password at Windows level.
■ By using a service or administrator account available on the endpoint computer with therequired Windows rights.
■ By using a Windows password reset disk on the endpoint computer.
As a help desk officer, you can inform the user which procedure should be used and eitherprovide the additional Windows credentials or the required disk.
3. The user enters the new password that the help desk has reset at Windows level. The user thenneeds to change this password immediately to a value only known to the user. A new usercertificate is created based on the newly chosen Windows password. This enables the user tolog on to the computer again and to log on at Power-on Authentication with the new password.
Note:
Keys for SafeGuard Data Exchange: When a password is reset and a new certificate is created,local keys previously created for SafeGuard Data Exchange can still be used if the endpoint isa member of a domain. If the endpoint is a member of a workgroup, the user has to rememberthe SafeGuard Data Exchange passphrase to reactivate these local keys.
The local cache needs to be repaired
The local cache stores all keys, policies, user certificates and audit files. By default, logon recoveryis deactivated when the local cache is corrupted, which means that it is restored automaticallyfrom its backup. In this case, no Challenge/Response procedure is required to repair the localcache. However, logon recovery can be activated by policy, if the local cache is to be repaired
236
SafeGuard Enterprise
explicitly with a Challenge/Response procedure. In this case, the user is prompted automaticallyto initiate a Challenge/Response procedure, if the local cache is corrupted.
27.7.2 Generate a response for unmanaged computers using the key recoveryfile
Note:
The key recovery file generated during installation of the SafeGuard Enterprise encryption softwareneeds to be stored in a location that a help desk officer is able to access and the name of the filemust be known.
1. In the SafeGuard Management Center, select Tools > Recovery from the menu bar to openthe Recovery Wizard.
2. In Recovery type, select Sophos SafeGuard Client (standalone).
3. Locate the required key recovery file by clicking the [...] button next to the Key recovery filefield. For easier identification, the recovery files carry the name of the computer:computername.GUID.xml.
4. Enter the challenge code the user has passed on to you and click Next. The challenge code isverified.
If the challenge code has been entered correctly, the recovery action requested by the computeras well as the possible recovery actions are displayed. If the code has been entered incorrectly,Invalid challenge is displayed below the block containing the error.
5. Select the action to be taken by the user and click Next.
6. A response code is generated. Communicate the response code to the user. A spelling aid isprovided. You may also copy the response code to the clipboard.
The user can enter the response code, perform the requested action and resume working.
237
Administrator help
28 System Recovery
SafeGuard Enterprise encrypts files and drives transparently. Boot drives can also be encrypted,so decryption functionalities such as code, encryption algorithms and encryption key must beavailable very early in the boot phase. Therefore encrypted information cannot be accessed if thecrucial SafeGuard Enterprise modules are unavailable or do not work.
The following sections cover possible problems and recovery methods.
28.1 Recover data by booting from an external medium
This recovery type can be applied when the user can still log on at the POA, but cannot access theencrypted volume any more. In this case, access to the encrypted data can be regained by bootingthe computer from a Windows PE recovery disk customized for SafeGuard Enterprise.
Prerequisites:
■ The user booting from the external medium must have the right to do so. This right can eitherbe configured in the SafeGuard Management Center within a policy of type Authentication(User may only boot from hard disk set to Yes) or can be obtained for a one-time use with aChallenge/Response procedure.
■ The computer must support booting from different media than the fixed hard drive.
To regain access to encrypted data on the computer, do the following:
1. Obtain the SafeGuard Enterprise Windows PE disk from technical support.
The help desk may download the Windows PE recovery disk with the latest Sophos SafeGuardfilter drivers from the Sophos support site. For further information, seehttp://www.sophos.com/support/knowledgebase/article/108805.html.
2. Log on at the Power-on Authentication with your credentials.
3. Insert the Windows PE recovery disk into the computer.
4. In the POA logon dialog under Continue booting from select external medium. The computeris started.
Access to the data stored on this partition is recovered.
Note:
Depending on the BIOS in use, booting from the disk may not work.
28.2 Corrupted MBR
For resolving problems with a corrupted MBR, SafeGuard Enterprise offers the tool BE_Restore.exe.
For a detailed description of how to restore a corrupted MBR with this tool refer to the SafeGuardTools Guide.
238
SafeGuard Enterprise
28.3 Code
It is possible to access a hard disk with damaged kernel boot code as keys are stored separatelyfrom the kernel in the so-called KSA (Key Storage Area). By separating the kernel and the keys,this type of drive can be decrypted when hooked up to another computer.
To do this, the user logging on to the other computer needs a key for the KSA of the unbootablepartition on their key ring.
In the worst case, the partition is only encrypted using the other computer's Boot_Key. In such acase, the Master Security Officer or the Recovery Officer must assign this Boot_Key to the user.
For further information, see "Slaving" a hard disk (page 241).
28.4 Volumes
SafeGuard Enterprise provides volume-based encryption. This includes saving encryptioninformation consisting of the boot sector, primary and backup KSA and the original boot sectoron each drive itself.
If one of the following conditions applies, the volume cannot be accessed any longer:
■ Both Key Storage Areas (KSA) are damaged at the same time.
■ The original MBR is damaged.
28.4.1 Boot sector
During the encryption process a volume's boot sector is swapped for the SafeGuard Enterpriseboot sector.
The SafeGuard Enterprise boot sector holds information about
■ the location of the primary and backup KSA in clusters and sectors in relation to the start ofthe partition
■ the size of the KSA
Even if the SafeGuard Enterprise boot sector is damaged, encrypted volumes cannot be accessed.
The tool BE_Restore can restore the damaged boot sector. For further information, see theSafeGuard Enterprise tools guide.
28.4.2 Original boot sector
The original boot sector is the one that is run after the DEK (Data Encryption Key) has beendecrypted and the algorithm and the key have been loaded to the BE filter driver.
239
Administrator help
If this boot sector is defective, Windows is unable to access the volume. Normally the commonerror message "Device is not formatted. Would you like to format it now? Yes/No" is displayed.
Nonetheless, SafeGuard Enterprise will load the DEK for this volume. A tool that is used to repairthe boot sector needs to be compatible with the SafeGuard Enterprise Upper Volume Filter.
28.5 Windows boot problems
Its cryptographic design of the volume-specific key (boot sector, Key Storage Area KSA) makesSafeGuard Enterprise extremely flexible.
You can save a damaged system by booting a restore medium from the SafeGuard EnterprisePower-on Authentication (Windows PE with the SafeGuard Enterprise encryption subsysteminstalled). These media have transparent en-/decryption access to volumes encrypted withSafeGuard Enterprise. The cause of the unbootable system can be remedied from there.
28.5.1 Encryption subsystem
Encryption subsystems are for example BEFLT.sys. Carry out the procedure described underWindows boot problems and repair the system.
28.5.2 GINA problems
GINA problems such as circular loops may be resolved as follows: Carry out the procedure describedunder Windows boot problems and repair the system.
28.6 Setting up WinPE for SafeGuard Enterprise
To get access to encrypted drives with a computer's BOOTKEY within a WinPE environment,SafeGuard Enterprise offers WinPE with the required SafeGuard Enterprise function modulesand drivers. To start SetupWinPE, enter the following command:
SetupWinPE -pe2 <WinPE image file>
WinPE image file being the full path name of a WinPE image file
SetupWinPE makes all the changes needed.
Note:
Note that, with this type of WinPE environment, only encrypted drives that are encrypted withthe BOOTKEY can be accessed. Drives that are encrypted with a user key cannot be accessedbecause the keys are not available in this environment.
240
SafeGuard Enterprise
28.7 "Slaving" a hard disk
SafeGuard Enterprise allows encrypted volumes or hard disks to be enslaved. It permits the enduser, the Windows administrator and the SafeGuard Enterprise Security Officer to connect orremove new volumes or hard disks in spite of sector-based encryption.
A volume's Key Storage Area (KSA) holds all the information required, this means:
■ The randomly generated DEK (Data Encryption Key).
■ An ID for the encryption algorithm used to encrypt the volume.
■ The list of GUIDs for the KEKs (Key Encryption Keys) that can encrypt and decrypt the DEK.
■ The volume itself contains its size.
A volume encrypted with SafeGuard Enterprise can be accessed from all SafeGuard Enterpriseprotected computers, provided that the user or computer possess a KEK for the KSA of the volumeon their key ring.
Users or computers must be able to decrypt the DEK encrypted by the KEK.
Many users and computers can access a volume that has been encrypted with a distributable KEKsuch as an OU, group or domain key, because many users/computers of a domain have this keyon their key ring.
However, a volume that is only encrypted with the individual boot key ("Boot_machinename")of the SafeGuard Enterprise protected computer can only be accessed by that particular computer.
If a volume does not boot on its original computer, it may be "enslaved" on another SafeGuardEnterprise protected computer. However, the correct boot key cannot be accessed then. It has tobe made accessible.
Whenever the user attempts to access the volume from another computer, this can be done, becausethe KEKs in the KSA and the key rings of the other users or computers match again.
28.7.1 Example
Alice has her own personal user key. Whenever she is logged on to her other computer("Laptop_Alice"), she cannot access the volume that is encrypted with the boot key of the "SGNCLT"computer.
The SafeGuard Enterprise protected computer "SGMCLT" only has its own boot keyBOOT_SGMCLT.
The Security Officer assigns the boot key "BOOT_SGNCLT" to Alice as follows:
1. Select user Alice
2. Click the "Binocular" icon in the SafeGuard Enterprise toolbar. This opens the search dialogwhich can also display boot keys.
3. Select the "BOOT_SGMCLT" key.
241
Administrator help
Now Alice has two keys - "User_Alice" and "BOOT_SGMCLT". This can be verified under Keys& Certificates.
The "BOOT_SGMCLT" has been assigned twice - to the SGMCLT computer and to user Alice.
Alice can now access the encrypted volume of any other SafeGuard Enterprise protected endpointcomputer which she is able to log on to.
She can then easily use tools such as Windows Explorer and regedit.exe to resolve the reason forthe boot problem.
If, in the worst case, the problem is not resolved, she can save data on another drive, reformat thevolume or set it up as new again.
242
SafeGuard Enterprise
29 Restore a corrupt SafeGuard Management Centerinstallation
If the installation of the SafeGuard Management Center is corrupted, but the database is still intact,the installation can be easily restored by installing the SafeGuard Management Center afresh andusing the existing database as well as the backed up Security Officer certificate.
■ The Master Security Officer certificate of the relevant database configuration must have beenexported to .p12 file and must be available and valid.
■ The passwords for the .p12 file as well as for the certificate store must be known to you.
To restore a corrupt SafeGuard Management Center installation:
1. Install the SafeGuard Management Center installation package afresh. Open the SafeGuardManagement Center. The Configuration Wizard is started automatically.
2. In Database Connection, select the relevant database server and configure the connection tothe database if required. Click Next.
3. In Database Settings click Select an available database and select the relevant database fromthe list.
4. In Security Officer Data, do either of the following:
■ If the backed up certificate file can be found on the computer, it is displayed. Enter thepassword you use for authenticating at the SafeGuard Management Center.
■ If the backed up certificate file cannot be found on the computer, select Import. Browsefor the backed up certificate file and click Open. Enter the password for the selected certificatefile. Click Yes. Enter and confirm a password for authenticating at the SafeGuardManagement Center.
5. Click Next, and then Finish to complete the SafeGuard Management Center configuration.
The corrupt SafeGuard Management Center installation is restored.
243
Administrator help
30 Restore a corrupt database configuration
A corrupt database configuration can be restored by installing SafeGuard Management Centerafresh to create a new instance of the database based upon the backed up certificate files. Thisguarantees that all existing SafeGuard Enterprise endpoint computers still accept policies fromthe new installation.
■ The company and Master Security Officer certificates of the relevant database configurationmust have been exported to .p12 files and must be available and valid.
■ The passwords for the two .p12 files as well as for the certificate store must be known to you.
Note: We only recommend this type of restore if there is no valid database backup available. Allcomputers that are connecting to a backend that was restored in this way will lose theiruser-machine assignment, resulting in a temporarily switched off Power-on Authentication.Challenge/Response mechanisms will not be available until the corresponding endpoint computerhas successfully sent its key information again.
To restore a corrupt database configuration:
1. Reinstall the SafeGuard Management Center installation package. Open the SafeGuardManagement Center. The Configuration Wizard is started automatically.
2. In Database Connection, check Create a new database. Under Database settings, configurethe connection to the database. Click Next.
3. In Security Officer Data, select the relevant MSO and click Import.
4. In Import Authentication Certificate browse for the backed up certificate file. Under Key fileenter and confirm the password specified for this file. Click OK.
5. The MSO certificate is imported. Click Next.
6. In Company Certificate, check Restore using an existing company certificate. Click Importto browse for the backed up certificate file that contains the valid company certificate. You areprompted to enter the password specified for the certificate store. Enter the password and clickOK to confirm it. Click Yes in the message displayed.
The company certificate is imported.
7. Click Next, then Finish.
The database configuration is restored.
244
SafeGuard Enterprise
31 Inventory and status data
SafeGuard Enterprise reads an extensive amount of inventory and status data from the endpointcomputers. This data shows the current global state of each computer. The data is displayed inthe SafeGuard Management Center in Users and Computer in the Inventory tab.
As a security officer, you can view, export and print out inventory and status data. For example,you can create compliance reports to show that endpoint computers have been encrypted.Wide-ranging sort and filter features are available to help you select the relevant data.
The Inventory provides for example the following data about each machine:
■ The policy applied.
■ The last server contact.
■ The encryption status of all media.
■ The POA status and the POA type.
■ The installed SafeGuard Enterprise modules.
■ The WOL status.
■ User data.
31.1 Inventory and status data of Macs
For Macs the Inventory provides the following data about each machine:
■ The name of the Mac
■ The operating system
■ The POA type
■ The POA status
■ The number of encrypted drives
■ The number of unencrypted drives
■ The last server contact
■ The modification date
■ Whether the current company certificate is used or not
31.2 View inventory data
1. In the navigation area of the SafeGuard Management Center, click Users and Computers.
245
Administrator help
2. In the navigation window, click the relevant container (domain, workgroup or computer) onthe left-hand side.
3. In the action area, switch to the Inventory tab on the right-hand side.
4. In the Filter area, select the filter to be applied on the inventory display, see Filtering inventorydata (page 246).
Note:
If you are selecting a particular computer, you receive the inventory data as soon as you switchto the Inventory tab. The Filter area is not available here.
5. In the Filter area, click the magnifier icon.
The inventory and status data appears in a summarized table for all the machines in the containerselected. The tabs Drives, Users and Features are also available for each machine.
By clicking a column header you can sort the inventory data based on the values of the selectedcolumn. The context menu for each column offers a number of features for sorting, grouping andcustomizing the display. Depending on your access rights, items in the inventory are shown indifferent colors:
■ Items for objects for which you have Full access rights are shown in black.
■ Items for objects for which you have Read only access rights are shown in blue.
■ Items for objects for which you have no access rights are greyed out.
31.3 Show hidden columns
Some columns in the inventory data display are hidden by default.
1. In the inventory data display, right-click the column header bar.
2. From the context menu, select Runtime Column Customization.
The Customization window is displayed showing the hidden columns.
3. Drag the required column from the Customization window to the column header bar.
The column is shown in the inventory data display. To hide it again, drag it back to theCustomization window.
31.4 Filtering inventory data
When working from an OU, filters can be defined to limit the display based on a particular criteria.
The following fields are available for defining filters in the Filter area of the Inventory tab:
246
SafeGuard Enterprise
DescriptionField
To display the inventory and status data for a particular computer,enter the computer's name in this field.
Computer name
Activate this field, if you want to include subcontainers in the display.Including subcontainers
Use this field to specify the number of last changes to be displayed.Show last modified
You can also use the Filter Editor to create user-defined filters. You can open the Filter Editorfrom the context menu for each column. In the Filter Builder window, you can define your ownfilters and apply them to the column concerned.
31.5 Refreshing inventory data
The endpoint computers usually send an update of the inventory data when the data have changed.
The Request Inventory Refresh command can be used to manually request a refresh of thecomputer's current inventory data. This command is available for a particular computer or forall the computers in a node (optionally including sub-nodes) from the context menu and theActions menu in the SafeGuard Management Center menu bar. The command can also be selectedusing the context menu for the list entries.
If you select this command or click the Request Inventory Refresh icon in the toolbar, the relevantcomputers send their current inventory data.
As is the case with other areas in the SafeGuard Management Center, you can use the Refreshcommand to refresh the display.You can select this command from the context menu for individualcomputers or all the computers in a node and from the View menu in the menu bar. You can alsouse the Refresh double-headed arrow icon in the toolbar to refresh the display.
31.6 Overview
The individual columns in the overview show the following information.
Note:
Some columns are hidden by default. You can customize the display to show them. For furtherinformation, see Show hidden columns (page 246).
ExplanationColumn
Shows the computer's name.Machine name
Shows the computer domain name.Domain
Shows the pre-Windows 2000 domain name.Domain Pre 2000
247
Administrator help
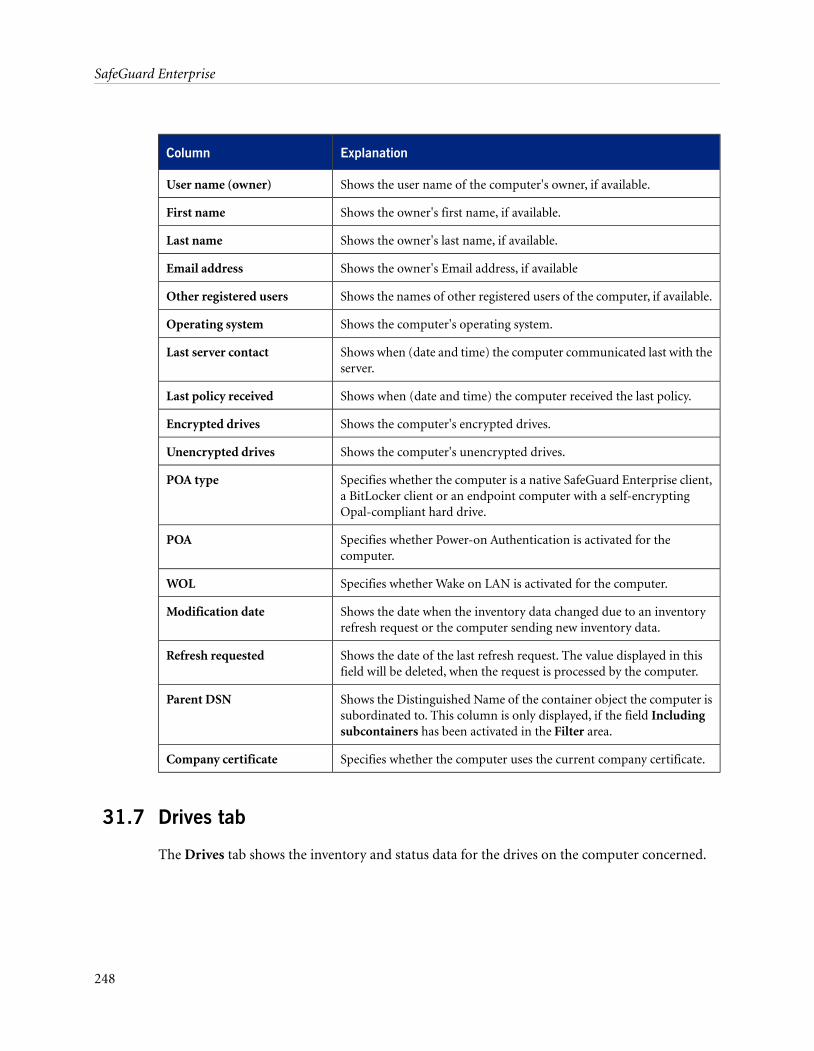
ExplanationColumn
Shows the user name of the computer's owner, if available.User name (owner)
Shows the owner's first name, if available.First name
Shows the owner's last name, if available.Last name
Shows the owner's Email address, if availableEmail address
Shows the names of other registered users of the computer, if available.Other registered users
Shows the computer's operating system.Operating system
Shows when (date and time) the computer communicated last with theserver.
Last server contact
Shows when (date and time) the computer received the last policy.Last policy received
Shows the computer's encrypted drives.Encrypted drives
Shows the computer's unencrypted drives.Unencrypted drives
Specifies whether the computer is a native SafeGuard Enterprise client,a BitLocker client or an endpoint computer with a self-encryptingOpal-compliant hard drive.
POA type
Specifies whether Power-on Authentication is activated for thecomputer.
POA
Specifies whether Wake on LAN is activated for the computer.WOL
Shows the date when the inventory data changed due to an inventoryrefresh request or the computer sending new inventory data.
Modification date
Shows the date of the last refresh request. The value displayed in thisfield will be deleted, when the request is processed by the computer.
Refresh requested
Shows the Distinguished Name of the container object the computer issubordinated to. This column is only displayed, if the field Includingsubcontainers has been activated in the Filter area.
Parent DSN
Specifies whether the computer uses the current company certificate.Company certificate
31.7 Drives tab
The Drives tab shows the inventory and status data for the drives on the computer concerned.
248
SafeGuard Enterprise
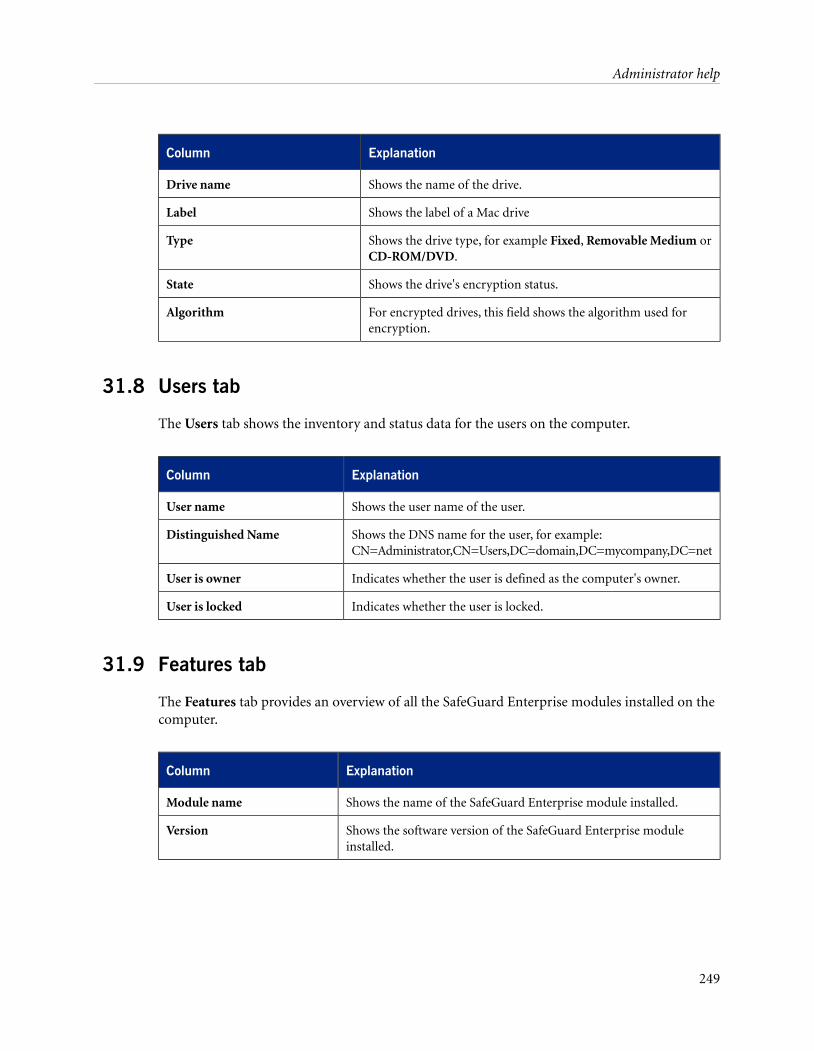
ExplanationColumn
Shows the name of the drive.Drive name
Shows the label of a Mac driveLabel
Shows the drive type, for example Fixed, Removable Medium orCD-ROM/DVD.
Type
Shows the drive's encryption status.State
For encrypted drives, this field shows the algorithm used forencryption.
Algorithm
31.8 Users tab
The Users tab shows the inventory and status data for the users on the computer.
ExplanationColumn
Shows the user name of the user.User name
Shows the DNS name for the user, for example:CN=Administrator,CN=Users,DC=domain,DC=mycompany,DC=net
Distinguished Name
Indicates whether the user is defined as the computer's owner.User is owner
Indicates whether the user is locked.User is locked
31.9 Features tab
The Features tab provides an overview of all the SafeGuard Enterprise modules installed on thecomputer.
ExplanationColumn
Shows the name of the SafeGuard Enterprise module installed.Module name
Shows the software version of the SafeGuard Enterprise moduleinstalled.
Version
249
Administrator help
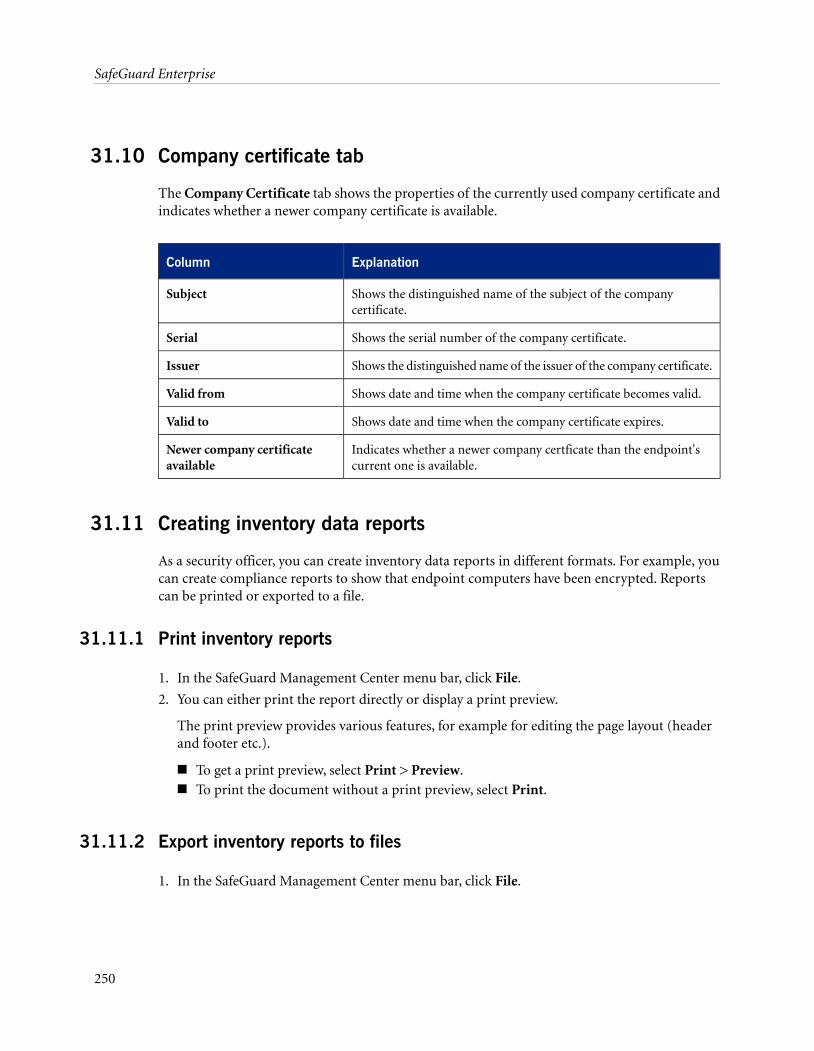
31.10 Company certificate tab
The Company Certificate tab shows the properties of the currently used company certificate andindicates whether a newer company certificate is available.
ExplanationColumn
Shows the distinguished name of the subject of the companycertificate.
Subject
Shows the serial number of the company certificate.Serial
Shows the distinguished name of the issuer of the company certificate.Issuer
Shows date and time when the company certificate becomes valid.Valid from
Shows date and time when the company certificate expires.Valid to
Indicates whether a newer company certficate than the endpoint'scurrent one is available.
Newer company certificateavailable
31.11 Creating inventory data reports
As a security officer, you can create inventory data reports in different formats. For example, youcan create compliance reports to show that endpoint computers have been encrypted. Reportscan be printed or exported to a file.
31.11.1 Print inventory reports
1. In the SafeGuard Management Center menu bar, click File.
2. You can either print the report directly or display a print preview.
The print preview provides various features, for example for editing the page layout (headerand footer etc.).
■ To get a print preview, select Print > Preview.■ To print the document without a print preview, select Print.
31.11.2 Export inventory reports to files
1. In the SafeGuard Management Center menu bar, click File.
250
SafeGuard Enterprise
2. Select Print > Preview.
The inventory report Preview is displayed.
The preview provides various features, for example for editing the page layout (header andfooter etc.).
3. In the toolbar of the Preview window, select the drop-down list of the Export Document...icon.
4. Select the required file type from the list.
5. Specify the required export options and click OK.
The inventory report is exported to a file of the file type specified.
251
Administrator help
32 Reports
Recording security-related incidents is a prerequisite for detailed system analysis. The events loggedfacilitate the exact tracking of processes on a specific workstation or within a network. By loggingevents, you can for example verify security breaches committed by third parties. By using thelogging functionality, administrators and security officers can also detect errors in granting userrights and correct them.
SafeGuard Enterprise logs all endpoint computer activities and status information as well asadministrator actions and security-related events and saves them centrally. The logging functionalityrecords events triggered by installed SafeGuard products. The type of logs is defined in policies ofthe type Logging. This is also where you specify the output and saving location for the loggedevents: the Windows Event Log of the endpoint computer or the SafeGuard Enterprise Database.
As a security officer with the necessary rights, you can view, print and archive status informationand log reports displayed in the SafeGuard Management Center. The SafeGuard ManagementCenter offers comprehensive sorting and filter functions which are very helpful when selectingthe relevant events from the information available.
Automated analyses of the log database, for example with Crystal Reports or Microsoft SystemCenter Operations Manager, are also possible. SafeGuard Enterprise protects the log entries againstunauthorized manipulation using signatures on the client and on the server side.
Depending on the logging policy, events of the following categories can be logged:
■ Authentication
■ Administration
■ System
■ Encryption
■ Client
■ Access control
For SafeGuard Data Exchange, you can track files accessed on removable media by logging therelevant events. For further information on this report type, see File access report for removablemedia (page 257).
32.1 Application scenarios
The SafeGuard Enterprise logging functionality is a user-friendly and comprehensive solution forrecording and analyzing events. The following examples show typical application scenarios forSafeGuard Enterprise Reports.
252
SafeGuard Enterprise
32.1.1 Central monitoring of workstations within a network
The security officer wants to be informed about critical events (for example, unauthorized dataaccess, a number of failed logon attempts within a specified time frame) on a regular basis. Usinga logging policy, the security officer can configure logging processes to log all security-relatedevents occurring on the endpoint computers in a local log file. This log file is transferred to theSafeGuard Enterprise Database by the SafeGuard Enterprise Server after a number of events hasbeen reached. The security officer can retrieve, view and analyze the events in the Event Viewerof the SafeGuard Management Center. The processes performed on different endpoint computerscan be audited without staff being able to influence logging.
32.1.2 Monitoring mobile users
In general, mobile users are not constantly connected to the company network. Sales representativesmay for example disconnect their notebooks for a meeting. As soon as they log on to the networkagain, the SafeGuard Enterprise events logged during the offline period are transferred. The loggingfunctionality provides an exact overview on the user's activities during the time that the computerwas not connected to the network.
32.2 Prerequisite
Events are handled by the SafeGuard Enterprise Server. On a computer on which only the SafeGuardManagement Center is installed, you need to make sure that events are sent to the SafeGuardEnterprise Server. You therefore have to install a client configuration package on the SafeGuardManagement Center computer telling the computer where the SafeGuard Enterprise Server islocated. By doing so, the computer is activated as a client at the server and the Windows orSafeGuard Enterprise logging functionality is enabled.
For further information on client configuration packages, see the SafeGuard Enterprise installationguide.
32.3 Destinations for logged events
There are two possible destinations for logged events: the Windows Event Viewer or the SafeGuardEnterprise Database. Only events related to a SafeGuard product are written to the relevantdestination.
The output destinations for events to be logged are specified in the logging policy.
32.3.1 Windows Event Viewer
Events for which you define the Windows Event Viewer as a destination in the logging policy arelogged in the Windows Event Viewer. The Windows Event Viewer can be used to display andmanage logs for system, security and application events. You can also save these event logs. For
253
Administrator help
these procedures, an administrator account for the relevant endpoint computer is required. Inthe Windows Event Viewer, an error code is displayed instead of a descriptive event text.
Note:
This chapter describes the processes of viewing, managing and analyzing event logs in the SafeGuardManagement Center. For further information on the Windows Event Viewer, refer to yourMicrosoft Documentation.
32.3.2 SafeGuard Enterprise Database
Events for which you define the SafeGuard Enterprise Database as a destination in the loggingpolicy are collected in a local log file in the local cache of the relevant endpoint computer in thefollowing directory: auditing\SGMTranslog. Log files are submitted to a transport mechanismwhich transfers them to the database through the SafeGuard Enterprise Server. By default, the fileis submitted as soon as the transport mechanism has successfully established a connection to theserver. To limit the size of a log file, you can define a maximum number of log entries in a policyof the type General Settings. The log file will be submitted to the transport queue of the SafeGuardEnterprise Server when the number of entries specified has been reached. The events logged inthe central database can be displayed in the SafeGuard Enterprise Event Viewer or File TrackingViewer. As a security officer, you need the relevant rights to view, analyze and manage the eventslogged in the database.
32.4 Configure logging settings
Report settings are defined in two policies:
■ General Settings policy
In a General Settings policy, you can specify a maximum number of logged entries after whichthe log file containing the events destined for the central database is to be transferred to theSafeGuard Enterprise Database. This reduces the size of the individual log files to be transferred.This setting is optional.
■ Logging policy
The events to be logged are specified in a logging policy. In this policy, a security officer withthe required policy rights defines which events will be logged to which output destination.
32.4.1 Define the number of events for feedback
1. Click the Policies button in the SafeGuard Management Center.
2. Create a new General Settings policy or select an existing one.
3. Under Logging in the Feedback after number of events field, specify the maximum numberof events for a log file.
4. Save your settings.
254
SafeGuard Enterprise
After assigning the policy, the number of events specified applies.
32.4.2 Select events
1. In the SafeGuard Management Center, select the Policies.
2. Create a new Logging policy or select an existing one.
In the action area on the right-hand side under Logging, all predefined events which can belogged are displayed. By clicking on the column headers you can sort the events by ID, Categoryetc.
3. To specify that an event is to be logged in the SafeGuard Enterprise Database, select the eventby clicking in the column showing the database icon Log events in database. For events to belogged in the Windows Event Viewer, click in the column showing the event log icon Log inevent log.
By clicking repeatedly you can deselect the event or set it to null. If you do not define a settingfor an event, the relevant default value applies. To display the valid default values, click thedefault value magnifier icon Show default values in the SafeGuard Management Center toolbar.
4. For all events selected, a green tick symbol is displayed in the relevant column. Save yoursettings.
After assigning the policy the selected events are logged in the relevant output destination.
Note:
For a list of all events available for logging, see Events available for reports (page 284).
32.5 View logged events
As a security officer with the necessary rights, you can view the events logged in the central databasein the SafeGuard Management Center Event Viewer.
To retrieve the entries logged in the central database:
1. In the navigation area of the SafeGuard Management Center, click Reports.
2. In the Reports navigation area, select Event Viewer.
3. In the Event Viewer action area on the right-hand side, click the magnifier icon.
All events logged in the central database are shown in the Event Viewer.
The individual columns show the following information concerning the events logged:
255
Administrator help
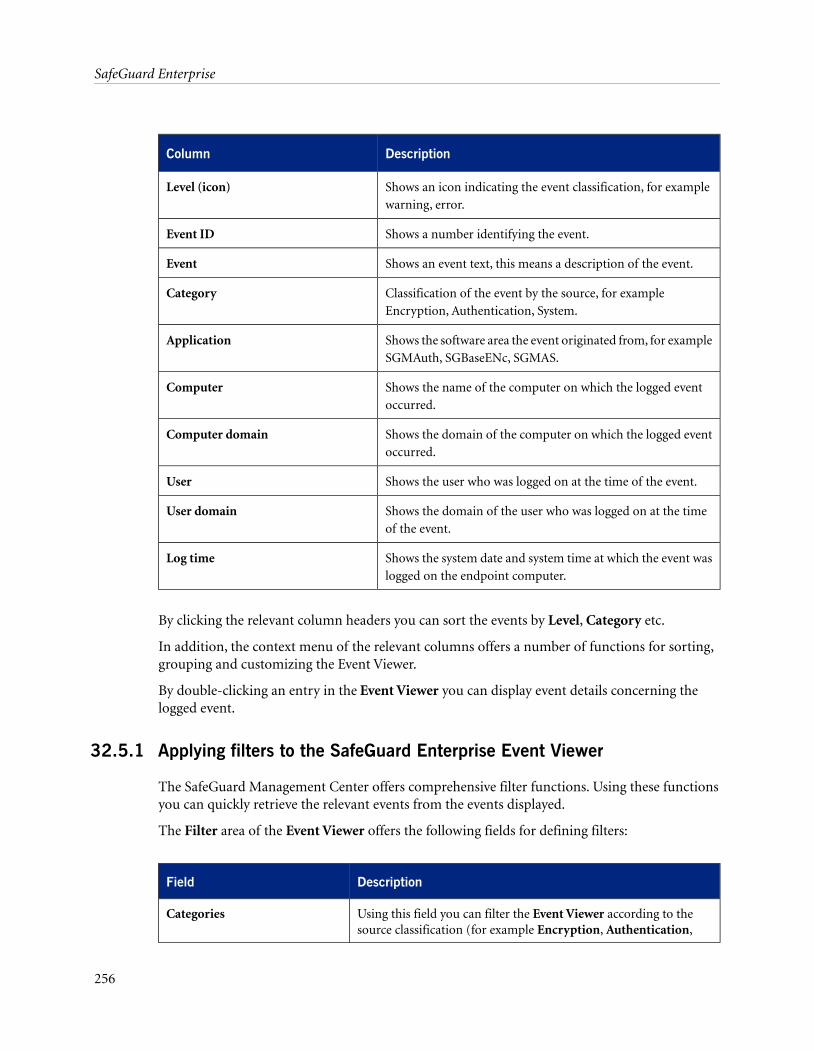
DescriptionColumn
Shows an icon indicating the event classification, for examplewarning, error.
Level (icon)
Shows a number identifying the event.Event ID
Shows an event text, this means a description of the event.Event
Classification of the event by the source, for exampleEncryption, Authentication, System.
Category
Shows the software area the event originated from, for exampleSGMAuth, SGBaseENc, SGMAS.
Application
Shows the name of the computer on which the logged eventoccurred.
Computer
Shows the domain of the computer on which the logged eventoccurred.
Computer domain
Shows the user who was logged on at the time of the event.User
Shows the domain of the user who was logged on at the timeof the event.
User domain
Shows the system date and system time at which the event waslogged on the endpoint computer.
Log time
By clicking the relevant column headers you can sort the events by Level, Category etc.
In addition, the context menu of the relevant columns offers a number of functions for sorting,grouping and customizing the Event Viewer.
By double-clicking an entry in the Event Viewer you can display event details concerning thelogged event.
32.5.1 Applying filters to the SafeGuard Enterprise Event Viewer
The SafeGuard Management Center offers comprehensive filter functions. Using these functionsyou can quickly retrieve the relevant events from the events displayed.
The Filter area of the Event Viewer offers the following fields for defining filters:
DescriptionField
Using this field you can filter the Event Viewer according to thesource classification (for example Encryption, Authentication,
Categories
256
SafeGuard Enterprise
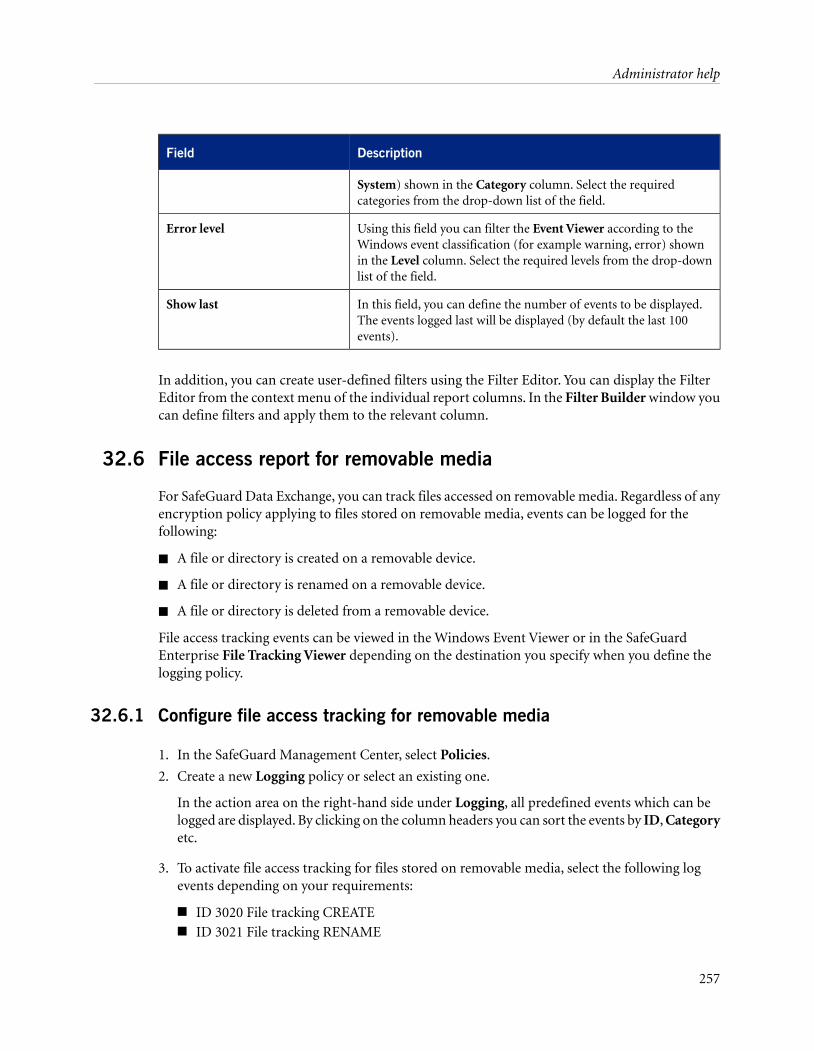
DescriptionField
System) shown in the Category column. Select the requiredcategories from the drop-down list of the field.
Using this field you can filter the Event Viewer according to theWindows event classification (for example warning, error) shown
Error level
in the Level column. Select the required levels from the drop-downlist of the field.
In this field, you can define the number of events to be displayed.The events logged last will be displayed (by default the last 100events).
Show last
In addition, you can create user-defined filters using the Filter Editor. You can display the FilterEditor from the context menu of the individual report columns. In the Filter Builder window youcan define filters and apply them to the relevant column.
32.6 File access report for removable media
For SafeGuard Data Exchange, you can track files accessed on removable media. Regardless of anyencryption policy applying to files stored on removable media, events can be logged for thefollowing:
■ A file or directory is created on a removable device.
■ A file or directory is renamed on a removable device.
■ A file or directory is deleted from a removable device.
File access tracking events can be viewed in the Windows Event Viewer or in the SafeGuardEnterprise File Tracking Viewer depending on the destination you specify when you define thelogging policy.
32.6.1 Configure file access tracking for removable media
1. In the SafeGuard Management Center, select Policies.
2. Create a new Logging policy or select an existing one.
In the action area on the right-hand side under Logging, all predefined events which can belogged are displayed. By clicking on the column headers you can sort the events by ID, Categoryetc.
3. To activate file access tracking for files stored on removable media, select the following logevents depending on your requirements:
■ ID 3020 File tracking CREATE■ ID 3021 File tracking RENAME
257
Administrator help
■ ID 3022 File tracking DELETE
To specify that an event is to be logged in the SafeGuard Enterprise Database, select the eventby clicking in the column showing the database icon Log events in database. For events to belogged in the Windows Event Viewer, click in the column showing the event log icon Log inevent log.
For all events selected, a green tick symbol is displayed in the relevant column.
4. Save your settings.
After assigning the policy, file access tracking on removable media is activated and the selectedevents are logged in the relevant output destination.
32.6.2 View file access tracking events
To view file access tracking logs, you need the right Display file tracking events.
1. In the navigation area of the SafeGuard Management Center, click Reports.
2. In the Reports navigation area, select File Tracking Viewer.
3. In the File Tracking Viewer action area on the right-hand side, click the magnifier icon.
All events logged in the central database are shown in the File Tracking Viewer. The display isidentical to the Event Viewer display. For further details, see View logged events (page 255).
32.7 Print reports
You can print the event reports displayed in the SafeGuard Management Center Event Viewerfrom the File menu in the menu bar of the SafeGuard Management Center.
■ To display a print preview before printing the report, select File > Print Preview. The printpreview offers different functions, for example for exporting the relevant document into anumber of output formats (for example .PDF) or editing the page layout (for example headerand footer).
■ To print the document without a print preview, select File > Print.
32.8 Connection of logged events
The events destined for the central database are logged in the EVENT table of the SafeGuardEnterprise Database. For this table, integrity protection can be applied. The events can be loggedas a concatenated list in the EVENT table. Due to the connection, each entry in the list is dependenton the previous entry. If an entry is removed from the list, this is evident and can be verified byan integrity check.
258
SafeGuard Enterprise
To enhance performance, the connection of events in the EVENT table is deactivated by default.You can activate the connection of logged events to check integrity (see Check the integrity of loggedevents (page 259)).
Note:
When the connection of logged events is deactivated, integrity protection does not apply to theEVENT table.
32.8.1 Activate the connection of logged events
1. Stop web service SGNSRV at the Web Server.
2. Delete all events from the database and create a backup during deletion (see Delete selected orall events (page 260)).
Note:
If you do not delete all old events from the database, the connection will not work correctly asthe remaining old events did not have it activated.
3. Set the following registry key to 0 or delete it:
HKEY_LOCAL_MACHINE\SOFTWARE\Utimaco\SafeGuard Enterprise DWORD:DisableLogEventChaining = 0
4. Restart the web service.
The connection of logged events is activated.
Note:
To deactivate the connection of events again, set the registry key to 1.
32.9 Check the integrity of logged events
Prerequisite: To check the integrity of logged events, the concatenation of events in the EVENTtable has to be activated.
1. In the SafeGuard Management Center, click the Reports.
2. In the SafeGuard Management Center menu bar, select Actions > Check integrity.
A message shows information about the integrity of the events logged.
Note:
If event concatenation is deactivated, an error is returned.
259
Administrator help
32.10 Delete selected or all events
1. In the SafeGuard Management Center, click Reports.
2. In the Event Viewer, select the events to be deleted.
3. To delete selected events, select Actions > Delete events or click the Delete events icon in thetoolbar. To delete all events, select Actions > Delete all events or click the Delete all eventsicon in the toolbar.
4. Before deleting the selected events, the system displays the Back up events as window forcreating a backup file (see Create a backup file (page 260)).
The events are deleted from the event log.
32.11 Create a backup file
When you are deleting events, you can create a backup file of the report displayed in the SafeGuardManagement Center Event Viewer.
1. When you select Actions > Delete events or Actions > Delete all events the Back up eventsas window for creating a backup file is displayed before events are deleted.
2. To create an .XML backup file of the event log, enter a file name and a file location and clickOK.
32.12 Open a backup file
1. In the SafeGuard Management Center, click Reports.
2. In the SafeGuard Management Center menu bar, select Actions > Open backup file.
The Open Event Backup window is displayed.
3. Select the backup file to be opened and click Open.
The backup file is opened and the events are shown in the SafeGuard Management Center EventViewer. To return to the regular view of the Event Viewer, click the Open backup file icon in thetoolbar again.
32.13 Scheduled event cleanup by script
Note:
SafeGuard Management Center offers the Task Scheduler to create and schedule periodic tasksbased on scripts. The tasks are automatically run by a service on the SafeGuard Enterprise Serverto execute the scripts specified.
260
SafeGuard Enterprise
For automatic and efficient cleanup of the EVENT table, four SQL scripts are available in the \toolsdirectory of your SafeGuard Enterprise software delivery:
■ spShrinkEventTable_install.sql
■ ScheduledShrinkEventTable_install.sql
■ spShrinkEventTable_uninstall.sql
■ ScheduledShrinkEventTable_uninstall.sql
The two scripts spShrinkEventTable_install.sql and ScheduledShrinkEventTable_install.sqlinstall a stored procedure and a scheduled job at the database server. The scheduled job runs thestored procedure at defined regular intervals. The stored procedure moves events from the EVENTtable to the backup log table EVENT_BACKUP leaving a defined number of latest events in theEVENT table.
The two scripts spShrinkEventTable_uninstall.sql and ScheduledShrinkEventTable_uninstall.sqluninstall the stored procedure and the scheduled job. These two scripts also delete theEVENT_BACKUP table.
Note:
If you use the stored procedure to move events from the EVENT table to the backup log table,event connection no longer applies. To activate connection while also using the stored procedurefor event cleanup does not make sense. For further information, see Connection of logged events(page 258).
32.13.1 Creating the stored procedure
The script spShrinkEventTable_install.sql creates a stored procedure which moves data fromthe EVENT table to a backup log table EVENT_BACKUP. If the EVENT_BACKUP table does notexist, it is created automatically.
The first line is "USE SafeGuard". If you have selected a different name for your SafeGuardEnterprise database, modify the name accordingly.
The stored procedure leaves the <n> latest events in the EVENT table and moves the rest of theevents to the EVENT_BACKUP table. The number of events to be left in the EVENT table isspecified by a parameter.
To execute the stored procedure, initiate the following command in SQL Server ManagementStudio (New Query):
exec spShrinkEventTable 1000
This command example moves all events except for the latest 1000 events.
261
Administrator help
32.13.2 Create a scheduled job for running the stored procedure
To automatically clean up the EVENT table at regular intervals, you can create a job at the SQLserver. The job can be created with the script ScheduledShrinkEventTable_install.sql or usingthe SQL Enterprise Manager.
Note:
The scheduled job does not work on SQL Express databases. For the job to be executed, the SQLServer Agent has to be running. As there is no SQL Server Agent on SQL Server Express installationsjobs are in this case not supported.
■ The script has to be executed in the msdb. If you have selected a different name for yourSafeGuard Enterprise database than SafeGuard, modify the name accordingly.
/* Default: Database name 'SafeGuard' change if required*/
SELECT @SafeGuardDataBase='SafeGuard'
■ You can also specify the number of events to be left in the EVENT table. The default is 100.000.
/* Default: keep the latest 100000 events, change if required*/
SELECT @ShrinkCommand='exec spShrinkEventTable 100000'
■ You can specify whether a job run is to be logged in the NT Event Log.
exec sp_add_job
@job_name='AutoShrinkEventTable',
@enabled=1,
@notify_level_eventlog=3
The following values are available for parameter notify_level_eventlog:
ResultValue
Log every time the job runs.3
Log, if the job fails.2
Log, if the job was carried out successfully.1
Do not log job run in NT Event Log.0
■ You can specify how often the job run should be repeated in case it fails.
exec sp_add_jobstep
■ @retry_attempts=3
262
SafeGuard Enterprise
This example defines 3 job run attempts in case of failure.
■ @retry_interval=60
This example defines a retry interval of 60 minutes.
■ You can specify a time schedule for running the job.
exec sp_add_jobschedule
■ @freq_type=4
This example defines that the job is run daily.
■ @freq_interval=1
This example defines that the job is run once per day.
■ @active_start_time=010000
This example defines that the job is run at 1 a.m.
Note:
The syntax for parameter @active_start_time stated above works with SQL Server 2005. Thecorrect syntax for SQL Server 2000 is: @active_start_time='1:00:00'.
Note:
Besides the example values stated above, you can define a number of different schedule optionswith sp_add-jobschedule. For example, the job can be run every two minutes or only once perweek. For further information, see the Microsoft Transact SQL Documentation.
32.13.3 Cleaning up stored procedures, jobs and tables
The script spShrinkEventTable_uninstall.sql deletes the stored procedure and theEVENT_BACKUP table. The script ScheduledShrinkEventTable_uninstall.sql deregisters thescheduled job.
Note:
When you execute spShrinkEventTable_uninstall.sql, the EVENT_BACKUP table will be deletedwith all data contained in it.
32.14 Report Message Templates
Events are not logged with their complete event texts in the SafeGuard Enterprise Database. OnlyID and the relevant parameter values are written to the database table. When the logged eventsare retrieved in the SafeGuard Management Center Event Viewer, the parameter values and thetext templates contained in the .dll are converted into the complete event text in the currentSafeGuard Management Center system language.
263
Administrator help
The templates used for event texts can be edited and processed, for example by using SQL queries.To do so, you can generate a table containing all text templates for event messages. Afterwardsyou can customize the templates according to your specific requirements.
To create a table containing the text templates for the individual event IDs:
1. In the menu bar of the SafeGuard Management Center, select Tools > Options.
2. In the Options window, go to tab Database.
3. In the Report Message Templates area, click Create Table.
The table containing the templates for the event ID is created in the current system language andcan be customized.
Note:
Before the templates are generated, the table is cleared. If the templates have been generated fora specific language and a user generates the templates for a different language, the templates forthe first language are deleted.
264
SafeGuard Enterprise
33 Scheduling tasks
The SafeGuard Management Center offers the Task Scheduler to create and schedule periodictasks based on scripts. The tasks are automatically run by a service on the SafeGuard EnterpriseServer to execute the scripts specified.
Periodic tasks are for example useful for
■ automatic synchronization between Active Directory and SafeGuard Enterprise.
■ automatic deletion of event logs.
For these two procedures, predefined script templates are available with SafeGuard Enterprise.You can use these scripts as they are or modify them according to your requirements. Fur furtherinformation, Predefined scripts for periodic tasks (page 271).
As a security officer with the required rights, you can specify scripts, rules and intervals for tasksin the Task Scheduler.
Note: Make sure that the appropriate SQL permissions are set for the account that is used to runthe SafeGuard Enterprise Task Scheduler. For further information, see the knowledgebase article:http://www.sophos.com/support/knowledgebase/article/113582.html.
33.1 Create a new task
To create tasks in the Task Scheduler, you need the security officer rights Use task scheduler andManage tasks.
1. In the menu bar of the SafeGuard Management Center, select Tools > Task Scheduler.
The Task Scheduler dialog is displayed.
2. Click the Create... button.
The New task dialog is displayed.
3. In the Name field, enter a unique task name.
If the task name is not unique, a warning is displayed when you click OK to save the task.
4. In the drop-down list of the SGN Server field, select the server the task should run on.
The drop-down list only shows servers for which scripting is allowed. You allow scripting fora specific server when you register it in the Configuration Package Tool in the SafeGuardManagement Center. For further information on registering servers, see the SafeGuard EnterpriseInstallation guide.
If you select None, the task is not executed.
265
Administrator help
5. Click the Import... button next to the Script field.
The Select script file to import dialog is displayed.
Note:
Two predefined scripts are available in the Script Templates directory of your SafeGuardManagement Center installation. The Select script file to import dialog automatically showsthis directory. For further information, see Predefined scripts for periodic tasks (page 271).
In the Task Scheduler, you can import, export and edit scripts. For further information, seeWorking with scripts in the Task Scheduler (page 269).
6. Select the script you want to run with the task and click OK.
If the script selected is empty, the OK button in the dialog remains disabled and a warningsymbol is displayed.
7. In the Start Time field, specify when the task should be run on the selected server.
The start time displayed is rendered using the local time of the computer on which the SafeGuardManagement Center is running. Internally, the start time is stored as Coordinated UniversalTime (UTC). This allows tasks to be executed at the same moment, even if servers are in differenttime zones. All servers use the current time of the database server to determine when to starttasks. To allow better monitoring of tasks, the database reference time is displayed in the TaskScheduler dialog.
8. Under Recurrence, specify how often the task should be run on the selected server.
■ To run the task once, select One time and specify the required Date.■ To run the task daily, select Daily followed by Every day (including Saturday and Sunday)
or Every weekday (Monday - Friday).■ To run the task weekly, select Weekly and specify the required day of the week.■ To run the task monthly, select Monthly and specify the required day of the month in a
range from 1 to 31. To run the task at the end of each month, select Last from the drop-downlist.
After you have filled in all mandatory fields, the OK button becomes available.
9. Click OK.
The task is saved in the database and displayed in the Task Scheduler overview. It is run on theselected server according to the schedule specified.
33.2 The Task Scheduler overview display
After you have created tasks to be run on a SafeGuard Enterprise Server, they are displayed in theTask Scheduler dialog you open by selecting Tools > Task Scheduler.
This dialog shows the following columns for each task:
266
SafeGuard Enterprise
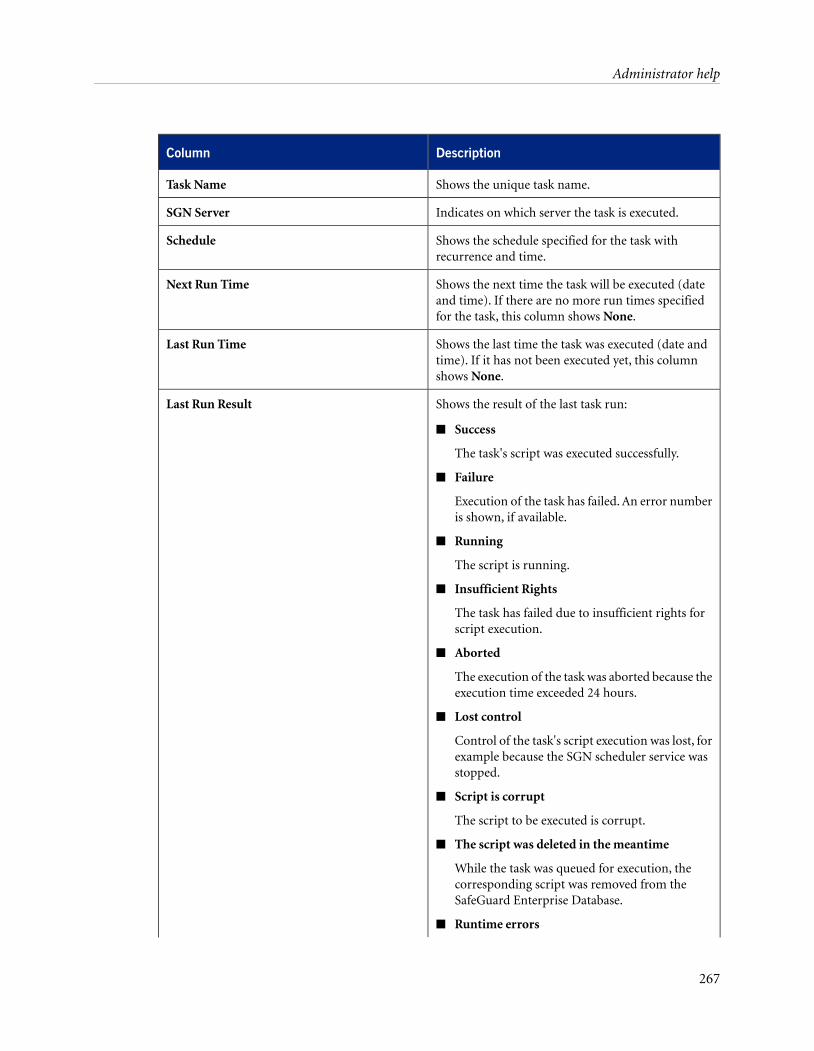
DescriptionColumn
Shows the unique task name.Task Name
Indicates on which server the task is executed.SGN Server
Shows the schedule specified for the task withrecurrence and time.
Schedule
Shows the next time the task will be executed (dateand time). If there are no more run times specifiedfor the task, this column shows None.
Next Run Time
Shows the last time the task was executed (date andtime). If it has not been executed yet, this columnshows None.
Last Run Time
Shows the result of the last task run:Last Run Result
■ Success
The task's script was executed successfully.
■ Failure
Execution of the task has failed. An error numberis shown, if available.
■ Running
The script is running.
■ Insufficient Rights
The task has failed due to insufficient rights forscript execution.
■ Aborted
The execution of the task was aborted because theexecution time exceeded 24 hours.
■ Lost control
Control of the task's script execution was lost, forexample because the SGN scheduler service wasstopped.
■ Script is corrupt
The script to be executed is corrupt.
■ The script was deleted in the meantime
While the task was queued for execution, thecorresponding script was removed from theSafeGuard Enterprise Database.
■ Runtime errors
267
Administrator help
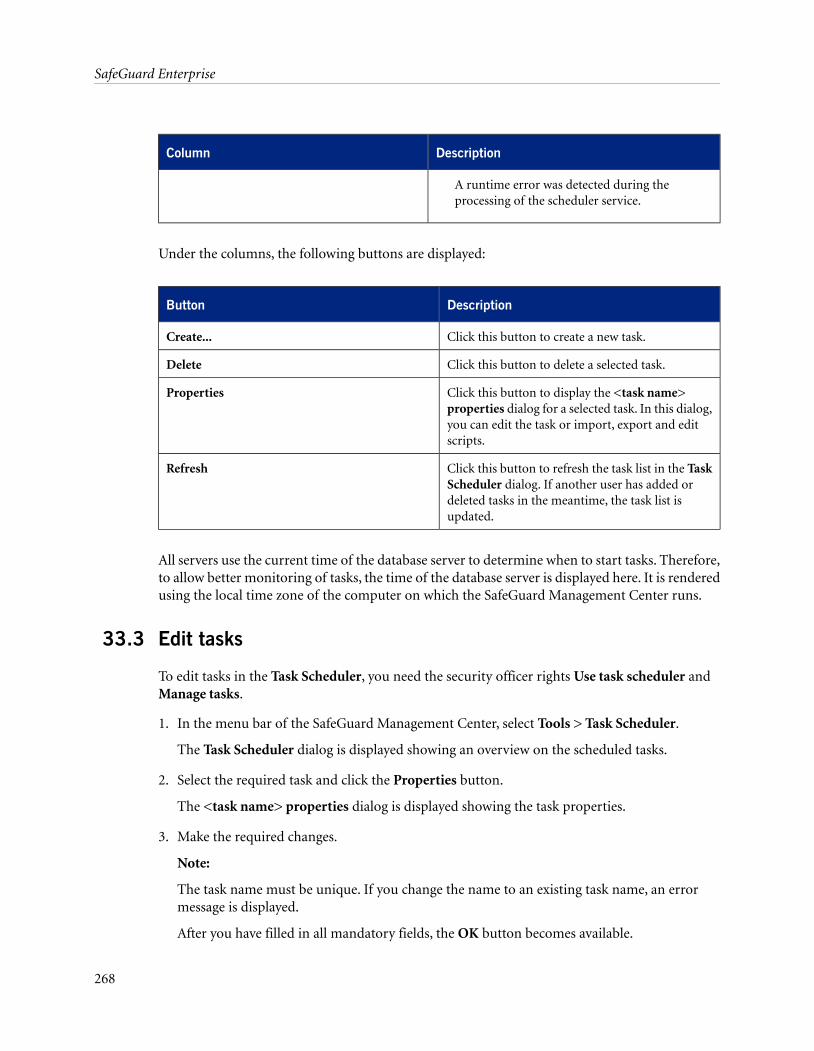
DescriptionColumn
A runtime error was detected during theprocessing of the scheduler service.
Under the columns, the following buttons are displayed:
DescriptionButton
Click this button to create a new task.Create...
Click this button to delete a selected task.Delete
Click this button to display the <task name>properties dialog for a selected task. In this dialog,
Properties
you can edit the task or import, export and editscripts.
Click this button to refresh the task list in the TaskScheduler dialog. If another user has added or
Refresh
deleted tasks in the meantime, the task list isupdated.
All servers use the current time of the database server to determine when to start tasks. Therefore,to allow better monitoring of tasks, the time of the database server is displayed here. It is renderedusing the local time zone of the computer on which the SafeGuard Management Center runs.
33.3 Edit tasks
To edit tasks in the Task Scheduler, you need the security officer rights Use task scheduler andManage tasks.
1. In the menu bar of the SafeGuard Management Center, select Tools > Task Scheduler.
The Task Scheduler dialog is displayed showing an overview on the scheduled tasks.
2. Select the required task and click the Properties button.
The <task name> properties dialog is displayed showing the task properties.
3. Make the required changes.
Note:
The task name must be unique. If you change the name to an existing task name, an errormessage is displayed.
After you have filled in all mandatory fields, the OK button becomes available.
268
SafeGuard Enterprise
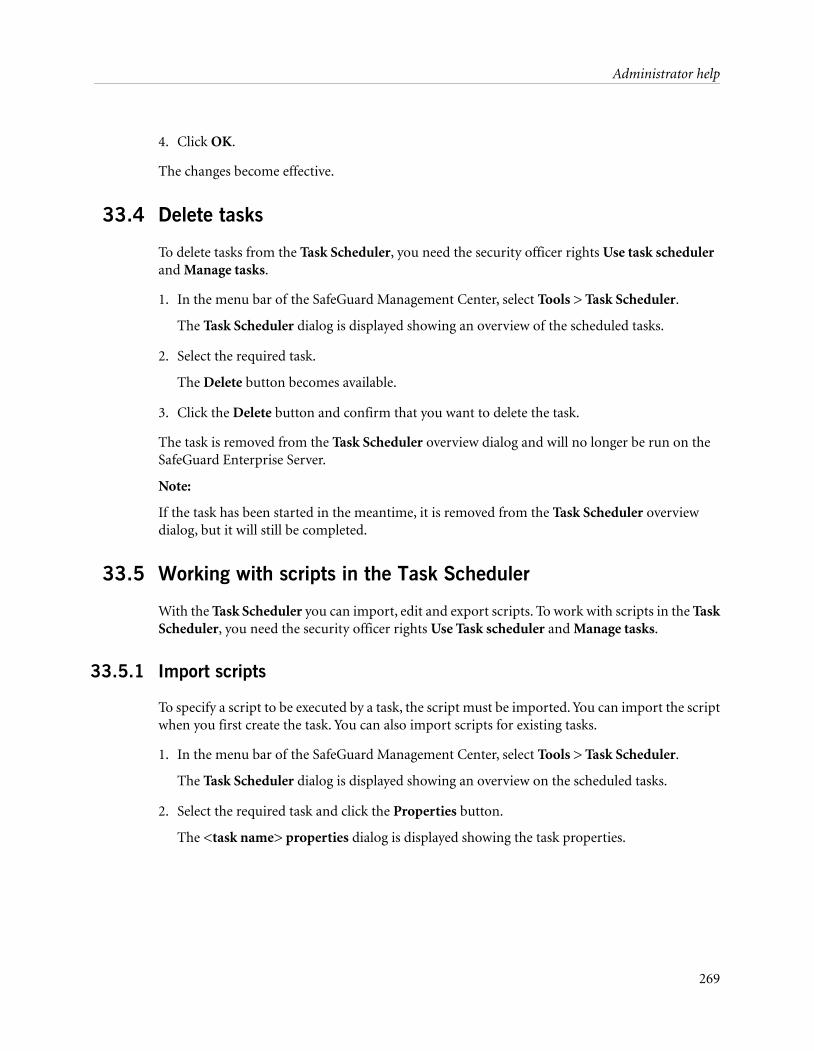
4. Click OK.
The changes become effective.
33.4 Delete tasks
To delete tasks from the Task Scheduler, you need the security officer rights Use task schedulerand Manage tasks.
1. In the menu bar of the SafeGuard Management Center, select Tools > Task Scheduler.
The Task Scheduler dialog is displayed showing an overview of the scheduled tasks.
2. Select the required task.
The Delete button becomes available.
3. Click the Delete button and confirm that you want to delete the task.
The task is removed from the Task Scheduler overview dialog and will no longer be run on theSafeGuard Enterprise Server.
Note:
If the task has been started in the meantime, it is removed from the Task Scheduler overviewdialog, but it will still be completed.
33.5 Working with scripts in the Task Scheduler
With the Task Scheduler you can import, edit and export scripts. To work with scripts in the TaskScheduler, you need the security officer rights Use Task scheduler and Manage tasks.
33.5.1 Import scripts
To specify a script to be executed by a task, the script must be imported. You can import the scriptwhen you first create the task. You can also import scripts for existing tasks.
1. In the menu bar of the SafeGuard Management Center, select Tools > Task Scheduler.
The Task Scheduler dialog is displayed showing an overview on the scheduled tasks.
2. Select the required task and click the Properties button.
The <task name> properties dialog is displayed showing the task properties.
269
Administrator help
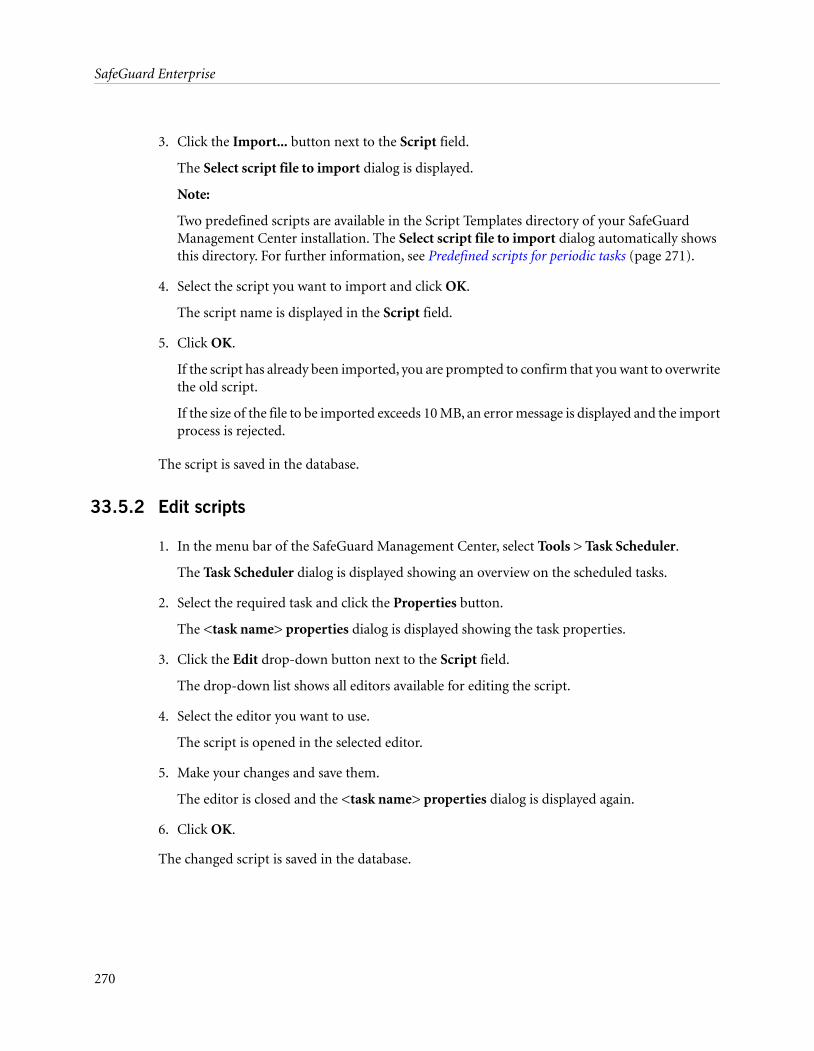
3. Click the Import... button next to the Script field.
The Select script file to import dialog is displayed.
Note:
Two predefined scripts are available in the Script Templates directory of your SafeGuardManagement Center installation. The Select script file to import dialog automatically showsthis directory. For further information, see Predefined scripts for periodic tasks (page 271).
4. Select the script you want to import and click OK.
The script name is displayed in the Script field.
5. Click OK.
If the script has already been imported, you are prompted to confirm that you want to overwritethe old script.
If the size of the file to be imported exceeds 10 MB, an error message is displayed and the importprocess is rejected.
The script is saved in the database.
33.5.2 Edit scripts
1. In the menu bar of the SafeGuard Management Center, select Tools > Task Scheduler.
The Task Scheduler dialog is displayed showing an overview on the scheduled tasks.
2. Select the required task and click the Properties button.
The <task name> properties dialog is displayed showing the task properties.
3. Click the Edit drop-down button next to the Script field.
The drop-down list shows all editors available for editing the script.
4. Select the editor you want to use.
The script is opened in the selected editor.
5. Make your changes and save them.
The editor is closed and the <task name> properties dialog is displayed again.
6. Click OK.
The changed script is saved in the database.
270
SafeGuard Enterprise
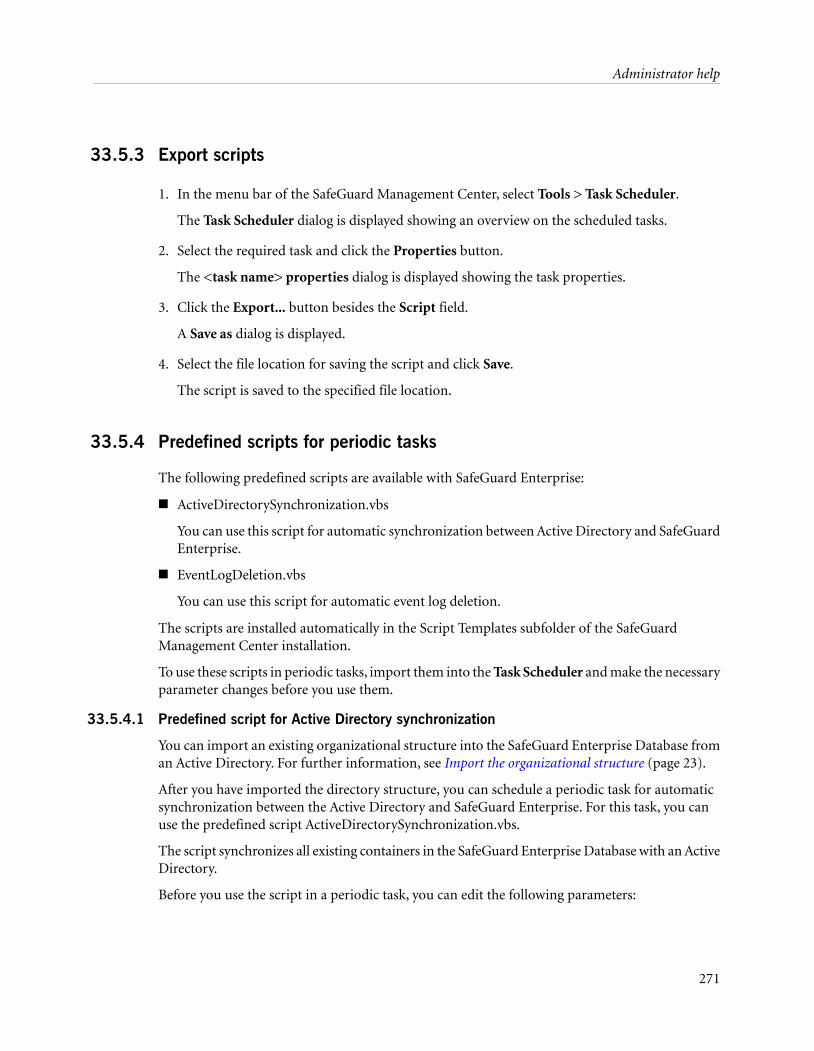
33.5.3 Export scripts
1. In the menu bar of the SafeGuard Management Center, select Tools > Task Scheduler.
The Task Scheduler dialog is displayed showing an overview on the scheduled tasks.
2. Select the required task and click the Properties button.
The <task name> properties dialog is displayed showing the task properties.
3. Click the Export... button besides the Script field.
A Save as dialog is displayed.
4. Select the file location for saving the script and click Save.
The script is saved to the specified file location.
33.5.4 Predefined scripts for periodic tasks
The following predefined scripts are available with SafeGuard Enterprise:
■ ActiveDirectorySynchronization.vbs
You can use this script for automatic synchronization between Active Directory and SafeGuardEnterprise.
■ EventLogDeletion.vbs
You can use this script for automatic event log deletion.
The scripts are installed automatically in the Script Templates subfolder of the SafeGuardManagement Center installation.
To use these scripts in periodic tasks, import them into the Task Scheduler and make the necessaryparameter changes before you use them.
33.5.4.1 Predefined script for Active Directory synchronization
You can import an existing organizational structure into the SafeGuard Enterprise Database froman Active Directory. For further information, see Import the organizational structure (page 23).
After you have imported the directory structure, you can schedule a periodic task for automaticsynchronization between the Active Directory and SafeGuard Enterprise. For this task, you canuse the predefined script ActiveDirectorySynchronization.vbs.
The script synchronizes all existing containers in the SafeGuard Enterprise Database with an ActiveDirectory.
Before you use the script in a periodic task, you can edit the following parameters:
271
Administrator help
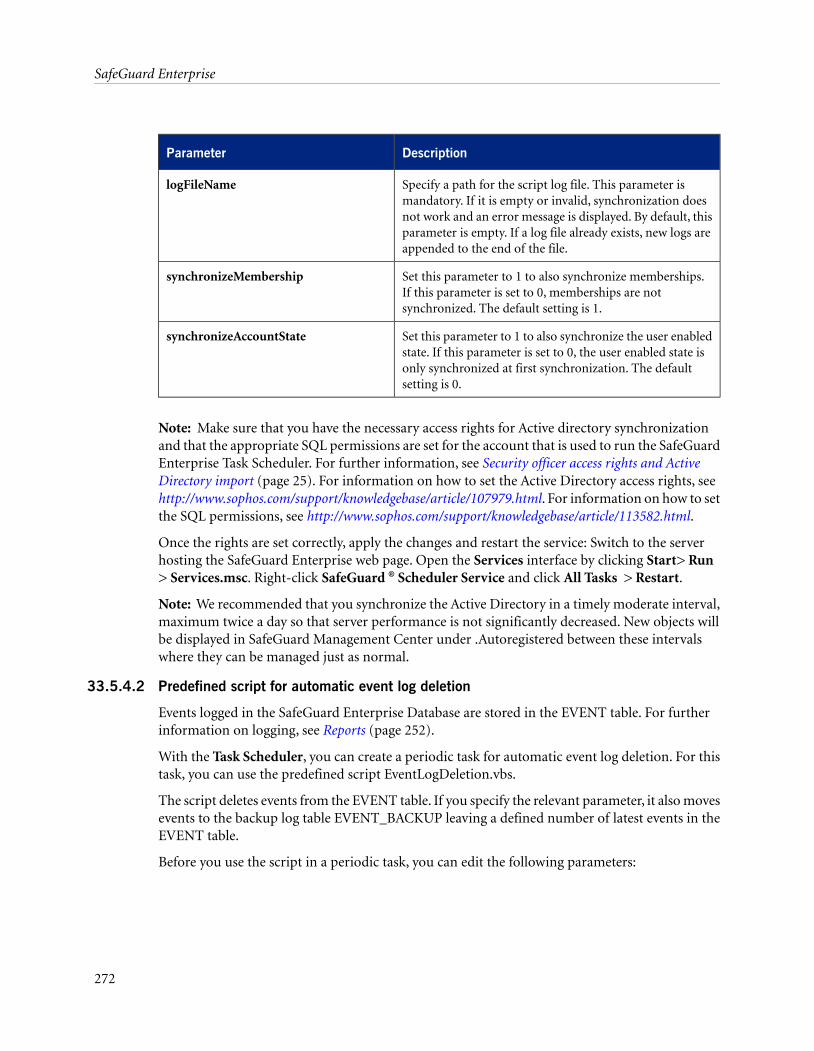
DescriptionParameter
Specify a path for the script log file. This parameter ismandatory. If it is empty or invalid, synchronization does
logFileName
not work and an error message is displayed. By default, thisparameter is empty. If a log file already exists, new logs areappended to the end of the file.
Set this parameter to 1 to also synchronize memberships.If this parameter is set to 0, memberships are notsynchronized. The default setting is 1.
synchronizeMembership
Set this parameter to 1 to also synchronize the user enabledstate. If this parameter is set to 0, the user enabled state is
synchronizeAccountState
only synchronized at first synchronization. The defaultsetting is 0.
Note: Make sure that you have the necessary access rights for Active directory synchronizationand that the appropriate SQL permissions are set for the account that is used to run the SafeGuardEnterprise Task Scheduler. For further information, see Security officer access rights and ActiveDirectory import (page 25). For information on how to set the Active Directory access rights, seehttp://www.sophos.com/support/knowledgebase/article/107979.html. For information on how to setthe SQL permissions, see http://www.sophos.com/support/knowledgebase/article/113582.html.
Once the rights are set correctly, apply the changes and restart the service: Switch to the serverhosting the SafeGuard Enterprise web page. Open the Services interface by clicking Start> Run> Services.msc. Right-click SafeGuard ® Scheduler Service and click All Tasks > Restart.
Note: We recommended that you synchronize the Active Directory in a timely moderate interval,maximum twice a day so that server performance is not significantly decreased. New objects willbe displayed in SafeGuard Management Center under .Autoregistered between these intervalswhere they can be managed just as normal.
33.5.4.2 Predefined script for automatic event log deletion
Events logged in the SafeGuard Enterprise Database are stored in the EVENT table. For furtherinformation on logging, see Reports (page 252).
With the Task Scheduler, you can create a periodic task for automatic event log deletion. For thistask, you can use the predefined script EventLogDeletion.vbs.
The script deletes events from the EVENT table. If you specify the relevant parameter, it also movesevents to the backup log table EVENT_BACKUP leaving a defined number of latest events in theEVENT table.
Before you use the script in a periodic task, you can edit the following parameters:
272
SafeGuard Enterprise
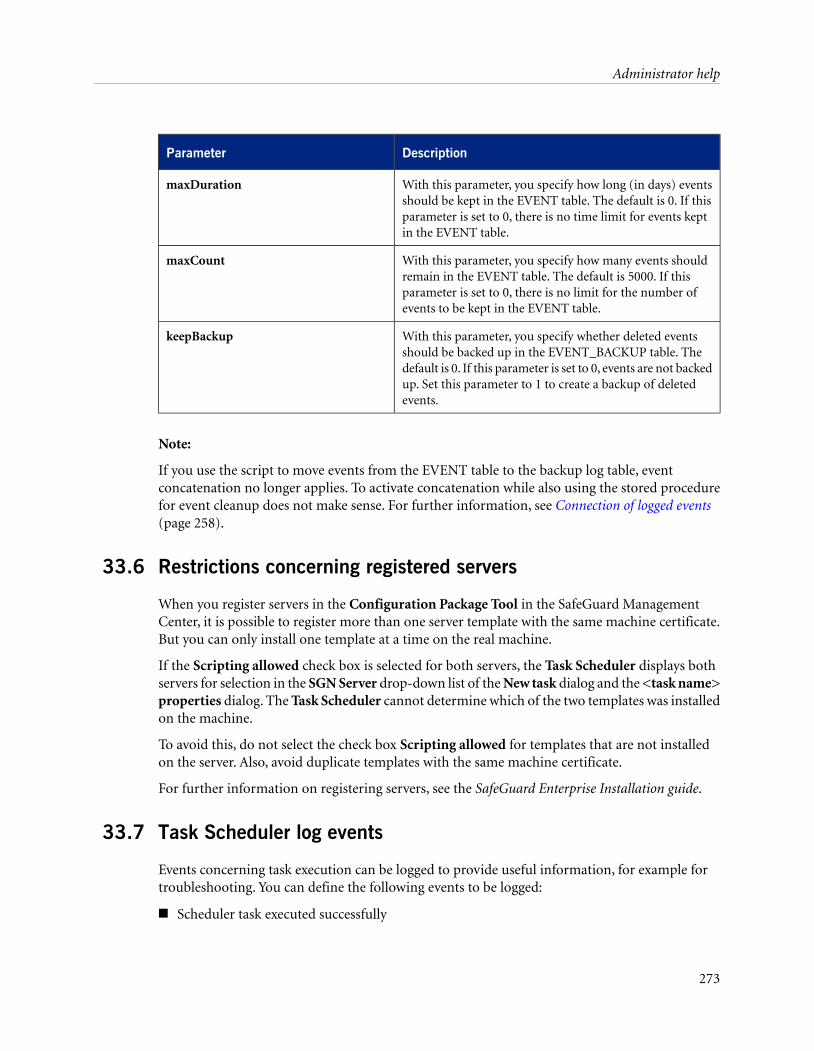
DescriptionParameter
With this parameter, you specify how long (in days) eventsshould be kept in the EVENT table. The default is 0. If this
maxDuration
parameter is set to 0, there is no time limit for events keptin the EVENT table.
With this parameter, you specify how many events shouldremain in the EVENT table. The default is 5000. If this
maxCount
parameter is set to 0, there is no limit for the number ofevents to be kept in the EVENT table.
With this parameter, you specify whether deleted eventsshould be backed up in the EVENT_BACKUP table. The
keepBackup
default is 0. If this parameter is set to 0, events are not backedup. Set this parameter to 1 to create a backup of deletedevents.
Note:
If you use the script to move events from the EVENT table to the backup log table, eventconcatenation no longer applies. To activate concatenation while also using the stored procedurefor event cleanup does not make sense. For further information, see Connection of logged events(page 258).
33.6 Restrictions concerning registered servers
When you register servers in the Configuration Package Tool in the SafeGuard ManagementCenter, it is possible to register more than one server template with the same machine certificate.But you can only install one template at a time on the real machine.
If the Scripting allowed check box is selected for both servers, the Task Scheduler displays bothservers for selection in the SGN Server drop-down list of the New task dialog and the <task name>properties dialog. The Task Scheduler cannot determine which of the two templates was installedon the machine.
To avoid this, do not select the check box Scripting allowed for templates that are not installedon the server. Also, avoid duplicate templates with the same machine certificate.
For further information on registering servers, see the SafeGuard Enterprise Installation guide.
33.7 Task Scheduler log events
Events concerning task execution can be logged to provide useful information, for example fortroubleshooting. You can define the following events to be logged:
■ Scheduler task executed successfully
273
Administrator help
■ Scheduler task failed
■ Scheduler service thread stopped due to an exception.
The events include the script console output to facilitate troubleshooting.
For further information on logging, see Reports (page 252).
274
SafeGuard Enterprise
34 SafeGuard Enterprise and BitLocker Drive Encryption
BitLocker Drive Encryption is a full disk encryption feature with pre-boot authentication includedwith Microsoft's Windows Vista and Windows 7 operating systems. It is designed to protect databy providing encryption for the boot volume.
34.1 How does SafeGuard Enterprise integrate BitLocker?
SafeGuard Enterprise enables BitLocker Drive Encryption provided in a Windows Vista or Windows7 Enterprise or Ultimate installation to be managed from the SafeGuard Management Center, likea native SafeGuard Enterprise Client.
During installation of the SafeGuard Enterprise Client, the feature BitLocker support needs to beexplicitly selected to enable BitLocker integration.
SafeGuard Enterprise’s central and fully transparent management of BitLocker thus allows for theuse in heterogeneous IT environments. SafeGuard Enterprise not only integrates BitLocker DriveEncryption seamlessly, but even enhances it significantly. Security policies for BitLocker can becentrally rolled out thanks to SafeGuard Enterprise. Even critical processes such as key managementand key recovery are available when BitLocker is managed with SafeGuard Enterprise.
For SafeGuard Enterprise support of the BitLocker To Go enhancement in Windows 7, seeSafeGuard Enterprise and BitLocker To Go (page 280).
34.2 Enhancement of BitLocker capabilities with SafeGuard Enterprise
When BitLocker is managed with SafeGuard Enterprise, customers benefit in the following ways:
■ Besides the boot partition additional volumes of the local disk may be encrypted by BitLocker.
■ SafeGuard Enterprise file-based encryption can be additionally applied to all volumes, includingremovable media.
■ In the SafeGuard Management Center BitLocker computers can be easily managed: Securitypolicies can be updated, distributed and automatically applied.
■ The BitLocker encryption status is displayed.
■ The BitLocker logon mode can be defined.
■ BitLocker activation and key backup is simplified compared to native Vista environments.
■ A BitLocker recovery mechanism for passwords and key files is enabled for boot as well asnon-boot volumes.
275
Administrator help

34.3 When to use SafeGuard Enterprise without BitLocker DriveEncryption
The SafeGuard Enterprise volume-based encryption method offers some benefits over BitLockerDrive Encryption, such as:
■ It additionally supports Windows XP and Vista Business (BitLocker only supports VistaEnterprise and Ultimate)
■ It requires no special hard disk partition for installation (BitLocker requires its own partition)
■ It supports different smartcards and tokens for pre-boot authentication (BitLocker supportsno smartcards, only memory sticks that contain a copyable key file)
■ It supports and differentiates between different users during pre-boot authentication (BitLockerdoes not differentiate between different users)
■ It provides a way for forgotten passwords to be reset with the secure, dynamicChallenge/Response mechanism (BitLocker uses a fixed 48-digit recovery key)
■ It has a graphical user interface in pre-boot authentication (BitLocker has only text)
■ It accepts complex passwords and password rules that are synchronized with Windows(BitLocker only permits a TPM PIN)
■ It also allows sector-based encryption for removable media (Vista BitLocker encrypts noremovable media). When a BitLocker client is used with SafeGuard Enterprise, file-basedremovable media encryption is possible.
34.4 Managing BitLocker clients with SafeGuard Enterprise
In the SafeGuard Enterprise Management Center, BitLocker endpoint computers can be managedjust like any native SafeGuard endpoint computers. As a security officer you can set encryptionand authentication policies for the BitLocker endpoint computers and distribute them.
Once a BitLocker endpoint computer is registered at SafeGuard Enterprise, information on user,computer, logon mode and encryption status is displayed. Events are logged for BitLocker clientsas well.
Management of the BitLocker clients in SafeGuard Enterprise is transparent, which means thatmanagement functions work in general the same for BitLocker and native SafeGuard Enterpriseclients. You can find out on the type of a computer in the Inventory of a container in Users &Computers. The column POA Type tells you if the respective computer is a BitLocker client or anative SafeGuard Enterprise Client.
276
SafeGuard Enterprise
34.5 Encrypting with BitLocker by using SafeGuard Enterprise
With BitLocker Drive Encryption support in SafeGuard Enterprise you can encrypt the following:
■ boot volume with BitLocker encryption and BitLocker keys
■ other volumes with BitLocker encryption and BitLocker keys
■ any data, for example of removable media with SafeGuard Enterprise file-based encryptionand SafeGuard Enterprise keys.
Please note that with SafeGuard Enterprise BitLocker support external hard disks are handled asother volumes and not as removable media. Thus, they can be volume encrypted.
34.5.1 BitLocker encryption keys
When encrypting the boot volume or other volumes with BitLocker through SafeGuard Enterprise,the encryption keys are always generated by BitLocker. A key is generated by BitLocker for eachvolume and cannot be reused for any other purpose. It needs to be stored in a safe place.
The advantage when using BitLocker with SafeGuard Enterprise is that for each BitLocker generatedkey a backup key is stored in the SafeGuard Enterprise Database. This allows for setting up a helpdesk and recovery mechanism similar to the SafeGuard Enterprise Challenge/Response otherwisenot available.
However, it is not possible to select keys globally or reuse them as with SafeGuard Enterprise nativeclients. The keys are not displayed in the SafeGuard Management Center either.
In case a volume is already encrypted with BitLocker before installing the BitLocker support ofSafeGuard Enterprise, the administrator needs to back up the keys of the formerly encryptedvolume by using the backup mechanisms offered by Microsoft.
Note:
In case a volume is encrypted when SafeGuard Enterprise BitLocker support is already installed,the administrator may save the backup keys (secured with a recovery password) in the ActiveDirectory, in addition to the storage in the SafeGuard Enterprise Database. The administratorneeds do so manually with the Windows Manage BDE tool and by saving them to a group policy.For Windows 2003 Server however, this requires to extend the Active Directory schema used. Inaddition, Domain Administrator rights are needed to recover the stored information.
34.5.2 BitLocker algorithms in SafeGuard Enterprise
BitLocker supports the following Advanced Encryption Standard (AES) algorithms:
■ AES-128
■ AES-256
■ AES-128 with diffuser
277
Administrator help
■ AES-256 with diffuser
The diffuser is BitLocker-specific and is not used for the SafeGuard Enterprise volume-basedencryption mode. If an algorithm with diffuser is selected for encryption, any non-BitLockermodules of SafeGuard Enterprise automatically use the algorithm without diffuser. When a policyis assigned to both BitLocker-enabled computers and native SafeGuard Enterprise computers, thenative SafeGuard Enterprise computers use the algorithm without diffuser and BitLocker computersuse the algorithm with diffuser.
34.5.3 Encryption policies for BitLocker Drive Encryption
The security officer can create a policy for (initial) encryption in the SafeGuard ManagementCenter and distribute it to the BitLocker endpoint computers where it is executed.
As the BitLocker clients are managed transparently in the SafeGuard Management Center, thesecurity officer does not have to specify any special BitLocker settings for encryption. SafeGuardEnterprise knows the client status and selects the BitLocker encryption accordingly. When aBitLocker client is installed with SafeGuard Enterprise and volume encryption is activated, thevolumes are encrypted by BitLocker Drive Encryption.
34.6 Authentication with BitLocker Drive Encryption
BitLocker Drive Encryption offers a range of authentication options. BitLocker users can eitherauthenticate with a Trusted Platform Module (TPM) or USB stick or a combination of both.
The security officer can set the various logon modes in a policy in the SafeGuard ManagementCenter and distribute it to the BitLocker endpoint computers.
The following logon modes exist for SafeGuard Enterprise BitLocker users:
■ TPM only
■ TPM + PIN
■ TPM + USB Stick
■ USB Stick only (TPM-less)
34.6.1 Trusted Platform module (TPM)
TPM is a smartcard-like module on the motherboard performing cryptographic functions anddigital signature operations. It can create, store and manage user keys. It is protected againstattacks.
34.6.2 USB stick
The external keys can be stored on an unprotected USB stick.
278
SafeGuard Enterprise

34.7 Logging
Events reported by the BitLocker Client are logged, just as for any other SafeGuard Enterpriseclient. It is not especially mentioned that the event refers to a BitLocker client. The events reportedare the same as for any SafeGuard Enterprise client.
279
Administrator help
35 SafeGuard Enterprise and BitLocker To Go
With BitLocker To Go the BitLocker Drive Encryption functionality has been extended in MicrosoftWindows 7 enabling users to encrypt internal volumes as well as volumes on removable mediaon endpoint computers from the Windows Explorer context menu.
■ When the SafeGuard Enterprise Device Encryption Client has been deployed with "BitLockersupport" enabled, BitLocker To Go is supported.
■ When the SafeGuard Enterprise Device Encryption Client has been deployed without activating"BitLocker support" or when the SafeGuard Data Exchange Client has been deployed, encryptionwith BitLocker To Go is not compatible and needs to be disabled in this case. However,encryption of internal volumes and removable media can be centrally and convenientlyconfigured in SafeGuard Enterprise security policies. Volumes and removable media that havebeen encrypted with BitLocker To Go before SafeGuard Enterprise deployment remain readable.
35.1 Deactivate BitLocker To Go encryption
1. In the Windows Group Policy Editor, select Default Domain Policy > Computer configuration> Policies > Administrative Templates (local computer)> Windows components > BitLockerdrive encryption > Removable media.
2. Under Removable media, select the following policy: Manage the use of BitLocker onremovable media. Set the options as follows:
a) Select Enabled.
b) Under Options, clear Users may apply BitLocker protection to removable media.
c) Under Options, select Users may stop and decrypt BitLocker protection on removablemedia.
3. Click OK.
BitLocker To Go encryption is deactivated on the endpoint computers. Users cannot encrypt newvolumes with BitLocker To Go anymore. Volumes encrypted with BitLocker To Go before thedeployment of the native SafeGuard Enterprise Device Encryption Client remain readable.
The resulting Registry settings on the client side are as follows:
[HKEY_LOCAL_MACHINE\SOFTWARE\Policies\Microsoft\FVE]
"RDVConfigureBDE"=dword:00000001
"RDVAllowBDE"=dword:00000000
"RDVDisableBDE"=dword:00000001
These Registry keys is also set during the installation of the SafeGuard Enterprise Device EncryptionClient so that BitLocker To Go is also deactivated on computers without domain managementlike workgroup or standalone computers.
280
SafeGuard Enterprise
36 SafeGuard Enterprise and self-encrypting, Opal-complianthard drives
Self-encrypting hard drives offer hardware-based encryption of data when they are written to thehard disk. The Trusted Computing Group (TCG) has published the vendor-independent Opalstandard for self-encrypting hard drives. Different hardware vendors offer Opal-compliant harddrives. SafeGuard Enterprise supports the Opal standard and offers management of endpointcomputers with self-encrypting, Opal-compliant hard drives.
36.1 How does SafeGuard Enterprise integrate Opal-compliant harddrives?
SafeGuard Enterprise enables endpoint computers with self-encrypting, Opal-compliant harddrives to be managed from the SafeGuard Management Center, like any other endpoint computerprotected by SafeGuard Enterprise.
Central and fully transparent management of Opal-compliant hard drives by SafeGuard Enterpriseallows for the use in heterogeneous IT environments. By supporting the Opal standard, we offerthe full set of SafeGuard Enterprise features to corporate users of self-encrypting, Opal-complianthard drives. In combination with SafeGuard Enterprise, Opal-compliant hard drives offer enhancedsecurity features.
36.2 Enhancement of Opal-compliant hard drives with SafeGuardEnterprise
SafeGuard Enterprise offers the following benefits in combination with self-encrypting,Opal-compliant hard drives:
■ Central management of endpoint computers
■ Power-on Authentication with graphical user interface
■ Multi-user support
■ Token/smartcard logon support
■ Fingerprint logon support
■ Recovery (Local Self Help, Challenge/Response)
■ Central auditing
■ Encryption of removable media (for example USB sticks) with SafeGuard Data Exchange
281
Administrator help
36.3 Managing endpoint-computers with Opal-compliant hard driveswith SafeGuard Enterprise
In the SafeGuard Management Center, you can manage endpoint computers with self-encrypting,Opal-compliant hard drives just like any other endpoint computer protected by SafeGuardEnterprise. As a security officer, you can define security policies, for example authenticationpolicies, and deploy them to endpoint computers.
Once an endpoint computer with an Opal-compliant hard drive is registered at SafeGuardEnterprise, information on user, computer, logon mode and encryption status is displayed. Inaddition, events are logged.
Management of endpoint computers with Opal-compliant hard drives in SafeGuard Enterpriseis transparent, which means that management functions in general work the same as for otherendpoint computers protected by SafeGuard Enterprise. The type of a computer is shown inInventory of a container in Users and Computers. The column POA Type tells you if the respectivecomputer is encrypted by SafeGuard Enterprise or uses a self-encrypting, Opal-compliant harddrive.
36.4 Encryption of Opal-compliant hard drives
Opal-compliant hard drives are self-encrypting. Data are encrypted automatically when they arewritten to the hard disk.
The hard drives are locked by an AES 128/256 key used as an Opal password. This password ismanaged by SafeGuard Enterprise through an encryption policy, see Lock Opal-compliant harddrives (page 282).
36.5 Lock Opal-compliant hard drives
To lock Opal-compliant hard drives, the machine key has to be defined for at least one volumeon the hard drive in an encryption policy. In case the encryption policy includes a boot volume,the machine key is defined automatically.
1. In the SafeGuard Management Center, create a policy of the type Device Protection.
2. In the field Media encryption mode, select Volume-based.
3. In the field Key to be used for encryption, select Defined machine key.
4. Save your changes in the database.
5. Deploy the policy to the relevant endpoint computer.
The Opal-compliant hard drive is locked and can only be accessed by logging on to the computerat the Power-on Authentication.
282
SafeGuard Enterprise
36.6 Enable users to unlock Opal-compliant hard drives
As a security officer, you can enable users to unlock Opal-compliant hard drives on their endpointcomputers by using the Decrypt command from the Windows Explorer context menu.
1. In the SafeGuard Management Center, create a policy of the type Device Protection and includeall volumes on the Opal-compliant hard drive.
2. In the field Media encryption mode, select No encryption.
3. In the field User may decrypt volume, select Yes.
4. Save your changes in the database.
5. Deploy the policy to the relevant endpoint computer.
The user can permanently unlock the Opal-compliant hard drive on the endpoint computer. Datais still encrypted when written to the hard drive.
36.7 Logging of events for endpoint computers with Opal-complianthard drives
Events reported by endpoint computers with self-encrypting, Opal-compliant hard drives arelogged, just as for any other endpoint computer protected by SafeGuard Enterprise. The eventsdo not especially mention the computer type. Events reported are the same as for any otherendpoint computer protected by SafeGuard Enterprise.
For further information, see Reports (page 252).
283
Administrator help
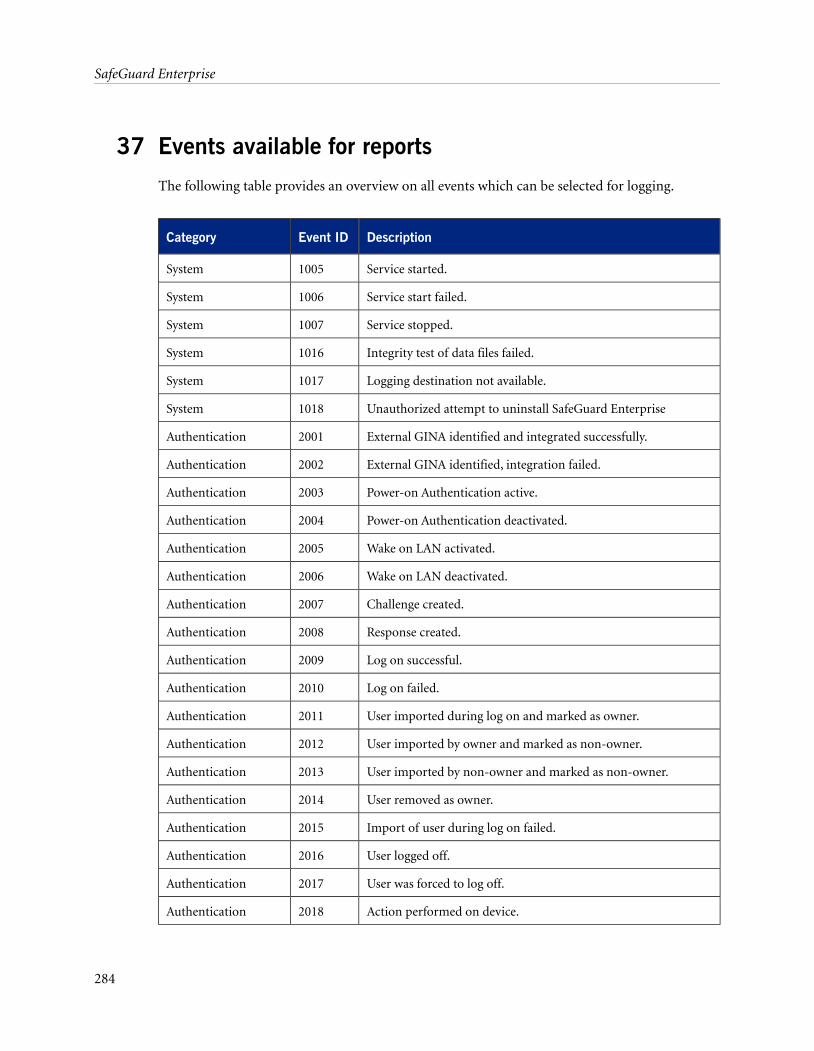
37 Events available for reports
The following table provides an overview on all events which can be selected for logging.
DescriptionEvent IDCategory
Service started.1005System
Service start failed.1006System
Service stopped.1007System
Integrity test of data files failed.1016System
Logging destination not available.1017System
Unauthorized attempt to uninstall SafeGuard Enterprise1018System
External GINA identified and integrated successfully.2001Authentication
External GINA identified, integration failed.2002Authentication
Power-on Authentication active.2003Authentication
Power-on Authentication deactivated.2004Authentication
Wake on LAN activated.2005Authentication
Wake on LAN deactivated.2006Authentication
Challenge created.2007Authentication
Response created.2008Authentication
Log on successful.2009Authentication
Log on failed.2010Authentication
User imported during log on and marked as owner.2011Authentication
User imported by owner and marked as non-owner.2012Authentication
User imported by non-owner and marked as non-owner.2013Authentication
User removed as owner.2014Authentication
Import of user during log on failed.2015Authentication
User logged off.2016Authentication
User was forced to log off.2017Authentication
Action performed on device.2018Authentication
284
SafeGuard Enterprise
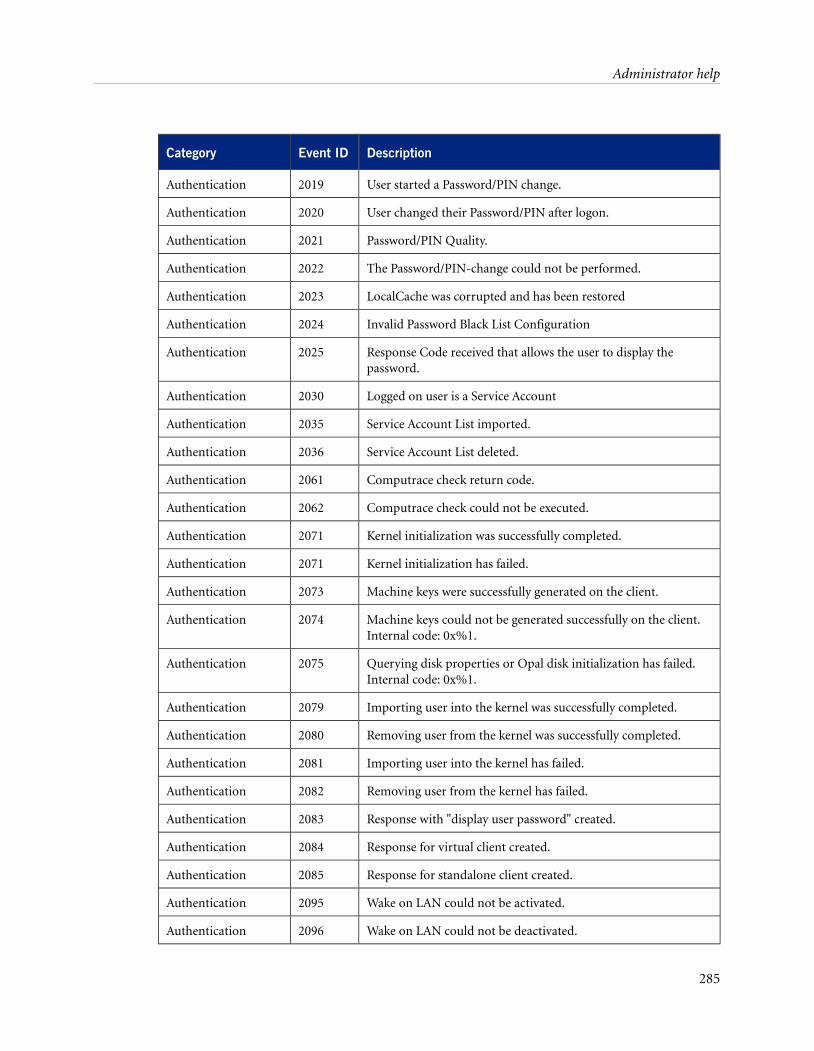
DescriptionEvent IDCategory
User started a Password/PIN change.2019Authentication
User changed their Password/PIN after logon.2020Authentication
Password/PIN Quality.2021Authentication
The Password/PIN-change could not be performed.2022Authentication
LocalCache was corrupted and has been restored2023Authentication
Invalid Password Black List Configuration2024Authentication
Response Code received that allows the user to display thepassword.
2025Authentication
Logged on user is a Service Account2030Authentication
Service Account List imported.2035Authentication
Service Account List deleted.2036Authentication
Computrace check return code.2061Authentication
Computrace check could not be executed.2062Authentication
Kernel initialization was successfully completed.2071Authentication
Kernel initialization has failed.2071Authentication
Machine keys were successfully generated on the client.2073Authentication
Machine keys could not be generated successfully on the client.Internal code: 0x%1.
2074Authentication
Querying disk properties or Opal disk initialization has failed.Internal code: 0x%1.
2075Authentication
Importing user into the kernel was successfully completed.2079Authentication
Removing user from the kernel was successfully completed.2080Authentication
Importing user into the kernel has failed.2081Authentication
Removing user from the kernel has failed.2082Authentication
Response with "display user password" created.2083Authentication
Response for virtual client created.2084Authentication
Response for standalone client created.2085Authentication
Wake on LAN could not be activated.2095Authentication
Wake on LAN could not be deactivated.2096Authentication
285
Administrator help
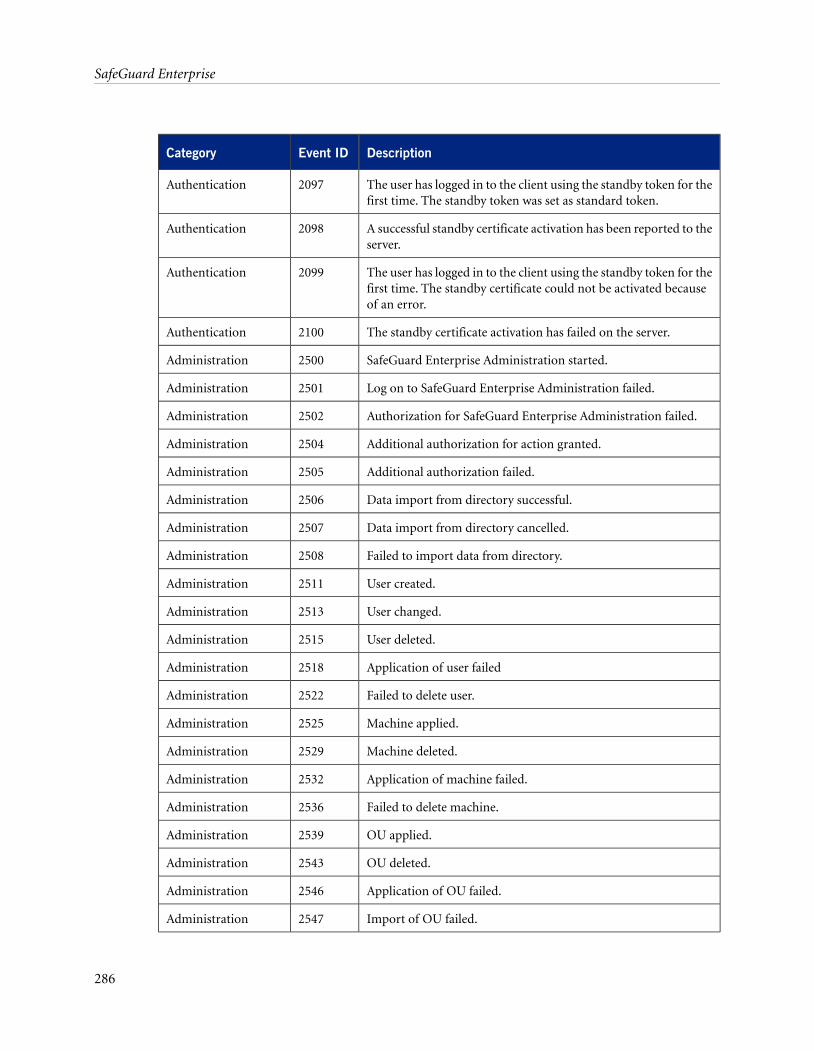
DescriptionEvent IDCategory
The user has logged in to the client using the standby token for thefirst time. The standby token was set as standard token.
2097Authentication
A successful standby certificate activation has been reported to theserver.
2098Authentication
The user has logged in to the client using the standby token for thefirst time. The standby certificate could not be activated becauseof an error.
2099Authentication
The standby certificate activation has failed on the server.2100Authentication
SafeGuard Enterprise Administration started.2500Administration
Log on to SafeGuard Enterprise Administration failed.2501Administration
Authorization for SafeGuard Enterprise Administration failed.2502Administration
Additional authorization for action granted.2504Administration
Additional authorization failed.2505Administration
Data import from directory successful.2506Administration
Data import from directory cancelled.2507Administration
Failed to import data from directory.2508Administration
User created.2511Administration
User changed.2513Administration
User deleted.2515Administration
Application of user failed2518Administration
Failed to delete user.2522Administration
Machine applied.2525Administration
Machine deleted.2529Administration
Application of machine failed.2532Administration
Failed to delete machine.2536Administration
OU applied.2539Administration
OU deleted.2543Administration
Application of OU failed.2546Administration
Import of OU failed.2547Administration
286
SafeGuard Enterprise
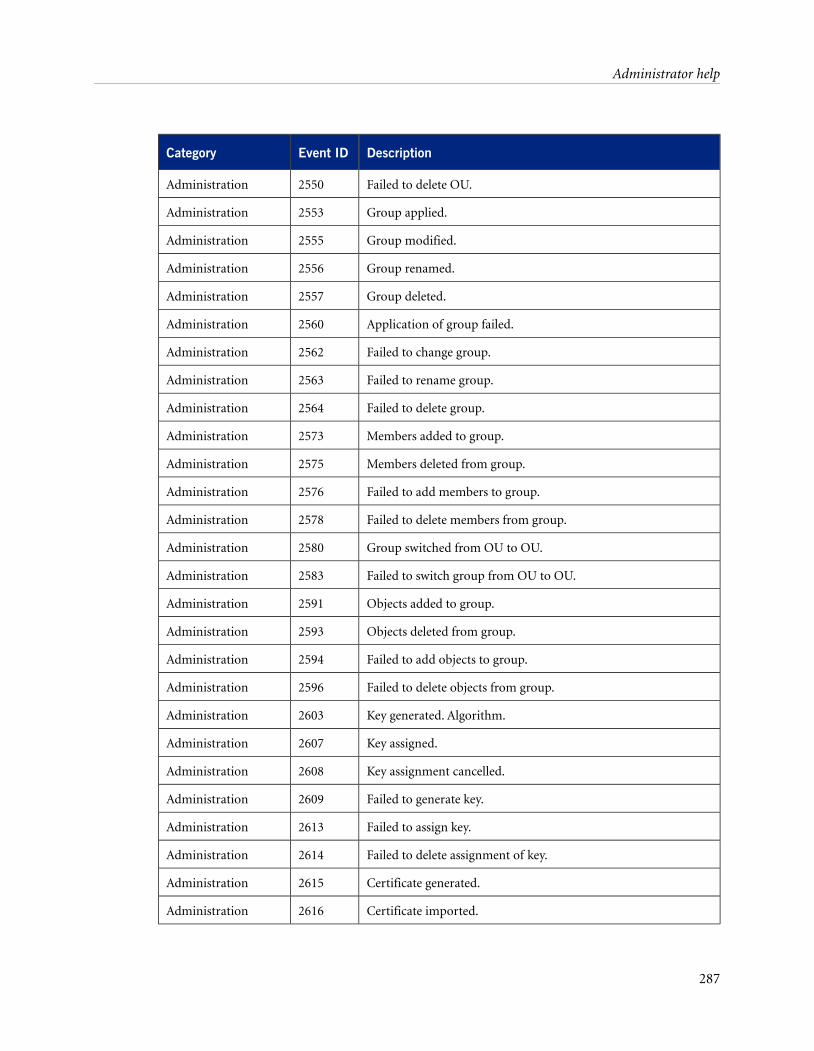
DescriptionEvent IDCategory
Failed to delete OU.2550Administration
Group applied.2553Administration
Group modified.2555Administration
Group renamed.2556Administration
Group deleted.2557Administration
Application of group failed.2560Administration
Failed to change group.2562Administration
Failed to rename group.2563Administration
Failed to delete group.2564Administration
Members added to group.2573Administration
Members deleted from group.2575Administration
Failed to add members to group.2576Administration
Failed to delete members from group.2578Administration
Group switched from OU to OU.2580Administration
Failed to switch group from OU to OU.2583Administration
Objects added to group.2591Administration
Objects deleted from group.2593Administration
Failed to add objects to group.2594Administration
Failed to delete objects from group.2596Administration
Key generated. Algorithm.2603Administration
Key assigned.2607Administration
Key assignment cancelled.2608Administration
Failed to generate key.2609Administration
Failed to assign key.2613Administration
Failed to delete assignment of key.2614Administration
Certificate generated.2615Administration
Certificate imported.2616Administration
287
Administrator help

DescriptionEvent IDCategory
Certificate deleted.2619Administration
Certificate assigned to user.2621Administration
Certificate assignment to user cancelled.2622Administration
Failed to create certificate.2623Administration
Failed to import certificate.2624Administration
Failed to delete certificate.2627Administration
Extension of certificate failed.2628Administration
Failed to assign certificate to user.2629Administration
Failed to delete assignment of certificate to user.2630Administration
Token plugged in.2631Administration
Token removed.2632Administration
Token issued to user.2633Administration
Change user PIN on token.2634Administration
Change SO PIN on token.2635Administration
Token locked.2636Administration
Token unlocked.2637Administration
Token deleted.2638Administration
Token assignment for user removed.2639Administration
Failed to issue token for user.2640Administration
Failed to change user PIN on token.2641Administration
Failed to change SO PIN on token.2642Administration
Failed to lock token2643Administration
Failed to unlock token.2644Administration
Failed to delete token.2645Administration
Policy created.2647Administration
Policy changed.2648Administration
Policy deleted.2650Administration
288
SafeGuard Enterprise
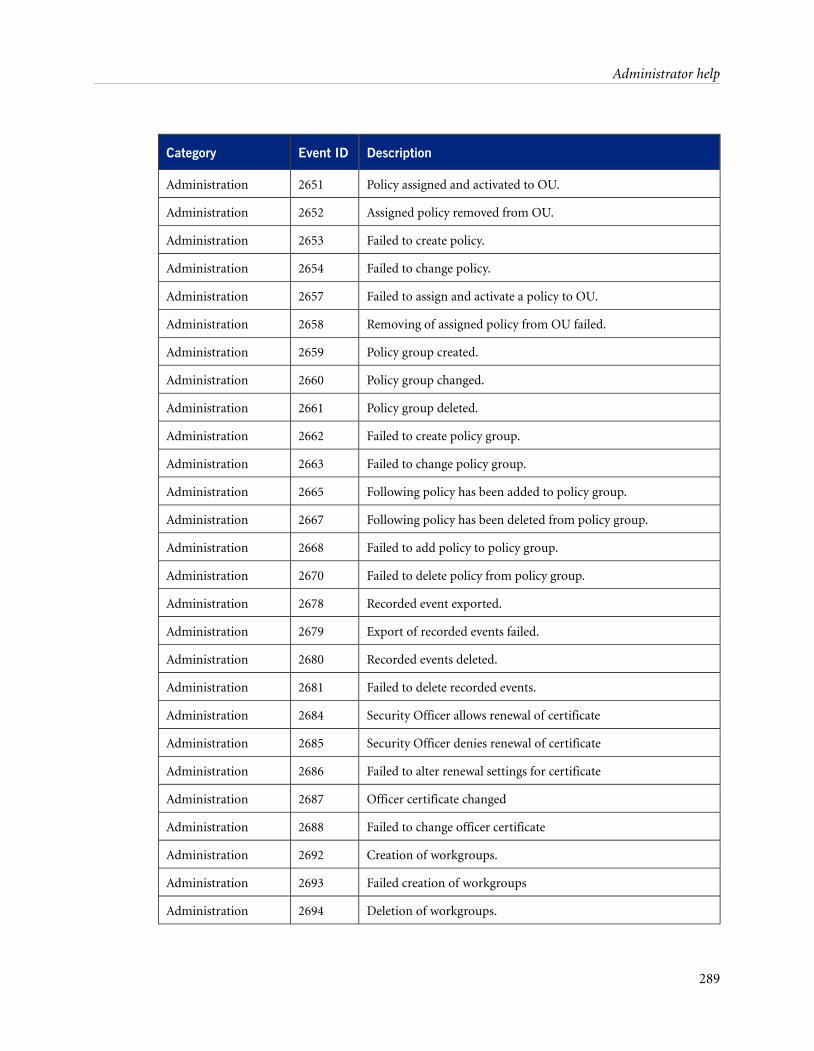
DescriptionEvent IDCategory
Policy assigned and activated to OU.2651Administration
Assigned policy removed from OU.2652Administration
Failed to create policy.2653Administration
Failed to change policy.2654Administration
Failed to assign and activate a policy to OU.2657Administration
Removing of assigned policy from OU failed.2658Administration
Policy group created.2659Administration
Policy group changed.2660Administration
Policy group deleted.2661Administration
Failed to create policy group.2662Administration
Failed to change policy group.2663Administration
Following policy has been added to policy group.2665Administration
Following policy has been deleted from policy group.2667Administration
Failed to add policy to policy group.2668Administration
Failed to delete policy from policy group.2670Administration
Recorded event exported.2678Administration
Export of recorded events failed.2679Administration
Recorded events deleted.2680Administration
Failed to delete recorded events.2681Administration
Security Officer allows renewal of certificate2684Administration
Security Officer denies renewal of certificate2685Administration
Failed to alter renewal settings for certificate2686Administration
Officer certificate changed2687Administration
Failed to change officer certificate2688Administration
Creation of workgroups.2692Administration
Failed creation of workgroups2693Administration
Deletion of workgroups.2694Administration
289
Administrator help

DescriptionEvent IDCategory
Failed deletion of workgroups2695Administration
Creation of users.2696Administration
Failed creation of users.2697Administration
Creation of machines.2698Administration
Failed creation of machines.2699Administration
License is violated2700Administration
Key file has been created.2701Administration
Key for key file has been deleted.2702Administration
Security Officer disabled Power-on Authentication in policy.2703Administration
LSH Question Theme created.2704Administration
LSH Question Theme changed.2705Administration
LSH Question Theme deleted.2706Administration
Question changed.2707Administration
Read Only Access to container '%1' granted for Security Officer'%2'.
2753Administration
Full access to container '%1' granted for Security Officer '%2'.2755Administration
Full access to container '%1' revoked for Security Officer '%2'.2757Administration
Access to container '%1' explicitly denied for Security Officer '%2'.2766Administration
Explicitly denied access to container '%1' revoked for SecurityOfficer '%2'.
2767Administration
Read access to container '%1' revoked for Security Officer '%2'.2768Administration
POA user "%1" created.2810Administration
POA user "%1" modified.2811Administration
POA user "%1" deleted.2812Administration
Creation of POA user "%1" failed.2815Administration
Modification of POA user "%1" failed.2816Administration
Deletion of POA user "%1" failed.2817Administration
POA group "%1" created.2820Administration
290
SafeGuard Enterprise
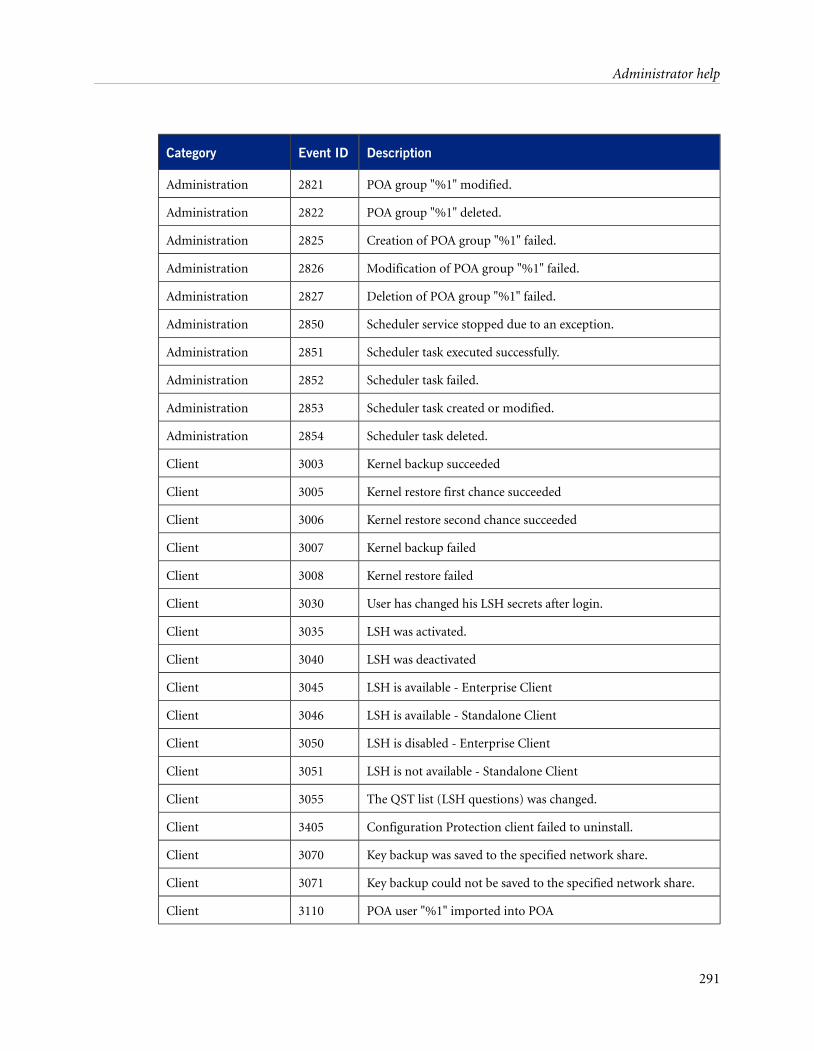
DescriptionEvent IDCategory
POA group "%1" modified.2821Administration
POA group "%1" deleted.2822Administration
Creation of POA group "%1" failed.2825Administration
Modification of POA group "%1" failed.2826Administration
Deletion of POA group "%1" failed.2827Administration
Scheduler service stopped due to an exception.2850Administration
Scheduler task executed successfully.2851Administration
Scheduler task failed.2852Administration
Scheduler task created or modified.2853Administration
Scheduler task deleted.2854Administration
Kernel backup succeeded3003Client
Kernel restore first chance succeeded3005Client
Kernel restore second chance succeeded3006Client
Kernel backup failed3007Client
Kernel restore failed3008Client
User has changed his LSH secrets after login.3030Client
LSH was activated.3035Client
LSH was deactivated3040Client
LSH is available - Enterprise Client3045Client
LSH is available - Standalone Client3046Client
LSH is disabled - Enterprise Client3050Client
LSH is not available - Standalone Client3051Client
The QST list (LSH questions) was changed.3055Client
Configuration Protection client failed to uninstall.3405Client
Key backup was saved to the specified network share.3070Client
Key backup could not be saved to the specified network share.3071Client
POA user "%1" imported into POA3110Client
291
Administrator help
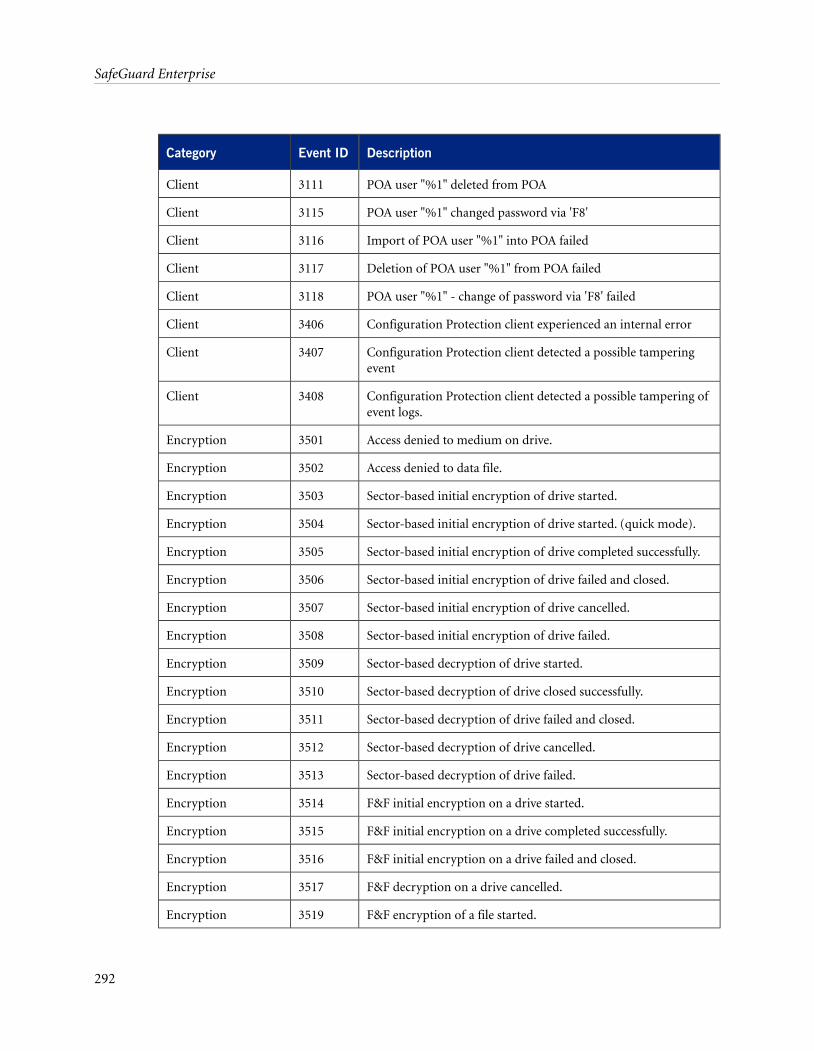
DescriptionEvent IDCategory
POA user "%1" deleted from POA3111Client
POA user "%1" changed password via 'F8'3115Client
Import of POA user "%1" into POA failed3116Client
Deletion of POA user "%1" from POA failed3117Client
POA user "%1" - change of password via 'F8' failed3118Client
Configuration Protection client experienced an internal error3406Client
Configuration Protection client detected a possible tamperingevent
3407Client
Configuration Protection client detected a possible tampering ofevent logs.
3408Client
Access denied to medium on drive.3501Encryption
Access denied to data file.3502Encryption
Sector-based initial encryption of drive started.3503Encryption
Sector-based initial encryption of drive started. (quick mode).3504Encryption
Sector-based initial encryption of drive completed successfully.3505Encryption
Sector-based initial encryption of drive failed and closed.3506Encryption
Sector-based initial encryption of drive cancelled.3507Encryption
Sector-based initial encryption of drive failed.3508Encryption
Sector-based decryption of drive started.3509Encryption
Sector-based decryption of drive closed successfully.3510Encryption
Sector-based decryption of drive failed and closed.3511Encryption
Sector-based decryption of drive cancelled.3512Encryption
Sector-based decryption of drive failed.3513Encryption
F&F initial encryption on a drive started.3514Encryption
F&F initial encryption on a drive completed successfully.3515Encryption
F&F initial encryption on a drive failed and closed.3516Encryption
F&F decryption on a drive cancelled.3517Encryption
F&F encryption of a file started.3519Encryption
292
SafeGuard Enterprise
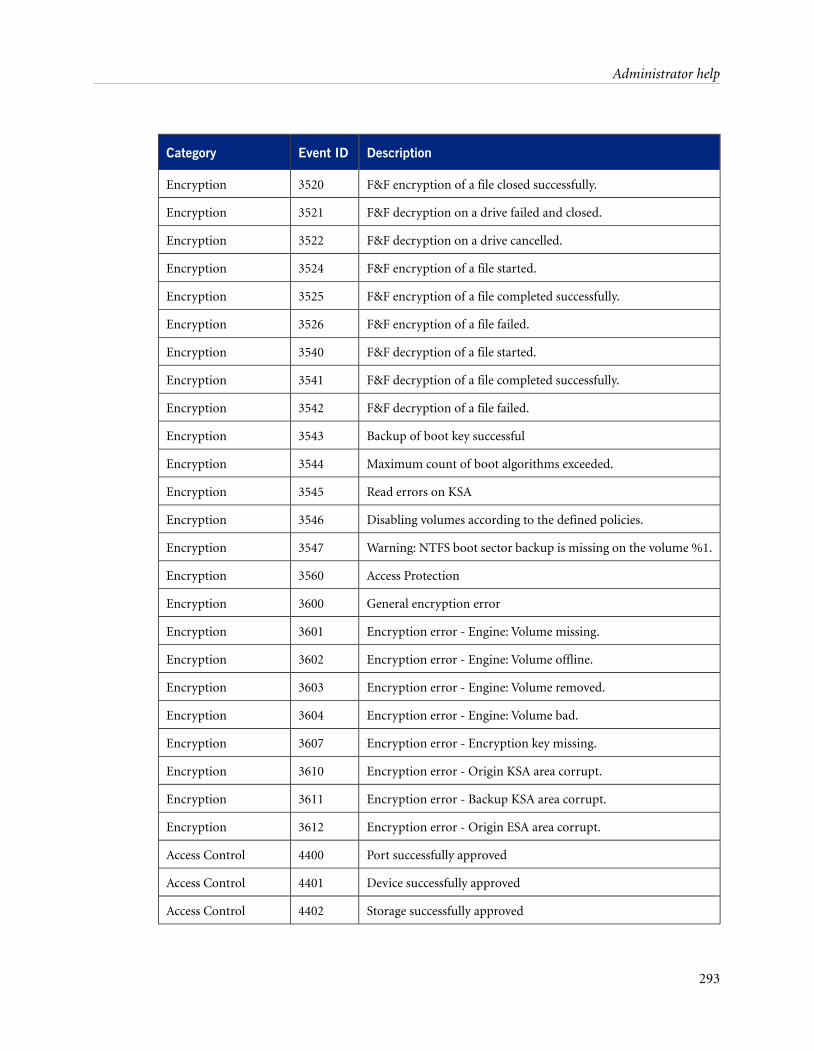
DescriptionEvent IDCategory
F&F encryption of a file closed successfully.3520Encryption
F&F decryption on a drive failed and closed.3521Encryption
F&F decryption on a drive cancelled.3522Encryption
F&F encryption of a file started.3524Encryption
F&F encryption of a file completed successfully.3525Encryption
F&F encryption of a file failed.3526Encryption
F&F decryption of a file started.3540Encryption
F&F decryption of a file completed successfully.3541Encryption
F&F decryption of a file failed.3542Encryption
Backup of boot key successful3543Encryption
Maximum count of boot algorithms exceeded.3544Encryption
Read errors on KSA3545Encryption
Disabling volumes according to the defined policies.3546Encryption
Warning: NTFS boot sector backup is missing on the volume %1.3547Encryption
Access Protection3560Encryption
General encryption error3600Encryption
Encryption error - Engine: Volume missing.3601Encryption
Encryption error - Engine: Volume offline.3602Encryption
Encryption error - Engine: Volume removed.3603Encryption
Encryption error - Engine: Volume bad.3604Encryption
Encryption error - Encryption key missing.3607Encryption
Encryption error - Origin KSA area corrupt.3610Encryption
Encryption error - Backup KSA area corrupt.3611Encryption
Encryption error - Origin ESA area corrupt.3612Encryption
Port successfully approved4400Access Control
Device successfully approved4401Access Control
Storage successfully approved4402Access Control
293
Administrator help
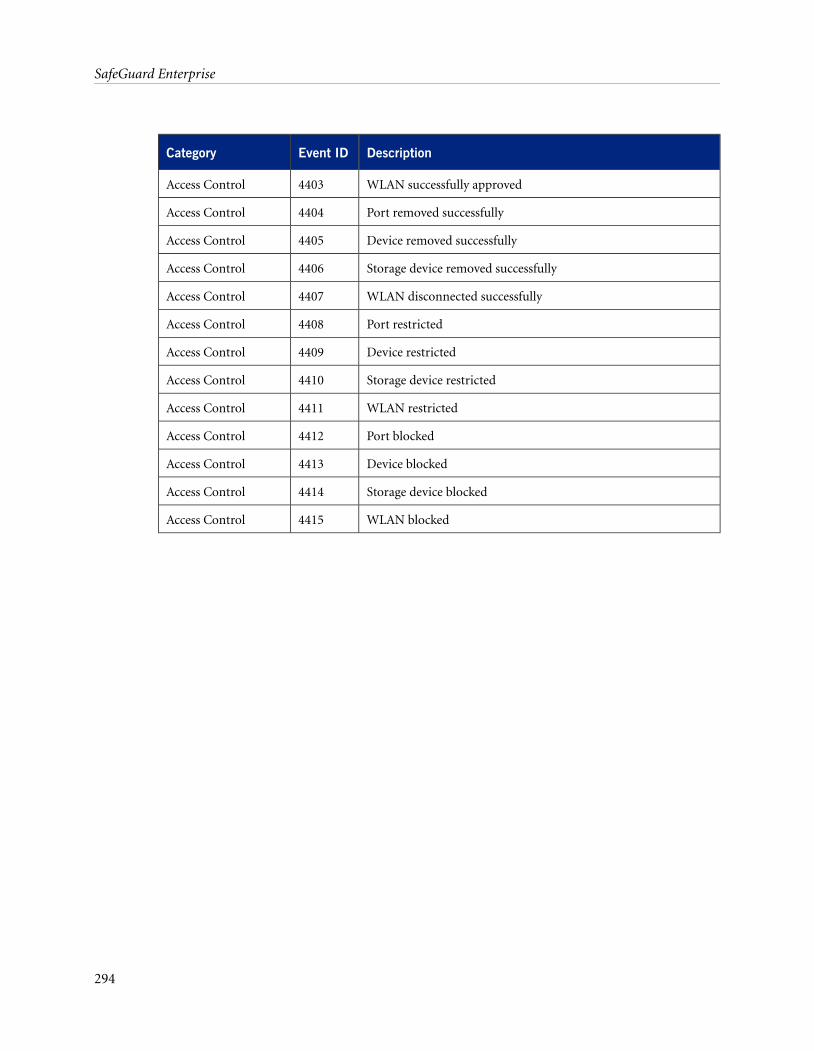
DescriptionEvent IDCategory
WLAN successfully approved4403Access Control
Port removed successfully4404Access Control
Device removed successfully4405Access Control
Storage device removed successfully4406Access Control
WLAN disconnected successfully4407Access Control
Port restricted4408Access Control
Device restricted4409Access Control
Storage device restricted4410Access Control
WLAN restricted4411Access Control
Port blocked4412Access Control
Device blocked4413Access Control
Storage device blocked4414Access Control
WLAN blocked4415Access Control
294
SafeGuard Enterprise
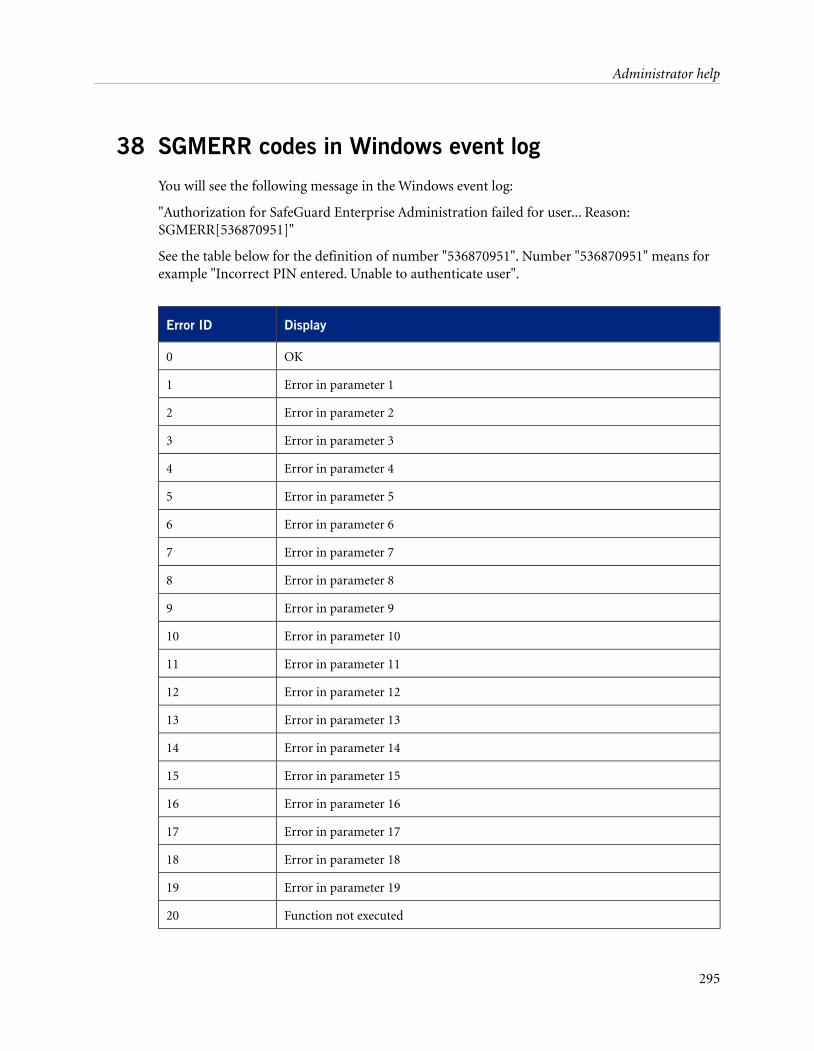
38 SGMERR codes in Windows event log
You will see the following message in the Windows event log:
"Authorization for SafeGuard Enterprise Administration failed for user... Reason:SGMERR[536870951]"
See the table below for the definition of number "536870951". Number "536870951" means forexample "Incorrect PIN entered. Unable to authenticate user".
DisplayError ID
OK0
Error in parameter 11
Error in parameter 22
Error in parameter 33
Error in parameter 44
Error in parameter 55
Error in parameter 66
Error in parameter 77
Error in parameter 88
Error in parameter 99
Error in parameter 1010
Error in parameter 1111
Error in parameter 1212
Error in parameter 1313
Error in parameter 1414
Error in parameter 1515
Error in parameter 1616
Error in parameter 1717
Error in parameter 1818
Error in parameter 1919
Function not executed20
295
Administrator help
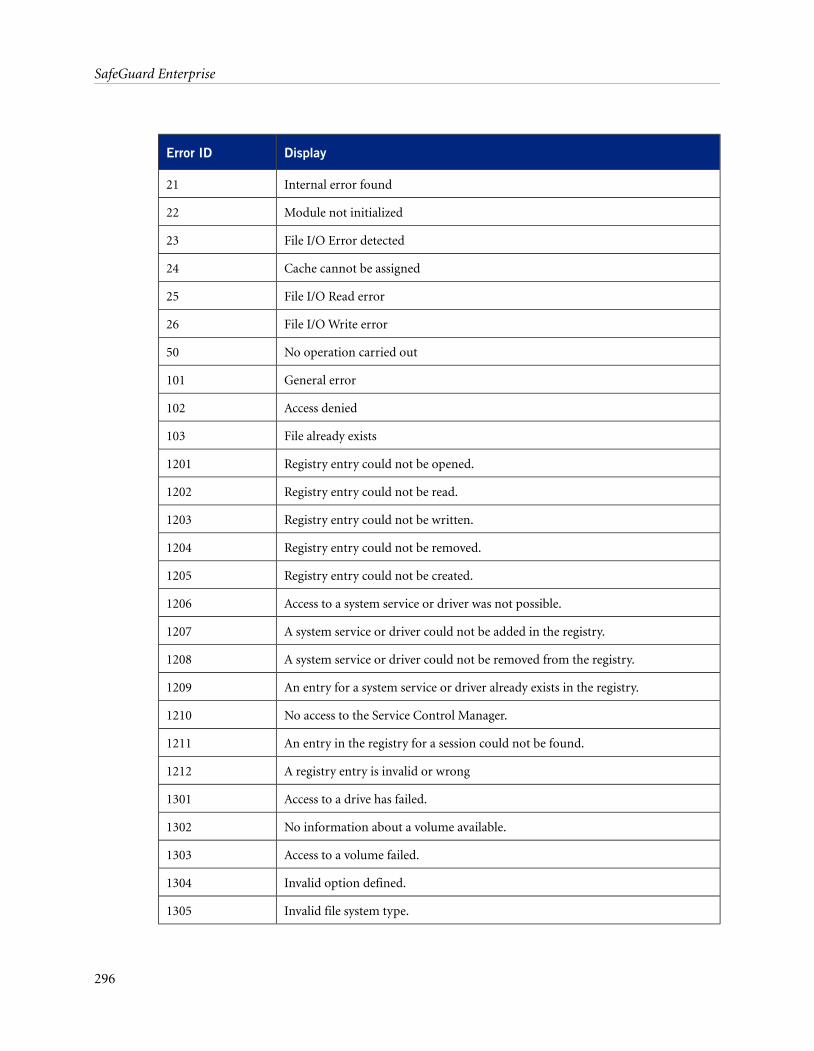
DisplayError ID
Internal error found21
Module not initialized22
File I/O Error detected23
Cache cannot be assigned24
File I/O Read error25
File I/O Write error26
No operation carried out50
General error101
Access denied102
File already exists103
Registry entry could not be opened.1201
Registry entry could not be read.1202
Registry entry could not be written.1203
Registry entry could not be removed.1204
Registry entry could not be created.1205
Access to a system service or driver was not possible.1206
A system service or driver could not be added in the registry.1207
A system service or driver could not be removed from the registry.1208
An entry for a system service or driver already exists in the registry.1209
No access to the Service Control Manager.1210
An entry in the registry for a session could not be found.1211
A registry entry is invalid or wrong1212
Access to a drive has failed.1301
No information about a volume available.1302
Access to a volume failed.1303
Invalid option defined.1304
Invalid file system type.1305
296
SafeGuard Enterprise
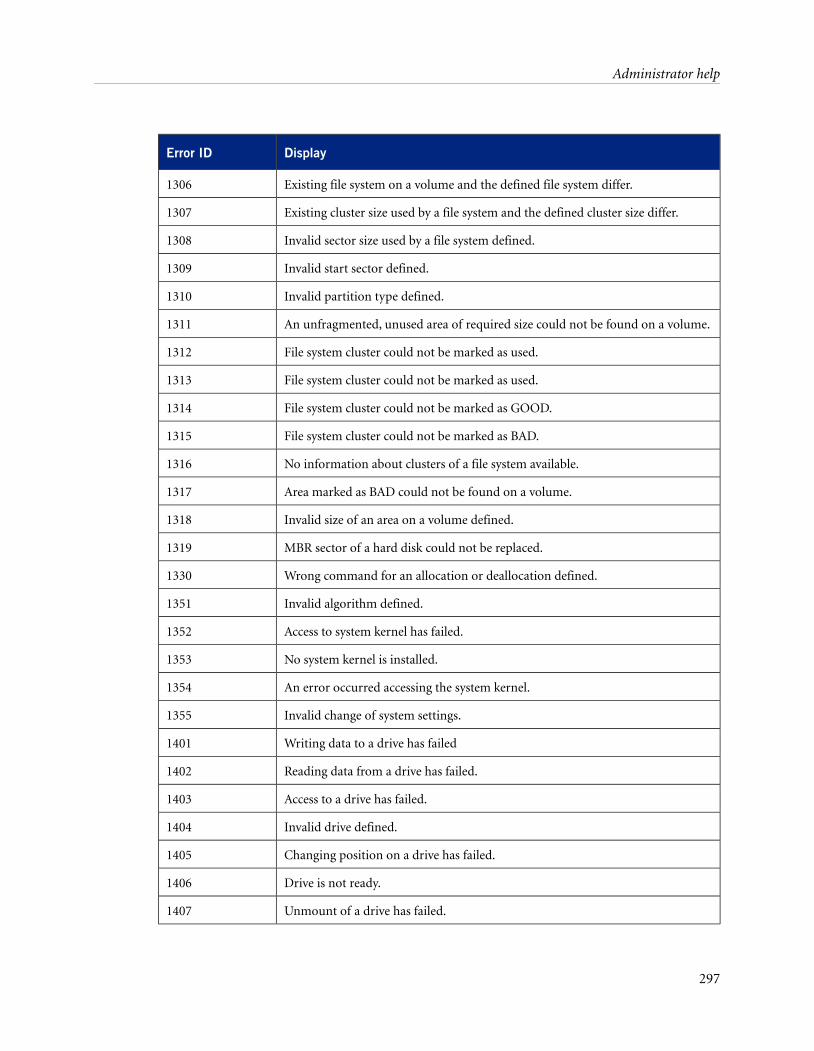
DisplayError ID
Existing file system on a volume and the defined file system differ.1306
Existing cluster size used by a file system and the defined cluster size differ.1307
Invalid sector size used by a file system defined.1308
Invalid start sector defined.1309
Invalid partition type defined.1310
An unfragmented, unused area of required size could not be found on a volume.1311
File system cluster could not be marked as used.1312
File system cluster could not be marked as used.1313
File system cluster could not be marked as GOOD.1314
File system cluster could not be marked as BAD.1315
No information about clusters of a file system available.1316
Area marked as BAD could not be found on a volume.1317
Invalid size of an area on a volume defined.1318
MBR sector of a hard disk could not be replaced.1319
Wrong command for an allocation or deallocation defined.1330
Invalid algorithm defined.1351
Access to system kernel has failed.1352
No system kernel is installed.1353
An error occurred accessing the system kernel.1354
Invalid change of system settings.1355
Writing data to a drive has failed1401
Reading data from a drive has failed.1402
Access to a drive has failed.1403
Invalid drive defined.1404
Changing position on a drive has failed.1405
Drive is not ready.1406
Unmount of a drive has failed.1407
297
Administrator help
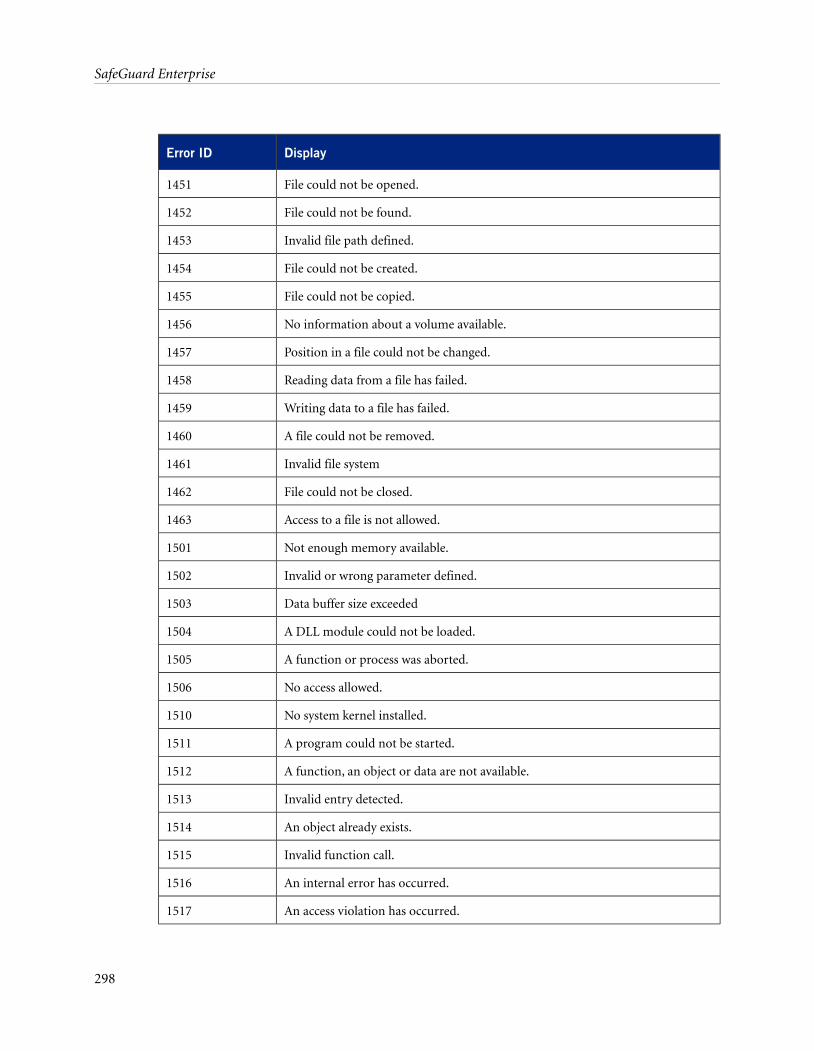
DisplayError ID
File could not be opened.1451
File could not be found.1452
Invalid file path defined.1453
File could not be created.1454
File could not be copied.1455
No information about a volume available.1456
Position in a file could not be changed.1457
Reading data from a file has failed.1458
Writing data to a file has failed.1459
A file could not be removed.1460
Invalid file system1461
File could not be closed.1462
Access to a file is not allowed.1463
Not enough memory available.1501
Invalid or wrong parameter defined.1502
Data buffer size exceeded1503
A DLL module could not be loaded.1504
A function or process was aborted.1505
No access allowed.1506
No system kernel installed.1510
A program could not be started.1511
A function, an object or data are not available.1512
Invalid entry detected.1513
An object already exists.1514
Invalid function call.1515
An internal error has occurred.1516
An access violation has occurred.1517
298
SafeGuard Enterprise
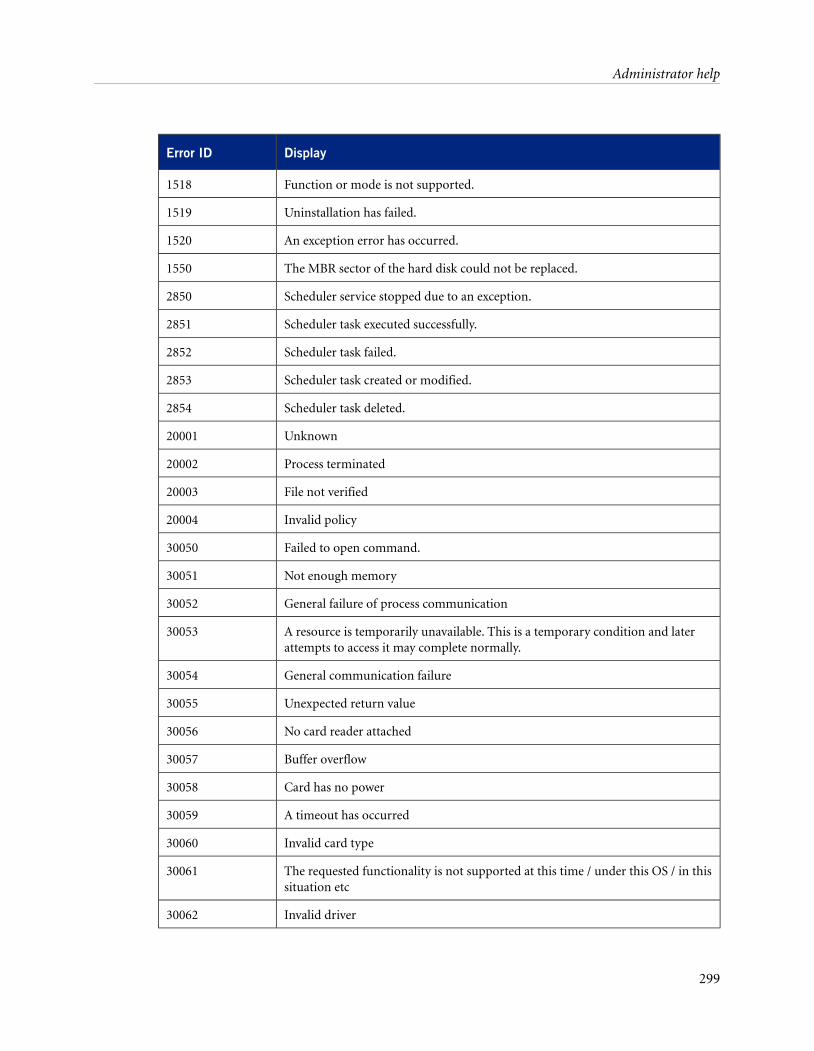
DisplayError ID
Function or mode is not supported.1518
Uninstallation has failed.1519
An exception error has occurred.1520
The MBR sector of the hard disk could not be replaced.1550
Scheduler service stopped due to an exception.2850
Scheduler task executed successfully.2851
Scheduler task failed.2852
Scheduler task created or modified.2853
Scheduler task deleted.2854
Unknown20001
Process terminated20002
File not verified20003
Invalid policy20004
Failed to open command.30050
Not enough memory30051
General failure of process communication30052
A resource is temporarily unavailable. This is a temporary condition and laterattempts to access it may complete normally.
30053
General communication failure30054
Unexpected return value30055
No card reader attached30056
Buffer overflow30057
Card has no power30058
A timeout has occurred30059
Invalid card type30060
The requested functionality is not supported at this time / under this OS / in thissituation etc
30061
Invalid driver30062
299
Administrator help
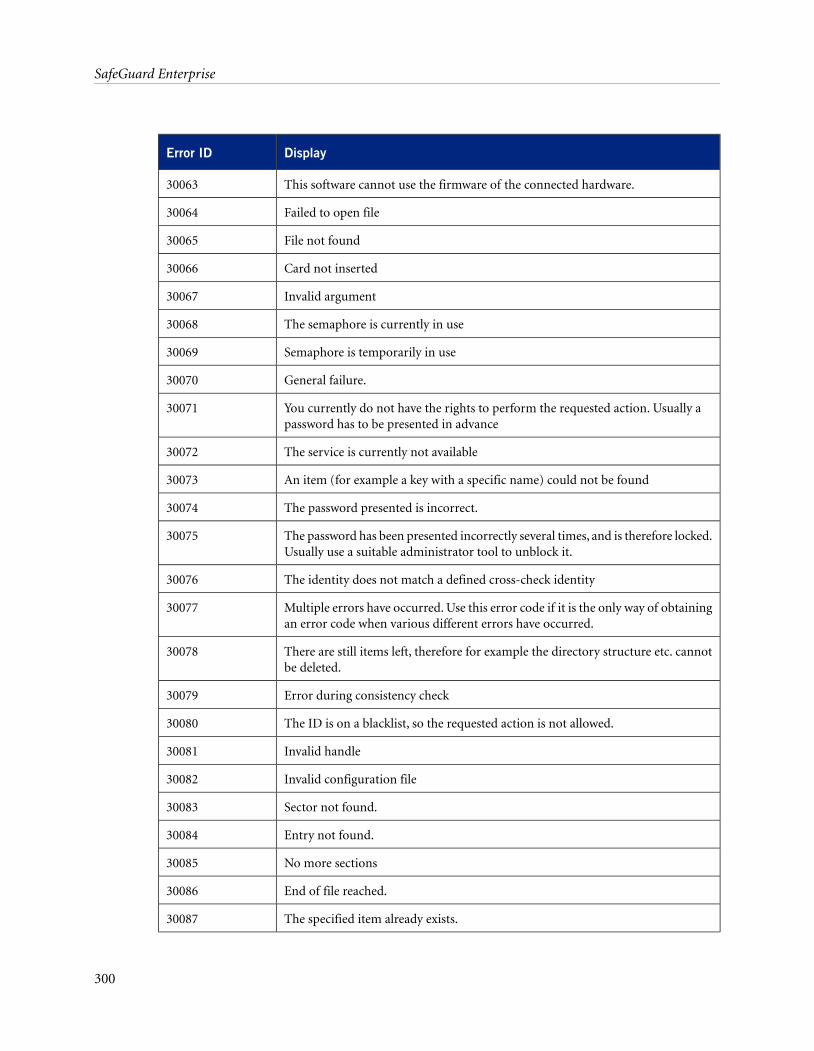
DisplayError ID
This software cannot use the firmware of the connected hardware.30063
Failed to open file30064
File not found30065
Card not inserted30066
Invalid argument30067
The semaphore is currently in use30068
Semaphore is temporarily in use30069
General failure.30070
You currently do not have the rights to perform the requested action. Usually apassword has to be presented in advance
30071
The service is currently not available30072
An item (for example a key with a specific name) could not be found30073
The password presented is incorrect.30074
The password has been presented incorrectly several times, and is therefore locked.Usually use a suitable administrator tool to unblock it.
30075
The identity does not match a defined cross-check identity30076
Multiple errors have occurred. Use this error code if it is the only way of obtainingan error code when various different errors have occurred.
30077
There are still items left, therefore for example the directory structure etc. cannotbe deleted.
30078
Error during consistency check30079
The ID is on a blacklist, so the requested action is not allowed.30080
Invalid handle30081
Invalid configuration file30082
Sector not found.30083
Entry not found.30084
No more sections30085
End of file reached.30086
The specified item already exists.30087
300
SafeGuard Enterprise
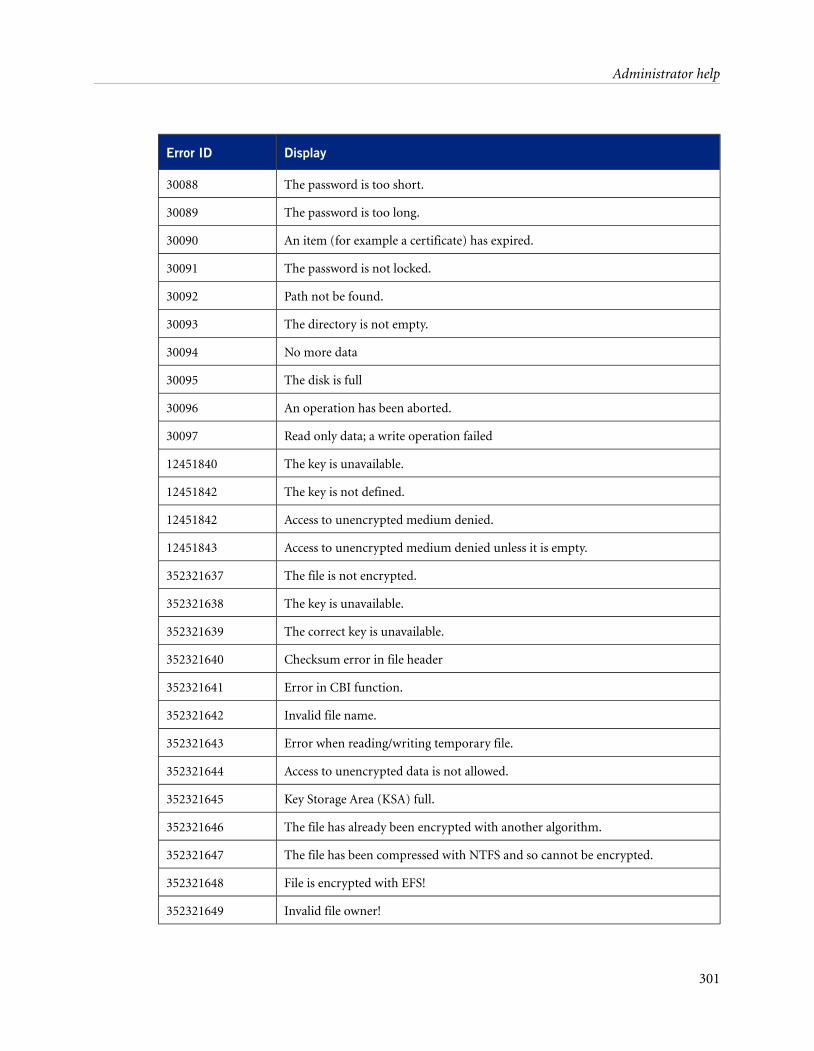
DisplayError ID
The password is too short.30088
The password is too long.30089
An item (for example a certificate) has expired.30090
The password is not locked.30091
Path not be found.30092
The directory is not empty.30093
No more data30094
The disk is full30095
An operation has been aborted.30096
Read only data; a write operation failed30097
The key is unavailable.12451840
The key is not defined.12451842
Access to unencrypted medium denied.12451842
Access to unencrypted medium denied unless it is empty.12451843
The file is not encrypted.352321637
The key is unavailable.352321638
The correct key is unavailable.352321639
Checksum error in file header352321640
Error in CBI function.352321641
Invalid file name.352321642
Error when reading/writing temporary file.352321643
Access to unencrypted data is not allowed.352321644
Key Storage Area (KSA) full.352321645
The file has already been encrypted with another algorithm.352321646
The file has been compressed with NTFS and so cannot be encrypted.352321647
File is encrypted with EFS!352321648
Invalid file owner!352321649
301
Administrator help
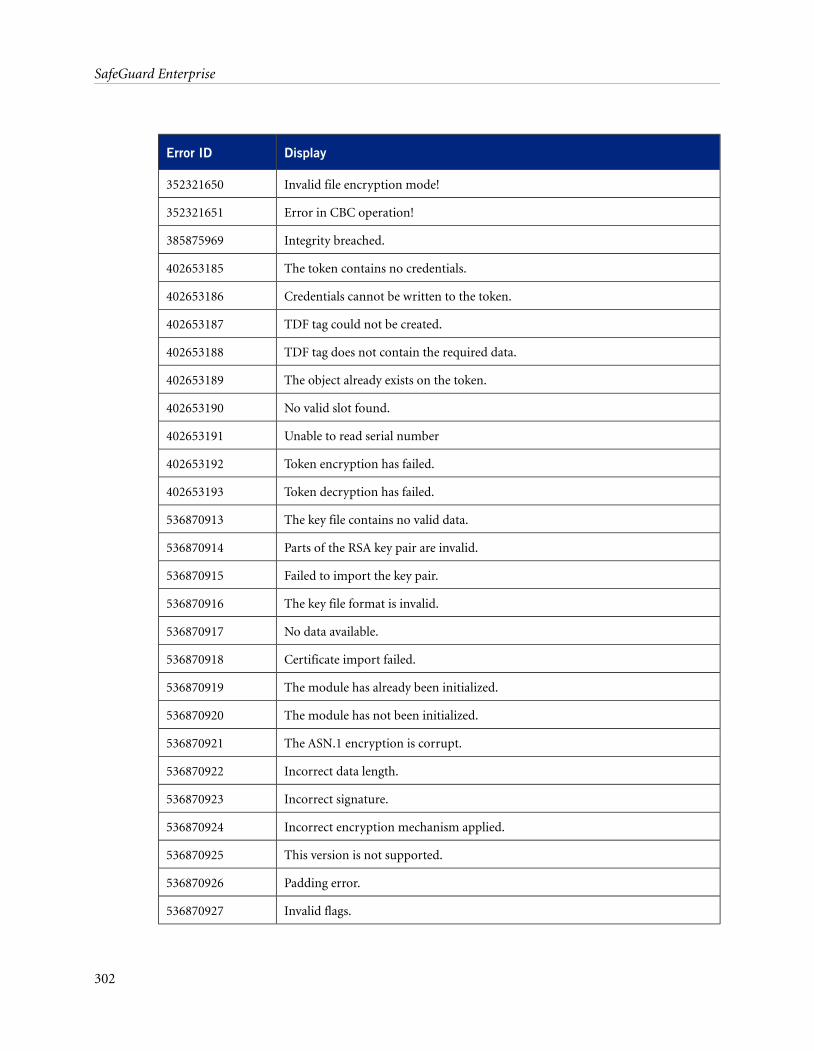
DisplayError ID
Invalid file encryption mode!352321650
Error in CBC operation!352321651
Integrity breached.385875969
The token contains no credentials.402653185
Credentials cannot be written to the token.402653186
TDF tag could not be created.402653187
TDF tag does not contain the required data.402653188
The object already exists on the token.402653189
No valid slot found.402653190
Unable to read serial number402653191
Token encryption has failed.402653192
Token decryption has failed.402653193
The key file contains no valid data.536870913
Parts of the RSA key pair are invalid.536870914
Failed to import the key pair.536870915
The key file format is invalid.536870916
No data available.536870917
Certificate import failed.536870918
The module has already been initialized.536870919
The module has not been initialized.536870920
The ASN.1 encryption is corrupt.536870921
Incorrect data length.536870922
Incorrect signature.536870923
Incorrect encryption mechanism applied.536870924
This version is not supported.536870925
Padding error.536870926
Invalid flags.536870927
302
SafeGuard Enterprise
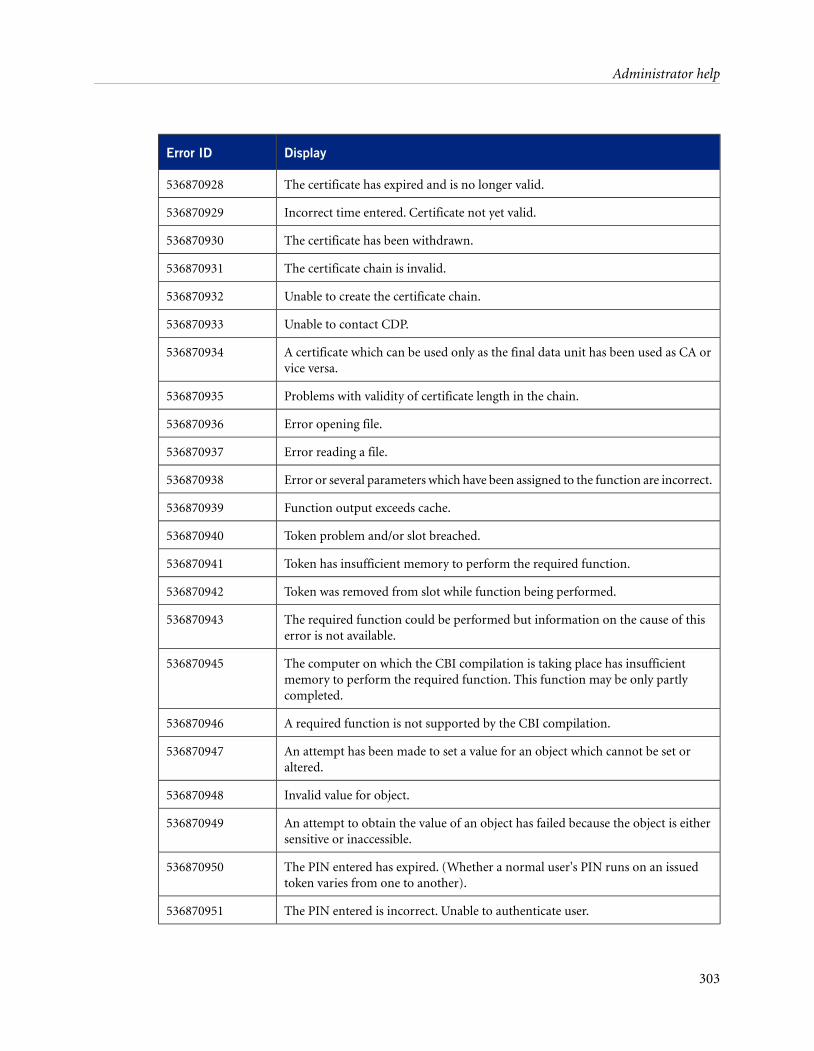
DisplayError ID
The certificate has expired and is no longer valid.536870928
Incorrect time entered. Certificate not yet valid.536870929
The certificate has been withdrawn.536870930
The certificate chain is invalid.536870931
Unable to create the certificate chain.536870932
Unable to contact CDP.536870933
A certificate which can be used only as the final data unit has been used as CA orvice versa.
536870934
Problems with validity of certificate length in the chain.536870935
Error opening file.536870936
Error reading a file.536870937
Error or several parameters which have been assigned to the function are incorrect.536870938
Function output exceeds cache.536870939
Token problem and/or slot breached.536870940
Token has insufficient memory to perform the required function.536870941
Token was removed from slot while function being performed.536870942
The required function could be performed but information on the cause of thiserror is not available.
536870943
The computer on which the CBI compilation is taking place has insufficientmemory to perform the required function. This function may be only partlycompleted.
536870945
A required function is not supported by the CBI compilation.536870946
An attempt has been made to set a value for an object which cannot be set oraltered.
536870947
Invalid value for object.536870948
An attempt to obtain the value of an object has failed because the object is eithersensitive or inaccessible.
536870949
The PIN entered has expired. (Whether a normal user's PIN runs on an issuedtoken varies from one to another).
536870950
The PIN entered is incorrect. Unable to authenticate user.536870951
303
Administrator help
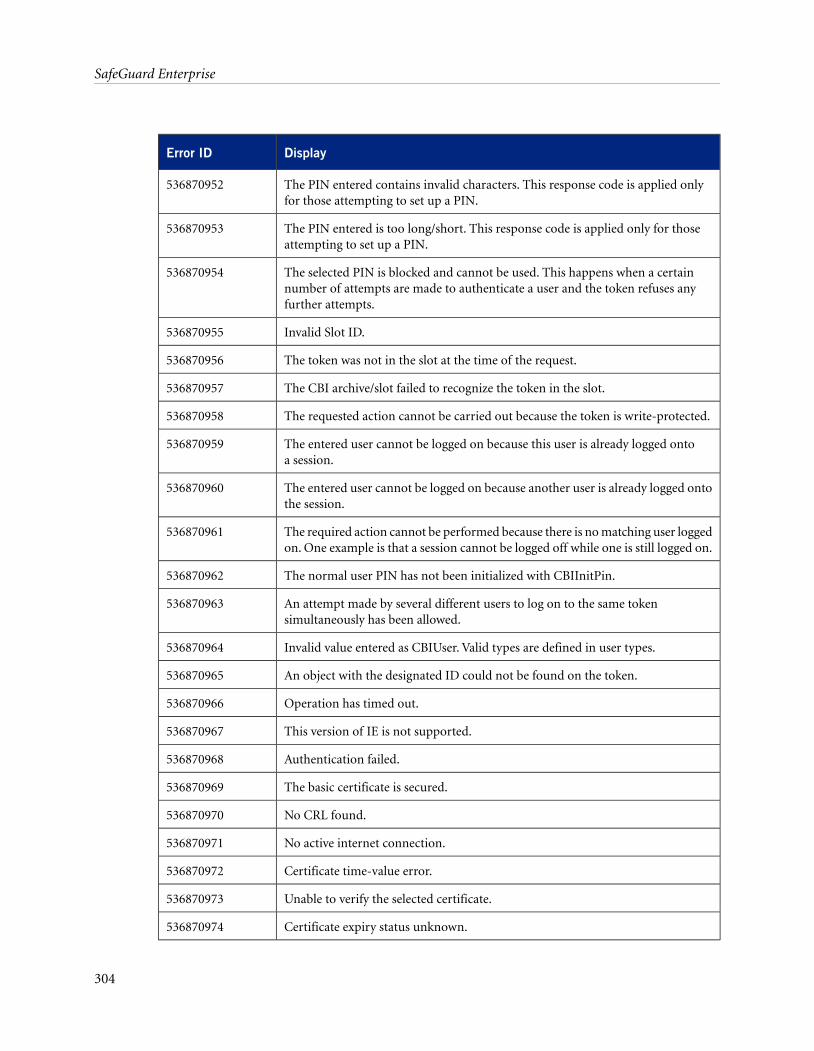
DisplayError ID
The PIN entered contains invalid characters. This response code is applied onlyfor those attempting to set up a PIN.
536870952
The PIN entered is too long/short. This response code is applied only for thoseattempting to set up a PIN.
536870953
The selected PIN is blocked and cannot be used. This happens when a certainnumber of attempts are made to authenticate a user and the token refuses anyfurther attempts.
536870954
Invalid Slot ID.536870955
The token was not in the slot at the time of the request.536870956
The CBI archive/slot failed to recognize the token in the slot.536870957
The requested action cannot be carried out because the token is write-protected.536870958
The entered user cannot be logged on because this user is already logged ontoa session.
536870959
The entered user cannot be logged on because another user is already logged ontothe session.
536870960
The required action cannot be performed because there is no matching user loggedon. One example is that a session cannot be logged off while one is still logged on.
536870961
The normal user PIN has not been initialized with CBIInitPin.536870962
An attempt made by several different users to log on to the same tokensimultaneously has been allowed.
536870963
Invalid value entered as CBIUser. Valid types are defined in user types.536870964
An object with the designated ID could not be found on the token.536870965
Operation has timed out.536870966
This version of IE is not supported.536870967
Authentication failed.536870968
The basic certificate is secured.536870969
No CRL found.536870970
No active internet connection.536870971
Certificate time-value error.536870972
Unable to verify the selected certificate.536870973
Certificate expiry status unknown.536870974
304
SafeGuard Enterprise
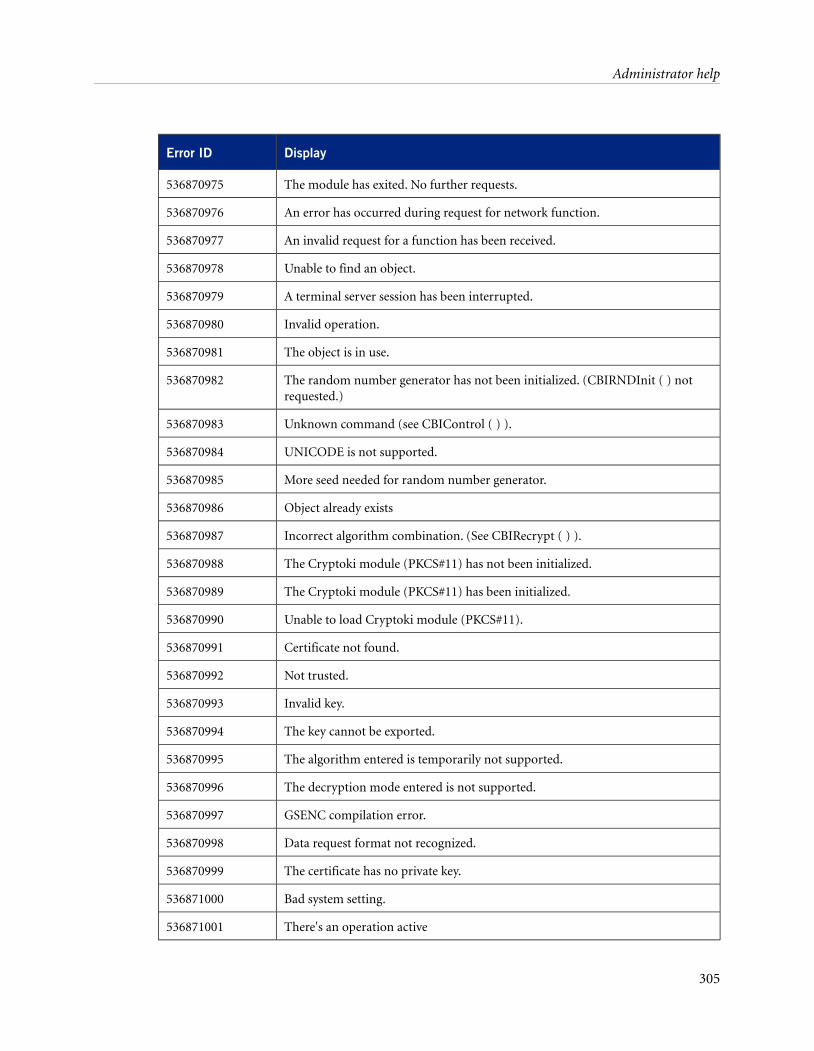
DisplayError ID
The module has exited. No further requests.536870975
An error has occurred during request for network function.536870976
An invalid request for a function has been received.536870977
Unable to find an object.536870978
A terminal server session has been interrupted.536870979
Invalid operation.536870980
The object is in use.536870981
The random number generator has not been initialized. (CBIRNDInit ( ) notrequested.)
536870982
Unknown command (see CBIControl ( ) ).536870983
UNICODE is not supported.536870984
More seed needed for random number generator.536870985
Object already exists536870986
Incorrect algorithm combination. (See CBIRecrypt ( ) ).536870987
The Cryptoki module (PKCS#11) has not been initialized.536870988
The Cryptoki module (PKCS#11) has been initialized.536870989
Unable to load Cryptoki module (PKCS#11).536870990
Certificate not found.536870991
Not trusted.536870992
Invalid key.536870993
The key cannot be exported.536870994
The algorithm entered is temporarily not supported.536870995
The decryption mode entered is not supported.536870996
GSENC compilation error.536870997
Data request format not recognized.536870998
The certificate has no private key.536870999
Bad system setting.536871000
There's an operation active536871001
305
Administrator help
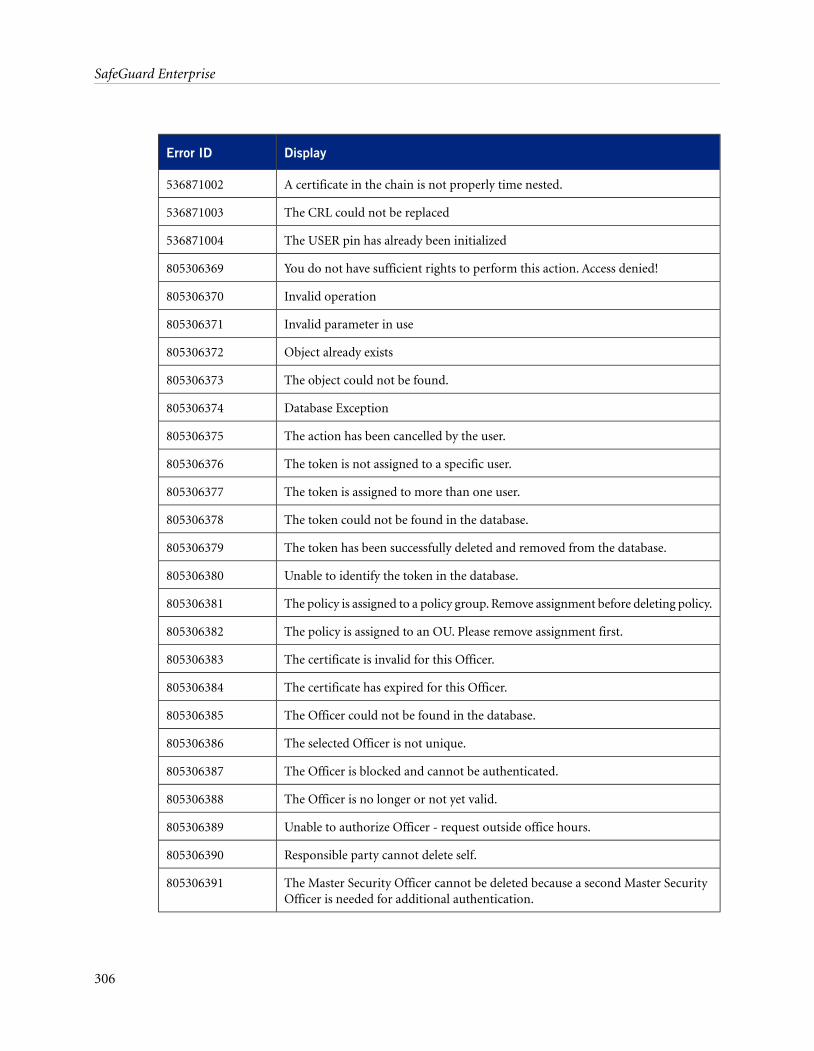
DisplayError ID
A certificate in the chain is not properly time nested.536871002
The CRL could not be replaced536871003
The USER pin has already been initialized536871004
You do not have sufficient rights to perform this action. Access denied!805306369
Invalid operation805306370
Invalid parameter in use805306371
Object already exists805306372
The object could not be found.805306373
Database Exception805306374
The action has been cancelled by the user.805306375
The token is not assigned to a specific user.805306376
The token is assigned to more than one user.805306377
The token could not be found in the database.805306378
The token has been successfully deleted and removed from the database.805306379
Unable to identify the token in the database.805306380
The policy is assigned to a policy group. Remove assignment before deleting policy.805306381
The policy is assigned to an OU. Please remove assignment first.805306382
The certificate is invalid for this Officer.805306383
The certificate has expired for this Officer.805306384
The Officer could not be found in the database.805306385
The selected Officer is not unique.805306386
The Officer is blocked and cannot be authenticated.805306387
The Officer is no longer or not yet valid.805306388
Unable to authorize Officer - request outside office hours.805306389
Responsible party cannot delete self.805306390
The Master Security Officer cannot be deleted because a second Master SecurityOfficer is needed for additional authentication.
805306391
306
SafeGuard Enterprise
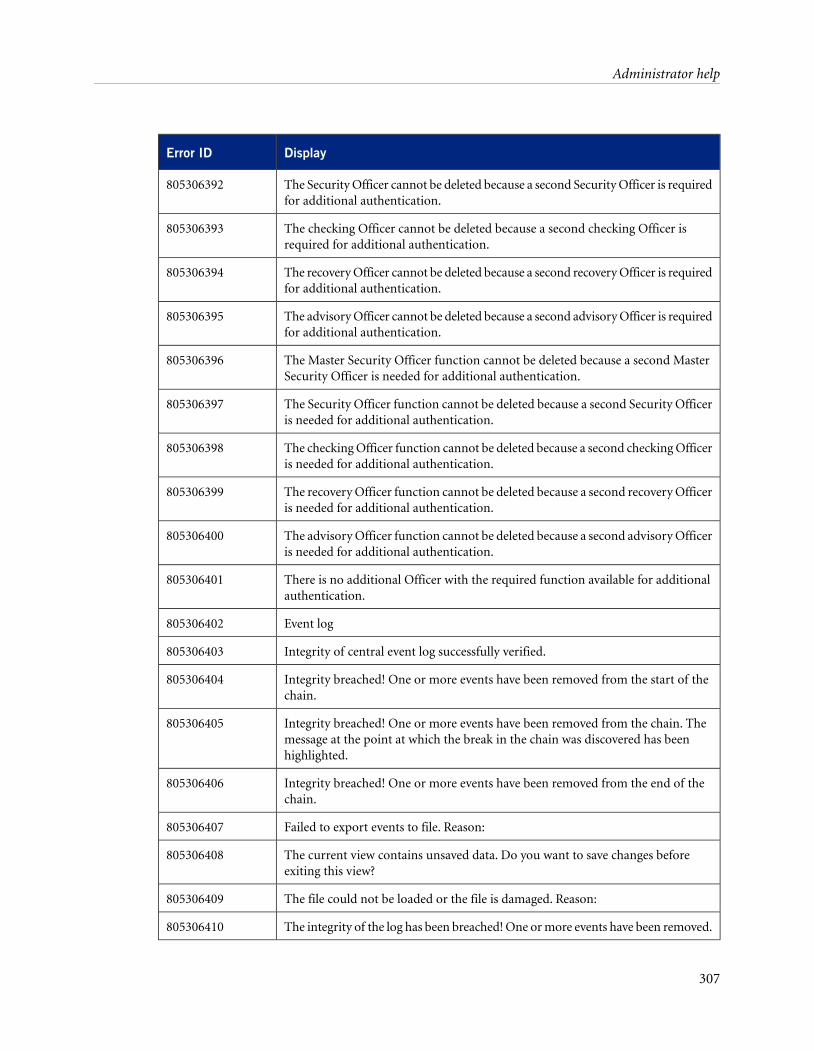
DisplayError ID
The Security Officer cannot be deleted because a second Security Officer is requiredfor additional authentication.
805306392
The checking Officer cannot be deleted because a second checking Officer isrequired for additional authentication.
805306393
The recovery Officer cannot be deleted because a second recovery Officer is requiredfor additional authentication.
805306394
The advisory Officer cannot be deleted because a second advisory Officer is requiredfor additional authentication.
805306395
The Master Security Officer function cannot be deleted because a second MasterSecurity Officer is needed for additional authentication.
805306396
The Security Officer function cannot be deleted because a second Security Officeris needed for additional authentication.
805306397
The checking Officer function cannot be deleted because a second checking Officeris needed for additional authentication.
805306398
The recovery Officer function cannot be deleted because a second recovery Officeris needed for additional authentication.
805306399
The advisory Officer function cannot be deleted because a second advisory Officeris needed for additional authentication.
805306400
There is no additional Officer with the required function available for additionalauthentication.
805306401
Event log805306402
Integrity of central event log successfully verified.805306403
Integrity breached! One or more events have been removed from the start of thechain.
805306404
Integrity breached! One or more events have been removed from the chain. Themessage at the point at which the break in the chain was discovered has beenhighlighted.
805306405
Integrity breached! One or more events have been removed from the end of thechain.
805306406
Failed to export events to file. Reason:805306407
The current view contains unsaved data. Do you want to save changes beforeexiting this view?
805306408
The file could not be loaded or the file is damaged. Reason:805306409
The integrity of the log has been breached! One or more events have been removed.805306410
307
Administrator help
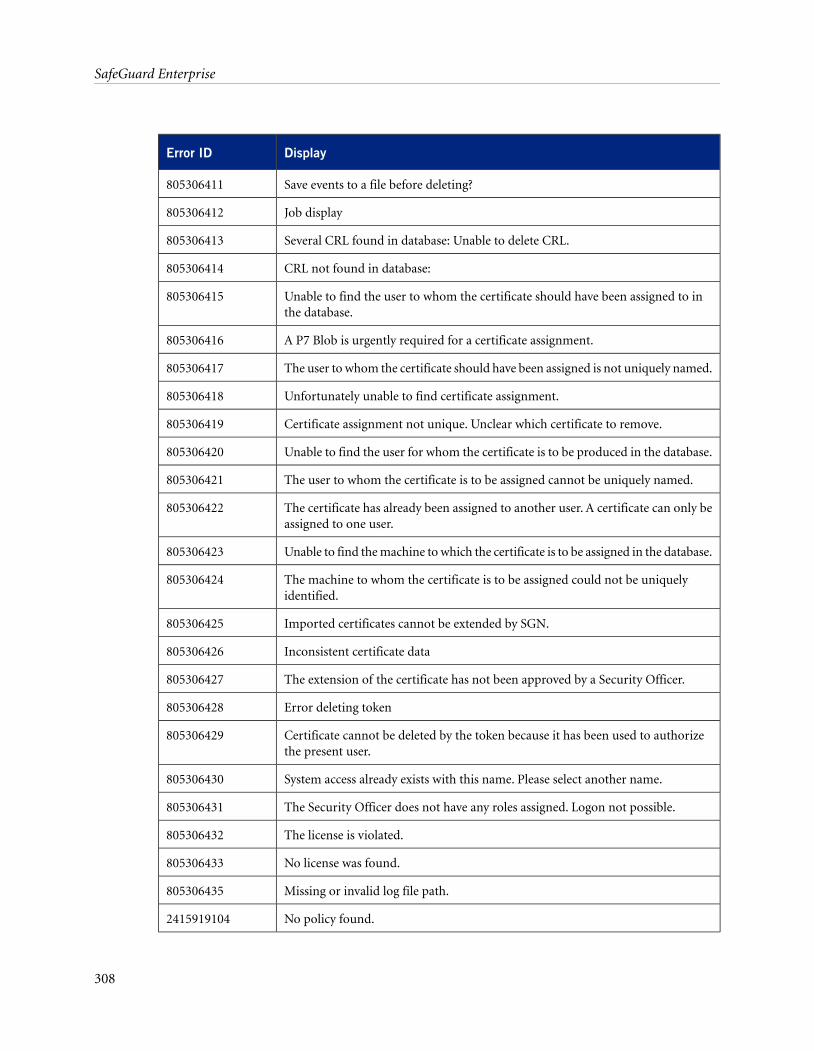
DisplayError ID
Save events to a file before deleting?805306411
Job display805306412
Several CRL found in database: Unable to delete CRL.805306413
CRL not found in database:805306414
Unable to find the user to whom the certificate should have been assigned to inthe database.
805306415
A P7 Blob is urgently required for a certificate assignment.805306416
The user to whom the certificate should have been assigned is not uniquely named.805306417
Unfortunately unable to find certificate assignment.805306418
Certificate assignment not unique. Unclear which certificate to remove.805306419
Unable to find the user for whom the certificate is to be produced in the database.805306420
The user to whom the certificate is to be assigned cannot be uniquely named.805306421
The certificate has already been assigned to another user. A certificate can only beassigned to one user.
805306422
Unable to find the machine to which the certificate is to be assigned in the database.805306423
The machine to whom the certificate is to be assigned could not be uniquelyidentified.
805306424
Imported certificates cannot be extended by SGN.805306425
Inconsistent certificate data805306426
The extension of the certificate has not been approved by a Security Officer.805306427
Error deleting token805306428
Certificate cannot be deleted by the token because it has been used to authorizethe present user.
805306429
System access already exists with this name. Please select another name.805306430
The Security Officer does not have any roles assigned. Logon not possible.805306431
The license is violated.805306432
No license was found.805306433
Missing or invalid log file path.805306435
No policy found.2415919104
308
SafeGuard Enterprise
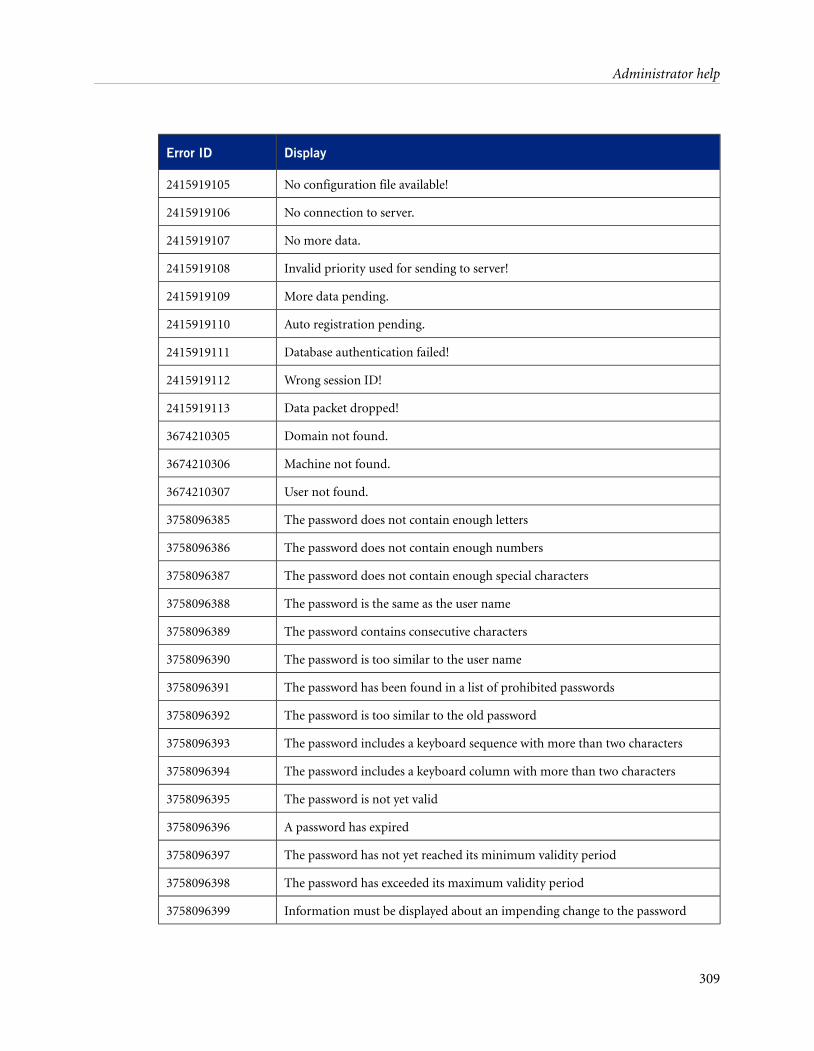
DisplayError ID
No configuration file available!2415919105
No connection to server.2415919106
No more data.2415919107
Invalid priority used for sending to server!2415919108
More data pending.2415919109
Auto registration pending.2415919110
Database authentication failed!2415919111
Wrong session ID!2415919112
Data packet dropped!2415919113
Domain not found.3674210305
Machine not found.3674210306
User not found.3674210307
The password does not contain enough letters3758096385
The password does not contain enough numbers3758096386
The password does not contain enough special characters3758096387
The password is the same as the user name3758096388
The password contains consecutive characters3758096389
The password is too similar to the user name3758096390
The password has been found in a list of prohibited passwords3758096391
The password is too similar to the old password3758096392
The password includes a keyboard sequence with more than two characters3758096393
The password includes a keyboard column with more than two characters3758096394
The password is not yet valid3758096395
A password has expired3758096396
The password has not yet reached its minimum validity period3758096397
The password has exceeded its maximum validity period3758096398
Information must be displayed about an impending change to the password3758096399
309
Administrator help
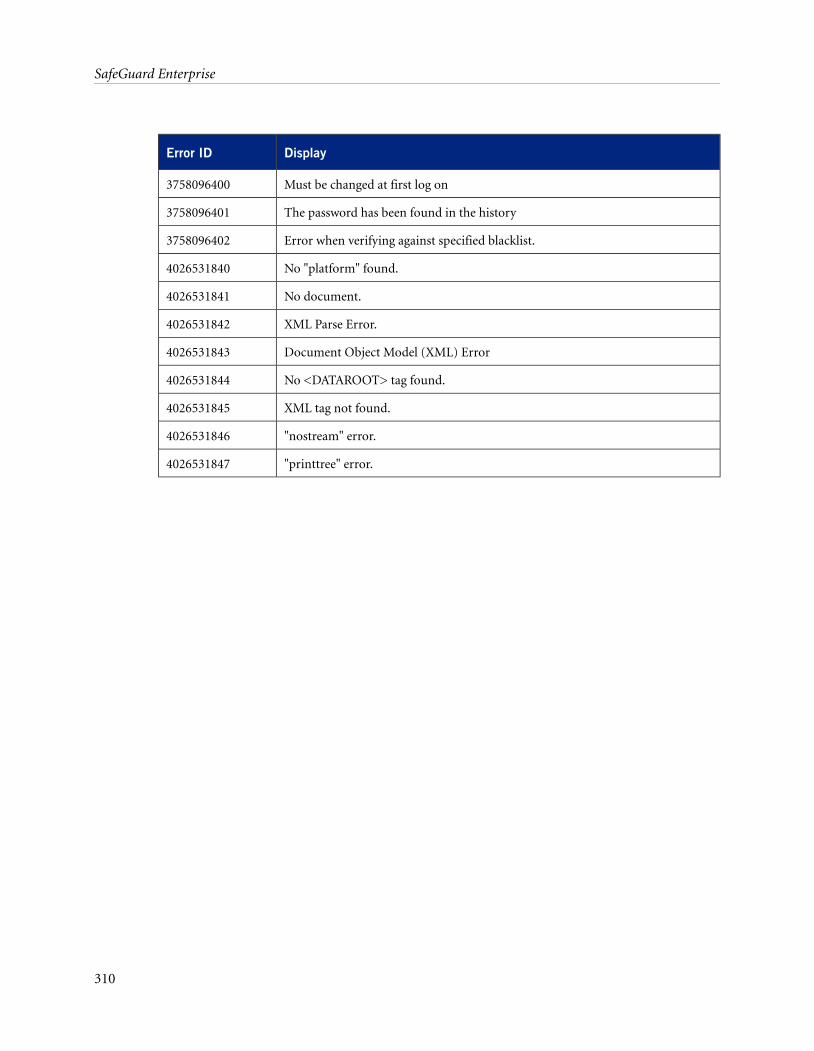
DisplayError ID
Must be changed at first log on3758096400
The password has been found in the history3758096401
Error when verifying against specified blacklist.3758096402
No "platform" found.4026531840
No document.4026531841
XML Parse Error.4026531842
Document Object Model (XML) Error4026531843
No <DATAROOT> tag found.4026531844
XML tag not found.4026531845
"nostream" error.4026531846
"printtree" error.4026531847
310
SafeGuard Enterprise
39 Technical support
You can find technical support for Sophos products in any of these ways:
■ Visit the SophosTalk community at http://community.sophos.com/ and search for other userswho are experiencing the same problem.
■ Visit the Sophos support knowledgebase at http://www.sophos.com/support/.
■ Download the product documentation at http://www.sophos.com/support/docs/.
■ Send an email to [email protected], including your Sophos software version number(s),operating system(s) and patch level(s), and the text of any error messages.
311
Administrator help
40 Legal notices
Copyright © 1996 - 2012 Sophos Group. All rights reserved. SafeGuard is a registered trademarkof Sophos Group.
No part of this publication may be reproduced, stored in a retrieval system, or transmitted, in anyform or by any means, electronic, mechanical, photocopying, recording or otherwise unless youare either a valid licensee where the documentation can be reproduced in accordance with thelicense terms or you otherwise have the prior permission in writing of the copyright owner.
Sophos, Sophos Anti-Virus and SafeGuard are registered trademarks of Sophos Limited, SophosGroup and Utimaco Safeware AG, as applicable.All other product and company names mentionedare trademarks or registered trademarks of their respective owners.
You find copyright information on third party suppliers in the Disclaimer and Copyright for 3rdParty Software document in your product directory.
312
SafeGuard Enterprise