Embed Size (px)
Citation preview
SafeNet ProtectToolkit-M 5.7USERGUIDE
Document Information
Product Version 5.7
Document Part Number 007-013682-005
Release Date 08 January 2020
Revision History
Revision Date Reason
Rev. A 08 January 2020 Initial release
Trademarks, Copyrights, and Third-Party SoftwareCopyright 2009-2020 Gemalto. All rights reserved. Gemalto and the Gemalto logo are trademarks and servicemarks of Gemalto and/or its subsidiaries and are registered in certain countries. All other trademarks andservice marks, whether registered or not in specific countries, are the property of their respective owners.
DisclaimerAll information herein is either public information or is the property of and owned solely by Gemalto and/or itssubsidiaries who shall have and keep the sole right to file patent applications or any other kind of intellectualproperty protection in connection with such information.
Nothing herein shall be construed as implying or granting to you any rights, by license, grant or otherwise,under any intellectual and/or industrial property rights of or concerning any of Gemalto’s information.
This document can be used for informational, non-commercial, internal, and personal use only provided that:
> The copyright notice, the confidentiality and proprietary legend and this full warning notice appear in allcopies.
> This document shall not be posted on any publicly accessible network computer or broadcast in any media,and no modification of any part of this document shall be made.
Use for any other purpose is expressly prohibited and may result in severe civil and criminal liabilities.
The information contained in this document is provided “AS IS” without any warranty of any kind. Unlessotherwise expressly agreed in writing, Gemalto makes no warranty as to the value or accuracy of informationcontained herein.
The document could include technical inaccuracies or typographical errors. Changes are periodically added tothe information herein. Furthermore, Gemalto reserves the right to make any change or improvement in thespecifications data, information, and the like described herein, at any time.
Gemalto hereby disclaims all warranties and conditions with regard to the information contained herein,including all implied warranties of merchantability, fitness for a particular purpose, title and non-infringement. Inno event shall Gemalto be liable, whether in contract, tort or otherwise, for any indirect, special or
SafeNet ProtectToolkit 5.7 User Guide007-013682-005 Rev. A 08 January 2020 Copyright 2009-2020Gemalto 2
consequential damages or any damages whatsoever including but not limited to damages resulting from lossof use, data, profits, revenues, or customers, arising out of or in connection with the use or performance ofinformation contained in this document.
Gemalto does not and shall not warrant that this product will be resistant to all possible attacks and shall notincur, and disclaims, any liability in this respect. Even if each product is compliant with current securitystandards in force on the date of their design, security mechanisms' resistance necessarily evolves accordingto the state of the art in security and notably under the emergence of new attacks. Under no circumstances,shall Gemalto be held liable for any third party actions and in particular in case of any successful attack againstsystems or equipment incorporating Gemalto products. Gemalto disclaims any liability with respect to securityfor direct, indirect, incidental or consequential damages that result from any use of its products. It is furtherstressed that independent testing and verification by the person using the product is particularly encouraged,especially in any application in which defective, incorrect or insecure functioning could result in damage topersons or property, denial of service, or loss of privacy.
All intellectual property is protected by copyright. All trademarks and product names used or referred to are thecopyright of their respective owners. No part of this document may be reproduced, stored in a retrieval systemor transmitted in any form or by any means, electronic, mechanical, chemical, photocopy, recording orotherwise without the prior written permission of Gemalto.
SafeNet ProtectToolkit 5.7 User Guide007-013682-005 Rev. A 08 January 2020 Copyright 2009-2020Gemalto 3
CONTENTS
Preface: About the SafeNet ProtectToolkit-M User Guide 7Gemalto Rebranding 7Audience 8Document Conventions 8Support Contacts 10
Chapter 1: Overview 11SafeNet ProtectToolkit-M Applications 11The MSCAPI Model and SafeNet ProtectToolkit-M 11Further Documentation 13
Chapter 2: Installation 14Requirements 14Installing the SafeNet ProtectToolkit-M Software 14KSP (for CNG) 14Uninstalling the SafeNet ProtectToolkit-M software 15
Chapter 3: Setup and Configuration 16User Roles 16Initial Configuration: Mandatory Steps 17Security Mode Descriptions 18Security Mode Flag Descriptions 19Allocating Keyset Space 21Configuration Options 23KSP (for CNG) Configuration 24Configuring IIS7 (Win2008) with CNG 26
Chapter 4: Administrative Tasks 33Changing the Device Administrator Password 33Allocating Keyset Space 34De-allocating Keyset Space 34Creating User Keysets 35Deleting a Keyset 35Setting the Adapter Transport Mode 36Correcting Clock Drift 37Viewing and Purging the HSM Event Log 37Checking and Upgrading HSM Firmware 38Tampering the HSM 39Backing up a Keyset 39Restoring a Keyset 40Enabling Private Key Clear Export 40
SafeNet ProtectToolkit 5.7 User Guide007-013682-005 Rev. A 08 January 2020 Copyright 2009-2020Gemalto 4

Chapter 5: User Tasks 42Creating Keysets 42Changing a Keyset Password 42Adding a Key Container 43Removing a Key Container 43Generating a Key Pair 44Deleting a Key Pair 44Displaying Key Pair Properties 45Backing up and Restoring Keysets 45
Chapter 6: Administration and User Utilities 46Administration Utility 46Starting and Exiting the Administration Utility 47User Interface 47All Adapters Menu 50Adapter Menu 51Keyset Menu 52
Keyset Management Utility 53Starting and Exiting the Keyset Management Utility 54User Interface 54Container Menu 55Key Pair Menu 56
CREATECERT Utility 56
Chapter 7: Integration with Microsoft CA 57Setting Up a CAwith SafeNet ProtectToolkit-M 57Certificate Template Support for SafeNet CSPs 58CAReplication (Key Backup and Recovery) 59Private Key Archiving and Recovery 61
Chapter 8: Known Issues 71
Chapter 9: Integration With IIS 73Creating a Certificate 73Using IIS 73Using the createcert utility 75
Installing a Certificate for use with IIS 75
Chapter 11: Work Load Distribution 81
Chapter 12: Registry Configuration 82Disclaimer 82ptkcRuntime 82CryptokiPath 83debugLevel 83Safenet RSA Full Cryptographic Provider 84Safenet RSASChannel Cryptographic Provider 84
SafeNet ProtectToolkit 5.7 User Guide007-013682-005 Rev. A 08 January 2020 Copyright 2009-2020Gemalto 5

Default RSASChannel Cryptographic Provider Type 84Default RSA Full Cryptographic Provider Type 84Silent User Keyset Login Password 85
Appendix A: Event Log Error Types 86
Glossary 90
SafeNet ProtectToolkit 5.7 User Guide007-013682-005 Rev. A 08 January 2020 Copyright 2009-2020Gemalto 6
PREFACE: About the SafeNetProtectToolkit-M User Guide
This document provides instructions on installation, configuration, administration, and troubleshooting for theSafeNet ProtectToolkit-M suite of applications. It contains the following chapters:
> "Overview" on page 11
> "Installation" on page 14
> "Setup and Configuration" on page 16
> "Administrative Tasks" on page 33
> "User Tasks" on page 42
> "Administration and User Utilities" on page 46
> "Integration with Microsoft CA" on page 57
> "Known Issues" on page 71
> "Objects, as described by PKCS #11, consist of a number of attributes that define both the object and itsaccess policy. In general, the SafeNet ProtectToolkit-C systemwill define the object’s attributes. Accesspolicy should be provided by the user based on their particular requirements. The following attributedescriptions are intended to assist with these decisions." on page 79
> "IntegrationWith IIS" on page 73
> "Work Load Distribution" on page 81
> "Registry Configuration" on page 82
> "Event Log Error Types" on page 86This preface also includes the following information about this document:
> "Gemalto Rebranding" below
> "Audience" on the next page
> "Document Conventions" on the next page
> "Support Contacts" on page 10
For information regarding the document status and revision history, see "Document Information" on page 2.
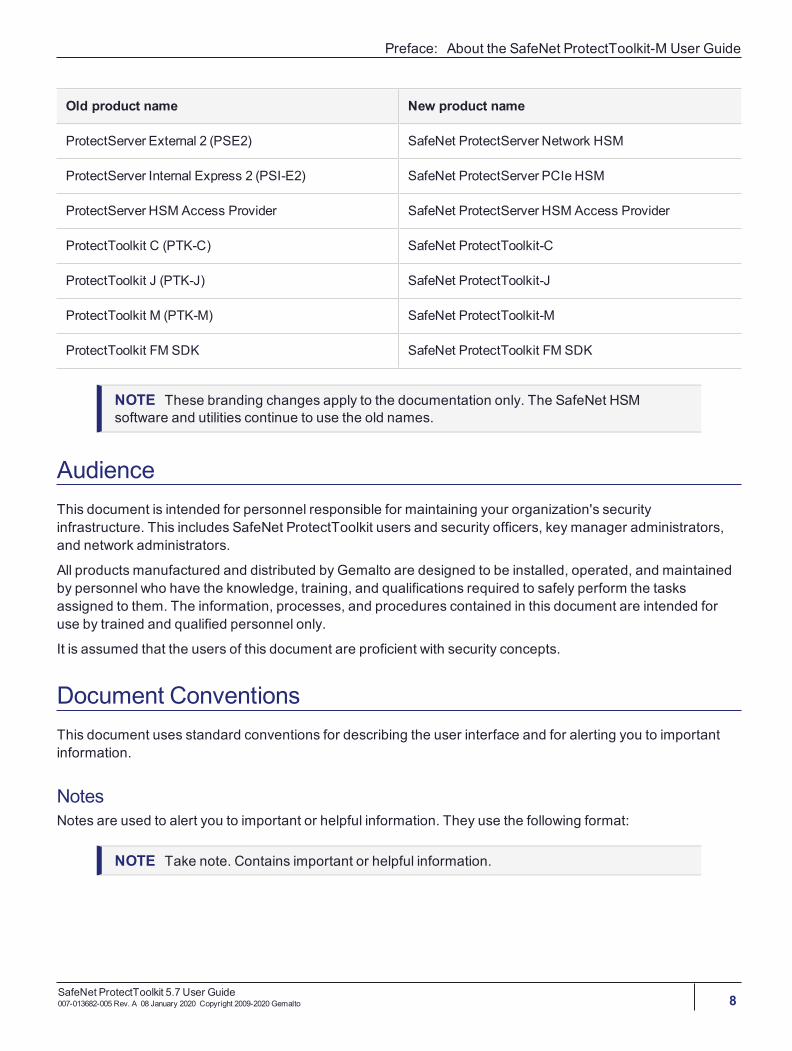
Gemalto RebrandingIn early 2015, Gemalto completed its acquisition of SafeNet, Inc. As part of the process of rationalizing theproduct portfolios between the two organizations, the SafeNet name has been retained. As a result, theproduct names for SafeNet HSMs have changed as follows:
SafeNet ProtectToolkit 5.7 User Guide007-013682-005 Rev. A 08 January 2020 Copyright 2009-2020Gemalto 7
Preface: About the SafeNet ProtectToolkit-M User Guide
Old product name New product name
ProtectServer External 2 (PSE2) SafeNet ProtectServer Network HSM
ProtectServer Internal Express 2 (PSI-E2) SafeNet ProtectServer PCIe HSM
ProtectServer HSM Access Provider SafeNet ProtectServer HSM Access Provider
ProtectToolkit C (PTK-C) SafeNet ProtectToolkit-C
ProtectToolkit J (PTK-J) SafeNet ProtectToolkit-J
ProtectToolkit M (PTK-M) SafeNet ProtectToolkit-M
ProtectToolkit FM SDK SafeNet ProtectToolkit FM SDK
NOTE These branding changes apply to the documentation only. The SafeNet HSMsoftware and utilities continue to use the old names.
AudienceThis document is intended for personnel responsible for maintaining your organization's securityinfrastructure. This includes SafeNet ProtectToolkit users and security officers, key manager administrators,and network administrators.
All products manufactured and distributed by Gemalto are designed to be installed, operated, and maintainedby personnel who have the knowledge, training, and qualifications required to safely perform the tasksassigned to them. The information, processes, and procedures contained in this document are intended foruse by trained and qualified personnel only.
It is assumed that the users of this document are proficient with security concepts.
Document ConventionsThis document uses standard conventions for describing the user interface and for alerting you to importantinformation.
NotesNotes are used to alert you to important or helpful information. They use the following format:
NOTE Take note. Contains important or helpful information.
SafeNet ProtectToolkit 5.7 User Guide007-013682-005 Rev. A 08 January 2020 Copyright 2009-2020Gemalto 8
Preface: About the SafeNet ProtectToolkit-M User Guide
CautionsCautions are used to alert you to important information that may help prevent unexpected results or data loss.They use the following format:
CAUTION! Exercise caution. Contains important information that may help preventunexpected results or data loss.
WarningsWarnings are used to alert you to the potential for catastrophic data loss or personal injury. They use thefollowing format:
**WARNING** Be extremely careful and obey all safety and security measures. Inthis situation you might do something that could result in catastrophic data loss orpersonal injury.
Command Syntax and Typeface Conventions
Format Convention
bold The bold attribute is used to indicate the following:> Command-line commands and options (Type dir /p.)> Button names (Click Save As.)> Check box and radio button names (Select thePrint Duplex check box.)> Dialog box titles (On theProtect Document dialog box, click Yes.)> Field names (User Name:Enter the name of the user.)> Menu names (On the Filemenu, click Save.) (Click Menu > Go To > Folders.)> User input (In theDate box, typeApril 1.)
italics In type, the italic attribute is used for emphasis or to indicate a related document. (See theInstallation Guide for more information.)
<variable> In command descriptions, angle brackets represent variables. Youmust substitute a value forcommand line arguments that are enclosed in angle brackets.
[optional][<optional>]
Represent optional keywords or <variables> in a command line description. Optionally enter thekeyword or <variable> that is enclosed in square brackets, if it is necessary or desirable tocomplete the task.
{a|b|c}{<a>|<b>|<c>}
Represent required alternate keywords or <variables> in a command line description. Youmustchoose one command line argument enclosed within the braces. Choices are separated by vertical(OR) bars.
[a|b|c][<a>|<b>|<c>]
Represent optional alternate keywords or variables in a command line description. Choose onecommand line argument enclosed within the braces, if desired. Choices are separated by vertical(OR) bars.
SafeNet ProtectToolkit 5.7 User Guide007-013682-005 Rev. A 08 January 2020 Copyright 2009-2020Gemalto 9
Preface: About the SafeNet ProtectToolkit-M User Guide
Support ContactsIf you encounter a problem while installing, registering, or operating this product, please refer to thedocumentation before contacting support. If you cannot resolve the issue, contact your supplier or GemaltoCustomer Support.
Gemalto Customer Support operates 24 hours a day, 7 days a week. Your level of access to this service isgoverned by the support plan arrangements made between Gemalto and your organization. Please consultthis support plan for further information about your entitlements, including the hours when telephone support isavailable to you.
Customer Support PortalThe Customer Support Portal, at https://supportportal.gemalto.com, is where you can find solutions for mostcommon problems. The Customer Support Portal is a comprehensive, fully searchable database of supportresources, including software and firmware downloads, release notes listing known problems andworkarounds, a knowledge base, FAQs, product documentation, technical notes, and more. You can also usethe portal to create and manage support cases.
NOTE You require an account to access the Customer Support Portal. To create a newaccount, go to the portal and click on the REGISTER link.
Telephone SupportIf you have an urgent problem, or cannot access the Customer Support Portal, you can contact GemaltoCustomer Support by telephone at +1 410-931-7520. Additional local telephone support numbers are listed onthe support portal.
Email SupportYou can also contact technical support by email at [email protected].
SafeNet ProtectToolkit 5.7 User Guide007-013682-005 Rev. A 08 January 2020 Copyright 2009-2020Gemalto 10
CHAPTER 1: Overview
This section introduces SafeNet ProtectToolkit-M and shows how SafeNet components and terminology applyin the Microsoft Cryptographic API environment.
SafeNet ProtectToolkit-M ApplicationsWith SafeNet ProtectToolkit-M installed, applications that call the Microsoft Cryptographic API (MSCAPI) canmake use of the secure key storage and high-speed cryptographic processing offered by SafeNet hardwaresecurity modules (HSMs).
The Microsoft Cryptographic API (MSCAPI) provides security services for a range of applications, such as web-based SSL processes.
Microsoft Certification Authority (MSCA) and Internet Information Services (IIS) (a Microsoft web server) usethe MSCAPI and therefore may be integrated with SafeNet ProtectToolkit-M. An MSCAmay store CA keys onan HSM, while IISmay use HSM key storage when establishing secure socket layer (SSL) communication.
TheMSCAPI Model and SafeNet ProtectToolkit-M
Cryptographic Service ProvidersSafeNet ProtectToolkit-M is implemented as a Microsoft Cryptographic Service Provider (CSP).
A CSP is a plug-in cryptographic module that integrates with Microsoft Windows and provides the underlyingkey storage and security operations for the Microsoft Cryptographic API (MSCAPI). The architecture of theMSCAPI supports the development of non-Microsoft CSPs such as SafeNet ProtectToolkit-M.
SafeNet ProtectToolkit-M includes both “RSA Full” and “RSASChannel” cryptographic service providers.These can be used instead of the corresponding Microsoft CSPs to provide hardware-based key storage andRSA encryption.
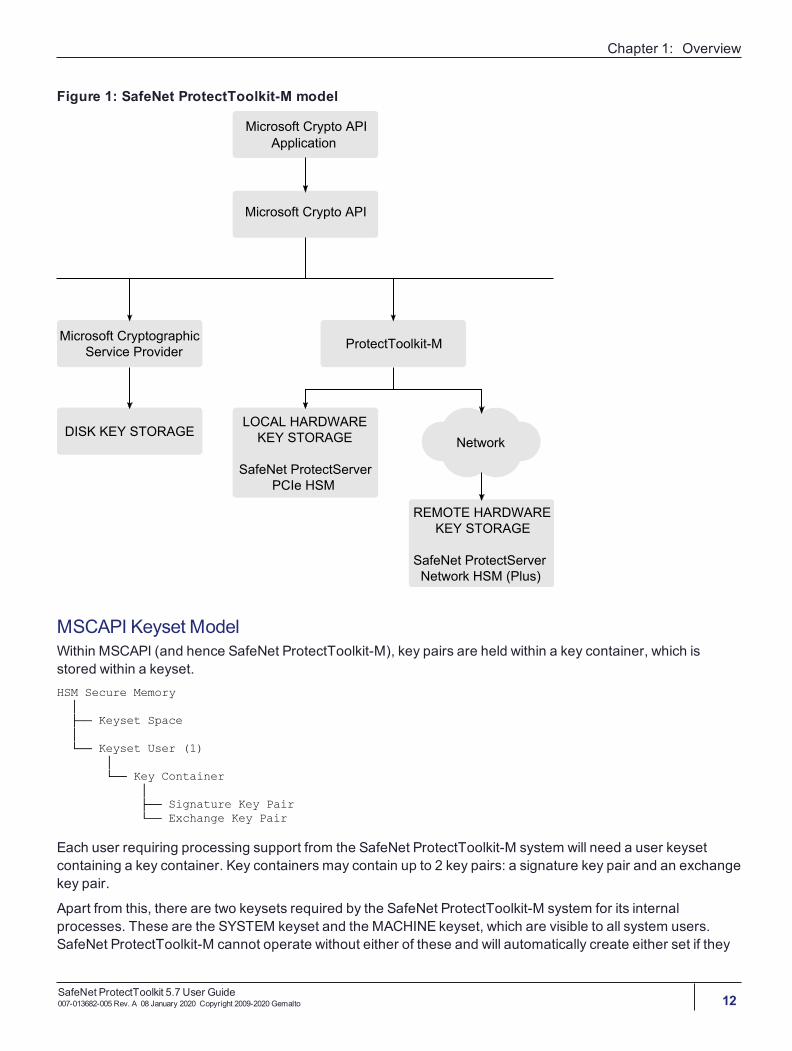
MSCAPI Implementation Using SafeNet ProtectToolkit-M"SafeNet ProtectToolkit-Mmodel" on the next page shows how SafeNet HSMs can be utilized as part of aMSCAPI system, using SafeNet ProtectToolkit-M as a CSP.
SafeNet ProtectToolkit 5.7 User Guide007-013682-005 Rev. A 08 January 2020 Copyright 2009-2020Gemalto 11
Chapter 1: Overview
Figure 1: SafeNet ProtectToolkit-M model
MSCAPI Keyset ModelWithin MSCAPI (and hence SafeNet ProtectToolkit-M), key pairs are held within a key container, which isstored within a keyset.HSM Secure Memory │ ├── Keyset Space │ └── Keyset User (1) │ └── Key Container │ ├── Signature Key Pair └── Exchange Key Pair
Each user requiring processing support from the SafeNet ProtectToolkit-M system will need a user keysetcontaining a key container. Key containers may contain up to 2 key pairs: a signature key pair and an exchangekey pair.
Apart from this, there are two keysets required by the SafeNet ProtectToolkit-M system for its internalprocesses. These are the SYSTEM keyset and the MACHINE keyset, which are visible to all system users.SafeNet ProtectToolkit-M cannot operate without either of these and will automatically create either set if they
SafeNet ProtectToolkit 5.7 User Guide007-013682-005 Rev. A 08 January 2020 Copyright 2009-2020Gemalto 12
Chapter 1: Overview
are not present or deleted. Shared keys (accessible by more than one user), such as those generatedautomatically when Microsoft CA is installed, will also be stored in one of these keysets when using a SafeNetProtectToolkit-M CSP. Generally these shared keys are stored in the MACHINE keyset.
The physical storage location for each keyset is CSP-dependent. By default, Microsoft CSPs store keys to disk,in user profiles. When using the “Safenet RSA Full” or “Safenet RSASChannel” CSPs, all keys are secured bySafeNet ProtectToolkit-M within SafeNet hardware security modules (HSMs).
Further DocumentationThe following reference material should be considered in addition to this user manual:
> SafeNet ProtectServer PCIe HSM Installation Guide
> SafeNet ProtectServer Network HSM Installation/Configuration Guide
> SafeNet HSM Access Provider Installation Guide
> Microsoft documentation on cryptographic service providers. See their web site.
SafeNet ProtectToolkit 5.7 User Guide007-013682-005 Rev. A 08 January 2020 Copyright 2009-2020Gemalto 13
CHAPTER 2: Installation
This section details installation and uninstallation components and instructions on the following:
> SafeNet ProtectToolkit-M Runtime
> SafeNet KSP (for CNG)
RequirementsBefore beginning with the SafeNet ProtectToolkit-M installation, please confirm that your system meets thefollowing minimum requirements:
> Microsoft IIS (Internet Information Services) should be installed, configured and working if integration withIIS is desired.
> ASafeNet ProtectServer hardware security module (HSM) must be available. An adapter can be installed inthe local machine or a device may be made available via a network connection.
Installing the SafeNet ProtectToolkit-M SoftwareIf a previous version of SafeNet ProtectToolkit-M is installed, uninstall it prior to installing the newer software.The latest versions of the client software and HSM firmware can be found on the Gemalto Technical SupportCustomer Portal. See "Support Contacts" on page 10 for more information.
To install the SafeNet ProtectToolkit-M software
NOTE Full support for SafeNet ProtectToolkit-M is provided on 64-bit versions of Windowsonly. 32-bit versions support KSP only.
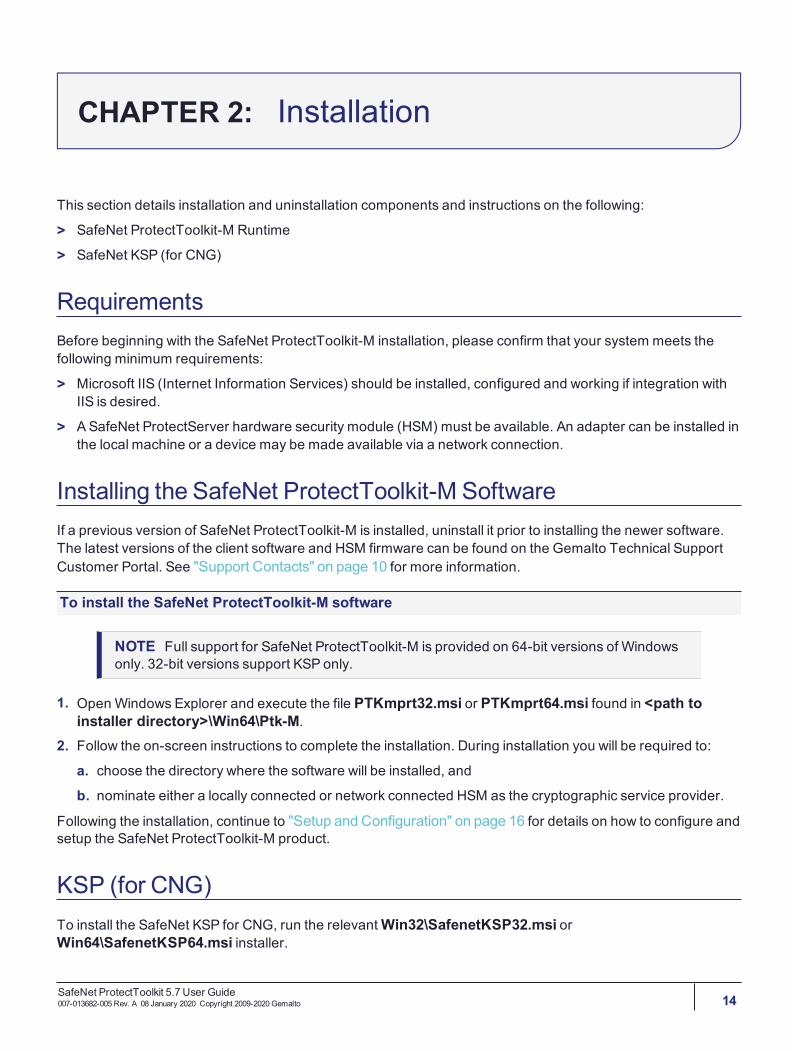
1. Open Windows Explorer and execute the file PTKmprt32.msi or PTKmprt64.msi found in <path toinstaller directory>\Win64\Ptk-M.
2. Follow the on-screen instructions to complete the installation. During installation you will be required to:
a. choose the directory where the software will be installed, andb. nominate either a locally connected or network connected HSM as the cryptographic service provider.
Following the installation, continue to "Setup and Configuration" on page 16 for details on how to configure andsetup the SafeNet ProtectToolkit-M product.
KSP (for CNG)To install the SafeNet KSP for CNG, run the relevantWin32\SafenetKSP32.msi orWin64\SafenetKSP64.msi installer.
SafeNet ProtectToolkit 5.7 User Guide007-013682-005 Rev. A 08 January 2020 Copyright 2009-2020Gemalto 14
Chapter 2: Installation
See special KSP configuration instructions in "KSP (for CNG) Configuration" on page 24.
Uninstalling the SafeNet ProtectToolkit-M softwareTo uninstall the SafeNet ProtectToolkit-M software
1. If the key information stored on the HSM is no longer required, tamper the HSM in order to destroy it. Seethe Tampering the Adapter section for further instructions if needed.
2. If the PCIe HSM access provider is installed, you must uninstall it before uninstalling the SafeNetProtectToolkit-M software. Failure to do so may prevent the SafeNet ProtectToolkit-M software fromuninstalling correctly.
3. Use the Programs and Features control panel to uninstall the SafeNet ProtectToolkit-M software.
SafeNet ProtectToolkit 5.7 User Guide007-013682-005 Rev. A 08 January 2020 Copyright 2009-2020Gemalto 15
CHAPTER 3: Setup and Configuration
After installing SafeNet ProtectToolkit-M it is necessary for the device administrator to:
> initialize the HSM
> set the security mode
> allocate keyset space
> create user keysets (This is optional as users may also create their own keysets)
> setup work load distribution (WLD) if required
After the device administrator has performed the above steps then users will typically need to undertake thefollowing tasks:
> create keysets
> add containers to keysets
> generate key pairs in containers
To perform these tasks follow the procedures described in this section:
> "User Roles" below
> "Initial Configuration: Mandatory Steps" on the next page
> "Allocating Keyset Space" on page 21
> "Configuration Options" on page 23
> "KSP (for CNG) Configuration" on page 24
> "Configuring IIS7 (Win2008) with CNG" on page 26
User RolesPrior to performing any configuration, it is important to understand the different SafeNet ProtectToolkit-M rolesavailable and to determine which type of role an individual will assume.
There are two defined roles available. These are:
> ASafeNet ProtectToolkit-M device administrator; and
> ASafeNet ProtectToolkit-M user
These roles are described below.
Device AdministratorThe device administrator is responsible for tasks that involve management of the associated HSM and thoseapplicable to SafeNet ProtectToolkit-M administration. Those assigned to this role are also responsible forperforming backup and restore operations for MACHINE and SYSTEM keysets and allocation of space for userkeysets.
SafeNet ProtectToolkit 5.7 User Guide007-013682-005 Rev. A 08 January 2020 Copyright 2009-2020Gemalto 16
Chapter 3: Setup and Configuration
UserASafeNet ProtectToolkit-M user is responsible for the creation and management of their own keyset storedwithin a HSM. This includes responsibility for backup and restore of their own keyset, the key container andassociated key pairs.
Initial Configuration: Mandatory Steps
Initializing the HSMSafeNet ProtectToolkit-M uses a hardware encryption HSM to store sensitive key information. The HSM needsto be initialized prior to use, or following a tamper event. A tamper event occurs, for example, if the HSMdetects that someone is trying to get inside the cover. It will then automatically erase its secure memory.
HSM management tasks can only be performed by a device administrator. During HSM initialization, the deviceadministrator password is set, and the HSM clock is synchronized with the host.
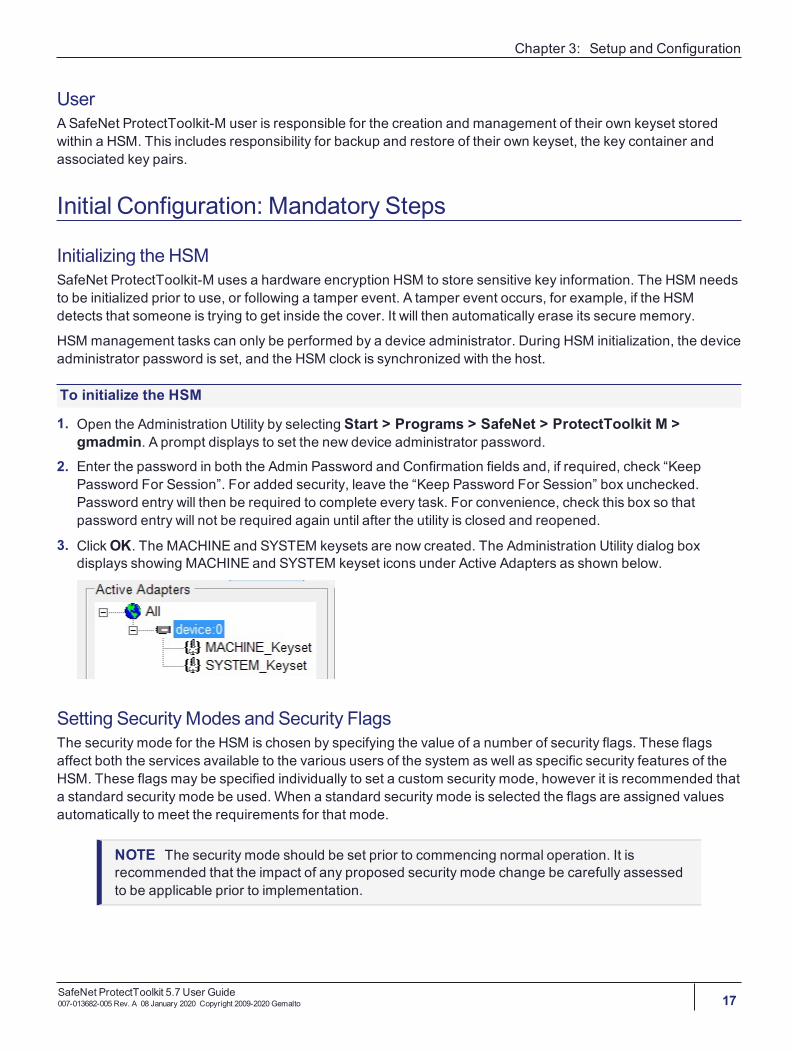
To initialize the HSM
1. Open the Administration Utility by selecting Start > Programs > SafeNet > ProtectToolkit M >gmadmin. A prompt displays to set the new device administrator password.
2. Enter the password in both the Admin Password and Confirmation fields and, if required, check “KeepPassword For Session”. For added security, leave the “Keep Password For Session” box unchecked.Password entry will then be required to complete every task. For convenience, check this box so thatpassword entry will not be required again until after the utility is closed and reopened.
3. ClickOK. The MACHINE and SYSTEM keysets are now created. The Administration Utility dialog boxdisplays showing MACHINE and SYSTEM keyset icons under Active Adapters as shown below.
Setting Security Modes and Security FlagsThe security mode for the HSM is chosen by specifying the value of a number of security flags. These flagsaffect both the services available to the various users of the system as well as specific security features of theHSM. These flags may be specified individually to set a custom security mode, however it is recommended thata standard security mode be used. When a standard security mode is selected the flags are assigned valuesautomatically to meet the requirements for that mode.
NOTE The security mode should be set prior to commencing normal operation. It isrecommended that the impact of any proposed security mode change be carefully assessedto be applicable prior to implementation.
SafeNet ProtectToolkit 5.7 User Guide007-013682-005 Rev. A 08 January 2020 Copyright 2009-2020Gemalto 17
Chapter 3: Setup and Configuration
To set a security mode
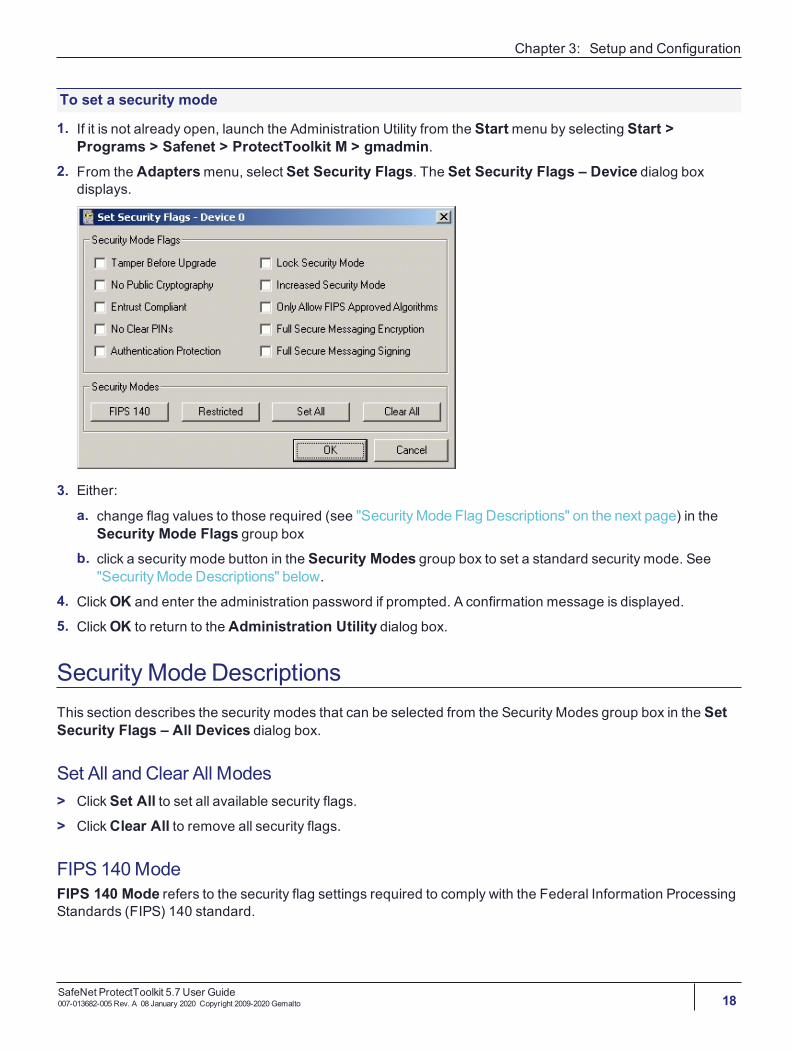
1. If it is not already open, launch the Administration Utility from the Startmenu by selecting Start >Programs > Safenet > ProtectToolkit M > gmadmin.
2. From the Adaptersmenu, select Set Security Flags. The Set Security Flags – Device dialog boxdisplays.
3. Either:a. change flag values to those required (see "SecurityMode Flag Descriptions" on the next page) in the
Security Mode Flags group boxb. click a security mode button in the Security Modes group box to set a standard security mode. See
"SecurityMode Descriptions" below.4. ClickOK and enter the administration password if prompted. A confirmation message is displayed.
5. ClickOK to return to the Administration Utility dialog box.
Security Mode DescriptionsThis section describes the security modes that can be selected from the Security Modes group box in the SetSecurity Flags – All Devices dialog box.
Set All and Clear All Modes> Click Set All to set all available security flags.> ClickClear All to remove all security flags.
FIPS 140ModeFIPS 140 Mode refers to the security flag settings required to comply with the Federal Information ProcessingStandards (FIPS) 140 standard.
SafeNet ProtectToolkit 5.7 User Guide007-013682-005 Rev. A 08 January 2020 Copyright 2009-2020Gemalto 18
Chapter 3: Setup and Configuration
It is important to note that the product can function outside the scope of this accreditation. Therefore, ensurethat the correct configuration is set if this level of FIPS secure operation is required.
The security mode flags set in FIPS 140 mode are shown in the table below.
RestrictedModeThe Restricted Mode security setting is a compromise between performance and security. If Restricted Modeis selected, then the HSM will require all users to identify themselves before cryptographic services areavailable. This mode also inhibits any clear PINs or sensitive key material from passing through the HSM’sPCIe bus interface but each individual request to the HSM does not need to be signed.
The security mode flags set in Restricted Mode are shown in the table below.
Security Mode Preconfigured Flag SettingsWhen the FIPS or Restricted security mode buttons are clicked in the Set Security – All Devices dialogbox, the status of the flags is changed as shown in the table below (default values). Those settings marked withan asterisk (*) are mandatory in order to implement the requirements for the mode concerned. Additional flags,marked with a plus (+), can be changed if required. See "SecurityMode Flag Descriptions" below.
Flag FIPS 140 Mode Restricted Mode
Tamper Before Upgrade. Set* Cleared+
No Public Cryptography Set* Set*
Entrust Compliant Cleared* Cleared*
No Clear PINs Set* Set*
Authentication Protection Set* Cleared*
Lock Security Mode Set* Set*
Increased Security Mode Cleared+ Cleared+
Only Allow FIPS Approved Algorithms. Set* Cleared*
Full SecureMessaging Encryption Cleared+ Cleared+
Full SecureMessaging Signing Cleared+ Cleared*
Security Mode Flag Descriptions
Tamper Before UpgradeWhen this flag is set, the HSM will automatically perform a soft tamper (erase all internal secure memory) aspart of a firmware upgrade, FM download, or FM disable operation.
SafeNet ProtectToolkit 5.7 User Guide007-013682-005 Rev. A 08 January 2020 Copyright 2009-2020Gemalto 19
Chapter 3: Setup and Configuration
NoPublic CryptographyWhen this flag is set, no user can perform a cryptographic operation without having authenticated themselves.
When this flag is set, each token in the system will have the PKCS #11 CKF_LOGIN_REQUIRED flag set, toindicate that applications must authenticate before operations. This security flag does not affect the Admintoken, which always requires authentication for use.
NOTE This setting does not impede the ability to perform RSA or other public keyprocessing. It ensures that crypto services cannot be performed by unauthenticated users.
Entrust CompliantWhen this flag is set, Entrust Compliant Mode is operational, ensuring compatibility with the Entrust range ofapplications. These applications require a specific security profile to operate correctly.
NoClear PINsWhen this flag is set, no user PINs or other sensitive information may be passed across the host interface in anunencrypted form. This enables secure messaging encryption between applications and the HSM. It will alsodisable certain functions that would otherwise result in the clear transmission of sensitive data. This flag willalso not allow any keys to be created with the attribute CKA_SENSITIVE=FALSE.
Authentication ProtectionThis flag, when set, enforces secure messaging authentication between applications and the HSM. Eachrequest to the HSM must be digitally signed and will be verified by the HSM. The key used for this signingprocess is derived from a key shared by the HSM and host application as well as the user PIN.
Applications will operate in a more secure manner with this flag set, but HSM performance will suffer due to theadditional operations required to sign each request and response message.
Lock Security ModeThe Lock Security Mode flag, when set, disables further modification of the security mode flag settings. Onceset, this flag (or any other security mode flag) cannot be modified. A new security mode can only beimplemented after a tamper operation is performed.
Increased Security LevelThe Increased Security Level flag, when set, disables the mechanism CKM_EXTRACT_KEY_FROM_KEY andalso does not allow the CKA_MODIFIABLE attribute to be changed from False to True.
Only Allow FIPSApproved AlgorithmsThe Only Allow FIPSApproved Algorithms flag, when set, disables the following non-FIPS-approvedalgorithms: MD2, MD5, RIPE, CAST, IDEA, RC2, RC4 and RC5.
SafeNet ProtectToolkit 5.7 User Guide007-013682-005 Rev. A 08 January 2020 Copyright 2009-2020Gemalto 20
Chapter 3: Setup and Configuration
Full SecureMessaging EncryptionThe Full Secure Messaging Encryption flag is similar to the No Clear PINs flag, except that every message isencrypted in both directions between the application and the HSM. The key used for the message encryption isgenerated using the PKCS#3 Diffie-Hellman Key Agreement Standard.
This flag only performs two-way encryption when using the SafeNet ProtectToolkit-M client library in theclient/server mode over TCP/IP.
Applications will operate in a more secure manner with this flag set, but HSM performance will suffer due to theadditional operations required to sign each request and response message.
Full SecureMessaging SigningThe Full Secure Messaging Encryption flag is similar to the Authentication Protection flag, except that everyrequest in both directions between the application and the HSM is digitally signed and verified. The key usedfor the message encryption is generated using the PKCS#3 Diffie-Hellman Key Agreement Standard.
This flag only performs two-way encryption when using the SafeNet ProtectToolkit-M client library in theclient/server mode over TCP/IP. Applications will operate in a more secure manner with this flag set, but HSMperformance will suffer due to the additional operations required to sign each request and response message.
Allocating Keyset SpaceIn order for applications to use SafeNet ProtectToolkit-M's key storage facilities, keyset space must beallocated on the HSM. Enough space should be allocated to accommodate the number of users requiring keystorage.
Allocation of keyset space is the responsibility of the device administrator and is performed using the SafeNetProtectToolkit-M administration utility.
NOTE It is important to determine howmany key sets may be needed over time and toallocate sufficient space so that additional key sets can be created without the need for aserver shutdown.
To allocate keyset space
1. Launch the Administration Utility from the Start menu by selecting Start > Programs > SafeNet >ProtectToolkit M > gtadmin.
2. Select the device on which to create keyset space from the Active Adapters list.3. Open the Adaptermenu and choose Allocate Space.
The Administration Utility prompts for the device administrator password.
Following correct password entry, the new keyset space is displayed under the device as shown below.
SafeNet ProtectToolkit 5.7 User Guide007-013682-005 Rev. A 08 January 2020 Copyright 2009-2020Gemalto 21
Chapter 3: Setup and Configuration
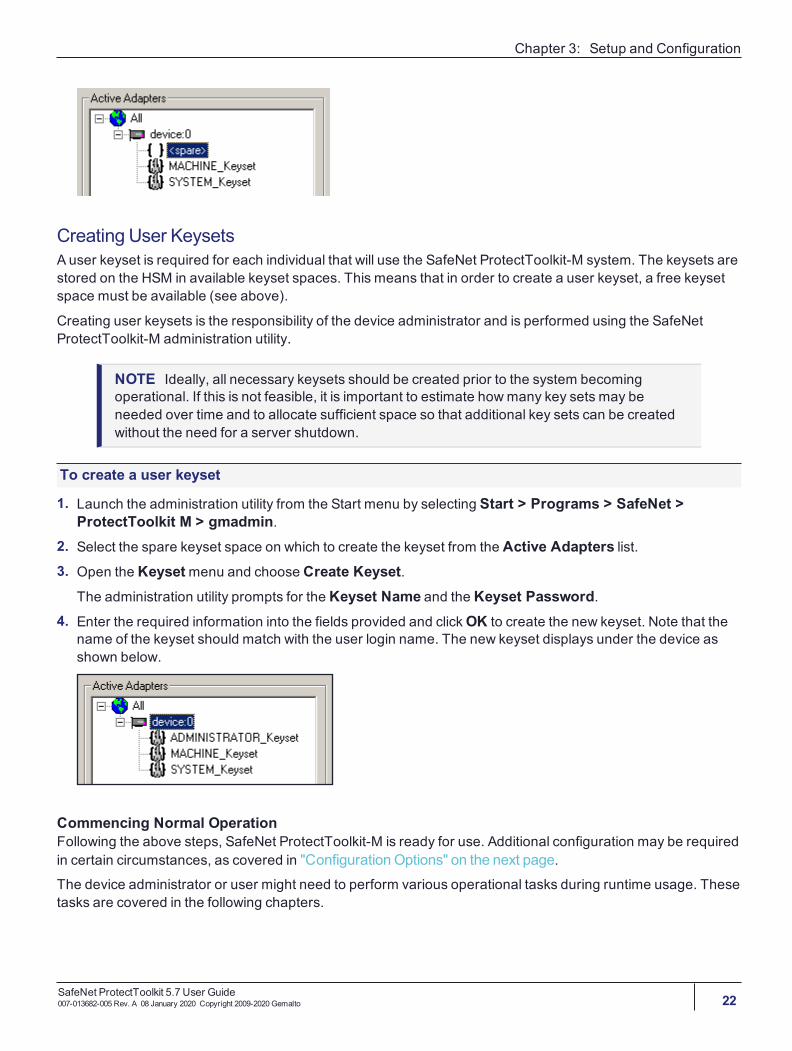
Creating User KeysetsA user keyset is required for each individual that will use the SafeNet ProtectToolkit-M system. The keysets arestored on the HSM in available keyset spaces. This means that in order to create a user keyset, a free keysetspace must be available (see above).
Creating user keysets is the responsibility of the device administrator and is performed using the SafeNetProtectToolkit-M administration utility.
NOTE Ideally, all necessary keysets should be created prior to the system becomingoperational. If this is not feasible, it is important to estimate howmany key sets may beneeded over time and to allocate sufficient space so that additional key sets can be createdwithout the need for a server shutdown.
To create a user keyset
1. Launch the administration utility from the Start menu by selecting Start > Programs > SafeNet >ProtectToolkit M > gmadmin.
2. Select the spare keyset space on which to create the keyset from the Active Adapters list.3. Open the Keysetmenu and choose Create Keyset.
The administration utility prompts for the Keyset Name and the Keyset Password.4. Enter the required information into the fields provided and clickOK to create the new keyset. Note that the
name of the keyset should match with the user login name. The new keyset displays under the device asshown below.
Commencing Normal OperationFollowing the above steps, SafeNet ProtectToolkit-M is ready for use. Additional configuration may be requiredin certain circumstances, as covered in "Configuration Options" on the next page.The device administrator or user might need to perform various operational tasks during runtime usage. Thesetasks are covered in the following chapters.
SafeNet ProtectToolkit 5.7 User Guide007-013682-005 Rev. A 08 January 2020 Copyright 2009-2020Gemalto 22
Chapter 3: Setup and Configuration
Configuration Options
Registry ConfigurationEntries made in the Windows registry during the installation of SafeNet ProtectToolkit-M are documented in"Registry Configuration" on page 82. These may be amended by expert users if required. Generally, thedefault values will not need to be changed. The exceptions are the Debug Level and User Keyset Passwordentries used to control error log file creation and silent user keyset login respectively. See the sections belowfor further information.
Error Log File CreationThe Debug Level registry key controls error log file creation. By default, the value of this key is set so that noerror log file is produced. Should it be necessary to create an error log file, see "debugLevel" on page 83 formore options.
Silent User Keyset LoginWhile access to the Machine and System keysets is open, access to a User keyset requires authentication.
Typically, User keyset access authentication is achieved by prompting the user for a password when access isrequested. This is not convenient/permissible in all situations, so silent user keyset login is also available.
To activate silent User keyset login
Add the following value to the Windows registry:HKEY_CURRENT_USER/Software/Safenet/ProtectToolkit M/UserKeysetPassword=<password>
where <password> is the clear text password for the User keyset.
Since this value is located in the Current Users registry hive (which is only accessible/visible when a userauthenticates themselves to the Windows operating system) there is no security risk, even though thepassword is stored in the clear.
Work Load Distribution (WLD)If required, more than one hardware security module (HSM) can be used in a Work Load Distribution (WLD)configuration.
WLD allows work to be balanced across a system by transferring units of work among HSM processingmodules during execution, reducing the demand on any particular processing module. This produces anincrease in the system's overall throughput of processing tasks. Using multiple HSMs in this way also providesredundancy. If an HSM goes down, the work will automatically be shared amongst the remaining operationalHSMs.
For further information, including implementation and maintenance instructions, refer to "Work LoadDistribution" on page 81.
SafeNet ProtectToolkit 5.7 User Guide007-013682-005 Rev. A 08 January 2020 Copyright 2009-2020Gemalto 23
Chapter 3: Setup and Configuration
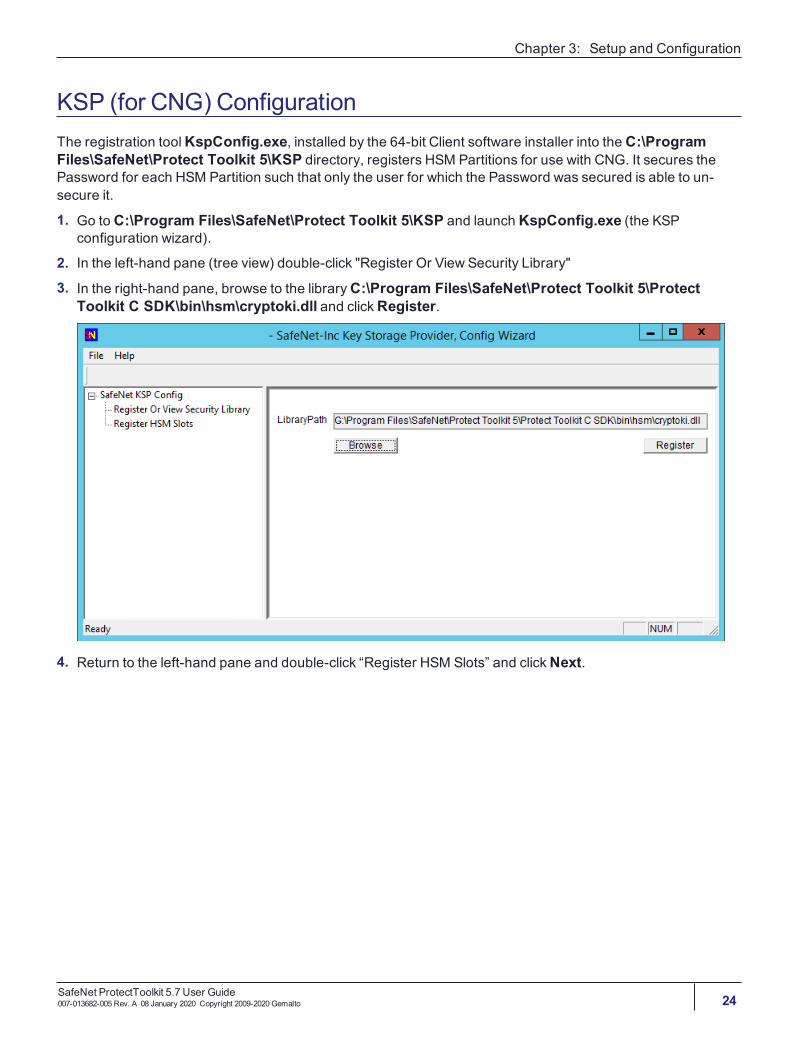
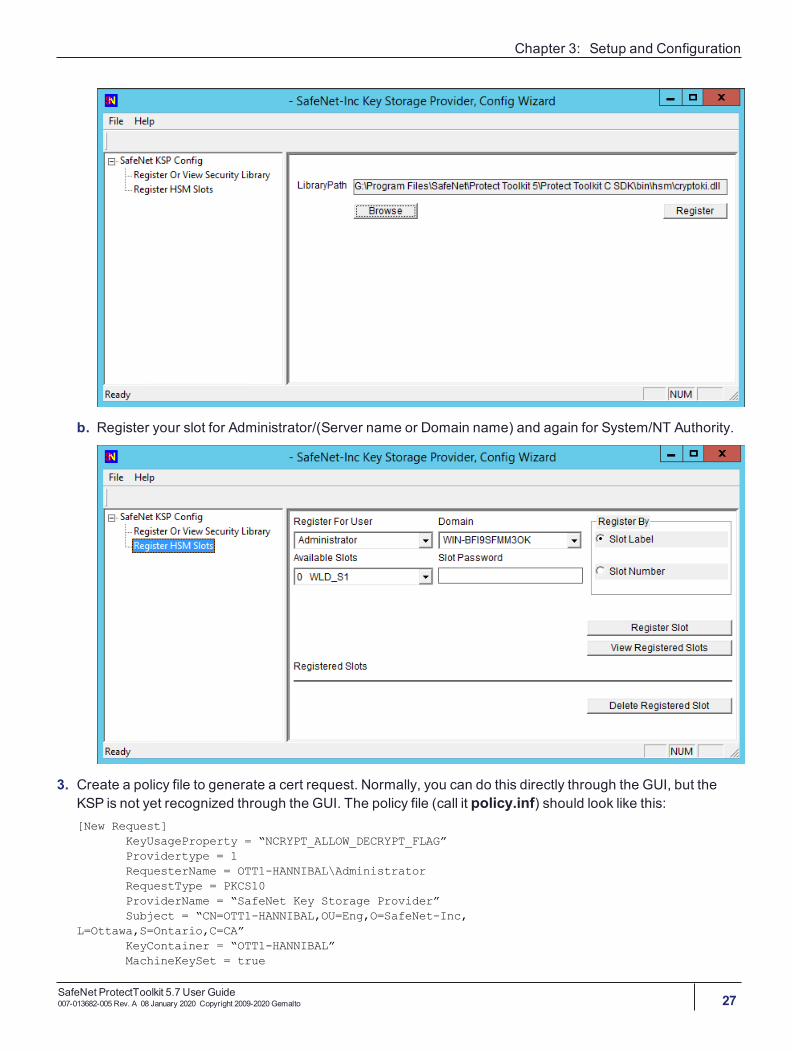
KSP (for CNG) ConfigurationThe registration toolKspConfig.exe, installed by the 64-bit Client software installer into the C:\ProgramFiles\SafeNet\Protect Toolkit 5\KSP directory, registers HSM Partitions for use with CNG. It secures thePassword for each HSM Partition such that only the user for which the Password was secured is able to un-secure it.
1. Go to C:\Program Files\SafeNet\Protect Toolkit 5\KSP and launch KspConfig.exe (the KSPconfiguration wizard).
2. In the left-hand pane (tree view) double-click "Register Or View Security Library"
3. In the right-hand pane, browse to the libraryC:\Program Files\SafeNet\Protect Toolkit 5\ProtectToolkit C SDK\bin\hsm\cryptoki.dll and click Register.
4. Return to the left-hand pane and double-click “Register HSM Slots” and clickNext.
SafeNet ProtectToolkit 5.7 User Guide007-013682-005 Rev. A 08 January 2020 Copyright 2009-2020Gemalto 24
Chapter 3: Setup and Configuration
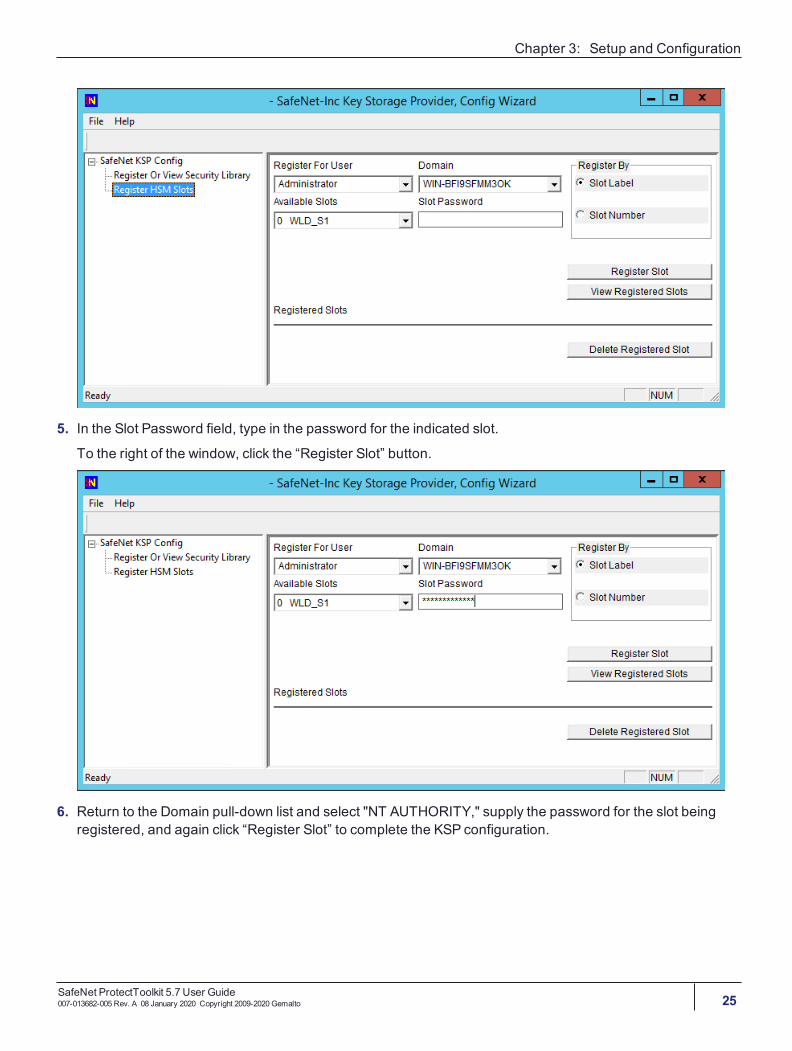
5. In the Slot Password field, type in the password for the indicated slot.To the right of the window, click the “Register Slot” button.
6. Return to the Domain pull-down list and select "NT AUTHORITY," supply the password for the slot beingregistered, and again click “Register Slot” to complete the KSP configuration.
SafeNet ProtectToolkit 5.7 User Guide007-013682-005 Rev. A 08 January 2020 Copyright 2009-2020Gemalto 25
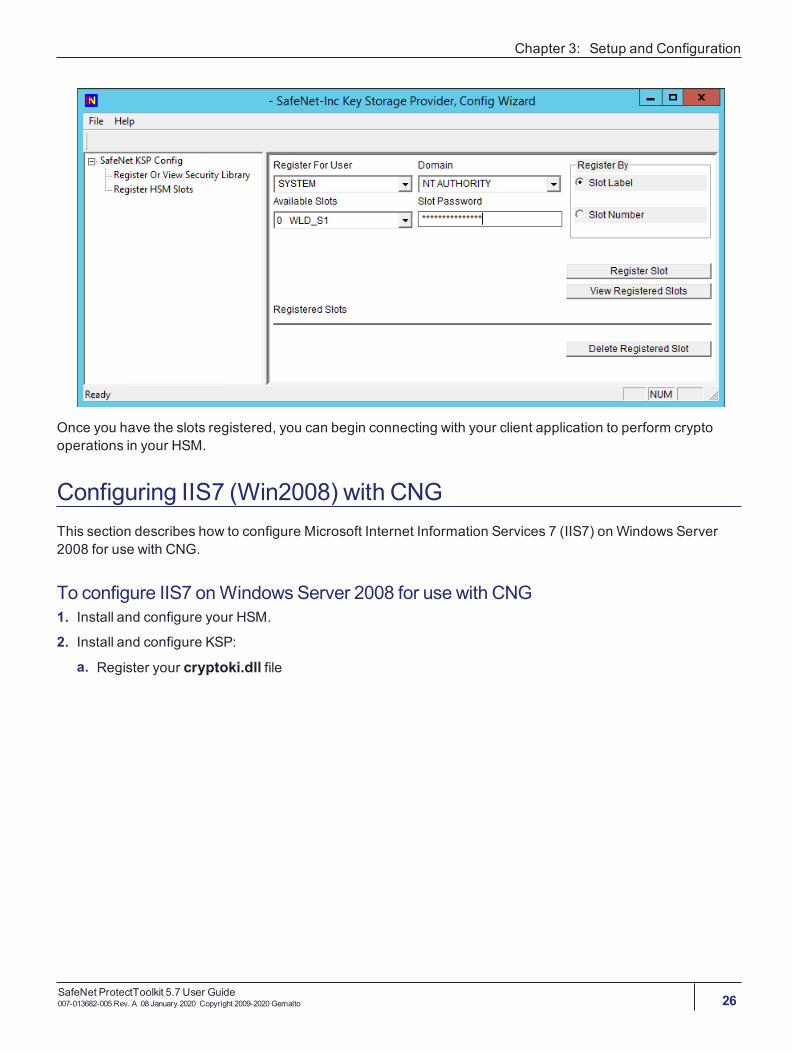
Chapter 3: Setup and Configuration
Once you have the slots registered, you can begin connecting with your client application to perform cryptooperations in your HSM.
Configuring IIS7 (Win2008) with CNGThis section describes how to configure Microsoft Internet Information Services 7 (IIS7) on Windows Server2008 for use with CNG.
To configure IIS7 onWindows Server 2008 for use with CNG1. Install and configure your HSM.2. Install and configure KSP:
a. Register your cryptoki.dll file
SafeNet ProtectToolkit 5.7 User Guide007-013682-005 Rev. A 08 January 2020 Copyright 2009-2020Gemalto 26
Chapter 3: Setup and Configuration
b. Register your slot for Administrator/(Server name or Domain name) and again for System/NT Authority.
3. Create a policy file to generate a cert request. Normally, you can do this directly through the GUI, but theKSP is not yet recognized through the GUI. The policy file (call it policy.inf) should look like this:[New Request]
KeyUsageProperty = “NCRYPT_ALLOW_DECRYPT_FLAG”Providertype = 1RequesterName = OTT1-HANNIBAL\AdministratorRequestType = PKCS10ProviderName = “SafeNet Key Storage Provider”Subject = “CN=OTT1-HANNIBAL,OU=Eng,O=SafeNet-Inc,
L=Ottawa,S=Ontario,C=CA”KeyContainer = “OTT1-HANNIBAL”MachineKeySet = true
SafeNet ProtectToolkit 5.7 User Guide007-013682-005 Rev. A 08 January 2020 Copyright 2009-2020Gemalto 27
Chapter 3: Setup and Configuration
HashAlgorithm = sha1KeyAlgorithm = RSAKeyLength = 2048
4. Using the above file, create your cert request:C:\>certreq -new policy.inf cert.req
5. Submit your cert request to a CA and obtain a signed cert, and the root cert of the CA. Move thesecertificates to your IIS server.
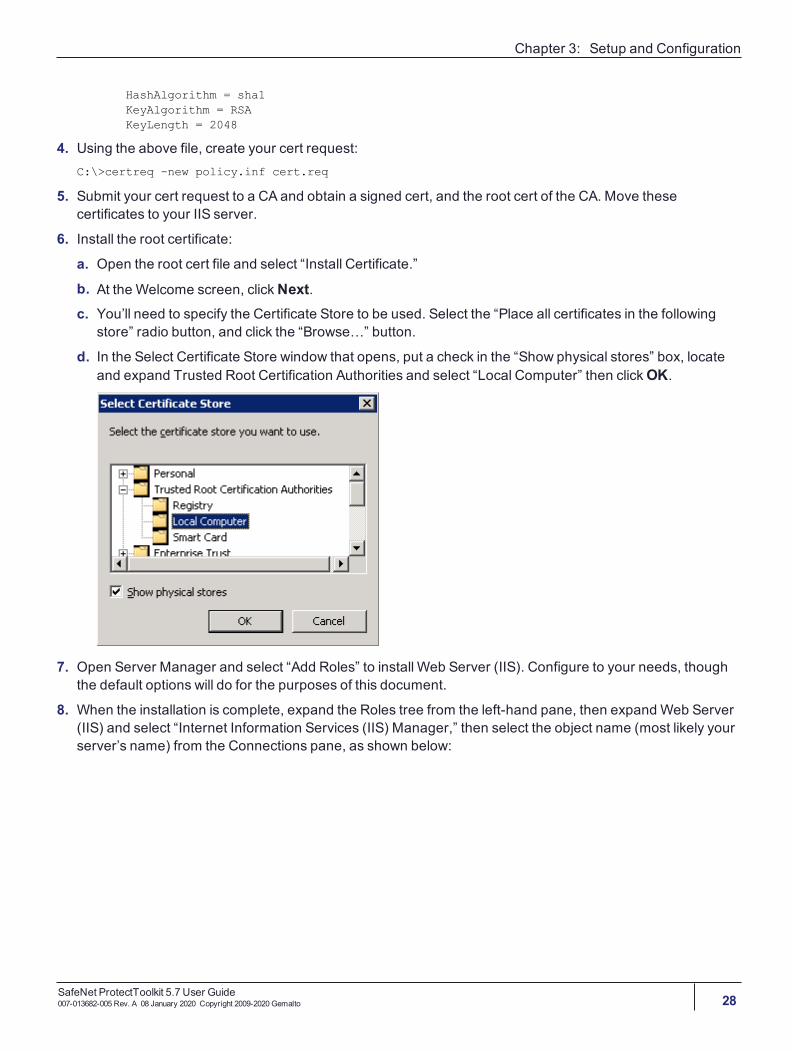
6. Install the root certificate:a. Open the root cert file and select “Install Certificate.”b. At the Welcome screen, clickNext.c. You’ll need to specify the Certificate Store to be used. Select the “Place all certificates in the following
store” radio button, and click the “Browse…” button.
d. In the Select Certificate Store window that opens, put a check in the “Show physical stores” box, locateand expand Trusted Root Certification Authorities and select “Local Computer” then clickOK.
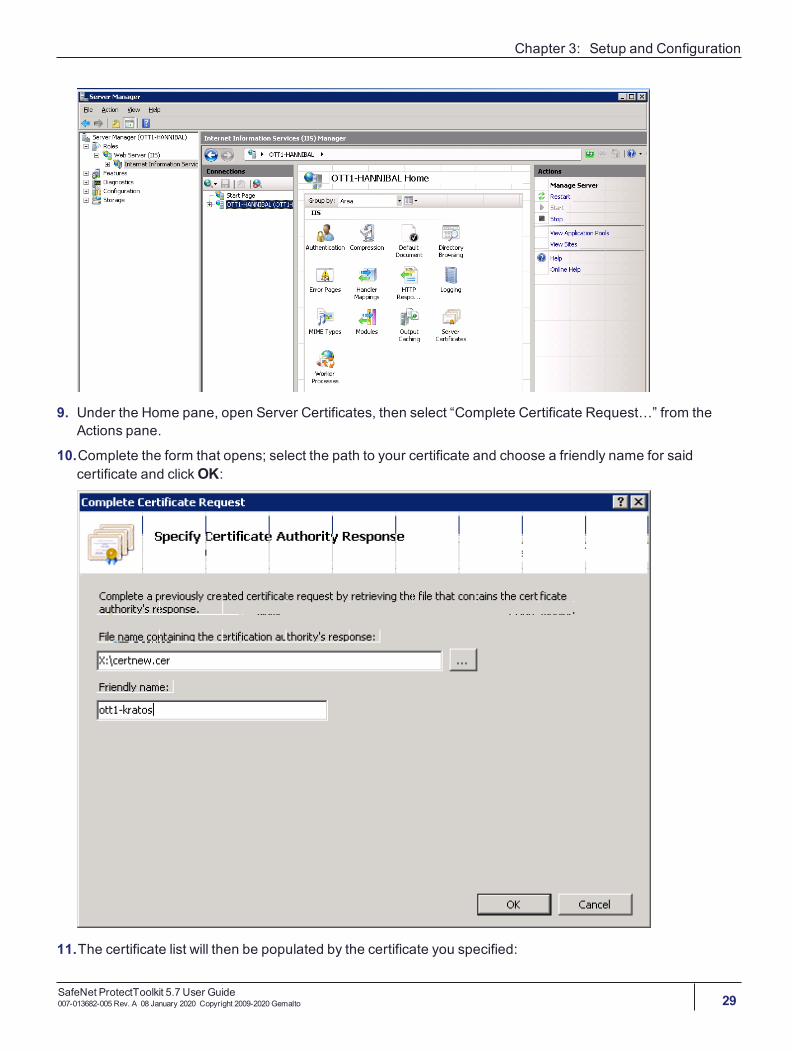
7. Open Server Manager and select “Add Roles” to install Web Server (IIS). Configure to your needs, thoughthe default options will do for the purposes of this document.
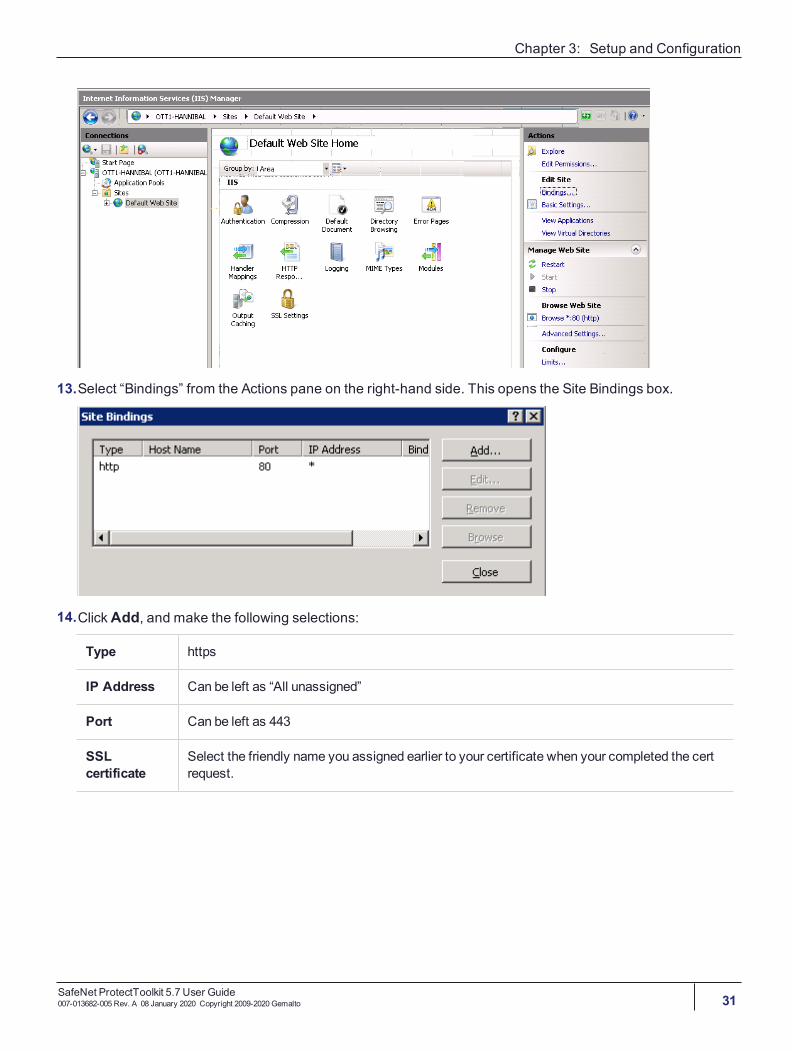
8. When the installation is complete, expand the Roles tree from the left-hand pane, then expand Web Server(IIS) and select “Internet Information Services (IIS) Manager,” then select the object name (most likely yourserver’s name) from the Connections pane, as shown below:
SafeNet ProtectToolkit 5.7 User Guide007-013682-005 Rev. A 08 January 2020 Copyright 2009-2020Gemalto 28
Chapter 3: Setup and Configuration
9. Under the Home pane, open Server Certificates, then select “Complete Certificate Request…” from theActions pane.
10.Complete the form that opens; select the path to your certificate and choose a friendly name for saidcertificate and clickOK:
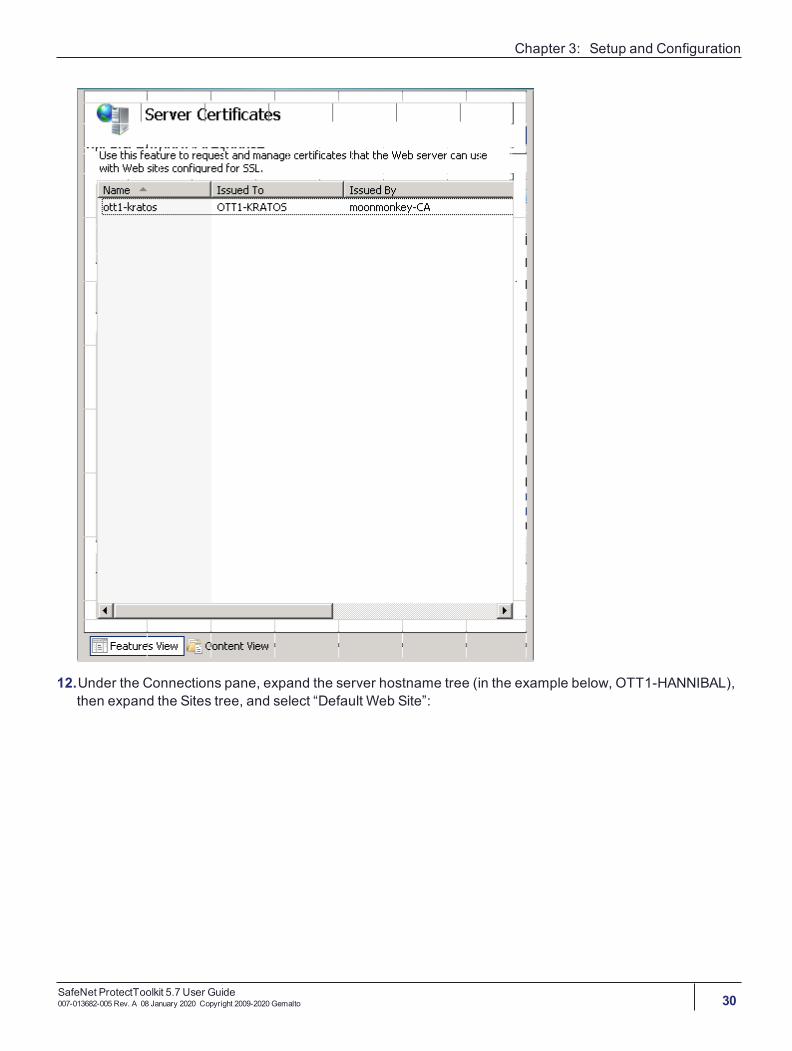
11.The certificate list will then be populated by the certificate you specified:
SafeNet ProtectToolkit 5.7 User Guide007-013682-005 Rev. A 08 January 2020 Copyright 2009-2020Gemalto 29
Chapter 3: Setup and Configuration
12.Under the Connections pane, expand the server hostname tree (in the example below, OTT1-HANNIBAL),then expand the Sites tree, and select “Default Web Site”:
SafeNet ProtectToolkit 5.7 User Guide007-013682-005 Rev. A 08 January 2020 Copyright 2009-2020Gemalto 30
Chapter 3: Setup and Configuration
13.Select “Bindings” from the Actions pane on the right-hand side. This opens the Site Bindings box.
14.ClickAdd, and make the following selections:
Type https
IP Address Can be left as “All unassigned”
Port Can be left as 443
SSLcertificate
Select the friendly name you assigned earlier to your certificate when your completed the certrequest.
SafeNet ProtectToolkit 5.7 User Guide007-013682-005 Rev. A 08 January 2020 Copyright 2009-2020Gemalto 31
Chapter 3: Setup and Configuration
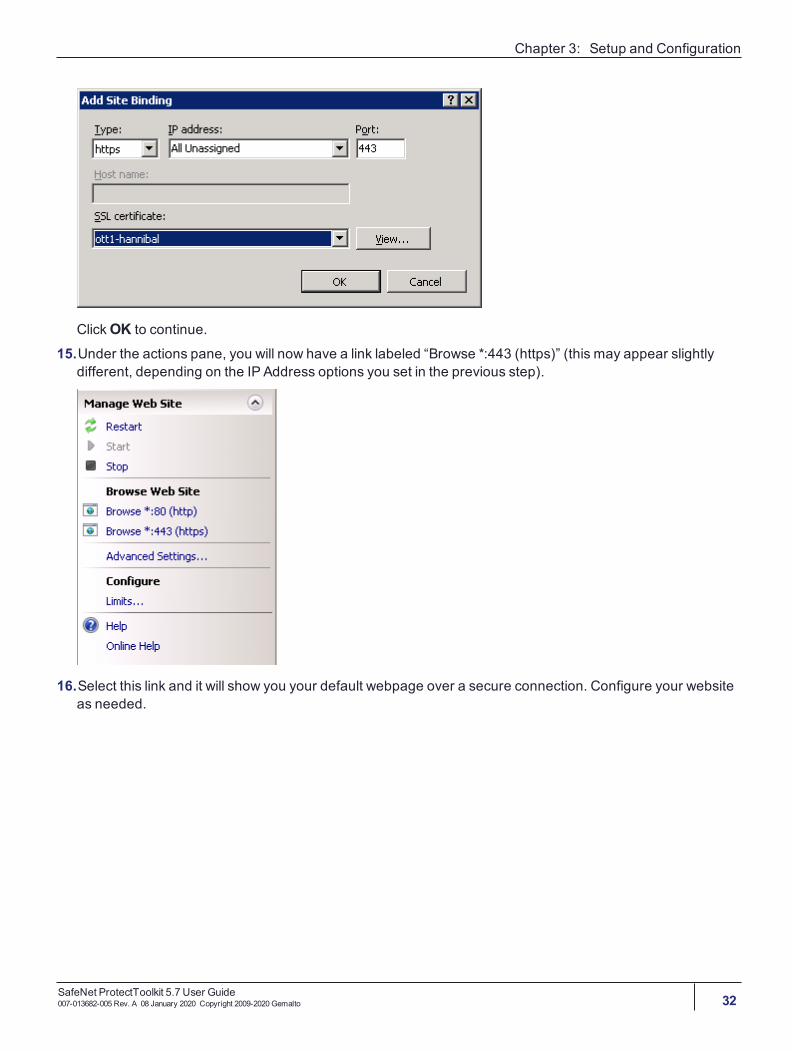
ClickOK to continue.
15.Under the actions pane, you will now have a link labeled “Browse *:443 (https)” (this may appear slightlydifferent, depending on the IP Address options you set in the previous step).
16.Select this link and it will show you your default webpage over a secure connection. Configure your websiteas needed.
SafeNet ProtectToolkit 5.7 User Guide007-013682-005 Rev. A 08 January 2020 Copyright 2009-2020Gemalto 32
CHAPTER 4: Administrative Tasks
This section describes the operational procedures a device administrator may perform during normal SafeNetProtectToolkit-M operation. It contains:
> "Changing the Device Administrator Password" below
> "Allocating Keyset Space" on the next page
> "De-allocating Keyset Space" on the next page
> "Creating User Keysets" on page 35
> "Deleting a Keyset" on page 35
> "Setting the Adapter Transport Mode" on page 36
> "Correcting ClockDrift " on page 37
> "Viewing and Purging the HSMEvent Log" on page 37
> "Checking and Upgrading HSMFirmware" on page 38
> "Tampering the HSM" on page 39
> "Backing up a Keyset" on page 39
> "Restoring a Keyset" on page 40
> "Enabling Private KeyClear Export" on page 40
Changing the Device Administrator PasswordThe device administrator can perform a password change at any time and on any token.
Changing the device administrator password may only be performed by the device administrator, using theSafeNet ProtectToolkit-M administration utility.
To change the device administrator password
1. Launch the administration utility from the Startmenu by selecting Start > Programs > SafeNet >ProtectToolkit M > gmadmin.
2. Select the device on which to change the device administrator password from the Active Adapters list.3. Open the Adaptermenu and choose Change Device Admin Password.4. The administration utility will now prompt for the current and new device administrator password.
NOTE Any existing backups of the MACHINE and SYSTEM keysets will no longer be usefulfollowing a device administrator password change, because the backup key is generatedfrom the password. New backups must be created after changing the password.
SafeNet ProtectToolkit 5.7 User Guide007-013682-005 Rev. A 08 January 2020 Copyright 2009-2020Gemalto 33
Chapter 4: Administrative Tasks
Allocating Keyset SpaceWhen additional user keysets are required, the system will need to be configured for additional keyset space.The number of allocated keyset spaces determines howmany separate SafeNet ProtectToolkit-M users, andkeysets, the system can have.
Allocation of keyset space is the responsibility of the device administrator and is performed using the SafeNetProtectToolkit-M administration utility.
To allocate keyset space
1. If it is not already open, launch the administration utility from the Startmenu by selecting Start >Programs > SafeNet > ProtectToolkit M > gmadmin.
2. Select the device on which to create keyset space from the Active Adapters list.3. Open the Adaptermenu and selectAllocate Space.4. The administration utility will now prompt for the device administrator password.
5. Following correct password entry, the new keyset space will be displayed under the device.
NOTE Additional keyset space cannot be allocated if an application is currently usingSafeNet ProtectToolkit-M. See Session Exists Error in "Known Issues" on page 71.
To check if an application has any open sessions to SafeNet ProtectToolkit-M, check the value shown next toApplication Count in the System section of the administration utility. This will need to be “1”, and the TotalSession Count must be “0” in order for keyset de-allocation to succeed.
NOTE If the value of Application Count is shown as “UNAVAILABLE”, your HSM firmwaredoesn’t support live application counting. In such a case, it is advisable to upgrade the HSMfirmware to the latest version. Please refer to "Checking and Upgrading HSMFirmware" onpage 38.
De-allocating Keyset SpaceIf there are keyset spaces which are not likely to be used, it is good practice to de-allocate spare spaces fromthe HSM in order to prevent memory exhaustion or invalid use.
De-allocation of keyset space is the responsibility of the device administrator and is performed using theSafeNet ProtectToolkit-M administration utility.
To de-allocate keyset space
1. Launch the administration utility from the Start menu by selecting Start > Programs > SafeNet >ProtectToolkit M > gmadmin.
2. Select any spare space from the Active Adapters list.3. Open the Keysetmenu and choose Deallocate Space.4. The administration utility will now prompt for the device administrator password.
SafeNet ProtectToolkit 5.7 User Guide007-013682-005 Rev. A 08 January 2020 Copyright 2009-2020Gemalto 34
Chapter 4: Administrative Tasks
5. Following correct password entry, the spare keyset space will be removed from the list of displayed keysets.
NOTE Keyset space cannot be de-allocated if an application is currently using SafeNetProtectToolkit-M. See Session Exists Error in "Known Issues" on page 71.
To check if an application has any open sessions to SafeNet ProtectToolkit-M, check the value shown next toApplication Count in the System section of the administration utility. This will need to be “1”, and the TotalSession Count must be “0” in order for keyset de-allocation to succeed.
NOTE If the value of Application Count is shown as “UNAVAILABLE”, your HSM firmwaredoesn’t support live application counting. In such a case, it is advisable to upgrade the HSMfirmware to the latest version. Please refer to "Checking and Upgrading HSMFirmware" onpage 38.
Creating User KeysetsIn order to create a new keyset for a specific user, you will first have to make sure that there is spare keysetspace available on the HSM. This can be done by opening the SafeNet ProtectToolkit-M administration utility.
Should no spare space be available, you will have to allocate additional keyset space on the HSM. For details,please refer to the appropriate section above.
NOTE Users can create keysets for themselves once space is available.
To create a user keyset
1. Launch the administration utility from the Start menu by selecting Start > Programs > SafeNet >ProtectToolkit M > gmadmin.
2. Select the spare keyset space on which to create the keyset from the Active Adapters list.
3. Open the Keyset menu and choose “Create Keyset.”4. The administration utility will now prompt for the Keyset Name and the Keyset Password. Enter the required
information into the fields provided and press OK to create the new keyset.
NOTE The name of the keyset should match with the user login name.
The new keyset is displayed under the device.
Deleting a KeysetDeleting user keysets is the responsibility of the device administrator and is performed using the SafeNetProtectToolkit-M administration utility.
SafeNet ProtectToolkit 5.7 User Guide007-013682-005 Rev. A 08 January 2020 Copyright 2009-2020Gemalto 35
Chapter 4: Administrative Tasks
To delete a user keyset
1. Launch the administration utility from the Startmenu by selecting Start > Programs > SafeNet >ProtectToolkit M > gmadmin.
2. Select the desired keyset from the Active Adapters list.3. Open the Keysetmenu and choose Delete Keyset.4. The administration utility will now prompt for the device administrator Password. Prior to deletion, the
administration utility will prompt for confirmation that deletion is the requested operation.
5. The keyset is removed from the displayed keysets under the selected device.
NOTE A keyset cannot be deleted if an application is currently using SafeNet ProtectToolkit-M. See Session Exists Error in "Known Issues" on page 71.
To check if an application has any open sessions to SafeNet ProtectToolkit-M, check the value shown next toApplication Count in the System section of the administration utility. This will need to be “1”, and the TotalSession Count must be “0” in order for the keyset deletion to succeed.
NOTE If the value of Application Count is shown as “UNAVAILABLE”, your HSM firmwaredoesn’t support live application counting. In such a case, it is advisable to upgrade the HSMfirmware to the latest version. Please refer to "Checking and Upgrading HSMFirmware" onpage 38.
Setting the Adapter Transport ModeThe adapter transport mode allows an adapter HSM to be removed from the host system PCI bus withoutcausing a tamper condition. A tamper will remove all sensitive material from the adapte,r including the adapterconfiguration, all keys, and certificates.
Setting the adapter transport mode is the responsibility of the device administrator and is performed using theSafeNet ProtectToolkit-M administration utility.
To set the adapter transport mode
1. Launch the administration utility from the Startmenu by selecting Start > Programs > SafeNet >ProtectToolkit M > gmadmin.
2. Select the desired adapter from the Active Adapters list.3. Open the Adaptermenu and choose Set Transport Mode.4. The device administrator is now prompted to choose one of three possible transport modes:
• None: To be applied when adapter is installed and configured. This mode will tamper the adapter ifremoved from the PCIe Bus.
• Single -Adapter: Will not be tampered after removal from the PCIe bus. Adapter will automaticallychange to “None” Transport Mode the next time the adapter is reset or power is removed and restored.
• Continuous -Adapter: Will not be tampered by being removed from the PCIe bus.
5. The administration utility will now prompt for the device administrator password.
SafeNet ProtectToolkit 5.7 User Guide007-013682-005 Rev. A 08 January 2020 Copyright 2009-2020Gemalto 36
Chapter 4: Administrative Tasks
NOTE The transport mode does not disable the tamper response mechanism entirely. Anyattempt to physically attack the adapter will still result in a tamper response.
Correcting Clock DriftDue to host system and HSM timing differences, such as clock drifts, it may become necessary, at certainstages, to adjust the internal time on the HSM.
Note that the HSM clock value cannot be specified directly. It is only possible to synchronize the HSM clock withthe host system clock.
Synchronizing the HSM clock is the responsibility of the device administrator and is performed using theSafeNet ProtectToolkit-M administration utility.
To adjust the HSM clock
1. Launch the administration utility from the Start menu by selecting Start > Programs > SafeNet >ProtectToolkit M > gmadmin.
2. Select the desired HSM from the Active Adapters list.3. Open the Adaptermenu and choose Sync Clock.4. The administration utility will now prompt for the device administrator password. Correct entry of the
password will result in clock synchronization.
Viewing and Purging the HSMEvent LogSafeNet ProtectServer HSMsmaintain event logs in order to provide a means of tracking serious hardware orconsistent operational faults. It is the device administrator’s task to view and purge HSM event log data. For fulldetails on what the event log stores and how to interpret its data, please refer to "Event Log Error Types" onpage 86.When the HSM event log is full, the HSM will no longer store new event records and will need to be purged.
NOTE The HSM event log cannot be purged until it is full.
To view the HSM event log
1. Launch the administration utility from the Start menu by selecting Start > Programs > SafeNet >ProtectToolkit M > gmadmin.
2. Select the desired HSM from the Active Adapters list.3. Open the Adaptermenu and select View Event Log.4. The administration utility will now prompt for the device administrator password. Correct entry of the
password will result in the event log being displayed.
5. The event log is shown as a series of pages. If there are more than one page of event log entries, theoperator can navigate through the pages via the first, prev, next, last buttons.
SafeNet ProtectToolkit 5.7 User Guide007-013682-005 Rev. A 08 January 2020 Copyright 2009-2020Gemalto 37
Chapter 4: Administrative Tasks
To purge the event log
1. Launch the administration utility from the Startmenu by selecting Start > Programs > SafeNet >ProtectToolkit M > gmadmin.
2. Select the desired HSM from the Active Adapters list.3. Open the Adaptermenu and choose Purge Event Log.4. The administration utility will now prompt for the device administrator password. Correct entry of the
password will result in the event log being purged.
NOTE The event log can also be purged via the View Event Log dialog by clicking thePurge button.
Checking and Upgrading HSM FirmwareThe SafeNet ProtectToolkit-M firmware that operates on the HSM can be upgraded to newer versions. Thisfacility will only allow the HSM to be upgraded to firmware versions that have been digitally signed by SafeNet.
The firmware update package, formerly supplied identically on both the SafeNet ProtectToolkit-C and SafeNetProtectToolkit-M DVDs, is now available only from the Gemalto eService Support Portal, along with a specificUpdate instruction document. The instructions in this section are generic in nature, intended only to show thescope of the operation. The authoritative, detailed instructions are always in the Update document thataccompanies the update package. The latest versions of the client software and HSM firmware can be foundon the Gemalto Technical Support Customer Portal. See "Support Contacts" on page 10 for more information.Prior to performing a firmware upgrade, the firmware upgrade file should be checked to confirm that it is a validSafeNet upgrade file.
Depending on the security policy in place, the HSM may perform a soft-tamper before the upgrade process isexecuted. This tamper will erase all key and configuration data on the HSM. Prior to performing a firmwareupgrade, ensure that you have performed the following:
> All important user data and keys have been backed up
> The current HSM configuration has been noted
> All applications using the HSM have been closed – this may require some services to be stopped (e.g.Certificate Services, IIS)
Upgrading the HSM firmware is the responsibility of the device administrator and is performed using theSafeNet ProtectToolkit-M administration utility.
To check the firmware upgrade file
1. If it is not already open, launch the administration utility from the Start menu by selecting Start > Programs> SafeNet > ProtectToolkit M > gmadmin.
2. Select the desired HSM from the Active Adapters list.3. Open the Adaptermenu and choose Check Firmware File.4. The administration utility will now prompt for the location of the firmware upgrade file.
5. The utility will show if the file is validated, or corrupt.
SafeNet ProtectToolkit 5.7 User Guide007-013682-005 Rev. A 08 January 2020 Copyright 2009-2020Gemalto 38
Chapter 4: Administrative Tasks
To upgrade the HSM firmware
1. If it is not already open, launch the administration utility from the Startmenu by selecting Start >Programs > SafeNet > ProtectToolkit M > gmadmin.
2. Select the desired HSM from the Active Adapters list.3. Open the Adaptermenu and choose Upgrade Firmware.4. The administration utility will now prompt for the location of the firmware upgrade file.
5. If the file is validated, the utility will prompt for the device administrator password. Correct password entrywill proceed with the firmware upgrade.
NOTE During the firmware upgrade the administration utility will appear to stop functioning.This is normal since firmware upgrades can take up to 40 seconds to complete. If the utilitydoes not respond after a number of minutes, shut down your system and reboot. If problemspersist, see "Support Contacts" on page 10 to contact SafeNet technical support.
Tampering the HSMThe tampering of the HSM may be necessary at the end of its lifecycle or any other security-sensitive event thatrequires all stored data to be immediately destroyed.
A tamper formats the secure memory of the HSM and thereby erases all configuration and key data.
Due to the highly destructive nature of this action, tampering the HSM is the responsibility of the deviceadministrator and is performed using the SafeNet ProtectToolkit-M administration utility. Note that this actionalso requires that all sessions have been closed and that no user is accessing the HSM.
To tamper the HSM
1. Launch the administration utility from the Startmenu by selecting Start > Programs > SafeNet >ProtectToolkit M > gmadmin.
2. Select the desired HSM from the Active Adapters list.3. Open the Adaptermenu and choose Tamper.4. The administration utility will now prompt for the device administrator password. Correct entry of the
password will show a final confirmation dialog to ensure that this is the desired course of action.
5. Press Yes to tamper the HSM, or No to Cancel.
NOTE The above action cannot tamper the HSM while other applications are active. Theadministration utility will indicate if the tamper operation was successful. A white cross on ared background shown next to the selected HSM indicates that the device is tampered.
Backing up a KeysetIndividual, HSM stored keysets can be backed up to a secure disk file or one or more smart cards. Backed upkeysets can then be restored in the event of a tamper to the HSM or if the keysets are otherwise lost.
SafeNet ProtectToolkit 5.7 User Guide007-013682-005 Rev. A 08 January 2020 Copyright 2009-2020Gemalto 39
Chapter 4: Administrative Tasks
NOTE Users are responsible for backing up their own keysets and the SafeNetProtectToolkit-M device administrator is responsible for backing up the MACHINE andSYSTEM keysets.
A triple-DESBackupKey is used to encrypt each keyset prior to storage on a smart card. A different BackupKeyis automatically created for each keyset when the keysets are created but these keys are not visible undernormal SafeNet ProtectToolkit-M operation. A BackupKey for a keyset is derived from a combination of thepassword used to secure that particular keyset and the keyset name. In the case of the MACHINE andSYSTEM keysets, the device administrator’s password and the keyset name are used to derive the key. Thusto restore a keyset that was previously backed up, the same password and keyset name must be used.
NOTE You cannot backup SafeNet ProtectToolkit-M FIPSmode keysets. If yourorganization requires you to use FIPSmode tokens we recommend securing your keysetusing an NofM schema. See the "Key Splitting SchemeSelection" on page 1 for moreinformation about NofM.
Keyset backup is accomplished with the command line tool ctkmu or the GUI tool kmu. Both the ctkmu utilityand the kmu utility are included in the SafeNet ProtectToolkit-C package. See the "Command Line UtilitiesReference" on page 1 and the "KeyManagement Utility (KMU) Reference" on page 1 for more information.
See the "Key Backup Procedure" on page 1 for example procedures and more information.
Restoring a Keyset
Precautions> To restore a key that was previously backed up, the same password and keyset name must be used.
> Extreme care should be taken to ensure that keys which are being restored DO NOT already exist on theSafeNet ProtectToolkit-M system. A restore operation DOESNOT replace existing keys, but will restore asecond instance of the same key pair. If you have accidentally created multiple instances of the same keypair, SafeNet ProtectToolkit-M will mark the affected keyset as being invalid. Please refer to "KnownIssues" on page 71 for details on how to address this type of problem.
Keyset restore is accomplished with the command line tool ctkmu or the GUI tool kmu. Both the ctkmu utilityand the kmu utility are included in the SafeNet ProtectToolkit-C package. See the "Command Line UtilitiesReference" on page 1 and the "KeyManagement Utility (KMU) Reference" on page 1 for more information.
See the "KeyRestore Procedure" on page 1 for example procedures and more information.
Enabling Private Key Clear ExportIn order to support the key archival process, it must be possible for the host machine to obtain the value of theprivate key in the clear.
Due to the inherent security risks, the Allow Clear Export of Private Keys flag controls whether this value can beobtained. This is a “secure configuration item”.
SafeNet ProtectToolkit 5.7 User Guide007-013682-005 Rev. A 08 January 2020 Copyright 2009-2020Gemalto 40
Chapter 4: Administrative Tasks
A secure configuration item is one which is open for reading, but requires authentication for writing. Suchconfiguration items are stored on the HSM and protected by the password of the device administrator.
If Allow Clear Export of Private Keys flag is set to True, then it is possible to obtain the value of a private key inthe clear using the Microsoft Crypto API (MSCAPI) (causing the key archival process to succeed).
If Allow Clear Export of Private Keys is set to False, then any requests to obtain the value of a private key inthe clear are denied (causing the key archival process to fail).
The value of the Allow Clear Export of Private Keys flag can be changed using the SafeNet ProtectToolkit-MAdministration Utility.
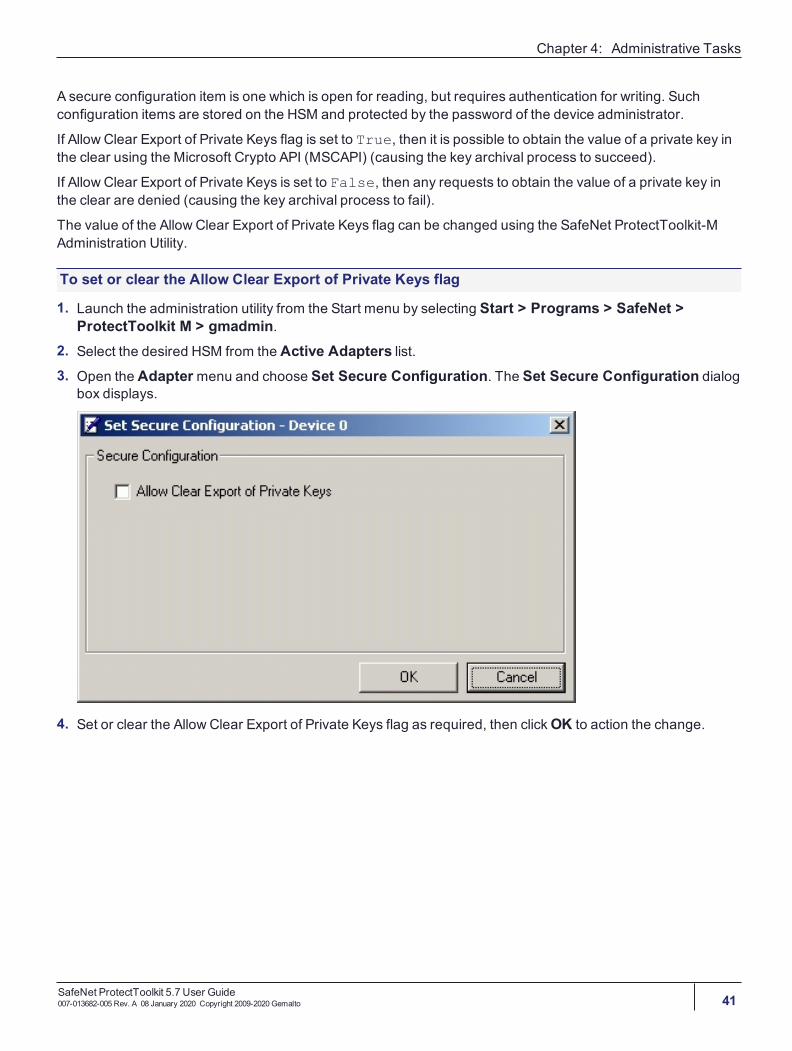
To set or clear the Allow Clear Export of Private Keys flag
1. Launch the administration utility from the Start menu by selecting Start > Programs > SafeNet >ProtectToolkit M > gmadmin.
2. Select the desired HSM from the Active Adapters list.3. Open the Adaptermenu and choose Set Secure Configuration. The Set Secure Configuration dialog
box displays.
4. Set or clear the Allow Clear Export of Private Keys flag as required, then clickOK to action the change.
SafeNet ProtectToolkit 5.7 User Guide007-013682-005 Rev. A 08 January 2020 Copyright 2009-2020Gemalto 41
CHAPTER 5: User Tasks
This section describes the operational procedures a User may perform during normal SafeNet ProtectToolkit-M operation. It contains sections on the following operations:
> "Creating Keysets" below
> "Changing a Keyset Password" below
> "Adding a KeyContainer" on the next page
> "Removing a KeyContainer" on the next page
> "Generating a Key Pair" on page 44
> "Deleting a Key Pair" on page 44
> "Displaying Key Pair Properties" on page 45
> "Backing up and Restoring Keysets" on page 45
Creating KeysetsTo create a new keyset, first ensure that there is enough keyset space available on the HSM. This can beconfirmed by opening the SafeNet ProtectToolkit-M Administration Utility.
If there is not enough space available, an administrator will have to allocate additional keyset space on theHSM. For details please refer to the previous chapter.
To create a keyset
1. Launch the administration utility from the Startmenu by selecting Start > Programs > SafeNet >ProtectToolkit M > gmadmin.
2. Select the spare keyset space on which to create the keyset from the Active Adapters list.3. Open the Keysetmenu and choose Create Keyset.4. The administration utility now prompts for the Keyset Name and the Keyset Password. Enter the required
information into the fields provided and pressOK to create the new keyset.
NOTE The name of the keyset should match with the user login name.
5. The new keyset is displayed under the device.
Changing a Keyset PasswordA keyset password may need to be changed periodically. A keyset password is changed by the keyset owner,using the SafeNet ProtectToolkit-M keyset management utility.
SafeNet ProtectToolkit 5.7 User Guide007-013682-005 Rev. A 08 January 2020 Copyright 2009-2020Gemalto 42

Chapter 5: User Tasks
To change the keyset password
1. Launch the keyset management utility from the Startmenu by selecting Start > Programs > SafeNet >ProtectToolkit M > gmksm.
2. From the displayed list, select the desired keyset.
3. Open the Keysetmenu and choose Change Password.4. The user is prompted for the current and new keyset password. Enter the required information into the
fields provided and pressOK to change the password.
NOTE Any existing keyset backups will no longer be useful following a keyset passwordchange, because the backup key is generated from the password. New backups should becreated after changing the password.
Adding a Key ContainerKey containers are created within a user’s keyset, so that the keyset can hold key pairs. The keyset owner canadd a key container using the SafeNet ProtectToolkit-M keyset management utility.
To add a key container
1. Launch the keyset management utility from the Startmenu by selecting Start > Programs > SafeNet >ProtectToolkit M > gmksm.
2. From the displayed list, select the desired keyset.
3. Open the Keysetmenu and choose Add Container.4. The user is prompted for the keyset password and key container name. Enter the required information into
the fields provided and pressOK to create the key container.
Removing a Key ContainerKey containers which are no longer required or hold obsolete key pairs may be removed from a keyset.
Removing a key container is performed by the keyset owner, using the SafeNet ProtectToolkit-M keysetmanagement utility.
To remove a key container
1. If it is not already open, launch the keyset management utility from the Startmenu by selecting Start >Programs > SafeNet > ProtectToolkit M > gmksm.
2. Select the keyset container which you wish to remove.3. Open the Keysetmenu and choose Remove.4. The user is prompted for the keyset password and confirmation that the container removal is the required
action. PressOK to remove the key container.
SafeNet ProtectToolkit 5.7 User Guide007-013682-005 Rev. A 08 January 2020 Copyright 2009-2020Gemalto 43
Chapter 5: User Tasks
Generating a Key PairKey pairs are used by Crypto API to encrypt or sign data. There are two types of key pairs, and they must becreated inside a key container. Please refer to "Adding a KeyContainer" on the previous page.The keyset owner can generate a key pair using the SafeNet ProtectToolkit-M keyset utility.
To generate a key pair
1. Launch the keyset management utility from the Startmenu by selecting Start > Programs > SafeNet >ProtectToolkit M > gmksm.
2. Select the keyset container in which to generate a key pair.3. Open the Containermenu and chooseGenerate Key Pair.4. The user is prompted to enter the keyset password. Correct password entry will display the generate key
pair dialog.5. The generate key pair dialog will prompt for the key usage and key size.6. Choose Exchange or Sign depending on the required key pair usage.7. Select a Key Size from the drop-down list.
8. Check the Exportable checkbox if you want to be able to back up this key pair.9. PressOK to generate the key pair.
Key UsageKey pairs generated using the keyset management utility have one of two usage attributes. These are:
> Exchange: This type of key pair is used to encrypt session keys for the user during normal SafeNetProtectToolkit-M operation.
> Sign: This type of key pair is used to create digital signatures for the user during normal SafeNetProtectToolkit-M operation.
Each user will generally require both types of keys within their particular keyset.
Key SizeKey size is an important consideration when using encryption as a security measure. When discussing keysize, the value is given as a bit length, referring to howmany digits are represented in the key value. As ageneral guideline, longer bit lengths produce longer keys and more secure encryption. However, larger keysizes slow the encryption process, due to the larger calculations involved.
Deleting a Key PairThe keyset owner can delete a key pair using the SafeNet ProtectToolkit-M keyset management utility.
SafeNet ProtectToolkit 5.7 User Guide007-013682-005 Rev. A 08 January 2020 Copyright 2009-2020Gemalto 44
Chapter 5: User Tasks
To delete a key pair
1. launch the keyset management utility from the Startmenu by selecting Start > Programs > SafeNet >ProtectToolkit M > gmksm.
2. Select the key pair you wish to delete.3. Open the KeyPairmenu and choose Delete.4. The user is prompted to enter the keyset password. Correct password entry deletes the selected key pair.
Displaying Key Pair PropertiesKey pair properties can be displayed by any user of the SafeNet ProtectToolkit-M keyset management utility.
To display the properties of a key pair
1. Launch the keyset management utility from the Startmenu by selecting Start > Programs > SafeNet >ProtectToolkit M > gmksm.
2. Select the key pair for which to display its properties.3. Open the KeyPairmenu and choose Properties.
Information shown includes the following:
• Keyset: Displays the name of the keyset on which the selected key pair resides.
• Container: Displays the name of the key container in which the selected key pair resides.
• Usage: Shows the key usage attribute of the selected key pair. This value will either be “EXCHANGE” or“SIGN”.
• Size: Shows the key size for the selected key pair.
• Private KeyHeld: This indicates if the private key for the selected key pair is present as part of the keypair. Since it is possible to import a public key only, this value will either be “TRUE” or “FALSE”.
• Exportable: Indicates whether the selected key pair can be backed up.
Backing up and Restoring KeysetsUsers are responsible for backing up their own keysets. The procedures involved in backing up and restoringkey pairs or keysets are detailed in "Administrative Tasks" on page 33
> "Backing up a Keyset" on page 39
> "Restoring a Keyset" on page 40Keyset backup or restore operations should not be attempted without thorough knowledge of the procedureand the possible consequences of incorrect actions. It is strongly advised that the device administrator isconsulted prior to performing a keyset backup or restore operation.
SafeNet ProtectToolkit 5.7 User Guide007-013682-005 Rev. A 08 January 2020 Copyright 2009-2020Gemalto 45
CHAPTER 6: Administration and UserUtilities
This section outlines the following utilities:
> "Administration Utility" below
> "Keyset Management Utility" on page 53
> "CREATECERTUtility" on page 56
Administration UtilityThe administration utility (gmadmin) is designed exclusively for use by the SafeNet ProtectToolkit-M deviceadministrator, and allows the following operations:
> Initialization of HSMs
> Synchronization of HSM clock with the system clock
> Setting of the adapter transport mode
> Setting security flags
> Changing of the SafeNet ProtectToolkit-M device administrator password
> Upgrade of the HSM firmware
> Allocation of keyset space
> De-allocation of keyset space
> Creation of keysets
> Deletion of keysets
> Viewing the HSM event log
> Purging the HSM event log
> Tampering the HSM
Please note that this section is only intended as a reference for the administration utility. When performingadministrative tasks, the reader is strongly advised to refer to "Administrative Tasks" on page 33 for detailsregarding each task.
SafeNet ProtectToolkit 5.7 User Guide007-013682-005 Rev. A 08 January 2020 Copyright 2009-2020Gemalto 46
Chapter 6: Administration and User Utilities
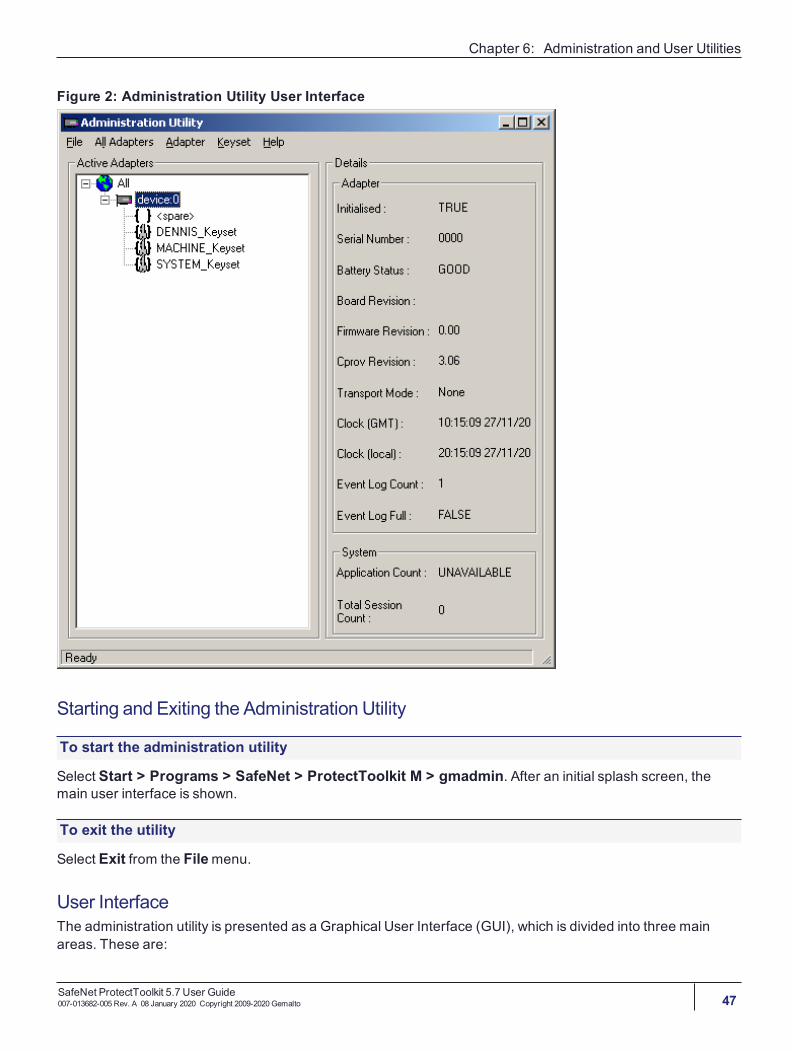
Figure 2: Administration Utility User Interface
Starting and Exiting the Administration Utility
To start the administration utility
Select Start > Programs > SafeNet > ProtectToolkit M > gmadmin. After an initial splash screen, themain user interface is shown.
To exit the utility
Select Exit from the Filemenu.
User InterfaceThe administration utility is presented as a Graphical User Interface (GUI), which is divided into three mainareas. These are:
SafeNet ProtectToolkit 5.7 User Guide007-013682-005 Rev. A 08 January 2020 Copyright 2009-2020Gemalto 47
Chapter 6: Administration and User Utilities
> TheMenu Bar – shown along the top of the utility. All available utility commands can be activated via thesemenus.
> The Active Adapters display pane – shows all hardware HSMs found on the host system and theirassociated keysets. These are represented as a hierarchical tree view, with HSMs being the highestmember and keysets or keyset spaces shown beneath each HSM.
> The Details pane – broken up into two sub-groups and displays the following information.
Adapter Details
Initialized Shows whether the currently selected HSM has been initialized. Values are either TRUE orFALSE.
Serial Number The serial number of the selected HSM.
Battery Status Indicates the charge of the onboard battery of the selected HSM. This may either beGOOD orLOW. If this indicates LOW, the selected HSMmay not be able to retain stored keyinformation in the event of a system power failure. The HSM should be returned to your nearestSafeNet service centre for battery replacement. See "Support Contacts" on page 10.
Board Revision Shows the hardware revision of the currently selected HSM.
Firmware Revision Shows the firmware revision of the currently selected HSM.
Cprov Revision Shows the revision of SafeNet ProtectToolkit-C found on the currently selected HSM. This is asoftware component which forms part of the HSM firmware. This valuemay need to be quotedwhen contacting Gemalto support.
Transport Mode Shows the transport mode which is set for the currently selected HSM. This value will be either“None”, “Single”, or “Continuous”. Refer below for details.
Clock (GMT) Shows date and time (GMT) on the currently selected HSM.
Clock (local) Shows the local date and time on the currently selected HSM.
Event Log Count Gives a total for the number of event log entries on the currently selected HSM.
Event Log Full Shows if the event log is full and needs purging. This valuemay be either “FALSE”, indicatingthat there is available space in the log, or “TRUE”, indicating that the log is full.
System Details
Application Count Shows the number of applications which are currently accessing the SafeNet ProtectToolkit-Msystem. This valuemay show as “UNAVAILABLE” which denotes that the firmware on theselected HSM does not support application counting.
Total SessionCount
Shows the number of open sessions to the SafeNet ProtectToolkit-M system.
SafeNet ProtectToolkit 5.7 User Guide007-013682-005 Rev. A 08 January 2020 Copyright 2009-2020Gemalto 48

Chapter 6: Administration and User Utilities
Password Entry Dialog BoxesMost actions performed within the administration utility will require entry of the device administrator password.The device administrator password is case-sensitive and may consist of any alphanumeric characters,between 4 and 32 characters in length.
Figure 3: Device administrator password entry dialog box
Keep Password FeatureThe utility can remember the device administrator password for the duration of the session. This eliminates theneed to repeatedly enter the password for multiple operations.
To enable this feature, check the box next to Keep Password For Session when entering the deviceadministrator password.
CAUTION! When this feature is enabled, take care not to leave the administration utilityunattended. To ensure that unauthorized people do not obtain management access to HSMs,close the administration utility once you have finished with your task.
Keyboard ShortcutsAll available menu items may be activated via keyboard shortcuts. The menu bar can be selected by pressingthe [Alt] key. Commands may then be selected by pressing the first unique letter of the required command. Forexample: [Alt] followed by [A] will open the Adapter menu.There are also a number of key combination shortcuts which will immediately activate a command:
> CTRL+I = Initialize HSM
> CTRL+A = Allocate Keyset Space
> CTRL+V = View Event Log
> CTRL+P = Change Admin Password
> CTRL+U = Upgrade Firmware
> CTRL+T = Tamper HSM
> CTRL+D = De-allocate Space
> CTRL+K = Create Keyset
SafeNet ProtectToolkit 5.7 User Guide007-013682-005 Rev. A 08 January 2020 Copyright 2009-2020Gemalto 49
Chapter 6: Administration and User Utilities
Context MenusRight-clicking on an item in the Active Adapters display pane will bring up a context menu showing availablecommands specific to that item.
For details about these commands, please refer to the section appropriate to the menu in question.
All Adapters MenuThe All Adaptersmenu is only available if there is more than one HSM installed on the system. This menuallows the device administrator to affect all installed HSMs with a single command. The following actions can beperformed via this menu:
Initialize AdaptersThis option initializes all uninitialized HSMs found on the system. Only initialized HSMs can store keyinformation.
Synchronize ClocksThis option synchronizes all HSMs found on the system with the value of the host system clock.
Set Transport ModesThis option sets the adapter transport mode for all adapters found on the system. The adapter transport modeallows an HSM to be removed from the host system's PCIe bus without causing a tamper condition. A tamperwill remove all sensitive material from the adapter, including the adapter configuration, keys, and certificates.
The device administrator is prompted to choose one of three possible transport modes:
> None - To be applied when adapter is installed and configured. This mode will tamper the adapter ifremoved from the PCIe bus.
> Single - Adapter will not be tampered after its next removal from the PCIe bus. Adapter will automaticallychange transport mode to None the next time the adapter is reset or power is removed and restored.
> Continuous - Adapter will not be tampered by being removed from the PCIe bus.
Set Security FlagsThis option allows the setting of a security mode using security flags. These flags affect both the servicesavailable to the various users of the system, as well as specific security features of the HSM. The flags may bespecified individually to set a custom security mode, but a standard security mode is recommended. When astandard security mode is selected, the flags are assigned values automatically to meet the requirements forthat mode. For further information see "Initial Configuration: Mandatory Steps" on page 17, "SecurityModeDescriptions" on page 18, and "SecurityMode Flag Descriptions" on page 19.
Set Secure ConfigurationThis option allows secure configuration items to be set.
A secure configuration item is one that is open for reading but requires authentication for writing. Suchconfiguration items are stored on the HSM, protected by the password of the device administrator.
A single item is currently supported - Allow Clear Export of Private Keys. See "Enabling Private KeyClearExport" on page 40 .
SafeNet ProtectToolkit 5.7 User Guide007-013682-005 Rev. A 08 January 2020 Copyright 2009-2020Gemalto 50
Chapter 6: Administration and User Utilities
Set Admin PasswordsThis option changes the current device administrator password for all HSMs on the host system.
Upgrade FirmwareThis option performs a firmware upgrade for all HSMs on the host system. The device administrator isprompted to enter the path to the firmware update file.
Tamper All AdaptersThis option causes a tamper of all HSMs found on the system. A tamper formats the secure memory of theHSM and thereby erases all configuration and key data.
Adapter MenuThe Adaptersmenu is used to perform the following administrative actions on a selected HSM:
InitializeThis option initializes the selected HSM. Only initialized HSMs can store key information.
Allocate SpaceThis option allocates one keyset space on the selected HSM. Keyset space is required to create user keysets.
View Event LogThis option opens the event log viewer. The dialog shows event log entries in chronological order, with themost current event showing last. The first, prev, next and last buttons can be used to navigate through theevent details, should there be more than one page of entries.
If the event log is full, it can be purged by clicking the Purge button.
NOTE The Purge button is disabled until the event log is full.
Purge Event LogThis option purges the event log.
NOTE This menu option is disabled until the event log is full.
Synchronize ClockThis menu option synchronizes the clock of the selected HSM with the host system clock.
Set Transport ModeThis menu option is used to set the adapter transport mode for the selected adapter. The adapter transportmode allows an HSM to be removed from the host system's PCIe bus without causing a tamper condition. Atamper will remove all sensitive material from the adapter, including the adapter configuration, keys, andcertificates.
The device administrator is prompted to choose one of three possible transport modes:
SafeNet ProtectToolkit 5.7 User Guide007-013682-005 Rev. A 08 January 2020 Copyright 2009-2020Gemalto 51
Chapter 6: Administration and User Utilities
> None - To be applied when adapter is installed and configured. This mode will tamper the adapter ifremoved from the PCIe bus.
> Single - Adapter will not be tampered after its next removal from the PCIe bus. Adapter will automaticallychange transport mode to None the next time the adapter is reset or power is removed and restored.
> Continuous - Adapter will not be tampered by being removed from the PCIe bus.
Change Admin PasswordThis option changes the device administrator password for the currently selected HSM.
Upgrade FirmwareThis option performs a firmware upgrade for the selected HSM. The device administrator is prompted to enterthe path to the firmware update file.
Check Firmware Upgrade FileThis option is used to check the validity of a firmware upgrade file. The device administrator is prompted toenter the path to the firmware update file.
TamperThis option causes a tamper of the selected HSM. A tamper formats the secure memory of the HSM, erasing allconfiguration and key data.
Set Security FlagsThis option allows the setting of a security mode using security flags. These flags affect both the servicesavailable to the various users of the system, as well as specific security features of the HSM. The flags may bespecified individually to set a custom security mode, but a standard security mode is recommended. When astandard security mode is selected, the flags are assigned values automatically to meet the requirements forthat mode. For further information see "Initial Configuration: Mandatory Steps" on page 17, "SecurityModeDescriptions" on page 18, and "SecurityMode Flag Descriptions" on page 19.
Set Secure configurationThis menu option allows the setting of security configuration items.
A secure configuration item is one that is open for reading but requires authentication for writing. Suchconfiguration items are stored on the HSM, protected by the password of the device administrator.
A single item is currently supported - Allow Clear Export of Private Keys. See "Enabling Private KeyClearExport" on page 40.
Keyset MenuThe Keysetmenu is used to perform the following administrative actions on a selected keyset:
DeleteThis option will delete the currently selected keyset.
SafeNet ProtectToolkit 5.7 User Guide007-013682-005 Rev. A 08 January 2020 Copyright 2009-2020Gemalto 52
Chapter 6: Administration and User Utilities
Create KeysetThis option creates a keyset within the currently selected keyset space.
DeallocateThis option removes the selected spare keyset space.
Keyset Management UtilityThe keyset management utility (gmksm) is designed for the SafeNet ProtectToolkit-M user, and allows thefollowing operations:
> Create keysets
> Generate key pairs
> Delete key pairs
> Show key pair properties
> Add key containers
> Remove key containers
> Change passwords
Please note that this section is only intended as a reference for the keyset management utility. Whenperforming administrative tasks, the reader is advised to refer to "Administrative Tasks" on page 33 for detailsregarding each task.
SafeNet ProtectToolkit 5.7 User Guide007-013682-005 Rev. A 08 January 2020 Copyright 2009-2020Gemalto 53
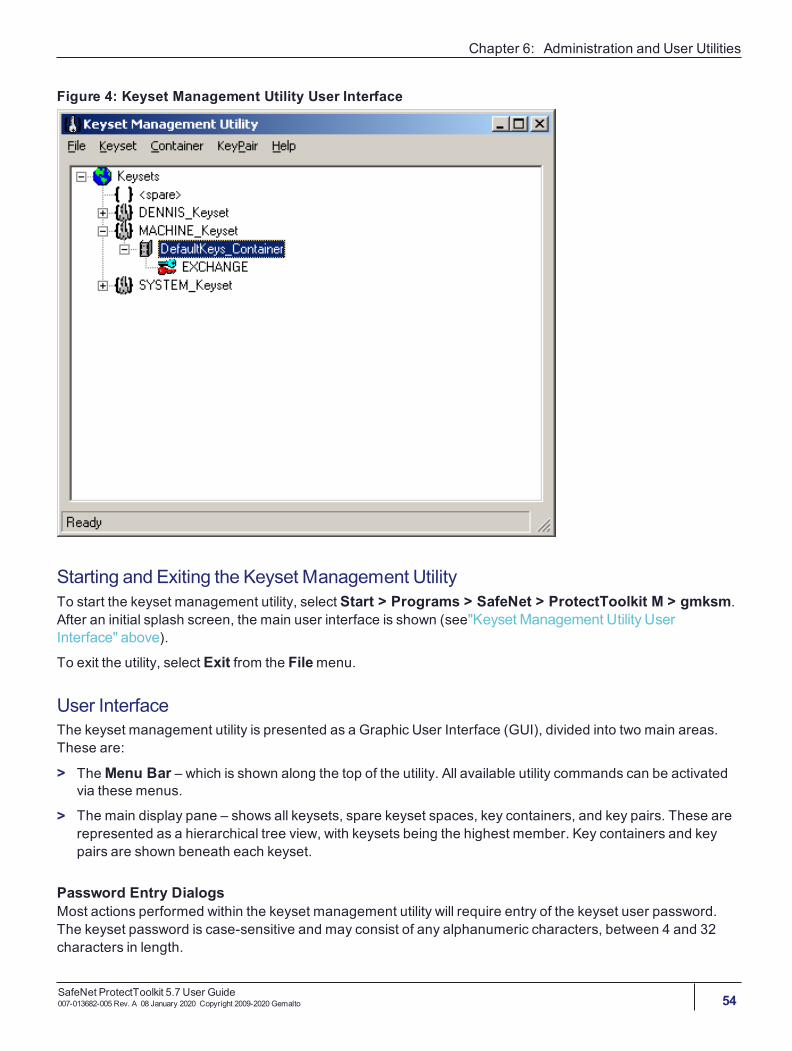
Chapter 6: Administration and User Utilities
Figure 4: Keyset Management Utility User Interface
Starting and Exiting the Keyset Management UtilityTo start the keyset management utility, select Start > Programs > SafeNet > ProtectToolkit M > gmksm.After an initial splash screen, the main user interface is shown (see"Keyset Management Utility UserInterface" above).
To exit the utility, select Exit from the Filemenu.
User InterfaceThe keyset management utility is presented as a Graphic User Interface (GUI), divided into two main areas.These are:
> TheMenu Bar – which is shown along the top of the utility. All available utility commands can be activatedvia these menus.
> The main display pane – shows all keysets, spare keyset spaces, key containers, and key pairs. These arerepresented as a hierarchical tree view, with keysets being the highest member. Key containers and keypairs are shown beneath each keyset.
Password Entry DialogsMost actions performed within the keyset management utility will require entry of the keyset user password.The keyset password is case-sensitive and may consist of any alphanumeric characters, between 4 and 32characters in length.
SafeNet ProtectToolkit 5.7 User Guide007-013682-005 Rev. A 08 January 2020 Copyright 2009-2020Gemalto 54
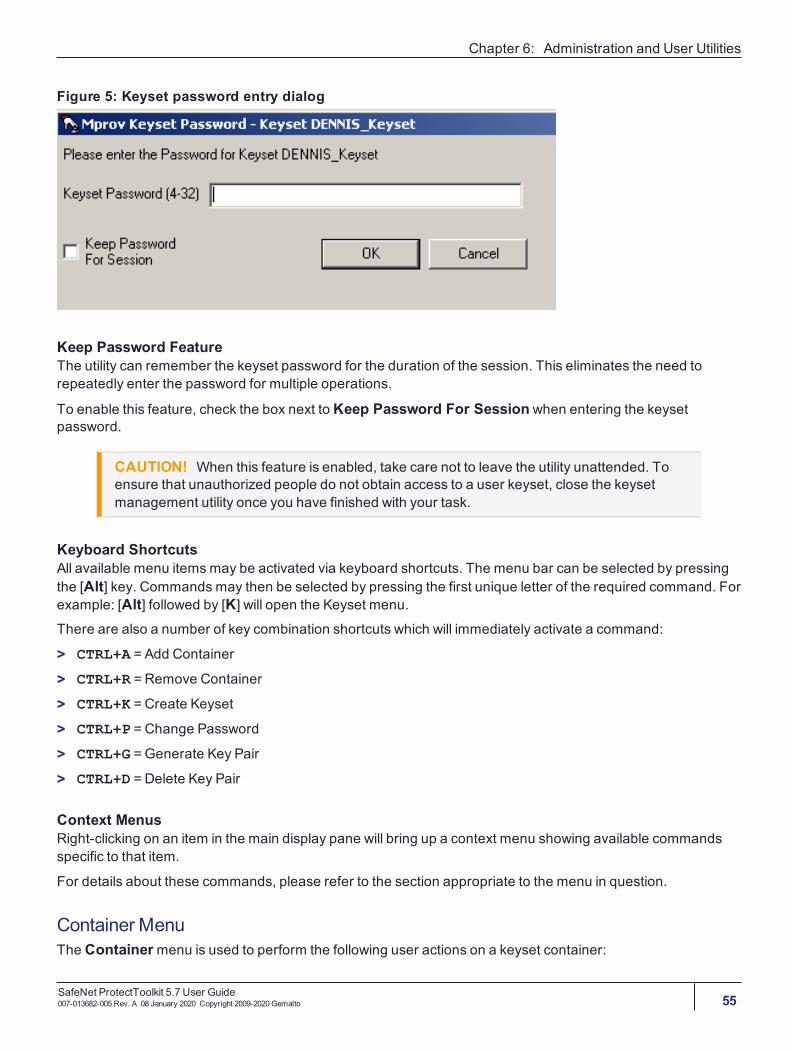
Chapter 6: Administration and User Utilities
Figure 5: Keyset password entry dialog
Keep Password FeatureThe utility can remember the keyset password for the duration of the session. This eliminates the need torepeatedly enter the password for multiple operations.
To enable this feature, check the box next to Keep Password For Session when entering the keysetpassword.
CAUTION! When this feature is enabled, take care not to leave the utility unattended. Toensure that unauthorized people do not obtain access to a user keyset, close the keysetmanagement utility once you have finished with your task.
Keyboard ShortcutsAll available menu items may be activated via keyboard shortcuts. The menu bar can be selected by pressingthe [Alt] key. Commands may then be selected by pressing the first unique letter of the required command. Forexample: [Alt] followed by [K] will open the Keyset menu.There are also a number of key combination shortcuts which will immediately activate a command:
> CTRL+A = Add Container
> CTRL+R = Remove Container
> CTRL+K = Create Keyset
> CTRL+P = Change Password
> CTRL+G =Generate Key Pair
> CTRL+D = Delete Key Pair
Context MenusRight-clicking on an item in the main display pane will bring up a context menu showing available commandsspecific to that item.
For details about these commands, please refer to the section appropriate to the menu in question.
Container MenuThe Containermenu is used to perform the following user actions on a keyset container:
SafeNet ProtectToolkit 5.7 User Guide007-013682-005 Rev. A 08 January 2020 Copyright 2009-2020Gemalto 55
Chapter 6: Administration and User Utilities
RemoveThis option removes the selected key container.
CAUTION! This action destroys any key pairs contained within the selected container.
Generate Key PairThis option generates a key pair within the selected container. The user is prompted for:
> Key Usage: Select "Sign" or "Exchange".> Key Size: Valid lengths are 512, 768, 1024, 2048 or 4096 bits.> Exportable: Checking this box allows the generated private key to be backed up to a file on the host
machine.
Key Pair MenuThe Key Pairmenu is used to perform the following user actions to a selected key pair:
DeleteThis option deletes the selected key pair
PropertiesThis option displays the properties of the selected key pair. The following attributes are shown:
> Keyset: Displays the name of the keyset where the selected key pair resides.
> Container: Displays the name of the key container where the selected key pair resides.
> Usage: Displays the key usage attribute of the selected key pair. This value will be “EXCHANGE” or “SIGN”.
> Size: Displays the size of the selected key pair.
> Private Key Held: If "TRUE", the private key for the selected key pair is present as part of the key pair. It isonly possible to import a public key .
> Exportable: Indicates whether the selected key pair can be backed up.
CREATECERT UtilityThe createcert utility is used as a quick and simple method of creating a self-signed certificate for the SafeNetProtectToolkit-M machine.
NOTE The user must be logged on as administrator to use this utility.
Synopsiscreatecert <X509 Name>
ParametersX509 Name The X.509 Certificate name. For example,CN=<machinename>.
SafeNet ProtectToolkit 5.7 User Guide007-013682-005 Rev. A 08 January 2020 Copyright 2009-2020Gemalto 56
CHAPTER 7: Integration with Microsoft CA
This section contains the following instructive subsections for integration with Microsoft CA:
> "Setting Up a CA with SafeNet ProtectToolkit-M" below
> "Certificate Template Support for SafeNet CSPs" on the next page
> "CA Replication (Key Backup and Recovery)" on page 59
> "Private Key Archiving and Recovery" on page 61
Setting Up a CA with SafeNet ProtectToolkit-MThis section explains how to configure SafeNet ProtectToolkit-M to be used with the Microsoft CA.
SafeNet ProtectToolkit-M, in conjunction with Microsoft CA, provides secure storage of keys related to signingcertificates.
Before you begin, ensure that:
> you have read and understood "Installation" on page 14 and "Setup and Configuration" on page 16.
> Microsoft CA has NOT been installed prior to the SafeNet ProtectToolkit-M installation.
> the current logged-on user hasWindows administrator privileges.
> a keyset exists for the logged-on user.
An example of how to setup the CAwith SafeNet ProtectToolkit-M on Microsoft Windows 2008 R2 follows.
NOTE This example assumes a standalone configuration for a root CA. Actual values shouldbe chosen as required, to suit each particular installation.
To set up the CA with SafeNet ProtectToolkit-M:
1. From the Windows Control Panel, selectAdministrative Tools and select Server Manager from the listof tools.
2. ClickAdd Roles.3. Check the box for “Active Directory Certificate Services”, clickNext, and then Next again.4. Check the box for “Certification Authority” and clickNext.5. Select Standalone and clickNext.6. SelectRoot CA and clickNext.7. Select the appropriate option (new or existing private key) and clickNext.8. Select the SafeNet CSP from the list, configure your cryptiographic options as required, and clickNext.9. Configure your CA name as required and clickNext.10.Set the validity period for the certificate generated for the CA as required and clickNext.
SafeNet ProtectToolkit 5.7 User Guide007-013682-005 Rev. A 08 January 2020 Copyright 2009-2020Gemalto 57
Chapter 7: Integration with Microsoft CA
11.Specify the locations for the certificate database and certificate database log and clickNext.12.Review the CA configuration. If any parameters are incorrect, use the links in the left pane to return to the
appropriate page to make changes. When the configuration is correct, click Install to install the CA.Following the successful completion of the above steps, SafeNet ProtectToolkit-M is now selected as the CSPfor Microsoft CA operations. For further details regarding the Microsoft CA, please refer to your Microsoftdocumentation.
Certificate Template Support for SafeNet CSPsThe current list of certificate templates in the CA do not make use of the SafeNet CSP. New templates must becreated in the Certificate Templates store and then issued from the CA templates store. For example, a webserver certificate template only supports the Microsoft DH and RSA providers.
In order to create new templates that support the SafeNet CSP, perform the following procedure. Theprocedure is basically the same for any certificate that you need to issue using the SafeNet CSPs.
To create a new template that supports the SafeNet CSP
Note that the use of the User template in this procedure is for example only. Substitute this for any othertemplate to meet your particular requirements.
1. Start a newMMC session and add both the Certification Authority and Certificate Template snap-ins.2. Expand the Certificate Templates object and locate the User template.3. Right click on the User template and selectDuplicate template. This will display the new template
properties.
4. Enter a Template display name. Note that you cannot give it the same name as the template that alreadyexists.
5. Go to the Request Handling tab and click on the CSP button. Either selectRequests can use any CSPavailable on the subject’s computer or make sure that the SafeNet RSA providers are checked.
6. Check the Issuance Requirements and Security tabs to ensure that the appropriate permissions arecorrect. ClickOK to complete.
7. Now go to the CA object and selectCertificate Templates.8. Right clickNew and selectCertificate Template to Issue.9. Locate the new template that was created in steps 1-6 and clickOK. Close the MMC console session.
10.To test that the SafeNet provider is now available, open a newMMC console and choose the Certificatessnap-in. SelectMy User Account when prompted. The Administrator’s personal certificate store is nowavailable.
11.Right click on the personal object and selectAll Tasks, Request new certificate. The Certificate RequestWizard displays.
12.ClickNext to reveal the certificate types available, select the new certificate and check the Advancedcheck box. ClickNext.
SafeNet ProtectToolkit 5.7 User Guide007-013682-005 Rev. A 08 January 2020 Copyright 2009-2020Gemalto 58
Chapter 7: Integration with Microsoft CA
13.On the CSP page that now displays, note that the SafeNet providers are now listed. Choose the RSA fullprovider and any other appropriate settings such asKey is Exportable, etc. Complete the process byclickingOK.The certificate is generated and visible in the personal store.
CAReplication (Key Backup and Recovery)Typically, to replicate a CA installation, keys may be backed up to smart cards and then restored from thesmart cards to establish the new CA installation. One smart card per keyset is required.
A triple-DESBackupKey is used to encrypt each keyset prior to storage on a smart card. A different BackupKeyis automatically created for each keyset when the keysets are created but these keys are not visible undernormal SafeNet ProtectToolkit-M operation. A BackupKey for a keyset is derived from a combination of thepassword used to secure that particular keyset and the keyset name. In the case of the MACHINE andSYSTEM keysets, the device administrator’s password and the keyset name are used to derive the key. Thus,to restore a keyset that was previously backed up, the same password and keyset name must be used.
Replicating a CA installation by restoring from a smart card requires access to the SafeNet ProtectToolkit-C.The command line tool ctkmu and the GUI tool kmu can be used to backup or restore keys from a smart card.Both the ctkmu utility and the kmu utility are included in the SafeNet ProtectToolkit-C package. See the"Command Line Utilities Reference" on page 1 and the "KeyManagement Utility (KMU) Reference" on page 1for more information.
To Back Up Keys for a CA Installation to Smart Cards
1. Obtain a listing of all keysets by executing ctkmu l from a command prompt. A list of all keysets andassociated slots displays.
NOTE Decide which keysets to back up. At a minimum, the MACHINE_Keyset must bebacked up, as this is where the CA keys are stored.
2. Record the slot number for each keyset that you wish to back up.3. To back up the MACHINE_Keyset to smart card, type the following in a command prompt, where n is the
slot number of the MACHINE_keyset and b is the slot number representing the smart card reader. Both nand b can be found in the listing obtained at step 1.ctkmu x –sn –wBackupKey –c
4. When prompted for a user password, enter the default “password”.5. Insert a new smart card and repeat steps 3 and 4 for the SYSTEM_Keyset if required.
6. Repeat steps 3 and 4 for each of the other required keysets.
Replicating a CAUsing Keys Restored from Backup Smart CardsThe following procedure takes the following key points into account:
> On the machine where the replica is to be created, SafeNet ProtectToolkit-M must be installed before theMicrosoft CA.
SafeNet ProtectToolkit 5.7 User Guide007-013682-005 Rev. A 08 January 2020 Copyright 2009-2020Gemalto 59
Chapter 7: Integration with Microsoft CA
> To allow installation of a CA that utilizes the SafeNet CSP for HSM storage of keysets, both the MACHINE_Keyset (where the CA stores keys) and a user keyset for the current user must be available. At CAinstallation time if either or both of these keysets are missing, the SafeNet CSPwill not display in the list ofCSPs available for selection.
> All keyset names and associated passwords created when establishing the replica must match the originalsthat are to be restored from the backup smart cards.
To Replicate a CA Using Keys Restored from Backup Smart Cards
1. Start the SafeNet ProtectToolkit-M administration utility. This can be done via the Windows Startmenu.Select Start > Programs > SafeNet > Protect Toolkit M > gmadmin.AMACHINE_Keyset and a SYSTEM_Keyset will be created. Later on, the MACHINE_Keyset created herewill be replaced with the version that was backed up to smart card, containing the CA keys.
The device administrator password will be requested, or must be set if this is the first time the HSM hasbeen accessed.
The Administration Utility default view displays.
2. Under Active Adapters, expand All to reveal the device and the Machine and System key sets justcreated on that device.
3. Highlight the device entry and selectAdapter on the menu bar. Now selectAllocate Space to create akeyset space.
4. Under Active Adapters, select the spare keyset space.5. SelectKeyset on the menu bar and then choose Create Keyset. The Administration Utility will now prompt
for a keyset name to use and the password for the currently logged-on user. The default name should beaccepted.
6. If additional user keysets containing keys are to be restored from smart card, create an empty replicakeyset on the HSM for each keyset to be restored with the same name and user password as the original.To do this, repeat steps 4 to 6 for each keyset, using the appropriate keyset name and user password eachtime.
7. Obtain a listing by name of all the keysets that now exist on the HSM and their corresponding slot numbersby executing ctkmu l from a command prompt.
8. Import a keyset from smart card to the HSM. To do this, insert the smart card containing the keyset. ssh intothe device and execute the following command from a command prompt:ctkmu i –sn –wBackupKey –cm
where n is the slot number of the keyset on the HSM discovered in step 8, andm is the smart card readerslot number. This will also be shown in the listing obtained at step 8.
9. When prompted for a user password, enter the value for the keyset being restored. In the case of themachine and system keysets, the default is “password”.
10.Insert a new smart card and repeat step 4-10 for each additional keyset until all have been restored.
11.Install the Microsoft CA.12.Select the SafeNet CSP from the drop-down box during installation. If the SafeNet option is not present, this
means that the keyset for the currently logged in user does not exist. Ensure the user is the same as theuser who did the backing up of the CA initially.
SafeNet ProtectToolkit 5.7 User Guide007-013682-005 Rev. A 08 January 2020 Copyright 2009-2020Gemalto 60
Chapter 7: Integration with Microsoft CA
13.After selection of the SafeNet CSP, click the Use existing keys box and select the key that corresponds tothe CA key pair.
Private Key Archiving and RecoveryWhen requesting a certificate using the Windows CA, users have the option to have their private key archivedby the CA. In a catastrophic system failure that results in the user losing their entire system, this feature allowsrecovery of the user’s private key.
Support for this archival and recovery process is included in SafeNet ProtectToolkit-M. The following examplesdemonstrate the use of this capability.
Private Key Archiving ExampleHere are the tasks required to archive a private key using a Microsoft certification authority (CA).
> Create a key recovery agent account
> Acquire the key recovery agent certificate
> Configure the certification authority to allow key recovery
> Create a new certificate template that allows key archiving
> Acquire a user certificate that has an archived key
PrerequisitesBefore doing these tasks:
> You must have a Windows Server domain controller.
> The Windows Server domain controller must also be configured as an enterprise root or subordinate CA.
> A user keyset for the user must exist. Refer to "Creating User Keysets" on page 22 for further information.
> The Allow Clear Export of Private Keys flag must be set. See the section "Enabling Private KeyClearExport" on page 40 for the procedure.
Task 1—Creating a Key Recovery Agent AccountConfigure and add the Key Recovery Agent certificate template as a template that can be issued by theenterprise CA.
To verify who can enroll the Key Recovery Agent template
1. Log on as administrator.2. Click Start,Run, type certtmpl.msc, and press Enter.
This opens the Certificate Templates snap-in in the Microsoft Management Console.
3. In the console tree, click “Certificate Templates.”4. In the details pane, right-clickKey Recovery Agent and click Properties.Select the Security tab.
By default, the security groups that can enroll the Key Recovery Agent certificate template are DomainAdministrators and Enterprise Administrators.
SafeNet ProtectToolkit 5.7 User Guide007-013682-005 Rev. A 08 January 2020 Copyright 2009-2020Gemalto 61
Chapter 7: Integration with Microsoft CA
5. To allow other users or groups to enroll the Key Recovery Agent certificate template, clickAdd to add theuser or group and grant them Read and Enroll permissions.
To change the default issuance behavior of the Key Recovery Agent template
1. In Key Recovery Agent Properties, click the Issuance Requirements tab.2. Clear the CA certificate manager approval check box and clickOK.3. Close the Microsoft Management Console.
To change the request handling to allow the Safenet CSPs
1. In the Key Recovery Agent Properties, click the Request Handling tab.2. Check the Allow Private Key to be Exported check box.3. Click on the CSP button and click on the radio button to allow requests to use any CSP available on the
subject’s computer.
To configure the Certification Authority (CA) to issue Key Recovery Agent certificates
1. On the Administrative Toolsmenu, clickCertification Authority.This opens the Certification Authority snap-in in the Microsoft Management Console.
2. In the console tree, double-click the CA, and then clickCertificate Templates.3. Right-clickCertificate Templates, then clickNew CertificateTemplate to Issue.4. In Enable Certificate Template, clickKey Recovery Agent, and then clickOK.
Task 2—Acquiring the Key Recovery Agent CertificateIn this series of steps, you will acquire a Key Recovery Agent Certificate for the purpose of recovering privatekeys. Begin by creating an MMC console with the Certificates snap-in loaded.
To ensure that you are logged on as the administrator
1. On the taskbar, click the Start button, and then clickRun.2. In Run, typemmc, and then clickOK.3. On the Filemenu, clickAdd/Remove Snap-in.4. In Add/Remove Snap-in, clickAdd.5. In Add Stand-alone Snap-in, clickCertificates, and then clickAdd.6. In Certificates, clickMy User account and then click Finish.7. ClickClose, and then clickOK.
To acquire a Key Recovery Agent certificate
1. In the console tree of the newly-created MMC console, double-clickCertificates - Current User.2. In the console tree, right-click Personal, clickAll Tasks,Request New Certificate.3. In the Certificate Request Wizard, clickNext.
SafeNet ProtectToolkit 5.7 User Guide007-013682-005 Rev. A 08 January 2020 Copyright 2009-2020Gemalto 62

Chapter 7: Integration with Microsoft CA
4. In Certificate Types, selectKey Recovery Agent and the Advanced checkbox, and then clickNext.5. On the CSP page that now displays, choose the SafeNet provider for HSM key storage and any other
appropriate settings such asKey is Exportable, etc. Then clickNext and Next again.6. On the Certificate Friendly Name and Description page, in the Friendly Name field, type Key Recovery,
and then clickNext.7. In Completing the Certificate Request Wizard, click Finish.8. In the console tree, double-click Personal and then click the Certificates folder.9. Ensure that a certificate with the friendly name ofKey Recovery exists.10.Close the console without saving changes.
Task 3—Configuring the CA to allow key recoveryIn this series of steps, configure the enterprise CA to use the Recovery Agent certificate acquired in Task 2.The CAmust load the public key for the Key Recovery Agent to be used for encrypting the recovery data.
To configure the Recovery Agent to be the Administrator's Key Recovery Agent certificate
1. Ensure that you are logged on as the administrator.2. In Administrative Tools, open Certification Authority.
This opens the Certification Authority snap-in in the Microsoft Management Console (MMC).
3. In the console tree, click the CA.4. Right-click the CA, and then click Properties.5. In the CA Properties, on the Recovery Agents tab, clickArchive the key and then clickAdd.6. In Key Recovery Agent Selection, click the certificate that is displayed, and then clickOK. The key
recovery agent certificate is shown with a status of Not loaded.
7. ClickOK, and when prompted to restart the CA, click Yes.
To open the Certificates console, focused on the local computer
1. On the taskbar, click the Start button, and then clickRun.2. In Run, typemmc, and then clickOK.3. On the File menu, clickAdd/Remove Snap-in.4. In Add/Remove Snap-in, clickAdd.5. In Add Standalone Snap-in, clickCertificates, and then clickAdd.6. In Certificates Snap-in, clickComputer account and then clickNext.7. In Select Computer, click Local Computer, and then click Finish.8. ClickClose, and then clickOK.
To verify the installation of the Key Recovery Agent (KRA) certificate
1. In the console tree, double-clickCertificates (Local Computer), double-clickKRA, and then clickCertificates.
SafeNet ProtectToolkit 5.7 User Guide007-013682-005 Rev. A 08 January 2020 Copyright 2009-2020Gemalto 63

Chapter 7: Integration with Microsoft CA
2. In the details pane, double-click the certificate.3. Verify that the intended use of the certificate is Key Recovery Agent and the certificate is issued to
Administrator. This procedure ensures that the Key Recovery Agent has been successfully configured.
4. ClickOK and then close the console without saving changes.
Task 4 — Creating a new certificate template that allows key archivingIn this series of steps, you define a new template that allows Key Archival and HSM key storage by using theCertificate Templates console. This will allow hardware key storage within a HSM at the client computer andkey recovery in the domain in the event that the private key is lost or corrupted at the client computer.
To open the Certificate Templates console
1. Log on as the administrator.2. On the taskbar, click the Start button, and then clickRun.3. In Run, typemmc, and then clickOK.4. On the Filemenu, clickAdd/Remove Snap-in.5. In Add/Remove Snap-in, clickAdd.6. In Add Standalone Snap-in, clickCertificate Templates, and then clickAdd.7. ClickClose, and thenOK.A duplicate of the Users certificate template is now created and named Archive User. This is a shortcut tocreating a template with permissions that allows both Domain Administrator and Domain User certificateenrollments. The template is then modified so that certificate enrollments made using this template will enableboth key archival and the ability to use Safenet as a CSP.
To create a modified Archive User certificate template
1. In the console tree, clickCertificate Templates.2. In the details pane, right-click the User template, and clickDuplicate Template.3. In the Properties of New Template dialog box, in theGeneral tab, in the Template display name box,
type Archive User.4. In the Request Handling tab, enable the Archive subject's encryption private key option (see the
screen shot below). This option makes it possible for a Key Recovery Agent to recover the private key fromthe certificate store.
SafeNet ProtectToolkit 5.7 User Guide007-013682-005 Rev. A 08 January 2020 Copyright 2009-2020Gemalto 64
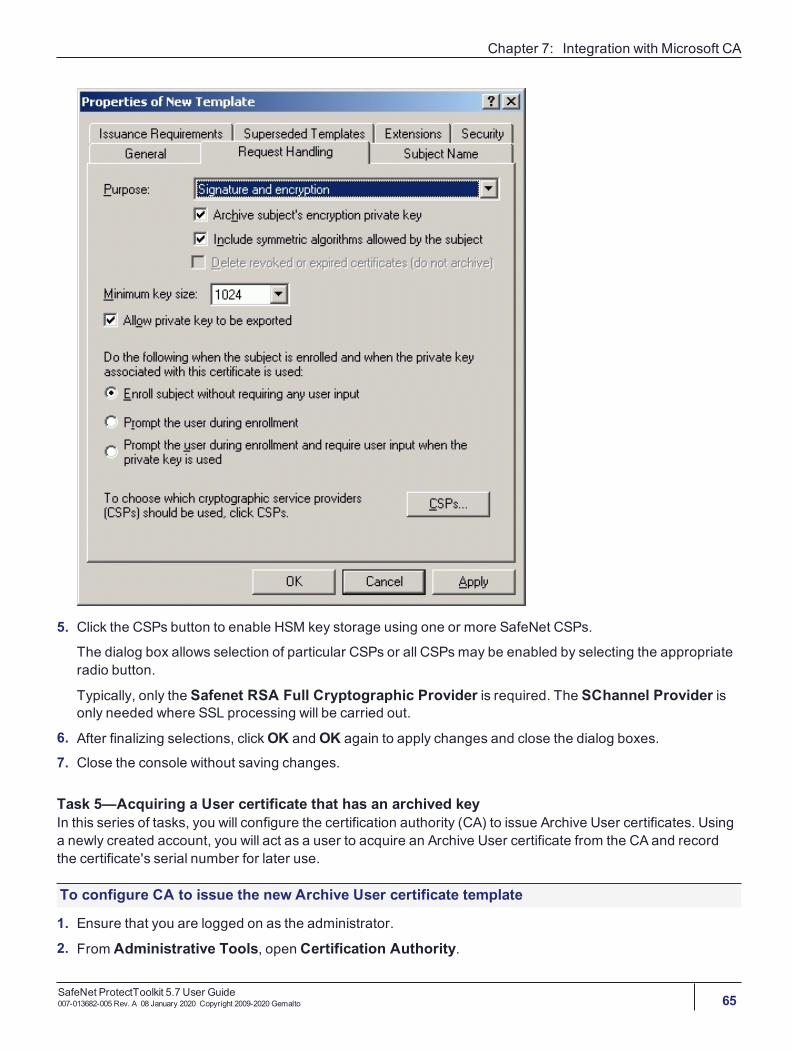
Chapter 7: Integration with Microsoft CA
5. Click the CSPs button to enable HSM key storage using one or more SafeNet CSPs.
The dialog box allows selection of particular CSPs or all CSPs may be enabled by selecting the appropriateradio button.
Typically, only the Safenet RSA Full Cryptographic Provider is required. The SChannel Provider isonly needed where SSL processing will be carried out.
6. After finalizing selections, clickOK andOK again to apply changes and close the dialog boxes.
7. Close the console without saving changes.
Task 5—Acquiring a User certificate that has an archived keyIn this series of tasks, you will configure the certification authority (CA) to issue Archive User certificates. Usinga newly created account, you will act as a user to acquire an Archive User certificate from the CA and recordthe certificate's serial number for later use.
To configure CA to issue the new Archive User certificate template
1. Ensure that you are logged on as the administrator.2. From Administrative Tools, open Certification Authority.
SafeNet ProtectToolkit 5.7 User Guide007-013682-005 Rev. A 08 January 2020 Copyright 2009-2020Gemalto 65
Chapter 7: Integration with Microsoft CA
3. In the console tree, double-click the CA name, and then clickCertificates Templates.4. Right-clickCertificate Templates, clickNew, and then clickCertificate Template to Issue.5. In Enable Certificate Templates, clickArchive User and then clickOK.6. The Archive User certificate template now appears in the details pane.
7. Close Certification Authority.
To create a new user account
1. In Administrative Tools, open Active Directory Users and Computers.2. Double-click the domain.3. SelectUsers then click the Create a new user in the current container button.4. Complete the following fields to create a user account:
a. First nameb. Last namec. User logon name (e.g. [email protected])
d. Password5. ClickNext, and then click Finish.6. Double-click the new user account, select theGeneral tab and enter the email address. e.g.
[email protected]. This is required if the option to include the email name is set in the template used tocreate the user (Subject Name tab).
7. For the purpose of demonstration here, add the user to the Server Operators group so they are able to logon locally to the domain controller. This would not normally be required.
a. Select theMember of tab.b. ClickAdd, in Select Groups, type Server Operators, clickCheck Names, and then clickOK.c. ClickOK to close Properties.
8. Close Active Directory Users and Computers.9. Close all open windows and log off the computer.
To open the Certificates console
1. Log on as the user.2. On the taskbar, click the Start button, and then clickRun.3. In Run, typemmc, and then clickOK.4. From the Filemenu, clickAdd/Remove Snap-in.5. In Add/Remove Snap-in, clickAdd.6. In Add Stand-alone Snap-in, clickCertificates, clickAdd, and then clickClose.7. ClickOK to close the Add/Remove Snap-in dialog box.
SafeNet ProtectToolkit 5.7 User Guide007-013682-005 Rev. A 08 January 2020 Copyright 2009-2020Gemalto 66

Chapter 7: Integration with Microsoft CA
To use the Certificates MMC to acquire an Archive User certificate
1. In the newly-created MMC console, in the console tree, double-clickCertificates (Current User).2. In the console tree, right-click Personal, clickAll Tasks, and then clickRequest New Certificate.3. In the Certificate Request Wizard, clickNext.4. Under Certificate types, selectArchive User and check the Advanced checkbox. Then clickNext.5. On the CSP page that is now visible, choose the SafeNet provider for HSM key storage and any other
appropriate settings such asKey is Exportable, etc. Then clickNext and Next again.6. In Friendly name, type Archive User, and then clickNext.7. On Completing the Certificate Request Wizard, click Finish.
If the dialog box shown below displays, the most likely cause of the problem is that the Allow Clear Export ofPrivate Keys flag has not been set. See "Enabling Private KeyClear Export" on page 40 for details.
8. Double-click Personal, and then clickCertificates.9. In the details pane, double-click the certificate with the friendly name ofArchive User.10.In Certificate, click the Details tab.
Note that the certificate template used to generate this certificate was Archive User, then clickOK.11.Close the new console without saving changes.
12.Close all windows and log off of the computer.
Private Key Recovery ExampleHere are the tasks required to recover a lost private key previously archived using a Microsoft certificationauthority (CA).
> Perform key recovery
> Import the recovered private key
Task 1—Performing a Key RecoveryIn this series of tasks, perform a key recovery by using Certutil.exe. For more information on Certutil, see yourMicrosoft documentation.
First, ensure that the private key is recoverable by viewing the Archived Key column in the CertificationAuthority console and obtain the certificate serial number required for recovery.
SafeNet ProtectToolkit 5.7 User Guide007-013682-005 Rev. A 08 January 2020 Copyright 2009-2020Gemalto 67
Chapter 7: Integration with Microsoft CA
To obtain the certificate serial number of the confirmed recoverable private key
1. Log on as the administrator.2. From Administrative Tools, open Certification Authority.3. In the console tree, double-click the CA, and then click Issued Certificates.4. From the Viewmenu, clickAdd/Remove Columns.5. In Add/Remove Columns, in Available Column, selectArchived Key, and then clickAdd. Archived
Key should now appear in Displayed Columns.
6. ClickOK and then, in the details pane, scroll to the right and confirm that the last issued certificate to theuser has a Yes value in the Archived Key column.
NOTE A certificate template must have been modified so that the Archive bit and MarkPrivate Key as Exportable attributes were enabled. The private key is only recoverable if thereis data in the Archived Key column.
7. Double-click the Archive User certificate.8. Click the Details tab9. Write down the serial number of the certificate. (Do not include spacing between digit pairs.) This is required
for recovery.
The serial number is a 20 character, hexadecimal string. The serial number of the private key is the sameas the serial number of the certificate.
For the purposes of this walkthrough, the serial number is referred to as serialnumber.
10.ClickOK.11.Close Certification Authority.
To recover the private key into a BLOB output file using certutil.exe
1. From a command prompt, type cd \ and then press Enter.2. Ensure that you are in the c:\ directory.3. At the command prompt, type:
Certutil -getkey serialnumber outputblob
4. At the command prompt, type dir outputblob
NOTE If the file outputblob does not exist, you probably typed the serial number incorrectlyfor the certificate. The outputblob file is a PKCS#7 file containing the KRA certificates and theuser certificate and chain. The inner content is an encrypted PKCS#7 containing the privatekey (encrypted to the KRA certificates).
To recover the original private/public key pair using certutil.exe
1. From a command prompt, type:Certutil -recoverkey outputblob <username>.pfx
SafeNet ProtectToolkit 5.7 User Guide007-013682-005 Rev. A 08 January 2020 Copyright 2009-2020Gemalto 68

Chapter 7: Integration with Microsoft CA
2. When prompted, enter the following information:
a. Enter new password: passwordb. Confirm new password: passwordc. Type exit, and then press Enter.
3. Close all windows and log off as the current user.
Task 2—Importing the recovered private keyRestoration of the recovered private key to the users certificate store by importing the <username>.pfx file.
To log on as the user and start the Certificates mmc
1. Log on as the user.2. On the taskbar, click the Start button, and then clickRun.3. In Run, typemmc, and then clickOK.4. On the Filemenu, clickAdd/Remove Snap-in.5. In Add/Remove Snap-in, clickAdd.6. In Add Standalone Snap-in, clickCertificates, clickAdd, and then clickClose andOK.
To delete all certificates issued by the CA to simulate a re-installed computer
1. Right-clickCertificates - Current User, and then click Find Certificates.2. In Find Certificates, in Contains, type the CA and then click Find Now.3. On the Editmenu, click Select All.4. On the Filemenu, clickDelete.5. In Certificates, click Yes.6. In Root Certificate Store, click Yes.7. Close Find Certificates.
To import the certificate at c:\ <username>.pfx and let the certificates be placed automatically
1. In the console tree, right-click Personal and then clickAll Tasks and then click Import.2. In the Certificate Import Wizard, clickNext.3. On Files to Import, in the File name box, type c:\ <username>.pfx, and then clickNext.4. In Password, type password and then clickNext.5. On Certificate Store, clickAutomatically select the certificate store based on the type of
certificate and then clickNext.6. On Completing the Certificate Import Wizard, click Finish.7. If the Root Certificate Store dialog box appears, click Yes.8. In Certificate Wizard Import, clickOK.
SafeNet ProtectToolkit 5.7 User Guide007-013682-005 Rev. A 08 January 2020 Copyright 2009-2020Gemalto 69
Chapter 7: Integration with Microsoft CA
Two certificates were imported. The Archive User certificate for the user is located in the Personalcertificates store and the CA certificate is located in the Trusted Root Certification Authorities store.
To verify the serial number of the imported certificate
1. In the console tree, double-click Personal and then clickCertificates.2. Double-click the certificate.3. In Certificate, click the Details tab. Verify that the serial number matches the original.4. Close all open windows and log off.
SafeNet ProtectToolkit 5.7 User Guide007-013682-005 Rev. A 08 January 2020 Copyright 2009-2020Gemalto 70
CHAPTER 8: Known Issues
This section describes some of the known issues that can occur due to incorrect configuration or usage of theSafeNet ProtectToolkit-M product. Should you encounter any difficulties not discussed in this section, pleasesee "Support Contacts" on page 10.
Session Exists ErrorThis error may occur during an attempt to allocate additional keyset space or during a delete keyset operation.
Problem: Error message during keyset delete or during space allocation / de-allocation.Cause: There are applications that have open sessions to SafeNet ProtectToolkit-M. Certain administrativeoperations require exclusive use of the system as a security measure; these include keyset sensitive taskssuch as space allocation and keyset deletion.
Solution: Close or temporarily stop any applications or services that may be using SafeNet ProtectToolkit-Msuch as Certificate Services, IIS etc.
To check if an application has any open sessions to SafeNet ProtectToolkit-M, check the value shown next toApplication Count in the System section of the administration utility. This will need to be “1”, and the TotalSession Count must be “0” in order for the chosen action to succeed.
If this error persists, try re-booting your machine and check for any self- or auto-starting applications whichmay open sessions to SafeNet ProtectToolkit-M.
The Certification Authority service:CertSvc is one application that may be using SafeNet ProtectToolkit-M. Ifafter reboot, the application count is still > 1, try disabling the service, performing the Admin operation and thenre-enabling the service.
Also try the following if applicable:
> Stop the CA
> Deactivate Directory Security (IIS)
> Reboot machine
> Run the E8KRESET utility (PCIe HSM only).
NOTE If the value of Application Count is shown as “UNAVAILABLE”, your HSM firmwaredoesn’t support live application counting. In such a case, it is advisable to upgrade the HSMfirmware to the latest version. Please refer to "Checking and Upgrading HSMFirmware" onpage 38.
Duplicate Container or Key InstancesIt is possible that following a key restore operation, there may be more than one instance of the same containeror key within a particular keyset.
SafeNet ProtectToolkit 5.7 User Guide007-013682-005 Rev. A 08 January 2020 Copyright 2009-2020Gemalto 71
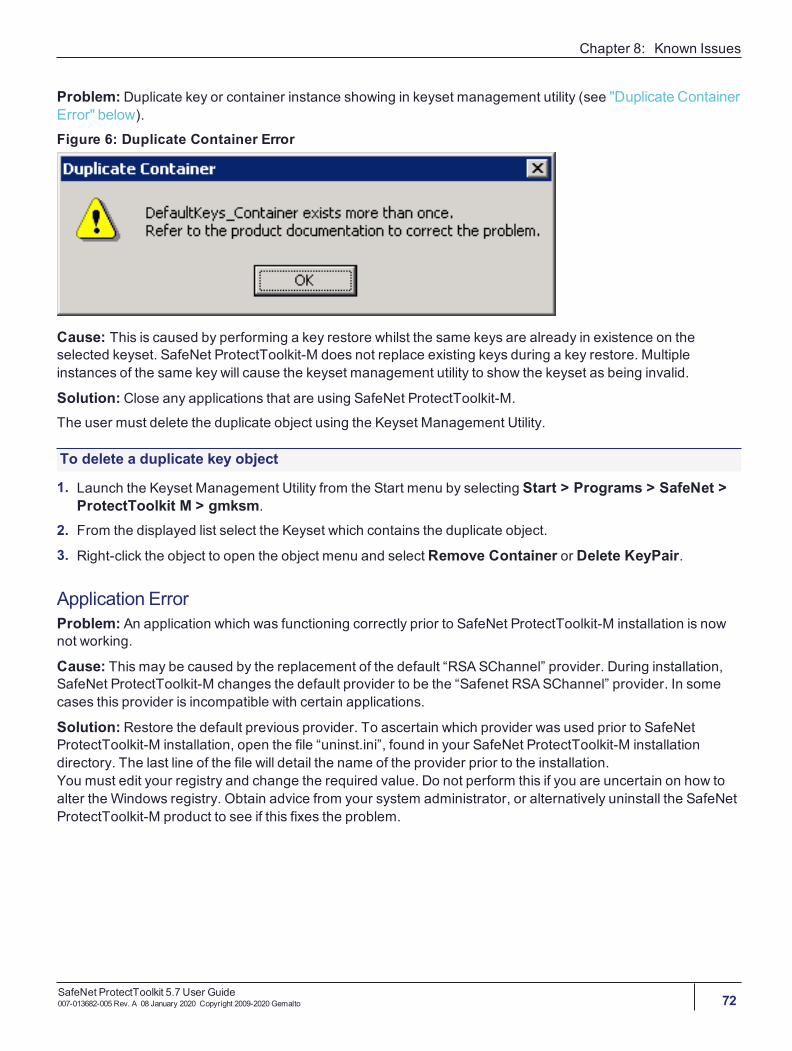
Chapter 8: Known Issues
Problem: Duplicate key or container instance showing in keyset management utility (see "Duplicate ContainerError" below).Figure 6: Duplicate Container Error
Cause: This is caused by performing a key restore whilst the same keys are already in existence on theselected keyset. SafeNet ProtectToolkit-M does not replace existing keys during a key restore. Multipleinstances of the same key will cause the keyset management utility to show the keyset as being invalid.
Solution: Close any applications that are using SafeNet ProtectToolkit-M.The user must delete the duplicate object using the Keyset Management Utility.
To delete a duplicate key object
1. Launch the Keyset Management Utility from the Start menu by selecting Start > Programs > SafeNet >ProtectToolkit M > gmksm.
2. From the displayed list select the Keyset which contains the duplicate object.
3. Right-click the object to open the object menu and selectRemove Container or Delete KeyPair.
Application ErrorProblem: An application which was functioning correctly prior to SafeNet ProtectToolkit-M installation is nownot working.
Cause: This may be caused by the replacement of the default “RSASChannel” provider. During installation,SafeNet ProtectToolkit-M changes the default provider to be the “Safenet RSASChannel” provider. In somecases this provider is incompatible with certain applications.
Solution: Restore the default previous provider. To ascertain which provider was used prior to SafeNetProtectToolkit-M installation, open the file “uninst.ini”, found in your SafeNet ProtectToolkit-M installationdirectory. The last line of the file will detail the name of the provider prior to the installation.You must edit your registry and change the required value. Do not perform this if you are uncertain on how toalter the Windows registry. Obtain advice from your system administrator, or alternatively uninstall the SafeNetProtectToolkit-M product to see if this fixes the problem.
SafeNet ProtectToolkit 5.7 User Guide007-013682-005 Rev. A 08 January 2020 Copyright 2009-2020Gemalto 72
CHAPTER 9: Integration With IIS
One of the uses for the Microsoft Cryptographic API is for Secure Socket Layer (SSL) processing. This sectionexplains the steps necessary to configure and use SafeNet ProtectToolkit-M in conjunction with IIS.
Prior to performing any of the following, please ensure that SafeNet ProtectToolkit-M is correctly installed andconfigured. For details, please refer to "Installation" on page 14 and "Setup and Configuration" on page 16.This section contains the following instructive subsections for integration with IIS:
> "Creating a Certificate" below
> "Installing a Certificate for use with IIS" on page 75
Creating a CertificateIn order for SafeNet ProtectToolkit-M and the HSM to be used for SSL processing, a certificate needs to be setup that specifies the details of the SafeNet ProtectToolkit-M machine.
There are multiple methods of creating a certificate for the machine:
> "Using IIS" below
> "Creating a Certificate Using theMicrosoft CA server" on the next page
> "Using the createcert utility" on page 75. Note that self-signed certificates created by the utility are only ofuse for testing purposes.
Using IISWhen using IIS to install a certificate on the host machine, the following has to be performed:
> Creating a certificate request
> Sending the certificate request to be signed by a CA
> Installing the signed certificate into IIS
To create a certificate request using IIS
1. Start the Internet Services Manager from the Administrative Toolsmenu.2. Highlight the Default Web Site entry, and right-click to open a context menu. Select Properties. The
default web site properties dialog opens. Select the Directory Security tab.3. Click on the Server Certificate button. This will start the IIS Certificate Wizard.
4. Choose Create a new certificate from the available options and pressNext to continue.5. Choose Prepare the request now, but send it later from the available options and pressNext to
continue.
SafeNet ProtectToolkit 5.7 User Guide007-013682-005 Rev. A 08 January 2020 Copyright 2009-2020Gemalto 73
Chapter 9: Integration With IIS
6. Select SafeNet as the security provider. On the Name and Security Settings page that now displays,check the Select cryptographic service provider (CSP) for this certificate checkbox. ClickNext tocontinue.
7. Continue to follow the on-screen prompts until the certificate request is completed.
The IIS Certificate Wizard creates the certificate request as a file. You should now forward this file onto yourCA in order to have it signed. The CA returns a new file, which is the signed certificate.
Refer to "Installing a Certificate for use with IIS" on the next page for details on how to install the signedcertificate.
Creating a Certificate Using theMicrosoft CA serverThe Microsoft CA server provides a standard internet browser interface for the creation of certificates.
NOTE Before starting the following procedure, ensure that the current logged on user hasWindows administrator privileges and has a valid keyset.
To create a certificate using MS CA server
1. Start the MSCA services interface by opening your web browser and specifying the Microsoft CA serverURL. For example:http://hostname/certsrv
The opening dialog for CA services appears.
2. Select the Request a certificate option and pressNext to continue. You are prompted to select therequest type.
3. Choose,Advanced request and pressNext to continue. You will be presented with the AdvancedCertificate Requests screen.
4. Select Submit a certificate request to this CA using a form, and pressNext to continue. You will bepresented with a form to input the certificate details.
5. Enter the details for the certificate into the fields provided:a. Certificate Name: enter the host machine's name. This can be found by executing the standard
Windows command hostname from a command prompt.
b. Intended Purpose: choose Server Authentication Certificate.c. Key Options: choose SafeNet RSA SChannel Cryptographic Provider as the CSPd. Key Usage: choose Exchangee. Key Size: enter as required, eg. “1024”f. selectCreate new key setg. if you want to be able to back up the keys associated with the certificate at a later date, chooseMark
keys as exportableh. choose Use local machine storei. Additional Options: choose Hash Algorithm, e.g. “MD5”
SafeNet ProtectToolkit 5.7 User Guide007-013682-005 Rev. A 08 January 2020 Copyright 2009-2020Gemalto 74
Chapter 9: Integration With IIS
NOTE If the current logged-on user’s keyset does not exist when the Safenet CSP isselected, the Hash Algorithm list box at the bottom of the screen will be empty. Should thisbe the case, abort this operation and create a keyset for the currently logged-on user beforeattempting this task again.
6. Press the Submit button when you have confirmed your inputs. If the Microsoft CAwas configured to “AutoIssue” certificates, you are presented with the Certificate Issued dialog.
Click Install this certificate to complete the certificate request and installation.If CA Services is not configured to auto-issue certificates, the dialog will state that your certificate request ispending. You will have to check on the status of the certificate using the CA services at a later time. Whenthe certificate is ready, you are presented with the Certificate Issued dialog.
Using the createcert utilityThe createcert utility is provided as a simple means to create a self-signed certificate for the SafeNetProtectToolkit-M host machine.
NOTE These certificates are intended for development and testing purposes only. Alsoensure that the current logged on user hasWindows administrator privileges and has a validkeyset.
You will need to know the machine name for the SafeNet ProtectToolkit-M system. Run the standard Windowscommand hostname from a command prompt.
To create a self-signed certificate using createcert utility
From a command prompt, execute the utility createcert, specifying the machine name. For example, if themachine name is “betaone”, the command would be as follows:C:\>createcert CN=betaone
Successful execution of the above will result in an RSA key pair being created, as well as a certificate which issaved in the file “selfsigned.cer”. This certificate is then automatically installed ready for IIS use.File calles SelfSigned.cer has been saved.Certificate created successfully and installed
Installing a Certificate for use with IISIn order to make use of the certificate in IIS, it will need to be assigned to a website.
To install the certificate with IIS
1. Start the Internet Services Manager from the Windows Start/Programs/Administrative Tools/menu.
SafeNet ProtectToolkit 5.7 User Guide007-013682-005 Rev. A 08 January 2020 Copyright 2009-2020Gemalto 75
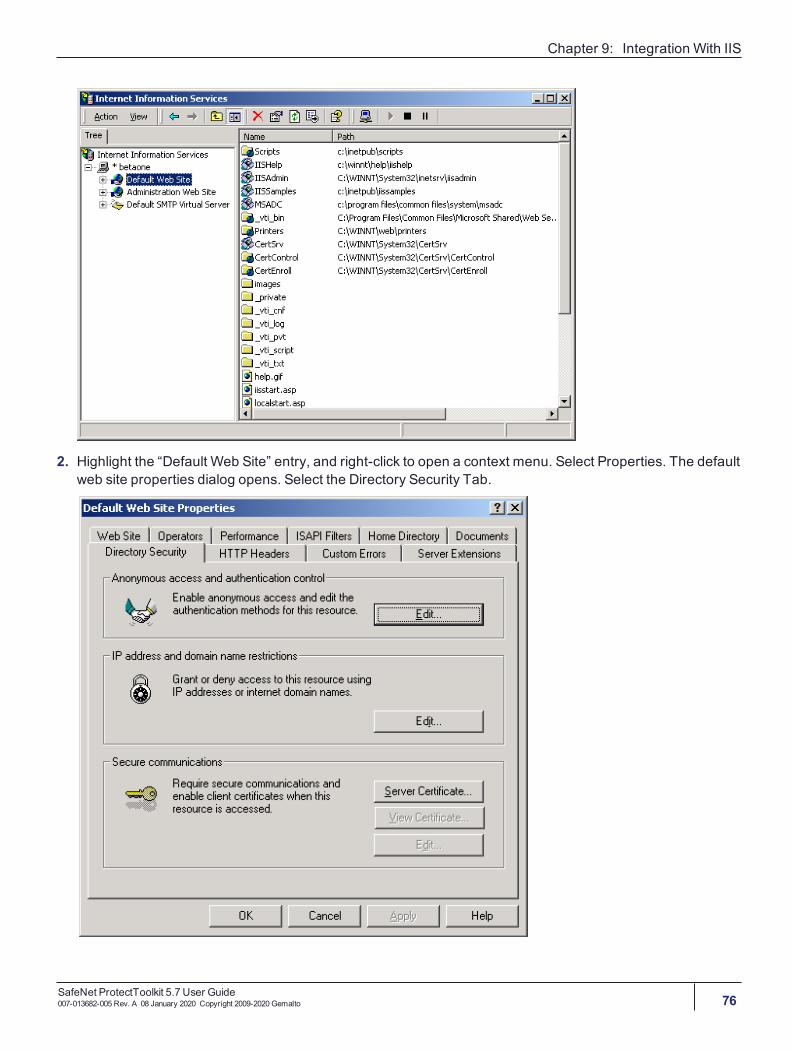
Chapter 9: Integration With IIS
2. Highlight the “Default Web Site” entry, and right-click to open a context menu. Select Properties. The defaultweb site properties dialog opens. Select the Directory Security Tab.
SafeNet ProtectToolkit 5.7 User Guide007-013682-005 Rev. A 08 January 2020 Copyright 2009-2020Gemalto 76
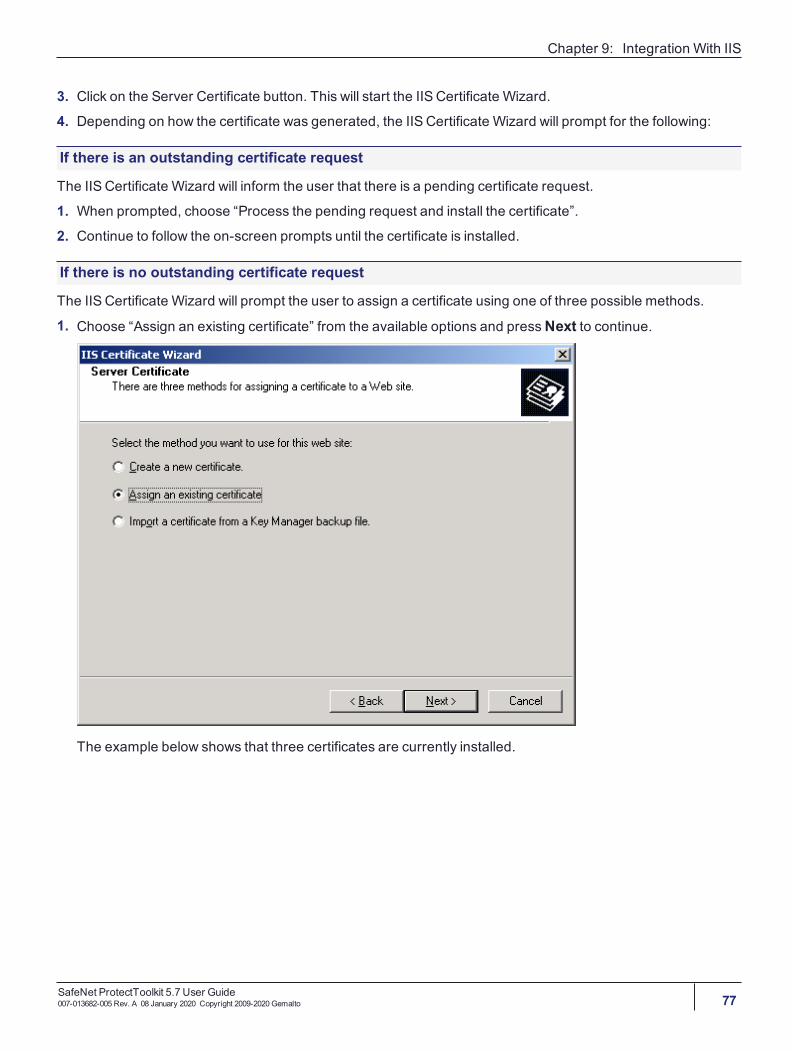
Chapter 9: Integration With IIS
3. Click on the Server Certificate button. This will start the IIS Certificate Wizard.
4. Depending on how the certificate was generated, the IIS Certificate Wizard will prompt for the following:
If there is an outstanding certificate request
The IIS Certificate Wizard will inform the user that there is a pending certificate request.
1. When prompted, choose “Process the pending request and install the certificate”.
2. Continue to follow the on-screen prompts until the certificate is installed.
If there is no outstanding certificate request
The IIS Certificate Wizard will prompt the user to assign a certificate using one of three possible methods.
1. Choose “Assign an existing certificate” from the available options and pressNext to continue.
The example below shows that three certificates are currently installed.
SafeNet ProtectToolkit 5.7 User Guide007-013682-005 Rev. A 08 January 2020 Copyright 2009-2020Gemalto 77
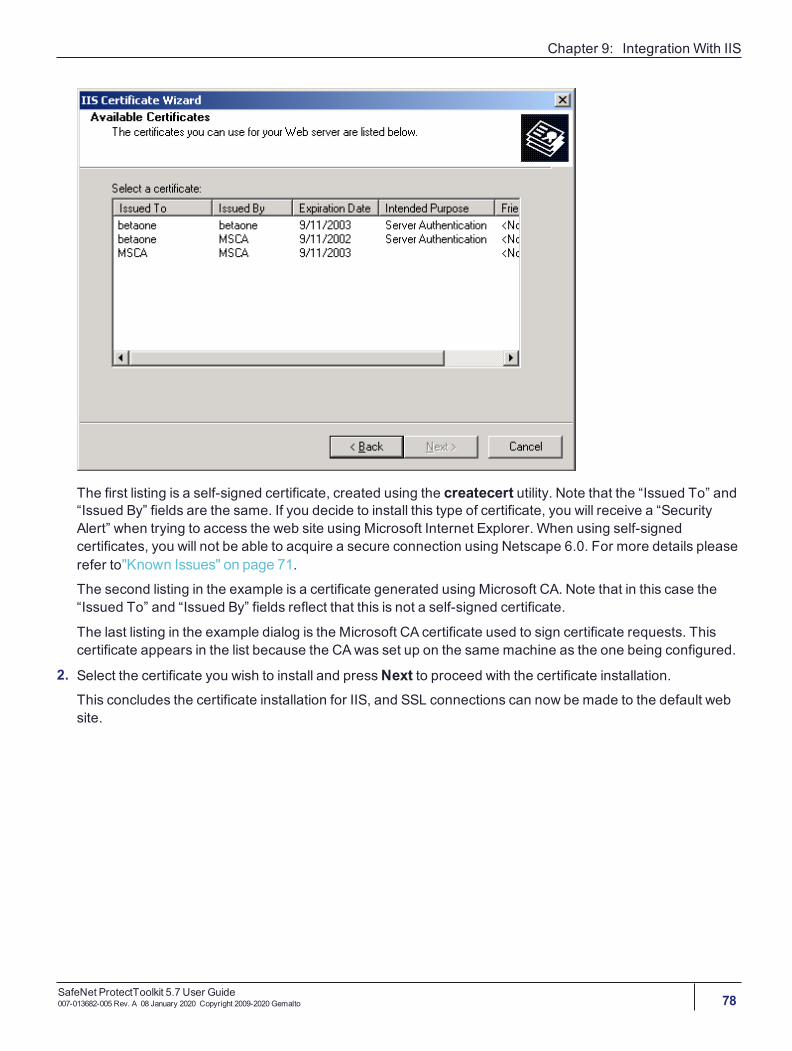
Chapter 9: Integration With IIS
The first listing is a self-signed certificate, created using the createcert utility. Note that the “Issued To” and“Issued By” fields are the same. If you decide to install this type of certificate, you will receive a “SecurityAlert” when trying to access the web site using Microsoft Internet Explorer. When using self-signedcertificates, you will not be able to acquire a secure connection using Netscape 6.0. For more details pleaserefer to"Known Issues" on page 71.The second listing in the example is a certificate generated using Microsoft CA. Note that in this case the“Issued To” and “Issued By” fields reflect that this is not a self-signed certificate.
The last listing in the example dialog is the Microsoft CA certificate used to sign certificate requests. Thiscertificate appears in the list because the CAwas set up on the same machine as the one being configured.
2. Select the certificate you wish to install and pressNext to proceed with the certificate installation.This concludes the certificate installation for IIS, and SSL connections can now be made to the default website.
SafeNet ProtectToolkit 5.7 User Guide007-013682-005 Rev. A 08 January 2020 Copyright 2009-2020Gemalto 78
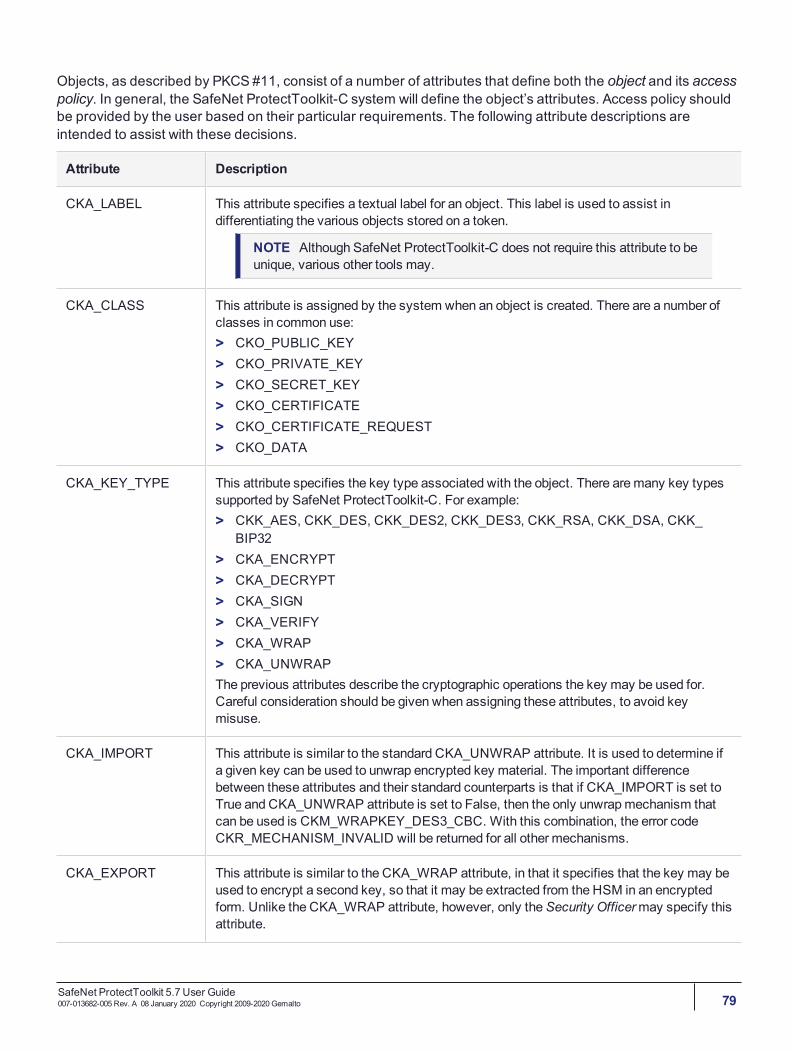
Objects, as described by PKCS #11, consist of a number of attributes that define both the object and its accesspolicy. In general, the SafeNet ProtectToolkit-C system will define the object’s attributes. Access policy shouldbe provided by the user based on their particular requirements. The following attribute descriptions areintended to assist with these decisions.
Attribute Description
CKA_LABEL This attribute specifies a textual label for an object. This label is used to assist indifferentiating the various objects stored on a token.
NOTE Although SafeNet ProtectToolkit-C does not require this attribute to beunique, various other tools may.
CKA_CLASS This attribute is assigned by the system when an object is created. There are a number ofclasses in common use:> CKO_PUBLIC_KEY> CKO_PRIVATE_KEY> CKO_SECRET_KEY> CKO_CERTIFICATE> CKO_CERTIFICATE_REQUEST> CKO_DATA
CKA_KEY_TYPE This attribute specifies the key type associated with the object. There aremany key typessupported by SafeNet ProtectToolkit-C. For example:> CKK_AES, CKK_DES, CKK_DES2, CKK_DES3, CKK_RSA, CKK_DSA, CKK_
BIP32> CKA_ENCRYPT> CKA_DECRYPT> CKA_SIGN> CKA_VERIFY> CKA_WRAP> CKA_UNWRAPThe previous attributes describe the cryptographic operations the key may be used for.Careful consideration should be given when assigning these attributes, to avoid keymisuse.
CKA_IMPORT This attribute is similar to the standard CKA_UNWRAP attribute. It is used to determine ifa given key can be used to unwrap encrypted key material. The important differencebetween these attributes and their standard counterparts is that if CKA_IMPORT is set toTrue and CKA_UNWRAP attribute is set to False, then the only unwrapmechanism thatcan be used is CKM_WRAPKEY_DES3_CBC. With this combination, the error codeCKR_MECHANISM_INVALID will be returned for all other mechanisms.
CKA_EXPORT This attribute is similar to the CKA_WRAP attribute, in that it specifies that the key may beused to encrypt a second key, so that it may be extracted from the HSM in an encryptedform. Unlike the CKA_WRAP attribute, however, only theSecurity Officermay specify thisattribute.
SafeNet ProtectToolkit 5.7 User Guide007-013682-005 Rev. A 08 January 2020 Copyright 2009-2020Gemalto 79
Attribute Description
CKA_SENSITIVE This attribute specifies that the key object cannot be extracted from the token in the clear.Generally this attribute should be specified to ensure the key material is not exposed.When theNoClear PINs flag is set only sensitive keys may be created on the HSM.
CKA_EXTRACTABLE/CKA_EXPORTABLE
These attributes are used to specify that the key may be extracted from the token in anencrypted (for example, wrapped) form. These attributes determine how the key may bebacked up. Please consult the key backup section in "Unauthenticated Users" on page 1for more information.
SafeNet ProtectToolkit 5.7 User Guide007-013682-005 Rev. A 08 January 2020 Copyright 2009-2020Gemalto 80
CHAPTER 11: Work Load Distribution
This chapter describes some of the benefits and limitations of using Work Load Distribution (WLD) in SafeNetProtectToolkit-M.
A full description of WLD can be found in the SafeNet ProtectToolkit-C Administration Guide.
Benefits of WLDWLD allows work to be balanced across a system by transferring units of work among HSM processingmodules during execution. The demand placed on any particular processing module is thereby reduced. Thisresults in an increase in the overall throughput of processing tasks for the system as a whole.
Utilization of multiple HSMs under WLD also provides redundancy in that if a HSM goes down, with theexception of the master HSM, the work will be shared amongst the remaining operational HSMs automatically.If the master HSM goes down this will most likely cause system failure.
WLDLimitations
Read-OnlyUsing SafeNet ProtectToolkit-M as a CSP under WLD is severely limited. WLD does not support write/createoperations. Therefore, the CSP cannot be used to create certificates when in WLDmode, as this involvescreating a key pair. The CSP can, however, be used to sign certificate requests that have been generated by aclient, provided the client also generated their own key pair.
Admin Token Cannot Be Distributed - Single Point of FailureThe HSM's admin token contains relevant configuration information. WLD does not allow replication of admintokens. SafeNet ProtectToolkit-M has a 'secure configuration', a collection of configuration items stored on adata object on the admin token, readable but not modifiable by anyone other than the administrator. Therelevant secure configuration item here is 'clear export'. This specifies whether or not keys may be exported inthe clear. Since admin tokens cannot be replicated, it is necessary to expose the admin token of one of theHSMs in the array, called the master HSM. If the master HSM fails, the admin token will no longer be available,most likely causing system failure.
SafeNet ProtectToolkit 5.7 User Guide007-013682-005 Rev. A 08 January 2020 Copyright 2009-2020Gemalto 81
CHAPTER 12: Registry Configuration
The registry entries documented here are those created by default when SafeNet ProtectToolkit-M is installedunless otherwise noted.
This section contains the following entries:
> "ptkcRuntime" below
> "CryptokiPath" on the next page
> "debugLevel" on the next page
> "Safenet RSA Full Cryptographic Provider" on page 84
> "Safenet RSA SChannel Cryptographic Provider" on page 84
> "Default RSA SChannel Cryptographic Provider Type" on page 84
> "Default RSA Full Cryptographic Provider Type" on page 84
> "Silent User Keyset Login Password" on page 85
DisclaimerThe SafeNet ProtectToolkit-M registry configuration, as documented in this appendix, should only be modifiedby personnel who are competent at making changes to the Windows registry using the regedit utility.Changing the registry incorrectly can leave a system in an unrecoverable state and Gemalto cannot be heldresponsible should this occur. If you are unfamiliar with editing the registry, it is strongly advised that you referto your Windows documentation or seek help from a qualified systems administrator before attempting anychanges.
ptkcRuntime
Key LocationHKEY_LOCAL_MACHINE\SOFTWARE\SAFENET\ProtectToolkit M\ptkcRuntime
TypeREG_SZ
ValuesThe SafeNet ProtectToolkit-M product relies on the SafeNet ProtectToolkit-C product. This is a string valuewhich is used to record the version of the SafeNet ProtectToolkit-C runtime installed in the SafeNetProtectToolkit-M installation directory.
SafeNet ProtectToolkit 5.7 User Guide007-013682-005 Rev. A 08 January 2020 Copyright 2009-2020Gemalto 82
Chapter 12: Registry Configuration
CryptokiPath
Key LocationHKEY_LOCAL_MACHINE\SOFTWARE\SAFENET\ProtectToolkit M\CryptokiPath
TypeREG_SZ
ValueThis string value is the path to where SafeNet ProtectToolkit-M is installed. This path is used to locate therequired cryptoki.dll file.
debugLevel
Key LocationHKEY_LOCAL_MACHINE\SOFTWARE\SAFENET\ProtectToolkit M\debugLevel
TypeREG_DWORD
ValuesValid values are 0 through 5. If turned on, debug output is saved in the ptkm.log file in the root directory of thecurrent drive. Each level includes the output of all preceding levels.
> 0: no debug output> 1: log the invocation of CSP related methods and if an error occurs, their return code> 2: Internal errors are converted to NTE_SYS_FAIL. This debug level logs the internal error at the point of
conversion.
> 3: CSP function input and output parameters - but NOT user related data (such as encrypted or clear text,or data to hash).
> 4: Other information not covered by the preceding levels - but NOT user related data.> 5: Lists the Cryptoki function calls, by name only.Note that the debug level is read when a process loads the SafeNet ProtectToolkit-M library file. This meansthat in order to change the debug level, you must first stop any SafeNet ProtectToolkit-M applications.
The log file ptkm.log is cleared during initialization of the SafeNet ProtectToolkit-M library.
SafeNet ProtectToolkit 5.7 User Guide007-013682-005 Rev. A 08 January 2020 Copyright 2009-2020Gemalto 83
Chapter 12: Registry Configuration
Safenet RSA Full Cryptographic Provider
Key LocationHKEY_LOCAL_MACHINE\SOFTWARE\Microsoft\Cryptography\Defaults\Provider\Safenet RSA FullCryptographic Provider
DescriptionThis is the registry key (and contained values) which defines one of the CSPs installed by the SafeNetProtectToolkit-M product.
Safenet RSA SChannel Cryptographic Provider
Key LocationHKEY_LOCAL_MACHINE\SOFTWARE\Microsoft\Cryptography\Defaults\Provider\Safenet RSASChannelCryptographic Provider
DescriptionThis is the registry key (and contained values) which defines one of the CSPs installed by the SafeNetProtectToolkit-M product.
Default RSA SChannel Cryptographic Provider Type
KeyHKEY_LOCAL_MACHINE\SOFTWARE\Microsoft\Cryptography\Defaults\Provider Types\Type 012
DescriptionThis is the registry key which defines the default “RSASChannel” provider. This provider is used byapplications which request RSASChannel services, but do not specify which provider (such as IIS).
ValueName of the default provider, after installing SafeNet ProtectToolkit-M. This should be “Safenet RSASChannelCryptographic Provider”.
Default RSA Full Cryptographic Provider Type
Key LocationHKEY_LOCAL_MACHINE\SOFTWARE\Microsoft\Cryptography\Defaults\Provider Types\Type 001
SafeNet ProtectToolkit 5.7 User Guide007-013682-005 Rev. A 08 January 2020 Copyright 2009-2020Gemalto 84
Chapter 12: Registry Configuration
DescriptionThis is the registry key which defines the default “RSA Full” provider. During the logon process, this provider isused to validate the entered password.
NOTE The logon process requires a particular key pair to exist. This key pair does not existin the “SafeNet RSA Full” provider. Therefore, the default should NOT be set to “SafeNet RSAFull Cryptographic Provider”
ValueName of the default provider. This should NOT be “SafeNet RSA Full Cryptographic Provider”
Silent User Keyset Login Password
Key LocationHKEY_CURRENT_USER\Software\SafeNet\ProtectToolkit M
DescriptionThis entry is NOT created by default. Create it manually if silent User keyset login is required. See "Silent UserKeyset Login" on page 23 for further information.
ValueEnter the password as clear text for key entry “UserKeysetPassword”.
SafeNet ProtectToolkit 5.7 User Guide007-013682-005 Rev. A 08 January 2020 Copyright 2009-2020Gemalto 85
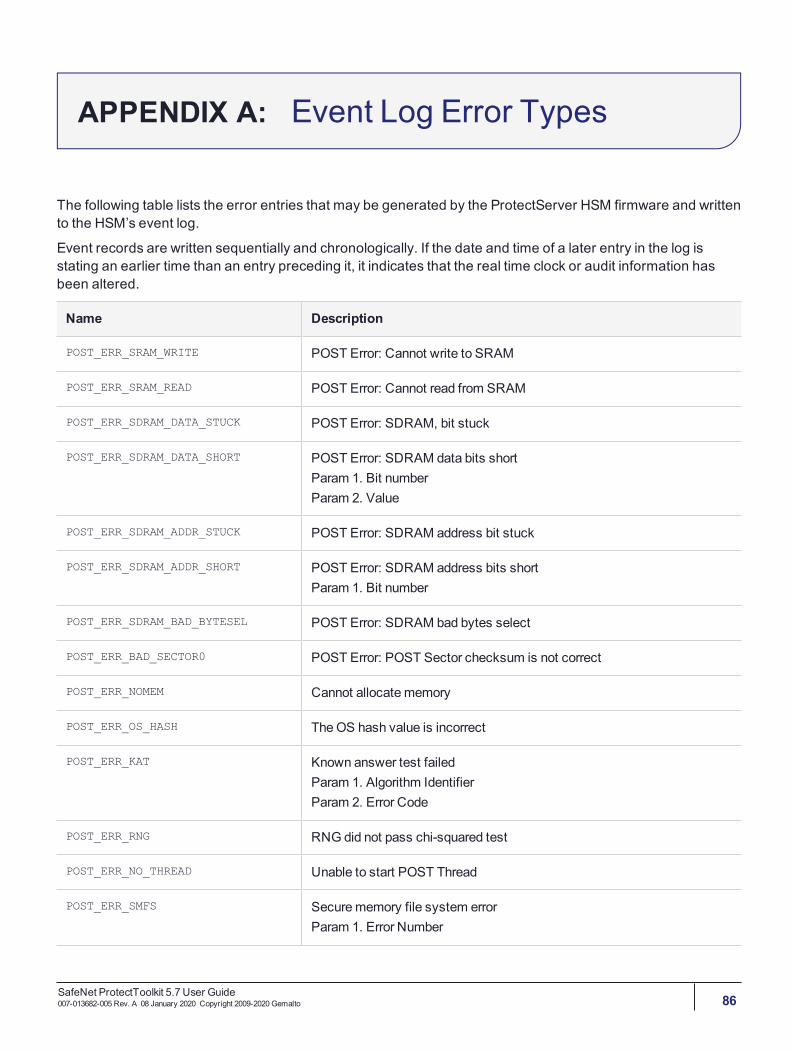
APPENDIX A: Event Log Error Types
The following table lists the error entries that may be generated by the ProtectServer HSM firmware and writtento the HSM’s event log.
Event records are written sequentially and chronologically. If the date and time of a later entry in the log isstating an earlier time than an entry preceding it, it indicates that the real time clock or audit information hasbeen altered.
Name Description
POST_ERR_SRAM_WRITE POST Error: Cannot write to SRAM
POST_ERR_SRAM_READ POST Error: Cannot read from SRAM
POST_ERR_SDRAM_DATA_STUCK POST Error: SDRAM, bit stuck
POST_ERR_SDRAM_DATA_SHORT POST Error: SDRAM data bits shortParam 1. Bit numberParam 2. Value
POST_ERR_SDRAM_ADDR_STUCK POST Error: SDRAM address bit stuck
POST_ERR_SDRAM_ADDR_SHORT POST Error: SDRAM address bits shortParam 1. Bit number
POST_ERR_SDRAM_BAD_BYTESEL POST Error: SDRAM bad bytes select
POST_ERR_BAD_SECTOR0 POST Error: POST Sector checksum is not correct
POST_ERR_NOMEM Cannot allocatememory
POST_ERR_OS_HASH TheOS hash value is incorrect
POST_ERR_KAT Known answer test failedParam 1. Algorithm IdentifierParam 2. Error Code
POST_ERR_RNG RNG did not pass chi-squared test
POST_ERR_NO_THREAD Unable to start POST Thread
POST_ERR_SMFS Securememory file system errorParam 1. Error Number
SafeNet ProtectToolkit 5.7 User Guide007-013682-005 Rev. A 08 January 2020 Copyright 2009-2020Gemalto 86
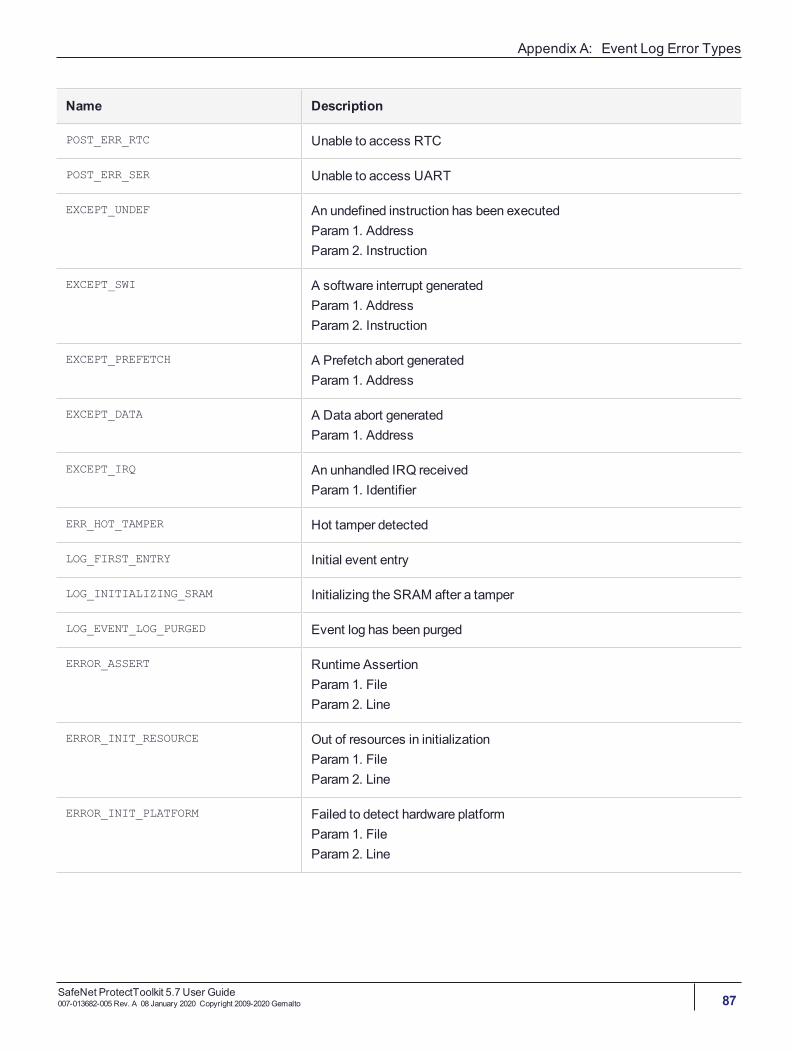
Appendix A: Event Log Error Types
Name Description
POST_ERR_RTC Unable to access RTC
POST_ERR_SER Unable to access UART
EXCEPT_UNDEF An undefined instruction has been executedParam 1. AddressParam 2. Instruction
EXCEPT_SWI A software interrupt generatedParam 1. AddressParam 2. Instruction
EXCEPT_PREFETCH A Prefetch abort generatedParam 1. Address
EXCEPT_DATA A Data abort generatedParam 1. Address
EXCEPT_IRQ An unhandled IRQ receivedParam 1. Identifier
ERR_HOT_TAMPER Hot tamper detected
LOG_FIRST_ENTRY Initial event entry
LOG_INITIALIZING_SRAM Initializing the SRAM after a tamper
LOG_EVENT_LOG_PURGED Event log has been purged
ERROR_ASSERT Runtime AssertionParam 1. FileParam 2. Line
ERROR_INIT_RESOURCE Out of resources in initializationParam 1. FileParam 2. Line
ERROR_INIT_PLATFORM Failed to detect hardware platformParam 1. FileParam 2. Line
SafeNet ProtectToolkit 5.7 User Guide007-013682-005 Rev. A 08 January 2020 Copyright 2009-2020Gemalto 87
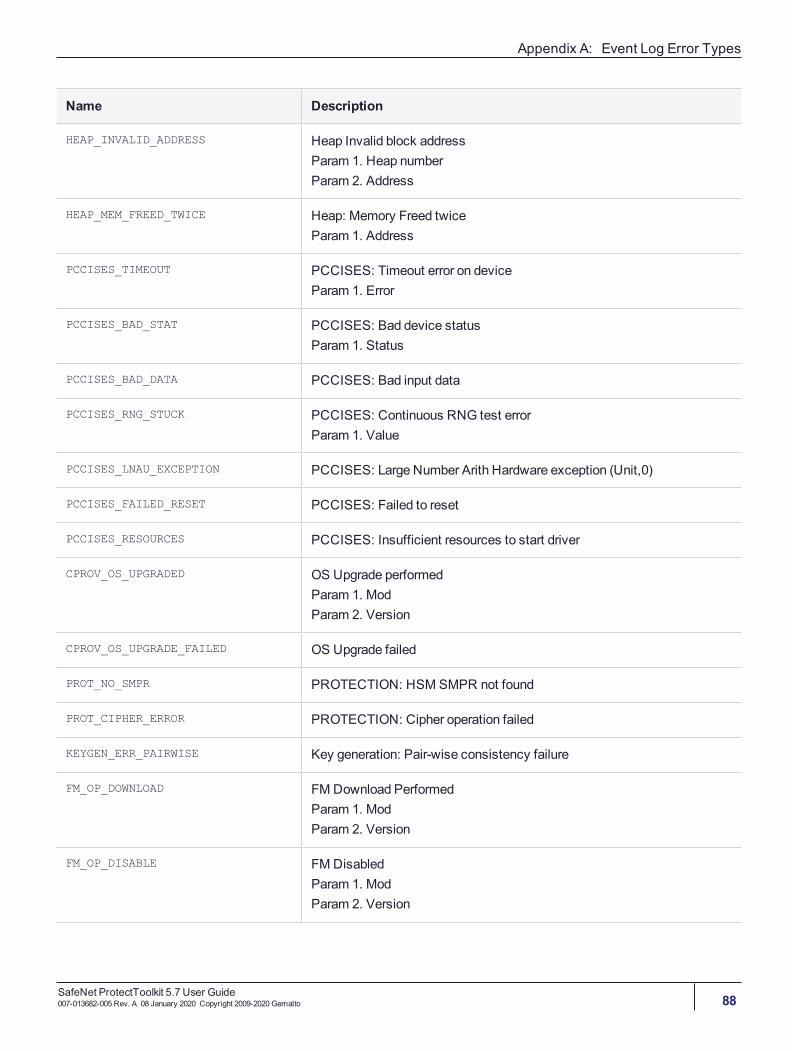
Appendix A: Event Log Error Types
Name Description
HEAP_INVALID_ADDRESS Heap Invalid block addressParam 1. Heap numberParam 2. Address
HEAP_MEM_FREED_TWICE Heap: Memory Freed twiceParam 1. Address
PCCISES_TIMEOUT PCCISES: Timeout error on deviceParam 1. Error
PCCISES_BAD_STAT PCCISES: Bad device statusParam 1. Status
PCCISES_BAD_DATA PCCISES: Bad input data
PCCISES_RNG_STUCK PCCISES: Continuous RNG test errorParam 1. Value
PCCISES_LNAU_EXCEPTION PCCISES: Large Number Arith Hardware exception (Unit,0)
PCCISES_FAILED_RESET PCCISES: Failed to reset
PCCISES_RESOURCES PCCISES: Insufficient resources to start driver
CPROV_OS_UPGRADED OS Upgrade performedParam 1. ModParam 2. Version
CPROV_OS_UPGRADE_FAILED OS Upgrade failed
PROT_NO_SMPR PROTECTION: HSM SMPR not found
PROT_CIPHER_ERROR PROTECTION: Cipher operation failed
KEYGEN_ERR_PAIRWISE Key generation: Pair-wise consistency failure
FM_OP_DOWNLOAD FM Download PerformedParam 1. ModParam 2. Version
FM_OP_DISABLE FM DisabledParam 1. ModParam 2. Version
SafeNet ProtectToolkit 5.7 User Guide007-013682-005 Rev. A 08 January 2020 Copyright 2009-2020Gemalto 88
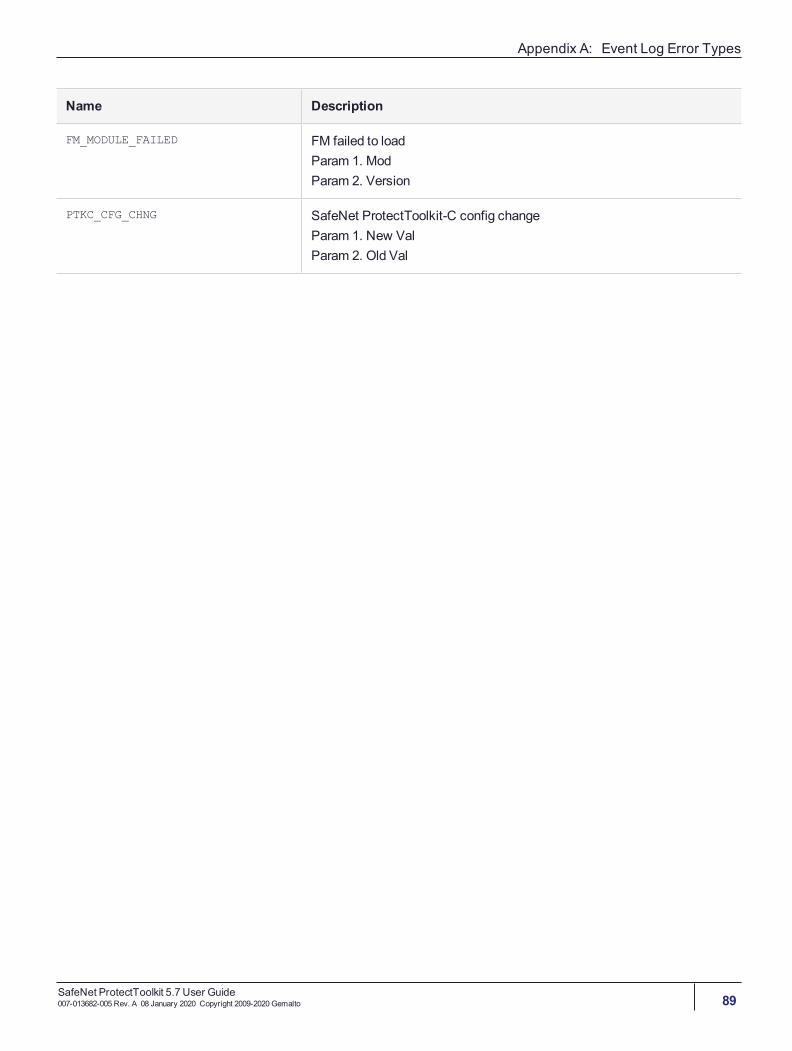
Appendix A: Event Log Error Types
Name Description
FM_MODULE_FAILED FM failed to loadParam 1. ModParam 2. Version
PTKC_CFG_CHNG SafeNet ProtectToolkit-C config changeParam 1. New ValParam 2. Old Val
SafeNet ProtectToolkit 5.7 User Guide007-013682-005 Rev. A 08 January 2020 Copyright 2009-2020Gemalto 89
Glossary
Glossary
AAdapterThe printed circuit board responsible for cryptographic processing in a HSM
AESAdvanced Encryption Standard
APIApplication Programming Interface
ASOAdministration Security Officer
Asymmetric CipherAn encryption algorithm that uses different keys for encryption and decryption. These ciphers are usually also knownas public-key ciphers as one of the keys is generally public and the other is private. RSA and ElGamal are two asym-metric algorithms
BBlock CipherA cipher that processes input in a fixed block size greater than 8 bits. A common block size is 64 bits
BusOne of the sets of conductors (wires, PCB tracks or connections) in an IC
CCACertification Authority
CASTEncryption algorithm developed by Carlisle Adams and Stafford Tavares
CertificateA binding of an identity (individual, group, etc.) to a public key which is generally signed by another identity. A cer-tificate chain is a list of certificates that indicates a chain of trust, i.e. the second certificate has signed the first, the
SafeNet ProtectToolkit 5.7 User Guide007-013682-005 Rev. A 08 January 2020 Copyright 2009-2020Gemalto 90

Glossary
third has signed the second and so on
CMOSComplementary Metal-Oxide Semiconductor. A common data storage component
CprovProtectToolkit C - SafeNet’s PKCS #11 Cryptoki Provider
CryptokiCryptographic Token Interface Standard. (aka PKCS#11)
CSACryptographic Services Adapter
CSPsMicrosoft Cryptographic Service Providers
DDecryptionThe process of recovering the plaintext from the ciphertext
DESCryptographic algorithm named as the Data Encryption Standard
Digital SignatureA mechanism that allows a recipient or third party to verify the originator of a document and to ensure that the doc-ument has not be altered in transit
DLLDynamically Linked Library. A library which is linked to application programs when they are loaded or run rather thanas the final phase of compilation
DSADigital Signature Algorithm
EEncryptionThe process of converting the plaintext data into the ciphertext so that the content of the data is no longer obvious.Some algorithms perform this function in such a way that there is no knownmechanism, other than decryption withthe appropriate key, to recover the plaintext. With other algorithms there are known flaws which reduce the difficultyin recovering the plaintext
SafeNet ProtectToolkit 5.7 User Guide007-013682-005 Rev. A 08 January 2020 Copyright 2009-2020Gemalto 91
Glossary
FFIPSFederal Information Protection Standards
FMFunctionality Module. A segment of custom program code operating inside the CSA800 HSM to provide additional orchanged functionality of the hardware
FMSWFunctionality Module Dispatch Switcher
HHAHigh Availability
HIFACEHost Interface. It is used to communicate with the host system
HSMHardware Security Module
IIDEAInternational Data Encryption Algorithm
IISMicrosoft Internet Information Services
IPInternet Protocol
JJCAJava Cryptography Architecture
SafeNet ProtectToolkit 5.7 User Guide007-013682-005 Rev. A 08 January 2020 Copyright 2009-2020Gemalto 92
Glossary
JCEJava Cryptography Extension
KKeysetA keyset is the definition given to an allocatedmemory space on the HSM. It contains the key information for a spe-cific user
KWRAPKey Wrapping Key
MMACMessage authentication code. A mechanism that allows a recipient of amessage to determine if a message has beentampered with. Broadly there are two types of MAC algorithms, one is based on symmetric encryption algorithms andthe second is based onMessage Digest algorithms. This second class of MAC algorithms are known as HMACalgorithms. A DES basedMAC is defined in FIPS PUB 113, see http://www.itl.nist.gov/div897/pubs/fip113.htm. Forinformation on HMAC algorithms see RFC-2104 at http://www.ietf.org/rfc/rfc2104.txt
Message DigestA condensed representation of a data stream. A message digest will convert an arbitrary data stream into a fixed sizeoutput. This output will always be the same for the same input stream however the input cannot be reconstructedfrom the digest
MSCAPIMicrosoft Cryptographic API
MSDNMicrosoft Developer Network
PPaddingA mechanism for extending the input data so that it is of the required size for a block cipher. The PKCS documentscontain details on themost common paddingmechanisms of PKCS#1 and PKCS#5
PCIPeripheral Component Interconnect
SafeNet ProtectToolkit 5.7 User Guide007-013682-005 Rev. A 08 January 2020 Copyright 2009-2020Gemalto 93
Glossary
PEMPrivacy EnhancedMail
PINPersonal Identification Number
PKCSPublic Key Cryptographic Standard. A set of standards developed by RSA Laboratories for Public Key Cryptographicprocessing
PKCS #11Cryptographic Token Interface Standard developed by RSA Laboratories
PKIPublic Key Infrastructure
ProtectServerSafeNet HSM
ProtectToolkit CSafeNet's implementation of PKCS#11. Protecttoolkit C represents a suite of products including various PKCS#11runtimes including software only, hardware adapter, and host security module based variants. A Remote client andserver are also available
ProtectToolkit JSafeNet's implementation of JCE. Runs on top of ProtectToolkit C
RRC2/RC4Ciphers designed by RSA Data Security, Inc.
RFCRequest for Comments, proposed specifications for various protocols and algorithms archived by the Internet Engin-eering Task Force (IETF), see http://www.ietf.org
RNGRandom Number Generator
RSACryptographic algorithm by RonRivest, Adi Shamir and Leonard Adelman
SafeNet ProtectToolkit 5.7 User Guide007-013682-005 Rev. A 08 January 2020 Copyright 2009-2020Gemalto 94
Glossary
RTCReal TimeClock
SSDKSoftware Development Kits Other documentationmay refer to the SafeNet Cprov and Protect Toolkit J SDKs. TheseSDKs have been renamed ProtectToolkit C and ProtectToolkit J respectively.·The names Cprov and Pro-tectToolkit C refer to the same device in the context of this or previous manuals.·The names Protect Toolkit J andProtectToolkit J refer to the same device in the context of this or previous manuals.
SlotPKCS#11 slot which is capable of holding a token
SlotPKCS#11Slot which is capable of holding a token
SOSecurity Officer
Symmetric CipherAn encryption algorithm that uses the same key for encryption and decryption. DES, RC4 and IDEA are all sym-metric algorithms
TTCTrusted Channel
TCP/IPTransmission Control Protocol / Internet Protocol
TokenPKCS#11 token that provides cryptographic services and access controlled secure key storage
TokenPKCS#11Token that provides cryptographic services and access controlled secure key storage
SafeNet ProtectToolkit 5.7 User Guide007-013682-005 Rev. A 08 January 2020 Copyright 2009-2020Gemalto 95
Glossary
UURIUniversal Resource Identifier
VVAValidation Authority
XX.509Digital Certificate Standard
X.509 CertificateSection 3.3.3 of X.509v3 defines a certificate as: "user certificate; public key certificate; certificate: The public keysof a user, together with some other information, rendered unforgeable by encipherment with the private key of the cer-tification authority which issued it"
SafeNet ProtectToolkit 5.7 User Guide007-013682-005 Rev. A 08 January 2020 Copyright 2009-2020Gemalto 96