Embed Size (px)
Citation preview
Circulate To: X General Manager X Service Manager X Parts Manager
X Service Advisor(s) X Technician(s) X Body Shop Manager X Fleet Repair
File Under: <Voluntary Safety Recall Campaign>
GROUP MODEL
Safety Recall
Campaign
Various Models
(See table, Pg. 2)
NUMBER DATE
098 April 2013
VOLUNTARY SAFETY RECALL CAMPAIGN
STOP LAMP SWITCH REPLACEMENT (SC 098)SUBJECT:
To improve customer satisfaction, always remember to refer to WebDCS Warranty
Coverage (validation) Inquiry Screen (Service> Warranty Coverage> Warranty
Coverage Inquiry) for a list of any additional campaigns or service actions that
may need to be performed on the vehicle before returning it to the customer.
NOTICE*
There is no charge to the vehicle owner for this repair. Under applicable law, you
may not sell or otherwise deliver any affected vehicle until it has been repaired
pursuant to the procedures set forth in this bulletin.
NOTICE*
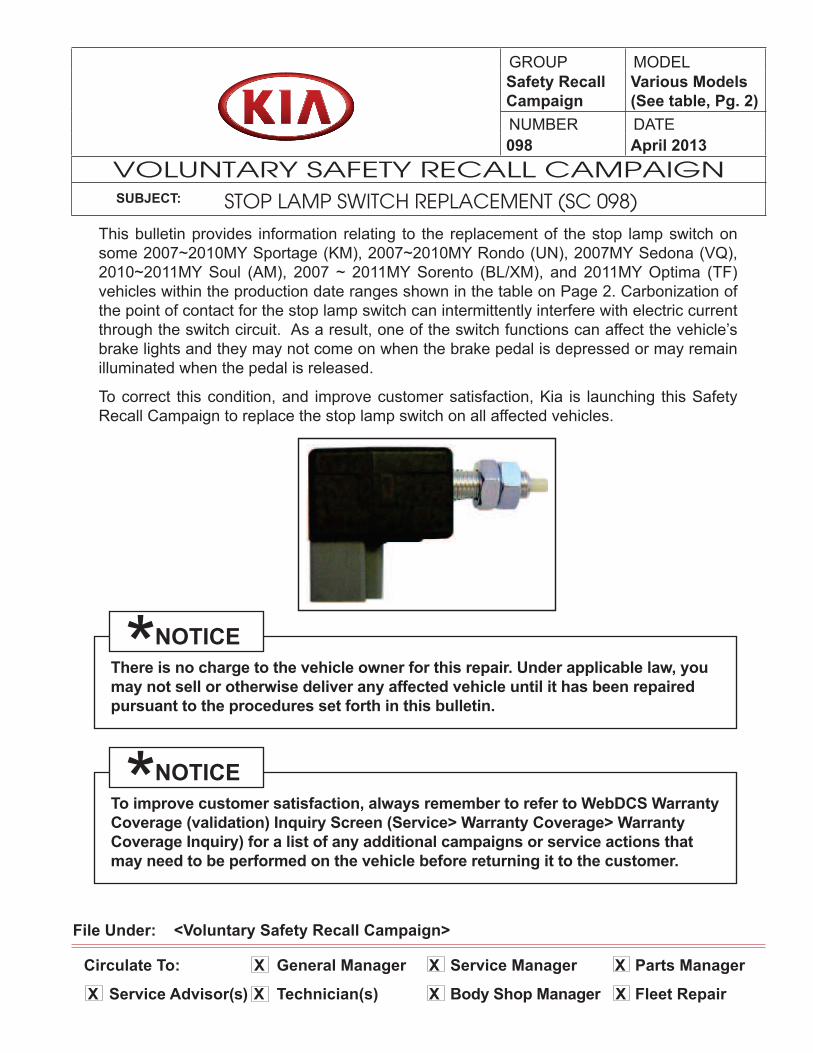
This bulletin provides information relating to the replacement of the stop lamp switch on
some 2007~2010MY Sportage (KM), 2007~2010MY Rondo (UN), 2007MY Sedona (VQ),
2010~2011MY Soul (AM), 2007 ~ 2011MY Sorento (BL/XM), and 2011MY Optima (TF)
vehicles within the production date ranges shown in the table on Page 2. Carbonization of
the point of contact for the stop lamp switch can intermittently interfere with electric current
through the switch circuit. As a result, one of the switch functions can affect the vehicle’s
brake lights and they may not come on when the brake pedal is depressed or may remain
illuminated when the pedal is released.
To correct this condition, and improve customer satisfaction, Kia is launching this Safety
Recall Campaign to replace the stop lamp switch on all affected vehicles.
TSB: SC 098 Safety Recall Campaign April 2013
Page 2 of 19
SUBJECT:
STOP LAMP SWITCH REPLACEMENT (SC 098)
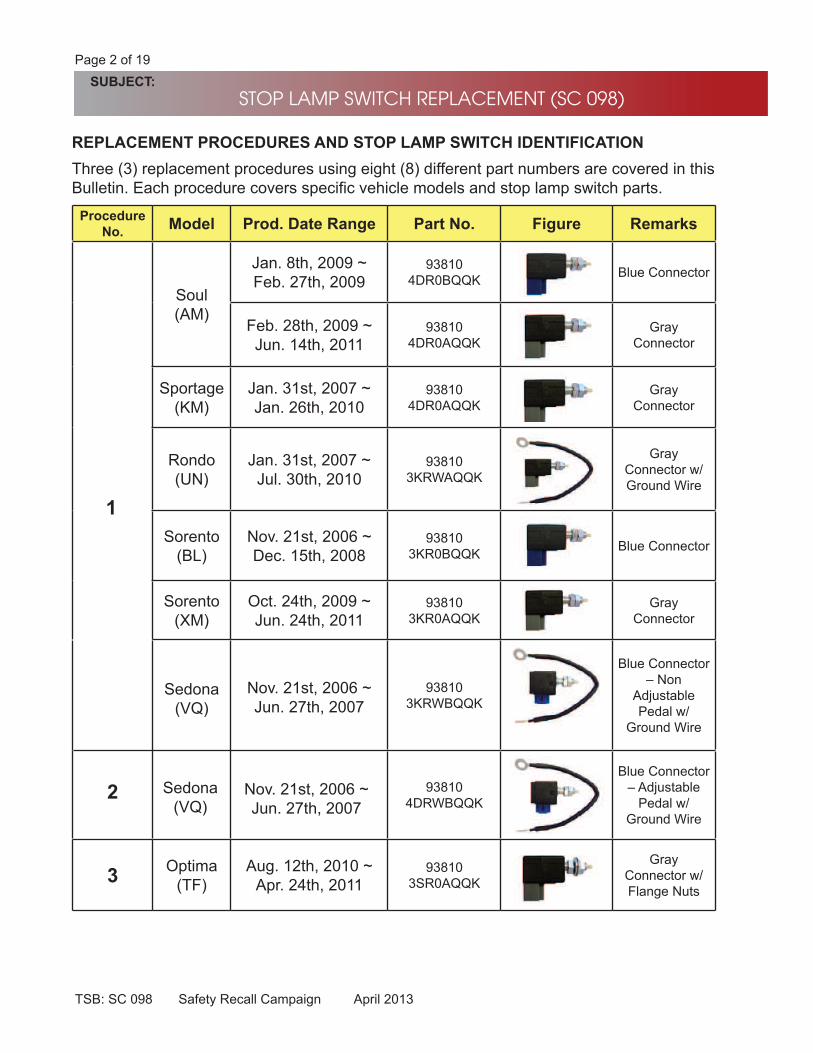
Three (3) replacement procedures using eight (8) different part numbers are covered in this
Bulletin. Each procedure covers specific vehicle models and stop lamp switch parts.
REPLACEMENT PROCEDURES AND STOP LAMP SWITCH IDENTIFICATION
Procedure
No.Model Prod. Date Range Part No. Figure Remarks
1
Soul
(AM)
Jan. 8th, 2009 ~
Feb. 27th, 200993810
4DR0BQQKBlue Connector
Feb. 28th, 2009 ~
Jun. 14th, 201193810
4DR0AQQK
Gray
Connector
Sportage
(KM)
Jan. 31st, 2007 ~
Jan. 26th, 201093810
4DR0AQQK
Gray
Connector
Rondo
(UN)
Jan. 31st, 2007 ~
Jul. 30th, 201093810
3KRWAQQK
Gray
Connector w/
Ground Wire
Sorento
(BL)
Nov. 21st, 2006 ~
Dec. 15th, 200893810
3KR0BQQKBlue Connector
Sorento
(XM)
Oct. 24th, 2009 ~
Jun. 24th, 201193810
3KR0AQQK
Gray
Connector
2
Sedona
(VQ)
Nov. 21st, 2006 ~
Jun. 27th, 2007
93810
3KRWBQQK
Blue Connector
– Non
Adjustable
Pedal w/
Ground Wire
93810
4DRWBQQK
Blue Connector
– Adjustable
Pedal w/
Ground Wire
3Optima
(TF)
Aug. 12th, 2010 ~
Apr. 24th, 201193810
3SR0AQQK
Gray
Connector w/
Flange Nuts
Nov. 21st, 2006 ~
Jun. 27th, 2007
Sedona
(VQ)
TSB: SC 098 Safety Recall Campaign April 2013
Page 3 of 19
SUBJECT:
STOP LAMP SWITCH REPLACEMENT (SC 098)
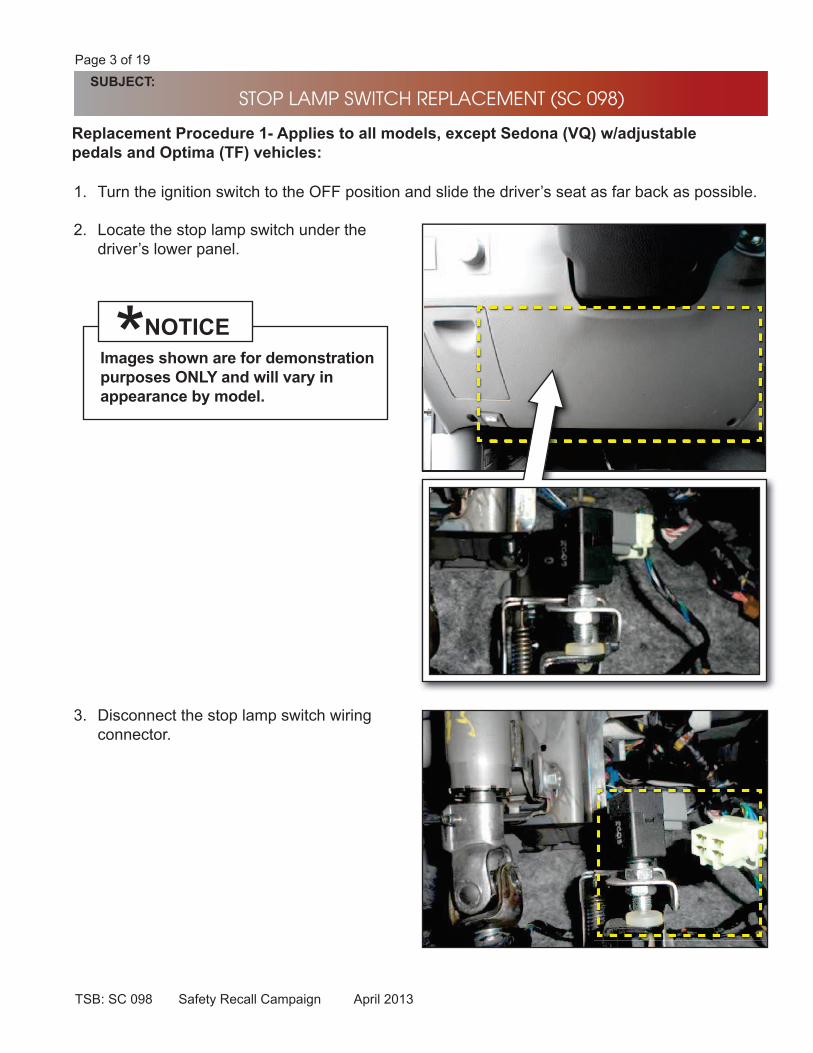
3. Disconnect the stop lamp switch wiring
connector.
1. Turn the ignition switch to the OFF position and slide the driver’s seat as far back as possible.
2. Locate the stop lamp switch under the
driver’s lower panel.
Replacement Procedure 1- Applies to all models, except Sedona (VQ) w/adjustable
pedals and Optima (TF) vehicles:
Images shown are for demonstration
purposes ONLY and will vary in
appearance by model.
NOTICE*
TSB: SC 098 Safety Recall Campaign April 2013
Page 4 of 19
SUBJECT:
STOP LAMP SWITCH REPLACEMENT (SC 098)
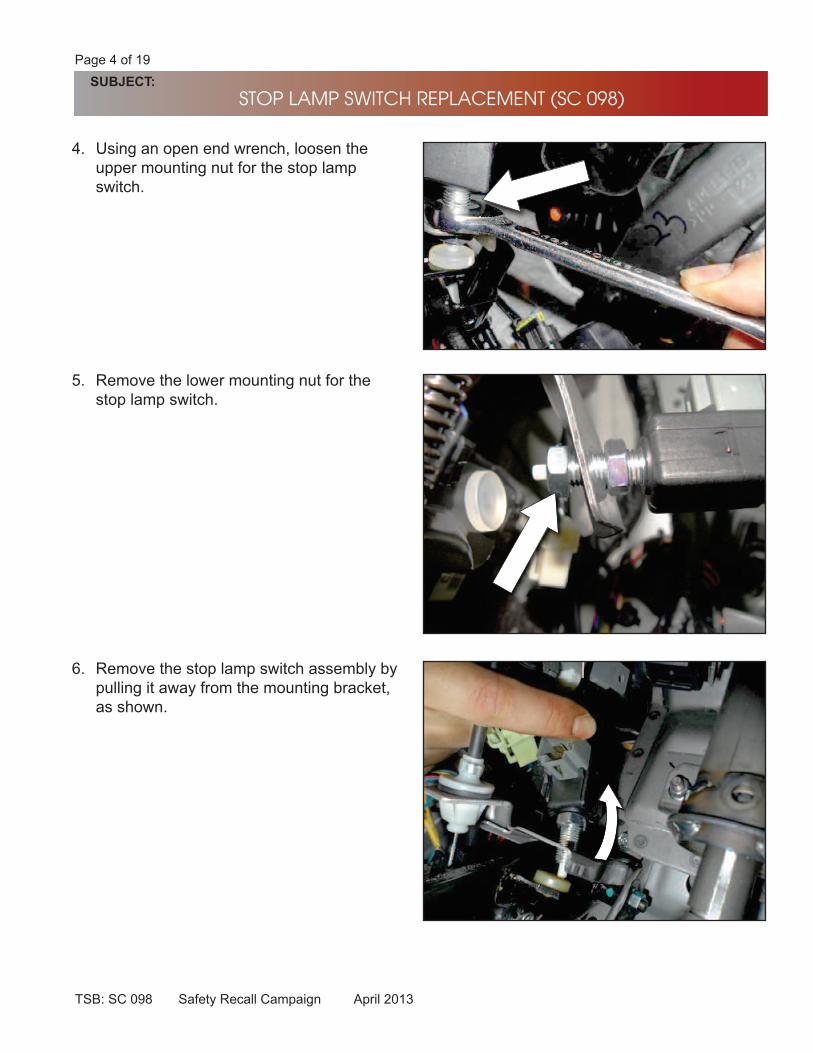
4. Using an open end wrench, loosen the
upper mounting nut for the stop lamp
switch.
5. Remove the lower mounting nut for the
stop lamp switch.
6. Remove the stop lamp switch assembly by
pulling it away from the mounting bracket,
as shown.
TSB: SC 098 Safety Recall Campaign April 2013
Page 5 of 19
SUBJECT:
STOP LAMP SWITCH REPLACEMENT (SC 098)
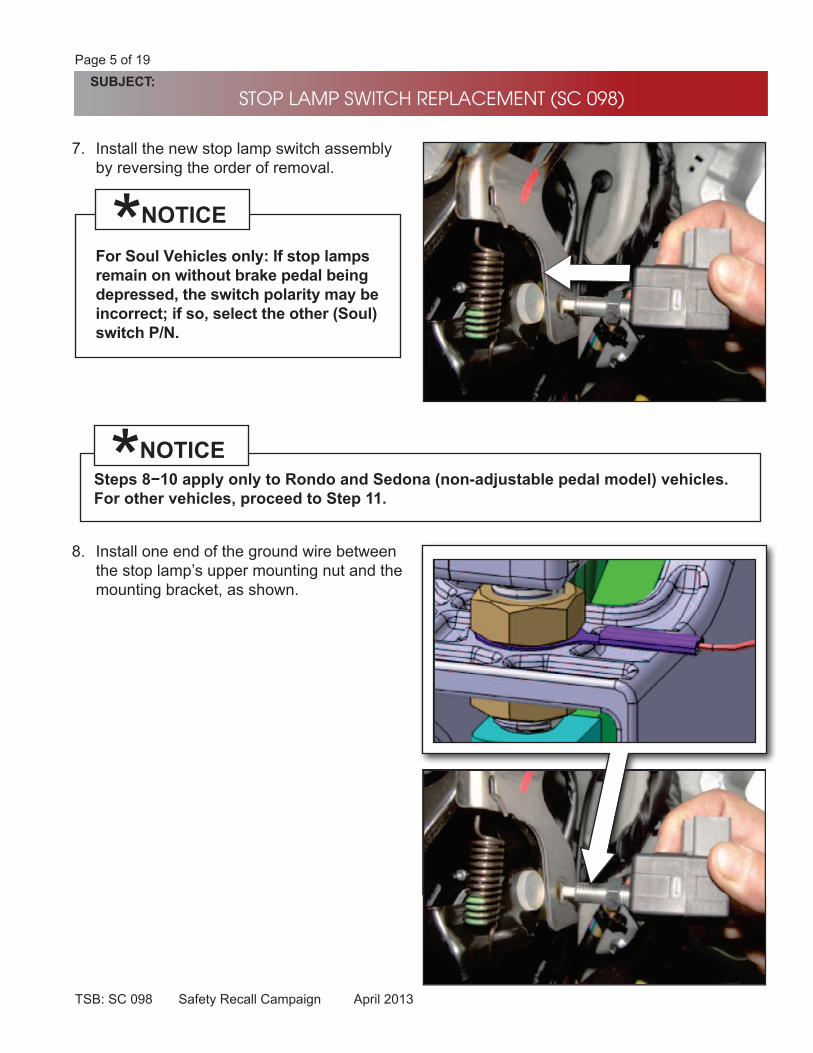
7. Install the new stop lamp switch assembly
by reversing the order of removal.
8. Install one end of the ground wire between
the stop lamp’s mounting nut and the
mounting bracket, as shown.
NOTICE*
NOTICE*
TSB: SC 098 Safety Recall Campaign April 2013
Page 6 of 19
SUBJECT:
STOP LAMP SWITCH REPLACEMENT (SC 098)
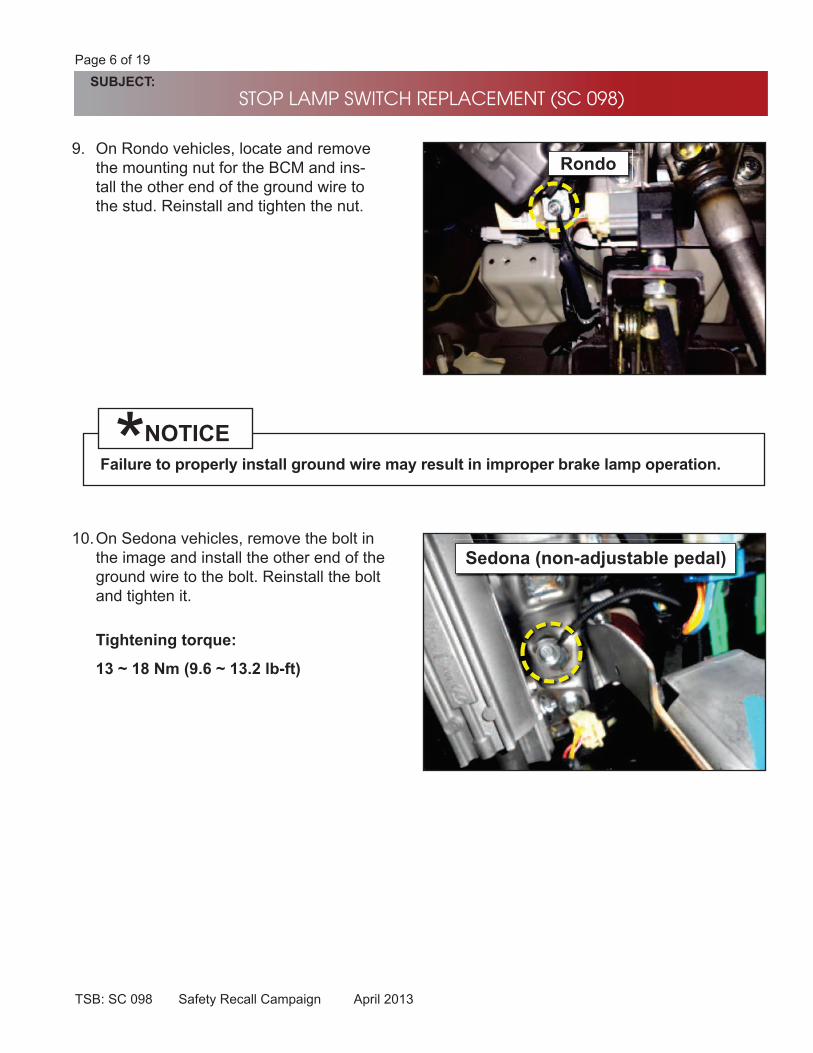
9. On Rondo vehicles, locate and remove
the mounting nut for the BCM and ins-
tall the other end of the ground wire to
the stud. Reinstall and tighten the nut.
10. On Sedona vehicles, remove the bolt in
the image and install the other end of the
ground wire to the bolt. Reinstall the bolt
and tighten it.
Tightening torque:
13 ~ 18 Nm (9.6 ~ 13.2 lb-ft)
Rondo
Sedona (non-adjustable pedal)
Failure to properly install ground wire may result in improper brake lamp operation.
NOTICE*
TSB: SC 098 Safety Recall Campaign April 2013
Page 7 of 19
SUBJECT:
STOP LAMP SWITCH REPLACEMENT (SC 098)
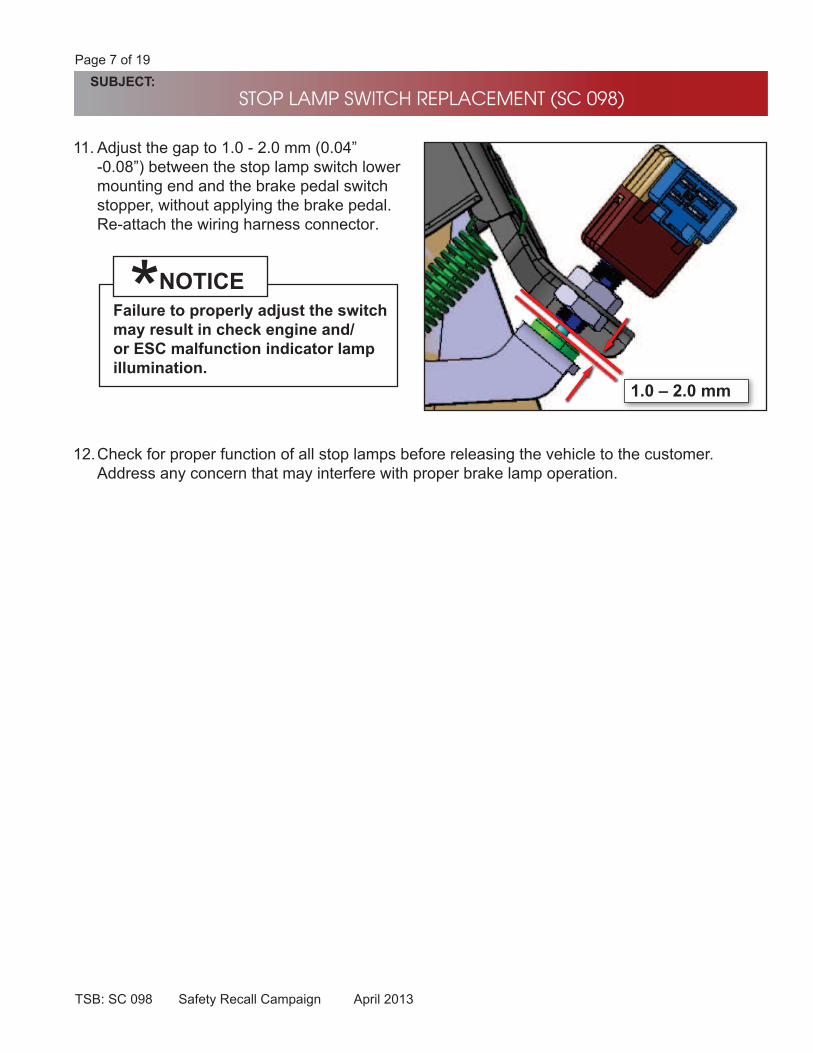
11. Adjust the gap to 1.0 - 2.0 mm (0.04”
-0.08”) between the stop lamp switch lower
mounting end and the brake pedal switch
stopper, without applying the brake pedal.
Re-attach the wiring harness connector.
12. Check for proper function of all stop lamps before releasing the vehicle to the customer.
Address any concern that may interfere with proper brake lamp operation.
Failure to properly adjust the switch
may result in check engine and/
or ESC malfunction indicator lamp
illumination.
NOTICE*1.0 – 2.0 mm
TSB: SC 098 Safety Recall Campaign April 2013
Page 8 of 19
SUBJECT:
STOP LAMP SWITCH REPLACEMENT (SC 098)
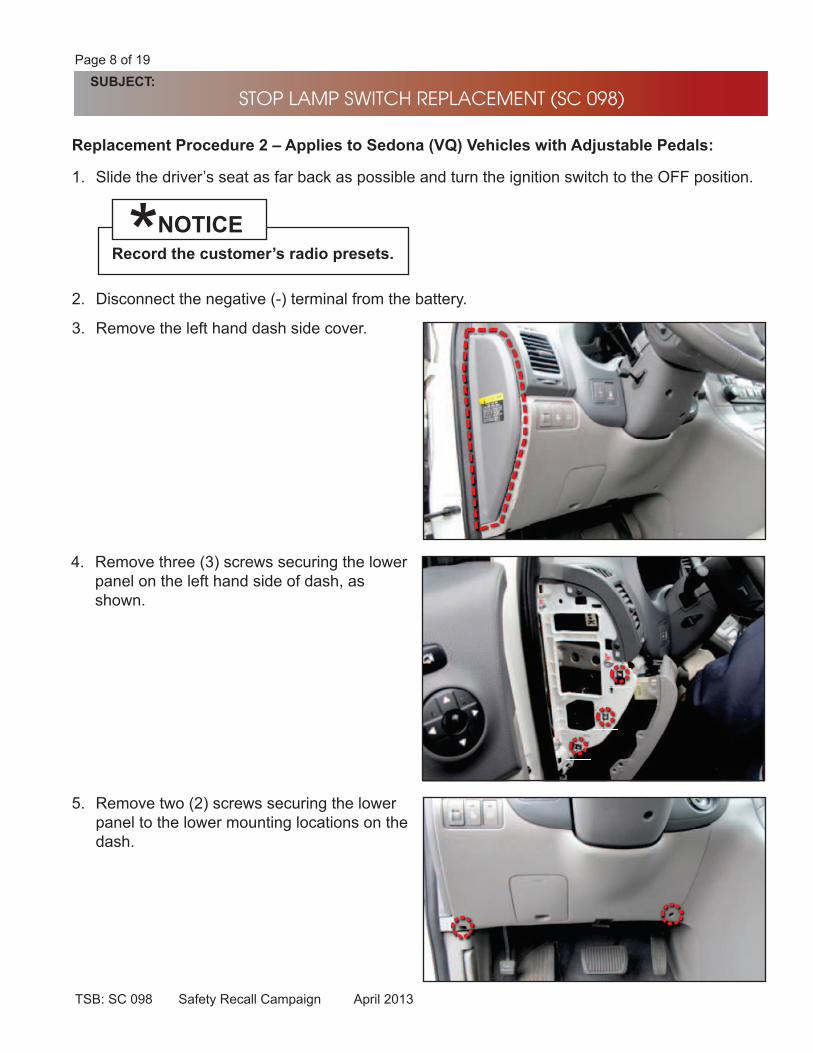
4. Remove three (3) screws securing the lower
panel on the left hand side of dash, as
shown.
5. Remove two (2) screws securing the lower
panel to the lower mounting locations on the
dash.
1. Slide the driver’s seat as far back as possible and turn the ignition switch to the OFF position.
2. Disconnect the negative (-) terminal from the battery.
3. Remove the left hand dash side cover.
Record the customer’s radio presets.
NOTICE*
Replacement Procedure 2 – Applies to Sedona (VQ) Vehicles with Adjustable Pedals:
TSB: SC 098 Safety Recall Campaign April 2013
Page 9 of 19
SUBJECT:
STOP LAMP SWITCH REPLACEMENT (SC 098)
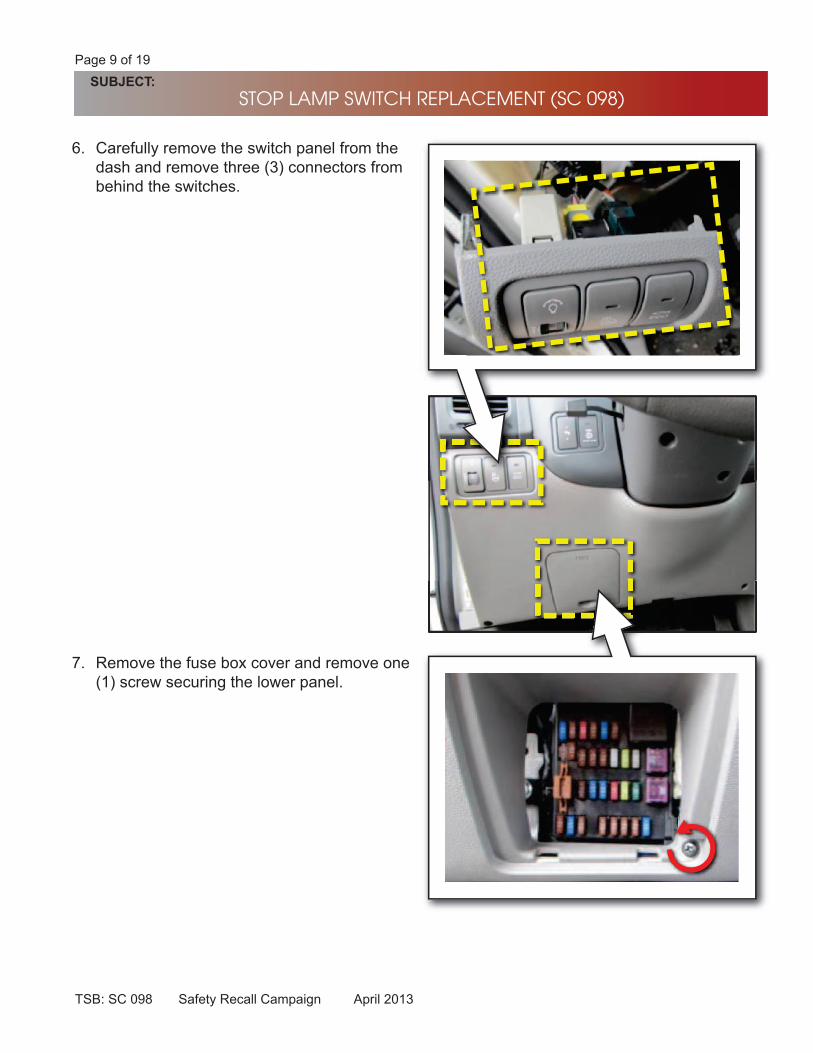
6. Carefully remove the switch panel from the
dash and remove three (3) connectors from
behind the switches.
7. Remove the fuse box cover and remove one
(1) screw securing the lower panel.
TSB: SC 098 Safety Recall Campaign April 2013
Page 10 of 19
SUBJECT:
STOP LAMP SWITCH REPLACEMENT (SC 098)
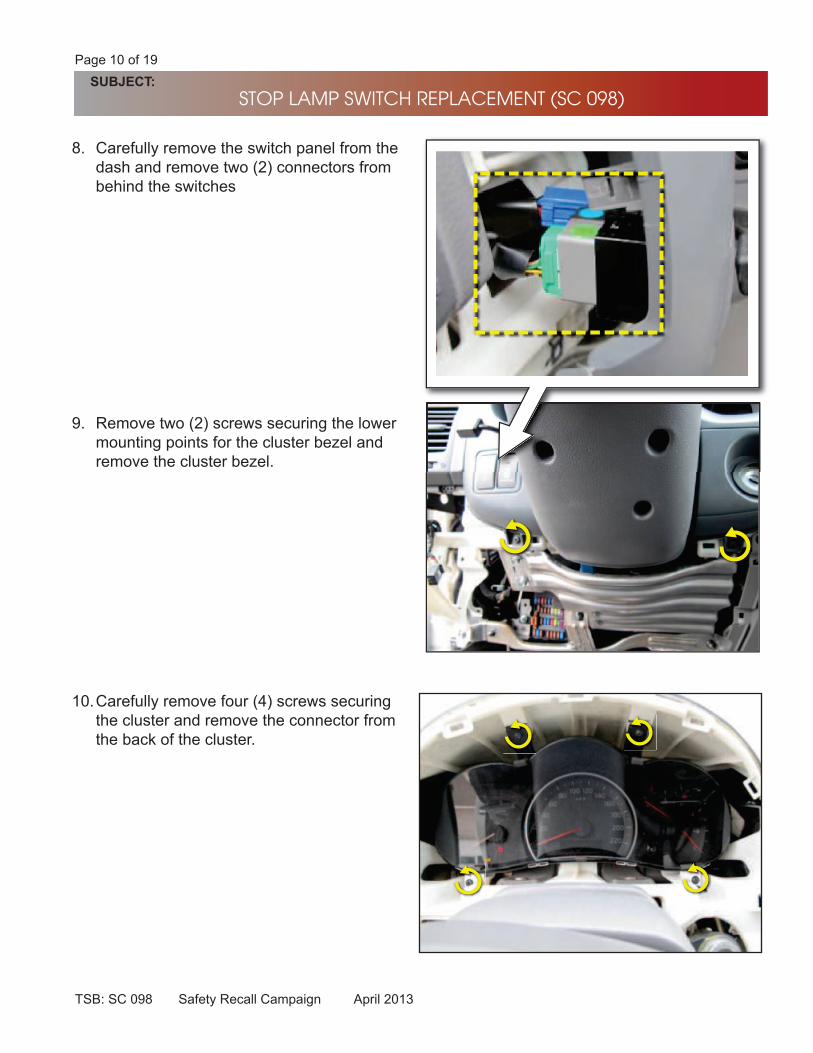
8. Carefully remove the switch panel from the
dash and remove two (2) connectors from
behind the switches
9. Remove two (2) screws securing the lower
mounting points for the cluster bezel and
remove the cluster bezel.
10. Carefully remove four (4) screws securing
the cluster and remove the connector from
the back of the cluster.
TSB: SC 098 Safety Recall Campaign April 2013
Page 11 of 19
SUBJECT:
STOP LAMP SWITCH REPLACEMENT (SC 098)
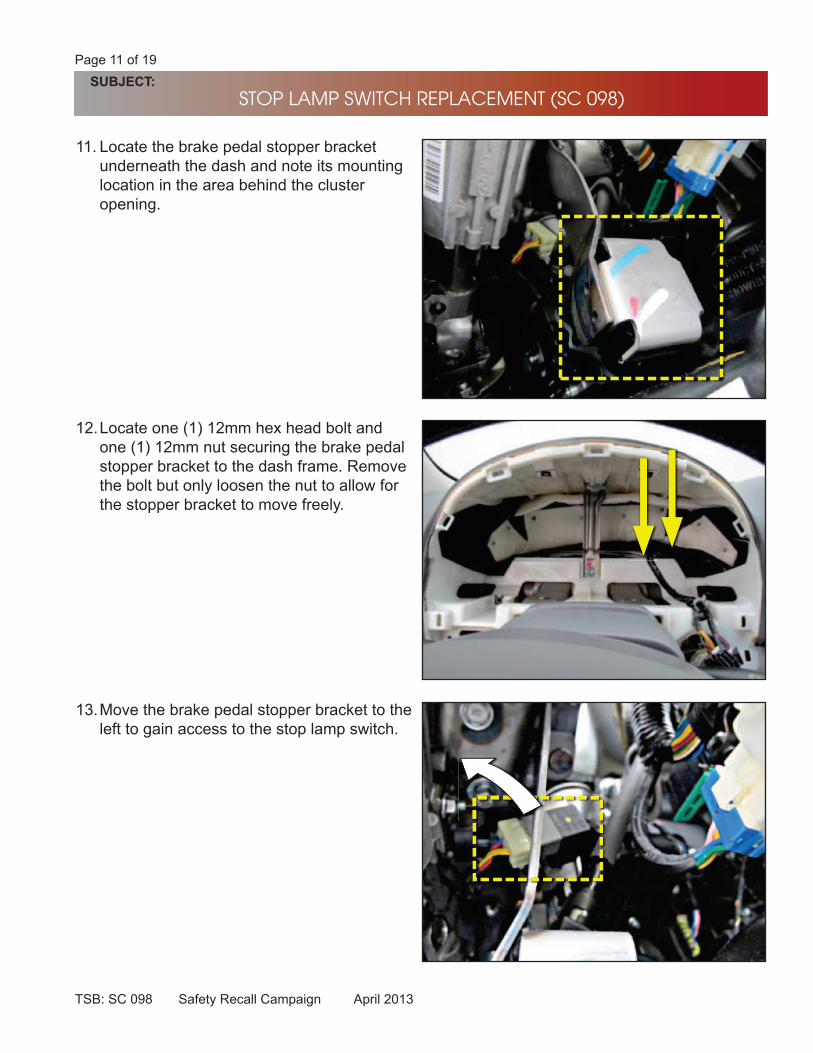
11. Locate the brake pedal stopper bracket
underneath the dash and note its mounting
location in the area behind the cluster
opening.
12. Locate one (1) 12mm hex head bolt and
one (1) 12mm nut securing the brake pedal
stopper bracket to the dash frame. Remove
the bolt but only loosen the nut to allow for
the stopper bracket to move freely.
13. Move the brake pedal stopper bracket to the
left to gain access to the stop lamp switch.
TSB: SC 098 Safety Recall Campaign April 2013
Page 12 of 19
SUBJECT:
STOP LAMP SWITCH REPLACEMENT (SC 098)
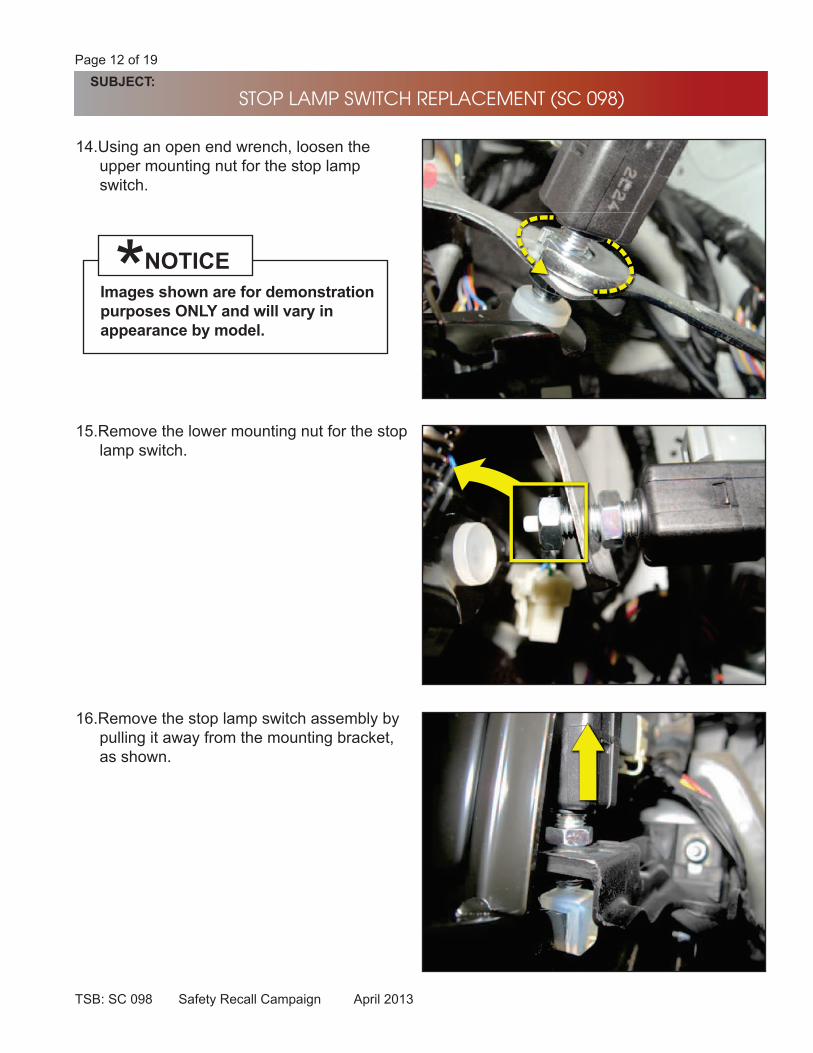
14.Using an open end wrench, loosen the
upper mounting nut for the stop lamp
switch.
15.Remove the lower mounting nut for the stop
lamp switch.
16.Remove the stop lamp switch assembly by
pulling it away from the mounting bracket,
as shown.
Images shown are for demonstration
purposes ONLY and will vary in
appearance by model.
NOTICE*

TSB: SC 098 Safety Recall Campaign April 2013
Page 13 of 19
SUBJECT:
STOP LAMP SWITCH REPLACEMENT (SC 098)
18.Install one end of the ground wire between the stop lamp’s lower mounting nut and the
mounting bracket, as shown.
19.Remove the bolt in the image and install
the other end of the ground wire to the
t, the bolt. Reinstall and tighten the bolt.
Tightening torque:
13 ~ 18 Nm (9.6 ~ 13.2 lb-ft)
17. Install the new stop lamp switch assembly
by reversing the order of removal.
TSB: SC 098 Safety Recall Campaign April 2013
Page 14 of 19
SUBJECT:
STOP LAMP SWITCH REPLACEMENT (SC 098)
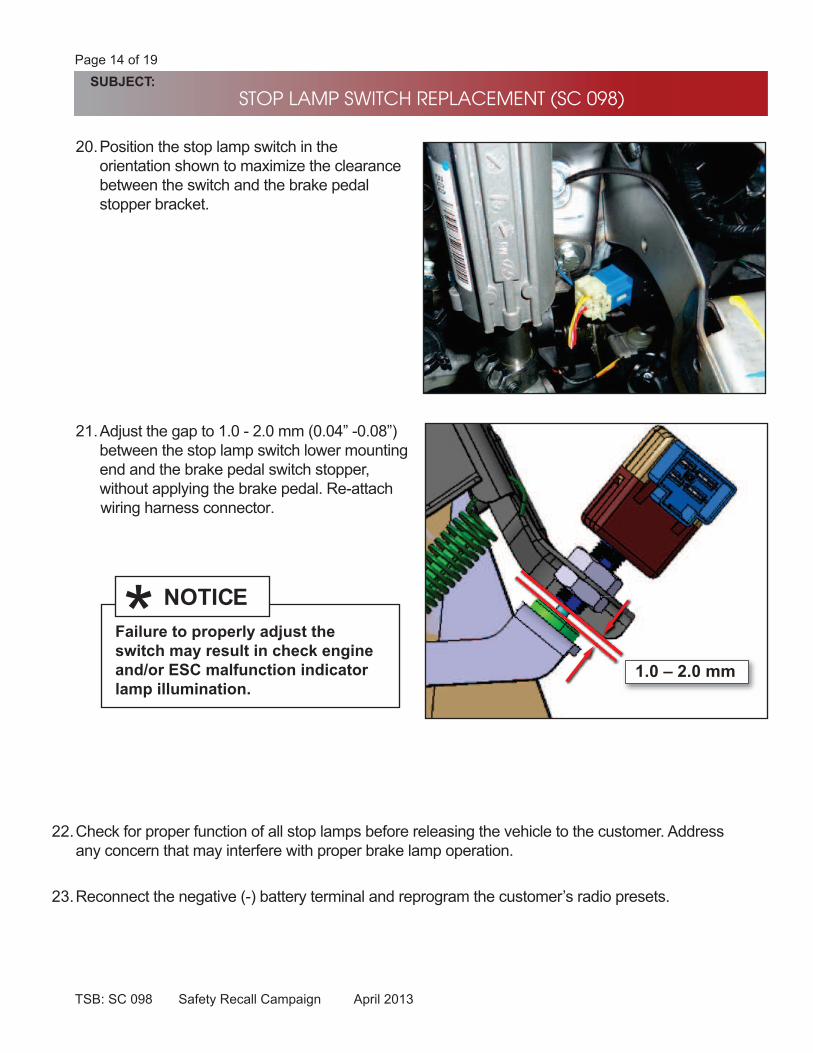
20. Position the stop lamp switch in the
orientation shown to maximize the clearance
between the switch and the brake pedal
stopper bracket.
21. Adjust the gap to 1.0 - 2.0 mm (0.04” -0.08”)
between the stop lamp switch lower mounting
end and the brake pedal switch stopper,
without applying the brake pedal. Re-attach
wiring harness connector.
22. Check for proper function of all stop lamps before releasing the vehicle to the customer. Address
any concern that may interfere with proper brake lamp operation.
23. Reconnect the negative (-) battery terminal and reprogram the customer’s radio presets.
1.0 – 2.0 mm
Failure to properly adjust the
switch may result in check engine
and/or ESC malfunction indicator
lamp illumination.
NOTICE
*

TSB: SC 098 Safety Recall Campaign April 2013
Page 15 of 19
SUBJECT:
STOP LAMP SWITCH REPLACEMENT (SC 098)
2. Locate the stop lamp switch under the driver’s
lower panel.
3. Disconnect the stop lamp switch wiring
connector.
1. Slide the driver’s seat as far back as possible and turn the ignition switch to the OFF position.
Replacement Procedure 3 – Applies to Optima (TF) Vehicles
Note the orientation of the stop lamp
switch and reinstall the new switch in
the same orientation.
NOTICE*
TSB: SC 098 Safety Recall Campaign April 2013
Page 16 of 19
SUBJECT:
STOP LAMP SWITCH REPLACEMENT (SC 098)
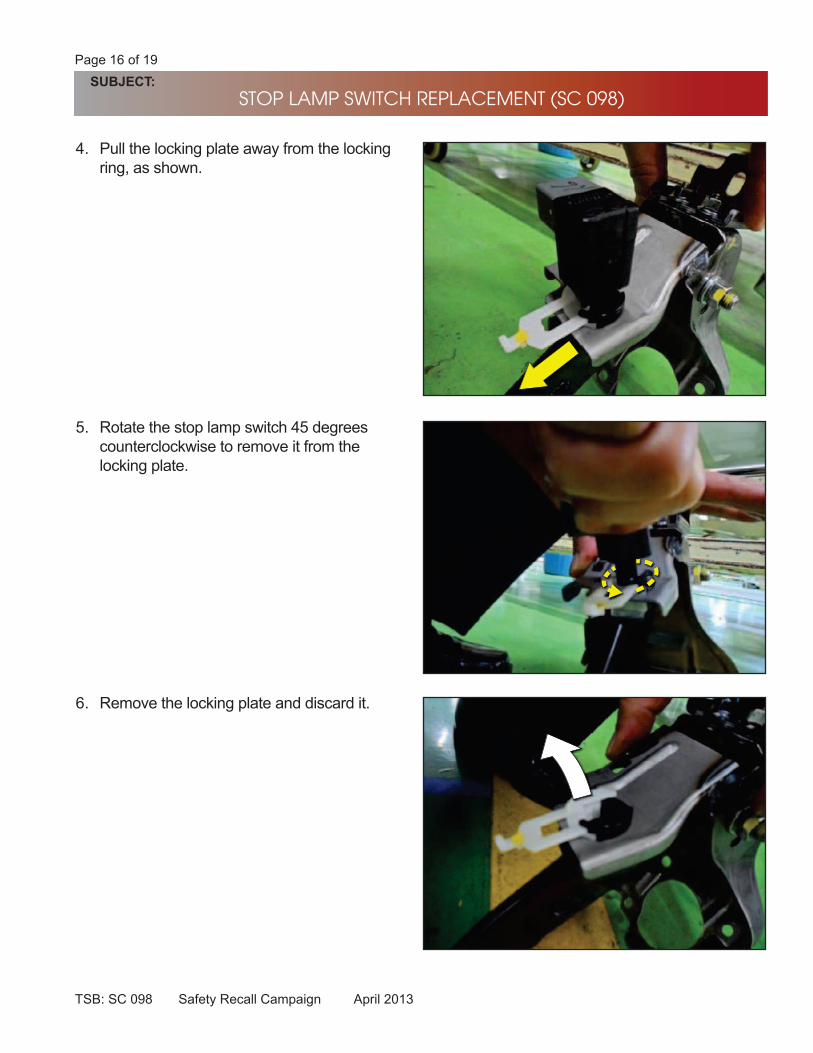
4. Pull the locking plate away from the locking
ring, as shown.
5. Rotate the stop lamp switch 45 degrees
counterclockwise to remove it from the
locking plate.
6. Remove the locking plate and discard it.
TSB: SC 098 Safety Recall Campaign April 2013
Page 17 of 19
SUBJECT:
STOP LAMP SWITCH REPLACEMENT (SC 098)
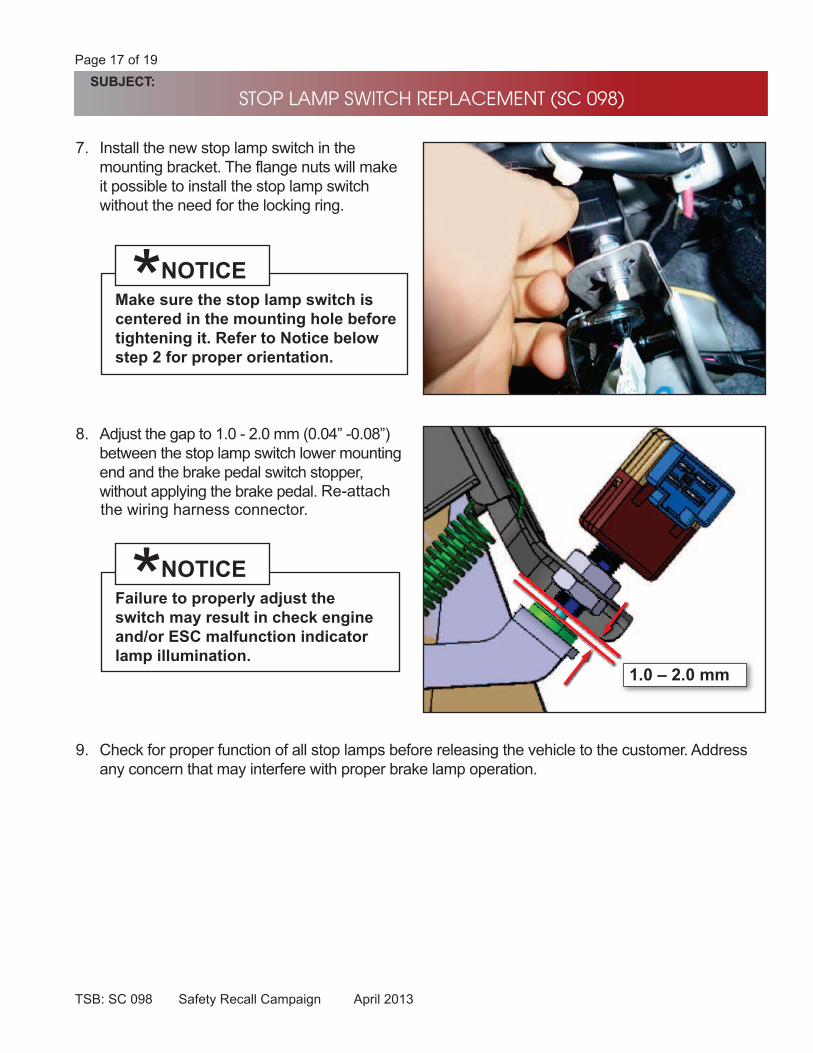
7. Install the new stop lamp switch in the
mounting bracket. The flange nuts will make
it possible to install the stop lamp switch
without the need for the locking ring.
9. Check for proper function of all stop lamps before releasing the vehicle to the customer. Address
any concern that may interfere with proper brake lamp operation.
8. Adjust the gap to 1.0 - 2.0 mm (0.04” -0.08”)
between the stop lamp switch lower mounting
end and the brake pedal switch stopper,
without applying the brake pedal.
Make sure the stop lamp switch is
centered in the mounting hole before
tightening it. Refer to Notice below
step 2 for proper orientation.
NOTICE*
Failure to properly adjust the
switch may result in check engine
and/or ESC malfunction indicator
lamp illumination.
NOTICE*1.0 – 2.0 mm
Re-attach the wiring harness connector.
TSB: SC 098 Safety Recall Campaign April 2013
Page 18 of 19
SUBJECT:
STOP LAMP SWITCH REPLACEMENT (SC 098)
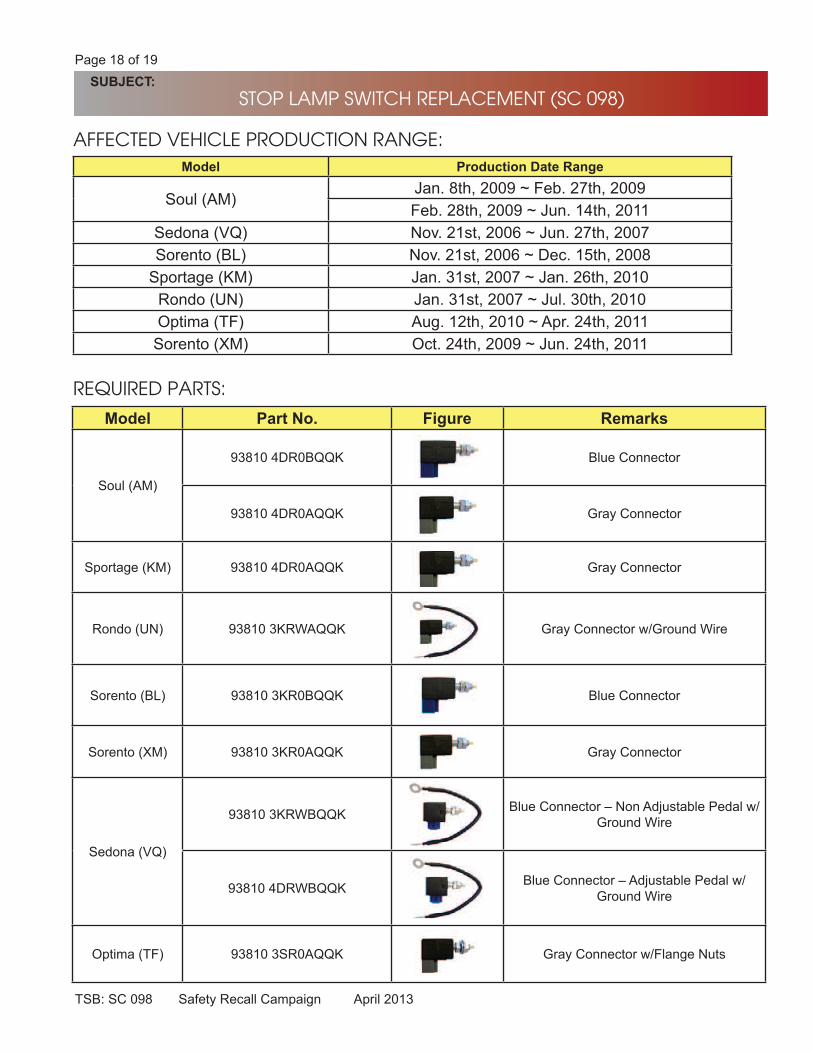
AFFECTED VEHICLE PRODUCTION RANGE:
REQUIRED PARTS:
Model Production Date Range
Soul (AM)Jan. 8th, 2009 ~ Feb. 27th, 2009
Feb. 28th, 2009 ~ Jun. 14th, 2011
Sedona (VQ) Nov. 21st, 2006 ~ Jun. 27th, 2007
Sorento (BL) Nov. 21st, 2006 ~ Dec. 15th, 2008
Sportage (KM) Jan. 31st, 2007 ~ Jan. 26th, 2010
Rondo (UN) Jan. 31st, 2007 ~ Jul. 30th, 2010
Optima (TF) Aug. 12th, 2010 ~ Apr. 24th, 2011
Sorento (XM) Oct. 24th, 2009 ~ Jun. 24th, 2011
Model Part No. Figure Remarks
Soul (AM)
93810 4DR0BQQK Blue Connector
93810 4DR0AQQK Gray Connector
Sportage (KM) 93810 4DR0AQQK Gray Connector
Rondo (UN) 93810 3KRWAQQK Gray Connector w/Ground Wire
Sorento (BL) 93810 3KR0BQQK Blue Connector
Sorento (XM) 93810 3KR0AQQK Gray Connector
Sedona (VQ)
93810 3KRWBQQKBlue Connector – Non Adjustable Pedal w/
Ground Wire
93810 4DRWBQQKBlue Connector – Adjustable Pedal w/
Ground Wire
Optima (TF) 93810 3SR0AQQK Gray Connector w/Flange Nuts
TSB: SC 098 Safety Recall Campaign April 2013
Page 19 of 19
SUBJECT:
STOP LAMP SWITCH REPLACEMENT (SC 098)
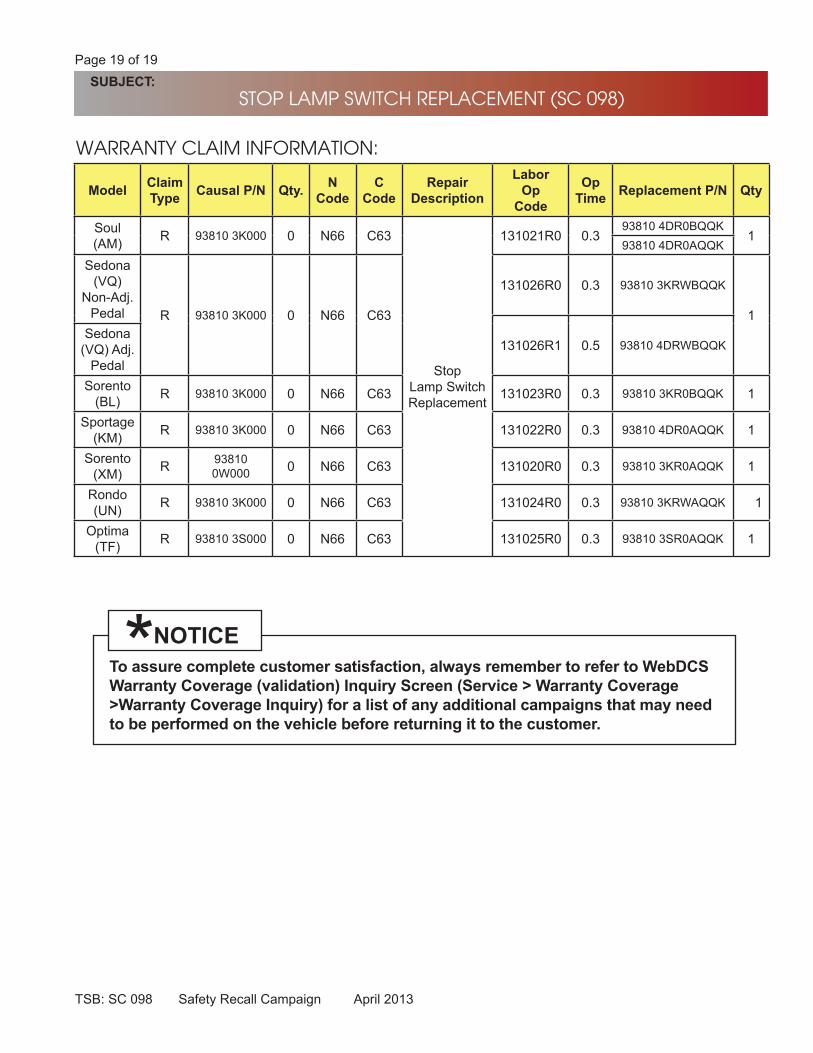
WARRANTY CLAIM INFORMATION:
ModelClaim
TypeCausal P/N Qty.
N
Code
C
Code
Repair
Description
Labor
Op
Code
Op
TimeReplacement P/N Qty
Soul
(AM)R 93810 3K000 0 N66 C63
Stop
Lamp Switch
Replacement
131021R0 0.93810 4DR0BQQK
193810 4DR0AQQK
Sedona
(VQ)
Non-Adj.
Pedal R 93810 3K000 0 N66 C63
131026R0 0.3 93810 3KRWBQQK
1
131026R1 0.5 93810 4DRWBQQKSedona
(VQ) Adj.
Pedal
Sorento
(BL)R 93810 3K000 0 N66 C63 131023R0 0. 93810 3KR0BQQK 1
Sportage
(KM) R 93810 3K000 0 N66 C63 131022R0 0. 93810 4DR0AQQK 1
Sorento
(XM)R
93810
0W0000 N66 C63 131020R0 0. 93810 3KR0AQQK 1
Rondo
(UN)R 93810 3K000 0 N66 C63 131024R0 0. 93810 3KRWAQQ 1
Optima
(TF)R 93810 3S000 0 N66 C63 131025R0 0. 93810 3SR0AQQK 1
To assure complete customer satisfaction, always remember to refer to WebDCS
Warranty Coverage (validation) Inquiry Screen (Service > Warranty Coverage
>Warranty Coverage Inquiry) for a list of any additional campaigns that may need
to be performed on the vehicle before returning it to the customer.
NOTICE*