Embed Size (px)
Citation preview

7/18/2019 SAP DB2 Administration Guide
http://slidepdf.com/reader/full/sap-db2-administration-guide-56d69bf9cdc08 1/230
SAP NetWeaver ’04
Database Administration Guide
SAP®
on IBM DB2
Universal Database
for UNIX and
Windows
Document Version 1.02 – July 10, 2006

7/18/2019 SAP DB2 Administration Guide
http://slidepdf.com/reader/full/sap-db2-administration-guide-56d69bf9cdc08 2/230
© Copyright 2004 SAP AG. All rights reserved.
No part of this publication may be reproduced or transmitted in any
form or for any purpose without the express permission of SAP AG.
The information contained herein may be changed without prior
notice.
Some software products marketed by SAP AG and its distributors
contain proprietary software components of other software vendors.
Microsoft, Windows, Outlook, and PowerPoint are registered
trademarks of Microsoft Corporation.
IBM, DB2, DB2 Universal Database, OS/2, Parallel Sysplex,
MVS/ESA, AIX, S/390, AS/400, OS/390, OS/400, iSeries, pSeries,
xSeries, zSeries, z/OS, AFP, Intelligent Miner, WebSphere, Netfinity,
Tivoli, and Informix are trademarks or registered trademarks of IBM
Corporation in the United States and/or other countries.
Oracle is a registered trademark of Oracle Corporation.
UNIX, X/Open, OSF/1, and Motif are registered trademarks of the
Open Group.
Citrix, ICA, Program Neighborhood, MetaFrame, WinFrame,
VideoFrame, and MultiWin are trademarks or registered trademarks of
Citrix Systems, Inc.
HTML, XML, XHTML and W3C are trademarks or registered
trademarks of W3C®, World Wide Web Consortium, Massachusetts
Institute of Technology.
Java is a registered trademark of Sun Microsystems, Inc.
JavaScript is a registered trademark of Sun Microsystems, Inc., used
under license for technology invented and implemented by Netscape.
MaxDB is a trademark of MySQL AB, Sweden.
SAP, R/3, mySAP, mySAP.com, xApps, xApp, SAP NetWeaver, and
other SAP products and services mentioned herein as well as their
respective logos are trademarks or registered trademarks of SAP AG
in Germany and in several other countries all over the world. All other
product and service names mentioned are the trademarks of their
respective companies. Data contained in this document serves
informational purposes only. National product specifications may
vary.
These materials are subject to change without notice. These materials
are provided by SAP AG and its affiliated companies ("SAP Group")
for informational purposes only, without representation or warranty of
any kind, and SAP Group shall not be liable for errors or
omissions with respect to the materials. The only warranties for SAP
Group products and services are those that are set forth in the express
warranty statements accompanying such products and services, if any.
Nothing herein should be construed as constituting an additional
warranty.
SAP Library document classification: PUBLIC
Disclaimer
Some components of this product are based on Java™. Any code
change in these components may cause unpredictable and severe
malfunctions and is therefore expressively prohibited, as is any
decompilation of these components.
Any Java™ Source Code delivered with this product is only to be used
by SAP’s Support Services and may not be modified or altered in any
way.
Documentation in the SAP Service Marketplace
You can find this documentation at the following Internet address:service.sap.com/instguides
SAP AGNeurottstraße 1669190 WalldorfGermanyT +49/18 05/34 34 24F +49/18 05/34 34 20www sap com

7/18/2019 SAP DB2 Administration Guide
http://slidepdf.com/reader/full/sap-db2-administration-guide-56d69bf9cdc08 3/230

7/18/2019 SAP DB2 Administration Guide
http://slidepdf.com/reader/full/sap-db2-administration-guide-56d69bf9cdc08 4/230
Technology makes no representations about the
suitability of this software for any purpose. It is
provided "as is" without express or implied warranty.
Boris Fomitchev makes no representations about the
suitability of this software for any purpose. This
material is provided "as is", with absolutely no
warranty expressed or implied. Any use is at your own
risk. Permission to use or copy this software for any
purpose is hereby granted without fee, provided the
above notices are retained on all copies. Permission to
modify the code and to distribute modified code is
granted, provided the above notices are retained, and a
notice that the code was modified is included with the
above copyright notice.
Permission to use, copy, modify, distribute and sell this
software and its documentation for any purpose is
hereby granted without fee, provided that the above
copyright notice appear in all copies and that both that
copyright notice and this permission notice appear in
supporting documentation. SAP makes no
representations about the suitability of this software for
any purpose. It is provided with a limited warranty and
liability as set forth in the License Agreement
distributed with this copy. SAP offers this liability and
warranty obligations only towards its customers and
only referring to its modifications.
2. Support and Maintenance
SAP does not provide software maintenance for the STLport.
Software maintenance of the STLport therefore shall be not
included.
All other services shall be charged according to the rates for
services quoted in the SAP List of Prices and Conditions and
shall be subject to a separate contract.
3. Exclusion of warranty
As the STLport is transferred to the Customer on a loan basis and
free of charge, SAP cannot guarantee that the STLport is error-
free, without material defects or suitable for a specific application
under third-party rights. Technical data, sales brochures,
advertising text and quality descriptions produced by SAP do not
indicate any assurance of particular attributes.
4. Limited Liability
a. Irrespective of the legal reasons, SAP shall only be liable for
damage, including unauthorized operation, if this (i) can be
compensated under the Product Liability Act or (ii) if caused
due to gross negligence or intent by SAP or (iii) if based on
the failure of a guaranteed attribute.
b. If SAP is liable for gross negligence or intent caused by
employees who are neither agents or managerial employees
of SAP, the total liability for such damage and a maximum
limit on the scope of any such damage shall depend on the
extent to which its occurrence ought to have anticipated by
SAP when concluding the contract, due to the circumstances
known to it at that point in time representing a typical
transfer of the software.
c. In the case of Art. 4.2 above, SAP shall not be liable for
indirect damage, consequential damage caused by a defect or
lost profit.
d. SAP and the Customer agree that the typical foreseeable
extent of damage shall under no circumstances exceed EUR
5,000.
e. The Customer shall take adequate measures for the
protection of data and programs, in particular by making
backup copies at the minimum intervals recommended by
SAP. SAP shall not be liable for the loss of data and its
recovery, notwithstanding the other limitations of the present
Art. 4 if this loss could have been avoided by observing this
obligation.
f. The exclusion or the limitation of claims in accordance with
the present Art. 4 includes claims against employees or
agents of SAP.

7/18/2019 SAP DB2 Administration Guide
http://slidepdf.com/reader/full/sap-db2-administration-guide-56d69bf9cdc08 5/230
Typographic Conventions
Type Style Description
Example Text Words or characters quotedfrom the screen. These includefield names, screen titles,pushbuttons labels, menunames, menu paths, and menuoptions.
Cross-references to otherdocumentation
Example text Emphasized words or phrasesin body text, graphic titles, andtable titles
EXAMPLE TEXT Technical names of systemobjects. These include reportnames, program names,transaction codes, tablenames, and key concepts of aprogramming language whenthey are surrounded by body
text, for example, SELECT andINCLUDE.
Exampl e t ext Output on the screen. Thisincludes file and directorynames and their paths,messages, names of variablesand parameters, source text,and names of installation,upgrade and database tools.
Example text Exact user entry. These arewords or characters that youenter in the system exactly as
they appear in thedocumentation.
<Exampletext>
Variable user entry. Anglebrackets indicate that youreplace these words andcharacters with appropriateentries to make entries in thesystem.
EXAMPLE TEXT Keys on the keyboard, forexample, F2 or ENTER.
Icons
Icon Meaning
Caution
Example
Note
Recommendation
Syntax
Additional icons are used in SAPLibrary documentation to help youidentify different types of information ata glance. For more information, seeHelp on Help → General InformationClasses and Information Classes for
Business Information Warehouse onthe first page of any version of SAPLibrary.

7/18/2019 SAP DB2 Administration Guide
http://slidepdf.com/reader/full/sap-db2-administration-guide-56d69bf9cdc08 6/230
6 July 2006
Contents
SAP Database Administration Guide: IBM DB2 UniversalDatabase for UNIX and Windows ...................................................10
1 Introduct ion .......................................................................................10
1.1 About this Documentation .................................................................. 10 1.1.1 Who Should Use this Documentation.........................................................................10 1.1.2 How this Documentation is Structured........................................................................11
1.2 Naming Conventions ........................................................................... 12
1.3 End of Support of SAP DB2 Admin Tools .......................................... 13
1.4 Admin Tools: Enhancements and Changes....................................... 13 1.4.1 New Features..............................................................................................................16 1.4.2 Differences Between 4.6D and 6.NN Admin Tools.....................................................19
1.5 DB2 UDB for UNIX and Windows Version 7: Enhancements ........... 20
1.6 DB2 UDB for UNIX and Windows Version 8: Enhancements ........... 22
1.7 DB2 UDB for UNIX and Windows Version 8: Enhancements ........... 24
1.8 DB2 UDB for UNIX and Windows Version 8.2.2: Enhancements ..... 25
2 Basic Concepts .................................................................................26
2.1 Introduct ion ..........................................................................................26 2.1.1 The SAP DB2 Admin Tools ........................................................................................26 2.1.2 User Interfaces............................................................................................................27
2.2 SAP Log File Management ..................................................................28 2.2.1 Recovery - The Need for Log Files.............................................................................28 2.2.2 Recovering Log Files..................................................................................................30 2.2.3 Log File Life Cycle (Archive and Restore) ..................................................................31 2.2.4 Log File Deletion.........................................................................................................34 2.2.5 Protocols .....................................................................................................................36 2.2.6 Raw Device Log Files.................................................................................................36 2.2.7 Log File States ............................................................................................................37 2.2.8 Special Cases - Non-Standard Behavior of Database Systems ................................38
2.3 SAP Secur ity Concept ......................................................................... 39
2.4 Mult i-Parti tioned Systems ................................................................... 40
3 Instal lat ion and Setup .......................................................................41 3.1 Introduct ion ..........................................................................................41
3.2 SAP System Envi ronment ...................................................................43 3.2.1 SAP System Users and Groups .................................................................................43 3.2.2 User Environment .......................................................................................................45 3.2.3 Access Authorizations for Admin Tool-Related Directories........................................46
3.3 Installing the Admin Tools Manually .................................................. 47 3.3.1 Prerequisites for the Admin Tools Installation ............................................................48 3.3.2 General Information ....................................................................................................50 3.3.3 Upgrading the Admin Tools ........................................................................................50 3.3.4 Installing the Latest Admin Tools................................................................................51 3.3.5 Checking the Admin Tools Environment ....................................................................52
3.3.6 Actions Performed by the sddb6ins Program.............................................................53

7/18/2019 SAP DB2 Administration Guide
http://slidepdf.com/reader/full/sap-db2-administration-guide-56d69bf9cdc08 7/230
July 2006 7
3.3.7 Special Configurations................................................................................................57 3.3.8 Enabling the Database for Rollforward Recovery.......................................................57
3.3.8.1 Enabling Rollforward Recovery for a Single-Partitioned Database ......................58 3.3.8.2 Enabling Rollforward Recovery for a Multi-Partitioned Database.........................59
3.3.9 Deinstalling the Admin Tools ......................................................................................60 3.4 Installation and Setup of the DB2 Control Center Extensions .........60
3.4.1 Installation of the DB2 Control Center ........................................................................61 3.4.2 Installing the DB2 Control Center Extensions ............................................................61 3.4.3 Setting Up the DB2 Control Center.............................................................................62 3.4.4 Using the DB2 Control Center Extensions .................................................................69
4 Conf iguration .....................................................................................70
4.1 Changing the Admin Tools Configuration ......................................... 70 4.1.1 Parameters Affecting Log File Management Storage.................................................70 4.1.2 Configuring the Admin Tools Using Environment Files ..............................................73
4.2 Configuring the System for Arch iving Log Files ............................... 78 4.2.1 Archiving Directly to TSM ...........................................................................................80
4.2.2 Archiving Directly to Disk............................................................................................81 4.2.3 Archiving to an Alternative Storage Management Product.........................................82 4.2.4 Indirect Archiving to Tape...........................................................................................82 4.2.5 Indirect Archiving to TSM............................................................................................88 4.2.6 Indirect Archiving Using a Customer Script ................................................................89
4.3 Configur ing TSM (Tivol i Storage Management).................................90 4.3.1 Configuring TSM Files dsm.opt and dsm.sys .............................................................91 4.3.2 Configuring TSM Environment Variables....................................................................92 4.3.3 Configuration Considerations .....................................................................................94
4.4 DB2 Configuration Parameters ........................................................... 95
4.5 Disk Space Considerations for Running the Admin Tools ............... 96
5 Regular Administration ....................................................................98 5.1 DB2 Log File Management ..................................................................98
5.1.1 Archiving Log Files from Disk to Backend ..................................................................98 5.1.2 Deleting Log Files .....................................................................................................101
5.2 Storage Management ......................................................................... 103 5.2.1 Checking the Space Available in a File System .......................................................104 5.2.2 Checking the Space Available in a Tablespace .......................................................104 5.2.3 Checking the Size of Tables and Indexes ................................................................106
5.3 Performance Monitor ing .................................................................... 107 5.3.1 Monitoring Database Performance...........................................................................107 5.3.2 Monitoring Dynamic SQL Statements.......................................................................109 5.3.3 Updating Statistics for Database Tables and Checking for Reorganization.............109 5.3.4 Job Monitoring ..........................................................................................................110
5.4 Database Backup ............................................................................... 110 5.4.1 Backup Considerations.............................................................................................111 5.4.2 Performing the Backup .............................................................................................111 5.4.3 Integrity of Backups ..................................................................................................113 5.4.4 Frequency of Backups and Time Required ..............................................................113 5.4.5 Advanced Backup Techniques .................................................................................114
6 Advanced Tasks ..............................................................................115
6.1 The db6uti l Tool .................................................................................. 115
6.2 Setting and Updating Passwords ..................................................... 116
6.3 Using the Journal in the DB2 Control Center Extensions .............. 116

7/18/2019 SAP DB2 Administration Guide
http://slidepdf.com/reader/full/sap-db2-administration-guide-56d69bf9cdc08 8/230
8 July 2006
6.4 Advanced Log File Management Tasks ........................................... 117 6.4.1 Deleting Special Log Files ........................................................................................118 6.4.2 Deleting Tapes from the Admin DB ..........................................................................120
6.5 Reorganization of Tables and Tablespaces ..................................... 120
6.6 Redirected Restore ............................................................................ 122 6.6.1 Usage of Tool brdb6brt .............................................................................................123
6.7 Command Line Tasks Using db6clp ................................................. 128
6.8 Monitor ing Database Alerts............................................................... 130
6.9 Moni tor ing Lock Waits and Deadlocks ............................................. 130
6.10 Managing Backups and Logs Archived on TSM............................ 131
6.11 The db2inidb Tool ............................................................................ 132 6.11.1 db2inidb Option: as mirror ......................................................................................133 6.11.2 db2inidb Option: as snapshot .................................................................................136 6.11.3 db2inidb Option: as standby for Backups ...............................................................138 6.11.4 db2inidb Option: as standby for Hot-Standby Database ........................................139
6.12 Dual Logging .................................................................................... 145
6.13 Adjust ing the Content of the Admin DB ......................................... 145
7 Emergency Tasks............................................................................147
7.1 SAP Database Recovery .................................................................... 147
7.2 Log File Restore of the SAP Database ............................................. 148
7.3 Recovery of the Admin DB ................................................................ 153 7.3.1 General Information ..................................................................................................153 7.3.2 Recovery Process.....................................................................................................154
Appendix A: Tool Command Line Parameters ................................157
brarchive - Log File Archive Tool............................................................ 157 brdb6br t - Redirected Restore Tool ........................................................ 160
brrestore - Log File Retrieval Tool .......................................................... 164
db2uext2 - DB2 User Exi t......................................................................... 167
db6adut l - SAP TSM Management Tool .................................................. 168
db6ut il - Tool to Assist Database Administration.................................. 169
dmdb6bkp - Database Backup Tool........................................................170
dmdb6srp - Update Statist ics Tool ......................................................... 172
dmdb6rts - Table Reorganization Tool ................................................... 173
sddb6ins - Admin Tools Installation Program ....................................... 174
sddb6mir - Admin DB Creation and Mirror Tool Utili ty ......................... 176
Appendix B: Troubleshooting...........................................................177
DB2 Traces ............................................................................................... 177 DB2 Trace Facility db2trc...................................................................................................177 DB2 CLI Trace ...................................................................................................................178
Admin Tools Traces ................................................................................. 179 Downloading Admin Tool Patches from SAP Service Marketplace ..................................180
Troubleshooting Admin Tools and Programs .......................................182 General Troubleshooting Comments.................................................................................182 Initial Troubleshooting Steps..............................................................................................183 Installation (sddb6ins) Troubleshooting.............................................................................183 User Exit Troubleshooting..................................................................................................184

7/18/2019 SAP DB2 Administration Guide
http://slidepdf.com/reader/full/sap-db2-administration-guide-56d69bf9cdc08 9/230
July 2006 9
brarchive/brrestore Troubleshooting..................................................................................189 DB2 Control Center Extensions Troubleshooting..............................................................204 Collecting Diagnostic Information for SAP Support ...........................................................205
Appendix C: Implementation Detai ls................................................206
Admin DB Structure ................................................................................. 206 brarchive and brrestore backend Library Architecture.......................................................210
DB2 Control Center Extensions Architecture........................................211
Appendix D: Example of File in it<DBSID>.db6 ...............................212
File in it<DBSID>.db6 on UNIX .................................................................212
File init<DBSID>.db6 on Windows .......................................................... 215
Appendix E: Example of Customer Script db6sctsm.smp.............221
Appendix F: References ....................................................................223
DB2 UDB for UNIX and Windows V7 - Addi tional Documentation ....... 223
DB2 UDB for UNIX and Windows V8 - Addi tional Documentation ....... 225 Glossary and Index ............................................................................227

7/18/2019 SAP DB2 Administration Guide
http://slidepdf.com/reader/full/sap-db2-administration-guide-56d69bf9cdc08 10/230
10 July 2006
1 Introduction
1.1 About this DocumentationThis documentation supplies information specific to the SAP environment and describes dailyadministration tasks using both product tools and the SAP-specific administration tools. Thedocumentation is written based on DB2 UDB Version 7 as the underlying database release.The concepts described in this documentation are also expected to apply to other DB2 forUNIX and Windows database versions.
The information in this documentation has been collected from a variety of sources such asprevious administration documentations, SAP Notes and customer experience and gives theadministrator a single point of reference. The information is presented in a task-oriented way,
separating information frequently needed from that which the administrator only requires, forexample, in an emergency. It also includes a new troubleshooting section giving advice aboutsolving problems before contacting SAP, or what information to send to SAP if no solutioncan be found.
The information provided in this documentation applies to all SAP kernelreleases starting from 3.1I and higher as well as IBM DB2 Universal Databasefor UNIX and Windows Version 7 and higher.
If you would like to give feedback on this documentation, use the following emailaddress: [email protected]
1.1.1 Who Should Use this DocumentationThis documentation is intended primarily for database administrators and SAP systemadministrators who need to install and maintain an SAP system running on DB2 UDB forUNIX and Windows. It is structured to be of use to both people new to databaseadministration and experienced SAP administrators alike, including those with experiencewith other database products.
It will also be of use to a range of customer support functions when planning, installing, andmaintaining systems, or assisting in these tasks.

7/18/2019 SAP DB2 Administration Guide
http://slidepdf.com/reader/full/sap-db2-administration-guide-56d69bf9cdc08 11/230
July 2006 11
1.1.2 How this Documentation is StructuredThis documentation is divided into the following sections:
Chapters...
1. Introduction
Provides general information about the guide, its targeted audience, interfaces, namingconventions and new features.
2. Basic Concepts
Describes administration and Admin Tools and the related concepts, including DB2UDB-specific information about installing and configuring servers and clients for theSAP system.
3. Installation and Setup
Explains how to install Admin Tool patches and deal with upgrades. It also coversmanual (re)installation of the tools if required.
4. Configuration
Describes the available options and steps required to configure the Admin Tools.
5. Regular Adminis tration
Lists and describes tasks that system administrators need to perform on a regularbasis such as storage administration, backup and log file management.
6. Advanced Tasks
Covers one-time or rarely needed tasks not related to configuration. Some tasks maybe prerequisites for other day-to-day tasks, which must be performed before log files
can be stored to tape. Also includes monitoring and performance considerations.
7. Emergency Tasks
Tasks that administrators may need to perform after a database failure.
Appendices
A. Tool Command L ine Parameters
Contains detailed command line syntax for each command.
B. Troubleshooting
Describes what to do when tools do not work as expected.
C. Implementation Details
Contains internal tool information, especially for support personnel.
D. Example of the File init<DBSID>.db6
E. Example of Customer Script db6sctsm.smp
F. References
G Glossary and Index
7/18/2019 SAP DB2 Administration Guide
http://slidepdf.com/reader/full/sap-db2-administration-guide-56d69bf9cdc08 12/230
12 July 2006
1.2 Naming Conventions
Terminology
For information about terminology used in this documentation, see Glossary andIndex [Page 227].
Product Names
In this documentation the following naming conventions apply:
SAP Web Application Server / SAP system
SAP Web Application Server is referred to as SAP Web AS or SAP system. Additionally theterm SAP system also refers to other applications of mySAP.com.
IBM DB2 Universal Database for UNIX and WindowsIBM DB2 Universal Database for UNIX and Windows is referred to as DB2 UDB for UNIX andWindows or DB2.
IBM DB2 Universal Database Enterprise Server Edit ion for UNIX and Windows
IBM DB2 Universal Database Enterprise Server Edition for UNIX and Windows is referred toas DB2 UDB ESE for UNIX and Windows
single-partitioned system / EE system
The term single-partitioned system replaces the term EE system.
multi-partitioned system / EEE system
The term multi-partitioned system replaces the term EEE system.
6.NN Admin Tools / 6.10 Admin Tools
The term 6.NN Admin Tools replaces the term 6.10 Admin Tools, as these Admin Tools canbe used for any SAP system release starting from 6.10 and higher.
Tivoli Storage Management (TSM) / ADSM
The IBM storage product ADSM has been renamed to TSM (Tivoli Storage Manager) in themost recent versions. The names are often used interchangeably, but in this documentationthe product is referred to as TSM. The term ADSM is normally only used in this guide toindicate program parameters or configuration parameter names.
Tivoli (IBM) no longer supports the product ADSM. Customers still using ADSMare strongly advised to upgrade to TSM Client Version 4.1 or higher.
Serious problems have occurred when using the Admin Tools with TSM Version3.7. This version is also out of service now, so an upgrade is also stronglyadvised.
Windows
The term Windows refers to Windows 95, Windows 98, Windows NT, or Windows 2000.
Servers can only be installed on Windows NT or Windows 2000. Clients can be installed onany Windows platform.

7/18/2019 SAP DB2 Administration Guide
http://slidepdf.com/reader/full/sap-db2-administration-guide-56d69bf9cdc08 13/230
July 2006 13
1.3 End of Support of SAP DB2 Admin ToolsWith version 8.2, DB2 UDB for UNIX and Windows has introduced its own log filemanagement that replaces the SAP log file management tools (referred to as Admin Toolsthroughout this document). Therefore, the SAP log file management tools are no longersupported by:
• Version 9 and higher of IBM DB2 for Linux, UNIX, and Windows
• SAP Java only systems
• SAP systems based on SAP kernel releases 7.00 or higher
• New operating system platforms, for example, Linux AMD64/EM64T, Linux on Power,Windows AMD64/EM64T or Solaris on AMD64.
• TheDB2 HADR feature.
If you are using DB2 UDB for UNIX and Windows version 8.2 or higher, werecommend that you use DB2’s integrated log file management. The DB2 logfile management is supported for all SAP releases. For more information, seethe following documentation:
• IBM DB2 Universal Database for UNIX and Windows: New Log FileManagement that is available on SAP Service Marketplace atservice.sap.com/instuidesNW2004s → Operations → Database-
Specific Guides
• DB2 documentation IBM DB2 Universal Database - Data Recovery andHigh Availability Guide and Reference
• SAP Note 913481
1.4 Admin Tools: Enhancements and ChangesThe following sections summarize recent changes to the Admin Tools.
Within these sections, we refer to the Admin Tools release and not the SAP
system release, which do not need to be the same.
For example, the 4.6D Admin Tools should be used on all SAP 3.1I to 4.6Dsystems where DB2 UDB for UNIX and Windows Version 7 or higher isinstalled. The 6.10 Admin Tools or higher should be used with all SAP systemreleases above and including 6.10.

7/18/2019 SAP DB2 Administration Guide
http://slidepdf.com/reader/full/sap-db2-administration-guide-56d69bf9cdc08 14/230
14 July 2006
The following changes are informational or not patch-specific:
• Installation Program sddb6ins
The command line syntax of sddb6i ns has been simplified by extracting information
from the environment. The sddb6i ns program now also contains the remaining AdminTools, which it installs. sddb6i ns therefore no longer requires a separateDBATOOLS. SAR file, and the shared library path environment variable must no longerbe set before starting it.
The Admin Tools installation program sddb6i ns now checks many aspects of theenvironment to locate the majority of problems experienced by customers. In the past adifficulty with the Admin Tools has been the runtime environment. Admin Tools filesand directories may have been unintentionally removed or were given the wrongownership or authorizations; environment variables may have been set to non-existentdirectories, and so on.
For more information, see Installing the Admin Tools Manually [Page 47].
• Admin Tools in an MCOD Environment
The Admin Tools have been modified to support this SAP feature. They are onlyinstalled with the first SAP system, that is, only once per database. As log files areshared by all the SAP systems using the same single database, user db2<dbsi d>andall <sapsi d>admusers can perform log file management tasks.
It is necessary to differentiate between the SAP system ID <SAPSI D>and the SAPsystem database name <DBSI D>, as these are no longer necessarily the same. Additionally, user IDs and directory names may be affected. If <SAPSI D>and<DBSI D>have the same value, as is often the case for the first SAP system installedon a database, the old terminology still applies as described in the table below.
However, there is a limitation in SAP 4.6x releases, that the initial SAP system must
have the same ID as the SAP database. Further SAP systems have different IDs. Thedatabase connect user for the first SAP system in a 4.6D system environment is stillsapr 3.
If an MCOD system is removed, you must make sure that the db2<dbsi d>userenvironment still points to another valid MCOD system using the same database.
The following terminology conversions must be used:
SAP System and Database Name Descrip tions
ID Old ID New ID SAP system ID <SI D>,
<si d><SAPSI D>, <sapsi d>
SAP databasename
<SI D>, <si d>
<DBSI D>, <dbsi d>
User ID Descriptions
User Old ID New ID
Databaseinstance owner
db2<si d> db2<dbsi d>
SAP databaseadministrator
<si d>adm <sapsi d>adm

7/18/2019 SAP DB2 Administration Guide
http://slidepdf.com/reader/full/sap-db2-administration-guide-56d69bf9cdc08 15/230
July 2006 15
Databaseconnect user
sapr3 sap<sapsi d>
sapr3 is still usedfor the first SAPsystem in a 4.6Dsystem environment.
Directory Names Descriptions
Directory Old Name New Name
SAP system relateddirectories
<SI D> <SAPSI D>
db2<dbsi d>homedirectory andsubdirectories
<SI D> <DBSI D>
The following are examples of how the descriptions of directory names havechanged on UNIX systems compared to earlier versions of this documentationon. If <SAPSI D>and <DBSI D>are the same, the real directory name aftersubstitution remains unchanged:
Old New
/ usr / sap/ <SI D>/ sys/ exe/ r un / usr / sap/ <SAPSI D>/ sys/ exe/ r un
/ db/ <SI D>/ l og_di r / db/ <DBSI D>/ l og_di r
If the original SAP system is removed, certain Admin Tools are no longer fullyfunctional. This restriction only applies to 4.6D SAP systems.
From SAP system Release 6.10 and higher, it is only necessary to verify thatthe db2<dbsi d>user is set up correctly. Use sddb6i ns –checkonl y toverify this. This user may require changes to his environment.
For more information about released platforms and availability, see SAP ServiceMarketplace at service.sap.com/mcod .
• 64-bit Support The Admin Tools have been modified to work with 64-bit platforms.
Some changes were specifically implemented for the 4.6D and 6.NN Admin Tools anddelivered as patches. For more detailed information, see New Features [Page 16].
For information about the main differences between the 4.6D and 6.NN Admin Tools, seeDifferences Between 4.6D and 6.NN Admin Tools [Page 19].

7/18/2019 SAP DB2 Administration Guide
http://slidepdf.com/reader/full/sap-db2-administration-guide-56d69bf9cdc08 16/230
16 July 2006
1.4.1 New FeaturesThis section provides information about new features that have been specifically implementedfor the 4.6D and 6.NN Admin Tools.
6.NN stands as a placeholder for all Admin Tools releases starting from 6.10and higher.
New Features of 4.6D Patch 20 and 6.NN Patch 9
• brarchive/brrestore customer script interface
You can now write your own individual backend interface. For more information, see Archiving Log Files from Disk to Backend [Page 98].
• Option brarchive –GAL/-DMP
You use this option to adjust the Admin DB to a file system. For more information, see Adjusting the Content of the Admin DB [Page 145].
• Option sddb6ins –r
You use this option to recreate the Admin DB from a SAR file. For more information,see Recovery of the Admin DB [Page 153].
• Support of two TSM management classes
The User Exit and br ar chi ve can now archive log files to two TSM managementclasses. For more information, see Archiving Directly to TSM [Page 80].
• Restore of log files excluding the Admin DB
The User Exit restores log files from l og_ar chi ve or l og_ret r i eve without anyinformation about those log files in the Admin DB. You activate this feature by settingconfiguration variable DB2DB6_UEXI T_RETRI EVE_WO_DB in file i ni t <DBSI D>. db6.
• Admin Tools and DB2 Version 8
The Admin Tools are now supported for DB2 UDB for UNIX and Windows Version 8.
For more detailed information about 4.6D patch 22 and 6.NN patch 11, see SAPNote 533979.
New Features of 4.6D Patch 22 and 6.NN Patch 11
• Option brarchive –dt
You use this option to delete tapes using the command line. For more information, seeDeleting Log Files [Page 101].
• Option brarchive –do
You use this option to delete obsolete log files using the command line. For moreinformation, see Advanced Log File Management Tasks [Page 117].

7/18/2019 SAP DB2 Administration Guide
http://slidepdf.com/reader/full/sap-db2-administration-guide-56d69bf9cdc08 17/230

7/18/2019 SAP DB2 Administration Guide
http://slidepdf.com/reader/full/sap-db2-administration-guide-56d69bf9cdc08 18/230
18 July 2006
New Features of Other Administ rative Tools
• Backup restore tool brdb6brt patch 12
If an incremental or delta backup was detected, option I NCREMENTAL AUTOMATI C was added.
• Backup restore tool brdb6brt patch 11
AutoSt orage support was added.
• Backup restore tool brdb6brt patch 9
Option –nn ALL was added. With this option, you can create backups or the redirectedrestore script for all database partitions with one call.
• Backup restore tool brdb6brt patch 5
New comments starting with SET I GNORE ROLLFORWARD
The script created by brdb6br t patch 2 or higher contains new commentsstarting with SET I GNORE ROLLFORWARD. You might have to use this feature ifthe log files contain information about cont ai ner change operat i ons andthe operations cannot be applied during the roll-forward recovery. This mayoccur in a redirected restore scenario because the container layout is thendifferent to the one when the backup was made.
You activate this feature by removing the two dashes (−−) at the beginning ofthe corresponding comment line.
Support of striped containers
Striped containers are created if you are using DB2 Version 7 and instanceregistry variable DB2_STRI PED_CONTAI NERS is set to ON. For DB2 Version 8,
this variable is set to ON by default. Backup information in brdb6br t
brdb6brt automatically contains the information from the latest full backup. Itretrieves the information from the backup history file.
Option –bm RETRI EVE RELOCATE
You use this option to create scripts that can be used for database relocation.These scripts can be used as a template in db2r el ocat edb with commandrelocate DB or in db2i ni db with command RELOCATE USING.
Option –r epl ace <r epl ace def i ni t i on>
You use this option to modify the generated scripts for redirected restore andrelocation. For example, you can replace the database name <DBSI D>.
For more detailed information about the current patch of brdb6br t , see SAP
Note 867914

7/18/2019 SAP DB2 Administration Guide
http://slidepdf.com/reader/full/sap-db2-administration-guide-56d69bf9cdc08 19/230
July 2006 19
• DB2 Control Center Extensions patch 4:
You can now use the DB2 Control Center Extensions for the 4.6D and 6.NN Admin Tools.
The DB2 Control Center Extensions have been modified to support the customerscript option of br ar chi ve.
The DB2 Control Center Extensions are supported for DB2 UDB for UNIX andWindows Version 8.
For more detailed information about patch 3 of the DB2 Control CenterExtensions, see SAP Note 703988.
1.4.2 Differences Between 4.6D and 6.NN Admin ToolsSince the implementation of the 6.NN Admin Tools, the main differences to the 4.6D AdminTools are:
• ADM<DBSI D>database mirroring no longer required
In the past, the Admin DB ADM<DBSI D>was mirrored to the SAP database to reducethe risk of data loss. This has proven to be unnecessary. Thus, the program sdd6mi r ,which was used to perform this action, is no longer required. When SAP system logfiles are stored directly by the User Exit to TSM, the Admin DB is not required and sono backup (mirror) of this database is needed. If log files are stored using br ar chi ve,a backup copy of the Admin DB is stored to the same medium as the log file(s) at the
end of each br ar chi ve run. For more information about how to recover the AdminDB, see Recovery of the Admin DB [Page 153].
This implies that the 6.NN Admin Tools delivery does not contain program sddb6mi r any more.
• New location for Admin Tools executables
To reduce the dependencies between the almost release-independent Admin Toolsand the release-dependent SAP products, the Admin Tools, their configuration,protocol and trace files have been moved. This means that, for example, unlike AdminTool versions up to 4.6D, the 6.10 Admin Tools no longer need to be re-installed afteran SAP system upgrade.
For more information, see Installing the Admin Tools Manually [Page 47].
7/18/2019 SAP DB2 Administration Guide
http://slidepdf.com/reader/full/sap-db2-administration-guide-56d69bf9cdc08 20/230
20 July 2006
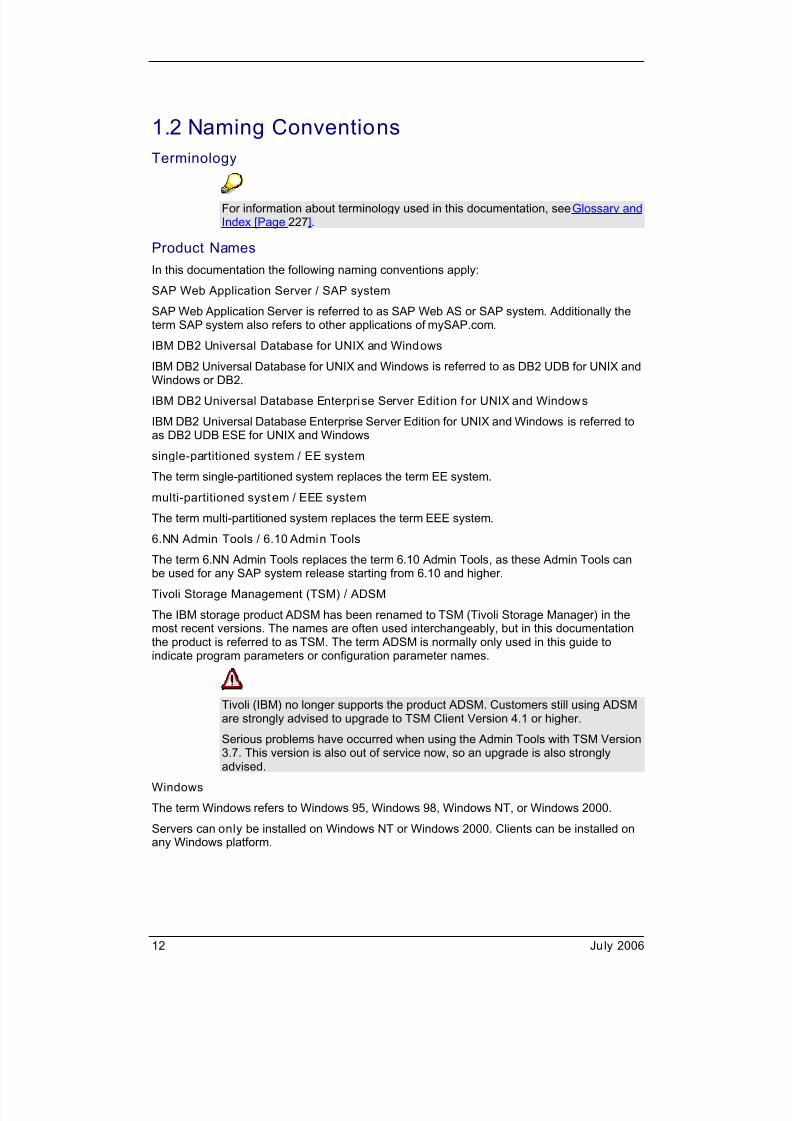
The following table shows the location of the Admin Tools files and variables for 4.6Dand 6.NN:
4.6D 6.NN
Executablesand libraries:
br ar chi ve/br r estore,db6adut l ,l i bdb6*
UNIX: / usr / sap/ <SAPSI D>SYS/exe/ r un
Windows:<dri ve>: \ usr \ sp\ <SAPSI D>\ SYS\exe\ r un
UNIX:<I NSTHOME>/ admi nt ool s/bi n
Windows:<I NSTHOME>\ admi nt ool s\bi n
Protocol files UNIX:/ db2/ <DBSI D>/ saparch / db2/ <DBSI D>/ sapr est
Windows:
<dri ve>: \ db2\ db2<dbsi d>\sapar ch<dr i ve>: \ db2\ db2<dbsi d>\sapr est
UNIX:<I NSTHOME>/ admi nt ool s/pr ot ocol s
Windows:
<I NSTHOME>\ admi nt ool s\pr ot ocol s
Trace files UNIX:/ t mp/ Tr aceFi l es
Windows:<DB2DB6_TEMP_DI R>\ Tr aceFi l es
UNIX:<I NSTHOME>/ admi nt ool s/ Tr aceFi l es
Windows:<I NSTHOME>\ admi nt ool s\ Tr aceFi l es
TSM
environmentvariables
UNIX:
i n. dbenv_<host >. csh/ sh Windows:user environment
UNIX:
<I NSTHOME>/ admi nt ool s/bi n/ dbaenv_<host >. csh/sh
Windows:user environment
1.5 DB2 UDB for UNIX and Windows Version 7:EnhancementsThe following are the major new features in Version 7.1 and Version 7.2, which are relevantto the Admin Tools:
Version 7.1
• Closing the Act ive Log File after Backup
After an online backup is complete, DB2 forces the currently active log file to be closedand as a result it will be archived. This ensures that an online backup has a completeset of archived log files available for recovery.For more information, see the IBM documentation DB2 Administration Guide:Implementation
7/18/2019 SAP DB2 Administration Guide
http://slidepdf.com/reader/full/sap-db2-administration-guide-56d69bf9cdc08 21/230
July 2006 21
• On Demand Log Archive Support
You can now force the currently active log file closed, which is then automaticallyarchived by DB2 if the User Exit is enabled. Database administrators are thus providedwith more granular control over their backup and restore strategy. For moreinformation, see the IBM documentation DB2 Administration Guide: Implementation .
• Log Limit Increased to 32 GB
The maximum size of (the sum of) all log files has been increased from 4 GB to 32 GB.This enables applications to perform extremely large amounts of work within a singletransaction. For more information, see the IBM documentation DB2 AdministrationGuide: Implementation.
• Renaming a Tablespace
When creating a tablespace, you specify its name. In previous versions, you were notallowed to change that name again during the lifetime of the tablespace object. Now,an administrator can rename a tablespace with the RENAME TABLESPACE statement.
For more information, see the IBM documentation DB2 Administration Guide:Implementation.
Version 7.2
• Block Transactions When Log Directory is Full
DB2 Version 7.2 provides a new registry variable DB2_BLOCK_ON_LOG_DI SK_FULL ,which is used to prevent disk full errors from being generated when DB2 cannot createa new log file in the active log directory. DB2 attempts to create the log file every fiveminutes and writes a message to file db2di ag. l og after each attempt. This fileindicates if your application is hanging.
For more information about the DB2 instance variable
DB2_BLOCK_ON_LOG_DI SK_FULL , see the DB2 Release Notes.• Suspended I/O
Supports continuous system availability, while allowing online split mirror handling ofthe database. By momentarily suspending I/O to disk, DB2 will ensure that the splitmirror copy maintains its integrity. A new tool db2i ni db has been created thatoperates on split mirror copies.
If you want to use the db2i ni db tool, we strongly recommend that you readThe db2inidb Tool [Page 132] before you start using it.
• Dual Logg ing
DB2 now has the capability to mirror the active log files to protect databases fromaccidental deletion of an active log and data corruption caused by a hardware failure. Anew registry variable DB2_NEWLOGPATH2 instructs the database to write an identicalcopy of the log files to a different path on a physically separate disk.

7/18/2019 SAP DB2 Administration Guide
http://slidepdf.com/reader/full/sap-db2-administration-guide-56d69bf9cdc08 22/230
22 July 2006
• Parallel Recovery
DB2 now uses multiple agents to perform both crash recovery and database roll-forward recovery. This may improve performance on SMP machines.
• Incremental and Delta Backups There are two backup types supported:
Incremental backup:
Only contains pages that have been modified since the last full database ortablespace backup.
Delta backup:
Only contains data that has changed since the last tablespace backup (full,incremental, or delta backup).
1.6 DB2 UDB for UNIX and Windows Version 8:Enhancements All new features of DB2 UDB for UNIX and Windows Version 8 are described in the IBMdocumentation IBM DB2 Universal Database Version 8 - What’s New.
This section briefly summarizes new features that affect log file management and databaseadministration in an SAP environment.
Logging Enhancements
• Dual Logg ing Restrictions of this feature, which was introduced in DB2 Version 7.2, have beenremoved. This feature is now supported on Windows as well. You can choose themirror log directory by setting database configuration parameter mi r r or l ogpat h.
• Infinite Logging
It allows an active unit of work to span the primary logs and archive logs, effectivelyallowing a transaction to use an infinite number of log files. Without infinite active logenabled, the log records for a unit of work must fit in the primary log space. Infiniteactive log is enabled by setting l ogsecond to - 1. Infinite active logging can be used tosupport environments with large jobs that require more log space than you wouldnormally allocate to the primary logs.
Be aware that if you activate this feature, rollbacks may take a long time if thelog files containing the rollback information need to be retrieved by the UserExit. We strongly recommend that you use this feature only if you are usingdirect archiving.
If you use indirect archiving, it is possible that the User Exit cannot retrieverequired log files for a rollback, because they have already been archived anddeleted from l og_ar chi ve by br ar chi ve. In addition, you should set the newdatabase configuration parameters MAX_LOG and NUM_LOG_SPAN to avoid thattransactions run indefinitely.
7/18/2019 SAP DB2 Administration Guide
http://slidepdf.com/reader/full/sap-db2-administration-guide-56d69bf9cdc08 23/230
July 2006 23
• Block Transactions when Log Directory is Full
The block on log disk full function, which was introduced in DB2 Version 7, is now setusing database configuration parameter bl k_l og_dsk_f ul .
• Increased Log Space
The maximum amount of log space, which can be defined, has increased from 32 GBto 256 GB.
Backup and Recovery Enhancements
• XBSA Support
Backup can now interface with solutions from storage vendors that have implementedthe XBSA industry standard interface.
• Point in Time Rollforward Recovery to Local Time
When using point in time (PIT) rollforward recovery, you can now specify the time as
local time. This makes it easier to roll forward to a specific point in time and eliminatespotential errors due to the translation of local to GMT time.
• Database Maintenance Mode: QUIESCE
Using the new QUI ESCE command, you can force all users off an instance or adatabase and put it into a quiesced mode for database maintenance activities. Thequiesce mode of the database is ideal to create an offline backup without the need tostop the SAP application servers.
Availabi lity Enhancements
• Online Table Reorganization
Online table reorganization allows applications to access the table during the
reorganization. In addition, online table reorganization can be paused and resumedlater by anyone with the appropriate authorization by using the schema and tablename. Online table reorganization is allowed only on tables with type-2 indexes andwithout extended indexes.
• Online Index Reorganization
A table and its existing indexes can be read and updated during an indexreorganization using the new REORG I NDEXES command.
• Online Configuration Parameters
Over 50 configuration parameters can now be set online. Changes to these onlineconfiguration parameters take immediate effect without the need to stop and start the
instance, or deactivate and activate the database. You no longer have to disconnectusers when you fine tune your system, which gives you more flexibility to decide whento change the configuration.
• DMS Container Operations
If you use database-managed tablespaces, DB2 Version 8 will allow you to drop acontainer from a tablespace, reduce the size of existing containers, and add newcontainers to a tablespace in a way that a rebalance does not occur.
Usability Enhancements
DB2 Control Center and 64-bit Instances
The DB2 Control Center can now be used to administer 32-bit and 64-bit instances.

7/18/2019 SAP DB2 Administration Guide
http://slidepdf.com/reader/full/sap-db2-administration-guide-56d69bf9cdc08 24/230

7/18/2019 SAP DB2 Administration Guide
http://slidepdf.com/reader/full/sap-db2-administration-guide-56d69bf9cdc08 25/230
July 2006 25
1.8 DB2 UDB for UNIX and Windows Version8.2.2: Enhancements
• Automatic resizing of DMS tablespaces ( AutoResize)
DMS tablespaces consist of file containers or raw device containers and their sizes areset when the containers are assigned to the tablespace. The tablespace is consideredfull when all of the space within the containers has been used. However, you can addor extend containers using the SQL statement ALTER TABLESPACE that allows morespace to be given to the tablespace. DMS tablespaces also have a feature called“auto-resize”. As space is consumed in a DMS table space that can be automaticallyresized.
• Automatic storage management ( AutoStorage)
Databases that are enabled for automatic storage have a set of one or more storagepaths associated with them. DB2 uses one or more storage paths as location where itcreates Aut oSt orage tablespace containers.
You can only enable DB2’s automatic storage management during databasecreation. You cannot disable automatic storage management afterwards.

7/18/2019 SAP DB2 Administration Guide
http://slidepdf.com/reader/full/sap-db2-administration-guide-56d69bf9cdc08 26/230
26 July 2006
2 Basic Concepts
2.1 IntroductionThis chapter describes the concepts relating to the Admin Tools, and the terminology usedthroughout this documentation. Much of this terminology is described in Glossary and Index[Page 227].
This documentation includes new and updated information that was notavailable in previous versions.
2.1.1 The SAP DB2 Admin ToolsThe SAP DB2 Admin Tools are a collection of tools specific to the SAP environment, whichsupplement standard DB2 tools. They can be divided into the following categories:
• Log file management tools
• Database backup and restore support tools
• Performance related tools
In addition to the tools themselves, a graphical interface, the DB2 Control CenterExtensions, has been created that simplifies access to several of the Admin Tools. Theseare extra menu options and windows that are available in the DB2 Control Center after theextensions are installed.
7/18/2019 SAP DB2 Administration Guide
http://slidepdf.com/reader/full/sap-db2-administration-guide-56d69bf9cdc08 27/230
July 2006 27
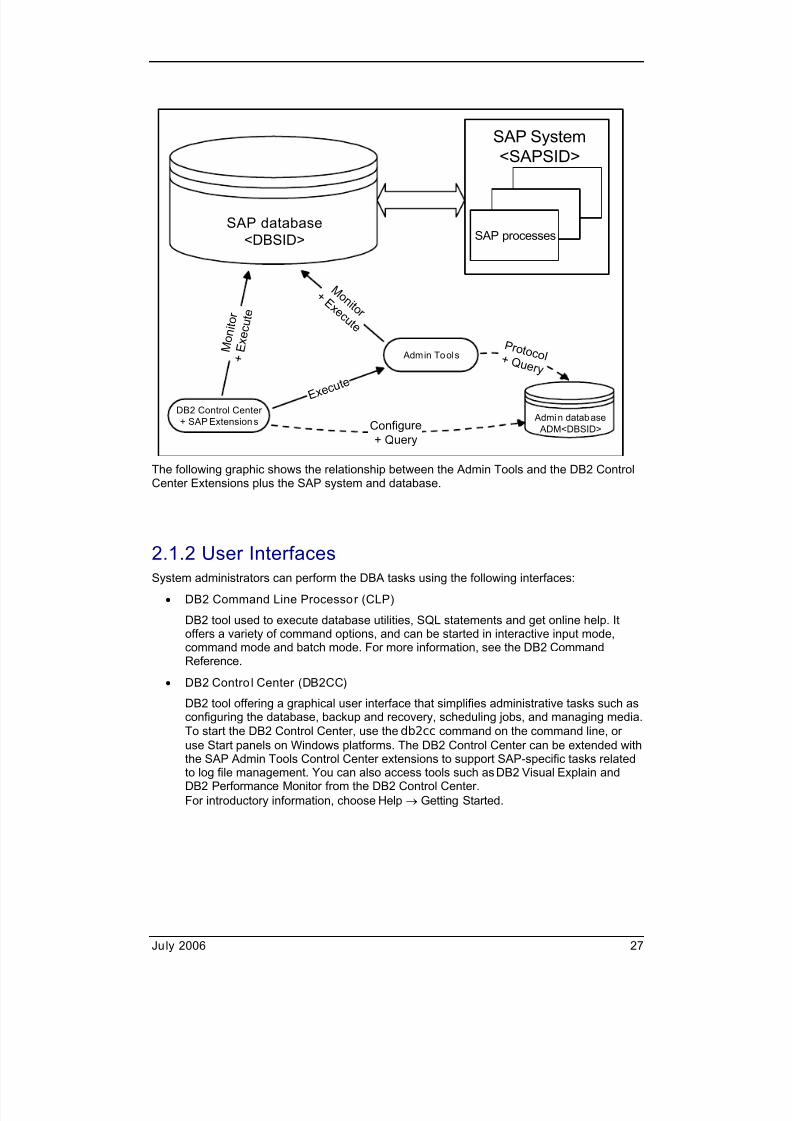
The following graphic shows the relationship between the Admin Tools and the DB2 ControlCenter Extensions plus the SAP system and database.
2.1.2 User InterfacesSystem administrators can perform the DBA tasks using the following interfaces:
• DB2 Command Line Processor (CLP)
DB2 tool used to execute database utilities, SQL statements and get online help. Itoffers a variety of command options, and can be started in interactive input mode,command mode and batch mode. For more information, see the DB2 CommandReference.
• DB2 Contro l Center (DB2CC)
DB2 tool offering a graphical user interface that simplifies administrative tasks such asconfiguring the database, backup and recovery, scheduling jobs, and managing media.To start the DB2 Control Center, use the db2cc command on the command line, oruse Start panels on Windows platforms. The DB2 Control Center can be extended withthe SAP Admin Tools Control Center extensions to support SAP-specific tasks relatedto log file management. You can also access tools such as DB2 Visual Explain andDB2 Performance Monitor from the DB2 Control Center.For introductory information, choose Help → Getting Started.
SAP database
<DBSID>
SAP System
<SAPSID>
SAP processes
DB2 Control Center
+ SAP Extensions
M
o n i t o
r
+ E
x e c u t e
M o n i t o r
+ E x e c u t e
Admi n database
ADM<DBSID>
P r o t o c o l + Q u e r y
E x e c u t
e
Admin Tools
Configure
+ Quer y

7/18/2019 SAP DB2 Administration Guide
http://slidepdf.com/reader/full/sap-db2-administration-guide-56d69bf9cdc08 28/230
28 July 2006
• Operating System Command Line
This can be used to perform the majority of tasks described in this documentation.Generally this is the fastest and most flexible method, but may require user knowledgeof complex command syntax. The system administrator can also use this interface toautomate tasks, for example, by writing scripts or batch files.
• SAP Transactions
These provide an additional graphical interface for starting specific tasks. The numberof available tasks is limited, but they are often neither platform nor database-specificand can therefore be used in a mixed environment.
2.2 SAP Log File Management
This section explains why log file management is an essential part of system administration,and how the Admin Tools assist in this task. It covers the following topics:
• Recovery − The Need for Log Files [Page 28]
• Recovering Log Files [Page 30]
• Log File Life Cycle (Archive and Restore) [Page 31]
• Log File Deletion [Page 34]
• Protocols [Page 36]
• Raw Device Log Files [Page 36]
• Log File States [Page 37]
• Special Cases – Non-Standard Behavior of Database Systems [Page 38]
2.2.1 Recovery - The Need for Log FilesOnce a database is up and running, one of the most essential tasks for a databaseadministrator is the management of database backups and log files to ensure that databasescan be recovered after a serious failure. The DB2 Database Manager generates log files tokeep track of changes made to the database. These log files are required for the followingpurposes:
• Explicit and implicit rollback
When a database transaction is rolled back all changes are undone.
Explicit rollback
An application indicates that changes that it started to make to the database areinvalid.
Implicit rollback
A program making changes to the database does not commit changes beforeexiting, either through incorrect programming or a crash.
In both cases the database needs log file information to return the database to thestate it was in before the changes were made.

7/18/2019 SAP DB2 Administration Guide
http://slidepdf.com/reader/full/sap-db2-administration-guide-56d69bf9cdc08 29/230
July 2006 29
• Database recovery
The DB2 Database Manager may be forced to restart without applications being able toclose all open transactions. The log files containing the information about changesmade by these transactions are required to perform database recovery when the
database manager is started again. This involves rolling back (undoing) all opentransactions for all applications.
• Database restore
A database can be recreated by restoring a previous backup. A backup represents thestate of a database at the time the backup was performed, but does not containinformation about transactions completed after this time. Therefore, after a backupimage is used to restore a database, log file data generated after the backup was takenmust be added to the database again, to bring the database completely up-to-date.This process is known as rollforward recovery. The command to add the log fileinformation is as follows:DB2 ROLLFORWARD.
Restoring from an offline backup imageSuch a database is immediately usable after the ROLLFORWARD STOP subcommand. Alternatively, log files can be first applied to bring the databaseup to date (to end of logs).
Restoring from an online backup image
In the case of an online backup, the log files generated while the backupoperation was running are also required, as transactions may have modified thedatabase contents during the time of the backup. Without this additional datathe restored database cannot be activated. The database must be rolled forwardto at least the point in time when the backup operation completed to ensurethat the data is consistent throughout the database.
Rollback and database recovery do not normally require user intervention. The DB2Database Manager retains all log files as long as they contain information from opentransactions. User intervention is only required if the directory where the database managerstores log files is damaged or lost. This directory is known both as the LOGPATH and log
directory. In case of loss or damage, you can recover at least those files that have beensuccessfully archived with the tools described below.
If the log directory is changed and then the subdirectory or any required log filesin that subdirectory are removed, DB2 will look for log files in the default logdirectory (SQLOGDI R) when the database is activated. If the log files are notfound, the database will enter a backup pending state.
In connection with rollforward operations, DB2 version 7 supports a log overflow directory.The rollforward operation first checks for logs in the location specified by the LOGPATH database configuration parameter. If you have moved any logs from the location specified bythe log path parameter, use the ROLLFORWARD overflow directory parameter to specify thepath to the logs that you moved. This is especially important in connection with recoverywhen logging to raw devices.

7/18/2019 SAP DB2 Administration Guide
http://slidepdf.com/reader/full/sap-db2-administration-guide-56d69bf9cdc08 30/230
30 July 2006
2.2.2 Recovering Log Files
The tools db2uext 2 (the User Exit), br ar chi ve and brrestore were developed as the logfile management component of the Admin Tools. Their main purposes are:
• To archive log files.
• To assist database administrators performing database rollforward operations after adatabase restore.
The Admin Tools are automatically installed as part of an SAP system installation withR3SETUP. If you install your SAP system with SAPinst, the Admin Tools are no longerautomatically installed. You can manually (re)install, upgrade or patch the Admin Tools usingthe sddb6i ns program. For more information, see Installing the Admin Tools Manually [Page47].
Rollforward recovery is not enabled by default. Unless otherwise configured, the DB2Database Manager reuses a fixed number of log files in a circular fashion, for example,
0,1,2,3,0,1,2,3,0 and so on. This behavior can be modified so that the database manageruses log files in an ascending order, for example, 0,1,2,3,4,…,9999999. By default, thedatabase manager also does not start any application (User Exit) to independently archivefull log files for later recovery.
Database administrators are strongly recommended to set the following database parametersin the SAP environment to ON:
• LOGRETAIN
Rollforward recovery is enabled by turning on this parameter. That is, circular logging is turned off and each new log file has a higher number.
Each time the LOGRETAI N parameter is turned off and on again, the databasemanager resets log file numbers and starts from zero again. This can result inseveral log files having the same log file number on a given node. The log filesmanagement tools only directly support recovery of the most recent version oflog files. Recovery of older versions must be done manually.
• USEREXIT
The User Exit mechanism is enabled by turning on this parameter. The User Exit isautomatically started by the DB2 engine each time a log file becomes full.
A backup is required after setting the LOGRETAI N parameter (or both), after which thedatabase can be started again.
To perform online backups, the database must be operated in rollforwardrecovery mode. To restore the database from an online backup, all log files inuse during the online backup operation must be available to complete therestore operation.
Once these parameters have been turned on and a backup has been performed, the AdminTools can be used to archive log files. The User Exit (db2uext 2) is then automaticallystarted by the database each time a log file is filled. Depending on how it is configured, theUser Exit either archives log files directly to a storage management product, or it copies thelog files to the directory referred to as archive directory (as defined by theDB2DB6_ARCHI VE_PATH environment variable). Groups of files in the archive directory can
then be archived to tape, TSM or with an individual script using br ar chi ve later.

7/18/2019 SAP DB2 Administration Guide
http://slidepdf.com/reader/full/sap-db2-administration-guide-56d69bf9cdc08 31/230
July 2006 31
The database can be recovered later using the DB2 commands RESTORE andROLLFORWARD. Dependent on the configuration, the User Exit either retrieves log files directlyfrom the chosen repository, or from the archive directory and/or retrieve directories. The latteris the directory (defined by the DB2DB6_RETRI EVE_PATH environment variable) to which log
files are restored using brrestore. To complete a rollforward operation (other than stop),brrestore and ROLLFORWARD operations may need to be performed repeatedly until allrequired log files have been retrieved and rolled into the database.
If the database is not rolled forward to the end of all logs when restarted, theDatabase Manager will create new log files starting with the numberimmediately following the last log file that was rolled into the database. This canresult in several log files having the same log file number on a given node. Thelog file management tools only directly support recovery of the most recentversion of log files. Recovery of older versions must be done manually.
Running the User Exit, brarchive and brrestoreThe User Exit does not need to be started by a user – it is automatically called by DB2 ifconfigured correctly. Both br ar chi ve and brrestore can be called from within the DB2Control Center or can be started from the command line. br ar chi ve can also be scheduledto be (regularly) started using the DBA Planning Calendar (SAP transaction DB13), orotherwise automated using scripts or batch files.
2.2.3 Log File Life Cycle (Archive and Restore)The following section covers the standard scenarios known as indirect and direct archiving.
There is a third scenario, which is a variation of direct archiving, where the SAP User Exit isconfigured to call a vendor User Exit. The log file cycle is similar to direct archiving with thelog files being copied elsewhere but the target and exact behavior depend on the vendorUser Exit.
The graphic describes the possible life cycle of a log file when using the log file managementtools.

7/18/2019 SAP DB2 Administration Guide
http://slidepdf.com/reader/full/sap-db2-administration-guide-56d69bf9cdc08 32/230
32 July 2006
Indirect
S0000003.LOG
LOGPATH DB Parameter S0000004.LOG
…/log_dir . User Exit offline retained
S0000005.LOG TSM, TAPE or SCRIPTS0000006.LOG S0000002.LOG
S0000007.LOG archived retained
online active User Exit restored retained
online retained S0000000.LOG
S0000001.LOG
Direct
LOGPATH DB Parameter . TSM, DISK or VENDOR
…/log_dir . S0000000.LOGS0000005.LOG S0000001.LOG
S0000006.LOG User Exit S0000002.LOG
S0000007.LOG S0000003.LOG
online active S0000004.LOG
online retained archived retained
Archive
Restore
…/log_retrieve/<DBSID>
brarchive
brrestore
DB2DB6_RETRIEVE_PATH
…/log_archive/<DBSID>
(A)(B)
(C)(D)
(D)
(A)
(D)
When the USEREXI T database configuration parameter is set, the database engine
automatically starts the User Exit program to archive each log file as soon as it is full or it isclosed. The location the file is moved to depends on the configuration of the User Exit. Bydefault, log files are archived indirectly by first copying the file to the archive directory. TheUser Exit can be reconfigured to archive directly using TSM, archive to disk or via analternative User Exit.
The Admin Tools can only administer the latest version of a log file with a givennumber per node, that is, you cannot administer two log files with the number 25 on node 0.
Indirect Archiving and Restore (Default)
Single log files are copied into the archive directory by the User Exit (A). br ar chi ve is thenused to archive groups of offline log files into an archive repository (also known as backend repository) (B). File archiving using the archive directory is referred to as indirect archiving.
brrestore retrieves archived log files from the repository if they are no longer in the archivedirectory, and places them in the retrieve directory (C) where the User Exit can access them.
When requested by a ROLLFORWARD operation in connection with a database restore action,the User Exit retrieves log files from the archive or the retrieve directory (D).

7/18/2019 SAP DB2 Administration Guide
http://slidepdf.com/reader/full/sap-db2-administration-guide-56d69bf9cdc08 33/230
July 2006 33
Only indirect archiving supports archiving to tape without a vendor storagemanagement product. However, before you decide to use this solution you
should take the following disadvantages into consideration:• Log files are not immediately archived to long-term storage. Therefore, log
files copied by the User Exit but not yet archived with br ar chi ve can be lostif the disk containing the archive directory fails.
• The complexity of the solution, including additional storage directories and anextra Admin DB slightly increases the risk of failure.
Direct Archiving and Restore
Direct archiving is the recommended method for log file archiving, as it is the simplest andtherefore most reliable method. Log files are archived immediately and directly to long-termstorage. However, either TSM or another storage management product with its own User Exit
is required. You can use these products not only to archive log files but also to archivebackups.
The User Exit can be configured to archive directly to TSM, archive to disk or to call avendor User Exit for an alternative storage product. The latter provides support for anyproducts which provide a User Exit, whilst ensuring that SAP tables containing log fileinformation are also updated. A later ROLLFORWARD operation, after restoring the database,results in the files being automatically restored from the same source. Log files are notrenamed during direct archiving or restore.
We recommend that database administrators use direct archiving as itperforms well and requires minimal maintenance. ROLLFORWARD operations
after a database restore normally require no user interaction when using directarchiving.
For more information about how to configure the User Exit and the Admin Tools in general,see Changing the Admin Tools Configuration [Page 70].
Log File Naming Convention
The log file names in the graphic above are simplified for readability depending on the waythey are archived:
• Direct archiving
Files are stored to the backend without their names being modified except if you areusing direct archiving to disk. In this case, the node number NODEXXXX is appended to
avoid problems in a multi-partitioned environment.
• Indirect archiving
When the User Exit copies log files from the log directory to the archive directory, thefiles are renamed by appending the file-closure timestamp (14 digits) and the nodenumber (NODExxxx). In ROLLFORWARD mode, when the User Exit moves files from thearchive or retrieve directory back to the log directory, the original name is restored.Otherwise, the files will not be recognized by DB2.

7/18/2019 SAP DB2 Administration Guide
http://slidepdf.com/reader/full/sap-db2-administration-guide-56d69bf9cdc08 34/230
34 July 2006
For example, during archiving, the copy of the file S0000001. LOG put in the archivedirectory might be renamed to S0000001. LOG. 20001130140536. NODE0000. A file restored by brrestore (in the LOG RETRI EVE directory) still has the extendedfile name.
The name is first truncated back to its original form in the copy returned to the logdirectory by the User Exit when it is called to retrieve files for a ROLLFORWARD operation.
DB2 log file names are of the format Snnnnnnn. LOG, where nnnnnnn is a seven digitnumber ranging from 0000000 to 9999999. When a database is first created, log filesstarting from S0000000. LOG are created. DB2 restarts the log file numbering sequence atS0000000. LOG under the following conditions:
• When the database configuration file is changed to enable archive logging
• When the database configuration file is changed to disable archive logging
• When the log file sequence wraps, that is after log S9999999. LOG is used
The states a log file passes through, which appear in the above graphic, for example, onlineactive, are described in Log File States [Page 37].
Admin Tool Log File Management Model – Indi rect Archiv ing Only
Whenever a log file is archived, the Admin Tools also associate it with a database backuptimestamp (that is, the date and time of the most recent SAP system database backupoperation – whichever was performed most recently). The Admin Tools are then able to tellthe database administrator which log files are needed to roll forward a database after aspecific backup image has been restored. For more information, see Log File Restore of theSAP Database [Page 148].
In combination with the log file close timestamp (another log file attribute), the backup
timestamp allows the Admin Tools to keep track of the restorable backup or log filecombinations. The Admin Tools GUI (DB2 Control Center Extensions) also supports this.
Normally, only the Admin Tools should be used to manage log files. The filesshould not be moved or deleted manually as this will lead to datainconsistencies. The only exception to this is when log files that are no longersupported by the tools (see Invalid in the section Log File States [Page 37]), arerestored. Those files must have the timestamp and node extension removedfrom their names when they are moved back to the log directory.
2.2.4 Log File Deletion
Log Files on Disk
Log files in the DB2 log directory should not be deleted. The database managerautomatically deletes or reuses these files after they have been successfully archived by theUser Exit. Depending on the archiving method you choose, the following happens:
• If you chose direct archiving, no log file copies are made on disk and no deletion isneeded.

7/18/2019 SAP DB2 Administration Guide
http://slidepdf.com/reader/full/sap-db2-administration-guide-56d69bf9cdc08 35/230
July 2006 35
• If you chose indirect archiving, log files copied to the archive directory by the User Exitand later successfully archived using br ar chi ve will only be deleted from the archivedirectory if this is explicitly requested. The same applies to log files restored to theretrieve directory by brrestore.
In the latter cases deletion is requested by:
• Indicating deletion as part of a br ar chi ve/brrestore operation (options - sd and –ssd).
• Explicitly deleting log files in a later call to an Admin Tool (options - ds and –dr ). Logfiles no longer required on the backend should also be deleted using these tools.
Be aware that the available disk space will eventually be exhausted if the UserExit is unable to successfully archive log files over a long period of time. Thesame will happen if log files archived using br ar chi ve and restored using
brrestore are not deleted using the same tools.Tapes can be reused, but other backend storage should be cleaned up regularlyusing the Admin Tools. Storage management products often supply their owntools for doing this or can be configured to automatically remove old files.However, it is essential that you use the Admin Tools to delete files when usingindirect archiving, as the Admin DB is then also updated.
Log Files in Long-Term Storage
• Tape
If you use a tape as a long-term storage, the Admin DB should always reflect thecontent of the tapes (in the Admin DB, there is an entry for each log file that is storedon tape). If you reuse a tape that already contains log files, all entries in the Admin DBwill automatically be removed before the tape is overwritten with new log files.Therefore the Admin DB does not grow. If you lose a tape or if a tape becomesunreadable, you should delete the tape from the Admin DB to reflect this lost orunreadable tape in the Admin DB. For more information, see Deleting Tapes from the Admin DB [Page 120].
• TSM
If TSM is configured correctly and if you use an archive copy group for storing log files,the log files will automatically be deleted from TSM. If you use indirect archiving, the Admin DB does not recognize the automatic deletion and runs out of sync. Tosynchronize the Admin DB, you should use brrestore –delete. For moreinformation, see Deleting Log Files [Page 101].
If you use a backup copy group, you need to delete the log files manually. If you useindirect archiving, use brrestore –delete. For more information, see Deleting Log
Files [Page 101]. If you use direct archiving, you may use db6adut l to delete the logfiles.
• Customer script
If you use a customer script, you should use brrestore –delete to delete log files.For more information, see Deleting Log Files [Page 101].

7/18/2019 SAP DB2 Administration Guide
http://slidepdf.com/reader/full/sap-db2-administration-guide-56d69bf9cdc08 36/230
36 July 2006
2.2.5 Protocols
The User Exit (db2uext 2), br ar chi ve and brrestore generate protocol information torecord the actions that have been performed. Protocol information is also written into the
Admin DB by the log file management tools. This information can be used by the DB2 ControlCenter Extensions. The Admin DB protocols and the protocol files of br ar chi ve andbrrestore are eventually deleted by br ar chi ve. The frequency can be configured bysetting configuration parameter del et e_pr ot ocol s using the DB2 Control CenterExtensions.
Protocol files should only be deleted by the database system administrator.
The protocol files have the following form and are written to the following directories:
Tool Protocol File(s) Location
User Exit db2uext 2. l og. NODExxxxdb2uext 2. er r . NODExxxx
(Files are appended)
Directory defined by theDI AGPATH configurationparameter(db2 get dbm cf g …)
br archi ve br archi ve. <t i mest amp>. l f a
(One file per run)
• For 4.6 D Admin Tools:<I NSTHOME>/ sapar ch
• For 6.NN Admin Tools:<I NSTHOME>/ admi nt ool s/pr ot ocol s
brrestore br r est or e. <t i mest amp>. l f r
(One file per run)
• For 4.6D Admin Tools<I NSTHOME>/ sapr est
• For 6.NN Admin Tools:<I NSTHOME>/ admi nt ool s/pr ot ocol s
These tools can also write more detailed traces, normally only for use by support anddevelopment. For more information, see Appendix B: Troubleshooting [Page 177].
2.2.6 Raw Device Log FilesTo achieve maximum performance, we recommend that you use raw devices for storing log
data. This has the effect of bypassing a possible file system management overhead andallows DB2 to manage the log data with optimum efficiency. However, it is generally easier towork with log files in file systems, as these can be maintained and manipulated usingstandard operating system tools.
The Admin Tools fully support raw logging. The differences between file system-basedlogging and raw device logging are hidden by the User Exit. The User Exit extracts raw datainto individual files that then behave identically to non-raw log files.
If you decide to use raw device logging, the following is necessary to enable roll-forwardduring database recovery. If logging information cannot be obtained from the log extentsavailable on the raw device, DB2 expects the logs to be in the log overflow directory. Toallow the User Exit to put missing logs in the log overflow directory, the ROLLFORWARD utilitymust specify the overflow log path parameter.

7/18/2019 SAP DB2 Administration Guide
http://slidepdf.com/reader/full/sap-db2-administration-guide-56d69bf9cdc08 37/230
July 2006 37
2.2.7 Log File States
This section is mainly written for system administrators and support personnelonly for use if problems involving the Admin DB occur.
Within an SAP environment, in order for the tools to know what operations have beenperformed on a log file, the log file is defined to pass though the following states during its lifecycle. This state information is stored in the Admin DB, so it is only relevant to systems usingthe (default) indirect archiving method. This information is consequently not stored onsystems performing direct archiving.
• Online active
The log file is currently being used to log transactions. The location of the log file isdefined in the LOGPATH database configuration parameter. This can be either a filesystem path or a raw device.
• Online retained
The log file is no longer being written to by the database, but may contain informationabout transactions that the database engine has not yet written from the buffer pool todisk. The log file is located in the log directory, and will also be in the archive directoryafter the User Exit has run.
• Offline retained
The log file is no longer being used and does not contain transactions with unwrittendata pages. The log file is in the archive directory.
The original log file will also remain in LOGPATH until the database is stopped orthe DB2 Database Manager reuses the file. However, the tools have noinfluence on this and so assume that the file is no longer there.
• Archived retained
The log file has been archived using br ar chi ve. The location of the archived log fileis a storage management product, for example, TSM (Tivoli Storage Manager) or tape.If not explicitly deleted, the original log file is also still in the archive directory and norestore is possible (or necessary) as long as this original log file has not been deletedusing brrestore.
• Restored retained
The log file has been restored using brrestore. The location of the restored log file is
the retrieve directory. If not explicitly deleted by using the - del et e option in asubsequent operation, the archived log file is also still available on the backend.
• INVALID
The Admin Tools can only administer the latest version of a log file with a given numberper node. If the database generates a second log file with a number already used, theUser Exit marks previous versions as I NVALI D. This can occur after a database
restore if the ROLLFORWARD operation does not use all log files, or by turning theLOGRETAI N database configuration parameter off and on again. Older log files thathave been archived can still be manually retrieved from the backend using system orstorage product tools, but the Admin Tools only support the retrieval of the newestversion.

7/18/2019 SAP DB2 Administration Guide
http://slidepdf.com/reader/full/sap-db2-administration-guide-56d69bf9cdc08 38/230
38 July 2006
• Gone
This state is only used internally to indicate that a log file could not be found in thelocation where it was expected, for example, if a customer uses MOVE, RENAME orDELETE. This state can also occur when storage products, such as TSM, automaticallydelete files after a certain period of time. A delete operation will delete such entries.
2.2.8 Special Cases - Non-Standard Behavior ofDatabase SystemsCertain systems are set up in a slightly non-standard way, for example:
• As split-mirror
• As homogeneous system copy
In both cases the Admin Tools are either restricted or must be configured differently.
Split-Mirror for Backup Purposes
DB2 has introduced a new concept known as split-mirror using the db2i ni db tool. With thistool, you can rapidly create a mirror copy of a production system database without the needto shut down the system. This copy can then be used to perform an offline backup withoutaffecting the performance of the original system, which continues processing as usual.
For this feature, we strongly recommend customers to only use direct archiving.This requires either TSM or a vendor product that provides its own User Exit.
For more information, see The db2inidb Tool [Page 132].
Homogenous System Copy
You can create new SAP systems from existing system backups. In this case, the AdminTools must be newly installed on the new system as the system name has changed.
Do not attempt to copy Admin DB information from the source system to thenew target system.
Although DB2 does not force a backup in this situation, as LOGRETAI N is normally alreadyactive, it is essential that you take a new backup before you use the Admin Tools on the newSAP system.
Sometimes a system copy is used to overwrite another system or a previous system copywhere the Admin Tools were already installed. In this case, the old Admin DB should bedropped before the Admin Tools are reinstalled. Additionally, the backup history file must bepruned to remove all previous backup information before a new backup is taken and beforethe Admin Tools are used.
7/18/2019 SAP DB2 Administration Guide
http://slidepdf.com/reader/full/sap-db2-administration-guide-56d69bf9cdc08 39/230
July 2006 39
2.3 SAP Securi ty Concept
General Information
In an SAP environment, DB2 runs with aut hent i cat i on set to the valueserver _encr ypt . This means that the user ID and password provided to connect todatabases or attach to database instances are verified by DB2 using operating systemservices from within the database server.
The user IDs and passwords for SAP system users are maintained and stored in the file:
• UNIX: / usr / sap/ <SAPSI D>/ SYS/ gl obal / dscdb6. conf
• Windows: \ \ %DSCDB6HOME%\ sapmnt \ <SAPSI D>\ SYS\ gl obal \ dscdb6. conf
In an exclusively Windows environment, environment variable DSCDB6HOME
contains the name of the database server. In a system environment where thedatabase server operates under an operating system other than Windows,DSCDB6HOME should contain the name of the server where file dscdb6.conf can be accessed with the path listed above.
File dscdb6. conf must be accessible from all application and database servers using NFS(UNIX) or Windows shares. Passwords are stored in encrypted form. This file is protectedfrom unauthorized access using file system access authorizations.
For all the dscdb6. conf accesses described in this documentation, environment variableDB2DB6EKEY is used to encrypt or decrypt the requested password.
The value of DB2DB6EKEY must be identical on all application servers, thecentral instance, and on the SAP system database servers (all systems with thesame <SAPSI D>).
DB2DB6EKEY is requested and set during SAP system installations. The defaultvalue is <DBSI D><db_ser ver _host name>, but will need modifying for all butthe central database server.
The administrator can change this value at any time, but this requires that thevalue be updated on all other related systems, and the passwords in the filedscdb6. conf be changed (see below).
UNIX:
The DB2DB6EKEY variable is set in the SAP profiles dbenv_<host name>. csh and.dbenv_<host name>. sh, which are read when <sapsi d>admor db2<dbsi d>logs on.
Windows:
The DB2DB6EKEY variable is set in the system environment.

7/18/2019 SAP DB2 Administration Guide
http://slidepdf.com/reader/full/sap-db2-administration-guide-56d69bf9cdc08 40/230
40 July 2006
Managing Passwords for Database Standard Users
DB2 uses operating system users to maintain system security. The Admin Tools need accessto the user passwords to access the database. These are stored in encrypted form in a
special file and must be updated using the dscdb6up tool.
Do not change user passwords only using operating system methods. Tools thatread password file dscdb6. conf will no longer be able to connect to thedatabase until tool dscdb6up has been used.
For information about how to set and update passwords for SAP system users, see Settingand Updating Passwords [Page 116].
2.4 Multi-Partitioned SystemsThe Admin Tools are also enabled to work with multi-partitioned systems. A multi-partitioneddatabase can be configured to consist of more than one database node. In this case, in theSAP implementation, certain directories found in the single-partitioned environment areextended to become node-specific in a multi-partitioned environment and other directories aremoved.
On UNIX, the home directory of the db2<dbsi d>user changes from/ db2/ <DBSI D>(single-partitioned system) to / db2/ db2<dbsi d>(multi-partitioned system).
Also tools such as br ar chi ve and brrestore should be used with the additionalparameter –node. For more information about the syntax of br ar chi ve and brrestore,see brarchive - Log File Archive Tool [Page 157] and brrestore - Log File Retrieval Tool [Page163].

7/18/2019 SAP DB2 Administration Guide
http://slidepdf.com/reader/full/sap-db2-administration-guide-56d69bf9cdc08 41/230
July 2006 41
3 Installation and Setup
3.1 IntroductionThis chapter is intended for administrators who want to check their environment, or need to(re)install or upgrade the Admin Tools manually.
The installation of the Admin Tools depends on the SAP installation tool. You can install theSAP system using:
• R3SETUP
The Admin Tools are automatically installed as part of the SAP system installation.R3SETUP creates the directories, user, groups and user environment that are required
to successfully install the Admin Tools using the sddb6i ns program.• SAPinst
The Admin Tools are not automatically installed during the SAP system installationwith SAPinst. However, you can install the Admin Tools after installing the SAP system.SAPinst creates the users and groups that are required to successfully install the Admin Tools using the sddb6i ns program. Version 6.10 of sddb6i ns and highercreates the directories and adds variables to the user environment that are required torun the Admin Tools.
The 6.NN Admin Tools must be used on SAP systems with release 6.10 or
higher. They do not perform correctly on SAP systems with release 4.6D orlower, and the 4.6D Admin Tools do not perform correctly on SAP systems withrelease 6.10 or higher.
Installation Overview
The following list provides an overview of the steps that you have to perform to install the Admin Tools and enable the SAP system database for recovery:
...
1. Check the SAP system environment [Page 43] to make sure that the SAP system wasinstalled correctly.
2. Check the prerequisites for the installation of the Admin Tools [Page 48].
3. Install or upgrade to the latest Admin Tools. For more information, see one of the
following sections: Upgrading the Admin Tools [Page 50] if you want to upgrade the Admin Tools to
the latest version.
Installing the Latest Admin Tools [Page 51]if you want to install the latestversion of the Admin Tools or apply the latest patch.
4. Check the Admin Tools environment [Page 52] after installation.
5. Install the DB2 Control Center on the SAP database server or one or moreworkstations. For more information, see Installation of the DB2 Control Center [Page61].

7/18/2019 SAP DB2 Administration Guide
http://slidepdf.com/reader/full/sap-db2-administration-guide-56d69bf9cdc08 42/230
42 July 2006
You may have already performed this step as part of the database installation.Otherwise, this can be delayed until step 7 if roll-forward recovery enabling (step 6) willbe performed on the command line.
6. Enable the database for roll-forward recovery [Page 57].
7. Catalog the databases to be administered. For more information, see Setting Up theDB2 Control Center [Page 62].
8. Check that the DB2 Control Center Extensions are working correctly. For moreinformation, see Using the DB2 Control Center Extensions [Page 69].
See also:
• For information about installing IBM DB2 Universal Database for UNIX and Windowswith the SAP system, see the following documentation:
For SAP Web AS Release 6.10, 6.20 and 6.30:
SAP Web Application Server Installation on UNIX: IBM DB2 Universal Database
for UNIX and WindowsSAP Web Application Server Installation on Windows 2000: IBM DB2 UniversalDatabase for UNIX and Windows
To find this documentation, see SAP Service Marketplace atservice.sap.com/instguides → SAP Components →SAP Web
Application Server .
For SAP Web AS 6.40 SR1:
SAP Web Application Server ABAP 6.40 SR1on UNIX: IBM DB2 UniversalDatabase for UNIX and Windows
SAP Web Application Server ABAP 6.40 SR1on Windows 2000: IBM DB2
Universal Database for UNIX and Windows To find this documentation, see SAP Service Marketplace atservice.sap.com/instguidesNW04 → Installation.
For SAP Basis Release 4.6D:
SAP Basis Installation on UNIX: IBM DB2 Universal Database for UNIX andWindows
SAP Basis Installation on Windows: IBM DB2 Universal Database for UNIX andWindows
To find this documentation, see SAP Service Marketplace atservice.sap.com/instguides → SAP Components →SAP Basis.
For SAP R/3 Release 4.6x and lower:
To find the corresponding documentation, see SAP Service Marketplace atservice.sap.com/instguides → SAP Components → SAP R/3.
• For additional information about installing the Admin Tools, see the following SAPNotes:
SAP Note 410252
DB6: Installing the latest 4.6D DB2 Admin Tools
SAP Note 455506
DB6: Installing the latest 6.NN DB2 Admin Tools
To find the SAP Notes, see SAP Service Marketplace at service.sap.com/notes.

7/18/2019 SAP DB2 Administration Guide
http://slidepdf.com/reader/full/sap-db2-administration-guide-56d69bf9cdc08 43/230
July 2006 43
3.2 SAP System EnvironmentThe following sections explain the SAP system environment that is a prerequisite for thesuccessful installation of the Admin Tools.
3.2.1 SAP System Users and GroupsThe following tables list the users and groups that are automatically created by the installationtool during the SAP system installation.
SAP System Users
User Description
db2<dbsi d>Database administrator This operating system user is the DB2 instanceowner and the SAP database administrator.
<sapsi d>adm SAP system administrator This operating system user is authorized to start andstop the SAP system and the DB2 DatabaseManager (instance). <sapsi d>admhas the DB2authorizations DBADMand SYSCTRL. DB2-specificmonitoring functions invoked by SAP applicationserver functions require SYSCTRL authorization. Thisuser belongs to the operating system groupdb<dbsi d>ct l .
sapr 3First installed SAP system withRelease 4.6D or lower
sap<sapsi d>
SAP systems based on SAPWeb AS kernel Release 6.10or higher and additional MCOD4.6D SAP systems
Database user These operating system users own all SAP databaseobjects (tables, indexes and views). All databaseconnection and instance access operations for anSAP application server are performed using theseusers.
These users belong to the operating system groupSAPSYS and are only created on SAP systems onwhich the SAP system database has been installed(not on remote application servers). These users have the following database authorizations:CREATETAB, BI NDADD, CONNECT, and
I MPLI CI T_SCHEMA Windows only:
sapse<sapsi d>
SAP service account user This operating system user is a virtual user. Ingeneral, on Windows the SAP system is started withthis user account, but there is no need to log on to theSAP system with it.
This user account must have the local userauthorizations to Log on as a servi ce and hasto be a member of the local administrator group. Thename of this user must be sapse<sapsi d>.

7/18/2019 SAP DB2 Administration Guide
http://slidepdf.com/reader/full/sap-db2-administration-guide-56d69bf9cdc08 44/230
44 July 2006
SAP System Groups
Groups Description
db<dbsi d>adm Database system administration group
Each member of this group has SYSADMauthorizationfor the DB2 Database Manager instance. This is thehighest level of authorization within the databasemanager and controls all database objects.
db<dbsi d>ct l Database system control group Each member of this group has SYSCTRL authorization for the DB2 Database Managerinstance. SYSCTRL has authorizations allowingoperations affecting system resources, but notallowing direct access to data.
db<dbsi d>mnt Database maintenance group
A user of this group can perform maintenanceoperations on all databases associated with aninstance. It does not allow direct access to data. Thisauthority includes privileges to update databaseconfiguration files, to back up a database or atablespace, to restore an existing database and tomonitor a database.
Windows only:
SAP_<SAPSI D>_Gl obal Admi n
Domain-level SAP sys tem administration group This group is used for grouping the SAP systemadministrators. The sole function of a global group isto gather users together at domain level so that theycan be placed in the appropriate local groups. Themembers of this group are the domain users<sapsi d>admand sapse<sapsi d>.
The group SAP_<SAPSI D>_Gl obal Admi n is onlyused when the SAP System belongs to a Windowsdomain. The group SAP_<SAPSI D>_Gl obal Admi n is not required for a local installation.
Windows only:
SAP_<SAPSI D>_Local Admi n
Local group on an application server
Only local groups are created and maintained on anapplication server. A local group can only be givenauthorizations to the system where it is located. If thesystem is part of the domain, the local group cancontain users and global groups from the domain.

7/18/2019 SAP DB2 Administration Guide
http://slidepdf.com/reader/full/sap-db2-administration-guide-56d69bf9cdc08 45/230
July 2006 45
3.2.2 User Environment
In the following table, the Set In column shows the location where the variablesare set and where they need to be changed.
General Environment Variables
EnvironmentVariable
Value Set In
DB2I NSTANCE DB2<DBSI D> UNIX: ~/ . dbenv_<host name>. csh
and
~/ . dbenv_<host name>. sh
Windows:
User environment
DB2DBDFT <DBSI D> Same as relevant locationfor variable DB2I NSTANCE as described in this table
DB2DB6EKEY <SAPSI D><dat abase ser vername>(default value)
Same as relevant locationfor variable DB2I NSTANCE as described in this table
I NSTHOME UNIX: Home directory of userdb2<dbsi d>
Windows:Default value for a single-partitioned system:<dr i ve>: \ DB2<DBSI D>Default value for a multi-partitioned system:\ \ %DSCDB6HOME%\ db2<dbsi d>
UNIX: ~/ . dbenv_<host name>. csh
and
~/ . dbenv_<host name>. sh
Windows:User environment
SAPSYSTEMNAME <SAPSI D> UNIX:
~/ . sapenv_<host name>. csh
and
~/ . sapenv_<host name>. sh
Windows:User environment

7/18/2019 SAP DB2 Administration Guide
http://slidepdf.com/reader/full/sap-db2-administration-guide-56d69bf9cdc08 46/230

7/18/2019 SAP DB2 Administration Guide
http://slidepdf.com/reader/full/sap-db2-administration-guide-56d69bf9cdc08 47/230
July 2006 47
Access Authorizations for Director ies and Files under Windows
Directory AccessPrivilege
Owner For User or Group
<dr i ve>: \ db2<dbsi d> FullControl
Administrator SAP_<SAPSI D>_Local Admi n,Syst em
<dr i ve>: \ db2 FullControl
Administrator Ever yone
<dri ve>: \ db2\ <dbsi d>\l og_di r
FullControl
Administrator db2<dbsi d>, Syst em
<dri ve>: \ db2\ <dbsi d>\l og_r et r i eve
FullControl
Administrator SAP_<SAPSI D>_Local Admi n,Syst em
<dr i ve>: \ db2\ <dbsi d\l og_ar chi ve
FullControl
Administrator SAP_<SAPSI D>_Local Admi n,Syst em
<dr i ve>: \ db2\ <dbsi d>\db2dump
FullControl
Administrator SAP_<SAPSI D>_Local Admi n,Syst em
3.3 Installing the Admin Tools Manually
The 4.6D Admin Tools must be used on all SAP systems with release 3.1I − 4.6D where DB2 UDB for UNIX and Windows Version 7 or higher is installed.
The Admin Tools are installed on the database server using program sddb6i ns. Duringnormal installation of an SAP system with R3SETUP, sddb6i ns is called automatically.
The administrator only needs to execute sddb6i ns manually in the following cases:
• If an SAP system was installed with SAPinst
• If you want to use the 4.6D Admin Tools and your SAP system is between Release 3.1Iand 4.6C
• After completion of an SAP system upgrade and if you have not yet installed the latest Admin Tools
• When applying a downward compatible kernel and if you have not yet installed the
latest Admin Tools
• When manually installing the Admin Tools or applying an Admin Tools patch
• When checking the installation of the Admin Tools

7/18/2019 SAP DB2 Administration Guide
http://slidepdf.com/reader/full/sap-db2-administration-guide-56d69bf9cdc08 48/230
48 July 2006
3.3.1 Prerequisi tes for the Admin Tools InstallationBefore you can install the Admin Tools, you must make sure that certain prerequisites aremet. Some are general, some apply to a certain patch level of the sddb6i ns program or
depend on your operating system.
General Prerequisi tes
• Sufficient space
Make sure that you have sufficient space (approx. 4 MB) in the directory containing the Admin Tools executables. sddb6i ns installs the executables in the following directory:
For 6.NN Admin Tools:
UNIX: $INSTHOME/admintools/bin
Windows: %INSTHOME%\admintools\bin
For 4.6D Admin Tools
UNIX: /usr/sap/<SAPSID>/SYS/exe/run
Windows: <drive>:\usr\sap\<SAPSID>\SYS\exe\run
If you are using indirect archiving (that is parameter - NODADMDB is not used duringinstallation), the Admin DB requires additional space. The directory to which thedatabase manager configuration parameter DFTDBPATH is pointing must be largeenough to hold the Admin DB and its log files (approx. 4 MB).
• Availabi li ty of the database instance
The SAP database instance DB2<DBSI D>must be running when installation programsddb6i ns is executed.
• Correct user environment
Program sddb6i ns must be executed in the correct user environment.
Windows:
To start sddb6i ns.exe, l og on to the database server as user <sapsi d>adm.
When working with Microsoft Cluster, sddb6i ns.exe must be executed on allcluster nodes. For this, set the environment variable DB2I NSTANCE todb2<dbsi d> (instead of db2l <dbsi d>) in the local command window. Thedatabase resource has to run on the actual cluster node.
UNIX:
To run sddb6i ns, you require r oot authorization with the <sapsi d>admuser
environment. Log on as <sapsi d>admand then change to user r oot using su.
Do not use su - to change to user r oot because the db2<dbsi d>userenvironment is then lost.

7/18/2019 SAP DB2 Administration Guide
http://slidepdf.com/reader/full/sap-db2-administration-guide-56d69bf9cdc08 49/230
July 2006 49
UNIX only: For SAP Systems lower than 4.6x
If you want to install the 4.6D Admin Tools for the first time on SAP systems lower than 4.6x,you have to perform the following additional steps as the group concept changed with
Release 4.6A:...
1. Create two new groups called db<dbsi d>ct l and db<dbsi d>admif they do notalready exist.
2. Change the primary group of user db<dbsi d>to db<dbsi d>admand keep groupsysadmas the secondary group.
3. Add group db<dbsi d>ct l as the secondary group to user <sapsi d>adm.
4. Update the database manager configuration.
To do so, log on to the database server as user db2<dbsi d>and enter the followingcommands:
db2 update dbm cfg using SYSADM_GROUP db<dbsid>adm
db2 update dbm cfg using SYSCTRL_GROUP db<dbsid>ctl
5. Perform an instance update to correct the file authorizations of executables, forexample, db2st art :
a. Log on to the database server as user db2<dbsi d>and stop the DB2 instance.Enter the following command:
db2stop force
b. As user r oot , switch to the instance directory and update the DB2 instance.Enter the following commands:
cd <DB2 installation directory>/instance
./db2iupdt db2<dbsid>
c. Log on again as user db2<dbsi d>and restart the DB2 instance. Enter thefollowing command:
db2start
6. Download the dscdb6up program from SAP Service Marketplace atservice.sap.com/patches .
7. To extract dscdb6up using CAR, enter the following command:
CAR -xvf dscdb6up.CAR
8. Copy the dscdb6up program to directory / usr / sap/ <SAPSI D>/ SYS/ exe/ r un.
9. Use chmod and chown to set the authorizations as follows:
File Permission Owner Group
<SAPMNT>/ SYS/ exe/ r un/ dscdb6up 4750 r oot db<dbsi d>ct l
<SAPMNT>/ SYS/ gl obal 750 <sapsi d>adm
db<dbsi d>adm
<SAPMNT>/ SYS/ gl obal / dscd6. conf 640 <sapsi d>adm
db<dbsi d>adm
<SAPMNT>acts as a place holder for / usr / sap/ <SAPSI D>.

7/18/2019 SAP DB2 Administration Guide
http://slidepdf.com/reader/full/sap-db2-administration-guide-56d69bf9cdc08 50/230
50 July 2006
3.3.2 General Information
Return Codes of sddb6ins
The sddb6i ns program writes information about the steps it performs to standard output.The return code of the sddb6i ns program depends on the success of the installation. Thefollowing table describes the possible return codes:
Return Code Descript ion
0 No error detected
1 Severe errors detected, the installation is not complete.For more information, see Appendix B: Troubleshooting[Page 177].
2 Warning. Errors have occurred during the installationbut the installation is complete. Check the output
messages.
The values listed in the table above differ from other Admin Tools.
Abbreviation of sddb6ins Options
The following options of the sddb6i ns program are not listed in detail in the sectionsUpgrading the Admin Tools [Page 50], Installing the Latest Admin Tools [Page 51] andChecking the Admin Tool Environment [Page 52]. Instead, {common opt i on} acts as aplaceholder for the following three options:
• [ - s <SAPSI D>]
• [ - db2dbnamepwd <pwd>] [ - db2dbnamedomai n <domai n>]
• [ - si dadmpwd <pwd>] [ - si dadmdomai n <domai n>]
• [ - NOADMDB]
• [ - DEB [ <l evel >] ]
For a detailed description of these options, see Appendix A: Tool Command Line Parameters[Page 157].
3.3.3 Upgrading the Admin ToolsUse
You use the - u option of the sddb6i ns program to upgrade the Admin Tools. The followingconditions apply:
• If you have performed an upgrade to an SAP system with Release 4.6D or lower butyou are still using a version of the Admin Tools from before 4.6D, an upgrade to thelatest 4.6D Admin Tools is strongly recommended.

7/18/2019 SAP DB2 Administration Guide
http://slidepdf.com/reader/full/sap-db2-administration-guide-56d69bf9cdc08 51/230
July 2006 51
• If you upgrade to an SAP system Release 6.10 or higher, an upgrade to the 6.NN Admin Tools is required.
If you are using an SAP system with Release 4.6D or lower and you want to usethe 6.NN Admin Tools, Admin Tools upgrades are not supported.
Procedure
To upgrade the Admin Tools, enter the following command:
sddb6ins -u <start release> [<target release>] {common options}
<st ar t r el ease>is a placeholder for the release of the previously installed Admin Tools.
For example, to upgrade the Admin Tools from 4.6D to 6.10 using the 6.10
sddb6i ns executable:
UNIX: sddb6ins –u 46D
Windows: sddb6ins –u 46D –db2dbnamepwd <password of userdb2<dbsid>>
If the - NOADMDB option is used, the Admin DB will not be installed. In this case log filearchiving is only performed directly by the User Exit program db2uext 2 (for moreinformation, see Archiving Directly to TSM [Page 80]). Otherwise, the Admin DB will beinstalled (if not already present) and br ar chi ve and brrestore are then also available.
See also:
Actions Performed by the sddb6ins Program [Page 53]
3.3.4 Installing the Latest Admin Tools
Use
You use the - i option in the following cases:
• You have to install the latest Admin Tools manually after an SAP system installation ofRelease 6.10 or higher.
•
You want to apply an Admin Tools patch for the currently installed Admin Tools.However, you must make sure that you are using a patch that is valid for the samerelease of the currently installed Admin Tools.
Procedure
To manually install the latest Admin Tools or to apply an Admin Tools patch, enter thefollowing command:
sddb6ins -i [<target release>] {common options}

7/18/2019 SAP DB2 Administration Guide
http://slidepdf.com/reader/full/sap-db2-administration-guide-56d69bf9cdc08 52/230
52 July 2006
For example, to install the current version of the Admin Tools, enter thefollowing command:
UNIX: sddb6ins –i
Windows: sddb6ins –i –db2dbnamepwd <password of userdb2<dbsid>>
If the - NOADMDB option is used, the Admin DB will not be installed. In this case log filearchiving is only performed directly by the User Exit program db2uext 2 (for moreinformation, see Archiving Directly to TSM [Page 80]). Otherwise, the Admin DB will beinstalled (if not already present) and br ar chi ve and brrestore are then also available.
On Windows, make sure that environment variable INSTHOME is set correctly:
• In a multi-host environment, INSTHOME must point to a Windows share(default directory \ \ <i nst ance- owni ng host >\ db2<dbsi d>).
• In a single-host environment, I NSTHOME must point to an existing directory,for example, d: \ db2\ db2<dbsi d>.
The directory name must not contain any spaces.
The - a option of sddb6i ns, which was used to install the latest Admin Toolsafter the installation of a downward-compatible kernel (DCK), no longer exists.Use the - i option instead.
See also:
Actions Performed by the sddb6ins Program [Page 51]
3.3.5 Checking the Admin Tools Environment
Use
You use option –checkonl y to verify the Admin Tools installation. The verification routinechecks if:
• The environments for user db2<dbsi d>and <sapsi d>admare set correctly.
• The necessary files and directories exist and have the correct authorizations.
• The DB2 instance variable DB2ENVLI ST is set correctly.
• The database configuration parameters LOGRETAI N and USEREXI T are set to ON forthe SAP database <DBSI D>.
• UNIX only: Users and groups are set up correctly.
• Windows only: The required shares exist.

7/18/2019 SAP DB2 Administration Guide
http://slidepdf.com/reader/full/sap-db2-administration-guide-56d69bf9cdc08 53/230
July 2006 53
Procedure
To check the environment of the Admin Tools, enter the following command:
sddb6ins –checkonly [<target release>] {common options}
For example, to check the Admin Tools, enter the following command:
UNIX: sddb6ins –checkonly
Windows: sddb6ins –checkonly –db2dbnamepwd <password ofuser db2<dbsid>>
With the sddb6i ns version 6.10 or higher, this verification is also performed automatically atthe end of an installation ( – i ) or upgrade ( -u) operation. The output contains usefulinformation about the environment in which the Admin Tools operate. The verification toolwrites the following message types:
MessageType
Description
[ I ] Provides information about the current configuration.
[E] Severe configuration errors have occurred during theinstallation.
[ W] Warnings if possible inconsistencies have been detected
3.3.6 Actions Performed by the sddb6ins ProgramThe following section describes the actions performed by the sddb6i ns program during theinstallation (option - i ) or upgrade (option - u) of the Admin Tools:
Actions Performed Dur ing Installation (-i)
The sddb6i ns program performs the following actions:
• 6.NN Admin Tools only:
The following table lists the directories that are created by sddb6i ns:
Directory Description
• UNIX:
$I NSTHOME/ admi nt ool s
• Windows: %I NSTHOME%\ admi nt ool s
Admin Tools directory, also
contains the environment filei ni t <DBSI D>. db6.
• UNIX: $I NSTHOME/ admi ntool s/ bi n
• Windows: %I NSTHOME%\ admi nt ool s\ bi n
Contains the Admin Toolsexecutables and libraries.

7/18/2019 SAP DB2 Administration Guide
http://slidepdf.com/reader/full/sap-db2-administration-guide-56d69bf9cdc08 54/230
54 July 2006
• UNIX:$I NSTHOME/ admi ntool s/ TraceFi l es
• Windows: %I NSTHOME%\ admi nt ool s\ TraceFi l es
Contains the trace filescreated by all Admin Tools.
• UNIX:$I NSTHOME/ admi ntool s/ pr otocol s
• Windows: %I NSTHOME%\ admi nt ool s\ prot ocol s
Contains br ar chi ve andbrrestore protocol files.
User Exit protocol files are inthe DI AGPATH directory.
• 6.NN Admin Tools on Windows only:
In a multi-partitioned system, sddb6i ns creates the following shares on the nodewhere host name matches the contents of the variable DSCDB6HOME:
l og_ar chi ve<DBSI D>
l og_r et r i eve<DBSI D>
• Extracts the executables stored in sddb6i ns to the following directory:
For 6.NN Admin Tools:
<I NSTHOME>/ admi nt ool s/ bi n
For 4.6D Admin Tools:
/ usr / sap/ <SAPSI D>/ SYS/ exe/ r un
• Copies the User Exit program db2uext 2 to the DB2 directory:
UNIX: $I NSTHOME/ sql l i b/ adm
Windows: <DB2_i nstal l _di r >\ sql l i b\ bi n
• Copies the stored procedure sddb6j ds, which is required for the DB2 Control CenterExtensions, to the DB2 directory.
UNIX: $I NSTHOME/ sql l i b/ f unct i on
Windows: <DB2_i nstal l _di r >\ sql l i b\ f uncti on
• 6.NN Admin Tools only:
Removes executables installed with previous versions, which are no longer required.The Admin Tools up to 4.6D were stored in the same directory as the standard SAPsystem executables and were therefore deleted during an SAP system upgrade.
• Creates or updates the environment file i ni t <DBSI D>. db6 in the following directory:
For 6.NN Admin Tools: <I NSTHOME>/ admi nt ool s directory (see table above)
For 4.6D Admin Tools: / usr / sap/ <SAPSI D>/ SYS/ gl obal
For an example of the environment file, see Appendix D: Example of Fileinit<DBSID>.db6 [Page 212].

7/18/2019 SAP DB2 Administration Guide
http://slidepdf.com/reader/full/sap-db2-administration-guide-56d69bf9cdc08 55/230
July 2006 55
• By default, sddb6i ns creates the Admin DB ADM<DBSI D>if it does not already existand performs the following actions:
Customizes a multi-partitioned system.
Grants the access authorizations to the Admin DB ADM<DBSI D>.
If required, it creates the tables in the Admin DB and fills the configuration tablewith default values if this table is empty.
4.6D Admin Tools only:
Creates mirror tables in the <DBSI D>database.
If you use the –NOADMDB option, the Admin Tool creation will be suppressed.The Admin DB will not be created then and the above steps will not beperformed. If you want to use indirect archiving, do not use the –NOADMDB option.
• 4.6D Admin Tools only:
Creates a user defined function (UDF) entry in the <DBSI D>database.
• 6.NN Admin Tools only:
Adds Admin Tools-specific environment variables, for example for TSM, to theenvironment of db2<dbsi d>and <sapsi d>adm.
• Sets the DB2 instance variable DB2ENVLI ST, so that the stored procedure worksproperly.
• UNIX only:
Sets the access authorizations on the Admin Tools directories and files as follows:6.NN Admin Tools
Directory or File AccessPrivilege inOctal Form
Owner Group
$I NSTHOME/ admi nt ool s 0755 db2<dbsi d> db<dbsi d>adm
$I NSTHOME/ admi nt ool s/ bi n 0755 db2<dbsi d> db<dbsi d>adm
$I NSTHOME/ admi nt ool s/ prot ocol s 0755 db2<dbsi d> db<dbsi d>adm
$I NSTHOME/ admi nt ool s/ TraceFi l es 0755 db2<dbsi d> db<dbsi d>adm
$I NSTHOME/ admi ntool s/ i ni t <DBSI D>.db6
0644 db2<dbsi d> db<dbsi d>adm
$I NSTHOME/ admi nt ool s/ bi n/ brarchi ve 6755 db2<dbsi d> db<dbsi d>adm
$I NSTHOME/ admi ntool s/ bi n/ brr est ore 6755 r oot db<dbsi d>adm
$I NSTHOME/ admi nt ool s/ bi n/ l i bdb6t p.[o| so| s l ]
0755 db2<dbsi d> db<dbsi d>adm
$I NSTHOME/ admi nt ool s/ bi n/ l i bdb6ds.[o| so| s l ]
0755 db2<dbsi d> db<dbsi d>adm
$I NSTHOME/ admi nt ool s/ bi n/ l i bdb6sc.[o| so| s l ]
0755 db2<dbsi d> db<dbsi d>adm

7/18/2019 SAP DB2 Administration Guide
http://slidepdf.com/reader/full/sap-db2-administration-guide-56d69bf9cdc08 56/230
56 July 2006
$I NSTHOME/ admi nt ool s/ bi n/ l i bdb6sctsm. smp
0755 db2<dbsi d> db<dbsi d>adm
$I NSTHOME/ admi ntool s/ bi n/ db6adut l 6755 r oot db<dbsi d>adm
$I NSTHOME/ sql l i b/ adm/ db2uext 2 0755 db2<dbsi d> db<dbsi d>adm$I NSTHOME/ sql l i b/ f unct i on/ sddb6j ds 0755 db2<dbsi d> db<dbsi d>adm
4.6D Admin Tools
Directory or File AccessPrivileg
e inOctalForm
Owner Group
$I NSTHOME/ saparch
$I NSTHOME/ saprest
0755 db2<dbsi d> db<dbsi d>adm
/ t mp/ TraceFi l es 0755 db2<dbsi d> db<dbsi d>adm
/ usr / sap/ <SAPSI D>/ SYS/ gl obal /i ni t <DBSI D>. db6
0640 db2<dbsi d> db<dbsi d>adm
<SAPEXE>/ br ar chi ve 6755 db2<dbsi d> db<dbsi d>adm
<SAPEXE>/ br r est or e 6755 r oot db<dbsi d>adm
<SAPEXE>/ l i bdb6t p. [ o| so| sl ] 0755 db2<dbsi d> db<dbsi d>adm
<SAPEXE>/ l i bdb6ds. [ o| so| sl ] 0755 db2<dbsi d> db<dbsi d>adm
<SAPEXE>/ l i bdb6sc. [ o| so| sl ] 0755 db2<dbsi d> db<dbsi d>adm<SAPEXE>/ db6sct sm. smp 0755 db2<dbsi d> db<dbsi d>adm
<SAPEXE>/ db6adut l 6755 r oot db<dbsi d>adm
$I NSTHOME/ sql l i b/ adm/ db2uext 2 0755 db2<dbsi d> db<dbsi d>adm
$I NSTHOME/ sql l i b/ f unct i on/ sddb6j ds 0755 db2<dbsi d> db<dbsi d>adm
<SAPEXE> is a placeholder for / usr / sap/ <SAPSI D>/ SYS/ exe/ r un.
• Inserts the Admin Tools release into the Admin DB.
• 6.10 Admin Tools only:
Checks the installation of the Admin Tools using, for example, the –checkonl y option,
which is described in Appendix A: Tool Command Line Parameters [Page 157] and Appendix B: Troubleshooting [Page 177].
7/18/2019 SAP DB2 Administration Guide
http://slidepdf.com/reader/full/sap-db2-administration-guide-56d69bf9cdc08 57/230
July 2006 57
Actions Performed During Upgrade (-u)
The actions performed during upgrade are similar to the actions performed during installation.However, some actions depend on the <st ar t r el ease>parameter.
The sddb6i ns program performs the following additional actions:
• If starting with 3.1I Admin Tools:
The 3.1I i ni t <DBSI D>. sap configuration file content is moved to the Admin DB.
• 4.0B − 4.6A Admin Tools
The log archive location must be changed. Any log files in the old location are movedand the Admin Database is updated.
• 3.1I − 4.6C Admin Tools
The executables and libraries are exchanged.
3.3.7 Special ConfigurationsThis section provides information about special configurations that apply in the case ofmultiple SAP systems on one database (MCOD) or if you are using a multi-partitioneddatabase system:
• MCOD
For SAP systems with Release 4.6D:
The Admin Tools are only enabled for the main SAP system that is the firstly
installed SAP system. The Admin Tools do not support any additionally installedSAP system .
For SAP systems with Release 6.10 or higher:
Call the sddb6i ns program for all <sapsi d>admusers to enable the AdminTools environment for all SAP systems that are installed on one database.
• Multi-partitioned database systems
If you are using a multi-partitioned database system, which is the default for an SAPBW installation, and more than one database node is used, you must call sddb6i ns on each host where a database node of the database <DBSI D>exists.
• Multi-partitioned database systems on UNIX only:
If you want to use indirect archiving, you have to split the database installation overseveral nodes (computers). The archive and retrieve directories must be mounted onall nodes using NFS. You must export the archive and retrieve directories on one nodeand mount these directories on all other nodes using NFS. You need to use the samepath on all nodes for the archive and retrieve directory.
3.3.8 Enabling the Database for Rollforward Recovery As outlined in Basic Concepts [Page 23], SAP and IBM recommend that the database systembe operated in roll-forward recovery mode (LOGRETAI N) with the USEREXI T database
parameter turned on. In this mode, the active log files, in which all database changes are

7/18/2019 SAP DB2 Administration Guide
http://slidepdf.com/reader/full/sap-db2-administration-guide-56d69bf9cdc08 58/230
58 July 2006
recorded, are archived by the User Exit program db2uext 2 when they are no longer neededfor processing transactions. Log file numbering increases with each new log file (up to9999999).
Roll-forward recovery is not enabled by default. You enable roll-forward recovery and the
User Exit mechanism by setting the database configuration parameters LOGRETAI N andUSEREXI T to ON. An offline backup of the database must be performed after setting theseparameters. The procedures differ depending whether you are using a single-partitioned ormulti-partitioned system.
Unlike with an offline backup, if you want to perform online backups, thedatabase must be in roll-forward recovery mode, that is LOGRETAI N must be setto ON.
There are ways of forcing the database out of BACKUP PENDING mode aftersetting these parameters without performing a backup first. Do not do this, asthe Admin Tools will not operate correctly until a backup has been performed.
System copies created by restoring a database backup will also not force a newbackup if the LOGRETAIN parameter was already ON for the original database. A new backup must be performed before the User Exit is called.
See also:
Enabling Rollforward Recovery for a Single-Partitioned Database [Page 58]
Enabling Rollforward Recovery for a Multi-Partitioned Database [Page 59]
3.3.8.1 Enabling Roll forward Recovery for a Single-Parti tionedDatabase
Updating Database Parameters
You can perform these actions either using the command line or the DB2 Control Center.
DB2 Command Line on the Database Server...
1. Log on to the database server as user db2<dbsi d>.
2. Windows only: Start the DB2 Command Window.
3. To update the database configuration parameters, enter the following commands:
db2 update db cfg for <DBSID> using USEREXIT ON
db2 update db cfg for <DBSID> using LOGRETAIN ON
4. Restart the database instance....

7/18/2019 SAP DB2 Administration Guide
http://slidepdf.com/reader/full/sap-db2-administration-guide-56d69bf9cdc08 59/230
July 2006 59
DB2 Control Center
Make sure that you have installed and set up the DB2 Control Center beforeperforming these steps. For more information, see Installation of the DB2Control Center [Page 61] and Setting Up the DB2 Control Center [Page 62].
1. Start the DB2 Control Center.
2. From the context menu of the <DBSI D>database icon, choose Configure.
3. Choose Logs of the notebook.
4. Choose Retain log files for roll-forward recovery from the list.
5. In the value area, select the Yes radio button.
6. To confirm, choose OK to confirm.
7. Restart the database instance....
Backing Up the Database
After having updated the database configuration parameters, back up your database. Formore information, see Performing the Backup [Page 111].
3.3.8.2 Enabling Rollforward Recovery for a Multi -PartitionedDatabase
Updating Database ParametersYou can perform these actions either using the command line or the DB2 Control Center.
DB2 Command Line on the Database Server ...
1. Log on to the database server as user db2<dbsi d>.
2. To update the database configuration parameters, enter the following commands:
db2_all "db2 update db cfg for <DBSID> using LOGRETAIN ON"
db2_all "db2 update db cfg for <DBSID> using USEREXIT ON"
3. Restart the database instance...
DB2 Control Center
Make sure that you have installed and set up the DB2 Control Center beforeperforming these steps. For more information, see Installation of the DB2Control Center [Page 61] and Setting Up the DB2 Control Center [Page 62].
1. Start the DB2 Control Center.
2. From the context menu of the <DBSI D>database icon, choose Open → Database
Partitions….
3. In the table Database Partitions, Select all nodes.
4. From the menu that appears, select Configure….

7/18/2019 SAP DB2 Administration Guide
http://slidepdf.com/reader/full/sap-db2-administration-guide-56d69bf9cdc08 60/230
60 July 2006
5. Choose Logs of the notebook.
6. Select Retain log files for roll-forward recovery from the list.
7. In the value area, choose the Yes radio button.
8. To confirm, choose OK.
9. Restart the database instance....
Backing Up the Database
After having updated the database configuration parameters, back up your database. Formore information, see Performing the Backup [Page 111].
3.3.9 Deinstall ing the Admin Tools
Use
You can deinstall the Admin Tools with option –d of sddb6i ns. This can be useful if you:
• Want to use other log file management tools
• Migrate to DB2 Version 8.2, which includes its own log file management
• Want to start the Admin Tools installation from scratch
This option performs the following actions:
• It removes the Admin Tool executables.
• It removes environment file i ni t <DBSI D>. db6.
• It drops the Admin DB.
• For the 4.6D Admin Tools: It drops the mirror tables from the <DBSI D>database.
Procedure
To deinstall the Admin Tools, enter the following command:
sddb6ins –d
3.4 Installation and Setup of the DB2 Control
Center ExtensionsThe Admin Tools have a user interface that is integrated into the DB2 Control Center as a setof extensions. As it is Java-based, it is available on all platforms which support Java. It can berun remotely, such as on a PC. To be able to use this interface, you must install the DB2Control Center first.

7/18/2019 SAP DB2 Administration Guide
http://slidepdf.com/reader/full/sap-db2-administration-guide-56d69bf9cdc08 61/230
July 2006 61
3.4.1 Installation of the DB2 Control CenterThe DB2 Control Center is part of the DB2 Client Software called the DB2 AdministrationClient, and also part of the DB2 server installation.
To install it, follow the standard DB2 installation process and make sure that you select theoption Control Center for installation. On a UNIX based operating system, you can start theDB2 Control Center by executing command db2cc. On Windows, there is also a menu entryin the DB2 group in the Start menu.
The DB2 Control Center of DB2 Version 7 or lower does not support 64-bitinstances in general. In order to work with 64-bit systems, the DRDA protocolmust be used. This is available with all single- and multi-partitioned systems. Onall other systems, install DB2 Connect in addition.
3.4.2 Installing the DB2 Control Center ExtensionsThe DB2 Control Center Extensions can only be installed after the DB2 Control Center hasbeen installed.
If you use the direct archiving mode to archive the log files, the DB2 ControlCenter Extensions are not required,.
On Windows:...
1. Log on to the machine where you want to install the Admin Tools as a user with local
administration authorizations.
2. Insert the SAP kernel CD.
3. On the CD, change to the directory NT\ I 386\ DBTOOLS.
4. Extract file DB6CCEXT. SAR to a temporary directory by using tool SAPCAR.
5. Change to the temporary directory.
6. Invoke set up. exe and follow the instructions.
For the DB2 Control Center Extensions to perform correctly, the DB2 variable
DB2I NSTANCE must have the same value in the system environment and theenvironment of the user who starts the DB2 Control Center.
7/18/2019 SAP DB2 Administration Guide
http://slidepdf.com/reader/full/sap-db2-administration-guide-56d69bf9cdc08 62/230
62 July 2006
On UNIX:...
1. Log on to the machine where you want to install the DB2 Control Center Extension asuser r oot .
2. Insert the SAP kernel CD.
3. Mount the CD.
4. On the CD, change to the directory UNI X/ <Uni x pl at f or m>/ DBTOOLS.
5. Extract file DB6CCEXT. SAR to a temporary directory by using SAPCAR.
6. Change to the temporary directory.
7. Invoke the shell script i ns tal l and follow the instructions
3.4.3 Setting Up the DB2 Control CenterThe DB2 Control Center Extensions are available for SAP databases and instances. If theDB2 Control Center is not running on the same machine as the SAP database, it is necessaryto catalog the remote computer, the SAP database and its instance. These tasks have to beperformed by an user with administrative authorizations.
Cataloging Databases on 32-Bit DB2 Instances
If communication error messages appear while performing actions in thissection, the DB2 Administration instance (db2das) may not be running on the
computer being cataloged or communication may not be set up correctly. Referto the DB2 documentation for setting up and starting the DB2 Administrationinstance and the DB2 Messages Reference.
Cataloging a Remote Computer:...
1. In the navigation frame of the DB2 Control Center, choose Systems from the contextmenu.
2. Choose Add from the menu.
The Add System dialog box appears.
7/18/2019 SAP DB2 Administration Guide
http://slidepdf.com/reader/full/sap-db2-administration-guide-56d69bf9cdc08 63/230
July 2006 63
3. To retrieve a list of DB2 systems located in the network, choose Refresh.
4. If available, choose the system on which the SAP database server is located. If thesystem is not listed, enter the name of the server in the System Name field. Fill out ormodify the remaining fields.
5. To add this and further systems, choose Apply. Otherwise, confirm with OK.

7/18/2019 SAP DB2 Administration Guide
http://slidepdf.com/reader/full/sap-db2-administration-guide-56d69bf9cdc08 64/230
64 July 2006
Cataloging a Database Manager Instance:
1. In the navigation frame of the DB2 Control Center, expand the node with the name ofthe system where the DB2 server is located.
2. From the context menu of the Instances subnode, choose Add.
The Add Instance dialog box appears.
3. To retrieve a list of instances on the chosen system, choose Refresh.
4. If available, select the instance from the list in the Remote Instance field. If the instanceis not listed, enter the name of the instance in the Remote Instance field and fill out theremaining fields. The service name should have the value sapdb2<DBSI D>and isdefined in the file / et c/servi ces on the database server.
5. To add this and further instances, choose Apply. Otherwise, confirm with OK.

7/18/2019 SAP DB2 Administration Guide
http://slidepdf.com/reader/full/sap-db2-administration-guide-56d69bf9cdc08 65/230
July 2006 65
Cataloging the Databases <DBSID> and ADM<DBSID>: ...
1. In the navigation frame of the DB2 Control Center, expand the <system name> node,then the instances node, and the <instance name> node.
2. From the context menu of the Databases node, choose Add.
The Add Database dialog box appears.
3. To retrieve the list of databases created on the instance, choose Refresh.
4. If available, choose the SAP database <DBSI D>in the Database Name field. If thedatabase is not listed, enter the name of the database in the Database Name field. Theother fields are optional.
5. Confirm the entry by choosing Apply.
6. In the same way, select the Admin DB ADM<DBSI D>in the Database Name field, orenter the name by overwriting the previous entry.
7. Confirm the entries with OK.
Cataloging Databases on 64-Bit DB2 Instances
With DB2 Version 8, cataloging databases on 64-bit DB2 instances is the same process ason 32-bit DB2 instances. The DB2 Control Center of DB2 Version 8 provides the samefunctionality for both instance types as long as your database is DB2 Version 8.
If you want to access a DB2 Version 7 64-bit instance using DB2 Control CenterVersion 8, you must configure the DRDA communication protocol to enablecommunication. Be aware, however, that in this case only limited functionality isavailable.
With DB2 Version 7, the DB2 Control Center does not provide all functions on 64-bit DB2instances. To use the DB2 Control Center for DB2 Version 7 for the administration of 64-bitDB2 instances, you must use the communication protocol DRDA.
Cataloging Databases to Use Communication Protocol DRDA
To be able to use communication protocol DRDA, the SAP database <DBSI D>and Admin DBADM<DBSI D>must be cataloged in a special procedure. On Windows, you can use the ClientConfiguration Assistant or the command line processor. On UNIX, you can only catalog thedatabases using the command line.

7/18/2019 SAP DB2 Administration Guide
http://slidepdf.com/reader/full/sap-db2-administration-guide-56d69bf9cdc08 66/230
66 July 2006
Using the DB2 Version 7 Client Configuration Assistant...
1. Log on as a user with administrative authorizations. If the computer is a member of adomain, the user must have domain administrator authorizations.
2. Start the Client Configuration Environment by choosing Start → Programs → IBM DB2→ Client Configuration Assistant.
The Client Configuration Assistant dialog box appears.
3. Choose Add.
The Add Database Wizard - 1. Source screen appears.
4. Choose Manually configure a connection to a database.
5. To continue, choose Next.
The Add Database Wizard - 2. Protocol screen appears.
6. Select TCP/IP.
7. To be able to connect to the server, select The database physically resides on a host or AS/400 system.
If this option does not appear, you have not installed DRDA support on the client.
8. Select Connect directly to the server .
9. To continue, choose Next.
The Add Database Wizard - 3. TCP/IP screen appears.
10. In the Host Name field, enter the host name where the SAP database is running.
11. In the Port Number field, enter the port number of the database instance.
You can find the port number in the following file on the database host. Thelocation depends on the host operating system:
• Windows: <WindowsSystemDirectory>\system32\drivers\etc\services
• UNIX: /etc/services
Look for the entry sapdb2<DBSID>.
12. To continue, choose Next.
The Add Database Wizard - 4. Database screen appears.
13. Enter the name of the SAP database and choose Next twice.
The Add Database Wizard - 6. Node Option screen appears.
14. In the System Name field, enter the name of the database host.
15. In the Instance Name field, enter the DB2 instance name.
16. Choose the corresponding operating system.

7/18/2019 SAP DB2 Administration Guide
http://slidepdf.com/reader/full/sap-db2-administration-guide-56d69bf9cdc08 67/230
July 2006 67
17. Choose Finish.
The Confirmation dialog box appears. To test the connection, choose Test Connection, enter the user ID and password, and choose OK.
18. To repeat the procedure for the Admin DB ADM<DBSI D>, choose Add and repeat steps13 to 17.
Using the DB2 Version 8 Configuration Client Assis tant
1. Log on as a user with administrator authorizations. If the computer is a member of adomain, the user must have domain administrator authorizations.
2. Start the client configuration environment by choosing Start → Programs → IBM DB2
→ Set-up Tools → Configuration Assistant.
The Client Configuration Assistant dialog box appears.
3. Choose Selected → Add Database Using Wizard…
The Add Database Wizard – 1. Source screen appears.4. Select Manually configure a connection to a database.
5. To continue, choose Next.
The Add Database Wizard – 2. Protocol screen appears.
6. Select TCP/IP.
7. To be able to connect to the server, select The database physically resides on a host or AS/400 system.
If this option does not appear, you have not installed DRDA support on the client.
8. Select Connect directly to the server .
9. To continue, choose Next.
The Add Database Wizard – 3. TCP/IP screen appears.
10. In the Host name field, enter the host name where the SAP database is running.
11. In the Port number field, enter the port number of the database instance.
You can find the port number on the database host in the following file:
• UNIX:
/ et c/serv i ces • Windows:
<Wi ndows_syst em_di r ectory>\ syst em32\ dri ver s\ etc\ servi ces
Look for the entry sapdb2<DBSI D>.
12. To continue, choose Next.
The Add Database Wizard – 4. Database screen appears.
13. Enter the name of the SAP database and choose Next.
The Add Database Wizard – 5. Data Source screen appears.
14. Deselect Register this database for ODBC and choose Next.
The Add Database Wizard – 6. Node Option screen appears.

7/18/2019 SAP DB2 Administration Guide
http://slidepdf.com/reader/full/sap-db2-administration-guide-56d69bf9cdc08 68/230
68 July 2006
15. Choose the corresponding operating system.
16. In the Remote instance name field, enter the DB2 instance name and choose Next.
The Add Database Wizard – 7. System Options screen appears.
17. To continue, choose Next.
The Add Database Wizard – 8. Security Options screen appears.
18. Select User authentication value in server’s DBM configuration.
19. To continue, choose Next.
The Add Database Wizard – 8 DCS Options screen appears.
20. Select Configure DCS options.
21. Select Disconnect if client generates an interrupt (INTERRUPT_ENABLED).
22. Choose Finish.
The Test Connection dialog box appears.
23. Select CLI and enter the user ID and password.
24. Choose Test Connection.
25. To check for a successful test connection, choose the Results tab. In case of asuccess, the following message is displayed:
CLI connect i on t est ed successf ul l y
26. To add the Admin DB ADM<DBSI D>, repeat steps 1 to 22.
Using the Command Line...
1. Log on as a user with SYSADMauthorization, for example, db2<dbsi d>.
2. Enter the following commands in the sequence given (use db2<dbsi d>as<nodeName>):
db2 catalog tcpip node <nodeName> remote <dbHostName> server<portNumber>
You can find the port number on the database host in the following file:
UNIX: / et c/ ser vi ces
Windows: %Syst emRoot %\ syst em32\ dr i ver s\ etc\ servi ces
Look for the entry sapdb2<DBSI D>.
db2 catalog db <DBSID> at node <nodeName> authentication dcs
db2 catalog dcs db <DBSID> parms ',,INTERRUPT_ENABLED,,,,,'
db2 catalog db ADM<DBSID> at node <nodeName> authentication dcs
db2 catalog dcs db ADM<DBSID> parms ',,INTERRUPT_ENABLED,,,,,'
7/18/2019 SAP DB2 Administration Guide
http://slidepdf.com/reader/full/sap-db2-administration-guide-56d69bf9cdc08 69/230
July 2006 69
3.4.4 Using the DB2 Control Center Extensions After cataloging the databases, the DB2 Control Center Extensions can now be used. Youcan access the DB2 Control Center Extensions using new context menu entries, which have
been added to the standard DB2 Control Center menus at the instance and database levels.
The <DBSI D>database context menu contains three entries: SAP Options Management, SAP Log File Management and SAP Tape Management.
For more information about how to use the option SAP Option Management, see Parameters Affecting Log File Management Storage [Page 70].
For more information about how to use the option SAP Log File Management, see AdvancedLog File Maintenance Tasks [Page 117].

7/18/2019 SAP DB2 Administration Guide
http://slidepdf.com/reader/full/sap-db2-administration-guide-56d69bf9cdc08 70/230
70 July 2006
4 Configuration
4.1 Changing the Admin Tools ConfigurationThe following sections describes how you can change the configuration of the Admin Tools.There are two locations where parameters may need to be changed:
• In the DB2 Control Center Extensions (only necessary for indirect archiving).
For more information, see Parameters Affecting Log File Management Storage [Page70].
• In the environment file i ni t <DBSI D>. db6
For more information, see Configuring the Admin Tools Using Environment Files [Page
73].
4.1.1 Parameters Affecting Log File ManagementStorageIf you have decided to use the default behavior of archiving log files indirectly via disk, the Admin DB will have been created. The Admin DB keeps track of the location and states of alllog files. Furthermore, it contains several configuration parameters for the log filemanagement tools.
To view or to change the parameters, proceed as follows:...
1. In the navigation frame of the DB2 Control Center, choose the database <DBSI D>using the context menu.
If you are using the DB2 Control Center Extensions with a patch level lower than3, you choose the database instance db2<dbsi d>(containing the <DBSI D>database) using context menu.

7/18/2019 SAP DB2 Administration Guide
http://slidepdf.com/reader/full/sap-db2-administration-guide-56d69bf9cdc08 71/230
July 2006 71
2. Choose SAP Option Management.
The Options dialog box appears. The following is an example from an AIX system.
When you select a parameter, its description is displayed in the field at the bottom ofthe dialog box.
3. To change the value of a selected parameter, double-click on the Value field.
4. Enter the new values.
The following parameters can be set in the Options dialog box:
Parameter Description
backup_dev_t ype Default storage management product, if not given on thecommand line. Initially set to t ape, but can be set to adsm
for TSM.Do not set this value to t sm.
cpi o_f l ags Flags used to modify the cpi o command when archivingfiles to tape. These may need modifying if a non-standardblock size is used. For more information, see Indirect Archiving to Tape [Page 82] section Modifying the TapeBlock Size.
cpi o_i n_f l ags Flags used to modify the cpi o command when restoringfiles from tape. These may need modifying if a non-standardblock size is used. For more information, see Indirect Archiving to Tape [Page 82] section Modifying the Tape
Block Size.

7/18/2019 SAP DB2 Administration Guide
http://slidepdf.com/reader/full/sap-db2-administration-guide-56d69bf9cdc08 72/230
72 July 2006
r ewi nd Command used to rewind a tape. The $ is replaced by thetape device name. This value should not normally bechanged.
r ewi nd_of f l i ne Command used to rewind a tape and then place it offline(some devices eject the tape). The $ is replaced by the tapedevice name. This value should not normally be changed.
t ape_pos_cmd Command used to a spool a tape forwards. The first $ isreplaced by the tape device name. The second $ is replacedby a number indicating the number of files to spool forwardby. This value should not be changed.
t ape_si ze Indicates the default size of tapes. It is only used to suggesthow much data might fit on a tape, but may be ignored. Mindicates megabytes. This value is used to set the defaultvalue for all user-defined tape devices.
t ape_address Non-rewind address of the default tape device. Using thisaddress ensures that the tape is not rewound at the end ofeach tape operation. For more information about non-rewindaddresses, see brrestore - Log File Retrieval Tool [Page163].
t ape_address_ r ew Standard address of the default tape device. Using thisaddress results in the tape being rewound at the end of eachtape operation.
expi r _per i od Number of weeks that must pass before a used tape can bere-used without the need to explicitly reinitialize it. Thedefault is value 6.
t ape_use_count Number of times a tape can be re-initialized before warningmessages appear requesting that the tape be replaced. Thedefault value is 100. Do not use operating system tools tomodify tapes or this information will be lost resulting in tapesbeing used too often, risking loss of data.
dd_f l ags Flags used to modify the dd command when archiving filesto tape. These may need modifying if a non-standard blocksize is used.
dd_i n_f l ags Flags used to modify the dd command when restoring filesfrom tape. These may need modifying if a non-standardblock size is used.
del et e_pr ot ocol s Number of days to retain tool protocol entries in the AdminDB, before they are deleted. The default value is 30.
adsm_mc Name of the default TSM management class.
5. To cancel changes, choose Escape. To confirm the changes, choose Enter .
A dialog box appears asking for confirmation of the changes.
6. To confirm the changes, choose Yes.

7/18/2019 SAP DB2 Administration Guide
http://slidepdf.com/reader/full/sap-db2-administration-guide-56d69bf9cdc08 73/230

7/18/2019 SAP DB2 Administration Guide
http://slidepdf.com/reader/full/sap-db2-administration-guide-56d69bf9cdc08 74/230
74 July 2006
Admin Tools Configuration Variables
The following table lists the configuration variables of the Admin Tools, which are listed in filei ni t <DBSI D>. db6 or i ni t <SAPSI D>. db6 respectively, and their values.
Variable Value
I NSTHOME
(4.6D Admin Tools only)
UNIX:
Points to the db2<dbsi d> home directory.
Windows:
Points to <CD- dr i ve>: \ db2\ db<dbsi d>.
DB2DB6_ARCHI VE_PATH Points to the archive directory.
UNIX: / db2/ <DBSI D>/ l og_ar chi ve (default value)
Windows: Default value for a single-partitioned database:<dri ve>: \ db2<DBSI D>\ l og_archi ve Default value for a multi-partitioned database:\ \ <i nst ance_owni ng_machi ne>\ l og_archi ve<DBSI D>
DB2DB6_RETRI EVE_PATH Points to the retrieve directory.
UNIX: / db2/ <DBSI D>/ l og_r et r i eve (default value)
Windows: Default value for a single-partitioned database:<dr i ve>: \ db2\ <DBSI D>\ l og_r et r i eve Default value for a multi-partitioned system:
\ \ <i nst ance_owni ng_machi ne>\ l og_r et r i eve<DBSI D>
DB2DB6_TEMP_DI R UNIX: / t mp (default value)
Windows: Value of %TEMP%(default value)
DB2DB6_STANDBY_DI R This variable is not set by default.
If this variable is used, the User Exit creates an additionalcopy of the log file in the standby directory during the archivingoperation. If you want to set up a hot-standby system, you canuse this variable For more information, see The db2inidb Tool[Page 132].
DB2DB6_STANDBY_DI R_NOERR By default, this variable is not set or set to OFF.
If the variable is set to ON, operations that fail in the standbydirectory do not cause the executable, which accesses thestandby directory, to abort with an error.
DB2DB6_STANDBY_DI R_ADMDBSAR By default, this variable is not set or set to OFF.
If the variable is set to ON, br ar chi ve creates an additionalcopy of the Admin DB backup SAR file in standby directoryDB2DB6_STANDBY_DI R.

7/18/2019 SAP DB2 Administration Guide
http://slidepdf.com/reader/full/sap-db2-administration-guide-56d69bf9cdc08 75/230
July 2006 75
DB2DB6_UEXI T_DI RECT • For indirect archiving:This variable is not set or set to OFF.
• For TSM:To activate archiving to TSM, set variable as follows:DB2DB6_UEXI T_DI RECT=TSM: <mgmtcl ass1>[ +<mgmt cl ass 2>]
• For direct archiving to an alternative storage product, setthe variable as follows:DB2DB6_UEXI T_DI RECT=VENDOR.In addition, to activate direct archiving to an alternativestorage product, you must configure variableDB2DB6_VENDOR_UEXI T.
• For archiving directly to disk, set the variable as follows:DB2DB6_UEXI T_DI RECT=DI SK .
For more information, see Configuring the System for ArchivingLog Files [Page 78].
DB2DB6_VENDOR_UEXI T By default, this variable is not set.
If you have configured DB2DB6_UEXI T_DI RECT=VENDOR,you need to set the variable as follows:DB2DB6_VENDOR_UEXI T=<pat h t o vendor UserExi t>.
For more information, see Archiving to an Alternative StorageManagement Product [Page 82].
DB2DB6_UEXI T_ARCHI VE_WO_DB By default, this variable is not set or set to ON.
If this variable is set to ON, the User Exit does not update the Admin DB during indirect archiving operations. br ar chi ve updates the Admin DB only during the next archivingoperation. For SAP system releases lower and including 4.6Dwhere program sddb6mi r is used, sddb6mi r updates the Admin DB as well.
DB2DB6_UEXI T_RETRI EVE_WO_DB By default, this variable is not set or set to OFF.
If this variable is set to ON, the User Exit tries to retrieve logfiles from l og_ar chi ve or l og_ret r i eve even if the AdminDB does not exist or is not up-to-date.
DB2DB6_CORE By default, this variable is not set or set to OFF.
If this variable is set to ON, the Admin Tools executables writea core file in UNIX instead of trying to handle exceptionsinternally. We strongly recommend that you do not set thisvariable to ON unless you are asked to do so by SAP support.
DB2DB6_NO_EJ ECT By default, this variable is not set or set to OFF whichgenerally avoids ejection of the tape To eject the tape, whichis the default behaviour, set this variable to ON.
DB2DB6_TSM_TI MEOUT Disconnects DB2 from TSM after a specified time in secondsof no response . By default, this variable is not set. To switchoff this function, set this parameter to zero.

7/18/2019 SAP DB2 Administration Guide
http://slidepdf.com/reader/full/sap-db2-administration-guide-56d69bf9cdc08 76/230

7/18/2019 SAP DB2 Administration Guide
http://slidepdf.com/reader/full/sap-db2-administration-guide-56d69bf9cdc08 77/230
July 2006 77
Configuration Variables of Other Tools
The following table lists the configuration variables of the redirected restore tool brdb6brt
and the CCMS tools, which are contained in file i ni t <SAPSI D>. db6, and their values.
Variable DefaultValue
Description
DB2DB6_DMDB6BKP_RETRI ES 10 Backup retries incase of offlinebackups.
DB2DB6_DMDB6BkP_TAPE_PATTERN
(Windows only)
\ \ Pattern whichdistinguishes tapesfrom normaldirectories
DB2DB6_DMDB6BKP_BLOCK_SI ZE 1024 Sets backup blocksize for tapes(used by tooldmdb6bkp)
DB2DB6_DBDM6SRP_UPDATE_THRESHOLD 15 Updates thresholdin percent to flagtables forRUNSTATS.
DB2DB6_DMDB6SRP_TABLESI ZE_THRESHOLD 1000 Specifies minimumtable size in rowsto flag tables forRUNSTATS.
DB2DB6_DMDB6BKP_UTI L_I MPACT_PRI ORI TY 0 Specifies impactpriority for backup.0 means nothrottling.
DB2DB6_DMDB6BKP_COMPRESS OFF Sets compressionflag for backup
DB2DB6_DMDB6BKP_ I NCLUDE_LOGS OFF Includes requiredtransaction log filesin an online backupto recover thedatabase to any
consistent point intime.

7/18/2019 SAP DB2 Administration Guide
http://slidepdf.com/reader/full/sap-db2-administration-guide-56d69bf9cdc08 78/230
78 July 2006
DB2DB6_DB2DB6_BLOCK_SI ZE 1024 Specifies backupblock size for tapes(used by tooldb2db6)
DB2DB6_DB6SRPRTS_PCT_LONG_LOB 10 Percentage of rowsthat are read fortable sizecalculation for longand lob columns.
DB2DB6_DMDB6RDI _REFRESH_LOG_I NFO 14 Number of days torefresh CCMSarchiving loginformation
See also:
Appendix D: Example of File init<DBSID>.db6 [Page 212].
4.2 Configuring the System for Archiving LogFiles
As outlined in Basic Concepts [Page 23], log files can be archived directly or indirectly .
Direct Archiving
The User Exit archives log files either directly to disk (DB2DB6_ARCHI VE_PATH), to TSM orto another vendor storage management product, that is log files are immediately copied fromthe system to a safe backend and do no longer reside on the local system. The User Exitprogram can be configured to support one of these options.
Archiving log files directly to a storage vendor product means that the User Exit program usesthe indicated storage management product to manage DB2 log files. In case of TSM the UserExit utilizes the TSM APIs to archive and retrieve log files. All other storage products (forexample, Legato Networker from Legato System, Inc.) deliver their own implementation of theUser Exit program.

7/18/2019 SAP DB2 Administration Guide
http://slidepdf.com/reader/full/sap-db2-administration-guide-56d69bf9cdc08 79/230
July 2006 79
Direct archiving offers the following advantages:
• System configuration is less complex as no Admin DB or DB2 Control CenterExtensions are required.
• Backups can also be archived with the storage management product.
• Tape access and management using storage management systems are easy to handleand no tape space is wasted.
• No extra space for an archive directory is needed when archiving to TSM or any otherstorage management product. You only need extra space if you archive directly todisk.
We recommend that database administrators use direct archiving as itperforms well and requires minimal maintenance. ROLLFORWARD operationsafter a database restore normally require no user interaction when using direct
archiving.However, when using direct archiving you have to take into considerations that someconstraints apply. During a roll-forward recovery of the database the storage managementsystem must be available. If it is not available, problems will arise. You can avoid thissituation by setting variable DB2DB6_STANDBY_DI R to keep local copies of log files until theyare no longer required on the local system. Furthermore, an overflow of the l og_di r ector y can occur due to network outage or unavailability of the storage management system.
You can avoid an overflow of the log directory by increasing the space of the logdirectory using the space you saved by not needing an archive directory. Inaddition, setting DB2 registry variable DB2_BLOCK_ON_LOG_DI SK_FULL=ON
(DB2 Version 7.2) or the corresponding database configuration variableparameter BLK_LOG_DSK_FULL=YES (DB2 Version 8) also reduces the risk ofdatabase failure. You also may consider to use infinite logging.
Indirect Archiving
This is the default configuration. The User Exit automatically copies log files to the directoryspecified in the DB2DB6_ARCHI VE_PATH variable. Then br ar chi ve is used to archive thecopied files. In this case, you can archive log files to TSM, tape or using a customer script.
Indirect archiving offers the following advantages:
• Log files are stored on the local system until deleted by br ar chi ve.
In case your storage management system is unavailable, you are still able to restoreand rollforward the database as long as all log files and backups are still available onthe local system.
• Simple tape support is provided by the Admin Tools.
• Option br r est or e –del et e allows deletion of log files that were created before aspecific timestamp. With direct archiving this function is not available.
• The time of the archiving operation can freely be chosen. Thus, network traffic can beavoided during the day by archiving during the night.

7/18/2019 SAP DB2 Administration Guide
http://slidepdf.com/reader/full/sap-db2-administration-guide-56d69bf9cdc08 80/230
80 July 2006
However, when using indirect archiving, you have to take into consideration that there are afew disadvantages. For example, log files located in the archive directory are unsafe untilstored to a safe backend by br ar chi ve. The complexity of the solution, including additionalstorage directories and an extra Admin DB, slightly increases the risk of failure. Especially the
existence of the Admin DB can cause problems in split-mirror scenarios and when performinga homogeneous system copy.
See also:
For detailed information about direct and indirect archiving, see the following sections:
• Archiving Directly to TSM [Page 80]
• Archiving Directly to Disk [Page 81]
• Archiving to an Alternative Storage Management Product [Page 82]
• Indirect Archiving to Tape [Page 82]
• Indirect Archiving to TSM [Page 88]
• Indirect Archiving Using a Customer Script [Page 89]
4.2.1 Archiving Directly to TSMIn order to use the Tivoli Storage Manager to manage DB2 log files and/or DB2 backups, theTSM client software must be installed on the DB2 database server and a TSM server must beavailable. For more information about how to set up the TSM client, see Configuring TSM(Tivoli Storage Management) [Page 90].
To indicate direct archiving to TSM, set the DB2DB6_UEXI T_DI RECT variable in the
environment file i ni t <DBSI D>. db6 (make sure that it is not commented out).
The following syntax is used to set variable DB2DB6_UEXI T_DI RECT:
DB2DB6_UEXI T_DI RECT = TSM: [ <Mgmt Cl ass>]
To use the TSM management class MLOG1:
DB2DB6_UEXI T_DI RECT = TSM: MLOG1
If you do not want to create and use a specific TSM management class, specifyeither of the following:
• DB2DB6_UEXI T_DI RECT = TSM
• DB2DB6_UEXI T_DI RECT = TSM: DEFAULT
After you have switched on direct archiving by setting variable DB2DB6_UEXI T_DI RECT, the Admin DB ADM<DBSI D>is no longer used and can be dropped.

7/18/2019 SAP DB2 Administration Guide
http://slidepdf.com/reader/full/sap-db2-administration-guide-56d69bf9cdc08 81/230
July 2006 81
The following naming conventions on the TSM server apply:
TSM Variable Meaning
/ <DBSI D> TSM file space name
DB2 TSM file space type
/ NODEyyyy High level file identifier, where yyyy is the node number
/ Szzzzzzz. LOG Low level file name, where zzzzzzz is the log file number
For the database BI N on node NODE0000, archiving log file S0000599. LOG would result in the following values:
• File space name: / BI N
• File space type: DB2
• Object name file space: / BI N
• Object high-level name: / NODE0000
• Object low-level name: / S0000599. LOG
For storing the log files, the archive copy group is used by default. If no archive copy group isdefined, a backup copy group is used. We recommend that you define an archive copy group.
Archiv ing to Two TSM Management Classes
For duplicated archiving of log files to TSM, you have to create two management classes inTSM. To do so, you specify both management classes, for example, MC1 and MC2, in the
User Exit variable DB2DB6_UEXI T_DI RECT.
DB2DB6_UEXIT_DIRECT = TSM:MC1+MC2
Archiving Using TSM Option LANFREE
To make sure that the Admin Tools work in a TSM LANFREE environment, you have toactivate variable DB2DB6_TSM_MULTI THREADED in file i ni t <DBSI D>. db6.
4.2.2 Archiving Directly to DiskSince Admin Tools patch 23 (6.NN Admin Tools) or patch 12 (4.6D Admin Tools), the Userexit can directly archive or retrieve log files to or from disk. To define the archive directory,you have to configure environment variable DB2DB6_ARCHI VE_PATH.
Set the DB2DB6_UEXI T_DI RECT and DB2DB6_ARCHI VE_PATH variables in the environmentfile i ni t <DBSI D>. db6 using the following syntax:
DB2DB6_UEXIT_DIRECT = DISK
DB2DB6_ARCHIVE_PATH = <log file archive path>
During the archiving operation the User Exit appends the partition number to the log file toavoid that log files from other DB2 partitions will be overwritten. During the retrieve operation

7/18/2019 SAP DB2 Administration Guide
http://slidepdf.com/reader/full/sap-db2-administration-guide-56d69bf9cdc08 82/230
82 July 2006
the log file is transferred back to the log directory and the partition number is removedautomatically.
The log files in the archive directory need to be manually archived to disk using tools of yourchoice.
Be aware that you cannot use br ar chi ve or brrestore to archive or restorethese log files.
4.2.3 Archiving to an Alternative Storage ManagementProductIn order to choose an alternative storage manager product to manage DB2 log files or DB2backups, the specific client software must be installed and configured on the DB2 databaseserver. The Admin Tools User Exit must also be installed.
Make sure that the vendor User Exit program is renamed and does notoverwrite the User Exit program delivered by SAP.
Set the DB2DB6_UEXI T_DI RECT and DB2DB6_VENDOR_UEXI T variables in the environment
file i ni t <DBSI D>. db6 using the following syntax:
DB2DB6_UEXIT_DIRECT = VENDOR
DB2DB6_VENDOR_UEXIT = <vendor user exit program name>
If the vendor User Exit program is not in the path of the DB2 instance owner db2<dbsi d>,specify the program with the fully qualified path.
For setup and error handling relating to the vendor User Exit program, refer to the vendor’sdocumentation.
4.2.4 Indirect Archiving to TapeYou can only archive log files to tape in indirect archiving mode. For this purpose, the AdminTools include a tape management facility. All tapes and tape devices used for log file
archiving must be registered here. Each tape and tape device is assigned to a tape deviceclass.
The basic steps in tape management include:
• Defining device classes.
• Defining devices.
• Initializing (naming) tapes.

7/18/2019 SAP DB2 Administration Guide
http://slidepdf.com/reader/full/sap-db2-administration-guide-56d69bf9cdc08 83/230
July 2006 83
Initially, a default device class is defined. This device class initially contains one defineddevice:
Windows: / dev/ mt 0
AIX: /dev/ r mt 0
Solaris: /dev/ r mt / 0
Linux: / dev/ st0
HP-UX: / dev/ r mt / 0m
We recommend that you update or replace default entries according to yourrequirements. To define device classes, devices and tapes, read the followingsections.
If you have more than one tape device, replace the 0 with 1, 2 and so on to address them.
For example, the second tape on Solaris is / dev/ r mt / 1.
Working with Tape Device Classes...
1. In the navigation frame of the DB2 Control Center, expand the <system name> nodeuntil the database names are visible.
2. From the context menu of the SAP database <DBSI D>icon, choose SAP Tape
Management.
3. If required, log on as user db2<dbsi d>.
The Tape Management dialog box appears.
4. Choose Tapes.
5. To display a list of all known device classes, expand the <System name> node in thetree.

7/18/2019 SAP DB2 Administration Guide
http://slidepdf.com/reader/full/sap-db2-administration-guide-56d69bf9cdc08 84/230
84 July 2006
6. You can choose from the following actions:
To add a new device class, choose Add Device Class from the context menu ofthe <system name> node.
To change an existing device class definition, choose Edit from the contextmenu of the <device class> node.
To remove a device class definition, choose Delete from the context menu of the<device class> node.
All devices and tapes of that class will also be removed by the delete action.
For the first two actions, the Add/Change Device Class dialog box appears.
7. Enter or change the fields as required. The fields are described in detail in the tablefollowing this procedure.
8. Choose Add or Change depending whether you want to add a new device class orchange existing data.
The fields in the Add/Change Device Class dialog box describe a tape device class. Mostfields have a corresponding configuration parameter as described in the table under
Parameters Affecting Log File Management Storage [Page 70].

7/18/2019 SAP DB2 Administration Guide
http://slidepdf.com/reader/full/sap-db2-administration-guide-56d69bf9cdc08 85/230

7/18/2019 SAP DB2 Administration Guide
http://slidepdf.com/reader/full/sap-db2-administration-guide-56d69bf9cdc08 86/230
86 July 2006
6. Enter or change the fields as required. Description is optional.
7. Choose Add or Change depending on whether you want to add a new tape or changeexisting data.
Modifying the Tape Block Size
To improve performance, it is sometimes necessary to modify the block size used to read andwrite tapes. The flags supplied to cpi o and dd will need modifying if a non-standard block
size is used. For cpi o, the option ‘B‘ must be replaced with ‘C‘ followed by the block sizedivided by 512. For dd, the bs value must be changed to the block size in bytes.
Due to a limitation in the Admin DB design, such changes apply to all tapeclasses and tape devices.
Initializing Tapes
Tapes must be initialized before files can be archived to them. This involves writing a headerfile to each tape, containing information such as volume name, SAP system ID and tapeusage count. Only a single archive operation involving one or more log files is permitted onan initialized tape. Tapes must normally then be re-initialized before new log files can bearchived to them. As described in Changing the Admin Tools Configuration [Page 70], tapescan be re-used if the log files go out of date as defined by the expi r _per i od configurationparameter.
Initializing Tapes Using the DB2 Control Center...
1. In the navigation frame of the DB2 Control Center, choose SAP Tape Managementfrom the context menu of the SAP database <DBSI D>.
2. If required, log on as user db2<dbsi d>.
3. Expand the <system name> node, and the <device class> node to which the tape to beinitialized belongs.
The Tape Management dialog box appears.

7/18/2019 SAP DB2 Administration Guide
http://slidepdf.com/reader/full/sap-db2-administration-guide-56d69bf9cdc08 87/230
July 2006 87
4. From the context menu of the Tapes node, choose Initialize Tape….
The Initialize Tape dialog box appears
5. Enter the name of the new tape.
6. Choose the device where the tape is located.
If the tape has never been initialized before or was used to archive files lessthan expi r _per i od weeks ago, the initialization is not permitted unless theForce initialization box is selected. You can change the value of theexpi r _per i od parameter in the SAP Option Management dialog box.
To initialize a tape the first time, the Force initialization option must be selected.
7. To initialize the tape, choose Init.
All tape actions and their results can be seen by choosing Journal tab.
To initialize an already registered tape again, choose Re-initialize ….from thecontext menu of the tape icon.
To remove a tape, choose Delete from the context menu of the tape icon.
Initializing Tapes w ith brarchive
br ar chi ve is the command that the DB2 Control Center uses to initialize tapes. Callingbr ar chi ve on the command line gives the administrator access to all command line optionsand may therefore be more flexible than the DB2 Control Center interface.
The following command initializes a tape with the name D4XA01 withoutchecking whether the tape has already been used or initialized. Messages areonly written to a protocol file. To initialize the tape, enter the following command:
brarchive -i force -v D4XA01 –t/dev/rmt/0
The complete syntax is explained in Appendix A: Tool Command LineParameters [Page 157].

7/18/2019 SAP DB2 Administration Guide
http://slidepdf.com/reader/full/sap-db2-administration-guide-56d69bf9cdc08 88/230
88 July 2006
4.2.5 Indirect Archiving to TSMFor indirect archiving to TSM, no special tasks must be performed other than configuring TSMitself. You can find more general information about TSM configuration in Configuring TSM
(Tivoli Storage Management) [Page 90].
The following naming conventions apply on the TSM server:
TSM Variable Descript ion
/ <DBSI D> TSM file space name
DB2 TSM file space type
/ NODEyyyy High level file identifier, where yyyy is the node number
/ Szzzzzzz. LOG. YYYYMMDDHHMMSS. NODEyyyy Low level file name, where
• zzzzzzz is the log file number
• YYYYMMDDHHMMSS is the file thatwas closed by DB2
• yyyy is the node number
For the database BI N on node NODE0000, archiving the log file S0000599. LOG would result in the following values:
• File space name: / BI N
• File space type: DB2
• High-level name: / NODE0000
• Low-level name:/ S0000599. LOG. 20010606103645. NODE0000
For storing the log files the archive copy group is used by default if no archive copy group isdefined. Then a backup copy group is used.
We recommend that you define an archive copy group.
Archiving Using the TSM Option LANFREE
If you want to use this option, you have to activate variable DB2DB6_TSM_MULTI THREADED in file i ni t <DBSI D>. db6 to enable the Admin Tools to work in a TSM-LANFREEenvironment.

7/18/2019 SAP DB2 Administration Guide
http://slidepdf.com/reader/full/sap-db2-administration-guide-56d69bf9cdc08 89/230
July 2006 89
4.2.6 Indirect Archiving Using a Customer Script
br ar chi ve und brrestore currently only support archiving to two backends: TSM andtape. By using your own script, you enable the Admin Tools to archive log files to any
backend, which means any other storage product or storage device, according to yourrequirements.
The script needs to be able to archive, retrieve or delete log files.
What Does the Script Need to Support?
If you want to use your own script to archive log files to any other back-end than TSM or tape,you have to make sure the script accepts the parameters and return codes provided bybr ar chi ve and brrestore.
The following table lists the parameters that the script needs to support:
Parameter Description
act i on You can set the parameter to perform the following actions:
• ARCHIVE
• RETRIEVE
• DELETE
di r ector y • If you are archiving log files, di r ector y points to the directorywhere the log files to be archived are located.
• If you are retrieving log files, di r ector y points to the directorywhere the log files should be retrieved to.
• If you are deleting log files, di r ector y points to the directory
where the log files were originally archived from.f i l e Defines the log file that is to be used. The log file has the following
format: Snnnnnnn. LOG<TS>. NODExxxx
The sequence of the parameters in the script must be the same as in the table....
The following table lists the return codes the script must issue for every action performed sothat br ar chi ve and brrestore can determine a success or failure:
Return Code Descript ion
LFMVND_STATUS_OK=0 Indicates success of the action performed.
LFMVND_RC_ERROR=64 Indicates failure of the action performed.
LFMVND_COMMAND_NOT_SUPPORTED=71 Indicates that the action specified in thescript is not supported.
You must make sure that you specify the correct return codes for every actionperformed − as described in the table.
For example, if the script returns LFM_STATUS_OK (although the action hasfailed) br ar chi ve and brrestore assume that the action was completedsuccessfully, which is not the case. Thus, the content of the Admin DB becomes
inconsistent and you risk to lose log files.

7/18/2019 SAP DB2 Administration Guide
http://slidepdf.com/reader/full/sap-db2-administration-guide-56d69bf9cdc08 90/230
90 July 2006
Writing Your Own Script
You use the sample script db6sct sm. smp, which is part of the Admin Tools delivery, to writeyour own script. The shell script is designed for UNIX. If your system is running on Windows,you have to write a batch file or an executable. In the sample script the TSM client dsmc isused to archive, retrieve or delete log files.
We strongly recommend that you copy the sample script to avoid overwritingduring the next Admin Tool installation. After having copied the script, you canenter your archive, retrieve or delete commands.
Activating the Scrip t
You activate the script by setting parameter DB2DB6_LI BDB6SC_SCRI PT=<pat h tocust omer scr i pt >in file i ni t <DBSI D>. db6.
For more information about how to set parameters in file i ni t <DBSI D>db6, see Configuring
the Admin Tools Using Environment Files [Page 73].
4.3 Configuring TSM (Tivoli StorageManagement)
Use
When issuing DB2 BACKUP or RESTORE commands, you can specify Tivoli Storage Manager(TSM product, to manage the database or tablespace backup). You can also use TSM tomanage archived DB2 log files.
We recommend that you use at least TSM Version 4.1.
Procedure
Before the DB2 Database Manager db2<dbsi d>can use TSM, you have to perform thefollowing steps:...
1. Install the TSM client and API on the DB2 server.
2. Configure the TSM files dsm. opt (UNIX and Windows) and dsm. sys (UNIX only) as
described in Configuring TSM Files dsm.opt and dsm.sys [Page 91].3. Configure the TSM environment variables DSM_DI R, DSMI _DI R, DSM_CONFI G,
DSMI _CONFI G, DSM_LOG and DSMI _LOG as described in Configuring TSMEnvironment Variables [Page 92].
4. To generate the password, run the TSM client dsmc once.
5. To make the environment variable visible to DB2, restart DB2 with db2st art .
For more detailed information about steps 2 and 3, see SAP Note 82029 ADSM/TSMInstallation in DB2 Environment.

7/18/2019 SAP DB2 Administration Guide
http://slidepdf.com/reader/full/sap-db2-administration-guide-56d69bf9cdc08 91/230
July 2006 91
4.3.1 Configuring TSM Files dsm.opt and dsm.sys
On UNIX systems, the TSM files dsm. opt and dsm. sys must be configured. On Windowssystems, the TSM file dsm. opt must be configured. The files must contain the following
parameters:
UNIX
File dsm.opt
Parameter Value
SERVERNAME <TSM ser ver name>
File dsm.sys
Parameter Value
SERVERNAME <TSM ser ver name>COMMETHOD TCP/ I P
TCPPORT 1500
TCPSERVERADDRESS <TSM ser ver I P addr ess or host name anddomai n name>
PASSWORDACCESS Gener at e
PASSWORDDI R / et c/ adsm
The entry of SERVERNAME in the dsm. opt file must fit the value SERVERNAME
in the dsm. sys file.
For parameter PASSWORDDI R:
The users r oot and db2<dbsi d>must be able to access directory/ et c/ adsm. Make sure that this directory has the appropriate authorizations.
Windows
File dsm.opt
Parameter Value
COMMMETHOD TCP/ I P
TCPPORT 1500
NODENAME <TSM cl i ent >
TCPSERVERADDRESS <TSM ser ver I P addr ess or host name anddomai n name>
PASSWORDACCESS Gener at e

7/18/2019 SAP DB2 Administration Guide
http://slidepdf.com/reader/full/sap-db2-administration-guide-56d69bf9cdc08 92/230
92 July 2006
4.3.2 Configuring TSM Environment Variables
TSM environment variables DSM_DI R, DSMI _DI R, DSM_CONFI G, DSMI _CONFI G, DSM_LOG and DSMI _LOG are needed to tell TSM where TSM resides and on which TSM server the
database backup and the log files should be stored.
The following list provides additional information about these variables that you have to takeinto consideration depending on the Admin Tools version you are using:
• 4.6D Admin Tools
UNIX
During the installation of the SAP system with R3SETUP the files. dbenv_<host name>. csh and . dbenv_<host name>. sh are created in the
home directory of db2<dbsi d>and <sapsi d>adm. These files contain somedefault values for the TSM variables, which are not valid in most cases andwhich must be corrected.
Windows
The above mentioned variables are not set during installation and must beadded manually to the user environment of db2<dbsi d>and <sapsi d>adm.
• 6.NN Admin Tools or higher
UNIX
The sddb6i ns program, which installs the Admin Tools, adds an entry to thepr of i l e, .cshrc and . l ogi n scripts in the home directories of db2<dbsi d>and <sapsi d>adm, which call the dbaenv_<host name>. csh anddbaenv_<host name>. sh script.
The shell script dbaenv_<host name>. csh and dbaenv_<host name>. sh add the TSM API-specific environment variables DSMI _DI R, DSMI _CONFI G andDSMI _LOG, as well as the TSM client-specific environment variables DSM_DI R,DSM_CONFI G and DSM_LOG. The values, which are set there, work on allstandard TSM installations and generally do need not to be corrected.
Windows
If the TSM software is installed on the database server before the sddb6i ns program is called, sddb6i ns detects this and sets the TSM API-specificenvironment variables DSMI _DI R, DSMI _CONFI G and DSMI _LOG to appropriatevalues in the user environment of users db2<dbsi d>and <sapsi d>adm.
If you install the TSM software afterwards, you can rerun sddb6i ns with the –i
option and sddb6i ns will add these variables.

7/18/2019 SAP DB2 Administration Guide
http://slidepdf.com/reader/full/sap-db2-administration-guide-56d69bf9cdc08 93/230
July 2006 93
Environment Variables for TSM:
The following table provides an overview of all environment variables you should check:
Variable Value Set In
DSMI _DI R Location of TSM API library with thefollowing default:
Windows:
<dr i ve>: \ pr ogr a~1\ Ti vol i \t sm\ api
UNIX:
For 6.NN Admin Tools:
• dbaenv_<host name>. csh
• dbaenv_<host name>. sh
For 4.6D Admin Tools:
• ~/ . dbenv_<host name>. csh
• ~/ . dbenv_<host name>. sh
Windows:
User environment ofdb2<dbsi d>and <sapsi d>adm
UNIX:
For 6.NN Admin Tools:
• $I NSTHOME/ admi ntool s/ bi n/ dbaenv_<host name>. csh
• dbaenv_<host name>. sh
For 4.6D Admin Tools:
• ~/ . dbenv_<host name>. csh
• ~/ . dbenv_<host name>. sh
DSMI _LOG Log directory for TSM API withthe following default:
Windows: <dr i ve>: \ pr ogr a~1\ Ti vol i\ t sm\ api
UNIX:
$I NSTHOME/ er r or s
Same as for variable DSMI _DI R as described in this table.
DSMI _CONFI G Location of dsm. opt file withthe following default:
Windows: <dr i ve>: \ pr ogr a~1\ Ti vol i\ t sm\ bacl i ent \ dsm. opt
UNIX: $I NSTHOME/ sql l i b/ adsm/ dsm. opt
Same as relevant locationfor variable DSMI _DI R asdescribed in this table
UNIX only:
DSM_DI R
Location of TSM client with thefollowing default:
For 6.NN Admin Tools:
• dbaenv_<host name>. csh
• dbaenv_<host name>. sh
For 4.6D Admin Tools:
• ~/ . dbenv_<host name>. csh
• ~/ . dbenv_<host name>. sh
UNIX only:
For 6.NN Admin Tools:• $I NSTHOME/ admi ntool s/ bi n/ dbaen
v_<host name>. csh
• $I NSTHOME/ admi ntool s/ bi n
For 4.6D Admin Tools:
• ~/ . dbenv_<host name>. csh
• ~/ . dbenv_<host name>. sh
7/18/2019 SAP DB2 Administration Guide
http://slidepdf.com/reader/full/sap-db2-administration-guide-56d69bf9cdc08 94/230
94 July 2006
UNIX only:
DSM_LOG
Log directory for TSM client.
The default is $I NSTHOME/ er r or s
UNIX only:
Same as for variable DSM_DI R
as described in this table
UNIX only:
DSM_CONFI G
Location of dsm. opt f i l e for TSMclient. The default is:
$I NSTHOME/ sql l i b/ adsm/dsm. opt
UNIX only:
Same as for variable DSM_DI R as described in this table
4.3.3 Configuration ConsiderationsWith TSM, you can use the same or different management classes for archiving backups and
log files. The preferable solution, however, is that you use a management class for backupsdifferent from the one you use for log files. If you use the same management class, backupsand log files might be archived to the same tape. In this case, the following disadvantageshave to be taken into consideration:
• If you lose a tape, you not only lose a backup but also the log files. If you only lose abackup, you can use an older backup and still perform a rollforward recovery. With logfiles missing, this is not possible.
• The performance during rollforward recovery is limited because log files are widelyspread on the tape if stored on the same tape as backups.
• Sometimes you might be forced to keep offline backups longer than log files. If log filesare deleted from tape by TSM, you cannot reuse the whole tape because backups still
reside on that tape and space reclamation drastically affects the system performance.
We recommend that for archiving log files you use a disk storage pool. Withthis pool, you can achieve a better system and rollforward performance ifcaching on the disk storage pool is switched on.
For backups, however, we recommend that you do not use such a disk storagepool. If the DB2 backup image does not fit into this disk storage pool, TSM willfail. An extremely large disk storage pool would be necessary to avoid thisproblem.

7/18/2019 SAP DB2 Administration Guide
http://slidepdf.com/reader/full/sap-db2-administration-guide-56d69bf9cdc08 95/230

7/18/2019 SAP DB2 Administration Guide
http://slidepdf.com/reader/full/sap-db2-administration-guide-56d69bf9cdc08 96/230
96 July 2006
4.5 Disk Space Considerations for Running the Admin Tools
The following section provides additional information about the directories that are needed ifyou want to install the Admin Tools. The given information refers to disk space considerationsfor:
• Log files
• Protocols
• Trace files
• Admin DB
Log Files
• Direct archiving
Make sure that the log directory provides sufficient space to avoid problems if yourstorage management system might be temporarily unavailable.
• Indirect archiving
The free space in the directory where DB2DB6_ARCHI VE_PATH is pointing to, needs tobe dimensioned, depending on the log file size and the period of time between twobr ar chi ve calls and the amount of log files that accumulate between two br ar chi ve calls.
The free space in the directory where DB2DB6_TEMP_DI R is pointing to needs to bedimensioned, so that two exports of the Admin DB fit into it. Otherwise, br ar chi ve fails to store the Admin DB.
Protocols• User Exit protocols
The User Exit writes its protocol files db2uext 2. NODExxxx. l og anddbuext 2. NODExxxx. er r to the directory where the database manager configurationparameter DI AGPATH points to.
• brarchive/brrestore protocols
These log files are initially generated in the directory where DB2DB6_TEMP_DI R pointsto. They are moved to the protocols directory at the end of thebr ar chi ve/brrestore run.
The directories differ for the Admin Tools version as follows:
For 6.NN Admin Tools:
<I NSTHOME>/ admi ntool s/ prot ocol s
For 4.6D Admin Tools:
brarchi ve: <I NSTHOME>/ saparch
br r est ore: <I NSTHOME>/ sapr est
These directories need to be dimensioned to hold the small protocol files.

7/18/2019 SAP DB2 Administration Guide
http://slidepdf.com/reader/full/sap-db2-administration-guide-56d69bf9cdc08 97/230
July 2006 97
Trace Files
Trace files are only generated if the user has explicitly enabled trace file generation in thei ni t <DBSI D>. db6 file. The trace files are only required to determine defects or by the SAP
support to fix problems.The trace file directory can be configured in the i ni t <DBSI D>. db6 file for each executableseparately. The default directories are:
• For 6.NN Admin Tools:
<I NSTHOME>/ admi ntool s/ TraceFi l es
• For 4.6D Admin Tools:
<DB2DB6_TEMP_DI R>/ Tr aceFi l es
Admin DB (Indi rect Arch iv ing)
The Admin DB is relatively small and its size increases slowly. All methods to keep the Admin
DB small are described in Regular Administration [Page 98].

7/18/2019 SAP DB2 Administration Guide
http://slidepdf.com/reader/full/sap-db2-administration-guide-56d69bf9cdc08 98/230
98 July 2006
5 Regular Administration
5.1 DB2 Log File ManagementThe concepts and terminology used in this chapter are described in Basic Concepts [Page23]. For more detailed information about how to configure the log file management tools, seeConfiguration [Page 70].
If you are archiving directly, all archive processes will run automatically. You may need todelete old log files from the storage product occasionally.
For indirect archiving (the default), the main daily action is archiving log files to tape or TSMafter they have been processed by the User Exit. If files are not deleted from the disk duringthese archive operations, the files remaining on the disk will also need deleting regularly. The
other less regular log file management action is deleting log files from the storage product.
5.1.1 Archiving Log Files from Disk to BackendThe log files are copied to a temporary disk location by the User Exit, as specified by theenvironment variable DB2DB6_ARCHI VE_PATH.
Log file management information is stored in the Admin DB ADM<DBSI D>. The log fileswritten to the DB2DB6_ARCHI VE_PATH location can by archived using the br ar chi ve tool,either to tape, TSM or any other backend using a customer script. You can start br ar chi ve
on the command line or using the DB2 Control Center Extensions, or using the DBA PlanningCalendar (transaction DB13).
Archiving wi th DB2 Control Center...
1. In the navigation frame of the DB2 Control Center, choose your system and log on as auser with administrator authorizations.
2. On the subnode Database, from the context menu of the database <DBSI D>, chooseSAP Log File Management.
3. If required, log on as user <sapsi d>admor db2<dbsi d>.
The Log File Management dialog box appears.
4. Choose Archive.5. In the Archive Log Files of Node field, choose the node from which log files should be
archived.
6. In the Log Files to be Archived field, choose the log file up to which you want toarchive. All older log files up to the one you have selected will be selected for archiving.
If you do not want the log files to be deleted from the archive directory afterarchiving, select Keep Log Files in File System. Select TSM, Tape or Script:
TSM:
In the TSM Management Class field, select a TSM management class.

7/18/2019 SAP DB2 Administration Guide
http://slidepdf.com/reader/full/sap-db2-administration-guide-56d69bf9cdc08 99/230

7/18/2019 SAP DB2 Administration Guide
http://slidepdf.com/reader/full/sap-db2-administration-guide-56d69bf9cdc08 100/230
100 July 2006
Archiving Log Files to Single Tape
Commandsyntax
brarchive -sd -d tape -v D4XA01 –t /dev/rmt/0 -out -n 25
Description Archives 25 log files to the tape D4XA01, and deletes them from thefile system if processing completes successfully. Messages are writtento the standard output and a protocol file.
Arch iv ing Log Files to Two Tapes (Double Store)
Commandsyntax
brarchive -ssd -d tape -v D4XA01 D4XA02 –t/dev/rmt/0 /dev/rmt/1 -out -n 10
Description Archives the same ten log files to both the tapes D4XA01 andD4XA02, and deletes them from the file system if processing
completes successfully. Messages are written to the standard outputfile and a protocol file.
Arch iv ing Log Files to TSM Without Delete
Commandsyntax
brarchive -s -d tsm –out
Description Archives all available log files to the default management class inTSM, without deleting them from the file system. Messages are writtento the standard output file and a protocol file. You might not want todelete log files immediately to allow them to be processed using other
tools. These must be deleted later using the –ds option.
Arch iv ing Log Files to Two TSM Management Classes
Commandsyntax
brarchive –ssd –d tsm MC1+MC2 –out
Description As of 4.6D Admin Tool patch 20 or 6.NN Admin Tool patch 9, you canarchive log files to two different management classes. You have tocreate two management classes, for example, MC1 and MC2, in TSMbefore you call br ar chi ve.
For more information about the bar chi ve syntax, see brarchive - Log File Archive Tool[Page 157].

7/18/2019 SAP DB2 Administration Guide
http://slidepdf.com/reader/full/sap-db2-administration-guide-56d69bf9cdc08 101/230
July 2006 101
Setting Parameter Default Values in the Admin DB
To avoid the necessity to specify all command line options, you can set some values in theSAP Option Management using the DB2 Control Center Extensions. For more information,
see Parameters Affecting Log File Management Storage [Page 70].Setting the values for the following configuration variables will help you to minimize therequired command line options:
• backup_dev_t ype
Specify the value that you normally specify using the –d command line option.
• adsm_mc
Specify the TSM management class(es) that you want to use by default.
Archiving Using Customer Script
To activate the script support, you have to set variable
DB2DB6_LI BDB6SC_SCRI PT=<pat h_t o_cust omer_scr i pt >in file i ni t <DBSI D>. db6.However, before you call br ar chi ve and brrestore using the command line, you mustmake sure that option –d scr i pt is specified in the script as described in the followingexample.
• If you want to archive all log files, you enter the following command:
brarchive –s –d script –out
• If you want to retrieve up to ten log files, you enter the following command:
brrestore –a –d script –n 10 –out
• If you want to delete log files for a specified backup timestamp, you enter thefollowing command:
brrestore –delete 20020107120000 –d script –out
For more information, see Appendix E: Example of Customer Script db6sctsm.smp [Page221].
5.1.2 Deleting Log FilesLog files may need to be deleted regularly depending on how often backups are taken, thenumber of log files generated each day, and the size of available storage. Log files are storedin the following locations:
• Log directory
• Archive directory
• Tape
• Storage Products
• Any other backend using a customer script

7/18/2019 SAP DB2 Administration Guide
http://slidepdf.com/reader/full/sap-db2-administration-guide-56d69bf9cdc08 102/230
102 July 2006
Deleting Log Files from the Log Directory
Normally there is no need to delete files from this directory. Do not delete filesthat are still needed by the database.
Log files will be deleted from the log directory if you:
• Drop a database.
This action deletes all log files in the current log path directory. You may need to backup these log files beforehand, for future recovery purposes.
• Recover the database to a point in time.
When recovering the database to a point in time, log files chronologically past the pointin time are re-used and therefore lost. For example, if a roll-forward operation onlyneeds log data up to the middle of log file 35 and you restart the database, the
remainder of log file 35 and the whole of log files 36 and onwards will be re-used.If you need to restore again past the point in time used earlier, you cannot do so sincethe log files were re-used. Retrieve the original set of log files manually to a differentlocation and copy them back for the restore action. You can identify the original log fileseasily by their timestamp if they have the following format:Snnnnnnn. LOG. <t i mest amp>. NODExxxx.
To actively delete log files, use the PRUNE LOG FI LE command. This DB2 commanddeletes all log files in the log directory created prior to a nominated log file. It will only do sofrom the active log path. If any log files have been moved to another path, they will not beconsidered by this command.
PRUNE LOGFILE PRIOR to S0000100.LOG
This command will delete all log files in the active log path up to and includingS0000099.LOG.
Deleting Log Files from the Archive Directory
Log files are placed here by the User Exit in indirect mode (default). If br ar chi ve is then
used with the –sd or –ssd archive actions, the log files are removed again when the fileshave been successfully stored. If only –s and –ss are used, the delete stored action ( -ds)must be run separately to delete these files from the disk.
Deleting Log Files from Tape
It is neither possible nor necessary to explicitly delete log files from tapes. As soon as a tapeis re-initialized or re-used, the files previously stored on the tape are removed from the AdminDB.
Deleting Unknown TSM files with brrestore
The log file management tool brrestore now allows removal of files from TSM that are notknown to the Admin DB. This is done by specifying a file pattern, either to match log files(*. LOG and *. LOG. * ), or Admin DB safety files (*. SAR).
The syntax is as follows:
brrestore –delete <timestamp> [file pattern]
7/18/2019 SAP DB2 Administration Guide
http://slidepdf.com/reader/full/sap-db2-administration-guide-56d69bf9cdc08 103/230
July 2006 103
Deleting Log Files from Storage Products
You can delete log files from either:
• TSM
Only use the Admin Tools to work with files stored indirectly to TSM. To delete old logfiles created with recent tools, enter the following command:
brrestore –delete.
For more information about the syntax of brrestore, see brrestore - Log FileRetrieval Tool [Page 163].
Files stored directly to TSM or archived indirectly with older tools (for example, for SAPsystem Release 3.1I and 4.0A) can be deleted using the db6adut l tool or the TSMutility dsmc. In this case, refer to Archiving Directly to TSM [Page 80] for a descriptionof where the files are stored.
• Other storage management products
Files directly archived using an additional User Exit must be managed with tools madeavailable by that product. For more information, see the corresponding productdocumentation.
Deleting Log Files Arch ived with a Customer Script
You delete log files, which were archived using a customer script, by entering the followingcommand:
brrestore –d script –delete.
The section DELETE must be implemented in the script.
For more information about the syntax of brrestore, see brrestore – Log File Retrieval Tool
[Page 163].
5.2 Storage Management Approaching the limit of available storage can degrade overall performance. Running out ofstorage may cause the database or system to fail. Therefore, one essential task for systemadministrators is storage management, which consists of tasks such as:
• Checking the free space in file systems.
• Checking the space available in tablespaces.
• Checking the size of tables and indexes.
• Managing (for example, adding or resizing,) these storage elements to deal withchanging requirements.

7/18/2019 SAP DB2 Administration Guide
http://slidepdf.com/reader/full/sap-db2-administration-guide-56d69bf9cdc08 104/230
104 July 2006
The tasks described in the following sections can be performed either using the DB2 ControlCenter or the DBA Cockpit.
The information provided for the DBA Cockpit is valid for SAP Web AS 6.10 orhigher.
For SAP system Release 4.6x, you must make sure that you have installed theDBA Cockpit as described in SAP Note 300828.
5.2.1 Checking the Space Available in a File SystemTo check the available free space of the log directory and the archive directory, proceed asfollows:
From the SAP Performance Monitor
You can access the information by calling transaction DB6COCKPIT and choosingConfiguration → File Systems in the navigation frame of the DBA Cockpit. The informationdisplayed on this screen helps you to determine how much free space is available in your filesystems.
For more information, see the SAP Online Documentation in the SAP Library.
From the Operating System:
Use the command df on UNIX systems and the program Explorer on Windows systems.
5.2.2 Checking the Space Available in a TablespaceTo check the amount of space available in a DMS tablespace, proceed as follows:
From the SAP Performance Monitor
You can access information about space for tablespaces by calling transaction DB02 andchoosing Space → Tablespaces in the navigation frame of the DBA Cockpit.
For more information, see the SAP Online Documentation in the SAP Library.
From the DB2 Control Center...
1. Open the database tree.
2. Double-click onTablespaces.
In the contents pane a list of all tablespaces is displayed.
3. Scroll to columns Allocated size, Size used and Percentage used to see details relatedto the amount of space available in a tablespace. Space is measured in pages whereone page is 4 KB.

7/18/2019 SAP DB2 Administration Guide
http://slidepdf.com/reader/full/sap-db2-administration-guide-56d69bf9cdc08 105/230
July 2006 105
Adding More Space to a Tablespace
The capacity for a DMS tablespace is the total size of all containers allocated to thistablespace. When a DMS tablespace reaches the threshold capacity (depending on the
usage of the tablespace, 90% is a possible threshold), you should add more space to it.
If you are using the new features of DB2 Version 8.2.2, that is, DMS AutoResize or AutoStorage, you do not have to manually add space to containers.
From the SAP Performance Monitor (SAP Web AS 6.20 or higher)
You can add more space to tablespaces by calling transaction DB02 and choosing Space → Tablespaces in the navigation frame of the DBA Cockpit and choosing Add.
From DB2 CLP
Using the following SQL commands you can:
• Add a new container to a DMS tablespace.
The DB2 database manager will automatically rebalance the tables in the DMStablespace across all available containers. During rebalancing, data in the tablespaceremains accessible. To add a new container, enter the following SQL command:
alter tablespace <tablespace name> add ( file '<container name>'<number of pages> )
• Increase the size of one or more containers in the DMS tablespace.
Extend one or more existing tablespace container by a specific size. To do so,enter the following SQL command:
alter tablespace <tablespace name> extend (all containers
<number additional pages> )
Resize one or more existing tablespace containers to a new size. Containersizes can only be increased. To do so, enter the following SQL command:
alter tablespace <tablespace name> resize (all containers<new container size in pages> )
The database manager will automatically rebalance the tables in the DMS tablespaceacross all available containers if necessary. During rebalancing, data in the tablespaceremains accessible.
• DB2 Version 8
Increase the size of a DMS tablespace by adding a new stripe set. To do so, enter the
following SQL command:
alter tablespace <tablespace name> begin new stripe set (file‘<container name>’ <number of pages>)
This does not cause rebalancing. The space that you have added will be availableimmediately.
For more detailed information about the command syntax, see the IBM documentation DB2Universal Database SQL Reference.
7/18/2019 SAP DB2 Administration Guide
http://slidepdf.com/reader/full/sap-db2-administration-guide-56d69bf9cdc08 106/230
106 July 2006
We recommend that you avoid rebalancing because it has an significant impacton the database performance. In addition, the added space is not available until
rebalancing has finished. Always resize all containers of the last stripe set, because no rebalancingoccurs there. If this is not possible any more, for example, because the filesystem is full, begin a new stripe set with an appropriate number of containers.
If you are using the new features of DB2 Version 8.2.2, that is, DMS AutoResize or AutoStorage, database containers do not have to be resized because this isautomatically done by DB2.
Reducing the Size of a Tablespace
• DB2 Version 7
You can reduce the size of tablespaces by reorganizing all the tables in the tablespace,
backing up the tablespace and restoring it using a new physical layout.• DB2 Version 8
From the SAP Performance Monitor (SAP Web AS 6.20 or higher)
You can reduce the space of a tablespace by calling transaction DB02 andchoosing Space → Tablespaces in the navigation frame of the DBA Cockpitand choosing Change.
From DB2 CLP
You can reduce the size of a tablespace using the following SQL command:
alter tablespace <tablespace name> resize (all containers<new container size in pages>)
5.2.3 Checking the Size of Tables and IndexesYou can access information about space for tables and indexes by calling transaction DB02and choosing Space → Tables and Indexes in the navigation frame of the DBA Cockpit.
When you call this transaction for the first time, the following check on the system catalogtables is performed:
• Are there tables that do not yet have an entry in the CCMS control tableDB6TREORG? (This table is always filled by CCMS programs after REORGCHK .)
• Are there tables that have entries in the CCMS control table DB6TREORG and that arenot up-to-date with the system catalog?
If any tables are found, a dialog box appears listing these tables that require reorganization.
Be aware that running a REORGCHK on the listed tables may take a long timeand affect the database performance.
To adjust the tables, choose REORGCHK. Otherwise, choose Continue.
For more information, see the SAP Online Documentation in the SAP Library.
7/18/2019 SAP DB2 Administration Guide
http://slidepdf.com/reader/full/sap-db2-administration-guide-56d69bf9cdc08 107/230
7/18/2019 SAP DB2 Administration Guide
http://slidepdf.com/reader/full/sap-db2-administration-guide-56d69bf9cdc08 108/230
108 July 2006
For more information, see the SAP Online Documentation in the SAP Library.
Checking Locks and Deadlocks
DB2 captures information for locks held by applications against a database and records each
deadlock event (by means of deadlock event monitors).
The information provided in this paragraph is only valid for SAP systemRelease 4.6C and higher.
You can access information about lock escalation, deadlocks and lock timeouts by callingtransaction ST04 and choosing Performance → Database → Buffer Pools in the navigationframe of the DBA Cockpit.
The value of Lock Escalations, Deadlocks Detected and Lock Timeouts should be almostzero. Otherwise, contact SAP remote services Early Watch to improve the values.
For more information, see the SAP Online Documentation in the SAP Library.
Checking Sort Overflows
The DB2 Snapshot Monitor provides cumulative information about the number of heaps used,overflows and the performance of sorts. These snapshots are used in the SAP performancemonitor to display sort overflows.
The information provided in this paragraph is only valid for SAP systemRelease 4.6C and higher.
You can access information about sort overflows by calling transaction ST04 and choosingPerformance → Database → Sorts in the navigation frame of the DBA Cockpit.
The value of Sort Overflows divided by Total Sorts should result in less than 0,01. Otherwise,contact SAP remote services Early Watch to improve the values.
For more information, see the SAP Online Documentation in the SAP Library.
Checking Cache Quality
You can access information about catalog cache and package cache by calling transactionST04 and choosing Performance → Database→ Cache in the navigation frame of the DBACockpit.
The values of Catalog Cache Quality and Package Cache Quality should be more the 95percent. Otherwise, contact SAP remote services Early Watch to improve the values.
For more information, see the SAP Online Documentation in the SAP Library.

7/18/2019 SAP DB2 Administration Guide
http://slidepdf.com/reader/full/sap-db2-administration-guide-56d69bf9cdc08 109/230
July 2006 109
5.3.2 Monitoring Dynamic SQL Statements
Use
The DB2 statement cache stores packages and statistics for frequently used SQLstatements. By examining the contents of this cache, you can identify the dynamic SQLstatements that are most frequently executed and the queries that consume the mostresource. Using this information, you can examine the most commonly executed and mostexpensive SQL operations, to determine if SQL tuning could result in better databaseperformance.
Procedure
You can access information about the dynamic SQL cache by calling transaction ST04 andchoosing Performance → SQL Cache in the navigation frame of the DBA Cockpit. You canretrieve the latest cached SQL statement by choosing Refresh.
If you retrieve data for the first time, a Selection Criteria dialog box appears where you can
limit the result set displayed. Depending on your system, the snapshot can give you a widerange of information, which might lead to a very large result set.
If a snapshot already exists, that is, if you had already chosen Refresh at least once, you candisplay the last snapshot taken by choosing Set Selection Criteria.
For more information, see the SAP Online Documentation in the SAP Library.
Explain Function
If a statement is displayed, choose Explain to list the access plan for the statement execution.The Explain function provides a detailed analysis of expensive SQL statements, for example,on how DB2 accesses the data to resolve the SQL statements.
To display the access plan of a statement from the SAP performance monitor:...
1. Follow the procedure as described above.
2. Select a statement.
3. Choose Explain.
For more information, see the IBM documentation Administration Guide: Chapter 26, SQLExplain Facility.
5.3.3 Updating Statistics for Database Tables and
Checking for ReorganizationRegular updates of statistics on the physical characteristics of the database tables andindexes provide the necessary information for the DB2 optimizer to determine the accesspath to the data.
In a partitioned database system, statistics are collected based on the table data that islocated on the database partition where the command is executed. Global table statistics foran entire partitioned table are derived by multiplying the values obtained at a databasepartition by the number of database partitions on the node group over which the table ispartitioned. The global statistics information is stored in the catalog tables.

7/18/2019 SAP DB2 Administration Guide
http://slidepdf.com/reader/full/sap-db2-administration-guide-56d69bf9cdc08 110/230
110 July 2006
To update database tables’ statistics and to check whether tables need to be reorganized,you can use the jobs Update Statistics + Reorgchk all tables or Update Statistics and Reorgchk (DBSTATC) in the DBA Planning Calendar (transaction DB13). These jobs beginby updating the database statistics (using the DB2 RUNSTATS utility) and then check whether
tables need to be reorganized (using the six formulas of the REORGCHK utility as described inthe IBM documentation IBM DB2 Universal Database Command Reference).
The REORGCHK formulas help to decide if tables and indexes require physical reorganization.
These formulas are general recommendations that show the relationship between theallocated space and the space that is being used for the data in tables. Three formulas areused for tables, and three are used for indexes. The results are stored in SAP internal tables.
To reorganize tables we recommend that you use the jobs provided in the DBAPlanning Calendar. These jobs automatically update the table and indexstatistics afterwards.
5.3.4 Job Monitoring
The information provided in this section is valid for SAP Web AS 6.10 andhigher.
For SAP system Release 4.6x, you must make sure that you have installed theDBA Cockpit as described in SAP Note 300828.
You can schedule background jobs to display information about protocol records on all jobsthat were executed by the SAP performance monitor by calling transaction DB6COCKPIT andchoosing Jobs → DBA Log in the navigation frame of the DBA Cockpit. If you want to displaydetails on a single protocol record, double-click it.
For more information, see the SAP Online Documentation in the SAP Library.
5.4 Database BackupBackups are complete copies of the database. You must perform backups on a regular basis
in order to be able to restore the database to a consistent state that is as up-to-date aspossible.
You can perform backups in online or offline mode:
• Online mode
Access to the database is not blocked. The users can continue to work normally duringthe backup.
• Offline mode
The backup process connects to the database in exclusive mode. The database can berestored without log files.

7/18/2019 SAP DB2 Administration Guide
http://slidepdf.com/reader/full/sap-db2-administration-guide-56d69bf9cdc08 111/230
July 2006 111
In either case, the database can be restored completely and brought up-to-date by rolling inthe log files generated after the backup was taken.
To perform both online and offline backups of the database, you can either use the BACKUPDATABASE command, the DB2 Control Center or the DBA Planning Calendar within the SAPsystem.
5.4.1 Backup Considerations
You cannot back up a database that is not in a usable state except for adatabase in the backup pending or the rollforward pending state.
The following is necessary to perform a backup:
• You must have SYSADM, SYSCTRL, or SYSMAI NT authorization to use the BACKUPDATABASE command.
• You must start the database manager (db2st art ) before taking a database backup. Ifyou want to use the DB2 Control Center, you do not need to explicitly start the DB2Database Manager.
• In a partitioned database system, keep a copy of the db2nodes. cf g file with anybackup copies you take. This copy is as a protection against possible damage to thisfile.
The database may be local or remote. The backup remains on the database server unless astorage management product, such as Tivoli Storage Manager (TSM), is used.
You can back up a database to a specified disk, a tape, or a location managed by TSM oranother vendor storage management product.
After an online backup, DB2 forces the currently active log file to be closed and as a result itwill be archived. This ensures that an online backup has a complete set of archived log filesavailable for recovery.
5.4.2 Performing the Backup
Backing Up a Single-Parti tioned Database
You can perform these actions either using the DB2 command line or the DB2 ControlCenter.
DB2 Command Line
1. Log on to the database server as user db2<dbsi d>.
2. Enter the following command:
db2 backup db <DBSID>…
For the complete syntax of this command check the DB2 documentation.

7/18/2019 SAP DB2 Administration Guide
http://slidepdf.com/reader/full/sap-db2-administration-guide-56d69bf9cdc08 112/230
112 July 2006
DB2 Control Center
Make sure that you have installed and set up the DB2 Control Center before
performing these steps. Fore more information, see Installation of the DB2Control Center [Page 61] and Setting Up the DB2 Control Center [Page 62].
1. Start the DB2 Control Center
2. From the context menu of <DBSI D>choose Backup → Database… .
3. In the dialog box that appears, enter the required values, including the correct backuptarget.
4. Choose Backup now.
A job will be generated that can be monitored using the DB2 Control Center Journal.
Backing Up a Multi-Parti tioned Database
You can perform these actions either using the DB2 command line or the DB2 ControlCenter.
DB2 Command Line
1. Log on to the database server as user db2<dbsi d>.
2. Enter the backup command for the catalog node:
db2_all “<<+n< db2 backup db <DBSID> …”
For the complete syntax check the DB2 documentation and replace n wit the
catalog node number (the default value is 0).3. To back up all other nodes in parallel, enter the following command:
db2_all "<<-n< db2 backup db <DBSID> ... "
DB2 Control Center
Make sure that you have installed and set up the DB2 Control Center beforeperforming these steps. Fore more information, see Installation of the DB2Control Center [Page 61] and Setting Up the DB2 Control Center [Page 62].
...
1. Start the DB2 Control Center
2. From the context menu of <DBSI D>choose Open → Database Partitions….
3. From the context menu of the node number where the system catalog resides (default:0), choose Backup….
4. In the dialog box that appears, enter the required values, including the correct backuptarget.
5. Choose Backup now.
6. Repeat steps 4 to 7 for all other nodes.
A job will be generated that can be monitored using the DB2 Control Center Journal.

7/18/2019 SAP DB2 Administration Guide
http://slidepdf.com/reader/full/sap-db2-administration-guide-56d69bf9cdc08 113/230
July 2006 113
5.4.3 Integrity of Backups
The db2ckbkp utility allows the user to test the integrity of a backup image on disk or tapeand determine whether or not it can be restored. It can also be used to display the meta data
stored in the backup header in order to determine information about a particular backupimage. One or more parts of an image can be checked. You can use the utility as follows:
If the full backup consists of multiple objects, the validation will only succeed if db2ckbkp isused to validate all of the objects at the same time.
When checking multiple parts of an image, the first backup image object (. 001) must bespecified first.
db2ckbkp SAMPLE.0.krodger.NODE0000.CTN0000.19990817150714.*
If the backup resides on TSM, refer to the information about db2adut l and db6adut l provided in Managing Backups and Logs Archived on TSM [Page 131].
For more information about the db2ckbkp utility, see db2ckbkp - DB2 Check Backup Utility[Page 166].
5.4.4 Frequency of Backups and Time RequiredYou should take full database backups regularly, regardless of how often log files arearchived. A recent full backup means that there are fewer archived log files to apply to thedatabase in case of recovery, which reduces the amount of time required by theROLLFORWARD utility to recover the database. It also reduces the chance of a log file not
being available (corruption or loss).To reduce the amount of time that the database is not available, consider using onlinebackups.
You can only use an online backup for recovery if the database log files that arecreated during the online backup are available.

7/18/2019 SAP DB2 Administration Guide
http://slidepdf.com/reader/full/sap-db2-administration-guide-56d69bf9cdc08 114/230
114 July 2006
5.4.5 Advanced Backup TechniquesThe following list provides information about advanced backup techniques:
• Incremental or delta backupsTo reduce the backup and restore time, you can use incremental or delta backups. Formore information, see the IBM documentation Data Recovery and High AvailabilityGuide and Reference.
• Backup by file system copy
For information about using tool db2i ni db as a mirror for a file system-based backup,see The db2inidb Tool [Page 132].
• Standby database for backup purposes
For information about using tool db2i ni db as a standby database for a backup, seeThe db2inidb Tool [Page 132].

7/18/2019 SAP DB2 Administration Guide
http://slidepdf.com/reader/full/sap-db2-administration-guide-56d69bf9cdc08 115/230
July 2006 115
6 Advanced Tasks
6.1 The db6util ToolThe db6ut i l tool contains a collection of utility routines that are mainly used during the SAPsystem upgrade. The following db6ut i l options are also useful for database administrationand troubleshooting and can be entered using the command line. To generate a complete listof all db6ut i l options, you can call db6ut i l –h from the command line.
The results or messages generated by all db6ut i l commands may be redirected by thecommand options [ - o <l og f i l e> ] or [ - w <r esul t f i l e> ] .
Tablespace Free Space
To generate a free space list for all tablespaces, enter the following command:
db6util –f
DB2 RUNSTATS Options
• To perform RUNSTATS on a single table, enter the following command:
db6util -r <tabname>
• To perform RUNSTATS on all tables specified in the file, create a file containing a list oftables and enter the following command:
db6util –rf <filename>
• To perform RUNSTATS on all tables that were temporarily marked as VOLATI LE in thedatabase and to remove the VOLATI LE attribute from the tables after RUNSTATS hasrun, enter the following command:
db6util –rv
Tables that are marked with an N in the ACTI VE column in table DBSTATC are notaffected by this option.
Database Lock Overview
db6ut i l helps to analyze database lock wait situations by extracting all involved processesfrom a snapshot for applications and displaying their dependencies in the form of a syntaxdiagram. Detailed information about those processes, such as the last SQL statement that
was executed or lock types, is displayed.• To display processes that are only involved in a deadlock situation, enter the following
command:
db6util –sd
• To display all processes that are involved in a lock wait situation, enter the followingcommand:
db6util –sl

7/18/2019 SAP DB2 Administration Guide
http://slidepdf.com/reader/full/sap-db2-administration-guide-56d69bf9cdc08 116/230
116 July 2006
Both commands can be executed with additional parameters to take snapshots periodically.Enter:
db6util –sd [sleep time] [number of snapshots]
db6util –sl [sleep time] [number of snapshots]For more information about the syntax of db6ut i l , see db6util - Tool to Assist Database Administration [Page 169].
6.2 Setting and Updating PasswordsYou can set and update the password of the users <sapsi d>admand sap<sapsi d>orsapr3 (for systems up to and including 4.6D) using the command line:...
1. Log on as user <sapsi d>adm.
2. Enter the following command:
dscdb6up <user> <password>
This command updates the contents of the dscdb6. conf file, which must not be modifiedmanually, and the operating system password. On multi-partitioned systems, this must bedone on all database nodes.
If you inadvertently delete or destroy file dscdb6. conf , you can recreate it byentering the following command:
dscdb6up –create <sap<sapsid>/sapr3 password> <<sapsid>adm
password>
The operating system passwords are not changed when you use the - creat e option.
6.3 Using the Journal in the DB2 Control CenterExtensionsMost tasks in the DB2 Control Center Extensions are logged in the Admin DB. You can
access these logs by choosing Journal. You can display completed tasks, such as archivingor restoring log files, initializing tapes and also display tasks still running. In addition, you candisplay the logs of the user exit. To access the journal:...
1. In the Log File Management, Tape Management or Log File Maintenance dialog box,choose Journal.
2. Choose the radio button with the category of actions you want to browse.
A list of actions is displayed with start and end time, return code (RC), category andreturn message.
3. If you want to see an action that took place more than seven days ago, you can use theBack button to go back in steps of seven days.

7/18/2019 SAP DB2 Administration Guide
http://slidepdf.com/reader/full/sap-db2-administration-guide-56d69bf9cdc08 117/230
July 2006 117
4. Choose an action from the list.
The detailed output of that action is displayed in the Description group box.
To update the list of actions with the most current data, choose Refresh.
6.4 Advanced Log File Management Tasks As outlined in Basic Concepts [Page 23], you can archive log files either automatically usingthe User Exit or let the User Exit copy them to the archive directory. From this directory youhave to archive them as described in Archiving Log Files from Disk to Tape or TSM [Page98].
If you need archived log files for a roll-forward recovery, you have to restore them into theretrieve directory as described in Log File Restore of the SAP Database [Page 148]. The Admin DB ADM<DBSI D>keeps track of the current location of the log files.

7/18/2019 SAP DB2 Administration Guide
http://slidepdf.com/reader/full/sap-db2-administration-guide-56d69bf9cdc08 118/230
118 July 2006
As outlined in Deleting Log Files [Page 101], you can delete log files from the log directory,archive directory, tape, storage management products and any other backend using acustomer script. However, there are two special cases that require advanced log filemanagement skills:
• Log files can have special states that can be maintained in special dialog boxes. Theseparticular log files need to be deleted manually from the Admin DB. For details on howto delete these log files, see Deleting Special Log Files [Page 118].
• Tapes can become unreadable or can be lost. In this case, you must manually deletethe entry for the tape from the Admin DB. For more information, see Deleting Tapesfrom the Admin DB [Page 120].
6.4.1 Deleting Special Log Files
Use
You use the following procedure to delete log files that can have a special status. The logfiles can be maintained in special dialogs. The status of these log files can be as follows:
• If you archive log files and choose at the same time to leave them in the archivedirectory (DB2DB6_ARCHI VE_PATH), they have two locations assigned.
• If you retrieve log files, they have two locations assigned − the retrieve directory(DB2DB6_RETRI EVE_PATH) and the archive location (for example, on tape).
• A log file has the status invalid. This can happen if you restore a database withoutrolling it forward to the end of the logs. In this case log files with the same sequencenumber are created again. In the Admin DB the old log files are marked as invalid.
Procedure
You can delete (or maintain) these special log files using either the DB2 Control CenterExtensions or the DB2 command line.
Using the DB2 Control Center Extensions...
1. In the DB2 Control Center select the SAP database <DBSI D>.
2. From the context menu of <DBSI D>choose SAP Logfile Management.
3. If required, enter user <sapsi d>admor db2<dbsi d>and the correspondingpassword.
The Log File Management dialog box appears.4. Choose Log File Maintenance… .
The Logfile Maintenance dialog box appears.

7/18/2019 SAP DB2 Administration Guide
http://slidepdf.com/reader/full/sap-db2-administration-guide-56d69bf9cdc08 119/230
July 2006 119
5. Choose the node where you want to delete or maintain log files.
6. Choose one of the three radio buttons:
archived
Displays log files previously archived and not deleted from the archive directory.
restored
Displays log files previously restored. from database
Displays log files known to the Admin DB and which are marked as I NVALI D.
7. Select a range of log files you want to delete.
8. Choose Delete.
Using the DB2 Command Line
• To delete log files from the archive directory that have already been archived but notremoved from the archive directory, enter the following command:
brarchive –ds –out
• To delete log files from the retrieve directory that have been restored but not removedfrom the retrieve directory, enter the following command:
brrestore –dr –out
• To delete log files that are marked as I NVALI D, enter the following command:
brarchive –do -out

7/18/2019 SAP DB2 Administration Guide
http://slidepdf.com/reader/full/sap-db2-administration-guide-56d69bf9cdc08 120/230

7/18/2019 SAP DB2 Administration Guide
http://slidepdf.com/reader/full/sap-db2-administration-guide-56d69bf9cdc08 121/230
July 2006 121
The DBA Planning Calendar (transaction DB13) provides the following jobs for thereorganization of tables and tablespaces:
• REORG and RUNSTATS of Flagged Tables
You can use this job to reorganize tables, particularly those for which reorganization isrecommended.
Whether or not it would be beneficial to reorganize a table is calculated by the UpdateStatistics Job described in Updating Statistics for Database Tables and Checking forReorganization [Page 109].
This job displays a maximum of 100 tables recommended for reorganization as well asadditional data, such as delta table size and the duration of the last reorganization. Youchoose which of the proposed tables to reorganize.
The selected tables are reorganized according to the order of the primary index usingthe DB6CLP tool. The table statistics are subsequently updated.
• REORG of Tables in Tablespace(s)
Sometimes, you may want to reorganize all the tables of a particular tablespace toremove fragmented data, thus increasing the free space. The DBA Planning Calendar(transaction DB13) provides a utility allowing you to do this.
The job uses the external program dmdb6r t s to reorganize all tables of a tablespaceand to subsequently update the table statistics.
• Automatic REORG
This job can be used to do automatic reorganizations of tables according to REORGCHK recommendations. This job is additionally controlled by user-defined limitations such as,for example, table size or runtime.
• REORG and RUNSTATS for Single Table
Yon can use this job to reorganize one single table
In all jobs you can specify the temporary tablespace where the DB2 Database Manager cantemporarily store the table that is being reconstructed. If no temporary tablespace is entered,the DB2 Database Manager stores a working copy of the table in the tablespace in which thetable being reorganized resides. This temporary table will be at least as large as the originaltable, so you must make sure that the tablespace used for reorganization has at leastsufficient free space to hold the original table.
Keep in mind that you may be reorganizing a table within a temporarytablespace that is using pages larger than 4 KB (for example, 8 KB, 16 KB or 32
KB).During the reorganization, the temporary tablespace, which is used during thereorganization, must have the same size pages as the base tablespace.
For more information, see the SAP Online Documentation in the SAP Library.

7/18/2019 SAP DB2 Administration Guide
http://slidepdf.com/reader/full/sap-db2-administration-guide-56d69bf9cdc08 122/230
122 July 2006
6.6 Redirected RestoreThe redirected restore tool brdb6br t retrieves a database backup and creates a CLP scriptfor the restore of this backup image. Before you run the script, you can modify it, for example,change the name and structure of the database.
brdb6brt
Source DB
Restore
Script
Customized
Restore
Script
User
brdb6brt
Customized
Restore
ScriptDB Copy
Retrieve Data &
Backup DB
Create
Backup
Image
Create
Edit
Create
Create
Check
Redirected Restore
for homgeneous
system copy
Redirected
Restore
to change
container
layout
1
2
3
4
5
6
7
8
9
The graphic above illustrates the tasks relevant to a redirected restore process. First of all,back up the database and retrieve data on the container layout (1) using tool brdb6br t . Thetool creates a backup of the database (3) and a CLP script for restoring this backup (2). Thisscript corresponds to the container layout of the database at the time of the backup. The
script can then be adapted to the needs of the database to be restored (4). This can involvechanges to the number, size or location of the containers for a restore to the same database(6 + 8). Another possibility is to perform a homogeneous system copy (9) that normallyrequires major changes to the script to match the new machine setup (5). Additionally,brdb6brt can serve to check the script (7). It reports any failure the restore process mightencounter. In this way, failures can be avoided before they occur.
7/18/2019 SAP DB2 Administration Guide
http://slidepdf.com/reader/full/sap-db2-administration-guide-56d69bf9cdc08 123/230

7/18/2019 SAP DB2 Administration Guide
http://slidepdf.com/reader/full/sap-db2-administration-guide-56d69bf9cdc08 124/230
124 July 2006
The parameters have the following meaning:
Parameter Meaning
- t Forces the CLP to use a semicolon (;) as terminatingcharacter for an SQL statement. The use of this option ismandatory for the execution of the script.
- v Forces the CLP to print each statement on the screen.
- f <f i l e> Forces the CLP to read the statements from the specifiedfile. By default, the brdb6br t tool creates a script file ofthe name <DBSI D>scr , where <DBSI D>is the name of thesource database.
If a backup and restore script of the database SAMPLE was created, the script should now beexecuted. Enter the following command:
db2 –tvf SAMPLE.scr
Changing the Container Layout
The following procedure only applies if you are using DMS tablespaces. Youmust not use it for tablespaces that are managed by DB2’s automatic storagemanagement.
You want to change the layout of the containers of your current database. This can comprisechanging the number of containers of a tablespace, changing their sizes or their location inthe file system. The following procedure is an example of of changing the container layoutand storing the backup into three separate directories:...
1. To create the backup and the restore script, enter the following command:
brdb6brt –s <DBSID> –bm BOTH –bpt Y:\BACKUPS1 Y:\BACKUPS2Y:\BACKUPS3
Since the database is rather large, the backup splitted and stored in three separatedirectories..
2. Edit the script SDB. scr and change the container’s location, size and number.
3. To change the container layout, restore the database using the following command:
db2 –tvf <DBSID>.scr
Changing the Storage Path
The following procedure only applies if you are using AutoStoragetablespaces and a database that also has automatic storage enabled.
If automatic storage is enabled for a database, the database can have AutoStorage tablespaces as well as DMS tablespaces without AutoStorage. The database has one ormore storage paths (that are database parameters) and automatically handles the spaceallocation for the automatic storage table spaces. The DMS tablespaces without AutoStorageare handled as described under Changing the Container Layout.

7/18/2019 SAP DB2 Administration Guide
http://slidepdf.com/reader/full/sap-db2-administration-guide-56d69bf9cdc08 125/230
July 2006 125
The following procedure is an example of changing the storage paths for the AutoStorage tablespaces and storing the backup into three separate directories:
1. Create the backup and the restore script by entering the following command:
brdb6brt –s <DBSID> –bm BOTH –bpt Y:\BACKUPS1 Y:\BACKUPS2Y:\BACKUPS3
Since the database is rather large, the backup splitted and stored in three separatedirectories.
2. Edit the SDB. scr script and change the AutoStorage paths for the AutoStoragetablespaces.
3. To change the container layout, restore the database using the following command:
db2 –tvf <DBSID>.scr
Performing a Homogeneous System Copy
You want to copy your database to another machine. For this purpose the container locationshave to be adapted. To do so for the database SDB, proceed as follows:...
1. To create the backup and the restore script, enter the following command:
brdb6brt –s <DBSID> –bm BOTH –bpt Y:\BACKUPS1 Y:\BACKUPS2Y:\BACKUPS3
Since the database is rather large, the backup is splitted and stored in three separatedirectories..
2. Make the backup images and the script available on the target machine. This can beaccomplished by copying them to the machine via f t p.
3. Log on to the target machine and edit the script SDB. scr . Change the container’s
locations. You also need to adapt the location of the backup image to the directorywhere the containers are available on the target machine.
4. Restore the database by entering:
db2 –tvf <DBSID>.scr
7/18/2019 SAP DB2 Administration Guide
http://slidepdf.com/reader/full/sap-db2-administration-guide-56d69bf9cdc08 126/230
126 July 2006
Creating a Script for Restoring Certain Tablespaces Only
You want to back up one or more tablespaces rather than of the entire database. Thetablespaces for backup have the names USERSPACE1, TBSPACE and TESTSP2. The backup
is done to TSM (three sessions). The database name is SAMPLE. The restore script is createdto restore only the specified tablespaces.
Enter the following command:
brdb6brt –s SAMPLE –bm BOTH –bpt TSM 3 –tbs USERSPACE1 TBSPACETESTSP2
Checking the Restore Script
After the script has been edited, the script can be checked whether it would succeed on thatmachine. The check allows scripts that perform full database or tablespace level restores. Also, restoring to a new or existing database is considered. The user running the checkshould be the user that will later run the script with DB2 CLP, in most cases the DB2 instanceowner (
db2<DBSI D>). To run a check on the
SAMPLE. scr script, enter the following
command:
brdb6brt –bm CHECK -ip SAMPLE.scr
The output from the check run shows possible errors, warnings and information about theredirected restore operation that the script will perform. Possible errors start with [ E] ,warnings with [ W] and informational messages with [ I ] . The output is also saved to a file in
the current directory. The file name is the script name replaced by the file ending . chk. Inthis example, the check output would be written to file SAMPLE. chk.
With the content of the check output, which is mainly error and warning messages, thedatabase administrator now should be able to find errors in the script or on the databaseserver system, for example, duplicated file names, missing write authorizations, out of spacesituations. Additional information about the used file systems is provided, such as:
• List of tablespace containers
• Information about used space
• Information about free space
• Information about missed space
• Information about required space in the DB2 log directory
Especially on UNIX database servers you should be aware that new tablespace containerswill be placed in the topmost existing directory and therefore in the underlying file system. Sobefore running brdb6brt , the tablespace container layout (distribution of tablespacecontainers in the file system(s)) should be implemented by creating file systems, directories
and links to get sound check output.
If you have a multi-partitioned database, you need to run brdb6brt for allpartitions of your database. To do so, use the –nn <node number >parameter. The scripts created include the partition number, which preventsexisting scripts from other database partitions from being overwritten.
If you use the –nn al l option, scripts for all database partitions areautomatically created.

7/18/2019 SAP DB2 Administration Guide
http://slidepdf.com/reader/full/sap-db2-administration-guide-56d69bf9cdc08 127/230
July 2006 127
Moving Existing Containers to Other Directoriesfor DMS tablespaces
If you are using AutoStorage tablespaces and a database that also hasautomatic storage enabled, you must not use the following procedure.
With brdb6brt patch 5 or higher, you can create relocate scripts to move existing containersto other directories using the db2r el ocat edb tool. Furthermore, you can use these scriptsto initialize mirrored databases with a modified container layout using the db2i ni db tool andits parameter RELOCATE USI NG.
1. To create the relocate script, enter the following command:
brdb6brt –s SAMPLE –bm RETRIEVE_RELOCATE
Script SAMPLE is generated. You need to modify it according to your requirements.
2. To move containers using the db2r el ocat edb tool, enter the following command:
db2relocatedb –f SAMPLE.scr
3. To initialize the mirrored database, for example, to create a database snapshot usingthe db2i ni db tool, enter the following command:
db2inidb SAMPLE as snapshot relocate using SAMPLE.scr
Changing the Storage Path
The following procedure only applies if you are using AutoStorage tablespacesand a database that also has automatic storage enabled.
When automatic storage is enabled for a database, it can have automatic storage tablespaces as well as “normal” DMS table spaces. The database has one or more storage paths(that are database parameters) and automatically handles the space allocation for theautomatic storage table spaces. The “normal” DMS table spaces are handled as describedunder Changing the Container Layout.
To change the storage paths for the AutoStorage tablespaces, proceed as follows:
1. Create the relocate script by entering the following command:
brdb6brt –s SAMPLE –bm RETRIEVE_RELOCATE
2. Edit the script SDB. scr and change the autostorage paths for the autostorage tablespaces
3. Move containers using the db2r el ocat edb tool by entering the following command:
db2relocatedb –f SAMPLE.scr

7/18/2019 SAP DB2 Administration Guide
http://slidepdf.com/reader/full/sap-db2-administration-guide-56d69bf9cdc08 128/230
128 July 2006
Changing Text During Script Generation
brdb6brt creates the scripts that are used to perform a redirected restore and to relocatethe database (r el ocat e DB scr i pt ). The script then needs to be adapted according to
your requirements.With brdb6brt patch 5 or higher, a new parameter –r epl ace <Repl aceDef i ni t i on>was introduced. You can use this parameter to adjust the script output during its generationinstead of adapting the output manually afterwards.
For example, you can use this parameter to change the destination databasename from SAMPLE to SAMand the container location from / db2/ sampl e to/ db2/ sam:
brdb6brt –s SAMPLE –bm RETRIEVE –replace
SAMPLE=SAM,/db2/sample=/db2/sam
6.7 Command Line Tasks Using db6clpDB2 UDB for UNIX and Windows provides the command line tool Command Line Processor(CLP) that allows you to administer your databases and instances as well as to access yourdatabases via SQL.
CLP accepts certain administrative commands like BACKUP DATABASE and SQL commandslike SELECT. However, you cannot chain commands on the command line.
On Windows you need a special environment to use CLP. The reason is that you can onlyaccess CLP on Windows by using a special command shell installed with DB2. Tool db6cl p was developed specifically for this reason. It is actually a wrapper of the original CLP.

7/18/2019 SAP DB2 Administration Guide
http://slidepdf.com/reader/full/sap-db2-administration-guide-56d69bf9cdc08 129/230
July 2006 129
It allows you to chain commands by separating them with semicolons. Furthermore, it is notnecessary to call it in the special DB2 command shell on Windows. The tool is defined as anexternal command in the SAP system and can be used on all platforms. There are otheradditional functions, which are presented in the following table.
Option Meaning
- a Explicitly attaches to the database instance before the commandexecution. The instance is the one to which the database given withthe –db switch belongs. If –db switch is omitted, <DBSI D>is assumedas the database name.
If S is specified, the attachment is made using user sap<sapsi d>.
If A is specified, user <sapsi d>admwill be used.
The password is retrieved using the password services of SAPsystems for DB2. Thus the correct environment must exist for asuccessful run (DB2DB6EKEY must be set).
This switch can only be used if the caller is one of the usersdb2<dbsi d>or <sapsi d>adm; or sapse<sapsi d>on Windows.
- c Explicitly connects to the database given with the –db switch.If –db switch is omitted, <DBSI D>is assumed as the database name.
For specification of S or A the same comments as for the –a switchapply.
This switch can only be used if the caller is one of the usersdb2<dbsi d>or <sapsi d>adm; or sapse<sapsi d>on Windows.
- l Sets the environment DB2I NSTANCE to this value before execution ofthe CLP command.
- db If this switch is specified without one of the –a and –c switches, anexplicit connection to the database is only made if it is catalogedremotely.
- p Sets the partition of the database to which the command applies. Thisis applicable in multi-partitioned environments. The environmentvariable DB2NODE is set to the given value before the commandexecution.
- V Prints out version and patch information of the tool.
<command> The command to be executed by DB2 CLP. Multiple commands canbe specified by separating them with semicolons.

7/18/2019 SAP DB2 Administration Guide
http://slidepdf.com/reader/full/sap-db2-administration-guide-56d69bf9cdc08 130/230
130 July 2006
The formal syntax of the command is as follows:
db6clp -V |
[-a S|A [-db <db name>]
| -c S|A [–db <db name>]
| -i <instance>
| -db <db name>]
[-p <partition>]
<command>
See also:
• For more information about external commands, see the SAP Online Documentation inthe SAP Library at SAP Web Application Server → Computing Center Management
System → Background Processing.
• For more information about DB2 CLP and administrative commands, see the IBM DB2administration documentation Command Reference.
• For more information about SQL, see the IBM DB2 documentation SQL Reference.
6.8 Monitoring Database AlertsFor information about how to monitor database alerts, see the SAP Online Documentation inthe SAP Library.
6.9 Monitoring Lock Waits and Deadlocks
Monitoring Lock Waits
A lock wait is a situation when one application updates or inserts a row without COMMI T and asecond application tries to access this row. As a result, the second application gets the status
l ock wai t .
You can access information about lock waits by calling transaction ST04 and choosingPerformance → Lock Waits in the navigation frame of the DBA Cockpit.
If you want to display data for the first time, choose Refresh. You can choose between thedisplay layouts by using the list box Layout.
For more information, see the SAP Online Documentation in the SAP Library.
7/18/2019 SAP DB2 Administration Guide
http://slidepdf.com/reader/full/sap-db2-administration-guide-56d69bf9cdc08 131/230
July 2006 131
Monitoring Deadlocks
Deadlocks are situations where two or more applications block each other, each waiting forthe other(s) to release a lock, for example, application 1 and application 2 update or insert
different rows without COMMI T. Then application 1 tries to access the rows that are locked byapplication 2, and application 2 tries to access rows that are locked by application 1.
You can access the Deadlocks screen by calling transaction ST04 and choosingPerformance → Deadlocks in the navigation frame of the DBA Cockpit. You can display alldeadlocks that occurred in the past by choosing Show History.
For more information, see the SAP Online Documentation in the SAP Library.
6.10 Managing Backups and Logs Archived on
TSMTSM distinguishes between:
• TSM backup copy group
A defined number of versions of each file is kept on the TSM server.
• TSM archive copy group
Each file is kept on the TSM server for a defined number of days.
The definition of kept versions and days must be performed on the TSM server and cannot bechanged by the TSM client.
The following table shows which type of TSM copy group is used by DB2 and the Admin
Tools.
DB2 Backup brarchive User Exit inDirect Mode
TSM Copy Group TSM backup copygroup
Default: TSMarchive copy group.If not present on the
TSM server thenTSM backup copy
group
Default: TSMarchive copy group.If not present on the
TSM server thenTSM backup copy
group
To query, extract and delete backups and log files, you should use the following tools:DB Backups Log Files saved
with brarchive Log Files savedusing the UserExit in DirectMode
TSM Backup Mode db2adut l br ar chi ve db6adut l
TSM Archive Mode -- br ar chi ve db6adut l

7/18/2019 SAP DB2 Administration Guide
http://slidepdf.com/reader/full/sap-db2-administration-guide-56d69bf9cdc08 132/230
132 July 2006
To run the program db6adut l , use the instance owning user db2<dbsi d>. db6adut l ispart of the Admin Tools and is installed in the following directory:
• For 6.NN Admin Tools UNIX: $I NSTHOME/ admi ntool s/ bi n
Windows: %I NSTHOME%\ admi nt ool s/ bi n
• For 4.6D Admin Tools
UNIX: / usr / sap/ <SAPSI D>/ SYS/ exe/ r un
Windows: <dr i ve>: \ usr \ sap\ <SAPSI D>\ SYS\ exe\ r un
The syntax of this command is provided in Appendix A: Tool Command Line Parameters[Page 157].
Additionally, db2adut l allows you to check backups, logs, and load copy images saved
using TSM. This utility is installed in the following directory:
UNIX: $I NSTHOME/ sql l i b/ mi sc
Windows: <DB2 i nst al l pat h>\ sql l i b\ mi sc
The syntax of this command is shown in Appendix A: Tool Command Line Parameters [Page157].
For more information about TSM, see the TSM documentation at:www.tivoli.com/support/storage_mgt/adsm/pubs/
For more information about where log files are archived to on the TSM server, see Indirect Archiving to TSM [Page 88] and Archiving Directly to TSM [Page 80].
6.11 The db2inidb ToolDB2 tool db2i ni db and the wr i t e suspend feature are new features of DB2 UDB forUNIX and Windows Version 7.2. Tool db2i ni db in combination with hardware technologieslike EMC Timefinder® or IBM ESS® provides the basis for fast backups or database clonecreation.
With these technologies you can split up an entire file system very fast, that is create a splitimage of a file system. This split image can be mounted on a different machine, in a differentdirectory on the same machine where the original file system is located or replace the current
content of the original file system in case of failure. EMC Timefinder® or IBM ESS® alsoprovide functions to archive a split image to storage devices, for example, tape.
The db2i ni db tool provides the following options:
• as mi r r or
You use this option to create fast backups and fast database restores with nearly nosystem outage. For more information, see db2inidb Option: as mirror [Page 133].
• as snapshot
You use this option to create database clones for quality assurance or test systems.For more information, see db2inidb Option: as snapshot [Page 136]

7/18/2019 SAP DB2 Administration Guide
http://slidepdf.com/reader/full/sap-db2-administration-guide-56d69bf9cdc08 133/230
July 2006 133
• as st andby
You use this option to:
Create normal DB2 backups with nearly no system outage. For more
information, see db2inidb Option: as standby for Backups [Page 138]. Build up a hot-standby system that is synchronized over log files. For more
information, see db2inidb Option: as standby for Hot-Standby Database [Page139].
The procedures provided in the following sections are only intended forexperienced DB2 database administrators. Be aware that when using theseoptions, problems with the log file management tools might occur.
For more detailed information about the db2i ni db tool, see the IBM DB2documentation Data Recovery and High Availability Guide and Reference.
6.11.1 db2inidb Option: as mirror
Use
You use the db2i ni db tool option as mi r r or to:
• Perform fast backups or restores.
The split image is created while the database is in wr i t e suspend mode. Thecreation of the split image is very fast if you are using hardware technologies such as
EMC Timefinder ® or IBM ESS®. This means you have nearly no system outage duringthe backup of the split image.
To restore the database, you mount the split image and roll forward the database. Themount time of the split image is very fast compared to a normal database restore. Thismeans you save the time for a normal database restore from a normal DB2 backupimage.
• Compress backups with the standard system command compr ess before archiving.
For example, the split image can be compressed before you archive it to tape. Thus,tape space and I/O bandwidth are saved.
• Store log files to any storage management system.
Using this function you are not restricted to the destinations provided by the DB2backup command. All storage management systems are able to archive files from thefile systems. You use this function to store all important DB2 files and databasecontainers.
With DB2, archiving and restoring the database files and database containers isonly allowed in conjunction with the wr i t e suspend feature and thedb2i ni db tool for the regular DB2 backup and restore function. If you do notuse these tools, you may cause irrevocable data loss or unexpected systembehavior.

7/18/2019 SAP DB2 Administration Guide
http://slidepdf.com/reader/full/sap-db2-administration-guide-56d69bf9cdc08 134/230
134 July 2006
Procedure
Performing a BackupLl...
1. To switch the database mode to wr i t e suspend, log on to the database server asuser db2<dbsi d>and enter the following command:
db2 set write suspend for database
The database only allows read access now.
2. Create the split image. The split image must include:
All database containers (sapdat a*)
The database directory:
UNIX: /db2/<DBSID>/db<dbsid>
Windows: <drive>:\db2\<DBSID>\db<dbsid>
Make sure that the image does not include log directory, archive directory andretrieve directory. This is important because, if the split image is mounted for adatabase restore, the current log files, which are contained in these directories,will be overwritten with the old log files contained in the split image.
3. To switch the database mode back to normal operation, enter the following command:
db2 set write resume for database
The database now allows full access again.
4. Archive the split image.
Performing a Restore
1. Log on to the database server as user db2<dbsi d>.
2. To restore the split image using the storage management system tools, enter thefollowing command:
db2inidb <DBSID> as mirror
The database is now in rollforward pending mode.
3. Make sure that the log files required for rollforward recovery are available:
For direct archiving:
The User Exit retrieves log files as required during rollforward recovery directlyfrom the storage management product.
For indirect archiving:
You have to recreate the Admin DB and restore required log files. To do so,proceed as follows:
i. Delete the Admin DB using the following command:
db2 drop db ADM<DBSID>
ii. Restore the latest Admin DB backup SAR file using br r est or e –ex oruse the SAR file located in directory<DB2DB6_TEMP_DI R>\ admi nDB_<DBSI D>using program sddb6i ns.

7/18/2019 SAP DB2 Administration Guide
http://slidepdf.com/reader/full/sap-db2-administration-guide-56d69bf9cdc08 135/230
July 2006 135
iii. To do so, enter the following command:
sddb6ins –r <latest_Admin_DB_backup_SAR_file>
iv. Restore log files required for rollforward recovery using brrestore.
You can avoid the recreation of the Admin DB in this scenario if the Admin DBuses a file system that is not located in the default database path/ db2/ <DBSI D>. Then the Admin DB is not contained in the split image andcontains up-to-date information after the split image has been mounted.
By default, the Admin DB is created in the path specified by the databasemanager configuration parameter DFTDBPATH. You can use the redirectedrestore tool to move an existing Admin DB. Alternatively, if the Admin DB hasnot existed so far, you can set the database manager configuration parameterDFTDBPATH to a different directory, for example, to / db2/ ADM<DBSI D>before
calling sddb6i ns –i . You should reset parameter DFTDBPATH aftersddb6i ns –i was called.
4. Perform a rollforward recovery to the end of logs as follows:
a. Start the rollforward recovery using the following command:
db2 rollforward database <DBSID> to end of logs
b. Check if the rollforward recovery is complete using the following command:
db2 rollforward database <DBSID> query status
If the rollforward recovery is not complete, you have to correct the problem, forexample, by providing missing log files and repeating step a.
c. Complete the rollforward recovery using the following command:
db2 rollforward database <DBSID> to end of logs andcomplete
If the operation was successful, the database should now be in the most currentstate and can be accessed again.
Log File Management Considerations
If you want to use indirect archiving, you have to consider the following:
If no normal database backup (that is a regular online or offline backup) was performed onthe system, the log files are assigned to the last backup made on the system. This affects, forexample, the usability of the br r est or e –del et e option.
7/18/2019 SAP DB2 Administration Guide
http://slidepdf.com/reader/full/sap-db2-administration-guide-56d69bf9cdc08 136/230
136 July 2006
The br r est or e –del et e option requires that you specify a backup timestamp. Since nonormal backup is performed, the backup timestamp is not known to the Admin Tools. Toavoid the log file deletion problem, brrestore option –f or ce was introduced. If you use–force in conjunction with –del et e <TS>, you can specify a timestamp that is not a
backup timestamp.
As an example, the following command would delete all log files before 1January 2003:
brrestore –delete 20030101000000 –force
Since indirect archiving is very complex and thus very error prone in conjunctionwith db2i ni db tool option as mi r r or , we strongly recommend that you usedirect archiving.
6.11.2 db2inidb Option: as snapshot
Use
You use the db2i ni db option as snapshot to create a database clone for test or qualityassurance systems from your production system. In the past it was necessary to copy a SAPsystem using the homogeneous system copy. The homogeneous system copy requires a fulldatabase backup and a redirected restore on the target system. This procedure can be time-consuming if your source system is very large (for example, several 100 MB). The db2i ni db
tool option as snapshot allows you to perform a homogeneous system copy for largedatabases very fast.
Procedure
On the source system:...
1. To switch the database mode to wr i t e suspend, log on to the database server asuser db2<dbsi d>and enter the following command:
db2 set write suspend for database
The database only allows read access now.
2. Create the split image. The split image must include:
All database containers (sapdat a*)
The database directory:
UNIX: / db2/ <DBSI D>/ db<dbsi d>
Windows: <dr i ve>: \ db2\ <DBSI D>\ db<dbsi d>
Log directory l og_di r
The log files are required to roll back open transactions when db2i ni db optionas snapshot is called on the target system.

7/18/2019 SAP DB2 Administration Guide
http://slidepdf.com/reader/full/sap-db2-administration-guide-56d69bf9cdc08 137/230
July 2006 137
Make sure that the split image does not include the archive and retrievedirectory.
3. To switch the database mode back to normal operation, enter the following command:
db2 set write resume for database
The database now allows full access again.
On the target system:
1. Prepare a standard SAP system environment for SAP databases using homogeneoussystem copy methods.
2. Mount the split image using the storage system tools.
3. To initialize the database, enter the following command:
db2inidb <DBSID> as snapshot
Alternatively, if you want to change the container layout on the target system todistinguish it from the one on the source system, you can use the following command:
db2inidb <DBSID> as snapshot using relocate <relocate db script>
You can easily create the <r el ocat e db scr i pt >using the brdb6br t option–bm RETRI EVE_RELOCATE on the source system. All open transaction are rolled backand the target database can be accessed now.
Before accessing the target database, however, you should perform the following tasksto clean up the target system.
If the source system was configured for indirect archiving, you must delete the AdminDB on the target system. The reason is that the Admin DB, which uses circular logging
(that is, LOGRETAI N is switched OFF), is included in the split image, but the db2i ni db <DBSI D> as snapshot command only supports databases where LOGRETAI N isswitched ON.:
a. To delete the Admin DB, enter the following command:
db2 drop db ADM<DBSID>
b. Prune the backup history file as the information included in that file is valid forthe source system. To do so, enter the following command:
db2 prune history force..
Log File Management Considerations
If you want to use the target system for quality assurance or test purposes, you shouldconsider to set parameter LOGRETAI N to OFF and to use circular logging instead. Thus, youdo not need to use the log file management tools.
Be aware that all databases using circular logging are subject to somerestrictions, for example, online backups and rollforward recovery are notsupported. If you require these features on the target system, you must reinstalland reconfigure the log file management tools on the target system.

7/18/2019 SAP DB2 Administration Guide
http://slidepdf.com/reader/full/sap-db2-administration-guide-56d69bf9cdc08 138/230
138 July 2006
6.11.3 db2inidb Option: as standby for Backups
Use
You use the db2i ni db tool option as st andby to perform fast backups with nearly nosystem outage, especially if you are using hardware technologies such as EMC Timefinder ® or IBM ESS®. Backups and restores are simply performed with standard DB2 commands. Incomparison to the db2i ni db option as mi r r or , where split images are used to back up thedatabase, normal DB2 backup images are created.
The normal DB2 backup images offer the following advantages:
• The backup image can be used to restore the database on a different hardwareplatform.
• The backup image can be used to perform a redirected restore.
• The backup image can be used to restore the database into a newer DB2 version, for
example to build up a quality assurance or test system on a new database version.
Procedure
Performing a Backup
On the source system:...
1. To switch the database mode to wr i t e suspend, log on to the database server asuser db2<dbsi d>and enter the following command:
db2 set write suspend for database
The database only allows read access now.
2. Create the split image. The split image must include: All database containers (sapdat a*)
The DB2 instance directory:
UNIX: / db2/ <DBSI D>/ db<dbsi d>
Windows: <dr i ve>: \ db2\ <DBSI D>\ db<dbsi d>
3. To switch the database mode back to normal operation, enter the following command:
db2 set write resume for database
The database now allows full access again.
4. Archive the split image.
On the target system:
1. To create a database instance using DB2 instance creation tool db2i cr t , enter thefollowing command:
db2icrt <instance_owner>
2. Log on as instance owner.
3. To start the database instance, enter the following command:
db2start

7/18/2019 SAP DB2 Administration Guide
http://slidepdf.com/reader/full/sap-db2-administration-guide-56d69bf9cdc08 139/230
July 2006 139
4. Recreate the database from the split image:
a. Mount the split image.
b. Initialize the standby database using the following command:
db2inidb <DBSID> as standby
5. To create a database online backup using the DB2 backup command, enter thefollowing command:
db2 backup db <DBSID> online to /tmp
Performing a Restore
The backup images created with the backup command on the standby system can be usedas normal backups for the source system. Thus, the restore procedure is equivalent.
The backup performed on the standby system is not listed in the backup historyof the source system.
Log File Management Considerations
If you want to use indirect archiving, you have to consider the following:
If no normal database backup (that is a regular online or offline backup) was performed o thesystem, the log files are assigned to the last backup made on the source system. This affects,for example, the usability of the br r est or e –del et e option.
The br r est or e –del et e option requires that you specify a backup timestamp. Since nonormal backup is performed, the backup timestamp is not known to the Admin Tools. Toavoid the log file deletion problem, brrestore option –f or ce was introduced. If you use –f or ce in conjunction with- del ete <TS>, you can specify a timestamp that is not a backup timestamp.
As an example, the following command would delete all log files before 1January 2003:
brrestore –delete 20030101000000 –force
6.11.4 db2inidb Option: as standby for Hot-Standby
Database
Use
You use the db2i ni db tool option as st andby to synchronize two databases using logfiles, that is you create a hot-standby database. Hot-standby database systems are used to:
• Avoid long restore operations after a hardware failure. The hot-standby databasebuffers are allocated and filled with the most recently changed data pages.
• Allow a fast recovery from logical failures.
In this case, the hot-standby system is kept in a state with a defined time delaycompared to the source system. If a logical error is detected on the source system, you

7/18/2019 SAP DB2 Administration Guide
http://slidepdf.com/reader/full/sap-db2-administration-guide-56d69bf9cdc08 140/230
140 July 2006
can switch to the state of the hot-standby system that may not have applied this logicalerror.
The setup can be as follows:
The source database works normally. The hot-standby database is in roll-forward pendingmode. All log files are created on the source database and are copied to thehot-standby database using the ROLLFORWARD command as shown in the following graphic.
sourcedatabase
hot-standby
database
log_dir log_dir
log file copied on regularbasis
source system hot-standby system
The following graphics show the differences for direct or indirect archiving.
Overview of Standby Databases If Direct Archiving Is Used
sourcedatabase
hot-standby
database
log_dir log_dir
StorageManagement
System
db2uext2 ARCHIVE
db2uext2RETRIEVE
hot-standby systemsource system

7/18/2019 SAP DB2 Administration Guide
http://slidepdf.com/reader/full/sap-db2-administration-guide-56d69bf9cdc08 141/230
July 2006 141
Overview of Standby Databases If Indirect Archiving Is Used
sourcedatabase
hot-standby
database
log_dir log_dir
backend
db2uext2 ARCHIVE
db2uext2RETRIEVEwithout DB
log_archive log_archive
Admin DB Admin DB
standby_dir
copy log file onregular basis
brarchive
hot-standby systemsource system
Procedure
The following procedures describe the end of l og scenario. The otherscenario, that is recovering from logical failures, works according to the end ofl og scenario, but you must use r ol l f or war d t o <poi nt of t i me>instead of r ol l f or war d t o end of l ogs to ensure the time delay for thehot-standby system.
Preparing the Source Database
• If you are using indi rect archiving:
Configure environment variable DB2DB6_STANDBY_DI R in file i ni t <DBSI D>. db6.The User Exit then writes a copy of the log file into the standby directory in addition tothe one the User Exit writes into the archive directory.
• If you are using direct archiving:
The central point for the log files is the storage management system. No further actionis required.

7/18/2019 SAP DB2 Administration Guide
http://slidepdf.com/reader/full/sap-db2-administration-guide-56d69bf9cdc08 142/230
142 July 2006
Creating an Init ial Hot-Standby Database Version
On the source system:
Create a database snapshot of the source system that is used as the starting point for the
hot-standby system:...
1. To switch the database mode to wr i t e suspend, log on to the database server asuser db2<dbsi d>and enter the following command:
db2 set write suspend for database
The database only allows read access now.
2. Create the split image. The split image must include:
All database containers (sapdat a*)
The database instance directory:
UNIX: / db2/ <DBSI D>/ db<dbsi d>
Windows: <dr i ve>: \ db2\ <DBSI D>\ db<dbsi d>
Make sure that the image does not include the log directory, the archivedirectory and the retrieve directory.
3. To switch the database mode back to normal operation, enter the following command:
db2 set write resume for database
The database now allows full access again.
4. Archive the split image....
On the hot-standby system:
1. Create the database by mounting the split image from the source system.
2. Initialize the hot-standby database using the following:
db2inidb <DBSID> as standby
The open transactions are not rolled back and the hot-standby database is now in roll-forward pending mode.
Preparing the Hot-Standby Database
If you want to use indirect archiving:
1. Drop the Admin DB using the following command:db2 drop db ADM<DBSID>
The Admin DB of the hot-standby system is empty until the system failover.
2. Set environment variable DB2DB6_UEXI T_RETRI EVE_WO_DB in filei ni t <DBSI D>. db6 to ON.
The Admin DB on the hot-standby system does not have any knowledge about log filescreated on the source database. To enable the User Exit to retrieve log files during roll-forward recovery, you have to activate this flag. The User Exit then retrieves the latestlog files with the log file number requested by the database engine during roll-forwardrecovery.

7/18/2019 SAP DB2 Administration Guide
http://slidepdf.com/reader/full/sap-db2-administration-guide-56d69bf9cdc08 143/230
July 2006 143
If you want to use direct archiving:
If you are using TSM, you have to configure the same NODENAME (TSM configurationparameter) on the hot-standby system as on the source database.
Keeping the Hot-Standby Database in Synchronization wi th the SourceDatabase
To keep the hot-standby database in synchronization with the source database, you have toperform the following tasks on a regular basis.
If you want to use indirect archiving:
• In most cases, the standby directory (DB2DB6_STANDBY_DI R) of the source databaseis a shared file system pointing to the archive directory of the hot-standby databasesystem (DB2DB6_ARCHI VE_PATH>/ <DBSI D>). If this is not the case, you have totransport the log files from the source database system to the hot-standby system.
• Perform a rollforward recovery on the hot-standby system (without the
st op/ compl et e option) using the following command:db2 rollforward db <DBSID> to end of logs
• Delete log files that have already been applied to the hot-standby database usingrollforward recovery and that have already been archived on the source system usingbr ar chi ve.
If you want to use direct archiving:
You perform a rollforward recovery on the hot-standby system (without the stop/compl et e option) using the following command:
db2 rollforward db <DBSID> to end of logs
The User Exit then retrieves the required log files directly from the storage managementsystem, where the source database had stored them.
Switch ing Over to the Hot-Standby Database System
If you are using direct archiving, you perform a rollforward recovery to the end of log files onthehot-standby system.
1. To start the rollforward recovery, enter the following command:
db2 rollforward db <DBSID> to end of logs
2. To check if the rollforward recovery is complete, enter the following command:
db2 rollforward db <DBSID> query status
If the rollforward recovery is not complete, you have to correct the error, for example,by providing missing log files and repeat step a.
3. To stop the rollforward recovery, enter the following command:
db2 rollforward database <DBSID> and complete
If the operation was successful, the hot-standby database is now in the most currentstate and can be accessed again.

7/18/2019 SAP DB2 Administration Guide
http://slidepdf.com/reader/full/sap-db2-administration-guide-56d69bf9cdc08 144/230
144 July 2006
If you are using indirect archiving, you perform the following tasks on the hot-standbysystem:...
1. Recreate the content of the Admin DB on the hot-standby system using the latest Admin DB backup SAR file. You can find the latest Admin DB backup SAR file in one ofthe following locations:
In the standby directory (DB2DB6_STANDBY_DI R).
The SAR file is only available in the standby directory if you have setconfiguration parameter DB2DB6_STANDBY_DI R_ADMDBSAR to ON in thei ni t <DBSI D>. db6 file.
In directory <DB2DB6_TEMP_DI R>/ admi nDB_<DBSI D>that is located on thesource system.
If the Admin DB backup SAR file is not in one of these locations or cannot be
accessed, you have to perform an emergency restore usingbrrestore –ex.
To recreate the content of the Admin DB, enter the following command:
sddb6ins –r <SAR file>
2. Perform a rollforward recovery to end of log files.
a. To start the rollforward recovery, enter the following command:
db2 rollforward db <DBSID> to end of logs
b. To check if the rollforward recovery is complete, enter the following command:
db2 rollforward db <DBSID> query status
If the rollforward recovery is not complete, you have to correct the error, forexample, by providing missing log files and repeat step a.
c. To complete the rollforward recovery, enter the following command:
db2 rollforward database <DBSID> and complete
If the operation was successful, the hot-standby database should now be in themost current state and can be accessed again.
Log File Management Considerations
If you are using indirect archiving, the Admin DB of the hot-standby database does not contain any information about log files and database backups before the system failover. The
system failover is relatively complex and error-prone. Thus, we recommend that you usedirect archiving.

7/18/2019 SAP DB2 Administration Guide
http://slidepdf.com/reader/full/sap-db2-administration-guide-56d69bf9cdc08 145/230
July 2006 145
6.12 Dual LoggingDual logging is a new feature of DB2 Version 7.2. It provides the option to keep two copies ofthe log files, which are normally only in the log directory.
To activate dual logging on DB2 V7:Set...
1. Set DB2 instance registry variable DB2_NEWLOGPATH2 using db2set . Enter thefollowing command:
db2set DB2_NEWLOGPATH2=ON
DB2 creates the name of the second log directory from the first log directory by adding2.
2. To activate this change, restart the instance.
To activate dual logging on DB2 UDB for UNIX and Windows Version 8, proceed as follows:
1. Set DB configuration parameter MI RROR_LOGPATH. Enter:
db2 update db cfg for <DBSID> using MIRROR_LOGPATH <second logdirectory>
2. To activate this change, restart the instance.
DB2 calls the User Exit just once for each log file regardless if dual logging isactivated or not. This means that the log files are not archived twice. If you useindirect archiving, the Admin DB keeps track of only one log file. br ar chi ve stores only one log file.
6.13 Adjusting the Content of the Admin DB
Use
You adjust the content of the Admin DB by using the br ar chi ve option –GAL.
Before you enter the –GAL option of br ar chi ve you should use the previewmode with the –DMP option to make sure that your changes to the Admin DB arecorrect.
Procedure
To adjust the content of the Admin DB, you use the following br ar chi ve options:
• - GAL add
Log files that are not known to the Admin DB but located in the archive directory areadded to the Admin DB.

7/18/2019 SAP DB2 Administration Guide
http://slidepdf.com/reader/full/sap-db2-administration-guide-56d69bf9cdc08 146/230
146 July 2006
• - GAL remove
Log files that are assumed to be in the archive directory but do not exist there areremoved from the Admin DB.
• - GAL r evert
With this option, you can revert the state of log files from ARCHRET (archive retained) toOFFLRET (offline retained) if the log files are still in the archive directory. The next timebr ar chi ve is run to archive log files, these log files will be treated like log files thathave not yet been archived; they will then be archived again.

7/18/2019 SAP DB2 Administration Guide
http://slidepdf.com/reader/full/sap-db2-administration-guide-56d69bf9cdc08 147/230
July 2006 147
7 Emergency Tasks
7.1 SAP Database RecoveryIf you are using a full database backup as a basis, you can choose to have DB2 apply all theunits of work for any or all of the tablespaces in the database, up to any point within the timeperiod covered by the logs ROLLFORWARD recovery. As long as all the log files are availablecovering the time period from the time of the backup through to the current time, roll-forwardrecovery re-applies the completed units of work recorded in the database logs to the restoreddatabase, tablespace or tablespaces. You can specify that roll-forward recovery is done tothe end of logs, or to a particular point in time.
During the restore phase, a copy of the SAP database and SAP database logs is needed for
recovery.The database administrator db2<dbsi d>or the SAP system administrator <sapsi d>admcan restore or rollforward the database. In a partitioned database environment, the rollforwardmust be issued from the catalog node of the database. The restore command can be enteredfrom the command line processor, DB2 Command Center or DB2 Control Center.
A database must be restored successfully before it can be rolled forward; but a tablespacedoes not. A database rollforward runs offline. The database is not available for use until therollforward completes either by reaching the end of the logs during a tablespace rollforward,or by specifying STOP on the ROLLFORWARD command. You can, however, perform an onlinerollforward of tablespaces as long as SYSCATSPACE is not included. When you perform anonline rollforward operation on a tablespace, it is not available for use, but the othertablespaces in the database are.
When the rollforward recovery method completes successfully, the last log that was used byrollforward is truncated, and logging begins with the next sequential log. The practical effect isthat any log in the log directory with a sequence number greater than the last log used forrollforward recovery is re-used. You have to make a copy of the logs before executing theROLLFORWARD command if not already done by the User Exit program.
The DB2 Database Manager ensures that an incorrect log is not applied during rollforwardrecovery, but it cannot detect the location of the required log. If the active log file is notsufficient for a recovery, the db2uext 2 interface will be called with the RETRI EVE request toget the missing log file.
Restoring Databases from an Offline Backup Without Rolling Forward
You can only restore without rolling forward at the database level, and not at the tablespacelevel. To restore a database without rolling forward, you could either restore a non-recoverable database, that is, a database that uses circular logging, or you could specify theWI THOUT ROLLI NG FORWARD parameter for the restore utility.

7/18/2019 SAP DB2 Administration Guide
http://slidepdf.com/reader/full/sap-db2-administration-guide-56d69bf9cdc08 148/230
148 July 2006
Restoring Databases and Tablespaces and Rolling Forward
You do not have to recover your database with the latest backup copy of the database. Youcan start with any backup as long as you have the logs associated with and following that
backup.One type of problem that requires point-in-time rollforward recovery is the corruption of datathat is caused by errant logic or incorrect input in an application. You can use rollforwardrecovery to recover the database to a point-in-time that is close to when the applicationbegan working with the database.
A log uses a timestamp associated with the completion of a unit of work. The timestamp inthe log uses the Coordinated Universal Time (CUT). CUT helps to avoid having the sametimestamp associated with different logs, for example, because of a change in timeassociated with daylight savings time. The timestamp used on the backup is based on thelocal time that the backup started. As a result, when you call the ROLLFORWARD command,you must specify the time in CUT.
Restoring Databases Using the New RECOVER DATABASE CommandDB2 version 8.2 offers the new command RECOVER DATABASE that combines thefunctionality of the RESTORE DATABASE and ROLLFORWARD DATABASE command.Using this command, you specify a point-in-time to which the database should be recovered.You do not have to indicate which backup image must be restored or which log files arerequired to reach the specific point-in-time.
7.2 Log File Restore of the SAP Database
As outlined in Basic Concepts [Page 23], you can restore log files either automatically usingthe User Exit program or you have to restore them from the retrieve directory. From there theUser Exit is able to retrieve log files to the online log directory. If you choose to restore fromstorage into the retrieve directory, use one of the following procedures.
You can restore log files from storage (tape, TSM or any other backend where you archivedlog files to using customer script) either with the brrestore tool or with the DB2 ControlCenter Extensions for the SAP system.
Restoring Log Files with the DB2 Control Center:
To restore the log files, proceed as follows:...
1. In the navigation frame of the DB2 Control Center, from the context menu of the SAPdatabase, choose SAP Log File Management.
2. If required, enter user <sapsi d>admor db2<dbsi d>.
The Logfile Management dialog box appears.
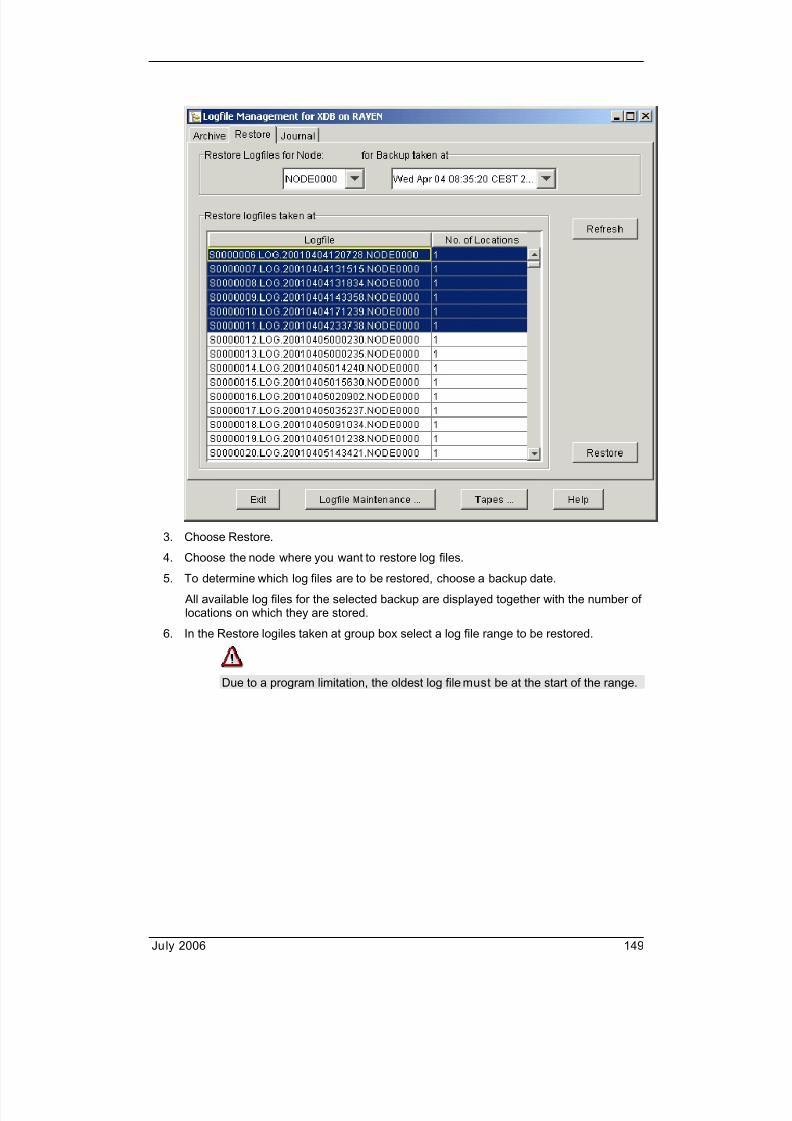
7/18/2019 SAP DB2 Administration Guide
http://slidepdf.com/reader/full/sap-db2-administration-guide-56d69bf9cdc08 149/230
July 2006 149
3. Choose Restore.
4. Choose the node where you want to restore log files.
5. To determine which log files are to be restored, choose a backup date.
All available log files for the selected backup are displayed together with the number oflocations on which they are stored.
6. In the Restore logiles taken at group box select a log file range to be restored.
Due to a program limitation, the oldest log file must be at the start of the range.

7/18/2019 SAP DB2 Administration Guide
http://slidepdf.com/reader/full/sap-db2-administration-guide-56d69bf9cdc08 150/230
150 July 2006
7. To start the restore procedure, choose Restore.
The Select Location dialog box appears.
8. Choose the location to be used for the restore process.
The best location is the default value. All log files that can be restored from the chosenlocation are displayed.
If you choose a tape location from where all matching devices are retrieved, you have
to choose a tape device in the Select tape drive field.9. To start restoring from the selected location, choose Start.
A dialog box appears informing you that the restore process has been started.
After the restore has finished, a check is made whether all selected log files wererestored. If so, a dialog box appears displaying a success message.
If there are still log files left to be restored, the Select Location dialog box reappearsagain and you have to repeat the process for all different locations where necessary. All restore actions and their results can be seen on the Journal screen.
Restoring Log Files wi th the Command Line Tool brrestore
brrestore can be used to retrieve any log file archived using br ar chi ve. Callingbrrestore on the command line gives the administrator access to all command line optionsand may therefore be more flexible than using the DB2 Control Center.
The following tables describes the most common usage of brrestore. If this fails, anemergency restore can be attempted, although we do not recommend this action.
The - a arguments (shown in the following tables) must be log file numbers andnot log file names. For more information about the syntax of brrestore, seebrrestore - Log File Retrieval Tool [Page 163].

7/18/2019 SAP DB2 Administration Guide
http://slidepdf.com/reader/full/sap-db2-administration-guide-56d69bf9cdc08 151/230

7/18/2019 SAP DB2 Administration Guide
http://slidepdf.com/reader/full/sap-db2-administration-guide-56d69bf9cdc08 152/230
7/18/2019 SAP DB2 Administration Guide
http://slidepdf.com/reader/full/sap-db2-administration-guide-56d69bf9cdc08 153/230
July 2006 153
7.3 Recovery of the Admin DB
7.3.1 General InformationThe Admin DB contains information about objects such as log files and their locations. Thisinformation is required to process these log files, for example, to recover them. The AdminDB data itself may need to be recovered for the following reasons:
• The Admin DB is lost or damaged.
• The SAP system is being moved or a duplicate SAP system is being set up on anothermachine. The SAPSI D and DBSI D must remain unchanged. Otherwise, you mustcreate a new empty Admin DB.
You can deal with these situations as follows:• You create a new Admin DB and take a backup o f the SAP database.
If you do not need the old log files, for example, on a test system, this is the fastest wayof recovering or recreating the Admin DB. Otherwise, you must recover the Admin DBfrom a safety copy as described below.
If theAdmi...
a. If the Admin DB still exists, drop it using the following command:
DROP DB ADM<DBSID>
b. To recreate an empty Admin DB, call sddb6i ns –i .
It is not essential but useful to prune the DB2 backup history file (PRUNE…).
c. Make sure that the SAP database parameters LOGRETAI N and USEREXI T areboth set to ON.
d. Perform a full backup of the SAP database.
• You recover the Admin DB from a safety copy.
To make sure that the Admin DB ADM<DBSI D>can be recovered, an export ofessential information from that database is archived to the same target as the log files just archived.
br ar chi ve does this export and archiving automatically after successfully archivingone or more log files. This database safety copy is not a database backup but a
compressed archive file (admi nDB<t i mest amp>. SAR) made up of individual tableexports. This database backup image does not contain job information such as the oneshown on journal pages in the DB2 Control Center. This data is lost whenADM<DBSI D>is recreated using this image.

7/18/2019 SAP DB2 Administration Guide
http://slidepdf.com/reader/full/sap-db2-administration-guide-56d69bf9cdc08 154/230
154 July 2006
7.3.2 Recovery ProcessThe recovery process consists of the following steps:Re...
1. Retrieving the Admin DB backup image from archive.2. Recreating the Admin DB using sddb6i ns or manually.
Retrieving the Admin DB Backup Image from Archive (TSM, CustomerScript or Tape)
A copy of the latest Admin DB safety copy export archive file(admi nDB. <t i mest amp>. SAR) should be located in subdirectory<DB2DB6_TEMP_DI R>/ admi nDB_<DBSI D>. If this file is available, you do not need torecover the Admin DB backup image from storage and you can continue with “Recreating the Admin DB” described further below in this section.
• TSM:
If the database log files were archived to TSM, Admin DB backup images are alsostored there. To find the most recent file, it may be necessary to retrieve several or allSAR files from TSM. If you specify admi nDB. *. SAR as the file pattern, all safety fileswill be retrieved. If you specify a part of the timestamp in the file pattern, the number offiles is reduced. You can restore the SAR file from TSM using the following command:
brrestore –d tsm –ex <file pattern> -out
• Customer script:
If the database logs were archived using a customer script, Admin DB backup imagesare also stored using a customer script. You need to restore the SAR file manually fromwhere the customer script has stored it.
• Tape: If database safety copies (and log files) are archived to tape, restore the safety file ofthe Admin DB from the current tape to the current working directory using the followingcommand:
brrestore –d tape –ex <file pattern> -t <non rewind addr> -out
<non rewi nd addr>is the non-rewind address of the tape for restoring fromtape. For more information about non-rewind addresses, see brrestore – LogFile Retrieval Tool [Page 163].
You can use the pattern admi nDB. 20000626*. SAR to retrieve all safety filesof the Admin DB archived on August 26, 2000. This pattern reduces the numberof log files that are to be retrieved. To retrieve the above mentioned safety file(s)to the current working directory, enter the following command:
For TSM:
brrestore –d tsm –out –ex “adminDB.20000626*.SAR“
For tape:
brrestore –d tape –out –ex “adminDB.20000626*.SAR“

7/18/2019 SAP DB2 Administration Guide
http://slidepdf.com/reader/full/sap-db2-administration-guide-56d69bf9cdc08 155/230
July 2006 155
Recreating the Admin DB
The Admin DB can be recreated either using program sddb6i ns or manually.
Recreating the Admin DB Using Program sddb6ins1. Log on to the database server:
On UNIX:
As user <sapsi d>admand switch to user r oot (su root ).
On Windows:
As user <sapsi d>adm.
2. Create the Admin DB using sddb6i ns. To do so, enter the following command:
sddb6ins –r <file name>
sddb6ins –r adminDB.20000626123504.SAR
This command performs the following actions:
• It creates the Admin DB.
• It extracts SAR file.
• It imports I XF files from SAR file.
• It adds backups, which were made after the SAR file has been created, tothe Admin DB.
• It adds log files from l og_ar chi ve that are not known to the Admin DB to
the Admin DB. The reason is that these log files are moved to l og_ar chi ve after the SAR file has been created.
Recreating the Admin DB Manually
1. To recreate the Admin DB step-by-step from the SAR file, enter the following command:
On UNIX:
a. Log on as user <sapsi d>admand switch to user r oot using the followingcommand:
su root
b. As user r oot , enter the following command:
sddb6ins –I
On Windows:
Log on to your database server as user <sapsi d>admand enter the followingcommand:
sddb6ins –i –db2dbnamepwd <password of user db2<dbsid>>
2. Extract the SAR file using the following command:
SAPCAR –xvf adminDB.<timestamp>.SAR
3. Import I XF files using the db2move tool.

7/18/2019 SAP DB2 Administration Guide
http://slidepdf.com/reader/full/sap-db2-administration-guide-56d69bf9cdc08 156/230
156 July 2006
4. To import the original data, call db2move as user <sapsi d>admfrom the directorywhere the archive was unpacked. db2move is located in the DB2 directory mi sc. Enter the following command:
db2move ADM<DBSID> IMPORT –io INSERT_UPDATE
This command performs the following actions:
Backups that were made after the SAR file was created are added to the AdminDB (brarchi ve –q backups –out ).
Log files that are not known to the Admin DB are added from l og_ar chi ve tothe Admin DB. The reason is that these log files are moved to l og_ar chi ve after the SAR file has been created (brarchi ve –GAL add –out ).
The output of the db2move command can be as follows:
I MPORT: - Rows r ead: 2109; –Rows commi t t ed; 2109 Tabl e:SAPR3. DB6I DENTI FI ER
I MPORT: - Rows r ead: 19; –Rows commi t t ed; 19 Tabl e:SAPR3. DB6CONFI G
I MPORT: - Rows r ead: 774; –Rows commi t t ed; 774 Tabl e:SAPR3. DB6LOGFI LE
I MPORT: - Rows r ead: 1774; –Rows commi t t ed; 1774 Tabl e:SAPR3. DB6LFSTATE
All errors and warnings are recorded in the table-specific message files namedt ab?. msg.
As a result, backups that are made after the SAR file has been created are
added to the Admin DB using the following command: brarchive –q backups –out
Tool db2move also adds log files that are not known to the Admin DB froml og_ar chi ve to the Admin DB using the following command: brarchive –GAL add –out. The reason is that these log files are moved to
l og_ar chi ve after the SAR file has been created.

7/18/2019 SAP DB2 Administration Guide
http://slidepdf.com/reader/full/sap-db2-administration-guide-56d69bf9cdc08 157/230
July 2006 157
Appendix A: Tool Command LineParameters
brarchive - Log File Archive Tool

7/18/2019 SAP DB2 Administration Guide
http://slidepdf.com/reader/full/sap-db2-administration-guide-56d69bf9cdc08 158/230
158 July 2006
Command Parameter Actions
Parameter Action
- h
- hel p
Displays the application command line syntax.
- V
- Ver si on
Displays the application information and library versioninformation if - d is specified.
- do Deletes obsolete files.
-d t Deletes tape with label volume from the Admin DB.For tape, also specify –v.
You use this option if the tape is lost or is physicallydamaged.
- i <subcommand>
- i ni t i al i ze . . .
<subcommand>can be replaced by one of thefollowing:
• show
Displays the tape volume name (default).
• set
Re-initializes the old archive tape.
• force Initializes the new tape or re-initializes the old tapecontaining the active log files.
- s Stores log file(s). For tape, also specify –v and –t .Files are not deleted on disk after they are archived.
- sd Stores and deletes log file(s). For tape, also specify –vand –t . Successfully archived files are deleted fromdisk.
-ss Stores each log file twice to backend. For tape, alsospecify –v and –t . Files are not deleted on disk afterthey are archived.
- ssd Tape only:Same as –ss action but removes original copies fromdisk.
- ds Deletes stored log file(s). Removes original copies
from disk.- q <t ype>
- quer y <t ype>
<t ype>can be replaced by one of the following:
• backupsDisplays the timestamps of all known backups.
• checkDisplays detailed information about a tape. Similarto- i show

7/18/2019 SAP DB2 Administration Guide
http://slidepdf.com/reader/full/sap-db2-administration-guide-56d69bf9cdc08 159/230
July 2006 159
Command Parameter Modifiers
Modifier Description
- d <devi ce>
- devi ce <devi ce>
Device to archive files to retrieve files from tape,tsm or any other backend using a customerscript. -d tsmcan be followed by a single TSMmanagement class or by two TSM managementclasses separated by ‘+‘.
- DEB [ <l evel >] Switches on trace. <l evel >is a value between1 (low detail) and 9 (high detail). However, thetrace is normally turned on in thei ni t <DBSI D>. db6 file.
- one No automatic tape eject after successful archiveoperation
- outDisplays the protocol on the command line(st dout ).
Without this parameter no output isdisplayed except - h and - V.
- n <number >
- number <number >
Maximum number of log files to process. Theoldest files are processed first. The numericalargument does not refer to a log file number.
- node NODExxxx
- node ALL
Node on which to perform processing or allnodes on which to perform processing. The
default value is NODE0000.
- node ALL cannot be used with allactions. This parameter is onlyrequired with multi-partitionedsystems.
- si d <SAPSI D> SAP system ID to which the operation applies
- t <devi ce>[ <dev2>]
- t ape_devi ce . . .
Tape only:
Tape device(s), for example, / dev/ r mt / 0 onSolaris. Two arguments are required for - ss and
–ssd.
- v <vol ume>[ <vol 2>]
- vol ume . . .
Tape only:
Volume name(s) on tape(s). Two arguments arerequired for - ss and –ssd.
- vndl i b <l i b> File name (including path) of the vendor library toload
br ar chi ve and brrestore only automatically display output with - h and - V.To display the output for other actions, - out must be specified.

7/18/2019 SAP DB2 Administration Guide
http://slidepdf.com/reader/full/sap-db2-administration-guide-56d69bf9cdc08 160/230
160 July 2006
brdb6brt - Redirected Restore Toolbrdb6brt runs in the following four modes:
• Backup/retrieve
• Check
• Tool information
The following sections provide syntax examples of each mode.
Backup/Retrieve Mode
To create a backup or a restore script, use the following syntax:
Command Parameter:
Parameter Description
- V Displays the version information (patch level) brdb6brt .
- h Displays an overview of the command line options ofbrdb6brt .
- bm BACKUP Creates a backup of the specified database only.
- bmRETRI EVE Creates the restore script for the specified database only.

7/18/2019 SAP DB2 Administration Guide
http://slidepdf.com/reader/full/sap-db2-administration-guide-56d69bf9cdc08 161/230
July 2006 161
- bm BOTH Creates a backup of and the restore script for the specifieddatabase.
- bmRETRI EVERELOCATE Creates the relocate script for the specified database.
- s <Sour ceDB> Name of the database for which the backup and/or restorescript should be created
- pp <Prot ocol Pat h> Directory where the protocol file for the brdb6brt run willbe written to. The default value is the working directory. Theprotocol file is named <SourceDB>. br p or<Sour ceDB>_NODE<NodeNumber >. br p in a multi-partitioned environment.
- i <Scr i pt Pat h> Directory where the restore script will be written to. Thedefault value is the working directory. The restore script is
named <SourceDB>. scr or<Sour ceDB>_NODE<NodeNumber >scr in a multi-partitioned environment.
- nb<Number Of Buf f er s>
Number of buffers reserved for the execution of the backup.The default value is 2.
- bs <Buf f erSi ze> Size of the buffer for the backup operation, in 4 KBallocation units. The default value is 1024.
- es The restore script is created for experts, that is, onlycomments that are really needed are included.
- ol Backup operation is done online.
- t s <Ti mest amp> Only used in retrieve mode. If specified, the timestamp inthe restore script is set to this value which must be in theform YYYYMMDDhhmmss. The default value is the currentdate and time.
- r epl ace<Repl aceDef i ni t i on>
With this option you replace strings in the generated scriptsfor redirected restore and relocate. ParameterRepl aceDef i ni t i on must have the format <or i g.st r i ng 1>=<r epl . st r i ng 1>, <or i g. st r i ng1>=<r epl . st r i ng 2>, …. This option only makes sensefor –bmRETRI EVE, - bm BOTH and –bm RETRI EVERELOCATE.
- paral l el i sm<degr ee> Allows you to specify the parallelism degree for backup andredirected restore operations.
- nn <NodeNr>
- nn ALL
In a multi-partitioned environment the backup operation isdone against this node. The restore script is specific for thisnode and is named<Sour ceDB>_NODE<NodeNumber >. scr .
To address all nodes in one run, use option –nn ALL.
- bpt <Devi ce> To back up the database to tape, specify a valid tapedevice. You can split the backup into multiple pieces byspecifying multiple devices separated by blanks.

7/18/2019 SAP DB2 Administration Guide
http://slidepdf.com/reader/full/sap-db2-administration-guide-56d69bf9cdc08 162/230
162 July 2006
- bpt <Di r ectory> To back up the database to a directory, specify a validdirectory. Make sure it has sufficient space to hold thebackup volume. It is possible to split the backup intomultiple pieces by specifying multiple directories separated
by blanks.- bpt TSM[ <NumberOf Sessi ons>]
With this option you back up the database into TSM. SpecifyNumberOf Sessi ons for the TSM connection.
- bpt XBSA[ <NumberOf Sessi ons>]
With this option you back up the database into an XBSA-compliant storage management system. SpecifyNumberOf Sessi ons for the XBSA connection. This featurecan only be used on DB2 V8.
- bpt VENDOR<Li bName>
[ <NumberOf Sessi ons>]
With this option you use a third party shared library toperform the backup operation. Specify the library asLi bName and optionally the NumberOf Sessi ons.
- t bs <Tabl espace> If this option is not specified, a full database backup isperformed. However, you may choose to back up only oneor more tablespaces of the database. To do so, specify thetablespaces separated by blanks. The restore script iscreated only for the specified tablespaces.
- user <User name> To perform the whole operation of brdb6brt as anotheruser, you can specify the user name here.
- usi ng <Password> Password for the specified user

7/18/2019 SAP DB2 Administration Guide
http://slidepdf.com/reader/full/sap-db2-administration-guide-56d69bf9cdc08 163/230
July 2006 163
Check Mode
Use this syntax to check whether a given restore script would succeed on this machine. Theuser who performs the check mode should be the instance owner of the database instance.
The terminal output of the check run is written to a protocol file in the current directory. Thename of the protocol file is <Sour ceDB>. chk or <Sour ceDB>_NODE<NodeNumber >. chk depending on the specified script name.
Command Parameters
Parameter Description
- bm CHECK Checks whether a given restore script would succeed on
this machine- i p <Scr i pt Name> Name of the restore script to be checked on this machine.
By default, the restore script is named <SourceDB>. scr or <Sour ceDB>_NODE<NodeNumber >. scr in a multi-partitioned environment.
- nn <NodeNr> In a multi-partitioned environment the check operation isdone against this node.
- user <User name> To perform the database dependent checking of the checkmode as another user, you can specify the user namehere.
- usi ng <Passwor d> Password for the specified user
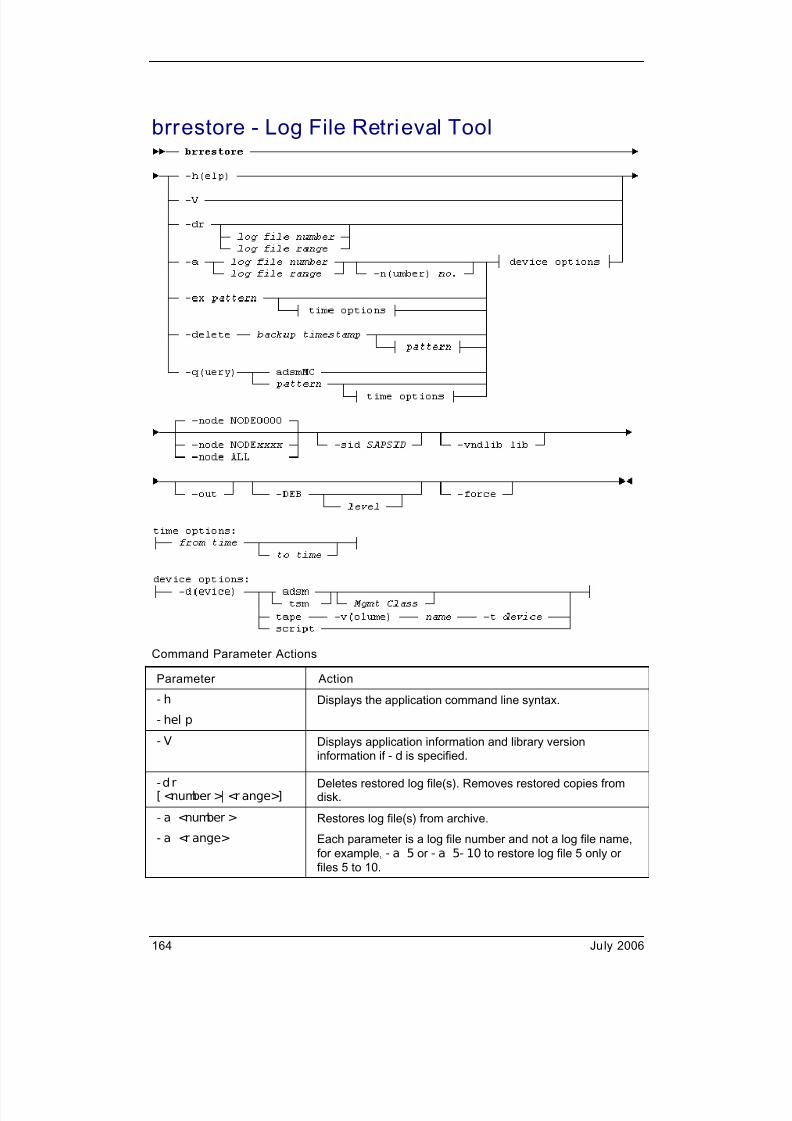
7/18/2019 SAP DB2 Administration Guide
http://slidepdf.com/reader/full/sap-db2-administration-guide-56d69bf9cdc08 164/230
164 July 2006
brrestore - Log File Retrieval Tool
Command Parameter Actions
Parameter Action
- h- hel p
Displays the application command line syntax.
- V Displays application information and library versioninformation if - d is specified.
-dr[ <number >| <r ange>]
Deletes restored log file(s). Removes restored copies fromdisk.
- a <number >
- a <r ange>
Restores log file(s) from archive.
Each parameter is a log file number and not a log file name,for example, - a 5 or - a 5- 10 to restore log file 5 only orfiles 5 to 10.

7/18/2019 SAP DB2 Administration Guide
http://slidepdf.com/reader/full/sap-db2-administration-guide-56d69bf9cdc08 165/230
July 2006 165
- ex <pat t ern> Performs emergency restore of log files when the Admin DBis not available.
Tape argument - t must refer to a non-rewind device. Non-rewind address examples are described under “Non-RewindTape Device Addresses” later in this section.
- del et e <t i mest amp>[ <pat t ern>]
Deletes all known log files in an archive (TSM only) olderthan the given backup timestamp t s. An additional (optional)file pattern can be specified to force all matching files olderthan the timestamp to be deleted, even if they are not knownto the Admin DB. If you want to specify a timestamp that isnot a backup timestamp, you need to specify the –force option in addition.
- q <t ype>
- quer y <t ype>
<t ype>can be replaced by one of the following:
• adsmMC Displays known TSM management classes.
• <pattern> Requests a list of log files matching the given file patternon the TSM server, for example, –q "* . LOG" (TSMonly).
- f orce Currently only used in conjunction with –del et e t s- .
Command Parameter Modifiers
Modifier Description
- d <devi ce>
- devi ce <devi ce>
Device to archive files to retrieve files from tape, TSM orany other backend using a customer script. - d t smcanbe followed by an TSM management class
- DEB [ <l evel >] Switches on trace. l evel is a value between 1 (lowdetail) and 9 (high detail). However, the trace is normallyturned on in the i ni t <DBSI D>. db6 file.
- one No automatic tape eject after successful archiveoperation
- out Displays the protocol on the command line (st dout ).
Without this parameter no output is displayedexcept - h and - V.
- n <number >
- number <number >
Maximum number of log files to process. The oldest filesare processed first. The numerical argument does not refer to a log file number.

7/18/2019 SAP DB2 Administration Guide
http://slidepdf.com/reader/full/sap-db2-administration-guide-56d69bf9cdc08 166/230
166 July 2006
- node NODExxxx
- node ALL
Node on which to perform processing. The default valueis NODE0000 or ALL nodes.
- node ALL cannot be used with all actions.This parameter is only required with multi-partitioned systems.
- si d <SAPSI D> SAP system ID to which the operation applies
- t <devi ceaddr ess>
- t ape_devi ce
Tape device, for example, / dev/ r mt / 0 on Solaris.
brrestore can only access one tape a time.
- v <vol ume>
- vol ume
Volume name on tape.
brrestore can only access one tape at a time.- vndl i b <l i b> File name (including path) of the vendor library to load
br ar chi ve and brrestore only automatically display output with - h and - V.To display output for other actions, - out must be specified
Non-Rewind Tape Device Addresses
This form of the addresses is only required for emergency restore (- ex). With the exceptionof AIX, it is formed by adding an "n" to the standard (rewind) address:
• Windows: / dev/ nmt 0
• AIX: /dev/ r mt 0. 1
• Solaris: /dev/ r mt / 0n
• Linux: / dev/ nst 0
• HP-UX: / dev/ r mt / 0mn
If you have more than one tape device to address, replace the “0” with “1”, “2”
and so on as appropriate. For example, the non-rewind address of the secondtape on Solaris is / dev/ r mt / 1n.

7/18/2019 SAP DB2 Administration Guide
http://slidepdf.com/reader/full/sap-db2-administration-guide-56d69bf9cdc08 167/230
July 2006 167
db2uext2 - DB2 User Exit
Wrong usage of this function can make database backups unusable.
The user exit is normally only called by the database engine. The syntaxdescription here is only for qualified SAP support personnel and administratorswho have been explicitly instructed to perform an action involving the User Exitby SAP support.
Unlike the other programs described here, the User Exit parameters allow no spaces before their arguments.
The - SP and - LS parameters are only used if a raw device is used for logging.
DB2 Parameters Passed to the User Exit Program
Parameter Description
- OS<os> Platform on which the instance is running, for example, AIX,Windows, Solaris, HP-UX and Windows 98
- RL<db2rel > DB2 release level
- RQ<r equest > Request type, for example, archive or retrieve
- DB<dbname> Database name
- NN<nodenum> Local node number
- LP<l ogpat h> Fully qualified path to the log files. The path must contain thetrailing path separator.
- LN<l og name> File name of the log file
- AP<TSMpasswd> TSM password. It is passed to the User Exit if it is providedin the database configuration.
- SP<st ar t page> Log extent starts at this number in steps of 4 KB pages ofthe device.
- LS<l ogsi ze> Size of the log extent in 4 KB pages
- V Displays the version information of the db2uext 2 tool

7/18/2019 SAP DB2 Administration Guide
http://slidepdf.com/reader/full/sap-db2-administration-guide-56d69bf9cdc08 168/230
168 July 2006
db6adutl - SAP TSM Management Tool
Parameter Description
QUERY Queries the TSM server for log files.
EXTRACT Copies log files from the TSM server to the currentdirectory on the local machine.
DELETE Either deactivates log files or deletes log files on theTSM server.
ARCHI VE Performs action for log files in TSM archive copy group.
BACKUP Performs action for log files in TSM backup copy group.
BOTH Performs action for log files in TSM archive and backupcopy group.
BETWEEN <sn1> AND<sn2>
Specifies that the logs between log sequence number 1 and log sequence number 2 are to be used.
DB <dbname> Considers only those objects associated with the
specified database name.NODE <n> Considers only those objects created by the specified
node number.
WI THOUT PROMPTI NG The user is not prompted for verification before objectsare deleted.
Archived Admin DB safety files (admi nDB. <t i mest amp>. SAR) should bedeleted using brrestore before changing from indirect archiving to directUser Exit archiving.
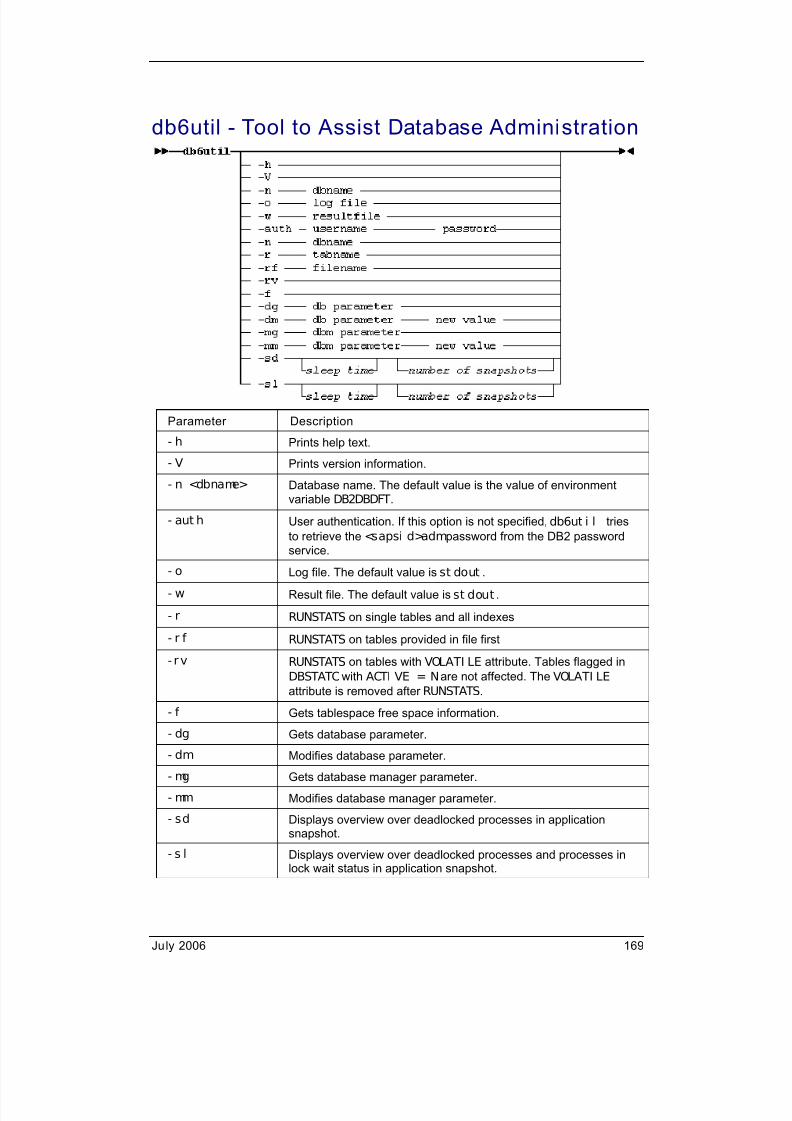
7/18/2019 SAP DB2 Administration Guide
http://slidepdf.com/reader/full/sap-db2-administration-guide-56d69bf9cdc08 169/230
July 2006 169
db6util - Tool to Assist Database Administration
Parameter Description
- h Prints help text.
- V Prints version information.
- n <dbname> Database name. The default value is the value of environmentvariable DB2DBDFT.
- aut h User authentication. If this option is not specified,db6ut i l
tries
to retrieve the <sapsi d>admpassword from the DB2 passwordservice.
- o Log file. The default value is st dout .
- w Result file. The default value is st dout .
- r RUNSTATS on single tables and all indexes
- r f RUNSTATS on tables provided in file first
- rv RUNSTATS on tables with VOLATI LE attribute. Tables flagged inDBSTATC with ACTI VE = N are not affected. The VOLATI LE attribute is removed after RUNSTATS.
- f Gets tablespace free space information.
- dg Gets database parameter.
- dm Modifies database parameter.
- mg Gets database manager parameter.
- mm Modifies database manager parameter.
- sd Displays overview over deadlocked processes in applicationsnapshot.
- s l Displays overview over deadlocked processes and processes inlock wait status in application snapshot.

7/18/2019 SAP DB2 Administration Guide
http://slidepdf.com/reader/full/sap-db2-administration-guide-56d69bf9cdc08 170/230
170 July 2006
dmdb6bkp - Database Backup Tool
Command Parameters
Parameter Description
<dbName> Specifies the SAP database name <DBSI D>.NODExxxx Partition number, for example, NODE0002
ONLI NE | OFFLI NE Specifies online or offline backup mode.
ADSM OPEN <num> SESSI ONS Number of I/O sessions to be used with TSM
TSM OPEN <num> SESSI ONS Identical to the –ADSM opt i on
TO <t ar getAr ea> Lists directory or tape device names.
XBSA <vendor Li brar y> Name of shared library that is compliant with theXBSA standard, whichcontains the vendor backupI/O functions
LOAD <vendor Li brar y>OPEN <num> SESSI ONS Name of shared library containing the vendor backupI/O functions and the number of I/O sessions to beused
BUFFERS <num> Number of buffers to be used
BUFFERSI ZE <si ze> Size, in pages, of the buffer used when building thebackup image. The default value is 1024.
PARALLELI SM <p> Number of buffer manipulators to be spawned duringthe backup process. The default value is 1.

7/18/2019 SAP DB2 Administration Guide
http://slidepdf.com/reader/full/sap-db2-administration-guide-56d69bf9cdc08 171/230
July 2006 171
I NCREMENTAL Specifies a cumulative backup image. The backupincludes all database data that has changed sincethe most recent successful full backup. –
I NCREMENTAL DELTA Specifies a non-cumulative backup image. Thebackup includes all database data that has changedsince the most recent successful backup of any type.
COMPRESS Indicates,that a backup should be compressed.
COMPRLI B- name Indicates the name of the library to be used toperform the compression (fully qualified path). If thisparameter is not set, the default DB2 compressionlibrary is used.
EXCLUDE Indicates that the compression library will not bestored in the backup.
COMPROPTS Describes a block of binary data that will be passedto the initialization routine of the compression library.
UTI L_I MPACT_PRI ORI TY Specifies, that the backup will run in throttled mode,with the priority specified. Throttling allows to controlthe impact of the backup operation on the databaseperformance
I NCLUDE LOGS Specifies that the backup image should include therange of log files that are required to restore androllforward the backup image to some consistentpoint in time.
You cannot use this option for an offlinebackup.
EXCLUDE LOGS Specifies that the backup image does not includeany database transaction log files. By default, this isoption is set.

7/18/2019 SAP DB2 Administration Guide
http://slidepdf.com/reader/full/sap-db2-administration-guide-56d69bf9cdc08 172/230
172 July 2006
dmdb6srp - Update Statistics Tool
Command Parameters
Parameter Description- V Prints out the version information (patch level) of
dmdb6sr p
- h Prints out an overview of the command lineoptions of dmdb6sr p
- n <dbsi d> Specifies the SAP database name <DBSI D>.
- t ALL Performs the operation on all database tables.
- t DBSTAT Performs the operation on all selected DBSTATC tables.
- t CALL Calculates REORGCHK information about alldatabase tables with current statistics.
- t <t abschema>. <t abname> Table name, for example, SAPR3. MONI
- m <st at i st i cal Opt i on> To use a statistical option, specify one of thefollowing letters:
• Y Basic table and extended index statisticsThis is the default value.
• B Basic table and basic index statistics.
• T Basic table and no index statistics
• A Distributed table and extended indexstatistics
• E Distributed table and basic index statistics
• D Distributed table and no index statistics
• I Basic Index and no table statistics
• X Extended Index and no table statistics

7/18/2019 SAP DB2 Administration Guide
http://slidepdf.com/reader/full/sap-db2-administration-guide-56d69bf9cdc08 173/230
July 2006 173
- z <maxRunt i me> Maximum amount of time (in minutes) for theexecution of the program. The default value is300 minutes.
- P Does NOT write protocol data to CCMS protocoltables
- I Ignores column dbstatc-ameth – In case youperform a RUNSTATS for a single table, you canoverride the DBSTATC entry for the analysismethod for the specific table. Without the –Iparameter, a given –m analysis method wouldhave no effect.
- l <l ongFi el dTi meFrame> Maximum amount of time (in minutes) spent onthe calculation of the size of long fields. Thedefault value is 3 minutes.
dmdb6rts - Table Reorganization Tool
Command Parameters
Parameter Description
- V Prints out the version information (patch level)
dmdb6rts- h Prints out an overview of the command line options for
the tool dmdb6rts
- n <dbName> Specifies the SAP database name <DBSI D>.
- t <t abl espace> Specifies the name of the tablespace that contains thetables to be reorganized.
- m<t empTabl espace>
Specifies the name of the tablespace where the DB2Database Manager can temporarily store the tablebeing reconstructed.
The page size must match the page size of the
tablespace specified with the –t switch.

7/18/2019 SAP DB2 Administration Guide
http://slidepdf.com/reader/full/sap-db2-administration-guide-56d69bf9cdc08 174/230
174 July 2006
sddb6ins - Admin Tools Installation Program
On UNIX, sddb6i ns must always be called with r oot authorization but with theuser environment for user db2<dbsi d>as described in Installation and Setup[Page 41].
Command Parameters
Parameter Description
- h Prints the usage of sddb6i ns.
- V Prints the version of sddb6i ns.
- i [ <t ar get r el ease>] Installs the Admin Tools. The default value of<t arget r el ease>is the release of
sddb6i ns.
- u <st art SAP rel ease>[ <t ar get r el ease>]
Upgrades the Admin Tools. <st ar tr el ease>indicates the release of the alreadyinstalled Admin Tools (for example, 46D). Thedefault value of <t ar get r el ease>is thedefault release of sddb6i ns.
- d Deinstalls the Admin Tools
- r [ <admi nDB backup i mage>] Recreates the Admin DB using the Admin DBbackup SAR file.
- checkonl y [ <t ar get r el ease>] Checks if the Admin Tools are installed
correctly. The default value of <t argetr el ease>is the release of sddb6i ns.

7/18/2019 SAP DB2 Administration Guide
http://slidepdf.com/reader/full/sap-db2-administration-guide-56d69bf9cdc08 175/230
July 2006 175
[ - db2dbnamepwd <pwd>][ - si dadmpwd <pwd>]
Windows only: [ - db2dbnamedomai n <domai n>][ - si dadmdomai n <domai n>]
All of these parameters have useful defaultvalues, except - db2dbnamepwd <pwd>. Thefollowing default values apply:
• The value of the USERDOMAI N environmentvariable is the default value for <domai n>.
• The value for - si dadmpwd <pwd>is readfrom the dscdb6up password file.
For the installation of the 6.NN Admin Tools onWindows, the - db2dbnamepwd <pwd> ismandatory.
- s <SAPSI D> Specifies the SAP system ID. The value of theSAPSYSTEMNAME environment variable is thedefault value for <SAPSI D>.
- DEB [ <l evel >] Activates the tracing facility. The detail level canbe specified using <l evel >. <l evel >can bebetween 1 and 9. The default value is 3. Thevalue 9 means "very detailed".
- NOADMDB The Admin DB is not needed because log filesare archived directly to the vendor storageproduct by the User Exit program.

7/18/2019 SAP DB2 Administration Guide
http://slidepdf.com/reader/full/sap-db2-administration-guide-56d69bf9cdc08 176/230
176 July 2006
sddb6mir - Admin DB Creation and Mirror ToolUtility
Command Parameters
Parameter Description
- V Prints out the version information (patch level) of sddb6mi r
- h Prints out an overview of the command line options of sddb6mi r
- m Mirrors the Admin DB ADM<DBSI D>to the SAP database<DBSI D>.
- DEB[ <l evel >]
Activates the tracing facility. The detail level can be specified using<l evel >. <l evel >can be between 1 and 9. The default value is3. The value 9 means “very detailed”.

7/18/2019 SAP DB2 Administration Guide
http://slidepdf.com/reader/full/sap-db2-administration-guide-56d69bf9cdc08 177/230
July 2006 177
Appendix B: Troubleshooting
DB2 TracesThe DB2 software provides several trace facilities to track down a variety of problemcategories that might occur when running or developing DB2 applications.
The decision to run a trace must be carefully met. The following facts should be taken intoconsideration:
• In most cases, system performance will decrease.
• It is a time-consuming task.
• The amount of trace data can be enormously large. For this reason, it is essential to
find the smallest possible scenario that reproduces the problem. It might be necessaryto drill down, or even stop other activities while recreating the problem situation with thetrace turned on.
• Interpreting trace data properly requires detailed low-level knowledge of DB2. For thisreason, traces are usually only run at the request of DB2 support.
• Problem situations that have been observed might disappear during attempts toreproduce them with the trace turned on.
All DB2 traces are documented in the Troubleshooting Guide of the DB2 OnlineDocumentation delivered with the software.
DB2 Trace Facil ity db2trc
The DB2 trace, controlled by the command db2t r c, traces events. It must be run by the DB2instance owner on the database server. To get an overview of the available options, run thecommand with no options.
When turned on, options for the location of trace data are:
• In shared memory
For this, the amount of memory available for tracing is limited by the amount ofavailable shared memory. In many cases, this reduces the duration of the trace to a
few minutes. Once the problem has been traced, trace data first needs to be dumpedbefore the trace is turned off.
• In a file
This severely affects performance. Given the number of activities in an SAPenvironment, DB2 will probably come to a standstill.
To get the trace into readable form, trace data needs to be formatted on the system the tracewas taken on.
7/18/2019 SAP DB2 Administration Guide
http://slidepdf.com/reader/full/sap-db2-administration-guide-56d69bf9cdc08 178/230
178 July 2006
Usually, the sequence of activities using this kind of trace is as follows:...
1. To store trace data in a preallocated buffer of size <memor y>in shared memory, turnthe trace on by entering the following command:
db2trc on –l <memory> -s
2. Reproduce the problem.
3. Dump the trace data to a file named, for example db2t r c. dmp, by entering thefollowing command:
db2trc dmp db2trc.dmp
4. Turn off the trace by entering the following command:
db2trc off
5. Format the trace into two files, db2t r c. f mt and db2tr c. f l wby entering thefollowing command:
db2trc fmt db2trc.dmp db2trc.fmtdb2trc flw db2trc.dmp db2trc.flw
While formatting, the output is written to the screen. If the output mentions that the trace haswrapped, the amount of memory reserved for trace data was insufficient and the trace mightnot be useful. The trace needs to be repeated with a larger amount of memory. Typicalvalues to start with are 20000000 or 40000000 (20 or 40 million bytes).
DB2 CLI Trace
The DB2 CLI trace traces all activities of the Call Level Interface (CLI), that is, the SQLinterface of DB2. It is run on the machine running the DB2 application program. It is activatedfor an application process when the trace is turned on or the process connects to thedatabase. There is no option to activate the trace for a process while it is being connected tothe database.
Procedure...
1. To turn the DB2 CLI trace on or off, log on as DB2 instance owner.
2. To activate the trace, parameter TRACE in the CLI configuration needs to be set to 1.To do so for all databases in a DB2 instance, enter the following command:
db2 update cli cfg for section common using trace 1
3. To de-activate the trace, enter the following command:
db2 update cli cfg for section common using trace 0
4. To configure the trace, several parameters can be set. Enter the following command:
db2 update cli cfg for section common using <parameter> <value>
5. To verify the current settings, enter the following command:
db2 get cli cfg

7/18/2019 SAP DB2 Administration Guide
http://slidepdf.com/reader/full/sap-db2-administration-guide-56d69bf9cdc08 179/230
July 2006 179
Examples of Available Parameters
Parameter Description
TRACEFI LENAME <f i l e> Path of the file containing all trace data
TRACEPATHNAME <path> Directory to store trace files, one perprocess
TRACEFLUSH 0| 1 If this parameter is set to 1 it forces a writeto disk for each entry.
Admin Tools TracesYou can activate all tracing activities of most SAP DB2 kernel tools using variable settings in
environment file i ni t <DBSI D>. db6. This environment file is located in the$I NSTHOME/ admi nt ool s directory (UNIX) or on the environment settings (Windows, alsoRegistry settings). Each component of the Admin Tools can be traced separately.
The trace output is intended for experienced support personnel and theapplication developers. There are often several items that appear to be errors,but are acceptable under certain conditions.
Environment Variables
Environment Variable Values
DB2DB6_TRC_<TOOL> ON or OFF Default value: OFF
For example: DB2DB6_TRC_DB2UEXT2=ON
DB2DB6_TRC_<TOOL>_LEVEL Default value: 2
1 ErrorsError tracing
2 FootprintFunction internal info
3 DEV: Development trace
DB2DB6_TRC_<TOOL>_PATH Any path where db2<dbsi d>has write access.For example:
DB2DB6_TRC_DB2UEXT2_PATH/ db2/ PRD/ admi nt ool s/ TraceFi l es
DB2DB6_TRC_<TOOL>_FI LE A fixed name for the file to be used for all traces, which isoverwritten by each new trace. This should normally be left unsetto use the default behavior of creating one file per trace.
In the table above, <TOOL>is DB2UEXT2, BRARCHI VE, BRRESTORE,SDDB6J DS, or BRDB6BRT.

7/18/2019 SAP DB2 Administration Guide
http://slidepdf.com/reader/full/sap-db2-administration-guide-56d69bf9cdc08 180/230
180 July 2006
You can control br ar chi ve and brrestore tracing using the command line option –DEB,which overrides the environment, or an optional trace level and trace directory. The tracelevel can have a value between 0 and 9.
Tracing of sddb6i ns can only be activated using the command line option- DEB. You can neither use the environment nor the i ni file.
Default Trace File Names
Admin Tools File Names
DB2 administration server sddb6j ds. <t i mest amp>. t r c
DB2 User Exit db2uext 2. <t i mest amp>. t r c
Log file management br archi ve. <t i mest amp>. t r cbr r est or e. <t i mest amp>. t r c
Data collector dmdb6rdi . <t i mest amp>. t r c
Update statistics dmdb6sr p. <t i mest amp>. t r c
Redirected restore br db6brt . <t i mest amp>. t r c
Backup tool dmdb6bkp. <t i mest amp>. t r c
DB6CLP (command line processor) db6cl p. <t i mest amp>. t r c
The default trace file directories are:
• UNIX: $INSTHOME/admintools/TraceFiles
• Windows: %INSTHOME%\admintools\TraceFiles
Downloading Admin Tool Patches from SAP ServiceMarketplace
Ggf. Verweis auf Hinweis, in dem die DL parameter stehen … (BRITTA) Was is hier nochmalmit DL gemeint?
You can download the latest available versions of the Admin Tools from SAP ServiceMarketplace at service.sap.com/patches.
For 4.6D Admin Tools
• For 32 Bit
Choose SAP R/3 → SAP R/3 4.6C → Binary Patches → SAP KERNEL 4.6D → <Your OS> → DB2 UDB.
• For 64 Bit
Choose SAP R/3 → SAP R/3 4.6C → Binary Patches → SAP KERNEL 4.6D 64-BIT →
<Your OS> → DB2 UDB.

7/18/2019 SAP DB2 Administration Guide
http://slidepdf.com/reader/full/sap-db2-administration-guide-56d69bf9cdc08 181/230
July 2006 181
For 6.NN Admin Tools
• For 32 Bit
Choose SAP Web AS → SAP Web AS <Release> → Binary Patches → SAP KERNEL <Release> → <Your OS> → DB2 UDB.
• For 64 Bit
Choose SAP Web AS → SAP Web AS <Release> → Binary Patches → SAP KERNEL <Release> 64-BIT → <Your OS> → DB2 UDB.
There is no Unicode version of sddb6i ns. Therefore, you must use the non-Unicode version.
For brdb6brt , there is both a Unicode and a non-Unicode version.
The following table provides an overview of the files available:File Description
SAPCAR. CAR Contains the extraction tool SAPSAR(. exe).
DB6CCEXT_HW. SAR Contains the SAP DB2 Control Center Extensions.
sddb6i ns. CAR/ SAR Contains the installation program sddb6i ns(. exe).
dscdb6up. CAR UNIX only and only for SAP system Releases 4.6x
Keep in mind that HWstands for UNIX if the DB2 Control Center runs on UNIX,or I 386 if it runs on Windows.

7/18/2019 SAP DB2 Administration Guide
http://slidepdf.com/reader/full/sap-db2-administration-guide-56d69bf9cdc08 182/230
182 July 2006
Troubleshooting Admin Tools and ProgramsThe following section provides information and advice on how to proceed when problemsoccur.
General Troubleshooting CommentsMany recent customer problems were caused by problems with the runtime environment. Aninstallation may not have completed successfully, or a user inadvertently changed theenvironment. For example, an environment variable was changed or unset, or file or directoryauthorizations were changed. You can now check the runtime environment for the AdminTools by calling sddb6i ns –checkonl y.
Password file problems are also common. Use dscdb6up to resynchronize passwords. Fordetailed information, see Setting and Updating Passwords [Page 116]. Also, check that theoperating system user has not revoked users.
Problems with devices are a frequent issue. Older versions of the Admin Tools, that is, SAPsystem Release 3.1I, are not compatible with TSM. ADSM must be still used in this case.
Initializing tapes with non-default values, for example, with a different block size, will causeproblems if these values conflict with the parameters in those in the Admin DB. For moreinformation, see Changing the Admin Tools Configuration [Page 70].
If brrestore or br ar chi ve can not terminate properly, a lock file may be left behind.Running the tool again will cause an LFA158 error that will contain the path of the lock file.Ensure that neither br ar chi ve nor brrestore are running and delete the file.
Often, defects that you find have already been found and addressed. Downloading andinstalling the latest patch from SAP Service Marketplace will often resolve the problem. For
more information, see Downloading Admin Tool Patches from SAP Service Marketplace[Page 180] in this appendix.
Customers occasionally run out of disk space. Make sure that the DB2 protocol filedb2di ag. l og in the db2dump directory has not become too large. Running br ar chi ve willfree up space by removing log files from the archive directory. If the database cannot bestarted, it may be necessary to first temporarily move some log files out of the log directory toprovide space. It is important to choose only the most recent inactive files as the user exit andbr ar chi ve will move older files first. Make sure that files are no longer active before movingthem. As soon as enough space is available, when the User Exit has archived several files,br ar chi ve should then be called and the log files in temporary storage moved back to thelog directory.

7/18/2019 SAP DB2 Administration Guide
http://slidepdf.com/reader/full/sap-db2-administration-guide-56d69bf9cdc08 183/230
July 2006 183
Initial Troubleshooting StepsImplement the following steps until the problem is resolved....
1. Look in the protocol file for the error.2. Look up the meaning of the error message in this appendix.
3. Perform the suggested action.
4. If there is an SQL return code in the error message, look it up in the DB2 MessageReference and perform the recommended action.
5. Search SAP Notes for solutions to previous occurrences of this error.
6. Check SAP Service Marketplace at service.sap.com/patches for new patches.Download and install the latest patch version.
7. If not, run the installation tool with the - checkonl y option and check the output. Makeany appropriate adjustments to the runtime environment.
8. Switch on Admin Tool tracing. Run the action again. Create a message using SAPNet− R/3 Frontend. Upload the protocol and trace files, the protocol filei ni t <DBSI D>. db6, and any core file to the SAP server.
To ensure efficient troubleshooting, go through the above steps and gather as muchinformation as possible about the problem before contacting SAP support.
Installation (sddb6ins) Troubleshooting
Installation FailureIn general, if the installation or upgrade has not completed successfully, you can retry thisoperation without causing data loss. The following error can occur during the installation ofthe Admin Tools:
ErrorMessage
Error opening file <f i l e>with mode wb.
Reason File cannot be replaced because the executable or shared libraryis currently in use.
ActionRequired
Retry installation or upgrade operation.
Common Installation ProblemThe password file is inconsistent with the operating system; variable DB2DB6EKEY changed.The passwords given when installing the SAP system or using the dscdb6up utility mustmatch the operating system passwords for the same users. DB2DB6EKEY must have thesame value on all systems. By default, the value is based on the machine name, which isoften different on multi-node systems (DB2 UDB EEE V7 or DB2 UDB ESE V8 with multiplepartitions).
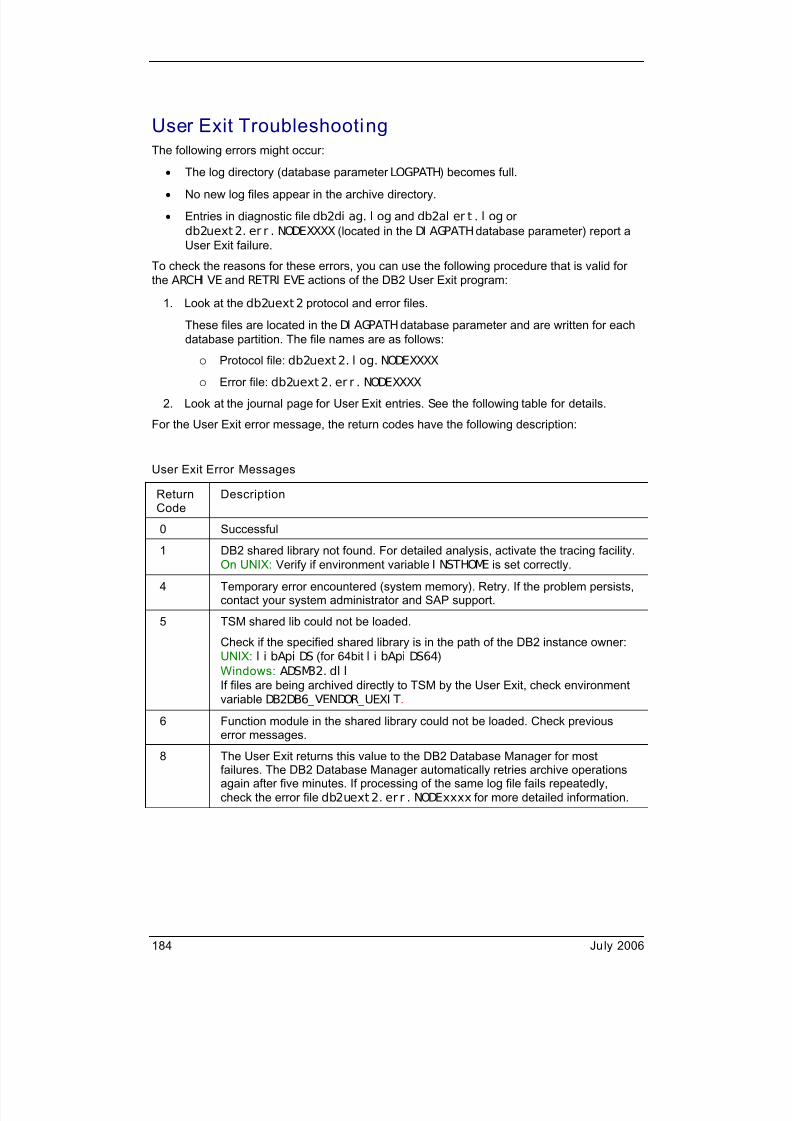
7/18/2019 SAP DB2 Administration Guide
http://slidepdf.com/reader/full/sap-db2-administration-guide-56d69bf9cdc08 184/230
184 July 2006
User Exit TroubleshootingThe following errors might occur:
• The log directory (database parameter LOGPATH) becomes full.• No new log files appear in the archive directory.
• Entries in diagnostic file db2di ag. l og and db2al er t . l og ordb2uext 2. er r . NODEXXXX (located in the DI AGPATH database parameter) report aUser Exit failure.
To check the reasons for these errors, you can use the following procedure that is valid forthe ARCHI VE and RETRI EVE actions of the DB2 User Exit program:...
1. Look at the db2uext 2 protocol and error files.
These files are located in the DI AGPATH database parameter and are written for eachdatabase partition. The file names are as follows:
Protocol file: db2uext 2. l og. NODEXXXX
Error file: db2uext 2. er r . NODEXXXX
2. Look at the journal page for User Exit entries. See the following table for details.
For the User Exit error message, the return codes have the following description:
User Exit Error Messages
ReturnCode
Description
0 Successful
1 DB2 shared library not found. For detailed analysis, activate the tracing facility.On UNIX: Verify if environment variable I NSTHOME is set correctly.
4 Temporary error encountered (system memory). Retry. If the problem persists,contact your system administrator and SAP support.
5 TSM shared lib could not be loaded.
Check if the specified shared library is in the path of the DB2 instance owner:UNIX: l i bApi DS (for 64bit l i bApi DS64)Windows: ADSM32. dl l If files are being archived directly to TSM by the User Exit, check environment
variable DB2DB6_VENDOR_UEXI T. 6 Function module in the shared library could not be loaded. Check previous
error messages.
8 The User Exit returns this value to the DB2 Database Manager for mostfailures. The DB2 Database Manager automatically retries archive operationsagain after five minutes. If processing of the same log file fails repeatedly,check the error file db2uext 2. er r . NODExxxx for more detailed information.

7/18/2019 SAP DB2 Administration Guide
http://slidepdf.com/reader/full/sap-db2-administration-guide-56d69bf9cdc08 185/230
July 2006 185
12 Hardware error
16 Error with the User Exit program or system function used by the program, for
example, signal handling). Retry. If the problem persists, contact SAP support.20 Error with one or more of the parameters passed to the User Exit program.
Check whether you are using a version of db2uext 2 that is compatible with thedatabase product release.
21 Invalid database parameter. This is an internal error that you must report toSAP support.
22 Invalid database manager parameter. This is an internal error that you mustreport to SAP support.
23 Admin DB access error. Contact SAP support.
24 The User Exit program was not found. This return code is recorded in the
db2di ag. l og. Check if program db2uext 2 is available in the followingdirectories:UNIX: $I NSTHOME/ sql l i b/ adm/
Windows: <DRI VE>: \ sql l i b\ bi n\
28 Failure of I/O
30 File I/O error. Accompanying message should contain the system error numberdefined in file er r no. h.
32 Operator or user terminated process
33 Operator or user terminated process
34 Copy of log file (archive or retrieve operation) failed
35 • Archive operations:
If the source is the log file to be archived by the DB2 User Exit, this is justa warning. The log file has probably been moved out of the online logdirectory. Make sure that the log file is still available. If not, you may haveproblems if a database recovery becomes necessary.
• Retrieve operations (ROLLFORWARD):
If the DB2 User Exit was called to retrieve log files, the log file could not befound in either the archive or the retrieve directory. Attempt to retrieve itusing brrestore. If the file does not exist (and never has existed) you
are finished and can perform ROLLFORWARD STOP. This is a safetyfeature to ensure that the ROLLFORWARD is not accidentally stopped whenlog files still exist that could be recovered using br ar chi ve. This isdeliberately different to the default (simplified) User Exits provided assource code together with DB2.
36 Opening file failed. Log file does not exist. Check error filedb2uext2. er r . NODExxxx for more detailed information.
Retrieve operations (ROLLFORWARD):This is not necessarily an error. Ensure that the file has never existed and thenperform ROLLFORWARD STOP.

7/18/2019 SAP DB2 Administration Guide
http://slidepdf.com/reader/full/sap-db2-administration-guide-56d69bf9cdc08 186/230
186 July 2006
37 Opening file failed. Check the messages and access authorizations. Checkerror file db2uext 2. er r . NODExxxx for more detailed information.
38 Reading from file failed. Wait to see if db2uext 2 succeeds at a future attempt.If not, check at the file system level. Check error filedb2uext2. er r . NODExxxx for more detailed information.
39 Writing to file failed: The log file could not be copied to the archive directory.There could be a free space problem. Check error filedb2uext2. er r . NODExxxx for more detailed information.
40 Closing of log file failed.
41 Creating directory failed. Check the file system access authorizations. Checkerror file db2uext 2. er r . NODExxxx for more detailed information. It may be
necessary to modify the environment variables DB2DB6_ARCHI VE_PATH andDB2DB6_RETRI EVE_PATH.
43 Unable to read environment variable. Check error filedb2uext2. er r . NODExxxx for more detailed information.
44 Error when accessing file. Check the file system access authorizations. Checkerror file db2uext 2. er r . NODExxxx for more detailed information (forexample, errno).
45 RC_AUDI T_I O_ERROR: Problem writing to db2uext 2. er r . NODExxxx ordb2uext 2. l og. NODExxxx
46 File I/O seek error. Check error file db2uext 2. er r . NODExxxx for moredetailed information (for example, errno).
48 SQL error occurred. Check error file db2uext 2. er r . NODExxxx for moredetailed information. Check the SQL code in DB2 Message Reference.
49 SQL warning occurred. Check error file db2uext 2. er r . NODExxxx for moredetailed information. Check the SQL code in DB2 Message Reference.
50 Registration of file space on ADSM/TSM server failed.
51 Binding of ADSM/TSM management class failed.
52 The API call “begin transaction” of the ADSM/TSM API failed.
53 The API call “end transaction” of the ADSM/TSM API failed.
54 Initialization of request to send object to ADSM/TSM server failed.
55 Sending of data stream to ADSM/TSM failed.56 End of data sending to ADSM/TSM failed.
57 The API call “begin query” of the ADSM/TSM API failed.
58 The API call “end query” of the ADSM/TSM API failed.
59 Query of object on ADMS/TSM server failed.
60 Start of retrieve operation in ADSM/TSM storage failed.
62 Getting data stream from ADSM/TSM failed.
63 Obtaining requested object data from ADSM/TSM failed.
64 Signifying end of getting object cycle failed

7/18/2019 SAP DB2 Administration Guide
http://slidepdf.com/reader/full/sap-db2-administration-guide-56d69bf9cdc08 187/230
July 2006 187
67 Object was not found on ADSM/TSM server.
68 Initialization of ADSM/TSM session failed.
69 Termination of ADSM/TSM session failed.
70 Deletion of object on ADSM/TSM server failed
80 DB2 CLI statemnet allocation failure. This is an internal error that you mustreport to SAP.
81 DB2 CLI Set statement option failure. This is an internal error that you mustreport to SAP.
82 DB2 CLI Prepare statement failure. This is an internal error that you mustreport to SAP.
83 DB2 CLI Bind parameter failure. This is an internal error that you must report toSAP.
84 DB2 CLI Execute statement failure. This is an internal error that you mustreport to SAP.
85 DB2 CLI Transcation statement failure. This is an internal error that you mustreport to SAP.
86 DB2 CLI Free statement. Failure.
Internal error. Report to SAP.
90 Windows only: Environment variable DSCDB6HOME not set. Check yourenvironment.
91 Environment variable DB2DB6EKEY not set. Check your environment.
92 Password could not be retrieved from password file dscdb6. conf .
On UNIX Check the file authorizations of / sapmnt / <SAPSI D>/ gl obal
(permission 700, owner <sapsi d>adm, gr oup db<dbsi d>adm) and/ sapmnt / <SAPSI D>/ gl obal / dscdb6. conf (permission 600, owner <sapsi d>adm, group sapsys).On Windows Check if share \ \ DSCDB6HOME\ sapmnt is available and if the DB2 service hasbeen started by user db2<dbsi d>.
93 Environment variable DB2DBDFT not set. Check your environment.
101 Database management (DBM) parameter DFTDBPATH is not set or could not beretrieved. Try to retrieve this parameter on the command line. Check the
database environment.102 Database management (DBM) parameter DI AGPATH is not set or could not be
retrieved. Try to retrieve this parameter on the command line. Check thedatabase environment.
104 Log file ID cannot be obtained. Any log file to be archived by the DB2 User Exitis assigned a unique ID. It is generated in the Admin DB. If this error occurs,check the ADM<DBSI D>database of your managed instance and contact SAPsupport.
110 Recording information failed: An action step cannot be protocolled in the AdminDB. Processing continues. Check error file db2uext 2. er r . NODExxxx formore detailed information.

7/18/2019 SAP DB2 Administration Guide
http://slidepdf.com/reader/full/sap-db2-administration-guide-56d69bf9cdc08 188/230
188 July 2006
111 Protocol database connect error. Check from the DB2 command line (CLP)whether a connection to ADM<DBSI D>can be established. If not, contact SAPsupport. See also SAP Note 543779.
112 ADM<DBSI D>object creation failed. No log file entry can be made in the AdminDB. Processing cannot continue. Check error file db2uext 2. er r . NODExxxx for more detailed information.
113 ADM<SID>: Write configuration parameter failed:
Internal error. Report to SAP.
114 ADM<SID>: Could not move log file to other location:
Internal error. Report to SAP.
115 Last backup timestamp could not be retrieved from the database recoveryhistory file and could not be inserted in the Admin DB. Check error filedb2uext2. er r . NODExxxx for more detailed information.
116 The vendor user exit program could not be started. Check error filedb2uext2. er r . NODExxxx for more detailed information.
117 Vendor user exit program error. For detailed information, refer to the vendoruser exit documentation.
For more detailed information about the most current documentation of the db2uext2 toolreturn codes, see SAP Note 104019.

7/18/2019 SAP DB2 Administration Guide
http://slidepdf.com/reader/full/sap-db2-administration-guide-56d69bf9cdc08 189/230
July 2006 189
brarchive/brrestore TroubleshootingChecking the protocol output and corresponding corrective actions can solve most problemsinvolving br ar chi ve and brrestore.
However, when called directly on the command line the protocol is by defaultonly written to file and no output appears on the command line. To override this,option - out must be included in the program call.
If an application does not perform correctly, make sure that you are using the most recentpatch available on SAP Service Marketplace at service.sap.com/patches . The versionand patch level of each program can be seen near the top of each protocol.
As mentioned above, in addition to the standard environment tracing switches, br ar chi ve and brrestore also allow activation of tracing on the command line using parameter- DEB <l evel >, for example, 1…9.
brarchive and brrestore Messages
The following tables list br ar chi ve and brrestore message IDs, their texts, andsuggested corrective actions.
• br ar chi ve and brrestore information messages have no numbers - only warningsand errors.
• LFA000 to LFA099 are br ar chi ve and brrestore warning messages.
• LFA100 to LFA999 are br ar chi ve and brrestore error messages.
• VND000 to VND999 are back end library error messages.

7/18/2019 SAP DB2 Administration Guide
http://slidepdf.com/reader/full/sap-db2-administration-guide-56d69bf9cdc08 190/230
190 July 2006
brarchive and brrestore Warning Messages
ID Message Comment
LFA000 Act i on endedwi t h war ni ngs.
Main action completed successfully but warningswere issued. See other messages for moreinformation.
LFA001 <OLD> synt axsupport ed butar chai c. Usenew synt ax.
Although the program still supports this old commandline option it may not in future releases. It is better touse the new syntax. Use option –hel p to see thesyntax.
LFA002 <OLD> synt axarchai c andi gnor ed. Usenew synt ax.
A command line option was ignored because it is nolonger valid syntax. Use the new syntax. Use option –hel p to see the syntax.
LFA005 <OLD> opt i on
support ed butar chai c. Use<NEW OPTI ON>.
Although the program still supports this old command
line option it may not in future releases. It is better touse the new syntax. Use option –hel p to see thesyntax.
LFA006 - s wi t h t wodevi ces andvol umessupport ed butar chai c. Use -s s.
Although the program still supports this old commandline option it may not in future releases. It is better touse the new syntax. Use option –hel p to see thesyntax.
LFA007 - sd wi t h t wodevi ces andvol umessupport ed butar chai c. Use -ssd.
Although the program still supports this old commandline option it may not in future releases. It is better touse the new syntax. Use option –hel p to see thesyntax.
LFA009 Opt i on<OPTI ON><ARG>support ed butar chai c –I nt er pr et edl i t er al l y
Although the program still supports this old commandline option it may not in future releases. It is better touse the new syntax. Use option –hel p to see thesyntax.
LFA010 - d/ - devi ce notspeci f i ed butt ape i mpl i ed.
Use - d t ape to explicitly specify the device type.
LFA011 - d/ - devi ce notspeci f i ed butADSM i mpl i ed.
Use - d adsmto explicitly specify the device type.
LFA015 Unexpect edpat t er nar gument
Use quotes for pattern, for example, '*. SAR'.
LFA015 No f i l e pat t er ngi ven
Warning if no file pattern is given. ‘*’ will be used.

7/18/2019 SAP DB2 Administration Guide
http://slidepdf.com/reader/full/sap-db2-administration-guide-56d69bf9cdc08 191/230
July 2006 191
LFA021 No act i onspeci f i ed oncommand l i ne.Assumi ng ' -
hel p' .
Specify an action option. See the syntax diagram thatis displayed.
LFA023 Usi ng<DI RECTORY> f ort empor aryf i l es.
Ensure that environment variableDB2DB6_TEMP_DI R is set for user db2<dbsi d>.
LFA024 Devi ce notspeci f i ed ori mpl i ed. Usi ngt ape.
Use - d t ape or - d adsmto explicitly specify thedevice type. The default value is tape.
LFA025 Devi ce notspeci f i ed ori mpl i ed. Usi ng
adsm ( def aul ti n t he conf i gt abl e of t heAdmi ndat abase) .
Use - d t ape or - d adsmto explicitly specify thedevice type. The default value was changed to TSMin the Admin DB using the DB2 Control CenterExtensions.
LFA031 Fi l e <FI LE>coul d not bef ound f ordel et i on.
A file intended for deletion was not found. No actionis necessary as the file would have been deletedanyway. However, try to determine why the file wasmissing.
LFA032 Tape i si ni t i al i zed butvol ume unknownt o syst em.
This is a valid log file archiving tape but appears to beowned by a different SAP system. Use - i f or ce to
force tape re-initialization for the current system.
LFA034 Unabl e t ochange r ealuser . Mayresul t i nerr ors .
Check installation and program authorizations. Maycause other errors. Use option –checkonl y ofprogram sddb6i ns to verify the installation. Formore information about authorizations, see Installingthe Admin Tools Manually [Page 47].
LFA036 Progr amf i ni shed bef or eI NSTHOME ordb2<dbsi d> homedi r det er mi ned.
Protocol f i l ewi l l r emai n i nt emp di r .
Look for the protocol file in the temporary directoryset in environment variable DB2DB6_TEMP_DI R.
LFA037 Si gnal handl i ngl oopi ng. Cl eanup may not besuccessf ul .
Internal problem caused by an error. Application maynot be able to terminate properly.

7/18/2019 SAP DB2 Administration Guide
http://slidepdf.com/reader/full/sap-db2-administration-guide-56d69bf9cdc08 192/230
192 July 2006
LFA038 . . . Oper at i oncompl et ed wi t hwar ni ngs.
Action was successful but warnings occurred. Checkthe protocol file for warning statements.
LFA039 Unabl e t oconnect t oadmi n db. l s dbst ar t ed? ( r c =<VALUE>)
Check if db2st ar t has been executed. Otherwise,check the database error files. For the SQL returncode, check the DB2 Message Reference.
LFA040 Query operat i onended wi t hwar ni ng.
Query may not be appropriate.
LFA041 Coul d notdel et e backupt i mest amp
ent r i es ( r c =<VALUE>) .
For the SQL return code, check the DB2 MessageReference.
LFA042 No backupt i mest ampent r i es f ound.
Warning: No backups appear to have beenperformed to this target.
LFA043 Unabl e t or emove ol dpr ot ocolent r i es f romadmi n db.
Non-critical error. Entries not found or internal errorwhen accessing or deleting them.
LFA044 Ar e t he progr amowner shi p andper mi ssi ons setcor r ectl y?
Normally suggested in connection with another erroror warning. Check the executable authorizations.
LFA046 XDB DB accessf uncti on er r or( r c=<VALUE>) .
SAP Basis Release 4.6D only:Log files may not be displayed in transaction DB13. Ifthis causes concern, contact SAP support.
LFA047 Ret ur n wi t houtt r yi ng t oconnect t o DB
Check DB environment or permission to connect tothe Admin DB.
LFA048 conf i gpar amet er t ool ong
Value of the configuration parameter in tableDB6CONFIG too long
LFA051 Unabl e to ej ectt ape.
Tape must be ejected manually.

7/18/2019 SAP DB2 Administration Guide
http://slidepdf.com/reader/full/sap-db2-administration-guide-56d69bf9cdc08 193/230
July 2006 193
LFA053 Di r ect ory <DI R>cannot bewri t t en t o.
Only a problem if other messages reflect this.
LFA070 Tape has SI D<SAPSI D> andnot <SAPSI D> asexpect ed!
Tape belongs to another system. If you are certainthis tape is not needed, the tape header must beoverwritten using operating system commands, forexample, t ar , cpi o, or dd.
LFA071 Tape # has beenr eused # t i mes( >#) and shoul dbe repl aced.
This tape must be replaced as soon as possible. It isno longer reliable.
LFA073 Bad envi r onmentval ue ?<VARI ABLE> =
<VALUE
The environment variable value may be invalid.Check this variable in the user environment.
brarchive and brrestore Error Messages
ID Message Comment
LFA101 Par amet er <OPTI ON>unknown.
Use option –hel p to see the syntax.
LFA102 Act i on not al l owedf or <PROGRAM>.
Use option –hel p to see the syntax.
LFA103 Act i on onl y al l owed
f or <PROGRAM>.
Use option –hel p to see the syntax.
LFA104 <OPTI ON> ar gument"<VALUE>" t oo l ong.
Use a shorter argument value. Be careful thatyou have not used wild card charactersinterpreted by the shell.
LFA105 <OPTI ON> ar gumentmi ssi ng.
Required argument is missing. Use option –hel p to see the syntax.
LFA106 <OPTI ON> ar gument"<VALUE>" not OK.
Check and replace the bad string argumentvalue. If the problem is not clear, refer to theoption documentation.
LFA107 <OPTI ON> ar gument"<VALUE>" not OK.
Check and replace bad numeric argumentvalue. If the problem is not clear, refer to theoption documentation.
LFA108 Too many act i ons ont he command l i ne.
Only one action option is permitted. Useoption–hel p to see the syntax.
LFA109 <OPTI ON> r esul t s i nr epeat ed orconf l i ct i ngpar ameters.
Check for repeating or conflicting options, forexample, . –d ADSM or –d TAPE.Use option –hel p to see the syntax.
LFA110 The opt i on <OPTI ON>i s requi red f or t hi sacti on.
The action requires that the additional optionbe used. Add the required option to the call.

7/18/2019 SAP DB2 Administration Guide
http://slidepdf.com/reader/full/sap-db2-administration-guide-56d69bf9cdc08 194/230
194 July 2006
LFA112 <VAL> “<VAL>”: Samedevi ce gi ven t wi ce.
Do not repeat arguments on the commandline.
LFA113 The opt i on <OPTI ON>r equi r es t wo
argument s f or t hi sacti on.
Provide the correct number of arguments.
LFA114 The opt i on<OPTI ON><ARG> i s 31I -speci f i c. Pl easer ef er t o new synt ax.
Use the new syntax. The old syntax may nolonger be supported in a later release. Useoption –hel p to see the syntax.
LFA115 The opt i on<OPTI ON><ARG> i s notsuppor t ed by<PROGRAM>
Use option - hel p to see the syntax.
LFA120 Probl em det er mi ni ng
val ue of <ENVI RONMENTVARI ABLE>.
Check the db2<dbsi d>user environment.
LFA121 Val ue of envi r onmentvar i abl e <ENV.VARI ABLE> t oo l ong.
Check the db2<dbsi d>user environment.
LFA130 Appl i cat i on er r or . Application error. Refer to other messages. Ifthe cause is not clear, contact SAP support.
LFA131 Admi n- t ool dat abaseerr or ( r c = VALUE) .
Internal database call failed. Refer to othermessages. Refer to the DB2 MessageReference for an explanation of the SQLcode.
LFA132 Log- f i l e del et ef ai l ed.
Unable to delete the file. Refer to othermessages.
LFA133 Er ror i ni t i al i zi ngt ape.
Unable to initialize the tape. Refer to othererror messages.
LFA134 Er r or whi l e pr epar i ngl i st of f i l es t opr ocess.
Error creating the file list for processing. Referto other error messages.
LFA136 Backend f unct i oner r or ( r c = <VALUE>) .
Backend library function failed. Refer to othermessages.
LFA137 Er r or whi l e get t i ngt ape l abel .
Most likely an error occurred opening thesession with the backend library. Refer toother messages.
LFA138 New t ape l abel notset corr ect l y.
Tape initialization failed. Retry the operation.
LFA141 <CONFI GURATI ONPARAMETER> par amet erer r or . Check val ue i ncont r ol cent er . ( ADGr c = <VALUE>)
Check the default, tape device and tapedevice class values using the DB2 ControlCenter Extensions. For more information, seeConfiguration [Page 70].
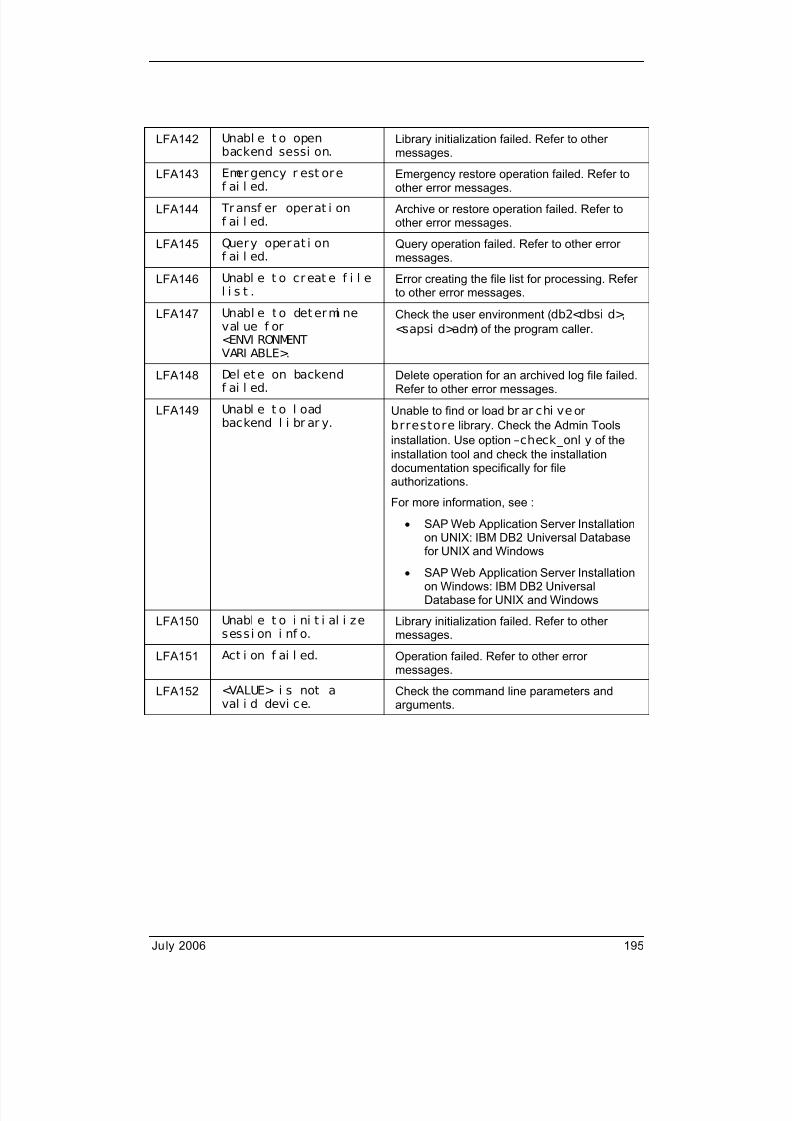
7/18/2019 SAP DB2 Administration Guide
http://slidepdf.com/reader/full/sap-db2-administration-guide-56d69bf9cdc08 195/230
July 2006 195
LFA142 Unabl e t o openbackend sessi on.
Library initialization failed. Refer to othermessages.
LFA143 Emergency r est oref ai l ed. Emergency restore operation failed. Refer toother error messages.
LFA144 Tr ansf er operat i onf ai l ed.
Archive or restore operation failed. Refer toother error messages.
LFA145 Query operat i onf ai l ed.
Query operation failed. Refer to other errormessages.
LFA146 Unabl e t o creat e f i l el i s t .
Error creating the file list for processing. Referto other error messages.
LFA147 Unabl e t o det ermi neval ue f or<ENVI RONMENT
VARI ABLE>.
Check the user environment (db2<dbsi d>,<sapsi d>adm) of the program caller.
LFA148 Del et e on backendf ai l ed.
Delete operation for an archived log file failed.Refer to other error messages.
LFA149 Unabl e t o l oadbackend l i br ar y.
Unable to find or load br ar chi ve orbrrestore library. Check the Admin Tools
installation. Use option –check_onl y of theinstallation tool and check the installationdocumentation specifically for fileauthorizations.
For more information, see :
• SAP Web Application Server Installationon UNIX: IBM DB2 Universal Databasefor UNIX and Windows
• SAP Web Application Server Installationon Windows: IBM DB2 UniversalDatabase for UNIX and Windows
LFA150 Unabl e t o i ni t i al i zesessi on i nf o.
Library initialization failed. Refer to othermessages.
LFA151 Act i on f ai l ed. Operation failed. Refer to other errormessages.
LFA152 <VALUE> i s not a
val i d devi ce.
Check the command line parameters and
arguments.

7/18/2019 SAP DB2 Administration Guide
http://slidepdf.com/reader/full/sap-db2-administration-guide-56d69bf9cdc08 196/230
196 July 2006
LFA153 Cannot accesssap<sapsi d>/ db2<dbsi d> dat a f i l e.
Unable to access an essential tool file. Checkthe Admin Tools installation. Use the–check_onl y option of the installation tooland check installation documentation
specifically for file authorizations.For more information, see:
• SAP Web Application Server Installationon UNIX: IBM DB2 Universal Databasefor UNIX and Windows
• SAP Web Application Server Installationon Windows: IBM DB2 UniversalDatabase for UNIX and Windows.
LFA154 Er r or prepar i ng f oroper at i on.
Refer to other messages.
LFA155 No f i l es wer esuccessf ul l yprocessed tocompl et i on.
Error prohibited file processing. Retryoperation.
LFA156 Not al l f i l es wer esuccessf ul l yprocessed tocompl et i on.
Error prohibited some file processing. Retryoperation.
LFA157 Unabl e t o creat e f i l esub l i st .
Internal error. Refer to other messages.
LFA158 Errorget t i ng/ r el easi ng
l ock: <FI LE>.
br ar chi ve or brrestore may already berunning. If not, delete the file and restart theprogram.
LFA159 No l og_archi ve ent r yi n Admi n DB. Has UserExi t been r un?
Target directory unknown but should havebeen made available by the User Exit. Checkthe User Exit protocols. This error can also becaused by incorrectly performed upgrade.
LFA160 ' - i set ' not ok i ft ape al r eady l abel ed.Use - i f or ce.
The action - i set can only be used toinitialize tapes that are out-of-date. Use - if or ce to force re-initialization of a currenttape.
LFA161 Tape <DEVI CE> must bei ni t i al i zed f i r st .Use –I set or - if or ce.
The tape is not initialized. Use - i f or ce toforce initialization of a new, invalid or currenttape.
LFA162 Tape <NUMBER> vol ume<LABEL> does notmat ch command l i neval ue <LABEL>.
The label found on the referenced tape doesnot match the value specified with - v on thecommand line. Check that the correct tapebeing used.
LFA163 Def aul t t ape rewi ndand non- r ewi ndaddr esses i dent i cal( <DEVI CE>)
Check the default, tape device and tapedevice class values using the DB2 ControlCenter extensions. For more informationabout non-rewind address examples, seebrrestore - Log File Retrieval Tool [Page 163].
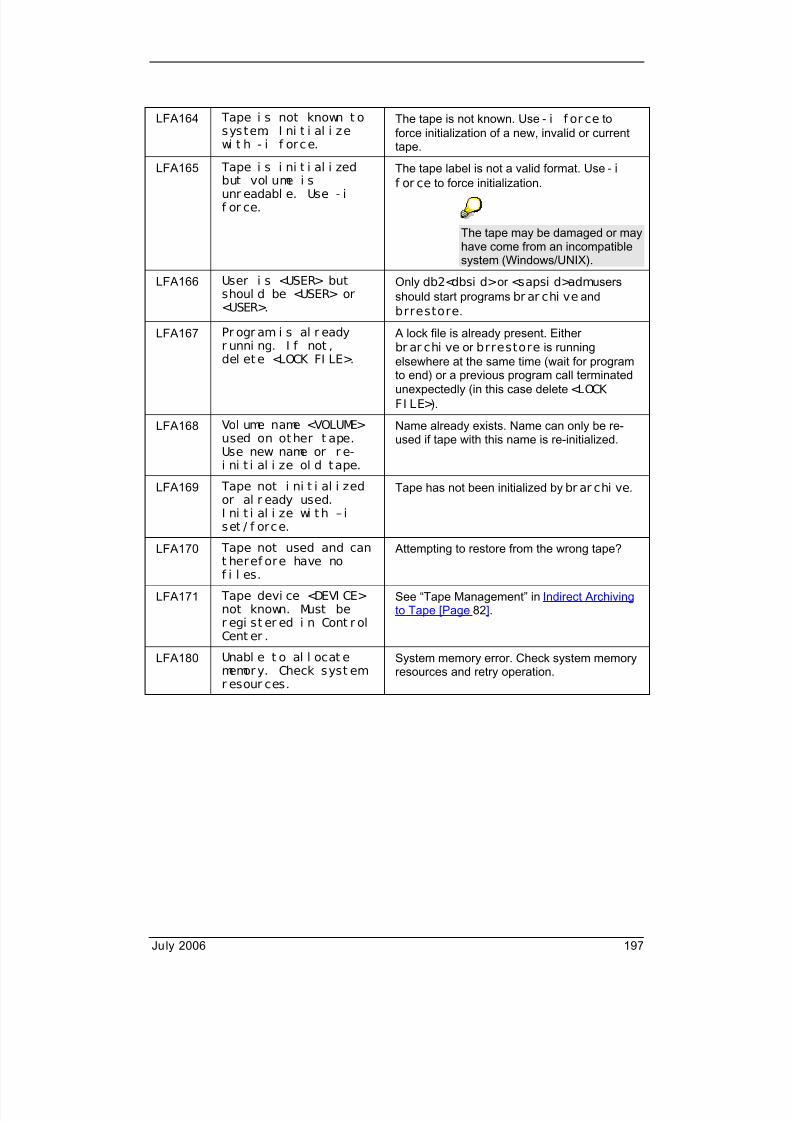
7/18/2019 SAP DB2 Administration Guide
http://slidepdf.com/reader/full/sap-db2-administration-guide-56d69bf9cdc08 197/230
July 2006 197
LFA164 Tape i s not known t osystem. I ni t i al i zewi t h - i f orce.
The tape is not known. Use - i f or ce toforce initialization of a new, invalid or currenttape.
LFA165 Tape i s i ni t i al i zedbut vol ume i sunr eadabl e. Use - if or ce.
The tape label is not a valid format. Use - if or ce to force initialization.
The tape may be damaged or mayhave come from an incompatiblesystem (Windows/UNIX).
LFA166 User i s <USER> butshoul d be <USER> or<USER>.
Only db2<dbsi d>or <sapsi d>admusersshould start programs br ar chi ve andbrrestore.
LFA167 Pr ogr am i s al r eady
r unni ng. I f not ,del et e <LOCK FI LE>.
A lock file is already present. Either
br ar chi ve or brrestore is runningelsewhere at the same time (wait for programto end) or a previous program call terminatedunexpectedly (in this case delete <LOCKFI LE>).
LFA168 Vol ume name <VOLUME>used on other t ape.Use new name or r e-i ni t i al i ze ol d tape.
Name already exists. Name can only be re-used if tape with this name is re-initialized.
LFA169 Tape not i ni t i al i zedor al r eady used.I ni t i al i ze wi t h – i
set / f orce.
Tape has not been initialized by br ar chi ve.
LFA170 Tape not used and cant heref ore have nof i l es.
Attempting to restore from the wrong tape?
LFA171 Tape devi ce <DEVI CE>not known. Must ber egi st er ed i n Cont r olCent er .
See “Tape Management” in Indirect Archivingto Tape [Page 82].
LFA180 Unabl e t o al l ocat ememory. Check syst emr esour ces.
System memory error. Check system memoryresources and retry operation.

7/18/2019 SAP DB2 Administration Guide
http://slidepdf.com/reader/full/sap-db2-administration-guide-56d69bf9cdc08 198/230
198 July 2006
LFA181 Unabl e t o l oadl i br ar y <LI BRARYNAME>.
Unable to find or load the br ar chi ve orbrrestore library. Check the Admin Toolsinstallation. Use option –check_onl y of theinstallation tool and check the installation
documentation specifically for files and fileauthorizations.
For more information, see:
• SAP Web Application Server Installationon UNIX: IBM DB2 Universal Databasefor UNIX and Windows
• SAP Web Application Server Installationon Windows: IBM DB2 UniversalDatabase for UNIX and Windows.
LFA182 Del et e f ai l ed f orf i l e <FI LENAME>.
er r no = <VALUE>.
Delete operation for the log file failed. Refer toother error messages. Check the fileauthorizations of <FI LENAME>.
LFA184 Unabl e t o det ermi nehome di r ectory of<USER>.
If environment variable I NSTHOME is not set,the application attempts to determine thehome directory of user db2<dbsi d>. Setvariable I NSTHOME.
LFA188 Unabl e t o set si gnalhandl er .
System error that may result in incorrectprogram execution. Contact your systemadministrator.
LFA189 Unabl e t o f i nd f i l eor di r ect ory <VALUE>.
Refer to other message and check theexistence of the item. Has the file beenautomatically deleted by TSM or movedmanually?
LFA190 Log f i l e <FI LE> haswr ong f ormat .
Check log file name is valid, for example,S0000000. 19920211152635. NODE0000.
LFA191 Di r ect or y <di r >cannot be wr i t t en t o.
Check installation using the check option ofprogram sddb6i ns. If the problem is notresolved, contact SAP.
LFA200 Get backup t i mest ampent r i es f ai l ed ( r c =<VALUE>)
No backup is known to the Admin DB. Makesure that you performed a database backupwhen you activated database recovery.
LFA201 Check backup
t i mest amp i s val i d.Use: - q backups –out
Wrong timestamp format or length. See the
output of the query for the correct format.
LFA202 Unabl e t o extend f i l el i s t
Cannot allocate memory to extend the file list.
LFA203 Add mi ss i ng backupsf ai l ed
Check the reason.
LFA240 Unexpect ed act i on. Internal error. Check the command line actionoption.
LFA241 Unexpect ed devi ce. Internal error. Check the command line deviceoption.

7/18/2019 SAP DB2 Administration Guide
http://slidepdf.com/reader/full/sap-db2-administration-guide-56d69bf9cdc08 199/230
July 2006 199
LFA242 Unexpect ed l og f i l estatus.
Internal error. Contact SAP support.
LFA243 Unexpect ed r et urncode.
Internal error. Contact SAP support.
LFA244 Unexpect ed val ue. Internal error. Contact SAP support.
LFA245 Er r or cr eat i ng Admi nDB backup f i l e.
Internal error. Contact SAP support.
LFA280 Err or del et i ng <TYPE>DB ent r y ( r c =<VALUE>)
Internal error. Contact SAP support.
LFA281 Er r or r et r i evi ng<TYPE> DB ent r y ( r c =<VALUE>)
Internal error. Contact SAP support.
LFA282 Er r or updat i ng <TYPE>
DB ent r y ( r c =<VALUE>)
Internal error. Contact SAP support.
LFA283 Err or cr eat i ng <TYPE>DB ent r y ( r c =<VALUE>)
Internal error. Contact SAP support.
LFA284 New ent r y al r eady i nDB ( r c = <VALUE>)
Internal error. Contact SAP support.
LFA285 Act i on <act i on>f ai l ed wi t h<err or_t ext >
Try to interpret the error text. If the meaning isnot clear to you, contact SAP support.
LFA286 SQL Err or : <SQL er r or
t ext>
Try to interpret the error text. If the meaning is
not clear to you, contact SAP support.
brarchive and brrestore Library Error Messages
ID Message Comment
VND000 Envi r onmentvar i abl e<ENVI RONMENTVARI ABLE> i s notset .
Check the db2<dbsi d>user environment. Seealso accompanying system error message VND180.
VND001 Not enough di skspace i n<DI RECTORY>.Avai l abl e:<VALUE> MB;needed: <VALUE>MB.
Delete files or increase the size of the file system.
Compressed file systems may calculatethe amount of space available wrongly.
VND002 Fi l e s i zemi smat ch f or<FI LE>. <VALUE>on di sk and<VALUE> kB ont ape
The original file size does not match the size of thefile restored. If the problem persists, the file may bedamaged. You may be able to restore the file usingthe emergency restore option - ex.

7/18/2019 SAP DB2 Administration Guide
http://slidepdf.com/reader/full/sap-db2-administration-guide-56d69bf9cdc08 200/230
200 July 2006
VND003 Unabl e t o accessl i st of f i l es t obe pr ocessed.
See previous error messages.
VND004 Fai l ed t o save
<FI LE> ( r c =<VALUE>) ! Cannotcont i nue…
Store operation failed. If the problem persists, the
media may be damaged. Note return code for SAPsupport.
VND005 Fai l ed t or et r i eve <FI LE>( r c = <VALUE>) !Cannot cont i nue…
Restore operation failed. If the problem persists, themedia may be damaged. Note the return code forSAP support.
VND006 Fai l ed t o del et e<FI LE> ( r c =<VALUE>) ! Cannotcont i nue…
Delete operation failed. If the problem persists, themedia may be damaged.
VND008 Er r or wr i t i ngdat a t o f i l e<FI LE> ( r c =<VALUE>) .
Check the file and directory authorizations.
VND009 Er r or r eadi ngdat a f rom f i l e<FI LE> ( r c =<VALUE>) .
Check the file and directory authorizations.
VND010 Er r or cl osi ngf i l e <VALUE> j ust sentt o/ retr i eved.
System error. If the problem persists, contact SAPsupport.
VND011 Er r or openi ngf i l e <FI LE> t obe sentt o/ retr i eved.
Check the file and directory authorizations.
VND012 Query <Val ue> i snot suppor t ed byback- endl i brary.
Backend does not support the query. Check thebackend version.
VND013 Command <Val ue>i s not suppor t edby back- endl i brary.
Backend does not support the command. Check thebackend version.
VND020 Vol ume si zel i mi t r eached -no mor e l ogf i l es wi l l bepr ocessed.
According to the tape device class tape entry - s i ze in the DB2 Control Center, the tape must now befull. Check that this entry matches the real tape size.Complete the (restart) operation with a new tape.
VND021 I f t he l og f i l emanagement t oolwas t ermi nated,del et e f i l e<FI LE>.
A temporary lock file is still present. Verify thatbr ar chi ve is not already running for the samenode or using the same device(s).

7/18/2019 SAP DB2 Administration Guide
http://slidepdf.com/reader/full/sap-db2-administration-guide-56d69bf9cdc08 201/230
July 2006 201
VND022 Vol ume i n devi ce<DEVI CE> has nol abel .
Tape needs initializing.
VND023 Check t he vol ume
or devi ce.Check the tape or tape drive. See other messages.
VND024 Label on vol umei n devi ce<DEVI CE> has t hewr ong f ormat .
Tape needs initializing or may be damaged. In bothcases, see other messages.
VND025 Wr ong vol ume<LABEL> i ndevi ce <DEVI CE>,shoul d be:<LABEL>
Put the correct tape in the drive or specify thecorrect label on the command line.
VND026 Vol ume i n devi ce
<DEVI CE> i swr i t e pr ot ect ed!
If the tape should be written to, remove the write
protection.
VND027 Vol ume l abelcoul d not bewr i t t en t o<DEVI CE>.
Check the tape and device. See other messages.
VND028 Tape has t o bei ni t i al i zedpr i or t o usage.
Initialize the tape.
VND029 Charact er' K' , ' M' , ' G' or' T' shoul ddi r ect l y f ol l owvol ume si ze.
The tape device class tape entry - s i ze in the DB2Control Center is incorrect.
VND030 Tape <Devi cename> i s al r eadyi n use. I f not ,del et e the l ockf i l e or l ook f orerr or ( <f i l ename or er r ormessage>) .
A tape lock file is already present. Eitherbr ar chi ve or brrestore is running elsewhere atthe same time (wait for program end) or a previousprogram call terminated unexpectedly (in this casedelete the lock file).
VND031 SAP- SI D on t apei s <SAPSI D>,shoul d be<SAPSI D>!
Tape is used by another SAP system. To overwrite
data on tape, use the br ar chi ve option - if or ce.
VND032 Wr ong t apenumber <#> i ndevi ce <Devi cename>, shoul d be<#>
Check the command line parameters and theversion of the backend.
VND042 Errorr egi st er i ng ADSMf i l e space' <FI LE>' of Type
' <St r i ng>’ .
Check the TSM installation and configuration.Check the accompanying messages for returncodes and TSM error messages. Contact Tivolisupport if necessary.

7/18/2019 SAP DB2 Administration Guide
http://slidepdf.com/reader/full/sap-db2-administration-guide-56d69bf9cdc08 202/230
202 July 2006
VND043 ADSM mgmt cl assbi nd ( <STRI NG>)f ai l ed! ( FS-name: <STRI NG> -
HL- name:<STRI NG> - LL-name: <FI LE>)
Check the TSM installation and configuration. Lookat the accompanying messages for return codesand TSM error messages. Contact Tivoli support ifnecessary.
VND044 Er r or st ar t i ngADSMt r ansacti on.
Check the TSM installation and configuration. Lookat the accompanying messages for return codesand TSM error messages. Contact Tivoli support ifnecessary.
VND045 Er r or sendi ngobj ect t o ADSM.
Check the TSM installation and configuration. Lookat the accompanying messages for return codesand TSM error messages. Contact Tivoli support ifnecessary.
VND046 Er r or sendi ngdat a t o ADSM.
Check the TSM installation and configuration. Lookat the accompanying messages for return codesand TSM error messages. Contact Tivoli support ifnecessary.
VND047 Er r or endi ngpr ocess f orsendi ng obj ectt o ADSM.
Check the TSM installation and configuration. Lookat the accompanying messages for return codesand TSM error messages. Contact Tivoli support ifnecessary.
VND048 Er r or endi ngADSMt r ansacti on.
Check the TSM installation and configuration. Lookat the accompanying messages for return codesand TSM error messages. Contact Tivoli support ifnecessary.
VND049 Er r or st ar t i ngADSM <STRI NG>quer y.
Check the TSM installation and configuration. Lookat the accompanying messages for return codesand TSM error messages. Contact Tivoli support ifnecessary.
VND050 Er r or endi ngADSM <STRI NG>quer y.
Check the TSM installation and configuration. Lookat the accompanying messages for return codesand TSM error messages. Contact Tivoli support ifnecessary.
VND051 ADSM obj ect squery f ound nomat ch.
No entries match the queries. See other messages.
VND052 Er r or st ar t i ngdat a t r ansf erf r omADSM' STRI NG'r eposi t or y.
Check the TSM installation and configuration. Lookat the accompanying messages for return codesand TSM error messages. Contact Tivoli support ifnecessary.
VND053 Er r or get t i ngobj ect f r om ADSM<STRI NG>r eposi t or y.
Check the TSM installation and configuration. Lookat the accompanying messages for return codesand TSM error messages. Contact Tivoli support ifnecessary.

7/18/2019 SAP DB2 Administration Guide
http://slidepdf.com/reader/full/sap-db2-administration-guide-56d69bf9cdc08 203/230
July 2006 203
VND054 Er r or dur i ngdat a t r ansf erf r om ADSM.
Check the TSM installation and configuration. Lookat the accompanying messages for return codesand TSM error messages. Contact Tivoli support ifnecessary.
VND055 Er r or concl udi ngobj ect t r ansf erf r omADSM<STRI NG>r eposi t or y.
Check the TSM installation and configuration. Lookat the accompanying messages for return codesand TSM error messages. Contact Tivoli support ifnecessary.
VND056 Er r or concl udi ngdat a t r ansf erf r omADSM<STRI NG>r eposi t or y.
Check the TSM installation and configuration. Lookat the accompanying messages for return codesand TSM error messages. Contact Tivoli support ifnecessary.
VND059 ADSM r eason<No>: <St r i ng>
TSM reason for an error
VND060 ADSM er r or <No>:<St r i ng>
TSM error number and description
VND061 Unabl e t o l oadADSM API DLL.
Check that TSM has been correctly installed.
VND062 Cl i ent ' s APIver si on i shi gher t han t heADSM ver si on
br ar chi ve executables and library do not match.Check the Admin Tools installation.
VND063 Cl i ent ' s ADSMAPI st r uctures
arei ncompat i bl e/ have changed
br ar chi ve executables and library do not match.Check the Admin Tools installation.
VND064 Fi l e <FI LE> notf ound i n ADSM.
No matching files in TSM. Use TSM tools to verify iffiles exist.
VND101 …f ai l ed Operation failed. Refer to other error messages.
VND102 I nt ernal l i braryerr or .
Internal error. Refer to other error messages.
VND111 Tape <DEVI CE>shoul d be a non-r ewi nd addr ess.
Check the command line device name and DB2Control Center configuration values. For moreinformation about non-rewind address examples,
see brrestore - Log File Retrieval Tool [Page 163].VND149 Rewi nd of vol ume
i n devi ce<DEVI CE> f ai l ed.
Check the tape and device.
VND150 Copyi ng <FI LE>to / f rom<LOCATI ON>f ai l ed due t opr evi ous er r or s.
See other error messages.

7/18/2019 SAP DB2 Administration Guide
http://slidepdf.com/reader/full/sap-db2-administration-guide-56d69bf9cdc08 204/230
204 July 2006
VND170 Fi l e <FI LE>al r eady exi sts.
File already exists and will be overwritten.
VND181 Rest or e of<FI LE> f ai l ed.
See other error messages.
VND182 Spacei nf or mat i onabout devi ce<DEVI CE>.Avai l abl e:<VALUE> MB;Needed: <VALUE>MB
Delete files or increase the size of the file system.
Compressed file systems may calculatethe amount of space available wrongly.
VND186 <FI LE> i s not adi r ectory.
Check if <FI LE>is a directory; check if there isenough free space in the directory.
VND190 Fi l e <FI LE> does
not exi st .
Check the file.
DB2 Control Center Extensions Troubleshoot ingThe following tables provide information about error messages from the DB2 Control Centerinstallation program on Windows:
Pl ease change di r ect ory t o <CDROM- dri ve>: \ \ NT\ \ I 386\ \ ADMI N and st artagai n!
Cause The installation program was not started in the specifieddirectory.
Solution Switch to the specified directory and restart the installation.
DB2HOME not f ound
Cause DB2 client application enabler (CAE) is not installed or anerror occurred during Registry access.
Solution Install DB2 client application enabler (CAE). Check that youcan access the Registry and that there is a keysof t ware\ I BM\ DB2\ DB2 Fol der Name under
HKEY_LOCAL_MACHI NE.
Di r ect or y does not exi st
Cause Directory <di r ect or y>does not exist.
Solution Check whether directory <di r ect or y>exists. If thedirectory is missing, one of the software components mightnot have been installed.

7/18/2019 SAP DB2 Administration Guide
http://slidepdf.com/reader/full/sap-db2-administration-guide-56d69bf9cdc08 205/230
July 2006 205
Er r or execut i ng car . exe
Cause Program car could not be executed.
Solution Contact SAP support.
Menu does not appear
Cause The DB2 administration tools were probably not installedcorrectly.
Solution Check whether directory.. . \ s ql l i b\ bi n contains filesapdef . dl l .
Logon di al og i s not di spl ayed
Cause The DB2 administration tools were probably not installedcorrectly.
Solution Check whether directory.. . \ sql l i b\ bi n contains filessapact. dl l and sddb6wf m. dl l .
Di al og i s not di spl ayed
Cause The DB2 administration tools were probably not installedcorrectly.
Solution Check whether directory.. . \ sql l i b\ bi n contains files
sddb6wf m. dl l , db6achpw. exe, db6at ape. exe,db6al gf l . exe, db6al gf l . exe, db6aopt anddb6ar 3db. exe.
Since DB2 Control Center Extensions are an extension of the DB2 Control Center, a specialstart script switches on tracing for the DB2 Control Center. To run the DB2 Control Centerwith the DB2 Control Center Extensions trace switched on, start it with scriptdb2ccdebug. bat . A trace file called db6cc. l og is created in your TEMP directory.
Collecting Diagnostic Information for SAP SupportWhile processing issues reported to SAP support, SAP support often needs data required forfurther investigation. Many of the data requested by SAP support for DB2 UDB for UNIX andWindows can be grouped together to form typical data sets.
To ease data collection, a tool is provided that is described in SAP Note 83819. At present,the tool currently runs on UNIX systems only. To speed up processing of reported issues inDB2 UDB for UNIX and Windows, the data collecting tool can be run when the issue is sentto SAP. The data collected needs to be provided to SAP. When you create a problemmessage, you should mention the file name and location.

7/18/2019 SAP DB2 Administration Guide
http://slidepdf.com/reader/full/sap-db2-administration-guide-56d69bf9cdc08 206/230
206 July 2006
Appendix C: Implementation Details
This appendix is only intended as a reference for SAP support personnel toassist with problem determination, or for customers directed by SAP support toperform specific operations.
Customers may wish to read this information for a better understanding of thetools and to inspect the system, but must not use this knowledge to change thesystem without an explicit request from SAP support.
Admin DB Structure
Wrong use of this information may make the log file management tools fail ormake it impossible to recover log files required to fully restore a databasebackup
The Admin DB (or ADM<DBSI D>database) is the core component of SAP DB2administration. It contains administration management data, configuration parameters, andadministration action protocols.
The most important tables in the Admin DB refer to log files and their locations. Thisinformation is used in recovering archived files. On occasion, support personnel will askdatabase administrators to extract information from this database to assist in problemdetermination. Other tables record information such as tape volume management and AdminTools protocol data.
To understand the log file information in the Admin DB, it is essential that you understand thefile states described in Log File States [Page 37].
The Admin DB should require very little administrative attention. The database administratorcan decide whether to back up the database. However, this is not strictly necessary asbr ar chi ve in archive mode also stores the essential parts of the database from which it canbe rebuilt.
Transaction logging is circular for the Admin DB, that is, LOGRETAI N and USEREXI T are setto OFF. This has the advantage that the Admin DB should continue to function even when themain SAP database is blocked by a file system containing log files that are becoming full.
The following graphic shows the Admin DB tables and their relationships.

7/18/2019 SAP DB2 Administration Guide
http://slidepdf.com/reader/full/sap-db2-administration-guide-56d69bf9cdc08 207/230
July 2006 207
The following table describes the Admin DB tables shown in the graphic above, together withtheir keys. To see the complete structure of each table, use the DB2 DESCRI BE command.
Admin DB Tables
Table Name Key Descript ion
DB6IDENTIFIER OBJID Unique identifier. Relates eachobject to a database node ifappropriate.
DB6CONFIG OBJID
(from DB6IDENTIFIER)
Contains Admin Toolsconfiguration parameters. Thesecan normally only be set using the
DB2 Control Center.DB6LOCATION LOCID
(OBJID inDB6IDENTIFIER)
Contains the locations of log filesand backups, plus tapeinformation, for example, the TSMserver name.
DB6BACKUP OBJID
(from DB6IDENTIFIER)
Contains imported backupinformation from the databaserecovery history file.
DB6LOGFILE OBJID
(from DB6IDENTIFIER)
Contains information about logfiles.
The OBJ I D key is not the log file number.
DB6LFSTATE OBJID
(from DB6IDENTIFIER) +LOCID (fromDB6LOCATION)
Contains the location and state ofeach log file.

7/18/2019 SAP DB2 Administration Guide
http://slidepdf.com/reader/full/sap-db2-administration-guide-56d69bf9cdc08 208/230
208 July 2006
DB6TAPE OBJID
(from DB6IDENTIFIER)
Contains tape volume information.
DB6TAPETOC OBJID
(from DB6TAPE) + LFID(OBJID in DB6LOGFILE)
Contains the position of log files oneach tape (accelerates recovery).
DB6DEVCLASS Name Contains tape device classes andrelated information, for example,8mm, DLT
DB6DEVICE Name Contains physical tape devicesand related information, forexample, / dev/ r mt 0.
DB6ACTION
DB6ACTIONDETAIL
Contain the tool protocols used by
DB2 Control Center Extensions.These tables can become very large.
DB6CACHE
DB6MESSAGE
Contain temporary data used forinternal communication.
Addi tional Notes and Troubleshooting Informat ion
• Schema
The Admin DB tables are created with schema SAPR3 (even with MCOD systems), so
all table references in SQL statements must be qualified with this value. For example,to list all location information, enter the following SQL statement:SELECT * from sapr3.db6location.
• Admin DB size
If the Admin DB is running out of space, this is usually due to the DB6ACTION andespecially the DB6ACTIONDETAIL tables. Make sure that the Admin Tools are up-to-date. Only recent versions of br ar chi ve prune these tables automatically.
Alternatively, if a tool is looping or being called repeatedly due to an error situation,these tables will fill very quickly. This can be determined by studying the contents ofthese tables.
• Log file information view DB6LOGFILE_PLACE
Log file numbers are stored in the integer column NAME in the DB6LOGFILE table.This number is the number contained in the log file name, for example,S0000456. LOG is log file number 456.
A convenient method of studying log file information is using the LOGFILE_PLACEview. This view joins several tables and displays the information in a slightly more user-friendly way. For example, enter the following SQL statement:SELECT * from sapr3.db6logfile_place
7/18/2019 SAP DB2 Administration Guide
http://slidepdf.com/reader/full/sap-db2-administration-guide-56d69bf9cdc08 209/230
July 2006 209
The output can be limited by specifying a value or range for the NAME column (whichcontains the log file number). This view contains no node information.
In a multi-partitioned environment, if you require node-specific information, you must join this view with the DB6IDENTIFIER table, where the OBJID columns have the same
value and NODE=’ NODExxxx’ (replace xxxx with the node number).
• Recursive deletion
The relationships between tables DB6IDENTIFIER, DB6CONFIG, DB6LOCATION,DB6BACKUP, DB6LOGFILE, DB6LFSTATE, DB6TAPE, and DB6TAPETOC are setup with cascading deletes. In other words, if an object in DB6IDENTIFIER that relatesto a log file is deleted, all related rows will also automatically be deleted from the tablesDB6LOGFILE, DB6LFSTATE, and DB6TAPETOC.
Each tape has two object IDs – one related to the DB6LOCATION table and onerelated to the DB6TAPE table. There is no direct relationship joining these two
objects.
• Backup data in table DB6BACKUP
The information in the DB6BACKUP table is extracted from the backup history file bythe User Exit. This information is used to associate log files with a backup. If no backupis performed after the Admin Tools are installed, the User Exit will not be able to addthis association. If the User Exit has not yet been run before br ar chi ve is called forthe first time, the backup information will be missing and br ar chi ve also generatesan error.
For best User Exit performance, it is also important that the backup history file is nottoo long. It may be necessary to prune the file occasionally.
•
Configuration table DB6CONFIG This table contains information to configure the Admin Tools. Normally it can only beupdated using the DB2 Control Center Extensions. You can also use SQL to updatethe entries directly.
If an entry is corrupt or lost, this table can be reset to the default values. You can dothis by using SQL to delete all related entries from the DB6IDENTIFIER table.
Be very careful only to delete the OBJIDs found in the configuration tableDB6CONFIG and running sddb6i ns - i .
• Mirroring in Admin Tools Release 4.6D
There is an extra executable in Admin Tools releases up to 4.6D called sddb6mi r .This is used to mirror (duplicate) informative Admin DB information to the SAPdatabase.
The mirror contains most of the tables that the Admin DB contains but thesetables have one column less. They all have no mirror flag column. Although thisshould not be necessary, if you want to create the mirrored tables manually, do not attempt to create these tables using exactly the same structure as in the Admin DB.

7/18/2019 SAP DB2 Administration Guide
http://slidepdf.com/reader/full/sap-db2-administration-guide-56d69bf9cdc08 210/230
210 July 2006
brarchive and brrestore backend Library Architecture
br ar chi ve and brrestore were designed with an open interface to separate log filemanagement logic from the lower-level code responsible for archiving and restoring data. The
interface is described in the SAP system header file vnddb6l f m. h, which can be madeavailable to vendors intending to provide a library interfacing to their archiving product. Theseparation of logic permits the log file management applications to retain full control over the Admin DB, whose interface is not open. At the same time it permits storage productmanufacturers to provide backend libraries that implement low-level file storage to theirproducts, for example, Tivoli Data Protection.
LfmVndInterface
tape
library
TSM
library
script
library
vendor
library
Tape
customerscript
backend
backend
TSM
brarchivebrrestore
AdminDB

7/18/2019 SAP DB2 Administration Guide
http://slidepdf.com/reader/full/sap-db2-administration-guide-56d69bf9cdc08 211/230
July 2006 211
DB2 Control Center Extensions ArchitectureThe DB2 Control Center Extensions make use of an open DB2 interface to add functions tothe DB2 Control Center via additional menu options. These functions are implemented usingthe following architecture:
The DB2 Control Center looks in directory sql l i b/ cc for a file called db2pl ug. zi p. If thisfile exists, it will be loaded. It comprises the SAP extensions for the DB2 Control Center. Inthe context menu of any SAP DB2 instance or database, supplementary menu options will beoffered. If any of these options is chosen, the corresponding SAP extension window appears.From this window, the user can perform several SAP DB2-specific administrative operations.Since all these operations are done on the server, stored procedure sddb6j ds is calledviJDBC. Sddb6j ds calls the Admin Tools and manages the Admin DB ADM<DBSI D>.

7/18/2019 SAP DB2 Administration Guide
http://slidepdf.com/reader/full/sap-db2-administration-guide-56d69bf9cdc08 212/230
212 July 2006
Appendix D: Example of Fileinit<DBSID>.db6
File init<DBSID>.db6 on UNIXThe following is an example of an environment file under UNIX:######################################################################### ## SAP DB2 Uni vers al DB f or Uni x/ Wi ndows Envi r onment Fi l e ## ## Encl ose par amet er val ues whi ch consi st of more t han one symbol i n ## doubl e quotes. ## Af t er any symbol , parameter def i ni t i on can be cont i nued on t he next ## l i ne. ## A parameter val ue l i st shoul d be encl osed i n parent heses, t he l i st ## i t ems shoul d be del i mi t ed by commas. ## There can be any number of whi t e spaces ( bl anks, t abs and new l i nes) #
# between symbol s f or parameter def i ni t i on. ## ######################################################################### # db2<dbsi d> home di r ectory## def aul t : no def aul tI NSTHOME = / db2/ Y6D
# Log f i l e archi ve di rect ory## def aul t : / db2/ <DBSI D>/ l og_archi veDB2DB6_ARCHI VE_PATH = / db2/ Y6D/ l og_ar chi ve
# Log f i l e retr i eve di rectory## defaul t : / db2/ <DBSI D>/ l og_r et r i eve
DB2DB6_RETRI EVE_PATH = / db2/ Y6D/ l og_r et r i eve
# Temporar y work di r ectory## def aul t : / t mpDB2DB6_TEMP_DI R = / t mp
# St andby di r ect ory## def aul t : no def aul t# DB2DB6_STANDBY_DI R =
# i gnor e er r or s on st andby di r## def aul t : OFF# DB2DB6_STANDBY_DI R_NOERR = ON
# i f ON, brar chi ve copi es Admi n DB backup SAR f i l e t o STANDBY_DI R## def aul t : OFF# DB2DB6_STANDBY_DI R_ADMDBSAR = ON
# Di rect userexi t ar chi vi ng## def aul t : no def aul tDB2DB6_UEXI T_DI RECT = TSM: DEFAULT
# Vendor user exi t ar chi vi ng## def aul t : no def aul t# DB2DB6_VENDOR_UEXI T =

7/18/2019 SAP DB2 Administration Guide
http://slidepdf.com/reader/full/sap-db2-administration-guide-56d69bf9cdc08 213/230
July 2006 213
# user exi t archi ve wi t hout ADMDB## def aul t : OFFDB2DB6_UEXI T_ARCHI VE_WO_DB = ON
# user exi t r et r i eve wi t hout ADMDB
## def aul t : OFF# DB2DB6_UEXI T_RETRI EVE_WO_DB = ON
# deact i vat e si gnal handl i ng f or SI GSEGV and SI GBUS## def aul t : OFF# DB2DB6_CORE = ON
# done ej ect t ape ( same as - one)## def aul t : OFF# DB2DB6_NO_EJ ECT = ON
# Scri pt name for - d scri pt#
# def aul t : no def aul tDB2DB6_LI BDB6SC_SCRI PT =
# TSM mul t i t hr ead support i s r equi r ed, i f TSM LANFREE opt i on shoul d be used## def aul t : OFF# DB2DB6_TSM_MULTI THREADED = ON
# TSM shared l i br ary## def aul t : l i bApi TSM64. a(dsmapi sh_64. o)# DB2DB6_TSM_SLI B = l i bApi TSM64. a( dsmapi sh_64. o)
# Admi n DB r eor g f r equency i n days## def aul t : 7# DB2DB6_ADMDB_REORG_FREQUENCY = 7
# Di sconnect f r omTSM af t er t hi s t i me i n seconds of no r esponse. A val ue of zer o t ur nsof f t hi s t i meout mechani sm.## def aul t : 0# DB2DB6_TSM_TI MEOUT = 0
# User exi t Trace# DB2DB6_TRC_DB2UEXT2 = ONDB2DB6_TRC_DB2UEXT2_LEVEL = 3DB2DB6_TRC_DB2UEXT2_PATH = / db2/ Y6D/ db2dump
# Br ar chi ve Tr ace# DB2DB6_TRC_BRARCHI VE = ONDB2DB6_TRC_BRARCHI VE_LEVEL = 3DB2DB6_TRC_BRARCHI VE_PATH = / db2/ Y6D/ db2dump
# Br r est ore Tr ace# DB2DB6_TRC_BRRESTORE = ONDB2DB6_TRC_BRRESTORE_LEVEL = 3DB2DB6_TRC_BRRESTORE_PATH = / db2/ Y6D/ db2dump
# St ored Procedur e Trace# DB2DB6_TRC_SDDB6J DS = ONDB2DB6_TRC_SDDB6J DS_LEVEL = 3DB2DB6_TRC_SDDB6J DS_PATH = / db2/ Y6D/ db2dump
# TSM Uti l Trace# DB2DB6_TRC_DB6ADUTL = ONDB2DB6_TRC_DB6ADUTL_LEVEL = 3DB2DB6_TRC_DB6ADUTL_PATH = / db2/ Y6D/ db2dump
7/18/2019 SAP DB2 Administration Guide
http://slidepdf.com/reader/full/sap-db2-administration-guide-56d69bf9cdc08 214/230
214 July 2006
# Backup/ Restor e tool Trace# DB2DB6_TRC_BRDB6BRT = ONDB2DB6_TRC_BRDB6BRT_LEVEL = 3DB2DB6_TRC_BRDB6BRT_PATH = / db2/ Y6D/ db2dump
# DB6CLP Tr ace
# DB2DB6_TRC_DB6CLP = ONDB2DB6_TRC_DB6CLP_LEVEL = 3DB2DB6_TRC_DB6CLP_PATH = / db2/ Y6D/ db2dump
# Data Col l ect or TraceDB2DB6_TRC_DMDB6RDI = ONDB2DB6_TRC_DMDB6RDI _LEVEL = 9DB2DB6_TRC_DMDB6RDI _PATH = / t mp
# Runst ats Tool TraceDB2DB6_TRC_DMDB6SRP = ONDB2DB6_TRC_DMDB6SRP_LEVEL = 3DB2DB6_TRC_DMDB6SRP_PATH = / t mp
# Reor g Tabl espace Tool Trace# DB2DB6_TRC_DMDB6RTS = ON
DB2DB6_TRC_DMDB6RTS_LEVEL = 3DB2DB6_TRC_DMDB6RTS_PATH = / db2/ Y6D/ db2dump
# Backup DB Tool Trace# DB2DB6_TRC_DMDB6BKP = ONDB2DB6_TRC_DMDB6BKP_LEVEL = 3DB2DB6_TRC_DMDB6BKP_PATH = / db2/ Y6D/ db2dump
# Hi s tory Ut i l i t y# DB2DB6_TRC_SDDB6HI S = ONDB2DB6_TRC_SDDB6HI S_LEVEL = 3DB2DB6_TRC_SDDB6HI S_PATH = / db2/ Y6D/ db2dump
# Mi r r or Ut i l i t y# DB2DB6_TRC_SDDB6MI R = ONDB2DB6_TRC_SDDB6MI R_LEVEL = 3DB2DB6_TRC_SDDB6MI R_PATH = / db2/ Y6D/ db2dump
# backup r et r i es## def aul t : 10# DB2DB6_DMDB6BKP_RETRI ES = 10
# backup bl ock si ze f or t apes## defaul t : 1024# DB2DB6_DMDB6BKP_BLOCK_SI ZE = 1024
# backup ut i l i mpact pri ori t y## def aul t : 0# DB2DB6_DMDB6BKP_UTI L_ I MPACT_PRI ORI TY = 0
# enabl e backup compress i on## def aul t : OFF# DB2DB6_DMDB6BKP_COMPRESS = OFF
# onl i ne backup i ncl udi ng l ogs## def aul t : OFF# DB2DB6_DMDB6BKP_I NCLUDE_LOGS = OFF
# Update thr eshol d i n per cent t o f l ag t abl es f or RUNSTATS## def aul t : 15# DB2DB6_DMDB6SRP_UPDATE_THRESHOLD = 15

7/18/2019 SAP DB2 Administration Guide
http://slidepdf.com/reader/full/sap-db2-administration-guide-56d69bf9cdc08 215/230
July 2006 215
# Mi ni mum t abl e si ze i n rows t o f l ag t abl es f or RUNSTATS## defaul t : 1000# DB2DB6_DMDB6SRP_TABLESI ZE_THRESHOLD = 1000
# backup bl ock si ze f or t apes
## def aul t : no def aul t# DB2DB6_DB2DB6_BLOCK_SI ZE = 1024
# Per cent age of r ows r ead f or t abl e si ze cal cul ati on f or l ong and l ob col umns## def aul t : 10# DB2DB6_DB6SRPRTS_PCT_LONG_LOB = 10
# Number of days t o r ef r esh CCMS ar chi ve l og i nf ormat i on## def aul t : 14# DB2DB6_DMDB6RDI _REFRESH_LOG_I NFO = 14
######################################################################### End of Envi r onment Fi l e #
########################################################################F i l e

7/18/2019 SAP DB2 Administration Guide
http://slidepdf.com/reader/full/sap-db2-administration-guide-56d69bf9cdc08 216/230
216 July 2006
init<DBSID>.db6 on WindowsThe following is an example of an environment file on Windows:######################################################################### ## SAP DB2 Uni vers al DB f or Uni x/ Wi ndows Envi r onment Fi l e ## ## Encl ose par amet er val ues whi ch consi st of more t han one symbol i n ## doubl e quotes. ## Af t er any symbol , parameter def i ni t i on can be cont i nued on t he next ## l i ne. ## A parameter val ue l i st shoul d be encl osed i n parent heses, t he l i st ## i t ems shoul d be del i mi t ed by commas. ## There can be any number of whi t e spaces ( bl anks, t abs and new l i nes) ## between symbol s f or parameter def i ni t i on. ## ######################################################################### # db2<dbsi d> home di r ectory#
# def aul t : no def aul tI NSTHOME = c: \ db2n4d
# Log f i l e archi ve di rect ory## def aul t : <dr i ve>: \ db2\ <DBSI D>\ l og_archi veDB2DB6_ARCHI VE_PATH = c: \ db2\ N4D\ l og_ar chi ve
# Log f i l e retr i eve di rectory## def aul t : <dr i ve>: \ db2\ <DBSI D>\ l og_r etr i eveDB2DB6_RETRI EVE_PATH = c: \ db2\ N4D\ l og_r et r i eve
# Temporar y work di r ectory## def aul t : C: \ WI NNT\ TEMP\ 1
DB2DB6_TEMP_DI R = C: \ WI NNT\ TEMP# St andby di r ect ory## def aul t : no def aul t# DB2DB6_STANDBY_DI R =
# i gnor e er r or s on st andby di r## def aul t : OFF# DB2DB6_STANDBY_DI R_NOERR = ON
# i f ON, brar chi ve copi es Admi n DB backup SAR f i l e t o STANDBY_DI R## def aul t : OFF# DB2DB6_STANDBY_DI R_ADMDBSAR = ON
# Di rect userexi t ar chi vi ng## def aul t : no def aul tDB2DB6_UEXI T_DI RECT = TSM: DEFAULT
# Vendor user exi t ar chi vi ng## def aul t : no def aul t# DB2DB6_VENDOR_UEXI T =
# user exi t archi ve wi t hout ADMDB## def aul t : OFFDB2DB6_UEXI T_ARCHI VE_WO_DB = ON
# user exi t r et r i eve wi t hout ADMDB
#

7/18/2019 SAP DB2 Administration Guide
http://slidepdf.com/reader/full/sap-db2-administration-guide-56d69bf9cdc08 217/230

7/18/2019 SAP DB2 Administration Guide
http://slidepdf.com/reader/full/sap-db2-administration-guide-56d69bf9cdc08 218/230
218 July 2006
# Runst ats Tool Trace# DB2DB6_TRC_DMDB6SRP = ONDB2DB6_TRC_DMDB6SRP_LEVEL = 3DB2DB6_TRC_DMDB6SRP_PATH = c: \ db2\ N4D\ db2dump
# Reor g Tabl espace Tool Trace# DB2DB6_TRC_DMDB6RTS = ONDB2DB6_TRC_DMDB6RTS_LEVEL = 3DB2DB6_TRC_DMDB6RTS_PATH = c: \ db2\ N4D\ db2dump
# Backup DB Tool Trace# DB2DB6_TRC_DMDB6BKP = ONDB2DB6_TRC_DMDB6BKP_LEVEL = 3DB2DB6_TRC_DMDB6BKP_PATH = c: \ db2\ N4D\ db2dump
# Hi s tory Ut i l i t y# DB2DB6_TRC_SDDB6HI S = ONDB2DB6_TRC_SDDB6HI S_LEVEL = 3DB2DB6_TRC_SDDB6HI S_PATH = c: \ db2\ N4D\ db2dump
# Mi r r or Ut i l i t y
# DB2DB6_TRC_SDDB6MI R = ONDB2DB6_TRC_SDDB6MI R_LEVEL = 3DB2DB6_TRC_SDDB6MI R_PATH = c: \ db2\ N4D\ db2dump
# backup r et r i es## def aul t : 10# DB2DB6_DMDB6BKP_RETRI ES = 10
# t ape patt ern## defaul t : \ \# DB2DB6_DMDB6BKP_TAPE_PATTERN = \ \
# backup bl ock si ze f or t apes## defaul t : 1024# DB2DB6_DMDB6BKP_BLOCK_SI ZE = 1024
# backup ut i l i mpact pri ori t y## def aul t : 0# DB2DB6_DMDB6BKP_UTI L_ I MPACT_PRI ORI TY = 0
# enabl e backup compress i on## def aul t : OFF# DB2DB6_DMDB6BKP_COMPRESS = OFF
# onl i ne backup i ncl udi ng l ogs## def aul t : OFF
# DB2DB6_DMDB6BKP_I NCLUDE_LOGS = OFF
# Update thr eshol d i n per cent t o f l ag t abl es f or RUNSTATS## def aul t : 15# DB2DB6_DMDB6SRP_UPDATE_THRESHOLD = 15
# Mi ni mum t abl e si ze i n rows t o f l ag t abl es f or RUNSTATS## defaul t : 1000# DB2DB6_DMDB6SRP_TABLESI ZE_THRESHOLD = 1000
# backup bl ock si ze f or t apes## def aul t : no def aul t# DB2DB6_DB2DB6_BLOCK_SI ZE = 1024

7/18/2019 SAP DB2 Administration Guide
http://slidepdf.com/reader/full/sap-db2-administration-guide-56d69bf9cdc08 219/230
July 2006 219
# Per cent age of r ows r ead f or t abl e si ze cal cul ati on f or l ong and l ob col umns## def aul t : 10# DB2DB6_DB6SRPRTS_PCT_LONG_LOB = 10
# Number of days t o r ef r esh CCMS ar chi ve l og i nf ormat i on
## def aul t : 14# DB2DB6_DMDB6RDI _REFRESH_LOG_I NFO = 14
######################################################################### End of Envi r onment Fi l e #########################################################################

7/18/2019 SAP DB2 Administration Guide
http://slidepdf.com/reader/full/sap-db2-administration-guide-56d69bf9cdc08 220/230
220 July 2006
7/18/2019 SAP DB2 Administration Guide
http://slidepdf.com/reader/full/sap-db2-administration-guide-56d69bf9cdc08 221/230
July 2006 221
Appendix E: Example of Customer Scriptdb6sctsm.smp#! / bi n/ sh#**************** **************** **************** **************** *****# *# SAP AG Wal l dor f / Germany *# Syst eme, Anwendungen und Pr odukte i n der Dat enver ar bei t ung *# *# ( C) Copyr i ght SAP AG *# *# *# db6sct sm. smp *# *# *# Sampl e scri pt t o be used wi t h br archi ve/ br r est or e - d scri pt . *# *# Thi s sampl e scri pt uses TSM ( dsmc) t o handl e t he l og f i l es. *# I nst ead of dsmc you can use your own commands. Al so you can *# use os commands l i ke cp, t ar, . . . . *# *# At t ent i on: I t i s i mport ant t o r eturn LFMVND_RC_ERROR i f t he *# ar chi ve, r etr i eve or del et e command f ai l es! *# *# Ar gument s: *# act i on *# di rectory *# f i l ename *# *# Returncodes *# LFMVND_STATUS_OK *# LFMVND_RC_ERROR *# LFMVND_COMMAND_NOT_SUPPORTED *# *#**************** **************** **************** **************** *****
#**************** **************** **************** **************** *****# Ret urnCodes#LFMVND_STATUS_OK=0LFMVND_RC_ERROR=64LFMVND_COMMAND_NOT_ SUPPORTED=71#**************** **************** **************** **************** *****# Vari abl es#r es=$LFMVND_RC_ERRORout f i l e=/ t mp/ dsmc$$. outLANG=Cexport LANG#**************** **************** **************** **************** *****# Ar guments#
act i on=$1di r ectory=$2f i l e=$3#**************** **************** **************** **************** *****# Messages#echo "act i on =$act i on"echo "di r ect ory=$di r ect ory"echo "f i l e =$f i l e"#**************** **************** **************** **************** *****# Conf i gurati on secti on#mgmt cl ass=DEFAULTI NI FI LE=$I NSTHOME/ admi ntool s/ i ni t $DB2DBDFT. db6i f [ ! - f $I NI FI LE ]t hen
I NI FI LE=/ usr / sap/ $SAPSYSTEMNAME/ SYS/ gl obal / i ni t $DB2DBDFT. db6
f i

7/18/2019 SAP DB2 Administration Guide
http://slidepdf.com/reader/full/sap-db2-administration-guide-56d69bf9cdc08 222/230
222 July 2006
#**************** **************** **************** **************** *****# Pat h t o put t he retr i eved l ogf i l e#ar ch_pat h=̀ gr ep DB2DB6_ARCHI VE_PATH $I NI FI LE | cut - f 2 - d =̀ / $DB2DBDFT/case "$act i on" i n#**************** **************** **************** **************** *****
# Thi s secti on put s t he l ogf i l e to the ar chi ve# "ARCHI VE")
$DSM_DI R/ dsmc archi ve - archmc=$mgmt cl ass - descr i pt i on=' Log f i l e' - compressa=yes$di rect ory/ $f i l e | t ee $outf i l e
G=̀ gr ep ' Ar chi ve pr ocessi ng of. *f i ni shed wi t hout f ai l ur e' $out f i l e`i f [ "$G" = "" ]t hen
r es=$LFMVND_RC_ERRORf i; ;
#**************** **************** **************** **************** *****# Thi s sect i on retr i eves t he l ogf i l e fr om the archi ve# "RETRI EVE")
$DSM_DI R/ dsmc ret r i eve - r epl ace=yes $arch_path/ $f i l e $di r ector y/ $f i l e | t ee
$out f i l eG=̀ gr ep ' Ret r i evi ng. *\ [ Done\ ] ' $out f i l e`i f [ "$G" = "" ]t hen
r es=$LFMVND_RC_ERRORf i; ;
#**************** **************** **************** **************** *****# Thi s secti on del et e t he l ogf i l e i n t he archi ve# " DELETE")
$DSM_DI R/ dsmc del ete archi ve - nopr ompt $ar ch_path/ $f i l e | t ee $out f i l eG=̀ gr ep ' Ar chi ve Del ete. *\ [ Sent \ ] ' $out f i l e`i f [ "$G" = "" ]t hen
r es=$LFMVND_RC_ERRORf i; ;
#**************** **************** **************** **************** *****# *)
echo "ERROR: act i on $act i on not suppor t ed"r es=$LFMVND_COMMAND_NOT_ SUPPORTED; ;
esacecho " r c =$res"r m - f $out f i l eexi t $r es

7/18/2019 SAP DB2 Administration Guide
http://slidepdf.com/reader/full/sap-db2-administration-guide-56d69bf9cdc08 223/230
July 2006 223
Appendix F: References
DB2 UDB for UNIX and Windows V7 - AdditionalDocumentationThe following table divides the DB2 books into two categories:
• DB2 guide and reference information
These books contain the common DB2 information for all platforms.
• DB2 installation and configuration information
These books are for DB2 on a specific platform, for example, there are separate Quick
Beginnings books for DB2 on platforms based on Windows and UNIX.
All manuals listed in the following table are available at www.software.ibm.com/db2.
Name Description
Administration Guide Administration Guide: Planning provides an overview ofdatabase concepts, information about design issues (such aslogical and physical database design), and information abouthigh availability.
Administration Guide: Implementation provides informationabout implementation issues such as implementing your
design, accessing databases, auditing, backup and recovery. Administration Guide: Performance provides informationabout database environment and application performanceevaluation and tuning.
Administrative APIReference
Describes the DB2 application programming interfaces(APIs) and data structures that you can use to manage yourdatabases. This book also explains how to call APIs fromyour applications.
Application Building Guide Provides environment setup information and step-by-stepinstructions about how to compile, link, and run DB2applications on Windows, OS/2, and UNIX platforms.
Application DevelopmentGuide
Explains how to develop applications that access DB2databases using embedded SQL or Java (JDBC and SQLJ).Discussion topics include writing stored procedures, writinguser-defined functions, creating user-defined types, usingtriggers, and developing applications in partitionedenvironments or with federated systems.
CLI Guide and Reference Explains how to develop applications that access DB2databases using the DB2 Call Level Interface, a callable SQLinterface that is compatible with the Microsoft ODBCspecification.

7/18/2019 SAP DB2 Administration Guide
http://slidepdf.com/reader/full/sap-db2-administration-guide-56d69bf9cdc08 224/230
224 July 2006
Command Reference Explains how to use the command line processor anddescribes the DB2 commands that you can use to manageyour database.
Data Movement UtilitiesGuide and Reference
Explains how to use DB2 utilities, such as i mpor t , expor t ,l oad, Aut oLoader , and DPROP, that facilitate themovement of data.
Message Reference Lists messages and codes issued by DB2, the InformationCatalog Manager, and the Data Warehouse Center, anddescribes the actions you should take.
SQL Getting Started Introduces SQL concepts and provides examples for manyconstructs and tasks.
SQL Reference, Volume 1and Volume 2
Describes SQL syntax, semantics, and the rules of thelanguage. This book also includes information about release-
to-release incompatibilities, product limits, and catalog views.System Monitor Guideand Reference
Describes how to collect different kinds of information aboutdatabases and the database manager. This book explainshow to use the information to understand database activity,improve performance, and determine the cause of problems.
Troubleshooting Guide Helps you determine the source of errors, recover fromproblems, and use diagnostic tools in consultation with DB2Customer Service.
What’s New Describes the new features, functions, and enhancements inDB2 UDB for UNIX and Windows Version 7.
DB2 Enterprise –
Extended Edition for UNIXQuick Beginnings
Provides planning, installation, and configuration information
for DB2 Enterprise - Extended Edition on UNIX platforms.This book also contains installation and setup information formany supported clients.
DB2 Enterprise –Extended Edition forWindows QuickBeginnings
Provides planning, installation, and configuration informationfor DB2 Enterprise - Extended Edition for Windows 32-bitoperating systems. This book also contains installation andsetup information for many supported clients.
DB2 for UNIX QuickBeginnings
Provides planning, installation, migration, and configurationinformation for DB2 Universal Database on UNIX platforms.This book also contains installation and setup information formany supported clients.
DB2 for Windows QuickBeginnings
Provides planning, installation, migration, and configurationinformation for DB2 Universal Database on Windows 32-bitoperating systems. This book also contains installation andsetup information for many supported clients.

7/18/2019 SAP DB2 Administration Guide
http://slidepdf.com/reader/full/sap-db2-administration-guide-56d69bf9cdc08 225/230
July 2006 225
DB2 UDB for UNIX and Windows V8 - AdditionalDocumentation
All manuals listed in the following table are available at software.ibm.com/db2.
Name Description
Administration Guide Administration Guide: Planning provides an overview ofdatabase concepts, information about design issues (such aslogical and physical database design), and information abouthigh availability.
Administration Guide: Implementation provides informationabout implementation issues such as implementing yourdesign, accessing databases, auditing, backup and recovery.
Administration Guide: Performance provides information aboutdatabase environment and application performance evaluationand tuning.
Administrative APIReference
Describes the DB2 application programming interfaces (APIs)and data structures that you can use to manage yourdatabases. This book also explains how to call APIs from yourapplications.
Application DevelopmentGuide: Building andRunning Applications
Provides environment setup information and step-by-stepinstructions about how to compile, link, and run DB2applications on Windows, OS/2, and UNIX platforms.
Application Development
Guide, ProgrammingClient Applications andProgramming Server Applications
Explains how to develop applications that access DB2
databases using embedded SQL or Java (JDBC and SQLJ).Discussion topics include writing stored procedure, writinguser-defined functions, creating user-defined types, usingtriggers, and developing applications in partitionedenvironments or with federated systems.
CLI Guide andReference Volume 1 andVolume 2
Explains how to develop applications that access DB2databases using the DB2 Call Level Interface, a callable SQLinterface that is compatible with the Microsoft ODBCspecification.
Command Reference Explains how to use the command line processor anddescribes the DB2 commands that you can use to manageyour database.
Data Movement UtilitiesGuide and Reference
Explains how to use DB2 utilities, such as i mpor t , expor t ,l oad, Aut oLoader , and DPROP, that facilitate the movementof data.
Message Reference Lists messages and codes issued by DB2, the InformationCatalog Manager, and the Data Warehouse Center, anddescribes the actions you should take.

7/18/2019 SAP DB2 Administration Guide
http://slidepdf.com/reader/full/sap-db2-administration-guide-56d69bf9cdc08 226/230
226 July 2006
SQL Getting Started Introduces SQL concepts and provides examples for manyconstructs and tasks.
SQL Reference, Volume1 and Volume 2
Describes SQL syntax, semantics, and the rules of thelanguage. This book also includes information about release-to-release incompatibilities, product limits, and catalog views.
System Monitor Guideand Reference
Describes how to collect different kinds of information aboutdatabases and the database manager. This book explainshow to use the information to understand database activity,improve performance, and determine the cause of problems.
What’s New Describes the new features, functions, and enhancements inDB2 UDB for UNIX and Windows Version 8.
Quick Beginnings forDB2 Servers
Provides planning, installation, migration, and configurationinformation for DB2 Universal Database servers.
Quick Beginnings forDB2 Clients
Provides planning, installation, migration, and configurationinformation for DB2 Universal Database client.

7/18/2019 SAP DB2 Administration Guide
http://slidepdf.com/reader/full/sap-db2-administration-guide-56d69bf9cdc08 227/230
July 2006 227
Glossary and IndexThis glossary defines terms used in this documentation or terms often used by supportpersonnel in connection with the Admin Tools. If appropriate, it also includes links to other
parts of this documentation, which describe the term in more detail.
If you are unable to find an appropriate link for a topic in this documentation,refer to the table of contents or the DB2 documentation.
Term Description
<DBSID> and <dbsid>
(SAP database name) Refer to “<SAPSID> and <sapsid>” in this table.
<SAPSID> and <sapsid>
(SAP system ID)
With the introduction of MCOD systems, it is necessary to
differentiate between SAP system IDs and SAP databasenames. The changes are as follows:
• The former SAP system ID <SI D>or <si d>changes
to <SAPSI D>or <sapsi d>.
• The former SAP database name <SI D>or <si d>changes to <DBSI D>or <dbsi d>.
The IDs and the SAP database names arecase-sensitive. Make sure that you observelower and upper case!
Additionally, user IDs (db2<dbsi d>, <sapsi d>adm,sapr 3, sap<sapsi d>) and directory names areaffected. They are explained in more detail in AdminTools: Enhancements and Changes [Page 13].
The new terms are valid for SAP systems with Release4.6D and higher.
Admin Database
Admin DB
Refers to the database associated with the log filemanagement tools.
The Admin DB has the name ADM<DBSI D>. This isseparate from the SAP system database <DBSI D>but
part of the same database manager instancedb2<dbsi d>.
Admin Tools Refers to the SAP DB2 administration tools described inthis documentation.
ADSM The IBM storage product ADSM has been renamed to TSM (Tivoli Storage Manager). For more information, seeNaming Conventions [Page 12].
archiving
archival
Refers to the movement or copying of a file to other longer-term storage, with the assumption that the file is less likelyto be lost there in case of system failure.
See the term User Exit for an example. Not to be confused

7/18/2019 SAP DB2 Administration Guide
http://slidepdf.com/reader/full/sap-db2-administration-guide-56d69bf9cdc08 228/230
228 July 2006
with backup. The opposite of retrieving.
archive directory Refers to the directory where br ar chi ve stores log files,usually / db2/ <DBSI D>/ l og_ar chi ve. It is defined in thei ni file as DB2DB6_ARCHI VE_PATH.
backend Refers to the target used to archive files to, such as tape,TSM or a vendor product
backup Refers to the action of storing the database in a form,which will allow it to be recovered (restored) later.
DB2 Control Center DB2 product offering a graphical interface used toadminister databases. Offers extra functions when usedwith the SAP DB2 Control Center Extensions.
DB2 Control CenterExtensions
Refer to SAP DB2 Control Center Extensions.
DB2 Database Manager Refers to the DB2 software controlling a database instance
and its databases.
ESE Product name and refers to IBM DB2 UDB EnterpriseServer Edition. For more information, see NamingConventions [Page 12].
ini file
init<DBSID>.db6
File i ni t <DBSI D>. db6 contains environment variablesused by the Admin Tools for tasks such as turning ontracing. For more information, see Actions Performed bythe sddb6ins Program [Page 53] and Appendix D: Exampleof File init<dbsid>db6 [Page 212].
log directory Refers to the directory where DB2 stores log files, usually/ db2/ <DBSI D>/ l og_di r / NODExxxx. This is a DB
parameter (db cf g) defined as “Path to log files”.
log file Refers to a file generated by DB2 to keep track of changesmade to the database, for recovery purposes.
log f ile management too ls The term log file management tools refers to componentsof the Admin Tools that perform log file managementtasks:
• br ar chi ve
• brrestore
• db2uext 2 (User Exit)
• db6adut l
• l i bdb6ds (br ar chi ve/brrestore library)
• l i bdb6t p (br ar chi ve/brrestore library)
• l i bdb6sc (br ar chi ve/brrestore library)
• sddb6mi r (4.6D Admin Tools only)
mirror Has two meanings depending on the context:
• A copy of the Admin DB tables mirrored in the SAPdatabase
• A copy of the entire SAP database, often on a

7/18/2019 SAP DB2 Administration Guide
http://slidepdf.com/reader/full/sap-db2-administration-guide-56d69bf9cdc08 229/230
July 2006 229
neighboring machine
Multiple Components inOne Database (MCOD)
Multiple Components in One Database is referred to asMCOD.
This means that you can install an additional SAP systeminto an existing database. The Admin Tools have beenmodified to support this SAP system feature. For moreinformation, see Admin Tools: Enhancements andChanges [Page 13].
For more information about released platforms andavailability, see SAP Service Marketplace atwww.service.sap.com/platforms and chooseMultiple Components in One Database (MCOD).
password file Refers to file dscdb6. conf containing encryptedpasswords. Contents are set using the dscdb6up utility.For more information, see Setting and Updating Passwords
[Page 116].
protocol file Refers to a file generated by an application, such as one ofthe Admin Tools, which indicates what the tool has doneand contains any results or errors.
restore Refers to the action of restoring the database from abackup. This may be done after a system failure or in orderto generate a database copy. This will often require adatabase roll-forward afterwards.
retrieving
retrieval
Refers to the movement or copying of a file back to diskfrom longer-term storage. This is normally only necessaryafter a system failure. See the term User Exit for an
example. Not to be confused with restore, which is theopposite of archiving.
retrieve directory Refers to the directory where brrestore stores log files,usually / db2/ <DBSI D>/ l og_r et r i eve. It is defined inthe i ni file as DB2DB6_RETRI EVE_PATH.
roll-forward Refers to the extraction of database transaction data fromlog files. This information is added to a database after arestore operation in order to bring it up to date. Refer to theDB2 documentation in Appendix F: References [Page 223].
SAP DB2 Control CenterExtensions
Product installed together with the Admin Tools, whichextends the functionality of the DB2 Control Center to
perform SAP-specific database administration tasks. Formore information, see Installation and Setup of the DB2Control Center Extensions [Page 60].
TSM The IBM storage product ADSM has been renamed to TSM (Tivoli Storage Manager). For more information, seeNaming Conventions [Page 12].
User Exit Executable db2uext 2. Used directly by DB2 to archive logfiles out of the log directory to either the archive directory,or directly to TSM. Also used by DB2 to retrieve log files inorder to perform roll-forward operations after a databaserestore operation. For more information, see SAP Log FileManagement [Page 28].

7/18/2019 SAP DB2 Administration Guide
http://slidepdf.com/reader/full/sap-db2-administration-guide-56d69bf9cdc08 230/230