Embed Size (px)
Citation preview

8/12/2019 SAP HANA Cloud Portal Author Tutorial
http://slidepdf.com/reader/full/sap-hana-cloud-portal-author-tutorial 1/22
Experience SAP HANA Cloud Portal
Use SAP HANA Cloud Portal to Create EngagingWebsites in 5 Simple Steps
8/12/2019 SAP HANA Cloud Portal Author Tutorial
http://slidepdf.com/reader/full/sap-hana-cloud-portal-author-tutorial 2/22
TABLE OF CONTENTS
TUTORIAL AGENDA ........................................................................................................................................ 3
PREREQUISITES .............................................................................................................................................. 3
EXERCISE 1: CREATE AND CONFIGURE A NEW CLOUD PORTAL SITE ................................................. 4 Access your trial account ................................................................................................................................... 4Create a new site ............................................................................................................................................... 4Configure the site access level ........................................................................................................................... 4Rename the Home page .................................................................................................................................... 5Set the site width ............................................................................................................................................... 5Show page grid and adjust the site width ......................................................................................................... 5
EXERCISE 2: ADD OUT-OF-THE-BOX WIDGETS FROM THE CONTENT CATALOG ................................ 6 Add content to the About the Event page ......................................................................................................... 6
EXERCISE 3: ADD PAGES AND CONTENT TO YOUR SITE ...................................................................... 11 Add a New Page ............................................................................................................................................... 11 Add content to the Agenda page .................................................................................................................... 12 Add content to Accommodations page structure ........................................................................................... 14 Add content to the Registration page ............................................................................................................. 16 Remove the page grid ...................................................................................................................................... 16
EXERCISE 4: ENHANCE THE SITE LAYOUT AND THEME ........................................................................ 17 Upload a ready-made theme and apply it to the site ...................................................................................... 17
EXERCISE 5: PREVIEW THE SITE AND PUBLISH TO USERS .................................................................. 18 Preview the site ............................................................................................................................................... 18 Publish the site and edit the site URL .............................................................................................................. 18
EXPLORE ADVANCED SITE MANAGEMENT AND AUTHORING CAPABILITIES .................................... 19 Manage Page Navigation Bar ........................................................................................................................... 19
APPENDIX: SETTING UP YOUR TRIAL ACCOUNT .................................................................................... 20
8/12/2019 SAP HANA Cloud Portal Author Tutorial
http://slidepdf.com/reader/full/sap-hana-cloud-portal-author-tutorial 3/22
3
3
In this exercise you will create a new Event Management site by using out-of-the-box content provided withCloud Portal. You will also apply themes, manage the content, and view the immediate results of your work.You will see how easy it is to author and administer engaging sites that expose your cloud-based, social andbusiness applications using Cloud Portal.
TUTORIAL AGENDA
This tutorial is structured into the following exercises:
1. Create and Configure a New Cloud Portal Site In the role of Site Cr eator, you will build a new site for a company’s upcoming open -house event, and configurethe site access level and layout settings.
2. Add Out-of-the-Box Widgets from the Catalog You will learn how to use the out-of-the-box widgets available in the Content Catalog, and then edit them toinclude the event information and promotional items.
3. Add Pages and Content to Your Site In this exercise, you will learn how to add pages and additional content to your event site.
4. Enhance the Site Layout and Theme Using the default theme provided by SAP HANA Cloud Portal, you can create an additional theme file to brandand improve the look-and-feel of your new site.
5. Preview the Site and Publish to Users In this exercise, you will learn how to preview your site, on both the desktop and mobile device, and publish it toend users.
PREREQUISITES
You have established a free trial account for SAP HANA Cloud Portal and have your SAP ID or
SCN credentials. If you do not have a trial HANA Cloud account, see the appendix for the relevant instructions Open the following ZIP file and save the files on your desktop: http://tiny.cc/EventSiteContent .
You will use them for adding content to your site in the steps of this exercise.
Please use Chrome browser in all of the exercises in this tutorial
8/12/2019 SAP HANA Cloud Portal Author Tutorial
http://slidepdf.com/reader/full/sap-hana-cloud-portal-author-tutorial 4/22
4
4
EXERCISE 1: CREATE AND CONFIGURE A NEW CLOUD PORTAL SITE
In this exercise, you assume the role of Site Creator, and build a new site for an upcoming open-house event, using your own
trial account. You then configure the site access level and layout settings.
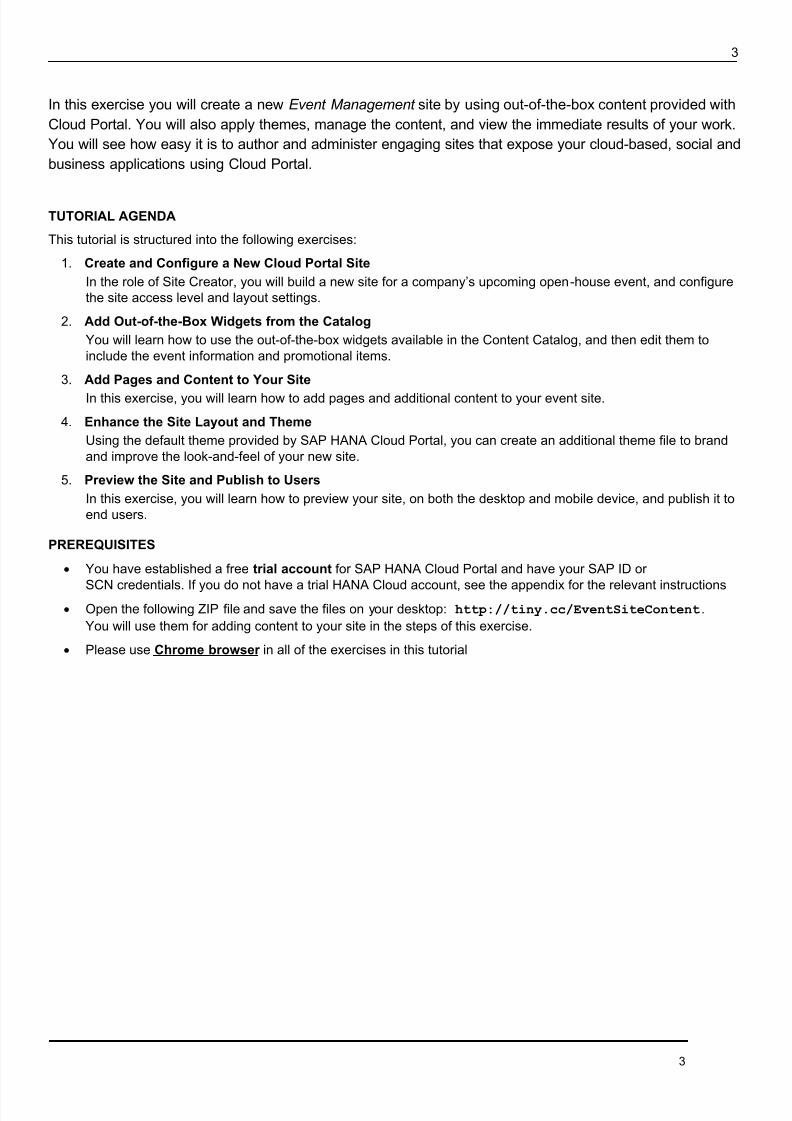
Access your trial account1. Go to https://account.hanatrial.ondemand.com/cockpit .
2. From the side-panel menu at the left, click Services .
3. From the Services list, click SAP HANA Cloud Portal . Cloud Portal opens, displaying the Site Directory.
Create a new site
4. At the top right of the Site Directory screen, click New Site . The New Site dialog box opens.
5. Enter the following information:
Site Name : ATOMIC - Open House Event
Description : <free text>6. Click Create and Open . The new site opens in a new browser tab.
Configure the site access levelYou can define the access level of an entire site, and you can set different access levels for individual pages in a site. Theaccess levels are:
Private : Only users whom you have invited can access the site or page.
Restricted : Only authenticated users can access the site or page.
Public : Anyone can access the site or page.
We will set the access level of the entire site to Public . This makes the site accessible to all end users.
7. From the side-panel menu, click (Site Settings). The Site Settings panel opens.
8. Set the Site Access Level to Public .
8/12/2019 SAP HANA Cloud Portal Author Tutorial
http://slidepdf.com/reader/full/sap-hana-cloud-portal-author-tutorial 5/22
5
5
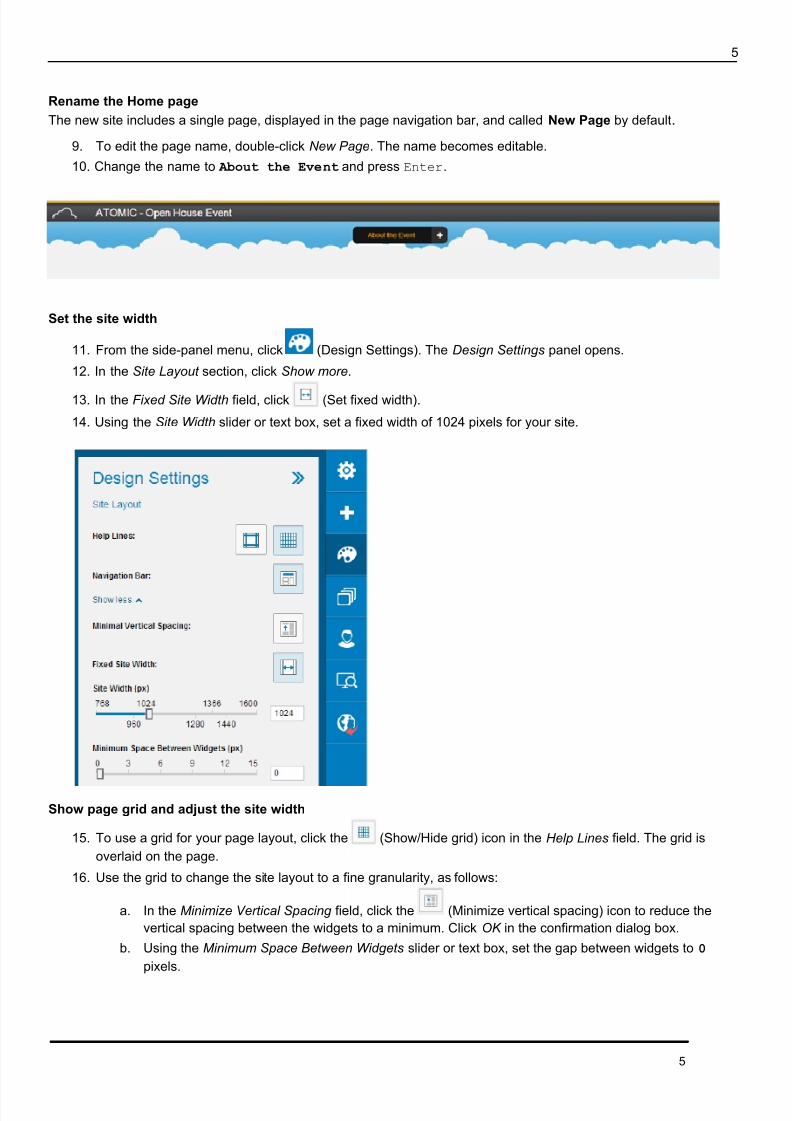
Rename the Home pageThe new site includes a single page, displayed in the page navigation bar, and called New Page by default .
9. To edit the page name, double-click New Page . The name becomes editable.
10. Change the name to About the Event and press Enter .
Set the site width
11. From the side-panel menu, click (Design Settings). The Design Settings panel opens.
12. In the Site Layout section, click Show more .
13. In the Fixed Site Width field, click (Set fixed width).
14. Using the Site Width slider or text box, set a fixed width of 1024 pixels for your site.
Show page grid and adjust the site width
15. To use a grid for your page layout, click the (Show/Hide grid) icon in the Help Lines field. The grid isoverlaid on the page.
16. Use the grid to change the site layout to a fine granularity, as follows:
a. In the Minimize Vertical Spacing field, click the (Minimize vertical spacing) icon to reduce thevertical spacing between the widgets to a minimum. Click OK in the confirmation dialog box.
b. Using the Minimum Space Between Widgets slider or text box, set the gap between widgets to 0 pixels.
8/12/2019 SAP HANA Cloud Portal Author Tutorial
http://slidepdf.com/reader/full/sap-hana-cloud-portal-author-tutorial 6/22
6
6
EXERCISE 2: ADD OUT-OF-THE-BOX WIDGETS FROM THE CONTENT CATALOG
In this exercise, you will learn how to use the out-of-the-box widgets available in the Content Catalog of Cloud Portal,and edit them to include your event information and promotional items.
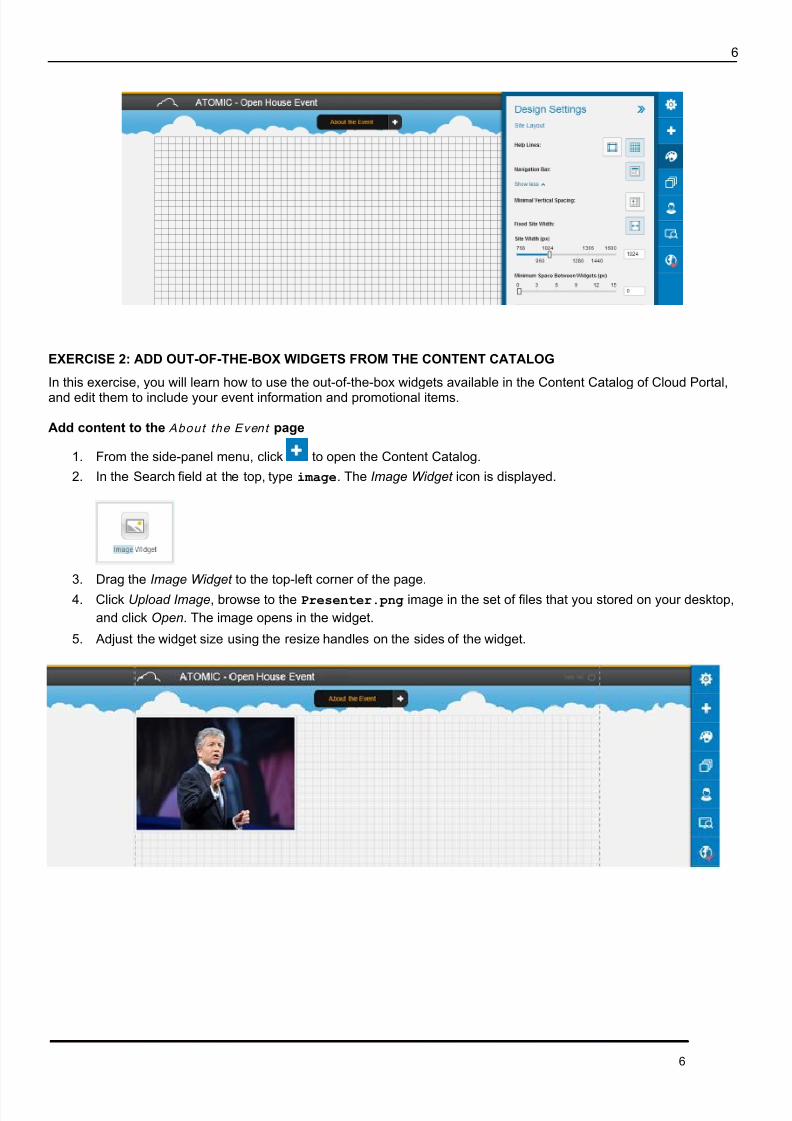
Add content to the About the Event page
1. From the side-panel menu, click to open the Content Catalog.2. In the Search field at the top, type image . The Image Widget icon is displayed.
3. Drag the Image Widget to the top-left corner of the page.
4. Click Upload Image , browse to the Presenter.png image in the set of files that you stored on your desktop,and click Open . The image opens in the widget.
5. Adjust the widget size using the resize handles on the sides of the widget.
8/12/2019 SAP HANA Cloud Portal Author Tutorial
http://slidepdf.com/reader/full/sap-hana-cloud-portal-author-tutorial 7/22
7
7
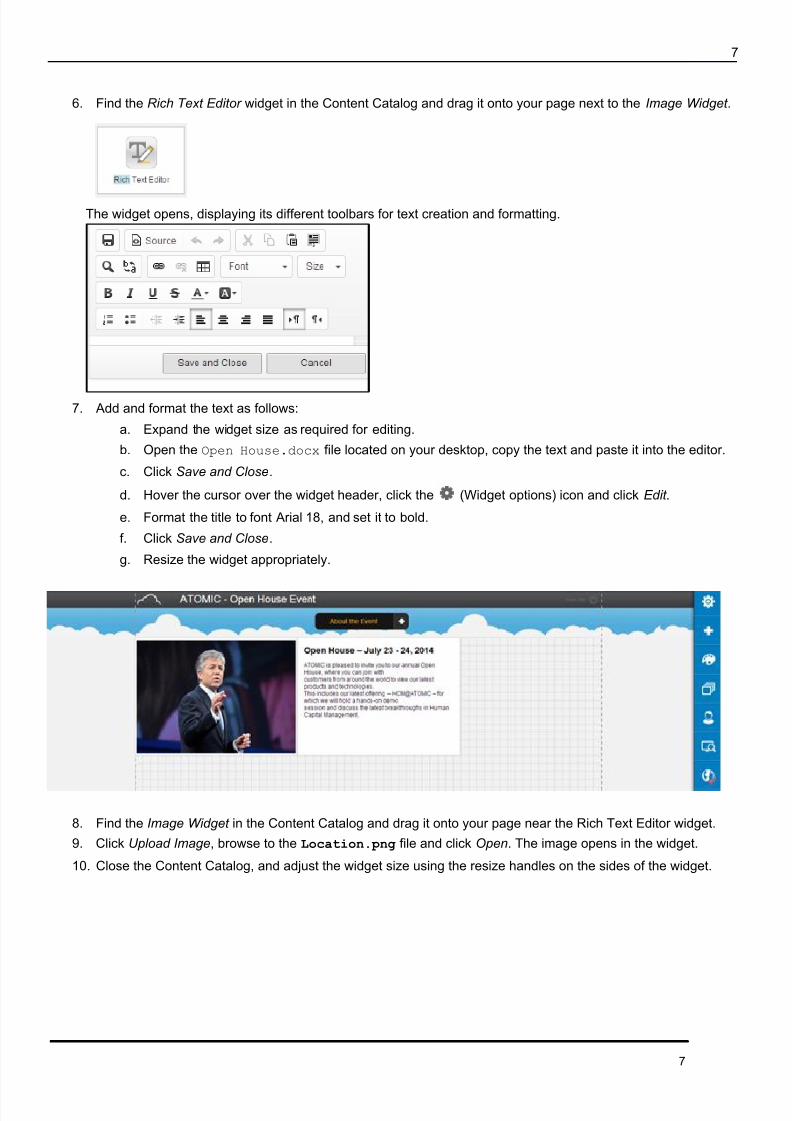
6. Find the Rich Text Editor widget in the Content Catalog and drag it onto your page next to the Image Widget .
The widget opens, displaying its different toolbars for text creation and formatting.
7. Add and format the text as follows:
a. Expand the widget size as required for editing.
b. Open the Open House.docx file located on your desktop, copy the text and paste it into the editor.
c. Click Save and Close .
d. Hover the cursor over the widget header, click the (Widget options) icon and click Edit .
e. Format the title to font Arial 18, and set it to bold.
f. Click Save and Close .
g. Resize the widget appropriately.
8. Find the Image Widget in the Content Catalog and drag it onto your page near the Rich Text Editor widget.
9. Click Upload Image , browse to the Location.png file and click Open . The image opens in the widget.
10. Close the Content Catalog, and adjust the widget size using the resize handles on the sides of the widget.
8/12/2019 SAP HANA Cloud Portal Author Tutorial
http://slidepdf.com/reader/full/sap-hana-cloud-portal-author-tutorial 8/22
8
8
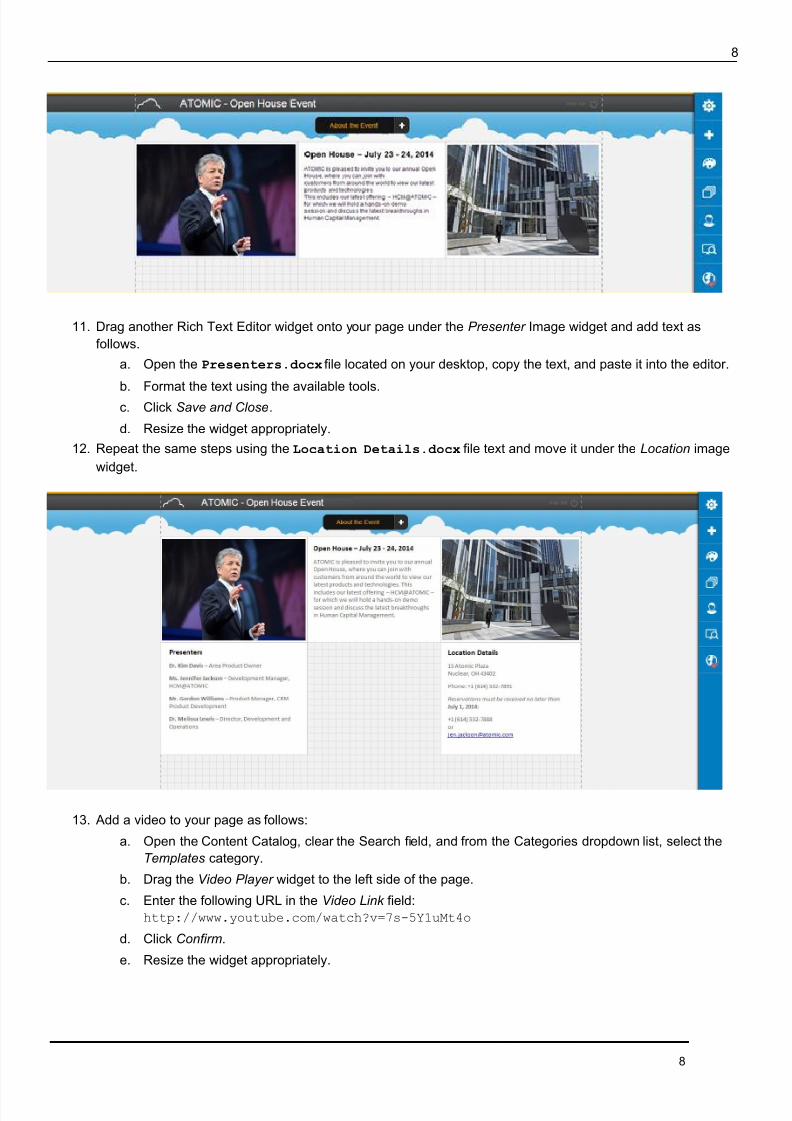
11. Drag another Rich Text Editor widget onto your page under the Presenter Image widget and add text asfollows.
a. Open the Presenters.docx file located on your desktop, copy the text, and paste it into the editor.
b. Format the text using the available tools.c. Click Save and Close .
d. Resize the widget appropriately.12. Repeat the same steps using the Location Details.docx file text and move it under the Location image
widget.
13. Add a video to your page as follows:
a. Open the Content Catalog, clear the Search field, and from the Categories dropdown list, select theTemplates category.
b. Drag the Video Player widget to the left side of the page.
c. Enter the following URL in the Video Link field:http://www.youtube.com/watch?v=7s-5Y1uMt4o
d. Click Confirm .
e. Resize the widget appropriately.
8/12/2019 SAP HANA Cloud Portal Author Tutorial
http://slidepdf.com/reader/full/sap-hana-cloud-portal-author-tutorial 9/22
9
9
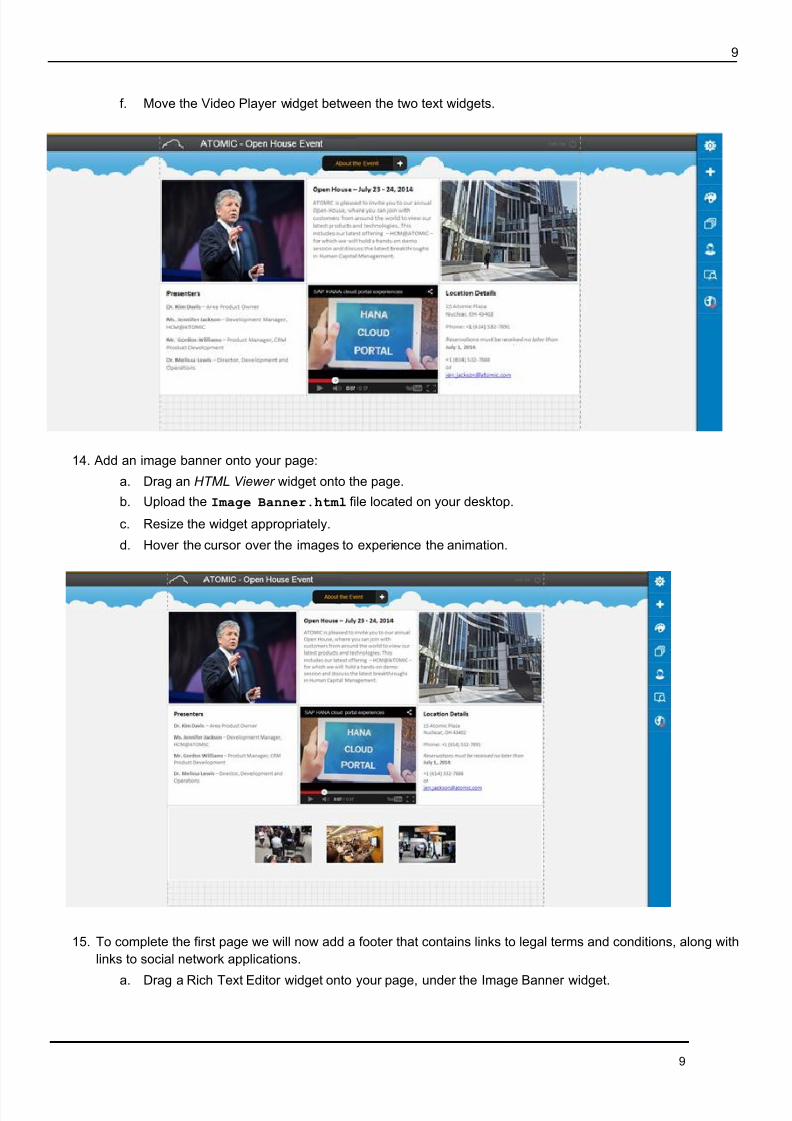
f. Move the Video Player widget between the two text widgets.
14. Add an image banner onto your page:
a. Drag an HTML Viewer widget onto the page.
b. Upload the Image Banner.html file located on your desktop.
c. Resize the widget appropriately.
d. Hover the cursor over the images to experience the animation.
15. To complete the first page we will now add a footer that contains links to legal terms and conditions, along withlinks to social network applications.
a. Drag a Rich Text Editor widget onto your page, under the Image Banner widget.

8/12/2019 SAP HANA Cloud Portal Author Tutorial
http://slidepdf.com/reader/full/sap-hana-cloud-portal-author-tutorial 10/22
10
10
b. Click the Source button in the toolbar
c. Open the Footer.html file located on your desktop using the Notepad editor, copy the text, andpaste it into the editor.
d. Click Save and Close .
e. Resize the widget appropriately.
8/12/2019 SAP HANA Cloud Portal Author Tutorial
http://slidepdf.com/reader/full/sap-hana-cloud-portal-author-tutorial 11/22
11
11
EXERCISE 3: ADD PAGES AND CONTENT TO YOUR SITE
In this exercise, you will learn how to add and manage pages by applying page management capabilities. You will addcontent to the new pages to provide information about accommodations and the registration procedure for the event.
Add a New Page
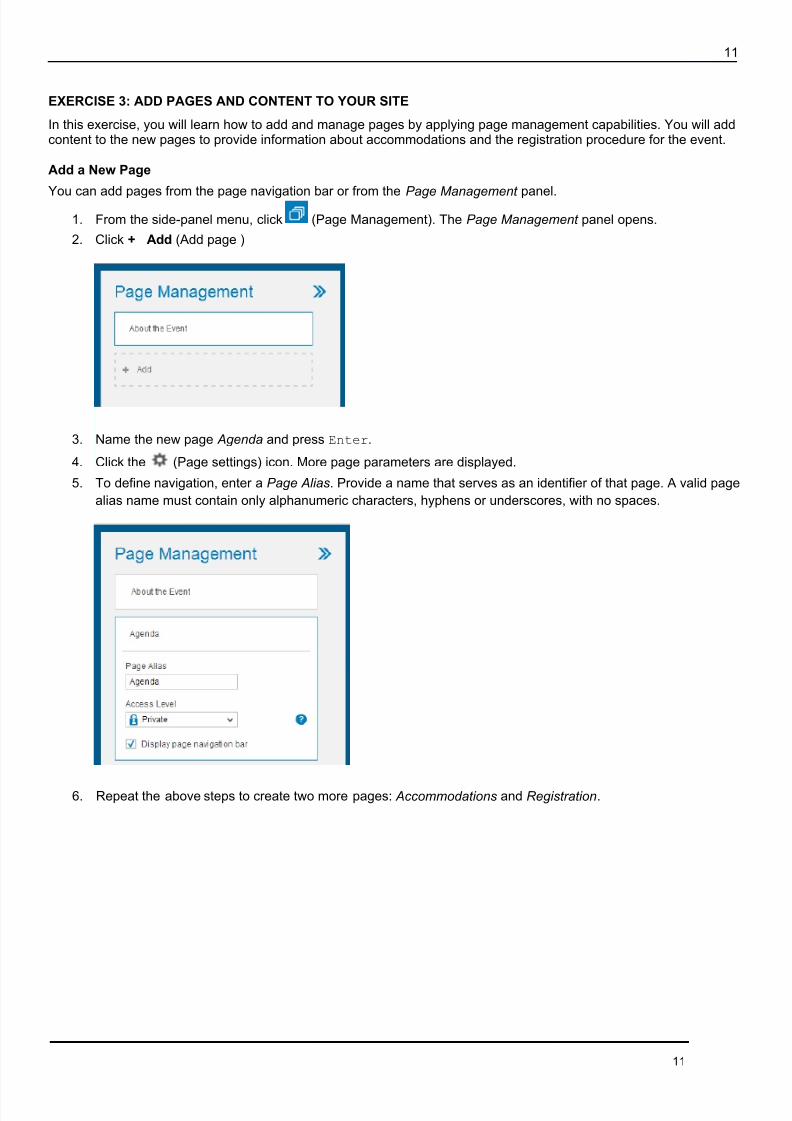
You can add pages from the page navigation bar or from the Page Management panel.1. From the side-panel menu, click (Page Management). The Page Management panel opens.
2. Click + Add (Add page )
3. Name the new page Agenda and press Enter .
4. Click the (Page settings) icon. More page parameters are displayed.
5. To define navigation, enter a Page Alias . Provide a name that serves as an identifier of that page. A valid pagealias name must contain only alphanumeric characters, hyphens or underscores, with no spaces.
6. Repeat the above steps to create two more pages: Accommodations and Registration .
8/12/2019 SAP HANA Cloud Portal Author Tutorial
http://slidepdf.com/reader/full/sap-hana-cloud-portal-author-tutorial 12/22
12
12
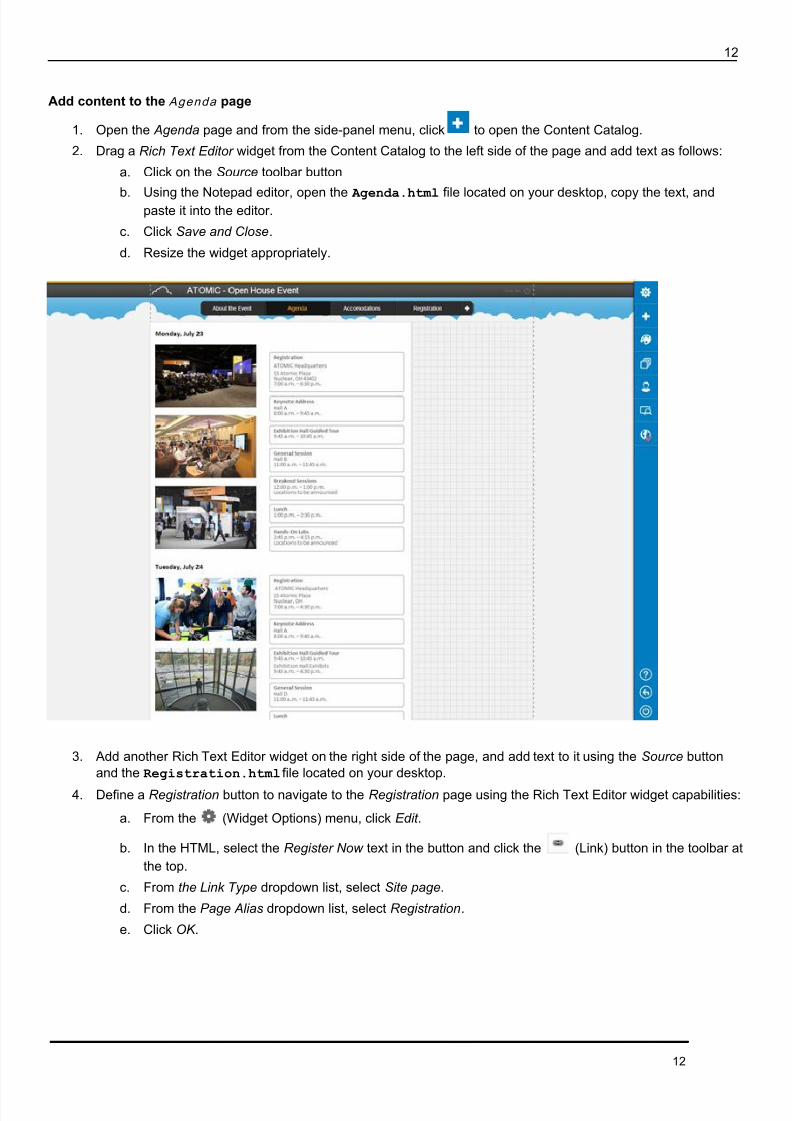
Add content to the Agenda page
1. Open the Agenda page and from the side-panel menu, click to open the Content Catalog.
2. Drag a Rich Text Editor widget from the Content Catalog to the left side of the page and add text as follows:
a. Click on the Source toolbar button
b. Using the Notepad editor, open the Agenda.html file located on your desktop, copy the text, andpaste it into the editor.
c. Click Save and Close .
d. Resize the widget appropriately.
3. Add another Rich Text Editor widget on the right side of the page, and add text to it using the Source buttonand the Registration.html file located on your desktop.
4. Define a Registration button to navigate to the Registration page using the Rich Text Editor widget capabilities:
a. From the (Widget Options) menu, click Edit .
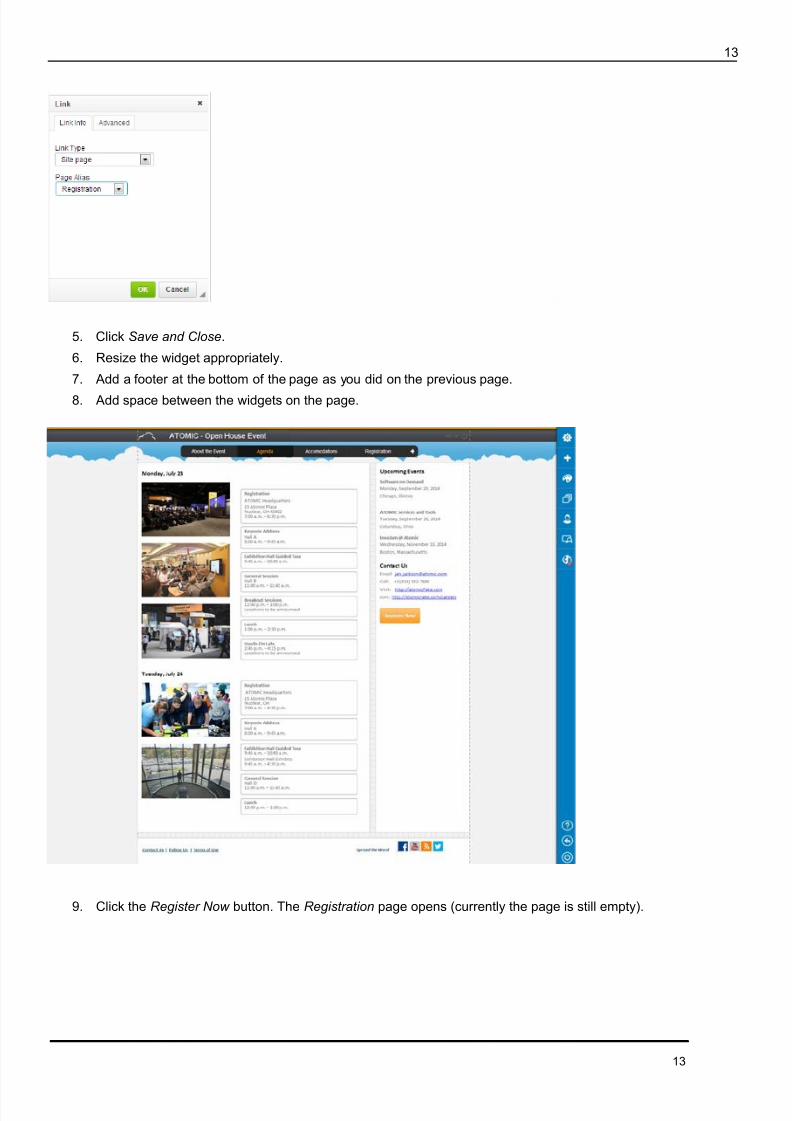
b. In the HTML, select the Register Now text in the button and click the (Link) button in the toolbar atthe top.
c. From the Link Type dropdown list, select Site page .
d. From the Page Alias dropdown list, select Registration .
e. Click OK .
8/12/2019 SAP HANA Cloud Portal Author Tutorial
http://slidepdf.com/reader/full/sap-hana-cloud-portal-author-tutorial 13/22
13
13
5. Click Save and Close .
6. Resize the widget appropriately.
7. Add a footer at the bottom of the page as you did on the previous page.
8. Add space between the widgets on the page.
9. Click the Register Now button. The Registration page opens (currently the page is still empty).
8/12/2019 SAP HANA Cloud Portal Author Tutorial
http://slidepdf.com/reader/full/sap-hana-cloud-portal-author-tutorial 14/22
14
14
Add content to Accommoda t i ons page structure
1. Open the Accommodations page and open the Content Catalog.
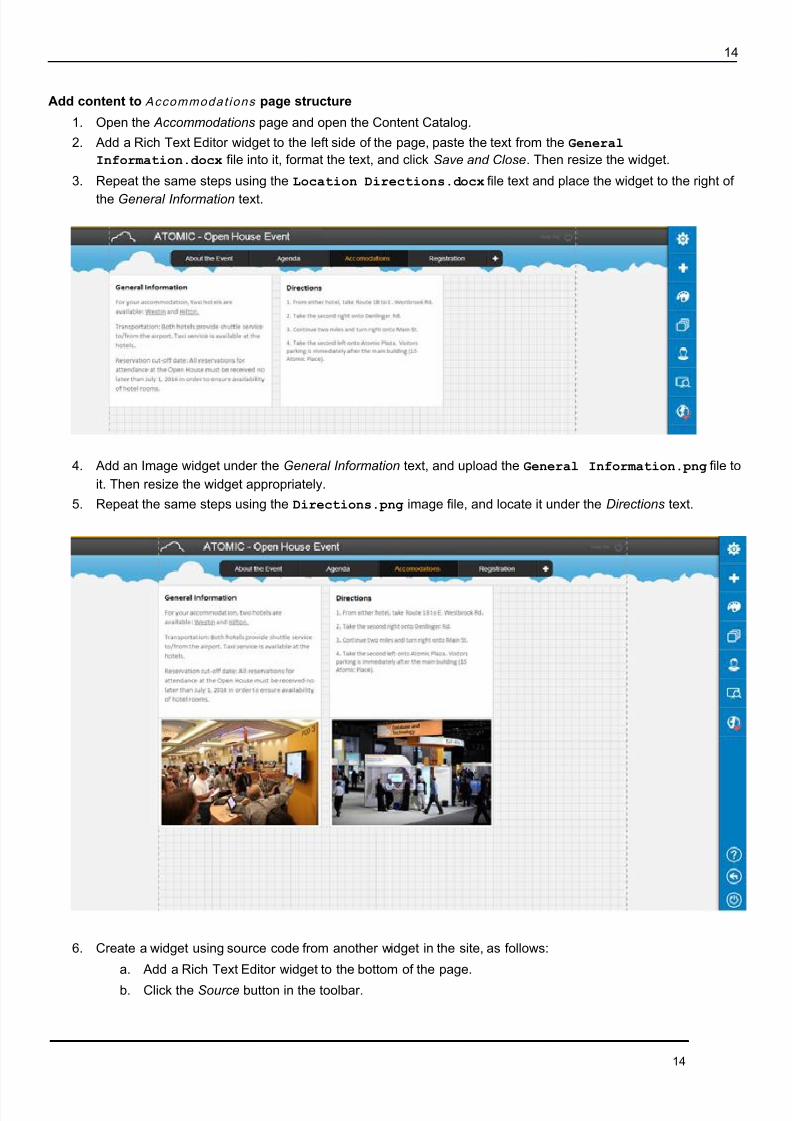
2. Add a Rich Text Editor widget to the left side of the page, paste the text from the GeneralInformation.docx file into it, format the text, and click Save and Close . Then resize the widget.
3. Repeat the same steps using the Location Directions.docx file text and place the widget to the right of
the General Information text.
4. Add an Image widget under the General Information text, and upload the General Information.png file toit. Then resize the widget appropriately.
5. Repeat the same steps using the Directions.png image file, and locate it under the Directions text.
6. Create a widget using source code from another widget in the site, as follows:
a. Add a Rich Text Editor widget to the bottom of the page.
b. Click the Source button in the toolbar.
8/12/2019 SAP HANA Cloud Portal Author Tutorial
http://slidepdf.com/reader/full/sap-hana-cloud-portal-author-tutorial 15/22
15
15
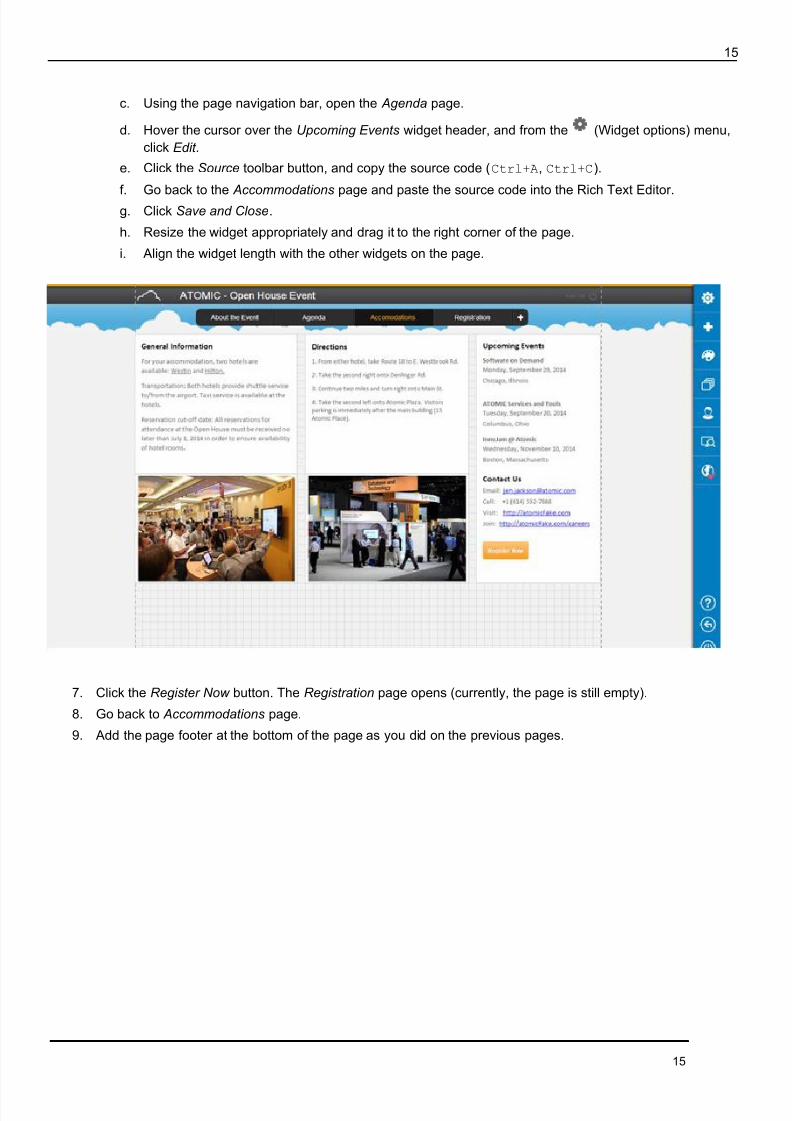
c. Using the page navigation bar, open the Agenda page.
d. Hover the cursor over the Upcoming Events widget header, and from the (Widget options) menu,click Edit .
e. Click the Source toolbar button, and copy the source code ( Ctrl+A , Ctrl+C ).
f. Go back to the Accommodations page and paste the source code into the Rich Text Editor.g. Click Save and Close .
h. Resize the widget appropriately and drag it to the right corner of the page.
i. Align the widget length with the other widgets on the page.
7. Click the Register Now button. The Registration page opens (currently, the page is still empty).
8. Go back to Accommodations page.
9. Add the page footer at the bottom of the page as you did on the previous pages.
8/12/2019 SAP HANA Cloud Portal Author Tutorial
http://slidepdf.com/reader/full/sap-hana-cloud-portal-author-tutorial 16/22
16
16
Add content to the Registrat ion page
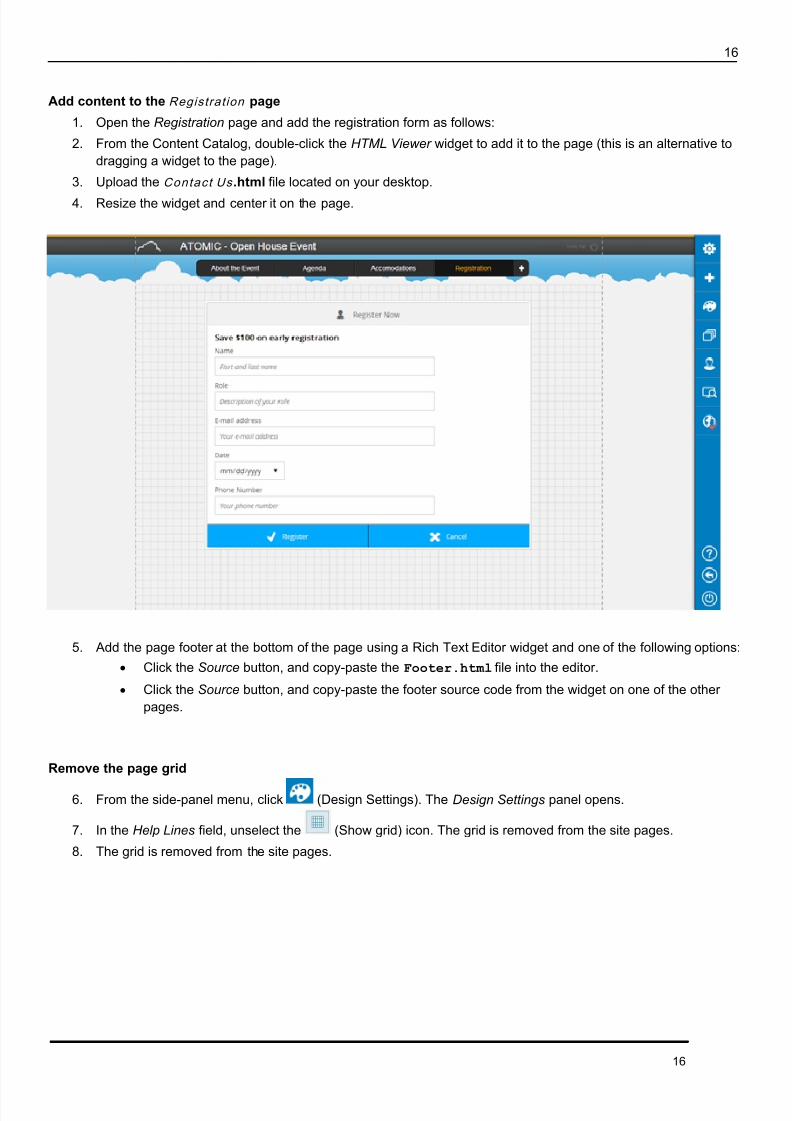
1. Open the Registration page and add the registration form as follows:
2. From the Content Catalog, double-click the HTML Viewer widget to add it to the page (this is an alternative todragging a widget to the page).
3. Upload the Contac t Us .html file located on your desktop.
4. Resize the widget and center it on the page.
5. Add the page footer at the bottom of the page using a Rich Text Editor widget and one of the following options:
Click the Source button, and copy-paste the Footer.html file into the editor.
Click the Source button, and copy-paste the footer source code from the widget on one of the otherpages.
Remove the page grid
6. From the side-panel menu, click (Design Settings). The Design Settings panel opens.
7. In the Help Lines field, unselect the (Show grid) icon. The grid is removed from the site pages.
8. The grid is removed from the site pages.

8/12/2019 SAP HANA Cloud Portal Author Tutorial
http://slidepdf.com/reader/full/sap-hana-cloud-portal-author-tutorial 17/22
17
17
EXERCISE 4: ENHANCE THE SITE LAYOUT AND THEME
Using the default theme provided by SAP HANA Cloud Portal, you can create a new theme based on your company’sbranding and site-design requirements. Cloud Portal supports both CSS and LESS as stylesheet languages for sitetheming.
For more information on designing site themes in Cloud Portal, please refer to this help page .
Upload a ready-made theme and apply it to the siteIn this exercise you will upload a new theme file that includes all the relevant changes required to make your event siteengaging, with a customized style, colors, fonts, background, and frames.
1. In the Cloud Portal Admin Space, click the THEMES tab.
2. Click Add Theme . The Add Theme dialog box opens.
3. Enter the following information:
a. Name: Event Theme
b. Description: <free text>
c. Theme Creator: <your name>d. LESS File: hcp_theme.less located on your desktop
4. Click Add . The new theme is added to the Available Themes table.
5. Click the SITE DIRECTORY tab.
6. Open your site for editing.
7. Open the Design Settings panel and apply the theme to the site.
8/12/2019 SAP HANA Cloud Portal Author Tutorial
http://slidepdf.com/reader/full/sap-hana-cloud-portal-author-tutorial 18/22
18
18
EXERCISE 5: PREVIEW THE SITE AND PUBLISH TO USERS
In this exercise, you will learn how to preview your site on a desktop, tablet or smartphone, and then publish it to yourclients. Once the site is published you will be able to view the site in consumption mode and access it with your mobiledevice.
Preview the siteWhen your site is ready, you can preview the site as it will appear on different devices.
1. In the side-panel menu, click (Site Preview).
2. In the Preview panel, click one of the icons to preview your site on desktop, tablet or smartphone. A fullyfunctional preview of the site as it will appear on the selected device is displayed.
3. Close the Preview panel.
Publish the site and edit the site URL
4. From the side-panel menu, click icon (Publishing Options - Offline)
5. Click Publish and then click Publish again in the confirmation dialog box. A notification dialog box opens,allowing you to access the site or scan its QR code.
6. Close the dialog box.
7. Open the Site Settings panels, and in the Site URL section, click the URL. The editable part of the URL isdisplayed in a text box.
8. Type Event and press Enter . The name shortens the URL and makes it meaningful.
View the site in consumption mode
9. Open the Publishing Options panel.
10. Click the Published Site link in the middle of the panel. A new browser tab opens, displaying the end-user site.
You can navigate through the site and interact with the widgets as an end user would.
Access the site with your mobile device
11. Return to the Authoring Space tab, to the Publishing Options panel.
12. Click the QR Code link to generate the code, and then scan it with your iPad/ iPhone. You will not berequested to provide credentials as the site access level was defined as Public.
8/12/2019 SAP HANA Cloud Portal Author Tutorial
http://slidepdf.com/reader/full/sap-hana-cloud-portal-author-tutorial 19/22
19
19
EXPLORE ADVANCED SITE MANAGEMENT AND AUTHORING CAPABILITIES
Manage Page Navigation Bar
Authors can choose to hide the page navigation bar on a specific page. You can also determine whether or not a pageis displayed in the page navigation bar
1. Open the Page Management panel and hover the cursor over the Registration page title.
2. Click the (Hide the Page) icon to hide the page in the page navigation bar. The page is now hidden in thenavigation bar but it can be displayed from the Register Now button on Agenda and Accommodations pages
3. You can choose to hide the page navigation bar on the Registration page to display only the registration form.Using the (Page Settings) option, clear the Display page navigation bar checkbox.
4. To navigate from this page to other pages you will have to include a navigation button on the page.
Revert Changes Made to the Site You can remove all changes made to the site since it was last published. This option is not available for sites that have
never been published.
5. Click the (Modified since last publish) icon in the side-panel menu. It indicates that the site has beenmodified since it was last published.
6. Open the Publishing Options panel.
7. Click Revert to Last Published Site , and click Revert in the confirmation dialog box.
8. Click Refresh Site in the notification dialog box. Check that the original page settings have been restored andthat the Registration page appears in the page navigation bar.
Set a URL for Downtime
You can point to any HTML page or URL when the system is offline for maintenance or other reasons. This URLreplaces redirection to the default SAP HANA Cloud Portal downtime message page.
9. Open the Site Settings panel.
10. In the URL Redirect When Site is Down section, you can click the Default downtime page link to view thedowntime-message page delivered with Cloud Portal, which is used by default when the system is offline.
11. To redirect to a different page or URL, click (Edit) and enter the required URL in the framed field.
12. Click (Save). You can check the link by clicking the URL, which displays the page in a separate browsertab. You can use the Revert to default link to cancel your latest selection and return to the Cloud Portal defaultdowntime-message page
8/12/2019 SAP HANA Cloud Portal Author Tutorial
http://slidepdf.com/reader/full/sap-hana-cloud-portal-author-tutorial 20/22
20
20
APPENDIX: SETTING UP YOUR TRIAL ACCOUNT
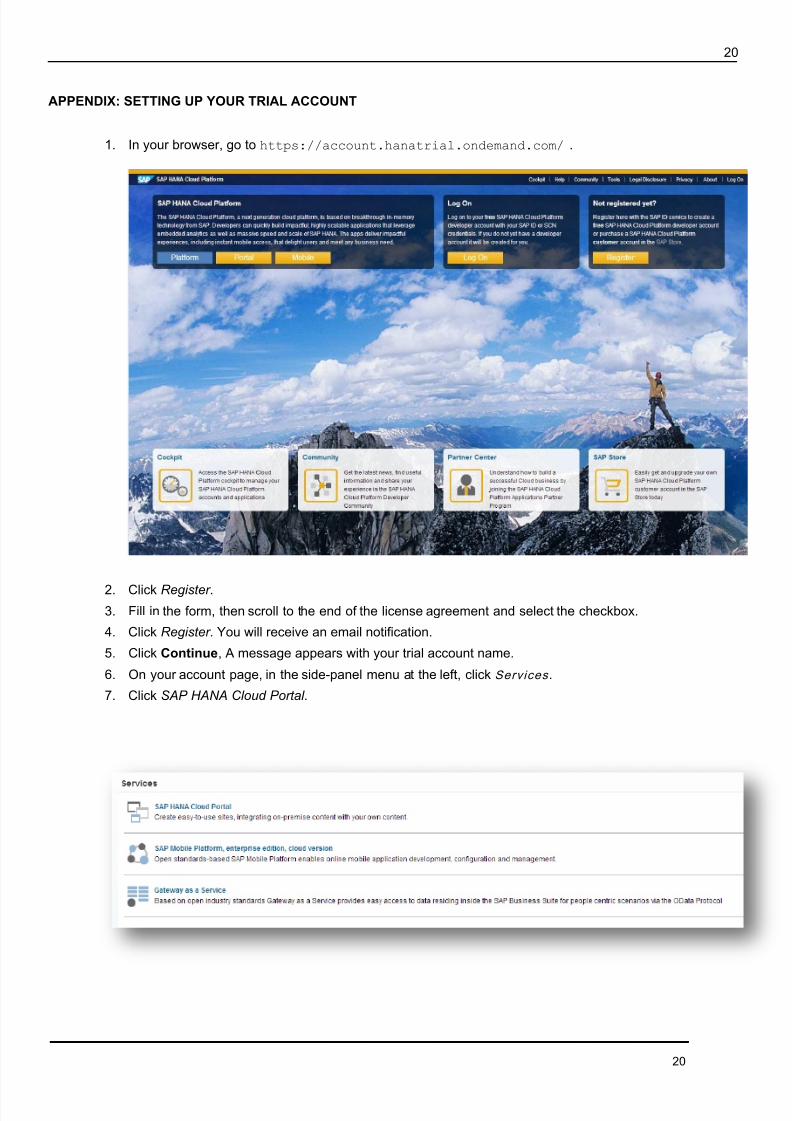
1. In your browser, go to https://account.hanatrial.ondemand.com/ .
2. Click Register .3. Fill in the form, then scroll to the end of the license agreement and select the checkbox.
4. Click Register . You will receive an email notification.
5. Click Continue , A message appears with your trial account name.
6. On your account page, in the side-panel menu at the left, click Services .
7. Click SAP HANA Cloud Portal .
8/12/2019 SAP HANA Cloud Portal Author Tutorial
http://slidepdf.com/reader/full/sap-hana-cloud-portal-author-tutorial 21/22
www sap com
© 2013 SAP AG. All rights reserved.
SAP, R/3, SAP NetWeaver, Duet, PartnerEdge, ByDesign, SAPBusinessObjects Explorer, StreamWork, SAP HANA, and other SAPproducts and services mentioned herein as well as their respectivelogos are trademarks or registered trademarks of SAP AG in Germanyand other countries.
Business Objects and the Business Objects logo, BusinessObjects,Crystal Reports, Crystal Decisions, Web Intelligence, Xcelsius, andother Business Objects products and services mentioned herein aswell as their respective logos are trademarks or registered trademarksof Business Objects Software Ltd. Business Objects is an SAPcompany.
Sybase and Adaptive Server, iAnywhere, Sybase 365, SQL Anywhere, and other Sybase products and services mentioned hereinas well as their respective logos are trademarks or registeredtrademarks of Sybase Inc. Sybase is an SAP company.
Crossgate, m@gic EDDY, B2B 360°, and B2B 360° Services areregistered trademarks of Crossgate AG in Germany and othercountries. Crossgate is an SAP company.
All other product and service names mentioned are the trademarks oftheir respective companies. Data contained in this document servesinformational purposes only. National product specifications may vary.
These materials are subject to change without notice. These materialsare provided by SAP AG and its affiliated companies ("SAP Group")for informational purposes only, without representation or warranty ofany kind, and SAP Group shall not be liable for errors or omissionswith respect to the materials. The only warranties for SAP Groupproducts and services are those that are set forth in the expresswarranty statements accompanying such products and services, ifany. Nothing herein should be construed as constituting an additionalwarranty.

8/12/2019 SAP HANA Cloud Portal Author Tutorial
http://slidepdf.com/reader/full/sap-hana-cloud-portal-author-tutorial 22/22
www sap com