Embed Size (px)
Citation preview

SPACE EMPIRES — Scenario Book
© 2011 GMT Games, LLC — SEPT 2011
�
S CENAR IOBOOK
Version 1.1
GMT Games, LLCP.O. Box 1308 • Hanford, CA 93232–1308 • www.GMTGames.com

SPACE EMPIRES — Scenario Book
© 2011 GMT Games, LLC — SEPT 2011
�
Introduction to the ScenariosPlayer At-Start Forces: Unless otherwise specified, in each sce-nario each player gets the following:• A fully developed home planet (20 CPs).• 3 Colony Ships, 1 Miner, 4 Ship Yards (SY), and 3 Scouts (SC)
at his home planet.
Basic Game: Until comfortable with the rules, it is suggested that you just play with the basic rule set. All players set aside their CV’s, F’s, R’s, SW’s, Mine’s, MS Pipeline counters, and all Alien counters.
Customizable: Give each rule a shot before you judge it. A lot of thought and play went into them. However, once familiar with the game, feel free to play the game any way you want—this game is meant to be customized. You won’t offend the designer!
Galaxy Set Up: Unless otherwise specified, Home System mark-ers of a player’s color are placed in hexes that represent his home territory and Deep Space System markers (white) are placed in all other hexes—even hexes that could possibly have been a home system area if there were more players. Excess system markers are set aside.
Warp Points and Doomsday Machines: Warp Point and Dooms-day Machine counters should not be removed from the game at setup. However, unless you are playing with the appropriate optional rule, they are considered “open space” and are removed from the game when flipped.
Victory Conditions 2-Player: The victory condition for each sce-nario, unless stated otherwise below, is to destroy your opponent’s home world. However, the winning side usually becomes obvious before every last ship of your opponent is eliminated and it is sug-gested that you end the game at that point.
Victory Conditions Multi-Player: Victory in multi-player games, unless stated otherwise below, is to destroy one opponent’s home world. When any player destroys any other player’s home world, he becomes the victor.
Victory Conditions Multi-Player Short Game: A player still wins by being the first to conquer a Homeworld or:
• A player wins by scoring 3 Colony Points. A player gets a Colony Point by:
◊ Destroying (not damaging) another player's Colony. This in-cludes new Colonies, but not Colony Ships. Once gained, this Colony Point can not be lost.
◊ By having a 5 CP colony in the deep space section or an opponent's section of the map at the end of any economic phase (after colony growth). Unlike the point for destroying colonies, this Colony Point is not permanent. A player has it only for so long as he has a 5 CP colony in those sections of the map.
• A player wins the instant he scores his third colony point and the game ends immediately, even if it is mid-turn.
• If multiple players score their third Colony Point in the same Economic Phase, the win goes to the player with the most Colony Points. In the event of a tie, after the purchases for the Economic Phase are completed, the players add up the CP value of all combat capable ships they have on the board and the winner is the player whose fleet adds up to the most CP.
• If playing with the random map set up then, obviously, there is not a dedicated deep space section of the map. Colony Points are only scored for destroying Colonies, not for having them.
Victory Conditions Multi-Player Long Game: Players are elimi-nated when their home colony is destroyed. Remove all of their pieces and colonies. Yes, we realize that their civilization would not disappear when this happens. This represents them ceasing to function as a political entity. The mechanism to bring the individual planets into your empire is represented by colonization. The winner is the last player standing. A player that eliminates another player gets a bonus 30 CPs in the next Economic Phase. If the player he conquered has technology that he does not possess, he may choose one level of two separate technologies from that player and mark that as researched on his sheet. Home planets that are re-colonized by other players act as normal planets (they produce 5 CPs).
Simultaneous Play: In order to speed up play (so that you can play more games!), many parts of Space Empires were designed to be done simultaneously. Economic Phases should be completed simul-taneously (obviously). More than that, much of the early turns can be done simultaneously. When playing with experienced players, it is suggested that, if there is no threat of direct interaction, that all players conduct their turns at once and only wait for people in order to keep everyone in the same Economic Phase.
Playtime AdviceThe play time for this game is in the 1 to 4 hour range for a 2 player game, depending on the scenario. For multi-player games, the play time will be at the higher end of that range, even if the players are experienced. Since new players tend to take longer the first couple of times they play any game, here are some suggestions to keep play time down in the early games.
Start with just the basic rules—While the rules are fairly simple the game offers a lot of choices and decisions. Starting with just the basic rules simplifies some of the choices and makes the first few Economic Phases easier to wrap your head around.
TABLE OF CONTENTS Introduction to the Scenarios . . . . . . . . . . . . . . . . . 22 Player Scenarios . . . . . . . . . . . . . . . . . . . . . . . . . . 23 Player Scenarios . . . . . . . . . . . . . . . . . . . . . . . . . . 64 Player Scenarios . . . . . . . . . . . . . . . . . . . . . . . . . . 6Epic Scenarios for 2-8 Players . . . . . . . . . . . . . . . . 71 Player Doomsday Machine Scenarios . . . . . . . . . 81 Player Alien Empire . . . . . . . . . . . . . . . . . . . . . . 10Designer Notes . . . . . . . . . . . . . . . . . . . . . . . . . . . . 13Comprehensive Example of Combat . . . . . . . . . . . 14
SPACE EMPIRES — Scenario Book
© 2011 GMT Games, LLC — SEPT 2011
�
Start with the 2 Player Small Map Scenario—This is a scenario that experienced players can finish in less than an hour and a half. Even if it takes a new player an hour longer than that, it is easily manageable.Team Play—For the first multi-player game, play teams. It will drastically shorten the playing time as you are learning the game.Be Aggressive—This is a game that rewards aggressive play.
2-Player Scenarios
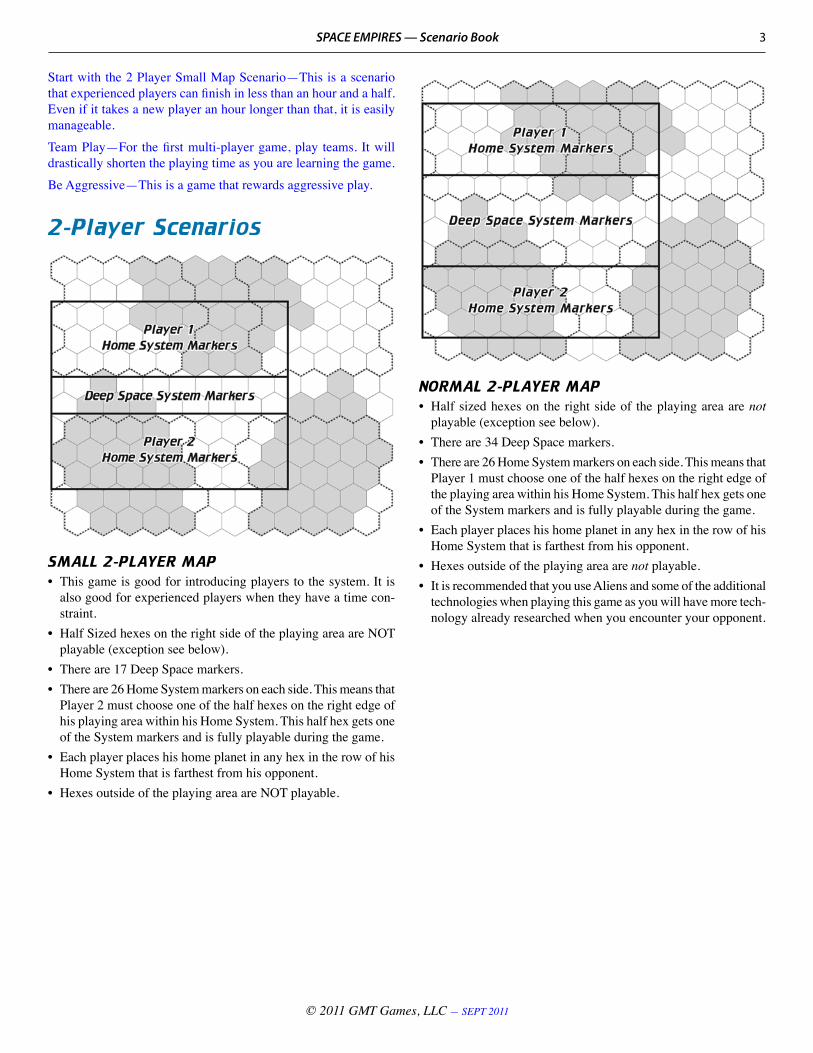
SmALL 2-PLAyEr mAP• This game is good for introducing players to the system. It is
also good for experienced players when they have a time con-straint.
• Half Sized hexes on the right side of the playing area are NOT playable (exception see below).
• There are 17 Deep Space markers.• There are 26 Home System markers on each side. This means that
Player 2 must choose one of the half hexes on the right edge of his playing area within his Home System. This half hex gets one of the System markers and is fully playable during the game.
• Each player places his home planet in any hex in the row of his Home System that is farthest from his opponent.
• Hexes outside of the playing area are NOT playable.
NOrmAL 2-PLAyEr mAP• Half sized hexes on the right side of the playing area are not
playable (exception see below). • There are 34 Deep Space markers.• There are 26 Home System markers on each side. This means that
Player 1 must choose one of the half hexes on the right edge of the playing area within his Home System. This half hex gets one of the System markers and is fully playable during the game.
• Each player places his home planet in any hex in the row of his Home System that is farthest from his opponent.
• Hexes outside of the playing area are not playable.• It is recommended that you use Aliens and some of the additional
technologies when playing this game as you will have more tech-nology already researched when you encounter your opponent.

SPACE EMPIRES — Scenario Book
© 2011 GMT Games, LLC — SEPT 2011
�
LArgE 2-PLAyEr mAP• Half sized hexes on the right side of the playing area are not
playable (exception see below). • There are 51 Deep Space markers.• There are 26 Home System markers on each side. This means that
Player 2 must choose one of the half hexes on the right edge of the playing area within his Home System. This half hex gets one of the System markers and is fully playable during the game.
• Each player places his home planet in any hex in the row of his Home System that is farthest from his opponent.
• Hexes outside of the playing area are not playable.• Yeah, you might want to research Exploration...
ExTrA LArgE 2-PLAyEr mAP• Each player sets up his 26 Home System markers in one of the
regions normally used in a 4-player game.
• The rest of the map, including unused home regions gets Deep Space markers. This will use 98 of them.
• Each player places his home planet in any hex within his Home System that is on the edge of the board.
“3D” 2-PLAyEr mAPThe title of this scenario promises more than it gives, but you’ll see what we mean. :-) • Each player sets up his 26 Home System markers in one of the
regions normally used in a 4-player game. • The rest of the map, except unused home regions, gets Deep
Space markers. This uses 46 of them. • Each player places his home planet in any hex within his Home
System that is on the edge of the board.• The two unused Home Systems get no System markers—they
are not in play.• More than not being in play, the unused Home Systems need to
be thought of as not being there. A player may move a ship into an unused Home System and come out in any other hex adjacent to that unused Home System. In essence, it is as if all the hexes adjacent to an unused Home System are adjacent to each other.
• It takes only 1 Movement Point to move from one hex adjacent to an unused Home System to any other hex adjacent to that Home System.
• This is an attempt to introduce a 3D element to the game board. Yes, it’s crude. Yes, it’s simple, but we think it is clever.

SPACE EMPIRES — Scenario Book
© 2011 GMT Games, LLC — SEPT 2011
�
mASSIvE 2-PLAyEr mAP• Each player sets up his 26 Home System markers as suggested by
the diagram. There are no guides on the game board to indicate this set up.
• Player 1 will have one Home System marker and Player 2 will have six Home System markers that do not fit within the area indicated by the line. These should be placed in any hex adjacent to that area.
• The rest of the map gets Deep Space markers. This will use 98 of them.
• Each player places his home planet in any hex within his Home System that is on the edge of the board.
“I DArE yOu TO PLAy ThIS” mAP• Each player sets up his 26 Home System markers as suggested by
the diagram. There are no guides on the game board to indicate this set up.
• 25 of the Home System markers will fill the first two rows clos-est to him. The remaining marker should be placed in any hex adjacent to that area.
• The rest of the map gets Deep Space markers. This will use 98 of them.
• Each player places his home planet in any hex within his Home System that is on the edge of the board.
DOuBLE TrOuBLE 2-PLAyEr mAP• Each player uses all the pieces of his color, plus the home system
markers from another color. One non-barren planet and the home planet is removed from each player’s additional color.
• The home system markers of both colors are mixed together and each player sets up these 50 Home System markers as suggested by the diagram. There are no guides on the game board to indicate this set up.
• The Home System markers will fill the first four rows closest to him.
• The rest of the map gets Deep Space markers. This will use 50 of them.
• Each player places his home planet in any hex within his Home System that is on the edge of the board.
• Each player also may use the Colony markers of the other color.

SPACE EMPIRES — Scenario Book
© 2011 GMT Games, LLC — SEPT 2011
�
3-Player Scenarios
STANDArD 3-PLAyEr mAP• Each player sets up his 26 Home System markers in one of the
regions normally used in a 3-player game (denoted by the shad-ing).
• The rest of the map (including the 2 hexes “behind” Player 2 and Player 3), gets Deep Space markers. This will use 72 of them.
• Each player places his home planet in the hex marked with an “X” in the diagram above.
• If all players agree, players may place their home planet in any hex of their Home System.
vArIABLE 3-PLAyEr mAP• Each player takes his home planet.• All other System markers, both Home System and Deep Space,
are mixed together and randomly placed all over the map.• Players then place their home planets randomly. A 20-sided die
can be used for this. If one is not available, then pieces of paper numbered 1 to 13 can be drawn out of a cup. The first number rolled/drawn is the row that your home planet will be placed in and the second number rolled/drawn in the number of hexes counted over in that row. If a number is rolled that is out of range, then the die is re-rolled until one in range is achieved.
• This will often lead to unbalanced map layouts. However, for those that love diplomacy, this is all part of the challenge. Those that have weaker positions often gang up on the strong.
3-PLAyEr TEAm PLAy• Set up is the same as the Standard 3-Player Map.• Mutually agree or determine randomly which two players will
be on the same team verses the third player.• The two teammates play under the rules as if they have an UN-
EASY ALLIANCE.
• UNEASY ALLIANCE: Teammates may never stack ships of any kind in the same hex and may not use each others MS Pipe-lines.
• A player is eliminated when his home world is destroyed. Obvi-ously, the team wins as soon as they destroy the home world of the single player. The single player must eliminate both of the other players in order to win. However, the single player does not get the conquering bonus listed in the long game victory conditions.
• Each of the allied players collect income normally, but all of their ships and technology cost 1.5 times normal (round up). That means a Scout would cost 9 instead of 6, a Destroyer would cost 14 instead of 9, and Tactics 1 Technology would cost 23 instead of 15 (for example).
• Maintenance and turn order bid would still be normal cost.
4-Player Scenarios
STANDArD 4-PLAyEr mAP• Each player sets up his 26 Home System markers in one of the
regions normally used in a 4-player game. • The rest of the map gets Deep Space markers. This will use 46
of them. • Each player places his home planet in any hex within his Home
System that is on the edge of the board.
vArIABLE 4-PLAyEr mAP• Set up is the same as the Variable 3-Player Map.

SPACE EMPIRES — Scenario Book
© 2011 GMT Games, LLC — SEPT 2011
�
4-PLAyEr TEAm PLAy• Set up is the same as the Standard 4-Player Map.• Mutually agree or determine randomly what the teams will be.• Teammates can be diagonally across from each other or next to
each depending on personal preference.• Players must decide to play UNEASY ALLIANCE or BLOOD
BROTHERS.• UNEASY ALLIANCE: Teammates may never stack ships
of any kind in the same hex and may not use each other’s MS Pipelines.
• BLOOD BROTHERS: Teammates execute their turns at the same time, may stack together, may attack together, and may use each other’s MS Pipelines for movement. However, they may not share research or CPs.
• In either case, the teammates win or lose the game together.
Epic Scenarios for 2-8 PlayersgENErAL IDEA• These scenarios require two copies of the game. The game is
played on two boards. • These are meant to enable a game with more than four players,
but any of the scenario set ups can be used for an epic scenario. If six players are in the game, using the 3-player set up on both boards makes sense. If seven, then using the 3-player set up on one and the 4-player set up on the other would work. A 2-player game can be played where each player controls an empire on both maps. A 4-player game could be played with two players on each map using the “I Dare You to Play This” set ups on both maps (in this case it is recommended that each player use all the colony ships of his color from both games). An 8-player game could be played with a random map set up. The possibilities are numerous.
• Warp Points: Warp Points are the connection between the boards. All six Warp Point 1’s (three on each board) are consid-ered connected. The same with all six Warp Point 2’s. Players should agree on the number of Warp Points used on each map. If the set up on a board requires less than the full complement of Deep Space System markers, then the number of markers needed must be counted out and the Warp Points must be among them before they are randomly placed on the board.
• If more than four players are playing, then some of the same color playing pieces would have to be used. There might be two green empires, for example. Empires of the same color should obviously be on separate maps. They are differentiated from each other by being on separate maps. When a unit crosses over maps, it should be marked with a spare token. Pieces from a Risk game would work, for example.
• In an epic scenario, when one player conquers another they add all of the conquered players pieces to their build pool.
gAmE vArIANTSQuICk STArT vArIANTAfter set up, all the System markers of the player’s color are flipped and all non-barren planets have a full strength colony placed on it. In this scenario the player does not start with any colony ships.
ShIP BuILD rEQuIrEmENT vArIANTPlayers may not research Fighter Technology until a BC, BB, or DN from either side has been in combat with another player (not aliens). Once this happens, all players may research Fighters.
Players may not research Cloaking until a DD or larger ship from either side has been in combat with another player (not aliens). Once this happens, all players may research Cloaking.
LOw mAINTENANCE gAmE vArIANTThis can be used in any of the scenarios. All maintenance costs are halved. When calculating maintenance, add up the total mainte-nance cost that you would normally pay and then divide it in half (rounded down). When tracking the change in maintenance on the Production Sheet, extra notes will have to be kept on the pre-halved value to prevent having to count all of your maintenance every Economic Phase.
This rule change encourages building ships early, early attacks, and larger fleets.
hEAvy TErrAIN gAmE vArIANTNormally, when a “Danger!” or a “Lost in Space” counter is flipped, the hex is left empty after the counter is resolved. In the Heavy Terrain version, a new Deep Space System marker is drawn from the unused ones and placed face down in the hex. Once all Deep Space System markers have been used, then the space would be left empty.
If the marker was flipped by scanning instead of exploration, then the new marker may be explored that turn normally. It may not be scanned by another cruiser that player turn.

SPACE EMPIRES — Scenario Book
© 2011 GMT Games, LLC — SEPT 2011
�
All attacks are at the same strength and occur at the same time. A DM is considered to have a Tactics Level of 2.
• Unless specified as a weakness, all DM’s are immune to Mines, Fighters (their weaponry is too small to affect them), Cloaking (they are equipped with the highest level of Scanners), and the player does not get the Fleet Size Bonus (5.1.4) for outnumbering a DM.
• Roll for a possible weakness in each Doomsday Machine the moment it enters combat for the first time.
• A player should use common sense when allocating the attacks of a DM. If weak against fighters, it should target fighters. If weak against large fleets, it should attack smaller ships and get the fleet size under 10, it should always attack damaged ships, etc. Like with human players, DMs may roll their attacks 1 at a time and see the result before rolling more attacks.
DOOmSDAy mAChINE STrENgTh DM Attack Defense Hull Number Strength Strength Strength Size ofAttacks 1 D7 1 6 3 2 C7 1 7 4 3 C8 2 7 4 4 C8 2 8 4 5 B9 2 8 5 6 B9 3 9 5 7 B10 3 9 6 8 A10 3 10 6 9 A11 4 10 6 10 A11 4 11 6
DOOmSDAy mAChINE wEAkNESS DieRoll Weakness 1-2 Fighters: Fighters can fire and damage a DM
normally. 3-4 Mines: Each Mine will cause a hit on a DM on
a roll of 1-5. 5-6 Cloaking: Raiders fire at A instead of D in every
round, and have a +1 Attack Strength bonus in the first round. In addition, this DM gets –2 on its Attack Strength when firing at Raiders.
7-8 Large Fleets: The player will get the 2:1 combat bonus in any round in which he attacks the DM with at least 10 ships (that could hit the DM).
9-10 None
1-Player Doomsday machine ScenariosPlayer At-Start Forces: Same as in the 2-player scenarios. The quick start option is not available for Solitaire scenarios.
Victory Conditions: One player sets up and plays his empire as normal. An evil race is sending “Doomsday Machines” at that growing empire. The player wins by defeating all of the Doomsday Machines sent at him and loses if his Homeworld is destroyed.
Turn Order: There is no need for a turn order bid. A player always moves before the DMs.
DOOmSDAy mAChINE mOvEmENT ruLES Doomsday Machines (DMs) enter in the Economic Phase specified by the scenario. Roll a die to determine the entry hex. DMs always have a speed of 1.
MOVEMENT GUIDELINES: DMs always move toward the clos-est player colony. If two colonies are equidistant, then a DM will always move toward the colony that is larger (in CPs). If more than one equidistant colonies are the same size, then the DM will move toward the colony that brings it closest to the player’s home planet. If it is still tied, then it is the player’s choice. As a DM moves toward a colony, if two different hexes will put it equidistant from the target colony, it will move toward the hex that is also closer to the player’s home planet. Each time a DM moves, its target colony may change. A player may not reduce a colony or remove it in order to change the direction of a DM.
DMs are unaffected by System markers. They don’t roll for be-ing destroyed in Black Holes. If a DM moves into a hex with an unexplored marker, it does NOT flip the marker. A player may not move into a hex with a DM and an unexplored System marker. If you wanted to move there you should have explored it before the DM got there!
DOOmSDAy mAChINE COmBAT ruLES• If a DM moves into a hex with player’s ships, it will engage them
in combat.• If a DM is in a hex with a planet (with or without a colony),
it will destroy that planet. Remove the planet and any colony from play. The DM must first defeat any defending ships. Unlike multi-player games, DMs do not destroy Asteroids in the 1-player scenarios.
• A DM never retreats from combat.• A roll of 1 is not an automatic hit on a DM. However, a roll of 1
by a DM is always a hit. A DM that rolls a 10 is always a miss.• DM firepower is not affected by Asteroids.• DMs are of different strengths. See the chart below.• DMs carry damage from combat to combat (they do not auto-
matically heal). However they heal two damage instantly every time they destroy a planet (whether or not it has a colony).
• DMs get more than one attack per round as shown on the chart.

SPACE EMPIRES — Scenario Book
© 2011 GMT Games, LLC — SEPT 2011
�
SmALL SOLITAIrE mAP: • There are 26 Home System markers for the player. The home
planet is placed in the hex with an “X”.• Deep Space Markers are placed within two hexes of the player’s
Home System area, except that a marker is not placed in any of the possible DM entry hexes. The player may not enter these hexes.
• The player will face a total of three DMs. Each enters during the Economic Phase at the strength according to the table below.
• “#/#” - the first number is the Economic Phase the DM enters, the second number is the strength of the DM.
Difficulty FirstDM SecondDM ThirdDM Easy 7/1 9/3 11/5 Normal 7/2 9/4 10/6 Hard 6/1 8/3 10/5 Harder 6/2 8/4 9/6 Good Luck! 5/1 7/3 9/5
LArgE SOLITAIrE mAP: • There are 26 Home System markers for the player. The home
planet is placed in the hex with an “X”.• Deep Space markers are placed within four hexes of the player's
Home System area, except that a marker is not placed in any of the possible DM entry hexes. The player may not enter these hexes.
• The player will face a total of three DMs. Each enters during the Economic Phase at the strength according to the table below.
• “#/#” - the first number is the Economic Phase the DM enters, the second number is the strength of the DM.
Difficulty FirstDM SecondDM ThirdDM Easy 8/5 10/7 12/9 Normal 8/6 10/8 11/10 Hard 7/5 9/7 11/9 Harder 7/6 9/8 10/10 Good Luck! 6/5 8/7 10/9

SPACE EMPIRES — Scenario Book
© 2011 GMT Games, LLC — SEPT 2011
�0
unsuccessful, the AP is done for the Economic Phase. A fleet will never launch if there is less than 6 CPs in the fleet column.
• If the AP has researched Fighters and has at least 25 CPs in the fleet column and the human player has not shown a level of Point Defense that equals the level of fighters that the AP has researched, subtract two (–2) from the Fleet Launch roll.
• If the AP has researched Cloaking and has at least 12 CPs in the fleet column and the human player has not shown a level of Scanner that equals the level of Cloak that the AP has researched, subtract two (–2) from the Fleet Launch roll.
• If a Fleet Launch is made, then the AP will determine if the fleet is a Raider Fleet or not (see below). If it is a Raider Fleet, then the entire fleet is built.
• If it is not a Raider Fleet, then the fleet is not built until it enters battle for the first time. Use any ship counter to represent an Alien non-Raider Fleet. Subtract all of the CP from the fleet column and write the CP in the ledger on the right side of the alien economic sheet. When it is time to build this alien fleet, use this CP.
rAIDEr FLEETSWhenever a fleet is launched, if the AP has already purchased Cloaking, it is at least a 12 CP fleet and the human player has not shown a level of Scanner Technology that could detect that Cloak-ing, then the fleet being launched is a Raider Fleet. The AP builds nothing but Raiders for this fleet. A Raider Fleet has different movement priorities as listed in the AP movement rules.
PurChASINg TEChNOLOgy• Alien Players automatically start with Mine Technology.• Whenever a fleet is launched, roll for Movement Technology. On
a roll of 1-4, the AP will purchase the next Movement Technol-ogy available if it has enough CPs in the Tech column. Subtract the appropriate amount of CPs and note that tech as purchased.
• Technologies other than Movement Tech are not purchased until combat occurs.
• When the fleet is engaged in combat for the first time, the AP will spend all available technology points purchasing technology and then will build the fleet.
• All available technology points will be spent in the following order:
• If the human player has used Fighters in combat and the AP does not have Point Defense 1, it will purchase Point Defense 1.
• Next, if the human player has shown Mines, and the AP does not have Minesweeper 1, the AP will purchase MS 1.
• Next, if the human player has used Raiders in combat, and the AP does not have a Scan level capable of detecting those Raiders, roll the die. On a roll of 1-4 the AP will purchase Scanners to be able to detect the Raiders. If the AP would need to purchase two levels of Scanning Technology, and it can only afford one, it will purchase one in an effort to work toward that goal. On a roll of 5-10, the AP will not purchase Scanners at this point in his expenditures.
• Next the AP will determine if it will spend on ship size. This
1 Player Alien Empire ScenariosPlayer At-Start Forces: Same as in other scenarios. The quick start option is not available for Solitaire scenarios.
Victory Conditions: One player sets up and plays his empire as normal. 2-3 Alien players are trying to destroy the human player. The player wins by destroying the home planets of all Aliens.
Special Rules: The human player may not use Decoys. There is no need for a turn order bid—the human player always moves before the AP. Barren planets found in Deep Space are not inhabited by aliens. In general, where the solitaire rules are silent, use common sense and play the aliens intelligently.
ALIEN PLAyEr hOmE PLANET• Alien Players (AP) each have a home planet. Use the home
planets and ships from the unused player colors. The AP home world represents the entire empire and resources of the AP.
• Each AP starts with one Base on his home world.• APs never use MS Pipelines, Colony Ships, Space Yards, Mining
Ships, or Decoys. • An AP is eliminated when its home world is eliminated. At that
point it will no longer produce ships, but existing ships will continue to fight to the death (unlike human players that are eliminated in multi-player games).
• Until an AP launches a fleet, the only actions that need to be taken for them (other than defending against an attack) occur in the Economic Phase.
• In combat, the AP never screens ships.
AP ECONOmIC rOLLS AND FLEET LAuNChDuring the economic turn, each AP takes the following actions:• AP’s make their economic roll(s). As seen on the AP Economic
Sheet, each AP starts with one economic roll. Each of these rolls is made on the appropriate table for the Economic Phase. If the result of the roll is Economy, then an extra economic roll will be gained every economic phase starting three economic phases from now. That is why 0 is written in the extra economic roll column for both the second and third economic phase. If economy is rolled on turn 1, then an extra economic roll will be gained starting the fourth Economic Phase.
• If any other result is rolled, a number of CPs (5, 10, or 15) is added in the appropriate column for that turn depending on the difficulty level (see chart by the map diagram). CPs put in the de-fense column are doubled. These columns (Fleet, Tech, Defense) represent what the AP has “in the bank” in each area. These totals carry over from turn to turn and accumulate until an AP spends them. When an AP spends in one of these areas, it always spends all of the available resources in that area that it can.
• A roll is made for each of the economic rolls that the AP has.• FLEET LAUNCH DIE ROLL: When all economic rolls have
been made, the fleet launch roll is made. The die roll necessary for Fleet Launch is indicated on the Alien Economic Sheet and changes each Economic Phase. If the Fleet Launch die roll is

SPACE EMPIRES — Scenario Book
© 2011 GMT Games, LLC — SEPT 2011
��
• If the AP has Fighter Technology and the human player has shown Point Defense, the AP will do the above on a roll of 1-4.
• If it is not a Carrier fleet and a 12 CPs or greater fleet is launched, and the AP has just purchased Cloaking that the human player has not shown a level of Scanner Technology that could detect that Cloaking, then the fleet being built is a Raider Fleet.
General Building Priorities: If the above four cases do not apply, then the AP will purchase ships in the following order:1. LARGEST SHIP FIRST: The first ship built will be the largest ship that the AP’s Ship Size Technology and points will allow it to spend.
2. POSSIBLE DD: If the AP has researched a level of Scanner Technology that is equal to or superior to the level of Cloaking that the human player has used in combat and the ship it built in step #1 is not a DD it will next build one DD if its technology level and CPs allow.
3. REMAINING SHIPS: Next, roll the die to determine the com-position of the rest of the fleet:
DieRoll FleetComposition 1-3 Largest Fleet 4-6 Balanced 7-10 Largest Ships
DIE ROLL MODIFIER: If the human player has used Fighters previously in this game, and the AP has Point Defense Technology, subtract two (–2) from the roll on the above table. If the modified result is not 1-3 and the AP fleet does not contain at least 1 CV with three Fighters, the AP will first spend 12 CPs to build 2 Scouts before building the rest of the fleet.
EXPLANATION OF RESULTS:• LARGEST FLEET: If the fleet composition is Largest Fleet, then
the remaining points will be spent on purchasing the largest fleet possible. Ships larger than a Scout will only be purchased if it would not lower fleet size. For instance 17 CPs would result in the purchase of a SC and a DD, but 18 CPs would result in the purchase of 3 SCs (not 2 DDs).
• LARGEST SHIPS: If the fleet composition is Largest Ships, then the remaining points will be spent on purchasing the largest ships possible. For instance, if there was an AP with a Ship Size Tech of 2, 18 CPs would result in the purchase of 2 DDs, while 17 CPs would result in the purchase of 1 DD and 1 SC.
• BALANCED: If the fleet composition is Balanced, then the remaining points will be spent on purchasing as many ships as possible that can use the highest Attack or Defense Technol-ogy that the AP has. Extra points would be used to build larger ships.
EXAMPLE: The AP has technology that allows it to build BBs, but only has Attack 2 and Defense 1 Technology. If it had 24 CPs available, it would build 2 CAs to take advantage of the Attack 2 Technology. If it has 27 CPs, it would build 1 CA and 1 BC. If it had 30 CPs available it would build 2 BCs. If it had 32 CPs
depends on its current ship size level. Only roll once on this table regardless of how many tech points the AP has to spend.
CurrentShipSize: 1 2 3 4 5 Rollneededto purchasenextlevel:
1-10 1-7 1-6 1-5 1-3
• If the AP has researched Fighter Technology and the human player has not shown Point Defense, then the AP will first buy the next level of Fighter Technology if it has the tech points to make the purchase on a roll of 1-6. On a roll of 7-10 the AP will proceed to the chart below.
• If this is a Raider Fleet with Cloak 1 the AP will first buy Cloak 2 on a roll of 1-6 if it has the tech points to make the purchase. On a roll of 7-10 the AP will proceed to the chart below.
• If there are tech points remaining, then the AP will roll on this table to determine which technology is purchased. If a technology is rolled that is too expensive, reroll until a tech is rolled that can be afforded.
DieRoll TechPurchased 1-2 Attack 3-4 Defense 5* Tactics 6** Cloak 7 Scan 8 Fighter 9 Point Defense 10 Mine Sweeper
*If Tactics are rolled and the AP is not yet at Attack 2 or Defense 2, then it will purchase one of them (in that order).
**If the Human player has shown Scanner 2 in combat reroll any 6's.
• If at any point in the above process, the AP does not have tech points available to make the purchase, then the purchase is not made.
• Finally, when the AP does not have enough tech points available to purchase a tech, then no more technology is purchased and the remaining points are recorded in the tech column.
• AP ships are always at the current tech level. They instantly upgrade when a new tech is purchased.
BuILDINg FLEETSAfter all tech points have been spent, all available fleet points are used to purchase ships in the following order: • If this is a Raider Fleet, all of the points are spent on Raiders.• If the AP has Fighter Technology and the human player has not
shown Point Defense in a battle, the AP will spend all available points on Carriers and Fighters to max out the number of full Carriers in the fleet (Carrier and three Fighters) before spending the rest of the CP. If it does not have enough for a full Carrier, it will not purchase Fighters or Carriers.

SPACE EMPIRES — Scenario Book
© 2011 GMT Games, LLC — SEPT 2011
��
• Once a non-raider alien fleet reaches a colony, it will stay there until the colony is destroyed. Alien fleets never retreat.
• RAIDER FLEET MOVEMENT: Raider fleets move the same as normal fleets, except that they will avoid combat, if possible, with player fleets unless it is larger than them in terms of CPs. This is even true at colonies. Whereas a non-raider fleet will sometimes attack strongly guarded colonies (because the near-est unguarded colony is not within range in the same number of Economic Phases), a Raider fleet will never do that. They will only attack a colony if they have a larger fleet than is guarding it. If not, they will move towards a different colony. Even if the player’s ships are unrevealed, the player should tally up the size of his fleets to make this determination.
EXAMPLE: A Raider Fleet can reach three different colonies in the same number of Economic Phases. There are two Raiders in this fleet (24 CPs). One colony is guarded by 4 SCs (24 CPs). The Raider Fleet will not attack that fleet and so will avoid that colony. The next colony is guarded by 3 SCs (18 CPs), but near that colony is a fleet of 3 DDs (27 CPs). The last colony is guarded by 1 BB (20 CPs). Since the two colonies are both guarded by a fleet that is smaller than the Raider Fleet (in terms of CP), the Raider Fleet will move toward the colony that is closest. If there had been a fourth colony that could be reached in the same number of Economic Phases and that one had only a SY present, the Raider Fleet would move toward that colony because it is considered unguarded.
• If a colony that a Raider Fleet was moving towards suddenly becomes guarded by a force that is equal to it in terms of points, the Raider Fleet will move toward the next closest colony at that point. If necessary it would even move through or past an enemy fleet to attack a colony or ship behind it.
DEFENSE POINTSDefense points are not used until an AP home world is attacked.When the attack takes place (before the dice are rolled), spend the technology points available. Follow the same procedure as if it were a fleet, except that you do not roll for the possibility of purchasing Movement Technology and reroll any 10s.
• Remember that APs start with Mine Technology and that points are doubled when placed in the defense column.
• In addition to the Base that the AP has at start (if it is still alive), the AP spends all CPs in both the defense and fleet column.
• CPs in the Fleet column are spent exactly as if a fleet was being constructed, except that this fleet will not be a Raider Fleet. These ships will aid in the defense of the home planet. If any survive, they will immediately launch as a fleet and begin moving on the next Alien turn.
• There is no effect to an AP Homeworld being blockaded. If a player's ships are in that hex during the Economic Phase, the AP will execute its Economic Phase normally, including automati-cally launching a fleet, building mines, and bases.
• CPs in the defense column are spent on either Bases or Mines. Aliens may have more than 1 base at their home planet. Roll on the following table:
available, it would build 1 CA and 1 BB. If it had 36 CPs avail-able, it would build 3 CAs.
• Ship purchase is always limited by the AP’s Ship Size Technol-ogy.
• If there are CPs left over from a fleet such that another ship can-not be built, credit the remainder back to the fleet budget.
• If the AP has Minesweeper Technology, all of their Scouts are considered equipped with this technology. An AP never purchases SW ships, the technology is carried on their Scouts.
AP FLEET mOvEmENTDuring its turn, AP fleets move differently than DMs. They will not enter hexes with Supernovas or Black Holes. Asteroids and Nebulas do not affect their movement (they still affect combat). Because of this, an AP will sometimes have a choice on whether to stop in open space, in Asteroids, or in Nebulas. Whenever this choice has to be made, the AP will always stop in the hex that benefits them the most in combat when comparing the known technologies of the AP and the human player. An AP will never move less than its full movement to stop in such a hex, however:
• If an AP moves into a hex with an unexplored marker, it does notflip the marker. A player may not move into a hex with an AP fleet and an unexplored System marker. If you wanted to move there you should have explored it before the AP reached that hex!The hex can still be explored by Exploration Technology.
• If an AP fleet can attack a single revealed ship without delay-ing it reaching its destination, it will. It will avoid combat with non-single ships (go around them) as long as doing so would not delay them from reaching its destination.
• The direction of movement of AP fleets is based on Economic Phases. Since there are three movement turns between each Economic Phase, AP fleets are concerned with reaching and at-tacking a colony in the fewest number of Economic Phases. For example, an AP fleet with a movement of 1 on the first turn after an Economic Phase is two hexes away from one colony and three hexes away from another. Since it can reach either colony before the next Economic Phase, there is a possibility (see below) that it might move toward either.
• An AP fleet will always move toward the colony it can reach in the fewest number of Economic Phases.
• If more than one colony qualifies, an AP fleet will move toward the colony that is undefended. In this case, SYs and a single revealed SCs are not considered a defense.
• If there is more than one undefended colony that it can reach in the same number of Economic Phases, then it will move toward the colony that it can reach in the fewest number of moves.
• If there are no undefended colonies but multiple defended colo-nies that it can reach in the same number of Economic Phases, then it will move toward the colony that it can reach in the fewest number of moves. If still tied, it will move toward the colony that is largest. If still tied, it will move toward the colony that brings it closer to the player's Homeworld. If still tied, the player chooses where to move the fleet.

SPACE EMPIRES — Scenario Book
© 2011 GMT Games, LLC — SEPT 2011
��
Roll DefenseComposition 1-3 Mines 4-7 Balanced 8-10 Most Bases
• If Mines is rolled, all available defense CPs will be spent on Mines.
• If Most Bases is rolled, all available defense CPs will be spent on Bases, with the rest being spent on Mines once there are not enough CPs left to purchase a Base.
• If Balance is rolled, the AP will build a Base first, followed by a Mine, and continue alternating purchases. The rest being spent on Mines once there are not enough CPs left to purchase a base.
ALIEN PLAyEr mAP• There are 26 Home System markers for the player. The home
planet is placed in the hex with an “X”.• Deep Space markers are placed within 3 hexes of the player's
Home System.• If there are two Alien empires, the Alien home worlds are placed
on the “2’s”.• If there are three Alien empires the Alien home worlds are placed
on the “2’s” and the “3”.• The chart below determines the number of AP and the number
of CPs per roll.
Difficulty #ofAP #ofCPsperroll Easy 2 5 Normal 3 5 Hard 2 10 Harder 3 10 Really Tough 2 15 Good Luck! 3 15
Designer NotesThis game all started in 1990 when my friends and I wanted to design a 4X space game that gave you lots of options, decisions, and control of your empire. We ended up with a monster game that was great fun, but took 6-7 nights to play. Then we had families and it became impossible for us to play a game that long.
After awhile, we began to have the old desires to play the game again, but we needed one that could be played in a night. So out came our old game design, but much would have to change.
Area movement was a must. We had developed the most complete and complicated set of rules for hexes that involved reaction move-ment and reaction task forces, but they accomplished nothing that a good area movement system couldn’t do in less time and one tenth the amount of rules.
Area movement also led to the next development. The System mark-ers came about to randomize the map. Obviously, we could never do this on a normal wargame map. In the past, our games allowed you to explore stars and get different random results, but the stars, nebulas, etc. were always in the same hexes. System markers make the map truly random. It also greatly speeded up exploration. No longer did you have to roll 5-10 sets of dice and record the results; you just flipped the counter.
Counters that could represent up to six ships and decoys that could really be no ship at all replaced Task Forces and hidden task force displays. This was another great simplification that speeded play and yet maintained the same level of “fog of war.”
Gone were the complicated research charts and the handmade, customizable counters. We actually used to use blank ship counters and write on them as we made the ships. Now we have much more generic technology increases and fewer ship classes. The current system of attack and defense technology levels was a tremendous breakthrough and took 2-3 nights off of game time alone, yet much of the same flavor of research and decision making remains.
The new way of technology also greatly simplified the combat system and speeded up the game. The way different technology levels are available and the way that the size of fleets affect combat is key. No more did we need complicated attack charts and 6 or 7 numbers on each counter.
The result is a game that maintains the desired flavor of expansion, research, and decision making, and yet can be played in a night with rules that are easy to use. If the game takes you too long to play, you’re not being aggressive enough. The only thing we really miss from our original design is naming each ship and writing the name on the counter. Long live the Icestorm, the most decorated heavy cruiser in my fleet.
It is our hope that you love this game as much as we do. Burn his colonies before he burns yours!

SPACE EMPIRES — Scenario Book
© 2011 GMT Games, LLC — SEPT 2011
��
x2 x3non-combatunit
x6 x2 x2
x1 x2 x1 x2 x2 x1
x1
In this example a yellow fleet of 15 combat capable ships and one non-combat ship enters a hex with a green fleet and colony. All units have been revealed and decoys have been removed. The number of each ship is indicated by the number below the group markers.
Detonate Mines: Yellow has not brought along any Minesweepers so the Mine in the green fleet detonates. The green player selects a CV as the Mine's target. Since there is now only 1 CV left, three of the Fighters are also destroyed. This is a huge loss for the yellow fleet. The green Mine is removed from play.
Combat Screening: Next, players form their battle lines. Yellow has 11 combat-capable ships remaining versus nine green combat-capable ships—yellow may therefore screen two of his ships. The Colony Ship is a non-combat ship and is automatically screened until the end of the battle. His CV cannot be targeted until all his Fighters are destroyed, so yellow doesn't screen any ships. Note that green's Colony cannot be attacked until all of green's ships have been destroyed or retreated.
Fleet Size Bonus: Neither side has twice as many ships as the other, so neither player receives this +1 bonus.
Technologies: Both players have the same Tactics Levels, so ties in Class ratings will be sided in the defender's favor. Both players have Fighter Technology Level 1 which means their Fighters have a Class = B, Attack = 5, and Defense = 0. Neither player has invested in Attack or Defense Technologies, so Attack and Defense Strengths will be unmodified. Both players have Level 1 Cloaking. Neither player has Scanner Technology to negate Cloaking.
Green Class A Fire: First to fire will be the defender's A class ships, but he has only one—his Base. Green fires his Base (Attack 7) against one of the Raiders (Defense 0). The Base will hit the Raider on a roll of 1-7. A 5 is rolled so the Raider Group receives a Hit marker. Since it takes two hits to eliminate each Raider, the Hit marker has no effect until a second hit is applied against the Raider Group.
Comprehensive Example of Combat
Yellow A Class: Now it is yellow's turn to fire his A Class ships. Since green does not have Scanner Technology the two yellow Raiders are considered Cloaked and so have an A Class rating. Level 1 Cloak gives them an Attack Strength of 4. During this first round of combat (only) they get a +1 to their Attack Strength. Both fire on the Battlecruiser Group needing a 1-4 to hit (5-1=4). The die rolls are 10 and 8—both misses. Next the 2 BBs also fire on the Battlecruiser Group. The BBs need a 1-4 to hit. One hit is achieved. A Hit marker is placed on the green BC group.
The rest of the attacks for round #1 are summarized below. The parenthetical numbers are the ship's Attack or Defense Strength, as appropriate.
Green B Class: 2 Fighters (5) and 2 BCs (5) fire on the three re-maining yellow Fighters (0). 1-5 needed. Two are destroyed.
Yellow B Class: 1 Fighter (5) fires on the Ship Yard (0). 1-5 needed to hit. 1 hit destroys it.
Green C Class: 2 CAs (4) fire on the yellow CA group (1). 1-3 needed to hit. One hit is achieved.
Yellow C Class: 3 CAs (4) fire on the green BC group (1). Two more hits are achieved. Since there are now 3 hits on this group, one BC is eliminated and the remaining BC has one hit.
Green E Class: The Scout (3) fires on the yellow Fighter (0). 1-3 needed to hit. A hit destroys the last yellow Fighter.
Yellow E Class: The CV (3) fires on a green Fighter (0). 1-3 need to hit. A hit destroys one of the green Fighters.
The surviving ships are shown below. Since yellow still has the majority of combat-capable ships (8-6), he elects to screen his CV since it is now vulnerable without the Fighters.
In this second round of combat, ships may now retreat instead of firing—retreating takes place at the moment the ship can fire.
First up to fire is the green Base and fire proceeds in the same order as the first round. The battle proceeds for as many rounds as it takes until one player is destroyed or all his units retreat. In this example, yellow may have a slight advantage but the battle is bound to be bloody for each side.
x1Screened
non-combatunit
x31 HIT
x21 HIT
x2
x1 x2 x1 x1 x11 HIT
non-combatunit
non-combatunit

SPACE EMPIRES — Scenario Book
© 2011 GMT Games, LLC — SEPT 2011
��
Spac
e Em
pire
s Pro
duc
tion
She
et w
ith
Unp
redic
tabl
e Res
earc
h Tu
rn1
23
45
67
89
10
11
12
13
14
15
16
17
18
19
20
Carr
y ov
er f
rom
las
t tu
rn0
+Co
lony
CPs
+M
iner
alCP
s+ M
S Pip
elin
e CP
s To
tal
- M
aint
enan
ce- Tu
rn o
rder
bid
Su
btot
al
- Te
chno
logy
spe
ndin
g(5
per
die
rol
l)
- Sh
ip s
pend
ing
Rem
aini
ngCP
Ship
2Sh
ip3
Ship
4Sh
ip5
Ship
6A
tt1
Att
2A
tt3
Def
1D
ef2
Def
3Ta
ct1
Tact
2Ta
ct3
Mov
2M
ov3
Mov
4M
ov5
1.__
__1.
____
1.__
__1.
____
1.__
__1.
____
1.__
__1.
____
1.__
__1.
____
1.__
__1.
____
1.__
__1.
____
1.__
__1.
____
1.__
__1.
____
2.__
__2.
____
2.__
__2.
____
2.__
__2.
____
2.__
__2.
____
2.__
__2.
____
2.__
__2.
____
2.__
__2.
____
2.__
__2.
____
2.__
__2.
____
3.__
__3.
____
3.__
__3.
____
3.__
__3.
____
3.__
__3.
____
3.__
__3.
____
3.__
__3.
____
3.__
__3.
____
3.__
__3.
____
3.__
__3.
____
4.__
__4.
____
4.__
__4.
____
4.__
__4.
____
4.__
__4.
____
4.__
__4.
____
4.__
__4.
____
4.__
__4.
____
4.__
__4.
____
4.__
__4.
____
5.__
__5.
____
5.__
__5.
____
5.__
__5.
____
5.__
__5.
____
5.__
__5.
____
5.__
__5.
____
5.__
__5.
____
5.__
__5.
____
5.__
__5.
____
6.__
__6.
____
6.__
__6.
____
6.__
__6.
____
6.__
__6.
____
6.__
__6.
____
6.__
__6.
____
6.__
__6.
____
6.__
__6.
____
6.__
__7.
____
7.__
__7.
____
7.__
__7.
____
7.__
__7.
____
7.__
__7.
____
7.__
__7.
____
7.__
__7.
____
7.__
__7.
____
7.__
__7.
____
8.__
__8.
____
8.__
__8.
____
8.__
__8.
____
8.__
__8.
____
8.__
__8.
____
8.__
__8.
____
8.__
__8.
____
8.__
__
9.
____
9.__
__9.
____
9.__
__9.
____
9.__
__9.
____
9.__
__9.
____
9.__
__9.
____
9.__
__9.
____
9.__
__9.
____
10
.___
10._
__10
.___
10._
__10
.___
10._
__
10
.___
10._
__10
.___
10._
__
11._
__11
.___
11._
__11
.___
11._
__11
.___
11._
__11
.___
11._
__11
.___
SY2
SY3
Terr
aFi
ght1
Figh
t2Fi
ght3
PD1
PD2
PD3
Clk
1C
lk2
Scan
1Sc
an2
Min
esM
S1
MS
2M
ov6
1.__
__1.
____
1.__
__1.
____
1.__
__1.
____
1.__
__1.
____
1.__
__1.
____
1.__
__1.
____
1.__
__1.
____
1.__
__1.
____
1.__
__2.
____
2.__
__2.
____
2.__
__2.
____
2.__
__2.
____
2.__
__2.
____
2.__
__2.
____
2.__
__2.
____
2.__
__2.
____
2.__
__2.
____
3.__
__3.
____
3.__
__3.
____
3.__
__3.
____
3.__
__3.
____
3.__
__3.
____
3.__
__3.
____
3.__
__3.
____
3.__
__3.
____
3.__
__4.
____
4.__
__4.
____
4.__
__4.
____
4.__
__4.
____
4.__
__4.
____
4.__
__4.
____
4.__
__4.
____
4.__
__4.
____
4.__
__4.
____
5.__
__5.
____
5.__
__5.
____
5.__
__5.
____
5.__
__5.
____
5.__
__5.
____
5.__
__5.
____
5.__
__5.
____
5.__
__5.
____
5.__
__6.
____
6.__
__6.
____
6.__
__6.
____
6.__
__6.
____
6.__
__6.
____
6.__
__6.
____
6.__
__6.
____
6.__
__6.
____
6.__
__7.
____
7.__
__7.
____
7.__
__7.
____
7.__
__7.
____
7.__
__7.
____
7.__
__7.
____
7.__
__7.
____
7.__
__7.
____
7.__
__8.
____
8.__
__8.
____
8.__
__8.
____
8.__
__8.
____
8.__
__8.
____
8.__
__8.
____
8.__
__8.
____
8.__
__8.
____
8.__
__9.
____
9.__
__9.
____
9.__
__9.
____
9.__
__9.
____
9.__
__9.
____
9.__
__9.
____
9.__
__9.
____
9.__
__9.
____
9.__
__10
.___
10._
__10
.___
10._
__10
.___
10._
__10
.___
10._
__10
.___
10._
__11
.___
11._
__11
.___
11._
__11
.___
11._
__11
.___
11._
__11
.___
11._
__

SPACE EMPIRES — Scenario Book
© 2011 GMT Games, LLC — SEPT 2011
��
EconTurn
EconRolls
ExtraEcon
Fleet Tech Defense FleetLaunch
Economy Roll Results List All TechsPurchasedEcon Fleet Tech Def
1 1 0 0 - 1-2 3-10 Mines
# Fleet CP Raider?
2 1 0 0 1-10 1 2-3 4-103 2 0 1-10 1 2-4 5-8 9-104 2 1-5 1 2-5 6-8 9-105 2 1-3 1 2-5 6-9 106 3 1-4 1 2-6 7-9 107 3 1-4 1-5 6-9 108 3 1-4 1-5 6-9 109 3 1-5 1-5 6-9 10
10 4 1-5 1-6 7-9 1011 4 1-3 1-6 7-9 1012 4 1-3 1-6 7-9 1013 4 1-3 1-6 7-1014 4 1-10 1-6 7-1015 5 1-3 1-7 8-1016 5 1-10 1-7 8-1017 5 1-3 1-8 9-1018 5 1-10 1-8 9-1019 5 1-3 1-9 1020 5 1-10 1-9 10
Alien Economic Sheet AP Color:____________________