Embed Size (px)
Citation preview
Scheduling a MyVirtualVisit Appointment
For technical support, please contact the
MyVirtualVisit Support Desk at 1-888-519-1880
Capturing a Patient’s Email and Consent
If this is a patient’s first MyVirtualVisit appointment, you will be required to obtain their email address as well as consent to use their email for MyVirtualVisit.
Email addresses and consent are collected to support the delivery of patient care, to communicate information about the patient’s health and care, and to keep the patient informed about Island Health’s care and services.
This can be captured one of two ways: registration/scheduling encounter or verbal consent.
1. At the point of registration or scheduling when an encounter is created or updated in Cerner (In PM Office Under the Address Tab)
a. In the email address field, type the email address provided by the patient i. Confirm you have recorded the correct email address with the patient
b. In the consent to use email field, Select Yes from the drop down.
2. Verbal consent captured as part of the patients record as per standard charting process ( Such as Cerner, Paper, Authorization for Electronic Communications Form)
Confirming Patient Email and Available Devices
Prior to scheduling a MyVirtualVisit appointment, it is important to confirm the following:
1. Patient Email Address
a. We know a patient’s email address may change at any point. It is important to confirm
the patients email address is still correct each time a MyVirtualVisit appointment
notification is sent at scheduling. If you need to update the patient’s email please see the
instructions below.
2. Patient’s comfort level with technology or using a web based virtual application, and access to a
suitable device. Key things to review when scheduling include:
NOTE: The MyVirtualVisit platform only displays the date and time of your video visits; it does not replace your
existing scheduling solution. It is important to ensure that you document any missed or “left without being
seen (LWBS)” appointments in your existing EMR or scheduling solution to ensure accuracy.
Scheduling a MyVirtualVisit Appointment
For technical support, please contact the
MyVirtualVisit Support Desk at 1-888-519-1880
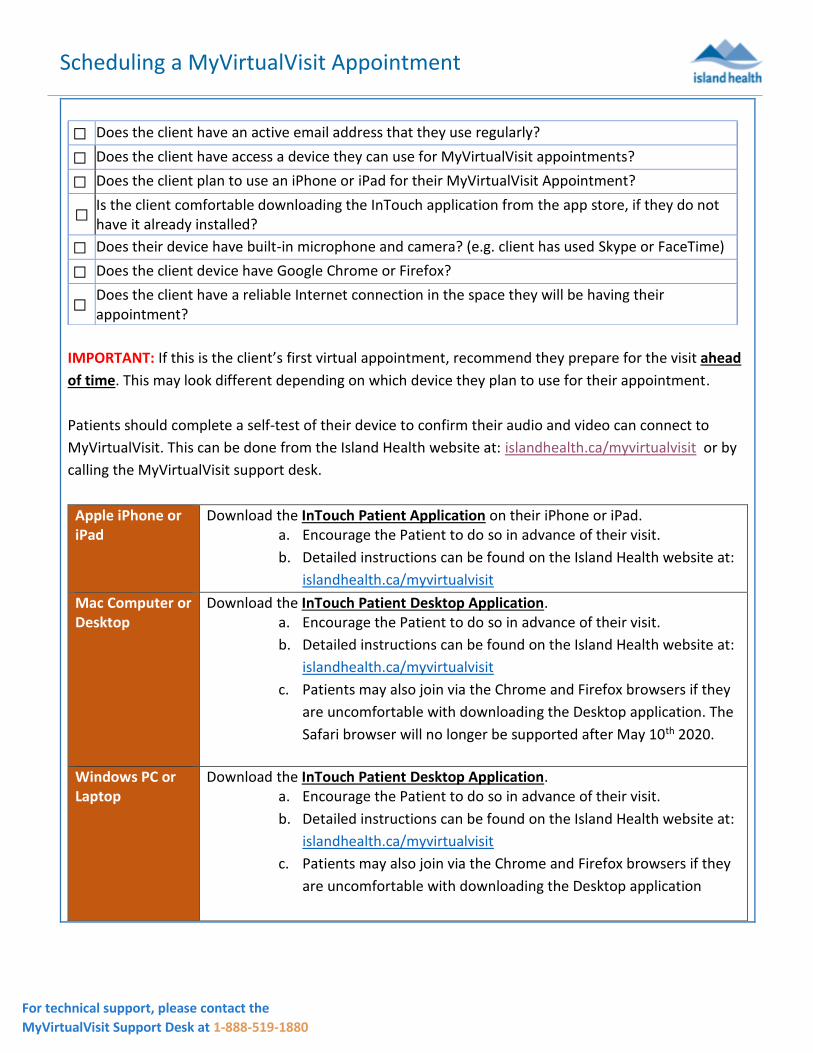
IMPORTANT: If this is the client’s first virtual appointment, recommend they prepare for the visit ahead
of time. This may look different depending on which device they plan to use for their appointment.
Patients should complete a self-test of their device to confirm their audio and video can connect to
MyVirtualVisit. This can be done from the Island Health website at: islandhealth.ca/myvirtualvisit or by
calling the MyVirtualVisit support desk.
Apple iPhone or iPad
Download the InTouch Patient Application on their iPhone or iPad. a. Encourage the Patient to do so in advance of their visit.
b. Detailed instructions can be found on the Island Health website at:
islandhealth.ca/myvirtualvisit
Mac Computer or Desktop
Download the InTouch Patient Desktop Application. a. Encourage the Patient to do so in advance of their visit.
b. Detailed instructions can be found on the Island Health website at:
islandhealth.ca/myvirtualvisit
c. Patients may also join via the Chrome and Firefox browsers if they
are uncomfortable with downloading the Desktop application. The
Safari browser will no longer be supported after May 10th 2020.
Windows PC or Laptop
Download the InTouch Patient Desktop Application. a. Encourage the Patient to do so in advance of their visit.
b. Detailed instructions can be found on the Island Health website at:
islandhealth.ca/myvirtualvisit
c. Patients may also join via the Chrome and Firefox browsers if they
are uncomfortable with downloading the Desktop application
☐ Does the client have an active email address that they use regularly?
☐ Does the client have access a device they can use for MyVirtualVisit appointments?
☐ Does the client plan to use an iPhone or iPad for their MyVirtualVisit Appointment?
☐ Is the client comfortable downloading the InTouch application from the app store, if they do not have it already installed?
☐ Does their device have built-in microphone and camera? (e.g. client has used Skype or FaceTime)
☐ Does the client device have Google Chrome or Firefox?
☐ Does the client have a reliable Internet connection in the space they will be having their appointment?
Scheduling a MyVirtualVisit Appointment
For technical support, please contact the
MyVirtualVisit Support Desk at 1-888-519-1880
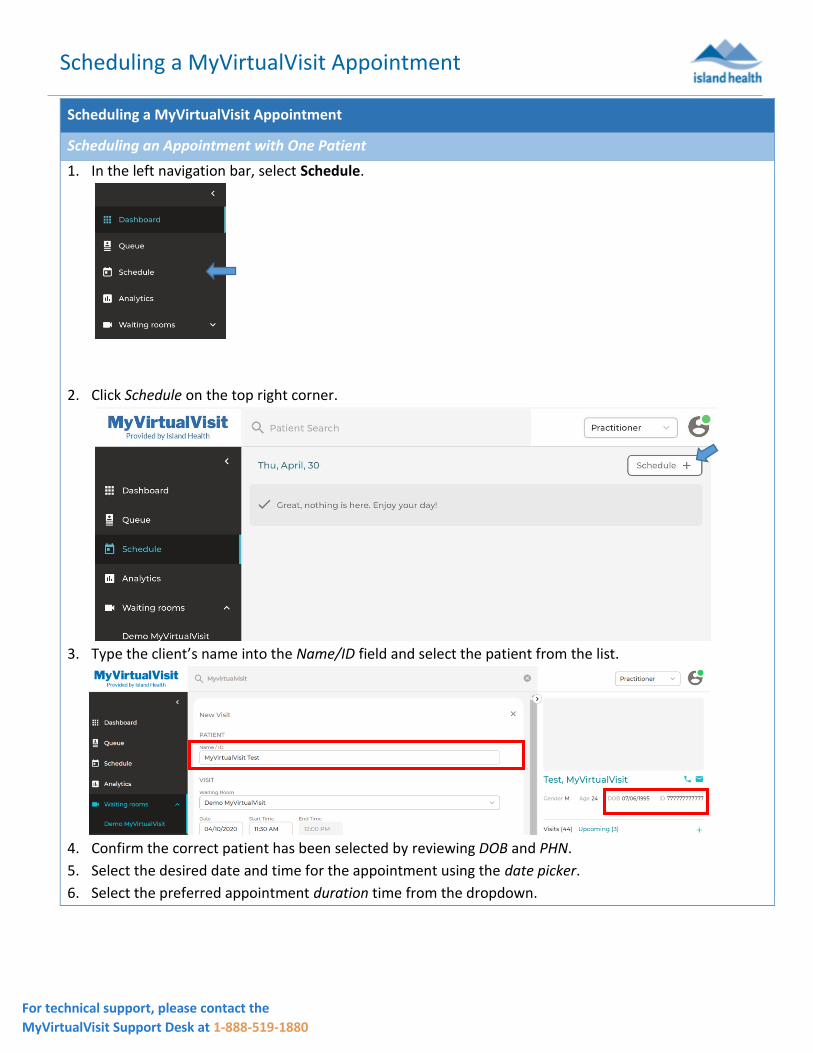
Scheduling a MyVirtualVisit Appointment
Scheduling an Appointment with One Patient
1. In the left navigation bar, select Schedule.
2. Click Schedule on the top right corner.
3. Type the client’s name into the Name/ID field and select the patient from the list.
4. Confirm the correct patient has been selected by reviewing DOB and PHN.
5. Select the desired date and time for the appointment using the date picker.
6. Select the preferred appointment duration time from the dropdown.
Scheduling a MyVirtualVisit Appointment
For technical support, please contact the
MyVirtualVisit Support Desk at 1-888-519-1880
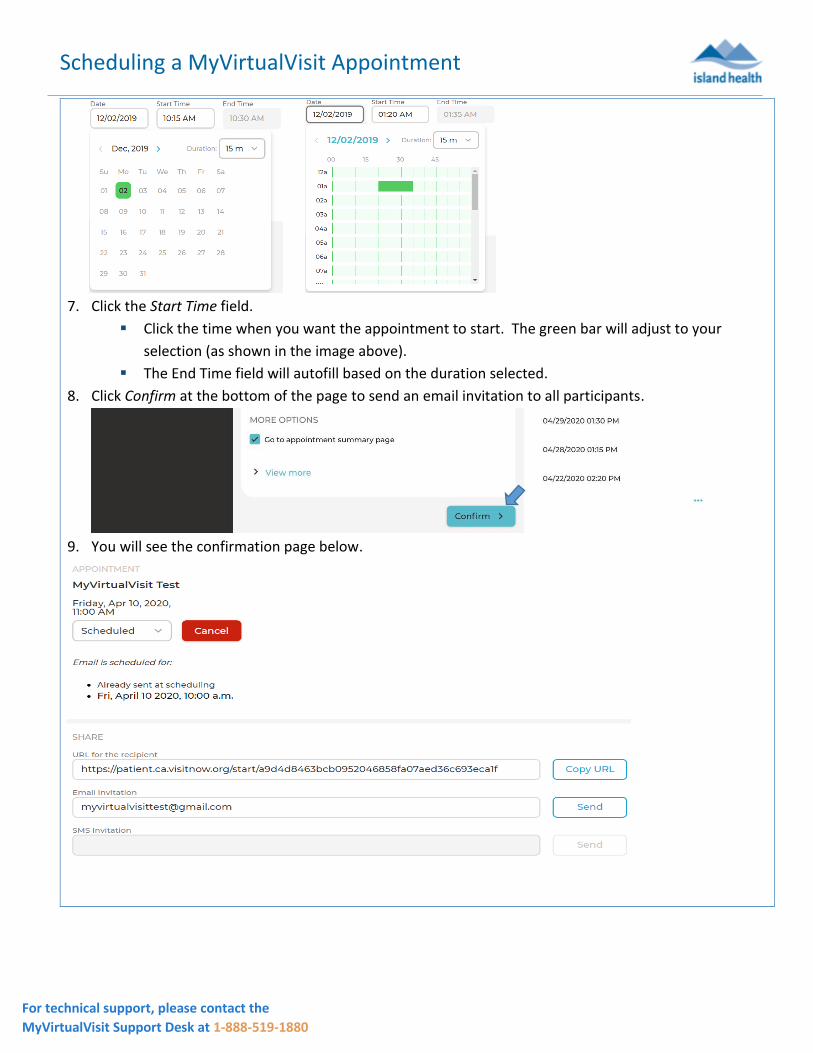
7. Click the Start Time field.
Click the time when you want the appointment to start. The green bar will adjust to your
selection (as shown in the image above).
The End Time field will autofill based on the duration selected.
8. Click Confirm at the bottom of the page to send an email invitation to all participants.
9. You will see the confirmation page below.

Scheduling a MyVirtualVisit Appointment
For technical support, please contact the
MyVirtualVisit Support Desk at 1-888-519-1880
Cancelling a MyVirtualVisit Appointment
1. Select Schedule from the left navigation bar.
2. Select the date at the top, and use the date picker to select the date you wish to view.
3. Select the appointment you wish to cancel.
4. Click Upcoming on the right navigation bar.
5. Click the appointment you wish to cancel.
6. Click the date at the top left of the Visit Notes window.
7. Click Cancel and click Yes to confirm. The patient will receive an email, SMS (text) message or both
NOTE: If you would like to cancel an appointment for a specific patient, you may use the patient search bar at
the top of the screen, and then follow the instructions below from step three onwards to cancel the
appointment.
Scheduling a MyVirtualVisit Appointment
For technical support, please contact the
MyVirtualVisit Support Desk at 1-888-519-1880
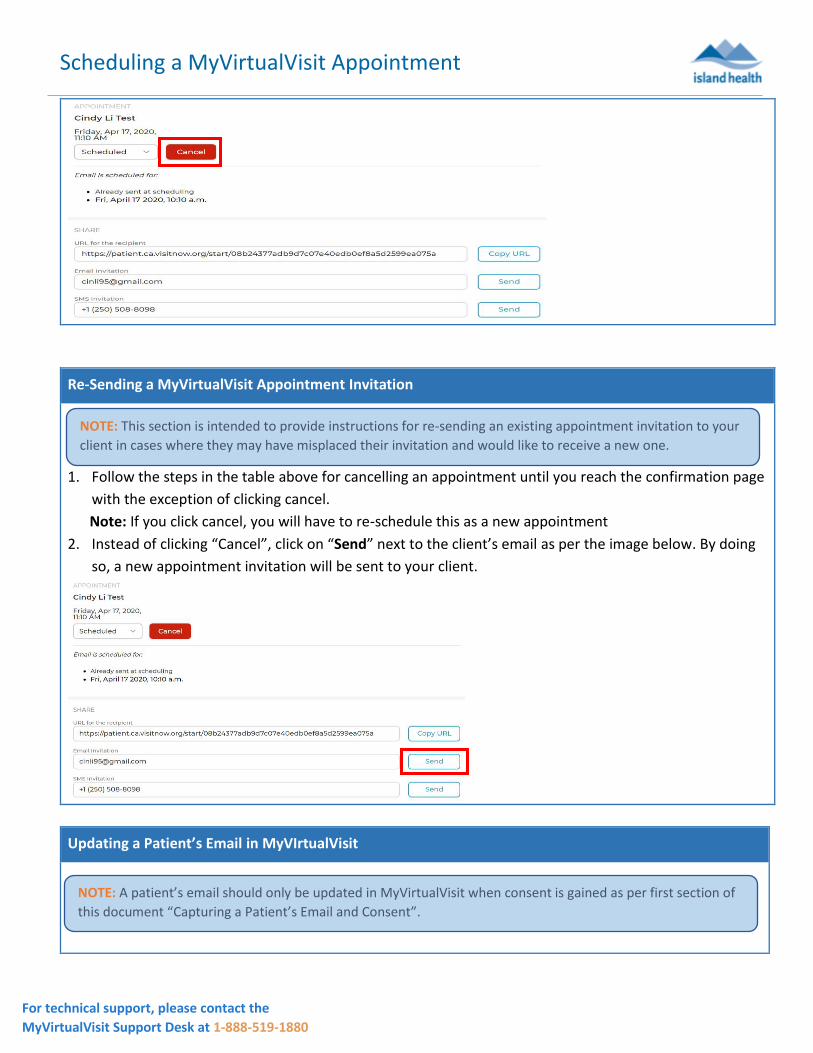
Re-Sending a MyVirtualVisit Appointment Invitation
1. Follow the steps in the table above for cancelling an appointment until you reach the confirmation page
with the exception of clicking cancel.
Note: If you click cancel, you will have to re-schedule this as a new appointment
2. Instead of clicking “Cancel”, click on “Send” next to the client’s email as per the image below. By doing
so, a new appointment invitation will be sent to your client.
Updating a Patient’s Email in MyVIrtualVisit
NOTE: A patient’s email should only be updated in MyVirtualVisit when consent is gained as per first section of
this document “Capturing a Patient’s Email and Consent”.
NOTE: This section is intended to provide instructions for re-sending an existing appointment invitation to your
client in cases where they may have misplaced their invitation and would like to receive a new one.
Scheduling a MyVirtualVisit Appointment
For technical support, please contact the
MyVirtualVisit Support Desk at 1-888-519-1880
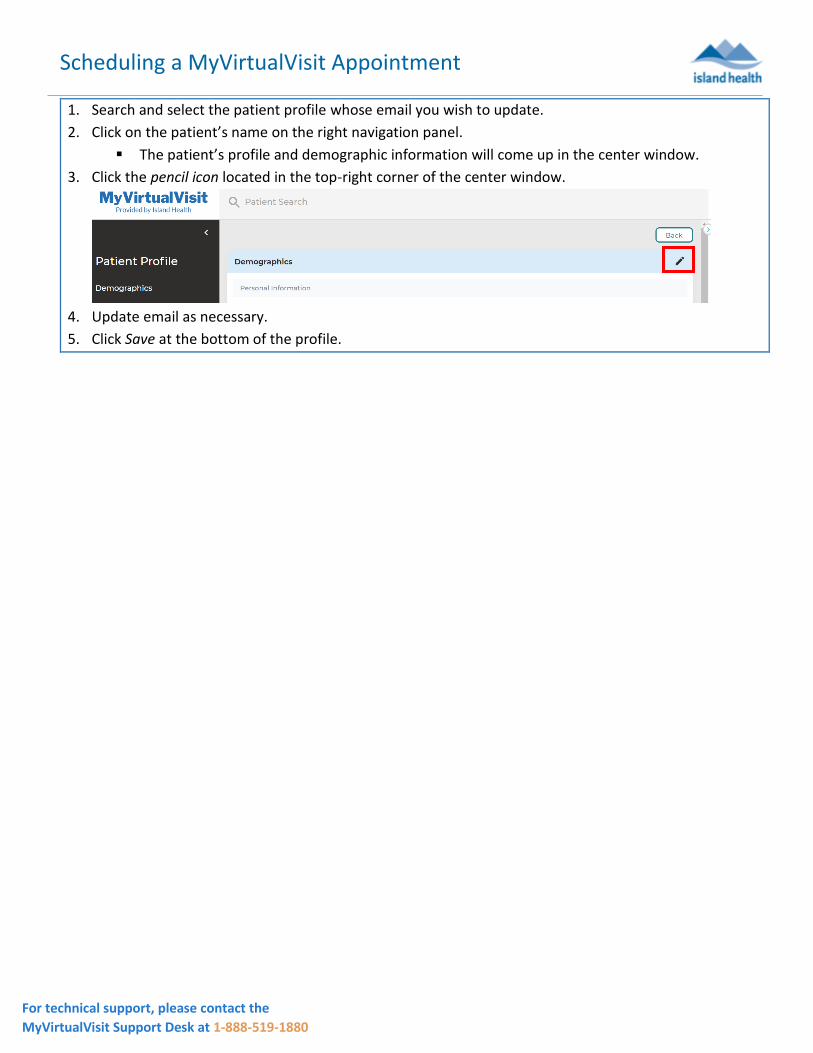
1. Search and select the patient profile whose email you wish to update.
2. Click on the patient’s name on the right navigation panel.
The patient’s profile and demographic information will come up in the center window.
3. Click the pencil icon located in the top-right corner of the center window.
4. Update email as necessary.
5. Click Save at the bottom of the profile.