Embed Size (px)
Citation preview

8/20/2019 scheduling.pdf
http://slidepdf.com/reader/full/schedulingpdf 1/70
Epicor ERP
Scheduling Course10.0.700.2
8/20/2019 scheduling.pdf
http://slidepdf.com/reader/full/schedulingpdf 2/70
Disclaimer
This document is for informational purposes only and is subject to change without notice. This document and itscontents, including the viewpoints, dates and functional content expressed herein are believed to be accurate as of itsdate of publication. However, Epicor Software Corporation makes no guarantee, representations or warranties with
regard to the enclosed information and specifically disclaims any applicable implied warranties, such as fitness for aparticular purpose, merchantability, satisfactory quality or reasonable skill and care. As each user of Epicor software islikely to be unique in their requirements in the use of such software and their business processes, users of this documentare always advised to discuss the content of this document with their Epicor account manager. All information containedherein is subject to change without notice and changes to this document since printing and other important informationabout the software product are made or published in release notes, and you are urged to obtain the current releasenotes for the software product. We welcome user comments and reserve the right to revise this publication and/ormake improvements or changes to the products or programs described in this publication at any time, without notice.The usage of any Epicor software shall be pursuant to an Epicor end user license agreement and the performance ofany consulting services by Epicor personnel shall be pursuant to Epicor's standard services terms and conditions. Usageof the solution(s) described in this document with other Epicor software or third party products may require the purchaseof licenses for such other products. Where any software is expressed to be compliant with local laws or requirementsin this document, such compliance is not a warranty and is based solely on Epicor's current understanding of such laws
and requirements. All laws and requirements are subject to varying interpretations as well as to change and accordinglyEpicor cannot guarantee that the software will be compliant and up to date with such changes. All statements ofplatform and product compatibility in this document shall be considered individually in relation to the products referredto in the relevant statement, i.e., where any Epicor software is stated to be compatible with one product and alsostated to be compatible with another product, it should not be interpreted that such Epicor software is compatiblewith both of the products running at the same time on the same platform or environment. Additionally platform orproduct compatibility may require the application of Epicor or third-party updates, patches and/or service packs andEpicor has no responsibility for compatibility issues which may be caused by updates, patches and/or service packsreleased by third parties after the date of publication of this document. Epicor® is a registered trademark and/ortrademark of Epicor Software Corporation in the United States, certain other countries and/or the EU. All othertrademarks mentioned are the property of their respective owners. Copyright © Epicor Software Corporation 2014.All rights reserved. No part of this publication may be reproduced in any form without the prior written consent of
Epicor Software Corporation.
ED820905
90521-10-9286-58310702
10.0.700.2
Revision: July 25, 2014 2:45 a.m.
Total pages: 70
course.ditaval

8/20/2019 scheduling.pdf
http://slidepdf.com/reader/full/schedulingpdf 3/70
Contents
Scheduling Course..................................................................................................................6
Before You Begin....................................................................................................................7
Audience.........................................................................................................................................................7
Prerequisites....................................................................................................................................................7
Environment Setup..........................................................................................................................................8
Workshop Constraints..............................................................................................................................8
Scheduling Overview.............................................................................................................9
Company Configuration.......................................................................................................12
Workshop - Review Company Configuration..................................................................................................12
Daily Scheduling Processes..................................................................................................14
The Role of the Scheduler..............................................................................................................................16
Resource Loading and Capacity......................................................................................................................17
Scheduling Tools............................................................................................................................................17
Workshop - Resource Group Scheduling Board.......................................................................................18
Access the Resource Group Scheduling Board..................................................................................18
Locate a Job....................................................................................................................................19
User Preferences..............................................................................................................................19
Tool Bar...........................................................................................................................................20
Change Grid Scale...........................................................................................................................20
Drag and Drop Scheduling...............................................................................................................20
Accept or Undo the Schedule..........................................................................................................21
Workshop - Overload Informer...............................................................................................................21
Workshop - Reschedule a Job.................................................................................................................22
Select the Overloaded Resource.......................................................................................................22
Move the Job..................................................................................................................................22
Capacity Management...................................................................................................................................23
Production Capacity................................................................................................................................25
Workshop - Define a Production Calendar.......................................................................................26
Workshop - Assign Calendar to Resource Group..............................................................................27
Scheduling Capacity...............................................................................................................................28
Workshop - Schedule Jobs with Multiple Resources.........................................................................29
Manufacturing Lead Time.......................................................................................................................30
Queue Time.....................................................................................................................................30Workshop - Manage Queue Time....................................................................................................31
Change Queue Time................................................................................................................31
Verify/Undo Queue Time Change.............................................................................................31
Move Time......................................................................................................................................32
Overlap Scheduling.................................................................................................................................33
Workshop - Overlap Scheduling.......................................................................................................34
Finish-to-Finish Scheduling.......................................................................................................34
3Epicor ERP | 10.0.700.2
ContentsScheduling Course

8/20/2019 scheduling.pdf
http://slidepdf.com/reader/full/schedulingpdf 4/70
Start-to-Start Scheduling..........................................................................................................36
Multi-level Scheduling / Branch Scheduling......................................................................................36
Workshop - Material Status and Move......................................................................................37
Global Scheduling..........................................................................................................................................38
Infinite Capacity......................................................................................................................................39
Workshop - Increase Capacity..........................................................................................................39
Workshop - Review the Resource Group Overload...........................................................................40Workshop - Update Resource Capacity............................................................................................40
Finite Capacity........................................................................................................................................41
Finite and Infinite Scheduling..................................................................................................................42
Global Scheduling Process......................................................................................................................43
Workshop - Calculate Global Scheduling Order................................................................................45
Calculate Global Scheduling Order...........................................................................................45
View the Calculation Results.....................................................................................................46
Modify Scheduling Priority Codes.............................................................................................46
Recalculate Global Scheduling Order........................................................................................48
View the Recalculation Results..................................................................................................48Override Global Scheduling Order.............................................................................................49
Workshop - Set Global Scheduling Options......................................................................................49
Set Finite Horizon.....................................................................................................................49
Lock a Job Schedule.................................................................................................................50
Workshop - Rough Cut Scheduling..................................................................................................50
Set the Rough Cut Horizon.......................................................................................................50
Review the Rough Cut Load.....................................................................................................50
Workshop - Process Global Scheduling............................................................................................51
Global Scheduling Process........................................................................................................51
View Resource Load.................................................................................................................52Scheduling Reports.................................................................................................................................53
Workshop - Shop Load Report.........................................................................................................54
Workshop - Priority Dispatch Report................................................................................................54
Workshop - Schedule Impact Report................................................................................................55
Workshop - Job Status Report.........................................................................................................56
Specialized Scheduling Processes........................................................................................57
Batch Scheduling...........................................................................................................................................57
Batch Jobs with Identical Methods..........................................................................................................58
Workshop - Batch Jobs with Identical Methods................................................................................58
Create Jobs..............................................................................................................................58
Batch Jobs................................................................................................................................59
Schedule the Batch Job............................................................................................................60
Review Jobs..............................................................................................................................60
Workshop - Save and Restore a Schedule.......................................................................................................62
Enter Scheduling Changes......................................................................................................................62
Generate Schedule Impact Report...........................................................................................................63
Undo the Changes..................................................................................................................................63
Workshop - Multi-Constraint Scheduling........................................................................................................63
Epicor ERP | 10.0.700.24
Scheduling CourseContents

8/20/2019 scheduling.pdf
http://slidepdf.com/reader/full/schedulingpdf 5/70
Add New Resource.................................................................................................................................63
Add Resource to Job Operation..............................................................................................................64
Reschedule the Job.................................................................................................................................65
View the Schedule Change.....................................................................................................................65
Workshop - Minimize WIP..............................................................................................................................66
Create Scheduling Priority Code..............................................................................................................66
Create a Job with Multiple Assemblies....................................................................................................67Backward Schedule the Job....................................................................................................................67
Forward Schedule the Job.......................................................................................................................68
Re-schedule the Job................................................................................................................................68
Conclusion.............................................................................................................................69
5Epicor ERP | 10.0.700.2
ContentsScheduling Course

8/20/2019 scheduling.pdf
http://slidepdf.com/reader/full/schedulingpdf 6/70
Scheduling Course
This course introduces the theory of scheduling and the use of the scheduling tools in the Epicor ERP application.The objective is to provide a foundation using the application to achieve realistic production schedules and load
estimates that can be used to help control the shop floor and aid in delivery promises. The Scheduling Coursefocuses on creating job schedules, computing resource loads, and communicating this information to stakeholders.
Upon successful completion of this course, you will be able to:
• Understand scheduling in a manufacturing environment.
• Apply scheduling features available in the Epicor ERP application.
• Understand scheduling options.
• Use the application to help create realistic production schedules and load estimates.
Epicor ERP | 10.0.700.26
Scheduling CourseScheduling Course

8/20/2019 scheduling.pdf
http://slidepdf.com/reader/full/schedulingpdf 7/70
Before You Begin
Read this topic for information you should know in order to successfully complete this course.
Audience
Specific audiences will benefit from this course.
• Production Control
• Material Planning
• Operations
• Scheduling
• Engineering
Prerequisites
To complete the workshops in this course, the necessary modules must be licensed and operating in your trainingenvironment. For more information on the modules available, contact your Epicor Customer Account Managerat [email protected]. It is also important you understand the prerequisite knowledge contained in othervaluable courses.
• Navigation Course - This course introduces navigational aspects of the Epicor application's user interface.Designed for a hands-on environment, general navigation principles and techniques available in two user
interface modes - Classic Menu and Modern Shell Menu. Workshops focus on each of these modes andguide you through each navigational principle introduced.
• Engineering Course - This course outlines the creation of a new part, engineering of a method of manufacture(MOM), approval of a method, and creation of a method available for use. Methods can be used in the quotingprocess, job entry, or as the basis for a new method.
• Industry Knowledge - A working knowledge of job scheduling capacity planning concepts.
7Epicor ERP | 10.0.700.2
Before You BeginScheduling Course

8/20/2019 scheduling.pdf
http://slidepdf.com/reader/full/schedulingpdf 8/70
Environment Setup
The environment setup steps and potential workshop constraints must be reviewed in order to successfullycomplete the workshops in this course.
Your Epicor training environment, in which the Epicor demonstration database is found, enables you to experienceEpicor functionality in action but does not affect data in your live, production environment.
The following steps must be taken to successfully complete the workshops in this course.
1. Verify the following or ask your system administrator to verify for you:
• Your Epicor training icon (or web address if you are using Epicor Web Access) points to yourEpicor training environment with the Epicor demonstration database installed. Do not completethe course workshops in your live, production environment.
Note It is recommended that multiple Epicor demonstration databases are installed. ContactSupport or Systems Consulting for billable assistance.
• The Epicor demonstration database is at the same service pack and patch as the Epicorapplication. Epicor's education team updates the Epicor demonstration database for each service packand patch. If your system administrator upgrades your Epicor application to a new service pack or patch,he or she must also download the corresponding Epicor demonstration database from EPICweb > Support> Epicor > Downloads and install it. If this is not performed, unexpected results can occur when completingthe course workshops.
• Your system administrator restored (refreshed) the Epicor demonstration database prior tostarting this course. The Epicor demonstration database comes standard with parts, customers, salesorders, and so on, already defined. If the Epicor demonstration database is shared with multiple users(that is, the database is located on a server and users access the same data, much like your live, productionenvironment) and is not periodically refreshed, unexpected results can occur. For example, if a courseworkshop requires you to ship a sales order that came standard in the Epicor demonstration database,
but a different user already completed this workshop and the Epicor demonstration database was notrestored (refreshed), then you will not be able to ship the sales order. Epicor's education team has writtenthe course workshops to minimize situations like this from occurring, but Epicor cannot prevent usersfrom manipulating the data in your installation of the Epicor demonstration database.
2. Log in to the training environment using the credentials manager/manager. If you are logged into yourtraining environment as a different user, from the Options menu, select Change User.
3. From the Main menu, select the company Epicor Education (EPIC06).
4. From the Main menu, select the Main Site.
Workshop Constraints
The workshops in this course can be performed only once in each instance of a restored (refreshed) database. Ifa user has already completed these workshops in the database, the database must be restored (refreshed) beforeanother user can complete this course.
Epicor ERP | 10.0.700.28
Scheduling CourseBefore You Begin

8/20/2019 scheduling.pdf
http://slidepdf.com/reader/full/schedulingpdf 9/70
Scheduling Overview
Scheduling is the process of determining the time, tasks, and resources required to attain an objective. Thisobjective may be large and complex, such as constructing a new building, or a simple task such as preparing a
meal. In order to successfully schedule you must have the following information:
• Tasks that must be completed
• Order in which tasks need to be completed, including identifying any pre-requisites
• Time needed to complete each task
• Projected completion date of each task
The process of scheduling determines when each task (or operation) must be started in order to meet a targetcompletion time, and which tasks may potentially delay meeting this objective. In a manufacturing company theprocess of scheduling requires the following:
1. A list of operations to be completed and the order in which they must be completed, usually called a Routingor Bill of Operations.
2. Estimated times to set up machines and to perform the actual manufacturing operations.
3. A target start date or completion date.
The scheduling process then assigns estimated start and completion dates for each operation in one of two ways:
Forward Scheduling
This method takes the target start date and adds the estimated operation time of the first operation to computeits estimated completion date. It then uses that date as the estimated, or scheduled, start date for the nextoperation, continuing until all operations are scheduled and an estimated completion date for the job results.This process is illustrated in the following graphic:
9Epicor ERP | 10.0.700.2
Scheduling OverviewScheduling Course

8/20/2019 scheduling.pdf
http://slidepdf.com/reader/full/schedulingpdf 10/70
Backward Scheduling
This method begins with the job's target completion date and subtracts the estimated operation time for the lastoperation to compute its scheduled starting time which, in turn, becomes the scheduled completion time of theprevious operation. This process continues until the first operation is scheduled and the scheduled start date forthe job results. This process is illustrated in the following graphic:
In both cases the calculations are similar, only the scheduling direction is different.
Epicor ERP | 10.0.700.210
Scheduling CourseScheduling Overview

8/20/2019 scheduling.pdf
http://slidepdf.com/reader/full/schedulingpdf 11/70
11Epicor ERP | 10.0.700.2
Scheduling OverviewScheduling Course

8/20/2019 scheduling.pdf
http://slidepdf.com/reader/full/schedulingpdf 12/70
Company Configuration
Much of company configuration is completed at the time of implementation. All application modules requiresome master table definition. This section of the course reviews pertinent configuration options that impact
Scheduling.
Company Configuration
Navigate to Company Configuration.
Menu Path: System Setup > Company/Site Maintenance > Company Configuration
Navigate to the Modules > All Modules > General sheet. Options on this sheet include setting defaults forsite, warehouse, and costing method.
Job Scheduling
Navigate to the Modules > Production > Job sheet.
• Global Reschedule Started Operations - This directs the Global Scheduling process, to allow an operationthat is already in process to be moved (if necessary) when running the Scheduling procedure finitely. If youdo not wish to move operations that are already in process, you may either clear this check box or lock the
job schedule.
• Allow Scheduling Before Today - This applies only when backward scheduling a job using the infinitescheduling assumption, and directs job scheduling to allow an operation to start earlier than the current date.If this check box is not selected, and job scheduling determines that an operation must start earlier than todayin order to meet the planned due date (need date) of the job, job scheduling schedules the job in a forwarddirection beginning with the current date. It is likely that the job will be scheduled to complete after its needdate and the user receives an appropriate warning.
• Load Relieved By - When reporting labor hours, the quantity reported to an operation as complete determinesthe amount of load to be removed from the resource or resource group. If the load is relieved by Quantity
(the default setting), then the load hours to be removed are computed based on the quantity completed andthe earned hours. If load is relieved by Hours, then the number of labor hours reported will be subtractedfrom the number of hours estimated (or Loaded) on the resource for the current operation. The latter settingis especially important for companies that manufacture items in job quantities of one.
• Change Impact Grace Periods - When printing the Schedule Impact Report or the Change Impact Informerto view planned what-if changes to the job schedules, these numbers determine whether or not a job isconsidered on time. If the scheduled completion date of a job is earlier by more than the number of daysindicated in the Early Grace Period, the job is considered early. If the scheduled completion date of a job islater than the number of days in the Late Grace Period, the job is considered to be late. Otherwise, the job isconsidered to be on time. This determines the number of jobs that fall into each category on the report orinquiry.
• Change Impact Price List - This is used by the Schedule Impact Report and shows the revenue resulting from
early, on time, and late jobs for both the actual and what-if job schedules. Specifically, it shows changes inthe revenue figures resulting from rescheduling jobs in what-if mode.
Workshop - Review Company Configuration
In this workshop, review the Company Configuration options that impact Scheduling.
Navigate to Company Configuration.
Epicor ERP | 10.0.700.212
Scheduling CourseCompany Configuration

8/20/2019 scheduling.pdf
http://slidepdf.com/reader/full/schedulingpdf 13/70
Menu Path: System Setup > Company/Site Maintenance > Company Configuration
1. Navigate to the Modules > Production > Job sheet.
2. Select or verify the Global Reschedule Started Operations check box is selected.
3. Select or verify the Allow Scheduling Before Today check box is selected.
4. Review the settings assigned for the Early Grace Period (Days) and Late Grace Period (Days) fields.
5. In the Load Relieved by section, verify Quantity is selected.
6. Click Save.
7. Exit Company Configuration.
13Epicor ERP | 10.0.700.2
Company ConfigurationScheduling Course

8/20/2019 scheduling.pdf
http://slidepdf.com/reader/full/schedulingpdf 14/70
Daily Scheduling Processes
This section of the course reviews scheduling process that takes place during a typical work day. Schedulingdetermines the time, tasks, and resources required to attain an objective. This objective can be large and complex,
such as constructing a new building, or a simple task such as preparing a meal.
Epicor ERP | 10.0.700.214
Scheduling CourseDaily Scheduling Processes

8/20/2019 scheduling.pdf
http://slidepdf.com/reader/full/schedulingpdf 15/70
15Epicor ERP | 10.0.700.2
Daily Scheduling ProcessesScheduling Course

8/20/2019 scheduling.pdf
http://slidepdf.com/reader/full/schedulingpdf 16/70
The Role of the Scheduler
A scheduler performs an important function in a manufacturing company. The scheduler performs the followingtasks:
1. Determines demand for resource time from all jobs that have been scheduled. This process is referred to asCapacity Management.
2. Prepares the shop paperwork, such as the Job Traveler, any necessary drawings or other documentation,and the dispatch list.
3. Communicates this information to the appropriate stakeholders, such as manufacturing, material planning,and sales.
4. Finishes jobs on time, or ahead of due dates.
5. Sequences work in order to make the most efficient use of resources.
6. Maintains high quality.
Scheduling can be a very complex task. There are numerous scenarios that can hinder effective scheduling. Thefollowing are some of the scenarios:
• Multiple routings and alternate paths through the shop floor. Not all jobs will pass through the same set ofresources, with the result that there will be uneven loads on resources during the same time period or acrossdifferent time periods.
It is likely that the planned and actual loads on resources vary from one resource to another, or from one dayor week to another. It is also likely that in any given day or week, the resource may have more load plannedthan it can handle and is said to be overloaded. This in turn both causes, and is caused by:
1. Uncertain arrival times at resources. In most manufacturing companies the scheduled times and actualtimes for operations can differ because there are no resources available to perform an operation whenit actually arrives at a resource center (or resource group) thereby delaying the actual completion of anoperation.
2. If a resource is available, it may make sense to start an operation early in order to keep a resource busyor guard against unanticipated demands for the resource's time. Both of these cases cause the scheduledand actual start and completion times to diverge.
The above illustrates the necessity of estimating the resource loads by day and/or week in order to assure thatthere is adequate time available on the resources and to identify any jobs that may be late due to lack of resourceavailability. Not only that, but there is an emotional aspect to scheduling. All jobs may display to be equally
important to the application while in fact some jobs are more important than others. A job for a key customerwill always receive more attention than a job for items destined for inventory.
The key questions include Who is the customer? and How important is this order?. When detailed schedulingis not an option, the only questions are How well will it be done? and How will the application communicatethe results?.
Epicor ERP | 10.0.700.216
Scheduling CourseDaily Scheduling Processes
8/20/2019 scheduling.pdf
http://slidepdf.com/reader/full/schedulingpdf 17/70
Resource Loading and Capacity
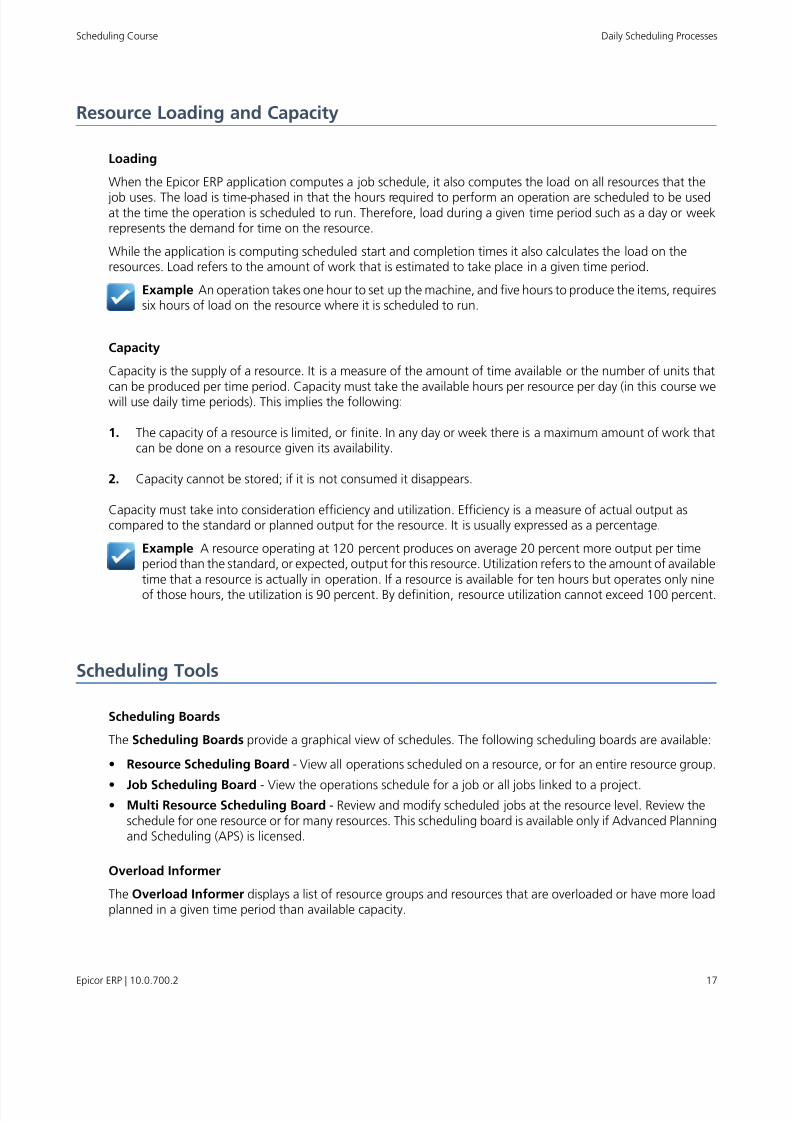
Loading
When the Epicor ERP application computes a job schedule, it also computes the load on all resources that the
job uses. The load is time-phased in that the hours required to perform an operation are scheduled to be usedat the time the operation is scheduled to run. Therefore, load during a given time period such as a day or weekrepresents the demand for time on the resource.
While the application is computing scheduled start and completion times it also calculates the load on theresources. Load refers to the amount of work that is estimated to take place in a given time period.
Example An operation takes one hour to set up the machine, and five hours to produce the items, requiressix hours of load on the resource where it is scheduled to run.
Capacity
Capacity is the supply of a resource. It is a measure of the amount of time available or the number of units that
can be produced per time period. Capacity must take the available hours per resource per day (in this course wewill use daily time periods). This implies the following:
1. The capacity of a resource is limited, or finite. In any day or week there is a maximum amount of work thatcan be done on a resource given its availability.
2. Capacity cannot be stored; if it is not consumed it disappears.
Capacity must take into consideration efficiency and utilization. Efficiency is a measure of actual output ascompared to the standard or planned output for the resource. It is usually expressed as a percentage.
Example A resource operating at 120 percent produces on average 20 percent more output per timeperiod than the standard, or expected, output for this resource. Utilization refers to the amount of availabletime that a resource is actually in operation. If a resource is available for ten hours but operates only nineof those hours, the utilization is 90 percent. By definition, resource utilization cannot exceed 100 percent.
Scheduling Tools
Scheduling Boards
The Scheduling Boards provide a graphical view of schedules. The following scheduling boards are available:
• Resource Scheduling Board - View all operations scheduled on a resource, or for an entire resource group.
• Job Scheduling Board - View the operations schedule for a job or all jobs linked to a project.• Multi Resource Scheduling Board - Review and modify scheduled jobs at the resource level. Review the
schedule for one resource or for many resources. This scheduling board is available only if Advanced Planningand Scheduling (APS) is licensed.
Overload Informer
The Overload Informer displays a list of resource groups and resources that are overloaded or have more loadplanned in a given time period than available capacity.
17Epicor ERP | 10.0.700.2
Daily Scheduling ProcessesScheduling Course

8/20/2019 scheduling.pdf
http://slidepdf.com/reader/full/schedulingpdf 18/70
The Overload Informer provides overload information by comparing actual resource overload, what-if resourceoverload, and overload percentages.
Workshop - Resource Group Scheduling Board
This workshop covers the available features of the Resource Group Scheduling Board.
Navigate to theResource Group Scheduling Board
.Menu Path: Production Management > Scheduling > General Operations > Resource Scheduling Board
Important This program is not available in the Epicor Web Access.
Access the Resource Group Scheduling Board
1. For the Scheduling Board Type, select Resource Group.
2. In the Start Date field, select 01/01/2015.
3. In the End Date field, select 12/31/2015.The date range must be wide enough to display the load on the resource scheduling board.
4. In the Resource Group field, enter ASM and press Tab.
5. Click Refresh.
6. Navigate to the Schedule sheet.
The load assigned jobs display.
Epicor ERP | 10.0.700.218
Scheduling CourseDaily Scheduling Processes

8/20/2019 scheduling.pdf
http://slidepdf.com/reader/full/schedulingpdf 19/70
Locate a Job
1. From the Operation list, select job 2193.
(0/10.10) represents the (Assy Seq/Opr Seq.Opr Detail).
2. Right-click on the operation and select Start Time.
3. Right-click on the 2193 (0/10.10) job operation on the list and select Job Tracker.
The Job Tracker displays.
4. In the tree view, expand the Operation node and select Opr:10 OP: ASSEM.
5. Review the operation detail.
6. Exit the Job Tracker and return to the Resource Group Scheduling Board.
User Preferences
1. From the Toolbar, select User Preferences (fourth icon from the left).
The Scheduling Job Preferences window displays. You can use this window to change the settings onthe scheduling board.
2. Review the default Color Settings.
Review the default colors assigned to the sample time bars and their descriptions.
ColorDescription
GreenCompleteColor
RedLateColorOlive GreenLockedColor
Light BlueQueueColor
YellowWhatIfColor
3. In the Assembly Move Option field, verify Assembly - All Operations displays.
4. In the Operation Move Option field, verify Operation Only displays.
These settings are the default options for moving assemblies and operations on the Resource SchedulingBoard. Use these fields to change how assemblies and operations are moved on this scheduling board.
5. Exit the Scheduling Board Preferences window.
19Epicor ERP | 10.0.700.2
Daily Scheduling ProcessesScheduling Course

8/20/2019 scheduling.pdf
http://slidepdf.com/reader/full/schedulingpdf 20/70
Tool Bar
1. On the Toolbar, hover over each Toggle button and review the display when turned on or off.
These icons are located to the right of User Preferences and allow changes to the following graphicaldisplays:
DescriptionToggle Button
Displays an estimate of how long the operation will wait untilstarting.
Toggle Queue Time
Indicates the number of units already completed for this operation.Toggle Completion Time
Shows the placement of this operation before performing anyrescheduling activities.
Toggle Original Time
Estimate of the time necessary to move this job to its next operation.Toggle Move Time
2. Verify that each Toggle button is on as indicated in red.
Change Grid Scale
1. Between the Left and Right arrows of the date range, click and hold the mouse while moving the mouseleft and right.
This expands and contracts the Scheduling Board visible detail.
2. Adjust the scale of the scheduling board so it displays the scope of the schedule you need.
3. Remain in the Resource Group Scheduling Board.
Drag and Drop Scheduling
When using drag and drop scheduling on the scheduling board, the load is placed in What-if scheduling mode.The change made to the operation takes place only in the scheduling board. It does not affect the job's scheduleuntil the change is accepted.
1. On the Operation list, right-click job 2193 and select Start Time.
2. Click and hold the operation Time bar, then drag and drop it one week to the left.
When you release the mouse button, the Move Job window displays, allowing you to make the followingchanges:
• Forward or Backward scheduling enables either the Start Date or Due Date.• The Move Option field indicates how the job will be impacted by the move.
• Production Complete and Setup Complete remove load when accepted.
3. For the Schedule option, select Forward.
4. In the Move Option field, select or verify Operation Only displays.
5. Click OK.
Epicor ERP | 10.0.700.220
Scheduling CourseDaily Scheduling Processes

8/20/2019 scheduling.pdf
http://slidepdf.com/reader/full/schedulingpdf 21/70
The time bars separate with the move. The Yellow time bar represents the What-If schedule and the Bluetime bar represents the original schedule. The schedule is not changed until accepted.
Accept or Undo the Schedule
1. From the Actions menu, select Undo All Changes.
• Undo All Changes - Restores moved jobs and operations back to original schedule.
• Undo Current Job Changes - Restores only the selected job to its original schedule.
• Accept All Changes - Changes the original job schedule to the what-if dates.
• Accept Current Job Changes - Changes the original job schedule for the selected job only.
2. Exit the Resourse Group Scheduling Board.
Workshop - Overload Informer
In this workshop, explore the general functionality of the Overload Informer dashboard including AdvancedSearch, Sort Options, and details that displays on the Actual and What-If sheets.
Navigate to the Overload Informer.
Menu Path: Production Management > Scheduling > General Operations > Overload Informer
1. Click Refresh.
2. Navigate to the Actual sheet to view the dashboard detail.
3. Click the Column Headers for different ways to view the dashboard data.
4. Navigate to the Advanced Search sheet.
5. Click Clear to clear the fields.
6. In the Percent Over >= field, enter 15.
7. Click Refresh and navigate to the Actual sheet.
Resources in excess of a 15% overload display.
8. Click and hold the Resource Group Desc column header, then drag and drop it into the area directly abovethe heading.
The display is now grouped by a resource group.
9. In the Actual grid, review the list of resource groups.
10. Remain in the Overload Informer for the next workshop.
21Epicor ERP | 10.0.700.2
Daily Scheduling ProcessesScheduling Course

8/20/2019 scheduling.pdf
http://slidepdf.com/reader/full/schedulingpdf 22/70
Workshop - Reschedule a Job
This workshop reinforces understanding of the Overload Informer and the use of drag and drop rescheduling.The workshop begins by identifying overloaded resources on the Overload Informer, then opens the correspondingresource scheduling board.
Select the Overloaded Resource
1. Navigate to the Advanced Search sheet.
2. Click Clear to clear the fields.
3. In the Resource Group field, select Asm Bench and click Refresh.
4. Navigate to the Actual sheet.
The occurrences of overload for this resource display.
5. Navigate to the Advanced Search sheet.
6. In the Resource ID field (displaying the AB1 resource), right click and select Open With > ResourceScheduling Board.
The Resource Scheduling Board displays. If the AB1 resource does not display enter it manually.
7. Verify that for the Scheduling Board Type, the Resource radio button option displays.
8. In the Start Date field, select 01/01/2015.
9. In the End Date field, select 12/31/2015.
10. Click Refresh.
Move the Job
1. Navigate to the Schedule sheet.
2. Right-click on job 2193 and select Start Time.
3. Select Job 2193, then drag-and-drop the operation to begin one week later.
The Move Job window displays.
4. In the Schedule field, select Forward.
The date defaults based on the drag-and-drop move.
5. In the Move Option field, select Job - All Operations.
This option reschedules operations on this resource group. All operations are rescheduled after forwardscheduling. However if multiple operations for a single job are scheduled at this resource group, this optionleaves gaps for any intervening operations on additional resource groups.
6. Accept the remaining defaults.
Epicor ERP | 10.0.700.222
Scheduling CourseDaily Scheduling Processes

8/20/2019 scheduling.pdf
http://slidepdf.com/reader/full/schedulingpdf 23/70
7. Click OK.
The what-if schedule is created.
8. From the Actions menu, select Undo All Changes.
9. Exit the Resource Scheduling Board.
10. Exit the Overload Informer.
Capacity Management
According to the Association for Operations Management (APICS) dictionary, Capacity Management is:
The function of establishing, measuring, and adjusting limits or levels of capacity. It is the process of determininghow much Labor and Machine Resources are required to accomplish the tasks of production. Open and PlannedOrders are translated into their hours demanded at each resource.
There are two different definitions of Capacity Management. The first one establishes, measures, and adjusts.This refers to the supply side and answers the question, How much capacity do we have?. The seconddetermines how much labor and machine resources are required. This refers to the demand side and answersthe question, How much capacity do we need?.
Capacity Management is the process of matching supply (capacity) with demand (load). This is commonly doneusing various load reports or a graphical display known as a load profile. The latter is better known as theScheduled Load Graph, which displays the capacity for a resource or resource group along with the scheduled(planned) load, and identifies those periods that are overloaded and under-loaded.
The objective of Capacity Management is to identify points of manufacturing constraint on the shop floor andwhat, if anything, can be done to relieve them. It does not attempt to provide level loads across all resources (orresource groups) nor does it attempt to load level by period.
Capacity Management provides a measurement of the capacity needed for all resources to meet the productionand shipment schedules. One of the most familiar il lustrations of load and capacity is the funnel analogy.
Example You can view input to a resource as a liquid poured into the funnel - regardless of how muchliquid we pour into the funnel there is a fixed amount which will exit the funnel. The size of the openingat the bottom of the funnel determines this amount - the rate at which liquid will exit the funnel. This isthe capacity, or the rate of output. If we pour more liquid into the funnel than it will hold, the level ofliquid in the funnel will rise - this is the load. We can expand this analogy to several funnels, with the outputof several funnels becoming the inputs to other funnels. In this example we see the relationship betweenthe output of one resource becoming the input of another.
The funnel analogy is also useful for demonstrating another law of capacity planning: No matter how much workis released to a resource there is a finite amount which can be produced in any time period. The only way toincrease output is to increase the size of the opening - to increase the output rate. This also helps to identify
capacity for what it is: the rate at which a resource can produce.
23Epicor ERP | 10.0.700.2
Daily Scheduling ProcessesScheduling Course

8/20/2019 scheduling.pdf
http://slidepdf.com/reader/full/schedulingpdf 24/70
In general, ERP applications plan to infinite capacity, meaning that it does not consider capacity limitations whilecomputing due dates and release dates on open and planned orders. It is concerned with meeting the buildschedule, and provides the part numbers, dates, and quantities necessary. This is the capacity necessary to meetthe production and shipment schedules, and the job of the planner is to find the available capacity to meet the
order dates.Capacity is not infinite, so the application can also plan to this finite capacity by not scheduling more work fora resource than the resource can perform. In this case, the jobs may be rescheduled to match the availablecapacity, and the due dates on the jobs may not meet the need dates. This will be covered in Global FiniteScheduling.
Epicor ERP | 10.0.700.224
Scheduling CourseDaily Scheduling Processes
8/20/2019 scheduling.pdf
http://slidepdf.com/reader/full/schedulingpdf 25/70
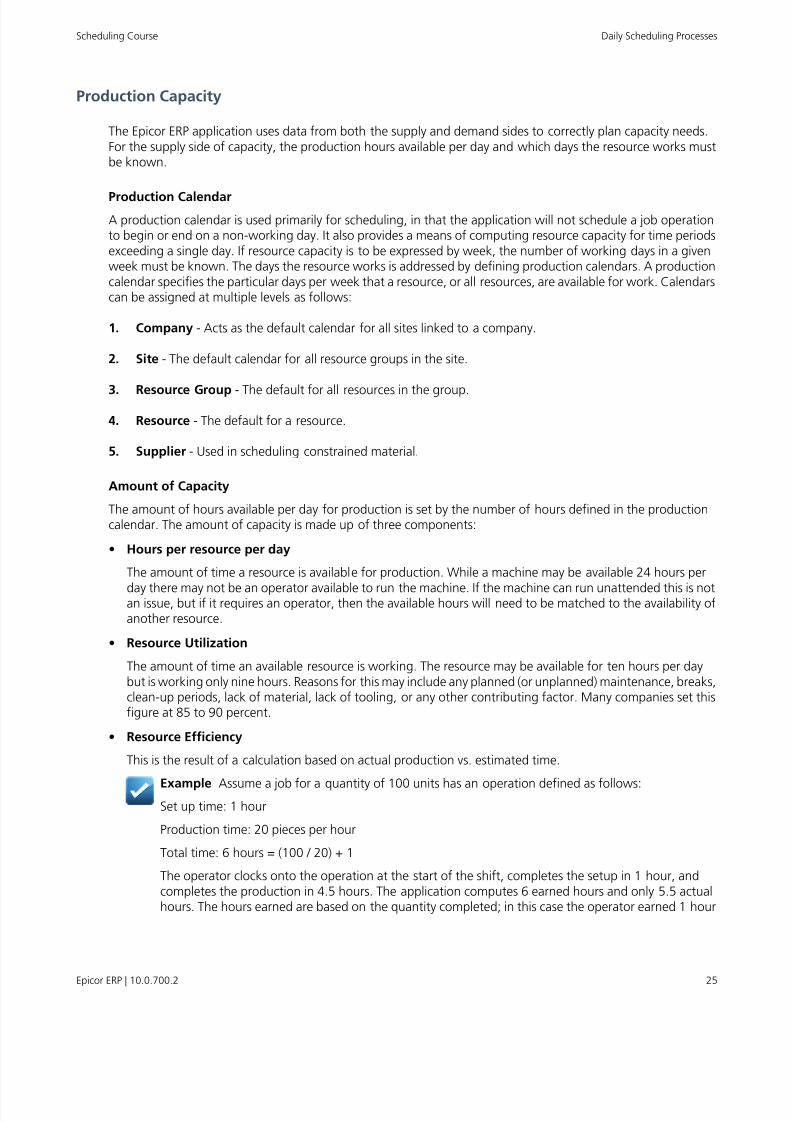
Production Capacity
The Epicor ERP application uses data from both the supply and demand sides to correctly plan capacity needs.For the supply side of capacity, the production hours available per day and which days the resource works mustbe known.
Production Calendar
A production calendar is used primarily for scheduling, in that the application will not schedule a job operationto begin or end on a non-working day. It also provides a means of computing resource capacity for time periodsexceeding a single day. If resource capacity is to be expressed by week, the number of working days in a givenweek must be known. The days the resource works is addressed by defining production calendars. A productioncalendar specifies the particular days per week that a resource, or all resources, are available for work. Calendarscan be assigned at multiple levels as follows:
1. Company - Acts as the default calendar for all sites linked to a company.
2. Site - The default calendar for all resource groups in the site.
3. Resource Group - The default for all resources in the group.
4. Resource - The default for a resource.
5. Supplier - Used in scheduling constrained material.
Amount of Capacity
The amount of hours available per day for production is set by the number of hours defined in the productioncalendar. The amount of capacity is made up of three components:
• Hours per resource per day
The amount of time a resource is available for production. While a machine may be available 24 hours per
day there may not be an operator available to run the machine. If the machine can run unattended this is notan issue, but if it requires an operator, then the available hours will need to be matched to the availability ofanother resource.
• Resource Utilization
The amount of time an available resource is working. The resource may be available for ten hours per daybut is working only nine hours. Reasons for this may include any planned (or unplanned) maintenance, breaks,clean-up periods, lack of material, lack of tooling, or any other contributing factor. Many companies set thisfigure at 85 to 90 percent.
• Resource Efficiency
This is the result of a calculation based on actual production vs. estimated time.
Example Assume a job for a quantity of 100 units has an operation defined as follows:Set up time: 1 hour
Production time: 20 pieces per hour
Total time: 6 hours = (100 / 20) + 1
The operator clocks onto the operation at the start of the shift, completes the setup in 1 hour, andcompletes the production in 4.5 hours. The application computes 6 earned hours and only 5.5 actualhours. The hours earned are based on the quantity completed; in this case the operator earned 1 hour
25Epicor ERP | 10.0.700.2
Daily Scheduling ProcessesScheduling Course

8/20/2019 scheduling.pdf
http://slidepdf.com/reader/full/schedulingpdf 26/70
by completing the setup and an additional 5 hours by completing 100 units. So efficiency is calculatedas:
Earned Hours / Actual Hours (6 / 5.5 = 1.09)
Since efficiency is usually expressed as a percentage, the result of the above calculation would be 109percent.
•Calculated CapacityThis is a manual calculation, also known as Rated Capacity.
Hours per Resource per Day X Resource Utilization X Resource Efficiency
Assuming 16 calendar hours for a resource and using the examples above, the calculation would be:
16 (hours / day) X 0.85 (Utilization) X 1.09 (Efficiency) = 14.824 or 15 hours per day
For further accuracy of efficiency and utilization, the resource calendar is set up with 15 hours per day, not16.
If there are multiple resources in a resource group, the capacity for that group can be defined as the sum ofthe capacities of all resources in the group.
Workshop - Define a Production Calendar
This workshop demonstrates the process of defining a Production Calendar based on the use of the followingcapacity components: Hours per Resource per day, Resource Utilization, and Resource Efficiency.
Navigate to Production Calendar Maintenance.
Menu Path: Production Management > Job Management > Setup > Production Calendar
Important This program is not available in the Epicor Web Access.
1. Click New.
2. Enter the following information:
DataField
XXXD5H15 (where XXX are your initials)Calendar ID
XXX 5 Days 15 Hours per day (where XXX are your initials)Description
24Default Hours Per Day
3. Click the buttons Monday through Friday.
4. Click the hour 21 button twice.
This clears the check boxes for each day of the week.
5. Repeat step 4 for hours 22 through 24 and 1 through 5.
The calendar reflects a schedule of Monday through Friday, 15 hours per day.
6. Navigate to the Working Days > Year sheet to open the yearly calendar.
Epicor ERP | 10.0.700.226
Scheduling CourseDaily Scheduling Processes

8/20/2019 scheduling.pdf
http://slidepdf.com/reader/full/schedulingpdf 27/70
7. While pressing the Ctrl key, select the following dates as holidays:
• January 1
• Last Monday in May
• First Monday in September
• Last Thursday and Friday in November
• December 25
8. Click the Toggle Day button to lock the holidays.
9. Click Save.The Exception Label window displays, displaying the default Exception Label, Non Work Day.
10. Click OK.These dates will now have the Non Work Day designation on the schedule.
11. Exit Production Calendar Maintenance.
Workshop - Assign Calendar to Resource Group
This workshop links the calendar to a Resource Group.
Navigate to Resource Group Maintenance.
Menu Path: Production Management > Scheduling > Setup > Resource Group
1. In the Resource Group field, enter ASM and press Tab.
2. In the Calendar field, search for and select the XXXD5H15 (where XXX are your initials) calendar youcreated in the Workshop - Define a Production Calendar.
3. Click Save.The Capacity changed, therefore, the 'Generate Shop Capacity Process' will need to be run toupdate shopload records' message displays.
4. To the message, click OK.
5. Exit Resource Group Maintenance.
27Epicor ERP | 10.0.700.2
Daily Scheduling ProcessesScheduling Course

8/20/2019 scheduling.pdf
http://slidepdf.com/reader/full/schedulingpdf 28/70
Scheduling Capacity
The scheduling capacity, or the manufacturing lead time for an operation at this resource group, means that a job can be scheduled to run on more than one resource. This can be set at the resource group level by enteringthe number of scheduling blocks. The scheduling blocks indicate the number of resources used to manufacturean item through this resource group. If two resources are used, then the number of scheduling blocks is two.
The number of scheduling blocks at the resource group level defaults to the scheduling block definition in theEngineering Workbench.
This applies only if the operation is scheduled at the resource group level.
The calculations in the Production Capacity section of this course define the production capacity. A job operationthat requires 30 hours is scheduled to run for 2 days on the above resource.
30 (load hours) / 15 (capacity hours) = 2 days
Given the 30 hours of load from the above job operation, and assuming two scheduling blocks, a job throughthis resource group would be scheduled to run for one day.
30 (load hours) / (15 (capacity hours) X 2 (scheduling blocks)) = 1 day
If the Asm Bench resource group has four resources, and the number of scheduling blocks is changed, the
manufacturing lead time for all jobs through this work center is as follows:
Assume a job operation with 30 load hours.
Planned Lead TimeScheduling Blocks
2 days1
1 day2
0.667 day3
0.5 day4
The load hours do not change, only the amount of time the job spends at this resource group.
Select the Split Operations check box to indicate that resources in this resource group are available to sharework on an operation. The number of hours that an operation requires can be divided by the number of resourcesthat have this check box selected.
Epicor ERP | 10.0.700.228
Scheduling CourseDaily Scheduling Processes

8/20/2019 scheduling.pdf
http://slidepdf.com/reader/full/schedulingpdf 29/70
Workshop - Schedule Jobs with Multiple Resources
You want to schedule large jobs through the ASM Bench resource group using multiple resources, while leavingsmall jobs on a single resource. This can be accomplished by assigning more Scheduling Blocks to the job operation,then rescheduling the job. Another way to handle this is to use the scheduling board which schedules it in What- If mode. After reviewing the schedule it can then be accepted or undone.
Navigate to Job Entry.
Menu Path: Production Management > Job Management > General Operations > Job Entry
1. In the Job field, enter 2051 and press Tab.
2. In the tree view, expand the Operations node and select Opr. 30: TURN.
The Scheduling Blocks field is used to assign additional resources to this job's operation and requiresrescheduling of the job. Alternately, this process can take place on the Job Scheduling Board.
3. In the Scheduling Blocks field, enter 2.
4. Click Save.
5. From the Actions menu, select Schedule > Job Scheduling Board.
The Job Scheduling Board displays.
6. Navigate to the Schedule sheet.
7. Right-click on the job number and select Start Time.
8. Double-click the time bar to open the Move Job window.
9. In the Schedule field, verify Forward defaults and click OK.
10. In the Start Date field, select the date one week forward and click OK.
11. On the Scheduling Board, view the What-if results.
12. From the Actions menu, select Undo Current Job Changes.
13. Exit the Job Scheduling Board and Job Entry.
29Epicor ERP | 10.0.700.2
Daily Scheduling ProcessesScheduling Course

8/20/2019 scheduling.pdf
http://slidepdf.com/reader/full/schedulingpdf 30/70
Manufacturing Lead Time
The lead time for a manufactured part consists of four elements:
1. Queue - Amount of time a job must wait at a resource before it can be started.
2. Move - Amount of time necessary to move the items to the next operation or resource.
3. Setup - Amount of time necessary to prepare a resource for an operation.
4. Production - Amount of time expended to produce the items.
Setup and run time, often referred to as the operation time, is a small percentage of the total manufacturinglead time for most jobs. The majority of manufacturing lead time is attributed to inter-operation time, which isqueue time plus move time.
Queue Time
Queue time is an estimate of the time a job waits for a resource to become available.
Queue time is determined by the following:
• The number of jobs scheduled through the resource group.
• The timing of the release of jobs to the shop floor.
• The arrival rate of jobs at the particular resource group.
• The time necessary to complete the jobs already in process according to their priority.
The queue time for a job is highly variable and cannot be predicted with any certainty, however, an averagequeue time for all jobs can be set at a Resource Group or a Resource level. Queue time tends to be the largestcomponent of a job’s lead time. Queue Time is assigned to a Resource Group, not a part. All jobs that arescheduled through a Resource Group are assigned the same (planned) queue time.
As more queue time is added, more lead time is required, leading to earlier job releases, which adds more queue.It is possible to manage queue time, but requires monitoring.
Managing Queue Time
There are many ways to manage queue time, but the most common is to view the planned lead time for any jobagainst its actual lead time:
• If jobs complete ahead of their scheduled (planned) completion date, there is too much queue time in itsschedule.
Epicor ERP | 10.0.700.230
Scheduling CourseDaily Scheduling Processes

8/20/2019 scheduling.pdf
http://slidepdf.com/reader/full/schedulingpdf 31/70
• If jobs complete after their scheduled completion date, there is too little queue time in its schedule.
How do you know this? If a job completes ahead of schedule, all things being equal, there is too much queuetime in the schedule and its scheduled start date was too early. If a job completes behind schedule, there is notenough queue time in the schedule and the start date was too late.
Workshop - Manage Queue Time
In this workshop, Queue Time hours are modified to view the impact on a job schedule. In this example, QueueTime is increased at the resource level and expands the job manufacturing lead time.
Navigate to Resource Group Maintenance.
Menu Path: Production Management > Scheduling > Setup > Resource Group
Change Queue Time
1. In the Resource Group field, enter ASM and press Tab.
2. In the Queue Hours field, enter 15.
3. Navigate to the Resources > Detail sheet.
4. In the Scheduling section, verify the Use Resource Group Values check box is selected for all 10 Resources.
Queue Hours can be setup at both the Resource Group and Resource levels. If queue hours need to bechanged at the Resource level, clear the Use Resource Group Values check box and enter the queue hours.
If no queue hours are established at the Resource level, the Resource Group queue hours are used.
5. Click Save and exit Resource Group Maintenance.
Verify/Undo Queue Time Change
Navigate to the Resource Group Scheduling Board.
Menu Path: Production Management > Scheduling > General Operations > Resource Scheduling Board
Important This program is not available in the Epicor Web Access.
1. In the Scheduling Board Type section, verify Resource Group defaults.
2. In the Start Date field, select 01/01/2015.
3. In the End Date field, select 12/31/2015.
4. In the Resource Group field, enter ASM and press Tab.
5. Click Refresh.
6. Navigate to the Schedule sheet.
7. Right-click job 2193 and select Start Time.
8. Double click on the Time Bar to open the Move Job window.
9. In the Schedule field, select Backward.
31Epicor ERP | 10.0.700.2
Daily Scheduling ProcessesScheduling Course

8/20/2019 scheduling.pdf
http://slidepdf.com/reader/full/schedulingpdf 32/70
10. Click OK.
The job shows a change in the queue time hours.
11. From the Actions menu select Undo Current Job Changes.
12. Exit the Resource Group Scheduling Board.
Move Time
Move Time is the time required to move an item to the next resource, or to stock after the last operation.
The following are the Move Time rules:
• If moving a job in the same building, it may not be necessary to add Move Time on top of queue time at thenext resource.
• If the move requires scheduling special equipment, such as an overhead crane or fork lift truck, then a MoveTime may be appropriate.
• If moving an item to another building or site, and it is necessary to use a company or vendor truck, a MoveTime is mandatory.
Other uses of Move Time include:
• Move Time adds an allowance for inspection activities without adding an inspection operation to the job.
• Certain processes, such as painting or epoxy, require that an item not be moved until it is dry or cured. MoveTime can add this time to the operation.
• It may be desirable to complete a job a few days prior to its scheduled ship date to make sure that any necessaryrework is done or that all shipment paperwork is ready. Adding Move Time to the last operation will accomplishthis.
Move Time is managed the same way as queue time. Update the Resource or Resource Group to add Move Time.
An increase in Move Time increases the planned (scheduled) lead time for all jobs using that Resource or Resource
Group.
Epicor ERP | 10.0.700.232
Scheduling CourseDaily Scheduling Processes

8/20/2019 scheduling.pdf
http://slidepdf.com/reader/full/schedulingpdf 33/70
Overlap Scheduling
When tasks are scheduled, the Epicor ERP application assumes each task is complete before the next task starts,even though several tasks may be done at once to finish the output. Manufacturing, or job scheduling makesthe same assumption – tasks are finished in sequence and each task completes before the next (successor) taskbegins.
In some situations you are able to overlap operations so two or more operations run at the same time. The EpicorERP application is designed to handle this situation and can schedule the operations accordingly. Operations canbe scheduled to overlap through the following methods:
Finish-to-Start
The default method of scheduling, this method follows the assumption made above, that an operation must becomplete before its successor can begin. Finish-to-Start scheduling resembles the following:
Finish-to-Finish
This scheduling method overlaps two operations to finish at the same time. This method is very useful for relatedoperations where the first (predecessor) has a much longer run time than its successor. In this case, the assumptionis the successor operation must start when sufficient units are complete on the predecessor operation, so thatboth operations finish at approximately the same time. To accomplish this, the Queue Time at the successorresource is ignored and not included in the scheduling calculation, as shown below.
Example A drill operation that takes 5 minutes per piece followed by a countersink operation that takes1 minute per piece is a prime candidate for Finish-to-Finish scheduling. If the setup at the countersinkoperation can be done before the arrival of parts from the drill operation, you can schedule most of theparts to complete at the drill operation, send them to the countersink operation, and complete the remainingparts at the drill operation before the countersink operation is done.
The key to Finish-to-Finish scheduling is for the successor resource to not run out of parts. Because of this, thetransfer, or overlap batch must be large enough to prevent this from happening as illustrated in the followingexample:
100Job Quantity
5 min / piece, or 500 minutesDrill Time
1 min / piece, or 100 minutesCountersink Time
If we use Finish-to-Start scheduling, the above sequence of operations would last 600 minutes, or 10 hours.
33Epicor ERP | 10.0.700.2
Daily Scheduling ProcessesScheduling Course
8/20/2019 scheduling.pdf
http://slidepdf.com/reader/full/schedulingpdf 34/70
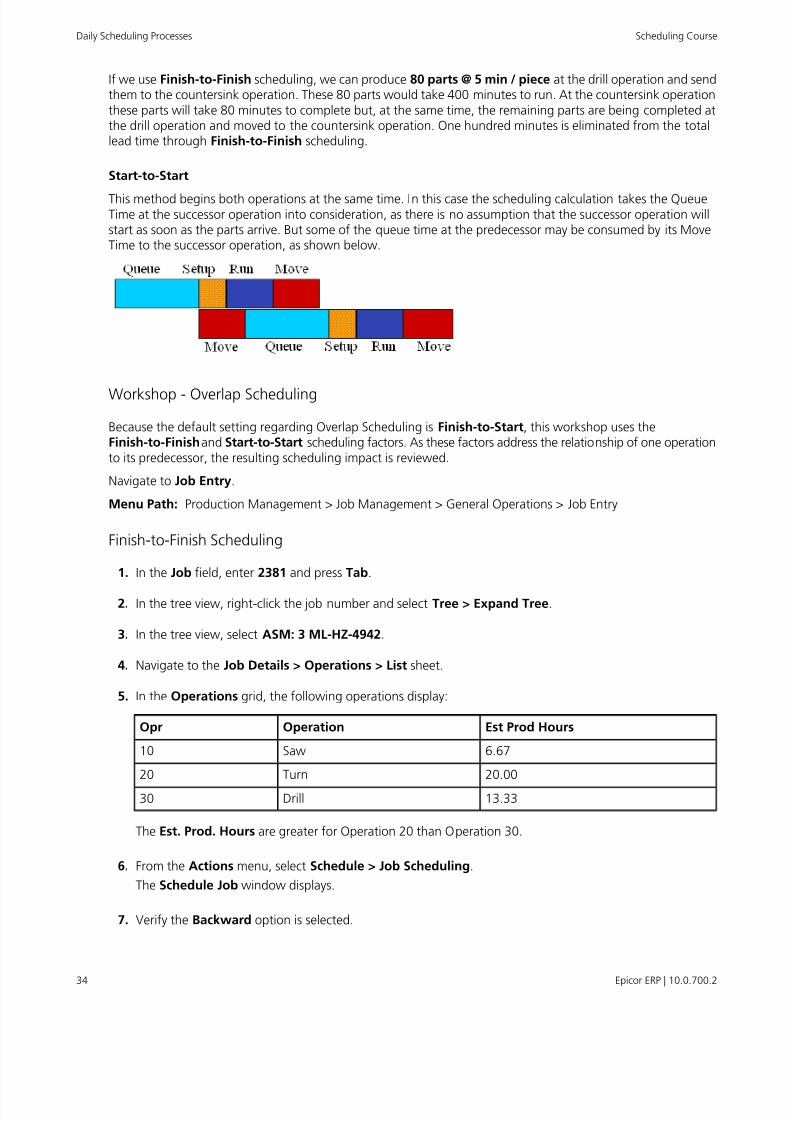
If we use Finish-to-Finish scheduling, we can produce 80 parts @ 5 min / piece at the drill operation and sendthem to the countersink operation. These 80 parts would take 400 minutes to run. At the countersink operationthese parts will take 80 minutes to complete but, at the same time, the remaining parts are being completed atthe drill operation and moved to the countersink operation. One hundred minutes is eliminated from the totallead time through Finish-to-Finish scheduling.
Start-to-Start
This method begins both operations at the same time. In this case the scheduling calculation takes the QueueTime at the successor operation into consideration, as there is no assumption that the successor operation willstart as soon as the parts arrive. But some of the queue time at the predecessor may be consumed by its MoveTime to the successor operation, as shown below.
Workshop - Overlap Scheduling
Because the default setting regarding Overlap Scheduling is Finish-to-Start, this workshop uses theFinish-to-Finish and Start-to-Start scheduling factors. As these factors address the relationship of one operationto its predecessor, the resulting scheduling impact is reviewed.
Navigate to Job Entry.
Menu Path: Production Management > Job Management > General Operations > Job Entry
Finish-to-Finish Scheduling
1. In the Job field, enter 2381 and press Tab.
2. In the tree view, right-click the job number and select Tree > Expand Tree.
3. In the tree view, select ASM: 3 ML-HZ-4942.
4. Navigate to the Job Details > Operations > List sheet.
5. In the Operations grid, the following operations display:
Est Prod HoursOperationOpr
6.67Saw10
20.00Turn20
13.33Drill30
The Est. Prod. Hours are greater for Operation 20 than Operation 30.
6. From the Actions menu, select Schedule > Job Scheduling.
The Schedule Job window displays.
7. Verify the Backward option is selected.
Epicor ERP | 10.0.700.234
Scheduling CourseDaily Scheduling Processes

8/20/2019 scheduling.pdf
http://slidepdf.com/reader/full/schedulingpdf 35/70
8. Select the What-If Schedule check box and click OK.
9. From the Actions menu, select Schedule > Job Scheduling Board.
The Job Scheduling Board displays.
10. Navigate to the Schedule sheet.
11. Right-click the job number and select Start Time.
12. Double-click the job number to display the operations.
13. Review the time bar.
Notice that operation 20 finishes before operation 30 starts.
14. In the Job Scheduling Board, select Actions > Undo Current Job Changes.
15. Exit the Job Scheduling Board.
16. Verify the Job Details > Operations > List sheet.
17. In the Operations grid, select Operation 30.
18. Navigate to the Job Details > Operations > Detail sheet.
19. In the Scheduling Factors section, select Finish-to-Finish.
20. Click Save.
21. From the Actions menu, select Schedule > Job Scheduling.
The Schedule Job window displays.
22. Verify the Backward option is selected.
23. Select the What-If Schedule check box and click OK.
24. From the Actions menu, select Schedule > Job Scheduling Board.
The Job Scheduling Board displays.
25. Navigate to the Schedule sheet.
26. Right-click the job number and select Start Time.
27. Double-click the job number to display the operations.
28. Review the time bar.
Notice that operation 20 finishes at the same time as operation 30.
29. In the Job Scheduling Board, select Actions > Undo Current Job Changes.
30. Exit the Job Scheduling Board.
31. Remain in Job Entry.
35Epicor ERP | 10.0.700.2
Daily Scheduling ProcessesScheduling Course

8/20/2019 scheduling.pdf
http://slidepdf.com/reader/full/schedulingpdf 36/70
Start-to-Start Scheduling
1. In Job Entry, verify the Job sheet displays.
2. In the Job field, enter 2376 and press Tab.
3. In the tree view, right-click the job number and select Tree > Expand Tree.
4. In the tree view, select ASM: 3 ML-HZ-4942.
5. Navigate to the Job Details > Operations > List sheet.
Note the difference in Est. Production Hours for Operations 10 and 20.
6. In the Operations grid, select Operation 20.
7. Navigate to the Job Details > Operations > Detail sheet.
8. In the Scheduling Factors section, select Start-to-Start.
9. Click Save.
10. From the Actions menu, select Schedule > Job Scheduling.
The Schedule Job window displays.
11. Verify the Backward option is selected.
12. Select the What-If Schedule check box and click OK.
13. From the Actions menu, select Schedule > Job Scheduling Board.
The Job Scheduling Board displays.
14. Navigate to the Schedule sheet.
15. Right-click the job number and select Start Time.
16. Double-click the job number to display the operations.
17. Review the time bar.
Operations 10 and 20 begin at the same time.
18. From the Actions menu, select Undo Current Job Changes.
19. Exit the Job Scheduling Board and Job Entry.
Multi-level Scheduling / Branch Scheduling
Jobs with multiple sub-assemblies present a particular challenge to scheduling because a change in one branch(sub-assembly) may or may not affect the scheduled completion of the job. This is determined by a sub-assembly'sCritical Path on the job.
The Critical Path for a job is determined by the sequence of assemblies, at all levels, that determine the jobduration.
Epicor ERP | 10.0.700.236
Scheduling CourseDaily Scheduling Processes

8/20/2019 scheduling.pdf
http://slidepdf.com/reader/full/schedulingpdf 37/70
Example A job may have three sub-assemblies, each of which has one of more sub-assemblies. One ofthe paths (links to sub-assemblies) will take longer than the others, and this determines the job schedule.The path that takes the longest is the Critical Path.
Available Move Options:
DefinitionMove Option
Reschedules a single operation only.Operation Only
Reschedules an operation and all later operations in the current assembly,but does not affect other assemblies on the job.
Assembly – SubsequentOperations
Reschedules an operation and all earlier operations in the currentassembly, but does not affect other assemblies on the job.
Assembly – PrecedingOperations
Reschedules all operations on this assembly but does not affect any otherassemblies.
Assembly – All Operations
Similar to Assembly – Subsequent Operations except that it alsoreschedules its parent assembly (the next higher one) and, if applicable,
Branch – SubsequentOperations
the parent of that one (its grandparent) until all assemblies have beenrescheduled. This may cause the job to be late, and disrupt the schedulesof multiple sub-assemblies.
Similar to Assembly – Preceding Operations except that it also reschedulesall of its lower level sub-assemblies (if any) and their children as well,
Branch – Preceding Operations
until the lowest level sub-assembly has been rescheduled. This may pushthe start date of operations and the job into a past due period.
Reschedules the top level assembly and all lower level sub-assemblies.Job – All Operations
Workshop - Material Status and Move
In this workshop, drag and drop the operation beyond the job's due date.
Navigate to the Job Scheduling Board.
Menu Path: Production Management > Scheduling > General Operations > Job Scheduling Board
Important This program is not available in the Epicor Web Access.
37Epicor ERP | 10.0.700.2
Daily Scheduling ProcessesScheduling Course

8/20/2019 scheduling.pdf
http://slidepdf.com/reader/full/schedulingpdf 38/70
1. In the Job field, enter 2175-SCH and press Tab.
2. Navigate to the Schedule sheet.
3. Right-click the job number and select Start Time.
4. Double-click the job number and each assembly (three cylinders) icon until all levels have been opened.
Assemblies (2/0 and 3/0) are denoted by a red icon – this indicates that the assemblies are on a criticalpath. For each assembly on the critical path, there are no open spaces, or gaps, in the schedule. A delay inany of these operations delays the completion of the job unless action is taken. Because assembly (1/0) isnot on a critical path (blue icon), it is possible to delay one or more operations without affecting thecompletion of the job. Multi-Level Scheduling is the same as scheduling a single-level job, except that achange in a lower-level operation may affect the entire job.
5. Under the 2/0 assembly, select operation (2/10) PUNC.
6. Drag and drop the operation beyond the job's due date.
The Move Job window displays.
7. In the Move Option field, select Branch– Subsequent Operations.
8. Click OK.
9. To the warning message, click OK.
Since the operation moved into the future, we need to reschedule not only the operation that was movedbut all of its successors as well. And, because this operation was on a subassembly, we need to rescheduleits parent assembly as well as any higher-level assemblies in the same path.
Note what happened when you clicked OK. The start times for the operation, its successors, and the enditem all moved into the future and you received a message that the job can not meet its required date. Thisis correct; branch scheduling will reschedule as many levels as necessary in order to assure that the jobschedule is accurate.
10. From the Actions menu, select Undo Current Job Changes.
11. Exit the Job Scheduling Board.
Global Scheduling
Global Scheduling schedules all open engineering jobs with either Infinite Capacity or Finite Capacity logic.The calculation evaluates the priority assigned to each engineered job to determine which jobs should be scheduled
ahead of other jobs.
Up to this point, the course has assumed no constraints on resource capacity, instead focusing on the relationshipbetween Capacity and Load. However resources do have limitations on the amount of output produced. Aresource with 15 hours of daily capacity can produce for only 15 hours per day regardless of the amount of loadscheduled on that resource. This is Finite Capacity.
Infinite Capacity allows more load to be scheduled above the available capacity within a specific resource.
Epicor ERP | 10.0.700.238
Scheduling CourseDaily Scheduling Processes

8/20/2019 scheduling.pdf
http://slidepdf.com/reader/full/schedulingpdf 39/70
Infinite Capacity
Under the Infinite Capacity assumption, the focus is on determining the amount of capacity needed to meetthe load requirements. These load requirements are generated by the production and shipment schedules. Inorder to meet scheduled production due dates and/or sales order shipment dates, the load requirements determinethe amount of capacity needed, by time period.
This is illustrated in the following graphic:
Capacity Management produces load profiles by loading to Infinite Capacity to determine the labor and machinecapacity needed to meet the production dates. The purpose of loading to Infinite Capacity is to identify resourcesthat will be overloaded by the open and planned orders, in each future time period, so additional capacity can
be made available or orders can be moved from one resource to another. It is impossible to produce more thanthe resource capacity allows, so the focus of capacity planning is to prevent resources from being overloadedwhile still meeting the order due dates. The above graphic indicates a resource overloaded in four periods, withexcess capacity in other periods.
Given the total capacity demands, it is possible to build everything in the schedule, but not necessarily in time tomeet the scheduled dates. If the resource is overloaded in any time period, the planner can increase the capacityor decrease the load.
There are several ways to increase capacity, such as overtime, adding another shift, or working additional days.Adding resources also alleviates overloaded periods in a resource group. Load can be decreased by moving it toanother resource or moving it to another (under-loaded) time period. It is possible to relieve load by combining
jobs that have common setup requirements. Time saved by eliminating setup can be used for production.
Loading to Infinite Capacity ignores the job priority – all jobs are equal in their demands on the resources and itis the planner’s job to determine the order in which the jobs are run. Also, Load refers to setup time and runtime only. Queue Hours and Move Hours are part of the schedule but are not part of the load.
Workshop - Increase Capacity
In this workshop, increase the production calendar capacity.
Navigate to Production Calendar Maintenance.
Menu Path: Production Management > Scheduling > Setup > Production Calendar
39Epicor ERP | 10.0.700.2
Daily Scheduling ProcessesScheduling Course

8/20/2019 scheduling.pdf
http://slidepdf.com/reader/full/schedulingpdf 40/70
Important This program is not available in the Epicor Web Access.
1. In the Calendar ID field, enter D5H16 and press Tab.
2. From the Actions menu, select Duplicate.
The Duplicate Calendar window displays.
3. In the New Calendar ID field, enter XXXD5H24 (where XXX are your initials).
4. Click OK.
5. Enter the following information:
DataField
XXX 5 Days 24 Hrs per day (where XXX are your initials)Description
24Default Hours Per Day
6. Select hours 1, 2, 3, 4, 5, 22, 23, and 24 Monday through Friday for a total of 24 hours per day.
7. Click Save.
8. Exit Production Calendar Maintenance.
Workshop - Review the Resource Group Overload
In this workshop, review the overload for the Assembly Bench resource group.
Navigate to the Overload Informer.
Menu Path: Production Management > Scheduling > General Operations > Overload Informer
1. In the Resource Group field, select Asm Bench and click Refresh.
2. Navigate to the Actual sheet.
Overload occurrences display.
3. Minimize the Overload Informer.
Workshop - Update Resource Capacity
In this workshop, link the previously created production calendar and link it to the resource group to increase itscapacity.
Navigate to Resource Group Maintenance.
Menu Path: Production Management > Scheduling > Setup > Resource Group
1. In the Resource Group field, enter ASM and press Tab.
2. In the Calendar field, search for and select XXXD5H24 (where XXX are your initials).
Epicor ERP | 10.0.700.240
Scheduling CourseDaily Scheduling Processes

8/20/2019 scheduling.pdf
http://slidepdf.com/reader/full/schedulingpdf 41/70
3. Click Save.
4. If a message displays, click OK.
5. Exit Resource Group Maintenance.
6. Maximize the Overload Informer.
7. Verify the Actual sheet displays.
8. Click Refresh.
In the Actual grid, all of the overload occurrences clear.
9. Exit the Overload Informer.
Finite Capacity
Finite Capacity assumption does not allow more load to be scheduled into a time period than the available
capacity. If the resource capacity is 15 hours per day, loading to Finite Capacity will not exceed that amount atthe resource level. If overload is encountered, and material and capacity are available, the Epicor ERP applicationpulls as much load as possible into earlier time periods.
When scheduling to Finite Capacity, the scheduling calculations must find an available block of time large enoughto run the operation. If an operation calls for one hour of setup and six hours of production time, the resourcemust have an available block of time of at least seven hours to insert the operation into the resource schedule.If that block of time is not available when the operation needs it, the application attempts to find the requiredtime in an earlier time period. If it is not available, or if doing so would violate material availability, the applicationpushes the operation into the future until an available block of time is found. The job is then late. Its scheduledcompletion date is beyond its need (required) date.
This is illustrated in the following graphic:
Loading to Finite Capacity means that capacity planning will not schedule more work into a resource than thecapacity available. Using the above example, the excess load from the first two periods is scheduled into the thirdperiod, and the excess load from the fourth period is scheduled into the future periods with excess capacity.
41Epicor ERP | 10.0.700.2
Daily Scheduling ProcessesScheduling Course

8/20/2019 scheduling.pdf
http://slidepdf.com/reader/full/schedulingpdf 42/70
While this guarantees that no resources will be overloaded in any time period, scheduling orders into the futurewill cause job need dates to be missed, with the result that the production and ship schedules will not be met.
Finite and Infinite Scheduling
Determine the scheduling process based on the expectation of scheduling and reaction to overloaded resources.
Infinite Scheduling - Shows how much capacity is needed by resource and date to meet production and shipmentschedules.
HindranceHelp
Does not automatically level resource loads.Overload and under load information is available.
Manually intensive process.The planner is the ultimate decision maker.
Relies on queue time to provide an allowance forirregular arrivals at resources.
Changing a job need date does not disrupt theschedule.
Finite Scheduling - Shows when a job is expected to be completed based on the current load in the site fromall open jobs.
HindranceHelp
May overload other resources not marked as finite.No resource marked as finite will be overloaded.
Gaps in a job schedule.The Epicor ERP application makes scheduling decisionbased on priority and need date.
Changing a job’s need date may cause all jobschedules to change.
Can run in What-if mode.
Infinite scheduling uses queue time to separate jobs at a resource and to allow for a job that is not placed intoproduction when it arrives at the resource.
Finite scheduling does not use queue time in its calculations since the job will not be scheduled to start until a
resource is available and there is a large enough block of time for that resource. If not, the job will wait. In thiscase, queue time is a result of the schedule and not one of its inputs.
Epicor ERP | 10.0.700.242
Scheduling CourseDaily Scheduling Processes

8/20/2019 scheduling.pdf
http://slidepdf.com/reader/full/schedulingpdf 43/70
Global Scheduling Process
Global Scheduling reschedules all open, engineered jobs. This process uses the scheduling priority code assignedto each job to determine which jobs should be scheduled before other jobs. All the jobs selected by the CalculateGlobal Scheduling Order process are placed within the schedule, either on the actual schedule or on a What-Ifschedule.
There are four steps in the Global Scheduling process:
1. Determine Schedule Order.
2. Schedule All Locked Jobs.
3. Compute New Dates.
4. Copy Dates to Job Schedule.
Scheduling Order
The Epicor ERP application needs to determine the order in which jobs are selected for scheduling. These are all
jobs that are currently open on the Scheduled Start Date. Since capacity is limited, there needs to be selectioncriteria, which is the job priority. The order in which these jobs will be scheduled is calculated using the Priorityvalue selected on each job by running the Calculate Global Scheduling Order process. The Calculate GlobalScheduling Order schedules each job infinitely and does not create load, or dates. It passes a date back to thecalculation procedure and this date is used in the job priority calculation.
To determine the scheduling order, the Calculate Global Scheduling Order process reschedules all open jobsusing either the Finite Capacity or Infinite Capacity logic to calculate the number of days late (or early). The
job that is the earliest (or least late) becomes the benchmark.
This is illustrated in the following graphic:
The numbers after the bars represent the number of days late or days early (negative). The earliest (least late) jobbecomes the benchmark; its number of days late (early) is used to adjust all other job dates. The Epicor ERP
43Epicor ERP | 10.0.700.2
Daily Scheduling ProcessesScheduling Course

8/20/2019 scheduling.pdf
http://slidepdf.com/reader/full/schedulingpdf 44/70
application computes the shifted days late based on this value by adding (if negative) or subtracting this valuefrom the days late for all jobs.
In the above graphic, job C is the benchmark - it is the earliest of all jobs to be scheduled. In terms of importance,this job becomes the least important because it is so far ahead of schedule that it can be delayed 35 days andstill finish on time. By adding 35 to this job’s earliness figure, the application computes a shifted days late of zero(0). But that will not let us include the job priority in the calculations, so the application adds 1 to this value. Thecalculation for Shifted Days Late becomes:
Job Earliness (Lateness) + 35 (benchmark value) +1
The Shifted Days Late for job C becomes one (1).
To include the impact of the job priority, multiply this number by the Priority Factor in the Scheduling PriorityCode. Assuming a factor of 100, the calculation now becomes 100. The following table shows the calculationsfor all jobs:
Weighted PriorityPriority FactorShifted Days LateDays Late/EarlyJob
340010034-2A
4840110448B
1001001-35C
61201205115D
342090382E
Ranking the weighted priority from highest to lowest shows that job D has the highest priority and would beselected first for scheduling. This would be followed by jobs B, E, A, and C.
The Scheduling Priority Code is assigned to each job as it is created, based on defining one of the codes asthe default.
You can create as many codes as you wish, but the one you consider to be a normal job priority should bedesignated as the default. It is not the value of the Priority Factor that is significant. Rather, it is the value relativeto the other codes that matters.
Once the Calculate Global Scheduling Order process is run, the results of this calculation are adjusted manuallyby running Adjust Global Scheduling Order. This allows changes to be made in the scheduling sequence valueof each job to re-order the scheduling priority. When saved, Global Scheduling either schedules these jobs, orproduces a what-if scenario of the schedule. Adjust Global Scheduling Order is not a required step in this process,but is available if needed.
Schedule All Locked Jobs
Schedule all locked jobs into the available capacity. In the above example, that is job D. This assures that any jobschedule designated as Locked is not changed.
When this phase is complete, there is an option to pause the process and potentially override the schedulingorder. If not satisfied with the results of the calculations, re-order the jobs manually.
Compute New Dates
Compute the scheduled start and due dates for all job operations. The Epicor ERP application places schedulingblocks (load) against the designated resources (or resource groups) that have available capacity closest to theneed date, and large enough to insert the operation.
If an available block of time cannot be found near the start date, the application attempts to place the schedulingblocks into available capacity within an earlier time period, unless this violates a material constraint. If not, thenthe application pushes the scheduling blocks ahead until it can find available capacity.
Epicor ERP | 10.0.700.244
Scheduling CourseDaily Scheduling Processes

8/20/2019 scheduling.pdf
http://slidepdf.com/reader/full/schedulingpdf 45/70
Copy Dates to Job Schedule
Copy the scheduled dates to the job’s What If schedule, or to the job’s current schedule. At this point, theprocess can be stopped, but it will not undo any job changes.
Log File and Log level
The log file contains the log for the global reschedule process.
The log level refers to the depth of how the log file gets created. The following describes each logging level:
• Basic – The log will display the Start Date and Start Time with the number of schedulers (processors) thatwere run. The log displays when each processor finished and if any errors occurred during the process.
• Process – This log displays the Basic information in addition to a log for each scheduler that displays the jobsthat were scheduled.
• Process and Scheduling – This log displays the Basic and Process information in addition to a log that displayshow each operation was scheduled, including constrained materials and the Finite Capacity used against eachresource.
Workshop - Calculate Global Scheduling Order
In this workshop, select several jobs to test the impact of job priority. Using the Calculate Global SchedulingOrder process, compare the Scheduling Order before and after scheduling priorities are changed. The processprecedes the Global Scheduling process.
Important Due to necessary setup and specific data used to execute the global scheduling process, thisworkshop can only be performed by one person on a shared database. If you are unable to complete thisworkshop, this does prohibit you from completing Workshop - Set Global Scheduling Options and Workshop- Process Global Scheduling.
Calculate Global Scheduling Order
Navigate to the Calculate Global Scheduling Order Process.
Menu Path: Production Management > Scheduling > General Operations > Calculate Global Scheduling Order
Important The calculating global scheduling process can only be performed by one person at a time. Ifmultiple people are completing this exercise at once, one person must be selected to run this process.
1. Enter the following information:
DataField
Today's dateScheduled Start Date
clearDynamic
accept defaultScheduled Start Time
XXX Schedule (where XXX are your initials)Log File
BasicLog Level
Accept the defaults for the remaining fields.
2. Click Submit.
45Epicor ERP | 10.0.700.2
Daily Scheduling ProcessesScheduling Course

8/20/2019 scheduling.pdf
http://slidepdf.com/reader/full/schedulingpdf 46/70
The Calculate Global Scheduling Order process schedules the jobs to determine how late they are. It scheduleseach job infinitely and does not create load or dates. Instead, it passes a date back to the calculation procedureand this date is used in the job priority calculation to determine the scheduling sequence value.
3. Exit the Calculate Global Scheduling Order Process.
4. To verify the process is complete, navigate to the System Monitor.
Menu Path: System Setup > System Maintenance > System Monitor
Important This program is not available in the Epicor Web Access.
The process may take several minutes to complete.
View the Calculation Results
Navigate to Adjust Global Scheduling Order.
Menu Path: Production Management > Scheduling > General Operations > Adjust Global Scheduling Order
1. Click the binoculars (search) icon and search for and select all jobs.The Job Search window displays.
2. Click the Options button.
The Search Options window displays.
3. Select the Return All Rows check box.
4. Click OK.
All the current jobs in the database display in the Search Results grid.
Tip If you are using the Epicor Education database, you should have about 286 jobs.
5. Click Select All and click OK.
6. In the Job Order List grid, click on the SchedSeq column header.
7. In the Job Order List grid, click on the Job column header.
8. Record the SchedSeq for jobs 2331 and 2391 ________ ________.
9. Exit Adjust Global Scheduling Order. If you are asked to save changes, click No.
Modify Scheduling Priority Codes
Navigate to Job Entry.
Menu Path: Production Management > Job Management > General Operations > Job Entry
1. In the Job field, search for and select job 2391.
2. In the Scheduling Priority section, in the Priority field, select Very High.
Epicor ERP | 10.0.700.246
Scheduling CourseDaily Scheduling Processes

8/20/2019 scheduling.pdf
http://slidepdf.com/reader/full/schedulingpdf 47/70
3. Click Save.
4. Repeat steps 1 through 3 for job 2331.
5. Exit Job Entry.
47Epicor ERP | 10.0.700.2
Daily Scheduling ProcessesScheduling Course

8/20/2019 scheduling.pdf
http://slidepdf.com/reader/full/schedulingpdf 48/70
Recalculate Global Scheduling Order
Navigate to the Calculate Global Scheduling Order Process.
Menu Path: Production Management > Scheduling > General Operations > Calculate Global Scheduling Order
1. Enter the following information:
DataField
Today's dateScheduled Start Date
clearDynamic
accept defaultScheduled Start Time
XXX Schedule 1 (where XXX are your initials)Log File
BasicLog Level
Accept the defaults for the remaining fields.
2. Click Submit.
3. Exit the Calculate Global Scheduling Order Process.
4. To verify the process is complete, navigate to the System Monitor.
Menu Path: System Setup > System Maintenance > System Monitor
Important This program is not available in the Epicor Web Access.
The process may take several minutes to complete.
View the Recalculation Results
Navigate to Adjust Global Scheduling Order.
Menu Path: Production Management > Scheduling > General Operations > Adjust Global Scheduling Order
1. Click the binoculars (search) icon and search for and select all jobs.
The Job Search window displays.
2. Click the Options button.
The Search Options window displays.
3. Select the Return All Rows check box.
4. Click OK.
All the current jobs in the database display in the Search Results grid.
Tip If you are using the Epicor Education database, you should have about 286 jobs.
5. Click Select All and click OK.
Epicor ERP | 10.0.700.248
Scheduling CourseDaily Scheduling Processes

8/20/2019 scheduling.pdf
http://slidepdf.com/reader/full/schedulingpdf 49/70
6. Click the Job column to locate jobs 2331 and 2391.
7. Record the scheduling sequence (SchedSeq) value for each job __________ __________.
The scheduling sequence codes should be a lower number, such as 20 and 30. This indicates these jobs arenow higher in the job scheduling priority, and will now be placed earlier in the schedule.
8. Remain in Adjust Global Scheduling Order.
Override Global Scheduling Order
1. In the SchedSeq field for job 2331, enter 5.
2. In the SchedSeq field for job 2391, enter 3.
3. Click Save.
4. Click the binoculars (search) icon and search for and select all jobs. In the search window, be sure to clickthe Options button and the Return All Rows check box.
5. In the Job Order List grid, click the SchedSeqv column heading.
The jobs reflect the updated Schedule Sequence and Scheduling Code. Jobs 2391 and 2331 should displayat the top of the list.
6. Exit Adjust Global Scheduling Order.
Workshop - Set Global Scheduling Options
This workshop introduces three additional Global Scheduling features: Finite Horizon, Job Schedule Locking, andRough Cut Scheduling.
Important If you were unable to complete Workshop - Calculate Global Scheduling Order you will notbe able to complete this workshop.
Set Finite Horizon
Instead of running Global Scheduling for all jobs, you can define an upper limit on the process by limiting thetime horizon for a resource (group). By setting the Finite Horizon, Global Scheduling considers a resource (group)as finite for a set period of time, and infinite outside that period of time.
Navigate to Resource Group Maintenance.
Menu Path: Production Management > Scheduling > Setup > Resource Group
1. In the Resource Group field, enter SAW and press Tab.
2. In the Finite Horizon field, enter 60.
3. Click Save.
4. Click Clear.
5. In the Resource Group field, enter PPL and press Tab.
6. In the Finite Horizon field, enter 60.
49Epicor ERP | 10.0.700.2
Daily Scheduling ProcessesScheduling Course

8/20/2019 scheduling.pdf
http://slidepdf.com/reader/full/schedulingpdf 50/70
7. Click Save.
8. Exit Resource Group Maintenance.
Lock a Job Schedule
Global Scheduling makes no changes to a job schedule that is locked.
Navigate to Job Entry.
Menu Path: Production Management > Job Management > General Operations > Job Entry
1. In the Job field, enter 2382 and press Tab.
2. In the Scheduling Priority section, select the Locked check box.
3. Click Save.
4. Exit Job Entry.
Workshop - Rough Cut Scheduling
Rough Cut Scheduling ignores resource and shop load records that are normally included within the schedulingcalculation.
To use this feature, you must define the Rough Cut Horizon value. This field is located in Site Maintenance. Every job scheduled past the horizon value ignores the resource and shop load records. To add the Shop Load for theRough Cut Scheduled jobs, use Save Resource Load.
Set the Rough Cut Horizon
Navigate to Site Maintenance.
Menu Path: Production Management > Job Management > Setup > Site Maintenance
1. Click the Site... button, search for and select the Main site.
2. In the Rough Cut Horizon field, enter 30.
3. Click Save.
4. Exit Site Maintenance.
Review the Rough Cut Load
Navigate to theSave Resource Load
.Menu Path: Production Management > Scheduling > General Operations > Save Resource Load
1. In the Start Date field, verify today's date defaults.
2. In the End Date field, enter the date one year from today.
3. Select the Edit list of Jobs check box.
4. Click Submit.
Epicor ERP | 10.0.700.250
Scheduling CourseDaily Scheduling Processes

8/20/2019 scheduling.pdf
http://slidepdf.com/reader/full/schedulingpdf 51/70
The Save Resource Load window displays.
5. Click Cancel.
6. Exit the Save Resource Load.
Workshop - Process Global Scheduling
Previous workshops calculated global scheduling orders, then adjusted the order. Based on those changes, runthe Global Scheduling Process with Finite Load. Global scheduling can also be run with Infinite Load.
Important If you were unable to complete Workshop - Calculate Global Scheduling Order or Workshop- Set Global Scheduling Options you will not be able to complete this workshop.
Global Scheduling Process
Navigate to Global Scheduling.
Menu Path: Production Management > Scheduling > General Operations > Global Scheduling
1. Enter the following information:
DataField
Today's dateScheduled Start Date
clearDynamic
Accept defaultScheduled Start Time
XXX Schedule 2 (where XXX are your initials)Log File
Process and SchedulingLog Level
selectWhat-If Schedule Only
selectFinite Load
The default Scheduled Start Date is the current date. If the configuration setting Allow Schedulingbefore Today is selected, jobs can schedule into the past. If not selected, the Scheduled Start Datedefaults to today's date and jobs will not schedule into the past. Jobs that would otherwise schedule intothe past reschedule with a forward schedule from the current date. These Jobs may become late jobs anddisplay on the schedule with a Late Job alert.
2. Click Submit.
3. To verify the process is complete, navigate to the System Monitor.
Menu Path: System Setup > System Maintenance > System Monitor
Important This program is not available in the Epicor Web Access.
The process may take several minutes to complete.
4. Exit Global Scheduling.
51Epicor ERP | 10.0.700.2
Daily Scheduling ProcessesScheduling Course

8/20/2019 scheduling.pdf
http://slidepdf.com/reader/full/schedulingpdf 52/70
View Resource Load
Navigate to the Save Resource Load.
Menu Path: Production Management > Scheduling > General Operations > Save Resource Load
1. Enter the following information:
DataField
Today's dateStart Date
12/31/2015End Date
selectEdit list of Jobs
2. Click Submit.
The Save Resource Load window displays a list of rough cut schedule jobs.
3. Click Cancel.
4. Exit the Save Resource Load.
Epicor ERP | 10.0.700.252
Scheduling CourseDaily Scheduling Processes

8/20/2019 scheduling.pdf
http://slidepdf.com/reader/full/schedulingpdf 53/70
Scheduling Reports
There are several standard reports that provide valuable information related to scheduling. Some of the informationpresented in these reports is available in the displays we viewed earlier but presented in a more concise form inthe reports.
Shop Load Report
Menu Path: Production Management > Job Management > Reports > Shop Load
The Shop Load report displays the scheduled load by resource group for six future user-defined time periods.This report can be printed in a summary form, to view load vs. capacity by resource group, or in full detail toview the composition of the load (the individual job operations that make up the load).
Priority Dispatch Report
Menu Path: Production Management > Scheduling > Reports > Priority Dispatch
The purpose of Priority Dispatch Report is to communicate the relative priority of each job; that is, which job(s)should be completed in any given time period in the order to be completed. This report lists all jobs by resource
group and sorts them by the scheduled start date of the operation to be performed. The report is divided intothree sections:
1. Current Work - These are jobs that have started at this Resource Group, the previous operation has beencompleted, or this is the Resource Group of the first operation.
2. Available Work - These jobs are at the predecessor Resource Group and are in process, and at least oneunit has been marked as completed.
3. Expected Work - These jobs can be anywhere in the site, but are expected to be at this Resource Groupby the scheduled start date.
It is not necessary to process the jobs in the exact order listed on the report, as long as each job is completedby its scheduled date.
Schedule Impact Report
Menu Path: Production Management > Scheduling > Reports > Schedule Impact
Use the Schedule Impact Report to view the changes to jobs, and revenue, as a result of What-If schedulechanges. Before accepting changes made through drag-and-drop scheduling, load leveling, or running GlobalFinite Scheduling, users should run this report to see how these changes will impact all open jobs.
The report will display the number of jobs early, late, or on-time, and the changes in these numbers from thecurrent job schedules. For more detail, users may view the actual changes by job to see the current and proposed(What If) start and completion dates by making the appropriate selections.
Job Status Report
Menu Path: Production Management > Job Management > Reports > Job Status
The Job Status Report displays only those jobs that meet the user-selected criteria:
1. The job actual hours exceed the estimated hours.
2. The job is delinquent.
3. Labor efficiency has fallen below a certain level.
53Epicor ERP | 10.0.700.2
Daily Scheduling ProcessesScheduling Course
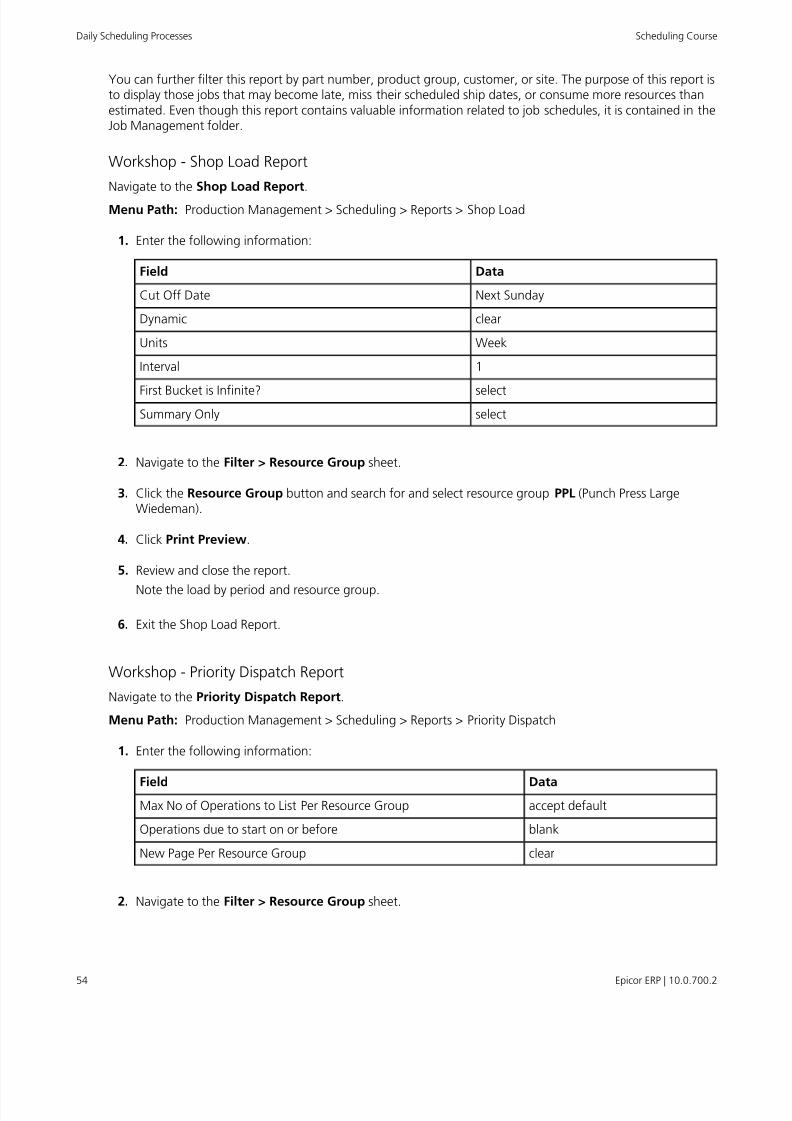
8/20/2019 scheduling.pdf
http://slidepdf.com/reader/full/schedulingpdf 54/70
You can further filter this report by part number, product group, customer, or site. The purpose of this report isto display those jobs that may become late, miss their scheduled ship dates, or consume more resources thanestimated. Even though this report contains valuable information related to job schedules, it is contained in theJob Management folder.
Workshop - Shop Load Report
Navigate to the Shop Load Report.
Menu Path: Production Management > Scheduling > Reports > Shop Load
1. Enter the following information:
DataField
Next SundayCut Off Date
clearDynamic
WeekUnits
1Interval
selectFirst Bucket is Infinite?selectSummary Only
2. Navigate to the Filter > Resource Group sheet.
3. Click the Resource Group button and search for and select resource group PPL (Punch Press LargeWiedeman).
4. Click Print Preview.
5. Review and close the report.
Note the load by period and resource group.
6. Exit the Shop Load Report.
Workshop - Priority Dispatch Report
Navigate to the Priority Dispatch Report.
Menu Path: Production Management > Scheduling > Reports > Priority Dispatch
1. Enter the following information:
DataFieldaccept defaultMax No of Operations to List Per Resource Group
blankOperations due to start on or before
clearNew Page Per Resource Group
2. Navigate to the Filter > Resource Group sheet.
Epicor ERP | 10.0.700.254
Scheduling CourseDaily Scheduling Processes

8/20/2019 scheduling.pdf
http://slidepdf.com/reader/full/schedulingpdf 55/70
3. Click the Resource Group button and search for and select resource group PPL (Punch Press LargeWiedeman).
4. Click Print Preview.
5. Review and close the report.
6. Exit the Priority Dispatch Report.
Workshop - Schedule Impact Report
This report uses the early and late grace period defined in Company Configuration and defines a job as on timeif its scheduled completion date falls within this interval.
Navigate to the Schedule Impact Report.
Menu Path: Production Management > Job Management > Reports > Schedule Impact
1. Enter the following information:
DataField
one month from todayJob Required Dates On or Before
clearDynamic
Accept the defaultEarly Grace Period (Days)
Accept the defaultLate Grace Period (Days)
Leave blankReport Name
selectSummary Only
2.Click
Print Preview.
3. Review the report. Note the number of jobs in the Actual and What-If categories, as well as the changesto work in process and revenue.
4. Close the report.
5. Repeat the steps above with the following information to see which jobs are contributing to these changes.
DataField
one month from todayJob Required Dates On or Before
clearDynamic
Accept the defaultEarly Grace Period (Days)
Accept the defaultLate Grace Period (Days)
Leave blankReport Name
clearSummary Only
selectLate Jobs as One Group
selectOntime Jobs as One Group
55Epicor ERP | 10.0.700.2
Daily Scheduling ProcessesScheduling Course

8/20/2019 scheduling.pdf
http://slidepdf.com/reader/full/schedulingpdf 56/70
DataField
selectEarly Jobs as One Group
Optionally, drill down further in each section to view late jobs that are later or less late. For example, runthis report using various selections to get the full view.
6. Exit the Schedule Impact Report.
Workshop - Job Status Report
Navigate to the Job Status Report.
Menu Path: Production Management > Job Management > Reports > Job Status
1. Enter the following information:
DataField
six months from todayDue Dates On or Before
clearDynamic
Accept the default% Over Estimated Time Greater Than
5Delinquent Days Greater Than
Accept the default% Efficiency Less Than
2. Click Print Preview.
3. Review and close the report.
This report can be re-run as many times as desired - each time specifying different selection criteria.
4. Exit the Job Status Report.
Epicor ERP | 10.0.700.256
Scheduling CourseDaily Scheduling Processes

8/20/2019 scheduling.pdf
http://slidepdf.com/reader/full/schedulingpdf 57/70
Specialized Scheduling Processes
This section of the course discusses special scheduling process capabilities of the Epicor application.
Saving What-If Schedules
You may want to make several changes and evaluate each of these by printing the Schedule Impact Report. Youcan save the What-If changes, make additional changes, and at any time restore an earlier saved schedule. Youcan save an unlimited number of What-If reschedules.
Multi-Constraint Scheduling
The base application allows up to two resources to be assigned to each operation, and each of these resourcescan be identified as constrained; that is, Finite Capacity is set for each resource. This means that a job operationcannot be scheduled unless both resources are available at the same time. This is determined by the calendarsassigned to each resource and, if using finite scheduling, the current load on each resource.
Example There is a resource or group that is available 16 hours per day (based on the availability of
operators). Any job using that resource or group could be run at any time during those 16 hours. Let usassume further that the resource requires a setup operation for each job, but the setup operator is availableonly 8 hours per day. This would constrain a job schedule that required the resource to be set up if nosetup resource is available.
Minimize WIP
The Minimize WIP feature allows Scheduling to reduce the gaps that can occur between operations and assembliesduring the Global Scheduling process. It causes this process to run the scheduling engine an additional timeagainst the jobs that meet a specific condition.
If Scheduling discovers that the Start Date on a job will occur before the Scheduled Start Date, it forward schedulesthe job. After the new End Date is calculated for this job, it backward schedules from that date, which tightens
the points where the assemblies are placed within the schedule.
This allows child assemblies to have a Just In Time relationship with their parent assemblies. By eliminating theunnecessary gaps between the assemblies, the jobs are scheduled more accurately.
Batch Scheduling
This section of the course reviews job batching functionality.
The job batching feature enables you to combine two or more jobs that either partially, or completely, use the
same routing. It allows you to select an operation shared by the jobs and indicate from which direction–
backwards or forwards – you will combine the routing.
Important Combine the operations from a start operation and then move backwards or forwards throughthe routing. You cannot combine a range of operations that occur in the middle of routing.
When the batching process is complete, a new job is created that manufactures the part quantities defined onall the original source jobs.
Always batch jobs that share similar operations. If you batch jobs that do not have similar operations, you couldget unexpected results.
57Epicor ERP | 10.0.700.2
Specialized Scheduling ProcessesScheduling Course

8/20/2019 scheduling.pdf
http://slidepdf.com/reader/full/schedulingpdf 58/70
Once you create a batched job, the Epicor ERP application treats the job the same as a regular job. A batched job can be scheduled and transactions can be placed against it. If necessary, you can even batch together otherbatch jobs!
Important To complete the Batch Scheduling course section, you must have the Advanced ProductionLicense installed.
Batch Jobs with Identical Methods
You can batch two jobs with identical methods of manufacture so that they can run together for efficiency.
Note At times, two jobs can be exactly alike except for the last operation. For example, a paint operationwhere the colors are different can have the same operations up to the paint operations batched for efficiencywith Auto Receive selected. The parts would then be transferred back to their original job for the paintoperation.
Workshop - Batch Jobs with Identical Methods
You can batch two jobs with identical methods of manufacture so that they can run together for efficiency. In
this workshop, create two jobs for parts that have identical methods of manufacture and combine both into one job.
Create Jobs
In this workshop task, create two jobs for the EAD-400-BLK and EAD-400-RED parts.
Navigate to Job Entry.
Menu Path: Production Management > Job Management > General Operations > Job Entry
1. From the New menu, select New Job.
2. The New Job Number window displays.
3. Click the Next Job button and click OK.
4. In the Part field, search for and select part EAD-400-BLK.
5. In the Req By field, select the date one month from today.
6. Click Save.
7. From the New menu, select New Demand Link > Make To Stock.
At the bottom of the Job sheet, the Make To Stock > Detail sheet displays.
8. In the Quantity field, enter 10.
9. Click Save.
10. From the Actions menu, select Job > Get Details.
The Get Details window displays.
11. In the Revisions grid, select A and click OK.
Epicor ERP | 10.0.700.258
Scheduling CourseSpecialized Scheduling Processes

8/20/2019 scheduling.pdf
http://slidepdf.com/reader/full/schedulingpdf 59/70
12. On the Job sheet, select the Engineered check box.
13. From the Actions menu, select Schedule > Job Scheduling.
The Schedule Job XXXX (where XXXX is your job number) window displays.
14. Accept the Backward scheduling default and click OK.
15. On the Job sheet, select the Released check box.
16. Click Save.
17. Record the job number____________.
18. Repeat steps 1-16 to create another job for the EAD-400-RED part.
19. Record the job number____________.
20. Minimize Job Entry.
Batch Jobs
In this workshop task, batch the previously entered jobs.
Navigate to the Resource Group Scheduling Board.
Menu Path: Production Management > Scheduling > General Operations > Resource Scheduling Board
Important This program is not available in the Epicor Web Access.
1. In the Resource Group field, enter WLDS and press the Tab key.
This is the Resource Group used for Operation 40 on both previously entered jobs. The Operation 50 on
both jobs is subcontracted.
2. Navigate to the List sheet.
3. In the Operations grid, in the Batch column, select the check boxes for the two jobs created in the previousworkshop task.
4. From the Actions menu, select Batch Operations.
The Batch Operations window displays.
5. In the Pull Direction section, verify Backward defaults.
6.In the
Job Processing Mode section, verify
Sequential defaults.
The Job Processing Mode options define if operations should be performed at the same time or one beforethe other. Use the Concurrent option when two parts are created at the same time; use the Sequentialoption when time for the operation will be accumulated for the duration of the operation.
7. Select the Auto Receive check box.
When selected, this check box indicates that labor or receipt transactions against this batch operation willcreate automatic receipts to inventory. If you use this feature, this receipt updates the quantity on hand onthe part record. The process is triggered when you post labor quantities against this batch operation thatexceed the quantities required for the sales order.
59Epicor ERP | 10.0.700.2
Specialized Scheduling ProcessesScheduling Course

8/20/2019 scheduling.pdf
http://slidepdf.com/reader/full/schedulingpdf 60/70
Normally, you will select this check box for the last operation on the assembly or the final assembly. Partsare received to inventory at the current unit cost, based on the part costing method (average, standard orlast).
8. Click the Create Batch button.
9. From the Batch Job Number field, record the job number_____________.
10. Click the Close button.
11. Exit the Resource Group Scheduling Board.
Schedule the Batch Job
In this workshop task, schedule the batch job created in the previous task.
1. Maximize Job Entry.
2. On the Standard toolbar, click Refresh.
3. Verify the Job sheet displays.
4. In the Job field, enter the batch job created in the Create a Batch workshop task and press Tab.
5. Clear the Released check box.
6. From the Actions menu, select Schedule > Job Scheduling.
The Schedule Job window displays.
7. Accept the default of Backward scheduling and click OK.
8. Select the Released check box.
9. Click Save.
10. Exit Job Entry.
Review Jobs
In this workshop task, review all three previously entered jobs to see how the Job Batching process affected themethods of manufacture used on the jobs.
Navigate to the Job Tracker.
Menu Path: Production Management > Job Management > General Operations > Job Tracker
1. Click the Job button.
The Job Search window displays.
2. In the Starting At field, enter the first job number created in the Create Jobs workshop task and clickSearch.
Epicor ERP | 10.0.700.260
Scheduling CourseSpecialized Scheduling Processes

8/20/2019 scheduling.pdf
http://slidepdf.com/reader/full/schedulingpdf 61/70
3. In the Search Results grid, using the Ctrl key, select all three jobs created in the Create Jobs and BatchJobs workshop tasks.
4. Click OK.
5. In the Job field, verify the first job number created in the Create Jobs workshop task displays.
The Open status displays.
6. In the tree view, right-click on ASM: 0 EAD-400-BLK and select Tree > Expand Tree.
The first four operations in the method of manufacture are marked as complete. This is because the operations10, 20, 30, and 40 will be completed on the batch job. Operation 50 is subcontracted, so once theEAD-400-BLK part is received back from painting, it will be received back to the original job. As a result ofthe job receipt, operations 60 and 70 can be worked on. Only material 40 (CS-060) in the method ofmanufacture is marked as issued, because it belongs to operation 10. The rest of materials belong tooperations 50, 60, and 70.
7. In the Navigation toolbar, click the right arrow button to select the second job created in the CreateJobs workshop tasks.
The Open status displays.
8. In the tree view, right-click on ASM: 0 EAD-400-RED and select Tree > Expand Tree.
The first four operations in the method of manufacture are marked as complete. This is because the operations10, 20, 30, and 40 will be completed on the batch job. Operation 50 is subcontracted, so once theEAD-400-RED part is received back from painting, it will be received back to the original job. As a result ofthe job receipt, operations 60 and 70 can be worked on. Only material 40 (CS-060) in the method ofmanufacture is marked as issued, because it belongs to operation 10. The rest of materials belong tooperations 50, 60, and 70.
9. In the Navigation toolbar, click the right arrow button to select the job created in the Batch Jobs workshoptask.
The Open status display.
10. In the tree view, right-click on ASM: 0 EAD-400-BLK-0-40 and select Tree > Expand Tree.
The method of manufacture includes only first four operations and one material, material 10 (CS-060).Material 10 is linked to operation 10 in the method. None of the operations are complete or material issuedbecause the job has not started yet. Once the job operation 40 is complete, both parts will be sent to asubcontractor for painting. After the subcontractor paints the parts, they are received back to their original
jobs, in order to complete work on operations 60 and 70.
11. In the tree view, under the Operations node, select Opr: 30 OP: FORM.
The Job Details > Operations > Detail sheet displays.
12. In the Production Per Machine pane, in the Est Hours field, verify 0.10 displays.
13. Record the estimation hours_____________.
14. In the tree view, under the Materials node, select Mtl: 10 CS-060.
The Job Details > Materials > Detail sheet displays.
15. In the Quantity pane, in the Required Qty field, verify 1.60 displays.
16. Record the required quantity______________.
61Epicor ERP | 10.0.700.2
Specialized Scheduling ProcessesScheduling Course

8/20/2019 scheduling.pdf
http://slidepdf.com/reader/full/schedulingpdf 62/70
17. In the Navigation toolbar, click the right arrow button to select the first job created in the Create Jobsworkshop task.
18. In the tree view, right-click on ASM: 0 EAD-400-BLK and select Tree > Expand Tree.
19. In the tree view, under the Operations node, select Opr: 30 OP: FORM.
The Job Details > Operations > Detail sheet displays.
20. In the Production Per Machine pane, in the Est Hours field, verify 0.05 displays.
The estimation hours are half the estimation hours on the batch job.
Note Refer to the previously recorded Estimation Hours value to cross compare.
21. In the tree view, under the Materials node, select Mtl: 40 CS-060.
The Job Details > Materials > Detail sheet displays.
22. In the Quantity pane, in the Required Qty field, verify 0.80 displays.
The required material quantity is half the required quantity on the batch job.
Note Refer to the previously recorded Required Quantity value to cross compare.
23. Repeat steps 17-22 to review details for the second job created in the Create Jobs workshop task.
24. Exit the Job Tracker.
Workshop - Save and Restore a Schedule
In this workshop, save and restore schedule for various jobs.
Enter Scheduling Changes
Navigate to the Job Scheduling Board.
Menu Path: Production Management > Scheduling > General Operations > Job Scheduling Board
Important This program is not available in the Epicor Web Access.
1. In the Job field, search for and select job 2381.
2. Navigate to the Schedule sheet.
3. Right-click on job 2381 and select Start Time.
4. Move the job out one month.
The Move Job window displays.
5. In the Move Option field, select Job - All Operations and click OK.
6. To the Schedule Move Warning message, click OK.
Epicor ERP | 10.0.700.262
Scheduling CourseSpecialized Scheduling Processes

8/20/2019 scheduling.pdf
http://slidepdf.com/reader/full/schedulingpdf 63/70
7. From the Actions menu, select Save Schedule.
Schedule Maintenance displays.
8. In the Description field, enter XXX Class Exercise.
9. Click OK.
10. Minimize the Job Scheduling Board.
Generate Schedule Impact Report
Navigate to the Schedule Impact Report.
Menu Path: Production Management > Scheduling > Reports > Schedule Impact
1. In the Job Required Dates On or Before field, select 12/31/2016.
2. In the Report Name field, enter XXX (where XXX are your initials).
3. Verify the Summary Only check box is selected.
4. Click Print Preview.
5. Review and close the report.
6. Exit the Schedule Impact Report.
Undo the Changes
1. Maximize the Job Scheduling Board.
2. From the Actions menu, select Undo All Changes.
3. Exit the Job Scheduling Board.
Workshop - Multi-Constraint Scheduling
When multiple resources are assigned to a job operation they need to be available simultaneously when schedulingfinitely. The process begins by creating a new Resource Group and Resource.
Add New ResourceNavigate to Resource Group Maintenance.
Menu Path: Production Management > Scheduling > Setup > Resource Group
1. From the New menu, select New Resource Group.
2. Enter the following information:
63Epicor ERP | 10.0.700.2
Specialized Scheduling ProcessesScheduling Course

8/20/2019 scheduling.pdf
http://slidepdf.com/reader/full/schedulingpdf 64/70
DataField
XXX-SUOP (where XXX are your initials)Resource Group
XXX Setup Operators (where XXX are your initials)Description
Sheet Metal DepartmentDepartment
D5H8Calendar
Production FloorInput Warehouse
MCHIn Bin
Important The Input Warehouse and Bin records must be entered only if the AMM license is installed.
3. Click Save.
4. If the Capacity changed, therefore, the 'Generate Shop Capacity Process' will need to be run theupdate ShopLoad records message displays, click OK.
5. From the New menu, select New Resource.The Resources > Detail sheet displays.
6. Enter the following information:
DataField
XXX-SHSU (where XXX are your initials)Resource
XXX Shear Setup (where XXX are your initials)Description
SelectFinite Capacity
D5H8Calendar
Production FloorInput Warehouse
MCHIn Bin
Important The Input Warehouse and Bin records must be entered only if the AMM license is installed.
7. In the Scheduling pane, clear the Use Resource Group Values check box.
8. In the Scheduling pane, in the Daily Production Capacity field, enter 8.00.
9. Click Save.
10. If the Capacity changed, therefore, the 'Generate Shop Capacity Process' will need to be run theupdate ShopLoad records message displays, click OK.
11. Exit Resource Group Maintenance.
Add Resource to Job Operation
Navigate to Job Entry.
Epicor ERP | 10.0.700.264
Scheduling CourseSpecialized Scheduling Processes

8/20/2019 scheduling.pdf
http://slidepdf.com/reader/full/schedulingpdf 65/70
Menu Path: Production Management > Job Management > General Operations > Job Entry
1. In the Job field, enter 2031 and press Tab.
2. Clear the Engineered check box.
3. Click Save.
4. In the tree view, expand the Operations node.
5. Select Opr 10 OP: SHEAR.
6. Navigate to the Job Details > Operations > Scheduling Resources > Detail sheet.
7. Enter the following information:
DataField
XXX Set Up OperatorsResource Group
XXX Shear SetupResource
BothRequired For
8. Click Save.
Reschedule the Job
1. Navigate to the Job sheet.
2. Select the Engineered check box.
3. Click Save.
4. From the Actions menu, select Schedule > Job Scheduling.
5. Enter the following information:
DataField
BackwardSchedule
selectFinite Capacity
selectWhat-If Schedule
6. Click OK.
View the Schedule Change
1. From the Actions menu, select Schedule > Job Scheduling Board.
The Job Scheduling Board displays.
65Epicor ERP | 10.0.700.2
Specialized Scheduling ProcessesScheduling Course

8/20/2019 scheduling.pdf
http://slidepdf.com/reader/full/schedulingpdf 66/70
2. Navigate to the Schedule sheet.
3. Right-click on job 2031 and select Start Time.
4. In the time bar, review the schedule.
5. Exit the Job Scheduling Board.
6. Select the Released check box.
7. Click Save.
8. Exit Job Entry.
Workshop - Minimize WIP
In order to see the impact of the Minimize WIP process, create a backward scheduled job with multi-level assemlies(which normally minimizes WIP). The backward schedule is then compared to a forward schedule on the samemulti-level job. The forward schedule normally does not Minimize WIP.
Create Scheduling Priority Code
Navigate to Scheduling Priority Code Maintenance.
Menu Path: Production Management > Scheduling > Setup > Scheduling Priority Code
Important This program is not available in the Epicor Web Access.
1. Click New.
2. In the Scheduling Code field, enter XXXNMW (where XXX are your initials).
3. In the Description field, enter XXX Normal - Minimize WIP (where XXX are your initials).
4. In the Priority Factor field, enter 30.
5. Verify the Schedule Backwards check box is selected.
6. Select the Minimize WIP check box.
7. Click Save.
8. Exit Scheduling Priority Code Maintenance.
Epicor ERP | 10.0.700.266
Scheduling CourseSpecialized Scheduling Processes

8/20/2019 scheduling.pdf
http://slidepdf.com/reader/full/schedulingpdf 67/70
Create a Job with Multiple Assemblies
Navigate to Job Entry.
Menu Path: Production Management > Job Management > General Operations > Job Entry
1. From the New menu, select New Job.
2. Click the Next Job button and click OK.
3. In the Part field, enter DCD-200-ML and press Tab.
4. In the Req By field, select a date one month from today.
5. Click Save.
6. From the New menu, select New Demand Link > Make to Stock.
The Job > Make To Stock > Detail sheet displays.
7. In the Quantity field, enter 200.
8. Click Save.
9. From the Actions menu, select Job > Get Details.
The Get Details window displays.
10. Select Rev B.
11. Click OK.
12. Remain in Job Entry.
Backward Schedule the Job
1. Select the Engineered check box.
2. From the Actions menu, select Schedule > Job Scheduling.
The Schedule Job window displays.
3. Accept the default of Backward scheduling and click OK.
4. From the Actions menu, select Schedule > Job Scheduling Board.
The Job Scheduling Board displays.
5. Navigate to the Schedule sheet and double-click the job number.
6. Double-click on all assemblies and subassemblies to expand them.
Note the job's current scheduled and the current start and end dates of the operations and job.
When a backward schedule is applied to a multi-level job, WIP is minimized. A child assembly will completein time for its parent assembly to begin.
67Epicor ERP | 10.0.700.2
Specialized Scheduling ProcessesScheduling Course

8/20/2019 scheduling.pdf
http://slidepdf.com/reader/full/schedulingpdf 68/70
7. Exit the Job Scheduling Board.
Forward Schedule the Job
1. From the Actions menu, select Schedule > Job Scheduling.
2. Select Forward and click OK.
3. From the Actions menu, select Schedule > Job Scheduling Board.
The Job Scheduling Board displays.
4. Navigate to the Schedule sheet and double-click the job number.
5. Double-click on all assemblies and subassemblies to expand them.
When a forward schedule is applied to a multi-level job, WIP is not minimized. A non-critical path childassembly will start at the same time as the start of the lowest critical path assembly.
6. Exit the Job Scheduling Board.
Re-schedule the Job
1. In Job Entry, in the Req By field, select a date one week from today.
In order for WIP to be automatically reduced, the job must bounce. A job will bounce if a job schedule isprevented from being scheduled in the past.
2. In the Priority field, select XXX Normal - Minimize WIP (where XXX are your initials).
3. From the Actions menu, select Schedule > Job Scheduling.
The Schedule Job window displays.
4. Accept the default of Backward scheduling and click OK.
5. From the Actions menu, select Schedule > Job Scheduling Board.
The Job Scheduling Board displays.
6. Navigate to the Schedule sheet and double-click the job number.
7. Double-click on all assemblies and subassemblies to expand them.
Because the job schedule was forced to bounce, WIP was minimized regardless of the Forward schedule.
8. Exit the Job Scheduling Board and Job Entry.
Epicor ERP | 10.0.700.268
Scheduling CourseSpecialized Scheduling Processes

8/20/2019 scheduling.pdf
http://slidepdf.com/reader/full/schedulingpdf 69/70
Conclusion
Congratulations! You have completed the Scheduling course.
69Epicor ERP | 10.0.700.2
ConclusionScheduling Course

8/20/2019 scheduling.pdf
http://slidepdf.com/reader/full/schedulingpdf 70/70
Additional information is available at the Education andDocumentation areas of the EPICweb Customer Portal. To access
this site, you need a Site ID and an EPICweb account. To create anaccount, go to http://support.epicor.com.


![CCIA 1 Scheduling - elvex.ugr.eselvex.ugr.es/decsai/project-management/slides/CCIA 1 Scheduling.pdf · Camino crítico CPM PERT Holguras [slack] Prioridades MMF Modelo en espiral](https://img.pdfslide.net/doc/110x75/5bdc415f09d3f2b4758d848b/ccia-1-scheduling-elvexugr-1-schedulingpdf-camino-critico-cpm-pert-holguras.jpg)


![LIUC11 - 3b - Resource Scheduling [modalità compatibilità]my.liuc.it/MatSup/2010/N90312/LIUC11 - 3b - Resource Scheduling.pdf · RSM (“Resource Scheduling Method”) The comparison](https://img.pdfslide.net/doc/110x75/5e6960f1b56ec73fd051b5f1/liuc11-3b-resource-scheduling-modalit-compatibilitmyliucitmatsup2010n90312liuc11.jpg)