Embed Size (px)
Citation preview
Sciatica
Introduction:I have chosen this topic of sciatica, after having suffered lower back pain all my life and sciatica pain since 2012. I had MRI done 2013 after my backpain started to affect my sleep and i would feel sharp pain when turning over to one side sleeping or getting up from the floor. MRI results for lumbar spine reveals: Grade 2 spondylosisof L5 in relation to S1 with superimposed disc buldge. Grade 1 spondylosis of L5 in relation to L4. Multilevel disc bulge and facet arhropathy with a small superimposed central protrusion at L4-L5. Severe bilateral neural foraminal narrowing at L5-S1.Loss of lumbar lordosis and degenerative endplate changes to L5-S1 disc. Cervical results reveals; cervical spondolysis withposterocentral herniation of C4-C5, C5-C6 and C6-C7 disc indenting the thecal sac and nerve roots. Doctor said: “Surgery is not an option” only pain medication can relieve your symptoms. I can call myself lucky that I am a yoga teacher and been teaching therapeutic yoga since 2005. Now I am given an opportunity to find out how yoga therapy can provide me with healthy and happy life in spite of my constant back pain.
1
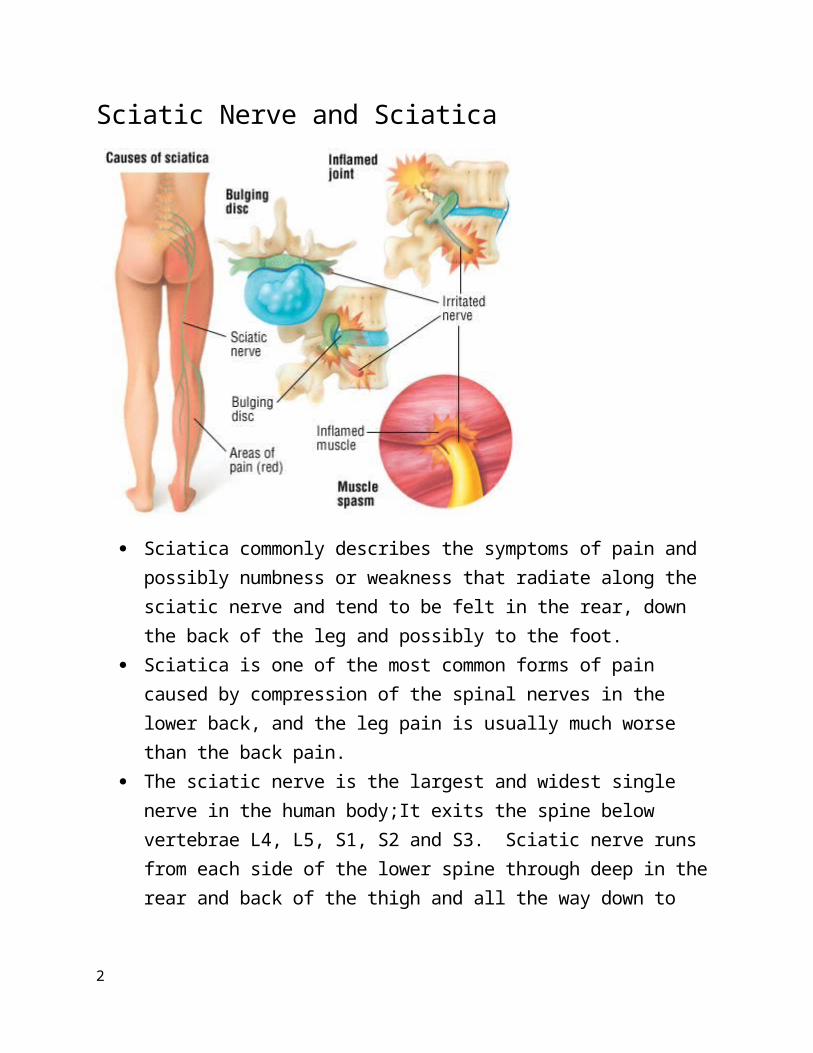
Sciatic Nerve and Sciatica
Sciatica commonly describes the symptoms of pain and possibly numbness or weakness that radiate along the sciatic nerve and tend to be felt in the rear, down the back of the leg and possibly to the foot.
Sciatica is one of the most common forms of pain caused by compression of the spinal nerves in the lower back, and the leg pain is usually much worse than the back pain.
The sciatic nerve is the largest and widest single nerve in the human body;It exits the spine below vertebrae L4, L5, S1, S2 and S3. Sciatic nerve runs from each side of the lower spine through deep in the rear and back of the thigh and all the way down to the foot, connecting the spinal cord with the leg and foot muscles.
Causes of Sciatica
2
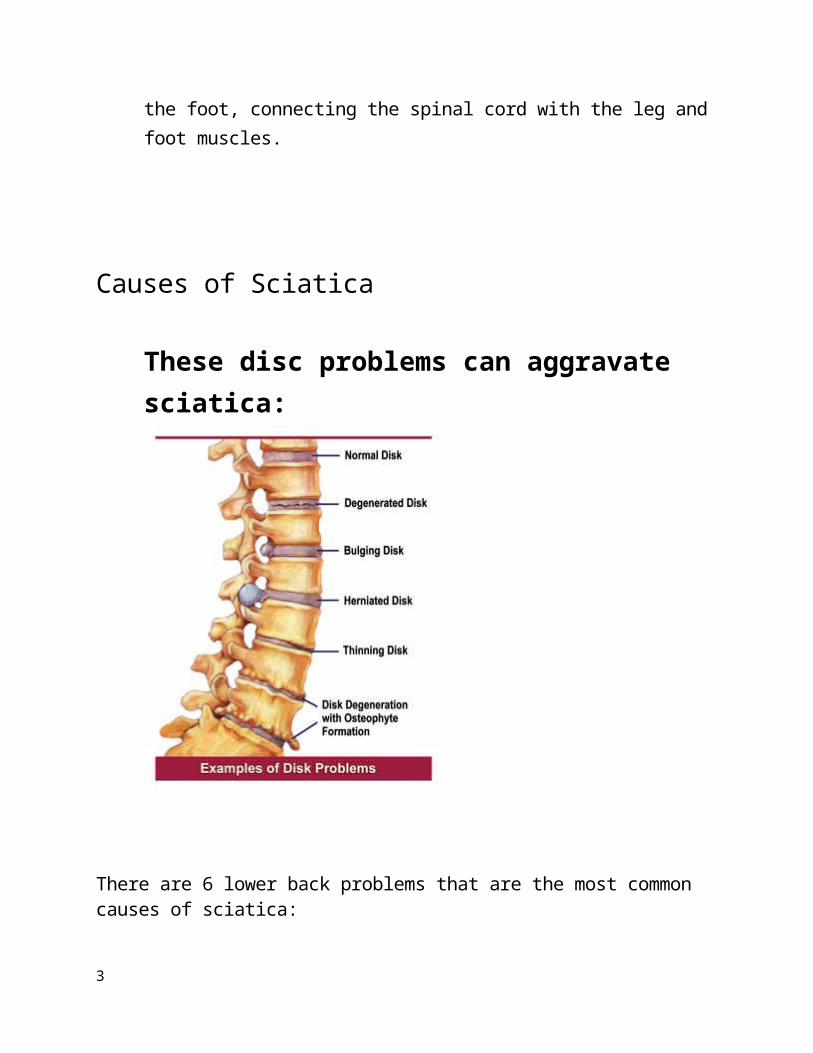
These disc problems can aggravate sciatica:
There are 6 lower back problems that are the most common causes of sciatica: Lumbar herniated disc
A herniated disc occurs when the soft inner core of the disc (nucleus pulposus) leaks out, or herniates, through the fibrous outer core (annulus) and irritates the contiguous nerve root. A herniated disc is sometimes referred to as a slipped disc, ruptured disc, bulging disc, protruding disc, or a pinched nerve. Sciatica is the most common symptom of a lumbar herniated disc.
Degenerative disc diseaseWhile disc degeneration is a natural process that occurs with aging, for some people one or more degenerated discs in the lower back can also irritate a nerve root and cause sciatica.Degenerative disc disease is diagnosed when a weakened disc results in excessive micro-motion at that spinal level, and inflammatory proteins from inside the disc become exposed and irritate the area (including the nerve roots).
3
Isthmic spondylolisthesisThis condition occurs when a small stress fracture allows one vertebral body to slip forward on another (e.g. the L5 vertebra slips over the S1 vertebra).With a combination of disc space collapse, the fracture, and the vertebral body slipping forward, the nerve can get pinched and cause sciatica.
Lumbar spinal stenosisThis condition commonly causes sciatica due to a narrowing of the spinal canal. Lumbar spinal stenosis is related to natural aging in the spine and is relatively common in adults over age 60.The condition typically results from a combination of one or more of the following: enlarged facet joints, overgrowth of soft tissue, and a bulging disc placing pressure on the nerve roots, causing sciatica pain.
Piriformis syndromeThe sciatic nerve can get irritated as it runs under the piriformis muscle in the buttock. If the piriformis muscle irritates or pinches a nerve root that comprises the sciatic nerve, it can cause sciatica-type pain.This is not a true radiculopathy (the clinical definition of sciatica), but the leg pain can feel the same as sciatica caused by a nerve irritation.
Sacroiliac joint dysfunctionIrritation of the sacroiliac joint - located at the bottom of the spine - can also irritate the L5 nerve, which lies on top of the sacroiliac joint, causing sciatica-type pain.The leg pain can feel the same as sciatica caused by a nerve.
More Causes of SciaticaIn addition to the most common causes, a number of other conditions can cause sciatica, including:
Pregnancy. The changes that the body goes through during pregnancy, including weight gain, a shift on one's center of gravity, and hormonal changes, can cause sciatica during pregnancy.
Scar tissue. If scar tissue compresses the nerve root, it can cause sciatica.
4

Muscle strain. In some cases, inflammation related to a muscle strain can put pressure on a nerve root and cause sciatica.
Spinal tumor. In rare cases, a spinal tumor can impinge on a nerve root in the lower back and cause sciatica symptoms.
Infection. While rare, an infection that occurs in the low back can affect the nerve root and cause sciatica.
Sciatica Symptoms (herniated discs) Lower back pain, is not as severe as leg pain Constant pain in only one side of the buttock or leg, but rarely both the right and
left sides Pain that originates in the low back or buttock and continues along the path of
the sciatic nerve - down the back of the thigh and into the lower leg and foot Pain that feels better when patients lie down or are walking, but worsens when
standing or sitting Pain that is typically described as sharp or searing, rather than dull Some experience a "pins-and-needles" sensation, numbness or weakness, or a
prickling sensation down the leg Weakness or numbness when moving the leg or foot Severe or shooting pain in one leg that may make it difficult to stand up or walk Depending on where the sciatic nerve is affected, the pain and other symptoms
may also include foot pain or pain in the toes.
Sciatica symptoms vary based on where the compressed nerve root is located. For example:
L4 nerve root sciatica symptoms usually affect the thigh. Patients may feel weakness in straightening the leg, and may have a diminished knee-jerk reflex.
L5 nerve root sciatica symptoms may extend to the big toe and ankle (called foot drop). Patients may feel pain or numbness on top of the foot, particularly on the "web" of skin between the big toe and second toe.
S1 nerve root sciatica affects the outer part of the foot, which may radiate to the little toe or toes. Patients may experience weakness when raising the heel off the ground or trying to stand on tiptoes. The ankle-jerk reflex may also be reduced.
5

Sciatica Symptoms That Require Immediate AttentionRarely, sciatica symptoms that worsen quickly may require immediate surgery. The following symptoms indicate a need for immediate medical care:
Symptoms that continue to get worse rather than improve, which may indicate possible nerve damage, especially if the progressive symptoms are neurological (such as weakness).
Symptoms that occur in both legs (called bilateral sciatica) and cause either bladder or bowel incontinence or dysfunction, which may indicate caudaequina syndrome.Caudaequina syndrome is an acute compression of one or several nerve roots that occurs relatively rarely (in approximately 2% of herniated lumbar disc cases).1
Patients should seek immediate medical attention if they experience any of the above symptoms.
Sciatica DiagnosisDiagnostic ProceduresSciatica is most commonly diagnosed by:History taking: o Complaints of radiating pain in the leg, which follows a dermatomalpattern[6]. o Pain generally radiates below the knee, into the foot[7]. o Dermatome maps used to locate the distribution of the pain[6]. o Patients complain about low back pain, which is usually less severe than the leg pain[6]. o Patients may also report sensory symptoms.The use of imaging to confirm the diagnosis of sciatica is not very useful[6][9]. It may be indicated if there are red flags in the acute phase. Imaging may be indicated in patients with severe symptoms who fail to respond to conservative treatment for 6-8 weeks[6] or to find the underlying cause of the sciatica.
[Examination
Neurological testing[6]
6
oMyotomes o Reflexes (L4-S3) o Sensations (Dermatomes)
Neural tension tests (preferably in a seated position[8]) o Straight leg raise test[6][7][8][13]
o Crossed straight leg raise test[6],[3]
o Slump test � o Femoral nerve tension test[7]
Lumbar mobility assesment[
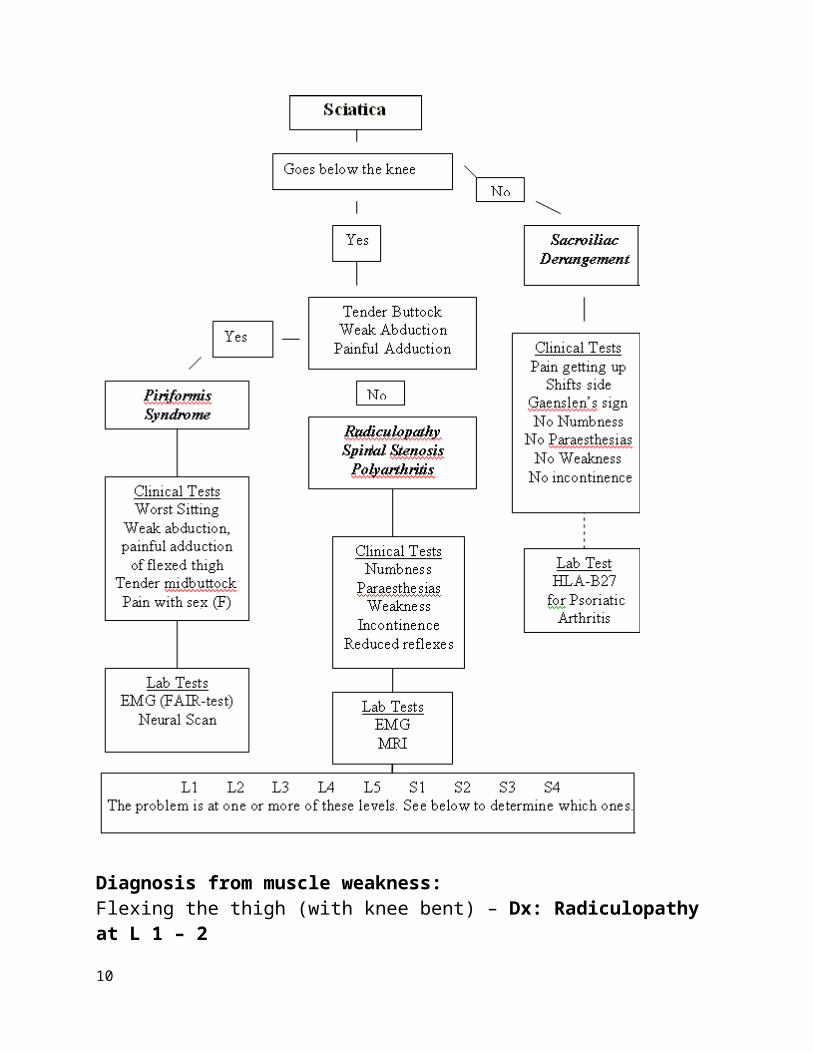
Differential diagnosis begins with the location of the pain and the accompanying symptoms and signs.
7
Diagnosis from muscle weakness:Flexing the thigh (with knee bent) – Dx: Radiculopathy at L 1 – 2 Extending the knee – Dx: Radiculopathy at L 3 – 4
8
Walking on the heels – Dx: Radiculopathy L 4 – 5 Walking on the toes – Dx: Radiculopathy L 5 – S1 Difficulty controlling the bowel or bladder – Dx: S 1 – 2 – 3
Sciatica TreatmentNon-Surgical Treatment:
Heat/IceFor acute sciatic pain, heat and/or ice packs are readily available and can help alleviate the leg pain, especially in the initial phase. Usually ice or heat is applied for approximately 20 minutes, andrepeated every two hours. Most people use ice first, but some people find more relief with heat. The two may be alternated.
Pain MedicationsOver-the-counter or prescription medications may also be helpful in relieving sciatica. Non-steroidal anti-inflammatory drugs (such as ibuprofen, naproxen, or COX-2 inhibitors), or oral steroids can reduce the inflammation that is usually a contributing factor in causing sciatica pain.
Epidural Steroid Injections for SciaticaIf the pain is severe, an epidural steroid injection can be performed to reduce the inflammation. An epidural injection is different from oral medications because it injects steroids directly to the painful area around the sciatic nerve to help decrease the inflammation that may be causing the pain.While the effects tend to be temporary (providing pain relief for as little as one week up to a year), and it does not work for everyone, an epidural steroid injection can be effective in providing relief from an acute episode of sciatic pain. Importantly, it can provide sufficient relief to allow a patient to progress with a conditioning and exercise program.
Alternative Sciatica Treatment: Physical Therapy
Physical therapy exercises incorporating strengthening, stretching, and aerobic conditioning are a central component of almost any sciatica treatment plan.
Chiropractic/Manual ManipulationSpinal adjustments and manual manipulation performed by appropriately
9
trained health professionals (such as chiropractors, osteopathic physicians, physical therapists) are focused on providing better spinal column alignment, which in turn should help to address a number of underlying conditions that can cause sciatic nerve pain.
Acupuncture, yoga and pilatesThe practice is centered on the philosophy of achieving or maintaining wellbeing through the open flow of energy via specific pathways in the body. Hair-thin needles (that are usually not felt) are inserted into the skin near the area of pain.Acupuncture has been approved by the U.S. FDA as a treatment for back pain, and the National Institutes of Health has recognized acupuncture as effective in relieving back pain, including sciatica.
Massage TherapyCertain forms of massage therapy have been shown to have a number of benefits for back pain, including increased blood circulation, muscle relaxation, and release of endorphins (the body’s natural pain relievers).
Low impact aerobic exerciseSome form of low impact cardiovascular exercise, such as walking, swimming or pool therapy is usually a component of recovery, as aerobic activity encourages the exchange of fluids and nutrients to help create a better healing environment.
Sciatica Surgery
If the sciatica pain is severe and has not gotten better within six to twelve weeks, it is generally reasonable to consider lower back surgery. Depending on the cause and the duration of the sciatica pain, one of two surgical procedures will typically be considered:
A microdiscectomy (or small open surgery) A lumbar laminectomy (an open decompression)
Microdiscectomy for SciaticaIn cases where the sciatica pain is due to a lumbar disc herniation, a microdiscectomy or small open surgery with magnification may be considered. In this surgery, the portion of the herniated disc that is pinching the nerve is removed.This surgery is generally considered after 4 to 6 weeks if the severe pain is not relieved by non-surgical means. If the patient’s pain and disability is severe, surgery may be considered sooner than 4 to 6 weeks.As a general rule, approximately 90% to 95% of patients will experience relief from their sciatica pain after this type of surgery.
10
Lumbar Laminectomy for SciaticaIn cases where the sciatica pain is due to lumbar spinal stenosis, a lumbar laminectomy may be recommended. In this surgery, the small portion of the bone and/or disc material that is pinching the nerve root is removed.Laminectomy surgery may be offered as an option if the spinal stenosis causes the patient’s activity tolerance to fall to an unacceptable level. The patient’s general health may also be a consideration in whether or not to have surgery.After a lumbar laminectomy (also called an open decompression), approximately 70% to 80% of patients typically experience relief from their sciatic nerve pain.
Complications:
Although most people recover fully from sciatica, often without any specific treatment, sciatica can potentially cause permanent nerve damage. Seek immediate medical attention if you experience:
Loss of feeling in the affected leg Weakness in the affected leg Loss of bowel or bladder function
Preventing the sciatica:
11
Conditions that cause sciatica cannot be prevented in all cases. The following measures can help reduce the risk for sciatica.
Avoid smoking, which may increase intervertebral disc degeneration. Eat healthy diet and maintain healthy weight.( more alkaline diet) Your discs lose fluids because gravity compresses the discs. Drink 2-4 liters
of water every day to keep the discs hydrated. Be aware of the position of your pelvis when sitting or standing. If the top
of the pelvis moves backward it forces the flexion at the L5-S1 and L4-L5 joints, which pushes the disc’s nuclei backward somewhat. This puts too much pressure on the lower spine and can aggravate the sciatica.
When lifting something, always bend forward from your hips, keeping your back straight, your knees bent, so you use your thigh muscles instead your back.
Focus on strengthening your core and back muscle to support your back. Any form of regular exercise that strengthens your core and back muscles, stretching breathing exercises (yoga, pilates) can keep your spine flexible and sustain its range of motion.
Positive outlook on life and your health Inflammation in the body increases as we age. Flax seed or fish oil. Relax and rest your back when needed Sleeping on your back, knees bent or if sleeping on your side, use pillow
between your knees. Anytime discomfort in your back try the effortless rest position (laying on
your back, knees bent). Contract the pelvic floor and inhale to your chest. Exhale and release completely. 10 – 12 breaths and observe afterwards for 1-2 minutes.
You can also try Makarasana pose with a same technique.
12
First Therapy Sequence:
30 minute yoga sequence that is good for those suffering from sciatica pain or seeking to prevent it. This sequence helps for any injuries in L5-S1 because this section of the spine is subjected to a large amount of stress. The asanas stretches the hamstrings and external hip rotators, creating space in the sacroiliac joint and releases stress or pressure from the lower lumbar area.
In this sequence the main focus of relieving the symptoms of sciatica is with relaxation and deep correct breathing using the primary breathing muscle diaphragm.
Best time to practice this sequence is in the morning to relieve the stiffness of the spine. If needed can be repeated in the evening for stress relief.
Many people are reverse breathers and their abdomen move in on the inhalation and out of the exhalation. Reverse breathing causes confusion in the diaphragm and all the muscles of the respiration, but it also causes a confused and disoriented state of mind. This breathing method causes a person to over use their secondary breathing muscles and create chronic tension in their upper body.
13
ASANAS
1.The effortless rest position
Diaphragmatic breathing: The breath arises predominantly through the action of the central diaphragm than through the action of the more external secondary respiratory muscles, which are higher up in the body. Inhale will let your abdomen rise and exhale moves your abdomen closer to your spine. The breath should have the feeling of being and creating calm in the body and mind and its rhythm is regular and filled with a sense of ease and relaxation.
Precautions: Most people have a reversed their natural flow of breath and are not even aware of it. Also it is common for people to hold their breath in their belly.
Benefits: Most people with back pain contract their abdominal muscles and this will increase the tension and stiffness in the back muscles and increase their pain levels. The diaphragm attaches along the front of the lumbar vertebrae, so any constriction in this important breathing muscle will immediately be reflected in the function of the spine. Ironically the only way the intervertebral discs (cushions between each vertebrae) can remain thick and
14
healthier is by imbibing fluid (much as a sponge absorbs water). This process of imbibition can happen only through movement since there is no direct blood supply to the discs after second decade. The oscillation of the breath also provides an effective means of giving traction to the spine, creating space between the bones and thereby reducing nerve impingement, bone degeneration, and arthritic conditions. Allowing your abdomen to move when you are breathing is the most effective way to keep your back healthy.
Technique: Lie on your back, knees bent, and feet on the floor, hip-width apart and comfortable distance away from your buttocks. Let your knees come together but keep the feet apart. Place your hands on top of your belly. From here we can find a neutral relaxation position for your spine and observe your diaphragmatic breathing for 5 minutes. Letting go any stress or tension through your natural movement of breath.
2.Setubandhasana
15
Precautions: Keep feet and knees in line with the hip or otherwise most often due to a strong external rotators ( gluteus maximus and piriformis underneat it) will shift the weight to outer aspect of the feet causing “gripping the tailbone” and compression in the lower back.
Benefits: Warms up the back muscles and increases the flexibility in the spine and shoulders.Flexible spine means healthier discs as the movement bring in new oxygenated blood into the discs and more space between the intervertebral discs. Also stretches the iliopsoas and thigh muscles.
Technique: Lie down on your back. Bent knees and place your feet parallel to each other, hip-width apart right under your knees. Arms by the side of the body, palms facing down. Inhale press into the feet and lift your hips. Lengthen your tailbone and extend from your pelvis out through your knees. One round of breath at the top. Exhale come down one vertebra at the time. One round of breath at the bottom. Try to keep your gluteus not gripping into the tailbone. Instead use the strength of hamstrings and try release your buttocks. Continue moving with your breath for 5 repetitions.
3.Pavana Muktasana
16
Benefits: Opens the iliopsoas muscles and stretches the lower back.
Technique: Lie on your back. Both legs straight to start.Exhale bend your right knee towards your chest wrapping your hands around the knee. The left leg stays active and straight on the floor. Inhale release the leg and repeat on the other side. 4 times each leg.
4.SuptaBaddhaKonasana
Benefits: Strengthens inner thighs and increases circulation to the sacrum.
17
Technique: Lie on your back with your knees bent and your feet together and comfortably close to the buttocks. Inhale and open the legs, bringing the soles of the feet together as the knees come apart. On a long slow exhalation draw the knees back together as you tighten the belly muscles and push the lower back down. On a inhalation, open the knees again. This time take the space of 2 exhalations to close them, pausing halfway up to inhale. Inhale and open the knees again. Take the space of 3 exhalations to them, pausing one-third of the way up and then two-thirds of the way up before returning to the starting position. Inhale and open the knees again. Finally, close the legs over the course of 4 exhalations, pausing to inhale at one-fourth, one-half, and three-fourths of the way up before returning to the starting position. Repeat 4 rounds.
5.VagraSwasa
Precautions:People with serious neck and cervical problems can practice this posture without moving their head.
18
Benefits: Helps with stiff shoulders and neck. Releases back pain. Helps you connect the breath with movement and in this case perfect asana for diaphragmatic breath.
Technique: Start with Vajrasana. Come up onto your hands and knees. Hands are directly under your shoulders and knees under your hips. Inhale drops your belly and arch your spine, moving from the hips and looking up (if comfortable for your neck) drawing your shoulder blades together. Exhale starting the movement from your hips and rounding your spine and looking towards your chest (if comfortable with your neck). Repeat for 5 rounds.
6.Bhujangasana
Benefits: Strengthens the muscles that support the sacrum.
Technique: Lie on your stomach with your chin down on your mat. Place your hands on either side of the chest in line with the nipples. The legs should extend and toes pointed. Inhale and use
19
the muscles of the lower back to lift the upper body of the floor, extending through your sternum. Exhale lower back to the starting position and turning your head to the right side. Repeat on the other side. Then spread your legs about 4 inches apart and repeat the sequence. Next, spread the legs 8 inches apart and repeat like earlier. Finally spread the legs 12 inches and perform final repetition. Come back to starting position and relax. These movements strengthen the gluteal muscles which help support the sacrum.
7.Vagra Swasa
Repeat as earlier in a sequence
8.JatharaParivrtti
Benefits: Stretches the lower back and stretches and strengthens the hip abductors.
20
Technique: Begin lying down on your back with your knees bent and lifted towards the chest, thighs together. Extend your arms out from the shoulders, palms down. On an exhalation, lower your knees toward the floor to the right, twisting through the abdomen as you turn your head and look to the left. On an inhalation, return the knees and head to center. Repeat on the other side. Continue the movement one more time on each side. Now on an exhalation lower the knees to the right and hold the position. Bring your right arm elbow bent underneath your head and left arm resting on your side. Maintaining that relationship of the hips and the bent knees, lift the left leg several inches off the right leg on each inhalation and lower the left leg on each exhalation. Repeat 4 times. Return to the starting position on an inhalation. On an exhalation, lower the knees to the left and do the leg lifts with the right leg. Repeat 4 times. Return to center and place both feet on the floor, and relax.
9.SuptaPadangusthasana
Benefits: Stretches the inner thighs, hamstrings and stabilizes the pelvis.
21
Technique: Lie on your back with the knees bent, hands behind them and elbows slightly bent. As you inhale, extend your legs as much as possible, flex your feet, and reach the heels up toward the ceiling, letting your arms straighten and resting your hands on the front of your legs. As you exhale, press the lower back toward the floor, bend your knees, and pull the legs in toward the belly. Repeat 4 times. Next move the hands to the insides of the knees and open the legs as wide as possible on the inhalation. On the exhalation, bring them together while keeping them extended. Repeat 4 times.
10.Setubandhasana
Repeat as earlier in the sequence
Mudra for lower lower back pain.
Right hand: The thumb, middle finger, and little finger are touching; the index finger and ring finger are extended.Left hand; place your thumb joint on the nail of the index finger
22
This mudra is primary effective when someone with a weak back has strained the back too much and caused painful tension or when someone has sat too long in a wrong position. Hold the mudra for 5 to 10 minutes.
Affirmation: My back is strong, my back is wide, and I am protected and supported both inside and outside.
Technique:Lie on your back, knees bent, and feet on the floor. Feet hip-width a part and knees together as your feet stay hip distance. You can also place your calves on the seat of the chair, knees right above your hips. This will release the sacrum area completely . Hands holding the mudra and arms relaxed by your side. If you want you can repeat the affirmation silently in your mind.
Benefits: Brings fresh new energy to your lower spine and affirmation add positive psychological effect.
You can ask these questions about your practice to deepen your understanding of your body and condition
Are you a reverse breather? Is you diaphragmatic breathing helping you to release the
symptoms of sciatica? Which of the asanas gave you the most relief for your back?
23
The second Therapy sequence:
30 minutes yoga sequence for strengthening the important muscles that support your injury or condition which is the main cause for the sciatica pain.
This sequence focuses on strengthening your back and abdominal muscles, hip flexors, externalrotators, quadriceps and muscles around your hip joint.
Also while performing the asana please pay attention how is your posture and the position of your pelvis. Feel what muscles are too weak and what need more strengthening.
This sequence is good to practice in the evening when body is less stiff and lower back has more range of motion.
1.Tadasana
Pranyama: Shitali “cooling” breath good for heat flashes.
24
Technique: Sit in a comfortable meditative position against the wall using a blanket underneath your sit bones to find a neutral pelvis. Hand in Chin mudra. Eyes closed. Take a few natural breaths. Open the mouth, stick the tongue out and roll the edges to make a tube. Inhale a full yogic breath through the tongue. Take the tongue into the mouth and close the mouth, hold as long as possible. Exhale through the nose. For those who can’t roll their tongue, they can lightly press the teeth together and inhale through the teeth. Practice this for 3 to 5 minutes.
Precaution: The most common error is overworking in order to strive for “perfect posture”. Remember the classical guideline is to become steady, yet comfortable, make a relaxed consistent effort, and remain
Benefits: Tadasana is a perfect pose to become aware of your habitual misalignments in a body. Yet some might be structural and those are much harder to correct. So let’s work on the habitual misalignments which are much easier to correct when we become aware of them. The position of your feet has a huge effect on muscular tone of the external and internal rotators which then affect the position of your pelvis which then affect the foundation of the spinal curves.
Technique: Start standing back against the wall. Feet together, equal weight on each foot, no pressure on the toes. Heels, calves, buttocks, shoulder blades and the back of the skull should be in contact of the wall. Your posture is erect and poised. Relax your arms, with your palms facing your sides. Your chest will be fully lifted, with a slight pelvic tuck, strong enough to produce a mild tone to your lower abdominal muscles
25
but still able to have belly breaths. Allow your eyes to gaze steadily, yet softly, at fixed spot, the focal point being either internal or external.
This asana will teach the person to explore and understand more of the position of their pelvis while they are standing and how it will affect the wellbeing of their lower spine depending of the tilt of their pelvis.
Observation:
How is your posture in Tadasana?
Did you find the natural arch of your lumbar spine? Too flat or too arched? How about the position of your pelvis? Too much in a forward tilt or too much in a back tilt?
This will tell you if your hip flexors and hip extensors are too tight or too lose?
This is vital information for the person to be able to feel during asanas and not to go too far into flexion or extension of the pelvis.
2.Utkatasana
Benefits: Strengthens the quadricepses that supports your knees and lower back when lifting something off the floor.
26
Technique: Start your knees bent and back against the wall. Feet together and far enough from the wall that you are able to see your toes. Move your back away from the wall by engaging your lower abdominals and tucking your pelvis under slightly. Sit bones should be touching the wall and hands into Anjali mudra. If you feel pressure on the knees your feet are too close to the wall. This asana should be felt mostly in your thigh muscles. Stay for 9 rounds of breath. Breathing smoothly in your belly avoiding tension into the shoulders and neck.
3.Utthita Hasta Padangusthasana B
Benefits: Stabilized the muscles of the pelvis, gives an opportunity to work on squaring the hips with the support of the wall and strengthens the quadriceps, back and abdominal muscles.
Technique: Start in Tadasana against the wall. Feet hip width apart, hands on your waist. Root down the left leg as you engage your abdominals and tuck your pelvis under slightly lifting the bent right leg, thigh parallel to the floor and foot flexed. Holding the leg up for 5 rounds of breath. If you feel comfortable extend the leg, point the toes and go for another 4 rounds of breath.
27
Observation:
Are your hip flexors strong or weak? You can tell by how long you are able to hold the leg up?
Tight and short hip flexors continuously pull your pelvis into anterior tilt, which can contribute to increased curve in the lower back and painful compression when backbends require full extension of the hip joint. If the hip flexors and extensors are balanced in terms of both strength and flexibility, they will support the pelvis in neutral position, which helps maintain the normal spinal curves and keep the weight of the upper body centered over the hips when you sit and over the legs when your stand.
4. Virabhadrasana II
Benefits: This pose stretches inner groin and the openness of the groin region releases compression of the lower back.
Technique: Begin in Tadasana against the wall. Step to the side into wide legged stance, feet parallel and on leg length apart. Turn your
28
right foot out 90 degree and keeping the knee above the ankle. Right heel in line with the middle of left arch of the foot. Right sit bone, shoulder blades and back of the skull are touching the wall. Extend your arms out shoulder level, palms facing down and looking over your right middle finger. Maintain equal weight in both feet.Shoulders above the hips, tucking your pelvis slightly.Hold the pose for 9 breaths and repeat on the left side.
5.EkaPadaRajakapotasana
Benefits: Open the hip flexor muscles (iliopsoas, rectus femoris) and the groin muscles. Opens the hip rotators muscles ( gluteusmaximus, medius, minimus and piriformis). May relieve sciatic nerve tension and ease chronic lower back pain.
Technique: Start on all fours in a squared table pose. Stretch your left leg back behind you the sole of the foot touching the wall. Bend your right knee so that your left foot is near your right pelvic bone. Hands on the ground in front of you for balance. Extended leg is straight back from your hip. Drop your pelvis as low as you can and keep pressing the wall with your left sole of the foot letting the knee drop on the floor.
29
This will keep your hips square. If comfortable and don’t feel a stretch on your right gluteus maximus, let your body extend over in front of you on the floor. If the right hip doesn’t reach the floor, you can place a blanket underneath for support.
6.Salabhasana
Benefits: The goal is to strengthen the area around the sciatic nerve without causing pain in the least invasive way possible. This asana is good for that. Strengthens the erector spinae muscles and the entire nervous system.
Technique: Lie on your stomach. Place palms underneath the pelvic region on either side of the body with palms facing up. Chin down on the mat, shoulders relaxed. Inhale and stretch the right leg back and up. Exhale down. Repeat for left leg. Each side 9 times.If you ready for step further, do 4 single leg lifts and after that 5 repetitions of lifting both chest and legs at the same time.
Observation:
If you have difficulty holding the pose or you have difficulty lifting off the floor, this is an indication of weak erector spinae muscles.
30
These muscles run parallel to your spine keeping us upright. If these muscles are weak they let the weight hang on the ligaments of the spine and the muscles in the front of the body becomes short and tight, causing spine to curve backwards and the head to poke forward. This causes slight to moderate flexion of the lumbar spine, so the disc nuclei push backward somewhat. Not good if you already have disc injury.
7.Sasamkasana
Benefits: Gently stretches lower back, hips and thighs. Relaxes the spine, shoulders and neck. Calms the mind thus helping relieve stress and tension. Perfect pose to get the breath in your back body.
Technique: Start in Vajrasana and let you buttock move towards your heels, placing the forehead on the mat and extending arms in front of you.
7.UrdhvaPrasaritapadasana
31
Benefits: Helpful for strengthening the abdominal and pelvic region. Using a wall as a prop helps to prevent any strain in a lower back and keeps the lumbar from arching. Also helps to keep the hips square.
Technique: Lie on your back with legs active and the feet together and pressing against the wall. Bend the elbows and place the hands behind the head. Keep the legs and the knees straight. Inhale and lift one leg up towards 90 degrees and with exhale lower the leg but don’t let it touch the floor and repeat 9 times on this side. Make sure your left leg is pressing firmly on the floor. Repeat on the other side.
8. PavanaMuktasana
Benefits: Stretches the lower back and hip flexors.
Technique: Lie on your back. Again both feet touching the wall. Exhale and pull the right knee to the chest, keeping you head on the floor. Pressing the left foot firmly against the wall and stretching the left leg away from the right knee. Inhale and release the leg. Repeat on the left side. 9 times each leg.
32
9.Savasana
Benefits: Allows your body to absorb the benefits of the practice. Lie flat on your back in final resting position. You can keep your knees bent or placing a blanket underneath the knees to release your back. You can also place your calves on the seat of a chair, knees right above your hips. This is very effective way to bring your back to neutral position and letting any pressure in a sacrum area to release. Stay here for a minimum of 5 minutes, breathing naturally and letting go of all tension in your body. If you enjoy visualization try the following: as you inhale, visualize a wave of warm, pure, healing water entering your body from the top of your head and moving towards your lower back and legs. As you exhale, visualize the wave leaving your body, taking with it all tension and stress.
Targeted group for this practice:
Women between the ages of 45-55. Spondylosis both in cervical and lumbar region, herniated discs in
thoracic, bulging disc in lumbar and facet arhropathy (arthritis) of the spine, including degeneration disease.
This age group can already have menopausal symptoms (anxiety, depression, weight gain and hot flashes).
33
Also body tightness due to connective tissue loses its elasticity as we get older.
Continuation practice for second Therapy sequence: Add suryanamaskara and move away from the wall when practicing the second series. After that can continue with Foundation series. Poses that should be avoided are chakrasana and sirsasana. Ustrasana should be practiced with care. Sarvangasana with at least one blanket underneath the shoulders. Pascimottanasana start with bend knees and proceed from there. Navasana should be done holding behind your bent knees, keeping your lower back lifted and thighs close to chest.
Poses that are appropriate for sciatica:
Back Bend Yoga Poses Recommended for Sciatica:
Anjaneyasana (Cresent Lunge Pose)Bhujanghasana (Cobra Pose)Dhanurasana (Bow Pose)Salabhasana (Locust Pose)
34
Setubandhasana (Brigde Pose)
Twisting yoga poses can help to create space in the lower back and increase circulation to the area affected by sciatica. When practicing twisting yoga poses for sciatica, it is important to use your muscles to twist rather than by pushing with your hands. If your sciatic pain is caused by herniated disc, twisting poses may not be the best choice for your yoga practice. Always move into the poses slowly, and stop if you feel any pain.
Twisting Yoga Poses Recommended for Sciatica:
ArdhaMatsyendrasana (Half Lord of the Fishes Pose)Bharadvajasana I (Bharadvaja’s Twist)Marichyasana III (Sage Pose III)Pasasana (Noose Pose)ParivrttaUtkatasana (Standing Chair Twist)
Worst Yoga Poses for Sciatica
The worst yoga poses for sciatica tend to be forward bends, whether standing or seated. If your hips or hamstrings are too tight, forward bending can put a strain on the lower back and worsen sciatica pain. When bending forward, always remember to hinge forward right at the hip crease and don’t round through your lower back. Forward bends are opposite of backbends, so
35
instead of drawing the tailbone down, release the tailbone and allow the sit bones to widen.
When practicing yoga for sciatic pain, either avoid forward bending entirely, or don’t move fully into the bend. You can modify forward bending poses keeping your spine long and straight and focusing on tilting the pelvis so that it rolls forward instead of back (widening your sit bones). Don’t try to touch your toes while you have sciatica. Once you heal from sciatica, work with forward bends slowly so the sciatic pain does not return.
Instead of forward bending, try the yoga pose SuptaPadangustasana (Reclining Big Toe Pose) with the strap to stretch your hamstrings. AdhoMukhaSvanasana (Downward Facing Dog Pose) may also offer some of the benefits of forward bends without aggravating sciatic pain.
What happenes to spine in forward bends and deep backbends?
An intervertebral disc is composed of a tough, fibrous ring (the annulus fibrosus) wrapped around a jelly-like center (the nucleus pulposus). The whole disc is attached firmly to the main cylindrical part (the bodies) the vertebrae above and below, so the nucleus is completely enclosed. (Note that the attachment is so strong that the disc cannot slide, so the term “slipped disk” is a misnomer).
36

When the spine bends, the bodies the adjacent vertebrae pinch closer together on one side and draw farther apart on the other side. This squeezes the disc that lies between them on one side and widens the disc space on the other, pushing the disc’s soft nucleus toward the open side. This is usually notproblem; in fact it’s necessary for normal healthy movement of the spine.
However, forcing the bend can push the nucleus pulposus so hard against the annulus fibrosus that the annulus stretchesor tears. If it stretches, the disc wall bulges out, and may press on the adjacent nerve (especially in forward bends). If it tears, some of the nucleus can leak out (herniate) and press very strongly on the nerve. Another, often-related disc problem is simple deterioration over time. As disclose their plumpness, the vertebrae draw closer together. This narrows the foraminae through which the nerves pass, thereby squeezing the nerves.
Nerve fibers that exit the spine below vertebrae L4, L5, S1 and S2, S3 combine to form the sciatic nerve. This means that many of the fibers that contribute to the sciatic nerve pass directly over L4-L5, and L5-S1 disc. If these discs are injured in a way that presses overlying nerve roots, it can cause sensations (pain, tingling, and numbness) that the brain thinks are coming from the sciatic nerve. This is why many people with sciatica often feel more symptoms in the buttock or leg than in the back. Some don’t even realize they have a back injury.
37
Of all the disc in the entire spine, the L5-S1 disc is subject to more mechanical stress than any other, so it is injured most often. The L4-L5 disc is subject to the second-largest amount of mechanical stress, so it is injured the next most often. The reason these discs take such a beating is that they lay at the “bottom of the totem pole”, the base of the vertebral column. This increase mechanical stress in two ways:
First, it makes them bear more weight than other discs. The compressive force of this weight flattens and spreads the nucleus pulposus, pressing outward on the annulus fibrosus on all sides. This pressure not only stretches the annulus, it also tends to slowly squeeze fluids out of the discs, narrowing the space between vertebrae.
Second, and probably more important, the entire vertebral column acts as a long lever that exerts its greatest leverage on the lowest lumbar disc. How much leverage? Imagine a pair of pliers with handles as long as your spine. Now imagine putting your finger between the jaws and having a friend squeeze the handles together. When we hold the sacrum fixed and bend the spine, we exert similar leverage on the L5-S2 disc, and nearly as much on the L4-L5 disc. Although this leverage effect occurs in backbend and side bends, it is most likely to cause injury in forward bends, especially, when they are combined with a slight twist. In backbends the nucleus pulposus shifts forward, but the disc wall cannot bulge forward because it runs up against a broad, strong ligament (the anterior longitudinal ligament) that runs vertically along the front of the vertebrae and discs for the entire length of
38

the spine. In side bends, the bone structure of the spine itself makes it difficult (but no impossible) to bend too far.
In forward bends, however, the lumbar bone structure offers no significant resistance, so the nucleus pulposus shifts freely backwards, where it passes the disc wall against the narrow, relatively weak posterior longitudinal ligament. This ligament runs vertically up the back of the vertebral bodies and disc. Although it helps prevent the disk from bulging straight backward, it does allow it to bulge (or herniate) diagonally backward and to one side. We amplify this diagonal action if we twist slightly while bending forward. Twisting not only direct the bulge of the disc toward the nerve, it also adds its own compressive force to the nucleus and its own extra stretch to the disc wall. Therefore, forward bends in general, and twisted forward bends in particular, pose the greatest risk to the lumbar discs and nerves.In reclining forward bends, (for example, SuptaPadangusthasana, or Reclining Big Toe Pose), gravity does not compress the discs. In standing forward bends ( for example, Uttanasana, or Standing Forward Bend), if the sacrum is tilted far enough forward to allow the spine to hang down, then gravity actually elongates the spine, widening the disc spaces. Only in seated forward bends does gravity compress the discs.
The erector spinae muscles that run vertically up the back exacerbate this compression, especially in seated poses. Although these muscles tend to bend the spine backward, and therefore help prevent excessive flexion, they also pull the vertebrae closer to one another, which puts additional pressure on the discs.
39
When reclining, the erector spinae muscles are relaxed or moderately active. But in sitting forward bends, unless hamstrings are very loose, the erector spinae muscles must contract very strongly to tilt the pelvis forward. This adds a very strong compressive force to the discs. Combined with the force of gravity and the effects of leverage, this put enormous pressure on the lower lumbar discs in seated forward bends.
Although seated forward bends are the worst, simply sitting upright is also hard on the lumbar disc. Whenever we sit, the top of the pelvis tends to tilt backwards, bringing the sacrum along with it. This causes slight to moderate flexion of the lumbar spine, so the discs’ nuclei push backward somewhat. The erector spinae muscles contract to prevent the pelvis from tilting farther back and to keep the spine from slumping. This limits flexion, but adds more vertical pressure. Meanwhile, gravity compresses the discs more strongly when the spine is upright than when it is tilted forward.So sitting upright puts more downward pressure but less backward pressure on the discs than bending forward does.
We tend to sit upright for long periods of time, so the effect on the discs is cumulative. The discs gradually lose fluids, and the spine becomes measurably shorter. As any person who suffers from sciatica can tell you, prolonged sitting can really make symptoms worse. Whether sitting upright or bending forward, the position of the pelvis is crucial. The pelvis holds the sacrum in place. If the top of pelvis tilts backward while sitting, or if it fails to forward in a forward fold, it forces flexion at the L5-S1 and L4-L5
40
joints. Tight hamstrings or hip rotator muscles are usually to blame for holding the pelvis back. For this reason, people who are inflexible in these areas are more prone to disc injury than those who are flexible there.
Resources:
The Breathing Book: Good Health and Vitality Through Essential Breath Work by Donna Farhi.
Yoga for Wellness: Healing with the Timeless Teachings of Viniyoga by Gary Kraftsow.
Mudras: Yoga in Your Hands by GetrudHirschi. IndeaYoga Teacher Training Manual Level 1 by Bharath Shetty www.yogajournal.com www.medicinenet.com www.healthcommunities.com www.physio-pedia.com www.spine-health.com www.sciatica.org . www.mayoclinic.org
41
42