Embed Size (px)
Citation preview
i n s t r u c t i o n s
Science Fair Wind Project
2
About KidWindThe KidWind Project is a team of teachers, students, engineers, and prac-titioners exploring the science behind wind energy in classrooms around the US. Our goal is to introduce as many people as possible to the elegance of renewable energy through hands-on science activities which are challenging, engaging, and teach basic science principles.
While improving science education is our main goal, we also aim to help schools become important resources for both students and the general public, to learn about and see renewable energy in action.
Thanks to …We would like to thank the Wright Center for Science Education at Tufts University for giving us the time and space to develop this idea into a use-ful project for thousands of teachers.
We would also like to thank Trudy Forsyth at the National Wind Technol-ogy Center and Richard Michaud at the Boston Office of the Department of Energy for having the vision and foresight to help establish the Kid-Wind Project in 2004. Lastly, we would like to thank all the teachers for their keen insight and feedback on making our kits and materials first rate!
Wind for AllAt KidWind, we strongly believe that K–12 education is an important foundation for promoting a more robust understanding of the opportuni-ties and challenges that emerging clean energy technologies present.
The Wind for All program seeks to support teachers and students all over the globe who do not have the financial capacity to access our training programs and equipment. We believe that all teachers and students—re-gardless of where they live or what school they attend—must be part of the clean energy future.
A Note on ReproductionThis work may not be reproduced by mechanical or electronic means without written permission from KidWind, except for educational uses by teachers in a classroom situation or a teacher training workshop. For permission to copy portions or all of this material for other purposes, such as for inclusion in other documents, please contact Michael Arquin at KidWind: [email protected]
V1.0
WeGiveBack
Made in US
Our plastic components are made from recycled resins.
We source domestically whenever possible, and assemble and pack our kits in St. Paul, MN.
Proceeds from your purchase help us train and supply teachers.

3
Parts
1
1
1 1 1 2 1
2
3
2
5
1
1
1
1
2
1
25 3 3
1
1
1
1
1
1
Science Fair Wind ProjectParts List
1 Solar Motor with Wires1 Hi Torque Motor with Wires 1 Wind Turbine Hub 2 Hex Driveshafts w/ Hub Quick Connect 1 Science fair driveshaft2 Conduit holders, 1 lg, 1 sm2 Advanced Wind Experiment Kit gear sets 1 Pulley set 1 Set of K’liK Gearbox Parts 2 Zip Ties 3 Mounting tape pieces, 6” 5 Rubber Bands 1 Red MINI blade1 Digital Multimeter1 Sound & Light Board2 22 Gauge wire, 4’ lengths
Blade Materials
25 1/4” dowels 3 18” Sheets of balsa wood 3 15” Corrugated plastic sheets
Power Output Pack
1 Alligator Clip Cord Pair1 LED1 Incandescents1 Blade Pitch Protractor1 Wind Turbine Motor with Wires1 Propeller1 Ultra Capacitor1 Set of Resistors: 10 OHM, 30 OHM, 50
OHM, 100 OHM
It will be useful to have some basic tools handy for building your tower and modifying some of the parts that we have included in the kit. Please use care when using tools. We recommend having an adult around to help with challenging cuts and drilling.
Power Output Pack
Blade Materials
V
BUZZER Flash LED
D1
Torch LED
D2
Q1 Q2+ −
P1
203-2
+ C1
R1R2
SW
FlashMusic Torch
2
4
Building Wind TurbinesWith the Science Fair Wind Project, students quickly learn that getting the various parts to work—and work well—is a project in patience. The most satisfying part of this lesson is that when students finally arrive at some-thing that works, they are ecstatic!
We have seen students use everything from LEGOs, Tinker Toys and K’nex to popsicle sticks, soup cans and aluminum pie tins. They create windmills that are vertical, horizontal and even sideways. No matter how students build their turbines, one thing remains the same—they always produce at least a little bit of energy.
This manual is NOT a step by step instruction guide; it is a collection of ideas and materials to get you started. The ideas in this booklet, coupled with your own ingenuity, should help you build a device that transforms the energy in the wind into electricity!
Some useful items to have around:
•Electrical & building materials
•Fan ($20 box fans work great)
•Tinker toys, k’nex, legos - Check Ebay or yard sales for great deals
•Scrap wood, PVC pipes and fittings, popsicle sticks, poster board, fabric, building “junk”
•Construction tools: hammers, drill, saw, craft knifes, glue guns
•Electrical tools: wire strippers, solder, soldering iron, wire, more generators
•Safety goggles
Other testing materials:
•Handheld wind speed meter (Kestrel or InSpeed)
•Computers for graphing, simulations, etc.
•Small hand-held tachometer to measure blade rotational speeds
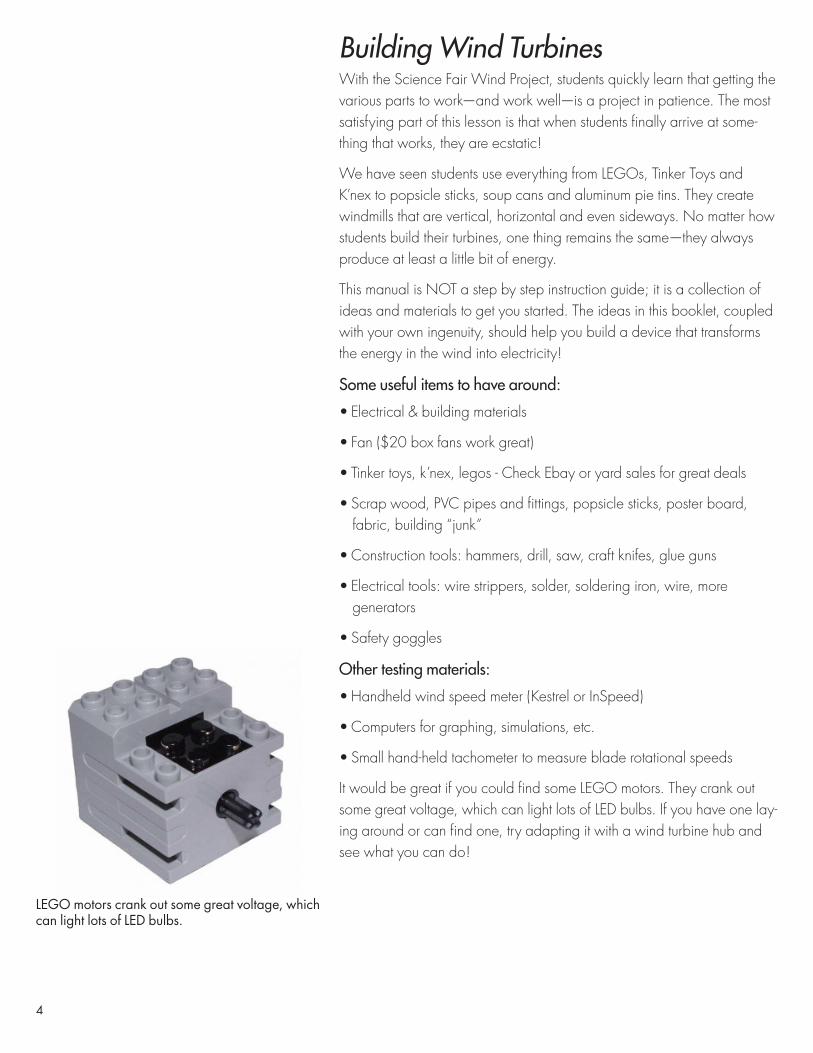
It would be great if you could find some LEGO motors. They crank out some great voltage, which can light lots of LED bulbs. If you have one lay-ing around or can find one, try adapting it with a wind turbine hub and see what you can do!
LEGO motors crank out some great voltage, which can light lots of LED bulbs.
5
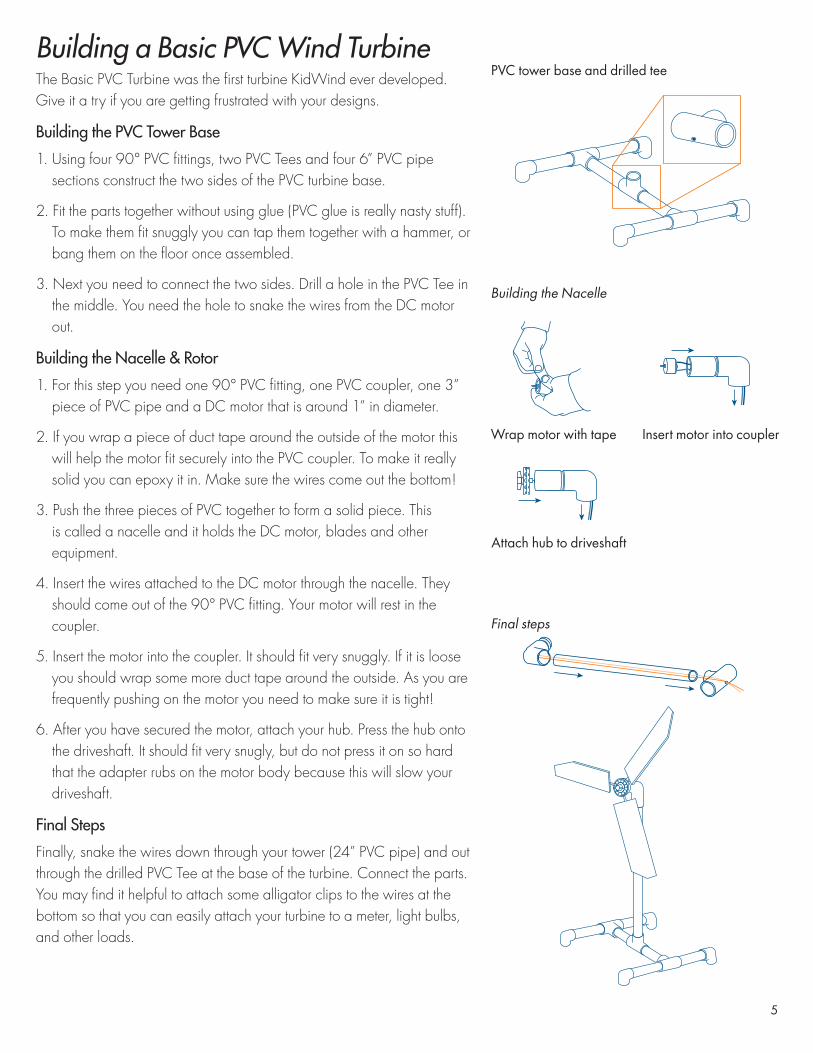
Building a Basic PVC Wind Turbine The Basic PVC Turbine was the first turbine KidWind ever developed. Give it a try if you are getting frustrated with your designs.
Building the PVC Tower Base
1. Using four 90° PVC fittings, two PVC Tees and four 6” PVC pipe sections construct the two sides of the PVC turbine base.
2. Fit the parts together without using glue (PVC glue is really nasty stuff). To make them fit snuggly you can tap them together with a hammer, or bang them on the floor once assembled.
3. Next you need to connect the two sides. Drill a hole in the PVC Tee in the middle. You need the hole to snake the wires from the DC motor out.
Building the Nacelle & Rotor
1. For this step you need one 90° PVC fitting, one PVC coupler, one 3” piece of PVC pipe and a DC motor that is around 1” in diameter.
2. If you wrap a piece of duct tape around the outside of the motor this will help the motor fit securely into the PVC coupler. To make it really solid you can epoxy it in. Make sure the wires come out the bottom!
3. Push the three pieces of PVC together to form a solid piece. This is called a nacelle and it holds the DC motor, blades and other equipment.
4. Insert the wires attached to the DC motor through the nacelle. They should come out of the 90° PVC fitting. Your motor will rest in the coupler.
5. Insert the motor into the coupler. It should fit very snuggly. If it is loose you should wrap some more duct tape around the outside. As you are frequently pushing on the motor you need to make sure it is tight!
6. After you have secured the motor, attach your hub. Press the hub onto the driveshaft. It should fit very snugly, but do not press it on so hard that the adapter rubs on the motor body because this will slow your driveshaft.
Final Steps
Finally, snake the wires down through your tower (24” PVC pipe) and out through the drilled PVC Tee at the base of the turbine. Connect the parts. You may find it helpful to attach some alligator clips to the wires at the bottom so that you can easily attach your turbine to a meter, light bulbs, and other loads.
PVC tower base and drilled tee
Final steps
Wrap motor with tape Insert motor into coupler
Attach hub to driveshaft
Building the Nacelle
6
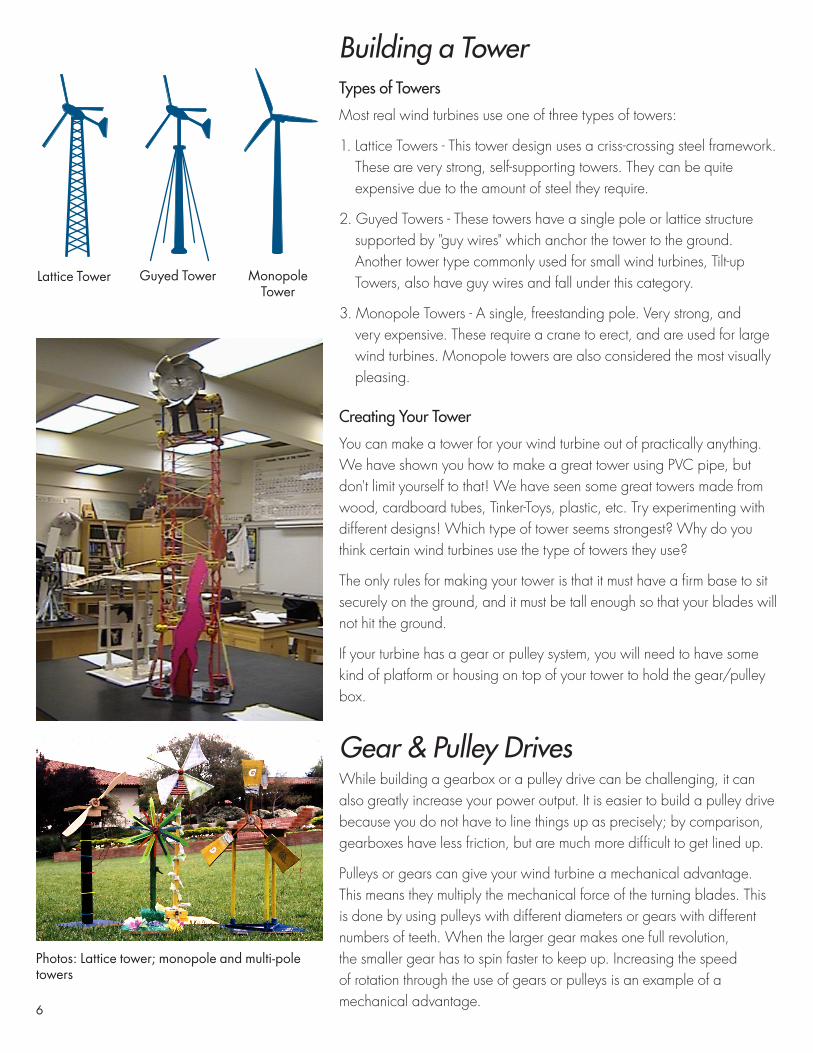
Building a TowerTypes of Towers
Most real wind turbines use one of three types of towers:
1. Lattice Towers - This tower design uses a criss-crossing steel framework. These are very strong, self-supporting towers. They can be quite expensive due to the amount of steel they require.
2. Guyed Towers - These towers have a single pole or lattice structure supported by "guy wires" which anchor the tower to the ground. Another tower type commonly used for small wind turbines, Tilt-up Towers, also have guy wires and fall under this category.
3. Monopole Towers - A single, freestanding pole. Very strong, and very expensive. These require a crane to erect, and are used for large wind turbines. Monopole towers are also considered the most visually pleasing.
Creating Your Tower
You can make a tower for your wind turbine out of practically anything. We have shown you how to make a great tower using PVC pipe, but don't limit yourself to that! We have seen some great towers made from wood, cardboard tubes, Tinker-Toys, plastic, etc. Try experimenting with different designs! Which type of tower seems strongest? Why do you think certain wind turbines use the type of towers they use?
The only rules for making your tower is that it must have a firm base to sit securely on the ground, and it must be tall enough so that your blades will not hit the ground.
If your turbine has a gear or pulley system, you will need to have some kind of platform or housing on top of your tower to hold the gear/pulley box.
Gear & Pulley Drives While building a gearbox or a pulley drive can be challenging, it can also greatly increase your power output. It is easier to build a pulley drive because you do not have to line things up as precisely; by comparison, gearboxes have less friction, but are much more difficult to get lined up.
Pulleys or gears can give your wind turbine a mechanical advantage. This means they multiply the mechanical force of the turning blades. This is done by using pulleys with different diameters or gears with different numbers of teeth. When the larger gear makes one full revolution, the smaller gear has to spin faster to keep up. Increasing the speed of rotation through the use of gears or pulleys is an example of a mechanical advantage.
Lattice Tower Guyed Tower Monopole Tower
Photos: Lattice tower; monopole and multi-pole towers
7
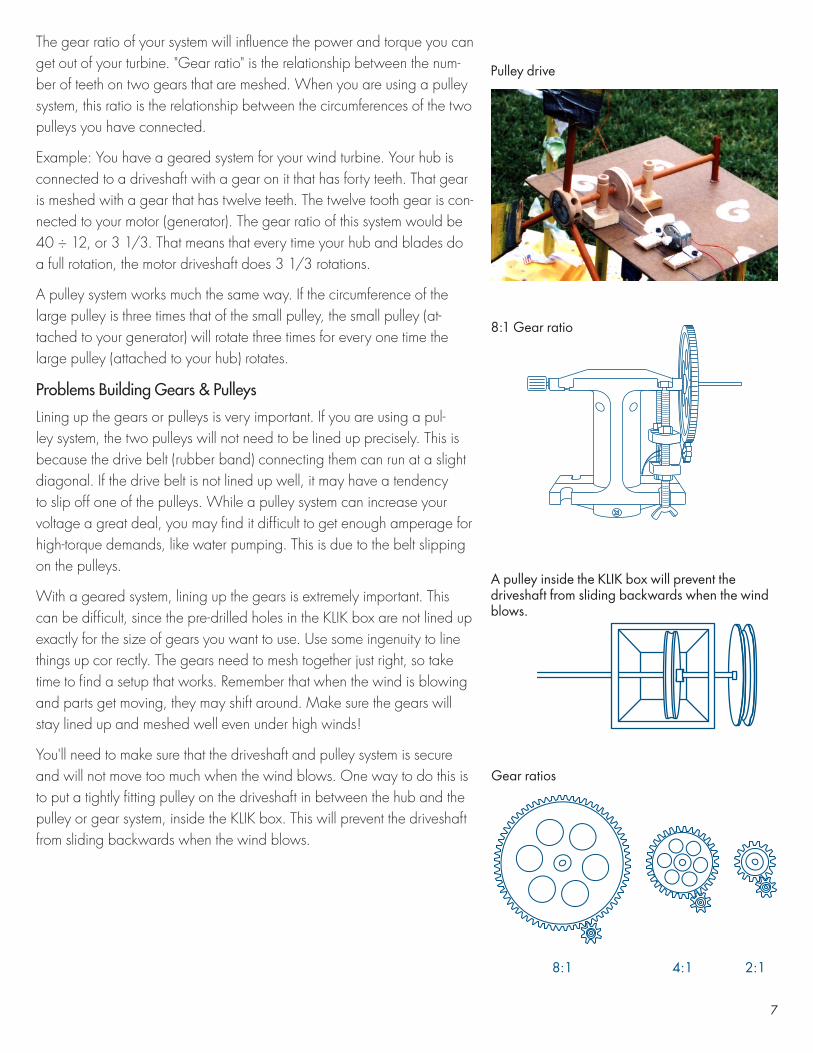
Pulley drive
8:1 Gear ratio
8:1 4:1 2:1
The gear ratio of your system will influence the power and torque you can get out of your turbine. "Gear ratio" is the relationship between the num-ber of teeth on two gears that are meshed. When you are using a pulley system, this ratio is the relationship between the circumferences of the two pulleys you have connected.
Example: You have a geared system for your wind turbine. Your hub is connected to a driveshaft with a gear on it that has forty teeth. That gear is meshed with a gear that has twelve teeth. The twelve tooth gear is con-nected to your motor (generator). The gear ratio of this system would be 40 ÷ 12, or 3 1/3. That means that every time your hub and blades do a full rotation, the motor driveshaft does 3 1/3 rotations.
A pulley system works much the same way. If the circumference of the large pulley is three times that of the small pulley, the small pulley (at-tached to your generator) will rotate three times for every one time the large pulley (attached to your hub) rotates.
Problems Building Gears & Pulleys
Lining up the gears or pulleys is very important. If you are using a pul-ley system, the two pulleys will not need to be lined up precisely. This is because the drive belt (rubber band) connecting them can run at a slight diagonal. If the drive belt is not lined up well, it may have a tendency to slip off one of the pulleys. While a pulley system can increase your voltage a great deal, you may find it difficult to get enough amperage for high-torque demands, like water pumping. This is due to the belt slipping on the pulleys.
With a geared system, lining up the gears is extremely important. This can be difficult, since the pre-drilled holes in the KLIK box are not lined up exactly for the size of gears you want to use. Use some ingenuity to line things up cor rectly. The gears need to mesh together just right, so take time to find a setup that works. Remember that when the wind is blowing and parts get moving, they may shift around. Make sure the gears will stay lined up and meshed well even under high winds!
You'll need to make sure that the driveshaft and pulley system is secure and will not move too much when the wind blows. One way to do this is to put a tightly fitting pulley on the driveshaft in between the hub and the pulley or gear system, inside the KLIK box. This will prevent the driveshaft from sliding backwards when the wind blows.
Gear ratios
A pulley inside the KLIK box will prevent the driveshaft from sliding backwards when the wind blows.
8
KLIK Box Gear and Pulley Systems Using the included KLIK parts, it is pretty easy to build yourself a simple gearbox or pulley drive with some basic materials. Using gears or pulleys can add a lot of juice to your turbine!
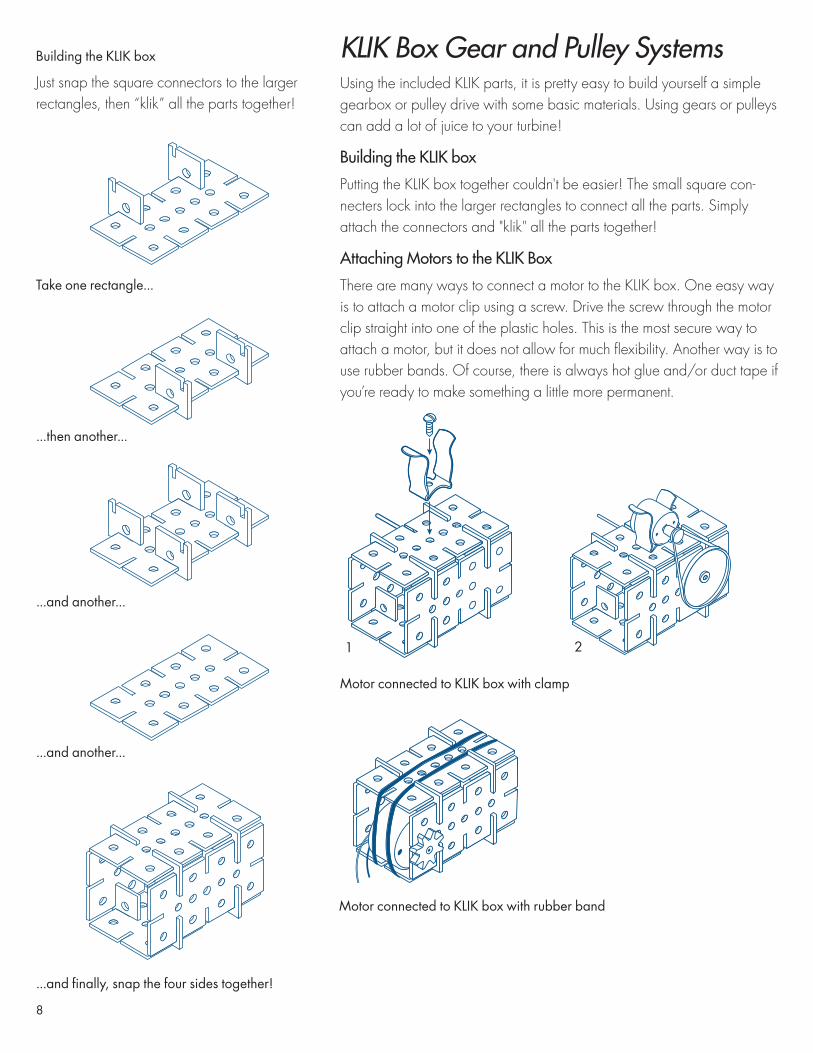
Building the KLIK box
Putting the KLIK box together couldn't be easier! The small square con-necters lock into the larger rectangles to connect all the parts. Simply attach the connectors and "klik" all the parts together!
Attaching Motors to the KLIK Box
There are many ways to connect a motor to the KLIK box. One easy way is to attach a motor clip using a screw. Drive the screw through the motor clip straight into one of the plastic holes. This is the most secure way to attach a motor, but it does not allow for much flexibility. Another way is to use rubber bands. Of course, there is always hot glue and/or duct tape if you’re ready to make something a little more permanent.
Take one rectangle...
...then another...
...and another...
...and another...
...and finally, snap the four sides together!
1 2
Motor connected to KLIK box with rubber band
Motor connected to KLIK box with clamp
Building the KLIK box
Just snap the square connectors to the larger rectangles, then “klik” all the parts together!
9
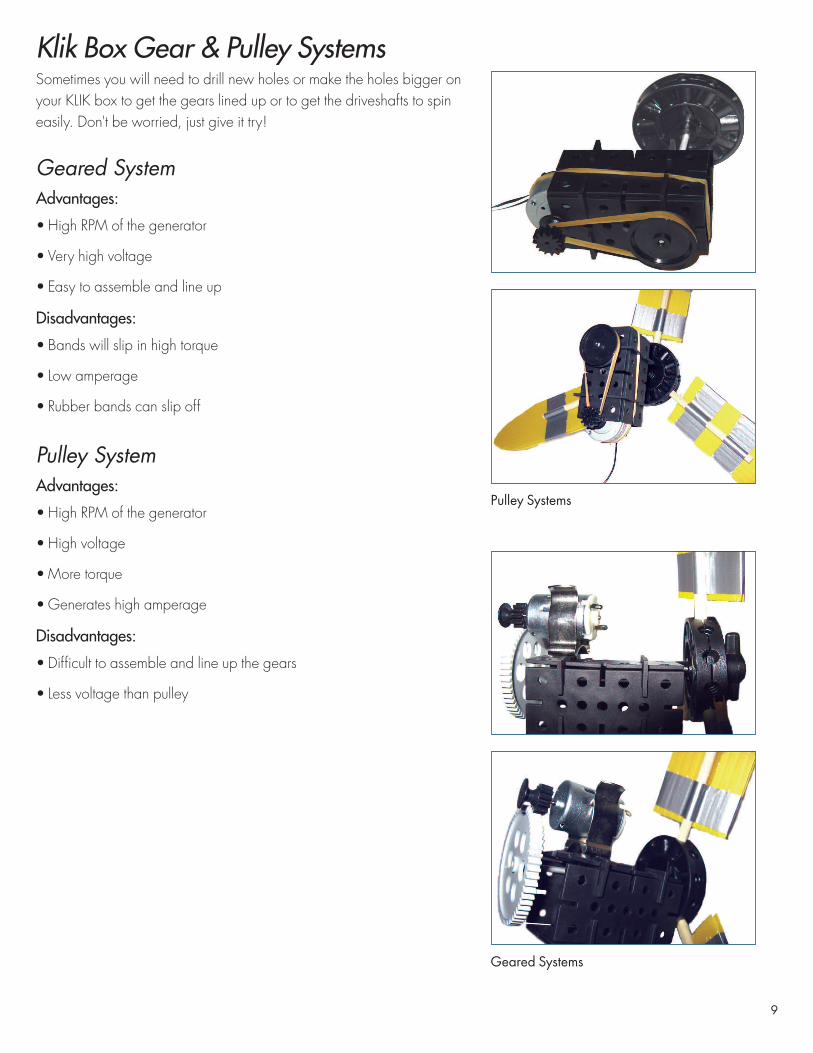
Klik Box Gear & Pulley SystemsSometimes you will need to drill new holes or make the holes bigger on your KLIK box to get the gears lined up or to get the driveshafts to spin easily. Don't be worried, just give it try!
Geared System Advantages:
•High RPM of the generator
•Very high voltage
•Easy to assemble and line up
Disadvantages:
•Bands will slip in high torque
•Low amperage
•Rubber bands can slip off
Pulley System Advantages:
•High RPM of the generator
•High voltage
•More torque
•Generates high amperage
Disadvantages:
•Difficult to assemble and line up the gears
•Less voltage than pulley
Pulley Systems
Geared Systems
10
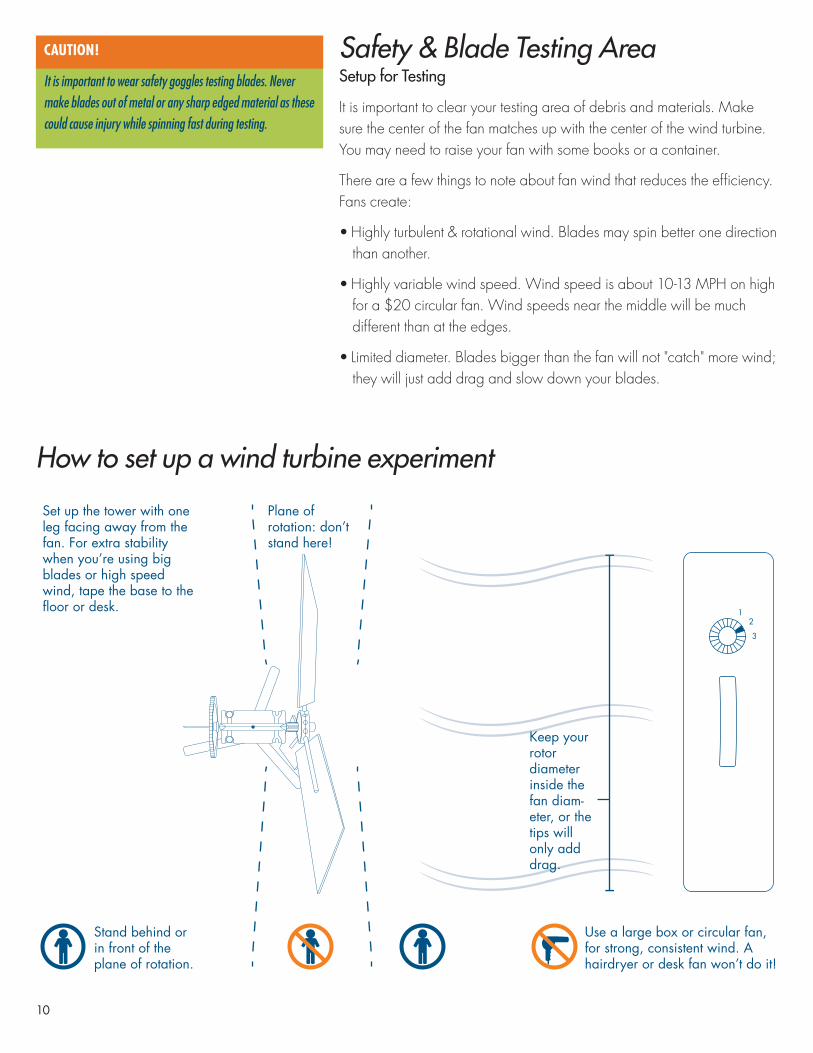
Safety & Blade Testing AreaSetup for Testing
It is important to clear your testing area of debris and materials. Make sure the center of the fan matches up with the center of the wind turbine. You may need to raise your fan with some books or a container.
There are a few things to note about fan wind that reduces the efficiency. Fans create:
•Highly turbulent & rotational wind. Blades may spin better one direction than another.
•Highly variable wind speed. Wind speed is about 10-13 MPH on high for a $20 circular fan. Wind speeds near the middle will be much different than at the edges.
•Limited diameter. Blades bigger than the fan will not "catch" more wind; they will just add drag and slow down your blades.
Plane of rotation: don’t stand here!
Stand behind or in front of the plane of rotation.
Keep your rotor diameter inside the fan diam-eter, or the tips will only add drag.
Use a large box or circular fan, for strong, consistent wind. A hairdryer or desk fan won’t do it!
12
3
Set up the tower with one leg facing away from the fan. For extra stability when you’re using big blades or high speed wind, tape the base to the floor or desk.
How to set up a wind turbine experiment
It is important to wear safety goggles testing blades. Never make blades out of metal or any sharp edged material as these could cause injury while spinning fast during testing.
CAUTION!
11
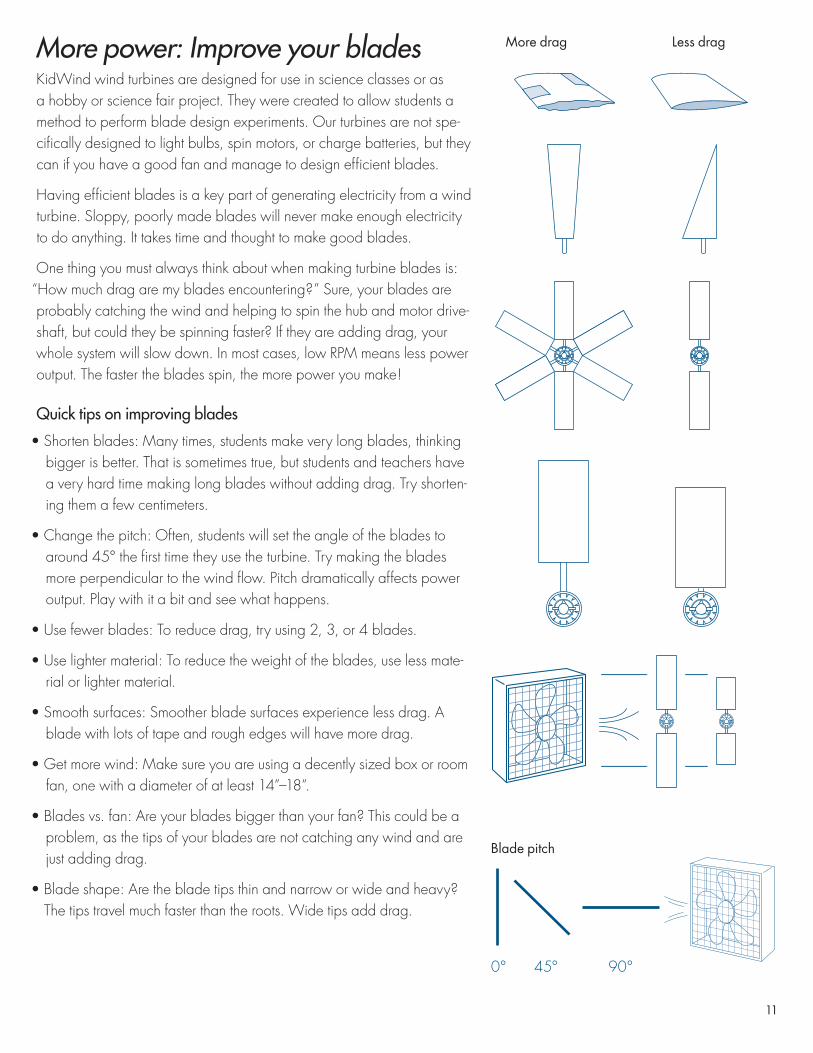
More power: Improve your bladesKidWind wind turbines are designed for use in science classes or as a hobby or science fair project. They were created to allow students a method to perform blade design experiments. Our turbines are not spe-cifically designed to light bulbs, spin motors, or charge batteries, but they can if you have a good fan and manage to design efficient blades.
Having efficient blades is a key part of generating electricity from a wind turbine. Sloppy, poorly made blades will never make enough electricity to do anything. It takes time and thought to make good blades.
One thing you must always think about when making turbine blades is: “How much drag are my blades encountering?” Sure, your blades are probably catching the wind and helping to spin the hub and motor drive-shaft, but could they be spinning faster? If they are adding drag, your whole system will slow down. In most cases, low RPM means less power output. The faster the blades spin, the more power you make!
Quick tips on improving blades
•Shortenblades:Manytimes,studentsmakeverylongblades,thinkingbigger is better. That is sometimes true, but students and teachers have a very hard time making long blades without adding drag. Try shorten-ing them a few centimeters.
•Changethepitch:Often,studentswillsettheangleofthebladestoaround 45° the first time they use the turbine. Try making the blades more perpendicular to the wind flow. Pitch dramatically affects power output. Play with it a bit and see what happens.
•Usefewerblades:Toreducedrag,tryusing2,3,or4blades.
•Uselightermaterial:Toreducetheweightoftheblades,uselessmate-rial or lighter material.
•Smoothsurfaces:Smootherbladesurfacesexperiencelessdrag.Ablade with lots of tape and rough edges will have more drag.
•Getmorewind:Makesureyouareusingadecentlysizedboxorroomfan, one with a diameter of at least 14”–18”.
•Bladesvs.fan:Areyourbladesbiggerthanyourfan?Thiscouldbeaproblem, as the tips of your blades are not catching any wind and are just adding drag.
•Bladeshape:Arethebladetipsthinandnarroworwideandheavy?The tips travel much faster than the roots. Wide tips add drag.
More drag Less drag
0° 45° 90°
Blade pitch
12
Advanced bladesTwo major forces act on wind turbine blades as they rotate: lift and drag. These forces are in constant competition. When you are optimizing wind turbine blades, try to maximize lift force but minimize drag force.
Wind turbine blades are airfoil shaped, much like airplane wings. This airfoil shape is designed to generate lift and minimize turbulence.
Lift is primarily produced as a result of the angle-of-attack of the blade. This angle creates a deflection force on the upwind side and a vacuum force on the downwind side of a wind turbine blade. The deflected air causes a reaction force that pushes the blade.
Turbine blades are tapered more at their tips and are also twisted slightly. Because of this twisted pitch, they have a greater angle-of-attack near their root where rotational velocity is slowest. Velocity is higher at the tip of the blade, so the angle-of-attack there is smaller. Turbine blades are designed in this manner to optimize the balance between lift and drag at all points on the blade.
Most real wind turbines use two or three blades. This configuration al-lows them to capture the most power with the least wind resistance. Using the fewest number of blades possible also reduces cost. The actual angle and taper of the blades depends on the anticipated wind speeds at the turbine’s location.
KidWind blades
Flat blades create a great deal of torque, and therefore work well for weight-lifting experiments. Airfoil blades have less drag and can gener-ate more power. You can make more sophisticated blades by giving them twisted pitch and an airfoil shape.
Ideas for constructing advanced blades
•Bendcardstockintoanairfoilshape.Glueadowelinsidetheblade.•Tapebentcardstocktoaflatpieceofcorrugatedplasticorbalsa
wood to produce an airfoil shape.•Takeablockoffoamandformitintoanairfoilshape.Trytoincorporate
both a taper and a twist into the design.•Carveandsandapieceofsoftwoodintoanairfoil.•Cutbladesoutofsomeformofcylinder.Tryacardboardtube,apaper
or plastic cup, etc.•Soakcardstockinwaterforafewminutes.Formitintothedesired
shape and clamp or tape it in place until it dries and holds that shape.
Higher pitch near root
Lower pitch near tip
Apparent wind Head wind
Lift force
Drag
Reaction todeflection
Rotation
Real wind
Twisted Pitch
Forces on an airfoil
0 -70-60-50-40-30-20-100
10
-10
010
2030
40
5060 70Using the KidWind
Protractor
13
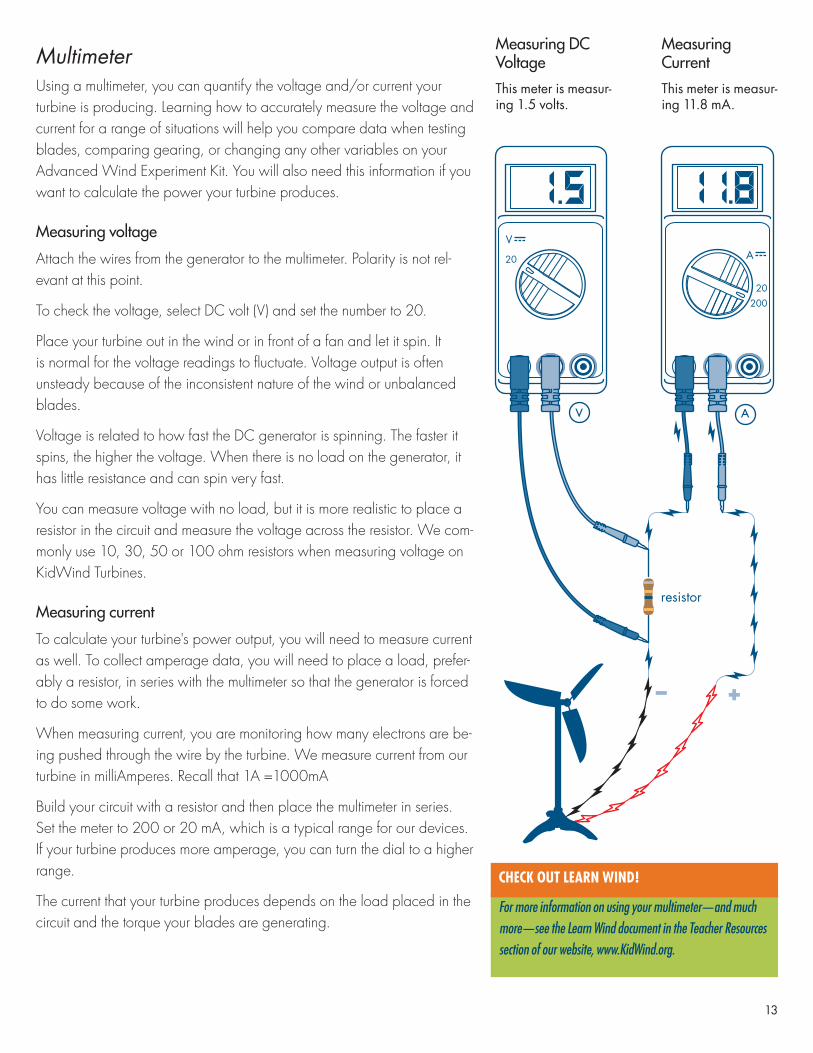
Measuring DC Voltage
This meter is measur-ing 1.5 volts.
Measuring Current
This meter is measur-ing 11.8 mA.
20
20200
VA
resistor
MultimeterUsing a multimeter, you can quantify the voltage and/or current your turbine is producing. Learning how to accurately measure the voltage and current for a range of situations will help you compare data when testing blades, comparing gearing, or changing any other variables on your Advanced Wind Experiment Kit. You will also need this information if you want to calculate the power your turbine produces.
Measuring voltage
Attach the wires from the generator to the multimeter. Polarity is not rel-evant at this point.
To check the voltage, select DC volt (V) and set the number to 20.
Place your turbine out in the wind or in front of a fan and let it spin. It is normal for the voltage readings to fluctuate. Voltage output is often unsteady because of the inconsistent nature of the wind or unbalanced blades.
Voltage is related to how fast the DC generator is spinning. The faster it spins, the higher the voltage. When there is no load on the generator, it has little resistance and can spin very fast.
You can measure voltage with no load, but it is more realistic to place a resistor in the circuit and measure the voltage across the resistor. We com-monly use 10, 30, 50 or 100 ohm resistors when measuring voltage on KidWind Turbines.
Measuring current
To calculate your turbine's power output, you will need to measure current as well. To collect amperage data, you will need to place a load, prefer-ably a resistor, in series with the multimeter so that the generator is forced to do some work.
When measuring current, you are monitoring how many electrons are be-ing pushed through the wire by the turbine. We measure current from our turbine in milliAmperes. Recall that 1A =1000mA
Build your circuit with a resistor and then place the multimeter in series. Set the meter to 200 or 20 mA, which is a typical range for our devices. If your turbine produces more amperage, you can turn the dial to a higher range.
The current that your turbine produces depends on the load placed in the circuit and the torque your blades are generating.
For more information on using your multimeter—and much more—see the Learn Wind document in the Teacher Resources section of our website, www.KidWind.org.
CHECK OUT LEARN WIND!
14
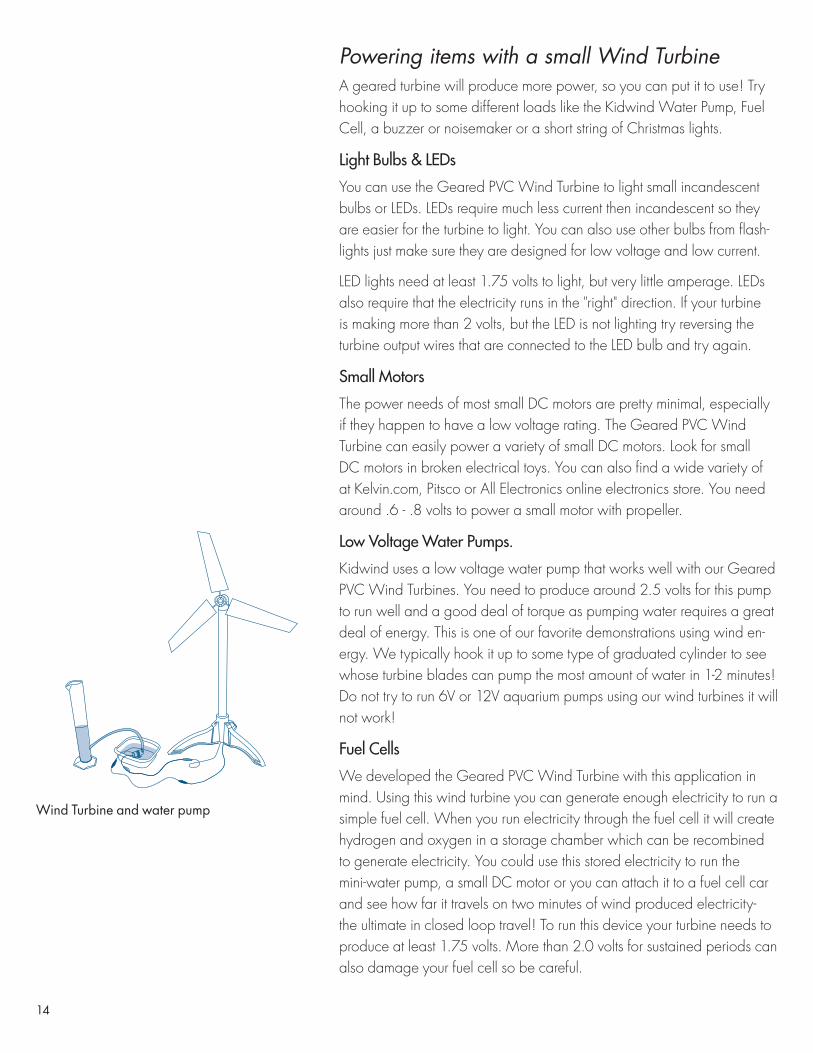
Powering items with a small Wind Turbine A geared turbine will produce more power, so you can put it to use! Try hooking it up to some different loads like the Kidwind Water Pump, Fuel Cell, a buzzer or noisemaker or a short string of Christmas lights.
Light Bulbs & LEDs
You can use the Geared PVC Wind Turbine to light small incandescent bulbs or LEDs. LEDs require much less current then incandescent so they are easier for the turbine to light. You can also use other bulbs from flash-lights just make sure they are designed for low voltage and low current.
LED lights need at least 1.75 volts to light, but very little amperage. LEDs also require that the electricity runs in the "right" direction. If your turbine is making more than 2 volts, but the LED is not lighting try reversing the turbine output wires that are connected to the LED bulb and try again.
Small Motors
The power needs of most small DC motors are pretty minimal, especially if they happen to have a low voltage rating. The Geared PVC Wind Turbine can easily power a variety of small DC motors. Look for small DC motors in broken electrical toys. You can also find a wide variety of at Kelvin.com, Pitsco or All Electronics online electronics store. You need around .6 - .8 volts to power a small motor with propeller.
Low Voltage Water Pumps.
Kidwind uses a low voltage water pump that works well with our Geared PVC Wind Turbines. You need to produce around 2.5 volts for this pump to run well and a good deal of torque as pumping water requires a great deal of energy. This is one of our favorite demonstrations using wind en-ergy. We typically hook it up to some type of graduated cylinder to see whose turbine blades can pump the most amount of water in 1-2 minutes! Do not try to run 6V or 12V aquarium pumps using our wind turbines it will not work!
Fuel Cells
We developed the Geared PVC Wind Turbine with this application in mind. Using this wind turbine you can generate enough electricity to run a simple fuel cell. When you run electricity through the fuel cell it will create hydrogen and oxygen in a storage chamber which can be recombined to generate electricity. You could use this stored electricity to run the mini-water pump, a small DC motor or you can attach it to a fuel cell car and see how far it travels on two minutes of wind produced electricity-the ultimate in closed loop travel! To run this device your turbine needs to produce at least 1.75 volts. More than 2.0 volts for sustained periods can also damage your fuel cell so be careful.
Wind Turbine and water pump
15
The power in the windIf a large truck or a 250 lb linebacker was moving toward you at a high speed, you would move out of the way, right?
Why do you move? You move because in your mind you know that this moving object has a great deal of energy as a result of its mass and its motion. And you do not want to be on the receiving end of that energy.
Just as those large moving objects have energy, so does the wind. Wind is the movement of air from one place on Earth to another. That’s the mo-tion part.
What is air? Air is a mixture of gas molecules. It turns out that if you get lots of them (and we mean lots of them) together in a gang and they start moving quickly, they will give you a serious push. Just think about hurri-canes, tornadoes, or a very windy day!
Why aren’t we scared of light winds, but we will stay inside during a hur-ricane or wind storm? The velocity of those gangs of gas molecules have a dramatic impact on whether or not we will be able to remain standing on our feet. In fact, in just a 20 mph gust, you can feel those gas mol-ecules pushing you around.
Humans have been taking advantage of the energy in the wind for ages. Sailboats, ancient windmills, and their newer cousin the electrical wind turbine, have all captured this energy with varying degrees of effective-ness. They all use a device to “catch” the wind, such as a sail, or blade. Sailboats use wind energy to propel them through the water. Windmills use this energy to turn a rod or shaft.
A simple equation for the power in the wind is described below. This equation describes the power found in a column of wind of a specific size moving at a particular velocity.
P = ½ ρ (π r2) v3
P = power in the wind (watts)ρ = density of the air (kg/m3)r = radius of your swept area (m)v = wind velocity (m/s)π = 3.14
From this formula you can see that the size of your turbine and the velocity of the wind are very strong drivers when it comes to power production. If we increase the velocity of the wind or the area of our blades, we increase power output.
The density of the air has some impact as well. Cold air is more dense than warm air, so you can capture more energy in colder climates.
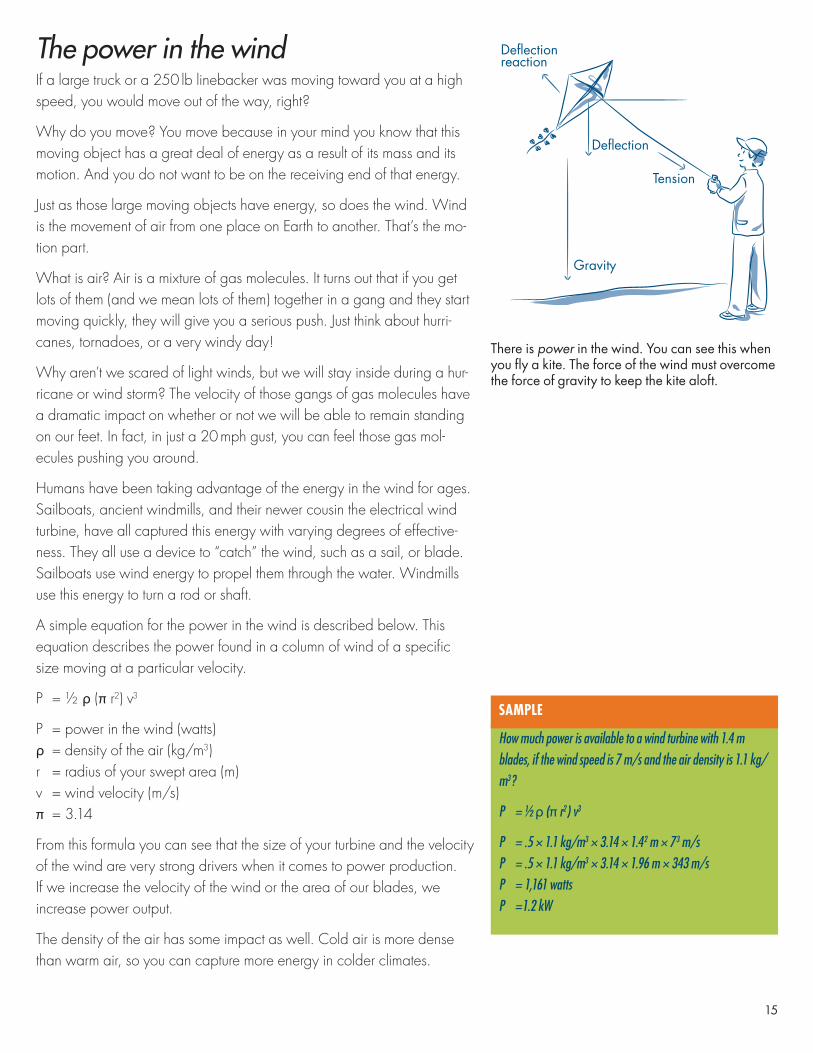
Tension
Gravity
Deflectionreaction
Deflection
There is power in the wind. You can see this when you fly a kite. The force of the wind must overcome the force of gravity to keep the kite aloft.
How much power is available to a wind turbine with 1.4 m blades, if the wind speed is 7 m/s and the air density is 1.1 kg/m3?
P = ½ ρ (π r2) v3
P = .5 × 1.1 kg/m3 × 3.14 × 1.4 2 m × 7 3 m/sP = .5 × 1.1 kg/m3 × 3.14 × 1.96 m × 343 m/sP = 1,161 wattsP =1.2 kW
SAMPLE
16
Science Fair Wind Project FAQ Why won't the rotor spin when I put my turbine in front of the fan?
Check the orientation of the blades. Are your blades oriented in the same direction? Are they flat? Are they hitting the tower? Look at some pictures of old and new windmills to get some ideas about how to orient your blades.
Why does the gearbox seems to turn slowly and is stiff?
The addition of the gearbox adds some friction to the system. Because of this you will need to make sure that your blades generate enough TORQUE (turning force) to overcome this friction.
Why does the turbine slow down when I attach it to a load (pump, bulb, motor)?
Loading the generator forces it to do work. This makes it harder to push electrons through the circuit. The more load you add the harder it is for the generator to turn and the more torque you must generate from the blades. The only way to do this is to make bigger blades or relocate your wind turbine to a place with higher wind speeds.
Why are the readings on my multimeter all over the place?
Your readings may be fluctuating because the wind coming out of your fan is fluctuating. This can also be caused by blades that don't spin smoothly or change shape as they spin. Additionally, if your blades are not balanced, evenly distributed, or are producing unequal amounts of drag your readings will be irregular.
What are the best blades?
That is for you to figure out! Lots of testing and playing will get you closer to your answer.
Is a fan a good wind source to test with?
The wind that comes out of a fan has a great deal of rotation and turbu-lence. It isn't very smooth. While it will still make your turbine spin it is not exactly like the wind outside. To see this turbulence, hold a short piece of thread in front of a fan and move it from the center out. It should head out straight all the time...does it?
Can I take my turbine outside? Can I leave it there?
You can certainly take, use and test your wind turbine outside. But unless you have a yawing turbine it will not track the wind and may not perform optimally. To make it work well you will have to continually face it into the wind. It is not a good idea to leave your turbine outside for too long. It is designed for basic lab tests and not to endure the rigors of the outdoor environment!

17
Based on the power in the wind equation it seems that longer blades should make more power. On my turbine this is not true! Why?
The blades on your turbine may be bigger than the diameter of the fan. If that is the case, the extra part is only adding drag so your blades will slow down. Additionally, if you design large blades poorly they will have lots of drag near the tips and slow down. This will negate any positive effect of the added length. Also, short blades spin faster than long ones, so if you are just recording voltage they will seem better. Try short blades with a load in series and see if they have enough torque to spin. In many cases they do not!

800 Transfer Road, Suite 30B, St. Paul, MN 55114www.kidwind.org ✦ Phone:877.917.0079Fax: 208.485.9419
© Copyright 2012 All rights reserved