Embed Size (px)
Citation preview

Science Term Three
Beneath Our Feet
Outcomes
ST2-4WS investigates their questions and predictions by analysing collected data, suggesting explanations for their findings, and copmmunicating and reflecting on the processes taken.
ST2-8ES describes some observable changes over time on the Earth’s surface that result from natural processes and human activity.
Introduction to landforms
Teacher background information
The Earth’s surface
The outer crust of the Earth is made up of rock. In places the rock is covered by soil or water. This outer shell isn’t rigid and events, such as earthquakes and volcanos help shape the landscape as they impact on the rocky layer and bring new material to the surface. The word ‘rock’ in common usage can refer to large cliffs and boulders as well as to small stones or pebbles. Scientists are more precise when they use the word ‘rock’ and understand it to mean an aggregate of minerals. Geologists (scientists who study the origin, history and structure of the earth) classify rocks into three basic types depending on the way that they were formed: igneous, sedimentary and metamorphic. Igneous rocks are formed from the solidification of the minerals found in magma. Sedimentary rocks are formed at the Earth’s surface from the accumulation and consolidation of sediment. Metamorphic rocks are formed from pre-existing rocks within the Earth’s crust by changes in temperature, pressure and by chemical action.
A volcanic rock is formed when the molten minerals (magma) inside the Earth arrive at the surface, for example, through volcanic activity or sea rifts. Not all magma is extruded at the surface, some remains beneath the surface as intrusions into surrounding rock where it can cool. At the Earth’s surface magma becomes lava. As it cools, the minerals change from liquid to solid and form igneous rocks. The nature of the materials formed depends on the rate of

cooling. If lava has a long time to cool, then individual minerals separate as distinct crystals to produce, for example, basalt with many different grains of crystals. However, if the same lava cools quickly, the molten mineral mix will harden and form a glassy black rock called obsidian. If it cools quickly and captures air pockets, a light crumbly stone called pumice is created; this is not dense and floats on water. All these rocks will have the mineral composition of the lava that created them, which might also be specific to different regions.
Sedimentary rocks are the most common type covering approximately 75% of the surface of the continents. Some examples are: sandstone, siltstone, shale, limestone, chalk, gypsum and coal. Their formation involves weathering of pre-existing rock, transportation of the material away from the original site (erosion) and depositing the eroded material in the sea or in some other sedimentary environment. Sedimentary rocks typically occur in layers or strata that cover large parts of the continents. The Grand Canyon in the US is a good example of sedimentary rock strata. Sedimentary rocks are formed from sediments that have been compacted and cemented to form solid rock bodies.
Metamorphic rocks are formed from rocks that have been altered by heat, pressure and chemical action to such an extent that the diagnostic features of the original rocks are modifi or obliterated. Some examples of metamorphic rocks include slate, quartzite and marble.
Rocks are made up of a variety of minerals put together in different ways resulting in different colours and textures. Geologists classify rocks based on their texture and composition. The texture of a rock refers to the size, shape and arrangement of the constituent mineral grains, whilst the composition of a rock is based on the chemical composition of the minerals it contains. Minerals have physical properties, such as cleavage, hardness, specific gravity, colour and streak (the colour of the powdered mineral).
Soil is composed of small particles of rocks and minerals, plus varying amounts of organic material (derived from living things), water and air. The particles are of different sizes ranging from sand to silt to clay. Sand makes a soil feel gritty; silts are similar to clays but have slightly larger particles; and clay feels silky to the touch because it has the smallest particles. The mixture of these particles gives soil its texture which influences how much water a soil can hold. Generally, the smaller the soil particles (the more silt and clay), the more water

a soil can hold. Soil scientists use texture to classify soils, such as sand, loamy sand, loam, clayey sand and medium clay. The ideal soil texture for growing plants is loam, a mixture of clay, silt and sand.
Soil composition is different in different places. These differences can be seen in a very small distance, such as from one side of a garden or farm to the other, as well as from country to country. The differences depend on the type of rocky material the soil was made from and the kinds of organisms that live in, around and on the soil.
Colour is a simple method of classifying soil. Black or dark brown soil is generally fertile soil for growing plants. Plain brown or yellow soil often indicates that the level of nutrients and organic matter is low and the fertility of this soil is low. Pale soils need plenty of organic material and mulching to become fertile. Red soil usually indicates extensive weathering and good drainage, but often it needs nutrients and organic matter to be fertile. The red colour is due to the oxidising of iron compounds (‘rusting’) in the soil. Organic material that can still be decomposed is called compost, whereas organic material that is stable is called humus (a Latin word meaning earth or ground).
Changes to the Earth’s surface
The surface of the Earth is constantly changing. Land is being uplifted through processes such as plate tectonics and volcanic activity. Landforms are then further shaped through the processes of weathering and erosion. Weathering is the process by which rocks are chemically altered or physically broken into fragments and involves little or no transportation of the fragments. Rocks can be weathered, for example, by ice formation in rock cavities which breaks the rock apart, and changes in temperature causing the rocks to expand and contract which fractures it.
Rocks can also be weathered through chemical processes, for example, the mild acidity of some rainfall can cause minerals in the rock to slowly dissolve. This is how caves such as the Jenolan Caves in New South Wales were formed. Acid can also be released from living things, for example, the decay of organic material, or by direct secretion of acids (lichens).
The rate at which weathering occurs depends on three main factors: climate, the susceptibility of minerals to weathering and the amount of surface exposed
to the atmosphere. The Devils Marbles in the Northern Territory are an example of rock bodies modified by weathering.
Erosion is the process that loosens sediments and moves them from one place to another. Agents of erosion include water, ice, wind and gravity. Erosion is affected by variations in the Earth’s surface. For example, if a creek flows over a cliff, a deep pool often forms at its base because the impact of the water falling from a height causes more erosion. Once there is mild erosion, subsequent water tends to flow in the same place, creating deeper and deeper river beds. Human activity can also lead to erosion, for example, the removal of vegetation and constructions such as fences or dams affect erosion rates.
Trees bind soil with their roots, slowing erosion, but their roots can also assist to break up rocks. The decay of once-living things (organic matter) can cause water to become more acidic, inducing chemical weathering of rocks. Rainfall and wind corridors are in turn influenced by the landscape.
By clearing plants away and leaving soil bare after harvest, farmers can leave soils vulnerable to erosion. The top layer of the soil is the most susceptible to being blown away. This is also the richest source of nutrients for crops that farmers grow.
Time scale of change
Many rocks take a long time to be broken down and worn away in natural conditions. However, some rocks can be weathered very quickly once they are exposed. For example, the limestone of the Twelve Apostles formation in Victoria developed around 20 million years ago on land. Between 7000 and 10000 years ago, at the end of the last ice age, sea levels rose and the limestone was exposed to the sea. Since then the force of the waves has slowly weathered and eroded the cliffs to create isolated stacks of rocks. In 2005, one of the stacks collapsed, leaving eight standing. The rate of erosion at the base of the limestone stacks is approximately 2 cm per year. Due to wave action eroding the cliff face, existing headlands are expected to become new limestone stacks in the future.
The creation of soils can take hundreds of years; however the erosion of soils can happen very quickly. For example, a mound of loose soil on a hill can be destabilised by water or by vibrations from an earthquake. The hillside might
then suddenly collapse due to gravity. The presence of plants such as trees provides a buffer against wind, and all plant roots can help bind soil, reducing the amount blown or washed away.
Australian soil
Most of Australia’s landmass is away from tectonic plate margins and has been exposed above sea level for a very long time. This has allowed weathering to occur over a long period. Long-term stability, and a relatively dry climate, ensured that soil-producing activity was very slow. Igneous basalts are often the basis of rich soils. However, only small regions of such soils exist in Australia. The Liverpool Plains, near Gunnedah and north to Narrabri, are perhaps the best example of soils produced from volcanic activity in Australia (350–330 million years ago). This area has some of the deepest and most fertile soils in NSW. Australia is the flattest continent, with no high mountains, as well as the lowest, with a mean elevation of 300 m, compared with the world’s mean of 700 m. Low relief contributes to low rainfall. There is little water available for weathering of rocks, and for transporting weathered material. This means that there has been little renewal of soils across most of the continent for millennia. In much of Australia, the vegetation cover is sparse, contributing to a slow rate of soil formation. Arid climate also results in lower levels of organic matter being available to enrich soils. This means Australian soils are generally very old, nutrient poor and slow forming, and need to be protected from loss by erosion.
Lesson 1. Lost location
At a Glance:

To capture students’ interest and find out what they think they know about soils, rocks and landscapes and how they change over time.
To elicit students’ questions about how soils, rocks and landscapes change over time. Students:
• discuss a map and what features of the landscape change over time
• explore soil and rock samples
• record their ideas and questions on a TWLH chart.
Equipment
Preparation
• Identify a place in the local area with rocks and soil. Collect rock samples so that each team has at least one rock to examine. Collect enough soil for each team to have a plastic cupful to study, for example, fill a 2 L ice cream container. Keep some of the soil sample (250 mL) for an activity in Lesson 2.
• Draw a large map that might have been drawn by someone hundreds of years ago to mark the area where the rocks and soil came from using simplistic stylistic features.
Include features that are likely to have changed, such as short-lived vegetation, a pile of small rocks, a stick marking the spot. Dabbing cold coffee on the paper and allowing it to dry in the sun will give it an aged appearance, as will tearing the edges and burning them with a match.
word wall
team roles chart team skills chart 1 mystery map (see ‘Preparation’) 1 enlarged copy of ‘Information note for
optional: Cards or paper strips forwords for the word wall
role wristbands or badges for Director, Manager and Speaker each team member’s science journal rock samples (see ‘Preparation’)
2 clear plastic cups disposable gloves per team member 1 copy of ‘Information note for families’(Resource sheet 1) per team member clay and sand (enough to make 3 balls)
FOR EACH TEAM

Example of a mystery map
• Decide when students will be sharing their findings from the ‘Soil and rock collection’ project with the class and write this information on the ‘Information note for families’ (Resource sheet 1). Prepare an enlarged copy of ‘Information note for families’ (Resource sheet 1).
• Begin collecting transparent jars with a screw top that can hold at least 400 mL of water to use in Lesson 2. The class will need four and it is advisable to have spares for students who forget to bring a jar (see ‘Information note for families’, Resource sheet 1).
• Prepare dried model rocks for each team to use in Lesson 4. Knead equal portions of clay and sand together ensuring the mixture stays moist. Mould balls about 2 cm in diameter and leave them to dry completely in a warm, dry place. Ensure that they are dry and hard before use. Try to keep ball size as uniform as possible. Each team will need three balls of approximately the same size. Make some spare balls in case some are damaged.
Lesson steps
1 Explain to students that you have a map that could be a copy of a map drawn many years ago by explorers. Introduce the map (see ‘Preparation’) and the accompanying soil and rock samples.
2 Discuss the purpose and features of a map, asking questions such as: • What features does this map have? • Is this map similar to other maps you have seen?
• What is different about this map? What is similar? • Is there evidence that humans were around when the map was made? How do you know? 3 Brainstorm ideas about what features of the map might still be useful hundreds of years later. Discuss what features might change. Record students’ ideas in the class science journal. 4 Explain that students will be working in collaborative learning teams to observe soil and rock samples from the site. Ask students to record their thoughts and ideas about the samples in their science journals. 5 Form teams and allocate roles. 6 Ask Managers to collect team soil and rock samples in plastic cups. 7Allow time for students to investigate the samples. Ask questions such as: • Have you seen something like this before? • Where do you think this came from? • How would you describe this? • What features does it have? • How deep beneath your feet do you think it is from? • If you left it outside, do you think it would look the same in … years? 8Discuss words or phrases that students know about soils, rocks, landscapes and how they change. Record students’ responses on cards or paper strips. Discuss which words could be grouped, for example, words about soils. Group the words according to students’ suggestions for display on the word wall. Add headings and words to the word wall and discuss its purpose and features. 9 Introduce the enlarged copy of ‘Information note for families’ (Resource sheet 1) and read through it with the class. Discuss places that students might find soil or rock samples, for example, in their backyard. Discuss the type of information to record when taking samples, such as location, date and a description of the surrounds.
Information and Communication Technology (ICT)
•Download Google Earth and view terrain in the local area and around Australia or the world: www.google.com/earth/
•Use Google Maps to pinpoint the school, then the suburb, the locality and the state. Invite students to take turns to find their street or use directions to find their route to school from home.

Lesson 2 Studying Soils
At a Glance To provide students with hands-on, shared experiences of soils and their features. Session 1 What’s in soil? Students: • explore and describe the features of different soils • discuss different components of soils. Session 2 Soil solutions Students: • draw an annotated diagram of their soil solutions • discuss what components of soils could change over time. Session 1 What’s in soil?
word wall
team roles chart
team skills chart
mystery map with associated soil sample
1 enlarged copy of ‘Exploring soilsamples’ (Resource sheet 2) 4 transparent screw-top jars 4 labels 4 small plastic bags source of water
role wristbands or badges for Director, Manager and Speaker each team member’s science journal 3 different samples of soil collected by
3 clear plastic cups 1 copy of ‘Exploring soil samples’
1 transparent screw-top jar per teamwith sample of soil from home
3 sheets of blank A4 paper 1 magnifying glass optional: 1 sieve 1 label per team member 400 mL water per team member 1 small plastic resealable bag per teammember
disposable gloves per team member
A spoon
FOR EACH TEAM
Preparation
• Allow sufficient time to collect jars and soil samples. • Collect enough soil from at least three different locations for each team to have 1 cup (200 ml) of each sample to study. For example, fill a 2 L ice cream container at each location. Label the container with the site of collection and a number. • Try to locate samples that have different colour, amounts of sand, clay, silt, decomposing organic matter. Near a sand pit you might find soil with high sand content. Sports fields and ovals often have higher clay content. Soil from a garden will usually have higher humus content (organic matter). Note: Avoid using potting mix as it does not contain living materials. • Check for student allergies to soil components, for example, potential fungal spores. Ask students not to attempt to smell the soil. • For each team, place 1 cup (250 mL) of the first soil type in a clear plastic cup and write ‘Sample 1’ on the cup with a waterproof marker. Repeat for each soil type. • Finish collecting jars to use in Lesson step 15 (see Lesson 1, ‘Preparation’). Each student will need a transparent jar or hard plastic container with a screw top that can hold at least 400 mL of water, and the class will need four. If jars or containers are difficult to source then one per team will suffice. • Organise an area for the jars to be placed and not disturbed. • Prepare an enlarged copy of ‘Exploring soil samples’ (Resource sheet 2).
Lesson Steps 1 Introduce the three different soil samples and explain that students will be working in collaborative learning teams to examine their features. Review the description of the term ‘features’ in the class science journal. Ask students not to taste or smell the soil for safety reasons. Remind students to wear disposable gloves and always wash their hands after handling soil. 2 Introduce the enlarged copy of ‘Exploring soil samples’ (Resource sheet 2) and explain that students will be filling out a table for each soil sample. Discuss the purpose and features of a table. 3 Model how to investigate a soil sample, for example:

• look at the soil through the clear plastic cup and describe characteristics, such as colours and layers • spread the soil on a piece of paper and look for details, such as types of particles and leaves • use the magnifying glass to look at particles closely • rub the soil between fingers to feel its consistency • listen as the soil is rubbed onto the paper. Optional: Sieve the soil to separate particles according to size. Ask students if they can think of other ways to investigate the soil. 4 Model recording results on the enlarged copy of ‘Exploring soil samples’ (Resource sheet 2) and by drawing observations in the class science journal. 5 Allow time for teams to complete the task. Ask questions such as: • Could you tell me more about this? • What do you mean by that? • Can you see anything else? 6 Ask Speakers to share their results with the class. Ask questions such as: • What did you notice? • In what way were the soils similar? • In what ways were the soils different? • Can you think of other soils that you have seen that are different from all these soils? • Why do you think it is useful to compare the soils? • Why do you think scientists want to know about different types of soil? • How could your findings help people in the community? Record students’ ideas in the class science journal. 7 Ask students if they recognise the components they have described, for example, sand or clay. Introduce other terms, such as humus, and discuss their meaning. Add the words to the word wall. 8 Explain that students will examine soil in more detail by creating soil solutions with the soil samples they brought from home (see ‘Information for families’, Resource sheet 1).

9 Model creating a soil solution by placing 1 cup (250 mL) of one of the soils the class studied into a transparent screw-top jar. Fill the jar with water (approximately 400 mL), leaving a small space at the top and screw the jar closed. Add a label to the jar, including your name, a description of the soil used, and the date and location of collection. Discuss with students why labelling things accurately is important in scientific investigations. 10 Place a few tablespoons of the same soil into a small plastic resealable bag. Label the bag and attach it to the jar using adhesive tape. Discuss with students why this might be useful, for example, to be able to compare the wet soil with how it looked originally. 11 Discuss how to work safely with glass in the classroom. 12 Ask students to create their own soil solution jars using the soil and jars they brought from home. 13 Create soil solution jars for the class, one for each of the soils studied during the lesson and one for the mystery soil from Lesson 1. 14 Ask students to watch their jar as the soil settles for a couple of minutes, and then describe in their science journal what they see. Remind students to leave their jars in a place where they will not be disturbed. The soil solutions will be examined in the next session after they have settled (see ‘Preparation’ for Session 2). It could take up to two weeks to settle completely depending on the soil type.
Session 2 Soil solutions
Equipment

Preparation
Check that student’s soil solutions have had enough time to settle. The water should be clear, and the soil should be deposited in layers at the bottom with organic matter possibly floating at the surface. This could take two weeks or more, depending on the soil type. The longer it rests the clearer the water will become.
Lesson Steps
1 Review the previous session using the class science journal, the TWLH chart and the word wall. Focus students’ attention on the three soil samples they explored in Lesson 2, session 1.
2Allow time for students to examine the three soil solutions made from the soils they explored. Discuss similarities and differences between the solutions. Record students’responses in the class science journal.
3Explain that students will be creating labelled diagrams of their soil solution in their science journal. Discuss the purpose and features of labelled diagrams, in particular the focus on accurate representation of the object representing scale.
4 Model how to use a ruler to measure the dimensions of the jar. Ask students to record the measurements of each layer next to their drawing. Discuss the importance of observation in scientists’ work, and the importance of drawing accurate representations.
word wall
team skills chart
team roles chart
Mystery soil solution (see Lesson 2, Session 1, Lesson step 15)
3 jars with different soil solutionscollected by the teacher (see Lesson 2, Session 1, Lesson step 15)
(or team if sufficient jarsare hard to source)
role wristbands or badges for Director, Manager and Speaker
jar with soil solution brought from home(see Lesson 2, Session 1)
ruler
1 magnifying glass
FOR EACH STUDENT

5Ask students to carefully pick up their soil solution jars and bring them to their desk ensuring they aren’t bumped otherwise some layers might disappear with their components mixing in the water again.
6After students have completed their observations and drawings, ask them to share their findings about their soil solutions with a talking partner, for example, the person sitting next to them. Ask questions such as: •Do the soils look similar? Why or why not? •Do the soil solutions look similar? Why or why not? •Are there differences between your soil solution and your partner’s? •Why do you think this is? Ask students to also compare their soils in the plastic resealable bags attached to their soil solutions. 7Ask students to discuss some of their findings by asking questions such as: •What is similar about your soils? •What is different about your soils? •What kinds of things are soils made of? •Where do the living things come from? •How are the non-living things formed? •Why are there different-sized pieces in the soil? Record students’ answers in the class science journal. 8 Remind students of the mystery map and the soil sample that came with it. Introduce the soil solution of the mystery soil. Discuss with students whether it resembles any of the samples they have seen, and where they are from. Ask students how they could use this technique to help identify where soils are from. 9 Discuss with students what components of soils might help scientists identify things about the surrounding environment, for example, specific mineral components or specific types of plants. Ask questions such as: •How do you think soils change over time? •What things might mean that soils change, for example, if the vegetation changes •What do you think you did well in the soil solution activity? If you were to repeat it would you do it differently? Why? How? Record answers in the class science journal. 10Ask students to compare the colour and consistency of their soil samples to identify similarities and differences between areas that students live in.
11Ask students to reflect on their learning by completing the following sentence starters in their science journal: •Today we... •I learned that... •Things I’m not sure about... •Things I’m interested to find out about are.... Lesson 3 Rock hard?
At a Glance To provide students with hands-on, shared experience of rocks and their features and how they have changed over time. Students: •work in teams to examine the features of different rocks •describe rocks using a game of ‘Twenty questions’ •discuss how to choose rocks for a purpose based on their features.
Equipment
Preparation • Read ‘How to facilitate evidence-based discussions’ (Appendix 5). • Place the four class soil solutions on display (see Lesson 2, Session 2). • Remind students to bring samples of rocks from home (see ‘Information note for families’, Resource sheet 1). • Collect a variety of different rocks for the class to also examine, such as granite, limestone and a soft sedimentary rock, for example, chalk. If your
word wall
team skills chart team roles chart 4 soil solutions (see ‘Preparation’) collection of rocks (see ‘Preparation’) optional: bucket full of water for densitytesting
role wristbands or badges for Director, Manager and Speaker each team member’s science journal a collection of rocks (see ‘Preparation’) 3 paper towels or cleaning cloths 1 magnifying glass optional: old glass to scratch for
optional: ½ cup of vinegar to clean therocks with
FOR EACH TEAM

selection has limited variety consider adding a rock kit or a museum loan collection. • Access information on how Indigenous Australians used knowledge of rocks to create tools. Information can be found on websites such as www.ghcma.vic.gov.au/community/cultural-heritage/aboriginal-tools
Lesson steps 1Review the previous lesson using the class science journal, TWLH chart and word wall. Ask questions such as: • How would you describe the soil samples you observed? • What did you find in the soil? • Where do you think the particles came from? 2Explain that students will be working in collaborative learning teams to examine the characteristics of the rocks that they have brought in (see ‘Preparation’). 3Brainstorm with the students the kind of things they might examine, for example: •what it looks like, for example, colour, shape, size of grains •what it sounds like when you rub it on paper •whether it scratches glass (the property of hardness) •whether it floats or sinks in water (the property of density). Record students’ answers in the class science journal. Introduce the terms ‘hardness’ and ‘density’ (see ‘Teacher background information’) and record a description of them in the science journal. Add new vocabulary to the word wall. 4Explain that each collaborative learning team will examine the rocks that they have collected using magnifying glasses. Each team member will be responsible for recording at least one different labelled diagram of a rock sample with accompanying descriptions. Review the purpose and features of a labelled diagram (see Lesson 1). Optional: Rocks can be cleaned with vinegar to enable better observations. 5Form teams and allocate roles. Ask Managers to collect team equipment. Allow time for teams to complete the task. Ask questions such as: •Can you tell me more about this?

•What do you mean by that? •Could you explain what you did? •I wonder what would happen if...? 6Ask the Speaker from each team to share their team’s observations. Ask students in the audience to use the ‘Science question starters’ (see Appendix 5) to ask each team about their investigation. 7As a class discuss how different rocks can have different properties and characteristics, for example, not all rocks are ‘hard’. Optional: Ask students to complete the rocks and soils activity at www.bbc.co.uk/ schools/scienceclips/teachersresources/ages7_8/tr_rocks_soils_lp.shtml Ask questions such as: •What properties of rocks did the activity allow you to test? •What did you discover about different rocks? 8Ask students to think of a series of Yes/No questions, for example, from a game of ‘Twenty questions’ that would allow them to quickly determine which rock in the classroom another student is thinking of. For example, is it bigger than my hand? Is it a dark colour? 9Allow time for students to practise the game with each other. Discuss as a class which questions were about the properties of the material of the rock (hardness, density) and which were the characteristics of the object (for example, the size). Discuss how questions about characteristics of the material of the rock might be used to determine the scientific names of rocks, to catalogue a collection or to help identify where it was found. 10Discuss how communities, including Indigenous Australians, have used the properties of rocks to create tools. Ask students if they can think of examples from their communities. Introduce information collected (see ‘Preparation’), asking questions such as: •Why do you think that tool was selected for that purpose?

•What other properties could be useful to consider when choosing a rock to create a tool? 11 Remind students of the mystery map and the accompanying rocks. Ask questions such as: •Does anyone have rocks that look like this one? •Do you think the rocks might help us identify the place shown in our mystery map? •Do you think rocks remain the same over time? Why or why not? Record answers in the class science journal.
Lesson 4 Rollin’ rock
Validity of investigation results
In this lesson, the students investigate what happens to a rock in a stream by shaking a model rock ball in a jar of water. The students will be looking for changes in the size of the ball after shaking for a few minutes. Some students may be concerned about the accuracy of their ball measurement as they tend to change shape as well as size during the process. The students might suggest ways to measure so that the results are comparable across teams, for example, they might want to use a set of scales to measure the mass rather than measure the circumference of the ball. If scales are used, ensure that they can measure small masses.
Equipment
At a glance To provide students with hands-on, shared experiences of rocks and how they changeover time.
Students:
investigate a model of the physical weathering of rocks
discuss how rocks might change over time.

Preparation
• Enlarge a copy of ‘Weathering investigation planner’ • Fill a plastic bottle to the brim with water, screw the lid on and freeze it. The expanding ice will damage the bottle which simulates similar processes that can happen in rocks. • Ensure students are provided with jars that do not break easily when shaken with rocks inside. An added precaution is to first wrap glass jars in a cloth bag so students are not directly holding the glass or alternatively use plastic jars. Lesson steps 1 Introduce the frozen bottle and ask students to describe what they think happened. Ask questions such as: • Why do you think this happened? • What do you think would happen if water got into rock crevices and froze? • Can you think of other ways that water might wear away at things? 2 Ask students to describe rocks they have seen in rivers. Ask what things might affect how smooth river rocks become over time (how fast the river fl the
word wall
team roles chart
team skills chart
1 enlarged copy of ‘Weatheringinvestigation planner’ (Resource sheet 3) 4 soil solutions (see ‘Preparation’) bottle of frozen water (see ‘Preparation’) optional: measuring scales for lightmasses
role wristbands or badges for Director, Manager and Speaker each team member’s science journal 1 copy of ‘Weathering investigationplanner’ (Resource sheet 3) per team 1 tape measure 3 screw-top jars 3 balls of dried clay-sand(see ‘Preparation’, Lesson 1) 1 spoon to scoop out the ball ofclay-sand 500 mL water 1 stopwatch or wristwatch withsecond hand newspaper to protect the workingsurface
FOR EACH TEAM

hardness of the rocks, the size of the rocks, how long the rocks have been in the river, what the rocks are made of, the temperature of the water). 3 Explain that students will be working in collaborative learning teams to investigate what happens to a rock when water flows over it in a stream. 4 Introduce the balls of dried clay-sand. Explain that the dried ball will be used as a model of a soft rock for the investigation, and shaking it in a bottle of water will be used to simulate water flow over the rock. Discuss the importance of using models in a scientific investigation. For example, if the system being investigated is too large and/ or the processes are too slow, then models can be used as a simulation. Discuss the limitations of using models. 5 Ask what things might affect the clay-sand ball if it is shaken with water. Use students’ answers to make a list in the class science journal, for example: • the size of the ball • what the ball is made of • the hardness of the ball • the amount of water • the type of liquid • the size of the jar • how hard it is shaken • how long it is shaken. 6 Introduce the term ‘variables’ and discuss that in an investigation these are the things that can be changed, measured or kept the same. Ask students why it is important to keep some things the same when measuring the changes (to make the test fair, and so we know what caused the observed changes). Explain that when a variable is kept the same it is said to be ‘controlled’. 7 Introduce students to the process of writing questions for investigation. Model how to develop a question, for example: • What happens to the size of a clay-sand ball when we change what the ball is made of? • What happens to the size of a clay-sand ball when we change how hard we shake it? • What happens to the size of a clay-sand ball when we change the time we shake it? 8 Introduce the enlarged copy of ‘Weathering investigation planner’ (Resource sheet 3). Explain that students will be investigating the question:

‘What happens to the size of a clay-sand ball when we change the time we shake it?’ Model how to record this on the planner. 9Ask students to predict what they think will happen, and indicate where they will record this in the planner. Ask them to include a scientific explanation for their opinion after discussion with their team mates. 10 Ask questions such as: • What would happen if we used different-sized balls in the different jars? • What would happen if we had water in some jars and not others? • What would happen if we put different amounts of water in the jars? 11 Ask students how they will manage the variables in the investigation to make it a fair test. Indicate where they will record this on the planner. If students haven’t conducted fair tests before, conduct a class brainstorm and record on the enlarged planner that teams will: • Change: the time of shaking • Measure/Observe: the size of the clay-sand ball after shaking • Keep the same: the size of the ball, what the ball is made of, the hardness of the ball, how hard it is shaken, the type of liquid, how much water is used, the size of the jar. 12 Form teams and allocate roles. Ask Managers to collect team equipment. Allow time for students to conduct the investigation and record their results. 13 Share team findings with the class, discussing ways to represent the data in a way that communicates their findings clearly. 14 Model how to construct a graph to represent the information that teams recorded in the table of their copy of ‘Weathering investigation planner’ (Resource sheet 3). 15 Ask students to construct their graphs and observe what their water now looks like. Allow time for students to record measurements and observations, •What changes can you see? •How was the water different after you shook the jar? •How has the size of the ball changed? •What can you see in the bottom of the jar?

16 As a class discuss what conclusions can be drawn from the collected results, asking questions such as: •What did we learn about what happens to dried balls when shaken in water? •How did each team measure their clay-sand ball? Can we compare results from each team? Why/Why not? •What do you think this simulation might help explain about real-life weathering? •Why do you think scientists use models to gather information? Can you think of any jobs in the workforce where models or simulations are used?
Lesson 5 Modelling Mountains
Equipment
At a glance To provide hands-on, shared experiences of how features of the landscape changeover time.
Students:
investigate the effect of water erosion on the landscape through the use of models
discuss how water erosion could affect landscapes.

word wall
team roles chart team skills chart
enlarged copy of ‘Procedure: Exploringwater erosion’ (Resource sheet 4) images of cut-away hillsides
source of water
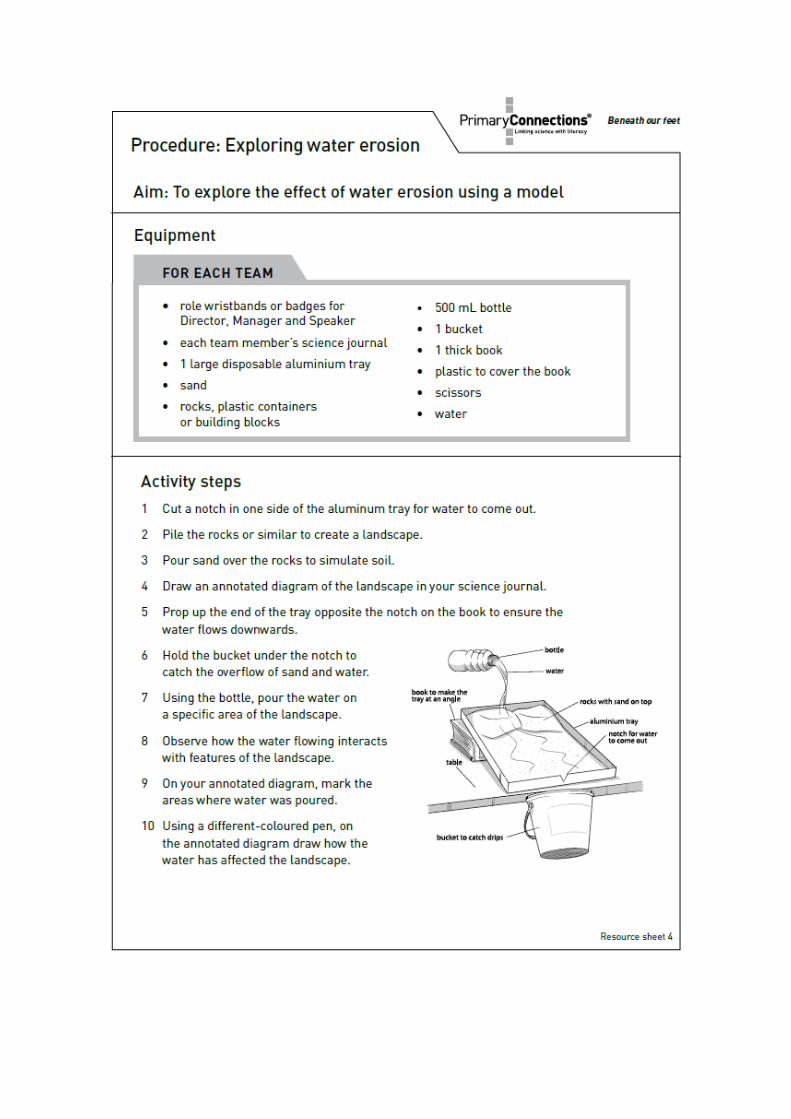
role wristbands or badges for Director, Manager and Speaker each team member’s science journal copy of ‘Procedure: Exploring watererosion’ (Resource sheet 4) 1 large disposable aluminium tray sand rocks, plastic containers or buildingblocks (see ‘Preparation’) 1x 500 mL bottle 1 bucket 1 thick book, wrapped in plastic scissors
FOR EACH TEAM
Preparation •Locate an area for the students to complete this activity with no electricity sources, such as a wet area or a veranda. •In this activity, students will be modelling landscapes which are composed of bedrock and soil. Students will first build the landscape with rocks or something that models rocks, for example, plastic containers or wooden building blocks. Collect enough for teams to create different rock formations. •Collect photos of exposed hillsides and rock faces, for example, using websites such as www.commons.wikimedia.org •Enlarge a copy of ‘Procedure: Exploring water erosion’ (Resource sheet 4).
Lesson Steps 1 Ask students to think about what they would encounter if they dug a hole as big as a skyscraper below a grassed area in the schoolyard. Ask students to draw an annotated diagram in their science journal of what they think is below their feet for that distance. Discuss the purpose and features of an annotated diagram.
2 Ask students if they have seen areas where hills have been cut for a road to go through, or where deep digging has occurred. Introduce the photos (see ‘Preparation’) and ask questions such as: • Did you see a lot of rock in those cut layers? • How does this information fit with what you think you know? • What questions do you have? Explain that scientists have found that we stand on a relatively thin amount of soil under which is a solid layer of rocks that extends for kilometres. 3 Ask students how they think landscapes can change over time, asking questions such as: • What parts of the landscape might change? • How might these changes occur? • Can rocks and soil change? How? • How might we investigate how landscapes change? Discuss the term ‘erosion’ and add a description to the class science journal. Discuss how human activity can impact on erosion and how the impact of erosion caused by water is a serious concern for farmers. 4 Explain that students will be working in collaborative learning teams to explore how water erosion can affect the landscape. Form teams and allocate roles. Ask students to brainstorm ways to explore water erosion. 5 Introduce the enlarged copy of ‘Procedure: Exploring water erosion’ (Resource sheet 4) and discuss it with the class. Explain that it is a procedural text and discuss its purpose and features. 6 Model building a landscape by piling rocks or similar and then heaping sand on top (see ‘Preparation’). Discuss the limits of the model, ask questions such as: • What does this represent? • Is it an accurate representation? • In what ways it is similar/different? • How does this affect the conclusions we can make? • Why do you think scientists use models in their work? Record students’ answers in the class science journal.

7 Explain that teams will model landscapes by piling bricks and blocks and covering them with sand. Discuss what each element represents. Discuss that the model will be of water erosion of soils. Remind students that weathering also occurs. 8 Explain that students will draw an annotated diagram of the landscapes they sculpt before they have poured water on them.
Sample of an annotated diagram Model drawing an annotated diagram of a landscape in the class science journal. Explain that students can draw modifications to the landscape from water erosion in a different colour once the investigation is complete. 9 Remind students to pour the water at the top of the tray at a consistent rate for each test. Ask questions such as: • What would happen if you only poured water on this spot? • What would happen if you carved a path down the hill for the water before pouring? • What would happen if the slope was different? Ask students to record additional observations in their science journals. 10 Invite Speakers to share observations with the class. Ask students in the audience to use the ‘Science question starters’ (see Appendix 5) to ask each team about their investigation. 11 Discuss the results as a class, asking questions such as:
word wall
team roles chart
team skills chart
mystery map with associated soil androck samples (see Lesson 1) 1 enlarged copy of ‘Red rock rising’
optional: collection of multimedia
role wristbands or badges for Director, Manager and Speaker each team member’s science journal 1 copy of ‘Red rock rising’ (Resource sheet 5) per team member
1 copy of the mystery map optional: material to create multimediapresentations
FOR EACH TEAM
• What have we learned about how water erosion affects landscapes? • Who might use this information in their work? • What do you think this model helps us understand about real-life landscapes? • What other elements does this model not take into account, for example, wind, plant life, weathering of rocks? 12 Discuss how hills gradually change shape but remain similar over the lifespan of a human. Discuss advantages of using different features of landscapes to mark something on a map, for example, sand dunes can easily change position and trees can fall down whereas rocks weather slowly. Ask questions such as: • How do you think the water erosion could be reduced? • How does human activity can impact on erosion of the landscape?
Lesson 6 Fabulous Formations
Equipment
At a glance To support students to represent and explain their understanding of soils, rocks andlandscapes and how they change over time, and introduce current scientifi views abouthow landscapes are formed over time.
Students:
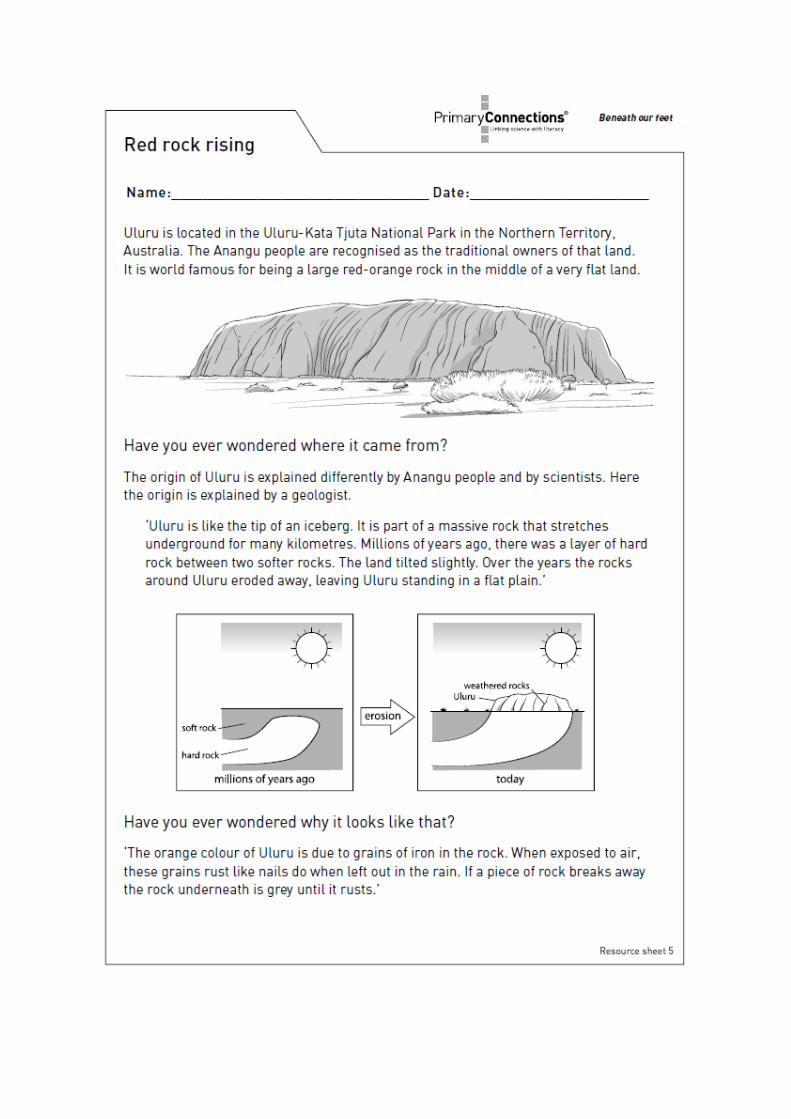
respond to pictures about landforms read and discuss a factual text about the origin of Uluru discuss theories of how a landscape might change in the future through erosion.

Preparation •Gather images of landmarks shaped by erosion. Australian examples include: ‘The Twelve Apostles’, ‘Wave Rock’ and ‘Uluru’. Use websites such as: www.commons.wikimedia.org www.scienceray.com/earth-sciences/geology/worlds-most-impressive-rock- formations •Optional: Identify multimedia resources, including books, photos and videos to help students access the science of erosion and the formation of landscapes. Useful websites include: www.parkweb.vic.gov.au www.qwiki.com www.mrsciguy.com/weathering.html www.teacher.scholastic.com/dirtrep/index.htm www.thelearningfederation.edu.au www.minerals.org.au/primary Scope: Earth and space TV series (9 episodes available through Enhance TV). •Prepare an enlarged copy of ‘Red rock rising’ (Resource sheet 5)
Lesson Steps 1 Introduce photos of strongly eroded landscapes (see ‘Preparation’) and ask questions such as: • Do you recognise this landform? • Why do you think it looks like this? • What might it have looked like a long time ago? 2 Ask students, as a class or individually, to read through the factual text ‘Red rock rising’ (Resource sheet 5), highlighting any key words, dates or names that might be relevant and/or important in explaining the origin of Uluru. Discuss the purpose and features of a factual text.

At a Glance
3 Discuss the terms that students have highlighted in ‘Red rock rising’ (Resource sheet 5). Add each word with a brief description if necessary to the word wall. 4 Discuss the model of what the area around Uluru might have looked like millions of years ago. Review the use of models in science as a useful way of thinking about complex things (see Teacher background information, Lesson 4). Discuss whether it would be possible to be sure of exactly what happened. 5 Remind students of the mystery map and samples from Lesson 1. Explain that students will be working in collaborative learning teams to create an annotated diagram of what the landscape of the map might look like 100 years after the map was drawn and then millions of years in the future. 6 Introduce the collected multimedia resource (see ‘Preparation’) and explain that teams can consult it while thinking about the possible changes to the landscape. 7 Ask students to provide reasons and explanations for why they think changes might happen. Optional: Ask students to create a multimedia presentation, such as a series of slides, a poster or a video to present their ideas. 8 Form teams and allocate roles. 9 Allow time for teams to discuss their ideas. Invite team members to discuss each other’s ideas by asking questions such as: • That’s interesting, what about …? • I think …. Does that fit with your idea? 10 Ask Speakers to share their ideas with the class. Ask students in the audience to use the ‘Science question starters’ (see Appendix 5) to ask each team about their investigation.
Lesson 7 Examining Erosion

discuss variables that might afcollaborative learning teams to plan and conduct an investigation to determine the effect of a chosen variable on the erosion of soils observe, record and share the results ofect soil erosion
To support students to plan and conduct an investigation of factors that influence
erosion of soils.
Students:
Equipment
Preparation • Locate an area for the students to complete this activity with no electricity sources, such as the one used for Lesson 5. The investigation in this lesson is messy and might be best conducted outside or in a wet area.
word wall
team roles chart
team skills chart
mystery map (see Lesson 1)
enlarged copy of ‘Procedure: Exploringwater erosion’ (Resource sheet 4, see Lesson 5)
1 enlarged copy of ‘Water erosion
1 disposable aluminium tray(from Lesson 5)
soil or sand
2 thick books, each wrapped in plastic
1 x 1.25 L bottle
1 permanent marker
1 ruler
source of water
role wristbands or badges for Director, Manager and Speaker
each team member’s science journal
1 copy of ‘Water erosion investigationplanner’ (Resource sheet 6)
1 disposable aluminium tray(from Lesson 5)
soil or sand
2 thick books, each wrapped in plastic
1 x 1.25 L bottle
1 bucket
1 permanent marker
1 ruler
FOR EACH TEAM

• Prepare an enlarged copy of ‘Water erosion investigation planner’ (Resource sheet 6).
Lesson Steps 1 Review the mystery map and annotated diagrams from Lesson 1. Discuss the use of maps to find buried things, for example, a pirate’s treasure map. Ask questions such as: • What things does a map need on it? • If the pirate buried the treasure 1 m down would it always stay at the same depth? • What might change over time? Record students’ answers in the class science journal. 2 Discuss how erosion might change the depth of something buried, for example, by removing soil from on top of it or by depositing soil on top. 3 Ask students what things might affect the erosion of soil. Revise the term ‘variables’ introduced in Lesson 4. Brainstorm possible variables, such as the type of soil, the angle of the surface, the amount of soil, the amount of water/wind, how the water/ wind falls on the slope, the presence of plants. Record students’ answers in the class science journal. 4 Explain that students will be working in collaborative learning teams to investigate the water erosion of soil. Introduce the enlarged copy of ‘Water erosion investigation planner’ (Resource sheet 6). Explain that each team will choose one variable to investigate from the list of variables and write their question for investigation on their planner. If students need support, model recording a question for investigation, for example: • What happens to the water erosion of soil when we change the angle of the slope? • What happens to the water erosion of soil when we change the type of soil? • What happens to the water erosion of soil when we change how the water falls on the slope?

5 Review the fair testing that students have completed throughout the unit and ask students how they will ensure that they conduct a fair test. Model how to set up one possible inquiry, for example: ‘What happens to the erosion of soil when we change the angle of the slope?’ Identify that teams will: • Change: the angle of the slope • Measure/Observe: the amount of erosion (the depth of soil moved by the water) • Keep the same: the type of soil, the angle of the surface, the amount of soil, the amount of water/wind, how the water/wind falls on the slope, the presence of plants. 6 Explain that students will need to plan how they will conduct their investigation. Introduce the enlarged copy of ‘Procedure: Exploring water erosion’ (Resource sheet 4) used in Lesson 5 and explain that teams can modify the steps to fit their question for investigation. Using the permanent marker, draw a level in the foil tray to which the soil will be filled, for example, 3 cm deep. Fill the tray to that level, even out the surface and then prop the tray on a book covered with plastic. This demonstration could also be done outside on sloping ground. Make sure the end with the notch is at the lower end and place the bucket underneath it. Pour water across the top of the tray evenly until the bottle is empty, catching excess water in the bucket. Measure the new depth of soil both at the top (the end of the tray elevated the highest) and at the bottom (end of the tray with the notch). Record the revised procedural text in the class science journal. Note: If not much soil accumulates using one bottle of water, pour another bottle of water over the tray. It is only essential that the quantity of water remain the same between tests. 7 Form teams and allocate roles. Provide teams with time to develop a question for investigation and complete the first page of the investigation planner. 8 Discuss the ‘Recording results’ section of the ‘Water erosion investigation planner’ (Resource sheet 6) and explain that teams will record measurements of

the depth as well as observations of the water that flows into the bucket at the end. Add new vocabulary, for example, ‘depth’, to the word wall. 9 Ask Managers to collect team equipment and allow time for students to conduct the investigation and record results. This is a messy activity and might best be conducted outside or in a wet area. 10 Ask students to use their results in the table to construct a graph to display their results. Review the purpose and features of a graph (see Lesson 4), and discuss how to construct a graph to represent their recorded results. 11 Ask students to analyse and compare graphs and look for patterns and relationships, asking questions such as: • What is the story of your graph? • Where did the soil erode the most? The least? • Using the data from the graph, what can you tell us about the relationship between the amount of erosion and the variable you chose to investigate? 12 Ask speakers to share their teams’ findings with the class. Encourage students to question each other using the ‘Science question starters’ (see Appendix 5). 13 Discuss what claims the class can now make about soil erosion and record in the class science journal along with students’ evidence and the science reasoning that students have used to come to these conclusions. 14 Ask students to complete the ‘Explaining results’ section of the investigation planner. 15 Review the investigation as a class, asking questions such as: • What went well with our investigation? • What didn’t go well? How could we have done it better? • What ideas do you have for another investigation about erosion? 16 Ask students to reflect on the investigation in the last section of the planner ‘Evaluating the investigation’.

Lesson 8 Meticulous Maps
Preparation • Write the questions for students to answer (see Lesson step 6) on a large piece of paper so they can refer to it. • Gather some books with maps and pictures of scenery for students to imagine where they might bury a time capsule.
Lesson Steps 1 Review the unit using the class science journal, word wall and TWLH chart. Ask questions such as: • What did we learn about soils? Do they change over time? How do we know? • What did we learn about rocks? Do they change over time? How do we know? • What did we learn about landscapes? Do they change over time? How do we know? • What did we learn about erosion? 2 Ask students to share their ideas about what a time capsule is. Explain that time capsules are sometimes made by people and buried so that in the far distant future people will retrieve them and learn about life as it is today. Discuss some things that are commonly included in time capsules, for example, newspapers. 3 Explain that students are going to think about where they would put a time capsule so that it might be easily found in a thousand years.
At a Glance To provide opportunities for students to represent what they know about erosion andhow soils, rocks and landscapes change over time, and to refl on their learningduring the unit.
Students:
draw a map of where they would bury a time capsule
describe how the landscape might change over time
reflect on their learning during the unit.
4 Introduce the available resources for students to plan where they would bury a time capsule (see ‘Preparation’). 5 Ask students to carefully consider what features of the landscape they would record on a map to show where the time capsule is. Review the purpose and features of a map (see Lesson 1). 6 Explain that students will be recording their map and their reasoning for where they would choose to bury their time capsule in their science journal. Ask students to answer the following questions: • Would you bury your time capsule near a river? Why/Why not? • Would you bury your time capsule in soil on top of a mountain? Why/Why not? • Would you bury your time capsule under a boulder made of hard materials? Why/Why not? 7 Invite students to use sentence starters such as the following: • The landscape where I would bury the time capsule is... • I chose to bury it here because... • The landscape might change in several ways, for example,... 8 Allow students time to complete their science journal entries and maps. 9 Invite students to share their maps and explanations with the class. Ask questions such as: • Why did you choose to bury it there? • Do you think people will be able to find it? Why? 10 Ask students to conduct a self-assessment of learning by completing sentences in their science journal, such as: • I really enjoyed… • I learned a lot about… • I could improve… • I’m still wondering about… • Next time we work in teams I will… • In the future I would like to…