Embed Size (px)
Citation preview

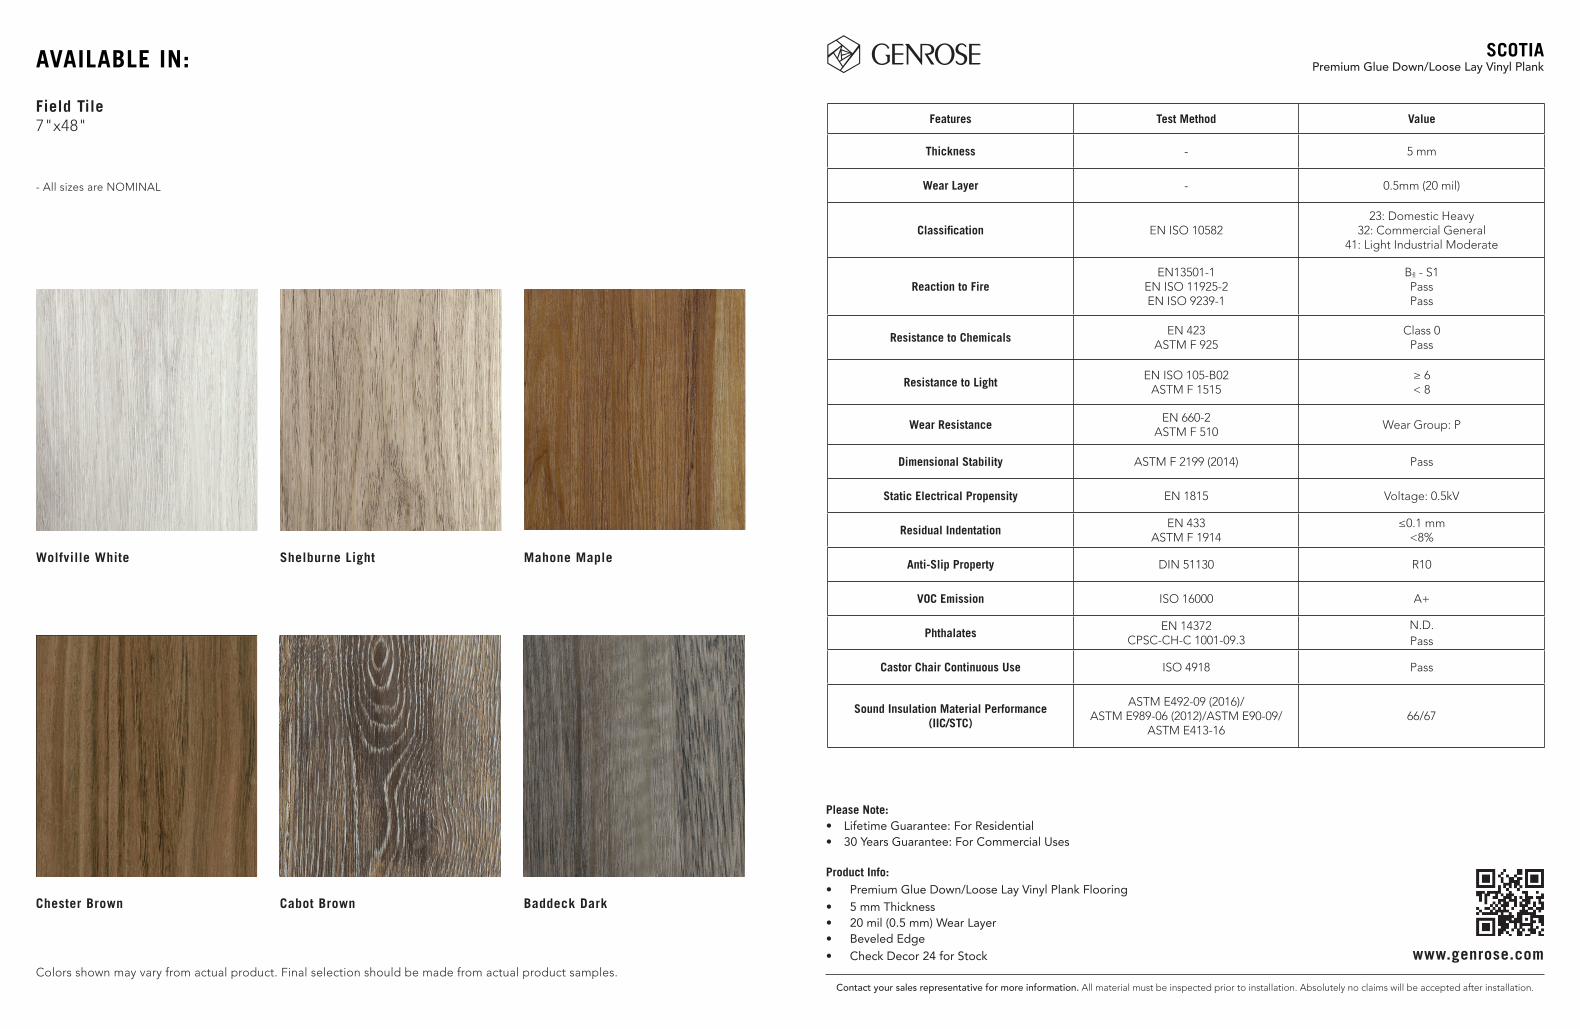
SCOTIA
7"x48" Field Tile in Wolfville White 7"x48" Field Tile in Mahone Maple
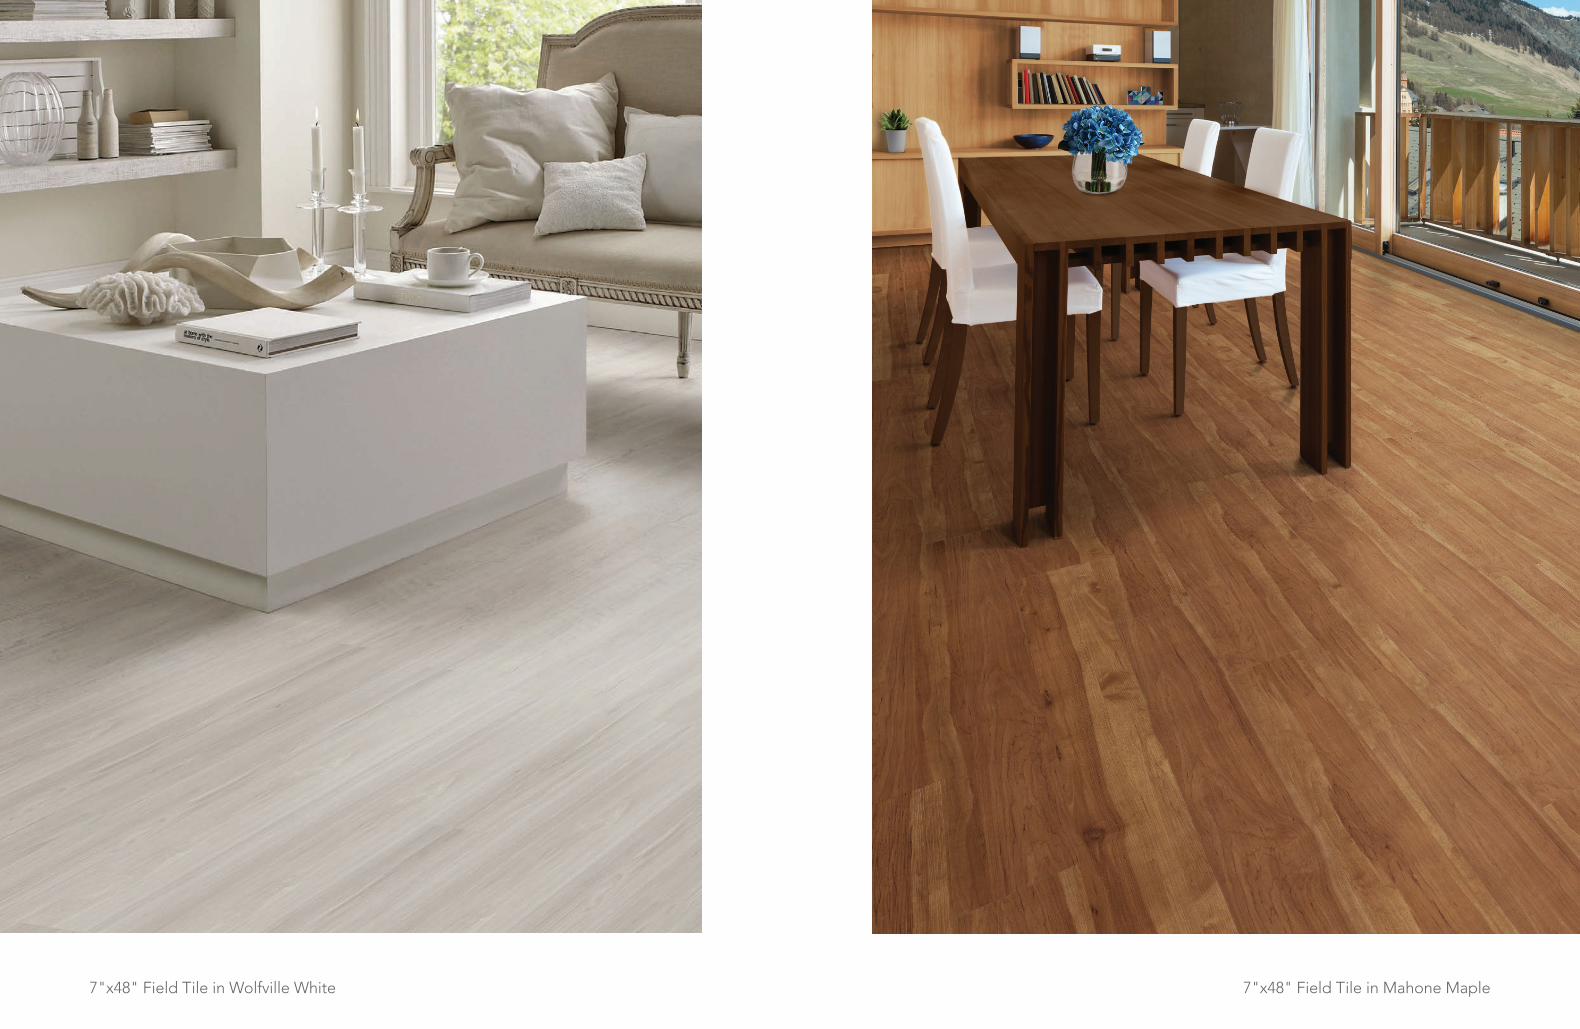
AVAILABLE IN:
Field Tile7"x48"
Shelburne LightWolfville White
Chester Brown Cabot Brown
Mahone Maple
Baddeck Dark
- All sizes are NOMINAL
Colors shown may vary from actual product. Final selection should be made from actual product samples.
Product Info:• Premium Glue Down/Loose Lay Vinyl Plank Flooring• 5 mm Thickness• 20 mil (0.5 mm) Wear Layer• Beveled Edge• Check Decor 24 for Stock
Features Test Method Value
Thickness - 5 mm
Wear Layer - 0.5mm (20 mil)
Classification EN ISO 1058223: Domestic Heavy
32: Commercial General41: Light Industrial Moderate
Reaction to FireEN13501-1
EN ISO 11925-2EN ISO 9239-1
Bfl - S1PassPass
Resistance to ChemicalsEN 423
ASTM F 925Class 0
Pass
Resistance to LightEN ISO 105-B02
ASTM F 1515≥ 6< 8
Wear ResistanceEN 660-2
ASTM F 510Wear Group: P
Dimensional Stability ASTM F 2199 (2014) Pass
Static Electrical Propensity EN 1815 Voltage: 0.5kV
Residual IndentationEN 433
ASTM F 1914≤0.1 mm
<8%
Anti-Slip Property DIN 51130 R10
VOC Emission ISO 16000 A+
PhthalatesEN 14372
CPSC-CH-C 1001-09.3N.D.Pass
Castor Chair Continuous Use ISO 4918 Pass
Sound Insulation Material Performance (IIC/STC)
ASTM E492-09 (2016)/ASTM E989-06 (2012)/ASTM E90-09/
ASTM E413-1666/67
Contact your sales representative for more information. All material must be inspected prior to installation. Absolutely no claims will be accepted after installation.
SCOTIAPremium Glue Down/Loose Lay Vinyl Plank
www.genrose.com
Please Note:• Lifetime Guarantee: For Residential• 30 Years Guarantee: For Commercial Uses
PREMIUM GLUE DOWN/LOOSE LAY VINYL PLANKINSTALLATION INSTRUCTIONS
PREMIUM GLUE DOWN/LOOSE LAY VINYL PLANKINSTALLATION INSTRUCTIONS
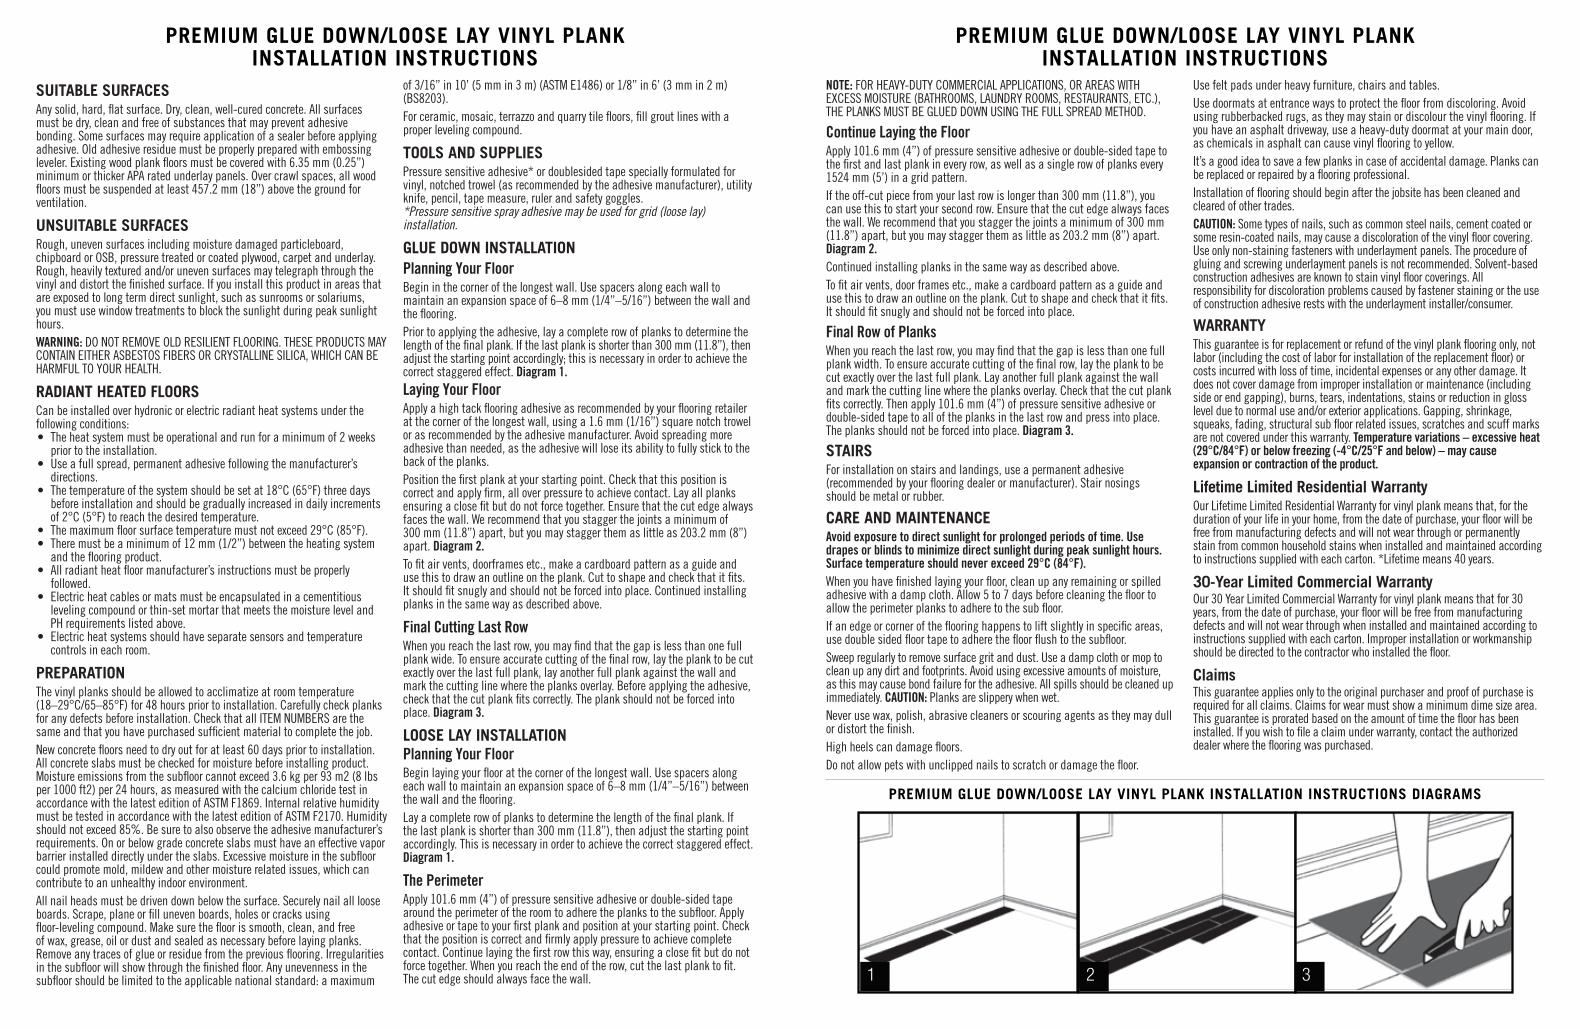
PREMIUM GLUE DOWN/LOOSE LAY VINYL PLANK INSTALLATION INSTRUCTIONS DIAGRAMS
SUITABLE SURFACESAny solid, hard, flat surface. Dry, clean, well-cured concrete. All surfaces must be dry, clean and free of substances that may prevent adhesive bonding. Some surfaces may require application of a sealer before applying adhesive. Old adhesive residue must be properly prepared with embossing leveler. Existing wood plank floors must be covered with 6.35 mm (0.25”) minimum or thicker APA rated underlay panels. Over crawl spaces, all wood floors must be suspended at least 457.2 mm (18”) above the ground for ventilation.
UNSUITABLE SURFACESRough, uneven surfaces including moisture damaged particleboard, chipboard or OSB, pressure treated or coated plywood, carpet and underlay. Rough, heavily textured and/or uneven surfaces may telegraph through the vinyl and distort the finished surface. If you install this product in areas that are exposed to long term direct sunlight, such as sunrooms or solariums, you must use window treatments to block the sunlight during peak sunlight hours.WARNING: DO NOT REMOVE OLD RESILIENT FLOORING. THESE PRODUCTS MAY CONTAIN EITHER ASBESTOS FIBERS OR CRYSTALLINE SILICA, WHICH CAN BE HARMFUL TO YOUR HEALTH.
RADIANT HEATED FLOORSCan be installed over hydronic or electric radiant heat systems under the following conditions: • The heat system must be operational and run for a minimum of 2 weeks prior to the installation. • Use a full spread, permanent adhesive following the manufacturer’s directions. • The temperature of the system should be set at 18°C (65°F) three days before installation and should be gradually increased in daily increments of 2°C (5°F) to reach the desired temperature. • The maximum floor surface temperature must not exceed 29°C (85°F). • There must be a minimum of 12 mm (1/2”) between the heating system and the flooring product. • All radiant heat floor manufacturer’s instructions must be properly followed. • Electric heat cables or mats must be encapsulated in a cementitious leveling compound or thin-set mortar that meets the moisture level and PH requirements listed above. • Electric heat systems should have separate sensors and temperature controls in each room.
PREPARATIONThe vinyl planks should be allowed to acclimatize at room temperature (18–29°C/65–85°F) for 48 hours prior to installation. Carefully check planks for any defects before installation. Check that all ITEM NUMBERS are the same and that you have purchased sufficient material to complete the job. New concrete floors need to dry out for at least 60 days prior to installation. All concrete slabs must be checked for moisture before installing product. Moisture emissions from the subfloor cannot exceed 3.6 kg per 93 m2 (8 lbs per 1000 ft2) per 24 hours, as measured with the calcium chloride test in accordance with the latest edition of ASTM F1869. Internal relative humidity must be tested in accordance with the latest edition of ASTM F2170. Humidity should not exceed 85%. Be sure to also observe the adhesive manufacturer’s requirements. On or below grade concrete slabs must have an effective vapor barrier installed directly under the slabs. Excessive moisture in the subfloor could promote mold, mildew and other moisture related issues, which can contribute to an unhealthy indoor environment.All nail heads must be driven down below the surface. Securely nail all loose boards. Scrape, plane or fill uneven boards, holes or cracks using floor-leveling compound. Make sure the floor is smooth, clean, and free of wax, grease, oil or dust and sealed as necessary before laying planks. Remove any traces of glue or residue from the previous flooring. Irregularities in the subfloor will show through the finished floor. Any unevenness in the subfloor should be limited to the applicable national standard: a maximum
of 3/16” in 10’ (5 mm in 3 m) (ASTM E1486) or 1/8” in 6’ (3 mm in 2 m) (BS8203).For ceramic, mosaic, terrazzo and quarry tile floors, fill grout lines with a proper leveling compound.
TOOLS AND SUPPLIESPressure sensitive adhesive* or doublesided tape specially formulated for vinyl, notched trowel (as recommended by the adhesive manufacturer), utility knife, pencil, tape measure, ruler and safety goggles.*Pressure sensitive spray adhesive may be used for grid (loose lay) installation.
GLUE DOWN INSTALLATIONPlanning Your Floor Begin in the corner of the longest wall. Use spacers along each wall to maintain an expansion space of 6–8 mm (1/4”–5/16”) between the wall and the flooring.Prior to applying the adhesive, lay a complete row of planks to determine the length of the final plank. If the last plank is shorter than 300 mm (11.8”), then adjust the starting point accordingly; this is necessary in order to achieve the correct staggered effect. Diagram 1.Laying Your Floor Apply a high tack flooring adhesive as recommended by your flooring retailer at the corner of the longest wall, using a 1.6 mm (1/16”) square notch trowel or as recommended by the adhesive manufacturer. Avoid spreading more adhesive than needed, as the adhesive will lose its ability to fully stick to the back of the planks.Position the first plank at your starting point. Check that this position is correct and apply firm, all over pressure to achieve contact. Lay all planks ensuring a close fit but do not force together. Ensure that the cut edge always faces the wall. We recommend that you stagger the joints a minimum of 300 mm (11.8”) apart, but you may stagger them as little as 203.2 mm (8”) apart. Diagram 2.To fit air vents, doorframes etc., make a cardboard pattern as a guide and use this to draw an outline on the plank. Cut to shape and check that it fits. It should fit snugly and should not be forced into place. Continued installing planks in the same way as described above.
Final Cutting Last Row When you reach the last row, you may find that the gap is less than one full plank wide. To ensure accurate cutting of the final row, lay the plank to be cut exactly over the last full plank, lay another full plank against the wall and mark the cutting line where the planks overlay. Before applying the adhesive, check that the cut plank fits correctly. The plank should not be forced into place. Diagram 3.
LOOSE LAY INSTALLATIONPlanning Your Floor Begin laying your floor at the corner of the longest wall. Use spacers along each wall to maintain an expansion space of 6–8 mm (1/4”–5/16”) between the wall and the flooring.Lay a complete row of planks to determine the length of the final plank. If the last plank is shorter than 300 mm (11.8”), then adjust the starting point accordingly. This is necessary in order to achieve the correct staggered effect.Diagram 1.
The PerimeterApply 101.6 mm (4”) of pressure sensitive adhesive or double-sided tape around the perimeter of the room to adhere the planks to the subfloor. Apply adhesive or tape to your first plank and position at your starting point. Check that the position is correct and firmly apply pressure to achieve complete contact. Continue laying the first row this way, ensuring a close fit but do not force together. When you reach the end of the row, cut the last plank to fit. The cut edge should always face the wall.
NOTE: FOR HEAVY-DUTY COMMERCIAL APPLICATIONS, OR AREAS WITH EXCESS MOISTURE (BATHROOMS, LAUNDRY ROOMS, RESTAURANTS, ETC.), THE PLANKS MUST BE GLUED DOWN USING THE FULL SPREAD METHOD.
Continue Laying the FloorApply 101.6 mm (4”) of pressure sensitive adhesive or double-sided tape to the first and last plank in every row, as well as a single row of planks every 1524 mm (5’) in a grid pattern.If the off-cut piece from your last row is longer than 300 mm (11.8”), you can use this to start your second row. Ensure that the cut edge always faces the wall. We recommend that you stagger the joints a minimum of 300 mm (11.8”) apart, but you may stagger them as little as 203.2 mm (8”) apart. Diagram 2.Continued installing planks in the same way as described above.To fit air vents, door frames etc., make a cardboard pattern as a guide and use this to draw an outline on the plank. Cut to shape and check that it fits. It should fit snugly and should not be forced into place.
Final Row of PlanksWhen you reach the last row, you may find that the gap is less than one full plank width. To ensure accurate cutting of the final row, lay the plank to be cut exactly over the last full plank. Lay another full plank against the wall and mark the cutting line where the planks overlay. Check that the cut plank fits correctly. Then apply 101.6 mm (4”) of pressure sensitive adhesive or double-sided tape to all of the planks in the last row and press into place. The planks should not be forced into place. Diagram 3.
STAIRSFor installation on stairs and landings, use a permanent adhesive (recommended by your flooring dealer or manufacturer). Stair nosings should be metal or rubber.
CARE AND MAINTENANCE Avoid exposure to direct sunlight for prolonged periods of time. Use drapes or blinds to minimize direct sunlight during peak sunlight hours. Surface temperature should never exceed 29°C (84°F). When you have finished laying your floor, clean up any remaining or spilled adhesive with a damp cloth. Allow 5 to 7 days before cleaning the floor to allow the perimeter planks to adhere to the sub floor.If an edge or corner of the flooring happens to lift slightly in specific areas, use double sided floor tape to adhere the floor flush to the subfloor.Sweep regularly to remove surface grit and dust. Use a damp cloth or mop to clean up any dirt and footprints. Avoid using excessive amounts of moisture, as this may cause bond failure for the adhesive. All spills should be cleaned up immediately. CAUTION: Planks are slippery when wet.Never use wax, polish, abrasive cleaners or scouring agents as they may dull or distort the finish.High heels can damage floors.Do not allow pets with unclipped nails to scratch or damage the floor.
Use felt pads under heavy furniture, chairs and tables.Use doormats at entrance ways to protect the floor from discoloring. Avoid using rubberbacked rugs, as they may stain or discolour the vinyl flooring. If you have an asphalt driveway, use a heavy-duty doormat at your main door, as chemicals in asphalt can cause vinyl flooring to yellow.It’s a good idea to save a few planks in case of accidental damage. Planks can be replaced or repaired by a flooring professional.Installation of flooring should begin after the jobsite has been cleaned and cleared of other trades.CAUTION: Some types of nails, such as common steel nails, cement coated or some resin-coated nails, may cause a discoloration of the vinyl floor covering. Use only non-staining fasteners with underlayment panels. The procedure of gluing and screwing underlayment panels is not recommended. Solvent-based construction adhesives are known to stain vinyl floor coverings. All responsibility for discoloration problems caused by fastener staining or the use of construction adhesive rests with the underlayment installer/consumer.
WARRANTY This guarantee is for replacement or refund of the vinyl plank flooring only, not labor (including the cost of labor for installation of the replacement floor) or costs incurred with loss of time, incidental expenses or any other damage. It does not cover damage from improper installation or maintenance (including side or end gapping), burns, tears, indentations, stains or reduction in gloss level due to normal use and/or exterior applications. Gapping, shrinkage, squeaks, fading, structural sub floor related issues, scratches and scuff marks are not covered under this warranty. Temperature variations – excessive heat (29°C/84°F) or below freezing (-4°C/25°F and below) – may cause expansion or contraction of the product.
Lifetime Limited Residential Warranty Our Lifetime Limited Residential Warranty for vinyl plank means that, for the duration of your life in your home, from the date of purchase, your floor will be free from manufacturing defects and will not wear through or permanently stain from common household stains when installed and maintained according to instructions supplied with each carton. *Lifetime means 40 years.
30-Year Limited Commercial Warranty Our 30 Year Limited Commercial Warranty for vinyl plank means that for 30 years, from the date of purchase, your floor will be free from manufacturing defects and will not wear through when installed and maintained according to instructions supplied with each carton. Improper installation or workmanship should be directed to the contractor who installed the floor.
Claims This guarantee applies only to the original purchaser and proof of purchase is required for all claims. Claims for wear must show a minimum dime size area. This guarantee is prorated based on the amount of time the floor has been installed. If you wish to file a claim under warranty, contact the authorized dealer where the flooring was purchased.
PREMIUM GLUE DOWN/LOOSE LAY VINYL PLANK INSTALLATION INSTRUCTIONS
SUITABLE SURFACESAny solid, hard, flat surface. Dry, clean, well-cured concrete. All surfaces must be dry, clean and free of substances that may prevent adhesive bonding. Some surfaces may require application of a sealer before applying adhesive. Old adhesive residue must be properly prepared with embossing leveler. Existing wood plank floors must be covered with 6.35 mm (0.25") minimum or thicker APA rated underlay panels. Over crawl spaces, all wood floors must be suspended at least 457.2 mm (18") above the ground for ventilation.
UNSUITABLE SURFACESRough, uneven surfaces including moisture damaged particleboard, chipboard or OSB, pressure treated or coated plywood, carpet and underlay. Rough, heavily textured and/or uneven surfaces may telegraph through the vinyl and distort the finished surface. If you install this product in areas that are exposed to long term direct sunlight, such as sunrooms or solariums, you must use window treatments to block the sunlight during peak sunlight hours.
WARNING: DO NOT REMOVE OLD RESILIENT FLOORING. THESE PRODUCTS MAY CONTAIN EITHER ASBESTOS FIBERS OR CRYSTALLINE SILICA, WHICH CAN BE HARMFUL TO YOUR HEALTH.
RADIANT HEATED FLOORSCan be installed over hydronic or electric radiant heat systems under the following conditions:
• The heat system must be operational and run for a minimum of 2 weeks prior to the installation.
• Use a full spread, permanent adhesive following the manufacturer’s directions.
• The temperature of the system should be set at 18°C (65°F) three days before installation and should be gradually increased in daily increments of 2°C (5°F) to reach the desired temperature.
• The maximum floor surface temperature must not exceed 29°C (85°F).
• There must be a minimum of 12 mm (1/2") between the heating system and the flooring product.
• All radiant heat floor manufacturer’s instructions must be properly followed.
• Electric heat cables or mats must be encapsulated in a cementitious leveling compound or thin-set mortar that meets the moisture level and PH requirements listed above.
• Electric heat systems should have separate sensors and temperature controls in each room.
PREPARATIONThe vinyl planks should be allowed to acclimatize at room temperature (18–29° C/65–85° F) for 48 hours prior to installation. Carefully check planks for any defects before installation. Check that all ITEM NUMBERS are the same and that you have purchased sufficient material to complete the job.
New concrete floors need to dry out for at least 60 days prior to installation. All concrete slabs must be checked for moisture before installing product. Moisture emissions from the subfloor cannot exceed 3.6 kg per 93 m2 (8 lbs per 1000 ft2) per 24 hours, as measured with the calcium chloride test in accordance with the latest edition of ASTM F1869. Internal relative humidity must be tested in accordance with the latest edition of ASTM F2170. Humidity should not exceed 85%. Be sure to also observe the adhesive manufacturer's requirements. On or below grade concrete slabs must have an effective vapor barrier installed directly under the slabs. Excessive moisture in the subfloor could promote mold, mildew and other moisture related issues, which can contribute to an unhealthy indoor environment.
All nail heads must be driven down below the surface. Securely nail all loose boards. Scrape, plane or fill uneven boards, holes or cracks using floor-leveling compound. Make sure the
floor is smooth, clean, and free of wax, grease, oil or dust and sealed as necessary before laying planks. Remove any traces of glue or residue from the previous flooring. Irregularities in the subfloor will show through the finished floor. Any unevenness in the subfloor should be limited to the applicable national standard: a maximum of 3/16" in 10' (5 mm in 3 m) (ASTM E1486) or 1/8" in 6' (3 mm in 2 m) (BS8203).
For ceramic, mosaic, terrazzo and quarry tile floors, fill grout lines with a proper leveling compound.
TOOLS AND SUPPLIESPressure sensitive adhesive* or double-sided tape specially formulated for vinyl, notched trowel (as recommended by the adhesive manufacturer), utility knife, pencil, tape measure, ruler and safety goggles.
*Pressure sensitive spray adhesive may be used for grid (loose lay) installation.
GLUE DOWN INSTALLATION Planning Your Floor Begin in the corner of the longest wall. Use spacers along each wall to maintain an expansion space of 6–8 mm (1/4"–5/16") between the wall and the flooring.
Prior to applying the adhesive, lay a complete row of planks to determine the length of the final plank. If the last plank is shorter than 300 mm (11.8"), then adjust the starting point accordingly; this is necessary in order to achieve the correct staggered effect. Diagram 1.
Laying your floor Apply a high tack flooring adhesive as recommended by your flooring retailer at the corner of the longest wall, using a 1.6 mm (1/16") square notch trowel or as recommended by the adhesive manufacturer. Avoid spreading more adhesive than needed, as the adhesive will lose its ability to fully stick to the back of the planks.
Position the first plank at your starting point. Check that this position is correct and apply firm, all over pressure to achieve contact. Lay all planks ensuring a close fit but do not force together. Ensure that the cut edge always faces the wall. We recommend that you stagger the joints a minimum of 300 mm (11.8") apart, but you may stagger them as little as 203.2 mm (8") apart. Diagram 2.
To fit air vents, doorframes etc. make a cardboard pattern as a guide and use this to draw an outline on the plank. Cut to shape and check that it fits. It should fit snugly and should not be forced into place.
Continued installing planks in the same way as described above.
Final cutting last row When you reach the last row, you may find that the gap is less than one full plank wide. To ensure accurate cutting of the final row, lay the plank to be cut exactly over the last full plank, lay another full plank against the wall and mark the cutting line where the planks overlay. Before applying the adhesive, check that the cut plank fits correctly. The plank should not be forced into place. Diagram 3.
LOOSE LAY INSTALLATIONPlanning Your Floor Begin laying your floor at the corner of the longest wall. Use spacers along each wall to maintain an expansion space of 6–8 mm (1/4"–5/16") between the wall and the flooring.
Lay a complete row of planks to determine the length of the final plank. If the last plank is shorter than 300 mm (11.8"), then adjust the starting point accordingly. This is necessary in order to achieve the correct staggered effect. Diagram 1.
The PerimeterApply 101.6 mm (4") of pressure sensitive adhesive or double-sided tape around the perimeter of the room to adhere the planks to the subfloor. Apply adhesive or tape to your first plank and position at your starting point. Check that the position is correct and firmly apply
1 2 3
V4 05/21

www.genrose.com