Embed Size (px)
Citation preview
Part No Applications: P5-002, C-AHT772, P4-004, C-AHT774, C-AHT778
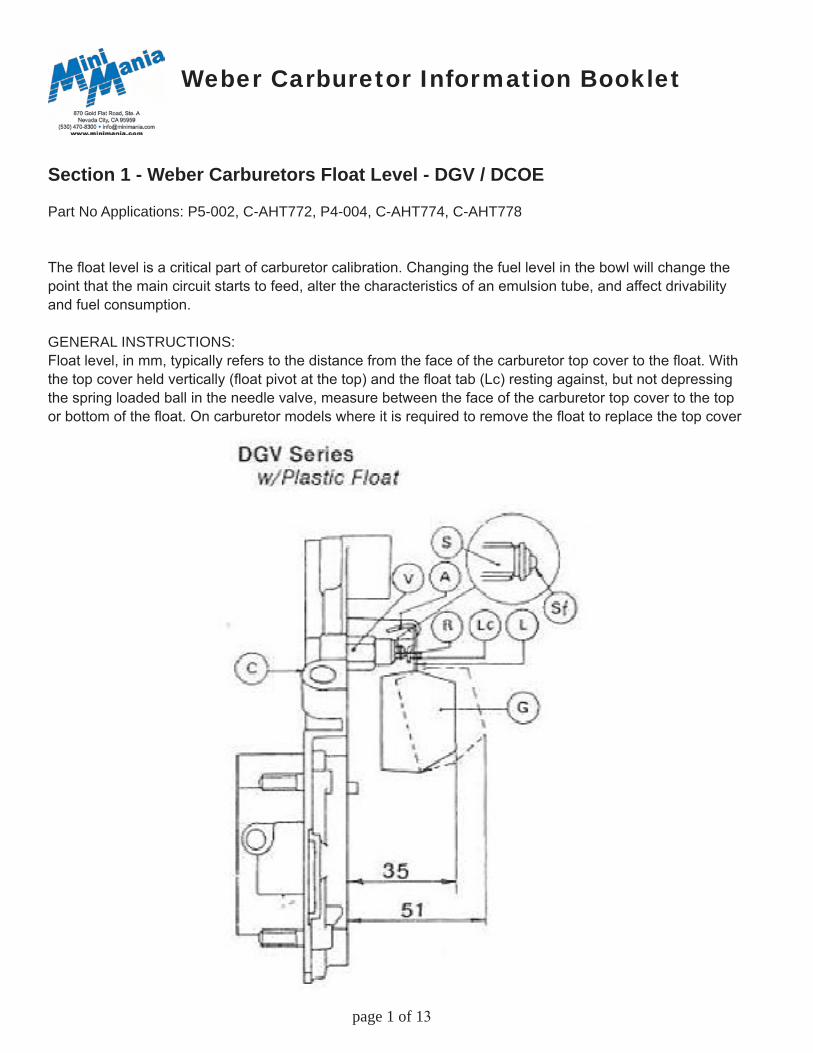
The float level is a critical part of carburetor calibration. Changing the fuel level in the bowl will change the point that the main circuit starts to feed, alter the characteristics of an emulsion tube, and affect drivability and fuel consumption.
GENERAL INSTRUCTIONS:Float level, in mm, typically refers to the distance from the face of the carburetor top cover to the float. With the top cover held vertically (float pivot at the top) and the float tab (Lc) resting against, but not depressing the spring loaded ball in the needle valve, measure between the face of the carburetor top cover to the top or bottom of the float. On carburetor models where it is required to remove the float to replace the top cover
Section 1 - Weber Carburetors Float Level - DGV / DCOE
page � of �3
Weber Carburetor Information Booklet
page � of �3
Section 3 - Carburation - Initial Considerations and Manifolds
By Keith Calver
When trying to improve your Mini’s breathing efficiency, carburation and inlet manifolds are open to as much speculation as other ‘performance enhancing’ components. A great deal of which falls into the b*llsh*t category. As is my wont, I’ll try and outline some basic guidelines.
Many facets of our lives are governed by one particular idiom - big is beautiful, and it seems from what many folk are told carburettors are no exception. This is all very well, but it can have drastic effects on how well the engine performs over the broad spectrum of its use. For maximum power, i.e. foot firmly buried in the carpet pile, the method of introducing air/fuel into the engine could be carburettors, injection, man and garden hose, milk pail, or whatever, as long as the air/fuel ratio is correct and the fuel is properly atomised for a complete and efficient ‘burn’. I’m not going to get into a discussion on air/fuel ratios and what’s best for power/economy here - a full subject in itself - but the metering device. And that, mes amies, is the carburettor. Then, having selected a suitable one, a decent inlet manifold is a definite requirement to maximise its performance. To cover all eventualities would take a tome, so we’re going to concentrate on road use in this article.
SizingBefore shelling out hard earned beer vouchers on another carb, a nanosecond’s contemplation as to why wouldn’t go amiss. Just why do you need to change it? If it’s solely to come tops in the bar room b*llsh*t com-petition, or aesthetics, then this article is not for you. If maximum performance - be that economy or power - is the goal, read on.
Your Mini engine is no less for it’s ancient design than any modern unit. They all accomplish the same thing - turning heat into mechanical energy to propel the four-wheeled wonder down the road. To do this the heat has to be developed from somewhere, in our case by burning (that’s burning, not exploding) a fuel with an oxidant - petrol from a pump and oxygen from the air. To achieve our goal of either maximum economy or power, or combination of both, these two parts need adding in a certain ratio. Years of development and tests have come up with certain well-defined limits as to which is relevant where. The carb is designed to complete this duty with efficiency given its mechanical/cost limitations. To whit, the vehicle manufacturers have carefully considered the carb chosen for each engine application, of which size plays a big part.
We fit modified cylinder heads to improve volumetric efficiency. Greater power outputs are achieved through maximising air consumption. The carb therefore needs to be sized so as not to be restrictive. However, the most common mistake made is fitting a carb that is too big. What you need is a carb sized to provide adequate airflow for the expected power output, NOT the size of the engine. This is based upon the fact that a certain volume of air is needed for a certain amount of power. To illustrate, air consumption of a 65 HP 998cc engine is going to be relatively similar to a 65 HP 1275 - so the carb size needed is going to be more or less the same within certain limits. To stress the point - if the correctly sized carb is used, there is absolutely no more power to be had from going bigger.
Bearing this in mind, on a bigger capacity engine, fitting a carb a shade on the small side will make the engine work a tad harder to draw air through it to achieve that power output. It’ll mean a slight reduction in outright power, but the benefits are worthwhile - greater fuel economy and greater torque. Torque is what accelerates the car in 99% of road use, so optimising this is far more beneficial than tuning for maximum power. Parting with a sizeable chunk of money for a big carb is a waste, as it’s full potential isn’t being used and bottom end flexibility is severely compromised. Check out the relevant chart for sizing.
page � of �3
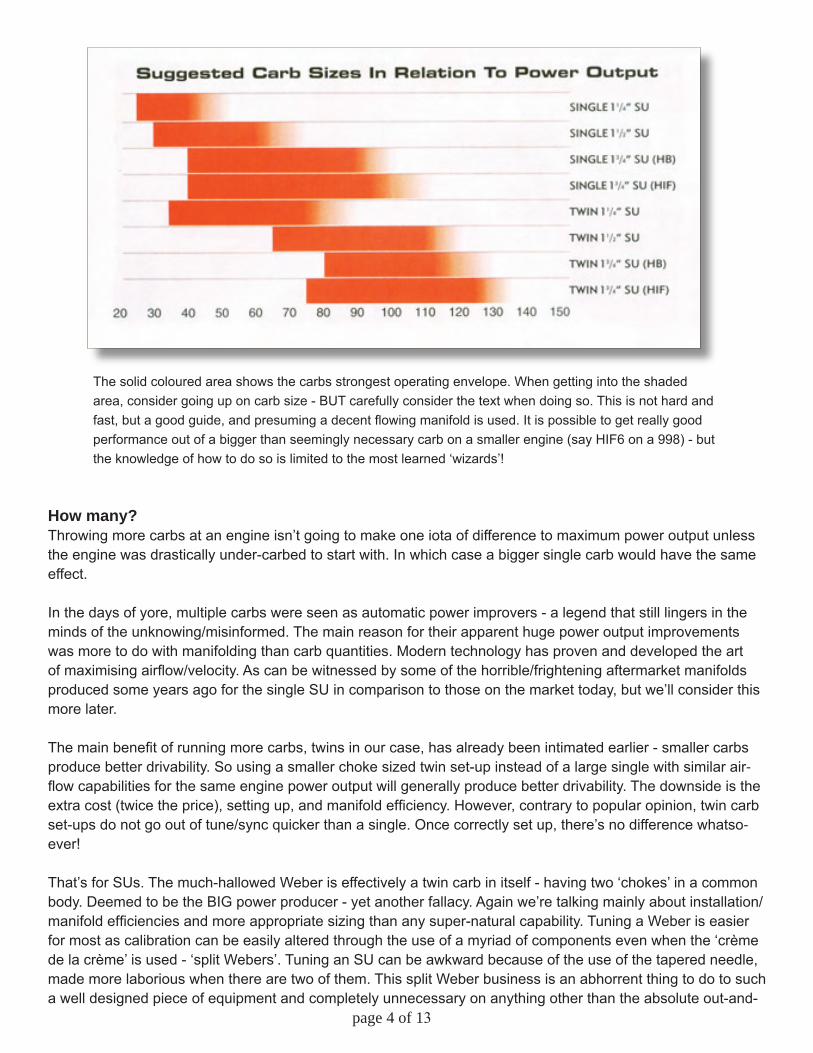
The solid coloured area shows the carbs strongest operating envelope. When getting into the shaded area, consider going up on carb size - BUT carefully consider the text when doing so. This is not hard and fast, but a good guide, and presuming a decent flowing manifold is used. It is possible to get really good performance out of a bigger than seemingly necessary carb on a smaller engine (say HIF6 on a 998) - but the knowledge of how to do so is limited to the most learned ‘wizards’!
How many?Throwing more carbs at an engine isn’t going to make one iota of difference to maximum power output unless the engine was drastically under-carbed to start with. In which case a bigger single carb would have the same effect.
In the days of yore, multiple carbs were seen as automatic power improvers - a legend that still lingers in the minds of the unknowing/misinformed. The main reason for their apparent huge power output improvements was more to do with manifolding than carb quantities. Modern technology has proven and developed the art of maximising airflow/velocity. As can be witnessed by some of the horrible/frightening aftermarket manifolds produced some years ago for the single SU in comparison to those on the market today, but we’ll consider this more later.
The main benefit of running more carbs, twins in our case, has already been intimated earlier - smaller carbs produce better drivability. So using a smaller choke sized twin set-up instead of a large single with similar air-flow capabilities for the same engine power output will generally produce better drivability. The downside is the extra cost (twice the price), setting up, and manifold efficiency. However, contrary to popular opinion, twin carb set-ups do not go out of tune/sync quicker than a single. Once correctly set up, there’s no difference whatso-ever!
That’s for SUs. The much-hallowed Weber is effectively a twin carb in itself - having two ‘chokes’ in a common body. Deemed to be the BIG power producer - yet another fallacy. Again we’re talking mainly about installation/manifold efficiencies and more appropriate sizing than any super-natural capability. Tuning a Weber is easier for most as calibration can be easily altered through the use of a myriad of components even when the ‘crème de la crème’ is used - ‘split Webers’. Tuning an SU can be awkward because of the use of the tapered needle, made more laborious when there are two of them. This split Weber business is an abhorrent thing to do to such a well designed piece of equipment and completely unnecessary on anything other than the absolute out-and-
page � of �3
out circuit racer. Not to mention the rude amount of money needed to do the job properly. Getting the benefits out of a Weber on a Mini means bodywork surgery, which is hassle and far from simple. It therefore isn’t really worth considering for a road car, and would need article on it’s own - so will be left for another time!
Manifolds - singlesHaving selected a carb suitable for the job, choosing a compatible manifold is of great importance. After all, if the carb is right and a crap manifold used, much of the sought-after power potential will be lost. It needs to meet a number of criteria - carry the carb at the correct angle, allow fitment of a suitable air filter, and provide uninhibited passage of the fuel/air mix to the engine without compromising velocity. This last feature being the most important for usable power, the others a definite bonus to avoid fitting hassles and frustration.
There are a variety of manifolds on the market, generally cast in aluminium-alloy. Few understand why this is, generally believing it’s mainly down to ease of production and is certainly one of the major considerations. Aluminium conducts heat faster than iron, the benefits of this being two-fold. As far as maximum power is concerned, the cooler the inlet charge, the better. Aluminium’s ability to dissipate heat faster keeps the intake charge down in comparison to an iron one. For economy, quicker warm up is essential, again aluminium’s rapid conduction of heat gets it up to running temperature quicker - hence Rover’s introduction of an aluminium-alloy manifold on the MG Metro engine to utilise these principles. The mistake they made was making it slightly too big in the ports.
Port size needs to be designed to achieve maximum airflow without compromising velocity for the given space the manifold has to fit in. In a Mini this equates to precious little! Big ports mean lower air speeds, and as a consequence bottom end/mid range drivability suffers. In days gone by, there were only a few alternative mani-folds on the market for single SUs. The best ones being mainly produced to suit one particular engine build type - namely the 1380cc big-bores. The small-bore engines were considered the poor cousins. A couple of the better manufacturers ended up making two manifolds to alleviate the situation, but were based on the big bore item. The big problem here was the fit - the big-bore block is 3/8” taller than the small-bore.
To achieve maximum performance, manifolds were conceived to be as flat in side plan as possible. Conse-quently on the big-bore engines, the jet tube was perilously close to the bulkhead. I remember from the pained experiences of others that if the engine wasn’t kept rock still, the jet tube invariably ended up being whacked against the bulkhead, bending it and rendering it useless. A situation made worse by using the choke!! When this design was used for the small-bore engines, mayhem ensued as the fragile jet tube was practically resting on the bulkhead before the engine was even started. One manufacturer tried countering this problem by using a much steeper angle on the carb-mounting flange. This worked after a fashion but necessitated the carb float bowl angle to be re-set to avoid fueling problems. Not many folk realised or understood this, so ended up frus-trated by apparently strange and inconsistent engine performance! Nearly all manifolds needed finishing off by hand to achieve acceptable airflow performance, so were not really consistent ‘off the shelf’.
One of the unfortunate aspect of all this is that some ill-informed or less-knowledgeable manifold suppliers/manufacturers today have copied these manifolds exactly, and therefore all the inherent problems. There are only a couple of really good, thoroughly investigated and developed manifolds for the single SU on the market, the best by some margin being the Mini Spares/Mania components. So when deciding on which one to go for, before you look at the cost consider the design. It should fit easily, take a standard air-cleaner box and hold the carb high enough to avoid bulkhead/speedo cable fouling. The ports should taper nicely from manifold to carb mounting face and have a reasonable cast finish. There should be provision for water heating, the tube size compatible with the Minis heating pipes (1/2” bore as opposed to the 5/8” bore of the Metro). As for port sizing, for road use on practically all engines 1.35” at the manifold face is good. For big engines, i.e. 1400cc plus or 1380cc where maximum top end power is wanted, 1.4” at the manifold face is needed.
page � of �3
Single SU inlet manifold flow test comparison 96.50 cfm - MG Metro standard alloy manifold as cast.99.00 cfm - Howley 1.75” - previously the best available - this onewas quite heavily modified to achieve this flow figure.105.00 cfm - Titan Motorsport 1.75” as cast.108.10 cfm - Mini Spares C-AHT770/A small-port 1.5/1.75” as cast.112.11 cfm - Mini Spares C-AHT771 large-port 1.75” as cast.
The higher the cfm (cubic feet per minute) figure, the more power potential. All manifolds tested on a known-performer cylinder head with a manifold-less maximum flow 138cfm.
The manifold to head mounting flange thickness is also an area where most have fallen down. Some have cop-ied the MG Metro manifold that has a raised lump where the retaining washers sit up against to be level with the cast iron exhaust manifold used only on the MG Metro. Others have gone for a thickness that suits the bud-get exhaust manifolds they sell where the flange thickness varies depending on what material was cheapest at the time of manufacture. This mish-mash of flange sizing causes manifold gasket sealing problems. Either the exhaust is blowing or the intake is leaking in air, causing erratic running. The better ones therefore have a flange thickness compatible with the more popular, and generally higher quality exhaust manifolds - that’s cur-rently 8mm thick as per Maniflow and Janspeed.
Manifolds - twinsWe already know the benefits of twin carbs, and have already commented on the fact that the manifold type was responsible for the early horsepower gains. You only have to look at it to see why - the carbs are almost running a ‘straight shot’ into the intake ports; far more efficient than the early single carb counterparts despite pretty awful castings - especially internally - that really were not at all as efficient as they should have been.
Apart from the factory fitted manifolds of the Coopers and S, there are only a couple of other options. Those fitted to the Sprite/Midget, MG1100 and Austin 1300GT have a lower carb-mounting angle; so can cause instal-lation problems in a Mini. The main problem was the manifold design - basic and not especially efficient. They hadn’t had the benefit of the development that the single carb one has in more recent years, simply because the demand is far smaller. Many of those using twins want it to look ‘original’ or where racing’s concerned have to meet homologation rules, so could be construed as looking original. Mini Spares took some time out when looking at reproducing the original ‘ST’ twin carb manifolds to make sure the internal finish and shape were maximised given the criteria of a seemingly ‘standard’ reproduction manifold. Consequently the ‘off-the-shelf’ performance is much better and more consistent.
For maximum performance out of a twin carb set-up, the best manifold is manufactured in steel by those mani-fold fabrication wizards at Maniflow. Unfortunately it is made to favour the bigger carbs, so isn’t really suitable for twin inch and a quarters - but probably works better than the original cast aluminium ones! BUT - there is a big price penalty. If you decide to run twin carbs, then this steel manifold is a must to maximum performance potential.
In conclusionApart from the foregoing and stressing yet again that big is not necessarily best, I would like to point out that if you’re considering a carb change, the best SU to go for is the HIF variety. Space precludes me from depicting why. Suffice to say much development was put into it - making it far more effective than the older HS versions. I know I always bang on about this one particular point, but it really makes a big difference in driving pleasure - ALWAYS, ALWAYS, be honest about your car’s main use and how you mostly drive before deciding what components you buy.
page � of �3
Useful part numbers:
C-AHT770 Mini Spares inlet manifold for 1.5” SU. Can be re-worked for 1.75” SU at carb mounting flange/hole if/when required. Has 5/8”UNF threaded hole for servo take-off adaptor and 1/2” water-heating facility. Suitable for all road applications up to 1380cc.
C-AHT770A Mini Spares inlet manifold for 1.75 SU. Has 5/8”UNF threaded hole for servo take-off adaptor and 1/2” water-heating facility. Suitability as above.
C-AHT771 Mini Spares large port manifold for 1.75” SU on engines. With a greater capacity than 1380cc and serious cams.
C-AHT771/MG Titan Motorsport 1.5”/1.75” manifold with lower carb height for MG Midget & Austin Healey Sprite to avoid bonnet fouling.
12H1405 Servo take-off adaptor.C-AEG488 Mini Spares cast ally inlet manifold for twin SU - takes 1.25” H/HS2 or 1.5” H4 carbs (vertical stud pattern).
C-AEG489 Mini spares cast ally inlet manifold for twin SU - takes 1.5” or 1.75” HS4/HS6 carbs.
C-AEG490 Maniflow fabricated steel inlet manifold for twin SU - Comes with all stud patterns to take all SUs.
MSSK1005 Twin HS2 heat shield & return spring kit - stainless steel
MSSK008 Twin HS2 heat shield & return spring kit - black
MSSK1006 Twin HS4 heat shield & return spring kit - stainless steel
MSSK1004 Twin HS4 heat shield & return spring kit - black
MSSK9 Twin card linkage kit includes accelerator cable manifold bracket, 2 cross bars with linkage, choke and throttle cable trunnions.
Note: It is entirely feasible to use an alternative servo take-off as per the injection Minis and all Metros. This was simply the oil transfer pipe banjo bolt from the engine block and the transfer pipe cut short.
page � of �3
page � of �3
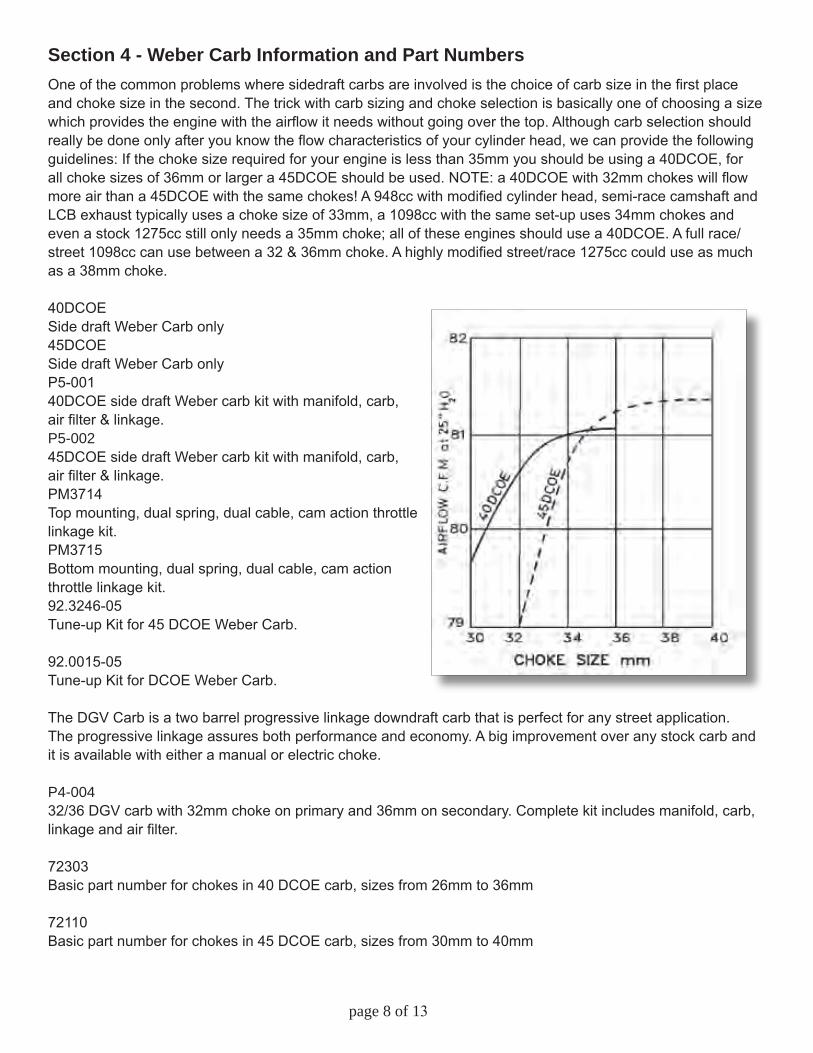
One of the common problems where sidedraft carbs are involved is the choice of carb size in the first place and choke size in the second. The trick with carb sizing and choke selection is basically one of choosing a size which provides the engine with the airflow it needs without going over the top. Although carb selection should really be done only after you know the flow characteristics of your cylinder head, we can provide the following guidelines: If the choke size required for your engine is less than 35mm you should be using a 40DCOE, for all choke sizes of 36mm or larger a 45DCOE should be used. NOTE: a 40DCOE with 32mm chokes will flow more air than a 45DCOE with the same chokes! A 948cc with modified cylinder head, semi-race camshaft and LCB exhaust typically uses a choke size of 33mm, a 1098cc with the same set-up uses 34mm chokes and even a stock 1275cc still only needs a 35mm choke; all of these engines should use a 40DCOE. A full race/street 1098cc can use between a 32 & 36mm choke. A highly modified street/race 1275cc could use as much as a 38mm choke.
40DCOESide draft Weber Carb only45DCOESide draft Weber Carb onlyP5-00140DCOE side draft Weber carb kit with manifold, carb, air filter & linkage.P5-00245DCOE side draft Weber carb kit with manifold, carb, air filter & linkage.PM3714Top mounting, dual spring, dual cable, cam action throttle linkage kit.PM3715Bottom mounting, dual spring, dual cable, cam action throttle linkage kit.92.3246-05Tune-up Kit for 45 DCOE Weber Carb.
92.0015-05Tune-up Kit for DCOE Weber Carb.
The DGV Carb is a two barrel progressive linkage downdraft carb that is perfect for any street application. The progressive linkage assures both performance and economy. A big improvement over any stock carb and it is available with either a manual or electric choke.
P4-00432/36 DGV carb with 32mm choke on primary and 36mm on secondary. Complete kit includes manifold, carb, linkage and air filter.
72303Basic part number for chokes in 40 DCOE carb, sizes from 26mm to 36mm
72110Basic part number for chokes in 45 DCOE carb, sizes from 30mm to 40mm
Section 4 - Weber Carb Information and Part Numbers

14-55Mini Mania
14
One oft h ecommonproblemsw h e r esidedraftcarbs areinvolvedis thechoice ofcarb sizein the firstplace andc h o k esize in the second. The trick with carbsizing and choke selection is basically oneof choosing a size which provides theengine with the airflow it needs withoutgoing over the top. Although carbselection should really be done only afteryou know the flow characteristics of yourcylinder head, we can provide the followingguidelines: If the choke size required foryour engine is less than 35mm you shouldbe using a 40DCOE, for all choke sizesof 36mm or larger a 45DCOE should beused. NOTE: a 40DCOE with 32mmchokes will flow more air than a 45DCOEwith the same chokes! A 948cc withmodified cylinder head, semi-racecamshaft and LCB exhaust typically usesa choke size of 33mm, a 1098cc withthe same set-up uses 34mm chokes andeven a stock 1275cc still only needs a35mm choke; all of these engines shoulduse a 40DCOE. A full race/street 1098cccan use between a 32 & 36mm choke.A highly modified street/race 1275cc coulduse as much as a 38mm choke.
40DCOESide draft WeberCarb only
45DCOESide draftWeber Carb only
P5-00140DCOE side draft Weber carb kit withmanifold, carb, air filter & linkage.
P5-00245DCOE side draft Weber carb kit withmanifold, carb, air filter & linkage.
PM3714Top mounting, dual spring, dual cable,cam action throttle linkage kit.
PM3715Bottom mounting, dual spring, dual cable,cam action throttle linkage kit.
92.3246-05Tune-up Kit for 45 DCOE Weber Carb.
92.0015-05Tune-up Kit for DCOE Weber Carb.
The DGV Carb is a two barrel progressivelinkage downdraft carb that is perfect forany street application. The progressivelinkage assures both performance andeconomy. A big improvement over anystock carb and it is available with eithera manual or electric choke.
P4-00432/36 DGV carb with 32mm choke onprimary and 36mm on secondary.Complete kit includes manifold, carb,linkage and air filter.
72303Basic part number for chokes in 40 DCOEcarb, sizes from 26mm to 36mm
72110Basic part number for chokes in 45 DCOEcarb, sizes from 30mm to 40mm
page 9 of �3

14-56 www.MiniMania.com e-mail [email protected] 800-946-2642 Tech: 408-942-5595
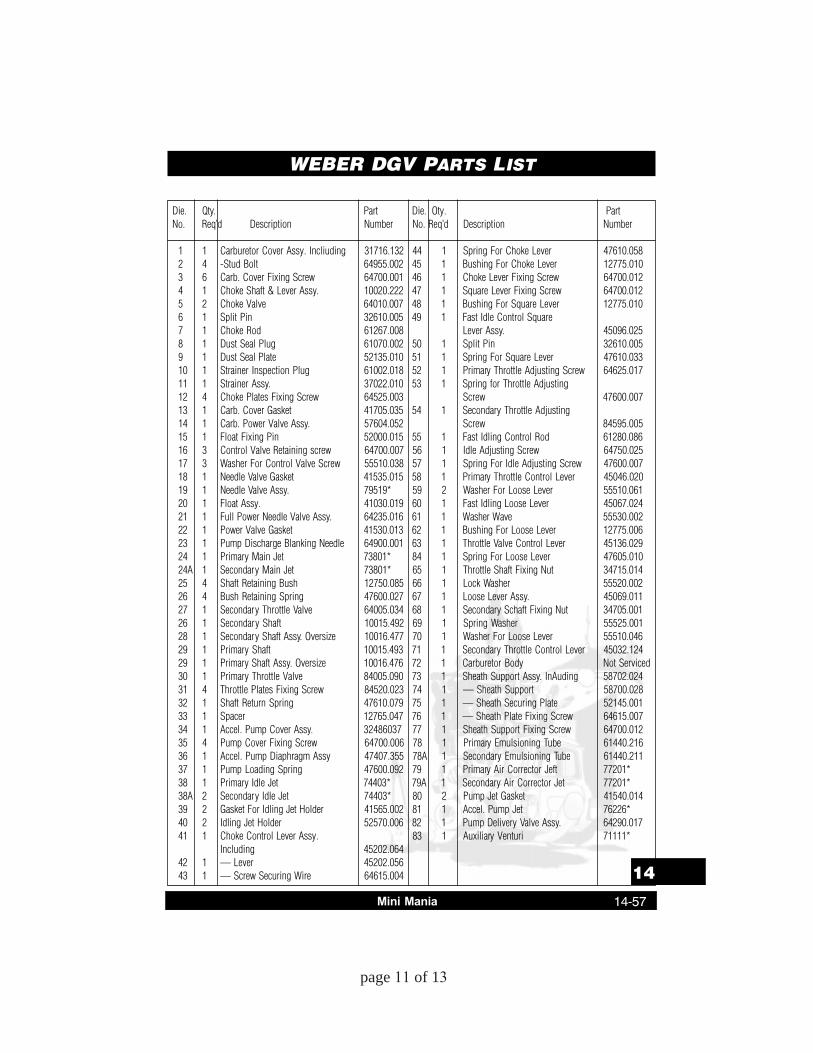
WEBER DGV PARTS
page 10 of �3
14-57Mini Mania
14
Die. Qty. Part Die. Oty. PartNo. Req�d Description Number No. Req�d Description Number
1 1 Carburetor Cover Assy. Incliuding 31716.132 44 1 Spring For Choke Lever 47610.0582 4 -Stud Bolt 64955.002 45 1 Bushing For Choke Lever 12775.0103 6 Carb. Cover Fixing Screw 64700.001 46 1 Choke Lever Fixing Screw 64700.0124 1 Choke Shaft & Lever Assy. 10020.222 47 1 Square Lever Fixing Screw 64700.0125 2 Choke Valve 64010.007 48 1 Bushing For Square Lever 12775.0106 1 Split Pin 32610.005 49 1 Fast Idle Control Square7 1 Choke Rod 61267.008 Lever Assy. 45096.0258 1 Dust Seal Plug 61070.002 50 1 Split Pin 32610.0059 1 Dust Seal Plate 52135.010 51 1 Spring For Square Lever 47610.03310 1 Strainer Inspection Plug 61002.018 52 1 Primary Throttle Adjusting Screw 64625.01711 1 Strainer Assy. 37022.010 53 1 Spring for Throttle Adjusting12 4 Choke Plates Fixing Screw 64525.003 Screw 47600.00713 1 Carb. Cover Gasket 41705.035 54 1 Secondary Throttle Adjusting14 1 Carb. Power Valve Assy. 57604.052 Screw 84595.00515 1 Float Fixing Pin 52000.015 55 1 Fast Idling Control Rod 61280.08616 3 Control Valve Retaining screw 64700.007 56 1 Idle Adjusting Screw 64750.02517 3 Washer For Control Valve Screw 55510.038 57 1 Spring For Idle Adjusting Screw 47600.00718 1 Needle Valve Gasket 41535.015 58 1 Primary Throttle Control Lever 45046.02019 1 Needle Valve Assy. 79519* 59 2 Washer For Loose Lever 55510.06120 1 Float Assy. 41030.019 60 1 Fast Idling Loose Lever 45067.02421 1 Full Power Needle Valve Assy. 64235.016 61 1 Washer Wave 55530.00222 1 Power Valve Gasket 41530.013 62 1 Bushing For Loose Lever 12775.00623 1 Pump Discharge Blanking Needle 64900.001 63 1 Throttle Valve Control Lever 45136.02924 1 Primary Main Jet 73801* 84 1 Spring For Loose Lever 47605.01024A 1 Secondary Main Jet 73801* 65 1 Throttle Shaft Fixing Nut 34715.01425 4 Shaft Retaining Bush 12750.085 66 1 Lock Washer 55520.00226 4 Bush Retaining Spring 47600.027 67 1 Loose Lever Assy. 45069.01127 1 Secondary Throttle Valve 64005.034 68 1 Secondary Schaft Fixing Nut 34705.00126 1 Secondary Shaft 10015.492 69 1 Spring Washer 55525.00128 1 Secondary Shaft Assy. Oversize 10016.477 70 1 Washer For Loose Lever 55510.04629 1 Primary Shaft 10015.493 71 1 Secondary Throttle Control Lever 45032.12429 1 Primary Shaft Assy. Oversize 10016.476 72 1 Carburetor Body Not Serviced30 1 Primary Throttle Valve 84005.090 73 1 Sheath Support Assy. InAuding 58702.02431 4 Throttle Plates Fixing Screw 84520.023 74 1 � Sheath Support 58700.02832 1 Shaft Return Spring 47610.079 75 1 � Sheath Securing Plate 52145.00133 1 Spacer 12765.047 76 1 � Sheath Plate Fixing Screw 64615.00734 1 Accel. Pump Cover Assy. 32486037 77 1 Sheath Support Fixing Screw 64700.01235 4 Pump Cover Fixing Screw 64700.006 78 1 Primary Emulsioning Tube 61440.21636 1 Accel. Pump Diaphragm Assy 47407.355 78A 1 Secondary Emulsioning Tube 61440.21137 1 Pump Loading Spring 47600.092 79 1 Primary Air Corrector Jeft 77201*38 1 Primary Idle Jet 74403* 79A 1 Secondary Air Corrector Jet 77201*38A 2 Secondary Idle Jet 74403* 80 2 Pump Jet Gasket 41540.01439 2 Gasket For Idling Jet Holder 41565.002 81 1 Accel. Pump Jet 76226*40 2 Idling Jet Holder 52570.006 82 1 Pump Delivery Valve Assy. 64290.01741 1 Choke Control Lever Assy. 83 1 Auxiliary Venturi 71111*
Including 45202.06442 1 � Lever 45202.05643 1 � Screw Securing Wire 64615.004
WEBER DGV PARTS LIST
page 11 of �3
14-58 www.MiniMania.com e-mail [email protected] 800-946-2642 Tech: 408-942-5595
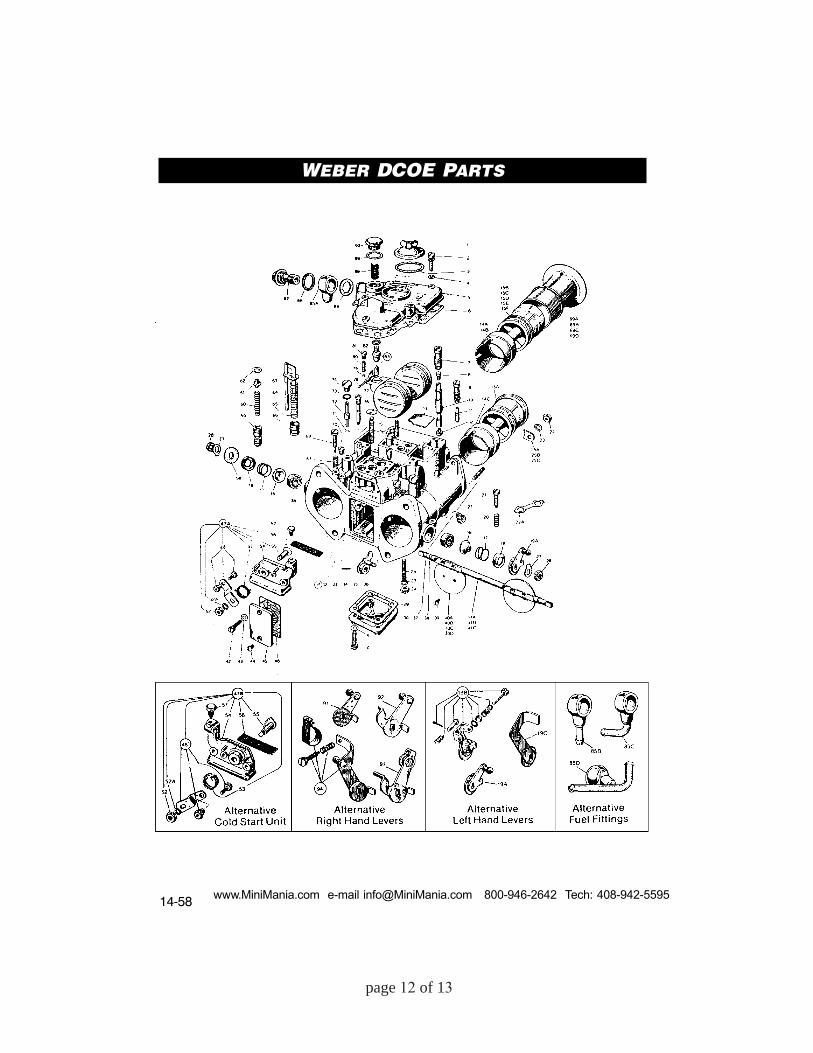
WEBER DCOE PARTS
page 12 of �3
14-59Mini Mania
14
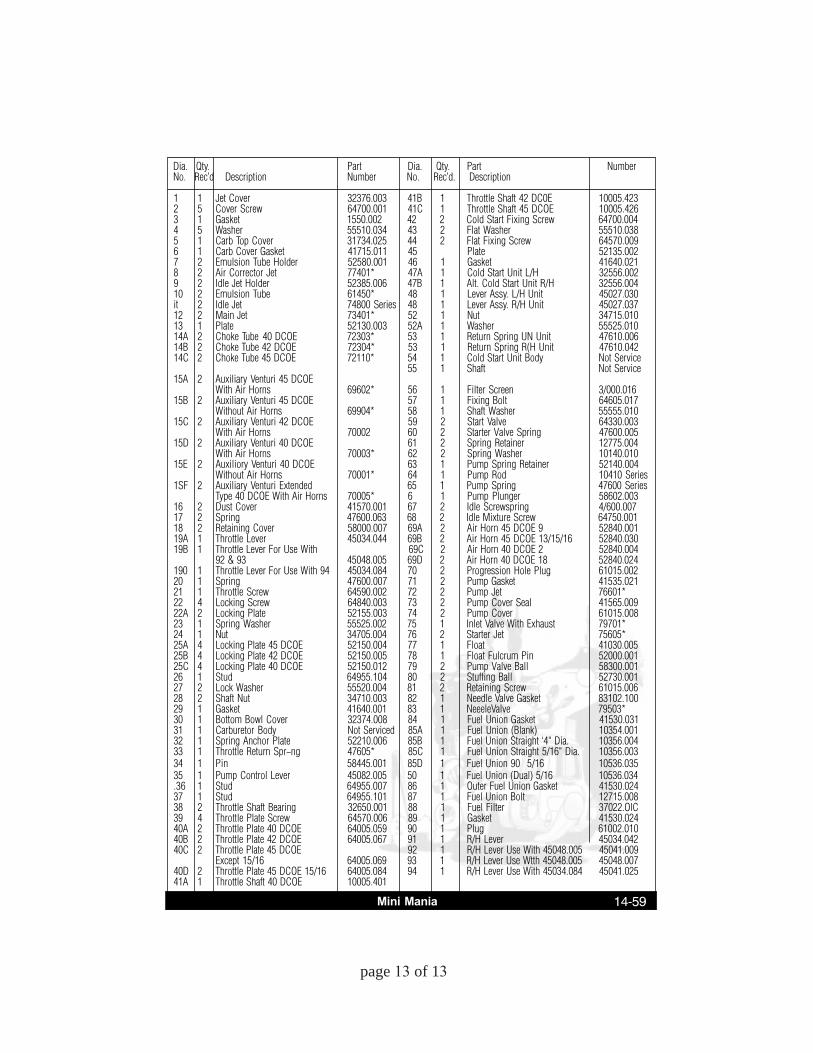
Dia. Qty. Part Dia. Qty. Part NumberNo. Rec'd Description Number No. Rec'd. Description
1 1 Jet Cover 32376.003 41B 1 Throttle Shaft 42 DC0E 10005.4232 5 Cover Screw 64700.001 41C 1 Throttle Shaft 45 DCOE 10005.4263 1 Gasket 1550.002 42 2 Cold Start Fixing Screw 64700.0044 5 Washer 55510.034 43 2 Flat Washer 55510.0385 1 Carb Top Cover 31734.025 44 2 Flat Fixing Screw 64570.0096 1 Carb Cover Gasket 41715.011 45 Plate 52135.0027 2 Emulsion Tube Holder 52580.001 46 1 Gasket 41640.0218 2 Air Corrector Jet 77401* 47A 1 Cold Start Unit L/H 32556.0029 2 Idle Jet Holder 52385.006 47B 1 Alt. Cold Start Unit R/H 32556.00410 2 Emulsion Tube 61450* 48 1 Lever Assy. L/H Unit 45027.030it 2 Idle Jet 74800 Series 48 1 Lever Assy. R/H Unit 45027.03712 2 Main Jet 73401* 52 1 Nut 34715.01013 1 Plate 52130.003 52A 1 Washer 55525.01014A 2 Choke Tube 40 DCOE 72303* 53 1 Return Spring UN Unit 47610.00614B 2 Choke Tube 42 DCOE 72304* 53 1 Return Spring R(H Unit 47610.04214C 2 Choke Tube 45 DCOE 72110* 54 1 Cold Start Unit Body Not Service
55 1 Shaft Not Service15A 2 Auxiliary Venturi 45 DCOE
With Air Horns 69602* 56 1 Filter Screen 3/000.01615B 2 Auxiliary Venturi 45 DCOE 57 1 Fixing Bolt 64605.017
Without Air Horns 69904* 58 1 Shaft Washer 55555.01015C 2 Auxiliary Venturi 42 DCOE 59 2 Start Valve 64330.003
With Air Horns 70002 60 2 Starter Valve Spring 47600.00515D 2 Auxiliary Venturi 40 DCOE 61 2 Spring Retainer 12775.004
With Air Horns 70003* 62 2 Spring Washer 10140.01015E 2 Auxiliory Venturi 40 DCOE 63 1 Pump Spring Retainer 52140.004
Without Air Horns 70001* 64 1 Pump Rod 10410 Series1SF 2 Auxiliary Venturi Extended 65 1 Pump Spring 47600 Series
Type 40 DCOE With Air Horns 70005* 6 1 Pump Plunger 58602.00316 2 Dust Cover 41570.001 67 2 Idle Screwspring 4/600.00717 2 Spring 47600.063 68 2 Idle Mixture Screw 64750.00118 2 Retaining Cover 58000.007 69A 2 Air Horn 45 DCOE 9 52840.00119A 1 Throttle Lever 45034.044 69B 2 Air Horn 45 DCOE 13/15/16 52840.03019B 1 Throttle Lever For Use With 69C 2 Air Horn 40 DCOE 2 52840.004
92 & 93 45048.005 69D 2 Air Horn 40 DCOE 18 52840.024190 1 Throttle Lever For Use With 94 45034.084 70 2 Progression Hole Plug 61015.00220 1 Spring 47600.007 71 2 Pump Gasket 41535.02121 1 Throttle Screw 64590.002 72 2 Pump Jet 76601*22 4 Locking Screw 64840.003 73 2 Pump Cover Seal 41565.00922A 2 Locking Plate 52155.003 74 2 Pump Cover 61015.00823 1 Spring Washer 55525.002 75 1 Inlet Valve With Exhaust 79701*24 1 Nut 34705.004 76 2 Starter Jet 75605*25A 4 Locking Plate 45 DCOE 52150.004 77 1 Float 41030.00525B 4 Locking Plate 42 DCOE 52150.005 78 1 Float Fulcrum Pin 52000.00125C 4 Locking Plate 40 DCOE 52150.012 79 2 Pump Valve Ball 58300.00126 1 Stud 64955.104 80 2 Stuffing Ball 52730.00127 2 Lock Washer 55520.004 81 2 Retaining Screw 61015.00628 2 Shaft Nut 34710.003 82 1 Needle Valve Gasket 83102.10029 1 Gasket 41640.001 83 1 NeeeleValve 79503*30 1 Bottom Bowl Cover 32374.008 84 1 Fuel Union Gasket 41530.03131 1 Carburetor Body Not Serviced 85A 1 Fuel Union (Blank) 10354.00132 1 Spring Anchor Plate 52210.006 85B 1 Fuel Union Straight �4" Dia. 10356.00433 1 Throttle Return Spr~ng 47605* 85C 1 Fuel Union Straight 5/16" Dia. 10356.00334 1 Pin 58445.001 85D 1 Fuel Union 90° 5/16 10536.03535 1 Pump Control Lever 45082.005 50 1 Fuel Union (Dual) 5/16 10536.034.36 1 Stud 64955.007 86 1 Outer Fuel Union Gasket 41530.02437 1 Stud 64955.101 87 1 Fuel Union Bolt 12715.00838 2 Throttle Shaft Bearing 32650.001 88 1 Fuel Filter 37022.OlC39 4 Throttle Plate Screw 64570.006 89 1 Gasket 41530.02440A 2 Throttle Plate 40 DCOE 64005.059 90 1 Plug 61002.01040B 2 Throttle Plate 42 DCOE 64005.067 91 1 R/H Lever 45034.04240C 2 Throttle Plate 45 DCOE 92 1 R/H Lever Use With 45048.005 45041.009
Except 15/16 64005.069 93 1 R/H Lever Use Wtth 45048.005 45048.00740D 2 Throttle Plate 45 DCOE 15/16 64005.084 94 1 R/H Lever Use With 45034.084 45041.02541A 1 Throttle Shaft 40 DCOE 10005.401
page 13 of �3