Embed Size (px)
Citation preview
May 2011 Altera Corporation
Section I. Scripting and Constraint Entry
As a result of the increasing complexity of today’s FPGA designs and the demand for higher performance, designers must make a large number of complex timing and logic constraints to meet their performance requirements. After you create a project and design, you can use the Quartus® II software Assignment Editor and other GUI features to specify your initial design constraints, such as pin assignments, device options, logic options, and timing constraints.
This section describes how to constrain designs, how to take advantage of Quartus II modular executables, how to develop and run Tcl scripts to perform a wide range of functions, and how to manage the Quartus II projects.
This section includes the following chapters:
■ Chapter 1, Constraining Designs
This chapter discusses the ways to constrain designs in the Quartus II software, including the tools avaliable in the Quartus II software GUI, as well as Tcl scripting flows.
■ Chapter 2, Command-Line Scripting
This chapter discusses Quartus II command-line executables, which provide command-line control over each step of the design flow. Each executable includes options to control commonly used software settings. Each executable also provides detailed, built-in help describing its function, available options, and settings.
■ Chapter 3, Tcl Scripting
This chapter discusses developing and running Tcl scripts in the Quartus II software to allow you to perform a wide range of functions, such as compiling a design or automating common tasks. This chapter includes sample Tcl scripts for automating the Quartus II software. You can modify these example scripts for use with your own designs.
■ Chapter 4, Managing Quartus II Projects
This chapter discusses the best ways to manage Quartus II projects. This chapter also discusses how to migrate your projects from one computing platform to another; create and compare revisions; and copy, archive and restore projects.
Quartus II Handbook Version 11.0 Volume 2: Design Implementation and Optimization

I–2 Section I: Scripting and Constraint Entry
Quartus II Handbook Version 11.0 Volume 2: Design Implementation and Optimization May 2011 Altera Corporation
Quartus II Handbook Version 11.0 Volume 2: Design December 2010
QII52001-10.0.1
© 2010 Altera Corporation. All rights reserved. ALTERA, ARRand/or trademarks of Altera Corporation in the U.S. and otherwww.altera.com/common/legal.html. Altera warrants performreserves the right to make changes to any products and servicesinformation, product, or service described herein except as expspecifications before relying on any published information and
December 2010QII52001-10.0.1
1. Constraining Designs
This chapter discusses the various tools and methods for constraining and re-constraining Quartus II designs in different design flows, both with the Quartus II GUI and with Tcl to facilitate a scripted flow.
Constraints, sometimes known as assignments or logic options, control the way the Quartus II software implements a design for an FPGA. Constraints are also central in the way that the TimeQuest Timing Analyzer and the PowerPlay Power Analyzer inform synthesis, placement, and routing. There are several types of constraints:
■ Global design constraints and software settings, such as device family selection, package type, and pin count.
■ Entity-level constraints, such as logic options and placement assignments.
■ Instance-level constraints.
■ Pin assignments and I/O constraints.
User-created constraints are contained in one of two files: the Quartus II Settings File (.qsf) or, in the case of timing constraints, the Synopsys Design Constraints file (.sdc). Constraints and assignments made with the Device dialog box, Settings dialog box, Assignment Editor, Chip Planner, and Pin Planner are contained in the Quartus II Settings File. The .qsf file contains project-wide and instance-level assignments for the current revision of the project in Tcl syntax. You can create separate revisions of your project with different settings, and there is a separate .qsf file for each revision.
The TimeQuest Timing Analyzer uses industry-standard Synopsys Design Constraints, also using Tcl syntax, that are contained in Synopsys Design Constraints (.sdc) files. The TimeQuest Timing Analyzer GUI is a tool for making timing constraints and viewing the results of subsequent analysis.
There are several ways to constrain a design, each potentially more appropriate than the others, depending on your tool chain and design flow. You can constrain designs for compilation and analysis in the Quartus II software using the GUI, as well as using Tcl syntax and scripting. By combining the Tcl syntax of the .qsf files and the .sdc files with procedural Tcl, you can automate iteration over several different settings, changing constraints and recompiling.
Constraining Designs with the Quartus II GUIIn the Quartus II GUI, the New Project Wizard, Device dialog box, and Settings dialog box allow you to make global constraints and software settings. The Assignment Editor and Pin Planner are spreadsheet-style interfaces for constraining your design at the instance or entity level. The Assignment Editor and Pin Planner make constraint types and values available based on global design characteristics such as the targeted device. These tools help you verify that your constraints are valid before compilation by allowing you to pick only from valid values for each constraint.
Implementation and Optimization
Subscribe
IA, CYCLONE, HARDCOPY, MAX, MEGACORE, NIOS, QUARTUS and STRATIX are Reg. U.S. Pat. & Tm. Off. countries. All other trademarks and service marks are the property of their respective holders as described at
ance of its semiconductor products to current specifications in accordance with Altera’s standard warranty, but at any time without notice. Altera assumes no responsibility or liability arising out of the application or use of any ressly agreed to in writing by Altera. Altera customers are advised to obtain the latest version of device before placing orders for products or services.
1–2 Chapter 1: Constraining DesignsConstraining Designs with the Quartus II GUI
The TimeQuest Timing Analyzer GUI allows you to make timing constraints in SDC format and view the effects of those constraints on the timing in your design. Before running the TimeQuest timing analyzer, you must specify initial timing constraints that describe the clock characteristics, timing exceptions, and external signal arrival and required times. The Quartus II Fitter optimizes the placement of logic in the device to meet your specified constraints.
h For more information about timing constraints and the TimeQuest Timing Analyzer, refer to About TimeQuest Timing Analysis in Quartus II Help.
Global ConstraintsGlobal constraints affect the entire Quartus II project and all of the applicable logic in the design. Many of these constraints are simply project settings, such as the targeted device selected for the design. Synthesis optimizations and global timing and power analysis settings can also be applied with globally. Global constraints are often made when running the New Project Wizard, or in the Device dialog box or the Settings dialog box, early project development.
The following are the most common types of global constraints:
■ Target device specification
■ Top-level entity of your design, and the names of the design files included in the project
■ Operating temperature limits and conditions
■ Physical synthesis optimizations
■ Analysis and synthesis options and optimization techniques
■ Verilog HDL and VHDL language versions used in your project
■ Fitter effort and timing driven compilation settings
■ .sdc files for the TimeQuest timing analyzer to use during analysis as part of a full compilation flow
Settings that direct compilation and analysis flows in the Quartus II software are also stored in the Quartus II Settings File for your project, including the following global software settings:
■ Early Timing Estimate mode
■ Settings for EDA tool integration such as third-party synthesis tools, simulation tools, timing analysis tools, and formal verification tools.
■ Settings and settings file specifications for the Quartus II Assembler, SignalTap II Logic Analyzer, PowerPlay power analyzer, and SSN Analyzer.
Global constraints and software settings stored in the Quartus II settings file are specific to each revision of your design, allowing you to control the operation of the software differently for different revisions. For example, different revisions can specify different operating temperatures and different devices, so that you can compare results.
Quartus II Handbook Version 11.0 Volume 2: Design Implementation and Optimization December 2010 Altera Corporation
Chapter 1: Constraining Designs 1–3Constraining Designs with the Quartus II GUI
Only the valid assignments made in the Assignment Editor are saved in the Quartus II Settings File, which is located in the project directory. When you make a design constraint, the new assignment is placed on a new line at the end of the file.
When you create or update a constraint in the GUI, the Quartus II software displays the equivalent Tcl command in the System tab of the Messages window. You can use the displayed messages as references when making assignments using Tcl commands.
h For more information about specifying initial global constraints and software settings, refer to Setting up and Running a Compilation in Quartus II Help.
f For more information about how the Quartus II software uses Quartus II Settings Files, refer to the Managing Quartus II Projects chapter in volume 2 of the Quartus II Handbook.
Node, Entity, and Instance-Level ConstraintsNode, entity, and instance-level constraints constrain a particular segment of the design hierarchy, as opposed to the entire design. In the Quartus II software GUI, most instance-level constraints are made with the Assignment Editor, Pin Planner, and Chip Planner. Both the Assignment Editor and Pin Planner aid you in correctly constraining your design, both passively, through device-and-assignment-determined pick lists, and actively, through live I/O checking.
You can assign logic functions to physical resources on the device, using location assignments with the Assignment Editor or the Chip Planner. Node, entity, and instance-level constraints take precedence over any global constraints that affect the same sections of the design hierarchy. You can edit and view all node and entity-level constraints you created in the Assignment Editor, or you can filter the assignments by choosing to view assignments only for specific locations, such as DSP blocks.
The Pin Planner provides a graphical representation of the target device, which allows you to easily plan, view, create, and edit pin assignments in terms of where the pins actually exist on the targeted device package. With the Pin Planner, you can visually identify I/O banks, VREF groups, edges, and differential pin pairings to assist you in the pin planning process. You can verify the legality of new and existing pin assignments with the live I/O check feature and view the results in the Live I/O Check Status window.
The Chip Planner allows you to view the device from a variety of different perspectives, and you can make precise assignments to specific floorplan locations. With the Chip Planner, you can adjust existing assignments to device resources, such as pins, logic cells, and LABs using drag and drop features and a graphical interface. You can also view equations and routing information, and demote assignments by dragging and dropping assignments to various regions in the Regions window.
h For more information about the Assignment Editor, refer to About the Assignment Editor in Quartus II Help. For more information about the Chip Planner, refer to About the Chip Planner in Quartus II Help. For more information about the Pin Planner, refer to About the Pin Planner in Quartus II Help.
December 2010 Altera Corporation Quartus II Handbook Version 11.0 Volume 2: Design Implementation and Optimization
1–4 Chapter 1: Constraining DesignsConstraining Designs with Tcl
Probing Between Components of the Quartus II GUIThe Assignment Editor, Chip Planner, and Pin Planner let you locate nodes and instances in the source files for your design in other Quartus II viewers. You can select a cell in the Assignment Editor spreadsheet and locate the corresponding item in another applicable Quartus II software window, such as the Chip Planner. To locate an item from the Assignment Editor in another window, right-click the item of interest in the spreadsheet, point to Locate, and click the appropriate command.
You can also locate nodes in the Assignment Editor and other constraint tools from other windows within the Quartus II software. First, select the node or nodes in the appropriate window. For example, select an entity in the Entity list in the Hierarchy tab in the Project Navigator, or select nodes in the Chip Planner. Next, right-click the selected object, point to Locate, and click Locate in Assignment Editor. The Assignment Editor opens, or it is brought to the foreground if it is already open.
h For more information about the Assignment Editor, refer to About the Assignment Editor in Quartus II Help. For more information about the Chip Planner, refer to About the Chip Planner in Quartus II Help. For more information about the Pin Planner, refer to About the Pin Planner in Quartus II Help.
SDC and the TimeQuest Timing AnalyzerYou can make individual timing constraints for individual entities, nodes, and pins with the Constraints menu of the TimeQuest Timing Analyzer. The TimeQuest Timing Analyzer GUI provides easy access to timing constraints, and reporting, without requiring knowledge of SDC syntax. As you specify commands and options in the GUI, the corresponding SDC or Tcl command appears in the Console. This lets you know exactly what constraint you have added to your Synopsys Design Constraints file, and also enables you to learn SDC syntax for use in scripted flows. The GUI also provides enhanced graphical reporting features.
Individual timing assignments override project-wide requirements. You can also assign timing exceptions to nodes and paths to avoid reporting of incorrect or irrelevant timing violations. The TimeQuest timing analyzer supports point-to-point timing constraints, wildcards to identify specific nodes when making constraints, and assignment groups to make individual constraints to groups of nodes.
h For more information about timing constraints and the TimeQuest Timing Analyzer, refer to About TimeQuest Timing Analysis in Quartus II Help.
Constraining Designs with TclBecause .sdc files and .qsf files are both in Tcl syntax, you can modify these files to be part of a scripted constraint and compilation flow. With Quartus II Tcl packages, Tcl scripts can open projects, make the assignments procedurally that would otherwise be specified in a .qsf file, compile a design, and compare compilation results against known goals and benchmarks for the design. Such a script can further automate the iterative process by modifying design constraints and recompiling the design.
h For more information about controlling the Quartus II software with Tcl, refer to About Quartus II Tcl Scripting in Quartus II Help.
Quartus II Handbook Version 11.0 Volume 2: Design Implementation and Optimization December 2010 Altera Corporation
Chapter 1: Constraining Designs 1–5Constraining Designs with Tcl
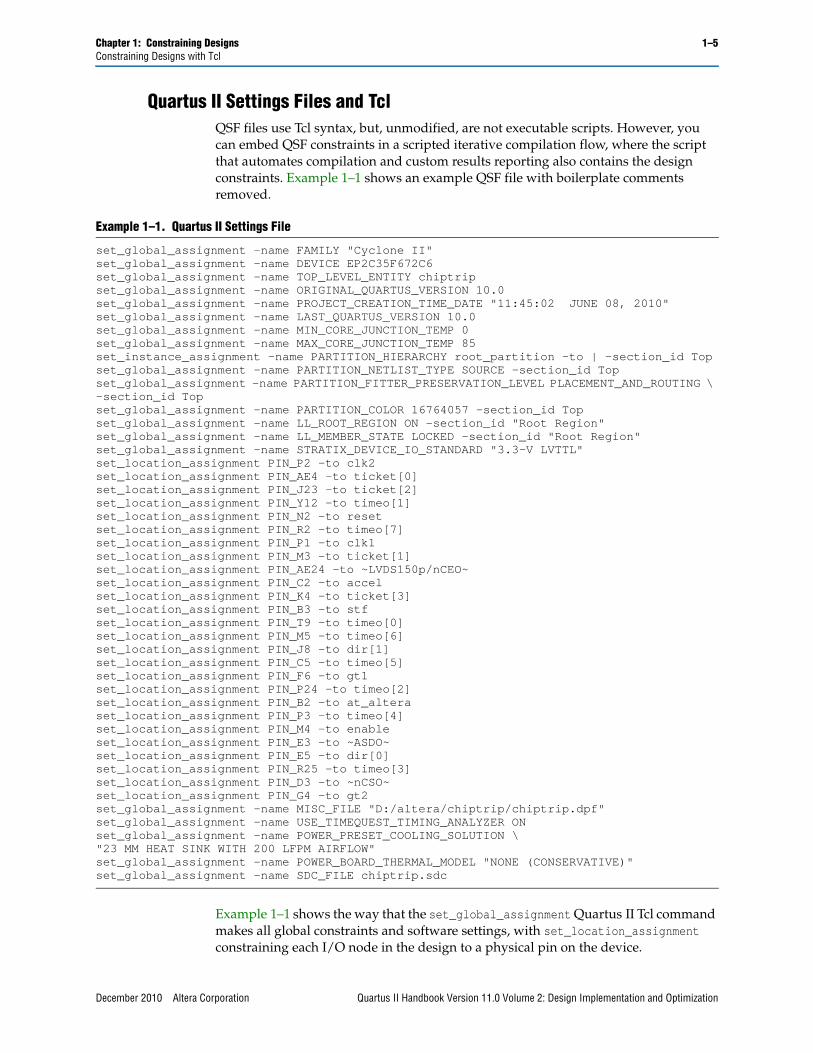
Quartus II Settings Files and TclQSF files use Tcl syntax, but, unmodified, are not executable scripts. However, you can embed QSF constraints in a scripted iterative compilation flow, where the script that automates compilation and custom results reporting also contains the design constraints. Example 1–1 shows an example QSF file with boilerplate comments removed.
Example 1–1 shows the way that the set_global_assignment Quartus II Tcl command makes all global constraints and software settings, with set_location_assignment constraining each I/O node in the design to a physical pin on the device.
Example 1–1. Quartus II Settings File
set_global_assignment -name FAMILY "Cyclone II"set_global_assignment -name DEVICE EP2C35F672C6set_global_assignment -name TOP_LEVEL_ENTITY chiptripset_global_assignment -name ORIGINAL_QUARTUS_VERSION 10.0set_global_assignment -name PROJECT_CREATION_TIME_DATE "11:45:02 JUNE 08, 2010"set_global_assignment -name LAST_QUARTUS_VERSION 10.0set_global_assignment -name MIN_CORE_JUNCTION_TEMP 0set_global_assignment -name MAX_CORE_JUNCTION_TEMP 85set_instance_assignment -name PARTITION_HIERARCHY root_partition -to | -section_id Topset_global_assignment -name PARTITION_NETLIST_TYPE SOURCE -section_id Topset_global_assignment -name PARTITION_FITTER_PRESERVATION_LEVEL PLACEMENT_AND_ROUTING \ -section_id Topset_global_assignment -name PARTITION_COLOR 16764057 -section_id Topset_global_assignment -name LL_ROOT_REGION ON -section_id "Root Region"set_global_assignment -name LL_MEMBER_STATE LOCKED -section_id "Root Region"set_global_assignment -name STRATIX_DEVICE_IO_STANDARD "3.3-V LVTTL"set_location_assignment PIN_P2 -to clk2set_location_assignment PIN_AE4 -to ticket[0]set_location_assignment PIN_J23 -to ticket[2]set_location_assignment PIN_Y12 -to timeo[1]set_location_assignment PIN_N2 -to resetset_location_assignment PIN_R2 -to timeo[7]set_location_assignment PIN_P1 -to clk1set_location_assignment PIN_M3 -to ticket[1]set_location_assignment PIN_AE24 -to ~LVDS150p/nCEO~set_location_assignment PIN_C2 -to accelset_location_assignment PIN_K4 -to ticket[3]set_location_assignment PIN_B3 -to stfset_location_assignment PIN_T9 -to timeo[0]set_location_assignment PIN_M5 -to timeo[6]set_location_assignment PIN_J8 -to dir[1]set_location_assignment PIN_C5 -to timeo[5]set_location_assignment PIN_F6 -to gt1set_location_assignment PIN_P24 -to timeo[2]set_location_assignment PIN_B2 -to at_alteraset_location_assignment PIN_P3 -to timeo[4]set_location_assignment PIN_M4 -to enableset_location_assignment PIN_E3 -to ~ASDO~set_location_assignment PIN_E5 -to dir[0]set_location_assignment PIN_R25 -to timeo[3]set_location_assignment PIN_D3 -to ~nCSO~set_location_assignment PIN_G4 -to gt2set_global_assignment -name MISC_FILE "D:/altera/chiptrip/chiptrip.dpf"set_global_assignment -name USE_TIMEQUEST_TIMING_ANALYZER ONset_global_assignment -name POWER_PRESET_COOLING_SOLUTION \"23 MM HEAT SINK WITH 200 LFPM AIRFLOW"set_global_assignment -name POWER_BOARD_THERMAL_MODEL "NONE (CONSERVATIVE)"set_global_assignment -name SDC_FILE chiptrip.sdc
December 2010 Altera Corporation Quartus II Handbook Version 11.0 Volume 2: Design Implementation and Optimization
1–6 Chapter 1: Constraining DesignsConstraining Designs with Tcl
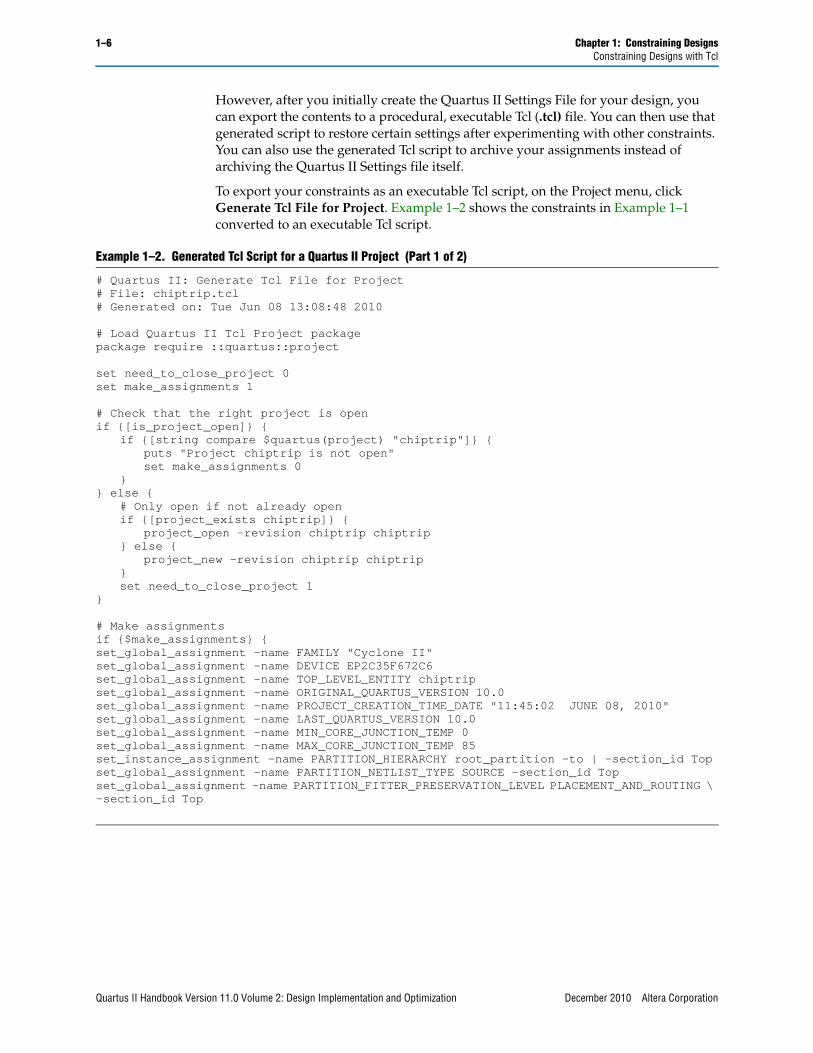
However, after you initially create the Quartus II Settings File for your design, you can export the contents to a procedural, executable Tcl (.tcl) file. You can then use that generated script to restore certain settings after experimenting with other constraints. You can also use the generated Tcl script to archive your assignments instead of archiving the Quartus II Settings file itself.
To export your constraints as an executable Tcl script, on the Project menu, click Generate Tcl File for Project. Example 1–2 shows the constraints in Example 1–1 converted to an executable Tcl script.
Example 1–2. Generated Tcl Script for a Quartus II Project (Part 1 of 2)
# Quartus II: Generate Tcl File for Project# File: chiptrip.tcl# Generated on: Tue Jun 08 13:08:48 2010
# Load Quartus II Tcl Project packagepackage require ::quartus::project
set need_to_close_project 0set make_assignments 1
# Check that the right project is openif {[is_project_open]} {
if {[string compare $quartus(project) "chiptrip"]} {puts "Project chiptrip is not open"set make_assignments 0
}} else {
# Only open if not already openif {[project_exists chiptrip]} {
project_open -revision chiptrip chiptrip} else {
project_new -revision chiptrip chiptrip}set need_to_close_project 1
}
# Make assignmentsif {$make_assignments} {set_global_assignment -name FAMILY "Cyclone II"set_global_assignment -name DEVICE EP2C35F672C6set_global_assignment -name TOP_LEVEL_ENTITY chiptripset_global_assignment -name ORIGINAL_QUARTUS_VERSION 10.0set_global_assignment -name PROJECT_CREATION_TIME_DATE "11:45:02 JUNE 08, 2010"set_global_assignment -name LAST_QUARTUS_VERSION 10.0set_global_assignment -name MIN_CORE_JUNCTION_TEMP 0set_global_assignment -name MAX_CORE_JUNCTION_TEMP 85set_instance_assignment -name PARTITION_HIERARCHY root_partition -to | -section_id Topset_global_assignment -name PARTITION_NETLIST_TYPE SOURCE -section_id Topset_global_assignment -name PARTITION_FITTER_PRESERVATION_LEVEL PLACEMENT_AND_ROUTING \ -section_id Top
Quartus II Handbook Version 11.0 Volume 2: Design Implementation and Optimization December 2010 Altera Corporation
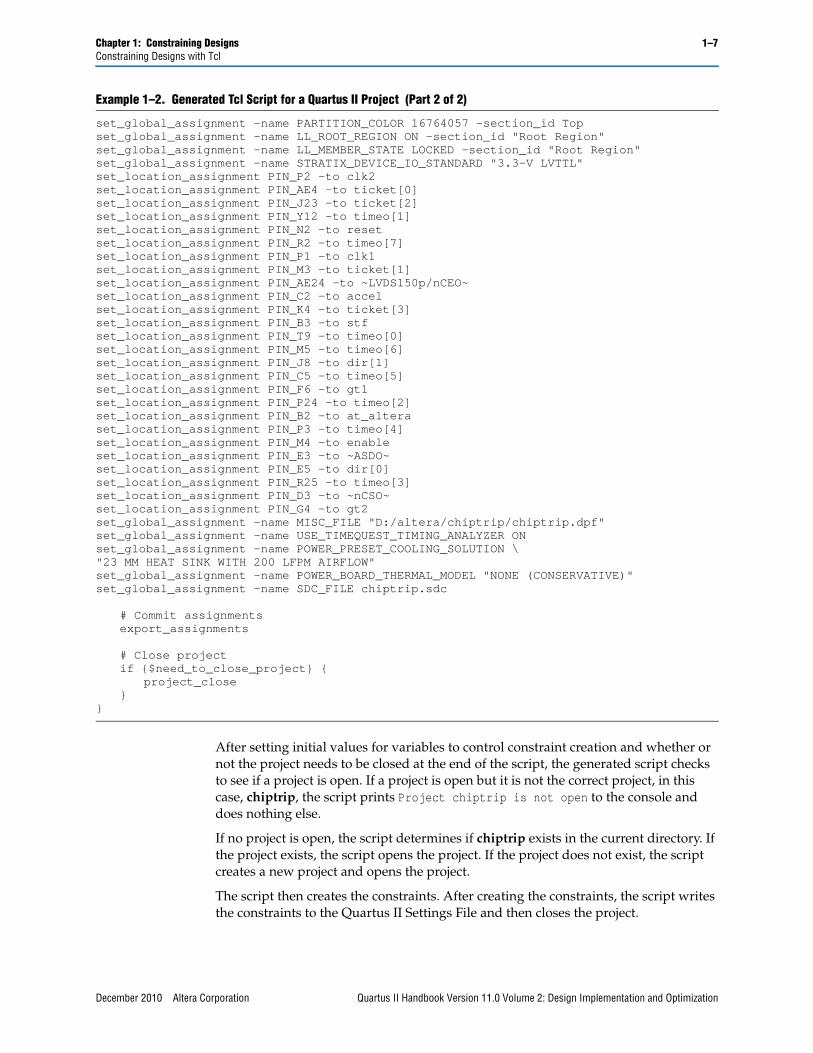
Chapter 1: Constraining Designs 1–7Constraining Designs with Tcl
After setting initial values for variables to control constraint creation and whether or not the project needs to be closed at the end of the script, the generated script checks to see if a project is open. If a project is open but it is not the correct project, in this case, chiptrip, the script prints Project chiptrip is not open to the console and does nothing else.
If no project is open, the script determines if chiptrip exists in the current directory. If the project exists, the script opens the project. If the project does not exist, the script creates a new project and opens the project.
The script then creates the constraints. After creating the constraints, the script writes the constraints to the Quartus II Settings File and then closes the project.
set_global_assignment -name PARTITION_COLOR 16764057 -section_id Topset_global_assignment -name LL_ROOT_REGION ON -section_id "Root Region"set_global_assignment -name LL_MEMBER_STATE LOCKED -section_id "Root Region"set_global_assignment -name STRATIX_DEVICE_IO_STANDARD "3.3-V LVTTL"set_location_assignment PIN_P2 -to clk2set_location_assignment PIN_AE4 -to ticket[0]set_location_assignment PIN_J23 -to ticket[2]set_location_assignment PIN_Y12 -to timeo[1]set_location_assignment PIN_N2 -to resetset_location_assignment PIN_R2 -to timeo[7]set_location_assignment PIN_P1 -to clk1set_location_assignment PIN_M3 -to ticket[1]set_location_assignment PIN_AE24 -to ~LVDS150p/nCEO~set_location_assignment PIN_C2 -to accelset_location_assignment PIN_K4 -to ticket[3]set_location_assignment PIN_B3 -to stfset_location_assignment PIN_T9 -to timeo[0]set_location_assignment PIN_M5 -to timeo[6]set_location_assignment PIN_J8 -to dir[1]set_location_assignment PIN_C5 -to timeo[5]set_location_assignment PIN_F6 -to gt1set_location_assignment PIN_P24 -to timeo[2]set_location_assignment PIN_B2 -to at_alteraset_location_assignment PIN_P3 -to timeo[4]set_location_assignment PIN_M4 -to enableset_location_assignment PIN_E3 -to ~ASDO~set_location_assignment PIN_E5 -to dir[0]set_location_assignment PIN_R25 -to timeo[3]set_location_assignment PIN_D3 -to ~nCSO~set_location_assignment PIN_G4 -to gt2set_global_assignment -name MISC_FILE "D:/altera/chiptrip/chiptrip.dpf"set_global_assignment -name USE_TIMEQUEST_TIMING_ANALYZER ONset_global_assignment -name POWER_PRESET_COOLING_SOLUTION \"23 MM HEAT SINK WITH 200 LFPM AIRFLOW"set_global_assignment -name POWER_BOARD_THERMAL_MODEL "NONE (CONSERVATIVE)"set_global_assignment -name SDC_FILE chiptrip.sdc
# Commit assignmentsexport_assignments
# Close projectif {$need_to_close_project} {
project_close}
}
Example 1–2. Generated Tcl Script for a Quartus II Project (Part 2 of 2)
December 2010 Altera Corporation Quartus II Handbook Version 11.0 Volume 2: Design Implementation and Optimization
1–8 Chapter 1: Constraining DesignsConstraining Designs with Tcl
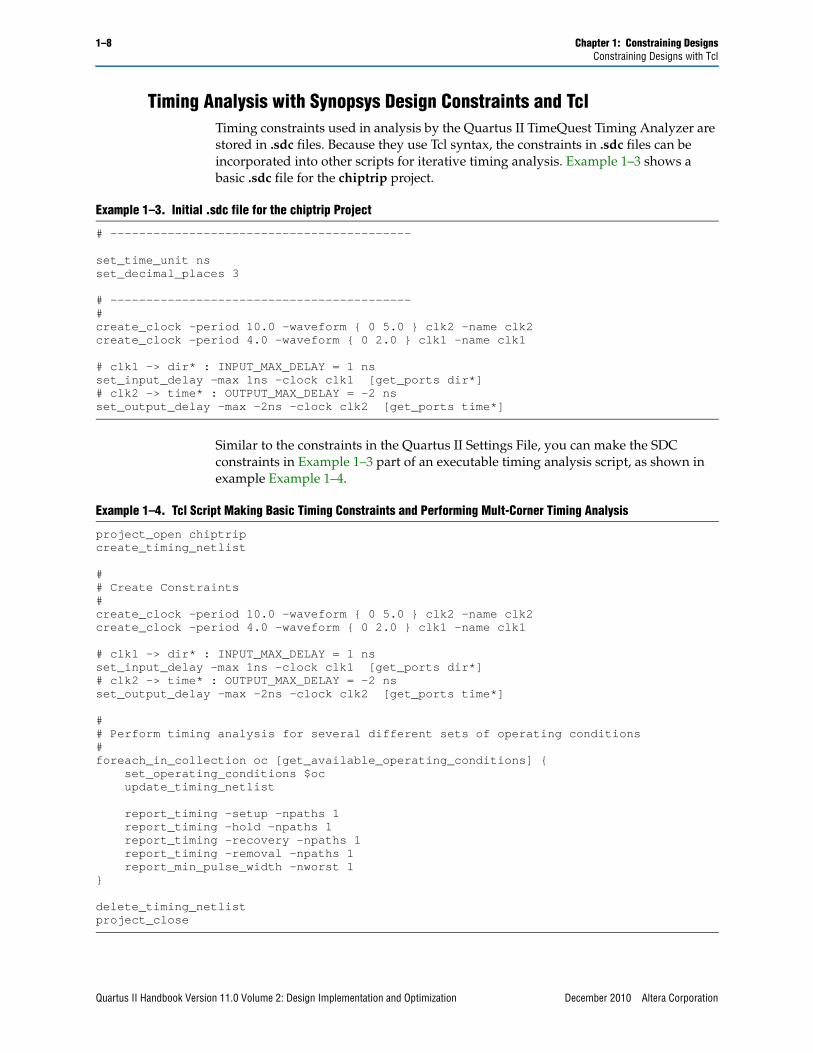
Timing Analysis with Synopsys Design Constraints and TclTiming constraints used in analysis by the Quartus II TimeQuest Timing Analyzer are stored in .sdc files. Because they use Tcl syntax, the constraints in .sdc files can be incorporated into other scripts for iterative timing analysis. Example 1–3 shows a basic .sdc file for the chiptrip project.
Similar to the constraints in the Quartus II Settings File, you can make the SDC constraints in Example 1–3 part of an executable timing analysis script, as shown in example Example 1–4.
Example 1–3. Initial .sdc file for the chiptrip Project
# ------------------------------------------
set_time_unit nsset_decimal_places 3
# ------------------------------------------#create_clock -period 10.0 -waveform { 0 5.0 } clk2 -name clk2create_clock -period 4.0 -waveform { 0 2.0 } clk1 -name clk1
# clk1 -> dir* : INPUT_MAX_DELAY = 1 nsset_input_delay -max 1ns -clock clk1 [get_ports dir*]# clk2 -> time* : OUTPUT_MAX_DELAY = -2 nsset_output_delay -max -2ns -clock clk2 [get_ports time*]
Example 1–4. Tcl Script Making Basic Timing Constraints and Performing Mult-Corner Timing Analysis
project_open chiptripcreate_timing_netlist
## Create Constraints#create_clock -period 10.0 -waveform { 0 5.0 } clk2 -name clk2create_clock -period 4.0 -waveform { 0 2.0 } clk1 -name clk1
# clk1 -> dir* : INPUT_MAX_DELAY = 1 nsset_input_delay -max 1ns -clock clk1 [get_ports dir*]# clk2 -> time* : OUTPUT_MAX_DELAY = -2 nsset_output_delay -max -2ns -clock clk2 [get_ports time*]
## Perform timing analysis for several different sets of operating conditions#foreach_in_collection oc [get_available_operating_conditions] { set_operating_conditions $oc update_timing_netlist
report_timing -setup -npaths 1 report_timing -hold -npaths 1 report_timing -recovery -npaths 1 report_timing -removal -npaths 1 report_min_pulse_width -nworst 1}
delete_timing_netlistproject_close
Quartus II Handbook Version 11.0 Volume 2: Design Implementation and Optimization December 2010 Altera Corporation
Chapter 1: Constraining Designs 1–9A Fully Iterative Scripted Flow
The script in Example 1–4 opens the project, creates a timing netlist, then constrains the two clocks in the design and applies input and output delay constraints. The clock settings and delay constraints are identical to those in the .sdc file shown in Example 1–3. The next section of the script updates the timing netlist for the constraints and performs multi-corner timing analysis on the design.
A Fully Iterative Scripted FlowYou can use the ::quartus::flow Tcl package and other packages in the Quartus II Tcl API to add flow control to modify constraints and recompile your design in an automated flow. You can combine your timing constraints with the other constraints for your design, and embed them in an executable Tcl script that also iteratively compiles your design as different constraints are applied.
Each time such a modified generated script is run, it can modify the .qsf file and .sdc file for your project based on the results of iterative compilations, effectively replacing these files for the purposes of archiving and version control using industry-standard source control methods and practices.
This type of scripted flow can include automated compilation of a design, modification of design constraints, and recompilation of the design, based on how you foresee results and pre-determine next-step constraint changes in response to those results.
h For more information about the Quartus II Tcl API, refer to API Functions for Tcl in Quartus II Help. For more information about controlling the Quartus II software with Tcl scripts, refer to About Quartus II Tcl Scripting in Quartus II Help.
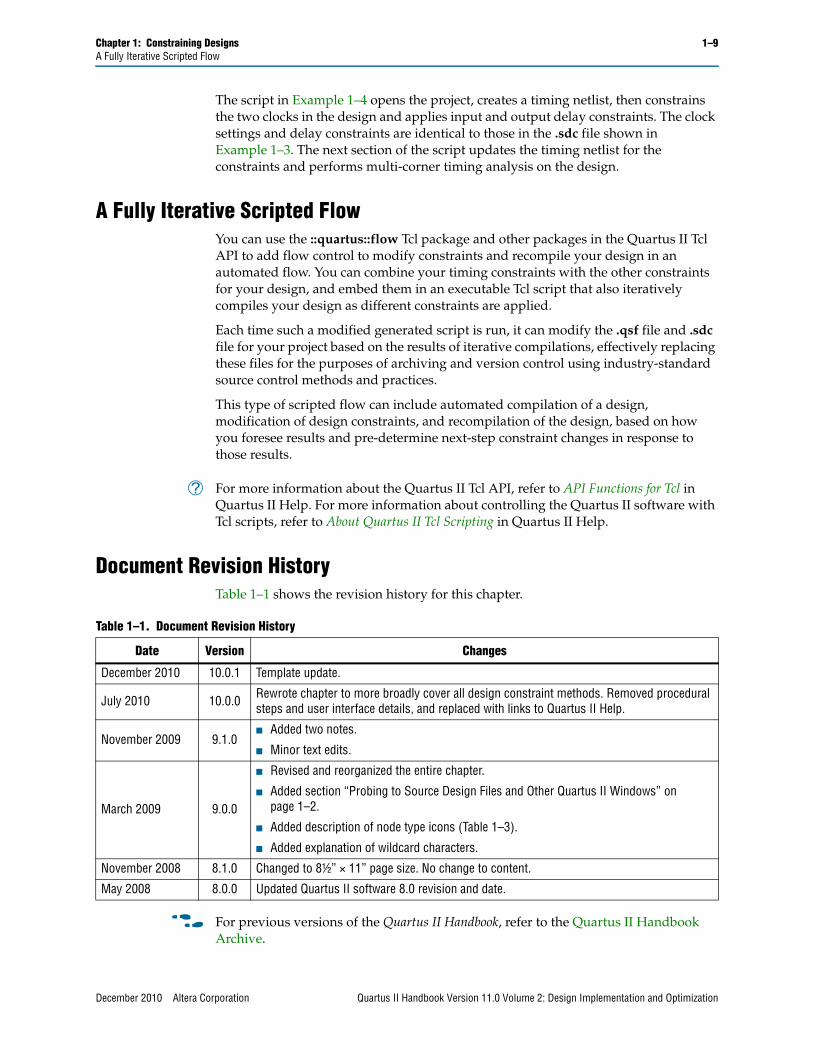
Document Revision HistoryTable 1–1 shows the revision history for this chapter.
f For previous versions of the Quartus II Handbook, refer to the Quartus II Handbook Archive.
Table 1–1. Document Revision History
Date Version Changes
December 2010 10.0.1 Template update.
July 2010 10.0.0 Rewrote chapter to more broadly cover all design constraint methods. Removed procedural steps and user interface details, and replaced with links to Quartus II Help.
November 2009 9.1.0■ Added two notes.
■ Minor text edits.
March 2009 9.0.0
■ Revised and reorganized the entire chapter.
■ Added section “Probing to Source Design Files and Other Quartus II Windows” on page 1–2.
■ Added description of node type icons (Table 1–3).
■ Added explanation of wildcard characters.
November 2008 8.1.0 Changed to 8½” × 11” page size. No change to content.
May 2008 8.0.0 Updated Quartus II software 8.0 revision and date.
December 2010 Altera Corporation Quartus II Handbook Version 11.0 Volume 2: Design Implementation and Optimization

1–10 Chapter 1: Constraining DesignsDocument Revision History
f Take an online survey to provide feedback about this handbook chapter.
Quartus II Handbook Version 11.0 Volume 2: Design Implementation and Optimization December 2010 Altera Corporation
Quartus II Handbook Version 11.0 Volume 2: Design May 2011
QII52002-11.0.0
© 2011 Altera Corporation. All rights reserved. ALTERA, ARRand/or trademarks of Altera Corporation in the U.S. and otherwww.altera.com/common/legal.html. Altera warrants performreserves the right to make changes to any products and servicesinformation, product, or service described herein except as expspecifications before relying on any published information and
May 2011QII52002-11.0.0
2. Command-Line Scripting
FPGA design software that easily integrates into your design flow saves time and improves productivity. The Altera® Quartus® II software provides you with a command-line executable for each step of the FPGA design flow to make the design process customizable and flexible.
The benefits provided by command-line executables include:
■ Command-line control over each step of the design flow
■ Easy integration with scripted design flows including makefiles
■ Reduced memory requirements
■ Improved performance
The command-line executables are also completely interchangable with the Quartus II GUI, allowing you to use the exact combination of tools that you prefer.
This chapter describes how to take advantage of Quartus II command-line executables, and provides several examples of scripts that automate different segments of the FPGA design flow. This chapter includes the following topics:
■ “Benefits of Command-Line Executables”
■ “Introductory Example” on page 2–2
■ “Compilation with quartus_sh --flow” on page 2–7
■ “The MegaWizard Plug-In Manager” on page 2–11
■ “Command-Line Scripting Examples” on page 2–17
Benefits of Command-Line ExecutablesThe Quartus II command-line executables provide control over each step of the design flow. Each executable includes options to control commonly used software settings. Each executable also provides detailed, built-in help describing its function, available options, and settings.
Command-line executables allow for easy integration with scripted design flows. You can easily create scripts with a series of commands. These scripts can be batch-processed, allowing for integration with distributed computing in server farms. You can also integrate the Quartus II command-line executables in makefile-based design flows. These features enhance the ease of integration between the Quartus II software and other EDA synthesis, simulation, and verification software.
Command-line executables add flexibility without sacrificing the ease-of-use of the Quartus II GUI. You can use the Quartus II GUI and command-line executables at different stages in the design flow. For example, you might use the Quartus II GUI to edit the floorplan for the design, use the command-line executables to perform place-and-route, and return to the Quartus II GUI to perform debugging with the Chip Editor.
Implementation and Optimization
Subscribe
IA, CYCLONE, HARDCOPY, MAX, MEGACORE, NIOS, QUARTUS and STRATIX are Reg. U.S. Pat. & Tm. Off. countries. All other trademarks and service marks are the property of their respective holders as described at
ance of its semiconductor products to current specifications in accordance with Altera’s standard warranty, but at any time without notice. Altera assumes no responsibility or liability arising out of the application or use of any ressly agreed to in writing by Altera. Altera customers are advised to obtain the latest version of device before placing orders for products or services.
2–2 Chapter 2: Command-Line ScriptingIntroductory Example
Command-line executables reduce the amount of memory required during each step in the design flow. Because each executable targets only one step in the design flow, the executables themselves are relatively compact, both in file size and the amount of memory used during processing. This memory usage reduction improves performance, and is particularly beneficial in design environments where heavy usage of computing resources results in reduced memory availability.
h For a complete list of the Quartus II command-line executables, refer to Using the Quartus II Executables in Shell Scripts in Quartus II Help.
Introductory ExampleThe following introduction to command-line executables demonstrates how to create a project, fit the design, and generate programming files.
The tutorial design included with the Quartus II software is used to demonstrate this functionality. If installed, the tutorial design is found in the <Quartus II directory>/qdesigns/fir_filter directory.
Before making changes, copy the tutorial directory and type the four commands shown in Example 2–1 at a command prompt in the new project directory.
1 The <Quartus II directory>/quartus/bin directory must be in your PATH environment variable.
The quartus_map filtref --source=filtref.bdf --family=”Cyclone III” command creates a new Quartus II project called filtref with filtref.bdf as the top-level file. It targets the Cyclone® III device family and performs logic synthesis and technology mapping on the design files.
The quartus_fit filtref --part=EP3C10F256C8 --pack_register=minimize_area command performs fitting on the filtref project. This command specifies an EP3C10F256C8 device, and the --pack_register=minimize_area option causes the Fitter to pack sequential and combinational functions into single logic cells to reduce device resource usage.
The quartus_asm filtref command creates programming files for the filtref project.
The quartus_sta filtref command performs basic timing analysis on the filtref project using the Quartus II TimeQuest Timing Analyzer, reporting worst-case setup slack, worst-case hold slack, and other measurements.
f The TimeQuest Timing Analyzer employs Synopsys Design Constraints to fully analyze the timing of your design. For more information about using all of the features of the quartus_sta executable, refer to the TimeQuest Timing Analyzer Quick Start Tutorial.
Example 2–1. Introductory Example
quartus_map filtref --source=filtref.bdf --family=”Cyclone III” rquartus_fit filtref --part=EP3C10F256C8 --pack_register=minimize_area rquartus_asm filtref r quartus_sta filtref r
Quartus II Handbook Version 11.0 Volume 2: Design Implementation and Optimization May 2011 Altera Corporation
Chapter 2: Command-Line Scripting 2–3Introductory Example
You can put the four commands from Example 2–1 into a batch file or script file, and run them. For example, you can create a simple UNIX shell script called compile.sh, which includes the code shown in Example 2–2.
Edit the script as necessary and compile your project.
Command-Line Scripting HelpHelp for command-line executables is available through different methods. You can access help built in to the executables with command-line options. You can use the Quartus II Command-Line and Tcl API Help browser for an easy graphical view of the help information.
To use the Quartus II Command-Line and Tcl API Help browser, type the following command:
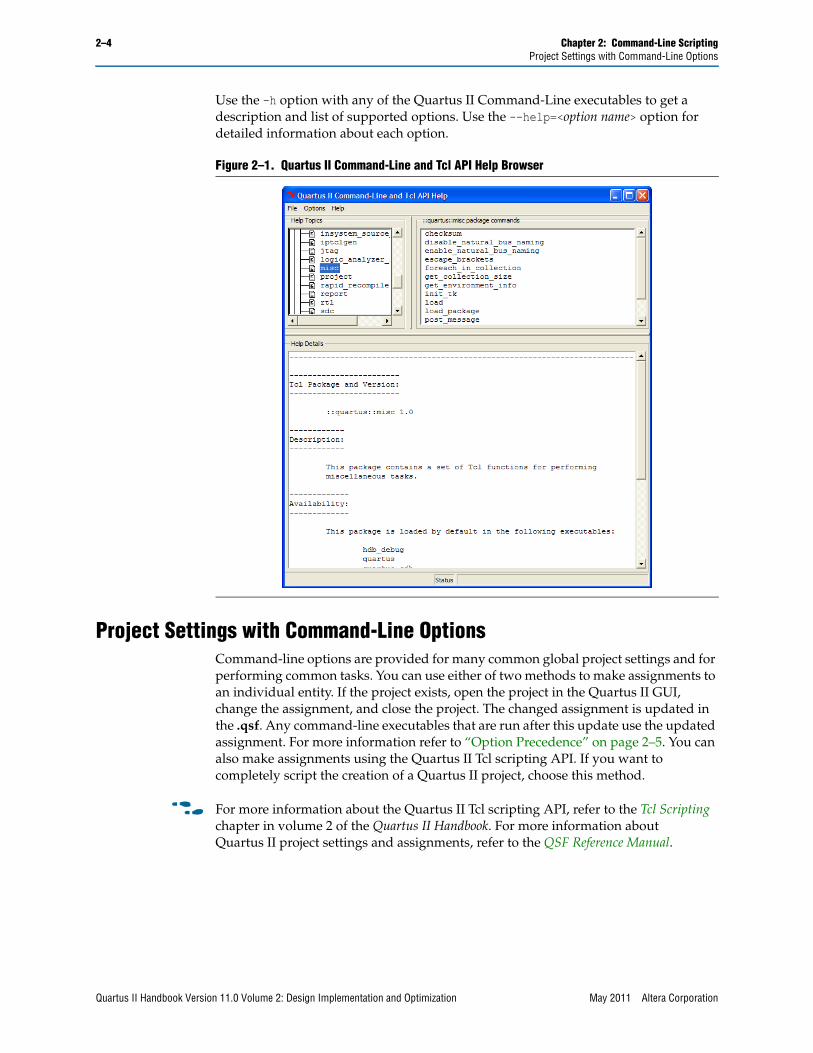
quartus_sh --qhelp rThis command starts the Quartus II Command-Line and Tcl API Help browser, a viewer for information about the Quartus II Command-Line executables and Tcl API (Figure 2–1).
Example 2–2. UNIX Shell Script: compile.sh
#!/bin/shPROJECT=filtrefTOP_LEVEL_FILE=filtref.bdfFAMILY=”Cyclone III”PART=EP3C10F256C8PACKING_OPTION=minimize_areaquartus_map $PROJECT --source=$TOP_LEVEL_FILE --family=$FAMILYquartus_fit $PROJECT --part=$PART --pack_register=$PACKING_OPTIONquartus_asm $PROJECTquartus_sta $PROJECT
May 2011 Altera Corporation Quartus II Handbook Version 11.0 Volume 2: Design Implementation and Optimization
2–4 Chapter 2: Command-Line ScriptingProject Settings with Command-Line Options
Use the -h option with any of the Quartus II Command-Line executables to get a description and list of supported options. Use the --help=<option name> option for detailed information about each option.
Project Settings with Command-Line OptionsCommand-line options are provided for many common global project settings and for performing common tasks. You can use either of two methods to make assignments to an individual entity. If the project exists, open the project in the Quartus II GUI, change the assignment, and close the project. The changed assignment is updated in the .qsf. Any command-line executables that are run after this update use the updated assignment. For more information refer to “Option Precedence” on page 2–5. You can also make assignments using the Quartus II Tcl scripting API. If you want to completely script the creation of a Quartus II project, choose this method.
f For more information about the Quartus II Tcl scripting API, refer to the Tcl Scripting chapter in volume 2 of the Quartus II Handbook. For more information about Quartus II project settings and assignments, refer to the QSF Reference Manual.
Figure 2–1. Quartus II Command-Line and Tcl API Help Browser
Quartus II Handbook Version 11.0 Volume 2: Design Implementation and Optimization May 2011 Altera Corporation
Chapter 2: Command-Line Scripting 2–5Project Settings with Command-Line Options
Option PrecedenceIf you use command-line executables, you must be aware of the precedence of various project assignments and how to control the precedence. Assignments for a particular project exist in the Quartus II Settings File (.qsf) for the project. Before the .qsf is updated after assignment changes, the updated assignments are reflected in compiler database files that hold intermediate compilation results..
All command-line options override any conflicting assignments found in the .qsf or the compiler database files. There are two command-line options to specify whether the .qsf or compiler database files take precedence for any assignments not specified as command-line options.
1 Any assignment not specified as a command-line option or found in the .qsf or compiler database file is set to its default value.
The file precedence command-line options are --read_settings_files and --write_settings_files.
By default, the --read_settings_files and --write_settings_files options are turned on. Turning on the --read_settings_files option causes a command-line executable to read assignments from the .qsf instead of from the compiler database files. Turning on the --write_settings_files option causes a command-line executable to update the .qsf to reflect any specified options, as happens when you close a project in the Quartus II GUI.
If you use command-line executables, be aware of the precedence of various project assignments and how to control the precedence. Assignments for a particular project can exist in three places:
■ The .qsf for the project
■ The result of the last compilation, in the /db directory, which reflects the assignments that existed when the project was compiled
■ Command-line options
Table 2–1 lists the precedence for reading assignments depending on the value of the --read_settings_files option.
Table 2–1. Precedence for Reading Assignments
Option Specified Precedence for Reading Assignments
--read_settings_files = on
(Default)
1. Command-line options
2. The .qsf for the project
3. Project database (db directory, if it exists)
4. Quartus II software defaults
--read_settings_files = off
1. Command-line options
2. Project database (db directory, if it exists)
3. Quartus II software defaults
May 2011 Altera Corporation Quartus II Handbook Version 11.0 Volume 2: Design Implementation and Optimization
2–6 Chapter 2: Command-Line ScriptingProject Settings with Command-Line Options
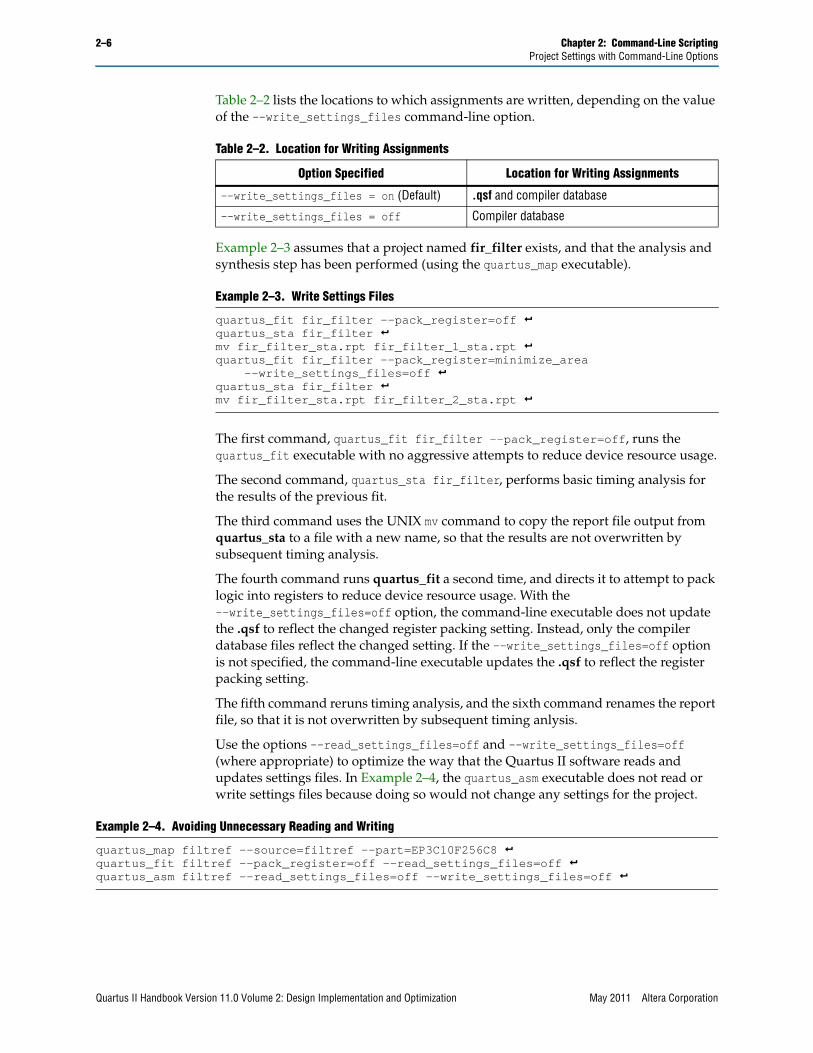
Table 2–2 lists the locations to which assignments are written, depending on the value of the --write_settings_files command-line option.
Example 2–3 assumes that a project named fir_filter exists, and that the analysis and synthesis step has been performed (using the quartus_map executable).
The first command, quartus_fit fir_filter --pack_register=off, runs the quartus_fit executable with no aggressive attempts to reduce device resource usage.
The second command, quartus_sta fir_filter, performs basic timing analysis for the results of the previous fit.
The third command uses the UNIX mv command to copy the report file output from quartus_sta to a file with a new name, so that the results are not overwritten by subsequent timing analysis.
The fourth command runs quartus_fit a second time, and directs it to attempt to pack logic into registers to reduce device resource usage. With the --write_settings_files=off option, the command-line executable does not update the .qsf to reflect the changed register packing setting. Instead, only the compiler database files reflect the changed setting. If the --write_settings_files=off option is not specified, the command-line executable updates the .qsf to reflect the register packing setting.
The fifth command reruns timing analysis, and the sixth command renames the report file, so that it is not overwritten by subsequent timing anlysis.
Use the options --read_settings_files=off and --write_settings_files=off (where appropriate) to optimize the way that the Quartus II software reads and updates settings files. In Example 2–4, the quartus_asm executable does not read or write settings files because doing so would not change any settings for the project.
Table 2–2. Location for Writing Assignments
Option Specified Location for Writing Assignments
--write_settings_files = on (Default) .qsf and compiler database
--write_settings_files = off Compiler database
Example 2–3. Write Settings Files
quartus_fit fir_filter --pack_register=off r quartus_sta fir_filter r mv fir_filter_sta.rpt fir_filter_1_sta.rpt r quartus_fit fir_filter --pack_register=minimize_area
--write_settings_files=off r quartus_sta fir_filter r mv fir_filter_sta.rpt fir_filter_2_sta.rpt r
Example 2–4. Avoiding Unnecessary Reading and Writing
quartus_map filtref --source=filtref --part=EP3C10F256C8 r quartus_fit filtref --pack_register=off --read_settings_files=off r quartus_asm filtref --read_settings_files=off --write_settings_files=off r
Quartus II Handbook Version 11.0 Volume 2: Design Implementation and Optimization May 2011 Altera Corporation
Chapter 2: Command-Line Scripting 2–7Compilation with quartus_sh --flow
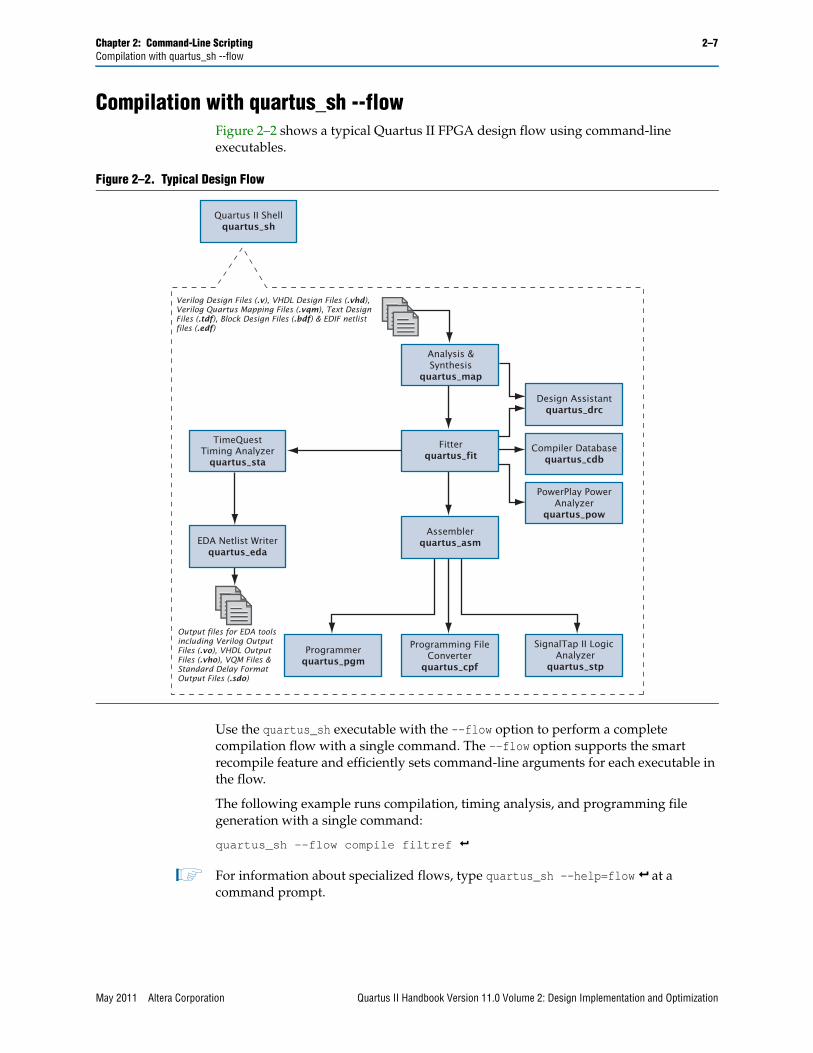
Compilation with quartus_sh --flowFigure 2–2 shows a typical Quartus II FPGA design flow using command-line executables.
Use the quartus_sh executable with the --flow option to perform a complete compilation flow with a single command. The --flow option supports the smart recompile feature and efficiently sets command-line arguments for each executable in the flow.
The following example runs compilation, timing analysis, and programming file generation with a single command:
quartus_sh --flow compile filtref r
1 For information about specialized flows, type quartus_sh --help=flow r at a command prompt.
Figure 2–2. Typical Design Flow
Programmerquartus_pgm
TimeQuestTiming Analyzerquartus_sta
Analysis &Synthesis
quartus_map
Design Assistantquartus_drc
Quartus II Shellquartus_sh
Programming FileConverterquartus_cpf
EDA Netlist Writerquartus_eda
Compiler Databasequartus_cdb
Verilog Design Files (.v), VHDL Design Files (.vhd),Verilog Quartus Mapping Files (.vqm), Text Design Files (.tdf), Block Design Files (.bdf) & EDIF netlist files (.edf)
Output files for EDA tools including Verilog Output Files (.vo), VHDL Output Files (.vho), VQM Files &Standard Delay Format Output Files (.sdo)
SignalTap II Logic Analyzer
quartus_stp
PowerPlay PowerAnalyzer
quartus_pow
Fitterquartus_fit
Assemblerquartus_asm
May 2011 Altera Corporation Quartus II Handbook Version 11.0 Volume 2: Design Implementation and Optimization
2–8 Chapter 2: Command-Line ScriptingText-Based Report Files
Text-Based Report FilesEach command-line executable creates a text report file when it is run. These files report success or failure, and contain information about the processing performed by the executable.
Report file names contain the revision name and the short-form name of the executable that generated the report file, in the format <revision>.<executable>.rpt. For example, using the quartus_fit executable to place and route a project with the revision name design_top generates a report file named design_top.fit.rpt. Similarly, using the quartus_sta executable to perform timing analysis on a project with the revision name fir_filter generates a report file named fir_filter.sta.rpt.
h As an alternative to parsing text-based report files, you can use the ::quartus::report Tcl package. For more information about this package, refer to ::quartus::report in Quartus II Help.
Using Command-Line Executables In ScriptsYou can use command-line executables in scripts that control other software in addition to the Quartus II software. For example, if your design flow uses third-party synthesis or simulation software, and if you can run the other software at a command prompt, you can include those commands with Quartus II executables in a single script.
The Quartus II command-line executables include options for common global project settings and operations, but you must use a Tcl script or the Quartus II GUI to set up a new project and apply individual constraints, such as pin location assignments and timing requirements. Command-line executables are very useful for working with existing projects, for making common global settings, and for performing common operations. For more flexibility in a flow, use a Tcl script, which makes it easier to pass data between different stages of the design flow and have more control during the flow.
f For more information about Tcl scripts, refer to the Tcl Scripting chapter in volume 2 of the Quartus II Handbook, or About Quartus II Tcl Scripting in Quartus II Help.
Quartus II Handbook Version 11.0 Volume 2: Design Implementation and Optimization May 2011 Altera Corporation
Chapter 2: Command-Line Scripting 2–9Using Command-Line Executables In Scripts
For example, a UNIX shell script could run other synthesis software, then place-and-route the design in the Quartus II software, then generate output netlists for other simulation software. Example 2–5 shows a script that synthesizes a design with the Synopsys Synplify software, simulates the design using the Mentor Graphics ModelSim® software, and then compiles the design targeting a Cyclone III device.
Makefile ImplementationYou can use the Quartus II command-line executables in conjunction with the make utility to automatically update files when other files they depend on change. The file dependencies and commands used to update files are specified in a text file called a makefile.
To facilitate easier development of efficient makefiles, the following “smart action” scripting command is provided with the Quartus II software:
quartus_sh --determine_smart_action rBecause assignments for a Quartus II project are stored in the .qsf, including it in every rule results in unnecessary processing steps. For example, updating a setting related to programming file generation, which requires re-running only quartus_asm, modifies the .qsf, requiring a complete recompilation if the .qsf is included in every rule.
The smart action command determines the earliest command-line executable in the compilation flow that must be run based on the current .qsf, and generates a change file corresponding to that executable. For example, if quartus_map must be re-run, the smart action command creates or updates a file named map.chg. Thus, rather than including the .qsf in each makefile rule, include only the appropriate change file.
Example 2–5. Script for End-to-End Flow
#!/bin/sh# Run synthesis first.# This example assumes you use Synplify softwaresynplify -batch synthesize.tcl
# If your Quartus II project exists already, you can just# recompile the design.# You can also use the script described in a later example to# create a new project from scratchquartus_sh --flow compile myproject
# Use the quartus_sta executable to do fast and slow-model# timing analysisquartus_sta myproject --model=slowquartus_sta myproject --model=fast
# Use the quartus_eda executable to write out a gate-level# Verilog simulation netlist for ModelSimquartus_eda my_project --simulation --tool=modelsim --format=verilog
# Perform the simulation with the ModelSim softwarevlib cycloneiii_vervlog -work cycloneiii_ver /opt/quartusii/eda/sim_lib/cycloneiii_atoms.vvlib workvlog -work work my_project.vovsim -L cycloneiii_ver -t 1ps work.my_project
May 2011 Altera Corporation Quartus II Handbook Version 11.0 Volume 2: Design Implementation and Optimization
2–10 Chapter 2: Command-Line ScriptingUsing Command-Line Executables In Scripts
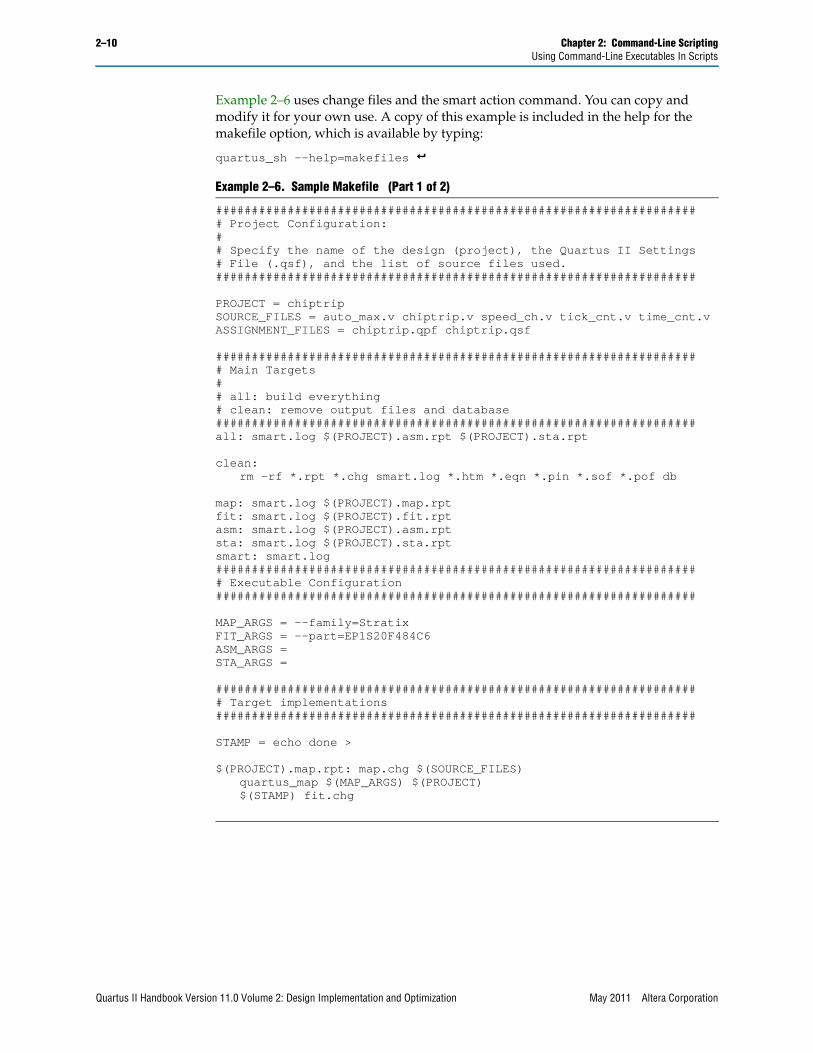
Example 2–6 uses change files and the smart action command. You can copy and modify it for your own use. A copy of this example is included in the help for the makefile option, which is available by typing:
quartus_sh --help=makefiles r
Example 2–6. Sample Makefile (Part 1 of 2)
#################################################################### Project Configuration: # # Specify the name of the design (project), the Quartus II Settings# File (.qsf), and the list of source files used.###################################################################
PROJECT = chiptripSOURCE_FILES = auto_max.v chiptrip.v speed_ch.v tick_cnt.v time_cnt.vASSIGNMENT_FILES = chiptrip.qpf chiptrip.qsf
#################################################################### Main Targets## all: build everything# clean: remove output files and database###################################################################all: smart.log $(PROJECT).asm.rpt $(PROJECT).sta.rpt
clean:rm -rf *.rpt *.chg smart.log *.htm *.eqn *.pin *.sof *.pof db
map: smart.log $(PROJECT).map.rptfit: smart.log $(PROJECT).fit.rptasm: smart.log $(PROJECT).asm.rptsta: smart.log $(PROJECT).sta.rptsmart: smart.log#################################################################### Executable Configuration###################################################################
MAP_ARGS = --family=StratixFIT_ARGS = --part=EP1S20F484C6ASM_ARGS =STA_ARGS =
#################################################################### Target implementations###################################################################
STAMP = echo done >
$(PROJECT).map.rpt: map.chg $(SOURCE_FILES) quartus_map $(MAP_ARGS) $(PROJECT)$(STAMP) fit.chg
Quartus II Handbook Version 11.0 Volume 2: Design Implementation and Optimization May 2011 Altera Corporation
Chapter 2: Command-Line Scripting 2–11The MegaWizard Plug-In Manager
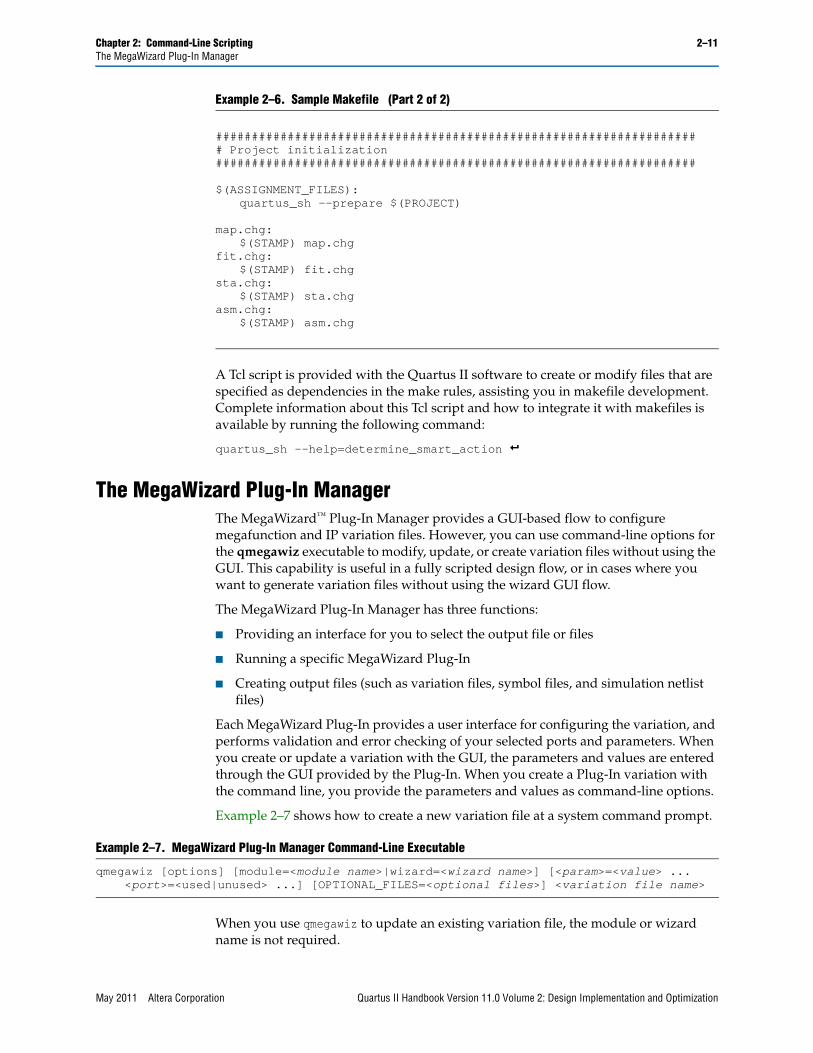
A Tcl script is provided with the Quartus II software to create or modify files that are specified as dependencies in the make rules, assisting you in makefile development. Complete information about this Tcl script and how to integrate it with makefiles is available by running the following command:
quartus_sh --help=determine_smart_action r
The MegaWizard Plug-In ManagerThe MegaWizard™ Plug-In Manager provides a GUI-based flow to configure megafunction and IP variation files. However, you can use command-line options for the qmegawiz executable to modify, update, or create variation files without using the GUI. This capability is useful in a fully scripted design flow, or in cases where you want to generate variation files without using the wizard GUI flow.
The MegaWizard Plug-In Manager has three functions:
■ Providing an interface for you to select the output file or files
■ Running a specific MegaWizard Plug-In
■ Creating output files (such as variation files, symbol files, and simulation netlist files)
Each MegaWizard Plug-In provides a user interface for configuring the variation, and performs validation and error checking of your selected ports and parameters. When you create or update a variation with the GUI, the parameters and values are entered through the GUI provided by the Plug-In. When you create a Plug-In variation with the command line, you provide the parameters and values as command-line options.
Example 2–7 shows how to create a new variation file at a system command prompt.
When you use qmegawiz to update an existing variation file, the module or wizard name is not required.
#################################################################### Project initialization###################################################################
$(ASSIGNMENT_FILES):quartus_sh --prepare $(PROJECT)
map.chg:$(STAMP) map.chg
fit.chg:$(STAMP) fit.chg
sta.chg:$(STAMP) sta.chg
asm.chg:$(STAMP) asm.chg
Example 2–6. Sample Makefile (Part 2 of 2)
Example 2–7. MegaWizard Plug-In Manager Command-Line Executable
qmegawiz [options] [module=<module name>|wizard=<wizard name>] [<param>=<value> ... <port>=<used|unused> ...] [OPTIONAL_FILES=<optional files>] <variation file name>
May 2011 Altera Corporation Quartus II Handbook Version 11.0 Volume 2: Design Implementation and Optimization
2–12 Chapter 2: Command-Line ScriptingThe MegaWizard Plug-In Manager
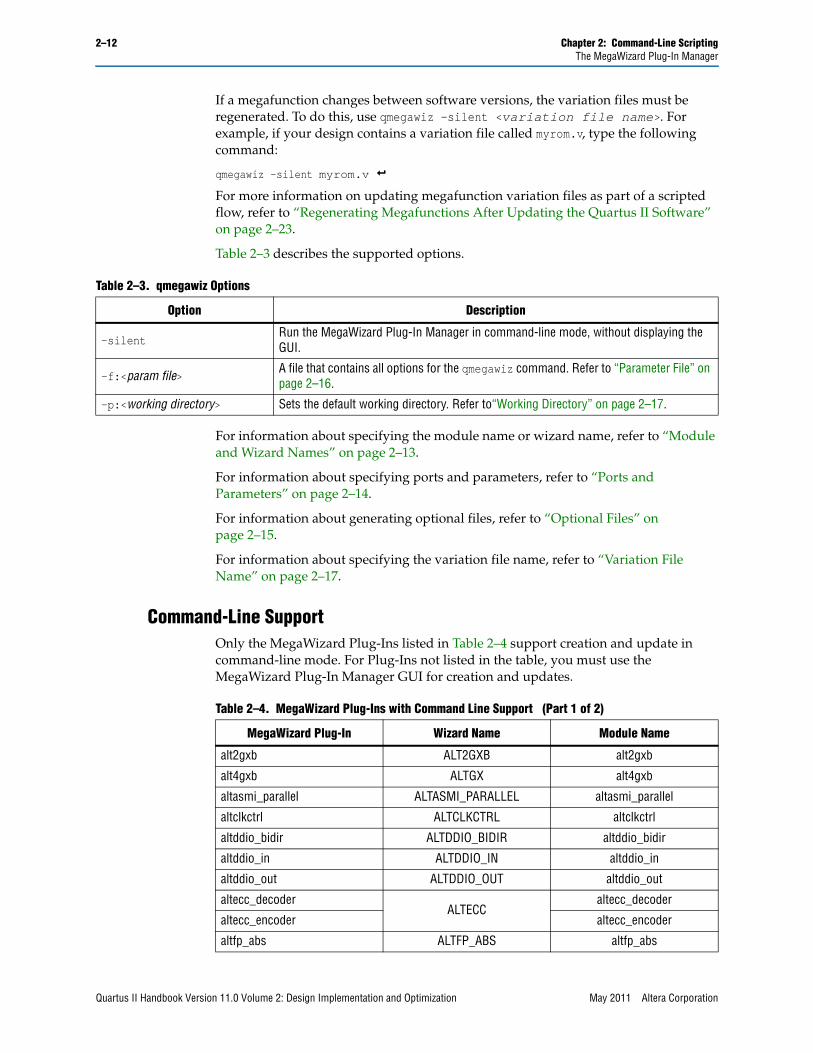
If a megafunction changes between software versions, the variation files must be regenerated. To do this, use qmegawiz -silent <variation file name>. For example, if your design contains a variation file called myrom.v, type the following command:
qmegawiz -silent myrom.v rFor more information on updating megafunction variation files as part of a scripted flow, refer to “Regenerating Megafunctions After Updating the Quartus II Software” on page 2–23.
Table 2–3 describes the supported options.
For information about specifying the module name or wizard name, refer to “Module and Wizard Names” on page 2–13.
For information about specifying ports and parameters, refer to “Ports and Parameters” on page 2–14.
For information about generating optional files, refer to “Optional Files” on page 2–15.
For information about specifying the variation file name, refer to “Variation File Name” on page 2–17.
Command-Line SupportOnly the MegaWizard Plug-Ins listed in Table 2–4 support creation and update in command-line mode. For Plug-Ins not listed in the table, you must use the MegaWizard Plug-In Manager GUI for creation and updates.
Table 2–3. qmegawiz Options
Option Description
-silentRun the MegaWizard Plug-In Manager in command-line mode, without displaying the GUI.
-f:<param file> A file that contains all options for the qmegawiz command. Refer to “Parameter File” on page 2–16.
-p:<working directory> Sets the default working directory. Refer to“Working Directory” on page 2–17.
Table 2–4. MegaWizard Plug-Ins with Command Line Support (Part 1 of 2)
MegaWizard Plug-In Wizard Name Module Name
alt2gxb ALT2GXB alt2gxb
alt4gxb ALTGX alt4gxb
altasmi_parallel ALTASMI_PARALLEL altasmi_parallel
altclkctrl ALTCLKCTRL altclkctrl
altddio_bidir ALTDDIO_BIDIR altddio_bidir
altddio_in ALTDDIO_IN altddio_in
altddio_out ALTDDIO_OUT altddio_out
altecc_decoderALTECC
altecc_decoder
altecc_encoder altecc_encoder
altfp_abs ALTFP_ABS altfp_abs
Quartus II Handbook Version 11.0 Volume 2: Design Implementation and Optimization May 2011 Altera Corporation
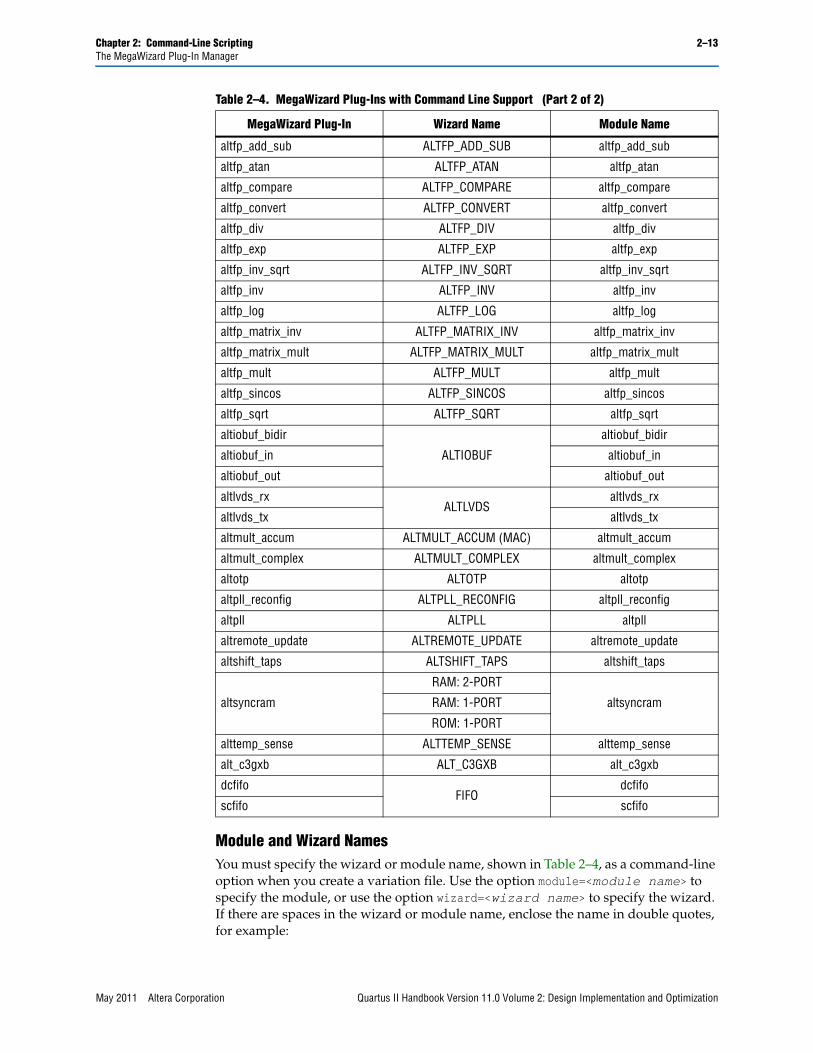
Chapter 2: Command-Line Scripting 2–13The MegaWizard Plug-In Manager
Module and Wizard NamesYou must specify the wizard or module name, shown in Table 2–4, as a command-line option when you create a variation file. Use the option module=<module name> to specify the module, or use the option wizard=<wizard name> to specify the wizard. If there are spaces in the wizard or module name, enclose the name in double quotes, for example:
altfp_add_sub ALTFP_ADD_SUB altfp_add_sub
altfp_atan ALTFP_ATAN altfp_atan
altfp_compare ALTFP_COMPARE altfp_compare
altfp_convert ALTFP_CONVERT altfp_convert
altfp_div ALTFP_DIV altfp_div
altfp_exp ALTFP_EXP altfp_exp
altfp_inv_sqrt ALTFP_INV_SQRT altfp_inv_sqrt
altfp_inv ALTFP_INV altfp_inv
altfp_log ALTFP_LOG altfp_log
altfp_matrix_inv ALTFP_MATRIX_INV altfp_matrix_inv
altfp_matrix_mult ALTFP_MATRIX_MULT altfp_matrix_mult
altfp_mult ALTFP_MULT altfp_mult
altfp_sincos ALTFP_SINCOS altfp_sincos
altfp_sqrt ALTFP_SQRT altfp_sqrt
altiobuf_bidir
ALTIOBUF
altiobuf_bidir
altiobuf_in altiobuf_in
altiobuf_out altiobuf_out
altlvds_rxALTLVDS
altlvds_rx
altlvds_tx altlvds_tx
altmult_accum ALTMULT_ACCUM (MAC) altmult_accum
altmult_complex ALTMULT_COMPLEX altmult_complex
altotp ALTOTP altotp
altpll_reconfig ALTPLL_RECONFIG altpll_reconfig
altpll ALTPLL altpll
altremote_update ALTREMOTE_UPDATE altremote_update
altshift_taps ALTSHIFT_TAPS altshift_taps
altsyncram
RAM: 2-PORT
altsyncramRAM: 1-PORT
ROM: 1-PORT
alttemp_sense ALTTEMP_SENSE alttemp_sense
alt_c3gxb ALT_C3GXB alt_c3gxb
dcfifoFIFO
dcfifo
scfifo scfifo
Table 2–4. MegaWizard Plug-Ins with Command Line Support (Part 2 of 2)
MegaWizard Plug-In Wizard Name Module Name
May 2011 Altera Corporation Quartus II Handbook Version 11.0 Volume 2: Design Implementation and Optimization
2–14 Chapter 2: Command-Line ScriptingThe MegaWizard Plug-In Manager
wizard="RAM: 2-PORT"
When there is a one-to-one mapping between the MegaWizard Plug-In, the wizard name, and the module name, you can use either the wizard option or the module option.
When there are multiple wizard names that correspond to one module name, use the wizard option to specify one wizard. For example, use the wizard option if you create a RAM, because one module is common to three wizards.
When there are multiple module names that correspond to one wizard name, use the module option to specify one module. For example, use the module option if you create a FIFO because one wizard is common to both modules.
If you edit or update an existing variation file, the wizard or module option is not necessary, because information about the wizard or module is already in the variation file.
Ports and ParametersPorts and parameters for each MegaWizard Plug-In are described in Quartus II Help, and in the Megafunction User Guides on the Altera website. Use these references to determine appropriate values for each port and parameter required for a particular variation configuration. Refer to “Strategies to Determine Port and Parameter Values” for more information. You do not have to specify every port and parameter supported by a Plug-In. The MegaWizard Plug-In Manager uses default values for any port or parameter you do not specify.
Specify ports as used or unused, for example:
<port>=used <port>=unused
You can specify port names in any order. Grouping does not matter. Separate port configuration options from each other with spaces.
Specify a value for a parameter with the equal sign, for example:
<parameter>=<value>
You can specify parameters in any order. Grouping does not matter. Separate parameter configuration options from each other with spaces. You can specify port names and parameter names in upper or lower case; case does not matter.
All MegaWizard Plug-Ins allow you to specify the target device family with the INTENDED_DEVICE_FAMILY parameter, as shown in the following example:
qmegawiz wizard=<wizard> INTENDED_DEVICE_FAMILY="Cyclone III" <file>
You must specify enough ports and parameters to create a legal configuration of the Plug-In. When you use the GUI flow, each MegaWizard Plug-In performs validation and error checking for the particular ports and parameters you choose. When you use command-line options to specify ports and parameters, you must ensure that the ports and parameters you use are complete for your particular configuration.
For example, when you use a RAM Plug-In to configure a RAM to be 32 words deep, the Plug-In automatically configures an address port that is five bits wide. If you use the command-line flow to configure a RAM that is 32 words deep, you must use one option to specify the depth of the RAM, then calculate the width of the address port and specify that width with another option.
Quartus II Handbook Version 11.0 Volume 2: Design Implementation and Optimization May 2011 Altera Corporation
Chapter 2: Command-Line Scripting 2–15The MegaWizard Plug-In Manager
Invalid ConfigurationsIf the combination of default and specified ports and parameters is not complete to create a legal configuration of the Plug-In, qmegawiz generates an error message that indicates what is missing and what values are supported. If the combination of default and specified ports and parameters results in an illegal configuration of the Plug-In, qmegawiz generates an error message that indicates what is illegal, and displays the legal values.
Strategies to Determine Port and Parameter ValuesFor simple Plug-In variations, it is often easy to determine appropriate port and parameter values with the information in Quartus II Help and other megafunction documentation. For example, determining that a 32-word-deep RAM requires an address port that is five bits wide is straightforward. For complex Plug-In variations, an option in the GUI might affect multiple port and parameter settings, so it can be difficult to determine a complete set of ports and parameters. In this case, use the GUI to generate a variation file that includes the ports and parameters for your desired configuration. Open the variation file in a text editor and use the port and parameter values in the variation file as command-line options.
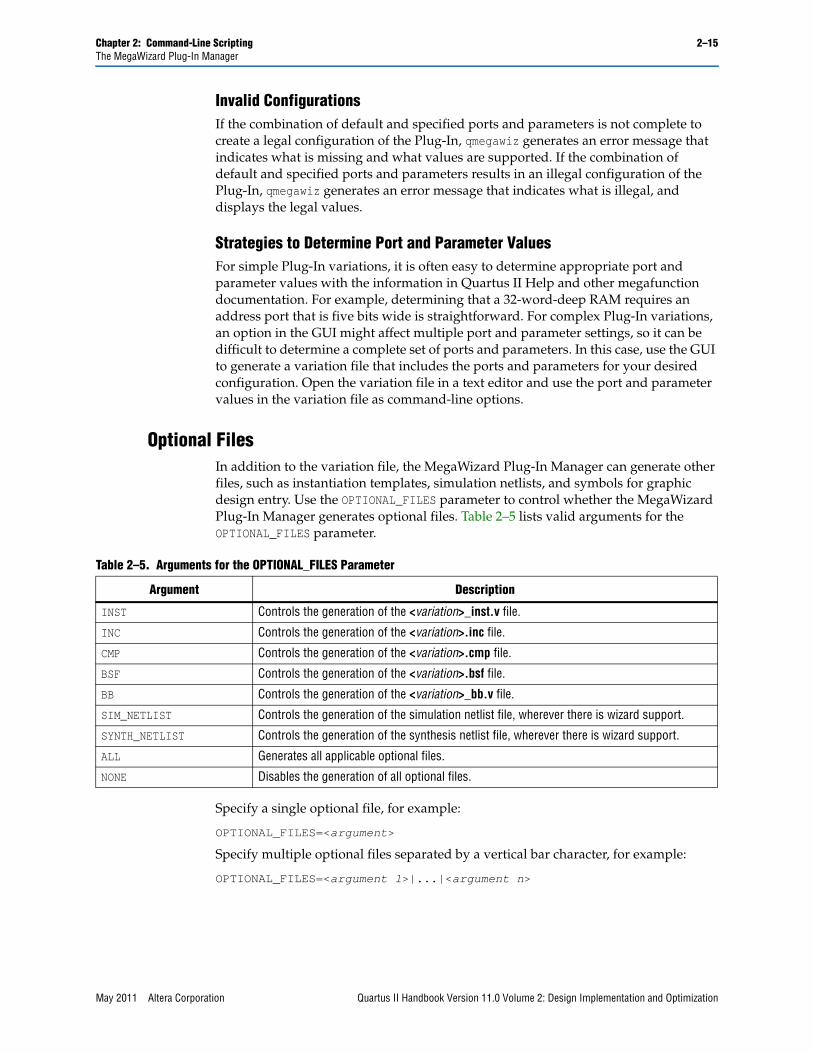
Optional FilesIn addition to the variation file, the MegaWizard Plug-In Manager can generate other files, such as instantiation templates, simulation netlists, and symbols for graphic design entry. Use the OPTIONAL_FILES parameter to control whether the MegaWizard Plug-In Manager generates optional files. Table 2–5 lists valid arguments for the OPTIONAL_FILES parameter.
Specify a single optional file, for example:
OPTIONAL_FILES=<argument>
Specify multiple optional files separated by a vertical bar character, for example:
OPTIONAL_FILES=<argument 1>|...|<argument n>
Table 2–5. Arguments for the OPTIONAL_FILES Parameter
Argument Description
INST Controls the generation of the <variation>_inst.v file.
INC Controls the generation of the <variation>.inc file.
CMP Controls the generation of the <variation>.cmp file.
BSF Controls the generation of the <variation>.bsf file.
BB Controls the generation of the <variation>_bb.v file.
SIM_NETLIST Controls the generation of the simulation netlist file, wherever there is wizard support.
SYNTH_NETLIST Controls the generation of the synthesis netlist file, wherever there is wizard support.
ALL Generates all applicable optional files.
NONE Disables the generation of all optional files.
May 2011 Altera Corporation Quartus II Handbook Version 11.0 Volume 2: Design Implementation and Optimization
2–16 Chapter 2: Command-Line ScriptingThe MegaWizard Plug-In Manager
If you prefix an argument with a dash (for example, -BB), it is excluded from the generated optional files. If any of the optional files exist when you run qmegawiz and they are excluded in the OPTIONAL_FILES parameter (with the NONE argument, or prefixed with a dash), they are deleted.
You can combine the ALL argument with other excluded arguments to generate “all files except <excluded files>.” You can combine the NONE argument with other included arguments to generate “no files except <files>.
When you combine multiple arguments, they are processed from left to right, and arguments evaluated later have precedence over arguments evaluated earlier. Therefore, use the ALL or NONE arguments first in a series of multiple arguments. When ALL is the first argument, all optional files are generated before exclusions are processed (deleted). When NONE is the first argument, none of the optional files are generated (in other words, any that exist are deleted), then any files you subsequently specify are generated.
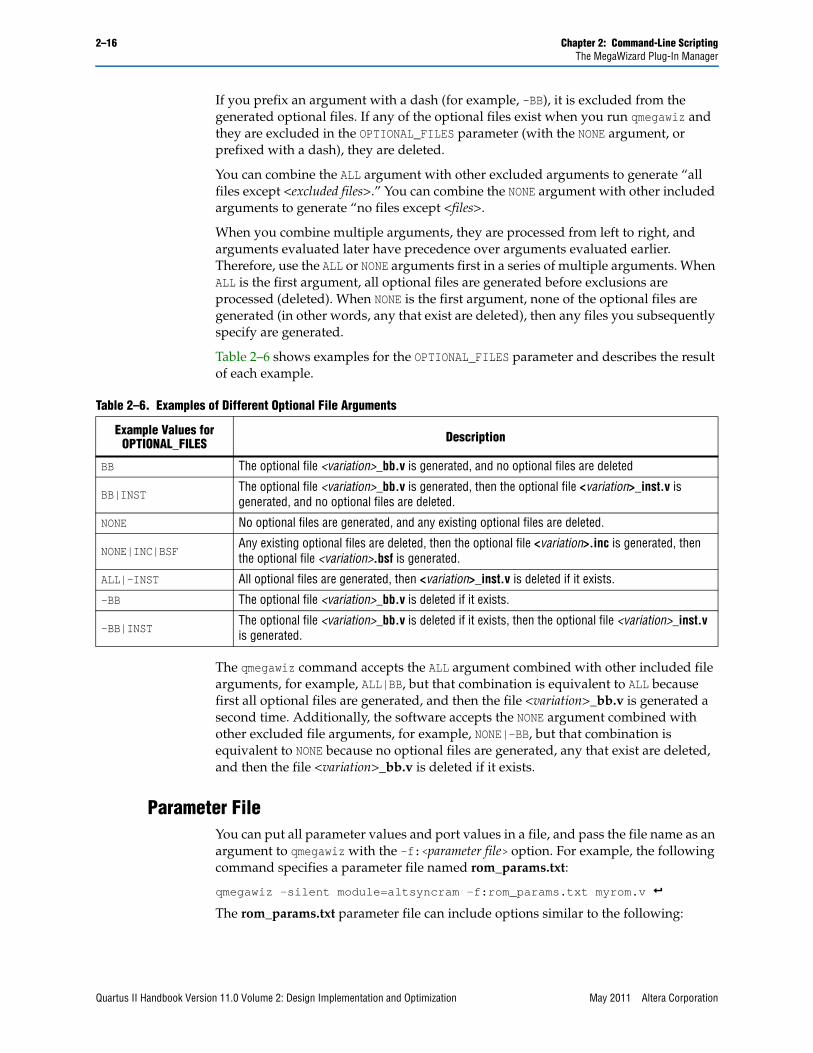
Table 2–6 shows examples for the OPTIONAL_FILES parameter and describes the result of each example.
The qmegawiz command accepts the ALL argument combined with other included file arguments, for example, ALL|BB, but that combination is equivalent to ALL because first all optional files are generated, and then the file <variation>_bb.v is generated a second time. Additionally, the software accepts the NONE argument combined with other excluded file arguments, for example, NONE|-BB, but that combination is equivalent to NONE because no optional files are generated, any that exist are deleted, and then the file <variation>_bb.v is deleted if it exists.
Parameter FileYou can put all parameter values and port values in a file, and pass the file name as an argument to qmegawiz with the -f:<parameter file> option. For example, the following command specifies a parameter file named rom_params.txt:
qmegawiz -silent module=altsyncram -f:rom_params.txt myrom.v r The rom_params.txt parameter file can include options similar to the following:
Table 2–6. Examples of Different Optional File Arguments
Example Values for OPTIONAL_FILES Description
BB The optional file <variation>_bb.v is generated, and no optional files are deleted
BB|INSTThe optional file <variation>_bb.v is generated, then the optional file <variation>_inst.v is generated, and no optional files are deleted.
NONE No optional files are generated, and any existing optional files are deleted.
NONE|INC|BSFAny existing optional files are deleted, then the optional file <variation>.inc is generated, then the optional file <variation>.bsf is generated.
ALL|-INST All optional files are generated, then <variation>_inst.v is deleted if it exists.
-BB The optional file <variation>_bb.v is deleted if it exists.
-BB|INSTThe optional file <variation>_bb.v is deleted if it exists, then the optional file <variation>_inst.v is generated.
Quartus II Handbook Version 11.0 Volume 2: Design Implementation and Optimization May 2011 Altera Corporation
Chapter 2: Command-Line Scripting 2–17Command-Line Scripting Examples
RAM_BLOCK_TYPE=M4K DEVICE_FAMILY=Stratix WIDTH_A=5 WIDTHAD_A=5 NUMWORDS_A=32 INIT_FILE=rom.hex OPERATION_MODE=ROM
Working DirectoryYou can change the working directory that qmegawiz uses when it generates files. By default, the working directory is the current directory when you execute the qmegawiz command. Use the -p option to specify a different working directory, for example:
-p:<working directory>
You can specify the working directory with an absolute or relative path. Specify an alternative working directory any time you do not want files generated in the current directory. The alternative working directory can be useful if you generate multiple variations in a batch script, and keep generated files for the different Plug-In variations in separate directories.
1 If you use the -f option and the -p option together, the MegaWizard Plug-In Manager sources the parameter file in a directory specified with the -p option, or in a directory relative to that directory. For example, if you specify C:\project\work with the -p option and work\params.txt with the -f option, the MegaWizard Plug-In Manager attempts to source the file params.txt in C:\project\work\work.
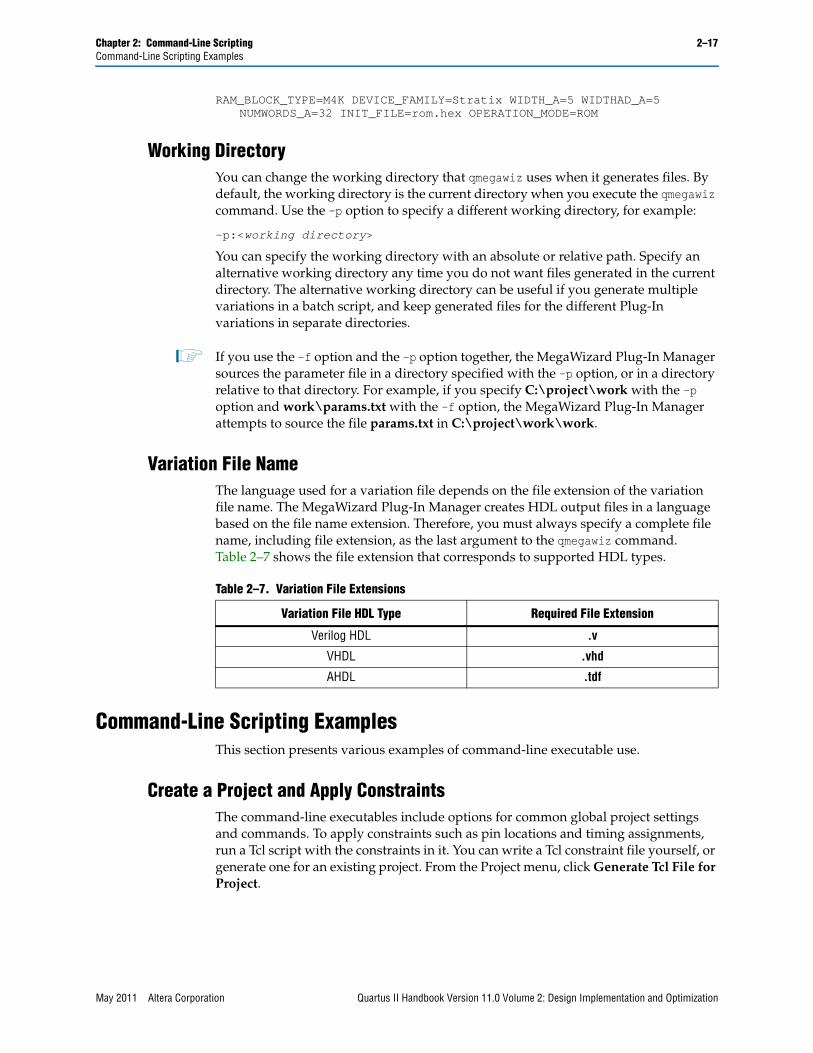
Variation File NameThe language used for a variation file depends on the file extension of the variation file name. The MegaWizard Plug-In Manager creates HDL output files in a language based on the file name extension. Therefore, you must always specify a complete file name, including file extension, as the last argument to the qmegawiz command. Table 2–7 shows the file extension that corresponds to supported HDL types.
Command-Line Scripting ExamplesThis section presents various examples of command-line executable use.
Create a Project and Apply ConstraintsThe command-line executables include options for common global project settings and commands. To apply constraints such as pin locations and timing assignments, run a Tcl script with the constraints in it. You can write a Tcl constraint file yourself, or generate one for an existing project. From the Project menu, click Generate Tcl File for Project.
Table 2–7. Variation File Extensions
Variation File HDL Type Required File Extension
Verilog HDL .v
VHDL .vhd
AHDL .tdf
May 2011 Altera Corporation Quartus II Handbook Version 11.0 Volume 2: Design Implementation and Optimization
2–18 Chapter 2: Command-Line ScriptingCommand-Line Scripting Examples
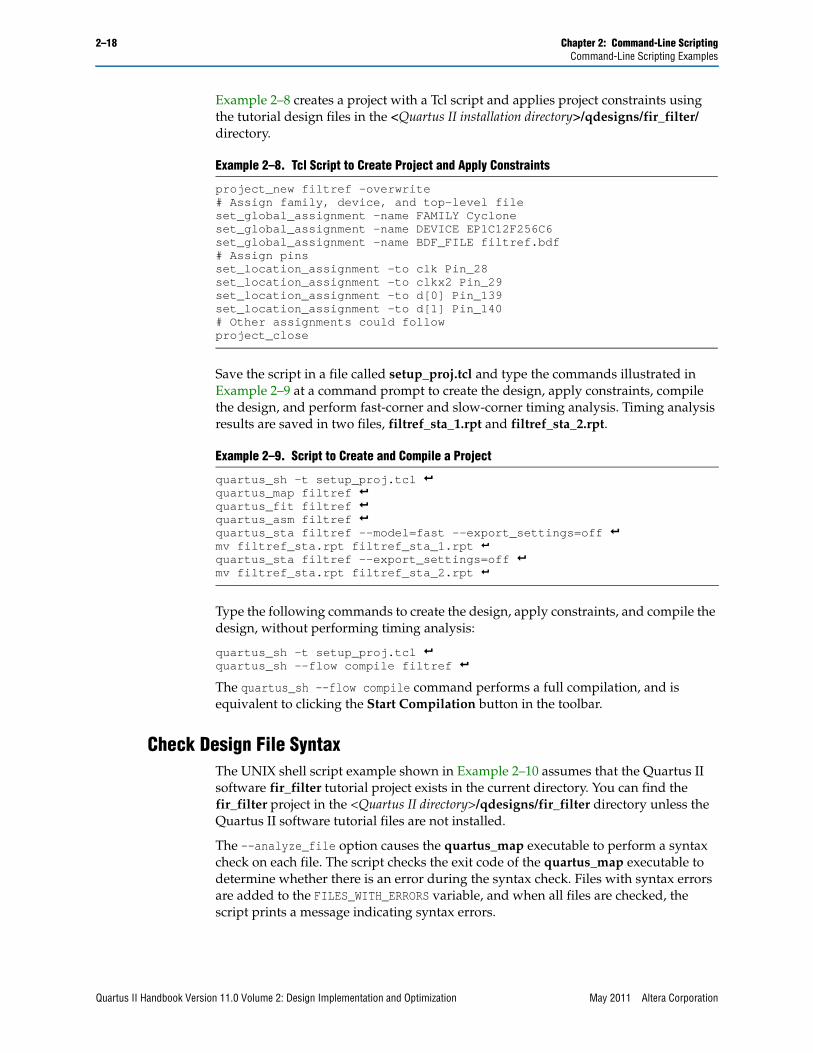
Example 2–8 creates a project with a Tcl script and applies project constraints using the tutorial design files in the <Quartus II installation directory>/qdesigns/fir_filter/ directory.
Save the script in a file called setup_proj.tcl and type the commands illustrated in Example 2–9 at a command prompt to create the design, apply constraints, compile the design, and perform fast-corner and slow-corner timing analysis. Timing analysis results are saved in two files, filtref_sta_1.rpt and filtref_sta_2.rpt.
Type the following commands to create the design, apply constraints, and compile the design, without performing timing analysis:
quartus_sh -t setup_proj.tcl rquartus_sh --flow compile filtref rThe quartus_sh --flow compile command performs a full compilation, and is equivalent to clicking the Start Compilation button in the toolbar.
Check Design File SyntaxThe UNIX shell script example shown in Example 2–10 assumes that the Quartus II software fir_filter tutorial project exists in the current directory. You can find the fir_filter project in the <Quartus II directory>/qdesigns/fir_filter directory unless the Quartus II software tutorial files are not installed.
The --analyze_file option causes the quartus_map executable to perform a syntax check on each file. The script checks the exit code of the quartus_map executable to determine whether there is an error during the syntax check. Files with syntax errors are added to the FILES_WITH_ERRORS variable, and when all files are checked, the script prints a message indicating syntax errors.
Example 2–8. Tcl Script to Create Project and Apply Constraints
project_new filtref -overwrite# Assign family, device, and top-level fileset_global_assignment -name FAMILY Cyclone set_global_assignment -name DEVICE EP1C12F256C6 set_global_assignment -name BDF_FILE filtref.bdf # Assign pinsset_location_assignment -to clk Pin_28 set_location_assignment -to clkx2 Pin_29 set_location_assignment -to d[0] Pin_139 set_location_assignment -to d[1] Pin_140 # Other assignments could follow project_close
Example 2–9. Script to Create and Compile a Project
quartus_sh -t setup_proj.tcl rquartus_map filtref rquartus_fit filtref rquartus_asm filtref rquartus_sta filtref --model=fast --export_settings=off rmv filtref_sta.rpt filtref_sta_1.rpt r quartus_sta filtref --export_settings=off rmv filtref_sta.rpt filtref_sta_2.rpt r
Quartus II Handbook Version 11.0 Volume 2: Design Implementation and Optimization May 2011 Altera Corporation
Chapter 2: Command-Line Scripting 2–19Command-Line Scripting Examples
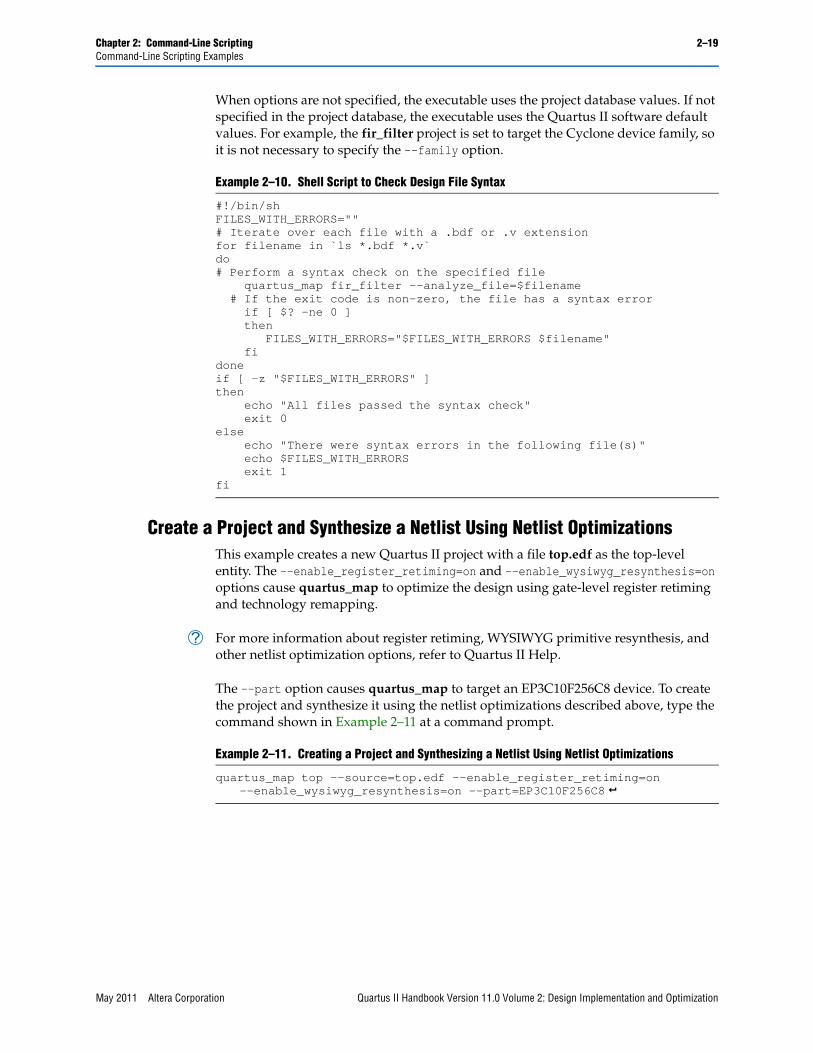
When options are not specified, the executable uses the project database values. If not specified in the project database, the executable uses the Quartus II software default values. For example, the fir_filter project is set to target the Cyclone device family, so it is not necessary to specify the --family option.
Create a Project and Synthesize a Netlist Using Netlist OptimizationsThis example creates a new Quartus II project with a file top.edf as the top-level entity. The --enable_register_retiming=on and --enable_wysiwyg_resynthesis=on options cause quartus_map to optimize the design using gate-level register retiming and technology remapping.
h For more information about register retiming, WYSIWYG primitive resynthesis, and other netlist optimization options, refer to Quartus II Help.
The --part option causes quartus_map to target an EP3C10F256C8 device. To create the project and synthesize it using the netlist optimizations described above, type the command shown in Example 2–11 at a command prompt.
Example 2–10. Shell Script to Check Design File Syntax
#!/bin/shFILES_WITH_ERRORS=""# Iterate over each file with a .bdf or .v extensionfor filename in `ls *.bdf *.v`do# Perform a syntax check on the specified file
quartus_map fir_filter --analyze_file=$filename# If the exit code is non-zero, the file has a syntax errorif [ $? -ne 0 ]then
FILES_WITH_ERRORS="$FILES_WITH_ERRORS $filename"fi
doneif [ -z "$FILES_WITH_ERRORS" ]then
echo "All files passed the syntax check"exit 0
elseecho "There were syntax errors in the following file(s)"echo $FILES_WITH_ERRORSexit 1
fi
Example 2–11. Creating a Project and Synthesizing a Netlist Using Netlist Optimizations
quartus_map top --source=top.edf --enable_register_retiming=on--enable_wysiwyg_resynthesis=on --part=EP3C10F256C8 r
May 2011 Altera Corporation Quartus II Handbook Version 11.0 Volume 2: Design Implementation and Optimization
2–20 Chapter 2: Command-Line ScriptingCommand-Line Scripting Examples
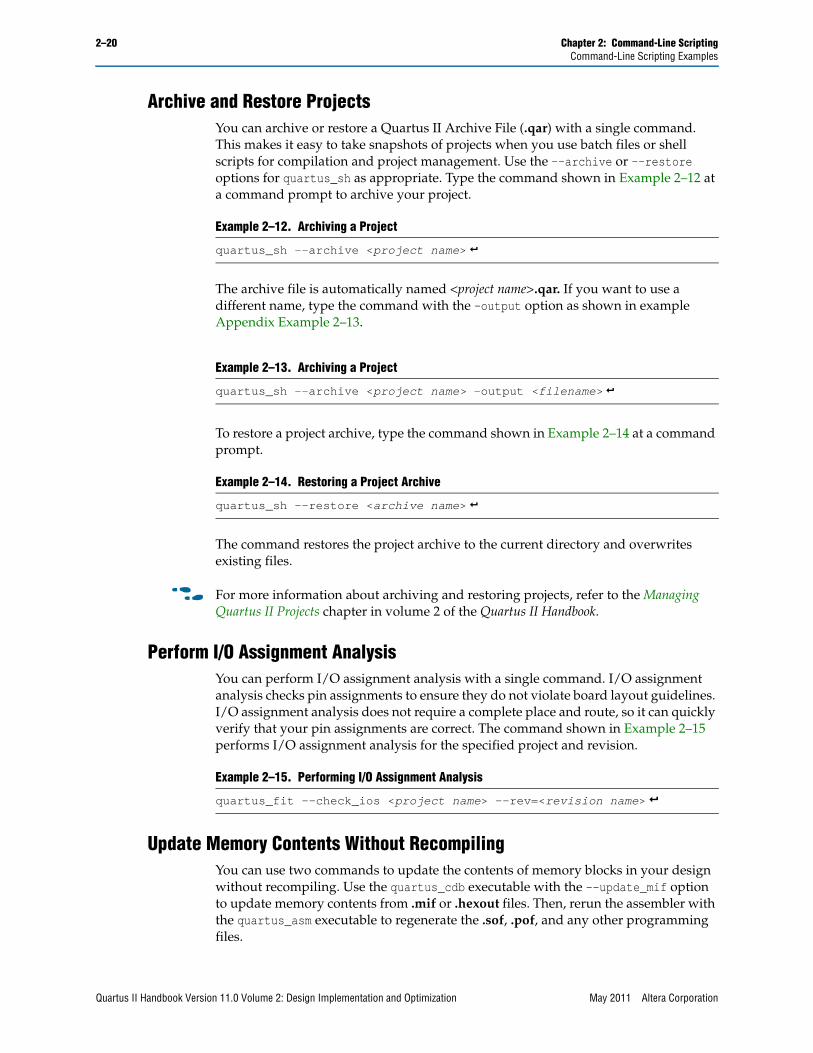
Archive and Restore ProjectsYou can archive or restore a Quartus II Archive File (.qar) with a single command. This makes it easy to take snapshots of projects when you use batch files or shell scripts for compilation and project management. Use the --archive or --restore options for quartus_sh as appropriate. Type the command shown in Example 2–12 at a command prompt to archive your project.
The archive file is automatically named <project name>.qar. If you want to use a different name, type the command with the -output option as shown in example Appendix Example 2–13.
To restore a project archive, type the command shown in Example 2–14 at a command prompt.
The command restores the project archive to the current directory and overwrites existing files.
f For more information about archiving and restoring projects, refer to the Managing Quartus II Projects chapter in volume 2 of the Quartus II Handbook.
Perform I/O Assignment AnalysisYou can perform I/O assignment analysis with a single command. I/O assignment analysis checks pin assignments to ensure they do not violate board layout guidelines. I/O assignment analysis does not require a complete place and route, so it can quickly verify that your pin assignments are correct. The command shown in Example 2–15 performs I/O assignment analysis for the specified project and revision.
Update Memory Contents Without RecompilingYou can use two commands to update the contents of memory blocks in your design without recompiling. Use the quartus_cdb executable with the --update_mif option to update memory contents from .mif or .hexout files. Then, rerun the assembler with the quartus_asm executable to regenerate the .sof, .pof, and any other programming files.
Example 2–12. Archiving a Project
quartus_sh --archive <project name> r
Example 2–13. Archiving a Project
quartus_sh --archive <project name> -output <filename> r
Example 2–14. Restoring a Project Archive
quartus_sh --restore <archive name> r
Example 2–15. Performing I/O Assignment Analysis
quartus_fit --check_ios <project name> --rev=<revision name> r
Quartus II Handbook Version 11.0 Volume 2: Design Implementation and Optimization May 2011 Altera Corporation
Chapter 2: Command-Line Scripting 2–21Command-Line Scripting Examples
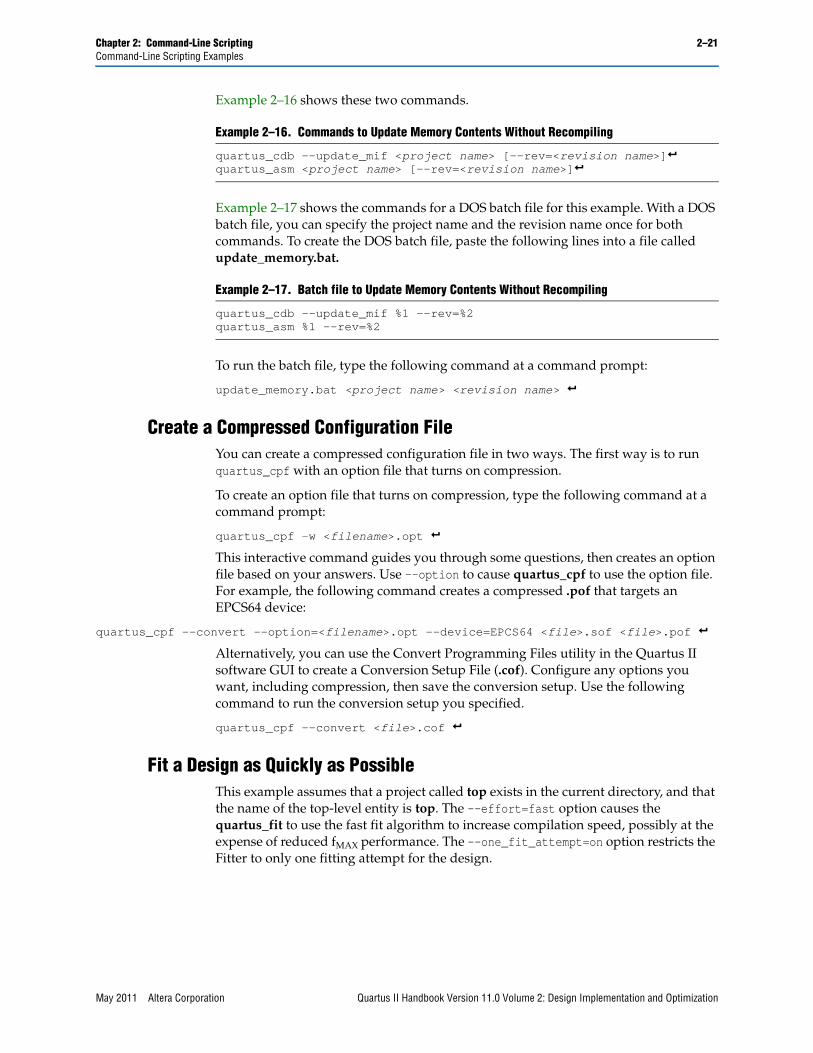
Example 2–16 shows these two commands.
Example 2–17 shows the commands for a DOS batch file for this example. With a DOS batch file, you can specify the project name and the revision name once for both commands. To create the DOS batch file, paste the following lines into a file called update_memory.bat.
To run the batch file, type the following command at a command prompt:
update_memory.bat <project name> <revision name> r
Create a Compressed Configuration FileYou can create a compressed configuration file in two ways. The first way is to run quartus_cpf with an option file that turns on compression.
To create an option file that turns on compression, type the following command at a command prompt:
quartus_cpf -w <filename>.opt rThis interactive command guides you through some questions, then creates an option file based on your answers. Use --option to cause quartus_cpf to use the option file. For example, the following command creates a compressed .pof that targets an EPCS64 device:
quartus_cpf --convert --option=<filename>.opt --device=EPCS64 <file>.sof <file>.pof rAlternatively, you can use the Convert Programming Files utility in the Quartus II software GUI to create a Conversion Setup File (.cof). Configure any options you want, including compression, then save the conversion setup. Use the following command to run the conversion setup you specified.
quartus_cpf --convert <file>.cof r
Fit a Design as Quickly as PossibleThis example assumes that a project called top exists in the current directory, and that the name of the top-level entity is top. The --effort=fast option causes the quartus_fit to use the fast fit algorithm to increase compilation speed, possibly at the expense of reduced fMAX performance. The --one_fit_attempt=on option restricts the Fitter to only one fitting attempt for the design.
Example 2–16. Commands to Update Memory Contents Without Recompiling
quartus_cdb --update_mif <project name> [--rev=<revision name>]rquartus_asm <project name> [--rev=<revision name>]r
Example 2–17. Batch file to Update Memory Contents Without Recompiling
quartus_cdb --update_mif %1 --rev=%2quartus_asm %1 --rev=%2
May 2011 Altera Corporation Quartus II Handbook Version 11.0 Volume 2: Design Implementation and Optimization
2–22 Chapter 2: Command-Line ScriptingCommand-Line Scripting Examples
To attempt to fit the project called top as quickly as possible, type the command shown in Example 2–18 at a command prompt.
Fit a Design Using Multiple SeedsThis shell script example assumes that the Quartus II software tutorial project called fir_filter exists in the current directory (defined in the file fir_filter.qpf). If the tutorial files are installed on your system, this project exists in the <Quartus II directory>/qdesigns<quartus_version_number> /fir_filter directory. Because the top-level entity in the project does not have the same name as the project, you must specify the revision name for the top-level entity with the --rev option. The --seed option specifies the seeds to use for fitting.
A seed is a parameter that affects the random initial placement of the Quartus II Fitter. Varying the seed can result in better performance for some designs.
After each fitting attempt, the script creates new directories for the results of each fitting attempt and copies the complete project to the new directory so that the results are available for viewing and debugging after the script has completed.
Example 2–19 is designed for use on UNIX systems using sh (the shell).
Example 2–18. Fitting a Project Quickly
quartus_fit top --effort=fast --one_fit_attempt=on r
Example 2–19. Shell Script to Fit a Design Using Multiple Seeds
#!/bin/shERROR_SEEDS=""quartus_map fir_filter --rev=filtref# Iterate over a number of seedsfor seed in 1 2 3 4 5doecho "Starting fit with seed=$seed"# Perform a fitting attempt with the specified seedquartus_fit fir_filter --seed=$seed --rev=filtref# If the exit-code is non-zero, the fitting attempt was# successful, so copy the project to a new directoryif [ $? -eq 0 ]then
mkdir ../fir_filter-seed_$seedmkdir ../fir_filter-seed_$seed/dbcp * ../fir_filter-seed_$seedcp db/* ../fir_filter-seed_$seed/db
elseERROR_SEEDS="$ERROR_SEEDS $seed"
fidoneif [ -z "$ERROR_SEEDS" ]thenecho "Seed sweeping was successful"exit 0elseecho "There were errors with the following seed(s)" echo $ERROR_SEEDSexit 1fi
Quartus II Handbook Version 11.0 Volume 2: Design Implementation and Optimization May 2011 Altera Corporation
Chapter 2: Command-Line Scripting 2–23Command-Line Scripting Examples
1 Use the Design Space Explorer (DSE) included with the Quartus II software script (by typing quartus_sh --dse r at a command prompt) to improve design performance by performing automated seed sweeping.
h For more information about the DSE, type quartus_sh --help=dse r at a command prompt, or refer to Design Space Explorer in Quartus II Help.
Regenerating Megafunctions After Updating the Quartus II SoftwareSome megafunction variations may reqiure regeneration when you update your installation of the Quartus II software. Read the release notes for the Quartus II software and any new documentation for the IP functions used in your design to determine if regeneration is necessary.
If regeneration is necessary, you can use a Tcl script to run the qmegawiz executable to update each function, allowing you to avoid regenerating each function in the Megawizard Plug-In Manager GUI.
Wizard-generated files are identified in the Source Files Used report panel (contained in <project name>.map.rpt) in the File Type column as “Auto-Found Wizard-Generated File”. In a Tcl script, use the commands in the ::quartus::report package from the Quartus II Tcl API to recover the list of files. Use the qexec command in a loop to run qmegawiz for each variation file:
qexec “qmegawiz -silent <variation file name>”
For example, if your script determines that your design contains a variation file called myrom.v, in one iteration of the loop in your script, a combination of strings and variables passed to the qexec command would be equivalent to the following command:
qexec “qmegawiz -silent myrom.v”
If your design flow incorporates parameter files, those can be included in the qmegawiz call in the same way you would include them from a command prompt:
qexec “qmegawiz -silent -f:<parameter file>.txt <variation file name>”
h For more information about the ::quartus::report Tcl package, refer to ::quartus::report in Quartus II Help.
f For more information about the Quartus II Tcl scripting API, refer to the Tcl Scripting chapter in volume 2 of the Quartus II Handbook.
The QFlow ScriptA Tcl/Tk-based graphical interface called QFlow is included with the command-line executables. You can use the QFlow interface to open projects, launch some of the command-line executables, view report files, and make some global project assignments. The QFlow interface can run the following command-line executables:
■ quartus_map (Analysis and Synthesis)
■ quartus_fit (Fitter)
■ quartus_sta (TimeQuest timing analyzer)
May 2011 Altera Corporation Quartus II Handbook Version 11.0 Volume 2: Design Implementation and Optimization
2–24 Chapter 2: Command-Line ScriptingDocument Revision History
■ quartus_asm (Assembler)
■ quartus_eda (EDA Netlist Writer)
To view floorplans or perform other GUI-intensive tasks, launch the Quartus II software.
Start QFlow by typing the following command at a command prompt:
quartus_sh -g r
1 The QFlow script is located in the <Quartus II directory>/common/tcl/apps/qflow/ directory.
Document Revision HistoryTable 2–8 shows the revision history for this chapter.
Table 2–8. Document Revision History (Part 1 of 2)
Date Version Changes
May 2011 11.0.0Corrected quartus_qpf example usage.
Updated examples.
December 2010 10.1.0
Template update.
Added section on using a script to regenerate megafunction variations.
Removed references to the Classic Timing Analyzer (quartus_tan).
Removed Qflow illustration.
July 2010 10.0.0 Updated script examples to use quartus_sta instead of quartus_tan, and other minor updates throughout document.
November 2009 9.1.0 Updated Table 2–1 to add quartus_jli and quartus_jbcc executables and descriptions, and other minor updates throughout document.
March 2009 9.0.0 No change to content.
Quartus II Handbook Version 11.0 Volume 2: Design Implementation and Optimization May 2011 Altera Corporation
Chapter 2: Command-Line Scripting 2–25Document Revision History
f For previous versions of the Quartus II Handbook, refer to the Quartus II Handbook Archive.
f Take an online survey to provide feedback about this handbook chapter.
November 2008 8.1.0
Added the following sections:
■ “The MegaWizard Plug-In Manager” on page 2–11
■ “Command-Line Support” on page 2–12
■ “Module and Wizard Names” on page 2–13
■ “Ports and Parameters” on page 2–14
■ “Invalid Configurations” on page 2–15
■ “Strategies to Determine Port and Parameter Values” on page 2–15
■ “Optional Files” on page 2–15
■ “Parameter File” on page 2–16
■ “Working Directory” on page 2–17
■ “Variation File Name” on page 2–17
■ “Create a Compressed Configuration File” on page 2–21
■ Updated “Option Precedence” on page 2–5 to clarify how to control precedence
■ Corrected Example 2–5 on page 2–8
■ Changed Example 2–1, Example 2–2, Example 2–4, and Example 2–7 to use the EP1C12F256C6 device
■ Minor editorial updates
■ Updated entire chapter using 8½” × 11” chapter template
May 2008 8.0.0■ Updated “Referenced Documents” on page 2–20.
■ Updated references in document.
Table 2–8. Document Revision History (Part 2 of 2)
Date Version Changes
May 2011 Altera Corporation Quartus II Handbook Version 11.0 Volume 2: Design Implementation and Optimization

2–26 Chapter 2: Command-Line ScriptingDocument Revision History
Quartus II Handbook Version 11.0 Volume 2: Design Implementation and Optimization May 2011 Altera Corporation
Quartus II Handbook Version 11.0 Volume 2: Design May 2011
QII52003-11.0.0
© 2011 Altera Corporation. All rights reserved. ALTERA, ARRand/or trademarks of Altera Corporation in the U.S. and otherwww.altera.com/common/legal.html. Altera warrants performreserves the right to make changes to any products and servicesinformation, product, or service described herein except as expspecifications before relying on any published information and
May 2011QII52003-11.0.0
3. Tcl Scripting
IntroductionDeveloping and running Tcl scripts to control the Altera® Quartus® II software allows you to perform a wide range of functions, such as compiling a design or writing procedures to automate common tasks.
You can use Tcl scripts to manage a Quartus II project, make assignments, define design constraints, make device assignments, compile your design, perform timing analysis, and access reports. Tcl scripts also facilitate project or assignment migration. For example, when desinging in different projects with the same prototype or development board, you can automate reassignment of pin locations in each new project. The Quartus II software can also generate a Tcl script based on all the current assignments in the project, which aids in switching assignments to another project.
The Quartus II software Tcl commands follow the EDA industry Tcl application programming interface (API) standards for command-line options. This simplifies learning and using Tcl commands. If you encounter an error with a command argument, the Tcl interpreter includes help information showing correct usage.
This chapter includes sample Tcl scripts for automating the Quartus II software. You can modify these example scripts for use with your own designs. You can find more Tcl scripts in the Design Examples section of the Support area on the Altera website.
This chapter includes the following topics:
■ “Quartus II Tcl Packages” on page 3–2
■ “Quartus II Tcl API Help” on page 3–3
■ “Command-Line Options: -t, -s, and --tcl_eval” on page 3–5
■ “End-to-End Design Flows” on page 3–7
■ “Creating Projects and Making Assignments” on page 3–7
■ “Compiling Designs” on page 3–8
■ “Reporting” on page 3–9
■ “Timing Analysis” on page 3–10
■ “Automating Script Execution” on page 3–10
■ “Other Scripting Features” on page 3–13
■ “The Quartus II Tcl Shell in Interactive Mode” on page 3–17
Implementation and Optimization
Subscribe
IA, CYCLONE, HARDCOPY, MAX, MEGACORE, NIOS, QUARTUS and STRATIX are Reg. U.S. Pat. & Tm. Off. countries. All other trademarks and service marks are the property of their respective holders as described at
ance of its semiconductor products to current specifications in accordance with Altera’s standard warranty, but at any time without notice. Altera assumes no responsibility or liability arising out of the application or use of any ressly agreed to in writing by Altera. Altera customers are advised to obtain the latest version of device before placing orders for products or services.
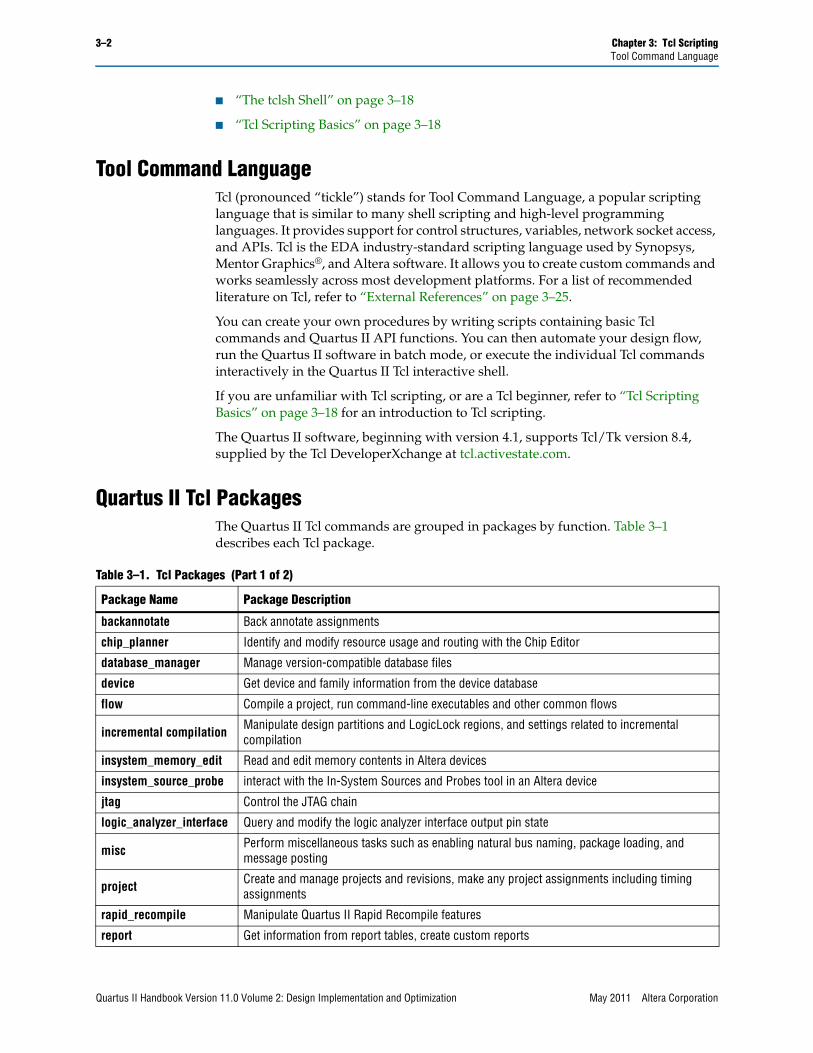
3–2 Chapter 3: Tcl ScriptingTool Command Language
■ “The tclsh Shell” on page 3–18
■ “Tcl Scripting Basics” on page 3–18
Tool Command LanguageTcl (pronounced “tickle”) stands for Tool Command Language, a popular scripting language that is similar to many shell scripting and high-level programming languages. It provides support for control structures, variables, network socket access, and APIs. Tcl is the EDA industry-standard scripting language used by Synopsys, Mentor Graphics®, and Altera software. It allows you to create custom commands and works seamlessly across most development platforms. For a list of recommended literature on Tcl, refer to “External References” on page 3–25.
You can create your own procedures by writing scripts containing basic Tcl commands and Quartus II API functions. You can then automate your design flow, run the Quartus II software in batch mode, or execute the individual Tcl commands interactively in the Quartus II Tcl interactive shell.
If you are unfamiliar with Tcl scripting, or are a Tcl beginner, refer to “Tcl Scripting Basics” on page 3–18 for an introduction to Tcl scripting.
The Quartus II software, beginning with version 4.1, supports Tcl/Tk version 8.4, supplied by the Tcl DeveloperXchange at tcl.activestate.com.
Quartus II Tcl PackagesThe Quartus II Tcl commands are grouped in packages by function. Table 3–1 describes each Tcl package.
Table 3–1. Tcl Packages (Part 1 of 2)
Package Name Package Description
backannotate Back annotate assignments
chip_planner Identify and modify resource usage and routing with the Chip Editor
database_manager Manage version-compatible database files
device Get device and family information from the device database
flow Compile a project, run command-line executables and other common flows
incremental compilation Manipulate design partitions and LogicLock regions, and settings related to incremental compilation
insystem_memory_edit Read and edit memory contents in Altera devices
insystem_source_probe interact with the In-System Sources and Probes tool in an Altera device
jtag Control the JTAG chain
logic_analyzer_interface Query and modify the logic analyzer interface output pin state
misc Perform miscellaneous tasks such as enabling natural bus naming, package loading, and message posting
project Create and manage projects and revisions, make any project assignments including timing assignments
rapid_recompile Manipulate Quartus II Rapid Recompile features
report Get information from report tables, create custom reports
Quartus II Handbook Version 11.0 Volume 2: Design Implementation and Optimization May 2011 Altera Corporation
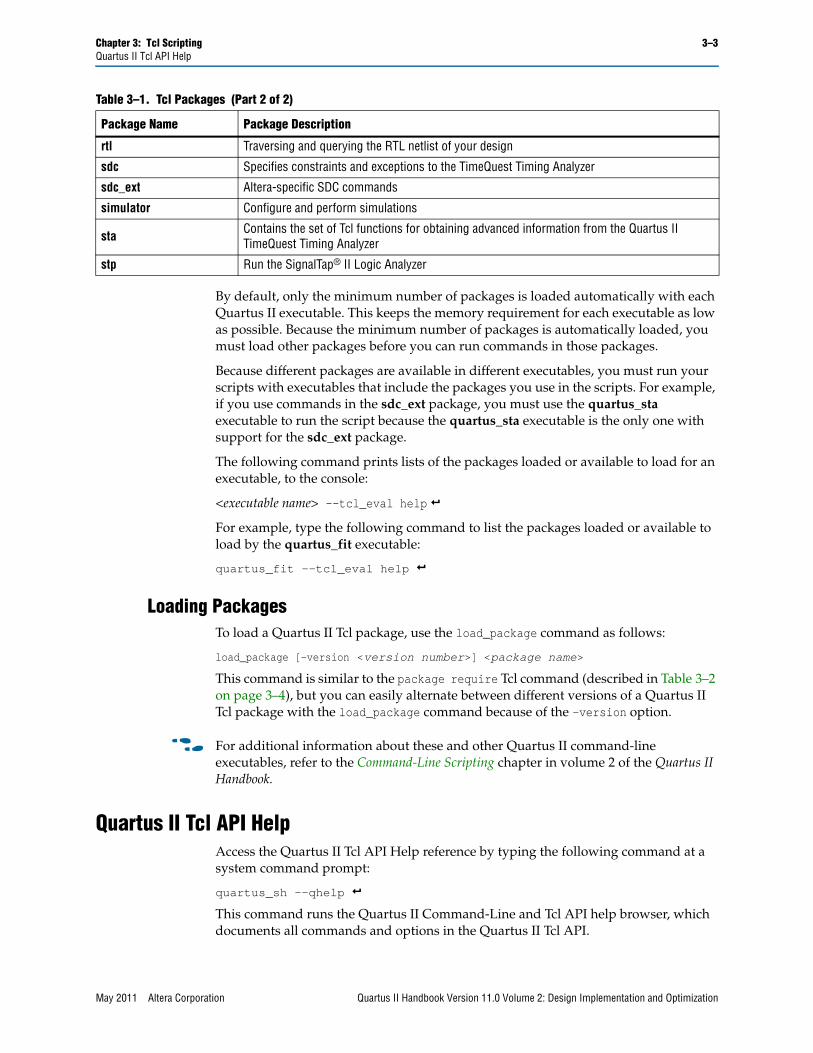
Chapter 3: Tcl Scripting 3–3Quartus II Tcl API Help
By default, only the minimum number of packages is loaded automatically with each Quartus II executable. This keeps the memory requirement for each executable as low as possible. Because the minimum number of packages is automatically loaded, you must load other packages before you can run commands in those packages.
Because different packages are available in different executables, you must run your scripts with executables that include the packages you use in the scripts. For example, if you use commands in the sdc_ext package, you must use the quartus_sta executable to run the script because the quartus_sta executable is the only one with support for the sdc_ext package.
The following command prints lists of the packages loaded or available to load for an executable, to the console:
<executable name> --tcl_eval help rFor example, type the following command to list the packages loaded or available to load by the quartus_fit executable:
quartus_fit --tcl_eval help r
Loading PackagesTo load a Quartus II Tcl package, use the load_package command as follows:
load_package [-version <version number>] <package name>
This command is similar to the package require Tcl command (described in Table 3–2 on page 3–4), but you can easily alternate between different versions of a Quartus II Tcl package with the load_package command because of the -version option.
f For additional information about these and other Quartus II command-line executables, refer to the Command-Line Scripting chapter in volume 2 of the Quartus II Handbook.
Quartus II Tcl API HelpAccess the Quartus II Tcl API Help reference by typing the following command at a system command prompt:
quartus_sh --qhelp rThis command runs the Quartus II Command-Line and Tcl API help browser, which documents all commands and options in the Quartus II Tcl API.
rtl Traversing and querying the RTL netlist of your design
sdc Specifies constraints and exceptions to the TimeQuest Timing Analyzer
sdc_ext Altera-specific SDC commands
simulator Configure and perform simulations
sta Contains the set of Tcl functions for obtaining advanced information from the Quartus II TimeQuest Timing Analyzer
stp Run the SignalTap® II Logic Analyzer
Table 3–1. Tcl Packages (Part 2 of 2)
Package Name Package Description
May 2011 Altera Corporation Quartus II Handbook Version 11.0 Volume 2: Design Implementation and Optimization
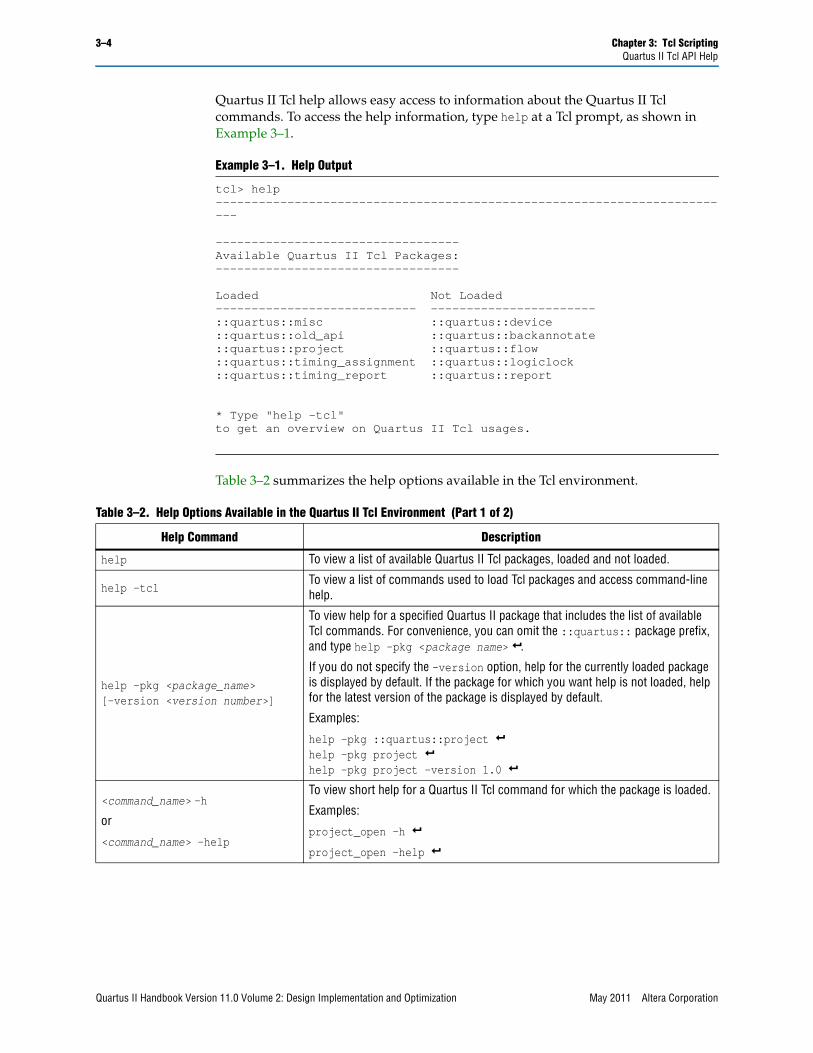
3–4 Chapter 3: Tcl ScriptingQuartus II Tcl API Help
Quartus II Tcl help allows easy access to information about the Quartus II Tcl commands. To access the help information, type help at a Tcl prompt, as shown in Example 3–1.
Table 3–2 summarizes the help options available in the Tcl environment.
Example 3–1. Help Output
tcl> help-------------------------------------------------------------------------
----------------------------------Available Quartus II Tcl Packages:----------------------------------
Loaded Not Loaded---------------------------- -----------------------::quartus::misc ::quartus::device::quartus::old_api ::quartus::backannotate::quartus::project ::quartus::flow::quartus::timing_assignment ::quartus::logiclock::quartus::timing_report ::quartus::report
* Type "help -tcl"to get an overview on Quartus II Tcl usages.
Table 3–2. Help Options Available in the Quartus II Tcl Environment (Part 1 of 2)
Help Command Description
help To view a list of available Quartus II Tcl packages, loaded and not loaded.
help -tclTo view a list of commands used to load Tcl packages and access command-line help.
help -pkg <package_name>[-version <version number>]
To view help for a specified Quartus II package that includes the list of available Tcl commands. For convenience, you can omit the ::quartus:: package prefix, and type help -pkg <package name> r.
If you do not specify the -version option, help for the currently loaded package is displayed by default. If the package for which you want help is not loaded, help for the latest version of the package is displayed by default.
Examples:
help -pkg ::quartus::project rhelp -pkg project rhelp -pkg project -version 1.0 r
<command_name> -h
or
<command_name> -help
To view short help for a Quartus II Tcl command for which the package is loaded.
Examples:
project_open -h rproject_open -help r
Quartus II Handbook Version 11.0 Volume 2: Design Implementation and Optimization May 2011 Altera Corporation
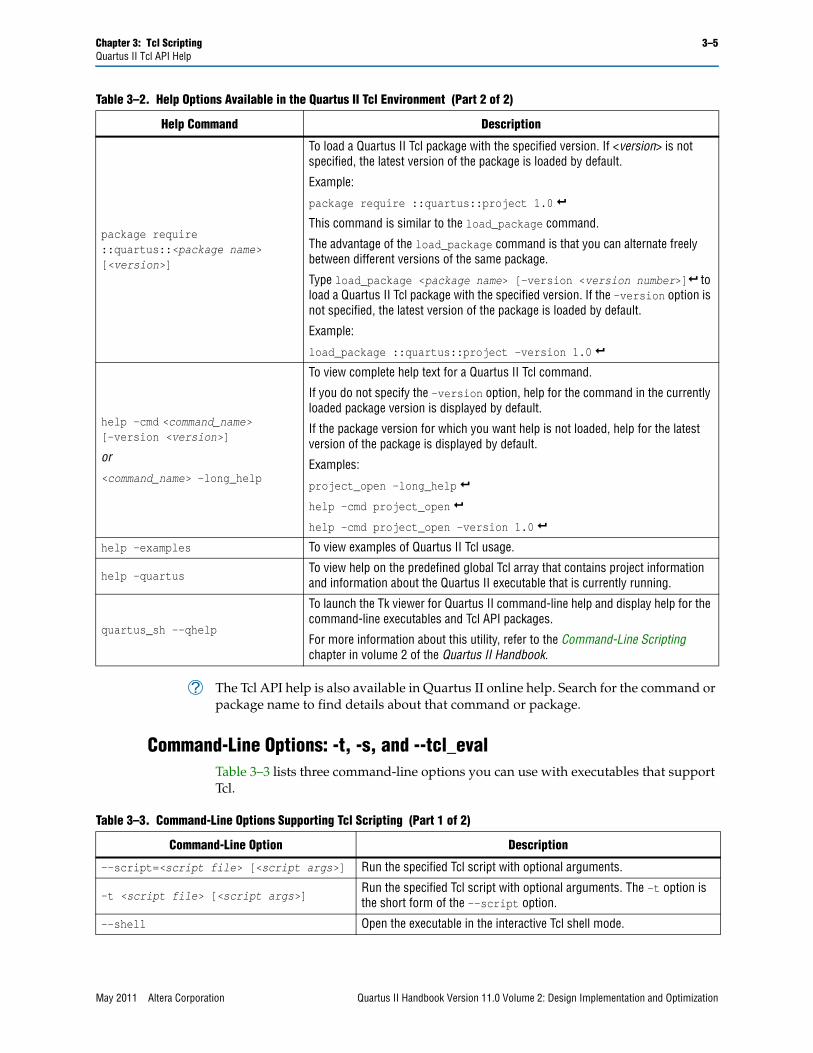
Chapter 3: Tcl Scripting 3–5Quartus II Tcl API Help
h The Tcl API help is also available in Quartus II online help. Search for the command or package name to find details about that command or package.
Command-Line Options: -t, -s, and --tcl_evalTable 3–3 lists three command-line options you can use with executables that support Tcl.
package require ::quartus::<package name> [<version>]
To load a Quartus II Tcl package with the specified version. If <version> is not specified, the latest version of the package is loaded by default.
Example:
package require ::quartus::project 1.0 rThis command is similar to the load_package command.
The advantage of the load_package command is that you can alternate freely between different versions of the same package.
Type load_package <package name> [-version <version number>]r to load a Quartus II Tcl package with the specified version. If the -version option is not specified, the latest version of the package is loaded by default.
Example:
load_package ::quartus::project -version 1.0 r
help -cmd <command_name> [-version <version>]
or
<command_name> -long_help
To view complete help text for a Quartus II Tcl command.
If you do not specify the -version option, help for the command in the currently loaded package version is displayed by default.
If the package version for which you want help is not loaded, help for the latest version of the package is displayed by default.
Examples:
project_open -long_help r
help -cmd project_open r
help -cmd project_open -version 1.0 r
help -examples To view examples of Quartus II Tcl usage.
help -quartusTo view help on the predefined global Tcl array that contains project information and information about the Quartus II executable that is currently running.
quartus_sh --qhelp
To launch the Tk viewer for Quartus II command-line help and display help for the command-line executables and Tcl API packages.
For more information about this utility, refer to the Command-Line Scripting chapter in volume 2 of the Quartus II Handbook.
Table 3–2. Help Options Available in the Quartus II Tcl Environment (Part 2 of 2)
Help Command Description
Table 3–3. Command-Line Options Supporting Tcl Scripting (Part 1 of 2)
Command-Line Option Description
--script=<script file> [<script args>] Run the specified Tcl script with optional arguments.
-t <script file> [<script args>]Run the specified Tcl script with optional arguments. The -t option is the short form of the --script option.
--shell Open the executable in the interactive Tcl shell mode.
May 2011 Altera Corporation Quartus II Handbook Version 11.0 Volume 2: Design Implementation and Optimization
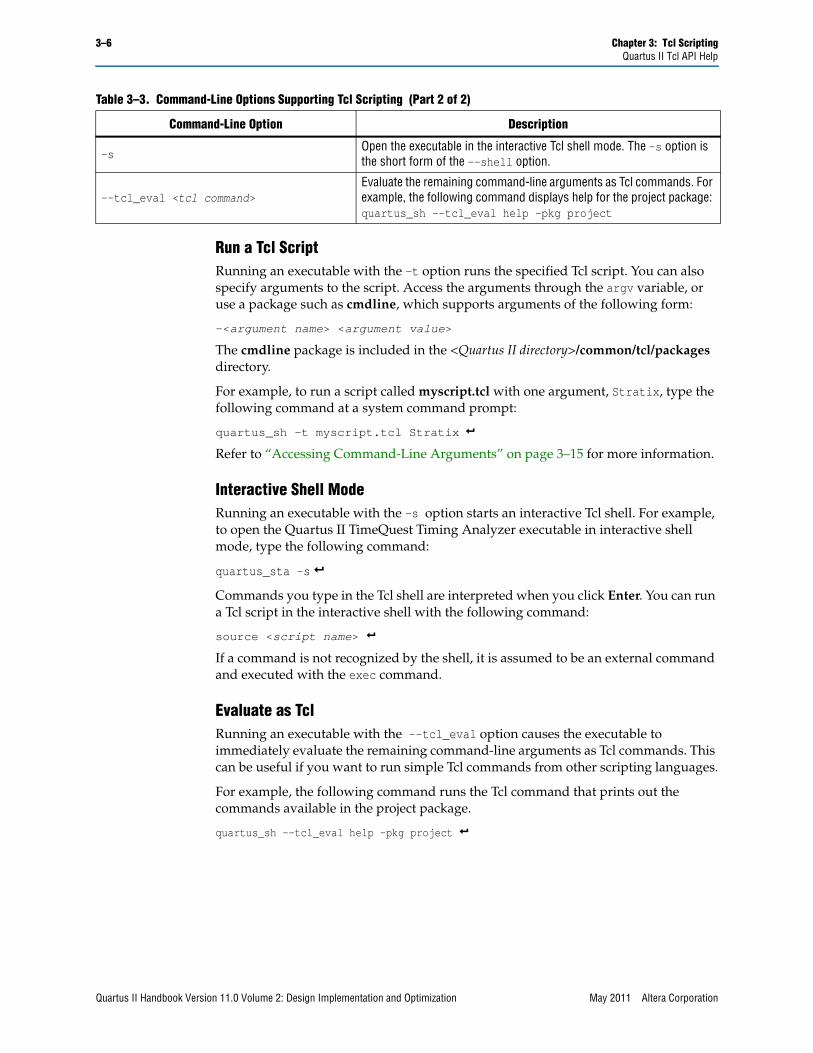
3–6 Chapter 3: Tcl ScriptingQuartus II Tcl API Help
Run a Tcl ScriptRunning an executable with the -t option runs the specified Tcl script. You can also specify arguments to the script. Access the arguments through the argv variable, or use a package such as cmdline, which supports arguments of the following form:
-<argument name> <argument value>
The cmdline package is included in the <Quartus II directory>/common/tcl/packages directory.
For example, to run a script called myscript.tcl with one argument, Stratix, type the following command at a system command prompt:
quartus_sh -t myscript.tcl Stratix rRefer to “Accessing Command-Line Arguments” on page 3–15 for more information.
Interactive Shell ModeRunning an executable with the -s option starts an interactive Tcl shell. For example, to open the Quartus II TimeQuest Timing Analyzer executable in interactive shell mode, type the following command:
quartus_sta -s rCommands you type in the Tcl shell are interpreted when you click Enter. You can run a Tcl script in the interactive shell with the following command:
source <script name> rIf a command is not recognized by the shell, it is assumed to be an external command and executed with the exec command.
Evaluate as TclRunning an executable with the --tcl_eval option causes the executable to immediately evaluate the remaining command-line arguments as Tcl commands. This can be useful if you want to run simple Tcl commands from other scripting languages.
For example, the following command runs the Tcl command that prints out the commands available in the project package.
quartus_sh --tcl_eval help -pkg project r
-sOpen the executable in the interactive Tcl shell mode. The -s option is the short form of the --shell option.
--tcl_eval <tcl command>Evaluate the remaining command-line arguments as Tcl commands. For example, the following command displays help for the project package: quartus_sh --tcl_eval help -pkg project
Table 3–3. Command-Line Options Supporting Tcl Scripting (Part 2 of 2)
Command-Line Option Description
Quartus II Handbook Version 11.0 Volume 2: Design Implementation and Optimization May 2011 Altera Corporation
Chapter 3: Tcl Scripting 3–7End-to-End Design Flows
The Quartus II Tcl Console WindowYou can run Tcl commands directly in the Quartus II Tcl Console window. On the View menu, click Utility Windows. By default, the Tcl Console window is docked in the bottom-right corner of the Quartus II GUI. All Tcl commands typed in the Tcl Console are interpreted by the Quartus II Tcl shell.
1 Some shell commands such as cd, ls, and others can be run in the Tcl Console window, with the Tcl exec command. However, for best results, run shell commands and Quartus II executables from a system command prompt outside of the Quartus II software GUI.
Tcl messages appear in the System tab (Messages window). Errors and messages written to stdout and stderr also are shown in the Quartus II Tcl Console window.
End-to-End Design FlowsYou can use Tcl scripts to control all aspects of the design flow, including controlling other software, when the other software also includes a scripting interface.
Typically, EDA tools include their own script interpreters that extend core language functionality with tool-specific commands. For example, the Quartus II Tcl interpreter supports all core Tcl commands, and adds numerous commands specific to the Quartus II software. You can include commands in one Tcl script to run another script, which allows you to combine or chain together scripts to control different tools. Because scripts for different tools must be executed with different Tcl interpreters, it is difficult to pass information between the scripts unless one script writes information into a file and another script reads it.
Within the Quartus II software, you can perform many different operations in a design flow (such as synthesis, fitting, and timing analysis) from a single script, making it easy to maintain global state information and pass data between the operations. However, there are some limitations on the operations you can perform in a single script due to the various packages supported by each executable.
There are no limitations on running flows from any executable. Flows include operations found in the Start section of the Processing menu in the Quartus II GUI, and are also documented as options for the execute_flow Tcl command. If you can make settings in the Quartus II software and run a flow to get your desired result, you can make the same settings and run the same flow in a Tcl script.
Creating Projects and Making AssignmentsYou can easily create a script that makes all the assignments for an existing project, and then use the script at any time to restore your project settings to a known state. From the Project menu, click Generate Tcl File for Project to automatically generate a .tcl file with all of your assignments. You can source this file to recreate your project, and you can edit the file to add other commands, such as compiling the design. The file is a good starting point to learn about project management commands and assignment commands.
May 2011 Altera Corporation Quartus II Handbook Version 11.0 Volume 2: Design Implementation and Optimization
3–8 Chapter 3: Tcl ScriptingCompiling Designs
f Refer to “Interactive Shell Mode” on page 3–6 for information about sourcing a script. Scripting information for all Quartus II project settings and assignments is located in the QSF Reference Manual. Refer to the Constraining Designs chapter in volume 2 of the Quartus II Handbook for more information on making assignments.
Example 3–2 shows how to create a project, make assignments, and compile the project. It uses the fir_filter tutorial design files in the qdesigns installation directory. Run this script in the fir_filter directory, with the quartus_sh executable.
1 The assignments created or modified while a project is open are not committed to the Quartus II Settings File (.qsf) unless you explicitly call export_assignments or project_close (unless -dont_export_assignments is specified). In some cases, such as when running execute_flow, the Quartus II software automatically commits the changes.
f For information about scripted design flows for HardCopy II designs, refer to the Script-Based Design for HardCopy II Devices chapter of the HardCopy Handbook. A separate chapter in the HardCopy Handbook called Timing Constraints for HardCopy II Devices also contains information about script-based design for HardCopy II devices, with an emphasis on timing constraints.
Compiling DesignsYou can run the Quartus II command-line executables from Tcl scripts. Use the included flow package to run various Quartus II compilation flows, or run each executable directly.
The flow PackageThe flow package includes two commands for running Quartus II command-line executables, either individually or together in standard compilation sequence. The execute_module command allows you to run an individual Quartus II command-line executable. The execute_flow command allows you to run some or all of the executables in commonly-used combinations. Use the flow package instead of system calls to run Quartus II executables from scripts or from the Quartus II Tcl Console.
Example 3–2. Create and Compile a Project
load_package flow
# Create the project and overwrite any settings# files that existproject_new fir_filter -revision filtref -overwrite# Set the device, the name of the top-level BDF,# and the name of the top level entityset_global_assignment -name FAMILY Cycloneset_global_assignment -name DEVICE EP1C6F256C6set_global_assignment -name BDF_FILE filtref.bdfset_global_assignment -name TOP_LEVEL_ENTITY filtref# Add other pin assignments hereset_location_assignment -to clk Pin_G1# compile the projectexecute_flow -compileproject_close
Quartus II Handbook Version 11.0 Volume 2: Design Implementation and Optimization May 2011 Altera Corporation
Chapter 3: Tcl Scripting 3–9Reporting
Compile All RevisionsYou can use a simple Tcl script to compile all revisions in your project. Save the script shown in Example 3–3 in a file called compile_revisions.tcl and type the following to run it:
quartus_sh -t compile_revisions.tcl <project name> r
ReportingIt is sometimes necessary to extract information from the Compilation Report to evaluate results. The Quartus II Tcl API provides easy access to report data so you do not have to write scripts to parse the text report files.
If you know the exact cell or cells you want to access, use the get_report_panel_data command and specify the row and column names (or x and y coordinates) and the name of the appropriate report panel. You can often search for data in a report panel. To do this, use a loop that reads the report one row at a time with the get_report_panel_row command.
Column headings in report panels are in row 0. If you use a loop that reads the report one row at a time, you can start with row 1 to skip the row with column headings. The get_number_of_rows command returns the number of rows in the report panel, including the column heading row. Because the number of rows includes the column heading row, continue your loop as long as the loop index is less than the number of rows.
Report panels are hierarchically arranged and each level of hierarchy is denoted by the string “||“ in the panel name. For example, the name of the Fitter Settings report panel is Fitter||Fitter Settings because it is in the Fitter folder. Panels at the highest hierarchy level do not use the “||” string. For example, the Flow Settings report panel is named Flow Settings.
The code in Example 3–4 prints a list of all report panel names in your project. You can run this code with any executable that includes support for the report package.
Example 3–3. Compile All Revisions
load_package flowproject_open [lindex $quartus(args) 0]set original_revision [get_current_revision]foreach revision [get_project_revisions] {
set_current_revision $revisionexecute flow -compile
}set_current_revision $original_revisionproject_close
Example 3–4. Print All Report Panel Names
load_package reportproject_open myprojectload_reportset panel_names [get_report_panel_names]foreach panel_name $panel_names {post_message "$panel_name"}
May 2011 Altera Corporation Quartus II Handbook Version 11.0 Volume 2: Design Implementation and Optimization
3–10 Chapter 3: Tcl ScriptingTiming Analysis
Viewing Report Data in ExcelThe Microsoft Excel software is sometimes used to view or manipulate timing analysis results. You can create a Comma Separated Value (.csv) file from any Quartus II report to open with Excel. Example 3–5 shows a simple way to create a .csv file with data from the Fitter panel in a report. You could modify the script to use command-line arguments to pass in the name of the project, report panel, and output file to use. You can run this script example with any executable that supports the report package.
Timing AnalysisThe Quartus II TimeQuest Timing Analyzer includes support for industry-standard SDC commands in the sdc package. The Quartus II software also includes comprehensive Tcl APIs and SDC extensions for the TimeQuest Timing Analyzer in the sta, and sdc_ext packages.
f Refer to the Quartus II TimeQuest Timing Analyzer chapter in volume 3 of the Quartus II Handbook for detailed information about how to perform timing analysis with the Quartus II TimeQuest Timing Analyzer.
Automating Script ExecutionYou can configure scripts to run automatically at various points during compilation. Use this capability to automatically run scripts that perform custom reporting, make specific assignments, and perform many other tasks.
The following three global assignments control when a script is run automatically:
■ PRE_FLOW_SCRIPT_FILE —before a flow starts
■ POST_MODULE_SCRIPT_FILE —after a module finishes
Example 3–5. Create .csv Files from Reports
load_package reportproject_open my-project
load_report
# This is the name of the report panel to save as a CSV fileset panel_name "Fitter||Fitter Settings"set csv_file "output.csv"
set fh [open $csv_file w]set num_rows [get_number_of_rows -name $panel_name]
# Go through all the rows in the report file, including the# row with headings, and write out the comma-separated datafor { set i 0 } { $i < $num_rows } { incr i } {
set row_data [get_report_panel_row -name $panel_name \-row $i]
puts $fh [join $row_data ","]}
close $fhunload_report
Quartus II Handbook Version 11.0 Volume 2: Design Implementation and Optimization May 2011 Altera Corporation
Chapter 3: Tcl Scripting 3–11Automating Script Execution
■ POST_FLOW_SCRIPT_FILE —after a flow finishes
A module is another term for a Quartus II executable that performs one step in a flow. For example, two modules are Analysis and Synthesis (quartus_map), and timing analysis (quartus_sta).
A flow is a series of modules that the Quartus II software runs with predefined options. For example, compiling a design is a flow that typically consists of the following steps (performed by the indicated module):
1. Analysis and synthesis (quartus_map)
2. Fitter (quartus_fit)
3. Assembler (quartus_asm)
4. Timing Analyzer (quartus_sta)
Other flows are described in the help for the execute_flow Tcl command. In addition, many commands in the Processing menu of the Quartus II GUI correspond to this design flow.
To make an assignment automatically run a script, add an assignment with the following form to the .qsf for your project:
set_global_assignment -name <assignment name> <executable>:<script name>
The Quartus II software runs the scripts as shown in Example 3–6.
The first argument passed in the argv variable (or quartus(args) variable) is the name of the flow or module being executed, depending on the assignment you use. The second argument is the name of the project and the third argument is the name of the revision.
When you use the POST_MODULE_SCRIPT_FILE assignment, the specified script is automatically run after every executable in a flow. You can use a string comparison with the module name (the first argument passed in to the script) to isolate script processing to certain modules.
Execution ExampleExample 3–7 illustrates how automatic script execution works in a complete flow, assuming you have a project called top with a current revision called rev_1, and you have the following assignments in the .qsf for your project.
When you compile your project, the PRE_FLOW_SCRIPT_FILE assignment causes the following command to be run before compilation begins:
Example 3–6.
<executable> -t <script name> <flow or module name> <project name> <revision name>
Example 3–7.
set_global_assignment -name PRE_FLOW_SCRIPT_FILE quartus_sh:first.tclset_global_assignment -name POST_MODULE_SCRIPT_FILE quartus_sh:next.tclset_global_assignment -name POST_FLOW_SCRIPT_FILE quartus_sh:last.tcl
May 2011 Altera Corporation Quartus II Handbook Version 11.0 Volume 2: Design Implementation and Optimization
3–12 Chapter 3: Tcl ScriptingAutomating Script Execution
quartus_sh -t first.tcl compile top rev_1
Next, the Quartus II software starts compilation with analysis and synthesis, performed by the quartus_map executable. After the analysis and synthesis finishes, the POST_MODULE_SCRIPT_FILE assignment causes the following command to run:
quartus_sh -t next.tcl quartus_map top rev_1
Then, the Quartus II software continues compilation with the Fitter, performed by the quartus_fit executable. After the Fitter finishes, the POST_MODULE_SCRIPT_FILE assignment runs the following command:
quartus_sh -t next.tcl quartus_fit top rev_1
Corresponding commands are run after the other stages of the compilation. When the compilation is over, the POST_FLOW_SCRIPT_FILE assignment runs the following command:
quartus_sh -t last.tcl compile top rev_1
Controlling ProcessingThe POST_MODULE_SCRIPT_FILE assignment causes a script to run after every module. Because the same script is run after every module, you might have to include some conditional statements that restrict processing in your script to certain modules.
For example, if you want a script to run only after timing analysis, use a conditional test like the one shown in Example 3–8. It checks the flow or module name passed as the first argument to the script and executes code when the module is quartus_sta.
Displaying MessagesBecause of the way the Quartus II software runs the scripts automatically, you must use the post_message command to display messages, instead of the puts command. This requirement applies only to scripts that are run by the three assignments listed in “Automating Script Execution” on page 3–10.
1 Refer to “The post_message Command” on page 3–14 for more information about this command.
Example 3–8. Restrict Processing to a Single Module
set module [lindex $quartus(args) 0]
if [string match "quartus_sta" $module] {
# Include commands here that are run # after timing analysis# Use the post-message command to display# messagespost_message "Running after timing analysis"
}
Quartus II Handbook Version 11.0 Volume 2: Design Implementation and Optimization May 2011 Altera Corporation
Chapter 3: Tcl Scripting 3–13Other Scripting Features
Other Scripting FeaturesThe Quartus II Tcl API includes other general-purpose commands and features described in this section.
Natural Bus Naming The Quartus II software supports natural bus naming. Natural bus naming allows you to use square brackets to specify bus indexes in HDL without including escape characters to prevent Tcl from interpreting the square brackets as containing commands. For example, one signal in a bus named address can be identified as address[0] instead of address\[0\]. You can take advantage of natural bus naming when making assignments, as in Example 3–9.
The Quartus II software defaults to natural bus naming. You can turn off natural bus naming with the disable_natural_bus_naming command. For more information about natural bus naming, type the following at a Quartus II Tcl prompt:
enable_natural_bus_naming -h r
Short Option NamesYou can use short versions of command options, as long as they are unambiguous. For example, the project_open command supports two options: -current_revision and -revision. You can use any of the following abbreviations of the -revision option: -r, -re, -rev, -revi, -revis, and -revisio. You can use an option as short as -r because in the case of the project_open command no other option starts with the letter r. However, the report_timing command includes the options -recovery and -removal. You cannot use -r or -re to shorten either of those options, because the abbreviation would not be unique to only one option.
Collection CommandsSome Quartus II Tcl functions return very large sets of data that would be inefficient as Tcl lists. These data structures are referred to as collections. The Quartus II Tcl API uses a collection ID to access the collection. There are two Quartus II Tcl commands for working with collections, foreach_in_collection and get_collection_size. Use the set command to assign a collection ID to a variable.
h For information about which Quartus II Tcl commands return collection IDs, refer to foreach_in_collection in Quartus II Help.
Example 3–9. Natural Bus Naming
set_location_assignment -to address[10] Pin_M20
May 2011 Altera Corporation Quartus II Handbook Version 11.0 Volume 2: Design Implementation and Optimization
3–14 Chapter 3: Tcl ScriptingOther Scripting Features
The foreach_in_collection CommandThe foreach_in_collection command is similar to the foreach Tcl command. Use it to iterate through all elements in a collection. Example 3–10 prints all instance assignments in an open project.
The get_collection_size CommandUse the get_collection_size command to get the number of elements in a collection. Example 3–11 prints the number of global assignments in an open project.
The post_message Command To print messages that are formatted like Quartus II software messages, use the post_message command. Messages printed by the post_message command appear in the System tab of the Messages window in the Quartus II GUI, and are written to standard at when scripts are run. Arguments for the post_message command include an optional message type and a required message string.
The message type can be one of the following:
■ info (default)
■ extra_info
■ warning
■ critical_warning
■ error
If you do not specify a type, Quartus II software defaults to info.
With the Quartus II software in Windows, you can color code messages displayed at the system command prompt with the post_message command. Add the following line to your quartus2.ini file:
DISPLAY_COMMAND_LINE_MESSAGES_IN_COLOR = on
Example 3–10. Collection Commands
set all_instance_assignments [get_all_instance_assignments -name *]foreach_in_collection asgn $all_instance_assignments {
# Information about each assignment is# returned in a list. For information# about the list elements, refer to Help# for the get-all-instance-assignments command.set to [lindex $asgn 2]set name [lindex $asgn 3]set value [lindex $asgn 4]puts "Assignment to $to: $name = $value"
}
Example 3–11. get_collection_size Command
set all_global_assignments [get_all_global_assignments -name *]set num_global_assignments [get_collection_size $all_global_assignments]puts "There are $num_global_assignments global assignments in your project"
Quartus II Handbook Version 11.0 Volume 2: Design Implementation and Optimization May 2011 Altera Corporation
Chapter 3: Tcl Scripting 3–15Other Scripting Features
Example 3–12 shows how to use the post_message command.
Accessing Command-Line ArgumentsMany Tcl scripts are designed to accept command-line arguments, such as the name of a project or revision. The global variable quartus(args) is a list of the arguments typed on the command-line following the name of the Tcl script. Example 3–13 shows code that prints all of the arguments in the quartus(args) variable.
If you copy the script in the previous example to a file named print_args.tcl, it displays the following output when you type the command shown in Example 3–14 at a command prompt.
The cmdline PackageYou can use the cmdline package included with the Quartus II software for more robust and self-documenting command-line argument passing. The cmdline package supports command-line arguments with the form -<option> <value>.
Example 3–15 uses the cmdline package.
Example 3–12. post_message command
post_message -type warning "Design has gated clocks"
Example 3–13. Simple Command-Line Argument Access
set i 0foreach arg $quartus(args) {
puts "The value at index $i is $arg"incr i
}
Example 3–14. Passing Command-Line Arguments to Scripts
quartus_sh -t print_args.tcl my_project 100MHz rThe value at index 0 is my_projectThe value at index 1 is 100MHz
Example 3–15. cmdline Package
package require cmdlinevariable ::argv0 $::quartus(args)set options {
{ "project.arg" "" "Project name" } { "frequency.arg" "" "Frequency" }
}set usage "You need to specify options and values"
array set optshash [::cmdline::getoptions ::argv $options $usage]puts "The project name is $optshash(project)"puts "The frequency is $optshash(frequency)"
May 2011 Altera Corporation Quartus II Handbook Version 11.0 Volume 2: Design Implementation and Optimization
3–16 Chapter 3: Tcl ScriptingOther Scripting Features
If you save those commands in a Tcl script called print_cmd_args.tcl you see the following output when you type the command shown in Example 3–16 at a command prompt.
Virtually all Quartus II Tcl scripts must open a project. Example 3–17 opens a project, and you can optionally specify a revision name. The example checks whether the specified project exists. If it does, the example opens the current revision, or the revision you specify.
If you do not require this flexibility or error checking, you can use just the project_open command, as shown in Example 3–18.
Example 3–16. Passing Command-Line Arguments for Scripts
quartus_sh -t print_cmd_args.tcl -project my_project -frequency 100MHz rThe project name is my_projectThe frequency is 100MHz
Example 3–17. Full-Featured Method to Open Projects
package require cmdlinevariable ::argv0 $::quartus(args)set options { \{ "project.arg" "" "Project Name" } \{ "revision.arg" "" "Revision Name" } \}array set optshash [::cmdline::getoptions ::argv0 $options]
# Ensure the project exists before trying to open itif {[project_exists $optshash(project)]} {
if {[string equal "" $optshash(revision)]} {
# There is no revision name specified, so default# to the current revisionproject_open $optshash(project) -current_revision
} else {
# There is a revision name specified, so open the# project with that revisionproject_open $optshash(project) -revision \
$optshash(revision)}
} else {puts "Project $optshash(project) does not exist"exit 1
}# The rest of your script goes here
Example 3–18. Simple Method to Open Projects
set proj_name [lindex $argv 0]project_open $proj_name
Quartus II Handbook Version 11.0 Volume 2: Design Implementation and Optimization May 2011 Altera Corporation
Chapter 3: Tcl Scripting 3–17The Quartus II Tcl Shell in Interactive Mode
The quartus() ArrayThe scripts in the preceding examples parsed command line arguments found in quartus(args). The global quartus() Tcl array includes other information about your project and the current Quartus II executable that might be useful to your scripts. For information on the other elements of the quartus() array, type the following command at a Tcl prompt:
help -quartus r
The Quartus II Tcl Shell in Interactive ModeThis section presents how to make project assignments and then compile the finite impulse response (FIR) filter tutorial project with the quartus_sh interactive shell. This example assumes that you already have the fir_filter tutorial design files in a project directory.
To begin, type the following at the system command prompt to run the interactive Tcl shell:
quartus_sh -s rCreate a new project called fir_filter, with a revision called filtref by typing the following command at a Tcl prompt:
project_new -revision filtref fir_filter r
1 If the project file and project name are the same, the Quartus II software gives the revision the same name as the project.
Because the revision named filtref matches the top-level file, all design files are automatically picked up from the hierarchy tree.
Next, set a global assignment for the device with the following command:
set_global_assignment -name family Cyclone r
h To learn more about assignment names that you can use with the -name option, refer to Quartus II Help.
1 For assignment values that contain spaces, enclose the value in quotation marks.
To quickly compile a design, use the ::quartus::flow package, which properly exports the new project assignments and compiles the design with the proper sequence of the command-line executables. First, load the package:
load_package flow rIt returns the following:
1.0
To perform a full compilation of the FIR filter design, use the execute_flow command with the -compile option:
exectue_flow -compile r
May 2011 Altera Corporation Quartus II Handbook Version 11.0 Volume 2: Design Implementation and Optimization
3–18 Chapter 3: Tcl ScriptingThe tclsh Shell
This command compiles the FIR filter tutorial project, exporting the project assignments and running quartus_map, quartus_fit, quartus_asm, and quartus_sta. This sequence of events is the same as selecting Start Compilation from the Processing menu in the Quartus II GUI.
When you are finished with a project, close it with the project_close command as shown in Example 3–19.
To exit the interactive Tcl shell, type exit r at a Tcl prompt.
The tclsh ShellOn the UNIX and Linux operating systems, the tclsh shell included with the Quartus II software is initialized with a minimal PATH environment variable. As a result, system commands might not be available within the tclsh shell because certain directories are not in the PATH environment variable. To include other directories in the path searched by the tclsh shell, set the QUARTUS_INIT_PATH environment variable before running the tclsh shell. Directories in the QUARTUS_INIT_PATH environment variable are searched by the tclsh shell when you execute a system command.
Tcl Scripting BasicsThe core Tcl commands support variables, control structures, and procedures. Additionally, there are commands for accessing the file system and network sockets, and running other programs. You can create platform-independent graphical interfaces with the Tk widget set.
Tcl commands are executed immediately as they are typed in an interactive Tcl shell. You can also create scripts (including the examples in this chapter) in files and run them with the Quartus II executables or with the tclsh shell.
Hello World ExampleThe following shows the basic “Hello world” example in Tcl:
puts "Hello world" rUse double quotation marks to group the words hello and world as one argument. Double quotation marks allow substitutions to occur in the group. Substitutions can be simple variable substitutions, or the result of running a nested command, described in “Substitutions” on page 3–19. Use curly braces {} for grouping when you want to prevent substitutions.
Example 3–19.
project_close r
Quartus II Handbook Version 11.0 Volume 2: Design Implementation and Optimization May 2011 Altera Corporation
Chapter 3: Tcl Scripting 3–19Tcl Scripting Basics
VariablesAssign a value to a variable with the set command. You do not have to declare a variable before using it. Tcl variable names are case-sensitive. Example 3–20 assigns the value 1 to the variable named a.
To access the contents of a variable, use a dollar sign (“$”) before the variable name. Example 3–21 prints "Hello world" in a different way.
SubstitutionsTcl performs three types of substitution:
■ Variable value substitution
■ Nested command substitution
■ Backslash substitution
Variable Value SubstitutionVariable value substitution, as shown in Example 3–21, refers to accessing the value stored in a variable with a dollar sign (“$”) before the variable name.
Nested Command SubstitutionNested command substitution refers to how the Tcl interpreter evaluates Tcl code in square brackets. The Tcl interpreter evaluates nested commands, starting with the innermost nested command, and commands nested at the same level from left to right. Each nested command result is substituted in the outer command. Example 3–22 sets a to the length of the string foo.
Example 3–20. Assigning Variables
set a 1
Example 3–21. Accessing Variables
set a Helloset b worldputs "$a $b"
Example 3–22. Command Substitution
set a [string length foo]
May 2011 Altera Corporation Quartus II Handbook Version 11.0 Volume 2: Design Implementation and Optimization

3–20 Chapter 3: Tcl ScriptingTcl Scripting Basics
Backlash SubstitutionBackslash substitution allows you to quote reserved characters in Tcl, such as dollar signs (“$”) and braces (“[ ]”). You can also specify other special ASCII characters like tabs and new lines with backslash substitutions. The backslash character is the Tcl line continuation character, used when a Tcl command wraps to more than one line. Example 3–23 shows how to use the backslash character for line continuation.
ArithmeticUse the expr command to perform arithmetic calculations. Use curly braces (“{ }”) to group the arguments of this command for greater efficiency and numeric precision. Example 3–24 sets b to the sum of the value in the variable a and the square root of 2.
Tcl also supports boolean operators such as && (AND), || (OR), ! (NOT), and comparison operators such as < (less than), > (greater than), and == (equal to).
ListsA Tcl list is a series of values. Supported list operations include creating lists, appending lists, extracting list elements, computing the length of a list, sorting a list, and more. Example 3–25 sets a to a list with three numbers in it.
You can use the lindex command to extract information at a specific index in a list. Indexes are zero-based. You can use the index end to specify the last element in the list, or the index end-<n> to count from the end of the list. Example 3–26 prints the second element (at index 1) in the list stored in a.
The llength command returns the length of a list. Example 3–27 prints the length of the list stored in a.
Example 3–23. Backslash Substitution
set this_is_a_long_variable_name [string length "Hello \world."]
Example 3–24. Arithmetic with the expr Command
set a 5set b [expr { $a + sqrt(2) }]
Example 3–25. Creating Simple Lists
set a { 1 2 3 }
Example 3–26. Accessing List Elements
puts [lindex $a 1]
Example 3–27. List Length
puts [llength $a]
Quartus II Handbook Version 11.0 Volume 2: Design Implementation and Optimization May 2011 Altera Corporation
Chapter 3: Tcl Scripting 3–21Tcl Scripting Basics
The lappend command appends elements to a list. If a list does not already exist, the list you specify is created. The list variable name is not specified with a dollar sign (“$”). Example 3–28 appends some elements to the list stored in a.
ArraysArrays are similar to lists except that they use a string-based index. Tcl arrays are implemented as hash tables. You can create arrays by setting each element individually or with the array set command. To set an element with an index of Mon to a value of Monday in an array called days, use the following command:
set days(Mon) Monday
The array set command requires a list of index/value pairs. This example sets the array called days:
array set days { Sun Sunday Mon Monday Tue Tuesday \Wed Wednesday Thu Thursday Fri Friday Sat Saturday }
Example 3–29 shows how to access the value for a particular index.
Use the array names command to get a list of all the indexes in a particular array. The index values are not returned in any specified order. Example 3–30 shows one way to iterate over all the values in an array.
Arrays are a very flexible way of storing information in a Tcl script and are a good way to build complex data structures.
Example 3–28. Appending to a List
lappend a 4 5 6
Example 3–29. Accessing Array Elements
set day_abbreviation Monputs $days($day_abbreviation)
Example 3–30. Iterating Over Arrays
foreach day [array names days] {puts "The abbreviation $day corresponds to the day \
name $days($day)"}
May 2011 Altera Corporation Quartus II Handbook Version 11.0 Volume 2: Design Implementation and Optimization
3–22 Chapter 3: Tcl ScriptingTcl Scripting Basics
Control StructuresTcl supports common control structures, including if-then-else conditions and for, foreach, and while loops. The position of the curly braces as shown in the following examples ensures the control structure commands are executed efficiently and correctly. Example 3–31 prints whether the value of variable a positive, negative, or zero.
Example 3–32 uses a for loop to print each element in a list.
Example 3–33 uses a foreach loop to print each element in a list.
Example 3–34 uses a while loop to print each element in a list.
You do not have to use the expr command in boolean expressions in control structure commands because they invoke the expr command automatically.
Example 3–31. If-Then-Else Structure
if { $a > 0 } { puts "The value is positive"
} elseif { $a < 0 } {puts "The value is negative"
} else {puts "The value is zero"
}
Example 3–32. For Loop
set a { 1 2 3 }for { set i 0 } { $i < [llength $a] } { incr i } {
puts "The list element at index $i is [lindex $a $i]"}
Example 3–33. foreach Loop
set a { 1 2 3 }foreach element $a {
puts "The list element is $element"}
Example 3–34. while Loop
set a { 1 2 3 }set i 0while { $i < [llength $a] } {
puts "The list element at index $i is [lindex $a $i]"incr i
}
Quartus II Handbook Version 11.0 Volume 2: Design Implementation and Optimization May 2011 Altera Corporation
Chapter 3: Tcl Scripting 3–23Tcl Scripting Basics
ProceduresUse the proc command to define a Tcl procedure (known as a subroutine or function in other scripting and programming languages). The scope of variables in a procedure is local to the procedure. If the procedure returns a value, use the return command to return the value from the procedure. Example 3–35 defines a procedure that multiplies two numbers and returns the result.
Example 3–36 shows how to use the multiply procedure in your code. You must define a procedure before your script calls it.
Define procedures near the beginning of a script. If you want to access global variables in a procedure, use the global command in each procedure that uses a global variable. Example 3–37 defines a procedure that prints an element in a global list of numbers, then calls the procedure.
File I/O Tcl includes commands to read from and write to files. You must open a file before you can read from or write to it, and close it when the read and write operations are done. To open a file, use the open command; to close a file, use the close command. When you open a file, specify its name and the mode in which to open it. If you do not specify a mode, Tcl defaults to read mode. To write to a file, specify w for write mode as shown in Example 3–38.
Example 3–35. Simple Procedure
proc multiply { x y } {set product [expr { $x * $y }]return $product
}
Example 3–36. Using a Procedure
proc multiply { x y } {set product [expr { $x * $y }]return $product
}set a 1set b 2puts [multiply $a $b]
Example 3–37. Accessing Global Variables
proc print_global_list_element { i } {global my_dataputs "The list element at index $i is [lindex $my_data $i]"
}set my_data { 1 2 3}print_global_list_element 0
Example 3–38. Open a File for Writing
set output [open myfile.txt w]
May 2011 Altera Corporation Quartus II Handbook Version 11.0 Volume 2: Design Implementation and Optimization
3–24 Chapter 3: Tcl ScriptingTcl Scripting Basics
Tcl supports other modes, including appending to existing files and reading from and writing to the same file.
The open command returns a file handle to use for read or write access. You can use the puts command to write to a file by specifying a filehandle, as shown in Example 3–39.
You can read a file one line at a time with the gets command. Example 3–40 uses the gets command to read each line of the file and then prints it out with its line number.
Syntax and CommentsArguments to Tcl commands are separated by white space, and Tcl commands are terminated by a newline character or a semicolon. As shown in “Substitutions” on page 3–19, you must use backslashes when a Tcl command extends more than one line.
Tcl uses the hash or pound character (#) to begin comments. The # character must begin a comment. If you prefer to include comments on the same line as a command, be sure to terminate the command with a semicolon before the # character. Example 3–41 is a valid line of code that includes a set command and a comment.
Without the semicolon, it would be an invalid command because the set command would not terminate until the new line after the comment.
The Tcl interpreter counts curly braces inside comments, which can lead to errors that are difficult to track down. Example 3–42 causes an error because of unbalanced curly braces.
Example 3–39. Write to a File
set output [open myfile.txt w]puts $output "This text is written to the file."close $output
Example 3–40. Read from a File
set input [open myfile.txt]set line_num 1while { [gets $input line] >= 0 } {
# Process the line of text hereputs "$line_num: $line"incr line_num
} close $input
Example 3–41. Comments
set a 1;# Initializes a
Example 3–42. Unbalanced Braces in Comments
# if { $x > 0 } { if { $y > 0 } {
# code here }
Quartus II Handbook Version 11.0 Volume 2: Design Implementation and Optimization May 2011 Altera Corporation
Chapter 3: Tcl Scripting 3–25Document Revision History
External References
f For more information about Tcl, refer to the following sources:
■ Practical Programming in Tcl and Tk, Brent B. Welch
■ Tcl and the TK Toolkit, John Ousterhout
■ Effective Tcl/TK Programming, Michael McLennan and Mark Harrison
■ Quartus II Tcl example scripts at www.altera.com/support/examples/tcl/tcl.html
■ Tcl Developer Xchange at tcl.activestate.com
Document Revision HistoryTable 3–4 shows the revision history for this chapter.
f For previous versions of the Quartus II Handbook, refer to the Quartus II Handbook Archive.
f Take an online survey to provide feedback about this handbook chapter.
Table 3–4. Document Revision History
Date Version Changes
May 2011 11.0.0 Minor updates throughout document.
December 2010 10.1.0Template update
Updated to remove tcl packages used by the Classic Timing Analyzer
July 2010 10.0.0 Minor updates throughout document.
November 2009 9.1.0
■ Removed LogicLock example.
■ Added the incremental_compilation, insystem_source_probe, and rtl packages to Table 3-1 and Table 3-2.
■ Added quartus_map to table 3-2.
March 2009 9.0.0
■ Removed the “EDA Tool Assignments” section
■ Added the section “Compile All Revisions” on page 3–9
■ Added the section “Using the tclsh Shell” on page 3–20
November 2008 8.1.0 Changed to 8½” × 11” page size. No change to content.
May 2008 8.0.0 Updated references.
May 2011 Altera Corporation Quartus II Handbook Version 11.0 Volume 2: Design Implementation and Optimization

3–26 Chapter 3: Tcl ScriptingDocument Revision History
Quartus II Handbook Version 11.0 Volume 2: Design Implementation and Optimization May 2011 Altera Corporation
Quartus II Handbook Version 11.0 Volume 2: Design December 2010
QII52012-10.1.0
© 2010 Altera Corporation. All rights reserved. ALTERA, ARRand/or trademarks of Altera Corporation in the U.S. and otherwww.altera.com/common/legal.html. Altera warrants performreserves the right to make changes to any products and servicesinformation, product, or service described herein except as expspecifications before relying on any published information and
December 2010QII52012-10.1.0
4. Managing Quartus II Projects
This chapter discusses how to create and manage projects, and how to migrate them from one computing platform to another.
Today’s larger and more sophisticated FPGA designs are often developed by several engineers and are constantly changing throughout the project lifecycle. Designers must track their project changes to ensure efficient design coordination.
This chapter discusses the following topics:
■ “Managing Your Quartus II Projects” on page 4–1
■ “Exporting and Importing Version-Compatible Database Files” on page 4–6
■ “Managing Projects in a Team-Based Design Environment” on page 4–15
■ “Scripting Support” on page 4–16
Managing Your Quartus II ProjectsTo help you manage your FPGA designs, the Quartus® II software provides tools that assist you with your design tasks, including creating a project, creating assignments, managing revisions, and archiving projects.
A Quartus II project contains all your design files, setting files, and other files necessary for the successful compilation of your design.
h For more information about creating and opening a project, adding files to and removing files from a project, modifying project settings, saving project changes, and specifying the top-level entity, refer to Managing Files in a Project in Quartus II Help.
For more information about libraries, refer to “Specifying Libraries” on page 4–10.
1 On the General page of the Options dialog box, you can also specify a default directory that automatically stores all project files.
After you create a new project, the Quartus II software automatically generates various project files necessary for successful compilation, including the Quartus II Project File (.qpf) and Quartus II Settings File (.qsf).
h For more information about the .qpf and .qsf, refer to Quartus II Project File (.qpf) and Quartus II Setting File (.qsf) in Quartus II Help.
f For a list of supported Quartus II project files and design file types, refer to Introduction to the Quartus II Software manual.
Implementation and Optimization
Subscribe
IA, CYCLONE, HARDCOPY, MAX, MEGACORE, NIOS, QUARTUS and STRATIX are Reg. U.S. Pat. & Tm. Off. countries. All other trademarks and service marks are the property of their respective holders as described at
ance of its semiconductor products to current specifications in accordance with Altera’s standard warranty, but at any time without notice. Altera assumes no responsibility or liability arising out of the application or use of any ressly agreed to in writing by Altera. Altera customers are advised to obtain the latest version of device before placing orders for products or services.
4–2 Chapter 4: Managing Quartus II ProjectsManaging Your Quartus II Projects
File AssociationQuartus II project files are files associated with a Quartus II project, but are not design files in the project hierarchy. Most project files do not contain design logic. The Quartus II software supports project files such as .qpf, Quartus II IP File (.qip), and .qsf, among others.
Design files are files that contain logic for a Quartus II project. The Compiler compiles the Quartus II design files. The Quartus II software also supports designs created from EDIF Input Files (.edf) or Verilog Quartus Mapping Files (.vqm) generated by EDA design entry and synthesis tools. You can also create Verilog HDL or VHDL designs in the Quartus II software and EDA design entry tools and either generate EDIF Input Files (.edf) and Verilog Quartus Mapping File (.vqm), or use the Verilog HDL or VHDL design files directly in Quartus II projects. The Quartus II software also supports use of Quartus II Exported Partition Files (.qxp) as source files containing entities you can add to your design.
The Quartus II software sets file type association when you run the Quartus II software version 9.1 or earlier; however, in the Quartus II software versions 10.0 and later, the Quartus II software sets file type association after installation, which can be overwritten if you run prior versions of the Quartus II software after installing Quartus II software versions 10.0 and later. If your files are associated with a different version of the Quartus II software, and you want to associate the files with the Quartus II software version 10.0, you can manually associate the files to the Quartus II software version 10.0.
Example 4–1 shows how to associate files with the current version of the Quartus II software manually:
Editing Text-Based Designs with the Quartus II Text EditorYou can use any text editor with the Quartus II software; however, the Quartus II Text Editor allows you to take advantage of features available only in the Quartus II software, error location, and predefined templates to help you with coding.
The Quartus II software provides templates that allow you to insert predefined code directly into your design file; you can choose from several design languages, and you can directly add TimeQuest analyzer design constraints and megafunction information. You can also create and save your own templates.
h For more information about editing Quartus II Text Editor files, refer to Editing Quartus II Text Editor Files in Quartus II Help. For more information about text editors, refer to About the Quartus II Text Editor in Quartus II Help. For more information about the Quartus II Text Editor options and setting a preferred text editor, refer to Setting Quartus II Text Editor Options in Quartus II Help.
f For more information about the Quartus II language template feature, refer to the “Quartus II Language Templates” section in the Recommended HDL Coding Styles chapter in volume 1 of the Quartus II Handbook.
Example 4–1. Command to Associate Files
<path to installation directory>\quartus\bin\qreg.exe --file_assoc r
Quartus II Handbook Version 11.0 Volume 2: Design Implementation and Optimization December 2010 Altera Corporation
Chapter 4: Managing Quartus II Projects 4–3Managing Your Quartus II Projects
Creating AssignmentsAssignments control a variety of different functions of the Quartus II software and are an important part of an efficient and effective design. When used in conjunction with a good design practices, assignments can help you successfully compile your design. You can create assignments with different editors and dialog boxes in the Quartus II software or with Tcl scripts. Assignments are logic functions you assign to a physical resource on the device, or compilation resources you assign to logic functions.
Quartus II Settings FileAs you create assignments in the Quartus II software, you can choose either to store the assignments in memory temporarily or write the assignment out to the .qsf with the Update assignments to disk during design processing only option located on the Processing page of the Options dialog box. You can open the Options dialog box by clicking Options on the Tools menu. If you turn on the Update assignments to disk during design processing only option, the Quartus II software stores all assignments in memory and writes to the .qsf when a compilation starts or when you save or close the project. The performance of the software improves when you save assignments in memory. You can view this performance improvement when the Quartus II software stores the project files on a remote data disk.
f For more information about the .qsf, refer to the Quartus II Settings File Manual.
Preserving QSF Format When you create new assignments, the Quartus II software appends the assignments to the end of the .qsf. If you modify an assignment, the corresponding line in the .qsf changes to maintain the order of assignments in the .qsf, unless you add and remove project source files, or when you add, remove, and exclude members from an assignment group. In these cases, the Quartus II software appends all assignments to the end of the .qsf. For example, if you add a new design file to the project, the Quartus II software appends the list of all your design files to the end of the .qsf.
The Quartus II software preserves all spaces and tabs for all unmodified assignments and comments. When you create a new assignment or modify an existing assignment in the GUI, the Quartus II software writes the assignment with the default formatting.
Quartus II Default Settings FileYou can ensure consistent results when defaults change between versions of the Quartus II software with the assignment_defaults.qdf, located in the bin or bin64 directory of the Quartus II installation path.
The Quartus II software reads assignments from various files and stores the assignments in memory. The Quartus II software reads settings files in the following order and assignments in subsequent files take precedence over earlier ones:
1. assignment_defaults.qdf from <Quartus II Installation directory>/bin or bin64
2. assignment_defaults.qdf from the project directory
3. <revision name>_assignment_defaults.qdf from the project directory
4. <revision name>.qsf from the project directory
December 2010 Altera Corporation Quartus II Handbook Version 11.0 Volume 2: Design Implementation and Optimization
4–4 Chapter 4: Managing Quartus II ProjectsManaging Your Quartus II Projects
As the Quartus II software reads each new file, if an existing assignment from an existing project file matches, following rules of case sensitivity, multivalued fields, and other rules, the Quartus II software replaces the old value with a new value. For example, if the first file has an assignment A=1, and the second file has A=2, the software replaces assignment A=1 with assignment A=2.
Creating Timing AssignmentsIf you create timing assignments with the TimeQuest Timing Analyzer, the Quartus II software creates a Synopsys Design Constraints File (.sdc) that contains your SDC commands.
f For more information about TimeQuest analyzer and SDC constraints, refer to the Quartus II TimeQuest Timing Analyzer chapter in volume 3 of the Quartus II Handbook.
Creating RevisionsIn the Quartus II software, a revision is a set of assignments and settings. A project may have multiple revisions, and each revision has its own set of assignments and settings. You can create multiple revisions in a project, and you can create a unique revision based on an existing revision. Creating a unique revision allows you to optimize a design for different results; creating a revision based on an existing revision allows you to try new settings and assignments and then compare the revisions.
Creating a revision of your design allows you to create a new set of assignments and settings for a set of design files without losing your previous assignments and settings. You can perform the following tasks with revisions:
■ Create a revision not based on a previous revision. Creating a unique revision allows you to optimize a design for different fundamental reasons, such as to optimize by area in one revision and then optimize for fMAX in another revision. When you create a unique revision, the Quartus II software uses all default settings.
■ Create a revision based on an existing revision, but try new settings and assignments in the new revision. A new revision includes all the assignments and settings in the existing revision.You can revert from the new revision to the original revision. You can compare revisions manually, or with features in the Quartus II software.
Managing Project RevisionsThe Revisions dialog box manages your revisions by allowing you to create and delete a revision, specify the current revision, and compare revisions.
Each time you create a new revision of a project, the Quartus II software creates a new .qsf and adds the name of the new revision to the list of revisions in the .qsf. The name of a new .qsf matches the revision name.
Quartus II Handbook Version 11.0 Volume 2: Design Implementation and Optimization December 2010 Altera Corporation
Chapter 4: Managing Quartus II Projects 4–5Managing Your Quartus II Projects
You can compare the compilation results of multiple revisions side by side with the Compare Revisions dialog box. The Compare Revisions dialog box compares the compilation results of each revision in three categories:
■ Analysis & Synthesis
■ Fitter
■ TimeQuest Timing Analyzer
In addition to viewing the compilation results of each revision, you can also compare the assignments for each revision. Comparing the compilation results and assignments for each revision allows you to gain a better understanding of how different optimization options affect your design.
h For more information about creating, deleting, specifying, and comparing revisions, refer to Managing Project Revisions in Quartus II Help.
Creating New Copies of Your DesignIf your design requires that you have two separate copies of your project, rather than just a separate revision, you can create a second copy of your project with the Copy Project command. For example, if you have a design that is compatible with a 32-bit data bus and you require a new copy of your design to interface with a 64-bit data bus, you may want a separate copy of the project.
The Quartus II software provides utilities to copy and save different copies of your project. Creating a copy of your project with the Copy Project command directs the Quartus II software to copy all your design files, your .qsf, and all your associated revisions.
If you are creating a new copy of a project that contains an .edf or a .vqm from a third-party EDA synthesis tool, first create a copy of your project and then replace any .edf or .vqm files with the newly generated .edf or .vqm.
h For more information about the Copy Project command, refer to Copy Project Dialog Box in Quartus II Help.
Archiving and Restoring ProjectsTo share large projects between engineers or to transfer your project to a new version of the Quartus II software, you can archive your project. Archiving your project creates a single compressed Quartus II Archive File (.qar) that contains all your design, project, and settings files. The .qar contains all the .qdf files required to compile your design and restore the original compilation results. When you restore the archive in a different version of the Quartus II software, you must include the .qdf in the archive to preserve previous compilation results. For more information about the .qdf, refer to “Quartus II Default Settings File” on page 4–3.
1 You can copy files listed in the Source Control file set for the Archiver with the Copy Project command. If you cannot find your source file in the Source Control file set, add the source file to your project before copying.
December 2010 Altera Corporation Quartus II Handbook Version 11.0 Volume 2: Design Implementation and Optimization
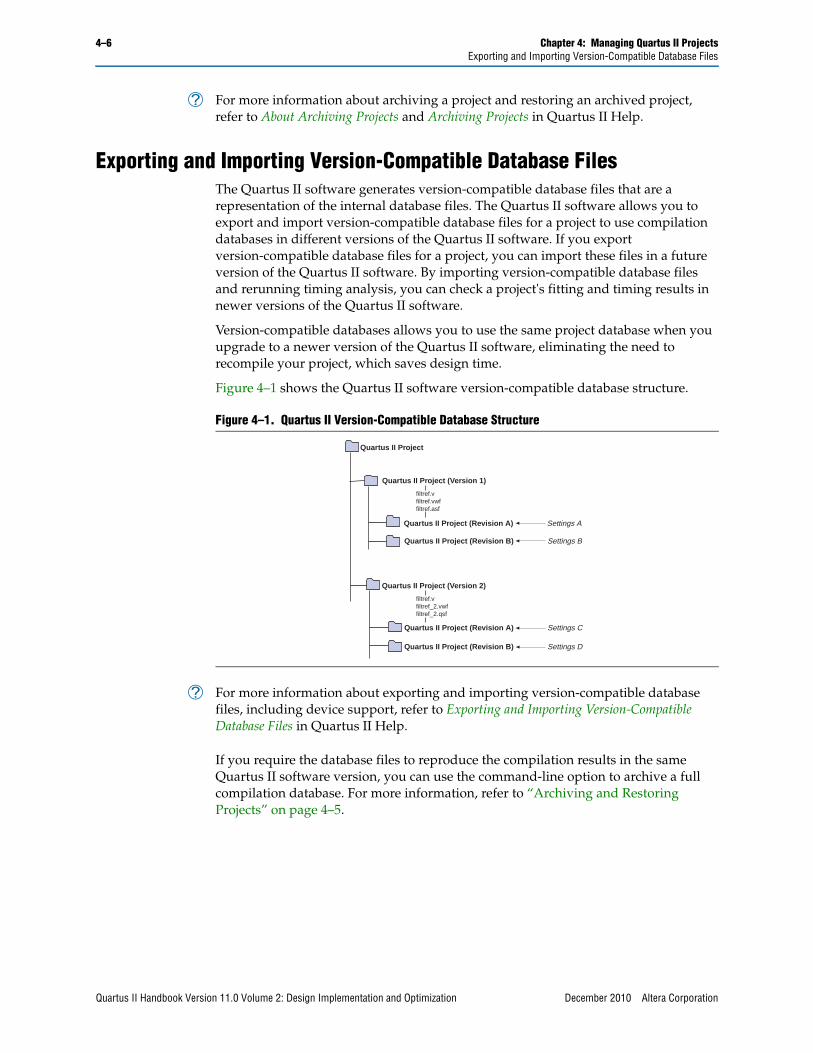
4–6 Chapter 4: Managing Quartus II ProjectsExporting and Importing Version-Compatible Database Files
h For more information about archiving a project and restoring an archived project, refer to About Archiving Projects and Archiving Projects in Quartus II Help.
Exporting and Importing Version-Compatible Database FilesThe Quartus II software generates version-compatible database files that are a representation of the internal database files. The Quartus II software allows you to export and import version-compatible database files for a project to use compilation databases in different versions of the Quartus II software. If you export version-compatible database files for a project, you can import these files in a future version of the Quartus II software. By importing version-compatible database files and rerunning timing analysis, you can check a project's fitting and timing results in newer versions of the Quartus II software.
Version-compatible databases allows you to use the same project database when you upgrade to a newer version of the Quartus II software, eliminating the need to recompile your project, which saves design time.
Figure 4–1 shows the Quartus II software version-compatible database structure.
h For more information about exporting and importing version-compatible database files, including device support, refer to Exporting and Importing Version-Compatible Database Files in Quartus II Help.
If you require the database files to reproduce the compilation results in the same Quartus II software version, you can use the command-line option to archive a full compilation database. For more information, refer to “Archiving and Restoring Projects” on page 4–5.
Figure 4–1. Quartus II Version-Compatible Database Structure
Quartus II Project (Version 1)
Quartus II Project (Revision A) Settings A
Quartus II Project (Revision B) Settings B
Quartus II Project (Version 2)
Quartus II Project (Revision A) Settings C
Quartus II Project (Revision B) Settings D
Quartus II Project
filtref.vfiltref.vwffiltref.asf
filtref.vfiltref_2.vwffiltref_2.qsf
Quartus II Handbook Version 11.0 Volume 2: Design Implementation and Optimization December 2010 Altera Corporation
Chapter 4: Managing Quartus II Projects 4–7Exporting and Importing Version-Compatible Database Files
Migrating to a New Version of the Quartus II SoftwareTo migrate your design to a newer version of the Quartus II software, follow these steps:
1. On the File menu, click Open Project and browse to select the Quartus II project file to open the older version of the Quartus II software project.
2. On the Project menu, click Copy Project to create a new copy of the project. The older version closes and the copied project opens.
3. Before exporting the database, you must run Analysis and Synthesis for the new version. On the Project menu, click Export Database. By default, the Quartus II software exports the database to the export_db directory of the copied project. You can also create a new directory.
4. Open the copied project from the new version of the Quartus II software. The Quartus II software deletes the existing database but not the exported database.
5. On the Project menu, click Import Database. By default, the Quartus II software selects the directory that contains the exported database you just created. Select the exported database and the Quartus II software imports the version-compatible database files.
Saving the Database in a Version-Compatible FormatTo save the database in a version-compatible format during a full compilation, follow these steps:
1. On the Assignments menu, click Settings. The Settings dialog box appears.
2. In the Category list, select Compilation Process Settings. The Compilation Process Settings page appears.
3. Turn on the Export version compatible database option.
4. Browse to the directory in which you want to save the database.
5. Click OK.
You can also export a project database as version-compatible database files during a full compilation.
h For more information about importing and exporting version-compatible databases, refer to Exporting and Importing Version-Compatible Database Files in Quartus II Help.
December 2010 Altera Corporation Quartus II Handbook Version 11.0 Volume 2: Design Implementation and Optimization
4–8 Chapter 4: Managing Quartus II ProjectsExporting and Importing Version-Compatible Database Files
Quartus II Project Platform MigrationWhen moving your project from one computing platform to another, you must consider the following cross-platform issues:
■ “File Names and Hierarchies”
■ “Specifying Libraries”
■ “Quartus II Search Path Precedence Rules”
■ “Quartus II-Generated Files for Third-Party EDA Tools”
■ “Migrating Database Files Between Platforms”
File Names and HierarchiesTo ensure a successful migration across platforms, consider the following differences between operating systems when naming source files, especially when interacting with the operating systems from the command prompt or a Tcl script:
■ Some operating system file systems are case sensitive. When writing scripts, ensure that you specify paths exactly, even if the current operating system is not case sensitive. Use lowercase letters when naming files.
■ Use a character set common to all the used platforms.
■ Do not change the forward-slash (/) and back-slash (\) path separators in the .qsf because the Quartus II software changes all back-slash (\) path separators to forward-slashes (/).
■ Observe the shortest file name length limit of the different operating systems you are using.
1 Altera recommends that you avoid using spaces in the name of the project directory. You can rename the directory with a symbol such as the underscore (_) as a place holder instead of spaces (for example, “my_design” instead of “my design”).
Quartus II Handbook Version 11.0 Volume 2: Design Implementation and Optimization December 2010 Altera Corporation
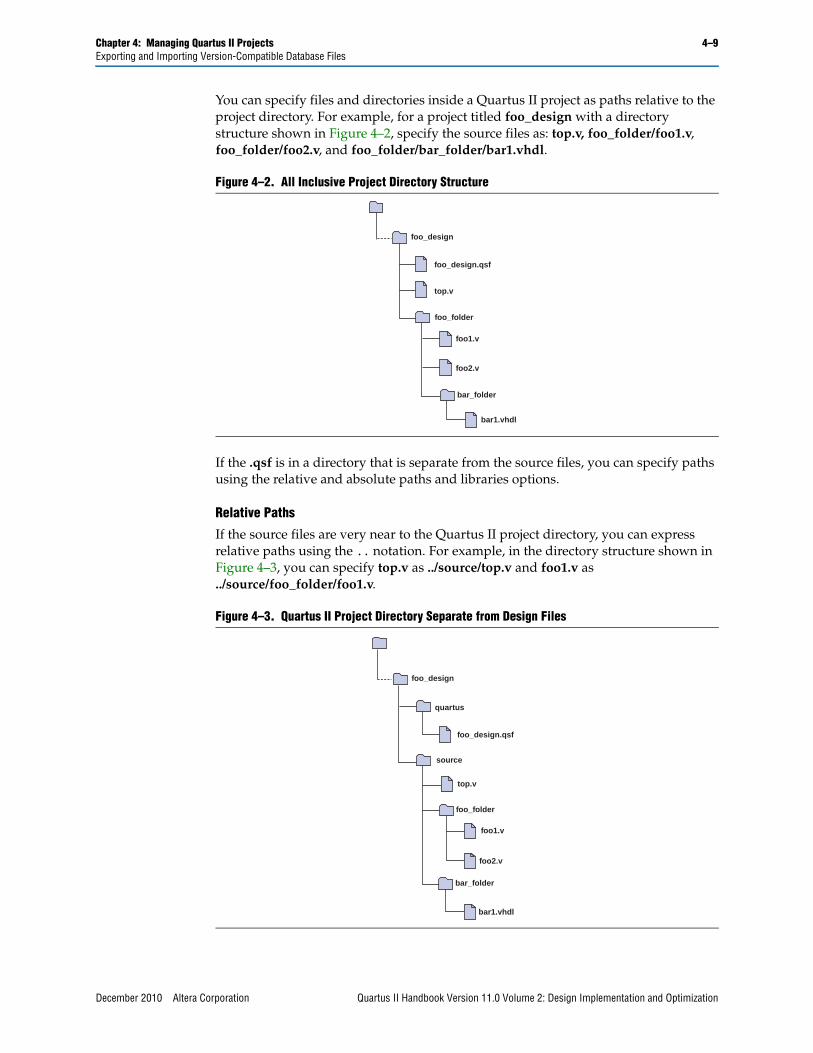
Chapter 4: Managing Quartus II Projects 4–9Exporting and Importing Version-Compatible Database Files
You can specify files and directories inside a Quartus II project as paths relative to the project directory. For example, for a project titled foo_design with a directory structure shown in Figure 4–2, specify the source files as: top.v, foo_folder/foo1.v, foo_folder/foo2.v, and foo_folder/bar_folder/bar1.vhdl.
If the .qsf is in a directory that is separate from the source files, you can specify paths using the relative and absolute paths and libraries options.
Relative Paths
If the source files are very near to the Quartus II project directory, you can express relative paths using the .. notation. For example, in the directory structure shown in Figure 4–3, you can specify top.v as ../source/top.v and foo1.v as ../source/foo_folder/foo1.v.
Figure 4–2. All Inclusive Project Directory Structure
Figure 4–3. Quartus II Project Directory Separate from Design Files
foo_design
foo1.v
bar_folder
bar1.vhdl
foo_design.qsf
top.v
foo_folder
foo2.v
foo_design
foo_design.qsf
top.v
foo1.v
bar_folder
bar1.vhdl
quartus
source
foo_folder
foo2.v
December 2010 Altera Corporation Quartus II Handbook Version 11.0 Volume 2: Design Implementation and Optimization
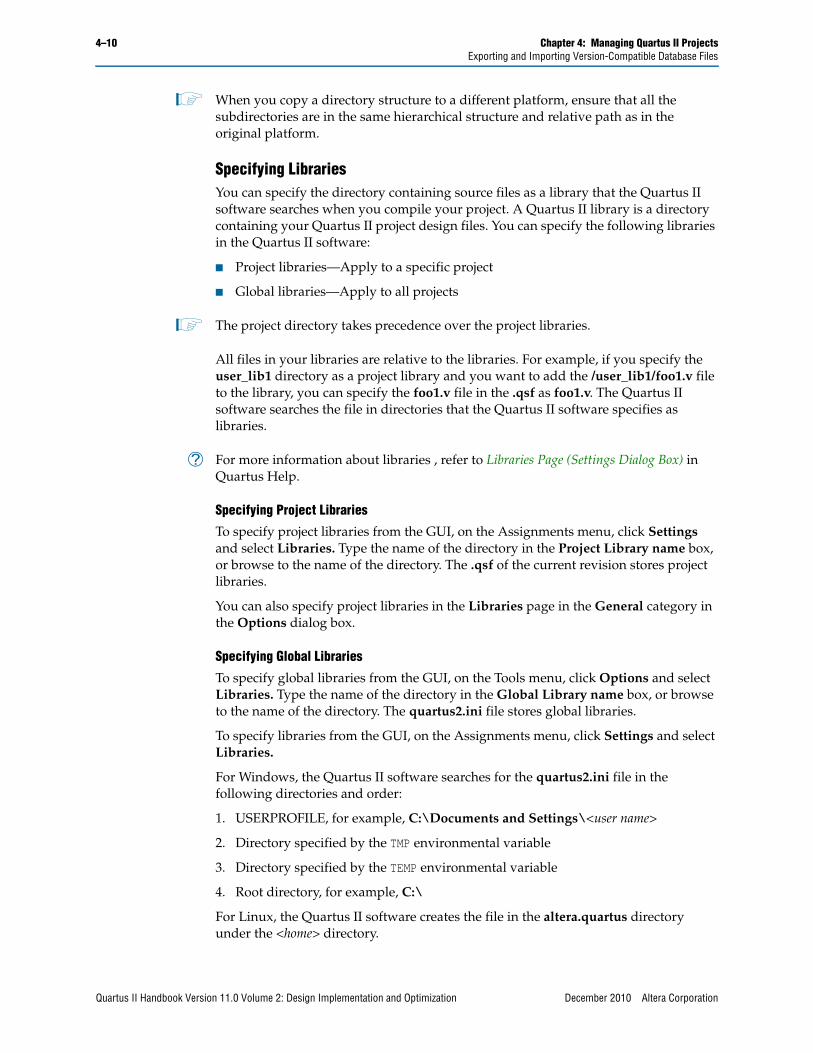
4–10 Chapter 4: Managing Quartus II ProjectsExporting and Importing Version-Compatible Database Files
1 When you copy a directory structure to a different platform, ensure that all the subdirectories are in the same hierarchical structure and relative path as in the original platform.
Specifying Libraries You can specify the directory containing source files as a library that the Quartus II software searches when you compile your project. A Quartus II library is a directory containing your Quartus II project design files. You can specify the following libraries in the Quartus II software:
■ Project libraries—Apply to a specific project
■ Global libraries—Apply to all projects
1 The project directory takes precedence over the project libraries.
All files in your libraries are relative to the libraries. For example, if you specify the user_lib1 directory as a project library and you want to add the /user_lib1/foo1.v file to the library, you can specify the foo1.v file in the .qsf as foo1.v. The Quartus II software searches the file in directories that the Quartus II software specifies as libraries.
h For more information about libraries , refer to Libraries Page (Settings Dialog Box) in Quartus Help.
Specifying Project Libraries
To specify project libraries from the GUI, on the Assignments menu, click Settings and select Libraries. Type the name of the directory in the Project Library name box, or browse to the name of the directory. The .qsf of the current revision stores project libraries.
You can also specify project libraries in the Libraries page in the General category in the Options dialog box.
Specifying Global Libraries
To specify global libraries from the GUI, on the Tools menu, click Options and select Libraries. Type the name of the directory in the Global Library name box, or browse to the name of the directory. The quartus2.ini file stores global libraries.
To specify libraries from the GUI, on the Assignments menu, click Settings and select Libraries.
For Windows, the Quartus II software searches for the quartus2.ini file in the following directories and order:
1. USERPROFILE, for example, C:\Documents and Settings\<user name>
2. Directory specified by the TMP environmental variable
3. Directory specified by the TEMP environmental variable
4. Root directory, for example, C:\
For Linux, the Quartus II software creates the file in the altera.quartus directory under the <home> directory.
Quartus II Handbook Version 11.0 Volume 2: Design Implementation and Optimization December 2010 Altera Corporation
Chapter 4: Managing Quartus II Projects 4–11Exporting and Importing Version-Compatible Database Files
1 If the altera.quartus directory does not exist, the Quartus II software creates the file in the <home> directory.
1 Whenever you specify a directory name in the GUI or in Tcl, the Quartus II software maintains the directory name you use in the .qsf rather than resolved to an absolute path.
If the directory is outside of the project directory, the path returned in the dialog box is an absolute path. You can use the Browse button in either the Settings dialog box or the Options dialog box to select a directory. You can change the absolute path to a relative path by editing the absolute path displayed in the library name field to create a relative path before you click Add to put the directory in the Libraries list. Alternatively, you can also select from the Libraries list and double-click to edit the path.
When copying projects that specify project libraries, you must either copy your project library files along with the project directory or ensure that your project library files exist in the target platform.
Quartus II Search Path Precedence RulesIf two files have the same file name, the Quartus II software’s search path precedence rules determine the found file. The Quartus II software resolves relative paths by searching for the file in the following directories and order:
1. The project directory.
2. The project’s database (db) directory.
3. Project libraries are searched in the order specified by the SEARCH_PATH setting of the .qsf for the current revision.
1 Altera recommends that you use the SEARCH_PATH assignment to define the project libraries. You can have multiple SEARCH_PATH assignments. However, you can specify only one source directory for each SEARCH_PATH assignment. For more information about SEARCH_PATH assignments, refer to Example 4–18 on page 4–19.
4. Global user libraries are searched in the order specified by the SEARCH_PATH setting on the Global User Libraries page in the Options dialog box.
5. The Quartus II software libraries directory, for example,<Quartus II Software Installation directory>\libraries. For more information about libraries, refer to “Specifying Libraries Using Scripts” on page 4–19.
December 2010 Altera Corporation Quartus II Handbook Version 11.0 Volume 2: Design Implementation and Optimization
4–12 Chapter 4: Managing Quartus II ProjectsExporting and Importing Version-Compatible Database Files
Quartus II-Generated Files for Third-Party EDA Tools The project archive and copy features in the Quartus II software do not include Quartus II generated files for third-party EDA tools such as:
■ Verilog Output Files (.vo)
■ VHDL Output Files (.vho)
■ Standard Delay Format Output Files (.sdo) output netlist files
■ Stamp model files
■ PartMiner XML-Format Files (.xml)
■ IBIS Output Files (.ibs)
When you archive your design project, you can save the database in a version-compatible format during a full compilation and include the version-compatible database files in your project archive.
1 Version-compatible databases may not be available for all device families because the archive does not include the compilation database. If you require the database files to reproduce the compilation results in the same Quartus II software version, you can use the command-line option to archive a full database. For more information, refer to “Archiving and Restoring Projects” on page 4–5.
For more information about saving the database in a version-compatible format and archiving projects, refer to “Saving the Database in a Version-Compatible Format” on page 4–7 and “Archiving Projects” on page 4–17.
To copy your project to another platform, you can regenerate the output netlist or output files by following these steps:
1. Import the version-compatible database. For more information, refer to “Migrating to a New Version of the Quartus II Software” on page 4–7.
2. From the Tools menu, run the TimeQuest analyzer.
3. Run the EDA Netlist Writer.
To restore your project, you can regenerate the output netlist or output files by performing the following steps:
1. Restore your design project. For more information about restoring an archived project, refer to “Archiving and Restoring Projects” on page 4–5.
2. Import the version-compatible database. For more information about migrating to a new version, refer to “Migrating to a New Version of the Quartus II Software” on page 4–7.
3. From the Processing menu, run the TimeQuest analyzer.
4. Run the EDA Netlist Writer.
1 When you create version-compatible databases, you do not need to recompile your design as you move across platforms.
Quartus II Handbook Version 11.0 Volume 2: Design Implementation and Optimization December 2010 Altera Corporation
Chapter 4: Managing Quartus II Projects 4–13Exporting and Importing Version-Compatible Database Files
Migrating Database Files Between PlatformsThere is nothing inherent in the file format and syntax of the exported version-compatible database files that might cause problems when migrating the files to other platforms. However, the contents of the database can cause problems for platform migration. For example, using the absolute paths in version-compatible database files generated by the Quartus II software can cause problems for migration. Altera recommends that you change the absolute paths to relative paths before migrating files whenever possible.
Working with MessagesThe Quartus II software generates various types of messages, including Information, Warning, Extra Info, Critical Warning, and Error messages. Some messages include information about software status during a compilation and alert you to possible problems with your design. The Messages box in the Quartus II GUI displays messages, and these messages are written to stdout when you use command-line executables. In both cases, Quartus II report files write messages.
You can right-click a message in the Message window to get help for the message, locate the source of the message of your design, and manage messages.
Messages provide useful information if you take time to review them after each compilation. The following sections describe the Quartus II software features to help you manage messages.
Messages WindowThe Messages window displays nine message tabs, enabling you to review all messages of a certain type. The Info, Extra Info, Warning, Critical Warning, and Error tabs display messages by type.
h For more information about the Messages window and message tabs, refer to About the Messages Window in Quartus II Help. For more information about managing messages in the Messages window, refer to Managing Messages in the Messages Window in Quartus II Help.
Message SuppressionYou can use message suppression to reduce the number of messages after a compilation by preventing individual messages and entire categories of messages from displaying. For example, if you review a particular message and determine that your design is not the cause of the message, you can suppress the message for subsequent compilations. Message suppression saves time because you see only new messages during subsequent compilations.
Adding a suppressed message creates a suppression rule. Suppressing exact selected messages adds patterns that are exact strings to the suppression rules. Suppressing all similar messages adds patterns with wildcards to the suppression rules.
Furthermore, you can suppress all messages of a particular type in a particular stage of the compilation flow. On the Tools menu, click Options. In the Category list, select Suppression in the Messages section.
December 2010 Altera Corporation Quartus II Handbook Version 11.0 Volume 2: Design Implementation and Optimization
4–14 Chapter 4: Managing Quartus II ProjectsExporting and Importing Version-Compatible Database Files
Suppressing individual messages is controlled in two locations in the Quartus II GUI. You can right-click on a message in the Messages window and choose commands in the Suppress sub-menu entry. To open the Message Suppression Manager, right-click in the Messages window. From the Suppress sub-menu, click Message Suppression Manager. For more information about the Message Suppression Manager, refer to “Message Suppression Manager” on page 4–15.
Message Suppression Methods
You can use the following methods to create suppression rules:
■ Suppress Exact Selected Messages
■ Suppress All Similar Messages
■ Suppress All Flagged Messages
If you suppress a message with the Suppress Exact Selected Messages option, the Quartus II software suppresses only messages that match the exact text during subsequent compilations. The Suppress All Similar Messages option behaves like a wildcard pattern on variable fields in messages and the Suppress All Flagged Messages option only suppresses flagged messages.
Example 4–2 shows an example of suppressing common Info type of messages:
This Info type of message is common during synthesis. The Quartus II software displays the message for each processed source file with varying information about the number of design units, entities, and source file name.
Example 4–3 shows an example of this message in Help:
Choosing to suppress all similar messages effectively replaces the variable parts of that message (<number>, <number>, and <name>) with wildcards.
Example 4–4 shows the suppression rule to suppress common Info type of messages:
The Quartus II software suppresses all messages that match the pattern.
Example 4–2. Example of Suppressing Common Info Type Message
Info: Found 1 design units, including 1 entities, in source file mult.v.
Example 4–3. Example of Suppressing Common Info Type Message
Found <number> design units, including <number> entities, in source file <name>.
Example 4–4. Suppression Rule to Suppress Common Info Type of Messages
Info: Found * design units, including * entities, in source file *.
Quartus II Handbook Version 11.0 Volume 2: Design Implementation and Optimization December 2010 Altera Corporation
Chapter 4: Managing Quartus II Projects 4–15Managing Projects in a Team-Based Design Environment
Message Suppression Details and Limitations
The following rules describe which messages that you can suppress and how to suppress them:
■ You cannot suppress error messages or messages with information about Altera legal agreements.
■ Suppressing a message also suppresses all its submessages, if any.
■ Suppressing a submessage causes the Quartus II software to suppress matching submessages only if the parent messages are the same.
■ You cannot create your own custom wildcards to suppress messages.
■ You must use the Quartus II GUI to manage message suppression, including choosing messages to suppress. The Quartus II software surpresses these messages during compilation in the GUI and when using command-line executables.
■ The Quartus II software surpresses the messages on a per-revision basis, not for an entire project. The Quartus II software stores information about which messages to suppress in a file called <revision>.srf. If you create a revision based on a suppressed messages revision, the Quartus II software copies the suppression rules file to the new revision. You cannot make all revisions in one project using the same suppression rules file.
■ You cannot remove messages or modify message suppression rules while a compilation is running.
Message Suppression Manager
You can use the Message Suppression Manager to view and suppress messages, view and delete suppression rules, and view suppressed messages. The Message Suppression Manager has three tabs labeled Suppressible Messages, Suppression Rules, and Suppressed Messages.
h For more information about the Message Suppression Manager, refer to About Message Suppression in Quartus II Help.
Managing Projects in a Team-Based Design EnvironmentThe Quartus II software provides several methods to help you manage efficient design coordination across multiple designers and design iterations. You can use the following features to preserve and track project changes:
■ Creating Revisions
■ Managing Different Design Versions
■ Creating Version-Compatible Databases
■ Archiving Projects
h For more information about creating revisions, managing different design versions, creating version-compatible databases, and archiving projects in a team-based design environment, refer to About Project Management in Quartus II Help.
December 2010 Altera Corporation Quartus II Handbook Version 11.0 Volume 2: Design Implementation and Optimization
4–16 Chapter 4: Managing Quartus II ProjectsScripting Support
The Quartus II software supports top-down incremental compilation flows. With top-down compilation, one designer or project lead compiles the entire design in the software. Different designers or IP providers can design and verify different parts of the design, and the project lead can add design entities to the project as they are completed. However, the project lead compiles and optimizes the top-level project as a whole. Completed parts of the design can have fitting results and performance fixed as other parts of the design change.
f For more information about incremental compilation for team-based design, refer to the Quartus II Incremental Compilation for Hierarchical and Team-Based Design chapter in volume 1 of the Quartus II Handbook. For more information about best practices for incremental compilation partitions and floorplan assignments, refer to Best Practices for Incremental Compilation Partitions and Floorplan Assignments chapter in volume 1 of the Quartus II Handbook.
Scripting SupportYou can run procedures and create settings described in this chapter in a Tcl script. You can also run some procedures at a command prompt. For more information about scripting command options, refer to the Quartus II Command-Line and Tcl API Help browser.
Example 4–5 shows the command to run the Help browser:
Managing RevisionsYou can use the following commands to create and manage revisions. For more information about managing revisions, including creating and deleting revisions, setting the current revision, and getting a list of revisions, refer to “Creating Revisions” on page 4–4.
Creating RevisionsThe -based_on and -set_current options are optional. You can also use -copy_results option to copy results from the “based_on” revision.
Example 4–6 shows a Tcl command to create a new revision called speed_ch, based on a revision called chiptrip, and sets the new revision as the current revision:
Setting the Current RevisionThe -force option enables you to open the revision that you specify under revision name and overwrite the compilation database if the database version is incompatible.
Example 4–5. Command to Run the Help Browser
quartus_sh --qhelp r
Example 4–6. Creating Revisions Command
create_revision speed_ch -based_on chiptrip -set_current
Quartus II Handbook Version 11.0 Volume 2: Design Implementation and Optimization December 2010 Altera Corporation
Chapter 4: Managing Quartus II Projects 4–17Scripting Support
Example 4–7 shows the Tcl command to specify the current revision:
Getting a List of RevisionsExample 4–8 shows the Tcl command to get a list of revisions in the opened project:
Deleting RevisionsExample 4–9 shows the Tcl command to delete a revision:
Archiving ProjectsYou can archive projects with a Tcl command or a command run at the system command prompt.
Example 4–10 shows the Tcl command to create a project archive with the default settings, overwriting the existing specified archived file:
You can change default settings with the project_archive command with options such as:
■ -all_revisions
■ -include_libraries
■ -include_outputs
■ -use_file_set <file_set>
■ -version_compatible_database
1 For new device families, a version-compatible database might not be available because the archive does not include the compilation database. If you require the database files to reproduce the compilation results in the same Quartus II software version, you can use the -use_file_set full_db command-line option to archive a full database. For more information, refer to “Archiving and Restoring Projects” on page 4–5.
Example 4–7. Specifying the Current Revision Command
set_current_revision -force <revision name>
Example 4–8. Getting a List of Revisions in an Opened Project Command
get_project_revisions <project_name>
Example 4–9. Deleting a Revision Command
delete_revision <revision name>
Example 4–10. Creating a Project Archive with the Default Settings Command
project_archive archive.qar -overwrite r
December 2010 Altera Corporation Quartus II Handbook Version 11.0 Volume 2: Design Implementation and Optimization
4–18 Chapter 4: Managing Quartus II ProjectsScripting Support
Example 4–11 shows the command to create a project archive called top:
You can overwrite the existing archive file with the -overwrite option.
Restoring Archived ProjectsYou can restore archived projects with a Tcl command or with a command run at a command prompt. For more information about restoring archived projects, refer to “Archiving and Restoring Projects” on page 4–5.
Example 4–12 shows the Tcl command to restore the project archive named archive.qar in the restored subdirectory and overwrite existing files:
Example 4–13 shows the command to restore a project archive:
Importing and Exporting Version-Compatible DatabasesYou can import and export version-compatible databases with either a Tcl command or a command run at a command prompt. For more information about importing and exporting version-compatible databases, refer to “Exporting and Importing Version-Compatible Database Files” on page 4–6.
1 The flow and database_manager packages contain commands to manage version-compatible databases.
Example 4–14 shows the Tcl command to import or export version-compatible databases from the database_manager package.
Example 4–15 shows the Tcl commands from the flow package to import or export version-compatible databases. If you use the flow package, you must specify the database directory variable name.
Example 4–11. Creating a Project Archive Command
quartus_sh --archive top r
Example 4–12. Restoring a Project Archive Command
project_restore archive.qar -destination restored -overwrite r
Example 4–13. Restoring a Project Archive Command
quartus_sh --restore archive.qar r
Example 4–14. Importing and Exporting Version-Compatible Databases Command
export_database <directory> rimport_database <directory> r
Example 4–15. Importing and Exporting Version-Compatible Databases from the flow Package Command
set_global_assignment -name VER_COMPATIBLE_DB_DIR <directory>execute_flow –flow export_databaseexecute_flow –flow import_database
Quartus II Handbook Version 11.0 Volume 2: Design Implementation and Optimization December 2010 Altera Corporation
Chapter 4: Managing Quartus II Projects 4–19Scripting Support
Example 4–16 shows the Tcl commands to generate version-compatible databases after every compilation.
Example 4–17 shows the quartus_cdb and the quartus_sh executables to manage version-compatible databases:
Specifying Libraries Using ScriptsIn Tcl, use commands in the ::quartus::project package to specify project libraries. To specify project libraries, use the set_global_assignment command.
Example 4–18 shows the typical usage of the set_global_assignment command:
To report any project libraries specified for a project and any global libraries specified for the current installation of the Quartus II software, use the get_global_assignment and get_user_option Tcl commands.
Example 4–19 shows that the Tcl script outputs the user paths and global libraries for an open Quartus II project:
f For more information about Tcl scripting, refer to the Tcl Scripting chapter in volume 2 of the Quartus II Handbook. For more information about all settings and constraints in the Quartus II software, refer to the Quartus II Settings File Manual. For more information about command-line scripting, refer to the Command-Line Scripting chapter in volume 2 of the Quartus II Handbook.
h For more information about Tcl scripting, refer to the API Functions for Tcl in Quartus II Help.
Example 4–16. Generating Version-Compatible Databases After Every Compilation Command
set_global_assignment -name AUTO_EXPORT_VER_COMPATIBLE_DB ONset_global_assignment-name VER_COMPATIBLE_DB_DIR <directory>
Example 4–17. quartus_cdb and quartus_sh Executable
quartus_cdb <project> -c <revision>--export_database=<directory> rquartus_cdb <project> -c <revision> --import_database=<directory>rquartus_sh –flow export_database <project> -c \ <revision> rquartus_sh –flow import_database <project> -c \ <revision> r
Example 4–18. Commands to Specify Project Libraries Using the SEARCH_PATH Assignment
set_global_assignment -name SEARCH_PATH "../other_dir/library1"set_global_assignment -name SEARCH_PATH "../other_dir/library2"set_global_assignment -name SEARCH_PATH "../other_dir/library3"
Example 4–19. Commands to Report Specified Project Libraries
get_global_assignment -name SEARCH_PATHget_user_option -name SEARCH_PATH
December 2010 Altera Corporation Quartus II Handbook Version 11.0 Volume 2: Design Implementation and Optimization
4–20 Chapter 4: Managing Quartus II ProjectsConclusion
ConclusionDesigners often try different settings and versions of their designs throughout the development process. The Quartus II project revisions facilitate the creation and management of different assignments and settings. Project archives are useful to save your results, or pass designs between different members of a team. In addition, understanding how to migrate your projects from one computing platform to another, controlling messages, and reducing compilation time are important as well. The Quartus II software facilitates efficient management of your design to accommodate today’s sophisticated FPGA designs.
Document Revision HistoryTable 4–1 shows the revision history for this chapter.
Table 4–1. Document Revision History (Part 1 of 2)
Date Version Changes
December 2010 10.1.0
■ Changed to new document template.
■ Removed Figure 4–1, Figure 4–6, Table 4–2.
■ Moved “Hiding Messages” to Help. Moved information in “Message Suppression Manager” on page 4–15 to Help.
■ Removed references about the set_user_option command in “Specifying Libraries Using Scripts” on page 4–19.
■ Removed Classic Timing Analyzer references.
July 2010 10.0.0
■ Major reorganization done to this chapter.
■ Updated “Working with Messages” on page 4–17. Added a link to Help. Removed Figure 4–2 on page 4–7, Figure 4–11 on page 23, and Figure 4–12 on page.
■ Updated “Specifying Libraries” on page 4–14 section. Changed “User Libraries” to “Libraries”. Removed “Reducing Compilation Time” on page 4–26.
■ Added “Managing Projects in a Team-Based Design Environment” on page 4–22 and “File Association” on page 4–2.
■ Updated Figure 4–1 on page 4–6, Figure 4–2 on page 4–8, Figure 4–6 on page 4–18, Figure 4–6 on page 4–19, and Figure 4–7 on page 4–21.
November 2009 9.1.0
■ Updated “Creating a New Project” on page 4–4, “Archiving a Project” on page 4–9, “Restoring an Archived Project” on page 4–11.
■ Added “Quartus II Text Editor” on page 4–2, “Reducing Compilation Time” on page 4–32.
■ Updated Table 4–1 on page 4–10, Table 4–2 on page 4–20.
■ Updated Figure 4–4 on page 4–9, Figure 4–7 on page 4–19.
Quartus II Handbook Version 11.0 Volume 2: Design Implementation and Optimization December 2010 Altera Corporation
Chapter 4: Managing Quartus II Projects 4–21Document Revision History
f For previous versions of the Quartus II Handbook, refer to the Quartus II Handbook Archive.
f Take an online survey to provide feedback about this handbook chapter.
April 2009 9.0.0 Updated to fix “Document Revision History” for version 9.0.0.
March 2009 9.0.0
■ Updated “Managing Quartus II Projects” on page 4–1, “Creating a New Project” on page 4–2, “Using Revisions with Your Design” on page 4–3, “Creating and Deleting Revisions” on page 4–4, “Creating New Copies of Your Design” on page 4–6, “Version-Compatible Databases” on page 4–11, “Quartus II Project Platform Migration” on page 4–12, “Filenames and Hierarchies” on page 4–12, “Quartus II Search Path Precedence Rules” on page 4–15, “Quartus II-Generated Files for Third-Party EDA Tools” on page 4–15, “Migrating Database Files between Platforms” on page 4–16, “Message Suppression” on page 4–20, “Quartus II Settings File” on page 4–24, “Quartus II Default Settings File” on page 4–25, “Managing Revisions” on page 4–26, “Archiving Projects” on page 4–26 and “Archiving Projects with the Quartus II Archive Project Feature” on page 4–7, “Importing and Exporting Version-Compatible Databases” on page 4–27, “Specifying Libraries Using Scripts” on page 4–28, “Conclusion” on page 4–30.
■ Updated Figure 4–1, Figure 4–7, Figure 4–8, and Figure 4–11.
■ Updated Table 4–1 and Table 4–2.
■ Updated Example 4–3, Example 4–4, Example 4–5, and Example 4–6.
Table 4–1. Document Revision History (Part 2 of 2)
Date Version Changes
December 2010 Altera Corporation Quartus II Handbook Version 11.0 Volume 2: Design Implementation and Optimization

4–22 Chapter 4: Managing Quartus II ProjectsDocument Revision History
Quartus II Handbook Version 11.0 Volume 2: Design Implementation and Optimization December 2010 Altera Corporation