Embed Size (px)
Citation preview
Secure Provider Website Instructional Guide
Operational Training 1 March 2017

Introduction The Secure Provider Web is a secure website developed to allow Providers across Centene health plans to perform a variety of functions from their office. By registering and creating an account, a Provider can easily check patient eligibility, and view their patient list. Providers can view and submit both authorizations and claims through the website. A secure messaging feature allows a Provider to communicate with the health plan without having to pick up the telephone.
How to Use the Manual This manual is intended to be a quick reference for using a tool or function offered on the website when a Provider or staff member needs assistance. The manual also explains many ways to use the site in order to get the most out of the resource.
System Requirements Access the secure provider website using Internet Explorer 10.0 or higher, Firefox and/or Google Chrome. Each browser should be updated to the most recent version available optimal performance.
Operational Training 2 March 2017
.................................................................................................................................................................... Contents Introduction 2 How to Use the Manual ................................................................................................................................................. 2System Requirements ................................................................................................................................................... 2 Registration.................................................................................................................................................................... 5 Create an account: ....................................................................................................................................................... 5 Login.............................................................................................................................................................................. 9The Dashboard ............................................................................................................................................................ 10Your Account ............................................................................................................................................................... 11Update an account....................................................................................................................................................... 12To modify demographic information about the Specific TIN ........................................................................................ 12Adding a TIN to an account ......................................................................................................................................... 13 User Management ....................................................................................................................................................... 14 Account Permission Definitions: ................................................................................................................................. 15 Invite a others to join your account .............................................................................................................................. 15 Verifying Patient Eligibility............................................................................................................................................ 16 Overview Tab on Patient Record................................................................................................................................. 18 Cost Sharing................................................................................................................................................................ 20 Assessments ............................................................................................................................................................... 21 Viewing Submitted Assessment Responses................................................................................................................ 22 Health Record.............................................................................................................................................................. 23 Care Plans................................................................................................................................................................... 25 Authorizations .............................................................................................................................................................. 27 Create an Authorization: .............................................................................................................................................. 30 Referrals ...................................................................................................................................................................... 52 Coordination of Benefits .............................................................................................................................................. 55 Claims.......................................................................................................................................................................... 56 Adding Diagnosis codes and coordination of benefits ................................................................................................. 57 Adding Coordination of Benefits .................................................................................................................................. 58 Adding Service Lines to the claim................................................................................................................................ 60 Adding Provider Information to the claim..................................................................................................................... 61 The Review Section of the claim.................................................................................................................................. 63 Creating an Institutional Claims ................................................................................................................................... 64 Uploading Documents for Quality Management / Medical Necessity Upload .............................................................. 73 To Upload a Medical Necessity Document for a member’s record .............................................................................. 77 To View Uploaded Documents for Quality Management / Medical Necessity Upload ................................................. 80
Operational Training 3 March 2017
Patient List .....................................................................................................................................................84Downloading the Patient List............................................................................................................................84Filter the Patient List .......................................................................................................................................85View Authorizations by TIN..............................................................................................................................86Viewing Claims: ........................................................................................................................................................... 88 To view the details of the Individual claim..........................................................................................................89Correct/Appeal Claim ......................................................................................................................................89Void/Recoup Claim Copy Claim ....................................................................................................................................................90Saved Claims.................................................................................................................................................90Submitted Claims 90.To view submitted batch claims: .................................................................................................................................. 92 Payment History .............................................................................................................................................93To view the Explanation of Payment details.......................................................................................................93Downloading an Explanation of Benefits ................................ 94Create a Secure Message ...............................................................................................................................97To view Sent messages: .................................................................................................................................98To view messages sent to Trash: .....................................................................................................................98
Operational Training 4 March 2017
...........................................................................
..........................................................................................................................................
Registration
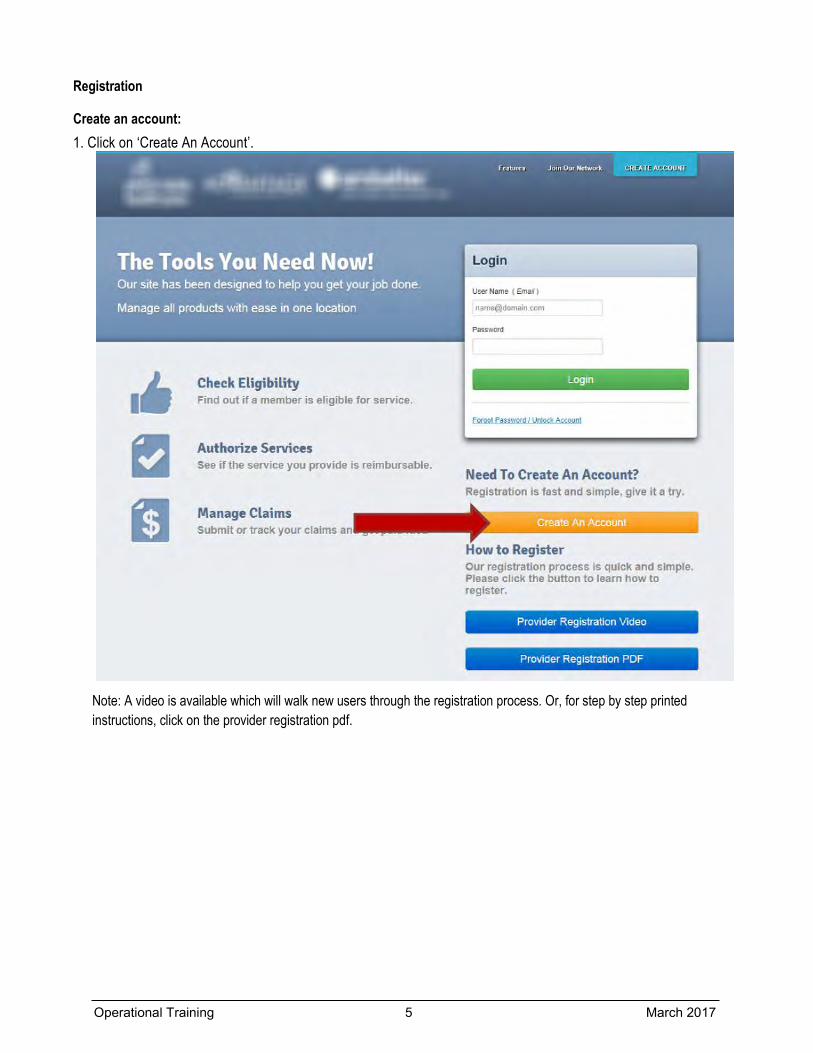
Create an account: 1. Click on ‘Create An Account’.
Note: A video is available which will walk new users through the registration process. Or, for step by step printed instructions, click on the provider registration pdf.
Operational Training 5 March 2017
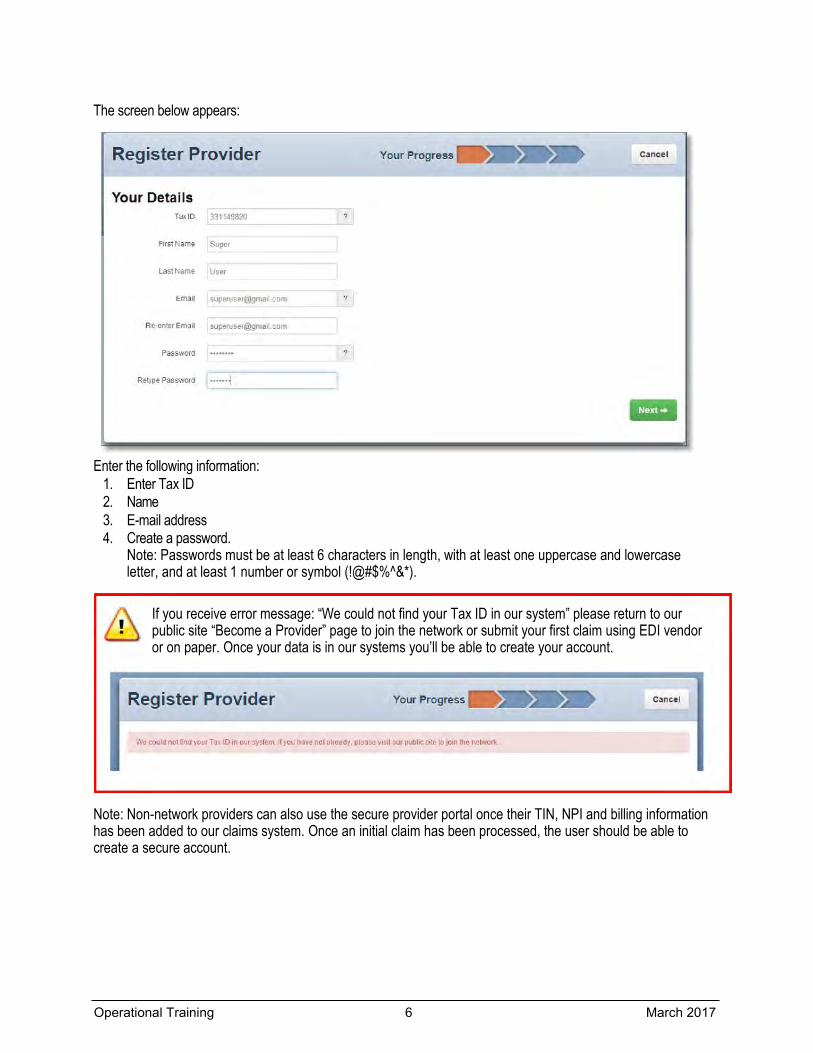
The screen below appears:
Enter the following information: 1. Enter Tax ID 2. Name 3. E-mail address 4. Create a password.
Note: Passwords must be at least 6 characters in length, with at least one uppercase and lowercase letter, and at least 1 number or symbol (!@#$%^&*).
If you receive error message: “We could not find your Tax ID in our system” please return to our public site “Become a Provider” page to join the network or submit your first claim using EDI vendor or on paper. Once your data is in our systems you’ll be able to create your account.
Note: Non-network providers can also use the secure provider portal once their TIN, NPI and billing information has been added to our claims system. Once an initial claim has been processed, the user should be able to create a secure account.
Operational Training 6 March 2017
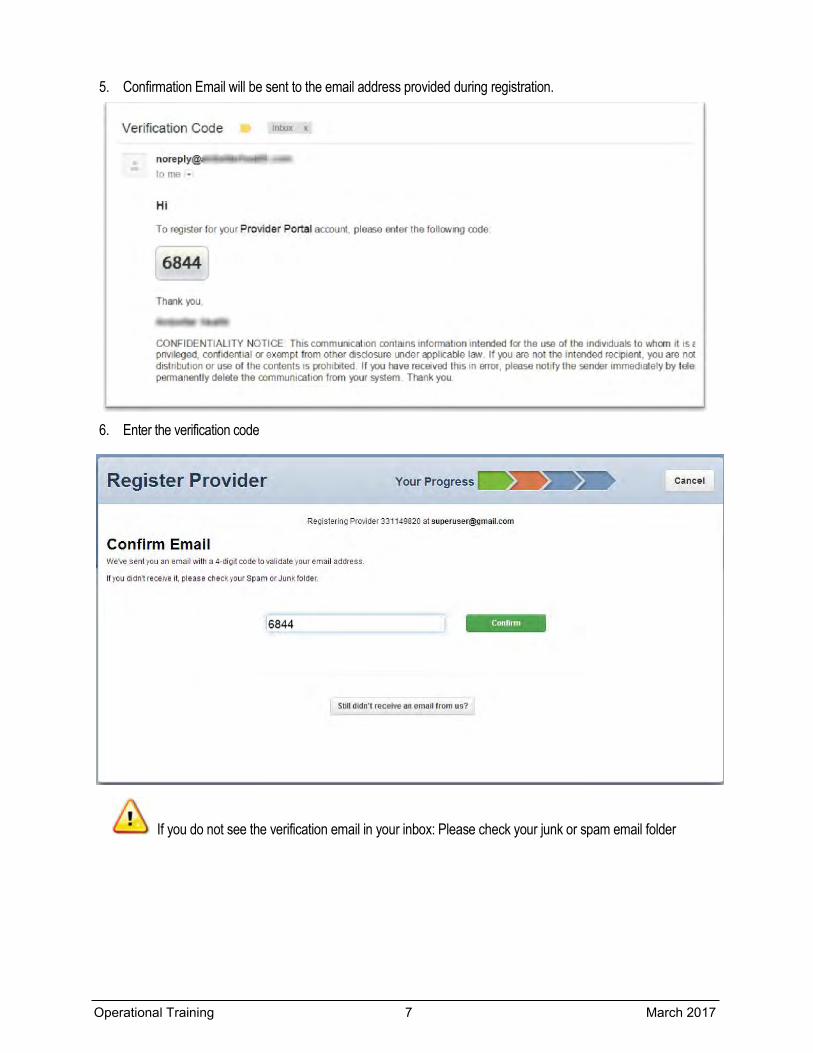
5. Confirmation Email will be sent to the email address provided during registration.
6. Enter the verification code
If you do not see the verification email in your inbox: Please check your junk or spam email folder
Operational Training 7 March 2017
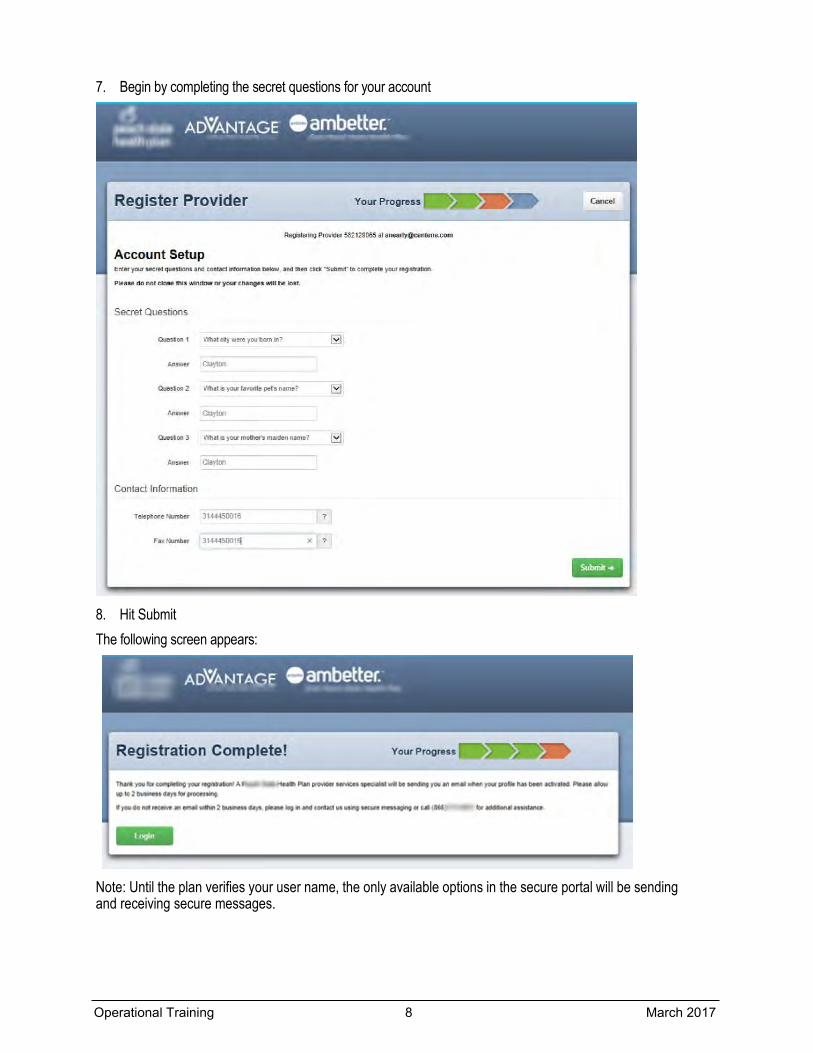
7. Begin by completing the secret questions for your account
8. Hit Submit The following screen appears:
Note: Until the plan verifies your user name, the only available options in the secure portal will be sending and receiving secure messages.
Operational Training 8 March 2017
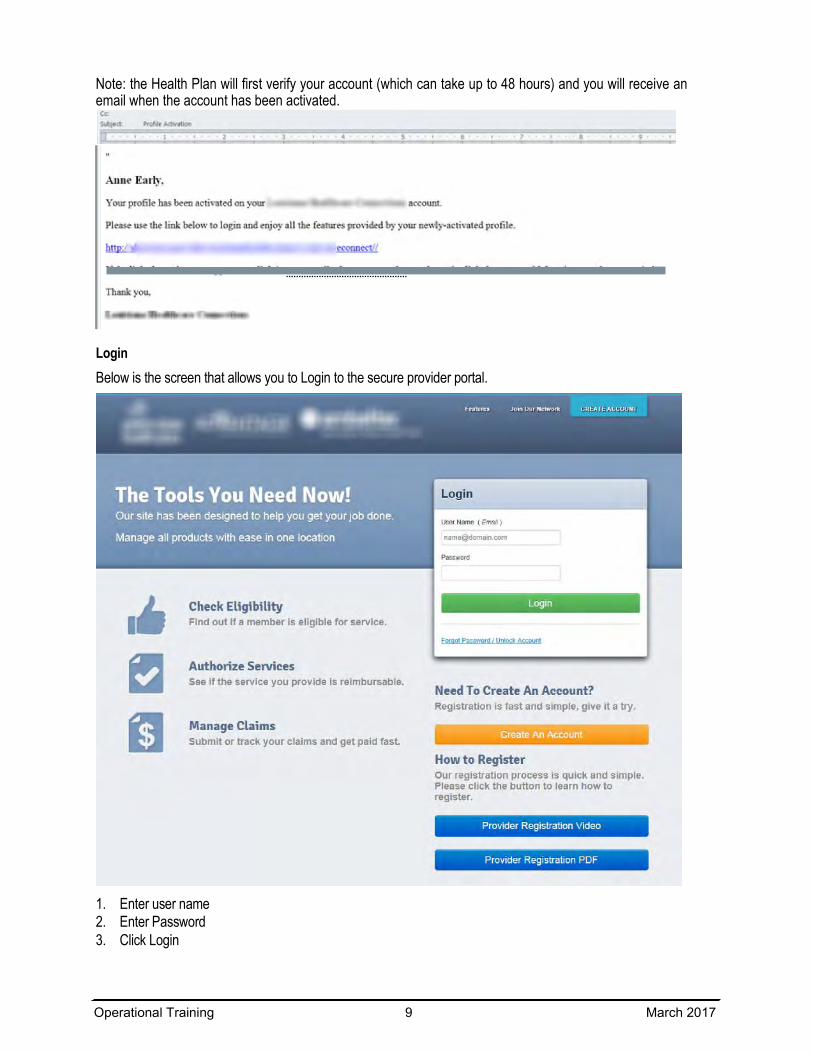
Note: the Health Plan will first verify your account (which can take up to 48 hours) and you will receive an email when the account has been activated.
Login Below is the screen that allows you to Login to the secure provider portal.
1. Enter user name 2. Enter Password 3. Click Login
Operational Training 9 March 2017
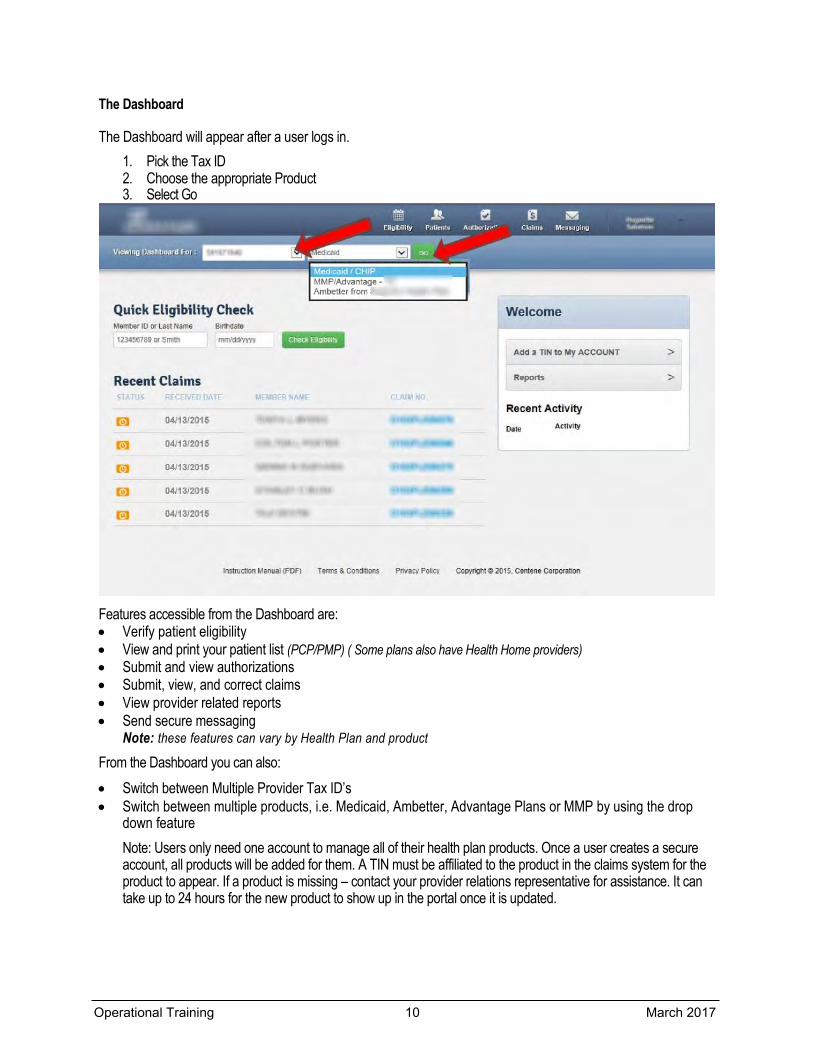
The Dashboard
The Dashboard will appear after a user logs in. 1. Pick the Tax ID 2. Choose the appropriate Product 3. Select Go
Features accessible from the Dashboard are: • Verify patient eligibility • View and print your patient list (PCP/PMP) ( Some plans also have Health Home providers) • Submit and view authorizations • Submit, view, and correct claims • View provider related reports • Send secure messaging
Note: these features can vary by Health Plan and product
From the Dashboard you can also: • Switch between Multiple Provider Tax ID’s • Switch between multiple products, i.e. Medicaid, Ambetter, Advantage Plans or MMP by using the drop
down feature Note: Users only need one account to manage all of their health plan products. Once a user creates a secure account, all products will be added for them. A TIN must be affiliated to the product in the claims system for the product to appear. If a product is missing – contact your provider relations representative for assistance. It can take up to 24 hours for the new product to show up in the portal once it is updated.
Operational Training 10 March 2017
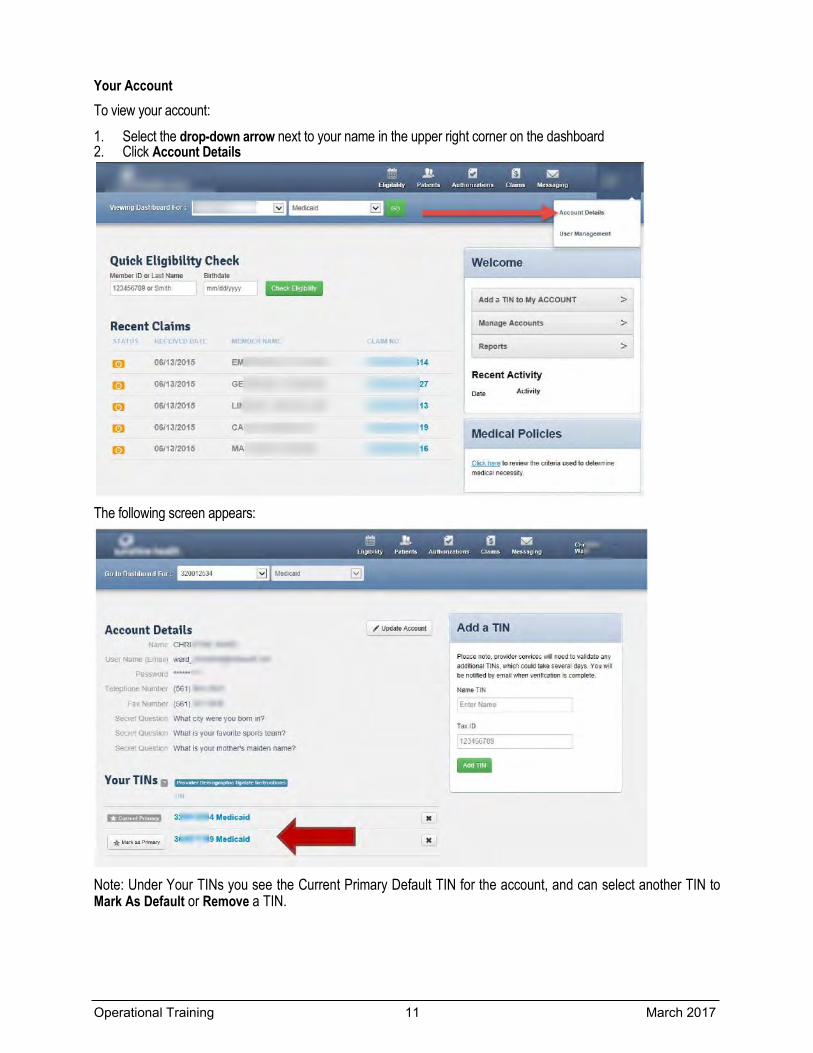
Your Account To view your account: 1. Select the drop-down arrow next to your name in the upper right corner on the dashboard 2. Click Account Details
The following screen appears:
Note: Under Your TINs you see the Current Primary Default TIN for the account, and can select another TIN to Mark As Default or Remove a TIN.
Operational Training 11 March 2017
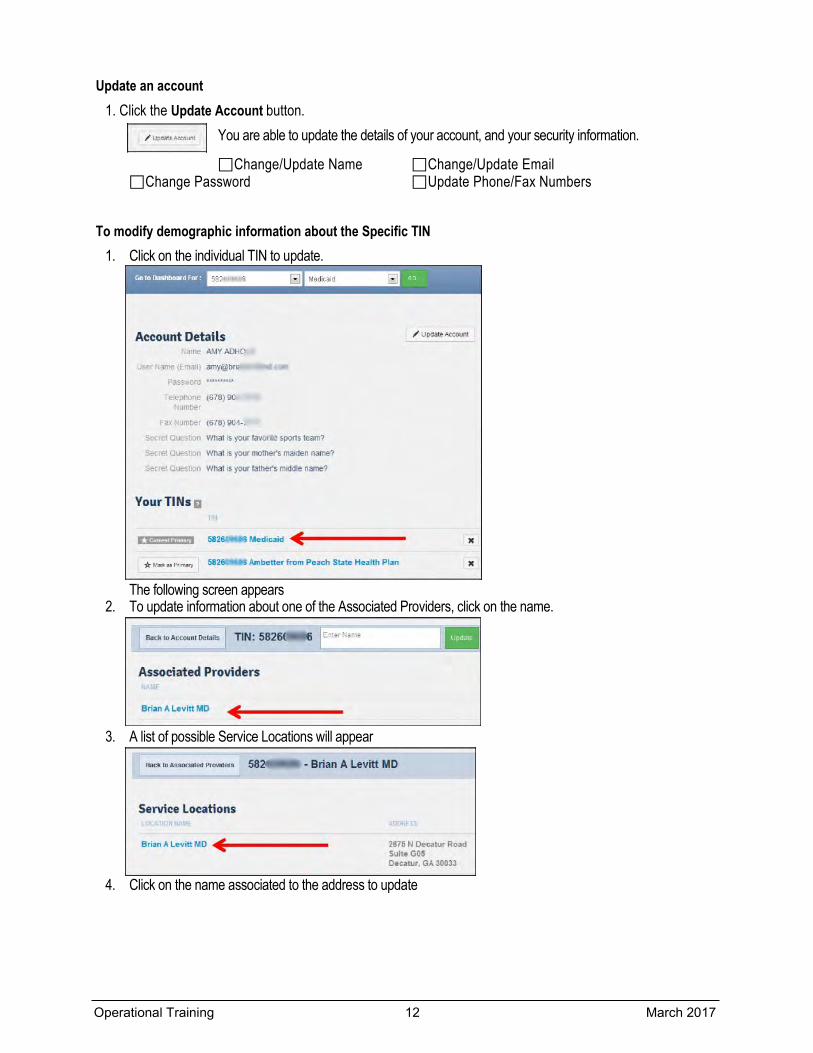
Update an account 1. Click the Update Account button.
You are able to update the details of your account, and your security information.
Change/Update Name Change/Update Email Change Password Update Phone/Fax Numbers
To modify demographic information about the Specific TIN 1. Click on the individual TIN to update.
The following screen appears 2. To update information about one of the Associated Providers, click on the name.
3. A list of possible Service Locations will appear
4. Click on the name associated to the address to update
Operational Training 12 March 2017
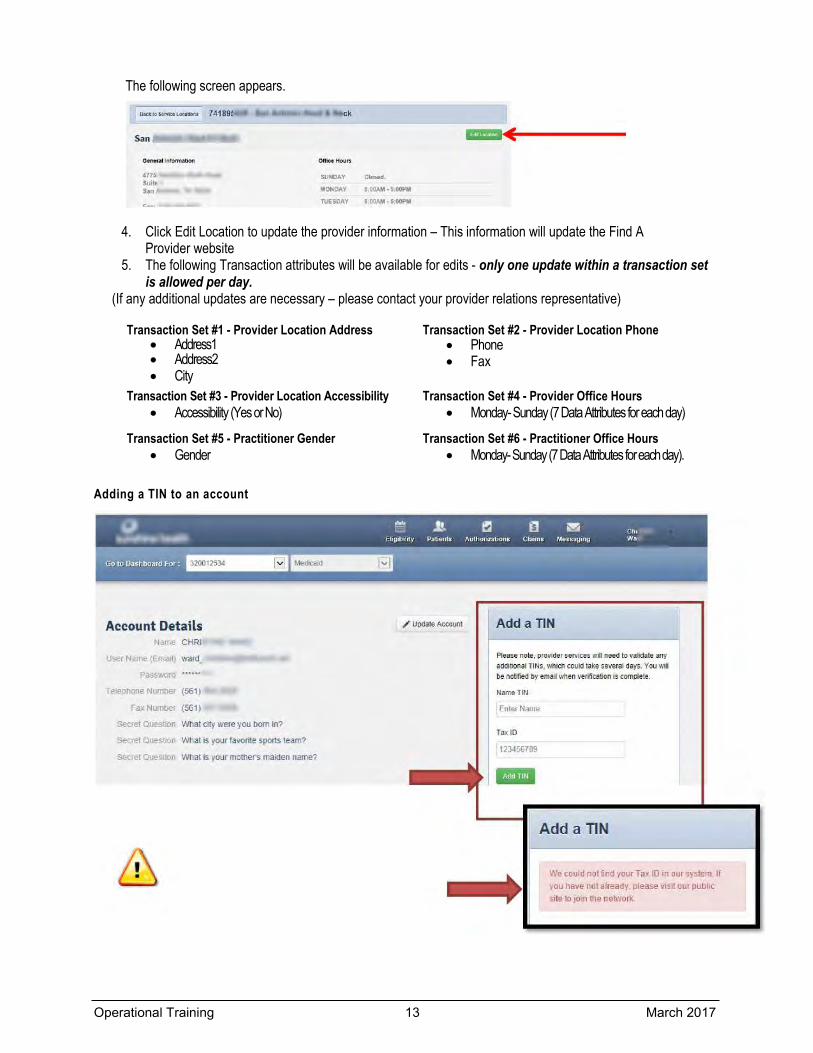
The following screen appears.
4. Click Edit Location to update the provider information – This information will update the Find A Provider website
5. The following Transaction attributes will be available for edits - only one update within a transaction set is allowed per day.
(If any additional updates are necessary – please contact your provider relations representative)
Transaction Set #1 - Provider Location Address • Address1 • Address2 • City
Transaction Set #2 - Provider Location Phone • Phone • Fax
Transaction Set #3 - Provider Location Accessibility Accessibility (Yes or No)
Transaction Set #4 - Provider Office Hours • • Monday-Sunday (7 Data Attributesfor each day)
Transaction Set #5 - Practitioner Gender Gender
Transaction Set #6 - Practitioner Office Hours • • Monday-Sunday (7 Data Attributesfor each day).
Adding a TIN to an account
Operational Training 13 March 2017
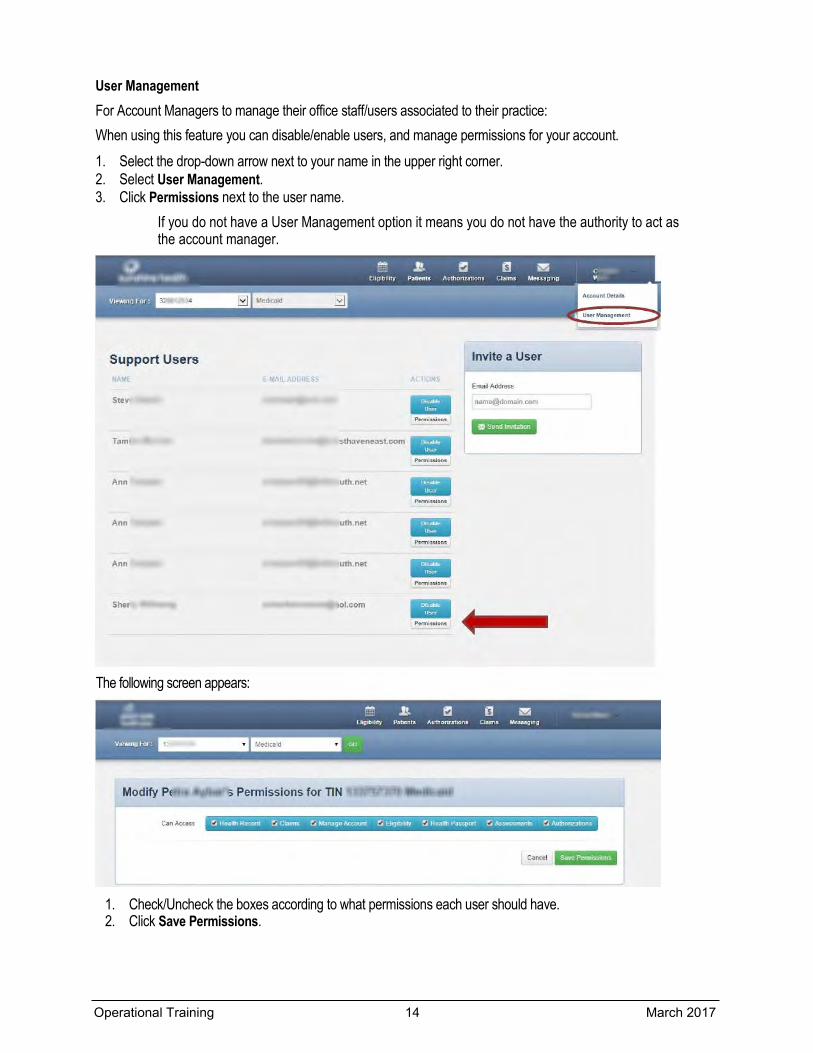
User Management For Account Managers to manage their office staff/users associated to their practice: When using this feature you can disable/enable users, and manage permissions for your account. 1. Select the drop-down arrow next to your name in the upper right corner. 2. Select User Management. 3. Click Permissions next to the user name.
If you do not have a User Management option it means you do not have the authority to act as the account manager.
The following screen appears:
1. Check/Uncheck the boxes according to what permissions each user should have. 2. Click Save Permissions.
Operational Training 14 March 2017
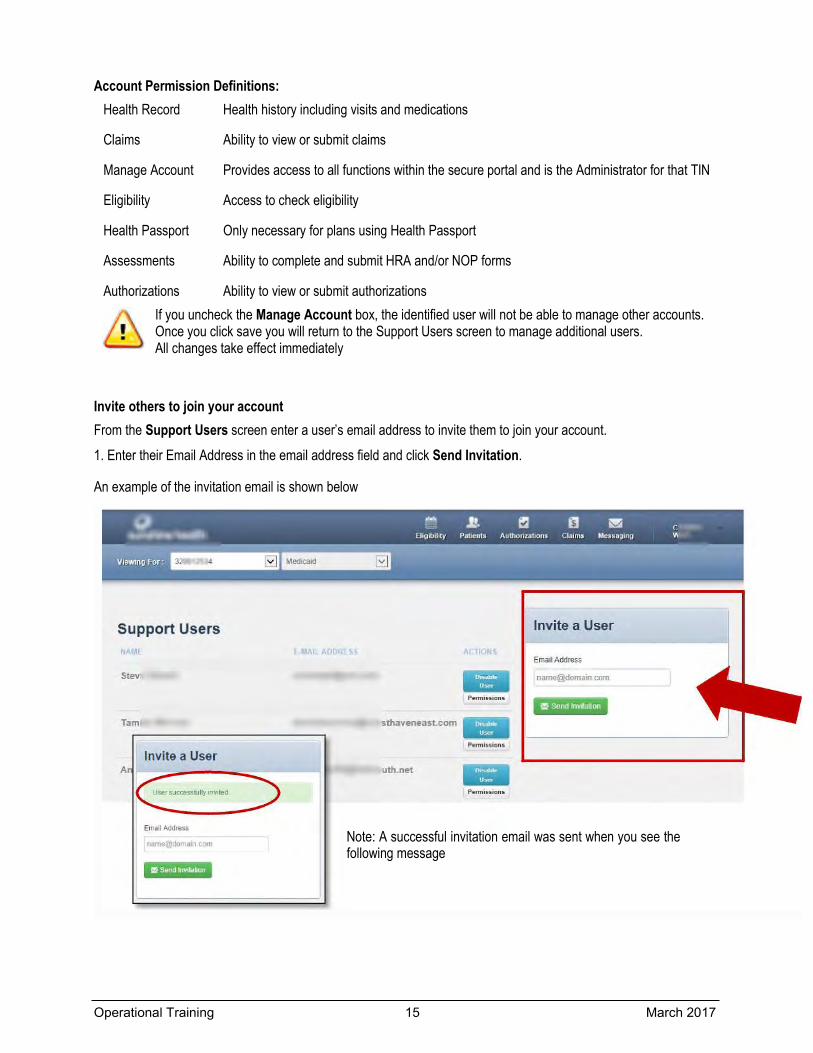
Account Permission Definitions: Health Record Health history including visits and medications
Claims Ability to view or submit claims
Manage Account Provides access to all functions within the secure portal and is the Administrator for that TIN
Eligibility Access to check eligibility
Health Passport Only necessary for plans using Health Passport
Assessments Ability to complete and submit HRA and/or NOP forms
Authorizations Ability to view or submit authorizations If you uncheck the Manage Account box, the identified user will not be able to manage other accounts. Once you click save you will return to the Support Users screen to manage additional users. All changes take effect immediately
Invite others to join your account From the Support Users screen enter a user’s email address to invite them to join your account. 1. Enter their Email Address in the email address field and click Send Invitation.
An example of the invitation email is shown below
Note: A successful invitation email was sent when you see the following message
Operational Training 15 March 2017
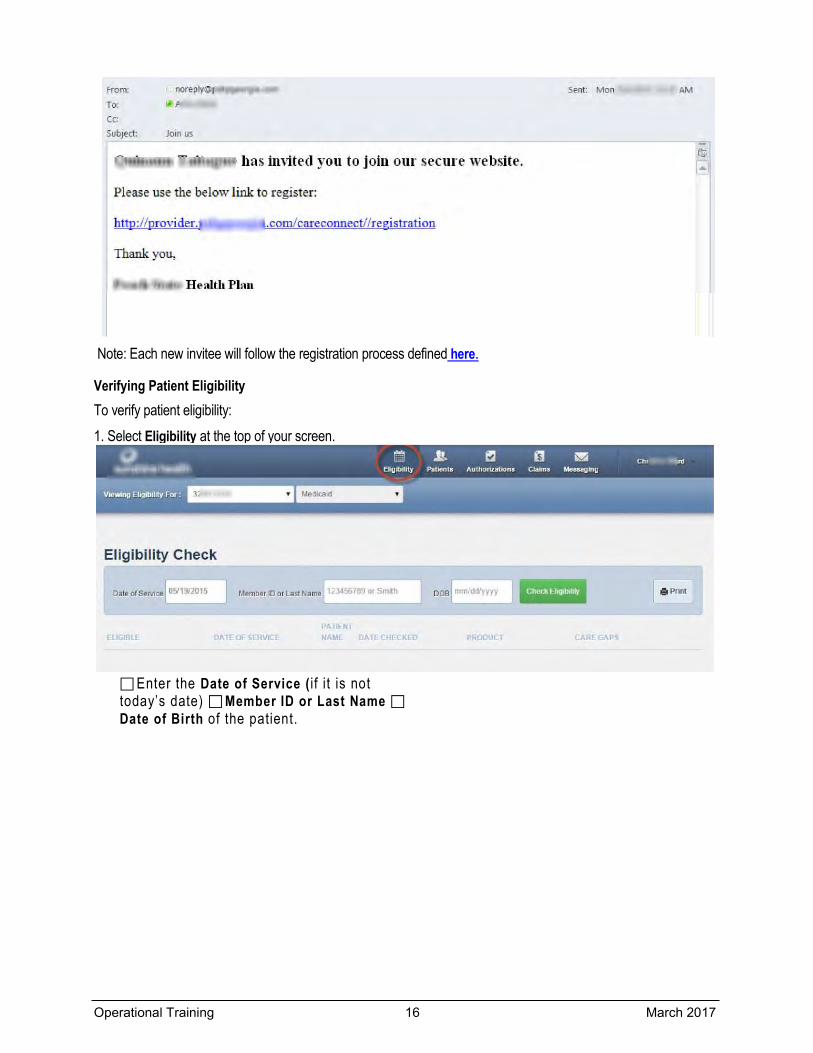
Note: Each new invitee will follow the registration process defined here.
Verifying Patient Eligibility To verify patient eligibility: 1. Select Eligibility at the top of your screen.
Enter the Date of Service ( if it is not today’s date) Member ID or Last Name Date of Birth of the patient.
Operational Training 16 March 2017
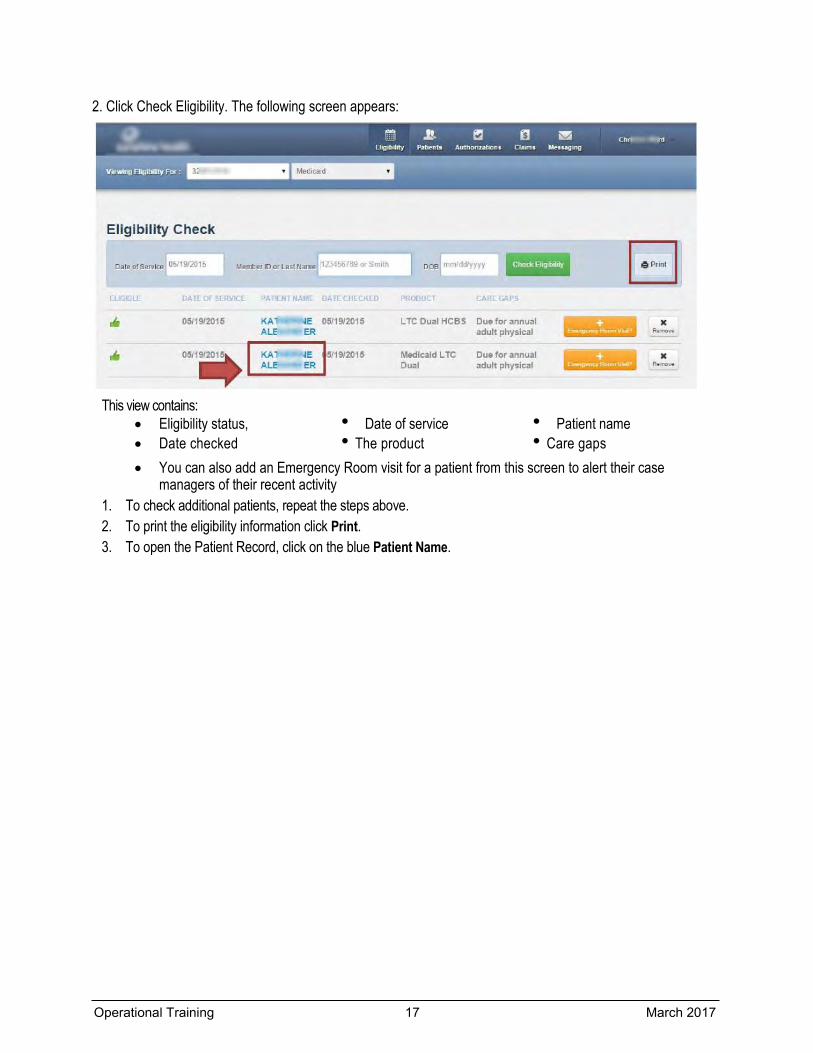
2. Click Check Eligibility. The following screen appears:
This view contains: • Eligibility status, • Date of service • Patient name • Date checked • The product • Care gaps • You can also add an Emergency Room visit for a patient from this screen to alert their case
managers of their recent activity 1. To check additional patients, repeat the steps above. 2. To print the eligibility information click Print. 3. To open the Patient Record, click on the blue Patient Name.
Operational Training 17 March 2017
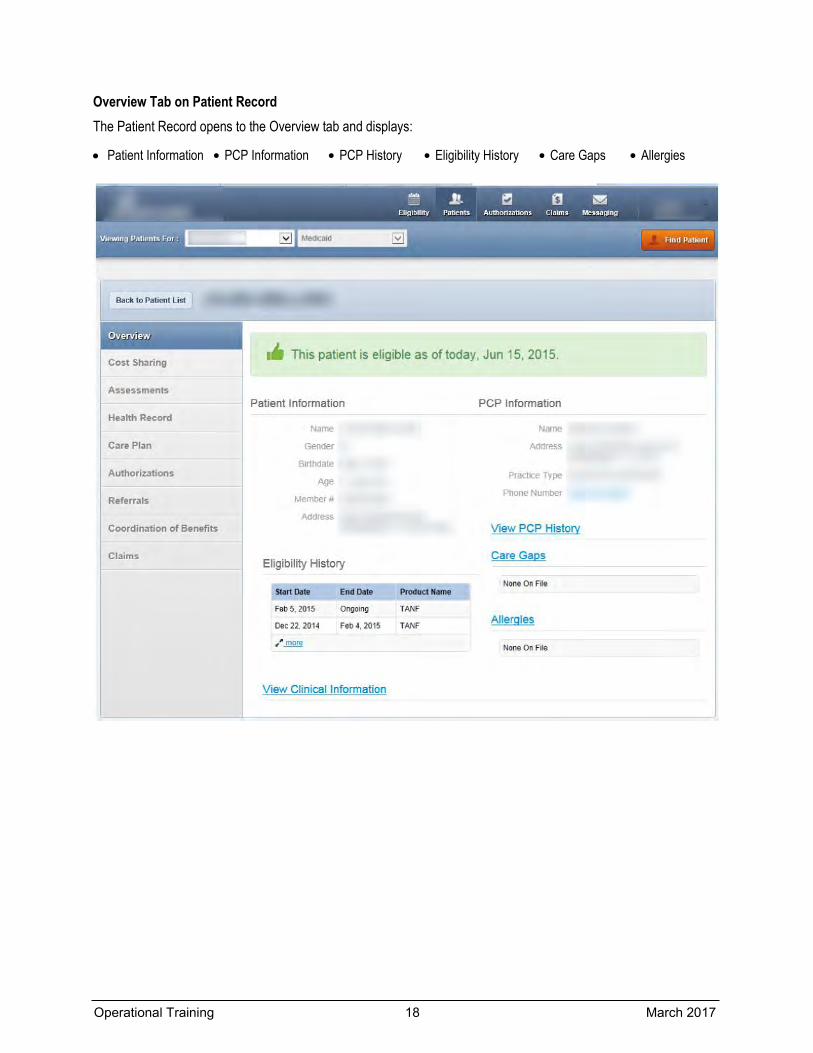
Overview Tab on Patient Record The Patient Record opens to the Overview tab and displays:
• Patient Information • PCP Information • PCP History • Eligibility History • Care Gaps • Allergies
Operational Training 18 March 2017
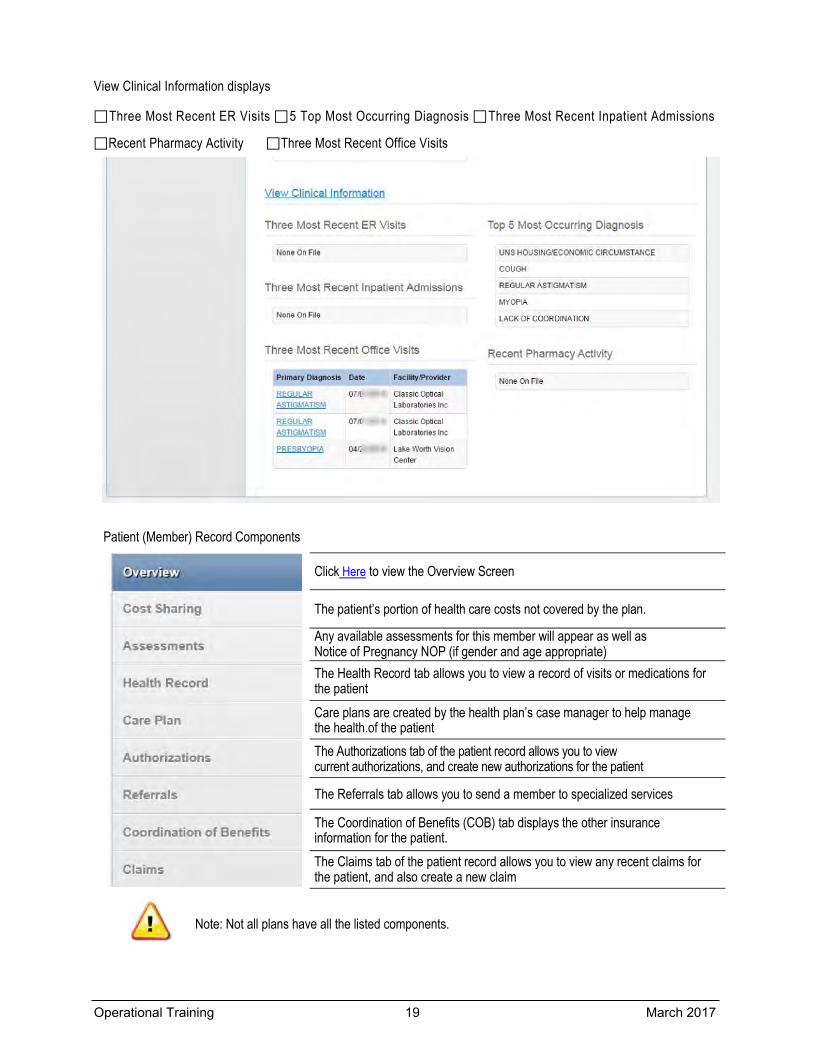
View Clinical Information displays
Three Most Recent ER Visits 5 Top Most Occurring Diagnosis Three Most Recent Inpatient Admissions
Recent Pharmacy Activity Three Most Recent Office Visits
Patient (Member) Record Components
Click Here to view the Overview Screen
The patient’s portion of health care costs not covered by the plan.
Any available assessments for this member will appear as well as Notice of Pregnancy NOP (if gender and age appropriate) The Health Record tab allows you to view a record of visits or medications for the patient Care plans are created by the health plan’s case manager to help manage the health.of the patient The Authorizations tab of the patient record allows you to view current authorizations, and create new authorizations for the patient
The Referrals tab allows you to send a member to specialized services
The Coordination of Benefits (COB) tab displays the other insurance information for the patient. The Claims tab of the patient record allows you to view any recent claims for the patient, and also create a new claim
Note: Not all plans have all the listed components.
Operational Training 19 March 2017
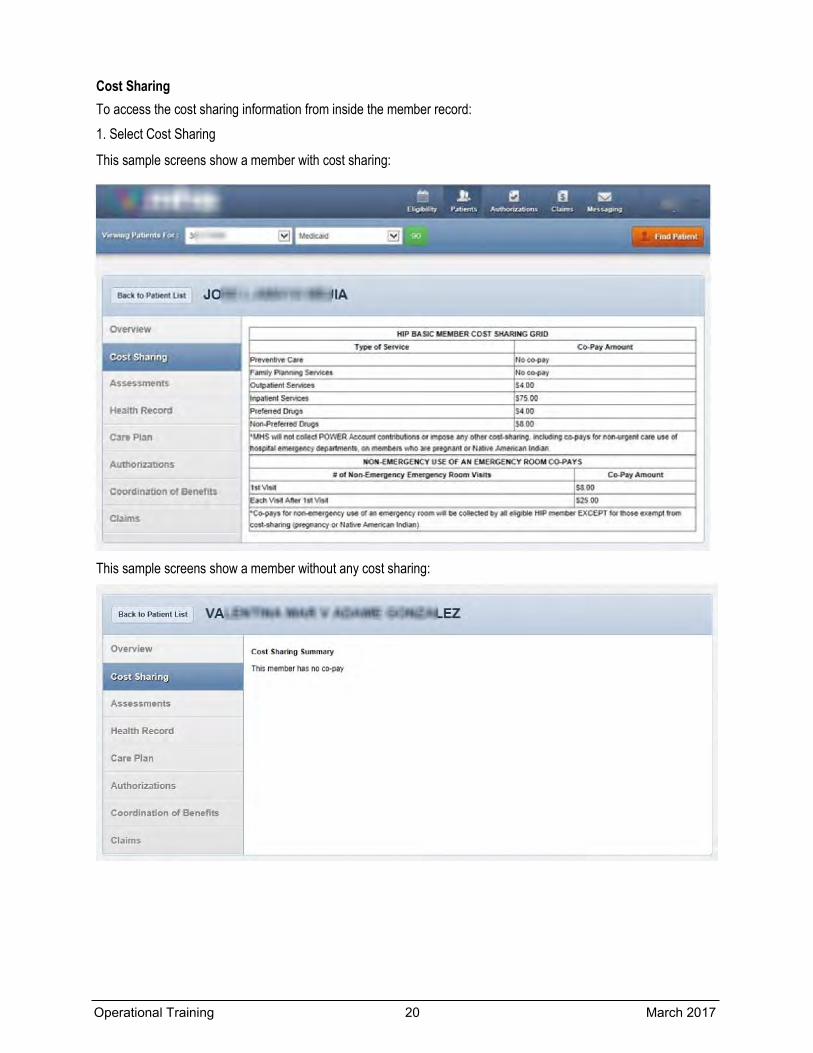
Cost Sharing To access the cost sharing information from inside the member record: 1. Select Cost Sharing
This sample screens show a member with cost sharing:
This sample screens show a member without any cost sharing:
Operational Training 20 March 2017
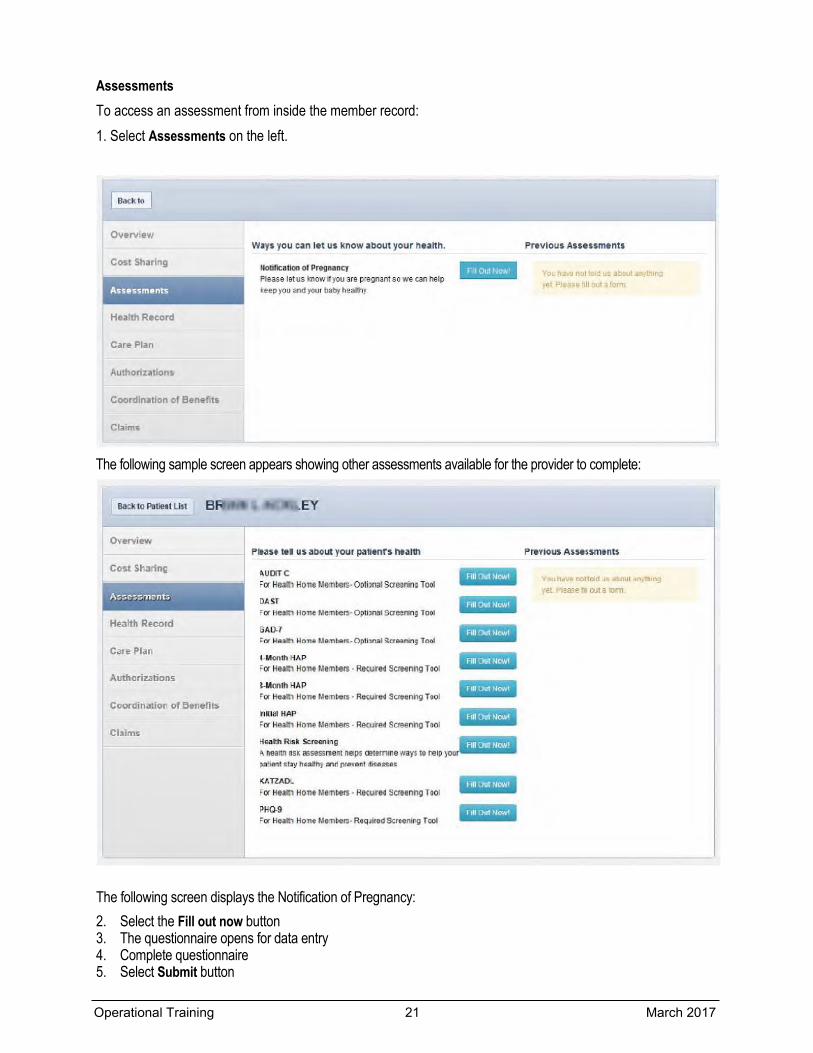
Assessments To access an assessment from inside the member record: 1. Select Assessments on the left.
The following sample screen appears showing other assessments available for the provider to complete:
The following screen displays the Notification of Pregnancy: 2. Select the Fill out now button 3. The questionnaire opens for data entry 4. Complete questionnaire 5. Select Submit button
O
perational Training 21 March 2017
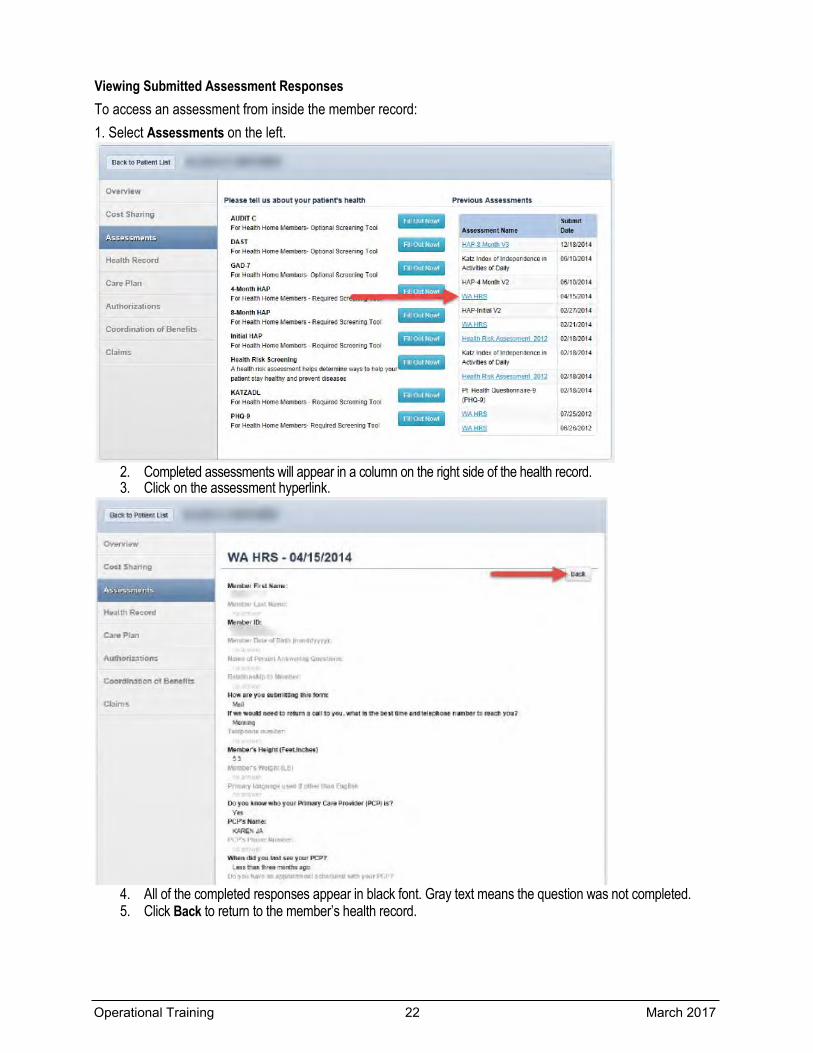
Viewing Submitted Assessment Responses To access an assessment from inside the member record: 1. Select Assessments on the left.
2. Completed assessments will appear in a column on the right side of the health record. 3. Click on the assessment hyperlink.
4. All of the completed responses appear in black font. Gray text means the question was not completed. 5. Click Back to return to the member’s health record.
Operational Training 22 March 2017
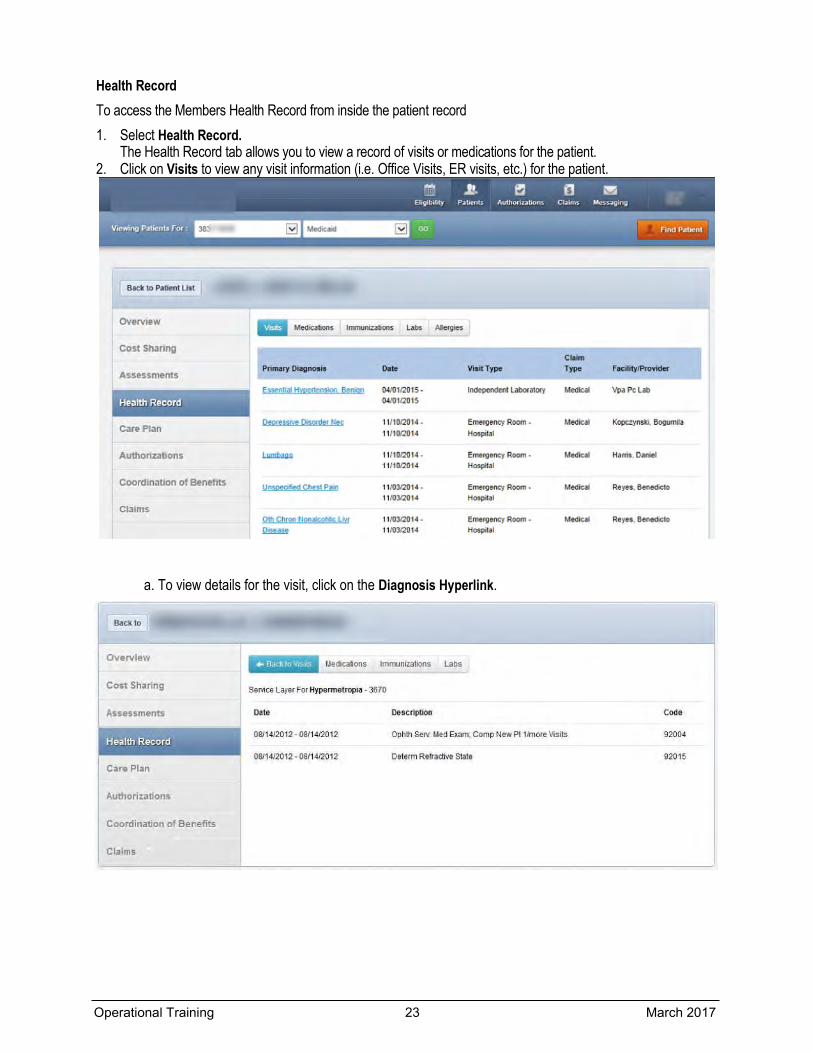
Health Record To access the Members Health Record from inside the patient record 1. Select Health Record.
The Health Record tab allows you to view a record of visits or medications for the patient. 2. Click on Visits to view any visit information (i.e. Office Visits, ER visits, etc.) for the patient.
a. To view details for the visit, click on the Diagnosis Hyperlink.
Operational Training 23 March 2017
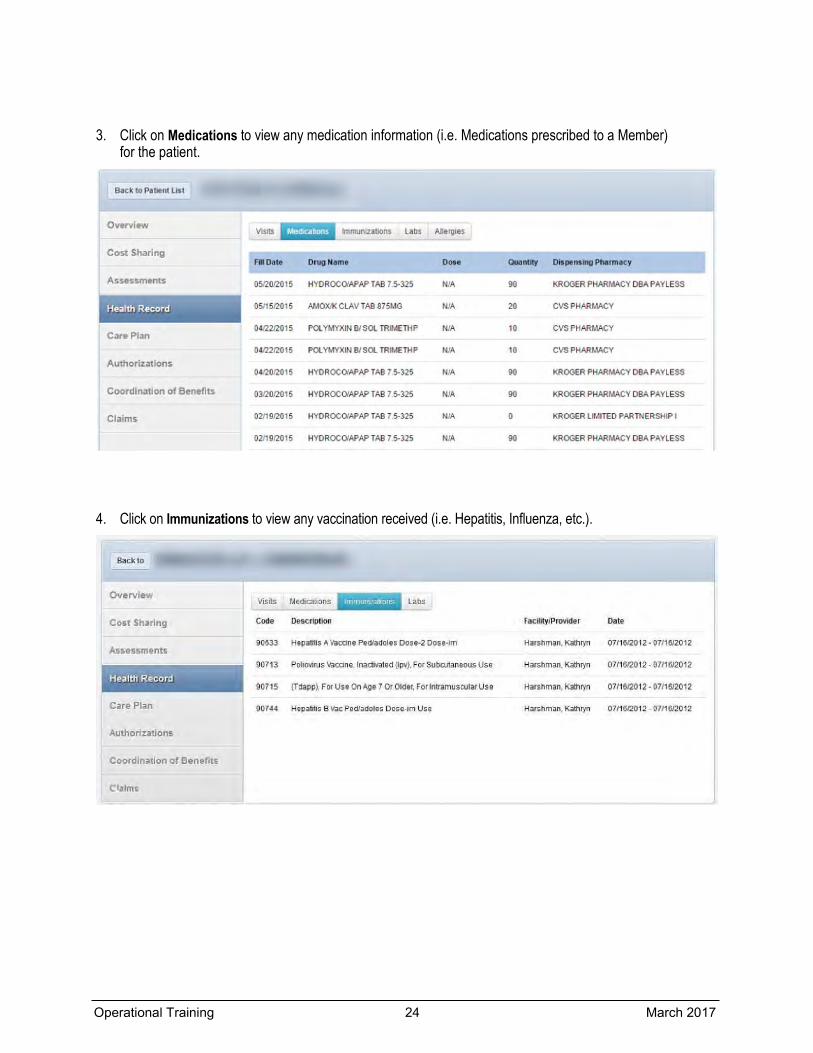
3. Click on Medications to view any medication information (i.e. Medications prescribed to a Member) for the patient.
4. Click on Immunizations to view any vaccination received (i.e. Hepatitis, Influenza, etc.).
Operational Training 24 March 2017

5. Click on Labs (i.e. Comprehensive metabolic panel, CBC) to view lab information for the member.
Note: For additional details about these lab values, click on the blue hyperlink of the test name. 6. Click on the Allergies (i.e. Sulfa, Codeine) tab to view the allergies for this member.
Note: Components appearing in the Patient Record are based on the last 24 months of claims data.
Care Plans Providers can view three types of care plans;
1. Medical Care Plans are the most common and include medical terminology 2. Member Centric Care Plans include “Self-Management” in the title and can be viewed by the member 3. Free Text Care Plans are created by the case manager without a template
Operational Training 25 March 2017
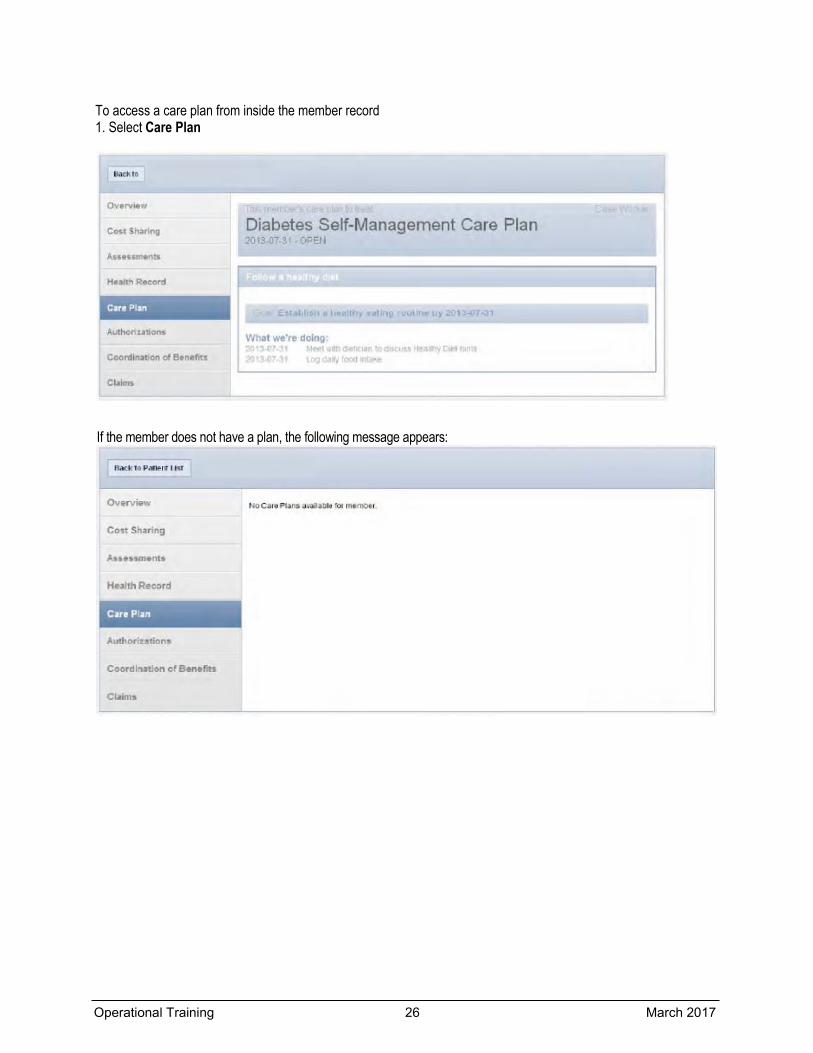
To access a care plan from inside the member record 1. Select Care Plan
If the member does not have a plan, the following message appears:
Operational Training 26 March 2017
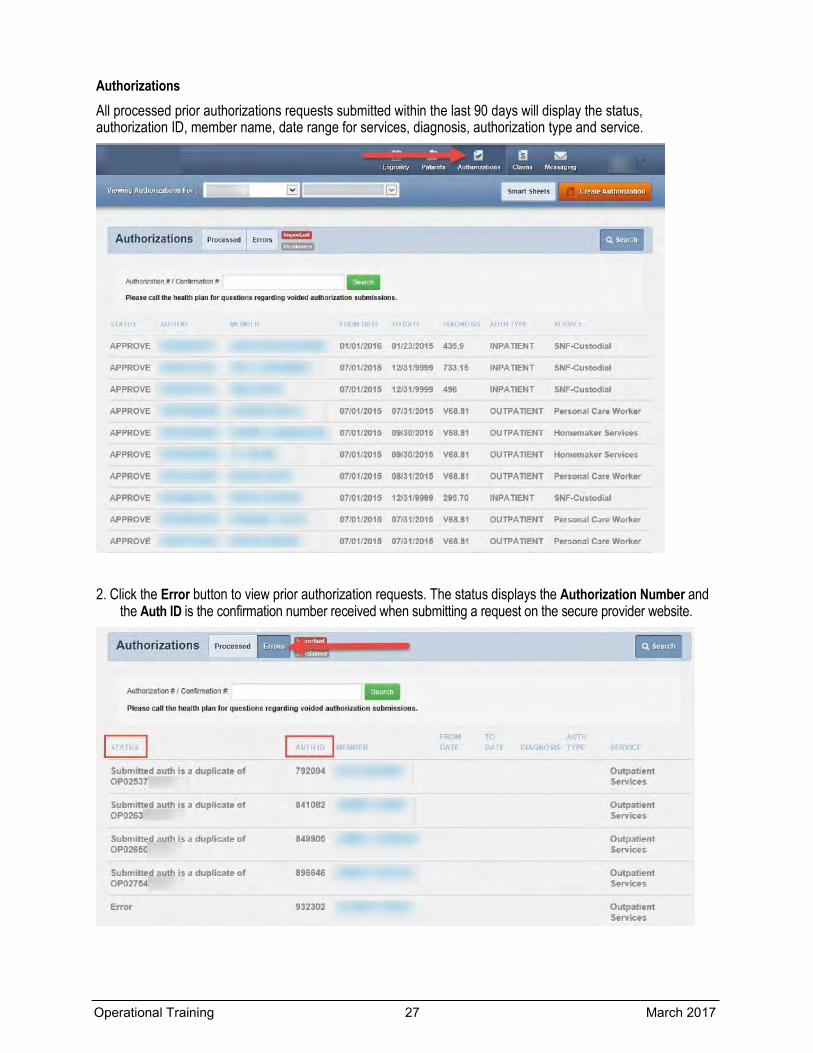
Authorizations All processed prior authorizations requests submitted within the last 90 days will display the status, authorization ID, member name, date range for services, diagnosis, authorization type and service.
2. Click the Error button to view prior authorization requests. The status displays the Authorization Number andthe Auth ID is the confirmation number received when submitting a request on the secure provider website.
Operational Training 27 March 2017
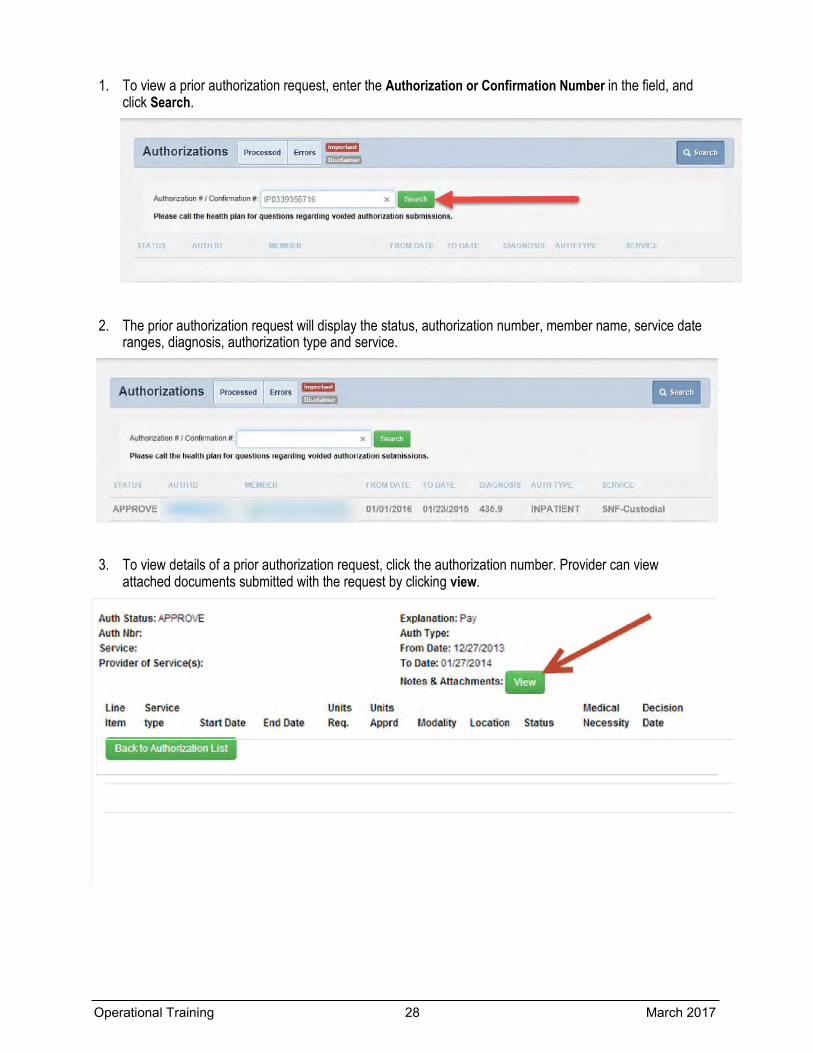
1. To view a prior authorization request, enter the Authorization or Confirmation Number in the field, and click Search.
2. The prior authorization request will display the status, authorization number, member name, service date ranges, diagnosis, authorization type and service.
3. To view details of a prior authorization request, click the authorization number. Provider can view attached documents submitted with the request by clicking view.
Operational Training 28 March 2017
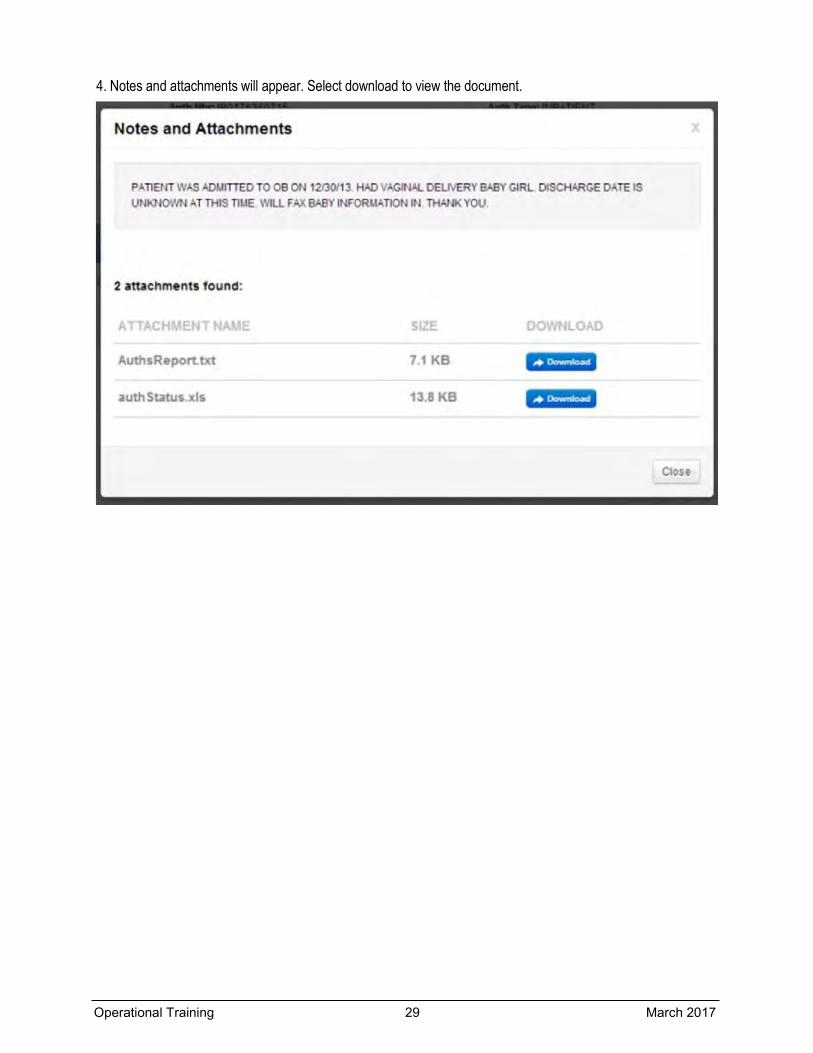
4. Notes and attachments will appear. Select download to view the document.
Operational Training 29 March 2017
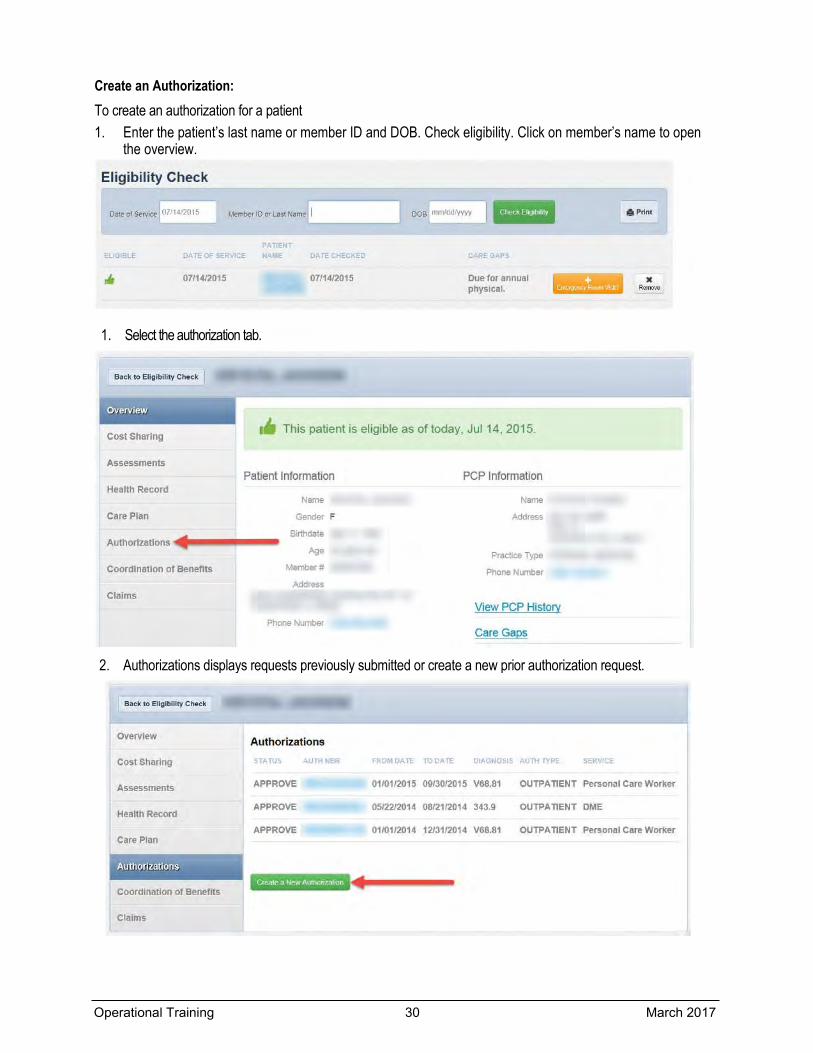
Create an Authorization: To create an authorization for a patient 1. Enter the patient’s last name or member ID and DOB. Check eligibility. Click on member’s name to open
the overview.
2. Authorizations displays requests previously submitted or create a new prior authorization request.
Operational Training 30 March 2017
1. Select the authorization tab.
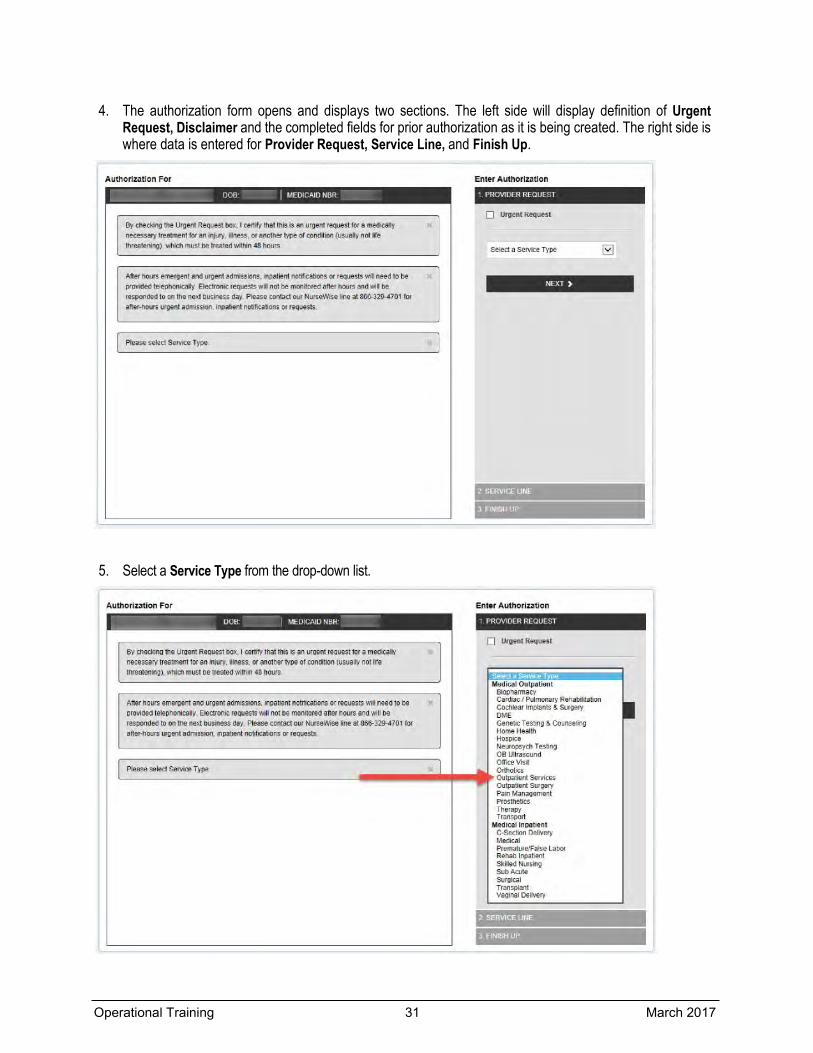
4. The authorization form opens and displays two sections. The left side will display definition of Urgent Request, Disclaimer and the completed fields for prior authorization as it is being created. The right side is where data is entered for Provider Request, Service Line, and Finish Up.
5. Select a Service Type from the drop-down list.
Operational Training 31 March 2017
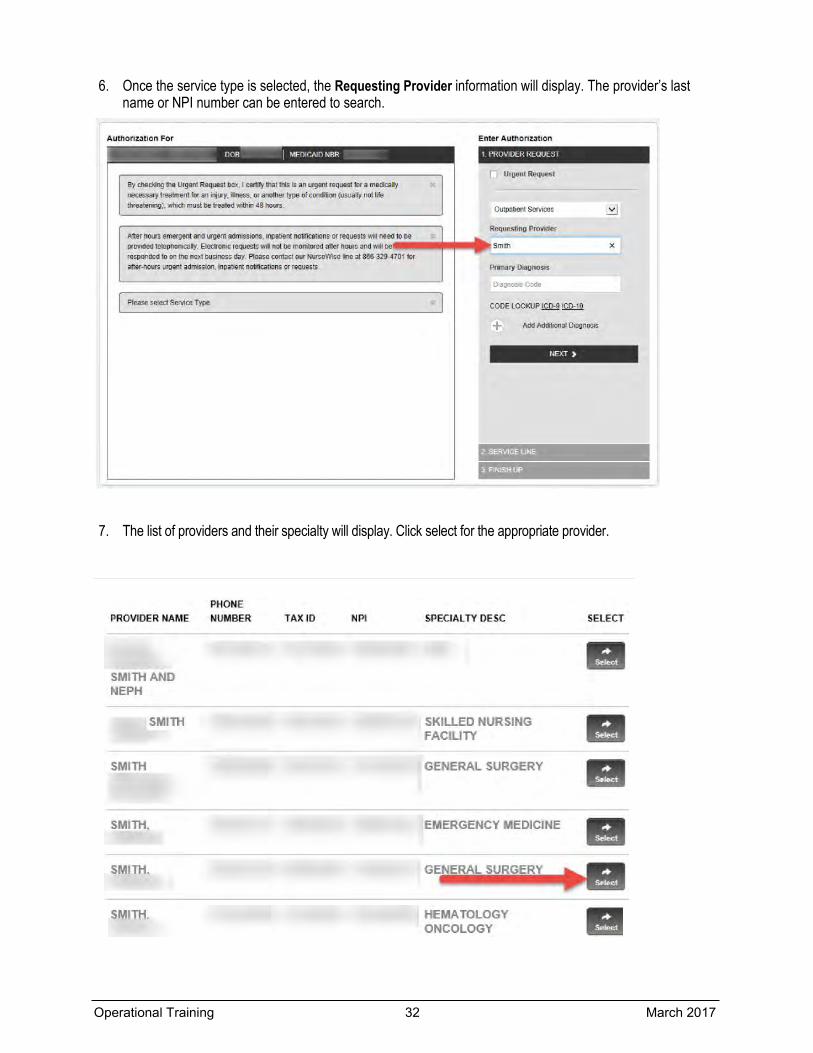
6. Once the service type is selected, the Requesting Provider information will display. The provider’s last name or NPI number can be entered to search.
7. The list of providers and their specialty will display. Click select for the appropriate provider.
Operational Training 32 March 2017
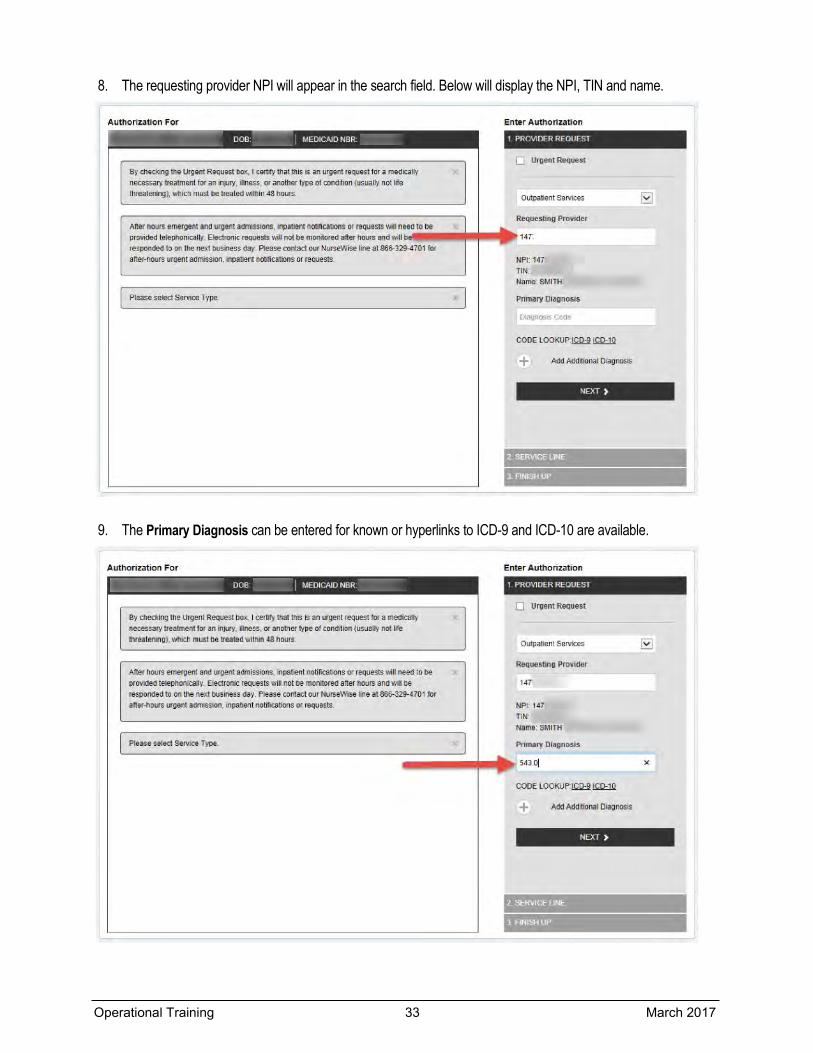
8. The requesting provider NPI will appear in the search field. Below will display the NPI, TIN and name.
9. The Primary Diagnosis can be entered for known or hyperlinks to ICD-9 and ICD-10 are available.
Operational Training 33 March 2017

10. The corresponding clinical name will display under the CPT code entered.
11. To add Additional Diagnosis, click on the + sign and the diagnosis field will appear. Enter the ICD code. Providers cannot combine ICD-9 and ICD-10 codes on the same request.
Operational Training 34 March 2017
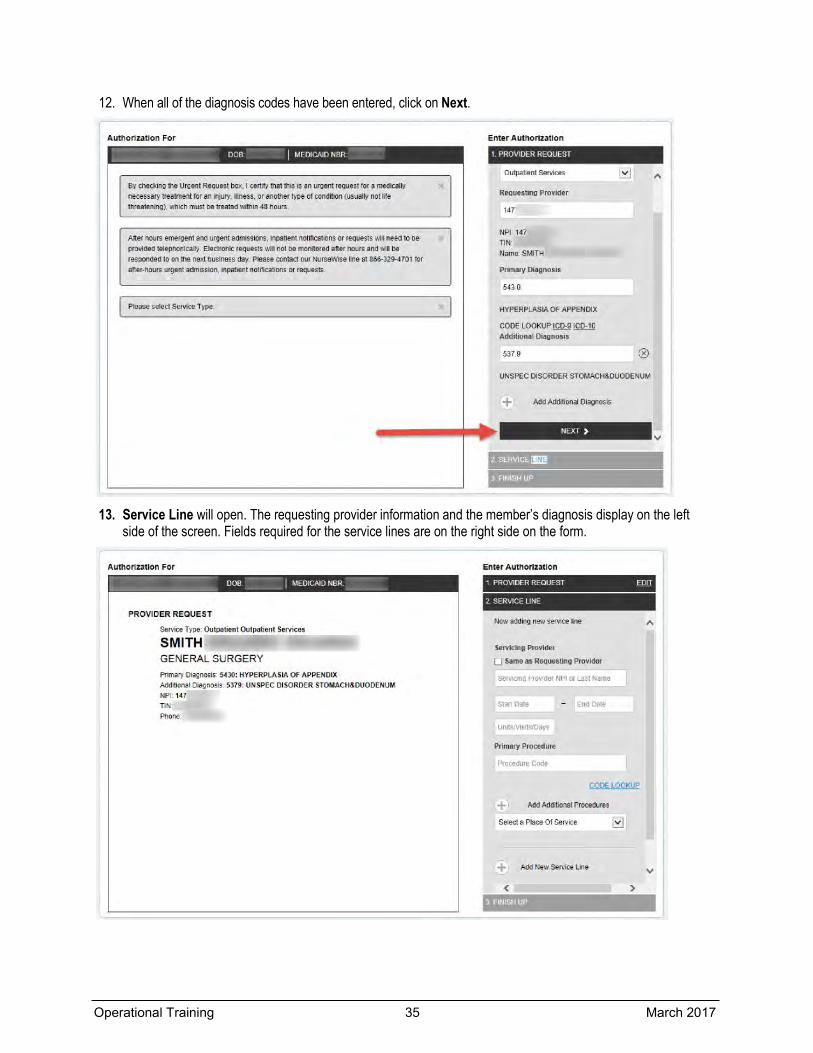
12. When all of the diagnosis codes have been entered, click on Next.
13. Service Line will open. The requesting provider information and the member’s diagnosis display on the left side of the screen. Fields required for the service lines are on the right side on the form.
Operational Training 35 March 2017
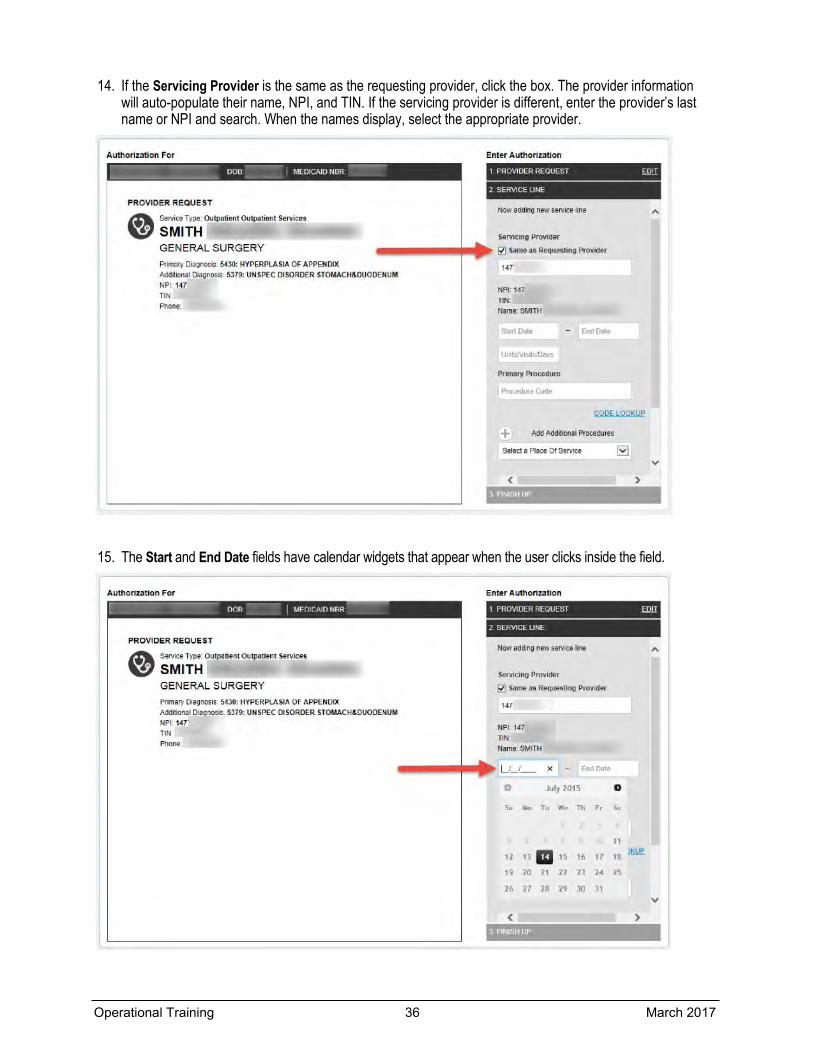
14. If the Servicing Provider is the same as the requesting provider, click the box. The provider information will auto-populate their name, NPI, and TIN. If the servicing provider is different, enter the provider’s last name or NPI and search. When the names display, select the appropriate provider.
15. The Start and End Date fields have calendar widgets that appear when the user clicks inside the field.
Operational Training 36 March 2017
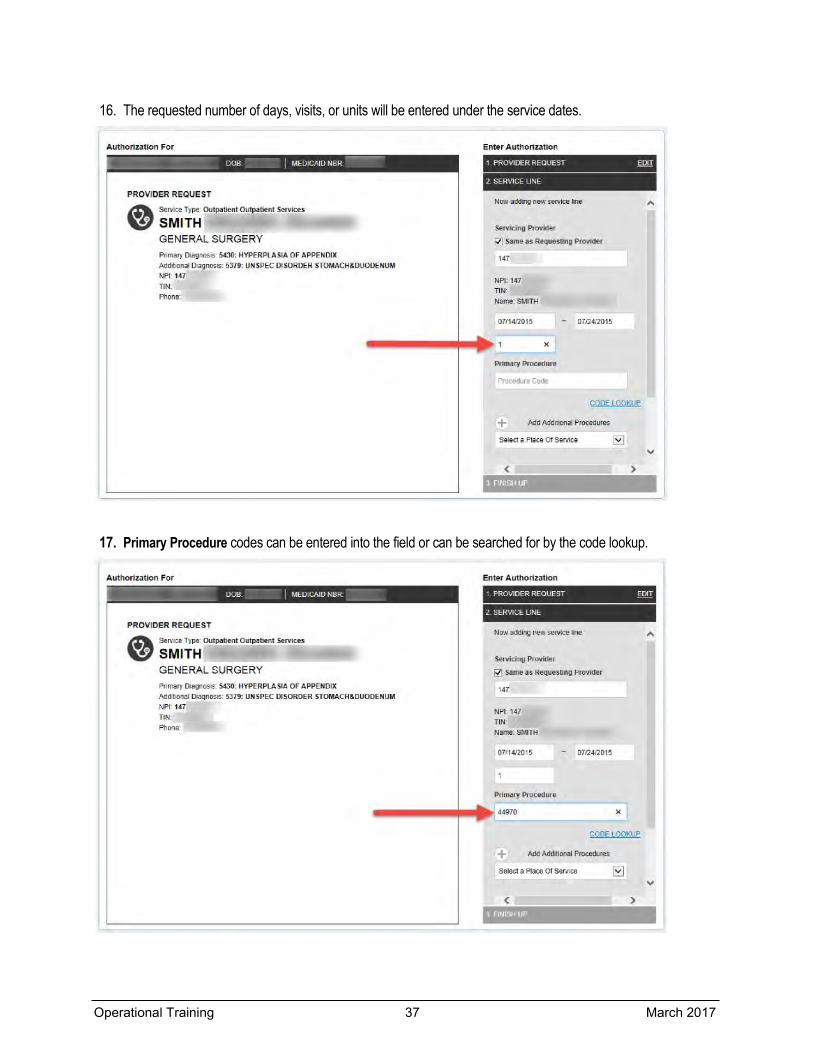
16. The requested number of days, visits, or units will be entered under the service dates.
17. Primary Procedure codes can be entered into the field or can be searched for by the code lookup.
Operational Training 37 March 2017
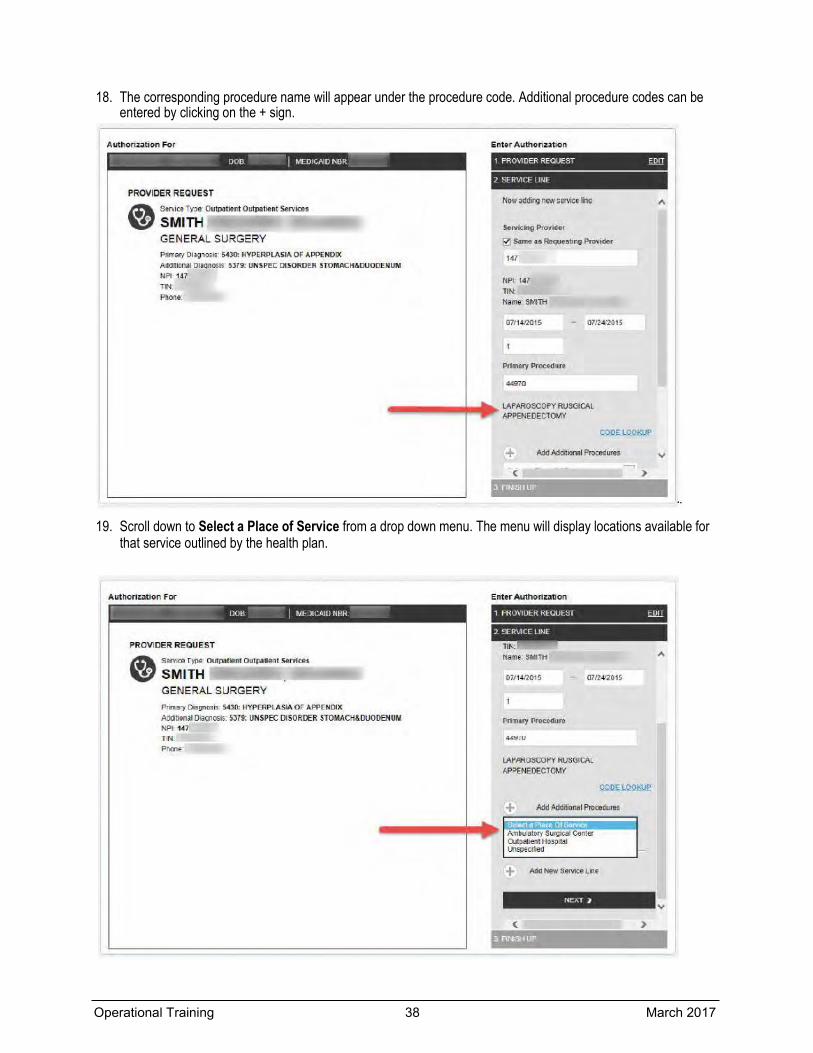
18. The corresponding procedure name will appear under the procedure code. Additional procedure codes can be entered by clicking on the + sign.
.
19. Scroll down to Select a Place of Service from a drop down menu. The menu will display locations available for that service outlined by the health plan.
Operational Training 38 March 2017
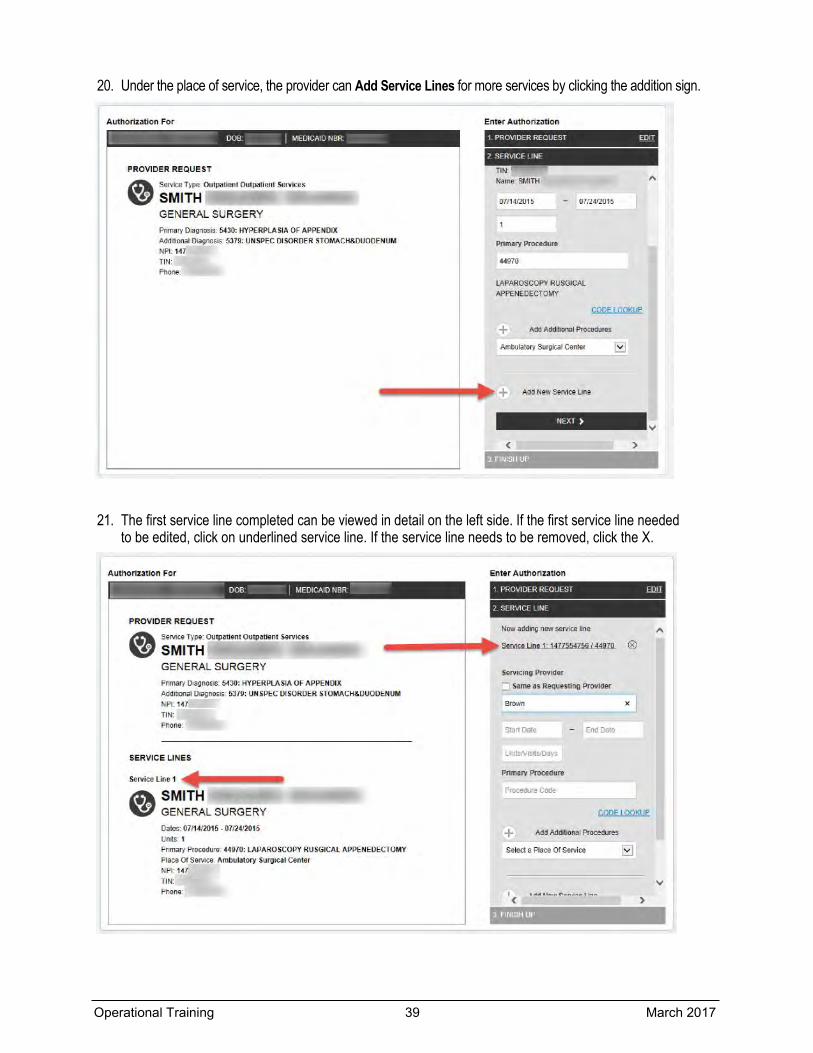
20. Under the place of service, the provider can Add Service Lines for more services by clicking the addition sign.
21. The first service line completed can be viewed in detail on the left side. If the first service line needed to be edited, click on underlined service line. If the service line needs to be removed, click the X.
Operational Training 39 March 2017
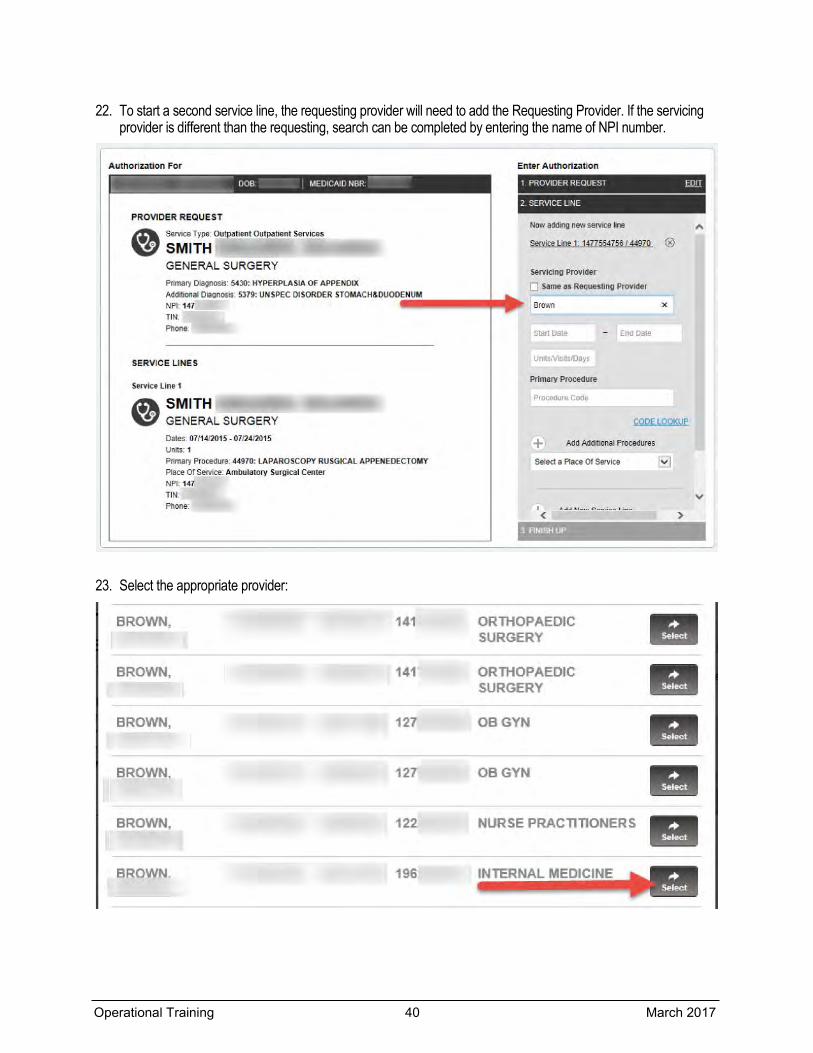
22. To start a second service line, the requesting provider will need to add the Requesting Provider. If the servicing provider is different than the requesting, search can be completed by entering the name of NPI number.
23. Select the appropriate provider:
Operational Training 40 March 2017
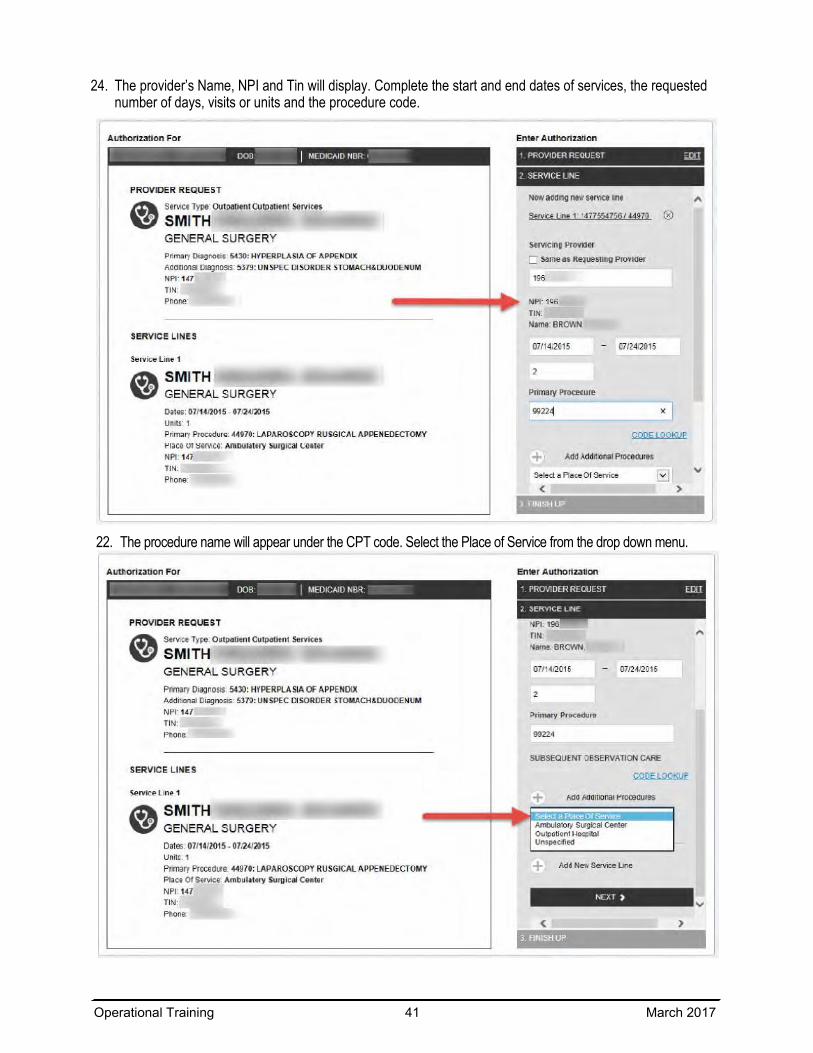
24. The provider’s Name, NPI and Tin will display. Complete the start and end dates of services, the requested number of days, visits or units and the procedure code.
22. The procedure name will appear under the CPT code. Select the Place of Service from the drop down menu.
Operational Training 41 March 2017
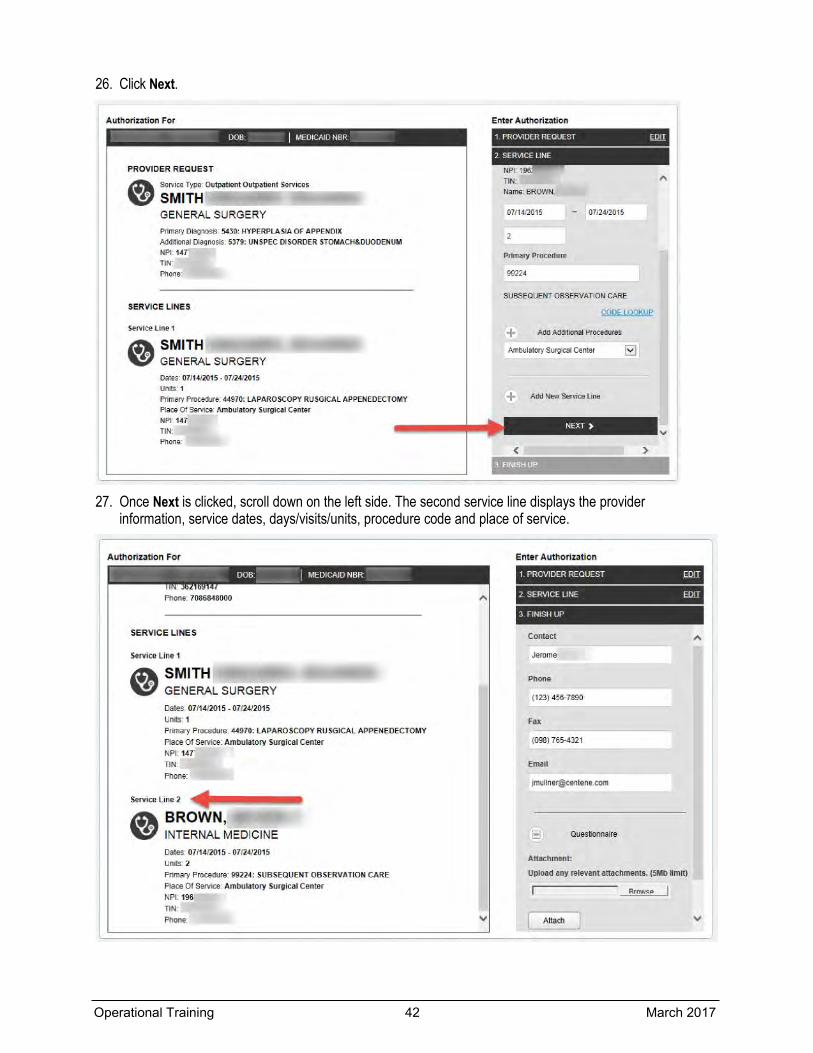
26. Click Next.
27. Once Next is clicked, scroll down on the left side. The second service line displays the provider information, service dates, days/visits/units, procedure code and place of service.
Operational Training 42 March 2017
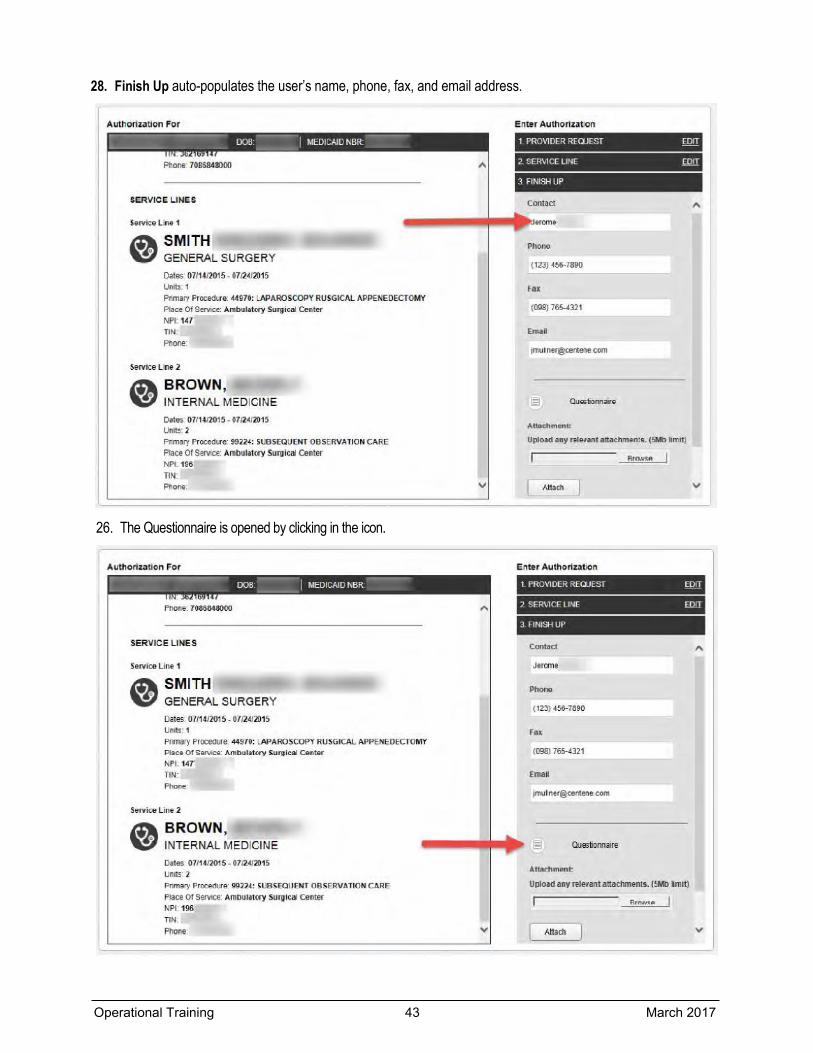
28. Finish Up auto-populates the user’s name, phone, fax, and email address.
26. The Questionnaire is opened by clicking in the icon.
Operational Training 43 March 2017
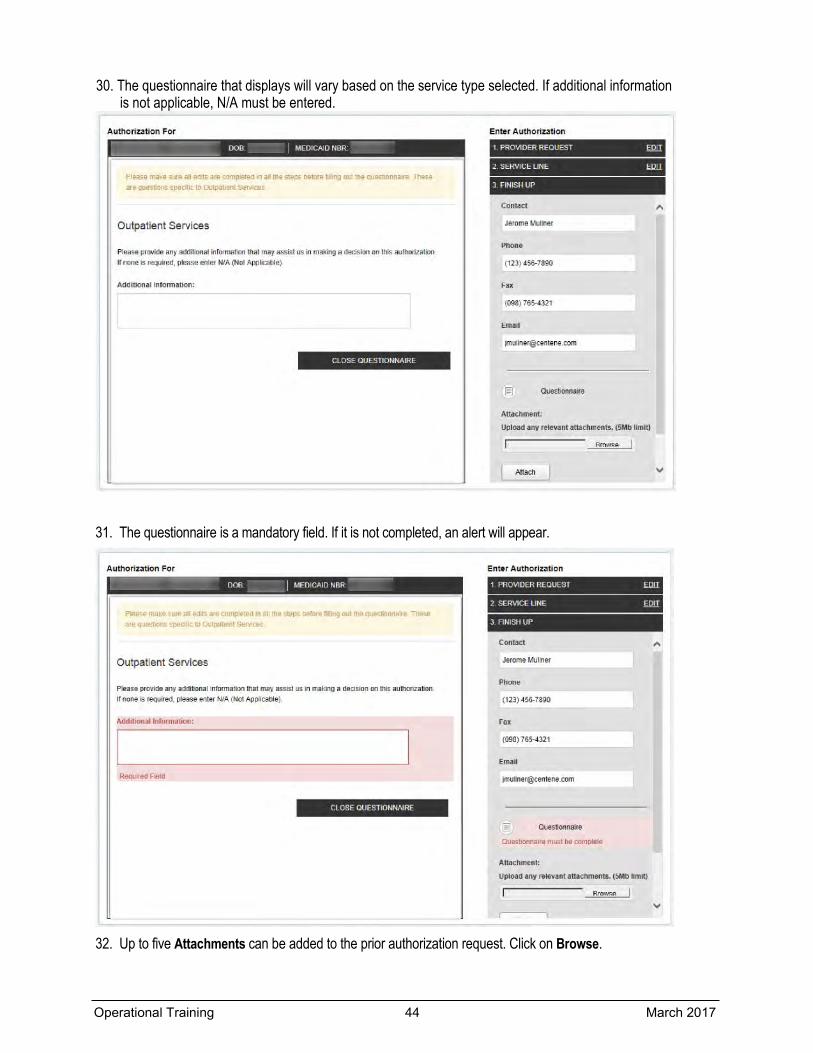
30. The questionnaire that displays will vary based on the service type selected. If additional information is not applicable, N/A must be entered.
31. The questionnaire is a mandatory field. If it is not completed, an alert will appear.
32. Up to five Attachments can be added to the prior authorization request. Click on Browse.
Operational Training 44 March 2017

33. Highlight the appropriate document, image, smart sheet... Click Insert.
34. The document name will appear in the browse field
Operational Training 45 March 2017
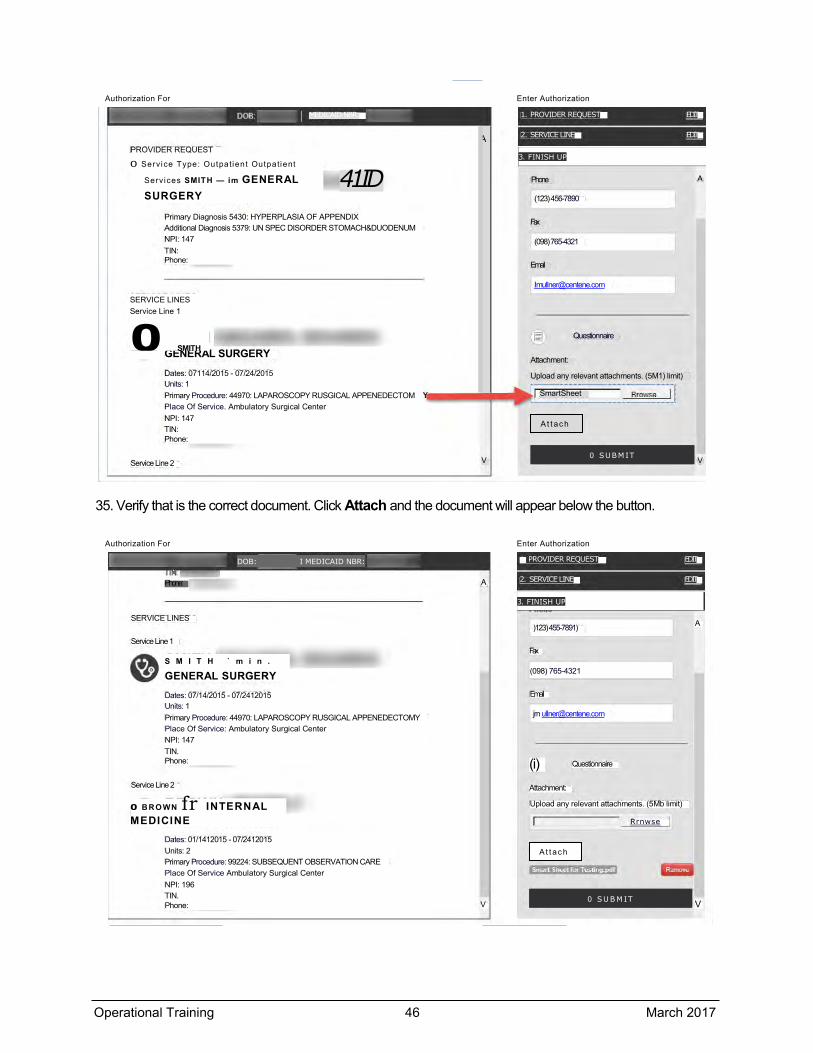
35. Verify that is the correct document. Click Attach and the document will appear below the button.
Authorization For Enter Authorization
1. PROVIDER REQUEST EDIT
2. SERVICE LINE EDIT
3. FINISH UP
MEDICAID NBR:
Phone
(123)456-7890
Fax
(098)765-4321
Questionnaire
Attachment:
Upload any relevant attachments. (5M1) limit)
SmartSheet
A t t ac h
0 S U B M I T
A
V
PROVIDER REQUEST
0 Service Type: Outpatient Outpatient
Services SMITH — im GENERAL SURGERY
Primary Diagnosis 5430: HYPERPLASIA OF APPENDIX Additional Diagnosis 5379: UN SPEC DISORDER STOMACH&DUODENUM NPI: 147 TIN: Phone:
GENERAL SURGERY
Dates: 07114/2015 - 07/24/2015 Units: 1 Primary Procedure: 44970: LAPAROSCOPY RUSGICAL APPENEDECTOM Place Of Service. Ambulatory Surgical Center NPI: 147 TIN: Phone:
Service Line 2
41ID
SERVICE LINES Service Line 1
0 SMITH
A
V
Authorization For Enter Authorization
2. SERVICE LINE EDIT
1. PROVIDER REQUEST EDIT
3. FINISH UP
A)123)455-7891)
Fax
(098) 765-4321
(i) Questionnaire
V 0 S U B M IT
Attachment:
Upload any relevant attachments. (5Mb limit)
Rrnwse
A t t ac h
A
V
DOB: I MEDICAID NBR: •
Phone:
SERVICE LINES
Service Line 1
S M I T H ` m i n .
GENERAL SURGERY Dates: 07/14/2015 - 07/2412015 Units: 1 Primary Procedure: 44970: LAPAROSCOPY RUSGICAL APPENEDECTOMY Place Of Service: Ambulatory Surgical Center NPI: 147 TIN. Phone:
Service Line 2
0 BRO WN fr INTERNAL MEDICINE
Dates: 01/1412015 - 07/2412015 Units: 2 Primary Procedure: 99224: SUBSEQUENT OBSERVATION CARE Place Of Service Ambulatory Surgical Center NPI: 196 TIN. Phone:
Operational Training 46 March 2017
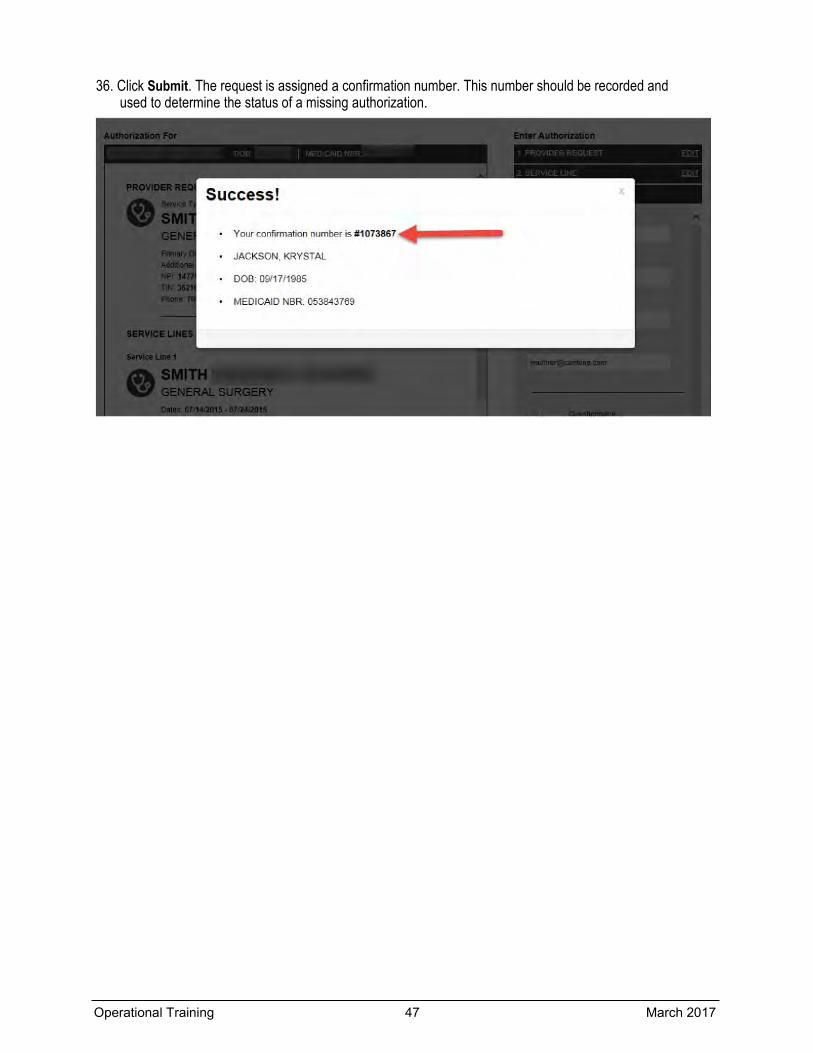
36. Click Submit. The request is assigned a confirmation number. This number should be recorded and used to determine the status of a missing authorization.
Operational Training 47 March 2017
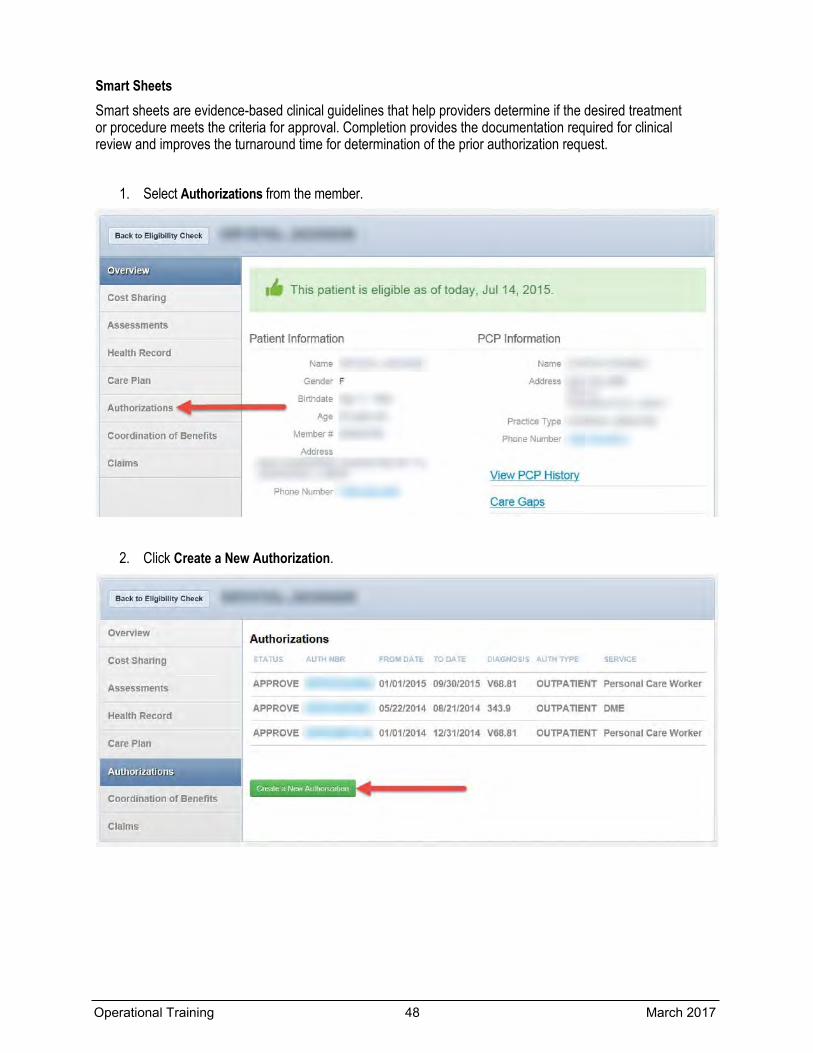
Smart Sheets Smart sheets are evidence-based clinical guidelines that help providers determine if the desired treatment or procedure meets the criteria for approval. Completion provides the documentation required for clinical review and improves the turnaround time for determination of the prior authorization request.
1. Select Authorizations from the member.
2. Click Create a New Authorization.
Operational Training 48 March 2017
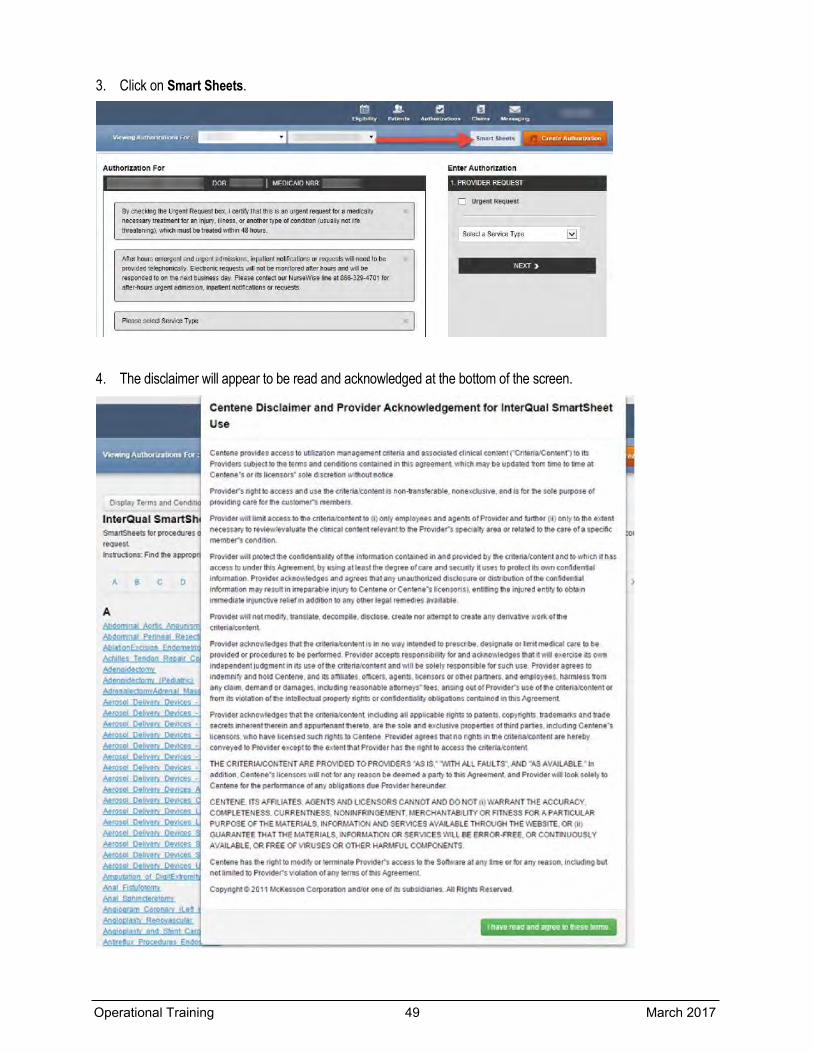
3. Click on Smart Sheets.
4. The disclaimer will appear to be read and acknowledged at the bottom of the screen.
Operational Training 49 March 2017
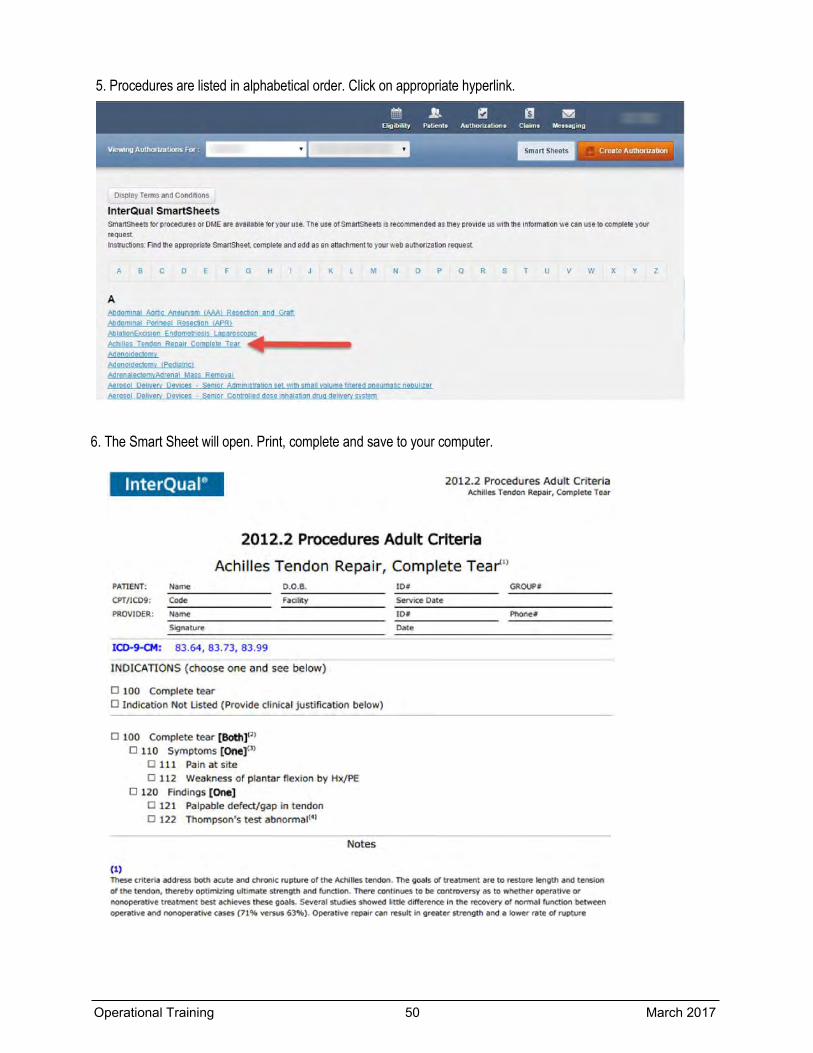
5. Procedures are listed in alphabetical order. Click on appropriate hyperlink.
6. The Smart Sheet will open. Print, complete and save to your computer.
Operational Training 50 March 2017
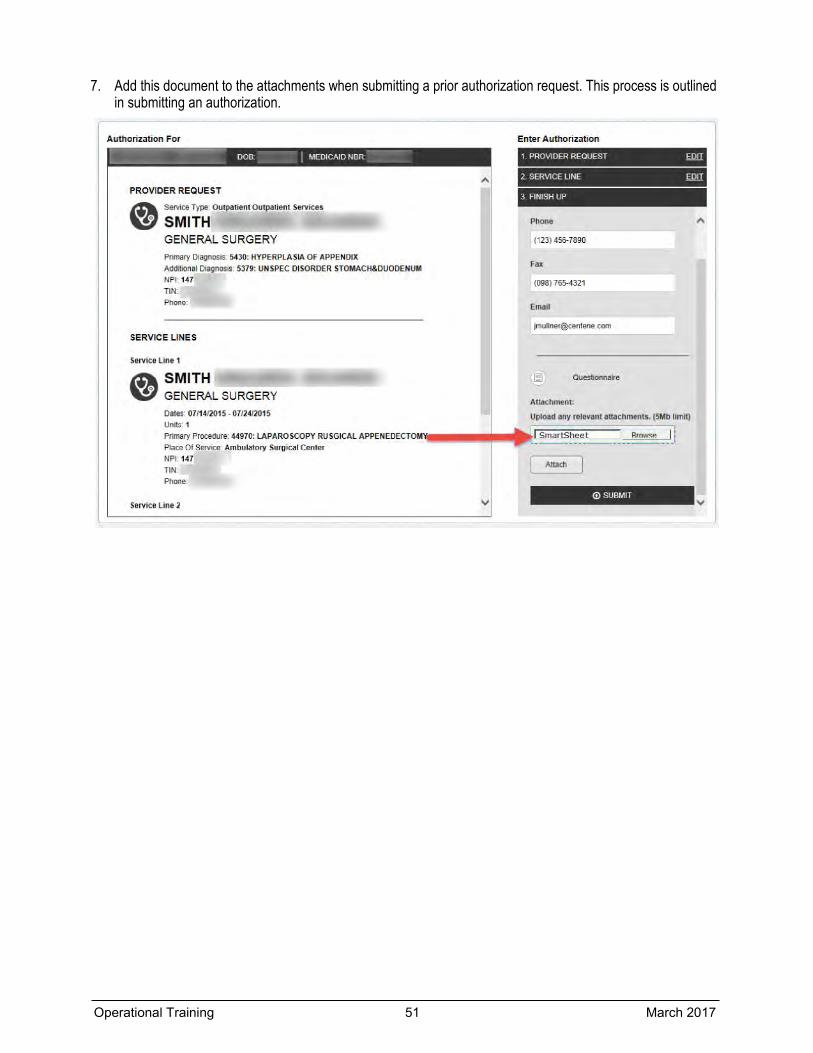
7. Add this document to the attachments when submitting a prior authorization request. This process is outlined in submitting an authorization.
Operational Training 51 March 2017
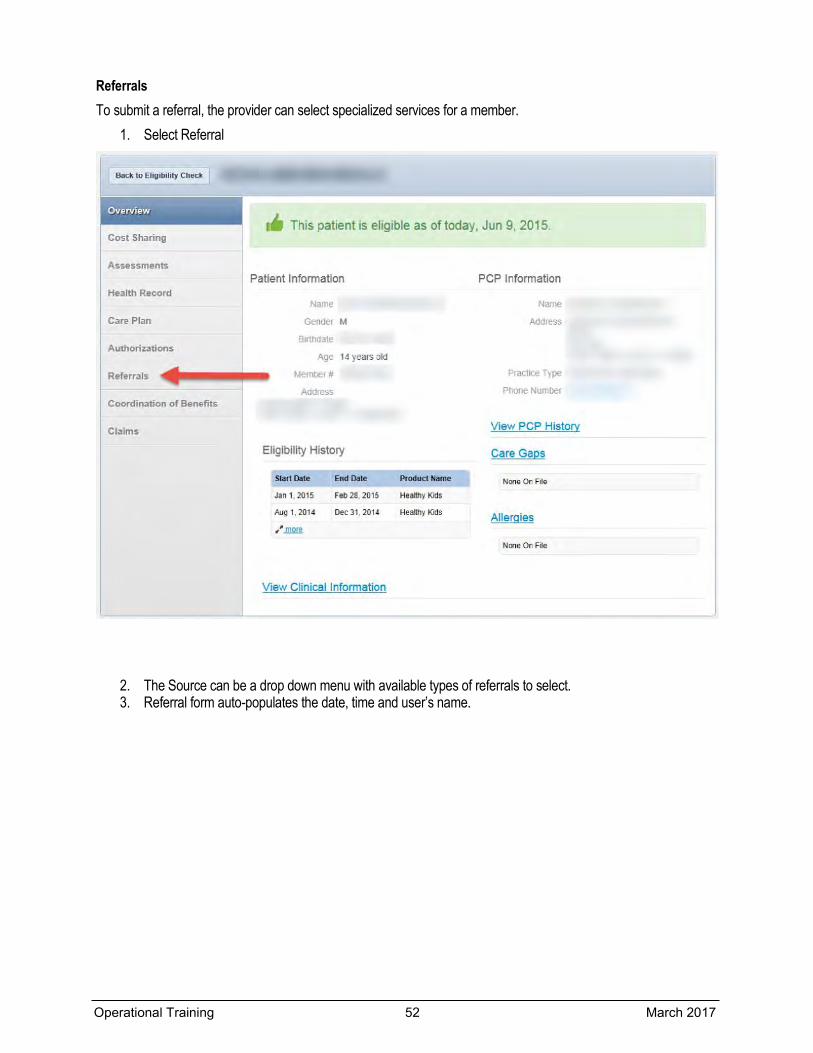
Referrals To submit a referral, the provider can select specialized services for a member.
1. Select Referral
2. The Source can be a drop down menu with available types of referrals to select. 3. Referral form auto-populates the date, time and user’s name.
Operational Training 52 March 2017
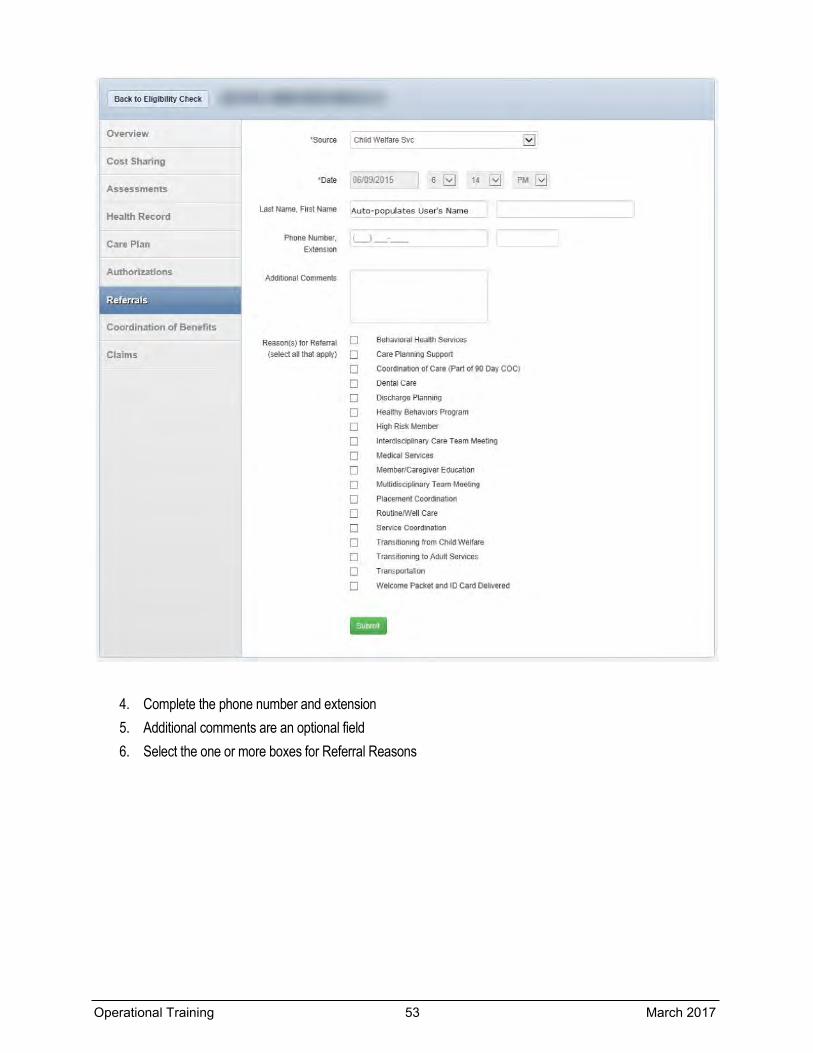
4. Complete the phone number and extension 5. Additional comments are an optional field 6. Select the one or more boxes for Referral Reasons
Operational Training 53 March 2017
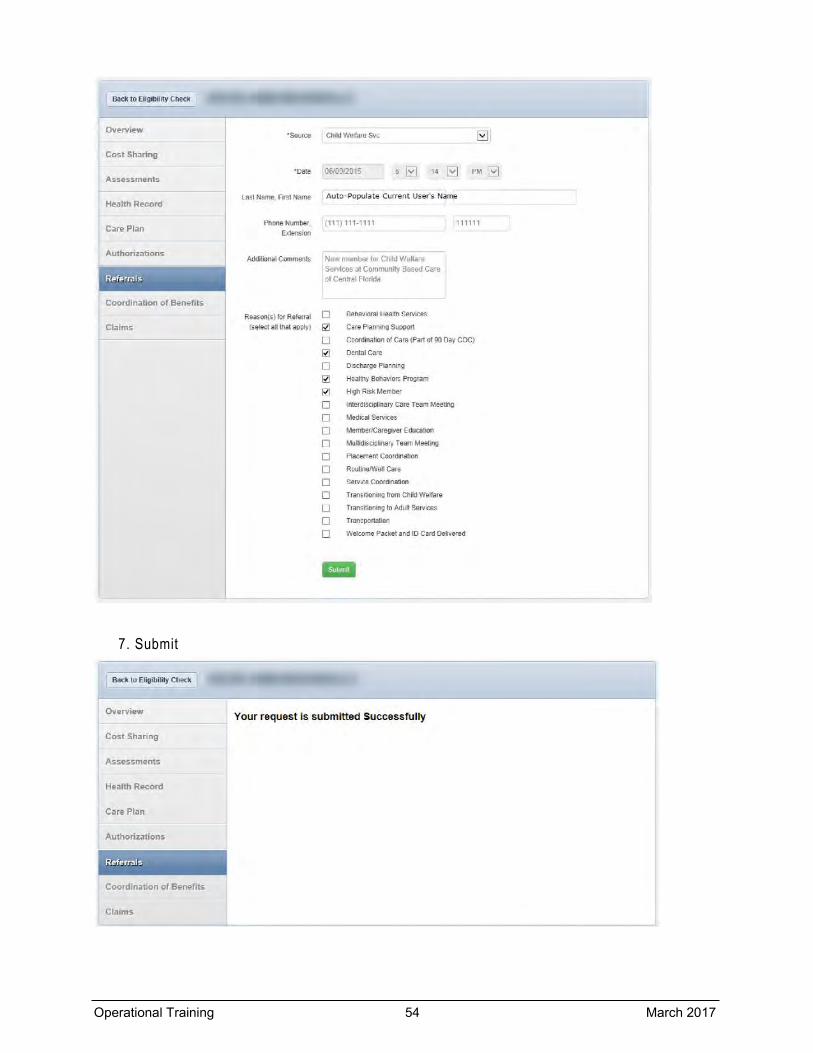
7. Submit
Operational Training 54 March 2017
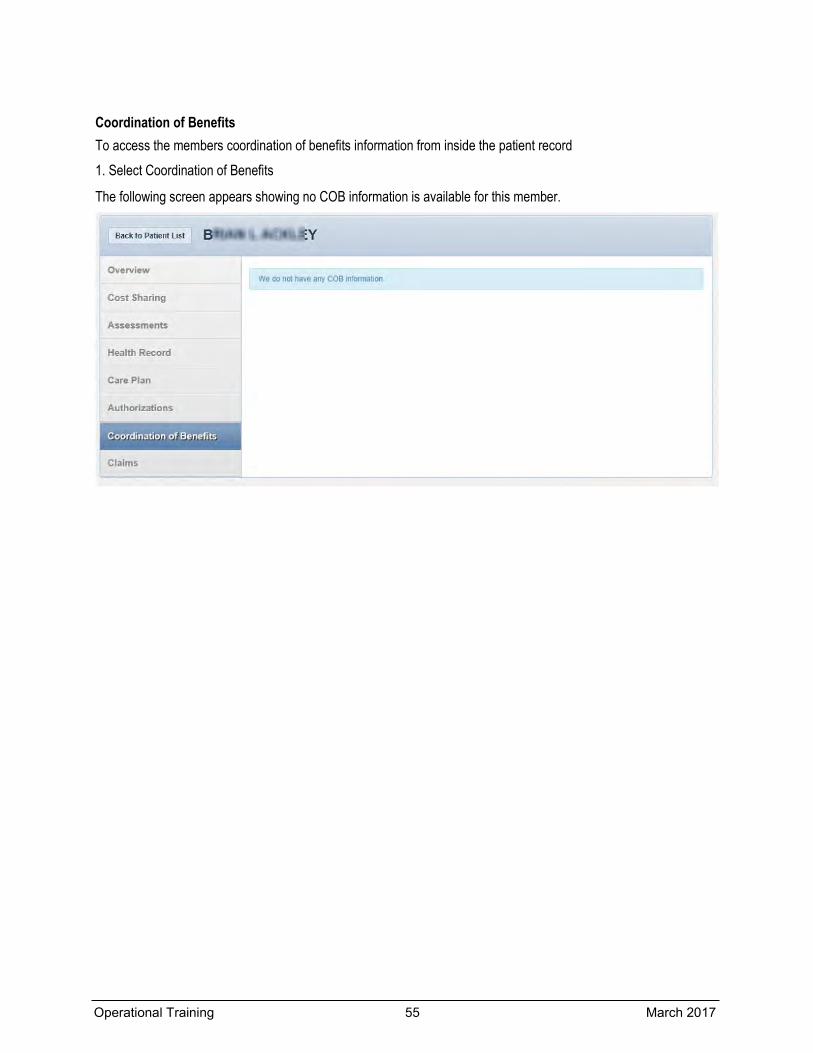
Coordination of Benefits To access the members coordination of benefits information from inside the patient record 1. Select Coordination of Benefits
The following screen appears showing no COB information is available for this member.
Operational Training 55 March 2017
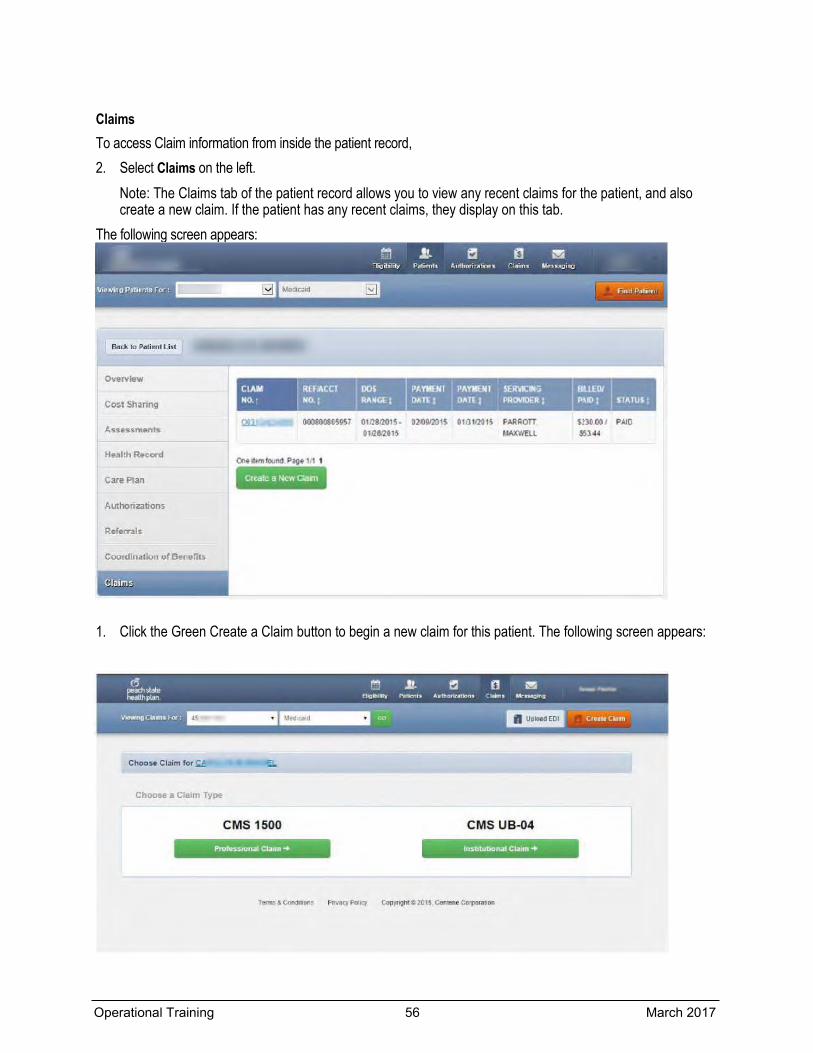
Claims To access Claim information from inside the patient record, 2. Select Claims on the left.
Note: The Claims tab of the patient record allows you to view any recent claims for the patient, and also create a new claim. If the patient has any recent claims, they display on this tab.
The following screen appears:
1. Click the Green Create a Claim button to begin a new claim for this patient. The following screen appears:
Operational Training 56 March 2017
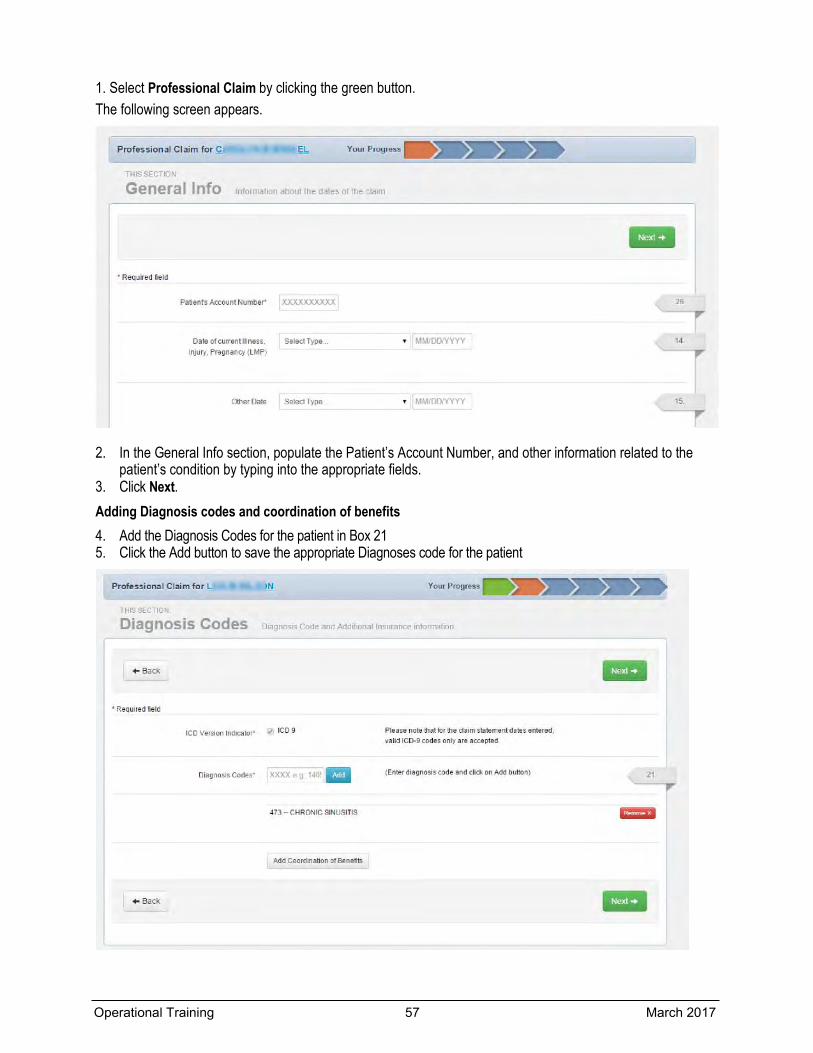
1. Select Professional Claim by clicking the green button. The following screen appears.
2. In the General Info section, populate the Patient’s Account Number, and other information related to the patient’s condition by typing into the appropriate fields.
3. Click Next. Adding Diagnosis codes and coordination of benefits 4. Add the Diagnosis Codes for the patient in Box 21 5. Click the Add button to save the appropriate Diagnoses code for the patient
Operational Training 57 March 2017

6. Click the Coordination of Benefits Button (if applicable) or the Next button.
Adding Coordination of Benefits 7. Click Add Coordination of Benefits to include any payments made by another insurance carrier (if applicable)
The following screen appears:
8. Enter the Carrier Type and the Policy Number 9. Click Next
Operational Training 58 March 2017
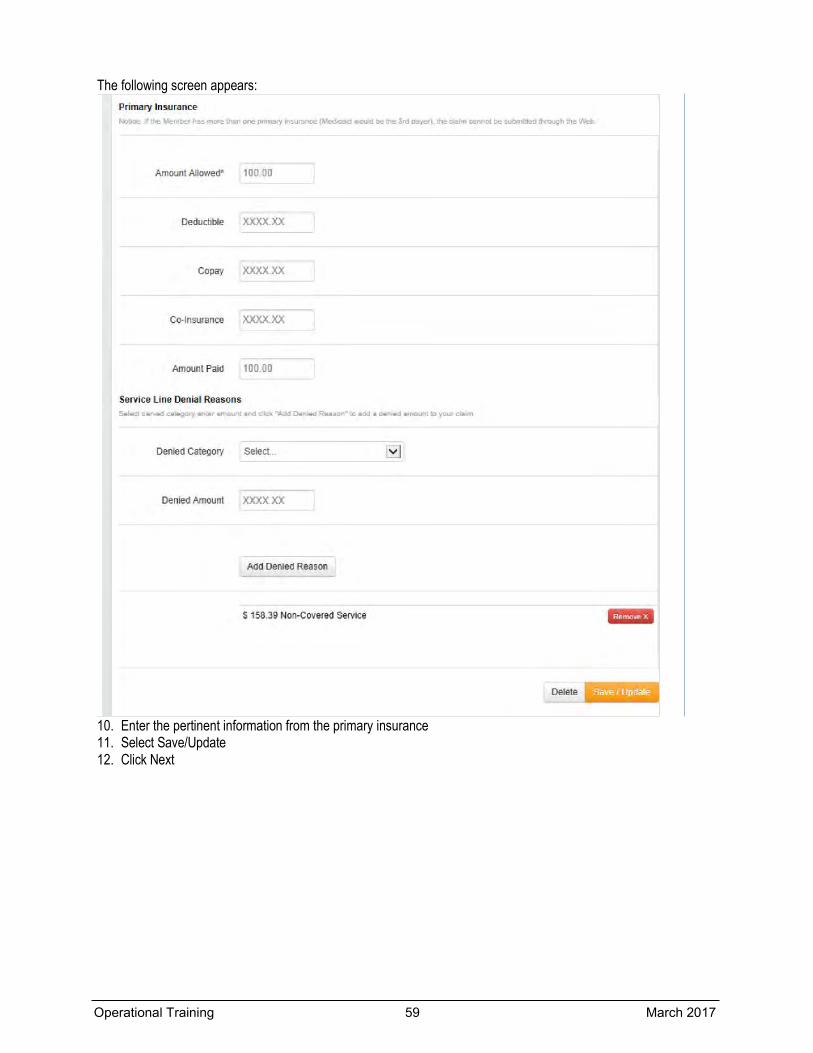
The following screen appears:
10. Enter the pertinent information from the primary insurance 11. Select Save/Update 12. Click Next
Operational Training 59 March 2017
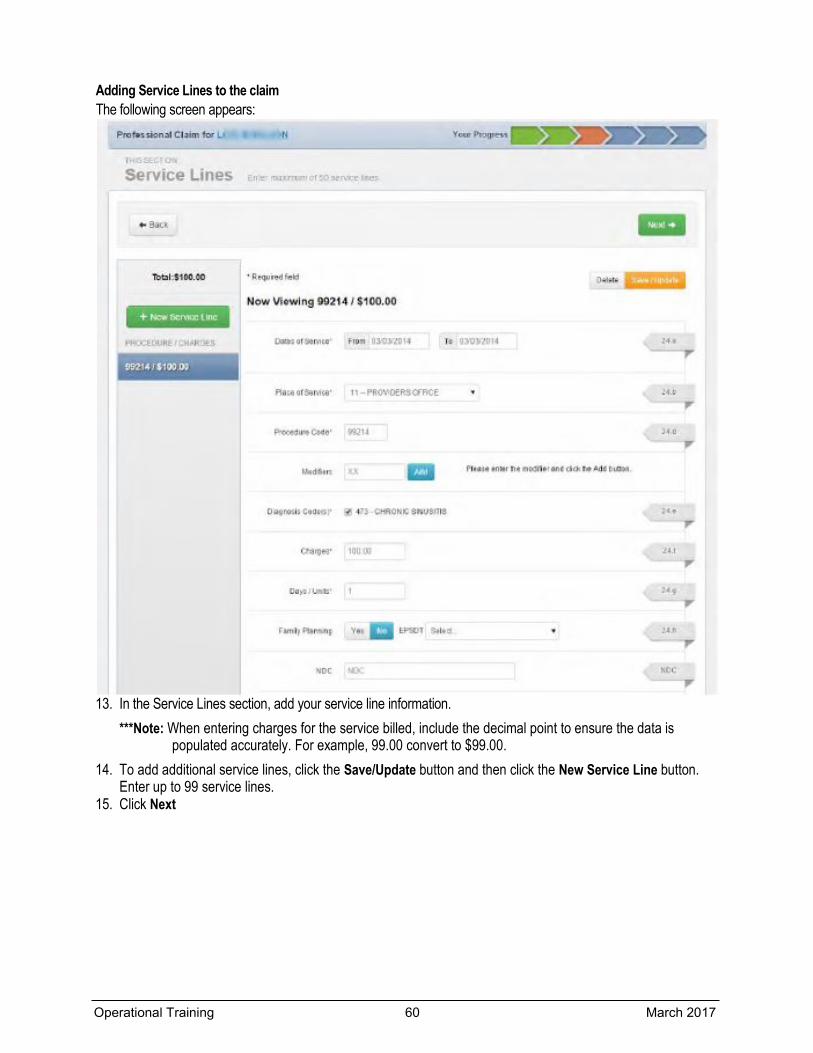
Adding Service Lines to the claim The following screen appears:
13. In the Service Lines section, add your service line information. ***Note: When entering charges for the service billed, include the decimal point to ensure the data is
populated accurately. For example, 99.00 convert to $99.00. 14. To add additional service lines, click the Save/Update button and then click the New Service Line button.
Enter up to 99 service lines. 15. Click Next
Operational Training 60 March 2017
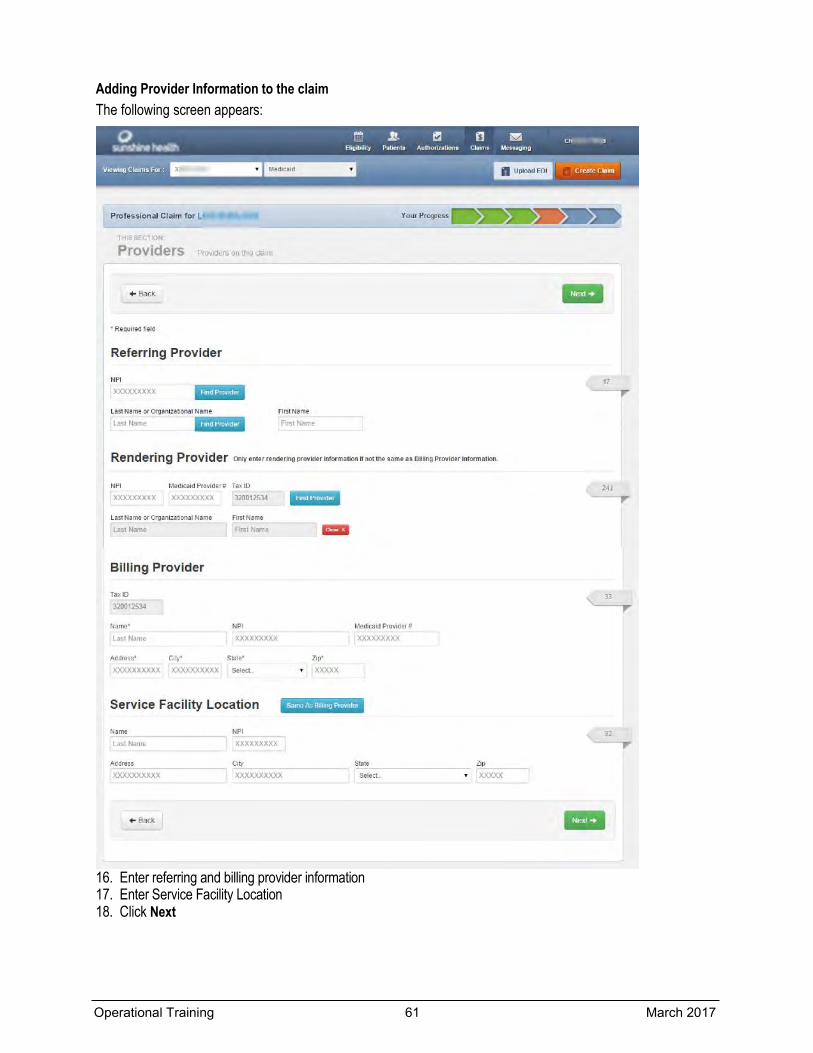
Adding Provider Information to the claim The following screen appears:
16. Enter referring and billing provider information 17. Enter Service Facility Location 18. Click Next
Operational Training 61 March 2017
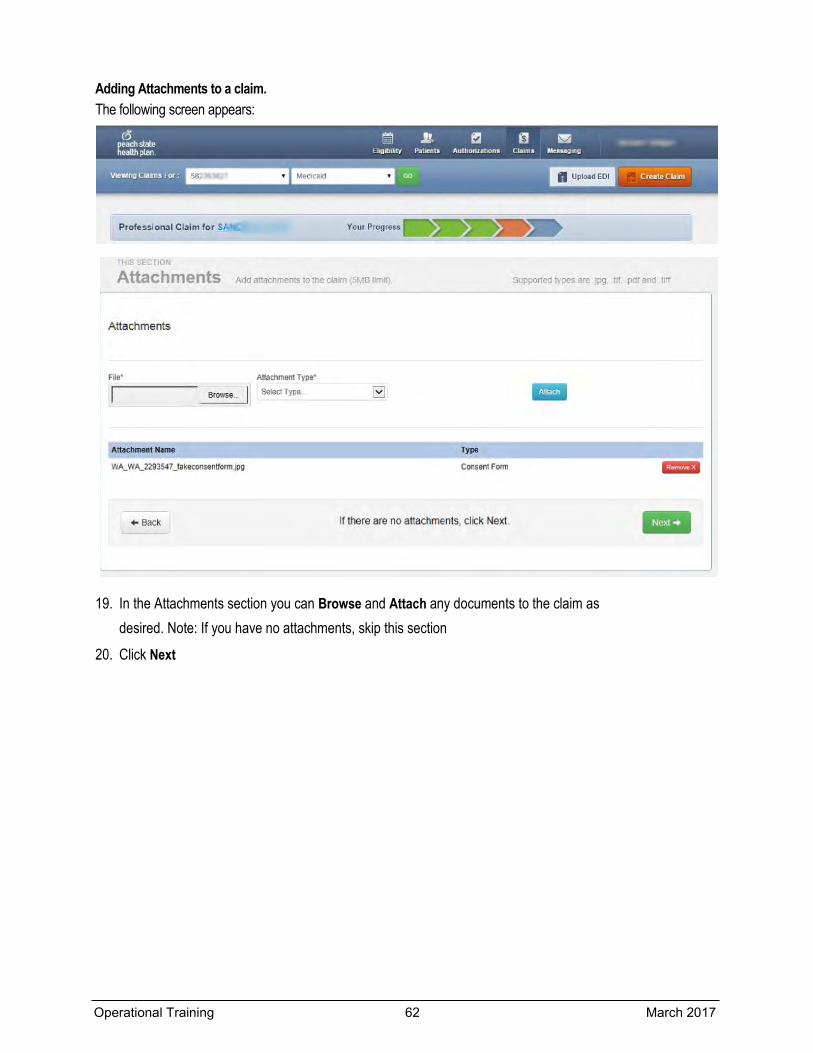
Adding Attachments to a claim. The following screen appears:
19. In the Attachments section you can Browse and Attach any documents to the claim as desired. Note: If you have no attachments, skip this section
20. Click Next
Operational Training 62 March 2017
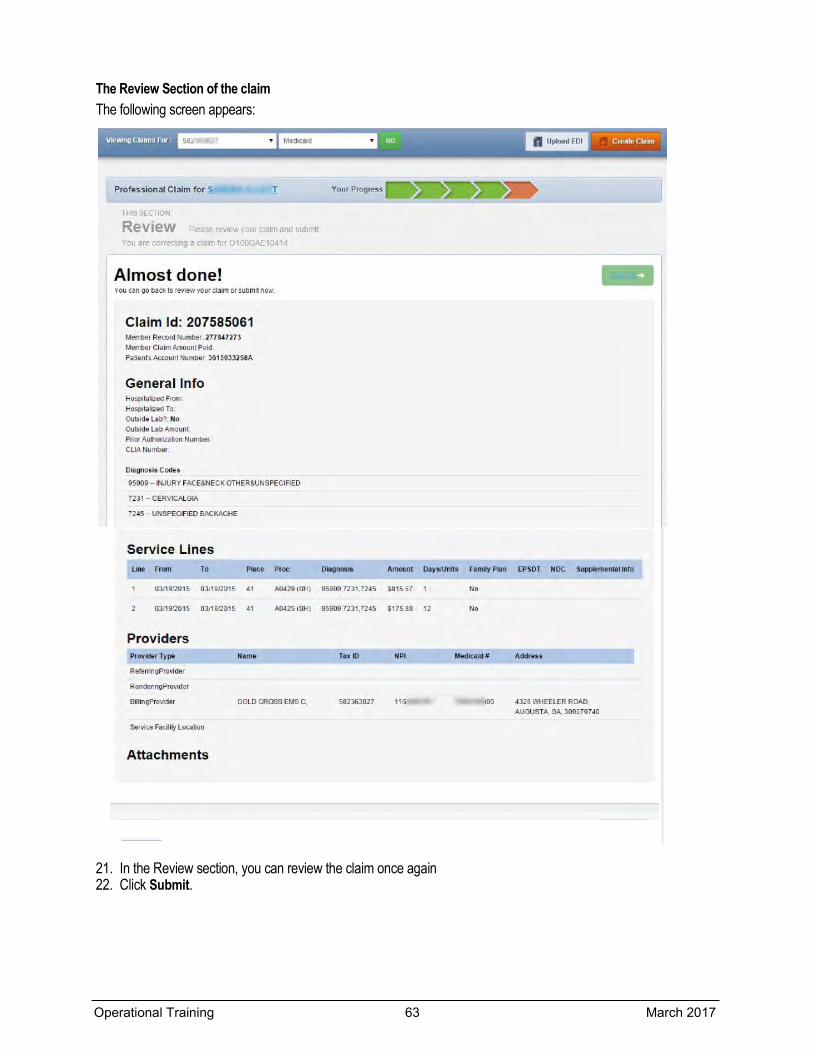
The Review Section of the claim The following screen appears:
21. In the Review section, you can review the claim once again 22. Click Submit.
Operational Training 63 March 2017
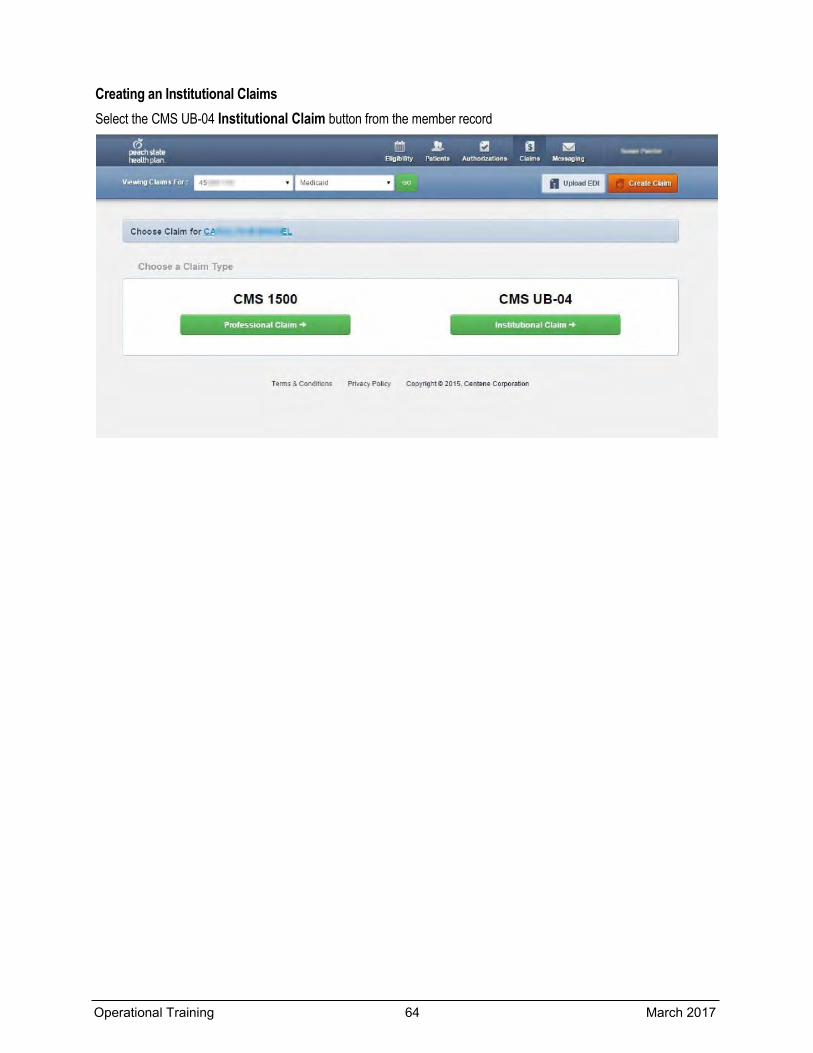
Creating an Institutional Claims Select the CMS UB-04 Institutional Claim button from the member record
Operational Training 64 March 2017
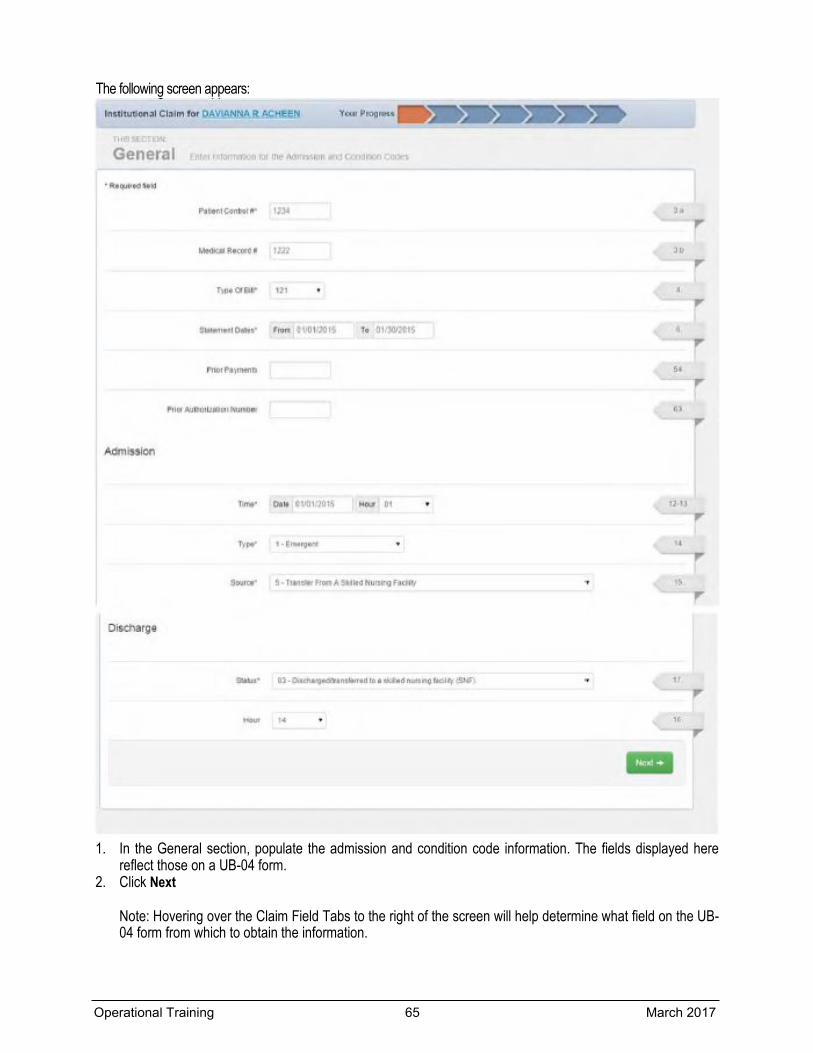
The following screen appears:
1. In the General section, populate the admission and condition code information. The fields displayed here reflect those on a UB-04 form.
2. Click Next
Note: Hovering over the Claim Field Tabs to the right of the screen will help determine what field on the UB-04 form from which to obtain the information.
Operational Training 65 March 2017
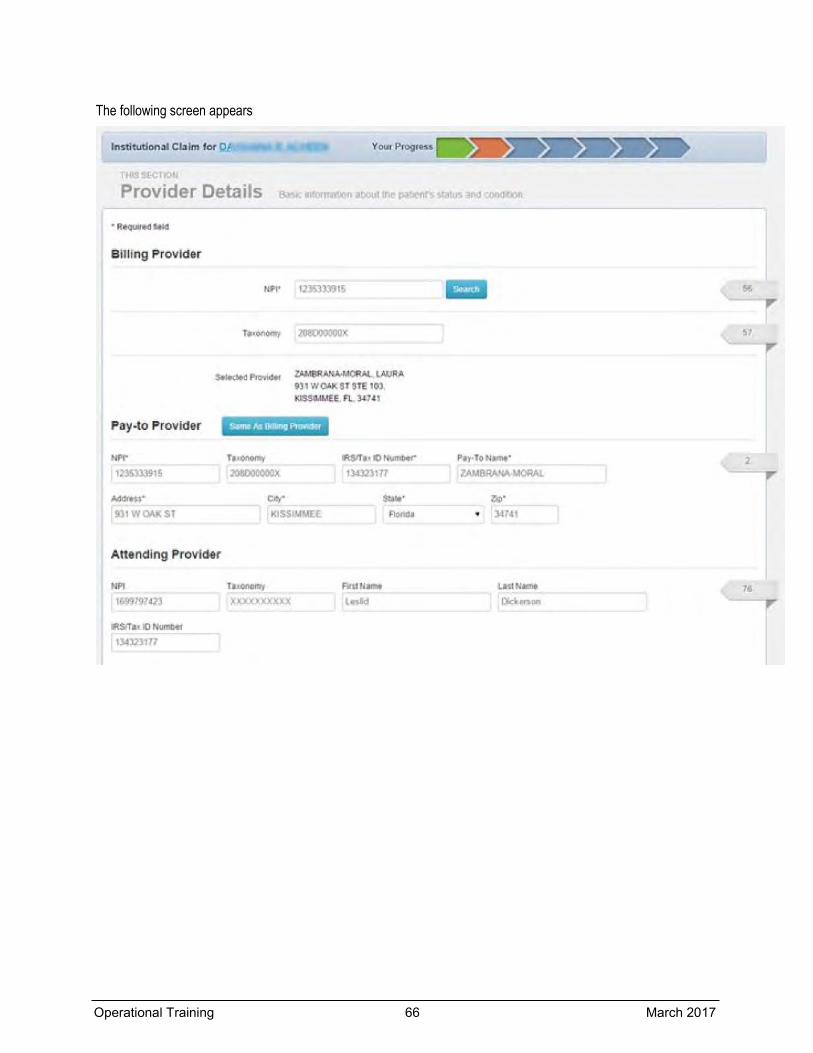
The following screen appears
Operational Training 66 March 2017
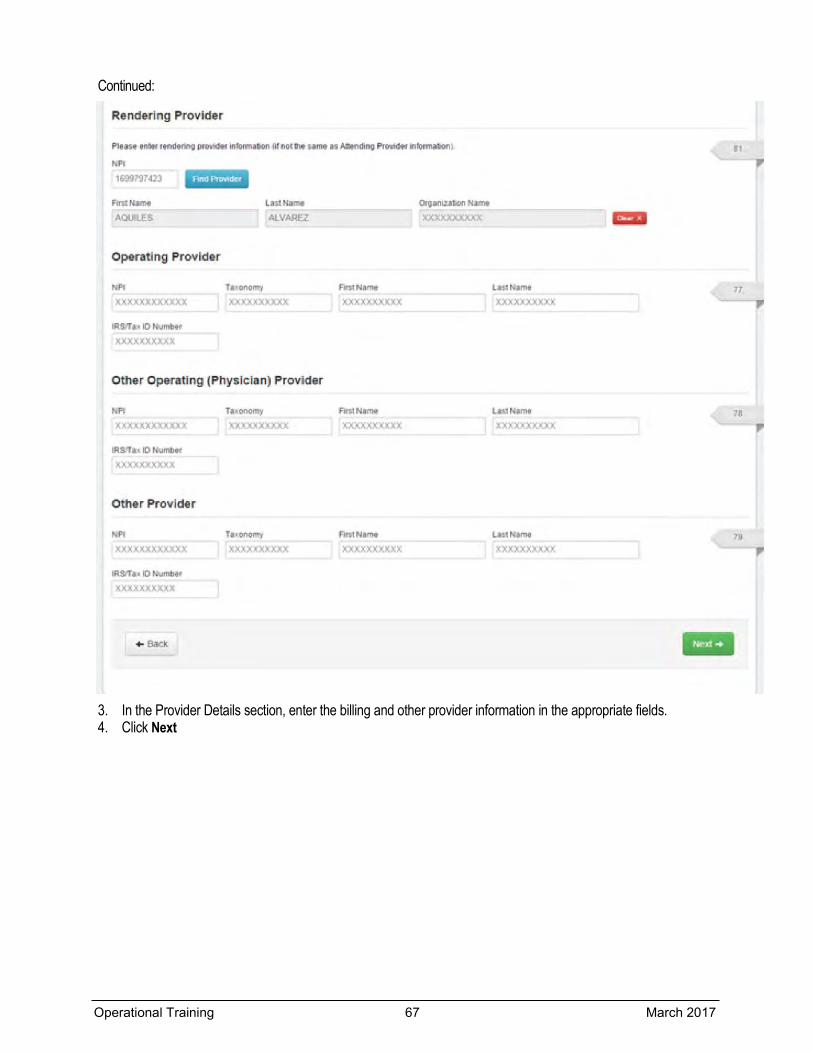
Continued:
3. In the Provider Details section, enter the billing and other provider information in the appropriate fields. 4. Click Next
Operational Training 67 March 2017
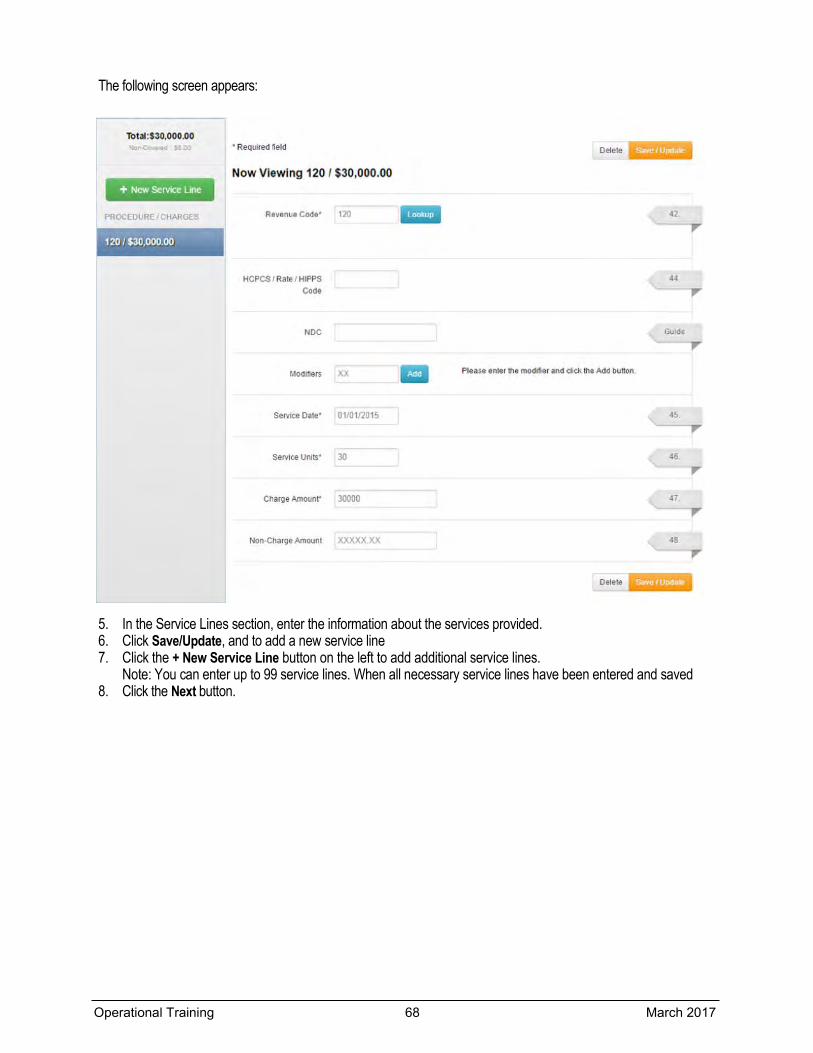
The following screen appears:
5. In the Service Lines section, enter the information about the services provided. 6. Click Save/Update, and to add a new service line 7. Click the + New Service Line button on the left to add additional service lines.
Note: You can enter up to 99 service lines. When all necessary service lines have been entered and saved 8. Click the Next button.
Operational Training 68 March 2017
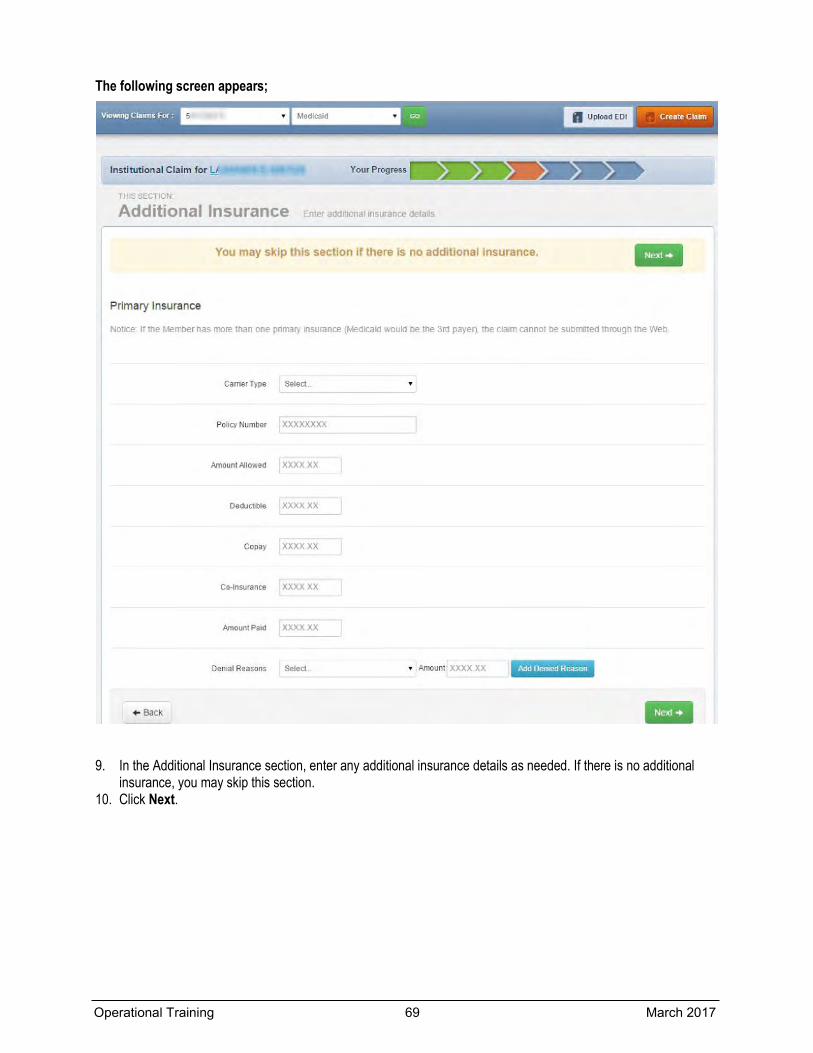
The following screen appears;
9. In the Additional Insurance section, enter any additional insurance details as needed. If there is no additional insurance, you may skip this section.
10. Click Next.
Operational Training 69 March 2017
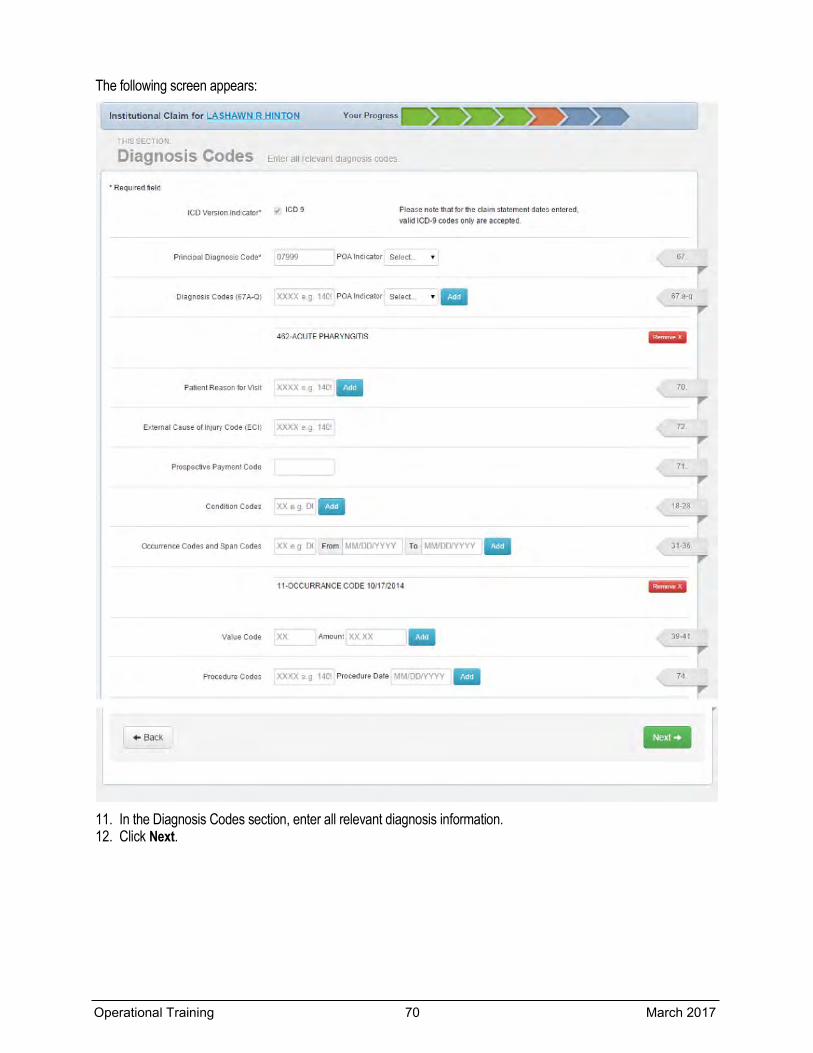
The following screen appears:
11. In the Diagnosis Codes section, enter all relevant diagnosis information. 12. Click Next.
Operational Training 70 March 2017
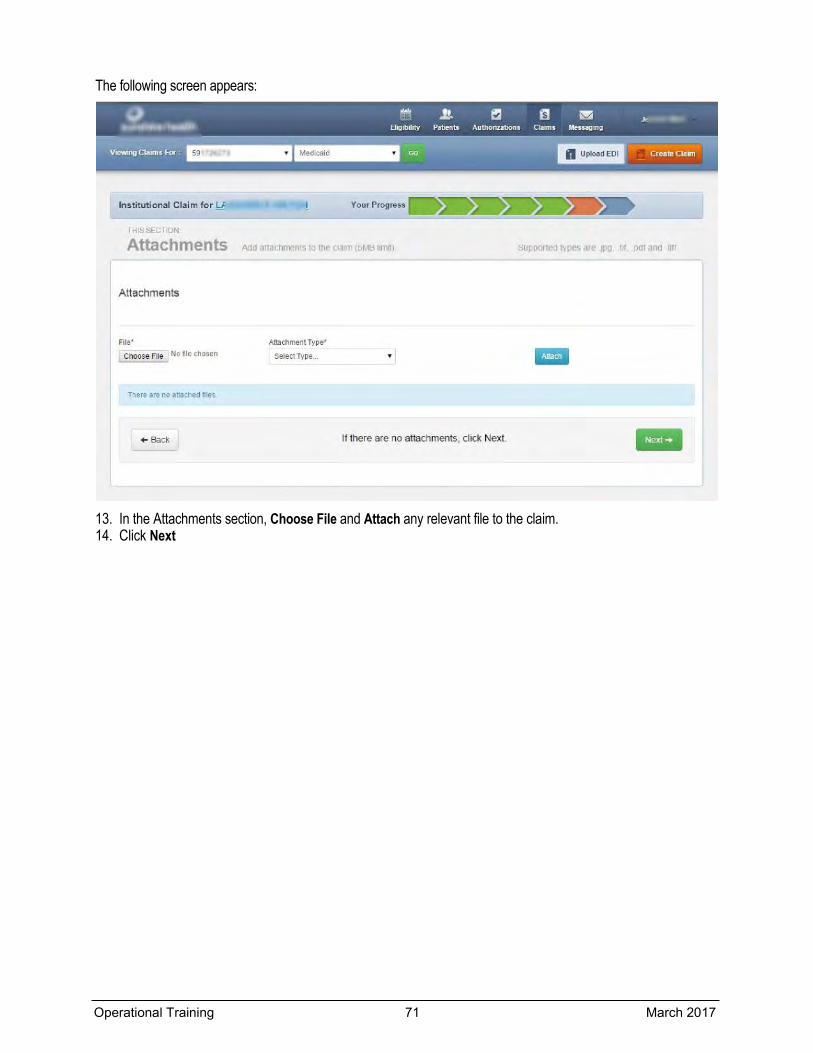
The following screen appears:
13. In the Attachments section, Choose File and Attach any relevant file to the claim. 14. Click Next
Operational Training 71 March 2017

The following screen appears: 15. Review the claim 16. Click Submit
Operational Training 72 March 2017
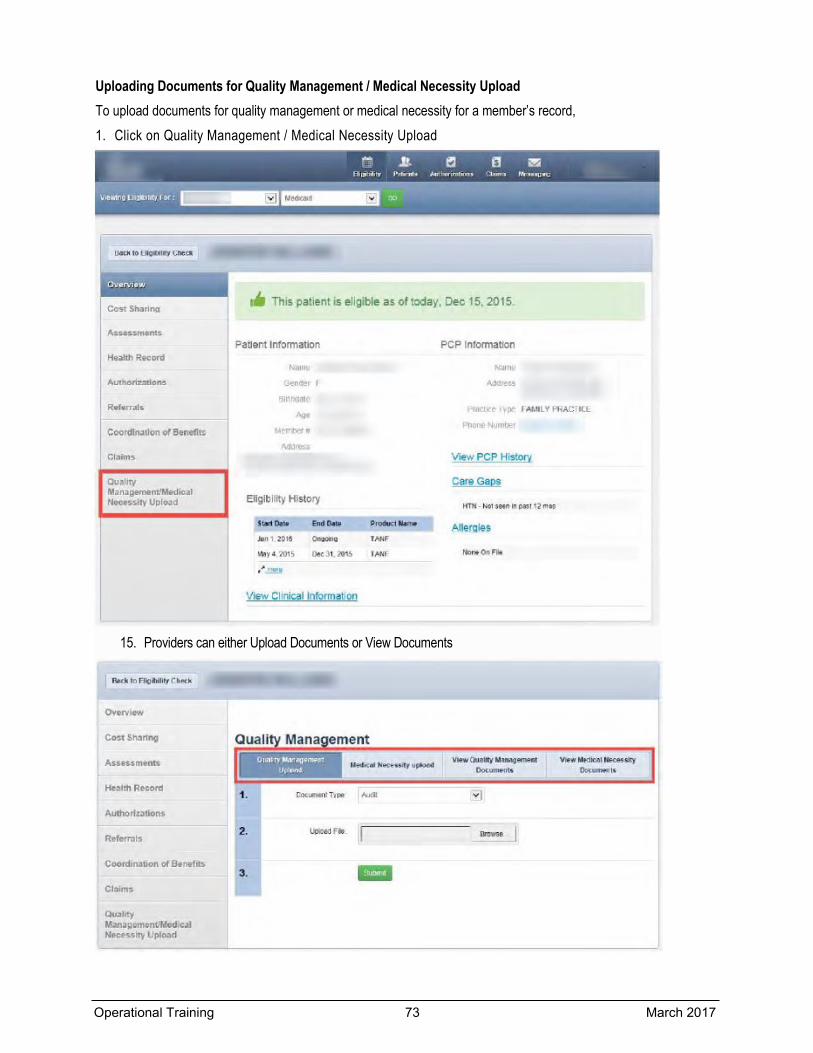
Uploading Documents for Quality Management / Medical Necessity Upload To upload documents for quality management or medical necessity for a member’s record, 1. Click on Quality Management / Medical Necessity Upload
15. Providers can either Upload Documents or View Documents
Operational Training 73 March 2017
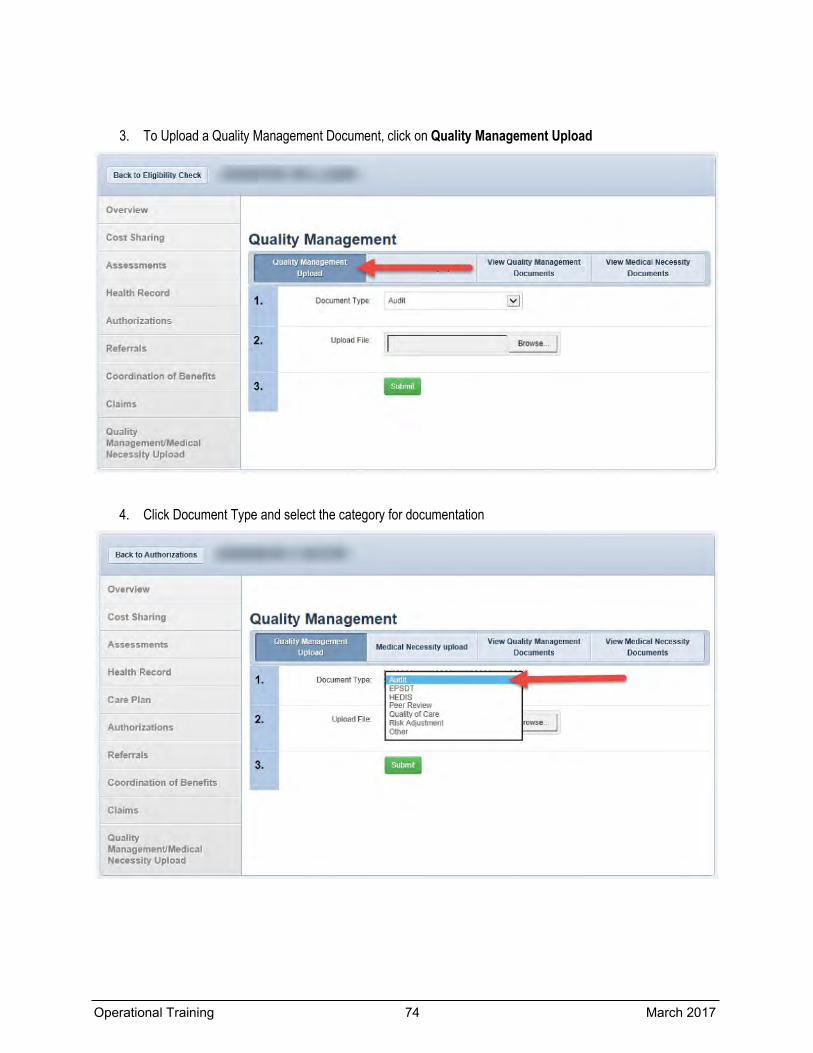
3. To Upload a Quality Management Document, click on Quality Management Upload
4. Click Document Type and select the category for documentation
Operational Training 74 March 2017

5. Click on Browse to open available documents
6. Highlight the document to be uploaded and the name will appear in the File Name field at the bottom of the document. Click on Open.
Operational Training 75 March 2017
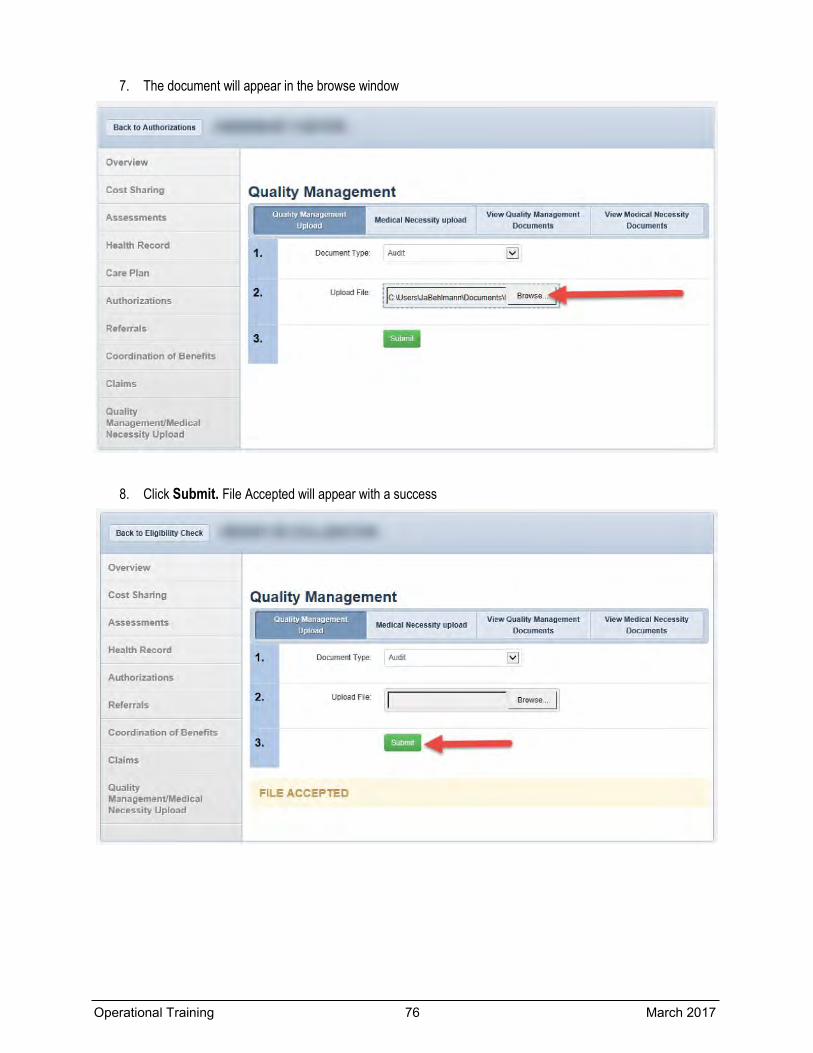
7. The document will appear in the browse window
8. Click Submit. File Accepted will appear with a success
Operational Training 76 March 2017
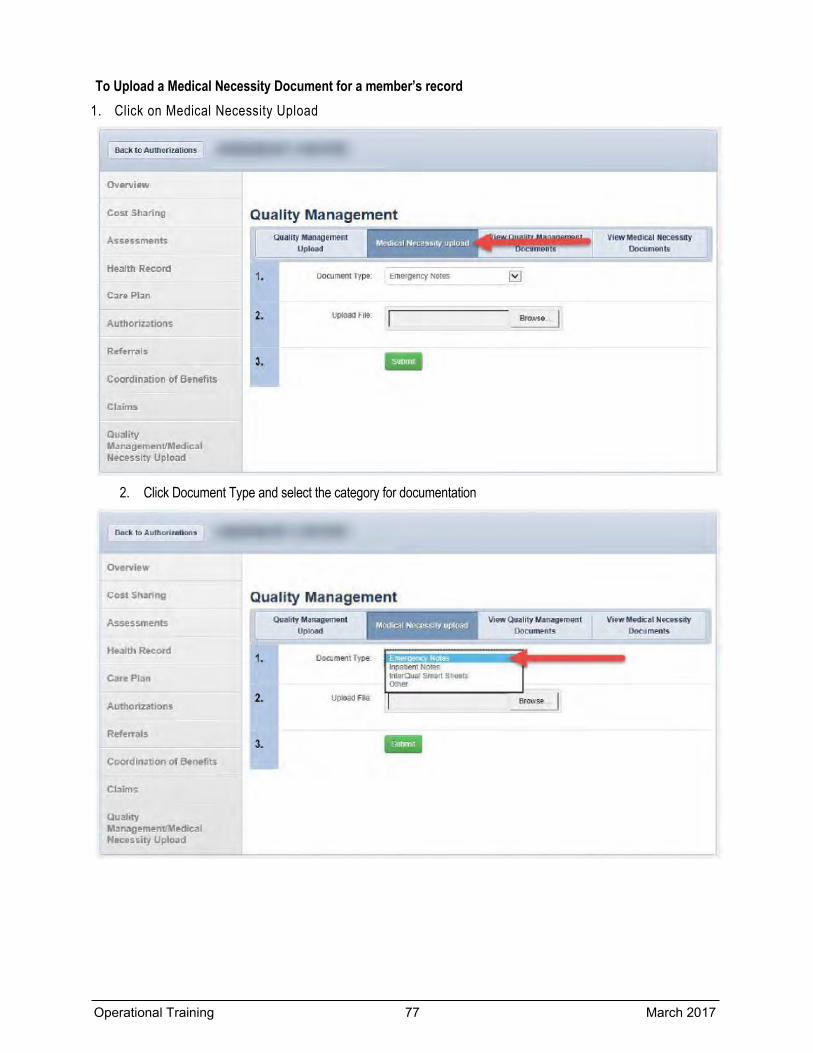
To Upload a Medical Necessity Document for a member’s record 1. Click on Medical Necessity Upload
2. Click Document Type and select the category for documentation
Operational Training 77 March 2017

3. Click on Browse to open available documents
4. Highlight the document to be uploaded and the name will appear in the File Name field at the bottom of the document. Click on Open.
Operational Training 78 March 2017
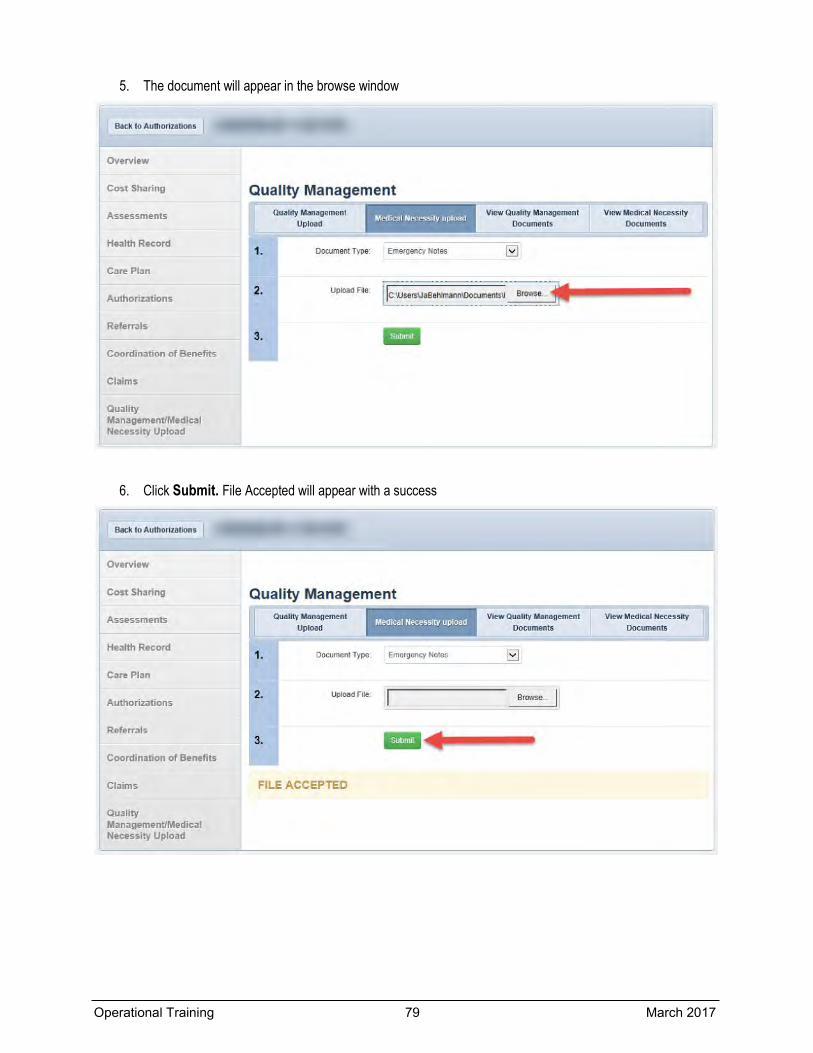
5. The document will appear in the browse window
6. Click Submit. File Accepted will appear with a success
Operational Training 79 March 2017
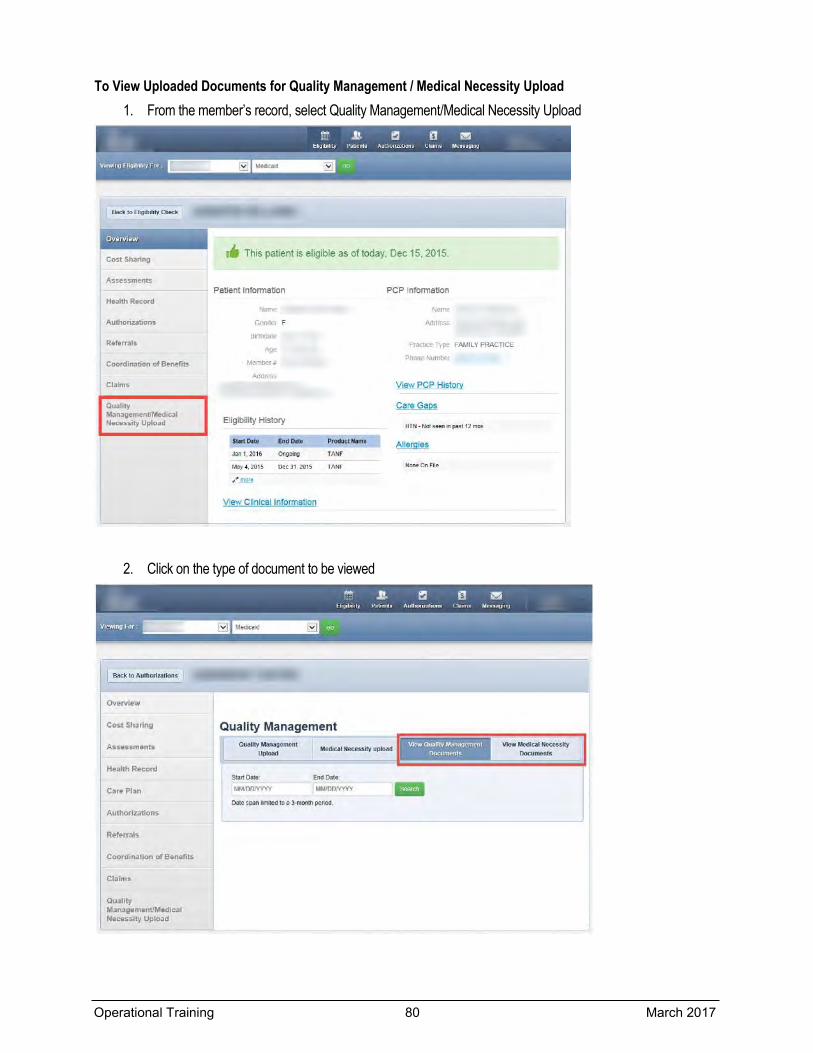
To View Uploaded Documents for Quality Management / Medical Necessity Upload 1. From the member’s record, select Quality Management/Medical Necessity Upload
2. Click on the type of document to be viewed
Operational Training 80 March 2017
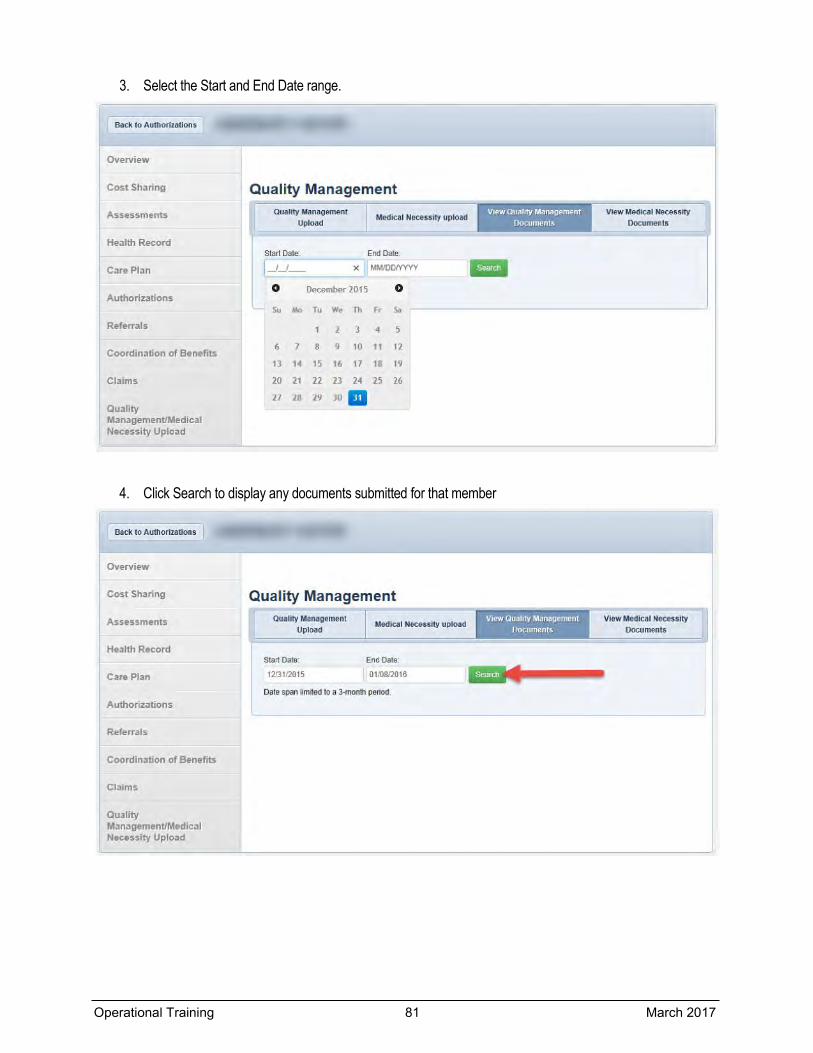
3. Select the Start and End Date range.
4. Click Search to display any documents submitted for that member
Operational Training 81 March 2017
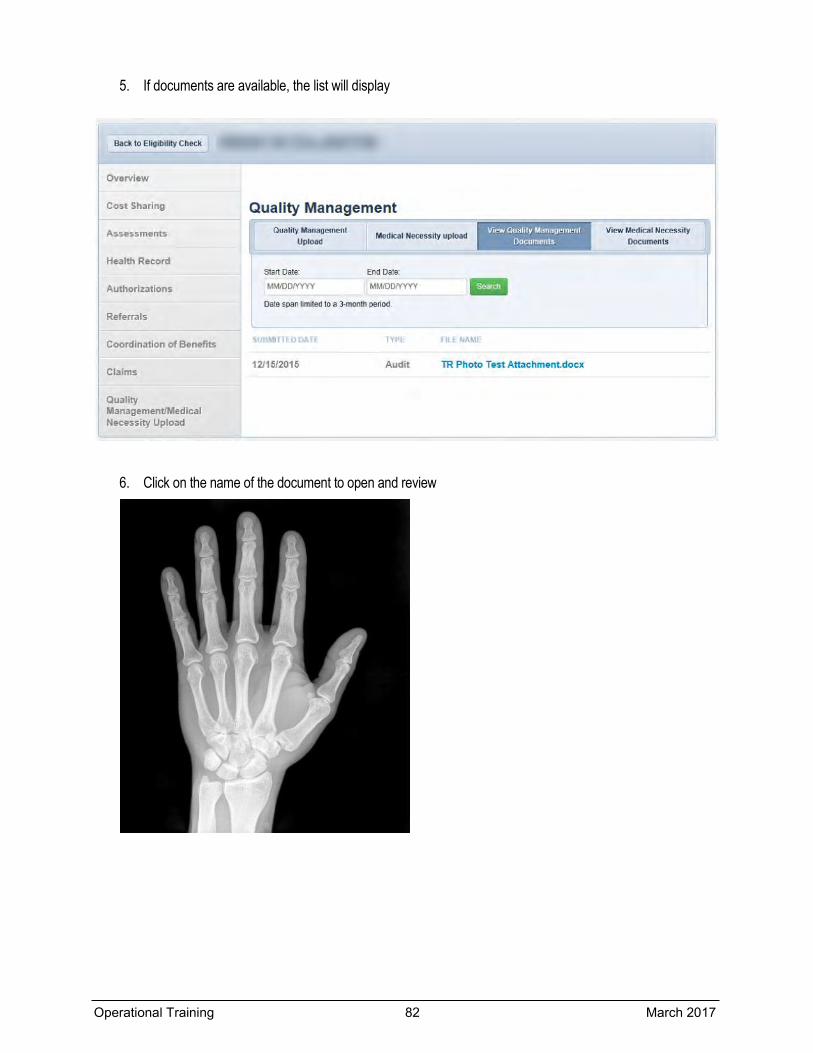
5. If documents are available, the list will display
6. Click on the name of the document to open and review
Operational Training 82 March 2017
Back to AlltllOIIHIIOOS
Overview
Cost Sharing
Assessments
Health Record
Care Plan
Authorizations
Referrals
Coordination of Benefits
Claims
Quality Management/Medical Necessity Upload
Quality Management Quality Management
Upload
Start Date·
MMJODIVYYY
Medical Neces tty upload
End Date·
MJDD/YYYY
Date span i mrted to a 3-m onth period.
No Data Found
View Medical NeCA!uity
Documents
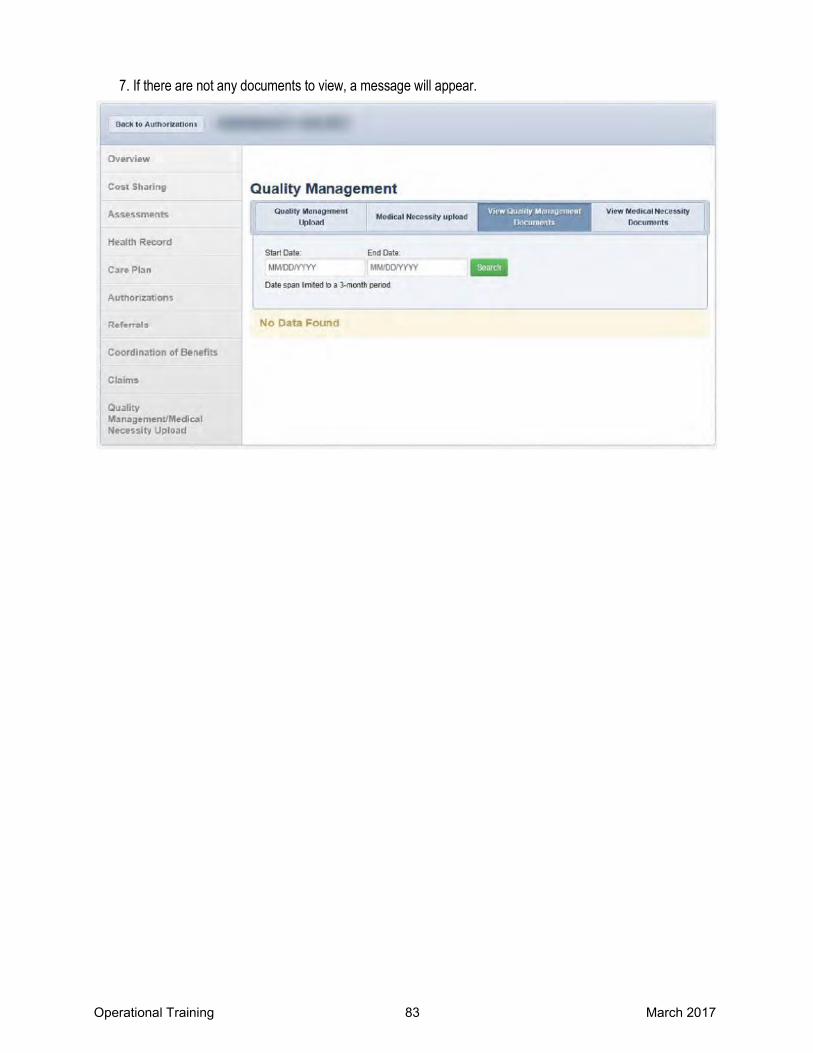
7. If there are not any documents to view, a message will appear.
Operational Training 83 March 2017
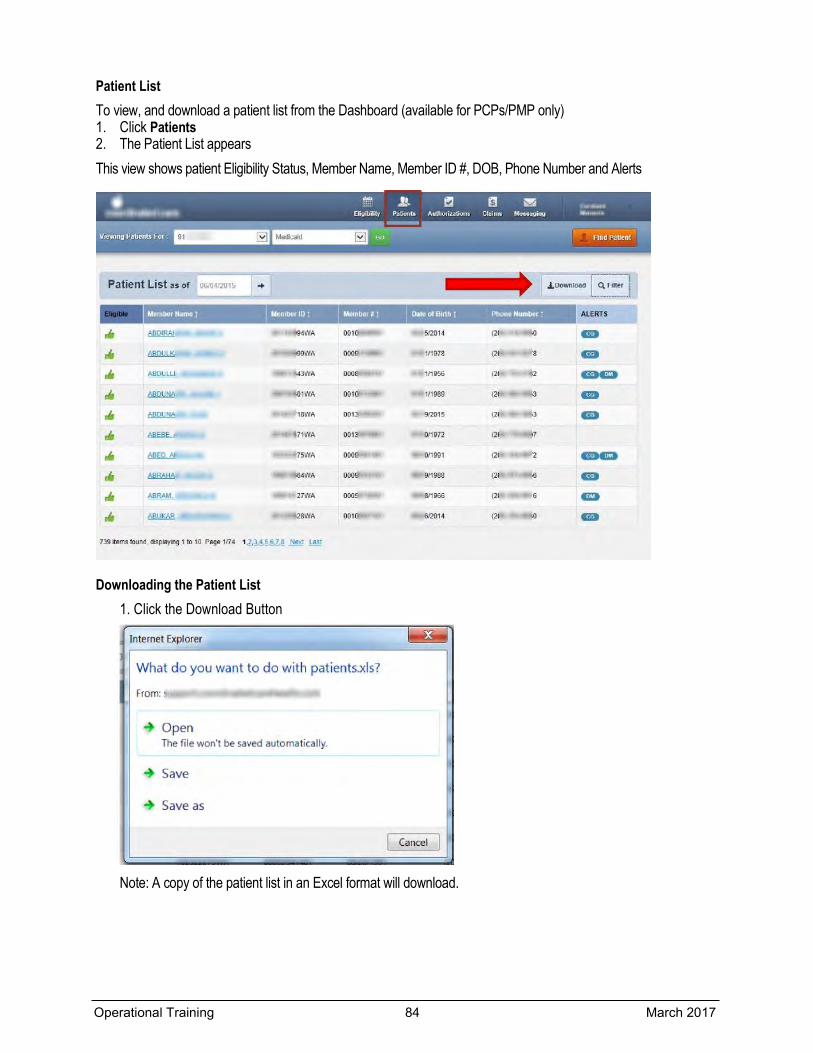
Patient List To view, and download a patient list from the Dashboard (available for PCPs/PMP only) 1. Click Patients 2. The Patient List appears This view shows patient Eligibility Status, Member Name, Member ID #, DOB, Phone Number and Alerts
Downloading the Patient List 1. Click the Download Button
Note: A copy of the patient list in an Excel format will download.
Operational Training 84 March 2017
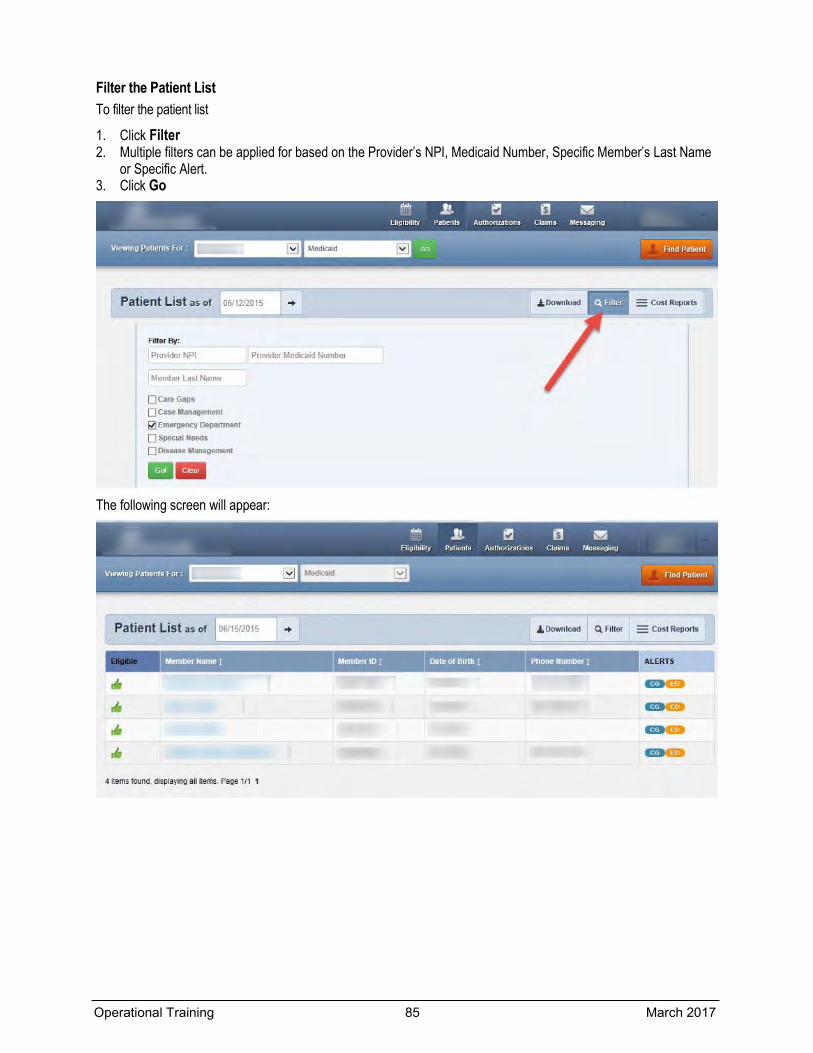
Filter the Patient List To filter the patient list
1. Click Filter 2. Multiple filters can be applied for based on the Provider’s NPI, Medicaid Number, Specific Member’s Last Name
or Specific Alert. 3. Click Go
The following screen will appear:
Operational Training 85 March 2017
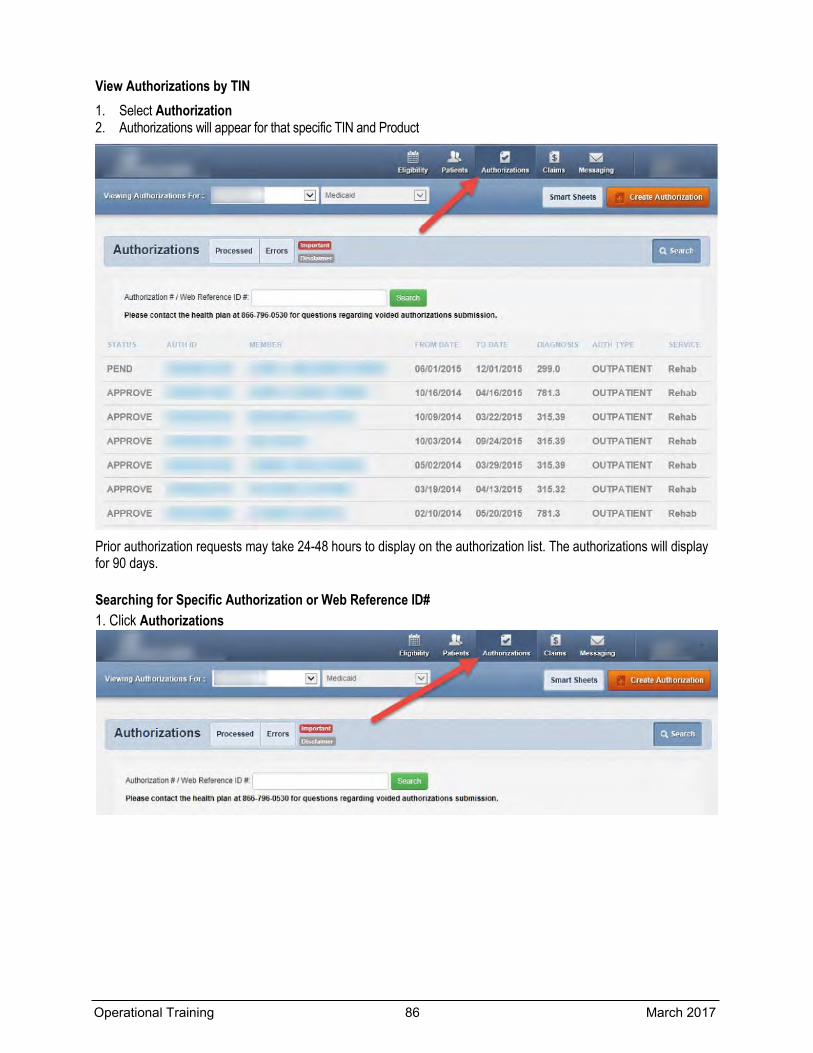
View Authorizations by TIN 1. Select Authorization2. Authorizations will appear for that specific TIN and Product
Prior authorization requests may take 24-48 hours to display on the authorization list. The authorizations will display for 90 days.
Searching for Specific Authorization or Web Reference ID# 1. Click Authorizations
Operational Training 86 March 2017
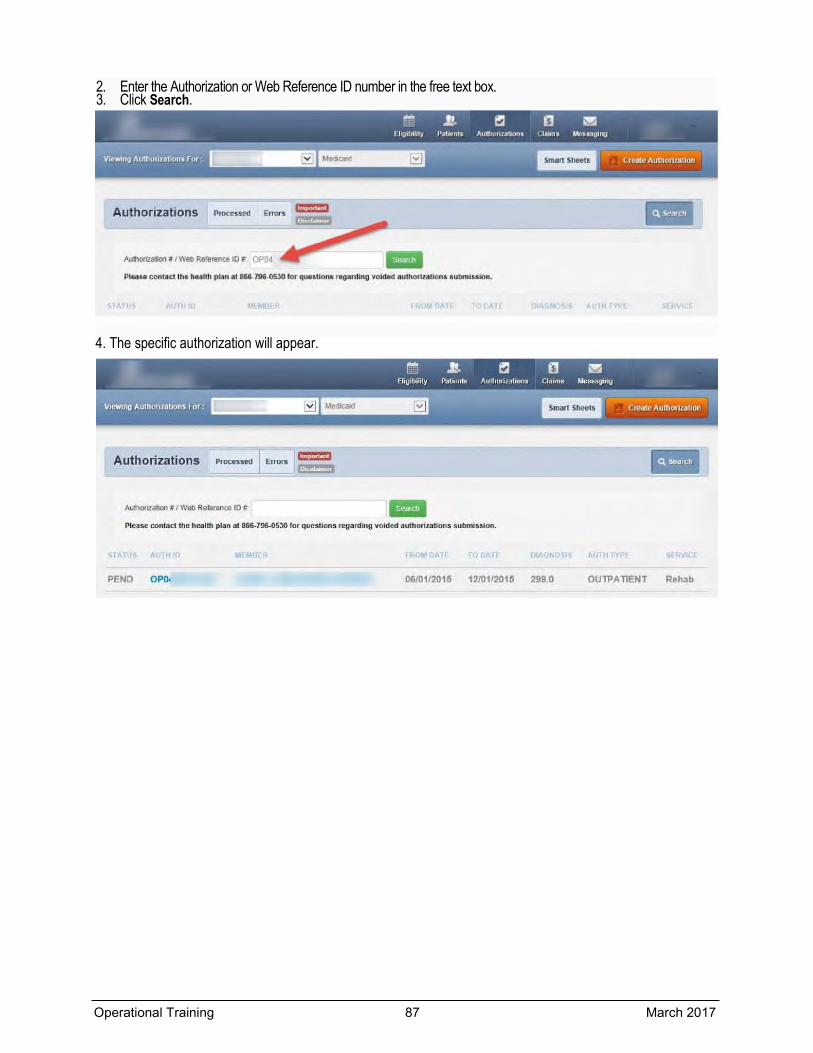
2. Enter the Authorization or Web Reference ID number in the free text box. 3. Click Search.
4. The specific authorization will appear.
Operational Training 87 March 2017
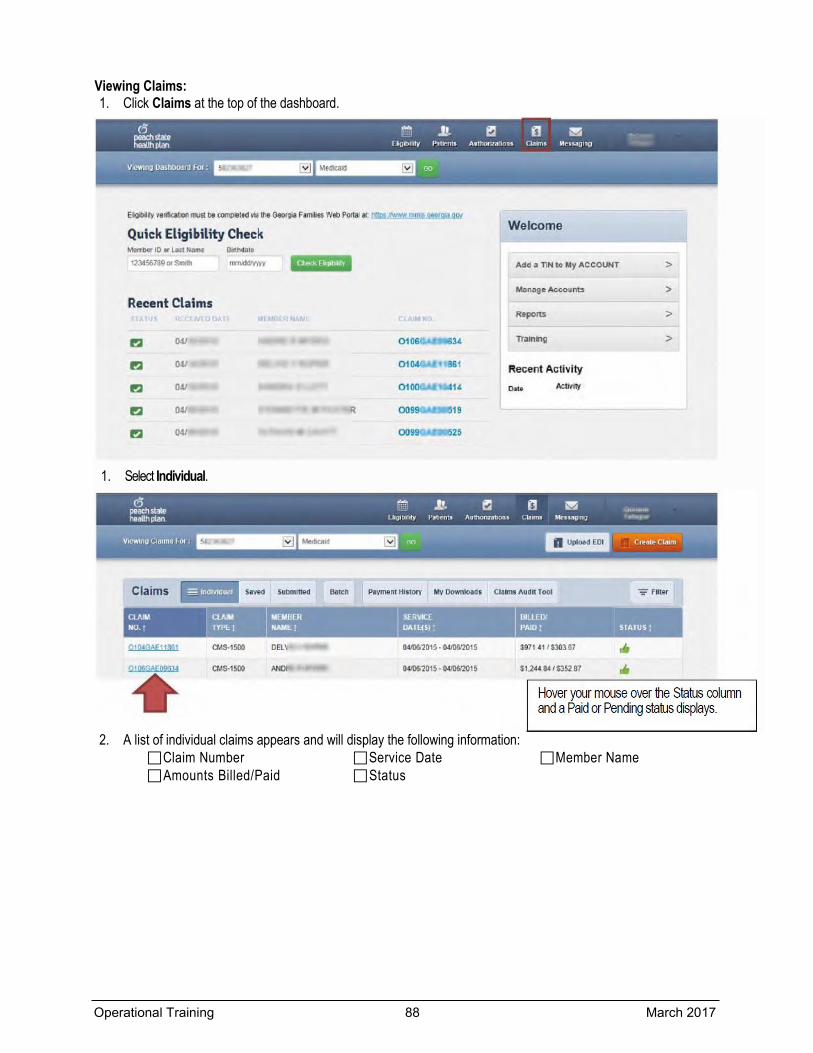
Viewing Claims: 1. Click Claims at the top of the dashboard.
Hover your mouse over the Status columnand a Paid or Pending status displays.
1. Select Individual.
2. A list of individual claims appears and will display the following information: Claim Number Service Date Member Name Amounts Billed/Paid Status
Operational Training 88 March 2017

To view the details of the Individual claim 1. Click the blue Claim Number to open the claim. The following screen appears:
Note: The Claim Details appear allowing you to see which services were covered and which were denied. You can view the payment amount and payment date, along with check number.
Correct/Appeal Claim
1. Click Correct/Appeal Claim 2. Proceed through the claims screens correcting the information that you may have omitted when the claim was
originally submitted. 3. Continue clicking NEXT to move through the screens required to resubmit. 4. Review the claim information 5. Click SUBMIT.
Void/Recoup Claim
1. Click VOID/RECOUP CLAIMS 2. Following message will appear if you are still needing to VOID/RECOUP
3. Click Submit
Operational Training 89 March 2017
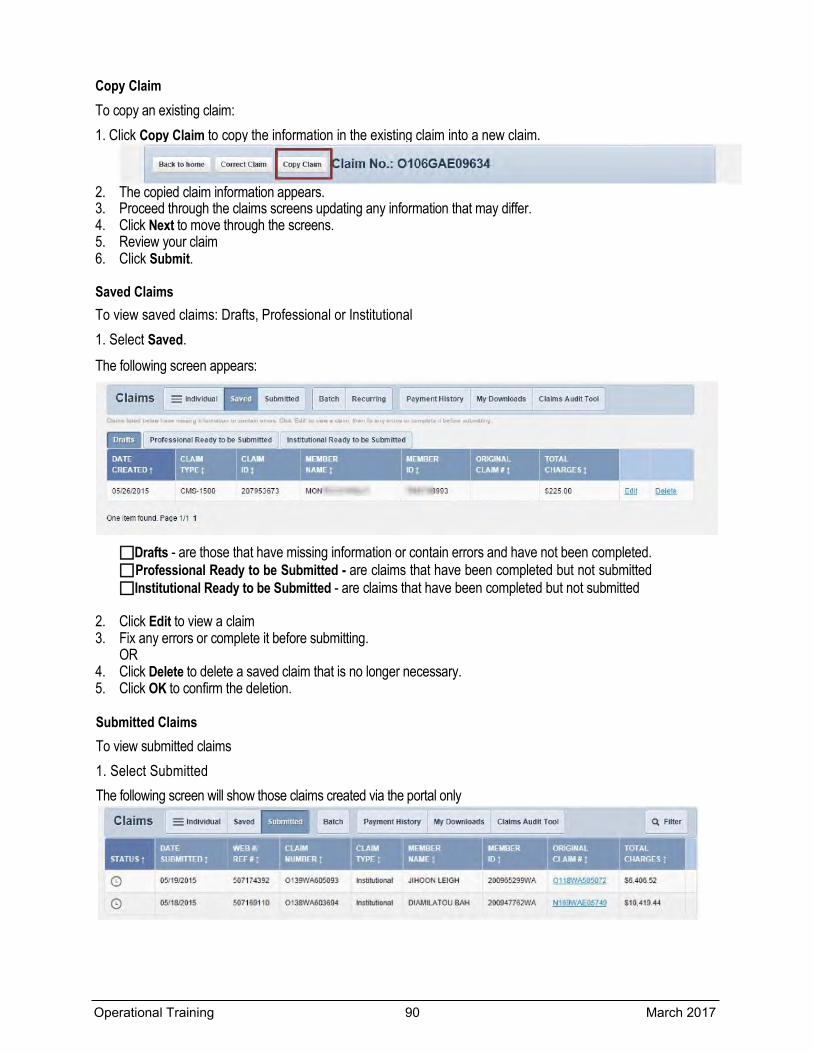
Copy Claim To copy an existing claim: 1. Click Copy Claim to copy the information in the existing claim into a new claim.
2. The copied claim information appears. 3. Proceed through the claims screens updating any information that may differ. 4. Click Next to move through the screens. 5. Review your claim 6. Click Submit.
Saved Claims To view saved claims: Drafts, Professional or Institutional 1. Select Saved. The following screen appears:
Drafts - are those that have missing information or contain errors and have not been completed. Professional Ready to be Submitted - are claims that have been completed but not submitted Institutional Ready to be Submitted - are claims that have been completed but not submitted
2. Click Edit to view a claim 3. Fix any errors or complete it before submitting.
OR 4. Click Delete to delete a saved claim that is no longer necessary. 5. Click OK to confirm the deletion.
Submitted Claims To view submitted claims 1. Select Submitted The following screen will show those claims created via the portal only
Operational Training 90 March 2017
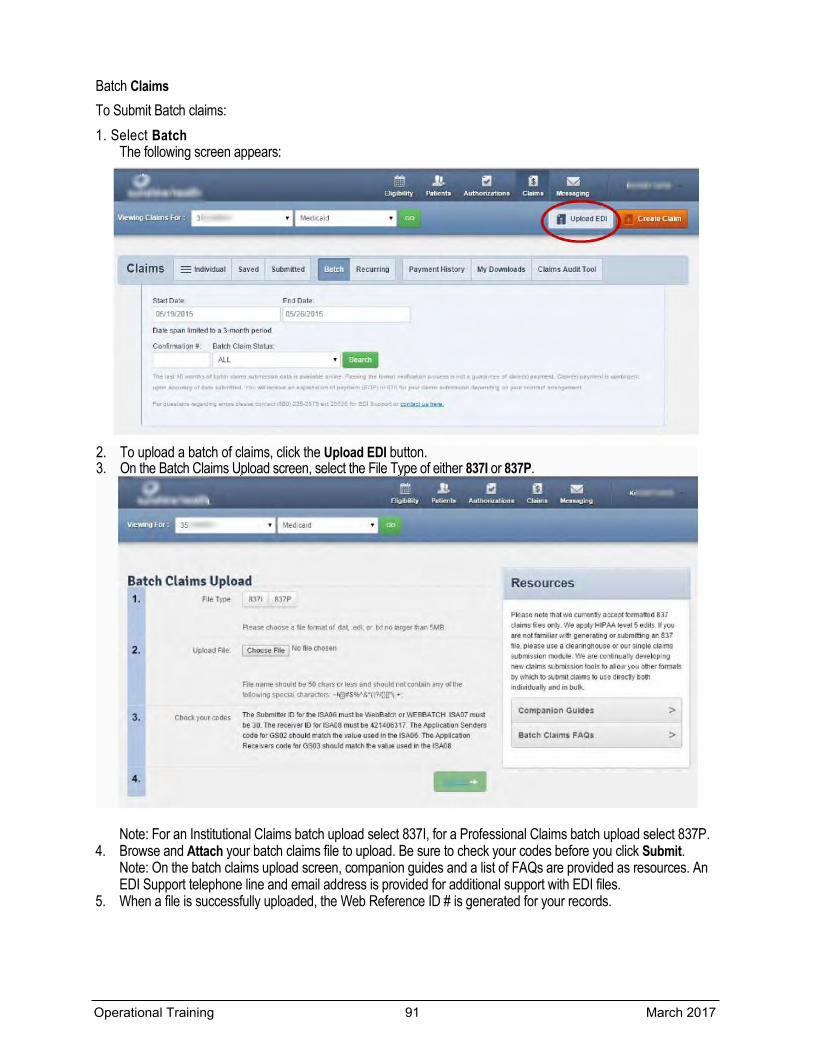
Batch Claims
To Submit Batch claims: 1. Select Batch
The following screen appears:
2. To upload a batch of claims, click the Upload EDI button. 3. On the Batch Claims Upload screen, select the File Type of either 837I or 837P.
Note: For an Institutional Claims batch upload select 837I, for a Professional Claims batch upload select 837P. 4. Browse and Attach your batch claims file to upload. Be sure to check your codes before you click Submit.
Note: On the batch claims upload screen, companion guides and a list of FAQs are provided as resources. An EDI Support telephone line and email address is provided for additional support with EDI files.
5. When a file is successfully uploaded, the Web Reference ID # is generated for your records.
Operational Training 91 March 2017

To view submitted batch claims: 1. Click Batch to view batch claims submitted in a 3-month period.
2. Enter the information to filter your results by Start Date, End Date, Web Reference#, and Batch Claim Status. Click Search.
3. The submitted batch claims display showing: Submitted Date, Type, Web Reference #, File Name, and Status.
Note: Only the last 24 months of batch claims submission history is available online. You will receive an explanation of payment (EOP) or 835 for your claims submission depending on your contract arrangement.
Operational Training 92 March 2017
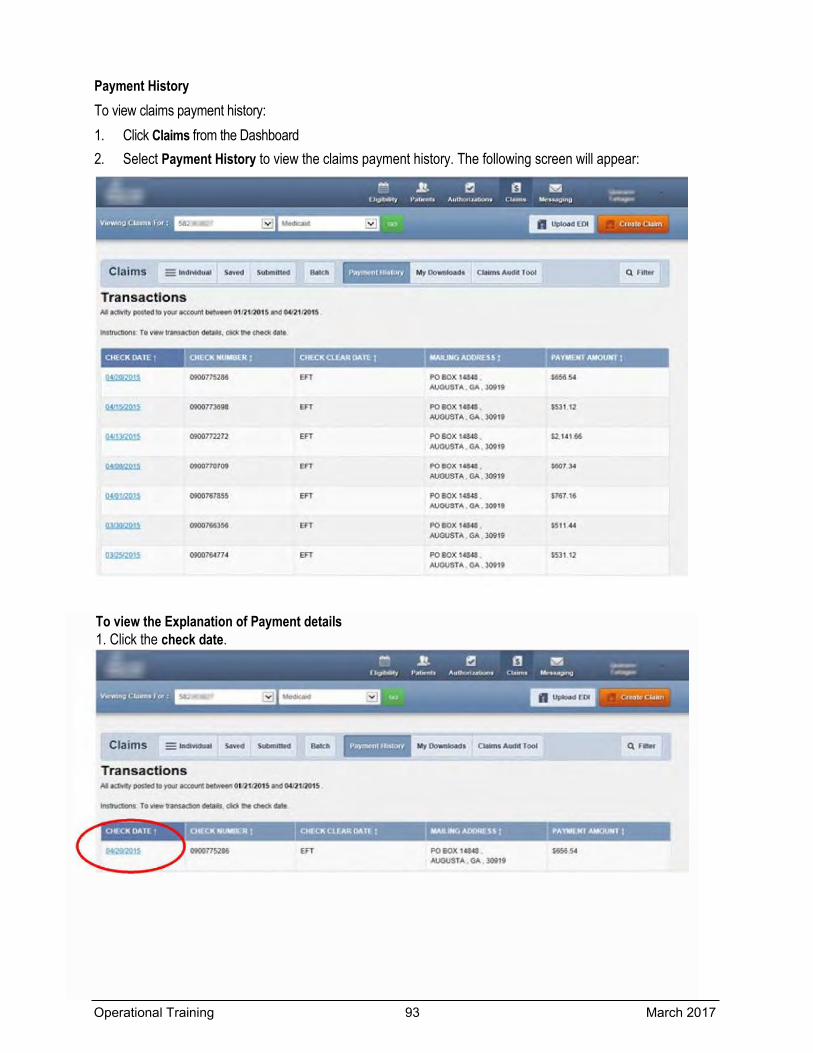
Payment History To view claims payment history: 1. Click Claims from the Dashboard 2. Select Payment History to view the claims payment history. The following screen will appear:
To view the Explanation of Payment details 1. Click the check date.
Operational Training 93 March 2017

The following screen appears: The explanation of payment details displays the date and check number. This view shows each patient payment by service line detail made on the check.
Downloading an Explanation of Benefits To download the EOP
1. Click the Download (Excel Format) Button
Operational Training 94 March 2017
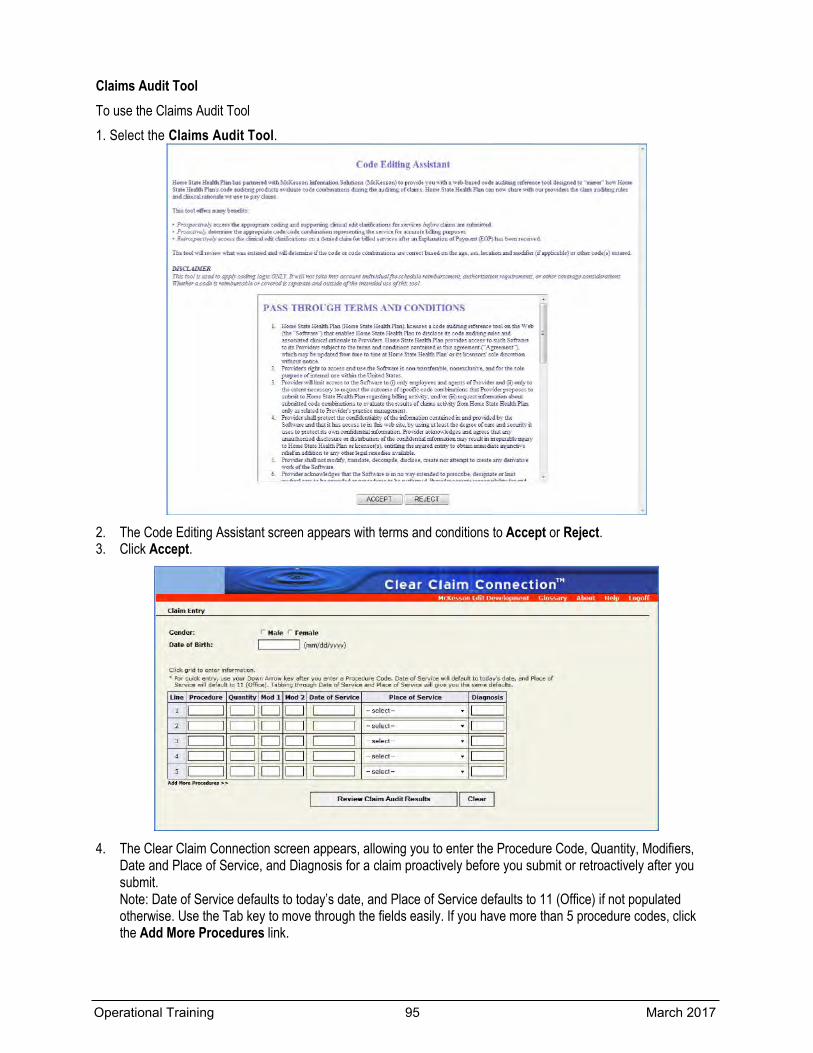
Claims Audit Tool To use the Claims Audit Tool 1. Select the Claims Audit Tool.
2. The Code Editing Assistant screen appears with terms and conditions to Accept or Reject. 3. Click Accept.
4. The Clear Claim Connection screen appears, allowing you to enter the Procedure Code, Quantity, Modifiers, Date and Place of Service, and Diagnosis for a claim proactively before you submit or retroactively after you submit. Note: Date of Service defaults to today’s date, and Place of Service defaults to 11 (Office) if not populated otherwise. Use the Tab key to move through the fields easily. If you have more than 5 procedure codes, click the Add More Procedures link.
Operational Training 95 March 2017
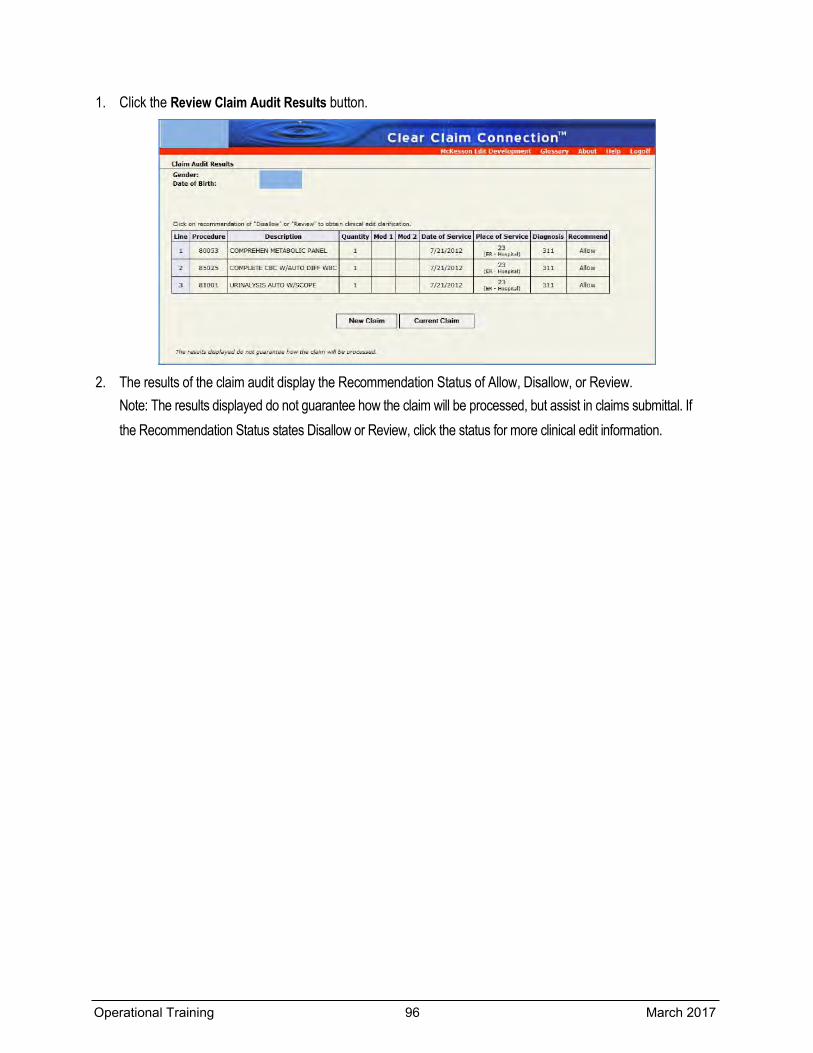
1. Click the Review Claim Audit Results button.
2. The results of the claim audit display the Recommendation Status of Allow, Disallow, or Review. Note: The results displayed do not guarantee how the claim will be processed, but assist in claims submittal. If the Recommendation Status states Disallow or Review, click the status for more clinical edit information.
Operational Training 96 March 2017
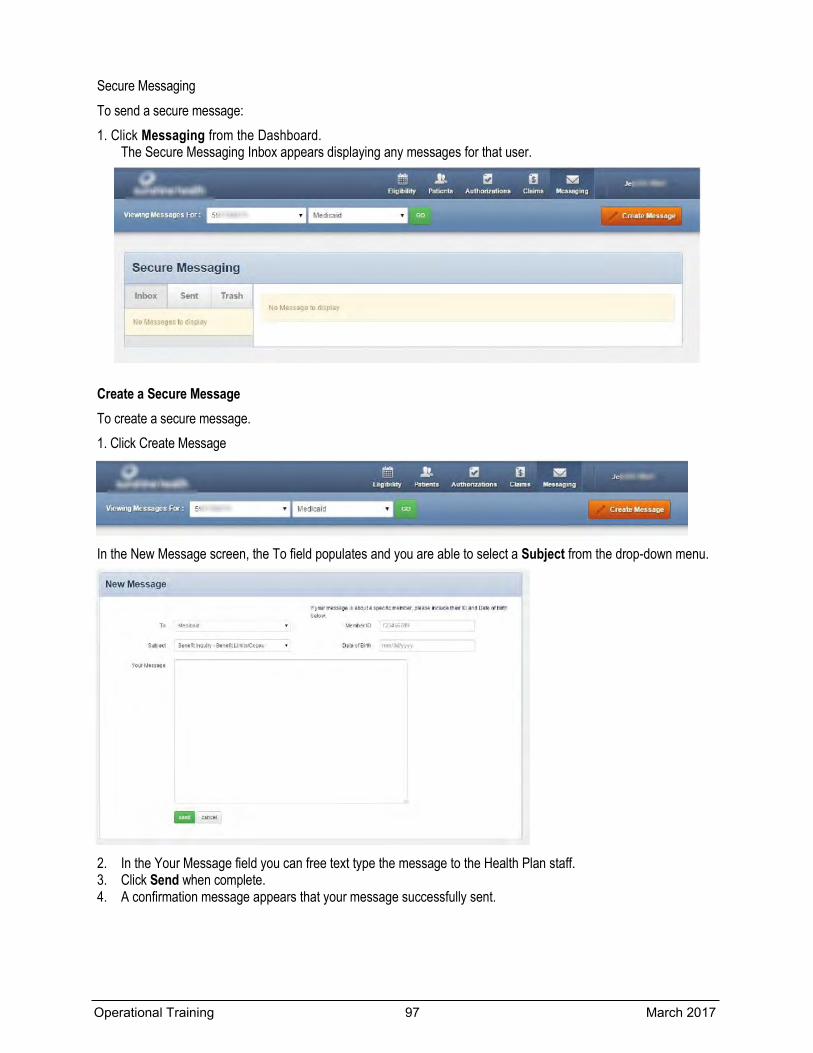
Secure Messaging
To send a secure message: 1. Click Messaging from the Dashboard.
The Secure Messaging Inbox appears displaying any messages for that user.
Create a Secure Message To create a secure message. 1. Click Create Message
In the New Message screen, the To field populates and you are able to select a Subject from the drop-down menu.
2. In the Your Message field you can free text type the message to the Health Plan staff. 3. Click Send when complete. 4. A confirmation message appears that your message successfully sent.
Operational Training 97 March 2017
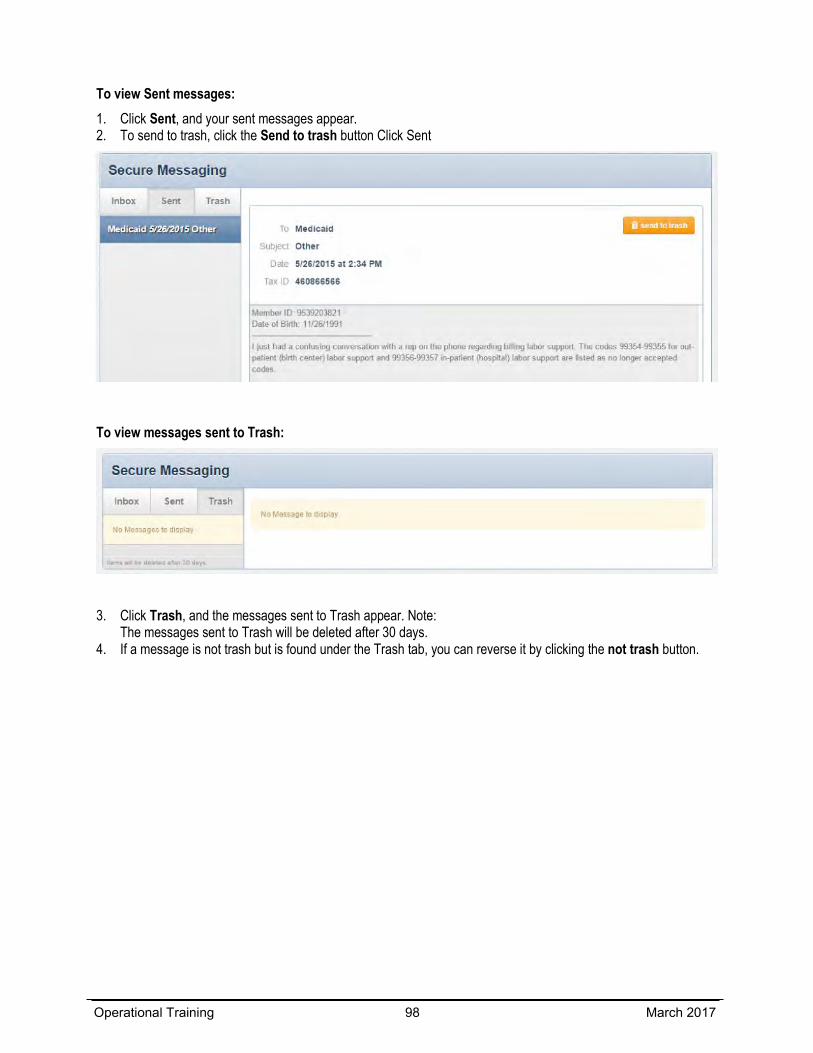
To view Sent messages: 1. Click Sent, and your sent messages appear. 2. To send to trash, click the Send to trash button Click Sent
To view messages sent to Trash:
3. Click Trash, and the messages sent to Trash appear. Note: The messages sent to Trash will be deleted after 30 days.
4. If a message is not trash but is found under the Trash tab, you can reverse it by clicking the not trash button.
Operational Training 98 March 2017