Embed Size (px)
Citation preview

07/14/2018 Page 1 of 7
SEMESTER & HIGH SCHOOL TEACHERS: GRADE BOOK SETUP & NEW ASSIGNMENTS (Overview)
Set the Grade Book Settings and Assignment Type Weighting before adding grades for the students.
1) Grade Book Setup: After logging into TeacherVUE, mouse over Grade Book and click on Gradebook Setup.
2) When the Gradebook Setup screen displays, follow steps A – E described below.
A. Click the Grade Book Settings Tab
B. In the Final Grade Rounding Settings section, select Rounding On.
C. Consider the following examples when making the rounding selection. In each example below, the
student’s class grade is on the bubble at 89.45%, but the final calculation will differ depending on the
rounding option selected:
Whole Number Only – Example: The grade calculation rounds to the nearest whole number. Gradebook,
PVUE, and SVUE display 89.00% and the student has a calculated class grade of 89.
1 Decimal Place – Example: The grade calculation rounds up using only one decimal place. Gradebook,
PVUE, and SVUE display 89.5% and the student has a calculated class grade of 90.
2 Decimal Places – Example: The grade calculation rounds up using two decimal places. Gradebook,
PVUE, and SVUE display 89.45% and the student has a calculated class grade of 89.
D. In the Grading Period Default For New Assignments section, select Assignment Due Date.
It is important to select this setting so that assignments will display in the appropriate Six Week Grading Period
AND so the grades will be calculated cumulatively throughout the term.
This setting allows for: (1) point-in-time grade capture for your report card grading periods (you will see a
separate grade average for 1st Six Weeks, 2nd Six Weeks, etc.) and (2) cumulative, final grade averages at the
end of the grading period to post to transcripts, report cards, and grade history.
E. Select an option in the Teacher Type Defaults section. Which Assignment Types would you like to use?
Only Show My Types or Add My Types to the District Types
Collaborate with your department to use
consistent Grade Book Settings, Assignment
Types, and Weights.
07/14/2018 Page 2 of 7
3) Class Settings:
Click the Class Settings sub-menu. Review all class options to confirm they match what was selected on the
Class Settings Tab.
4) Assignment Types:
Click the Assignment Types sub-menu. The District has created one Assignment Type, called CTLS
Assessments, which will display on this screen only if teachers select ‘Add My Types to the District Types.’
Returning teachers should review existing types to decide it they will be used for the current school year.
NOTE: Prior year’s types may be hidden. Click the Options button and check to ‘Show Hidden’ to view all
types.
To reactivate a hidden type so it to can be used again, click the Edit button, or point the mouse in the edit
column next to the name of the type desired. Either action enables the type for editing. Make any change to the
type – even if you delete a letter and add it back. When all changes have been made, click SAVE.
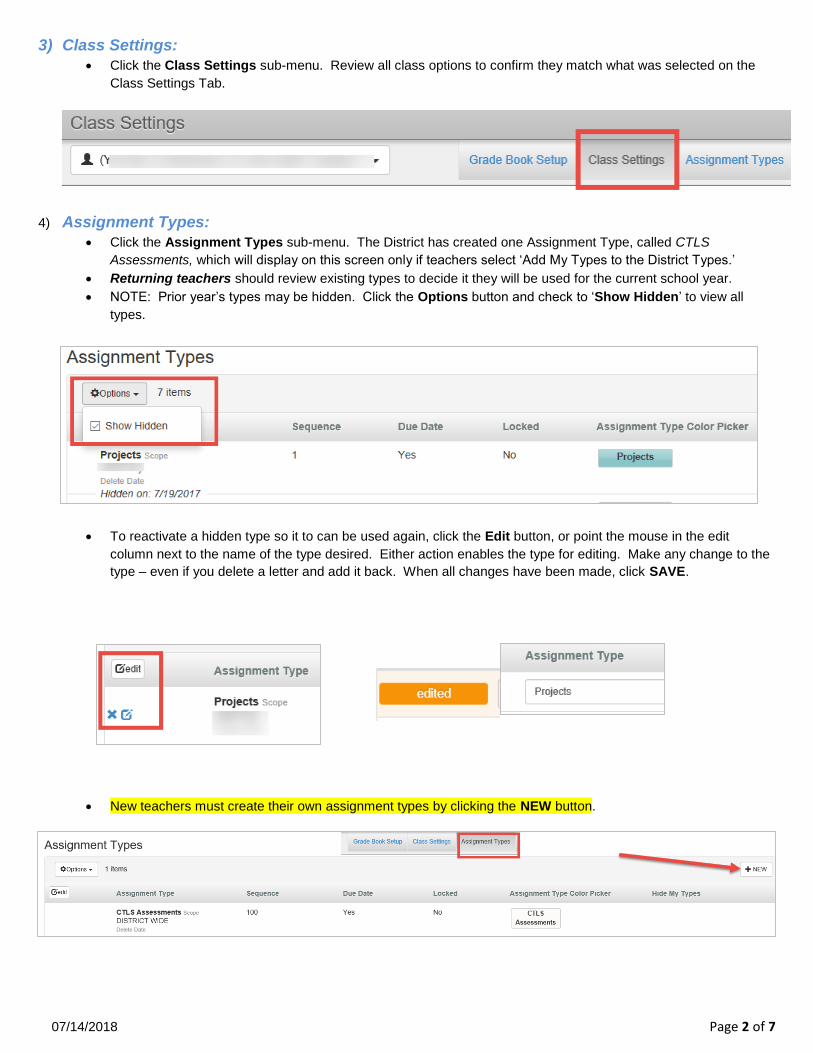
New teachers must create their own assignment types by clicking the NEW button.

07/14/2018 Page 3 of 7
Enter the Name of the new assignment type, enter the Sequence which refers to the order the type will appear in
the list when creating a new assignment, select YES for the Due Date option, and select a custom color
(recommended) so the assignment will be easily identified in the gradebook.
Click the INSERT button when all options are set.
NOTE: If the course requires an End of Course exam (EOC), create one assignment type named simply EOC.
DO NOT create an assignment type called EOC if you do not teach an EOC-required course.
TIP: Keep assignment type names at a high level. Use the actual assignment name for details about specific standards,
modules, chapters, or lessons during the grading period.
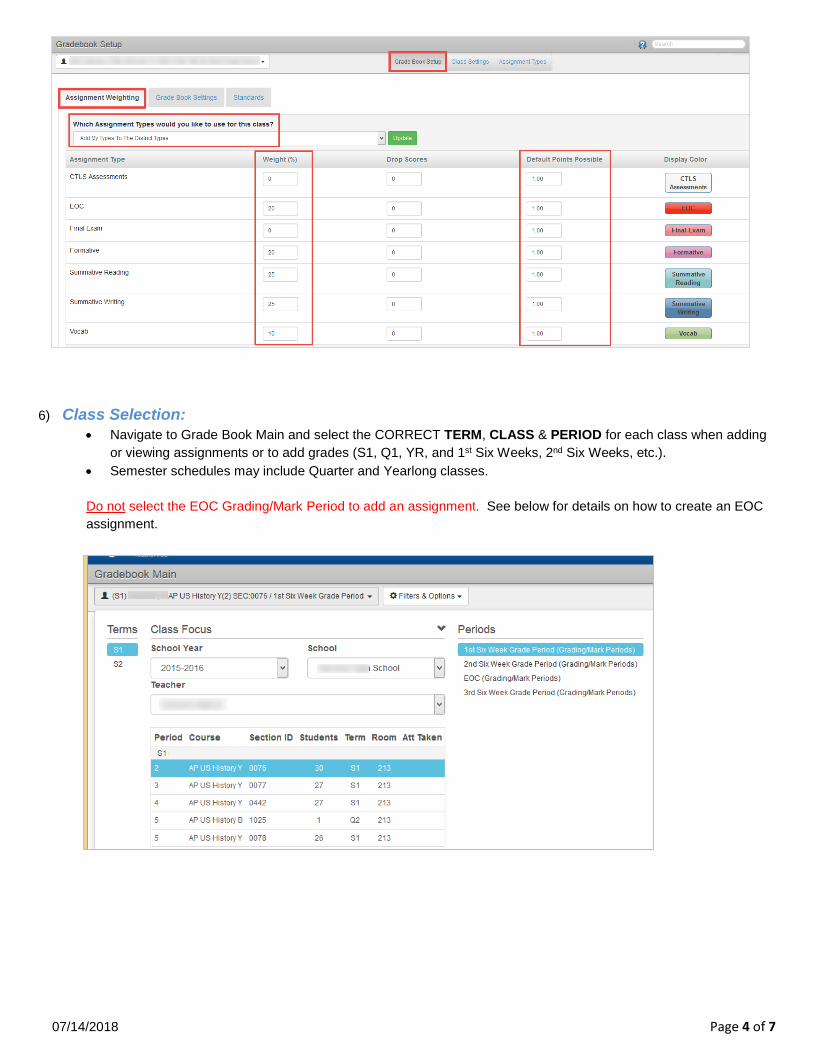
5) Assignment Type Weighting:
After creating the new assignment types, click the Grade Book Setup link and select the Assignment Weighting Tab to apply the weights.
Decide if you want to ‘Use Teacher Default’, ‘Only Show My Types’ or ‘Add My Types to the District Types.’
Weights must total 100% for each class. Collaborate with your school, department &/or team for consistency.
**IMPORTANT: Apply appropriate 20% weight for EOC-required courses.
o If teaching both EOC-required & non-required, leave EOC assignment type weight at zero for non-
required classes.
Add Default Points Possible, if desired. If left at zero, the points will need to be added each time a new
assignment is created.
Click Update to save changes and additions made on the screen – see the next page.
07/14/2018 Page 4 of 7
6) Class Selection:
Navigate to Grade Book Main and select the CORRECT TERM, CLASS & PERIOD for each class when adding
or viewing assignments or to add grades (S1, Q1, YR, and 1st Six Weeks, 2nd Six Weeks, etc.).
Semester schedules may include Quarter and Yearlong classes.
Do not select the EOC Grading/Mark Period to add an assignment. See below for details on how to create an EOC
assignment.
07/14/2018 Page 5 of 7
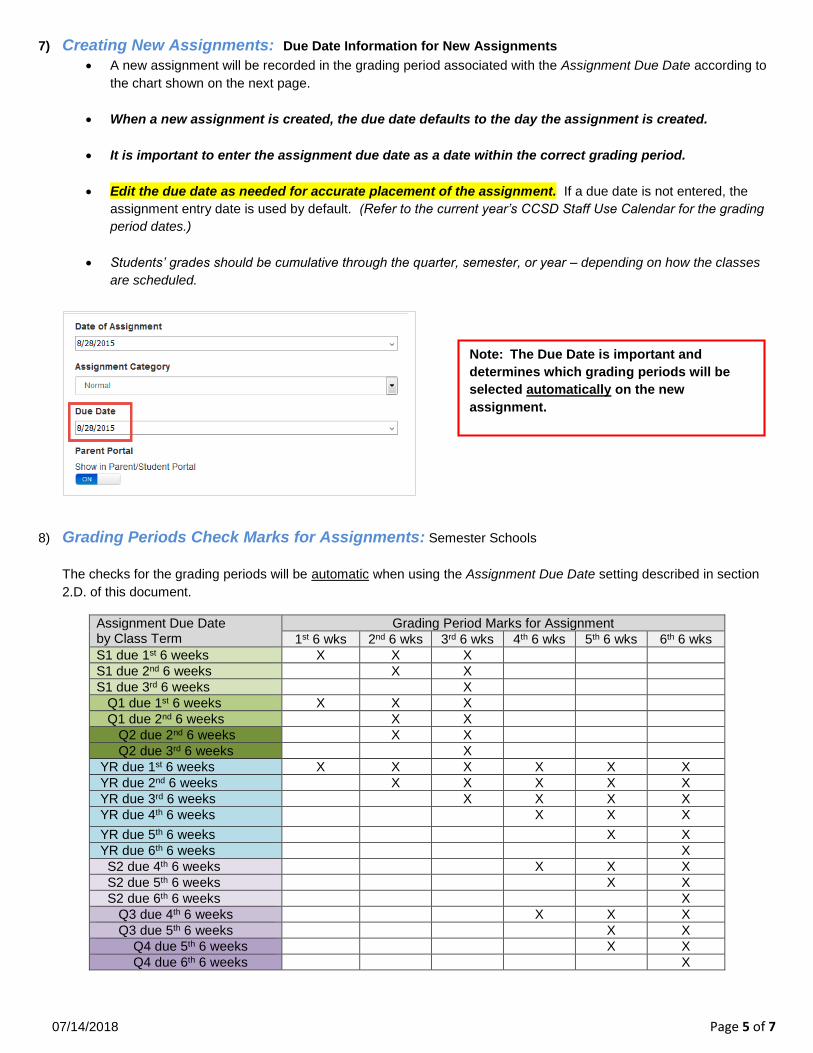
7) Creating New Assignments: Due Date Information for New Assignments
A new assignment will be recorded in the grading period associated with the Assignment Due Date according to
the chart shown on the next page.
When a new assignment is created, the due date defaults to the day the assignment is created.
It is important to enter the assignment due date as a date within the correct grading period.
Edit the due date as needed for accurate placement of the assignment. If a due date is not entered, the
assignment entry date is used by default. (Refer to the current year’s CCSD Staff Use Calendar for the grading
period dates.)
Students’ grades should be cumulative through the quarter, semester, or year – depending on how the classes
are scheduled.
8) Grading Periods Check Marks for Assignments: Semester Schools
The checks for the grading periods will be automatic when using the Assignment Due Date setting described in section
2.D. of this document.
Assignment Due Date by Class Term
Grading Period Marks for Assignment
1st 6 wks 2nd 6 wks 3rd 6 wks 4th 6 wks 5th 6 wks 6th 6 wks
S1 due 1st 6 weeks X X X
S1 due 2nd 6 weeks X X
S1 due 3rd 6 weeks X
Q1 due 1st 6 weeks X X X
Q1 due 2nd 6 weeks X X
Q2 due 2nd 6 weeks X X
Q2 due 3rd 6 weeks X
YR due 1st 6 weeks X X X X X X
YR due 2nd 6 weeks X X X X X
YR due 3rd 6 weeks X X X X
YR due 4th 6 weeks X X X
YR due 5th 6 weeks X X
YR due 6th 6 weeks X
S2 due 4th 6 weeks X X X
S2 due 5th 6 weeks X X
S2 due 6th 6 weeks X
Q3 due 4th 6 weeks X X X
Q3 due 5th 6 weeks X X
Q4 due 5th 6 weeks X X
Q4 due 6th 6 weeks X
Note: The Due Date is important and
determines which grading periods will be
selected automatically on the new
assignment.
07/14/2018 Page 6 of 7
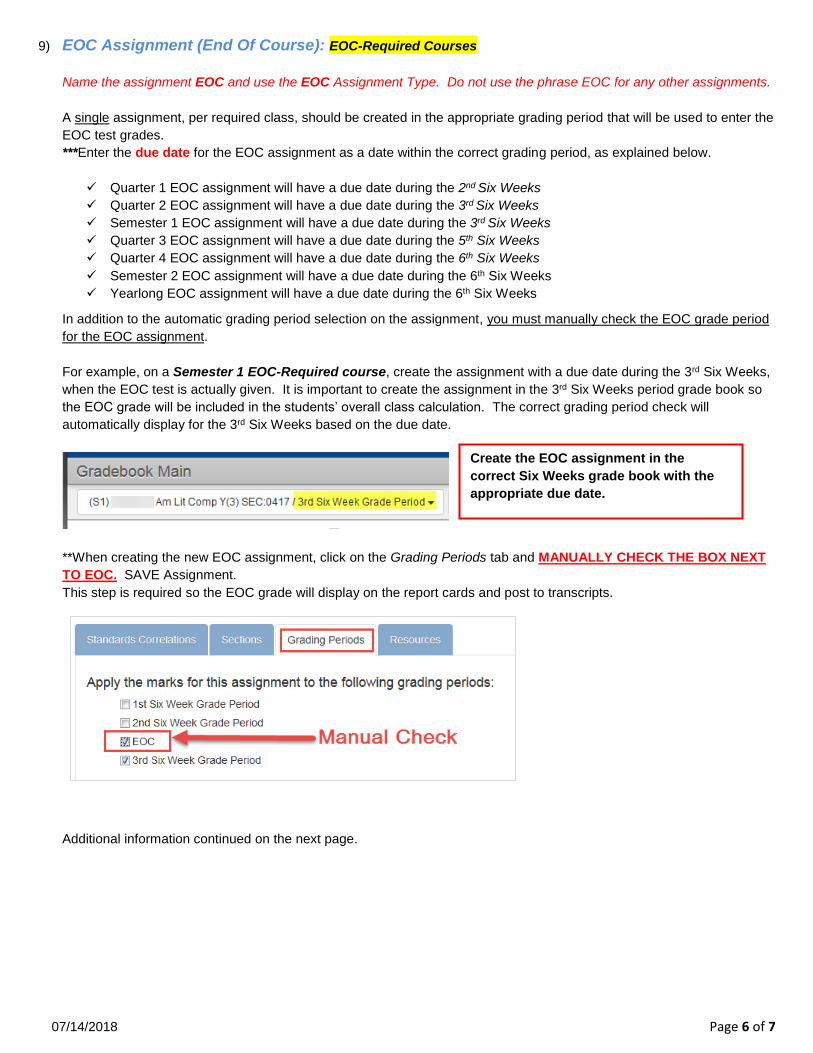
9) EOC Assignment (End Of Course): EOC-Required Courses
Name the assignment EOC and use the EOC Assignment Type. Do not use the phrase EOC for any other assignments.
A single assignment, per required class, should be created in the appropriate grading period that will be used to enter the
EOC test grades.
***Enter the due date for the EOC assignment as a date within the correct grading period, as explained below.
Quarter 1 EOC assignment will have a due date during the 2nd Six Weeks
Quarter 2 EOC assignment will have a due date during the 3rd Six Weeks
Semester 1 EOC assignment will have a due date during the 3rd Six Weeks
Quarter 3 EOC assignment will have a due date during the 5th Six Weeks
Quarter 4 EOC assignment will have a due date during the 6th Six Weeks
Semester 2 EOC assignment will have a due date during the 6th Six Weeks
Yearlong EOC assignment will have a due date during the 6th Six Weeks
In addition to the automatic grading period selection on the assignment, you must manually check the EOC grade period
for the EOC assignment.
For example, on a Semester 1 EOC-Required course, create the assignment with a due date during the 3rd Six Weeks,
when the EOC test is actually given. It is important to create the assignment in the 3rd Six Weeks period grade book so
the EOC grade will be included in the students’ overall class calculation. The correct grading period check will
automatically display for the 3rd Six Weeks based on the due date.
**When creating the new EOC assignment, click on the Grading Periods tab and MANUALLY CHECK THE BOX NEXT
TO EOC. SAVE Assignment.
This step is required so the EOC grade will display on the report cards and post to transcripts.
Additional information continued on the next page.
Create the EOC assignment in the
correct Six Weeks grade book with the
appropriate due date.
07/14/2018 Page 7 of 7
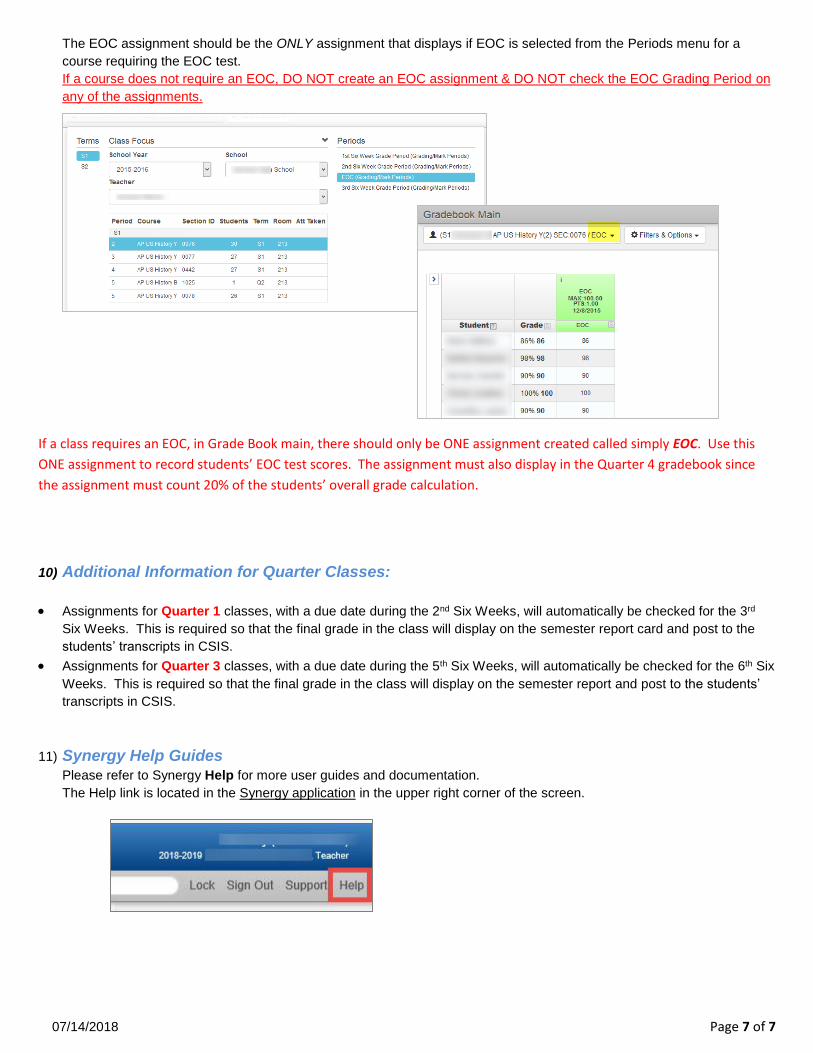
The EOC assignment should be the ONLY assignment that displays if EOC is selected from the Periods menu for a
course requiring the EOC test.
If a course does not require an EOC, DO NOT create an EOC assignment & DO NOT check the EOC Grading Period on
any of the assignments.
If a class requires an EOC, in Grade Book main, there should only be ONE assignment created called simply EOC. Use this
ONE assignment to record students’ EOC test scores. The assignment must also display in the Quarter 4 gradebook since
the assignment must count 20% of the students’ overall grade calculation.
10) Additional Information for Quarter Classes:
Assignments for Quarter 1 classes, with a due date during the 2nd Six Weeks, will automatically be checked for the 3rd
Six Weeks. This is required so that the final grade in the class will display on the semester report card and post to the
students’ transcripts in CSIS.
Assignments for Quarter 3 classes, with a due date during the 5th Six Weeks, will automatically be checked for the 6th Six
Weeks. This is required so that the final grade in the class will display on the semester report and post to the students’
transcripts in CSIS.
11) Synergy Help Guides
Please refer to Synergy Help for more user guides and documentation.
The Help link is located in the Synergy application in the upper right corner of the screen.